solar unit 100 - acv … · · 2016-05-12solar controller manual for the specialised craftsman...
TRANSCRIPT

Thank you for buying this product.Please read this manual carefully to get the best performance from this unit. Please keep this manual safe. Manual »²
Solar controllerManual for the specialised craftsmanInstallation
Operation
Functions and options
Troubleshooting
öïïîïðïèêö 11210186
Solar Unit 100
2en Safety advicePlease pay attention to the following safety advice in order to avoid danger and damage to people and property.
InstructionsAttention must be paid to the valid local standards, regulations and directives!Information about the product
Proper usageThe solar controller is designed for electronically controlling standard solar thermal manual.Improper use excludes all liability claims.CE Declaration of conformityThe product complies with the relevant directives and is therefore labelled with the CE mark. The Declaration of Conformity is available upon request, please contact the manufacturer.
Note Make sure the controller as well as the system are not exposed Subject to technical change. Errors excepted.
Target groupThese instructions are exclusively addressed to authorised skilled personnel.named by the system owner.Description of symbols
WARNING! Warnings are indicated with a warning triangle! They contain information on how to avoid the danger described.Signal words describe the danger that may occur, when it is not avoided.
• WARNING means that injury, possibly life-threatening injury, can occur.• ATTENTION means that damage to the appliance can occur.
NoteNotes are indicated with an information symbol. Arrows indicate instruction steps that should be carried out.Disposal• Dispose of the packaging in an environmentally sound manner.• Dispose of old appliances in an environmentally sound manner. Upon request we will take back your old appliances bought from us and guarantee an environmen-tally sound disposal of the devices.
© 20151030_11210186_ACV_Solar_Unit_100.monen

3enSolar controller Solar Unit 100The Solar Unit 100 is the smallest controller of the SL series. Its equipment is op-timised for small and medium-sized solar thermal and heating systems, 10 pre-con-of its category to offer the automatic function control according to the VDI 2169 directive. Additionally, it is equipped with a potential-free extra-low voltage relay for after-
Contents
1 Overview ..............................................................................................4
2 Installation ...........................................................................................52.1 Mounting ........................................................................................................................52.2 Electrical connection ...................................................................................................52.3 Data communication / Bus ..........................................................................................62.4 System overview ..........................................................................................................72.5 Systems ...........................................................................................................................83 Operation and function ....................................................................183.1 Buttons and adjustment dial ....................................................................................183.2 Microbuttons for manual mode and holiday mode ............................................183.3 Control lamp ...............................................................................................................193.4 Menu structure ...........................................................................................................193.5 Selecting menu points and adjusting values .........................................................193.6 Resetting balance values ...........................................................................................204 System-Monitoring-Display ..............................................................204.1 System screen .............................................................................................................214.2 Further indications ....................................................................................................21
5 Status level / Measurement values ....................................................22
6 Balance values....................................................................................22
7 Commissioning ..................................................................................23
8 Indications, functions and options....................................................268.1 Status level ...................................................................................................................268.2 Menu overview ...........................................................................................................309 User code and short menu – Adjustment values ...........................51
10 Messages .............................................................................................51
11 Troubleshooting .................................................................................52
12 Index ...................................................................................................55

4en 1 Overview
• 3 relay outputs (incl. 1 extra-low voltage relay)
• 4 inputs for Pt1000, Pt500 or KTY temperature sensors
• 1 V40 impulse input
•
• 10 basic systems to choose from
• Automatic function control according to VDI 2169
ïïð
Technical data
Inputs: 4 inputs for Pt1000, Pt500 or KTY temperature sensors, 1 V40 impulse inputOutputs: 2 semiconductor relays, 1 potential-free extra-low voltage relay, 2 PWM outputsPWM frequency: 1000 HzPWM voltage: 10,5 VSwitching capacity:1 (1) A 240 V~ (semiconductor relay)1 (1) A 30 V (potential-free relay)Total switching capacity: 2 A 240 V~Power supply: 100 … 240 V~ (50 … 60 Hz)Supply connection: YStandby: 0.67 WTemperature controls class: I 1 %Mode of operation: Type 1.B.C.YRated impulse voltage: 2.5 kVData interface: VBus®VBus® current supply: 60 mAFunctions: operating hours counter, tube collector function, thermostat function, pump speed control, heat quantity measurement, adjustable system parameters and optional functions (menu-driven), balance and diagnostics function, function control according to VDI 2169Housing: plastic, PC-ABS and PMMAMounting: wall mounting, also suitable for mounting into patch panelsIndication / Display: System-Monitoring-Display, for visualisation of the systems, 16-segment-display, 8 symbols for indication of the system status, Lightwheel® (adjust-ment dial) and background illuminationOperation: 4 push buttons at the front and 1 Lightwheel®)Protection type: IP 20 / DIN EN 60529Protection class: IAmbient temperature: 0 … 40 °CDegree of pollution: 2Dimensions: 110 x 166 x 47 mm
Upper fasteningLower fastening

en5
InstallationIndications, functions and option
sMessages
CommissioningOperation and function
2 Installation
2.1 Mounting
WARNING! Electric shock!Upon opening the housing, live parts are exposed!
Always disconnect the controller from power supply before opening the housing!
Note Make sure the controller as well as the system are not exposed to The unit must only be located in dry interior rooms. The controller must additionally be supplied from a double pole switch with contact gap of at least 3 mm.Please pay attention to separate routing of sensor cables and mains cables.In order to mount the device to the wall, carry out the following steps: Unscrew the crosshead screw from the cover and remove it along with the cover from the housing. Mark the upper fastening point on the wall. Drill and fasten the enclosed wall plug and screw leaving the head protruding. Hang the housing from the upper fastening point and mark the lower fastening points (centres 130 mm). Insert lower wall plugs. Fasten the housing to the wall with the lower fastening screw and tighten. Carry out the electrical wiring in accordance with the terminal allocation (see chap. 2.2). Put the cover on the housing. Attach with the fastening screw.
2.2 Electrical connection
WARNING! Electric shock!Upon opening the housing, live parts are exposed!
Always disconnect the controller from power supply before opening the housing!
ATTENTION! ESD damage!Electrostatic discharge can lead to damage to electronic components! Take care to discharge properly before touching the inside of the device! To do so, touch a grounded surface such as a radiator or tap!
NoteConnecting the device to the power supply must always be the last step of the installation!NoteThe pump speed must be set to 100 % when auxiliary relays or valves are connected.The controller is supplied with power via a mains cable. The power supply of the device must be 100 … 240 V~ (50 … 60 Hz).The controller is equipped with 3 relays in total to which loads such as pumps, valves, etc. can be connected:• Relays 1 … 2 are semiconductor relays, designed for pump speed control: Conductor R1 … R2 Neutral conductor N Protective conductor • Relay 4 is a potential-free low voltage relayNoteThe terminal R3 has no function!Depending on the product version, mains cables and sensor cables are already con-nected to the device. If that is not the case, please proceed as follows:Connect the temperature sensors (S1 to S5) to the corresponding terminals with either polarity:S1 = Sensor 1 (collector sensor )S2 = Sensor 2 (store sensor base)S3 = Sensor 3 (e. g. store sensor top)S4 = Sensor 4 (e. g. store sensor store 2)

en6
InstallationIndications, functions and optionsMessages
CommissioningOperation and function
A V40The terminals marked PWMpage 18).Relay allocation for PWM outputs:PWM A - Relay 1 PWM B - Relay 2
ÊÞ« ÊÞ«ÊìðÍìÍí ÙÒÜÍ»²±®ÍîÍï ïðð òòò îìð ÊÌîßëðóêð ئÒß îìð ß íðÊ ×Ð îð ß Þ Ò Ò Ò Ò ï î í ì ë ê ïð ïïThe mains connection is at the terminals:Neutral conductor NConductor LProtective conductor NoteThe connection depends on the system layout selected (see page 7).NoteFor more details about the initial commissioning procedure see page 23.
2.3 Data communication / BusThe controller is equipped with the VBus® for data transfer and energy supply to external modules. The connection is to be carried out at the two terminals marked VBus (any polarity). One or more VBus® modules can be connected via this data bus.Furthermore, the controller can be connected to a PC or integrated into a network via the VBus®/USB or VBus®/LAN interface adapter (not included).

en7
InstallationIndications, functions and option
sMessages
CommissioningOperation and function
2.4 System overview1 Solar system with 1 store (page 8)5 Solar system with 2 stores and valve control (page 12)9 Solar system with 1 store and return preheating (page 16)
2 Solar system with 2 stores and heat exchange (page 9)6 Solar system with 2 stores and pump control (page 13)10 Solar system with 1 store and heat dump (page 17)
3 Solar system with 1 store and afterheating (page 10)7 Solar system with east-/west collectors (page 14)4 Solar system with 1 store and 3-port valve for store loading in layers (page 11)8 Solar system with 1 store and solid fuel boiler (page 15)

en8
InstallationIndications, functions and optionsMessages
CommissioningOperation and function
2.5 Systems
System 1: Standard solar system with 1 store
The controller calculates the temperature difference between collector sensor S1 and store sensor S2. If the difference is larger than or identical to the adjusted switch-on temperature difference, the pump (R1) will be switched on and the store will be loaded until the switch-off temperature difference or the maximum store temperature is reached.System 1 system screenTemperature sensorsS1 Temperature collectorS2 Temperature store baseS3 FreeS4 Free RelayR1 Solar pump R1 / N / PER2 Free R2 / N / PER4 Free R4 / R4
ÍîÎï Íï
ÍîÍï Îî ÎïÎî Îïï î ïïî îMains

en9
InstallationIndications, functions and option
sMessages
CommissioningOperation and function
System 2: Solar system with 2 stores and heat exchange
The controller calculates the temperature difference between collector sensor S1 and store sensor S2. If the difference is larger than or identical to the adjusted switch-on temperature difference, the pump (R1) will be switched on and the store will be loaded until the switch-off temperature difference or the maximum store temperature is reached.Heat exchange control to an existent store via an additional pump (R2) can be carried out with another temperature differential function (S3 heat source/S4 heat sink).System 2 system screenTemperature sensorsS1 Temperature collectorS2 Temperature store baseS3 Temperature heat exchange sourceS4 Temperature heat exchange sink RelayR1 Solar pump R1 / N / PER2 Store loading pump R2 / N / PER4 Free R4 / R4Ò Ò Ò ÒÒ
Mains

en10
InstallationIndications, functions and optionsMessages
CommissioningOperation and function
System 3: Solar system with 1 store and afterheating
The controller calculates the temperature difference between collector sensor S1 and store sensor S2. If the difference is larger than or identical to the adjusted switch-on temperature difference, the pump (R1) will be switched on and the store will be loaded until the switch-off temperature difference or the maximum store temperature is reached.Afterheating (R2 and R4) can be carried out with a thermostat function (S3). If the value at S3 reaches the switch-on temperature for the afterheating, the relay is switched on. If the value exceeds the switch-off temperature for the afterheating, the relay is switched off again.System 3 system screenÎï ÍîÍï Îî Îì
ïïî î î î
ÍìÍîÍï Îî ÎïÎî Îïï î Temperature sensorsS1 Temperature collectorS2 Temperature store baseS3 Temperature afterheatingS4 Free RelayR1 Solar pump R1 / N / PER2 Store loading pump R2 / N / PER4 Afterheating demand R4 / R4Mains

en11
InstallationIndications, functions and option
sMessages
CommissioningOperation and function
System 4: Solar system with 1 store and 3-port valve for store loading in layers
The controller compares the temperature at sensor S1 to the temperatures at sensors S2 and S3. If the measured temperature differences are higher than the adjusted switch-on temperature differences, the pump (R1) will be activated and the corresponding store zone will be loaded up to the adjusted store maximum or set temperature respectively via the valve (R2). The priority logic effects prior loading of the upper zone of the store.System 4 system screenTemperature sensorsS1 Temperature collectorS2 Temperature store baseS3 Temperature store topS4 Free RelayR1 Solar pump R1 / N / PER2 Valve Solar R2 / N / PER4 Free R4 / R4
ÎîÎï ÍíÍîÍï ïï ííî î î í
ÍíÍîÍï Îî ÎïÎî Îïï îMains
Flow direction when normally open

en12
InstallationIndications, functions and optionsMessages
CommissioningOperation and function
System 5: 2-store system with valve logic, 1 pump, 3 sensors and 3-port valve
The controller compares the temperature at sensor S1 to the temperatures at sensors S2 and S4. If the measured temperature differences are higher than the adjusted switch-on temperature differences, the pump (R1) will be activated and the corresponding store will be loaded up to the adjusted store maximum or set temperature respectively via the valve (R2). The priority logic effects prior loading of store 1.System 5 system screenTemperature sensorsS1 Temperature collectorS2 Temperature store baseS3 FreeS4 Temperature store 2 base RelayR1 Solar pump R1 / N / PER2 Valve Solar R2 / N / PER4 Free R4 / R4Ò Ò Ò ÒÒ
Mains
Flow direction when normally open
en13
InstallationIndications, functions and option
sMessages
CommissioningOperation and function
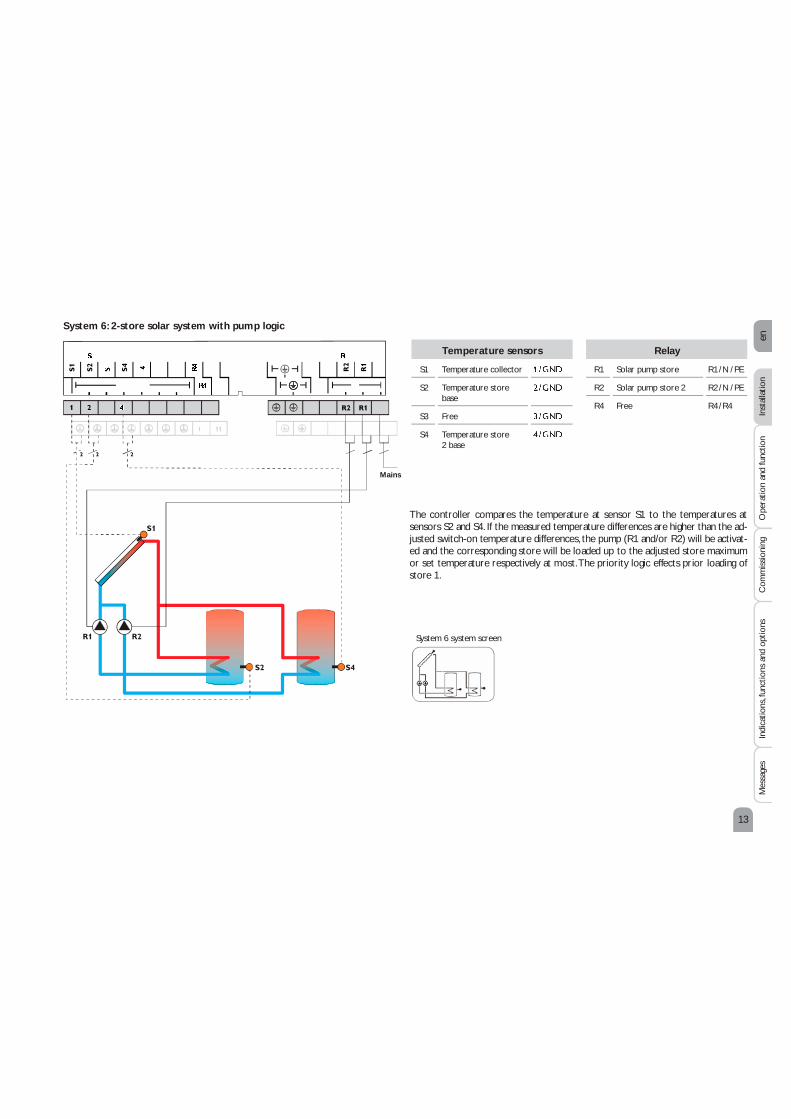
System 6: 2-store solar system with pump logic
The controller compares the temperature at sensor S1 to the temperatures at sensors S2 and S4. If the measured temperature differences are higher than the ad-justed switch-on temperature differences, the pump (R1 and/or R2) will be activat-ed and the corresponding store will be loaded up to the adjusted store maximum or set temperature respectively at most. The priority logic effects prior loading of store 1.System 6 system screenÎîÎï ÍìÍîÍï ïïîî î
ÍìÍîÍï Îî ÎïÎî Îïï î Temperature sensorsS1 Temperature collectorS2 Temperature store baseS3 FreeS4 Temperature store 2 base RelayR1 Solar pump store R1 / N / PER2 Solar pump store 2 R2 / N / PER4 Free R4 / R4Mains

en14
InstallationIndications, functions and optionsMessages
CommissioningOperation and function
System 7: Solar system with east- / west collectors
The controller compares the temperatures at the collector sensors S1 and S4 to the store temperature at sensor S2. If one of the measured temperature difference is higher than the adusted switch-on temperature difference, the corresponding pump (R1 and/or R2) will be switched on, thus loading the store until either the switch-off temperature difference or the store maximum temperature is reached.System 7 system screenÎîÎï ÍîÍï Íì ïïî î î
ÍìÍîÍï Îî ÎïÎî Îïï î Temperature sensorsS1 Temperature collectorS2 Temperature store baseS3 FreeS4 Temperature collector 2 RelayR1 Solar pump collector R1 / N / PER2 Solar pump collector 2 R2 / N / PER4 Free R4 / R4Mains

en15
InstallationIndications, functions and option
sMessages
CommissioningOperation and function
System 8: Solar system with 1 store and afterheating with solid fuel boiler
The controller calculates the temperature difference between collector sensor S1 and store sensor S2. If the difference is larger than or identical to the adjusted switch-on temperature difference, the pump (R1) will be switched on and the store will be loaded until the switch-off temperature difference or the maximum store temperature is reached.With another temperature differential function (S4 heat source/S3 heat sink), after-heating of the store with a solid fuel boiler can be carried out via another pump (R2).System 8 system screenÒ Ò Ò ÒÒ Temperature sensorsS1 Temperature collectorS2 Temperature store baseS3 Temperature store topS4 Temperature solid fuel boiler RelayR1 Solar pump R1 / N / PER2 Loading pump solid fuel boiler R2 / N / PER4 Free R4 / R4
Mains

en16
InstallationIndications, functions and optionsMessages
CommissioningOperation and function
System 9: Solar system with 1 store and return preheating
The controller calculates the temperature difference between collector sensor S1 and store sensor S2. If the difference is larger than or identical to the adjusted switch-on temperature difference, the pump (R1) will be switched on and the store will be loaded until the switch-off temperature difference or the maximum store temperature is reached.With another temperature differential function (S3 heat source/S4 heat sink) return preheating (heating circuit backup) is possible via another valve (R2).System 9 system screenTemperature sensorsS1 Temperature collectorS2 Temperature store baseS3 Temperature store return preheatingS4 Temperature heating return RelayR1 Solar pump R1 / N / PER2 Valve return preheating R2 / N / PER4 Free R4 / R4Ò Ò Ò ÒÒ
Mains
Flow direction when normally open

en17
InstallationIndications, functions and option
sMessages
CommissioningOperation and function
System 10: Solar system with 1 store and heat dump
The controller calculates the temperature difference between collector sensor S1 and store sensor S2. If the difference is larger than or identical to the adjusted switch-on temperature difference, the pump (R1) will be switched on and the store will be loaded until the switch-off temperature difference or the maximum store temperature is reached.If the collector maximum temperature (CMAX) is reached, the solar pump will be energised by R1 and the 3-port valve by R2 in order to divert excess heat to a heat sink. For safety reasons, excess heat dump will only take place as long as the store temperature is below the non-adjustable shutdown temperature of 95 °C [200 °F].System 10 system screenTemperature sensorsS1 Temperature collectorS2 Temperature store baseS3 FreeS4 Free RelayR1 Solar pump R1 / N / PER2 Heat dump valve R2 / N / PER4 Free R4 / R4Ò Ò Ò ÒÒ
Mains
Flow direction when normally open

en18
InstallationIndications, functions and optionsMessages
CommissioningOperation and function
3 Operation and function
3.1 Buttons and adjustment dial
The controller is operated via 2 buttons and 1 adjustment dial (Lightwheel®) below the display:Left button ( ) - escape button for changing into the previous menuRight button (Lightwheel® - scrolling upwards / scrolling downwards, increasing adjustment values / reducing adjustment values3.2 Microbuttons for manual mode and holiday modeThe controller is equipped with two microbuttons for quick access to the manual mode and the holiday function. The microbuttons are located underneath the slida-ble housing cover, the slider.Mircobutton : If the microbutton the manual mode menu (see page 44).Microbutton : The microbutton is used for activating the holiday function (see page 43). If the microbutton is pressed and held down for approx. 3 s, the adjustment channel DAYS appears, allowing to enter the number of days for an absence. If the parameter is set to a value higher than 0, the function becomes active using the adjustments that have previously been made in the H-DAY menu. The days will be counted backwards at 00:00. If the value is set to 0, the function is deactivated.
Speed control of a HE pump is possible via a PWM signal. The pump has to be connected to the relay (power supply) as well as to one of the PWM A/B outputs of the controller. Relay allocation for PWM outputs:PWM A - Relay 1 PWM B - Relay 2
í×Ð îð
NoteFor more information about relay control, see page 42.

en19
InstallationIndications, functions and option
sMessages
CommissioningOperation and function
3.3 Control lampThe controller is equipped with a multicolour LED in the centre of the Lightwheel®, indicating the following states:Colour Permanently shown FlashingEverything OK Manual mode: at least one relay HAND ON / mini-mum speed / maximum speedRed monitoring, overpressure, low pressureYellow Holiday function active T too high, night circulation, FL/RE interchanged, store maximum temperature exceededRed /green Manual mode: at least one relay HAND OFF3.4 Menu structure
Adjustment valuesDT ODT FDT SS SETS MAXSMAXS…Menu levelBALANAdjustment levelSYSLOADCOL…Status levelTCOLTCOL2TSTBTSTT… Balance valuesh R1h R2MAXS1MINS1…
The menu structure of the controller consists of 2 levels: the status level and the menu level.The status level consists of different display channels which indicate display values and messages.The menu level consists of the balance values menu and several menu items each of which consists of sub-menus and adjustment channels. In order to activate or deactivate a function, it must be selected in the menu level. The display changes to the adjustment menu in which all adjustments required can be carried out.NoteSome of the menu items depend on the selected system and the adjusted options. Therefore, they are only displayed if they are available.NoteThe abstract from the menu structure is for information on the structure of the controller menu and is therefore not complete.
3.5 Selecting menu points and adjusting valuesDuring normal operation of the controller, the display shows the status level with the adjustment channels. If no button is pressed for 1 min, the display illumination goes out. If no button is pressed for further 3 min, the display indicates the status level. Press any key to reactivate the display illumination. In order to scroll through the display channels, turn the Lightwheel®.Accessing the adjustment level: Press the right button ( ) for approx. 3 s.The display changes to the adjustment level. All menus contain adjustment channels and are marked with PUSH below the menu item. In order to access the desired menu, press the right button ( )
NoteOnly if the installer code is entered (see page 51), will the adjustment level be accessible.

en20
InstallationIndications, functions and optionsMessages
CommissioningOperation and function
4 System- Monitoring-Display
System-Monitoring- DisplayThe System-Monitoring-Display consists of 3 blocks: channel display, tool bar and system screen.Channel displayThe channel display consists of 2 lines. The upper display line is an alphanumeric 16-segment display. In this line, mainly channel names and menu items are displayed. In the lower 16-segment display, values are displayed.Tool barThe additional symbols in the tool bar indicate the current system state.
Selecting and adjusting options / functionsAn option or function containing adjustment values are marked with PUSH. In order to access the sub-menu of the option, select the option by turning the Lightwheel® and press the right button ( ) . In order to activate an option, select ON. In order to deactivate it, select OFF.The adjustment channels are characterised by the indication . Select the desired adjustment channel by turning the Lightwheel®. ). starts flashing (ad-justment mode). Adjust the value by turning the Lightwheel®. ). permanently appears, the adjustment has been saved.BACK PUSH appears as the last display. In order to get back to the menu selection, press the right button ( ).If no button has been pressed within a couple of minutes, the adjustment is can-celled and the previous value is retained.3.6 Resetting balance valuesHeat quantity, operating hours of the relays as well as minimum and maximum temperatures can be set back to zero. In order to reset a value, proceed as follows: Select the desired value and press the right button( ). starts flashing. Turn the Lightwheel® anticlockwise.The value is set back to 0. Press the right button( ).The message DEL will be displayed. Turn the Lightwheel® clockwise. YES instead of NO will be displayed. ).The value will be set back to zero and the symbol will be permanently displayed. In order to interrupt this process, press the left button ( ).
en21
InstallationIndications, functions and option
sMessages
CommissioningOperation and function
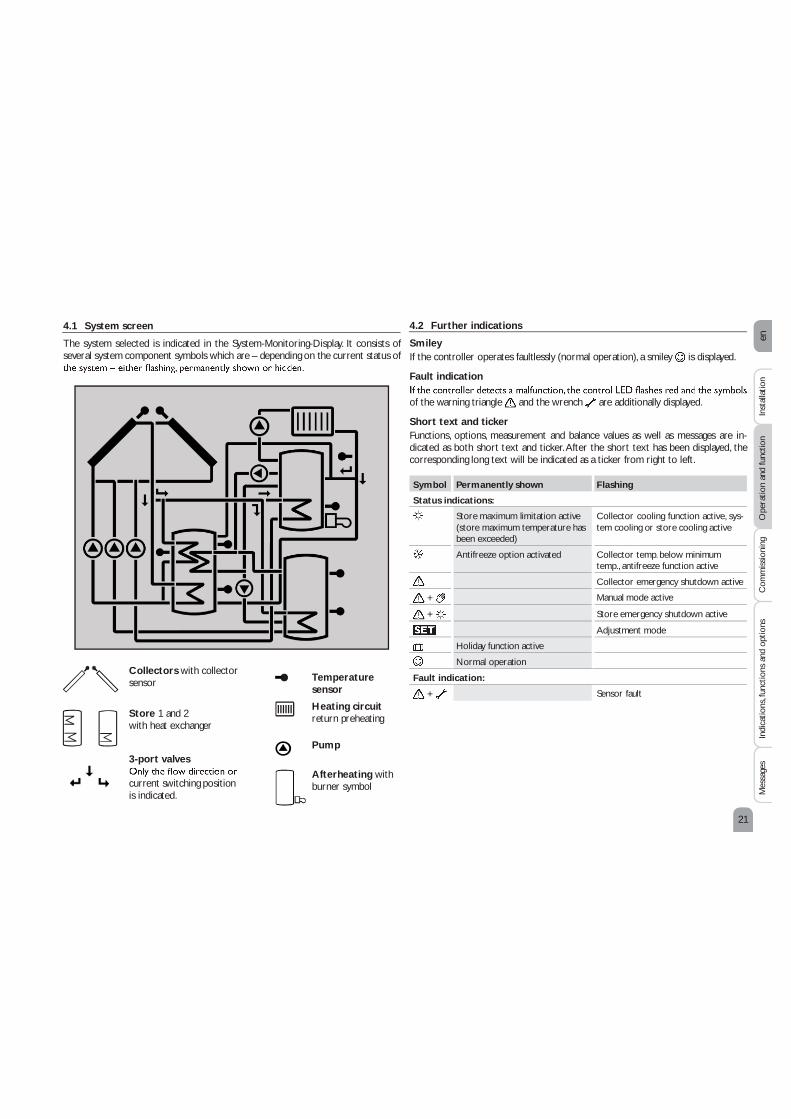
4.1 System screenThe system selected is indicated in the System-Monitoring-Display. It consists of several system component symbols which are – depending on the current status of Collectors with collector sensor3-port valves current switching position is indicated.Store 1 and 2 with heat exchanger
Pump
Heating circuit return preheatingAfterheating with burner symbolTemperature sensor
4.2 Further indications
SmileyIf the controller operates faultlessly (normal operation), a smiley is displayed. Fault indicationof the warning triangle and the wrench are additionally displayed.Short text and tickerFunctions, options, measurement and balance values as well as messages are in-dicated as both short text and ticker. After the short text has been displayed, the corresponding long text will be indicated as a ticker from right to left. Symbol Permanently shown Flashing
Status indications: Store maximum limitation active (store maximum temperature has been exceeded) Collector cooling function active, sys-tem cooling or store cooling active Antifreeze option activated Collector temp. below minimum temp., antifreeze function active Collector emergency shutdown active + Manual mode active + Store emergency shutdown active Adjustment mode Holiday function active Normal operation Fault indication: + Sensor fault

en22
InstallationIndications, functions and optionsMessages
CommissioningOperation and function
5 Status level / Measurement valuesDuring normal operation of the controller, the display is in the status level, indicating the measurement values (depending on the system) shown in the table.In addition to the display values, possible error messages are indicated in the status menu (see page 51).Display Description (long text)TCOL Temperature collectorTCOL2 Temperature collector 2TSTB Temperature store baseTSTT Temperature store topTST2B Temperature store 2 baseTSTTS Temperature heat exchange sourceTST2S Temperature heat exchange sinkTAH Temperature afterheatingTSFB Temperature solid fuel boilerTSTSF Temperature store - solid fuel boilerTSTRP Temperature store return preheatingTRET Temperature heating circuit returnS3 Temperature sensor 3S4 Temperature sensor 4n1 % Speed relay 1n2 % Speed relay 2L/h Flow rate sensor V40TFHQMTRHQM Heat quantity measurement return temperaturekWh Heat quantity in kWhMWh Heat quantity in MWhBLPR Blocking protection relay 1BLPR2 Blocking protection relay 2INIT Initialisation drainbackFLLT Filling time drainbackSTAB Stabilisation drainbackTDIS Disinfection temperatureCDIS Countdown thermal disinfectionDDIS Disinfection periodSDIS Starting time delayTIMEDATE
6 Balance valuesThe balance value menu indicates the balance values.Display Descriptionh R1 Operating hours relay 1h R2 Operating hours relay 2h R4 Operating hours relay 4DAYS Operating days of the controller (cannot be set back to zero)MAXS1 Maximum temperature sensor 1MINS1 Minimum temperature sensor 1MAXS2 Maximum temperature sensor 2MINS2 Minimum temperature sensor 2MAXS3 Maximum temperature sensor 3MINS3 Minimum temperature sensor 3MAXS4 Maximum temperature sensor 4MINS4 Minimum temperature sensor 4

en23
InstallationIndications, functions and option
sMessages
CommissioningOperation and function
7 Commissioningto the mains. The controller runs an initialisation phase in which all symbols are indicated in the display. The Lightwheel®When the controller is commissioned or when it is reset, it will run a commis-sioning menu after the initialisation phase. The commissioning menu leads the user through the most important adjustment channels needed for operating the system.Commissioning menuThe commissioning menu consists of the channels described in the following. In order to make an adjustment, press the right button ( ). starts flashing and). Turn the Lightwheel®, the next channel will appear on the screen. Adjustment mode Operation changing a value to the next parameter
1. Language: Adjust the desired menu language.Commissioning
2. Time: Adjust the clock time. First of all adjust the hours, then the minutes.3. Daylight savings time adjustment: Activate or deactivate the automatic daylight savings time adjustment.4. Date: Adjust the date. First of all adjust the year, then the month and then the day.

en24
InstallationIndications, functions and optionsMessages
CommissioningOperation and function
9. Loading store 2: Switch on or off the “ loading store 2” option (see page 33). Note “ Loading store 2” is only available if a 2-store system or store loading in layers has been previously selected in the sub-channel SYS. Commissioning
5. System: Adjust the desired system (see page 49).6. Store set temperature: Adjust the desired store set temperature. In 2-store systems, the adjustment has to be carried for S2SET aswell (see page 32).7. Maximum store temperature: Adjust the maximum store temperature. In 2-store systems, the adjustment has to be carried out for
S2MAX aswell (see page 33).8. Loading store 1: Switch on or off the “ loading store 1” option (see page 33).
Note “ Loading store 1” is only available if a 2-store system or store loading in layers has been previously selected in the sub-channel SYS. 10. Relay control type: Select the relay control type for REL. Carry out this adjustment for REL2 as well, if necessary (see page 42).11. Minimum speed: Adjust the minimum speed MIN of the relay. Car-ry out this adjustment for relay 2 as well, if neces-sary (see page 42).
Note The minimum speed value will not be available if ONOF has been selected in the sub-channelREL (REL2)

en25
InstallationIndications, functions and option
sMessages
CommissioningOperation and function
12. Maximum speed: Adjust the maximum speed MAX of the relay. Carry out this adjustment for relay 2 as well, if necessary (see page 42). Note The maximum speed value will not be avail-able if ONOF has been selected in the sub-channel REL (REL2). Commissioning
Complete the commissioning menu by pressing the right button ( ):The controller is then ready for operation and nor-mally the factory settings will give close to optimum operation.
Note The adjustments carried out during commis-sioning can be changed anytime in the cor-responding adjustment channel. Additional functions and options can also be activated or deactivated (see page 26). Set the code to the customer code before handing over the controller to the custom-er (see page 51).

en26
InstallationIndications, functions and optionsMessages
CommissioningOperation and function
8 Indications, functions and options
Note The values and adjustment channels as well as the adjustment ranges de-pend on the system selected, the functions and options as well as the user code entered and the system components connected to the controller. 8.1 Status level
Display of blocking protection time
BLPR(2)Blocking protection activeDisplay of drainback time periods
INITInitialisation activeIndicates the time adjusted in tDTO, running backwards.FLLTFilling time activeIndicates the time adjusted in tFLL, running backwards.
STABStabilisationIndicates the time adjusted in tSTB, running backwards.Display of collector temperatures
TCOL(2)Collector temperatureDisplay range: -40 … +260 °CDisplays the current collector temperature.• TCOL : Collector temperature• TCOL2 : Collector temperature 2 (2-collector system)

en27
InstallationIndications, functions and option
sMessages
CommissioningOperation and function
Display of store temperatures
TSTB, etc.Store temperaturesDisplay range: -40 … +260 °CDisplays the current store temperature. • TSTB : Store temperature base• TSTT : Store temperature topin 2-store systems (only if available):• TST2T : Temperature store 2 top• TST2B : Temperature store 2 base• TSTTS : Temperature heat exchange source• TST2S : Temperature heat exchange sink• TSTSF : Temperature store - solid fuel boilerDisplay of temperatures at S3 and S4
S3, S4Temperature sensorsDisplay range: -40 … +260 °CIndicates the current temperature at the corresponding additional sensor (without control function).• S3 : Temperature sensor 3• S4 : Temperature sensor 4 Note In systems with return preheating, S3 is used as the heat source sen-sor TSTR.
Display of further temperatures
TSFB, etc.Further measured temperaturesIndication range: -40 … +260 °CIndicates the current temperature at the corresponding sensor. The display of these temperatures depends on the system selected.• TSFB : Temperature solid fuel boiler• TRET : Temperature heating return• TSTR : Temperature store return preheating• • TRHQM : Temperature return (HQM)• TAH : Temperature afterheatingL/Flow rateIndication range: 0 … 9999 l/hthe heat quantity supplied (V40).

en28
InstallationIndications, functions and optionsMessages
CommissioningOperation and function
Display of speed
1 %, 2 %Current pump speedIndication range: 20 … 100 % (standard pump / HE pump)Indicates the current speed of the corresponding pump.Display of heat quantity
kW /MWHeat quantity in kWh / MWhIndicates the heat quantity produced in the system. For this purpose, the heat heat quantity supplied. It is shown in kWh in the kWh channel and in MWh in the MWh channel. The overall heat quantity results from the sum of both values.The accumulated heat quantity can be set back to zero (see page 20). Indication of thermal disinfection
TDISDisinfection temperatureIndication range: -40 … +260 °CIf the thermal disinfection option (OTDIS) is activated and the disinfectionperiod is in progress, the disinfection temperature measured at the reference sensor is displayed in this channel.CDIS Countdown monitoring periodDisplay range: 0 … 30:0 … 24 (dd:hh)If the thermal disinfection option (OTDIS) is activated and the monitoring period is in progress, the remaining time of the monitoring period is displayed as CDIS (in hours and minutes), counting backwards.SDIS Starting timeDisplay range: 0:00 … 24:00 (time)If the thermal disinfection option (OTDIS) is activated and a starting delay

en29
InstallationIndications, functions and option
sMessages
CommissioningOperation and functionDDISDisinfection periodDisplay range: 0:00 … 23:59 (hh:mm)If the thermal disinfection option (OTDIS) is activated and the disinfection period is in progress, the remaining time of the heating period is displayed (in hours and minutes) in this channel, counting backwards.
Display of time
TimeIndicates the current clock time.Display of date
DATEIndicates the current date.

en30
InstallationIndications, functions and optionsMessages
CommissioningOperation and function
8.2 Menu overview
BALAN 1BALANCE VALUESLOAD 7
REL 13RELAY ADJUSTMENTOHQM 19HEAT QUANTITY MEASUREMENTLOAD 2 4 STORE 2
HEATX 10
BLPR 16PROTECTIONLANG 22SYS 2SYSTEM SELECTION
COOL 8FUNCTIONSH-DAY 14HOLIDAY FUNCTION
SENS 20SENSORSCOL 5COOL
AH 11OTDIS 17THERMAL DISINFECTION
VDI 23FUNCTION CONTROL VDI 2169LOAD 3 STORESFB 9SOLID FUEL BOILER
MAN 15MANUAL MODE
DATE 21DATECOL 2 6COLLECTOR 2RPH 12RETURN
OPARR 18PARALLEL RELAYCODE 24USER CODERESET 25
» P. 31 » P. 36 » P. 42 » P.46» P. 31 » P. 39 » P. 43 » P. 47» P. 32 » P. 40 » P. 44
»P. 48» P. 32 » P. 41
» P. 44 » P. 48» P. 34
» P. 41 » P. 45 » P. 49» P. 34 » P. 42 » P. 45 » P. 50» P. 50Parameters shown in the following with a dashed line depend on options and are only indicated if they are available in the system selected.

en31
InstallationIndications, functions and option
sMessages
CommissioningOperation and function BALAN 1
PUSH
hR 1 (2, 4)Operating hours Relays 1, 2, 4 DAYSOperating daysMAXS1(… 4)Maximum temperature Sensors 1 … 4 MINS1(… 4)Minimum temperature Sensors 1 … 4
1 Operating hours counter
R (1, 2, 4)Operating hours counterThe operating hours counter accumulates the solar operating hours of the relay (h R1 / h R2 / h R4). Full hours are displayed.The accumulated operating hours can be set back to zero (see page 20). Operating daysDisplay of operating days since commissioning or last reset. The operating days cannot be set back to zero. Minimum and maximum temperatures
MAXS1(2, 3, 4)Maximum temperatures at S1 … S4MINS1(2, 3, 4)Minimum temperatures at S1 … S4Indication of the minimum and maximum temperatures at S1… S4.The temperature indication can be set back to zero (see page 20). 2 System
Selecting the systemEach system has pre-programmed options and adjustments which can be activated
1Balance values
SYS 2
PUSH
SYSBasic systemAdjustment range: 1 … 10Factory setting: 1BACK
PUSH
Adjustment level 2

en32
InstallationIndications, functions and optionsMessages
CommissioningOperation and function
3/4 3/4 T controlThe controller works as a standard differential controller. If the temperature reach-es or exceeds the switch-on temperature difference, the pump switches on. When the temperature difference reaches or falls below the adjusted switch-off tempera-ture difference, the respective relay switches off.NoteThe switch-on temperature difference must be 0.5 K higher than the switch-off temperature difference. The set temperature difference must be at least 0.5 K higher than the switch-on temperature difference.NoteIn systems with 2 stores or store loading in layers, 2 separate menus (LOAD and LOAD 2) will be displayed.
Speed controlIf the temperature difference reaches or exceeds the switch-on temperature differ-ence, the pump switches on at 100 % speed for 10 s. Then, the speed is reduced to the minimum pump speed value. If the temperature difference reaches the adjusted nominal value, the pump speed increases by one step (10 %). The response of the controller can be adapted via the parameter Rise. Each time the difference increases by the adjustable rise value, the pump speed increases by 10 % until the maximum pump speed of 100% is reached. If the temperature difference decreases by the adjustable rise value, pump speed will be decreased by one step.Note To enable speed control, the corresponding relay has to be set to AUTO, MIN, MAX or ADAP (MAN channel) and relay control to PULS, PSOL or PHEA (adjustment channel REL).
Store set temperatureThe store set temperature can be adjusted in the S(2)SET channel. NoteFor more information about relay control, see page 42.
LOAD (2) 3/4
PUSH
DT(2) OSwitch-on temperature diff. Adjustment range: 1.0 … 50.0 K in steps of 0.5 KFactory setting: 6.0 KDT(2) FSwitch-off temperature diff. Adjustment range: 0.5 … 49.5 K in steps of 0.5 KFactory setting: 4.0 KDT(2)SSet temperature difference Adjustment range: 1.5 … 50.0 K in steps of 0.5 KFactory setting: 10.0 KS(2)SETStore set temperatureAdjustment range: 4 … 95 °CFactory setting: 45 °Ca cb

en33
InstallationIndications, functions and option
sMessages
CommissioningOperation and function
3/4 Priority logicPriority logic can be used in 2-store systems or systems with store loading in layers only and determines how the heat is divided between the stores. PRIO: Store 1 / store basePRIO2: Store 2 / store topThe store which has been adjusted to 1 is considered as the priority store.If both stores have been adjusted to an identical value, they will be loaded in parallel.Store maximum temperature and Sensor store maximum temperatureIf the store temperature reaches the adjusted maximum temperature, the store will no longer be loaded in order to avoid damage caused by overheating. If the maximum store temperature is exceeded, is displayed.The sensor for store maximum limitation can be selected. The maximum limitation always refers to the sensor selected. The switch-on hysteresis is selectable.
NoteIn systems with 2 stores or store loading in layers, 2 separate menus (LOAD and LOAD 2) will be displayed.Loading storeIn systems with 2 stores or store loading in layers, one of the two stores or the store zone respectively can be switched off with the parameter LST(2).If LST or LST2 is adjusted to OFF, the system runs like a 1-store system. The representation in the display remains the same.PRIO (2)Priority logicSelection: 1, 2Factory setting: 1
S(2)MAXStore maximum temperature Adjustment range: 4 … 95 °Cin steps of 1 °CFactory setting: 60 °CS(2)MAXSSensor store maximum temp.Adjustment range: 1-store system: S2, S3 2-store system: S4, S5Factory setting: 1-store system S2 2-store system: S4LST (2)Loading store 1, 2 Selection: ON / OFF Factory setting: ONRIS (2)RiseAdjustment range: 1 … 20 K in steps of 1 KFactory setting: 2 K
a c
BACK
PUSH
3/4
5/6
b

en34
InstallationIndications, functions and optionsMessages
CommissioningOperation and function
5/6 Collector emergency shutdownWhen the collector temperature exceeds the adjusted collector emergency tem-perature, the solar pump (R1 / R2) switches off in order to protect the system components against overheating (collector emergency shutdown). If the maximum collector temperature is exceeded, NoteIf the drainback option is activated, the adjustment range of the collector emergency temperature is 80 … 95°C. The factory setting then is 95 °C.NoteIn systems with east- / west collectors, 2 separate menus (COL and COL 2) will be displayed.
WARNING! Risk of injury! Risk of system damage by pressure surge!water will boil at 100 °C. In pressureless systems with water as the heat transfer
than 95 °C.
Collector coolingThe collector cooling function keeps the collector rise temperature within the operating range by heating the store. If the store temperature reaches 95 °C the function will switch off for safety reasons.When the store temperature exceeds the adjusted maximum store temperature, the solar system switches off. If the collector temperature increases to the adjusted maximum collector temperature, the solar pump is activated until the collector temperature falls below the maximum collector temperature. The store tempera-ture may then exceed the maximum temperature, but only up to 95°C (emergency shutdown of the store). If the collector cooling is active, NoteThis function is only available if the system cooling function and the heat dump function are not activated.NoteIn systems with east- / west collectors, 2 separate menus (COL and COL 2) will be displayed.
CMAXCollector maximum temp. Adjustment range: 70 … 160 °C in steps of 1 °CFactory setting: 110 °CSwitch-on hysteresis: -5KOCCOSelection: OFF / ON Factory setting: OFFOK OFF ONOCCO
PUSH
COL (2) 5/6
PUSH
CEM( 2)Collector emergency tem-perature Adjustment range: 80 … 200 °C in steps of 1 °CFactory setting: 130 °C Switch-on hysteresis: -10 K
a cBACK
PUSH
5/6
b

en35
InstallationIndications, functions and option
sMessages
CommissioningOperation and function
5/6 Collector minimum temperature The minimum collector temperature is the minimum switch-on temperature which must be exceeded for the solar pump (R1 / R2) to switch on. If the collector tem-perature falls below the adjusted minimum temperature, NoteIn systems with east- / west collectors, 2 separate menus (COL and COL 2) will be displayed.
Tube collector functionThis function is used for improving the switch-on behaviour in systems with non-ideal sensor positions (e. g. with some tube collectors).This function operates within an adjusted time frame. It activates the collector circuit pump for an adjustable runtime between adjustable pauses in order to com-pensate for the delayed temperature measurement.10 s of the runtime. For the remaining runtime, the pump will be run at the adjusted minimum speed.If the collector sensor is defective or the collector is blocked, this function is sup-pressed or switched off.2-collector systemsIn 2-collector systems, the tube collector function is available for each individual In 2-collector systems, the tube collector function will affect the inactive collector
Note If the drainback option is activated, the tube collector function will not be available. OTCO (2)Tube collector function Selection: OFF / ON Factory setting: OFF
TCST (2)Starting time Adjustment range: 00:00 … 23:00 Factory setting: 07:00TCRU (2)Runtime Adjustment range: 30 … 600 s in steps of 5 s Factory setting: 30 sTCEN (2)Ending time Adjustment range: 00:30 … 23:30 in steps of 00:30 Factory setting: 19:00TCIN (2)Standstill interval Adjustment range: 5 … 60 min in steps of 00:01Factory setting: 30 min
OTCO
PUSH
CMIN (2)Collector minimum temp. Adjustment range: 10 … 90 °C in steps of 1 °C Factory setting: 10 °COCMI (2)Collector minimum temp. Selection: OFF / ON Factory setting: OFFOKOKOFF
OFFONON
OCMN
PUSH
c
c
a
a
BACK
PUSH
BACK
PUSH
5/6 b
b

en36
InstallationIndications, functions and optionsMessages
CommissioningOperation and function
5/6 Antifreeze functionThe antifreeze function activates the loading circuit between the collector and the store when the temperature falls below the adjusted temperature CFR O. This will CFR F is exceeded, the solar pump will be switched off again.The antifreeze function will be suppressed if the store temperature of the selected store falls below 5 °C. In 2-store systems, the function then switches to the second store or, in the case of store loading in layers, to the upper store zone. If the tem-perature of the second store (or of the upper store zone respectively) also falls below 5 °C, the system will be switched off.
NoteIn systems with east- / west collectors, 2 separate menus (COL and COL 2) will be displayed.Note Since this function uses the limited heat quantity of the store, the anti-freeze function should be used in regions with few days of temperatures around the freezing point.
OCFR (2)Antifreeze function Selection: OFF / ON Factory setting: OFFCFR(2)OAntifreeze temperature onAdjustment range: -40 … +8 °CFactory setting: 4 °CCFR(2)FAntifreeze temperature offAdjustment range: -39 … +9 °CFactory setting: 5 °C
OCFR
PUSH
OKOFF ONcaBACK
PUSH
BACK
PUSH 7 Drainback optionloading is about to start. If the drainback option is activated, the following adjust-ment can be made:Note A drainback system requires additional components such as a holding tank. The drainback option should only be activated if all components required are properly installed.
Time period – switch-on conditionThe parameter tDTO is used for adjusting the time period during which the Filling time
tFLL. During this period, the pump runs at 100 % speed.StabilisationThe parameter tSTB is used for adjusting the time period during which the switch-
ODBDrainback option Selection: OFF / ON Factory setting: OFFLOAD 7
PUSH
ODB
PUSH
tDTOTime period - switch-on condition Adjustment range: 1 … 100 s in steps of 1 s Factory setting: 60 stSTB / Stabilisation Adjustment range: 1.0 … 15.0 minin steps of 0.5 min Factory setting: 2.0 mintFLL / Filling time Adjustment range: 1.0 … 30.0 minin steps of 0.5 min Factory setting: 5.0 min
OKOFF ON7a b
b
c d e f
5/6

en37
InstallationIndications, functions and option
sMessages
CommissioningOperation and function
Note If the drainback option is activated, the cooling functions and the antifreeze function will not be available.The H-DAY (holiday function) menu will also not be available and cannot be selected by means of the microbutton .Note The drainback option is only available in systems with 1 store and 1 collector Note If the drainback function ODB is activated, the factory settings of the parameters DT O, DT F und DT S will be adapted to values suiting drain-back systems:DT O = 10 KDT F = 4 K DT S = 15 K Additionally, the adjustment range and the factory setting of the collector emergency shutdown CEM will change:Adjustment range: 80 … 120 °C; Factory setting: 95 °CAdjustments previously made in these channels will be overridden and have to be entered again if the drainback option is deactivated later on.NoteIf the holiday function is activated, the drainback option will not be available.
Booster functiontime has elapsed, R2 switches off. Note The booster function is available in system 1 only.
Successive loading optionSuccessive loading means that the priority store will be loaded up to its maximum temperature. If it is reached, the second store will be loaded. If the temperature of be loaded, regardless of whether the switch-on conditions of the priority store or If both store have been loaded to their set temperature, the same process described above will take place until the stores heave reached their maximum temperature.
OBSTBooster function Selection: OFF / ON Factory setting: OFF
a
a
b
b
c
c
d
d e fBACK
PUSH
OSuCSuccessive loading option Selection: OFF / ON Factory setting: OFFOSE
PUSH
DTSETemperature diff. Spreaded loading Adjustment range: 20 … 90 K Factory setting: 40 KOSESpreaded loading option Selection: OFF / ON Factory setting: OFFOKOFF ON
BACK
PUSH
7

en38
InstallationIndications, functions and optionsMessages
CommissioningOperation and function
Spreaded loading optionIn 2-store systems with 2 pumps, a spreaded loading function can be activated:As soon as the adjustable temperature difference DTSE between the collector and the priority store is reached, the second store will be loaded in parallel unless it is blocked. If the temperature difference falls by 2 K below DTSE, the pump is switched off.The collector temperature has to be higher than the store temperature.Loading logicIn systems with 2 stores or store loading in layers, store sequence control can be adjusted.In 1-store systems, only the menu item PDELA will be available.Store sequence controlIf the priority store cannot be loaded, the subordinate store will be checked. If useful heat can be added, it will be loaded for the circulation time.After this, the loading process stops and the controller monitors the increase in collector temperature during the loading break time. If it increases by 2 K, the break time timer starts again to allow the collector to gain more heat. If the collector again for the circulation time.store will be continued. If the priority store reaches its set temperature, store se-quence control will not be carried out.The minimum runtime of each loading process is 3 min.In systems with 2 stores or store loading in layers, all stores / store zones will be loaded to their set temperature (according to their priority and store sequence control). Only when all stores / store zones have exceeded their set temperature will they be loaded up to their maximum temperatures, again according to their priority and store sequence control.If store sequence control is active and the system switches to load the priority store, the parameter Loading break also acts as a stabilisation time, during which the switch off temperature difference will be ignored.OverrunBy means of this function, store loading continues after the temperature difference between the collector and the store has fallen below the switch-off difference. It sensors falls below the switch-off difference DT(2)F.
tLBLoading break timeAdjustment range: 1 … 30 minFactory setting: 2 minPDELAPump delaySelection: ON / OFFFactory setting: OFFtRUNCirculation timeAdjustment range: 1 … 30 minFactory setting: 15 minPSPEE Pause speedSelection: ON / OFFFactory setting: OFF
8
a b c dBACK
PUSH
7

en39
InstallationIndications, functions and option
sMessages
CommissioningOperation and function
8 Cooling functionsDifferent cooling functions can be activated: system cooling, store cooling and heat dump.Note If the temperature at the store sensor reaches 95 °C, all cooling functions will be blocked. The switch-on hysteresis is -5 K.NoteIf one of the cooling functions or the antifreeze function is activated, the drainback option will not be available.
System coolingThe system cooling function aims to keep the solar system operational for a longer time. The function overrides the maximum store temperature to provide thermal If the store temperature is higher than the adjusted maximum store temperature and the switch-on temperature difference DTO is reached, the solar pump remains switched on or will be switched on. Solar loading is continued until either the tem-perature difference falls below the adjusted value DTF or the collector emergency shutdown temperature is reached.In 2-store systems the sequence of the stores can be adjusted.If the system cooling is active, NoteThis function will only be available if the collector cooling function, the heat dump function, and the drainback option are not activated.
Store coolingWhen the store cooling function is activated, the controller aims to cool down the store during the night in order to prepare it for solar loading on the following day.If the adjusted maximum store temperature is exceeded and the collector temper-ature falls below the store temperature, the system will be reactivated in order to cool down the store.DTCO and DTCF are used as the reference temperature differences.Heat dumpThe heat dump function can be used to direct excess heat generated by strong solar irradiation to an external heat exchanger (e. g. fan coil) in order to keep the collector temperature within the operating range.The heat dump function can either use an additional pump or valve (OTPUM ON = pump logic, OTPUM OFF = valve logic).
DTCOSwitch-on temperature diff. Adjustment range: 1.0 … 30.0 KFactory setting: 20.0 KDTCFSwitch-off temperature diff. Adjustment range: 0.5 … 29.5 K Factory setting: 15.0 KOSTCOption store cooling Adjustment range: OFF / ON Factory setting: OFFOSYCOption system cooling Adjustment range: OFF / ON Factory setting: OFFCOOL 8
PUSH
8
a d e fOHDPHeat dump option Selection: OFF / ON Factory setting: OFFOKOFF ONOHDP
PUSH
BACK
PUSH

en40
InstallationIndications, functions and optionsMessages
CommissioningOperation and function
Variant pump:The allocated relay is energised with 100 %, if the collector temperature reaches the adjusted switch-on temperature. If the collector temperature falls by 5 K below the adjusted collector overtemper-ature, the relay will be switched off. In the variant pump, the heat dump function works independent from solar loading.Variant valve:The allocated relay will be energised in parallel to the solar pump, if the collector temperature reaches the adjusted collector overtemperature. If the collector tem-perature falls by 5 K below the adjusted collector overtemperature, the relay will be switched off.If the store temperature exceeds its maximum temperature by more than 5 K while the heat dump function is being active, the function will be deactivated. If the tem-perature falls below this value by the hysteresis maximum store temperature (HYSP(2) in BEL(2)), the heat dump function is will be available again.
Note In system 1, the adjustable value OTCL is blocked against the collector emergency temperature by 10 K. This function will only be available if the collector cooling function, the heat dump function, and the drainback option are deactivated.109 a d e f
OTCLOvertemperature collectorAdjustment range: 40 … 160 °C Factory setting: 110 °COTPUMPump or valve logic Selection: OFF / ON Factory setting: OFF
SFB 9
PUSH
DTSFOSwitch-on temperature diff. Adjustment range: 1.0 … 50.0 K Factory setting: 6.0 KDTSFFSwitch-on temperature diff. Adjustment range: 0.5 … 49.5 KFactory setting: 4.0 KDTSFSSet temperature diff. Adjustment range: 1.5 … 50.0 K Factory setting: 10.0 KMNSFOMinimum limitation Adjustment range: 0.5 … 89.5 °C Factory setting: 60.0 °CMXSFSMaximum limitation Adjustment range: 0.5 … 95.0 °C Factory setting: 60.0 °C
9 Solid fuel boilerThe solid fuel boiler function can be used for transferring heat from a solid fuel boiler to a store.The relay (system-dependent) is energised when all switch-on conditions are ful-• the temperature difference between the sensors heat source and heat sink has exceeded the switch-on temperature difference.• the temperature at the solid fuel boiler sensor has exceeded the minimum tem-perature• the temperature at the store sensor has fallen below the maximum temperatureWhen the Set temperature difference is exceeded, pump speed control starts. For every increase or decrease by the rise value, the pump speed will be adjusted by 10 %. The switch-on hysteresis is -5 K.OK
BACK
PUSH
BACK
PUSH
8
en41
InstallationIndications, functions and option
sMessages
CommissioningOperation and function
HEATX 10
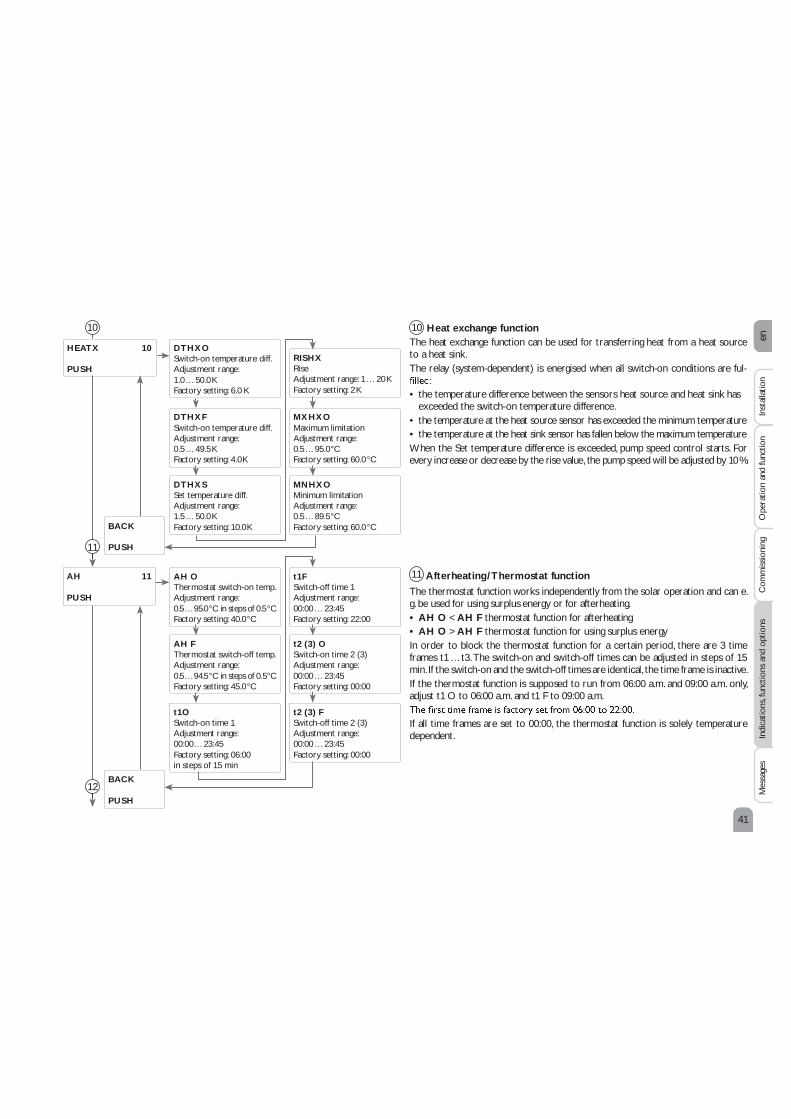
PUSH
DTHXO Switch-on temperature diff. Adjustment range: 1.0 … 50.0 K Factory setting: 6.0 KDTHXFSwitch-on temperature diff. Adjustment range: 0.5 … 49.5 KFactory setting: 4.0 KDTHXSSet temperature diff. Adjustment range: 1.5 … 50.0 K Factory setting: 10.0 K MXHXOMaximum limitationAdjustment range: 0.5 … 95.0 °CFactory setting: 60.0 °CRISHXRise Adjustment range: 1 … 20 K Factory setting: 2 K
MNHXOMinimum limitationAdjustment range: 0.5 … 89.5 °CFactory setting: 60.0 °C10 Heat exchange functionThe heat exchange function can be used for transferring heat from a heat source to a heat sink.The relay (system-dependent) is energised when all switch-on conditions are ful-• the temperature difference between the sensors heat source and heat sink has exceeded the switch-on temperature difference.• the temperature at the heat source sensor has exceeded the minimum temperature• the temperature at the heat sink sensor has fallen below the maximum temperatureWhen the Set temperature difference is exceeded, pump speed control starts. For every increase or decrease by the rise value, the pump speed will be adjusted by 10 %.10
11 BACK
PUSH
BACK
PUSH
AH 11
PUSH
AH O Thermostat switch-on temp.Adjustment range: 0.5 … 95.0 °C in steps of 0.5 °C Factory setting: 40.0 °CAH F Thermostat switch-off temp.Adjustment range: 0.5 … 94.5 °C in steps of 0.5 °C Factory setting: 45.0 °Ct1OSwitch-on time 1Adjustment range: 00:00 … 23:45Factory setting: 06:00 in steps of 15 min
t2 (3) OSwitch-on time 2 (3)Adjustment range: 00:00 … 23:45Factory setting: 00:00t1FSwitch-off time 1Adjustment range: 00:00 … 23:45Factory setting: 22:00t2 (3) FSwitch-off time 2 (3)Adjustment range: 00:00 … 23:45Factory setting: 00:0012
11 Afterheating / Thermostat functionThe thermostat function works independently from the solar operation and can e. g. be used for using surplus energy or for afterheating.• AH O < AH F thermostat function for afterheating• AH O > AH F thermostat function for using surplus energyIn order to block the thermostat function for a certain period, there are 3 time frames t1 … t3. The switch-on and switch-off times can be adjusted in steps of 15 min. If the switch-on and the switch-off times are identical, the time frame is inactive.If the thermostat function is supposed to run from 06:00 a.m. and 09:00 a.m. only, adjust t1 O to 06:00 a.m. and t1 F to 09:00 a.m. If all time frames are set to 00:00, the thermostat function is solely temperature dependent.
en42
InstallationIndications, functions and optionsMessages
CommissioningOperation and function
RPH 12
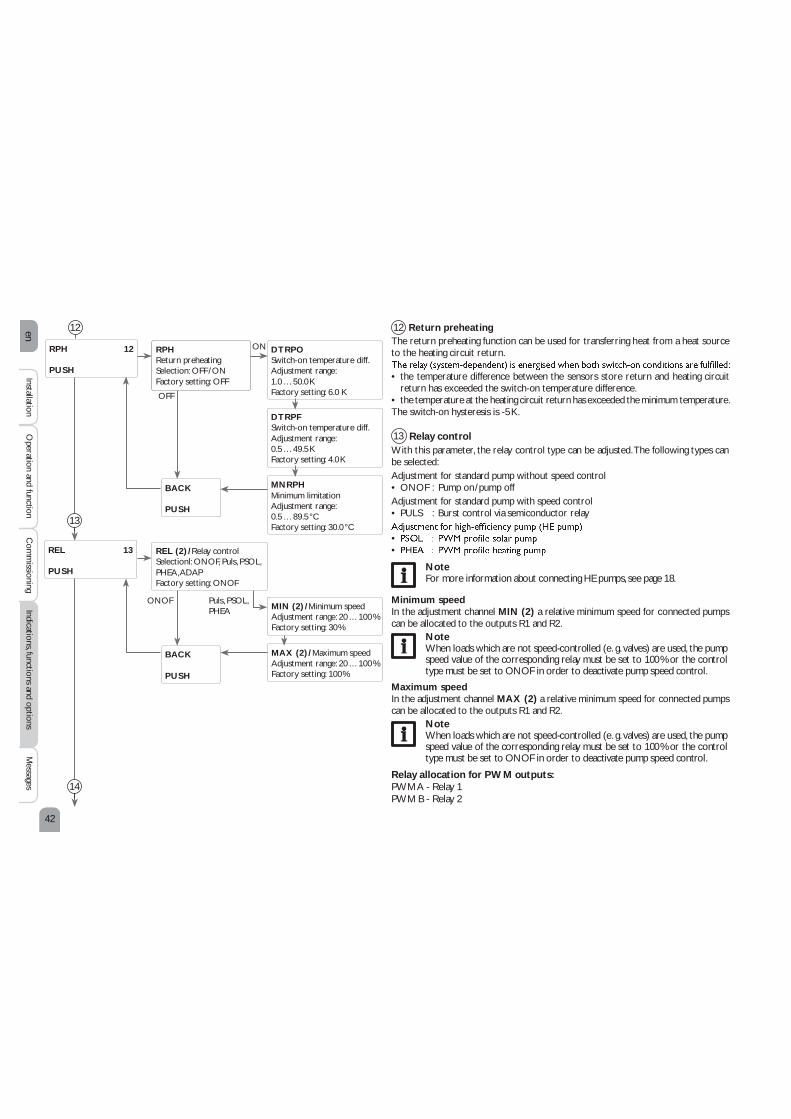
PUSH
DTRPOSwitch-on temperature diff. Adjustment range: 1.0 … 50.0 K Factory setting: 6.0 KRPHReturn preheating Selection: OFF / ON Factory setting: OFFDTRPFSwitch-on temperature diff. Adjustment range: 0.5 … 49.5 KFactory setting: 4.0 KMNRPHMinimum limitation Adjustment range: 0.5 … 89.5 °C Factory setting: 30.0 °C
12 Return preheatingThe return preheating function can be used for transferring heat from a heat source to the heating circuit return.• the temperature difference between the sensors store return and heating circuit return has exceeded the switch-on temperature difference.• the temperature at the heating circuit return has exceeded the minimum temperature.The switch-on hysteresis is -5 K.12
14
OFF ONBACK
PUSH
REL (2) / Relay control Selectionl: ONOF, Puls, PSOL, PHEA, ADAP Factory setting: ONOFREL 13
PUSH
MAX (2) / Maximum speed Adjustment range: 20 … 100 % Factory setting: 100 %MIN (2) / Minimum speed Adjustment range: 20 … 100 % Factory setting: 30 %13 Relay controlWith this parameter, the relay control type can be adjusted. The following types can be selected:Adjustment for standard pump without speed control• ONOF : Pump on / pump offAdjustment for standard pump with speed control• PULS : Burst control via semiconductor relay• •
NoteFor more information about connecting HE pumps, see page 18.Minimum speedIn the adjustment channel MIN (2) a relative minimum speed for connected pumps can be allocated to the outputs R1 and R2.
NoteWhen loads which are not speed-controlled (e. g. valves) are used, the pump speed value of the corresponding relay must be set to 100 % or the control type must be set to ONOF in order to deactivate pump speed control.Maximum speedIn the adjustment channel MAX (2) a relative minimum speed for connected pumps can be allocated to the outputs R1 and R2.
NoteWhen loads which are not speed-controlled (e. g. valves) are used, the pump speed value of the corresponding relay must be set to 100 % or the control type must be set to ONOF in order to deactivate pump speed control.Relay allocation for PWM outputs:PWM A - Relay 1 PWM B - Relay 2
13 ONOF Puls, PSOL, PHEABACK
PUSH

en43
InstallationIndications, functions and option
sMessages
CommissioningOperation and function
14 Holiday function The holiday function is used for operating the system when no water consumption is expected, e. g. during a holiday absence. This function cools down the system in order to reduce the thermal load. Only if the holiday function has been activated with the parameter DAYS will the adjustments described in the following become active.3 cooling functions are available: system cooling, store cooling and store heat dump. The system cooling function aims to keep the solar system operational for a longer time. The function overrides the maximum store temperature to provide thermal The system cooling option can be activated with the parameter OSYC. The func-tion uses the adjustable switch-on and switch-off temperature differences DTO and DTF from the LOAD1(2) menu. The store cooling option is activated by default and can be deactivated with the parameter OSTC. Store cooling starts when the store temperature exceeds the collector temperature by the adjustable value DTCO. It switches off if the store temperature reaches THOL or if the temperature difference falls below DTCF. The parameter THOL is used for adjusting the temperature for store cooling.The store heat dump function can be used to direct excess heat generated by strong solar irradiation from the store to an external heat exchanger (e. g. fan coil) or radiator in order to prevent the collectors from overheating. The store heat dump function is independent of the solar system and can be activated with the parameter OHDPS. The function uses the adjustable switch-on and switch-off temperature differences DTO and DTF. If temperature measured at sensor 3 reaches the switch-on temperature, relay 2 will be energised until the temperature falls below the switch-off value. The parameter DAYS can be used for entering the number of days for a holiday absence. If the parameter is set to a value higher than 0, the function becomes active using the adjustments that have previously been made in the H-DAY menu. The days will be counted backwards at 00:00. If the value is set to 0, the function is deactivated.NoteThe OHDPS option is available in system 1 only.NoteThe parameter DAYS can be accessed via the microbutton only (see page 18).
H-DAY 14
PUSH
OHDPS
PUSH
OHDPSStore heat dump Selection: OFF / ON Factory setting: OFFOTSPOOvertemperature Store onSelection: 5 … 95 °C Factory setting: 65 °COTSPFOvertemperature Store off Selection: 4 … 94 °C Factory setting: 45 °C
14
BACK
PUSH
OFF ONDTCOSwitch-on temperature diff. Adjustment range: 1.0 … 30.0 KFactory setting: 20.0 KDTCFSwitch-off temperature diff. Adjustment range: 0.5 … 29.5 K Factory setting: 15.0 KTHOLTemp. store cooling holidayAdjustment range: 4 … 95 °CFactory setting: 45 °COSTCOption store cooling Adjustment range: OFF / ON Factory setting: ONOSYCOption system cooling Adjustment range: OFF / ON Factory setting: OFF
OKBACK
PUSH14

en44
InstallationIndications, functions and optionsMessages
CommissioningOperation and function
BACK
PUSH
BACK
PUSH
15 Manual modeFor control and service work, the operating mode of the relays can be manually adjusted. For this purpose, select the adjustment channel MAN1(2, 4) (for R1, 2, 4) in which the following adjustments can be made:Operating modeAUTO : relay in automatic modeOFF : relay is switched offMIN : relay is switched with adjusted minimum speed (not if REL = ONOF)MAX : relay is switched with adjusted maximum speed (not if REL = ONOF)
NoteAfter service and maintenance work, set the relay mode back to AUTO. Normal operation is not possible in manual mode.NoteFor information about the control LED in the Lightwheel® see page 19.
MAN 15
PUSH
BLPR 16
PUSH
MAN1 (2)Adjustment range: AUTO, ON, OFF, MIN, MAX Factory setting: AUTOBLPRAdjustment range: ON, OFF Factory setting: OFFMAN4Adjustment range: AUTO, ON, OFF Factory setting: AUTO
16 Blocking protectionIn order to protect the pumps against blocking after standstill, the controller is equipped with a blocking protection function. This function switches on the relays one after another every day at 12:00 a.m. for 10 s at 100 %.1617
NoteThe adjustments described in this chapter are independent of those in the COOL menu, which are inactive during a holiday.NoteWhen the drainback option is activated, the holiday function will not be available and cannot be selected by means of the microbutton .NoteIf the holiday function is activated, the drainback option will not be avail-able. 1514

en45
InstallationIndications, functions and option
sMessages
CommissioningOperation and function
17 17 Thermal disinfectionThis function helps to contain the spread of Legionella in DHW stores by system-atically activating the afterheating.R2 is the reference relay, S3 is the reference sensor.For thermal disinfection, the temperature at the reference sensor has to be moni-tored. This protection is ensured when, during the monitoring period, the disinfec-tion temperature is continuously exceeded for the entire disinfection period. The monitoring period starts as soon as the temperature at the reference sensor falls below the disinfection temperature. When the monitoring period ends, R2 and R4 activate the circulating pump and the afterheating. The disinfection period starts, if the temperature at the reference sensor exceeds the disinfection temperature. Thermal disinfection can only be completed when the disinfection temperature is exceeded for the duration of the disinfection period without any interruption.Starting time delayIf the starting delay option is activated, a starting time for the thermal disinfection with starting delay can be adjusted. The activation of the afterheating is then delayed until that starting time after the monitoring period has ended. If the monitoring period ends, for example, at 12:00 o’clock, and the starting time has been set to 18:00, the reference relay will be energised with a delay of 6 hours at 18:00 instead of 12:00 o’clock.
Note If the thermal disinfection option is activated, the display channels TDIS, CDIS, SDIS and DDIS will be displayed.
OTDIS 17
PUSH
PDIS / Monitoring operiodAdjustment range: 0 … 30:0 … 24 h (dd:hh)Factory setting: 01:00OTDISThermal disinfection optionAdjustment range: OFF / ON Factory setting: OFFSDIS / Starting time delay Adjustment range: 00:00 … 23:00Factory setting: 18:00 (full hours only)DDIS / Disinfection period Adjustment range: 00:00 … 23:59 Factory setting: 01:00TDIS / Disinfection temperature Adjustment range: 0 … 95 °C in steps of 1 °C Factory setting: 60 °COSDIS / Starting delay optionSelection: ON / OFFFactory setting: OFF
19
OFF
OFF
ON
ONBACK
PUSH
OPARR 18
PUSH
OPARRParallel relay optionSelection: OFF / ON Factory setting: OFFINVER / InversionSelection: OFF / ON Factory setting: OFF18
BACK
PUSH
18 Parallel relayWith this function, e. g. a valve can be controlled in parallel to the pump via a sep-arate relay.If solar loading takes place or if a solar function is active, the relay selected will be energised. The parallel relay can also be energised inversely.Note If R1 is in the manual mode, the selected parallel relay will not be energised.

en46
InstallationIndications, functions and optionsMessages
CommissioningOperation and function
19OHQM 19
PUSH
FMAXFlow rate in l/minAdjustment range: 0.5 … 100.0in steps of 0.1 Factory setting: 6.0MEDT Adjustment range: 0 … 3 Factory setting: 3SFHQMFlow sensor Adjustment range: 1, 3, 4 Factory setting: 1 / 3MED%Antifreeze concentration in vol. % (MED% will not be displayed when MEDT 0 or 3 is used)Adjustment range: 20 … 70 %in steps of in 1 % Factory setting: 45 %SRHQMReturn sensor Adjustment range: 2, 3, 4 Factory setting: 2 / 4
FTYPEFlow rate detection type: Selection: 1, 2 Factory setting: 1OHQMHeat quantity measurement option Adjustment range: OFF / ONFactory setting: OFF 19 Heat quantity measurementThe heat quantity measurement can be carried out in 2 different ways: without V40 Note The most precise heat quantity measurement is achieved by using sensors In 2-collector systems, heat quantity measurement can only be carried out Flow sensorV40 / Return sensor Enable the heat quantity measurement option in the channel OHQM. FTYPE.
Flow rate detection type:2 : V40Note the sensor must be adjusted in the SENS menu (see page 47).Note then deactivated in the SENS
OFF ON
19 BACK
PUSH

en47
InstallationIndications, functions and option
sMessages
CommissioningOperation and function
19 The heat quantity measurement calculation (estimation) uses the difference be-speed). Adjust 1 in the channel FTYPE. FMAX channel. channels MEDT and MED%.
Note Heat quantity measurement is not possible in systems with 2 solar pumps.Antifreeze type:0 : Water 1 : Propylene glycol 2 : Ethylene glycol 3 : Tyfocor®
Adjust 2 in the channel FTYPE. channels MEDT and MED%.HQM sensorsmeasurement. In the channel SFHQM In the channel SRHQM select the return sensor.
SENS 20
PUSH
SEN 1 (… 4) / Sensor typeSensortyp Selection: Pt1000, KTY, Pt500 Factory setting: Pt1000VIMPImpulse rate of the V40 Adjustment range: OFF, 0.5 … 100.0 l/imp Factory setting: OFF 20 Temperature sensorsThe sensor type can be selected for the sensor inputs S1 to S4.The impulse rate can be adjusted for the sensor input V40.OFF V40
BACK
PUSH
192021

en48
InstallationIndications, functions and optionsMessages
CommissioningOperation and function
DATE 21
PUSH
TIME / timeAdjustment range: 00:00 … 23:59 Factory setting: 12:00ADSTAutomatic daylight savings time adjustmentSelection: ON / OFFFactory setting: ON MM / MonthAdjustment range: 01 … 12 Factory setting: 03YYYY / YearAdjustment range: 2010 … 2099Factory setting: 2010DD / DayAdjustment range: 01 … 31 Factory setting: 15
21 Time and date The controller is equipped with a real time clock required e. g. for the thermostat function.In the display, the lower line indicates the day followed by the month. 2122 Language In this adjustment channel the menu language can be chosen.• • EN : English• FR : French• ES : Spanish• IT : Italian• NL : DutchLANG 22
PUSH
LANGLanguageSelection: DE, EN, FR, ES, IT, NLFactory setting: DE2223

en49
InstallationIndications, functions and option
sMessages
CommissioningOperation and function
23VDI 23
PUSH
NIGHTNight circulation monitoring optionSelection: ON / OFFFactory setting: OFFFL / REFL / RE interchange monitoring option Selection: ON / OFFFactory setting: OFF
T HIOption T too high Selection: ON / OFFFactory setting: OFF 23 Function control
T monitoringThis function is used for monitoring the temperature difference. The message T too high is shown, if solar loading has been carried out for a period of 20 min with a differential higher than 50 K. Normal operation is not aborted or inhibited, but the system should be checked for the cause of the warning. Possible causes are:• pump power too weak• blocked system components• circulation problems in the collector• air inside the pipework• defective valve/ defective pumpNight circulationThis function can be used for detecting thermal circulation inside the solar circuit that leads to an unwanted cooling of the store. A warning message will appear when the following condition has been detected for at least 1 min during the period be-tween 11 p.m. and 5 a.m.:• collector temperature exceeds 40 °CThe delay time of 1 min ensures that the message is not triggered by short-term fault conditions.Possible causes are:• defective non-return valves• defective valve• wrongly adjusted timeFlow and return interchangedbadly placed collector sensor. For this purpose, the collector temperature is moni-tored for plausibility during the switch-on phases of the solar pump. An error mes-sage will appear, if the plausibility criteria have not been met 5 times in a row.a b c

en50
InstallationIndications, functions and optionsMessages
CommissioningOperation and function ST1(2)Maximum store temperature monitoring store 1, 2Selection: ON / OFFFactory setting: ON
ST1(2)MXMaximum store temperature exceedance counterSTMAXMaximum store temperature monitoring optionSelection: ON / OFFFactory setting: OFFSTMAX
PUSH
Maximum store temperatureThis function is used for detecting and indicating if the adjusted maximum store temperature has been exceeded. The controller compares the current store tem-perature to the adjusted maximum store temperature, thus monitoring the store loading circuits. The maximum store temperature is considered exceeded when the temperature measured at the store sensor exceeds the adjusted maximum store temperature by at least 5 K. The monitoring becomes active again as soon as the store temperature falls below the adjusted maximum store temperature.The channels ST1, ST2 can be used for selecting the stores to be monitored. The number of exceedances is displayed in the ST(2)MX channels. A possible cause for an unwanted exceedance of the maximum store temperature is a defective valve.Note Only if the installer code is entered (see page 51), will the option be avai-labe.OFF ONOKa b c
BACK
PUSH
BACK
PUSH 24 CODEThe user code can be entered in the CODE menu (see page 51).25 ResetBy means of the reset function, all adjustments can be set back to the factory set-tings. To do so, the installer code must be entered (see page 51).24
RESET 25
PUSH
CODE 24
PUSH25
23

en51
InstallationIndications, functions and option
sMessages
CommissioningOperation and function
CodeThe access to some adjustment values can be restricted via a user code (customer). 1. Installer 0262 (Factory setting) All menus and adjustment values are shown and all values can be altered.2. Customer 0000The installer level is not shown, adjustment values can be changed partly. For safety reasons, the user code should generally be set to the customer code before the controller is handed to the customer! In order to restrict the access, enter 0000 in the menu item CODE.The display changes to the status level. The short menu shown will then be available in the adjustment level. The short menu suits the selected system. In order to authorise access to the installer level, enter 0262 in the menu item CODE.
Short menu
Channel Factory setting Adjustment range DesignationTIME 12:00 00:00 … 23:59 TimeDT O 6.0 K 1.0 … 50.0 K Switch-on temperature difference storeDT F 4.0 K 0.5 … 49.5 K Switch-off temperature difference storeS SET 45 °C 5.0 … 95.0 °C Store set temperatureS MAX 60 °C 4 … 95 °C Store maximum limitationLST ON ON / OFF Loading store onDT2O 6.0 K 1.0 … 50.0 K Switch-on temperature difference store 2DT2F 4.0 K 0.5 … 49.5 K Switch-off temperature difference store 2S2SET 45 °C 5.0 … 95.0 °C Set store temperature store 2S2MAX 60 °C 4 … 95 K Store maximum limitation store 2LST2 ON ON / OFF Loading store 2 onCODE 0000 0000 / 0262 User codein the status display. A warning triangle is additionally indicated. If more than one error or fault condition has occurred, only the one with the highest priority will be displayed as a message in the status display.Error code
display
Plain text display Monitoring function Cause 0001 !LINE BREAK SENSOR X! Sensor line break Sensor line broken0002 !SHORT CIRCUIT SENSOR X! Sensor short circuit Sensor line short-circuited0011 ! T too high Collector 50 K > than store to be loaded0021 Night circulation Betw. 11 p.m. and 5 a.m. col. temp. > 40 °C0031 FL/RL interchanged Col. temp. does not rise after switching on0061 !DATA MEMORY DEFECTIVE! Storing and changing adjustments not possible0081 STORE MAX EXCEEDED Maximum store temperature St. max has been exceededAfter the error has been removed and acknowledged, the error message disappears. In order to acknowledge an error message, select the message and press the left button ( ) for 2 s.In the case of a sensor error, the system switches off, and a message appears on the display. Additionally, a corresponding value for the error type assumed is indicated.
9 User code and short menu – Adjustment values
10 Messages
Note -terchanged“ according to the VDI guidelines 2169 can only correctly detect and indicate if the collector sensor measures the tempera-If the collector sensor is not correctly placed, a false message may occur. Place the collector sensor directly in the -tion control.
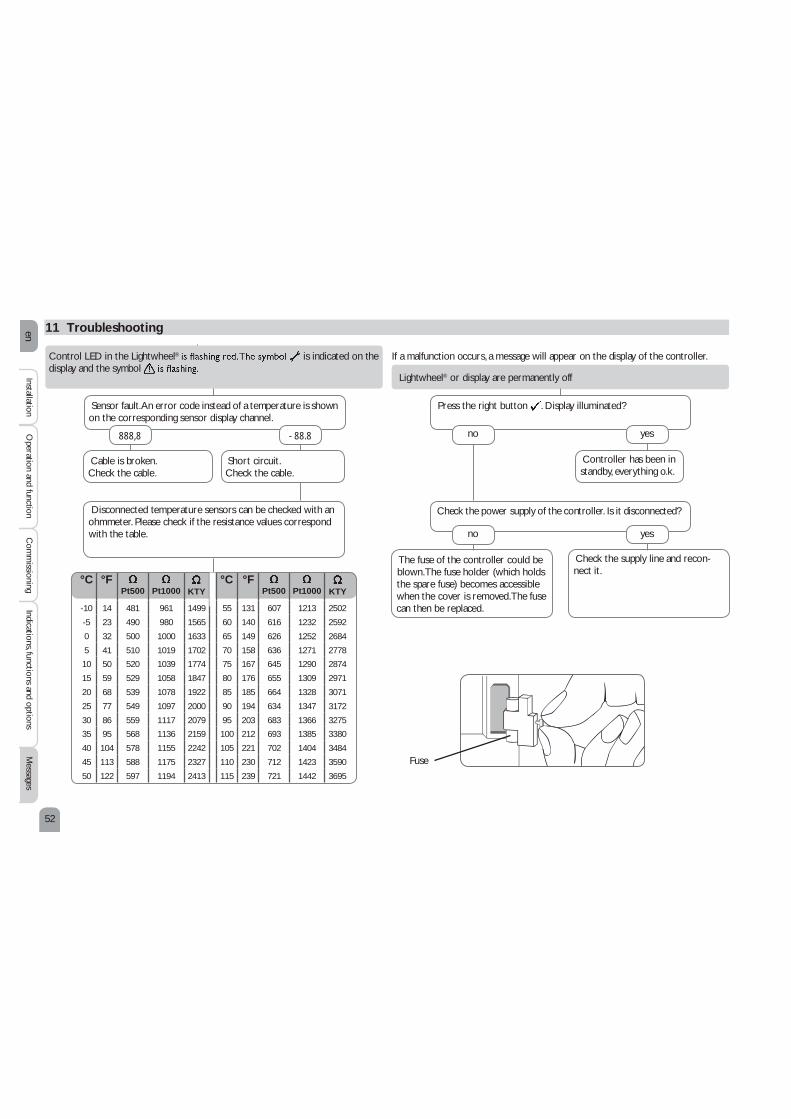
en52
InstallationIndications, functions and optionsMessages
CommissioningOperation and function
11 Troubleshooting If a malfunction occurs, a message will appear on the display of the controller.Lightwheel® or display are permanently offPress the right button . Display illuminated?no yesController has been in standby, everything o.k.Check the supply line and recon-nect it.The fuse of the controller could be blown. The fuse holder (which holds the spare fuse) becomes accessible when the cover is removed.The fuse can then be replaced.Check the power supply of the controller. Is it disconnected?no yesDisconnected temperature sensors can be checked with an ohmmeter. Please check if the resistance values correspond with the table.°C °F
Pt500 Pt1000 KTY°C °F
Pt500 Pt1000 KTY-10 14 481 961 1499 55 131 607 1213 2502-5 23 490 980 1565 60 140 616 1232 25920 32 500 1000 1633 65 149 626 1252 26845 41 510 1019 1702 70 158 636 1271 277810 50 520 1039 1774 75 167 645 1290 287415 59 529 1058 1847 80 176 655 1309 297120 68 539 1078 1922 85 185 664 1328 307125 77 549 1097 2000 90 194 634 1347 317230 86 559 1117 2079 95 203 683 1366 327535 95 568 1136 2159 100 212 693 1385 338040 104 578 1155 2242 105 221 702 1404 348445 113 588 1175 2327 110 230 712 1423 359050 122 597 1194 2413 115 239 721 1442 3695
Control LED in the Lightwheel® is indicated on the display and the symbol Sensor fault. An error code instead of a temperature is shown on the corresponding sensor display channel. - 88.8888,8Cable is broken. Check the cable. Short circuit. Check the cable.
Fuse

en53
InstallationIndications, functions and option
sMessages
CommissioningOperation and function
and return have the same temperature; perhaps also bubbling in the lines.Air or gas bubbles in the system?no yesIs the collector circuit blocked at the dirt trap? yes Clean dirt trapPump starts for a short moment, switches off, switches on again, etc.Temperature difference at the controller too small?no yesWrong position of collector sensors? yes Change Ton and Toff corre-spondingly.Mount the collector sensor at solar immersion sleeve of the respective collector.no no o.k.Pump starts up very late.The temperature difference between store and collector increases enormous-ly during operation; the collector circuit cannot dissipate the heat.Collector circuit pump defective?no yesyes Check / replace itDecalcify itnoHeat exchanger blocked? yesno Clean itHeat exchanger too small? yes
Change Ton and Toff corre-spondingly.Switch-on temperature difference Ton too large?no yesVent the system; increase the system pressure to a static primary pressure of at least plus 0.5 bar; if necessary continue to increase pressure; switch the pump on and off for a short time.Plausibility control of the option tube collector function Replace with correctly sized one.
Non-ideal position of the collector of sensor in immersion sleeves).yes Activate tube collector function if necessary. o.k.
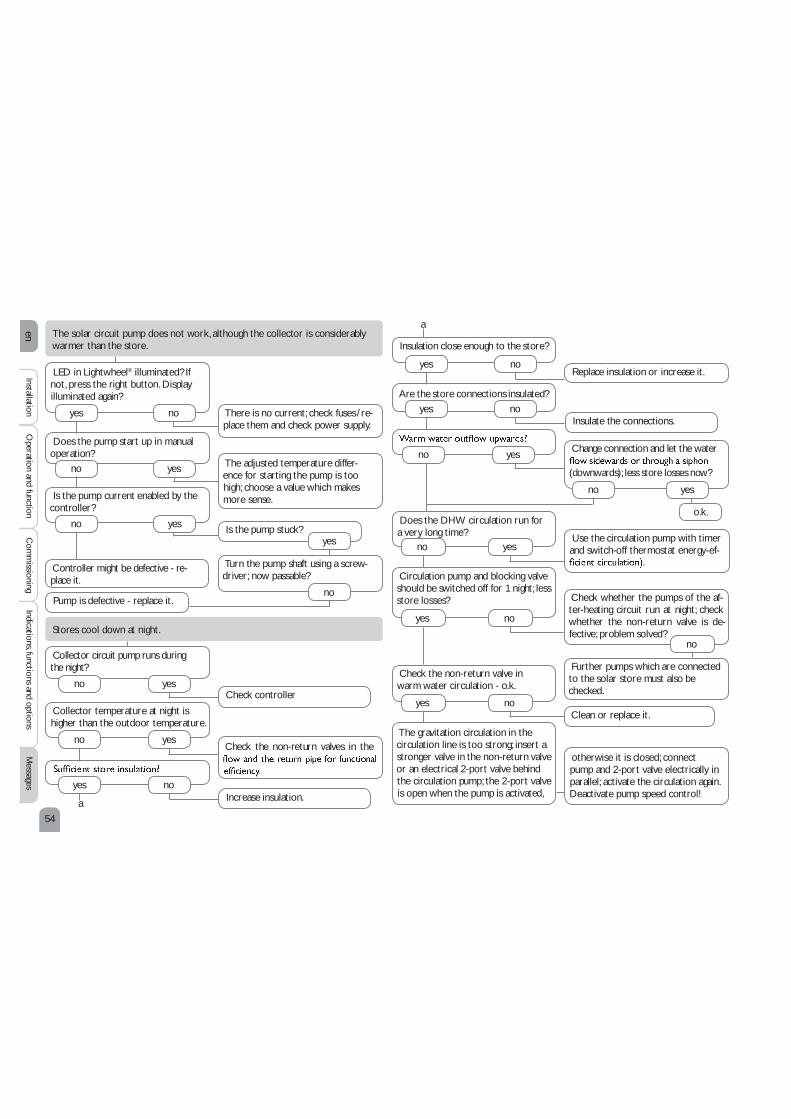
en54
InstallationIndications, functions and optionsMessages
CommissioningOperation and function Is the pump current enabled by the controller?LED in Lightwheel® illuminated? If not, press the right button. Display illuminated again?Does the pump start up in manual operation?The solar circuit pump does not work, although the collector is considerably warmer than the store.yes noyes There is no current; check fuses / re-place them and check power supply.The adjusted temperature differ-ence for starting the pump is too high; choose a value which makes more sense.no yesnoStores cool down at night.Collector circuit pump runs during the night?no yes Check controllerCheck the non-return valves in the yes no Increase insulation.
Insulation close enough to the store?yes no Replace insulation or increase it.Are the store connections insulated?yes no Insulate the connections.no yes Change connection and let the water (downwards); less store losses now?no yeso.k.aCollector temperature at night is higher than the outdoor temperature.no yes
Controller might be defective - re-place it. Is the pump stuck?Turn the pump shaft using a screw-driver; now passable?Pump is defective - replace it. yesno Does the DHW circulation run for a very long time?no yes Use the circulation pump with timer and switch-off thermostat energy-ef-Circulation pump and blocking valve should be switched off for 1 night; less store losses?yes no Check whether the pumps of the af-ter-heating circuit run at night; check whether the non-return valve is de-fective; problem solved? noCheck the non-return valve in warm water circulation - o.k.yes no
a
The gravitation circulation in the circulation line is too strong; insert a stronger valve in the non-return valve or an electrical 2-port valve behind the circulation pump; the 2-port valve is open when the pump is activated, otherwise it is closed; connect pump and 2-port valve electrically in parallel; activate the circulation again. Deactivate pump speed control!Clean or replace it.Further pumps which are connected to the solar store must also be checked.

55en
AAfterheating ......................................................................................................................... 41Antifreeze function ............................................................................................................ 36BBlocking protection ........................................................................................................... 44Booster function ................................................................................................................ 37CCode ..................................................................................................................................... 51Collector cooling ............................................................................................................... 34Collector emergency shutdown ..................................................................................... 34Collector minimum temperature ................................................................................... 35Commissioning ................................................................................................................... 23Control lamp ....................................................................................................................... 19Cooling function ................................................................................................................. 39DT control ........................................................................................................................... 32Data communication / Bus .................................................................................................. 6Displays ................................................................................................................................. 20Drainback option ............................................................................................................... 36EElectrical connection ............................................................................................................ 5Error messages ................................................................................................................... 51FFault indication.................................................................................................................... 21Function control ................................................................................................................. 49HHeat exchange function .................................................................................................... 41Heat quantity measurement ............................................................................................ 46Holiday function ................................................................................................................. 43LLanguage ............................................................................................................................... 48MManual mode ....................................................................................................................... 44Menu overview ................................................................................................................... 30Menu structure ................................................................................................................... 19
Messages .............................................................................................................................. 51Microbuttons ....................................................................................................................... 18Minimum and maximum temperatures ......................................................................... 31Monitoring-Display ............................................................................................................ 20Mounting ................................................................................................................................. 5NNight circulation ................................................................................................................. 49OOperating days .................................................................................................................... 31PParallel relay ........................................................................................................................ 45Priority logic ........................................................................................................................ 33Protection against Legionella ........................................................................................... 45RRelay control ....................................................................................................................... 42resetting balance values .................................................................................................... 20Return preheating .............................................................................................................. 42SSolid fuel boiler ................................................................................................................... 40Speed control ...................................................................................................................... 32Store cooling ....................................................................................................................... 39Store sequence control .................................................................................................... 38System overview ................................................................................................................. 7System screen ..................................................................................................................... 21System selection ................................................................................................................. 31TTechnical data ....................................................................................................................... 4Temperature differential control ( T control) ............................................................ 32Temperature sensors ........................................................................................................ 47Thermal disinfection .......................................................................................................... 45Time and date ..................................................................................................................... 48Troubleshooting .................................................................................................................. 52UUser code ............................................................................................................................ 51
12 Index
Distributed by: ACV InternationalOude Vijverweg 6B-1653 - Dworp - Belgium© All contents of this document are protected by copyright.