software licensing introduction & installation leica geosystems software licensing is based on a...
TRANSCRIPT

Leica Geosystems Software Licensing Introduction & Installation
Version 2.0
English
Table of Contents
1 Introduction .................................................................................... 3 Table of Contents 2 License Models ................................................................................ 4
2.1 Node locked Licenses ......................................................................4 2.2 Floating Licenses .............................................................................5
3 Node locked Licenses ...................................................................... 7 3.1 Installing & Activating Licenses .......................................................7 3.2 Registering the License at myWorld ................................................13 3.3 Managing Licenses...........................................................................16
3.3.1 Viewing Licenses..........................................................................17 3.3.2 Updating Licenses........................................................................17 3.3.3 Rehosting Licenses ......................................................................18
4 Floating Licenses ............................................................................. 19 4.1 Installing & Activating Licenses .......................................................19
4.1.1 Installing the Local License Server...............................................19 4.1.2 Installing on Local Client(s)..........................................................23
4.2 Registering the License at myWorld ................................................28 4.3 Managing Licenses...........................................................................31
4.3.1 Managing the Local License Server ..............................................31 4.3.1.1 Viewing Licenses......................................................................32 4.3.1.2 Viewing Licenses in use ...........................................................32 4.3.1.3 Managing the License Server ...................................................33 4.3.1.4 Updating Licenses....................................................................33 4.3.1.5 Activating new Licenses...........................................................34 4.3.1.6 Rehosting Licenses ..................................................................35 4.3.1.7 Verifying Connection to the Leica Geosystems License Server 36
4.3.2 Managing Licenses on Local Clients .............................................37 4.3.2.1 Viewing Licenses......................................................................37 4.3.2.2 Updating Licenses....................................................................38 4.3.2.3 Borrowing Licenses..................................................................38 4.3.2.4 Rehosting Licenses ..................................................................39
5 Offline License Transfer .................................................................. 41 5.1 Activating Licenses offline...............................................................42
5.1.1 Getting the Offline Activation Start file .......................................42 5.1.2 Creating an Offline Activation Request file..................................44 5.1.3 Getting the Offline Activation Response file ...............................46 5.1.4 Processing the Activation Response file ......................................47
5.2 Returning Licenses offline ...............................................................48 5.2.1 Getting the Offline Return Start file ............................................49 5.2.2 Creating an Offline Return Request file.......................................49 5.2.3 Getting the Offline Return Response file ....................................51 5.2.4 Processing the Return Response file ...........................................52
5.3 Updating Licenses offline ................................................................53
6 Frequently Asked Questions (FAQs)................................................. 55
7 Glossary .......................................................................................... 59
Leica Geosystems Software Licensing – Introduction & Installation 2
1 Introduction
Introduction The Leica Geosystems Software Licensing is based on a reliable and secure technology that does not require any Software Protection Key (“Dongle”). An internet connection to the Leica Geosystems License Server is all that is required for installation and license activation.
License Models Depending on the Leica Geosystems software product there is a choice between two different License Models matching different user requirements:
Node locked Floating
Node locked Licenses are tied to a single PC whereas Floating Licenses can be shared between multiple users working on different PCs within the same network.
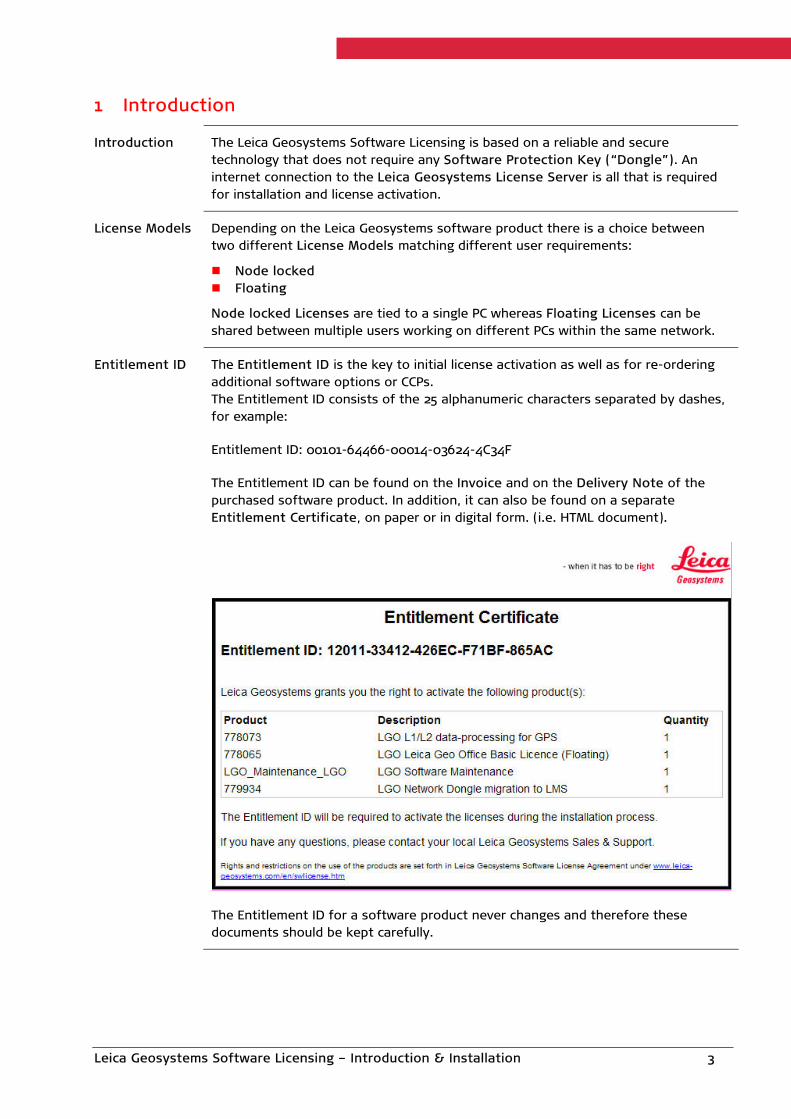
Entitlement ID The Entitlement ID is the key to initial license activation as well as for re-ordering additional software options or CCPs. The Entitlement ID consists of the 25 alphanumeric characters separated by dashes, for example:
Entitlement ID: 00101-64466-00014-03624-4C34F
The Entitlement ID can be found on the Invoice and on the Delivery Note of the purchased software product. In addition, it can also be found on a separate Entitlement Certificate, on paper or in digital form. (i.e. HTML document).
The Entitlement ID for a software product never changes and therefore these documents should be kept carefully.
Leica Geosystems Software Licensing – Introduction & Installation 3
2 License Models
Introduction Depending on the Leica Geosystems software product there is a choice between two different License Models matching different user requirements:
Node locked Floating
The available license models and the related functionality depend on the Leica Geosystems software product.
2.1 Node locked Licenses
Node locked License
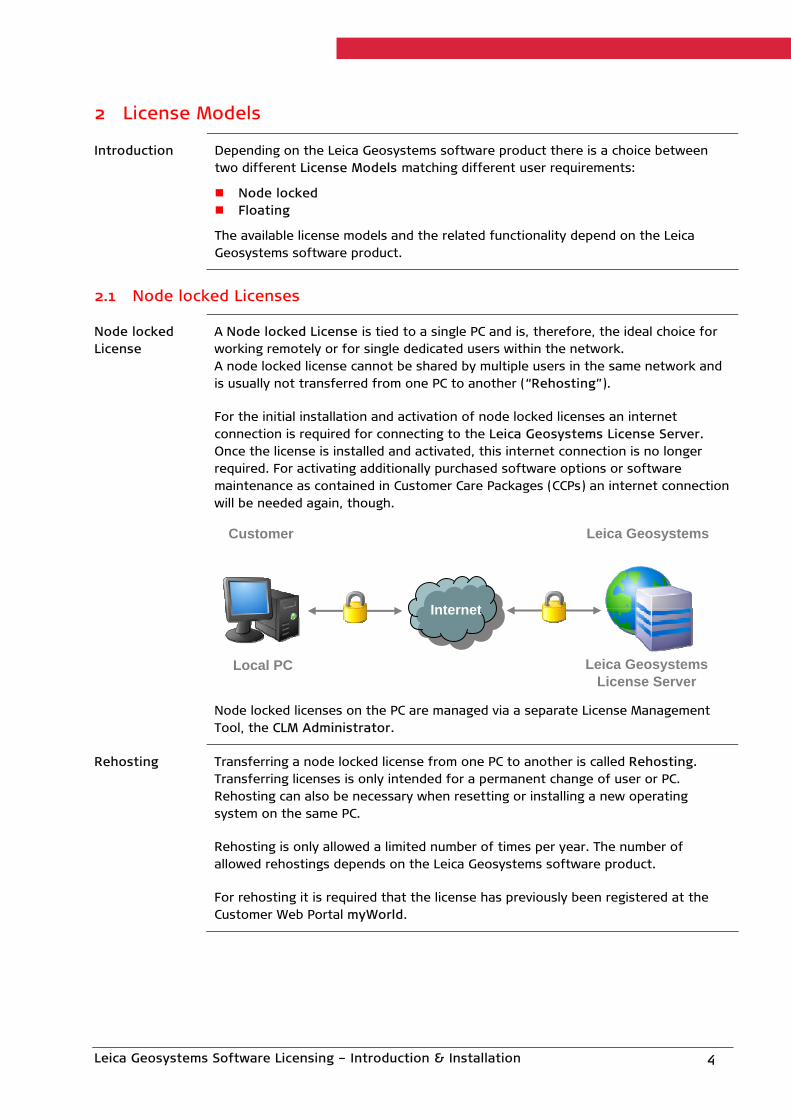
A Node locked License is tied to a single PC and is, therefore, the ideal choice for working remotely or for single dedicated users within the network. A node locked license cannot be shared by multiple users in the same network and is usually not transferred from one PC to another (“Rehosting”).
For the initial installation and activation of node locked licenses an internet connection is required for connecting to the Leica Geosystems License Server. Once the license is installed and activated, this internet connection is no longer required. For activating additionally purchased software options or software maintenance as contained in Customer Care Packages (CCPs) an internet connection will be needed again, though.
Node locked licenses on the PC are managed via a separate License Management Tool, the CLM Administrator.
Rehosting Transferring a node locked license from one PC to another is called Rehosting. Transferring licenses is only intended for a permanent change of user or PC. Rehosting can also be necessary when resetting or installing a new operating system on the same PC.
Rehosting is only allowed a limited number of times per year. The number of allowed rehostings depends on the Leica Geosystems software product.
For rehosting it is required that the license has previously been registered at the Customer Web Portal myWorld.
Leica Geosystems Customer
Internet
Leica Geosystems License Server
Local PC
Leica Geosystems Software Licensing – Introduction & Installation 4

Leica Geosystems Software Licensing – Introduction & Installation 5
2.2 Floating Licenses
Floating License Floating Licenses can be shared across multiple client workstations within the same local network. Floating licenses are the ideal choice if the software shall be “floated”over a local network, transferring from one client workstation to the next as required.
Floating licenses are managed by a Local License Server running in the local network. This Local License Server manages the license pool and controls that the number of simultaneously used licenses does not exceed the total number of purchased licenses. If no more licenses are available, the user is notified and has to wait until another user finishes using a license. The Local License Server can be installed on either a normal PC or a dedicated server, but it cannot be installed on a "virtual" computer or server system. The Local License Server can manage the licenses for one or more Leica Geosystems software products. Usually the license is not transferred from one Local License Server to another (“Rehosting”).
For the initial installation and activation of the Local License Server an internet connection is required for connecting to the Leica Geosystems License Server. Once the local server is installed and activated, this internet connection is no longer required. For activating additionally purchased software options or software maintenance as contained in Customer Care Packages (CCPs) an internet connection will be needed again, though.
If it is required to use the software remotely on a PC or notebook without connection to the network and the Local License Server it is possible to “borrow” licenses from the Local License Server and to “return” them after usage (“Borrowing”).
Floating licenses on the Local License Server are managed via a separate License Management Tool, the CLM Administrator Server.
Customer
Internet
Leica Geosystems
Local Network
Leica Geosystems
License Server
Local License
Server
Local Client 1
Local Client 2
Local Client n

Rehosting Transferring the license from one Local License Server within the local network to another is called Rehosting. Transferring the license is only intended for a permanent change of the Local License Server. Rehosting the license can also be necessary when resetting or installing a new operating system on the same server or PC.
Rehosting of the license is only allowed a limited number of times per year. The number of allowed rehostings depends on the Leica Geosystems software product.
For rehosting it is required that the license has previously been registered at the Customer Web Portal myWorld.
Borrowing If it is required to use the software remotely on a PC or notebook without connection to the network and the Local License Server, it is possible to “borrow” licenses from the Local License Server and “return” them after usage. This process is called Borrowing. The availability of borrowing depends on the Leica Geosystems software product.
Leica Geosystems Software Licensing – Introduction & Installation 6

3 Node locked Licenses
3.1 Installing & Activating Licenses
Installation Requirements
To install the software package on a PC and to activate the licenses the following is required:
PC with connection to the internet. Invoice, delivery note or Entitlement Certificate with the Entitlement ID for the
software package. Installation CD-ROM or DVD or downloaded setup program for the software
package.
Installation Wizard
The installation of the software and activation of the software package is done with an installation wizard that automatically guides the user through the complete installation and activation process. The following chapter will explain these setup steps in detail.
Please note that the installation steps and screenshots in this manual are taken from the software package Leica Geo Office. For other software packages they may differ slightly.
Step 1:
Starting the Setup program
To begin the installation of the software package:
Start the setup program Setup.exe from the installation CD-ROM or DVD or from local hard disk.
Step 2:
Installing the License Management Tools
The installation program now automatically checks if the required License Management Tools are already installed.
If not installed yet:
Select Install to install the License Management Tools.
The tools will now be installed on the PC.
Leica Geosystems Software Licensing – Introduction & Installation 7

Step 3:
Starting the Installation of the Software Package
The installation wizard of the software package is started:
Select Next to start the installation of the software package.
Step 4:
Accepting the Software License Agreement
The terms in the Leica Geosystems Software License Agreement have to be accepted before the software can be installed:
Read the Software License Agreement and select “I accept…”
Select Next to continue with the installation.
Step 5:
Starting the License Activation Wizard
To activate your Entitlement the License Activation Wizard has to be started:
Press Next to start the License Activation Wizard.
If you have already activated a license of your software or if you want to activate offline:
Select Skip License Activation.
For details on Offline Activation refer to chapter 5.
Leica Geosystems Software Licensing – Introduction & Installation 8
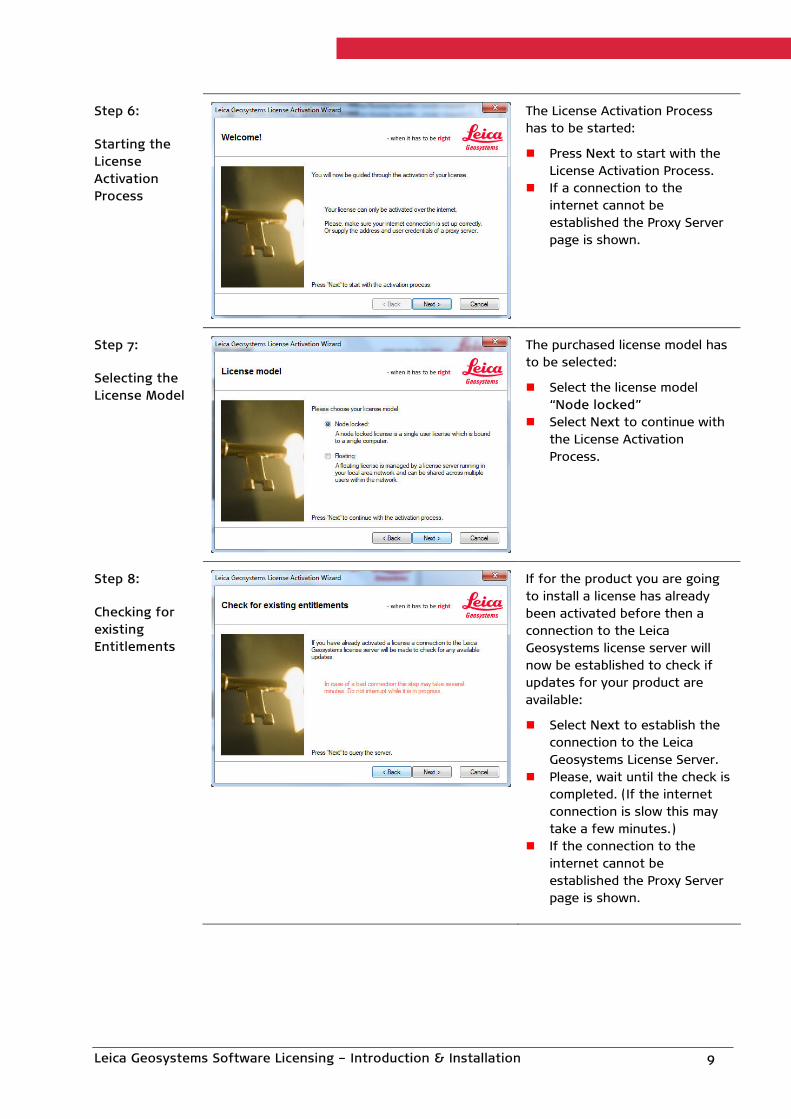
Step 6:
Starting the License Activation Process
The License Activation Process has to be started:
Press Next to start with the License Activation Process.
If a connection to the internet cannot be established the Proxy Server page is shown.
Step 7:
Selecting the License Model
The purchased license model has to be selected:
Select the license model “Node locked”
Select Next to continue with the License Activation Process.
Step 8:
Checking for existing Entitlements
If for the product you are going to install a license has already been activated before then a connection to the Leica Geosystems license server will now be established to check if updates for your product are available:
Select Next to establish the connection to the Leica Geosystems License Server.
Please, wait until the check is completed. (If the internet connection is slow this may take a few minutes.)
If the connection to the internet cannot be established the Proxy Server page is shown.
Leica Geosystems Software Licensing – Introduction & Installation 9
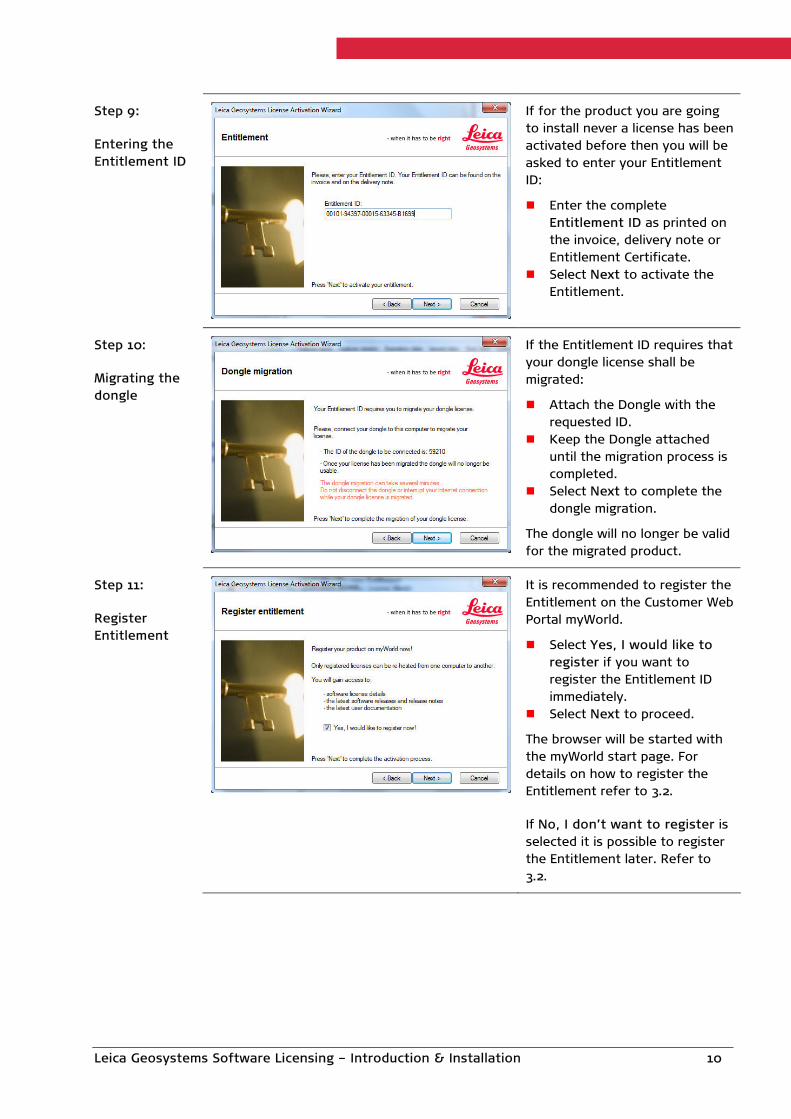
Step 9:
Entering the Entitlement ID
If for the product you are going to install never a license has been activated before then you will be asked to enter your Entitlement ID:
Enter the complete Entitlement ID as printed on the invoice, delivery note or Entitlement Certificate.
Select Next to activate the Entitlement.
Step 10:
Migrating the dongle
If the Entitlement ID requires that your dongle license shall be migrated:
Attach the Dongle with the requested ID.
Keep the Dongle attached until the migration process is completed.
Select Next to complete the dongle migration.
The dongle will no longer be valid for the migrated product.
Step 11:
Register Entitlement
It is recommended to register the Entitlement on the Customer Web Portal myWorld.
Select Yes, I would like to register if you want to register the Entitlement ID immediately.
Select Next to proceed.
The browser will be started with the myWorld start page. For details on how to register the Entitlement refer to 3.2.
If No, I don’t want to register is selected it is possible to register the Entitlement later. Refer to 3.2.
Leica Geosystems Software Licensing – Introduction & Installation 10
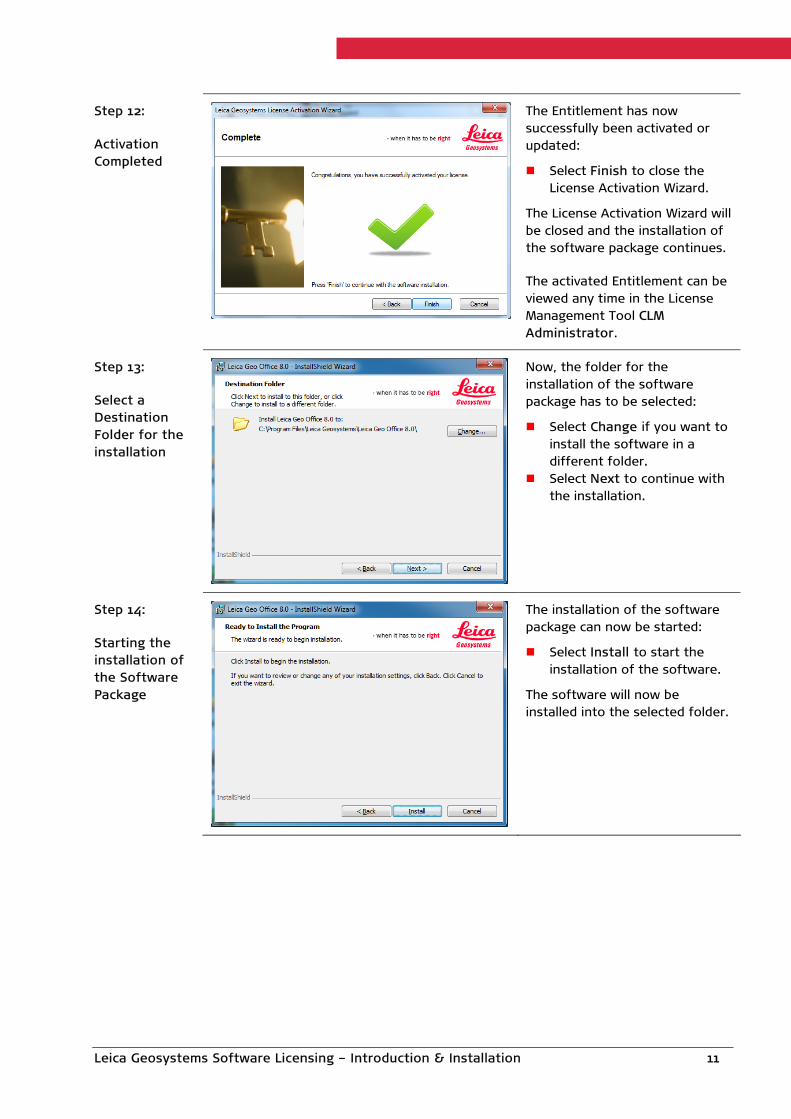
Step 12:
Activation Completed
The Entitlement has now successfully been activated or updated:
Select Finish to close the License Activation Wizard.
The License Activation Wizard will be closed and the installation of the software package continues.
The activated Entitlement can be viewed any time in the License Management Tool CLM Administrator.
Step 13:
Select a Destination Folder for the installation
Now, the folder for the installation of the software package has to be selected:
Select Change if you want to install the software in a different folder.
Select Next to continue with the installation.
Step 14:
Starting the installation of the Software Package
The installation of the software package can now be started:
Select Install to start the installation of the software.
The software will now be installed into the selected folder.
Leica Geosystems Software Licensing – Introduction & Installation 11

Step 15:
Installation Completed
After the installation of the software package has successfully been completed:
Select Finish to exit the Installation Wizard and to start the software product.
Now, the software product is installed and the purchased license is fully activated.
Leica Geosystems Software Licensing – Introduction & Installation 12
3.2 Registering the License at myWorld
Introduction Registering of licenses at the Customer Web Portal myWorld is required for rehosting and for accessing product related information and software updates. For the registration of licenses the Entitlement ID is required.
The registration of licenses can be done during the installation process, but also at a later stage.
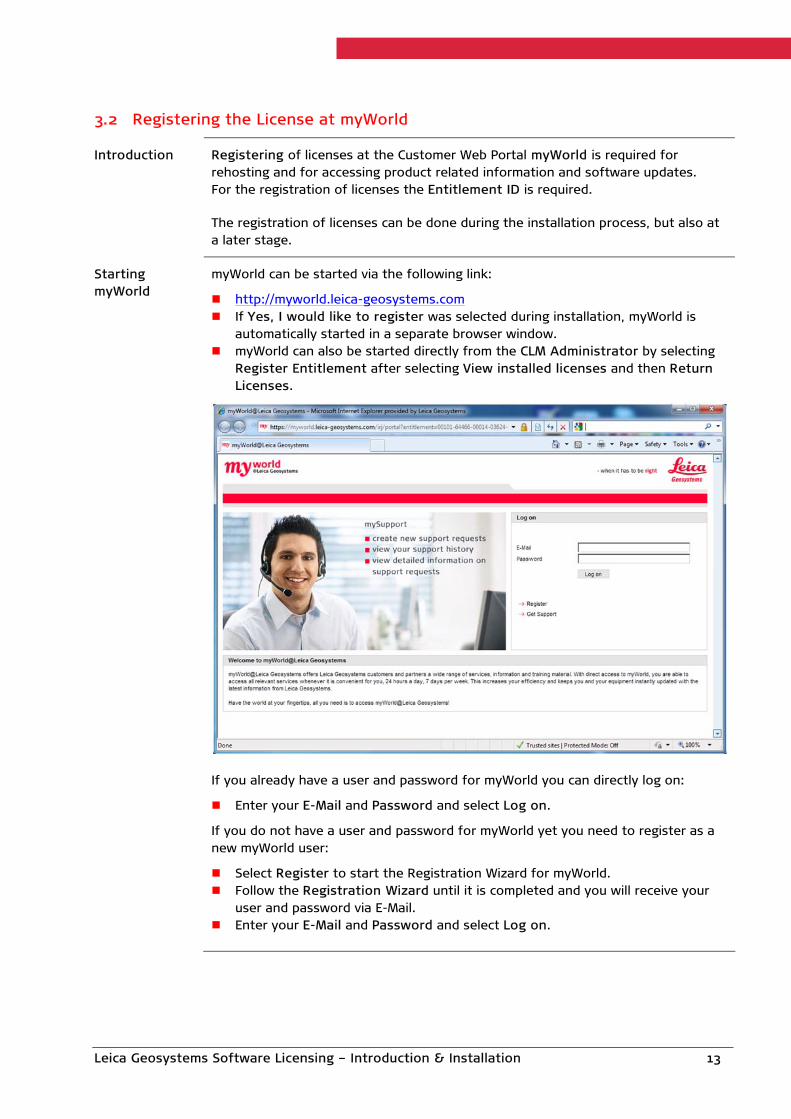
Starting myWorld
myWorld can be started via the following link:
http://myworld.leica-geosystems.com If Yes, I would like to register was selected during installation, myWorld is
automatically started in a separate browser window. myWorld can also be started directly from the CLM Administrator by selecting
Register Entitlement after selecting View installed licenses and then Return Licenses.
If you already have a user and password for myWorld you can directly log on:
Enter your E-Mail and Password and select Log on.
If you do not have a user and password for myWorld yet you need to register as a new myWorld user:
Select Register to start the Registration Wizard for myWorld. Follow the Registration Wizard until it is completed and you will receive your
user and password via E-Mail. Enter your E-Mail and Password and select Log on.
Leica Geosystems Software Licensing – Introduction & Installation 13

Starting myProducts
Registering the license to your user (i.e. company) is done via myProducts. To start myProducts:
Select myProducts from the menu on the left.
Add Product myProducts shows all Leica Geosystems products that are registered with the current user. To add an additional product or license:
Select Add Product from the button below the product list.
Leica Geosystems Software Licensing – Introduction & Installation 14

Register License
To add a license:
Select Software. Enter the Entitlement ID. Select OK.
Now, the license is registered and the software package added to the myProducts list.
Leica Geosystems Software Licensing – Introduction & Installation 15
3.3 Managing Licenses
Introduction Managing licenses on a PC is done via the “View Licenses” dialog within the software package or with the separate CLM Administrator Tool.
Please note that the screenshots in this manual are taken from the software package Leica Geo Office. For other software packages they may differ slightly.
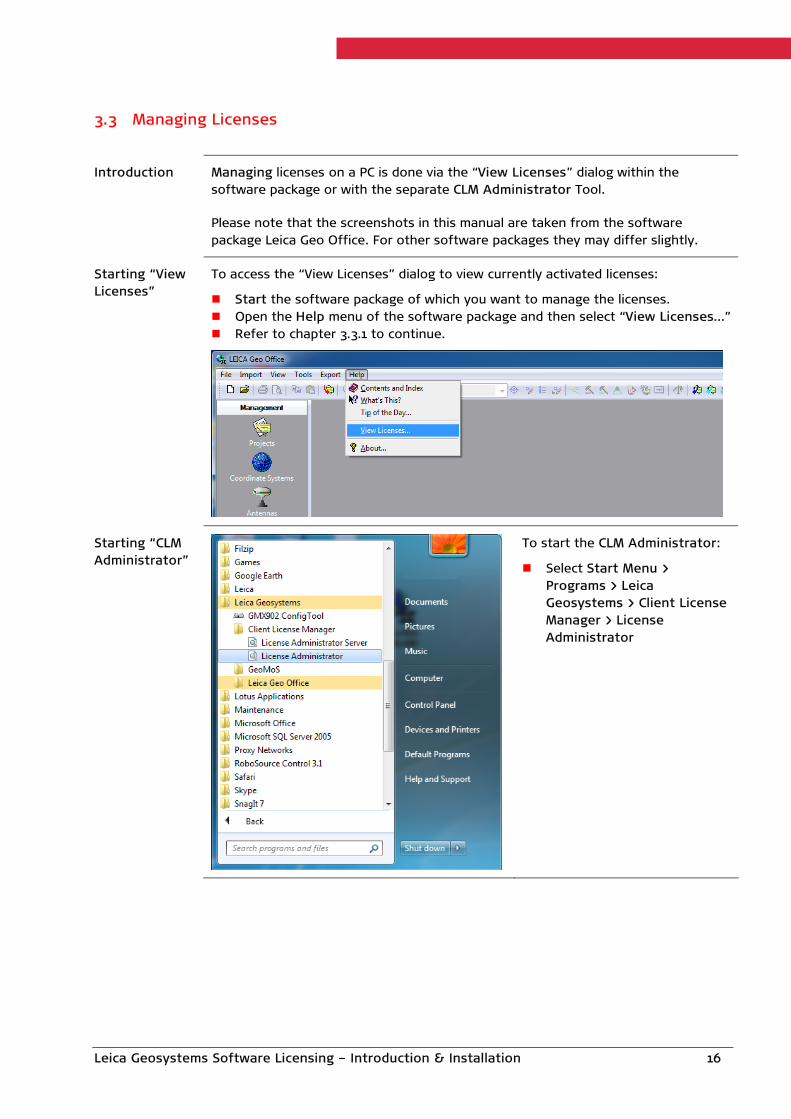
Starting “View Licenses”
To access the “View Licenses” dialog to view currently activated licenses:
Start the software package of which you want to manage the licenses. Open the Help menu of the software package and then select “View Licenses…” Refer to chapter 3.3.1 to continue.
Starting “CLM Administrator”
To start the CLM Administrator:
Select Start Menu > Programs > Leica Geosystems > Client License Manager > License Administrator
Leica Geosystems Software Licensing – Introduction & Installation 16

3.3.1 Viewing Licenses
Introduction Viewing the licenses currently activated on a PC is done via the “View Licenses” dialog within the software package (refer to chapter 3.3). For viewing the currently activated licenses a connection to the internet is not required.
“View Licenses” To view the licenses for a software package:
Start the “View Licenses” dialog within the software package (refer to chapter 3.3).
The “View Licenses” dialog shows the Entitlement ID and all currently activated options of the software package.
3.3.2 Updating Licenses
Introduction Activating additionally purchased software options or software maintenance is called “Updating Licenses”. Updating licenses is done via the “View Licenses” dialog within the software package (refer to chapter 3.3).
For this functionality an internet connection is required to allow for a connection to the Leica Geosystems License Server.
“Check for License Updates”
To update newly purchased software options or software maintenance:
Start the “View Licenses” dialog within the software package (refer to chapter 3.3).
Make sure the PC is connected to the internet.
Select “Check for License Updates”.
“Updating Licenses”
A connection to the Leica Geosystems License Server will now be established and the check for license updates is initiated.
If no license updates are available you will get the message: "No new licenses are available” and be prompted to confirm with OK.
If license updates are available you will get the message "New node locked licenses are available, do you want to activate them?" and be prompted to select Yes or No.
Leica Geosystems Software Licensing – Introduction & Installation 17
3.3.3 Rehosting Licenses
Introduction Rehosting (transferring a license from one PC to another) and managing licenses for different Leica Geosystems software products on the same PC is done with a separate tool, the CLM Administrator (refer to chapter 3.3).
For rehosting it is required that the license has previously been registered at the Customer Web Portal myWorld. For details refer to chapter 3.2.
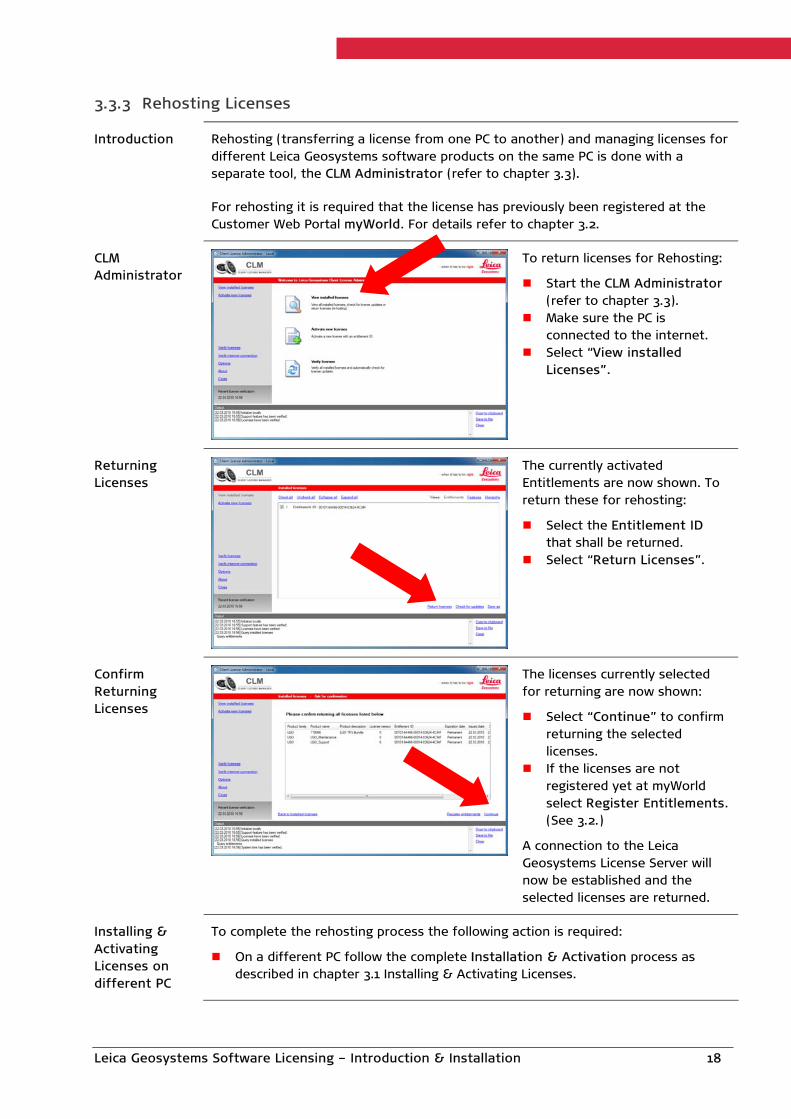
CLM Administrator
To return licenses for Rehosting:
Start the CLM Administrator (refer to chapter 3.3).
Make sure the PC is connected to the internet.
Select “View installed Licenses”.
Returning Licenses
The currently activated Entitlements are now shown. To return these for rehosting:
Select the Entitlement ID that shall be returned.
Select “Return Licenses”.
Confirm Returning Licenses
The licenses currently selected for returning are now shown:
Select “Continue” to confirm returning the selected licenses.
If the licenses are not registered yet at myWorld select Register Entitlements. (See 3.2.)
A connection to the Leica Geosystems License Server will now be established and the selected licenses are returned.
Installing & Activating Licenses on different PC
To complete the rehosting process the following action is required:
On a different PC follow the complete Installation & Activation process as described in chapter 3.1 Installing & Activating Licenses.
Leica Geosystems Software Licensing – Introduction & Installation 18

4 Floating Licenses
4.1 Installing & Activating Licenses
Installation Steps
To install the purchased software package on one or more local PCs and to activate the purchased floating licenses the following installation steps are required:
1. Installation of Local License Server 2. Installation of Local Client(s)
4.1.1 Installing the Local License Server
Installation Requirements
To install the Local License Server the following is required:
Server or PC running in the local network with connection to the internet (once the license is activated this connection is no longer required). This server or PC will then be used by all Local Clients to retrieve a license of the software package.
Invoice, delivery note or Entitlement Certificate with the Entitlement ID for the software package.
Installation CD-ROM or DVD or downloaded setup program for the CLM Server Package.
Installation Wizard
The installation of the Local License Server is done with an installation wizard that automatically guides the user through the complete installation and licence activation process for the software package. The following chapter will explain these setup steps in detail.
Please note that the installation steps and screenshots in this manual are taken from the software package Leica Geo Office. For other software packages they may differ slightly.
Step 1:
Starting the Setup program
To begin the installation of the Local License Server:
Start the setup program “LGO Server Package Setup.exe” from the installation CD-ROM or DVD or from local hard disk (if previously downloaded from the Leica Geosystems website).
Leica Geosystems Software Licensing – Introduction & Installation 19
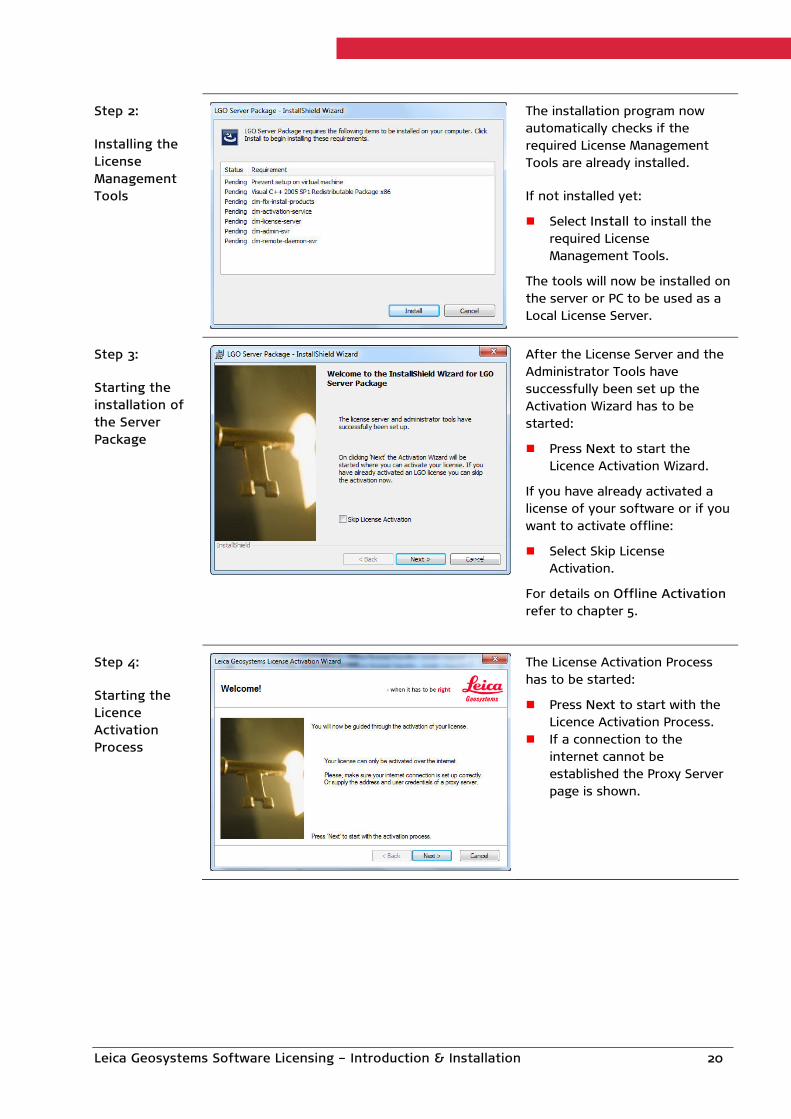
Step 2:
Installing the License Management Tools
The installation program now automatically checks if the required License Management Tools are already installed.
If not installed yet:
Select Install to install the required License Management Tools.
The tools will now be installed on the server or PC to be used as a Local License Server.
Step 3:
Starting the installation of the Server Package
After the License Server and the Administrator Tools have successfully been set up the Activation Wizard has to be started:
Press Next to start the Licence Activation Wizard.
If you have already activated a license of your software or if you want to activate offline:
Select Skip License Activation.
For details on Offline Activation refer to chapter 5.
Step 4:
Starting the Licence Activation Process
The License Activation Process has to be started:
Press Next to start with the Licence Activation Process.
If a connection to the internet cannot be established the Proxy Server page is shown.
Leica Geosystems Software Licensing – Introduction & Installation 20
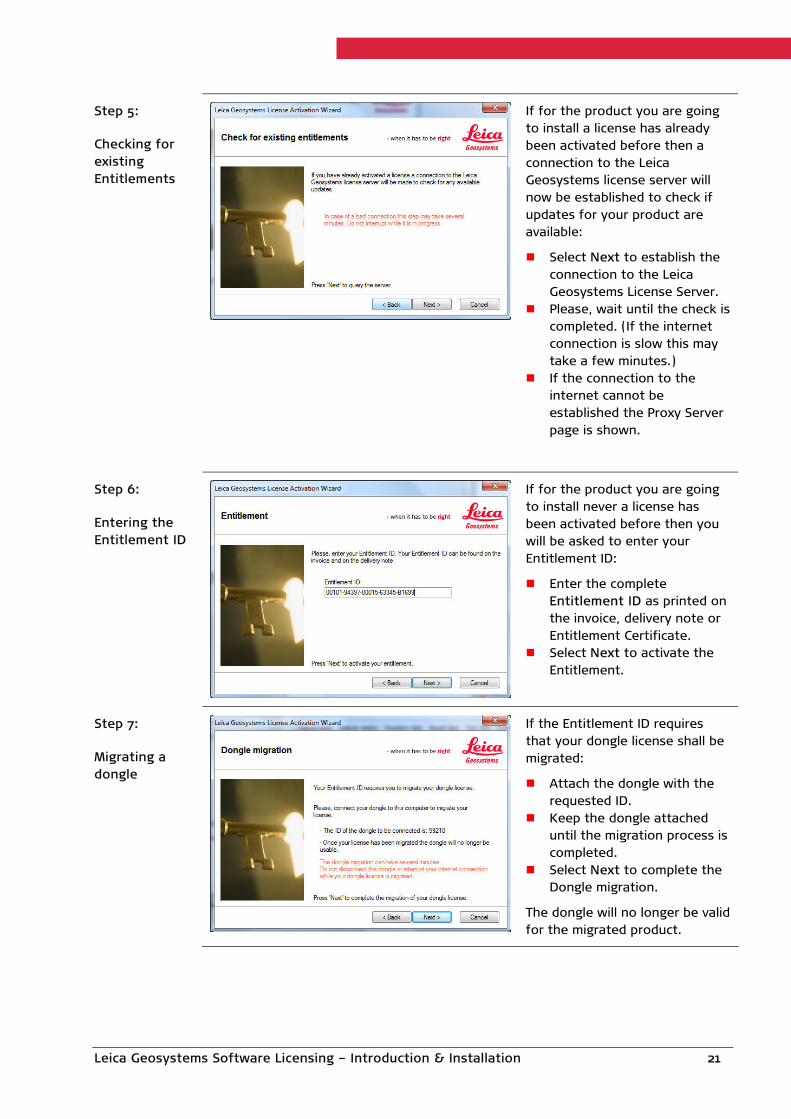
Step 5:
Checking for existing Entitlements
If for the product you are going to install a license has already been activated before then a connection to the Leica Geosystems license server will now be established to check if updates for your product are available:
Select Next to establish the connection to the Leica Geosystems License Server.
Please, wait until the check is completed. (If the internet connection is slow this may take a few minutes.)
If the connection to the internet cannot be established the Proxy Server page is shown.
Step 6:
Entering the Entitlement ID
If for the product you are going to install never a license has been activated before then you will be asked to enter your Entitlement ID:
Enter the complete Entitlement ID as printed on the invoice, delivery note or Entitlement Certificate.
Select Next to activate the Entitlement.
Step 7:
Migrating a dongle
If the Entitlement ID requires that your dongle license shall be migrated:
Attach the dongle with the requested ID.
Keep the dongle attached until the migration process is completed.
Select Next to complete the Dongle migration.
The dongle will no longer be valid for the migrated product.
Leica Geosystems Software Licensing – Introduction & Installation 21

Step 8
Register Entitlement
It is recommended to register the Entitlement on the Customer Web Portal myWorld.
Select Yes, I would like to register if you would like to register the Entitlement ID immediately.
Select Next to proceed.
The browser is now started with the myWorld start page. For details on how to register the Entitlement refer to 4.2.
If No, I don’t want to register is selected it is possible to register the Entitlement at a later stage. Refer to 4.2.
Step 9:
Activation completed
The Entitlement has now successfully been activated:
Select Finish to close the License Activation Wizard.
The License Activation Wizard will be closed and the installation of the Server Package continues.
The activated Entitlement can be viewed any time in the License Management Tool CLM Administrator Server.
Step 10:
Completing the Installation
The required License Management Tools are now installed on the PC or server and the given Entitlement has successfully been activated or updated.
Select Finish to finalize the installation.
Write down the name of the Server or PC in the local network as this is required to install and activate the software on the local clients.
Continue with the Installation of Local Client(s) (refer to chapter 4.1.2.)
Leica Geosystems Software Licensing – Introduction & Installation 22
Additional features or Entitlements can be activated any time in the License Management Tool CLM Administrator Server.
4.1.2 Installing on Local Client(s)
Installation Requirements
To install and activate the software package on Local Client(s) in the network the following is required:
PC running in the local network with connection to the Local License Server and to the internet (once the software package is installed the internet connection is no longer needed).
Installation CD-ROM or DVD or downloaded setup program for the software package.
Installation Wizard
The installation of the software package is done with an installation wizard that automatically guides the user through the complete software installation process. The following chapter will explain these setup steps in detail.
Please note that the installation steps and screenshots in this manual are taken from the software package Leica Geo Office. For other software packages they may differ slightly.
Step 1:
Starting the Setup program
To begin the installation of the software package:
Start the setup program Setup.exe from the installation CD-ROM or DVD or from local hard disk.
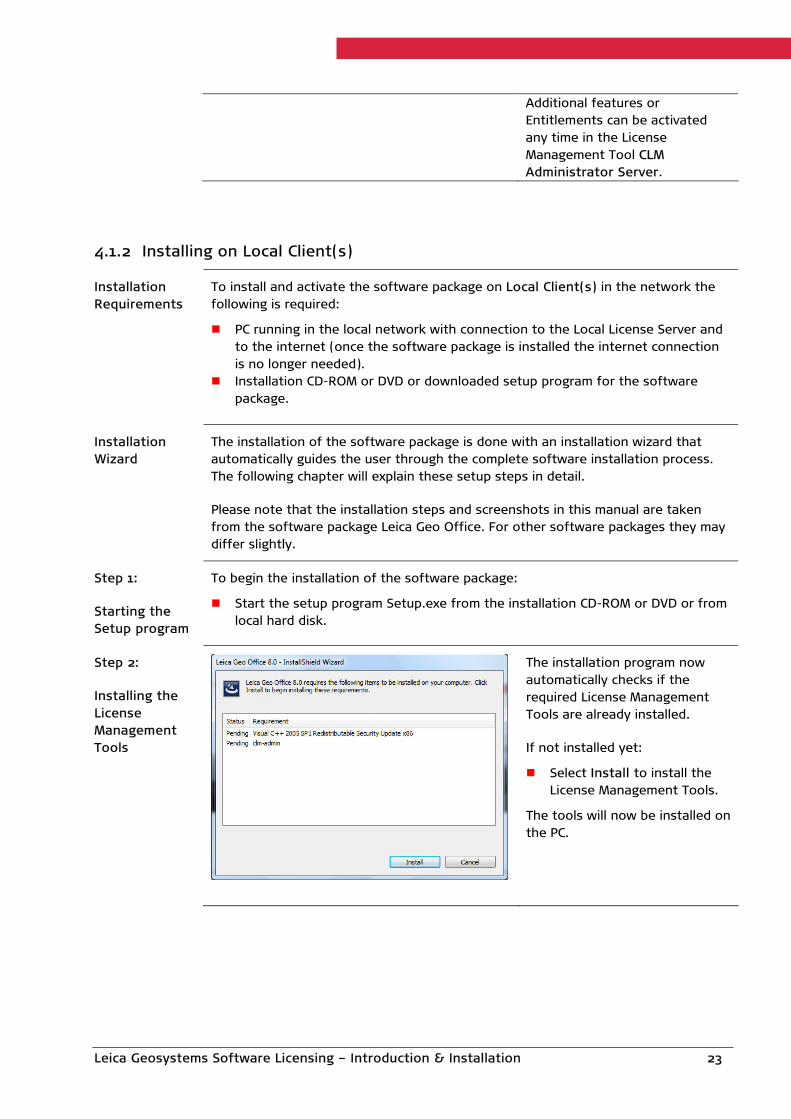
Step 2:
Installing the License Management Tools
The installation program now automatically checks if the required License Management Tools are already installed.
If not installed yet:
Select Install to install the License Management Tools.
The tools will now be installed on the PC.
Leica Geosystems Software Licensing – Introduction & Installation 23

Step 3:
Starting the Installation of the Software Package
The installation wizard of the software package is started:
Select Next to start the installation of the software package.
Step 4:
Accepting the Software License Agreement
The terms in the Leica Geosystems Software License Agreement have to be accepted before the software can be installed:
Read the Software License Agreement and select “I accept…”
Select Next to continue with the installation.
Step 5:
Starting the License Activation Wizard
The License Activation Wizard has to be started:
Press Next to start the License Activation Wizard.
If you have already activated a license of your software:
Select Skip License Activation.
Leica Geosystems Software Licensing – Introduction & Installation 24

Step 6:
Starting the License Activation Process
The License Activation Process has to be started:
Press Next to start with the License Activation Process.
Step 7:
Selecting the License Model
The purchased license model has to be selected:
Select the License Model “Floating”
Select Next to continue with the License Activation Process.
Step 8:
Specifying the License Server
The connection to the Local License Server has to be specified:
Enter the Address (IP-address and port) or host name (computer name) of the previously installed License Server. If the software is installed on the same PC as the License Server then enter “@localhost”.
Select Next to confirm the specified connection details.
Leica Geosystems Software Licensing – Introduction & Installation 25

Step 9:
Checking for existing Entitlements
If for the product you are going to install a license has already been activated on the Local License Server before then a connection to the Leica Geosystems license server will now be established to check if updates for your product are available:
Select Next to establish the connection to the Leica Geosystems License Server.
Please, wait until the check is completed. (If the internet connection is slow this may take a few minutes.)
If the connection to the internet cannot be established the Proxy Server page is shown.
Step 10:
Activation Completed
The activation of the Local Client is now complete:
Select Finish to close the License Activation Wizard.
The License Activation Wizard will be closed and the installation of the software package continues.
Step 11:
Select Destination Folder for the installation
Now, the folder for the installation of the software package has to be selected:
Select Change if you want to install the software in a different folder.
Select Next to continue with installation.
Leica Geosystems Software Licensing – Introduction & Installation 26
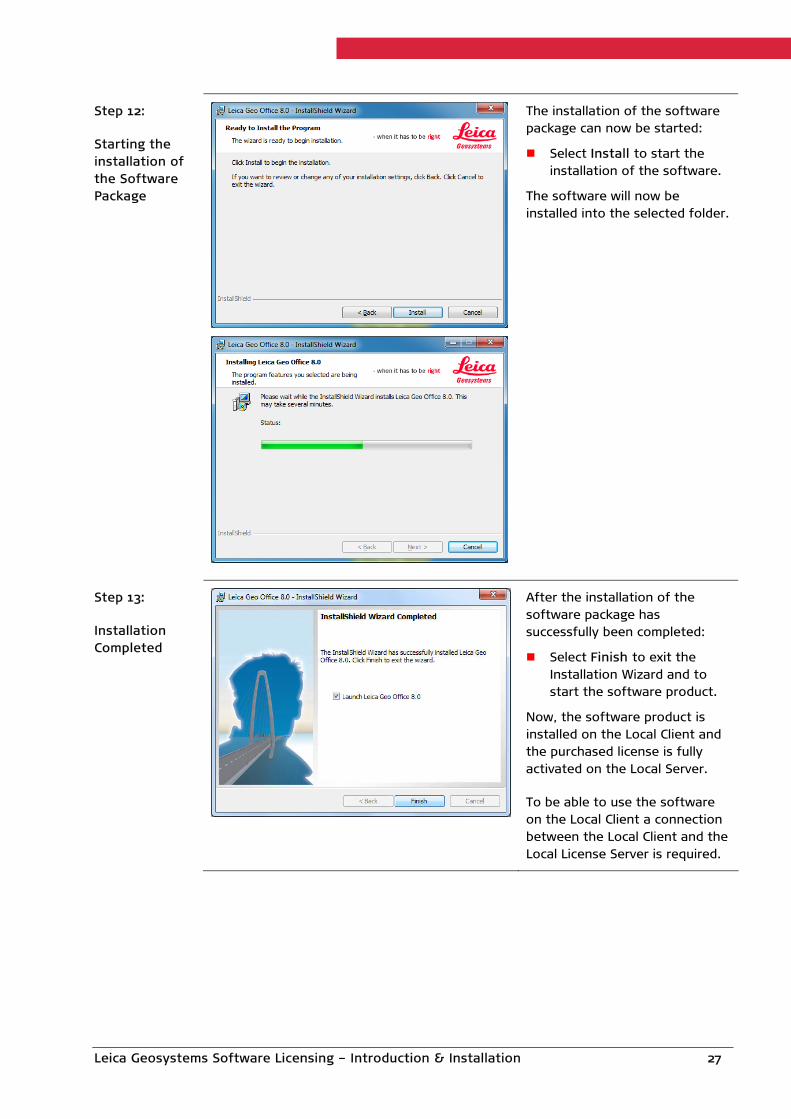
Step 12:
Starting the installation of the Software Package
The installation of the software package can now be started:
Select Install to start the installation of the software.
The software will now be installed into the selected folder.
Step 13:
Installation Completed
After the installation of the software package has successfully been completed:
Select Finish to exit the Installation Wizard and to start the software product.
Now, the software product is installed on the Local Client and the purchased license is fully activated on the Local Server.
To be able to use the software on the Local Client a connection between the Local Client and the Local License Server is required.
Leica Geosystems Software Licensing – Introduction & Installation 27

4.2 Registering the License at myWorld
Introduction Registering of licenses at the Customer Web Portal myWorld is required for rehosting and for accessing product related information and software updates. For registration of the licenses the Entitlement ID is required.
The registration of the licenses can be done during the installation process, but also at a later stage.
Starting myWorld
myWorld can be started via the following link:
http://myworld.leica-geosystems.com If Yes, I would like to register was selected during installation, myWorld is
automatically started in a separate browser window. myWorld can also be started directly from the CLM Administrator by selecting
Register Entitlement after selecting View installed licenses and then Return Licenses.
If you already have a user and password for myWorld you can directly log on:
Enter your E-Mail and Password and select Log on.
If you do not have a user and password for myWorld yet you need to register as a new myWorld user:
Select Register to start the Registration Wizard for myWorld. Follow the Registration Wizard until it is completed and you will receive your
user and password in an E-Mail. Enter your E-Mail and Password and select Log on.
Leica Geosystems Software Licensing – Introduction & Installation 28

Starting myProducts
Registering the license to your user (i.e. company) is done via myProducts. To start myProducts:
Select myProducts from the menu on the left.
Add Product myProducts shows all Leica Geosystems products that are registered with the current user. To add an additional product or license:
Select Add Product from the button below the product list.
Leica Geosystems Software Licensing – Introduction & Installation 29
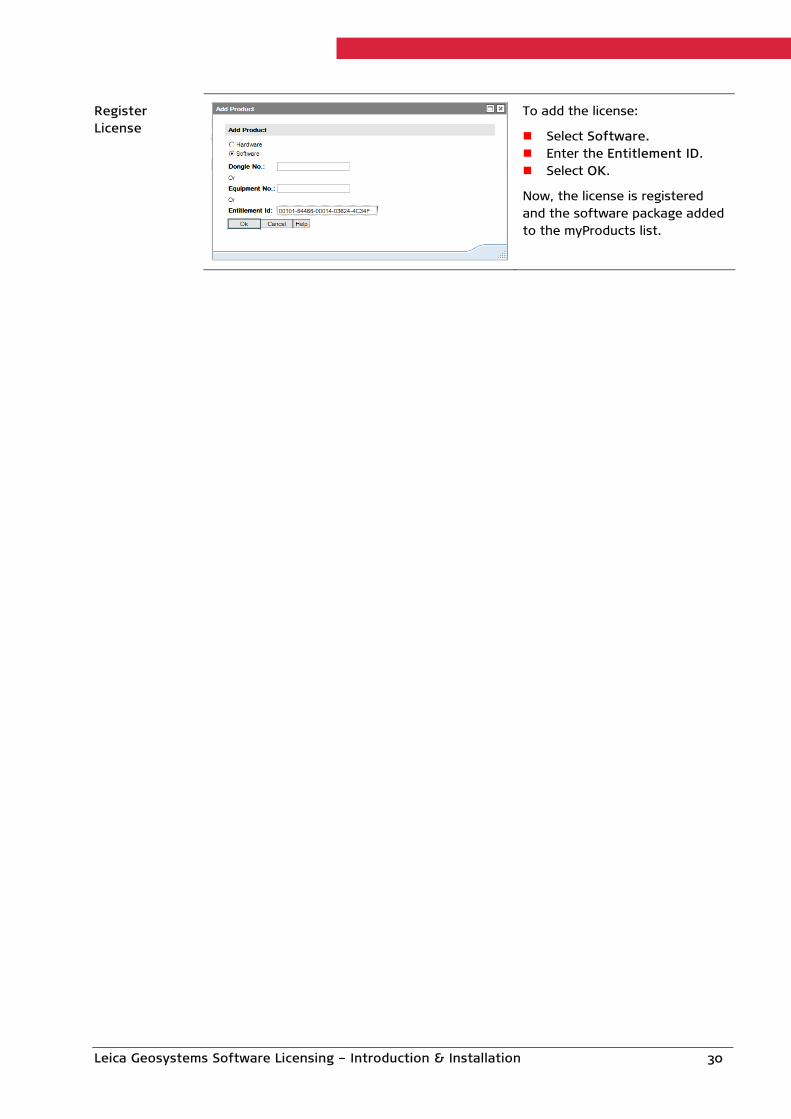
Register License
To add the license:
Select Software. Enter the Entitlement ID. Select OK.
Now, the license is registered and the software package added to the myProducts list.
Leica Geosystems Software Licensing – Introduction & Installation 30

4.3 Managing Licenses
4.3.1 Managing the Local License Server
Introduction Managing of the Local License Server is done via the separate tool CLM Administrator Server.
Please note that the installation steps and screenshots in this manual are taken from the software package Leica Geo Office. For other software packages they may differ slightly.
Starting “CLM Administrator Server”
To start the CLM Administrator Server:
Select Start Menu > Programs > Leica Geosystems > Client License Manager > Licence Administrator Server
“CLM Administrator Server”
All managing of the Local License Server is done with the “CLM Administrator Server”.
Leica Geosystems Software Licensing – Introduction & Installation 31
4.3.1.1 Viewing Licenses
Introduction Viewing the licenses currently activated on the Local License Server is done with the “CLM Administrator Server” (refer to chapter 4.3.1.)
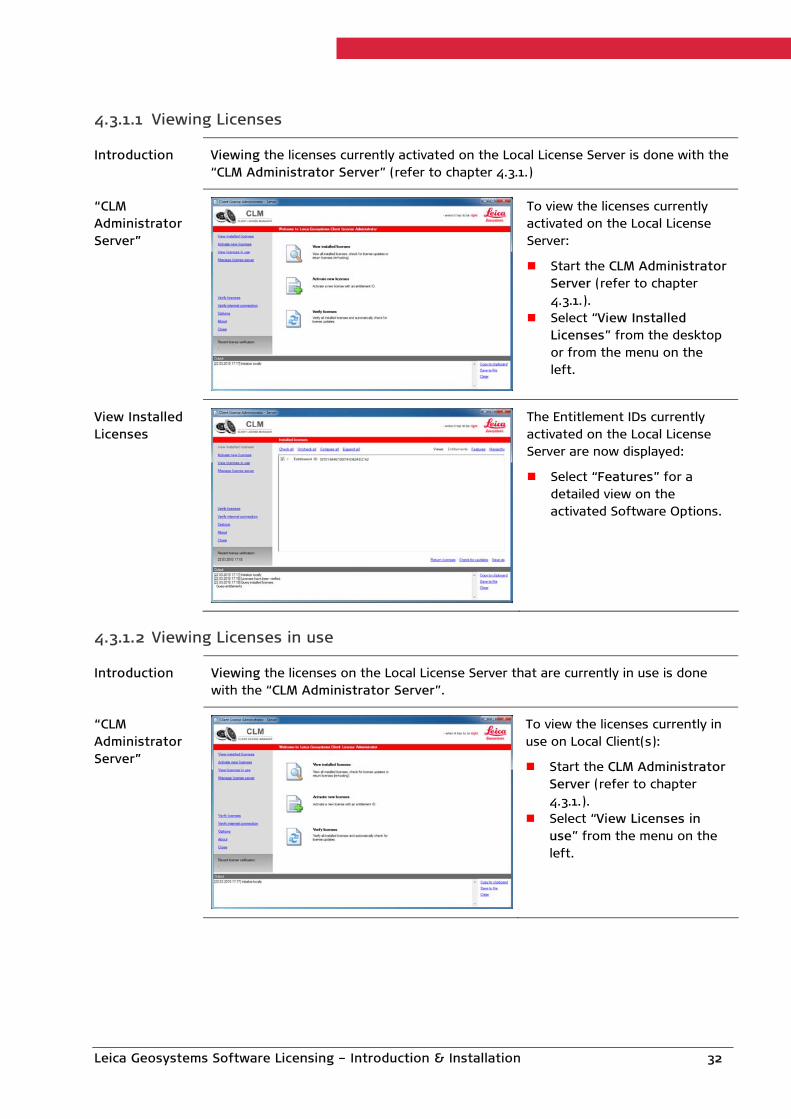
“CLM Administrator Server”
To view the licenses currently activated on the Local License Server:
Start the CLM Administrator Server (refer to chapter 4.3.1.).
Select “View Installed Licenses” from the desktop or from the menu on the left.
View Installed Licenses
The Entitlement IDs currently activated on the Local License Server are now displayed:
Select “Features” for a detailed view on the activated Software Options.
4.3.1.2 Viewing Licenses in use
Introduction Viewing the licenses on the Local License Server that are currently in use is done with the “CLM Administrator Server”.
“CLM Administrator Server”
To view the licenses currently in use on Local Client(s):
Start the CLM Administrator Server (refer to chapter 4.3.1.).
Select “View Licenses in use” from the menu on the left.
Leica Geosystems Software Licensing – Introduction & Installation 32
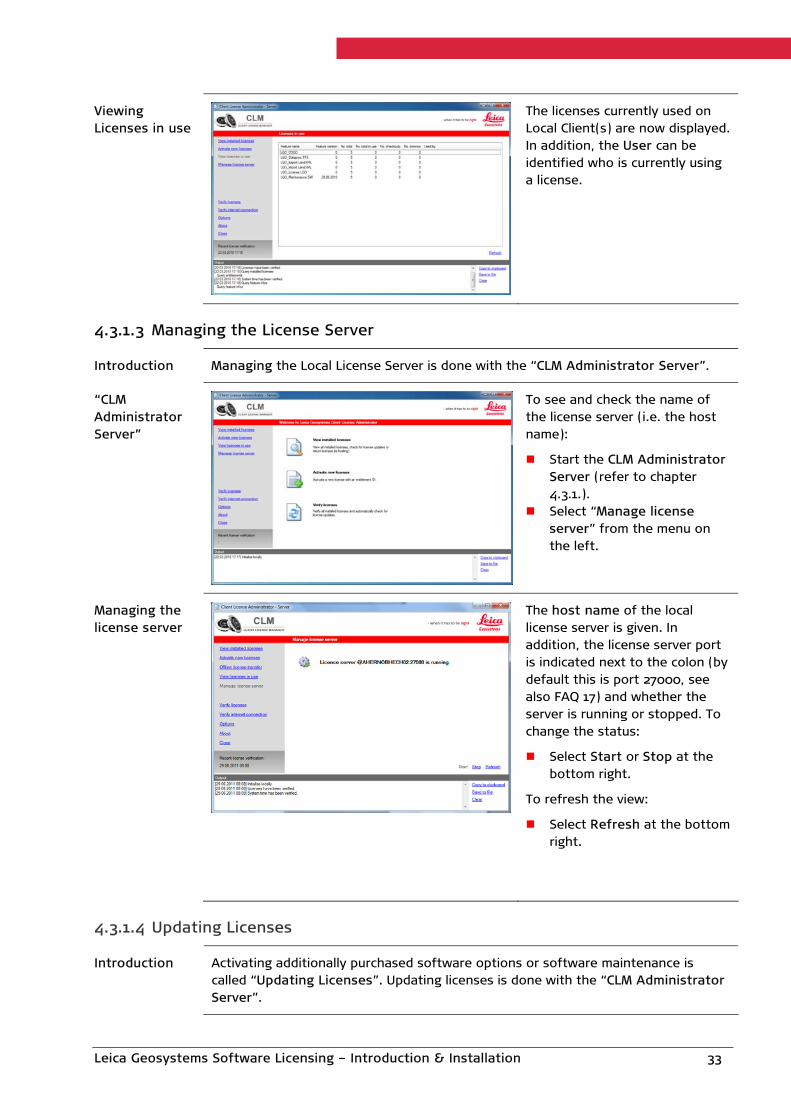
Viewing Licenses in use
The licenses currently used on Local Client(s) are now displayed. In addition, the User can be identified who is currently using a license.
4.3.1.3 Managing the License Server
Introduction Managing the Local License Server is done with the “CLM Administrator Server”.
“CLM Administrator Server”
To see and check the name of the license server (i.e. the host name):
Start the CLM Administrator Server (refer to chapter 4.3.1.).
Select “Manage license server” from the menu on the left.
Managing the license server
The host name of the local license server is given. In addition, the license server port is indicated next to the colon (by default this is port 27000, see also FAQ 17) and whether the server is running or stopped. To change the status:
Select Start or Stop at the bottom right.
To refresh the view:
Select Refresh at the bottom right.
4.3.1.4 Updating Licenses
Introduction Activating additionally purchased software options or software maintenance is called “Updating Licenses”. Updating licenses is done with the “CLM Administrator Server”.
Leica Geosystems Software Licensing – Introduction & Installation 33
For this functionality an internet connection is required to allow for a connection to the Leica Geosystems License Server.
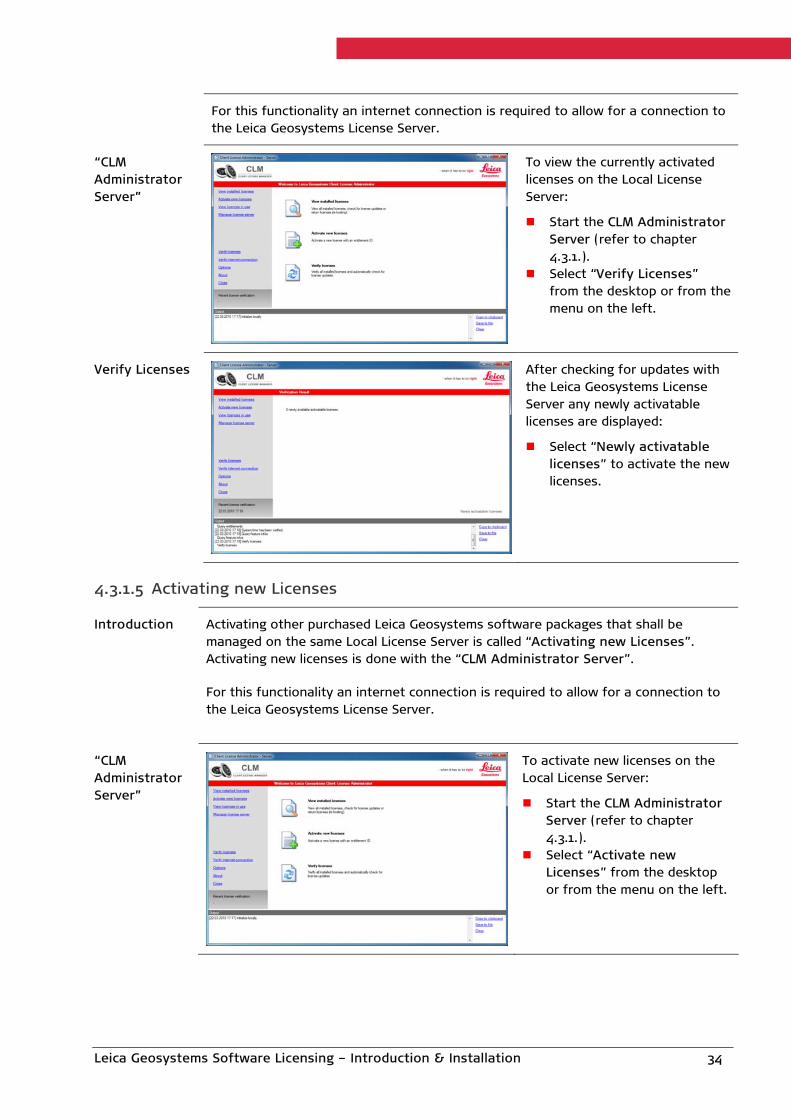
“CLM Administrator Server”
To view the currently activated licenses on the Local License Server:
Start the CLM Administrator Server (refer to chapter 4.3.1.).
Select “Verify Licenses” from the desktop or from the menu on the left.
Verify Licenses After checking for updates with the Leica Geosystems License Server any newly activatable licenses are displayed:
Select “Newly activatable licenses” to activate the new licenses.
4.3.1.5 Activating new Licenses
Introduction Activating other purchased Leica Geosystems software packages that shall be managed on the same Local License Server is called “Activating new Licenses”. Activating new licenses is done with the “CLM Administrator Server”.
For this functionality an internet connection is required to allow for a connection to the Leica Geosystems License Server.
“CLM Administrator Server”
To activate new licenses on the Local License Server:
Start the CLM Administrator Server (refer to chapter 4.3.1.).
Select “Activate new Licenses” from the desktop or from the menu on the left.
Leica Geosystems Software Licensing – Introduction & Installation 34
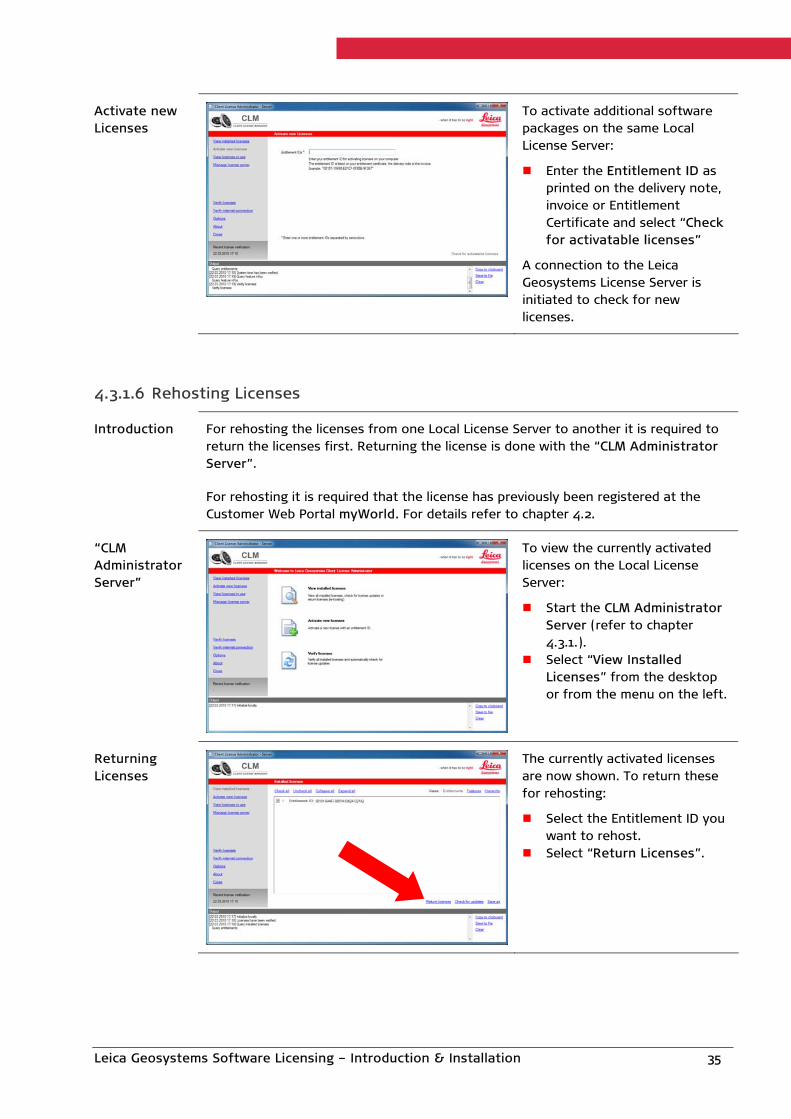
Activate new Licenses
To activate additional software packages on the same Local License Server:
Enter the Entitlement ID as printed on the delivery note, invoice or Entitlement Certificate and select “Check for activatable licenses”
A connection to the Leica Geosystems License Server is initiated to check for new licenses.
4.3.1.6 Rehosting Licenses
Introduction For rehosting the licenses from one Local License Server to another it is required to return the licenses first. Returning the license is done with the “CLM Administrator Server”.
For rehosting it is required that the license has previously been registered at the Customer Web Portal myWorld. For details refer to chapter 4.2.
“CLM Administrator Server”
To view the currently activated licenses on the Local License Server:
Start the CLM Administrator Server (refer to chapter 4.3.1.).
Select “View Installed Licenses” from the desktop or from the menu on the left.
Returning Licenses
The currently activated licenses are now shown. To return these for rehosting:
Select the Entitlement ID you want to rehost.
Select “Return Licenses”.
Leica Geosystems Software Licensing – Introduction & Installation 35

Confirm Returning Licenses
The licenses currently selected for returning are now shown:
Select “Continue” to confirm returning the selected licenses.
If the licenses are not yet registered at myWorld select “Register Entitlements”. (See 4.2.)
A connection to the Leica Geosystems License Server will now be established and the selected licenses are returned.
Installing & Activating Licenses on a different PC or Server
To complete the rehosting process the following is required:
On a different server or PC follow the complete Installation process as described in chapter 4.1.1. and then follow the instructions for updating the license server configuration on the local clients in chapter 4.3.2.4.
4.3.1.7 Verifying the Connection to the Leica Geosystems License Server
Introduction In case of problems during the license activation process it may be necessary to confirm that the connection to the Leica Geosystems License Server is working. This verification is done with the “CLM Administrator Server”.
“CLM Administrator Server”
To verify the connection to the Leica Geosystems License Server:
Start the CLM Administrator Server (refer to chapter 4.3.1.).
Select “Verify Internet Connection” from the menu on the left.
Verify Internet Connection
The “Verify Internet Connection” dialog displays the status of the connection and gives error descriptions if applicable.
This functionality should be used after experiencing problems during the license activation process.
Leica Geosystems Software Licensing – Introduction & Installation 36

4.3.2 Managing Licenses on Local Clients
Introduction Managing licenses on local clients is done via the “View Licenses” dialog within the software package.
Please note that the screenshots in this manual are taken from the software package Leica Geo Office. For other software packages they may differ slightly.
Starting “View Licenses”
To access the “View Licenses” dialog to view currently activated licenses:
Start the software package of which you want to manage the licenses. Open the Help menu of the software package and then select “View Licenses…”
4.3.2.1 Viewing Licenses
Introduction Viewing the licenses currently activated for a software on the server PC is done via the “View Licenses” dialog within the software package (refer to chapter 4.3.2). For viewing the currently activated licenses a connection to the internet is not required.
“View Licenses”
To view the licenses for a software package:
Start the “View Licenses” dialog within the software package (refer to chapter 4.3.2).
The “View Licenses” dialog shows the Entitlement ID and all currently activated options of the software package.
Leica Geosystems Software Licensing – Introduction & Installation 37

4.3.2.2 Updating Licenses
Introduction Activating additionally purchased software options or software maintenance is called “Updating Licenses”. Updating licenses is usually done with the “CLM Administrator Server” on the Local License Server (refer to chapter 4.3.1.3), but can alternatively also be done via the “View Licenses” dialog within the software package on a Local Client (refer to chapter 4.3.2).
For this functionality an internet connection is required to allow for a connection to the Leica Geosystems License Server.
“Check for License Updates”
To update newly purchased software options or software maintenance:
Start the “View Licenses” dialog within the software package (refer to chapter 4.3.2).
Make sure the PC is connected to the internet.
Select “Check for License Updates”.
“Updating Licenses”
A connection to the Leica Geosystems License Server will now be established and the check for License Updates is initiated.
If no license updates are available you will get the message: "No new licenses are available” and be prompted to confirm with OK.
If license updates are available you will get the message “New floating licenses are available, please contact your license server administrator.”
4.3.2.3 Borrowing Licenses
Introduction If it is required to use the software remotely on a PC or notebook with no connection to the network and the Local License Server it is possible to “borrow” licenses from the Local License Server and “return” them after usage. This process is called Borrowing. The availability of borrowing depends on the Leica Geosystems software product.
Borrowing and returning of licenses are managed via the “View Licenses” dialog within the software package (refer to chapter 4.3.2).
Leica Geosystems Software Licensing – Introduction & Installation 38

“View Licenses” To view the licenses for the software package:
Start the “View Licenses” dialog within the software package (refer to chapter 4.3.2).
The “View Licenses” dialog shows the Entitlement ID and all currently activated options of the software package.
Borrow Licenses
To borrow licenses:
Enter the date until which you plan to borrow the licenses.
Select “Borrow Licenses”.
The licenses will now be borrowed and the “View Licenses” dialog is updated with the latest status.
Return Borrowed Licenses
To return the borrowed licenses:
Select “Return Borrowed Licenses”
The licenses will now be returned and the “View Licenses” dialog is updated with the latest status.
4.3.2.4 Rehosting Licenses
Introduction If the Local License Server has been rehosted, i.e. permanently transferred from one PC or server to another, it becomes necessary to update the License Server Configuration for all local clients.
This updating of the License Server Configuration is done via the “View Licenses” dialog.
Leica Geosystems Software Licensing – Introduction & Installation 39

“View Licenses” To open the “View Licenses” dialog:
Start your application and see the “View Licenses” dialog coming up with an empty list of Licensed products and options because the required product license has not been found.
Go to the Settings tab to update the License Server Configuration.
Updating the License Server Configuration
In the Settings tab of the “View Licenses” dialog the current Local License Server Configuration is shown.
To update the Local License Server configuration:
Enter the new Host. The host name is indicated in the CLM Administrator Server under “Manage license server” (refer to chapter 4.3.1.3 for details)
Confirm with Apply to identify the address of the new Host.
Leave the dialog with OK to change the Configuration.
The Local Client now connects to the new Local License Server.
(The “Proxy Server Configuration" is only required if a proxy server is used instead of a direct internet connection.)
Leica Geosystems Software Licensing – Introduction & Installation 40

5 Offline License Transfer
Introduction The Offline License Transfer functionality offers the customer who cannot establish an internet conection on the PC where the software shall be activated (i.e. the target PC), the chance to activate/ return or update a software license offline.
There are several cases when an internet connection may not be available or possible:
Companies/ Institutions that only allow email. Special Networks that are offline on purpose. Problems with the network connection (e.g. due to Proxy servers or
Firewalls).
To overcome such problems Leica Geosystems offers the chance to activate/ return or update a license offline via a second PC or any other device that must at least have email connection to the internet (e.g. a smartphone).
The Offline License Transfer Process
When a customer has got the Entitlement ID (refer to chapter 1 for details), the following steps have to be taken to activate/ return or update the Entitlement offline:
1. On a computer or other device with an internet connection get a Start file either via email or via the myWorld customer portal and transfer it via a portable storage device, e.g. a USB stick,to the target PC (i.e. the PC where the software shall be activated).
2. Install the software on the target PC to get the CLM Administration tools installed and create a Request file.
3. Transfer the Request file via a portable storage device, e.g. a USB stick to a computer or other device with an internet connection and request Leica Geosystems for a Response file either via the myWorld customer portal or via email.
4. Transfer the Response file via a portable storage device, e.g. a USB stick, back to the target PC and process the Response file.
Start file
Internet
Request file
Leica Geosystems PC with Internet Target PC License Server Response file
Leica Geosystems Software Licensing – Introduction & Installation 41
5.1 Activating Licenses offline
Introduction To be able to start the offline activation process the activation Start file is needed. The customer can get a Start file either:
via email or via the myWorld customer portal.
5.1.1 Getting the Offline Activation Start file
Option A: Sending the Request for an Activation Start file via email
To get the offline activation Start file via your email agent send an email to [email protected].
Enter the Entitlement ID to be activated offline as body text into the email and send the email to the given address.
The offline activation Start file will be sent back to your email address.
Save the Start file to a portable storage device, e.g. a USB stick, and transfer it to the target PC.
Note: If the license shall be activated via email, please, continue directly with chapter 5.1.2.
Option B: Getting the Activation Start file via myWorld
To get the offline activation Start file via myWorld go to: http://myworld.leica-geosystems.com.
The default internet browser will be opened with the myWorld Log on page.
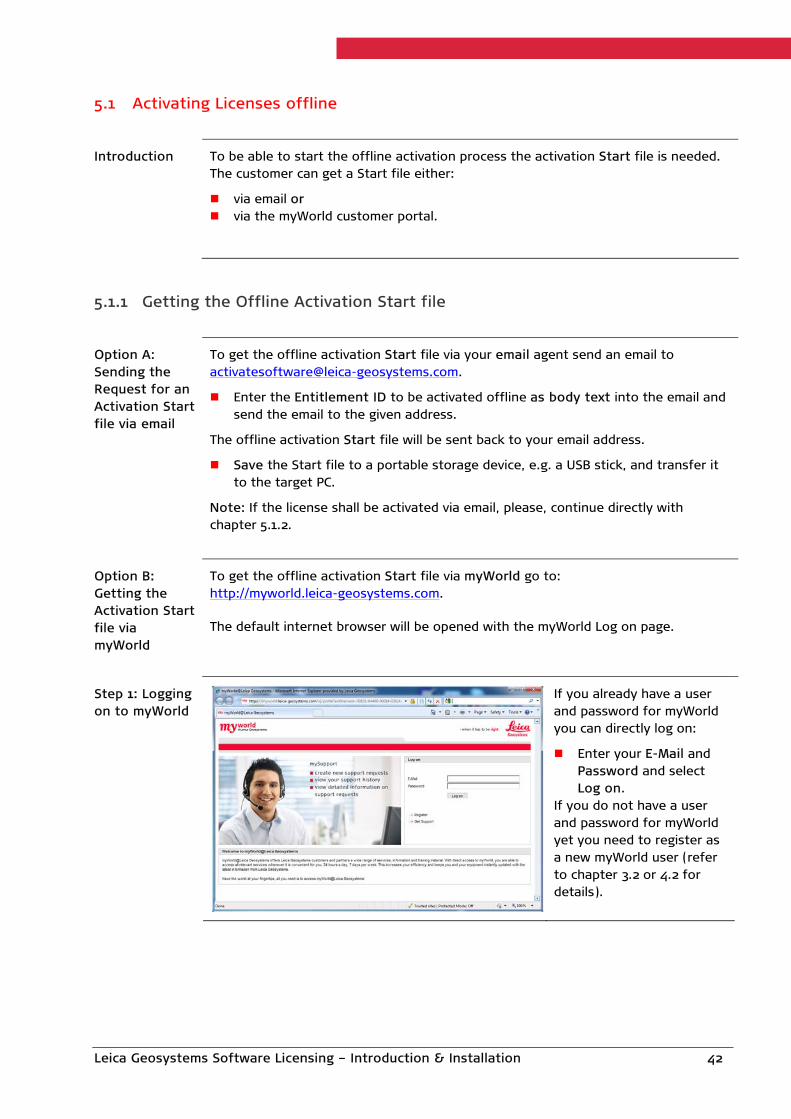
Step 1: Logging on to myWorld
If you already have a user and password for myWorld you can directly log on:
Enter your E-Mail and Password and select Log on.
If you do not have a user and password for myWorld yet you need to register as a new myWorld user (refer to chapter 3.2 or 4.2 for details).
Leica Geosystems Software Licensing – Introduction & Installation 42

Step 2: Starting myProducts
Starting the Offline Activation/ Return procedure in myWorld is done via myProducts:
Select myProducts from the menu on the left.
Step 3: Select Product
myProducts shows all Leica Geosystems products that are registered with the current user:
Select the product to be activated/ returned offline and click on the Details button below the product list.
Note: If the license is not yet registered, please, refer to chapter 3.2 or 4.2.
Step 4: Open the Offline Activation/ Return dialog
In the Details page for the product to be activated/ returned offline:
Click the Offline Activation/ Return button at the top.
Leica Geosystems Software Licensing – Introduction & Installation 43

Step 5: Download the Offline Activation Start file
To download the required offline activation/ return start file:
Press “Download” and save the start file (*.clmstart) to a portable storage device, e.g. a USB stick.
5.1.2 Creating an Offline Activation Request file
Introduction To create an offline activation request file with the given start file the CLM Administration tools are needed.
To activate a node locked license offline the CLM Administrator is needed:
To get the CLM Administrator tool installed start the software installation. Refer to chapter 3.1 for a step-by-step description and select Skip License Activation in Step 5.
To activate a floating license offline the CLM Administrator Server is needed:
To get the CLM Administrator Server tool installed start the installation of the Server Package. Refer to chapter 4.1.1 for a step-by-step description and select Skip License Activation in Step 3.
Starting the CLM Administration tools
To start the CLM Administration tools:
For a node locked license select Start Menu > Programs > Leica Geosystems > Client License Manager > License Administrator
For a floating license select Start Menu > Programs > Leica Geosystems > Client License Manager > License Administrator Server
Leica Geosystems Software Licensing – Introduction & Installation 44
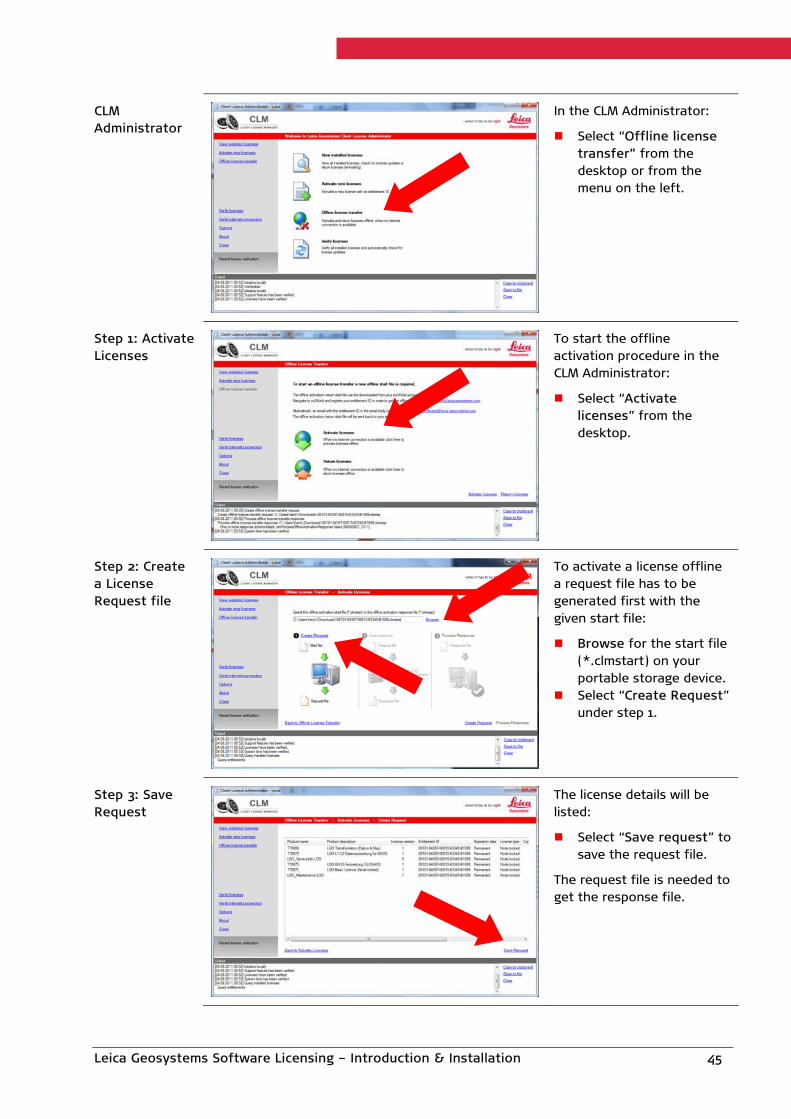
CLM Administrator
In the CLM Administrator:
Select “Offline license transfer” from the desktop or from the menu on the left.
Step 1: Activate Licenses
To start the offline activation procedure in the CLM Administrator:
Select “Activate licenses” from the desktop.
Step 2: Create a License Request file
To activate a license offline a request file has to be generated first with the given start file:
Browse for the start file (*.clmstart) on your portable storage device.
Select “Create Request” under step 1.
Step 3: Save Request
The license details will be listed:
Select “Save request” to save the request file.
The request file is needed to get the response file.
Leica Geosystems Software Licensing – Introduction & Installation 45
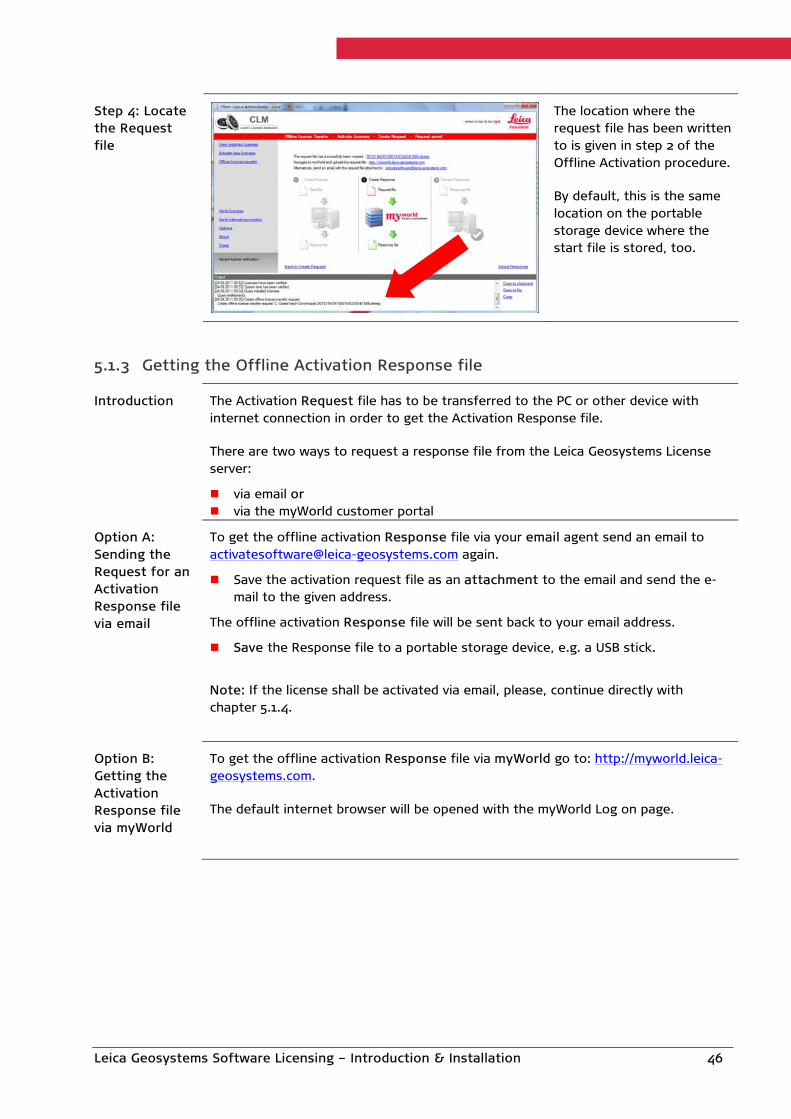
Step 4: Locate the Request file
The location where the request file has been written to is given in step 2 of the Offline Activation procedure.
By default, this is the same location on the portable storage device where the start file is stored, too.
5.1.3 Getting the Offline Activation Response file
Introduction The Activation Request file has to be transferred to the PC or other device with internet connection in order to get the Activation Response file.
There are two ways to request a response file from the Leica Geosystems License server:
via email or via the myWorld customer portal
Option A: Sending the Request for an Activation Response file via email
To get the offline activation Response file via your email agent send an email to [email protected] again.
Save the activation request file as an attachment to the email and send the e-mail to the given address.
The offline activation Response file will be sent back to your email address.
Save the Response file to a portable storage device, e.g. a USB stick.
Note: If the license shall be activated via email, please, continue directly with chapter 5.1.4.
Option B: Getting the Activation Response file via myWorld
To get the offline activation Response file via myWorld go to: http://myworld.leica-geosystems.com.
The default internet browser will be opened with the myWorld Log on page.
Leica Geosystems Software Licensing – Introduction & Installation 46

Upload Request and download Response file from myWorld
Log in to myWorld again and repeat steps 1 to 4 outlined in chapter 5.1.1 above. In the Offline Activation/ Return dialog:
Select “Browse…” to browse for the request file that has been created and upload it to myWorld.
Press “Download” and save the response file (*.clmresp) to a portable storage device, e.g. a USB stick.
Download latest response file
In case the generated response file has been lost, the latest one is still being available on myWorld for one month.
Press “Download” to download the latest reponse file.
Note: Response files that have already been processed cannot be used again. For Returning or Updating a license a new reponse file has to be generated.
5.1.4 Processing the Activation Response file
Introduction To finally activate the license the Activation Response file has to be transferred back to the target PC and be processed within the CLM Administration tools.
For a node locked license use the CLM Administrator. For a floating license use the CLM Administrator Server.
Leica Geosystems Software Licensing – Introduction & Installation 47
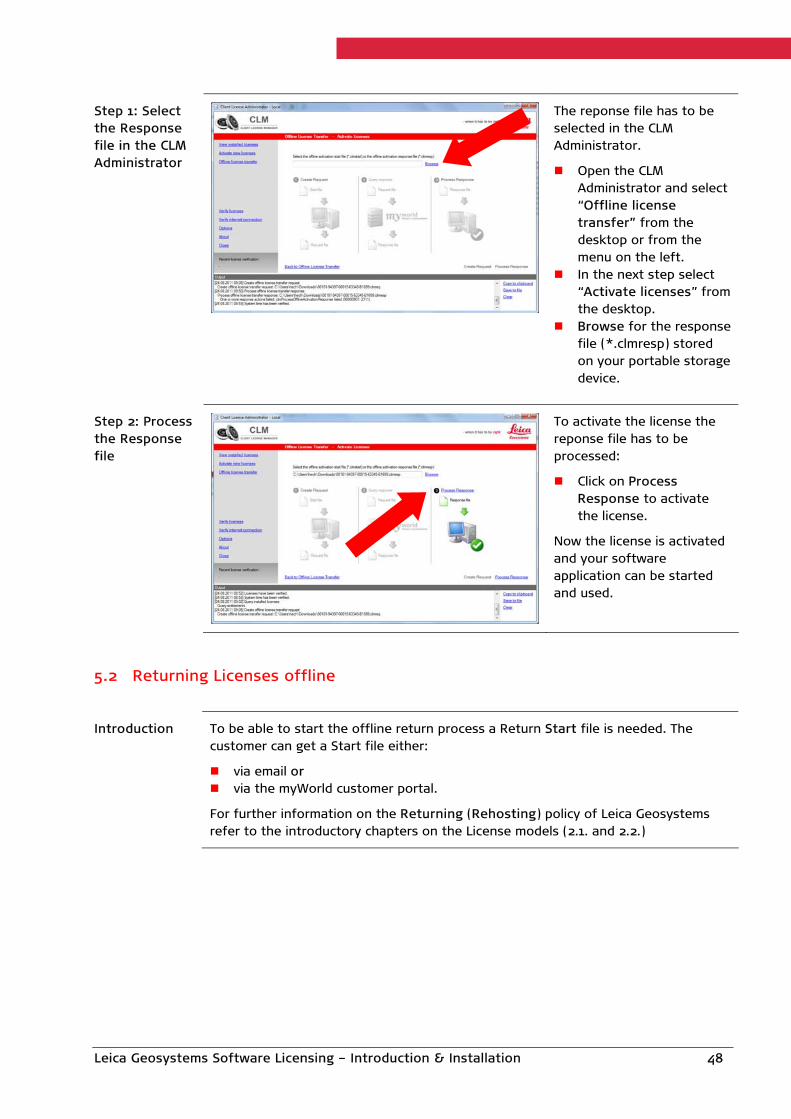
Step 1: Select the Response file in the CLM Administrator
The reponse file has to be selected in the CLM Administrator.
Open the CLM Administrator and select “Offline license transfer” from the desktop or from the menu on the left.
In the next step select “Activate licenses” from the desktop.
Browse for the response file (*.clmresp) stored on your portable storage device.
Step 2: Process the Response file
To activate the license the reponse file has to be processed:
Click on Process Response to activate the license.
Now the license is activated and your software application can be started and used.
5.2 Returning Licenses offline
Introduction To be able to start the offline return process a Return Start file is needed. The customer can get a Start file either:
via email or via the myWorld customer portal.
For further information on the Returning (Rehosting) policy of Leica Geosystems refer to the introductory chapters on the License models (2.1. and 2.2.)
Leica Geosystems Software Licensing – Introduction & Installation 48

5.2.1 Getting the Offline Return Start file
Option A: Sending the Request for a Return Start file via email
To get the offline return Start file via your email agent send an email to [email protected].
Enter the Entitlement ID to be returned offline as body text into the email and send the email to the given address.
The offline return Start file will be sent back to your email address.
Save the Start file to a portable storage device, e.g. a USB stick, and transfer it to the target PC.
Note: If the license shall be returned via email, please, continue directly with chapter 5.2.2.
Option B: Getting the Return Start file via myWorld
To get the offline return Start file via myWorld go to: http://myworld.leica-geosystems.com.
The default internet browser will be opened with the myWorld Log on page.
Download the Offline Return Start file
Log in to myWorld and follow steps 1 to 4 outlined in chapter 5.1.1 above. In the Offline Activation/ Return dialog:
Press “Download” and save the start file (*.clmstart) to a portable storage device, e.g. a USB stick.
5.2.2 Creating an Offline Return Request file
Introduction To create an offline return request file with the given start file the CLM Administration tools are needed.
Leica Geosystems Software Licensing – Introduction & Installation 49

Starting the CLM Administration tools
To start the CLM Administration tools
For a node locked license select Start Menu > Programs > Leica Geosystems > Client License Manager > License Administrator
For a floating license select Start Menu > Programs > Leica Geosystems > Client License Manager > License Administrator Server
CLM Administrator
In the CLM Administrator:
Select “Offline license transfer” from the desktop or from the menu on the left.
Step 1: Return Licenses
To start the offline return procedure in the CLM Administrator:
Select “Return licenses” from the desktop.
Leica Geosystems Software Licensing – Introduction & Installation 50

Step 2: Create a License Request file
To return a license offline a request file has to be generated first with the given start file:
Browse for the start file (*.clmstart) on your portable storage device.
Select “Create Request” under step 1.
Note: At the moment the Request file is created the license will be disabled and the software cannot be used any longer!
Step 3: Save Request
The license details will be listed:
Select “Save request” to save the request file.
The request file is needed to get the response file.
Step 4: Locate the Request file
The location where the request file has been written to is given in step 2 of the Offline Return procedure.
By default, this is the same location on the portable storage device where the start file is stored, too.
5.2.3 Getting the Offline Return Response file
Introduction The Return Request file has to be transferred to the PC or other device with internet connection in order to get the Return Response file.
There are two ways to request a response file from the Leica Geosystems License server:
Leica Geosystems Software Licensing – Introduction & Installation 51

via email or via the myWorld customer portal
Option A: Sending the Request for a Return Response file via email
To get the offline return Response file via your email agent send an email to [email protected] again.
Save the return Request file as an attachment to the email and send the e-mail to the given address.
The offline return Response file will be sent back to your email address.
Save the Response file to a portable storage device, e.g. a USB stick.
Note: If the license shall be returned via email, please, continue directly with chapter 5.2.4.
Option B: Getting the Return Response file via myWorld
To get the offline return Response file via myWorld go to: http://myworld.leica-geosystems.com.
The default internet browser will be opened with the myWorld Log on page.
Upload Request and download Response file from myWorld
Log in to myWorld again and follow steps 1 to 4 outlined in chapter 5.1.1 above.
Note: For Returning a license a new reponse file has to be generated.
In the Offline Activation/ Return dialog:
Select “Browse…” to browse for the request file that has been created and upload it to myWorld.
Press “Download” and save the response file (*.clmresp) to a portable storage device, e.g. a USB stick.
5.2.4 Processing the Return Response file
Introduction To finally return the license the Return Response file has to be transferred back to the target PC and be processed within the CLM Administration tools.
For a node locked license use the CLM Administrator. For a floating license use the CLM Administrator Server.
Leica Geosystems Software Licensing – Introduction & Installation 52
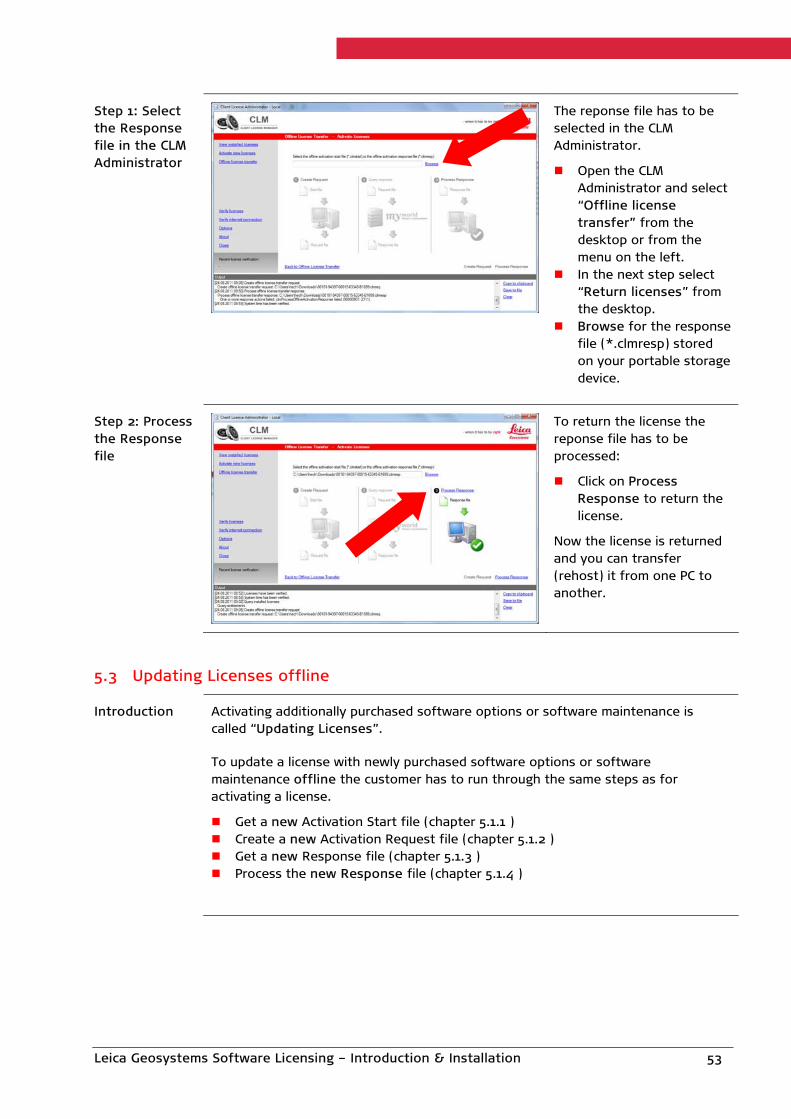
Step 1: Select the Response file in the CLM Administrator
The reponse file has to be selected in the CLM Administrator.
Open the CLM Administrator and select “Offline license transfer” from the desktop or from the menu on the left.
In the next step select “Return licenses” from the desktop.
Browse for the response file (*.clmresp) stored on your portable storage device.
Step 2: Process the Response file
To return the license the reponse file has to be processed:
Click on Process Response to return the license.
Now the license is returned and you can transfer (rehost) it from one PC to another.
5.3 Updating Licenses offline
Introduction Activating additionally purchased software options or software maintenance is called “Updating Licenses”.
To update a license with newly purchased software options or software maintenance offline the customer has to run through the same steps as for activating a license.
Get a new Activation Start file (chapter 5.1.1 ) Create a new Activation Request file (chapter 5.1.2 ) Get a new Response file (chapter 5.1.3 ) Process the new Response file (chapter 5.1.4 )
Leica Geosystems Software Licensing – Introduction & Installation 53

Note! Note: For Updating a license a new reponse file has to be generated.
Select “Browse…” to browse for the request file that has been created and upload it to myWorld.
Press “Download” and save the response file (*.clmresp) to a portable storage device, e.g. a USB stick.
Leica Geosystems Software Licensing – Introduction & Installation 54

6 Frequently Asked Questions (FAQs)
Question 1 I have to enter the Entitlement ID for the installation and license activation. What is an Entitlement ID and where can I find it?
An Entitlement ID is a unique representation of the license for a product that a customer has bought. The Entitlement ID can be found on the Invoice, the Delivery Note and the Entitlement Certificate.
Question 2 What is Product Activation?
Product Activation is the process to get a license for a Leica Geosystems product onto your computer. You can activate your product 24 hours a day, seven days a week via the Internet.
Question 3 What kind of information is transmitted during Product Activation?
Product Activation requires that Leica Geosystems collects a minimum of information needed to validate the authenticity of a product activation request. Most of the data identifies the product, including the Entitlement ID and the product version. A randomly computed machine ID (host ID) is also generated, which cannot be used to identify the make, model or components of your computer, though. Additionally, the operating system and name of your computer are transmitted. All data are transmitted securely to Leica Geosystems for validation.
Question 4 Can I use my Entitlement ID on more than one computer?
No. A unique activation process is required per computer. Once a product has been activated, the software license is assigned only to that specific computer.
Question 5 Do I need administrator rights for activation?
No, the activation itself does not require administrator rights, but the installation of the individual software packages may require administrator rights.
Question 6 Is it possible to activate licenses on a PC without Internet connection?
Yes, Leica Geosystems offers you the chance to activate/ return or update a license offline via another PC or any other device that must at least have email connection to the internet (e.g. a smartphone).
Please, refer to chapter 5 ``Offline License Transfer`` for details.
Question 7 Do I have to be online to use software that includes the new software licensing?
No. In case of node locked licenses, once you have activated the product, you need not be online to use the software. However, if your license has been enhanced, e.g. after buying an additional option or after extending your software maintenance contract, you have to be online to activate updates.
Leica Geosystems Software Licensing – Introduction & Installation 55

Question 8 I have purchased additional software options or software maintenance (as contained in CCPs). How can I activate these newly purchased licenses?
Activating the newly purchased options is called Update Licenses. Please, follow the instructions for updating node locked licenses given in chapter 3.3.2. and for updating floating licenses in chapter 4.3.1.3.
Question 9 I would like to permanently transfer the software and license from one PC to another. How can I do this?
Permanently transferring the software and license from one PC to another is called Rehosting. Please, follow the instructions for rehosting node locked licenses given in chapter 3.3.3. and for rehosting floating licenses in chapter 4.3.1.5.
Question 10 My Computer has broken down and I would like to transfer the node locked license to a different PC. But I am unable to follow the rehosting process and return the licenses as described in this manual. What can I do?
Please, contact your local Leica Geosystems Support with your Entitlement ID and explain your problem to them. They will be able to return the license for you to allow you to install and activate the software again on a different PC.
Question 11 I would like to reset the operating system or install a new operating system on the PC where I have installed the Leica Geosystems software product and activated the license. What should I do?
Prior to installing a new operating system it is necessary to follow the Rehosting process. Please, follow the instructions for rehosting node locked licenses given in chapter 3.3.3. and for rehosting floating licenses in chapter 4.3.1.5.
Question 12 Will changes to the system date and time properties on my computer require reactivation?
No. If your software license has no expiration date (like e.g. an evaluation license), there are no restrictions to adjusting your system date and time properties. If your software license has an expiration date, only changing the system date and time properties by more than one day would trigger reactivation.
Question 13 I am currently using a Leica Geosystems software product protected with a dongle. What is the process to switch to the new software licensing?
First, you have to contact your local Leica Geosystems Sales Representative and indicate the dongle number to him. Then he will order a “Dongle Migration” for you. Once this order is placed you will receive your new Entitlement ID. Then you can start the installation following the instructions given in this manual. During the installation you will be asked to plug in your dongle. When the installation is completed the software will be activated using the new software licensing and the dongle will no longer be valid for the migrated product.
Leica Geosystems Software Licensing – Introduction & Installation 56
Question 14 Do I need a dedicated server computer for running a license server?
The license server can be installed as a standard software package. Due to the very low computing power, a standard PC can be used to run a license server. This computer must be connected to the local network (LAN) for sharing the licenses with other computers connected in the same LAN.
Question 15 Is it possible to use the same Local License Server for different Leica Geosystems software packages?
Yes, you have to setup only one Local License Server for all your Leica Geosystems software products. Once the License Server has been set up it is possible to add various additional licenses via “Activating new Licenses”. Then the local clients can be installed.
Question 16 Do I need an internet connection for using floating licenses?
No, the server only has to be online during the license activation process on the license server. However, you have to be permanently connected to your license server in the local area network to be able to use floating licenses. For a temporary disconnection from the LAN, e.g. for travelling with your notebook, a functionality to borrow licenses is supported in some of the Leica Geosystems software packages. Please, follow the instructions for borrowing licenses given in chapter 4.3.2.3.
Question 17 I am using a Firewall on my local license server. Do I have to open ports on the local licence server to enable communication?
Yes, to enable clients to check-out or borrow licenses from a server in your local area network (LAN) you have to add the following ports as exceptions from the firewall protection: For the application ’lmgrd.exe’ open a local TCP port with a number in the range
from ’27000…27009’. The default for the server port is TCP port 27000. You may also look up the port actually used in the CLM Administrator Server program under ‘Manage license server’ or in the ‘lgs.log’ file. This file can be found in the license server installation folder, which by default is: C:\Program Files\Common Files\Leica Geosystems\License-Server.
For the application ’LGS.exe’ open any unused TCP port, e.g. 27010.
Both ports also have to be defined in the file ’svr_lgs.lic’. This file is installed in the license server installation folder, which by default is: C:\Program Files\Common Files\Leica Geosystems\License-Server. You have to: add the server port number to the first line: SERVER this_host ANY 27000 add the vendor daemon port to the second line: VENDOR LGS port=27010
Leica Geosystems Software Licensing – Introduction & Installation 57

To enable remote access for the License Management tools it is recommended to add a remote daemon port as an exception: For the application ’clmrdsvr.exe’ open the local TCP port 19701.
Question 18 I am using a Firewall on my local client PC. Do I have to open ports on the local client to enable communication?
Yes, to enable clients to check-out or borrow licenses from a server in your local area network (LAN) you have to add the following ports as exceptions from the firewall protection: For the client application (e.g. ’LGO.exe’) open the remote license server TCP
port (e.g. 27000) and the remote vendor daemon TCP port (e.g. 27010). You may also look up the ports actually used in the ‘lgs.log’ file or in the ‘svr_lgs.lic’ file. Both files can be found on the license server in the license server installation folder, which by default is: C:\Program Files\Common Files\Leica Geosystems\License-Server.
To enable remote access for the License Management tools it is recommended to add a remote daemon port as an exception: For the application ’clmadminsvr.exe’ open the remote TCP port 19701.
Question 19 I have successfully set up my local license server and I am connected to it via the local area network. Still, when I install a local client and specify the address and port of my local license server I get an error message telling me that the destination is unreachable or that the message expired. What is the reason for these messages and how can I solve the problem?
The reason for these messages may be that the time on your local license server and the time on your local client are not synchronized. If the time differs by more than 5 minutes you will get the message ”Destination unreachable”, if it differs by more than 10 minutes you will get the message ”Message expired”. Please, note that it is no problem if your server runs in a different time zone than your client.
Leica Geosystems Software Licensing – Introduction & Installation 58

7 Glossary
Activation Activation is the process to get a license for a Leica Geosystems product onto your computer.
Borrowing Borrowing means to check out a floating license from the Local License Server so that it can be used like a node locked license on a PC or notebook if it is required to run the software remotely without connection to the network and the Local License Server.
CLM CLM stands for Client License Manager and is the name of the software tool which is used to manage the software licenseon a PC or server.
CLM Administrator
CLM Administrator is the License Management Tool for PC installations of node locked licenses. It can be used to view licenses, update licenses, activate new licenses or return licenses for rehosting.
CLM Administrator Server
CLM Administrator Server is the License Management Tool for License Server Installations of floating licenses. It can be used to view licenses, update licenses, activate new licenses or return licenses for rehosting.
Dongle A “dongle”, also called hardware key or Software Protection Key, is a small protection device that has to be connected to the parallel or USB port of the PC to secure the software against unauthorized use.
Entitlement Certificate
The Entitlement Certificate is a document which contains the Entitlement ID. This document should be kept carefully as the Entitlement ID is required for purchasing additional software options or Customer Care Packages (CCPs).
Entitlement ID The Entitlement ID is the key to initial license activation as well as for re-ordering additional software options or Customer Care Packages (CCPs). The Entitlement ID can be found on the invoice, the delivery note or the Entitlement Certificate.
Floating License Floating licenses can be shared across multiple users within the same local network and allow for a simultaneous use up to the number of available purchased licenses.
Leica Geosystems License Server
The Leica Geosystems License Server is the central location where all information on the purchased software licenses is stored. Therefore, an internet connection is required for license activation or other tasks to be able to connect to the Leica Geosystems License Server.
License Model The license model defines if a license is tied to a single PC or can be shared across different PCs within the same network. For Leica Geosystems products two different license models are available, node locked and floating. The availability of the license model depends on the Leica Geosystems software product.
Local Client A local client is a PC which shares floating licenses within the local network and, therefore, has to be connected to the Local License Server.
Local License Server
A Local License Server is required for serving floating licenses. It can be either a PC or server within the local network.
Leica Geosystems Software Licensing – Introduction & Installation 59

Leica Geosystems Software Licensing – Introduction & Installation 60
Node locked License
A node locked license is tied to a single PC and is, therefore, the ideal choice for working remotely or for single dedicated users within the network. A node locked license cannot be shared across multiple users in the same network and is usually not transferred from one PC to another.
myWorld myWorld is the Customer Web Portal of Leica Geosystems where products are registered in order to access product related information or software updates. myWorld is accessed via: http://myworld.leica-geosystems.com
Registering Licenses
Licenses are registered at the Customer Web Portal myWorld. Registration of a license is required for rehosting and for accessing product related information on software updates.
Rehosting Rehosting means permanently transferring a license from one PC or Local License Server to another. Rehosting a license is only allowed for a limited number of times per year. The number of allowed rehostings depends on the Leica Geosystems software product. Rehosting requires that the license has previously been registered at the Customer Web Portal myWorld.
Returning Licenses
Returning licenses is the first step required for the rehosting process. Before a license can be activated on a different PC it is necessary to return the license to the Leica Geosystems License Server.
Software Protection Key
A software protection key, also called “dongle” or hardware key, is a small protection device that has to be connected to the parallel or USB port of the PC to secure the software against unauthorized use.
Updating Licenses
Updating licenses means activating additionally purchased software options or software maintenance as part of a Customer Care Package (CCP).