so, you want to lay track… - seacoast division nmra · so, you want to lay track… we will be...
TRANSCRIPT

So, you want to lay track…
We will be touching on:
• Planning (briefly as this is a topic by itself)
• Roadbed
• Laying track
• Ballasting track
• Soldering track wires
• Trouble shooting track problems
• Adding small details
• Cleaning up

Planning
What you will need:
• Define what you want to do
• Building new or re-vamping existing track work
• Make a to-scale track diagram
• Gather all the track components needed
• Create a track wiring plan (save this for future reference!)

Materials
Materials used to lay track:
• Sub-roadbed- plywood, spline
• Roadbed- cork, Homabed, Woodland Scenics
• Track- flex track, snap track, rail and wood ties
• Track nails or spikes
• Rail joiners- solid or insulated
• Ballast
• Light oil
• Glue- white glue (“wet water”)
• Track feeder wire
• Rosin core solder
• Paint- rust color

Standards…They work
NMRA has developed
Standards for track and
wheels that allow
interchange of products
across all manufacturer's
products.
National Model Railroad Association Standards and Recommended Practices can be
found at: http://www.nmra.org/standards/sandrp/consist.html

This STANDARD lists Track Center Distances and provides for Side Clearances
required for various curvatures with three size categories of models.
• Class II - Includes small four-wheel truck diesels, geared and other small steam
locomotives with short end overhangs typical of old-time, logging and branch
lines and equivalent rolling stock.
• Class I - Includes longer steam locomotives typically with two-wheel trailing
trucks, larger four and six-wheel truck diesels and equivalent rolling stock.
• Class Ia - Includes the largest steam locomotives with four-wheel trailing trucks,
articulated locomotives, those with rigid wheelbases in excess of 20 feet, full
length passenger cars and other long rolling stock.
Layouts constructed to one of these classes should accept models of its own and
smaller classes, but larger models can expect clearance problems on a layout built
to a smaller classification. See STANDARD S-7 and RP-11.
NMRA Standard S-8
TRACK CENTERS in CURVES - 'HO' Scale
Radius-
Inches Tang. 158 79 53 40 32 26 1/2 23 20 18
Class II 2 1/16 1 13/16 1 13/16 1 13/16 1 7/8 1 15/16 2 2 1/16 2 3/32 2 1/8 2 3/16
Class I 2 1/16 1 13/16 1 7/8 1 15/16 2 2 1/16 2 1/8 2 3/16 2 5/16 See note 8
Class Ia 2 1/16 1 13/16 1 31/32 2 1/8 2 1/4 2 3/8 2 1/2 See note 8
Pssssst……use 2 inch centers

NMRA Recommended Practices RP-11
Class: M
Diesel Locos to 60’ long with two four-wheel trucks, suburban, postal
and baggage cars to 60’ with diaphragms, standard cars to 50’ long with
regular couplers or with cushion under frames and regular couplers
HO Scale
• Minimum turnout #6
• Minimum radius 23”
In “real life” these HO Scale standards and practices are boiled down to:
• Broad curve 30” radius and #6 or #8 turnouts
• Conventional curve 24” radius and #5 or #6 turnouts
• Sharp curve 18” radius and #4 turnouts

Allow enough space
When laying out the track location check on how much space is needed and
how much clearance from the track is needed.

Let’s get to Laying some track!
Things that need to be done BEFORE flopping that bundle of flex track on
the bench work:
• Sub-roadbed is down- plywood table top, plywood cookie cutter, spline
construction
• Track center lines are drawn
• Turnout locations are marked

Roadbed
Roadbed comes in
two pieces that need
to be separated
Using the track
center line glue
roadbed to sub-
roadbed
Use small nails or
tee pins to hold
roadbed in place.
Note staggered
joints.
Commercial switch
blocks are available
or you can make your
own.

Laying Track

Ballasting Track
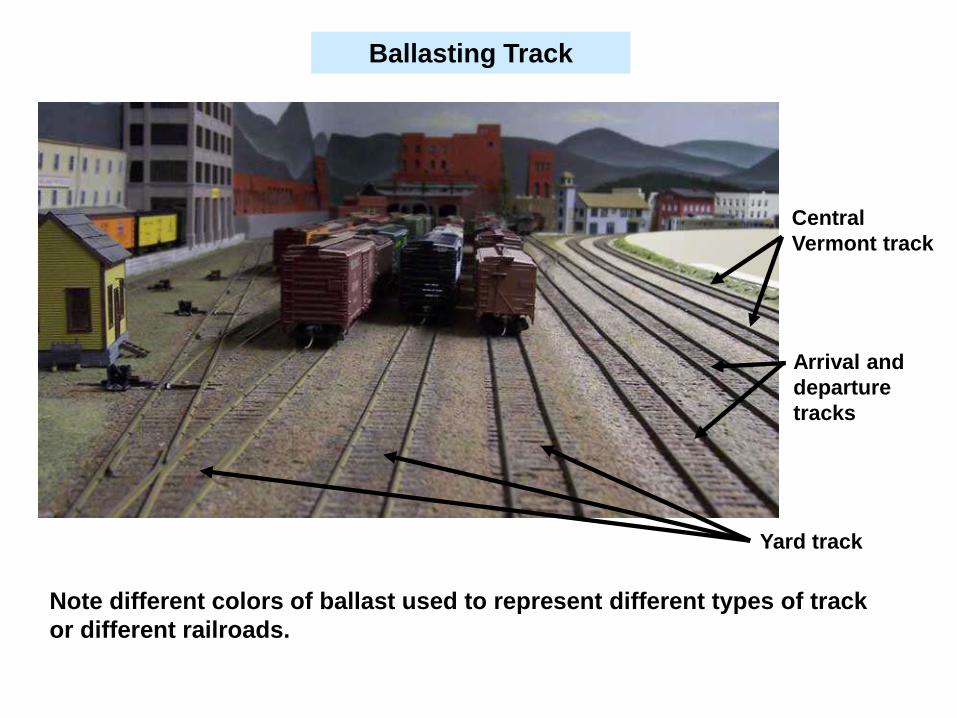
Ballasting Track
Note different colors of ballast used to represent different types of track
or different railroads.
Arrival and
departure
tracks
Central
Vermont track
Yard track

Troubleshooting track problems
Track joint forced into a too tight
radius. Note open joint. Rail joiner misaligned. Rail
has slide over joiner.
Push rails together in the
joiners tightly on curves. Solder
these joints.
Leave small gaps in straight
track to allow for expansion
and contraction

Add some details

Cleaning up
After the track has been completed and the ballast has dried the
next steps will to be to test all the work that has been done.
The track must be cleaned (remember all the wet glue you used?).
A Bright Boy track eraser can be used to scrub the residue off the
top of the railhead.
Now that you have soaked the turnouts with water and white glue
don’t forget to get them un-stuck ! Now you know what the light
oil was for…..grins

Remember to always watch your signals !
(that is because the dispatcher gave you clearance only to the next signal)