snort install manual - internet security guru · version 7 – from rpm page 1 of 31 updated...
TRANSCRIPT

Version 7 – From RPM Page 1 of 31 Updated 4/21/2004 5:16 PM
Snort Install Manual
Snort, Apache, SSL, PHP, MySQL and Acid Install on Fedora Core 1 – From RPM
By Patrick Harper | CISSP, RHCT, MCSE
http://www.InternetSecurityGuru.com
ACID: Analysis Console for Intrusion Detection
Version 7 – From RPM Page 2 of 31 Updated 4/21/2004 5:16 PM
Introduction: This document originated when a friend of mine asked me to put together this procedure for him so that he could install Snort and Acid. It is pretty basic and is for the Linux newbie, as well the Snort newbie. This is not an ultra-secure end-all to Snort IDS deployment guide; this is a “How in the hell do I get this installed and working” guide. This document will walk you through installing a stand-alone RedHat/Fedora system (this is not for a dual boot system). For text editors I would suggest using nano, as it is very easy to use. Type “nano <filename>” and it will open the file in the editor. All the commands are listed on the bottom. (Remember that the ^ is for ctrl)
I have also added a troubleshooting section at the end of this document Acknowledgments: I would like to thank all my friends and the people on the Snort-users list that proofed this for me. First of all, to my wife Kris, who puts up with me and my ever expanding lab. A special thanks to Nick Oliver. He downloaded and used the first document I wrote and volunteered to do test installs and proof the spelling and punctuation for this document. He has become quite proficient with Linux and Snort in the past year. Without him and his valuable input this document would not be as complete as it is. Also a great thanks to Marty and the Snort team, where would we be without you. Comments or Corrections: Please e-mail any comments or corrections to mailto:[email protected] Nick Oliver has also made himself available for contact if for any reason I may be unavailable or running behind on my large and ever growing inbox. mailto:[email protected] The latest version of this document is located at http://www.internetsecurityguru.com/documents/. Please use the most up to date version I will do my best to keep it updated. If you follow this doc line by line it will work for you. Over 90% of the e-mails I get are from people who miss a step. However, I always welcome comments and questions and will do my best to help when ever I can.

Version 7 – From RPM Page 3 of 31 Updated 4/21/2004 5:16 PM
Info for the install: IP Address Subnet Mask Gateway DNS Servers Hostname
Other important reading: Snort users manual http://www.Snort.org/docs/writing_rules/ Snort FAQ http://www.Snort.org/docs/faq.html The Snort user’s mailing list http://lists.sourceforge.net/lists/listinfo/snort-users This is the place to get help AFTER you read the FAQ,, ALL the documentation on the Snort website, AND have searched Google). Also make sure to read the link below before sending questions. It helps to know the rules. ☺ The Snort drinking game http://www.theadamsfamily.net/~erek/snort/drinking_game.txt (Thanks Erek) ACID FAQ http://www.andrew.cmu.edu/~rdanyliw/snort/acid_faq.html ACID install guide http://www.andrew.cmu.edu/~rdanyliw/snort/acid_config.html RedHat Support documents for Fedora – http://fedora.redhat.com/docs/release-notes/ Websites to visit: http://www.Snort.org http://www.cert.org/kb/acid/ http://www.mysql.com http://www.php.net http://fedora.redhat.com http://www.chiark.greenend.org.uk/~sgtatham/putty/ (the putty ssh client) http://www.bastille-linux.org (Hardening scripts for UNIX and Linux) http://www.internetsecurityguru.com (my website) Installing Fedora Core 1: We will install a minimal number of packages, sufficient for a usable system. After the install we’ll turn off anything that is not needed. By hardening the OS and further securing the system, it will be ideal as a dedicated IDS. It is, however, also a system that can easily be added to for other uses. There are lots of good articles on how to secure a Redhat/Fedora box on the web. Just go to http://www.google.com and search for “securing redhat” or visit http://www.bastille-linux.org/ .

Version 7 – From RPM Page 4 of 31 Updated 4/21/2004 5:16 PM
Welcome: Click next
Language: English

Version 7 – From RPM Page 5 of 31 Updated 4/21/2004 5:16 PM
Keyboard: U.S. English
Mouse Configuration: I always use the generic drivers for my mice (PS/2 or USB, depending on the system), but I am almost always working on a KVM. If you are on a KVM, use the generic drivers. If not, see if your mouse is on the list.

Version 7 – From RPM Page 6 of 31 Updated 4/21/2004 5:16 PM
Install Type: Choose custom
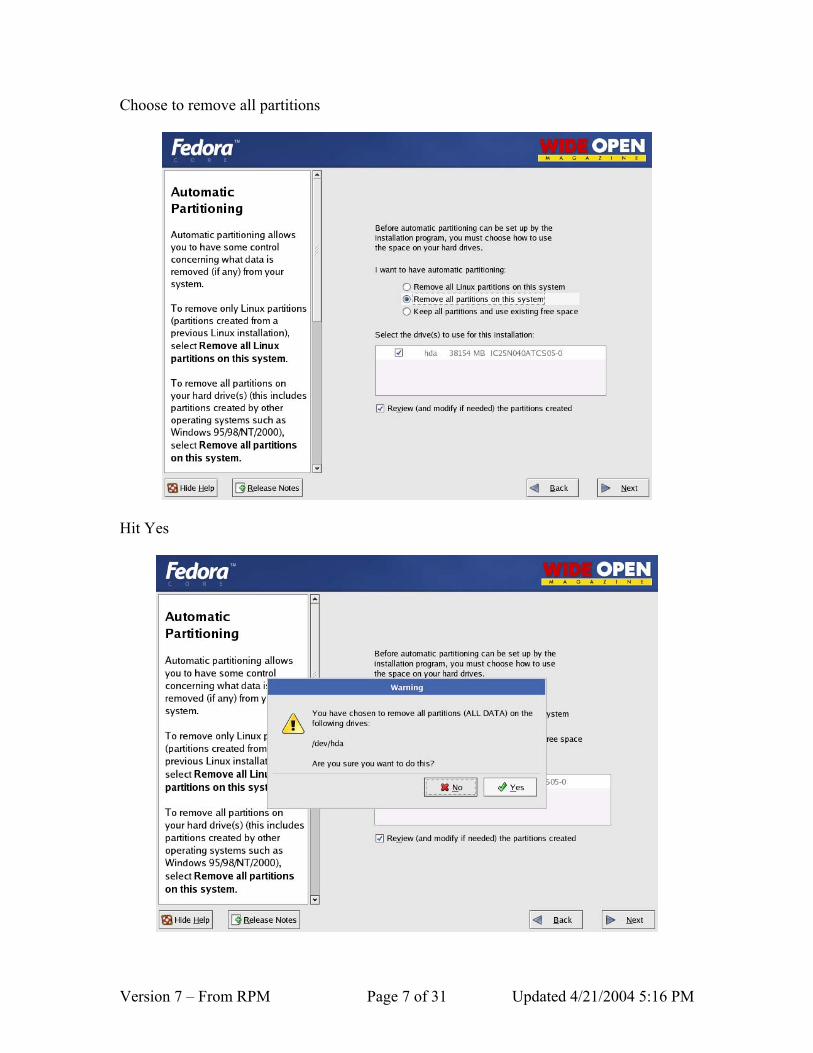
Disk Partitioning: Choose to automatically partition the hard drive Choose to remove all partitions from this hard drive (I am assuming that this not a dual boot box) Make sure the review button is checked
Version 7 – From RPM Page 7 of 31 Updated 4/21/2004 5:16 PM
Choose to remove all partitions
Hit Yes

Version 7 – From RPM Page 8 of 31 Updated 4/21/2004 5:16 PM
Accept the default layout. Most of the disk will be /
Boot Loader: Go with the default (if this is a dual boot system then go to google and search for info on how to install grub for dual booting)

Version 7 – From RPM Page 9 of 31 Updated 4/21/2004 5:16 PM
Network Configuration: Hit edit, Uncheck “Configure with DHCP”, Leave “Activate on boot” Set a static IP and subnet mask for your network, manually set the hostname Then set a gateway and DNS address’s
Always try to assign a static IP address here. I think it is best not to run Snort off of a Dynamic IP, however, if you need to, go ahead and do it, just make sure to point your $HOME_NET variable in your Snort.conf to the interface name. You can get more info on that in the Snort FAQ. If this is a dedicated IDS then you do not need to have an IP on the interface that Snort is monitoring (this is not covered in this document but there is lots of info on how to do that out on the web).

Version 7 – From RPM Page 10 of 31 Updated 4/21/2004 5:16 PM
Firewall: Security Level - Leave the default at Medium, Choose “Customize” Trusted devices = BLANK, “Allow Incoming” SSH and WWW” and port 443 only.
Additional Language: Choose only US English

Version 7 – From RPM Page 11 of 31 Updated 4/21/2004 5:16 PM
Time Setup: Choose the closest city within your time zone (for central choose Chicago)
Root Password: Set a strong root password here (a strong password has at least 8 characters with a combination of upper case, lower case, numbers and symbols. It should also not be, or resemble, anything that might be found in a dictionary of any language)

Version 7 – From RPM Page 12 of 31 Updated 4/21/2004 5:16 PM
Suggested Packages: Take the defaults with the following exceptions. (Default is what ever it has when you choose custom; for example, gnome is checked by default and kde is not) Desktops: X Window System – click “details” and uncheck the following
• xisdnload • VNC Server
Gnome Desktop Environment – Accept the default (checked) KDE Desktop Environment - Accept the default (unchecked) Applications: Editors – Choose your favorites, however, nano is suggested and is part of the base install. Engineering and Scientific – Accept the default (unchecked) Graphical Internet – check this one and click “details”. Install only the following:
• evolution (if you want to check e-mail with an Outlook-like client in X) • Mozilla

Version 7 – From RPM Page 13 of 31 Updated 4/21/2004 5:16 PM
Text based internet – check this one and click “details”. Install only the following:
• elinks – a text based web browser
Office/Productivity – Only gpdf should be selected Sound and Video – None of this is needed Authoring and Publishing – None of this is needed Graphics – check this one and click “details”. Check the following:
• Gimp – good to have if your using gnome • Gimp data extras • Gimp print plugin
Games and Entertainment – None of this is needed Server Section: Server configuration tools
• Check and leave at the default Web Server – check only the following
• Mod_auth_mysql • Mod_ssl • Php • Php_mysql
Mail Server – none Windows File Server – None DNS server – None SQL Database server – Check only the following
• Mysql-server News server – none Network Servers – None Development: Development tools – check this one and click “details” and check the following in addition to what is checked by default
• Expect • Gcc-objc

Version 7 – From RPM Page 14 of 31 Updated 4/21/2004 5:16 PM
Kernel development – check this one, everything is selected by default X Software Development – check this one and click and accept the default under optional packages. Gnome Software Development – Leave this unchecked KDE Software Development – Leave this unchecked System: Administration – check and accept default System Tools – check this one and click “details” and check only the following (some will need to be unchecked)
• Ethereal • Ethereal gnome • Nmap • Nmap frontend
Printing support – Uncheck this (unless you need printing from this machine, then configure as needed) Miscellaneous: Choose nothing from this entire section Hit next, then next again. It will tell you that you will need all 3 CD’s. Hit continue and the install will start. First it will format the drive(s) and then it will install the packages. This will take a little while, depending on the speed of the system you’re on, so putting on a pot of coffee is good right about here.

Version 7 – From RPM Page 15 of 31 Updated 4/21/2004 5:16 PM
Installing extra software: You can install almost anything, as long as it is not in the “servers” section of the package’s page. Remember, however, that if this system is located outside your firewall, is your production IDS, or if you want it really secure, you will want to install the least amount of software possible. Each piece of software you install and forget to update and maintain is a vulnerability waiting to happen, and that goes for all systems. To me this is one of the most important rules for systems administration. Make sure you know what you have, and make sure you keep it patched and secured so you do not contribute to the next worm, virus, or hacking spree that threatens to shut down major portions of the internet. If this is a system you are using to learn Snort, Linux, and all the other cool Linux type things, and is not directly connected to the Internet (i.e. NAT’d behind a firewall/Router), then just have fun. Linux is a great operating system, and it can fully replace a Windows desktop or server. The 3 Fedora Core 1 CD’s (as well as most other distributions) are all you need, right there, and they are free.
If this is a production system, please make sure you learn how to secure it. After the packages install: Reboot – hit the reboot button

Version 7 – From RPM Page 16 of 31 Updated 4/21/2004 5:16 PM
After the reboot: Welcome screen: Click next
License Agreement: Accept and hit next
Version 7 – From RPM Page 17 of 31 Updated 4/21/2004 5:16 PM
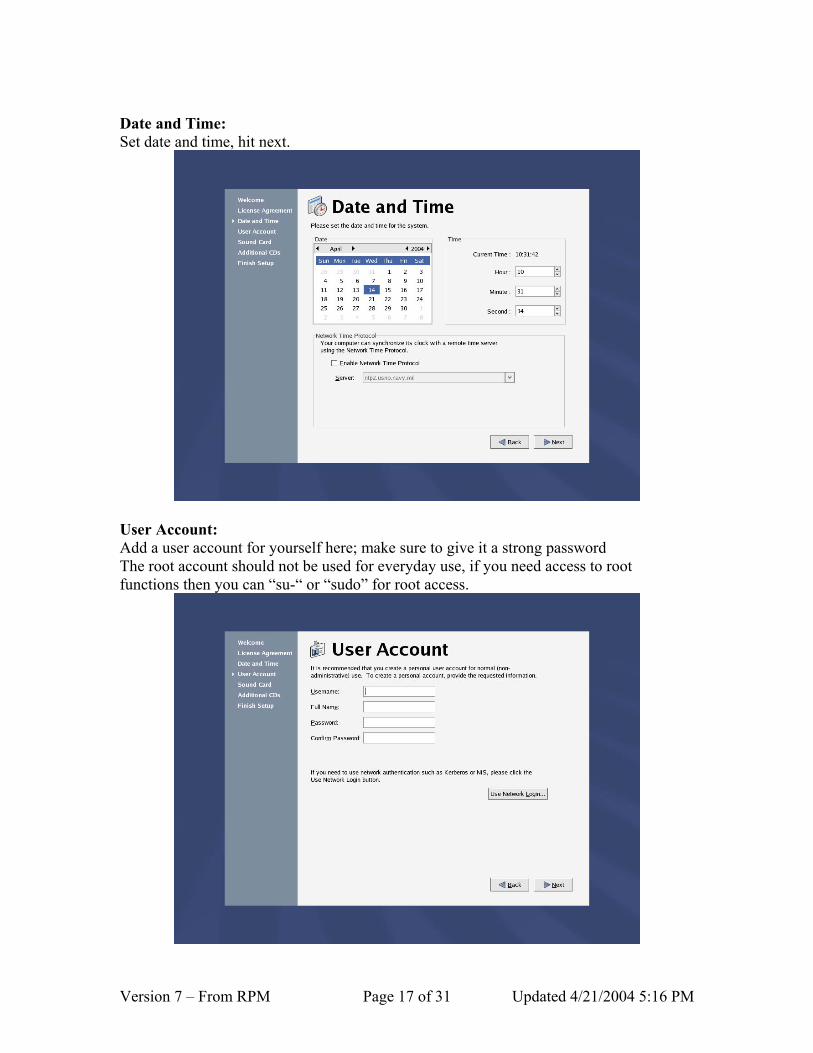
Date and Time: Set date and time, hit next.
User Account: Add a user account for yourself here; make sure to give it a strong password The root account should not be used for everyday use, if you need access to root functions then you can “su-“ or “sudo” for root access.

Version 7 – From RPM Page 18 of 31 Updated 4/21/2004 5:16 PM
Sound Card: You can do this one or just hit next if you want
Additional CD’s: Hit next
Version 7 – From RPM Page 19 of 31 Updated 4/21/2004 5:16 PM
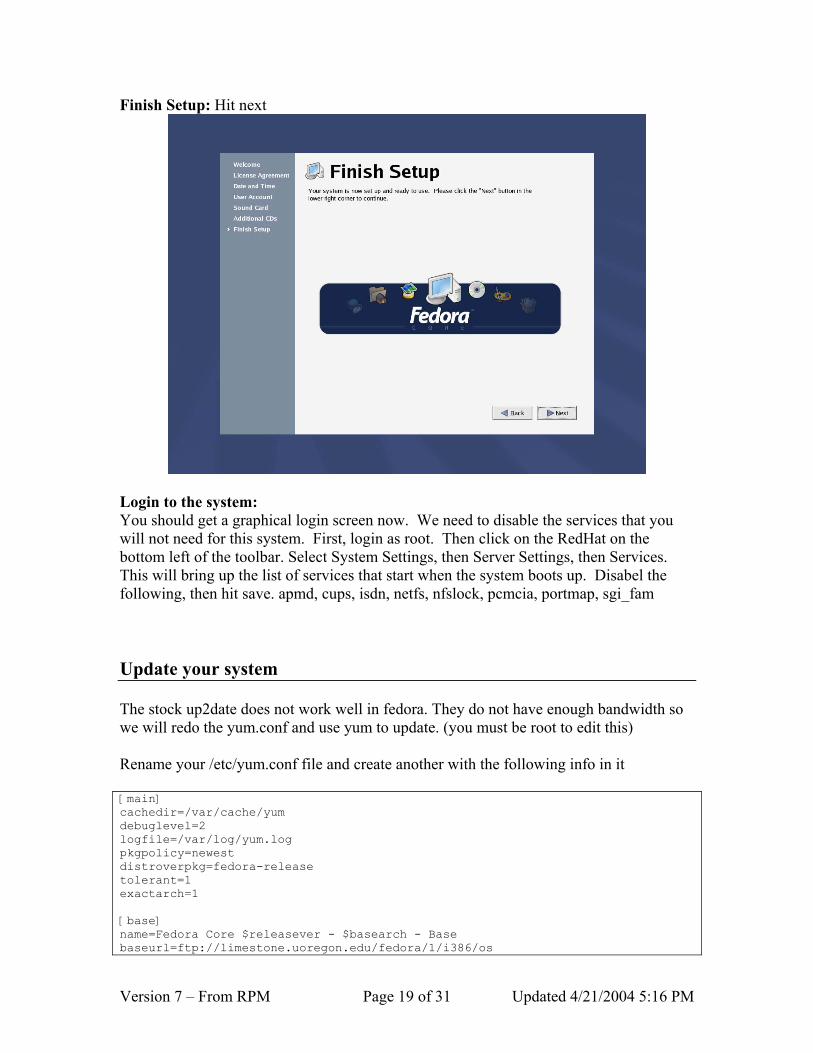
Finish Setup: Hit next
Login to the system: You should get a graphical login screen now. We need to disable the services that you will not need for this system. First, login as root. Then click on the RedHat on the bottom left of the toolbar. Select System Settings, then Server Settings, then Services. This will bring up the list of services that start when the system boots up. Disabel the following, then hit save. apmd, cups, isdn, netfs, nfslock, pcmcia, portmap, sgi_fam Update your system The stock up2date does not work well in fedora. They do not have enough bandwidth so we will redo the yum.conf and use yum to update. (you must be root to edit this) Rename your /etc/yum.conf file and create another with the following info in it [main] cachedir=/var/cache/yum debuglevel=2 logfile=/var/log/yum.log pkgpolicy=newest distroverpkg=fedora-release tolerant=1 exactarch=1 [base] name=Fedora Core $releasever - $basearch - Base baseurl=ftp://limestone.uoregon.edu/fedora/1/i386/os

Version 7 – From RPM Page 20 of 31 Updated 4/21/2004 5:16 PM
#http://fedora.redhat.com/releases/fedora-core-$releasever [updates-released] name=Fedora Core $releasever - $basearch - Released Updates baseurl=ftp://limestone.uoregon.edu/fedora/updates/1/i386 #http://fedora.redhat.com/updates/released/fedora-core-$releasever This site has a fast pipe; you can change it to other sites too. Look at http://www.xades.com/proj/fedora_repos.html to find out more. Now do a “yum update” and it will check what you need. A little bit later it will want some input to download the files, hit y. Reboot your system (you installed a new kernel when you updated the installation, so a reboot is necessary). You are now up to date with all the latest packages. You are now ready to start installing Snort and all of the software it needs. You can either use the desktop terminal window, or SSH into the server from another box. Either will work fine. For the novice it might be easier to do this from SSH so they can cut and paste the commands from this document into the session, instead of typing some of the long strings. (You can cut and paste from the PDF by using the text select tool in Adobe Acrobat
Download all the needed files: Place all the downloaded files into a directory for easy access and consolidation. This directory will not be needed when you are finished with the installation and may be deleted at that time. I create a directory under /root called Snortinstall. Use the mkdir command from the shell. Make sure you are in the /root directory (cd /root). You can check where you are currently by using the pwd command. Note: If you are not logged in as root, then you will need to execute “su –“ (“su” gives you the super user or root account rights, the “–“ loads the environmental variables of the root account for you) and then enter the root password.
!!!DO THE FOLLOWING AS ROOT!!! If you’re SSH’d into the box, you can use wget (wget will place the file you’re downloading into the directory where you’re currently located) to download these files. To use wget, type “wget <URL_to_file>”, and it will begin the download to the directory that you are currently in. If you want to use a Windows box and need an SSH client, then you can go to the PuTTY http://www.chiark.greenend.org.uk/~sgtatham/putty/ home page and download a free one. You can also get a scp (secure copy) and a sftp (Secure

Version 7 – From RPM Page 21 of 31 Updated 4/21/2004 5:16 PM
FTP) client for Windows there as well. (For notes on quick ways to download see the bottom of this paper) Download Snort http://www.snort.org/dl/binaries/linux/snort-mysql-2.1.2-2.i386.rpm http://www.snort.org/dl/binaries/linux/snort-2.1.2-2.i386.rpm http://www.snort.org/dl/snort-2.1.2.tar.gz Download ADODB http://phplens.com/lens/dl/adodb411.tgz Download Acid http://acidlab.sourceforge.net/acid-0.9.6b23.tar.gz Download Zlib http://www.zlib.net/zlib-1.2.1.tar.gz Download JPGraph http://www.aditus.nu/jpgraph/downloads/jpgraph-1.14.tar.gz Download LibPcap http://www.tcpdump.org/release/libpcap-0.8.1.tar.gz Download PCRE ftp://ftp.csx.cam.ac.uk/pub/software/programming/pcre/pcre-4.4.tar.gz Preparing for the install: Again, if you are not logged in as root, then you will need to su to root ("su -" will load the environmental variables of root. Use that when you su.) Ensure that you have downloaded all of the installation files before you start the install, it will go smoother, trust me. Go to your download directory and start with the following procedures. Securing SSH In the /etc/ssh/sshd_config file change the following lines (if it is commented out remove the #): Protocol 2 PermitRootLogin no PermitEmptyPasswords no (You will need to SSH into the box with the user account you created after this, as root will no longer be accepted. Just “su –“ to the root account)

Version 7 – From RPM Page 22 of 31 Updated 4/21/2004 5:16 PM
Turn on and set to start the services you will need chkconfig httpd on chkconfig mysqld on service httpd start service mysqld start Installing PCRE: tar –xvzf pcre-4.4.tar.gz cd pcre-4.4 ./configure make make install Install zlib: tar -xvzf zlib-1.2.1.tar.gz cd zlib-1.2.1 ./configure; make test make install cd .. Install LibPcap: tar –xvzf libpcap-0.8.1.tar.gz cd libpcap-0.8.1 ./configure make make install cd .. Testing Apache To test the Apache and PHP, create a file called test.php in the /var/www/html directory. Place the following line in the file: <?php phpinfo(); ?> Now use a web browser to look at the file (http://IP_Addess/test.php). It should give you info on your system, Apache, and PHP.
Version 7 – From RPM Page 23 of 31 Updated 4/21/2004 5:16 PM
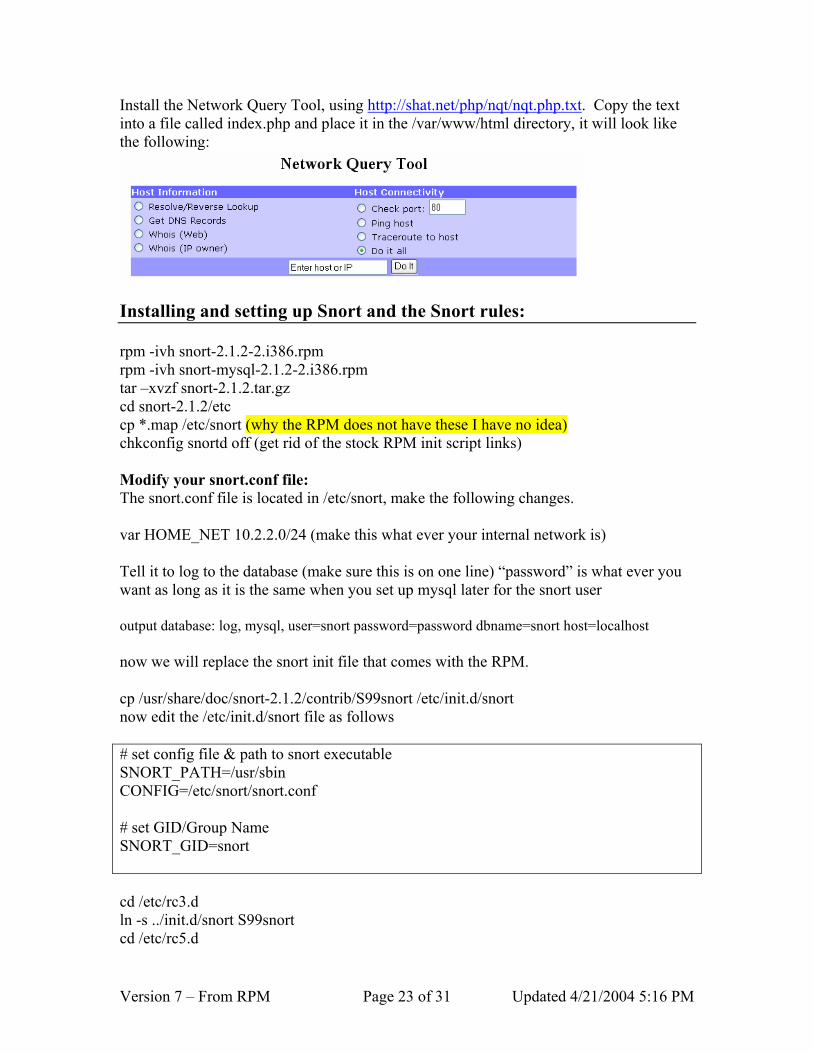
Install the Network Query Tool, using http://shat.net/php/nqt/nqt.php.txt. Copy the text into a file called index.php and place it in the /var/www/html directory, it will look like the following:
Installing and setting up Snort and the Snort rules: rpm -ivh snort-2.1.2-2.i386.rpm rpm -ivh snort-mysql-2.1.2-2.i386.rpm tar –xvzf snort-2.1.2.tar.gz cd snort-2.1.2/etc cp *.map /etc/snort (why the RPM does not have these I have no idea) chkconfig snortd off (get rid of the stock RPM init script links) Modify your snort.conf file: The snort.conf file is located in /etc/snort, make the following changes. var HOME_NET 10.2.2.0/24 (make this what ever your internal network is) Tell it to log to the database (make sure this is on one line) “password” is what ever you want as long as it is the same when you set up mysql later for the snort user output database: log, mysql, user=snort password=password dbname=snort host=localhost now we will replace the snort init file that comes with the RPM. cp /usr/share/doc/snort-2.1.2/contrib/S99snort /etc/init.d/snort now edit the /etc/init.d/snort file as follows # set config file & path to snort executable SNORT_PATH=/usr/sbin CONFIG=/etc/snort/snort.conf # set GID/Group Name SNORT_GID=snort cd /etc/rc3.d ln -s ../init.d/snort S99snort cd /etc/rc5.d

Version 7 – From RPM Page 24 of 31 Updated 4/21/2004 5:16 PM
ln -s ../init.d/snort S99snort Snort will now start automatically for you when you start the sensor Setting up the database in MySQL: I will put a line with a > in front of it so you will see what the output should be. (Note: In MySQL, a semi-colon ” ; “character is mandatory at the end of each input line) (new_password is whatever password you want to give) mysql mysql> SET PASSWORD FOR root@localhost=PASSWORD('password'); >Query OK, 0 rows affected (0.25 sec) mysql> create database snort; >Query OK, 1 row affected (0.01 sec) mysql> grant INSERT,SELECT on root.* to snort@localhost; >Query OK, 0 rows affected (0.02 sec) mysql> SET PASSWORD FOR snort@localhost=PASSWORD('password'); >Query OK, 0 rows affected (0.25 sec) mysql> grant CREATE, INSERT, SELECT, DELETE, UPDATE on snort.* to snort@localhost; >Query OK, 0 rows affected (0.02 sec) mysql> grant CREATE, INSERT, SELECT, DELETE, UPDATE on snort.* to snort; >Query OK, 0 rows affected (0.02 sec) mysql> exit >Bye Execute the following commands to create the tables mysql -u root -p < /usr/share/doc/snort-2.1.2/contrib/create_mysql snort Enter password: the mysql root password Then install the extra DB tables using the following command zcat /usr/share/doc/snort-2.1.2/contrib/snortdb-extra.gz |mysql -p snort Enter password: the mysql root password Now you need to check and make sure that the Snort DB was created correctly mysql -p >Enter password: mysql> SHOW DATABASES; (You should see the following) +------------+ | Database +------------+ | mysql | Snort | test +------------+ 3 rows in set (0.00 sec)

Version 7 – From RPM Page 25 of 31 Updated 4/21/2004 5:16 PM
mysql> use Snort >Database changed mysql> SHOW TABLES; +------------------+ | Tables_in_Snort +------------------+ | data | detail | encoding | event | flags | icmphdr | iphdr | opt | protocols | reference | reference_system | schema | sensor | services | sig_class | sig_reference | signature | tcphdr | udphdr +------------------+ 19 rows in set (0.00 sec) exit Install JPGraph: Go back to your downloads directory cp jpgraph-1.14.tar.gz /var/www/html cd /var/www/html tar –xvzf jpgraph-1.14.tar.gz rm –rf jpgraph-1.14.tar.gz cd jpgraph-1.14 rm -rf README rm -rf QPL.txt Installing ADODB: Go back to your download directory cp adodb411.tgz /var/www/html/ cd /var/www/html tar -xvzf adodb411.tgz

Version 7 – From RPM Page 26 of 31 Updated 4/21/2004 5:16 PM
rm –rf adodb411.tgz Installing and configuring Acid: Go back to your downloads directory cp acid-0.9.6b23.tar.gz /var/www/html cd /var/www/html tar –xvzf acid-0.9.6b23.tar.gz rm -rf acid-0.9.6b23.tar.gz Configuring Acid: Go to the /www/html/acid/ directory and edit the acid_conf.php file. It should look like this (except of course you will need your password): The highlighted items are what you need to change $DBlib_path = "/var/www/html/adodb"; $DBtype = "mysql"; /* Alert DB connection parameters * - $alert_dbname : MySQL database name of Snort alert DB * - $alert_host : host on which the DB is stored * - $alert_port : port on which to access the DB * - $alert_user : login to the database with this user * - $alert_password : password of the DB user * * This information can be gleaned from the Snort database * output plugin configuration. */ $alert_dbname = "snort"; $alert_host = "localhost"; $alert_port = ""; $alert_user = "snort"; $alert_password = "password"; /* Archive DB connection parameters */ $archive_dbname = "snort"; $archive_host = "localhost"; $archive_port = ""; $archive_user = "snort"; $archive_password = "password "; And a little further down $ChartLib_path = "/var/www/html/jpgraph-1.14/src";

Version 7 – From RPM Page 27 of 31 Updated 4/21/2004 5:16 PM
Go to http://yourhost/acid/acid_main.php . You will get a message that looks like this in your browser:
Click on the “Setup Page” hyperlink to create the tables that Acid uses, then you will see the following.
Then click the button that says “Create Acid AG” Now when you go to http://yourhost/acid/ you should see the ACID homepage

Version 7 – From RPM Page 28 of 31 Updated 4/21/2004 5:16 PM
Securing the Acid directory: mkdir /var/www/html/passwords /usr/bin/htpasswd -c /var/www/html/passwords/passwords acid (acid will be the username you will use to get into this directory, along with the password you choose) It will ask you to enter the password you want for this user, this is what you will have to type when you want to view your acid page Edit the httpd.conf , I put it under the section that has: <Directory /> Options FollowSymLinks AllowOverride None </Directory> These are the lines to add: <Directory "/var/www/html/acid"> AuthType Basic AuthName "SnortIDS" AuthUserFile /var/www/html/passwords/passwords Require user acid </Directory>

Version 7 – From RPM Page 29 of 31 Updated 4/21/2004 5:16 PM
Reboot your system; watch to make sure everything starts. You can check by doing a “ps –ef |grep <service>” the service can be any running process. i.e. mysql, httpd, Snort, etc.
If you want the machine to start at a text prompt instead of X, then change the default in the inittab file (/etc/inittab) from 5 to 3.
Go to a shell as root and check everything important to see if it is running.
To check you can execute “ps –ef |grep <SERVICE>” where service is Snort. httpd, or mysql.
Or use “ps –ef |grep httpd && ps –ef |grep mysql && ps –ef |grep Snort”
Now it’s time to test Snort. I suggest using something free like CIS Scanner (http://www.cerberus-infosec.co.uk/CIS-5.0.02.zip) or Nessus (http://www.nessus.org) if you have it, and running it against your Snort box. Check ACID when you’re done and it should have a bunch or alerts. If you are on DSL or cable then you could already have a bunch in there right after you start it up. When you go to the acid screen in your browser now you should see alerts (And this is without running any programs against it)
Now you need to tune your IDS for your environment. This is an important step. Look at the Snort list archives and the other links listed above and you will find good tips on how to do that.
There is also a very good book out on Snort for those that want to learn more about it
http://www.amazon.com/exec/obidos/tg/stores/detail/-/books/1931836744/
And a few others listed at http://www.Snort.org/docs/#Snort_books
Download tip
When I want to download all of these real quick I take the following and create a file in the /root/snortinstall dir called get, edit it and put the following in it

Version 7 – From RPM Page 30 of 31 Updated 4/21/2004 5:16 PM
wget http://www.snort.org/dl/binaries/linux/snort-mysql-2.1.2-2.i386.rpm wget http://www.snort.org/dl/binaries/linux/snort-2.1.2-2.i386.rpm wget http://phplens.com/lens/dl/adodb411.tgz wget http://acidlab.sourceforge.net/acid-0.9.6b23.tar.gz wget http://www.zlib.net/zlib-1.2.1.tar.gz wget http://www.aditus.nu/jpgraph/downloads/jpgraph-1.14.tar.gz wget http://www.tcpdump.org/release/libpcap-0.8.3.tar.gz wget ftp://ftp.csx.cam.ac.uk/pub/software/programming/pcre/pcre-4.4.tar.gz wget http://www.snort.org/dl/snort-2.1.2.tar.gz Then I save the file and type chmod +x get, then ./get and it will download all the files for me. Troubleshooting If you are having trouble type the following snort –c /etc/snort/sort.conf It will give you output that will be helpful. It will tell you if you are having problems with rules or if you have a bad line in your conf file. If you do this and read the output you will be able to fix most of the problems I get e-mailed with. Make sure that the line for MySQL in the snort.conf file is not wrapped or cut into two lines. I have seen this happen a lot. Next, this is an end-to-end guide. I designed it to take a system from bare metal to functional IDS. If you follow it step by step you will get an IDS working, then you customize it more. I have the RedHat install listed the way I do because there are some parts that are needed. If you do not have a sensor number, it means that you have not received an alert on that sensor yet. Make sure everything is running without error and check ACID again If you get errors about libpng, libjpg, or any other lib item (when you are compiling PHP) you missed them during the install of the OS. Go to system settings (hit the “Redhat” in the bottom left and look for it on the pop up menu), then to add/remove applications and you can check what you installed. Make sure it is at the minimum what I have listed for the OS install. If you are getting nothing in ACID you could have a number of problems. Check your /var/log/snort directory and see if you have an alert file. If it has alerts, then Snort is working and you most likely do not have your Snort.conf output lines correct. Check where you setup your database in it first. If you do not have an alert file then make sure Snort is running. If it is, make sure that if you are on a switch, you are on a span (or mirrored) port, or you will not see anything but what is destined for that port.

Version 7 – From RPM Page 31 of 31 Updated 4/21/2004 5:16 PM
The best place to look for other answers is the Snort-users archive, which is indexed by Google. If you are not proficient at searching, I would suggest reading http://www.google.com/help/basics.html . It is a good primer, as is http://www.googleguide.com/ Read what is out there for you. Go to http://www.snort.org and look around. http://www.snort.org/docs/snort_manual/ is also something you should read all the way through, as well as http://www.snort.org/docs/FAQ.txt between them and Google almost all your questions will be answered. Most of the problems people have had stem from them missing a step, frequently only one step, somewhere. There are a lot of them and it is easy to do. If you do have problems feel free to e-mail me, Nick, or the Snort-users list. There is a huge community of people out there using this product that will help you if you are in trouble. Remember, however, that this support is free and done out of love of this product. You certainly should not expect the same response from the Snort community as you would from an IDS vendor (though I have gotten better response time from the Snort-users list than I have from some vendors in the past) Hope this gets you going. If not, then feel free to e-mail either myself, Nick Oliver, or the Snort-users list. They are a great bunch of people and will do all they can for you (if you have manners). Just remember, however, that it is a volunteer thing, so you will probably not get answers in 10 minutes. Do NOT repost your question merely because you have not yet seen an answer.
Good luck and happy Snorting. Coming soon Oinkmaster – Rule Management Swatch – log e-mails System Hardening – so you don’t get r00ted