smoke lamps - shootingshed.co.ukshootingshed.co.uk/.../uploads/2018/04/output_1524908158.docx ·...
TRANSCRIPT
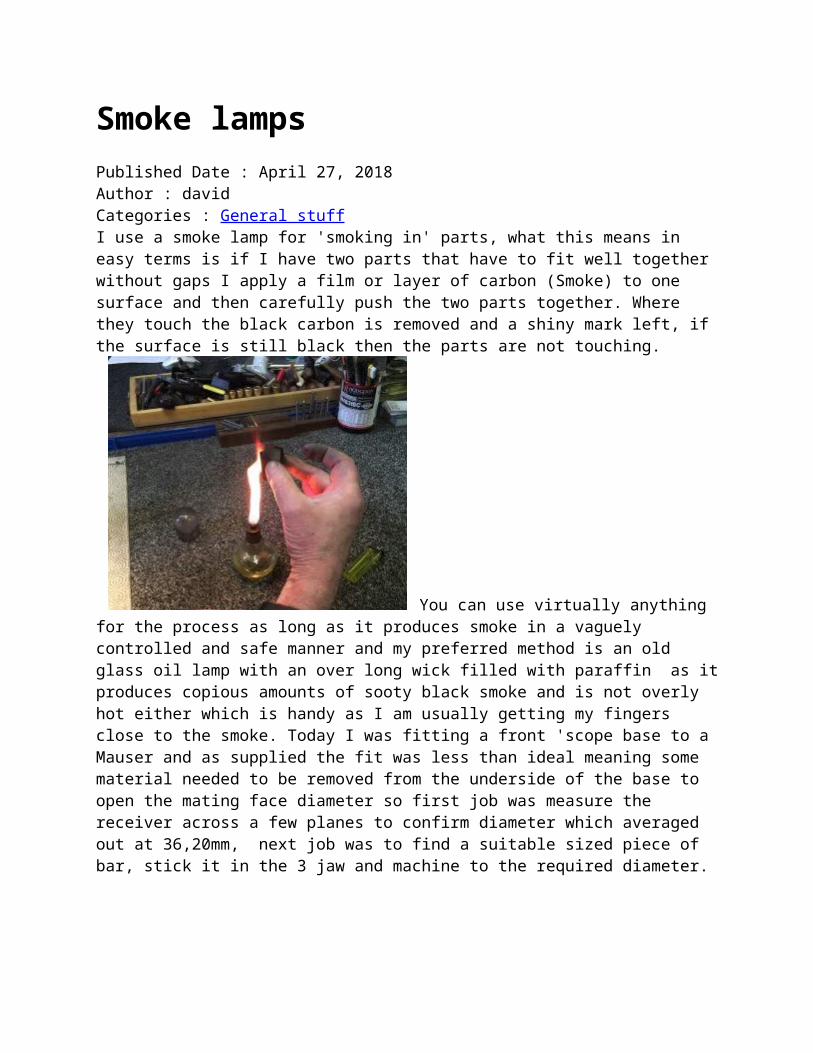
Smoke lamps Published Date : April 27, 2018Author : davidCategories : General stuffI use a smoke lamp for 'smoking in' parts, what this means in easy terms is if I have two parts that have to fit well together without gaps I apply a film or layer of carbon (Smoke) to one surface and then carefully push the two parts together. Where they touch the black carbon is removed and a shiny mark left, if the surface is still black then the parts are not touching.
You can use virtually anything for the process as long as it produces smoke in a vaguely controlled and safe manner and my preferred method is an old glass oil lamp with an over long wick filled with paraffin as it produces copious amounts of sooty black smoke and is not overly hot either which is handy as I am usually getting my fingers close to the smoke. Today I was fitting a front 'scope base to a Mauser and as supplied the fit was less than ideal meaning some material needed to be removed from the underside of the base to open the mating face diameter so first job was measure the receiver across a few planes to confirm diameter which averaged out at 36,20mm, next job was to find a suitable sized piece of bar, stick it in the 3 jaw and machine to the required diameter.
I used some 120 grit self adhesive aluminium oxide paper recently donated to us (Thanks Nick) It measures at 0,25mm thick so it is simply a matter of machining 0,5mm from the diameter, sticking the paper to the Mandrel/Arbor and
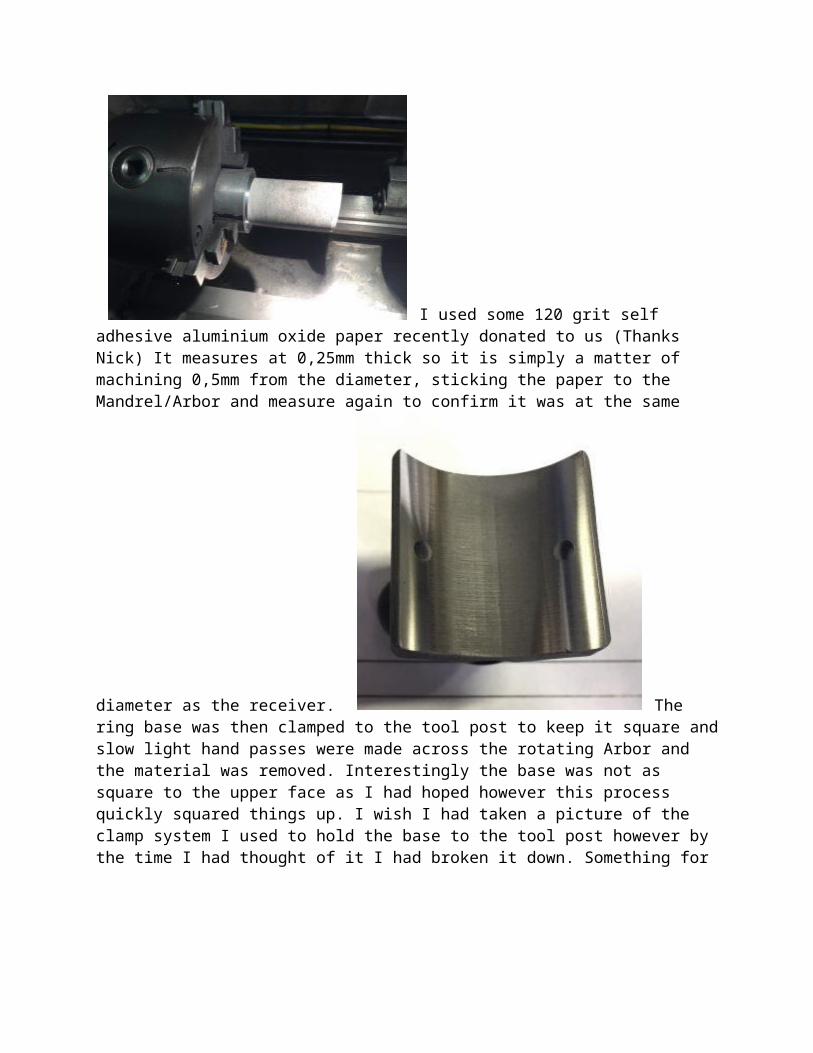
measure again to confirm it was at the same diameter as the receiver.
The ring base was then clamped to the tool post to keep it square and slow light hand passes were made across the rotating Arbor and the material was removed. Interestingly the base was not as square to the upper face as I had hoped however this process quickly squared things up. I wish I had taken a picture of the clamp system I used to hold the base to the tool post however by the time I had thought of it I had broken it
down. Something for next time. Next job was check fit with the smoke lamp and repeat until I was happy with the fit. This part can be quite time consuming however it is also very rewarding as you slowly watch the sooty part reducing and being replaced by shiny metal. I am not looking for a 100% fit on this job however 85-90% is good so a bit to go in this picture. This is a staged photograph as I tend to put the lamp out when not in use, you can see the little glass cap that fits snugly over the lamp with a ground finish, it came out of a junk shop years ago and cost GBP1.00 from memory, the wick is actually a length of cotton string wound up tightly until it doubles back on itself, a trick my father showed

me a long while ago. Of course now I have removed a small amount of material from the front mount I need to consider the rear and I have two choices, machine the rear to suit the front which I have done in the past however it is fiddly clocking the part up and accordingly time consuming. The alternative is fit is as it is and yes, it does fit quite well. Then lap the lower 'scope tube cups in to match each, this has the advantage of adding a small amount of incline to the otherwise zero MOA (ish) alignment which is ideal for the proposed use of the rifle which is 300m to 600m informal plinking. I now need to strip the finish from the rings and bases and black them properly excluding the bases as I will soft solder them to the receiver before drilling and tapping them in their final places. Solder does not adhere to blued surfaces so the receiver top will need to be stripped first. Easily done with some 240 grit and it gives a nice surface for the solder to grip.
Comments
(Micro) Boring work Published Date : April 27, 2018Author : davidCategories : General stuff, Machine shopPeople I speak to often seem to associate 'Gunsmiths' as either people who stand at a bench knee deep in wood shavings clutching parts of an old shotgun, or people standing in front of a lathe in a garage adding threads to things. Both pictures do apply and yet they could not be further from the truth for many of us who work with firearms. My goal has always been to buy British for work and if I stand in the workshop I am surrounded by British machinery or British produced. Harrison CNC, Colchester Manual, Bridgeport Mill and so the list goes on. The bandsaw is a UK model, the bench sander is again a UK thing as is the barrel press and it is not until you get to the

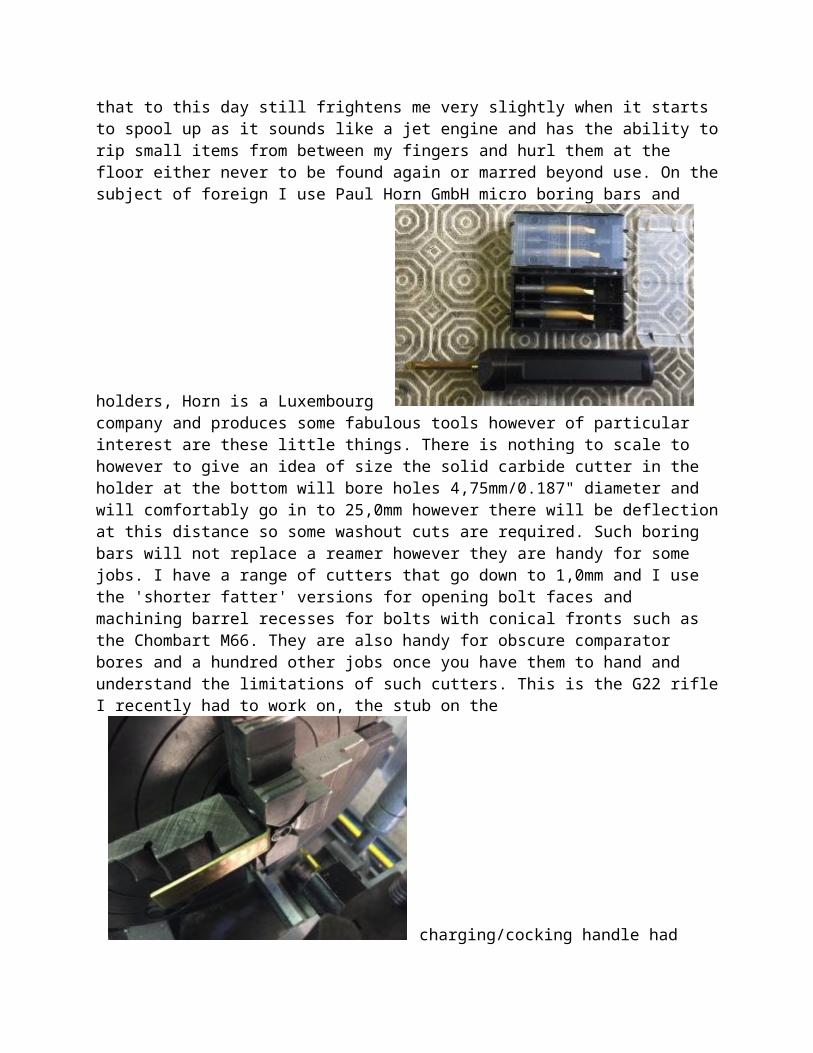
polishing station that foreign things appear in the form of a German double ended system that to this day still frightens me very slightly when it starts to spool up as it sounds like a jet engine and has the ability to rip small items from between my fingers and hurl them at the floor either never to be found again or marred beyond use. On the subject of foreign I use Paul Horn GmbH micro boring bars and holders, Horn is a Luxembourg
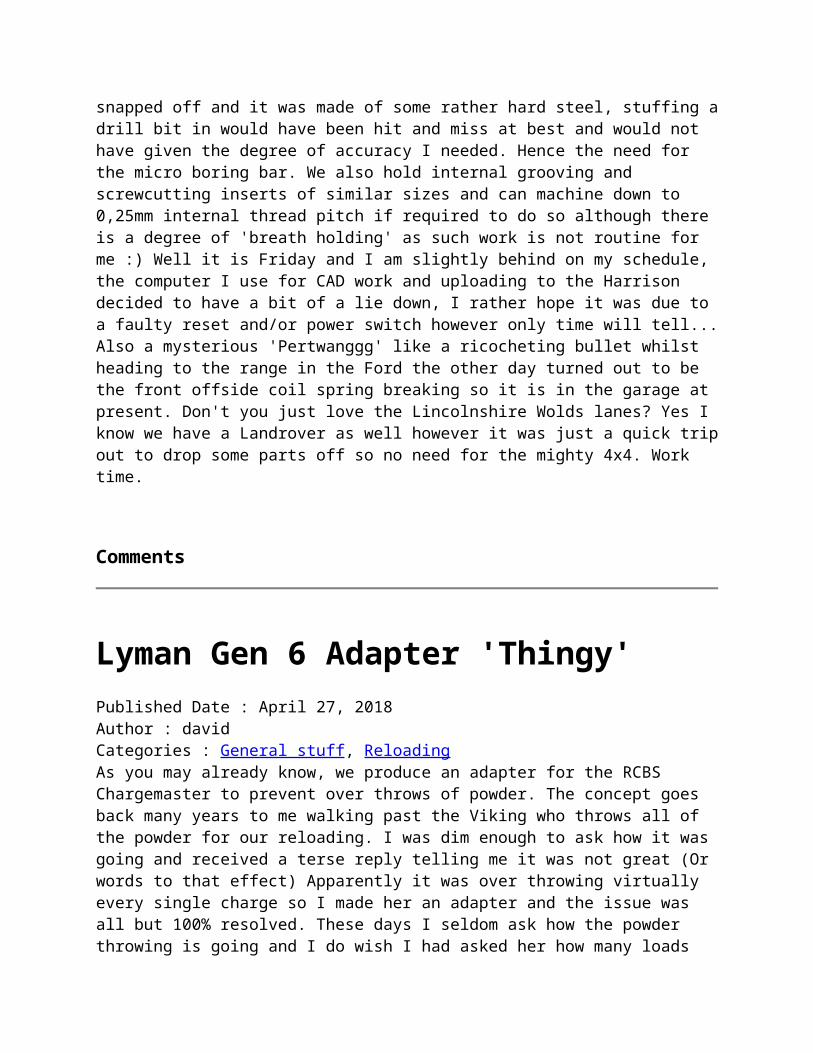
company and produces some fabulous tools however of particular interest are these little things. There is nothing to scale to however to give an idea of size the solid carbide cutter in the holder at the bottom will bore holes 4,75mm/0.187" diameter and will comfortably go in to 25,0mm however there will be deflection at this distance so some washout cuts are required. Such boring bars will not replace a reamer however they are handy for some jobs. I have a range of cutters that go down to 1,0mm and I use the 'shorter fatter' versions for opening bolt faces and machining barrel recesses for bolts with conical fronts such as the Chombart M66. They are also handy for obscure comparator bores and a hundred other jobs once you have them to hand and understand the limitations of such cutters. This is the G22
rifle I recently had to work on, the stub on the charging/cocking handle had snapped off and it was made of some rather hard steel, stuffing a drill bit in would have been hit and miss at best and would not have given the degree of accuracy I needed. Hence the need for the micro boring bar. We also hold internal grooving and screwcutting inserts of similar sizes and can machine down to 0,25mm internal thread pitch if required to do so although there is a degree of 'breath holding' as such work is not routine for me :) Well it is Friday and I am slightly behind on my schedule, the computer I use for CAD work and uploading to the Harrison decided to have a bit of a lie down, I rather hope it was due to a faulty reset and/or power switch however only time will tell... Also a mysterious 'Pertwanggg' like a ricocheting bullet whilst heading to the range in the Ford the other day turned out to be the front offside coil spring breaking so it is in the garage at present. Don't you just
love the Lincolnshire Wolds lanes? Yes I know we have a Landrover as well however it was just a quick trip out to drop some parts off so no need for the mighty 4x4. Work time.
Comments
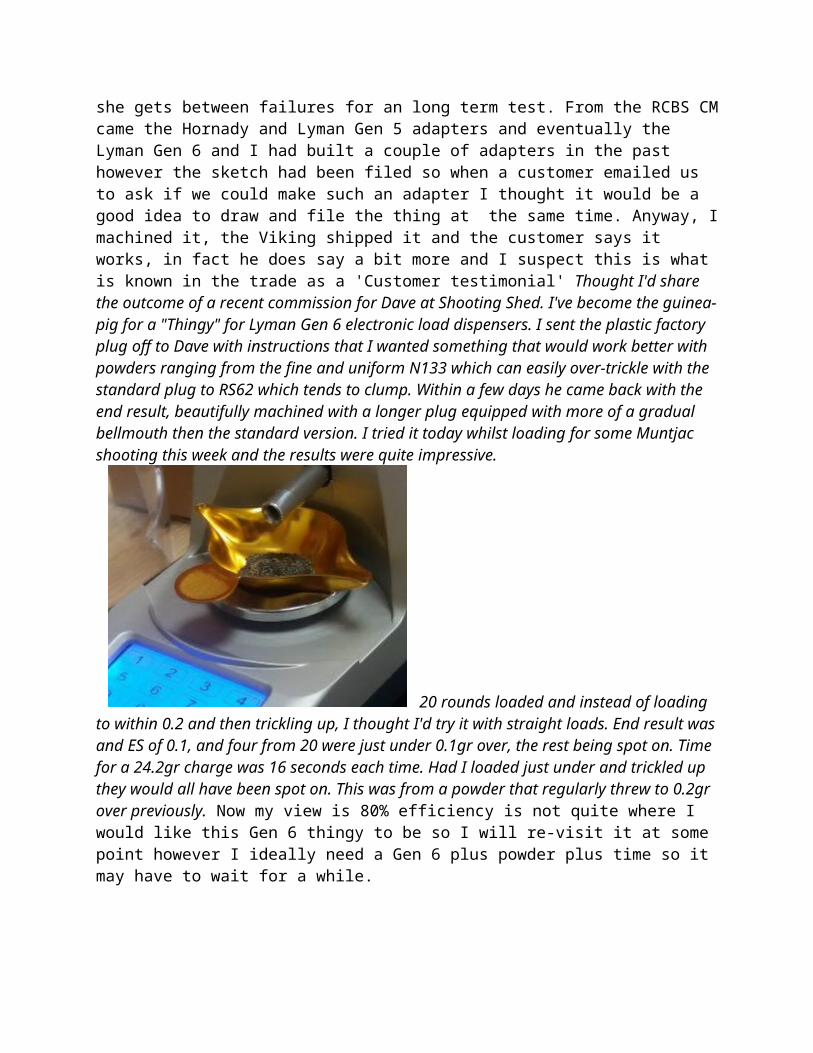
Lyman Gen 6 Adapter 'Thingy' Published Date : April 27, 2018Author : davidCategories : General stuff, ReloadingAs you may already know, we produce an adapter for the RCBS Chargemaster to prevent over throws of powder. The concept goes back many years to me walking past the Viking who throws all of the powder for our reloading. I was dim enough to ask how it was going and received a terse reply telling me it was not great (Or words to that effect) Apparently it was over throwing virtually every single charge so I made her an adapter and the issue was all but 100% resolved. These days I seldom ask how the powder throwing is going and I do wish I had asked her how many loads she gets between failures for an long term test. From the RCBS CM came the Hornady and Lyman Gen 5 adapters and eventually the Lyman Gen 6 and I had built a couple of adapters in the past however the sketch had been filed so when a customer emailed us to ask if we could make such an adapter I thought it would be a good idea to draw and file the thing at the same time. Anyway, I machined it, the Viking shipped it and the customer says it works, in fact he does say a bit more and I suspect this is what is known in the trade as a 'Customer testimonial' Thought I'd share the outcome of a recent commission for Dave at Shooting Shed. I've become the guinea-pig for a "Thingy" for Lyman Gen 6 electronic load dispensers. I sent the plastic factory plug off to Dave with instructions that I wanted something that would work better with powders ranging from the fine and uniform N133 which can easily over-trickle with the standard plug to RS62 which tends to clump. Within a few days he came back with the end result, beautifully machined with a longer plug equipped with more of a gradual bellmouth then the standard version. I tried it today whilst loading for some Muntjac shooting this week and the
results were quite impressive. 20 rounds loaded and instead of loading to within 0.2 and then trickling up, I thought I'd try it with straight loads. End result was and ES of 0.1, and four from 20 were just under 0.1gr over, the rest being spot on. Time for a 24.2gr charge was 16 seconds each time. Had I loaded just under and trickled up they would all have been spot on. This was from a powder that regularly threw to 0.2gr over previously. Now my view is 80% efficiency is not quite where I would like this Gen 6 thingy to be so I will re-visit it at some point however I ideally need a Gen 6 plus powder plus time so it may have to wait for a while.
Comments
Trev Eeles Interesting read, i use a Lyman Gen 6 and your dead right about its performance with the extremely long and fine powders, funnily enough, ive just loaded 50 x 6.5 creedmoor cartridges with RS62, and only had 8 that threw 0.1 under my 42.4 measure. RS62 is a long powder and it hasnt clumped yet. I do have problems with the very fine powders on tge Lyman so this might solve the problem
Inter brackets for lefties Published Date : April 23, 2018Author : davidCategories : General stuff, Life MapYou have probably noticed I have been fairly quiet this month and for good reason, we have set ourselves the target of being completely up-to-date with all Shooting Shed items and gun smithing by the end of this month and with seven days left to go I rather think we will hit the target. This is the result of numerous long days and we have been working 7 days a week with the only breaks being to take the dogs out. It has been hard work however it has been worth the effort and it is strangely rewarding to see the job list under control at long last :) Our goal is to process orders for our standard range of products such as Bore guides/Cleaning rod guides,
Comparators and OAL gauges, plus bag riders and all the other parts we make within 7 days and ideally a lot better than this. Rifle and Shotgun work is a bit different as we may not always hold the requisite parts for the job such as a specific barrel profile or some obscure spares so the time to complete the job will be extended however our goal is still to get the vast majority of jobs out within 14 days or better. 'Inter brackets for lefties' Translation: We are just waiting for a handful of left handed 'scope brackets and zero MOA rails for left handed BSA International .22 rifles to arrive back from anodising. Hopefully they will be here Thursday/Friday of this week and time permitted will be added to the shop over the weekend. So what does this mean? Well for starters it means you can haul your old BSA International out of the cabinet and add a telescopic sight in a few minutes thanks to the left handed version of our standard BSA bracket. It also means you can now compete in the highly popular .22LR Bench rest discipline with examples of suitable rifles to be found at virtually every indoor rifle range in the country these days. It also means you can compete against many like minded individuals for a fraction of the cost or centre fire Bench rest shooting and a BSA international is an incredibly competitive rifle in the right hands. Yes, I know some pictures would be good and I will get something posted up hopefully at the weekend if not before :)
Comments
Pulling Balls Published Date : April 20, 2018Author : davidCategories : General stuffRemoving stuck balls from a muzzle loading rifle is not always as easy as you might think and a cannon is no exception. This particular one was a .700" that originally came from Kranks with a ball absolutely jammed tight. After a couple of goes with a normal puller I was getting nowhere, so out came the 'Very stuck ball puller', you can do this sort of job with a slide hammer as well however it is very easy to rip the screw out if you are overly enthusiastic hence using the screw type puller. My puller is home made for obvious reasons and comprises of a length of M8 stainless studding with a T handle welded to the back end. A second handle that can be screwed down the bar is added and used to jack the bar out and at the pointy end is an adapter that accepts a wood screw with a turned down head. The adapter is screwed onto the main threaded section tightly which holds the woodscrew in place and I have added a nut behind to lock everything in

place. Here it is in use, the bushing is to align it to the bore and it is just a matter of screwing the extractor screw into the stuck ball a suitable distance and then jack the offending item out using the front bar.
The front end is a wood screw with the end turned down to fit inside the front adapter and the main thread locks the screw in place with a
locknut behind. Once the ball was out the reason for the fail to fire is immediately apparent, the bore had not been cleaned properly in the past and a plug of fouling had built up and eventually blocked the flash hole from inside, so a good measure of powder could be added and the fuse inserted into the flash hole however the fuse was not able to ignite the powder... I just noticed I have been quiet on here so I will update you with our latest antics very shortly :)
Comments
Safety Glasses and Skylarks Published Date : March 29, 2018Author : david
Categories : General stuff, Life MapI am at the age where some form of magnification is always a plus when it comes to close up work and as a consequence wear reading glasses which is all well and good unless I am on the machines when I definitely should be wearing safety glasses. In the good old days I would put my safety specs over my rather stylish Danish Titanium reading glasses for close up stuff however I would invariably remove the safety specs and end up with my nose a few inches from a chuck rotating at 1000RPM+ I say would in the past tense as I moved to safety bifocals a couple of years ago and at that point I made a conscious decision to not have normal reading glasses in the workshop so I could never be tempted to wear them and these days you will invariably find me either with safety bifocals either protecting my eyes or pushed back on the top
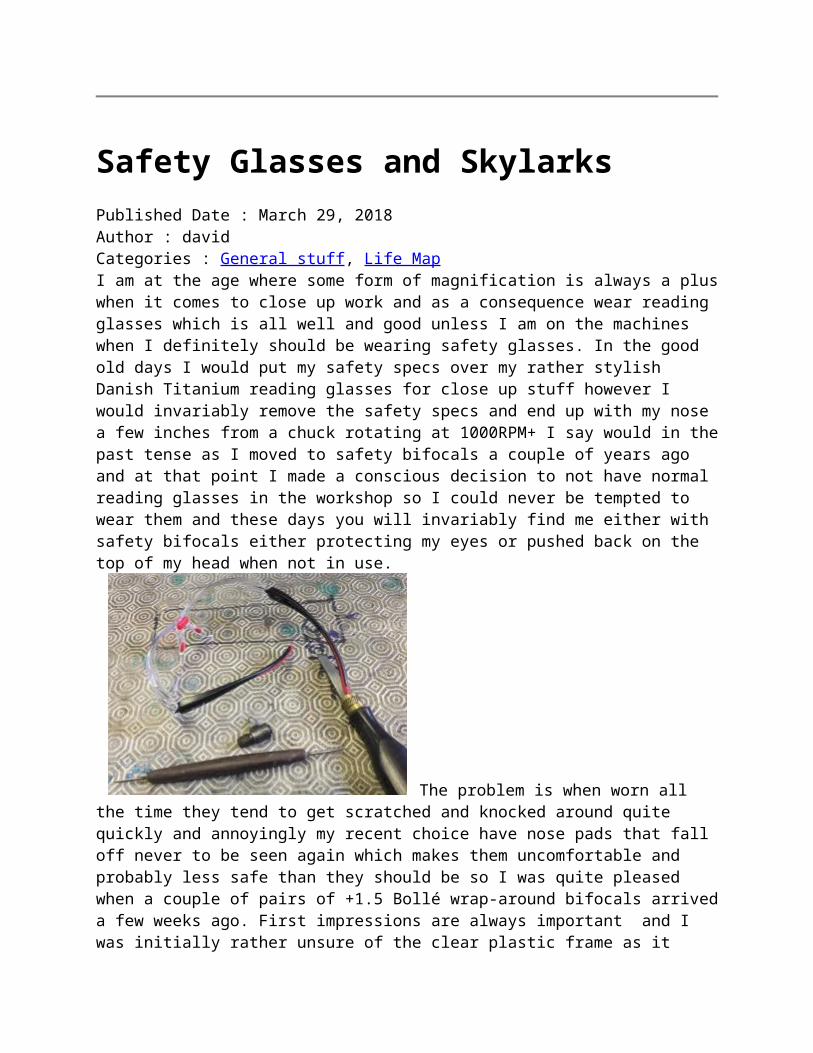
of my head when not in use. The problem is when worn all the time they tend to get scratched and knocked around quite quickly and annoyingly my recent choice have nose pads that fall off never to be seen again which makes them uncomfortable and probably less safe than they should be so I was quite pleased when a couple of pairs of +1.5 Bollé wrap-around bifocals arrived a few weeks ago. First impressions are always important and I was initially rather unsure of the clear plastic frame as it seems to refract the light coming through which was distracting however my existing safety specs were somewhat tired so I preserved and soon forgot about that aspect. Colour wise they do nothing for me and anyway, since when have I been a style icon. Fit was good and they certainly hold securely on your head, I just know they are never going to slide off at the wrong moment. One thing I have noticed is the top frame is moulded back towards the face slightly which gives better protection from above however the really important part is they are still looking crisp and new and so far are showing very few signs of wear and tear which is handy. One thing I have noticed is the mostly clear frame makes it easier for me to misplace them if I do take them off however this is so infrequent that it is hardly a problem and I have come back from walking the Labrador on several occasions only to realise my safety specs have just been for an hours walk with myself and the dog however he never seems to mind :) I did receive some Bollé wrap-around general safety glasses at the same time however they have been snapped up at the local club probably because they are rather more stylish than the usual club offerings, any more than that it is difficult to say as they are gone although it is always a good sign if you do not find them discarded at the firing point :) One particular user has just gone on to become a UK champion so I must catch up with him and find out if he attributes the title to his new safety glasses, or his superb shooting ability, oh and his modesty of course! These particular safety glasses came from Jonathan Low-Hang who can be found here: https://www.nothingbutsafetyglasses.com/ We had our three yearly RFD visit this morning, so with this in mind we closed early yesterday and

headed off to the coast to try and tire the dogs out. The Viking headed North with the Lurcher and the Labrador and I headed South agreeing to meet up in 90 minutes time. It was looking rather gloomy as we headed off and within 5 minutes the dog and I were walking through driving
hail although he seemed unperturbed and concentrated on picking up every single empty plastic bottle he could find, most of which he would return to me with an expectant look. Hah! I thought, there was no way I was picking a bottle up from him as I would never see the end of it. Parts of the path have been covered with seaweed and grass from the recent high tides and bad weather so this probably explains the excessive amount of flotsam and jetsam visible at present and I often wonder where something came from and how it arrived here. I just got my head down and continued the walk without a real break from the rain and we eventually arrived at the bay at Saltfleet Havn so we turned around and headed back to the car park a couple of miles or so further up the coast. As we neared the car park the sun broke through and we were greeted by a splendid rainbow and a chance to listen to the Skylarks again. I filmed this pair for my Mother as she seldom hears them these days and typically they chose to all but stop singing and instead fall to the ground in formation before heading off again in a continued courtship. https://www.youtube.com/watch?v=neM2DdB0hnA The RFD renewal visit seems to have gone well however the dogs have rejoined us in the workshop and judging by the way they are rolling and tussling they are no longer tired and both look like they would benefit from a long walk by the coast again. They will have to wait as I am back on gun stuff :)
Comments
The Schmidt Rubin M Published Date : March 25, 2018Author : david
Categories : General stuff, RiflesAnother Schmidt Rubin arrived recently, this time a Model 1889 chambered in 7,5x53,5mm so
originally designed for the GP90 round. This one dates back to 1893 so 125 years old and is in remarkably good condition considering its age and with all matching numbers and came with a sling and a later charger clip to enable the 12 round magazine to be filled quickly with the use of two of the charger clips.
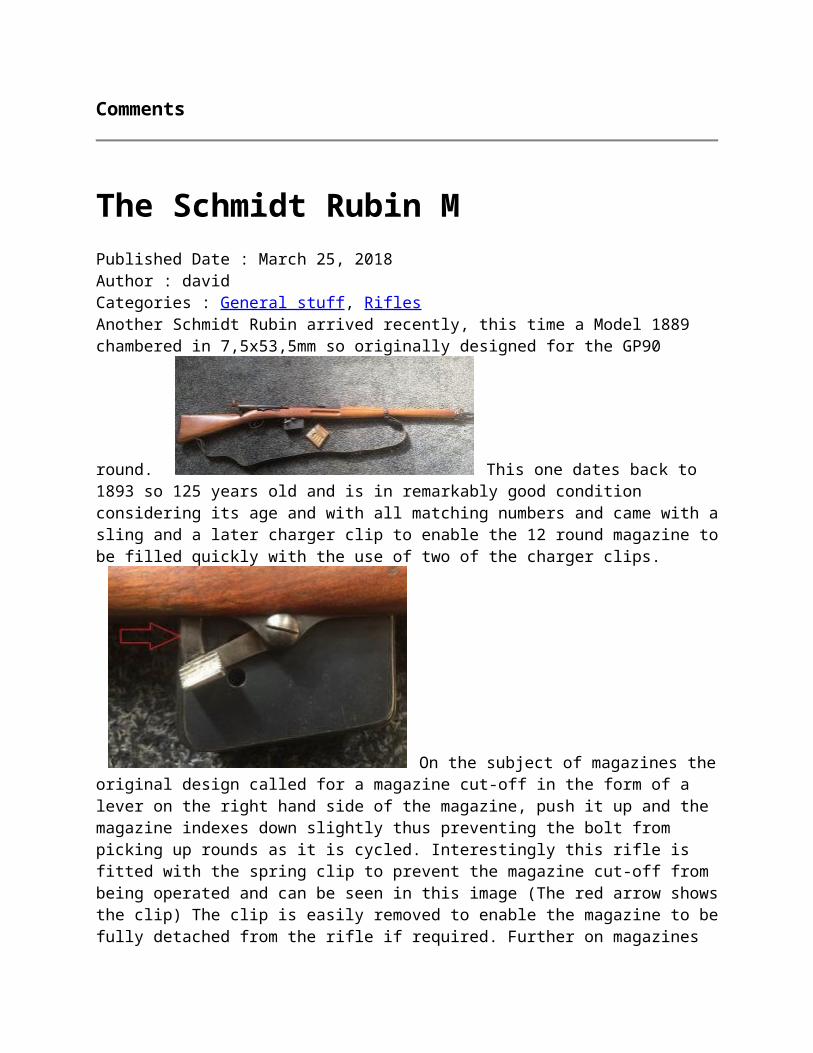
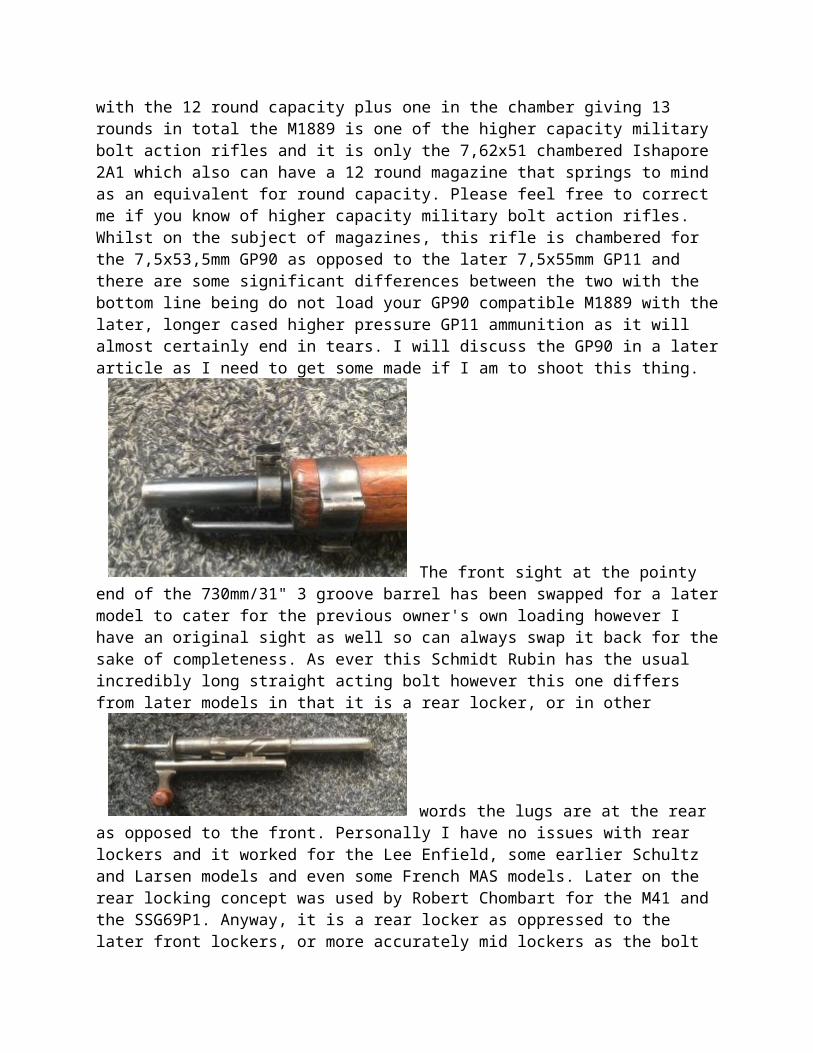
On the subject of magazines the original design called for a magazine cut-off in the form of a lever on the right hand side of the magazine, push it up and the magazine indexes down slightly thus preventing the bolt from picking up rounds as it is cycled. Interestingly this rifle is fitted with the spring clip to prevent the magazine cut-off from being operated and can be seen in this image (The red arrow shows the clip) The clip is easily removed to enable the magazine to be fully detached from the rifle if required. Further on magazines with the 12 round capacity plus one in the chamber giving 13 rounds in total the M1889 is one of the higher capacity military bolt action rifles and it is only the 7,62x51 chambered Ishapore 2A1 which also can have a 12 round magazine that springs to mind as an equivalent for round capacity. Please feel free to correct me if you know of higher capacity military bolt action rifles. Whilst on the subject of magazines, this rifle is chambered for the 7,5x53,5mm GP90 as opposed to the later 7,5x55mm GP11 and there are some significant differences between the two with the bottom line being do not load your GP90 compatible M1889 with the later, longer cased higher pressure GP11 ammunition as it will almost certainly end in tears. I will discuss the GP90 in a later article as I need to get some made if I am to shoot

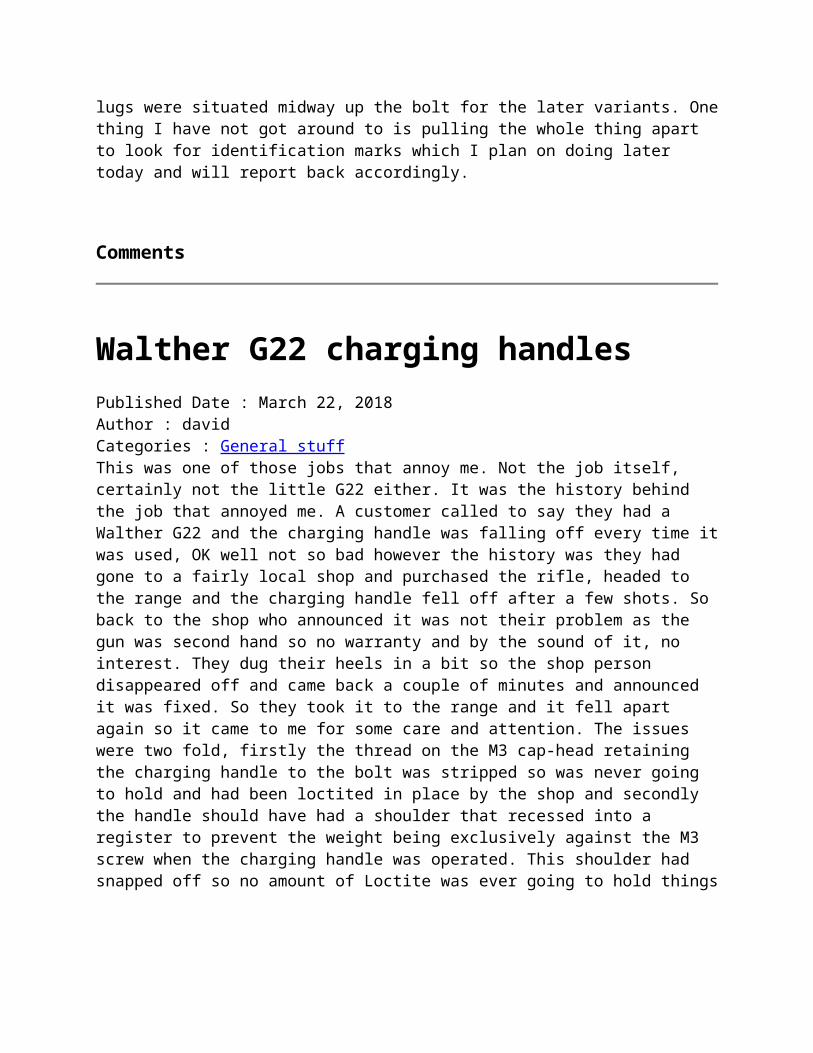
this thing. The front sight at the pointy end of the 730mm/31" 3 groove barrel has been swapped for a later model to cater for the previous owner's own loading however I have an original sight as well so can always swap it back for the sake of completeness. As ever this Schmidt Rubin has the usual incredibly long straight acting bolt however this one differs from later models in that it is a rear locker, or in other
words the lugs are at the rear as opposed to the front. Personally I have no issues with rear lockers and it worked for the Lee Enfield, some earlier Schultz and Larsen models and even some French MAS models. Later on the rear locking concept was used by Robert Chombart for the M41 and the SSG69P1. Anyway, it is a rear locker as oppressed to the later front lockers, or more accurately mid lockers as the bolt lugs were situated midway up the bolt for the later variants. One thing I have not got around to is pulling the whole thing apart to look for identification marks which I plan on doing later today and will report back accordingly.
Comments
Walther G22 charging handles Published Date : March 22, 2018Author : davidCategories : General stuffThis was one of those jobs that annoy me. Not the job itself, certainly not the little G22 either. It was the history behind the job that annoyed me. A customer called to say they had a Walther G22 and the charging handle was falling off every time it was used, OK well not so bad however the history was they had gone to a fairly local shop and purchased the rifle, headed to the range and the charging handle fell off after a few shots. So back to the shop who announced it was not

their problem as the gun was second hand so no warranty and by the sound of it, no interest. They dug their heels in a bit so the shop person disappeared off and came back a couple of minutes and announced it was fixed. So they took it to the range and it fell apart again so it came to me for some care and attention. The issues were two fold, firstly the thread on the M3 cap-head retaining the charging handle to the bolt was stripped so was never going to hold and had been loctited in place by the shop and secondly the handle should have had a shoulder that recessed into a register to prevent the weight being exclusively against the M3 screw when the charging handle was operated. This shoulder had snapped off so no amount of Loctite was ever
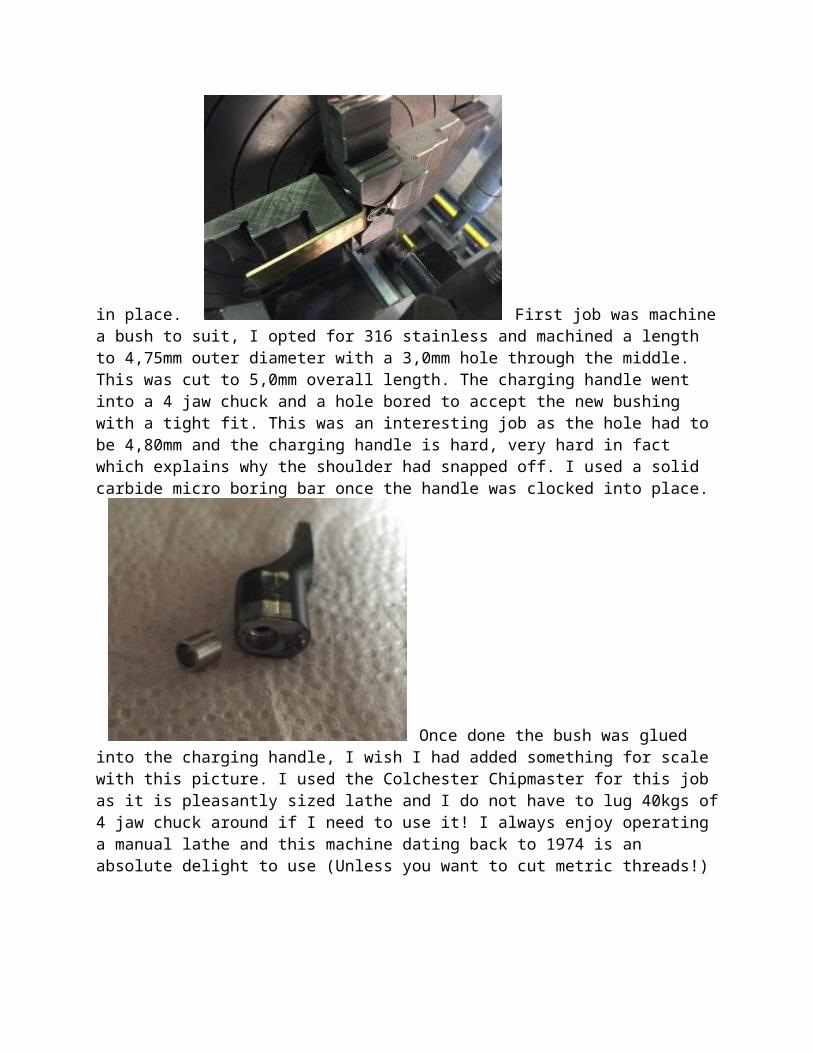
going to hold things in place. First job was machine a bush to suit, I opted for 316 stainless and machined a length to 4,75mm outer diameter with a 3,0mm hole through the middle. This was cut to 5,0mm overall length. The charging handle went into a 4 jaw chuck and a hole bored to accept the new bushing with a tight fit. This was an interesting job as the hole had to be 4,80mm and the charging handle is hard, very hard in fact which explains why the shoulder had snapped off. I used a solid carbide micro boring bar
once the handle was clocked into place. Once done the bush was glued into the charging handle, I wish I had added something for scale with this picture. I used the Colchester Chipmaster for this job as it is pleasantly sized lathe and I do not have to lug 40kgs of 4 jaw chuck around if I need to use it! I always enjoy operating a manual lathe and this machine dating back to 1974 is an absolute delight to use (Unless you want
to cut metric threads!) Once glued it was time for a quick cup of coffee, then it was just a matter of re-assembling everything and the job was complete. The G22 always comes apart remarkably easily however it is full of linkages and springs and clips and really does need some attention if you intend to put it all back together. Ah yes, I bet you are wondering why I didn't just order a new handle from the importers? Mostly because they only imported the rifles and omitted to bring any spares in with them... On the
subject of machining hard things, the next job requires the use of some of these things. Cubic boron nitride (CBN)Inserts for a boring job. No, boring as in holes not boring as I really cannot be bothered, in fact I know it is going to be an interesting job and I am really looking forward to it :)
Comments
Work In Progress (WIP) Published Date : March 19, 2018Author : davidCategories : General stuff, Life Map, Machine shop
I needed somewhere to place round bits whilst in-between machining operations and had come to the conclusion a piece of corrugated plastic roofing might be suitable so I mentioned it to my son who volunteered to make something out of a bit of tree instead. Sounds like a plan I thought as he likes working with wood and I needed something to put my part turned parts in.
He called in Saturday and gave me this tray, room for WIP and space for a couple of measuring things on the end. All nicely made from hand oiled Walnut and Maple with soft rubber inserts. Arghhh! I have at long last plucked up the courage to use it and it does work very well although I do wonder what it will look like in a couple of years time
Thank you son. Actually, writing this reminded me of the Eddie Izzard Death Star sketch so here it is (Not safe for work) If you are not sure who Eddie Izzard is it is probably not for you. https://www.youtube.com/watch?v=Sv5iEK-IEzw
Comments
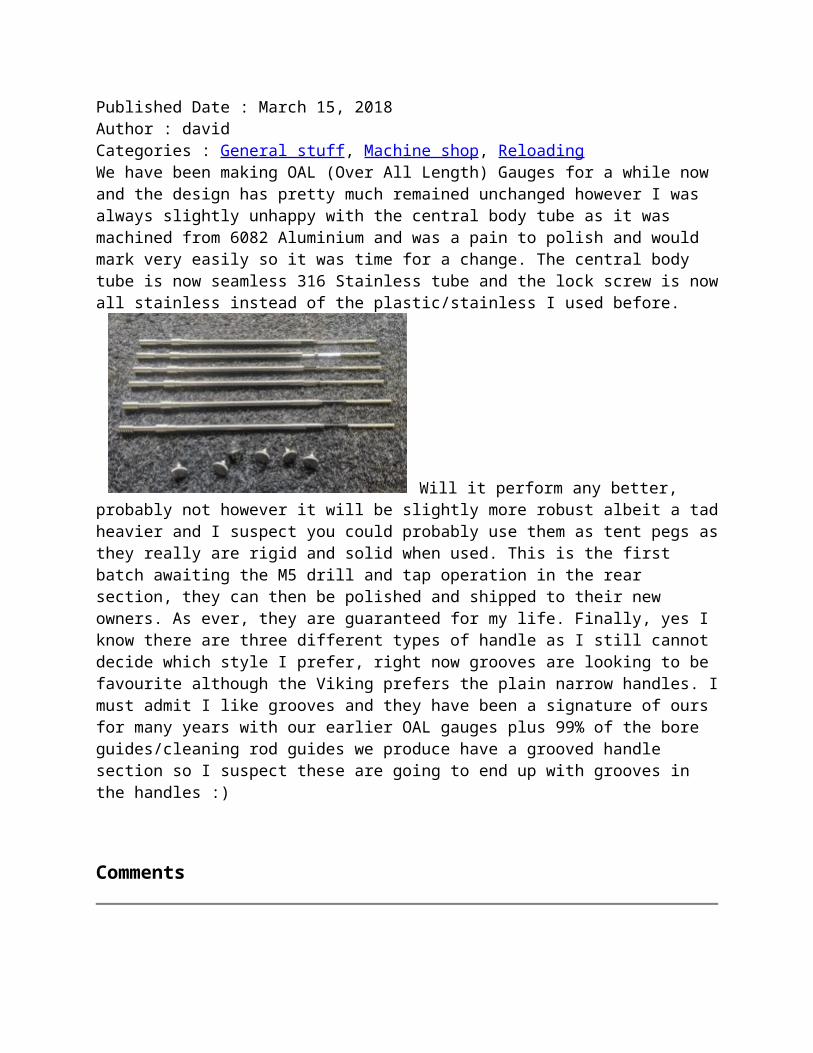
OAL Gauges Published Date : March 15, 2018Author : davidCategories : General stuff, Machine shop, ReloadingWe have been making OAL (Over All Length) Gauges for a while now and the design has pretty much remained unchanged however I was always slightly unhappy with the central body tube as it was machined from 6082 Aluminium and was a pain to polish and would mark very easily so it was time for a change. The central body tube is now seamless 316 Stainless tube and the lock screw is now all stainless instead of the plastic/stainless I used before.
Will it perform any better, probably not however it will be slightly more robust albeit a tad heavier and I suspect you could probably use them as tent pegs as they really are rigid and solid when used. This is the first batch awaiting the M5 drill and tap operation in the rear section, they can then be polished and shipped to their new owners. As ever, they are guaranteed for my life. Finally, yes I know there are three different types of handle as I still cannot decide which style I prefer, right now grooves are looking to be favourite although the Viking prefers the plain narrow handles. I must admit I like grooves and they have been a signature of ours for many years with our earlier OAL gauges plus 99% of the bore guides/cleaning rod guides we produce have a grooved handle section so I suspect these are going to end up with grooves in the handles :)
Comments
The Hushpower Mossberg 410 Pump Action Published Date : March 15, 2018Author : davidCategories : General stuff, ShotgunsBeing a bit of a fan of the Mossberg and sound moderators, I have been meaning to post a picture of one of these for a while so, when this one arrived this afternoon out came the camera, or more
accurately the iFone and here you go: This is a Mossberg 500 Pump that comes fitted with a 14" sound moderator which when used in conjunction with .410 subsonic cartridges makes for a remarkably quiet shotgun which means it is ideal for discreet vermin bashing. Chambered for anything up to 3" means it can be used for more meaningful applications if required and about the only thing I can say against it is it is quite long however this is as much down to it being a Pump Action as anything as the sound moderator only adds around 4" to the overall length and it starts off with a 24" barrel so truth be known it is probably not much longer that the modern 30" barrel .410 offerings. Plus side is .410 + Pump Action+ Sound Moderator + All weather stock so what is there not to like, in fact I
really should get myself one of these very soon :)
About the only thing I do to these is copper slip the rear threaded section to aid future removal of the outer sleeve, the baffle section is located at the front of the tube and cannot be removed however periodic removal of the outer sleeve and a good blast of WD40 or similar plus a shake to remove any loose debris is about all that is needed. Although not usually held in stock we can normally get these in within 48 hours if needed.
Comments
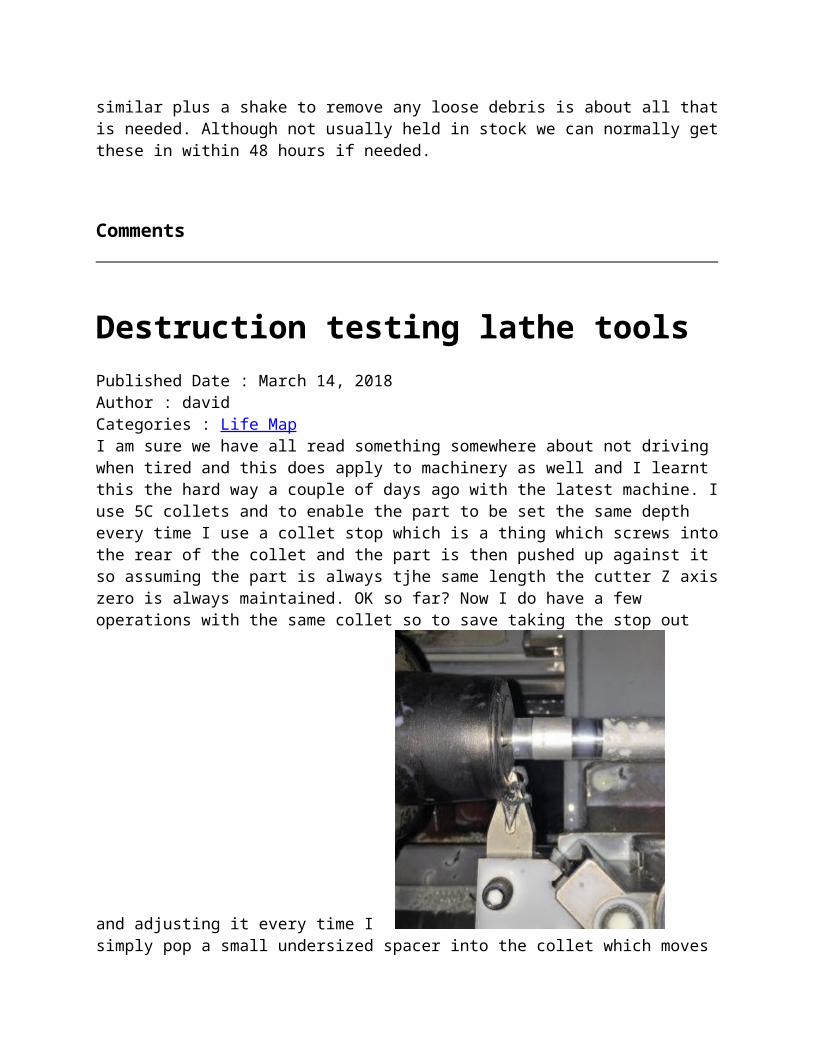
Destruction testing lathe tools Published Date : March 14, 2018Author : davidCategories : Life MapI am sure we have all read something somewhere about not driving when tired and this does apply to machinery as well and I learnt this the hard way a couple of days ago with the latest machine. I use 5C collets and to enable the part to be set the same depth every time I use a collet stop which is a thing which screws into the rear of the collet and the part is then pushed up against it so assuming the part is always tjhe same length the cutter Z axis zero is always maintained. OK so far? Now I do have a few operations with the same collet so to save taking

the stop out and adjusting it every time I simply pop a small undersized spacer into the collet which moves the stop datum out by 10,0mm which is simplicity itself until you set a 225,0mm cut on a piece of material which is now only sticking out by 220,0mm because the 10,0mm spacer has been omitted and the resulting crash when the brand new tool and insert crashes into the brand new micro adjust 5C collet chuck looks something like this. The replacement profiling tool has arrived and the spare should be here in the morning and I slackened the chuck from its backing plate and dialled everything back in this morning and everything is running correctly with TIR (Total Indicated Runout) being0,005mm ish so pretty good actually. I checked the tail stock alignment at the same time and it was spot-on so apart from having a now rather second hand nose to my collet chuck and being one tool down everything is good. Another lesson learned, pay attention to what you are doing late at night, or better still pack in for the day, after all the jobs and machine will still be there in the morning...
Comments
The things I do Published Date : March 10, 2018Author : davidCategories : General stuff, Life Map, Rifles, Shiny stuff, ShotgunsI have been finishing off 5P comparator sets today, this means they are bored and finished with just the polishing left for me to do which was this afternoon's task.

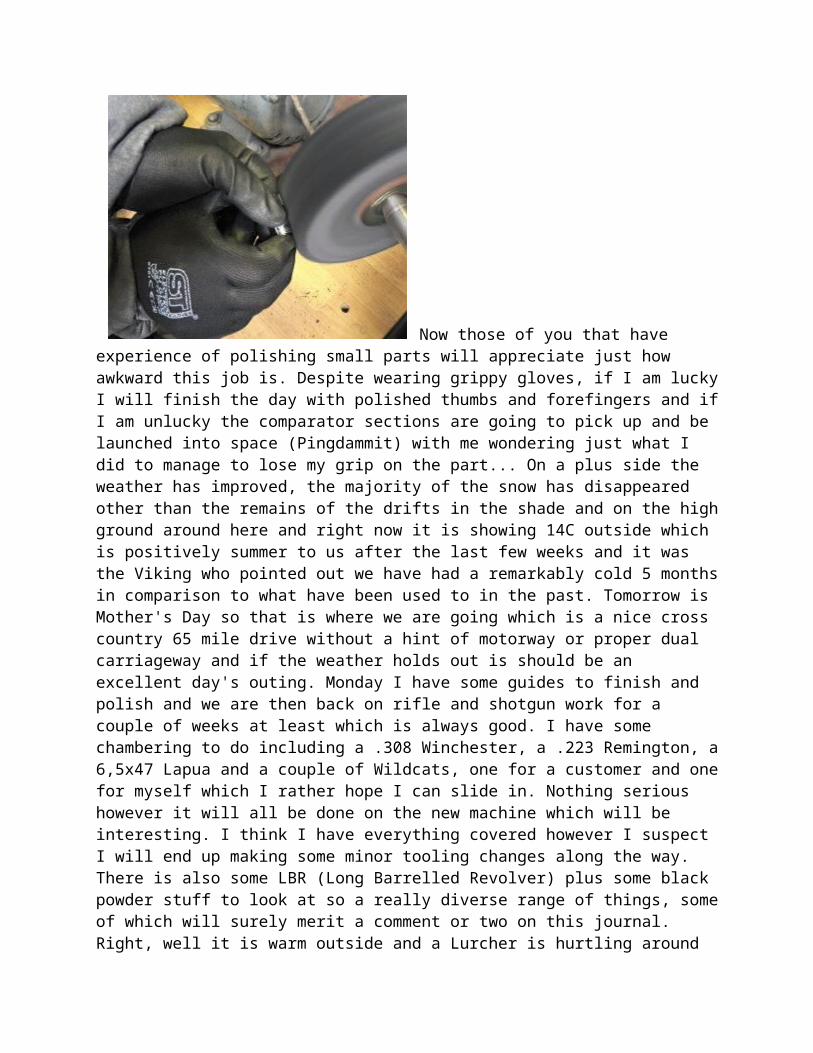
Now those of you that have experience of polishing small parts will appreciate just how awkward this job is. Despite wearing grippy gloves, if I am lucky I will finish the day with polished thumbs and forefingers and if I am unlucky the comparator sections are going to pick up and be launched into space (Pingdammit) with me wondering just what I did to manage to lose my grip on the part... On a plus side the weather has improved, the majority of the snow has disappeared other than the remains of the drifts in the shade and on the high ground around here and right now it is showing 14C outside which is positively summer to us after the last few weeks and it was the Viking who pointed out we have had a remarkably cold 5 months in comparison to what have been used to in the past. Tomorrow is Mother's Day so that is where we are going which is a nice cross country 65 mile drive without a hint of motorway or proper dual carriageway and if the weather holds out is should be an excellent day's outing. Monday I have some guides to finish and polish and we are then back on rifle and shotgun work for a couple of weeks at least which is always good. I have some chambering to do including a .308 Winchester, a .223 Remington, a 6,5x47 Lapua and a couple of Wildcats, one for a customer and one for myself which I rather hope I can slide in. Nothing serious however it will all be done on the new machine which will be interesting. I think I have everything covered however I suspect I will end up making some minor tooling changes along the way. There is also some LBR (Long Barrelled Revolver) plus some black powder stuff to look at so a really diverse range of things, some of which will surely merit a comment or two on this journal. Right, well it is warm outside and a Lurcher is hurtling around the gallery upstairs so it is probably time to get him out for some exercise along with the Labrador who has looked absolutely pathetic whenever I have walked past him which is his way of saying he wants to get out as well :)
Comments
The snow has gone and we are back on Track
Published Date : March 6, 2018Author : davidCategories : General stuffA quick update - The snow has cleared, the temperatures are back above zero and we are shipping again and dare I say getting on top of orders as well :) I have to admit we had a few cold days here with the village being cut off for a while so I for one am pleased to hopefully see the back of the snow for the next few months. Snow is great on Christmas cards, after that I tend to lose interest and much prefer hot sunny days instead. Back to the machines with an update to follow shortly.
Comments
Snow and deliveries Published Date : March 1, 2018Author : davidCategories : General stuff, Life MapThe snow has not stopped us working however it has stopped deliveries in and out and it looks like orders that were due to be shipped will be delayed by a couple of days or so, hopefully not more. The dogs look to be enjoying the snow regardless of everyone else which must be a good thing and I am really glad we picked up some supplies from Louth Tuesday as I suspect it would not be a fun journey right now with reports of snow drifting across roads on the high ground.
Comments
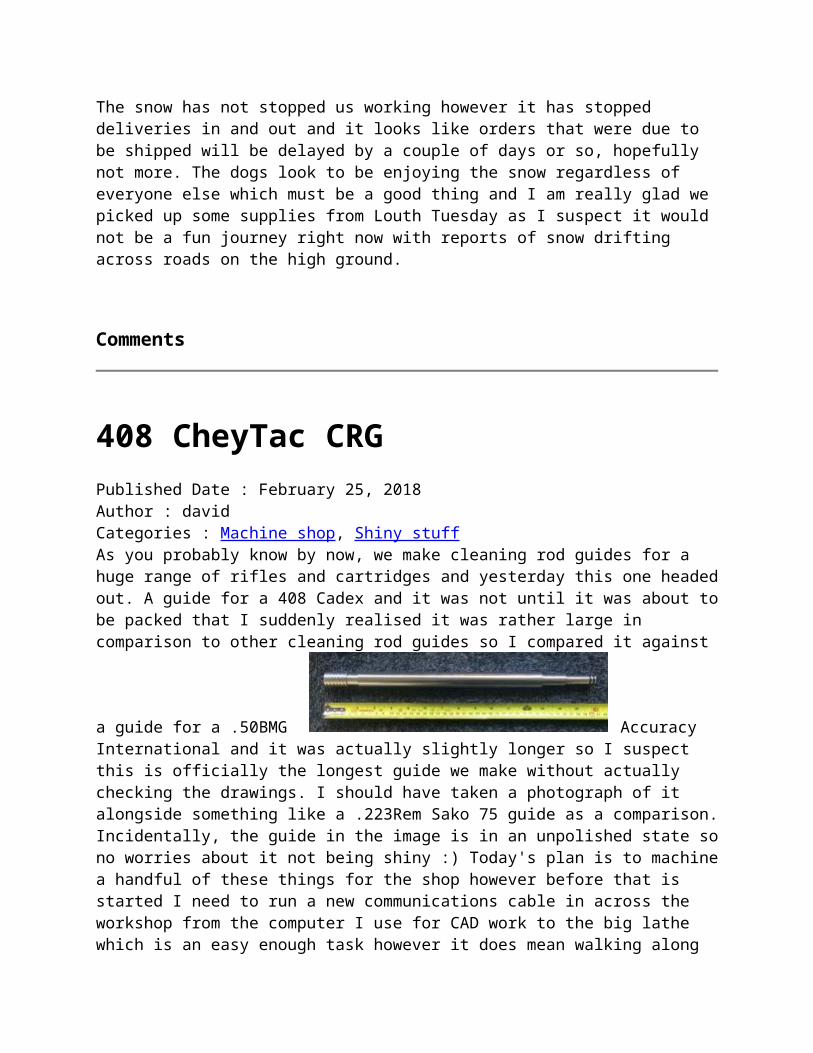
408 CheyTac CRG Published Date : February 25, 2018Author : davidCategories : Machine shop, Shiny stuffAs you probably know by now, we make cleaning rod guides for a huge range of rifles and cartridges and yesterday this one headed out. A guide for a 408 Cadex and it was not until it was about to be packed that I suddenly realised it was rather large in comparison to other cleaning rod guides so I compared it against a guide for a .50BMG

Accuracy International and it was actually slightly longer so I suspect this is officially the longest guide we make without actually checking the drawings. I should have taken a photograph of it alongside something like a .223Rem Sako 75 guide as a comparison. Incidentally, the guide in the image is in an unpolished state so no worries about it not being shiny :) Today's plan is to machine a handful of these things for the shop however before that is started I need to run a new communications cable in across the workshop from the computer I use for CAD work to the big lathe which is an easy enough task however it does mean walking along the top of a machine at one point as it is directly under the proposed cable route, followed by some careful soldering and testing before going live with the system. I had better make a start and on a plus side the workshop will be considerably warmer first thing in the morning now the builders have finished installing a load of insulation in the roof. There was nothing worse than being greeted by a inside temperature of 6C on a winter's morning, first thing today it was 12C without any heating despite the outside temperature hovering around zero C. Next week will be a good test as the weather forecast is not looking good with the outside temperature potentially dropping well below zero.
Comments
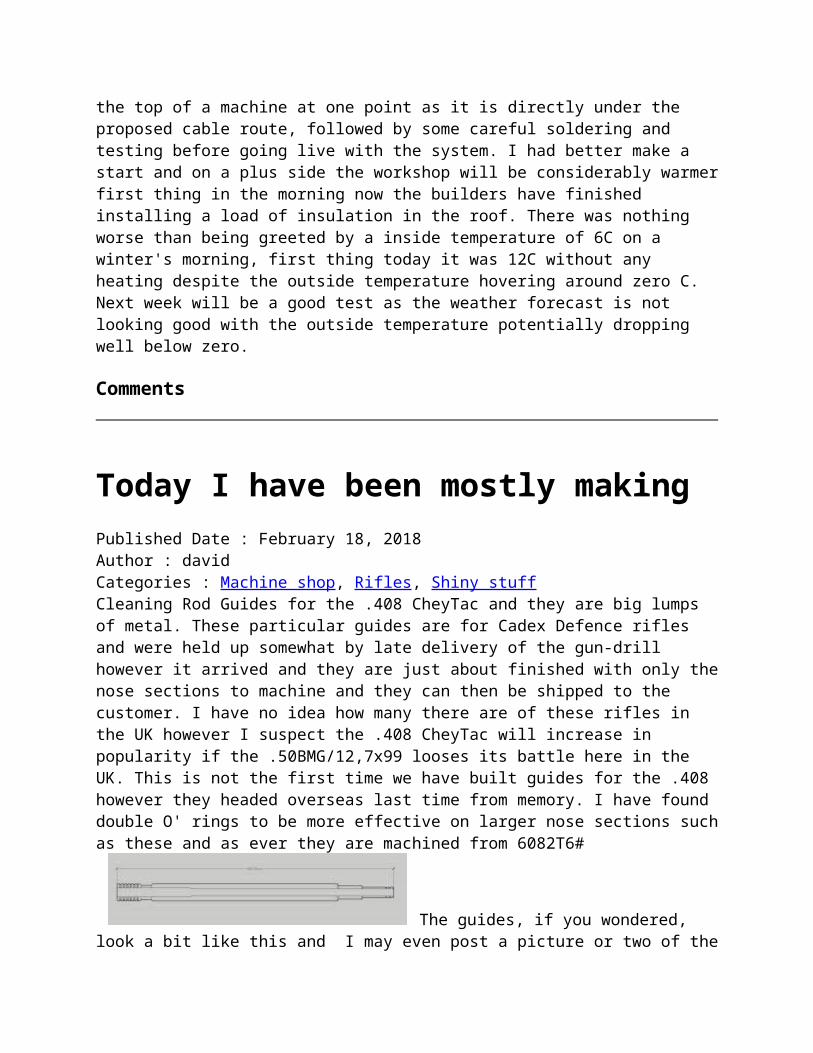
Today I have been mostly making Published Date : February 18, 2018Author : davidCategories : Machine shop, Rifles, Shiny stuffCleaning Rod Guides for the .408 CheyTac and they are big lumps of metal. These particular guides are for Cadex Defence rifles and were held up somewhat by late delivery of the gun-drill however it arrived and they are just about finished with only the nose sections to machine and they can then be shipped to the customer. I have no idea how many there are of these rifles in the UK however I suspect the .408 CheyTac will increase in popularity if the .50BMG/12,7x99 looses its battle here in the UK. This is not the first time we have built guides for the .408 however they headed overseas last time from memory. I have found double O' rings to be more effective on larger nose sections such as these and as ever they are machined from 6082T6#
The guides, if you wondered, look a bit like this and I may even post a picture or two of the finished articles once they have been grooved and polished. I was even tempted to have them anodised however it adds time to the job and serves very little purpose other than making them a different colour. The Labrador and I are just back from a very brisk and rather hilly hour or so walk, it took him a couple of minutes to realise
the Viking and Lurcher were heading in the opposite direction however this usually means we move more quickly so he did not seem unduly concerned and he soon got his head down and walked on point some 5m ahead of me scanning the hedgerows which is normal for him unless called to heel. We also managed to get the polishing station moved and bolted down in its new location today, modified a material rack and moved a free standing vice and again bolted it down so all in all a productive week's work has been completed and we are ready to get back on the machines in the morning although I do have a couple of interesting gun jobs to look at this coming week which is always fun.
Comments
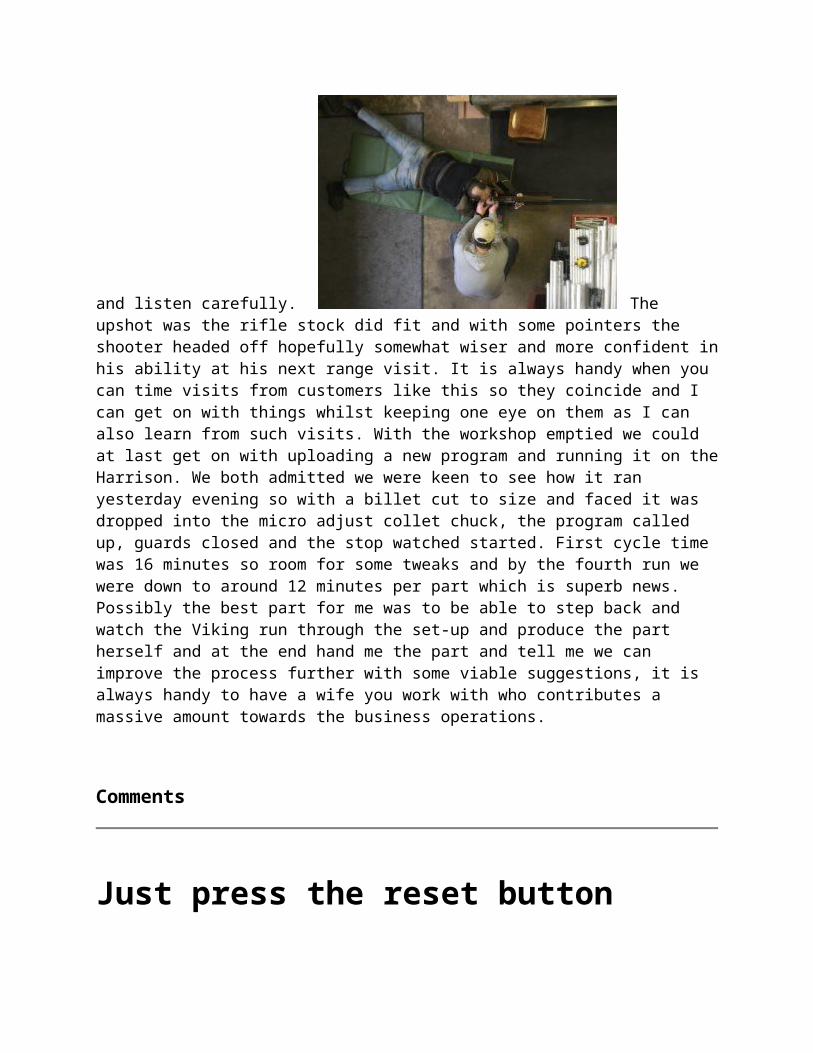
Training and machining Published Date : February 17, 2018Author : davidCategories : Machine shopWe had another interesting day with a steady stream of visitors including an ex County Shooter small bore shooter and instructor and a small bore shooter with rifle fit and positional concerns, well that is an easy fix, put them together, get the kettle on and listen carefully.
The upshot was the rifle stock did fit and with some pointers the shooter headed off hopefully somewhat wiser and more confident in his ability at his next range visit. It is always handy when you can time visits from customers like this so they coincide and I can get on with things whilst keeping one eye on them as I can also learn from such visits. With the workshop emptied we could at last get on with uploading a new program and running it on the Harrison. We both admitted we were keen to see how it ran yesterday evening so with a billet cut to size and faced it was dropped into the micro adjust collet chuck, the program called up, guards closed and the stop watched started. First cycle time was 16 minutes so room for some tweaks and by the fourth run we were down to around 12 minutes per part which is superb news. Possibly the best part for me was to be able to step back and watch the Viking run through the set-up and produce the part herself and at the end hand me the part

and tell me we can improve the process further with some viable suggestions, it is always handy to have a wife you work with who contributes a massive amount towards the business operations.
Comments
Just press the reset button Published Date : February 17, 2018Author : davidCategories : General stuff, Life Map, Machine shopI managed to confuse one of our machines the other day and I found it was a remarkably simple process in that I just dumped the wrong type of file to it. I had a feeling something was wrong as *.Prg type files usually go up in a matter of seconds and this particular upload took a few minutes and stalled at 93% so eventually I cancelled the upload as it was going nowhere. At this point it is worth explaining what I am actually uploading. I draw the item I am to machine with a CAD package, in fact I only draw the profile split along the horizontal axis as that is all that is needed. I then save the drawing as a *.Dxf file and import it into the CAM package I use. Select the billet size and tool or tools required. Set the roughing cycle and finish cycles with feeds and speeds and depth of cuts and finally it is saved and a machine cycle generated and uploaded to the lathe. I save the file initially as a CAM file however the upload to the lathe must be as a PRG and this is where I had gone wrong as I sent the CAM file instead.. Anyway back to the problem, I restarted everything and up came an error on the Fanuc control I have not come across before and was not listed in the manuals (Yes I do read them from time to time!) So I rang the support techs at the machine manufacturers who referred me to the application team who in turn came up with a solution which was all well and good. Basically I had probably filled the memory up with the wrong file type and it needed resetting. Great I thought, where was the reset button? Ah, here lies the problem, these machines don't actually have a reset button for what I had managed to do, instead I needed a reset file (Macro.mop) to upload. That will be GBP120.00 + VAT please sir. Humph, I was not impressed, I know it was my fault however a reset button would have saved me loosing a couple of days work and I doubt I am the first to do this... No matter as it is back up and working and I have the file available for next time should I manage to mess things up again. What did annoy me is the instructions were incomplete and it took the Viking to realise where we were going wrong and get things back on track. I have learnt to pay attention if she is at the control panel as she has a very good understanding of the machine operation and process. In fact it is her who sources just about everything for it and helps me with the programming, about all I do is run the thing and even then it is often under her watchful eye. I doubt either of us ever thought she would take such a keen interest in CNC machinery. Spring is on its way, well I think it is. It is definitely starting to warm up outside and the days are getting warmer with fields taking on a distinct green sheen as new shoots continue to grow.
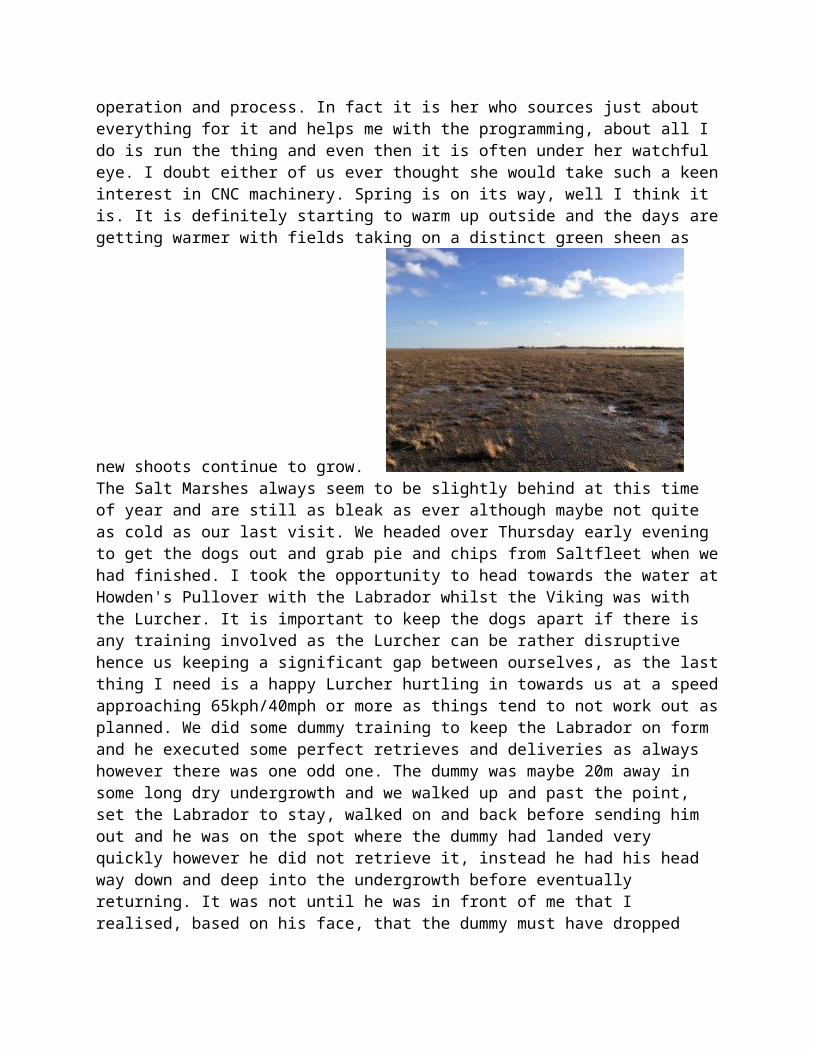
The Salt Marshes always seem to be slightly behind at this time of year and are still as bleak as ever although maybe not quite as cold as our last visit. We headed over Thursday early evening to get the dogs out and grab pie and chips from Saltfleet when we had finished. I took the opportunity to head towards the water at Howden's Pullover with the Labrador whilst the Viking was with the Lurcher. It is important to keep the dogs apart if there is any training involved as the Lurcher can be rather disruptive hence us keeping a significant gap between ourselves, as the last thing I need is a happy Lurcher hurtling in towards us at a speed approaching 65kph/40mph or more as things tend to not work out as planned. We did some dummy training to keep the Labrador on form and he executed some perfect retrieves and deliveries as always however there was one odd one. The dummy was maybe 20m away in some long dry undergrowth and we walked up and past the point, set the Labrador to stay, walked on and back before sending him out and he was on the spot where the dummy had landed very quickly however he did not retrieve it, instead he had his head way down and deep into the undergrowth before eventually returning. It was not until he was in front of me that I realised, based on his face, that the dummy must have dropped into a hidden muddy
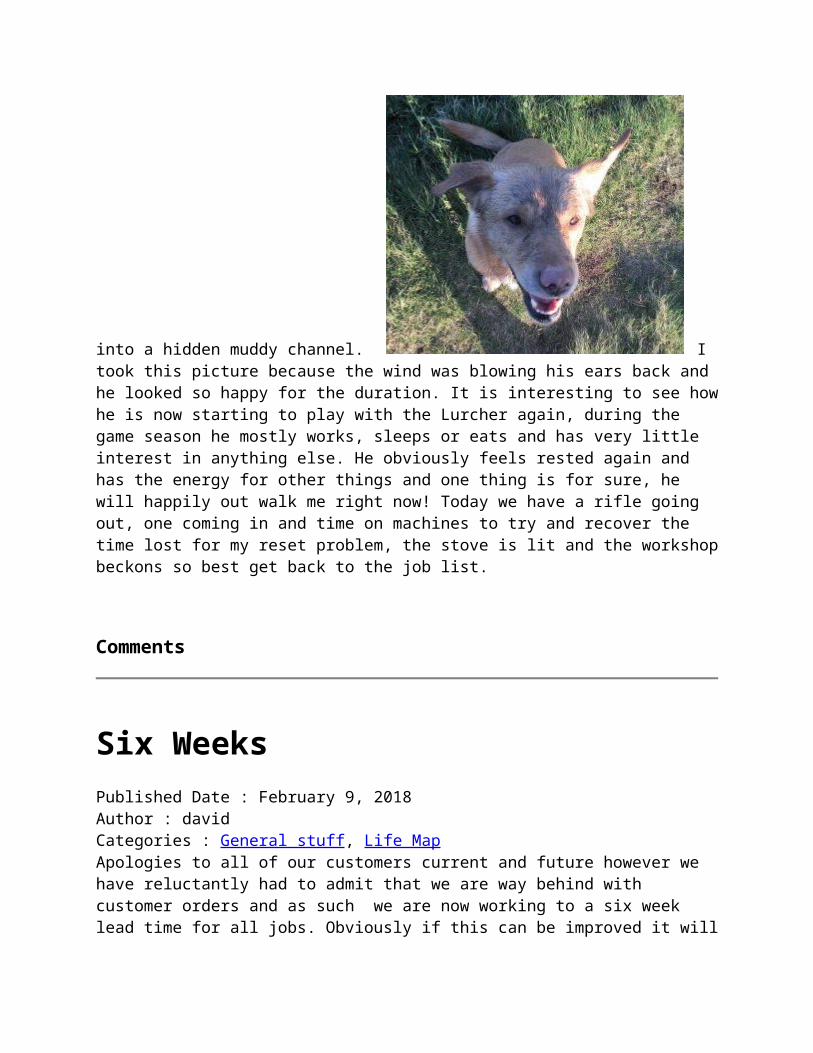
channel. I took this picture because the wind was blowing his ears back and he looked so happy for the duration. It is interesting to see how he is now starting to play with the Lurcher again, during the game season he mostly works, sleeps or eats and has very little interest in anything else. He obviously feels rested again and has the energy for other things and one thing is for sure, he will happily out walk me right now! Today we have a rifle going out, one coming in and time on machines to try and recover the time lost for my reset problem, the stove is lit and the workshop beckons so best get back to the job list.

Comments
Six Weeks Published Date : February 9, 2018Author : davidCategories : General stuff, Life MapApologies to all of our customers current and future however we have reluctantly had to admit that we are way behind with customer orders and as such we are now working to a six week lead time for all jobs. Obviously if this can be improved it will be and it certainly is not a permanent thing, we will just keep our heads down and continue to get things out as quickly as possible and hopefully get things back to a reasonable delivery time ASAP.
Comments
The FN Trombone Published Date : February 8, 2018Author : davidCategories : General stuff, RiflesI am a bit of a fan of Fabrique Nationale produced rifles so when a little Browning Pump action popped up I thought it would be worth a closer look especially
as it ticked all of the boxes; it is a John Moses Browning design, FN produced and a take down rifle, add to that it is a .22 Rim-fire and in rather nice condition and what is there not to like? These little rifles were designed by Browning in 1919 and first produced in 1922 and production ceased in 1974, during this period a very modest 150,000 were produced. To put this into perspective around 500,000 SA-22 FN Browning Semi-automatic .22 Rimfire have been produced since 1914 however production was shifted from Herstal to Japan in the 1970s whereas production of the Trombone just stopped in the 1970s. Being described as a take-down means the rifle has to be capable of being
disassembled without hand tools and this is easily undertaken by unscrewing the captive thumb screw on the right rear of the receiver. Give this a few turns and a tug and the rifle breaks into two handy sized pieces ready for storage or, erm... well whatever you want to do with it when it is in bits. From memory the tubular magazine holds 10-12 rounds of rim-fire ammunition dependant on what you load it with and the barrel is stamped .22L however a .22LR round chambers perfectly and the bolt can be closed on a .22LR head space gauge. I have read in the past that FN stamped .22LR chambers as .22L however I have never confirmed this so this rifle might just be the proof required. Luckily I have .22L and .22LR here if needed. There is, of course, a difference between the .22L and .22LR dimensionally with the .22L being some 2,8mm shorter than the .22LR which is 25,4mm in length (ish) there are also differences in projectile weight and velocities just to confuse matters
further. This particular rifle looks to have been produced around 1966-68 and is in remarkable condition with a crisp bright varnish over blonde wood with the bluing in excellent condition. This rifle also has grooves in the receiver so a period 'scope could easily be attached. Operation is quite slick and I have no doubt that it will be huge fun to shoot when we head down the range next.
Comments
Lincoln Ejectors Published Date : February 7, 2018Author : davidCategories : ShotgunsAs I recently wrote about shotgun ejectors and have just had a Lincoln in bits I thought it was worth adding a couple of pictures for those of you that would like to give you ejectors a proper
clean. This is the ejector in place, the vertical section in the centre of the image is the bit that holds the ejector in place and is secured by that
small screw near the bottom. Slacken the screw off and slide the plate down whilst keeping some pressure on the ejector and you can now allow the ejector to release, do remember there is a spring and plunger behind each ejector so some opportunities to see parts flying off if not kept in check. Once removed give everything a good clean, I use Acetone and cotton buds, lubricate the moving parts and reverse the procedure
and the job is done. This is the Lincoln opened up and yes it does look like a Sidelock externally however it is just a Boxlock when you look closely. To drop the action out from the butt remove the butt pad, remove the long screw which requires a 10mm socket and long extension, now remove the rearmost screw from the side plates and give the butt a tug and it should come away without any issues. The side plates are held in place by a couple more screws on each side. It is bitterly cold in the workshop this morning, I managed to break the glass on the stove first thing Monday morning, ordered a replacement which arrived and was incorrect, so now a template has been sent to a glass cutter and I doubt we

will see anything before next week and the stove really does not perform well without the glass in the door so right now we are working in 6C which is not great. Roll on Spring :)
Comments
Lanber Ejectors and Pingdammits Published Date : February 1, 2018Author : davidCategories : General stuff, ShotgunsI am still avoiding machinery however we still have guns to work on and first job today is to remove some stuck choke tubes from a Lanber 12 Bore O/U shotgun and give it a good service. Normally I would not comment further on stuck choke tubes however this is the third time this week I have had to perform such a task which would suggest some basic gun care is being over looked by some of my fellow shooters. So my words of wisdom on the matter are very simple: Remove and clean your choke tubes after every outing and that includes the male and female threads and re-assemble them with a good anti seize compound or a light wipe of oil. You do not need to crank a choke tube up RFT (Really Flipping tight) I screw the choke tubes in by hand and use the pad of my thumb to tighten them and that is enough to hold them in place. Remember, if they are well and truly stuck there is a good chance they will be damaged during the removal process so you will be paying for the removal of the chokes plus some replacements, so it has got to be cheaper to remove and clean them after you have been shooting, surely? Onto Lanber shotgun ejectors, ever so easy to remove and you do need to remove them from time to time as the springs and plungers rust however a careful clean and lubricate and you are invariably good to go, and it is well worth paying attention to such tasks as Lanber shotguns are no longer available here in the UK and as such spares are becoming
increasingly difficult to source. The removal process is as follows: Compress the ejector slightly to take weight off the ejector trip. Place a
suitably sized pin punch into the hole identified in this image and push and you will feel a small spring plunger compress slightly. Now slide the ejector trip down to clear the plunger and the ejector can be removed. Now, if you were careful whilst sliding the trip down the spring and plunger has remained captive, if however you paid slightly less attention than you should have done you have just launched a very small Pingdammit across the workshop and it is going to be interesting trying to source a replacement. Hopefully you have read this to the end before starting the job... Next on the list was a Bettinsoli shotgun that required new ejectors and a service. Ejectors seldom come with the rims cut and the cutter I had was hopeless so I contacted Dr Kolby at Border Ballistics Technologies and a couple of weeks later a rim cutter arrived. As it was to be used today I needed a T handle holder and had nothing suitable available so I grabbed a suitable piece of stainless and headed to the lathe.
It machined OK however when I drilled the pilots I noticed it was a tad tough and it was when it went into the mill to drill the hole for the T Handle that I realised I had just grabbed what was probably the toughest bit of stainless in the workshop and had to resort to a carbide cutter for that T Handle hole. No matter, with the handle completed the work could be done and I must say I am impressed, there was a tiny bit of chatter to start with however once the rim cut had been established the process went remarkably smoothly and the work is finished and ready for a test firing in the morning. I really should have taken a picture before it went back into the armoury.
Comments
Time off Published Date : January 31, 2018Author : davidCategories : Life Map

We have both been battling dreadful coughs and colds these last few days and have decided to put everything on hold until we both feel a bit better so no more machining for the next few days. It does seem a bit extreme however I find myself not just making but repeating mistakes on set-up which at best will cost time and materials and at worst possibly a broken finger or two (I have done it before!) It really is not worth the risk, so I will restrict myself to paperwork and outstanding design work and programming until I feel a bit better. We are both sorry about this and if you have an order with us we will get to it as quickly as possible so please bear with us.
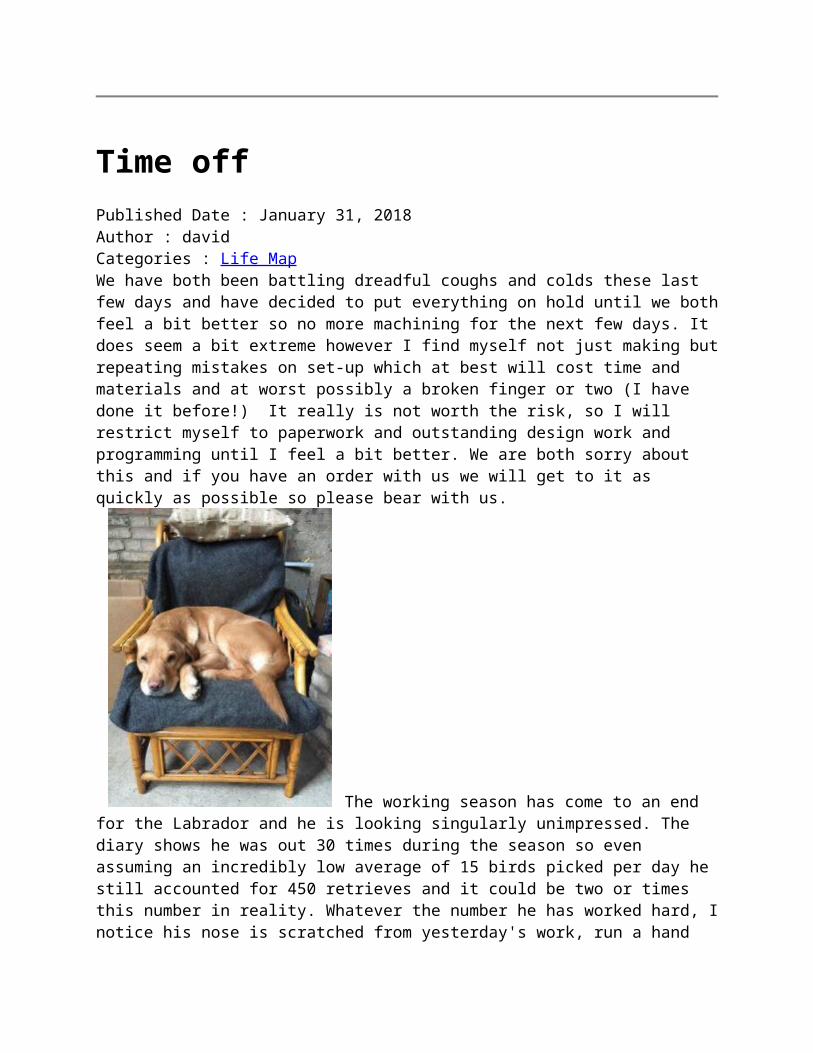
The working season has come to an end for the Labrador and he is looking singularly unimpressed. The diary shows he was out 30 times during the season so even assuming an incredibly low average of 15 birds picked per day he still accounted for 450 retrieves and it could be two or times this number in reality. Whatever the number he has worked hard, I notice his nose is scratched from yesterday's work, run a hand over him and you will feel tiny marks, check the undersides of his ears and scratches are visible. The damage to his Carpal pad is just about healed now and I notice he is is not launching himself off the raised plinth in the workshop any more so he can feel the season's work as well. He is carrying very little body fat and is displaying superb tone and form. He went on the scales this morning and is at 28,8Kgs so I would say he is at his peak right now. A good dog. Right, I am back to paperwork :)
Comments
An update on the FELWG Minutes archive Published Date : January 29, 2018Author : davidCategories : FELWG, Life MapAfter a long wait I have added the minutes to the September 2017 FELWG meeting and many thanks to David Ellison for pointing me in the right direction. I still seem to be either missing a
significant quantity of minutes or the group did not sit for 12 months so if anyone can point me to the missing bits or even suggest a search string that allows me to find them I would be eternally grateful. EDIT on this - I have just located and added FELWG minutes for December 2016 and April 2017 so I may well be up to date on this however if you know different.... In other news yes, I know I am quiet however I am battling a dreadful cough and cold which has left me flattened, indeed I am yet to haul the Westley Richards out so things must be bad and I genuinely cannot remember when I last felt this grim. On a vaguely plus side the Viking ordered me a bottle of Highland Parks Viking Honour which although not a cure for a cold should make it more bearable although personally I would happily swap the single malt for not having to wake up coughing at 02:00 and 03:00 and so on...
Comments
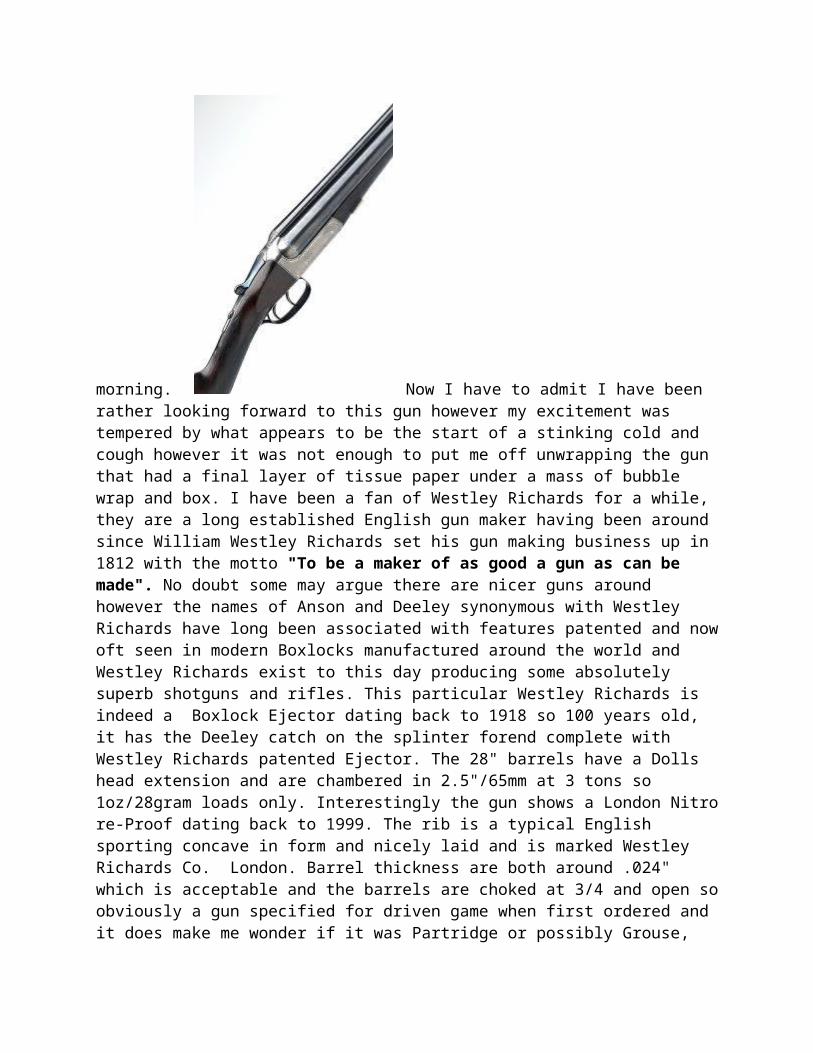
You know what you can do with that Pheasant Published Date : January 23, 2018Author : davidCategories : General stuffIt is nearing the end of the season and I guess we are all a bit tired with our Labrador being no exception. Last drive yesterday his handler sent him off to find birds, he ambled a few paces then came back and sat down and that was as far as he was concerned the end of the day as far as to picking Pheasants. Apparently he spent the last few minutes walking obediently at his side and no amount of encouragement would get him to go out. Interestingly he did this to me a couple of weekends ago, I was convinced I had dropped a Partridge, he however decided I had not and so did the additional pair of dogs with us, sometimes dogs just seem to know better. I have shot Pigeons before and he has remained unconvinced, equally I have missed shots before and he has headed out and retrieved the bird I was sure I had missed. As I said, it has been a busy season for all of us, he has been out on numerous occasions and I have lost count of how many shotguns have come in requiring immediate repairs or servicing. I seem to have my hands on a few English shotguns recently and this had me thinking, I have English rifles but not an English shotgun to my name so I decided to have a hunt around and was vaguely considering Webley & Scott Boxlocks when I happened upon a D Serial # Westley Richards and after an interesting 'phone call and a bit of a chat a deal was struck and it arrived this morning.
Now I have to admit I have been rather looking forward to this gun however my excitement was tempered by what appears to be the start of a stinking cold and cough however it was not enough to put me off unwrapping the gun that had a final layer of tissue paper under a mass of bubble wrap and box. I have been a fan of Westley Richards for a while, they are a long established English gun maker having been around since William Westley Richards set his gun making business up in 1812 with the motto "To be a maker of as good a gun as can be made". No doubt some may argue there are nicer guns around however the names of Anson and Deeley synonymous with Westley Richards have long been associated with features patented and now oft seen in modern Boxlocks manufactured around the world and Westley Richards exist to this day producing some absolutely superb shotguns and rifles. This particular Westley Richards is indeed a Boxlock Ejector dating back to 1918 so 100 years old, it has the Deeley catch on the splinter forend complete with Westley Richards patented Ejector. The 28" barrels have a Dolls head extension and are chambered in 2.5"/65mm at 3 tons so 1oz/28gram loads only. Interestingly the gun shows a London Nitro re-Proof dating back to 1999. The rib is a typical English sporting concave in form and nicely laid and is marked Westley Richards Co. London. Barrel thickness are both around .024" which is acceptable and the barrels are choked at 3/4 and open so obviously a gun specified for driven game when first ordered and it does make me wonder if it was Partridge or possibly Grouse, despite the names on the rib this is a fairly basic model however it could have been either.
The stock is English Walnut and is quite pleasantly figured although the forend and straight hand grip are both quite dark. Fit for me is

actually quite good, there is a slight cast to the stock however it measures to 15" Length of pull with a red butt pad and interestingly without extension as is so often seen on guns of this age. It comes up well for me and already seems to be a reasonable fit so now I need to get it out and shoot it to confirm just how it really stacks up. I have a slab of Eley Impax here which should get the job done. There are a few items I am not so happy with, some of the screws have been re-blued and now have a typical modern hot salt electric blue finish which although contrasting is just wrong so they will be stripped and blacked. The top lever has also been blued and really does not match anything else so again it will have to be blacked. The lever is also moving up and down a bit which needs addressing, a new screw would do this however I will probably opt for shimming the screw head base first to confirm this theory. Also the trigger pulls are heavier than I would expect so I will measure them and take a view once I have the numbers in front of me. I would have expected around 4lbs for the front trigger and maybe 4.6lbs for the rear so they end up feeling similar and these feel to be closer to 5.5lbs front and more for the rear. I also note the chequering has been sharpened up at some point around the wrist and has been run over, I may just leave it as it is as it is now part of the gun's history. So there you are, a 100 year old English Boxlock from an English gun maker and I have already added it to my Shotgun Certificate so it looks to be a keeper for the immediate future. I know I will have fun tidying up the bits I have identified and it has already benefited from a good external clean and a first coat of Red Oil to put some depth back into the wood. Tomorrow is a 'No-Gun' day, I have so much machining to get on with and the Viking will be hopping up and down soon if I do not give some parts for shipping so I will have to be content with an occasional coat of oil being the only interaction the Westley Richards and I will have until Friday. Assuming I don't dream about it.... :)
Comments
Non select single triggers Published Date : January 17, 2018Author : davidCategories : ShotgunsA new reamer arrived from BBT (http://www.bbt.scot/) yesterday. I have some new ejectors to
fit in an over and under 12 Bore shotgun and ejectors often come without the cartridge rim cut-out so time for a new reamer and who else to speak to than Border Ballistic Technology as they are UK based and they always supply a quality

product in a timely manner. On this occasion I contacted Dr Geoffrey Kolbe of BBT and explained what I needed and he said he would have a think about the design and get it sorted and this is what it looks like. I do like the BBT take on the design and look forward to using it later this week. BBT say the following:
The problems with rim cutters for chambers like the 12 bore is firstly to ensure the cutter stays centred and concentric to the chamber, secondly that the cutter is well supported and thirdly that it does not chatter. Offerings by other reamer manufacturers do not seem to satisfy these requirements well, so we have developed this rim cutter, seen above. 12 bore rim cutter detail The rim cutter is supported by the pilot which locates in the bore at the front. There is a sliding tapered cylinder which sits in the back of the chamber, so the cutter well supported and yet able to slide freely on the cutting axis. The tolerance and concentricity of the pilot and sliding tapered cylinder ensure the cutter is very well centred to the chamber.
We see a lot of sporting guns at this time of year and as the season progresses things come in showing signs of wear and tear, mainsprings fail, firing pins burn, safeties fall apart and things
generally start to rattle loose. With a fortnight left in the season a non select single trigger shotgun arrived. It was failing to fire the second barrel so time for a complete strip and inspect and here is a rather poor image of the trigger assembly partly stripped down on the bench. This particular shotgun is probably around 100 years old and caused some head scratching before I identified the issue and I can say with some conviction that I am now intimately acquainted with such triggers. The gun was serviced at the same time and I took it out for a test firing yesterday and everything looks good so the gun can be collected by its owner for another days shooting. Today I really hope I can get back on machining, with only two of us in the workshop it is so easy for one side of the business to slip and right now I have both gun work and machining to get on with if we are too keep customers smiling. Snow outside and 6C in the workshop suggests Winter has not left the Wolds quite yet which is probably why I am so looking forward to my next cup of coffee :)
Comments
Two and a half years later Published Date : January 14, 2018Author : david

Categories : Life Map, RiflesWe moved to the Lincolnshire Wolds just over two and a half years ago after 15 years in a Bedfordshire village which of course means 15 years worth of stuff to pack and move. For the most it all went well and we now have a significantly larger workshop in a far nicer part of the country, however I have always wondered what happened to my RCBS hand priming tools. I knew they had been packed so they must have come here however they failed to surface which infuriated me as I had spent some time tuning them to give a better feel, removed the sharp edges and generally made them mine so there was no way I was just going to head out and buy some more especially given the replacement cost, even if you can buy this style here in the UK these days. So I decided to go for an interim replacement until they were found. First option was the Lyman E-ZEE Prime which in my eyes is a simply dreadful device and it was soon relegated to a shelf and replaced with a Forster Bench Coax Priming Tool which allows me to change cartridges and primer sizes fairly quickly. The Forster is certainly a good tool however it is quite fiddly to load primers to and I was still yearning for my RCBS primer tools however by this time I was beginning to suspect they had been binned along with some wrapping or packing boxes or similar even though the Viking and I are very careful about such things. This morning I headed down to the workshop to prepare for Monday as I have four rush gun smithing jobs to get out (More on these at a later date as they are all interesting and fairly unusual)
It was at this point that I heard an exclamation from the Viking, she was unpacking/unwrapping some items from the cottage living room (Yes 2.5 years later) and guess what she had found. Now I have to ask myself how they managed to end up in a box of ornaments from the living room and I can only assume I came in with them from the Shed and asked her to pack them somewhere safe. I still have all of the primer trays neatly labelled and stored in a drawer in the armoury as I was always convinced the tools would turn up, eventually. So, anyone need a Forster bench primer system? :) Yesterday I was out with the Labrador on a Beaters' day which means we get to shoot and the guns beat for us and it was

an absolutely brilliant day. The Labrador looks happy even though I did not give him a great deal to pick up. No matter as I now have two brace of Pheasants hanging up and I am looking forward to eating them at a later date. This season is nearly over now, the Labrador only has a few more working days and then he is finished until the coming season however we do have some Pigeons to deal with if the rape in this image is anything to go on, so some more picking up for him and some more food for the freezer which is always good as I do like Pigeon. I have never been happy with the rings fitted to my Model 1930 FN Mauser so I ordered a set of High Turret rings over the Christmas break and
they arrived yesterday. I deliberately chose the screwed two piece type rings as opposed to the original solder ring type as it is important to me that this rifle is not misrepresented in any way. The 'scope is a rather battered/well used 6x45 Pecar Champion that was given to me a while ago, I do like the Champion as the 4 way Heavy Duplex style reticle is always centred in the image and you have the advantage of superb glass and an interchangeable reticle system. I hope this will be a good combination of 'scope and rifle for shorter distances. I do have a Kar98K stock that the barrelled action could be dropped into and I always liked the Kar98K stock aesthetically, it has the turned down bolt cut-out and I find it to be very comfortable to shoot however I am slightly uncomfortable about making such a change plus it is nigh on identical to the model 1930 fit wise. It will be an 'On the day' decision as the rifle has got to come apart to allow me to fit the receiver in my fixture to ensure the 'scope brackets are correctly aligned. Right now the new rings are the biggest investment in this project and even then the whole thing including the superb Model 22 trigger complete with prototype hanger very kindly donated by Robert Chombart has still come to significantly less than GBP200.00 according to my reckoning. Odd how I seem to get so much pleasure from Pre-45 Action rifles these days as opposed to the more sanitised modern offerings with the guaranteed of sub MOA performance without effort. Col. Townsend Whelen is quoted as saying 'Only accurate rifles are interesting' and I could certainly not disagree however these older rifle offer a fascinating insight into a sometimes forgotten era of shooting that we owe a great deal to.
Comments

Video - Screwcutting COAL gauge tubes Published Date : January 8, 2018Author : davidCategories : General stuff, Machine shop, Shiny stuffI seldom post videos unless I think it is something interesting however I was machining the centre tubes for our COAL gauges today and decided to video the screw cutting cycle as the thread is fine at 8X0,75mm and the machine was running at 1000 Revolutions/minute. OK so that was the plan, run a cycle and video it, however running coolant would mean the guards had to be closed and filming through a screen would mostly reveal coolant splashing in all directions so I opted to give the part a squirt of oil and run it and that was a bit of a problem in that you can clearly hear it sounding slightly rough towards the end of the cycle, the good news is the part was OK and the cutter still seems happy. Anyway, the technical bit: Machine: Harrison 400T teach CNC centre lathe Spindle speed: 1000 RPM No of passes: 15 + 2 spring passes Thread: 8x0,75mm Class 3A Material: 316 Seamless thick wall stainless tube Cycle time: Around 42 seconds Operator: Me of course although the Viking did wander over to see what I was doing which is handy as she should really be running this sort of job. https://youtu.be/79QOFMHU2-A Yes I know the tool is sticking out a fair bit however it is normally used for a different threading job with the tail stock in place hence the need to hang it out a bit more than normal.
Comments
David I started off screwcutting with a manual lathe and screwcutting with a Teach-CNC is not so different in that you still have to set your X axis (Diameter) Then length of thread (-Z Axis) finally you set the upper and lower limits of the thread diameter and the number of passes so everything you would do if planning a new thread with a manual. The difference is the machine stops and withdraws the cutter at the end of each pass and it does it a lot quicker than I can which means I can screwcut at speeds that actually allow the carbide insert to work efficiently. Regardless of type of machine an understanding of threads and thread classes is still essential as is a means of checking the final form. /dAlpha1 We tend to use a myford ML10 for screw cutting jobs. CNC would be a bonus.Alpha1 I would love a CNC lathe.
303 Case Head Separation - A bit more Published Date : January 8, 2018Author : davidCategories : Reloading, Rifles

Following on from my previous post regarding fire forming .303 brass (First shot) with an O'Ring seated tight to the cartridge rim, this image shows from top to bottom:
No1 New and unfired .303 brass. No2 Once fired with O'Ring .303 brass. No3 Once fired without O'Ring .303 brass. No4 Shows what can eventually happen as the case is repeatedly stretched and full length re-sized between shots. No2 has been shot once and the overall length is now +.009"/0,02mm to factory length which gives an indication of how far the shoulder and neck has moved forward.
No3 is from a P14 with a reasonable chamber however after just one shot you can see indication of stretching as a shiny section just in front of the rim. The actual case length is now +.007.5"/0,02mm so shorter than that fired in the Lee Speed. The difference in shoulder profiles is interesting, No2 being a commercial BSA Lee Speed probably built around 1900 and No3 being a Remington built P14 from around 1917 so it is worth remembering not all rifle chambers are equal and especially not the .303 service rifles from the first quarter of the last century No4 is from a 1915 BSA No1 Mk3* that was well past its sell by date and sadly had to be retired for a number of reasons.
Comments
The 303 and 'O'Rings Published Date : January 6, 2018Author : davidCategories : Reloading, RiflesIf you shoot and reload for a .303 chambered rifle you probably know all about case head separation. This is where the case stretches and thins just in front of the rim and eventually fails leaving a cartridge case minus the rim stuck in the chamber. The good news is the remains of the
case is usually easily removed, either with a phosphor bronze brush or a broken case extractor. I have used both methods in the past however if you can avoid the issue in the first place life is a lot easier. Today was a bit of change of plan and saw us at the range complete with the Lurcher at midday, the Labrador being otherwise indisposed leaping around picking up Pheasants and Partridges. The Lurcher is always happy to get out to the range as it means he can meet and greet people, run around like a, well like a Lurcher and once tired he spends some quality time sleeping in the back of the Landrover whilst we shoot, talk and generally enjoy ourselves. It works well for all parties concerned. As this was a bit of a last minute thing we opted to take four
rifles. The Schmidt Rubin M1911 chambered in 7,5x55 Swiss. A BSA Lee Speed (Sporter) chambered in .303 British along with a BSA No1 Mk3 Sporter, again in .303 British and finally the Savage M1899 chambered in 22 Savage High Power. The middle two rifles being .303 were in dire need of some new brass and this gave me the opportunity to show you how I fire form my .303 Brass. The vast majority of people load their favourite .303 round typically with around 41,0 grains of N140 behind a 174 grain SMK which works well for distance stuff and is a reasonable approximation of MkVII Ball. Get it right and you have a superbly accurate round. Incidentally, I usually start at around 39,0 grains of N140 and work up, I have also found similar loads with RS50 (What was TR140) work equally well although RS50 appears to fractionally slower than N140 which is not a bad thing. Whatever you opt for please do ensure it is safe for you rifle. Once loaded it is simply a matter of stuffing the round in your rifle and pulling the trigger in a safe manner. Well nearly... The thing about military rifles chambered in .303 is the chambers can be rather generous, after all they were designed to be used in war where a shot was fired and the spent cartridge case discarded. The military certainly were not interested in preserving fired cases and a generous chamber meant the round could be chambered in muddy or dusty conditions which it did admirably. The downside is the cartridge case which head spaces off the rim tended to rattle around inside the chamber when ignited, the shoulders would go forward however the rim would go back and this would lead to stretching/thinning of the brass just forward of the rim, this can be evident on even once fired cases where the stretched area of material is clearly evident.
This leads to case failure in time so if I have a

new box of brass to work with I add an O'ring to the rear of the case just in front of the rim. This means when the bolt is closed the O'ring compresses and holds the case head tight to the bolt face and as the internal ballistics take place the case head stays where it is and the shoulder moves forward. Yes the case has stretched but in a far more manageable manner.
You can clearly see the difference in the shoulder position on this 'Before and After' image.I guess a picture of a case shot without an O'ring would be good at this stage however it would also seriously upset my nice neat rows of fired brass as there would be a gap. I will look out for a stretched case and add it to this post if I find one. Look carefully and you will spot a ring on the bullet just behind the meplat, this is where the seater stem has been cutting into the jacket as it is designed for a 174 SMK as opposed to a 150 grain soft nosed bullet such as the Pro Hunter here. I will machine a new seater stem to suit the profile of the 150 at some stage however as today was a combination of zeroing and blowing the cases neck forward it was not incredibly important. So there you are, fire formed 303 brass that should last for ages with neck sizing only and an occasional annealing. Before you ask, the O'rings I use are actually those used on our .308 Cleaning Rod Guides and I leave the ordering of such things to the Viking and have long since forgotten the details, however if you would really like to know give her a shout and I am sure she will be able to help :)
Comments
David Yes, I will add a picture or two when I do the next one :) /dAlpha1 Another interesting post. I don't suppose you would post how you machine the custom seating stems. I could do with a couple myself.
Another batch of BSA brackets

Published Date : January 6, 2018Author : davidCategories : General stuff, Machine shopOur latest run of BSA 'Scope brackets are back from being anodised so I grabbed the rails with the intention of assembling 15 sets only to discover we were nearly out of the M5 low head
screws I normally use, I ended up building 5 and had to stop. The remaining screws will be with us next week so not a real problem even though these 5 sets are already sold and heading out on Monday. So if you are after a 'Scope bracket for your BSA International the remainder will be ready to go end of the week. At this point I will say I seldom have anything to do with the ordering of consumables, I just make things. Not that I am pointing the finger at anyone as that would be very wrong :) Yes, the rails are long, I have started leaving them full length as some people have asked for a longer rail, if it is too long you can either cut it to suit your needs or ask me and I can soon shorten and tidy the ends up as required.
Comments
Some range time Published Date : January 4, 2018Author : davidCategories : Reloading, RiflesWe managed to get to the range for an hour or so yesterday and the Schmidt Rubin came with me. Having had an eye operation last October my interest is how do I get on with open sights these days and the place to check was on the 25m firing point. OK, I know it sounds odd to be shooting a centre fire at 25m when it should be at 300m however our local range only extends
out to 100m and that is in a tunnel range which is not ideal for open sights hence the 25m choice. First thing was get some control over the ejected brass and I found that placing my left hand over the top of the receiver whilst opening the bolt kept the brass in place and resolved the dinged necks issue. Next thing was sight picture. I can see the target which is always
good and the front sight blade is in focus which is also good however the rear sight is blurred which is to be expected, except it is blurred to the degree that I tend to see a fuzzy double V and I need to understand which part of this sight picture works best for me. Once I had established an aiming point given the short distance I shot a couple of 10 shot groups shown here which I personally found rather interesting. Top was shot first in a standing/crouched position on a high bench as is the way of the 25m range however it was without a sling which would probably have tightened things up a bit and reduced the horizontal wandering. Second group also crouched with a slightly different fuzzy sight picture and things had tightened up however this time with vertical stinging. The Model 1911 has an interesting two stage trigger with a long first stage followed by a light second stage which is around 800 grams/1.75 lbs and it caught me out a couple of times which did not help things. I would hope that a combination of more trigger time and a sling should help matters however it does make me wonder how well I will be able to shoot with such sights in the future. My load was 155 Scenar, 44.0 grains N140, Remington primer and a COAL 77,7mm using a Lee collet die. Just because it worked for me and with no evidence of over pressure does not mean it will work for you. Whilst I was faffing around with the 1899 the Viking put a few shots through the Savage 1899 and confirmed the .227" bullets made a huge difference, it no longer keyholed so stable bullets with good accuracy and recoil was pleasant. My view is a period tang type peep hole sight would improve things considerably however she is keen to keep the rifle in its original condition. Best get on now, we are uploading to the Harrison today amongst other things which will be interesting, I always cross my fingers when I run a new program :)
Comments

Time at the reloading bench Published Date : January 2, 2018Author : davidCategories : General stuff, ReloadingBefore I forget, Happy New Year all :) We took some time out today to load ammunition for the
M1899 Savage mostly because the bullets (Projectiles) have arrived at long last. I decided on 25 grains of Viht N140 which when used behind the 70 grain Hornady bullets should give around 2700fps with a reasonable pressure reduction versus the factory rounds that were run at closer to 3100fps so in theory I am running at around 10% down which should be a reasonable start point. Obviously I will watch the rifle and fired cases with close interest to make sure there are no signs of over pressure. OK, I will watch the Viking shooting with close interest as it is destined to become her rifle even though next outing will be for testing purposes to ensure the rifle is running smoothly. Sadly the 200 Hornady 70 grain .227" projectiles that arrived today are the last 200 in the country as far as I know so once they are gone things are going to get a lot tougher reloading wise unless the importer decides to talk to me which would be nice as we could do with some brass as well. This is one of the occasions when I am acutely aware of the difficulty in sourcing reloading components for the more obscure cartridges. I took advantage of the N140 tub being in the hands of the Viking and loaded a few 7,5x55 Swiss rounds with 45 grains of N140 and 155 Scenar bullets, this is going to be a short distance round so a maximum of 300m and being quite honest I doubt the rifle will go out much further distance wise in my hands other than a possible 1000 at Barton Road if I am confident I can get it to go where it should. If not it will be 300 and possibly 600 at best. I find it odd how I actually enjoy the shorter distance shooting with older rifles these days, not that I am suggesting that 300 will ever be a substitute for 1000/1200 on a fine day, or even on a cold winters morning. On the subject of obscure reloading components one hundred 8x57J cartridge cases arrived this morning. The J denotes a 'J' Bore or .308" versus the more common .324" and will be used in a fairly early Gewehr Model 88 (G88) that is sitting in the armoury awaiting a good airing. All this fun with SOWR's that is planned for 2018 is really something to look forward to and I feel a range day with rifles only dating from 1921 and older coming on. Our new years resolution is to spend more time with such rifles at the range. The Viking did mutter something about not swearing although I am not sure if she means me or her and trust me that will be forgotten the next time I break a carbide micro boring bar or the Lurcher excels himself. The Labrador's paw appears to be healing nicely which is handy as he is out tomorrow for a days picking up, we will be working as usual however it will be on the workshop

as opposed to in the workshop as we still have a load of jobs to finish plus it would be nice to get out and try those 5,6x52R rounds at some point.
Comments
Last day of the year Published Date : December 31, 2017Author : davidCategories : Life Map, ReloadingToday is the last day of 2017 and a Sunday so I have absolutely no intention of working. Famous last words as so far I have put a mirror up in the bathroom which has to vaguely count towards something. I had planned on reloading some 5,6x52R ammunition this weekend however it is designed to use .227" bullets instead of the more readily available .224" or even .223" for the older Hornet and similar. I say planned however they failed to arrive Friday so now I will have to wait until some point next week. .227" bullets seem to be incredibly difficult to source here in the UK. Hornady have apparently stopped manufacturing them, or at least shipping them to the UK and I have been trying all of my contacts in the trade to no avail until Thursday when I happened upon a couple of boxes so I had them on the spot, now if only they would be delivered... Alternatively Sellier and Bellot should still hold them however my local sources deny all knowledge of them and the Sellier and Bellot UK importer seems to be rather difficult to deal with which is frustrating. The 5,6x52R also known as the .22 Savage High-Power dates back to around 1911/12 and was designed for the Savage Model 1899 amongst others and we just happen to have a Model 1899 chambered for this round hence my desire to get it shooting properly. The original cartridge specification was capable of firing the 70 grain soft nosed bullet at around 2750fps which is impressive, it is also a very comfortable round to shoot in the M1899 and we all know the Vikings views on hard recoiling rifles these days. I wrote about the rifle here: Savage Model 1899 and since writing the article the Viking has taken a more than passing interest in it and has applied to have it added to her FAC (Firearms Certificate) and assuming it is agreed to and actually turns up within the next few weeks she should be good to go so happy late
Christmas Viking. This is what the finished
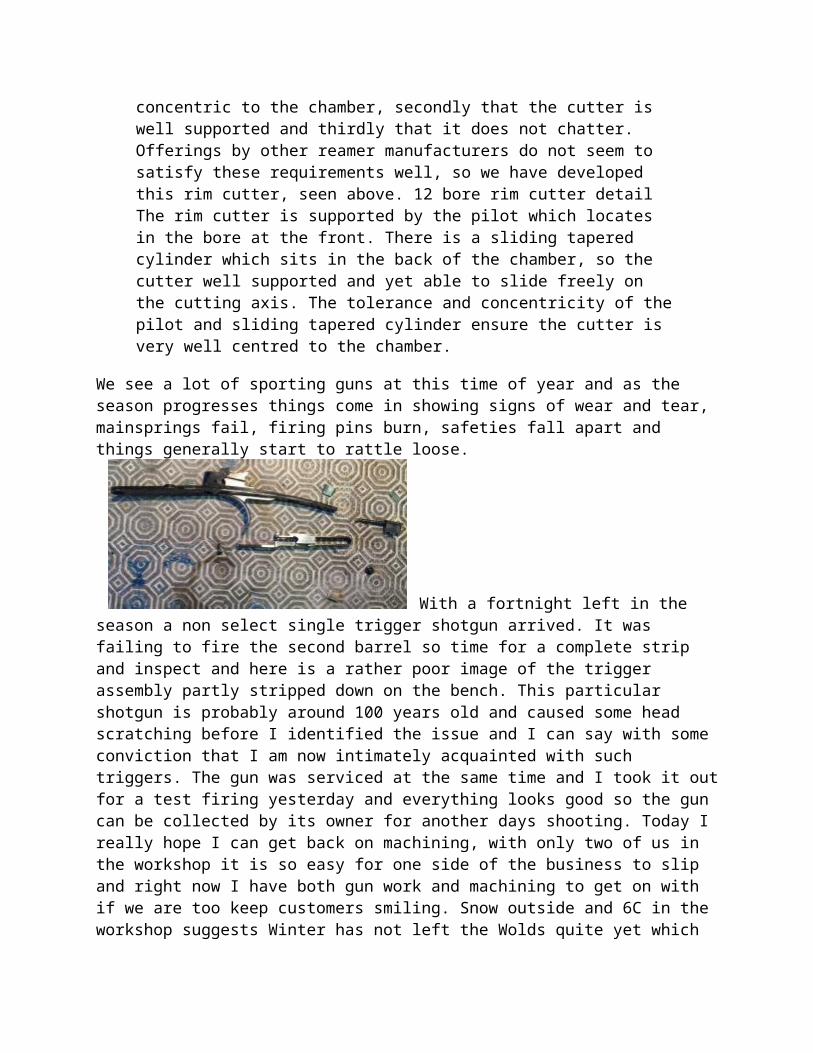
rounds should look like, this is a picture grabbed from the Internet as I obviously do not have any completed examples and have the brass cleaned and ready on the reloading bench. Load wise I would like to keep it to around a maximum of 2600fps as it will only be used for target work and casual plinking and it seems silly to stress the rifle or its potential new owner unduly. Load data is rather thin on the ground however Norma suggest their own 202, 203B and 204 powders with load data however I have not seen Norma powder on the shelf anywhere in years despite still being imported by RUAG. The good news is powder comparison charts exist and it would appear that 203B is a direct burn rate equivalent to Viht N140. Obviously such charts need to be treated with caution at best although N140 does seem to be an option according to Quickload, as does Varget which sadly will cease to become available here in the UK as it is not REACH compliant. Another option is N150 which gives a good fill density and luckily these are all powders I currently use and hold. I have a few days until the bullets arrive so I will continue my research.
Comments
At the range with the Schmidt Rubin Infanteriegewehr Modell Published Date : December 27, 2017Author : davidCategories : Rifles, ShootingWe had planned on taking a few rifles to the range Christmas day however by the time I had faffed around reloading we were out of time so we had a Boxing day trip instead and one of the rifles to come with us was the SR Model 1911. First job was load some ammunition and this was the part that delayed me. Not because it is difficult to load as it is a very easy process, instead it was my choice of reloading dies... I knew I had some once fired brass on the shelf however it had been fired in the Vikings 1896/11 so needed to be full length resized and here was the problem in that the only dies we have are Lee collet type which means they size the neck only and do not bump the shoulder back which meant the brass was not chamber once neck sized, obviously the chamber of the 1896/11 was longer which had me scratching my head however the Viking soon put her hands on 35 shiny new Prvi cases that had been primed already and even by eye the difference in length from case head to shoulder/neck junction was obvious and more to the point the new unfired brass chambered perfectly. Next step was choice of bullet and I opted for the 155 grain Scenar, I did have to hunt around for them as I mostly have the likes of 155 Type L and Berger Hybrids on the shelf and they were probably an overkill for the rife especially as it was a shoot and load test outing at best. I was tempted to load with the 170 Lockbase however given the factory COAL is 77,7mm I would not have a lot of bearing surface being held by the neck so Scenar it was. With a choice of bullet I could select my powder which was Vihtavuori N140 which is always dependable in similar cartridges with this weight of bullet. Quickload tells me 41 grains of N140 should give around 2580 fps with the 31.7" barrel and my reloading book suggested 41 grains was indeed a safe load and good start point so 35 rounds were loaded and the

rifle was good to go. First round down a new to me rifle is always interesting and I always wear safety glasses along with ear protection. Initial reaction was wow, not a huge recoil and an intact rifle so after a quick inspection I completed a group of 5 rounds and checked the target, 5 holes in the same general area so all good however I had noticed two things.
The brass is ejected vertically and was being thrown over my head and behind me and when retrieved was displaying some significant dents in the neck. Even with a spotter to catch the brass before it hit the ground it was still showing dents so it was the rifle ejection process as opposed to the landing that was the culprit. I have since been advised to be less forceful when pulling the bolt back and this should be prevented. I did entice the Viking over to the Schmidt Rubin and she put one round down range before pulling a face and handing it back, odd how I think it is a mild recoiling rifle and she says it thumps, could be down to padding and it could be a gender or anatomy thing. Of course it could also be that she was spoilt by shooting the 5,56x45 in the Dansk Army followed by heavy and/or mildly recoiling centre fire rifles and her recent time spent with Rimfires :)
What about accuracy? Well I did not measure the group however I would say around 7MOA shot off hand with impacts slightly high which would be down to my sight picture. Thinking about it, this is the first time I have shot a centre fire rifle since my eye operation and I had no issues whatsoever with a clear target and foresight blade although the back sight was a tad more blurred than I would have hoped for. Regardless of this I could see and hit the target :) Regarding the 7MOA, I would hope to halve this off my elbows with some load development and some warmer weather. One thing that is worth mentioning is the trigger, it has an odd curve to the blade that when first used would suggest it has been bent at some point however this is normal and after a long first stage the second stage is remarkably light for a battle rifle, probably just under a couple of pounds although I would need to confirm

this with the scales. Whilst on the subject of accuracy, yes I do remember the famous Townsend Whelen quote "Only accurate rifles are interesting" however I would argue that this was an accurate rifle in its day and now 100 years later it will probably do quite well and I suspect working up to around 43 grains of N140 will give reasonable results and better replicate the issued GP11 ammunition at around 2680fps and regardless of if it shoots 3MOA or 1MOA it is a fine old battle rifle and certainly worthy of a place in the Armoury. On a separate note I need a M1911 rifle sling so if anyone knows of such a thing please do let me know. Well today is a sort of work day so I had best get on.
Comments
Nick Bonsor I hope they're still hanging around! Yes an 8mm fest sounds like a plan, I have to do some loading for the Mauser and the Enfield so give me a bit of notice! NickDavid I am expecting some 70 grain .227" bullets for the mighty 22 High Power and if they do arrive we can get some loaded and head out Sunday/Monday and hopefully find them at the same time. We need an 8mm fest soon for some proper recoil :) /dNick Bonsor Yes, the Rem Mag was oddly mild ish with the factory stuff and decidedly more angry with the development ammo, best 5 shot group was 12mm though so could be worse. She sounds like a Viking, does that count? Re the gloves, found one and left it at the back of the range! Didn't realise it was yours or i'd have hung onto it.David So did I, certainly milder than your Rem Mag. Sadly I have to conclude she is a lightweight and not a real Viking :) I don't suppose you spotted my gloves at the firing point when you left? /dNick Bonsor I thought it was incredibly mild shooting!
A very Happy Christmas to all of our Shooting Shed friends Published Date : December 25, 2017Author : davidCategories : Life MapFestive greetings to Shed Journal readers everywhere! Yesterday we celebrated the Viking's Christmas and today it is my Christmas day so I get to eat too much two days running. Traditionally we head to the range on Christmas day to make some noise and give our favourite guns an airing however we have decided to make the trip on Boxing day and instead stay in and enjoy each others company with the Stove to warm things up and maybe a glass or two of Danish Mead. We plan on taking a couple of days off now and will also be shut down for the first week of the new year however we will still be working hard. We have a machine to move, new racking to go up to allow reorganisation of the tooling storage for the machines and some more cabling
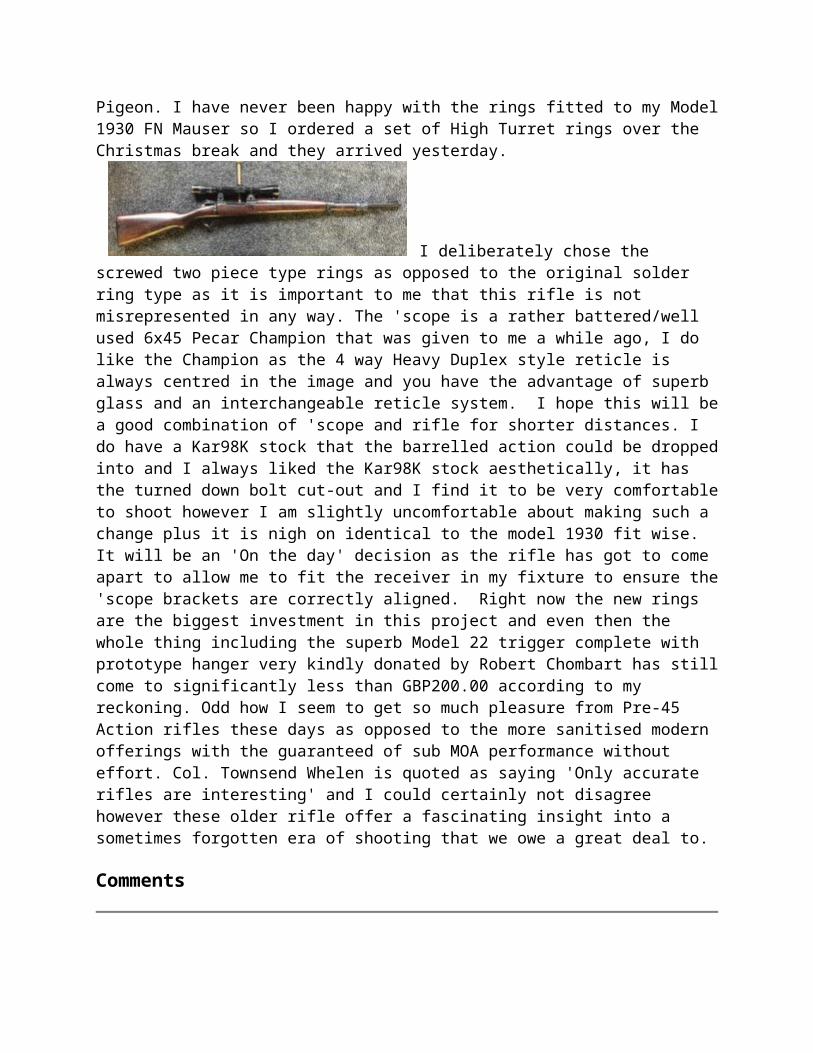
to go in for local sockets and the relocated machine. We also have some programming to do on the new Harrison, there are several repetitive and low volume jobs that it will be used for as well as barrel work if it is to earn its keep. I need to set the rotator up in its final position on the Bridgeport which means a fair amount of initial set-up time however it will be worth it as it has been a nuisance having to remove it for some of the jobs. Hopefully it can sit in semi permanent position now and will be used for fluting rifle bolts, barrels and rifle receivers (Yes, people do ask for lightening and decorative cuts on rifle receivers from time to time) The rotator is also used for the final machining of cleaning rod guides for Rim-fire rifle so it should get a fair amount of use in the new year. Final job is a new wash room facility in the workshop which should make life easier for ourselves and visiting customers. Well I am ready for another coffee so best get it sorted. Merry Christmas and a very Happy New year to you all.
Comments
I hate cast iron Published Date : December 23, 2017Author : davidCategories : General stuffIn between time spent on the Infanteriegewehr Modell 1911 I have been modifying a band saw table for someone, a simple job really, machine a couple of 19,0mm X 9,8mm deep slots for a
new guide system and then a new centre bushing. Nothing serious really however it meant removing the machine vice and rotator from the Bridgeport , then clocking in the existing slots followed by making a lot of cast iron dust which is filthy stuff to work with and not particularly nice to machines as it gets into the slide-ways and all this with the owner of the table standing next to me. On a plus note it was my son and it is always good to spend time with him plus we share many common interests so we are never short of things to talk about. It also meant he could spend some time on the machines as well and he has assured me he will be back on Boxing day to clock my vice in (Yeah right!) Tomorrow is the Viking's Christmas day as she is a foreigner so we will aim for a day with a bias
towards Denmark. Not sure what that is going to be, maybe catch up on an episode or two of the Vikings TV series.
Comments
A bit more on the Schmidt Rubin Infanteriegewehr Modell Published Date : December 23, 2017Author : davidCategories : RiflesThis morning was started with a look at yesterdays acquisition, the Schmidt Rubin Infanteriegewehr Modell 1911 (K11) and first job was get some patches down the bore and inspect. Given that this is a 100 year old rifle I decided against a full copper strip with C2R as it really does do a good job and can lead to the need to take several shots to 'season' the barrel afterwards, so instead I opted for a couple of paraffin soaked patches followed by a carbon cleaner followed by lightly oiled patches and finally dry. Time for the Borescope, I use a Hawkeye so no chance of any pictures however it looked quite bright with crisp rifling, a reasonable throat and no evidence of a hard life, I completed the process with a lightly oiled patch and moved onto the rest of the rifle. Stripping the Model 1911 is usually very simple, a couple of barrel bands, three action screws and that is it however on this occasion the rear barrel band screw was very tight so I gave it a dose of Plus-Gas, made a cup of coffee and resorted to a screwdriver system reserved specifically for tight screws and it is probably not what you would
expect. This is a Milwaukee screwdriver bit set designed for impact drivers (Well I do drive a Defender!) These bits are super tough, should not shatter and have proved to be very handy for such applications. This time was no exception as the screw came undone with a good twist, another point is whoever had removed it before had replaced it back to front as the screw should be on the right as is the front band screw. Time to inspect and clean and i saw nothing of concern, no rust pitting on the underside of the barrel or around the trigger and the trigger matched the rifle as did the wood so all good.
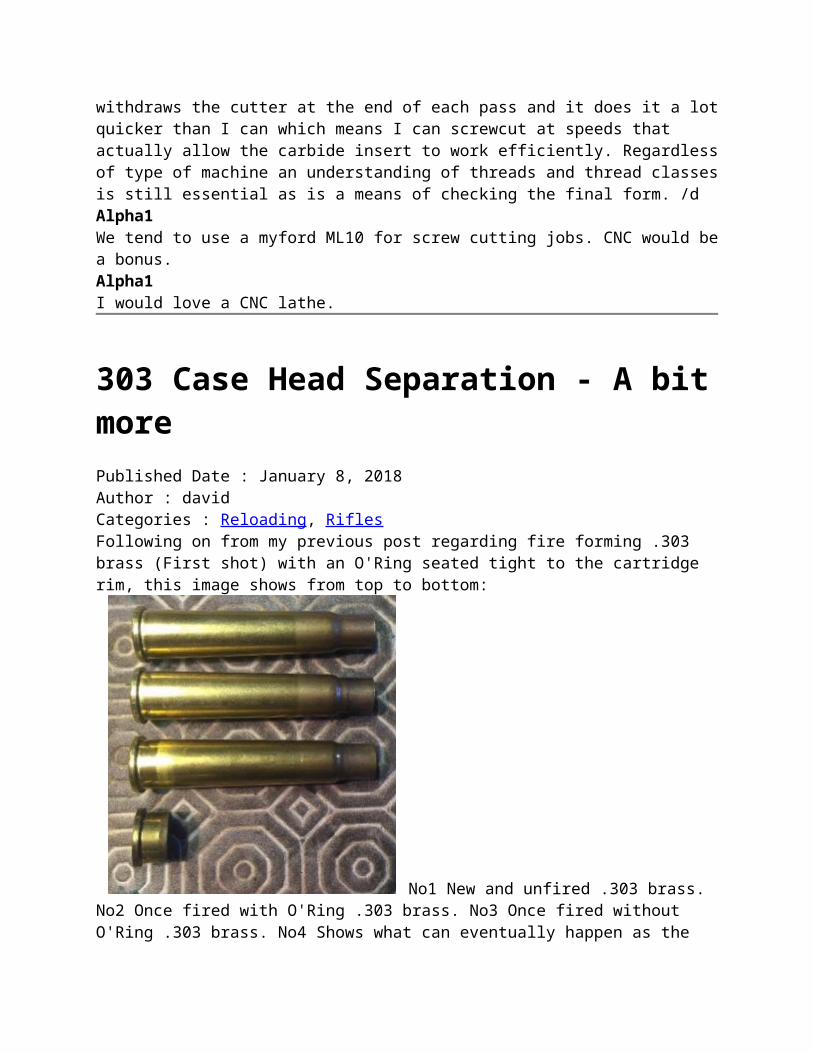
The barrel has the H&H stamp so was manufactured by Hämmerli & Hausch all those years ago. I assume the 76736 would be the barrel identification number prior to assembly to the rifle. With the rifle parts stripped and cleaned it was time for assembly and I tend to use Renaissance Wax to protect the surfaces of older rifles that are not going to be dragged out on rainy days, it works well and leaves a nice
satin sheen that does not show finger marks. Stripping the Model 1911 bolt is very easy and requires no hand tools unless you wish to remove the extractor and for this task a flat bladed screwdriver or similar does the job and the extractor rotates off the bolt. This bolt had obviously been stripped fairly recently as the moving parts had a liberal coating of a translucent grease, about the only thing I noticed during cleaning was the firing pin was quite rough on the major diameter however this was easily resolved with a satin polishing mop which is no more than a very fine Scotchbrite pad that I have mounted to a pig-tail on an old motor, it does a great job of removing slight imperfections and bringing items to a satin finish yet can never remove an excess of material. (There you go, one of my secrets shared!) Beware though as it can easily round corners off which may not be desirable. One thing I did notice is the outer edge of the crown was slightly ragged so I tidied it up and added a drop of cold blue to remove the bright edge, so back to the cleaning rod, a couple of oiled patches followed by clean then by lightly oiled to remove any debris. So here it is after three or so hours work, not a significant change from yesterday other than it has now been cleaned, checked and preserved and is ready for the range. As I sit here in the workshop I can see a set of dies marked 7,5x55 Swiss and a box of 50 once fired PPV brass plus I should have a box of primed in the Armoury so it looks like we are good to go for our Christmas day testing.
Comments
Last minute Christmas shopping Published Date : December 22, 2017Author : davidCategories : RiflesWe tend to take a slightly different view on last minute Christmas shopping, after all if you have not got whatever you need by now you have probably left things too late, unless it is another rifle... On this occasion it was an unplanned acquisition, we had a few deliveries to accept plus a customer visit however by 13:00 we were all done and decided to head out for a drive. There is a gunshop a bit north of here that we have never visited plus a Danish shop in Grimsby so we decided to link the two together and make an afternoon of it and came back with this thing.
A Schmidt Rubin Model 1911 chambered in 7,5x55 and a serial that shows it was built in very late 1917 so exactly 100 years old. The important numbers match such as barrel, receiver, bolt and magazine however the rear band and sight are different which was to be expected. Bore is remarkably bright and crisp which given that this is a Swiss Army rifle is unsurprising as they are invariably in good condition. Externally the old girl is best described as used but then again so would you be at 100 years old. The shop tells me it shoots well and I have no reason to think otherwise as these things always shoot well. Best of all I have a set of dies here plus some brass that has already been sized and primed so I know what I can take to the range for testing Christmas day. The Viking has owned a M1896/11 built in 1910 that was a lot prettier than this however this does look very original so I am happy and it really was a rather keen price by the time the Viking had finished negotiating. Happy Christmas to me :) Ah yes what about the Viking and her trip to the Danish shop? Well it was shut so bad luck however I have told her she can have a go with the latest acquisition when it is tested which shows how nice a person I am :)
Comments
Subscribe Published Date : December 22, 2017Author : davidCategories : General stuffI have added a subscribe form to my Journal, it is located bottom right on the sidebar and will be experimenting with it over the Christmas break. If it works all well and good, if not it will be

binned/replaced. If anyone subscribes and has problems with it please shout. Meanwhile I am off to try and understand how to change the text of the default message.
Comments
Turnscrews Published Date : December 22, 2017Author : davidCategories : General stuffTurnscrews, or for our American cousins Screwdrivers. Anyone working on rifles and/or shotguns is going to end up with a good selection of screwdrivers and I am certainly no exception in that I seem to have loads of the things, some made by myself and some purchased along the way and they all serve a different function however the turnscrews/screwdrivers are subtly different to those you might use for general DIY. For starters the age of the firearm has a significant bearing on the type of screw and I may need a taper ground or hollow ground tool, equally the width of the screw slot may mean I need a particularly fine blade hence the need for
so many variants. Anyway Turnscrews, this is an example of three shop versions that arrived this morning. Normally I would not entertain such things, especially as they were incredibly cheap at around £35.00 plus some postage for the set however they were worth a look and I must admit to being rather pleased with them. Yes they need finishing and I will harden and temper them to suit my needs however I really do think they will do the job plus our customers always seem to like the look of such things to the degree that I feel I should count them at the end of the day (Not really :) )
Comments
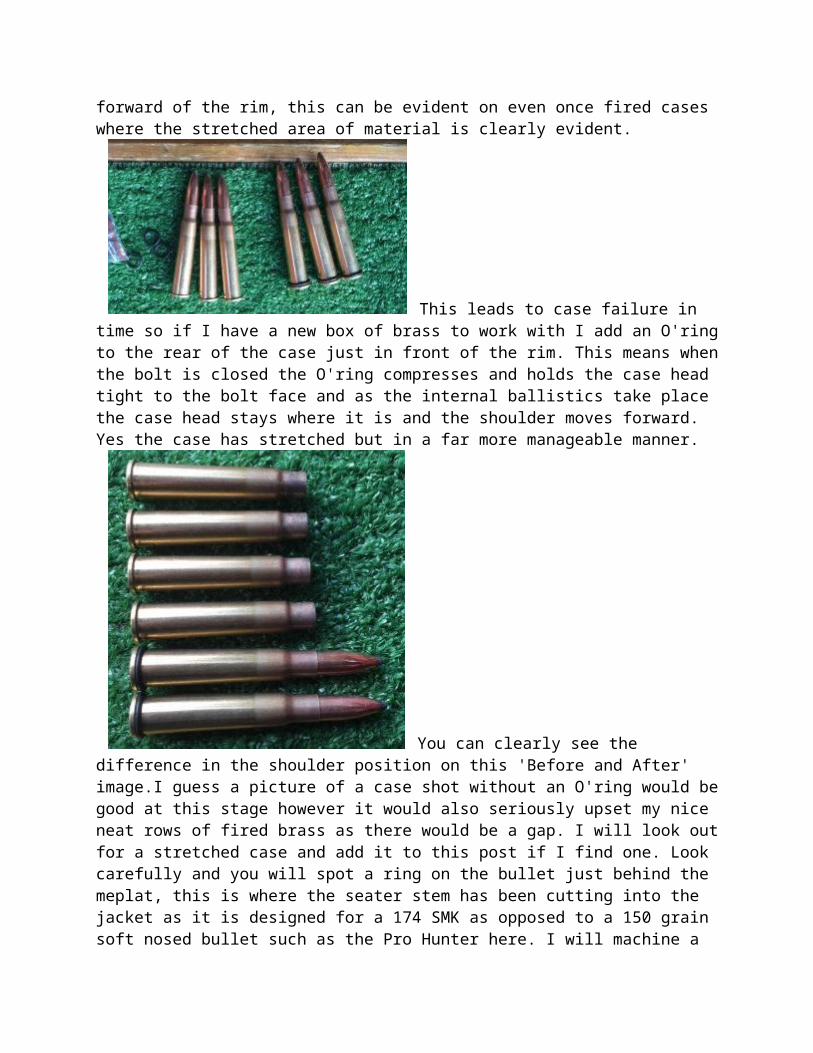
Today I am mostly doing Published Date : December 22, 2017Author : davidCategories : General stuffActually I am not going to do a lot today as we have officially broken up for Christmas. Every year the Viking tells me we will stop mid December and every year I assure her it will happen but it never actually happens so it is rather nice to have stopped now. We traditionally work long days and tend to just keep going so a few days off is going to go down rather well. The Labrador is starting to look a bit better, he can walk reasonably well however he favours his leg with the slightest activity so sadly he will be stopping with us today instead of getting out at the local shoot for a days picking up. Tomorrow we are off to the range to test a couple of guns that have been with us for work, function and scope alignment will be the order of the day and I really should take advantage of our down time and take something interesting to shoot with us and we certainly have enough interesting things to keep us going for a while. One thing we have earmarked over the next few days is a full stock take. We do this once a year and every single rifle, shotgun, revolver, sound moderator and action is removed from the armoury, inspected, ticked off and returned. Now there is absolutely no way anything can creep in or escape the armoury as it is religiously logged in and out of a register by myself and the register has to be available for inspection at all times so that side will be OK, however it is always good to check. The next part of the audit is ammunition and we carry a lot of different makes and types for testing as well as retail sales. Add to what we buy in the 'Handed in' which is ammunition which is literally handed in by people who no longer want to hold it for a variety of reasons and all of a sudden we have quite a mix here. As with firearms every single round is logged in and out, additionally expanding projectiles were always logged however the law changed earlier this year and I no longer need to control them in the same manner as I would live ammunition and this is why I am not particularly looking forward to the ammunition audit as I will be removing a huge range of expanding projectiles from the register and from the secure storage and moving them to a shelf along with the usual range of FMJ (Full Metal Jacket) target ammunition. So an entry will have to be made alongside every single expanding projectile variant noting it as moved to normal stock and the holding set to zero. I need to do it for my own peace of mind as I do like things to be correctly recorded however it is certainly going to be a real pain to get through especially as I will also have to open several boxes of part used ammunition and count the rounds to confirm the label and then find the entry on the register and confirm the two tally. Urgh... I recall an old RFD once telling me he never bothered to record ammunition used for testing and to this day I cannot quite get my head around why he chose to adopt this approach and I do wonder if he is still going, or indeed his FEO who I would have hoped would have visited him and asked him

what he was holding in stock. Finally a random image of the mighty Defender taken last weekend, the picture does not portray just how bitingly cold the day was with the ground covered with frost mid afternoon with ice on the puddles. Needless to say this did not stop the dogs jumping in and out of the creeks and swimming at every opportunity and yet again the Lurcher was the first one into the deeper water. I watched him dive in with a mixture of horror and interest and it did cross my mind that I might have to go in if anything happened (The water would have been wading depth for me) By the time I had contemplated the scenario he was out the other side and barking madly at the Labrador who was steadily heading across the creek after him, I guess all he needed to make the day complete was a Duck or two to make it worthwhile. I am awaiting a delivery and we can then head out with the dogs so I will take this opportunity to wish all of my readers a very good Christmas and Happy New Year.
Comments
An update on the 'Oddity' Published Date : December 19, 2017Author : davidCategories : General stuff
I had to find out exactly what the .44 revolving magazine shotgun was classified as so I rang BASC - The British Association for Shooting and Conservation firearms team this morning and as ever they were able to confirm that this is indeed a Section 2 Firearm, and pointed me to the relevant section within the Guide on Firearms Licensing Law:Category (v) covers most smooth-bore revolver guns though an exception is made for the so-called ‘ratting guns’ chambered for 9mm rimfire and for muzzle-loading revolver guns, both of which are subject to control under section 1 of the Act. Section 57(2B) of the 1968 Act (as inserted by the 1988 Act) defines a smooth-bore revolver gun as one containing a series of

chambers, which revolve when the gun is fired. Examples of such guns are the ‘Dragon’ and the ‘Striker’.So now I have it confirmed as a Section 2You can download a copy of the current Guide on Firearms Law here:https://www.gov.uk/government/uploads/system/uploads/attachment_data/file/518193/Guidance_on_Firearms_Licensing_Law_April_2016_v20.pdf
Comments
David Hi Mark, Good luck with your Blog, I will take a closer look this evening :) I have added a subscribe box on the bottom of the right hand sidebar and tested it and all looks good right now. /dMark Fennell Hello, I've been reading your blog for a month or so but I can't see a "Follow" button anywhere. I noticed in one of your older posts that you commented on the lack of UK shooting blogs out there. I agree with you. I don't know if you'd be interested but I've recently started shooting (clay and rough at the moment) and am blogging about my experiences here... https://clayfurandfeather.wordpress.com/ Hope you might have chance for a quick look some time. Thank you, Mark.
Walking wounded and an oddity Published Date : December 18, 2017Author : davidCategories : General stuffThe Labrador is back from a day’s work sporting a natty blue adhesive bandage having managed to cut a pad, the good news is he was apparently unperturbed by the event and returned with the Pheasant in his mouth. Downside is he was side-lined for the final drive of the day. He now has four days for it to heal up as he is out again this coming Friday.
I was trying to answer emails with these two who had decided they also needed my attention and if I failed to give them the attention they felt
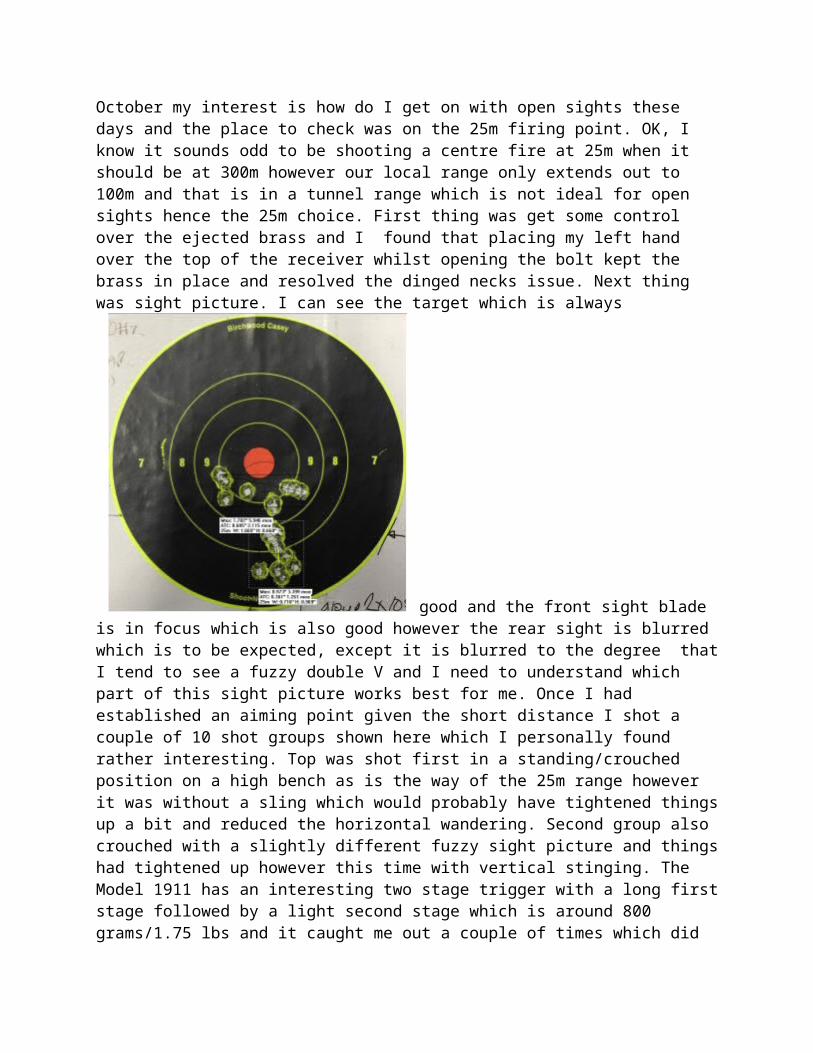
they needed the next stage was for the Labrador to keep bashing my right elbow so jogging the mouse and the Lurcher to go for the full on approach and try and climb onto my knee regardless of what I threatened him with. Apparently dogs only understand English as and when it suits
them :) The blue bandage after it had been cleaned and given a squirt of antiseptic spray. No doubt a good meal this evening will take his mind off the indignity of being bandaged up. I normally expect to see the occasional scratch over an eye or on the underside of an ear however he is a working dog and things do happen.
This thing came in today. I say thing as I was slightly at a loss as to what to categorise it as. It is a .44 revolver with a 25" barrel, is muzzle loading and smooth bored. It also has a removable butt section.
My initial reaction was it had to be Section 1 being a six shot however being a muzzle loading gun proofed for black powder and smooth bored it is apparently an anomaly in the law and is deemed to be a Section 2 shotgun. Despite working on shotguns a fair amount of the time at this time of the year I seldom move beyond side by side or over and under 12 or 20 bore Section 2 guns and I usually refer to the Viking when it comes to definitive law on things like barrel lengths for under lever shotguns and other oddities. So there you go, something new today and I am pleased I have learnt something else about the UK firearm laws. Of course the next question is will I ever see something like this again? Well it is 16:30 and I have not actually switched a machine on today despite what was certainly a busy day, I have guns to get out for the end of the week and a load of machining to do so I guess we have a busy time in front of us if we are to have any time off over the Christmas break... Best get on with something :)
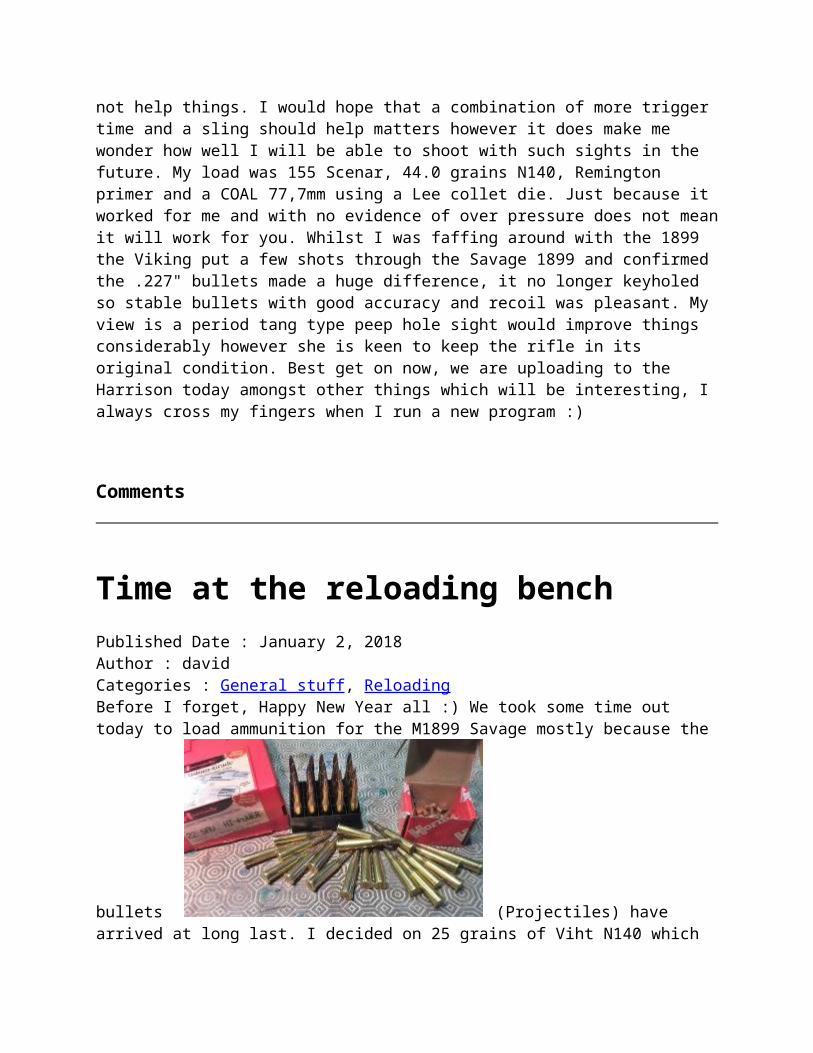
Comments
Collets and Collet Chucks Published Date : December 16, 2017Author : davidCategories : General stuff, Machine shopI use collet chucks :) OK, is this an admission? Well apparently some people dislike them however I use them a fair bit as they serve a very useful purpose in the machine shop, offering reasonable accuracy, a reduced rotating mass, they are quick and convenient and when correctly sized they should not mark the work piece. So a couple of things, firstly what is a collet and collet chuck, well in the simplest of terms it is collar with an external taper that when tightened by means of a collar or draw bar tightens uniformly and precisely around a work piece. The advantage is a uniform pressure gripping the work piece which is handy on soft or hollow materials such as aluminium tube and brass cartridge cases.The collet chuck is simply the bit that holds the collet. Collets also enable you to hold very small diameter items and I hold collets in multiple systems capable of going down to 1,0mm/0.040" although it is fair to say I seldom have need to drop below 3,0mm or around 1/8th of an inch. I say seldom as I have dropped down to just shy of 2,0mm on a occasion. Collets are also a handy means of gripping milling cutters and indeed my Bridgeport Mill uses R8 type collets to grip the more common sized cutters I use, I say more common as things such as Boring Heads, Face Mills and Jacobs type chucks utilise a similar system in that the Arbor matches the taper of the R8 collet chuck however it is integral to the tooling being used. Of course there is a problem in the workshop as we currently use multiple and incompatible systems including the following:
Crawford 5C type on the Chipmaster and here lies the first problem in that the Crawford TRUGRIP collets are not the same as standard 5C collets in that they have a coarser thread, this means they lock up quicker and swapping them out is equally quick, the downside is they are difficult to source and costly, very costly. I use this particular lathe for smaller jobs and even with the basic Crawford chuck without any fine

adjustment and I would expect to see repeatability of better than 0,02mm/0.0008" or 8/10ths of
thousandth of an inch. On the subject of 5C collets I run a 5C micro adjust chuck on our Harrison Teach CNC lathe. This particular chuck has the ability to adjust the position of the collet relative to the axis of the machine and with some care it can be dialled into better than 0,005mm/0.0002" or 2/10ths of thousandth of an inch. one of the downsides of this system is although it is light, the 4 jaw chuck I use on occasion is not and it is a real nuisance when moving to a 4 Jaw for barrel work. The reason for the 4 Jaw is two fold, firstly material diameter as I cannot hold larger diameter barrels in a collet chuck and secondly barrel outer diameters are not always concentric to the bore and the fine adjust on the collet chuck is insufficient to dial in the bore to the level of accuracy required, hence the move to the 4 Jaw. These days we have a hydraulic hoist to enable the chucks to be swapped out however
it is still a nuisance. I use an ER32 system on the Bridgeport rotary table, now this one might look a bit odd as I actually run a 4 Jaw chuck for irregular shaped parts and then add a small square block that can hold the collets this enables me to swap from square to round parts and is used for work such as bolt and receiver fluting and rim-fire cleaning rod guides with the added advantage that the 4 jaw chuck can tilt from

horizontal to vertical. For smaller work holding I use an ER16 system and this is a collet holder on No2 Morse taper shown in a Dickson tool holder, typical operations include tapping and drilling and the system in this form will hold items with a diameter of up to 10,0mm so ample for a lot of my work. I can also use this particular tool holder for drilling with shorter gun drills.
Of course all of the systems mean lots of collets, hundreds in fact and these are 5C metric in full sizes, I have some metric part sizes in 0,5mm increments plus imperial as required. The rack is an easy way of storing them in the correct order for easy access and I can instantly see if anything is missing and yes there is one in the machine right now plus one on the bench ready to go in. So when is a collet chucking system not useful? When holding irregular shaped items, or when holding larger diameter items as the majority of the more common collet systems max out at around 28,0 to 30,0mm. Finally when absolute accuracy is required and this is why some people dislike collet systems because they do not offer absolute accuracy, typically the TIR or Total Indicated Runout can be usually around 0,01mm/0.0004" or 4/10ths of one thousandth of an inch and as mentioned above there are occasions when a greater level of accuracy is required. What a collet system does offer is good repeatability which means a work piece can be removed and reversed in a collet chuck and for the vast majority of the time the next operation can be started without fear of excessive runout. Incidentally collet systems are used extensively on some CNC systems with very high levels of accuracy returned. Right, that is enough waffling on about collets and collet chucks, time to use some on this cold Saturday morning :)
Comments
Alpha1 I'm a big fan of collet chucks I have them on the lathe and the mill. I have also recently invested heavily in micro boring tooling.

A BSA International 'Back on the road' Published Date : December 11, 2017Author : davidCategories : General stuff, Machine shop, RiflesIt was snowing outside and 7C inside the chapel yesterday morning and despite stoking up the stove the temperature refused to edge much into double figures so out of desperation/boredom we headed out across the fields with the dogs, 90 minutes later and covered in snow we returned to a chapel that felt positively toasty at around 14C so my tip for those of you working in a cold, draughty and uninsulated chapel is take the dogs for a walk and it will feel so much warmer on your return :) There are of course advantages to this time of year, the fields were frozen Saturday so a days beating meant clean trousers and Wellington boots at the end of the day and my fingers did warm up eventually. The Labrador was booked out for an afternoons picking up on a local Duck shoot and apparently enjoyed himself even though he spent as much time crashing through the ice after downed birds and on dry ground by the sound of it. Regardless of his activities he was certainly up for the following days cold walk and the Lurcher certainly enjoyed the snow. First job of the day was fit a replacement extractor/ejector to a BSA Martini
International. The replacing of the part is simple enough, however sourcing a spare is not quite as easy and they are quite pricey as and when you can find them. We do keep a few International spares on the shelf however our stock is steadily dwindling and I have recently been quoted more for a single part than I have sold complete rifles for in the past. The alternative is to buy complete rifles and break them for spares however this is simply something I cannot bring myself to do a it goes against everything I believe in. Interestingly I have been asked on a few occasions if I can make some spares for other owners, sadly the answer is I probably will not be doing a run. They are fiddly little things, require vacuum hardening and possibly grinding and as such would end up as costly items and as much as I like to put old rifles back on the road I am not overly keen on having a dozen or so spares sitting on a shelf for the next three years, so sorry about that all of you that would like to keep a spare just in case. I am in the middle of a run of Ruger Precision Rifle cleaning rod guides and was a tad surprised to see an order for a .223 Remington variant. A quick check by the Viking confirmed they do indeed exist and have done so for a while, I would consider the .223 Rem a worthwhile addition, and no doubt it shoots as well.

Comments
CAD-CAM Published Date : December 8, 2017Author : davidCategories : General stuff, Machine shopCAD-CAM stands for Computer Aided Design - Computer Aided Manufacture, and the new software that arrived today is essentially a CAD-CAM package. This means I can design a part using CAD, which in its self is not an issue as I have been using a variety of CAD packages since the late 1990's when I was working with AutoCAD 14.0 for 2D work, right up to modern 3D modelling packages such as SolidWorks and Sketchup with a handful of 2D stuff thrown in for good measure. These days I mostly use Sketchup mostly because it is simple and efficient and there is a massive price difference between it and Solidworks, however Iwill use Solidworks when I get the opportunity. The CAM side of things again goes back to the late 90's for me however since then I have not really had an opportunity to work such systems. Today things changed with the arrival of the new CAD-CAM package for the Harrison lathe and my initial reaction is Urgh...! It is certainly not as intuitive as the systems I currently use and appears to miss short-cut keystroke commands (The reason I always disliked AuoCAD 2000 was they moved everything around and changed some of the keystroke short-cuts) So this leaves me with a dilemma, do I persevere with the system which is coordinate based which is fine as that is how I run all of the CAD systems here, albeit not as clunky as the new one, or do I say stuff it, draw in Sketchup and simply export as DXF files which is a standard drawing format, then import into the new system and simply upload it to the machine and start making stuff. It is an easy way out and should work, however it also means we have just spent a small fortune on not much more than a file upload process, OK I am vastly oversimplifying things now however you should get the general idea. Urgh...! Deep down I know I am going to have to learn the new system, so time to stop faffing around and learn how to use it properly I guess... On a far more interesting note I am surrounded by shiny little bits (Not ours) for the humble Ruger 10/22 and will be rebuilding a customer 10/22 with them over the next 2-3 days or whenever I get a free hour or so. I have been working on and off with Shotguns for so long now I am actually looking forward to the little semi automatic rim-fire rifle. Yup, I never thought I would say that either!

Remember the little 7mm Pinfire revolver that was coming, well it is here and so far has been stripped, inspected and popped in the case on the Armoury wall, I have just been so busy that is about all I had time for although things do look to be quietening down very slightly now. The 'Display' cabinet is one we used to take to shows and I modified it to suit a wall location and am slowly filling it with bits we design and make along with things that I have worked on or caught my eye. The blown Marlin barrel sits on it on the bottom left hand side along with some turned and milled parts including the prototype Winchester 1874 lifter and even some early test runs for laser engraving of our logo on some rifle chassis from a few years ago. The signs are mostly from customers and friends and add a splash of colour to an otherwise bland concrete wall, yes I could paint it however it is coming down in the new year as we are having an all new Armoury that will give us more room for the storage of firearms and ammunition. Right, I had best get back to the CAD-CAM package and see if I can get my head around it ready for next week as I have a batch of some fairly intricate parts that need machining and I know the Viking is keen to get her hands on the machine again and produce some interesting parts before the Christmas break :)
Comments
An engine hoist has arrived Published Date : December 8, 2017Author : davidCategories : General stuffNo, this is not another stage in the life of the mighty Land Rover Defender, indeed it is for a far simpler purpose, to move the three and four jaw chucks for the new CNC Harrison lathe from the rack to the machine and back to the rack. Now you would be mistaken for thinking this is a bit of an overkill however for starters they are bloody heavy and add the fact that I have to lean in just under half a metre to get them in line with the spindle nose, then lift them up and into place, the engine hoist seems like a good idea. The theory being the engine hoist/crane is only used when a chuck change is required and remains folded up in a corner when not in use so it is not taking up
a huge amount of space. I have a feeling I will end up shortening the stabilising legs slightly however that is why we have a horizontal bandsaw and it is just a matter of chopping a bit off the end of the leg, drilling and tapping 4 new holes in each leg for the trolley wheel and then back to work, probably half an hours work total and I certainly have no plans to lift any truck engines out any time soon...
Comments
Yet another batch of BSA International ‘Scope rails and brackets Published Date : December 4, 2017Author : davidCategories : General stuffPeople keep asking about BSA International ‘Scope rails and brackets, well don't worry as we will be sending another batch out for anodising very shortly.
Comments
Gunsmithing Published Date : December 1, 2017Author : davidCategories : General stuff, ShotgunsThe last couple of weeks seem to have been mostly dedicated to Gunsmithing. OK that might sound odd given that this is the Shooting Shed so this is what we are supposed to do however there are seasonal trends and sometimes I find myself spending days in front of machines making things as opposed to fixing or modifying things however it has been more of the latter these last

few weeks. A typical job was this AYA no2 that came in Wednesday with a broken mainspring, all I had to do was fit a new spring in and the customer could collect it however I did not have a spring here and it had to be fixed for the weekend. Add to that the complication of it was only one of three we saw before 10:45 on the day and all equally important and I really need to get my head down and get things moved quickly. Luckily springs are available however they still need some fitting and the AYA was in desperate need of a service having been over oiled in the past. The gun has now been collected ready for its next outing, It has been a long barrelled revolver week as well with a couple turning up for work, a Ruger and an Uberti Buntline, both chambered in .357Magnum and both will need a fair amount of time dedicating to them. We took the afternoon off to get the Lurcher out, we have a little bit of snow here and he likes snow so it seemed like a good idea even when it started snowing again however it was short lived as the wind soon blew the snow clouds away and we had to make do with cold rain. The terrain was devoid of apparent wild life other than a solitary Gull however we did spot a Brown Hare on the way back, it raced across the field, flattened for a few seconds and was off again, the Lurcher watched intently however he was on a leash and certainly was not going to be let off at this point.
Tomorrow is back to work as normal, we have four visitors booked in through the day plus who knows what as well, we are appointment only on Saturdays however we invariably see someone turn up unannounced. (Not always a good idea as we may not be in the workshop at weekends) The Labrador is booked out again tomorrow so that is four days for him this week, next week is just a couple of days so he will get a well deserved rest even if he will sulk when he realises nobody is coming for him for the first couple of days. As an aside I managed to get a days shooting in last Saturday, a shoot I had not been aware of suddenly had a spare place on a syndicate day so I took it and had a thoroughly good day with a few birds shot as well. I tend not

to post pictures of things I have shot however this fine chap was just one of those nigh on perfect shots, he came quartering in from the left at a good height, I mounted the gun swept through him and squeezed the trigger. A flurry of feathers seemed to hang in the air as he fell to my right a few paces away and he came home with me for the pot. My father told me many years ago never to shoot something unless I was going to eat it and although I cannot always apply this rule I always keep it in mind. As a final note this should be with me in the next couple of days, a 7mm Pinfire revolver.
manufactured in Belgium in the 19th century it is of an obsolete calibre so can legally be held without a certificate and will probably end up on the desk as a talking point although I will strip and lightly clean it first. I must admit to having little interest in Pinfire revolvers however this was was too cheap to pass over, it will be interesting to see if the pictures I have been sent are a true indication of its condition. I did not ask about the bore as it does not really apply given it is of an obsolete nature however I must admit to being curious :) CAD work beckons so best get on.
Comments
Doubles Published Date : November 14, 2017Author : davidCategories : General stuff, Machine shop
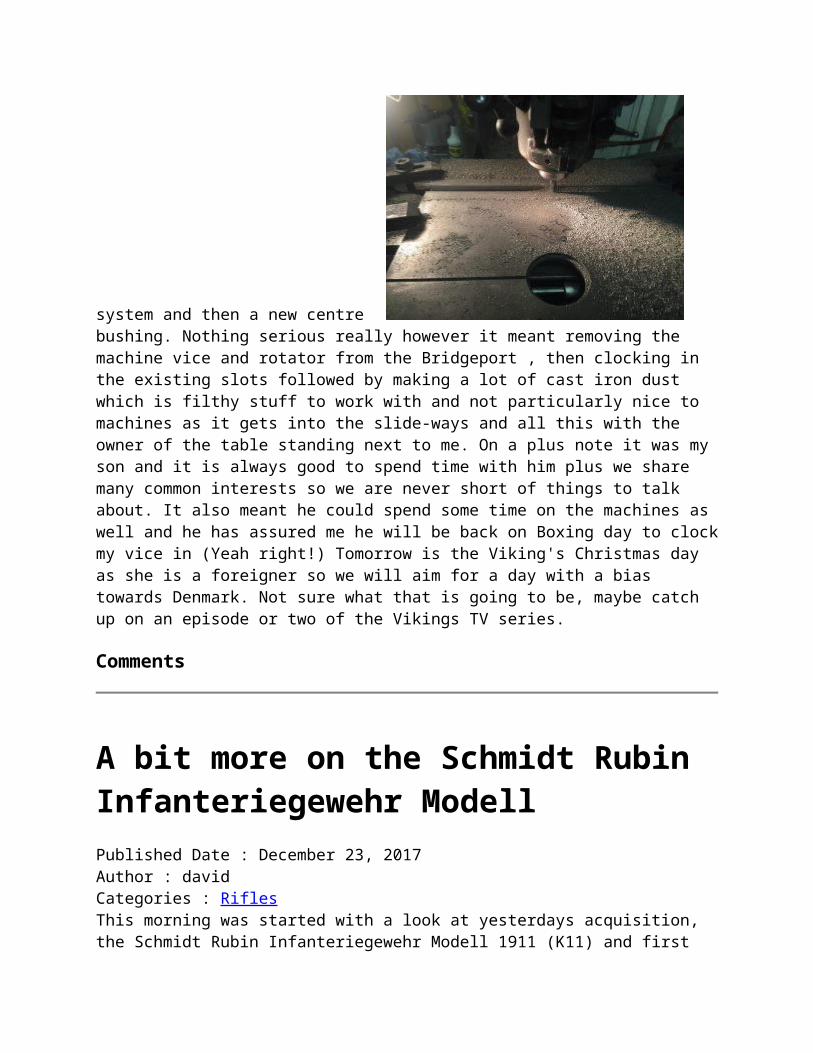
The Labrador is out again tomorrow, he is getting more shooting in than I am right now, he is booked to go out three times this week, it was twice last week and I think twice again next week. No wonder some of the local folks refer to him as 'Rent Boy' although it is slightly inaccurate as I certainly would not consider charging for him to do what he loves most, retrieving and picking up birds. Monday he apparently surpassed himself by bringing back not one but two Cock pheasants in one go, I always thought he had a big mouth after he managed to fit a ballcock from a cistern in it one day! On the subject of doubles I have been working on a pair of 12 bore Berettas recently, and Sunday we took them out for a road test against some simulated Grouse (Clays) So with my trusty loader and a quick lesson on how to conduct myself with two guns the clays were launched and I started shooting, as quick as I fired the second barrel another gun was placed upright and directly in front of me and I found it remarkably intuitive to raise the gun, thumb the safety off, shoot again, repeat and repeat. I had absolutely no idea how tiring it was going to be and combined with my stint at loading the doubles I was positively tired by the end of the days shooting however I was equally happy as this was the first time since my eye operation that I had been out shooting. I had mentally allocated myself a four week period to allow my eye to get over the surgery performed on it and it certainly felt good on the day, I could see the clays and even managed to hit some of them. All in all a brilliant day right up until the moment I woke very early Monday morning feeling like someone had thrown sand in my eye, I crept out of bed, threw some saline solution in my eye, some Paracetamol down my neck and felt thoroughly wretched until I managed to doze off a few hours later, just in time to get up and get ready for the Labrador to be collected and head off into town to have my eyes checked at the Opticians, the appointment had been made three weeks earlier and I was not totally sure of what to expect as I peered at a bloodshot eye in the mirror. Luckily he gave me a clean bill of health, assured me the Cornea was intact and I was fine to carry on shooting. He always strikes me as a decent sort and the Viking who was downstairs said they could hear us laughing, with that we left and headed home via the local bakery so despite a somewhat battered eye life was OK. Today I feel a lot better and the eye looks to be mostly recovered however I will treat it as a warning and try to remember not to shoot so many cartridges off in one go next time. Lathe parts are starting to arrive, today was the collet chuck and fine adjust back plate plus a load of 5C collets to cover a range of material diameters. I had not realised quite how heavy the thing was going to be, certainly not something to drop on my foot, although I would rather it hit my foot first as opposed to a concrete floor if only to break its fall. The ER16 collet chuck along with 1,0mm to 10,0mm collets also arrived, these are for one of the tool holders and are for a specific project I have in mind for the new machine, they will also be handy for CNC tapping and drilling operations. I went for Vertex and have great hopes for them, not absolute top of the range however certainly reasonable enough to prove a theory. Tomorrow should see a load of tool holders arriving and no doubt other stuff that I have already forgotten about.
Time for another Gun dog picture, I had a T3 in for a chop and thread and laid it on the raised section whilst I went off to grab the Bore scope from the armoury, on my return the Lurcher had taken up station alongside hence the picture. I must admit to being very impressed with the bore of this rifle which is chambered in .243

Winchester. Given its slightly tatty appearance I had half expected to find a fire cracked throat and bore however it was bordering on pristine, someone has certainly left a decent time between shots so almost certainly a stalking rifle. I will screw cut it 1/2" x 20tpi which should give the owner a good range of sound moderators to choose from, now all I have to do is persuade him to take the Lurcher or maybe not as it would probably not go down particularly well with the Viking. On a final note we fitted a new DAB radio thing plus speakers in the workshop today and it appears I can send music to it from my mobile 'phone so to prove this I stuck some tunes on the 'phone, connected it to the new thing via Bluetooth and hey presto, I can play whatever I want and stop and start it without ever going near it, the wonders of the modern world and all at my age as well :)
Comments
Today I am mostly spending money Published Date : November 10, 2017Author : davidCategories : General stuff, Life Map, Machine shopWe have another machine due in soon and this means a load more tooling... Today I ordered a new D1-6 fine adjust collet chuck, a complete set of metric 5C collets with 0,5mm increments, the rack to suit, plus a precision ER16 collet chuck and collets. Last week it was tool holders and next on the list is a third party CAD-CAM package so the new machine can be hung on the network which saves wandering around with a USB key or similar. of course this does mean getting to grips with an all new 2D CAD system however I already regularly use three 2D and 3D systems so one more should not be a problem and is more than made up by the ability to import DXF files and convert to enable upload direct to the machine. Next week will be interesting as we need to start clearing racking and work benches along with some machinery to make room for the new machine to come in. Luckily we will be able to maintain Lathe and Mill capacity during the move around however I will not have a work bench for maybe three days and the polishing and grinding stations will be ripped out to allow access as will both the horizontal and vertical band saws so I will make sure I have the materials cut for next weeks work as best I can as I really do not fancy quality time with a hacksaw! The beating and picking up season is well on now, which means I am out on a Saturday thrashing hedgerows with a stick and dragging mud around whilst the Labrador is out again next week on three days. Unfortunately we never seem to be together as he works with his litter brother and breeder on different shoots to me. Not that I mind really as I know he is being well cared for, is getting lots of exercise and most importantly mental stimulation and the opportunity to show off his superb nose for birds. Downside is he absolutely hammered by the time he gets home early evening and we tend not to see him until breakfast next day plus it is a great refresher course for him so he is ready when we both get out together to shoot on a couple of days next January. I am looking forward to it and I
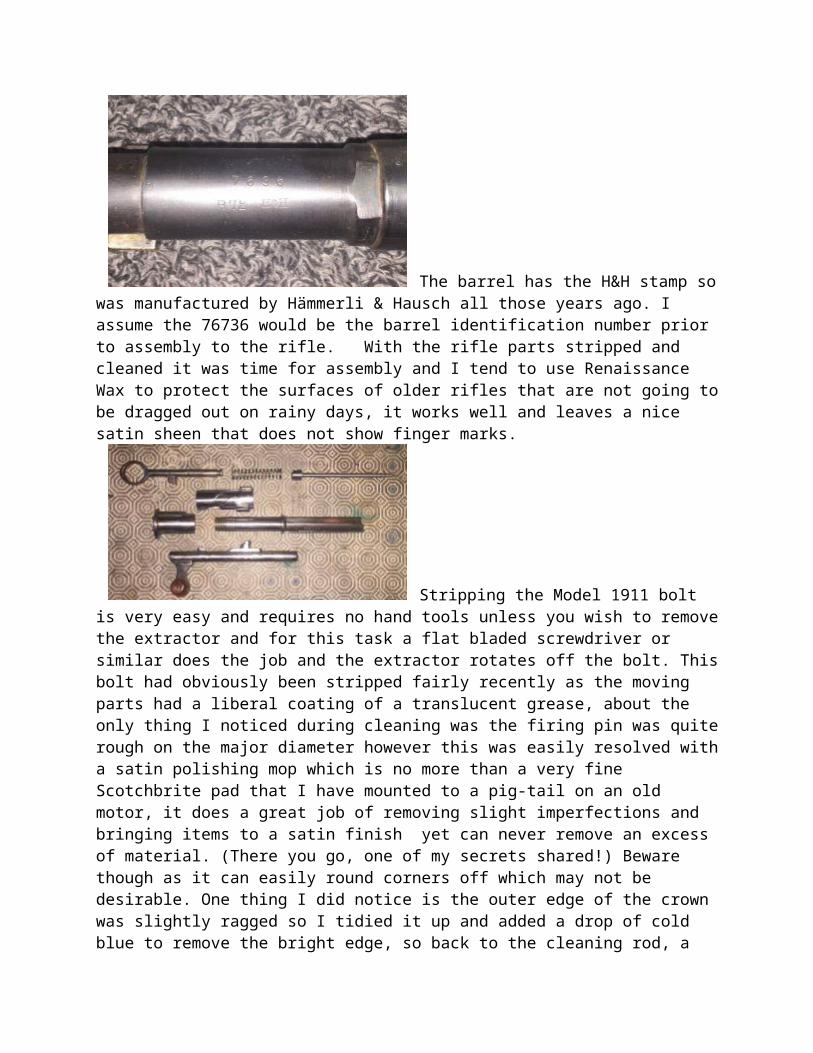
know he will love it as well. Here he is already looking lean and attentive albeit scratches under his left eye. I can always tell what he has been doing by checking the inside of his ears, if they are scratched he has been in the thick of it :) A final small rant, why do on-line shops set their shopping cookies to expire after stupidly short time periods, I will sometimes add items to the basket then leave it open until I can complete it during the evening and twice this week I have lost complete lists of items I was about to order. Grrrr.... Back to work.
Comments
Beretta Ejector springs Published Date : November 3, 2017Author : davidCategories : ShotgunsI have been asked in the past why I change both ejector springs on a shotgun if only one is sticking, so this is a quick post to show the difference between new and old Beretta 686/687

ejector springs and plungers. The new springs and plungers are at the bottom of the image and there are four because this job was two matching 687 12 bore shotguns and you can clearly see the difference in length between old and new however look closer at the old springs and you will see bright areas on the coils, this is where the springs have deformed and started to compress ultimately leading to sticking ejectors. In my experience if one spring has gone the other is not far behind and the last thing you want is to be fumbling with a stuck case with a dozen birds above your head. Also you ill see a significant difference in the speed and trajectory of ejected cases when using an old and new spring so I just swap the pair and save the owner from potential problems at a later date. Why swap the plungers at the same time, well they are usually worn so best to bin them and do the job properly.
On a separate note I found some of these the other day. Sloes, the fruit of the Blackthorn which is my best friend at this timer of year as I use the fruit to make Sloe Gin and now have enough Sloes to go with three bottles of Gin. Hopefully they will be ready to drink around this time next year. There is a downside to the Hawthorn and the scientific name gives it away 'Prunus Spinosa' - It is prickly stuff and a nightmare to deal with if it is in your way when you are brush beating and I can think of a couple of places with some particularly prickly specimens awaiting the tired Beater at the end of the day.
Comments
David Try John Knibbs http://www.airgunspares.com/store/search.asp - they should be around a fiver each plus postage. If you get stuck shout as I can order them direct from the importers. /d

Andy vale Can you give me a website to purchase new ejector springs on berretta silver pigeon 20 bore pls
New tools and tapers Published Date : November 1, 2017Author : davidCategories : General stuffThe tooling and other necessary parts for the new lathe are starting to arrive and first in the post was an MT5 live centre which is quite a lump, certainly bigger than I am used to which has made me realise I need to allow for the location of some racking local to the machine that will hold items such as Tool holders, the chucks I will be using including a PB 3 Jaw, a PB 4 jaw, a Collet chuck that will probably be a Crawford and finally a PB Setrite 6 Jaw. Seeing as I am buying a Harrison lathe it seems only right and proper to stop with British products as much as possible. One thing at the front of my mind is chambering and screw cutting with this lathe and as it is a 'Teach CNC' I can hold programs for individual components
Comments
Another Seal Dog Published Date : October 21, 2017Author : davidCategories : Life Map, Machine shop
This sorry looking thing that is doing its best to pass itself off as a Daily Telegraph RSPCA advert for maltreated animals is the Lurcher. We headed off to a very windy coast late afternoon and at about 600m out across the Salt Marsh he turned tail and quartered off across the remains of the Samphire and Sea Lavender where in the distance he threw himself down with obvious delight and proceeded to roll around for a good while in something not particularly nice. A youg dead Seal that had obviously come in on a tide a while ago, in fact a long while ago and wow does he smell right now having done his best to
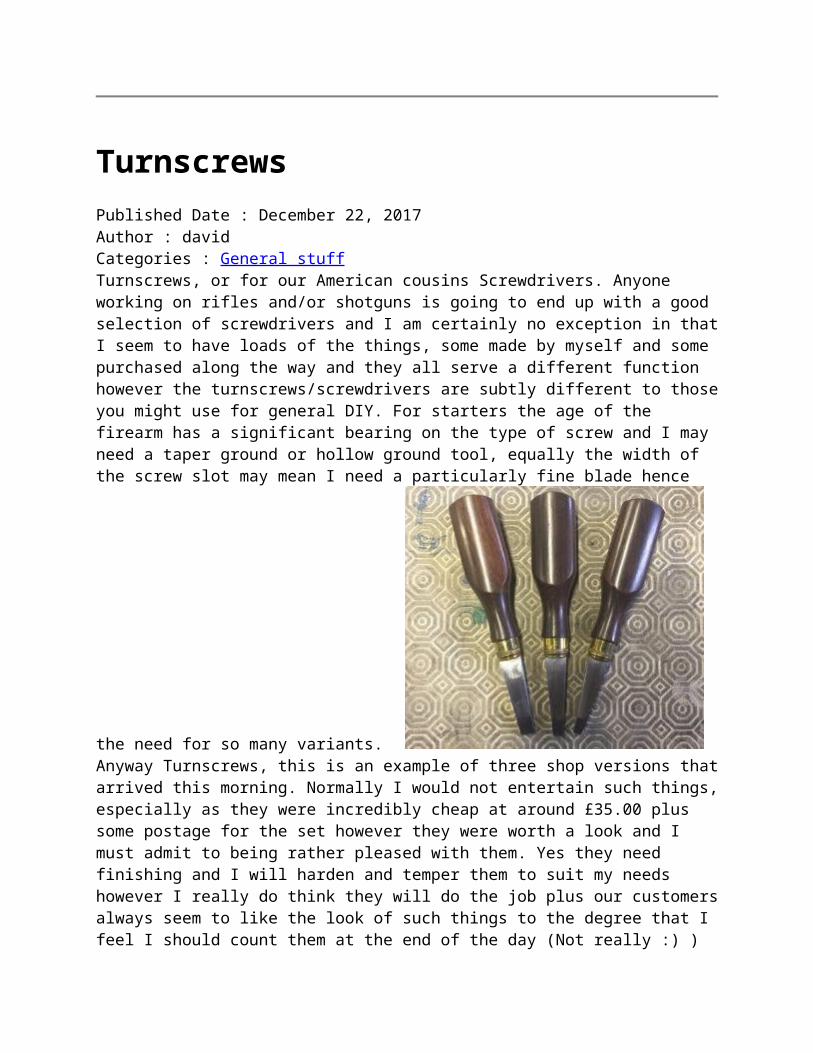
cover himself in its less than palatable remains. The joys of having a Lurcher with a keen nose. He has since been swimming in a couple of creeks been washed in clean water, wiped down and yet the whole house has the faintest hint of something from the sea to it. I remember the Labrador doing it a couple of years ago so I know the smell will not last ling, however until then.. It has been a busy week, in fact a busy month and we had to squeeze in things like an eye operation for me, I am not very comfortable with a new -10.0D implant in my right eye and can wonderfully well, of course the real test will be with a rifle however that is still a while off as it is only a week since the operation. People assured me I would b a walk in the park however I felt rather fragile first evening with a gritty eye and opaque vision however things returned to normality over the next 2-3 days and now I really can see well. We drove home in the dark this evening and the halos and flashes in my vision I had been warned about did not manifest themselves which is a good sign so I really hope my eye will stay like this for some while. We had a rush job come in, a couple of shotguns that needed the fore-ends tightening and a good service amongst other things and they went out same day which pleased the chap waiting to return them to their rightful owner (I really cannot share any more on this subject) It was a pleasant change to work on shotguns again and it was not until afterwards that I realised I had not photographed them, something I used to do for every single firearm I worked on, I guess I am beyond such things these days. On an exciting note we have decided to add another machine to the workshop, this time it will be a lathe with a larger spindle bore and will be a semi- CNC with a rather handy 1250,0mm/49.0" between centres. Of course this means an investment in more new tooling... so is life and it does give me a larger capacity manual machine with the ability to run details such as threading, crown profiles and barrel profiling by CNC so the best of both worlds. Also apparently I will be able to design and programme off-line and then upload the jobs via my PC although this does sound like a perfect job for my Laptop which was replaced with a workstation with a larger screen and more memory not so long ago. Of course this does mean we have to find space for another machine of significant proportions (To us at least!) So I spent the first half of today looking at multiple layouts for the workshop and right now I getting close to where I need to be with room to move around and right now nearly everything in place other than some racking and the 300,0mm rotary sanding station. The good side of such layouts is they are all done on 2D CAD and I can easily switch to 3D modelling if needed so no more rubbing our pencil lines or screwed up pieces of paper in the bin, in fact it is yet to be printed which must be a friendly way of doing things. Exciting times indeed :) One final thing, I am about to start on a new run of our OAL gauges and this time they will be all stainless so no more 6082T6 barrels or handles. As far as I know these re the only production all stainless and guaranteed for life OAL gauges available :) Time for bed.
Comments
Feeds and Speeds Published Date : October 12, 2017Author : davidCategories : Life Map, Machine shop

This is a first for me, I managed to shatter a 7mm Gun Drill this morning, a 300,0mm carbide tipped through coolant job that has not had a great deal of use. I was advancing it as usual when at around 80,0mm in there was a slight rattle and the carbide end tip sheared off so that was an expensive start to the day. Luckily a replacement was a quick 'phone call away and the replacement will be here by mid next week. It was the same feed and speed as usual, the only difference was the coolant and this is not the first issue I have had with the new system. The coolant itself works well with good cooling and lubricating properties however it seems to leave a slightly sticky residue and I can feel it when I slide the tail stock to a new position. Very odd and I have tried it at different mix ratios to no avail. I can see my self going back to a neat oil system at this rate. Tomorrow is a day off for us however normality will resume this coming Monday :)
Comments
A new barrel for a Marlin Published Date : October 4, 2017Author : davidCategories : General stuff, RiflesOne of yesterdays jobs was a re-barrel for a .357Mag Marlin 1894. The previous barrel was 24" octagonal which are impossible to find here in the UK however I did track down a 20" octagonal as an alternative which was handy and meant the price could be kept to a sensible level.
First job was strip the rifle and drop the barrel off. The Marlin has a fairly coarse (12TPIx0.779") square type thread which means barrels usually come off fairly easily. The trick is to hold the barrel securely and get a decent grip of the receiver. I use a parallel sided action wrench I built a while ago for this sort of job and protect the receiver with
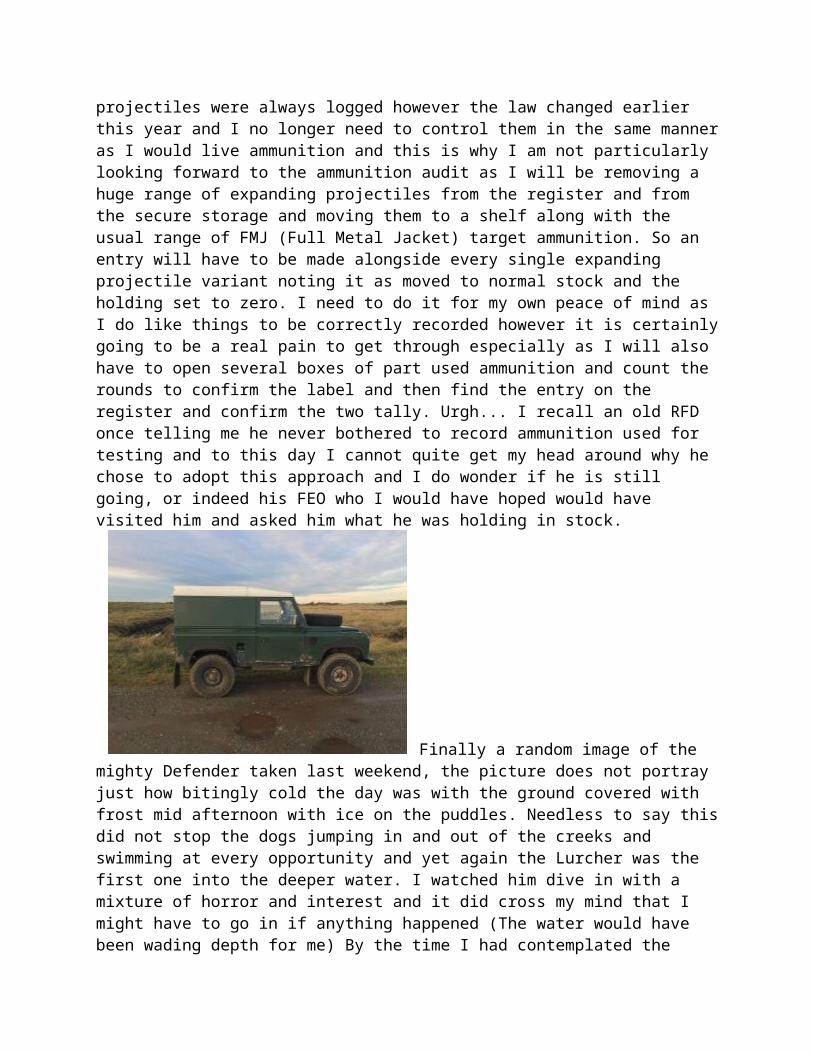
masking tape. There is always the potential issue of twisting the receiver or marking it so some care is needed at this stage. This is the receiver separated from the barrel, note that is has not been fully stripped as I want to keep as much support in the receiver as possible and this approach seems to work well however you do need to be mindful of the lifter/carrier position when doing this as it will be flopping around. Next job is strip and clean everything and this particular rifle was certainly in need of a good clean! I usually pass all the parts to the Viking and she does a good job with the help of Acetone and cotton buds amongst other things. The parts are then lightly oiled (I use Browning Legia for
this) and are ready to be assembled. Time to fit the barrel, here you can see some witness marks I have added although I always finish the job by eye, there would be nothing worse than peering through a set of sights that are canted to one side or the other! These barrels are pre-fit in theory however you may need to take a couple of thou off the shoulder which will have an impact on head space so make sure you have some gauges handy before undertaking this sort of work.
This one head spaced perfectly which is always good and here is the finished item ready for testing this coming weekend.
Comments
Garden finds Published Date : September 28, 2017Author : davidCategories : General stuff, Machine shopIn the ongoing quest to remain dry with the new flood coolant system I had ordered a screen and an A4 lump of acrylic and fitted it this evening. Hopefully the cut out will enable the compound
slide to be used at any angle, as it is attached to the tool post by a 50,0mm magnet it is easily removed and the tests with a piece of cardboard to determine the optimum size and location should keep me reasonably dry from now on even though I have just about conquered the optimal feed nozzle location. The Spider is in ready for a couple of bolt jobs first thing in the morning, after that I have an hour or so on the Mill and then it is back to rifle and shotgun work. I am always interested in older cartridges and a
neighbour recently handed in this garden find, a Winchester Arms 45ACP round in remarkably good condition. With the head stamp:
WRA Co .45ACP

Given the markings I suspect this will be American 'Lend-Lease' ammunition as my understanding is Winchester focussed more on such production although not exclusively. What it was destined to be used in is a bit of a mystery as about all I can think of is the M1928 Thompson machine gun as I am not aware of the 1911 being in general military use in the British Army. I guess that is one mystery I may never solve. I will give it a careful clean with some bronze wire wool when I get a moment and see if any additional details are revealed. This particular garden has been the source of some interesting finds including .303 Incendiary and it does make me wonder how such things ended up in such a location, luckily he will come and find me when he finds such things :)
Comments
Flood coolant continued Published Date : September 27, 2017Author : davidCategories : General stuff, Machine shopWe seem to have had our fair share of walk in customers today. It might sound strange that I should comment on such visits however our preference is always by appointment so we schedule such visits whenever possible, however it always good to see long time customer friends and this afternoon was no exception so the kettle went on as I finished off the job in the lathe and sat down for a chat. It was at this point that the Viking pointed out the majority of the contents of the coolant tank were now on the floor of the workshop. It brought new meaning to the phrase 'Flood Coolant' Once the coolant had been mopped up and things for the most tidied up we took a closer look at the tank and spotted a small hole at the bottom. I must admit I had not paid attention to the tank when it was cleaned out prior to the new coolant pump and coolant change however I had not had issues with the previous system and in fact had drained out a full tank with the new pump prior to going to the new stuff so somewhat wrongly assumed it was OK.

The problem was how to effect a temporary repair to get things going and it was our visitor who suggested silver solder and even better he undertook the task and here is the tank with the small hole plus some suspect pits filled and the tank topped up with clean water. I will check in the morning and if all is good add the soluble oil and we are back in business for the time being. Long term I need a more permanent solution however fingers crossed it will last until I have decided on what to do next. On a final plus note I am now clean again after the afternoons antics and looking forward to some food and maybe a cheeky evening glass of Red :)
Comments
Optilock Screws Published Date : September 27, 2017Author : davidCategories : General stuffWe seem to be receiving lots of orders for Optilock Screws for Sako rings. I machine ours from A4 stainless which means they actually last when tightened a few times unlike the originals which seem to be made of toffee. The last batch I did numbered 104 individual screws (13 sets) and they went very quickly so this time I will do a run of 25 sets which hopefully will keep the Sako shooters around the world going for a while. We also hold the ring to base and base screws, all in A4 stainless so you order the lot in one go if needed. I use them on my own Sako and they are a fit and forget solution and you can find them in our eCommerce shop listed as Optilock Screws, if you are outside of the EU there is no VAT to pay so an instant saving of 20%.
Comments
David Rob, http://shootingshed.co.uk/oscom/index.php?cPath=106 We have emailed you :) /dRobert Cameron Good morning, I'm yet another customer in Australia (Melbourne 3071) looking for a set of replacement optilock small ring screws (8 of) The original ones are made of shortbread and I'm nervous about the upcoming scope change! Can you please provide a link/info as to how to order some for urgent post to Australia. Thank you! Rob
South Dakota Published Date : September 27, 2017Author : davidCategories : General stuff, Machine shop, RiflesI have moved to an all new flood coolant system on my Colchester and can confirm that neither the machine nor myself will be going rusty any time soon. I have been meaning to upgrade the original system for a while and ordered a new pump and flow regulator earlier this year and decided to fir the lot this last weekend. I knew this was never going to be an easy job as I have been without contact lenses for the last few days and had resorted to a very old pair of glasses as an interim which meant detail work was a non starter unless I put my nose up against the work piece which is never good when it is spinning at 1200 RPM - Never good! Anyway on the subject of good I now have my contacts back in and actually see what I am doing. I also have a date for new lens in my right eye, Friday the 13th of October - Apparently it was a cancellation and I do wonder why :) Back to flooding which is the best description for the new coolant system on the lathe as it left me soaked for the first half day I ran it however with some tweaking it is starting to look good although I will be adding a splash screen to the front by utilising a 2" magnet and A4 sized sheet of Acrylic cut to shape and attached to the quick change tool post which should be the final piece of the puzzle to keep me dry and still have a good level of coolant. The biggest issue has been deciding where to direct the flow of coolant and I have found that directing it to the carbide cutter itself as opposed to the work piece is best for my needs. Next step is to add a remote filter housing and filter with bypass and design and build a new rotary coupling for fitting to the muzzle of a barrel for chambering. I plan on running the system unfiltered for normal machining and through the filter for chambers however that might change. I also need to move the on/off switch to the front of the lathe for ease of access and I will fit a splash proof version for obvious reasons. South Dakota - I run a system (Hitsteps) on the journal that tells me where visitors come from and the data can be displayed on a map of the world that I can zoom into for greater detail. I was looking at the map Monday evening and was pleased to see that I had received visitors from all of the US states, well nearly all as nobody has visited from South Dakota so I went back for the last 60 days and still no hits from South Dakota which has set me wondering, does anyone own a rifle in the Badlands? :) First job for today is some Accuracy International barrel thread protectors then finish off some parts for OAL gauges so I can get them assembled and as this involves some Mill work I will take a look at the Vikings Voere which has snapped the ejector off and it looks like it is staked into the bolt hence the need to mill the old one out. This is certainly going to lead to issues as I need to maintain the bolt weight as it is a blow back system so the bolt will go on the scales before and afterwards, not that

I really expect to lose a significant amount of weight during the machining process. Hopefully I can get the remains of the extractor out in one piece and duplicate it in a fashion that allows it to be held in place with a roll pin or similar. More on this later.
Comments
A Remington Published Date : September 14, 2017Author : davidCategories : RiflesI was asked to put together something based on a Remington 700 and some bits. The customer
had specified a GRS stock, inletted for a bottom metal to accept AICS magazines, a custom reflex type sound moderator and green paint so very straight forward really and this is the finished item. The barrel is a heavy profile stainless chopped at 18" and threaded to accept a custom built Barton Gunworks sound moderator. I have been using BGW built moderators for a while and always like what I get plus it is always easy to deal with Will Westlake the owner, I just send him a text or give him a call and whatever I need arrives normally a couple of days later. This particular moderator was a custom build so took a bit longer however it was still with me in well under 10 days which was perfect for my time
scale of build. The GRS stock took a bit longer and I had to cut it to accept an Atlas bottom metal the customer had supplied plus bed the action and open the barrel channel sufficiently to accept the rather hefty profile of the barrel. I added an invisible thread cap should the rifle ever be shot without the moderator and the whole job had a coat of OD Green Cerakote thrown over it including the rail and rings. Accuracy wise the rifle is superb with 155 grain factory rounds and should suit the customers needs, namely an accurate and quiet rifle for 300m work and my view is it will be equally capable out to 600m with very little effort. I rather look the look of this particular build hence the pictures and despite its apparent bulk it still comes in an at 6,5kgs so light enough to move around and ideal for prone range work. Who said Remington rifles lack style :)
Comments

A Brace of Cannons Published Date : September 11, 2017Author : davidCategories : General stuffRemember the test firing of the little cannon on Saturday? Well it was in preparation for an event at our local shooting club North Cotes Butts which is located on the East Coast of the Lincolnshire and about half a dozen miles out of the Wolds, for us it is a comfortable 25 minute drive in the mighty Defender and the club has ranges open 24/7 every week of the year so handy for testing. Sundays event as the Baikal challenge which comprises amongst other things of a variety of competitions using the club Baikal shotguns, .22LR Bench-rest shooting and new for
this year the cannon. The little cannon was set up with members charged GBP2.00 per shot so costs covered plus a little bit for the club. The Viking and I manned the cannon so to speak and the members assisting in loading then sighting and firing the cannon at a splendid model of a Frenchie. Points were awarded for shot placement with the maximum score being awarded for a hit on the magazine marked just forward of the

middle mast and just above the waterline. As luck would have it a fellow club member had his .50" cannon with him so he set his up alongside the club cannon and even attempted a synchronised firing at one point however a combination of a strong breeze and rather sketchy lighters meant we missed the mark by a few seconds. Firing commenced at just after 10:00 and did not stop until close of play at a couple of minutes before 13:00 and I was impressed both by the take up by people with queues at a couple of points. Load was 60 grains of Black Powder, a 4 finger width of fuse with some toilet paper used as wadding and a patched .682" cast ball. Looking at the 'target' at the end of the morning shot placement was remarkably accurate given the numbers of users and lack of sights and the maximum scoring magazine being solidly hit on a couple of occasions. Someone did suggest a small Tannerite charge being added to the magazine next time for maximum spectacle. All in all a great morning and the cannon only rolled off the table on one occasion so lesson learned, leave a bigger gap between the rear of the carriage and the edge of the table :)
Comments
Rifle stock and no longer in circulation Published Date : September 11, 2017Author : davidCategories : RiflesFirstly the no longer in circulation bit, well that would be me for the next seven days. I have been having a few problems with my eyes of recent and as a consequence have been to see a consultant at the local hospital who tells me things are easily fixes with a new lens in my eye. Super news I thought as I headed off to be measured up for the bit that is going into my right eye with the left to follow at some point in the not too distant future. Everything went well right up to the point when I mentioned I had my contacts in place. Apparently I should have removed them a week ago however I had not actually been told this so I am back in a weeks time to be measured up. The downside of this is I am as blind as a bat without contacts which means I am probably going to be a liability to myself if I venture onto the machines given that best I can

focus my eyes at is a maximum of my hand span. Put a different way if I stick my thumb on the end of my nose and extend my fingers my little finger is completely out of focus. I also look rather silly trying this experiment so... On a plus side we did decide to take a few days off a short while ago however it never really happened and we probably managed a day and a half away from the customer orders at best. So it looks like my week off starts around now. The good news is I can still use a computer if I put my nose really close to the screen, and I can still use my hands so I am rather hoping I can carry on with some hand sanding on a couple of stock jobs I am working on. Also handy is my vision is superb at 6" from the work piece so as long as it is
not spinning at 2500rpm I *should* be safe :) An update on the Steyr stock that had been chopped up, I have added a filler block to fill the hole that had been cut for a cheek piece and extended the length of pull by around 1.4"/46,0mm and I can always cut it back if needed, the picture is the stock rough sanded with the bits attached and some dowels in the various sling attachment holes as I will decide on what I want regarding such attachments at a later date. Next job will be to peg and glue the front section to the rear, right now that might be a job best left until I can see properly again. The glue I use is a PU foaming glue that although not he first choice of the purists certainly holds stuff together. Application is very simple, dampen one surface slightly, apply some glue to the other surface and hold the parts firmly together with dowels, screws of clamps. I learnt a long while ago that the wood is pushed apart by the foaming action if not securely held and the result is less than ideal. Also avoid getting the stuff on your clothes or hands as it is not going to come off any time soon... (I wear disposable latex gloves) I usually allow overnight curing although maximum strength is not
achieved for 24 hours. The lurid green Remington stock is starting to look vaguely acceptable to my eyes (HA!) The picture really does not do the job justice and the barrelled action finished in OD Green Cerakote is actually quite complimentary to the overall look. Yes, I know some will disagree however it is all down to taste and I am sure someone somewhere will like it although the Viking is still not 100% convinced it is something she could own. If all else fails I will source an alternative stock and this one will become firewood however I do have my fingers crossed.
EDIT - Sanding is something you do with your hands not your eyes and feel counts for more than looks at this stage. Anyway it is glued and rough sanded so copying is not so far away once I found a suitable piece of Walnut :)
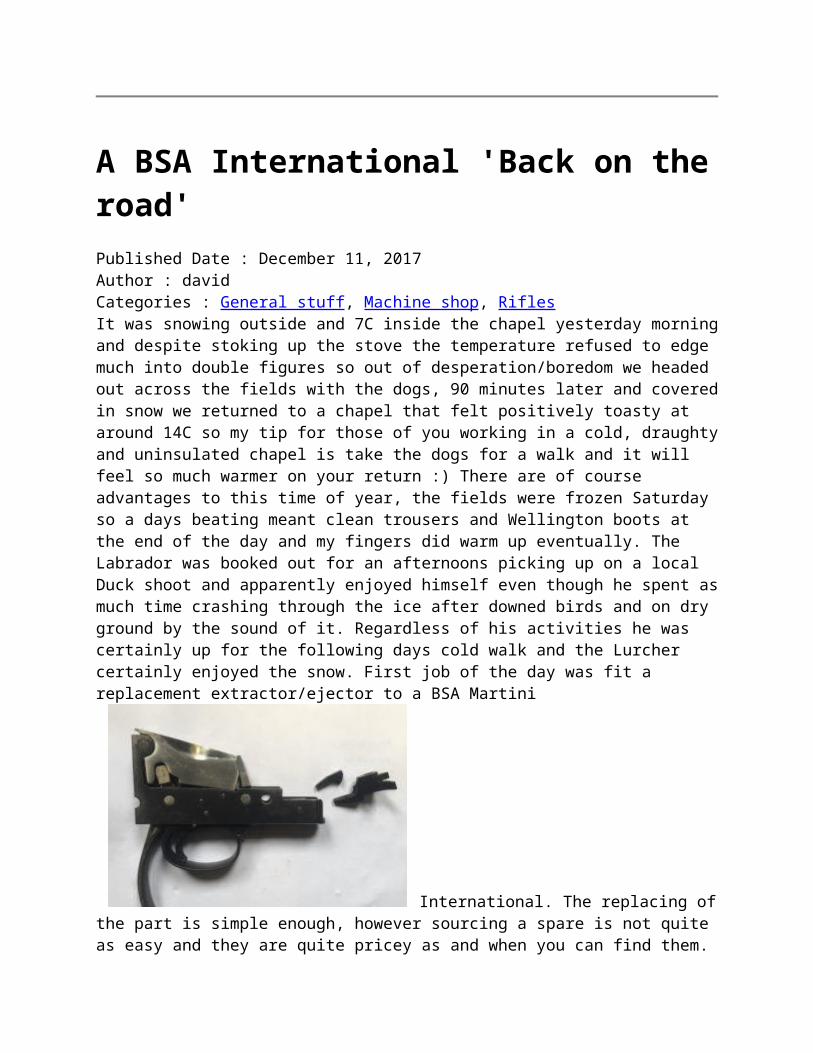
Comments
Easy Reading - The Nammo Handbook Published Date : September 10, 2017Author : davidCategories : Reloading, RiflesThe Nammo Ammunition Handbook - You need a copy of this book if you have any more than a passing interest in shooting and ammunition. Nammo say it is a 'Complete overview of Nammo’s military ammunition' and I say it is compulsive reading even if you do not shoot anything
over .308 as it lists all of the Nammo offerings from 5,56x45 through to 12,7x99 including blank, ball and armour piercing plus details of their larger offerings up to the large calibres such as 120,0mm along with some basic details including projectile weight, use and accuracy and for me is an instant reference for the more common military ball offerings. It is also an easy way of checking factory ammunition accuracy. I am lucky enough to have a hard copy however it is also available as a Pdf here: https://www.nammo.com/globalassets/pdfs/ammobook/nammo_ammo-handbook_2016.pdf
Comments
Pictures from today Published Date : September 9, 2017Author : david

Categories : General stuff, RiflesIt has been a busy day so what better way to explain than with a few pictures. First job of the day was to prepare a stock for copying, this is the Steyr chambered in 6,5x53R and it has a few bits missing. As the stock is going to be used as a pattern there
is no real need for matching the parts I am letting into the stock so first operation was onto the Bridgeport to square up a hideous cut out along the top where someone has let in a cheek raiser. This is the butt in the extended jaws and the material that looks like and old toilet mat is exactly that, a cut up toilet mat as it is nice and soft and minimises the chance of leaving pressure marks in the wood. All I did was cut back to a decent edge at either end and level the middle part up so the piece of Walnut I had cut to size
could be glued straight in. Next job was chop the rubber pad off as it has been both screwed and glued in place and I want to fit something more in keeping with the original rifle and with a length of pull of around 13.75" to 14.00" when finished. I was just getting ready to glue and screw the new butt extension in place when there was a knock at the door and the second rifle of the day arrived. I have to say I cannot remember seeing two rifles so well packed and from completely different parts of the company.
This Marlin is in for a fairly obvious reason and the new magazine tube and barrel are below the rifle. Sourcing a new octagonal Marlin barrel was interesting and no matter how much I tried I could not find a 24" replacement so a 20" will be going on in its place which means the replacement tube will have to be cut to suit. Next

job was off to the range for the Viking to test a potential rifle for herself, sadly the extractor failed instantly so that was the end of the shooting for her until she found someone with a black gun and proceeded to rattle off a fair few CCI HP Subs. I think it was a Walther built HK416 replica and it seemed very reasonable to me however I was at the range to test fire this little thing: https://youtu.be/Bb0q_akCW9E Finally it was back home, grab the dogs and throw them
in the back of the Defender and off out to the coast to get them wet, muddy and tired which they needed very little help in doing. Despite the tide being out the ground is sodden with deep puddles along the track, luckily I had my Wellington boots on. Unfortunately I had a Labrador and Lurcher as company as well as the Viking and the dogs conspired to jump in the deepest of puddles as I walked so I am nigh on as wet and muddy as they are. Yes, I am also tired after another busy week :)
Comments
A change of Header Media Published Date : September 3, 2017Author : davidCategories : Life MapHeader Media is a posh way of describing the image at the top of my Journal, The Lurcher has been swapped out in favour of the Defender in one of my favourite habitats, the Lincolnshire Salt Marshes. Favourite because although there are sandy beaches they are a reasonable walk which keeps the vast majority of people away so we can walk for 2-3 hours and not see a single person, not even from a distance. This particular spot is Howden's Pullover just North of Saltfleet which means we can always head down to Saltfleet for some Chips once the walk is done and there is no better way of restoring the balance after burning off a few calories - bring them back up with a bag of chips! If the journey is to be an adventure we take the Discovery, although the last half mile or so to the Marsh is on a badly rutted road a land Rover is not necessary however it does work well in such terrain. The downside of using a Defender and leaving it unattended is you need to make sure it is well secured, even in such a remote area.

Walking in a Salt Marsh means you need to be mindful of the Flora and Fauna and I am always very conscious of the plant life with the Sea Lavender adding a purple tint to the land, moving closer towards the water you will find Samphire although the season for it has now passed. We seldom see animals other than the Grey Seals on the beach and I never move closer than 500m to them and the ground nesting birds on the edges. It is great to get out with the dogs however it is important to be aware of your surroundings. Something else to keep an eye on is the tide as even the car park at Howden's will flood during a decent high tide so last thing to do before we leave is to check the local tide tables. I use the Great Eau as a reference: http://tides.willyweather.co.uk/em/lincolnshire/great-eau-entrance.html When you venture into the area you would see the Little Egret in reasonable numbers, Golden Plovers, maybe the occasional Marsh Harrier and there is always the Dunlin to keep you occupied. Overhead there is an abundance of Larks and I have heard the Cuckoo slightly North of Howden's. There are many other birds, too many to list in fact so the best thing you can do is go find a bit of the
Lincolnshire Salt marsh and take a look for yourself. ..and this is me dressed on a typical summers day in the Marshes. Sunglasses, a scarf and cap, oh and a dog whistle to lure the Labrador back should he venture too far, not that he will as I might have something interesting in my pocket.

Comments
It's so Green - The tale of a Walnut rifle stock Published Date : September 3, 2017Author : davidCategories : RiflesA while ago a very sad looking Model 7 chambered in .223 Remington came in. The rifle itself looked awful with a knocked around factory lacquered stock and an interesting looking bull barrel. First job was to bore scope it and one look confirmed things were grim and at best it would be a donor however as it was a Model 7 it had a shorter action than the Model 700 and as such was of less interest to rifle builders. Despite this a provisional sale was made however it dropped through so I decided to put it to some sort of use. First job was to remove the barrel so into the barrel press it went, I popped an action key into the receiver (A standard Remington 700 does the job) and proceeded to unscrew the barrel, the Viking was watching with interest and she soon pointed out something was wrong, the outer surface of the barrel was twisting! Hmm... things did not bode well for the rifle so I popped the barrelled action into the lathe and undercut the barrel just in front of the receiver and was greeted with a strong and vaguely familiar smell. Closer examination revealed the barrel was in fact a standard sporter with some tube pushed over to make it look bigger and the voids filled with car body filler and the smell was the filler heating up. With the barrel undercut and the outer tube pulled off I carried on, removed the barrel and gave everything a good clean. Under all of the debris it did not look so bad so I trued the action and then forgot all about the job for a while as we were incredibly busy with 'proper' jobs. We have been taking a few days off albeit mostly in the workshop or house so when I spotted the
stock in the armoury I decided to strip the finish and see what it revealed. Several applications of paint stripper later and some careful scraping a very average Walnut stock was revealed and with some sanding it ended up looking like this. I was tempted to re-cut

the chequering however deep down I had a feeling it was never going to really come up to scratch so it was time to test out a long held theory regarding the staining of hard woods and specifically Walnut with brightly coloured dyes, namely how does it work in practice with a rifle stock. Now fairly obviously I was not going to experiment on a good rifle stock however this Model 7 seemed like an ideal candidate so time to see what happens. Disappointingly there was some oil contamination behind the tang section and no amount of soaking in Acetone managed to remove all of the oil however the vast majority is gone now. It is not sounding too good is it? :) First job was source some suitable green dye. I invariably make most of my own stains and coloured oils however concocting something that ends up with quite a vibrant green would be problematical so I opted for Liberon Green concentrated dye.
This is the Liberon Green dye thinned to 1:25 with water. I chose a water based dye so it would not drag when I added a finish to the stock. At this stage I have a leaning towards an oil finish with some wax on top however a thinned down coat of varnish might be a good move to start the process. I print and attach labels to all of my dyes, stains, oils and finishes however I have a feeling this one will be OK without such a label :)

This is the stock starting to dry, the chequering was reasonable at best for a mass produced factory stock and as much as I tried I could not avoid losing some definition. The action will be pillar bedded only as I see no point in glass bedding such a project if the stock goes onto the stove at a later date. I am undecided on the butt pad and may even fit an adjustable for LOP and height version as I machined some to my own design a few years ago and ended up with a couple of spares. If I do opt for such a stock it will be painted black as I really do not spoil the rifle any further with shiny bits. Now you are probably wondering about the rest of the rifle. Well the barrel is a fairly heavy profile 22" stainless and the receiver has been trued and tidied up with the sharper edges blended in. It is screw-cut for a sound moderator and has an invisible thread protector. Finish is OD Green Cerakote in keeping with the stock and the rail and rings have gone the same way. Scope is probably going to be a Sightron 8-32X56 which I have had sitting in a box for a while. I will drill and tap the rear action screw to suit the standard size instead of the silly little screw that is standard on the Model 7. I am tempted to bin the floor plate and replace it with a PTG bottom metal to accept AR15 type magazines. Why AR15 magazines over AICS? Well mostly because they are a third of the price of the Accuracy International offering and give a greater capacity if I can think of a good reason including 10, 15, 20 and 25 rounds, plus I have some original Colt 20 shot magazines languishing on a shelf in the Armoury. So this is where I am right now on a Sunday afternoon, I need to let the dye dry for at least 24 hours then will carefully knock down any grain that has raised with 0000 Wire wool, the grain raise should be minimal as I have already wetted and sanded the stock several times. If all goes according to plan I might even get a chance to assemble the rifle towards the end of next week and then it is off to the range to zero it. I know the Viking has has had a hankering for a Zombie green rifle for ages so she may even humour me and give it a home...
Comments
One for SuperMoto fans
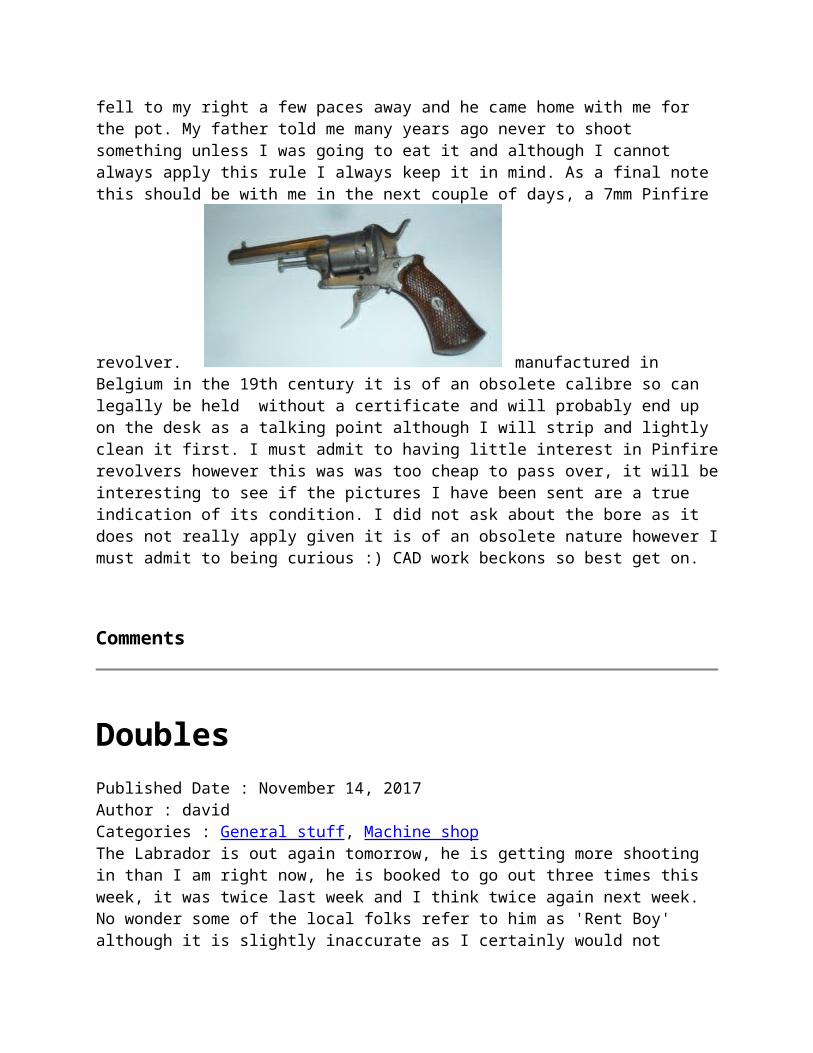
Published Date : September 2, 2017Author : davidCategories : Life MapCertainly not shooting related however... I was lucky enough to spend half an hour on a street legal factory Husaberg FS 570 with all the factory go fast bits yesterday afternoon. Wow, I had forgotten just how well 'Bergs go and this was my first time out on a 70 degree engine jobbie. Despite looking weird it handled superbly with reasonable power although it tails off at the top end, however it was quite capable of lifting the front wheelin the first few gears with very little effort. The 570 was fitted with a full titanium Akro system so it was pleasantly anti-social when nailed and shook its head around in a quite controllable manner, I actually found myself laughing which is rare for me on a motorbike these days. In fact the last time I laughed like this was on a RRT Fireblade which had appalling bad manners and did its utmost to bite me at every possible opportunity. I ran a 640 SM Husaberg for a while which got close however the 10 hour service interval and vibration coupled with a knife edge like seat meant I kept journeys to a maximum of 25 miles... Thinking about it, the only downside of this 570 was the factory radial front brake that was not up to my previous 6 pot Berringer.
I have ridden a few 'bikes around our local Wolds lanes however they have invariably been compromises either aimed at fast road use or off-road and as I have no desire to ever ride off road again, nor attain licence robbing three figure speeds so the SM was absolutely ideal and still capable of some serious performance and the ability to shame the current glut of superbike types around here. Hmm... was it wrong to take one out so late in the year and do I need another SuperMoto at my age?
Comments
Happy to the Holidays :)

Published Date : August 28, 2017Author : davidCategories : General stuffI think it was Valentino Rossi who used the phrase "I go Happy to the Holidays" and it does rather sum us up right now. We have worked virtually every single weekend for the last three or four months trying to get on top of the backlog of orders and I think we are about there which is handy because starting tomorrow we are having a few days off. We have no real plans as such, just some time away from machines and emails and hopefully do some reloading for the more obscure of our rifles and get out and shoot them. I have a Lee Speed that I am itching to try out having only put a couple of rounds through it and I have some 200 grain .314" cast bullets that should get the job done. We will resume normal working practices week commencing Monday
4th September. One of today's jobs was to open the bolt face of a .223 Tikka T3 to suit the 308 cartridge, the T3 is always a nice bolt to machine and I use a stubby solid carbide micro boring bar so no chatter. This one clocked in with no discernible movement on a 0,01mm lever dial indicator so I was happy. It is one of those jobs where it takes as long to clock the job in as do the machining and I used a .308 Go-Gauge to confirm the fit. Probably the hardest part was fitting the extractor and ejector back in afterwards however with the Viking to hand it took very little time and I am sure the trade customer will be happy. I have been building a .223 Remington as a project and this afternoon as the mill was set-up for stock work I took a few minutes out to machine a larger channel for the heavy barrel that has been used for the project. I have no idea what we will do with the rifle when I have finished it however I am looking forward to trying it out as it is a while since I owned or even shot a .223 Rem and who knows, the Viking might even take a shine to it. We have been on rifle work for a while now and today was no exception and I can still smell Rosin from removing and fitting barrels today. Rosin has an odd smell that seems to linger no matter what you do, on a plus side it gets the job done and I seldom have to go above 5 Tons pressure on the barrel press to crack actions off. Roll on the holiday :)
Comments

Why is it? Published Date : August 20, 2017Author : davidCategories : General stuffWhy is it when you build a rifle for a customer things are cut and dried however when you start talking about a rifle project with your wife things get confusing... She wants a zombie hydrographic stock job, I want a nice oiled walnut finish. I want a drab green barrel, she wants black...
Comments
The Hummingbird Hawk Moth is back Published Date : August 17, 2017Author : davidCategories : Life MapThe Viking called me over this morning to watch a Hummingbird Hawk Moth on the Phlox at the rear of the Chapel, I last spotted one in September 2015 with no sightings last year. I find it fascinating that these moths seem to find the Phlox which is a good incentive to not dig it up :) Now back to the machines...
Comments
Another Gibbs Published Date : August 14, 2017Author : davidCategories : RiflesThis rather sad looking rifle (Top in the picture) Has come in. Another Gibbs however this time it is chambered in .256 Mannlicher/6,5x53R which is very similar to the 6,5x54MS other than it is rimmed. The rifle itself is a Model 1895/Dutch Mannlicher and is actually marked up STEYR 1899 which is correct as Steyr manufactured the M1895 until the early 20th century.
The action and barrel are reasonably nice however you may well have spotted a minor issue with the stock, it is missing a rather important part. The story behind it is the stock had split so it was chopped and the front half sent to a stock maker here in the UK who understandably pointed out he needed the back half as well, so that was also forwarded to the stock maker neatly chopped and consequently missing around 25,0mm/1.0" At this stage the stock builder declined the job so I stepped in and bought the barrelled action only. Luckily I know the stock builder and with a quick telephone call he agreed to ship the parts to me plus a block of Walnut to effect a repair. The plan is I will add a section which will be dowelled and glued in place and shaped, I will also extend the Length of Pull to around 14" without the rubber butt pad and the stock can then be copied from a nice piece of Walnut that I am yet to source. I will use my take down Gibbs 6,5x54MS as a reference and hopefully should end up with a reasonable rifle. The good news is I already have the Dies and reload data for the cartridge and a few hundred 160 grain RN bullets so reloading for it should not be an issue and it will make a nice companion rifle to the other Gibbs. The M1895 Action is typically slick and this time feeds from an En-Bloc fed magazine as opposed to the later rotary type magazine. The barrel bore itself is quite crisp and the bore scope revealed plenty of life, the downside is the barrel has been chopped to just under 18" Argh... I did say it was rather sad looking. I think the important thing is to get it into a new stock and at that point I can make a decision on the barrel, ideally I need to fit something in the 26" length range I may well fit a period telescopic sight as I have something suitable and in keeping with the rifles age already to hand although I do prefer the original express sights the front is now missing and the rear has been butchered. I do like a challenge and it was an incredibly sensible price :) First job today was an hour on the Mill, I do like Bridgeport's and the one we have here gives a superb finish. After that it was chop, thread and crown the barrel for a .223 build and I also added an invisible thread protector if only to amuse the Viking as she likes that sort of thing. It is a heavy Palma barrel, cut to 21.75" Bullet of choice will probably be in the 70 grain range with a reasonable dose of N140 behind it should see 3000fps or a bit more. I have a feeling I will be on rifle work for a while now as we have so many jobs to finish off over the next few weeks.
Comments
Using your SHED Bump Gauge Published Date : August 7, 2017Author : david

Categories : ReloadingI have always maintained that I never have any idea what the next telephone call will be about so I surprised me to receive two virtually identical calls from customers within an hour of each other this morning. Surprised me so much I guess I should put something down on paper or whatever this media is. Shooting SHED Bump Gauges in their simplest form are a means of comparing the distance from a cartridge case head to the shoulder across a batch of like cartridge cases. The gauge works on the same principle as the other gauges in our 2P range in that it has an upper and lower tool that interlock with each other to precisely align and are used in a Vernier type calliper. Once aligned the comparator can be closed and zeroed
(If Digital) and from this point onwards cases when inserted can have the distance between the case head and a pre-determined datum on the shoulder of the case accurately compared. A bit like the image alongside. This process enables you to set your sizing or bush bump die to exactly the shoulder setback you require. The issue is how much do you require and how can you check it? Well the clue is in the name, this tool is a comparator so it compares dimensions as opposed to giving an absolute measurement, so how do you measure the exact distance between the chamber shoulder and bolt face which is what you need to know if you are to determine how far back you need to bump your case shoulder. Well you could measure a factory case, make a note and then bake sure the shoulder of all of your reloaded brass from this point onwards emulates the factory case and this does work however you are now dependant on your brass manufacturer producing incredibly accurate cases and your master case may have just come out of tooling with half a million cases already produced. Alternatively you could fire half a dozen rounds, clean them carefully and then run them through the comparator to see how they vary from each other and from a factory unfired case. All well and good in theory however different makes of brass spring back at different rates post annealing, add a few firings to the cases and the brass has hardened and things get even tougher to figure out. So this is what I do. Fire a case and give it a wipe over to remove any carbon or dirt. Now thoroughly clean your rifle barrel and chamber and don't forget the bolt face either. Now remove the firing pin, this is usually just a matter of removing the shroud first and the pin and spring should come out in either one or more parts. Now replace the bolt minus the spring and pin and close it carefully as if you were chambering a round, you should feel no resistance as such, try it a couple of times to get a feel for what is happening. Now chamber your clean case carefully. Because you have removed the firing pin it should close and feel exactly as it did with an empty chamber, if this is not the case and you meet resistance the case shoulder is too far from the case head/bolt face so resize it and try again. At this point you are probably wondering why you are doing this with a fired case, well in theory it is going to be a lot closer to your chamber dimensions so it makes a good starting point. Assuming you now have a case that will chamber without resistance remove it and add a small section to the case head face (The bit that comes in contact with the bolt face) Repeat the process and close the bolt, if you still do not feel any resistance add a second piece of tape and check again. At this point you should feel resistance when closing the bolt because you have increased the distance between the case

shoulder and base of the case (Head) Now you can pop the case into your Bump gauge and measure it, now remove the tape and measure it again and you now determine how from the shoulders your fired or sized brass is. If you are wondering how thick your electrical tape is simply fold a length back on itself so it is stuck together double thickness and measure it using a micrometer or a Vernier calliper. The tape I use is quite thin and gives 0.0045”/0,11mm when doubled up so a single thickness is going to be around 0.0025"/0.55mm. Check yours to make sure it is not excessively thick. TIP - Duct /Gaffer Tape is probably not the ideal choice for this experiment! So now you know what the distance between your bolt face and chamber shoulder albeit in the form of a case with a bit of tape stuck to it. Keep this case as it is your initial master. If you find your bolt handle closes without resistance with the tape missing yet you feel reasonable resistance with a single piece of tape added and the tape thickness is 0.0025"/0.55mm halve this distance and you have a theoretical shoulder position. Now you need to decide how far you want to set your shoulder back and I am not going to go into the subject as there has been far too much written on it already. My preference is around a couple of thou or slightly less however your choice will be based on your chosen discipline and the number of rounds you shoot between firings amongst other factors. Once you have this determined adjust your reloading die to give the required bump by setting back slightly and checking until you have the distance as and keep this case as it is your new and final master case. Now it is just a matter of referring to your master case when you next set the shoulders back, to do this either measure it from a pre-zeroed SHED bump gauge or pop the master in the gauge and zero it, then any discrepancy is shown as hopefully single figures. I hope this makes sense!
Comments
Winchester 1894AE .357/.38 Billet machined lifter Published Date : August 5, 2017Author : davidCategories : General stuff...and here it is, the Shooting SHED Winchester 1894AE .357/.38 Lifter
machined from EN26T - I have marked this this one SHED 0001 so I know it is the hard prototype. All future versions will be rumble de-burred and will have something to denote they are from the SHED on them. I cannot do the

rumbling in house although I guess I could always bung then in my old tumbler although I doubt Walnut medium would do much in less than a week or two, alternatively I could use the ceramic media that is reserved for Moly and HBN coating however I also doubt they are a match made in heaven, so I will outsource this operation and the plan is to ship end of the week give or take a couple of days. This is a really bad video of the lifter in action, the lighting was poor, the Viking was holding my iFone, there was no stock or barrel attached, erm... Do I need more excuses? Anyway you should get the idea. https://youtu.be/FxdFtHGOHlY I am pleased with the result and it has taken more hours than I should count, cutters have been burnt out, tweaks added, soft parts machined which were so soft they scuffed up and all the other issues you see when prototyping something for the first time. There will be an initial run of 25 units and after that I will have a think. Everything is set up now and the process learnt and I did say I would never do another run of F/TRbipods and that was two builds/upgrades ago :) I must admit I like doing small runs of items and then moving on, I would hate to think I was tied into a single product or a very limited product range. On the subject of videos here is one of our 2P comparators. To use the comparators I push the two ends together first then insert them loosely into the calliper jaws, close the jaws so the comparators are pushed firmly together and then nip the grub screws up. The grub screws are fully backed out to start with and are only thereto make very minor adjustments to alignment if the calliper jaws are slightly bowed. The thumbscrew are then nipped up and the display set to zero. If you look carefully there is a slight gap between the major diameters when fully closed, this is intentional as it enables the comparator to measure from the faces. https://www.youtube.com/watch?v=aRWbpJlopC4 I should have kept the display in the picture so the return to zero could have been seen. These comparators always return to zero and once set-up simply insert a built, loaded round or cartridge case dependant on what you want to check or batch and off you go. This does make me wonder if I should start a series of videos to better explain our products, I always like to think the operation is self explanatory however I do design them so I have a head start over most people. We do include instructions for the majority of products if that helps any :)
Comments
Winchester 1894 .357Mag/.38Spl machined lifter Published Date : August 5, 2017Author : davidCategories : General stuff
Comments

Another batch of BSA International 'Scope rails and brackets Published Date : July 24, 2017Author : davidCategories : Machine shop, RiflesJust finished and back from the Anodisers are my latest batch of BSA International 'Scope brackets and Rails, all ready and waiting to take you an your International onto the small bore bench rest circuit. Eagle eyed readers will also note it is something a bit newer for a change even
if it is for something old... I have deliberately left the rail a bit longer on this batch of BSA International brackets and machined them with a longer support underneath, they are also slightly lower than the earlier builds for a sleeker look yet they still leave you loads of room for a large 'scope objective without having to resort to ridiculously high rings. The longer rail means they can be cut to length or left as supplied at the users discretion. They are supplied with screws to attach to the receiver plus a spare.
Of course you know what this means? It means you have absolutely no excuses for not hauling your old and trusted BSA International out, frightening the spiders away and fitting that spare 'scope to it ready to compete in your clubs small bore bench rest competitions. It also means you now have the potential for an incredibly accurate bunny rifle with night vision or normal glass. Lunch break is over and the Viking is muttering whilst packing things so I should probably get back to the machines :)
Comments

Reloading can be dangerous Published Date : July 23, 2017Author : davidCategories : Reloading, RiflesI would like to think that those of us who reload ammunition understand the potential dangers and the need to be vigilant when at the bench and luckily documented failures related to reloading your own ammunition are few and far between however they do happen and this Winchester 1894 chambered in 30-30 is a perfect example.
My guess is a round with very little or no powder (Primer only) was fired through the rifle, the bullet failed to leave the barrel and a second round was shot with the resultant catastrophic failure. The interesting thing here is this is the second under lever rifle to come in over the last couple of weeks with bulged barrels, the other being a 44 Remington Magnum and the common factor is they are both under lever rifles. Now I am certainly not saying under lever rifles are more prone to barrel bulging when a second moving round meets a first stationary round because this could happen in any type of rifle and I have no idea statistically if this sort of incident is more prevalent with under levers, however add reloading to under levers and the type of shooting they are used for here in the UK and there might and I do say just might be an increased risk here. Let me explain. Under lever rifles are often used for competition shooting which in turn can be against the clock. I shoot a .357Mag Marlin in local club competitions and to be vaguely competitive I need to get accurately placed rounds off very quickly, typically two rounds in two seconds on turning targets which means I acquire the target, pull the trigger cycle the lever to load a second round and pull the trigger. During this period I have very little chance of seeing my fall of shot due to the nature of the target and the lack of splash behind and my interest is getting that second round down range. Whilst doing this I need to be aware of anything that seems different, less noise, a reduced recoil or similar and if that happens I need to stop myself from taking that next shot. It can be done, by that I mean you can be aware of something not being quite right and accordingly stop yourself, equally I suspect in the heat of the moment a mistake can be made. OK, so that is one scenario. Probably the more worrisome is when you are shooting simultaneously with other competitors with low loaded rounds and ear defenders and I believe this is going to give a greater potential for missing something which might lead to a failure. Something we have to be aware of and if there is any doubt never under any circumstances take a further shot until the rifle has been inspected. This leads onto another thought. Driving a soft lead bullet through a barrel is one thing, driving a jacketed bullet is something else and I have a length of barrel I sectioned a few years ago. The shooter had managed to load without powder in a Remington 700 chambered in 6mmBR. He instantly recognised the error, stopped shooting and took the rifle to a shop, there a long rod was placed down the barrel from the muzzle and given a few reasonable clouts with a large hammer, this succeeded in expanding the bullet further and securely jammed it in the
barrel. The barrel came to me in such a state that the only realistic way forward was to fit a new barrel. My view is if a bullet is jammed in a barrel the only direction it should be moved is in its original direction of flight, that is away from the chamber and towards the barrel and this can be done reasonably easily with the addition of some light lubrication and care. Equally I have seen the job done with a screwdriver on a S&W 686 and it also worked! Please note, I am certainly not suggesting it is only reloaded ammunition in under lever rifles that has the potential for failure because it can equally be factory ammunition in bolt action rifles and in totally different disciplines. What I am saying is it is incredibly important to be aware of your reloading process and what is happening when you are shooting for your safety and the safety of those around you. Finally, don't forget your safety gasses next time you head down the range!
Comments
Trev Eeles Great article, thanks for posting David, I too have seen many a pistol calibre round recently fired through an under lever that has no powder, fortunately the shooters have recognised that their round didnt strike the target and took tge safe and appropriate action.
How I Drill & Tap cases Published Date : July 21, 2017Author : davidCategories : General stuff, ReloadingSuch a simple subject however people seem to have many different views on drilling and tapping cases for use with an OAL (Overall length) gauge so as I had some cases to do first thing I took some pictures of the process. First job is pass a mandrel through

the neck to ensure a good sliding fit for the bullet and this is the first potential problem area as the brass spring back can leave you with a case neck that is either under size which means moving to the next mandrel size up. People ask me where I buy my mandrels, the easier answer is I make them to suit the job and have an assortment to suit everything from .17 bullets and upwards with .0001" steps on some. This image is my 'every day' set, these are the mandrels I use most and if they don't get the job done I have another set to work with. Next job is pop the case in the lathe, I use the Colchester Chipmaster for this as it is accurate and easy to use and I grip the brass case in a collet chuck. The advantage of the collet chuck is it grips evenly around the circumference of the case and if you look carefully you will see the collet is just sitting over the groove which prevents any pressure marks. In theory I have no need to do this however it is very easy to over tighten a collet chuck and deform the material being gripped and this way works for me.
I drill the primer out with a centre drill however this case came full length sized so I simply drill with a 7,0mm HSS drill, this particular drill is a Dormer Jobber drill that I only use for this job and I have reground it to suit brass.

Now I add a generous chamfer to the hole, this is because burrs can occur during the drilling and tapping process and these lead to incorrect readings when measuring with your OAL gauge so care at this stage ensures you will measure from the case head as opposed to a burr that adds a couple of thou to the measured length. It is always worth running a finger across the back of a drilled and tapped case to ensure there are no burrs evident, if there are you can carefully stone them off however take care not to remove material from the case head itself as it will lead to measurement errors.
Onto the tapping process, I am using an M8x0,75mm Volkel tap. This may sound an odd size to you however it is the thread I use for all of my OAL gauges, there is a long and involved reason for this however the short reason is if it is M8x0,75mm I probably tapped it which takes any doubt away as to the method of tapping. Yes, other people use the same tap however they are usually in the USA or AUS, are using one of our OAL gauges and prefer to not send cases. I tap at 410 RPM and use a Rocol cutting compound. The tap is held in a drill chuck and although I do use a tapping head for other work it is not necessary for this particular application. (OK, it is convenient to stick with the same chuck
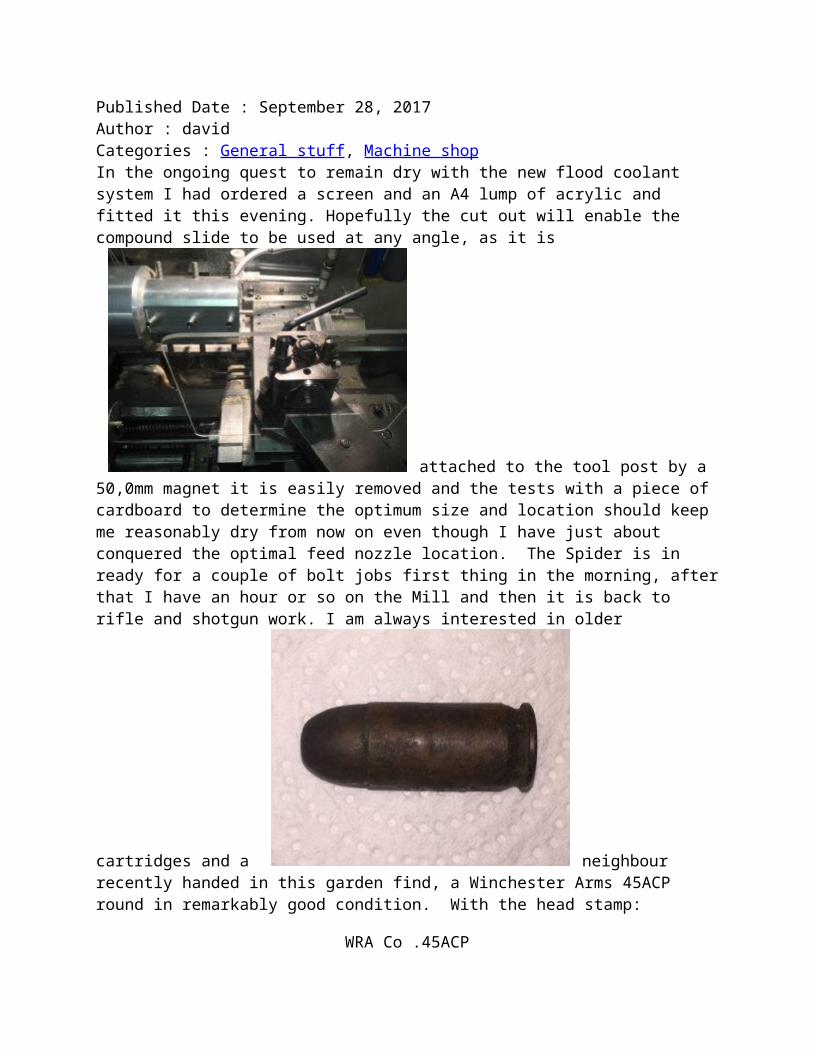
for the duration of the job) Finally the case can be cleaned and checked and despatched to the customer. I always do cases in pairs so if you need one doing send me a couple as it is the same price. We also allow for some cases to be tapped within the price of our OAL gauges. I do drill and tap to suit the Hornady OAL gauges in 5/16"x36 TPI and I will even carefully polish your brass if requested. Finally, I am often asked the question, 'In what state should I send my cases, fired, or fired and neck sized, or full length sized or something else?' My answer is whatever is best for you. The datum for the tapped case when checking OAL is the shoulder of the case versus the chamber shoulder and you will be pushing the case against the chamber shoulder so if you are setting your shoulders back a thou or so after every firing you will instantly dial in a variance of your 0.0015" or whatever your setback is. Does this matter, well yes and no, yes in that you get a slightly incorrect measurement. However no as this check will be part of your load development and is a combination of finite measurement and comparison so as long as you always use the same case preparation and reloading process and measure/compare in the same manner you are good to go. Do remember that just because a .012" jump is perfect for one rifle does not mean it will work as well in another. I know that is a simplistic answer so maybe I should write something when I have a spare couple of hours :) Right, my coffee is drunk so best get back to work now.
Comments
Dave Harding (alpha1) Nice work David thanks for sharing.
The Savage Model 99 in 22 High-Power Published Date : July 20, 2017Author : davidCategories : RiflesWe do a lot of work on modern rifles however they are modern and many of my readers have

probably either come across them or even own similar. Older rifles are a bit different and even something like this, the Savage Model 99 with over a million examples produced is quite unusual
here in the UK. Designed by Arthur Savage at the end of the 19th Century the Savage Model 1899, later to be known as the Savage Model 99 was a bit of a revelation. It was an under-lever however it was fitted with a rotary magazine which allowed spitzer (Pointed) bullets to be used. More traditional under-lever rifles had a tube magazine slung under the barrel which called for round nosed bullets to prevent a chain fire under recoil. Also the Model 99 was hammerless which means there is less chance of snagging a hammer on clothing, the side of your horse or on undergrowth. Arthur had hoped to win a significant military contract with the rifle however it was not to happen. Despite the lack of initial military contract around 1,000,000 Model 99 rifles were produced. Interestingly Arthur also designed and patented the Radial Tyre in 1915 so even if you have not heard of him you have probably taken advantage of his technology. This particular rifle is chambered in 22 Savage High Power, more commonly known as the 5,6mmx52R here in Europe and yes that is a tad bigger than 5,46 and accordingly uses a .227" bullet as opposed to the more readily available .224". The 22 Savage H-P designed by Newton (Charles not Isaac) was capable of moving a 70 grain bullet at 2800fps way back in 1912 which is impressive. The 5,6mmx52R was used by many including allegedly by WDM Bell and this is the very first tenuous link that made this rifle so attractive to us here at the SHED, we already have a .256 Mannlicher that was much loved by Bell for culling of Bull Elephants, right up until the point at which he had ammunition issues and dropped the Mannlicher on the spot and ran off with a Rigby (If my memory serves
me correctly) Back to the rifle, it is a take down variant (Second tick in the box) I have a thing for take down rifles and the Viking likes Under-levers so best of both worlds, add to that it is chambered in a 22 and she shoots a 22 Wildcat named after herself and finally it is a Savage and they are quite fine rifles and again the Viking shoots one as her long distance rifle. The Savage Model 99 is reasonably heavy at 7.0lbs/3,12kgs however it is perfectly balanced and has some lovely features with favourite being the brass rotary magazine round count that is shown through a window at the front left hand side of the receiver so you can instantly see how many rounds are carried, there is also a cocking indicator behind the bolt in the form of a small round pin that pops up when the bolt is closed. The take down process is remarkably simple, slide the catch on the fore end and the wood slides off, you can confirm its origin by checking the number crudely stamped on the inside of the wood versus the serial on the underside of the receiver. The barrel has a full length and interrupted thread and the fore end features a key on the inside that aligns with a corresponding slot cut out on the outer edge of the barrel and receiver, align the two and the fore
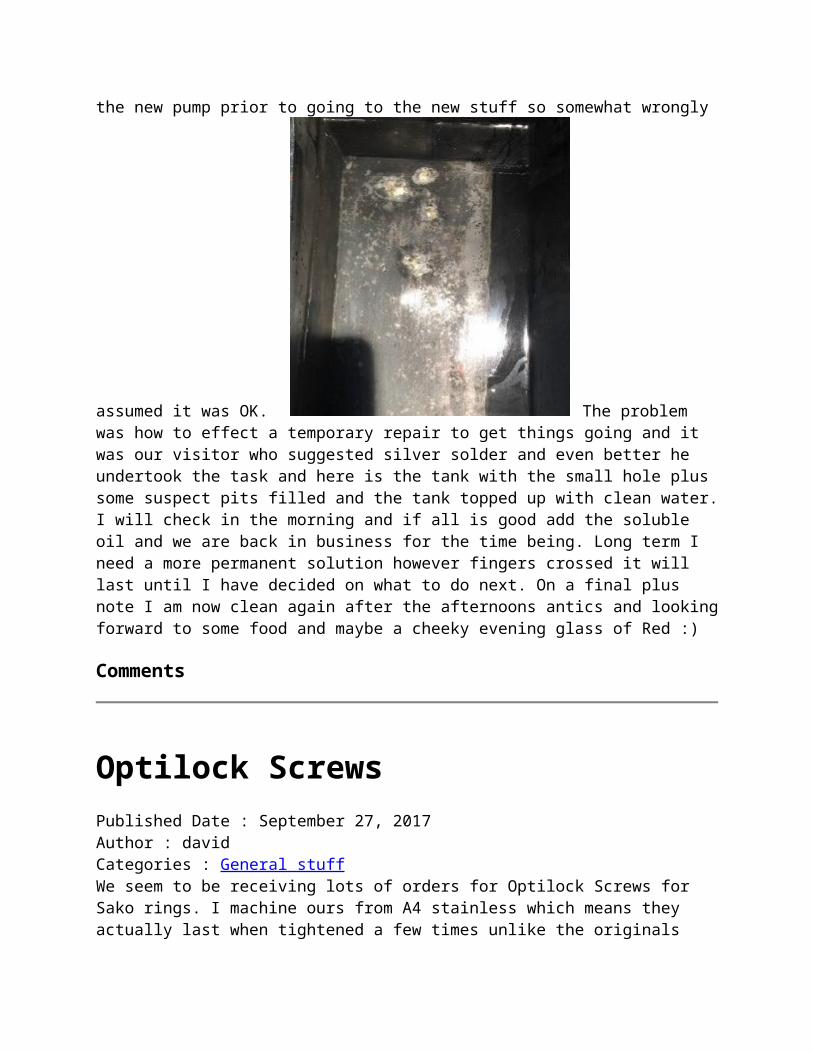
end goes on perfectly and if the barrel is slightly tight there is a square notch cut into the underside of the fore end that can be used to assist the removal of the barrel by slipping it over the catch on the under side of the barrel. I will add a better picture at some point to demonstrate this. The rifle has a 20" barrel with an integral front sight with blade, there is absolutely no chequering or engraving on the rifle and it has a straight necked stock so it is remarkably simple. Overall length of this example is a tad under 40" with a 13.5" LOP. Rear sight is an express type graduated at 200 yards with further blades for 300, 400 and 500 yards. Initial research would suggest this rifle is from the early 1920s however I do need to confirm this, I also need to get it stripped and give it a careful inspection and service. So far I have not done much more than to peer closely at the bore with a bore scope and I was actually quite surprised, there is indication of fire cracking for the first inch or so however after that the bore is remarkably good, certainly if you compare it to my 22-250 Sako 75 which has a severely fire cracked bore for a good few inches and yet still holds better than one inch groups at 100 when checked for zero. All in all an interesting rifle and I have a feeling it is already spoken for, we really do need to get it cleaned and load a few rounds for it and as luck would have it I have some brass and dies so hopefully I will find a few minutes over the weekend. :) EDIT - I had been pondering over how to de-cock the rifle without having the firing pin smack forward onto and empty chamber and it suddenly dawned on me, just depress the trigger as you are raising the lever and you should be fine. Do remember check the chamber is empty before doing this!
Comments
A bit more on the Manufrance Rapid Published Date : July 18, 2017Author : davidCategories : RiflesThe Viking gave the Manufrance a good clean for the last part of this afternoon and it certainly
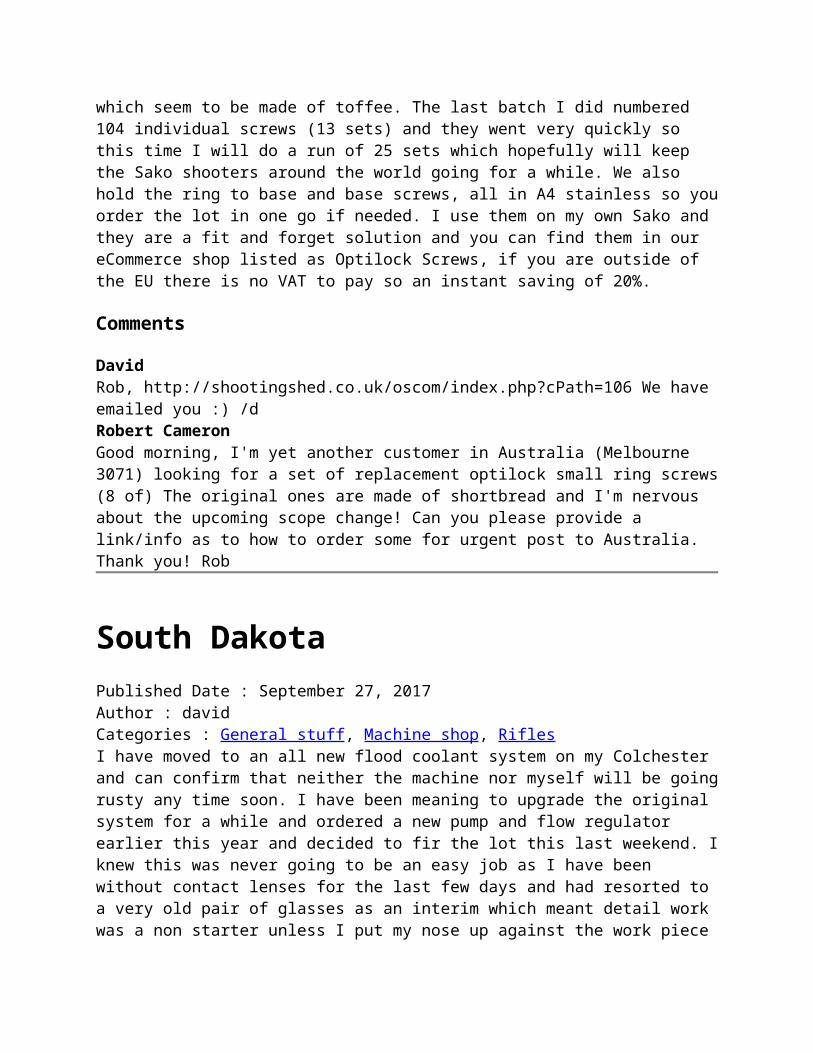
seems to cycle a little bit easier now. This is the 'Rapid' stripped and it still vaguely reminds me of the Remington 870 however there are some significant differences and given that the design of the majority of the mid to late last century Pump Actions are all reasonably similar I guess it could be anything although it certainly is not based on a Mossberg or Stevens. Apparently the French company Manufrance created a Rapid-type shotgun in 1958 which ended production in 1980 although I have come across a suggestion that it was briefly introduced again a few years later.
One thing that is not similar to the 870 is the trigger plate assembly which is clearly marked 'Made in France' and is cast from soft metal, this image shows the central forend release button which in its ambidextrous form is rather handy regardless of which shoulder it is shot from, what is not so handy is the spent cases ejecting across your field of view if you are shooting from your left/weak shoulder. I had considered giving this a thorough strip and a coat of OD Green Cerakote however it seems a shame to remove the patina and scratches of possibly 50 years of use so it will stay as it is. That reminds me, if anyone has access to the Manufrance serial number database I would be interested as it would be good to know how old this gun actually is, my guess is late 60s however I could be quite a bit off. I have a Anschütz rimfire that has been in for a service and inspection (Probably one of the filthiest rifles I have ever worked on) and now that is done it needs test firing and zeroing so I suspect the Manufrance will be coming out again for a few shots to make sure it really works as it should.
Comments
The Manufrance Rapid Published Date : July 17, 2017Author : davidCategories : General stuffNow here is something slightly different, a Manufrance Rapid. A 12 Bore Pump Action shotgun
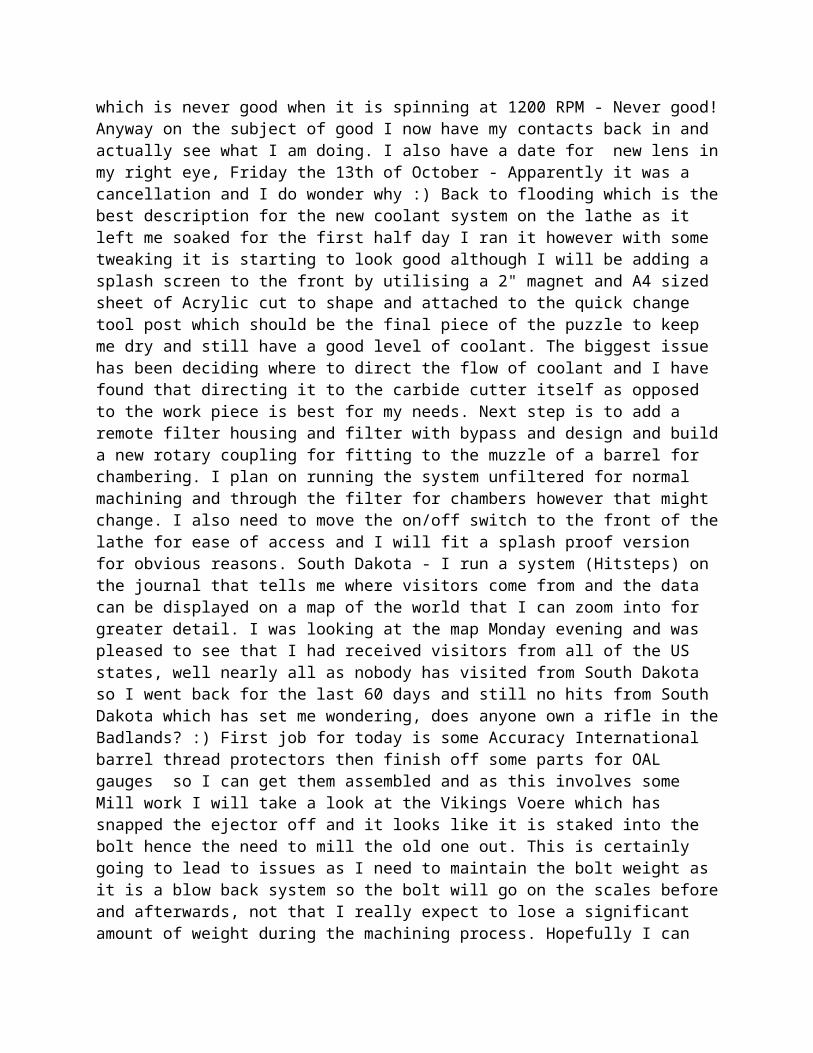
(Section 2 Three Shot) with a 28" fixed choke barrel that arrived over the weekend.
First impressions are it is very similar to the Remington 870 however it has an aluminium receiver and the slide release is a central round button just in front of the trigger guard. I also noticed it rattles like a Mossberg and there was some movement in the barrel where it locks into the receiver, even with the bolt forward so time for some investigation. Strip down is remarkably simple, unscrew the front locking ring and slide the barrel out. Pull the slide forward and out pops the bolt assembly and you are ready to clean and inspect. The trigger group is held in place by a couple of pins which can be pushed out
making everything easily accessible. During inspection something immediately caught my eye, the magazine tube is held in place by two m4 screws that retain a pinned block and the screws were lose which meant the tube was wobbling around, one screw was slightly graunched so I tidied it up in the lathe and re-assembled and the tube locked up snugly, once back together the barrel was now held securely and all movement was gone, in fact the gun no longer rattles. In fact there is absolutely no excessive movement anywhere and it cycles incredibly smoothly for what is an obviously well used shot gun probably from the 1970s. A check with some dummy cartridges confirmed it cycles and ejects satisfactorily so the next job will be to test it - I do like Pump Action shotguns so I am looking forward to putting a few cartridges through it at some point. EDIT - We had to head down the range to test fire some rifles so the Manufrance came with us and did not perform as well as I had hoped for, the extractor had moved slightly and was sitting in front of the plunger however that was easily rectified, it also did not feed from the magazine if cycled rapidly however all was good if it was cycled reasonably slowly and deliberately. I will strip it when I get a moment and take a closer look. I suspect some light lubrication will probably do the job and will confirm this later.
Comments
Replacement Winchester 1894 Carriers

Published Date : July 6, 2017Author : davidCategories : RiflesWe always seem to have functioning .357 Marlins and broken .357 Winchesters in the Armoury and the Winchester failure is usually missing screws or broken carriers with the latter being a nightmare to source so I sat down with some broken bits one afternoon and a clean sheet of paper
and many hours later this is the result. OK technically this is nearly the finished item as this is actually a soft metal carrier to confirm fit, function and operation and I'm delighted to announce it fitted and worked perfectly on the two rifles I have here so time to get on with the final versions which are machined in EN24T. I had planned on using 316 stainless initially however I know that with EN24T they are not going to wear out or break and should last a lifetime and more so giving all of those broken 1894s languishing in a gun safe a new lease of life. Someone did ask me why not just order a replacement from the USA and there is an easy answer. Getting such spares from the USA is all but impossible through legitimate channels and if you can source them they will be the normal items made from what looks like sintered steel and ready to snap at the most inopportune moment. The new carriers will be added to our Webshop hopefully at the weekend and should be ready to ship in the next few days. Final price is going to be around £110.00 however I do need to work out the final hours count. Please note these carriers are for the Winchester .357mag/.38Spl model 1894 only and may need some final fitting dependant on your rifle.
Comments
Summer time in the Marshes Published Date : June 30, 2017Author : davidCategories : Life MapWhat an odd start to summer we are having, last week I was getting sunburn, this week we have lit the stove in the workshop and I have mostly been working with a sweater and coat in the mornings. A typical British summer I guess. We have managed to escape a couple of times recently and our chosen haunt is the Salt Marshes to the east of us. I always check the tide tables

before we head off so we know what to expect including flooded car parks which lead to muddy dogs which means Defender time or low tides and low water in the creeks which means incredibly muddy dogs and again time to take the Defender.
With the onset of summer things are really coming to life with the Samphire showing its head above the sands and the marsh full of wild life and colour, this image was taken a couple of weeks or so ago and when we visited this evening the Marsh was a purple/mauve haze of Sea Lavender with the Larks shrilling away above our
heads. Chose the right time and the dogs get to have a good swim in the creeks and on this occasion I found a discarded plastic water bottle which made an impromptu dummy for the Labrador, the Lurcher eventually had to get in on the act and it was not until I got home and looked at the picture that I realised the Lurcher has latched onto the Lab's right ear. Charming I thought and I did bring it to the attention of the Viking who is the keeper of the White thing, in typical Danish fashion she said 'Lovely, he is a
rascal' and returned to her book. Something I tend not to do is post personal pictures however I thought this one summed up our summer perfectly. Blue sky, sunglasses and a flat cap and scarf because it was quite chilly at the time. As ever I
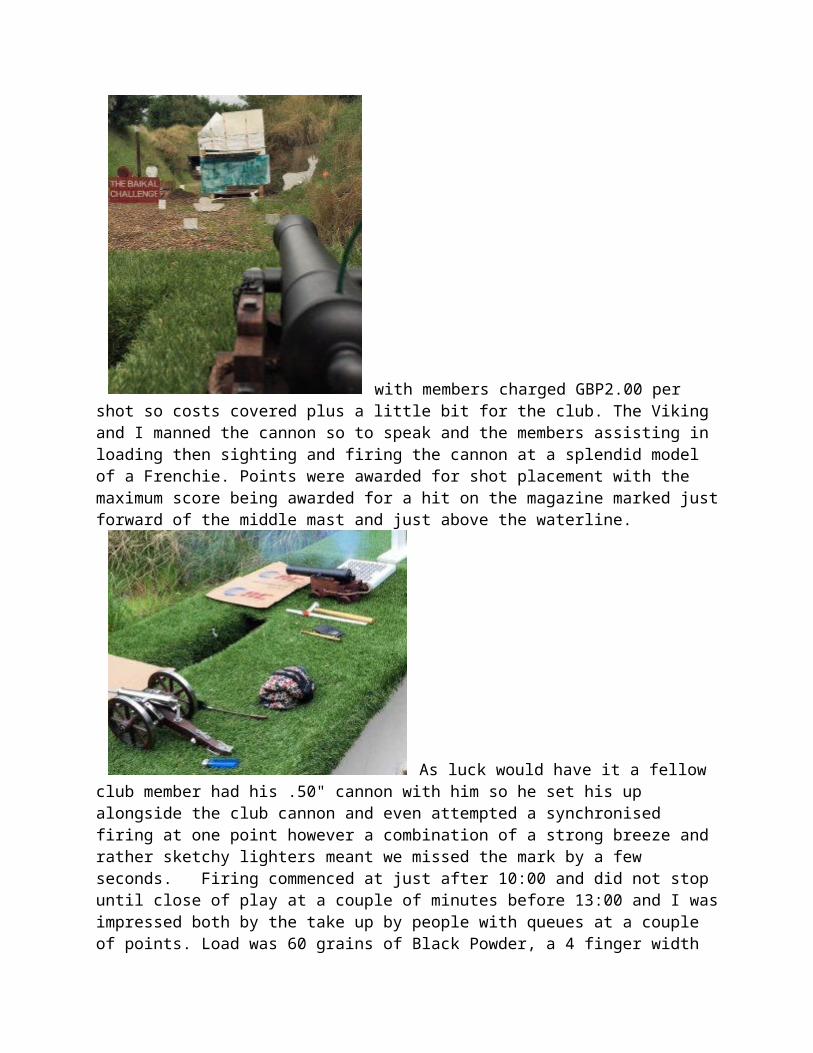
have a dog whistle around my neck plus a leash so people will think I am vaguely in control of something canine. See above picture and you will understand there is some doubt in this statement when it comes to dealing with the Lurcher which is why I tend to prefer the steadier traits of Labrador who are born half trained. Having said that the Lurcher is quick in the water and will retrieve when it suits him however he tends to rush towards me with whatever it is in his mouth, hurtle past and drop it a stride or two further on. Yes I know I am going grey and I will officially be changing the description of my Journal later this year in keeping with growing old.
Comments
A new mode of transport Published Date : June 30, 2017Author : davidCategories : Life MapI have become a white van man! Having run the same old 4X4 for over 10 years we decided it
was time for a change so we found ourselves a Landrover Defender 90 Truck earlier this year which left us with 2 4x4 trucks. Hmmm... something had to give so one Saturday morning with lots of things to get on with we started chatting over coffee and 90 minutes later we were heading north to look at a Ford Fiesta van. I honestly have no idea why we chose a Fiesta however some on the fly investigation revealed that they can actually be quite good on fuel and this particular one is a 1.6 litre TDCi Econetic so rather good on fuel and nippy at the same time. The car really was in lovely condition and without further ado we took it for a test drive. First thing that I noticed is these things are low, very low, in fact lower that standard as it is the Eco version, second thing was it really is nippy and reminded me of the days when I drove 'Hot Hatches' and I soon got into the swing of things right up until the first time I had to brake. Yes I had put my foot on the brake pedal before pulling off but this was the first time I had actually tried to slow the car down. At this point I must admit to having quite a heavy foot when it comes to braking probably due to driving 4x4 vehicles and for one fleeting moment I thought I had hit a brick wall as the car all but stood on its nose, luckily nothing was following... We drove back steadily and I tentatively dabbed the brake a couple more times confirming they are the most vicious brakes I have ever come across.

So the deal was done and we picked the car up a couple of days later swapping out our trusty old 4x4 at the same time. Since the picture was taken I have replaced the wing mirror covers with colour matched versions, not to be flash, simply because one was cracked and it was cheaper to buy a couple of after market items than one original Ford item. I have also discovered the car talks to me if I press the right or should that be wrong button, in fact I can say 'Call the Viking' and it rings her mobile number via my iFone. It also gives me spot and average MPG which amuses me and I noted tonight that it had returned 70.9 MPG for the first 300 odd miles and that includes a lot of driving in the Wolds which is quite hilly with twisty lanes. Average speed has been 30MPH and I still have around 300 miles left on the tank which takes 45 litres/10 gallons. It also takes a Lurcher and a Labrador in the back comfortably and they can barely see out of it which means they just sleep for the most until we reach our destination. It must be enjoying it as I am writing about it :)
Comments
The 'Tactical' Mossberg Published Date : June 30, 2017Author : davidCategories : General stuffI have been meaning to post a picture of this for a while, come to think of it I have been meaning to post to the Journal for a while however as normal life conspired to get in the way of things :) For a change I will do things back to front so here it is nigh on finished, I say nigh on as I was still on the hunt for a H&K type hook for the front however finding one designed to accept a 1.5" sling here in the UK proved to be problematical so I opted for an ITW Mash hook instead which although clunky works very well.
OK so what is it? This a 24" barrelled Mossberg 500 Pump Action Slugster with a cylinder choke and 8+1 capacity for 2.75" 12 bore cartridges. With 3" capacity is 7+1 The finish is Flat Dark Earth Cerakote with black Cerakote lifter and slide with a black ambidextrous safety, the furniture is Magpul. The colour match to the Magpul parts is actually very good however the slightly difference in texture makes the metalwork look slightly different in tone.
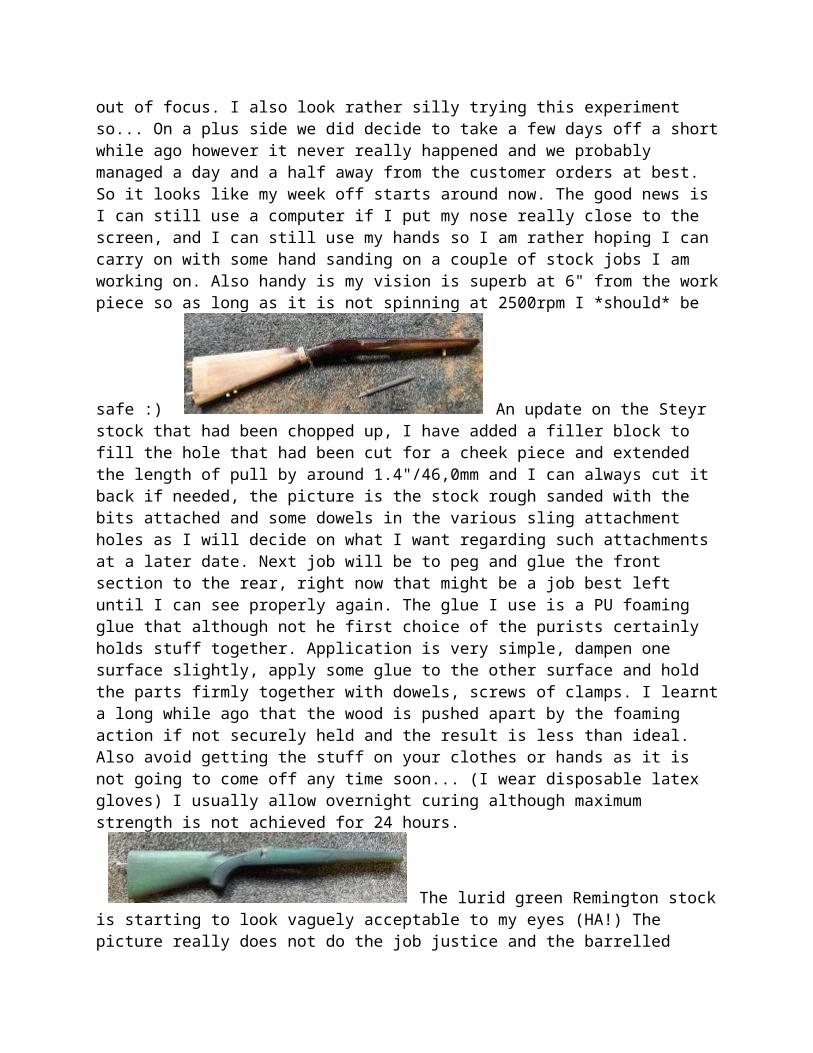
I had been looking for an excuse to build a 'Tactical' pump action for a while when a bog standard 500 suddenly showed up on a UK forum so I pointed it out to the Viking who said have it and the deed was done. Being a Section 1 it was a reasonable price and this was mitigated further by finding someone who needed some Mossberg 500 furniture so the initial outlay was further reduced. At this point I decided that Magpul plastics were the way forward so I ordered a set from Brownells UK along with a Picatinny rail with ambidextrous safety and a Magpul sling and front sling support. Yes, I could probably find things cheaper than Brownells however nobody else seemed to have the parts I needed here in the UK and I was not going to sit on a Mossberg 500 for many weeks on the off chance that someone might stock them again. The parts arrived within a couple of weeks and I found a Saturday afternoon to mock everything up. One thing I noticed was the sight rail was way too long so I machined to fit just slightly forward of the receiver, you need to look hard to spot the overhang which was deliberate as it acts as a register. The receiver was not drilled so I did this at the same time and the rail is held in place by 4 steel M4 Capheads. A bit of a change for me as I tend to use A4 stainless fixings however I did not want anything shiny on this gun.
Next job was the load port which was smoothed and rounded to make things easier when it came to loading and the lifter was smoothed and blended at the same time. As the trigger was out I stripped and cleaned it and lightened the
pull to a sensible level. The 500 was factory fitted with open sights however I had just added a rail so the rear sight was now redundant so I drifted it out and filled the dovetail with a suitable sized piece of steel and blended it into the barrel. Here it is approaching completion. Next on the list was the front sight, I machined the

original down and cut a dovetail for a front sight. I am not sure of what I am going to go for right now however I have a few ideas and as I am making it myself I can experiment to my hearts content and then some. What it will certainly be is a single blade with a Tritium bead for use in low light conditions. I will machine a rear rail mounted sight to suit and add a couple of tritium beads to further assist low lighting conditions. Zero will be for slug at 50m with no windage and the rear sight will have wings to protect it. Simple really. Until then I have a Vortex on the back, this is my first venture with red dot sight and I must admit I rather like it. The irons sights will co-witness with the red dot so I will always maintain the same head position. Right now I am having to raise my cheek well above the butt so I will order a Magpul extended cheek piece at some point. So what does it shoot like? Well I must admit I have enjoyed testing it although I did hit one minor issue, during the build I confirmed the magazine accepted and fed all 8 cartridges. I then swapped out the follower for an after market version and did not test it until it was painted and assembled and it was at this point that I discovered the 500 had reverted to a 3 shot! I had noticed a crimp ring in the magazine tube when I stripped it however it worked OK so I wrongly assumed the crimp had been fully removed, unfortunately it has not and the new snugger follower was just fouling it. Easily sorted luckily. So there you are, a 'Tactical' Mossberg 500 because I could, and what will become of it now? Well the Viking has expressed an interest and her FAC is up for renewal later this year so it may well be spoken for :)
Comments
Fitting a shotgun top spring Published Date : May 17, 2017Author : davidCategories : General stuffLife is not all about new rifles and we have our fair share of older things coming in for some love

and attention, being quite honest I enjoy working on such things and if we can give them a new lease of life all the better. We had a fairly old 'JM Urriola Sarasqueta Eibar' Boxlock Side by
Side come in the other day with a lever that was flopping around meaning the top spring had given up. I doubt this old side by side is worth a great deal however it has sentimental value to the owner so the least we could do was get it back up and running as quickly as possible. First job was strip it down carefully and confirm the spring was indeed broken, you can see the offending item on the tissue along with the pin that usually holds the sears in place and it is in the process of being stripped for cleaning and checking over. Such an issue is fairly common and other than some rust the gun appears OK and locks up well with everything doing as it should do so time to continue with the job.
If you have ever wondered what a side by side looks like when partly stripped this is your chance, the broken top spring is centre left in this image. This particular shotgun is a side by side. I forgot to take a further picture once it was completely in bits however you should get the idea by now.
The lever was marred and the screws rounded and graunched so my guess is it has been apart a few times during its life. Normally at this point the job would entail some time with a hammer, gas and a piece of spring steel followed by a lot of filing and polishing however as luck had it a centre peg top spring that was reasonably close to the original was available so with some dressing and a very slight trim to length it was ready to go in. Here it is part finished ready for trial fitting.
..and here it is in place so it fits! Next job was hook it out and give it a polish and final assembly could go ahead. The surface you often see behind my pictures is an industrial floor mat that sits on a raised section at the back of the workshop, it is a wonderful thing to work on, it is the right height, easily vacuumed clean and a nice soft surface to place rifles and shotguns on. There is of course a downside, the colour lends itself very nicely to hiding small shiny or black parts hence the need for pieces of tissue and I place small parts in plastic trays with a piece of tissue in the bottom so they are not lost and can be put on a shelf if I am awaiting parts. It works for me :) Back to work.
Comments
Tuesday

Published Date : May 16, 2017Author : davidCategories : General stuffI am sitting here trying to answer an email with two attentive dogs, a Labrador and a Lurcher.
The Labrador has found a rope toy and diligently returns it to me if I throw it across the workshop, the Lurcher does his best to intercept and steal the toy and managed to gain possession for a fleeting second before being body slammed by the Labrador. Lurchers might be fast across the fields however when it comes to a sock in the workshop he has no chance. They appear to have given up on the game now and grappling with each other in the corner, it is times like this when I sit back and watch, a cup of coffee to go with the job would be good but no matter. Last week was pointing systems and guides amongst other things, this week seems to be on track for rifle/shotgun work. I have an archaic Odessa side by side with a broken top spring to repair, the Viking and I tend to strip such things, she inspects, cleans and oils the parts and I effect the repairs which on this occasion means forming a new top spring from spring steel which is always interesting as you never quite know if it is going to be OK until the job is completed. If it compresses and opens a few times I am happy. If it snaps or is weak start again. The bipods are going well however one has required spares to be shipped out. The cant of our bipods is controlled by two toggle locks and it is important that these are reasonably snug when you place the rifle on the bipod or the whole assembly can fall to one side resulting in a potentially bent elevation screw. Something to be aware of and the instructions recommend adding a dab of red Loctite before inserting the long screws that hold the legs to the head, once this is done set the tension such that there is some resistance when moving the legs out and final tension can be added with the toggle locks. This is how I set up the original versions however the way they are packed prevents this from being done prior to final assembly once received by the customer. On an interesting front a Section 1 (FAC) 24" Mossberg 8+1 Pump Action 12 bore came in last week, it is destined for a makeover complete with some Magpul after market parts and a paint job, oddly enough I am looking forward to it as I tend not to work on Pump Actions so often. So even if it is a mostly put together job albeit I will probably end up machining the rear ghost sight for it myself. No doubt I will post pictures along the way. Best get on :)
Comments

The all new C2R Website Published Date : May 14, 2017Author : davidCategories : General stuff
We have just launched a dedicated e-commerce shop so you can purchase your C2R direct via the internet. There is also a Journal so you can catch up with everything C2R related including reviews, tests, how best to use C2R and keep your rifle clean plus other tips, tricks and offers. You can find the e-commerce site here: http://www.c2rcleaner.com/osc/
Comments
A couple of Sporters from BSA Published Date : April 25, 2017Author : davidCategories : General stuff, RiflesI have been a fan of older Sporting rifles for a while so I was quite excited to hear a Lee Speed Pattern No2 was winging its way down to us from across the border and it arrived this morning at 09:30 sharp. Not bad considering the distance it had to travel and the booking was only placed with the courier yesterday afternoon. Looks like Parcelforce came good on this occasion and at this rate I might even forgive them for a previous oversight...
Anyway, to the rifle. It is a .303 BSA built Lee Speed No2 Pattern rifle with safety flag on the bolt (The No1 Pattern has a safety on the wrist) The No2 came with reasonable wood, ebony caps. It also has a slightly heavier barrel than the later No1 Mk3 we have here (Top in the picture) and has a 10 shot magazine which appears to be original based on the matching engraving to the base and trigger guard and a period sales brochure from BSA. This particular model is marked W. Kavanagh & Sons, 12 Dame St Dublin The company dates back to 1782 and appears to have disappeared by 1922 according to internet sources (http://www.doublegunshop.com) William Kavanagh took over from James Kavanagh and by 1881 they were recorded as being W. Kavanagh & Sons so the rifle is post 1881. Actually it is more likely to be after 1881 as the bolt head is marked Patent 19,145/90 with the /90 denoting the year of patent 1890, so the rifle is post 1890 and my guess is around 1895 however I need to do some research on the serial number to confirm my thoughts.
Incidentally, it is worth explaining at this stage that the "Lee-Speed" is basically a "commercial" Lee-Metford and as such has the Lee Metford rifling as opposed to the Lee Enfield rifling, this explained in the adjacent image. Metford rifling was designed by William Ellis Metford and the idea goes back to 1865 with the 7 groove system being used on the Lee-Metford. This form of rifling was dropped with the move from Black Powder to Cordite so when you read of Polygonal rifling think of WE Metford 150 years ago. The Lee side of things was James Paris Lee who designed the rear locking rifle action and indeed the concept of the box magazine, and the Speed part comes from Joseph J. Speed, a Superintendent of the Enfield Royal Small Arms Factory (RSAF) Interestingly the patent was held by Speed despite being for the RSAF. The rifle has an adjustable blade foresight that can be drifted for windage and has a reasonable sized bead on it, moving back there is an express type sight plus optimistic ladder and the wood is nice however certainly not as finally figured as the Gibbs Mannlicher that arrived recently. The bolt complete with dust cover is a cock on close and requires a significant effort to close the bolt so I will be taking a look at the bolt and firing pin spring, the trigger breaks at a reasonably crisp single stage 7lbs/3,2kgs which sent me off searching for the BSA No1 Mk3 and sure enough it was a more traditional Enfield two stage trigger albeit of a similar weight. The length of pull is 14.25 inches and it seems to fit me well however I have long acknowledged that if I like a rifle I make sure I fit it as much as it fits me. So a brief introduction to a 120 year old rifle. Next job is to slug the bore which actually looks reasonable and get some ammunition loaded. I will be using cast bullets and have an assortment varying from 180 to 220 grains in .314" with a few sizes either side so I should have something that shoots. accuracy wise I have an open mind however a palm sized group at 100 yards would see me with a broad grin :) I will review this rifle in detail in the future.
Comments
Keith I am writing this exactly one year on but presume that it will get to you. I have a No. 2 which incidentally, does have a tang safety. Mine was retailed by D Gray in Inverness. They went out of firearms in 1922 but continue to trade in optical instruments. I am researching Lee Speeds for an article and would be interested in recording your serial numbers. I presume there are two (but not always), one often being a three digit number following a letter - H123 for instance which is usually about the middle of the strap. The other being a larger number at the top of the strap, under the bolt handle. I am also researching pre-war Mannlicher-Schoenauers and I have a nice M.1903 with a Gibbs serial (always begin with a "B") which was retailed by Charles Lancaster. I bet a pound to a penny that yours is also an M.1903, I haven't found any M.1905's, M. 1908's, nor M.1910's that have been stocked by Gibbs. I also bet yours has a 26" barrel. Gibbs seemed to have a fascination with that length in other rifles too, such as Mausers. Both early BSA and Steyr records are missing so I am one person trying to fill in the gaps. So far I have about 100 Lee

Speed numbers and 250 M.1903 ones.David I seem to remember mine is the same however I will haul it out and take a closer look. /dVrey Viljoen Hi. I bought a BSA with the safety flag on the bolt. When cocked it does not want to activatexthe flag to put the rifle on safe. In un cocked position it however does. Is there any video clips explaining the correct opperatuin. I am from South Africa. Thanks
Anzac Day 2017 - Lest We Forget Published Date : April 25, 2017Author : davidCategories : Life MapAn important day for us all and a moment to pause and reflect on what could have been. Lest We forget.
https://www.awm.gov.au/commemoration/anzac-day/
Comments
Sandgroper And lets not forget the other half of the ANZACs, the Kiwi's...http://www.mch.govt.nz/anzac-day
Engraving and some Dillon time Published Date : April 13, 2017Author : david

Categories : General stuff, Machine shop, ReloadingIt has been utter madness this week, the legs of the bipods needed engraving, I had to get a load of 2P comparators finished polished and out and somewhere along the line orders for 23 cleaning rod guides have come in and need to be drilled, machined, polished and shipped. On top of that I have a couple of rifle builds to finish and a Dillon RL-1000B that needed my attention. The engraving is outsourced and the legs once anodised go straight to those clever people that put writing on things. We have opted for laser engraving in the past and even considered doing the laser work in house (Well I did however the Viking was not convinced!) the plus side of having the wording put on by CNC is it always goes in the same place and can be put on reasonably deep so it stands out at a distance plus there is a very slight weight saving.
Being version 4 it is named accordingly, I asked that the number four be in Roman numerals in keeping with the previous versions and that is where the doubts started, do Roman numerals have a bar at the top and bottom? After some mock-ups we agreed on the image shown which just works although it is quite cramped. Fingers crossed it looks OK in the flesh with the silver letters on the satin black anodised background. Did I mention the perspex used for the powder hopper on the Dillon was broken? I spent some time trying to track a replacement down however 2.5" diameter perspex is not particularly easy
to come by and the closest metric I could find was 64,0mm which was slightly oversize which would have meant reducing the diameter at the bottom where it goes into the stainless hopper and machining a new cap so I opted for the shiny solution. A 300,0mm length of 2.5"/63,5mm seamless aluminium was sourced for under GBP10.00 I
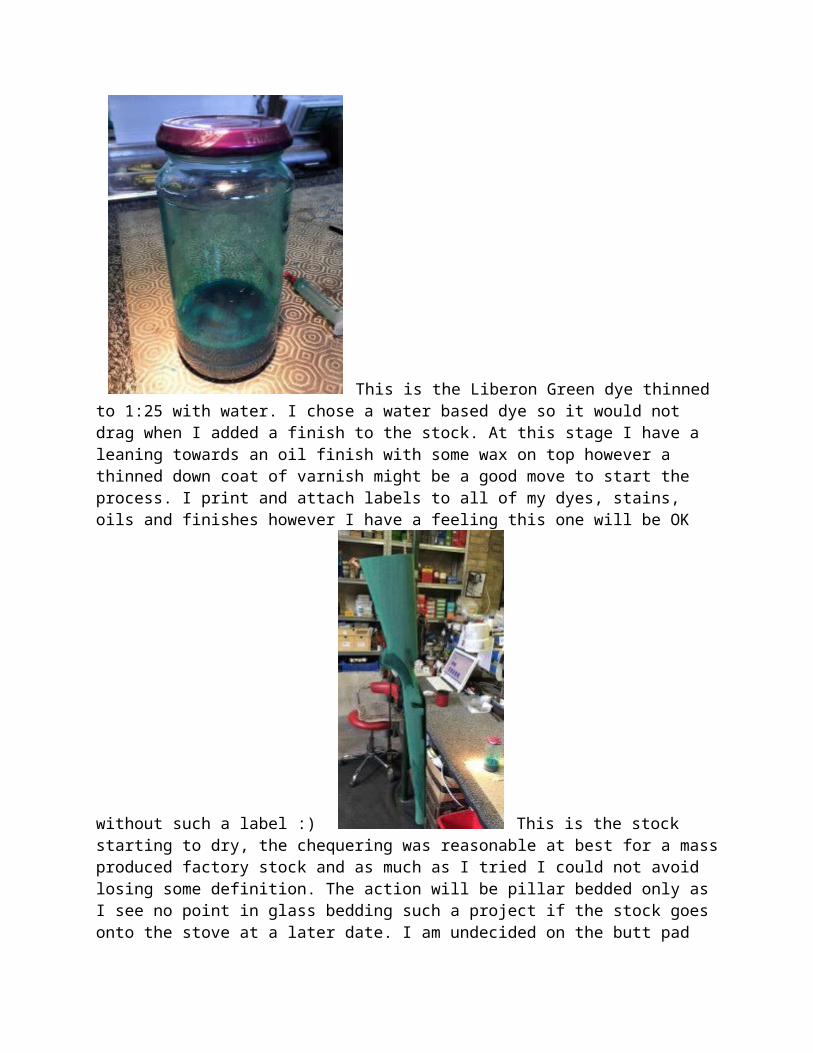
machined a new top cap with O ring to keep things snug and keep the spiders out, added a level indicator in stainless rod with an aluminium cap and piston and gave the whole lot a quick shine at the polishing station and this is the finished result. Note the now shiny stainless feed tube for the primer station and the container that catches spent primers has also been polished. Mostly because I can :) The press now has the Dillon Carbide .357Mag dies in place which only leaves the bullet feed station which I will build myself as some form of cassette system as we will only load around 500-750 rounds at a time and I need to build something to catch the loaded rounds as well. The one thing that stands out now is the bullet feed tube and limit switch which is clear perspex and looking rather tired. I have some correctly sized aluminium tube so I am tempted to machine an aluminium block to hold the limit in place and Tig weld the block to the tube, polished of course. It will serve no practical purpose other than to look rather nice and give me some aluminium welding practice :) Next job? Well we are looking forward to a couple of days off now with the Easter break so walk the dogs, shoot stuff and a couple of jobs for myself along the way before a fresh start next week with bipods to assemble and ship out to their new owners at the top of the list.
Comments
An odd barrel Published Date : April 9, 2017Author : davidCategories : General stuff, Machine shop, RiflesHere is an odd one, I had to remove the barrel from a Remington action, first impression was I was dealing with a varmint barrel however it seemed remarkably light given the diameter and the material seemed to be aluminium or at least an aluminium sleeve. Such a construction is not unique and I seem to remember the original 30-06 AR-1 had a steel barrel sleeved with light metal to keep weight down and better dissipate heat and that was back in the 1950s so it has certainly been done before however not something I have come across on a Remington.
No matter as the barrel was coming off

regardless so it was popped into the barrel press, nipped up to 4 Tons and the action wrench inserted and with that I gave it a good twist. Surprisingly it started to rotate off with ease and the Viking who was in attendance pointed out the barrel sticking out of the back of the press was not turning! She was right as well, the barrel outer was twisting on the barrel inner and some extra pressure on the press was not helping matters so I popped the barrelled action in the lathe and undercut the barrel just in front of the recoil lug, the barrel was scrap so I had nothing to loose and this is exactly why the press is located virtually adjacent to the lathe.
With the barrel undercut and a skim taken to square the barrel something became very apparent, this was not a factory finished barrel, what appeared to be car body filler had been used to stick an outer tube over the original barrel profile. Back into the vice and the receiver unscrewed with very little effort and gave us the opportunity
to take a closer look at the barrel. Time to get it chopped up and take a closer look and this is what was revealed, an original Remington factory fitted sporter barrel, with a length of over sized steel tube hammered and glued as far as it would go over the original profile followed by an aluminium sleeve again pushed and glued in place and the final void at the receiver end blended in with car filler. Finally it was sanded to shape and given a coat of black paint. Quite why this was done will only ever be known to the person who did the work and it is certainly unusual. It is also now in the bin ready for a new barrel to go on :)
Comments
The Blue machine - Dillon RL-1000B Published Date : April 9, 2017Author : davidCategories : General stuff, Life Map, ReloadingI have felt there was a need for a Dillon progressive press for a while now, we are primarily long distance shooters however that is not where our reloading time is spent. We are geared up for precision reloading and so we should be as we design and build the kit we use! Also the vast majority of LR outings use less than 50 rounds, especially as I no longer shoot competitions. We also shoot .22LR however no reloading is required, just grab a couple of boxes of ammunition
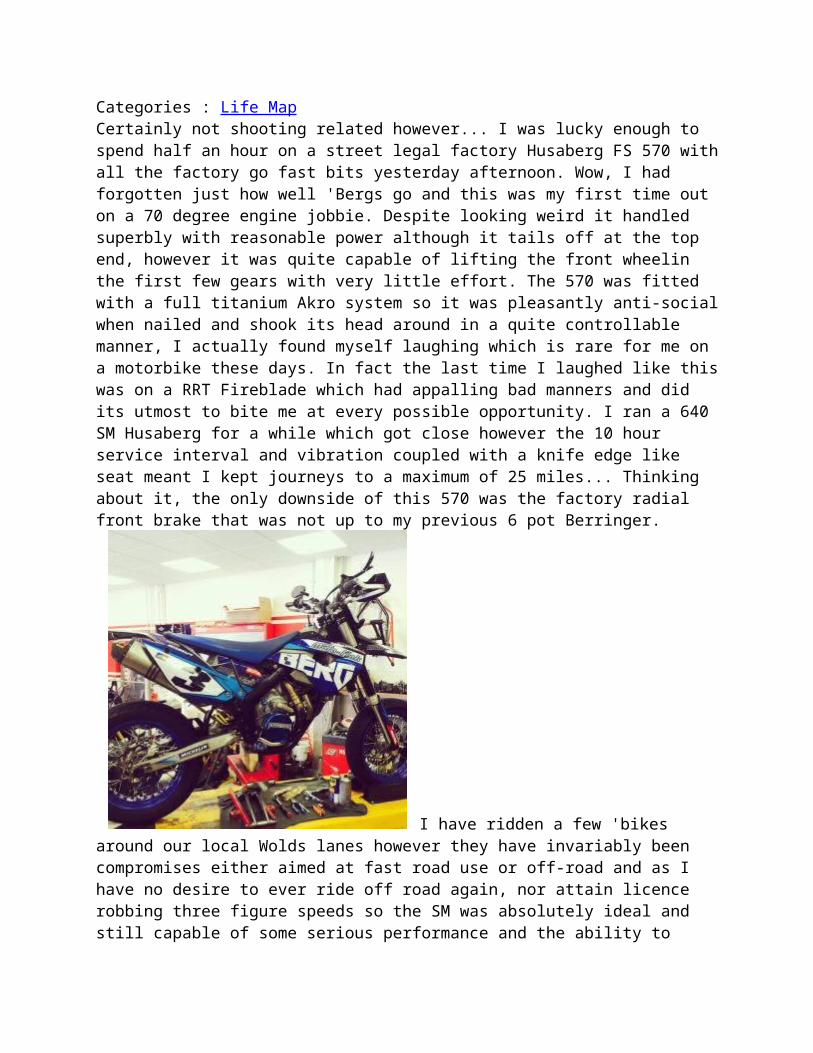
and head for the range. The time consuming part is reloading for the Marlin .357Mags especially when using a single stage press and the procedure is as follows: De-cap and into the stainless media cleaner. Dry and place in trays of 50 Over to me to Size and case flare and back into trays of 50 Over to the Viking to the powder charge and back into trays of 50 Back to me to seat and crimp Finally the loaded rounds are boxed up and go into the ammunition safe for the next outing It really is a time consuming operation, especially if you need to load 250-300 rounds so we end up loading just enough for the small competitions I shoot leaving virtually nothing for practice hence the need for a Progressive press of some sort. I had considered a 1050B in the past as I had always wanted to try my hand at volume reloading for the .308 however I was put off by potential errors leading to poor accuracy plus the 1050B is a commercial system and priced accordingly and I just could not justify the outlay. There was also the 550 or 650 however they seemed slightly limited in some ways although there are tens of thousands of users who are going to strongly disagree so really it was just a matter of doing it the old fashioned way.
Then I spotted a Dillon RL-1000B for sale and with some negotiation it was far too good a bargain to ignore so I said yes and it arrived Friday in large parts in a sturdy box and thankfully in undamaged condition for the most. I say for the most as careful inspection revealed that there were some minor post transit issues. First job was clean everything and get it assembled. The original Dillon manual came with the machine however it seems to miss out huge lumps of information and assumes you have an assembled and set-up machine to start with, luckily it is fairly obvious how the thing goes together and by early evening it was bolted together and cycling. There were however a few small issues, the good news is there was also a large box of spares so I set to replacing the ground steel pins holding the case feeder in place. I also swapped out the pusher to suit the .357mag brass we will be using. I cannot check the stroke and set-up of the feeder yet as the new shell plate has not yet arrived from Dillon. The good news is the tracking shows Your item departed a transfer airport in LONDON, UNITED KINGDOM on April 8, 2017 at 2:29 pm. The item is currently in transit to the destination. Case feeder time, a nice feature of the rotating disk on the RL-1000B is it is universal and the nice people at Dillon emailed me conversion details which means it is just a matter of removing the plate via 2 cap head screws, pull out the existing 1/8" ground steel pins and re-insert in the correct sequence which is Pin, two spaces, Pin and repeat then replace the disk. There was a large washer underneath which did not appear to be original so it was

discarded. The wiring on the case collator was tidied up, a big handful of brass added and the tube soon filled up and a quick tweak of the limit and it stopped when required. Next job was the powder hopper, unfortunately the plastic tube had been damaged in transit so I set about trying to source an alternative however it is a 2.5" diameter tube (63,5mm) which is a bit of an oddball to us metric Brits and suitable material is either impossible to find or outrageously expensive so I have set the Viking the task of finding something suitable before I resort to Plan B. I needed the powder hopper to function so I carefully wrapped it in Hockey tape to stop it cracking further and cut away the damaged section hence the black section on the tube right now. Plan B? Replace it with a length of 2.5" OD aluminium. There is an obvious downside in that you cannot see the powder level however it does give me an excuse to machine a suitable indicator system and maybe even add an alarm. On the subject of alarms the primer load station needed one however first job was to swap out to the small primer feed plate. Remember me saying this was the later B model? Mine has a serial after #400 which means it has the thicker primer feed plate which apparently is a good thing. One thing that did not seem quite right was the primer fill tubes, with the red pick-up cap on the end the tube was tight to enter the outer tube and when I attempted to pull it out the red cap was left behind however this was easily resolved by machining a little bit off the outer diameter for 5,5mm which enabled the end cap to be fitted and still slide into place. Next job was fit a new primer level alarm, the one that came with the machine was damaged and oddly I had a spare sitting on the shelf. The problem was it was designed for a larger diameter end cap and this was easily resolved with a few minutes on the lathe so now there was a primer alarm fitted. One thing that is handy is the primer tube is 17" in length as opposed to the shorter 12" on the 1050B so I can hold more primers, the downside is to top up the primers I have to remove the alarm by unscrewing, lift the fill tube out, pick-up another 140 odd primers and reverse the procedure. The fill tube is easy enough to deal with as I can soon make some more and I have spare ends. I also have spare clips so I can drill the ends and fit them to prevent primers falling out before use. The downside is filling and fitting the primer fill tube is time consuming and something to look at for the future, after all what is the point in having a progressive press if you have extended down time loading the consumables. On the subject of loading consumables one thing the press does not have is a bullet collator, this means I have to manually add a bullet to the case before cycling and even though this is the only manual intervention required other than moving the operating arm back and forth it is one operation I need to get rid of. There are a few commercial options available for automating bullet feeding however I prefer to build my own, I had planned on using a bullet feeding die and adding a rotary collator of my own design however I suspect I will end up building a cassette type feeder instead which speeds things up a bit and if I feel the need to fit a rotary collator I have a couple of ideas. So there you go, a Dillon RL-1000B up and nearly running. There have been discussions on various forums about this model and the general opinion is Dillon no longer hold spares for them however I had no issues ordering the .357 Shell plate, they also had the ejector wire and both are in the post. I have a couple of spare shell plates with the machine including a .223 and we are talking about building a little mouse gun (.223) for ourselves so I could in theory use the Dillon to rattle off a thousand or so rounds whenever needed. One thing I am not 100% about is the accuracy of the powder charge system however I have some idea on this which I will implement when I change the tube. After that it will be a matter of throw one, weigh and repeat until I have an accurate system, or as accurate as I can get it and from there make a decision. What I have noticed is the general build quality of the RL-1000B is absolutely superb. They were over $2500 when new and I have read comments that suggest based on inflation such

a machine would be closer to $9000 if it was to be built today, I am not sure about that however it was certainly not cheap in its day. This is a commercial machine and with the addition of a drive system the machine is certainly capable of 1200-1500 rounds per hour for extended periods with minimal intervention. Materials used are predominantly stainless steel and good quality aluminium castings and superbly thought out and I have to say I am thoroughly delighted with its acquisition and look forward to getting it set-up and producing ammunition and moving it to its final location adjacent to the new armoury. Happy days :)
Comments
A new theme for the Journal Published Date : March 21, 2017Author : davidCategories : Life MapThe more eagle eyed of my readers may have noticed a slight change to the layout of my Journal as it was way overdue. I use Wordpress for this Journal (I hate the Bl*g word) and although I have always ensured everything was fully up to date version and security wise I had never actually got around to changing the theme to something more in keeping with this part of decade until this evening and I do hope you like it! The main image is our Lurcher asleep in a chair by the log pile enjoying the sun, one of the advantages of living and working in a chapel is large windows and the sun comes in through the back windows in the afternoons. There is a downside in that the heat goes out via the expanse of glass rather quickly during the winter and our wood and coal man is probably dreading the day we get this place fully insulated. Anyway, I hope you like the change however if not let me know please as I am not 100% convinced at this stage, certainly the header image is not really shooting related and you know what they say about Lurchers, they steal things and cause fights...
Comments
The Shooting SHED F/TR "Støtteben" MkIII bipod - we are going to do another run Published Date : March 20, 2017Author : davidCategories : Black stuff, Machine shop

We have received several emails recently asking us if we have any of our MkIII bipods in stock and if not would we consider another run so after some debate we have decided on what is probably going to be our final run. The bipod is already well known internationally within the F/TR class however if you are new to the discipline here are some vital statistics for the Shooting SHED "Støtteben" MkIII Main bipod assembly: 6082 T6 aluminiumFinish: Vapour honed and black anodised surfaces.Screws: A4 Stainless Steel.Elevations shaft: Stainless SteelElevation nuts: 316 stainless steelWeight: Approximately 610 gramsWeight with optional toggle locks fitted: Approximately 674 grams Weight of optional toggle lock 32 grams (1.15 Ozs)Maximum recommended width: 785,0mm (31 Inches)Maximum recommended height: 380,0mm (13.5 Inches)
If you would like to know more about the product and get your name on the list please email the Viking: [email protected]
Comments
BSA Martini International 'Scope brackets Published Date : March 20, 2017Author : davidCategories : Machine shop, RiflesThese are a small run of BSA Martini International 'Scope brackets. I designed these brackets for the MkI and MkII with the 1-1/8″ receiver width however they they also work with the MkIII/MkIV/MkV 1-1/16″ receiver albeit with the central axis of the rail shifted by
a 1/16″ which is 1.58mm. I doubt you will notice the change once zeroed if it is to be used at a fixed distance such as 25 yards/metres. The finish is satin black Cerakote and they do look nice on the Internationals. If anyone is interested in just how much of an issue the misalignment of just under 1,6mm is at 25m I will take my socks off and have a go at the math, I might just do it anyway to satisfy my own curiosity :) Today is a rifle day again, I have a couple of bedding jobs to complete plus more machining than I care to think about. I machined a couple of soft metal extended jaws for the machine vice on the Bridgeport over the weekend to improve work holding of stock during inletting a bit easier and will be putting them to use towards the end of the day. They stand an extra 50,0mm high and I machined them from 30,0mm thick Ecocast plate which is basically a 6082 with a nice finish. The hardest part is swapping the jaws out however it takes less time than swapping the vice out and squaring it up. Best get on :) EDIT - I reckon the variance of 1,58mm scope offset is the equivalent to 0.0054 MOA calculated at 100 metres and I have checked my calculations twice with the same result however it is a Monday and I am yet to start my second coffee of the day...
Comments
David George, I have emailed you /dGeorge W Taylor Hi. I have a very accurate model 12 BSA Martini 22 cal that I would like to put a scope on ... I also have a Int mk 111 that I use for open-sight shooting. I would like to try one of your brackets on the model 12 ... this rifle has a receiver width of 30.60 mm so the centre line of the weaver mounting strip would be sitting to the left of centre by ~1.013mm I believe also, the mounting holes would need to be drilled and tapped into the receiver side or use the existing that are on my rifle for central sight mounting then re-drill your bracket to suit given that the existing are already threaded. by the way I am a target shooter for the SSAA NSW Australia. My address is [EDITED FOR PRIVACY REASONS!]if you could send me a sample or sell me one to try ... I would appreciate it. Cheers George.
Ruger Precision Rifle - Rear bag rider Published Date : March 17, 2017Author : david

Categories : Black stuff, Machine shop, Rifles, Shiny stuffI have had a few enquiries of recent for a rear bag rider for the Ruger Precision Rifle so here it is as a prototype fitted to a customer rifle. This rider has a 23,4mm tube suspended from a rear plate and if it looks to be sloping up it is! The customer asked for a 10 degree angle on the rider however I opted for 2.5 degrees to keep things low. The idea of the slope is by moving the rifle forwards and back subtle changes can be made to the elevation without excessive bag squeezing.
The finished product will be anodised in black and available with a spacer to give either zero or 2.5 degree slope if requested. I will also offer it with a 20,0mm tube as an alternative so you size it to your own make of rear bag. The bag rider incorporates the original Ruger fixings so the butt can be canted as with the original and will be made in a limited run so if you are interested or have any questions or comments please let me know.
Comments
Dan Klosterman I would be interested in Ruger Precision Rifle – Rear bag rider If you are still making them.
Run out Published Date : March 6, 2017Author : davidCategories : Machine shopThere is always a lot of discussion about run out when it comes to chambering barrels however regardless of how well you clock in the barrel prior to taking that first cut with the reamer you need a tail stock that is aligned to the head stock because it is your tail stock that carries the reamer and reamer holder so getting this correctly aligned is important. I say important as opposed to critical as there is a glut of reamer holders designed to take out radial and angular

errors when using a reamer and they all work to varying degrees however it is important to make sure your machine is as near to perfect as you can get it. I turn a fair amount between centres and I make a point of checking the diameter of the material at both ends during an intermediate cut. Friday I performed the check and noticed around 0,1mm negative error on the diameter per 300,0mm length (.004"/12") Which is enough to send me off for my check gauge to see what was happening. The gauge is very simple, a round
disk with a 25,0mm spigot machined on one side. The outer diameter has an M6 tapped hole aligned with the centre axis of the gauge to attach a Mercer 0.0001" Dial indicator. To use I pop into a collet chuck, start the machine and take a fine cut off the major diameter to ensure it is concentric to the spigot and then attach the indicator. Making sure the bed and underside of the tail stock is clean I use an unused good quality #3 MT Adapter in the tail stock, move it into place so the indicator is touching the MT, lock the tails stock in place, zero the indicator at the 270 degree point, then flip it over to the 90 degree point and read the error. In theory both reading should be zero however if they not you need to make some adjustments. Most lathe tail stocks have two hex head screws in the base which in turn screw into a block that sits on the underside and tightening/slackening one screw in conjunction with the other pulls the headstock to the left or right when viewed by above. I use two T handled hex keys and on mine turning the front screw clockwise whilst turning the rear screw counter clockwise gives a positive reading and reversing the procedure gives a negative reading. Negative and positive is best explained thus, place a length of material between the headstock and tail stock and take a cut, now measure the diameter at the head stock and again at the tail stock, if the second reading is greater than the first then you have a positive error, if it is less you have a negative error and from this you know which was to adjust the tail stock. What I must point out is this is counter intuitive in that you would expect to be pulling the headstock towards the cutter when adjusting from the front when you are actually moving an internal floating block so the direction of movement is reversed. Back to business, three minor tweaks and a test cut showed zero error at 300,0mm and that was to 5 decimal places so happy days :) Finally, yes there are other ways of checking tail stock alignment, some a simple as a steel rule suspended between centres to using a ground steel bar however this is the way I take care of the job, moderately 'Old school' however it works very well for me.
Comments