small engine carburetor tips - middleburg power
TRANSCRIPT
60
1
A Guide to Smal l Engine Carburetor Service and
Troubleshoot ing
Small Engine Carburetor Tips

2
59
58
Comments
Carburetor Adjustments
About the techniques: The techniques described in this booklet have been tried and tested over the years by small engine repair technicians and back-yard-mechanics alike. I acknowledge that they may not be the ONLY techniques available for small engine carburetor troubleshooting and repair, and they may not be the best possible techniques, but they were chosen for this booklet because they have been proven to work in the vast majority of cases and they are the easiest to understand and to perform. The outcome: As stated at the beginning of this booklet, there are so many different types of carburetors in use to-day that it would have taken volumes to address the is-sues, benefits, and shortcomings of each specific one. I believe have done my best to provide you with a generic working knowledge of small engine carburetors, and to of-fer informed suggestions as to the nature of certain opera-tions, problems, and remedial measures. I sincerely hope that the final outcome of this booklet is one that has met your small engine needs. For additional assistance, or to offer your comments and suggestions, please feel free to email me at:
3
There are several companies that manufacture carburetors for gasoline powered small engines, and there are many different models and styles of carburetors in use. In some cases the differ-ences may be subtle, while in other cases the differences are drastic. Therefore, this booklet will approach the subject of small engine carbu-retor problems from a generic view. This booklet will help you determine whether or not your small engine problem is in fact related to the carburetor, and provide instructions to remedy the most common carburetor problems. The bowl and float style carburetor is the most common, and problematic, carburetor used on small engines. You will, therefore, find this style used in many of the illustrations throughout this booklet. While you may have a different style carburetor on your machine, the remedies de-scribed here-in will work with most any type of carburetor.
Small Engine Carburetor Tips

4 57
Final Comments
56
You must now readjust the main valve
Turn the Idle Speed Adjustment screw until it “just” con-tacts the mechanical throttle linkage arm. This will pre-vent the engine from dropping below “stall” speed when you move the throttle to slow.
Idle Speed Adjustment
Carburetor Adjustments
5
Carburetor
Basics

6 55
Carburetor Adjustments
High Idle Adjustment
Allow the machine to run until it reaches normal operating temperature, then set the mechanical speed control (throttle) on the machine’s handle to the fastest possible speed. Begin turning the high Idle Valve screw inward (clockwise) until you hear the engine change speed. If the engine begins to run slower, turn the screw in the other direction. The machine should begin to run faster. Continue increasing the engine’s speed (by turning the screw) until the engine either begins to sputter or begins to slow down again. Once this happens, return the screw to the position where the engine was running at it’s fast-est speed. This adjustment is complete.
Low Idle Adjustment
Move the mechanical throttle to the engines slowest speed and perform the same procedure on the low idle valve that you just used on the high idle valve, until you reach the slowest speed at which the engine continues to run smoothly without stalling. NOTE: It may be necessary to back-off the mechanical idle speed adjustment screw first.
54
Carburetor Adjustments
Rule-of-Thumb
If engine will not start
A general rule of thumb for all adjustable valves is to gently turn the valve inward (clockwise) until it seats, (DO NOT OVER-TIGHTEN) and then back the valve out (counter-clockwise) one full turn. In many (if not most) cases, where the valve is not dam-aged and the ports are not obstructed, this will provide sufficient fuel to allow the small engine to start and run. If this fails, you may have to experiment with your par-ticular machine by changing the number of turns any where from a low of one–half turn, to a high of two complete turns (it is not an exact science). Fine tuning of these valves will be required once the ma-chine can remain running on it’s own.
Main Valve Adjustment
Once the engine can remain running on it’s own, adjust the main valve by turning it in either, or both, directions until the engine runs smoothly at all speeds. This will have to be repeated after high and low idle adjust-ments are made.
7
Before we get started it is important for you to understand some simple and basic concepts about carburetors
Regardless of the type, style, or manufacturer, every carburetor, performs the same function: 1) to mix fuel (gasoline) and oxygen (air) in the exact
proportions needed to sustain combustion 2) To send that mixture to the combustion chamber
where it is converted into energy to perform work.
Carburetor Basics
In order to accomplish the above, a carburetor re-quires two things: 1) an adequate supply of fresh, clean fuel 2) an adequate supply of clean air Removing, restricting, or contaminating either of these two, will impede, or prevent, your carburetor from per-forming it’s function.
It’s a fairly simple formula but one which can not be changed:
Air + Fuel = Combustible mixture

8
Carburetor Basics
All small engines require these basic elements in order to operate:
These basic elements are
our main concern
♦ FUEL - Fresh, clean, gasoline of
an octane rating recommended by the manufacturer.
♦ AIR - Mixes with fuel to make it combustible. ♦ COMPRESSION - Fuel and air
mixture are compressed inside the engine.
♦ SPARK - Produced by the “spark
plug”. It ignites the compressed fuel and air mixture and forces the piston to turn the engine.
Remove any one of these and the engine won’t run
FUEL - AIR - COMPRESSION - SPARK
53
The High Idle Adjustment (usually indicated by the letter “H” stamped on the carb) is a valve that controls fuel flow when the engine is running at it’s fastest speed. Turning the screw clockwise will case the machine to run slower. Counter-clockwise will make it run faster. This must be adjusted BEFORE the low idle is adjusted and only when the machine’s throttle (speed con-trol) is set at the fastest setting.
Carburetor Adjustments
High Idle Adjustment
Main Valve
The main valve controls the flow of fuel from the bowl to the throat of the carburetor. Turning the screw clockwise restricts the flow of fuel. Counter-clockwise increases the flow of fuel.
52
The Low Idle Adjustment (usually indicated by the letter “L” stamped on the carb) is a valve that controls fuel flow when the engine is at idle. Turning the screw clockwise will cause the machine to run slower. Counter-clockwise will make it run faster. This is adjusted only when the ma-chine’s throttle (speed control) is set at the slowest setting.
Carburetor Adjustments
As the name implies, the Idle Speed Adjustment controls the speed (in RPMs) at which the engine idles. It is a mechanical adjustment and not a fuel valve. Tightening (turning clockwise) the screw will push the mechanical arm outward and make the machine idle faster, while turning it counter-clockwise (loosening) will cause the machine to idle slower. This adjustment simply determines how far the throttle linkage can move toward the slow position. This must be adjusted AFTER the high and low idle valves (if present) are adjusted.
Idle Speed Adjustment
Low Idle Adjustment
9
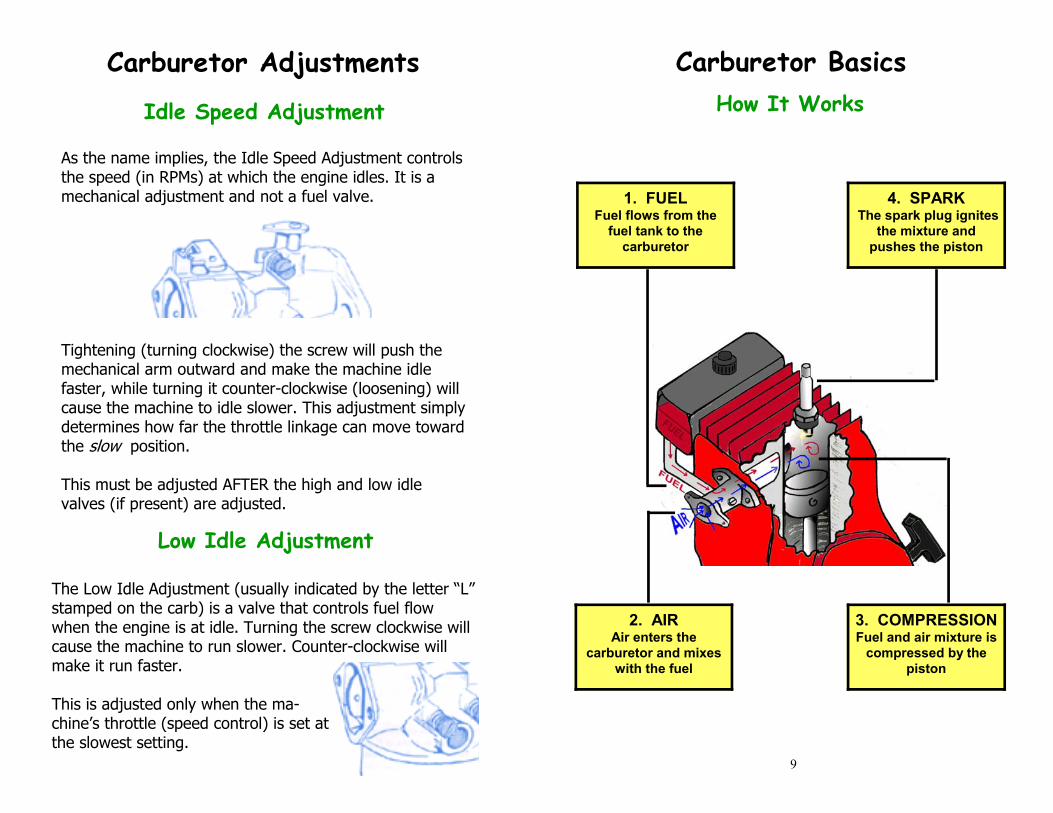
How It Works
Carburetor Basics
1. FUEL Fuel flows from the
fuel tank to the carburetor
2. AIR Air enters the
carburetor and mixes with the fuel
3. COMPRESSION Fuel and air mixture is
compressed by the piston
4. SPARK The spark plug ignites
the mixture and pushes the piston
10
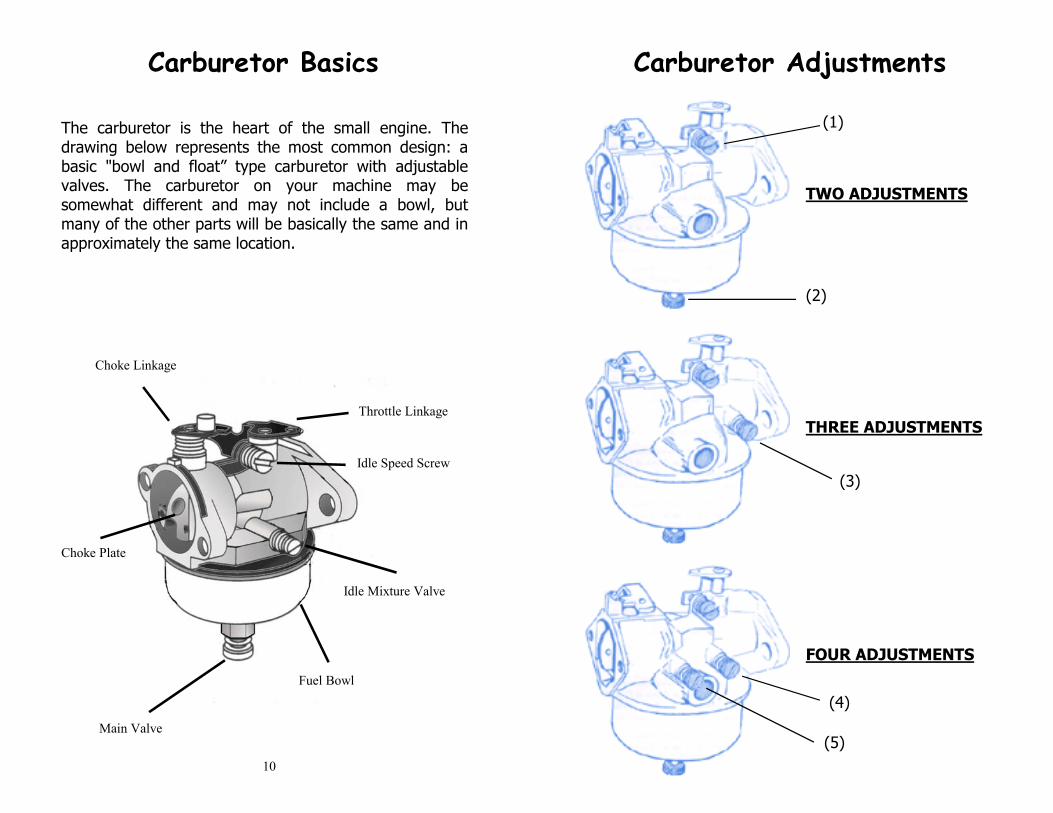
Carburetor Basics
Choke Linkage
Fuel Bowl
Idle Speed Screw
Throttle Linkage
Main Valve
Choke Plate
Idle Mixture Valve
The carburetor is the heart of the small engine. The drawing below represents the most common design: a basic "bowl and float” type carburetor with adjustable valves. The carburetor on your machine may be somewhat different and may not include a bowl, but many of the other parts will be basically the same and in approximately the same location.
51
Carburetor Adjustments
(1)
(2)
TWO ADJUSTMENTS
FOUR ADJUSTMENTS
THREE ADJUSTMENTS
(3)
(4) (5)
50
Carburetor Adjustments There is no gauge with which a small engine carburetor can be properly adjusted, nor is there a chart, table, or diagram I can provide that will assist you in properly adjusting it. The art of adjusting a small engine carburetor comes from training and experience. A small engine technician adjusts more by feel and sound than by manufacturer’s specs and this is something that comes only from experience. That being said, I will provide you with some very basic, “rule of thumb” techniques. I do not guarantee that they will make your machine run smoothly (or even correctly). Some small engine carburetors have no adjustable features at all. Of those that do have adjustable features, most have two adjustments, some have a third, and others may have a fourth. These are: TWO ADJUSTMENTS Idle speed adjustment (1) Main Valve (2) THREE ADJUSTMENTS (1) and (2) plus: Mixture Valve (3) FOUR ADJUSTMENTS (1) and (2) plus: High Idle Valve (4) Low Idle (5)
11
Carburetor Maintenance

12 49
Carburetor Adjustments
48 13
Carburetor Maintenance Preventive Maintenance
Before we get into solving your carburetor problems, lets take a few minutes to talk about preventing them. While it is the most important part of a small engine, the carburetor is often, unfortunately, the most neglected part. Hidden behind (or beneath) the air filter, the carbu-retor is truly “out of sight, out of mind”… until something goes wrong. A good program of regular maintenance can help insure that your carburetor performs as intended, and may help avoid costly repairs. Here are some simple suggestions to keep your carbure-tor functioning smoothly:
1) Keep the carburetor covered: removing the housing that covers the carburetor (usually the air filter hous-ing) can allow dust, (and other foreign particles) and water to enter the carburetor
2) Lubricate the carburetor: the occasional use of a good quality spray lubricant, applied lightly to all moving parts and to the linkage, will insure smooth operation
3) Clean the exterior of the carburetor frequently: Saw-dust, grass clippings, grease, and grime can interfere with the linkage.
4) Clean the inside of the carburetor: an occasional shot of carburetor cleaner directly into the throat of the carburetor will go a long way toward avoiding poten-tial problems.
14
As stated earlier, your carburetor requires an adequate supply of fresh fuel (gasoline) in order to perform prop-erly. Gasoline has a relatively short, useful, life span. If you have ever pumped your own gas on a hot summer day, you have seen the vapors rising from the spout. It is ac-tually these vapors which are the most combustible com-ponent of the fuel. Gasoline begins to evaporate almost the instant you pur-chase it. The older it gets, the more of it‘s highly com-bustible vapors it looses. As more and more vapors are lost, the gasoline becomes less and less combustible. Old, stale, gasoline which has lost all of it’s vapors is said to have “turned to varnish”. Varnish is a brownish residue left in fuel cans, fuel tanks, carburetors, and fuel lines, once the gasoline has com-pletely evaporated. However, long before the vapors have completely evaporated, the fuel will reach a point where it is extremely difficult (or impossible) to burn. You could, in all reality, have a full tank of gas, but your small engine will not run!
Gasoline
Most small engines are designed to use REGULAR unleaded gasoline (unless otherwise noted in your owners manual)
Carburetor Maintenance Preventive Maintenance
47
The Float Assembly
Carburetor Service and Repair
To Remove The Needle Valve
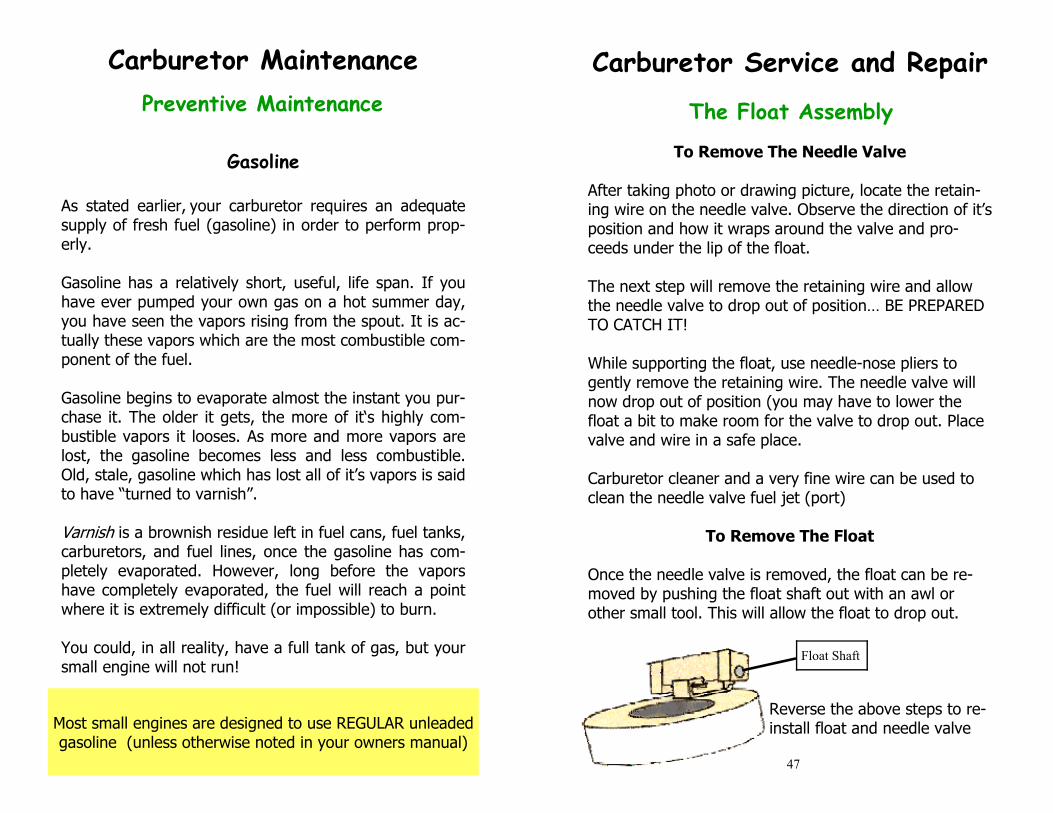
After taking photo or drawing picture, locate the retain-ing wire on the needle valve. Observe the direction of it’s position and how it wraps around the valve and pro-ceeds under the lip of the float. The next step will remove the retaining wire and allow the needle valve to drop out of position… BE PREPARED TO CATCH IT! While supporting the float, use needle-nose pliers to gently remove the retaining wire. The needle valve will now drop out of position (you may have to lower the float a bit to make room for the valve to drop out. Place valve and wire in a safe place. Carburetor cleaner and a very fine wire can be used to clean the needle valve fuel jet (port)
To Remove The Float
Once the needle valve is removed, the float can be re-moved by pushing the float shaft out with an awl or other small tool. This will allow the float to drop out.
Reverse the above steps to re-install float and needle valve
Float Shaft
46
The Float Assembly
Carburetor Service and Repair
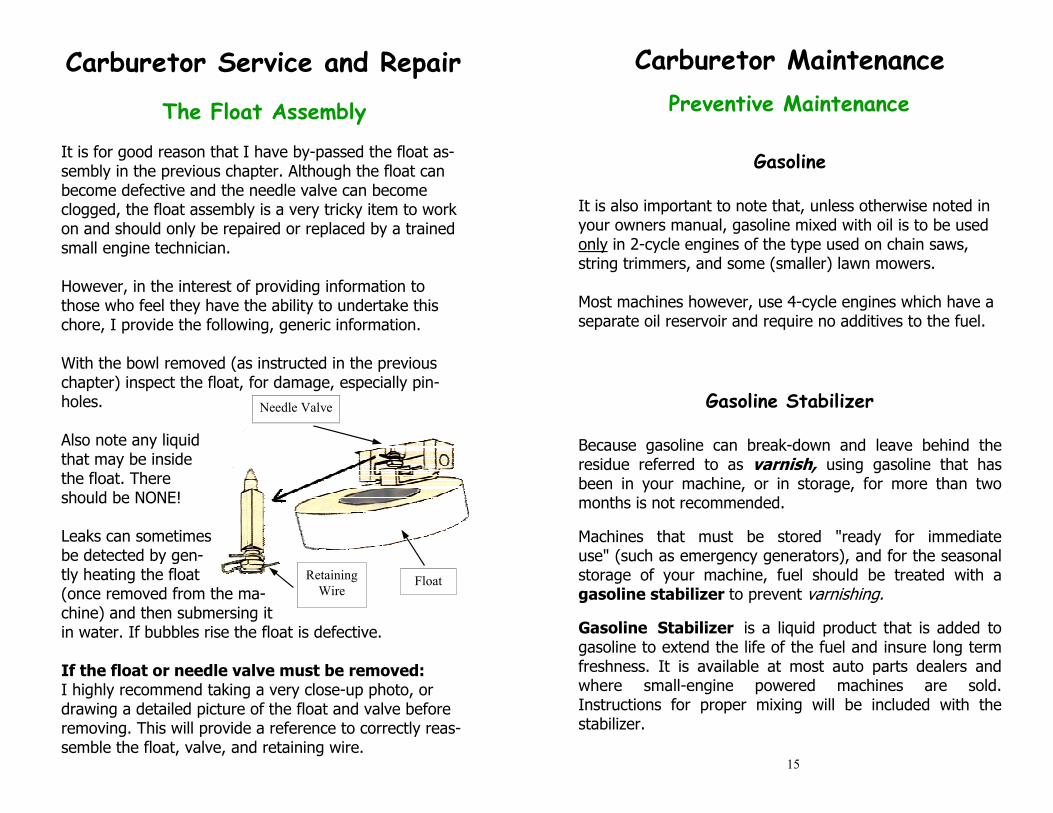
It is for good reason that I have by-passed the float as-sembly in the previous chapter. Although the float can become defective and the needle valve can become clogged, the float assembly is a very tricky item to work on and should only be repaired or replaced by a trained small engine technician. However, in the interest of providing information to those who feel they have the ability to undertake this chore, I provide the following, generic information. With the bowl removed (as instructed in the previous chapter) inspect the float, for damage, especially pin-holes. Also note any liquid that may be inside the float. There should be NONE! Leaks can sometimes be detected by gen-tly heating the float (once removed from the ma-chine) and then submersing it in water. If bubbles rise the float is defective. If the float or needle valve must be removed: I highly recommend taking a very close-up photo, or drawing a detailed picture of the float and valve before removing. This will provide a reference to correctly reas-semble the float, valve, and retaining wire.
Needle Valve
Float Retaining Wire
15
Preventive Maintenance
Carburetor Maintenance
Gasoline Stabilizer
Because gasoline can break-down and leave behind the residue referred to as varnish, using gasoline that has been in your machine, or in storage, for more than two months is not recommended. Machines that must be stored "ready for immediate use" (such as emergency generators), and for the seasonal storage of your machine, fuel should be treated with a gasoline stabilizer to prevent varnishing. Gasoline Stabilizer is a liquid product that is added to gasoline to extend the life of the fuel and insure long term freshness. It is available at most auto parts dealers and where small-engine powered machines are sold. Instructions for proper mixing will be included with the stabilizer.
Gasoline
It is also important to note that, unless otherwise noted in your owners manual, gasoline mixed with oil is to be used only in 2-cycle engines of the type used on chain saws, string trimmers, and some (smaller) lawn mowers. Most machines however, use 4-cycle engines which have a separate oil reservoir and require no additives to the fuel.
16
Preventive Maintenance
Air Filters
Carburetor Maintenance
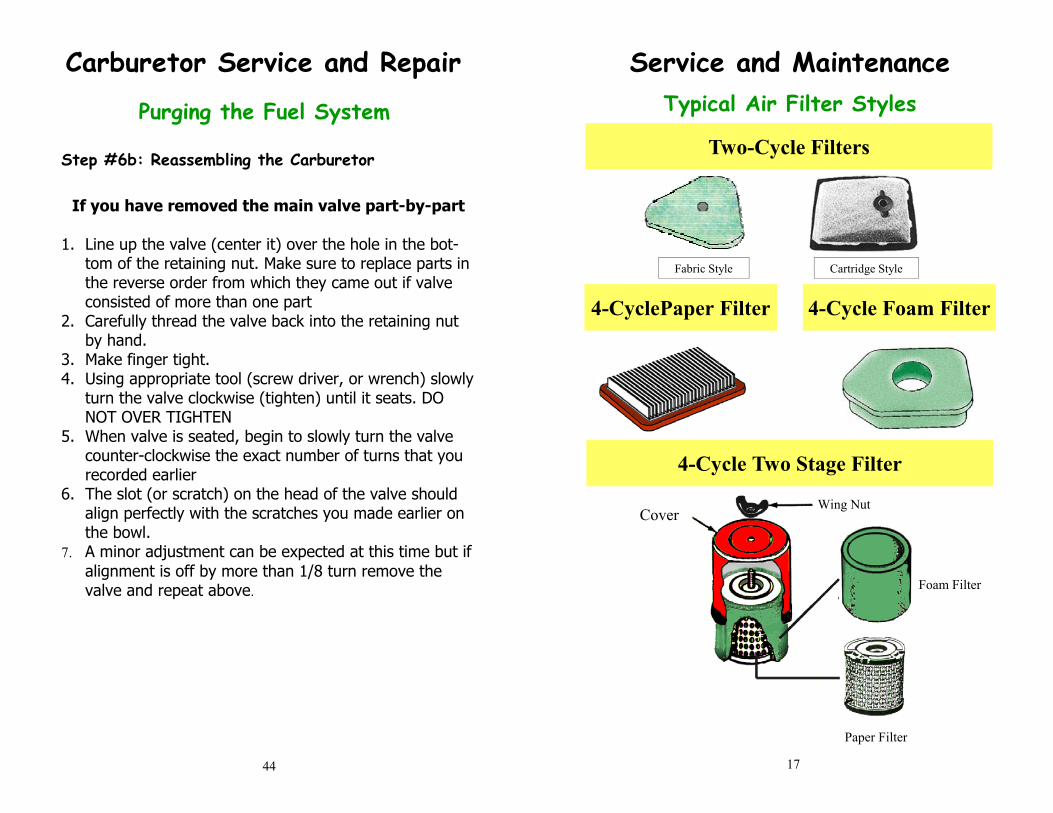
We mentioned earlier that the second component re-quired by your carburetor is an adequate supply of clean air. In order to insure that the air reaching your carbure-tor remains clean, the manufacturer installed an air filter specifically designed to filter out foreign particles while allowing the proper amount of air to reach the carbure-tor. Not all 4-cycle small engines will have an air filter, since air filters are designed for engines used in dusty areas (like lawnmowers and chainsaws), but those that do, will have one of three types: "paper element", "foam filter", or "two-stage filter" consisting of a paper element surrounded by a foam filter. Chainsaws, and other 2-cycle machines, may have a flat filter (made of a thin, cloth-like, fabric), a cartridge style filter, or a plastic cone shaped filter made of fine mesh. It is very important that these filters remain on the ma-chine, and that you KEEP THEM CLEAN. Most manufacturers recommend that you clean or replace the filter after every 20 hours of use. Machines used in dusty areas, such as chainsaws and chippers, should have the filter changed much more often.
Preventive Maintenance
45
Step #7: Reassembling the Fuel System
1. Reattach the fuel tank (if removed) 2. Replace fuel filter 3. Reconnect all fuel lines (replacement with new lines is
recommended) making sure that all hose clamps are tight.
4. Insure that fuel shut-off (if equipped) it turned to the ON position
5. Fill fuel tank with clean, fresh gasoline of at least 87 octane. Watch for leaks and tighten clamps and nuts as needed.
6. Replace oil drain plug and refill oil supply. (If unsure of oil requirement, 10W30 automotive motor oil will suf-fice in warm climates)
7. Install new spark plug and reconnect plug wire
Purging the Fuel System
Carburetor Service and Repair
Now reassemble the fuel system, fill will a small amount of fresh gasoline, and attempt to start the engine. If engine will not start go to next section.
44
Step #6b: Reassembling the Carburetor
If you have removed the main valve part-by-part
1. Line up the valve (center it) over the hole in the bot-tom of the retaining nut. Make sure to replace parts in the reverse order from which they came out if valve consisted of more than one part
2. Carefully thread the valve back into the retaining nut by hand.
3. Make finger tight. 4. Using appropriate tool (screw driver, or wrench) slowly
turn the valve clockwise (tighten) until it seats. DO NOT OVER TIGHTEN
5. When valve is seated, begin to slowly turn the valve counter-clockwise the exact number of turns that you recorded earlier
6. The slot (or scratch) on the head of the valve should align perfectly with the scratches you made earlier on the bowl.
7. A minor adjustment can be expected at this time but if alignment is off by more than 1/8 turn remove the valve and repeat above.
Purging the Fuel System
Carburetor Service and Repair
17
Typical Air Filter Styles
Service and Maintenance
4-Cycle Two Stage Filter
Cover Wing Nut
Paper Filter
Foam Filter
4-Cycle Foam Filter 4-CyclePaper Filter
Two-Cycle Filters
Fabric Style Cartridge Style
18 43
Step #5: Cleaning the Carburetor
With the main valve removed, once again spray large amounts of carburetor cleaner directly into the throat of the carburetor. Cleaner should easily flow through the carburetor, into the bowl, and drain through the main valve assembly hole or through the hole in the retaining nut. When cleaner is flowing easily in this manner you can be-gin to reassemble the carburetor and fuel system.
Step #6a: Reassembling the Carburetor
If you have removed the main valve as a complete assembly
1. Line up the assembly (center it) over the hole in the
bottom of the carburetor bowl 2. Carefully thread the assembly back into the bowl by
hand, watching to make sure that the head of the valve turns exactly the same amount as the retaining nut.
3. Make finger tight. 4. Place wrench over the retaining nut and slowly turn
clockwise (tighten) again making sure that valve and nut turn exactly the same amount.
5. Tighten until nut is snug but do not over tighten.
Purging the Fuel System
Carburetor Service and Repair
42
4. Once valve can be turned, hold the retaining nut firmly in place and gently begin to turn the valve CLOCKWISE (tighten) carefully counting the number or turns (or fractions of turns) until the valve “SEATS”. The valve is seated when the tip of the valve contacts the metal. DO NOT OVER TIGHTEN AS THIS WILL FLATTEN THE TIP OF THE VALVE.
5. Write down the number of turns it took to reach the seated position. Example: “one and one-eighth turns” or “two, half turns”, or “one half turn and one eighth turn” etc. When you replace the vale this is the exact amount that you will loosen the valve from the seated position to return it to it’s original position.
6. With the number of turns recorded, return machine to up-right position. Hold retaining nut firmly in place and begin to turn the valve counterclockwise (loosen) until it can be removed from the assembly. The valve may have more than one part, so be care-ful when removing the valve so as to “catch” all parts as they come out of the assembly. Lay all parts in an area where they will be undisturbed and place them in the order in which they came out of the assembly.
7. Fuel should now be draining from the machine and it should not be necessary to remove the retaining nut.
Purging the Fuel System
Carburetor Service and Repair
NOTE: If your carburetor has a bowl but no nut or bolt on the bottom, the entire bowl will unscrew from the bottom
of the carburetor. Do this carefully, as described.
19
Carburetor Troubleshooting
20 41
Purging the Fuel System
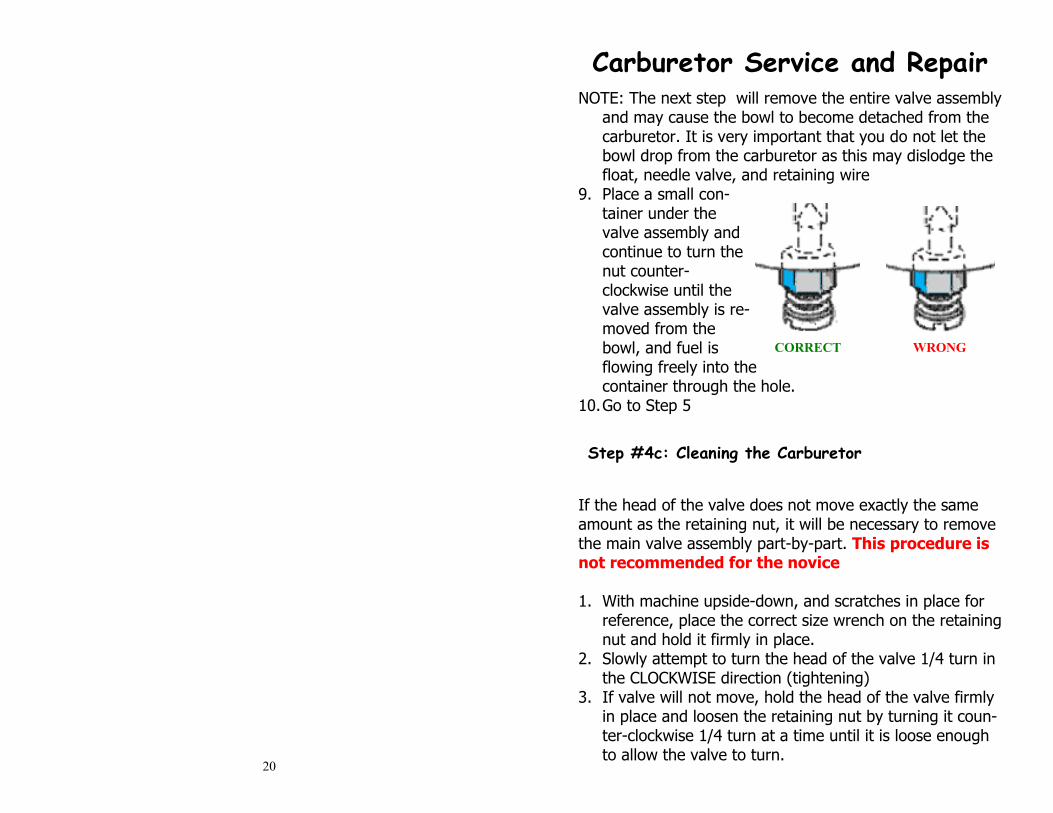
Carburetor Service and Repair NOTE: The next step will remove the entire valve assembly
and may cause the bowl to become detached from the carburetor. It is very important that you do not let the bowl drop from the carburetor as this may dislodge the float, needle valve, and retaining wire
9. Place a small con-tainer under the valve assembly and continue to turn the nut counter-clockwise until the valve assembly is re-moved from the bowl, and fuel is flowing freely into the container through the hole.
10.Go to Step 5
Step #4c: Cleaning the Carburetor
If the head of the valve does not move exactly the same amount as the retaining nut, it will be necessary to remove the main valve assembly part-by-part. This procedure is not recommended for the novice 1. With machine upside-down, and scratches in place for
reference, place the correct size wrench on the retaining nut and hold it firmly in place.
2. Slowly attempt to turn the head of the valve 1/4 turn in the CLOCKWISE direction (tightening)
3. If valve will not move, hold the head of the valve firmly in place and loosen the retaining nut by turning it coun-ter-clockwise 1/4 turn at a time until it is loose enough to allow the valve to turn.
CORRECT WRONG
40
surface of the bowl, on both sides of the slotted head of the valve to indicate it’s exact position. (If head is not slotted, make scratches on both sides and across the top of the head in one straight line).
6. Place the proper size wrench over the retaining nut.
Do not use a socket as you must be able to see the head of the valve
7. While closely watch-ing the head of the valve, turn the re-taining nut 1/4 turn counter-clockwise.
NOTE: the head of the valve must turn exactly the same amount as the retaining nut in order to maintain it’s posi-tion when you retighten. If this does not happen, return the nut and head to their original positions and jump to step #4c. 8. If valve and nut are turning exactly the same amount
on each turn, flip the machine back to the up-right po-sition and continue to next step.
Purging the Fuel System
Carburetor Service and Repair
Retaining Nut
21
I can’t begin to tell you how many machines have come into my shop with the owner insisting the problem was with the carburetor, only to find out later that it wasn’t. There can be many reasons why a small engine powered machine won’t start, runs rough, or stalls, that have abso-lutely nothing to do with the carburetor. Let’s set aside the two most common problems; bad fuel and a dirty air filter... did you know that an engine that starts, runs fine until it warms up, and then stalls (but will restart after cooling down) probably has a bad condenser? Or that a machine that backfires (or leaks fuel) through the muffler may have a stuck exhaust valve? And a hairline crack in a spark plug is enough to keep your engine from starting. In addition, many people don’t even realize that their (older model) machines have ignition points, which can produce many problems that may be mistaken for a bad carburetor. So how do you narrow down the field to identify a real car-buretor problem? Well, there are of course the obvious signs: • The carburetor is visibly broken • Fuel is leaking from it • The moving parts don’t move If none of these conditions exist then it gets a bit harder.
Carburetor Troubleshooting Is It The Carburetor?
22
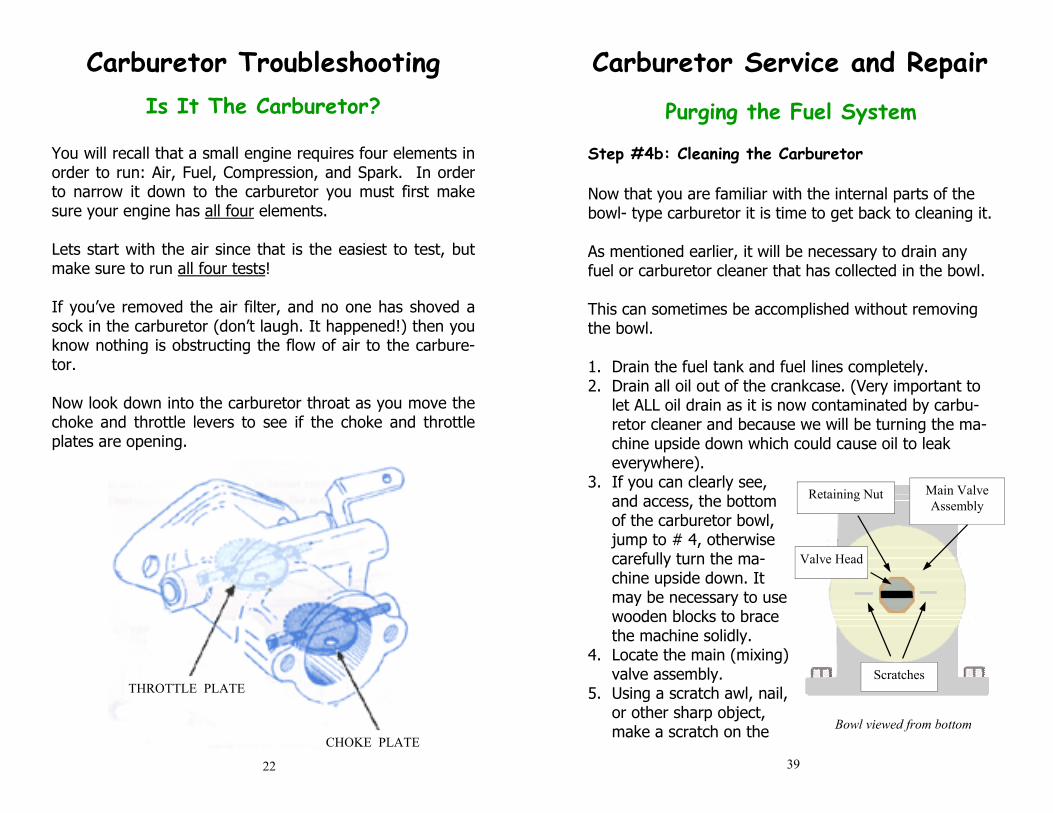
You will recall that a small engine requires four elements in order to run: Air, Fuel, Compression, and Spark. In order to narrow it down to the carburetor you must first make sure your engine has all four elements. Lets start with the air since that is the easiest to test, but make sure to run all four tests! If you’ve removed the air filter, and no one has shoved a sock in the carburetor (don’t laugh. It happened!) then you know nothing is obstructing the flow of air to the carbure-tor. Now look down into the carburetor throat as you move the choke and throttle levers to see if the choke and throttle plates are opening.
Carburetor Troubleshooting Is It The Carburetor?
THROTTLE PLATE
CHOKE PLATE
39
Purging the Fuel System
Carburetor Service and Repair
Step #4b: Cleaning the Carburetor
Now that you are familiar with the internal parts of the bowl- type carburetor it is time to get back to cleaning it. As mentioned earlier, it will be necessary to drain any fuel or carburetor cleaner that has collected in the bowl. This can sometimes be accomplished without removing the bowl. 1. Drain the fuel tank and fuel lines completely. 2. Drain all oil out of the crankcase. (Very important to
let ALL oil drain as it is now contaminated by carbu-retor cleaner and because we will be turning the ma-chine upside down which could cause oil to leak everywhere).
3. If you can clearly see, and access, the bottom of the carburetor bowl, jump to # 4, otherwise carefully turn the ma-chine upside down. It may be necessary to use wooden blocks to brace the machine solidly.
4. Locate the main (mixing) valve assembly.
5. Using a scratch awl, nail, or other sharp object, make a scratch on the
Main Valve Assembly
Scratches
Bowl viewed from bottom
Retaining Nut
Valve Head
38
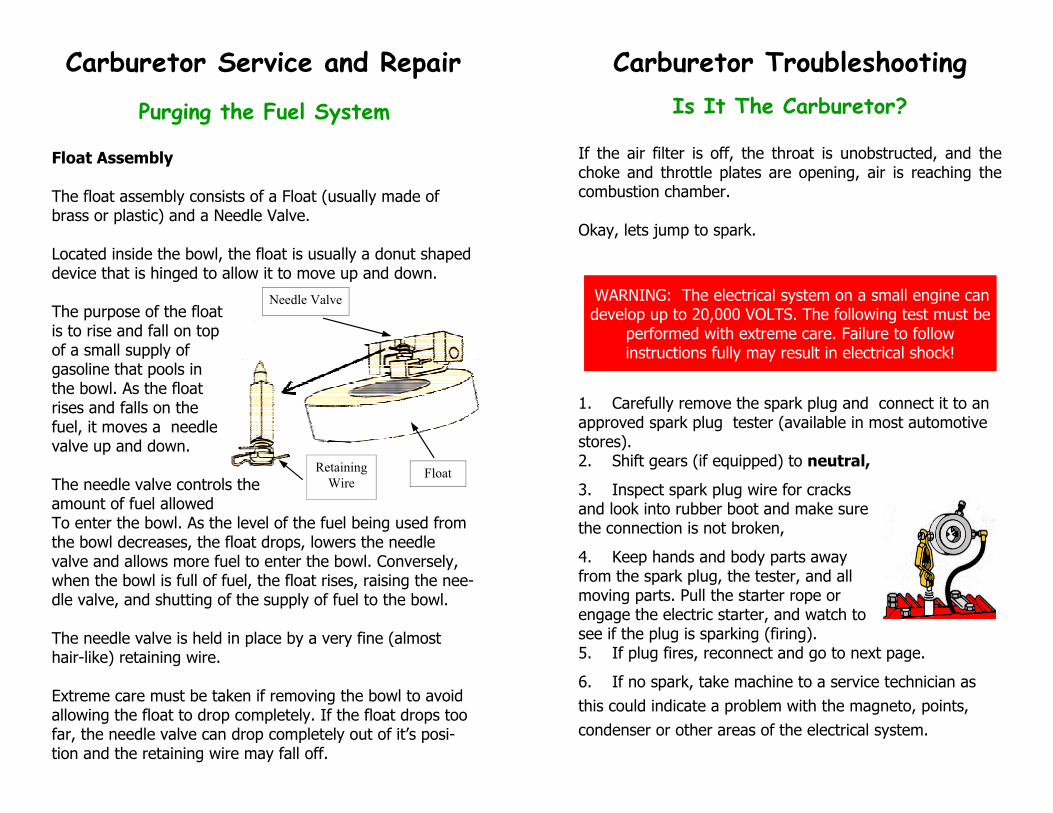
Float Assembly The float assembly consists of a Float (usually made of brass or plastic) and a Needle Valve. Located inside the bowl, the float is usually a donut shaped device that is hinged to allow it to move up and down. The purpose of the float is to rise and fall on top of a small supply of gasoline that pools in the bowl. As the float rises and falls on the fuel, it moves a needle valve up and down. The needle valve controls the amount of fuel allowed To enter the bowl. As the level of the fuel being used from the bowl decreases, the float drops, lowers the needle valve and allows more fuel to enter the bowl. Conversely, when the bowl is full of fuel, the float rises, raising the nee-dle valve, and shutting of the supply of fuel to the bowl. The needle valve is held in place by a very fine (almost hair-like) retaining wire. Extreme care must be taken if removing the bowl to avoid allowing the float to drop completely. If the float drops too far, the needle valve can drop completely out of it’s posi-tion and the retaining wire may fall off.
Needle Valve
Float Retaining Wire
Purging the Fuel System
Carburetor Service and Repair
23
If the air filter is off, the throat is unobstructed, and the choke and throttle plates are opening, air is reaching the combustion chamber. Okay, lets jump to spark.
Carburetor Troubleshooting Is It The Carburetor?
WARNING: The electrical system on a small engine can develop up to 20,000 VOLTS. The following test must be
performed with extreme care. Failure to follow instructions fully may result in electrical shock!
1. Carefully remove the spark plug and connect it to an approved spark plug tester (available in most automotive stores). 2. Shift gears (if equipped) to neutral,
3. Inspect spark plug wire for cracks and look into rubber boot and make sure the connection is not broken, 4. Keep hands and body parts away from the spark plug, the tester, and all moving parts. Pull the starter rope or engage the electric starter, and watch to see if the plug is sparking (firing). 5. If plug fires, reconnect and go to next page.
6. If no spark, take machine to a service technician as this could indicate a problem with the magneto, points, condenser or other areas of the electrical system.
24
In order to get an accurate measurement of compression in your engine, a small-engine compression tester should be used. However, this tool would be used so rarely by the average small engine owner that it may not justify the expense. The method I am about to suggest is an old favorite of the back-yard handyman.
1. Check to make sure that all parts driven by the engine are securely connected and bolts are tight. This is especially important on lawnmower blades. A missing or loose blade can imitate a compression problem. 2. Shift gears (if equipped) to neutral.
3. Disconnect the ignition wire from the spark plug.
4. Pull starter handle slowly. After a few inches you should feel significant resistance. If little (or no) resistance is felt, repeat step one and try again. If you still feel no resistance, this may indicate a compression problem in the engine. Have the machine checked by a service technician.
Carburetor Troubleshooting Is It The Carburetor?
Since you made it to this page we will assume you have air and spark. Now lets check for compression.
37
Purging the Fuel System
Carburetor Service and Repair
The tensioning spring maintains tension on the valve to prevent engine vibrations from turning it out of adjustment. Even the slightest adjustment will change the way the en-gine runs! Not all bowl style carburetors have an exposed main valve, some will have the main valve on the inside of the bowl, and other may employ an automatic type main valve. Do not be concerned if your bowl style carburetor looks somewhat different from these pictures. If there is a bowl, the following instructions will still apply. If there is no bowl present on your carburetor, you can skip past this chapter.
36
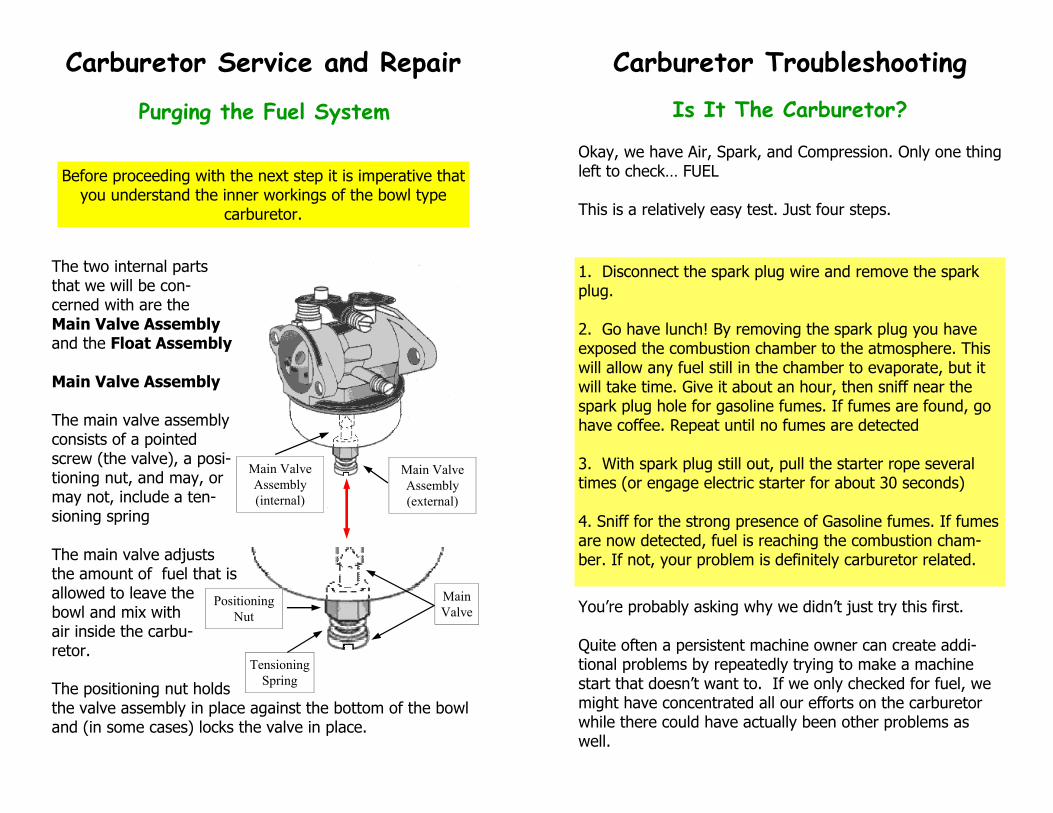
The two internal parts that we will be con-cerned with are the Main Valve Assembly and the Float Assembly Main Valve Assembly The main valve assembly consists of a pointed screw (the valve), a posi-tioning nut, and may, or may not, include a ten-sioning spring The main valve adjusts the amount of fuel that is allowed to leave the bowl and mix with air inside the carbu-retor. The positioning nut holds the valve assembly in place against the bottom of the bowl and (in some cases) locks the valve in place.
Before proceeding with the next step it is imperative that you understand the inner workings of the bowl type
carburetor.
Tensioning Spring
Main Valve
Positioning Nut
Main Valve Assembly (internal)
Main Valve Assembly (external)
Purging the Fuel System
Carburetor Service and Repair
25
Carburetor Troubleshooting Is It The Carburetor?
Okay, we have Air, Spark, and Compression. Only one thing left to check… FUEL This is a relatively easy test. Just four steps.
1. Disconnect the spark plug wire and remove the spark plug. 2. Go have lunch! By removing the spark plug you have exposed the combustion chamber to the atmosphere. This will allow any fuel still in the chamber to evaporate, but it will take time. Give it about an hour, then sniff near the spark plug hole for gasoline fumes. If fumes are found, go have coffee. Repeat until no fumes are detected 3. With spark plug still out, pull the starter rope several times (or engage electric starter for about 30 seconds) 4. Sniff for the strong presence of Gasoline fumes. If fumes are now detected, fuel is reaching the combustion cham-ber. If not, your problem is definitely carburetor related.
You’re probably asking why we didn’t just try this first. Quite often a persistent machine owner can create addi-tional problems by repeatedly trying to make a machine start that doesn’t want to. If we only checked for fuel, we might have concentrated all our efforts on the carburetor while there could have actually been other problems as well.
26 35
Cleaning the carburetor may require disassembly which is a complicated process and to which I have dedicated
the next several pages.
Failure to correctly follow these steps will result in im-proper adjustment of the main valve which will cause your engine to malfunction or prevent it from starting.
This procedure is not recommended for
the novice.
Step #4a: Cleaning the Carburetor
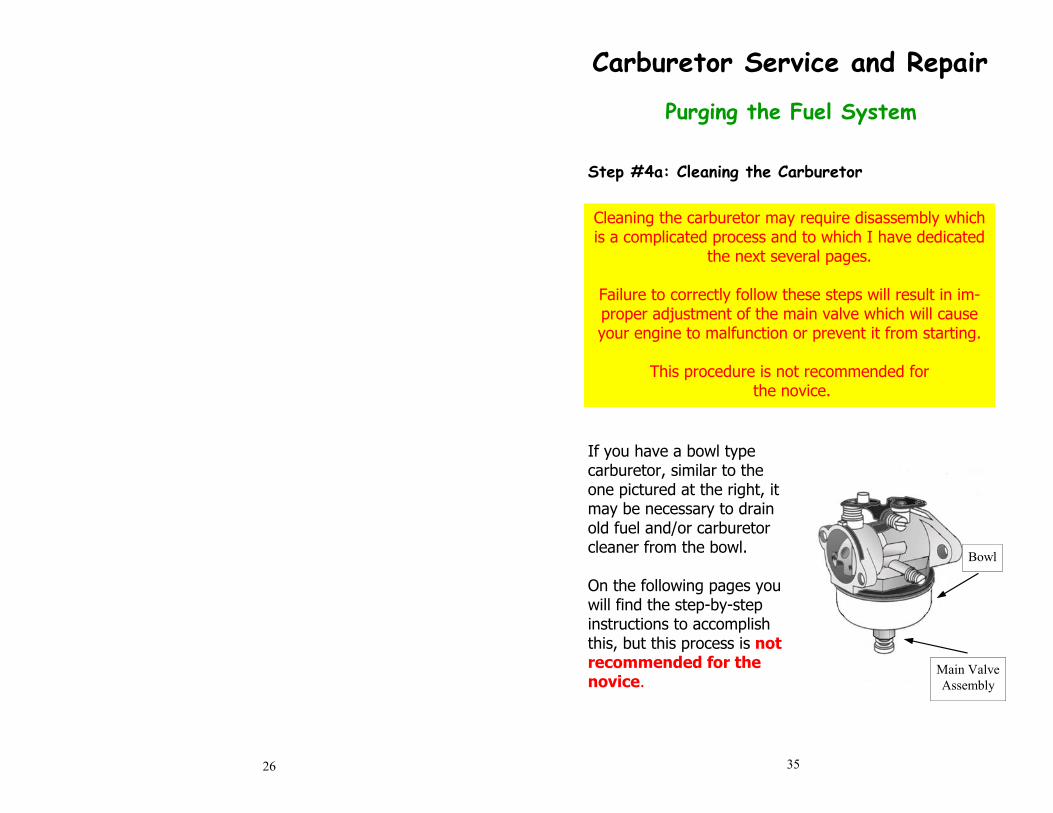
If you have a bowl type carburetor, similar to the one pictured at the right, it may be necessary to drain old fuel and/or carburetor cleaner from the bowl. On the following pages you will find the step-by-step instructions to accomplish this, but this process is not recommended for the novice.
Bowl
Main Valve Assembly
Purging the Fuel System
Carburetor Service and Repair

34
Step #4: Cleaning the Carburetor
Carburetor disassembly can be very tricky, depending upon the type of carburetor on your machine. Unless you have extensive knowledge of carburetors, it is not recom-mended that you attempt to remove it. We will first at-
tempt to clean it without disassembly.
Spray large amounts of carburetor cleaner directly into the throat of the car-buretor. Be prepared to catch leakage. While spraying, continuously move throt-tle and choke to insure that all internal parts move and allow the cleaner to penetrate into all areas of the carburetor. If carburetor is equipped with a primer bulb, pump the bulb as well. Try starting the engine.
Throat
It is important to remember that you are not just trying to rinse out the fuel system. You are attempting to dis-solve varnish which has taken months to develop and has adhered to the internal surfaces of your fuel system (much like paint). The varnish may also be blocking very fine fuel ports, jets, and needle valves. Do not rush this process! It may take hours to dissolve enough of this varnish to start your engine.
Purging the Fuel System
Carburetor Service and Repair
27
Carburetor Service
and Repair
28
As previously described, gasoline can break-down over time and leave behind a by-product known as varnish in your fuel system. Fuel stored for as little as sixty days may have evaporated enough of the combustible vapors to make the remaining fuel non-combustible (depending upon temperature and climate). In this section we will cover how to purge your fuel system of bad gasoline and varnish. It is very important that you use proper safety procedures during these steps since gasoline can be very dangerous!
WARNING:
Gasoline vapors are heavier than air, they will drop to the floor and spread, unnoticed, in all directions. Any ignition source, such as the pilot flame of a furnace, water heater,
or clothes dryer, can cause these vapors to ignite. or explode!
Always perform these steps OUTDOORS!
Carburetor Service and Repair It Tests OK But Won’t Start
Bad fuel is the number one reason why small engines fail to start, especially when attempting to start your engine for the first time of the season. Thousands of dollars are wasted each year on unneeded carburetor repairs simply
because the fuel went bad during storage.
33
Depending upon your machine, the fuel tank may be a separate item easily located and removed, or it may be built into the plastic cowl on top of the engine. Still other fuel tanks are mounted directly onto the carburetor (usually directly beneath the carburetor). The best method to purge your fuel system is to remove the fuel tank, however, if your tank is difficult to remove, or is mounted to the carburetor, you may leave the tank in place. The following instructions will work with either set-up. Close the fuel line shut-off or clamp the fuel line again. Spray, or pour approximately one-half cup of carburetor cleaner (or automotive varnish remover) into the fuel tank. Swirl liquid to coat entire inside surface of tank. Let liquid remain in tank for at least one hour, swirling occasionally, then drain the tank as in the previous step. Repeat this process at least twice.
Step #3: Cleaning the Tank
Carburetor Service and Repair
If your machine is equipped with a fuel filter, remove the filter and purchase a new one. When all of the old fuel has finished draining from the carburetor, place the end of the fuel line into the con-tainer and open the shut-off (or unclamp the line) to drain the tank. You may have to tilt the machine again to drain the tank.
Purging the Fuel System

32
Carefully disconnect the spark plug wire and remove the spark plug from the machine. Purchase a new plug but do not install it yet. Spray a liberal amount of carburetor cleaner directly into the spark plug hole to begin dissolving varnish from the combustion chamber. NOTE: Carburetor cleaner may seep down past the rings and into the oil supply. It will be necessary to drain and change the oil before starting the engine.
Step #1: Spark Plug and Combustion Chamber
Step #2: Draining the Fuel
We are about to disconnect the fuel line and fuel tank. Please be aware that there may still be fuel in the system and be prepared to catch any fuel that leaks out, into an adequately sized, empty container. Fuel may leak from
both, the fuel line and the carburetor!
If your machine is equipped with a fuel line shut-off, turn it to the off position or clamp the fuel line so that it does not leak. From the carburetor end of the fuel line, carefully discon-nect the fuel line from the carburetor and allow to drain into a container. You may have to tilt the machine to get all old fuel out of the carburetor and fuel line.
Purging the Fuel System
Carburetor Service and Repair
29
Your fuel system consists of three major components: ♦ Fuel Tank ♦ Fuel Line (including the filter) ♦ Carburetor In addition, you must also consider the Spark Plug and the Combustion Chamber when purging varnish from your machine. Each of these must be completely purged of varnish and cleaned thoroughly before fresh fuel is added.
Fuel Tank
Fuel Line
Carburetor
Spark Plug (combustion chamber)
Purging the Fuel System
Carburetor Service and Repair
30
Carburetor Service and Repair
DETOUR!
Before we get into the difficult an intricate task of tear-ing down your fuel system to purge it of bad fuel, we’re going to take a slight detour and try a simpler method first. Many times, the amount of varnish that has accumu-lated in the fuel system is not so great that it requires a complete tear-down of the fuel system. In these cases it is some times possible to “dissolve” enough of the var-nish to get the engine running again. Continued opera-tion will flush out any remaining varnish, and a good maintenance program will prevent it from reoccurring. Before proceeding to a complete fuel system tear-down, try these steps: 1. Drain all fuel from the machine 2. Spray large amounts of carburetor cleaner directly
into the carburetor 3. Remove and replace spark plug 4. Change oil 5. Clean or replace air filter 6. Fill fuel tank with fresh gasoline 7. Now try to start the engine…
31
Carburetor Service and Repair
Remember, you are trying to dissolve varnish by forcing fresh gasoline throughout the entire fuel system. This is not going happen in a matter of seconds or even min-utes. It may take up to an hour or more of constantly trying to start the engine before enough of the fresh gasoline reaches all the places where varnish may have accumu-lated, and have adequate time to dissolve the varnish and open the passages. This is especially true of the fuel ports and jets: fine passages where fuel must flow unimpeded. If, at any time during this process, you experience fuel leaking from the carburetor or the exhaust, if you expe-rience “back-firing” through the carburetor or the ex-haust, if the engine continuously sounds like it is about to start but won’t, or if the engine emits any strange sounds (especially metallic sounds) stop immediately. This machine may have serious problems that will only be compounded by continuing to attempt to start it. If none of the above occur, but the engine still will not run, proceed to the next chapter to begin purging the fuel system.
DETOUR!