small arms -...
TRANSCRIPT

CHAPTER 11
SMALL ARMS
A number of duty assignments in the Navy mayrequire you to be armed with a rifle or pistol.Examples of shipboard duty assignments include theforecastle, fantail , and pier sentry watches,quarterdeck, and magazine security watches.Examples of ashore duty assignments include basesecurity forces and duties of Seabee personnel.Although none of these assignments may be yournormal watch-standing duties, you may be required tosupport these or other security forces at any time. Forthis reason, you must be familiar with the proper useand care of small arms.
Strictly defined, the term small arm means anyfirearm of .60-caliber, 15-mm, or smaller bore.However, the term is generally considered to mean aweapon intended to be fired from the hand or shoulder,such as a rifle or a pistol.
At most naval commands, the small arms carried bysecurity watches are maintained by armory personnel.Armory personnel should give you instructions on theproper use and handling of small arms.
SMALL ARMS SAFETY PRECAUTIONS
Learning Objective: When you finish this chapter, youwill be able to—
• Recognize the purpose for and identify the safetyprecautions to follow when using small arms.
Before you learn to use any firearm, you must learnto handle it safely. Remember, firearms aredangerous. Their purpose is to kill or to cause injury.
NOTE
When at the firing range, follow all safetyprecautions.
Every firearm used by Navy personnel has sometype of built-in safety device, and some have more thanone. The safety device guards against accidental
discharge of a firearm. In almost every case ofaccidental shooting, negligence or carelessness is theprime cause. A weapon is only as safe as the personusing it. Learn to respect each firearm as a deadlyweapon.
You should observe the following generalprecautions when handling any type of firearm:
1. Treat every weapon with respect. Consider itloaded.
2. Never point a weapon at anything or anyone youdo not intend to shoot.
3. Always make sure that the bore is clear and thatall oil and grease have been removed from thebarrel and chamber before firing.
4. Use only the proper size of ammunition.
5. Unload firearms before transporting them to andfrom a shooting area.
6. Always carry the firearm so as to control thedirection of the muzzle. Keep the muzzlepointed in a safe direction until ready to fire.
7. Keep the safety on until you are ready to shoot.
8. Never shoot until you have positively identifiedthe target.
9. Unload unattended weapons. At home, storefirearms (with trigger locks installed) andammunition out of the reach of children.
10. Do not climb trees or fences with a loadedfirearm.
11. Do not pull a firearm toward you by the muzzle.
12. Avoid shooting a rifle over a hard, flat surface orbody of water because of possible erratic andlengthy bullet ricochets.
13. Like oil and water, firearms and alcohol do notmix. Do not drink alcoholic beverages orpartake of any narcotic or drug before or duringshooting activities.
11-1
A good Navy is not a provocation to war. It is the surest guarantee of peace.
—Theodore Roosevelt

14. Know your weapon—its shooting character-istics, its safeties, and its loading and unloadingprocedures.
15. Never indulge in horseplay when carrying afirearm.
In addition to observing these safety precautionswhen handling and using firearms, you should takesteps to protect your hearing and sight, particularlywhen you are exposed to repeated small arms fire suchas that on a rifle or pistol range. Blast noise from smallarms fire may cause a temporary or permanent hearingloss. The extent of injury depends on a number offactors, such as intensity of the noise, length ofexposure, and your own sensitivity to noise hazards.
Two general types of personal ear protectivedevices are used to reduce noise and thus protect the ear.These are the insert type (earplug) and the circumauraltype (covers the entire outer ear). The circumaural typeis sometimes referred to as Mickey Mouse ears.
If you work in a noise hazard area, you may befitted with a pair of earplugs. It’s important to have theplugs fitted by a qualified member of the medicaldepartment because each person’s auditory canals area different size and structure.
The Mickey Mouse ears (fig. 11-1) are made withrigid plastic ear cups lined with foam, plastic, or rubberto provide a comfortable seal around the outer ear. Thecups are connected over the head with an adjustablespring type of headband for a snug fit.
Protecting your sight is as important as protectingyour hearing. The Navy has several types of safetyglasses and goggles that provide adequate protectionfrom the danger of small arms. They range from thestandard safety goggles used in everyday work toprescription safety glasses.
When you are on the range, use these protectivedevices so that you will always be able to see and hearthe full spectrum of sounds and sights you see and heartoday.
REVIEW 1 QUESTIONS
Q1. When handling a firearm, you should NOT takewhich of the following actions?
a. Always treat a weapon a if it were loaded
b. Never point a weapon at anything or anyoneyou don’t intend to shoot
c. Carry the weapon by the muzzle as long as thesafety is on
d. Never engage in horseplay when carrying afirearm
Q2. List the protective equipment you should wearwhen firing a weapon.
a.
b.
THE M14 RIFLE
Learning Objective: When you finish this chapter, youwill be able to—
• Identify the M14 rifle.
The 7.62-mm M14 (fig. 11-2) rifle is a lightweight,air-cooled, gas-operated, magazine-fed shoulderweapon. It was widely used during Vietnam. Sincethen, it has since been replaced by the M16. It isdesigned for semiautomatic or automatic fire atthe rate of 750 rounds per minute. The rifle ischambered for the 7.62-mm NATO cartridge and is
11-2
Figure 11-1.—Circumaural (Mickey Mouse) type of earprotector.
Student Notes:

designed to accommodate a 20-round magazine, theM76 grenade launcher, and the M6 bayonet.
The overall length of the rifle (with a flashsuppressor) is 41.31 inches. The weapon has a muzzlevelocity of 2,800 feet per second and a maximum rangeof 4,075 yards. Empty, the rifle weighs about 9 pounds.Fully loaded and ready to fire, the rifle weighs about 11pounds.
THE M16A1/A2 RIFLE
Learning Objectives: When you finish this chapter, youwill be able to—
• Identify the differences between the M16A1 andM16A2 rifles.
• Recognize procedures to load and unload themagazine.
• Ident i fy procedures for cleaning andmaintaining the M16A1 and M16A2 rifles.
The M16A1 and the M16A2 rifles (fig. 11-3 and fig.11-4) are magazine-fed, gas-operated shoulderweapons. They are chambered for a 5.56-mm (about
.22-caliber) cartridge. The magazine has a capacity of
20 or 30 rounds and may be loaded with any amount, up
to capacity. The caliber may seem small, but the bullet
has a muzzle velocity of more than 3,000 feet per second
and a muzzle energy of more than 13,000 foot-pounds.
A forward assist assembly, located on the right rear of
the upper receiver, permits the operator to ensure the
bolt is locked in the forward position. They have a
maximum effective range of 460 meters.
DIFFERENCE BETWEEN THE M16A1 ANDTHE M16A2
The steps you take when field-stripping andcleaning the M16A1 and M16A2 weapons are basicallythe same. However, there are some major differencesbetween the two weapons. These differences includethe barrel, sights, selector assembly, ammunition, andhand guards of the two rifles.
WARNING
Ensure you are using the proper ammunitionfor the M16A1 and the M16A2. Improper usemay cause serious damage.
11-3
Student Notes:
Figure 11-2.—The 7.62-mm M14 rifle.

11-4
Figure 11-3.—M16A1 service rifle, 5.56 mm, left and right side views.
Figure 11-4.—M16A2 service rifle, 5.56 mm, left and right side views.

CLEARING THE RIFLE
The following maintenance procedures (clearing,field-stripping, assembling, etc.) for the M16 servicerifles are written for the right-handed Sailor. Theleft-handed Sailor can reverse the hand directions forthese procedures for the M16
NOTE
Unless specifically stated otherwise, thefollowing discussion of the M16 rifle appliesequally to both the M16A1 and M16A2.
The first precaution you should take in handling anyweapon is to make it safe by clearing it. To clear the M16rifle, place the butt against the right thigh and proceed asfollows:
1. Point the selector lever toward SAFE (fig. 11-8,view A). If the weapon is not cocked, the selector levercannot be pointed toward SAFE. If that is the case, do
11-5
Student Notes:
COMPONENT M16A1 M16A2
Barrel Lighter barrel because of ammunition fired Heavier barrel because of ammunition fired
Sights Rear sight uses a windage drum forwindage (fig. 11-5)Front sight is same as the M16A2 (fig.11-6)
Rear sight is adjusted by means of awindage knob for windage and an elevationknob for elevation (fig.11-7)
Selector assembly Has semiautomatic or fully automaticfeatures
Has a semiautomatic or burst (three rounds)feature
Ammunition Fires a 5.56-mm round and a 62-grainNATO round
Fires a 5.56-mm round and a 62-grainNATO round
Hand guards Round and ridged, making them strongerand easier to grip than the M16A1 handguards. They are also interchangeable.
Figure 11-5.—M16A1 windage drum.
Figure 11-6.—Front sight for the M16A1 and the
M16A2 rifle.

not cock the weapon at this time; instead, go on to thenext step in clearing.
2. Remove the magazine (fig. 11-9). Grasp themagazine with the left hand (fingers curled around thefront of the magazine, thumb placed on the magazinecatch button). Use your right hand and apply pressure onthe magazine catch button with the thumb and pull themagazine straight out of the weapon.
3. Lock the bolt open (figs. 11-10 and 11-11).Grasp the charging handle with the thumb andforefinger of the right hand, depress the charginghandle, latch it with the right thumb, and pull to the rear(fig. 11-10). When the bolt is fully rearward, press thebottom of the bolt catch with the thumb or forefinger ofthe left hand (fig. 11-11). Allow the bolt to move slowly
11-6
Student Notes:
Figure 11-7.—M16A2 rear sight.
Figure 11-9.—Removing the magazine.
Figure 11-10.—Pulling the charging handle rearward.
Figure 11-8.—Selector lever pointing to SAFE.

forward until it engages the bolt catch, and return the
charging handle to its forward position.
4. Inspect the receiver and chamber of the weapon
by looking through the ejection port to ensure these
spaces contain no ammunition.
5. Check the selector lever to ensure it points
toward SAFE; then allow the bolt to go forward by
depressing the upper portion of the bolt catch.
CAUTION
The selector must be on SAFE to preventdamage to the automatic sear during assemblyand disassembly.
FIELD-STRIPPING THE RIFLE
Before you can field-strip a rifle, you must bequalified to do so. You will use instructions when youactually field-strip a rifle. Follow the procedures inthe instruction that deals with the weapon that you arefield stripping.
LOADING THE MAGAZINE
A magazine can come in either a 20- or 30-roundcapacity and may be loaded with any amount up to thatcapacity. The magazine follower has a raised portiongenerally resembling the outline of a cartridge.Cartridges are loaded into the magazine so the tips ofthe bullets point in the same direction as the raisedportion of the follower (fig. 11-12).
CAUTION
Do not load or attempt to load more roundsthan what the magazine was designed for.Overloading deforms the lips of the magazineand can cause malfunctions.
UNLOADING THE MAGAZINE
To prevent damage to the lips of the magazine, youshould remove the ammunition in the following manner:
1. Hold the magazine in your left hand with theopen end away from your body and with the nose of thecartridge down (fig. 11-13, view A).
2. Depress the center of the second round in themagazine using the nose of the cartridge, allowing thefirst round to drop out of the magazine (fig. 11-13, viewB). Repeat this procedure until you remove all therounds from the magazine except the last one.
3. Use the nose of the cartridge to depress thefollower to remove the last round, allowing the lastround to drop out of the magazine (fig. 11-13, view C).
LOADING THE RIFLE
With the hammer cocked, place the selector lever onSAFE. (Refer to figure 11-8, view A.) Notice that youcan’t place the selector lever on SAFE unless the rifle iscocked. You may insert the magazine with the bolt andbolt carrier open or closed; however, you should learn toload with the bolt open. Loading with the bolt openreduces the possibility of first round stoppage and savesthe time needed to pull the charging handle to the rear.
Hold the stock of the rifle under your right arm withyour right hand. Grasp the pistol grip; then point the
11-7
Student Notes:
Figure 11-12.—Loading cartridges into the magazine,
20 -round capacity.
Figure 11-11.—Locking the bolt open.

muzzle in a safe direction. With your left hand, insertthe loaded magazine into the magazine housing. Pushupward until the magazine catch engages and holds themagazine. Rap the base of the magazine sharply withthe heel of your hand to ensure positive retention. If theaction is open, release the bolt by depressing the upperportion of the bolt catch with the thumb of your lefthand, allowing the action to close, chambering theround. If the action is closed when the magazine isinserted, pull the charging handle fully to the rear withyour right hand and release it. (Refer to figure 11-10.)
WARNING
Don’t ride the charging handle forward with
the right hand. If the charging handle is eased
forward from the open position, the bolt mayfail to lock. If the bolt fails to go fully forward,use the bolt closure forward assist assembly(fig. 11-4) with the heel of your right hand. Therifle is now loaded and is ready to fire when youplace the selector lever in the automatic orsemiautomatic position. If it is not ready to fire,make sure the selector lever is on SAFE.
After the last round has been fired, the bolt catchholds the bolt carrier to the rear. To change the magazinefor reloading, press the magazine catch button andremove the empty magazine from the weapon.
FIRING THE RIFLE
The rifle fires semiautomatic or burst (automaticfor the M16A1) when you move the selector lever tothe desired position. (Refer to figure 11-8.) With theselector lever in the semiautomatic position, the riflefires one round each time you pull the trigger. Withthe selector lever in the burst position, the M16A2fires in short bursts of three rounds. (NOTE: TheM16A1 rifle fires fully automatically and willcontinue to fire until the magazine is empty or yourelease the trigger.) When the rifle is fired in eitherSEMI or BURST or AUTOMATIC, the bolt locks inthe open position when the last round from themagazine has been fired.
UNLOADING AND CLEARING THE RIFLE
As you read this section, refer back to figures 11-8,11-9, 11-10, and 11-11. To unload the rifle and make itsafe, place the selector lever on the SAFE position (fig.11-8); and remove the magazine by pressing themagazine release button (fig. 11-9). Pull the charginghandle to the rear (fig. 11-10), ejecting any round fromthe chamber. Inspect the chamber and receiver toensure that it is clear. Releasing the charging handlewill allow the bolt to close. To keep the bolt open,depress the lower portion of the bolt catch beforereturning the charging handle forward (fig. 11-11).The rifle is clear only when the following conditionsexist:
• No case or round is in the chamber.
• The magazine is out.
11-8
Student Notes:
Figure 11-13.—Unloading the magazine with the nose of a
cartridge.

• The bolt carrier is to the rear.
• The selector lever is on the SAFE position.
CARING AND CLEANING OF THE RIFLEAND AMMUNITION
A clean, properly lubricated and maintainedrifle that is loaded with clean ammunition will firewhen needed. To keep the rifle in good condition,
you need to take care of it and clean it. Under badweather conditions, some key parts may need care andcleaning several times a day. The cleaning material(fig. 11-14) used for the care of the rifle is carried inthe rifle stock. Special attention must be given to thebarrel bore and chamber, bolt carrier group, upperreceiver group, lower receiver group, and theammunition magazines.
11-9
Figure 11-14.—M16Al and M16A2 rifle cleaning material.
Student Notes:
PART ACTION
Barrel bore and chamber 1.
2.
3.
4.
5.
Dip a bore brush in the bore cleaner; then brush from the chamber to the muzzle, usingstraight-through strokes. Don’t reverse the brush while it is in the bore: it may jam. Ajammed brush is hard to remove, and removing the brush might damage the bore.
Dip the brush in bore cleaner; then clean the chamber with the bore brush.
Replace the bore brush with a slotted cleaning patch tip, and push the dry patches throughthe bore and chamber until they come out clean.
After you clean the bore, lightly lubricate the bore and chamber to prevent corrosion andpitting. Use the recommended lubricant on a patch.
Lightly lubricate the lugs in the barrel extension.
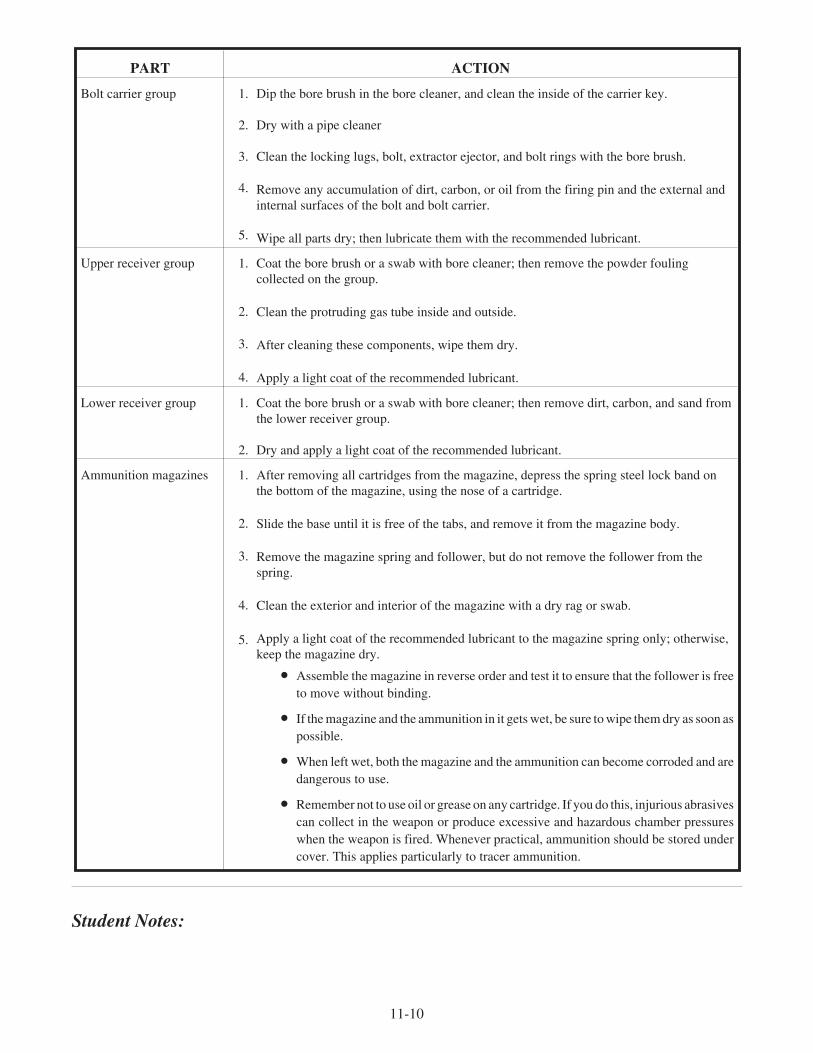
11-10
Student Notes:
PART ACTION
Bolt carrier group 1.
2.
3.
4.
5.
Dip the bore brush in the bore cleaner, and clean the inside of the carrier key.
Dry with a pipe cleaner
Clean the locking lugs, bolt, extractor ejector, and bolt rings with the bore brush.
Remove any accumulation of dirt, carbon, or oil from the firing pin and the external andinternal surfaces of the bolt and bolt carrier.
Wipe all parts dry; then lubricate them with the recommended lubricant.
Upper receiver group 1.
2.
3.
4.
Coat the bore brush or a swab with bore cleaner; then remove the powder foulingcollected on the group.
Clean the protruding gas tube inside and outside.
After cleaning these components, wipe them dry.
Apply a light coat of the recommended lubricant.
Lower receiver group 1.
2.
Coat the bore brush or a swab with bore cleaner; then remove dirt, carbon, and sand fromthe lower receiver group.
Dry and apply a light coat of the recommended lubricant.
Ammunition magazines 1.
2.
3.
4.
5.
After removing all cartridges from the magazine, depress the spring steel lock band onthe bottom of the magazine, using the nose of a cartridge.
Slide the base until it is free of the tabs, and remove it from the magazine body.
Remove the magazine spring and follower, but do not remove the follower from thespring.
Clean the exterior and interior of the magazine with a dry rag or swab.
Apply a light coat of the recommended lubricant to the magazine spring only; otherwise,keep the magazine dry.
• Assemble the magazine in reverse order and test it to ensure that the follower is freeto move without binding.
• If the magazine and the ammunition in it gets wet, be sure to wipe them dry as soon aspossible.
• When left wet, both the magazine and the ammunition can become corroded and aredangerous to use.
• Remember not to use oil or grease on any cartridge. If you do this, injurious abrasivescan collect in the weapon or produce excessive and hazardous chamber pressureswhen the weapon is fired. Whenever practical, ammunition should be stored undercover. This applies particularly to tracer ammunition.

REVIEW 2 QUESTIONS
Q1. What type of ammo is the M-14 rifle chamberedto fire?
Q2. When ful ly loaded, the M-14 weighs__________.
Q3. Identify the following rifle components as eitherM16A1 or M16A2.
Q4. What is the first step in cleaning the M16 rifle?
Q5. How many rounds does an M16 rifle carry?
Q6. When loading the M16 rifle, why shouldn’t youride the charging handle forward?
Q7. When the selector is set for burst, how manyrounds will the M16A2 fire?
Q8. List the conditions that must exist to consider theM16 rifle clear.
a.
b.
c.
d.
Q9. Where are the cleaning materials for the M16stored?
REVOLVERS AND SERVICE PISTOLS
Learning Objectives: When you finish this chapter, youwill be able to—
• Recognize the operating characteristics of the.38-caliber revolver.
• Recognize the procedures to follow whenloading and unloading the magazine, andunloading and cleaning the .45-caliber pistol.
• Identify the procedures for cleaning andmaintaining the .45-caliber pistol.
• Identify the safety devices of the 9mm caliberpistol.
• Recognize the procedures to follow whenloading and unloading the 9mm pistol.
NOTE
The .38-caliber revolver and the .45-caliberservice pistol have been replaced by the 9mmpistol. However, small units may still carrythese revolvers and pistols in their allowance.
11-11
Student Notes:
Component Rifle
a. Has a lighter barrel because ofthe ammunition fired
b. Rear sights are adjusted bymeans of a windage knob andelevation knob
c. Has a semiautomatic or burstfeature
d. Fires a 5.56-mm round and a62-grain round

THE .38-CALIBER REVOLVER
The .38-caliber revolver is a cylinder-loading,single- or a double-action, manually operated handweapon (fig. 11-15). Several barrel lengths and weightsare available.
THE .45-CALIBER SERVICE PISTOL
The .45-caliber service pistol (fig. 11-16) is anindividual weapon intended for use in close combat.The .45-ca l iber p is to l i s a semiautomat ic ,recoil-operated, magazine-fed hand weapon. Thepistol fires one round each time the trigger is squeezed.The pistol can be carried in either a hip or shoulderholster.
The magazine holds seven cartridges. The forwardmovement of the slide strips the upper cartridge fromthe magazine into the chamber. After the last cartridgefrom the magazine has been fired, the slide remains inthe rear.
Only your ability to change magazines, aim, andsqueeze the trigger rapidly limits the rate of fire of the.45-caliber service pistol.
11-12
Student Notes:
Figure 11-15.—The .38-caliber revolver.
Figure 11-16.—.45-caliber semiautomatic service pistol. (A) Assembled; (B) Sectional view in recoil position.

The pistol is 8 5/8 inches in length and weighs 3pounds fully loaded, with a maximum range of 1,500yards, and a maximum effective range of 50 yards.
THE 9MM SERVICE PISTOL
In 1985, the armed forces selected a 9mm pistol toreplace the .45-caliber pistol. The pistol selected is asingle- or double-action semiautomatic hand weapon.As soon as the pistol is fired, either in single or doubleaction, the slide automatically comes back and cocksthe hammer. To fire the pistol again, all you have to do ispull the trigger. The 9mm pistol has a large magazinecapacity—it can hold 15 rounds in the magazine. Slotsin the magazine help the user know the number ofrounds that remain.
Description and Technical Data
As you know, the 9mm service pistol is a semi-automatic, magazine-fed, recoil operated, double-action pistol. The pistol fires one round each time thetrigger is pulled. The energy needed to operate the pistolcomes from the recoil, which is created by the rearwardforce of expanding gases of a fired round. The double-action feature lets you fire a weapon when the hammeris in the forward position, the safety is in the fireposition, and the trigger is pulled. The magazine holds15 cartridges. When the last cartridge from the mag-azine is fired, the slide remains locked to the rear. Lookat the following chart for the technical data of the 9MMservice pistol.
Safety Devices
The 9mm service pistol is equipped with three typesof safety features—the ambidextrous slide safety, thefiring pin block, and the half cock notch.
AMBIDEXTROUS SAFETY.—This safetyallows for safe operation of the pistol by both right- andleft-handed users. It lowers the hammer safely withoutcausing an accidental discharge. When the hammer iscocked, it may be safely lowered by moving the safetyto the safe (down) position. When the safety is in the fire(up) position, a red dot will be visible indicating that thepistol should be handled with caution (red you’redead).
FIRING PIN BLOCK.—This safety prevents anymotion of the firing pin and is only overcome by pullingon the trigger. Both the firing pin and the firing pin blockhave a notch cut into them. The firing pin block remainsin the firing pin notch and prevents any motion of thefiring pin. When you pull the trigger, the firing pin blockis pushed upward and aligns its notch with the firing pinso that the firing pin can move forward to strike theprimer of a round.
HALF COCK NOTCH.—This safety preventsaccidental discharge. The half cock notch is located onthe hammer. If a cocked hammer should fall forwardbecause of a mechanical failure, the half cock notchwould catch on the sear before the hammer strikes thefiring pin and prevent an accidental discharge of thepistol.
Loading
The 9mm service pistol incorporates single- anddouble-action modes of fire. With the safety in theFIRE position, in the double-action mode, squeezing
11-13
Student Notes:
COMPONENT TECHNICAL DATA
Caliber 9 x 9mm (9mm NATO)
Diameter of bore .356 in.
Length 217 mm (8.54 in.)
Width 38 mm (1.50 in.)
Height 140 mm (5.51 in.)
Weight with 15-roundmagazine
1,134 g (2.50 lb.)
Weight with emptymagazine
960 g (2.12 lb.)
Barrel length 125 mm (4.92 in.)
Muzzle velocity 375 m/sec (1,230 ft/sec)
Maximum effective range 50 mm (45.7 yd)
Cyclic rate of fire 1,100 rpm
Trigger pull 4 to 6.5 lb single actionand7.5 to 16.6 lb doubleaction

the trigger will automatically cock and fire the pistol.Always keep your finger away from the trigger unlessyou intend to fire. The safety should be in the downposition (the red dot not visible), which indicates thatthe pistol is in a safe condition before loading. With thepistol pointing in a safe direction and the slide in itsforward position, follow the steps listed below.
WARNING
Although rare, it is possible that the safety maybecome disengaged during the loading
procedure. Make sure the safety is on afterloading.
Unloading
To unload the 9MM service pistol, follow the stepslisted below.
Unloading the Magazine
To unload the magazine, hold the magazine usingone hand, with the front end forward. With yourthumb, press firmly on the cartridge rim and pushforward. Repeat this procedure until the magazine isempty.
REVIEW 3 QUESTIONS
Q1. How many rounds will a .45-caliber pistolmagazine hold?
11-14
Student Notes:
STEP ACTION
1 Insert a loaded magazine into the magazinewell of the pistol until you hear a click. Thisensures a proper catch engagement.
2 Grasp the serrated portion of the slide withthe nonshooting hand (fig. 11-17).
3 Pull the slide all the way to the rear (fig.11-18).
4 Release the slide. This will strip a cartridgefrom the magazine and chamber a round (fig.11-19).
Figure 11-17.—Grasping the serrations of the slide.
Figure 11-18.—Pulling the slide to the rear.
Figure 11-19.—Releasing the slide.
STEP ACTION
1 Place the safety in the safe position.
2 Depress the magazine release button toremove the magazine from the pistol.
3 With the pistol pointing in a safe direction,grasp the slide serrations and fully retractthe slide to remove the chambered cartridge.
4 Use the right thumb and push upward on theslide stop to lock the slide to the rear, andvisually inspect the chamber to ensure that itis empty.

Q2. The .45 caliber pistol was designed to be used as
___________________________.
Q3. List the three safety features of the 9mm servicepistol.
a.
b.
c.
Q4. You are loading your pistol. The safety should bein what position?
SHOTGUNS
Learning Objective: When you finish this chapter, youwill be able to—
• Identify the safety practices to follow whenusing shotguns.
Shotguns (fig. 11-20) are being used by the Navy insecurity guard work. Shotguns are the weapons ofchoice for short-range work, which includes therequirement to protect vital nuclear propulsion systemsand nuclear weapons. The advantage of shotguns overpistols/revolvers is that sight alignment is not so critical.Each trigger pull of a shotgun expels anywhere fromnine to hundreds of projectiles (shot). These projectilescover a wide area. The characteristics of the M870shotgun are shown in the following chart:
NOTE
Make certain you load the M870 with theproper ammunition. For example, many peoplehave been injured by a shotgun loaded with asmaller gauge shell. This smaller shell goes partway down the barrel and cannot be fired. Theuser thinks a misfire has occurred and chambersthe proper size shell. Firing the weapon causesthe gun to explode because the smaller shell isan obstruction. Serious injury or death couldoccur.
REVIEW 4 QUESTION
Q1. What advantage does a shotgun have over other
firearms?
MARKSMANSHIP
Learning Objective: When you finish this chapter, youwill be able to—
• Recognize the firing techniques for rifles andpistols.
• Identify the shooting positions.
Marksmanship training gives you proper informationand instruction on how to be a safe and effective shooter.Good shooting, whether on the firing range or in combat,depends on your knowledge and use of basicmarksmanship principles. These principles are interrelatedand must be practiced each time you fire a shot.
11-15
Student Notes:
COMPONENT CHARACTERISTIC
M870 shotgunA manually operated, magazine-fed(tubular), pump-action shoulderweapon.
Length–Overall 39 inches
Barrel 20 inches
AmmunitionFour rounds of 12-gauge , 2 ¾ inchin the magazine. Normal ammunitionissue is 12 gauge, 00 buck
Crossbolt Safety
Figure 11-20.—M870 shotgun.

FIRING TECHNIQUES—RIFLE
The most important factors for you to rememberabout firing a rifle are sight alignment and achieving acorrect aiming point. Together they make up the sightpicture.
Sight Alignment
Sight alignment involves looking through the rearsight aperture, focusing the eye on the front sight post(or blade), and centering the front sight post exactly inthe rear sight aperture, both vertically and horizontally.The top of the front sight is level with the horizontalcenter line of the rear sight, and the body of the frontsight is centered between the rear sight aperture(fig. 11-21).
REAR SIGHT.—When you are in different firingpositions (standing, kneeling, or sitting), your aimingeye is at a slightly different distance from the rear sight.This distance is referred to as eye relief. Eye reliefmakes the opening (peep) of the rear sight appear largeror smaller, depending on the firing position. Regardlessof the apparent size of the rear sight opening, youmust align the front sight in the center of theopening.
It is important to keep your eye the same distancefrom the peep sight in any particular firing position. Toensure this distance is always the same, you must holdthe rifle in the same exact location for each shot. Thislocation is commonly called the spot weld or anchor.There are several tricks shooters use to help maintainthis distance. For example, you can place a small piece
of tape on the stock of the rifle where it touches thecheek. In this way, you can feel whether your cheek hasthe proper eye relief.
FRONT SIGHT.—The front sight always appearsto be the same size. However, depending on the distanceyour eye is from the rear sight, more or less of the frontsight may be visible in the sight picture. The front sight,not the target, is the point of focus for the eye. As such,the front sight will be sharp and distinct in outline. Forthis reason, keep the front sight square, level, andblackened.
AIMING POINT.—The aiming point is the pointon the target where the sights of the weapon are broughtto bear. The correct aiming point is at 6 o’clock; that is,the bottom of the bull’s-eye of a type “A” target (fig.11-22) or the silhouette of a type “D” target (fig. 11-23).Any location on the target face is always given relativeto a similar position on a clock face regardless of thetarget shape. Therefore, a vertical line in the exact centerof the target would be described as running from 12o’clock (top) to 6 o’clock (bottom).
SIGHT PICTURE.—To obtain the correct sightpicture, you need to align the rear sight, the frontsight, and the bull’s-eye (figs. 11-22 and 11-23). Eachof these three elements affects the sight picture. Asyou can see from figure 11-24, any error in sightalignment will increase as the range increases. Anerror in the aiming point remains constant as therange increases.
At close ranges, the bull’s-eye or silhouette appearslarger in relation to the front sight than it will at longer
11-16
Student Notes:
Figure 11-21.—Proper sight alignment.
Figure 11-22.—6 o’clock sight picture held on “A” targetat a range of 200 yards.

ranges. This means that the sight picture will vary notonly from one firing position to another but also fromone firing line to another (fig. 11-25).
TRAINING.—You will receive training in aimingalong with the position and trigger squeeze beforeactually firing on the rifle range. You do this by aimingat a series of small bull’s-eyes at least 20 feet away on adry firing range; this training is known as snapping in.
BLACKENING SIGHTS.—You should blackenthe sights during sighting and aiming exercises to helpeliminate light reflection or glare. Blacken all sights,both front and rear, on the base of the receiver and the
top of the barrel. Usually, sights are blackened by usinga smudge pot, carbide lamp, oily patch, candle, cigarettelighter, or ordinary match. Be sure to remove all oil fromthe sight before blackening it.
Shooting Positions
For the best results in rifle shooting, you need toshoot in the correct shooting position. The better theposition, the easier it is to hold the rifle and squeeze thetrigger while the sights are properly aligned on thetarget. However, shooting position won’t compensatefor lack of practice. You may have difficulty inassuming a correct position until sufficient practice haslimbered up your muscles. Once your muscles arelimber, you will find the positions both comfortable andsteady.
A standard qualification course requires you tolearn and use three standard positions whileshooting—standing, kneeling, and sitting. Experiencehas proved that these positions produce excellent resultswith men and women of all physical types.
Once you master the correct positions, you mustcombine sighting and aiming with your practice. Learnto get into the correct position and align the sightswithout moving the rifle. If the target isn’t properlyaligned with the sights, you must move your body
11-17
Student Notes:
Figure 11-24.—Error in sight alignment increases as range increases.
Figure 11-23.—6 o’clock sight picture held on a “D” target
at a range of 200 yards.

instead of the rifle until you obtain the proper sightpicture.
STANDING (OFF-HAND) POSITION.—Thestanding position (fig. 11-26) is used to engage surprisetargets that appear at close ranges. Normally, you usethis position when engaging targets less than 100 yardsin range and when you are constantly firing and moving.
11-18
Student Notes:
Figure 11-25.—Variation in sight picture for each range of fire.
Figure 11-26.—Standing position. Figure 11-27.—Kneeling position.

KNEELING POSITION .—The kneelingposition (fig. 11-27) is a natural position that can beassumed quickly. It is suitable for use on level ground oron ground that slopes upward.
SITTING POSITION .—There are threevariations of the sitting position:
1. Open leg
2. Cross leg
3. Cross ankle
The position used depends entirely on the shooter.The open-leg position (fig. 11-28) is especially suited
for use on ground that slopes downward. The other twoalternate sitting positions are the cross-leg position (fig.11-29) and the cross-ankle position (fig. 11-30).
Trigger Control
The most important single factor in marksmanshipis trigger control. Everything about your position andaim may be perfect; but if you do not squeeze the triggerproperly, your shot will not go where you aimed it.
The key to trigger control is that the trigger must besqueezed smoothly, gradually, and evenly straight to therear. Any sideward pressure, however slight, applied tothe trigger during its rearward movement will likelyresult in a wide shot. Similarly, upward or downwardpressure on the trigger will result in high or low shots.Trigger control can be done as shown in the chart on thefollowing page:
When you fire from the standing position,coordinating the trigger squeeze and proper aim iscritical. You must start and continue the squeeze onlywhen the front sight is momentarily at rest or is slowlymoving in the smallest area of the bull’s-eye.Inexperienced shooters usually tend to snap shoot inthis position; that is, they attempt to complete the triggeraction instantly as the front sight moves across theaiming point. This invariably results in jerking the rifleand producing a wild shot.
11-19
Student Notes:
Figure 11-28.—Open-leg position.
Figure 11-29.—Cross-leg position.
Figure 11-30.—Cross-ankle position.

Squeezing the trigger correctly is not as easy as itmay appear; the technique must be fully mastered. Tohelp you remember the correct technique, the acronymBRASS was developed (see chart above).
FIRING TECHNIQUES—PISTOL
Good pistol shooting, like rifle shooting, dependson your ability to master and apply certain basicmarksmanship skills. You must practice theseskills—aiming, position, and trigger squeeze—often.Apply these fundamentals of marksmanship! If yourlife ever depends on how well and accurately you shootthe pistol, you might walk away alive.
Aiming the Pistol
Aiming the pistol consists of combining proper
sight alignment with the correct aiming point to obtain a
correct sight picture.
SIGHT ALIGNMENT.—Sight alignment is best
defined as placing the front and rear sights into correct
alignment with the eye. The top of the front sight is level
with the top of the rear sight, and the body of the front
sight is centered between the rear sight aperture (fig.
11-31). Correct sight alignment is essential for accuracy
because of the short sight radius (about 6 1/2 inches).
For example, if a 1/10-inch error is made in aligning the
11-20
Student Notes:
Trigger hand Grasp the stock or pistol grip firmly, but without strain, so the trigger finger has the propersupport to overcome trigger weight. An unnatural, straining grasp causes excessive muscletension in the hand, which results in a tremor that is transmitted to the weapon.
Trigger (index)finger
Make contact with the trigger where the contact produces a movement straight to the rear(usually between the first joint and the tip). (NOTE: The trigger finger must not touch thereceiver or rifle.)
Line up thesights and applypressure on thetrigger
Gradually increase the pressure until the hammer releases and the shot fires. (NOTE: If,during this process, the sights drift off the target, interrupt the trigger squeeze but maintainthe pressure. When the sight picture is correct, continue the squeeze until you fire the shot.)
B BREATH Proper breathing is essential. It helps you relax, steadies your aim, and clears your vision.First, take a normal breath; then release part of it (enough to be comfortable); and hold theremainder. Do not hold your breath for more than 10 seconds before shooting. This maytense your muscles and blur your vision. If you do not shoot during this breathing period,take another normal breath and repeat the procedure.
R RELAX You must relax. The more relaxed you are, the better your shot will be.
A AIM Concentrate on the proper sight alignment of the correct sight picture. Focus your eye on thefront sight post (blade).
S SLACK Some rifles have a certain amount of slack in the trigger. Take up this slack before startingyour squeeze to the rear to fire. The M16 trigger slack is insignificant, and this step isgenerally omitted when firing that weapon. Knowing your weapon is important.
S SQUEEZE Squeeze the trigger as previously described. If you squeeze it properly, you will not knowwhen the round will fire. This will prevent flinching, caused by anticipation of the shock, orrecoil, from the exploding cartridge.
front sight in the rear sight, the bullet will miss the pointof aim by almost 15 inches at 25 yards of range.
AIMING POINT.—The correct aiming point,when you fire at a bull’s-eye target at 25 yards, is a 6o’clock sight picture. At 15 yards, bring the aimingpoint well up into the black. When you fire at an “E”type of silhouette target, the aiming point is in the centerof the target.
CORRECT SIGHT PICTURE.—A sight pictureis the pattern of the pistol sights in relation to the targetas you aim the pistol. A correct sight picture combinescorrect sight alignment and correct aiming point (fig.11-31). When you are aiming, your eye cannot focussimultaneously on three objects (rear sight, front sight,and bull’s-eye) at different ranges. Therefore, the lastfocus of the eye should always be on the front sight. Youwill see the front and rear sights sharp and clear, but thebull’s-eye will appear to be a bit hazy.
NOTE
If sight alignment is correct, the bullet willstrike the bull’s-eye even if the sight picture ispartially off center but still touching thebull’s-eye.
Since it is physically impossible to hold the weaponperfectly still, you must learn to apply trigger squeezeand to maintain correct sight alignment while theweapon is moving around the bull’s-eye. Thismovement is referred to as the wobble area. You mustaccept this wobble area, or movement, trying to keep itto a minimum.
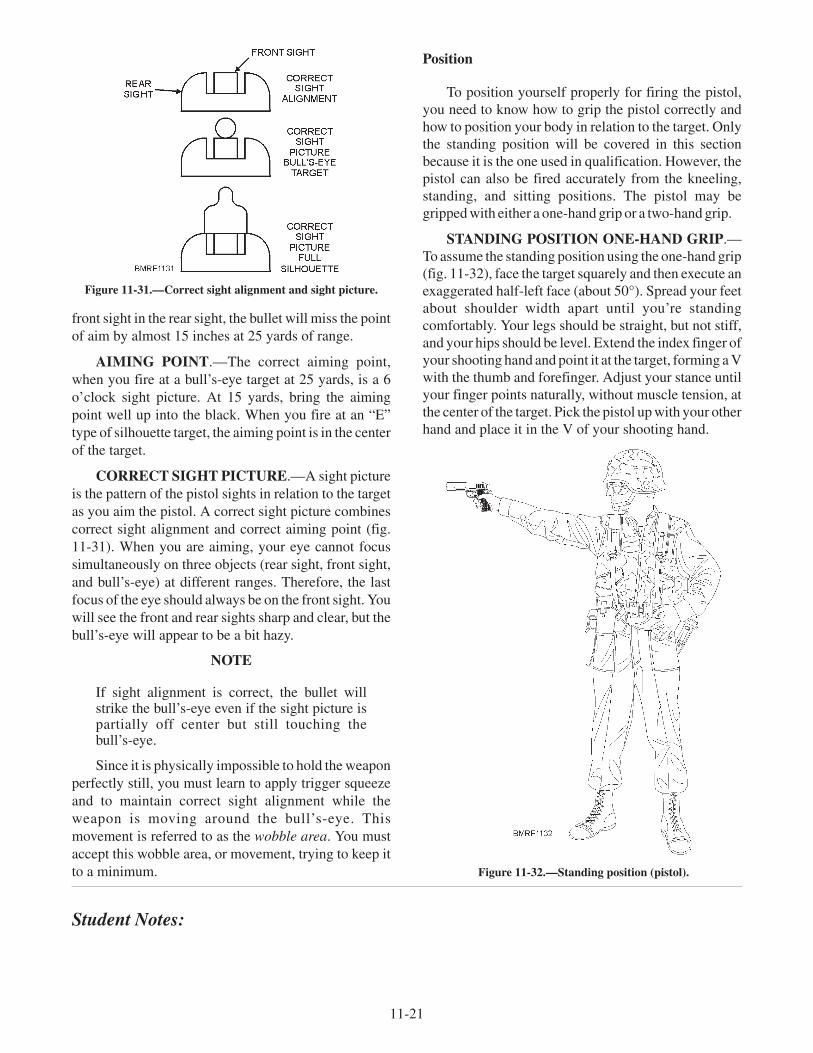
Position
To position yourself properly for firing the pistol,you need to know how to grip the pistol correctly andhow to position your body in relation to the target. Onlythe standing position will be covered in this sectionbecause it is the one used in qualification. However, thepistol can also be fired accurately from the kneeling,standing, and sitting positions. The pistol may begripped with either a one-hand grip or a two-hand grip.
STANDING POSITION ONE-HAND GRIP.—To assume the standing position using the one-hand grip(fig. 11-32), face the target squarely and then execute anexaggerated half-left face (about 50°). Spread your feetabout shoulder width apart until you’re standingcomfortably. Your legs should be straight, but not stiff,and your hips should be level. Extend the index finger ofyour shooting hand and point it at the target, forming a Vwith the thumb and forefinger. Adjust your stance untilyour finger points naturally, without muscle tension, atthe center of the target. Pick the pistol up with your otherhand and place it in the V of your shooting hand.
11-21
Student Notes:
Figure 11-31.—Correct sight alignment and sight picture.
Figure 11-32.—Standing position (pistol).

As you read this paragraph, refer to figure 11-33.Grip the receiver firmly with the hand and fingers. Wrapthe three lower fingers around the receiver (grip), andplace the trigger finger on the trigger between the tipand second joint so that the trigger can be squeezed tothe rear. Hold your thumb up and along the side of thepistol with enough pressure to steady the pistol and toequalize any pressure from the other side by the palmand forefinger. Once you have a firm grip, maintainingthe same degree of firmness throughout firing isimportant. A change in your grip will change thelocation of the shot group on the target. A tight griptends to cause the bullet to strike low and a loose grip tostrike high.
With a proper grip on the pistol, the muscles of yourarm should be firm, but not rigid. Your arm should bestraight with your wrist and elbow locked. This willprevent excessive up-and-down movement of theweapon. When the weapon is fired, the recoil will beabsorbed through the arm to the shoulder. If you are inthe correct position, the pistol will return toapproximately the same sight picture after each shot.
STANDING POSITION TWO-HAND GRIP.—In this position (fig. 11-34), you face the target squarelywith your feet placed comfortably about shoulder widthapart. Keep your legs straight without stiffness and yourhips level and slightly forward. Relax the muscles ofyour diaphragm, and make no effort to hold in yourabdomen.
Grasp the pistol in the same manner as if you werefiring one-handed. Place the nonfiring hand under thefiring hand, wrapping the nonfiring fingers around the
back of the firing hand. Place the thumb over the middlefinger of the firing hand. Lock the weapon firmly in bothhands (fig. 11-35). Bring the weapon onto the center ofthe target by shifting your feet.
MISCELLANEOUS.—In both the one-hand andtwo-hand positions, position your head so that you are
11-22
Student Notes:
Figure 11-33.—Gripping the pistol (one hand).
Figure 11-34.—Standing position (pistol), two-handed grip.

looking straight out through your shooting eye. Keepyour shooting arm fully extended.
In the one-handed position, the shoulder of yourshooting hand should be slightly raised. Turn your headin order to see the target through the sights. The easewith which your head can be turned is anotherdetermining factor in how far you must turn to the rightor left. There should be no strain on the neck muscleswith your head held upright. The whole position, withthe exception of your shooting arm, is one that can bemaintained with the least muscular effort. Your body isbalanced, rather than held in position. The muscles ofyour shooting arm and shoulder should be tightenedsomewhat to sustain the weight of the pistol and tomaintain a correct grip. Excessive tightening of themuscles of your shooting arm and hand should beavoided. The tension in the muscles of your shooting armand hand should be maintained after the hammer falls.This will assist in getting off your second shot quicker.
Because of the differences in the body structure ofindividuals, the standing position will vary slightly.However, regardless of your size, your position shouldbe relaxed and comfortable. The pistol should point atthe center of the target or you will be tense while firing. Ifyou are tense, there will be excessive muzzle movement.
Trigger Squeeze
Poor shooting is most often caused by disturbingyour aim as the bullet is leaving the barrel. This is usuallythe result of jerking the trigger or flinching. The triggerdoes not have to be jerked violently to spoil your aim;even a slight off-center pressure of your finger while
squeezing the trigger is enough to move the strike of thebullet several inches.
• Flinching is a subconscious reflex caused byanticipating the recoil from firing.
• Jerking results from attempting to fire the pistol atthe precise time that you align the sights with thetarget.
• Heeling causes the bullet to strike the target highand to the right.
You can correct all these shooting errors byunderstanding and using the correct trigger squeeze.Both flinching and jerking will cause the bullet to strikethe lower left section of the target. An attempt to correctflinching and jerking by tightening the large muscle inthe heel of the hand may cause heeling. An impropertrigger squeeze will cause more misses on the target thanany other single step of preparatory marksmanshiptraining.
You obtain a correct trigger squeeze by applying auniformly increasing pressure on the trigger straight tothe rear without disturbing the sight alignment until thepistol fires. The trigger slack, or free play, is taken upfirst, and the correct squeeze continues steadily until thehammer falls. If the trigger is squeezed properly, youwill not know when the hammer will fall. This is the bestway to prevent jerking, flinching, and heeling.
To help you squeeze the pistol trigger properly, usethe acronym BRASS as you did with the rifle. You mustalso learn to call your shots. If you cannot call your shots
11-23
Student Notes:
Figure 11-35.—Two-hand grip.

correctly, you are not concentrating properly on sightalignment and trigger squeeze.
REVIEW 5 QUESTIONS
Q1. When you have properly aligned your sights,what is the relationship between the front sightand the rear sight?
Q2. The distance between your eye and the rear sight
is referred to as the _____________.
Q3. Why is it sometimes necessary to blacken sightsduring sighting and aiming exercises?
Q4. List the three standard positions for shooting.
a.
b.
c
Q5. List the three sitting positions for shooting.
a.
b.
c.
Q6. What is the single most important factor in goodmarksmanship?
Q7. What does the acronym BRASS mean?
Q8. When sighting with a pistol, how should the topof the front sight align with the rear sight?
SUMMARY
In this chapter, you have learned about varioussmall arms used by the Navy. You may never have theoccasion to use small arms; then again you may usethem every day in your routine aboard a ship. It isimperative that when using small arms, you ALWAYSabide by all prescribed safety precautions. The use ofsafety equipment is also essential. Respect small arms,but don’t be afraid of them. They can be your best sourceof personal defense in times of trouble if handledproperly. All the small arms used by the U.S. Navy aremanufactured to have a high degree of reliability if theyare cared for and maintained properly. Propermaintenance could mean the difference between yoursmall arm working properly or jamming at criticalmoments.
Take advantage of every opportunity you may haveof going to a rifle or pistol range. The more familiar youbecome with small arms, the better you will be able tohandle them safely. The more you shoot, the better youwill become.
REVIEW 1 ANSWERS
A1. When handling a firearm, you should nevercarry the weapon by the muzzle.
A2. The protective gear you should wear when firinga weapon includes—
a. hearing protection and
b. safety goggles.
11-24
Student Notes:

REVIEW 2 ANSWERS
A1. The M-14 rifle is chambered to fire the 7.62-mmNATO cartridge.
A2. Fully loaded, the M-14 weighs 11 pounds.
A3. Identify the following rifle components as eitherM16A1 or M16A2:
A4. The first step in cleaning the M16 rifle is to pointthe selector lever toward SAFE.
A5. The M16 rifle carries 20 or 30 rounds ofammunition.
A6. When loading the M16 rifle, you shouldn’t ridethe charging handle forward because the boltmay fail to lock.
A7. When the selector is set for burst, the M16A2fires three rounds.
A8. The conditions that must exist to consider theM16 rifle clear include—
a. No case or rounds is/are in the chamber
b. The magazine is out
c. The bolt carrier is to the rear
d. The selector lever is on the SAFE position
A9. The cleaning materials for the M16 are stored inthe rifle stock.
REVIEW 3 ANSWERS
A1. A .45-caliber pistol magazine will hold sevencartridges.
A2. The .45-caliber pistol was designed to be used asan individual weapon for close use.
A3. The three safety features of the 9mm servicepistol are—
a. Ambidextrous safety
b. Firing pin block
c. Half cock notch
A4. When loading your pistol, you should make surethe safety is in the down position.
REVIEW 4 ANSWER
A1. The shotgun has the advantage of being able toexpel anywhere from nine to hundreds ofprojectiles covering a wide area.
REVIEW 5 ANSWERS
A1. When you have properly aligned your sights, thetop of the front sight is level with thehorizontal center line of the rear sight, and thebody of the front sight is centered between therear sight aperture.
A2. The distance between your eye and the rear sightis referred to as eye relief.
A3. At times, it’s necessary to blacken sights duringsighting and aiming exercises to reducereflection and glare.
A4. The three standard positions for shooting are—
a. Standing
b. Kneeling
c. Sitting
11-25
Component Rifle
a. Has a lighter barrel because ofthe ammunition fired
M16A1
b. Rear sights are adjusted bymeans of a windage knob andelevation knob
M16A2
c. Has a semiautomatic or burstfeature
M16A2
d. Fires a 5.56-mm round and a62-grain round
M16A1M16A2

A5. The three sitting positions for shooting are—
a. Open leg
b. Cross leg
c. Cross ankle
A6. The single most important factor in goodmarksmanship is trigger control.
A7. The acronym BRASS means breath, relax, aim,slack, squeeze.
A8. When sighting with a pistol, the front sight islevel with the top of the rear sight.
11-26