sm title page 02 - rose's 90th birthday party!90ième ...81west.com/curriculum/grade...
TRANSCRIPT

Teacher’s Notes
Oobleck (for 20 children):½ quart water, 2 boxes cornstarch, foodcolouring (I use green). Mix water and foodcolouring, add cornstarch while stirring untilyou get Oobleck.
Ontario Science and Technology Curriculum 1999Strand: Structures and MechanismsTopic: StabilityGrade: 3
©Goggled Science, 2001All rights reservedDeveloped by T. TaskerMay be photocopied for classroom use. Further replication or commercial use is strictly prohibited.
Overall Expectations:- demonstrate an understanding of the factors that affect the stability of objects- design and make structures that include mechanisms and that can support and move a load, and investigatethe forces acting on them- describe, using their observations, systems involving mechanisms and structures, and explain how thesesystems meet specific needs and how they have been madeSpecific Expectations* All specific expectations are covered by this unit and are mentioned at the end of each activity with theexception of the following one which is covered by all activities.SM9:plan investigations to answer some of these questions or solve some of these problems, and explain thesteps involved
Materials box (* indicates a class set is needed, the number in front indicates the number of class setsneeded)
paper*cereal boxes (3+*)books (as props)shoe box lid*short cardboard tubes*medium cardboard tubes*tall cardboard tubes*thread spools (4)building blockscardboard (heavy)rulers*erasers*50g mass*paintpaint brushes*elastics*hole punchfood colouringhair dryerrubber banddried beansscooptissue papercornstarchThe books: Bartholemew and the Oobleck andThe Greedy Triangle
string (2*)straws(3*)Q-cards (8*)junkplasticeneapple sauce container*marbles*pipe cleanerbristol boardpaper fasterners (7*)construction paperpopsicle sticks (2*)pipe cleaners*safety goggles*tongue depressors (4*)sawmitre box

Dear Parent or Guardian,We are beginning to look toward our next Science and Technology Unit, Structures andMechanisms, Stability. Like all science units, this unit requires a lot of materials. Our classeswould really appreciate it if you would save some everyday household items and instead ofthrowing them out, send them to school. These items include:
cereal boxes (one box is needed per student)shoe box lid (one for each student is needed)cardboard tubes (all shapes and sizes - we need lots of these)thread spoolsjuice can lidsjar lidsany kind of junk that can be used for wheelsapple sauce containers (the little motts lunch container - we have already startedcollecting during lunch hour)popsicle sticks
Thanks for your support.
**Photocopy and send home with your students about 1 month before starting the unit.**
Dear Parent or Guardian,We are beginning to look toward our next Science and Technology Unit, Structures andMechanisms, Stability. Like all science units, this unit requires a lot of materials. Our classeswould really appreciate it if you would save some everyday household items and instead ofthrowing them out, send them to school. These items include:
cereal boxes (one box is needed per student)shoe box lid (one for each student is needed)cardboard tubes (all shapes and sizes - we need lots of these)thread spoolsjuice can lidsjar lidsany kind of junk that can be used for wheelsapple sauce containers (the little motts lunch container - we have already startedcollecting during lunch hour)popsicle sticks
Thanks for your support.

Dear Parent or Guardian,
We are beginning our second Science and Technology Unit,Structures and Mechanisms, Stability. By the end of this unit, yourchild will:-demonstrate an understanding of the factors that affect the stability of objects-design and make structures that include mechanisms and that can support and move a load, andinvestigate the forces acting on them- describe, using their observations, systems involving mechanisms and structures, and explain howthese systems meet specific needs and how they have been made
As outlined in the Science and TechnologyCurriculum, Ministry of Education , 1999.
Home Links:To help your child further their understandingin this science unit, here are some fun activitiesfor you and your family.
- visit the CN tower/sky scrapers in downtown Toronto- visit buildings of architectural interest in your community- encourage them to build and create with things found athome and with building toys (such as lego, kinex etc)
The specific expectationSM18:use hand tools (eg. hand saws, scissors) and equipment (eg. templates, mitreboxes) appropriately to cut a variety of materials (eg. wood, paper, cardboard,plastic)is part of our stability unit. To cover this specific expectation wewill be using hand saws and mitre boxes to cut tongue depressors at45 degree angles to make a picture frame. Parental consent isneeded for your child to participate in this activity, otherwise theywill be completing an alternate activity. Please fill out andDETACH the form below and return it to school as soon as possible.
C.....................................................................................................
I, ______________________ give my child,___________________,permission to use a saw and mitre box to cut tongue depressors at 45degree angles to make a picture frame.
_______________________________ ________________Parent’s signature Date
|||||||||||||||||||||||||||||||||||||||||||||

StabilityOur New Science Words
Grade 3 glossary covers:SM10:use appropriate vocabulary to describe their investigations, explorations, and observations (eg. use terms such as fulcrum, load, and effortwhen describing levers)©Goggled Science, 2001

Materials:1) 2 pieces ofpaper the samesize2) 1 smaller pieceof paper3) 1 bigger pieceof paper
I predict I can fold a piece of paper _________ times.
My paper folding tally:
My paper folding tally (with the smaller piece of paper):
My paper folding tally (with the bigger piece of paper):
StabilityAre You Stronger Than Paper?
Purpose: To find how many times you can fold a piece of paper **The fixed number of times you can fold a piece of paper is 7 (although thereis a guiness book of world records recording of 8). It doesn’t matter how largeor small a paper, the maximum will always be 7.**
Method:1) Predict how many times you think you can fold a piece ofpaper.
2) Fold one of the pieces of paper in half, make a tally markon your chart below. Keep folding and tallying until you canno longer fold the piece of paper.
3) Repeat STEP 2 with the smaller piece of paper. Make atally.
4) Repeat STEP 2 with the bigger piece of paper. Make a tally.
Answer these questions (In full SENTENCES):1) How many times did you fold the first piece of paper? 7__________________________________________________________________

2) How well did you predict the number of times you could fold the piece ofpaper?__________________________________________________________________
3) Compare your folded piece of paper to your unfolded piece of paper. Whichone is stronger?The folded piece of paper.
4) Why do you think it is stronger?Because it has more layers, and that makes it stronger.
5) How many times did you fold the smaller piece of paper? 7__________________________________________________________________
6) How many times did you fold the bigger piece of paper? 7__________________________________________________________________
7) Does it matter how big or small a piece of paper is? No__________________________________________________________________
8) Is there a fixed number of times you can fold a piece of paper? Yes, 7.__________________________________________________________________
Grade 3 SMactivity001 covers:SM1:describe using their observations, ways in which the strength of different materials can be altered (eg. folding increases the strength ofpaper)©Goggled Science, 2001

Materials:1) a piece of square paper2) a piece of rectangular paper3) a piece of triangular paper4) a piece of circular paper
StabilityLet’s Shape It Up
Method:1) Make predictions:I think when I fold the square piece of paper 3times it will be a _________________________.
I think when I fold the rectangular piece of paper3 times it will be a _______________________.
I think when I fold the triangular piece of paper 3times it will be a _________________________.
I think when I fold the circular piece of paper 3times it will be a _________________________.
2)Fold the square piece of paper three times.3) Fold the rectangular piece of paper three times.4) Fold the triangular piece of paper three times.5) Fold the circular piece of paper three times.6) Draw your results in the chart below.
The square pieceof paper lookedlike . . .
The rectangularpiece of paperlooked like . . .
The triangularpiece of paperlooked like . . .
The circular pieceof paper lookedlike . . .
A rectangle or atriangle (if youfolded it on anangle). If youfolded the squarean even number oftimes it would bea square.
A rectangle A triangle A piece of pie or apiece of pizza, ORa fraction slice!
Describe what happens when you fold a shape.It will sometimes change shape and it will sometimes maintain its shape.
Grade 3 SMactivity002 covers:SM8:ask questions about and identify needs and problems related to structures and mechanisms in their immediate environment, and explorepossible answers and solutions (eg. investigate the effects of folding on the shape and strength of materials)©Goggled Science, 2001

Rules:1) You may touch it.2) You may look at it.3) You may smell it.4) You may listen to it.5) You may NOT eat it!!!!!!!6) You may NOT throw it!!!!!7) You may NOT wipe your hands on anyone.8) You may NOT splash the Oobleck9) You may wash your hands at any time.10) You MUST clean up any spilt Oobleck.11) You may NOT pour the Oobleck downthe sink.12) You should use whisper voices at alltimes.13) Work with a partner.14) Wait until everything is tidied up beforewriting in your science book.15) If ANY ONE rule is broken, the Oobleckwill be taken away from you and your partner. No second chances!
StabilityThe Ooze and Ahs of Oobleck
As a class we will read the book Bartholemew and the Oobleck, by Dr. Seuss
Luckily, Bartholemew came by this morning and delivered some Oobleck. Let’sread the rules of the Oobleck.**To make Oobleck for 20 students, ½ quart water, 2 boxes cornstarch, foodcolouring (I use green). Mix water and food colouring, add cornstarch whilestirring until you get Oobleck.**
Method:1) A dish of Oobleck will be placed infront of you. Play with it for severalminutes.2) STOP! In your whisper voices toyour partner come up with five wordsthat describe Oobleck. Rememberthem so you can write them downlater.3) Touch the Oobleck softly. Whathappens to it? (Remember youranswer to write down after tidy uptime).4) Poke or hit the Oobleck (Rememberrule number 8). What happens to it?(Remember your answer to write downafter tidy up time).
After cleaning up, write down your answers.1) What are five words to describe Oobleck? (Remember to use commas in yourlist)____________________________________________________________________________________________________________________________________
2)What happened when you touched Oobleck softly?It felt like a liquid.
3) What happened when you poked or hit the Oobleck?It felt like a solid.Grade 3 SMactivity003 covers:SM2:describe ways in which forces alter the shape or strength of different structures (eg. a load may cause a cardboard box to buckle)©Goggled Science, 2001

Materials:1) 3 cereal boxes2) books
StabilityBuckling Boxes!
Purpose: To find out how strong rectangular prisms are.**Use heavy textbooks if you can.**
Method:1) Stand a cardboard box upright (this is box A).2) Place books on top of the cardboard box one at a time.3) Stand a cardboard box on its front (or back) (this is box B).4) Place books on top of the cardboard box one at a time.5) Stand a cardboard box on its side (this is box C). 6) Place books on top of the cardboard box one at a time.
What happened to Box A____________________________________________________________________________________________________
What happened to Box B____________________________________________________________________________________________________
What happened to Box C____________________________________________________________________________________________________
Draw a beginning picture Draw a beginning picture Draw a beginning picture
Draw a middle picture Draw a middle picture Draw a middle picture
Draw a final picture Draw a final picture Draw a final picture
Grade 3 SMactivity004 covers:SM2:describe ways in which forces alter the shape or strength of different structures (eg. a load may cause a cardboard box to buckle).SM7:describe the effects of different forces on specific structures and mechanisms (eg. a structure collapses when the load is too heavy; a latch ona gate opens when pressed).©Goggled Science, 2001

Materials:1) you2) a partner
What happened to the foundation?The foundation fell down.__________________________________________________________________________________________________________________
What happened to the foundation?The foundation was more stable and did not fall down.____________________________________________________________________________________________________________________
StabilityA Balancing Act
Method:1) Always use whisper voices.2) REMEMBER: ALWAYS BE GENTLE.3) Choose one partner to be the wind and the other the foundation.4) Without saying one word, meet at the carpet with your partner.5) FOUNDATION: stand with your feet together.6) WIND: give the foundation a GENTLE push.
7) FOUNDATION: stand with your feet apart.8) WIND: give the foundation a GENTLE push.
9) Switch roles and repeat STEPS 1 to 8.
Answer these questions (Remember to answer in full sentences):1) What position provided a better foundation (feet together or feet apart)?Feet apart provided a better foundation.__________________________________________________________________
2) Why was this a better foundation?The feet apart provided a bigger base and this makes the foundation more stable.__________________________________________________________________
3) Can you think of an even better body position?One foot in front, one foot in back. Lying down.__________________________________________________________________Grade 3 SMactivity005 covers:SM25:predict which body position provide the most stability in various circumstances (eg. standing with legs apart, lying on the ground)©Goggled Science, 2001

Materials:1) a shoe box lid2) 3 cardboard tubes(short, medium and tall)
I predict that the ________________________ tube will fallfirst.
Materials:1) two cardboardtubes2) tissue paper3) a rubber band4) dried beans5) a scoop6) a marker7) hair dryer
StabilityTIMBER!
Purpose (of the next three experiments):To find out what makes a structure stable.__________________________________________________________________
Experiment ONEMethod:1) Stand the three cardboard tubes along the edge of theshoe box lid.2) Predict which tube will fall first.
3) Tip the edge of the shoe box.4) Record the order of falling cardboard tubes.
The first tube to fall was . . .
The second tube to fallwas . . .
The third tube to fallwas . . .
The tallest The middle The shortest
Why do you think they fell in this order?Because of their centre of gravities, it is easier for a structure with a taller centreof gravity to fall than a structure with a shorter centre of gravity.
Experiment TWOHow can we make these tubes more stable?
Method:1) Label one tube A and one tube B.2) Cover one end of tube A with the tissue paper and hold iton with the rubber band.3) Using the scoop, fill tube A with the dried beans.4) Place tube A and tube B side by side.5) Plug in the hair dryer and turn it on. Turn it toward thecardboard tubes.

Materials:1) 4 thread spools2) 6 building blocks3) a piece of heavycardboard
Using words, tell what happened?Tube B fell over, but tube A remained standing despite the wind from the blowdryer.
Draw what happened . . .
Experiment THREE
Method:1) Put the four spools in a group.2) Place the cardboard on top.3) Now place the building blocks in different placesall over the piece of cardboard.
Draw what you did . . .
4) Now move the four spools to the four corners ofthe cardboard.5) Place the building blocks in different places allover the piece of cardboard.
Draw what you did . . .
Answer these questions in full sentences:1) Which building was stronger, the first building or the second building?The second building with the spools at the corners was stronger.__________________________________________________________________
2) Why do you think it was stronger?Because the spools at the corners provided a larger base and therefore a morestable foundation.
3) Think of our WIND/FOUNDATION activity at the carpet. Which bodyposition was more stable?Where the foundation had their feet apart.__________________________________________________________________
Grade 3 SMactivity006 covers:SM24: describe, using their observations, how different balance points of different masses affect the stability of a structure©Goggled Science, 2001

StabilityWhat is it?
** Talk about levers in general, that is, there is a fixed end and an end that moves.**
Object Name How does it help us?
Pliers It helps us tighten nutsand bolts, and it cutswires.
Tongs It helps us flip meat onthe barbeque.
Hammer It helps us build thingsby hammering in nails.
Scissors It helps us cut paper.
Tweezers It helps us pick outslivers.
Wheelbarrow It helps us carry heavyloads.
Crowbar It helps us open crates,or pull apart things.
Grade 3 SMactivity007 covers:SM22:identify a number of common levers (eg. crowbars, scissors, hammers, pliers, wheelbarrows, tweezers, tongs) and describe how they makework easier©Goggled Science, 2001

Materials:1) a ruler2) an eraser3) a 50g mass (ablock or a mass)4) YOUR indexfinger
StabilityLever IT
Purpose: To find out how levers can help make lifting a load easier.
Method: 1) Lay the ruler on your desk with the zero at your left hand. 2) Place the eraser underneath the ruler at 5 cm. 3) Place the mass on top of the ruler at 30 cm. 4) Place your left index finger at the zero on your ruler. By pressing down try to lift the mass. 5) Place the eraser underneath the ruler at 10 cm.
6) Place the mass on top of the ruler at 30 cm.7) Place your left index finger at the zero on your ruler. By pressing down try to lift the mass. Was it hard,medium or easy? (circle your answer)8) Place the eraser underneath the ruler at 15 cm.9) Place the mass on top of the ruler at 30 cm.10) Place your left index finger at the zero on your ruler. By pressing down try to lift the mass. Was it hard,medium or easy? (circle your answer)11) Place the eraser underneath the ruler at 20 cm.12) Place the mass on top of the ruler at 30 cm.13) Place your left index finger at the zero on your ruler. By pressing down try to lift the mass. Was it hard,medium or easy? (circle your answer)14) Place the eraser underneath the ruler at 25 cm.15) Place the mass on top of the ruler at 30 cm.16) Place your left index finger at the zero on your ruler. By pressing down try to lift the mass. Was it hard,medium or easy? (circle your answer)17) On the chart below, record whether it was hard,medium or easy to lift the mass, with the eraser atdifferent points on the ruler.
Eraser at 5 cm
Eraser at 10 cm
Eraser at 15 cm
Eraser at 20 cm
Eraser at 25 cm
hard hard-medium medium medium-easy easy

Load ____________________________________________________ ____________________________________________________
In this experiment the RULER was the LEVER and the ERASER was theFULCRUM. In our Stability Unit teeter-totter graphic, what do you think the lever is?The lever is the plank the children sit on.
What do you think the fulcrum is?It is the post in the middle.
Label them on the diagram below.
What eraser position was it easiest to lift the load?When the eraser was at 25cm it was the easiest to lift the load.
What eraser position was it the hardest to lift the load?When the eraser was at 5 cm, it was the hardest to lift the load.
In general, as you moved the eraser from 5 cm to 25 cm on the ruler, did lifting theload become easier or harder?Lifting the load became easier.
If you had a really heavy load to move with a lever, where would you put thefulcrum for the easiest lift? Show me on the lever below:
(The fulcrum should be placed just in front of the load)
Grade 3 SMactivity008 covers:SM5:describe, using their observations, the changes in the amount of effort needed to lift a specific load with a lever when the position of thefulcrum is changed©Goggled Science, 2001

Materials:1) cardboard2) cardboardtube3) paint4) paint brushes5) two elastics6) hole punch7) string (2 shortpieces, 2 longerpieces)8) tape
StabilityMuppet Puppet
**Talk about what colour birds are. Red for cardinals, yellow for canaries(you could talk about how canaries were sent down in to mines to make sure itwas safe for the miners), blue for blue jays, black for crows, brown forCanadian geese, green for parrots. Let the students decide the bird (orcolour) they want to use. You may want to use an art period for thisactivity.**
Method:1) Cut out wing-shaped pieces of cardboard.2) Paint the cardboard wings and cardboard tube (the body) likeyour favourite bird.3) Punch two holes into the cardboard wings where the wingswill be joined to the body.4) Thread the elastic through the holes, so that there are twoloops coming out of the holes.5) Feed the cardboard tube body through the elastic loops.6) Repeat steps 3 to 5 for the second wing (make sure the topsof the wings are on the same side of the tube)7) Punch one hole in the tip of each wing.8) Attach a piece of string to each wing.9) Tie these two pieces of string to a third string.10) Tie the fourth piece of string around the middle of the bodyand tape it in place.11) Hang your bird from the ceiling with the fourth string andpull on the string that is hanging down. Watch your bird fly.
Answer these questions in full sentences:1) What scientific word would describe the wings?A lever.2) What part of the bird would be the fulcrum?The body.3) If you pull the hanging string down all the way, do the wings move a little bit ora lot?The wings move a lot.4) If you pull the hanging string gently (just a teeny tiny bit), do the wings move alittle bit or a lot?The wings move just a little bit.Grade 3 SMactivity009 covers:SM15:design and make a levered mechanism (eg. model of an animal whose legs are moved with a lever)SM6:describe, using their observations, how simple levers, amplify or reduce movement (eg. in operating the limbs of a puppet)©Goggled Science, 2001

Materials:1) straws2) string3) 3 Q-Cards4) junk (from the junkbox)5) scissors6) pencils
StabilityMobile
**Talk about balance in general, and how you can make things balanced bychanging the position on a rod or by changing the weight.**
Method:1) As a class let’s answer: What have we learned aboutbalance so far?2) Write down the 3 best answers on the Q-cards.3) Tie a Q-card to one end of a straw.4) Tie a piece of junk to the other end of the same straw.5) Place another string somewhere between the two endsso that the two ends are balanced when held.6) Repeat steps 3 to 5. However, NOW you have tobalance three things on the straw, the piece of junk, theQ-card and the first straw you made.7) Repeat steps 3 to 6, for the third straw.
Draw your mobile here:
Write about a special trick you used while making your mobile:________________________________________________________________________________________________________________________________________________________________________________________________________________________________________________________________________________________________________________________________________________________________________________________________
Grade 3 SMactivity010 covers:SM12:communicate the procedures and results of investigations for specific purposes and to specific audiences, using demonstrations, drawings,simple media works, and oral and written descriptions (eg. make a mobile that illustrates their discoveries about balance)©Goggled Science, 2001

StabilityLet’s Build
Your mission, if you choose to accept it, is to build the tallest freestandingstructure in the class that does not fall down less than one minute after constructionis finished. Your materials include STRAWS and MASKING tape. You MUSTuse WHISPER VOICES and POSITIVE comments ONLY!!! You have exactly 8minutes and 23 seconds. GO!!** Tape a grid on the carpet with masking tape.**Draw your straw structure here:
Describe it using words here:________________________________________________________________________________________________________________________________________________________________________________________________________________________________________________________________________________________________________________________________________________________________________________________________
Graph the number and kinds of materials here (do not include masking tape)Material used / Scale ,
Straws
Pieces of masking tape
Grade 3 SMactivity011 covers:SM11:record relevant observations, findings, and measurements, using written language, drawings, charts, and graphs (eg. record themodifications they have made to increase the stability and strength of their structures)©Goggled Science, 2001
Materials:1) plasticene2) four small Q-cards3) apple sauce container4) marbles
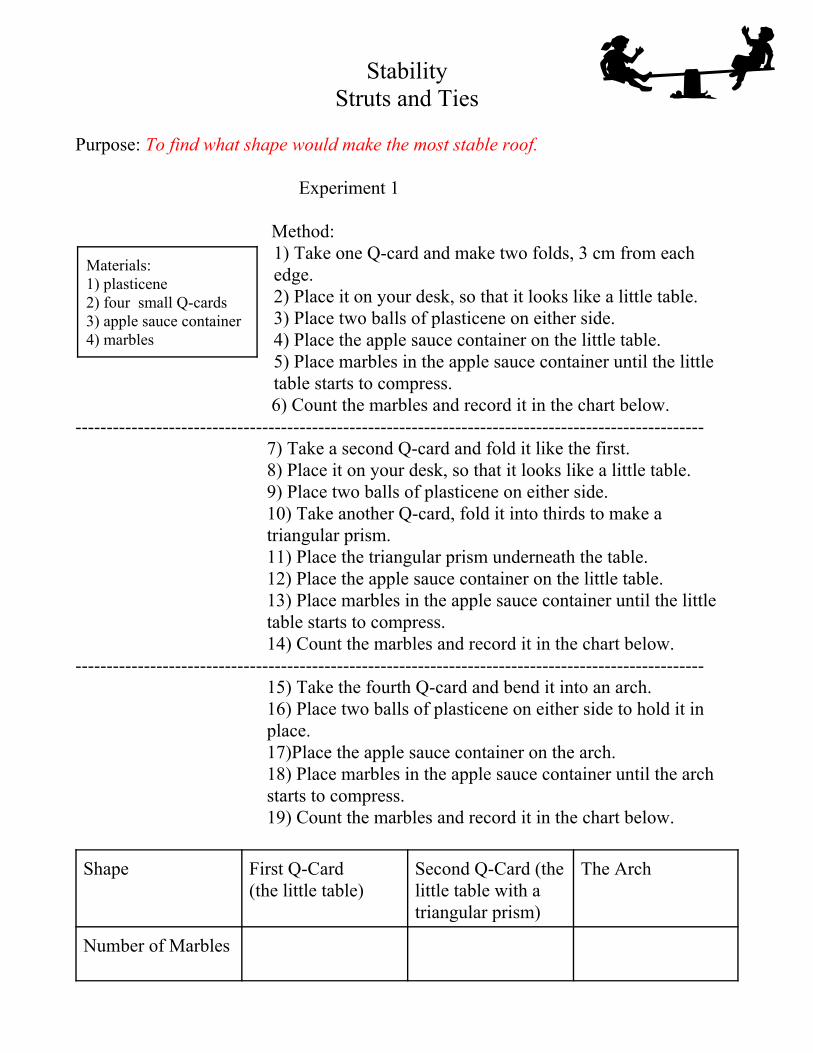
StabilityStruts and Ties
Purpose: To find what shape would make the most stable roof.
Experiment 1
Method:1) Take one Q-card and make two folds, 3 cm from eachedge.2) Place it on your desk, so that it looks like a little table.3) Place two balls of plasticene on either side.4) Place the apple sauce container on the little table.5) Place marbles in the apple sauce container until the littletable starts to compress.
6) Count the marbles and record it in the chart below.-----------------------------------------------------------------------------------------------------
7) Take a second Q-card and fold it like the first.8) Place it on your desk, so that it looks like a little table.9) Place two balls of plasticene on either side.10) Take another Q-card, fold it into thirds to make atriangular prism.11) Place the triangular prism underneath the table.12) Place the apple sauce container on the little table.13) Place marbles in the apple sauce container until the littletable starts to compress.14) Count the marbles and record it in the chart below.
-----------------------------------------------------------------------------------------------------15) Take the fourth Q-card and bend it into an arch.16) Place two balls of plasticene on either side to hold it inplace.17)Place the apple sauce container on the arch.18) Place marbles in the apple sauce container until the archstarts to compress.19) Count the marbles and record it in the chart below.
Shape First Q-Card(the little table)
Second Q-Card (thelittle table with atriangular prism)
The Arch
Number of Marbles

Materials:1) one Q-card2) a ruler3) a pipecleaner
Load
Tie
Stru
t
Answer these questions in FULL sentences:Which structure was the strongest?The arch._______________________________________________________________________
Why do you think it was stronger?It equally distributed the load._______________________________________________________________________
Experiment 2Method:1) Take one Q-card and make two folds, 3 cm from each edge.2) Place the Q-card on your desk, table top down.3) Place the ruler on top of the legs. What happened?The legs fell down.4)Take the pipe cleaner and “tie”the two legs together.5) Place the ruler on top of the legs again. What happened?
The legs stayed in place.
Look at the picture below.
1) Colour the strut in RED. Struts resist compression.2) Colour the tie in GREEN. Ties resist tension.
Grade 3 SMactivity012 covers:SM4:describe, using their observations, the role of struts (eg. to resist compression) and ties (eg. to resist tension) in structures under load (eg. describe theeffect of adding a strut to a wooden frame).©Goggled Science, 2001

Materials:1)seven bristol boardstrips per student(withholes punched in eachend)2) paper fasteners
StabilityGeometric Patterns
As a class read the book The Greedy Triangle by Marilyn Burns.Purpose: To find out which shape is stronger.
Method:1) Make a square with four bristol board strips and fourpaper fasteners.2)Make a triangle with three bristol board strips and threepaper fasteners.3) Draw the shapes in the chart below.4) With your fingers, push at the corners of your shapes.5) Draw the shape after pushing the corners in.
Triangle BEFORE Triangle AFTERshould remain the same
Square BEFORE Square AFTERshould turn into a rhombus orparallelogram
If you were designing a bridge, what pattern shape would you want to use?A triangular shape pattern.
Make a list of all the structures where you see triangles (remember to use commas).____________________________________________________________________________________________________________________________________Grade 3 SMactivity013 covers:SM20:recognize that geometrical patterns in a structure contribute to the strength and stability of that structure (eg. a climbing frame)©Goggled Science, 2001

Materials:1) one sheet ofconstruction paper perstudent2) two popsicle sticks perstudent3) five straws per student4) one pipe cleaner perstudent
StabilityLet’s Join It!
A JOINT is a place where two or more pieces of a structure are joined together. Can you think of a joint on your body? Elbow, knee.Today we are going to make FOUR examples of joints that you can use whenbuilding structures.
Method:FIRST JOINT1) Fold your construction paper in half.2) Cut along the fold.3) Fold that piece in half.4) Cut along that fold.5) Cut a slit down the middle halfway through the paper.6) Slide the slits into each other.SECOND JOINT1) Glue the corners of your popsicle sticks together.THIRD JOINT (Called a GUSSET)1) Cut a triangular piece of construction paper.2) Glue one straw at the base of the triangle.3) Glue the second straw perpendicular (like a T) to thefirst straw.FOURTH JOINT1) Fold the pipe cleaner so that it looks like a T in bubbleletters.2) Put the folded ends into the three straws.
Which of the four joints is your favourite?__________________________________________________________________
Why is it your favourite?______________________________________________________________________________________________________________________________________________________________________________________________________
Grade 3 SMactivity014 covers:SM3:describe ways to improve the strength and stability of a frame structure (eg. use of triangulation or a cross-member)©Goggled Science, 2001

StabilityLet’s Build
Like last time, your mission, if you choose to accept it, is to build the tallestfreestanding structure in the class that does not fall down less than one minute afterconstruction is finished. However, this time your materials include STRAWS,CONSTRUCTION PAPER, PIPE CLEANERS, GLUE and MASKING TAPE. You MUST use WHISPER VOICES and POSITIVE comments ONLY!!! Youhave exactly 8 minutes and 23 seconds. GO!!
Draw your straw structure here:
How did you improve upon your structure this time?_____________________________________________________________________________________________________________________________________________________________________________________________________________________________________________________________________________________________________________________________________
Graph the number and kinds of materials here (do not include masking tape)Material used / Scale ,
Grade 3 SMactivity015 covers:SM11:record relevant observations, findings, and measurements, using written language, drawings, charts, and graphs (eg. record themodifications they have made to increase the stability and strength of their structures)SM14:use appropriate materials to strengthen and stabilize structures that they have designed and made and that are intended to support a load (eg.use gussets, struts, ties, buttresses)©Goggled Science, 2001

Materials:1) safety goggles2) four tonguedepressors3) masking tape4) a ruler5) a saw6) a mitre box7) poster board, cut intosmall triangles8) glue
StabilityMaking A Picture Frame
Parental Consent Glued here:**Make sure all safety rules and regulations are fully understood. Try to geta parent volunteer to help monitor this activity in the classroom. Under NOcircumstance should a child participate in this activity without a signedconsent form.**
If you handed in your permission form, this is your list of materials and yourmethod.
Method:1) Place your goggles on your head.2) Tape a pair of tongue depressors together. 3) Tape the other pair of tongue depressors together.4) Measure 1 cm from either end and mark it with apencil.5) Read these RULES:
- WHISPER VOICES ONLY!- do NOT push, shove, or fool around, we areusing very SHARP tools!- Leave ONE metre space between the front of theline and the student cutting.- IF you break any of these rules, you will nolonger be allowed to make your frame.
6) Lift your chair in and get in line in front of one of themitre boxes.7) Make one cut on the mitre box with the help of anadult.8) Once you have made your one cut, go to the back ofthe line to wait to make your next cut.9) Once you have finished your four cuts, glue yourjoints together using a gusset.

Materials:1) safety goggles2) four Tonguedepressors3) glue
10) Once your joints are dry, go to a painting area anddecorate your frame.11) When your decorating is finished and DRY, come geta magnet to put on the back of your frame.
If you did NOT hand in your permission form, this is your list of materials andyour method.
Method:1) Place your goggles on your head2) Glue the corners of the tongue depressors togethermaking a square.3) Once your joints are dry, go to a painting area anddecorate your frame.4) When your decorating is finished and DRY, come get
a magnet to put on the back of your frame.
Reflecting on Science (in FULL SENTENCES)1) What was the hardest part of making your frame?__________________________________________________________________
2) What was the easiest part of making your frame?__________________________________________________________________
Draw a picture of your frame here:
Grade 3 SMactivity016 covers:SM13:design and make a stable structure that will support a given mass and perform a specific function (eg. a bridge, a photo frame)SM17:use appropriate equipment and adhesives when making structures that they have designed themselves (eg. transparent tape for paper; low-temperatures glue gun for wood)SM18:use hand tools (eg. hand saws, scissors) and equipment (eg. templates, mitre boxes) appropriately to cut a variety of materials (eg. wood,paper cardboard, plastic).©Goggled Science, 2001

The body of a car is the chassis.____________________________________________________________________________________________________________
Materials:1) the box car design2) construction paper3) scissors4) glue5) tape6) junk from the junkbox
StabilityVroom Goes the Car!
Is a car a structure? Yes
The chassis (pronounced cha-see) of a vehicle supports thousands of parts. Therefore, it is a structure. As a class let’s think of some parts it would support andwrite them down on our special notepad below.
The other things in a car are called mechanical parts. There are three veryimportant mechanical parts in a car. Think about it, then pair up, and share yourideas with the class. Write the three important mechanical parts down here:
1)Wheels2)Axel3)Engine
Let’s Build a CarMethod:1) Glue the box car design to your construction paper.2) Fold on all the lines.3) Unfold.4) Cut along the dotted lines.5) Fold it to make a box.6) Glue the corners to the sides.7) Select some junk from the junk box, and design yourmechanical parts.
8) Label the chassis and mechanical parts on your car. 9) PLAY with your homemade toy!
Grade 3 SMactivity017 covers:SM19:distinguish between the structure of an object (eg. the chassis of a vehicle) and its mechanical parts (eg. the wheels and axles)SM23:identify efficient ways of joining the components of a mechanical structure or system (eg. construct a right-angled corner; use an axle at aright angle to the frame)©Goggled Science, 2001

** Photocopy for students**
.........................
.........................
_____________________________________________
_____________________________________________
.........................
.........................

Stability Certificate
This certificate hereby certifies
______________________
as a Grade 3 Stability expert.
___________________ __________________Principal Teacher
Share you science booklet with at least one family member athome. After you have shared complete the following:
1) Cut out your Stability Certificate.2) Get the person you shared your science booklet with tofill out the form below, detach it and bring it back toschool.
C.................................................................................................
_______________________ shared their science booklet withthe following family members:
___________________Parent’s Signature© Goggled Science, 2001

StabilityHomework
Due:________________Name:_______________
With various materials at home create a portable (it must be able to be brought toschool) castle with a drawbridge OR a crane (the machines they use to buildbuildings). Your creation will be marked on the following:
Level 1 Level 2 Level 3 Level 4
Inquiry and designskills
- a workingdrawbridge or cranewas created
- drawbridge orcrane designfunctionseffectively
- drawbridge orcrane design iscreative andfunctional
- drawbridge orcrane designcreatively improvesthe functionality ofthe mechanism
Draw a picture of your creation here:
Please bring this sheet back to school with your project so we can savepaper. Good luck and have FUN creating your masterpiece!!Grade 3 SM homework activity covers:SM16:design and make a stable structure that contains a mechanism and perform a function that meets a specific need (eg. drawbridge, a crane)© Goggled Science, 2001


© Goggled Science, 2001