skype for business quick start guide - mednet · 2 installing skype for business a copy of skype...
TRANSCRIPT

1
Skype for Business – Quick Start Guide
Contents:
Installing Skype for Business
Connecting for the First Time
Troubleshooting a login error message
Getting Started
Setting your Status Message
Changing Your Presence State
Adding Contacts
Sending an Instant Message
Receiving an Instant Message
Finding your Conversation Records
Disabling Conversation Records
Creating a Skype for Business Meeting
Advanced Skype for Business Meeting Settings
Joining a Faculty of Medicine VC Bridge Meeting
Basic Troubleshooting
Connectivity (Wi-Fi)
Setting up your headset
Presenting content
More Information

2
Installing Skype for Business
A copy of Skype for Business 2016 or Skype for Business 2015 can be downloaded from the Microsoft website.
Depending on your version of Microsoft Office, you will need to select either the 32 bit or 64 bit version of Skype
for Business. If you are unsure of which version to install, please contact UBC IT Desktop Services.
Minimum system requirements:
PC:
Higher than Office 2013 version
Mac OS X:
Skype for Business Server 2015 or Lync Server 2013
OSX 10.11 (El Capitan) or OSX 10.12 (Sierra)
Outlook Mac build 15.27 (161010) required for Outlook integration
Skype for Business 2015*
Version Link File Name
32-bit https://www.microsoft.com/en-
ca/download/details.aspx?id=35451
lyncentry.exe
64-bit https://www.microsoft.com/en-
ca/download/details.aspx?id=35450
lyncentry.exe
Skype for Business 2016
Version Link Fine Name
32-bit https://www.microsoft.com/en-
us/download/details.aspx?id=49440
Lyncentry_4351-1001_x86_en-
us.exe
64-bit https://www.microsoft.com/en-
us/download/details.aspx?id=49440
Lyncentry_4351-1001_x64_en-
us.exe
*These links from Microsoft still say it’s Microsoft Lync Basic 2013 but the version of Lync should be 15.0
meaning it will be Skype for Business 2015

3
Follow the steps presented by the Skype for Business installation wizard to complete your Skype for Business
install.
Connecting for the First Time
1) Open Skype for Business. If a shortcut wasn’t created on your Desktop, you will be able to find Skype for
Business 2015 by going to Start All Programs Microsoft Office 2013 Skype for Business 2015.
Or if you have Office 2016 installed Skype for Business 2016 will be found via this pathway: Start All
Programs Microsoft Office 2016 Skype for Business 2016.
2) If your workstation is joined to EAD, Skype for Business will automatically log you in and you can skip to
the next section of this document. If your workstation isn’t joined to EAD, continue to the next step.
3) When Skype for Business opens, you will see the following login screen:
In the Sign-in address box, enter your address in the format of [email protected]. For
example, if your name were “John Doe”, your address would be [email protected]. If you are unsure,
please check the UBC Directory to confirm or check with your department’s Directory Administrator. Click
the Sign In button to continue.
4) A Password box will appear on the login screen. Enter your CWL password and click the Sign In button
to continue.

4
5) Skype for Business will ask you if you wish to save your login information. Click Yes.
6) If you receive an error message “Can’t sign in to Skype for Business”, follow the instructions below.
Troubleshooting a login error message
1) If your workstation isn’t joined to EAD, then you may see an error message reading “Can’t sign in to
Skype for Business”.
2) You will see that the login screen has changed to display an additional field for a username. In the User
name field, enter your CWL username in the format of “ead\<CWL username>”. For example, if your
CWL username were jdoe, you would enter “ead\jdoe”.

5
3) Skype for Business will ask you if you wish to save your login information. Click Yes.
4) You will now be successfully signed-in to Skype for Business.

6
Getting Started
When you first sign-in to Skype for Business, you will see a number of controls. Let’s quickly review them.
Setting your Status Message
You can change your status message by clicking on the speech bubble above your picture. Once you’ve entered
a message, save it by pressing enter. If you don’t wish to have a status message, simply delete your text and
press enter.
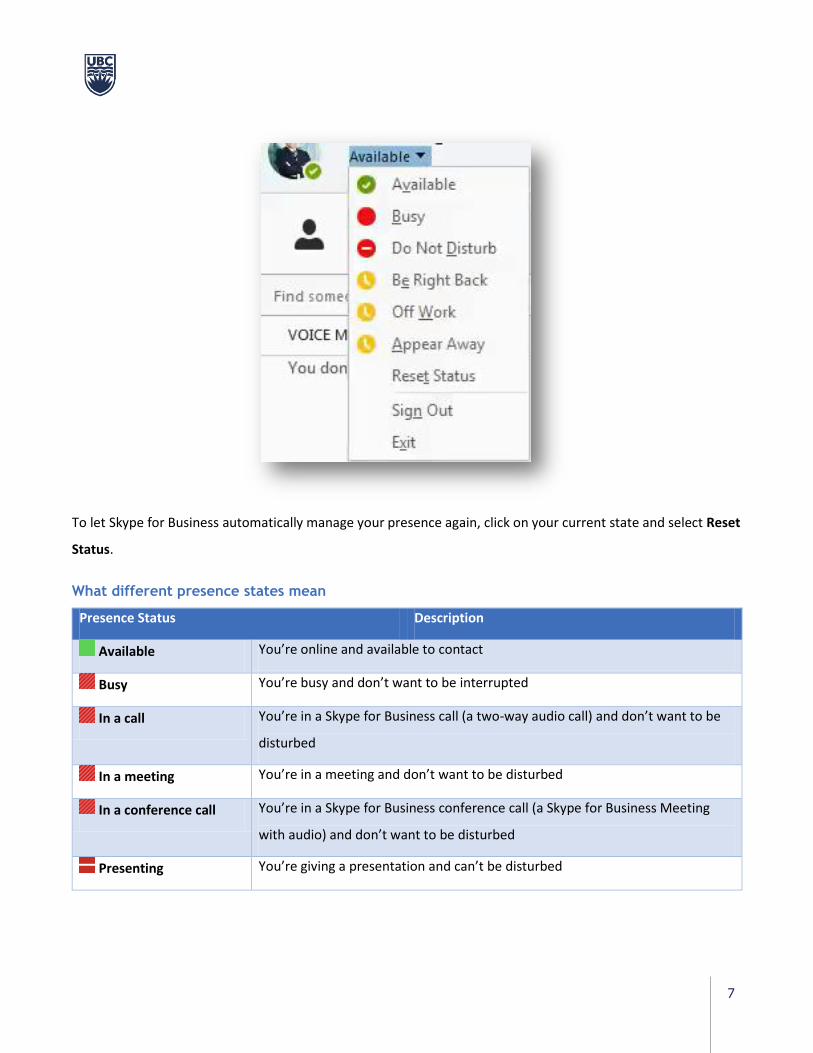
Changing Your Presence State
Skype for Business will automatically set your presence based on your Outlook calendar, as well as your activity
(i.e., if you’ve stepped away from your computer). If you would like to manually set your presence state, simply
click on your current state and change it to another value.
7
To let Skype for Business automatically manage your presence again, click on your current state and select Reset
Status.
What different presence states mean
Presence Status Description
Available You’re online and available to contact
Busy You’re busy and don’t want to be interrupted
In a call You’re in a Skype for Business call (a two-way audio call) and don’t want to be
disturbed
In a meeting You’re in a meeting and don’t want to be disturbed
In a conference call You’re in a Skype for Business conference call (a Skype for Business Meeting
with audio) and don’t want to be disturbed
Presenting You’re giving a presentation and can’t be disturbed

8
Do Not Disturb You don’t want to be disturbed and will see conversation notifications only if
sent by someone in your Workgroup
Be Right Back You’re stepping away from the computer for a few moments
Inactive/Away You’re logged on but your computer has been idle, or you’ve been away from
your computer for a specified (set by you) period of time
Off Work You’re not working and not available to be contacted
Offline You’re not signed in. You’ll appear as Offline to people whom you’ve blocked
from seeing your presence.
Unknown Your presence isn’t known
Adding Contacts
You’ll want to add someone as a contact if you will be communicating with them frequently.
1) In the search box (“Find someone or dial a number”), enter the name or email address of the person
you’re trying to reach
2) In the search results, right-click on the person and do one of the following:
a. Add to Favorites – if you will be contacting them often, on a daily basis
b. Add to Contacts List – if you would like to add them to another contacts list you’ve created
Optionally, if you would like to know when a contact’s status changes, right-click on the contact and select Tag
for Status Change Alerts.
Sending an Instant Message
1) In your Contacts list, double-click on a contact

9
2) A message box will appear. Type message in the area at the bottom of the message box and press enter.
Receiving an Instant Message
When someone sends you an instant message, an alert will appear in the lower-right corner of your screen. You
will be able to do one of the following:
To accept the conversation invitation: Click on the alert
To decline the invitation, click Ignore
Finding your conversation records

10
Outlook: You will find a folder under your Inbox in Outlook called Conversation History.
Skype for Business:
1. In the main window click on the Conversation tab, all conversations will be listed with the most recent on top;
double click on one to open and view a conversation.
OR
2. In the main window, click File in the top ribbon, and then View Conversation History.
Disabling Conversation records
Within Skype for Business, you can stop saving conversations by disabling the option in settings (Tools
>Options>Personal tab).

11
Creating a Skype for Business Meeting
You can schedule a web conference involving both internal (Skype for Business) users, as well as non-Skype for
Business users at UBC and external institutions. If users don’t have a Skype for Business installed, a browser
plug-in will be automatically downloaded when they join the meeting.
To schedule a Skype for Business meeting:
1) In Outlook, click on New Items and select Meeting
2) Add attendees as usual, and then select the Skype Meeting button
3) The meeting description will be populated with a Skype for Business link, and telephone bridge
information.
4) Click Send to mail the meeting invitation.
How and where do I find Web link in Skype Meeting to share with the users to join by web?
Basically there are two ways that link can be found and shared with the users to join by web client:
1. For a scheduled SfB Meeting, the link is included in the outlook invite as shown below

12
2. If you are the meeting host and created an ad-hoc meeting using “Meet Now” then the link can be found or shared using below :
Note that this option is only available for the host and will not be available for point to point call or participants
to share which makes sense.
So once you click, “Meeting Entry Info” above, you see the pop-up window as shown below:

13
If you enter that meeting link shown above in any web browser, the Skype Web App will initiate to join the call.
It is very helpful for users who do not have SfB Desktop clients installed or having trouble joining by SfB Meeting
using the desktop client.
If you click on the “Copy All Info” button, it actually copies all of the meeting info which can either be pasted in
an email or texted to the user to join. Once pasted, it looks like below:
Join Skype Meeting
https://meet.ubc.ca/asif.hayat/L2435VDG
Join by Phone
Number: 1 (604) 822-3636 (Vancouver Local)
Conference ID: 791272
Find a Local Number: https://dialin.meetme.ubc.ca

14
Advanced Skype for Business Meeting Settings
Skype for Business includes some advanced meeting settings that enable you to adjust how others join your
meeting.
After reaching step 3) in the above instructions (Creating a Skype for Business Meeting), the following box will
appear in the appointment:
1. Click on the “Meeting Options” button
2. You will see that you can manually adjust the settings to create either a “Dedicated Meeting Space” or a
“New Meeting Space” with different permissions:

15
3. These settings enable you to create a “lobby” – where participants wait until you admit them, and also
control who can present.
NOTE: Under the “Dedicated Meeting Space” function (default), people from outside your company
(including those within UBC / FoM who do not have Skype for Business) have to wait to be admitted. To
enable anyone to be admitted immediately, select the settings in the image above.
Joining a Faculty of Medicine VC Bridge Meeting
You can join a Faculty of Medicine VC Meeting directly from Skype for Business. To do this, you will need the
bridge ID from the meeting invitation (e.g. 30226). Type <bridgeID>@vc.ubc.ca into the search bar and the
meeting room will appear below:

16
To join the meeting, double click on the icon and the box below will open. Click the camera button and “Start my
video” to joing the meeting,
17
Basic Troubleshooting:
Connectivity (Wi-Fi) Settings
Turning off Wi-Fi
1. Using a wired internet connection will result in the best quality video. To ensure that you are using a wired
connection, plug in your network cable and switch off your Wi-Fi by one of the following:
1. Pressing the antenna button on your keyboard.
2. Click the Start button on your Windows taskbar. Select Control Panel>Network and
Internet>Network Connections. Right-click on Wireless Network Connection, and select Disable.
In rare cases, you may experience poor quality video due to network bandwidth issues. Disabling your video
feed by clicking on the video icon during an active video call may alleviate some of the congestion. Others will
not see you but the overall experience may be improved.
Dropped Calls
The most common reason for dropped calls is internet connection. Skype for Business works best on a wired
connection, so plugging your laptop into a network cable and disabling Wi-Fi may prevent this from happening
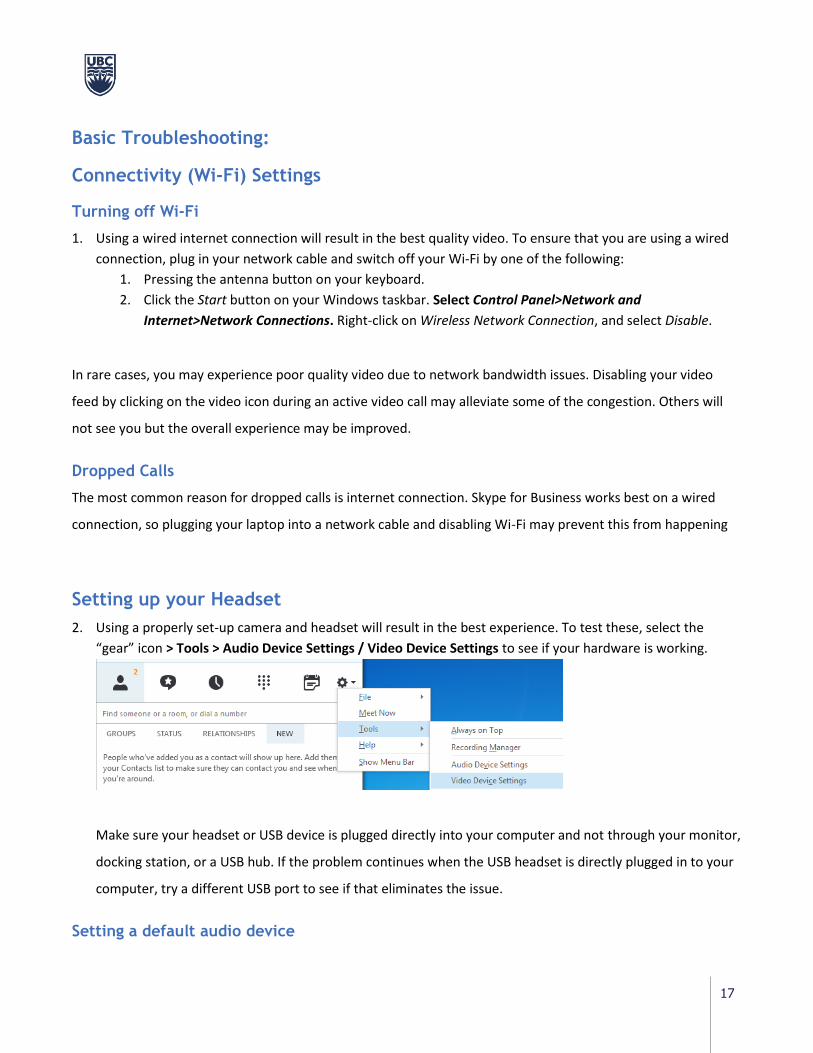
Setting up your Headset
2. Using a properly set-up camera and headset will result in the best experience. To test these, select the
“gear” icon > Tools > Audio Device Settings / Video Device Settings to see if your hardware is working.
Make sure your headset or USB device is plugged directly into your computer and not through your monitor,
docking station, or a USB hub. If the problem continues when the USB headset is directly plugged in to your
computer, try a different USB port to see if that eliminates the issue.
Setting a default audio device

18
Audio Devices:
To set your default (audio) communication devices, right click on the sound icon in the system tray, select
“playback” devices for headphones, and “recording” devices for microphones (you can switch the tabs once
you’re in between both as well).
You have the option of setting a default device (indicated by a green checkmark) or a default communications
device (indicated by a green telephone). Skype for Business will look for and default to the default
communications device. To automatically have your headset detected and configured when you plug it in, set
the headphones and microphone to the default communications device.
Setting up your Audio Device – MAC Users
To verify your audio communication devices are correctly set in Skype for Business (Mac), click on “Skype for
Business” in the top left corner and select “Preferences”.

19
In the new pop-up window choose the Audio/Video tab to verify the correct microphone, speakers and camera
are selected. These menu options will change if you are using headphones with or without a mic.
Presenting Content
Skype meetings can take up a higher % of CPU processing/usage, particularly if presenting content. If the user
has many applications open (as most administrators would) it is best practice to close other major applications
when presenting.

20
More Information
Microsoft has detailed guides and additional information about Skype for Business Basic available online.
https://support.office.com/en-us/article/Discover-Skype-for-Business-8a3491a3-c095-4718-80cf-
cbbe4afe4eba?ui=en-US&rs=en-US&ad=US
There is also Skype for Business on-demand training at the following location:
https://support.office.com/en-us/article/Introducing-Skype-for-Business-e705627e-8e94-4bae-ac8b-
4ccea5a9c4c0?ui=en-US&rs=en-US&ad=US