skill sets covered during the session: - search - …staff.um.edu.mt/jcilia/ecdlmanuals/ict ecdlv5...
TRANSCRIPT

EEuropean CComputer DDriving LLicence
ECDL Sy l labus 5 .0ECDL Sy l labus 5 .0
Form 1Form 1ECDL CoreECDL Core
20092009

ECDL Syllabus 5 Courseware Form 1
Contents
MODULE 1 CONCEPTS OF INFORMATION & COMMUNICATION TECHNOLOGY (ICT)........1HARDWARE, SOFTWARE & INFORMATION TECHNOLOGY..........................................................1MAIN PARTS OF A PERSONAL COMPUTER.............................................................................2
Activity 1.............................................................................................................2
RANDOM ACCESS MEMORY (RAM) & READ ONLY MEMORY (ROM).........................................3 Activity 2.............................................................................................................5
STORAGE DEVICES..........................................................................................................5INPUT DEVICES...............................................................................................................6
Activity 3.............................................................................................................9
OUTPUT DEVICES............................................................................................................9INPUT & OUTPUT DEVICES..............................................................................................10
Activity 4...........................................................................................................11
MODULE 2 USING THE COMPUTER & MANAGING FILES...............................12STARTING THE COMPUTER..............................................................................................12SWITCHING OFF THE COMPUTER......................................................................................15RESTARTING THE COMPUTER...........................................................................................15SHUTTING DOWN A NON-RESPONDING APPLICATION............................................................15
Activity 5...........................................................................................................17
COMMON ICONS............................................................................................................17SELECTING & MOVING ICONS..........................................................................................18OPENING FOLDERS OR ICONS..........................................................................................19CREATING DESKTOP SHORTCUT ICONS..............................................................................19
Activity 6...........................................................................................................19
THE ANATOMY OF A WINDOW.........................................................................................20WORKING WITH WINDOWS..............................................................................................20SWITCHING BETWEEN WINDOWS......................................................................................22
Activity 7...........................................................................................................22
USING HELP.................................................................................................................23USING A TEXT EDITING APPLICATION.................................................................................25
Activity 8...........................................................................................................27
MODULE 3 WORD PROCESSING.................................................................28OPENING MS WORD......................................................................................................28OPENING EXISTING DOCUMENTS......................................................................................29SWITCHING BETWEEN OPEN DOCUMENTS...........................................................................30CLOSING A DOCUMENT..................................................................................................30CLOSING MS WORD......................................................................................................30CREATING A NEW DOCUMENT.........................................................................................31SAVING A DOCUMENT....................................................................................................32USING MAGNIFICATION & ZOOM TOOLS............................................................................33
Activity 9...........................................................................................................33
i

DISPLAYING & HIDING BUILT-IN TOOLBARS........................................................................34SWITCHING BETWEEN PAGE VIEW MODES..........................................................................35ENTERING TEXT IN A DOCUMENT......................................................................................36INSERTING SPECIAL CHARACTERS & SYMBOLS....................................................................37EDITING TEXT..............................................................................................................37DELETING TEXT............................................................................................................38USING UNDO & REDO COMMAND....................................................................................38
Activity 10.........................................................................................................39
SELECTING TEXT...........................................................................................................40MOVING & COPYING TEXT..............................................................................................40APPLYING FONT TYPES & SIZES.......................................................................................41APPLYING TYPESTYLES: BOLD, ITALICS & UNDERLINE...........................................................42APPLYING SUBSCRIPT & SUPERSCRIPT...............................................................................42APPLYING COLOURS TO TEXT..........................................................................................42APPLYING CASE CHANGES TO TEXT..................................................................................43
Activity 11.........................................................................................................43
ALIGNING TEXT.............................................................................................................44INSERTING AN OBJECT....................................................................................................45SELECTING AN OBJECT...................................................................................................46RESIZING & DELETING AN OBJECT....................................................................................47
Activity 12.........................................................................................................48
CHANGING THE DOCUMENT ORIENTATION & PAPER SIZE......................................................49CHANGING THE PAGE MARGINS.......................................................................................49PREVIEWING A DOCUMENT..............................................................................................50PRINTING A DOCUMENT..................................................................................................51
Activity 13.........................................................................................................52
MODULE 4 SPREADSHEETS.......................................................................53OPENING MS EXCEL......................................................................................................53OPENING EXISTING WORKBOOKS & SPREADSHEETS.............................................................55CLOSING WORKBOOKS & SPREADSHEETS..........................................................................55CLOSING MS EXCEL......................................................................................................56CREATING A NEW WORKBOOK & SPREADSHEET..................................................................56SAVING A WORKBOOK & SPREADSHEET.............................................................................57SWITCHING BETWEEN OPEN WORKBOOKS & SHEETS...........................................................58USING MAGNIFICATION & ZOOM TOOLS............................................................................58DISPLAYING & HIDING BUILT-IN TOOLBARS........................................................................59
Activity 14.........................................................................................................60
ENTERING DATA IN CELLS...............................................................................................61SELECTING CELLS.........................................................................................................62SELECTING ROWS.........................................................................................................62SELECTING COLUMNS.....................................................................................................64EDITING CELL CONTENT.................................................................................................65USING UNDO & REDO COMMAND....................................................................................65DELETING CELL CONTENTS.............................................................................................65APPLYING FONT TYPES & SIZES.......................................................................................65APPLYING TYPESTYLES: BOLD, ITALICS, UNDERLINE & DOUBLE UNDERLINE..............................66APPLYING COLOURS TO CELL CONTENT & BACKGROUND......................................................66
Activity 15.........................................................................................................67
ii

ECDL Syllabus 5 Courseware Form 1
MOVING & COPYING DATA.............................................................................................68INSERTING & DELETING ROWS OR COLUMNS......................................................................68MODIFYING COLUMN WIDTHS & ROW HEIGHTS..................................................................69
Activity 16.........................................................................................................70
CREATING FORMULAE....................................................................................................71IDENTIFYING FORMULA ERROR MESSAGES..........................................................................72
Activity 17.........................................................................................................73
CHANGING WORKSHEET MARGINS....................................................................................74CHANGING WORKSHEET ORIENTATION & PAPER SIZE...........................................................74ADJUSTING PAGE SETUP TO FIT WORKSHEET CONTENTS.......................................................75PREVIEWING A WORKSHEET............................................................................................75TURNING ON & OFF GRIDLINES & ROW & COLUMN HEADINGS.............................................76APPLYING AUTOMATIC TITLE ROW/S..................................................................................76
Activity 18.........................................................................................................77
MODULE 6 PRESENTATION.......................................................................78OPENING MS POWERPOINT.............................................................................................78OPENING EXISTING PRESENTATIONS..................................................................................79CLOSING A PRESENTATION..............................................................................................80CLOSING MS POWERPOINT.............................................................................................80CREATING A NEW PRESENTATION.....................................................................................81SAVING A PRESENTATION................................................................................................81USING MAGNIFICATION & ZOOM TOOLS............................................................................82DISPLAYING & HIDING BUILT-IN TOOLBARS........................................................................82
Activity 19.........................................................................................................84
CHANGING BETWEEN PRESENTATION VIEW MODES..............................................................85INSERTING A NEW SLIDE................................................................................................85CHANGING A BUILT-IN SLIDE LAYOUT................................................................................86APPLYING A DESIGN TEMPLATE........................................................................................87ADDING, EDITING & DELETING TEXT IN A SLIDE..................................................................87COPYING & MOVING SLIDES............................................................................................88DELETING SLIDE/S.........................................................................................................89USING UNDO & REDO COMMAND....................................................................................89MOVING & COPYING DATA.............................................................................................89
Activity 20.........................................................................................................90
APPLYING FONT TYPES & SIZES.......................................................................................91APPLYING TYPESTYLES: BOLD, ITALICS, UNDERLINE & SHADOW.............................................92APPLYING COLOURS TO TEXT..........................................................................................92APPLYING CASE CHANGES TO TEXT..................................................................................92ALIGNING TEXT.............................................................................................................93RUNNING THE SLIDE SHOW.............................................................................................94
Activity 21.........................................................................................................94
MODULE 7 WEB BROWSING & COMMUNICATION........................................95INTERNET VS WORLD WIDE WEB.....................................................................................95INTERNET SERVICE PROVIDER, UNIFORM RESOURCE LOCATOR & HYPERLINK............................95WEB BROWSERS...........................................................................................................97SEARCH ENGINES..........................................................................................................98
Activity 22.........................................................................................................98
iii

OPENING & CLOSING MS INTERNET EXPLORER...................................................................99ENTERING A URL........................................................................................................100DISPLAYING A WEB PAGE.............................................................................................100STOPPING A WEB PAGE FROM DOWNLOADING..................................................................101REFRESHING A WEB PAGE............................................................................................101HIDING & DISPLAYING TOOLBARS...................................................................................101ACTIVATING A HYPERLINK.............................................................................................102NAVIGATING BACKWARDS & FORWARDS..........................................................................103NAVIGATING TO THE HOME PAGE...................................................................................103DISPLAYING PREVIOUSLY VISITED URLS...........................................................................103
Activity 23.......................................................................................................104
USING BOOKMARKS.....................................................................................................105CREATING & DELETING BOOKMARK FOLDERS...................................................................106ADDING WEB PAGES TO A BOOKMARK FOLDER.................................................................107SELECTING A SEARCH ENGINE.......................................................................................107USING THE KEYWORD SEARCH FACILITY..........................................................................108SEARCHING FOR INFORMATION USING A SEARCH ENGINE....................................................109PREVIEWING A WEB PAGE............................................................................................110CHANGING THE PAGE SETUP.........................................................................................111PRINTING...................................................................................................................112
Activity 24.......................................................................................................112
ELECTRONIC MAIL.......................................................................................................113THE STRUCTURE OF AN EMAIL ADDRESS..........................................................................114NETIQUETTE...............................................................................................................114OPENING & CLOSING MS OUTLOOK...............................................................................115OPENING & CLOSING AN EMAIL.....................................................................................116RETRIEVING MESSAGES................................................................................................117CREATING A NEW EMAIL...............................................................................................118
Activity 25.......................................................................................................119
INSERTING & REMOVING A FILE ATTACHMENT...................................................................119SETTING MESSAGE PRIORITY.........................................................................................120IDENTIFYING & MARKING READ OR UNREAD EMAILS..........................................................121DELETING AN EMAIL....................................................................................................121RESTORING DELETED EMAIL..........................................................................................122EMPTYING THE DELETED ITEMS FOLDER...........................................................................122
Activity 26.......................................................................................................123
Courseware compiled by James Cilia
2009
iv
ECDL Syllabus 5 Courseware Form 1
Module 1 Concepts of Information & Communication Technology (ICT)
Hardware, Software & Information TechnologyGenerally speaking, we think of computers as machines, which help us, perform tasks efficiently.
Any computer system processes data. What is data? Most of us use the words ‘data’ and ‘information’ to refer to the information which is handled by the computer. However, the two words have different meanings. We will explain the different meanings using the following example:
The 8-digit number 19072009 is ‘data’. However, when this number is interpreted as a date, then this number has a meaning and this will be referred to as ‘information’. The word ‘information’ refers to processed ‘data’.
Of course, you must first enter or input data into the computer before your machine can do anything to it. The computer processes (works on) the data to produce meaningful information. The computer will then show this information i.e. it will output the result. Thus any computer system goes through the following phases:
Therefore, we can now describe a computer system as being made up of input, processing and output devices. However, before you learn about the bits and pieces of a computer system it is necessary to distinguish between the terms ‘hardware’ and ‘software’.
Hardware - refers to the physical components of a computer system i.e. those parts which you can actually touch. Hardware includes:
system unit keyboard monitor mouse disks modem printer scanner speakers web camera cables microphone
Software – refers to all types of computer programs. Software programs are simply a huge set of instructions, which make the computer do something useful. They tell the computer what to do with the information you are feeding into it, what to show on screen, and what to print.
In a computer system, the hardware and software work together to process raw data/words rapidly into useful information or accurate, well-displayed documents.
Information and Communications Technology (ICT) – encompasses all forms of technology used to create, store, exchange and use information in its various forms.
1
INPUT PROCESSING OUTPUT

Information includes business data, voice conversations, still images, motion pictures and multimedia presentations.
ICT is a technology that combines computing with communication links carrying data, sound and video.
Main Parts of a Personal Computer
You will now look at the different parts of a computer. Your computer may look similar to the following:
The above computer is often referred to as a personal computer (PC). Typically a PC consists of a system unit (tower or desktop) that contains slots for CDs/DVDs and USB flash drives, a monitor, a keyboard, a mouse, a set of speakers and a printer.
We use the term peripheral device for any equipment that is externally connected to the system unit such as keyboard, printer, mouse, monitor, speakers, scanner, webcam, microphone, digital camera, data projector etc.
Activity 1
1. Distinguish between data and information.2. Distinguish between hardware and software.3. What is Information Technology (IT)?4. List 4 examples of hardware.5. Name 3 peripheral devices.
2
System Unit
CD/DVD drive
Speakers
Monitor
MouseKeyboard
Printer

ECDL Syllabus 5 Courseware Form 1
Central Processing Unit (CPU)
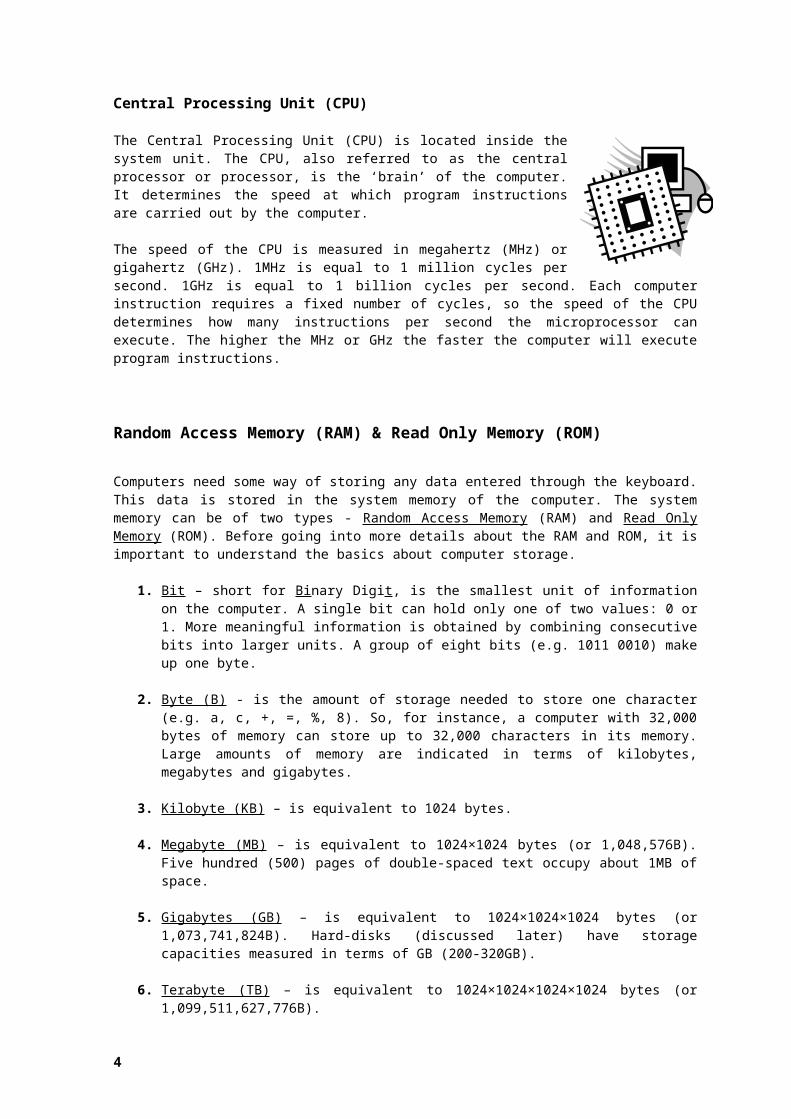
The Central Processing Unit (CPU) is located inside the system unit. The CPU, also referred to as the central processor or processor, is the ‘brain’ of the computer. It determines the speed at which program instructions are carried out by the computer.
The speed of the CPU is measured in megahertz (MHz) or gigahertz (GHz). 1MHz is equal to 1 million cycles per second. 1GHz is equal to 1 billion cycles per second. Each computer instruction requires a fixed number of cycles, so the speed of the CPU determines how many instructions per second the microprocessor can execute. The higher the MHz or GHz the faster the computer will execute program instructions.
Random Access Memory (RAM) & Read Only Memory (ROM)
Computers need some way of storing any data entered through the keyboard. This data is stored in the system memory of the computer. The system memory can be of two types - Random Access Memory (RAM) and Read Only Memory (ROM). Before going into more details about the RAM and ROM, it is important to understand the basics about computer storage.
1. Bit – short for Binary Digit, is the smallest unit of information on the computer. A single bit can hold only one of two values: 0 or 1. More meaningful information is obtained by combining consecutive bits into larger units. A group of eight bits (e.g. 1011 0010) make up one byte.
2. Byte (B) - is the amount of storage needed to store one character (e.g. a, c, +, =, %, 8). So, for instance, a computer with 32,000 bytes of memory can store up to 32,000 characters in its memory. Large amounts of memory are indicated in terms of kilobytes, megabytes and gigabytes.
3. Kilobyte (KB) – is equivalent to 1024 bytes.
4. Megabyte (MB) – is equivalent to 1024×1024 bytes (or 1,048,576B). Five hundred (500) pages of double-spaced text occupy about 1MB of space.
5. Gigabytes (GB) – is equivalent to 1024×1024×1024 bytes (or 1,073,741,824B). Hard-disks (discussed later) have storage capacities measured in terms of GB (200-320GB).
6. Terabyte (TB) – is equivalent to 1024×1024×1024×1024 bytes (or 1,099,511,627,776B).
Files – are units that store collections of data. Almost all information stored in your computer must be in a file. Different types of files store different types of information. For example, program files store programs, text files store text; graphic files store images or pictures etc. Each file has a name referred to as a filename. Typically file sizes range from KB to MB.
3

Folders – store collections of files. Typically you organise your word-processing, spreadsheet and picture files (from your digital camera) in folders. Computer programs (e.g. MS Windows, MS Word, MS Excel etc) are stored in separate folders. Folders may also contain other folders (sub-folders) in them. Folder sizes may range from KB to GB.
As indicated earlier there are two main types of memory:
1. Random Access Memory (RAM) – is volatile storage that holds the program and data that the CPU would be processing.
The information you type on the keyboard is stored in the RAM. It is called ‘random access’ because any part of it can be examined and, if necessary, altered by the programs. In computer terminology, RAM can be ‘written to’, or ‘read from’ and is often described as ‘read/write’ memory. RAM is the memory that the computer uses to run word-processing or spreadsheets packages. Normally, such programs are stored on disks (discussed later).
When you want to use a program, you instruct the system to load the required program. In a matter of seconds the computer reads the program from the disk and starts loading (copying) it into the RAM.
If the computer’s power supply is cut off, the information held in the RAM is lost. For this reason, RAM is also called volatile memory - when the power goes off, its contents ‘evaporate’. For this reason, data stored in RAM, which is required for future use, has to be stored on non-volatile secondary storage devices such as USB (Universal Serial Bus) flash drives and hard disks. USB flash drives are sometimes referred to as USB pen disks.
As programs become more sophisticated and larger in size, the amount of RAM required to run these programs is always on the increase. Nowadays, 1-2GB RAM is a standard on all computers.
2. Read Only Memory (ROM) – refers to chips that have programs built into them by the manufacturer.
How does your computer know what to do when you turn it on? How does it know what to do to check out your hardware components (keyboard, monitor etc) to see that that these are connected correctly? Without these basic control functions, the computer would not be able to start up and accept other instructions or programs. Instructions to perform such critical operations are stored permanently on a read only memory (ROM) chip installed by the manufacturer inside the computer.
The ROM chip retains important instructions permanently. When the power supply is turned off, the instructions stored in ROM are not lost. The capacity of the ROM is typically smaller compared to that of the RAM.
4

ECDL Syllabus 5 Courseware Form 1
Activity 2
1. What does CPU stand for?2. What are the units of the speed of a CPU?3. How many bits are there in a byte?4. How many bytes are there in the following: KB and MB?5. What do RAM and ROM stand for? Lits some of the differences between these
two types of memory.
Storage Devices
As indicated in the previous section, the internal memory (RAM) is temporary, and therefore information has to be stored on permanent media (hard-disks or USB flash drives) referred to as secondary or backing storage. To use any type of disk, the computer has to be equipped with the appropriate disk drives.
Hard disk – is constructed of rigid magnetic disks sealed in a protective case. Data is recorded magnetically onto concentric circular tracks, each one divided into a number of sectors. Hard disks can hold very large amounts of data (200-320GB).Most hard disks, referred to as internal hard disks, are fixed inside the computer. There are also external hard disks which connect to the computer through USB ports (small rectangular slots in the computer). External hard disks can be carried around easily.
USB flash drive – consists of a small printed circuit board protected inside a plastic, metal or rubber case. The USB connector is often protected by a removable cap. USB flash drives are small and easy to carry around. They can store large amounts of data (up to 256GB). USB flash drives connect to the computer through USB ports.
CD-ROM (Compact Disk – Read-only memory) – is an optical disk containing data, which has been written and can be read through the use of a laser beam. CD-ROMs are read-only media i.e. data on CD-ROMS cannot be erased or modified – it can only be read. CD-ROM disks have large storage capacities – 650MB. Typically, these disks are used to distribute large databases (catalogues) and reference encyclopaedias (e.g. Encarta, Britannica etc).
5
USB connector

Other types of optical disks include CD-R and CD-RW.a. CD-R (CD-Recordable) - disks can be written to once. Data on CD-R disks
can be read but cannot be modified or deleted.b. CD-RW (CD-Rewritable) - disks can be erased and written to over and
over again.
DVD-RW (Digital Versatile Disk or Digital Video Disk Re-Writable) - disks are very similar to CD-RWs but they can store much more data than CDs. DVDs have storage capacities which range from 4.7GB to 17GB. Typically these disks are used for full-length movies, advanced multimedia games and interactive encyclopaedias.
Memory card – or flash memory card is a compact disk used to store digital data. Memory cards are typically used with digital cameras, smartphones etc.
Network drive - is typically a shared disk that is accessed by several computers connected to a network. Typically a network stores data files that are shared amongst several users.
Online file storage – is an Internet service that one can use to store personal files for personal backup of files. Users can upload their files and share them publicly or keep them password-protected.
It is important to copy data files present on the hard-disk onto a secondary storage medium (e.g. USB flash drive, CD-RW or DVD-RW) in case the hard-disk fails. This process is known as data backup. You should backup your files regularly.
It is also recommended that you make two/three backups of all data files. One copy should be kept away from the computer room – off-site storage.
In recent years, some users are using online storage facilities available through Internet to store data files. These can be easily accessed from any computer connected to Internet. Such storage is particularly useful to share data files with friends or colleagues.
Input Devices
An input device is any piece of equipment used to enter data in a computer e.g. keyboard, mouse, trackball, scanner, touchpad, light pen, joystick, digital camera and microphone.
Mouse – a device that controls the movement of the cursor or pointer on a display screen. The mouse may contain up to three push buttons each of which has a different functions depending on the program being used have. Nowadays, mice may also include a scroll wheel for scrolling through long documents etc.
Keyboard – contains a set of typewriter like keys that enable you to enter data in the computer. The keys on computer keyboards are often classified as follows:
6

ECDL Syllabus 5 Courseware Form 1
a. Alphanumeric keys - letters and numbersb. Punctuation keys - comma, period, semicolon etc.c. Special keys - function keys, control keys, arrow keys, Caps Lock key
etc.The standard keyboard layout that we use is known as a QWERTY keyboard because the first six keys on the top row of letters spell QWERTY. Local computer stores sell keyboards with the Maltese characters.
Standard 48-key layout 47-key layout
Trackball – is a pointing device. Essentially, a trackball is a mouse lying on its back. To move the pointer, you rotate the ball with your thumb, your fingers, or the palm of your hand.
The trackball usually has two or three buttons next to the ball. These buttons are used in the same way that you use mouse buttons. The trackball, unlike the mouse, is stationary and so it does not require much space to use it.
Scanner – is a device that transfers printed text and images to a computer. There are different types of scanners – the flatbed scanners being the most common. Sometimes scanners form part of a multifunction printer. Such printers have printing, scanning and photocopying features.
Scanners arrive with:a. Driver software –the program that controls the operation of the scanner.b. Photo-editing software – the program used to manipulate scanned
images.c. OCR (Optical Character Recognition) software – the program used to
transfer printed text into a word-processor for editing and formatting
Touchpad – is a small, touch-sensitive pad used as a pointing device on most laptop computers. By moving a finger or other object along the pad, you can move the pointer on the display screen. Tapping the pad is equivalent to clicking the mouse.
Stylus – is a pointing and drawing device shaped like a pen used on digitizing tablets or touch screens on mobile phones. The stylus is used to move the pointer and select objects on the display screen.
7

Joystick – is a lever that moves in all directions and controls the movement of a pointer or some other display symbol. Joysticks typically include two buttons called triggers and are used mostly for computer games.
Web camera or Webcam – is a device used to hold video communications over Internet. Typically webcams are used with communication programs such as Skype and MSN Messenger. Through webcams users are able to see each other and movements in real time. Webcams can be used to record video files and to take still pictures. External webcams connect to the computer through USB ports. Most laptops have in-built webcams.
Digital camera – is an electronic camera that uses a light-sensitive processor chip to capture photographic images in digital form on a small diskette inserted in the camera or on flash-memory chips. Once a picture has been taken, it can be transferred to the computer, and then manipulated with a graphics program and printed.
Digital photos can be incorporated in word-processing documents, presentations, sent by email or posted on a web site. The resolution of the digital photos is limited by the optical resolution of the digital camera. Digital photos are quicker and cheaper to process compared to film photos.
Microphone – is a device that allows sound signals to be converted into digital files that may be stored on the computer. Microphones can be stand-alone or incorporated with headphones or in-built in laptops.
Voice-recognition software uses a microphone to convert a person’s speech into digital signals by comparing the electrical patterns produced by the speaker’s voice with a set of pre-recorded patterns stored in the computer. Microphones are also used along with Internet telephony software to communicate with other people via Internet.
8
ECDL Syllabus 5 Courseware Form 1
Activity 3
1. What is an input device?2. List 5 examples of input devices.3. Distinguish between a mouse, trackball and a touchpad.4. What is a scanner used for?5. What is the difference between a web cam and a digital camera?6. Mention one use of a microphone connected to a computer.
Output Devices
An output device is any piece of equipment that translates information processed by the computer into a form that we can understand e.g. monitor, printers and speakers.
Monitor – also known as the display screen, video display or visual display unit (VDU), is the most common output device. Monitors can have different screen sizes e.g. 14”-, 15”-, 17”-, 19”- and 21”-inch.
There are two main categories of monitors:a. Cathode-ray tube (CRT) monitors – have a vacuum tube
used as a display screen. This same kind of display technology is used for televisions and flight-information monitors at airports.
b. Thin Film Transistor Liquid Crystal Display (TFT-LCD) monitors – are made up of two plates of glass with a substance in between them in which light is manipulated. Molecules of liquid crystal line up in a way that alters their optical properties, creating images on the screen by transmitting or blocking out light.Compared to CRT monitors, TFT-LCD monitors are much thinner, weigh less and consume less power. Thus, they are suitable for laptop computers. TFT-LCD monitors are also available for desktop computers – they take less desk space compared to CRT monitors.
Printers – there are three categories of printers: dot-matrix, inkjet and laser printers.
a. Dot-matrix printer – produces characters and illustrations by striking pins against an ink ribbon to print closely spaced dots in the appropriate shape. Dot-matrix printers are not good for high quality output. They are relatively inexpensive and quite noisy compared to inkjet and laser printers.In general, dot-matrix printers are used for tasks where a high-quality image is not essential such as printing of invoices, receipts and other forms.
b. Inkjet printer – sprays small droplets of ink at high speed onto the surface of paper. This process
9

produces high quality print approaching that produced by laser printers. Inkjet printers are reliable, quiet and inexpensive. Colour inkjet printers provide an inexpensive way to print full colour documents.
c. Laser printer - uses a technology similar to that used in a photocopying machine. It uses a laser beam to produce images with excellent letter and graphics quality. They are quiet and fast but somewhat expensive compared to dot matrix and inkjet printers. Laser printers are widely used in applications requiring high-quality output.
Some printers, known as multifunction printers, have printing, scanning and photocopying features.
Speakers – can be plugged into the back of computers carrying a sound card. The sound card is used to capture as well as play back recorded sounds. The speakers enhance the multimedia capabilities of computers.
Headphones – are typically plugged into the front of computers. These are used to hear sound coming out of the computer. Some headphones incorporate also a microphone.
Input & Output Devices
Some devices e.g. touch screens and modems can serve as both input and output devices.
Touch screens - used in some restaurants and some ATMs (Automated Teller Machines) can also be used as both input and output devices. These screens are covered with a plastic layer, behind which are invisible beams of infrared light. Users can input requests for information by pressing buttons or menus displayed. The answers to users’ requests are displayed as output in words or pictures on the screen.
Modems - are used as input devices when these receive information from the Internet (such as email). They are used as output devices when sending information (such as email) to a recipient.
10

ECDL Syllabus 5 Courseware Form 1
Activity 4
1. What is an output device?2. List 3 examples of output devices.3. Distinguish between an inkjet and a laser printer.4. List two examples of input/output devices.
11

Module 2 Using the Computer & Managing Files
Starting the Computer
You will now start your computer system:1. Locate the power switch on the system unit and press this.2. Locate the power switch on the monitor and press this.
After some time you should be able to see a dialog box similar to the one shown below. A dialog box is a rectangular area where you can type text, tick options available and use buttons. The dialog box shown below shows that the software you are going to use is Microsoft Windows XP.
In the Log On to Windows dialog box:1. Type in your user name in the User name: field.2. Type in your password in the Password: field.3. Choose the Log on to: field4. Click OK button. This will take you to a screen similar to the one shown
overleaf.
Note that: Your teacher will provide you with the username and password. Passwords are case sensitive i.e. you need to type the password as shown on
the sheet provided by your teacher. You need to use the uppercase and lowercase letters as shown.
It is important not to share your password with any friends etc. If you suspect that anyone knows your password, speak to your teacher so that this can be changed.
Microsoft Windows
12

ECDL Syllabus 5 Courseware Form 1
Microsoft (MS) Windows is a program which is referred to as the computer operating system.
The Operating System (OS) is a program that manages the hardware and software installed on the computer. Sometimes operating system software is also called system software.
MS Windows – is the most common operating system on personal computers. MS Windows provides an easy interface between the computer and the user. It uses pictures (graphical representations) which look like push buttons on the screen and you can use the mouse to press them. This interface is known as a Graphical User Interface (GUI).
There are other brands of system software such as Macintosh Operating System (MAC OS), Linux, UNIX etc.
MS Windows Desktop
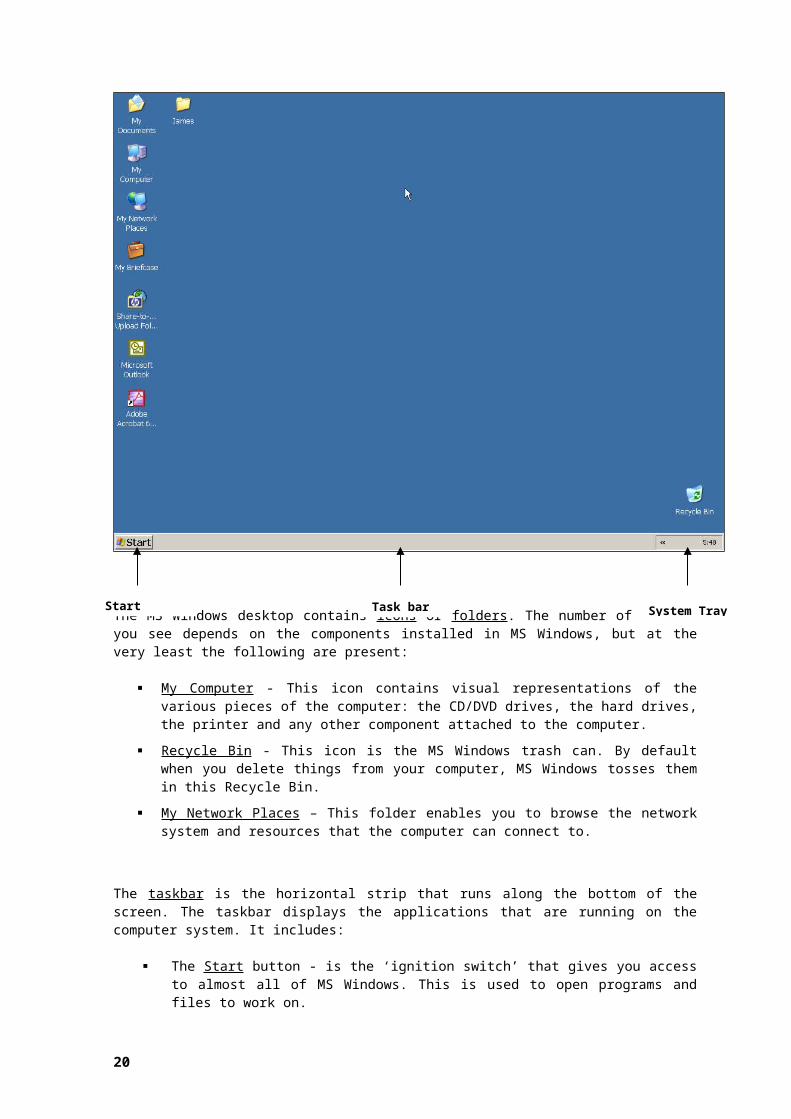
The MS Windows desktop contains icons or folders. The number of folders you see depends on the components installed in MS Windows, but at the very least the following are present:
13
Start button Task bar System Tray
Icons/Desktop Desktop

My Computer - This icon contains visual representations of the various pieces of the computer: the CD/DVD drives, the hard drives, the printer and any other component attached to the computer.
Recycle Bin - This icon is the MS Windows trash can. By default when you delete things from your computer, MS Windows tosses them in this Recycle Bin.
My Network Places – This folder enables you to browse the network system and resources that the computer can connect to.
The taskbar is the horizontal strip that runs along the bottom of the screen. The taskbar displays the applications that are running on the computer system. It includes:
The Start button - is the ‘ignition switch’ that gives you access to almost all of MS Windows. This is used to open programs and files to work on.
The System Tray - displays little pictures that tell you what is happening with your computer. When you are printing, for example, a picture of a printer appears in this area. If you have a sound card fitted in your computer, a picture of a speaker appears.
The System Clock - displays the current time.
The Mouse
The mouse is an important tool you need to use to do most of the tasks in MS Windows. This is particularly so if you are beginning to use computers. The basic idea is simple - you move the mouse on its pad, and a small arrow (the mouse pointer) moves correspondingly on the screen.
Mouse Technique Example
Pointing If you position the mouse pointer over the Start button, a yellow banner that says “Click here to begin” appears. The technique of positioning the mouse pointer on an item is known as pointing.
Clicking If you point the mouse to the Start button and press the left mouse button, a list of options appears on top of the Start button. The technique of pressing the left mouse button once is known as clicking.
Double-clicking If you point the mouse to the My Computer icon and press the left mouse button twice in rapid succession, a frame (known as a window or a dialog box) will open. The technique of pressing the left mouse button twice is known as double-clicking.
Right-clicking If you position the mouse over the desktop and press the right mouse button, a pop-up menu will be displayed. The technique of pressing the right mouse button is known as right-clicking.
Dragging If you position the mouse over any desktop icon, press and hold the left mouse button whilst moving the mouse, you will move the icon*. This technique is known as dragging.*The icon will move only if the Auto Arrange option is not switched on.
Switching Off the Computer
When you have finished working with MS Windows and you are ready to turn off the computer, you first need to close all windows. Never turn off your computer while MS
14

ECDL Syllabus 5 Courseware Form 1
Windows is still running. Doing so could result in loss or corruption of data. The process of switching off the computer is also known as shutting down the system.
1. Click Start button.2. In the Start menu, click Turn Off Computer. The screen shown overleaf will be
displayed.
3. Click Turn Off button. The system will start to shut down. After some time a message advising you that it is safe to switch off your computer is displayed.
4. Turn off the computer and monitor.
Restarting the Computer
1. Click Start button.2. In the Start menu, click Turn Off Computer. The screen shown in the previous
section will be displayed.3. Click Restart button. The system will shut down and restart again.
Note that: You may need to restart your computer when install program updates and new
programs. Typically updates will be applied when you restart your system.
Shutting Down a Non-Responding Application
Sometimes a program (also known as an application) fails to respond to keyboard/mouse commands i.e. the program ‘hangs’. Typically non-responsive programs cannot be closed in the normal way. You need to follow these steps to close the program:
1. Press CTRL+ALT+DEL key combination. A dialog box will be displayed.2. Click Task Manager button. The Windows Task Manager will be displayed.
15

3. Click the non-responding program from the list.4. Click End Task button. The End Program dialog box will be displayed.5. Click End Now button.
16

ECDL Syllabus 5 Courseware Form 1
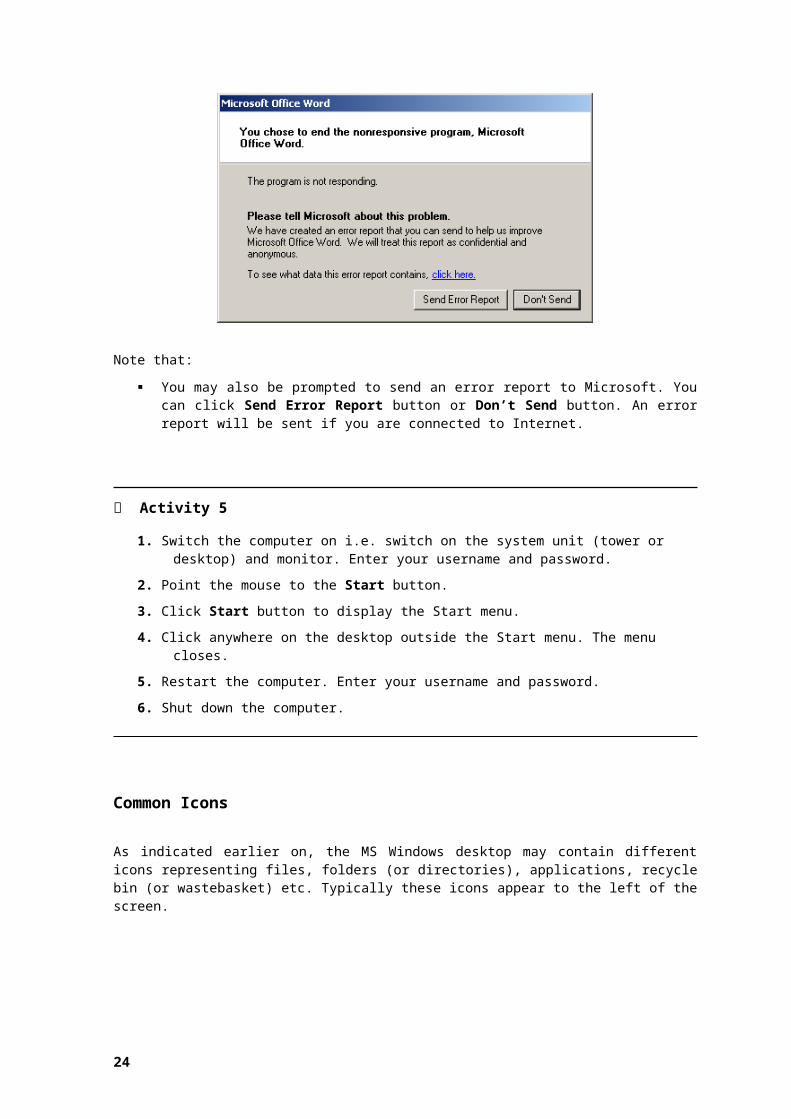
Note that: You may also be prompted to send an error report to Microsoft. You can click
Send Error Report button or Don’t Send button. An error report will be sent if you are connected to Internet.
Activity 5
1. Switch the computer on i.e. switch on the system unit (tower or desktop) and monitor. Enter your username and password.
2. Point the mouse to the Start button.3. Click Start button to display the Start menu.4. Click anywhere on the desktop outside the Start menu. The menu closes.5. Restart the computer. Enter your username and password.6. Shut down the computer.
Common Icons
As indicated earlier on, the MS Windows desktop may contain different icons representing files, folders (or directories), applications, recycle bin (or wastebasket) etc. Typically these icons appear to the left of the screen.
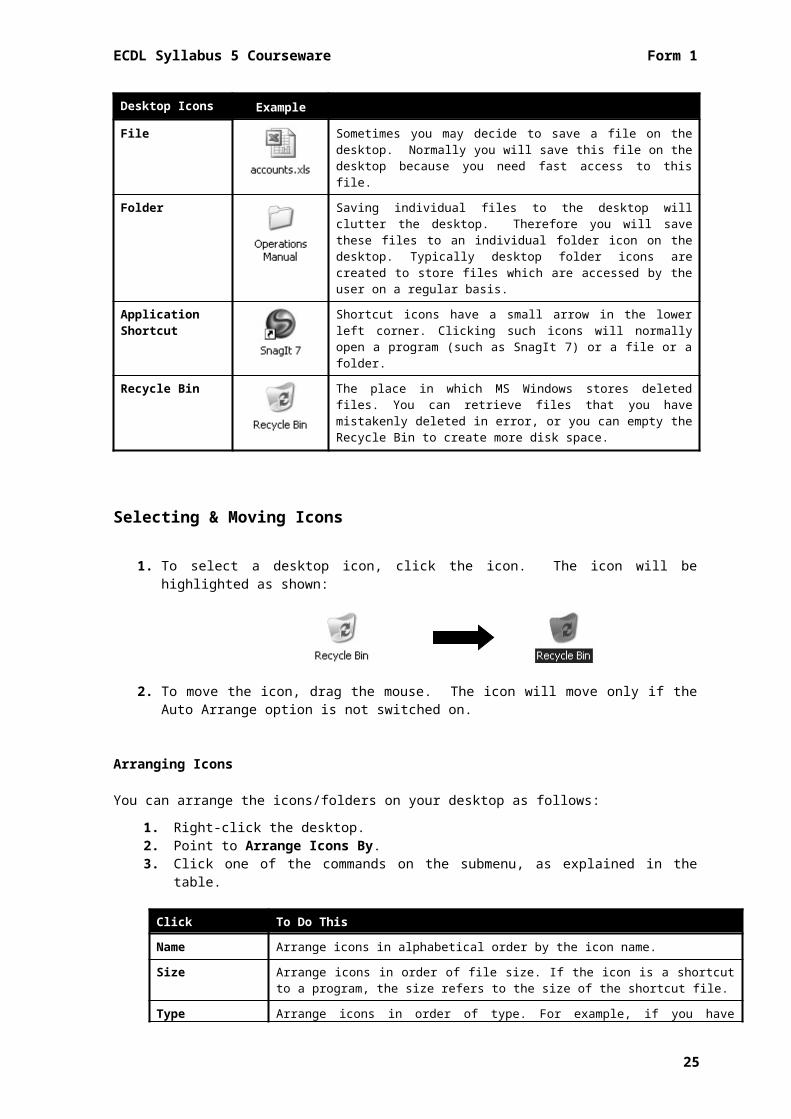
Desktop Icons Example
File Sometimes you may decide to save a file on the desktop. Normally you will save this file on the desktop because you need fast access to this file.
Folder Saving individual files to the desktop will clutter the desktop. Therefore you will save these files to an individual folder icon on the desktop. Typically desktop folder icons are created to store files which are accessed by the user on a regular basis.
17

Desktop Icons ExampleApplication Shortcut Shortcut icons have a small arrow in the lower left corner.
Clicking such icons will normally open a program (such as SnagIt 7) or a file or a folder.
Recycle Bin The place in which MS Windows stores deleted files. You can retrieve files that you have mistakenly deleted in error, or you can empty the Recycle Bin to create more disk space.
Selecting & Moving Icons
1. To select a desktop icon, click the icon. The icon will be highlighted as shown:
2. To move the icon, drag the mouse. The icon will move only if the Auto Arrange option is not switched on.
Arranging Icons
You can arrange the icons/folders on your desktop as follows:1. Right-click the desktop.2. Point to Arrange Icons By.3. Click one of the commands on the submenu, as explained in the table.
Click To Do ThisName Arrange icons in alphabetical order by the icon name.Size Arrange icons in order of file size. If the icon is a shortcut to a program, the
size refers to the size of the shortcut file.Type Arrange icons in order of type. For example, if you have shortcuts to several
MS PowerPoint presentations on your desktop, these will be arranged next to each other.
Modified Arrange icons in the order that the shortcut was last modified.Auto Arrange Arrange the icons in columns along the left side of your screen.Align to Grid Snap icons into place as designated by an invisible grid on your screen. The
grid keeps the icons aligned with each other.Show Desktop Icons
Hide or show all desktop icons. When this command is checked, desktop icons are displayed on your desktop.
18

ECDL Syllabus 5 Courseware Form 1
Opening Folders or Icons
1. Point the mouse pointer to the folder to open e.g. Recycle Bin.2. Double-click the mouse.
A window will show on the desktop area. The title-bar of this window shows a name which corresponds to the folder opened (Recycle Bin). The window may contain several icons or folders.
Creating Desktop Shortcut Icons
In MS Windows a shortcut is a pointer to a file, document or printer. A shortcut is represented by an icon on the desktop or in the My Computer window, or as an entry in the Start menu. Selecting the program shortcut icon or menu entry runs the program to which the shortcut “points”. Selecting a document shortcut runs the application that created the document (provided the document type is associated with a program).
To create a desktop shortcut:1. Open My Computer window.2. Double-click a drive or folder.3. Click the item you want, such as a file, program, folder, printer, or computer. 4. Click File menu.5. Click Create Shortcut. 6. Resize the window so you can see the desktop. 7. Drag the new shortcut to the desktop.
Note that: You can also drag an item to the desktop with the right mouse button, and then
click Create Shortcut(s) Here. A shortcut does not create a copy of the item (file, folder or application
program) on the desktop. Therefore deleting a shortcut to an item, does not delete the item. It still exists on your computer in its original location.
Activity 6
1. Switch the computer on i.e. switch on the system unit (tower or desktop) and monitor. Enter your username and password.
2. Click the Recycle Bin icon on MS Windows desktop.3. Drag the Recycle Bin icon to another location on MS Windows desktop.4. Select and drag any other icons to other locations of MS Windows desktop.5. Use the Auto Arrange command to arrange the icons moved in steps 3 and 4.6. Open Recycle Bin icon.7. Close Recycle Bin window.8. Open the My Computer window.
continued…9. Click hard-disk C.
19

10.Select a file or folder and create its shortcut icon on the Windows desktop.11.Shut down the computer.
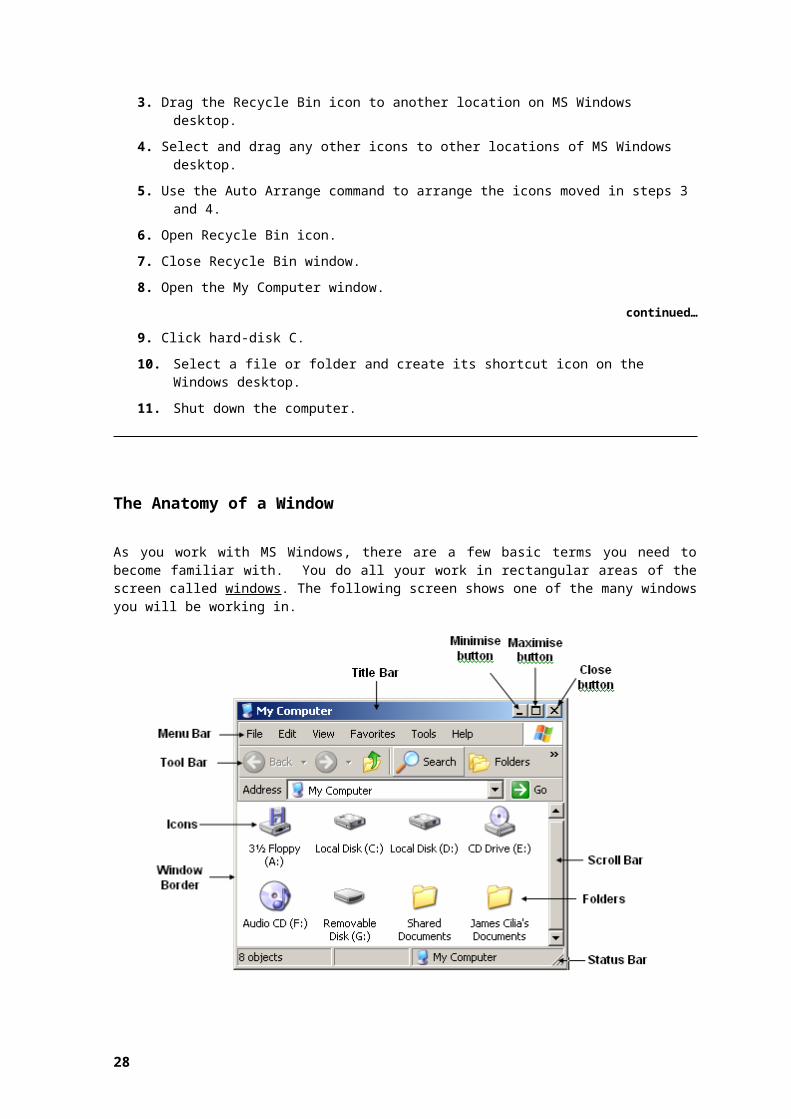
The Anatomy of a Window
As you work with MS Windows, there are a few basic terms you need to become familiar with. You do all your work in rectangular areas of the screen called windows. The following screen shows one of the many windows you will be working in.
Working with Windows
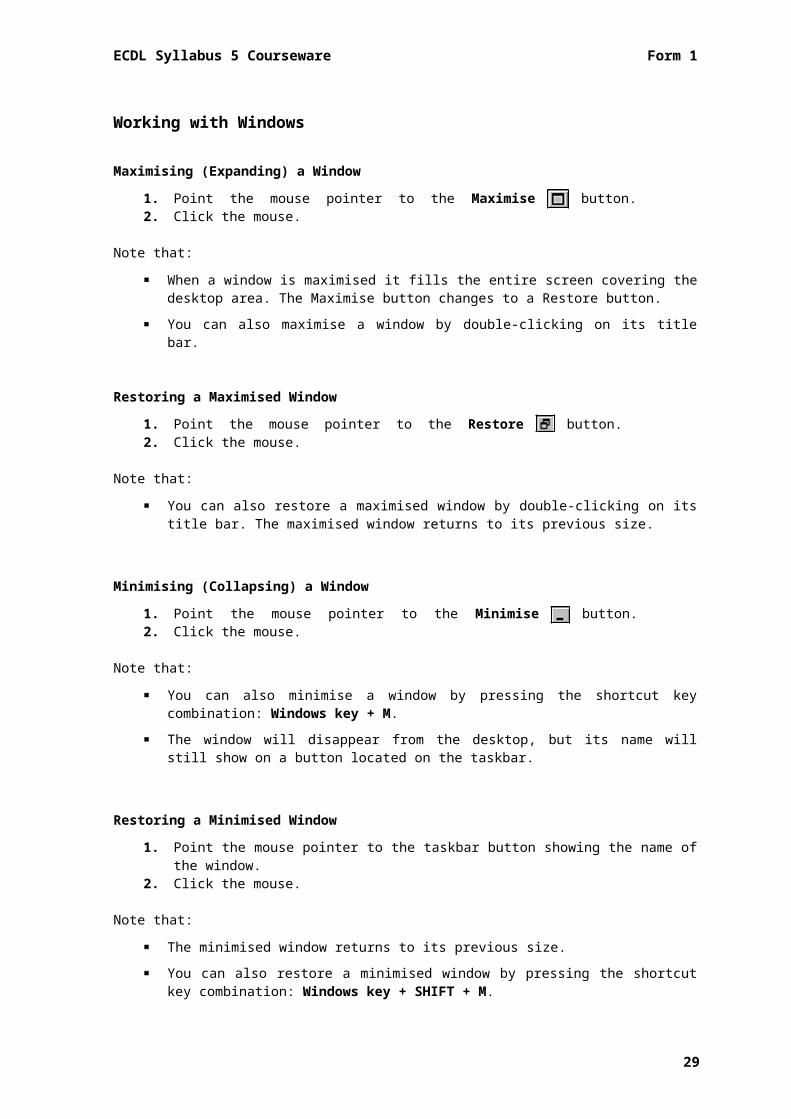
Maximising (Expanding) a Window1. Point the mouse pointer to the Maximise button. 2. Click the mouse.
Note that: When a window is maximised it fills the entire screen covering the desktop
area. The Maximise button changes to a Restore button. You can also maximise a window by double-clicking on its title bar.
Restoring a Maximised Window1. Point the mouse pointer to the Restore button. 2. Click the mouse.
Note that:
20

ECDL Syllabus 5 Courseware Form 1
You can also restore a maximised window by double-clicking on its title bar. The maximised window returns to its previous size.
Minimising (Collapsing) a Window1. Point the mouse pointer to the Minimise button.2. Click the mouse.
Note that: You can also minimise a window by pressing the shortcut key combination:
Windows key + M. The window will disappear from the desktop, but its name will still show on a
button located on the taskbar.
Restoring a Minimised Window1. Point the mouse pointer to the taskbar button showing the name of the
window.2. Click the mouse.
Note that: The minimised window returns to its previous size. You can also restore a minimised window by pressing the shortcut key
combination: Windows key + SHIFT + M.
Moving a Window1. Point the mouse pointer to the title bar of the window. 2. Press the left mouse button.3. Move the mouse to the location where the window will be positioned.4. Release the mouse button.
The technique of pressing the left mouse button, moving the mouse and releasing the button is known as dragging.
Resizing a Window1. Point the mouse pointer to the window border (the pointer will change to a
double-headed arrow).2. Drag the mouse.
Note that: If some of the icons will be hidden when changing the window size, columns
appear to the right or bottom of the window. The right or vertical grey column is known as the vertical scroll bar. The bottom or horizontal grey rectangle is known as the horizontal scroll bar. The arrows in the scroll bar are used to display any hidden icons in the window.
Closing a Window1. Point the mouse pointer to the Close button.2. Click the mouse.
21

Note that: When you close a window, this will disappear from the desktop. When a
window is minimised, this will also disappear from the desktop, but its button appears in the taskbar.
Switching between WindowsIf you have two application windows running, you can switch from one window to another by clicking on the appropriate button located on the taskbar.
You can also cycle through application windows that are running on the computer by pressing ALT+ESC keys or ALT+TAB keys.
You can also arrange windows in cascade or tile format:1. Open several windows.2. Right-click the mouse on an empty section of the taskbar.3. Click Cascade Windows or Tile Windows Vertically or Tile Windows
Horizontally.
Note that: If the Cascade Windows format is chosen, the windows will be arranged in a
stair-like format. If the Tile format is chosen, the windows will be arranged one next to another.
Tiling divides up your screen and gives equal estate to each window. Tile Windows Vertically arranges the windows in vertical strips. Tile Windows Horizontally arranges the windows in horizontal strips. Tiling enables you to work in one window and still keep an eye on what is happening in the other windows.
Activity 7
1. Switch the computer on i.e. switch on the system unit (tower or desktop) and monitor. Enter your username and password.
2. Maximize My Computer window.3. Restore the maximised window to its previous size.4. Minimize My Computer window.5. Restore the minimized window to its previous size.6. Move My Computer window to different parts of the screen.7. Reduce the size of the window (use the window border).8. Use the horizontal and vertical scroll bars to view any hidden icons.
continued…9. Resize the My Computer window to be approximately one third the size of the
screen.10.Open the Recycle Bin window.11.Arrange the two windows in Cascade form.12.Arrange the windows to Tile Horizontally.
22

ECDL Syllabus 5 Courseware Form 1
13.Arrange the windows to Tile Vertically.14.Switch between the two windows using the shortcut key combination:
ALT+TAB15.Close My Computer and Recycle Bin windows.16.Shut down the computer.
Using Help
MS Windows provides on-line help to assist you as you use the program. Some of the ways you can obtain help are:
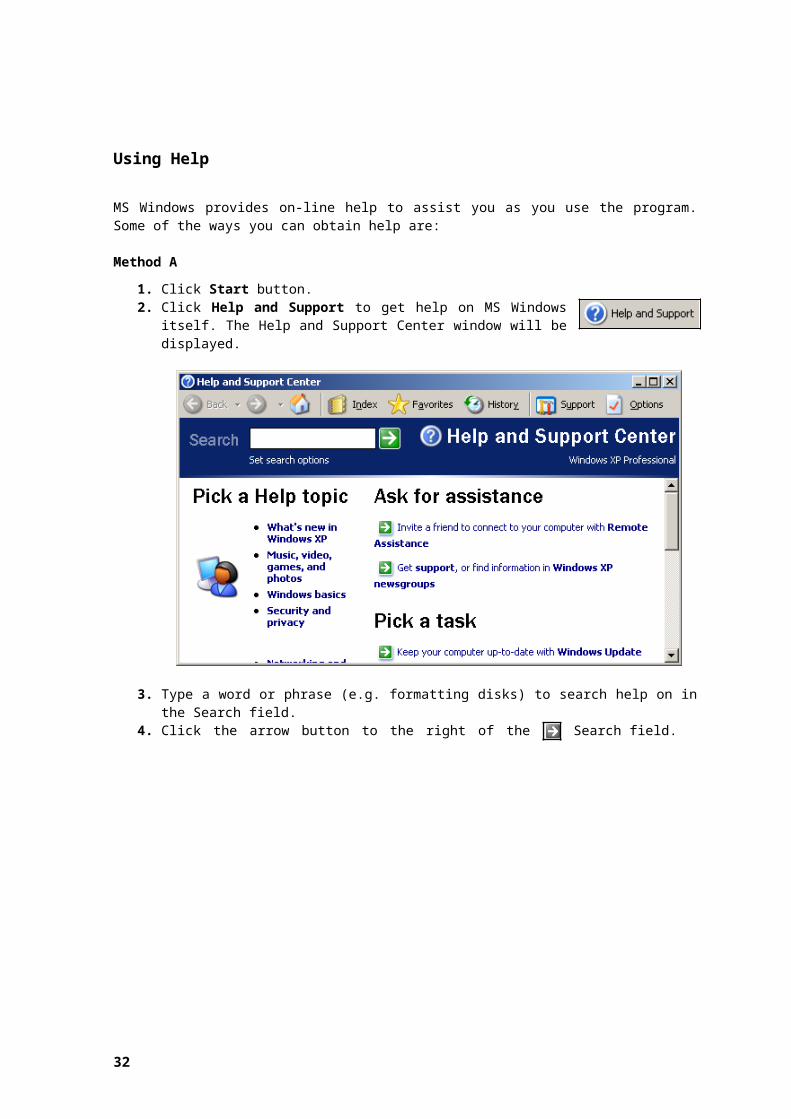
Method A1. Click Start button.2. Click Help and Support to get help on MS Windows itself.
The Help and Support Center window will be displayed.
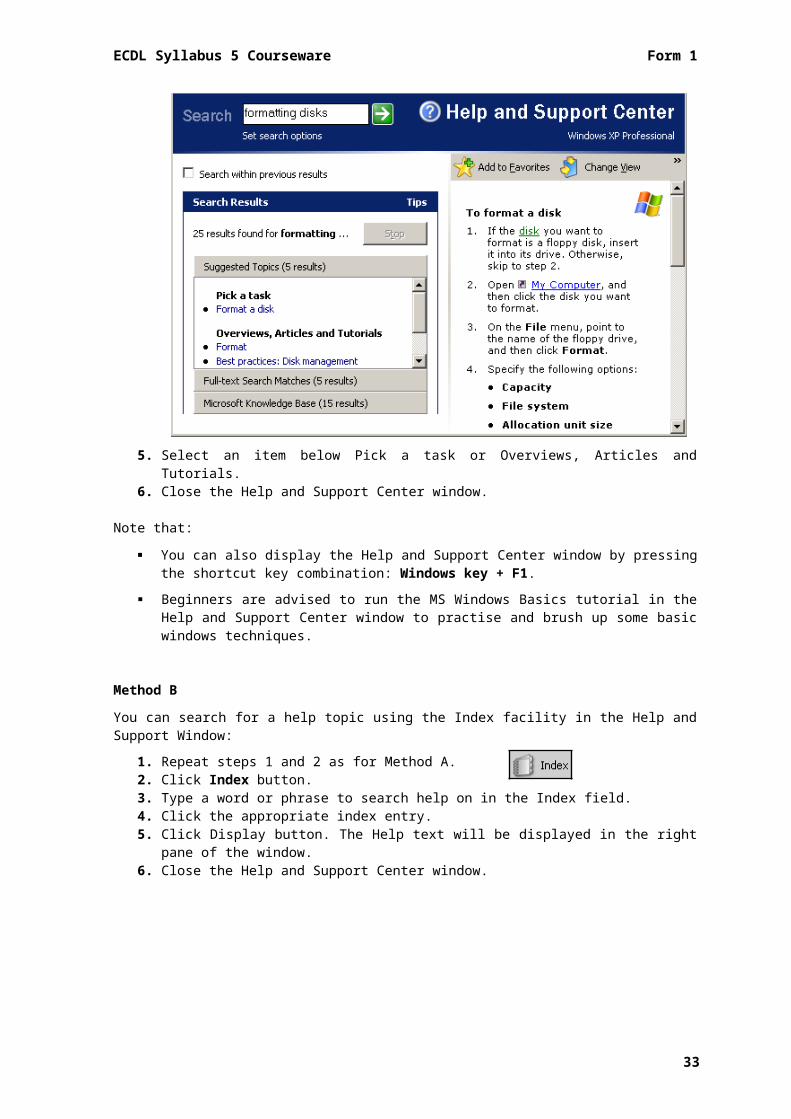
3. Type a word or phrase (e.g. formatting disks) to search help on in the Search field.
4. Click the arrow button to the right of the Search field.
23

5. Select an item below Pick a task or Overviews, Articles and Tutorials.6. Close the Help and Support Center window.
Note that: You can also display the Help and Support Center window by pressing the
shortcut key combination: Windows key + F1. Beginners are advised to run the MS Windows Basics tutorial in the Help and
Support Center window to practise and brush up some basic windows techniques.
Method BYou can search for a help topic using the Index facility in the Help and Support Window:
1. Repeat steps 1 and 2 as for Method A.2. Click Index button. 3. Type a word or phrase to search help on in the Index field.4. Click the appropriate index entry.5. Click Display button. The Help text will be displayed in the right pane of the
window.6. Close the Help and Support Center window.
24
ECDL Syllabus 5 Courseware Form 1
Method C1. In a dialog box, click Help button.2. Click an option in the dialog box. A yellow help box appears. Read through the
help text.3. Click inside the text box to close Help.
Help topics can include graphics and text that link to other Help topics or to more information about the current topic. These are called jumps. Jumps are usually identified by a different colour or an underline. When you point to a jump, the pointer changes to a hand shape.
1. Point the mouse to underlined/coloured text.2. Click the mouse.
Using a Text Editing Application
MS Windows has two text editing programs: Notepad and WordPad. Both programs have basic word processing facilities; however WordPad has more features compared to Notepad.
Opening WordPad1. Click Start button.2. Select All Programs.3. Select Accessories. 4. Click WordPad.
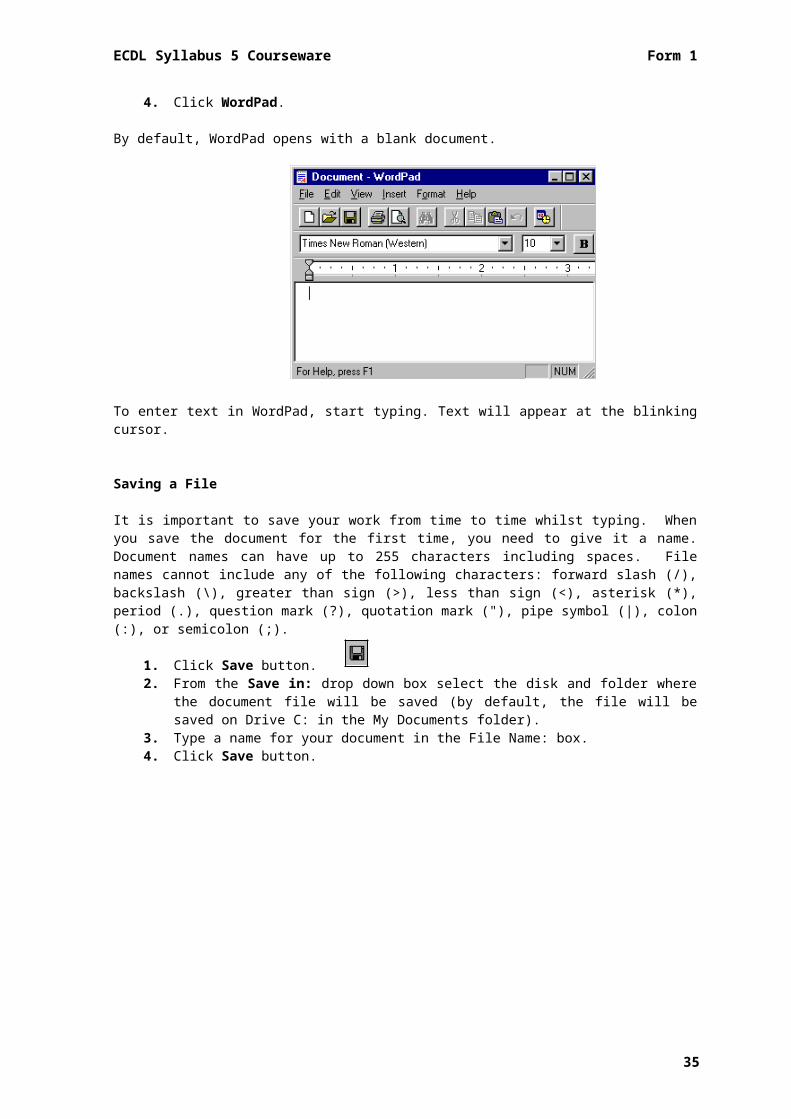
By default, WordPad opens with a blank document.
25

To enter text in WordPad, start typing. Text will appear at the blinking cursor.
Saving a File
It is important to save your work from time to time whilst typing. When you save the document for the first time, you need to give it a name. Document names can have up to 255 characters including spaces. File names cannot include any of the following characters: forward slash (/), backslash (\), greater than sign (>), less than sign (<), asterisk (*), period (.), question mark (?), quotation mark ("), pipe symbol (|), colon (:), or semicolon (;).
1. Click Save button.2. From the Save in: drop down box select the disk and folder where the
document file will be saved (by default, the file will be saved on Drive C: in the My Documents folder).
3. Type a name for your document in the File Name: box.4. Click Save button.
Note that:
26

ECDL Syllabus 5 Courseware Form 1
After you save a file for the first time, the filename appears in the title bar. When you save the file the second, third, fourth time etc. the computer will not ask you to input all this information again but will only update the file with the changes made up to that moment.
Closing WordPad
1. Save your work.2. Click File menu3. Click Exit command.
Opening an Existing WordPad File
1. Click Open button. 2. In the Look in: box browse to the drive or folder that contains the document
to open.3. In the folder list, double-click folders until you open the folder that contains
the document you want.4. Double-click the document you want to open.
Activity 8
1. Switch the computer on i.e. switch on the system unit (tower or desktop) and monitor. Enter your username and password.
2. Use Windows Help and Support facility to search help on connect to a printer.3. Use the Index facility in Windows Help and Support to search for help on Using
MS WordPad.4. Close the Help and Support Window.5. Start MS WordPad.6. Type in the text: This is a test MS WordPad file. 7. Save this file as activity8 on MS Windows desktop.8. Close MS WordPad.9. Re-open MS WordPad.10.Open the file activity8 on MS Windows desktop.11.Close MS WordPad.12.Shut down the computer.
27

Module 3 Word Processing
Word-processors are the most commonly used software in computers. Microsoft (MS) Word is an example of a word processor program. You can use MS Word to prepare letters, essays, project reports etc. All word processor have spell checking, thesaurus and grammar checking facilities.
MS Word comes in a variety of versions. Over the years the program has been updated, making it more powerful and easier to use. This courseware is based on MS Word 2003.
Opening MS Word
1. Click Start button.2. Select All Programs.3. Click Microsoft Word.
28
Title Bar
WORKPLACE
Menu Bar
Toolbars
Blinking cursor
Scroll bar
Task pane
Status bar
Ruler
ECDL Syllabus 5 Courseware Form 1
Features of the MS Word Screen
The title bar shows the document name. MS Word assigns your document a temporary name (e.g. Document2) until you save it with the name you choose.The menu bar is used to choose all commands while working in MS Word.The toolbars provide quick access to some of MS Word’s commands without having to use a pull-down menu.The ruler lets you change paragraph indentations, margins, and column widths for text and tables.The workplace is the area where text entered through the keyboard shows up. A small blinking vertical line can be seen at the upper left of this text area.The blinking cursor is the position where the next character will be displayed when you press a key.The scroll bar is used to move vertically or horizontally within a document.The task pane is a window located on the right hand side of the document window. It serves as additional navigation to help you quickly perform the tasks you need. The status bar, located at the bottom of the screen displays the page number, section number, the number of pages in the document etc.
Opening Existing Documents
1. Click Open button.
2. Click the drop-down arrow in the Look in: field and select the drive and/or folder that contain the document to open.
3. Double-click the document you want to open.
29
Note that: You can also open a recently used document using the File menu. By default,
the File menu displays a list of 4 recently used documents. You can also open a recently used document using the New Document task
pane. In the Open a document section, click the name of the document to open. If the Task Pane is not visible, click View menu and Task Pane.
You can open an existing document using the shortcut key combination: CTRL+O keys.
To open other existing documents repeat steps 1-3.
Switching between Open Documents
You can switch between two or more open documents by:1. Click Window menu.2. Click the name of the document file to display.
Note that: To switch between open documents you can click on the document file button
on the task bar (running horizontally across the bottom of the MS Windows screen).
Closing a Document
1. Save your work.2. Click File menu3. Click Close command.
Note that: You can close a document using the shortcut key combination: CTRL+F4 keys.
Closing MS Word
1. Click File menu.2. Click Exit.
Note that: You can close MS Word using the shortcut key combination: ALT+F4 keys.
30

ECDL Syllabus 5 Courseware Form 1
Creating a New Document
Every MS Word document is based on a template. A template determines the basic structure for a document and contains document settings such as fonts, page layout, special formatting, and styles.
By default all new documents are created on a standard (or default) template called normal.dot. To create a new document based on the default template:
Click New button. A new file with an empty workplace will be opened.
Note that: You also open a new document based on the default
template using the New Document task pane. In the New section, click Blank Document.
You can also base a new document on other templates available in MS Word or created by you.
1. In the New Document task pane, click General Templates… below New from template section.
2. Select the appropriate template tab card e.g. Memos. 3. Click the template within the template category selected in step 2 e.g.
Contemporary Memo.4. Click OK button.
Note that: You can open a new document using the shortcut key combination: CTRL+N
keys.
31

Saving a Document
It is important to save your work from time to time whilst typing. When you save a document for the first time, you need to give it a name. Document names can have up to 255 characters including spaces. File names cannot include any of the following characters: forward slash (/), backslash (\), greater than sign (>), less than sign (<), asterisk (*), period (.), question mark (?), quotation mark ("), pipe symbol (|), colon (:), or semicolon (;).
To save a document to a location/drive:
1. Click Save button.
2. Click the drop-down arrow in the Save in: field and select the disk and/or folder where the document file will be saved. By default, the file will be saved on Drive C: in the My Documents folder.
3. Type a name for your document in the File name: field.4. Click Save button.
Note that: After you save a file for the first time, the filename appears in the title bar. When you save the file the second, third, fourth time etc. the computer will not
ask you to input all this information again but will only update the file with the changes made up to that moment.
You can save a document using the shortcut key combination: CTRL+S keys.
To save an open document under another name:1. Click File menu.2. Click Save As… The Save As dialog box will be displayed.3. Repeat steps 2-4 as above.
Using Magnification & Zoom Tools
32
ECDL Syllabus 5 Courseware Form 1
The zoom feature allows you to enlarge or reduce the view of a page on the screen. MS Word offers two ways of zooming – the zoom tool on the standard toolbar and the zoom dialog box in the View menu.
1. Click Zoom control button.2. Select the appropriate option. At 100%, the letters and page are
the same size they will be when you print them. Below 100% they are smaller. Above 100%, they are bigger.
Note that: You can also type in any percentage value in the zoom textbox.
Activity 9
You will use Module 3 practice files.1. Start MS Word.2. Open the file first.doc located in Module 3 Exercises folder.3. Open a new (blank) document.4. Type the text: This is my first file.5. Save this document in Module 3 Exercises folder using the name myfile.doc.6. Switch to the document first.doc.7. Switch back to the document myfile.doc.8. Use the Help facility to find information about mail merge.9. Close the help screen.10.Close MS Word.11.Restart MS Word and open the document first.doc located in Module 3
Exercises folder.12.Change the Zoom control from 100% to 200%.13.Change the Zoom Control to Page Width.14.Type 80% in the Zoom Control and press ENTER key.15.Save and close the document. Close MS Word.
33
Displaying & Hiding Built-in Toolbars
A toolbar is a row/column of buttons/icons. These buttons are used to perform tasks quickly without opening menus. By default, MS Word displays two toolbars - the Standard toolbar and the Formatting toolbar – on a single row.
To display the Standard and Formatting toolbars on two separate rows:1. Click Tools menu.2. Click Customize…
3. In the Options tab card, tick the option Show Standard and Formatting Toolbars on two rows.
4. Click Close button.
To display additional toolbars:1. Click View menu.2. Select Toolbars. A sub-menu will be displayed showing all MS Word toolbars.
The toolbars that are currently being displayed on the screen are preceded with a checkmark.
3. Click on the toolbar to put on display. The selected toolbar is displayed on the screen
Toolbars are not fixed to any part of the MS Word screen – they can float. Accordingly, you can move toolbars to any part of the screen by dragging them.
To move a floating toolbar:1. Position the pointer anywhere on the title-bar of toolbar. 2. Drag the toolbar to any part of the screen.3. Release the mouse button when the toolbar is at the desired location.
34

ECDL Syllabus 5 Courseware Form 1
To turn a fixed toolbar into a floating toolbar:1. Position the mouse pointer on an empty part i.e. an area without any buttons
of the toolbar to detach.2. Double-click the mouse.
To re-attach a floating toolbar:1. Position the pointer anywhere on the title-bar of toolbar.2. Double-click the mouse.
The toolbar moves to its home port at the top or bottom of the screen.
To hide toolbars:1. Click View menu.2. Point to Toolbars. A sub-menu displaying available toolbars will be displayed.
The toolbars which are currently displayed in MS Word will have a checkmark.3. Click the check marked toolbar to hide the toolbar.
Switching between Page View Modes
You can view MS Word documents in different page display modes.1. Click View menu.2. Select Normal, Web layout, Print layout or Outline view.
Depending on the task at hand, some views are better than others.
Option To Do This
Normal Used for writing first drafts and basic editing. In Normal view you can focus on writing. Normal view is often quicker to use as less memory is used.
Web layout Used for laying out web pages to be displayed online. Colour backgrounds only appear in this view. By switching to Web layout view, you can see what web pages will look like online in a browser (e.g. Internet Explorer & Mozilla Firefox)
Print layout Used for laying out documents. In this view, you can see where graphics, columns, and the pages begin and end. Headers and footers also appear in this view.
Outline Used for organising long papers and reports. In Outline view, you can move to a different location in the document and move/copy text quicker than in Normal view.
You can also view a document in full screen mode. Full screen view removes the toolbars and menus from the screen and displays the document over the entire computer screen. You can bring the toolbars and menus back onto the screen and edit the document as usual.
1. Click View menu.2. Select Full Screen.3. Click on the Close Full Screen box or press ESC key to return to the
Normal/Print layout view.
Entering Text in a Document
35

Somewhere in the workplace of the MS Word window there will be a vertical line called the blinking cursor. Note that as you type, text will always be inserted to the left of this cursor. When the text reaches the right margin, MS Word automatically begins a new line. This feature is called word-wrap.
The following table shows the use of spaces as you type your document:
No Spaces One Space
after opening a bracket ( after comma ,before closing a bracket ) after a colon :before a fullstop . after a semi-colon ;before an exclamation mark ! after a fullstop .before a question mark ? after an exclamation mark !before a comma , after a question mark ?before a semi-colon ;
Press the CAPS LOCK key to type text in uppercase. Press SHIFT key in combination with an alphabetical letter key to type the latter in uppercase.
To move the cursor within the text:
To move the Insertion Point PressBack one character Left Arrow Forward one character Right Arrow Up one line Up Arrow Down one line Down Arrow To the previous word Ctrl-Left ArrowTo the next word Ctrl-Right ArrowTo the beginning of the line Home keyTo the end of the line End key
When pressing any of the keys indicated above, the cursor just moves within the text but nothing else happens.
To insert a new paragraph:1. Place the cursor to the right of the last character on the line.2. Press Enter key.
Note that: The cursor moves to the beginning of the next line. If the cursor is not at the
end of the line, pressing Enter key will move whatever follows to the right of the cursor on the next line.
Inserting Special Characters & Symbols
Sometimes you need to insert special characters or symbols in your document (e.g. ©, ® etc) which are not available on the keyboard.
36
ECDL Syllabus 5 Courseware Form 1
1. Position the cursor where the special character will be inserted.2. Click Insert menu.3. Click Symbol... The Symbol dialog box shown below will be displayed.4. Click on the character to insert.5. Click Insert button.6. Click Close button.
More characters are available if you click in the font box and select other fonts such as Wingdings etc.
Editing Text
You can edit content by (a) entering, removing characters/words within existing text or (b) overtyping to replace existing text.
By default, any new text you enter in the middle of a line is inserted between existing text. To edit text using the Backspace or Delete keys:
1. Position the cursor to the right/left of the character/s to edit.2. Press Backspace or Delete key.3. Type in the new character/s.
To replace existing characters as you type:1. Position the cursor to the right/left of the character/s to replace.2. Press Insert key. The OVR (Overtype mode) text in the status bar will be
displayed in bold.3. Type in the new character/s.4. Press Insert key to switch off the overtype mode.
Note that: You can also double-click OVR on the status bar to turn overtype on or off.
37
Deleting Text
You can delete characters/words using (a) the Backspace key or (b) the Delete key.
To delete characters using the Backspace key:1. Position the cursor to the right of the character to erase.2. Press Backspace key.
To delete characters using the Delete key:1. Position the cursor to the left of the character to erase.2. Press Delete key.
Note that: The Backspace key erases characters from the right to the left. The Delete
key erases characters from the left to the right.
Using Undo & Redo Command
The Undo button reverses the last action you performed. 1. Click the drop-down arrow next to the Undo button to display a history list of
all actions you have performed since opening the document. From this list, you can reverse actions.
2. Click the action you want to undo. If you don’t see the action, scroll through the list.
Note that: When you undo an action, you also undo all actions above it in the list. You can undo the very last action you took by just clicking Undo on the
Standard toolbar.
If you later decide you didn't want to undo an action click Redo button on the Standard toolbar.
38

ECDL Syllabus 5 Courseware Form 1
Activity 10
You will use Module 3 practice files.1. Start MS Word.2. Open the file first.doc located in Module 3 Exercises folder.3. Switch to Print Layout view. Note that in this view the left, right, top and bottom
margins are displayed. Switch back to the Normal view.4. Display the document first.doc in full screen mode.5. Display the document first.doc in Print Layout view.6. Display the Standard and Formatting toolbars on two separate rows.7. Display the Tables and Borders toolbar.8. Move the Tables and Borders toolbar such that this will be located on a
separate row underneath the Formatting toolbar.9. Hide the Tables and Borders toolbar.10.Display the paragraph marks in the first.doc. 11.Close the first.doc.12.Open the document second.doc located in Module 3 Exercises folder.13.Type in the following text at the top of the page: Contributions of Media to
the Learning Process.14.Using the BACKSPACE key, delete the word Process and instead type the
word Environment.15.Using the navigation keys, position the cursor in front of the word Learning.
Use the DELETE key to erase Learning and instead type Classroom.16.Using the navigation keys position the cursor just after the word Media and
press ENTER key twice. Use the UNDO button to move the text back to its original position.
17.Position the cursor after the word Environment and press ENTER key twice.18.Type in the following text below the title Contributions of Media to the
Classroom Environment:When skilfully combined, pictures, words and sounds have the power to evoke emotions, change attitudes and motivate actions. Examples of this power can be seen every day on television: the commercial that motivates the viewer to buy a product, the political spot that attempts to sway a voter’s choice of candidate etc.
19.At the end of this paragraph type: The temperature today is 25ºC. Use the Symbol dialog box to insert º. Save your work.
20.Save and close the document. Close MS Word.
39
Selecting Text
A typical feature of MS Word is the ‘select and do’ function i.e. before you carry out some function (such as applying an underline), text has to be selected. Selecting text means that you highlight it so that it is displayed as light text on a dark background.
To select Do this
A word Double-click on the word.A line of text 1. Place the pointer in the selection bar pointing it to the line to
select.2. Click the mouse.
A paragraph of text 1. Place the pointer in the selection bar pointing it to the paragraph to select.
2. Double-click the mouse.A sentence Hold down Ctrl and click anywhere in the sentence.An entire document Triple-click the mouse anywhere in the selection bar.A phrase of text Drag the mouse over the text to select.
To switch-off the highlighting:1. Position the mouse pointer anywhere outside the highlighted area.2. Click the mouse.
Moving & Copying Text
An important feature in a word-processor is the facility of moving text from one location of a document to another. MS Word uses a temporary storage area called the clipboard for moving and copying text within a document. This area functions much like a clipboard that holds loose pieces of paper.
To move text:1. Select the text to move.2. Click Cut button or press Ctrl+X3. Position the cursor where the text will be moved.4. Click the Paste button or press Ctrl+V
Note that: The Cut button removes the selected text or object and places it on the
Clipboard, where you cannot see it in the work area.
To copy text1. Select the text to copy.2. Click Copy button or press Ctrl+C3. Position the cursor where the text will be copied.4. Click Paste button or press Ctrl+V
40
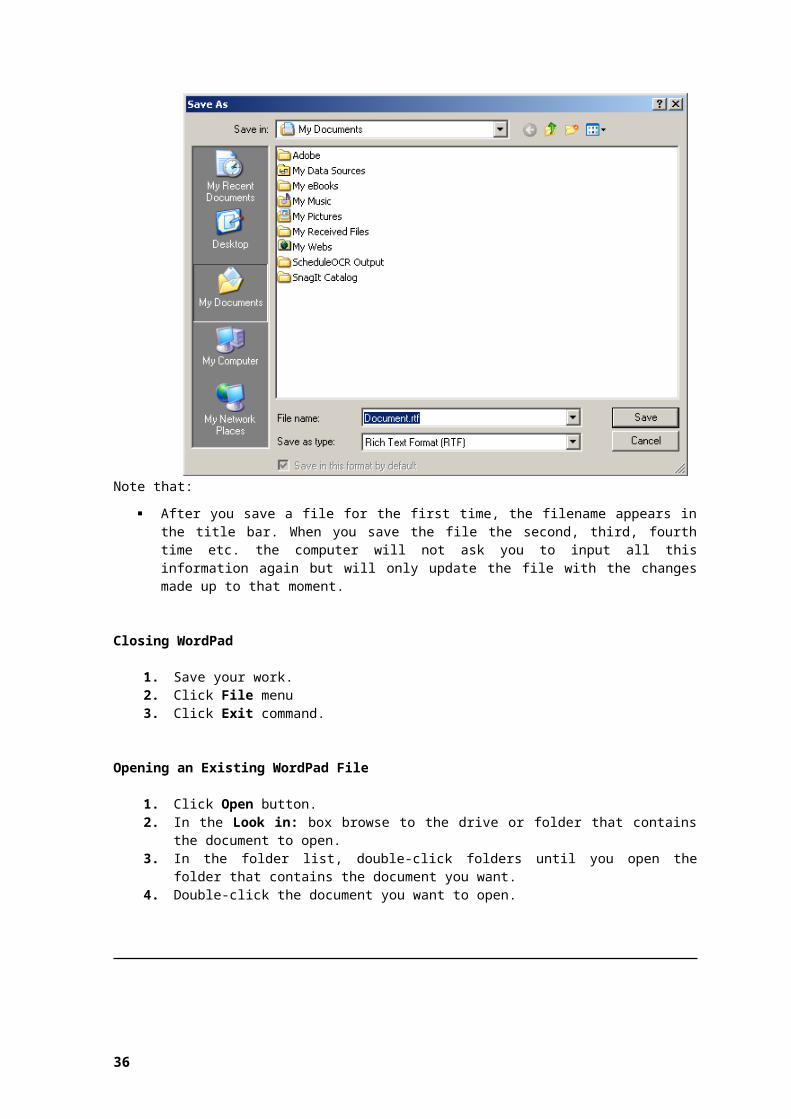
ECDL Syllabus 5 Courseware Form 1
Note that: The Copy button copies the selected text or object and places it on the
Clipboard, where you cannot see it in the work area.
You can even cut-paste or copy-paste information from one document to another, and to and from other programs, such as MS Excel worksheet.
Applying Font Types & Sizes
A font is a collection of characters (letters, numerals, symbols and punctuation marks) that have a particular design. A list of some of the most common fonts used in MS Word documents is below. The list shows both the font name and the way the characters look.
Arial pt. 13 Bookman Old Style pt.13Lucida Calligraphy pt.12 Impact pt. 13Century Gothic pt.13 Courier pt.13
Mercurius Script MT pt.14 Times New Roman pt. 13
The font size determines the size of the selected characters. The height of a character is expressed in points (1 point = 1/72”). The larger the number, the larger the character.
By default, MS Word displays Times New Roman point size 12 unless you change it.
To change the font type:1. Select the text to change its font style.2. Click the Font Style drop-down arrow.3. Click the appropriate font style to apply.
To change the font size:1. Select the text to change its font size.2. Click the Font Size drop-down arrow. 3. Click the appropriate size to apply.
41

Applying Typestyles: Bold, Italics & Underline
Typestyles are applied to text to emphasise it. There are three ways of emphasising text, using either or a combination of the following typestyles:
Typestyle Button Effect Shortcut Key
Bold to make the characters look darker CTRL+B
Italics to slant the characters to the right CTRL+I
Underline to underline characters CTRL+U
To apply typestyles:1. Select the text to apply typestyles to.2. Click the appropriate typestyle/s button/s required.
To remove typestyles:1. Select the text to remove its typestyles.2. Click the appropriate typestyle/s button/s to remove.
Applying Subscript & Superscript
Subscript text is text that is slightly lower than other text on a line e.g. ‘2’ in H2O. Superscript text is text that is slightly higher than other text on a line e.g. ‘2’ in AB2.
To make text subscript or superscript:1. Select the text you want to format as superscript or subscript. 2. Click Format menu.3. Click Font.4. Click the Font tab. 5. Tick the Superscript or Subscript check box. 6. Click OK button.
Applying Colours to Text
To apply a different colour to the text:1. Select the text to apply colour to. 2. Click the drop-down arrow next to the Font colour button on the
Formatting toolbar. 3. Select the appropriate colour.
42

ECDL Syllabus 5 Courseware Form 1
Applying Case Changes to Text
You can change the case of a text to uppercase, lower case, title case, sentence case etc.
1. Select the text you want to change its case. 2. Click Format menu.3. Click Change Case… 4. Click the appropriate case option.5. Click OK button.
Option To Do This
Sentence case. Capitalises the first letter of the first word in the selected sentences.lowercase Changes all selected text to lowercase letters.UPPERCASE Changes all selected text to capital letters.Title Case Capitalises the first letter of each word in the selection.tOGGLE cASE Changes all uppercase letters to lowercase in the selection and vice versa.
Activity 11
You will use Module 3 practice files.1. Start MS Word.2. Open the file second.doc located in Module 3 Exercises folder.3. Select the first paragraph: When skillfully… today is 25ºC.4. Click CUT button and paste this text at the end of the document. 5. Select the second paragraph: The impressions… (Wilkinson, 1980).6. Click COPY button and paste this text at the end of the document below: When
skillfully… today is 25ºC. 7. Select the last pasted paragraph and delete this. 8. Save and close the document.9. Open third.doc located in Module 3 Exercises.10.Switch to Print Layout view.11.Select all the text in the document and apply the font Times New Roman. Set
the size to 12pt.12.Select the title Inside the Computer Case. Apply bold, italics and underline to
this text. Apply the font Impact pt. size 28. Save your work.13.Select the sentence This is the heart of your computer and apply italics.14.Type the following text at the end of the document: Water = H2O.15.Below the text Water = H2O type AB2 = BC2+ AC2
16.Use the facility to automatically convert the title text Inside the Computer Case to uppercase.
continued…17.Apply green colour to the title text Inside the Computer Case.
43

18.Select the phrase Random Access memory (RAM). Apply bold and underlining typestyle to this text. Apply the font Comic Sans MS pt size 12.
19.Save and close the document. Close MS Word.
Aligning Text
This facility is important to change the position of text in relation to the left and right margins. The left and right margins are the white spaces at the left and right edges of a page.
There are four different alignment options:
This is left-aligned text.This is centered text.
This is right-aligned text.
This is justified text. If this text is on a line that is shorter than the paragraph width, it will remain aligned left.
It is a good practice to use the align features of MS Word to position text rather than inserting spaces.
Option To Do This
Left Aligns each line of the paragraph with the left margin, leaving a ragged right edge which means that there is no alignment on the right side.
Centered Aligns each line of the paragraph between the left and right margins. This is useful for headings and titles.
Right Aligns each line of the paragraph with the right margin leaving a ragged left edge, which means that there is no alignment on the left side. This is useful for a right-aligned date and return address in a letter.
Justified Aligns paragraph text so that both the left and right margins have a straight edge, creating blocks. Use this option judiciously because it can create white “rivers” of space in the text, which can make reading difficult.
1. Select the text or position the cursor in the text to align.2. Click:
Alignment option Button Shortcut Key
Align Left button CTRL+L
Center button CTRL+E
Align Right button CTRL+R
Justify button CTRL+J
Inserting an Object
44

ECDL Syllabus 5 Courseware Form 1
MS Word enables you to add objects – pictures/images, charts and drawn objects - to your documents. There are two categories of objects that you can use to enhance your documents:
Pictures – are graphics that were created elsewhere and that you bring into your document. Examples include images in the picture gallery of MS Office, images available on a CD, and images acquired through a scanner or digital camera.
Drawn objects – are graphics that you generate within MS Word. Examples include AutoShapes, drawings you create from scratch in MS Word, graphs and organisation charts.
MS Word has a built-in gallery of images, also known as clip arts, which can be used in your documents. Clip arts are prepared files of black and white or colour line drawings and half tone images to be used in documents.
To insert a clip art:1. Click wher you want to insert the clip art.2. Click Insert menu.3. Point to Picture...4. Click Clip Art… The Insert Clip Art task pane will
be displayed.5. In the Search text: field type a word or phrase
that describes the clip you want. 6. Click Search button. The Insert Clip Art task pane
will display the search results.
7. In the Results box, click the clip to insert it.
Note that: To narrow your search, do one or both of the following:
i. To limit search results to a specific collection of clips, in the Search in box, click the arrow and select the collections you want to search.
ii. To limit search results to a specific type of media file, in the Results should be box, click the arrow and select the check box next to the types of clips you want to find.
As indicated earlier you can also insert images available on a secondary storage medium (floppy-disk, hard-disk, CD etc.).
45
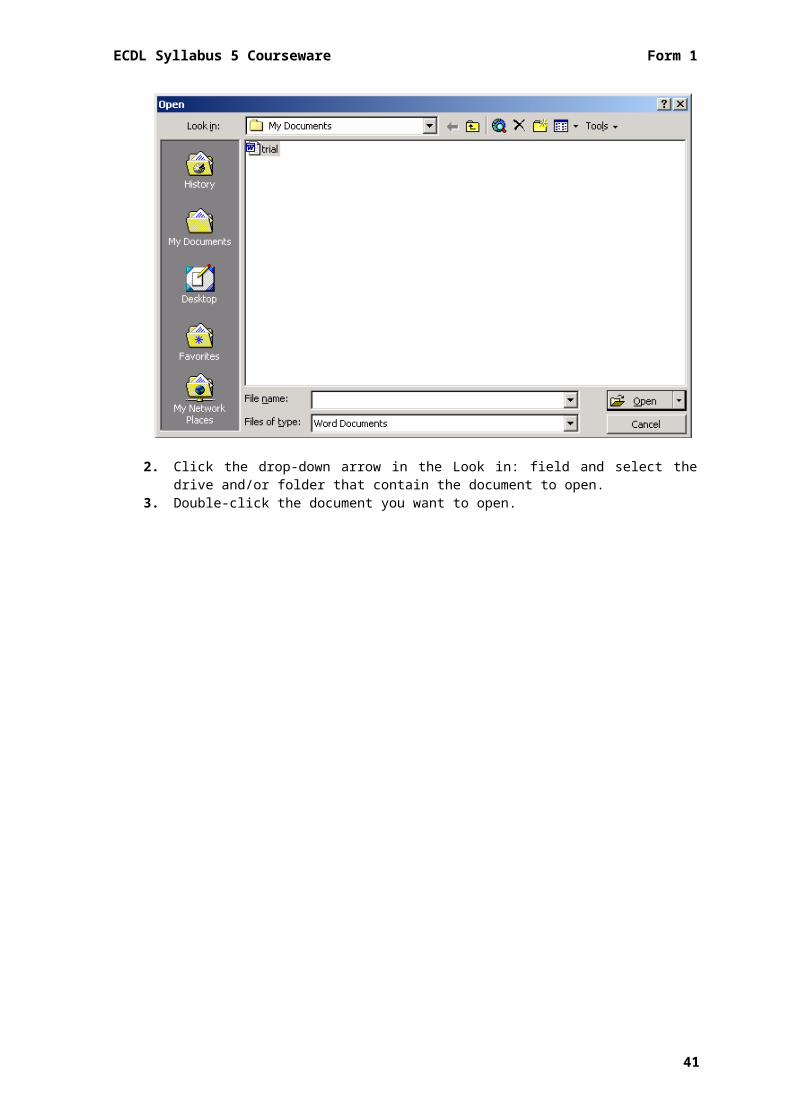
To insert an image from file:1. Click where you want to insert the picture. 2. Repeat steps 2-3 as above.3. Click From File… The Insert Picture dialog box will be displayed.4. Browse to the disk/folder where the image file is located.5. Double-click the picture you want to insert.
To insert a chart/graph:1. Click where you want to insert the chart. 2. Click Insert menu.3. Point to Picture.4. Click Chart. The datasheet dialog box and a chart (based on the data in the
datasheet box) will be displayed.
5. Select all data in the datsheet dialog box.6. Press Delete key. The contents of the chart will be deleted. The chart
frame/border will still be visible.7. Type in your data in the datasheet. As you type in the data the chart is
created.8. Click outside the chart. The datasheet dialog box will disappear.
Note that: If you close the datasheet you can reopen it by double-clicking the chart and
then clicking Datasheet on the View menu. You may need to re-open the datasheet dialog box to edit the chart data.
Selecting an Object
Objects can be selected by clicking on them. A selected object displays a border with eight small squares known as sizing handles.
To deselect an object, click outside the object. The border with the eight sizing handles will disappear.
46

ECDL Syllabus 5 Courseware Form 1
Resizing & Deleting an Object
You can resize an object using (a) the mouse or (b) the format picture/object dialog box.
To resize an object using the mouse:1. Click the object to resize. The border of the object will display eight small
squares known as sizing handles.2. Position the mouse pointer on anyone of the sizing handles.3. Drag the mouse to resize the object.
Note that: The diagonal sizing handles increase or decrease the size of the object without
changing its proportion. The middle sizing handles on the left and right of the box widen or narrow the image. The top and bottom sizing handles in the middle of the box make the graphic taller and shorter.
To resize a graphic to specific measurements use the format picture/object dialog box:1. Click the object to resize.2. Click Format menu.3. Click Picture… (if you clicked a picture or image) or Object… (if you clicked a
chart in step 1). The Format Picture or Format Object dialog box will be displayed.
4. Click Size tab.5. Adjust the Height: and Width: measurements under Size and rotate. 6. Click OK button.
Note that: Alternatively you can enter the height you want for the selected object as a
percentage of the original size under Scale. If the Lock aspect ratio check box is selected, the Height and Width settings
change in relation to one another.
47

To delete an object:1. Click the object to delete.2. Press Delete or Backspace key.
Activity 12
You will use Module 3 practice files.1. Start MS Word.2. Open the document fourth.doc located in Module 3 Exercises folder.3. Select all text in the document and apply justify alignment.4. Center the main title UNDER THE SUN.5. Apply right alignment to the sub-title Is Our World Warming?6. Insert a clip art related to the sun below the sub-title - Is Our World
Warming?7. Resize proportionally the inserted clip art such that its size will be about
3cm×3cm.8. Move the clip art inserted in step 2 below the sub-title text 1. NATURAL
GREENHOUSE.9. Insert the picture traffic.jpg located in Module 3 Exercises disk below the
sub-title text 2. CARBON CYCLE.10.Resize the inserted picture to: Height = 3cm Width = 5cm.11.Copy the picture inserted in step 5 below the sub-title text 3. HUMAN
INFLUENCES.12.Delete the picture inserted in step 5.
continued…13.Insert a chart on page 2 using the following data:
Month Sunny Hours hrs Rainfall in mmJanuary 5.5 90.1February 6.4 60.8March 7.4 44.7
14.Resize the chart to: Height = 9cm and Width = 13cm.15.Save and close the document. Close MS Word.
48

ECDL Syllabus 5 Courseware Form 1
Changing the Document Orientation & Paper Size
The orientation of a page can be either portrait or landscape. By default, MS Word will display the page in portrait layout. Use portrait orientation if you want the reader to hold the page with the short edge at the top; use landscape orientation if you want the reader to hold the page sideways with the long edge at the top.
To set the document orientation:1. Click File menu.2. Click Page Setup... The Page Setup dialog box will be displayed.3. Click Margins tab.4. Select Portrait or Landscape below Orientation.
5. Click OK button.
You can set the size of the paper:1. Click File menu.2. Click Page Setup... The Page Setup dialog box will be displayed.3. Click Paper tab.
4. Click one of the Paper sizes supported by your printer, or click Custom size and then enter the paper size dimensions in the Width and Height boxes.
5. Click OK button.
Changing the Page Margins
MS Word’s default setup assumes that you are working on a 21-by-29.7cm page with top and bottom margins of 2.54cm, left and right margins of 3.17cm. This is acceptable for a variety of documents. You can choose to alter these page settings at any time while you are working in a document.
To set page margins:1. Click File menu2. Click Page Setup...3. Click Margins tab.
49

4. Enter the appropriate measurements.5. Click OK button
Option To Do This
Top, Bottom, Left, Right
Set the width of these margins.
Gutter Sets the width of the extra space you want to add to the margin for binding.Gutter position
Position the gutter at the top, left, or right of a document.
Previewing a Document
1. Click Print Preview button. 2. Select any of the buttons in the toolbar (refer to the following table).3. Click Close button to return to the editing screen.
Select To Do This
Sends the document to the printer.
To zoom in and out of the text. Click the magnifier over the area to zoom in and click.Displays one page at a time in the Preview window.
To view a number of pages at a time. Click on this button. A drop-down box that contains page icons appears. Click and drag the mouse pointer over the number of pages to display on the screen.Allows you to increase or decrease the view of the page/s.
Displays a ruler proportional to the size of the page/s. The ruler is useful to change the margins.Shrinks your document to move a small portion of text that appears on the last page of the document to the previous page.Displays the page/s without any of the screen elements.
Closes the Preview Window.
Displays help on the style and formatting of the area selected.
50

ECDL Syllabus 5 Courseware Form 1
Printing a Document
To print a document you can click Print button on the Standard toolbar.
Doing the above prints one copy of the entire document to the printer. However, in some cases, you want to print only a couple of pages from your document or else more than one copy of your document.
1. Click File menu.2. Click Print... The Print dialog box will be displayed.
51

3. Choose any of the appropriate options. (Refer to the following table).4. Click OK button.
Select To Do This
Page Range All Prints the entire document.Current page
Prints the page where the insertion point is located.
Selection Prints the highlighted text.Pages Prints any pages which you select. Enter the page numbers to
print e.g. 3,7,9-12, 18 prints pages 3, 7, 9, 10, 11, 12 and 18.Copies Allows you to set the number of copies you want to print.Collate Copies Prints a complete range of pages before printing the next
copy. For example, if you are printing 2 copies of pages 1-3, Word prints one copy of each page before starting over and printing each of the three pages again to make the second copy of the set of pages.
Print What: Indicates what you want to print: Document, Summary, Info, Annotations etc.
Print: Prints all pages in range, odd pages or even pages.Print to File Prints the document to a file on disk. Word prompts you to
enter the name of the file.
Activity 13
You will use Module 3 practice files.1. Start MS Word.2. Open the document fifth.doc located in Module 3 Exercises folder.3. Change the page orientation of the entire document to portrait.4. Change the paper size of the document from Letter to A4.5. Adjust the top and bottom margins to 3.5cm.6. Adjust the left and right margins to 2.5cm.7. Switch to Print Preview.8. Adjust the preview display such that 2 pages are displayed at a time.9. Adjust the preview display such that 1 page is displayed at a time.10.Print two copies of the fifth.doc document.11.Save and close the document. Close MS Word.
52

ECDL Syllabus 5 Courseware Form 1
Module 4 Spreadsheets
Spreadsheet applications are computer programs that originated in the accounting world. These programs can be used for a wide variety of activities, but most applications of spreadsheets focus on generating numeric information from other numeric information. MS Excel is an example of a spreadsheet program.
MS Excel comes in a variety of versions. Over the years the program has been updated, making it more powerful and easier to use. These course notes are based on MS Excel 2003.
Opening MS Excel
1. Click Start button.2. Select All Programs.3. Click Microsoft Excel.
Features of the MS Excel Screen
MS Excel screen displays a grid of rectangles similar to a graph paper. This grid is known as a spreadsheet or worksheet - it is the primary document where you store and manipulate data.
A worksheet is made up of vertical lines called columns and horizontal lines called rows.
53

A group of worksheets make up a workbook or spreadsheet. By default, each MS Excel workbook or spreadsheet displays three worksheets, which are identified by tabs along the bottom of the screen – Sheet 1, Sheet 2, Sheet 3.
Worksheets are like pages in a book. The workbook/spreadsheet is the book containing these pages or worksheets.
Each column has a heading, consisting of one or two alphabet letters. Each row has a heading, consisting of a number.
The screen shows only a small portion of the whole worksheet. Every single worksheet is made up of 256 columns and 65,536 rows. The intersection of each column and row is a cell. The total number of cells in a worksheet is 16,777,216.
Each cell has a unique address known as its ‘cell reference’. A cell reference consists of:
the column heading the row heading(A, B, C…) (1, 2, 3…)
Examples of cell references include A1, F23, BC25 etc.
Note that: Cell references always start with the column heading and then the row heading. Cell references are not case sensitive i.e. you can use lowercase letters (a5) or
uppercase letters (A5).
54
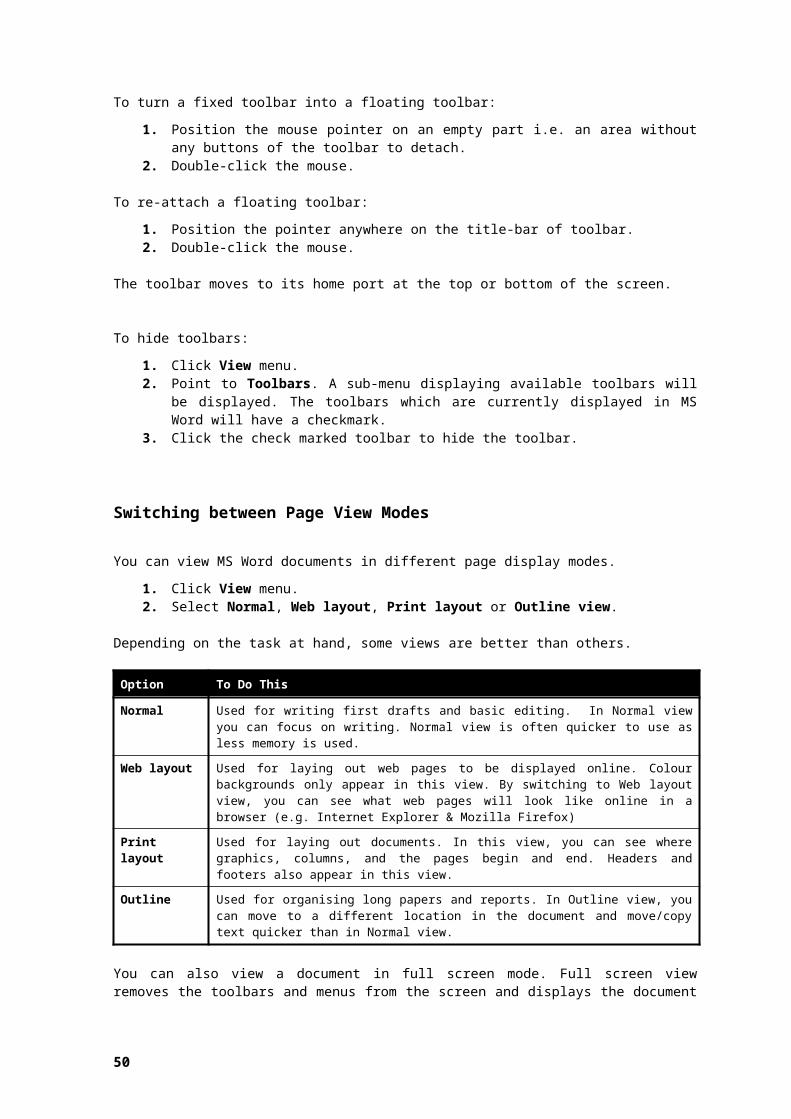
ECDL Syllabus 5 Courseware Form 1
Opening Existing Workbooks & Spreadsheets
1. Click Open button.
2. Click the drop-down arrow in the Look in: field and select the drive and/or folder that contain the workbook to open.
3. Double-click the workbook to open.
Note that: You can open a recently used workbook using the File menu. By default, the
File menu displays a list of 4 recently used workbooks. You can also open a recently used workbook using the New Workbook task
pane. In the Open a workbook section, click the name of the workbook to open. If the Task Pane is not visible, click View menu and Task Pane.
You can open an existing workbook using the shortcut key combination: CTRL+O keys.
To open other existing workbooks repeat steps 1-3.
Closing Workbooks & Spreadsheets
1. Save your work.2. Click File menu3. Click Close command.
Note that: You can close a workbook using the shortcut key combination: CTRL+F4 keys.
55
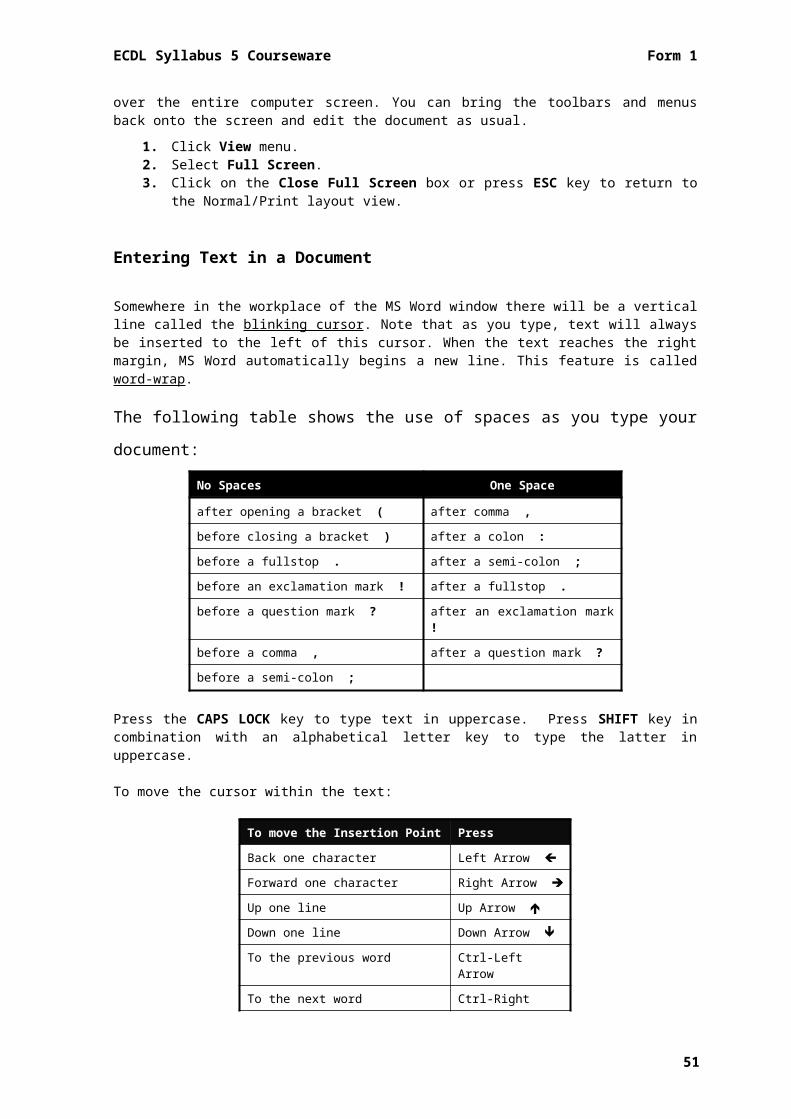
Closing MS Excel
1. Click File menu.2. Click Exit.
Note that: You can also close MS Excel using the shortcut key combination: ALT+F4 keys.
Creating a New Workbook & Spreadsheet
Every MS Excel workbook is based on a template. A template determines the basic structure for a workbook and contains the settings of the workbook such as fonts, page layout, special formatting, and styles.
By default, all new workbooks are created on a standard (or default) template called workbook.xlt. To open a new workbook based on the default template:
Click New button. A new file with empty cells will be opened.
Note that: You also open a new workbook based on the default
template using the New Workbook task pane. In the New section, click Blank Workbook.
You can also base a new workbook on other templates that are available in MS Excel or created by you.
1. In the New Document task pane, click General Templates… below New from template section. The Templates dialog box will be displayed.
2. Select the template tab card Spreadsheet Solutions.
3. Click the template within Spreadsheet Solutions in step 2 e.g. Balance Sheet
56

ECDL Syllabus 5 Courseware Form 1
4. Click OK button.
Note that: You can open a new workbook using the shortcut key combination: CTRL+N
keys.
Saving a Workbook & Spreadsheet
It is important to save your work from time to time whilst typing. When you save a workbook or spreadsheet for the first time, you need to give it a name. Workbook or spreadsheet names can have up to 255 characters including spaces. File names cannot include any of the following characters: forward slash (/), backslash (\), greater than sign (>), less than sign (<), asterisk (*), period (.), question mark (?), quotation mark ("), pipe symbol (|), colon (:), or semicolon (;).
To save a workbook or spreadsheet to a location or drive:1. Click Save button.
2. Click the drop-down arrow in the Save in: field and select the disk and/or folder where the workbook will be saved. By default, the file will be saved on Drive C: in My Documents folder.
3. Type a name for your workbook in the File name: field.4. Click Save button.
57

Note that: After you save a file for the first time, the filename appears in the title bar. When you save the file the second, third, fourth time etc. the computer will not
ask you to input all this information again but will only update the file with the changes made up to that moment.
You can save a workbook using the shortcut key combination: CTRL+S keys.
To save an open workbook or spreadsheet under another name:1. Click File menu.2. Click Save As… The Save As dialog box will be displayed.3. Repeat steps 2-4 as above.
Switching between Open Workbooks & Sheets
You can switch between two or more open workbooks by:1. Click Window menu.2. Click the name of the workbook to display.
Note that: You can also switch between open workbooks by clicking the workbook file
button on the task bar (running horizontally across the bottom of the MS Windows screen).
You can switch to another sheet within the same workbook by clicking on the appropriate tab at the bottom left of the spreadsheet screen.
Using Magnification & Zoom Tools
The zoom feature allows you to enlarge or reduce the view of a page on the screen. MS Excel offers two ways of zooming – the zoom tool on the standard toolbar and the zoom dialog box in the View menu.
1. Click Zoom control button.2. Select the appropriate option. At 100%, the letters and numbers
are the same size they will be when you print them. Below 100% they are smaller. Above 100%, they are bigger.
Note that: You can also type in any percentage value in the zoom textbox.
58

ECDL Syllabus 5 Courseware Form 1
Displaying & Hiding Built-in Toolbars
A toolbar is a row/column of buttons/icons. These buttons are used to perform tasks quickly without opening menus. By default, MS Excel displays two toolbars - the Standard toolbar and the Formatting toolbar – on a single row.
To display the Standard and Formatting toolbars on two separate rows:1. Click Tools menu.2. Click Customize…
3. In the Options tab card, tick the option Show Standard and Formatting Toolbars on two rows.
4. Click Close button.
To display additional toolbars:1. Click View menu.2. Select Toolbars.3. Click on the toolbar to display. The selected toolbar is displayed on the screen
Toolbars are not fixed to any part of the MS Excel screen – they can float. Accordingly, you can move toolbars to any part of the screen by dragging them.
To move a floating toolbar:1. Position the pointer anywhere on the title-bar of toolbar. 2. Drag the toolbar to any part of the screen.3. Release the mouse button when the toolbar is at the desired location.
59
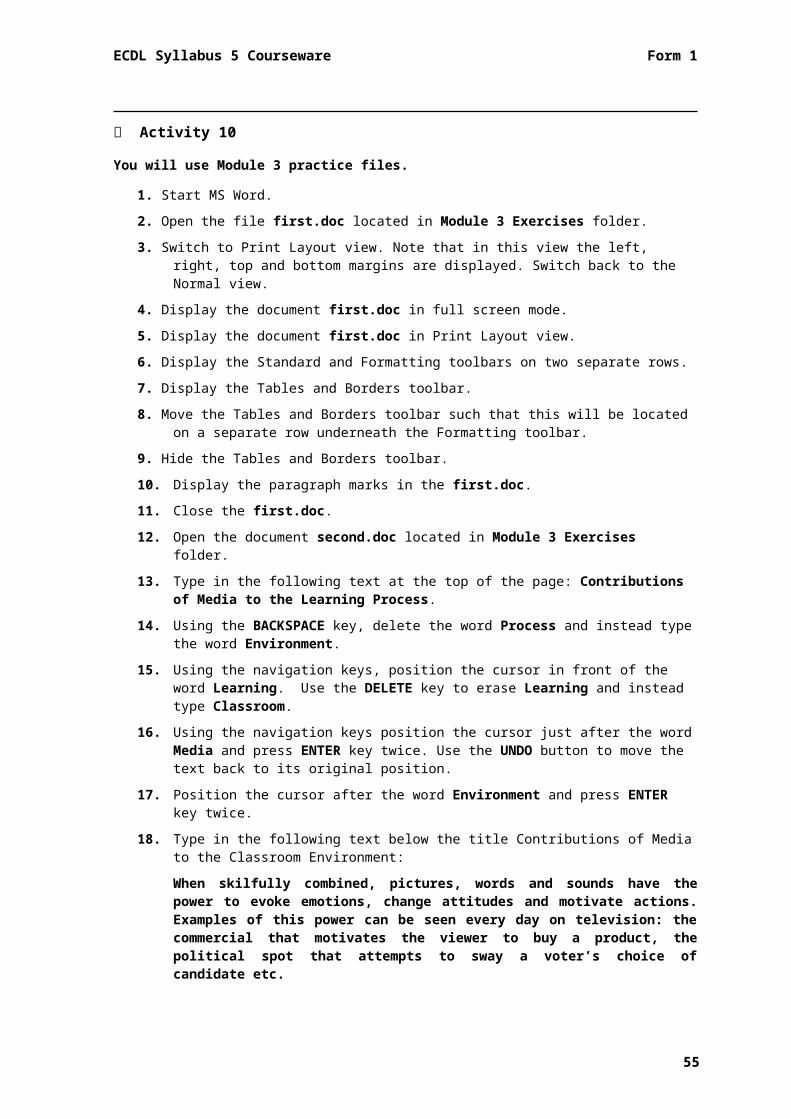
To turn a fixed toolbar into a floating toolbar:1. Position the mouse pointer on an empty part i.e. an area without any buttons
of the toolbar to detach.2. Double-click the mouse.
To re-attach a floating toolbar:1. Position the pointer anywhere on the title-bar of toolbar.2. Double-click the mouse.
The toolbar moves to its home port at the top or bottom of the screen.
To hide toolbars:1. Click View menu.2. Point to Toolbars. A sub-menu displaying available toolbars will be displayed.
The toolbars which are currently displayed in MS Excel will have a checkmark.3. Click the check marked toolbar to hide the toolbar.
Activity 14
You will use Module 4 practice files.1. Start MS Excel.2. Open the workbook first.xls located Module 4 Exercises folder.3. Open a new (blank) workbook.4. In cell A1 type your name.5. Save this workbook in Module 4 Exercises folder using the name myfile.xls.6. Switch to the workbook first.xls.7. Switch to English Results sheet.8. Switch back to Sheet 1.9. Switch back to the workbook myfile.xls.10.Open the file myfile.xls.11.Close MS Excel.12.Restart MS Excel and re-open the workbook first.xls located in Module 4
Exercises folder.13.Change the Zoom control from 100% to 200%.14.Change the Zoom control from 200% to 80%.15.Display the Standard and Formatting toolbars on two separate rows.16.Display the Formula Auditing toolbar.17.Move the Formula Auditing toolbar such that this will be located on a separate
row underneath the Formatting toolbar.18.Hide the Formula Auditing toolbar.19.Save and close the workbook. Close MS Excel.
Entering Data in Cells
Worksheet cells can hold three kinds of data: text, numbers and formulas.
60
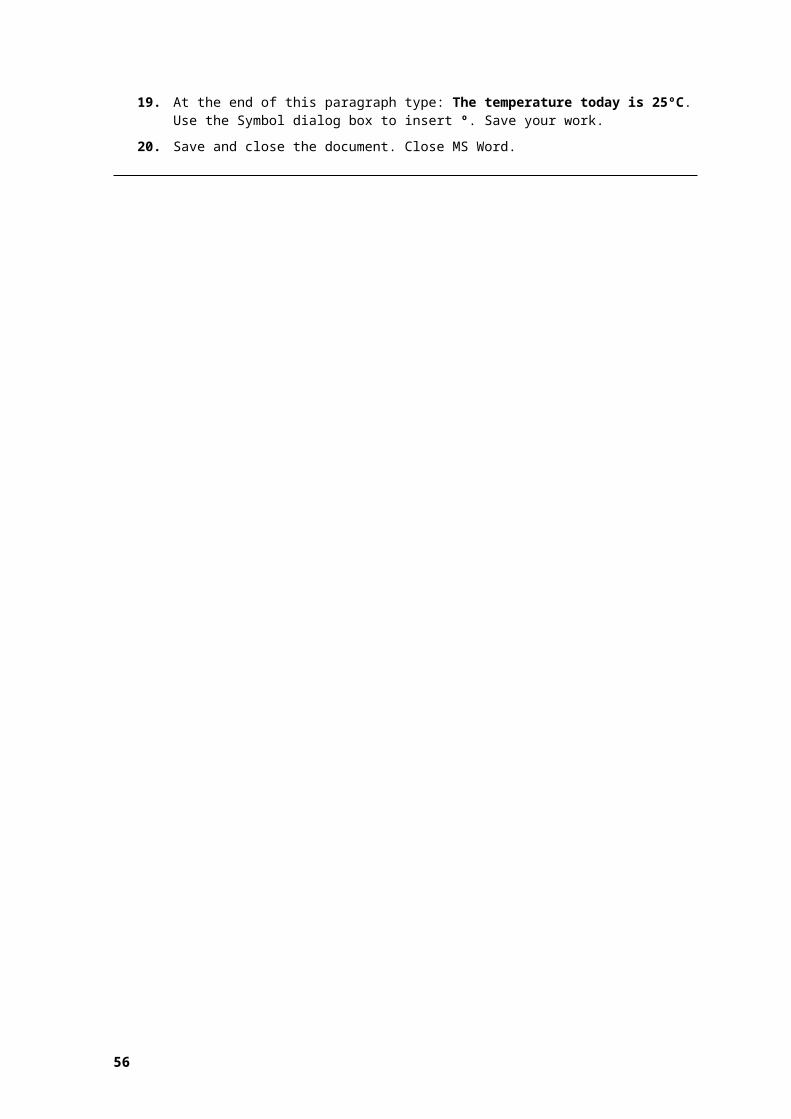
ECDL Syllabus 5 Courseware Form 1
Text entries - are labels such as December or Zebbug or text/number combinations such as birth dates etc.
Numeric entries - are numbers on which calculations will be performed. Formulas - are calculations involving two or more values (to be discussed later
on).
A cell in a worksheet should contain only one element of data, for example, first name detail in one cell and surname detail in the adjacent cell.
As a good practice when you create lists: avoid blank rows and columns in the main body of list insert blank row before Total row ensure that cells bordering the list are blank.
To enter a number, text or date in a cell:1. Click the cell where the data will be entered.2. The selected cell will show a thick border. Its reference will also be displayed
in the Name box (over the top left box of the worksheet). When you select a cell you make this active i.e. you can type in this cell.
3. Type the appropriate data.4. Press Enter key or click Enter button in the formula bar.
Note that: By default, text entries are aligned to the left
of cells and numeric entries are aligned to the right of cells.
Text entries are usually referred to as labels. Labels describe numeric data in a cell/s.
To enter dates use a slash or a hyphen to separate the parts of a date; for example, type 19/08/2002 or 19-Aug-2002.
To move from one cell to the next you press the arrow/cursor keys on the keyboard. You can also click on any cell to make this active.
You can move to column IV (the last column in the spreadsheet) by pressing CTRL+ keys. You can move to row 65,536 (the last row in the spreadsheet) by pressing CTRL+ keys. To return back to cell A1 – the home cell – press HOME key.
61

Selecting Cells
To select a single cell:Click the cell to select.
Note that: The thick border around the cell indicates that it is highlighted. Click anywhere outside the highlighted cell/area to switch off the highlighting.
A range of cells is a group of cells in a worksheet.
An adjacent cell range is a group of cells that are directly beside, above or below one another. Adjacent cells are sometimes referred to as contiguous cells.
To select an adjacent cell range:1. Click the first cell to select.2. Hold down the mouse button and drag through the remaining cells to select.
Note that: The first cell will also be included in the selection even though it is not shaded.
A non-adjacent cell range consists of group of cells that are not directly beside, above or below one another. Non-adjacent cells are sometimes referred to as non-contiguous cells.
To select a non-adjacent cell range:1. Select the first cell or range of cells to select.2. Press and hold the CTRL key and drag through another range of cells.
To select an entire worksheet:Click Select All button of the worksheet i.e. the shaded cell where row 1 meets the column A.
Selecting Rows
To select a single row:Click the heading of the row to select e.g. click 3 to select row 3.
Note that: The entire row of the spreadsheet will be highlighted. The leftmost cell will also
be included in the selection even though it is not shaded.
62
ECDL Syllabus 5 Courseware Form 1
To select a range of adjacent rows:1. Click the heading of the first row to select e.g. click row heading 3.2. Press and hold SHIFT key and click the heading of the last row to select e.g.
row heading 5.
Note that: Alternatively you can drag across the row headings of the rows to be selected.
To select a range of non-adjacent rows:1. Click the heading of the row to select e.g. click row heading 3.2. Press and hold CTRL key and click the heading of the row to select next row
e.g. row heading 5.
3. Repeat step 2 to select other rows.4. Release the mouse.5. Release CTRL key.
63
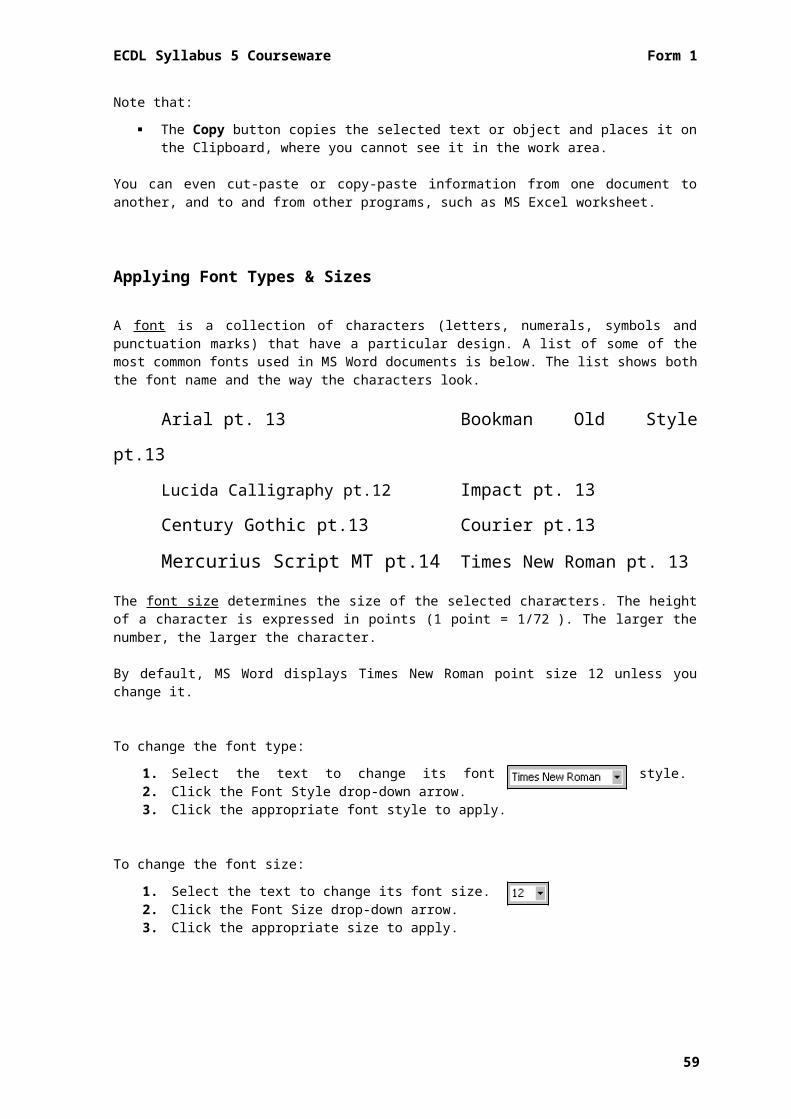
Selecting Columns
To select a single column:Click the heading of the column to select e.g. click column heading D.
Note that: The entire column of the spreadsheet will be selected. The topmost cell will also
be included in the selection even though it is not shaded.
To select a range of adjacent columns:1. Click the heading of the first column to select e.g. click column heading B.2. Press and hold SHIFT key and click the heading of the last column to select
e.g. column heading D.
Note that: Alternatively you can drag across the column headings of the columns to select.
To select a range of non-adjacent columns:1. Click the heading of the column to select e.g. click column heading A.2. Press and hold CTRL key and click the heading of the column to select next
column e.g. column heading C.
3. Repeat step 2 to select other columns.4. Release the mouse.5. Release CTRL key.
64
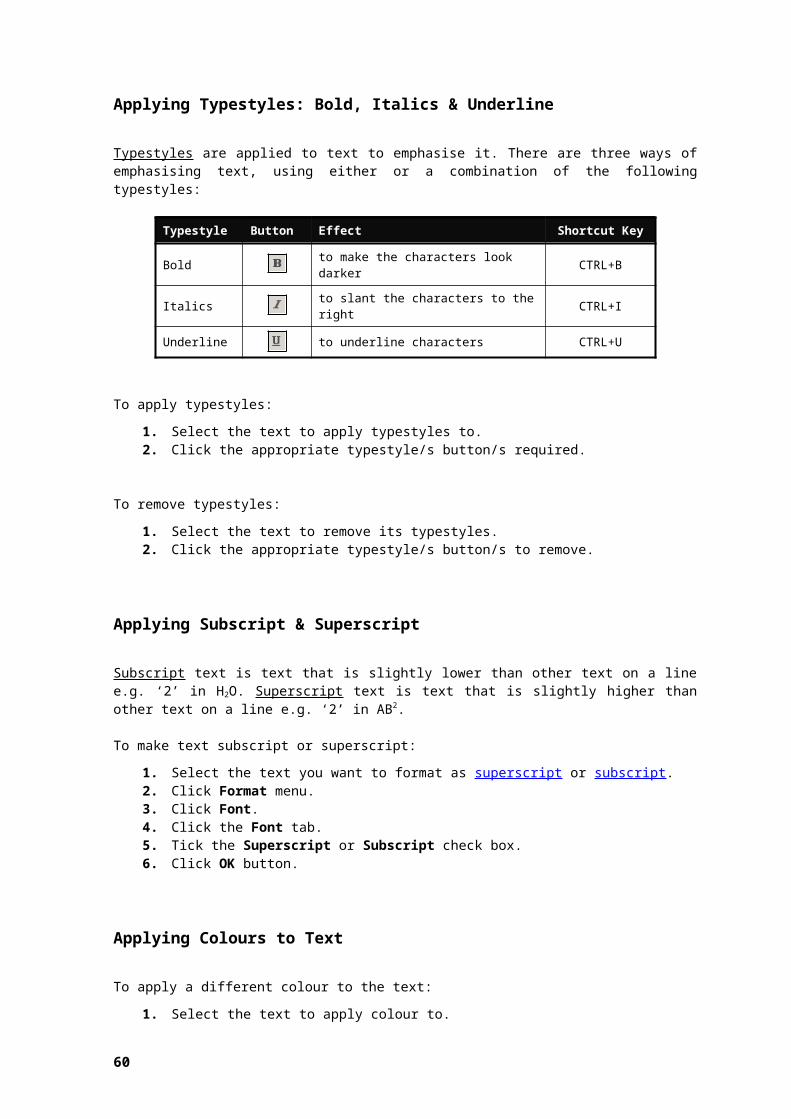
ECDL Syllabus 5 Courseware Form 1
Editing Cell Content
You can replace the content of a cell:1. Double-click the cell that contains the data to edit.2. Perform the necessary editing.
Note that: You can also edit the contents of a cell by clicking the cell and pressing F2 key.
Using Undo & Redo Command
MS Excel records all actions you performed since you opened the workbook during a session. All actions are stored in the Undo list. If you change your mind, you can tell MS Excel to ‘undo’ them.
Click Undo button to reverse your previous action/s.Click Redo button to undo your Undo action.
Note that: The Undo feature does not work once you close your workbook. Closing a
workbook removes all contents from the Undo list.
Deleting Cell Contents
To delete the contents of a cell:1. Select the cell to delete.2. Press DELETE key. The cell will be emptied.
Applying Font Types & Sizes
A font is a collection of characters (letters, numerals, symbols and punctuation marks) that have a particular design. The font size determines the size of the selected characters. The height of a character is expressed in points (1 point = 1/72”). The larger the number, the larger the character.
By default, MS Excel is set to use Arial font pt. 10. You can change the font style of the data:
1. Select the cells or specific data in a single cell to change its font style.2. Click the drop-down arrow of the Font box.3. Select the appropriate font style.
To change the font size of the data:1. Select the cells or specific data in a single cell to change its font size.2. Click the drop-down arrow of the Font Size box.3. Select the appropriate size.
65
Applying Typestyles: Bold, Italics, Underline & Double Underline
To apply typestyles:1. Select the cells or specific data in a single cell that you want to apply a
typestyle to.2. Click the appropriate typestyle/s button/s required
Typestyle Button Effect Shortcut Key
Bold to make the characters look darker CTRL+B
Italics to slant the characters to the right CTRL+I
Underline to underline characters CTRL+U
To apply double-underlining to data:1. Select the cells or specific data in a single cell that
you want to format.2. Click Format menu.3. Click Cells… The Format Cells dialog box will be
displayed.4. Click Font tab.5. Select Double below Underline:6. Click OK button.
Applying Colours to Cell Content & Background
You can change the colour of the text/numbers in a cell:1. Select the cells or specific data in a single cell that you want to format.2. Click the drop-down arrow of the Font Colour button.3. Select the appropriate colour.
You can apply a different colour (shading) to the cell background 1. Select the cell/s to add shading to.2. Click Format menu.3. Click Cells... The Format Cells dialog box will be displayed. 4. Click Patterns tab.5. Select the appropriate shading.6. Click OK button.
66

ECDL Syllabus 5 Courseware Form 1
Activity 15
You will use Module 4 practice files.1. Start MS Excel.2. Open a new workbook and save it as second.xls in Module 4 Exercises
folder.3. Enter the following data as shown below:
A B C D E
1 November Sales
2
3 Surname Name Minerals Beer Water
4 Bonnici Maria 58.72 63 65.1
5 Borg John 78 67.02 88.23
6 Vella Mary 75.54 89 99
4. Apply the font Times New Roman pt. size 13 to the entire spreadsheet.5. Apply bold typestyle to all text in column A.6. Apply italics typestyle to all text in row 3.7. Apply bold and italics to cell A1.8. In cell B3, edit Name to read FirstName.9. Undo the editing performed in the previous step.10.Redo the last action so that the content of cell B3 reads again FirstName.
continued…11.Delete the contents of cell C3.
67

12.Type in the text Soft drinks in cell C3.13.Apply grey cell shading to row 3.14.Save and close the workbook.15.Close MS Excel.
Moving & Copying Data
You can move the content of one or more cells from one location to another, either within a worksheet, between worksheets or to another workbook/spreadsheet file.
1. Select the cell/s to move.2. Click Cut button.3. Select the upper-left cell of the paste area - the cells you want the data to
move to - or select the entire paste area. You can click on a cell in a different sheet within the same workbook or open another workbook file.
4. Click Paste button.
You can copy the content of one or more cells from one location to another, either within a worksheet, between worksheets or to another workbook.
1. Highlight the cell/s to copy.2. Click Copy button. 3. Select the upper-left cell of the paste area - the cells you want the data to be
copied to - or select the entire paste area. You can click on a cell in a different sheet within the same workbook or open another workbook file.
4. Click Paste button.
Note that: When you click Copy button, MS Excel surrounds the selected cells with a
moving border and copies the data to the Clipboard. You can use ESC key to switch off the moving border.
Inserting & Deleting Rows or Columns
1. Select the entire row or column you want shifted to open space for the new row or column.
2. Click Insert menu.3. Click Rows or Columns.
Note that: To insert multiple rows or columns, extend the selection to include the same
number of rows or columns you want to insert.
68
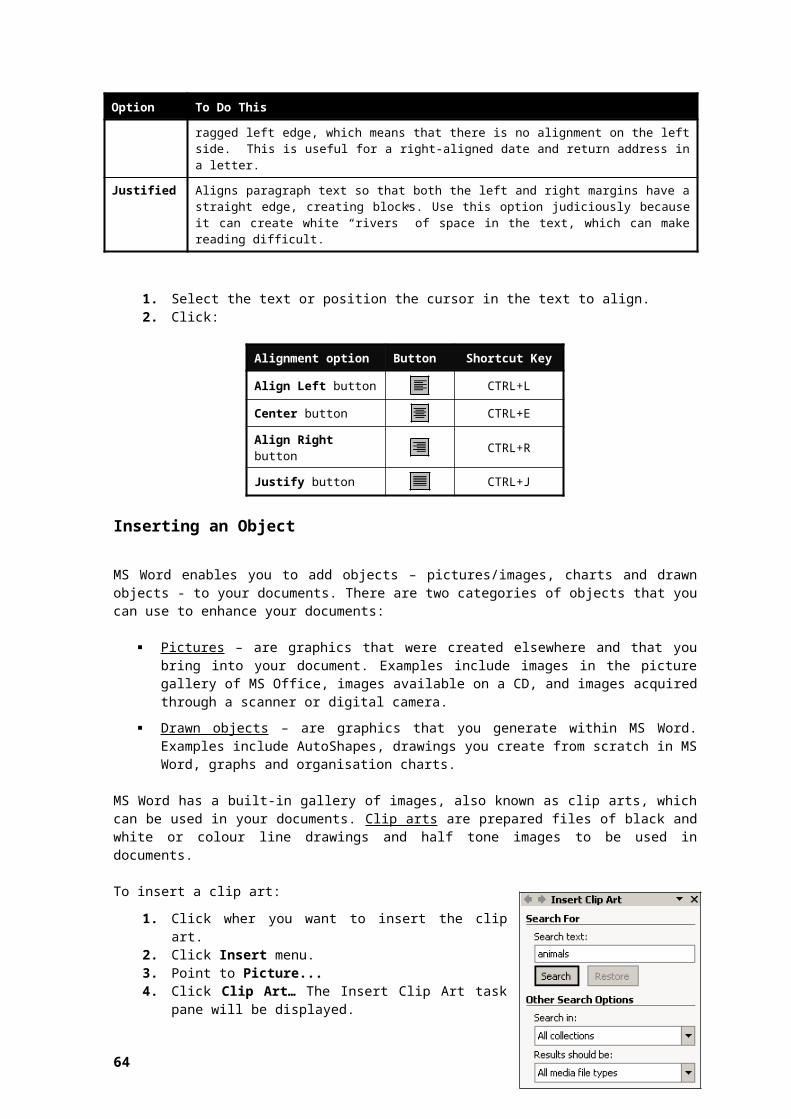
ECDL Syllabus 5 Courseware Form 1
To delete cells, rows or columns:
1. Select the cells, rows or columns to delete.2. Click Edit menu.3. Click Delete...4. Select the appropriate option.5. Click OK button.
Modifying Column Widths & Row Heights
Column widths can be changed to allow enough space for the data to fit in the cells of the column:
1. Position the mouse pointer over the right border of the column heading to adjust.
2. Drag the mouse.3. Release the mouse button to complete the
adjustment.
The same procedure can be used to adjust the row height but instead you use the row heading.
You can specify a value for the width of a column:1. Select the column/s to adjust its width. 2. Click Format menu.3. Point to Column.4. Click Width…5. Enter the width value.6. Click OK button.
You can specify a value for the height of a row:1. Select the row/s to adjust its width. 2. Click Format menu.3. Point to Row.4. Click Height…5. Enter the height value.6. Click OK button.
You can also adjust the width of a column according to the longest data entry in that column. This is also referred to as optimal width.
1. Select the column/s to adjust its width.2. Click Format menu.3. Point to Column.4. Click AutoFit Selection.
Note that: Alternatively you can double-click the right edge of the column heading. This
adjusts the column width according to the longest entry in that column.
You can also adjust the height of a row according to the data entry in that row:1. Select the row/s to adjust its height.
69

2. Click Format menu.3. Point to Row.4. Click AutoFit.
Note that: Alternatively you can double-click the bottom edge of the row heading.
Activity 16
You will use Module 4 practice files.1. Start MS Excel.2. Open the workbook second.xls in Module 4 Exercises folder.3. Insert a blank row between rows 5 and 6.4. Enter the text: Callus, Philip, 25.7, 32.4 and 46.9.5. Insert a blank column between columns B and C.6. Enter the text: Spirits, 45.6, 32.3, 47.2 and 50.5.7. Insert a blank row between rows 3 and row 4.8. Insert a blank column between columns C and D.9. Delete the blank row (i.e. row 4) and the blank column (i.e. column D) inserted
in steps 7 and 8.10.Adjust the width of column A such that this fits the longest entry in this column.11.Adjust the height of row 1 to size 25.12.Save and close the workbook.13.Open the workbook third.xls located in Module 4 Exercises folder.14.Move the contents of cells A1:B6 to cells H1:I6.15.Undo this command.16.Copy the contents of row 3 to row 7.17.Delete the row 7.18.Copy all data located in Sheet 1 to Sheet 2 in the same workbook.19.Save and close the workbook. Close MS Excel.
70
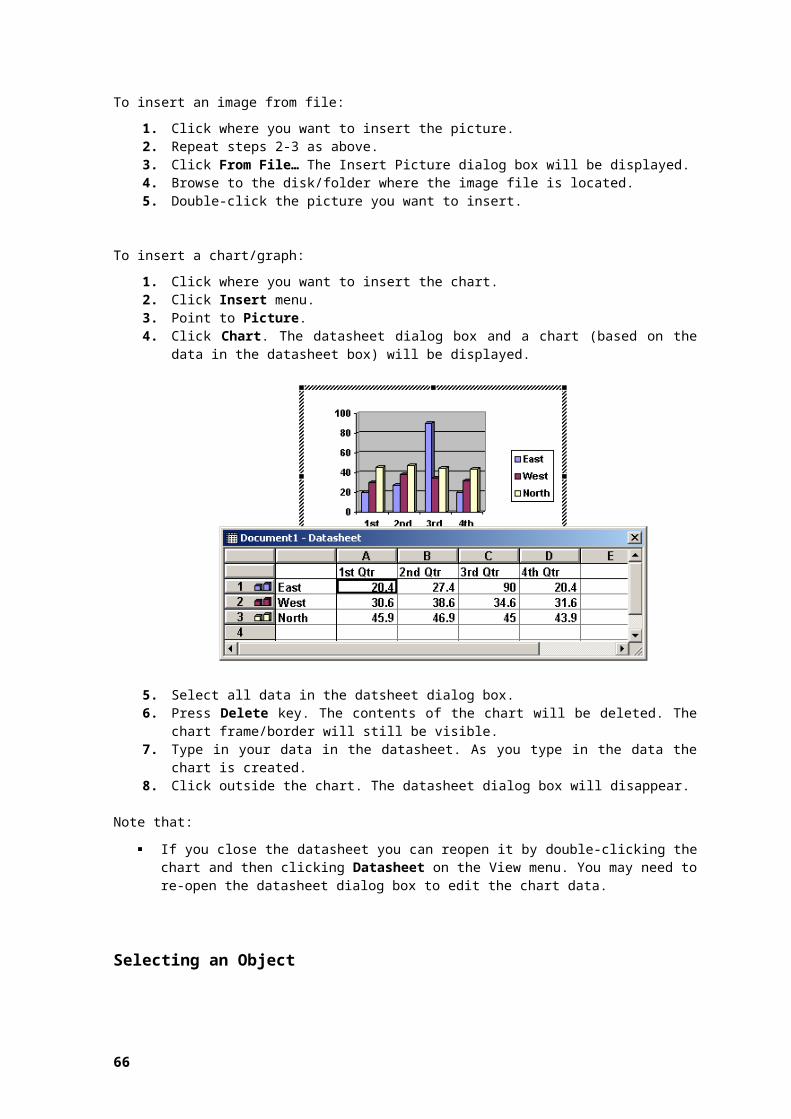
ECDL Syllabus 5 Courseware Form 1
Creating Formulae
Formulae allow you to perform calculations – addition, subtraction, multiplication and division - using values from any cell/s in a spreadsheet. You build formulae using the arithmetic operators:
The plus sign (+). The slash (/) for division.The minus sign (-). The asterisk (*) for multiplication.
There are some basic rules associated with formulae: A formula always begins with an equal (=) sign. Cells are referenced in a formula by their column-row identifier, i.e. A1, B2 etc. You do not have to enter capital letters in your formula; MS Excel will
automatically capitalize them for you. The symbols for addition, subtraction, multiplication, and division are: + - * / A formula cannot contain spaces. Always press Enter key to confirm your formula. The answer to the formula
displays in the cell into which the formula is entered.
Addition
Consider the following sheet:
A B C D1 Income2 Total Sales 4000 500034 Expenses5 Cost of Goods Sold 1500 18006 Advertising 300 3507 Rent 450 6508 Total Expenses9
10 Profit or Loss1112 Average Expenses1314 Tax Rate @8%15
1. Click the cell where the answer will be placed e.g. C82. Enter the formula: =C5+C6+C73. Press ENTER key.
Note that: The answer will be displayed in the cell where you entered the formula. You can still see the formula in the formula bar. The answer can also be worked out by typing =1500+300+450 in cell C8,
however, if one of the values in cell C5, C6 or C7 change, you will also need to change the number in cell C8 otherwise the answer will be wrong. Instead of numbers we use cell references in cell C8 so that the answer will be automatically updated when values change.
71

Subtraction
1. Click the cell where the answer will be placed e.g. C102. Enter the formula: =C2-C83. Press ENTER key.
Multiplication
1. Click the cell where the answer will be placed e.g. C142. Enter the formula: =C10*8%3. Press ENTER key.
Division
1. Click the cell where the answer will be placed e.g. C122. Enter the formula: =C8/33. Press ENTER key.
Identifying Formula Error Messages
Excel displays error messages when your formula/function cannot do the calculation. The following are some standard error messages associated with formulae:
Error Explanation##### The cell contains a number or calculation result that is too wide for the cell to
display. Adjust the column width to accommodate the result.#REF! Probably the formula contains a cell reference that points to an invalid cell (the
cell could have been deleted).#NAME? MS Excel does not recognise text contained within a formula.#DIV/0 The formula divides a number by zero or by a cell reference that points to a cell
containing a zero. The same message is displayed if you divide a number by a cell reference that points to an empty cell.
72

ECDL Syllabus 5 Courseware Form 1
Activity 17
You will use Module 4 practice files.1. Start MS Excel.2. Open a new blank workbook and save this workbook as fourth.xls in Module
4 Exercises folder.3. Type in the following data in Sheet1:
A B C D E F1 Jan-Mar Apr-Jun Jul-Sep Oct-Dec23 Income4 Total Sales 4000 5000 4800 430056 Expenses7 Cost of Goods Sold 1500 1800 1105 9878 Advertising 300 350 298 3109 Rent 450 650 389 250
10 Total Expenses1112 Profit or Loss1314 Average Expenses1516 Tax Rate @8%17
4. In cell C10 use a formula to add the contents of cells C7, C8 and C9.5. In cell D10 use a formula to add the contents of cells D7, D8 and D9.6. In cell E10 use a formula to add the contents of cells E7, E8 and E9.7. In cell F10 use a formula to add the contents of cells F7, F8 and F9.8. In cell C12 use a formula to subtract the contents of cell C10 from cell C4.9. In cell D12 use a formula to subtract the contents of cell D10 from cell D4.10.In cell E12 use a formula to subtract the contents of cell E10 from cell E4.11.In cell F12 use a formula to subtract the contents of cell F10 from cell F4.12.In cell C14 use a formula to divide the contents of cell C10 by 3.13.In cell D14 use a formula to divide the contents of cell D10 by 3.14.In cell E14 use a formula to divide the contents of cell E10 by 3.15.In cell F14 use a formula to divide the contents of cell F10 by 3.16.In cell C16 use a formula to multiply the contents of cell C12 by 8%.17.In cell D16 use a formula to multiply the contents of cell D12 by 8%.18.In cell E16 use a formula to multiply the contents of cell E12 by 8%.19.In cell F16 use a formula to multiply the contents of cell F12 by 8%.20.Save and close the workbook. Close MS Excel.
73

Changing Worksheet Margins
To change the top, bottom, left and right margins of a worksheet:1. Click File menu.2. Click Page Setup… The Page Setup dialog box will be displayed.3. Click Margins tab. 4. Enter the appropriate measurements in the Top: Bottom: Left: and Right:
fields.5. Click OK button.
Changing Worksheet Orientation & Paper Size
To change the orientation of the worksheet to portrait or landscape: 1. Click File menu.2. Click Page Setup… The Page Setup dialog box will be displayed.3. Click Page tab.4. Tick the option Portrait or Landscape below Orientation.5. Click OK button.
To change the paper size:1. Click File menu.2. Click Page Setup… The Page Setup dialog box will be displayed.3. Click Page tab.4. Select the appropriate option from the Paper size: drop down list.5. Click OK button.
74
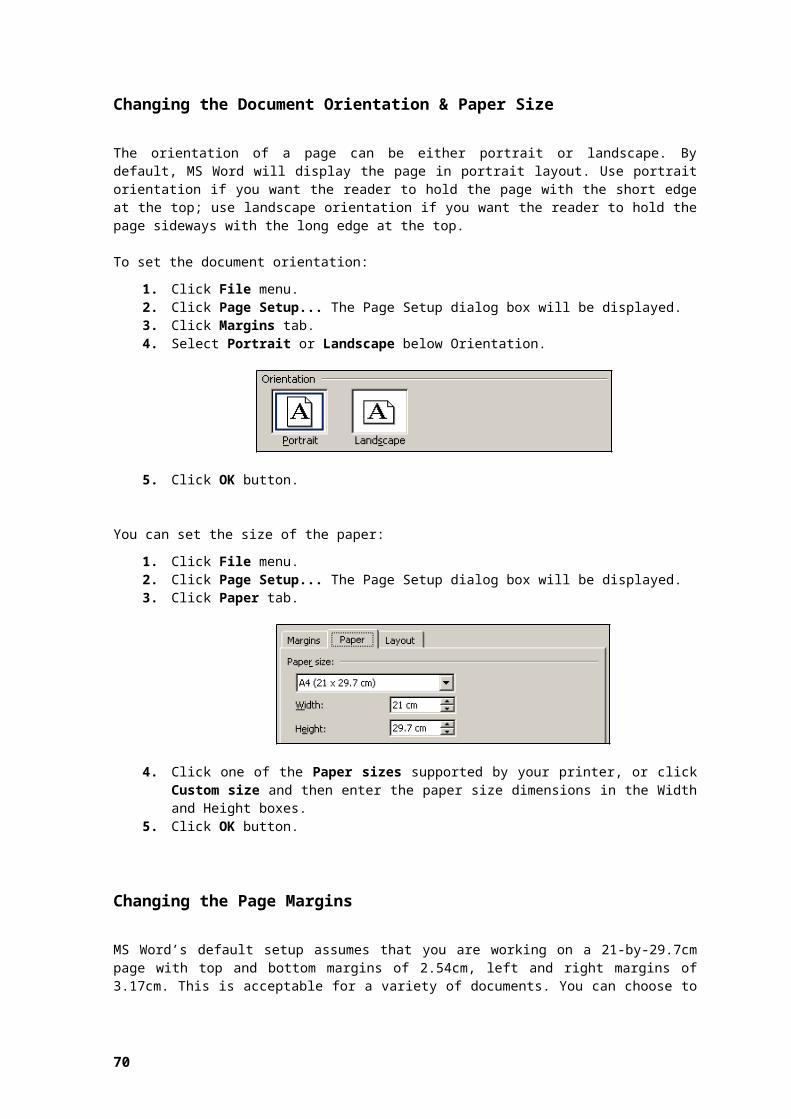
ECDL Syllabus 5 Courseware Form 1
Adjusting Page Setup to Fit Worksheet Contents
You can also adjust the page setup such that worksheet contents fit on a single page or on a specific number of pages:
1. Click File menu.2. Click Page Setup… The Page Setup dialog box will be displayed.3. Click Page tab.4. Select Fit to: check box.5. Type a number in the page(s) wide by box.6. Type a number in the tall box.7. Click OK button.
Note that: The Fit to: option reduces the worksheet or selection when you print so that it
fits on the specified number of pages. To fill the paper width and use as many pages as necessary, type 1 in the
pages(s) wide by box and leave the tall box blank.
Previewing a Worksheet
By previewing the worksheet, you can see each page exactly as it will be printed, with the correct margins and page breaks, and the headers and footers in place.
1. Click File menu.2. Click Print Preview.3. Click Close button to return to the editing screen.
Note that: You can click Print Preview button.
75

Turning On & Off Gridlines & Row & Column Headings
To turn on/off gridlines on printed sheet:1. Click File menu.2. Click Page Setup… The Page Setup dialog box will be displayed.3. Click Sheet tab.4. Tick the option Gridlines.5. Click OK button.
To turn on/off row and column headings on printed sheet:1. Repeat steps 1-3 as above.2. Tick the option Row and column headings.3. Click OK button.
Applying Automatic Title Row/s
To set automatic titles to print on every page of a printed worksheet:1. Click File menu.2. Click Page Setup… The Page Setup dialog box will be displayed.3. Click Sheet tab.
4. Select the appropriate collapse button (under Print titles) to print the same columns or rows as titles on every page of a printed worksheet.
5. Click the appropriate row or column.6. Click Expand button to display the Page Setup dialog box again.
76

ECDL Syllabus 5 Courseware Form 1
7. Click OK button.
Activity 18
You will use Module 4 practice files.1. Start MS Excel.2. Open the workbook fifth.xls in Module 4 Exercises folder.3. Apply the following page setup settings:
Orientation: PortraitMargins: Top 2.5, Bottom 2.5, Left 2.5 & Right 2.5Paper size: A4 210×297mm
4. Turn on the gridlines of the sheet for printing purposes.5. Display row and column headings of the sheet for printing purposes.6. Adjust the page setup such that worksheet contents fit on two pages.7. Set automatic titles to print on every page of a printed worksheet.8. Save and close the workbook. Close MS Excel.
77

Module 6 Presentation
Presentation software is a program designed for the production and display of computer text and graphics, usually for presentation to a group. It is intended primarily to replace the functions typically associated with a slide or an overhead projector. Besides presentation software, you will need additional hardware – the data projector – to project your presentations on a display surface (e.g. whiteboard, screen).
MS PowerPoint comes in a variety of versions. Over the years the program has been updated, making it more powerful and easier to use. These course notes are based on MS PowerPoint 2003.
Opening MS PowerPoint
1. Click Start button.2. Select All Programs.3. Click Microsoft PowerPoint.
78

ECDL Syllabus 5 Courseware Form 1
Features of the MS PowerPoint Screen
MS PowerPoint opens in the Normal view.
The title bar shows the name of the presentation. PowerPoint assigns your presentation a temporary name (e.g. Presentation1) until you save it with the name you choose.
The menu bar is used to choose all commands while working in PowerPoint. The toolbars provide quick access to some of PowerPoint’s commands without
having to use a pull-down menu. The slide pane displays a large view of the current slide. The notes pane is the area where you type notes that you want to accompany
a slide. The status bar, located at the bottom of the screen displays the slide number
and the name of the slide design.
Basic Terms
A presentation is a collection of slides, audience handouts, and speaker’s notes all in one file.
Slides are the individual ‘pages’ or overhead transparencies of the presentation. Slides can have titles, text, charts, drawn objects and clip arts. They can be presented on a screen or as black-and-white transparencies or as colour overhead transparencies or 35mm slides.
A Slide show is a group of slides organised in a specific order or with a specific choice of paths from one slide to the next.
Opening Existing Presentations
1. Click Open button.2. Click the drop-down arrow in the Look in: field and select the drive and/or
folder that contain the presentation to open.3. Double-click the presentation you want to open.
Note that: You can open a recently used presentation using the File menu. By default, the
File menu displays a list of 4 recently used presentations. You can also open a recently used presentation using the New Presentation
task pane. In the Open a presentation section, click the name of the presentation to open. If the Task Pane is not visible, click View menu and Task Pane.
You can open a presentation workbook using the shortcut key combination: CTRL+O keys.
To open other existing presentations repeat steps 1-3.
79
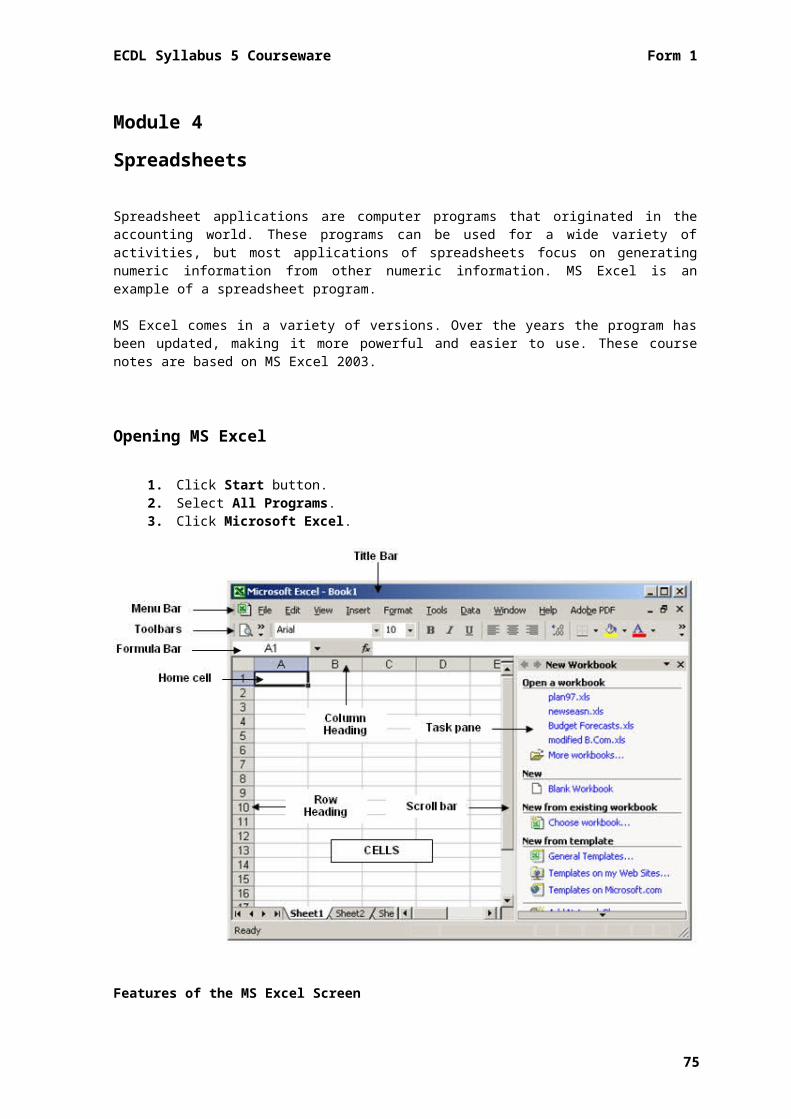
Closing a Presentation
1. Save your work.2. Click File menu3. Click Close command.
Note that: You can close a presentation using the shortcut key combination: CTRL+F4
keys.
Closing MS PowerPoint
1. Click File menu.2. Click Exit.
Note that: You can close MS PowerPoint using the shortcut key combination: ALT+F4
keys.
80

ECDL Syllabus 5 Courseware Form 1
Creating a New Presentation
By default all new presentations are created on a standard (or default) template:Click New button.
Note that: You also open a new presentation based on the default
template using the New Presentation task pane. In the New section, click Blank Presentation.
You can open a new workbook using the shortcut key combination: CTRL+N keys.
Saving a Presentation
It is important to save your work from time to time whilst typing. When you save a presentation for the first time, you need to give it a name. Presentation names can have up to 255 characters including spaces. File names cannot include any of the following characters: forward slash (/), backslash (\), greater than sign (>), less than sign (<), asterisk (*), period (.), question mark (?), quotation mark ("), pipe symbol (|), colon (:), or semicolon (;).
To save a presentation to a location or drive:1. Click Save button.
2. Click the drop-down arrow in the Save in: field and select the disk and/or folder where the presentation will be saved. By default, the file will be saved on Drive C: in the My Documents folder.
3. Type a name for your presentation in the File name: field.4. Click Save button.
81

Note that: After you save a file for the first time, the filename appears in the title bar. When you save the file the second, third, fourth time etc. the computer will not
ask you to input all this information again but will only update the file with the changes made up to that moment.
You can save a presentation using the shortcut key combination: CTRL+S keys.
To save an open presentation under another name:1. Click File menu.2. Click Save As… The Save As dialog box will be displayed.3. Repeat steps 2-4 as above.
Using Magnification & Zoom Tools
The zoom feature allows you to enlarge or reduce the view of a page on the screen. MS PowerPoint offers two ways of zooming – the zoom tool on the standard toolbar and the zoom dialog box in the View menu.
1. Click Zoom control button.2. Select the appropriate option. At 100%, the text and images are
the same size they will be when you print them. Below 100% they are smaller. Above 100%, they are bigger.
Note that: You can also type in any percentage value in the zoom textbox.
Displaying & Hiding Built-in Toolbars
A toolbar is a row/column of buttons/icons. These buttons are used to accomplish tasks quickly without opening menus. By default, MS PowerPoint displays three toolbars - the Standard, Formatting and Drawing toolbars. The Standard and Formatting toolbars are displayed on a single row.
To display the Standard and Formatting toolbars on two separate rows:1. Click Tools menu.2. Click Customize… The Customize dialog box will be displayed.3. In the Options tab card, tick the option Show Standard and Formatting
Toolbars on two rows.4. Click Close button.
82

ECDL Syllabus 5 Courseware Form 1
To display additional toolbars:1. Click View menu.2. Select Toolbars.3. Click on the toolbar to put one display. The selected toolbar is displayed on
the screen
Toolbars are not fixed to any part of the MS PowerPoint screen – they can float. Accordingly, you can move toolbars to any part of the screen by dragging them.
To move a floating toolbar:1. Position the pointer anywhere on the title-bar of toolbar. 2. Drag the toolbar to any part of the screen.3. Release the mouse button when the toolbar is at the desired location.
To turn a fixed toolbar into a floating toolbar:1. Position the mouse pointer on an empty part i.e. an area without any buttons
of the toolbar to detach.2. Double-click the mouse.
To re-attach a floating toolbar:1. Position the pointer anywhere on the title-bar of toolbar.2. Double-click the mouse.
The toolbar moves to its home port at the top or bottom of the screen.
83
To hide a toolbar:1. Click View menu.2. Point to Toolbars. A sub-menu displaying available toolbars will be displayed.
The toolbars which are currently displayed in MS PowerPoint will have a check mark.
3. Click the check marked toolbar to hide the toolbar.
Activity 19
You will use Module 6 practice files.1. Start MS PowerPoint.2. Open the file first.ppt located in Module 6 Exercises folder.3. Open a new (blank) presentation.4. Type the text as shown below:
5. Save this presentation in Module 6 Exercises folder using the name myfile.ppt.
6. Switch to the presentation first.ppt.7. Switch back to the presentation myfile.ppt.8. Close the presentation myfile.ppt.9. Close first.ppt.10.Close MS PowerPoint.11.Restart MS PowerPoint and open the document first.ppt.12.Set the magnification of the slide pane to 100%.13.Lower the magnification of the slide pane to 80%.14.Set the magnification such that the entire slide fits in the screen.15.Display the Standard and Formatting toolbars on two separate rows.16.Display the Tables and Borders toolbar.17.Move the Tables and Borders toolbar such that this will be located on a
separate row underneath the Formatting toolbar.continued…
18.Hide the Tables and Borders toolbar.19.Save and close first.ppt. Close MS PowerPoint.
84
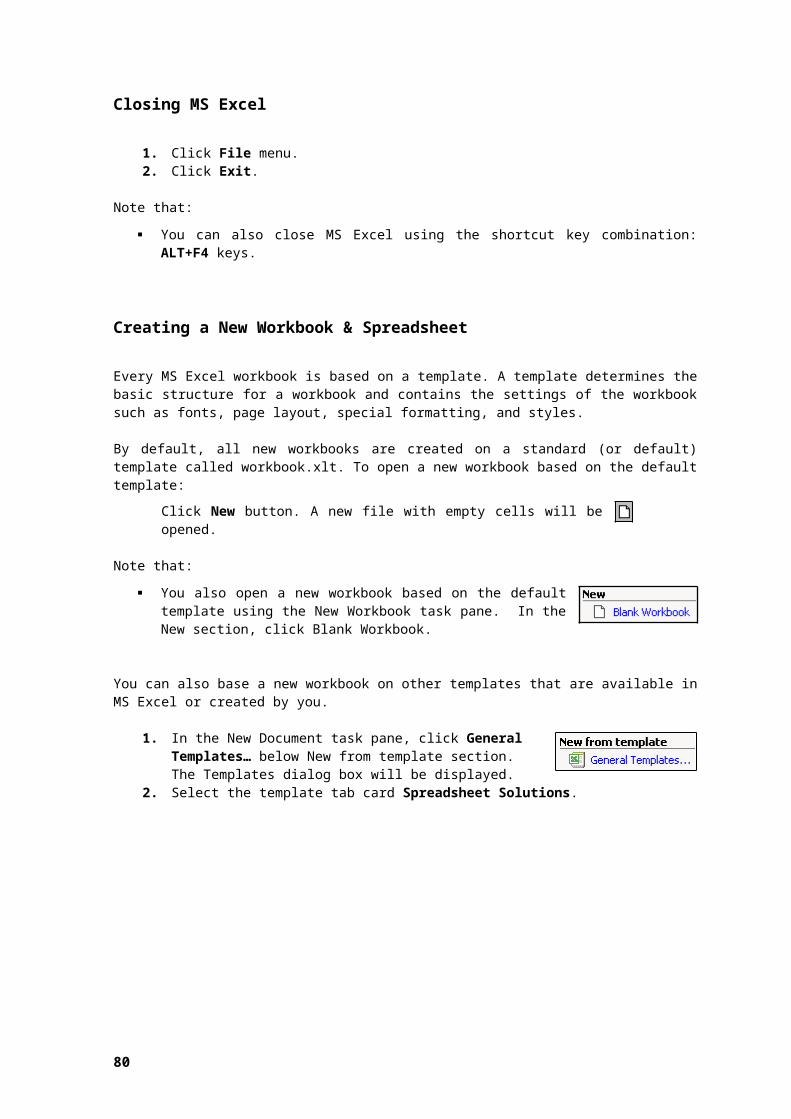
ECDL Syllabus 5 Courseware Form 1
Changing between Presentation View Modes
You can view PowerPoint Presentations in different page display modes.1. Click View menu.2. Select Normal, Slide Sorter, Notes Pages or Slide Show view.
Depending on the task at hand, some views are better than others.
Option To Do This
Normal Contains three panes: the outline pane, the slide pane, and the notes pane. These panes let you work on all aspects of your presentation in one place. You can adjust the size of the different panes by dragging the pane borders.
Slide Sorter Displays a miniature version of all the slides in your presentation. You can use this to check the consistency of the layout and colour scheme. You change the order of slides, delete slides, add timings, and select animated transitions for moving from slide to slide.
Notes Pages Used to add the speaker’s or presenter’s notes or information to be shared with the audience.
Slide Show Used to view slides full-screen (without any menu bars), exactly as they would appear projected. To exit from Slide Show view, press the ESC key.
Note that: You can also switch to different views using the view buttons at the bottom left
corner of the PowerPoint screen:
Inserting a New Slide
Each time you insert a new slide you will choose a speicific layout depending on the content of the slide. Layout refers to the way content is arranged in a slide. A layout contains placeholders, which in turn hold text such as titles and bulleted lists and slide content such as tables, charts, pictures, shapes, and clip art.
By default the Title Slide layout will be displayed when you open a new presentation file. This layout contains two placeholders – the main title and the subtitle placeholder.
85
Slide SorterView
Normal View Slide Show
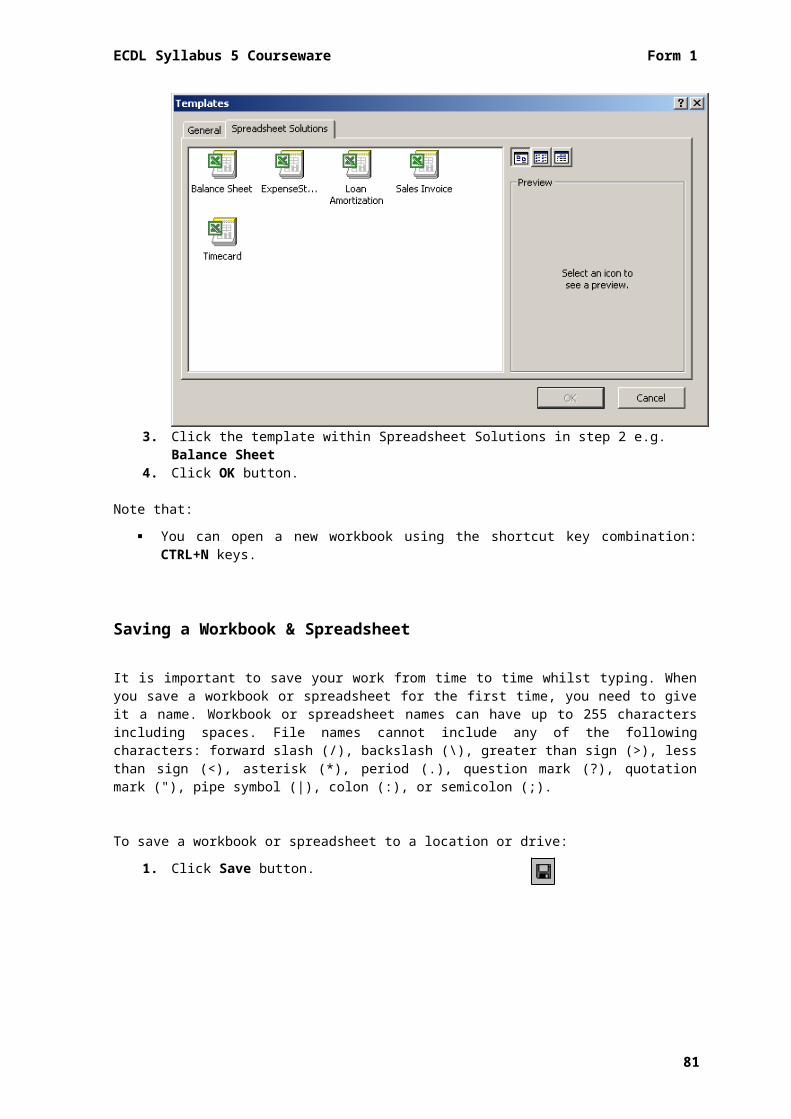
To insert a new blank slide, do either of the following: 1. On the Formatting toolbar, click New Slide button. 2. In the Slide Layout task pane, click the layout you want.
Note that: If the insertion point is in the Outline or Slides tab,
you can insert a new slide, by pressing Enter key. You can also insert a new slide from the Slide Layout
task pane: point to a layout, click the arrow, and then click Insert New Slide.
If you want to keep the Slide Layout task pane from displaying each time you click New Slide clear the Show when inserting new slides check box at the bottom of the pane.
Changing a Built-in Slide Layout
During this course you will be using the different built-in slide layouts:
Title Slide Title & Text Title & 2 Column Text
Title Only
Title & Chart Title & Table Text & Clip art Organisation Chart
To choose a different built-in slide layout:1. Click Format menu.2. Click Slide Layout…The Slide Layout task pane will be displayed.3. On the Slides tab in normal view, select the slide/s you want to apply a layout
to.4. In the Slide Layout task pane, point to the layout you want, and then click it.
Note that: If you skip step 3, the formatting will be applied to the current slide.
86

ECDL Syllabus 5 Courseware Form 1
Applying a Design Template
You don’t need to be a professional graphic designer to enhance the presentation of your slides. MS PowerPoint comes with many artist-created templates. A template is a presentation in which the masters and the colours have been especially designed for a particular ‘look’. Templates define what your text will look like and where it will appear, and they offer a complete colour scheme.
Using the Slide Design task pane, you can preview and apply a design template to your presentation. The template can be applied to all slides or selected slides, and you can apply more than one type of design template in a single presentation.
To apply a design template to a presentation:1. Click Slide Design button on the Formatting toolbar. The Slide
Design task pane will be displayed.2. Click Design Templates in the Slide Design task pane.3. Click the template you want to apply to all the slides.
Note that: To apply a template to a single slide, select the thumbnail on the Slides tab; in
the task pane, point to the template and click the arrow, and then click Apply to Selected Slides.
To apply a template to multiple selected slides, select the thumbnails on the Slides tab, and in the task pane, click the template.
The design templates you have applied appear below the Recently Used list in the Slide Design. All available design templates appear under Available for use.
To change between available templates repeat steps 1-3 as above.
Adding, Editing & Deleting Text in a Slide
To add or edit text in a slide:1. Click in a text placeholder. Sizing handles will be displayed at the edges of the
placeholder.2. Type in or edit text as necessary.3. Click outside the placeholder to deselect it.
Note that: If your text exceeds the size of the placeholder, MS PowerPoint reduces the
font size and line spacing incrementally as you type, to make the text fit.
You can also insert text in the Outline view:1. In the Normal view, click the Outline tab.2. Position the pointer at the appropriate
location and add/edit text as necessary.
87
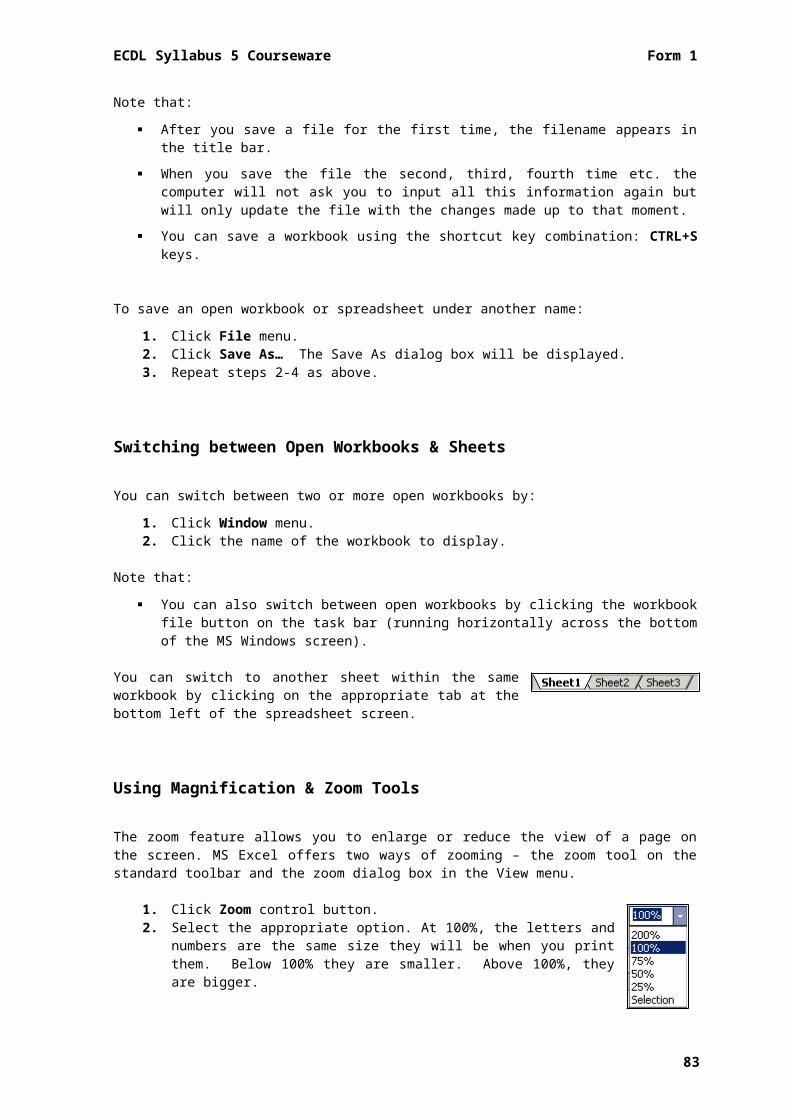
Note that: As a good practice you should avoid long sentences or paragraphs in a slide.
Keep your text short (concise). Use bullet points and numbered lists for your text as appropriate.
To delete text:1. Select the text to delete.2. Press DELETE key.
Copying & Moving Slides
You can copy an entire slide within the same presentation file:
1. Click View menu.2. Click Slide Sorter.3. Click the slide to copy. A blue frame will be displayed around the selected
slide.4. Click Copy button.5. Click at the location where the slide will be copied.6. Click Paste button.
Note that: You can also switch to the Slide Sorter View by clicking the Slide Sorter
View button.
You can also copy a slide to a different presentation file:1. Repeat steps 1-4 as for above.2. Open the other presentation file.3. Switch to Slide Sorter view by clicking Slide Sorter View button.4. Repeat steps 5-6 as above.
You can move or re-order slides in a presentation.1. Switch to Slide Sorter view by clicking Slide Sorter View button.2. Click the slide to move.3. Drag the slide to the new position.
You can move slides to another presentation file:1. In the first presentation file, switch to Slide Sorter view by clicking Slide
Sorter View button.2. Right-click the slide to move.3. Click Cut button.4. In the second presentation file, switch to Slide Sorter view and click at the
location where the slide will be copied.5. Click Paste button.
88

ECDL Syllabus 5 Courseware Form 1
Note that: If you want to select more than one slide, click on the first slide, press and
hold CTRL key and click on the next slide/s.
Deleting Slide/s
1. On the Outline tab or Slides tab in normal view, select the slide/s you want to delete.
2. Click the Edit menu.3. Click Delete Slide.
Note that: If you want to select slides in order, press and hold SHIFT key as you click. If you want to select slides that are not in order, press and hold CTRL key as
you click. Instead of step 2 and 3 above, you can press the DELETE key to delete slides.
Using Undo & Redo Command
There are different types of actions that you can undo: actions you make yourself, such as typing a word, or actions that MS PowerPoint makes automatically using the AutoCorrect feature, such as automatically capitalizing the first letter of a sentence.
To undo or redo your most recent actions:On the Standard toolbar, click Undo or Redo button. This will undo or redo the last action.
Note that: To undo or redo your most recent action (or actions), click the arrow next to
Undo or Redo, select the actions you want to undo or redo, and click.
Moving & Copying Data
You can move text or graphics from one slide to another within the same presentation:1. Select the text or image to move.2. Click Cut button.3. Move to the slide where the text or graphic will be inserted.4. Click in the appropriate text or graphic placeholder.5. Click Paste button.
You can also move text or images from one slide to another in a different presentation file:
1. Repeat steps 1-2 as for above.2. Open the other presentation file.3. Repeat steps 3-5 as above.
You can copy text or graphic from one slide to another within the same presentation:1. Select the text or graphic to copy.2. Click Copy button.
89
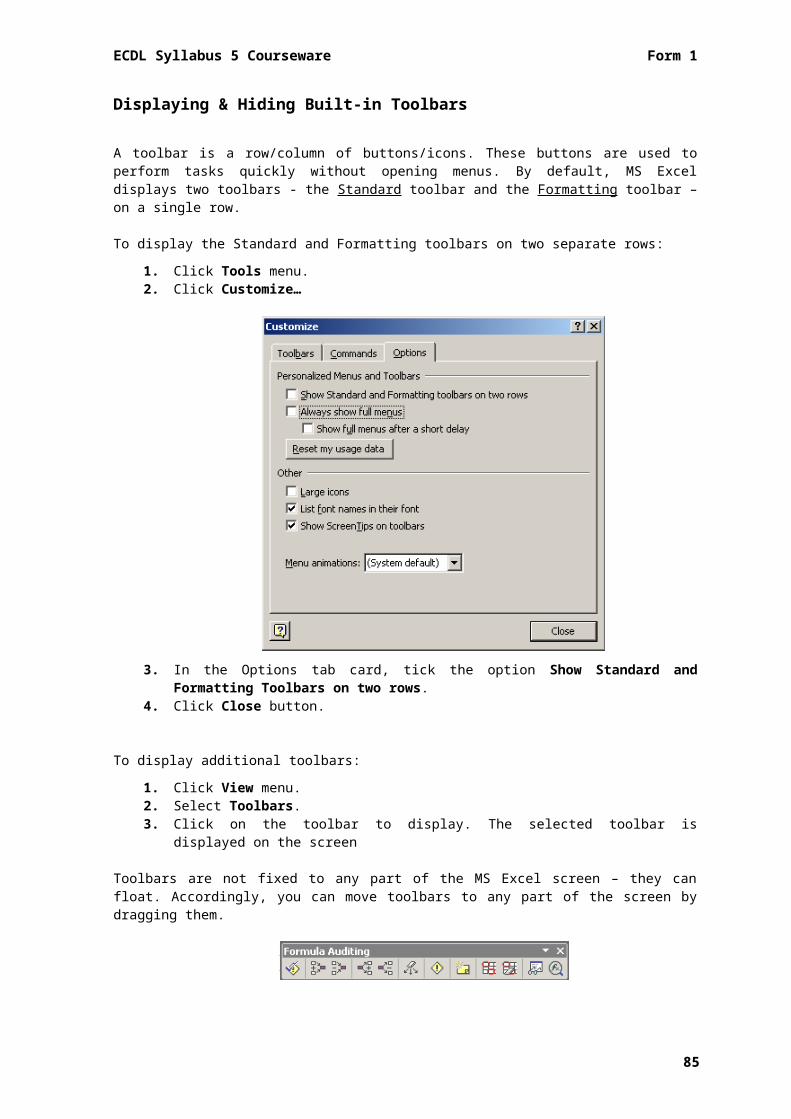
3. Move to the slide where the text or graphic will be inserted.4. Click in the appropriate text or graphic placeholder.5. Click Paste button.
You can also copy text or graphics from one slide to another in a different presentation file:
1. Repeat steps 1-2 as for above.2. Open the other presentation file.3. Repeat steps 3-5 as above.
Activity 20
You will use Module 6 practice files.1. Start MS PowerPoint.2. Open the file second.ppt located in Module 6 Exercises folder.3. Switch to Slide Sorter View.4. Preview your slides in Normal View.5. Apply the Title Slide layout to slide 1.6. Apply the Title, Clip Art and Text layout to slide 4.7. Apply the Glass Layers.pot design template to the presentation.8. Change the design template to Balloons.pot.9. Insert a new slide between slide 3 and 4. Use Title and Text layout.10.Type in the following:
11.In slide 5 edit the title Quality of Scanner to Resolution & Sharpness.12.In slide 5 delete the sentence Interpolation… of an image.13.Delete slide 5.14.Undo the previous action.
continued…
15.Insert a new slide after slide 4. Use Title and Text layout.16.Copy the text Image Transfer (in slide 4) to slide 5.
90

ECDL Syllabus 5 Courseware Form 1
17.Move the last two sentences starting with Universal Serial Bus (USB) and FireWire to slide 5.
18.Save and close second.ppt. Close MS PowerPoint.
Applying Font Types & Sizes
A font is a collection of characters (letters, numerals, symbols and punctuation marks) that have a particular design. The font size determines the size of the selected characters. The height of a character is expressed in points (1 point = 1/72”). The larger the number, the larger the character.
To change the font style of text:1. Select the text or the placeholder containing the text you want to change its
font style. 2. Click the Font Style drop-down arrow.3. Click the appropriate font style to apply.
Note that: To change the font for all the text in a placeholder, either drag to select all the
text, or select the placeholder containing the text. To select the placeholder, first click the text. The placeholder border becomes hatchmarked. Point to the border and click. The border changes to a thick, dotted border, and it's now selected.
To change the font size:1. Select the text or the placeholder containing the text you want to change its
font size. 2. Click the Font Size drop-down arrow. 3. Click the appropriate size to apply.
Note that: You can also increase the font size using the Increase Font Size button.
You can decrease the font size using the Decrease Font Size button.
91
Applying Typestyles: Bold, Italics, Underline & Shadow
Typestyles are applied to text to emphasise it. There are several ways of emphasising text, using either or a combination of the following typestyles:
Typestyle Button Effect Shortcut Key
Bold to make the characters look darker CTRL+B
Italics to slant the characters to the right CTRL+I
Underline to underline characters CTRL+U
Shadow to apply a shadow effect to characters n/a
To apply typestyles:1. Select the text or the placeholder containing the text you want to apply
typestyles to. 2. Click the appropriate typestyle/s button/s required.
To remove typestyles from text:1. Select the text or the placeholder containing the text you want to remove its
typestyles.2. Click the appropriate typestyle/s button/s to remove.
Applying Colours to Text
To apply a different colour to text:1. Select the text or the placeholder containing the text you want to apply colour
to. 2. Click Font Colour button drop-down arrow on the Formatting toolbar.
Applying Case Changes to Text
You can change the case of a text to uppercase, lower case, title case, sentence case etc.
1. Select the text or the placeholder containing the text you want to change its case.
2. Click Format menu.3. Click Change Case… 4. Click the appropriate case option.5. Click OK button.
Option To Do This
Sentence case. Capitalises the first letter of the first word in the selected sentences.
92

ECDL Syllabus 5 Courseware Form 1
lowercase Changes all selected text to lowercase letters.UPPERCASE Changes all selected text to capital letters.Title Case Capitalises the first letter of each word in the selection.tOGGLE cASE Changes all uppercase letters to lowercase in the selection and vice versa.
Aligning Text
This facility is important to change the position of text in relation to the left and right edges of the placeholder.
There are four different alignment options:
This is left-aligned text.This is centered text.
This is right-aligned text.
This is justified text. If this text is on a line that is shorter than the paragraph width, it will remain aligned left.
Option To Do This
Align Left Aligns each line of the paragraph with the left edge of the placeholder, leaving a ragged right edge which means that there is no alignment on the right side.
Center Aligns each line of the paragraph between the left and right edges of the placeholder.
Align Right
Aligns each line of the paragraph with the right edge of the placeholder leaving a ragged left edge, which means that there is no alignment on the left side.
Justify Aligns paragraph text so that both the left and right margins have a straight edge, creating blocks.
1. Select the text or the placeholder containing the text you want to align. 2. Click:
Alignment option Button Shortcut Key
Align Left button CTRL+L
Center button CTRL+E
Align Right button CTRL+R
Justify button CTRL+J
Note that: The Justify button can be accessed through the Alignment option in the
Format menu.
Running the Slide Show
In Slide Show view, you see your slides as an electronic presentation on your computer. Each slide fills the screen.
93

You can start a slide show so that the entire presentation will be displayed starting from the first slide:
1. Click Slide Show menu. 2. Click View Show.
Note that: To start a slide show on the current slide click Slide show (from current
slide) button.
During the Slide Show you can navigate from one slide to the next or to a specific slide as indicated here:
To Do ThisAdvance to the next slide. Mouse click, SPACEBAR, N, RIGHT ARROW, DOWN ARROW
or PAGE DOWN.Return to the previous slide.
Right click mouse, BACKSPACE, P, LEFT ARROW, UP ARROW or PAGE UP.
Go to a specific slide. Press number key followed by ENTER key.
Activity 21
You will use Module 6 practice files.1. Start MS PowerPoint.2. Open the file second.ppt located in Module 6 Exercises folder.3. Change the font type of the title Scanners in slide 1 to Trebuchet MS.4. Change the font size of the title Scanners in slide 1 to 80pt.5. Apply bold and underlining to the text Parallel and Small Computer System
Interface (SCSI) in slide 4.6. Change the case of the text Scanners in slide 1 to uppercase.7. Change the case of the text Types of Scanners in slide 2 to lowercase.8. Run slide show.9. Save and close second.ppt. Close MS PowerPoint.
94
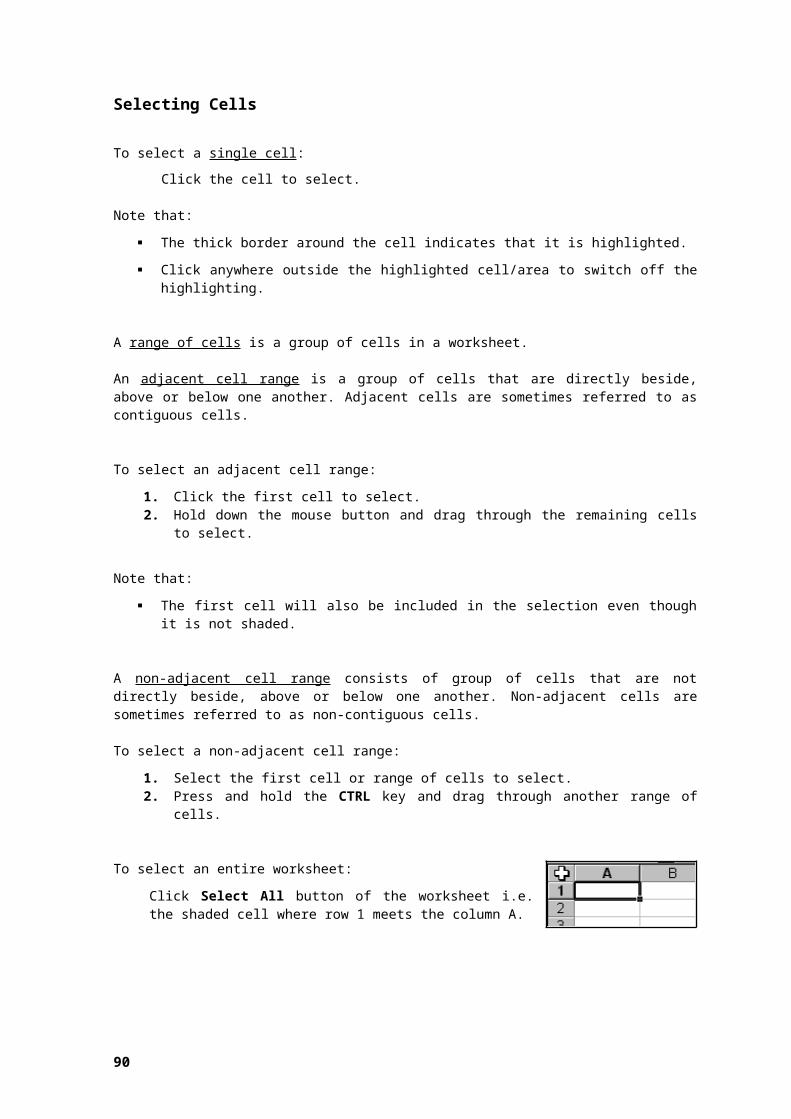
ECDL Syllabus 5 Courseware Form 1
Module 7 Web Browsing & Communication
Internet vs World Wide Web
Many people use the terms Internet and World Wide Web interchangeably, but in fact the two terms are not synonymous. The Internet and the Web are two separate but related things.
The Internet, short for ‘International networking,’ consists of thousands of computer networks that connect millions of computers around the world. The Internet refers to the hardware and software that provides different communications services between computer networks. The Internet is also referred to as the ‘Net’, ‘Information Superhighway’ and ‘cyberspace’.
The World Wide Web (WWW, W3 or the ‘Web’) is a way of accessing information over the Internet. It is an information-sharing model that is built on top of the Internet.
The Web is just one of the ways that information can be disseminated over the Internet. The Internet (not the Web), is also used for electronic mail, file transfer protocol, Usenet newsgroups and instant messaging. So the Web is just a one part of the Internet.
The Web consists of the text and pictures that you view on your computer. It encompasses all the Internet screens that appear on your computer. Over the years, these screens have evolved from heavily based text screens to graphical screens with pictures, sounds and video files. Such displays are commonly referred to as web pages.
Internet Service Provider, Uniform Resource Locator & Hyperlink
The Internet Service Provider (ISP) is a company that provides users with Internet connection services. ISPs provide home users with an Internet Account consisting of a username and a password. Users having the appropriate hardware and software will use the Internet Account to access the services available on the Internet.ISPs may charge a monthly subscription fee or a pay-per-use fee for use of the Internet Account.
The Uniform Resource Locator (URL) is a standard address that tells your browser how to locate a file or other resource on the Web. This is also known as an Internet address or Web address. Every web page is assigned an address e.g.:
http://www.skola.edu.mt
The URL contains all the useful information about the site that you are looking for. From the URL it is possible to know what type of organisation has put up the site, and also an indication of where the organisation is based.
95

The URL of a web page is made up of 3 distinct components:
1. Service Protocol – Thousands of computers on Internet communicate with each other by sending packets of data back and forth. The diversity and multitude of computers on Internet dictate a standard procedure or protocol (set of rules) for the reading of web pages. http:// is the language used by the web browser to request web pages from a Web server.
2. Domain Name – This identifies the name of the organisation where the information is stored. ‘mt’ indicates that the web site is registered IN Malta. ‘edu’ shows that skola is an educational website.
The following table shows some geographical domains:
Domain Area Domain Areaat Austria fr Franceau Australia gr Greececa Canada ie Irelandch Switzerland jp Japande Germany mt Maltadk Denmark nz New Zealandit Italy uk United Kingdom
The following table shows the types of organisations that may be found on Internet:
Organisation Meaningcom Commercial organisationedu/ac Educational institutiongov Government body or departmentint International organisation (e.g. NATO)net Networking organisationorg Non-profit making organisation (unions or charities)
3. Folder & Filename (the File Path) - This shows the location of the web page on the Internet server and the name of the document that is being requested. The file ‘ecdl’ ends with the extension ‘.html’ – short for hypertext markup language.
Some examples of URLs include:Ministry of Education http://www.education.gov.mt/University of Malta http://www.um.edu.mtGovernment of Malta http://www.gov.mtNATO http://www.nato.int
96
http://www.skola.edu.mt/courses/ecdl.html
Service Protocol
Domain Name
Folder on Server
Filename
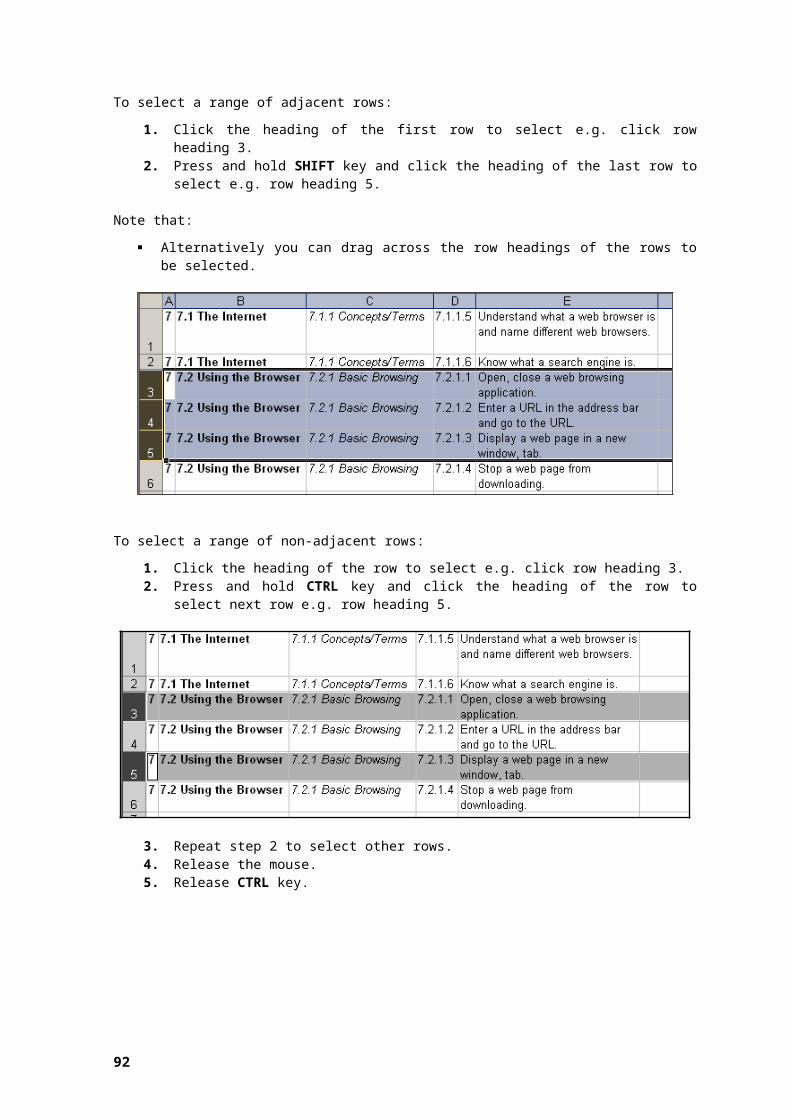
ECDL Syllabus 5 Courseware Form 1
web page – is the basic unit of the WWW. web pages are hypermedia documents or screen displays containing all sorts of data ranging from text files and sound (audio) files to graphic images and any other sort of data stored in a computer file.
Unlike regular documents, web pages contain coloured text and graphics, which can link to other web pages.
For example, a web page about Malta may contain the following coloured text - ‘Beaches’. When you position the pointer over this text, the pointer changes to a pointing finger. Clicking the mouse over this text will take you to another web page displaying information and small pictures (called thumbnails) of popular beaches in Malta. When you click on a thumbnail you will be taken to another web page displaying an enlarged view of the small picture. The beaches page may also contain the following coloured text ‘Transport in Malta’. Clicking the mouse over this text will take you to a web page with information about transport in Malta.
As you move from one web page to the next, you may be jumping from one computer to another on the Internet. The coloured text and graphics which take you from one web page to the next are known as hyperlinks.
Hyperlinks are text or images available on web pages which make connections to: other sections on the same web page. a different web page.
Hyperlinks may be used to download files or launch an application, video or sound.
Web Browsers
The web browser is a program used to locate and display web pages. The two most popular browsers are Microsoft Internet Explorer and Mozilla Firefox. These are available (can be downloaded) for free from Internet. Both of these are graphical browsers, which mean that they can display graphics as well as text. In addition, these can present multimedia information, including sound and video, though they may require plug-ins for some formats.
The web server is a computer connected to the Internet that makes web pages available to other computers. Web servers store and deliver files over the Internet in response to requests from web browsers. Any computer can be turned into a web server by installing server software and connecting the machine to the Internet.
97

Search Engines
If you do not know the URL of a web page, you can still search for it using the search engines available on Internet. A search engine is a program that locates Web sites via searches for keywords and phrases.
Typically, a search engines use a program known as a spider to fetch as many web pages as possible. Another program known as indexer, then reads these documents and creates an index based on the words contained in each document. Therefore search engines do not search the WWW in real time. Each search engine maintains a database of information accumulated from the WWW.
When you use a search engine and submit a query, the database is searched to yield web pages that fit the search criteria. These are returned as a list of ‘hits’, rank ordered according to criteria applied by the search engine. Different search engines maintain different databases of information and apply different criteria to rank order the list of potential sites.
There are several search engines on the Internet including:
Search Engine URLGoogle http://www.google.com Yahoo http://www.yahoo.com Askjeeves http://www.askjeeves.com Webcrawler http://www.webcrawler.com
Most search engine sites contain sub-headings called directory indexes to facilitate the location of information on Internet. Directory indexes are used as a starting point for a search, refining the search criteria at each step of the way.
Activity 22
1. Distinguish between Internet and the World Wide Web.2. What do URL and ISP stand for?3. What is HTTP?
A. Hyperlink Transfer ProtocolB. Hyperlink Transmission ProcedureC. Hypertext Transfer ProtocolD. Hypertext Transmission Procedure
4. What is a Search Engine?A. A program that searches web pages for virusesB. A program that searches for an Internet connectionC. A program that refreshes web pagesD. A program that searches the Internet by key words
5. Distinguish between a browser and a Web server.continued…
98

ECDL Syllabus 5 Courseware Form 1
6. What type geographical domain will an organisation in Italy have?A. .deB. .mtC. .ukD. .it
7. What type organisational domain will a school have?A. .comB. .netC. .eduD. .gov
8. Name two popular search engines.
Opening & Closing MS Internet Explorer
As indicated earlier the Web browser is a program used to locate and display web pages. The two most popular browsers are Microsoft Internet Explorer and Mozilla Firefox. The web browser used during this course is MS Internet Explorer 8.0.
To start MS Internet Explorer:1. Click Start button.2. Point to Programs.3. Click Internet Explorer. The following screen may be displayed:
Note that: You may also open MS Internet Explorer by double-clicking Internet
Explorer icon which may be located on the MS Windows desktop.
99
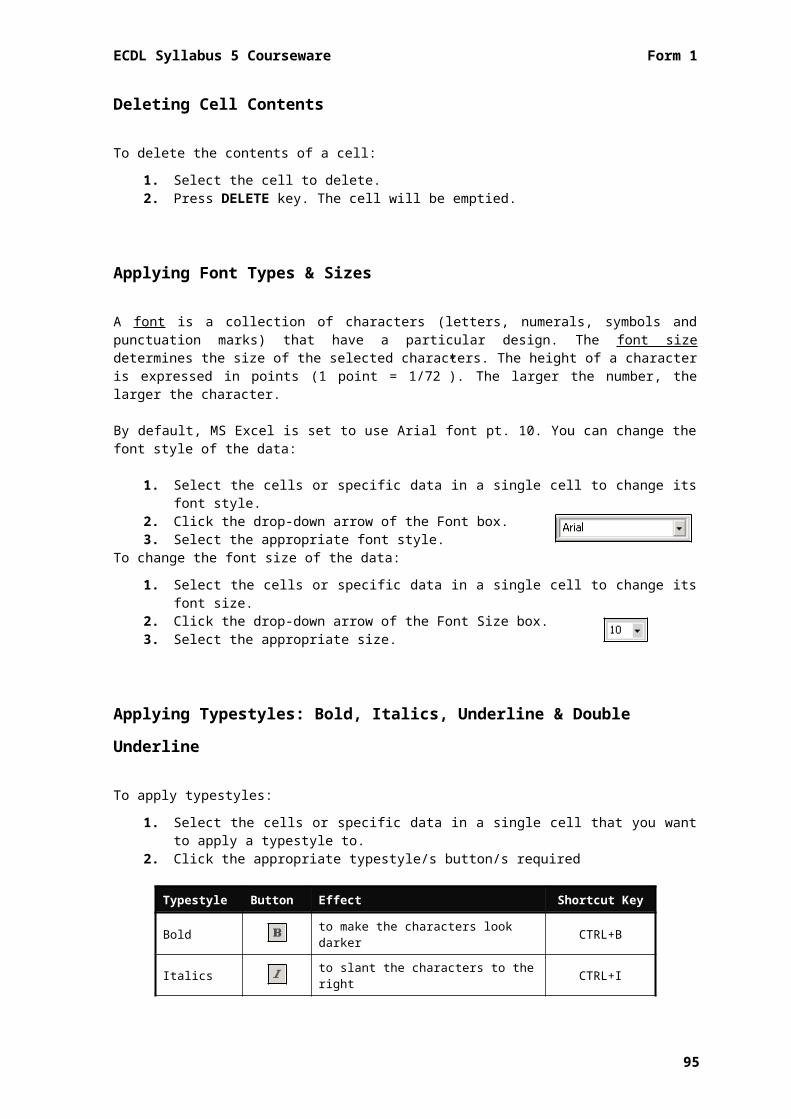
When you start MS Internet Explorer, this will display a specific web page. The first page displayed when you start up your browser is called the home page.
Entering a URL
1. Type the URL in the address field e.g. http://www.google.com.mt
2. Press ENTER key.
Displaying a Web Page
web pages may contain text, images and icons, referred to as hyperlinks that may link to other:
parts of the same web page. web pages within the same website. Websites.
Text that links to other areas in the same web page or different web pages is usually underlined or/and coloured differently from the other text in the page. You can open a hyperlink and display the web page in a new browser window:
1. Position the pointer on a hyperlink.2. Right-click the mouse. This will display a pop-
up menu.3. Click Open in New Window.
Note that: You can also open a hyperlink and display the web page in a new browser
window by pressing SHIFT key whilst clicking on the link. Your screen will display two browser windows, one containing the first web
page and the second containing the second web page. Typically you can switch between different browser windows by clicking the
appropriate browser window button on the task bar.
To display a web page in a new tab:1. Repeat steps 1-2 as above.2. Click Open in New Tab.
Note that: Your screen will display one browser window with two web pages in separate
tab panes. Tabs enable you to switch between web pages within the same browser window. There are some features associated with tab browsing such as bookmarking all web pages
100

ECDL Syllabus 5 Courseware Form 1
Stopping a Web Page from Downloading
The downloading of some web pages from web servers to your computer may take considerable time. There may be several reasons for this:
1. Web pages that are heavy loaded with images, sounds and movies are larger in terms of memory compared to text based web pages. Accordingly these pages take considerable time to transmit from Web servers to your computer.
2. The web server may be slow.3. The modem and link to the Web server may be slow.
You can stop a transfer whenever the loading process takes longer than expected:
Click Stop button in the standard toolbar.
Refreshing a Web Page
Sometimes the content of a web page (news page) may be updated during your online session. Your browser downloads the page once but it will not automatically reload the page when this has been changed. The refresh facility forces the browser to download the latest version of the page. To reload a web page:
Click Refresh button.
Hiding & Displaying Toolbars
To hide or display toolbars: 1. Click Tools on the Command bar.2. Point to Toolbars.3. Click the toolbar to hide/display.
Note that: If the command bar is hidden, right-click in the empty area. Click the
Command Bar from the shortcut menu.
101
Tab panes
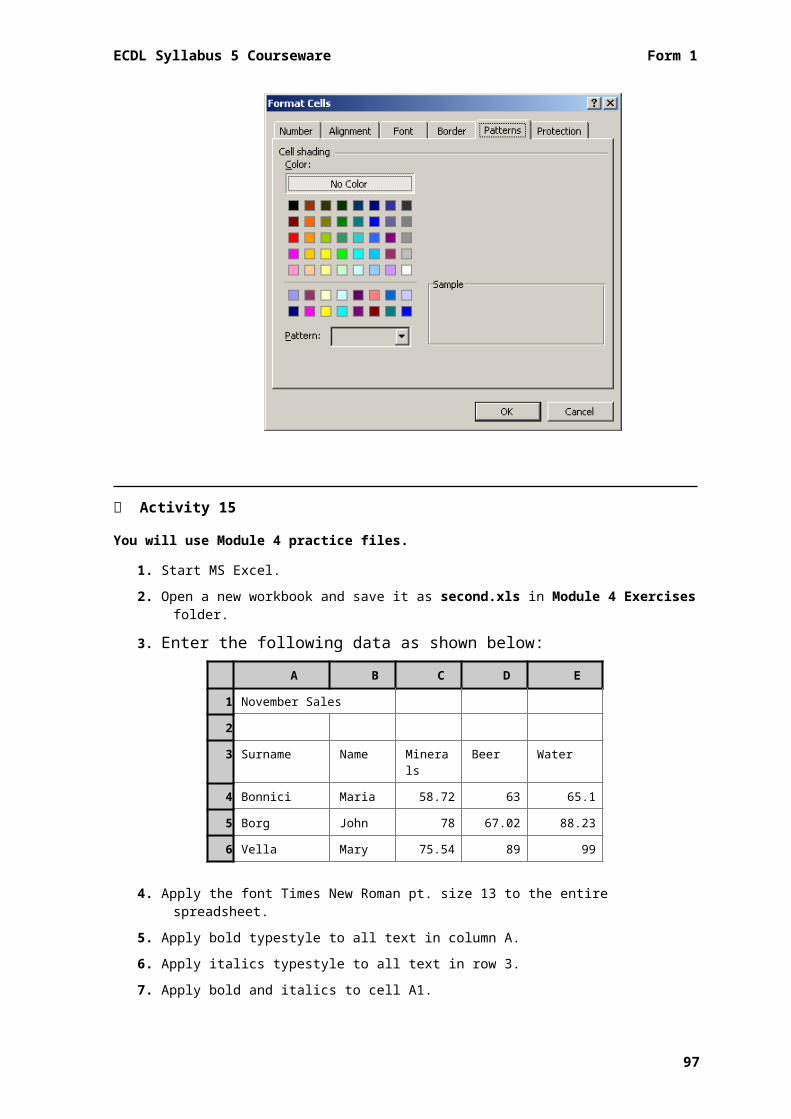
Activating a Hyperlink
As indicated earlier on, links or hyperlinks are words or pictures in a web page that can connect to another web page. Links are usually underlined or in a different colour than the regular text in the web page. Another way to find out if a piece of text or picture is a link, by placing the cursor over it. If it is a link, the cursor will change to a pointing hand.
To navigate a website:1. Position the mouse pointer over the hyperlink. The pointer will change into a
pointing hand. Also the URL location of the link appears in the status message area at the bottom-left of the window.
2. Click once on the highlighted text, image, or icon. This transfers page content from a server location to your computer.
Note that: Sometimes the page specified by a link may not be available. Such links are
often referred to as dead links. The error window shown below will be displayed.
102

ECDL Syllabus 5 Courseware Form 1
By default, links you have previously visited (referred to as followed links) are shown in a different colour compared to links (or unfollowed links) that you have not visited.
Navigating Backwards & Forwards
You can navigate backwards and forwards between previously visited web pages:
1. Click Back button or ALT+ keys to display the previous page in the history list.
2. Click Forward button ALT+ keys to display the next page in the history list. This button is available only after you have used Back button or a history menu item.
Navigating to the Home Page
You can navigate to the home page of MS Internet Explorer:
In the Command bar click Home button.
Note that: Alternatively you can press ALT+M keys to display the browser’s home page.
Displaying Previously Visited URLs
MS Internet Explorer offers several facilities to re-display previously visited web pages.
To display previously visited URLs using the address bar:
1. Click the drop down arrow to the right of the address bar. A list of previously visited URLs will be displayed.
2. Click the address of the web page you wish to visit.
MS Internet Explorer automatically saves previously visited web pages in a list known as the history list. The history list contains shortcuts to pages you viewed during browsing sessions. The list allows you to quickly return to the pages you have recently visited.
103

To access the history list and display previously visited web pages:1. Click Recent pages button. This is the
arrow pointing downwards to the right of the Forward button.
2. Click History at the bottom of the drop down menu. The History pane appears along the left side of the browser window. This contains links to Web sites and pages visited in the previous days and weeks.
3. In the History pane, click a week or day.4. Click a Web site folder to display individual pages.5. Click the web page icon to display page.
Activity 23
1. Start MS Internet Explorer. 2. Type the URL http://www.education.gov.mt and open the web page.3. Type the URL http://www.skola.edu.mt and open the web page.4. Open the hyperlink College Websites in a new browser window.5. Try and locate the website of your school - Click here to see the list of
Secondary state schools.6. Go to the browser window showing the Skola website.7. Open the hyperlink Photo Resources in a new tab within the same browser
window.8. Refresh the web page displayed in the previous step.9. Hide the Command Bar toolbar.10.Display again the Command Bar toolbar.11.Go to the browser window showing your school website.12.Use the back button to return back to the web page showing the Colleges
Websites.13.Display the History side bar.14.Delete today’s entries in the History list.15.Close MS Internet Explorer.
104
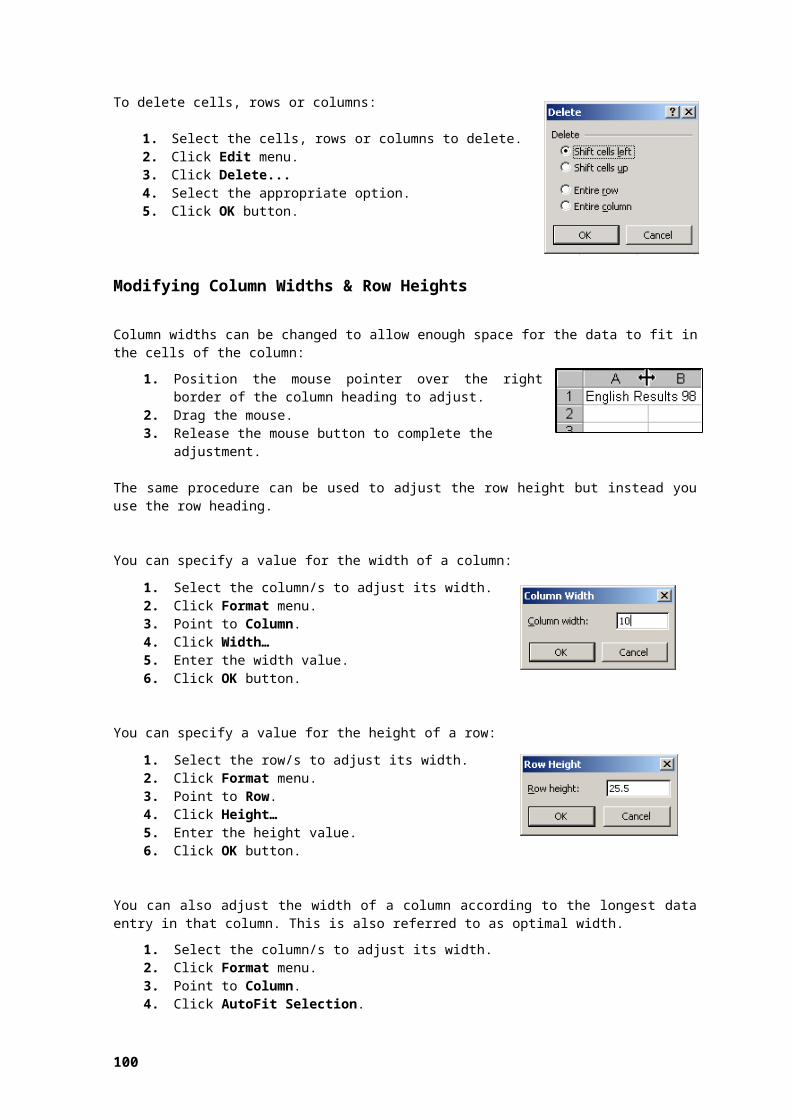
ECDL Syllabus 5 Courseware Form 1
Using Bookmarks
The Bookmarks, referred to as favourites in MS Internet Explorer enables you to store the URLs of web pages that you frequently visit. It is a list of URLs of frequently visited web pages. Through the favourites list you can return to a web page without having to remember and retype its URL. Once you add a URL to the favourite list, the item stays until you remove it or edit the list.
To add a URL to your list of favourite web pages:1. Go to the page that you want to add to your favourites list.2. Click Favourites button. The Favourites pane appears along the
left side of the browser window.3. Click Add to Favourites… The following dialog box will
be displayed. You can replace the default name of the web page in the Name: field.
4. Click OK button.
Note that: The title of the currently displayed web page will be added to the Favourites
list. The Favourites menu grows as you add web pages.
To display a bookmarked web page:1. Click Favourites button. The Favourites pane appears along the left side of
the browser window. 2. Click Favourites tab in the pane. This will display a list of bookmarked web
pages.3. Click the page to open. The browser will display the selected web page.
To delete a bookmark:1. Click Favourites button. The Favourites pane appears along the left side of
the browser window. 2. Click Favourites tab in the pane. This will display a list of bookmarked web
pages.3. Right-click the web page to delete from the Favourites list.4. Click Delete in the shortcut menu. The Confirm File Delete dialog box is
displayed.5. Click Yes button.
105

Creating & Deleting Bookmark Folders
As your list of favourite pages grows, you can organise them by moving them into folders. To create a folder in the favourites list:
1. Click Favourites button.2. Click the drop down arrow to the right of the Add to Favourites…
3. Click Organise Favourites…
4. Click New Folder button.5. Type in the name of the new folder.6. Click Close button.
Note that: You can also rename folders stored in the Favourites list.
106
ECDL Syllabus 5 Courseware Form 1
To delete a folder in the Favourites list:1. Repeat steps 1-3 as above.2. Select the name of the folder to delete.3. Click Delete… button.
Adding Web Pages to a Bookmark Folder
To add a web page to a particular folder in the Favourites list:1. Go to the web page that you want to add to your Favourites list.2. Click Favourites button.3. Click Add to Favourites… button. The Add a Favourite dialog box is
displayed.4. Click the drop-down arrow in the Create in: field. This will display the available
Favourite folders.
5. Click the folder where the web page will be added.6. Click Add button.
Selecting a Search Engine
As indicated earlier there are a search engine is a program that locates Web sites via searches for keywords and phrases. You can use different search engines e.g. Google, MS Live Search etc.
To select a search engine:1. Click Search Options drop-down
arrow.2. Choose the search engine to use e.g.
Live Search. The Search field will display the name of the search engine chosen.
Using the Keyword Search Facility
107
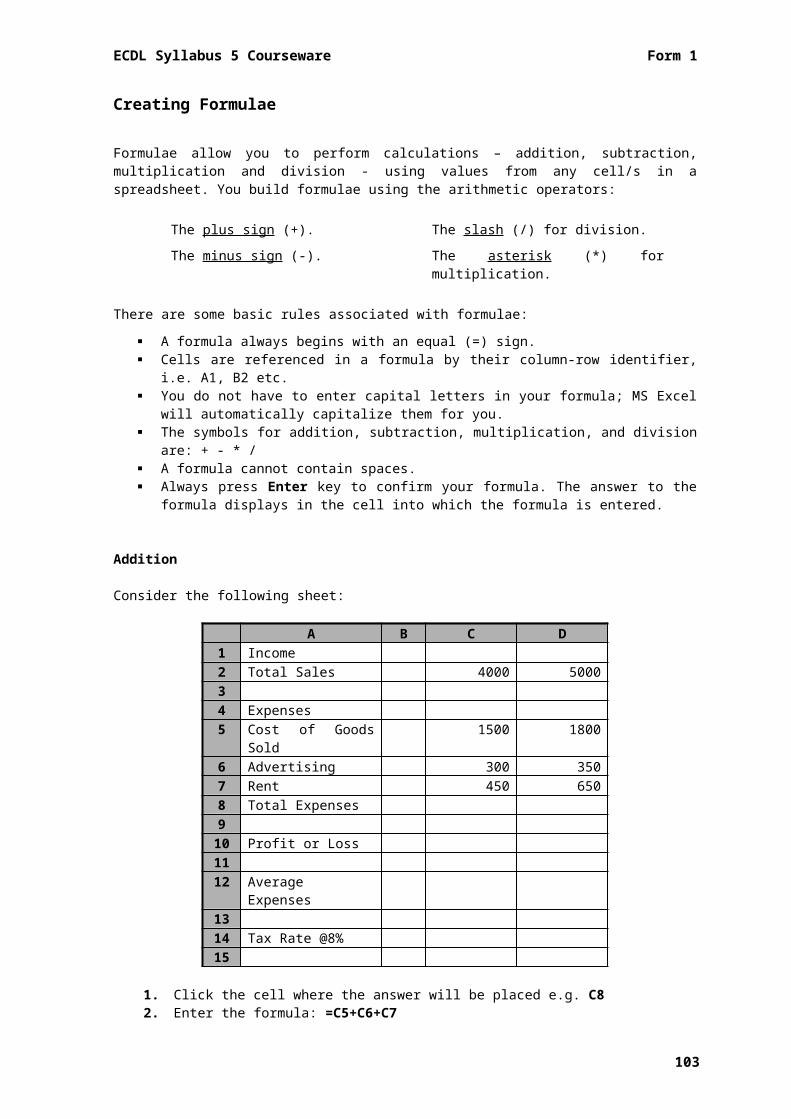
It is possible to look for information using the search facility available on the search engine site. If you know exactly what you are looking for, type the word or phrase that best describes the subject, click on ‘search’ button, and wait for the search engine to come up with the results.
In some cases the search engine would list thousands of web pages related to the subject you are searching for. This would make it next to impossible to go through all the web pages on the list. The following hints might help you select the appropriate information from Internet:
Read the ‘hints’ and ‘help’ for each search engine - these will explain how the search tool works, and which commands can be used to attain more accurate results.
Use specific words instead of general ones – for example, searching for ‘constructivist education’ will have more specific results than a search for ‘education’.
Use quotes around words that are part of a phrase - if you want the words to be found in a specific order, it is important to enclose them in inverted commas. Thus, if you want to find documents about Jean Piaget, type in ‘Jean Piaget’. The former will produce a never-ending list of web pages having either Jean or Piaget or both.
Use the ‘+’ (plus) for words that the search must contain – if you are looking for Italian cars, you should search for +Italian+cars, which, means that the documents retrieved will all have both the word ‘Italian’ and the word ‘cars’ in them.
Use the ‘-‘ (minus) for words that the search must not contain – if you are looking for information about cars but these must not be Italian cars, you should search for +cars-Italian. The results of this search would include a list of documents about cars with no mention of Italian cars.
Use Boolean operators AND, OR, AND NOT – These operators must appear in capital letters and with a space on each side.
108

ECDL Syllabus 5 Courseware Form 1
o AND – documents found must contain all words joined by this operator, for example italian AND cars would list all web pages about Italian cars.
o OR – documents found must contain at least one of the words joined by OR, for example butterfly OR caterpillar would list all web pages containing either butterfly or caterpillar.
o AND NOT – documents found cannot contain the word that follows AND NOT, for example English language AND NOT England would display of all web pages containing English language and not England.
Searching for Information using a Search Engine
1. In the Search field: type the keywords.2. Press ENTER key. The search engine will locate occurrences of the text in its
database of web pages.3. Examine the search results. These are usually presented as a list of links to
pages containing the text you requested. Click any link to display a web page.
109

Previewing a Web Page
When printing a web page, MS Internet Explorer formats content according to the size of the printed page. The Print command rearranges the page layout (text is word-wrapped and graphics are repositioned) to fit in the paper.
To preview the appearance of a printed web page:1. Click the drop down arrow next to Print button on the Command bar. 2. Click Print Preview… The Print Preview dialog box will be displayed.
3. Select the appropriate option.4. Click Close button to close the Print Preview screen.
Option Button To do this
Print Set printing options and print the page
Portrait Print the page vertically (portrait orientation).
Landscape Print the page horizontally (landscape orientation).
Page Setup Change paper size, orientation, or margins, and add headers or footers.
Turn headers or footers on or off
Decide whether to print additional information (such as the date, website address, or page number) at the top or bottom of the page.
View full width Zoom the webpage to the width of the preview screen.
View full page Zoom the webpage to show the full webpage in the preview screen.
Show multiple pages View multiple pages on the preview screen
110

ECDL Syllabus 5 Courseware Form 1
Option Button To do thisChange Print Size
Stretch or shrink the page size to fill the printed page.
Page number Type the number of the page you want displayed.
First page Display the first page to be printed.
Previous page Display the previous page to be printed.
Next Display the next page to be printed.
Last Page Display the last page to be printed.
Changing the Page Setup
You can also adjust the Page setup options before printing:1. Click the drop down arrow next to Print button on the Command bar.2. Click Page Setup… The Page Setup dialog box will be displayed.3. Select the appropriate options e.g. paper size, orientation and margins.4. Click OK button.
111

Printing
You can also adjust the Page setup options before printing:1. Click the drop down arrow next to Print button on the Command bar.2. Click Print… The Print dialog box will be displayed.3. Select the appropriate options.4. Click Print button.
To print… Do thisEntire web page Tick the option All in the Page Range section.Specific page(s) Type the pages to print in the Pages: field.Selected text Tick the option Selection in the Page Range section. Number of copies Type in a number in the Number of copies: field.
Activity 24
1. Start MS Internet Explorer. 2. Type the URL http://www.skola.edu.mt and open the page.3. Add this page to the favourites list.4. Create a folder in your favourites called International News.5. Type the URL http://www.cnn.com and open the page.6. Add this page to your favourites list in the folder International News.
continued…
112

ECDL Syllabus 5 Courseware Form 1
7. Type the URL http://www.bbc.co.uk and open the page.8. Add this page to your favourites list in the folder International News.9. Type the URL http://english.pravda.ru/ and open the page.10.Add this page to your favourites list in the folder International News.11.Delete the Pravda entry in the favourites list.12.Type the URL http://www.google.com and open the page.13.Type the keywords airport Malta and click Fittex bil-Google button.14.Locate the entry showing www.maltairport.com and open the page.15.Type the URL http://www.yahoo.com and open the page.16.Type the keywords University of Malta and click Yahoo! Search button.17.Preview this page.18.Set the orientation of this page to landscape.19.Print 2 copies of this page.20.Close MS Internet Explorer.
Electronic Mail
Electronic mail or email is a way of sending electronic messages through the systems and networks that make up the Internet. Email is the most frequently used application on the Internet. This is because email has many advantages over other means of communication:
Email is very fast compared to normal the postal service. An email gets to any destination in a few minutes.
Email is cheaper compared to the normal postal service. It only requires an Internet connection. There is no need for envelopes and stamps.
To send and receive email you will need an Internet connection and an email address. You may also need an email client (or program) with specific email addresses.
You can obtain an email address from any of the following sources: Typically the ISP which provides you with your home Internet connection will
also provide you with an email address. Your school will provide you with an email address. It is important that you use
such email for schoolwork. Such emails should not be used for personal communication or to forward jokes.
You can get a free email address from some Web sites e.g. Hotmail, Yahoo, Gmail etc. Email addresses derived from the Web are known as Web-based email accounts. Web-based accounts enable you to read and send email through a web page i.e. from any location. You will not need to configure an email program on the Internet connected computer. However, most ISPs and organizations do offer facilities to check their email addresses through the Web.
113

The Structure of an Email Address
Email addresses have a standard format made up of two parts separated by the @ symbol:
1. The UserID or Username is a unique identification of a person on a particular server.
2. The Host name or Domain name is the location at which the mail is sent. This refers to the mail server i.e. the computer where the recipient has a mailbox.
How does Email work?
Every user with an email address has a mailbox that stores all incoming and outgoing mail. The mailbox is located on the mail server computer at the ISP. This mail server computer is connected to Internet 24 hours a day. So, your incoming mail is delivered to your mailbox even while you have your computer switched off. Therefore, you need to check your mailbox to read your mail. You will need a mail program such as MS Outlook or Mozilla Thunderbird to read and send mail (unless you will be checking email on the Web).
Therefore, you type a message on your computer using a mail client. You send the message when you connect to Internet. The email will be delivered to the electronic mailbox of the recipient (the person who receives your email) on a mail server computer. The recipient can check his or her mailbox and can download the electronic messages from the mail server to his/her computer. The recipient of your message can respond to you, forward the message to someone else, file the message in the computer, or just delete the message.
It is important to understand that the recipients of your mail do not have to be present at their computer when you send mail to them. Your message travels to the destination mailbox quickly. But the person at the other end still has to check the mailbox to read your message.
Netiquette
As with other forms of communication media, there are widely observed conventions, often known as ‘network etiquette’ or ‘netiquette’ - associated with email communication. Netiquette is a set of guidelines intended to promote effective, efficient and responsible communication between all email users.
The following netiquette guidelines are derived from those in use at many locations on the Internet:
114
Username Domain name
ganni.borg@ @skola.gov.mt

ECDL Syllabus 5 Courseware Form 1
Use short meaningful descriptions in the subject field of all your messages. Messages without subject lines can confuse and frustrate the persons who receive these particularly if they receive a lot of mail.
Messages should be concise and to the point. Use short paragraphs with breaks in between. White space makes long text easier to read.
Be careful about the way you express yourself in a message, especially if you feel strongly about an issue. Never shoot off a quick response to some issue. Once you press the send button there is no way you can retrieve the message back.
Never type your messages in all uppercase letters. Capitalizing whole words that are not titles is the equivalent of shouting. Asterisks are usually used to add *emphasis* to a word.
Acronyms (e.g. ASAP – as soon as possible) are often used in email messages. Avoid overuse of acronyms in your messages. Such messages can confuse and annoy readers that are not familiar with acronyms.
Ensure that your message is free of spelling and grammar errors before pressing the ‘send’ button.
It is unethical to forward a message without asking permission of the person who wrote the message.
Do not make changes to someone else's message and pass it on without making it clear where you have made the changes.
Do not initiate or forward chain letters and other unwanted email, known as ‘spam’, to your friends.
Opening & Closing MS Outlook
As indicated earlier, an email client is a program used to send and receive email. There are several email clients – MS Outlook, MS Outlook Express, Mozilla Thunderbird. The email program that you will use is MS Outlook 2003.
To start MS Outlook:1. Click Start button.2. Select All Programs.3. Click MS Outlook.
MS Outlook 2003 displays three vertical panes: Navigation Pane (1) – has tools and information determined by the current
selection. The Navigation Pane displays several tabs including Mail, Calendar, Contacts, Tasks, Notes, Folder List, Journal, and Shortcuts.
Message Pane (2) - contains all emails in the folder currently selected. Reading Pane (3) - displays the content of the email currently selected, its basic
header information (sender, recipients and subject) and any file attachments.
115
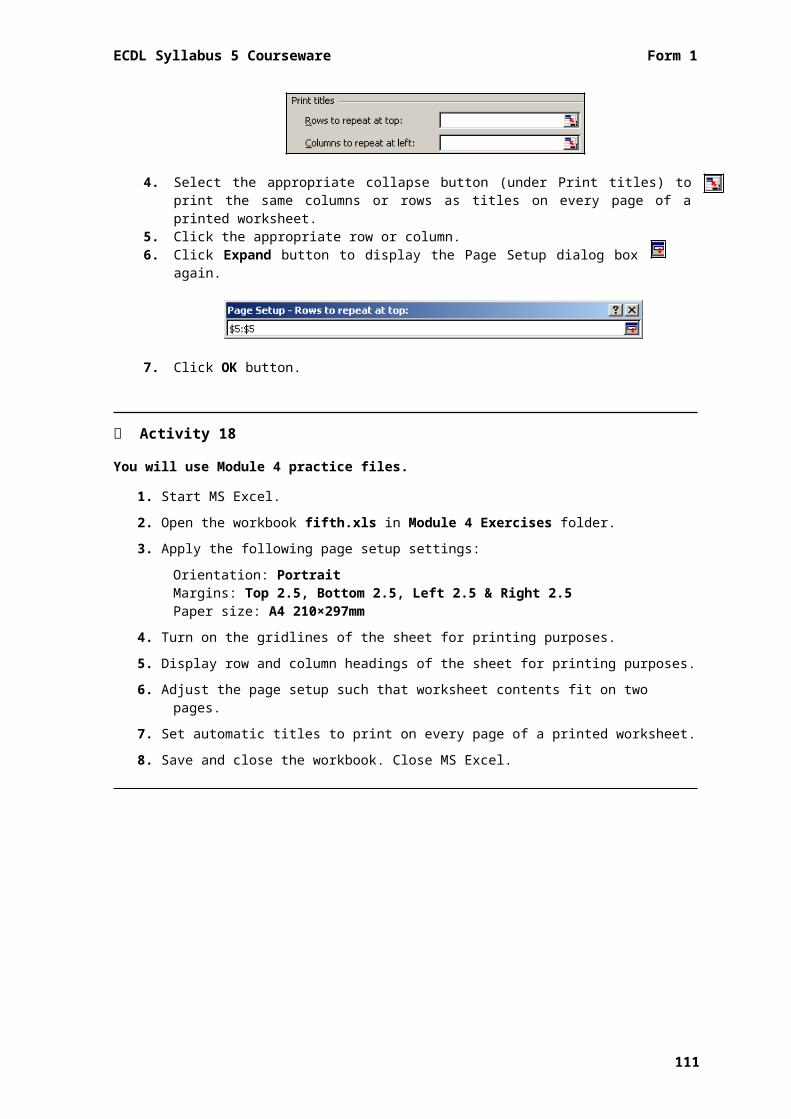
To close MS Outlook click Close button.
Opening & Closing an Email
To open an email i.e. to view a message:1. In the Navigation pane click Inbox folder. The Message Pane will display the
list of emails in the Inbox folder.2. In the Message pane, click the email to open. The Reading pane will display
the message.
Note that: To view a message in a separate window, double click the email in the
Message pane.
To view messages that you have sent, click Sent Items folder in the Navigation pane.
116
1
2
3

ECDL Syllabus 5 Courseware Form 1
To close an email:If you are viewing the email in a separate window, click the close button of the window. You will be returned to the previous MS Outlook screen.
A typical email message includes: Subject: a short meaningful description of the message Date: when mail was sent From: the sender’s address To: the recipient’s address Body of the message.
The From: and To: lines contain addresses that are similar to the addresses you put on a paper envelope. The electronic postmaster is much stricter about the format of the address. All the spelling and punctuation must be correct, or the message will be sent right back to you from the electronic mailbox.
The Subject line is a convenient place to give a one-line description of your message. This description helps the person receiving your email to decide what your mail is all about.
Retrieving Messages
Messages are stored in your mailbox on the mail server until you download them using your mail program. To retrieve messages, you need to connect to the Internet:
1. Open MS Outlook.2. Click Tools menu. 3. Select Send/Receive4. Click Send/Receive All. The program retrieves all mail in your mailbox.
117
Note that: By default, the Inbox folder stores all incoming mail.
Creating a New Email
1. Click New Mail Message button. The Untitled Message window will be displayed - here you will type the message to send.
2. Type the email address of the person you want to send the message to in the To: field. If you want to send the same message to several people, press ENTER key after typing the first address and type another email address.
An address in an address list can have one of the following recipient types:
To: Primary recipients of your message.Cc: Carbon Copy, for secondary recipients i.e. the persons whom you decide to
keep them informed. Bcc: Blind Carbon Copy, email addresses typed in this field are not visible.
3. Type the subject of your message in the Subject: field. 4. Click in the lower part of the window and type in the message. You can copy
and paste text from other programs such as MS Word etc.5. Click Send button to send your message.
Note that: By default, the email message sent is stored in the Sent Items folder. To discard your message without sending it, just close the window.
118

ECDL Syllabus 5 Courseware Form 1
Activity 25
1. Start MS Outlook. 2. Retrieve any messages you have in your mailbox.3. Open the message with the subject Hello ECDL Candidate…4. Display the message with the subject Next ECDL Course… in a new window5. Switch to the window displaying the message with the subject Hello ECDL
Candidate…6. Switch to the window displaying the message with the subject Next ECDL
Course…7. Close the window displaying the message with the subject Next ECDL
Course…8. Type a new message addressed to your teacher and carbon copied to your
friend. Your teacher will guide you what email address to use. Type the following text:Subject: IT LessonsBody:Dear Teacher,I do enjoy my IT lessons but now I am looking forward for holidays.Regards,<type your name>
9. Send the message that you created in step 8.10.Close MS Outlook.
Inserting & Removing a File Attachment
You can attach a file such as a MS Word document or a MS PowerPoint presentation to an email message:
1. In the Message window, click Insert File button. The Insert File dialog box will be displayed.
2. Browse to the disk/folder where the file (to be attached) is located.3. Click the file to attach.4. Click Insert button.
119
Note that: The name of the selected file will be displayed in the Attach… field.
It is important to attach small files, which do not exceed 4MB. Large files can completely fill the recipient’s mailbox making it impossible for him/her to receive any more messages. Compression utility programs can be used to reduce the sizes of your attached files.
To remove a file attachment:1. Click the name of the file in the Attach… field.2. Press Delete key.
Setting Message Priority
When you send a new message, you can assign a priority to it, so the recipient could see if the message has a high or low priority setting.
You can set the priority of a message by clicking the Importance: High button. To switch off the high priority setting click on the Importance: High button.
Note that: Messages sent with a high priority setting will be delivered at the same speed
as a message having a low priority setting.
120

ECDL Syllabus 5 Courseware Form 1
Identifying & Marking Read or Unread Emails
When you receive emails, the Unread Mail folder will be bold. It will also display the number of unread messages within a bracket.
Unread emails in the Message pane will display a closed envelope. Messages that you have already opened will display an open envelope.
You can also mark emails as read or unread:1. Choose the message in the Message pane.2. Click Edit menu.3. Choose Mark as Read or Mark as Unread.
Deleting an Email
1. Choose the message in the Message pane.2. Press DELETE key.
Note that: Deleted messages are transferred to the Deleted Items folder.
121
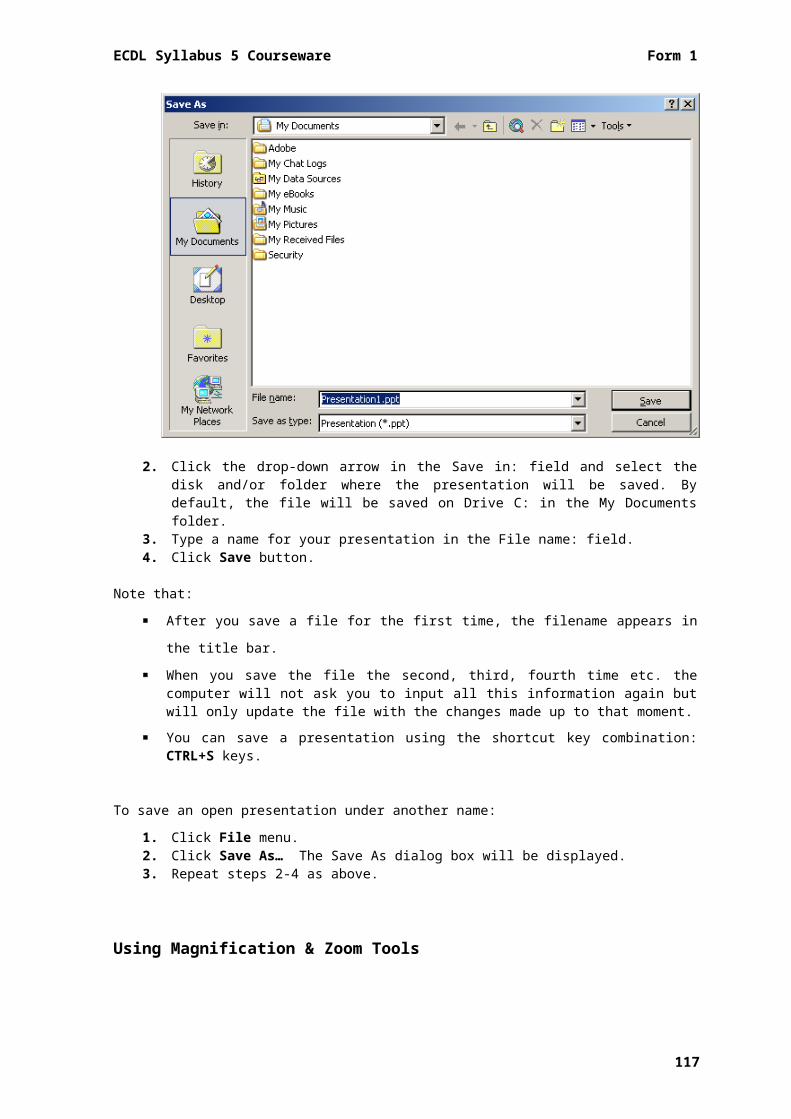
Restoring Deleted Email
You restore deleted messages:1. Click Deleted Items folder. This will display the list of messages that have
been deleted.2. Choose the message to undelete in the Message pane.3. Click Edit menu.4. Click Move To Folder… The Move Items dialog box is displayed.
5. Click the folder e.g. Inbox where the message will be moved to.6. Click OK button.
Emptying the Deleted Items Folder
You can decide to delete your mail permanently from the Deleted Items folder as follows:
1. Right-click Deleted Items folder.2. Click Empty “Deleted Items” Folder.
Alternatively, you can delete all messages in the Deleted Items folder as follows:1. Click Tools menu.2. Click Empty “Deleted Items” Folder.
122

ECDL Syllabus 5 Courseware Form 1
Activity 26
You will use Module 7 practice files.1. Start MS Outlook. 2. Retrieve any messages you have in your mailbox.3. Type a new message addressed to your teacher and carbon copied to your
friend. Your teacher will guide you what email address to use. Type the following text:Subject: SummaryBody:Dear Teacher,
Attached please find summary.doc.
Kind regards,<type your name>
4. Attach the file summary.doc located in Module 7 Exercises folder to the message.
5. Apply a high priority setting to your message.6. Send the message that you created in step 3.7. Mark as unread the message with the subject Next ECDL Course… at the
Inbox folder.8. Delete the message with the subject Hello ECDL Candidate… at the Inbox
folder. 9. Restore the message with the subject Hello ECDL Candidate… from the
Deleted Items folder.10.Delete all messages in the Inbox folder.11.Empty the Deleted Items folder.12.Close MS Outlook.
123