sintering: grain boundaries, interfaces, and porosity1 teacher instructions sintering: grain...
TRANSCRIPT

1
TEACHER INSTRUCTIONS
Sintering: Grain Boundaries, Interfaces, and Porosity
Objective: To demonstrate how individual particles and powders can be processed and formed
into large solid objects and investigate the material concept of microstructural porosity.
Background Information: All materials must be processed in some way to achieve either a
particular material property or create a specific shape. There are many different material
processing techniques, but one that is fundamental to ceramic materials is sintering. Sintering is a
processing technique by which a solid mass of material is formed from the fusion of many
smaller pieces, often a powder. This is done primarily through the application of heat but
sometimes by adding pressure concurrently. It is unique in that sintering is a solid state process,
unlike other common material shaping techniques that require melting the material to pour into a
mold, followed by cooling. The typical temperatures used for sintering are around 2/3 of a
material’s melting temperature, making it ideal for materials with extremely high melting points.
Sintering has been used for centuries in the construction of pottery by ancient civilizations.
Recently, however, the advent of nanotechnology has used nanoparticles to create materials with
novel and unique properties.
Sintering is effectively a process where porosity, i.e., open space, is removed from compacted
powder particles to form a solid mass. Material moves to the contact points between particles and
fills in the open space. This accumulation of material at pores causes contact points to extend and
become interfaces between grains, commonly called grain boundaries. This process is outlined
in Figure 1 with a point contact between particles, marked by a red dot before sintering,
becoming a grain boundary after sintering (the red line). Material moves to pores by diffusion
facilitated by high temperatures.
Figure 1: During sintering, high temperatures allow material to transport to the open space
between powder particles. Eventually, the pores disappear resulting in a dense pore free object.

2
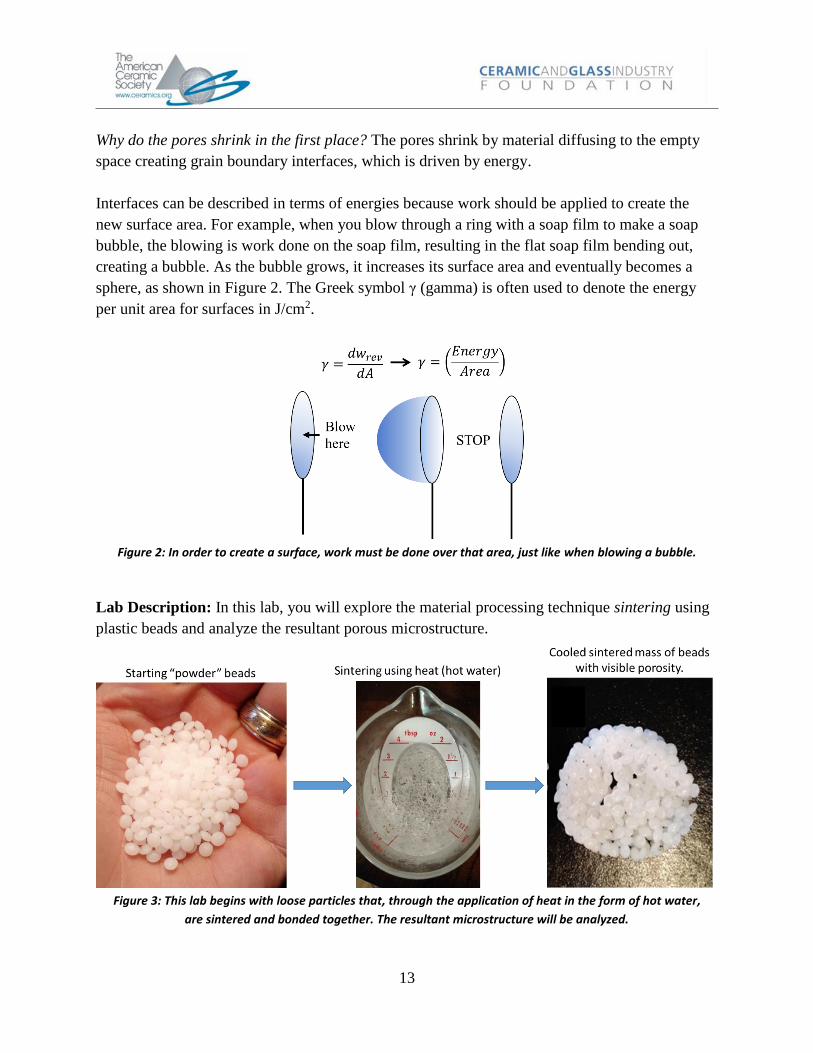
Why do the pores shrink in the first place? The pores shrink by material diffusing to the empty
space creating grain boundary interfaces, which is driven by energy.
Interfaces can be described in terms of energies because work should be applied to create the
new surface area. For example, when you blow through a ring with a soap film to make a soap
bubble, the blowing is work done on the soap film, resulting in the flat soap film bending out,
creating a bubble. As the bubble grows, it increases its surface area and eventually becomes a
sphere, as shown in Figure 2. The Greek symbol γ (gamma) is often used to denote the energy
per unit area for surfaces in J/cm2.
Figure 2: In order to create a surface, work must be done over that area, just like when blowing a bubble.
Lab Description: In this lab, polyester beads are used as an analogy to demonstrate the process
of sintering. Each polyester bead represents an individual powder particle. As the particles bond
together in hot water, a porous solid is created which can be cut or broken to investigate its
porous structure.
Keywords:
· interface – a boundary defining a change in a material’s chemistry, type, structure, etc.
· grain – small individual “pieces” of a larger portion of material.
· grain boundary – interface between two grains.
· porosity/pores – the open space between grains.
· microstructure – the structure of a material as observed through microscopic examination.
· diffusion: movement of atoms from one location to another due to some driving force, such as
high temperatures.

3
Materials List:
· one 12-ounce container of InstaMorph Moldable Plastic beads (10 grams/experiment)
· juice glass, beaker, test tube, or other clear container – 1 per group to mix the hot water and
InstaMorph beads
· pot holder/glove (to protect hands from the hot water)
· pen, pencil, fork, or tongs, etc. – 1 utensil per group for retrieving beads from water
· paper towels or rags (for placing beads onto and absorbing spilled water)
· scissors, kitchen shears, or tin snips for cutting the sintered body in half to examine the pore
structure
· water for sintering the submerged beads together
· hot plate, stove, Bunsen burner, etc. (to heat water to the desired temperature)
· thermometer for measuring the temperature of the water as it is heated
· ruler or micrometer (for measuring pore sizes and other physical dimensions)
Safety Precautions: It is recommended that a glove or pot holder be worn by students when
retrieving the beads from the hot water to prevent any possible burns. Lab glasses should be
worn by anyone nearby when cutting the sintered mass to protect eyes from plastic pieces.
Depending on the age of the students, the teacher could do the cutting for the students.
Furthermore, standard lab rules and procedures (e.g., using the items as described in the handout,
not for any other purposes) should be followed.
Optional Demonstration (to perform before experiment):
An unglazed (not shiny) ceramic pot (gardening pot) is excellent for this and can be used to
demonstrate the concept of porosity in a real-world ceramic. The day before you plan to do the
experiment, fill the unglazed pot with water and have the students record the height of the water
line. Let the pot sit overnight with the top covered by plastic food wrap or the like, and have the
students record the height the next day that they come to class (it will be less). Discuss with the
students why they think the water line went down and where the water could have gone.

4
Instructions:
1. Discuss with the students the basic equations discussed in the supplementary information.
2. The students should weigh 10 grams (g) of InstaMorph beads. If the beads are unable to
be weighed, the amount of beads needed for 10g can be calculated (refer to
supplementary information).
3. Heat enough water for students to submerge their beads; the water should be at least
150°F (65.5˚C). This can be done before class starts.
Water can be heated in whatever way is most convenient (stove, microwave, hot
plate, electric water kettle, etc.).
To keep InstaMorph moldable for longer and to speed up the bonding/sintering
process, the water can be heated above 150°F. CAUTION: This will increase the
temperature of the beads and increase the chance for burns or other heat-related
injuries.
Either the teacher can heat the water and add it to students’ beakers, OR if the
teacher deems it appropriate, each group can heat the water themselves if there are
enough heat sources, heating vessels, thermometers, etc.
4. Have students put the 10g of InstaMorph beads into a clear glass container, and either the
students or the teacher pour enough hot water to cover them.
The container should not be wider than 1.5 inches so there are multiple layers of
beads on top of one another. Larger diameter containers will require larger
amounts of beads.
Consequences of a thin layer of beads are that the fracture surface for the end of the
lab will not have sufficient enough area to measure or clearly see the pores.
The water cools quickly below the activation temperature of the beads, keeping
them from bonding, so do not delay the transfer from the heat source to the beads.
5. Wait for the beads to change from opaque to clear as shown below (approximately < 10
minutes, depending on the temperature of the water). Have students record their
observations.

5
6. While being careful not to disturb the bead mass too much, remove the now “sintered”
beads from the water using the pen or fork and place them on a paper towel to cool and
drain. Cooling can be accelerated by holding the mass under a running faucet or placing
it in a water bath.
7. Once it is cool enough to touch, task the students with examining the sintered mass and
recording their observations of its structure, strength, rigidity, etc.

6
8. Have the students calculate the percent porosity and/or percent theoretical density using
the procedure outlined in the Student Handout.
9. Use the scissors or shears to cut the porous body in half. Note that these beads are
remarkably strong when densely bonded, in which case the use of regular small scissors
may not be sufficient to cut them. If the mass is thin or did not bond well, it can be quite
brittle and easier to cut through. This will vary for each experiment.
10. Have students examine the microstructure of the cut face, looking for pores.
Lab Delivery Hints:
1. This lab is best done in groups of 2 to 3 students. Together the group can weigh the beads
or work on estimating how many beads are needed if they are unable to weigh them.
2. There is more than one brand of this type of polymer bead. InstaMorph, shown in this
document, was purchased from Amazon.com, but there are also colored InstaMorph
beads as well, if desired.
3. The container should not be wider than 1.5 inches so there are multiple layers of beads on
top of one another. Larger containers will require larger amounts of beads. Using a 1.5
inch diameter container will result in a 10-gram mass of approximate dimensions shown
in the image below:
4. Use glass containers as the beads can bond to plastic containers making clean up more
difficult.
5. Remind students to be careful not to smash/mush the beads when removing them from
the water so pores don’t collapse.
7
Troubleshooting: The time it takes for the beads to become clear and bond together is
dependent on the temperature of the water, which can cool rapidly when the heat is turned off.
The water may need to be reheated multiple times if students are waiting or heated above the
target temperature in anticipation of it cooling. A temperature of 170-175°F makes the beads
bond quickly and allows time to transfer water from the heater to the vessel containing the beads.
If it is taking too long to bond the beads, increase the temperature of the water to around 170-
180°F, but remember the considerations above. This should cause the beads to bond and become
clear in under 1 minute and allow more time to get the water into student’s vessels.
***Wear appropriate safety equipment to prevent any burning from the hot water***
Cleanup/Replacement parts: The beads are not reusable experiment to experiment. They can,
however, be heated and remolded if the students want to take them home. Otherwise, they should
be thrown away. Ensure the water has been dried from the tools before storage.

8
TEACHER DISCUSSION QUESTIONS
Sintering: Grain Boundaries, Interfaces, and Porosity
Discussion Questions to Ask Before the Lab
1. Ask students what type of things they can think of that may be created using sintering or
powder processing.
Discussion: Remind them that it is bonding of a powder by applying heat and sometimes
pressure. During winter, making a snowball is a direct application of sintering that most
people have experience with. Pressing snow between your gloves to make a snowball
applies pressure as well as heats the snow. The contact points between the small snow
particles melt and refreeze and the snowball bonds.
It is common for people to say pottery or coffee cups, but you should emphasize that it
isn’t just those things that are made via sintering. Most people think of those examples as
ceramics, but many other functional materials use powder processing techniques. 3D
printing of powdered metals is becoming a rapidly utilized process due to the ability to
create complicated shapes. There is a 6-minute video showing such uses on YouTube:
https://www.youtube.com/watch?v=cRE-PzI6uZA.
Here are a few other examples of objects that are a direct result of sintering that students
may know a few of: Teflon non-stick pan coatings, protective body armor and bulletproof
windows, jet engine turbine blades and other parts that operate in high temperature
environments, solar cell (photovoltaic) thin films, radioactive material containment, fuel
cell components, kitchen cooktops, and bioactive scaffold implants for tissue and bone
growth.
2. Ask students what they think the benefits of the “near net shape” forming ability of
sintering might be (i.e., the ability to make the object before sintering close to the shape
you want after sintering).
Discussion: Provide the example of a clay pot; it looks like a pot when the clay is wet and
molded, which is before sintering. After sintering, the shape still looks like the same pot,
just slightly shrunken due to densification and the removal of pores. This is near net
shape processing.

9
One benefit is that the initial production of the part before sintering starts very close to
the final (net) shape, so the need for final finishing or shaping steps is reduced. Removing
the final steps such as grinding or cutting can eliminate production costs and reduce the
time needed to make the object. In many cases, ceramics are very difficult if not
impossible to cut after sintering (due to their extreme hardness), so near net shaped
processing can be the only way to produce complex shapes.
3. Are there any difficulties associated with the near net shaping of objects?
Discussion: Remind the students that you start with a porous object and that through
heating, the object shrinks and becomes denser. What would happen if the object was
very complicated and had areas of varying thickness? One common difficulty is the less
uniform a shape is, differences in how the object shrinks can occur. The pieces that are
thin may shrink more than the thicker, larger pieces of the same object making the object
distorted.
Discussion Questions to Ask After the Lab
1. Have students think of different ways things can be heated. What methods would they
think would work better for reducing porosity of a part and why? Remember that
ceramics and metals that are processed with sintering have very high melting
temperatures.
Discussion: There are many different methods to heat an object: ovens, fire, microwaves,
friction, etc. Some of the methods such as ovens are better at getting the powder
uniformly hot for even sintering and porosity reduction. Others, such as fire, heat locally,
in a small area. That area may sinter, but the rest would not.
Students can relate to microwaves, which are exactly like the ones in their kitchen. They
should think about whether or not it would work for ceramics. Do coffee mugs get hot?
Usually not, but the liquid inside does. Microwaves emit high frequency radio waves, at
just the right frequency that they preferentially interact with water, fat, and sugar
molecules within organic matter (food) to cause bond vibrations, which cause the
increase in temperature. This is why some plastics, also made of organic material, are not
“microwave safe.” It is more difficult to heat up ceramics and glasses because the atoms
are more restricted and bonded tightly to one another in these materials.
2. Ask students how the performance of a ceramic material would change if it wasn’t
sintered to full density (i.e., if there were pores left). Would it be stronger or weaker?
Are there any advantages to having a structure that purposely has pores in it?

10
Discussion: When ceramics are used for structural purposes (buildings, parking garages,
etc.) or for high impact situations (body armor, turbine blades, etc.), incomplete sintering
(pores left in the material) would cause a decrease in performance – they would be
weaker. The pores would act as weak spots in the material where cracks could easily
propagate.
Sometimes ceramics are made to be purposely porous (contain many pores, often in a
uniform arrangement). The pores can act as a pathway between the material for things
like water (ceramic filters, like those found in filtered water bottles), ions (ceramic solid
electrolytes in batteries), etc. Porous ceramics are also used to mimic the material in your
bone.

11
SUPPLEMENTARY INFORMATION
Equations:
𝐴𝑐𝑖𝑟𝑐𝑙𝑒 =𝜋
4𝑑2
Equation 1: Area of a circle in terms of diameter.
2𝑟 = 𝑑 Equation 2: The relation of a circle’s radius (r) to its diameter (d).
𝑉𝑏𝑒𝑎𝑑 =1
6𝜋𝑑3
Equation 3: Volume (V) of a single bead of diameter (d) by
combining Equation 1 and Equation 2.
𝑉𝑡𝑜𝑡𝑎𝑙 = 𝑉𝑏𝑒𝑎𝑑 × 𝑛 Equation 4: The total volume (Vtotal) is equal to the ‘n’ number of
beads times the volume of an individual bead, Vbead
𝑛 =6
𝜋𝑑3∗ (
𝑚
𝜌𝑏𝑒𝑎𝑑)
Equation 5: The number of beads (n) of density (ρ) and diameter
(d) needed to generate a desired mass (m) can be
calculated. This assumes spherical particles.
𝜌𝑏𝑒𝑎𝑑 = 1.37𝑔
𝑐𝑚3⁄
Density of a polyester thermoplastic bead1.
𝐴𝑡𝑜𝑡𝑎𝑙_𝑝𝑜𝑟𝑒𝑠 = 𝐴𝑎𝑣𝑔_𝑝𝑜𝑟𝑒 × 𝑛𝑡𝑜𝑡𝑎𝑙_𝑝𝑜𝑟𝑒𝑠 Equation 6: The estimated total area of pores is the average area
of a pore (Aavg_pore) multiplied by the total number of pores on the
face (npores).
% 𝑃𝑜𝑟𝑜𝑠𝑖𝑡𝑦 =𝐴𝑡𝑜𝑡𝑎𝑙_𝑝𝑜𝑟𝑒𝑠
𝐴𝑏𝑢𝑙𝑘× 100
Equation 7: The estimated percent of the face that is pores by
using the total average porous area (Atotal_pores) to the area of the
bulk solid (Abulk).
% 𝐷𝑒𝑛𝑠𝑖𝑡𝑦 = 1 − % 𝑃𝑜𝑟𝑜𝑠𝑖𝑡𝑦
Equation 8: The estimated density of the solid based on how much
open space (pores) exists.
The Equation 5 can be used to calculate the number of beads needed for 10 grams if the student
cannot weigh it.
1 British Plastics Federation, Plastipedia: Polyesters (Thermoplastic) PETP, PBT, PET
http://www.bpf.co.uk/plastipedia/polymers/Polyesters.aspx

12
STUDENT LAB HANDOUT
Sintering: Grain Boundaries, Interfaces, and Porosity
Background Information: All materials must be processed in some way to achieve either a
particular material property or create a specific shape. There are many different material
processing techniques, but one that is fundamental to ceramic materials is sintering. Sintering is a
processing technique by which a solid mass of material is formed from the fusion of many
smaller pieces, often a powder. This is done primarily through the application of heat but
sometimes by adding pressure concurrently. It is unique in that sintering is a solid state process,
unlike other common material shaping techniques that require melting the material to pour into a
mold, followed by cooling. The typical temperatures used for sintering are around 2/3 of a
material’s melting temperature, making it ideal for materials with extremely high melting points.
Sintering has been used for centuries in the construction of pottery by ancient civilizations.
However, recently, the advent of nanotechnology has used nanoparticles to create materials with
novel and unique properties.
Sintering is effectively a process where porosity, i.e., open space, is removed from compacted
powder particles to form a solid mass. Material moves to the contact points between particles and
fills in the open space. This accumulation of material at pores causes contact points to extend and
become interfaces between grains, commonly called grain boundaries. This process is outlined
in Figure 1 with a point contact between particles, marked by a red dot before sintering,
becoming a grain boundary after sintering (the red line). Material moves to pores by diffusion
facilitated by high temperatures.
Figure 1: During sintering, high temperatures allow material to transport to the open space
between powder particles. Eventually, the pores disappear resulting in a dense pore free object.
13
Why do the pores shrink in the first place? The pores shrink by material diffusing to the empty
space creating grain boundary interfaces, which is driven by energy.
Interfaces can be described in terms of energies because work should be applied to create the
new surface area. For example, when you blow through a ring with a soap film to make a soap
bubble, the blowing is work done on the soap film, resulting in the flat soap film bending out,
creating a bubble. As the bubble grows, it increases its surface area and eventually becomes a
sphere, as shown in Figure 2. The Greek symbol γ (gamma) is often used to denote the energy
per unit area for surfaces in J/cm2.
Figure 2: In order to create a surface, work must be done over that area, just like when blowing a bubble.
Lab Description: In this lab, you will explore the material processing technique sintering using
plastic beads and analyze the resultant porous microstructure.
Figure 3: This lab begins with loose particles that, through the application of heat in the form of hot water,
are sintered and bonded together. The resultant microstructure will be analyzed.

14
Keywords: grain, grain boundary, interface, surface energy, diffusion, porosity, microstructure
Materials List:
· 10 grams InstaMorph beads
· enough hot water (~150°F) to just cover the beads
· beaker or container for the beads and water
· utensil to retrieve the beads from the water
· glove
· paper towels for cleaning water
· thermometer to monitor water temperature (optional)
· hot plate to heat water to 150°F (optional)
Safety Precautions: When retrieving the mass from the hot water, be sure to wear a thermally
insulated glove to protect your hand from burns or other heat related injuries. Standard lab rules
and procedures (only using the equipment as indicated in the instructions) should be followed.
Instructions:
1. Ensure you have all required materials to perform the lab.
2. Review the questions in the student handout and data sheet to get an idea of what you
need to pay attention to and record.
3. Weigh 10 grams of InstaMorph beads and put them into a clear glass container.
4. Using a thermometer to monitor water temperature, heat the water to 150°F or the
instructed temperature determined by the teacher. Be sure to put on gloves to protect
your hands from any potential burns or heat-related injuries while handling the hot water.
5. Make sure the experiment setup is ready and quickly transfer the heated water to the
beaker containing the polymer beads. Pour enough water into the beaker so that the beads
are completely covered.
6. Record the time needed for the beads to turn clear and note any observations during the
sintering process.
7. When the beads are completely clear, carefully remove the sintered mass from the water.
Being careful not to splash any hot water, use a pencil, fork or similar tool and place the
mass on a paper towel to drain. Be careful to not squish the beads too much when
retrieving them from the water.

15
8. Examine the sintered body and estimate what the percentage of the material that is open
space (pores) vs. material.
9. Once it is cool enough to handle, record any observations on the material’s apparent
structure, strength, and rigidity properties as compared to the mound of beads you
weighed previously.
10. Approximately measure the pore diameters, number of pores, and the height and diameter
of the surface of the sintered mass (which should be close to the diameter of your
container) and then record the values onto the data sheet and calculate the percent
porosity.
a. First measure the diameter of the surface and calculate the area of the bulk
material. Use Equation 1, below.
𝑨𝒃𝒖𝒍𝒌 =𝝅
𝟒𝒅𝟐
Equation 1: The area of the surface including pores by
measuring the diameter, approximating a circle.
b. Count how many pores and record (n), and then measure the diameter of as many
of the pores as you can, based on your judgment.
c. Calculate the areas of pores considering a circular shape and average the values to
get a representative area.
d. Multiply that average pore area by the total number of pores you see (n) on the
surface to get a total pore area using equation 2.
𝑨𝒕𝒐𝒕𝒂𝒍_𝒑𝒐𝒓𝒆𝒔 = 𝑨𝒂𝒗𝒈_𝒑𝒐𝒓𝒆 × 𝒏𝒕𝒐𝒕𝒂𝒍_𝒑𝒐𝒓𝒆𝒔
Equation 2: The estimated total area of
pores is the average area of a
pore (Aavg_pore) multiplied by the
total number of pores on the
face (npores).
e. Calculate the porosity percentage, which will be the ratio of porous area (part d) to
the bulk area (part a) described by Equation 3.
% 𝑷𝒐𝒓𝒐𝒔𝒊𝒕𝒚 =𝑨𝒕𝒐𝒕𝒂𝒍_𝒑𝒐𝒓𝒆𝒔
𝑨𝒃𝒖𝒍𝒌× 𝟏𝟎𝟎
Equation 3: The estimated percent of the
face that is pores by using the
total average porous area
(Atotal_pores) to the area of the
bulk material (Abulk).
f. It may be easier to think of it terms of density, which is described by Equation 4.

16
% 𝑫𝒆𝒏𝒔𝒊𝒕𝒚 = 𝟏 − % 𝑷𝒐𝒓𝒐𝒔𝒊𝒕𝒚 Equation 4: The estimated density of
the material based on how
much open space (pores)
exists.
11. Cut the sintered bead mass in half, examine the cut surface, and record any observations
on the internal microstructure.
12. Complete the questions on the Student Question Handout.
EXTRA CREDIT
Can you think of another, quicker way that could be used to find the % porosity of the sintered
mass? If so, find it. Hint: you’ll need the density of a single InstaMorph polyester bead (1.37
g/cm3).
Clean Up: Wipe up any excess or spilled water with the paper towels. Dry the utensils and
beakers. The sintered beads can be reheated and molded so you can take pieces of the material
home!

17
Data Sheet for a Beads and Porosity
Weight of beads in grams Time for beads to turn clear
Estimated % of Pores Estimated % of Dense Material
Observations during sintering while beads where submerged in water:
What are the properties of the cooled, sintered mass?
What observations of the microstructure of the sintered body and porous surface, after
cutting, can be made?
Diameter of
the surface
Area of the surface of the
bulk material, Abulk
Height of
sintered
mass
Measured pore diameters Calculated pore areas
1)
2)
3)
4)
5)
6)
7)
8)
9)
10)
1)
2)
3)
4)
5)
6)
7)
8)
9)
10)
Number of pores counted
on surface (n)
Calculation of average
pore area, Aavg_pore
Calculation of total pore area,
Atotal_pores
Calculations for % Porosity and % Density:

18
STUDENT QUESTION HANDOUT
Sintering: Grain Boundaries, Interfaces, and Porosity
1. What percent of the material did you estimate to be pores (open space) vs. material? How
different were the estimated values compared with the calculated % of pores and % of
dense material? When you cut the material to look at the inside surface, would your
estimates of porosity have been more accurate?
2. Why did the porosity decrease when exposed to hot water? If the beads were left in hot
water over night, would you expect higher porosity % or lower?
3. What relationship exists between the porosity and density? If porosity is increased, do you
think strength will increase or decrease?
4. If the mass was put back into the hot water and you added pressure by pressing the beads
together using a fork, what would happen to the remaining porosity?

19
The American Ceramic Society Materials Science Kits
Warranty Disclaimer, Limitation of Liability and Safety Disclaimer
NO WARRANTY – DISCLAIMER OF WARRANTY
THE AMERICAN CERAMIC SOCIETY (ACerS), OFFERS THE MATERIALS SCIENCE KITS “AS-IS”, WITH NO WARRANTIES
WHATSOEVER, EXPRESS OR IMPLIED, INCLUDING, WITHOUT LIMITATION, WARRANTIES OF MERCHANTABILITY, SAFETY,
FITNESS FOR ANY PARTICULAR PURPOSE OR NON-INFRINGEMENT OF PATENTS, COPYRIGHTS OR OTHER
PROPRIETARY RIGHTS OF OTHERS. SOME STATES AND JURISDICTIONS DO NOT ALLOW LIMITATIONS ON IMPLIED
WARRANTIES, SO THE ABOVE LIMITATIONS MAY NOT APPLY TO CUSTOMER. WHEN THE IMPLIED WARRANTIES ARE
NOT ALLOWED TO BE EXCLUDED IN THEIR ENTIRETY, THEY WILL BE LIMITED TO THE SHORTEST DURATION PERMITTED
UNDER APPLICABLE LAW. CUSTOMER MAY ALSO HAVE OTHER RIGHTS WHICH VARY FROM STATE TO STATE.
WITHOUT LIMITING THE GENERALITY OF THE FOREGOING, ACerS DOES NOT WARRANT THAT EACH MATERIALS SCIENCE
KIT IS COMPLETELY ERROR FREE, WILL OPERATE WITHOUT INTERRUPTION, OR IS COMPATIBLE WITH ALL EQUIPMENT
AND SOFTWARE CONFIGURATIONS. CUSTOMER EXPRESSLY ASSUMES ALL RISK FOR USE OF THE MATERIALS SCIENCE
KITS.
LIMITATION OF LIABILITY
TO THE MAXIMUM EXTENT PERMITTED BY LAW, ACerS WILL NOT HAVE ANY LIABILITY OR RESPONSIBILITY TO
CUSTOMER FOR DAMAGES OF ANY KIND, INCLUDING SPECIAL, INDIRECT OR CONSEQUENTIAL DAMAGES (INCLUDING,
WITHOUT LIMITATION, DAMAGES FOR LOSS OF DATA), ARISING OUT OF OR RESULTING FROM THE MATERIALS SCIENCE
KITS, ANY COMPONENT, DOCUMENTATION, SERVICES OR MATERIALS MADE AVAILABLE TO CUSTOMER IN CONNECTION
WITH THE MATERIALS SCIENCE KITS OR THE USE OR MODIFICATION OF ANY OF THEM, EVEN IF ACerS HAS BEEN
ADVISED OF THE POSSIBILITY OF THE DAMAGES. IN ANY CASE, ACerS AND ITS LICENSORS’ ENTIRE LIABILITY UNDER
ANY PROVISION OF THIS AGREEMENT WILL BE LIMITED TO THE AMOUNT ACTUALLY PAID BY CUSTOMER TO ACerS FOR
THE PRODUCT OR TEN DOLLARS ($10.00), WHICHEVER IS GREATER. Some states do not allow the limitation or exclusion
of liability for incidental or consequential damages, or have legislation which restricts the limitation or exclusion of
liability, so the above limitation may not apply to Customer.
CALIFORNIA RESIDENTS
California Residents: I understand that I am waiving rights with respect to claims that are at this time unknown or
unsuspected, and in accordance with such waiver, I acknowledge that I have read and understand, and I hereby
expressly waive, the benefits of section 1542 of the civil code of California, and any similar law of any state, country or
territory, which provides as follows: “A general release does not extend to claims which the creditor does not know or
suspect to exist in his or her favor at the time of executing the release, which if known by him or her must have materially
affected his or her settlement with the debtor.”
MATERIALS SCIENCE SAFETY DISCLAIMER
The materials science kits contain lessons that are believed to be reliable regarding the safe use and handling of these
materials in laboratories and student classrooms. ACerS, however, does not represent or warrant in this, or in any other
publication, to specify minimum safety or legal standards or to address all of the compliance requirements, risks, or
safety problems associated with the handling of hazardous materials, their use, or the methods prescribed for using
them in laboratories or classrooms. This information is intended to serve only as a beginning point for information and
should not be construed as containing all the necessary compliance, safety, or warning information, nor should it be
construed as representing the policy of ACerS. The kits should be used by minors (under 18) only with adult supervision.
Without limiting the generality of the foregoing disclaimers, no warranty, guarantee, or other form of representation is
made by ACerS as to the accuracy or sufficiency of the information and guidelines included with the materials science
kits, and ACerS assumes no liability or responsibility concerning the use of such instructions and guidelines for any
purpose. It is the responsibility of the users of these materials to consult and comply with pertinent local, state, and
federal laws, regulations, and standards with respect to the handling of materials. Users of the materials science kits
should consult with the school’s legal counsel or other professional advisers about the applicable laws, safety issues,
and compliance issues for the storage of materials and the methods for using the materials in school classrooms and
laboratories.
THIS DISCLAIMER APPLIES TO ANY LIABILITY THAT IS, OR MAY BE INCURRED BY, OR ON BEHALF OF THE INSTITUTIONS
THAT USE THE MATERIALS SCIENCE KITS; INCLUIDNG, WITHOUT LIMITATION, THE FACULTIES, STUDENTS, OR
PROSPECTIVE STUDENTS OF THOSE INSTITUTIONS; AND ANY MEMBER OF THE PUBLIC AT LARGE; AND INCLUDES, BUT
IS NOT LIMITED TO, A FULL DISCLAIMER OF ANY LIABILITY THAT MAY BE INCURRED WITH RESPECT TO POSSIBLE
INADEQUATE SAFETY PROCEDURES TAKEN BY ANY USER.