simple woodworking: potting bench - wordpress.com · want more chief's shop plans? visit...
TRANSCRIPT

Want more Chief's Shop plans? Visitchiefsshop.com and look through thePlans section. Be sure to "Like" Chief'sShop on facebook by heading over tofacebook.com/ChiefsShop.
More Plans
lumber1 - 2 x 4 x 89 - 2 x 4 x 101 - 2 x 6 x 82 - 2 x 6 x 101 - 2 x 10 x 82 - 4 x 4 x 8(availability will vary)hardware/supplies2 1 /2" pocket hole screws2 1 /2" deck screwswood gluepaint/stain/polyurethanetoolstable sawmiter sawjig sawdrill/driverpneumatic nailer or hammerKreg pocket hole j ig& drill bit
clamps
WhatYou'll Need v
SSiimmpplleeWWooooddwwoorrkkiinngg::PPoottttiinngg BBeenncchh
© Chris Hill/Chief's Shop 2012 Page 1chiefs‐shop.com
NOTELayout
take care!
About These PlansOn this first page you will see above the project complete. On the last page you'll find thefinished outer dimensions.
To the right is a list of the Lumber, Hardware/Supplies, and Tools you will need tocomplete this project. A measuring tape and pencil are not included because that should bepretty standard and self explanatory.
Below What You'll Need is the Parts list. This also is included on the Cutting Diagrampage, which is the last page of this plan document.
Throughout these plans you'll find the icons below:
This indicates a diagram detailing the dimensions of a project partand/or the placement for pocket holes, screws, nails, etc.
Notes are the instructions for a particular step/section of the project.
This indicates when to pay close attention to the diagrams,take precautions for safety, etc.
PartsBack Legs (2) - 3 1 /2 x 3 1 /2 x 48 1 /2
Front Legs (2) - 3 1 /2 x 3 1 /2 x 34 1 /2
Bottom End Rails (2) - 1 1 /2 x 3 1 /2 x 26
Top End Rails (2) - 1 1 /2 x 5 1 /2 x 26
Bottom Back Rail (1 ) - 1 1 /2 x 3 1 /2 x 48
Top Back Rail (1 ) - 1 1 /2 x 5 1 /2 x 48
Bottom Front Rail (1 ) - 1 1 /2 x 3 1 /2 x 48
Top Front Rail (1 ) - 1 1 /2 x 5 1 /2 x 48
Bottom Stretcher (1 ) - 1 1 /2 x 3 1 /2 x 26
Top Stretcher (1 ) - 1 1 /2 x 1 1 /2 x 26
Short Bottom Slats (2) - 1 1 /2 x 3 1 /2 x 48
Bottom Slats (7) - 1 1 /2 x 3 1 /2 x 57
Top Slats (7) - 1 1 /2 x 3 1 /2 x 57
Front Slat (1 ) - 1 1 /2 x 5 1 /2 x 57
ShelfRail (1 ) - 1 1 /2 x 5 1 /2 x 48
Shelf (1 ) - 1 1 /2 x 8 1 /4 x 48
All parts are listed in actual dimensions. Refer to theCutting Diagram on the last page of this plan as aguide for determining the specific board from whichto cut the parts.
© Chris Hill/Chief's Shop 2012 Page 2chiefs‐shop.com
Layout NOTE
SSiimmppllee WWooooddwwoorrkkiinngg::PPoottttiinngg BBeenncchh
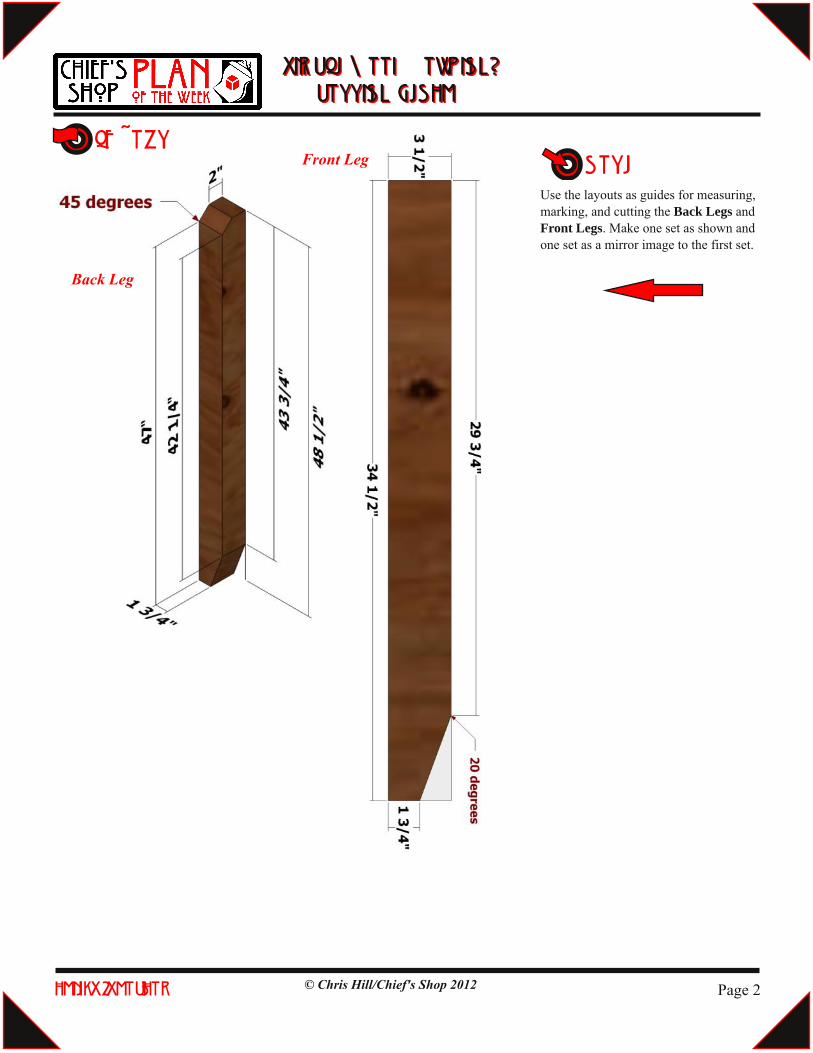
Use the layouts as guides for measuring,
marking, and cutting the Back Legs andFront Legs. Make one set as shown and
one set as a mirror image to the first set.
Back Leg
Front Leg

Page 3chiefs‐shop.com © Chris Hill/Chief's Shop 2012
NOTE
NOTE
Position the Bottom and Top EndRails as shown and attach to theLegs using glue and 2 1 /2-inchpocket hole screws. Create asecond End Assembly as a mirrorimage to the first.
Top End Rail
SSiimmppllee WWooooddwwoorrkkiinngg::PPoottttiinngg BBeenncchh
Layout
Bottom End Rail/Bottom Stretcher
Use the layout as a guide for measuring, marking, cutting ,anddrilling pocket holes in the Top End Rails, Bottom End Rails,and Bottom Stretcher. Set your pocket hole j ig and drill bit for1 1 /2-inch stock.
Bottom End Rail
Top End Rail
Front Leg
Back Leg
pocket holes
pocket holes

Page 4© Chris Hill/Chief's Shop 2012chiefs‐shop.com
NOTE
Position the Top Back Rail and BottomBack Rail as shown and attach usingglue and 2 1 /2-inch pocket hole screws.
NOTE
Top Back Rail
Bottom Back/Front Rail
SSiimmppllee WWooooddwwoorrkkiinngg::PPoottttiinngg BBeenncchh
Layout
Use the layout as a guide for measuring, marking, cutting ,anddrilling pocket holes in the Bottom Back Rail, Bottom FrontRail, and Top Back Rail. Set your pocket hole j ig and drill bitfor 1 1 /2-inch stock.
pocket holes
pocket holes

Page 5© Chris Hill/Chief's Shop 2012chiefs‐shop.com
NOTE
NOTEPosition the Bottom Front Rail andTop Front Rail as shown and attachusing glue and 2 1 /2-inch pocket holescrews.
SSiimmppllee WWooooddwwoorrkkiinngg::PPoottttiinngg BBeenncchh
LayoutTop Front Rail/ShelfRail
Use the layout as a guide for measuring, marking, cutting ,anddrilling pocket holes in the Top Front Rail and Shelf Rail. Setyour pocket hole j ig and drill bit for 1 1 /2-inch stock.
pocket holes

Page 6© Chris Hill/Chief's Shop 2012chiefs‐shop.com
SSiimmppllee WWooooddwwoorrkkiinngg::PPoottttiinngg BBeenncchh
NOTEUse the layout above to create the TopStretcher. Set your pocket hole j ig anddrill bit for 1 1 /2-inch stock. Position theTop Stretcher and Bottom Stretcher asshown (centered) and attach using glueand 2 1 /2-inch pocket hole screws.
NOTEPosition the remaining End Assemblyas shown and attach using glue and 21 /2-inch pocket hole screws.
LayoutTop
Stretcher
Top Front Rail/ShelfRail
BottomStretcher

Page 7© Chris Hill/Chief's Shop 2012chiefs‐shop.com
SSiimmppllee WWooooddwwoorrkkiinngg::PPoottttiinngg BBeenncchh
NOTEPosition the Bottom Short Slats asshown (flush with the legs and on topof the Bottom Back and BottomFront Rails and attach using2 1 /2-inch deck screws.
BottomShort Slat
BottomShort Slat
NOTEAttach the Bottom Slats spacedequidistantly apart (about 3/16" apart)between the Bottom Short Slats, andflush with the outer edge of the Legs, andattach to the Bottom Rails and BottomStretcher using 2 1 /2-inch deck screws.

Page 8© Chris Hill/Chief's Shop 2012chiefs‐shop.com
SSiimmppllee WWooooddwwoorrkkiinngg::PPoottttiinngg BBeenncchh
NOTEPosition one Top Slat flush against andextending 1 -inch past the outer edge ofthe Back Legs and attach to the TopEnd Rails and Top Stretcher using2 1 /2-inch deck screws.
NOTEAttach the remaining Top Slats and theTop Front Slat spaced equidistantly apart(about 3/16" apart) and with the ends flushwith each other, and attach using 2 1 /2-inch deck screws.
Top Slat
FrontTop Slat
Page 9© Chris Hill/Chief's Shop 2012chiefs‐shop.com
SSiimmppllee WWooooddwwoorrkkiinngg::PPoottttiinngg BBeenncchh
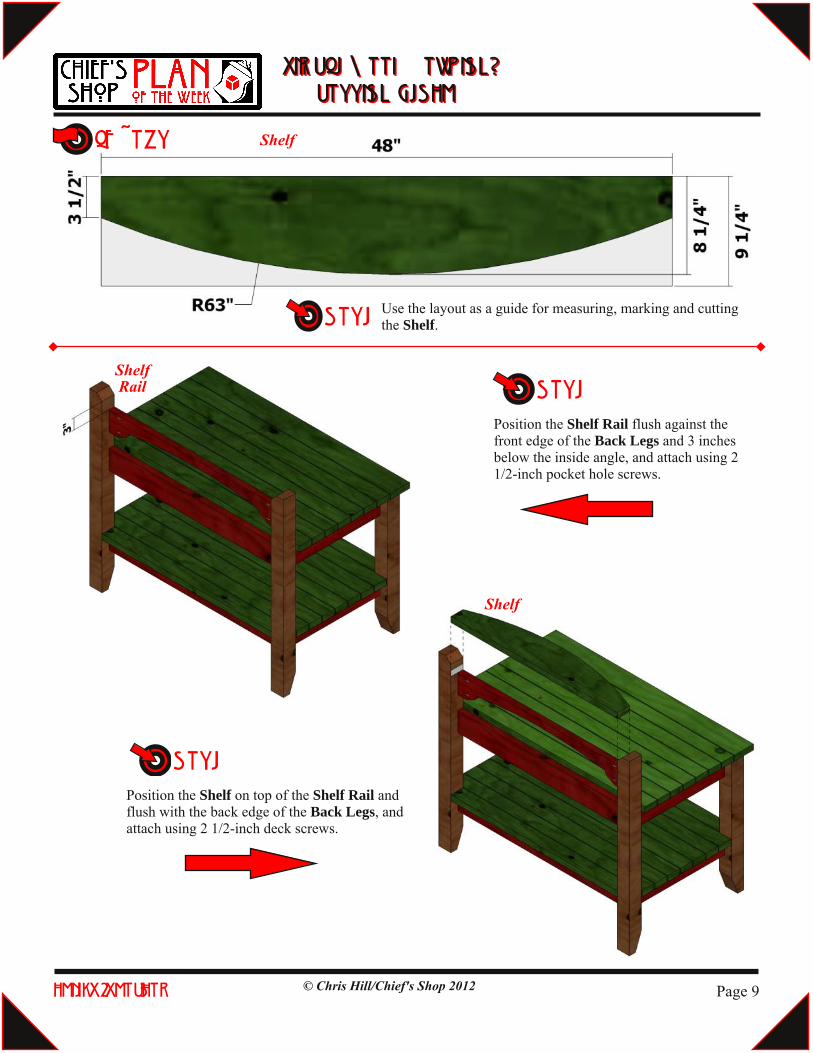
Layout Shelf
NOTE Use the layout as a guide for measuring, marking and cuttingthe Shelf.
NOTEPosition the Shelf Rail flush against thefront edge of the Back Legs and 3 inchesbelow the inside angle, and attach using 21 /2-inch pocket hole screws.
NOTEPosition the Shelf on top of the Shelf Rail andflush with the back edge of the Back Legs, andattach using 2 1 /2-inch deck screws.
Shelf
ShelfRail

Page 10
Follow ALL SAFETYGUIDELINES AND RECOMMENDATIONS provided
by the manufacturers ofyour tools, and any chemicals such as glue and
finishes you use in this project. YOUare responsible for your safety, so use
common sense when working in the shop!
chiefs‐shop.com
take care!
KcUTTING DIAGRAM
© Chris Hill/Chief's Shop 2012
2 x 4 x 8
PartsBack Legs (2) - 3 1 /2 x 3 1 /2 x 48 1 /2
Front Legs (2) - 3 1 /2 x 3 1 /2 x 34 1 /2
Bottom End Rails (2) - 1 1 /2 x 3 1 /2 x 26
Top End Rails (2) - 1 1 /2 x 5 1 /2 x 26
Bottom Back Rail (1 ) - 1 1 /2 x 3 1 /2 x 48
Top Back Rail (1 ) - 1 1 /2 x 5 1 /2 x 48
Bottom Front Rail (1 ) - 1 1 /2 x 3 1 /2 x 48
Top Front Rail (1 ) - 1 1 /2 x 5 1 /2 x 48
Bottom Stretcher (1 ) - 1 1 /2 x 3 1 /2 x 26
Top Stretcher (1 ) - 1 1 /2 x 1 1 /2 x 26
Short Bottom Slats (2) - 1 1 /2 x 3 1 /2 x 48
Bottom Slats (7) - 1 1 /2 x 3 1 /2 x 57
Top Slats (7) - 1 1 /2 x 3 1 /2 x 57
Front Slat (1 ) - 1 1 /2 x 5 1 /2 x 57
ShelfRail (1 ) - 1 1 /2 x 5 1 /2 x 48
Shelf (1 ) - 1 1 /2 x 8 1 /4 x 48
All parts are listed in actual dimensions. Refer to theCutting Diagram on the last page of this plan as aguide for determining the specific board from whichto cut the parts.
2 x 4 x 1 0
2 x 6 x 8
2 x 6 x 1 0
4 x 4 x 8
2 x 1 0 x 8
SSiimmppllee WWooooddwwoorrkkiinngg::PPoottttiinngg BBeenncchh

chiefs‐shop.com © Chris Hill/Chief's Shop 2012
SSiimmppllee WWooooddwwoorrkkiinngg::PPoottttiinngg BBeenncchh
Page 11