silo operating instructions - cpi euromix · the silo requires a 3/4" water supply with a...
TRANSCRIPT

Silo Operating Instructions

CONTENTS
PANEL CONNECTION Page 4-5
SILO SETUP Page 6-9
• PANEL ISOLATOR – 6• MIXER START/STOP – 6• TOGGLE SWITCH – 7• CONNECTING MOTOR & MAINS SUPPLY CABLE – 7• CORRECT CONNECTION OF WATER SUPPLY – 8• ELECTRICAL INSPECTION & TESTING – 8
SILO OPERATION Page 9
• FILLING A MORTAR TUB – 9• MORTAR CONSISTENCY – 9
CLEANING Page 10-11
• DAILY CLEANING – 10• WEEKLY CLEANING – 10
FROST PROTECTION Page 12
WORKING SPACE REQUIREMENTS Page 13
FAULT DIAGNOSIS Page 14-15
2

INTRODUCTION H&S DISCLAIMER
This quick guide will show you how to connect, start up and use the mortar mixer that comes with your EuroMix silo.Your silo will be set-up and checked by the EuroMix technician before being handed over to you for use. However, there are a few simple things you can do to make sure the silo gives you easy and trouble free mixing.The most important thing you can do to help keep the machine working is to always carry out your daily and weekly clean. The cleaning procedure is shown in this guide in detail, but if you need any help or have any questions please call your local plant.During the winter months or if frost is at all likely, please follow the cold weather working guide. It is important that you protect the control panel from frost damage as this will also prevent any downtime from damaged equipment.There is a fault diagnosis flowchart at the back of the guide which you should follow to resolve any issues with the mixer.
Only trained operatives should operate this equipment. The equipment requires to be stripped and cleaned, and it is EXTREMELY IMPORTANT that the machinery is disconnected from the mains supply by fully removing the supply plug before carrying out any work on the machine.It is the customers responsibility to ensure that all staff operating a EuroMix Silo Station are fully trained. CPI EuroMix are happy to carry out training free of charge, simply contact your local CPI office to book.
3

MIXER SET UP
!
!
SPLIT PANEL
WATER PANEL
MAINS SUPPLY
WATER IN
MIXER
ELECTRICAL PANEL
4

!
STANDARD PANEL
5
MAINS SUPPLY
WATER IN
MIXER

The isolator switch turns the electricity supply to the panel off. Nothing will function whilst this switch is in the ‘Off’ position. To operate the mixer, this switch must be turned clockwise to the ‘On’ position.
To completely isolate the panel the power supply MUST be disconnected by removing the mains supply.
To start the mixer operating, simply depress the green ‘On’ button. The mixer shaft will then start to turn, the water valve will open and the water pump will operate.
You can tell if the machine is operating by checking the shaft is rotating clockwise in the face of the outlet and the motor fan is
turning. Water should be coming out of the outlet of the mixer.
The mixer is operated on a timer and will stop automatically. You can also stop it at any time by depressing the red ‘Stop’ button.
The buttons are clearly marked as shown below.
PANEL ISOLATOR
MIXER START / STOP
SILO SETUP
6
Off
Start
Stop

This switch must always be in the down position. If the switch is in the up position, water will pass through the panel and mixer and the ‘start’ and ‘stop’ buttons will not function.
NoteNot all control panels will contain this switch.
There are multiple sockets on the panel – for the mixer motor, vibrator and mains inlet. It is important that these are all correctly connected. All cables should be visually inspected before any connection is made.
Refer to the diagrams on pages 4 and 5 for a simple guide.
TOGGLE SWITCH
CONNECTING MOTOR AND MAINS SUPPLY CABLE
7
!!
Mixer Motor
Vibrator
Mains Inlet

The silo requires a 3/4" water supply with a minimum flow capacity of 900litres per hour at 2 BAR pressure. Some sites may require a break tank to comply with local water Bylaws and this can be supplied by CPI EuroMix on request.
The water supply can be provided by a water tank if there is no mains supply to the site. The tank outlet must be placed a minimum of 500mm above ground level, within 5mtrs of the silo and equipped with a 3/4" outlet. An inline filter must be included prior to the silo connection.
All CPI EuroMix silo equipment will be inspected and tested prior to the commencement of the hire. A certificate showing the results of the test will be issued for each piece of equipment.
It is the customer’s responsibility to ensure the equipment is safe to use whilst on site and to ensure compliance with the Use of Electricity at Work Regulations.
CPI will carry out subsequent tests on request. There is a charge for this service.
CORRECT CONNECTION OF WATER SUPPLY
ELECTRICAL INSPECTION AND TESTING
SILO SETUP
8
!
!
WATER PANELMAINS SUPPLY
WATER IN
MIXER
ELECTRICAL PANEL
!
MAINS SUPPLY
WATER IN
MIXER
SPLIT PANEL STANDARD PANEL

Adjust the mortar to the required consistency by slowly turning the black water tap. This can be found on the left hand side of the combined panel, or inside the water panel on a split unit.
This adjustment will be carried out by the CPI EuroMix Service Technician during the set-up process, but can be altered by the user.
Be careful not to run the material too dry, as this could cause the mixer to stall and the motor to trip the protection device.
The mixer operates on a timer. This timer will be adjusted during the set-up of your CPI EuroMix silo to suit the size of your mortar tubs.
The timer cannot be adjusted whilst the mixer is running and should only be adjusted by a qualified person.
Always start the mixer with the product handle on the silo in the shut position (horizontal).
When the mixer is running and water can be seen coming from the mixer outlet, slowly open the product handle (move towards the vertical).
MORTAR CONSISTENCY
FILLING A MORTAR TUB
SILO OPERATION
9
Adjust the mortar to the required consistency by slowly turning the black water tap. This can be found on the left hand side of the combined panel, or inside the water panel on a split unit.
This adjustment will be carried out by the CPI EuroMix Service
Technician during the set-up process, but can be altered by the user.
Be careful not to run the material too dry, as this could cause the mixer to stall and the motor to trip the protection device.
The mixer operates on a timer. This timer will be adjusted during the set-up of your CPI EuroMix silo to suit the size of your mortar tubs.
The timer cannot be adjusted whilst the mixer is running and should only be adjusted by a qualified person.
Always start the mixer with the product handle on the silo in the shut position (horizontal).
When the mixer is running and water can be seen coming from the mixer outlet, slowly open the product handle (move towards the vertical).
MOrTar CONsisTENCy
filliNg a MOrTar Tub
silO OPEraTiON
9
Open
Close
Turn the isolator to the on position
Press the on switch Once water can be seen coming from the mixer outlet, move the product
handle to the vertical (open) position
1 2 3

CLEANINGRegular cleaning is essential to ensure continued performance of the mixer. Wet mortar will set hard, so it is important the mixer is emptied of material after each run of tubs.
If the mixer is to be left for more than 30 minutes, slowly close the product handle (down to horizontal) as the last tub is completed. Let the mixer run for 20 seconds until water comes from the outlet to ensure the mixer is clean.
Daily Cleaning
After running out the last tub of the day, close the product handle on the silo (down to horizontal) and continue to run the mixer. Water will come from the outlet. Once this water
is clear, run the mixer for a further 1 minute to ensure the mixer is clean.
Weekly Cleaning
It is important that a thorough internal clean of the mixer is completed at least once a week. A properly cleaned machine will give long and reliable service. If the clean is not carried out, the set mortar will cause accelerated wear of the moving parts, and the machine will quickly cease to operate.
The weekly clean will be demonstrated to you during training. The steps are detailed below for reference.
1. Following your daily clean, disconnect the mains power and fully isolate the machine
Note: Only trained and competent operatives should undertake this operation.
3. Withdraw the mixing screw and clean it thoroughly. If there is excessive wear on the blades resulting in metal showing through, call CPI EuroMix for a service
2. Remove the three nuts securing the mixing chamber to the dry chamber with a 19mm spanner and remove the mixing chamber
4. Clean any hard material that has gathered inside the mixing chamber paying close attention to the discharge chute and narrow rubber insert section
Off
Remove
Remove
10
ClEaNiNgRegular cleaning is essential to ensure continued performance of the mixer. Wet mortar will set hard, so it is important the mixer is emptied of material after each run of tubs.
If the mixer is to be left for more than 30 minutes, slowly close the product handle (down to horizontal) as the last tub is completed. Let the mixer run for 20 seconds until water comes from the outlet to ensure the mixer is clean.
Daily Cleaning
After running out the last tub of the day, close the product handle on the silo (down to horizontal) and continue to run the mixer. Water will come from the outlet. Once this water
Note: Only trained and competent operatives should undertake this operation.
is clear, run the mixer for a further 1 minute to ensure the mixer is clean.
Weekly Cleaning
It is important that a thorough internal clean of the mixer is completed at least once a week. A properly cleaned machine will give long and reliable service. If the clean is not carried out, the set mortar will cause accelerated wear of the moving parts, and the machine will quickly cease to operate.
The weekly clean will be demonstrated to you during training. The steps are detailed below for reference.
1. Following your daily clean, disconnect the mains power and fully isolate the machine
3. Withdraw the mixing screw and clean it thoroughly. If there is excessive wear on the blades resulting in metal showing through, call CPI EuroMix for a service
2. Remove the three nuts securing the mixing chamber to the dry chamber with a 19mm spanner and remove the mixing chamber
4. Clean any hard material that has gathered inside the mixing chamber paying close attention to the discharge chute and narrow rubber insert section
OFF
REMOVE
DISCONNECT MAINS SUPPLY
REMOVE
10
fOllOw ThEsE sTEPs fOr wEEkly ClEaN
1 2
3 4
Disconnect Mains Supply
1 2
43

7. To reassemble, insert the mixing screw fully and swing the motor back into place, ensuring the mixing screw is seated correctly in the coupling
5. Open the dry chamber by removing the securing nut with a 19mm spanner and swing the motor to the side
9. Secure the motor into place using the securing bolt
8. Place the mixing chamber back over the mixing screw and secure in place with nuts provided
6. Clean out any material that’s left in the dry chamber and the motor coupling
11
7. To reassemble, insert the mixing screw fully and swing the motor back into place, ensuring the mixing screw is seated correctly in the coupling
5. Open the dry chamber by removing the securing nut with a 19mm spanner and swing the motor to the side
9. Secure the motor into place using the securing bolt
8. Place the mixing chamber back over the mixing screw and secure in place with nuts provided
6. Clean out any material that’s left in the dry chamber and the motor coupling
SWING
11
5
7
9
6
8
Swing
5
7
9
6
8

FROST PROTECTIONIn cold weather the freezing water may seriously damage the control panel and water fittings. It is therefore important to ensure the panel is drained of all water and stored in a frost free location overnight.
There are 8 simple steps to follow to protect the panel from frost:
frOsT PrOTECTiONIn cold weather the freezing water may seriously damage the control panel and water fittings. It is therefore important to ensure the panel is drained of all water and stored in a frost free location overnight.
There are 8 simple steps to follow to protect the panel from frost:
1. Close the product handle on the silo
6. Open both water drain valves
5. Press on switch and operate for 10 seconds
7. Let the water drain off completely
8. Remove the panel and store in a frost free location
2. Complete the daily clean 3. Turn off the water supply 4. Remove both the supply and feed pipes from the panel
For further advice on frost protection please refer to CPI EuroMix InfoSheet 18 in your starter pack for details.
!
!
12
!
1. Close the product handle on the silo
6. Press on switch and operate for 10 seconds
5. Open both water drain valves
7. Let the water drain off completely
8. Remove the panel and store in a frost free location
2. Complete the daily clean 3. Turn off the water supply 4. Remove both the supply and feed pipes from the panel
12

3 Metres
6 Metres
9 Metres3 Metres
Lorry Access
WORKING SPACE REQUIREMENTS
• 3 metres x 3 metres minimum for single silo installations• 6 metres x 3 metres single silo installations or for silo swap outs• 9 metres x 3 metres minimum for triple silo installations
Clear access suitable for 44 tonne articulated HGV trafficMinimum width 5 metres centred on each silo
13

NO,SILENT
ALL OK
NO, BANGING NOISEHEARD
YES
RESTART
ALL OK
NOIs mixer running?
(Shaft of mixer turning when viewed from front)
YES, BUT KEEPS STOPPING AFTER PRODUCING SOME MATERIAL
Restart
SET MATERIAL / BLOCKAGE FOUND
Return to aboveaction and
inspect
NO CHANGE OR REPEAT
RESTART
ALL LOOKS IN ORDER
No Change, still humming sound
Humming sound coming from mixer motor?
Actions
Actions
Action
Action
Action
Check RCDs in panel
not tripped
Check panel is turned on (Main Isolator)
Ensure cleaning/working toggle switch is in correct “working”
position
Check site electricity supply is live
Plugs are pushed in correctly
(all plugs)
Check condition of cables
Check key switch light indicator - if red lights shows clean out mixer
then call CPI
Rotation Indicator Light showing - Polarity of site
electrical supply has changed, site electrician
required
Plugs are pushed in correctly (all
plugs)
Check condition of cables and
plugs
Check RCDs in panel not tripped
Check site electricity supply
is live
Unplug vibratorif in use
Check for correct rotation of motor
Actions -Clean out then call CPI for advice
Service required,Call CPI
No change,Call CPI
Isolate power and clean out mixer
Check supply RSCs for earth phase, Neutral
and Earth (Site Electrician)
Strip down and carry out full cleandown and
inspect
Call CPICall CPI
POSSIBLE WEAR(see reference photos
below)
Worn Dosing Screw
Worn Scraper
Worn Mixing Flight
CPI EuroMix has produced a flow chart to help you diagnose faults and help you keep your silo working. It is often the case that the cause of a fault is a simple thing that can easily be rectified by the operator.
Common faults include:
• Water hoses being connected incorrectly
• Power supply not being energised
• Water supply turned off at stop cock
• Silo product handle is in the closed position
• Electrical Safety Devices tripped
FAULT DIAGNOSIS FLOW CHART
14
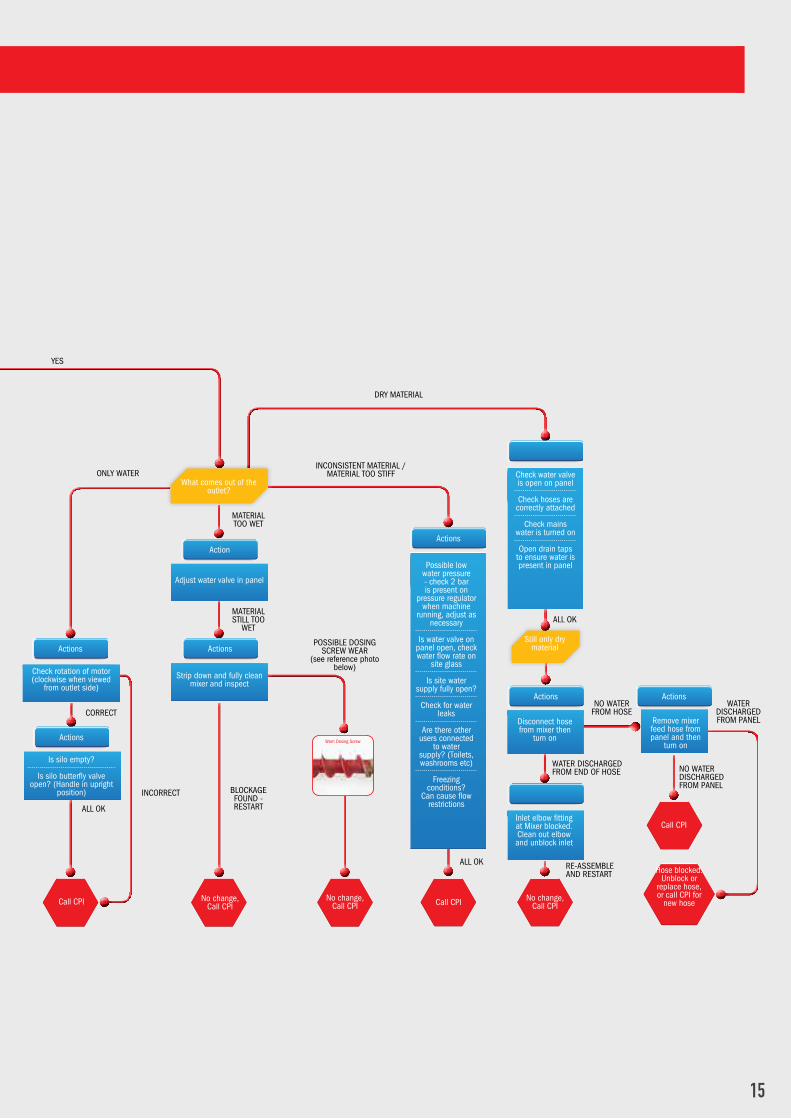
YES
What comes out of the outlet?
ONLY WATER
CORRECT
ALL OK
INCORRECT BLOCKAGE FOUND - RESTART
MATERIAL STILL TOO
WET
MATERIAL TOO WET
ALL OK
INCONSISTENT MATERIAL / MATERIAL TOO STIFF
Still only dry material
RE-ASSEMBLE AND RESTART
ALL OK
WATER DISCHARGED FROM END OF HOSE
DRY MATERIAL
NO WATER DISCHARGED FROM PANEL
WATER DISCHARGED FROM PANEL
Hose blocked. Unblock or
replace hose, or call CPI for
new hose
Actions
Actions
Actions
Action
Actions
Actions Actions
Possible low water pressure - check 2 bar is present on
pressure regulator when machine
running, adjust as necessary
Is water valve on panel open, check water flow rate on
site glass
Is site water supply fully open?
Check for water leaks
Are there other users connected
to water supply? (Toilets, washrooms etc)
Freezing conditions?
Can cause flow restrictions
Check water valve is open on panel
Check hoses are correctly attached
Check mains water is turned on
Open drain taps to ensure water is present in panel
No change,Call CPI
No change,Call CPI
No change,Call CPI
Check rotation of motor (clockwise when viewed
from outlet side)
Is silo empty?
Is silo butterfly valve open? (Handle in upright
position)
Adjust water valve in panel
Strip down and fully clean mixer and inspect
Disconnect hose from mixer then
turn on
Inlet elbow fitting at Mixer blocked. Clean out elbow and unblock inlet
Remove mixer feed hose from panel and then
turn on
Call CPI Call CPI
Call CPI
NO WATER FROM HOSE
POSSIBLE DOSING SCREW WEAR
(see reference photo below)
Worn Dosing Screw
15

BeaconsfieldSpringfield Farm Quarry, Broad Lane, Beaconsfield, Buckinghamshire HP9 1XDTel: +44 (0) 1494 680 814 Fax: +44 (0) 1494 730 816
Bilston, WolverhamptonSpringvale Industrial Park, Springvale Avenue Bilston, Wolverhampton West Midlands WV14 0QLTel: +44 (0) 1902 357 500Fax: +44 (0) 1902 357 506
Coatbridge Gartsherrie Industrial Estate, Hornock Rd, Coatbridge ML5 2DXTel: +44 (0) 1236 700 500 Fax: +44 (0) 1236 700 520
Harlow 29 Mead Industrial ParkRiverway, HarlowEssex CM20 2SETel: +44 (0) 1279 634 680 Fax: +44 (0) 1279 634 681
Irlam, Manchester Northbank Industrial EstateMartens Road, IrlamManchester M44 5AXTel: +44 (0) 161 777 7500Fax: +44 (0) 161 777 7501
LeedsStadium Park, Altofts Lane, WhitwoodCastleford, WF10 5PZTel: +44 (0)1977 523 300Fax: +44 (0)1977 523 333
NorthfleetRobins Wharf, Grove Road, Northfleet, Kent DA11 9AX Tel: +44 (0) 1474 333 372 Fax: +44 (0) 1474 325 080
SouthamptonMarchwood Industrial ParkMarchwood, SouthamptonHants SO40 4PBTel: +44 (0) 2380 662 000 Fax: +44 (0) 2380 662 009
BristolUnit 8, Severnside Industrial Park, Central Avenue, Bristol BS10 7SDTel: +44 (0) 1179 160 300 Fax: +44 (0) 1179 160 333
05/2
017
Helpline: 0845 850 9090 Visit us at: www.euromix.com E-mail: [email protected]
A Grafton Group Company