shotgun lesson plans table of · pdf fileintroduction using the shotgun lesson plans james v....
TRANSCRIPT

Shotgun Lesson Plans Table of Contents
. . . . . . . . . . . . . . . . . . . . . . . . . . . . . . . . . . . . . . . . . . . . . Using the Basic Shotgun Lesson Plans 1
. . . . . . . . . . . . . . . . . . . . . . . . . . . . . . . . . . . . . . . . . . . . . . . Lesson 1 : Basic Shotgun Knowledge 3
. . . . . . . . . . . . . . . . . . . . . . . . . . . . . . . . . . . . . . . . . . . . . . . . Lesson 2: Safe Shotgun Handling 17
. . . . . . . . . . . . . . . . . . . . . . . . . . . . . . . . . . . . . . . . . Lesson 3: Shotgun Shooting Fundamentals 31
. . . . . . . . . . . . . . . . . . . . . . . . . . . . . . . . . . . . . . . . . . . . . . . . . . Lesson 4: Firing the First Shots 45
. . . . . . . . . . . . . . . . . . . . . . . . . . . . . . . . . . . . . . . . . . . . . . . Lesson 5: Caring for Your Shotgun 54
. . . . . . . . . . . . . . . . . . . . . . . . . . . . . . . . . . . . . . . . . . Fact Sheet: Determining Eye Dominance 65
. . . . . . . . . . . . . . . . . . . . . . . . . . . . . . . . . . . Fact Sheet: Non-threatening Hands-on Instruction 67
. . . . . . . . . . . . . . . . . . . . . . . . . . . . . . . . . . . . . Fact Sheet: Shotgun and Ammunition Selection 69
. . . . . . . . . . . . . . . . . . . . . . . . . . . . . . . . . . . . . . . . . Fact Sheet: Practicing Your Shotgun Skills 71
. . . . . . . . . . . . . . . . . . . . . . . . . . . . . . . . . . . . . . . . . . . . . . . . . . . . . . . Fact Sheet: Clover Clays 73
. . . . . . . . . . . . . . . . . . . . . . . . . . . . . . . . Fact Sheet: Detecting and Correcting Shooting Errors 75
Fact Sheet: Range Setup and Operation for Shotgun Instruction . . . . . . . . . . . . . . . . . . . . . . . . 79
. . . . . . . . . . . . . . . . . . . . . . Fact Sheet: Shooting from the Gun-Ready and High-Gun Positions 85


Introduction
Using the Shotgun Lesson Plans James V. Peter, Jr.*
Shotgun shooting is exciting to many young people. Proper preparation, organization and orientation are the keys to successful shotgun instruction. Since youth development is the foundation of the program, the instructor must keep the young people in mind at all times. Safety is always a primary consideration. The instructor must maintain the highest standards of safety at all times for participants, other instructors and all assistants. The methods used here introduce the fbndamentals of firing a shotgun, some of the informal games that can be used to increase shotgun shooting skill and the fundamentals of the formal target games with shotguns.
Shotgun instructors should consider carefully the following points whenplanning or delivering their courses.
1. Consider the age and size of the participants carefully. One of the most important features of shotgun instruction is the ability of the shooter to handle the physical mass and size of the shotgun. Recoil is seldom a consideration if the shotgun is properly sized to fit the shooter. Oversized shotguns predispose the shooter to being hurt by recoil by requiring that the body be bent backward to compensate for the difficulty in holding the gun at the ready position. See Fact Sheet 9 for more information on gun selection.
2. In a basic course, many instructors prefer using a matched set of shotguns. This reduces the level of expense for the shooters while minimizing the number of elements instructors must introduce and watch. Instruction is easier, more consistent and safer when the only variable is shotgun size, function type, safety location, action release, and similar features should be uniform if possible. As students progress, they should obtain and use their own shotguns. All shotguns used should be checked by a qualified person to ensure their safe condition.
3. Maintain control over all live ammunition during the basic instruc- tion phase of the program. As the shooters gain skill, the ammunition may be handled by the "coach" of the coach-pupil pair. Finally, each shooter may take the responsibility for their
*County Extension director and agricultural agent for the Dubois County Office of Purdue Cooperative Extension, Jasper, Indiana.
4-H Shooting Sports Guide Revised 06-02

Using the Basic Shotgun Lessons Basic Shotgun Lesson I: Basic Shotgun Knowledge Basic Shotgun Lesson 2: Safe Shotgun Handling Basic Shotgun Lesson 3: Shotgun Shooting Fundamentals Basic Shotgun Lesson 4: Firing the First Shot Basic Shotgun Lesson 5: Caring for Your Shotgun
Fact Sheets Fact Sheet 3: Determining Eye Dominance Fact Sheet 4: Non-threatening Hands-on Instruction Fact Sheet 9: Shotgun and Ammunition Selection Fact Sheet 10: Hand Loading Shotgun Ammunition Fact Sheet 11 : Practicing Your Shotgun Skills Fact Sheet 12: Clover Clays Fact Sheet 13: Detecting and Correcting Shotgun Shooting
Errors Fact Sheet 14: Range Setup and Operation fiom Shotgun
Instruction Fact Sheet 15: Shotgun Shootingfiom the Gun-Ready and
High-Gun Positions
Revised 06-02 4-H Shooting Sports Guide

Basic Shotgun Lesson 1
Basic Shotgun Knowledge James V. Peters. Jr."
Objectives
Participating youth and adults will: 1. Understand the parts of a shotgun and their functions 2. Understand and be able to identify shotgun action types. 3. Understand the differences between rifles and shotguns. 4. Understand the basics of matching choices and shotgun
uses. 5. Demonstrate understanding of shotgun safety. 6. Understand the function of basic shotgun ammunition
components. 7. Have fun while learning.
Roles for Teen and Junior Leaders Set up and arrange room for instruction Demonstrate various shotgun action types
- Supervise circulation of "pass arounds." - Tutor or quiz participants.
Parental Involvement - See Roles for Teen and Junior Leaders above. - Arrange for or provide transportation. Arrange for or provide refreshments. Present portions of the lesson.
* County Extension Director and Agricultural Agent for the Dubois County Office of Perdue Cooperative Extension, Jasper, Indiana
Best Time to Teach Anytime of year
Best Location Indoor or outdoor classroom setting
Time Required Approximately 1 hour
Materials/Equipment -chalkboard or newsprint pad -appropriate writing materials -shotguns of various action types: hinge (single. over/under, side-by-side) bolt, pump or slide, semi- automatic
-pattern sheets -sections, illustrations or models of rifles and shotgun barrels
-dummy ammunition in ap- propriate gauges
-shot shell components -dissected rifled slug -small quantity of smokeless shotgun powder
-fue-proof container w e a small plate)
-tools to assemble and disassemble a shotgun
-twelve % inch lead balls -caliber .69 musket b d s - N U Shotgun Instructional Charts
-action type illustrations from manufacturers
-shot size chart or models Absolutely no live ammunitions
References Shogunnit% The Art And
Science R. Brister. Winchester Press, New York, N.Y. 1987.
The Basics ofShogut~ Shoot- itg. H . Sheets, National Rifle Association, Washington, D. C. 1985
NRA Basic Shotgun Shooting Course
4-H Shooting Sports Guide Revised 06-02

TEACHING OUTLINE Presentation Application
I. History of the shotgun REVIEW learning objectives of lesson to set stage for learning.
A. Past EXPLAIN evolution of shotgun from a tool for food gathering, personal, protection and war to uses of recreation and competition.
1. All guns smoothbores 2. Shot or ball 3. Hunting and protection fiom
Predators 4. Self-defense 5. Use in warfare
B. Present 1. Some military and police use 2. Hunting DISCUSS popularity of shotguns as hunting arms and types of
hunting uses.
.small game
.upland buds and waterfowl
.big game
3. Shotgun sports .international
-clay pigeon Briefly OUTLINE various clay target games using ,illustrations videos, or other means.
American trap American skeet sporting clays informal shotgun sports -hand trap -clover clays
C. Shotgun versus rifle 1. Purpose DISCUSS uses of shotguns versus rifles and RELATE that to
design of barrels. single projectile multiple projectiles
2. Design rifles have rifling
-spiral ridges and POINT OUT that "rifling" in shotguns is designed for groove either rifle-like purposes or for pattern control.
-lend stability to projec- tiles
- shotguns have smoothbores -straight or slowly spual-
ing rifling -specialized uses
11. Shotgun parts A. Basic parts of shotguns POINT OUT and DISCUSS each shotgun part as it is mentioned.
If possible, USE small groups of youth with adult or teen leader to get closer contact.
Revised 06-02 4-H Shooting Sports Guide

2. Action 3. Barrel
B. Stock
1. Function of stock
Use disassembled shotgun to ILLUSTRATE and EXPLAIN parts of a shotgun, where they are, how they fit together and work and how they relate to shooter.
ASSEMBLE shotgun as each part is identified.
MENTION drop and stock fit in process of discussing stock, but DO NOT dwell on technical aspects of it.
.recoil control
-aid in operating action
2. Butt
-supports shotgun on shoulder
-spreads recoil -supports cheek
sheel *toe .butt pad or plate .drop at heel
3. Comb .styles .drop at comb
4. Grip sfunction - shooting hand support .styles - pistol grip - straight grip
.checkering 5. Forearm
.functions -non-shooting hand sup-
port -operating handle for slide or pump action
.styles -splinter -beaver tad -semi-beaver tail
C. Action DEMONSTRATE each part as it is discussed. Note that receiver is
1. Parts that operate the firearm center piece of firearm. 2. Receiver 3. Loading or ejection port
sometimes called the breech -opening in receiver for ac-
cess to the chamber 4. Firing mechanism
DEMONSTRATE and POINT OUT parts of firing mechanism on fire control module.
4-H Shooting Sports Guide Revised 06-02
- tngger sear hammer
- hammer spring firing pin ejectors/exirractors
5. Safety
6. Trigger guard 7. Action release only on semi-auto and slide-
action guns - usually around trigger
guard, on receiver or on loading gate 8. Magazine
D. Barrel
1. Functions - launching tube for projec-
tdes - seals gases behind projec-
ales 2. Muzzle
DEMONSTRATE operation of safety and action release on shotgun being used in shooting sessions.
M A I E SURE every shooter understands what muzzle is early in class to avoid any chance of confusion on safety rules.
; points in direction projec- tiles will go
- muzzle control critical 3. Bore size
gauges ILLUSTRATE various bore sizes with a picture or actual barrels. - English gauges - num- DEMONSTRATE how gauge was determined using lead balls. ber of bore-sized balls that can be cast from one pound of lead
- modem standard USE barrel sections or piece of tubing and a paper towel tube to borings ILLUSTRATE dfference between a rifle barrel and a shotgun barrel.
o 10 gauge o 12 gauge o 16 gauge o 20 gauge o 28 gauge 0.410 bore actually a
caliber
4. Bead(s) single bead
- target guns 5. Chokes
construction
- forcing cone - choke
ILLUSTRATE various shotgun chokes and choke types using actual barrel, photographs or diagrams. USE pattern sheets to illustrate differences between various chokes at close range (about 25 yards) and long range (about 45 yards).
types - built in - choke tubes
Revised 06-02 4-H Shooting Sports Guide

- collet chokes function - controhg shot disper- POINT OUT each part on shotgun being used as it is dscussed.
sion - adjusting shot pattern
to use
111. Action types A. Hinge action
1. Single barrel 2. Over/under 3. Side-by-side (double)
B. Bolt C. Pump/slide action D. Self-loadmg/semi-automatic E. Others (such as lever action)
IV. Shotgun ammunition components and function
A. Basic components
1. Case or shell 2. Battery cup or primer 3. Powder charge 4. Wad 5. Shot charge
B. Base or shell 1. Construction
- paper plastic
2. Head head stamp
- rim for extraction composition - metal - all plastic
3. Base wad assembled was - composition was - plastic base wad
- compression formed plastic 4. Case or body
- holds other components in place seals gases in place at the bepn ing of the shot
5. Crimp seals case temporarily types - folded - rolled
DISPLAY and DISCUSS each type of shotgun you have available. NOTE sirmlarities and dfferences among them.
DEMONSTRATE and DESCRIBE function of each action types. REVIEW parts and operation of a shotgun.
C. Battery cup or primer
4-H Shooting Sports Guide Revised 06-02

1. Pressure sensitive 2. Ignites powder charge
D. Powder charge 1. Propellant for shot 2. Smokeless powder
progressive burning h g h pressure
3. Dram equivalents .equal to the listed volume
of black powder velocity measure
E. Wad
1. Seals gas behind shot 2. Cushons and protects shot 3. Composition wads
.over-powder wad shot sleeve or cup
4. Plastic unit wads gas seal cushon shot cup
F. Shot charge 1. Carry energy to the target 2. Materials
.lead and lead alloys soft iron (steel)
3. Sizes .fine shot
Diameter about 0.17 inch minus the shot size - #2 shot = 0.15 inch - #9 shot = 0.12 inch
- buckshot - cast pellets - #4 buck (0.24 inch) to
000 buck (0.35 inch) 4. Pattern density and shot size
inversely related 5. Energy and shot size kectly
related 6. Balance of shot size, pellet
energy and pattern density 7. Rifled slugs
G. Shotshell sizes and shot charges
1. 10 gauge - length 2 7/8 and 3 ' /2 in- ches
STRESS importance of using proper ammunition with each boring and ILLUSTRATE how a smaller gauge could lodge in a larger one.
Revised 06-02 4-H Shooting Sports Guide

shot charges to 2 1/2 ounces
2. 12 gauge length 23/4' 3 or 31 /2 inches shot charges 1 to 2 1/2 ounces
3. 16 gauge length 2 3/4 inches shot charges 1 to 11/4
ounces 4. 20 gauge
lengths 2 3/4 and 3 inches shot charges 7/8 to 11 /4 ounces
5. 28 gauge length 2 3/4 inches shot charges 3/4 to 1 ounce
6. .410 bore length 2 1/2 and 3 inches
shot charges 1/2 and 11/16 ounces
7. Dangerous combinations longer shells in short chambers lodgmg of smaller gauge in larger bore - 16 gauge in 10 gauge - - 20 gauge in 12 gauge - - 28 gauge in 20 gauge
never mix gauges
V. Summary A. History and sipficance of shotguns B. Parts and functions of shotguns C. Parts and functions of shotgun ammunition D. Fundamentals of shotgun safety
4-H Shooting Sports Guide Revised 06-02

Lesson Narrative
History of the Shotgun Shotguns have been in existence for centuries. Before development of the rifling process, firearms could be used with either a single projecde or multiple projectiles. Shotguns developed as specialized firearms to shoot multiple projectdes over relatively short ranges. In their earliest form, they were used for military purposes. As ignition systems increased in speed and reliability, shotguns became practical for self- defense, controlling wildhfe or killing game for food. The shotgun, or scattergun as it was often known, served prominently in the early development of North America, both as a good gathering arm and a weapon.
The bell-mouthed blunderbuss commonly pictured as the Pilgrim's hunting tool was a matchlock arm that was cumbersome and slow to fire. They were used to hunt game that was at rest or moving slowly. Fowling pieces with wheel lock designs were faster, but they were complicated and very expensive. When the flintlock design became available, shotguns became accessible and effective hunting arms and the arm of choice for hunting moving game. caplock muzzleloading shotguns increased their speed and reliability, and soon they were replaced by single- or double-barrel breach-loadmg shotguns. Other action types developed rather rapidly, gving us the wide variety of shotgun designs available today.
Shotguns are the arm of choice for swiftly moving targets or situations where a pattern of smaller pellets (shot) is preferred to a single projectile. They still have some law enforcement and d t a r y applications, but the vast majority of all shotgun use is for recreational purposes. Millions of shooters participate in a variety of shotgun-shooting games using clay targets. The shotgun is also preferred by many hunters for small game, waterfowl, or upland birds. In some areas, the versade shotgun is even used with specially designed loads of buckshot or a single projecde for hunting big game.
The shotgun usually fires a large number of pellets, called shot, instead of a single bullet. Once the shot leaves the barrel it spreads out forming a pattern. The pattern is the area covered by the spreading bullet, increasing the likelihood of hitting the target.
Parts of the Shotgun The phrase "lock, stock and barrel" refers to the major parts of a muzzleloading firearm. Modem shotguns are made up of three basic groups of pans: action sunilar to the lock), stock and barrel. They work together to make a functional shotgun.
10 Revised 06-02 4-H Shooting Sports Guide

Stock
The stock is the shotgun's handle. It helps you hold and shoot the shotgun comfortably and accurately. Fiberglass (or other reinforced plastics) and metal stocks are avdable, but most shotgun stocks are made of hardwood. Each part of the stock performs a Function for the shooter. Stock designs affect shot placement, accuracy and shooter comfort. Most shotgun stocks have two sections, divided by the receiver. The rear part that fits the shoulder and supports the shooting hand and the cheek is called the butt stock. The part that supports the forwzrd hand is called for forend, forearm or fore stock. On some shotguns movement of the forearm operates the action. Understanding the parts of the stock and how each part influences the behavior of the shotgun aids in shooting more comfortably and accurately.
The butt of the stock is the part that rests against the shoulder when the shotgun is mounted for firing. The blunt, top part of the butt is known as the heel. The more pointed, bottom part of the butt is the toe. Many shotguns have a butt plate made of plastic, metal or rubber attached to the butt. Others have a recoil pad made of honey combed rubber in that area. The butt on a few shotguns is simply checkered wood, with or without a metal skeleton around it. The shape and size of the butt is important in proper gun fit and recoil distribution. The vertical distance from the top of the heel to a h e extended from the upper surface of the barrel measures drop at the heel. The amount of drop at the heel affects both the apparent recoil and the shooter's stance.
The top edge of the butt stock, running from the heel to the p p or wrist is the comb. A shotgun is properly mounted when the comb is brought firmly to the cheek. Like the drop at the heel, the drop at the comb is important in determining how "straight" or "crooked" a stock d be. Stock straightness is a major factor in regulating the relationship between the point of impact and the shooter's impression of where the muzzle is pointing. Straight stocks tend to pattern higher. Crooked stocks tend to pattern lower. Straight stocks also tend to recoil back rather than upward, reducing the apparent or felt recoil. When the gun is used to shoot rising targets, as in trap shooting, the comb may be built up to raise the point of impact.
The grip or wrist is the part of the stock you hold in your trigger hand. The grip is usually one of two basic shapes. The pistol grip is the most common. The straight or English p p is found on many light- hunting guns. Like bu~lding up the comb, the straight p p tends to raise the point of impact. The grip is often checkered to gve the hand a more secure hold.
The part of the stock located under the barrel is called the fore stock, forend or forearm. Like the grip of the butt stock, the forend is often checkered, carved or otherwise sculpted to increase the security of the p p by the forward hand.
Revised 06-02 4-H Shooting Sports Guide

Barrel
The barrel is simply a tube through which the shot passes on its way to the target. The end of the barrel that holds the unfired cartridge is the breech end. The end from which the fired shot emerges is the muzzle. Since the muzzle points toward the impact area, muzzle duection must be controlled at all times to ensure safety.
The inside of the barrel is called the bore. Most shotguns have smooth bores, although a few specialty barrels may have straight or spiral riflmg. In contrast, rifle barrels almost always have a spiraling set of lands and grooves that cause the bullet to spin, thus increasing its stability in fight.
Today most shotguns are manufactured in one of six standard bore diameters. Bore diameters are measured in gauges. Gauge is a measure that oiigmated in England long age. Gauge was determined by the number of bore-diameter lead balls that could be cast from one pound of lead. Thus, the smaller the gauge number, the larger the diameter of the lead balls and the shotgun bore. A 20 gauge shotgun (20 lead balls to the pound) is substantially smaller in bore diameter than a 10 gauge (10 lead balls to the pound). Most shotguns are manufactured in six standard sizes. The modem gauges, starting with the largest bore, include 10, 12, 16, 20 and 28 gauge guns. The sixth standard boring is the .410 bore. This exception to the rule for shotgun sizes, this one is actually a .410 caliber, that is, its bore is 410/1000 inch in dtameter. If expressed as a gauge, the .410 would be a 67Y2 gauge gun. Standardued ammunition sizes and barrel dimensions for each of these shotgun borings have been established by the arms and ammunition manufacturers. For safety reasons, cartridges designed for dtfferent
( ) @ , borings should never be mixed. Ammunition for some boring w d lodge V - --, .& in the barrel of others with potentially fatal results. Most shooters know
that a 20 gauge shell will lodge in a 12 gauge barrel, but other potentially deadly combinations exist. sixteen shells will lodge in 10 gauge barrels, and 28 gauge shells d lodge in 20 gauge barrels.
Externally the shotgun barrel appears to be a simple tube, usually with a small bead near the muzzle. It may also be fitted with a solid or ventdated rib. In some overlunder doubles the side ribs are also ventilated to help dsperse heat. Almost all shotgun barrels have one or more beads on them. Field guns usually have an additional smaller bead midway along the rib. These reference points may be made of metal, plastic or a combination of materials. Shooters may refer to them as sights, but they are merely reference points. Proper shotgun shooting calls for the gun to be pointed rather than aimed.
Internally shotgun barrels are more than just a tube. At the breech end, they have a chamber designed to fit snugly around the appropriate shotgun shell. Beyond the chamber, the tube may have a uniform diameter; but most shotguns have some construction at the muzzle end of the barrel. That construction is called a choke. The
4-H Shooting Sports Guide
12 Revised 06-02

choke controls how fast the shot wdl spread out after it leaves the muzzle. Within a rather narrow range of tolerance, increasing choke constriction decreases shot dispersal. ~ ~ - k e e ~ i n ~ the shot in a more restricted area (a tighter pattern), the density of the pattern is increased. That increases the effective range of the shotgun, allowing the shooter to fire at longer distance. Selecting the appropriate choke for the type of shooting being done is part of learning to use a shotgun effectively.
A series of "standard" chokes are defined by the arms and ammunition manufacturers. These definitions include a range of tolerance, and they may differ among manufacturers or between guns. A shotgun with no choke I -
constriction has a cylinder bore. Listed in order of increasing amounts of r I .I-( 1 constriction the standard chokes include: cyhnder, skeet, improved -..- ~. .
. .. : - Ld -..-
cylinder, modified, improved modified, full and extra full. (The ones in . . . .- /-
bold print are most commonly seen in field guns. The others are found mainly in target guns or those designed for special purposes, like long-range p ~ . - -p t-1 waterfowling, turkey hunting or shooting slugs.) A full or extra iull choke 1 1 I 1 /- &I/-. ;J
. __.I--- shotgun has the tightest constriction and the greatest range. AT close range a . ,--- :....-- \J
full choke pattern can be too small to consistently hit a moving target. When a close target is hit, the pattern is so dense that a clay target is "smoked" I * (reduced to a cloud of dust) or a game animal is ruined. The modified choke has less constriction than a full choke. The modified choke wdl have a shorter effective range than a full one, but a wider pattern at close ranges. Improved cylinder choke is less constricted than the previous two and gves .-
a wide pattern at close range.
Three basic types of chokes are avadable in modern shotguns. First, in many shotgun barrels the choke is an integral part of the barrel, b d t into it during the manufacturing process. In other barrels, a threaded portion of the barrel may accept short tubes with different choke constrictions built into them. Having a variety of choke tubes that may be used greatly increases the versatility of a shotgun. The tubes are small enough to be easily carried in the field or to the range. The third choke design is a collet- type that is adjusted by rotating a collar. As the collar is tightened, the collet moves a set of thin steel blades closer together. That increases the choke constriction and degree of choke. These devices are attached to the barrel after it is made. ~ i f ferent chokes are obtained by adjusting the collar to the proper setting.
Action
The moving parts that allow you to load, fire and unload the shotgun are called the action. Most of these parts are housed in a metal frame called the receiver. There are many different types of actions, among the most common are hinge, bolt, pump or slide and self-loading or semi- automatic.
In nearly all cases, the action cocks a shotgun by compressing a main spring that drives the firing pin or hammer. The spring-loaded
4-H Shooting Sports Guide Revised 06-02

finger outside the trigger guard until you are ready to fire.
hammer locks in place until released. Loading is done by opening the action and placing a shot shell into the chamber (or a loading port) at the breech end of the barrel. Then the shell is locked in place with a bolt or breech block as the action is closed. Operating the action on many shotguns requires you to activate a button or lever called the action release. The cocked and loaded firearm can be fired immediately and should always be treated with care and respect. On a target range, the shotgun should be loaded only in immedate anticipation of a shot and accordng to the rules of the game being shot. When in the field (hunting), the safety should be placed in the ON position. A safety is a mechanical device. Like other mechanical devices it may fail to operate properly. Ultimately safety depends on the person holding the shotgun. Never point a gun at something you are not willing to shoot. We d learn more about safe gun handling in a future lesson.
In order to fire the shotgun, move the safety to the OFF position (if it was ON). Then simply press the trigger. That releases the spring energy stored by the opening of the action, causing the firing pin to stnke the battery cup and fire the round. The trigger is the lever pressed to fire the shotgun. It is surrounded by a trigger guard to help prevent accidental firing. The trigger finger should stay outside the trigger guard und you are ready to shoot - under all circumstances. Under hunting conditions, the finger acts as an additional trigger guard to prevent brush or other obstructions from reaching the trigger. Remember - ALWAYS keep your finger outside the trigger guard und you are ready to fire.
Some types of shotguns have a magazine, a part of the action that stores additional shot shells until they are ready to be used. Operating the action ejects the fired shell and loads a fresh one into the chamber. Some bolt-
-- action shotguns have clip-fed magazines, but most shotgun magazines are tubular and located immediately below the barrel. A careful shooter always
; checks both the chamber and magazine of a shotgun to be sure they are --, " empty before handling it.
Action Types
There are four basic action types commonly used in shotguns. One of the oldest designs if the hinge or break action. This action operates much like a hinge on a door. The action is opened by pressing the action release lever (usually to the right). The barrel(s) are then pivoted down, exposing the chamber(s) of the shotgun. This cocks the action and lifts spent cartridges to ease removal or ejects them by spring action. To load, place live round(s) in the charnber(s) and close the action. Hinge-action firearms are easily checked to see if they are loaded or if the barrels are obstructed because the shooter can physically see down the barrel(s). Shotguns of this type come in three basic forms. Many single-shot break action models are available. Some of them are inexpensive, and other are among the most expensive shotguns made. Double-barreled shotguns (doubles) come in two basic styles. The barrels may be fixed side-by-side or stacked vertically. Those with the side-by-side arrangement are
'. .
14 Revised 06-02 4-H Shooting Sports Guide

known as doubles or side-by-sides. Those using the vertical arrangement are called over/unders.
Bolt-action shotguns operate on the same principle as a door bolt. Much more common in rifles than in shotguns, the bolt action is strong but relatively slow. Bolt-action shotguns are usually relatively inexpensive guns. Lifting the bolt handle cocks the shotgun, and drawing the bolt back ejects the spent cartridge. A new one loads when you push the bolt forward and - - - - - - rotate the bolt handle downward, locking the action closed. These shotguns ,/- are suitable for many types of hunting, but slow cycling and awkward action-,"' for a second shot makes bolt actions a poor choice for most clay target games. Bolt action shotguns are readily available, but probably the least common action in use today.
Pump or slide action shotguns resemble a trombone or an insect spraver - A ,
in action. Pulling the forearm back toward the receiver cocks the action ejects the spent shell. Pushng it back toward the muzzle loads the
.- round and locks the action closed. If the shotgun is not fired, the remains in a closed and locked condition until an action release (usually
/ located near the trigger guard) is pressed. Experienced shooters can fire several rounds in rapid succession, often as quickly as a shooter using a /
//
they are reliable, positive and durable under all sorts of weather condtions. semi-automatic shotgun. Many hunters are pump action shotguns because
Semi-automatic actions could be more properly called "self-loaders." The action uses some of the recoil energy or gases from a fired shot to cock the hammer, eject a spent round and load a new one. Most semi-automatics lock open when the magazine is empty. A fresh round can be loaded by inserting a shell into the loading port when the bolt is locked back. Pressing the action release allows the action to close by spring tension. In normal operation, the shooter merely pulls the trigger to shoot a second round. The trigger is equipped with an interrupter, so it must be released between shots. Self- - loading shotguns are extremely popular with both target shooters and hunters. Most models are heavy compared with other action types in the same gauge. The weight can help smooth a shooter's swing, and the quick follow-up shot requires little effort. By using part of the recoil energy to operate the action, semi-automatics spread the recoil energy over a longer time and reduces its impact. Most semi-autos require more care to keep clean and function smoothly than other types of shotguns.
Shotgun Ammunition
Modern shotgun ammunition is composed of five basic parts. The case or shell is a container for the rest of the components. The initial spark is provided by the battery cup or shotshell primer. Like other ammunition, shotshells contain a powder charge. The powder is separated from the shot or other projectile by a wad column of some type. Most shotshells carry a charge of shot; but some are designed to use a single projectile usually a rifled slug.
4-H Shooting Sports Guide Revised 06-02 15

The most common types of shotshell cases or shells are made of paper or plastic, but brass cases are available from some sources. The head of the shell is the part that is located in the rear of the chamber when the shell is loaded in the shotgun. The flat, back portion of the head is marked with information on the manufacturer and gauge of the shotshell. This material is known as the beadstamp. The rim of the shotshell's head serves two primary functions. It provides the proper headspace for the cartridge in the firearm's chamber and allows the shotshell to be extracted from the chamber. Most shotshells have metal rim, but some have a case composed entirely of plastic including the rim. In shells with a metal head, the length of that head varies considerably. In most modern shotshells, the height of the metal head on the body tube has very little to do with the strength of the tube itself.
The shotshell case contains a base wad at the head end of the tube. In compression-formed plastic cases the base wad is an integral part of the case. In composite cases, those made up of several parts, the base wad may be a separate plastic unit, rolled paper similar to the case body in design or another material. The base wad strengthens the head of the case.
The case or body tube holds the other components in place prior to firing, keeps them in proper relation to one another and provides an initial seal for the gases produced by the powder. The case mouth is crimped to maintain the integrity of the shell.
Crimps come in two basic designs. Rolled crimps are used in conjunction with rifled slugs, sabots or overshot wads. They are formed by simply tucking the end of the body tube back inside itself forming a smooth rim. Folded crimps lock the end of the body tube into a series of six or eight pie- shaped wedges with adequate pressure to lock them in place. Most modern shells containing shot use a folded crimp.
The battery cup is the shotshell primer. It contains a pressure sensitive chemical that detonates when compressed between the base material of the battery cup and the internal anvil. The flash from the process is directed through the opening in the top of the battery cup into the powder charge, igniting the powder.
Nearly all modern shotshells use a progressive, smokeless powder as a propellant for the shot. This powder generates much higher chamber pressures than did the black powder it replaced. The powder charge is listed on the cartridge box in dram equivalents. That is an approximate measure of the velocity of the shot charge, based on the velocity that would have been generated by the listed number of drams of black powder.
The wad column serves two primary functions. It seals the powder gases behind the shot charge (obturation) and it cushions and protects the shot from being deformed during firing. The wad column may be composed of a single plastic unit or a series of components. The plastic unity combines a gas-sealing skirt with a cushioning section and a shot cup that protects the shot from abrasion on its way down the barrel. Other types of wad columns may use a plastic or card wad to seal in the gases
16 Revised 06-02 4-H Shooting Sports Guide

and a cork or fiber wad to cushion the shot with or without a separate shot cup or plastic liver strip. Plastic units are used by the bast majority of handloaders as well as many manufacturers.
The shot charge carries the energy produced by the shotshell to the target. Shot is made from lead or lead alloys, soft iron (steel shot), scintered lead and steel and a few other materials. Fine shot is commonly formed by pouring molten material through a screen and allowing it to drop into a water bath at the bottom of a tower. It is commonly avadable in sizes from BB to #9. The diameter of the shot is approximately 0.17 inch minus the shot size. Thus, #2 shot is about 0.15 inch in dameter and #9 shot is about 0.12 inch in diameter. Buckshot is cast in molds rather than in a shot tower. The smallest buckshot is #4 buck, approximately 0.24 inch in diameter. The largest is #000 buck, approximately 0.35 inch in dameter. Rifle slugs are bore dameter projectiles intended for large game. Most American slugs are shaped like an inverted cup. Some European slugs are longer with an attached wad column. Some manufacturers make bullet-like projectiles contained in a set of plastic sleeves - . or sabots for the same types of uses.
Pattern density, the number of pellets per unit or area in the shot pattern, is inversely related to the shot size. Larger shot are more dispersed because there are fewer of them in the shot charge. Pellet energy, the striking energy of each pellet, is bectly related to the size and mass (weight) of the pellet. Larger pellets retain their energy longer and hit harder than smaller ones. Shotgunners must strike a balance between pattern diversity and pellet energy when selecting shotshells. Usually target shooters use light charges of #9, #8 or #71/2 shot. Shotgun hunters match the shot type, size and charge to the hunting conditions and quarry.
Common Shotshell Loadings Commercial shotgun shells are avadable to fit a variety of chamberings. The largest shotgun shells readily available in this country are loaded for the 10 gauge. Shells are loaded in two lengths, 2 7 / 8 and 31/2 inches, with shot charges as heavy as 2% ounces of lead shot or slightly lighter charges of steel shot. Shotguns in this gauge are used primady in hunting waterfowl, turkeys and big game. They may not be used in any target games.
The 12 gauge shotgun is the most versatile boring avadable. It has standard chamberings for 2%, 3, or 3% inch shotshells. Shorter shells may be used in longer chambers, but using longer shells in short chambers results in dangerous pressures. Shot charges of an ounce or less up to 2'/2 ounces of lead shot in the 31/2 inch case are available. Steel shot is readily available for 12 gauge guns in all case lengths.
Standard loadmgs for the 16 gauge are 2% inch cases loaded with shot charges of 1 to 11/4 ounces of lead shot. Though less common than 12 gauge ammunition, steel shot for 16 gauge guns is ready avadable. Users of older 16 gauge guns should be certain that the chamber is actually 2% inches, since earlier guns may have been made with chambers slightly shorter.
4-H Shooting Sports Guide
Revised 06-02 16a
ammo should be permitted in the area!
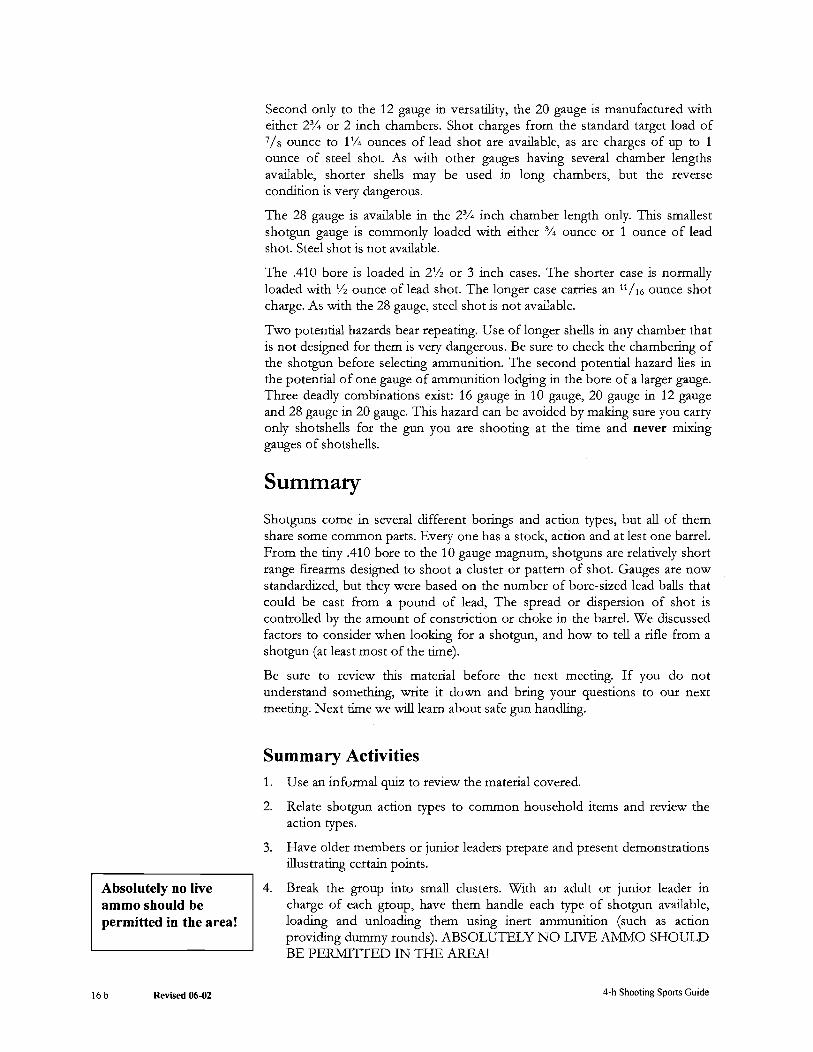
Second only to the 12 gauge in versathty, the 20 gauge is manufactured with either 2% or 2 inch chambers. Shot charges from the standard target load of 7/s ounce to 11/4 ounces of lead shot are available, as are charges of up to 1 ounce of steel shot. As with other gauges having several chamber lengths available, shorter shells may be used in long chambers, but the reverse condtion is very dangerous.
The 28 gauge is available in the 2% inch chamber length only. Th~s smallest shotgun gauge is commonly loaded with either % ounce or 1 ounce of lead shot. Steel shot is not avadable.
The .410 bore is loaded in 2% or 3 inch cases. The shorter case is normally loaded with '/2 ounce of lead shot. The longer case carries an "/I6 ounce shot charge. As with the 28 gauge, steel shot is not avadable.
Two potential hazards bear repeating. Use of longer shells in any chamber that is not designed for them is very dangerous. Be sure to check the chambering of the shotgun before selecting ammunition. The second potential hazard lies in the potential of one gauge of ammunition lodging in the bore of a larger gauge. Three deadly combinations exist: 16 gauge in 10 gauge, 20 gauge in 12 gauge and 28 gauge in 20 gauge. This hazard can be avoided by makmg sure you carry only shotshells for the gun you are shooting at the time and never mixing gauges of shotshells.
Summary
Shotguns come in several different borings and action types, but all of them share some common parts. Every one has a stock, action and at lest one barrel. From the tiny .410 bore to the 10 gauge magnum, shotguns are relatively short range firearms designed to shoot a cluster or pattern of shot. Gauges are now standardized, but they were based on the number of bore-sized lead balls that could be cast from a pound of lead, The spread or dspersion of shot is controlled by the amount of constriction or choke in the barrel. We dscussed factors to consider when lookmg for a shotgun, and how to tell a rifle from a shotgun (at least most of the time).
Be sure to review this material before the next meeting. If you do not understand somethmg, write it down and bring your questions to our next meeting. Next time we wdl learn about safe gun handhg.
Summary Activities 1. Use an informal quiz to review the material covered.
2. Relate shotgun action types to common household items and review the action types.
3. Have older members or junior leaders prepare and present demonstrations illustrating certain points.
4. Break the group into small clusters. With an adult or junior leader in charge of each group, have them handle each type of shotgun available, loadmg and unloading them using inert ammunition (such as action providmg dummy rounds). ABSOLUTELY NO LIVE AMMO SHOULD BE PERMITTED IN THE AREA!
16 b Revised 06-02 4-h Shooting Sports Guide
Sharing or Exhibit Ideas
1. Discuss the parts of a shotgun, action types or ammunition parts with an adult or another shooter using diagrams or illustrations.
2. Construct a quiz board covering shotgun parts or action types.
3. Make and display posters of shotgun action types or parts to be used in teachmg the shotgun program.
4. Study the history of shotguns and their role in the settlement of Noah America. Prepare and share a report on your discoveries.
5. Demonstrate principles of shotgun safety and proper shotgun handling.
6. Demonstrate how various shotgun actions operate using dummy or inert ammunition.
7. Study the importance of stock fit and present a report on it to your group or another group of interested people.
4-H Shooting Sports Guide
Revised 06-02

Basic Shotgun Lesson 2
Safe Shotgun Handling
Objectives Participating youth and adults will:
Best Time to Teach Any time of year, but before any shotgun handling on the range
Best Location
1. Understand and practice safe shotgun handling practices. Indoor or outdoor classroom
Time Required 2. Practice checking various types of shotguns to see if they are 1 hour
loaded. Materials/Equipment
3. Demonstrate safe shotgun handling practices and procedures. - chalkboard or newsprint with markers
4. Have fun while learning.
Roles for Teen and Junior Leaders - Demonstrate proper shotgun handling procedures. - Review main points of the lesson in small groups.
Tutor or quiz participants on the lesson content. - Teach portions of the lesson. - Assist shooters in practice sessions.
Parental Involvement See Roles for Teen and Junior Leaders above.
- Supply materials or equipment needed to teach the lesson.
Arrange for or provide transportation.
- Arrange for or provide refreshments.
Act as an assistant instructor, backing up teen leaders and instructing part of the lesson.
* County Extension director and agricultural agent for the Dubois County Office of Purdue Cooperative Extension, Jasper, Indiana.
- shotguns of various action types
- dummy action testing ammuni- tion
- NRA shotgun instructional charts (optional)
References The Basics ofShotgurr Shooting. H.W. Sheets, National Rifle
Association, Washington, nc. isas
National &ye Associaiiotz Basic Sl~otgun Shooting Course, National Rifle Association, Washington, DC.
State, NRA or Outdoor Eqzre Hunter Education Manuah. Contact your state hunter education coordinator
Basic Sho@utz Shootztg: A Bet/er Wq. Video. Contact your state 4-H Shooting Sports Coordinator or Federal Cartridge, ilnoka, MN.
4-H Shooting Sports Guide Revised 06-02
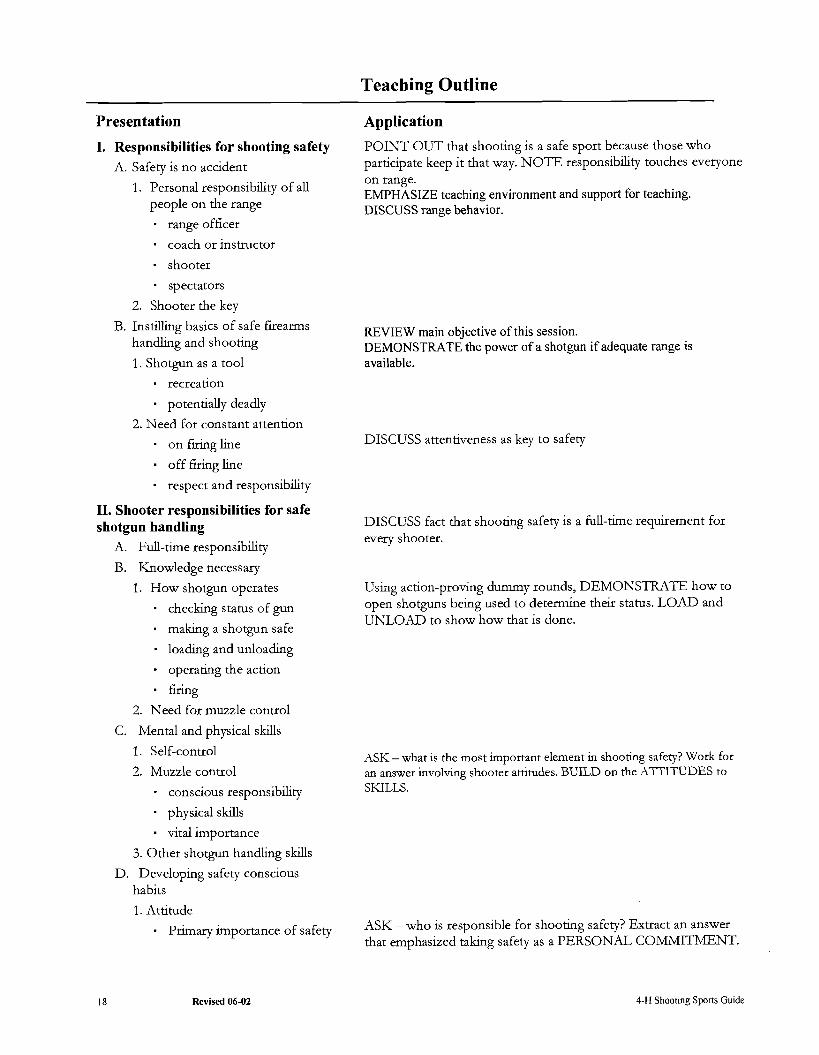
Teaching Outline
Presentation Application
I. Responsibilities for shooting safety POINT OUT that shooting is a safe sport because those who
A. Safety is no accident participate keep it that way. NOTE responsibhty touches everyone on range.
1. Personal responsibility of all EMPHASIZE teaching environment and support for teaching.
people on the range DISCUSS range behavior. - - range officer
coach or instructor
- shooter
- spectators
2. Shooter the key
B. Insidhg basics of safe firearms REVIEW main objective of this session. handling and shooting DEMONSTRATE the power of a shotgun if adequate range is 1. Shotgun as a tool available.
recreation
potentially deadly
2. Need for constant attention
on firing h e DISCUSS attentiveness as key to safety
off firing h e
- respect and responsibhty
11. Shooter responsibilities for safe shotgun handling DISCUSS fact that shooting safety is a fill-time requirement for
every shooter. A. Full-time responsibility
B. I(nowledge necessary
1. How shotgun operates Using action-proving dummy rounds, DEMONSTRATE how to
- checking status of gun open shotguns being used to determine their status. LOAD and UNLOAD to show how that is done.
malung a shotgun safe
loadmg and unloading
- operating the action
firing
2. Need for muzzle control
C. Mental and physical skills
1. Self-control ASK - what is the most important element in shooting safety? Work f o ~ 2. Muzzle control an answer involving shooter attitudes. BUILD on the ATTITUDES to
- conscious responsibhty SKILLS.
physical skills
vital importance
3. Other shotgun handling skills
D. Developing safety conscious habits
1. Attitude
. primary importance of safety ASK - who is responsible for shooting safety? Extract an answer that emphasized tahng safety as a PERSONAL COMMITMENT.
Revised 06-02 4-H Shooting Sports Guide

taking safety personally not permitting "accidents"
2. Rules not enough applying and practicing the rules
- nothing taken for granted
111. Basic rules of safe gun handling
A. Rules come from responsibilities 1. Self-control 2. Muzzle control 3. Personal responsibility 4. Trigger control
B. Three fundamental rules of safety with firearms
1. Pointed in a safe direction - Muzzle always under
control Never pointed at anydung you do not intend to shoot - Common sense and "safe" directions
2. Open, empty and exposed to view
Closed action equals "ready to fire" Loaded unless personally verified as empty - chamber - magazine action open except when
h g - safety courtesy
- exposed to view fore easy checking by instructors
3. Finger off the trigger Outside the trigger guard - protects trigger - keeps finger off
trigger - on only when fiang
C. Golden rule of shooting safety 1. Treat every firearm with
the respect as if loaded 2. Practice proper and safe
handling
DISCUSS foundations of firearms safety and sources of rules of safe firearms handhg and use.
DISCUSS and demonstrate importance of these three basic rules.
ROLE PLAY several scenes to stimulate discussion of what a "safe direction" is. Use a BARREL ONLY to demonstrate size of hole in muzzle.
STRESS that a closed action means ready to fire to any shooter. USE a shotshell loaded with a PRIrvLER ONLY to reinforce thls point. POINT OUT that assuming a gun is empty can be fatal.
ROLE PLAY a group of shooters who do not open their guns and another group of shooters who do. ASK - how d d you feel about these scenes? Which group would you shoot with?
DEMONSTRATE proper trigger finger location on trigger guard. DISCUSS why that location is important.
ASK shooters why this rule might be called the golden rule of shooting safety. POINT OUT that following it and other simple rules could eliminate almost all shooting accidents.
4-H Shooting Sports Guide Revised 06-02

3. Refuse to associate with those who d not do so
IV. Shotgun handling protocols A. Piclung up a shotgun
1. Pointed in a safe direction 2. Firm, secure grip
- one hand on forearm - one hand on grip
3. Never by the muzzle or barrel
B. Passing a shotgun between people
1. Practice open and empty rule 2. During instruction
- always in a safe direction closed action part of teachmg method extra caution required instructor - one hand on forearm - other hand on receiver - fingers cupped over
the tripper guard shooter - one hand grasps
forearm - other grasps grip - "thank youy7 to signal
control over the shogun
- "you're welcome" signals instructor's release of control
security and courtesy
V. Elements of safe shooting op en
A. Ihowing how gun operates 1. What the gun can do 2. Lirmtations of the gun 3. Operations
Opening and closing action
- Safety operation - Coping with minor
malfunctions 4. Safe shooting technique
B. Compatible arm and ammunition
DEMONSTRATE proper way to pick up a shotgun. Have shooters break into small groups and PRACTICE picking up a shotgun with aid of an assistant or teen leader.
DEMONSTRATE and have each shooter PRACTICE passing shotguns between persons using the protocols described here. BE ABSOLUTELY SURE NO LIVE AMMUNITION IS PRESENT! Use same small groups with assistants or teen leaders.
DISCUSS each element and how it relates to shooting safety.
DEMONSTRATE various action types once more, showing how all these operations are carried out. CAUTION shooters to keep shotgun pointed down range any time a malfunction occurs.
DEMONSTRATE effect of chamber length by dropping a dummy 3-inch shell in a Z3/4- inch chamber. Now PLACE a fired 3-inch round in the chamber. NOTE that the length that must be forced into the chamber constricts the barrel and creates a dangerous situation.
20 Revised 06-02 4-H Shooting Sports Guide

1. Arm and ammo of same
gauge 2. Length of case equal to or
less than chamber length
C. Carry only one gauge of ammunition
1. k g gauges is dangerous 2. Potential4 lethal mixes
16gaugeinlOgauge - 20 gauge in 12 gauge
28 gauge in 20 gauge D. Be sure of the target and what
lies beyond it 1. Identify target and safe shot
fall zone before firing 2. Range proportional to shot
size - target loads - shot #7% or smaller - range up to about 275 meters or 300 yards
buckshot up to nearly 600 meters or over 600 yards hunting shot sizes between these extremes
E. Eye and ear protection is vital 1. Protecting vision
potential eye injury - pellets - target chips - gases and powder
residue
STRESS using proper length shell (or SHORTER ones) in any shotgun chamber.
DEMONSTRATE the potential for dtsaster using any of gauge combinations listed. If available SHOW the results on a blown barrel. STRESS that h s is important on range and in field.
SHOW selected shot sizes and discuss how their size and weight affect their range. Have several assistants DEMONSTRATE range of various shot sizes if a large open area is available.
- other foreign bodies shooting glasses for SHOW several types and colors of shooting glasses. If time and
protection glasses are available, allow shooters to try different styles and colors.
- corrective lenses - tinted lenses NOTE that prescription lenses can be ground from materials used in
needed in all types of most shooting glasses. shooting
2. Hearing protection cumulative and gradual loss all powder firearms produce harmful sound levels targetshootingworse than hunting
4-H Shooting Sports Guide Revised 06-02

protection shows wisdom -plugs -muffs -combination of both -electronic muffs use them-ears wdl repay
with better hearing F. No alcohol or other drugs
1. Impact of alcohol or other Depressants
poor concentration reduced judgment feeling of heightened slull or awareness
2. Not just illegal drugs 3. Prescription or over-the
Counter drugs cold tablets cough suppressants anti-histamines some pain relievers if drowsiness occurs, do not shoot
G. Any special precautions 1. Local condtions may require
More restriction 2. Range officer in charge
VI. Personal responsibility and safety
A. Safety lapses can occur with any shooter
I. Inexperienced begmners 2. Experienced shooters
B. Keep a safety focus and point out safety violations 1. Avoid habitually unsafe
shooters 2. Take personal responsibility
for yourself and others C. Shooting safer than tennis-
keep it that way!
VII. SUMMARY A. Fundamentals of firearm safety B. Personal knowledge, skills and
attitudes the key
DEMONSTRATE the use of ear plugs and muffs. PASS OUT foam ear plugs and HELP each shooter insert them properly.
STRESS gradual but permanent nature of hearing loss.
STRESS importance of complete attention and impact of these drugs on concentration.
POINT OUT that many prescriptions or over-the-counter drugs may affect judgment and attention. STRESS importance of knowing whether a drug causes drowsiness or other problems before t a h g it.- ASIC shooters who may be taking medication to inform instructor so arrangements can be made for them to shoot - under controlled condtions.
ANNOUNCE any local restrictions and point out the need to be flexible.
ASIC shooters what they would do if a person shooting with them did not follow safe shooting procedures. STRESS that they should call the fault to the attention of the other person AND rehse to shoot with them if they are un&g to shoot safely. NOTE personal responsibihty to keep shooting safe.
USE quiz game or other means to review content of h s lesson and previous one.
Revised 06-02 4-H Shoot~ng Sports Guide

C. Shotgun handhg and proce- dure for passing guns between people on the range.
D Rules and considerations for safe shooting.
D. Next session starts range work.
4-H Shooting sports Guide
REMIND the shooters that eye and ear protection will be needed for the next session.
Revised 06-02

Lesson Narrative
Shooting safety does not just happen. It is the responsibility of every person on the range - the range officer, coaches and instructors, shooters and spectators. Ultimately the shooter is responsible for his or her actions, own personal safety and the safety of every other person around. That is serious. The objective of this session is to instdl the fundamentals of safe firearms handhg and range behavior. We will use a combination of methods, including hands-on practice, to accomplish h s .
A shotgun is a tool, hke a power saw or a lawnmower. When used properly, a shotgun can hlt moving targets the way it was designed to do. But when improperly used, it can ktll or injure the shooter or anyone nearby. A shotgun poses no danger if the shooter exercises responsibhty and common sense. Shooting safety demands constant attention, understanhg and personal responsibhty.
Even behavior off the firing line influences those who are on the h e at the time. This time also gives the shooter a chance to observe and learn from watching other shooters, as well as listen to advice of coaches and rehearse the behaviors needed for solid shotgun shooting. Participants not on the firing line are expected to act in a responsible manner. Disruptive behavior cannot and will not be tolerated. Not only does it make learning difficult for those on the h e , but it also creates a potential hazard for all persons on the range. The instructor or range officer is the ultimate authority on the range, and that includes the spectator or observation area. Show respect for the other shooters and obey all instructions or commands from range officials.
Shotgun Handling Safety To handle a shotgun, or any firearm safely, the shooter must be completely- 100 percent sure of their gun's status at all times. Firearms do not think. The shooter has mental control over it.
To handle a shotgun safely, shooters must know how the parts of the gun operate. They must understand the necessity for muzzle control. They must be able to determine a shotgun's status and know how to make it safe. They must know how to load or unload it safely, and how to fire it and operate the action. These simple things must be learned and practiced.
Both mental and physical skills must be developed by safe and responsible shooters. Self-control is one of the most important elements of safety. It may seem to be an attitude, but it is a learned skill. Muzzle control is similar. It involves both a conscious awareness and an attitude of responsibility, as well as the physical skills to handle the shotgun with control and muzzle awareness. Muzzle control makes the difference when a handling mistake or a malfunction causes a shotgun to discharge unexpectedly. The result is determined entirely by the muzzle control of the shooter. The other mechanics of shotgun handling must become instilled to the shooter can perform them while consciously focusing on safety.
Revised 06-02 4-H Shooting Sports Guide

Developing safety conscious habits of shotgun handling takes effort and reinforcement. It is a matter of attitude. You must consider safe gun handling so important that no one ever needs to worry about your shotgun. Safety is your job - to never - permit a potential accident to occur. Exercise complete control over your shotgun at all times. Knowing the rules is not enough. They must be practiced constantly without lapses. Even when safety becomes second nature, the shooters must make a conscious effort to keep their shooting safe.
Basic Rules for Safe Gun Handling Shooting organizations promote a set of rules for safe firearms handhg, often called, 'The 10 Commandments of Shooting Safety'. In their most basic form, they include self-control, muzzle control, personal assurance of a "safe" frrearm and trigger control. All the others are based on these basic rules.
Always keep the muzzle pointed in a safe direction. Whether shooting, hunting or just handling a frrearm, the muzzle must always be kept under control. It should never be pointed at another human being, nor at anything you are not &g to shoot, destroy or km. Your location and common sense will tell you which direction is safest under various conditions. It is usually safest to point the muzzle of a shotgun down range (into a safe shot-fall zone) or straight up.
Keep the shotgun empty with the action open and exposed to view except when preparing to shoot. Any firearm with its action closed should be considered loaded and ready to fire. The frrst act after pickmg up a frrearm is to open the action and verify personally that the gun is unloaded in both the chamber(s) and the magazine. Be sure beyond all shadow of doubt. In order to keep the shooting range safe, all shotguns are to have their actions open and exposed to view at all times except while actually h g . Except in the ball and dummy instruction activities, guns with closed actions should never be passed between people. Practice opening the action before passing any firearm to another person and insist that others do the same. Your life and that of other people is at stake
Keep your finger off the trigger until you are in the act of shooting. It is very tempting to place your finger on the trigger when handling a gun. This bad habit can be prevented by consciously avoiding it when you start handling firearms. The trigger guard is there to protect the trigger and to help prevent accidental discharges. The finger should be placed along ale trigger guard to reinforce this function. Placing your finger on the trigger of a firearm means the h g sequence has started. A sudden bump or startling noise could cause you to move discharging that shotgun without intending to do so. Be safe stay clear of the trigger untd you are ready to fire.
4-H Shooting Spons Guide Revised 06-02

Treat every firearm as if it were loaded. This applies even to those you have personally checked to be sure they are unloaded.
The golden rule of firearms safety is to tteat every fitearm as if it were loaded. This applies even to those you have petsonally checked to be sure they ate unloaded. Shooting safety means that you must pay attention to detail and show the responsibhty needed with loaded firearms at all times. By handling unloaded guns with the same respect as a loaded one, you will establish good gun handling habits and will never have to say, "I thought the gun was unloaded." If other shooters refuse to follow these guldehes, refuse to associate with them in any firearms handling situation. They are unsafe and pose a danger to both themselves and to you.
Shotgun Handling Procedures Many circumstances require a firearm to be passed between two indviduals. The teaching method we will use requires passing loaded shotguns from a coach or instructor to a shooter. We will use a standard process to pick up a shotgun or pass it between people on the range.
You may have noticed that all the shotguns used here have had their actions open with the muzzles pointing away from people. We will keep all shotguns stored in this condtion on a rack, bench, table or other surface until they are ready to be used. Before picking up a shotgun check to see that it is empty. Grasp it firmy by the forearm with one hand and by the grip with the other. Thls requires the use of both hands. With a firm and secure grip, lift the shotgun. Never grab a gun by the barrel to drag it toward you or swing it into your grasp. That provides poor muzzle control and exposes you and others to potential danger. It also risks dropping and damaging the shotgun. Slidmg the gun across a surface also should be avoided. Such actions can scratch or mar both wood and metal surfaces, as well as risk exposure to danger (and the wrath of the shotgun's owner.)
Passing a shotgun between people always requires caution. Since the teaching method involves handmg a shotgun with a closed action to another person, an extra measure of caution is necessary. The instructor or coach must maintain control of the shotgun and the muzzle direction until the shooter signals that they have the gun and its duection under control. Here is how to do thls effectively. The instructor loads the firearm and closes the action with the shotgun pointed in a safe direction. Before handmg it to the shooter, the instructor grasps it with one hand on the forearm and the other on the action. The hand grasping the action should have its fingers extended over the trigger guard to prevent the shooter from touching the trigger. The shooter should grasp the shotgun firmly with one hand on the forearm and the other on the grip. Once their grasp is secure, the shooter should say "thank you" to indcate that the gun is under control The instructor should say "you're welcome" to indicate that he or she is releasing the shotgun. Safe handling is introduced while reinforcing courtesy and sportsmanship.
Revised 06-02 4-H Shooting Sports Guide

Elements of Safe Shooting On the range or in the field, safe shooting demands certain things of the shooter. Some are skills. Others are matters of knowledge and preparation. The skills will develop with practice, but they must be practiced to become fixed. Some of the knowledge must be memorized. Some of it is a matter of common sense.
Know how your gun operates. This may seem elementary, but the shooter must learn how the gun works, what it can do and what its limitations are. Opening and closing the action, operating the safety and coping with minor malfunctions are also essential knowledge. Safe and proper shooting technique comes with practice.
Be sure your gun and ammunition are compatible. Shotgun shells are not interchangeable between gauges nor even between lengths in sonie cases. Only shotshells that are manufactured for your shotgun should be carried. Using the wrong shells or mixing gauges can have disastrous results. Note that a 3-inch shell fits easily in a 23/4-inch chamber. A fired 3-inch case dropped into the same chamber tends to project slightly. It can be forced into the barrel, but it does not fit easily. Why does that happen? When the shell is fired, the crimp begins to unfold. Since the chamber is too short, it unfolds into the barrel, causing it to be partially obstructed. This results in increased pressure levels and stresses on the barrel. In an extreme case, the barrel could rupture, causing injury. Be sure the shells are appropriate for the gun being used.
Carry only one gauge of ammunition when hunting or shooting. Watch what happens when a 20 gauge shell is dropped into a 12-gauge barrel. Note that a 12-gauge shell can now be chambered behind it. What could happen if this shell were fired? Not only is the barrel obstructed, it also contains an additional round that wd fire when struck. The barrel is hkely to burst, destroying the barrel or the shotgun and risking injury to the shooter and others. This is not the only potentially dangerous combination. The same dung can happen with 16 gauge shells in a 10 gauge or with 28 gauge shells in a 20 gauge. Do NOT mixgatrges!Let your buddies carry their own shells.
Be sure of your target and what is beyond. Every shooter must be absolutely sure they correctly and completely identify their target before firing a shot. They also must make sure that the area beyond the target provides a safe shot-fall zone for their load. A shooter must never fire in a dxection where any potential for a mishap is present. Remember, the range of a shot charge is proportional to the size of the shot. Although target loads normally have a range of less than 275 meters (300 yards), buckshot may have a range of more than twice that distance. The shooter relmquishes all control over the shot as soon as it is fired, so the determination of a safe zone of fire must be made before the trigger is pulled.
Wear eye and ear protection when it is appropriate. Eye and ear protection should be considered mandatory for all shooters, coaches and others o n the range. Vision is priceless, so it would be
4-H Shooting Sports Guide Revised 06-02

wise for everyone to protect their eyes. The hkelihood of an injury is relatively small, but the impact of such an injury could be serious. Stray or deflected pellets, target chlps, gases and powder residue from shotgun and other foreign objects have the potential to damage the eyes. The simple precaution of wearing shooting glasses protects them. Many shooters combine their eye protection with corrective lenses or tinted lenses that increase contrast, reduce hght intensity, or enhance vision in other ways. Eye protection should be used whenever shooting is taking place.
Revised
Like sight, hearing is a precious gift. The sound levels produced by any powder firearm are sufficient to cause hearing damage. Hearing damage is usually gradual. The shooter seldom notices the loss u n d it is serious. The damage is cumulative and permanent. The infrequent firing during hunting may have little effect, but some shooters wear ear protection even whde hunting. All authorities agree, however, that the damage from the prolonged exposure during target shooting is a real and present threat. Shooting without hearing protection does not show toughness. It shows foolishness. Inexpensive and comfortable hearing protection in the form of either plugs or muffs is readily available. Some shooters use both plugs and muffs for added protection. Instructors often use electronic muffs to allow them to hear better for firing h e control. The sounds of h g are muffled electronically. Choose the type of protection that fits your shooting style and budget. Always wear them on the range. Your inner ears d repay you with better hearing.
Avoid mixing alcohol or other drugs with shooting. Anything that reduces your concentration or judgment whde shooting poses a threat to you and others on the range. Alcohol and other depressant drugs cloud judgment and reduce concentration even though the user experiences a heightened sense of security or ability. Illegal drugs are not the only culprits. Some prescription or over-the-counter medicines may have the same effect. Cold tablets, cough suppressants, antihistamines and some pain relievers can have a s d a r effect on some people. Read the label and observe the impact the drug has on you before entering the shooting range. Products that cause drowsiness or similar effects should not be used if you are shooting. If you are using them, you should not be shooting. If you are ill or on medication, tell the instructor, who can arrange for you to shoot under more controlled conditions.
Be aware of special precautions related to the specific situation. Special circumstances or unique features of a particular site may require additional safety rules. If you are not sure a situation is safe, a~kyotrr range o$cer! The range officer is responsible for controhg the range, assuring that all safety rules are followed and ensuring that aLl shooters are treated with respect.
4-H Shooting Sports Guide

Personal Responsibility and Safety, Occasionally you may encounter unsafe shooters, and even experienced shooters who become lax at times. Do not allow people who are acting foolish and practicing risky behavior to influence you. Point out the unsafe behavior. If the shooters refuse to modify their behavior to meet the standards of safe shooting, don't shoot with them. As you grow older, you d become increasingly concerned with shooting safety. Shooting is a very safe sport, safer than such non-contact sports as tennis; but the results of a shooting accident can be disastrous. Keep shooting safe by insisting on the highest standards of safety from yourself and everyone who shoots with you.
Summary Are there any questions? Be sure to review this material before our next meeting. If you don't understand s o m e h g in your review, write yourself a note and bring it to the next session. Today we learned about safe gun handhg practices. We learned that we must check all guns to see if they are loaded before handling them. You have demonstrated your ability to safely handle shotguns. In our next session we will move to the range and begin learning to hit moving targets with a shotgun.
Summary Activities 1. With a teen leader or assistant instructor in charge of each small group,
have every shooter go through the mechanics of using the shotguns that will be used in the shooting sessions. Have them check and clear the shotgun. Then let them load, unload and operate the safety. Use a mousetrap pistol to demonstrate trigger operation. Instmctor note: No live ammunition should be present. Use only dummy rounds or snap caps.
2. Have teen leaders or assistant instructors work with small groups practicing the procedures for pickmg up a shotgun, checking it for safety and passing it to another person.
3. Have teen leaders or assistant instructors conduct an informal quiz over the content of this lesson and the previous one.
4. Role play several range or field situations and have the participants dscuss safe muzzle directions and other safety considerations.
Exhibit and Sharing Ideas 1. List some of the things you learned in your shooting journal. 2. Make a poster or a set of signs reinforcing the cardma1 rules of safe
firearms handling. Post them in the classroom or in a
No live ammunition should be present. Use only dummy rounds or snap caps.
4-H Shooting Sports Guide Revised 06-02

3. Make a poster or &splay that illustrates one of the safety considerations in shotgun shooting (for example, show the range of various shot sizes). Integrate the posters into a &splay for 4-H Week, your club, National Hunting and Fishing Day or some other timely event.
4. Prepare a group exhlbit or demonstration on shotgun safety.
5. Prepare a demonstration or illustrated talk on shotgun safety and share it with your club, other interested shooters or a small group of adults.
6. Demonstrate and practice the protocols for passing a shotgun between two people with a parent or other interested adult.
7. Explain the basics of shotgun safety to a parent or other interested adult
Revised 06-02 4-H Shooting Sports Guide

Basic Shotgun Lesson 3
Shotgun Shooting Fundamentals James V. Peter, Jr.*
Objectives
Participating youth and adults wLL1:
1. Determine eye dominance and assist others in doing so.
2. Understand and practice six fundamental steps in shotgun shooting.
3. Practice the fundamentals on the range.
4. Understand and practice using spring-powered traps.
5. Observe and understand the basics of clay target fight.
6. Have fun while learning.
Roles for Teen and Junior Leaders Demonstrate elements of shooting form without shotguns.
Demonstrate trap operation.
Demonstrate the elements of proper shooting form with live ammunition.
Supervise a small group learning to use the traps.
Assist any young person having difficulty with the lesson.
Teach portions of the lesson.
Parental Involvement See Roles for Teen and Junior Leaders above.
Assist in securing supplies needed to teach the lesson.
Assist with range set up.
Assist with range operation.
Arrange for or provide transportation.
Arrange for or provide refreshments.
Act as an assistant instructor, coach or range officer.
* County Extension director and agricultural agent for the Dubois County Office of Purdue Cooperative Extension, Jasper, Indiana
Best Time to Teach Any time weather is suitable, but after Introduction to shotguns and shotgun safety and before firing the first shots
Best Location Classroom and range
Time Required Approximately 1 hour
Materials /Equipment - traps - clay targets - eye and ear protection - shotguns - appropriate ammunition (on
range only) - materials to set up range if
needed - 8% x I I-inch paper - %-inch or larger diameter
dowels (if used) - string or cord - tacks or nails
References Shotgunning: The Art and Science.
R. Brister, 1977. Winchester Press, New York
The Basics ofshotgun Shooting. H.W. Sheets. 1985. The National Rifle Association of America, Washington, DC.
NRA Basic Shotgun Shooting Course, National Rifle Association, Washington, DC.
Basic Shotgun Shooting - A Better Way. Video. Contact your state coordinator or Federal Cartridge Corporation, Anoka, MN.
4-H Shooting Sports Guide I Revised 06-02

Teaching Outline
Presentation
I. Shotgun shooting skills learned
A. Complex set of activities 1. Moving target 2. Movingshot 3. Coordination 4. Timing
B. Learned, not genetic
11. Determining eye dominance
A. Handedness and eyedness 1. Same side 2. Cross-dominance
B. Influence on learning to shoot 1. Pointing natural for
dominant eye 2. Hands easier to retrain 3. Shoot from the dominant-
eye side
C. Determining dominant eye 1. Partners stand about 3
meters (1 0 feet) apart face squarely toward each other both eyes open
2. Make sighting triangle thumb on top of thumb fingers crossed over fingers
3. Extend arms fully 4. Focus attention on
partner's nose 5. Raise hands and center
nose in triangle partner note visible eye watch for switching
6. Bring hands back to face focus on nose, not hands comes to dominant eye
7. Switch roles and repeat
D. Demonstrating dominance 1. Point at an object
both eyes open focus on object, not finger
Application POINT OUT that shotgun shooting is a learned skill involving moving objects and fundamental sMs.
DISCUSS eye dominance and importance of shooting with dominant eye.
Have shooters DETERMINE their dominant eye. USE crossed-hands method here or one of other techniques from the Fact Sheet 3: Detemining Eye Dominance. STRESS importance of keeping both eyes open and facing other person squarely.
CAUTION partners to watch for "cheating" or forcing hands to non- dominant eye.
Use h s exercise to DEMONSTRATE influence of dominant eye in pointing. STRESS that shotguns are POINTED not aimed.
32 Revised 06-02 4-H Shooting Sports Guide

2. Cover or close non- dominant eye
3. Cover or close dominant
eye 4. Note dfference
Finger stable with dominant eye open Moves off object with dominant eye covered
E. Importance of using both eyes 1. Better depth perception 2. Better peripheral vision 3. Less fatigue 4. Getting on target faster
111. Shotgun shooting fundamentals
A. Ambidextrous directions 1. Dominant or shooting
refers to the dominant- eye side
2. Non-dominant or off refers to the opposite side
B. Stance 1. Body position and posture
2. Foundation of shooting form
3. Orients shooter to target
4. Foot position body square to target area feet shoulder-width apart off foot slightly forward weight dstributed evenly line through heel of dominant foot and toes of forward foot points to target breaking area
5 . Knees bent slightly hips free to move boxer's stance
6. Upper body boxer's stance off hand forward - gnps shotgun forearm - elbow raised dominant hand closer to face - gnps shotgun grip - elbow raised head erect
7. Gun-ready position
4-H Shooting Sports Guide
ASIC shooters how using both eyes might help their shooting. STRESS depth perception, peripheral vision and reduced fatigue.
Use adult or teen leaders to DEMONSTRATE shooting fundamental.
ILLUSTRATE ambidextrous directions with right- and left-handed examples. See Fact Sheet 15: Shotpn Shooting from the Gtm-ready and High-gtm Positions.
DEMONSTRATE proper stance while DESCRIBING it. Have shooters adopt stance with help of teen leaders or assistant instructors.
STRESS importance of freedom of movement for shotgun shooter.
DEMONSTRATE boxer's stance. NOTE lead with off hand.
EXPLAIN how raising elbow increases upper body freedom of movement.
DEMONSTRATE and DESCRIBE a proper gun-ready position. POINT OUT that it is flexible, but h s one is basic position for developing one that is comfortable and effective.
Revised 06-02

practiced here to prepare for later use shotgun held slightly across chest - muzzle on or just below
fight h e of target - heel of stock under
dominant elbow - toe of stock near point
of h1p - stock close to body but
clear of clothing off elbow flexed, not extended fully - grasp forearm near
middle - gun balanced between
hands - index finger pointed
along forearm grip firm but not tense both eyes open, looking where target will appear
8. Gun mount shotgun in shooting position muzzle as pivot point bringing shotgun to face and shoulder - butt in pocket formed
when dominant elbow is lifted
- stock firmly against cheek
slight lean into shot by upper body
- weight 70 to 80 percent on forward foot
- head nearly over front foot
- forward knee slightly bent
9. Swing to target smooth movement of shotgun to point at target - straight-away targets - forward lead for angled
targets o swing through leads o sustained leads
EXPLAIN importance of free movement of stock to shoulder.
STRESS that position is alert and poised for action, but not tense. Demonstrate and explain how to reach hlgh-gun position.
DISCUSS l o o h g toward area where target will appear.
DEMONSTRATE a proper gun mount at normal speed, and then at slow speed while DESCRIBING process. STRESS mount as being part of swing. Also STRESS the importance of staying on fhght path of target with muzzle.
EMPHASIZE bringing stock to face and proper location on shoulder. Have each shooter LOCATE hollow in their shoulder. STRESS importance of firm, consistent contact between the stock and cheek.
DEMONSTRATE shift of weight forward, flex of forward knee and forward lean of body. DEMONSTRATE and DISCUSS value of this position in absorbing recoil. PUSH on shooter and have them rock back onto rear leg.
DISCUSS and DEMONSTRATE a proper swing. Use dowels as guns and have shooters TRACI< a string either along a wall or strung between two posts.
DISCUSS different leading methods.
Revised 06-02 4-H Shooting Sports Guide

continuation of mount to follow through sequence
10. Trigger pull timing of shot critical precise location not important quick, crisp pull avoid snatchmg or jerkmg
1 1. Follow through vital to successful shooting continues through recoil more important as target speed increases following a piece to the ground swing from the hips upper body and gun a
IV. Orientation to clay targets
A. Target types 1. Standard target 2. Other shapes and sizes
B. Target colors 1. Single color
black painted
2. Colored dome orange white yellow
C. Target flight 1. Smooth arc
rising to peak falling to earth
2. Distance of flight 3. Consistency of fight 4. Influence of wind 5. Spinning for stabhty
V. Orientation to trap
A. Spring-dnven traps 1. Spring 2. Thrower arm 3. Latch 4. Lanyard
B. Safe operation of trap 1.Cocking the arm with the
finger tips
ILLUSTRATE importance of a proper trigger pull.
CAUTION shooters about jerhng or sna tchg trigger. ILLUSTRATE a proper follow through. DISCUSS why it is important for consistently good shooting.
DEMONSTRATE how swing comes from hips and knees rather than from arms.
PASS AROUND some clay targets. ASIC shooters what they can tell you about them. If available, show several types and colors.
THROW one target with trap. ASK shooters to tell you what they observed. STRESS flight path of target.
THROW several more to show consistency of trap or influence of wind.
REVIEW basic parts of trap. CAUTION shooters about dangers around throwing arm. Have each shooter THROW several targets under direction of an assistant or teen leader.
4-H Shooting Sports Guide

pull back to the latch be sure its latched
2. Loadmg the trap hold target dome with finger tips place target agamst rad purpose of mark on arm - consistent fight - direction control
3. Firing the trap pull lanyard never with anydung in the way of the thrower arm risk of injury from arm or target pieces
IV. Orientation to the range
A. Firing h e 1. Traps set along it 2. Beyond line is danger zone 3. Danger zone includes shot-
fall area 4. Carpet square or shooting
box for shooter 5. Coach between shooter and
trap operator 6. Down range only on
command range safe traps uncocked guns on rack
B. Range control 1. Ammunition under
instructor control 2. No shooters with guns until
range declared open for shooting
3. Firing points independent, but under range officer control
disturbance in safety area potential impact on h e
C. Safety area 1. Clearly marked 2. Physical barrier 3. Part of range and under control of range officer
disturbance in safety area potential impact on h e
D. Cease fire 1. Any time unsafe condition
exists
DISCUSS range layout and DEMONSTRATE proper range procedures. Have groups of shooters ROLE PLAY the responsibilities of all people on range.
DISCUSS importance of protecting trap operator.
STRESS sttict control of all ammunition on range whde primary teaching is in progress.
REINFORCE absolute authority of range officer.
DEMONSTRATE potential hazard of distractions in safety area using teen leaders and dowel "guns". ASIC shooters to dscuss possible impacts of a mistake.
ASK shooters to describe actions to be taken on a CEASE FIRE.
Revised 06-02 4-H Shooting Sports Guide

3. Everyone's responsibhty 4. Stop, unload and make safe 5. Resume only on command
E. Misfires and malfunctions 1. Muzzle down range
two-minute wait range assistance raise hand for help
2. Problem shells bloopers or squib loads check barrel before
shooting
VII. Summary
A. Eye dominance
B. Elements of shooting form 1. Stance 2. Gun-ready position 3. Mount 4. Swing to target 5. Trigger pull 6. Follow through
C. Introduction to clay target
D. Introduction to trap operation
E. Introduction to the range
F. Live firing next time
STRESS importance of treating malfunctions or misfires as shots waiting to happen.
EMPHASIZE potential hazard of an obstructed barrel.
ASIC questions or use game format to REVIEW main content of lesson.
STIMULATE thought and prepare shooters for live firing by having teen leaders DEMONSTRATE live firing.
Revised 06-02 4-H Shooting Sports Guide

Lesson Narrative Shotgun shooting involves hitting moving targets with a cloud of moving shot. To accomplish ths, the shooter must see the target, point the shotgun and fire when all the moving parts are in a proper relationship to each other. Learned skills and coordmation are needed for effective shooting. One element must be determined before learning can begin. The shooter must know which eye is dominant when the shotgun is pointed.
Eye Dominance Most people are right handed. The vast majority of them are also right eyed. Others have a dominant left side. Some people are cross- dominant, with their handedness and eyedness on opposite sides. Shooting is more easily learned if the shooter allows the dominant eye to serve its natural function. fight-eyed people should shoot from the right shoulder and left-eyed people should shoot from the left shoulder regardless of their hand dominance.
Findmg out which eye is dominant is fairly easy. Stand about 3 meters (10 feet) from your partner, facing each other squarely. One of you should place one thumb on top of the other and cross the fingers of the top hand over the fingers of the bottom one, leaving a small triangular hole. With both eyes open, face the other person squarely and raise your hands until you can see your partner's nose through the hole. Hold your position for a few seconds, while your partner notes which eye they can see. Then bring your hands back to your face slowly while keeping your partner's nose in focus and in the middle of the hole. Partners, watch for any switching of the hands from eye to eye, and be sure the hands return to the eye you saw through the opening earlier. The eye your hands come to is your dominant eye. Try it again. Now change roles and do the whole thng again.
How many of you are left eyed? Even if you are right handed, you should learn to shoot left handed. It is easier to teach your non- dominant hand what to do than to switch your eye dominance. Since pointing is one of the key elements in htting a target with a shotgun, the dominant eye needs to be involved or a lot of unexplained missing will take place. Demonstrate that for yourself. With both eyes open, point at a distant object with your finger. Cover your non- dominant eye with your other hand. Did your finger stay on the object? It should have. Now, cover your dominant eye. Did your finger seem to jump to the side, pointing to the wrong spot? That is exactly what happens when you try to shoot with your non-dominant eye. The dominant eye takes over and you wind up pointing at the wrong spot.
Some shooters compensate for being cross-dominant by shooting with the dominant eye closed. Although that works, it is a much poorer shooting strategy. You lose depth perception and peripheral
Revised 06-02 4-H Shooting Sports Guide

vision. Both of them are helpful to a shotgun shooter. Be patient and try to use the dominant eye. You will shoot better if you do.
Shotgun Shooting Fundamentals Shotgun shooting is learned, not an inborn gift. Six fundamental form concepts must be learned and practiced before they can be put together effectively: stance, gun-ready position, mounting the gun, swing to the target, trigger pull and follow through. Each of them involves a number of skills important to good shotgun shooting. We WLU develop them one at a time before trying to put all of them together. Please note that all the instmctions aregiven in relation to the dominant ye. Thm, "dominant" or shooting" side is on the dominant-ye side. Similar-, "non-dominant" or "of'side refers to the opposite side. These instructions are the same for both right- and left-handed shooters.
Stance
The stance is the position and posture of the, body during the course of shooting. It is the foundation of good shooting. Although some variation in stance is seen among good shot shooters, most of them share certain elements. Freedom of movement is vital. The stance provides support and recoil absorption; the shooter is oriented to the area where the target will be broken.
A proper shotgun shooting stance starts with the feet. One experienced shotgun instructor says, "you may hit the target with the shot, but you miss with your feet." The body should face the area where the target is likely to be broken. The feet should be comfortably set about shoulder width apart. The offshoot should be slightly forward of the dominant foot, perhaps 10 to 20 centimeters (about 4 to 8 inches). The weight should be evenly distributed, favoring the forward foot slightly. When the feet are properly set, a line drawn through the heel of the rear foot and toes of the front one should point to the area where the target WLU be broken.
The knees should be bent slightly, giving the hips freedom to rotate freely. This movement is critical when shooting crossing targets, since a smooth swing starts from the hips rather than the upper body. Most instructors refer to this as a boxer's stance. It shows the same readlness to act and freedom of movement a boxer must have.
The upper body also requires a boxer's stance. The off hand, the one that will hold the forearm or forend on the shotgun, is extended halfway or slightly more. The arm is held nearly parallel with the ground, giving the upper body freedom to move. The dominant hand, the one on the grip and trigger, is held closer to the chest. Most good shooters also raise that elbow to aid in movement.
Please note that all the instructions are given in relation to the dominant eye. Thus, "dominant" or "shooting" side is on the dominant-eye side. Similarly, "non- dominant" or "off' side refers tot he opposite side.
This stance is the one that will be assumed as the shooter prepares to call for a target with the gun either in the ready position or raised and ready to fire. I
4-H Shooting Sports Guide Revised 06-02

Gun-rea4 Po~ition We d be shooting from a hlgh-gun position during the early part of the instruction. A proper gun-ready position is essential for hunting, sporting clays, international skeet and other shotgun shooting activities. We wdl teach the position as part of the fundamentals and practice it in controlled way each time the shotgun is fired.
Gun-ready position is the upper body posture and the position of the shotgun prior to mounting the gun. The shotgun is angled slightly across the chest. The muzzle should be on or slightly below the fight line of the target. The heel of the stock should be under the dominant elbow and slightly above the belt or waist. The toe of the butt plate or recoil pad should be on or near the point of the hip. The stock should be held close to the body, barely t o u c h g it or w i t h a few centimeters (about 1% inches). The elbow of the shooting hand should be lifted about 5 to 10 centimeters (2 to 4 inches) away from the stock. T h s position makes raising the gun to the shoulder easy by keeping the butt of the gun forward of the arm pit and free from any restrictive contact with the clothes.
The off elbow should be flexed, placing the hand on the forearm without extending the arm fully. The shotgun should be balanced between the hands. If the stock is the proper length, the forward hand should be near the middle of the forearm. Some shooters prefer to move their hands back toward the receiver for better support and control and many good shooters point the index finger toward the muzzle, and at the target with it. Both hands should grip the shotgun firmly, but without excess tension.
Both your eyes should be open and looking at the area where the target is expected to appear. If the muzzle obstructs your vision, lower it slightly. Good shooting demands that you be able to see the target quickly and clearly. Once the target appears, every bit of concentration should be focused on it. Both the background and the barrel will be somewhat out of focus, but the target d be in sharp focus.
Mounting the Shogun
Bringing the shotgun into shooting position on the shoulder is called mounting the gun. The shotgun is raised to the face and shoulder in a smooth motion. The muzzle acts as a pivot point for the mount, with little vertical movement. It should track the target (begin moving along the fight path of the target) as the stock comes to the cheek. The head remains comfortably erect as the stock is brought up to the dominant cheek. This mounting method prevents many of the problems associated with head position that bother shotgun shooters. Avoid b r i n p g the gun to the shoulder and lowering the head to the stock. With practice, the stock d reach a consistent position on both the shoulder and the cheek. Ths wdl lead to quicker and better shooting. The cheek and the comb should remain firmly against each other throughout the firing process. The butt of the stock should be held firmly agamst the shoulder in the pocket formed when the dominant elbow is raised to shoulder height. The heel of
Revised 06-02 4-H Shooting Sports Guide

the stock should not project much above the top of the shoulder. That keeps most of the butt against the shoulder and helps to distribute recoil.
During the mount, the upper body should move forward slightly, leaning 70 to 80 percent of the weight on the front foot. The forward knee should flex slightly as well. This rings your head into a position almost directly over the forward foot. We will take our time with t h s process, mounting the gun before calling for the target. With practice the mount will become a swift and fluid motion that blends with the swing to the target and follow through.
Swing to the Target
As you gun experience and begin shooting from the gun-ready position, the mount and swing to the target d l blend into a smooth motion. Since we are starting with the gun mounted, the swing will be taught as a separate unit first. With the gun at the shoulder and your gaze shifted to the area where the target wfi appear, call for the target by saying "pull." As soon as you see the target, focus all your attention on it and point the shotgun at it by swinging the entire upper body and shotgun as a unit. When shooting at rising, straight-away targets, simply point the gun at the clay target and shoot. When other angles are encountered, you must swing the shotgun to znd through the target smoothly. The legs and hps power the swing, and the upper body and shotgun move as a unit. Some lead will be needed to hit a crossing target. Every shooter perceives an appropriate lead differently. A swing-through method of leading will usually succeed for most shooters. Starting with the shotgun behind the target, accelerate the muzzle through the target along its fight path. As the muzzle clears the target, to point ahead of the target, fire and continue to swing. Target shooters, often prefer a sustained lead, where the muzzle is perceived as towing the target with a gap of appropriate length. Both methods require some practice, and both depend upon the shooter to perceive the relationship between the muzzle and the target, pointing rather than aiming.
Successful shotgun shooting requires proper timing of a shot charge and a target. You must fire the shotgun when the muzzle is pointing at the location where the target will be when the shot charge arrives. Since the shot charge is spread over a fairly large area, there is no need for the careful aiming needed with rifle shooting. In fact, that approach is hkely to cause all kinds of difficulties for the shooter. The trigger needs to be pressed with a quick, crisp pull, but not snatched or jerked. Violent movements can dsrupt the smooth swing essential to good shotgun shooting. The shotgun should flow smoothly from the mount to the follow through without interruption by the tngger pull. Eventually, a condtioned reflex of hand-eye coordination will fire the shot when the target and muzzle are in the proper positions.
4-H Shooting Sports Guide Revised 06-02

Follow Though
Be careful when cock- ing the thrower arm or placing a target on it. It can deliver a very powerful blow if released.
Follow through refers to the continued smooth swing of the shotgun after it is fired. Many instructors consider it the most important part of consistent shotgun shooting. Follow through the recoil of the fired shot until after the target is broken. To practice a follow through, many shooters follow a broken piece of the target to the ground. Follow through becomes more important as the speed of the target increases. As with other elements of the swing, good follow through is governed by movement of the hips and legs.
Putting all these elements together into a swift and smooth action may seem like a challenge. It is, but it is a challenge you can meet. We will put each of these skdls together to help you hit targets effectively, and add new challenges when you are ready. Let's move over to the fLting line and get started on your skills.
Orientation to Clay Targets A standard clay target looks somewhat like a frisbee or a saucer. Other shooting games, like sporting clays can use other types and sizes of targets, but we will used the standard trap and skeet target for instructions. These targets may be painted, unpainted or painted only on the dome. Usually they are painted white, yellow or orange for better visibility.
Watch while this target is thrown. I will call for the target as you will during instruction. "Pull." What did you notice about the target's flight? The target flew in a curved course, rising to a peak height, then fahng to the ground about 50 meters (55 yards) away. The target had a fairly straight line of flight. The target was spinning as it flew. Let's watch a few more. Did you notice anytlung else about these targets. They landed fairly close together, so they had a consistent line of flight. Wind gusts can cause them to rise, fall or curve to one side. They also slow down as they move down range.
Orientation to the Trap These traps are powered by a strong coil spring that can be adjusted to throw faster or slower targets. Tightening the spring increases target speed. The throwing arm is cocked by grasping its upper edge with the fingers of both hands and pulling it back until it latches in place. Be careful when cocking the thrower arm or placing a target on it. It can deliver a very powerful blow if released.
To place a target on the thrower arm, grasp the target by its dome with the finger tips and set the target on the thrower arm against the back rail. Note that the thrower arm has a line marked on it. Place the target on the arm touclung that line. That is what controls the duection of the target.
To launch a target, pull the lanyard. That releases the latch, allowing the spring to pull the thrower arm around powerfully. Never
42 Revised 06-02 4-H Shooting Sports Guide

release the thrower arm when anythmg is in its path. It could cause severe injury. Always leave the thrower arm uncocked when the trap is not being used or is unattended. Let's spread out along the finng line and try throwing a target or two.
Orientation to Range Operation Insttztctor note: This dtscussion is based upon a range set up in a safe, open area. If you are using a regulation field, you will need to modify your orientation to meet the local conditions.
Before we go any further we need to under and how the firing h e operates. The traps are lined up on the firing line. The danger area includes not only the area covered by the targets, but the shot fall zone as well. That zone extends 300 meters (330 yards) down range from the firing h e . Firing should never take place with anyone in that area.
We will be retrieving some of the targets we use, but no one should be forward of the firing line until or unless specifically authorized by the range officer or instructor. Only after all the traps are sprung and the shotguns are safely in the racks will we move down range.
Notice that there is a carpet square on the ground to the left of each trap. The shooter wdl stand on that carpet square. The coach stands between the shooter and the trap operator, keeping clear of the throwing arm and making sure the shotgun never endangers the trap operator. The coach or instructor will keep will ammunition under control, either loading the shotgun for the shooter or handmg the shooter a round to load personally. Although each firing point will operate independently during the ball and dummy exercise, the range officer or chef instructor is in ultimate, control of the entire range. No shooter may touch a shotgun until the range officer declares the range open to shooting by stating, "Live ammunition on the range" or "The range is hot!"
The safety area behind the tape barrier is for spectators and shooters who are not on the h e at the moment. Those in the safety zone must be careful not to dtsturb the shooters on the line or interfere with the instruction in any way. Disturbance behind the h e is extremely dangerous to those on the firing line. Inexperienced shooters may have a lapse in muzzle control if they come dtstracted or embarrassed by actions behind them. Show respect and restraint when off the finng line.
Anyone on the range may declare a cease fire by shouting "cease fire!" or "freeze!" when an unsafe condition exists. That command stops everything on the range immediately. All shotguns should be made safe (pointed in a safe direction, opened, all ammunition removed and pointed straight up with the action open and exposed to view), and all trap operators should make sure no target is thrown. Once the problem is fixed, the range officer will declare the range open and shooting may resume.
4-H Shooting Sports Guide Revised 06-02

without checking the
Should a miss fire or other malfunction occur, keep the shotgun pointed down range for at least two minutes. D o not move the shotgun until the range officer takes control of it using the protocols we practiced last time. If any shell fails to perform properly (bloopers or squib loads), do notjre another round tvithout checking the barrelfar obstmctions. If in doubt, raise a hand to get help from the range officer or assistants.
Summary We have learned a great deal about shotgun shooting and ourselves today. You determined your eye dominance. You learned the fundamentals of shotgun shooting without equipment and with unloaded guns, practicing the six fundamentals of shotgun shooting: stance, gun-ready position, mount, swing to the target, trigger pull and follow through. Then we moved to the range and you got a chance to throw a few clay targets on the trap, to watch some targets in fight and to become farmliar with range operation. Next time we will start on the range and begn live firing. If you have any questions between now and the next session, please write them on a piece of paper and bring them to the next session.
Summary Activities 1. Have a teen leader demonstrate proper shooting fomi without equipment,
then with an empty shotgun and then with several live rounds. Review the elements of shooting forrn with the shooters after each sequence, and any that are necessary later.
2. Discuss the content of the lesson with the shooters, asking them questions or responding to questions they may have.
3. Have shooters practice the elements of shotgun shooting forrn without equipment in the classroom and with dowels or empty shotguns on the tiring line.
4. Demonstrate the potential for problems caused by disturbance in the safety tone using instructors and teens as models. Use only dowels or mimetics without equipment for the demonstration.
Exhibit or Sharing Ideas 1. List the things you have learned about shotgun shooting and range
operation in your shooting journal.
2. Share thngs you learned with a parent or other interested adult.
3. Construct a teaching poster listing the six fundamentals of shotgun shooting, how to determine eye dominance or range layout. Post it where it will remind your group of the right way to hit moving targets with a shotgun.
Revised 06-02 4-H Shooting Sports Guide

Basic Shotgun Lesson 4
Firing the First Shots James V. Peter. Jr. *
5. Have fun while learning.
Roles for Teen and Junior Leaders
Objectives Participating youth and adults will:
1. Successfully shoot a moving target using the fundamentals of shotgun shooting.
2. Practice fundamental shotgun shooting skds in a ball and dummy exercise.
3. Demonstrate the necessary knowledge, skill and mental attitudes for safety firing shotguns at moving targets.
4. Operate a spring-powered trap.
Set up range and traps for instruction.
Stock each trap with targets and supply shells to instructors
Operate traps
Work with shooters having dfficulties with the fundamentals.
Supervise one k g point after proper training and supervision.
Demonstrate shooting fundamentals.
Serve as an assistant range officer.
Supervise shooters and spectators in the safety area.
Best Time to Teach Soon after shotgun shooting fun- damentals, any time of year when shooters can be outside comfortably.
Best Location Any safe shooting range
Time Required 1 hour or more depending on class size repeat as needed
MaterialsIEquipment - one shotgun per shooting station
Parental Involvement See Roles for Teen and Junior Leaders above
Serve as assistant instructors for one firing point.
Support teen leaders in their roles
Control off range activity.
Arrange for or provide transportation.
Arrange for or provide refreshments.
* County Extension director and agricultural agent for the Dubois County Office of Purdue Cooperative Extension, Jasper, Indiana
(suitable-types and sizes for the shooters)
-ammunition (five rounds minimum per shooter)
-ammunition (five rounds minimum per shooter)
-clay targets (75 to 100 for demonstration plus 15 per shooter)
-one trap per shooting station spring-powered traps with seats recommended)
-eye and ear protection -range set-up materials (Fact Sheet 14:
Range Se t9 atzd Operationfor Shotgutz Itistmctioti)
-range safety posters -gun rack
References The Basics of Shotgun Shooting.
H.W. Sheets. National Rifle Association, Washington, .DC. 1985.
Basic Shotgun Shooting: A Better Way. Video. Consult your state 4-H shooting sports coordinator or Federal Cartridge Corporation, Anoka, MN.
At this stage, every firing point should be controlled by a qualified adult volunteer or an advanced teen leader with considerable shooting and teaching experience.
4-H Shooting Sports Guide I Revised 06-02

teach in^ Outline
Presentation I. Fundamentals of shotgun
shooting A. Safety
1. Muzzle in a safe drection 2. Action open, empty and
exposed to view 3. Finger off the trigger untd
shooting 4. Self-control
B. Elements of shotgun shooting 1. Stance 2. Gun-ready position 3. Mounting the shotgun 4. Swing to the target 5. Trigger pull 6. Follow through
C. Hitting moving targets complex 1. Step-by-step process 2. Emphasis on developing
basics 3. Shooting only when you are
ready
11. Range safety and orientation review
A. Danger zones 1. Down range 2. Shot-fall zone 3. Area around trap
B. Safety zone behmd line
C. Shooter control 1. Shooting Box 2. On line when called by the
instructor to be there 3. Inactive shooters behmd
safety line
D. All ammunition under instructor control 1. No other live ammo on h e 2. "Live ammunition on the
h e " means range is hot and ready for live firing
E. Only instructor may bring shotguns to the firing line
F. "Cease fie!" or "Freeze!"
Application ASIC - what are the rules for safe shotgun shooting? REVIEW the fundamentals carefully with the shooters.
ASIC - what are the elements of shotgun shooting form? Have a teen leader DEMONSTRATE if needed to reinforce these elements.
EMPHASIZE that a step-wise process will be used to teach the basics of shotgun shooting and that each shooter will progress at their own pace.
If a range officer wlll be used, let that person COVER all range operations. POINT OUT the danger and safety zones and safety area.
EMPHASIZE shooter control and instructor actions.
STRESS that NO LIVE AMMUNITION is permitted on the h e EXCEPT by the instructors.
STRESS shotguns being under instructor control exclusively.
EMPHASIZE that meaning and actions of either command. ENSURE
46 Revised 06-02 4-H Shooting Sports Guide

1. Immediately stop 2. Make your shotgun safe 3. Resume only when range
officer or instructor gives command
G. Shooter/spectator behavior 1. Importance
learning safety - yours - mine
2. Consequences of violations removal from line removal from session removal from program
111. Targets and traps A. Targets
1. Composed of pitch and clay hard aerodynamic easily broken toxic to swine
2. Visible chip: broken target
B. Traps 1. Powerful operating spring
caution cockmg and loadmg
trap stay away from thrower arm shooting glasses
2. Consistent operation needed location of throwing
assembly - elevation - direction target location on thrower arm - consistent fight
IV. Shotgun shooting step-by-step
A. Watching targets 1. W shooters on f h g line 2.Face target impact area squarely 3. Watch target flight
that every shooter knows what to do. DEMONSTRATE if necessary.
ASIC shooters why these rules are important. STRESS the importance of SAFETY for EVERYONE.
PRESENT the consequences in a straight-forward manner, not as a threat.
PASS AROUND a target for each shooter. Have them Handle it, then STRIICE it sharply on a hard object. DISCUSS the results.
DISCUSS how hits and misses are determined. EMPHASIZE safety with the traps. DEMONSTRATE trap operation one more time.
BRING shooters to the h e as a group. Line them up on either side of the active trap and watch several targets. ASK them what they observed.
4-H Shooting Sports Guide Revised 06-02

"pull" for release straight h e rising and falling trajectory consistent impact area
B. Finger point
1. Boxer's stance on the line square to the target area off foot slightly forward off arm straight - held about 45 degrees to
the ground - index finger pointed
2. Both eyes open
3. Concentration on target
4. Point finger at target and follow to the ground
5. Realign body if needed
C. Finger point and BANG
1. Repeat sequence
2. Say "bang" when fmger touches target
3. Late or unison "bangers" late -aiming unison -waiting for group when YOU are on target
D. Safety review
1. Muzzle in safe direction
2. Shotgun empty, action open and exposed to view
3. Finger off trigger
E. Dry point with shotgun
1. Shooters to the line
2. Follow sequence used in finger point and bang
3. Open hands for shotgun will place gun in hands f m gap with both hands "thank you when under control
Have the shooters TAKE a BOXER'S STANCE facing the target flight area and follow several targets with the index finger of the off hand.
CHECK eye dominance again if necessary. Be sure to FOLLOW the a target to the ground WITHOUT aiming. WATCH for poorly aligned stances and CORRECT as needed.
REPEAT the finger point sequence, but add the shouted "bang?" when the finger first touches the target. BEWARE of the problems that can be caused by unison or late "banger". CORRECT this problem before going on.
REVIEW basic shooting safety with all shooters. REPEAT the process once more with each individual on the h e . DEMONSTRATE the process of checlung a shotgun for safety.
Bring one shooter per instructor or trap to the h e . WALK them through several DRY POINTS at targets. STRESS a uniform ways of doing business with all elements. ICEEP the ACTION OPEN for this series of targets. WATCH for fatigue, particularly with smaller shooters.
Revised 06-02 4-H Shooting Sports Guide
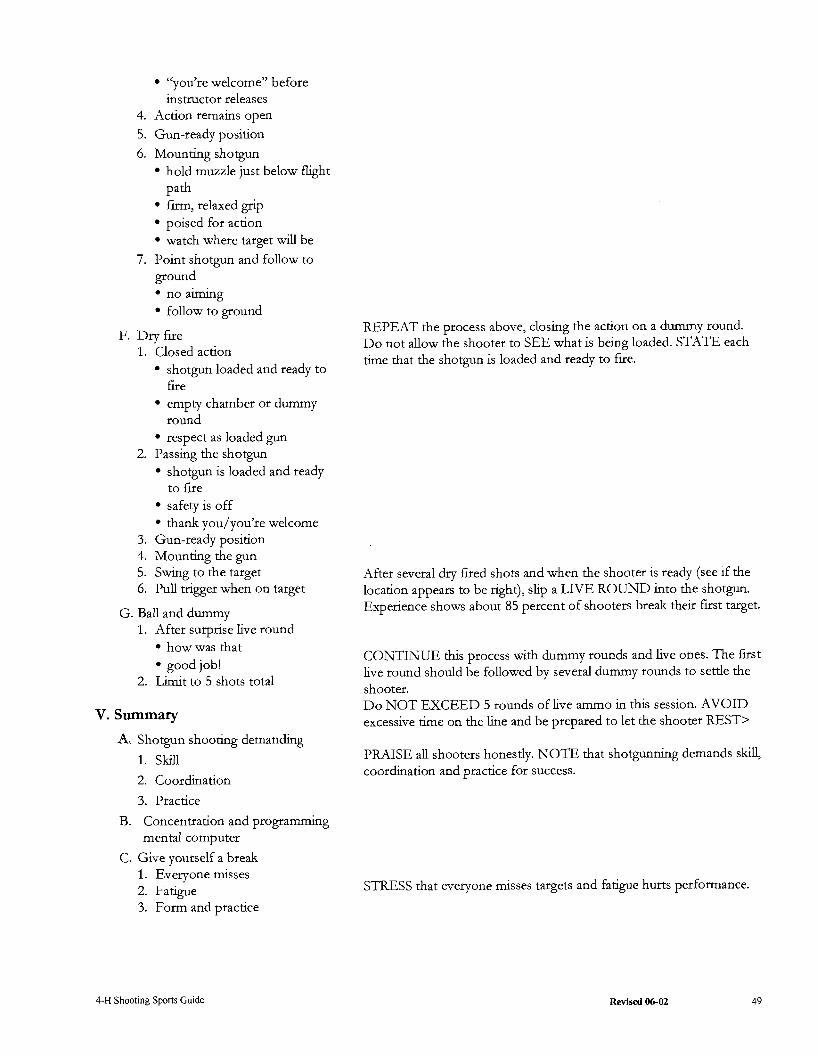
''you're welcome" before instructor releases
4. Action remains open
5. Gun-ready position
6. Mounting shotgun hold muzzle just below fight
path firm, relaxed gnp ~o i sed for action I
watch where target d be
7. Point shotgun and follow to ground
no aiming follow to ground
REPEAT the process above, closing the action on a dummy round. F. Dry fire
Do not allow the shooter to SEE what is being loaded. STATE each 1. Closed action
time that the shotgun is loaded and ready to fire. shotgun loaded and ready to fire empty chamber or dummy round respect as loaded gun
2. Passing the shotgun shotgun is loaded and ready to fire safety is off thank you/you7re welcome
3. Gun-ready position 4. Mounting the gun 5. Swing to the target 6. Pull trigger when on target
G. Ball and dummy 1. After surprise live round
how was that good job!
2. Limit to 5 shots total
V. Summary
A.. Shotgun shooting demandmg
1. Skill
2. Coordination
3. Practice
B. Concentration and programming mental computer
C. Give yourself a break 1. Everyone misses 2. Fatigue 3. Form and practice
After several dry fired shots and when the shooter is ready (see if the location appears to be right), slip a LIVE ROUND into the shotgun. Experience shows about 85 percent of shooters break their first target.
CONTIlVUE this process with dummy rounds and live ones. The first live round should be followed by several dummy rounds to settle the shooter. Do NOT EXCEED 5 rounds of live ammo in this session. AVOID excessive time on the h e and be prepared to let the shooter REST>
PRAISE all shooters honestly. NOTE that shotgunning demands skill, coordmation and practice for success.
STRESS that everyone misses targets and fatigue hurts performance.
4-H Shooting Sports Guide Revised 06-02

Lesson Narrative
Shotgun Shooting Fundamentals We covered six fundamentals for shotgun shooting when we met last time. You had a chance to practice a stance, go to a gun-ready position, mount the gun, swing to a "target1' and follow through without having a trigger to pull. You have learned how shotguns operate and the importance of safety rules when using shotguns. You are ready to begm developing shooting skills needed for becoming a successful shotgun shooter. We will take this process step-by- step, moving slowly and carefully toward becoming an accomplished shot.'
Learning to h t a moving target involves a number of steps. The best way to learn is to be patient and take each step as it comes, even if it seems sdly. We d not let you shoot your first shot before you are ready. Each of the steps we take is designed to prepare you for breaking your first target.
Range Safety and Orientation We discussed the shooting range last time. Anything down range of the firing line to the boundary of the shot-fall zone is a danger area. Shooters d be restricted to each of the shooting boxes marked by the carpet squares. No one is to approach the f&g h e until told to do so by the range officer (or chef instructor). All shooters who are not immediately involved in the shooting session must stay behind the safety h e . The shotguns are in the rack between the firing h e and the safety h e . They have all been made safe before being put in the rack. Only the instructor for each firing point may pick up a shotgun. No one may have any live ammunition in their possession under any circumstance except for the instructors. When live ammunition is on the h e and the line is ready for instruction, I d announce it by saying, 'There is live ammo on the h e . " Anyone who sees an unsafe condition should shout "CEASE FIRE!" Any cease fire command must be obeyed immediately. If you are in the act of firing, stop if you possibly can. Stop where you are, open the action and remove the ammunition from the shotgun. Do not do anything else until the instructor corrects the problem and tells you to resume. These rules, and those we shared last time, are for your safety and mine. Anyone who does not follow them d be removed from-the firing-he.
Targets and Traps We have already observed several targets and practiced using the traps. (If this has not been done, see Lesson 3.) Please pick up a clay target. Notice that it is very hard, made of clay and pitch and molded into a flylng saucer shape. The targets are brittle, so they break easily when struck by shotgun pellets, Hit the target sharply in
Revised 06-02 4-H Shooting Sports Guide

the center with vou knuckles. Notice that it shatters easilv from the blow. The ease G t h whch the targets break makes them is excellent --. a2ir:.m .. .. .3 - indcator of hits by shotgun pellets. A visible chip from the target scores P:.;G?:L . :a;"-.<. . -_
::.*$,Q:;,;., -.. it as a hit. Millions of these targets are shot every year in practice and ,.,- - :.: . - " .. competition by shotgunners. Clay targets break down easily, but the -.~~~:,~;;*~~:~::' . . . :. :,.: pitch used in makmg them is toxic to swine. Do not use them where ::,:::..:::.-
, . hogs could eat the chips. Remember that the traps are powerful and demand respect. When you operate the trap, take care in placing the target on the thrower arm so the targets will fly consistently.
Shotgun shooting step-by-step Watching Tat;qet~
Let's all move to the hnng line and review the flight of the target. Line up with about half the group on either side of this trap. Face squarely down range, and watch as we throw several targets. As we learned last time, the shooters call for the release of the target by saying "pull."
"Pull." Note the speed of the target as it is thrown. "Pull." Notice that the target travels in a fairly straight line. "Pull." Look at how the target rises to a peak and then travels downward. "Pull." Remember that the location on the thrower arm is important for getting the target to fly straight down range from the trap.
Finger Point
Assume a boxer's stance with the off foot slightly forward and facing the flight path of the targets. Extend the off arm and point the index finger while holdmg the arm at about a 45-degree angle to the ground. When the target appears, raise your hand quickly and smoothly to point at the target and follow it to the ground. Keep both eyes open and concentrate on the target. Do not try to aim with your finger, point! Ready? "Pull." Did anyone have a problem getting their finger on the target? Realign your stance to the area where you got on the target. This concentration on the target and pointing technique will make you successful with the shotgun. Try bringing your finger up and pointing at several more target.
Finper Point and Band! O 0
Now let's repeat the same exercise with a new twist. This time the instant your finger touches the target, I want you to "break the target" by shooting "BANG!" Remember to follow through. [In most groups a few shooters will be sipficantly slower than the majority. Stress the importance of saying "Bang" the instant the finger touches the target. Some groups wdl have a tendency to "bang" in unison. It is very u d e l y that all shooters will get on the target simultaneously. Emphasize that they should say bang when they get on the target, not when others do so.] This process is programming your mental computer to perform instinctively when live firing starts later.
4-H Shooting Sports Guide Revised 06-02

pepeat h s activity as many times as necessary.] Before we go on to the next step, let's review the basics of shotgun handling. We keep the muzzle of the shotgun pointed in a safe direction at all times. The shotgun is kept empty in both magazine and chamber with the action open and exposed to view except when we are ready to shoot. Note that the action is open and the gun is unloaded. I am usually and physically checking the chamber and magazine to assure that the shotgun is unloaded. Finally, the trigger finger is kept off the trigger unal you are ready to fire. phis should be repeated with each shooter on the line as well.]
Dry Point with the Sbotgzn
Your first shotgun handhg experience will be a repetition of the first three fundamentals. Get into your boxer's stance. Be sure you are balanced and facing the target breaking zone. Swing yourself to the right and the left. Can you move freely through either side of the area where you expect to break the target? If not, change your position until you are able to move freely
Open your hands and let me put the shotgun in your hands. Take a firm grip on the shotgun with both hands. When you have the shotgun under control say, "Thank You". Before I release it, I will respond by saying, << you're welcome". Assume the gun-ready position. Now bring the shotgun to your shoulder. Hold the muzzle slightly below the expected flight path of the target. Relax, but be ready for action. Watch in the area where the target w d appear and call for the target. When the target appears, point the gun at it and follow it all the way to the ground. pepeat this exercise several times. Be sure to take the shotgun from the shooter and return it each time. Follow the thank-you-you're-welcome procedure each time. During pauses for advice, take the shotgun so the shooter does not tire too quickly.]
Dry Fire This time, we are going to close the action on an empty chamber and pull the trigger when the shotgun touches the target on the swing. T h ~ s is known as dry firing the shotgun. It is an excellent way to practice your swing and timing. Any time the action is closed for the rest of the session, I will tell you that the shotgun is loaded and ready to fire. As before, you should treat the shotgun with the respect due a loaded one at all times. The safety is off, the shotgun is loaded and ready to fire. Assume the gun-ready position. Mount the shotgun. Look to the area where the target will appear. Remember to fire as quickly as the muzzle touches the target and to follow through until the target touches the ground. pepeat h s process four or five times.]
Ball and Dummy
When the instructor sees that the shooter is getting on the target and h g , a live round is slipped into the chamber during the loading
Revised 06-02 4-H Shooting Sports Guide

process. The shooter will hit the target most of the time. After the first live round, a dummy round should be loaded. After one or more dry rounds (wait until the shooter is on the targets properly), insert another live round. If the shooter is htting the targets well and handling the shotgun properly, the instructor may elect to permit him or her to load and fire the final round on their own. The shooter should not fire more than about five rounds in this session.
Summary Shotgun shooting, like any other sport, requires skd, coordmation and a lot of practice. Concentration and programming your mental computer with lots of perfect practice will develop your skill and reflexes. Do not be too hard on yourself if you missed a few targets today. Everyone misses some. You probably feel a little tired. Even though we only fired five shots, you "fired" quite a few more. As we continue to practice, your stamina will increase. Continue worlung on shooting form and you d get better. At our next session, we will review these steps and practice shotgun shooting.
Summary Activities
1. Have a brief discussion session about h g s the shooters learned or questions they have about shooting straight-away targets.
2. Teen or junior leaders or assistant instructors can tutor shooters who have had difficulty during the live finng stage.
3. Shooters should prepare to coach each other using the coach pupil method in later stages. In this session, the technique can be used up to the live firing stage.
Exhibit or Sharing Ideas
1. List things you learned in this session in your shooting journal.
2. Make a poster showing the steps to safe and effective shotgun shooting. Display it in a location where it can be reviewed by other shooters in the program.
3. Share things you have learned in the lesson with an adult or parent who is interested in shooting.
4. Demonstrate the fundamentals of shotgun shooting without a shotgun for your club or another small group.
5. Demonstrate how to pass a shotgun between two persons for your club or another group.
4-H Shooting Sports Guide Revised 06-02

Basic Shotgun Lesson 5
Caring for Your Shotgun James V. Peter. Jr.
Objectives Participating
1. Assemble the equipment and supplies needed to clean a shotgun.
2. Understand and practice the proper methods of cleaning a shotgun.
3. Understand and demonstrate the proper way to care for, store and transport a shotgun.
4. Have fun while learning.
Roles for Teen and Junior Leaders Demonstrate various stages of shotgun cleaning
Assist shooters with assembly and use of the equipment
Assist individual shooters with stripping or assembly of shotguns after cleaning.
Parental Involvement See Roles for Teen and Junior Leaders above.
Provide shotguns for the cleaning program
Provide necessary equipment for teaching the lesson.
Arrange for or provide transportation.
Arrange for or provide refreshments.
Assist instructor in conducting the lesson.
* County Extension director and agricultural agent for the Dubois County Office of Purdue Cooperative Extension, Jasper, Indiana.
54 Revised 06-02
Best Time to Teach Any time of year when fired shotguns are available
Best Location Classroom or shop area
Time Required Approximately 1 hour
Materials/Equipment -shotguns of various action types and models
-cleaning rods -cleaning jags -bronze brushes -cleaning swabs -cleaning patches -powder solvent -lubricant oil or light grease -moisture protectant -wiping rag -action brush or toothbrush - punches and other tools for stripping shotguns
References The Basics of Shotgun Shooting H.W. Sheets, National Rifle Association Washington, D. C. 1985.
Manufacturer 's owner manuals
Cleaning product or kit manufacturer 's literature
4-H Shooting Sports Guide

Teaching - Outline
Presentation Application
I. Proper shotgun care important DISPLAY several shotguns of different ages and types. DISCUSS ages,
A. A big investment original values and current values.
1. Quality shotguns valuable 2. Value increases over time 3. Care determines value
B. Cleaning 1. Reduces wear 2. Prevents damage 3. Aids functioning
ASIC how proper cleaning and storage can enhance value and uthty.
DISCUSS answers.
C. Storage and transportation 1. Protects shotgun 2. Protects other people 3. Protects you DISCUSS some general guidelines for cleaning shotguns used under
11. Cleaning various cond~dons and levels of use.
A. When to clean your shotgun STRESS importance of deep cleaning under wet or salty conditions. 1. After each use 2. As needed 3. Frequency dictated by use LABEL several shotguns with a variety of conditions and ASIC
clean dry conditions, little shooters to recommend cleaning strategies. DISCUSS choices. or no shooting -light wipe down Get, dusty or salty cond- itions - thorough cleaning heavy shooting - thorough cleaning DISPLAY and DISCUSS proper tools and equipment for cleaning
U
B. Equipment and supplies 1. Cleaning rod
proper length - 10 cm (6 inches) longer than barrel
proper sue accessories
- bronze brush of proper
gauge - cleaning jag
- bore swab 2. Cleaning patches
proper sue cotton - flannel - m u s h synthetics
shotguns.
DEMONSTRATE proper use of equipment and materials on a single shotgun as it is being shown.
4-H Shooting Sports Guide

3. Solvents bore cleaning - powder residue - unburned powder - plastic residue - lead fouling general purpose or special purpose
4. Lubricating and corrosion resistance
light machine or gun oil gun grease moisture replacers - oils - silicone-based
5. Other products wiping rags small brush pipe cleaners punches screwdrivers - fitting gun screws - seldom necessary
C. Cleaning procedure 1. Mmimurn cleaning
wipe down external metal wipe down stock
2. Bore and surface cleaning swab bore with patch and solvent dry patch oily patch lightly lubricate moving parts of action wipe down metal surfaces with moisture barrier
3. Field stripping and cleaning bore
DISCUSS nature of some solvents and their function. CAUTION shooters to have adequate ventilation.
DISPLAY various lubricating and corrosion preventive materials. DEMONSTRATE their use on at least one shotgun
DEMONSTRATE and ADAPT cleaning techniques on one or more shoguns representing different action types, makes and models. AID individual shooters with specific elements of cleaning task.
NOTE differences in cleaning needs among different types of actions.
- remove barrel from action
- bronze brush and solvent - dry I&htb oil bore and CAUTION shooters that too much oil or lubricant is often worse that
chamber not enough. TINY amounts are usually adequate. barrel exterior - dry and clean surface - apply moisture barrier action
4-H Shooting Sports Gu~de

- remove action, bolt and operating rods
follow instructions from manufacturer
0 get help if needed - brush loose fouhg from
action and bolt - swab fouling or dirt from action rods
- brush or swab &t and fouling from interior of receiver
- lubricate action rods and interior moving parts very lightly
magazine tube and semi- automatic gas metering system - clean surface f o u h g - thoroughly dry surface - use dry lubricant or leave
dry - reassemble action and operating mechanism. wipe all metal parts with moisture protectant excess oil or grease - fouls action -rots wood -use with care
4. Preparation for storage thorough cleaning moisture protectant chemical drying agent in storage area
D. Stock care 1. Varies with stock finish 2. Oil finish - hseed oil 3. Varnish - thinned varnish 4. No petroleum oils
111. Storage
A. Safety 1. Check before storing
clean empty and safe
2. Secure from children and other unauthorized use
B. Security 1. Any locked storage
Security for family
STRESS importance of having a DRY operating surface for gas operated semi-automatics like Remington 1100 and similar actions.
REINFORCE hazards and potential damage from excessive amounts of lubricant.
DISPLAY different types of stocks and proper use of stock treatments.
EMPHASIZE infrequent need for treatment.
STRESS that proper storage begins with a clean, safe shotgun.
DISCUSS security needs and different levels of protection.
4-H Shooting Sports Guide Revised 06-02

security for guns in friendly hands
2. Gun safes security for family security for guns - theft - fire
IV. Transportation
A. Legal bounds vary 1. State and local laws
&ffer 2. Federal laws apply in
inter-state travel 3. Your responsibility 4. Au travel restrictive
B. Sources of information
1. National Rifle Association
2. State associations 3. Common camers
C. Safety I. Secure storage and
protection of firearm 2. Empty - personally
checked
D. Avoiding image problems 1. Think of other people
appearances potential impact on others
2. Consideration for others
E. Avoiding thteves 1. Out of sight 2. Locked, secure storage
V. Summary
A. Shotguns as investments
B. Care and storage Important
1. Value 2. Functioning 3. Reliability
C. Safety a consideration
D. Transportation
OBTAIN summaries of state and local regulations on transportation of firearms and M I = them available to participants.
REFER shooters to common carriers for information on their transportation regulations.
STRESS personal responsibility for safety.
DISCUSS image problems and avoiding temptation for thieves when transporting firearms.
USE questions to summarize the content of the lesson. Have each shooter CLEAN a shotgun under supervision and with assistance from a volunteer or teen leader.
Revised 06-02 4-H Shooting Sports Guide

Lesson Narrative Purchasing a shotgun is a major investment. Those made by modem manufacturers, even some very inexpensive models, are designed to gve years of service. With proper care and use, they should last a lifetime and become treasured bonds across generations of shooters. Keeping your shotgun clean and properly maintained ensures years of trouble-free service and also maintains the gun's value. That can be helpful if you wish to sell or trade it for a hfferent model or gauge later. Proper care supports appreciation of shotgun values as well. Nearly all models have increased in real value in the past and the trend is likely to continue.
Proper storage is also important. Storage must provide proper protection for the shotgun, preventing children or other untrained persons from having access to it. Security is also essential.
A shotgun must be protected from damage during transport. It also must meet all laws governing transportation of firearms. Finally. proper transportation must provide security for the gun. Proper storage. transportation and cleaning of your shotgun protects your shotgun. other people and you.
Cleaning Your Shotgun
How often should I clean my shotgun? Ideally the shotgun should be cleaned after every use. The degree of cleaning varies with the amount of use and the conditions under which that use took place. If used very little or merely carried without shooting under dry conditions, a simple one-pass bore swabbing and wiping the exterior surfaces may be adequate. After heavy use, or any time the shotgun is used under wet conditions or exposed to salt water or acid rain, cleaning may require complete disassembly and thorough cleaning inside and out. The same procedure should be followed if the shotgun is going to be stored for an extended time.
Cleaning Equipment and Supplies
Most commercial cleaning hts supply the basic necessities for proper shotgun cleaning. Your shotgun owner's manual or the manufacturer will tell you what is required in proper maintenance. Assemble the materials and equipment needed to do the job. General cleaning and maintenance requires the following items.
Cleaning Rod and Accessories
Shotgun cleaning rods usually have a relatively large shaft diameter and an adapter to handle standard shotgun cleaning aids. They should be at
ast 10 centimeters (6 inches) longer than the barrel being cleaned. Most shooters find a need for a bronze bore brush in the right gauge, a cleaning jag to hold cleaning patches and a cloth bore swab or mop of the proper gauge. The rod and its attachments
4-H Shooting Sports Guide Revised 06-02

with an appropriate solvent is used to remove dut, powder residue, unburned powder, lead fouling and plastic residue from the bore. It is also used to dry the bore and to apply rust preventive materials.
Cleaning Patches
A good supply of cleaning patches is necessary for any firearm cleaning session. They should be the proper size for the firearm you are cleaning. They can be made from soft absorbent cloth, old T-shirts, flannel or muslin. Commercial patches from these materials or synthetics designed specifically for cleaning shotguns are also avdable. These patches are used to remove fouling from the bore and to apply solvents or protective coatings.
Solvent
Several excellent general gun-cleaning solvents are available commercially. The residues and dirt that accumulate in the shotgun bore may be difficult to remove. Read the label and match the solvent to the task. Some solvents contain noxious compounds and must be used in a well-ventilated area. General-purpose solvents work well for cleaning a shotgun. Those products specifically designed to remove metal f o h g from rifle barrels may not work properly.
Lubricating and Corrosion Protection Products
The moving parts of the shotgun require very light lubrication with a light machine oil, gun oil or gun grease. Use the minimum amount needed to accomplish the task. Excess lubricant can foul the action, slow functioning or induce rot In wood parts of the shotgun. Metal parts may also require use of some corrosion protection product.
Gun oil may be adequate for minimally demandmg conditions. Synthetic products often provide tougher and more durable protection. Check the manufacturer's recommendations for the types and amounts of lubricants on your particular shotgun.
Other Gun Cleaning Materials
Screwdrivers with blades designed to fit gun screws or punches may be helpful in d.tsassembly and cleaning operations. The cleaning kit should also contain one or more clean rags, a chamber brush, a small brush or toothbrush and a small supply of pipe cleaners. These wdl be helpful in cleaning actions and other hard to reach spots.
General Cleaning Techniques
Although it is impossible to tell you how to clean every specific shotgun action type, model and make, some general procedures are commonly used. Each part of the shotgun is cleaned using techniques that are easily transferred from gun to gun.
Cleaning the Bore
A fouled bore is cleaned by using a series of tools in sequence. Where easily accomplished, the barrel(s) is removed from the receiver for cleaning. A bronze brush of proper size for the gauge is attached to the
4-H Shooting Sports Guide 60 Revised 06-02

cleaning rod, saturated with solvent and swabbed through the bore to &dodge any fouhg. Once the foulmg has been loosened, it is removed using a series of cleaning patches on a jag or bore swab. Patches saturated with solvent are followed by clean ones, leaving a dry, clean bore. If desired, a lightly oiled patch may be run through the bore to leave a very thin film of protective oil in the bore. A chamber brush may be helpful in cleaning the chamber. n semi-automatics a clean, dry chamber may be critical to smooth functioning. When applying lubricants, do not fall prey to the notion that "if a little bit is good, a whole lot is better." Too much lubricant is worse than none at all.
Action Cleaning
The interior action parts of slide-action or semi-automatic action shotguns need periodic cleaning. Most of them are easily removed modules. They can be cleaned of debris and dirt with a brush and solvent. When the fire-control mechanism is removed, the action can be further stripped, allowing the receiver, bolt, action rods and other parts to be cleaned as well. Lubricate moving parts sparingly with appropriate materials. On gas operated semi-autos the gas ports need to be kept clean, and the exterior of the magazine tube and the associated gas containment mechanism must be clean and dry. Lubricants tend to collect powder residues and gum the operating mechanism quickly.
Stock Maintenance
Stock maintenance is rarely necessary. Most modern stocks are covered with a polymer or varnish f ~ s h that is durable, weather resistant and tough. It does not need oil or other treatment. Scratches or scrapes may be repaired by applying diluted varnishes or thin layers of polyurethane. Oil-finished stocks may be refreshed by using boiled linseed oil diluted with turpentine or mineral spirits.
External Metal Treatment
Light gun oil may be adequate under light duty conditions, but sihcone- based materials that &splace moisture and prevent corrosion may do a better job. Avoid the temptation to use excessive amounts of any material. A little is enough a lot just causes problems. Dirt, fmgerprints and even solvents in some plastic shotshell cases can start corrosion. Use a lightly treated rag to keep the metal clean and the protectant in place.
Minimum Maintenance
Minimum maintenance should include wiping down the external parts of the shotgun, swabbing out the bore with a dry patch and ensuring the shotgun is empty before it is put in the rack or case.
Bore and Surface Cleaning
4-H Shooting Sports Guide
The guidelines above for surface metal, stocks and bore maintenance should be followed. The shotgun should be checked once more to be sure it is safe before being put away.
Revised 06-02

Field Stripping and Complete Cleaning
All the steps o u h e d above should be followed. If you are not confident about any operation, seek the assistance of a veteran shooter who is famihar with your shotgun, or consult a gunsmith. Professional cleaning may be essential In some circumstances.
Preparation for Long-term Storage
Once the shotgun is thoroughly cleaned and checked to be sure it is safe, It may be placed in storage. As a safety precaution, you may want to use a chemical or electrical desiccant to keep moisture under control. Periodic checks of stored firearms is wise.
Proper Shotgun Storage All firearms should be stored where they are not easily accessible to small children or other untrained persons in your home. Firearms attract attention and are very tempting items for people to handle. Assume others do not know how to handle any firearm properly unal they have demonstrated a sound knowledge of proper handlmg. Storage to prevent improper handling can be ensured by storing all firearms in a safe condition, storing ammunition separately and using a locked chest or display cabinet. These cabinets provide relatively secure storage among people who do not wish to violate the obvious barrier. They provide very little security from theft. Shooters who want a more secure storage utilize heavy metal vaults or "gun safes." These units are usually bolted to the floor and provide maximum security for your valuable firearms.
As a minimum security measure, guns should be locked away, with access by youngsters or visitors denied. Shotguns placed in storage should be clean and protected from corrosive residue, moisture and fingerprints. Long-term storage makes these considerations even more important. Keep your ammunition in a cool, dry place. It is best to store guns and ammunition in separate places. The last thing you should do before storing a gun is to see that it is unloaded. The first thing you should do when taking a gun from storage is to check to be sure it is unloaded. T h ~ s is especially important when more than one person has access to the guns.
Transporting Firearms Rules and regulations for transporting firearms differ among states and among localities. Federal law governs interstate transportation and transporting firearms on common carriers like airlines. It is your responsibility to understand and abide by regulations in your area.
The National kf le Association, state associations, common carriers and the place where you purchased your shotgun may be able to help you understand the regulations on transporting firearms.
Having an unloaded gun in a secure case locked in a secure area wdl comply with most laws. It is also wise practice in several other ways.
All firearms should be stored where they are not easily accessible to small children or other untrained persons in your home.
62 Revised 06-02 4-H Shooting Sports Guide

4-H Shooting Sports Guide
It avoids irritating people who do not hke guns or any evidence of their presence in society. By putting yourself in their place, you may be able to see that avoiding the obvious gun in the vehcle avoids problems. It also prevents thieves from locating your shotgun readily and liberating it for their personal gain. Inaccessibility and secure storage are a wise choice when travehng.
Summary Shotguns have real value that can appreciate over time. The care and cleaning of the shotgun has a major impact on that value as well as on the functioning and safety of the gun. Cleaning is relatively simple, but specific differences exist among action types, makes and models. We practiced the fundamentals of keeping the shotgun clean and in top condition. Considerations for proper storage and security were also discussed. Finally, we considered some of the elements of shotgun transportation, including legal considerations, security and public Image of shooters.
Summary Activities 1. Allow each individual or coach-pupil pair to clean a shotgun under the supervision of a qualified volunteer or teen leader.
2. Arrange a presentation on local firearms laws and regulations by an appropriate person.
3. Use a question and answer format to review the content of the lesson with the shooters.
4. Display several shotguns with descriptions of situations related to their use and have shooters prescribe appropriate cleaning needs.
Exhibit and Sharing Ideas 1 . Enter important thrngs you have learned in your shooting journal.
2. Demonstrate the proper way to clean a shotgun for a parent or other interested adult.
3. Construct a display of shotgun cleaning equipment and supplies, cleaning techniques for a gven shotgun, shotgun storage or transportation laws or suggestions.
4. Develop a method demonstration of firearms cleaning, storage or transportation.
5. Explore the value of a selected make and model of shotgun over a period of 20 or more years. Show how shotgun condtion may affect value. Write a report or construct an exhibit about findings.
6. Conduct a corrosion prevention experiment with several products under controlled conditions using small pieces of steel. Organize results and display in a science fair format or similar public display.
Revised 06-02

Revised 06-02 4-H Shooting Sports Guide

Fact Sheet 3
Determining Eye Dominance Ronald A Howard Jr. and James V. Peter, Jr. *
Eye Dominance greater challenge, but they do
Most people have a dominant eye, just as they have a dominant hand or foot. When a person looks at an object with both eyes, the dominant eye aligns directly with the object unless an obstruction interferes with a clear h e of sight. Under normal condtions, when a finger is pointed at an object, or two or more objects are aligned visually, the dominant eye determines the alignment. Just as some people are truly ambidextrous, a very small number of people have indeterminate eye dominance. The majority, however, have a dominant eye. In most cases eye dominance and hand dominance are on the same side, but many people are cross-dominant. That is, their handedness and eyedness are on opposite sides.
Humans have binocular vision - they get slightly different images from each eye and blend them in the brain to yield one image and a sense of depth or &stance. With both eyes open, you have a wider field of vision with more peripheral vision and better motion detection. In shot, you simply see better when both eyes are used. Experience shows that
better when they learn to shoot with the dominant eye. Some shooters, particularly those with successful experience in shooting with the non-dominant eye, are reluctant to switch. The switching process usually involves a brief period of reduced success and frustration, followed by improved skill levels beyond their o r i p a l level. Some experienced shooters have learned to shoot one-eyed, closing the dominant eye or obstructing it with a sheld, blinder, spot of tape of a small object on the lens of the shooting glasses. Others have learned to override their dominant eye through practiced concentration or to compensate in some other fashon. Fewer than 1 percent of all shooters must shoot one-eyed because of dominance switching. In most cases, the shooter learns to use both eyes and shoot from the dominant-eye side. Learning one-eyed or with the dominant eye obstructed or closed increases stress and fatigue, and reduces concentration and quickness. Results in&cate reduced performance levels, increased frustration for the shooter and slower learning.
shooting skds are learned more Leaning to shoot well is a
easily and often better developed challenge. You need every
when a shooter learns from the advantage to meet that challenge
dominant eye side. Where effectively. Learning from the
eyedness and handedness are on dominant-eye side is a major
the same side, new shooters advantage.
easily use the dominant side.
How to Determine Eye Dominance
Four basic methods for deter- mining eye dominance are described. Those that provide a check for "cheating" are more effective in an instructional setting. Regardless of the method selected, the exercise should be repeated several times. In- structors should remain alert for eye-dominance related problems with shooting performance.
Coach-pt(pi1 Method
Shooters should get into their - coach-pupil pairs, standing several arm-lengths apart and facing each other squarely. The "pupil" should place one thumb over the other, then cross the fingers of the top hand over those of the bottom one. T h ~ s leaves a small, triangular opening. Raise the hands, keeping both eyes open, and center the "coach's7' nose in the triangular opening. At this point the coach should note whch eye is visible in the opening. Then the "pupil" should bring his or her hands slowly back to the face, keeping the "coach's" nose in the opening. The hands should come to the dominant eye. Coaches must watch closely for wavering between the eyes, an indcation of "cheating" or forcing the hands to a predetermined eye. The exercise should be repeated several times to c o n f m original - results with both partners checking their eye dominance. Cross-dominant shooters have a
4-H Shooting Sports Guide Revised 06-02

Option: Shooters could cup their hands together, leaving small openings between the bases of the little fingers and the thumbs. A card or a sheet of notebook paper with a small hole centered in it could also be used.
Distant-objeect Method
Use any of the methods of making an aiming device outlined above. Center a distant object in the opening. Make sure both eyes stay open and face the object squarely.
Finger-point Method
With a pointing method, a distant object or a partner is used. The finger is pointed naturally at the object with both eyes open and the face square to the object. The eyes are covered or closed alternately. When the dominant eye is closed or covered the finger appears to jump away from the original location.
Tube Method
I<aleidoscopes, toilet paper tubes and s d a r objects can be used with many young people to determine eye dominance. When the person is not aware of being - tested for eye dominance, the tube wdl almost always be
brought to the dominant eye. T h s also occurs with spotting scopes, telescopes and smilar tools where one-eyed viewing is needed. Troubleshooting for Coaches and Instructors
Some shooters will bring the opening back to their own noses because they are loolung at the paper or their hands rather than at the target. Those who use the finger-point method wdl see two fingers if they focus on their hand rather than on the target. If inconclusive results are obtained, try another method. Make note of that shooter, however, and watch for evidence of switching dominance in the act of shooting. Consistently missing to one side of the target usually indicates an eye-dominance related problem.
A Note of Caution
Vision problems can have a serious impact on shooting ability. Often they go undetected by the shooter or those around them. Unless you are an ophthalmologst dr optometrist, avoid "diagnosing" vision problems, but be aware of the types of problems a shooter with
vision problems may face. Discuss any potential problems you observe with the shooter and his or her parents. Like teachers who notice reading problems or other vision related difficulties, the shooting instructor may notice things that even the shooter misses.
Finally, be sure that all shooters are wearing adequate eye
protection whde they are on or near the firing line. Some people recommend the use of shooting glasses even for archers. Eyes are precious and vision is vital to shooting. Let's do our part in protecting them.
4-H Shooting Sports Guide
Revised 06-02

Fact Sheet 4
Non-threatening Hands-on Instruction James V. Peter, Jr.'
A major element of shooting is question of anxiety or her hlps. The posture of your stance. When worlung with impropriety. hands when contacting the shooters, particularly beginners, Respectful, non- threa tening student can also ease anxiety. instructors frequently must use treatment of shooters begins with Except in an unsafe situation their hands to position them or demonstration. Use a junior where immediate and decisive correct their form. Even though leader or an assistant to action is required, it is seldom close contact with the shooter is demonstrate how instructors d necessary to "grab" a student or essential for effective instruction, handle shooters to correct their the firearm. When your hands are the instructor must be careful to posture or position. By t e h g the held relatively rigid with the avoid any action that could shooter what you are about to do fingers straight and the thumbs appear improper or cause the you can further reduce h s or her resting on the top of the hands, student anxiety. A few simple anxiety. Tell the shooter you are they are much less threatened. actions can ensure a worlung going to push h s or her torso Pressure from the palms of relationship between instructor forward, raise an elbow, flattened hands (fingers not or coach and student without any reposition a hand or turn his or curled) can accomOplish most
positioning and controhg needs.
4-H Shooting Sports Guide Revised 06-02

Revised 06-02 4-H Shooting Sports Guide

Fact Sheet 9
Shotgun and Ammunition Selection James V. Peter, Jr.*
Proper shotgun and ammunition selection is vital for young people to successfully learn to shoot a shotgun. Shooting form faults will develop if shooters have dfficulty handlrng the physical size, weight and recoil of a -
shotgun. Very young or small shooters are quickly tired by excessive gun mass or poorly fitting guns. They also feel recoil more severely, sometimes to the point of bruising and pain. That almost invariably results in flinching and the development of form faults. They are hkely to see shotgunning as an ordeal rather than a challenging and fun activity. Since this is a voluntary activity, they may lost interest and drop out under those condtions.
young people do not fit that description. As a result, the dunensions of the shotgun stock are not correct for the young shooter. Stock length is usually excessive for bepning shooters. The larger youth may be able to compensate for that length, but most smaller shooters will need to have a shorter stock to properly handle the shotgun.
Several manufacturers market youth models having stocks with a length of pull in the 12- to 13- inch range. In several cases, those stocks are interchangeable with "adult sized" stocks at a modest cost. An alternative is to have the stocks cut to the proper length by a competent person. When the shotgun is mounted properly, there should be approximately 2
Interest in shooting, desire to inches of space between the shoot better or prove one self or shooter's nose and the base of slrnilar motivations may drive the the thumb of the dominant hand. shooter to use equipment beyond Two inches is the width of 2 or 3 his or her capabihties. The fingers. Save the piece that is cut instructor must assist the shooter off so it can be reattached as the with selecting a shotgun and load to promote success. Success enhances the shooter's self-image and increases fun and interests. It also increases desire and wdhgness to learn.
Proper Gun Fit
Most shotguns are designed to fit the "average" American male, approximately 5'9" tall, of average bulld and weighing 170 pounds. Most people, particularly
youngster grows. In addtion to stock fit, the length and mass of the barrel is critiial. The balance point of the gun should be between the hands for optimum gun handling. The shooter barrels of youth models work well with the shorter stock to keep the balance point between the hands, increasing handlrng ease. These guns are also lighter in weight and easier for smaller students to use.
Action Types and Gauges
Lght weight makes the shotgun more responsive and easier to hold, but it also increases the felt recoil. One of the best ways to handle the combination of handling and recoil is to use a gas operated semi-automatic shotgun. Although the laws of physics remain (for every action there is an equal and opposite reaction), gas operated actions spread the recoil over a longer time span. That reduces felt recoil, producing more of a push than a sharp blow. Most young people find the recoil of either 20 gauge or 12 gauge semi-autos acceptable.
Avoid the temptation to use smaller gauge guns with smaller shooters. Smaller gauge shotguns actually handcap the shooter. They have sparser patterns with less density at their edges. As a result, they require the shooter to center the target more precisely in order to break the targets consistently. For that reason, they are less effective as teachmg tools. Avoid the temptation to go to 28 gauge or .410 shotguns. These guns belong in the hands of experts, and are extremely frustrating for begmners. To ensure success put more shot in the air with better pattern density. That increases the odds for the shooter. Stick to 12 gauges for shooters who can handle them, and plan to use 20
* County Extension director and agricultural agent for the Dubois County Office of Purdue Cooperative Extension, Jasper, Indiana
4-H Shooting Sports Guide

gauge guns for those who need a smaller one.
Barrel Length and Choke
Barrels 21 to 26 inches long help keep the balance point of the shotgun between the hands, easing the process of swingmg to the target. That characteristic is very important to smaller students and it can be gained without serious loss of power.
Shotshells loaded with smokeless powder consume their powder w i t h the first 14 to 18 inches of the barrel. Although slight i8ncreases in velocity and energy are attained with longer barrels, the gains are relatively insignificant. The belief that longer barrels shoot "harder" is a holdover from the days of black powder. Longer barrels have
advantages in some situations. the powder charge determines They provide a longer "sighting the velocity and the potential radius" and a smoother swing recoil. Increasing the powder than shorter barrels. charge increases both velocity
A large pattern is advantageous whde the basics of shotgun shooting are being learned. Since the ranges are relatively short, skeet or improved cylinder chokes are preferred for instruction, even when trap fields are being used. Combining those chokes with small shot keeps the pattern both wide and dense, ensuring success for the learner.
and recoil. Increasing the shot charge decreases the velocity while increasing the felt recoil. Lght target loads in either 20 gauge or 12 gauge will gve optimum performance. Extra light loads using one ounce of shot in a 12 gauge yield lighter recoil with minimal loss of pattern density. Using frne shot, #8 or #9, puts more shot in the pattern, increasing pattern density
Ammunition without increasing recoil. MiLk recoil, modest velocity and good
Lke the considerations on size pattern density contribute to and mass of the shotgun, success. Using heavier shot selection of ammunition for charges or increasing velocities instruction involves several beyond normal target levels competing factors. The weight of increases recoil without the shot charge and the weight of contributing significantly to
shooting effectiveness.
Revised 06-02 4-H Shooting Sports Guide

.Fact Sheet 11
Practicing Your Shotgun Skills James V. Peter, Jr.*
When shooters have a sound understanding of shotgun shooting fundamentals on straight-away targets, move on to greater challenges. Limit shooting to a maximum of five rounds in succession to prevent shooters from tiring. If necessary, the ball and dummy exercises can be repeated unul hndamentals are understood. After several repetitions most shooters will be ready to move on to greater challenges, like learning to hit angled or crossing targets.
Moving from predctable straight- away targets to those that vary in angle or take an angled flight path adds a whole new set of variables.
introduced to high 7 first. They should then move progressively toward station 1, establishing themselves at each station before moving on to the next. On trap fields, the shooters can start shooting at anghg targets, slowly moving back from the trap house to the 16 yard h e .
Several suggestions are listed below for increasing the challenge using ground-mounted portable traps.
1. Slowly increase the angle of the target's flight in relation to the shooter. Consider the position of the trap operator and maintain angles and shooting positions that protect him or her.
If the shooters have progressed 2. Alter the position of the target on according to plan, they should be the throwing arm of the trap to ready to hit crossing targets. On a vary the direction taken by the skeet field, the shooters should be target with each call. Begin with
moderate angles and slowly increase them to about 45 degrees.
3. Adjust the elevation of the thrower arm head to vary the height and trajectory of the targets.
4. M o w the trap operator to release the target within a few seconds of the shooter calling for the target, with the release being at their dscretion.
5. Try throwing doubles from the same trap.
6. Rather than mounting the shotgun before c a h g for the target, have the shooter call for the target from the gun-ready position, mounting it only after the target is thrown.
* County Extension director and agricultural agent for the Dubois County Office of Purdue Cooperative Extension, Jasper, Indiana.
4-H Shooting Sports Guide Revised 06-02

Revised 06-02 4-H Shooting Sports Guide
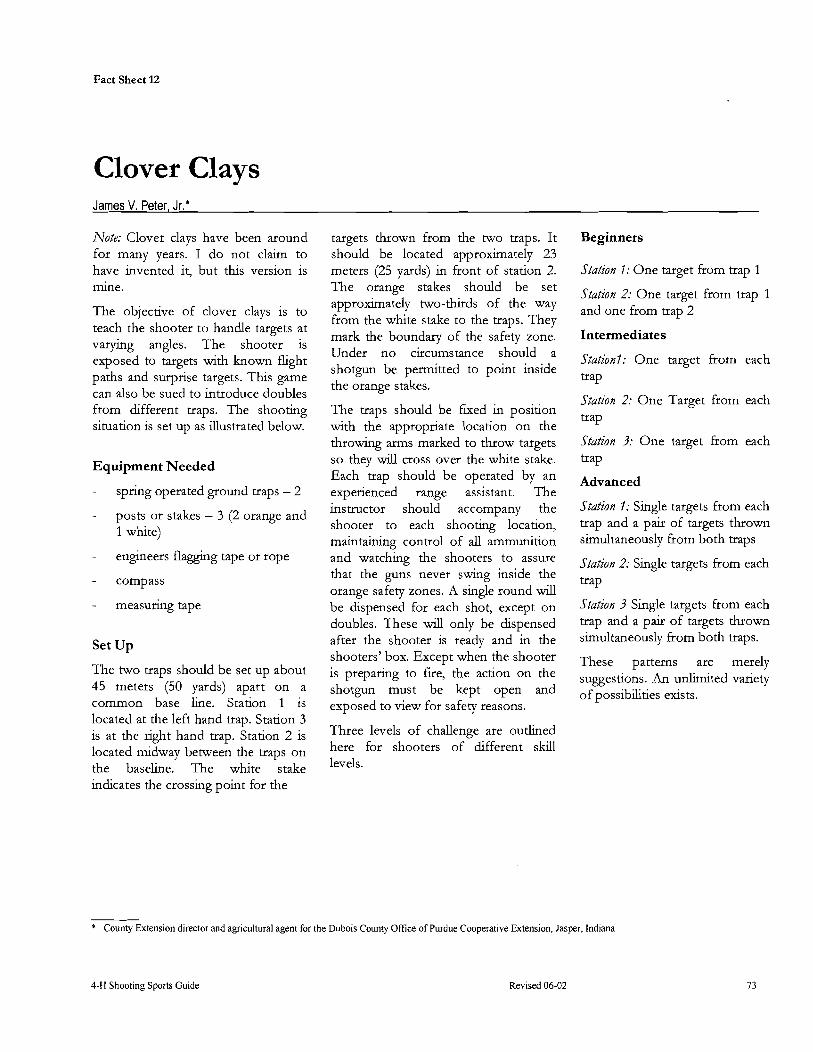
Fact Sheet 12
Clover Clays James V. Peter, Jr.*
Note: Clover clays have been around targets thrown from the two traps. It Beginners for many years. I do not claim to should be located approximately 23 have invented it, but this version is meters (25 ~ards) in front of station 2. Station I : One target from trap 1 mine.
The objective of clover clays is to teach the shooter to handle targets at varying angles. The shooter is exposed to targets with known fight paths and surprise targets. This game can also be sued to introduce doubles from different traps. The shooting situation is set up as illustrated below.
Equipment Needed
- spring operated ground traps - 2
- posts or stakes - 3 (2 orange and 1 white)
- engineers flagging tape or rope
- compass
- measuring tape
Set Up
The two traps should be set up about 45 meters (50 yards) apart on a common base line. Station 1 is located at the left hand trap. Station 3 is at the right hand trap. Station 2 is located midway between the traps on the baseline. The white stake indicates the crossing point for the
The orange stakes should be set approximately t w o - h d s of the way from the whlte stake to the traps. They mark the boundary of the safety zone. Under no circumstance should a shotgun be permitted to point inside the orange stakes.
The traps should be faed in position with the appropriate location on the throwing arms marked to throw targets so they will cross over the white stake. Each trap should be operated by an experienced range assistant. The instructor should accompany the shooter to each shooting location, maintaining control of all ammunition and watchmg the shooters to assure that the guns never swing inside the orange safety zones. A single round will be dispensed for each shot, except on doubles. These wdl only be dispensed after the shooter is ready and in the shooters' box. Except when the shooter is preparing to fire, the action on the shotgun must be kept open and exposed to view for safety reasons.
Three levels of challenge are outlined here for shooters of-different skill levels.
Station 2: One target from trap 1 and one from trap 2
Intermediates
Stationl: One target from each
trap
Station 2: One Target from each
trap
Station 3: One target from each
trap
Advanced
Station I: Single targets from each trap and a pair of targets thrown simultaneously from both traps
Station 2: Single targets from each
trap
Station 3 Single targets from each trap and a pair of targets thrown simultaneously from both traps.
These patterns are merely suggestions. An unlimited variety of possibilities exists.
* County Extension director and agricultural agent for the Dubois County Office of Purdue Cooperative Extension, Jasper, Indiana
4-H Shooting Sports Guide Revised 06-02

Revised 06-02 4-H Shooting Sports Guide

Fact Sheet 13
Detecting and Correcting Shotgun Shooting Errors James V. Peter. Jr.'
Detecting and correcting errors made by shooters can be a challenge. Some instructors consider thls skdl to be a science. Others consider it a mystical art. There is truth to both opinions. The abdity to recognize symptoms of shooting errors, analyze what the shooter is doing to create the situation and then help him or her to correct the action is an acquired skdl. It becomes more effective with time and experience, but a g f t of perception is often needed. This fact sheet outhes some common shooting errors, how to r e c o p e them and how to suggest correcting them.
Detecting errors I important, but understandmg how to correct them without causing the shooter to lose confidence or focus on the fault is more critical. Emphasize the positive actions to develop proper form fundamentals. Demonstrate the correct actions when appropriate. Use your creativity to get the shooter to do the proper thing. Remember that the shooters are young. Have reasonable expectations for the shooters wlde challenging them to do their best.
Eye Dominance
head across the comb in an effort to align their dominant eye with the barrel. Mysterious misses, those with no readily apparent reason, are among the most frustrating of the eye-dominance problems. This may occur when the shooter concentrates on the barrel (sighting or aiming) rather than focusing on the target. When that occurs, the barrel may become an obstruction to the dominant eye, causing the focus to switch to the other eye. Consistently shooting to one side of straight-away targets, or consistently missing either ahead of or behmd crossing targets often indicates a dominance problem. When crossing targets from both sides are being shot, the shooter may hit targets from one side easily while being a long way (1 to 2 meters or 4 to 6 feet) behmd targets from the other side. Some shooters will complain that they are seeing the side of the barrel.
The most obvious solution for eye dominance problems is to switch the shotgun to the other shoulder, changmg the handed- ness of the stance to the dominant-eye side. This is the
the shooter will adapt quickly and be "cured." Some shooters will not switch sides or physically cannot switch sides due to injuries or other problems. They can be helped by interfering with the vision of the dominant eye. The eye does not have to be covered or closed. Adequate interference can be achieved by placing a spot of tape about the size of a notebook reinforcement ring on the lens of the shooting glasses. Place it where it will block the center of the dominant eye when it is in shooting position. A small square or strip of cellophane tape placed vertically over the center of the safety glasses also works well. This technique maintains the advantages in peripheral vision and depth perception that come from binocular vision but forces the non-dominant eye to assume the directing role for the point. One- eyed shooting is necessary in very few cases. Where the shooter switches dominance almost randomly, one-eyed shooting is the easiest way to get them on target. They can either cover or close the non-shooting eye. This alternative should be tlsed on4 gall others have been t ied withotlt stlc~~ess.
best solution to eye- dominance Coping with an eye dominance Eye dominance problems can be problems, even if the shooter has problem causes the shooter to use obvious or very subtle. One of the considerable experience from the an unfarmliar position that feels most obvious is noticing that the
shooter is tdting his or her "wrong" side. In most cases, awkward. They may become
County Extension director and agricultural agent for the Dubois County Office of Purdue Cooperative Extension, Jasper, Indiana.
4-H Shooting Sports Guide Revised 06-02

frustrated when scores drop and their form feels uncomfortable. Patience and positive reinforcement are essential. Give shooters enough time to adapt and to reinforce the fundamentals of good shooting form as they develop this new skill.
Shooter Not Relaxed
Excessive tension causes many types of shooting errors. Experienced instructors may refer to seeing sawdust between the knucldes of excessively intense shooters. Although not true literally, white knuckles and obviously flexed forearm muscles are a strong indication of excessive tension. Deterioration of scores after a miss is another one, usually attributable to peer pressure. Tense shooters may fidget on the firing line, express a lack of confidence or fear of missing, spend an excessive amount of time preparing to shoot or shoot very late and deliberately.
Being too tense causes other problems, so the symptoms of excessive tension may. be masked as other difficulties. The shooter may stop his or her swing or look up to see the target break. They may lunge at targets, losing the smooth swing needed for consistent performance. They may spot shoot targets or take excessive leads; or they may ride the target and aim rather than point. They may fiddle with their foot, body or gun position, changing from a sound one to one that is contorted and unstable. Unless broken by positive action from the instmctor, excessive tension will almost always continue to worsen, feeding upon itseqand destroying the shooter? confdence. Instmctor intewention is essential to assist these shooters!
Correcting excess tension can be an exhaustive process, particularly with shooters who hold themselves to a standard of perfection they are not ready to acheve. One of the most important tools is to e h a t e peer pressure by isolating the shooter for instruction. One-on-one instruction with a gentle, cooperative coach usually succeeds. Allow the shooter to observe others. Throw a few targets without shooting. Return to the finger point and dry firing sequence in private. Reduce the challenge, for example return to straight-away targets, to rebuild confidence. Be careful and patient. Excessive tension is frequently a symptom of problems with self- confidence, self-image or perceptions of personal worth based on shooting performance. Damage control is essential in any instmctional technique.
Improper Stance
Targets are h t with the shot, but missed with the feet. Stance and foot position are vitally important to good shotgun shooting. Stance problems may be easy to detect, but instructors may overlook them when worlung on other problems. Poor stance causes problems with getting on targets, establishing proper leads and following through the shot properly. New shooters can dnft from a good stance to a poor one gradually and without noticing it. Performance deteriorates and they alter other elements of their form to compensate. Stance should be checked frequently by the instructor.
Observing foot position relative to the target-breaking zone is one of the best ways to detect stance problems. One of the most common faults is adjusting the stance to the area where the target will appear rather than where it will be broken. The body
comes under increased tension as the target brealung zone is approached. The result is shooting behind, having the stance "fly apart" at the end of the swing or having a short, abrupt follow through or none at all.
Preventing stance problems is easier than curing them. Verbal reminders of proper stance and physical readjustment of stances early in the learning process helps to fix a proper stance in the shooter's mind. Practicing a preparation routine before every shot is valuable for beginning and experienced shooters alike.
Correcting stance problems is relatively simple if the problem has not become fixed by too much practice. Concentrate on the elements of a good stance. Avoid emphasis on form faults. Adjust foot spacing for comfort. Adjust foot orientation to the area where the target will be broken. Without moving the feet, swivel the body from the hps untll the target can be seen easily. Using a spring analogy may help. The spring should be under tension when and where the target is fsst acquired. It should be relaxed and free when the target is broken.
Other elements of the stance must be considered as well. Shooters vary greatly in the amount of knee flex or body lean. Slight amounts of knee flex and lean into the gun are desirable. Shooting from a crouch is tiring. Rebuild stances carefully, avoiding the notion of one best posture for all shotgunners in all situations. Change only one element of the stance at a t h e to avoid confusing the shooter.
Some stance faults must be addressed quickly. One of the most
Revised 06-02 4-H Shooting Sports Guide

common is leaning away from the target. It results in severe recoil. Shooters suffering a pounding from recoil are less kely to enjoy themselves and learning will suffer. They wdl also develop faults that are more difficult to detect and cure. Fear of recoil, improper gun fit and excessive gun mass are common causes of this fault. Switching to a lighter or shorter gun helps the situation greatly, even when the problem is fear. Demonstrating the recoil absorbing action of a proper stance also helps.
Improper Head Position
Improper head position often results from improper gun mounting or improper fit. Anticipating recoil and wanting to see the target break are also commonly involved. Shooters who try to swing the shoulders rather than from the waist wdl also have problems coordinating the positions of the head and the gun.
Consistently shooting over or under targets, randomly missing high or low or punishing recoil to the face or cheek commonly indtcate poor head position. Shooters may "peek" by lowering the gun as the shot is fired. Most shots go low, even though the target was being tracked properly. Others may "raise their heads" shooting over the target. Both problems are based in improper gun mounting.
The shooter's head should be erect and relaxed. The shotgun should be - brought to the shoulder and face during the mount. Emphasize proper shotgun mounting each time a shooter raises the gun. Practice the mount, swinging from the hips and following through. These exercises wdl cure most head position problems. In extreme cases use dummy ammunition to let
the shooter see what is happening. Stock fit, particularly length of pull, drop at the comb and drop at the heel, may need to be addressed. A shooter adapting to a stock that does not fit may move the head as the gun is mounted, causing head position problems. Following targets or pieces through the entire flight cures or prevents problems.
Aiming
Shotguns must be pointed, not aimed, if the shooter is going to become a good shotgun shot. The desire to make sure of each shot can cause shooters to aim at targets rather than point. Ridmg the target is a common symptom of aiming rather than pointing. Shooters suffering from this fault often fire very late. In extreme cases they may be unable to fire, particularly on crossing targets. They may show a pre-occupation with the barrel or the beads on the shotgun. They may fidget on the stock, trying to get their head position set. In some cases the follow through will be non-existent or very brief and abrupt.
Focus on the fundamentals of sound shotgun shooting to gve positive correction. Emphasize that the shooter should focus attention on the target rather than the barrel. Try to get the shooter to fire more quickly, shooting as quickly as they can touch or pass the target with the muzzle. Ask the shooter to exaggerate the follow through and pay no attention to the target after h g .
No Follow Through
An inadequate follow through is most often revealed by consistently missing behind crossing targets or consistently shooting under rising targets. Watch carefully to see if the shot is being fired with a stlll shotgun or the swing stops abruptly at the shot.
There are several causes of improper follow through. ALrmng or spot shooting (pointing at a spot where the shooter hopes to intercept the target) are common causes. The shooter may simply stop swinging as the shotgun is fired or irnmedtately after firing. Another common cause of poor follow through is "riding the target." This may come from trying to make sure of a h t or from failing to shoot as soon as the muzzle is pointing at the target. Poor body position may cause the shooter to run out of swinging room, stopping the swing short. Some shooters stop the gun because they are trying to see the target break. They seem to lift their heads as they fire, stopping the gun at the same time.
Positive correction of follow through problems starts with the shooter. Relaxing the grip, stance and sense of pressure to achieve a hit can be helpful. Clothing that may restrict the swing should be exchanged for something that allows more freedom of movement. Position the shooter so his or her stance allows freedom of movement through the target breaking zone. The shooter may follow a piece of the broken target or dry fire and lead targets into the ground. In extreme cases, tell the shooter where the gun should be pointing at the end of the follow through. A slightly muzzle heavy shotgun may help to smooth the swing and follow through.
Flinching
All shooters tend to h c h at some time. Minor flinching is inconsequential to a shotgun shooter. Intense flinching, however, can destroy the shooter's abllity to h t targets with a shotgun. Flinching is the result of anticipating either the report of the shotgun or its recoil. Past
4-H Shooting Sports Guide Revised 06-02 77

experience, poor form, excessive Preventing h c h m g is much easier needed. Use dry-firing practice and shooting and improper gun fit are that correcting it. Establishmg sound ball and dummy procedures to the major causes of flinching. fundamentals with properly fitted work through the shooting
Flinching often causes erratic performance on targets. The shooter is usually not conscious of the problem. F h c h g may be the cause of otherwise unexplained misses or complaints about noise, recoil or soreness. The easiest way to demonstrate it is to use a ball and dummy technique, watching the shooter carefully when the dummy rounds are being used.
guns and adequate protective gear prevent most problems. Correcting h c h g problems starts with an analysis of the reasons for h c h g . Determine whether the gauge and load being used is appropriate for the size of the shooter. Make sure the gun fits adequately. Check the shooter's ear protection to make sure it is adequa;e and is being used properly. Add an additional layer of protection, using plugs and muffs if
sequence without the noise and recoil. Finally, position the body to act as a recoil absorber and demonstrate how to ride with the recoil rather than fight it. Explain that a firm, snug hold and a slight to moderate lean into the shot will convert most of the recoil into a push rather than a blow. Patience is essential when trying to correct recoil sensitivity and flinching. Work with the shooter carefully using positive reinforcement and avoidtng excessive pressure.
Revised 06-02 4-H Shooting Sports Guide
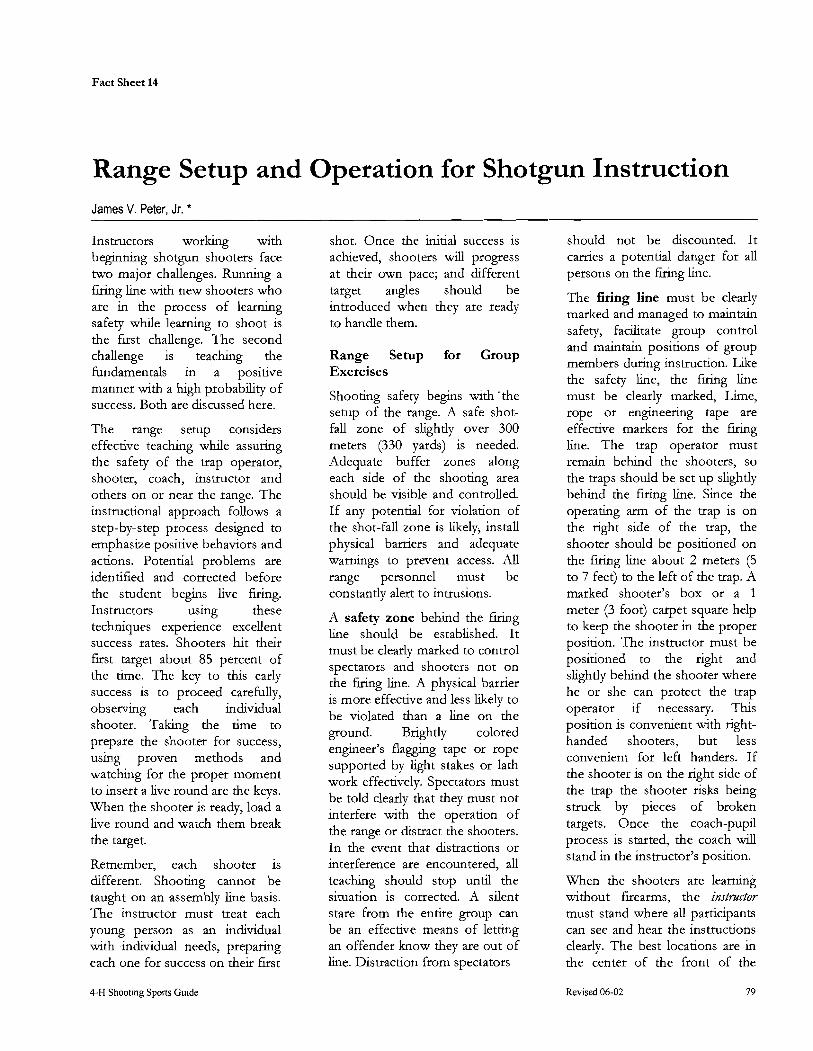
Fact Sheet 14
Range Setup and Operation for Shotgun Instruction James V. Peter. Jr. *
Instructors worktng with begmning shotgun shooters face two major challenges. Running a firing h e with new shooters who are in the process of learning safety whde learning to shoot is the first challenge. The second challenge is teaching the fundamentals in a positive manner with a high probabihty of success. Both are dscussed here.
The range setup considers effective teachmg while assuring the safety of the trap operator, shooter, coach, instructor and others on or near the range. The instructional approach follows a step-by-step process designed to emphasize positive behaviors and actions. Potential problems are identified and corrected before the student begins live firing. Instructors using these techniques experience excellent success rates. Shooters hit their first target about 85 percent of the time. The key to this early success is to proceed carefully, observing each indvidual shooter. Taktng the time to prepare the shooter for success, using proven methods and watchmg for the proper moment to insert a live round are the keys. When the shooter is ready, load a live round and watch them break the target.
Remember, each shooter is
shot. Once the initial success is achieved, shooters d progress at their own pace; and different target angles should be introduced when they are ready to handle them.
Range Setup for Group Exercises
Shooting safety begins with 'the setup of the range. A safe shot- fall zone of slightly over 300 meters (330 yards) is needed. Adequate buffer zones along each side of the shooting area should be visible and controlled. If any potential for violation of the shot-fall zone is likely, install physical barriers and adequate warnings to prevent access. All range personnel must be constantly alert to intrusions.
A safety zone behmd the firing h e should be established. It must be clearly marked to control spectators and shooters not on the firing line. A physical barrier is more effective and less likely to be violated than a line on the ground. Brightly colored engineer's flaggmg tape or rope supported by light stakes or lath work effectively. Spectators must be told clearly that they must not interfere with the operation of the range or distract the shooters. In the event that dstracdons or interference are encountered, all
should not be dscounted. It carries a potential danger for all persons on the h m g h e .
The firing line must be clearly marked and managed to maintain safety, fachtate group control and maintain positions of group members during instruction. Lke the safety line, the firing h e must be clearly marked, Lime, rope or engineering tape are effective markers for the firing line. The trap operator must remain behmd the shooters, so the traps should be set up slightly behind the firing h e . Since the operating arm of the trap is on the right side of the trap, the shooter should be positioned on the firing h e about 2 meters (5 to 7 feet) to the left of the trap. A marked shooter's box or a 1 meter (3 foot) carpet square help to keep the shooter in the proper position. The instructor must be positioned to the right and slightly behind the shooter where he or she can protect the trap operator if necessary. This position is convenient with right- handed shooters, but less convenient for left handers. If the shooter is on the right side of the trap the shooter risks being struck by pieces of broken targets. Once the coach-pupil process is started, the coach d stand in the instructor's position.
different. Shooting cannot be teaching should stop until the When the shooters are learning taught on an assembly line basis. situation is corrected. A silent without firearms, the instmctor The instructor must treat each stare from the entire group can must stand where all participants young person as an individual be an effective means of letting can see and hear the instructions with indtvidual needs, preparing an offender know they are out of clearly. The best locations are in each one for success on their first h e . Distraction from spectators the center of the front of the
4-H Shooting Sports Guide Revised 06-02 79

class or at one end of the firing line. With firearms, the instructor should be at one end of the firing line with an assistant at the other end. The chief instructor or range officer may prefer to stand behtnd the center of the group with assistants covering both ends of the line. Untd the shooters have demonstrated understanding and practice of shooting safety, an assistant instructor should be located at every shooting position.
Trap Operation for Group Instruction
Study the drections for setting up and using the trap carefully. Test the trap several times before the class and mark the proper location on the trap arm to throw straight-away targets. Be sure the trap is fLrmly anchored so a safe, repeatable target flight path can be followed. Instruct the group in trap operation, demonstrating the proper way to cook, load and fire the trap. Caution them about the power of the throwing arm spring.
The operator must remain behind the shooters and clear of any muzzles. Students should be no closer than 2.5 meters (8 feet) on either side of the trap during the group exercises. Only one shooter should be stationed at each trap during the individual instruction phase.
Instructional procedures for Group Instruction
Basic shotgun shooting instruction involves five steps before shooters actually take a shotgun to the line. These steps can be completed with all shooters on the line at one time in a group setting. Complete this sequence:
1. Introduce the clay target - At the outset of the instruction hold up a clay target to allow all shooters to identify it, note its shape and coloration and see how it is made.
2. Watchtng the fight of several targets - Have all shooters line up along the fitvlg line, talung care to keep all persons clear of the active trap. Explain that the target is requested by c a h g "pull." Call for five targets, and have the shooters watch their fight. Ask them to describe the flight of the targets. Demonstrate and dlscuss the flight path, noting the target direction and speed and its path from the trap to the ground.
3. Recheck eye dominance - Make sure of each shooter's eye dominance before having them follow a target with an index fmger. Eye dominance and handedness start playing a role, starting with following a target with a fmger point.
4. Following targets with a fmger point - Have all shooters take a boxer's stance on the firing line with the non-dominant foot forward Have them extend their non-dominant or forward hand at about a 45 degree angle with the index fmger extended. Explain that they are to keep both eyes open, point at the target with their fmger and follow the target to the ground. Throughout the fight the shooter should keep their concentration on the target, not on the fmger. Call for a target and have the students follow its fight repeating the process with at least three to five more targets.
This exercise teaches the concept of pointing rather than aiming and helps the shooters to concentrate on the target rather than the fmger. It also helps to develop the hand-eye coordination needed to hit a moving target. If the shooter is having problems with target alignment, this is the time to adjust the stance to the proper position.
5. Point at a target and BANG! - Repeat the exercise above, but have the shooters say "13ang7' sharply when their fmger first touches the target. - Throw three targets before pausing to dlscuss the results. Each shooter should start from the ready position with the finger pointed at a 45 degree angle. Call for a target. Each shooter should swing smoothly and quickly to the target and call "bang" as the target is touched, following through to the ground.
The instructor should watch for two potential problems at this point. If all the shooters seem to say "BANG" in unison, stress that each shooter should indicate when they have "touched" the target. It is very unlikely that all shooters will touch the target with their fingers at the same time. Repeat the exercise with an addltional five or more targets. Watch for shooters that are a little later than the majority of shooters in getting on the target. These
Revised 06-02 4-H Shooting Sports Guide

shooters are likely to be aiming or riding the target rather than "shooting" as soon as they get on it. That problem tends to resurface. Take the time to correct the problem now by having the shooter "shoot" as soon as they touch the target.
A third problem of relatively minor Gor tance is a timid "bang." Stress that shotgun shooting requires an aggressive approach. In spite of feeling foolish, the shooter should speak loudly when "shooting" targets with their index finger. The relatively timid shooters may need -more support and reinforcement later.
Procedures for Individual Instruction
A coach-pupil technique is recommended for thls stage of the instruction. It is extremely effective when it can be used without risk to the shooters. Two young people form each coach- pupil unit. One shooter acts as the pupil while the others serve as the coach. The coach loads the shotgun, assists the shooter with - positioning and form and observes the field for safety. While assisting the other shooter, the coach is reinforcing the main points and processes of the lesson. After one shooter completes an instruction sequence, roles are reversed and the instruction is repeated.
Some instructors prefer to use a three-shooter group for shotgun instruction, putting one on the trap as well. If the young people are mature enough and strong enough to handle the trap duties, they derive some of the same benefits gained by the coach and pupil. The triad can be rotated on the same basis. Using the method provides additional focus on
safety, involves more shooters in the learning process at any gven time, improves shooter performance and increases learning effectiveness.
Some instructors feel uncomfortable using the technique untd the shooters have had considerable experience on the firing h e . Only you can decide whether your group is ready to use the coach-pupil method. Consider your experience and confidence, the number of students in the class and their level of maturity. An assistant instructor or advanced teen leader should be at each shooting station during the early stages of instruction, even if the coach-pupil method is used. Some instructors use the method through out the indvidual instruction process. Others wait untd after they have completed the dry firing or ball and dummy exercises to use coach-pupil methods.
Dry Firing
As in other shooting sports, shotgun shooters can benefit from dry firing. The shooter goes through the shooting process using snap caps or dummy rounds. That allows the shooter to concentrate on the fundamentals without the complications of recoil, noise and peer pressure. Form faults or other problems can be identified and corrected before the target, recoil and noise mask them. Dry firing allows the instructor to develop readmess to succeed before the first live round is fired.
T h ~ s is the time to establish a protocol for passing a shotgun between people on the firing h e . Since the coach or instructor wdl be loadmg the shotgun in the beginning, the shooter does not
know whether it is loaded or not. The uncertainty is an important part of the instructional method. Shooters must maintain control over the shotgun at all times, and both the coach or instructor and the shooter must take responsibihty for a safe transfer. The coach or instructor keeps a f m grip on the shotgun with the muzzle pointed safely down range untll the shooter signals that he or she has it under control by saying "thank you." The coach or instructor should say "you're welcome7' prior to releasing their grip on the gun. That brief exchange of courtesies does much for establishing mutual interaction and responsibihties, as well as preventing guns from being dropped accidentally.
Safety Review
Before proceeding to a live firing exercise, pause and review all range safety operations with the shooter. Discuss the range layout briefly, including the shot-fall zone and any danger areas. The firing line and positions for all persons at each firing point should be reviewed. The safety zone behmd the firing h e should be reviewed. All spectators should understand their role and the importance of not disturbing the shooters. Remind shooters to ask questions imrnedately if they do not understand any part of the instruction. Review the fundamental rules of safe firearms handling, includtng passing firearms between people on the h e . Only instructors will handle ammunition, and they wdl have only one gauge of ammunition in their possession at any one time. Since the actions at each shooting station follow the progress and rhythm of the shooter, each one operates more
4-H Shooting Sports Guide Revised 06-02
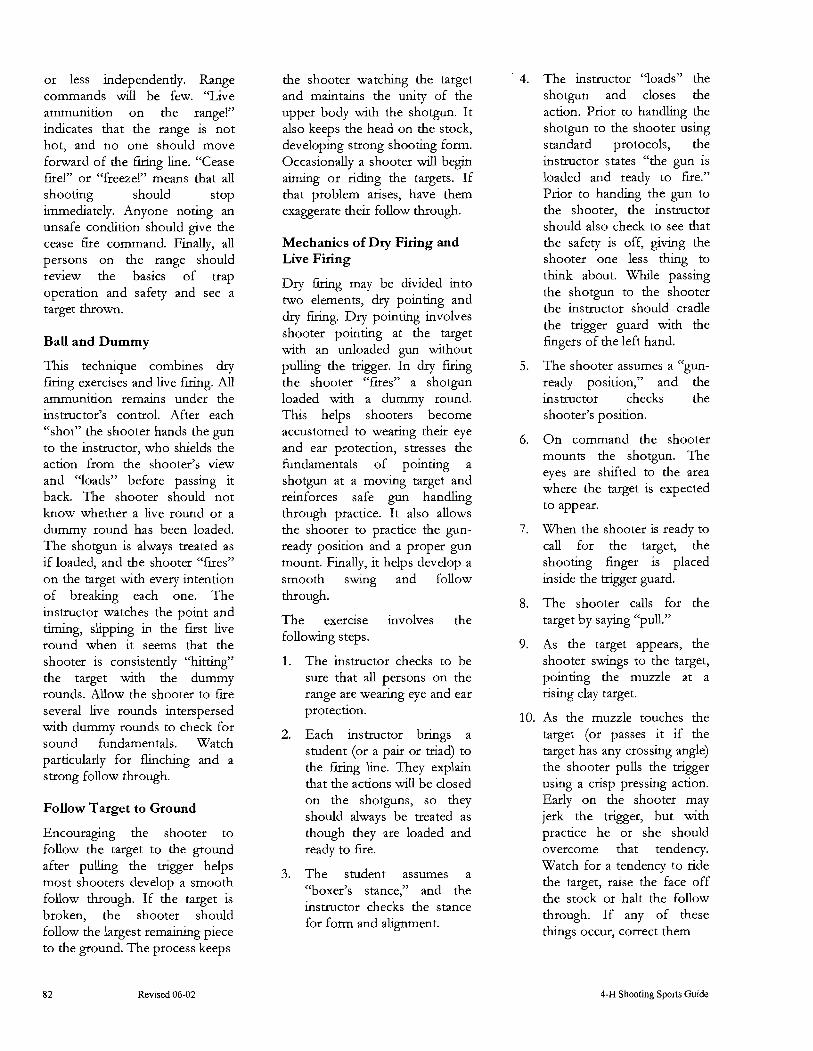
or less independently. Range commands will be few. "Live ammunition on the range!" indicates that the range is not hot, and no one should move forward of the f i g h e . "Cease fire!" or "freeze!" means that all shooting should stop immediately. Anyone noting an unsafe condition should gve the cease fire command. Finally, all persons on the range should review the basics of trap operation and safety and see a target thrown.
Ball and Dummy
This technique combines dry fLting exercises and live firing. All ammunition remains under the instructor's control. After each "shot" the shooter hands the gun to the instructor, who shelds the action from the shooter's view and "loads" before passing it back. The shooter should not know whether a live round or a dummy round has been loaded. The shotgun is always treated as if loaded, and the shooter "fires" on the target with every intention of breaking each one. The - instructor watches the point and timing, slipping in the first live round when it seems that the shooter is consistently "hitting" the target with the dummy rounds. Allow the shooter to fire several live rounds interspersed with dummy rounds to check for sound fundamentals. Watch particularly for flinching and a strong follow through.
Follow Target to Ground
Encouraging the shooter to follow the target to the ground after pulling the trigger helps most shooters develop a smooth follow through. If the target is broken, the shooter should follow the largest remaining piece to the ground. The process keeps
the shooter watching the target and maintains the unity of the upper body with the shotgun. It also keeps the head on the stock, developing strong shooting form. Occasionally a shooter will begm aiming or riding the targets. If that problem arises, have them exaggerate their follow through.
Mechanics of Dry Firing and Live Firing
Dry firing may be divided into two elements, dry pointing and dry firing. Dry pointing involves shooter pointing at the target with an unloaded gun without pulltng the trigger. In dry firing the shooter "fires" a shotgun loaded with a dummy round. This helps shooters become accustomed to wearing their eye and ear protection, stresses the fundamentals of pointing a shotgun at a moving target and reinforces safe gun handling through practice. It also allows the shooter to practice the gun- ready position and a proper gun mount. Finally, it helps develop a smooth swing and follow through.
The exercise involves the following steps.
1. The instructor checks to be sure that all persons on the range are wearing eye and ear protection.
Each instructor brings a student (or a pair or triad) to the firing h e . They explain that the actions will be closed on the shotguns, so they should always be treated as though they are loaded and ready to fie.
3. The student assumes a "boxer's stance," and the instructor checks the stance for form and alignment.
4. The instructor "loads" the shotgun and closes the action. Prior to handhng the - shotgun to the shooter using standard protocols, the instructor states "the gun is loaded and ready to fire." Prior to handing the gun to the shooter, the instructor should also check to see that the safety is off, giving the shooter one less thing to think about. While passing the shotgun to the shooter the instructor should cradle the trigger guard with the figers of the left hand.
5 . The shooter assumes a "gun- ready position," and the instructor checks the shooter's position.
6. On command the shooter mounts the shotgun. The eyes are shfted to the area where the target is expected to appear.
7. When the shooter is ready to call for the target, the shooting finger is placed inside the trigger guard.
8. The shooter calls for the target by saying "pull."
9. As the target appears, the shooter swings to the target, pointing the muzzle at a rising clay target.
10. As the muzzle touches the target (or passes it if the target has any crossing angle) the shooter pulls the trigger using a crisp pressing action. Early on the shooter may jerk the trigger, but with practice he or she should overcome that tendency. Watch for a tendency to ride the target, raise the face off the stock or halt the follow through. If any of these things occur, correct them
82 Revised 06-02 4-H Shooting Sports Guide

now, before going to live firing.
11. The shooter should follow through, tracking the target all the way to the ground.
12. After the follow through is completed, the shooter hands the shotgun to the instructors using the standard protocols, and the exercise is repeated several times.
Live Firing
After the shooter is proficient with dry firing, let the procedure evolve into a a1 and dummy exercise. This exercise is actually a continuation of the dry-firing exercise interspersed with live firing. The shooter should fire no more than five rounds during th~s exercise. Continue to reinforce safe gun handhg and proper shooting form. Each shooter should fire the first shot when they are ready. The learned and practiced fundamentals should be continued. Finally, at the discretion of the instructor, the shooter learns to load the shotgun personally.
The shooting procedure outlined above is followed with the exceptions noted below.
1. After the shooter is on the target with fundamentally sound form three or four times under dry firing condtions, the instructor loads a live round.
2. After the first shot, hit or miss, the instructor must be supportive of the shooter.
3. Insert one to three dummy rounds before another live round is inserted.
4. Repeat the ball and dummy exercise as needed. If addtional rounds remain after the shooter has demonstrated an ability to hlt targets consistently, allow the shooter to load and fire.
Take the time needed to ensure success on the first shot, working with one shooter at a time. Be particularly careful when passing the shotgun to the shooter. If the shooter has problems on the first attempt, continue the dry- firing
exercise, but do not dry fire more than five or six times in a row. More than thls tends to frustrate the shooter, increase fatigue and reduce concentration. If fatigue is evident, either allow the shooter to leave the line and rest briefly (bring them back to the line quickly so their confidence is not hurt) or allow the shooter to fire one round, even if it is likely to miss. Thls gets them through the anxiety of the first shot. Knowing when to load the first live round and how to handle a shooter who is developing slowly will come with experience.
Keep the shooting fun and enjoyable. Keep thtngs moving, be positive and enthusiastic. Remember that beginners tire easily and that the; are easily confused by over-instruction. Be sure that shooters off the line are positively involved and supervised. Do not instruct the other shooters at the expense of the individual on the h e . Keep the fundamentals in mind, maintain a safe and secure range and keep the shooting fun.
4-H Shooting Sports Guide Revised 06-02

Revised 06-02 4-H Shooting Sports Guide

Fact Sheet 15
Shotgun Shooting from the Gun-Ready and High-Gun Positions James V. Peter, Jr. *
Beginning instructors will find the process of mounting the consistent shotgunning. The this brief review of shotgun gun, swinging to the target, process involves several shooting fundamentals useful. shooting and following through fundamental steps: stance, gun- Take time to review the with a coordinated and smooth ready position, mount, swing to fundamentals as you prepare for motion. the target, trigger pull and teaching. Remember, shooters follow through. Each are made, not born. Shooting Eye Dominance component is vital to becoming skills must be developed by establishing the fundamentals before moving to more advanced shooting skills.
This teaching method has the shooter call for the target with a high gun-the gun mounted at the shoulder. This reduces the number of variables the beginning shooter must address and promotes faster learning. ~ l t h o u ~ h many shotgun games permit the gun to be mounted before calling for a target, teaching the gun-ready position is also important in this process.
Have beginning shooters start from the gun-ready position. Have them mount the gun on command or at will before calling for the target. This will teach the ready position used in international skeet, sporting clays or hunting without the added variable of inconsistent gun mounting during early stages of learning. As the shooters' experience and skill increase, the low gun or gun- ready position may be added to the process. Have them practice
Shooting is learned more easily if the dominant eye performs its natural function. First, the dominant eye must be determined (see Fact Sheet 3: Determining Eye Dominance). When the dominant eye and the dominant hand are on the same side of the body, instructors have very little difficulty convincing shooters to shoot from that side. When the shooter is cross dominant (eyedness and handedness differ), the eyedness should take precedence even if the shooter has been shooting from the "wrong" side.
Shotgun Shooting Fundamentals
Shotgun shooting involves placing a cloud of shot where a target will be when the shot reaches that location. The pattern or shot cloud is relatively large, so precise aiming is unnecessary. Aiming is a serious form fault in shotgun shooting. Timing and pointing are the keys to
an accomplished shotgun shooter. The following instructions are given in relation to the dominant eye, thus "dominant side" means the dominant-eye side, and "off' or "non-dominant" side refers to the non-dominant eye side. Using these "ambidextrous" instructions increases the instructor's effectiveness.
Stance
Stance refers to the position and posture of the body relative to the target. Proper stance forms the foundation for proper shotgun shooting. An experienced shooting instructor once said that you hit with the shot, but you miss with your feet. The first component of a good stance is foot position.
The point of reference for taking a stance is the location where the target is likely to be broken. The body should face the intended target-breaking area squarely with the feet comfortably set about shoulder width apart. The off foot should
* County Extension director and agricultural agent for the Dubois County Office of Purdue Cooperative Extension, Jasper, Indiana.
4-H Shooting Sports Guide Revised 06-02

be slightly forward of the dominant foot, perhaps 10 to 20 centimeters (about 4 to 8 inches). Most shooters feel comfortable with the weight evenly distributed or slightly (about 60:40) toward the front foot. The knees should be flexed slightly, allowing the hips to rotate freely. This freedom of movement is critical in games that involve crossing targets, since the swing comes from the hips rather than the upper body. If properly aligned, a line through the heel of the back foot and the toes of the front one should point to the target- breaking area.
Most instructors refer to this as a "boxer's stance." The term is descriptive of the upper body, too. The off hand, the one that holds the forearm of the shotgun, is extended partially with shoulder rotated upward to raise the elbow. The dominant hand, the one on the grip and trigger, is held closer to the chest with the elbow raised.
Gun-ready Position
The gun-ready position is the posture assumed by the upper body prior to mounting the gun. The shotgun is held at an angle across the front of the chest with the muzzle on the anticipated flight line of the target. The heel of the stock is held just above the belt or waistline, under the dominant elbow. The butt plate or recoil pad should be near the forward point of the hip, with the stock close to the body (barely touching) to within a few centimeters (an inch or so.) The dominant elbow should be about 5 to 10 centimeters (2 to 4 inches) away from the stock. This position makes mounting the gun easier by locating the
butt forward of the arm pit and free from interference by the clothing or the body.
The off hand (the one on the forearm) should be somewhat flexed, with the shotgun balanced between the hands. If the stock dimensions are correct, the hand should be near the middle of the forearm. Some shooters prefer keeping the hand closer to the rear of the forearm for support and control. The grip should be firm enough to control the shotgun, but not excessively tight. Many shooters like to point the index finger toward the muzzle to reinforce pointing rather than aiming the shotgun.
The ideal position for the muzzle is on the anticipated flight line, not obstructing the shooter's field of vision. Being slightly low is preferable to being above the flight line. The shooter must see the target quickly and clearly to hit it.
Both eyes should be open and watching where the target is going to appear. Concentration should be focused totally on the target, not on the background or the barrel of the shotgun.
Mounting the Shotgun
The act of bringing the shotgun into shooting position is called the mount. The shotgun is brought to the face and shoulder in a smooth motion. Vertical movement of the muzzle should be kept to a minimum, with the muzzle acting as a pivot point and tracking the target as the gun is mounted. Raising the stock to the dominant cheek with the head held comfortably erect prevents many of the shooting form faults that plague many shotgun shooters. With
practice you can bring the stock to the same position on the face and shoulder each time it is mounted. Consistent placement from shot to shot leads to better shooting and more consistent hits. The comb of the stock should be firmly against the cheek during the entire shooting process.
With the dominant elbow raised to shoulder height, the shoulder forms a pocket that receives the butt of the stock. Although shooting styles differ somewhat, the heel of the stock should not project appreciably above the top of the shoulder. By keeping most of the butt or recoil pad on the shoulder helps to distribute the recoil, as well as position the shotgun for consistent shooting results.
As the gun is mounted, the upper body shifts, leaning forward to place about 60 to 75 percent of the weight on the forward foot. The forward knee is bent slightly, and the shooter's head is positioned almost directly over the front foot. Although this process seems complicated and long, with practice it becomes a swift and fluid motion that blends with the swing to the target and follow through. In the beginning, the shooter mounts the gun before calling for the target.
Swing to the Target
Experienced shooters will start the swing to the target as the shotgun is being mounted, but that process is too complicated for beginning shooters. Beginning shooters should start with a mounted and still gun. Before calling for a target, the shooter shifts his or her visual field to the area where the target
86 Revised 06-02 4-H Shooting Sports Guide

is going to appear. The target is requested by calling "pull." Once the target is seen, the shooter focuses on it and moves the upper body and shotgun to cover it. In the early stages of learning, straight-away targets will be used. The shooter merely points at the target and shoots. Once other types of targets, particularly crossing ones are encountered, the shooter must accelerate the movement of the shotgun to catch and pass the target. That acceleration comes from the legs and hips, which pivot the upper body as a unit. Lead, the forward allowance needed to hit the target, is perceived differently by every shooter. Using a swing-through method is often more effective for field shots and those who are learning to use a shotgun. The shooter starts with the gun behind the target, accelerates through it, fires and continues to accelerate into the follow through. Sustained lead shooters find a forward allowance that works for them, then visually try to tow the target along its flight path with the muzzle, keeping them the proper distance apart.
Trigger Pull
Timing is much more critical than precise location for shotgun shooters. The shooter needs to fire when the barrel is pointing at the intersection point between the flight path of the shot and that of the target. Using the swing-through approach, the shooter fires when the shotgun touches, covers or passes the target. The trigger is pressed with a quick, crisp pull, but it is not snatched or jerked. The smooth flow of motion from the mount to the follow through should not be interrupted by the trigger pull. Firing the shot becomes a conditioned hand-eye reflex with practice, where the eye recognizes the proper relationship between muzzle and target and trips the trigger finger into action.
Follow Through
Follow through is the continuation of the smooth swing to and through the target. It is the most critical element to consistently good shotgun shooting. Follow through should flow smoothly through the recoil until the target is broken.
Many shooters follow a broken piece of the target to accentuate their follow through. As target speeds increase, follow through becomes increasingly critical. Like the swing to the target, the follow through involves a properly mounted gun and movement generated from the hips and legs. This movement keeps the gun aligned with where the target will be when the shot charge reaches it.
Combining these elements in a few split seconds takes practice. Coaches must know the components of a good shotgun shot in order to help the learners improve. Keep the challenges simple at the outset. Keep target height and direction as uniform and straight-away as possible. Hold target speed down to modest levels. Keep the shooting sequence as easy as possible by starting with the gun mounted and ready to fire. Watch the shooters to make sure the elements of sound shooting are developing, and work on no more than one correction at a time. Good luck and good teaching.
4-H Shooting Sports Guide Revised 06-02

Revised 06-02 4-H Shooting Sports Guide