shirts & robes - puppet · pdf filebasic front, back, and sleeve patterns, as explained in...
TRANSCRIPT

53
Shirts & robesShirts & robesShirts & robesShirts & robes
So many uses for shirtsSo many uses for shirtsSo many uses for shirtsSo many uses for shirts
Shirts are a standby for any puppet wardrobe, casual or dressy, hand puppet or marionette, male or female. By varying the length of sleeves, type of collar, and closure type (button down, zipper back, or pullover), you can make a wide variety of looks from the same basic style. You can even turn a “shirt” into a simple robe, coat, pajama top, or dress top! As always, your choice of fabric has the greatest influence on how the shirt looks. Just about any kind of fabric works—cottons, polyesters, flannels—but if you want to make a pullover shirt, you need to use something a little bit stretchy.
What you needWhat you needWhat you needWhat you need
✄ Basic front, back, and sleeve patterns, as explained in the “Easy pattern making” and “Sleeves” chapters
✄ Fabric (at least enough to cut out two sleeves, two fronts, and two backs according to the fabric cutting guidelines on page 45)
✄ Matching thread
✄ Fastener(s) of your choice (see the chapter “Zippers, buttons, & more”)
Shirts & robes, suits & coats… what’s the difference?
In this book, the outfits in the “Shirts & robes” chapter do not have a lining, while those in the “Suits & coats” chapter do. This distinction is somewhat arbitrary since you can, of course, make coats that are unlined and robes that are lined.
Lined costumes generally work well when you want the edges to have a finished, stitch-free look. (See page 60 for details.)

Shirts & robes
54
Tweak the patternTweak the patternTweak the patternTweak the pattern
Once you have completed the basic front, back, and sleeve patterns (by following all the directions in the “Easy pattern making” and “Sleeves” chapters), you only need to modify them a little bit to make a shirt.
First, you need to decide whether you want the shirt to open in front or in back and what type of fastener you want to use. (For guidelines, see the “Zippers, buttons, & more” chapter.)
If you’re not sure what you want to do in the way of fasteners, just add 2” extra. That’s a safe amount for any type of opening.
You may also want to adjust the pattern’s neckline. (Remember to add at least 1/2” to the neckline for seam allowance so you have room to hem it!)
You can also adjust the pattern’s length:
Lengthening the shirt pattern works well for simple robes. For a very full, swooshy robe what you really want is a dress in disguise. See page 87 for more information.
Cut out the fabricCut out the fabricCut out the fabricCut out the fabric
To make a shirt (or robe), you need to cut out two sleeves, plus the front and back pieces. If you want your puppet’s shirt to open and close in the front, you need to layout your pattern pieces with the back piece against the fold and the front piece away from the fold. (Remember that the edge along the fold does not need seam allowance.)

Shirts & robes
55
For a shirt that opens in the back (or needs an opening in the back for you to get your hand through), place the back piece away from the fold.
For a pullover shirt that needs no opening, cut both the front and back pieces along the fold.
Sew the front and back togetherSew the front and back togetherSew the front and back togetherSew the front and back together
1. Place the front and back right sides together, lining them up along the top.
2. Stitch the front and back together along the shoulders only.
Attach the sleevesAttach the sleevesAttach the sleevesAttach the sleeves
1. Spread the shirt out flat.
2. Place the shirt on one of the sleeve pieces right sides together, lining up the corners of the sleeve with the corners of the armhole. Pin the sleeve to the shirt.
3. Stitch the sleeve and the shirt together, then cut off any excess sleeve fabric.

Shirts & robes
56
4. Attach the other sleeve to the shirt in the same way.
5. Fold the shirt in half right sides together (or in other words, turn the shirt inside out).
6. Stitch along the underside of one sleeve, then pivot and stitch down the side of the shirt. Do the same for the other side. (For pivoting instructions, see page 18.)
Finish the top of the shirtFinish the top of the shirtFinish the top of the shirtFinish the top of the shirt
You can finish the top of the shirt with a simple hem or you can add any kind of collar you like. (To add a collar, skip the hem-making steps and go on to the next section, “Add a collar (optional).”)
To hem the shirt (without adding a collar):
1. Fold the edges under 1/4” and iron them flat. (You may need to make small cuts in the fabric here and there to get it to turn under more easily.)
2. If you have enough fabric to do so, turn the edges under another 1/4”. This encloses the edges and helps prevent raveling.
3. Stitch all the way around the top of the shirt. (This can be a good place to use a decorative stitch if you have one.)
You’re finished! Now you can complete the ends of the sleeves by following the steps in the “Cuffs & hems” section on page 59. (Or, if you’ve changed your mind about adding a collar, you can do that now.)

Shirts & robes
57
Add a collarAdd a collarAdd a collarAdd a collar (optional) (optional) (optional) (optional)
Before you can begin making a collar, you need to decide what you want it to look like. A few basic styles include:
You can create the collar directly from fabric, but you might want to practice on paper towels first. Once you get a shape you like, you can use the paper towel as a pattern.
To make a standard, Peter Pan, comical, or square collar:
1. Cut a rectangle of fabric that’s long enough to wrap all the way around the shirt’s neckline with a few inches to spare, and at least as tall as you want the
collar. (This can be same fabric as the shirt, or it can contrast with it, depending on the style you want.)
2. Fold the fabric in half widthwise (if you want the collar to be symmetrical) and trim it into the shape you want, leaving an opening where the costume needs to open and close. Remember to make the collar 1/4” larger all the way around than you actually want it to provide for seam allowance.

Shirts & robes
58
3. Cut another piece of fabric identical to the first.
4. Place the two pieces of fabric right sides together and stitch them together along all the edges except the top.
5. Turn the collar right side out. (You may need to use a blunt object, like the end of a pen or a seam ripper, to get the corners nice and crisp.) Then iron it flat.
6. Line up the unsewn edge of the collar with the inside of the top of the shirt, matching up the opening in the collar with the opening in the shirt. Pin the collar in place.
7. Stitch the collar to the shirt, removing the pins as you go.
Turn the collar down, give it a really firm ironing, and you’re done! Go on to “Cuffs & hems.”
To make a ruffled collar, you can use a ready-made piece of trim or lace, or you can gather the top edge of a long piece of fabric by following the directions on page 22. Then hem the ungathered edges (page 21) and attach it to the shirt just like a standard collar (steps 6 and 7).
Bib collars work especially well for shirts that don’t open in the front (otherwise, you’ll have to make “half bibs,” as shown below). To make a bib collar, cut a rectangle that nicely fits the front of the shirt, rounding out the top to match the neckline. Hem the edges of the fabric (as shown on page 21) and attach it to the costume just like a standard collar (steps 6 and 7). If you want, you can stitch a piece of lace or trim around the edges.
If you want, you can make half bibs for the back of the costume by cutting the bib in half down the middle.

Shirts & robes
59
Cuffs & hemsCuffs & hemsCuffs & hemsCuffs & hems
Before you finish the ends of the sleeves, you need to make sure they’re the right length for your puppet (plus 1/2” for the upcoming hem!) For long sleeves, the fabric should cover your puppet’s wrist but not its hand, even with its arms extended. To achieve this, you may need to make the sleeve a little longer on the backside than on the front.
Once you have the sleeves cut to the right length, you can hem the ends by following the directions on page 21.
For a more stylish finish, you can add cuffs to the ends of the sleeves. (You can also use cuffs to lengthen sleeves if necessary.) To make cuffs:
1. Cut two pieces of fabric, each twice as wide as you want the cuff plus 1/2” and long enough to wrap around the end of the sleeve with 1/2” to spare.
2. Fold each piece in half lengthwise right sides together and stitch across the edge opposite the fold.
3. Turn the fabric right side out using the “Nifty safety pin trick” from page 29, then iron it flat.
4. Fold the fabric in half widthwise (right sides together) and stitch the end opposite the fold closed.
5. Place the fabric on the end of the sleeve and stitch 1/4” from the edge all the way around.
Turn the cuff right side out and you’re finished!
Finish with fastenersFinish with fastenersFinish with fastenersFinish with fasteners
You can finish the shirt with the fastener of your choice—a zipper, buttons, snaps, velcro—by following the advice in the chapter “Zippers, buttons, & more.”

60
Suits & coatsSuits & coatsSuits & coatsSuits & coats
Lining up the possibilitiesLining up the possibilitiesLining up the possibilitiesLining up the possibilities
In this book, the outfits in the “Shirts & robes” chapter do not have a lining, while those in the “Suits & coats” chapter do. This distinction is somewhat arbitrary since you can, of course, make coats that are unlined and robes that are lined.
Some people suspect that adding a lining automatically makes costuming more difficult. Although linings do take extra fabric, they can actually save you time since they can eliminate the need for hems. This can be especially useful for very small costumes parts like dress tops. (See the “Dresses & jumpers” chapter for more information.)
Linings generally work well for costumes that need finished, stitch-free edges—like tuxedos and dinner jackets, or dresses with elegant necklines. Linings also come in handy for materials that are difficult to hem, such as fake fur or fabric that ravels, and can help give shape to thick or flimsy fabric.
When working with lined costumes, make sure the fabric and lining pieces match up before you sew them together, since it’s harder to trim off extra material at the end (as you can with unlined costumes).
Stylish reminders
Even though various costume parts might not look very much alike, you can make them in almost exactly the same way.
On the back outside cover, for example, I made both the top of Glinda’s pink dress and Fred Astaire’s tuxedo using the instructions from this chapter. They may have different necklines, different sleeve types, and different closure styles, but they’re basically the same type of top. The most important difference is not the style, but the fabric. See the “Choosing fabric” chapter for details.
Suits & coats
61
What you needWhat you needWhat you needWhat you need
✄ Basic front and back patterns (as directed in the “Easy pattern making” chapter)
✄ Basic sleeve pattern (from the “Sleeves” chapter)
✄ Fabric for the outside of the suit (enough to layout two pattern fronts, one pattern back, and two sleeve patterns, plus a little extra, according to the guidelines on page 45)
✄ Fabric for the lining of the suit (enough to layout two pattern fronts and one pattern back, plus a little extra)
✄ Buttons, a zipper, or the fastener of your choice
The lining should definitely be a lightweight fabric, as you don’t want to make your costumes any heavier or bulkier than necessary. Looks aren’t really critical, but you should pick something that’s a lighter color than the outside fabric to keep it from showing through.
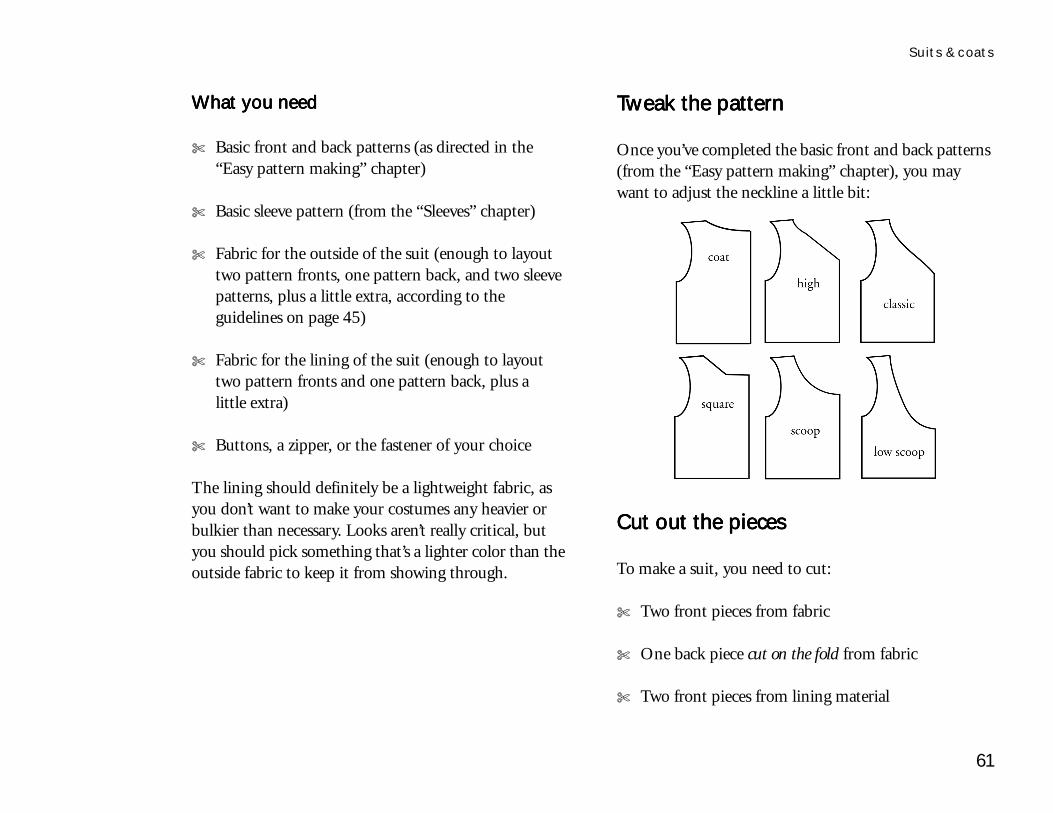
Tweak the patternTweak the patternTweak the patternTweak the pattern
Once you’ve completed the basic front and back patterns (from the “Easy pattern making” chapter), you may want to adjust the neckline a little bit:
Cut out the piecesCut out the piecesCut out the piecesCut out the pieces
To make a suit, you need to cut:
✄ Two front pieces from fabric
✄ One back piece cut on the fold from fabric
✄ Two front pieces from lining material

Suits & coats
62
✄ One back piece cut on the fold from lining material
You also need two sleeves cut from fabric. You can either cut out two complete sleeve patterns, or (if the sleeves are symmetrical) you can cut out two half-sleeve patterns placed against the fold.
If you need an opening in the back…If you need an opening in the back…If you need an opening in the back…If you need an opening in the back…
If you have a puppet that needs an opening in the back of its costumes (like many traditional style ventriloquist characters), or you want to place a zipper or other fastener in the back of the suit, there are a few steps you need to follow before you can continue.
1. Cut out your back pattern pieces with 1/4” extra fabric (or lining material) on the inside edge.
2. Fold the inside edge of each back piece under 1/4”, iron it flat, and stitch along the edge.
3. Place each fabric piece right sides together with its matching lining piece and stitch them along the inside edge.

Suits & coats
63
4. Place the back pieces on top of each other (fabric sides together) and stitch along the inside edge, leaving an opening where your puppet needs it. OR… Insert a zipper (or other fastener) instead of stitching. (See the chapter “Zippers, buttons, & more” for instructions.)
Now you can continue with the rest of the suit!
Sew the lining to the fabricSew the lining to the fabricSew the lining to the fabricSew the lining to the fabric
1. Place one of the lining front sections and one of the fabric front sections right sides together.
2. Stitch along the armhole, bottom, and inner edges, leaving the outside and top edges open.
3. Do the same for the other lining and fabric front sections.
4. Now do the same for the lining and fabric backs.
If you do not want to add a collar or lapel to the suit, stitch the top of each lining/fabric section (as shown below) and skip to the section “Sew the front and back together” on page 65. If you do want to add a collar, leave the tops unstitched and go on the next section.
Add a Add a Add a Add a collar or lapels (optional)collar or lapels (optional)collar or lapels (optional)collar or lapels (optional)
If you want to add a collar or lapels, it’s best to do that now before stitching the front and back sections together. That way, the unfinished ends of the collar end up in between the lining and fabric layers. You need to make the collar (or lapel) in three separate sections—one for each of the front pieces and one for the back.
Suits & coats
64
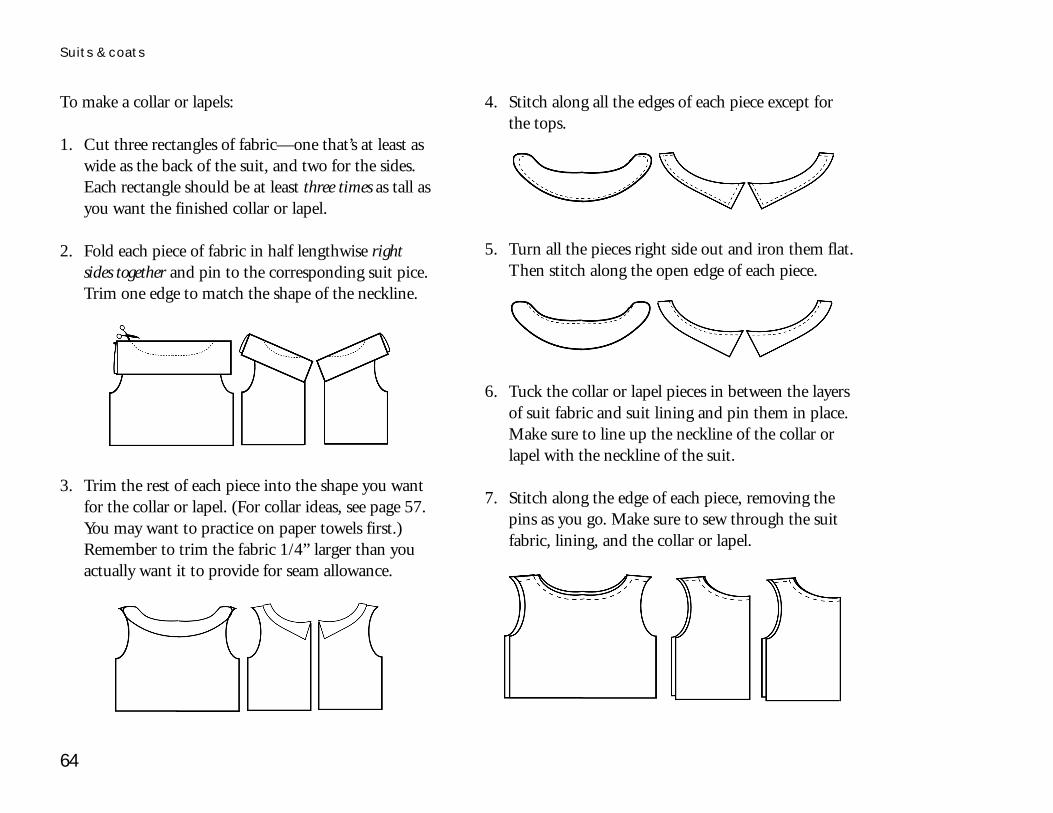
To make a collar or lapels:
1. Cut three rectangles of fabric—one that’s at least as wide as the back of the suit, and two for the sides. Each rectangle should be at least three times as tall as you want the finished collar or lapel.
2. Fold each piece of fabric in half lengthwise right sides together and pin to the corresponding suit pice. Trim one edge to match the shape of the neckline.
3. Trim the rest of each piece into the shape you want for the collar or lapel. (For collar ideas, see page 57. You may want to practice on paper towels first.) Remember to trim the fabric 1/4” larger than you actually want it to provide for seam allowance.
4. Stitch along all the edges of each piece except for the tops.
5. Turn all the pieces right side out and iron them flat. Then stitch along the open edge of each piece.
6. Tuck the collar or lapel pieces in between the layers of suit fabric and suit lining and pin them in place. Make sure to line up the neckline of the collar or lapel with the neckline of the suit.
7. Stitch along the edge of each piece, removing the pins as you go. Make sure to sew through the suit fabric, lining, and the collar or lapel.

Suits & coats
65
Sew the front and back togetherSew the front and back togetherSew the front and back togetherSew the front and back together
1. Turn the front and back pieces right side out and iron them flat.
2. Place the front and back pieces right sides together, lining them up along shoulder seams.
3. Stitch the front and back together along the shoulders only.
Attach the sleevesAttach the sleevesAttach the sleevesAttach the sleeves
1. Spread the suit out flat.
2. Place the suit fabric side down on one of the sleeve pieces right sides together, lining up the corners and middle of the sleeve with the corners and middle of the armhole. Then pin the sleeve to the suit.
3. Stitch the sleeve and the suit together, then cut off any excess sleeve fabric.
4. Attach the other sleeve to the suit in the same way.
The suit should now look something like this!

Suits & coats
66
Sew the sides and sleevesSew the sides and sleevesSew the sides and sleevesSew the sides and sleeves
To finish the sides of the suit (or coat), I recommend using the “French seams” technique from page 24. This keeps the inner seams from raveling and prevents unsightly loose threads from hanging out. Once you sew the sides, you can close up each sleeve by stitching along the lower edge (right sides together!)
To finish the sides of the suit in the usual way, simply stitch along the sides of the suit (right sides together!), then pivot and stitch along the lower edge of the sleeves. (For pivoting advice, see page 18.)
To finish the ends of the sleeves, see the “Cuffs & hems” section on page 59.
Finish with fastenersFinish with fastenersFinish with fastenersFinish with fasteners
You can finish the suit with the fastener of your choice (buttons work particularly well) by following the advice in the chapter “Zippers, buttons, & more.” Since the suit has two layers (the fabric and the lining), you don’t even need to hem the opening—just go ahead and put in the fasteners. Then your puppet will be ready to suit up!
NOTE: If you want to add a hood to your puppet’s coat, please see page 107.