ships bottles
TRANSCRIPT
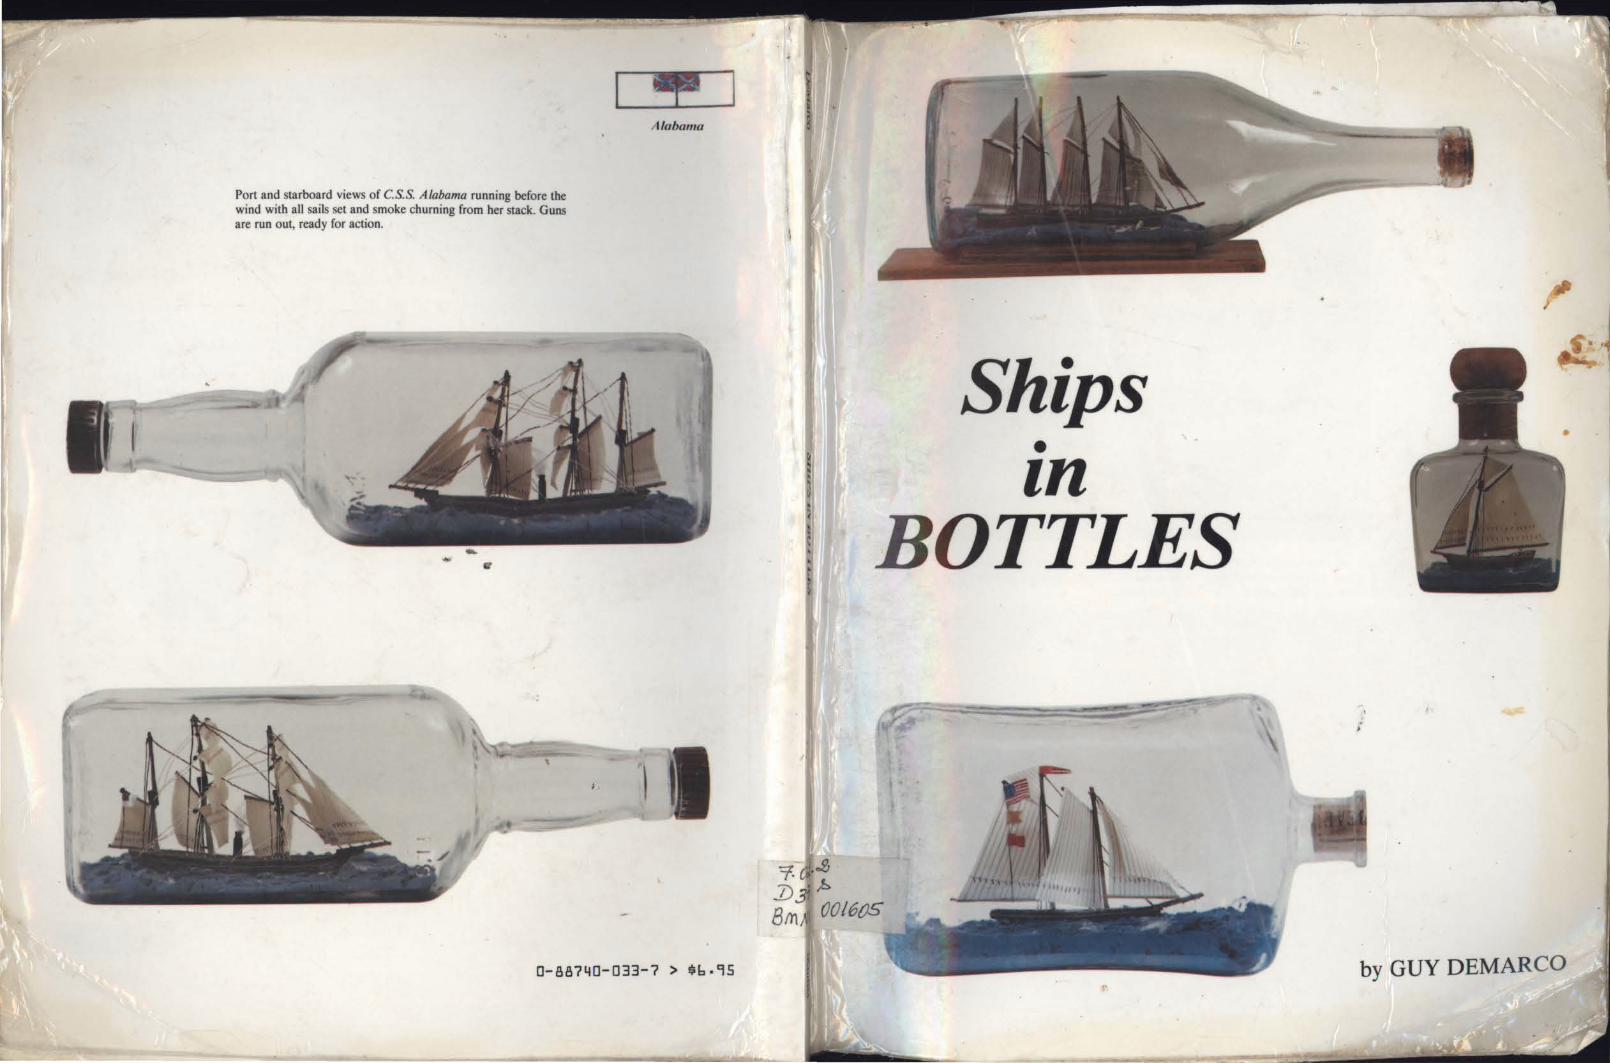
Port and starboard views of C.S.S. Alabama running before the wind with all sails set and smoke churning from her stack. Guns are run out, ready for action.
Alabama
0-88740-033-7 > $6-95
-=;. J)
8rn
Ships • tn
BOTTLES
. }
.J3 ,b
00160.5
by GUY DEMARCO
Victorine
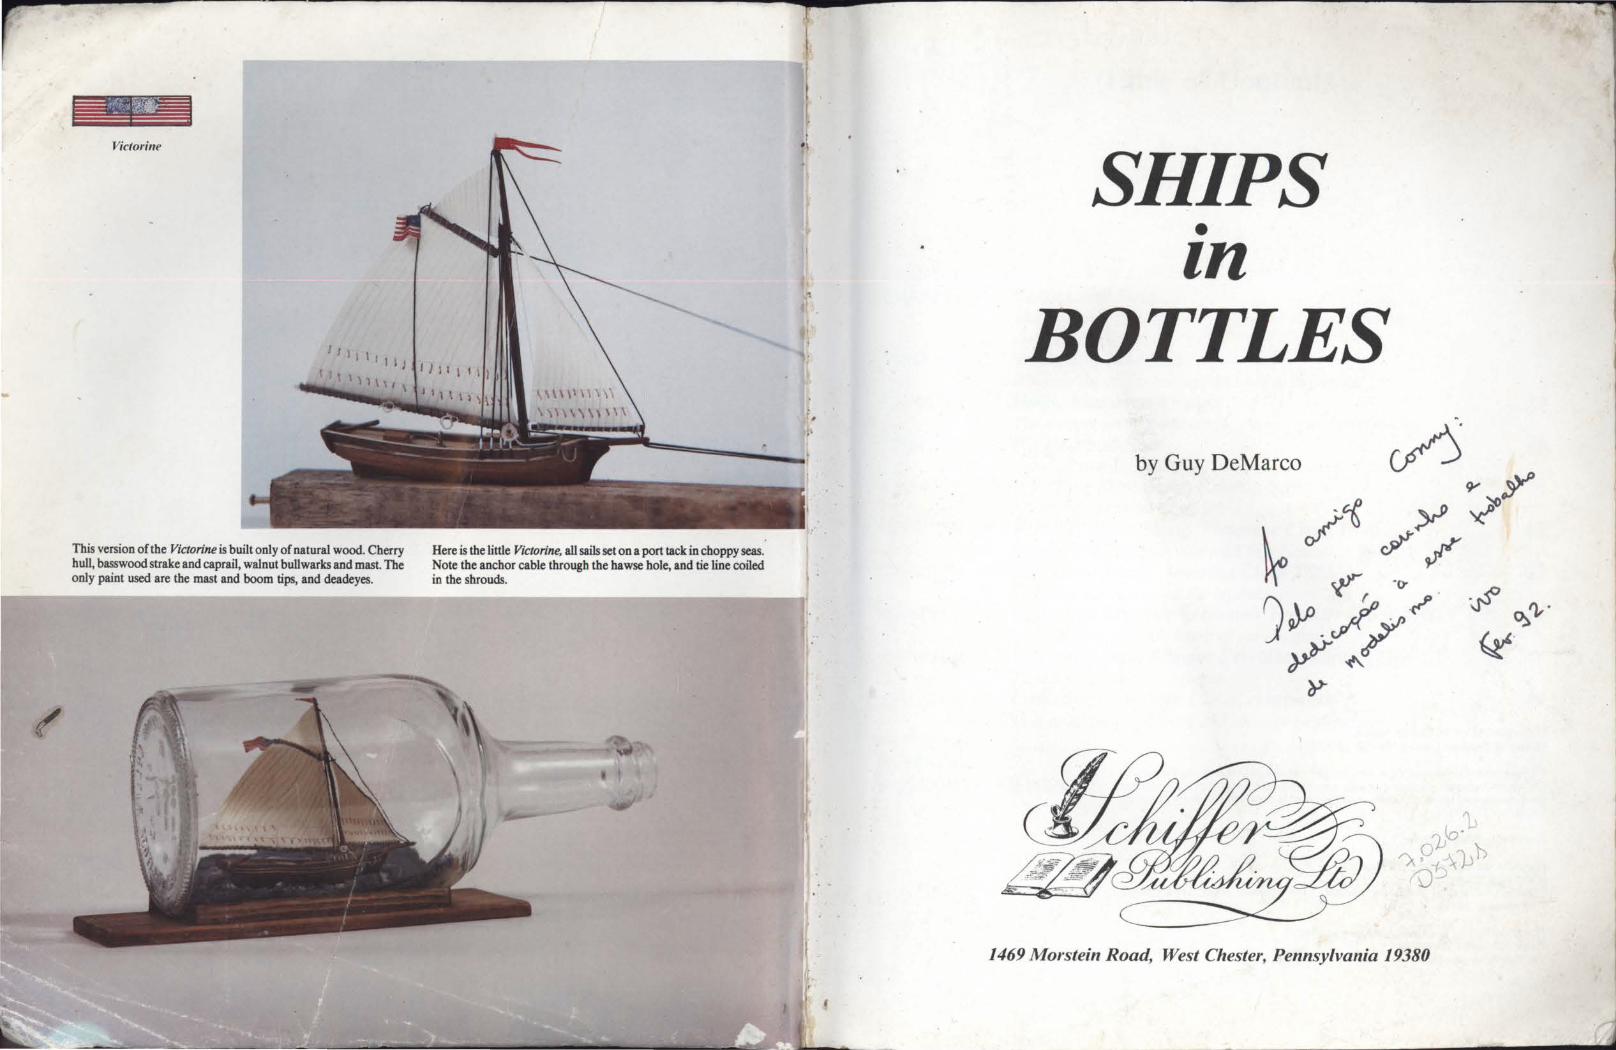
This version of the Victorine is built only of natural wood. Cherry hull, basswood strake and caprail, walnut bullwarks and mast. The only paint used are the mast and boom tips, and deadeyes.
Here is the little Victorine, all sails set on a port tack in choppy seas. Note the anchor cable through the hawse hole, and tie line coiled in the shrouds.
..
#
SHIPS • tn
BOTTLES by Guy DeMarco
1469 Morstein Road, West Chester, Pennsylvania 19380
Mut€u ~~o 10\ do Y\a."' - orbe_·o+e.co.. ~ DOJ+..t.
OMN~CO~Ci:£
Copyright I 985 © by Guy DeMarco. Library of Congress Catalog Number 84-52714
All rights reserved. No part of this work may be reproduced or used in any forms or by any means- graphic, electronic or mechanical, including photocopying or information storage and retrieval systems- without written permission from the copyright holder.
Designed by E/len J Taylor
Printed in the United States of America. ISBN: 0-88740-033-7 Published by Schiffer Publishing Limited, I 469 Morstein Road, West Chester, Pennsylvania I 9380
This book may be purchased from the publisher. Please include $1.50 postage. Try your bookstore first.
Table of Contents
PREFACE 4 CHAPTER 1. Bottles and Seas 5
The container for the thing contained, always different, always a challenge.
CHAPTER 2. Tools and Materials 7 Wherein the crafty mariner learned to improvise.·
CHAPTER 3. Hulls, Masts, and Spars 13 The ancient art of woodcarving, shaping and assembling.
CHAPTER 4. Rigging and Sails 19 Tying of strings, splicing of cord, and hoisting of sails.
CHAPTER 5. Inserting Model and Raising Sails 25 Tis not complete 'til its sealed.
CHAPTER 6. Hudson River Sloop Victorine Circa 1840 33 Commerce of the time, lifeblood of a Nation.
CHAPTER 7. Schooner Yacht America Circa 1851 37 The Cup, the glory, and the legend.
CHAPTER 8. California Lumber Schooner Forester Circa 1900 43 Unsung hero, draught horse of the Pacific.
CHAPTER 9. Baltimore Built Clipper Privateer. Circa 1815 47 To sail free, against all flags.
CHAPTER 10. Confederate Raider C.S.S. Alabama 49 True to a cause, gallantry and chivalry on the waves.
GLOSSARY 52 APPENDIX 54 ACKNOWLEDGEMENTS 55
Preface
In a world where most hobbies require a strong commitment in dollars or time to complete a project, this little known, and less written about art form is an oasis. There are no large outlays of time, space or monies. If one had to buy all the tools mentioned in the chapter, as well as beginning with a full bottle of liquor or wine, the total cost could be under twenty dollars. That's the initial outlay for the fir.:;t model. After that they only cost pennies, with the exception of the bottle.
As for time constraints, I once timed a total beginner in ship bottling who completed a credible job in just eight hours. But why rush? A hobby is meant to relax and challenge the participant, as well as please those directly involved with him.
Display possibilities are endless, with the bottles themselves taking little room. I've used them as wall plaques, table models, and shelf pieces. One friend who became a disciple of mine converted a large vertical wine rack to house his models.
My romance with the sea began at an early age. There were stories from my parents and grandparents of their Sicilian fishing village. My father helped me with my beginning models. I can still remember the first one.
As a "landlubber", my models were built from plans, kits, and pictures. In those days "ten cents" bought a dry "clipper" model with a balsa hull block, printed balsa deck, and stripwood balsa for the masts and spars. Toothpicks and dowels from medical swabs soon replaced those balsa masts. Armed with a ten cent bottle of glue, with the cork that always stuck and broke, a single edged razor blade, eyebrow treezers, the family scissors, small pliers and a box of pins, I was ready to create, fabricating the parts I needed. There was little money to buy those expensive models for sale in New York hobby shops, so almost every larger model I built was from scratch. I remember going to Polks in New York just to buy plans and cannons. Being lucky, I have been able to rescue some of these early attempts from my parents' basement. They have been repaired and cleaned, calling me back through the years from their glass cases. When I could afford them, I built those unobtainable kits of my childhood. I feel that I have come full circle. I am now back to a shipcraft in which everything, including some of the tools, are scratch built.
With this in mind, let me take you on a journey, back a hundred years or so. You are on the deck of a "windjammer", with the trade winds blowing steady as you near the horse latitudes. Your body is in tune with the pitch and roll of the deck. You are seated on the "fo'cstle" with the sun and wind at your back. Within reach, your knife, pieces of wood, awl, needles and pins, along with bits of thread from the sailmaker. Turning, you hold a bottle up to the sun, checking for impurities in the glass. Sighing, remembering how you emptied it, you begin ........................... .
Enjoy the craft of our forebearers, it was meant to be enjoyment.
Guy
Chapter One
Bottle Choice and Sea Preparation The container for the thing contained, always different, always a challenge.
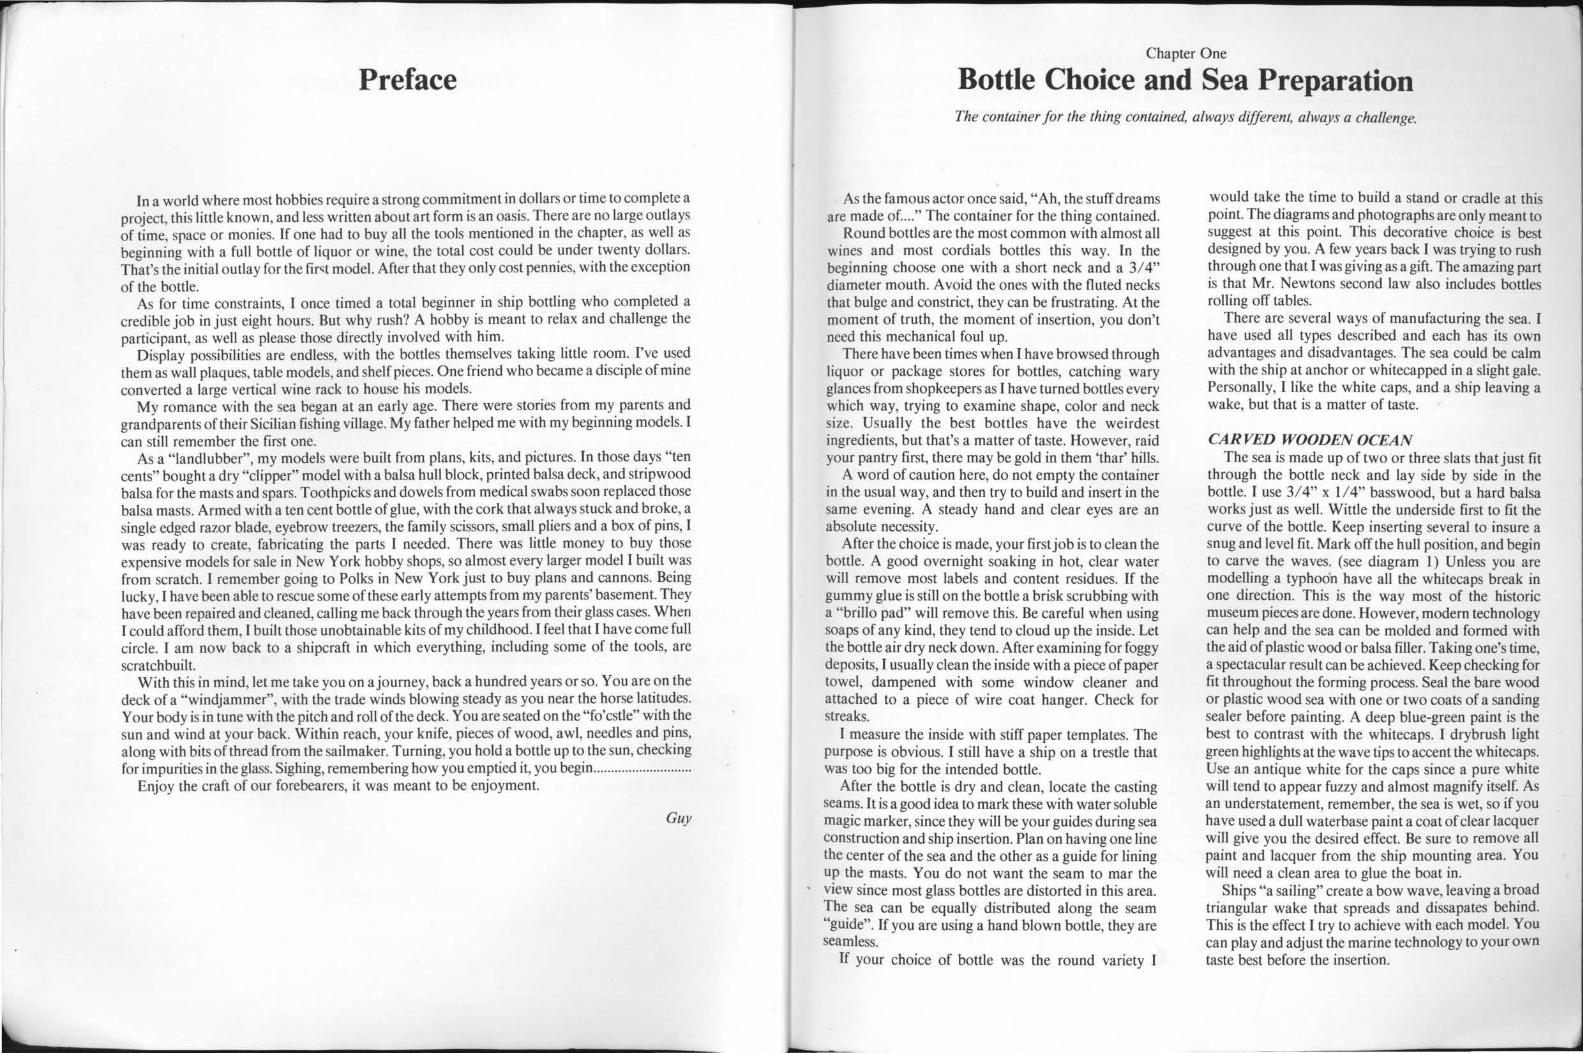
As the famous actor once said, "Ah, the stuff dreams are made of...." The container for the thing contained.
Round bottles are the most common with almost all wines and most cordials bottles this way. In the beginning choose one with a short neck and a 3/ 4" diameter mouth. A void the ones with the fluted necks that bulge and constrict, they can be frustrating. At the moment of truth, the moment of insertion, you don't need this mechanical foul up.
There have been times when I have browsed through liquor or package stores for bottles, catching wary glances from shopkeepers as I have turned bottles every which way, trying to examine shape, calor and neck size. Usually the best bottles have the weirdest ingredients, but that's a matter of taste. However, raid your pantry first, there may be gold in them 'thar' hills.
A word of caution here, do not empty the container in the usual way, and then try to build and insert in the same evening. A steady hand and clear eyes are an absolute necessity.
After the choice is made, your first job is to clean the bottle. A good overnight soaking in hot, clear water will remove most labels and content residues. If the gummy glue is still on the bottle a brisk scrubbing with a "brillo pad" will remove this. Be careful when using soaps of any kind, they tend to cloud up the inside. Let the bottle air dry neck down. After examining for foggy deposits, I usually clean the inside with a piece of paper towel, dampened with some window cleaner and attached to a piece of wire coat hanger. Check for streaks.
I measure the inside with stiff paper templates. The purpose is obvious. I still have a ship on a trestle that was too big for the intended bottle.
After the bottle is dry and clean, locate the casting seams. It is a good idea to mark these with water soluble magic marker, since they will be your guides during sea construction and ship insertion. Plan on having one line the center of the sea and the other as a guide for lining up the masts. You do not want the seam to mar the
- view since most glass bottles are distorted in this area. The sea can be equally distributed along the seam "guide". If you are using a hand blown bottle, they are seamless.
If your choice of bottle was the round variety I
would take the time to build a stand or cradle at this point. The diagrams and photographs are only meant to suggest at this point. This decorative choice is best designed by you. A few years back I was trying to rush through one that I was giving as a gift. The amazing part is that Mr. Newtons second law also includes bottles rolling off tables.
There are several ways of manufacturing the sea. I have used all types described and each has its own advantages and disadvantages. The sea could be calm with the ship at anchor or whitecapped in a slight gale. Personally, I like the white caps, and a ship leaving a wake, but that is a matter of taste.
CARVED WOODENOCEAN The sea is made up of two or three slats that just fit
through the bottle neck and lay side by side in the bottle. I use 3/ 4" x 1/4" basswood, but a hard balsa works just as well. Wittle the underside first to fit the curve of the bottle. Keep inserting several to insure a snug and level fit. Mark off the hull position, and begin to carve the waves. (see diagram 1) Unless you are modelling a typhoo'n have all the whitecaps break in one direction. This is the way most of the historic museum pieces are done. However, modern technology can help and the sea can be molded and formed with the aid of plastic wood or balsa filler. Taking one's time, a spectacular result can be achieved. Keep checking for fit throughout the forming process. Seal the bare wood or plastic wood sea with one or two coats of a sanding sealer before painting. A deep blue-green paint is the best to contrast with the whitecaps. I drybrush light green highlights at the wave tips to accent the whitecaps. Use an antique white for the caps since a pure white will tend to appear fuzzy and almost magnify itself. As an understatement, remember, the sea is wet, so if you have used a dull waterbase paint a coat of clear lacquer will give you the desired effect. Be sure to remove all paint and lacquer from the ship mounting area. You will need a clean area to glue the boat in.
Ships "a sailing" create a bow wave, leaving a broad triangular wake that spreads and dissapates behind. This is the effect I try to achieve with each model. You can play and adjust the marine technology to your own taste best before the insertion.
AIR HARDENING CLAY This is the messy clay that most ceramic shops will
sell. It drys to a light wheat color, and after drying accepts paint readily. Begin by inserting sausage shaped pieces the size of your pinky. Be careful not to get too much on the neck or sides of the bottle. Keep a piece of coat hanger with a bit of clean paper towel handy to swab the inside of the bottle. After the rough pieces of sea are in place mold with those home made instruments described in the chapter. To avoid the mess of insertion I have used a wooden shish-ka-bob skewer to steady the blobs of clay through the neck.
After molding the sea, press a "hull blank" to depress the clay that will hold the completed model. Set aside to dry.
After drying the sea can be painted. A steady hand is necessary here. Use only water base paints to facilitate clean up of those inevitable errors.
PLASTICINE SEAS The "clay" of our childhood, memories of rainy days
in grammer school, blobs thrown at friends behind teacher's back, caught under our fingernails, warnings from Mom about the clay in the carpet, that oily odor that truly never left our senses.
I have found this the easiest to use. It molds fast, it is already colored, and since it never dries, mistakes and adjustments can be corrected. In fact final molding can be done after the ship is set in to give the appearance of being truly water.
You can find it in most art supply stores. Get it in blue, green and white. Use the blue as the base, with the green and white for highlights and whitecaps.
Insert and mold as previously explained, and as a "piece de resistance" use the white as a full ship bed. When the boat is inserted in the water the white will hold the boat and cling to the sides creating the "disturbance effect" desired.
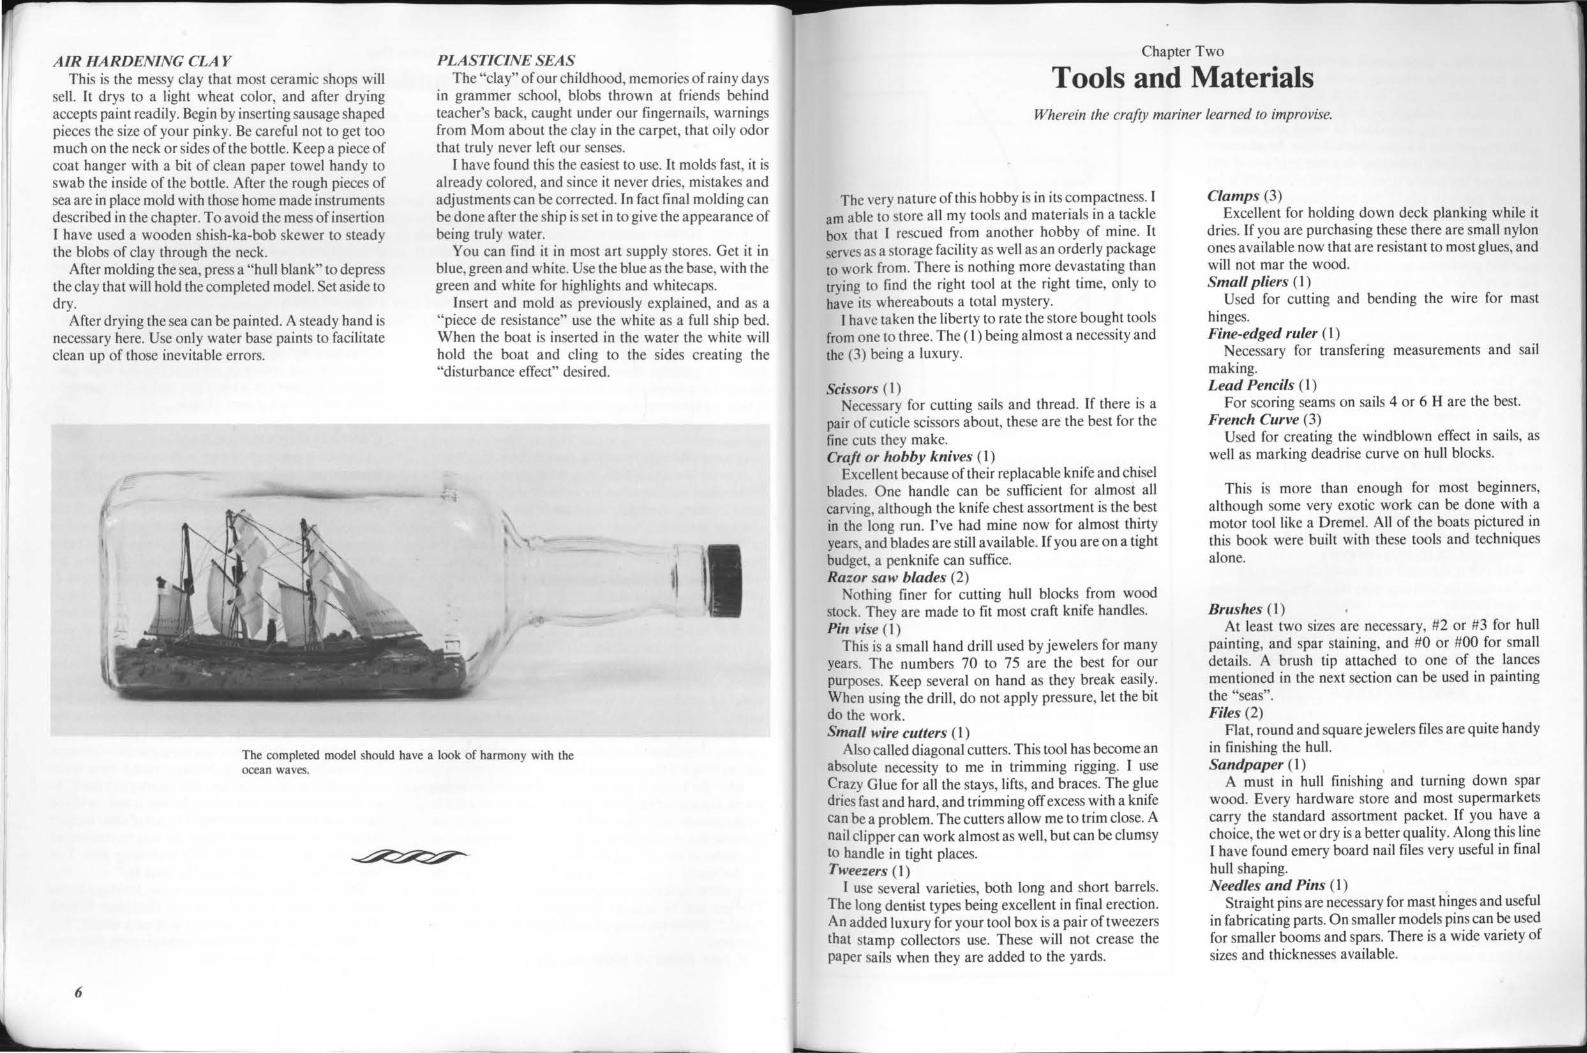
The completed model should have a look of harmony with the ocean waves.
6
Chapter Two
Tools and Materials Wherein the crafty mariner learned to improvise.
The very nature of this hobby is in its compactness. I am able to store all my tools and materials in a tackle box that I rescued from another hobby of mine. It serves as a storage facility as well as an orderly package to work from . There is nothing more devastating than trying to find the right tool at the right time, only to have its whereabouts a total mystery.
I have taken the liberty to rate the store bought tools from one to three. The ( 1) being almost a necessity and the (3) being a luxury.
Scissors ( 1) Necessary for cutting sails and thread. If there is a
pair of cuticle scissors about, these are the best for the fine cuts they make. Craft or hobby knives ( 1)
Excellent because of their replacable knife and chisel blades. One handle can be sufficient for almost all carving, although the knife chest assortment is the best in the long run. I've had mine now for almost thirty years, and blades are still available. If you are on a tight budget, a penknife can suffice. Razor saw blades (2)
Nothing finer for cutting hull blocks from wood stock. They are made to fit most craft knife handles. Pin vise (1)
This is a small hand drill used by jewelers for many years. The numbers 70 to 75 are the best for our purposes. Keep several on hand as they break easily. When using the drill, do not apply pressure, let the bit do the work. Small wire cutters ( 1)
Also called diagonal cutters. This tool has become an absolute necessity to me in trimming rigging. I use Crazy Glue for all the stays, lifts, and braces. The glue dries fast and hard, and trimming off excess with a knife can be a problem. The cutters allow me to trim close. A nail clipper can work almost as well, but can be clumsy to handle in tight places. Tweezers ( 1)
I use several varieties, both long and short barrels. The long dentist types being excellent in final erection. An added luxury for your tool box is a pair of tweezers that stamp collectors use. These will not crease the paper sails when they are added to the yards.
Clamps (3) Excellent for holding down deck planking while it
dries. If you are purchasing these there are small nylon ones available now that are resistant to most glues, and will not mar the wood. Small pliers ( 1)
Used for cutting and bending the wire for mast hinges. Fine-edged ruler ( 1)
Necessary for transfering measurements and sail making. Lead Pencils ( l)
For scoring seams on sails 4 or 6 H are the best. French Curve (3)
Used for creating the windblown effect in sails, as well as marking deadrise curve on hull blocks.
This is more than enough for most beginners, although some very exotic work can be done with a motor tool like a Dremel. All of the boats pictured in this book were built with these tools and techniques alone.
Brushes (1) At least two sizes are necessary, #2 or #3 for hull
painting, and spar staining, and #0 or #00 for small details. A brush tip attached to one of the lances mentioned in the next section can be used in painting the "seas". Files (2)
Flat, round and square jewelers files are quite handy in finishing the hull. Sandpaper ( 1)
A must in hull finishing and turning down spar wood. Every hardware store and most supermarkets carry the standard assortment packet. If you have a choice, the wet or dry is a better quality. Along this line I have found emery board nail files very useful in final hull shaping. Needles and Pins ( 1)
Straight pins are necessary for mast hinges and useful in fabricating parts. On smaller models pins can be used for smaller booms and spars. There is a wide variety of sizes and thicknesses available.
Staples are a good source of wire for fabrication, with their one flat side they can be used for davits for lifeboats, anchor blades, and deck bitts.
Historically, needles were broken off and filed flat on two or three sides, imbedded in wood and used for drills. If a pin vise is impossible to locate, by all means use this. A needle imbedded in a block of wood and heated red hot over a stove can be used to burn holes through masts. I would not recommend this for the shroud holes through the bullwarks.
This being a specialized hobby, most of the tools used had to be manufactured. I used dowels, safety pins and wire coat hangers along with bits of razor blades.
SEA TOOLS
Old metal knitting needles ( 1) can be bent to shape for insertion ofthe clay or putty
sea. The back end is an excellent scoop for making the ship groove. Wire coat hangers ( 1)
are easily formed and bent. Absolutely invaluable in forming seas, inserting clay, and with a bit of paper towel or cotton swab attached to one end excellent in cleaning off the grease marks that the clay might leave on the inside viewing surface and neck of the bottle.
If you are able to find a thick one, a small right angled bend (1/2" is sufficient) put into it makes it an excellent tool for planting the ship in its clay ocean.
With one of the small craft blades attached to an end, this becomes the tool necessary for during final erecting string removal. Rubber tubing (2)
A piece of this attached to a knitting needle or coat hanger and you have a tool for texturing the clay "seas".
ERECTING TOOLS
I began with one half dozen pieces of 3/ 16" dowels. Using pieces of bent safety pins I fashioned the following:
(a.) Straight lance. Used for picking and untangling after the ship is bottled.
(b.) Curved lance Same as (a.) but useful for arranging "water" around hull .
(c.) Bent lance Made with wire that is heavier than (a.) or (b.) this is the best tool in my assortment for seating the hull in the "ocean".
The lance design is not set in concrete, you might find that a shape of your choosing is just as good.
8
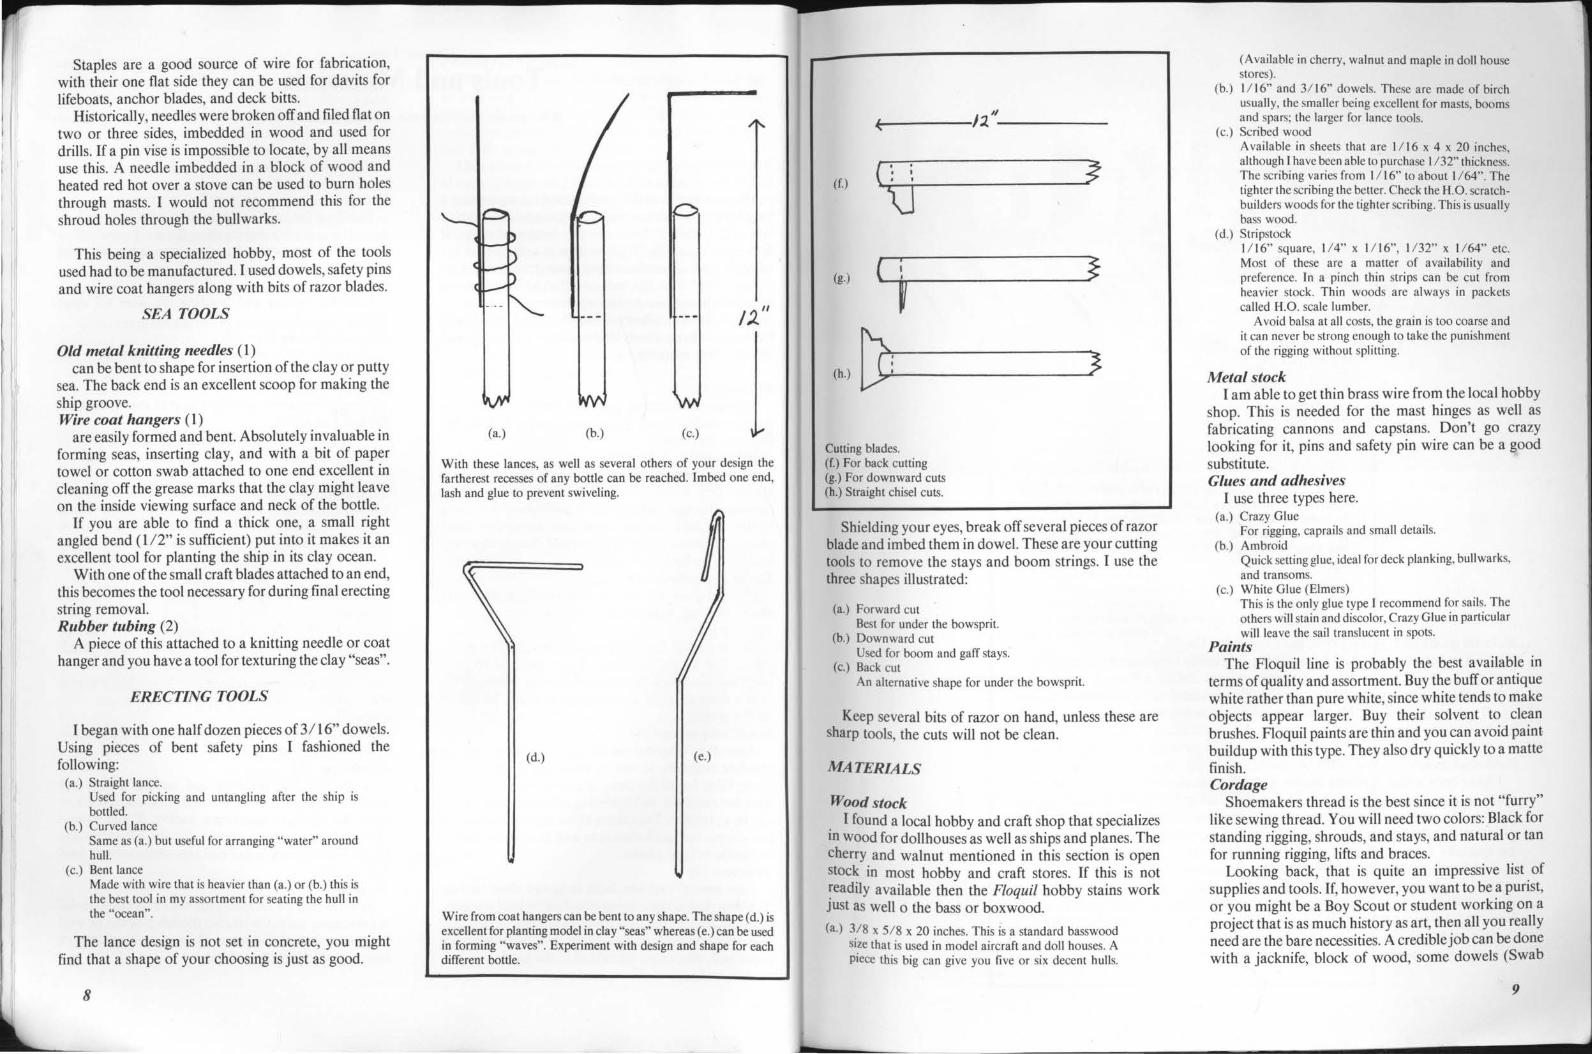
12"
(a.) (b.) (c.)
With these lances, as well as several others of your design the fartherest recesses of any bottle can be reached. I m bed one end, lash and glue to prevent swiveling.
(d.) (e.)
Wire from coat hangers can be bent to any shape. The shape (d.) is excellent for planting model in clay "seas" whereas (e.) can be used in forming "waves". Experiment with design and shape for each different bottle.
1-------.J 2. ''-------
(f.) {\..F-'-T-------~ \]
(g.) (..._i..,_~ ______ }
(h.) ~.!-...: _____ ____.i,}
Cutting blades. (f.) For back cutting (g.) For downward cuts (h.) Straight chisel cuts.
Shielding your eyes, break off several pieces of razor blade and imbed them in dowel. These are your cutting tools to remove the stays and boom strings. I use the three shapes illustrated:
(a.) Forward cut Best for under the bowsprit.
(b.) Downward cut Used for boom and gaff stays.
(c.) Back cut An alternative shape for under the bowsprit.
Keep several bits of razor on hand, unless these are sharp tools, the cuts will not be clean.
MATERIALS
Wood stock . I found a local hobby and craft shop that specializes m wood for dollhouses as well as ships and planes. The cherry and walnut mentioned in this section is open stock in most hobby and craft stores. If this is not ~eadily available then the Floquil hobby stains work JUSt as well o the bass or boxwood.
(a.) 318 x 518 x 20 inches. This is a standard basswood size that is used in model aircraft and doll houses. A piece this big can give you five or six decent hulls.
(Available in cherry, walnut and maple in doll house stores).
(b.) I I 16" and 31 16" dowels. These are made of birch usually, the smaller being excellent for masts, booms and spars; the larger for lance tools.
(c.) Scribed wood Available in sheets that are I I 16 x 4 x 20 inches although I have been able to purchase I 132" thickness: The scribing varies from I I 16" to about I 164". The tighter the scribing the better. Check the H.O. scratchbuilders woods for the tighter scribing. This is usually bass wood.
(d.) Stripstock !1 16" square, 114" x 1116", 1132" x !164" etc. Most of these are a matter of availability and preference. In a pinch thin strips can be cut from heavier stock. Thin woods are always in packets called H.O. scale lumber.
A void balsa at all costs, the grain is too coarse and it can never be strong enough to take the punishment of the rigging without splitting.
Metal stock I am able to get thin brass wire from the local hobby
shop. This is needed for the mast hinges as well as fabricating cannons and capstans. Don't go crazy looking for it, pins and safety pin wire can be a good substitute. Glues and adhesives
I use three types here. (a.) Crazy Glue
For rigging, caprails and small details. (b.) Ambroid
Quick setting glue, ideal for deck planking, bullwarks, and transoms.
(c.) White Glue (Eimers) This is the only glue type I recommend for sails. The others will stain and discolor, Crazy Glue in particular will leave the sail translucent in spots.
Paints The Floquil line is probably the best available in
terms of quality and assortment. Buy the buff or antique white rather than pure white, since white tends to make objects appear larger. Buy their solvent to clean brushes. Floquil paints are thin and you can avoid paint buildup with this type. They also dry quickly to a matte finish. Cordage
Shoemakers thread is the best since it is not "furry" like sewing thread. You will need two colors: Black for standing rigging, shrouds, and stays, and natural or tan for running rigging, lifts and braces.
Looking back, that is quite an impressive list of supplies and tools. If, however, you want to be a purist, or you might be a Boy Scout or student working on a project that is as much history as art, then all you really need are the bare necessities. A credible job can be done with a jacknife, block of wood, some dowels (Swab
9
•
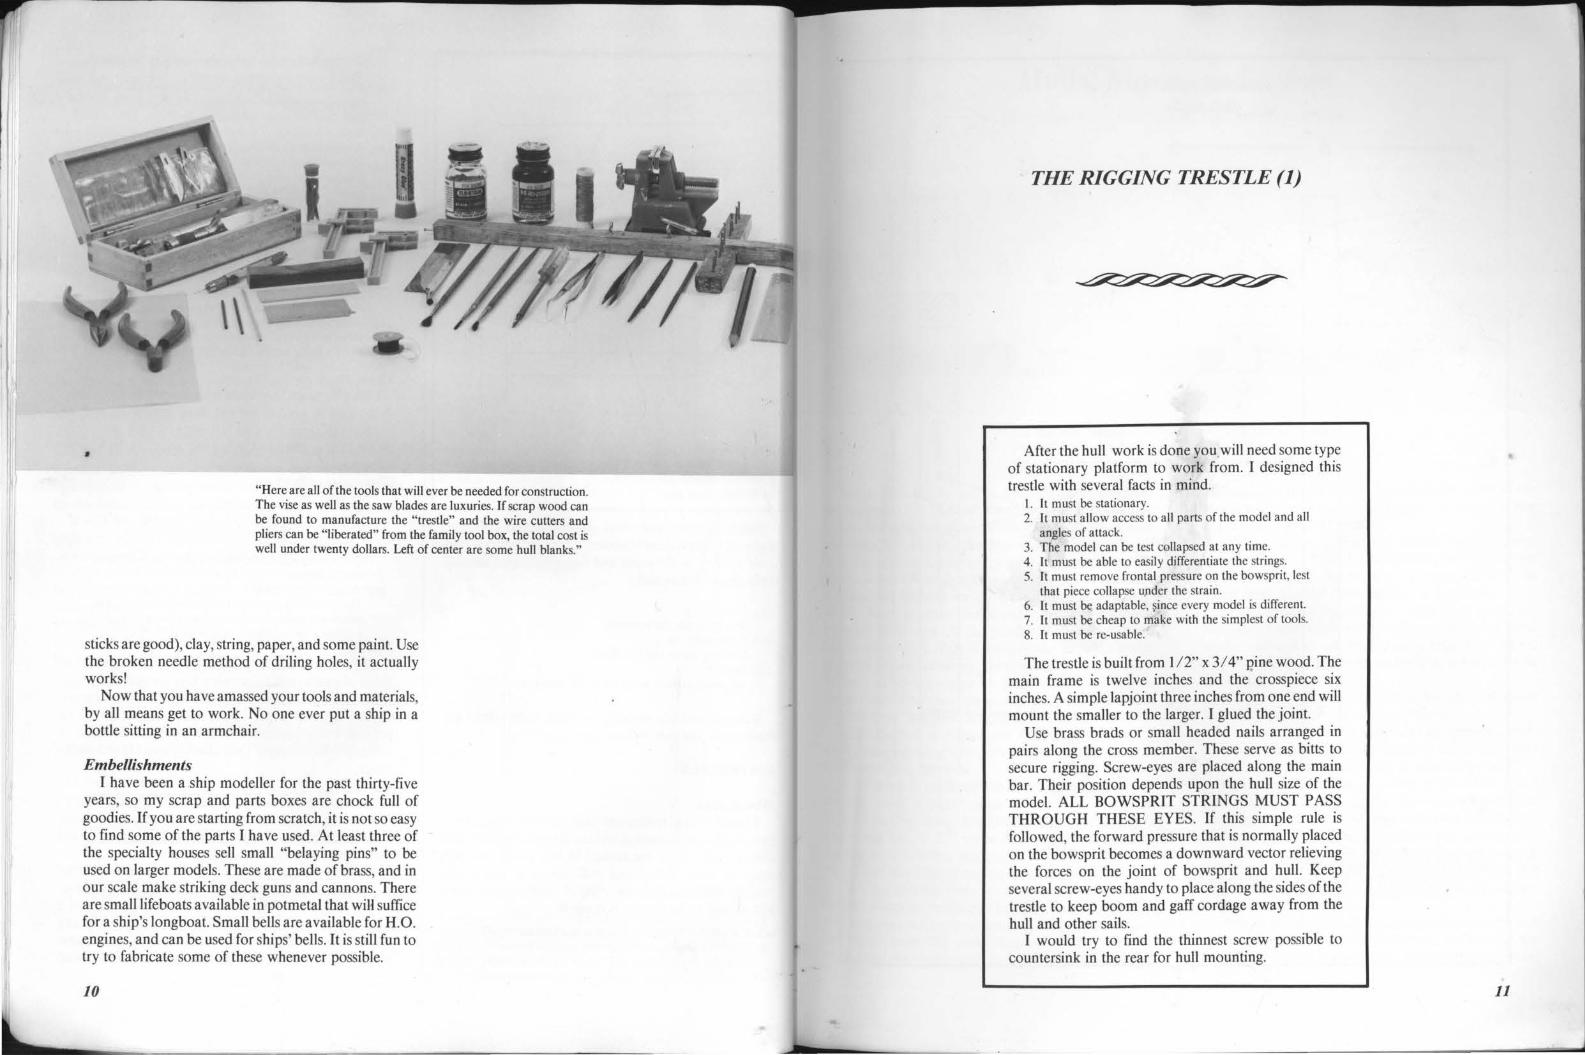
"Here are all of the tools that will ever be needed for construction. The vise as well as the saw blades are luxuries. If scrap wood can be found to manufacture the "trestle" and the wire cutters and pliers can be "liberated" from the family tool box, the total cost is well under twenty dollars. Left of center are some hull blanks."
sticks are good), clay, string, paper, and some paint. Use the broken needle method of driling holes, it actually works!
Now that you have amassed your tools and materials, by all means get to work. No one ever put a ship in a bottle sitting in an armchair.
Embellishments I have been a .ship modeller for the past thirty-five
years, so my scrap and parts boxes are chock full of goodies. If you are starting from scratch, it is not so easy to find some of the parts I have used. At least three of the specialty houses sell small "belaying pins" to be used on larger models. These are made of brass, and in our scale make striking deck guns and cannons. There are small lifeboats available in potmetal that will suffice for a ship's longboat. Small bells are available for H.O. engines, and can be used for ships' bells. It is still fun to try to fabricate some of these whenever possible.
10
THE RIGGING TRESTLE (1)
After the hull work is done you. will need some type of stationary platform to work from. I designed this trestle with several facts in mind.
I. It must be stationary. 2. It must allow access to all parts of the model and all
angles of attack. 3. The model can be test c01Iapsed at any time. 4. It must be able to easily differentiate the strings. 5. It must remove frontal pressure on the bowsprit, lest
that piece collapse u.nder the strain. 6. It must be adaptable, ~ince every model is different. 7. It must be cheap to make with the simplest of tools. 8. It must be re-usable.
The trestle is built from 1 /2" x 3/ 4" P.ine wood. The main frame is twelve inches and the crosspiece six inches. A simple lapjoint three inches from one end will mount the smaller to the larger. I glued the joint.
Use brass brads or small headed nails arranged in pairs along the cross member. These serve as bitts to secure rigging. Screw-eyes are placed along the main bar. Their position depends upon the hull size of the model. ALL BOWSPRIT STRINGS MUST PASS THROUGH THESE EYES. If this simple rule is followed, the forward pressure that is normally placed on the bowsprit becomes a downward vector relieving the forces on the joint of bowsprit and hull. Keep several screw-eyes handy to place along the sides of the trestle to keep boom and gaff cordage away from the hull and other sails.
I would try to find the thinnest screw possible to countersink in the rear for hull mounting.
11

12
RIGGING TRESTLE (112 Scale)
" 6
)(
~c, X
X
(a.) (e.) Position of brad or nail "bitts" (b.) Lap joint (fitted, pinned and glued) (cl.) (c2.) Screw eye "guides". Position relative to model. (d) Hull screw mounting hole
b
I .z."
r X
c ..2. X
~
l
Chapter Three
Hulls, Masts, and Spars The ancient art of woocjcarving, shaping and assembling.
The first three stages of hull construction from port to starboard. The hull blank, the hull with deadrise carved in, and the deck wood glued in place. Teacup is shown for relative size.
As the Mad Hatter said to Alice, "You must start at the beginning .... " The hull block then is our beginning. Use a close-grained block of wood smooth on at least two sides. Mark off the deadrise and carve the belly out first. Finish with sandpaper attached to a wooden bar. This is where the scribed deck will mount, so make sure it is smooth without waves. Woodfiller can do just so much. Next, n:J.easure, mark and carve the hull shape from the deck view. At this point you have what I will call the hull blank. Test fit in the bottle neck. If a sledge hammer is not necessary, then you are on your way. When you begin to carve the final hull shape based on the stations in the plan, remember that you are building a "waterline" model, it should have a flat bottom.
After the hull is shaped ·and rough sanded add the deck plan king using clamps or rubber bands to make it conform to the deadrise.
After this is dry add the bullwarks. In most cases you can use 1/32" x 3/32" stock for this. Soak the wood first to avoid splitting. After this is dry finish with very fine sandpaper. 1132" wood does not allow for much leeway so watch that sandpaper. A good commercial woodfiller like Elmers can cover little mistakes.
Here is a little tip. Since we are going to drill through the bullwarks for the shroud lines, the wood in this area will be weakened by the holes and yet have pressure put on them from the lines themselves. In order to strengthen the wood, soak in a blob of Crazy Glue on
both sides of the bullwark. It will fill the pores of the wood and when dry, accept the drill bit easily. When dry it can be painted over.
When I am not using natural woods, I prefer to give the hull a coat or two of sanding sealer to fill the pores of the wood. After drying sand each coat down to the wood level. Use the finest sandpaper available.
Before painting the hull you might want to rub the deck down with a thin wash of walnut, brown or burnt umber stain. Rub off immediately after application, and pigmept will be left in the scribing giving a warm glow to the deck.
Paint the hull and the inside of the bullwarks following the color scheme on the plans.
After the hull is dried, mount tp the rigging trestle. From now on all work will be done on· the mounted hull. You'll find it much easier to handle this way.
If the model calls for a transom, it should be added next, along with the caprail. If wood of sufficient thinness cannot be found, there are two alterna!ives. First use the thinnest wood available and sand it down to size, or use strips of brown craft paper or a paper bag. If cut properly the paper is just as good. With this hobby you will quickly learn to improvise, or nothing
will ever be done. Add all the deck details at this time. Remove the hull
from the trestle. It should fit through the neck of the bottle, leaving the upper half of the circle free for masts,
14
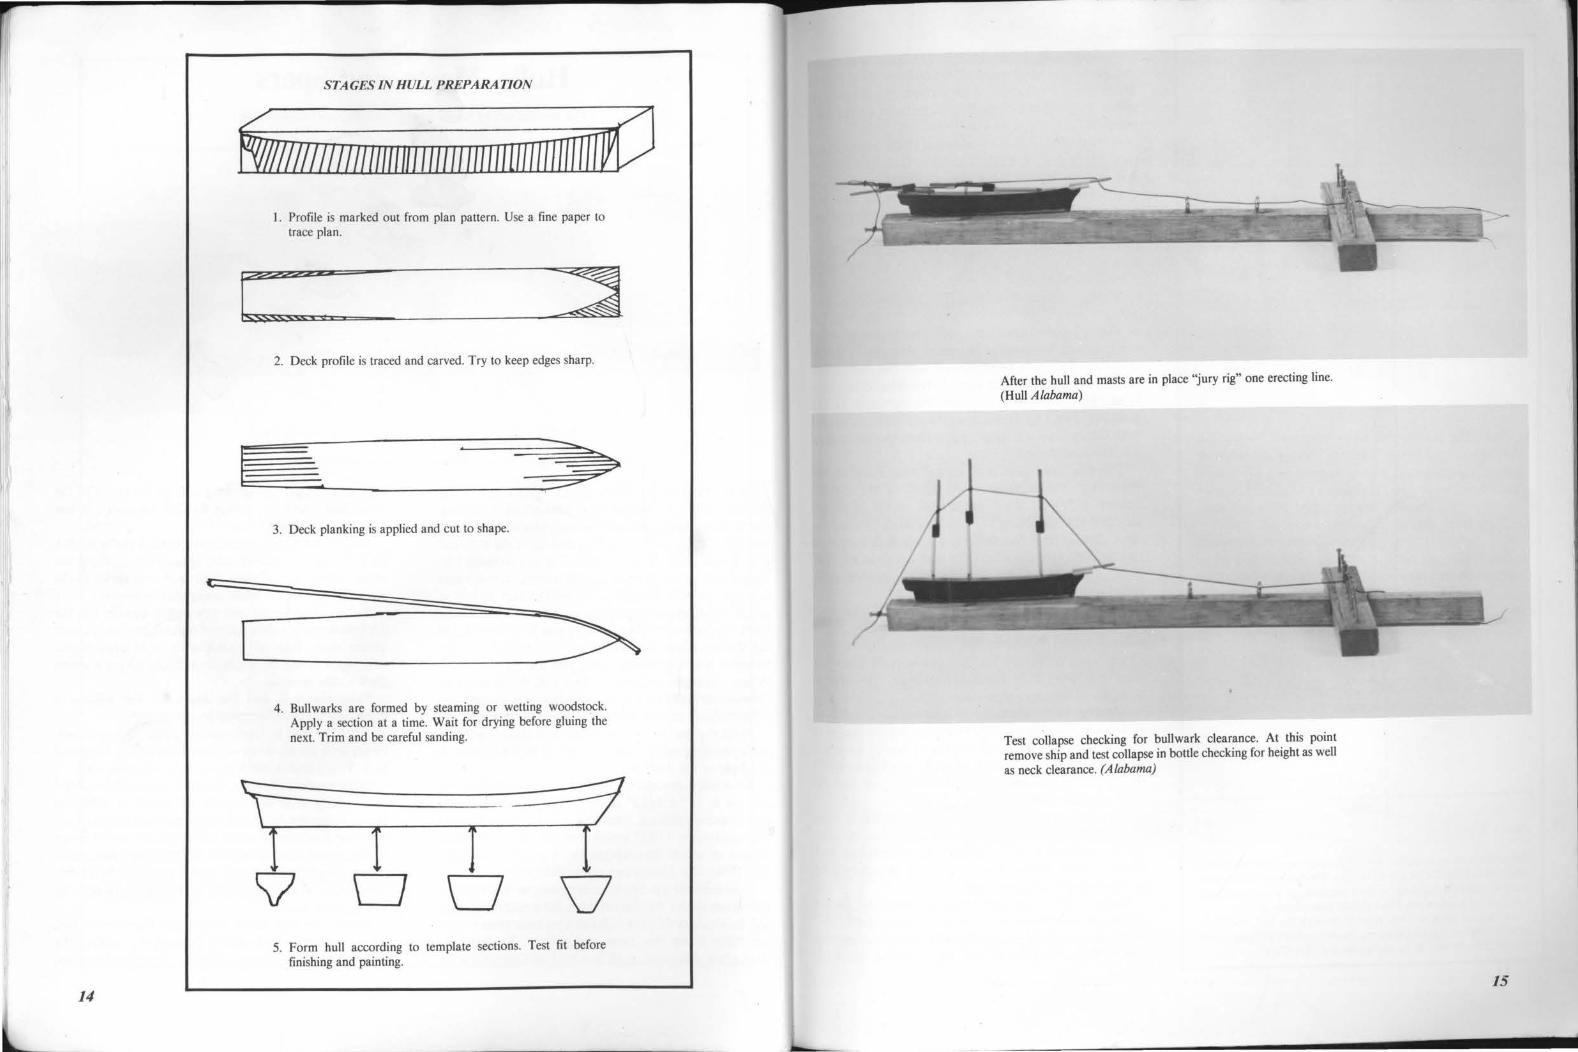
STAGES IN HULL PREPARATION
fitl!mmmmnmJ m um1um m miitJ I. Profile is marked out from plan pattern. Use a fine paper to
trace plan.
c:: 2. Deck profile is traced and carved. Try to keep edges sharp.
3. Deck planking is applied and cut to shape.
4. Bullwarks are formed by steaming or wetting woodstock. Apply a section at a time. Wait for drying before gluing the next. Trim and be careful sanding.
D 0 5. Form hull according to template sections. Test fit before
finishing and painting.
After the hull and masts are in place "jury rig" one erecting line. (Hull Alabama)
Test collapse checking for bullwark clearance. At this point remove ship and test collapse in bottle checking for height as well as neck clearance. (Alabama)
15
- -~ .......... -
- ~~ I I I I I
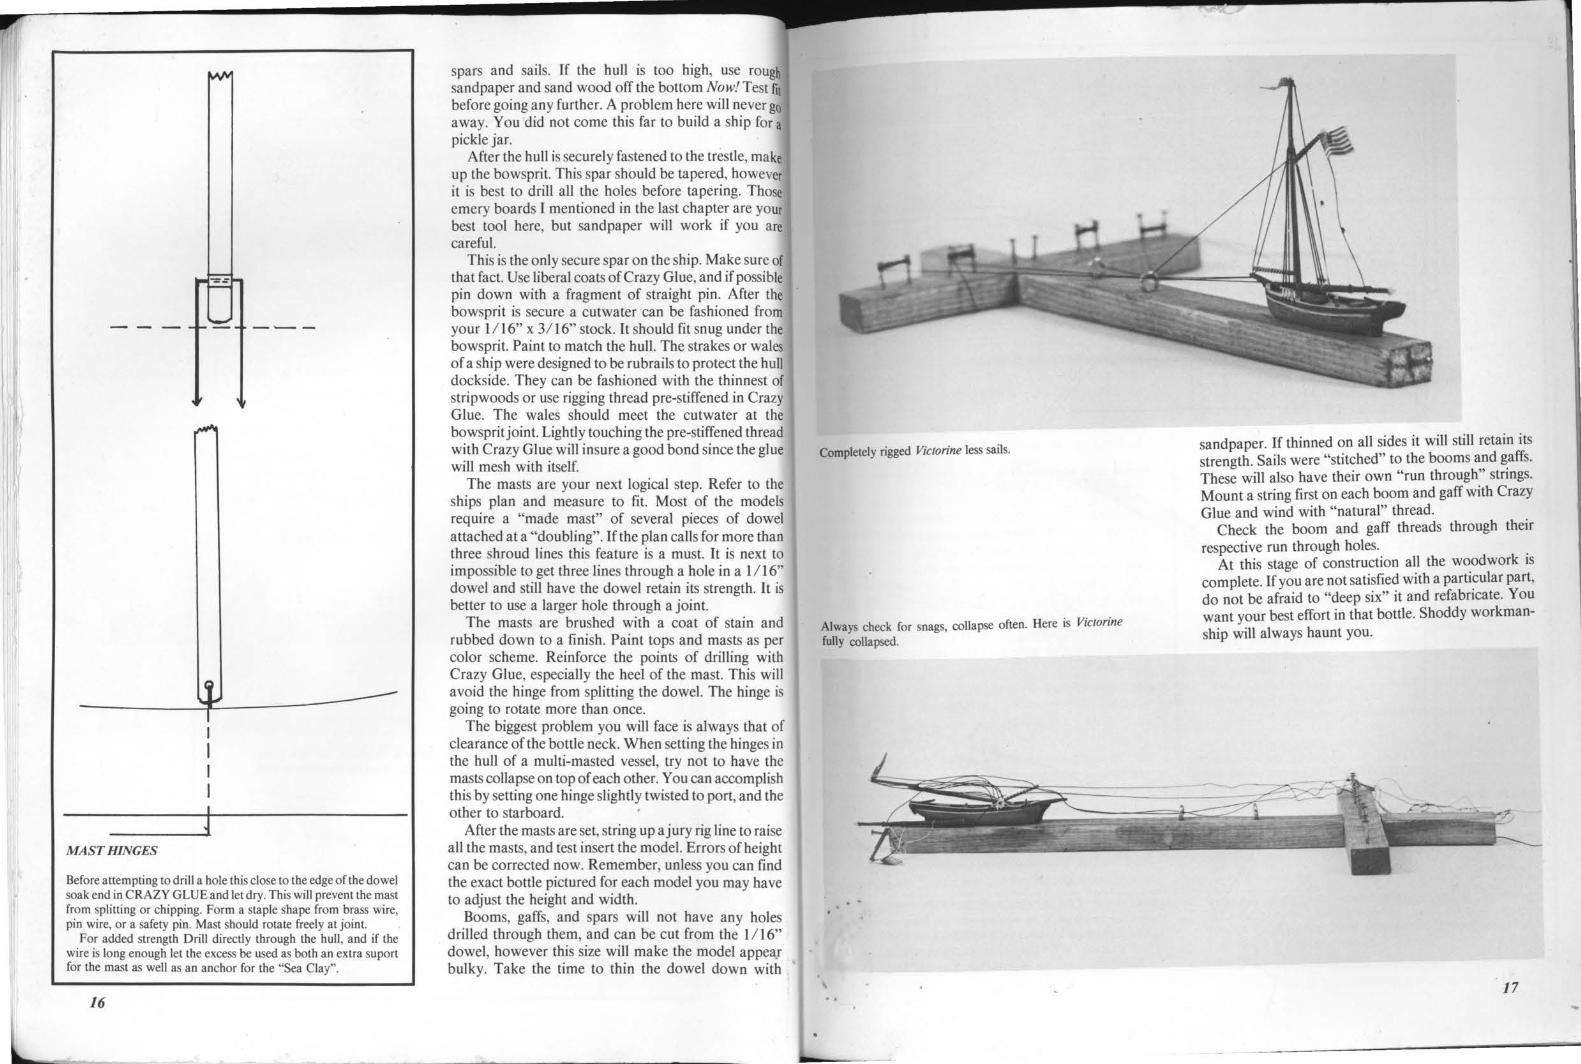
~ MAST HINGES
Before attempting to drill a hole this close to the edge of the dowel soak end in CRAZY GLUE and let dry. This will prevent the mast from splitting or chipping. Form a staple shape from brass wire pin wire, or a safety pin. Mast should rotate freely at joint. '.
For added strength Drill directly through the hull, and if the wire is long enough let the excess be used as both an extra suport for the mast as well as an anchor for the "Sea Clay".
16
spars and sails. If the hull is too high, use rough sandpaper and sand wood off the bottom Now! Test fit before going any further. A problem here will never go away. You 'did not come this far to build a ship for a pickle jar.
After the hull is securely fastened to the trestle, make up the bowsprit. This spar should be tapered, however it is best to drill all the holes before tapering. Those emery boards I mentioned in the last chapter are your best tool here, but sandpaper will work if you are careful.
This is the only secure spar on the ship. Make sure of that fact. Use liberal coats of Crazy Glue, and if possible pin down with a fragment of straight pin. After the bowsprit is secure a cutwater can be fashioned from your 1116" x 3116" stock. It should fit snug under the bowsprit. Paint to match the hull. The strakes or wales of a ship were designed to be rubrails to protect the hull dockside. They can be fashioned with the thinnest of stripwoods or use rigging thread pre-stiffened in Crazy Glue. The wales should meet the cutwater at the bowspritjoint. Lightly touching the pre-stiffened thread with Crazy Glue will insure a good bond since the glue will mesh with itself.
The masts are your next logical step. Refer to the ships plan and measure to fit. Most of the models require a "made mast" of several pieces of dowel attached at a "doubling". If the plan calls for more than three shroud lines this feature is a must. It is next to impossible to get three lines through a hole in a 1 I 16" dowel and still have the dowel retain its strength. It is better to use a larger hole through a joint.
The masts are brushed with a coat of stain and rubbed down to a finish. Paint tops and masts as per color scheme. Reinforce the points of drilling with Crazy Glue, especially the heel of the mast. This will avoid the hinge from splitting the dowel. The hinge is going to rotate more than once.
The biggest problem you will face is always that of clearance of the bottle neck. When setting the hinges in the hull of a multi-masted vessel, try not to have the masts collapse on top of each other. You can accomplish this by setting one hinge slightly twisted to port, and the other to starboard.
After the masts are set, string up a jury rig line to raise all the masts, and test insert the model. Errors of height can be corrected now. Remember, unless you can find the exact bottle pictured for each model you may have to adjust the height and width.
Booms, gaffs, and spars will not have any holes . drilled through them, and can be cut from the 1 I 16"
dowel, however this size will make the model appea_r bulky. Take the time to thin the dowel down with
Completely rigged Victorine less sails.
Always check for snags, collapse often. Here is Victorine fully collapsed.
. ~
sandpaper. If thinned on all sides it will still retain its strength. Sails were "stitched" to the booms and gaffs. These will also have their own "run through" strings. Mount a string first on each boom and gaff with Crazy Glue and wind with "natural" thread.
Check the boom and gaff threads through their respective run through holes.
At this stage of construction all the woodwork is complete. If you are not satisfied with a particular part, do not be afraid to "deep six" it and refabricate. You want your best effort in that bottle. Shoddy workmanship will always haunt you.
17

Drill hole for shrouds through mast joint for greater strength whenever possible.
Run through strings for gaff and boom allow greater flexibility when inserting ship. Lines can be run through "eyes" on the trestle side to keep them clear of shrouds, masts, and yards.
18
Simple clove hitch glued only at yard front and mast knot will allow yard to be "cock-billed".
Most booms, gaffs, and clubs had sails "stitched" to them. These spars can be prepared by winding with the finest of threads and
· glued. If thread is too obvious, tone down with stain .
Chapter Four
Rigging and Sails Tying of strings, splicing of cord, and hoisting of sails.
The rig of a vessel has two major functions, to .support masts and spars·, and to operate the sails. The former is called standing rigging, the latter running. Standing rigging was usually tarred to protect it against the elements and is best represented by black thread. The running rigging had to run through assorted blocks, tackles, and pulleys and therefore this protection was !lOt possible. Use the off white or natural (tan) thread for this. In addition our models have a third type, of thread, the rigging needed for raising the sails and masts. I have incorporated this as part of the standing rigging, hence black. All of the plans for the models in this book have separate diagrams for standing and running rigging, with erecting lines clearly labelled. Follow the diagram at all times.
Start with the shroud lines first. Drill the appropiate lines through the bullwarks. Knot one end of the string and stiffen the ~ther end by rubbing in some Ambroid, which will dry almost immediately. Now cut the end on a diagonal, and you have the equivalent of a "needle" without the thickness. This is the best method that I have found for inserting rigging lines on any size model. Rig the first shroud line through the most forward hole, tighten up and apply a spot of Crazy Glue. ALL SHROUD HOLES MUST BE BEHIND THE LINE OF THE MAST OR IT WILL NOT COLLAPSE.
When dry, thread the remaining shroud lines through the mast to the other side, lace internally and repeat the process. When the mast is at the appropiate rake, use your tweezer and tighten all the shroud lines. Check the frontal view to make sure the mast is at right angles to the deck line. When satisfied a drop of glue at the bullwark and mast holes will make this permanent.
The next part of the project is the erecting and run through strings. I have tried to keep these down to an absolute minimum. On the multi-masted models some are disguised as forestays and mainstays serving both purposes. After the strings are rigged touch each knot with a drop of Crazy Glue and snip with the cutters when dry. If the cut is not clean, re-glue and finish up the joint with an emery board. The mast tips where the knots are usually tied can be topped off in black or buff paint. This will draw attention away from the knot. No
h
STANDING RIGGING
The shrouds are set by knotting the first one through its bullwark hole and gluing. (g) They are now threaded through the bullwark and up through the mast to the other side. Draw tight before final glue is applied.
Heavy white or beige paint is applied at these sections to simulate deadeye assembly. (f)
A thin piece of wood or pre-glued string is applied to simulate spreader.
The anchor assembly is made of pre-glued black string and wood for shank. It is lashed to the caprail with (t) the excess rope coiled to the shrouds. (s) The anchor cable passes through a hawse hole in the bullwark. (See Victorine)
matter what size thread is used all knots will be oversized. When run through strings are complete, test collapse.
All shrouds were tightened by a series of"deadeyes". These were compound pulleys of three strands. This feature is almost impossible to model on a three inch model. Applying a thick coat of buff or white paint 1 /8" long from the caprail on each shroud will more than suffice for this illusion. Using the thinnest piece of
20
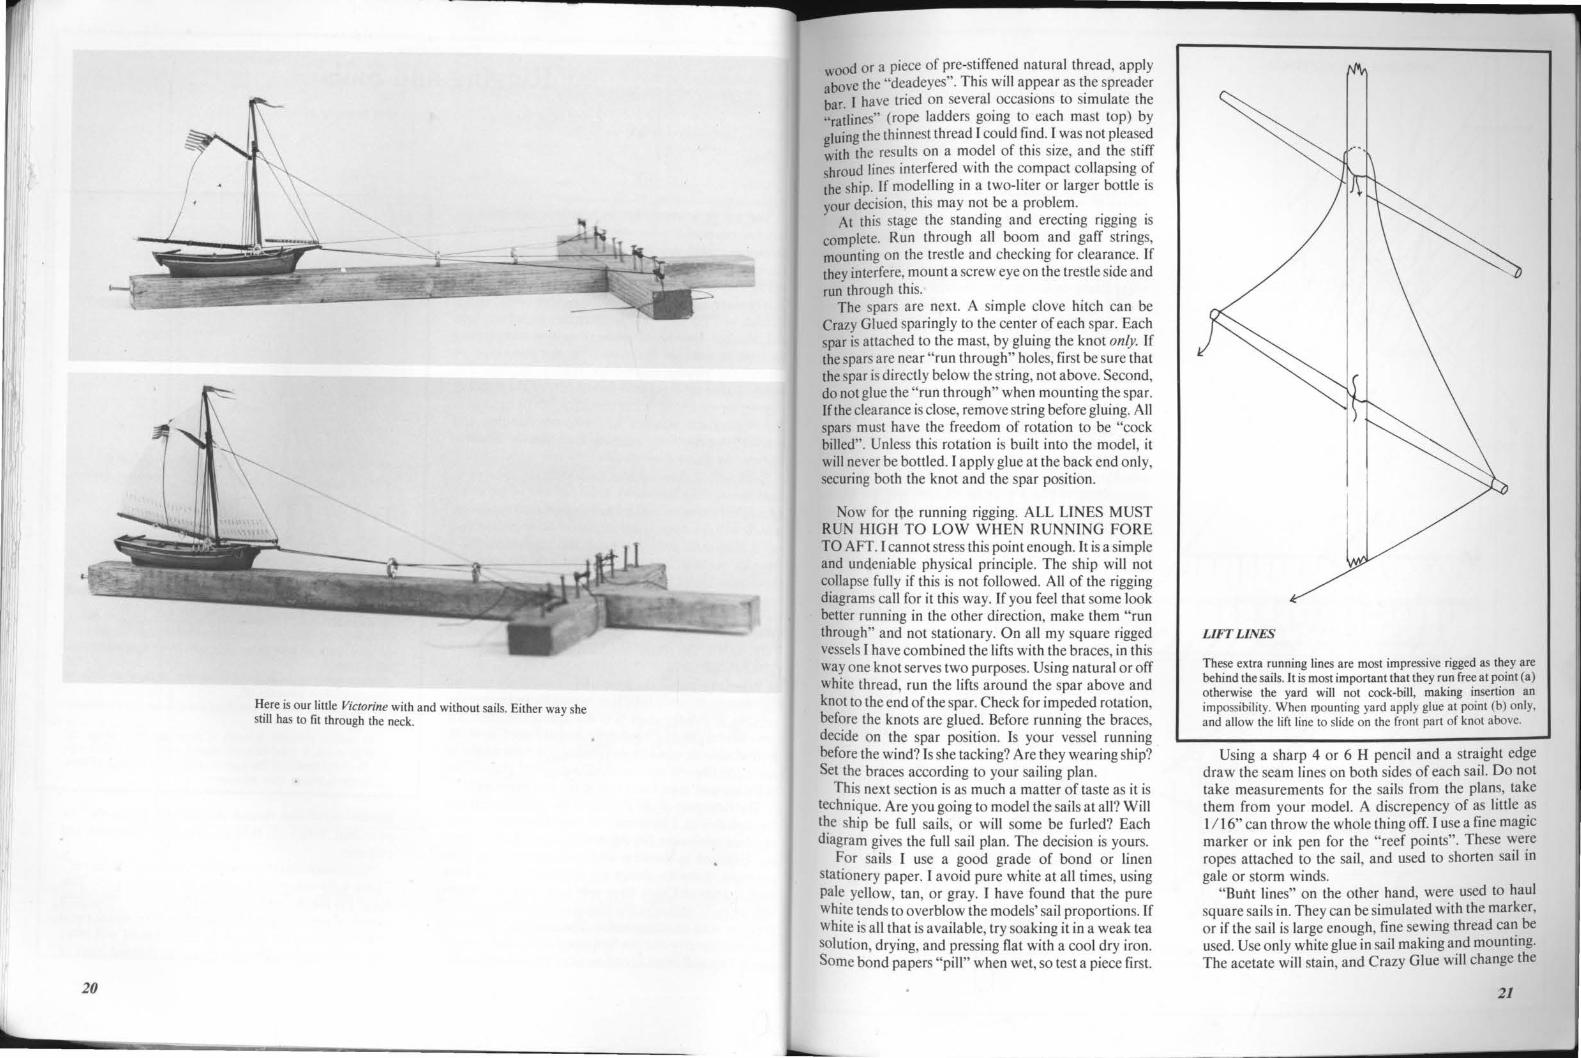
Here is our little Victorine with and without sails. Either way she still has to fit through the neck.
wood or a piece of pre-stiffened natural thread, apply above the "deadeyes". This will appear as the spreader bar. I have tried on several occasions to simulate the "ratlines" (rope ladders going to each mast top) by gluing the thinnest thread I could find. I was not pleased with the results on a model of this size, and the stiff shroud lines interfered with the compact collapsing of the ship. If modelling in a two-liter or larger bottle is your decision, this may no~ be a proble~. . . .
At this stage the standmg and erectmg nggmg IS
complete. Run through all boom and gaff strings, mounting on the trestle and checking for clearance. If they interfere, mount a screw eye on the trestle side and run through this.
The spars are next. A simple clove hitch can be Crazy Glued sparingly to the center of each spar. Each spar is attached to the mast, by gluing the knot only. If the spars are near "run through" holes, first be sure that the spar is directly below the string, not above. Second, do not glue the "run through" when mounting the spar. If the clearance is close, remove string before gluing. All spars must have the freedom of rotation to be "cock billed". Unless this rotation is built into the model, it will never be bottled. I apply glue at the back end only, securing both the knot and the spar position.
Now for tbe running rigging. ALL LINES MUST RUN HIGH TO LOW WHEN RUNNING FORE TO AFT. I cannot stress this point enough. It is a simple and undeniable physical principle. The ship will not collapse fully if this is not followed. All of the rigging diagrams call for it this way. If you feel that some look better running in the other direction, make them "run through" and not stationary. On all my square rigged vessels I have combined the lifts with the braces, in this way one knot serves two purposes. Using natural or off white thread, run the lifts around the spar above and knot to the end of the spar. Check for impeded rotation, before the knots are glued. Before running the braces, decide on the spar position. Is your vessel running before the wind? Is she tacking? Are they wearing ship? Set the braces according to your sailing plan.
This next section is as much a matter of taste as it is technique. Are you going to model the sails at all? Will the ship be full sails, or will some be furled? Each diagram gives the full sail plan. The decision is yours.
For sails I use a good grade of bond or linen stationery paper. I avoid pure white at all times, using pale yellow, tan, or gray. I have found that the pure white tends to over blow the models' sail proportions. If white is all that is available, try soaking it in a weak tea solution, drying, and pressing flat with a cool dry iron. Some bond papers "pill" when wet, so test a piece first.
LIFT LINES
These extra running lines are most impressive rigged as they are behind the sails. It is most important that they run free at point (a) otherwise the yard will not cock-bill, making insertion an impossibility. When ll)Ounting yard apply glue at point (b) only, and allow the lift line to slide on the front part of knot above.
Using a sharp 4 or 6 H pencil and a straight edge draw the seam lines on both sides of each sail. Do not take measurements for the sails from the plans, take them from your model. A discrepency ·of as little as 1 I 16" can throw the whole thing off. I use a fine magic marker or ink pen for the "reef points". These were ropes attached to the sail, and used to shorten sail in gale or storm winds.
"Built lines" on the other hand, were used to haul square sails in. They can be simulated with the marker, or if the sail is large enough, fine sewing thread ea~ be used. Use only white glue in sail making and mountmg. The acetate will stain, and Crazy Glue will change the
21
Schooner Rig
Ship Rig
22
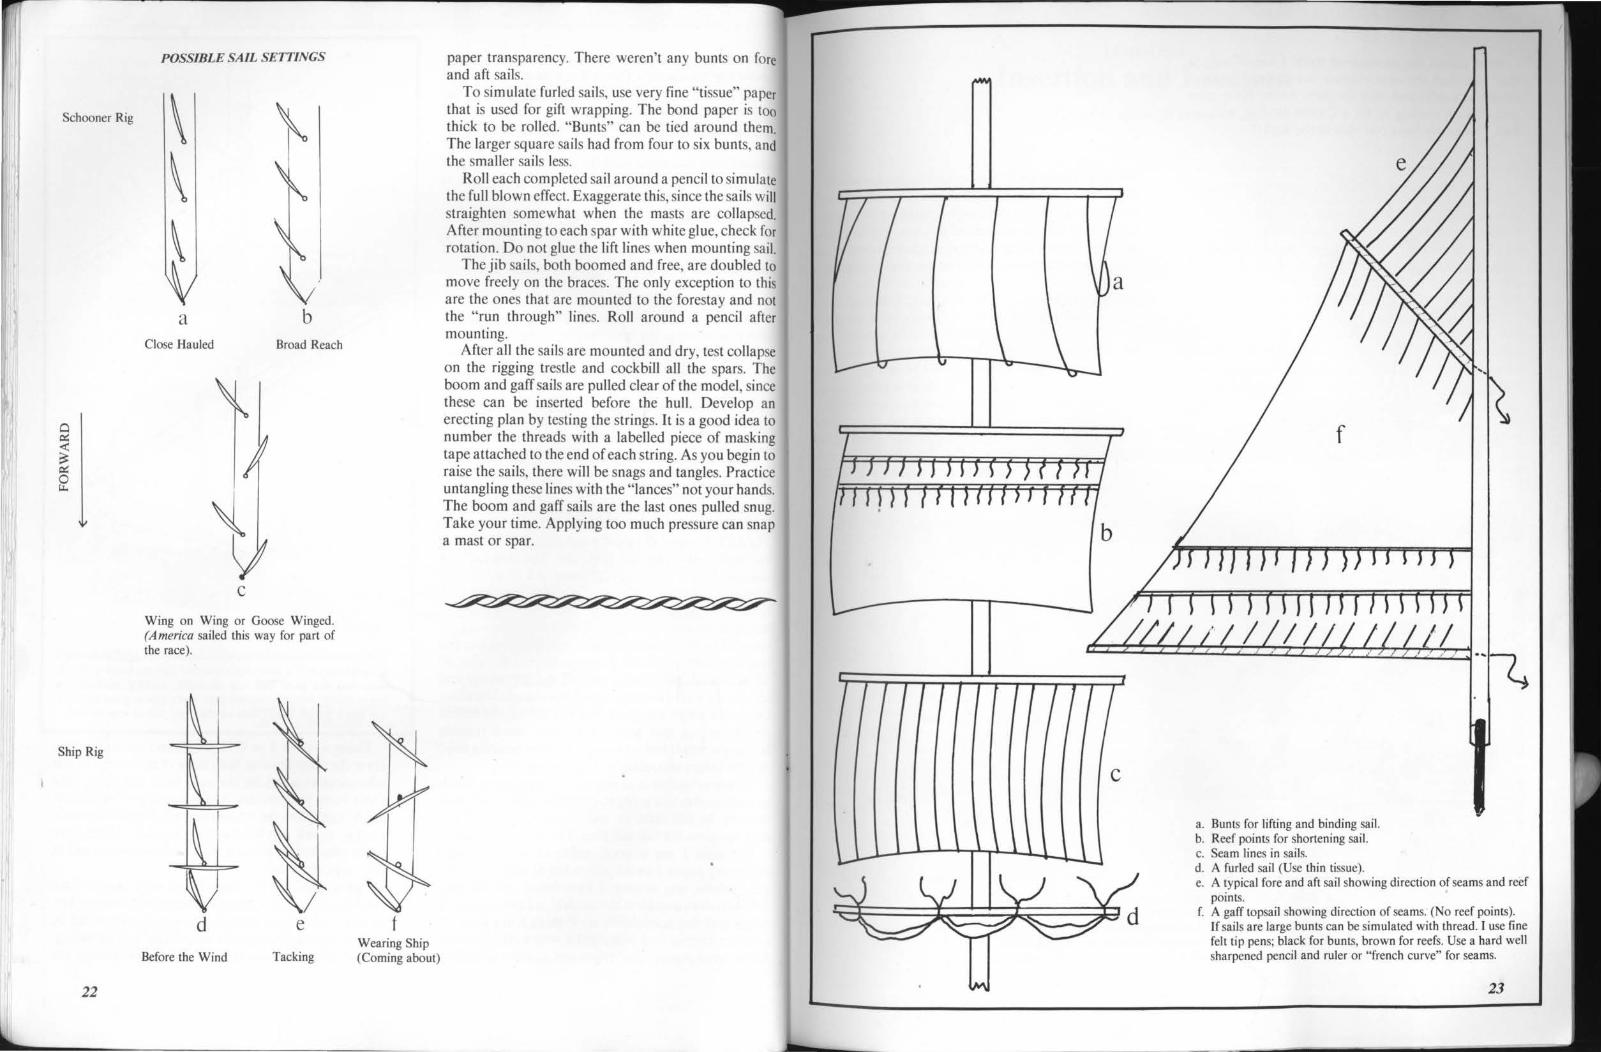
POSSIBLE SAIL SETTINGS
a b Close Hauled Broad Reach
c
Wing on Wing or Goose Winged. (America sailed this way for part of the race).
d e
Before the Wind Tacking
t Wearing Ship (Coming about)
paper transparency. There weren't any bunts on fore and aft sails.
To simulate furled sails, use very fine "tissue" paper that is used for gift wrapping. The bond paper is too thick to be rolled. "Bunts" can be tied around them. The larger square sails had from four to six bunts, and the smaller sails less.
Roll each completed sail around a pencil to simulate the full blown effect. Exaggerate this, since the sails will straighten somewhat when the masts are collapsed. After mounting to each spar with white glue, check for rotation. Do not glue the lift lines when mounting sail.
The jib sails, both boomed and free, are doubled to move freely on the braces. The only exception to this are the ones that are mounted to the forestay and not the "run through" lines. Roll around a pencil after mounting.
After all the sails are mounted and dry, test collapse on the rigging trestle and cockbill all the spars. The boom and gaff sails are pulled clear of the model, since these can be inserted before the hull. Develop an erecting plan by testing the strings. It is a good idea to number the threads with a labelled piece of masking tape attached to the end of each string. As you begin to raise the sails, there will be snags and tangles. Practice untangling these lines with the "lances" not your hands. The boom and gaff sails are the last ones pulled snug. Take your time. Applying too much pressure can snap a mast or spar.
c
a. Bunts for lifting and binding sail. b. Reef points for shortening sail. c. Seam lines in sails. d. A furled sail (Use thin tissue). e. A typical fore and aft sail showing direction of seams and reef
points. f. A gaff topsail showing direction of seams. (No reef points).
If sails are large bunts can be simulated with thread. I use fine felt tip pens; black for bunts, brown for reefs. Use a hard well sharpened pencil and ruler or "french curve" for seams.
23
Now comes the moment of truth. I would suggest that you read the next chapter before attempting to insert the model and raise the sails. As the Navy pilot was told on coming in for a Carrier landing with no fuel, "You only have one shot at the deck!"
24
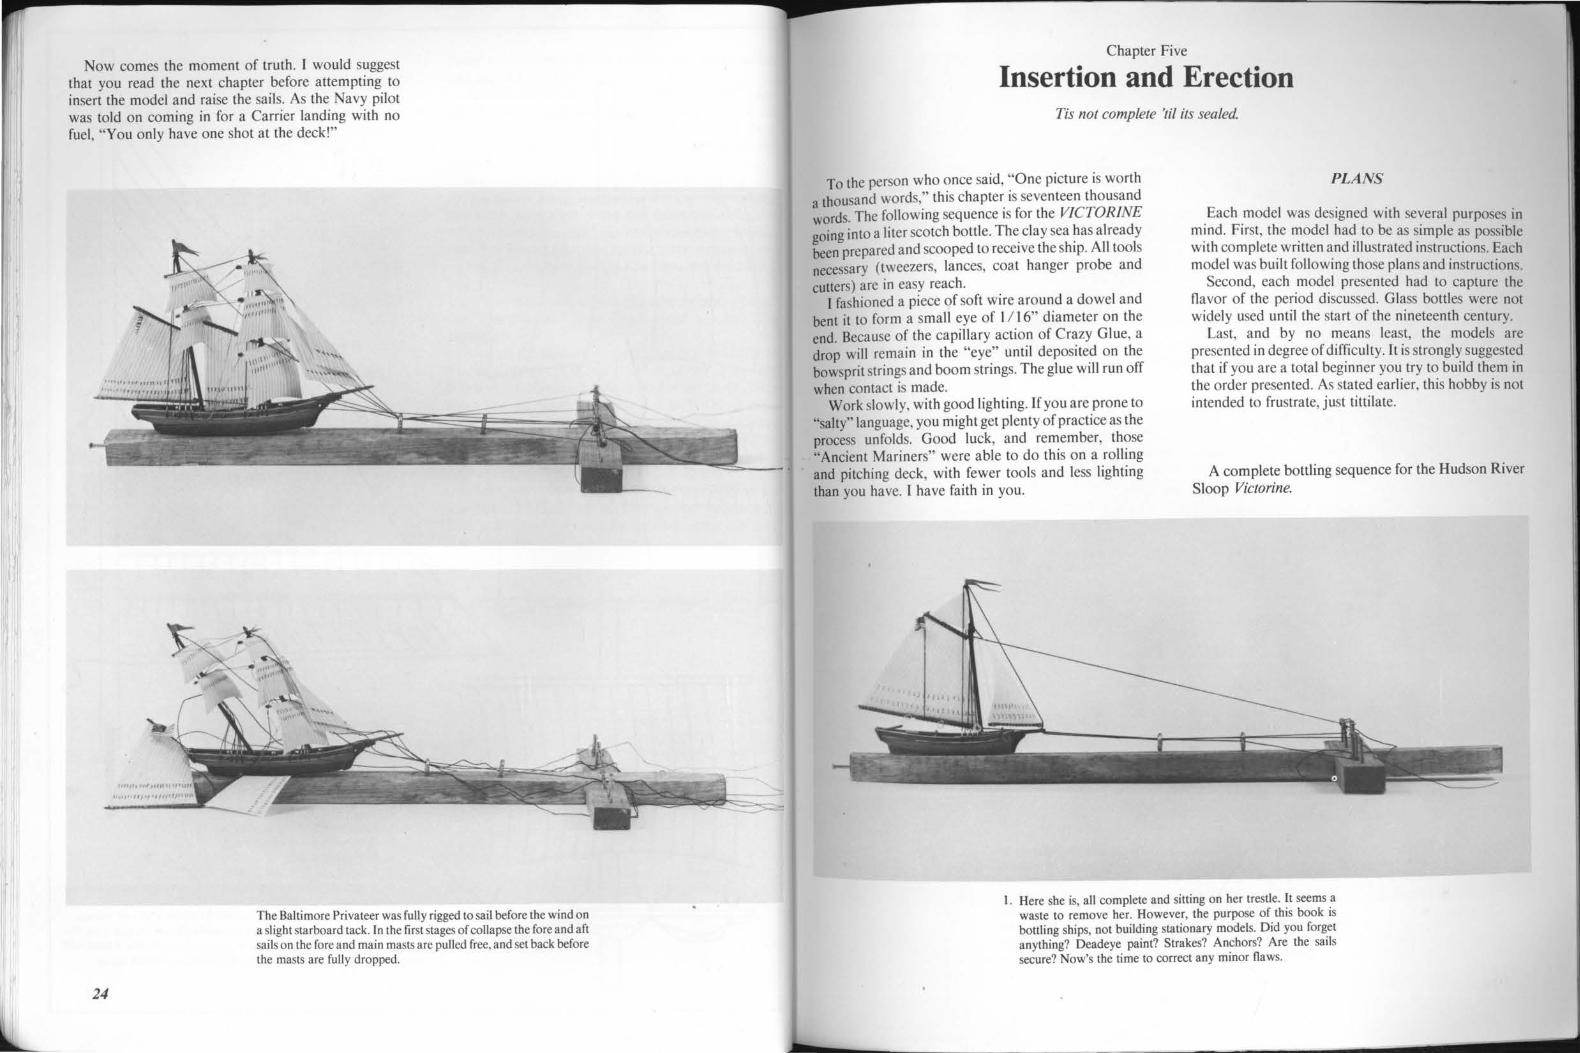
The Baltimore Privateer was fully rigged to sail before the wind on a slight starboard tack. In the first stages of collapse the fore and aft sails on the fore and main masts are pulled free, and set back before the masts are fully dropped.
Chapter Five
Insertion and Erection Tis not complete 'til its sealed.
To the person who once said, "One picture is worth a thousand words," this chapter is seventeen thousand words. The following sequence is for the VICTORINE going into a !iter scotch bottle. The clay sea has already been prepared and scooped to receive the ship. All tools necessary (tweezers, lances, coat hanger probe and cutters) are in easy reach.
I fashioned a piece of soft wire around a dowel and bent it to form a small eye of I I 16" diameter on the end. Because of the capillary action of Crazy Glue, a drop will remain in the "eye" until deposited on the bowsprit strings and boom strings. The glue will run off when contact is made.
Work slowly, with good lighting. If you are prone to "salty" language, you might get plenty of practice as the process unfolds. Good luck, and remember, those "Ancient Mariners" were able to do this on a rolling and pitching deck, with fewer tools and less lighting than you have. I have faith in you.
PLANS
Each model was designed with several purposes in mind. First, the model had to be as simple as possible with complete written and illustrated instructions. Each model was built following those plans and instructions.
Second, each model presented had to capture the fla vor of the period discussed. Glass bottles were not widely used until the start of the nineteenth century.
Last, and by no means least, the models are presented in degree of difficulty. It is strongly suggested that if you are a total beginner you try to build them in the order presented. As stated earlier, this hobby is not intended to frustrate, just tittilate.
A complete bottling sequence for the Hudson River Sloop Victorine.
1. Here she is, all complete and sitting on her trestle. It seems a waste to remove her. However, the purpose of this book is bottling ships, not building stationary models. Did you forget anything? Deadeye paint? Strakes? Anchors? Are the sails secure? Now's the time to correct any minor flaws.
26
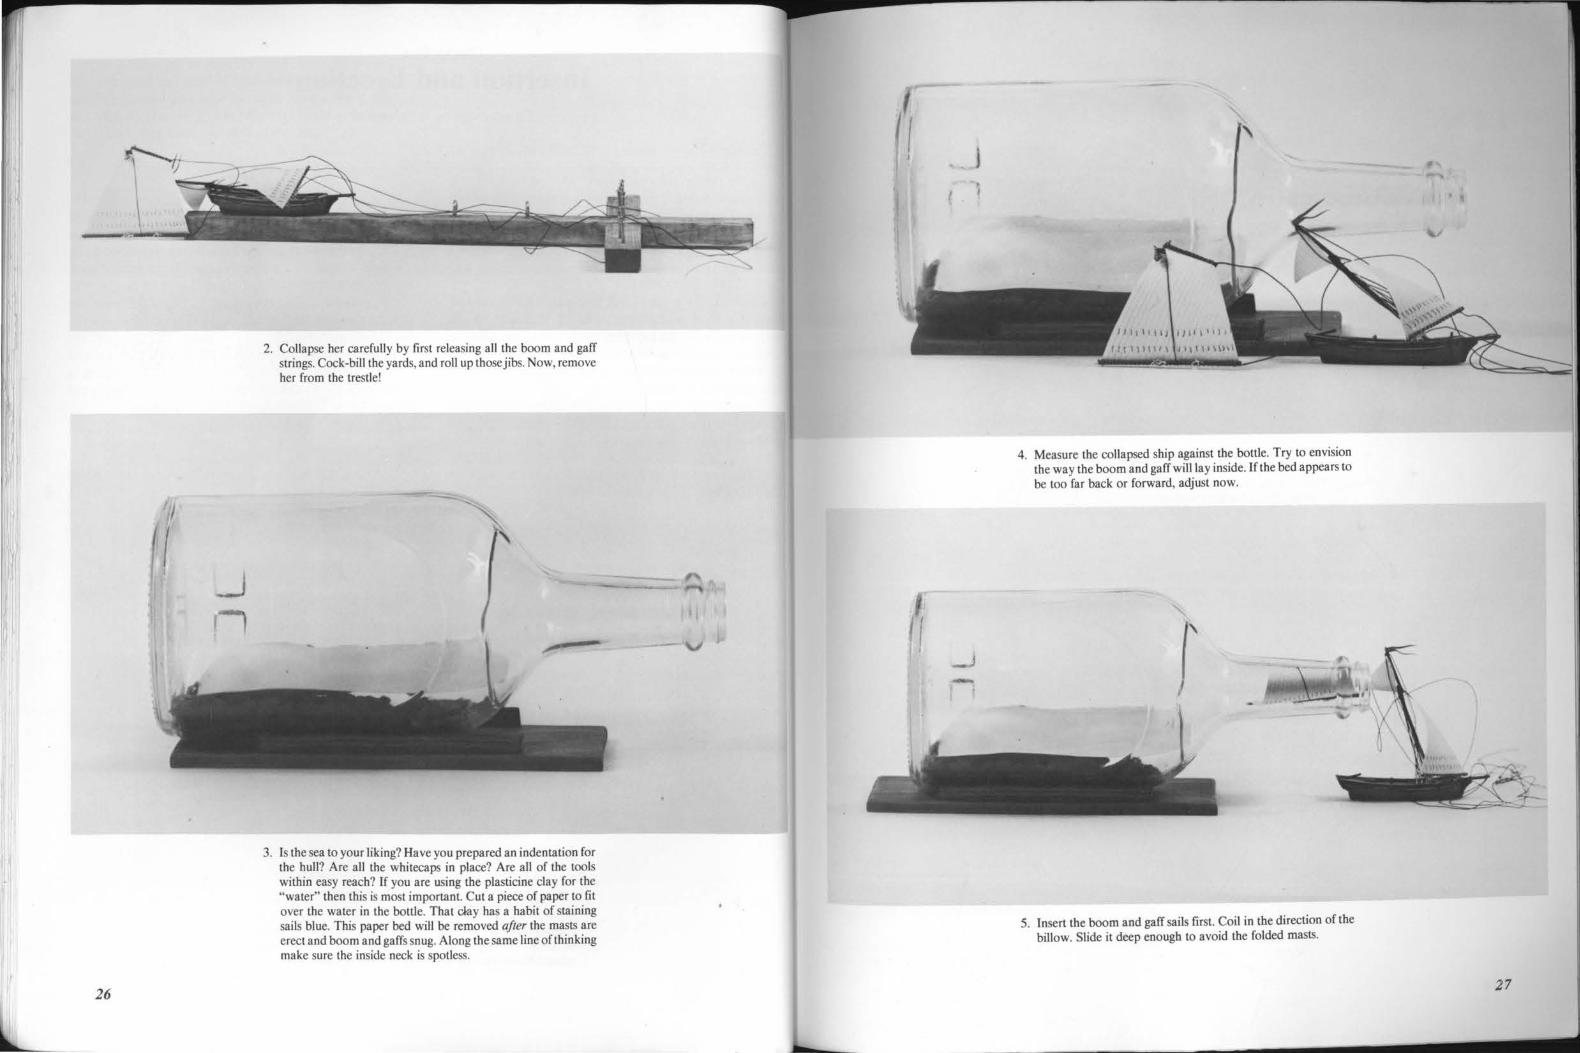
2. Collapse her carefully by first releasing all the boom and gaff strings. Cock-bill the yards, and roll up those jibs. Now, remove her from the trestle!
-
3. Is the sea to your liking? Have you prepared an indentation for the hull? Are all the whitecaps in place? Are all of the tools within easy reach? If you are using the plasticine clay for the "water" then this is most important. Cut a piece of paper to fit over the water in the bottle. That clay has a habit of staining sails blue. This paper bed will be removed after the masts are erect and boom and gaffs snug. Along the same line of thinking make sure the inside neck is spotless.
j
4. Measure the collapsed ship against the bottle. Try to envision the way the boom and gaff will lay inside. If the bed appears to be too far back or forward, adjust now.
5. Insert the boom and gaff sails first. Coil in the direction of the billow. Slide it deep enough to avoid the folded masts.
27

28
6. With the boom and gaff inside the "barrel" of the bottle start to inser~. the ship. Be careful with the sails, lest you crea;e them. The Jib with its attached club has to be worked with care. I wrapped the ~ail around the hull.
7. "She's in all the way"!
• ....
8. Laying on the paper bed, (I told you this was necessary) she looks like a tangled lump. Remember, the hardest part is over. You got it in! All of those measurements actually worked out.
9. Grab the bow with a pair of long tweezers and slowly raise the mast. It doesn't have to be snug now, just up. You are first trying to get those sails out of the water.
lO. Pull the boom and gaff strings in sequence, first one and then the other until snug against the mast.
29
30
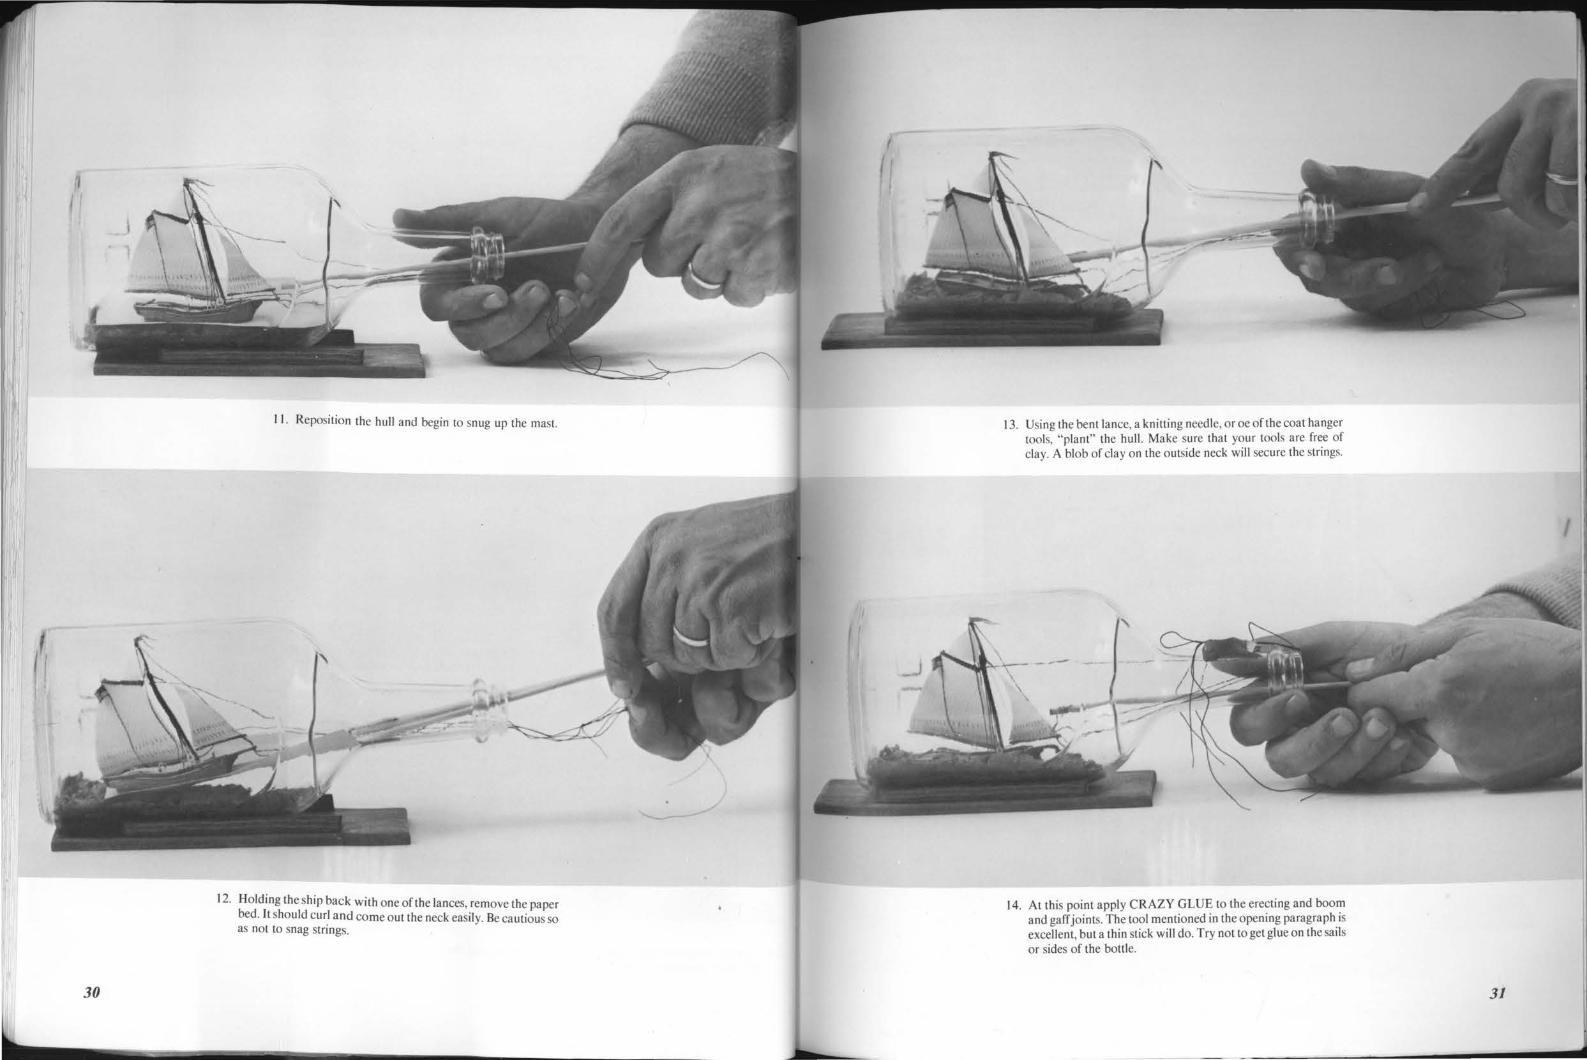
11 . Reposition the hull and begin to snug up the mast.
12. Holding the ship back with one of the lances, remove the paper bed. It should curl and come out the neck easily. Be cautious so as not to snag strings.
13. Using the bent lance, a knitting needle, or oe of the coat hanger tools, "plant" the hull. Make sure that your tools are free of clay. A blob of clay on the outside neck will secure the strings.
14. At this point apply CRAZY GLUE to the erecting and boom and gaff joints. The tool mentioned in the opening paragraph is excellent, but a thin stick will do. Try not to get glue on the sails or sides of the bottle.
31
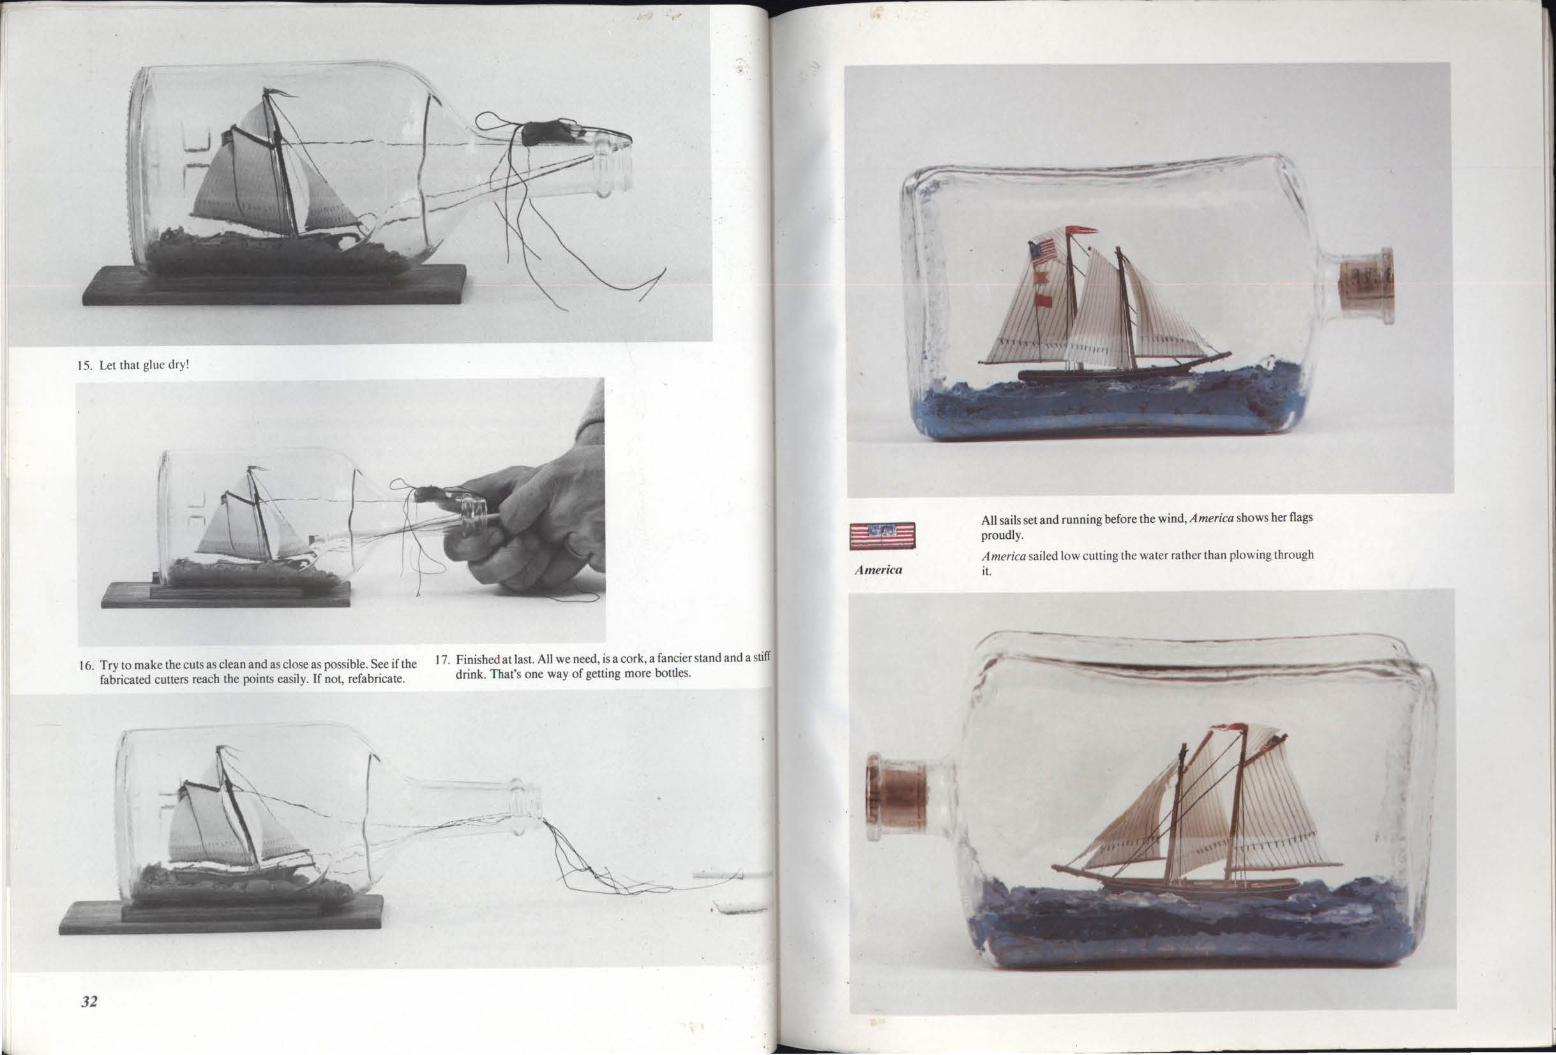
I 5. Let that glue dry!
I 6. Try to make the cuts as clean and as close as possible. See if the fabricated cutters reach the points easily. If not, refabricate.
32
I 7. Finished at last. All we need, is a cork, a fancier stand and a stiff drink. That's one way of getting more bottles.
America
All sails set and running before the wind, America shows her flags proudly.
America sailed low cutting the water rather than plowing through it.
Forester
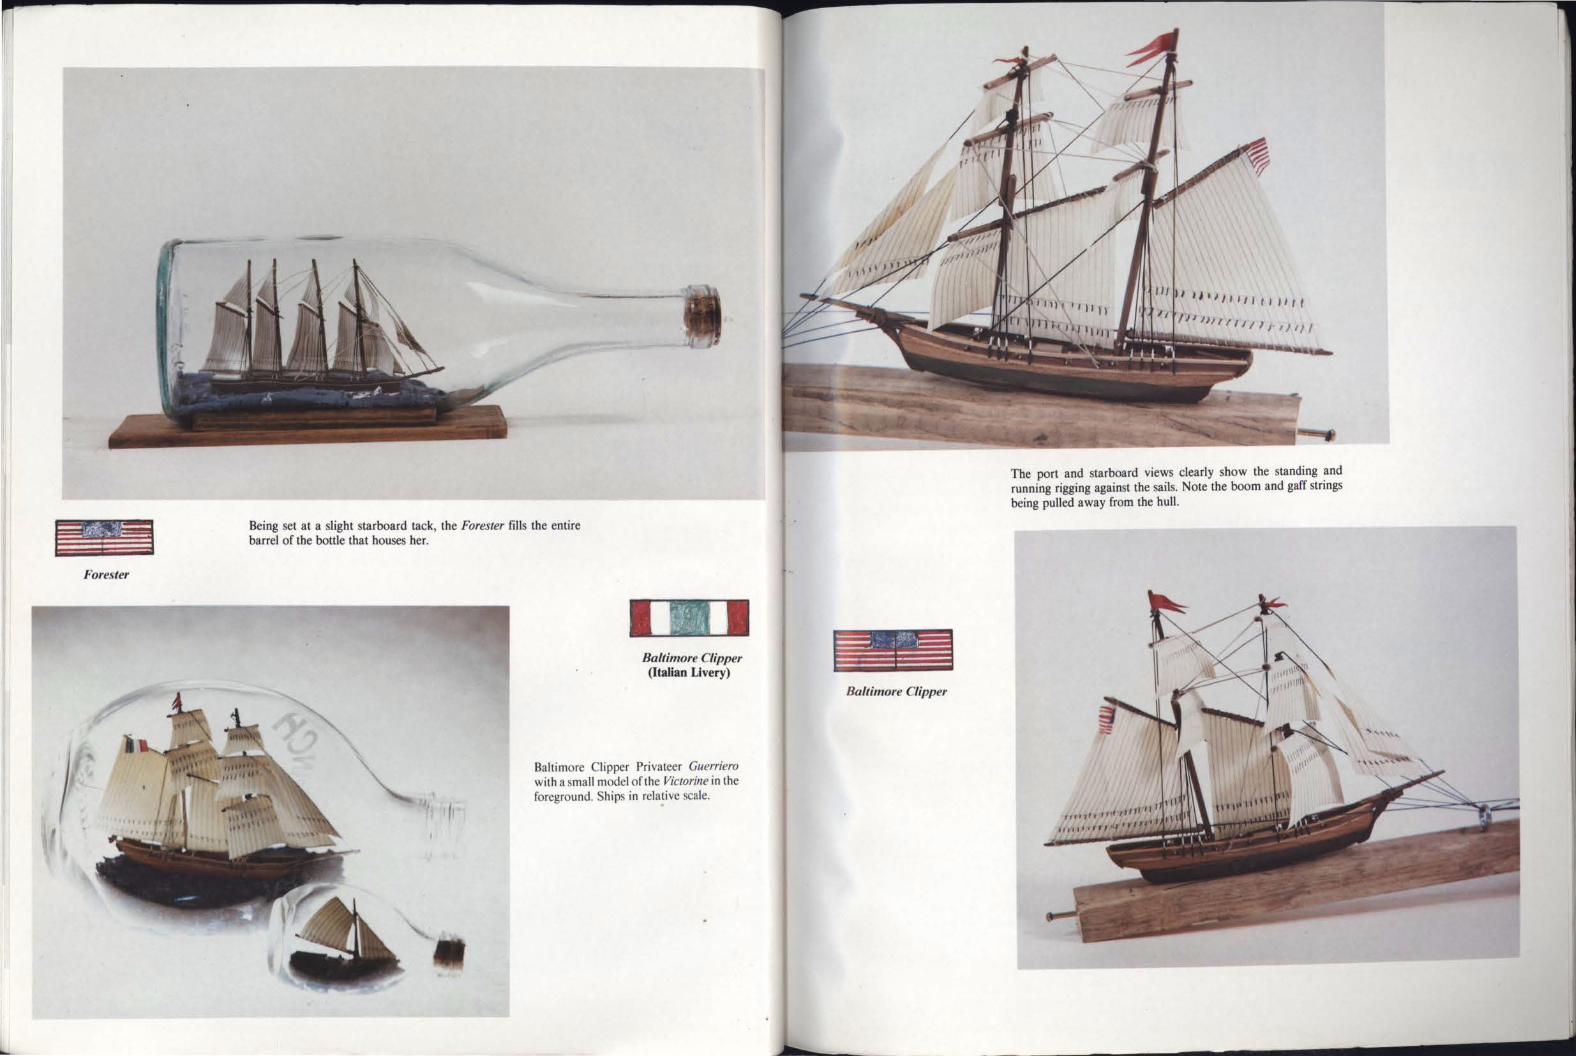
Being set at a slight starboard tack, the Forester fills the entire barrel of the bottle that houses her.
Baltimore Clipper (Italian Livery)
Baltimore Clipper Privateer Guerriero with a small model of the Victorine in the foreground. Ships in relative scale.
-=--- ~ . ~:-._= •''" ~f ... ~ i= -----~-
Baltimore Clipper
''i' ''''''t' Jlrt
The port and starboard views clearly show the standing and running rigging against the sails. Note the boom and gaff strings being pulled away from the hull.
Baltimore Clipper (Italian Livery)
·.
The ship fills the bo~tle, with mast tips barely missing the top of the bottle.
Builders eye view of completed model.
•' ·.. "" '.
Chapter Six
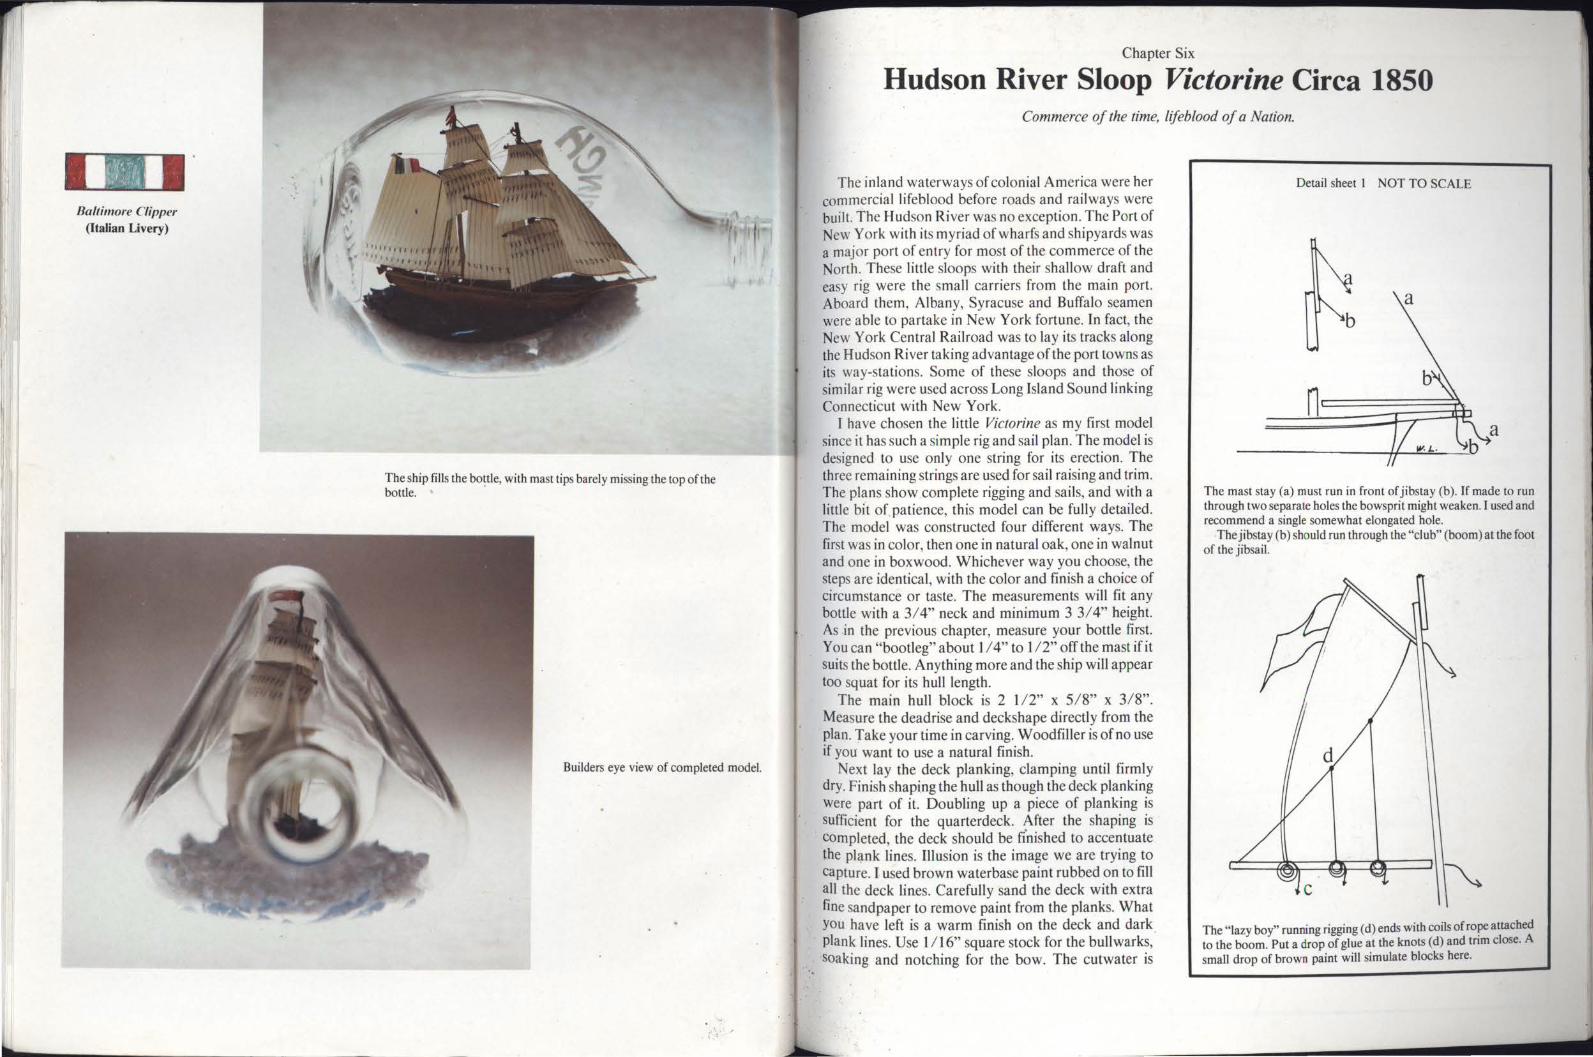
Hudson River Sloop Victorine Circa 1850 Commerce of the time, lifeblood of a Nation.
The inland waterways of colonial America were her commercial lifeblood before roads and railways were built. The Hudson River was no exception. The Port of New York with its myriad of wharfs and shipyards was a major port of entry for most of the commerce of the North. These little sloops with their shallow draft and easy rig were the small carriers from the main port. Aboard them, Albany, Syracuse and Buffalo seamen were able to partake in New York fortune. In fact, the New York Central Railroad was to lay its tracks along the Hudson River taking advantage of the port towns as its way-stations. Some of these sloops and those of similar rig were used across Long Island Sound linking Connecticut with New York.
I have chosen the little Victorine as my first model since it has such a simple rig and sail plan. The model is designed to use only one string for its erection. The three remaining strings are used for sail raising and trim. The plans show.complete rigging and sails, and with a little bit of. patience, this model can be fully detailed. The model was constructed four different ways. The first was in color, then one in natural oak, one in walnut and one in boxwood. Whichever way you choose, the steps are identical, with the color and finish a choice of circumstance or taste. The measurements will fit any bottle with a 3/ 4" neck and minimum 3 3/ 4" height. As .in the previous chapter, measure your bottle first. You can "bootleg" about 1 I 4" to 112" off the mast if it suits the bottle. Anything more and the ship will appear too squat for its hull length.
The main hull block is 2 1 / 2" x 5/ 8" x 3/8". Measure the deadrise and deckshape directly from the plan. Take your time in carving. Wood filler is of no use if you want to use a natural finish.
Next lay the deck planking, clamping until firmly dry. Finish shaping the hull as though the deck plan king were part of it. Doubling up a piece of planking is sufficient for the quarterdeck. After the shaping is completed, the deck should be fi"nished to accentuate the plc,mk lines. Illusion is the image we are trying to capture. I used brown waterbase paint rubbed on to fill all the deck lines. Carefully sand the deck with extra fine sandpaper to remove paint from the planks. What You have left is a warm finish on the deck and dark Pl<!.nk lines. Use 1 / 16" square stock for the bullwarks, soaking and notching for the bow. The cutwater is
Detail sheet I NOT TO SCALE
n
The mast stay (a) must run in front of jibstay (b). If made to run through two separate holes the bowsprit might weaken. I used and recommend a single somewhat elongated hole.
Thejibstay (b) should run through the "club" (boom) at the foot of the jibsail.
The "lazy boy" running rigging (d) ends with coils of rope attached to the boom. Put a drop of glue at the knots (d) and trim close. A small drop of brown paint will simulate blocks here.
3 2
0 t ~ IJ v-G-e E3+
CAPSTAN HATCH
0
34
·-
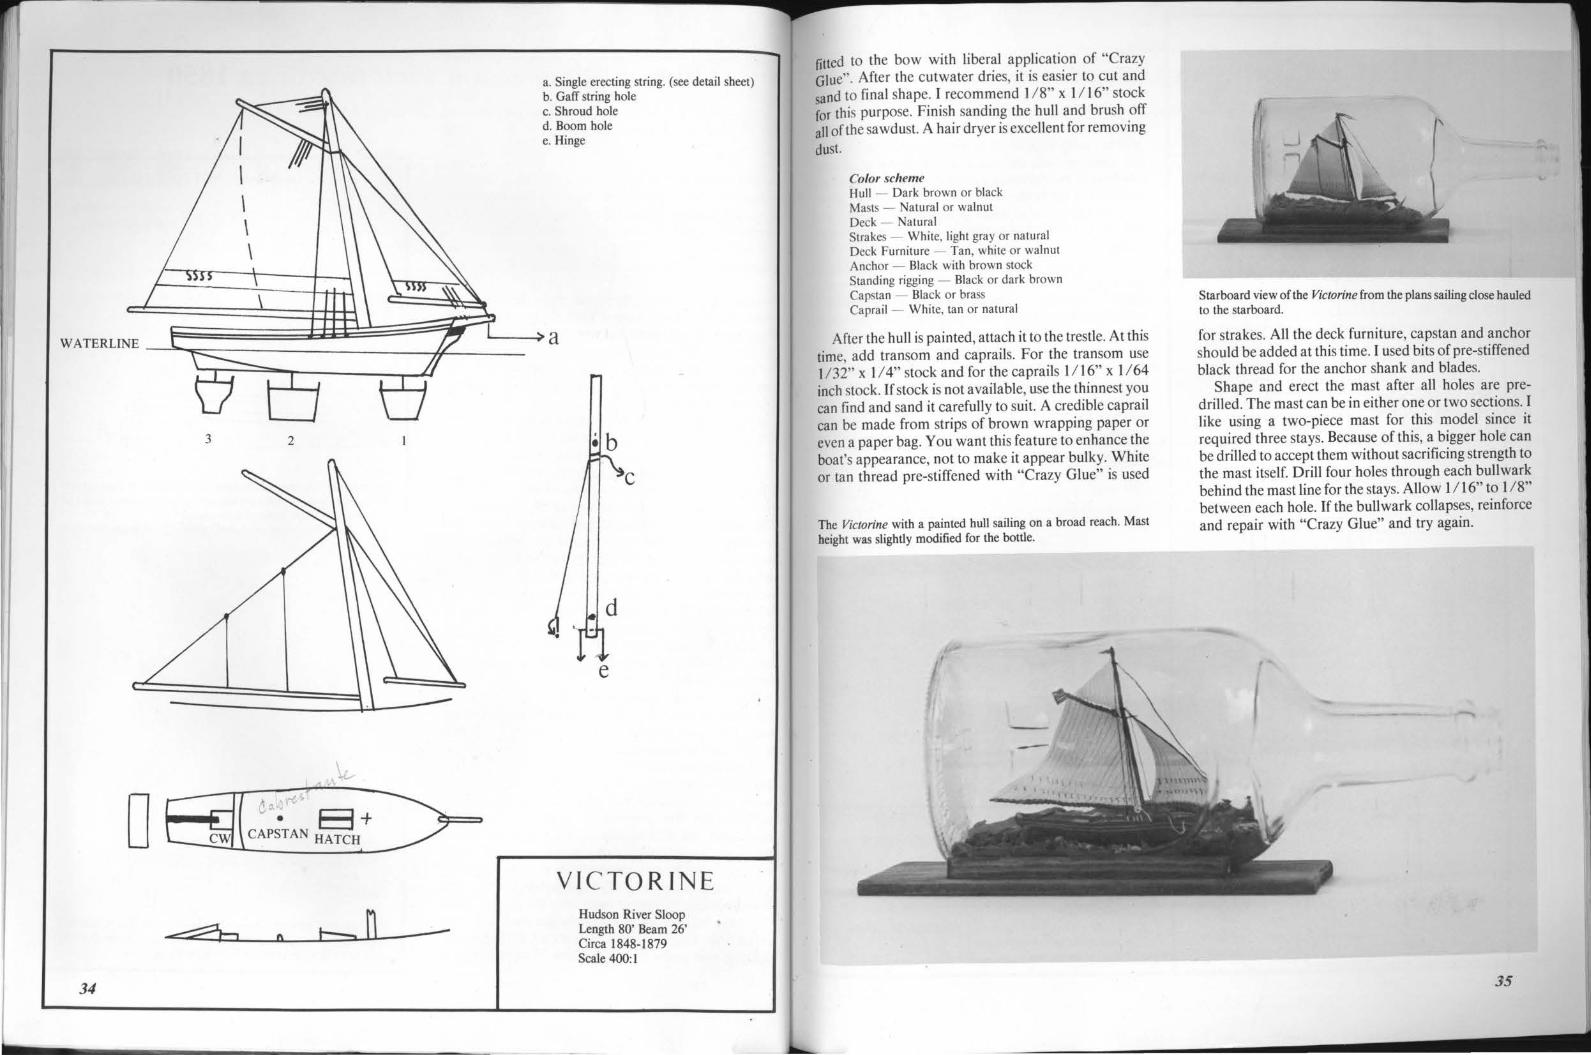
a. Single erecting string. (see detail sheet) b. Gaff string hole c. Shroud hole d. Boom hole e. Hinge
ib
e
VICTORINE Hudson River Sloop Length 80' Beam 26' Circa 1848-1879 Scale 400:1
fitted to the bow with liberal application of "Crazy Glue". After the cutwater dries, it is easier to cut and sand to final shape. I recommend 1 18" x 1 I 16" stock for this purpose. Finish sanding the hull and brush off all of the sawdust. A hair dryer is excellent for removing
dust.
Co/or scheme Hull - Dark brown or black Masts - Natural or walnut Deck - Natural Strakes - White, light gray or natural Deck Furniture - Tan, white or walnut Anchor - Black with brown stock Standing rigging - Black or dark brown Capstan - Black or brass Caprail - White, tan or natural
After the hull is painted, attach it to the trestle. At this time, add transom and caprails. For the transom use 1132" x 1 I 4" stock and for the caprails 1116" x 1 I 64 inch stock. If stock is not available, use the thinnest you can find and sand it carefully to suit. A credible caprail can be made from strips of brown wrapping paper or even a paper bag. You want this feature to enhance the boat's appearance, not to make it appear bulky. White or tan thread pre-stiffened with "Crazy Glue" is used
The Victorine with a painted hull sailing on a broad reach. Mast height was slightly modified for the bottle.
Starboard view of the Victorine from the plans sailing close hauled to the starboard.
for strakes. All the deck furniture, capstan and anchor should be added at this time. I used bits of pre-stiffened black thread for the anchor shank and blades.
Shape and erect the mast after all holes are predrilled. The mast can be in either one or two sections. I like using a two-piece mast for this model since it required three stays. Because of this, a bigger hole can be drilled to accept them without sacrificing strength to the mast itself. Drill four holes through each bullwark behind the mast line for the stays. Allow 1 I 16" to 1 18" between each hole. If the bullwark collapses, reinforce and repair with "Crazy Glue" and try again.
35

on
m
36
I have ~ound it easier to completely rig a model before addmg sails, but this is a matter of choice. The boom and gaff should run free through their rigging holes as well as the erecting string(s). At this time test c~llapse t~e model to check for snags. Try erecting Without ~smg your hand~ to rc!ieve problems. Use only t~e ere~ti~g tools descnbed m the previous chapter smce this IS the only way it can be worked on when the model is in the bottle.
Now the sails can be added. Again, test collapse and erect to get the feel of the strings and to locate possible snags. . As .a rule of thumb, I wait at least a day before msertmg the model. I want to begin this odessey with a fresh set of nerves. The photosequence of my little VICTOR/NE entering her permanent berth is self explanatory.
Th~s successful venture should more than wet your appetite for the challenge of this hobby. This writer advises that you tackle each project slowly. Try not to make a full rigged clipper your second choice.
You are now the proud possessor of a piece of history, first as its own historic art form, and second the ship it represents.
VICTORINE
Detail sheet 2 NOT TO SCALE
h. Hawse hole through bullwark (Starboard only). i. Position of mast (relative). j. Forward hatch. . k. Capstan (small belayi ng pin or thick pinhead. Anchor rope
coiled about with free end aft. m. Tiller (small piece of wood or pre-glued shaped thread.
Chapter Seven
Schooner Yacht America Circa 1851 The Cup, the glory, and the legend.
The yacht America is full of the lore of the sea and makes an excellent choice for a model. The America was afloat well into our century with a famous and varied career. First, and foremost, this was the yacht for which the "Americas Cup" race is associated, the pride of the yachting world. Until recently the trophy cup appeared to be permenantly housed by the N.Y. Yacht Club, but everything changes. The yacht itself was built in the early spring of 1851 for one specific purpose: to enter the English challenge race of that year.
What a ship! Her severe hull lines went steps farther than the Baltimore Clippers she was designed after. Some say that it was her expert handling that brought her to ultimate victory, but in fact when she crossed the Atlantic on her maiden voyage, both crew and ship
were untried. Others congratulate her sailmakers for using close-woven American linen, as opposed to coarser English hemp, in the ships ability to "capture the wind". Whatever the reasons, crew, ship or sails, she challenged and beat the best that the English had to offer at the time, sending home a trophy still called the "Americas Cup" in her honor.
There are stories and legends about this race. First her master decided to add an extra sail before the start of the race. It was a flying jib attached to a spar that elongated her bowsprit. It actually hampered her sailing qualities, and when carried away in mid-race her handling improved. As the story goes, Queen Victoria, an avid yacht enthusiast herself, watched the race from a vantage point on shore. She asked after
AMERICA
Detail sheet l NOT TO SCALE fr-----------$ The mainstay runthrough (a) passes BEHIND forestay (b) and "club" (boom). Decide which side sail will billow before this is mounted. · ,.........._ ________ -<
Transom is rounded beyond bullwark lines.
a b
g Trail or trim board can be made of gold leaf candy wrapper or gold painted paper. ' Cockpit was circular with tiller opposite a round bench.
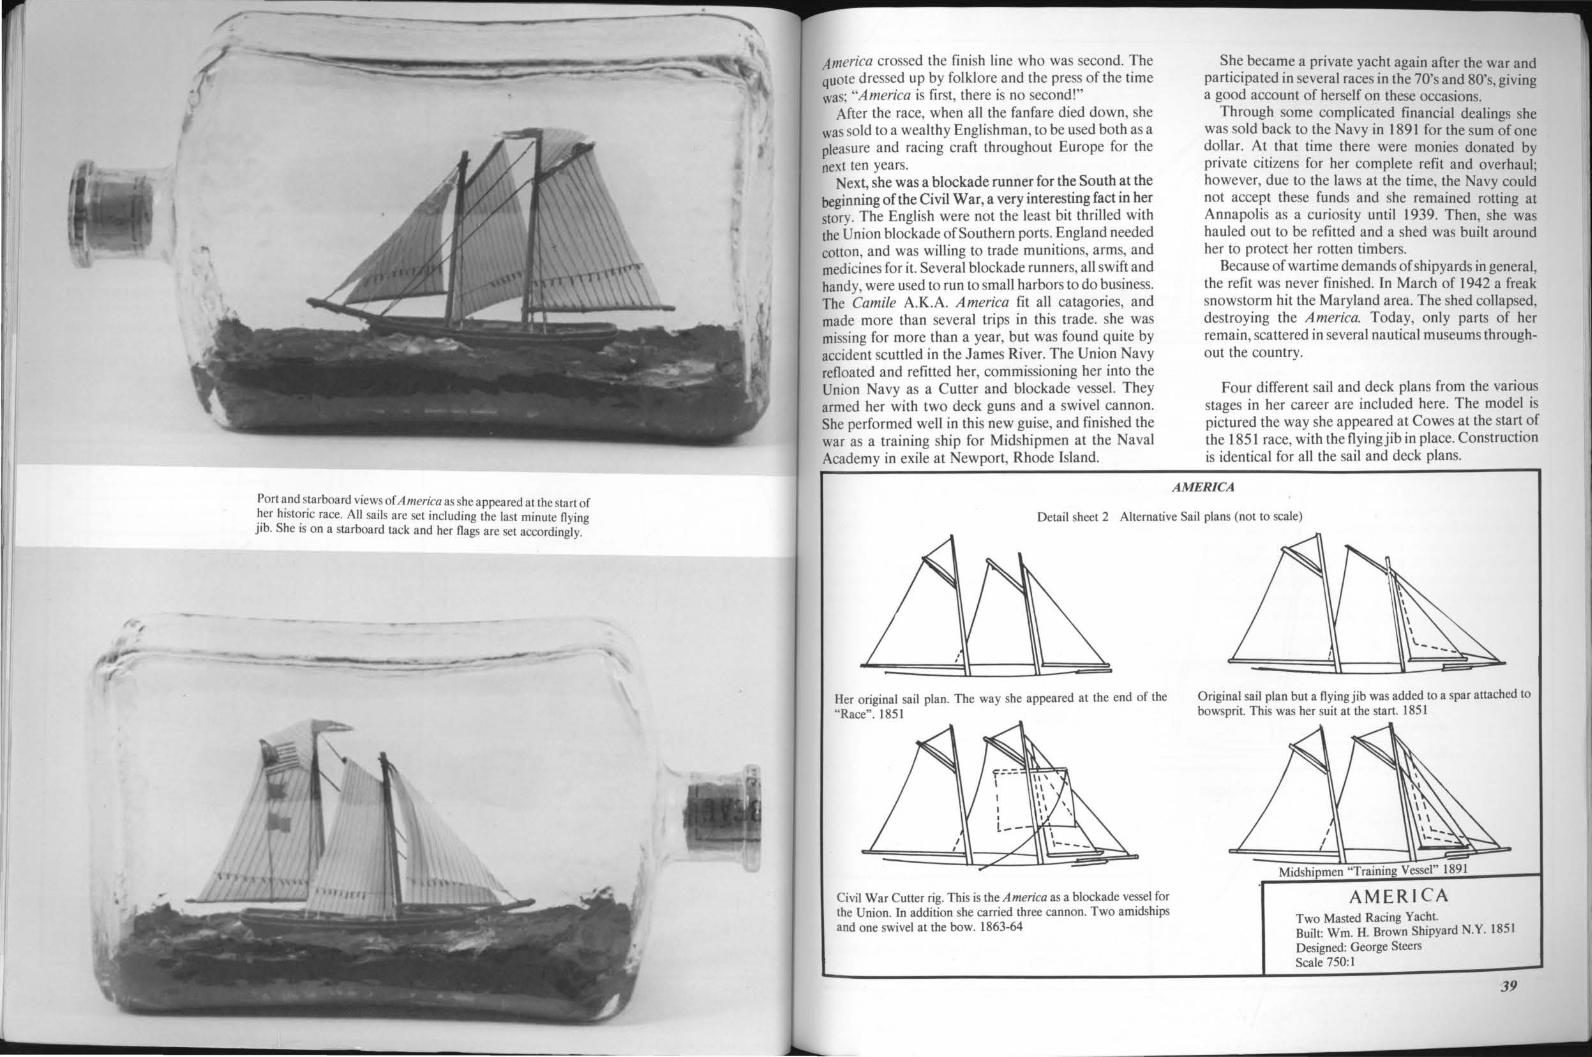
Port ~nd s~arboard views of America as she appeared at the start of ~er h1st~nc race. All sails are set including the last minute flying Jib. She IS on a starboard tack and her flags are set accordingly.
America crossed the finish line who was second. The quote dressed up by folklore and the press of the time was; "America is first, there is no second!"
After the race, when all the fanfare died down, she was sold to a wealthy Englishman, to be used both as a pleasure and racing craft throughout Europe for the next ten years.
Next, she was a blockade runner for the South at the beginning of the Civil War, a very interesting fact in her story. The English were not the least bit thrilled with the Union blockade of Southern ports. England needed cotton, and was willing to trade munitions, arms, and medicines for it. Several blockade runners, all swift and handy, were used to run to small harbors to do business. The Camile A.K.A. America fit all catagories, and made more than several trips in this trade. she was missing for more than a year, but was found quite by accident scuttled in the lames River. The Union Navy refloated and refitted her, commissioning her into the Union Navy as a Cutter and blockade vessel. They armed her with two deck guns and a swivel cannon. She performed well in this new guise, and finished the war as a training ship for Midshipmen at the Naval Academy in exile at Newport, Rhode Island.
She became a private yacht again after the war and participated in several races in the 70's and 80's, giving a good account of herself on these occasions.
Through some complicated financial dealings she was sold back to the Navy in 1891 for the sum of one dollar. At that time there were monies donated by private citizens for her complete refit and overhaul; however, due to the laws at the time, the Navy could not accept these funds and she remained rotting at Annapolis as a curiosity until 1939. Then, she was hauled out to be refitted and a shed was built around her to protect her rotten timbers.
Because of wartime demands of shipyards in general, the refit was never finished. In March of 1942 a freak snowstorm hit the Maryland area. The shed collapsed, destroying the America. Today, only parts of her remain, scattered in several nautical museums throughout the country.
Four different sail and deck plans from the various stages in her career are included here. The model is pictured the way she appeared at Cowes at the start of the 1851 race, with the flying jib in place. Construction is identical for all the sail and deck plans.
AMERICA
Detail sheet 2 Alternative Sail plans (not to scale)
Her original sail plan. The way she appeared at the end of the "Race". 1851
Civil War Cutter rig. This is the America as a blockade vessel for the Union. In addition she carried three cannon. Two amidships and one swivel at the bow. 1863-64
Original sail plan but a flying jib was added to a spar attached to bowsprit. This was her suit at the start. 1851
AMERICA Two Masted Racing Yacht. Built: Wm. H. Brown Shipyard N.Y. 1851 Designed: George Steers Scale 750:1
39
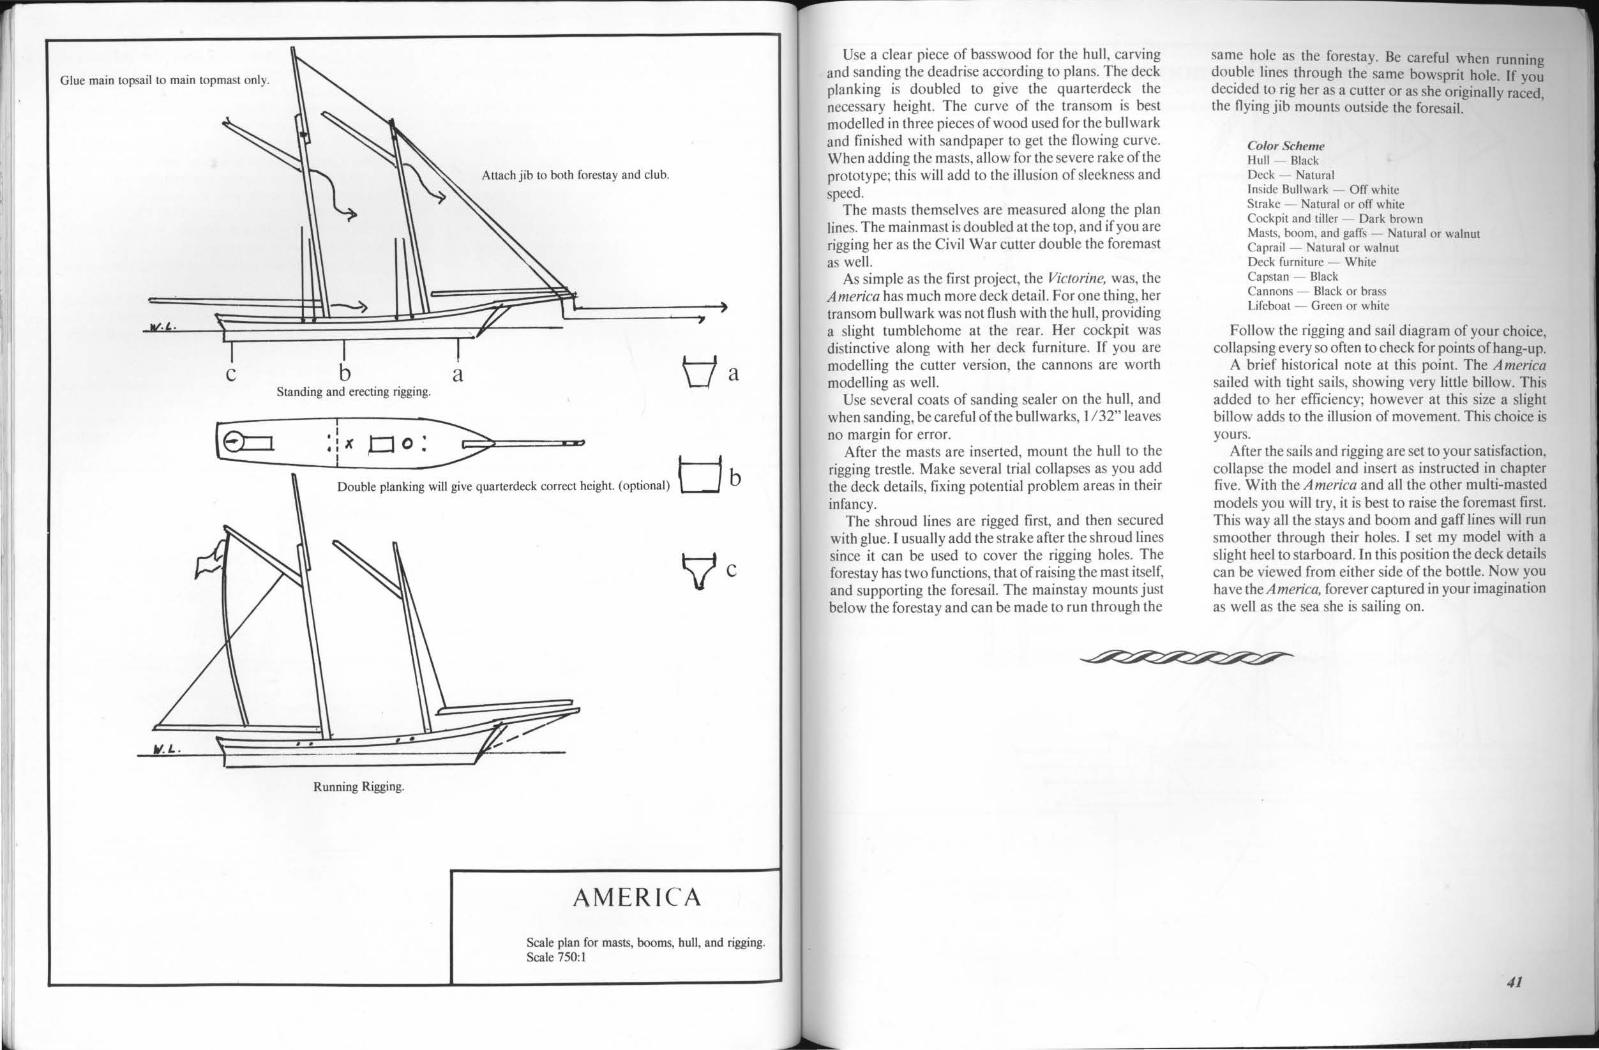
Glue main topsail to main topmast only.
c
ti.L.
Attach jib to both forestay and club.
tJa b a Standing and erecting rigging.
+· po:Y, ... D ouble plan king will give quarterdeck correct height. (optional) U b
Running Rigging.
~c
AMERICA
Scale plan for masts, booms, hull, and rigging. Scale 750:1
Use a clear piece of basswood for the hull, carving and sanding the deadrise according to plans. The deck planking is doubled to give the quarterdeck the necessary height. The curve of the transom is best modelled in three pieces of wood used for the bullwark and finished with sandpaper to get the flowing curve. When adding the masts, allow for the severe rake of the prototype; this will add to the illusion of sleekness and speed.
The masts themselves are measured along the plan lines. The main mast is doubled at the top, and if you are rigging her as the Civil War cutter double the foremast as well.
As simple as the first project, the Victorine, was, the America has much more deck detail. For one thing, her transom bullwark was not flush with the hull, providing a slight tumblehome at the rear. Her cockpit was distinctive along with her deck furniture. If you are modelling the cutter version, the cannons are worth modelling as well.
Use several coats of sanding sealer on the hull, and when sanding, be careful of the bullwarks, 1132" leaves no margin for error.
After the masts are inserted, mount the hull to the rigging trestle. Make several trial collapses as you add the deck details, fixing potential problem areas in their infancy.
The shroud lines are rigged first, and then secured with glue. I usually add the strake after the shroud lines since it can be used to cover the rigging holes. The forestay has two functions, that of raising the mast itself, and supporting the foresail. The mainstay mounts just below the forestay and can be made to run through the
same ho~e as the forestay. Be careful when running dou.ble hnc~ through the same bowsprit hole. If you decide? to.~Ig her as a cut~er or as she originally raced, the flymg Jib mounts outside the foresail.
Color Scheme Hull - Black Deck - Natural Inside Bullwark - Off white Strake - Natural or off white Cockpit and tiller - Dark brown Masts, boom, and gaffs - Natural or walnut Caprail - Natural or walnut Deck furniture - White Capstan - Black Cannons - Black or brass Lifeboat - Green or white
Follow the rigging and sail diagram of your choice, collapsing every so often to check for points of hang-up.
A brief historical note at this point. The America sailed with tight sails, showing very little billow. This added to her efficiency; however at this size a slight billow adds to the illusion of movement. This choice is yours.
After the sails and rigging are set to your satisfaction, collapse the model and insert as instructed in chapter five. With the America and all the other multi-masted models you will try, it is best to raise the foremast first. This way all the stays and boom and gaff lines will run smoother through their holes. I set my model with a slight heel to starboard. In this position the deck details can be viewed from either side of the bottle. Now you have the America, forever captured in your imagination as well as the sea she is sailing on.
41
\
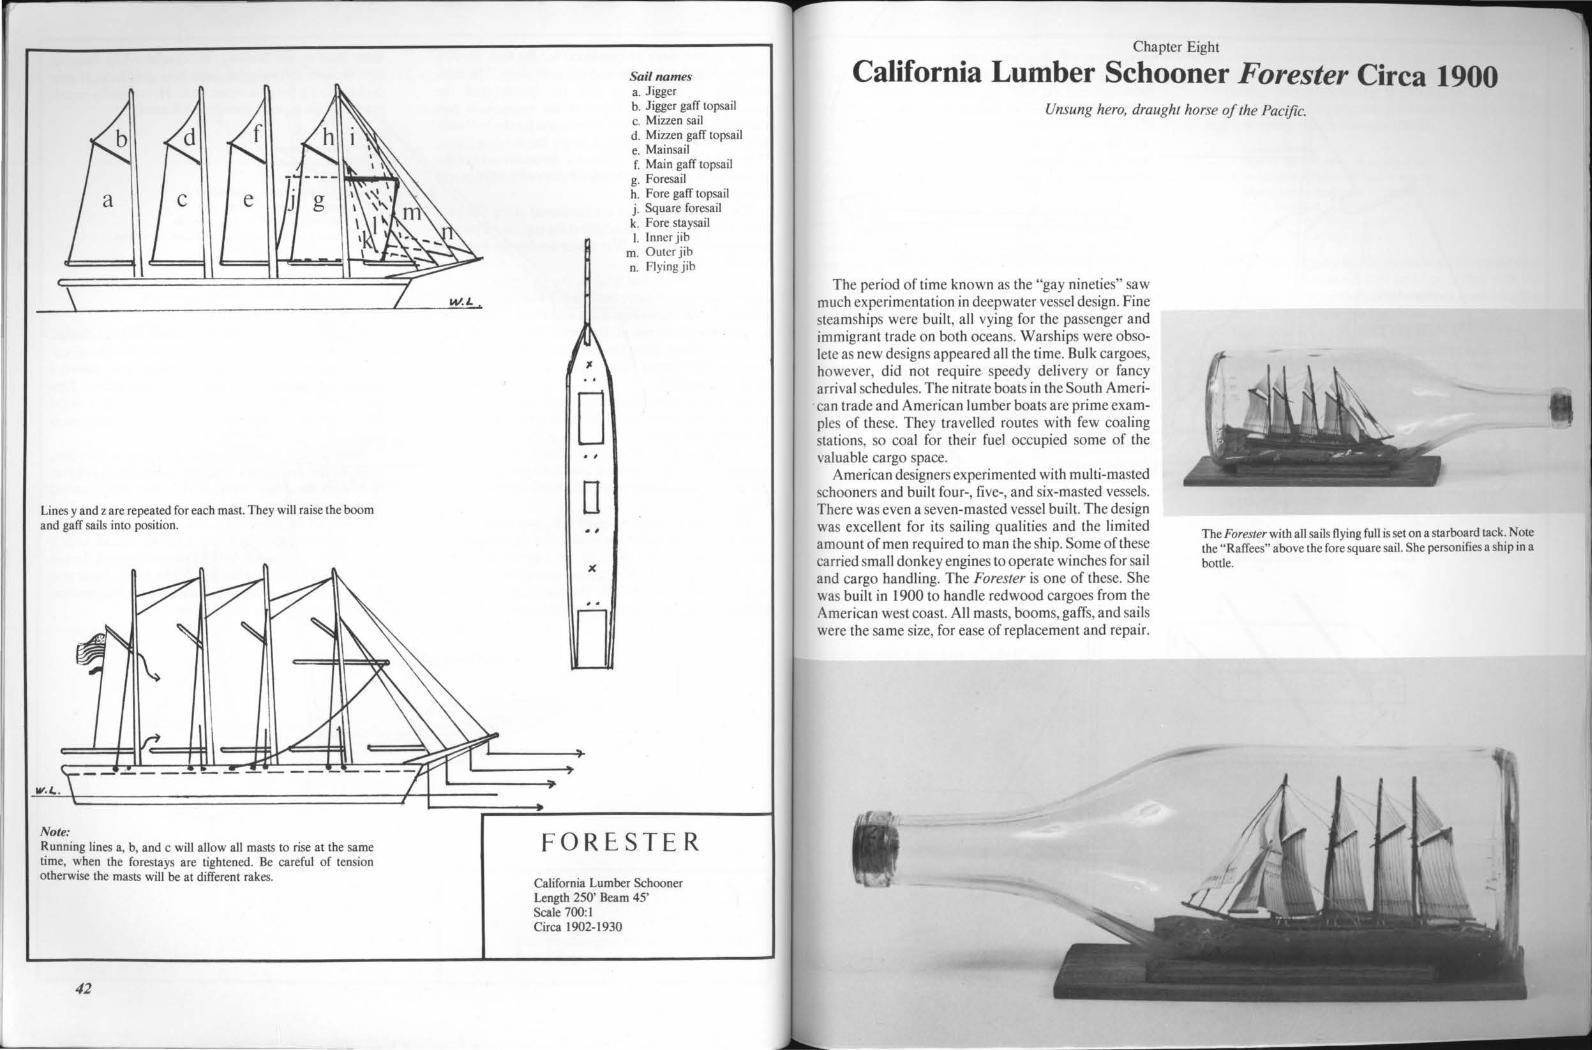
Lines y and z are repeated for each mast. They will raise the boom and gaff sails into position.
Note: Running lines a, b, and c will allow all masts to rise at the same time, when the forestays are tightened. Be careful of tension otherwise the masts will be at different rakes.
42
D . '
D .. ,
# •
Sail names a. Jigger b. Jigger gaff topsail c. Mizzen sail d. Mizzen gaff topsail e. Mainsail f. Main gaff topsail g. Foresail h. Fore gaff topsail j. Square foresail k. Fore staysail I. Inner jib
m. Outer jib n. Flying jib
FORESTER
California Lumber Schooner Length 250' Beam 45' Scale 700:1 Circa 1902-1930
Chapter Eight
California Lumber Schooner Forester Circa 1900 Unsung hero, draught horse of the Pacific.
The period of time known as the "gay nineties" saw much experimentation in deepwater vessel design. Fine steamships were built, all vying for the passenger and immigrant trade on both oceans. Warships were obsolete as new designs appeared all the time. Bulk cargoes, however, did not require speedy delivery or fancy arrival schedules. The nitrate boats in the South Ameri-
. can trade and American lumber boats are prime examples of these. They travelled routes with few coaling stations, so coal for their fuel occupied some of the valuable cargo space .
American designers experimented with multi-masted schooners and built four-, five-, and six-masted vessels. There was even a seven-masted vessel built. The design was excellent for its sailing qualities and the limited amount of men required to man the ship. Some of these carried small donkey engines to operate winches for sail and cargo handling. The Forester is one of these. She was built in 1900 to handle redwood cargoes from the American west coast. All masts, booms, gaffs, and sails were the same size, for ease of replacement and repair.
The Forester with all sails flying full is set on a starboard tack. Note the "Raffees" above the fore square sail. She personifies a ship in a bottle.
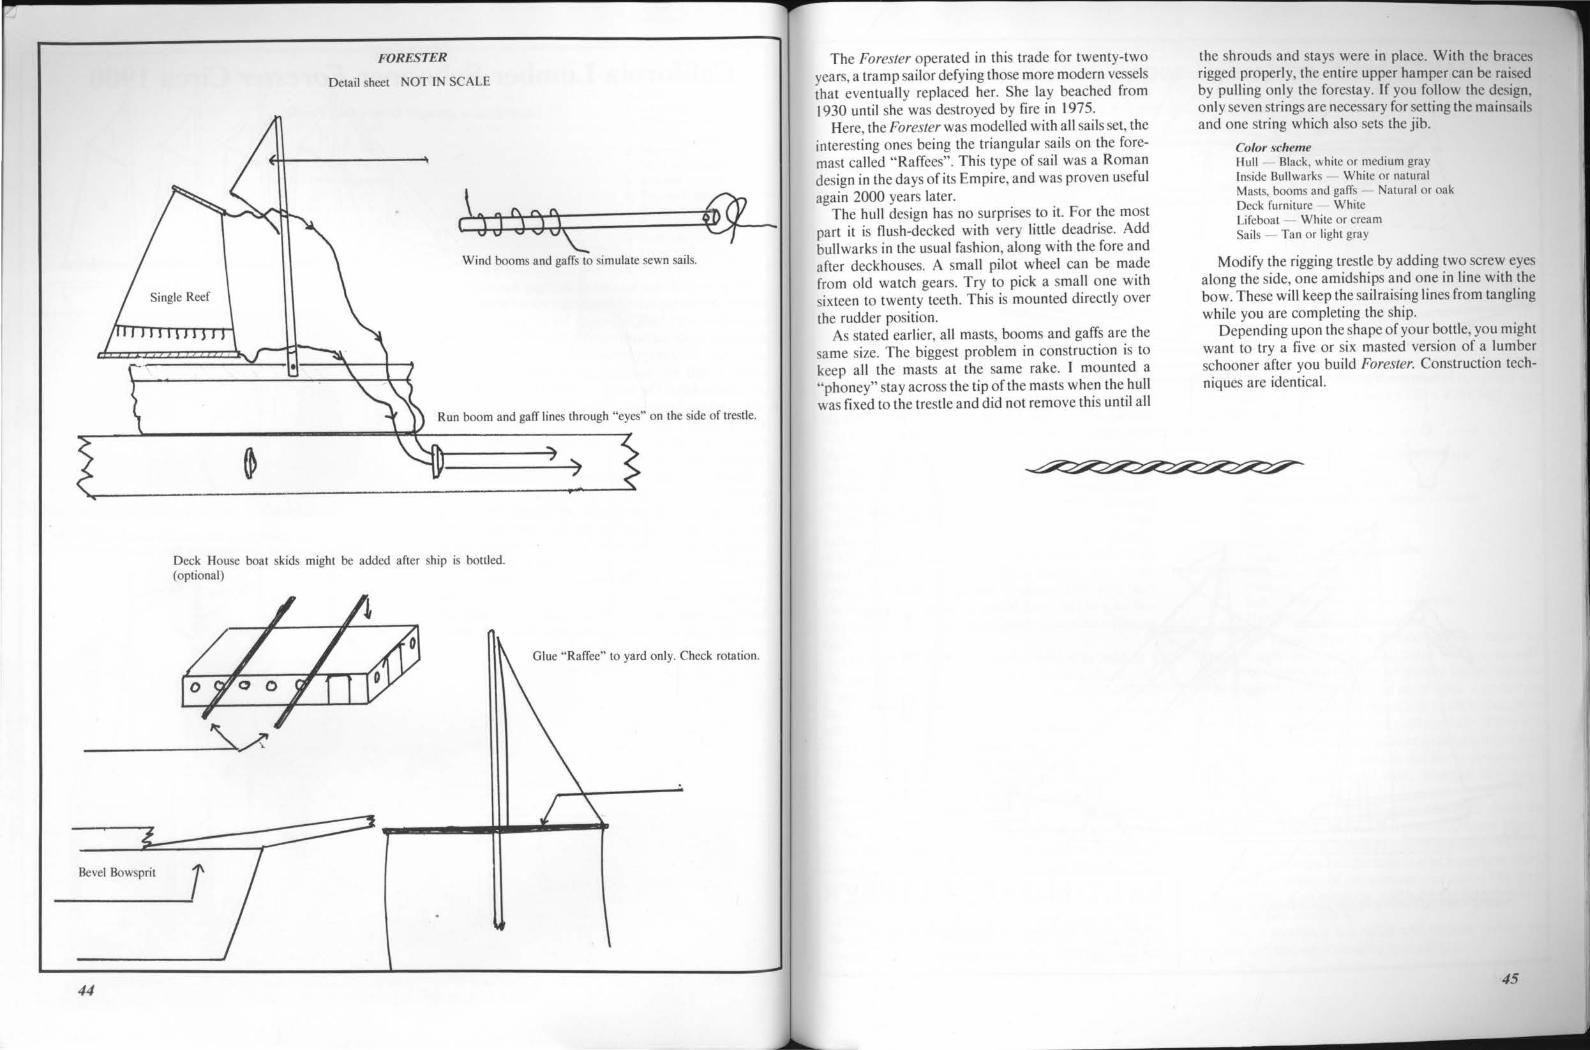
FORESTER
Detail sheet NOT IN SCALE
( \ j ;1 ~ :) j\00 €J!-,___ Wind booms and gaffs to simulate sewn sails.
Run boom and gaff lines through "eyes" on the side of trestle.
Deck House boat skids might be added after ship is bottled. (optional)
Glue "Raffee" to yard only. Check rotation.
Bevel Bowsprit T -----!
44
The Forester operated in this trade for twenty-two years, a tramp sailor defying those more modern vessels that eventually replaced her. She lay beached from 1930 until she was destroyed by fire in 1975.
Here, the Forester was modelled with all sails set, the interesting ones being the triangular sails on the foremast called "Raffees". This type of sail was a Roman design in the days of its Empire, and was proven useful again 2000 years later.
The hull design has no surprises to it. For the most part it is flush-decked with very little deadrise. Add bullwarks in the usual fashion, along with the fore and after deckhouses. A small pilot wheel can be made from old watch gears. Try to pick a small one with sixteen to twenty teeth. This is mounted directly over the rudder position.
As stated earlier, all masts, booms and gaffs are the same size. The biggest problem in construction is to keep all the masts at the same rake. I mounted a "phoney" stay across the tip of the masts when the hull was fixed to the trestle and did not remove this until all
the shrouds and stays were in place. With the braces rigged properly, the entire upper hamper can be raised by pulling only the forestay. If you follow the design, only seven strings are necessary for setting the mainsails and one string which also sets the jib.
Color scheme Hull - Black, white or medium gray Inside Bullwarks - White or natural Masts, booms and gaffs - Natural or oak Deck furniture - White Lifeboat - White or cream Sails - Tan or light gray
Modify the rigging trestle by adding two screw eyes along the side, one amidships and one in line with the bow. These will keep the sail raising lines from tangling while you are completing the ship.
Depending upon the shape of your bottle, you might want to try a five or six masted version of a lumber schooner after you build Forester. Construction techniques are identical.
45
I 1..---
I
j ____ ... ---" ··- · -··
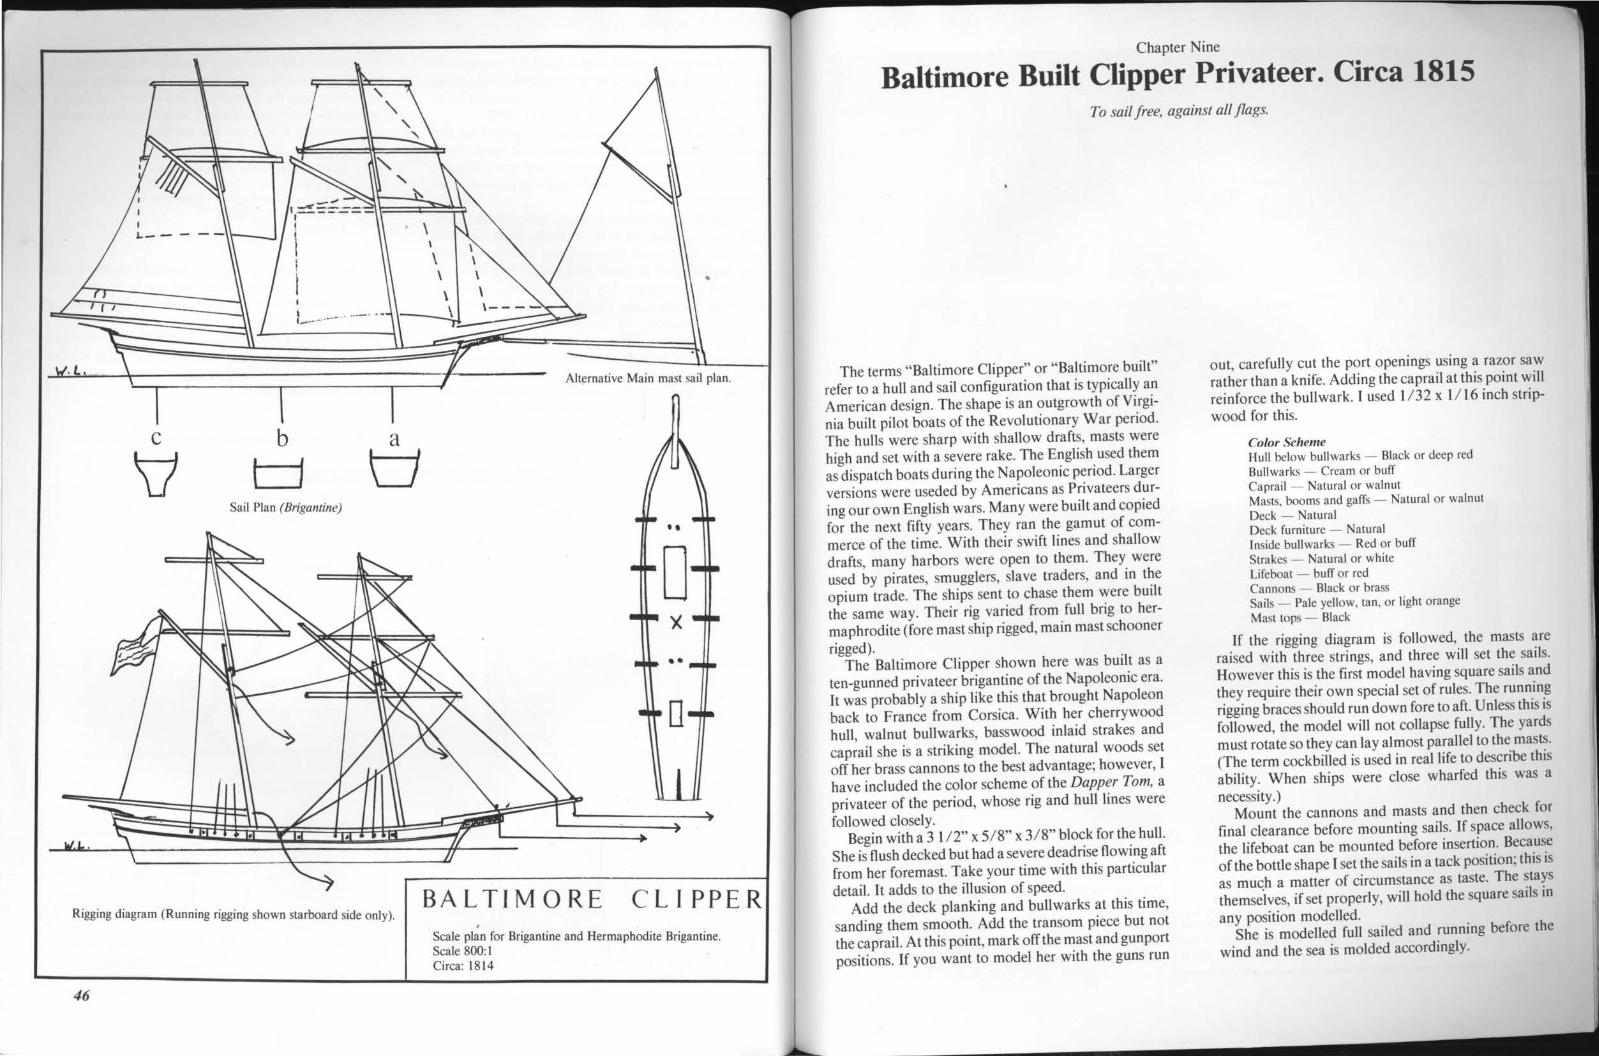
c b a
V Lj u Sail Plan (Brigantine)
Rigging diagram (Running rigging shown starboard side only).
46
Alternative Main mast sail plan.
BALTIMORE CLIPPER .
Scale plan for Brigantine and Hermaphodite Brigantine. Scale 800:1 Circa: 1814
Chapter Nine
Baltimore Built Clipper Privateer. Circa 1815 To sail free, against all flags.
The terms "Baltimore Clipper" or "Baltimore built" refer to a hull and sail configuration that is typically an American design. The shape is an outgrowth of Virginia built pilot boats of the Revolutionary War period. The hulls were sharp with shallow drafts, masts were high and set with a severe rake. The English used them as dispatch boats during the Napoleonic period. Larger versions were useded by Americans as Privateers during our own English wars. Many were built and copied for the next fifty years. They ran the gamut of commerce of the time. With their swift lines and shallow drafts, many harbors were open to them. They were used by pirates, smugglers, slave traders, and in the opium trade. The ships sent to chase them were built the same way. Their rig varied from full brig to hermaphrodite (fore mast ship rigged, main mast schooner rigged).
The Baltimore Clipper shown here was built as a ten-gunned privateer brigantine of the Napoleonic era. It was probably a ship like this that brought Napoleon back to France from Corsica. With her cherrywood hull, walnut bullwarks, basswood inlaid strakes and caprail she is a striking model. The natural woods set off her brass cannons to the best advantage; however, I have included the color scheme of the Dapper Tom, a privateer of the period, whose rig and hull lines were followed closely.
Begin with a 3 1 /2" x 5/ 8" x 3/8" block for the hull. She is flush decked but had a severe dead rise flowing aft from her foremast. Take your time with this particular detail. It adds to the illusion of speed.
Add the deck planking and bullwarks at this time, sanding them smooth. Add the transom piece but not the cap rail. At this point, mark off the mast and gun port positions. If you want to model her with the guns run
out, carefully cut the port openings using a razor saw rather than a knife. Adding the caprail at this point will reinforce the bullwark. I used 1/ 32 x 1/16 inch stripwood for this.
Co/or Scheme Hull below bullwarks - Black or deep red Bullwarks - Cream or buff Caprail - Natural or walnut Masts, booms and gaffs - Natural or walnut Deck - Natural Deck furniture - Natural Inside bullwarks - Red or buff Strakes - Natural or white Lifeboat - buff or red Cannons - Black or brass Sails- Pale yellow, tan, or light orange Mast tops - Black
If the rigging diagram is followed, the masts are raised with three strings, and three will set the sails. However this is the first model having square sails and they require their own special set of rules. The running rigging braces should run down fore to aft. Unless this is followed, the model will not collapse fully. The yards must rotate so they can lay almost parallel to the masts. (The term cockbilled is used in real life to describe this ability. When ships were close wharfed this was a necessity.)
Mount the cannons and masts and then check for final clearance before mounting sails. If space allows, the lifeboat can be mounted before insertion. Because of the bottle shape I set the sails in a tack position; this is as much a matter of circumstance as taste. The stays themse'tves, if set properly, will hold the square sails in any position modelled.
She is modelled full sailed and running before the wind and the sea is molded accordingly.

48
Portside and starboard view of my Privateer in Italian Livery. I've named her Guerriero (WARRIOR in Italian). He11wood is cherry for the hull, basswood strakes, and walnut bullwarks. I designed her in order to get the most ship in a bottle this size.
Chapter Ten
Confederate Raider C.S.S. Alabama True to a cause, gallantry and chivalry on the waves.
The Alabama was afloat only two years, as a member of a Navy that lasted only four years itself. The American Civil War conjures up many memories, some sad, some horrible, and some romantic as it flows back into the corridors oftime. The names that remain, Gettysburg, Shiloh, Arlington, The Wilderness, and the rest are now tourist attractions and amusement parks, to be visited and commemorated. But what of the Navies? There are no shrines or hallowed grounds to mark their passing. Only the sea remains, covering all that once was.
The Alabama was built in Great Britain under the cloak and dagger politics of the period. England needed Southern cotton. She had already outfitted several blockade runners to keep the Southern trade lanes open. The Alabama and her two sister ships, Florida and Shenandoah, were built for a different purpose. Their function was to destroy Yankee commerce by pulling the already overtaxed Northern Navy off blockade to chase them.
Alabama sailed from Liverpool in July of 1862 bearing papers that identified her as the British merchantman Enrica. She sailed to the Azores to take on arms and a confederate crew. For twenty-two months she sailed the oceans, always one step ahead of her pursuers, managing to capture and destroy 52 Yankee vessels, many of them high stepping clippers. Her bunkers only carried coal for fifteen days of sailing, so much of her action was under sail. Under full sail and steam she could make fourteen knots, more than enough to chase, catch, and elude.
Not To Scale
( a
~b 1===1/
Smokestack is fabricated from 1/ 8 inch dowel with small taper near the top. a. Pin hole is drilled near the top and a bent lance is used to locate
in position after ship is bottled. b. Thin paper bands or pieces of preglued string.
c
Many English and French ports were open to her for supplies and repairs. In June of 1864 she put into Cherbourg where they hoped to give her a complete overhaul. Napoleon Ill was friendly to the South since they were keeping the Union busy while his troops invaded Mexico.
Alabama was caught in harbor by the newly built steam ship Kearsarge. She came out to fight for many reasons, one of which was the fear of being blockaded herself. Like two medieval knights the ships jousted and parried, both evenly matched in speed and armament. The Yankee ship shrouded her vital sides in heavy anchor chain to ward off cannon shells. Alabama was hit several times below the waterline and began to sink.
---------=·o=M~f __________ d ~~~~~~~~~--------e
c. Cap rail d. Upper strake preglued string e. Lower strake of thin wood f. Gunport hatches. They opened to the side in two pieces.
Fabricate out of paper. Painted the same color as inside the bullwark.
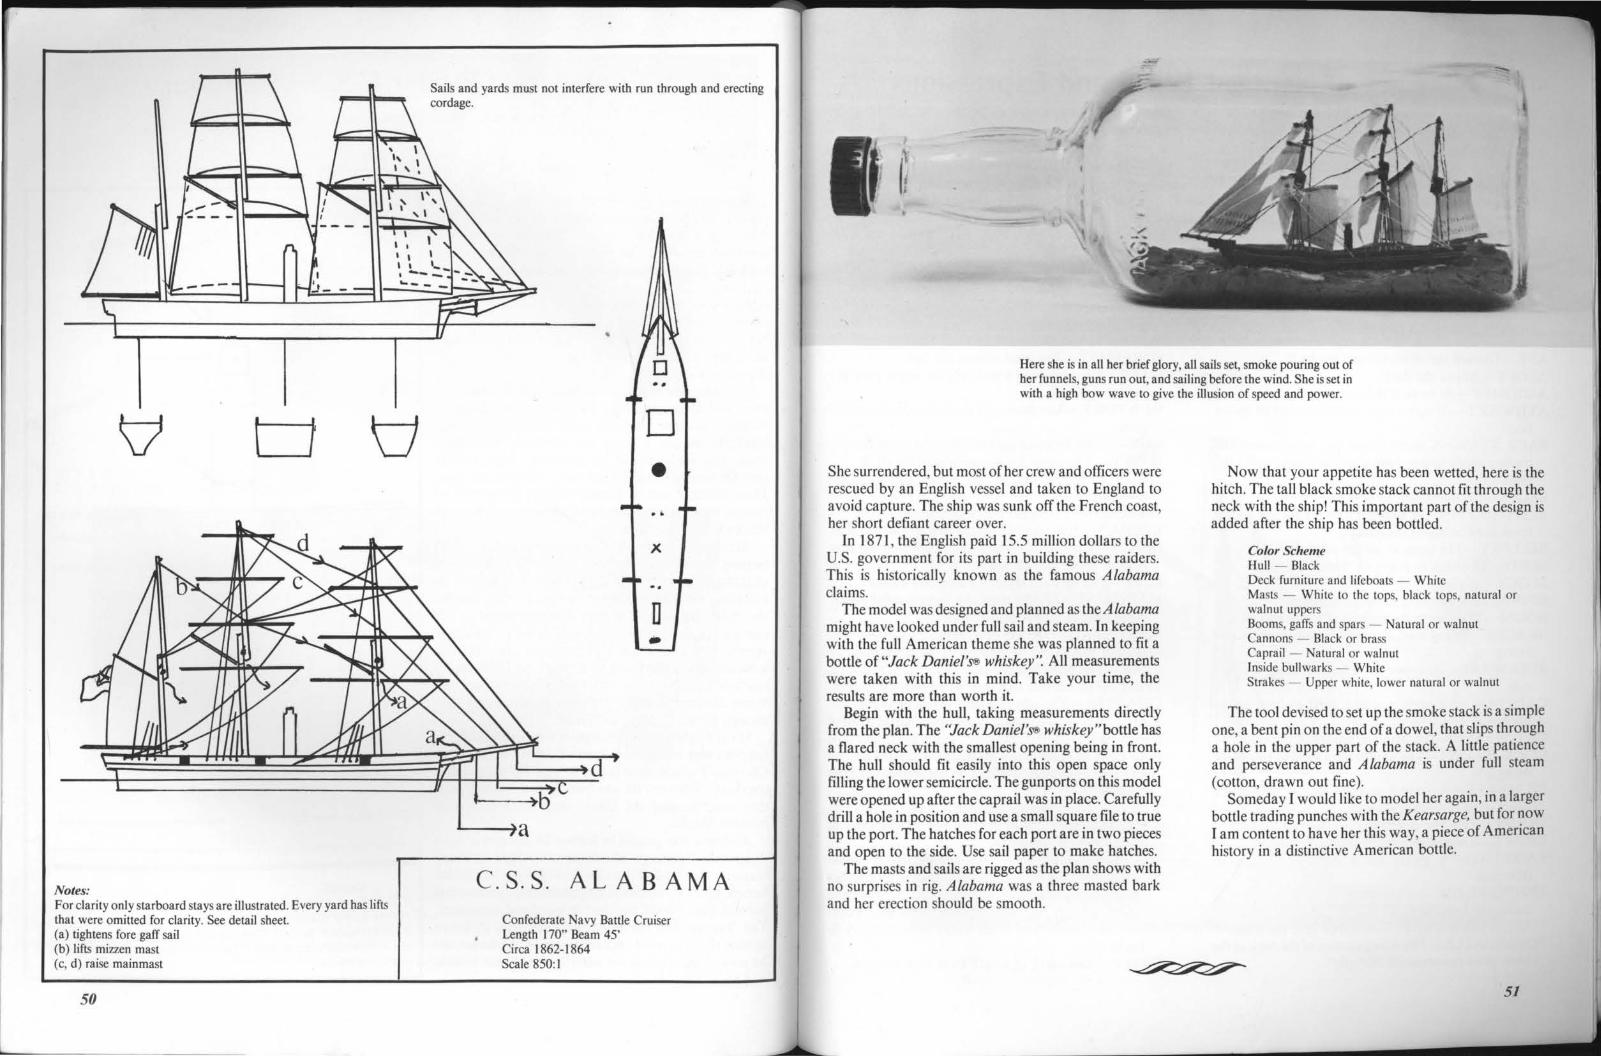
Notes: For clarity only starboard stays are illustrated. Every yard has lifts that were omitted for clarity. See detail sheet. (a) tightens fore gaff sail (b) lifts mizzen mast (c, d) raise mainmast
50
Sails and yards must not interfere with run through and erecting cordage.
0 • . " X
.. D
C.S.S. ALABAMA Confederate Navy Battle Cruiser Length 170" Beam 45' Circa 1862-1864 Scale 850:1
-
I:
Here she is in all her brief glory, all sails set, smoke pouring out of her funnels, guns run out, and sailing before the wind. She is set in with a high bow wave to give the illusion of speed and power.
She surrendered, but most of her crew and officers were rescued by an English vessel and taken to England to avoid capture. The ship was sunk off the French coast, her short defiant career over.
In 1871 , the English paid 15.5 million dollars to the U.S. government for its part in building these raiders. This is historically known as the famous Alabama claims.
The model was designed and planned as the Alabama might have looked under full sail and steam. In keeping with the full American theme she was planned to fit a bottle of "Jack Daniel'S® whiskey". All measurements were taken with this in mind. Take your time, the results are more than worth it.
Begin with the hull, taking measurements directly from the plan. The "Jack Daniel'S® whiskey"bottle has a flared neck with the smallest opening being in front. The hull should fit easily into this open space only filling the lower semicircle. The gun ports on this model were opened up after the caprail was in place. Carefully drill a hole in position and use a small square file to true up the port. The hatches for each port are in two pieces and open to the side. Use sail paper to make hatches.
The masts and sails are rigged as the plan shows with no surprises in rig. Alabama was a three masted bark and her erection should be smooth.
Now that your appetite has been wetted, here is the hitch. The tall black smoke stack cannot fit through the neck with the ship! This important part of the design is added after the ship has been bottled.
Color Scheme Hull - Black Deck furniture and lifeboats - White Masts - White to the tops, black tops, natural or walnut uppers Booms, gaffs and spars - Natural or walnut Cannons - Black or brass Caprail - Natural or walnut Inside bullwarks- White Strakes - Upper white, lower natural or walnut
The tool devised to set up the smoke stack is a simple one, a bent pin on the end of a dowel, that slips through a hole in the upper part of the stack. A little patience and perseverance and Alabama is under full steam (cotton, drawn out fine).
Someday I would like to model her again, in a larger bottle trading punches with the Kearsarge, but for now I am content to have her this way, a piece of American history in a distinctive American bottle.
51
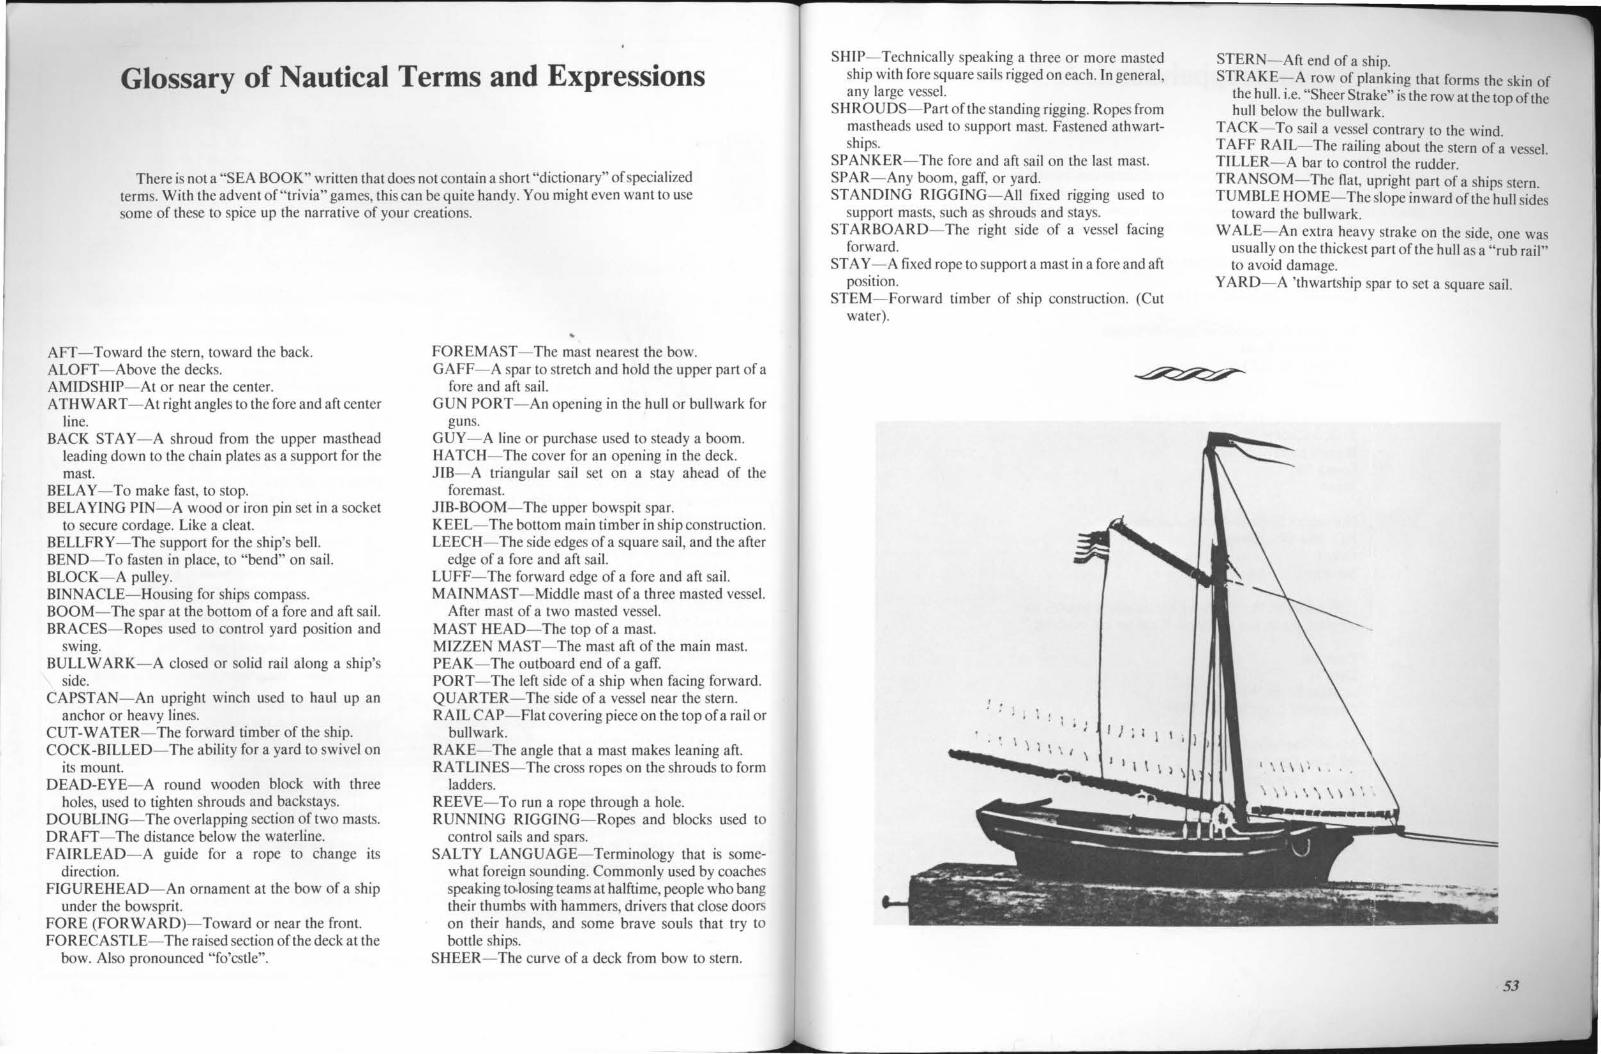
Glossary of Nautical Terms and Expressions
There is not a "SEA BOOK" written that does not contain a short "dictionary" of specialized terms. With the advent of"trivia" games, this can be quite handy. You might even want to use some of these to spice up the narrative of your creations.
AFT- Toward the stern, toward the back. ALOFT - Above the decks. AMIDSHIP-At or near the center. ATHWART -At right angles to the fore and aft center
line. BACK STAY - A shroud from the upper masthead
leading down to the chain plates as a support for the mast.
BELAY- To make fast, to stop. BELAYING PIN- A wood or iron pin set in a socket
to secure cordage. Like a cleat. BELLFR Y- The support for the ship's bell. BEND-To fasten in place, to "bend" on sail. BLOCK- A pulley. BINNACLE-Housing for ships compass. BOOM-The spar at the bottom of a fore and aft sail. BRACES- Ropes used to control yard position and
swing. BULL W ARK- A closed or solid rail along a ship's
side. CAPSTAN-An upright winch used to haul up an
anchor or heavy lines. CUT-WATER- The forward timber of the ship. COCK-BILLED-The ability for a yard to swivel on
its mount. DEAD-EYE- A round wooden block with three
holes, used to tighten shrouds and backstays. DOUBLING- The overlapping section of two masts. DRAFT- The distance below the waterline. FAIRLEAD-A guide for a rope to change its
direction. FIGUREHEAD-An ornament at the bow of a ship
under the bowsprit. FORE (FORWARD)-Toward or near the front. FORECASTLE-The raised section of the deck at the
bow. Also pronounced "fo'cstle".
FOREMAST- The mast nearest the bow. GAFF- A spar to stretch and hold the upper part of a
fore and aft sail. GUN PORT -An opening in the hull or bullwark for
guns. GUY- A line or purchase used to steady a boom. HATCH- The cover for an opening in the deck. JIB- A triangular sail set on a stay ahead of the
foremast. JIB-BOOM-The upper bowspit spar. KEEL-The bottom main timber in ship construction. LEECH-The side edges of a square sail, and the after
edge of a fore and aft sail. LUFF- The forward edge of a fore and aft sail. MAINMAST - Middle mast of a three masted vessel.
After mast of a two masted vessel. MAST HEAD- The top of a mast. MIZZEN MAST- The mast aft of the main mast. PEAK- The outboard end of a gaff. PORT- The left side of a ship when facing forward. QUARTER-The side of a vessel near the stern. RAIL CAP-Flat covering piece on the top of a rail or
bullwark. RAKE-The angle that a mast makes leaning aft. RA TUNES-The cross ropes on the shrouds to form
ladders. REEVE- To run a rope through a hole. RUNNING RIGGING-Ropes and blocks used to
control sails and spars. SALTY LANGUAGE-Terminology that is some
what foreign sounding. Commonly used by coaches speaking to-losing teams at halftime, people who bang their thumbs with hammers, drivers that close doors on their hands, and some brave souls that try to bottle ships.
SHEER- The curve of a deck from bow to stern.
SHIP- Technically speaking a three or more masted ship with fore square sails rigged on each. In general, any large vessel.
SHR 0 UDS- Part of the standing rigging. Ropes from mastheads used to support mast. Fastened athwartships.
SPANKER- The fore and aft sail on the last mast. SPAR- Any boom, gaff, or yard. STANDING RIGGING- All fixed rigging used to
support masts, such as shrouds and stays. STARBOARD- The right side of a vessel facing
forward. STAY -A fixed rope to support a mast in a fore and aft
position. STEM-Forward timber of ship construction. (Cut
water).
STERN- Aft end of a ship. STRAKE- A row of planking that forms the skin of
the hull. i.e. "Sheer Strake" is the row at the top of the hull below the bullwark.
TACK- To sail a vessel contrary to the wind. T AFF RAIL- The railing about the stern of a vessel. TILLER- A bar to control the rudder. TRANSOM- The flat, upright part of a ships stern. TUMBLE HOME- The slope inward of the hull sides
toward the bullwark. WALE-An extra heavy strake on the side, one was
usually on the thickest part of the hull as a "rub rail" to a void damage.
YARD- A 'thwartship spar to set a square sail.
53
54
Appendix
The following clubs and associations can be very helpful in locating others that are involved in this wonderful hobby. I belong to all of them. It is always a pleasure to share ones hobby with fellow enthusiasts.
Ships-In-Bottles Association of America Box 550 Coronado, California 92118
European Association of Ships-In-Bottles 400 Atlantic Road Sheffield, S8 7GQ England
Japanese Ship-In-Bottle Association 21-8, 3-Chome Tanabe Higashi Sumiyoshi-ku Osaka 546 Japan
Norwegian Ships-In-Bottles Association P.O. Box 893, Sentrum Oslo 1 Norway
In addition, the following are excellent sources for supplies, plans, kits and tools. Catalogs are available.
Prestons DeptH at Main Street Wharf Greenport, Long Island 11944
Model Shipways Company Inc. 39 West Fort Lee Road Bogata, New Jersey 07603
Bliss Marine 100 Allied Drive Dedham, Massachusetts 02026
Acknowledgements
A volume such as this requires as much work as it does dedication to become a reality. I want to express by deepest gratitude to my son, Guy DeMarco Jr. for his work on the diagrams and plans, Judith Riddell for her excellent photographic work, and Ellen J . Taylor (Sue) for her patience, skill and understanding in the final layout of this project.
Guy
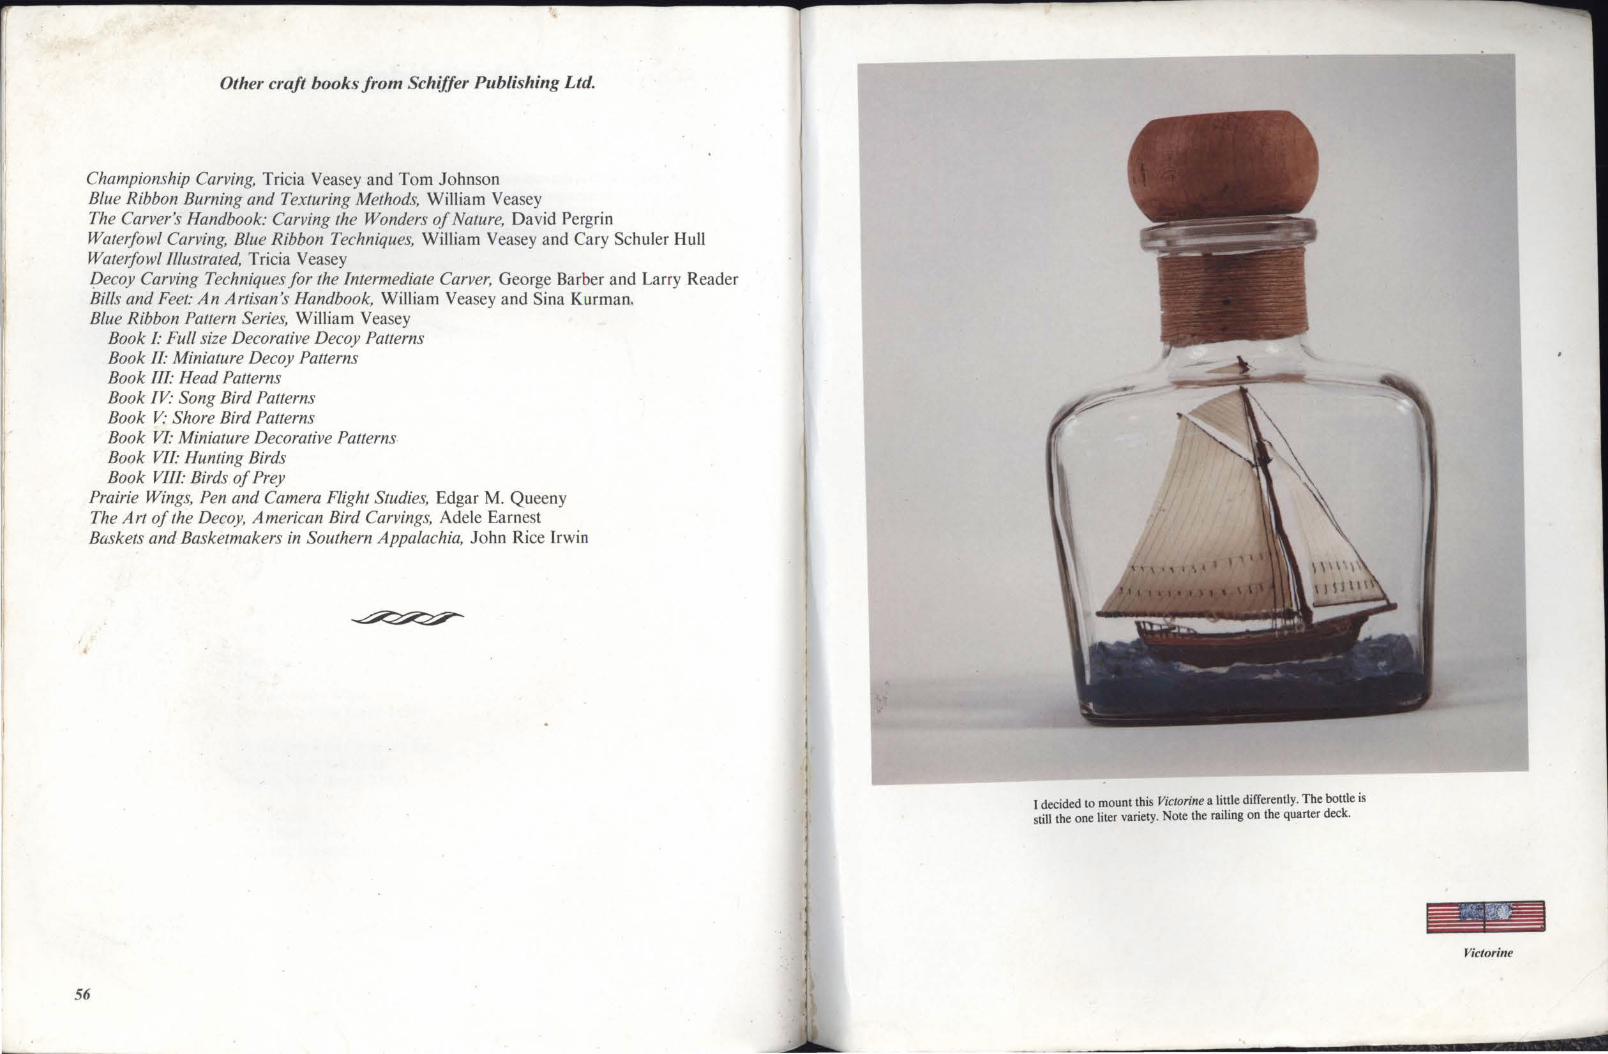
Other craft books from Schiffer Publishing Ltd.
Championship Carving, Tricia Veasey and Tom Johnson Blue Ribbon Burning and Texturing Methods, William Veasey The Carver's Handbook: Carving the Wonders of Nature, David Pergrin Waterfowl Carving, Blue Ribbon Techniques, William Veasey and Cary Schuler Hull Waterfowl Illustrated, Tricia Veasey I)ecoy Carving Techniques for the Intermediate Carver, George Barber and Larry Reader Bills and Feet: An Artisan's Handbook, William Veasey and Sina Kurman. Blue Ribbon Pattern Series, William Veasey
Book L Full size Decorative Decoy Patterns Book IL Miniature Decoy Patterns Book Ill· Head Patterns Book IV: Song Bird Patterns Book V: Shore Bird Patterns Book VI· Miniature Decorative Patterns Book VII· Hunting Birds Book VIII· Birds of Prey
Prairie Wings, Pen and Camera Flight Studies, Edgar M. Queeny The Art of the Decoy, American Bird Carvings, Adele Earnest Baskets and Basketmakers in Southern Appalachia, John Rice Irwin
56
1 decided to mount this Victorine a little differently. The bottle is still the one liter variety. Note the railing on the quarter deck.
< ~ - <;-: ==..,~J. .. ~ ... j -- -·--
Victorine