sharpeye music reader version 2 - music scanning · sharpeye music reader version 2 for the windows...
TRANSCRIPT
SharpEye Music Reader
Version 2
For the Windows r© operating system
c© Visiv Ltd 2006
http://www.visiv.co.uk
Contents
1 Introduction 3
1.1 System requirements . . . . . . . . . . . . . . . . . . . . . . . . . . . . . . . . . . . . . . . . . 31.2 Installation . . . . . . . . . . . . . . . . . . . . . . . . . . . . . . . . . . . . . . . . . . . . . . 31.3 Brief guide . . . . . . . . . . . . . . . . . . . . . . . . . . . . . . . . . . . . . . . . . . . . . . 31.4 Upgrading from version 1 . . . . . . . . . . . . . . . . . . . . . . . . . . . . . . . . . . . . . . 4
2 Overall Process 5
2.1 Image And Music Windows . . . . . . . . . . . . . . . . . . . . . . . . . . . . . . . . . . . . . 52.2 Scanning . . . . . . . . . . . . . . . . . . . . . . . . . . . . . . . . . . . . . . . . . . . . . . . . 62.3 Saving, Loading and Editing an Image . . . . . . . . . . . . . . . . . . . . . . . . . . . . . . . 72.4 Reading the image . . . . . . . . . . . . . . . . . . . . . . . . . . . . . . . . . . . . . . . . . . 82.5 Music Editor . . . . . . . . . . . . . . . . . . . . . . . . . . . . . . . . . . . . . . . . . . . . . 92.6 Hearing the music . . . . . . . . . . . . . . . . . . . . . . . . . . . . . . . . . . . . . . . . . . 92.7 Saving Music Files . . . . . . . . . . . . . . . . . . . . . . . . . . . . . . . . . . . . . . . . . . 92.8 Saving as MIDI . . . . . . . . . . . . . . . . . . . . . . . . . . . . . . . . . . . . . . . . . . . . 102.9 Saving as NIFF . . . . . . . . . . . . . . . . . . . . . . . . . . . . . . . . . . . . . . . . . . . . 102.10 Saving as MusicXML . . . . . . . . . . . . . . . . . . . . . . . . . . . . . . . . . . . . . . . . . 112.11 Multi page scores . . . . . . . . . . . . . . . . . . . . . . . . . . . . . . . . . . . . . . . . . . . 122.12 Batch processing . . . . . . . . . . . . . . . . . . . . . . . . . . . . . . . . . . . . . . . . . . . 122.13 Miscellaneous Options . . . . . . . . . . . . . . . . . . . . . . . . . . . . . . . . . . . . . . . . 13
3 The Music Editor 15
3.1 What it does and doesn’t do . . . . . . . . . . . . . . . . . . . . . . . . . . . . . . . . . . . . 153.2 Simple Editor . . . . . . . . . . . . . . . . . . . . . . . . . . . . . . . . . . . . . . . . . . . . . 153.3 Warnings about rhythm problems . . . . . . . . . . . . . . . . . . . . . . . . . . . . . . . . . . 163.4 Controlling Rhythm Analysis . . . . . . . . . . . . . . . . . . . . . . . . . . . . . . . . . . . . 163.5 Selections . . . . . . . . . . . . . . . . . . . . . . . . . . . . . . . . . . . . . . . . . . . . . . . 173.6 Deleting objects . . . . . . . . . . . . . . . . . . . . . . . . . . . . . . . . . . . . . . . . . . . . 173.7 Modifying Symbols . . . . . . . . . . . . . . . . . . . . . . . . . . . . . . . . . . . . . . . . . . 173.8 Moving symbols . . . . . . . . . . . . . . . . . . . . . . . . . . . . . . . . . . . . . . . . . . . . 193.9 Creating symbols . . . . . . . . . . . . . . . . . . . . . . . . . . . . . . . . . . . . . . . . . . . 193.10 Joining Staves . . . . . . . . . . . . . . . . . . . . . . . . . . . . . . . . . . . . . . . . . . . . . 203.11 Muting parts . . . . . . . . . . . . . . . . . . . . . . . . . . . . . . . . . . . . . . . . . . . . . 213.12 Edit Music menu . . . . . . . . . . . . . . . . . . . . . . . . . . . . . . . . . . . . . . . . . . . 213.13 Irregular Systems . . . . . . . . . . . . . . . . . . . . . . . . . . . . . . . . . . . . . . . . . . . 223.14 Editing guidelines . . . . . . . . . . . . . . . . . . . . . . . . . . . . . . . . . . . . . . . . . . . 223.15 Keyboard shortcuts . . . . . . . . . . . . . . . . . . . . . . . . . . . . . . . . . . . . . . . . . . 23
4 Problems and Tips 24
4.1 Problems and Tips - Introduction . . . . . . . . . . . . . . . . . . . . . . . . . . . . . . . . . . 244.2 Limitations on notation recognised . . . . . . . . . . . . . . . . . . . . . . . . . . . . . . . . . 244.3 Image quality . . . . . . . . . . . . . . . . . . . . . . . . . . . . . . . . . . . . . . . . . . . . . 244.4 Tips and techniques . . . . . . . . . . . . . . . . . . . . . . . . . . . . . . . . . . . . . . . . . 244.5 Grey notes won’t go . . . . . . . . . . . . . . . . . . . . . . . . . . . . . . . . . . . . . . . . . 254.6 Images from unusual sources . . . . . . . . . . . . . . . . . . . . . . . . . . . . . . . . . . . . 264.7 Black rectangles in display . . . . . . . . . . . . . . . . . . . . . . . . . . . . . . . . . . . . . . 26
5 Other information 27
5.1 Web site . . . . . . . . . . . . . . . . . . . . . . . . . . . . . . . . . . . . . . . . . . . . . . . . 275.2 Reporting Bugs . . . . . . . . . . . . . . . . . . . . . . . . . . . . . . . . . . . . . . . . . . . . 275.3 Acknowledgements . . . . . . . . . . . . . . . . . . . . . . . . . . . . . . . . . . . . . . . . . . 28

Chapter 1
Introduction
SharpEye is a music OCR program. It converts scanned images of printed music into MIDI, NIFF orMusicXML files. (NIFF and MusicXML are file formats for music notation.) This is a difficult task fora computer program to perform, and inevitably there will be some errors when the music is complex orcrowded, or the input image is of poor quality. SharpEye has a built in music notation editor which hasbeen specially designed for checking and correcting the output before saving it as a music file.
1.1 System requirements
You need a computer with W95/W98/Me/NT4/W2000/XP. If you have an old computer, memory may bean issue. SharpEye uses about 10Mb to 30Mb RAM to process an image, depending on the size of the scoreand the complexity of the music, and this amount msut be added to what your OS uses.
You will need a scanner to scan the printed music in.
It is not essential, but you will almost certainly want a music notation editor or a MIDI editor/sequencer (ifyou don’t already have one) so that you can play around with the output from SharpEye. Windows MediaPlayer (supplied with Windows) can play MIDI files saved from SharpEye, but the music will all be playedon a synthesised ‘piano’.
1.2 Installation
SharpEye is supplied as a single self-extracting file, usually with a name like “installsharpeye2.exe”. Double-clicking on this will start the installation. By default, this will put the program files in the folder “ProgramFiles\visiv-co-uk\SharpEye2” and add a few icons to the start menu.
To uninstall SharpEye, open the Control Panel and double click on Add or Remove Programs. Select SharpEye
Music Reader 2 from the list and click on the Add/Remove button.
1.3 Brief guide
If you don’t like reading manuals, and prefer to learn by trial and error, here is a brief guide to get youstarted.
Scanning
SharpEye 2 allows you to scan via the TWAIN interface. You can either use this or use another program todo the scan, save it as a TIFF file or bitmap (.BMP) file, and then load it into SharpEye.
3

In any case it should be a black and white scan. Scan at 300dpi for most music. A higher resolution may bebetter if the music is printed small. Try to make the scan as straight as possible.
Click on the blue arrow to start the conversion.
Music Editor
The right button is devoted to inserting new symbols.
You’ll often have to insert a symbol which is not quite what you want and then select and modify it. Thetools for modifying a symbol will not appear until you select it.
The black rectangles at the start of the score are for joining staves. You should normally join staves thatbelong to one instrument (usually a keyboard instrument).
Warnings about bars (measures) that SharpEye doesn’t understand are shown at the end of each measure,and individual notes that are not understood are shown in grey.
1.4 Upgrading from version 1
If you are familiar with using SharpEye version 1, you will find most of the facilities that you are used towork as before. Here are some things that you might miss.
Triplets and other tuplets
One thing which may cause confusion is editing of triplets and other tuplets. In version 1, it was only possibleto use triplets, and these were edited in a simple but limited way. Now the editing of triplets and othertuplets is a bit more complicated, but a lot more flexible. In order to apply a tuplet you have to select allthe notes and rests you want to affect, not just the middle one of a triplet. See section 3.7 for more details.
New features that are easily missed
• You can hold down the Shift key and drag out a box in order to select notes and rests in the musiceditor.
• The Home and End keys take you to the previous or next system.
• The Up and Down keys can be used to move a selected notehead up or down one step at a time.
• Ctrl-F4 closes the image window. Ctrl-Tab will move the keyboard focus from the image window to themain window.
• The Save and open temp file options for MIDI and NIFF are a bit less accessible than they were. Youmay find the keyboard shortcuts Alt-F-D-F and Alt-F-F-F useful.
• There is no “Progress” window during conversion, but the status bar shows the percentage complete.
4

Chapter 2
Overall Process
2.1 Image And Music Windows
There are two important windows in SharpEye, one that displays the input image and one which displaysthe music output. The music output window is SharpEye’s main window. It contains the main menu andtoolbar, and closing it will quit SharpEye.
Here is the music output window:
5

The Image window displays the scanned image. You can drag TIFF or BMP files in here. You can move andre-size it as you wish, and change the scale at which it is displayed. You can also create a zone to processpart of the image. As you edit in the music output window, a small red cross will show the correspondingposition in the image window.
If the image window has the keyboard focus it can be closed using Ctrl-F4, and Ctrl-Tab will make SharpEye’smain window have the keyboard focus instead.
You can change the window positions that SharpEye uses when it starts. Arrange the windows the way youwant, then click on Save window positions in the Options menu.
2.2 Scanning
SharpEye 2 allows you to scan via the TWAIN interface. This is available under the File menu, where youwill see options Acquire... and Select Twain source.... There is also a toolbar button for the Acquire option.
The Select Twain source... option allows you to choose which TWAIN device to receive images from, if youhave more than one. The Acquire option will start up the usual interface to your scanner (assuming it isTWAIN compatible). You should set the scanner options appropriately (see below) before scanning. Youcan also use another program to do the scanning, and save the image as a BMP or TIFF file. These filescan then be loaded into SharpEye, either by dragging to the input image window, or via File - Open Image
or a toolbar button.
Note that it is generally best to save the image after scanning, and before converting it into music, sinceSharpEye can then keep a reference to the saved image file, and load it as required when you are editing themusic. (This will become clearer once you start using the music editor, especially with multi-page scores.)You will get warning if you have not saved the image, but if you find this irritating you can turn it off: seesection 2.13.
General
Make the scan as straight as possible. SharpEye automatically copes with small amounts of skew, butaccuracy is highest when the scan is straight. Be sure that the printed music is flat on the scanning surface.If the paper is not flat, it’s likely that the image will be smudged or distorted, and this will confuse SharpEye.
Scanner settings - colours
You should set the colours to black and white. Different scanner drivers use different terms for a blackand white image. It may be described as “Monochrome” or “Line art” or “Bi-level” or “One bit per pixel
6

(1bpp)”, or there may be an “OCR” setting which is suitable. Note that “black and white”, which justuses those two colours, is different from “grey scale” which uses a range of 256 greys. From version 2.50,SharpEye will convert grey scale scans and files into the black and white format it needs, but this is notideal. Grey scale files uses more memory, disc space and time. If you use grey scale images SharpEye willdecide which greys become black and which become white automatically. If you use black and white scans,the decision will be made by the brightness setting in your scanner interface, so you can set it manually.Black and white scans therefore give you more control, while grey scale may be more convenient.
Scanner settings - resolution
You should set the resolution to 300dpi for most printed music. A higher resolution (eg 400dpi) may beuseful if the music is printed small or a lower resolution (eg 200dpi) if it is large. As a check to see if you’vegot things right, an uncompressed black and white scan of an A4 page at 300dpi will be about 1Mb in size,and an uncompressed grey scale scan of an A4 page at 300dpi will be about 8Mb in size. Another check:when you have loaded the file into SharpEye, and displayed it at 100%, the distance between the staff linesshould be very roughly 20 pixels. The standard mouse pointer is 16 pixels high.
SharpEye will attempt to read music when this spacing is as low as about 10, or as high as 40 or so, butaccuracy tends to suffer when the scale is too small and speed suffers when it is too large. People quite oftenthink that they will get better accuracy by increasing the resolution. It is very rarely useful to increase itbeyond the point where staff lines are 20 pixels apart. If thin lines are broken in the scan, it is better toobtain a darker scan, not a bigger one.
Scanner settings - brightness
The default brightness level is usually fine. One thing to watch is that with high quality printing, the stafflines may be very thin (less than 1/300 inch) and may become broken when scanned. In this case reducingthe brightness may improve things a lot. With poorer quality printing the lines are usually thicker, or alreadybroken, and the default brightness level is usually best.
Scanner settings - miscellaneous
Some scanners have settings such as ‘photo’, ‘halftone’ or ‘dithered’. These attempt to represent grey levelswith patterns of black dots and are not helpful for OCR (music or text), so turn these settings off. Optionssuch as ‘text’ or ‘line-art’ are probably a good thing. See the section on image quality in the on-screen helpto get an idea of what kind of scans SharpEye can cope with.
2.3 Saving, Loading and Editing an Image
You can save an image from the File menu in either Windows bitmap (.BMP) or TIFF format. In thecase of TIFF, the image will be compressed using the “CCITT4” compression method, which gives excellentcompression.
To load an image into SharpEye, you can drag the file from Windows Explorer into the input image window.You can also load images via an Open File dialog. Choose File - Open Image... from the main menu, or clickon the appropriate toolbar button, then double click on the file you want to load. In either case it will bedisplayed in the input image window.
SharpEye can load most black and white BMP and TIFF images. It can also load most grey scale BMP andTIFF files, but there is no advantage in using such images - they just take up more disc space and SharpEyeconverts them to black and white as it loads them. It can load most compressed TIFF images.
You can zoom the view of the image to different sizes. This doesn’t change the image, just the way it lookson screen. Either use View - Zoom Image or the two zoom buttons.
You can invert the image if necessary (swap black and white) from the Image menu.
You can also rotate the image by multiples of 90 degrees from the Image menu.
7
2.4 Reading the image
To convert the image, choose Read - Read from the main menu, or click on the button with the blue arrow.
This will start another program (the “music OCR engine”) which does the conversion. While this is takingplace, the status bar shows the percentage complete.
The conversion can take some time, depending on the size of the image and the complexity of the music -and the speed of your computer of course. Once the engine has finished, the result will be loaded into themusic editor for you to check and edit.
You can stop the reading process once it has started by choosing Read - Stop.
If the recognition is poor, please see section 2.2 above, and “Image quality” in the on-screen help.
Zones
If you want to process only part of the image you can create a zone around the area. You can use the mouseto drag out a rectangle in the image window. This can then be adjusted using the eight handles around itsborder, or moved as a whole by picking it up in the middle. You can delete it using the Delete key or fromthe Edit Image menu.
Music recognition options
You can control the recognition of some musical symbols under Options - Music recognition options... Thereare four check boxes which turn on or off the recognition of various objects. The first, Old style symbols,determines whether the following are recognised: old style clefs, old style flags (straight flags), old stylewhole notes (with the hole slanted like // instead of the normal \\) and old style rests where the quarterrest (crotchet rest) looks like a reversed eighth rest (quaver rest).
The second check box determines whether an unusual style of open note head (which is labelled ‘symmetric’)is recognised. You may find SharpEye recognises such heads even without this turned on, but it may improveaccuracy on some scores.
The third turns on the recognition of thin beams. Some music has beams which are just a thin line, sometimesas thin as a stave line. Also, beamed grace notes may require this option turned on.
The other buttons determine how small note heads are dealt with. SharpEye can either treat them as gracenotes, or as normal notes (but not both in the same score). The ‘normal notes’ option can be useful for cuenotes: SharpEye does not currently deal with cue notes as such, but this option may enable you to get thenotes into another program. Grace notes do not affect the MIDI files that SharpEye generates, so it is onlyuseful to recognise grace notes if you are using NIFF or MusicXML.
In general, it is best to leave these options off unless you need them, since they can lead to recognition errors.
Text recognition options
You can set various options to control the recognition of text in the image using the dialog under Options
- Text recognition options.... SharpEye can recognise three kinds of text: lyrics, guitar chords like “Am”,“D]7”, and musical directions such as “Andante” or “cresc”. In this dialog box, ‘other text’ means chords,directions, and any other non-lyric text which appears to belong to a stave. If you are using MIDI youshould turn ‘other text’ off, since it cannot be put into a MIDI file. If there are no lyrics, it is best to turn offlyric recognition, or some text may be misinterpreted as lyrics. The different kinds of text may be treateddifferently by a notation editor. (Also see section 2.9 under “Text and chords”.)
You can also choose a language for the lyrics using the drop down list. This will tell the recognition engineto use the frequency of trigrams (ie how often three letter sequences like “abc”, “ing”, “ijk” occur) for thegiven language, in order to resolve ambiguities. There is considerable similarity between languages at thislevel, so don’t worry if the language you want is not available (choose one that seems similar) or if you havelyrics in two languages (choose either). And don’t feel that you must set this ‘correctly’ for every scan.
When you set the above options, SharpEye automatically chooses an appropriate set of characters that itwill attempt to recognise. Occasionally, you may wish to override this using the check boxes in the lower
8

section of the dialog. Note that the more you characters you include, the more possibilities there are forerrors as well as for recognition - so don’t turn lots of characters on just because ‘they might be there’.
You can choose where SharpEye looks for lyrics and (guitar) chords. Here, auto (the default) means thatSharpEye will make the decision, which means that lyrics will be searched for below staves, while chordswill be searched for above and below, and assigned to the nearest stave. If you choose above staves or below
staves, this will force SharpEye to only look in the specified place. (For lyrics, there is currently (v2.67) nodifference between auto and below staves.)
Finally, the option Assign lyrics to up-stem voice tells SharpEye to assign lyrics to notes with up stems whenboth up and down stem notes line up with a lyric syllable. With this option off, SharpEye will assign todown stem notes in this situation. This option may be useful where there are two voices in a stave and youwant the lyrics assigned to a particular voice. It may affect how the lyrics can be edited in a notation editor.
2.5 Music Editor
Most of the time you are using SharpEye, you will be checking and correcting the output in the musicnotation editor. The next chapter is devoted to this.
2.6 Hearing the music
SharpEye can play the music as MIDI. This option is only intended as an aid to spotting errors. You shouldsave as MIDI and use a MIDI sequencer to change instruments, etc.
You will find three commands on the File menu (Play, Stop playing, Play current measure). There are threecorresponding buttons on the tool bar. The Play option will play from the current measure if there is one,otherwise from the start of the piece. The current measure is the measure in which there is one or moreselected symbols (notes, rests, clefs, key and time signatures). If there is no such symbol selected, or if thereis more than one measure selected, the current measure is not defined, and Play current measure will not beavailable.
The MIDI options will affect the tempo and volume, just as when you save as a MIDI file, but repeats arealways ignored.
2.7 Saving Music Files
You can save the music as a MIDI file, a NIFF file, a MusicXML file, or in SharpEye’s own format (.mro).If you save the music in SharpEye format, you can load it back later and continue editing. If you save itas a MIDI file, you can play the file or edit it in a MIDI editor/sequencer. You can also import MIDI filesinto most notation programs, but a lot of layout information is lost when you do this. NIFF and MusicXMLcontain layout information, but you will need a program that imports such a file to make use of it. SharpEyedoes not import MIDI, NIFF, or MusicXML files. You can find the usual save options under the File menu.The Save music and Save music as will save in SharpEye’s own format, with similar options in the MIDI,NIFF and MusicXML sub menus. There are also four save buttons. The one with the M is for SharpEyeformat, the others are for MIDI, NIFF, and MusicXML.
There is also an option on the NIFF and MIDI sub menus to save a temporary file and then immediatelyopen it (as if you had double-clicked on it). This provides a simple way of transferring a NIFF or MIDI fileto another program. It is not guaranteed to work with any program, and will of course depend on how youhave the file associations set up for .mid and .nif files.
By default SharpEye will only regard files that are saved in its own format as ‘safe’, so when you save asanother format, the music will remain marked as edited. You can change this by going to Options - Warnings
options and unchecking Warn if not saved in SharpEye format.
9

2.8 Saving as MIDI
There are a few options for MIDI output available from the Options menu:
• You can set the tempo for the piece. The tempo is in quarter notes (crotchets) per minute, regardlessof the time signature.
• You can set the MIDI velocity (ie volume) for all the notes in piece. This is in the range 0-127, andthe default is 64. For example, if you are using Cakewalk to work on the MIDI files, it is convenientto set this value to 100, since Cakewalk gives any new notes you insert a velocity of 100. Note that ifyou set the velocity near zero, you will get a very quiet and possibly inaudible MIDI file which can beconfusing!
• You can decide whether repeat signs are taken account of or ignored when generating the MIDI file.
• You can choose whether to include any lyrics that SharpEye has found. Note that it is not possibleto put more than one line of lyrics into a MIDI file - SharpEye puts in the top line of lyrics if there ismore than one. Also note that some programs that import MIDI files ignore any lyrics. When a staveis split (see below) you can decide whether the up-stem part gets the lower channel number.
• You can make SharpEye put different voices on different channels, so that notes with up stems will geta different channel number to those with down stems. This can be set per stave using the circles atthe start of the score. You can toggle between one circle (one channel output for that stave) or two byclicking on them.
• You can join pairs of staves. This puts both staves on one MIDI channel. This also changes the waythat SharpEye analyses the rhythm, and is described in more detail in section 3.10.
The MIDI format has both and channels, and this sometimes causes confusion. SharpEye always uses onetrack per stave, but allows channels to be assigned quite flexibly. To take a common example of an SATBscore for 4 voices, written on 2 staves as SA+TB, the tracks and channels will be assigned like:
S track 1, channel 1 track 1, channel 2 track 1, channel 1
A track 1, channel 1 track 1, channel 1 track 1, channel 2
T track 2, channel 2 track 2, channel 4 track 2, channel 3
B track 2, channel 2 track 2, channel 3 track 2, channel 4
where the first column is with no splits; the second column has both staves split and the Up stem parts on
low channels option off; and the last both staves split with this option on.
MIDI sequencers need to know the timing of notes, so grey notes are omitted when exporting MIDI files.
Short notes wrong
If notes have the wrong length when imported into a MIDI sequencer, check that the settings in the sequencerare appropriate. Sequencers often expect input to be played in on a keyboard, and may be set up to forcenotes into a particular rhythm. This may misinterpret short notes and rests in MIDI files.
2.9 Saving as NIFF
NIFF (Notation Interchange File Format) is a music notation format which can contain much more infor-mation than MIDI which stores little more than the sound of the music. For example, information aboutstem direction, beaming, expression marks such as staccato and accent, ties and slurs are all lost whenSharpEye makes a MIDI file. Even clefs and bar lines cannot be put into a MIDI file, though they may bereconstructed by the program reading the MIDI file. NIFF was designed to overcome these limitations andprovide a publicly documented format for interchanging music notation information between programs.
NIFF is becoming increasingly popular, but it is a very flexible format and different people are using it indifferent ways. SharpEye therefore gives you some control over the kind of NIFF it generates via the NIFFoptions dialog.
10

In order to make use of the NIFF facility you need a program that imports NIFF files. It is best to look atthe SharpEye web site www.visiv.co.uk for the latest information about this, since more and more programsare supporting NIFF. If your favourite notation program does not import NIFF, and you would like to useSharpEye with it, please ask the producers to add this feature.
Graphical and musical NIFF
The ‘Musical’ NIFF export writes a file which omits the grey notes. As long as you do not have the Relaxed,
allow overlong measures option set for rhythm analysis, the NIFF file will be rhythmically consistent, that is,notes will not over spill measures.
The ‘Graphical’ NIFF export writes a file similar to that generated by Smart Score (another music OCRprogram). Grey notes are included. In this case, there will be some rhythmic errors unless you ensureeverything is correct before exporting.
Both Musical and Graphical NIFF export include the positions of all the staves, notes and rests and someother symbols. The Graphical export leaves more work for the importing program to do, and may not beunderstood by some programs. On the other hand it includes the grey notes, so if the importing programcan cope with rhythmic inconsistencies, this may be an advantage.
Scan DPI
There is also an edit field where you can enter the scan resolution in DPI. It may seem strange to havethis under NIFF options, but it is only when saving as NIFF or MusicXML 1.1 that the scan resolution hasany effect on the way SharpEye behaves. If you set this correctly, the dimensions in the NIFF file will be(approximately) the same as the original. If it is set incorrectly, the whole NIFF file will be scaled, but itwill still be a valid NIFF file.
Text and chords
When exporting as NIFF, you can choose whether lyrics and other text are in a sans serif font (Arial), or aserif font (Times).
Finally, there is an option to export guitar chords (text like “Am”, “D]7”, etc) as plain text, or as NIFFchord symbols. If the NIFF importer understands NIFF chord symbols, they will become chords in thenotation program (which can have fret diagrams, transpose properly, etc), but not all NIFF importers arecapable of this.
Parts and voices
NIFF has provision for both parts and voices, with voices being a subdivision of parts. The precise meaningand function of parts and voices is not well defined so different programs may interpret them slightly differ-ently. One thing does seem clear, which is that it should be possible to extract a single part from a NIFFfile (eg for an individual performer), and for this reason SharpEye gives you some control over how notes aredivided into parts. (Voices are assigned automatically within parts.)
Normally there is one part per stave. If you join two staves at the start of the score, they will become onepart in the NIFF file. You can also split a single stave into two parts, so that SharpEye will give notes withup stems a different part to those with down stems. This can be set per stave using the circles at the startof the score. You can toggle between one circle (one part for that stave) or two by clicking on them.
2.10 Saving as MusicXML
MusicXML is a format being developed by a company called Recordare. See www.recordare.com forgeneral information about the MusicXML format and software which supports it.
The facilities for saving as MusicXML are on the File menu. In general, programs that import MusicXMLneed to know the timing of notes, not just where they are, so grey notes are omitted when exportingMusicXML files.
11

MusicXML 1.0 and 1.1
The MusicXML options dialog box (which is opened from the Options menu) allows you to choose to exportMusicXML 1.1, or the default 1.0. The main difference is that 1.1 includes more layout information. Mu-sicXML 1.0 cannot represent detailed graphical information about the music. However it can be useful topreserve the page and system breaks in the original scan, and these can be optionally included. If you chooseto export MusicXML 1.1, the extra layout information includes the page and system breaks, page size andmargins, vertical spacing of systems and staffs, staff heights and measure widths. You will of course need anotation program that understands MusicXML 1.1 to take advantage of these features. Note that SharpEyedoes some ‘tidying up’ when calculating these values. For example, in a multi-page score it estimates a singlepage size and set of page margins, and it never uses more than two stave sizes (ie either normal size only, ornormal and cue size). throughout a score.
Scan DPI
There is also an edit field where you can enter the scan resolution in DPI. It may seem strange to have thisunder MusicXML options, but it is only when saving as MusicXML 1.1 or NIFF that the scan resolution hasany effect on the way SharpEye behaves. If you set this correctly, the dimensions in the MusicXML 1.1 filewill be (approximately) the same as the original. If it is set incorrectly, the whole MusicXML 1.1 file will bescaled, but it will still be a valid MusicXML 1.1 file.
Parts in MusicXML
This works in a similar way to NIFF. Normally there is one part per stave. If you join two staves at thestart of the score, they will become one part in the MusicXML file. You can also split a single stave intotwo parts, so that SharpEye will give notes with up stems a different part to those with down stems, usingthe circles at the start of the score. MusicXML handles parts somewhat differently to NIFF, so if you splita stave, each part will have its own stave.
2.11 Multi page scores
Music scores are often more than one page. You can deal with these in several ways. One option is toprocess pages individually as usual, and join them together in a MIDI or notation editor. Alternatively, youcan convert the pages individually into SharpEye’s own output format, and then join them in SharpEye (seebelow). A third, more automatic option is described in the next section.
For example you might have scans of a three page score called page1.tif, page2.tif, and page3.tif. You can loadthese one by one into SharpEye and convert them, saving them as page1.mro, page2.mro, and page3.mro.Then load page1.mro into SharpEye, then page2.mro, then page3.mro. Each time you load an output fileinto the editor when there’s already a score there, you will be asked if you want to replace the existing scoreor join the new one onto the end. Obviously in this case you should choose Append.
You can load the *.mro files by double-clicking on them, by dragging them into SharpEye’s main window,or via the Open File dialog. You can do corrections before and after joining. SharpEye will automaticallyload the correct image as you edit different pages, as long as the image files are still where they were whenfirst converted.
Appending a file to an existing score is a ‘large’ operation, so by default SharpEye warns you to save yourwork before appending. If you find these warnings annoying, you can turn them off by going to Options -
Warnings options....
2.12 Batch processing
SharpEye has a ‘batch mode’, so that many images can be processed at once. These might be several pagesfrom the same score or separate pieces of music. The batch mode converts a set of image files into musicfiles in SharpEye’s own format. It can also join the output files together. In order to set up a batch, choose
12

Batch process from the Image menu. This opens a dialogue where you can choose the images to be convertedand the folder where the output music files will be put.
The Add files... button opens the standard Open File dialog, where you can select one or more images (TIFFor BMP files). You can add images from several folders, but note that they must all have different names.
If you want to remove some files from the batch, select them and use the Remove selection button.
You also need to choose an output folder where all the music files (*.mro files) will be put. The Browse...
button allows you to do this. If there are already music files in the output folder with the same name(s)they will not be overwritten - instead there will be an error for this image. It is advisable to use an emptyfolder for the output folder to avoid confusion.
If you check the Join files after conversion option, all the output music files will be joined together to forma single file, in addition to the individual files. Obviously, this only makes sense if the images are scans ofpages from the same score. The files are joined in alphabetical order of file name, as they appear in thebatch window. The name of the combined file is “AllPages” by default, but you can edit this in the editbox. Now you can click on Start batch to start the processing. A window will open to show you how thingsare going. This shows a list of the files and their status. The image being processed will have “Converting”next to it. Once it is finished it will become “Done” or “Error” if the conversion fails for some reason. Ifthere are any errors, a log file “SharpEye batch errors.txt” will be created in the output folder where youcan look for more details. This will overwrite any previous file with the same name.
While a batch is being processed various options are disabled. You can stop the batch by clicking on theStop batch button in the Batch progress window, or by closing this window.
2.13 Miscellaneous Options
This covers the setting and saving of various options in the options menu.
MIDI output options
See the section 2.8 for the meanings of these settings. These are saved when you exit the program so thatthey will still be as you set them next session. The settings in the MIDI options box are used for newlyconverted images. However, note that these values (except the Up-stem parts on lower numbered channels
option) are also saved in the corresponding SharpEye music file (.mro file), so if you load a SharpEye file,this will replace the settings in the MIDI options box.
NIFF output options
See section 2.9 for the meanings of these settings. These are saved when you exit the program. They arenot stored in .mro files.
MusicXML output options
See section 2.10 for the meanings of these settings. These are saved when you exit the program. They arenot stored in .mro files.
Music and Text Recognition options
See section 2.4 for the meanings of these settings. These are saved when you exit the program.
Warnings options
There are three options here. See section 2.11 for the one about appending, section 2.7 for the one aboutsaving in SharpEye format, and under 2.2 for the one about reading an unsaved image. These are savedwhen you exit the program.
Rhythm analysis options
See section 3.3 for the meanings of these settings. These are saved when you exit the program.
13

Window Positions
You can arrange the image and music windows as you like, and then choose Options - Save window positions.This will set the initial positions for the next time you start SharpEye.
Saving and loading options
Sometimes it may be useful to save all the current options in a file which you can load later. The Save
options... and Load options... menu items allow you to do this. The options are saved in a plain text file, butit is not recommended that you edit these files in another program.
Directories for image and music files
SharpEye saves the directories (folders) you use for images, its own music files, MIDI, NIFF and MusicXMLfiles, and the batch directories when you exit the program.
14
Chapter 3
The Music Editor
3.1 What it does and doesn’t do
The music editor in this version of SharpEye never formats the music. For this reason alone it is not suitableas a general purpose music notation editor. It is designed only for correcting the output from the musicOCR process. On the other hand, it has several features that are designed to help with the corrections.
The way you edit music in SharpEye is more ‘graphical’ and less ‘musical’ than a normal notation editor. Ingeneral, you should think in terms of drawing onto the score, in order to make it look like the original. Forexample, adding a clef to most notation editors will change the position of following notes in order to keepthe pitches the same. This is inappropriate for correcting scanned music, so SharpEye keeps the position ofthe notes the same instead. Another example: when you enter notes in most notation editors, you tell theprogram when the note should occur, and which voice it belongs to, and the program decides exactly whereto put the note. SharpEye works the other way: you decide exactly where the note should go, and SharpEyeanalyses the measure to decide the voice and start time for the note.
The music editor window is linked to the image window, so that when you click in the editor, the imagescrolls to the same place in the image. A red cross shows the point in the image which corresponds to thecursor position. Do not rely on this cross for accurate positioning if staves are of different sizes, or notexactly straight. It displays warning symbols at the end of each bar (measure) that has errors or ambiguitiesin the rhythm. It also draws any note heads that it can’t understand in grey. This works a bit like a spellchecker, and directs your attention to likely errors.
It is intended to be easy to learn. Almost everything can be done with the mouse and the Delete key.SharpEye does not try to ensure that what you do looks good. There are many ways of writing a piece ofmusic which will produce the same sound (and in most cases the same MIDI file). Some are sensible andsome aren’t - SharpEye doesn’t try to make you sensible! SharpEye is also fairly limited in its ability toavoid clashes of symbols, and in complex or crowded music symbols may overlap one another.
3.2 Simple Editor
From the View menu, you can open a dialog box which provides some simple editing facilities. It is aimedat visually impaired users, and at those who want to get the score into another program without usingSharpEye’s normal editing facilities. It enables you to set the initial key and clef for each stave, andoptionally copy these to other staves. If SharpEye misreads clef or key changes that occur later, you will notbe able to correct them using this dialog.
The dialog shows the information for one stave at a time, and the Previous and Next buttons allow you tomove from stave to stave. The score is not changed until you click on the Apply button. If you move fromone stave to another without clicking on Apply, any changes you made to the old stave are ignored.
15

The clef and key signature can be set from a dropdown lists. Once you have set these correctly, you cancheck the boxes to copy the clef or key to other staves. Copying to other staves in system means copyingvertically, while copying to later systems means copying horizontally to the same stave in other systems. Ifyou check both these boxes the clef or key will be copied to every stave in the score.
The radio buttons allow you to split a stave into two parts or join a stave to the next stave, giving the samefunctionality as the circles and rectangles at the start of the score. See section 3.10 and the ones on savingthe music as MIDI, NIFF and MusicXML for more information.
3.3 Warnings about rhythm problems
SharpEye uses two methods to indicate problems with rhythm. At the end of each measure that contains aproblem, just below the barline, it displays a warning symbol (a blue triangle). In such a measure, it mayalso display some of the notes in grey instead of black. This means SharpEye is not sure when they shouldbe sounded. SharpEye also displays ties, slurs and lyrics in grey if it doesn’t know which notes to attachthem to.
The status bar shows how many measures still have warnings.
If you see the warning sign, but no grey notes, it means there are not enough notes or rests to fill the measure.This is probably because SharpEye has missed a note or has made a note too short, perhaps by missing anaugmentation dot. If there are warnings on lots of measures, it may be a time signature error. If SharpEyemisses, or misreads a time signature, or if the music is from the middle of a piece and so contains no timesignature, it will cause lots of warnings.
If there are grey notes, there are two main causes. The first is the opposite of the problem above: SharpEyehas ‘seen’ a note (or rest) that is isn’t really there, or made a note too long by missing flags or beams, orthere is a time signature error.
The second cause of grey notes is a bit more subtle. It may be that there are neither too few nor too manynotes, but it is still not clear when they should sound. This typically happens in keyboard music, where twostaves are used for one instrument. By default SharpEye looks at each stave individually when analysingmeasures. But keyboard music often only makes sense by looking at both together. The best cure here isto join the two staves at the beginning of the score. An alternative is to add rests to fill in the gaps in eachstave, but that’s usually a lot more work!
3.4 Controlling Rhythm Analysis
You can control how strict SharpEye is when it analyses the rhythm, using the Rhythm analysis options dialogfrom the Options menu.
• Strict: SharpEye expects every voice in every measure to be complete (ie to exactly fill the measure).
• Normal: SharpEye expects every measure to contain at least one voice which is complete, and willassign start times to notes from incomplete voices if they line up with those in a complete voice, butleave other ones grey.
• Relaxed, no overlong measures: SharpEye will assign start times to all notes that it can without anynote ‘over spilling’ the measure, ie ending after the measure is supposed to end according to the timesignature.
• Relaxed, allow overlong measures: SharpEye will assign start times to all notes, even if they over spillthe measure.
In the case of music with one voice per stave, there is little difference between the first three options. Thingsget more interesting when there is more than one voice. The Strict setting is appropriate if you have musicwhere two independent parts are written on one stave, using up stems for one part and down stems for theother. This setting will give a lot of spurious warnings on some piano music, where voices are used muchmore flexibly. Either Normal or Relaxed, no overlong measures would be better for this.
16
It also depends on whether you want to make sure the music is as correct as possible before exporting (choosea more strict setting), or whether you prefer to get the music into another program and do any correctionsthere (choose a more relaxed setting). The Relaxed, allow overlong measures is likely to confuse importingprograms, but it may be useful in some cases.
You can also control the maximum number of voices that will be assigned per stave using the radio buttonsnext to Maximum voices per stave. This can be useful in spotting errors. If you know that there should neverbe more than two simultaneous voices, and you set this to two, you will get rhythm warnings wheneverSharpEye has used three or more voices in a measure.
3.5 Selections
You can select objects by clicking on them, and they will become red. Once they are selected you can modifythem or delete them.
Clicking on a barline or time signature will select all the ones vertically above and below in the same system(ie all the ones that occur at the same time).
When you click on a notehead that is part of a chord, it will become red and the rest of the chord willbecome dark red. This is to indicate that you can modify either the chord or the single note but pressingthe Delete key will just delete the note. You can select the whole chord by double-clicking.
You can select multiple notes, chords and rests by using Control-click, as long as they are all in the samesystem. You can also hold down the Shift key, and drag out a box with the mouse to make a selection.
You can select a complete line of text by double-clicking on it. It can then be deleted but not otherwisemodified. When you have selected something, you can delete it with the Delete key. Also a toolpane withdark red symbols will open at the top for modifying the selection.
3.6 Deleting objects
Symbols are deleted by selecting them and using the Delete key, the Backspace key, or Ctrl-X.
Note that some objects - augmentation dots, triplets, accidentals, and articulation marks such as staccato,tenuto, accent and the pause sign (fermata) are regarded as properties of notes and not as symbols in theirown right. In order to ‘delete’ these, you should select the note or chord they belong to and modify itappropriately.
If you select a lyric word, or other text, the delete key operates in the editable field in the toolpane, iedeleting individual letters. If you select a whole lyric line (by double-clicking) you can delete it with thedelete key.
You cannot delete the rightmost barline in a system.
3.7 Modifying Symbols
The general method is to select the object(s) you want to change in the score, then click on the symbol inthe toolpane that you want to change it into.
Clefs and keys
These are straightforward, the only slight complication is when a key signature changes the key to C. Thenatural sign in the key signature toolpane is for this. If you change an existing key signature using this, itwill show as the right number of natural signs to cancel the last key signature.
Also see section 3.12 for how to edit many clefs and key signatures at once.
17

Time Signatures
If you can see the symbol you want, click on it as with clefs and keys. For less common time signatures,enter the signature in the edit box (eg “12/16”) and then click on the p/q symbol next to it.
Lyrics and other text
You can edit lyrics a word (or syllable) at a time in the edit field. If you insert a space in the word, SharpEyewill split the word into two at this point. It attempts to attach the parts to nearby chords. If this fails, oneor both parts will become grey, and you will need to move them.
Other text can also be edited in a similar way, but is not divided into syllables, you just edit the line of textas a whole. Note that in order to make a visual distinction between lyrics and other text, SharpEye displayslyrics in a sans serif font (Arial) and other text in a serif font (Times), and that guitar chords appear ingreen. Editing of text is quite limited. You cannot change the style (bold, italic) or size of the text or addnew lines of text.
Dynamics
These are straightforward: the symbols pppp ... ffff and various others as well as hairpins can be edited.
Rests
You can change the kind of rest and also set the number of augmentation dots. To remove any augmentationdots, click on the empty circle. (This circle is used to mean ‘none’ or ‘nothing’ elsewhere too.)
To convert a rest into a multi-measure rest, first make sure the all other measures in the system have nonotes in them, then enter the required number of measures in the edit box at the right, and click on themulti-measure rest next to it.
You can set or remove a pause sign (fermata). The fermata symbol toggles the symbol on or off.
You can set or remove a triplet or other tuplet on any rests and notes in one measure. See under modifyingnotes for more details.
Notes and chords
Most modifications apply to a note or to the whole chord if the head is part of a chord. You can selectmultiple chords and apply the same operation to all at once. A couple of operations only make sense if morethan one note or chord is selected.
At the left of the toolpane there is a tool for swapping the stem direction of a note. This will swap all thenotes in a beamed group if you select one note in the group.
Next is a tool for swapping between flags and beams. If you select some notes which are not beamed togetherand click here, SharpEye will attempt to join them. Note that SharpEye will join quarter notes (crotchets)in this way. This may not make musical sense, but it is useful for correcting common recognition errors (egdue to broken stems). If you select one or more notes that are all within a beamed group, this will separatethem into single notes with flags. The notes must all be in the same measure and stave.
You can set the number of augmentation dots as with rests.
You can change the duration by clicking on one of the note symbols.
Below the note symbols are various articulations and ornaments. These toggle the symbol on or off.
You can change the accidental for a single notehead, or remove it by clicking on the empty circle.
To the right of the accidentals is a tool for vertically aligning selected notes. They must all be in thesame measure, but not necessarily in the same stave. The horizontal positions of the selected notes will beaveraged.
18
Next to the right is a tool for adding and removing ties. If a note or chord has a tie to its right this willremove it. Otherwise SharpEye will try to add a tie from the note or chord. Note that slurs are drawn inthin lines, and ties with thicker lines to help distinguish them. Also note that ties or slurs which are notattached at both ends are shown in grey. Ties and slurs can also be edited by dragging - see the next section.
Below the tie symbol are two tools for swapping between between grace note heads and normal ones. Theright-hand one also adds a slash to make an acciaccatura (if the note is not beamed).
You can add triplets and other tuplets by selecting the notes and rests you wish to affect, and using the“–n–” symbol. The edit box below is used to choose the kind of tuplet. It is entered as two numbers witha colon : between. You should read “N:M” as “N notes in the time of M”. Common values are “3:2” fortriplets, “2:3” for duplets, and “5:4” for quintuplets. To remove a tuplet, select any note in the tuplet anduse the “–O–” symbol.
3.8 Moving symbols
You can move some objects by dragging with left button.
Noteheads can be moved up and down, and placed either side of the stem. You can also use the up anddown arrow keys to move a selected head up or down one step at a time.
Rests can be moved freely, as long as they stay in the same measure and stave.
Clefs and key signatures can be moved horizontally, as long as they stay in the same measure and stave.Lyric words can be moved horizontally within the same line.
Slurs can be moved within a system. If you drag near one end you will move that end; the other end staysfixed. If you drag near the middle you will be able to move the slur as a whole.
Dynamics (ppp...fff and hairpins) can be moved within a system. They will be attached to the stave aboveunless they are above the top stave of a system, or very close to (touching or almost touching) the stavebelow. It doesn’t matter much which stave they’re attached to in SharpEye, but it may affect how otherprograms interpret the NIFF and MusicXML files that SharpEye makes. If you drag near the end of ahairpin you can change its length. Drag near the middle to move it as a whole.
3.9 Creating symbols
The right button
You always use the right button to insert things. If you have been selecting things, the first right clickwill not insert anything, but will show the insertion toolpane, with a symbol similar to the last selectionhighlighted. The insertion toolpane uses green symbols to distinguish it from the modification tool panes.
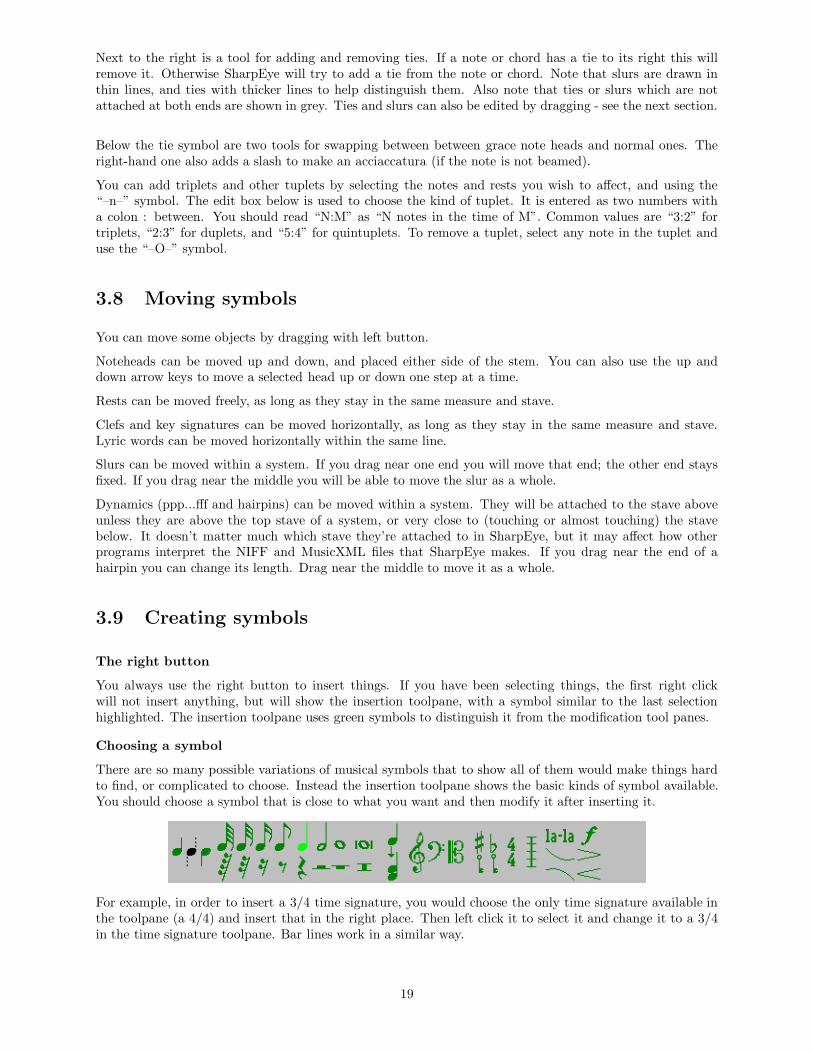
Choosing a symbol
There are so many possible variations of musical symbols that to show all of them would make things hardto find, or complicated to choose. Instead the insertion toolpane shows the basic kinds of symbol available.You should choose a symbol that is close to what you want and then modify it after inserting it.
For example, in order to insert a 3/4 time signature, you would choose the only time signature available inthe toolpane (a 4/4) and insert that in the right place. Then left click it to select it and change it to a 3/4in the time signature toolpane. Bar lines work in a similar way.
19

The three shapes of clef can be chosen directly. If you need a tenor clef you need to insert an alto clef (Cclef) and then change it.
There are two key signature symbols, one for flats and one for sharps, which insert a single sharp or flat. Forkeys with more than one sharp or flat, insert either of these then modify it. If you need a key change to thekey of C insert either of these then change it by clicking on the natural sign in the key signature toolpane.
You can choose all the basic durations of rests, and add augmentation dots later if need be. You can convertany type of rest into a multi-measure rest.
Notes and chords are a little more complex. You can only insert notes with flags, not beams. You can setthe stem direction using the three symbols on the left (up stem, let SharpEye decide, down stem).
To make chords, you add note heads to notes that are already there. For this use the symbol (which showsa single note and a two-note chord) just to the right of the notes and rests. Do not try to make chords bylining up two notes - SharpEye will regard them as separate notes and they will not behave as expected.
To insert a lyric word, choose the “la-la” symbol. Note that it is only possible to edit text in an existingline of lyrics but not to insert a new line. Sometimes SharpEye will miss a complete line (usually when thesyllables are few and far between) and you will have to enter the text in a notation editor. Likewise it is notcurrently possible to add other text, only to correct what is there.
To insert a slur, choose one of the curves just below the “la-la” symbol.
To insert a dynamic (ppp...fff and hairpins) choose the “f” symbol for ppp...fff and one of the symbols belowfor hairpins. As when moving a dynamic, they will normally be attached to the stave above. (See thatsection for more details.)
When you have chosen a symbol to insert, the pointer will change to indicate this, but remember to use theright button - the left button will still select things.
3.10 Joining Staves
It is sometimes necessary to join two adjacent staves in a system, usually because they are both to be playedby one instrument (eg keyboard or harp). The pair of staves is known as a grand staff. Joining staves in thisway enables SharpEye to analyse the rhythm properly, and will put both staves on the same MIDI channel.SharpEye can recognise the braces which are usually used to indicate a grand staff, but you may wish toover-ride this.
The black rectangles at the start of the score are for joining staves. Initially these are usually horizontal,indicating the staves are separated. If you click on one, it will become vertical, joining a pair of staves. Youcan reverse the operation by clicking again.
It is not always necessary to join staves in keyboard music. Sometimes the right hand and left hand partsmake sense independently. Occasions when it is necessary include:
(1) Where a single melody line is written on two staves, wandering between both, and with no rests to fillin the measures where no notes are sounding.
(2) When the main rhythm is given by the left hand part of a piece for keyboard, and notes are aligned withthis in the top stave without rests or other notes to indicate when they sound.
On the other hand, it can be useful to separate two staves in a grand staff in order to help spot rhythm errors.If the two staves have independent left-hand and right-hand parts, which should make sense individually,you may wish to separate them as this can reveal more errors.
If you’re wondering what the circles at the start of the score are for, see sections 2.8, 2.9, and 2.10.
Note for experts: It might seem better if SharpEye always looked at neighbouring staves in a system toanalyse the rhythm. However there are problems with this approach as well. While the rule that notes thatsound together should be vertically aligned is usually followed, it is not always the case in printed music, sothis assumption can lead to errors too. Also, if SharpEye makes an error in one stave, it might spread intoother staves if it relied too much on vertical alignment. Future versions may handle this differently.
20

3.11 Muting parts
Sometimes it can be useful to mute a part when checking for errors. You can do this by using Control-clickon the circles at the start of the score. This will toggle the part on or off, and is indicated by an outline circlefor a muted part. These settings are not saved in SharpEye’s own format, nor do they affect the export inany format.
3.12 Edit Music menu
This menu contains some options for making ‘large scale’ changes to the score in order to save time. Someof the options relate to ‘the current measure’. This means the measure (bar) in which there is one or moreselected symbols (notes, rests, clefs, key and time signatures). If there is no such symbol selected, or if thereis more than one measure selected, the current measure is not defined, and the option will not be available.
Undo
The first option is Undo, which is a one step undo.
Editing clefs and key signatures
The next two, Copy clef to and Copy key sig to work in a very similar way. First you select a clef or keysignature in the score. Then you can copy this symbol to the start of other staves, where it will replaceexisting symbols of the same type if they exist. All staves in this system means the clef or key signature willbe copied ‘vertically’ that is, up and down to other staves but not to other systems. This stave from here on
will copy ‘to the right’ but will only affect one stave throughout the score. All staves from here on will copyvertically and to the right.
Recalculate triplets
SharpEye can recognise triplets, duplets, quintuplets, and sextuplets (2,3,5,6) as long as they have a bracketor a beam which indicates which notes belong to them. Since triplet signs are often omitted, it also analysesthe rhythm and in most simple cases can determine which notes should be triplets. It does this calculationwhen a new image is converted, but it can also be useful to let SharpEye have another go at finding tripletsonce you have corrected some errors - especially if you have corrected or added a time signature. On theother hand, if you have already edited some triplets, this might overwrite what you have done. You caneither let SharpEye recalculate triplets for the whole score, or from the current measure (bar) onwards, sothat it will not affect earlier measures.
Delete system
You can either delete a single system, or all systems from the current one (the one containing the currentmeasure) onwards.
Delete stave
In order to use this you must select a symbol in the first system of the score, in the stave you want to delete.The stave is removed from the entire score, following the green arrows.
Split two-note chords
This option is for dealing with a particular situation where two parts (often two vocal parts in SATB music)are written using up and down stems in some places, and as two note chords in others. This can confusethe rhythm analysis, and also cause difficulties when the music is exported to another program. This isespecially important if you wish to extract the parts - the notation editor may not allow you to separate twonotes that belong to one chord. This tool allows you to convert such chords into two separate ones. It canbe applied to the notes that are selected, or to all notes in the current stave, or to all notes in the currentstave and the same stave in all later systems.
21

Go to next rhythm warning
This will scroll the music editor so that the next measure with a rhythm warning will appear near the topleft of the window. There is also a toolbar button for this.
3.13 Irregular Systems
If SharpEye finds systems with different numbers of staves in the page (or when appending, in the score)it will add extra empty staves at the bottom to make the score ‘rectangular’. These ‘invented’ staves areshown in grey, and you cannot add notes to them.
In order to deal with scores like this, you can use the green arrows that are shown between systems. Bydefault they join each stave to the corresponding one in the next system, ie, they are ‘parallel’. This maybe correct, but often it isn’t. If this is wrong, you can drag the arrow heads up or down to join the correctpairs of staves.
For example, it may be that all instruments are shown on the first system of a score, but on later systems,instruments are dropped if they are not playing at that point. SharpEye will add empty staves at the bottom,but unless it happens to be the bottom instrument that was dropped, this will mean that some instrumentsare mismatched. However, if you change the linking arrows you can correct this, by linking the missinginstruments to the empty staves.
Here is another example. A piece for piano and voice has an introduction with two staves for piano only,then the voice comes in on a third stave above the piano. At the point where the voice comes in, you needto use the green arrows to join the invented stave to the voice like this:
When you export the music as MIDI, NIFF, or MusicXML, SharpEye will respect the way the staves arelinked. It also attempts to put the staves in the correct overall order (for example in the case above thevoice should be above the piano throughout). To do this it looks for the first system with no invented stavesand uses the order of the staves in this system.
Not every score layout can be dealt with in this way, especially when an instrument or group of instrumentsuses a variable number of staves throughout the piece. In such a case you may have to deal with the scorein sections and join them together with a music notation or MIDI editor.
3.14 Editing guidelines
If you’re not sure how to go about checking and correcting a score, here are some suggestions.
22

• Check the time signature(s) first. There’s usually just one at the start of the music, but some music haschanges in the middle. If there are warnings on most of the measures, the time signature is probablywrong.
• Next check the clefs and key signatures. These usually occur at the left of each system, sometimes alsoin the middle. If you export and play the MIDI file, and it mostly sounds OK, but it sounds horriblefor some section(s), its likely to be this kind of error.
• Look at all the measures marked with warnings.
• Remember that the warnings are like those from a spell checker and don’t catch all errors. Proof-readingmusic to ensure there are no errors at all is difficult. Use your ears as well as your eyes.
• Editing of ties, slurs and lyrics is usually best left to last. Remember that they will be shown in greyuntil SharpEye can attach them to notes.
If you have a MIDI sequencer or notation editor it is up to you how much editing you do in SharpEye andhow much you leave to do later. It is almost essential to ensure the time signatures, clefs, key signatures andbar lines are correct before exporting, but detailed note editing can be done either way. In general, MIDIsequencers and notation editors need to know the timing of notes, not just where they are, so grey notes areomitted when exporting MIDI files and MusicXML files. For NIFF files you can choose whether to includethem (see Saving as NIFF).
3.15 Keyboard shortcuts
The Home and End keys will scroll the music editor to the previous or next system. If a notehead is selected,the up and down arrow keys can be used to move it up and down one step at a time. There are also somekeyboard shortcuts to speed up the process of correcting errors which use the function keys. Not everythingcan be done in this way, only the more common operations.
F1 starts the SharpEye help.
The other function keys only operate when inserting, and when modifying notes and rests. The keys F5
through F10 are assigned note durations as follows.
F5 F6 F7 F8 F9 F10
1/32 1/16 1/8 1/4 1/2 1
In insert mode, these select notes of these durations. In modify mode, they changed the selected rest ornotes to these durations.
When in insert mode, F2, F3, and F4 can be used to set the stem direction of the note to be inserted, in thesame order as the toolpane: F2=up, F3=auto, F4=down. F11 selects the “add head to chord” option. Whenmodifying notes, F2 swaps stem direction, F3 changes flags to beams or vice-versa, F4 cycles through zero,one or two augmentation dots, and F11 cycles through the common accidentals: none, sharp, flat, natural.When modifying rests, F4 cycles through zero, one or two augmentation dots. The available shortcuts aresummarised in the diagram below. The first line relates to the create toolpane, the others to modifying notesand rests.
23

Chapter 4
Problems and Tips
4.1 Problems and Tips - Introduction
There is a lot of variety in musical scores: both the music itself and the styles and conventions used in thelayout. There is much variation in the quality of printing. There are also a lot of scanners available, oftenwith many options, which can be confusing. All this means you may have some difficulty getting SharpEyeto work well. This section tries to deal with the most common problems you’re likely to encounter, andwhere possible, gives advice about dealing with them.
If you have a problem that is not covered here or think you have found a bug in SharpEye, there is informationon the SharpEye website and on reporting bugs in sections 5.1 and 5.2.
4.2 Limitations on notation recognised
This describes some limitations on the kind of music you can expect SharpEye to read.
• It only recognises standard 5-line staves.
• It does not deal properly with scores where the same instrument or instrument group uses differentnumbers of staves in different systems.
• Chords and groups of beamed notes which span more than one stave are read, but converted intoone-stave objects.
• There are some limits on size - maximum 50 staves per system, maximum image size 15000 width by30000 height - which are not likely to cause practical problems. Only 15 channels are exported asMIDI. (Channel 10 is avoided since it is usually used for percussion.)
4.3 Image quality
Please see the corresponding section in the on-screen Help, since it is important to compare what you seeon screen in the manual with what you see on screen in SharpEye’s image window.
4.4 Tips and techniques
24
Adding notes to the right stave
Sometimes, notes on ledger lines may be much nearer a neighbouring stave than the one they should belongto, which can cause a problem when inserting such notes.
When deciding which stave to insert a note into, SharpEye looks at symbols already belonging to each staveas well as the position of the staves themselves. So if there are already notes on ledger lines nearby it willusually add further notes to the correct stave. But if not, add the note near the correct stave, then drag itup or down to the right position.
Selecting overlapping note heads
When two note heads coincide (as when two voices sound together) you can select one head by clickingtowards its stem. Eg, click just above the centre of the head to select the one with the up stem.
Partial measures
At the start of a score, and next to bar lines which are double lines, or repeat signs, there is a ‘partialmeasure’ which may or may not be a complete measure. In such cases SharpEye tries to guess the length bylooking at the notes. This means the warnings are not as reliable as usual, and you should check these areascarefully. If there is more than one stave, and the partial measures in different staves do not have the samelength, there will be warnings on all the measures. The warnings should disappear when everything is right.
4.5 Grey notes won’t go
There can be several causes for this. Here are some things to check:
Vertical alignment
Sometimes notes which should sound together are not vertically aligned. SharpEye can correctly analysesome measures where this happens, but not all. You may have to move some notes to make things clear. Ifthe heads overlap significantly, or the stems are very close, they will be regarded as sounding together. Morerarely the opposite problem happens, and notes which should sound separately overlap enough to confuseSharpEye.
Chords entered as two notes
It is possible, for example, to insert two or more 1/4 notes (crotchets) so that together they look like a chord.However SharpEye will still regard them as separate notes which may confuse the rhythm analysis.
Missed notes in beamed groups
If SharpEye misses a note in the middle of a group of notes that are beamed together, it is not enough tojust add a note of the right duration. You must also join it to the group.
Rests in the wrong voice or stave
This is normally only a problem with multiple voices per stave. SharpEye expects rests in a voice to behorizontally aligned with the nearby notes in that voice. You may have to move a rest up or down to ensurethis is the case. It is also possible for a rest to be put into the wrong stave if it is nearer the wrong one thanthe right one. In this case you will have to delete the rest and insert a new one in the right stave.
Hidden overlaps
Occasionally, a symbol may be hidden by another symbol. When note heads are very close, a dot on a notemay be hidden by another notehead. Or a rest (eg whole or half note rest) may be hidden by something. Ifyou can’t guess what the problem is, you may have to delete symbols until you can see what is going on.
25
Incomplete voices
When there are two voices in one stave, and one of the voices is incomplete (ie it doesn’t contain enoughnotes or rests to fill the measure) some of the notes may be grey. See section 3.3 for more information aboutthis.
4.6 Images from unusual sources
Bitmap files
(‘Bitmap files’ means images made of pixels such as the formats BMP, TIFF, GIF, PNG, JPEG). Sometimesyou may want to convert an image that was not scanned from printed music. It may have been generated byanother program, or found on the Internet, or scanned as a grey scale or colour image and then convertedby some image processing program. These images often look OK to a person but convert badly or not at allwith SharpEye.
Often the scale of such images is too small. A typical scan at 300dpi will have the staff lines about 20 pixelsapart, and SharpEye can cope with a range of about 10 to 40 pixels. If the spacing is less than 10, SharpEyewill probably give up with a “Can’t find any staves in image. Music-OCR abandoned” message. Even if youscale the image, it is likely the shapes will be too “chunky” and the recognition poor.
If the image is grey scale or coloured, it may look good to the human eye, but converting to the black andwhite image that SharpEye needs can cause a lot of damage. Just as scanners often have a ‘dithering’ option,image conversion programs have a similar option, which makes matters worse, so make sure any such optionis turned off.
Finally, don’t judge SharpEye’s performance on such images - unless these are the main kind of images youwant to process.
PDF files
SharpEye does not import PDF files directly. However, there are a number of utilities available which canconvert PDF files to BMP or TIFF files. PDF files generally work much better than bitmap files, thoughsince more or less anything can be put into a PDF file there is no guarantee. Be careful to set the resolutionof the bitmap appropriately. Usually 300dpi (as for scanning) is about right. If you have difficulty, itmay be helpful to read through the section on scanning, since many of the same considerations (resolution,brightness, dithering) apply.
4.7 Black rectangles in display
A few people with ATI graphics cards have reported that the music display shows black rectangles instead ofmusical symbols. This appears to be due to a bug in the device driver. It can be cured by going to Settings,
Control Panel, System, Performance, Graphics (in Windows 95,98,ME), or Control Panel, Display, Settings,
Advanced, Troubleshoot (in Windows XP), and reducing the hardware acceleration. A more satisfactorysolution is to obtain an updated driver for your graphics card which fixes the bug (if one is available).
26

Chapter 5
Other information
5.1 Web site
The website www.visiv.co.uk contains the latest version of SharpEye, workarounds for problems when usingSharpEye, the latest information about registering, and so on. This should be the first place you look if youcan’t find what you want here.
5.2 Reporting Bugs
If you bought SharpEye from a distributor who provides support such as Tempo Productions (USA) Recor-dare (USA, producers of Dolet), Et Cetera (UK), Dancing Dots (USA, producers of GOODFEEL), OptekSystems (Australia, producers of Toccata), Lugert Verlag (German version), or Keynote (RISC OS version),please report bugs to them. There are full and up-to-date details of SharpEye distributors on the links pageat www.visiv.co.uk.
If you bought directly from Visiv, or on-line via BMT Micro, you should contact Visiv for support, and toreport bugs. If you find a bug when using SharpEye, please visit the website www.visiv.co.uk if possible,especially if you are not using the latest version. There may be a version of SharpEye with the problemfixed.
If that doesn’t help, please send a description of the problem to us. You can use the form below as a startingpoint. If you have a particular image or one of its own format music files that causes SharpEye to crash orotherwise misbehave, please don’t delete it! We know it is pain for you, but that file may be valuable to us,and we may well ask you to send it.
Please try to be as precise as you can about how to make the problem occur. If we can reproduce theproblem on our machine we can almost certainly fix it (assuming it is our fault). If we can’t reproduce it wealmost certainly can’t fix it.
SharpEye version:
Windows version:
Memory:
Other system details that seem relevant:
Problem happens always/sometimes/once
Description:
Email address: [email protected]
27
5.3 Acknowledgements
We are happy to acknowledge the use of the TIFF library from Sam Leffler and Silicon Graphics. We wouldlike to thank Richard Hallas for advice on musical notation and Philip Hazel and Oliver Linton for helpfulcomments.
28

Index
.mro file, 12
.mro files, 9
accelerator keys, 23accidentals, 18Acquire..., 6added staves, 22appending scores, 12articulations, 18augmentation dots, 18
bar lines, 19batch processing, 12beams, 18bi-level, 6bitmap file, 7bitmap files, 26black rectangles, 20blue triangles, 16BMP file, 6, 7brightness (scanning), 7bugs, 27
chords, 20, 25clefs, 17, 20, 21colours (scanning), 6convert the image, 8creating symbols, 19cue notes, 8
deleting staves, 21deleting symbols, 17deleting systems, 21directories, 14dithered, 7dpi, 7dragging symbols, 19duration, 18dynamics, 18, 20
Edit Music menu, 21editing guidelines, 22editing music, 15
fermata, 18flags, 18folders, 14
grace notes, 8, 19
Graphical NIFF, 10grey notes, 16, 25grey scale, 6guidelines (editing), 22guitar chords, 8
halftone, 7hearing the music, 9
image - loading, 7image editing, 7image input window, 5image zones, 8inserting symbols, 19inserting symbols (brief guide), 4installation, 3installsharpeye2.exe, 3invented staves, 22invert image, 7irregular systems, 22
joining scores, 12joining staves, 20joining staves (brief guide), 4
key signatures, 17, 20, 21keyboard shortcuts, 23
language, 8line art, 6lyrics, 8, 18, 20
main window, 5memory, 3MIDI - saving, 9MIDI channel, 20MIDI channels, 9MIDI options, 9MIDI tracks, 9modifying symbols, 17monochrome, 6moving symbols, 19multi page scores, 12multi-measure rest, 18music output window, 5music recognition options, 8musical directions, 8Musical NIFF, 10MusicXML - parts, 12
29

MusicXML 1.0 and 1.1, 11muting parts, 21
NIFF - chords, 11NIFF - parts, 11NIFF - text, 11NIFF - voices, 11note duration, 18notes, 20
old style symbols, 8one bit per pixel (1bpp), 6options, 13ornaments, 18other text, 8own format, 9
partial measures, 25parts, 11, 12pause sign, 18PDF files, 26photo, 7play music, 9problems, 24, 27
RAM, 3reading the image, 8recognition options, 8resolution (scanning), 7rests, 18, 20rhythm analysis, 16rhythm warning, 22rhythm warnings (brief guide), 4rotate image, 7
saving as MIDI, 9saving as MusicXML, 11saving as NIFF, 10saving music files, 9scan dpi, 11, 12scanning, 6scanning (brief guide), 3scanning - general advice, 6Select Twain source.., 6selections (music editor), 17shortcuts, 23simple editor, 15slurs, 20small note heads, 8sound, 9stem direction, 18syllables, 20symmetric note head, 8system requirements, 3
text, 18text recognition options, 8thin beams, 8
ties, 19TIFF file, 6, 7time signature, 19time signatures, 18tips, 24triplet, 18triplets, 19, 21tuplet, 18tuplets, 19TWAIN, 6TWAIN (brief guide), 3two-note chords, 21
undo, 21uninstall, 3upgrading, 4
vertical alignment, 18visually impaired users, 15voices, 11
warnings, 13warnings about rhythm problems, 16web site, 27window positions, 5, 13
zones, 8zoom, 7
30