sgtalon’s enterprise foamie build guide sgtalon’s enterprise a
TRANSCRIPT

SGTalon’s Enterprise-A Foamie Build Guide
Page 1 4-13-2013
SGTalon’s SGTalon’s SGTalon’s SGTalon’s
EnterpriseEnterpriseEnterpriseEnterprise----AAAA
Assembly Instructions

SGTalon’s Enterprise-A Foamie Build Guide
Page 2 4-13-2013
*******Recommended Hardware********
• 2.6oz 250w Motor and Speed Control with 8x6 prop – Turnigy L2210-1650 -
http://www.hobbyking.com/hobbyking/store/__18545__Turnigy_L2210_1650_Bell_Style_Motor_250w_.html
• Going to need some connectors for the motor and esc -
http://www.hobbyking.com/hobbyking/store/__11961__Nylon_T_Connectors_10_Pairs_20pc_.html
• Servos - Hextronic 9g and 5g servo (1 of each) -
http://www.hobbyking.com/hobbyking/store/__663__HXT500_5g_8kg_10sec_Micro_Servo.html
http://www.hobbyking.com/hobbyking/store/__662__HXT900_9g_1_6kg_12sec_Micro_Servo.html
• Battery - 2200 Mah 3s 11.1v LiPo –
http://www.hobbyking.com/hobbyking/store/__8932__Turnigy_2200mAh_3S_20C_Lipo_Pack.html
• Radio Hardware - Any 3 channel or higher radio will work
*********Build Materials*********
• Carbon Tube for foam Reinforcement - 4mm OD x 3mm ID x 750mm long -
http://www.hobbyking.com/hobbyking/store/__6723__Carbon_Fiber_Tube_hollow_4x750mm.html
• Carbon Tube for nacelle support – 3mm x 2mm Tube -
http://www.hobbyking.com/hobbyking/store/__6722__Carbon_Fiber_Tube_hollow_3x2x750mm.html
• Carbon Flat for Saucer Reinforcement - 1mm x 6mm or so.
http://www.hobbyking.com/hobbyking/store/__15387__Carbon_Strip_1x6x750mm_5pcs_set_.html
• Gorilla Glue
• Razor Knife / Single Edge Safety Razor Blades
• Pushrod Wire - i usually use .037 but you can use any size you like
• Control Horns - I usually make my own from old credit cards.
• Hinge Tape - I use 3m Fiber tape 1/2" wide and make overlapping hinge strips.
www.rcgroups.com/forums/showpost.php?p=10334011&postcount=16
***********Finishing/Painting************
• It is pretty easy to just toss a light coat of White or Light Gray paint on and call it a plane but this thing is begging
for more than that!
• I usually use Krylon H20 Latex Spray paint as my base coat then decide what to do.
• You can Airbrush the shadows and use a brush to put in the windows and stuff.
• You should definitely use an Acrylic or latex paint.
• It is also handy to put a coat of acrylic clear on the foam first to help seal the foam and you can also use it for a
topcoat to seal up the final paint.
• To really make the plane look awesome you have to go with the Skin Kit though.

� � � � � � � � � � � � � � � �-A Foamie Build Guide
Page 3 4-13-2013
Step 1 - Saucer Assembly
1. Cut out all pieces and remove internal cutouts. Make sure you remove the entire tab.
2. Cut a 30” Long piece of .032 x .25” Carbon Strip and test fit in the prop slot oval.
3. Wet down the saucer doubler and the front half of the saucer with water to help the Gorilla Glue cure.
4. Lay gorilla glue in the oval on both sides.
5. Insert the carbon strip in the saucer.
6. Lay a very thin bead of gorilla glue around all the edges and the prop slot of the Saucer Doubler, then the middle
so there is around an inch or 2 between beads and covering the entire doubler.
7. Lay the Saucer Doubler on the Saucer. You may need to wiggle the doubler around a bit to get it to seat on the
carbon strip properly. I put my thumb on the area where the strip is and bent the edge of the saucer up a bit to
get it over the strip.
8. Put the Saucer on a flat surface, saucer doubler up, and cover the entire surface with heavy books.
9. Let the saucer cure for at least 30 Minutes.

� � � � � � � � � � � � � � � �-A Foamie Build Guide
Page 4 4-13-2013
Step 3 - Vertical Hull Assembly
10. Size up and cut a 4mm Carbon Tube to fit in the center angled slot in the center section
11. Wet one side piece, one side of the center piece, and the carbon tube
12. Lay a thin bead of gorilla glue on the side piece starting around the edges and filling in the center.
13. Place the center piece on the side piece
14. Lay a bead of glue in the reinforcement slot and insert the carbon tube
15. Wet down the center section and the other side piece.
16. Lay a thin bead of glue on the center section and put the other side piece on.
17. Tape all of the pieces together so they can’t shift
18. Lay the assembly on a flat surface and weigh it down with large books.
Step 5 - Nacelle Assembly
19. Cut a piece of 4mm Carbon Tube to fit in the Nacelle Pylon. Glue it in and put a piece of packing tape on the top
then press it with books and leave to dry.

� � � � � � � � � � � � � � � �-A Foamie Build Guide
Page 5 4-13-2013
20. Test fit the engine nacelle pieces to make sure they fit. There is a small slot that is in the bottom of the nacelle.
21. Wet both sides of both pieces of foam with water.
22. Put a thin layer of glue the full length of the nacelle in line with the slot on both sides of both pieces.
23. Slide the 2 pieces together and push the tabs into the small slots. Be sure the small slot is on the bottom of the
horizontal piece.
24. Wrap both ends of the nacelle with tape to keep the pieces together and make sure they stay square.

� � � � � � � � � � � � � � � �-A Foamie Build Guide
Page 6 4-13-2013
25. Repeat these steps for the other nacelle.

� � � � � � � � � � � � � � � �-A Foamie Build Guide
Page 7 4-13-2013
Now it is Decision Time!
Are you going to paint or skin? If you are going to paint I recommend moving on to the Final Assembly
Step 7 – Finishing/Painting
26. Use a razor blade to clean up the parts. Trim off the extra foam nubs, excess glue, and even out the parts.
27. Gently sand each edge to remove the cutting marks and make everything flush. I also like to round off my edges
a little bit.
28. With a sanding block and fine or extra fine grit sand paper sand every flat surface of the foam just to make sure
you have a nice smooth surface. Sometimes the foam has marks on it from the molding process .
29. At this point I like to put a nice light coat of Clear Acrylic paint to seal the foam.
30. Now it is time to put your base coat of paint on the plane. Choose your weapon here. Airbrush or Rattle Can. I
like to use Kyrlon H2O paint.
31. If you are going to airbrush/paint the details on the plane – Good Luck! I am not an airbrush guy!
Step 8 – Skinning/Decoupage
If you purchased the Skin Kit you can skip the next few parts up to “Applying Skins”.
The skins do add quite a bit of weight to the plane. It also makes the CG move back. This means you will need a
bigger battery to balance the plane.
32. Roughly cut out all of the skins and lay them on the parts.
33. Trim all of the skins to be about ¼” outside of the parts.

� � � � � � � � � � � � � � � �-A Foamie Build Guide
Page 8 4-13-2013
Applying Skins -
There are 2 ways you can skin the Enterprise-D. The Decoupage Method, and the 3M 77 Adhesive and Polycrylic
Method.
3M 77 Adhesive and Polycrylic Method –
This method uses the same procedure as the Decoupage Method but we change it around a bit.
- After painting all of your parts spray one side of the part with 3M Super 77 Spray Adhesive and let dry for at
least 15 minutes but not more than 30.
- Carefully position your skin on the part to make sure everything lines up properly. Do not apply any pressure to
the skin yet. Just set it on. If you need to reposition it very carefully peel it back.
- Once you are happy with the placement of the skin, gently secure one spot of the skin and stretch/smooth the
skin on the rest of the way. You need to be careful that the skin is tight and there are no wrinkles
- After you are satisfied that there are no wrinkles, spray on some Minwax Polycrylic Clearcoat.
- The skins will bubble and wrinkle a little while the spray is curing but it should come out perfectly!
Decoupage Method
34. Start with the Saucer for skinning. Use a 1” wide paint brush to put a coat of the Decoupage glue on the
centerline of the saucer going towards the first side you are going to skin. I usually do about 3” of glue the entire
length of the centerline.
35. Carefully lay the first saucer skin half on the centerline. Make sure you line it up properly and on the center so
the other side will match up.
36. When the skin is lined up, carefully smooth out the skin so there are no wrinkles in the skin.

� � � � � � � � � � � � � � � �-A Foamie Build Guide
Page 9 4-13-2013
37. Coat the rest of the saucer side with decoupage glue including the edge
38. Carefully lay the skin over the rest of the saucer half. Avoid wrinkles as much as possible.
39. Apply a coat of decoupage glue on the skin to seal it to the foam. Be careful not to brush the skin too much. It
can damage the skin.
40. Wrap the skin around the edge of the foam and coat it with decoupage glue.
41. Follow the same instructions to do the other half of the saucer.
42. Set the Saucer aside to dry for at least 30 minutes. You can go on to skinning the rest of the parts using the same
method.

� � � � � � � � � � � � � � � �-A Foamie Build Guide
Page 10 4-13-2013
Nacelle Skinning.
43. With the engine nacelles the edges need to be done first.
44. Trim the nacelle skin strips to be about ¼” wide.
45. Lay the top and bottom horizontal skins and trim them to exactly the same size as the foam.
46. Lay the horizontal top or bottom nacelle skin on the foam and mark the location of dark line on the foam to help
with lining up everything.
47. Put decoupage glue on the edge of the horizontal nacelle part.
48. Starting with the skin that has the red and blue and line up the dark lines first and wrap it around to the center
of the nacelle.
49. Trim off the excess red part of the skin at the nacelle centerline.
50. Do the same for the other side of the nacelle edge.
51. Attach the back side blue edge skin to the remaining part of the horizontal foam.
52. Now attach the top and bottom horizontal nacelle skins.
Final Assembly
Make sure you have some blue painters tape for this stage. If your tape is too sticky it could damage the skins or pull it
off of the foam. If you don’t have blue painters tape, remove some of the stickiness from your masking tape by rubbing
your hand over the tape to weaken the adhesive.
53. Trim away the skins in the area that the parts connect.
54. Test fit all the parts to make sure they slide into place without too much force. Trim away foam as needed.
55. Test fit the servos in the saucer and vertical fuse. The servos should be a tight fit.
56. Use a straight edge and a razor blade to trim the ailerons and elevator off of the main parts. Be careful to trim
right up to the edge of the control surface.

� � � � � � � � � � � � � � � �-A Foamie Build Guide
Page 11 4-13-2013
Saucer Installation
57. Install the aileron servo into the saucer from the bottom of the saucer.
58. Wet down the join lines on the saucer and vertical hull and apply a very light bead of glue down on the center of
the saucer.
59. Slide the saucer into the vertical hull. Be sure it is centered and level.
60. Use blue painters tape to hold the saucer perpendicular to the vertical hull.
61. Use books to hold the saucer square to the vertical hull to the saucer and let dry for about an hour.
Lower Horizontal Hull Installation
62. Wet down the join lines on the Vertical Hull and the Lower Horizontal and apply a light bead of glue on the
center of the lower horizontal and vertical where they join.
63. Slide the horizontal into the vertical. Make sure it is perpendicular and use blue painters tape to hold it in place.
64. Weigh down the pieces to hold them together while the glue dries.
Engine Nacelles
65. Trim off a piece of 3mm carbon tube for the nacelle bracing to the width of the nacelles.
66. Find the slots in the nacelles and poke the rod through the skin.
67. Find the slots in the saucer glue them in.
68. Find the holes in the vertical portion of the nacelles to make the transverse (side to side) brace. Measure the
width at the saucer and match the width at the back of the nacelle.
69. Glue in the Nacelle Pylons into the slots in the saucer and lower hull. Use Blue Painters tape to hold everything
square while the glue dries.

� � � � � � � � � � � � � � � �-A Foamie Build Guide
Page 12 4-13-2013
Motor Mount Installation
70. Cut a 1 ½” round or square piece of 3/32” plywood for a motor mount firewall. Test fit the firewall to make sure
it fits in the cutout on the plane. The firewall needs to be square to the plane.
71. Drill a ¼” hole in the center of the firewall.
72. Wet the firewall and cutout in the plane for the firewall.
73. Apply a bead of glue on the foam.
74. Install the firewall and use painters tape to hold it square and centered on the plane.
75. Let the firewall dry for at least 1 hour.
76. Mount the motor to the firewall.
Control Surface Installation
77. Trim the Control Surfaces off (if you haven’t already) and use Blenderm, clear packing tape or the over-under
tape hinge method to secure the control surfaces to the plane.
78. Glue on the control horns on the bottom of the control surfaces.
79. Install the elevator servo
80. Install the control pushrods

� � � � � � � � � � � � � � � �-A Foamie Build Guide
Page 13 4-13-2013
Final assembly is now complete!!
Radio and Hardware Installation
The radio, esc, and battery need to be installed as far forward as possible. To make sure the CG is in the right place.
The CG also needs to be balanced from side to side too. This may mean moving the battery off center.
The Center of Gravity for this plane is around 7 ½” – 8” from the nose of the plane. You also need to make sure it is
balanced side to side. It will not fly straight if there is any extra weight on the side.
I used an 18” servo extension to run the elevator servo up to the radio.
I also embedded the servo extension in the center of the vertical. I used a razor blade to cut a slot then enlarged it with a
small thin screwdriver and pushed the wires into the slot.

� � � � � � � � � � � � � � � �-A Foamie Build Guide
Page 14 4-13-2013
To help with the CG and to help with making sure the radio hardware stays on, I coated the saucer doubler with Scotch
Extreme Reinforcement tape. This gives a nice smooth surface to mount everything to.
I put the speed control in front of the slot and covered the wires with another layer of the tape.
I like to use a long rubber band to hold the battery in place. Some people use high strength Velcro.
� � � � � � � � � � � � � � � �-A Foamie Build Guide
Page 15 4-13-2013
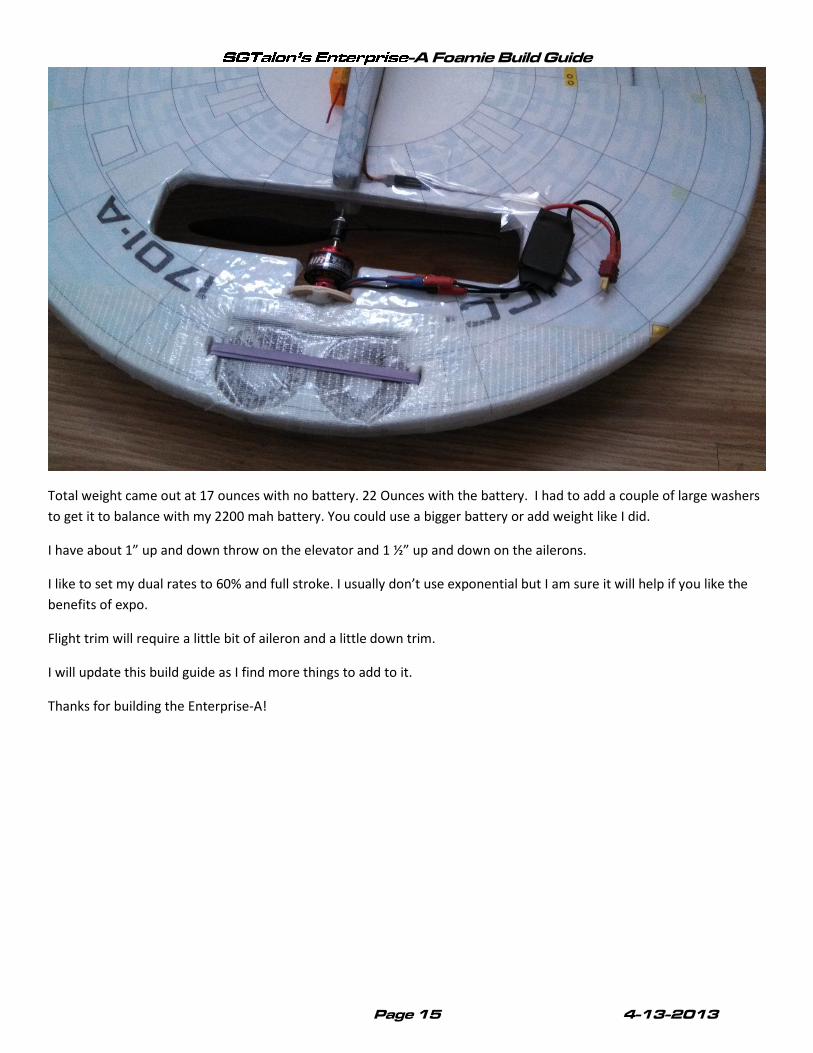
Total weight came out at 17 ounces with no battery. 22 Ounces with the battery. I had to add a couple of large washers
to get it to balance with my 2200 mah battery. You could use a bigger battery or add weight like I did.
I have about 1” up and down throw on the elevator and 1 ½” up and down on the ailerons.
I like to set my dual rates to 60% and full stroke. I usually don’t use exponential but I am sure it will help if you like the
benefits of expo.
Flight trim will require a little bit of aileron and a little down trim.
I will update this build guide as I find more things to add to it.
Thanks for building the Enterprise-A!

� � � � � � � � � � � � � � � �-A Foamie Build Guide
Page 16 4-13-2013