sfm installation guide sunframe microrail ul code compliance notes r- tested / certified module list...
TRANSCRIPT

INSTALLATION GUIDE SFM SUNFRAMEMICRORAIL™
PUB2018JAN18
TABLE OF CONTENTSA- TOOLS & SPECIFICATIONSB- SYSTEM COMPONENTSC- SYSTEM COMPONENTSD- SYSTEM COMPONENTSE - SYSTEM LAYOUTF- THERMAL EXPANSION LIMITSG- FLASHING & SLIDERSH- 1ST ROW INSTALLATIONI- MICRORAIL INSTALLATIONJ- MODULE MOUNTINGK- FLOATING TRIMRAIL INSTALLATIONL - MICROINVERTER & WIRE MGMT.M- MICROINVERTER & WIRE MGMT.N- FINISHING TOUCHESO- SYSTEM BONDING & GROUNDINGP- ENPHASE SYSTEM MICROINVERTER GROUNDINGQ- UL CODE COMPLIANCE NOTESR- TESTED / CERTIFIED MODULE LISTS- MODULE MAINTENANCET- CONSIDERATIONS & MAINTENANCE

SFM SUNFRAMEMICRORAIL™ INSTALLATION GUIDE PAGE
TECHNICAL SPECIFICATIONS:
Material TypesAll extruded components: 6005A-T61 or 6061-T6 Aluminum
Hardware: Stainless Steel
Bonding and Grounding: Integrated in MicrorailTM (TrimraillTM and row to row bonding require additional components)
TOOLS & SPECIFICATIONS A
TOOLS REQUIRED OR RECOMMENDED FOR LAYOUT, FLASHINGS & ROOF ATTACHMENTS:• Hammer• Marker / crayon• Measuring tape• Drill• Pilot drill bit• Pry bar• String line
TOOLS FOR MODULE INSTALL: • Drill and socket adapter or socket wrench• 1/2" socket • 1/4" hex driver• Torque wrench
SAFETY: All applicable OSHA safety guidelines should be observed when working on a PV installation job site. The installation and handling of PV solar modules, electrical installation and PV racking systems involves handling components with potentially sharp metal edges. Rules regarding the use of gloves and other personal protective equipment should be observed.
TORQUE SPECIFICATIONS:All SFM Hardware 20 ft-lbs
Grounding lugs Per Page "0"
SFM SUNFRAMEMICRORAIL™ INSTALLATION GUIDE PAGE
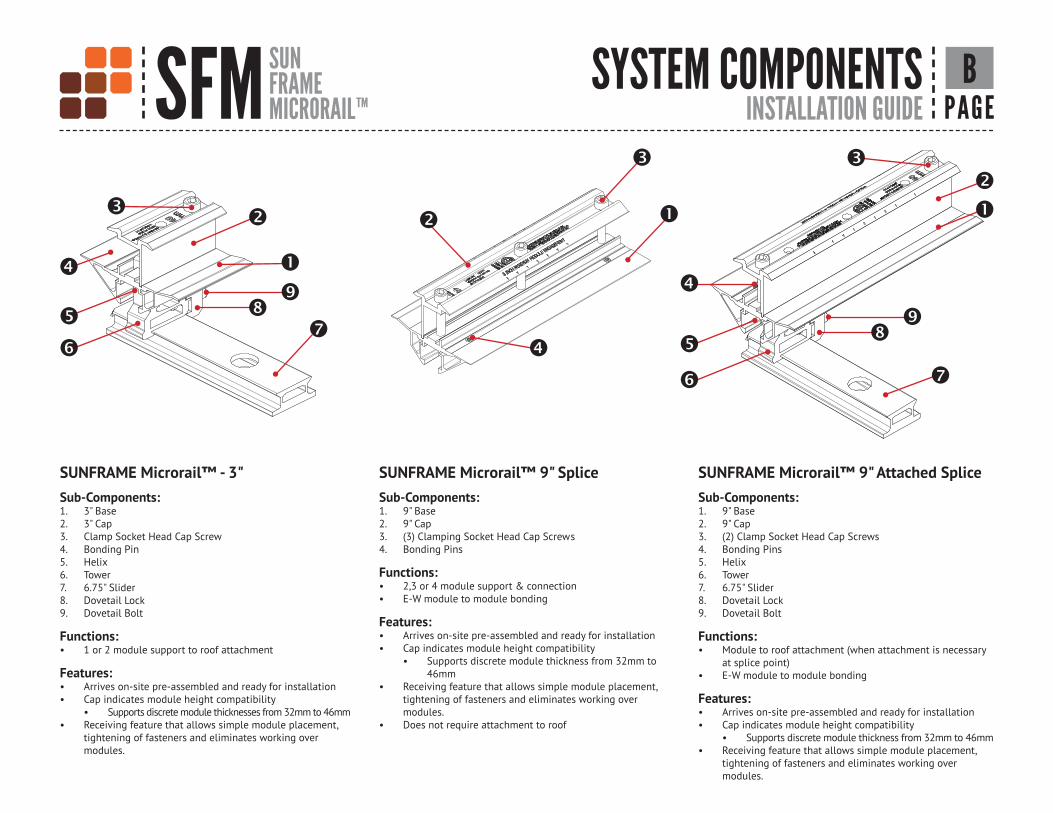
SYSTEM COMPONENTS B
SUNFRAME Microrail™ 9" Attached SpliceSub-Components: 1. 9" Base2. 9" Cap3. (2) Clamp Socket Head Cap Screws4. Bonding Pins5. Helix6. Tower7. 6.75" Slider8. Dovetail Lock9. Dovetail Bolt
Functions: • Module to roof attachment (when attachment is necessary
at splice point) • E-W module to module bonding
Features: • Arrives on-site pre-assembled and ready for installation• Cap indicates module height compatibility
• Supports discrete module thickness from 32mm to 46mm• Receiving feature that allows simple module placement,
tightening of fasteners and eliminates working over modules.
SUNFRAME Microrail™ 9" SpliceSub-Components: 1. 9" Base 2. 9" Cap 3. (3) Clamping Socket Head Cap Screw s 4. Bonding Pins
Functions: • 2,3 or 4 module support & connection • E-W module to module bonding
Features: • Arrives on-site pre-assembled and ready for installation• Cap indicates module height compatibility
• Supports discrete module thickness from 32mm to 46mm
• Receiving feature that allows simple module placement, tightening of fasteners and eliminates working over modules.
• Does not require attachment to roof
SUNFRAME Microrail™ - 3" Sub-Components: 1. 3" Base2. 3" Cap3. Clamp Socket Head Cap Screw4. Bonding Pin5. Helix6. Tower7. 6.75" Slider8. Dovetail Lock9. Dovetail Bolt
Functions: • 1 or 2 module support to roof attachment
Features: • Arrives on-site pre-assembled and ready for installation• Cap indicates module height compatibility
• Supports discrete module thicknesses from 32mm to 46mm• Receiving feature that allows simple module placement,
tightening of fasteners and eliminates working over modules.

SFM SUNFRAMEMICRORAIL™ INSTALLATION GUIDE PAGE
SYSTEM COMPONENTS C
TrimrailTM Roof AttachmentSub-Components: 1. Trimrail roof attachment2. Hex bolt and Tri-drive nut3. Tri-drive nut4. Dovetail locks5. Square nut6. Clamp bolt7. 3" Slider
Functions: • Attach TrimrailTM to roof attachment / flashing
Features: • Slots provide vertical adjustments to level array• Slider provides north/south adjustment along the slope of
the roof.
TrimrailTM
Functions: • Required front row structural support• Module mounting• Installation aid• Aesthetic trim
• Features: • Mounts directly to L-feet• Aligns and captures module leading edge• Available for various module heights
• Supports discrete module thicknesses from 32mm to 46mm
Floating Trim ClipFunctions: • Attaches TrimrailTM to module when fewer than 2 rafter
attachment points are available
Features: • Compatible with all TrimrailTM profiles• Tool-less installation
TrimrailTM SpliceFunctions: • Front row structural support• Installation aid• Structurally connects 2 pieces of TrimrailTM
• Features: • Aligns and connects TrimrailTM pieces• Compatible with all TrimrailTM profiles• Tool-less installation
CHECKCOMPATIBLEMODULE THICKNESS
FLOATING TRIM CLIP
SPLICE
32mm 35mm 40mm 46mm

SFM SUNFRAMEMICRORAIL™ INSTALLATION GUIDE PAGE
SYSTEM COMPONENTS D
SFM Flat FlashingFunctions: • Patented roof sealing technology at roof attachment point• For use with compatible 3" & 6.75" SFM Sliders
(See Unirac Master Price List for details)
Features: • Integrated EDPM Rubber Bushing• Manufactured by EcoFasten Solar
Enphase Engage Cable ClipFunctions: • Securely attaches Enphase Engage cables to module
flanges• Allows three (3) mounting positions to suit any cable
orientation
Features: • Resists sliding to reduce cable slack
Wire Bonding Clip w/ 8AWGFunctions: • Row to row bonding• Module to TrimrailTM bonding• Single Use Only
Features: No fasteners required
MLPE Mounting AssemblyFunctions: • Securely mounts MLPE to module frames• MLPE to module bonding
Features: • Mounts easily to typical module flange• UL2703 Recognized
MLPE = Module Level Power Electronics, e.g. microinverter or power optimizer
1
1
2
2
3
3
4
4
A A
B B
C C
D D
DRAWING NUMBER:
REV:
2 OF 2 SHEET:SHEET
SIZE:
1411 Broadway Blvd. NEAlbuquerque NM 87102 USA
Phone: 505.242.6411WWW.UNIRAC.COM
TITLE:
MLPE MOUNTSFM
P27320077
C:\_Vault_Working_Folder\Designs\Inventory\P273XXXXXX\P27320077 SFM MI MOUNT PINNED ASSY.idw
CCFINISH:
MATERIAL:
ENGINEERING APPROVAL:
MFG APPROVAL:K NICOLAEDIS
QUALITY APPROVAL:
2/3/2016DATE:
PM APPROVAL:
D ALVAREZ
B McCORMICKDIMENSIONING AND TOLERANCES PER ASME Y14.5-2009
ALL INFORMATION PROVIDED HEREIN IS CONFIDENTIAL AND PROPRIETARY AND IS THE SOLE PROPERTY OF UNIRAC.REPRODUCTION AND/OR DISTRIBUTION WITHOUT WRITTEN PERMISSION IS FORBIDDEN AND WILL CONSITTUTE COPYRIGHT INFRINGEMENT UNDER U.S. LAW
APPLICATION ENGINEERING BY:
APPLICATION ENGINEERING APPROVAL:
DIMENSIONS ARE INCHES AND [MILLIMETERS]
DRAWING TYPE:
MANUFACTURING
UNLESS OTHERWISE SPECIFIED
DO NOT SCALE DRAWING
ANGLES ±2°±1/16 in [1.6] mm
.XX ±.03 in [0.8] mm .XXX ±.010 in [0.25] mm
TOLERANCES ARE: FRACTIONSDECIMALS
THIRD ANGLE
PROJECTION E GALLEGOSNOTEDNOTED
Alternate Orientation #1 Alternate Orientation #2
Wire Bonding Clip w/ 8AWG
MLPE Mounting Assembly

SFM SUNFRAMEMICRORAIL™ INSTALLATION GUIDE PAGE
SYSTEM LAYOUT E
1. Determine appropriate array location on roof. NOTE: Consult local AHJ regarding setback requirements2. Select starting course of shingles (or tiles)
3. Mark next row of attachments and repeat for remaining rows
- NS distance equals module width +1"
4. Locate 1st rafter closest to array edge (and inside array footprint) and mark
5. Find next rafter for attachment based onappropriate span- Continue to end of array- Mark last rafter before end or array
Span
6. Mark attachment points on rafters along each NS module grid line
7. Refer to Unirac SFM D&E Guide and U-Builder for allowable spans and cantilevers.
TO STAGGER ATTACHMENTS: Shift each subsequent row of attachments one rafter over.
See the Design and Engineering Guide for details on regional max spans and overhang.
N
S
N S

SFM SUNFRAMEMICRORAIL™ INSTALLATION GUIDE PAGE
THERMAL EXPANSION LIMITS F
NORTH-SOUTH THERMAL EXPANSION LIMITS:• 12 Rows of modules - Landscape orientation• 7 Rows of modules - Portrait Orientation
EAST-WEST THERMAL EXPANSION LIMITS:• 33ft. with no module gap (butted modules)• 100ft. with a minimum module gap of 1/8"MAX ROWS
LANDSCAPE = 12PORTRAIT =7
1" N/S GAP SET BY SFM SYSTEM
GEOMETRY
INSTALLED E/W MODULE GAP0.0" TO 1"
MAXIMUM EAST / WEST ARRAY & TRIMRAIL LENGTH NO GAP BETWEEN MODULES: 33 FEET
0.1" to 1" GAP BETWEEN MODULES: 100 FEET

SFM SUNFRAMEMICRORAIL™ INSTALLATION GUIDE PAGE
FLASHING & SLIDERS G
PILOT HOLES: Drill pilot holes for lag screws or structural screws (as necessary)
FLASHINGS: Place flashings
INSTALL SLIDERS AND TRIMRAIL ROOF ATTACHMENTS: • Insert flashings per manufacturer instructionsNOTE: Use Lag screw or structural fastener with a maximum diameter of 5/16" • Attach sliders to rafters• Verify proper row to row spacing for module size (Mod NS + 1")• Ensure that TrimrailTM roof attachments in each row have sufficient
engagement with slider dovetails for proper attachment.
INSTALL SLIDERS AND ROOF ATTACHMENTS:
Follow manufacturer instructionsfor flashing installation procedures
NOTE: If N-S module edge is within 1” of the shingle course above, you have the option to pivot / rotate slider at the attachment point to span the next course and cut shingles as required.
ROOF RIDGE
EAVE
Mod NS + 1"
Mod NS + 1"
N/S MODULE EDGE
Rotate Slider
Cut Shingles as Required
Less Than 1"

SFM SUNFRAMEMICRORAIL™ INSTALLATION GUIDE PAGE
TIGHTEN SLIDER: Tighten front row lag screw and TrimrailTM roof attachments dovetail clamp bolt.
ALIGN FRONT ROW: Align front row TrimrailTM roof attachments with string line
TIP: Pull String-line across back (smooth) edge of attachments
TRIMRAIL PREPARATION: Determine overall length of TrimrailTM for front row. Determine splice locations (if any) and TrimrailTM
lengths required. When 2 or less attachment points are available at front of module edge, a Trimrail floating clip may be required, see page (K) for details.
INSTALL TRIMRAIL SPLICE BARS: Place TrimrailTM with front side up and firmly insert splice bar into TrimrailTM, until it clicks.
NOTE: Do not over-insert splice
ATTACH SPLICE BARS: While holding TrimrailTM sections in alignment, join sections together with splice bar centered at joint. Bonding between trim sections occurs through the splice bar.
See the Design and Engineering Guide for details on regional max spans and overhang.
1ST ROW INSTALLATION H

SFM SUNFRAMEMICRORAIL™ INSTALLATION GUIDE PAGE
MICRORAIL INSTALLATION I
INSTALL MICRORAILS: Install remaining Microrails at marked attachment points. Loosen dovetail retaining fastener and push MicrorailTM to top of slider. DO NOT SLIDE ALL THE WAY OFF SLIDER.
NOTE: Bonding pin on Microrails should be positioned downslope.
TRIMRAIL ROOF ATTACHMENTS & TRIMRAIL ORIENTATION: TrimrailTM roof attachment should have horizontal flange facing uphill for uniform row spacing and ease of lag screw assembly. On first row, position TrimrailTM with module catch side facing uphill.
ATTACH TRIMRAIL TO ROOF ATTACHMENT: Attach rail using 3/8" hex bolt & Tri-drive nut and serrated flange nuts. Make sure TrimrailTM is level across all TrimrailTM roof attachments. After rail is level, tighten dovetail bolts to secure TrimrailTM roof attachments to sliders.
BONDING PIN

SFM SUNFRAMEMICRORAIL™ INSTALLATION GUIDE PAGE
SECTION B-BSCALE 1 : 1
B
B
MODULE MOUNTING J
FASTEN MODULES: Finish installing modules along row and tighten fastening bolts after entire row is installed.
ATTACH SPLICE: Attach splice at intersection of two (2) modules. • Use attached splice if necessary.• Ensure minimum module engagement using
indicator marks.
SECTION B-BSCALE 1 : 1
B
B
B
B
SECTION B-BSCALE 1 : 1
B
B
SEAT MODULE(S): Ensure that modules are properly seated in top cap and base.
TIGHTEN FASTENERS: Tighten fasteners to required torque.
NOTE: Tighten components from the roof up, Dovetail Bolt then Clamp Socket Head Cap Screw
LAY IN MODULE(S): Install first two (2) modules on bottom row. Install downhill end of module into the TrimrailTM first and then position uphill 3" microrails to support modules.
LAY IN MODULE(S): Module should slide into catch feature of the TrimrailTM.
Wire management is performed after each row of modules is installed. Refer to wire management section (pp. L & M) for detailed instructions.

SFM SUNFRAMEMICRORAIL™ INSTALLATION GUIDE PAGE
REQUIREMENTS FOR TRIMRAIL ROOF ATTACHMENTS & FLOATING TRIM CLIP:TrimrailTM Roof Attachments shall be used at rafters nearest to outside edge of array. • Use Floating Trim Clip on the longest "free" side if only one (1) TrimrailTM Roof Attachment is utilized.• Use of 2 Floating Trim Clip(s) without a TrimrailTM Roof Attachment is acceptable if the section of TrimrailTM being mounting is less than 24" and there are no available roof attachment points.
FLOATING TRIM INSTALLATION K
TrimrailTM Roof Attachment Required
TrimrailTM Roof Attachment Required
TrimrailTM Roof Attachment Required
TrimrailTM Roof Attachment orFloating Trim Clip Acceptable
TrimrailTM Roof Attachment orFloating Trim Clip Acceptable
Floating Trim Clip Required
Floating Trim Clip Required
Floating Trim Clip Required
RAFTER
RAFTER
A A
SECURING TRIMRAIL WITH FLOATING TRIM CLIPS: When necessary, use floating trim clips to secure trimrail to module. Installation should occur after module is secured. Floating Trim Clip captures module flange and clips inside of trimrail as shown above.

SFM SUNFRAMEMICRORAIL™ INSTALLATION GUIDE PAGE
MICROINVERTER & WIRE MGMT. L
PRE-INSTALL MLPE: Install MLPE in a location on the module that will not interfere with microrails or grounding lugs. To use trunk cable most efficiently, install MLPE components in the same locations on all modules in the same row.TORQUE VALUE: 20FT-LBS (SEE NOTE ON PAGE A)
MLPE MOUNTING LOCATION & WIRE MANAGEMENT: Install the MLPE Mount on the short side of the module when mounting in landscape orientation. Install MLPE Mount on the long side of module when mounting in portrait orientation. ABOVE IMAGE: MLPE mount w/ microinverter & wire managementBELOW IMAGE: MLPE mount w/ power optimizer & wire mgnt.

SFM SUNFRAMEMICRORAIL™ INSTALLATION GUIDE PAGE
MICROINVERTER & WIRE MGMT. M
MICROINVERTER CONNECTION: Before securing a module to the Microrails, install trunk cable mounting clip on the connector block. Attach clip to module flange. Plug microinverter into connector.
WIRE MANAGEMENT: Verify wire management is complete after each row is installed.
JJ
JJ
MICROINVERTER: Before installing a row of modules place microinverter trunk cable.
TIPS & TRICKS: Tie a loose knot in the microinverter Engage connector wire to help manage the length.
EXAMPLES:
MICROINVERTER TRUNK CABLE: The trunk cable can be managed securely by using stainless steel wire management clips attached to the module frame.
TIPS & TRICKS: Twisting the PV module wires and / or tying a loose knot can also help manage these wires.

SFM SUNFRAMEMICRORAIL™ INSTALLATION GUIDE PAGE
FINISHING TOUCHES N
POST INSTALL HEIGHT ADJUSTMENT: Height adjustment of each attached MicrorailTM assembly can be performed by inserting a long 1/4" hex drive through the cap and into the helix. CAUTION: DO NOT RAISE THE BASE HIGHER THAN THE TOP OF THE TOWER.
N/S Bonding Clip: A N/S bonding clip must be used to bond adjacent rows of modules together.
TRIMRAIL BONDING: Attach a bonding clip from the TrimrailTM to an adjacent module. Fully seat bonding clip until radius portion is in contact with TrimrailTM
mating surface and module flange.
M
M

SFM SUNFRAMEMICRORAIL™ INSTALLATION GUIDE PAGE
SYSTEM BONDING & GROUNDING O
E-W BONDING PATH: E-W module to module bonding is accomplished with 2 pre-installed bonding clips which engage on the secure side of the MicrorailTM and splice.
N-S BONDING PATH: N-S system bonding is accomplished through a N-S bonding clip. Insert each end of the N-S bonding clip onto a module frame flange. System is bonded with a single array edge, however it is recommended that N-S bonding clips be installed on both edges for ease of maintenance (see also: Maintenance Page S)
System bonding is accomplished through modules. System grounding accomplished by attaching a ground lug to any module at a location on the module specified by the module manufacturer.
LUG DETAIL & TORQUE INFOIlsco Lay-In Lug (GBL-4DBT)• 10-32 mounting hardware • Torque = 5 ft-lb• AWG 4-14 - Solid or Stranded
LUG DETAIL & TORQUE INFOIlsco Flange Lug(SGB-4)• 1/4” mounting hardware • Torque = 75 in-lb• AWG 4-14 - Solid or Stranded
LUG DETAIL & TORQUE INFOWiley WEEBLug (6.7)• 1/4” mounting hardware • Torque = 10 ft-lb• AWG 6-14 - Solid or Stranded
NOTE: ISOLATE COPPER FROM ALUMINUM CONTACT TO PREVENT CORROSION
TERMINAL TORQUE, Install Conductor and torque to the following: 4-6 AWG: 35in-lbs8 AWG: 25 in-lbs10-14 AWG: 20 in-lbs
TERMINAL TORQUE,Install Conductor and torque to the following: 6-14 AWG: 7ft-lbs
TERMINAL TORQUE,Install Conductor and torque to the following: 4-14 AWG: 35in-lbs
WEEBLUGSingle Use Only
Star Washer isSingle Use Only

SFM SUNFRAMEMICRORAIL™ INSTALLATION GUIDE PAGE
MICROINVERTER GROUNDING P
SECTION H-HSCALE 1.5 : 1
H
H
SFM EQUIPMENT GROUNDING THROUGH ENPHASE MICROINVERTERSThe Enphase M215 and M250 microinverters have integrated grounding capabilities built in. In this case, the DC circuit is isolated from the AC circuit, and the AC equipment grounding conductor (EGC) is built into the Enphase Engage integrated grounding (IG) cabling.
In order to ground the SunFrame Microrail racking system through the Enphase Microinverter and Engage cable assembly, there must be a minimum of three PV modules connected to the same trunk cable within a continuous array. Continuous array is defined as a grouping of modules installed and electrically bonded per the requirements of this installation guide. The microinverters are bonded to the SunFrame Microrail via the mounting hardware. Complete equipment grounding is achieved through the Enphase Engage cabling with integrated grounding (IG). No additional EGC grounding cables are required, as all fault current is carried to ground through the Engage cable.
ENPHASESYSTEM

SFM SUNFRAMEMICRORAIL™ INSTALLATION GUIDE PAGE
UL CODE COMPLIANCE NOTES Q
SYSTEM LEVEL FIRE CLASSIFICATIONThe system fire class rating requires installation in the manner specified in the SUNFRAME MICRORAIL (SFM) Installation Guide. SFM has been classified to the system level fire portion of UL 1703. This UL 1703 classification has been incorporated into the UL 2703 product certification. SFM has achieved Class A, B & C system level performance for low slope & steep sloped roofs when used in conjunction with type 1 and type 2 modules. Class A, B & C system level fire performance is inherent in the SFM design, and no additional mitigation measures are required. The fire classification rating is valid for any roof pitch. There is no required minimum or maximum height limitation above the roof deck to maintain the Class A, B & C fire rating for SFM. SUNFRAME MICRORAILTM components shall be mounted over a fire resistant roof covering rated for the application.
UL2703 TEST MODULESSee page "R" for a list of modules that were electrically and mechanically tested or qualified with the SUNFRAME MICRORAIL (SFM) components outlined within this Installation Guide. • Maximum Area of Module = 22.3 sqft• UL2703 Design Load Ratings: a) Downward Pressure – 113 PSF b) Upward Pressure – 50 PSF c) Down-Slope Load – 30 PSF• Tested Loads: a) Downward Pressure – 170 PSF / 8000 Pa b) Upward Pressure – 75 PSF / 3500 Pa c) Down-Slope Load – 45 PSF / 2100 Pa• Maximum Span = 6ft• Use with a maximum over current protection device OCPD of 30A
LABEL MARKINGS• System fire class rating: See installation instructions for installation requirements
to achieve a specified system fire class rating with Unirac .• Unirac SUNFRAME MICRORAILTM is listed to UL 2703.• All splices within a system are shipped with marking indicating date and location
of manufacture.
Module Type Roof Slope System Level Fire Rating Microrail Direction Module Orientation Mitigation Required
Type 1 and Type 2 Steep Slope & Low Slope Class A, B & C East-West Landscape OR Portrait None Required
H
H

SFM SUNFRAMEMICRORAIL™ INSTALLATION GUIDE PAGE
TESTED / CERTIFIED MODULE LIST R
Please see the SFM UL2703Construction Data Report at Unirac.com to ensure the exact solar module selected is approved for use with SFM.
Manufacturer Module SeriesAleo P-Series
AUXIN AXN6M610T, AXN6P610T, AXN6M612T, AXN6P612T
Canadian Solar CS6V-M, CS6P-P, CS6K-M, CS5A-M, CS6K-MS, CS6U-P, CS6U-M, CS6X-P, CS6K-MS, CS6K-M, CS6K-P, CS6P-P, CS6P-M, CS3U-P, CS3U-MS, CS3K-P, CS3K-MS, CS1K-MS
CentroSolar C Series, E Series
Certainteed CT-01 Series, CTxxxMxx-02
Ecosolargy Orion 1000, Apollo 1000
Hanwha Q-Cells Plus, Pro, Peak, G3, L-G4, L-G2, G4, G5
Heliene 36M, 60M, 72M, 60P, 72P
Hyundai KG, MG, TG, RI, RG, TI and KI Series
ITEK iT-xxx, iT-xxx-HE, iT-xxx-SE, iT-xxx-SE-72
Japan Solar JPS-xxxP-60, JPS-xxxM-60, JPS-xxxP-72, JPS-xxxM-60-BB, JPS-xxxP-72-BB
JA Solar JAP6 60, JAM6 60, JAM6 72, JAM72, JAP72
Jinko JKM, JKMS Series
Kyocera KU Series
LG Mono X Plus, NeON2, NeON R, Mono X Plus, AC Module, NeON2 Bifacial, Mono X Plus,NeON2 Ace, Mono X, NeON, Mono X Plus
LONGi LR6-60, LR6-72, LR6-60 HV, LR6-72 HV, LR6-60 PH, LR6-72 PH, LR6-60 PE, LR6-72 PE, LR6-60 BK, LR6-72 BK, LR6-60 PB, LR6-72 PB
Mission Solar MES Series
Mitsubishi MJE Series, MLE Series, NSP (Neo Solar Power Co.) Series
Panasonic VBHN SA15(B), SA16(B)/SA17/SA18/KA01/KA03/KA04
REC Solar PEAK Energy Series, PEAK Energy BLK2 Series, PEAK Energy 72 Series, TWINPEAK 2 Series, TWINPEAK 2 BLK2 Series, TWINPEAK Series
Renesola Virtus II Series, 156 Series
Seraphim SEG-6 Series, SEG-E Series, and SRP Series (40mm only)
Sharp NUSA Series, NUSC Series
Silfab SLA-M Series, SLG-M Series
Suniva MV, Optimus
Sunpower E-Series, X-Series, P-Series
Talesun TP572, TP596, TP654, TP660 (35 mm/40mm), TP672, Hipor M350+ (40mm), Talesun Smart (35mm)
Trina Solar PA05, PD05, DD05, PE14, DE14, PD14 and DD14 Series
Yingli YGE60
Winaico WST, WSP

SFM SUNFRAMEMICRORAIL™ INSTALLATION GUIDE PAGE
MODULE MAINTENANCE S
1. Loosen 9" splice bolts approximately 3 turns. DO NOT REMOVE.
2. Remove bolts and caps from 3" Microrails and attached splices
3. Slide splices away from the module to be removed
4. Lift module and disconnect MLPE cables
5. Remove Module. Reverse steps to replace module removed.
Bonding note: If both sides of array are bonded with NS Bonding Clips, as recommended, then no additional bonding is required for module maintenance.
If necessary, on the row of modules containing the module being removed, one additional bonding clip can be added to the edge of the array opposite of the edge with bonding clips already installed.

SFM SUNFRAMEMICRORAIL™ INSTALLATION GUIDE PAGE
CONSIDERATIONS & MAINTENANCE T
ELECTRICAL CONSIDERATIONSSUNFRAME Microrail is intended to be used with PV modules that have a system voltage less than or equal to that allowable by the NEC. A minimum 10AWG, 105°C copper grounding conductor should be used to ground a system, according to the National Electric Code (NEC). It is the installer’s responsibility to check local codes, which may vary.
INTERCONNECTION INFORMATIONThere is no size constraint beyond structural thermal expansion limits on how many SUNFRAME Microrails & PV modules can be mechanically interconnected for any given configuration, provided that the installation meets the requirements of applicable building and fire codes.
GROUNDING NOTES: The installation must be conducted in accordance with the National Electric Code (NEC) and the authority having jurisdiction. Please refer to these resources in your location for required grounding lug quantities specific to your project. The grounding / bonding components may overhang parts of the array so care must be taken when walking around the array to avoid damage. Conductor fastener torque values depend on conductor size. This racking system may be used to ground and/or mount a PV module complying with UL 1703 only when the specific module has been evaluated for grounding and/or mounting in compliance with the included instruction
PERIODIC INSPECTION: Conduct periodic inspections for loose components, loose fasteners or any corrosion, immediately replace any affected components.