several models of fritschi bindings are currently
TRANSCRIPT

What is this FAQ about?Several models of Fritschi bindings are currently distributed in North America, additonal models exist on the market, both new and used. Current models are the Freeride Plus and Explore, earlier
models are the Freeride, Express and Diamir models 1, 2 and 3. All models work the same way and are similar looking. For general and comparative information about the bindings, you are in the right place. While browsing this and other articles on WildSnow.com, you'll notice our shopping
links. These help support our work here and allow us to provide our FAQs, so please shop our links if possible.
Recommended Products Black Diamond Fritschi Diamir Eagle Binding
$419.95 Buy Now Ads by AvantLink.com
Fritschi Diamir Freeride Plus released in 2006/2007 and includes an improved heel unit as well as decorative plastic that might give the binding a slightly more solid feel. See details about Freeride Plus binding.
Shop for Fritschi Diamir Freeride Plus Binding
Fritschi Diamir Freeride (above) ruled the roost in
2004/2005 and is still a good bet on the used market.
Shop for Fritschi Diamir Freeride Binding Fritschi Diamir Explore is lighter and excellent
for most skiers. Shop for Fritschi Diamir Explore Binding
Fritschi Diamir Express is the same binding as the
Explore, only with a different color scheme, and not available in long size.
Are the safety brakes interchangeable between Fritschi models?Yes. Be advised that two widths are sold (standard fits skis up to 86 mm, wide goes to 106mm, so pick the appropriate width for your skis.)
Shop for Fritschi Diamir Freeride Ski Brakes
I bought brakes, are they easy to install?See this article.
How much do Fritschi bindings weigh?The Freeride is sold with brakes, while the Explore/Express is sold without, so we weigh them that way. Note that with brakes, weights of all models are similar. We get all our weights by actually weighing items on a digital postal scale. Weights shown here may differ from other published weights, this could be due to manufacturing changes or publishing errors. If you see a weight that doesn't look right, please contact us (use contact option on main menu). The following weights were verified by weighing actual production model bindings.
Freeride Plus:72 ounces (pair, standard length, no straps, with standard brakes)
Freeride:70 ounces (pair of 05/06 model with white toe/heel, standard length, no straps, with standard brakes, previous model with gray toe/heel weighs virtually the same)
Express/Explore: 61.7 ounces (pair, standard length, no brakes or straps)
Brakes, regular width (up to 86mm): 3.9 ounces each (05/06 model), 7.8 ounces/pair (previous year models are about one ounce heavier per pair)
What DIN settings do the bindings go to?
• Freeride: 4-12 • Express/Explore: 4-10
Do I need to get a certain size binding for my boot?Yes, all Fritschi bindings are sold in three sizes (short,standard,long). To reduce weight and unwanted flex, use the shortest binding your boot will work in. Here are the numbers:
• Freeride: Short 4.5-9/5.5–10 • Standard 6-12 • Long 12–13 • Express/Explore: Short 4-7.5/5.5–9.5 • Standard 7.5-12/10 • Long 11–13/NA (Express not
available in long size)
Someone wants to buy my bindings mail-order, how do we know their boots will fit for sure? For a rough idea of this, see above. To be more specific: Yes, all Fritschi bindings do come in different sizes, and the range of boot sizes a binding fits is indicated by the numbers printed on the binding rail, which show just behind the heel unit of the binding. These indicate the length of the boot sole in millimeters. So, find out what your friends boot sole length is, and look for a number in that range on the rear of your binding rail. If you see a number on the binding rail that's close to their boot sole length, then you're all set to make the sale. Know that some of the numbers will be under the heel unit, so you may have to move it forward or back to see them all. Also, to save time known that many boots have the sole length printed on the shell, somewhere on the side of the heel.
Can I use my Fritschi bindings at the ski resort?Using your randonnee bindings for all your skiing, resort and backcountry, is known as "one rig." The wisdom of using bindings as "one rig" depends on a few factors. If you're primarily doing laps
using ski lifts you'll be covering an immense amount of vertical that places wear on the bindings they were not designed for. More, though the Fritschi toe release is adequate, it's not as highly engineered as the latest alpine bindings. Thus, if you're only using the lifts for access to the backcountry, by all means use any of the Fritschi models, but if you're simply riding ski lifts and charging max vertical inside the ski area, a full-on alpine rig is probably safer and more durable (more vertical = more chances of falling and needing release). As for which model binding to choose for your "one rig," use a Freeride if you're larger or aggressive, for smaller or more mellow skiers, the Explore/Express will work fine.
What about ramp angle, is that why I feel like I'm in the back seat when I use Diamirs?Ramp angle, otherwise known as "delta," is the difference in height between boot toe and heel. If your toe is lower than your heel, you're said to have "positive ramp angle." Most skiers like a few degrees positive ramp angle, or at least a neutral angle (heel/toe at equal heights). All Fritschi bindings lack much in the way of positive ramp angle. If you need more ramp angle, most people can get enough delta by eliminating the shim under the toe unit of Fritschi bindings. If this doesn't yield enough ramp, you can shim up the rear of the binding with a custom made plastic spacer. If you use different bindings and boots, try to adjust all your ramp angles so they're similar -- I believe most complaints about ramp angle come more from folks switching between different boot/binding combos. If you're used to one setup and change to something with significantly more or less ramp, you'll feel a huge difference you'll most often dislike. If you use one setup exclusively, you can get used to just about anything.
Can I shorten the bar on Fritschi bindings so they'll work with smaller feet?Sorry, not likely. The bar connecting the toe and heel units of all Fritschi backcountry skiing bindings has machined slots near both ends that would end up where you'd cut the bar to make any significant length change.
Fritschi bindings are kind of pricey, can I play on a budget?Yes. If you need Freeride bindings look for them on the used market. Search web forums and Ebay. If you don't need the beef of a Freeride the older Diamir Titanal 3 is a good alternative and may still available on the retail market. T3 is not in production, however, so it's somewhat of an "orphan" product. Earlier Titanal bindings had a few durability problems, so buy nothing earlier than the "3," which can be identified by the dark blue plastic of the toe jaw and heel unit, as well as a "T3" logo printed on the toe jaw.
How do you adjust the forward pressure setting on Fritschi bindings?First do a rough adjustment of length so that your boot snaps in and looks like it's correctly held (if possible, use boot sole length in millimeters and set binding to corresponding number that shows on rail just behind heel unit.) Length adjustment is done with the screw at back end of the binding rail. Next, with the boot in the binding, adjust the length screw a few turns in or out so that it's exactly flush with the rear surface of the rail. Take care to get this right. Too much forward pressure may cause the toe unit to break off the binding, while too little will cause pre-release.
(Note: Writers, magazines, etc., using this FAQ for reference, please give credit where credit is due.)
Disclaimer: By using these mounting instructions and templates, you agree to not hold Wildsnow.com, its owners or associates liable for anything.
By Louis Dawson
Backcountry skiing bindings based on the "plate" design, such as all the Fritschi models (Freeride, Diamir, Titanal, Explore, Express), are easy to mount at home. Take care to locate the binding in the correct for/aft position on the ski, be sure the binding is centered left/right, position the heel unit correctly -- and you're good to go.

Fritschi Freeride backcountry skiing and ski mountaineering binding.
To mount your Fritschi backcountry skiing bindings at home, follow the directions below and use our PDF mounting template. Our standard template works with most Fritschi bindings, including the Freeride and Freeride plus. The 2006 Explore model has a slight manufacturing variation in the front/back spacing of the front screw holes (about 1/2 millimeter) and we compensate for that with a slightly different template. Eagle requires its own template. When you print template, take care with your print scaling settings so the screw holes match. Set to "no scaling," or "100 %" and so forth. More about this on the template. Links below:
Download standard template for most Fritschi bindings.
Download slightly different template for 2006 Explore.
Download EAGLE template.
(Warning: After downloading and printing template, compare to screw hole patterns on actual binding, as printing can sometimes distort the layout. If the holes don't match, tweak printer settings such as scaling, which should usually be set to 100% or possibly "no scaling.")
The keys to success with home binding mounts are careful measurement, going slow, and using the binding and paper template as a substitute for the mechanical jig used by a shop. Also, if you're new to ski work consider doing a dummy mount on a pair of dumpster skis or a wood 2x4.
Disclaimer: By using these mounting instructions and templates, you agree to not hold Wildsnow.com, its owners or associates liable for anything. What I'm presenting here is one of many ways a craftsman could achieve a good back country skiing binding mount. If you're comfortable with tools and measurements, you'll probably figure out a few variations along the way. Whatever you do, remember the idea is to center the bindings left/right on the ski, and locate the boot so it matches the boot location mark on the ski.
How to do the deed:
First, you need a good workbench or kitchen counter. Cover your counters with something liked taped butcher paper, but leave the outside edge exposed in case you want to use if for reference. Tools and materials needed:
• handheld screwdriver with pozi-drive bit to fit screws that come with the binding (with care you can use a jumbo philips bit, but pozi is much better*.)
• electric drill with sharp 5/32 inch bit* • electrical tape and clear office tape, and of course some duct tape • sharp center-punch, with associated hammer • long straight steel ruler (wooden yardstick is not straight enough) • tape measure • fine point Sharpie type marker • 1-hour epoxy (or wood glue if you prefer) • paper templates • scissors
Step 1 Make sure you know where the mounting mark (aka "sole midpoint") is on your boots. It's usually a small vertical line, arrow, or triangle molded into the side of the sole midway between heel and toe. If your boot doesn't have it, as in the case of the Scarpa Laser, compare to another boot of the same size that has the mark, and transfer the mark. Or, as most of these marks are simply half the
distance between toe and heel, just locate it by measurement. Enhance the mark with your Sharpie so you can't miss it.
Step 2 Locate boot mounting mark on skis. Enhance this mark with your Sharpie if it's minimal.
Step 3 Using careful measurement, draw a LONG. tip/tail oriented center line on both skis in the binding mounting area. This line is used to align the template, and should extend a good distance past the front and rear of the binding.
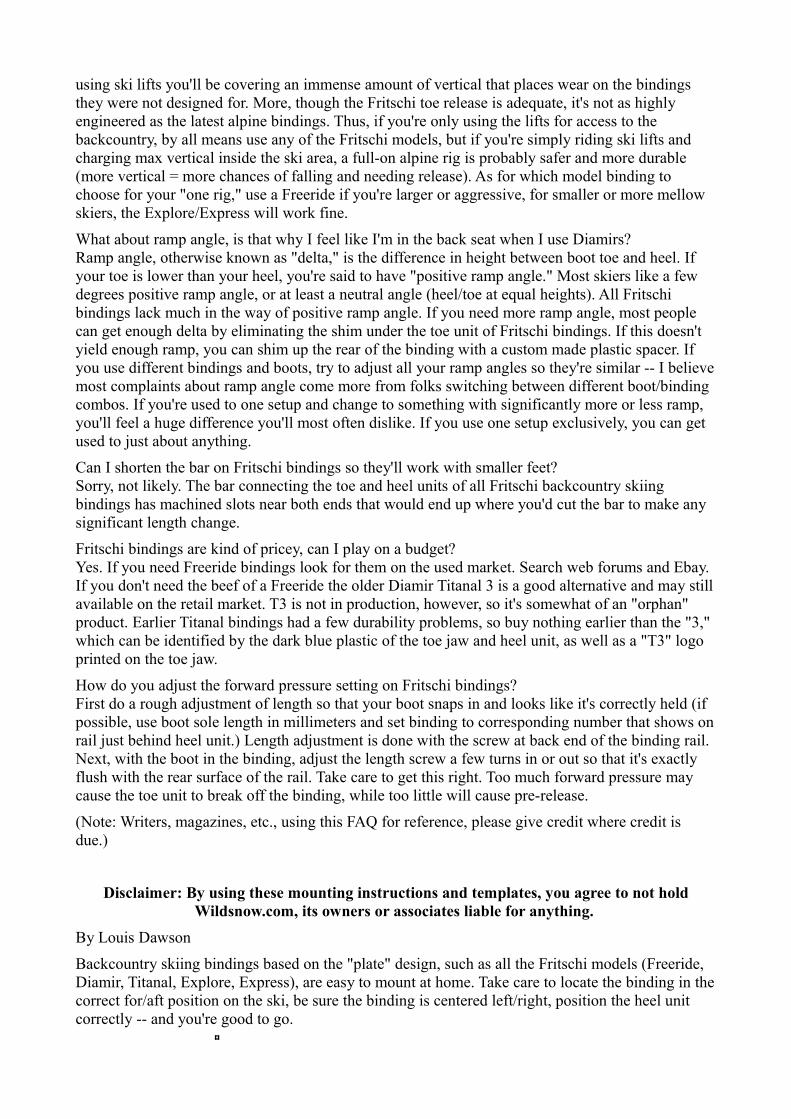
A good way to find left/right center of a ski is to use folded paper. To do so simply wrap a strip of paper around the ski, crease it over the sharp steel base edges, remove and fold in half using the edge marks as reference, then place back on ski and use the crease to locate center. While this method is simple, work carefully (mainly, mark the spot on your ski where you place the paper, as moving it towards the tip or tail will throw things off because of the ski’s varied width.)
Connect your left/right center marks with a your yardstick and draw an accurate line using the edge of the yardstick as a guide. The idea is to create a long mark down the center of each backcountry ski in the binding mount area (in the tip/tail direction). Be sure this mark is long enough to go well past the mounting area of both front and rear binding units.
Using paper fold method to mark left/right center of ski.
Step 4 Adjust binding and snap boot into binding.
Step 5 Set binding on ski, align boot mounting mark with that on ski.
Step 6 Near edge of ski, carefully mark the for/aft location of the front screw holes, so you can locate your template using the screw location lines on the template.
Step 7 Grab your other ski, lay both skis side-by-side. Using combination of measurement and straight edge, duplicate for/aft location of front screw holes on both skis. Hint, measure from tail with tape measure if you're in doubt.
The idea here is that you're using the frontmost screw holes as your template positioning reference -- after you've matched up the boot/binding to the boot position mark on the ski.
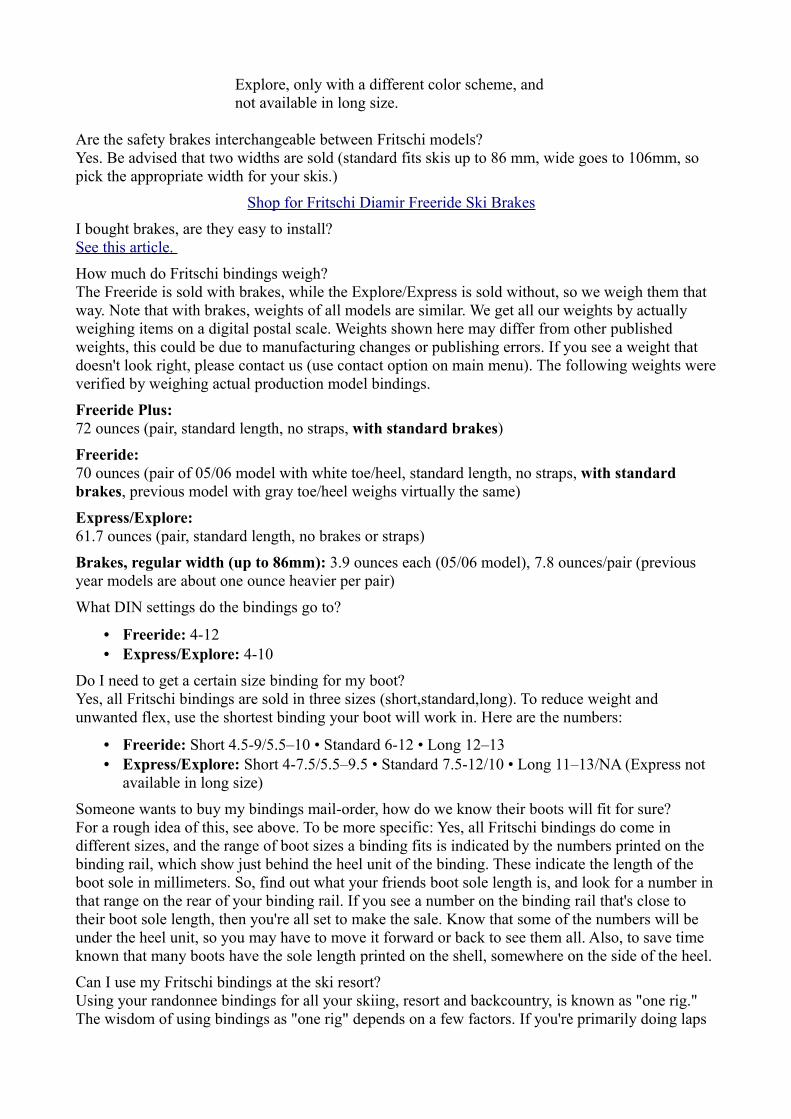
Step 8 Download a template if you have not done so already (see above), and be sure the template prints correctly by comparison to actual screw holes in the binding. Cut template apart to separate toe and heel units, leave plenty of the tip/tail center line on template. If in doubt, download several copies of template so you can cut with plenty of extra center line. Cut template narrower
Some skis may have such a useful boot location mark such as this, if so, you won't need to enhance it. ("3.5" indicates recommenced metric drill size for this ski).

than ski, so it fits on the ski and allows you to see the position location marks you made near the edge of the ski.
Step 9 Set template on ski, line up with center line, and line up front screw location lines with those you made near edge of ski. Tape template to ski.
Step 10 Double check. Set boot and binding plate combo on ski, on top of the template. Check that when backcountry skiing binding is aligned with template, your boot is still lined up with mark on ski.
Step 11 Using a thin sharp object, make small divots in paper template at marked screw locations. Grab your center punch, and using the small divots you made to help exact alignment of the punch, center punch your screw location with a few hammer taps on the punch.
Step 12 Chuck that sharp 5/32 bit in your drill. (Using a sharp drill bit prevents the bit from wandering sideways while you drill, use a special ski bit if possible, see bottom of page for drill bit information.) Place a screw in the binding (with the plastic shoe that goes under the toe unit) as if it were already in the ski, and use the protruding screw as a gage to to figure how deep you will drill. If necessary tape a depth stop to the drill bit by wrapping tightly with electrical tape to create the stop. Drill your center punch marks with minimal pressure, so you don't mash the bit through a ski.
Step 13 Screw the binding to the ski using the front screws. Torque with care as not to strip the screw hole (don't use a power drill to torque screws unless you're a tool ace). Start by gently tightening one screw, then check how the rear of the plate lines up with your tip/tail centerline. Continue to tighten screws will checking alignment. If you're confident about your mount, place epoxy in the screw holes before inserting screws. Otherwise, do a "dry mount" first and only gently tighten screws. Once you're sure you've got it right, pull the screws, then re-insert with epoxy. While doing this, constantly check that the rear of the binding plate is aligned with your tip/tail centermark.
Heel Unit
This is the tricky part of mounting any Fritschi. There is no good rule-of-thumb or visual check that tells where to locate the heel unit. You have to use measurements from the front screws to the rear screws, per those shown on the template.
Step 1 Using the hee/toe separation measurement from the template, and an accurate steel rule, locate for/aft position of rear screw holes and mark this across ski. More than a millimeter off and your heel clamp may not work, so be careful!
(2006 Freeride Plus heel unit mount requires an extra screw to hold down the plastic plate. Locate this screw by first dry-mounting the heel unit, mark the additional screw location, remove binding from ski, drill hole, then do final mount of heel unit.)
Step 2 Lay the heel template on the ski, line up the center line, and align the left/right screw line with the mark on your skis. Tape template to ski.
Step 3 Drop binding plate down, and do a dry-run with the heel unit for a visual check, compare to photo here.

Detail of Fritschi Freeride heel unit in locked position. Before drilling holes in ski, dry fit this together, line up screw holes with template on ski, and make sure it matches position in photo.
Step 4 Once you're satisfied with heel unit location, center punch screw locations, drill, then run the screws in.
Step 5 Triple check function of binding again. If everything looks good, re-insert screws with 1-hour epoxy (to remove, gently heat screws with soldering iron).
Fritschi Diamir Titanal* & Freeride (Free Ride)Safety Brake "Ski Stopper" Installation
Shop for Fritschi ski brakes at Backcountry Store
Fritschi Diamir binding with brake installed.
Ski brakes are state-of-the-art in ski safety. Safety straps (AKA leashes) should only be used when weight saving is critical, or in terrain (such as a crevassed glacier) where a ski could be permanently lost. Many people buy Fritschi bindings without brakes, try to install them later, and discover it's a bit tricky to do so. Follow along as we install a set of brakes on a pair of Diamirs. (*Diamir ski brakes are interchangeable between models Titanal 2, Titanal 3, and Freeride. The Freeride is sold with brakes included, but this how-to will apply if you need to repair the Freeride brakes, or swap widths.)

Tools required:
• WD 40 lubricant• #10 star drive screwdriver• #2 philips or #3 posi-drive screwdriver (posi=better) • medium/small size regular screwdriver
1. De-cock the binding to save your fingers from being whacked by inadvertently de-cocking the binding while you're working. In other words, if the binding is set to receive a boot, lift up on UNDERSIDE of the cocking lever until it snaps up and changes the binding to the closed (boot in) position. While doing this, keep your hand and fingers UNDER the lever as shown in the photo, because it snaps up with high velocity and can hurt you if your flesh is in the way.
2. Using #10 star drive, remove support bumper from bottom of binding (see photo).
This step is only necessary if you'd like to preserve the boot heel support plate (see photos). If you don't plan on ever using straps again, skip removiing the support bumper, and just pry off the boot heel support plate with a flat blade screw driver, possibly damaging the plate.
3. Now the hardest part, if you're trying to perserver the boot heel support plate. The black boot-heel support is attached to the binding by 4 plastic pins and 2 small plastic catches.
Working from the bottom, you can insert a small screwdriver and release the catches, then gently pry the support up off the binding.
FIRST, from the underside, thoroughly lubricate the pins and catches with WD 40 or penetrating oil.
Next, insert the small screwdriver blade in the catch access holes (see photo), and attempt to release the catches by prying towards the center of the plate. As you pry, press down on the screwdriver.
If you're blessed the plate will separate from the binding, making a small crack you can use to continue prying it off. In the end you'll get the plate off, but you may end up damaging it. Not to worry, as it's unlikely you'll go back to using safety straps instead of brakes,and the plates are available as spare parts.
Prying the clips. Lube everything first, and examine with flashlight if you're mystified about how to pry.
Looking from the top, prying the plate up. It's difficulty to remove. Be gentle, but it may break anyway.
Flip the binding lever up to de-cock -- do so without any flesh in front of lever, as it moves at supersonic speed!
Removing support bumper from bottom of binding. Pry off after you remove the screws.
Removing this boot heel support plate is the hardest part. If you're not planning on using straps ever again, skip all other steps and just pry the thing off, possibly damaging it, but you're throwing it away.

4. Next, simply drop the brake into the hole where the boot-heel support was located. Slip on the small plastic boot-heel support provided with the brakes, and run in the screws. Don't forget the boot heel support, it's essential to the correct function of the binding.
Slip the new plastic boot heel support in and around the new brake.
Run in the screws gently but make sure they're seated.
5. Replace the support bumper on the bottom of the binding (the one you removed as the first step.) Tighten the screws gently, so you don't strip them as they thread into the plastic.
Done!
Shop for Fritschi ski brakes at Backcountry Store
If you need specialized tools for this work, see Tognar Tool Works
*Diamir ski brakes are interchangeable between models Titanal 2, Titanal 3, and Freeride (Free Ride). They come in a regular and wide widths -- be sure to get the correct width for your skis. Freeride bindings are sold with brakes. Backcountry Store sells the Freeride Binding with either the regular width brake or the wide version.
Fritschi Freeride Plus - Backcountry Skiing Alpine Touring Binding
The first production models of the Fristchi Freeride Plus were released during late winter 2006. The binding is an incremental improvement in performance, with a plastic base plate that's mostly cosmetic but might have a slight effect in terms of binding stability during aggressive skiing. On the test bench this binding is virtually identical in side twisting flex to the previous model Freeride, and weighs one ounce more per binding. No doubt responding to several years of complaints by skiers of the Fritschi "back seat" feeling, the Plus has slightly more ramp angle (toe lower then heel), and ramp angle can easily be increased by mounting without the front baseplate.
Fritschi Diamir Freeride Plus Binding
The Fritschi Diamir Freeride Plus Binding is equally ready for a backcountry tour or ridgeline carcass huck.
Buy

Complete backcountry skiing binding shown above. Red parts are the "Power Transmission Control." Click photo to enlarge, or click here for detailed zoom and pan.
Red device on heel latch is the excellent "anti insta-tele" feature. Former Freeride bindings would sometimes come unlatched when the ski flexed during aggressive skiing. This was caused by the tabs on the sides of the catch sliding back and forth and eventually popping out from under the part meant to hold them. The new feature allows the catches to remain engaged with with the latch while everything else moves. Check out the video.

Another view of the ant insta-tele feature, showing the red plastic tabs engaged under the latch.
Detail of anti insta-tele.
Bottom of heel unit showing legs (with holes) that rest on ski. These are farther apart and longer than those of previous models, and are said to make the binding more stable.

Rear base plate. Legs fit on outside of ribs, binding rail fits in the central slot. Again, the idea is to make the binding more stable but bench testing shows little difference between this model and previous.
Front plate is totally cosmetic. The binding can be mounted without this for more ramp angle, though this model has more ramp angle than previous models.
For a deeper look at this binding see Inside the Freeride Plus.
Weight: One binding with screws, 36 oz., 1022 g
You asked for it; an overview of how deeply the standard Fritschi crampon penetrates under your ski, dependent on heel lift height. Binding shown below is on a demo board that’s slightly thicker than some skis, but you get the overall idea.

Fritschi standard model crampon penetration at various heel lift heights.
With heel height set to flat-on-ski mode, penetration is of course very good. Go to the next step up and it’s okay as well. But got to the top two heel lift heights and you’ll get minimal to no grip from your crampons. In our opinion, the crampon should be longer so it grips better with higher heel lifts — but it still works if you’re aware of its limits and use it with lower heel lift.
Yet using the Fritschi medium lift height is very common, and the high lift gets used quite a bit as well, so that’s the problem. Downside of a longer (taller) crampon solution is such can stilt you up and trip you when on hard snow or ice.
As always, we’re led to the conclusion that the best ski crampon is one of moderate height that’s fixed to the ski and does not move up and down. To that end, the Voile or B&D crampons can be easily fitted to skis with Fritschi Freeride binding. (Know that Fritschi also makes a crampon called the Axion, which is available in a taller height for use with higher heel lifts, and folds up out of the way when not in use. Sadly, Axion is only available for skis up to 82 mm at the waist, thus obviating its use for most of our’s and many other folk’s backcountry skiing quivers.)

We test randonnee backcountry skiing bindings for how solid they attach your foot to the ski (as when the cuff of the boot is tilted/pushed from side to side). While this is not as big a factor in control as some people think, it still makes a difference in how the binding “feels,” and definitely affects how well bindings ski on hard snow or ice, especially if your skis tend to flutter or chatter, and you need a binding that doesn’t exacerbate that effect.
For this evaluation I use essentially the same test rig as in my preliminary test done a while back. With the general procedure the same as detailed here, though we’re now a bit more careful, and made sure our results repeat. Results below use dashed lines as horizontal bar graph, each dash for one unit of deflection. A “unit” is simply arbitrary and only a basis for comparison, it is not a defined measure of weight or force. What I found fascinating is that the Freeride and heavy duty Naxo Nx21 (formerly known as the “Stomp”) were essentially equal to the Marker alpine binding, while the Dynafit was quite a bit more solid than anything but the Duke, even though it appears incredibly minimal. Shows you what good design can do.
Marker Duke——————– (19 units deflection from vertical*)
Dynafit——————– (20 units deflection from vertical)
Fritschi Freeride Plus (2006 model with black toe wings and red support plate under binding)————————– (26 units deflection…)
Fritschi Freeride (2004 model with white toe wings)————————— (27 units deflection…)
Marker M1100 Titanium alpine binding—————————- (28 units deflection…)
Naxo Nx21—————————– (29 units deflection…)
Silvretta Pure Freeride———————————– (35 units deflection, measured virtually the same as other Pure models)
Silvretta Pure Performance———————————— (36 units deflection, 07/08 model has solid carbon rails instead of hollow, should be slightly stiffer)
Naxo NX01
——————————————- (45 units deflection…)
*Marker Duke, when used with alpine boots could possibly be somewhat stiffer than measured here, as we used Dynafit compatible randonnee boots for all tests, and the sole of most such boots does twist more than a quality alpine boot. More, the base support of Duke is wider than any binding, and is said to thus give better edge control on wider skis. We don’t know if that’s true or not, but it sounds worth considering and could mean the real-life feel of the Duke is more solid than our chart indicates.
Due to inherent error in any mechanical testing system, I’m confident in saying the Marker alpine, Freeride and Naxo Nx21 bindings are all essentially equal in lateral twisting stiffness, while the Pure and Naxo NXO1 are clearly much looser. Marker and Dynafit are the clear winners overall — stiffer than the alpine binding and the Freeride!
The “units” above are for comparison only, they have no direct relationship to any unit of distance or weight. My gut tells me a difference of under 4 units would only be noticeable to precision skiers who could switch skis during the same run while using the same boots.
An interesting aspect of this study is the realization that if you use bindings with less flex, you might be able to use a more moderate boot and get the same performance as with a stiffer boot and flexy binding. All you stiff boot lovers might want to keep that in mind when considering Dynafit.
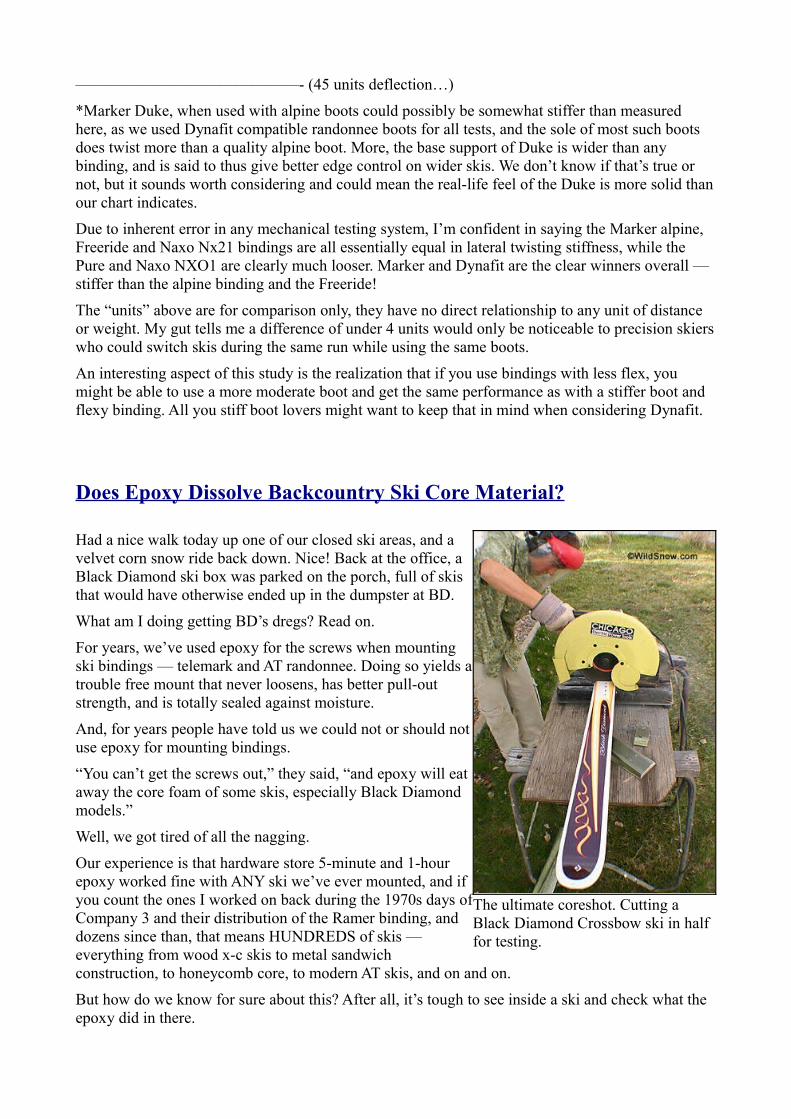
Does Epoxy Dissolve Backcountry Ski Core Material?
Had a nice walk today up one of our closed ski areas, and a velvet corn snow ride back down. Nice! Back at the office, a Black Diamond ski box was parked on the porch, full of skis that would have otherwise ended up in the dumpster at BD.
What am I doing getting BD’s dregs? Read on.
For years, we’ve used epoxy for the screws when mounting ski bindings — telemark and AT randonnee. Doing so yields a trouble free mount that never loosens, has better pull-out strength, and is totally sealed against moisture.
And, for years people have told us we could not or should not use epoxy for mounting bindings.
“You can’t get the screws out,” they said, “and epoxy will eat away the core foam of some skis, especially Black Diamond models.”
Well, we got tired of all the nagging.
Our experience is that hardware store 5-minute and 1-hour epoxy worked fine with ANY ski we’ve ever mounted, and if you count the ones I worked on back during the 1970s days of Company 3 and their distribution of the Ramer binding, and dozens since than, that means HUNDREDS of skis — everything from wood x-c skis to metal sandwich construction, to honeycomb core, to modern AT skis, and on and on.
But how do we know for sure about this? After all, it’s tough to see inside a ski and check what the epoxy did in there.
The ultimate coreshot. Cutting a Black Diamond Crossbow ski in half for testing.

Solution: Black Diamond was kind enough to send us a few pair of late model skis they had destined for the dumpster — for what I described as “experiments,” with a mad scientist slant.
1. We sectioned a ski to look at the core, and test our cutting method (abrasive wheel with water spray). The cut was clean, and exposed un-damaged core material.
2. We drilled a mounting hole, filled it with epoxy, then inserted a screw. After giving the 5-minute epoxy an hour to cure, we heated the screw with a soldering iron and removed it, then carefully sectioned the ski exactly at the edge of the screw hole, so we could see the hole from the side. Result: a nice threaded hole with hardened epoxy, no core damage or dissolving foam whatsoever.
Cutaway at exact edge of epoxied screw hole. Epoxy cured nice and hard, with no damage to foam. What you’re actually looking at here is a thin layer of epoxy on the near edge of the screw hole, somehow our cut was accurate enough to leave that intact. Didn’t know we could use an el-cheapo cutof saw as a micrometer — but it happened!
3. We cut out a chunk of core foam, placed it in a puddle of epoxy, and let it cure. Result: no damage, no dissolving foam.
4. Lastly, we repeated the “puddle” routine with foam from the other skis BD sent us, in case there was a difference.
Conclusion: We will continue to mount skis using 5-minute epoxy for the screws. To remove, we simply heat each screw for about 30 seconds with an electric soldering iron (experiment, you may need more or less heating time depending on your soldering iron, size of screw, etc.)
Caveat: Our test does nothing to prove there is not SOME ski out there that doesn’t like epoxy, but judging from this and past experience, I’d say that unless a ski maker specifically says to NOT use epoxy for mounting , it’s a safe way to make those binding screws bombproof! (We’ll see what BD says after they see this, as it’s said they recommend against using epoxy for mounting.) Also, bear in mind there are numerous flavors of epoxy. We’ll try our “puddle” test with a few more brands, and report back if we find any that do damage the foam.
Update: As of 2007 Black Diamond skis have wood cores so this
Filling the screw hole
with epoxy.
We placed this chunk of Black Diamond core foam in puddle of epoxy, then let it cure. It remained rock solid. We’ll keep these and observe over the next few weeks to make sure there is not long-term problem with the foam/epoxy combo. We’ll also do this same test with different brands and types of epoxy, and report back here.

issue is moot for that brand, but many other brands of skis use foam, and my guess is that epoxy is not a problem with most, if not all.
Real World Backcountry Binding Weights – Fritschi
The latest model Fritschi backcountry skiing bindings greeted me on the doorstep today. Interesting weights now that we could get them on our digital scale. Turns out the Freeride has lost a smidge of weight over the older model, but the amount is so small it could have just been the type of screws I weighed it with. BUT, what I found interesting is that the Explore/Express weighs out at nearly the same weight as the Freeride (if used with brakes)! see FAQ for weights
I have to admit this drove me crazy for a while, I just couldn’t believe the bindings would be so close in weight and thought my scale was messing up or something.
So I weighed each binding several times and continued getting the same results. One factor in this cosmic convergence is that the Freeride does NOT have return spring, while the Explore/Express does (a pair of return springs weighs .6 ounces). I updated the Fritschi FAQ for you ounce watchers out there. So why use the Explore/Express? I guess price and color, and to save an ounce or two. Why use the Freeride? It’s said that the stronger DIN 12 spring might behave differently as to elasticity, and perhaps the binding is built with better plastic or something like that…or perhaps having the word “Freeride” on your gear is self actualizing…or perhaps you need DIN 12…
Remember that I weighed the Explore/Express and Freeride with no brakes. Weights you’ll find elsewhere are confusing for comparison because the Freeride is sold with brakes, while the Explore/Express is sold without.
As an experiment I also weighed the Freeride without the shim and bumper that goes under the toe (many people eliminate this stuff so the toe is lower, for better ramp angle). The stripped Freeride weighed virtually the same as the Explore/Express. In other words, don’t buy the Explore/Express to save weight.
Garmont Megaride Backcountry Skiing Boot – Closer Look Garmont Tornado,Endorphin,Adrenalin and Megaride is compatible with alpine bindings.This year’s Garmont Megaride is significantly improved over last year. And how does it compare to the Dynafit Aero Freeride? Read on.
The biggest performance difference I noticed is this year’s Megaride has a slightly stiffer tongue — good news for anyone seeking a beefy AT boot. Another major change is a redesigned lean-lock lever that appears to be more protected from rock and ski damage. And for you hikers out there, that pesky fourth buckle (down front) has been relocated in the correct position so it doesn’t get ripped off the first time you encounter a scree field (though the buckle anchor might need the lower notches ground off). And, I might be imagining this, but the famous G-fit thermo liner seems even nicer than last year’s, with a high density area around the upper cuff and upper tongue — more alpine like all the time! In all, this appears to be a mature iteration of the Mega: some bugs fixed,
Garmont Megaride is one of the best blends of performance and touring ease you can get in a backcountry skiing boot. Please click image for massive enlargement.

a few improvements. Nice!
So, oh ye blog readers, thanks to Garmont and Life-Link, here is the comparo ye have requested between Garmont and Dynafit’s biggest Dynafit compatible boots: (for Aero 314 length shell, Mega 320, the best shell sizes for my feet):
Weight (liners are essentially the same weight, at 8 oz, 226 g):- Aero SHELL, 63.7 oz, 1806 g- Mega SHELL, 51.4 oz, 1456 g
Lean Lock:- Aero operated by twisting knob, might be difficult, may freeze easier. Very easy to add forward lean to exact personal desire (boot fitter drills one small hole). Only has one factory forward lean setting.- Mega operated by flipping catch that seems good (can be seen in enlarged photo), but has two positions so you get to guess which forward lean setting you’re on. Fine tuning forward lean requires MIG welder and Santa’s workshop.
Beef:-Aero is definitely stiffer in all directions than the Mega (that’s why it weighs quite a bit more, could be too stiff for some users, but is almost an alpine boot).-Mega is still a good compromise between alpine and randonnee flex and will remain my long distance touring boot of choice.
Ease of use:-Aero has non-hinged tongue that makes entry and exit more difficult, and no touring catches on upper buckles.-Mega has hinged tongue, and nice touring catches so you can leave buckles loose but not flapping around while you’re backcountry skiing.-Aero has the cool new Dynafit toe sockets with lead-in notch. It works and does make binding entry slightly easier.-Mega has the original style toe sockets, which work fine (though I like the new ones on the Aero).
Fit:-Aero is a larger volume boot with a flatter footboard, though it still has enough built-in arch to drive a boot fitter crazy.-Mega has noticeably less volume, and a higher arch, though it’s still flatter than a Scarpa.-Aero has no cuff alignment (cant) rivet, boot fitter has to swap one in from a dumpster boot in Santa’s workshop.-Mega has alignment rivet.
Shell height:Effectively the same at the rear, though the Aero has a rear spoiler that a boot fitter can either remove or raise. Mega has a small spoiler that can be removed, but would not lend itself to raising up. The Mega liner is slightly higher, and has a slightly more alpine-like transition zone from cuff to liner — a consideration of you tend to get calf or shine bite.
Summary:Both these fine boots both represent state-of-art randonnee shoe design. The Megaride is obviously a terrific compromise between weight and performance. The Aero trends over to the performance side, while still being significantly lighter than a full-on alpine boot. My shopping stress level is low, as I get to ski both boots this year and don’t have to choose. If you’re shopping angst is rising, consider fit first and buy the boot with volume and arch appropriate for your feet. After that, buy the Aero if you’ll be spending much time on ski lifts, or want what is easily the stiffest Dynafit compatible backcountry skiing boot out there. Conversely, if you are looking for touring efficiency mixed with beef, the Megaride is one of the best boots of that sort I’ve ever used.
