service manual - my.vulcanfeg.com ..... 3 oil filtering ..... 3 ... pilot orifice ..... ..... 9...
TRANSCRIPT

F-35641 (2-05)
- NOTICE -
This manual is prepared for the use of trained Vulcan ServiceTechnicians and should not be used by those not properly qualified.If you have attended a Vulcan Service School for this product, youmay be qualified to perform all the procedures described in thismanual.
This manual is not intended to be all encompassing. If you have notattended a Vulcan Service School for this product, you shouldread, in it's entirety, the repair procedure you wish to perform todetermine if you have the necessary tools, instruments and skillsrequired to perform the procedure. Procedures for which you donot have the necessary tools, instruments and skills should beperformed by a trained Vulcan Service Technician.
Reproduction or other use of this Manual, without the expresswritten consent of Vulcan, is prohibited.
SERVICE MANUAL
For additional information on Vulcan-Hart or to locate an authorized partsand service provider in your area, visit our website at www.vulcanhart.com
EF SERIESGAS FRYERS
MODELS
EF3 ML-52099EF4 ML-114943EF5 ML-114944
VULCAN-HARTDIVISION OF ITW FOOD EQUIPMENT GROUP, LLC
WWW.VULCANHART.COM
P.O. BOX 696, LOUISVILLE, KY 40201-0696TEL. (502) 778-2791

— 2 —F35641 (02-05)
EF SERIES GAS FRYERS
CONTENTS
GENERAL .......................................................................................................................................... 3INTRODUCTION ........................................................................................................................ 3
Models ................................................................................................................................ 3INSTALLATION .......................................................................................................................... 3OIL FILTERING .......................................................................................................................... 3OPERATION .............................................................................................................................. 3CLEANING ................................................................................................................................. 3LIGHTING PILOT ....................................................................................................................... 3SPECIFICATIONS ..................................................................................................................... 3
Gas Data ............................................................................................................................ 3TOOLS ....................................................................................................................................... 3
Standard ............................................................................................................................. 3REMOVAL AND REPLACEMENT OF PARTS .................................................................................. 4
COVERS AND PANELS ............................................................................................................ 4Door .................................................................................................................................... 4Heat Shield......................................................................................................................... 4
BURNERS.................................................................................................................................. 5THERMOSTAT ........................................................................................................................... 5HIGH LIMIT ................................................................................................................................ 7THERMOPILE ............................................................................................................................ 8PILOT ORIFICE ......................................................................................................................... 9PILOT ......................................................................................................................................... 9COMBINATION VALVE ............................................................................................................ 10FRY TANK ................................................................................................................................. 11
SERVICE PROCEDURES AND ADJUSTMENTS ........................................................................... 12MILLIVOLT CONTROLS TEST ................................................................................................ 12THERMOSTAT CALIBRATION ................................................................................................ 12
Calibration Steps .............................................................................................................. 12PILOT ADJUSTMENT .............................................................................................................. 13BURNERS, NOZZLES AND ORIFICES .................................................................................. 13
Burners ............................................................................................................................. 13Nozzles and Orifices ........................................................................................................ 13
COMBINATION VALVE REGULATOR ADJUSTMENT............................................................ 14ELECTRICAL OPERATION ............................................................................................................. 16
CONTROL SYSTEM DESCRIPTION ...................................................................................... 16SYSTEM CONDITION QUICK CHECK PROCEDURES ......................................................... 17SCHEMATIC ............................................................................................................................ 17COMPONENT FUNCTION ...................................................................................................... 17
TROUBLESHOOTING ..................................................................................................................... 18

— 3 — F35641 (02-05)
EF SERIES GAS FRYERS
GENERAL
INTRODUCTION
Models
This service manual was writ ten for:EF3, EF4 and EF5 Gas Fryers.
INSTALLATION
Generally, installations are made by the dealeror contracted by the dealer or owner. Detailedinstallation instructions are included in theInstallation and Operation Manual, which issent with each fryer.
OIL FILTERING
Filtering instructions are included in theInstallation and Operation Manual.
OPERATION
Detailed operation instructions are includedwith each fryer in the Installation andOperation Manual.
CLEANING
Detailed cleaning procedures are included inthe Installation and Operation Manual.
LIGHTING PILOT
1. Turn thermostat OFF.
2. Turn gas control valve knob to OFF/PILOT.Wait 5 minutes.
3. Push the gas control valve knob in.
4. While still holding knob in light the pilotwith a taper. Continue to depress knob(approximately 30 seconds) until the pilotremains lit after the knob is released. Ifpilot does not remain lit, repeat steps 2, 3& 4.
5. Turn gas control valve knob to ON.
6. If gas supply is interrupted, repeat steps1-5.
SPECIFICATIONS
Gas Data
MODEL NO. TUBES BTU/HR
EF3 3 90,000EF4 4 120,000EF5 5 150,000
TOOLS
Standard
• Hand tools (standard set)
• VOM with AC current tester (any qualityVOM with a sensitivity of at least 29,000ohms per volt can be used)
• Gas test kit
• Temperature tester (thermocouple type)
• Manometer

— 4 —F35641 (02-05)
EF SERIES GAS FRYERS
COVERS AND PANELS
WARNING: SHUT OFF THE GAS BEFORESERVICING.
Door
1. While holding onto the door remove (2)screws securing the door hinge to thefryer bottom front flange (Figure 1).
Figure 1
2. Prepare to catch door assembly. Oncescrews and hinge are removed, the doorwill drop off into your hand(s).
3. Reinstall door assembly by reversingsteps 1 & 2 above.
Heat Shield
1. Remove screws holding heat shield inplace (Figure 2).
Figure 2
2. Remove heat shield.
REMOVAL AND REPLACEMENT OF PARTS

— 5 — F35641 (02-05)
EF SERIES GAS FRYERS
BURNERS
WARNING: SHUT OFF THE GAS BEFORESERVICING.
1. Remove heat shield as outlined underCover and Panels. (Optional)
2. Loosen the two mounting bolts at the topof each burner (Figure 3).
Figure 3
3. Push burner up while pulling the bottomof the burner forward to clear the burnernozzle (Figure 4).
Figure 4
4. Reverse the procedure to install.
THERMOSTAT
WARNING: SHUT OFF THE GAS BEFORESERVICING.
1. Drain shortening from fry tank.
2. Remove heat shield as outlined underCovers and Panels.
3. Remove left burner as outlined underBurners.
4. Remove thermostat knob by pulling knoboff thermostat shaft.

— 6 —F35641 (02-05)
EF SERIES GAS FRYERS
5. Remove thermostat mounting screws andremove thermostat from mounting bracket(Figure 5).
Figure 5
6. Remove wire leads from the rear of thethermostat, noting all connections forreassembly (Figure 6).
Figure 6
7. Loosen the packing nut and holding nut(Figure 7).
Figure 7
8. Remove the thermostat bulb from theclamp (Figure 8).
Figure 8
9. Pull the thermostat bulb through theunderside of the fry tank and remove thethermostat assembly.
— 7 — F35641 (02-05)
EF SERIES GAS FRYERS
10. Reverse the procedure to install. Wheninstalling the new thermostat assembly,do not kink the thermostat capillary. Wrapthreads of packing nut with Teflon tape toprevent leakage.
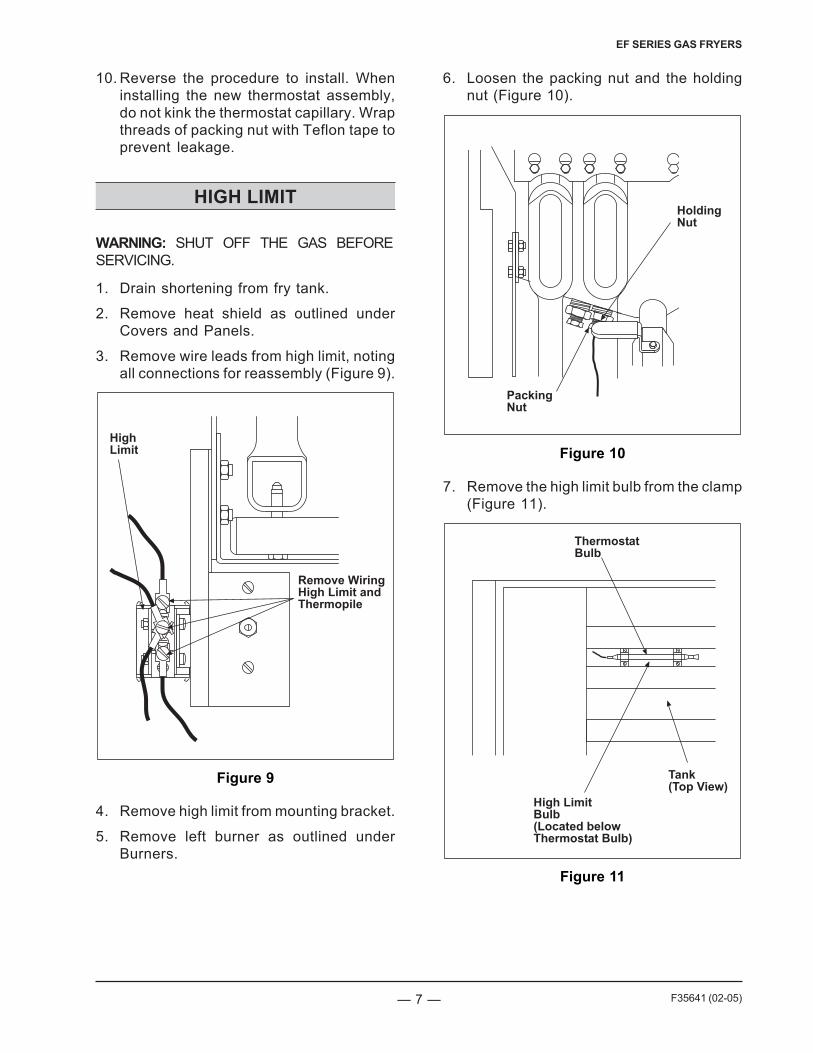
HIGH LIMIT
WARNING: SHUT OFF THE GAS BEFORESERVICING.
1. Drain shortening from fry tank.
2. Remove heat shield as outlined underCovers and Panels.
3. Remove wire leads from high limit, notingall connections for reassembly (Figure 9).
Figure 9
4. Remove high limit from mounting bracket.
5. Remove left burner as outlined underBurners.
6. Loosen the packing nut and the holdingnut (Figure 10).
Figure 10
7. Remove the high limit bulb from the clamp(Figure 11).
Figure 11

— 8 —F35641 (02-05)
EF SERIES GAS FRYERS
8. Pull the high limit bulb through theunderside of the fry tank and remove thehigh limit.
9. Reverse the procedure to install. Wheninstalling the new high limit assembly, donot kink the high limit capillary. Wrapthreads of packing nut with Teflon tape toprevent leakage.
THERMOPILE
WARNING: SHUT OFF THE GAS BEFORESERVICING.
WARNING: ALL GAS JOINTS DISTURBEDDURING SERVICING MUST BE CHECKEDFOR LEAKS. CHECK WITH SOAP ANDWATER SOLUTION (BUBBLES). DO NOTUSE AN OPEN FLAME.
1. Remove the screw securing the Pilot/Thermopile Assembly Bracket to the tankfront. Lower the assembly away from thetank (Figure 12).
2. Disconnect thermopile lead wires asoutlined under High Limit.
Figure 12

— 9 — F35641 (02-05)
EF SERIES GAS FRYERS
3. Remove thermopile from pilot bracket byloosening the holding nut (Figure 13).
Figure 13
4. Reverse procedure to install.
PILOT ORIFICE
WARNING: SHUT OFF THE GAS BEFORESERVICING.
WARNING: ALL GAS JOINTS DISTURBEDDURING SERVICING MUST BE CHECKEDFOR LEAKS. CHECK WITH SOAP ANDWATER SOLUTION (BUBBLES). DO NOTUSE AN OPEN FLAME.
1. Remove the screw securing the Pilot/Thermopile Assembly Bracket to the tankfront. Lower the assembly away from thetank (Figure 12).
2. While holding assembly in the palm ofyour hand remove the pilot compressionfitting at the bottom of the pilot to exposethe orifice (Figure 12).
3. Replace orifice and reverse procedure toassemble.
PILOT
WARNING: SHUT OFF THE GAS BEFORESERVICING.
WARNING: ALL GAS JOINTS DISTURBEDDURING SERVICING MUST BE CHECKEDFOR LEAKS. CHECK WITH SOAP ANDWATER SOLUTION (BUBBLES). DO NOTUSE AN OPEN FLAME.
1. Remove the screw securing the Pilot/Thermopile Assembly Bracket to the tankfront. Lower the assembly away from thetank (Figure 12).
2. While holding assembly in the palm ofyour hand remove the pilot compressionfitting at the bottom of the pilot anddisconnect the pilot tubing (Figure 12).
3. Remove thermopile as outlined underThermopile (set aside for reassembly).
4. Remove (2) screws holding the pilotassembly to the Pi lot/ThermopileAssembly Bracket and replace the oldpilot with the new assembly (Figure14).
Figure 14
5. Reinstall by reversing steps 1-4.

— 10 —F35641 (02-05)
EF SERIES GAS FRYERS
COMBINATION VALVE
WARNING: SHUT OFF THE GAS BEFORESERVICING.
WARNING: ALL GAS JOINTS DISTURBEDDURING SERVICING MUST BE CHECKEDFOR LEAKS. CHECK WITH SOAP ANDWATER SOLUTION (BUBBLES). DO NOTUSE AN OPEN FLAME.
1. Disconnect fryer from main gas supply.
2. Remove heat shield as outlined underCovers and Panels. (Optional)
3. Remove right burner as outlined underBurners.
4. Disconnect wire leads from thecombination valve and mark forreconnecting.
5. Disconnect pilot tubing from combinationvalve (Figure 15).
Figure 15
6. Disconnect combination valve union andpressure fitting (Figure 16).
Figure 16
7. Remove the combination valve from thefryer.
8. Remove all pipe fittings from the oldcombination valve if the new valve is notsupplied with fittings.
9. Reverse procedure to install using originalpipe fittings.

— 11 — F35641 (02-05)
EF SERIES GAS FRYERS
FRY TANK
WARNING: SHUT OFF THE GAS BEFORESERVICING.
WARNING: ALL GAS JOINTS DISTURBEDDURING SERVICING MUST BE CHECKEDFOR LEAKS. CHECK WITH SOAP ANDWATER SOLUTION (BUBBLES). DO NOTUSE AN OPEN FLAME.
1. Disconnect fryer from main gas supply.
2. Remove baskets, fryer basket hanger andcrumb screen.
3. Drain oil from tank.
4. Remove heat shield as outlined underCovers and Panels.
5. Remove screws holding fryer tank(Figure 17).
Figure 17
6. Remove burners as outlined underBurners.
7. Remove the manifold bracket from thetank assembly by removing the (4) bolts(Figure 18).
Figure 18
8. Remove thermostat and high limit asoutlined under Thermostat and High Limit.
9. Remove the screw securing the Pilot/Thermopile Bracket Assembly (Figure 19).
Figure 19
10. Lift the fry tank up and out of cabinet.Carefully place the tank assembly on thefloor (this procedure requires two people).
11. Remove the tank bal l drain valve(Figure 18).
12. Reverse the procedure to install new tank.

— 12 —F35641 (02-05)
EF SERIES GAS FRYERS
MILLIVOLT CONTROLS TEST
1. Verify proper gas (natural or propane) ispresent.
2. Check for correct wiring and secureconnections.
3. Verify the pilot flame is adjusted properlyas outlined in Pilot Adjustment.
4. If the pilot is not lit, light pilot as outlinedunder Lighting Pilot. Allow the pilot toburn for 3 to 4 minutes to stabilize.
A. If the pilot remains lit, proceed tostep 6.
B. If the pilot will not remain lit, proceedto step 5.
5. Connect DC voltmeter to terminalsTH-PG and PG of combination valve.Relight the pilot, hold the gas controlvalve knob in and allow the pilot to burnfor 3 to 4 minutes to stabilize.
A. lf the voltage measures 450 millivoltsor greater and the pilot will not stay lit,replace the combination valve.
B. lf the voltage is less than 450 millivolts,measure the voltage at terminals NOand C of high limit.
1) If the voltage is 500 millivolts ormore, replace the high limit.
2) If the voltage is less than 500millivolts, disconnect the lead wirefrom terminal TH-PG of thecombination valve and remeasurevoltage at the high limit.
a. If the voltage is less than 500millivolts, replace the thermopile.
b. If the voltage is 500 millivolts ormore, replace the combinationvalve.
6. Connect DC voltmeter to terminals PGand TH of combination valve.
7. Turn gas control valve knob to ON. Turnthermostat to a setting higher than theshortening temperature.
A. If the voltage measures 150 millivoltsor more but the burners do not ignite,replace the combination valve.
B. If the voltage is less than 150 millivolts,measure the voltage betweenterminals NO of the high limit and PGof the combination valve.
1) If the voltage is 200 millivolts orgreater, replace the thermostat.
2) If the voltage is less than 200millivolts, replace the combinationvalve.
THERMOSTAT CALIBRATION
1. Place temperature tester in the fry tanknear the thermostat bulb.
2. Set the thermostat to 300°F and allow thetemperature to stabilize.
3. Check the temperature tester readingagainst the thermostat dial reading. Ifthere is a variance of more than ±20°F(280°F to 320°F), calibration is required.
Calibration Steps
1. Remove thermostat knob from shaft.
2. Using a small screwdriver, rotate thesetscrew inside the hol low shaftcounterclockwise to increase thetemperature or clockwise to decrease thetemperature (1/4 turn equals approx-imately 18°F).
3. Allow temperature to stabilize and rechecktemperature. Repeat until the temperaturefalls within the limits as stated in step 3under Thermostat Calibration.
4. Install thermostat knob and set dial to350°
SERVICE PROCEDURES AND ADJUSTMENTS

— 13 — F35641 (02-05)
EF SERIES GAS FRYERS
5. Allow temperature to stabilize at newsetting and compare temperature testerto dial sett ing. Recal ibrate i f thetemperature does not fall within the rangeof 330°F to 370°F.
6. If the temperature does not fall within thelimits at both settings, replace thethermostat.
PILOT ADJUSTMENT
1. Light pilot as outlined under Lighting Pilot.
2. If the flame does not extend beyond theouter edges of the pilot shield 1/2”, orextends more than 1/2”, (Figure 20), anadjustment is necessary.
Figure 20
3. Remove the cap covering pilot adjustmentscrew, (Figure 21). Turn the recessedpilot adjustment screw counterclockwiseto increase the size of the flame orclockwise to decrease the size of theflame.
Figure 21
BURNERS, NOZZLESAND ORIFICES
WARNING: SHUT OFF THE GAS BEFORESERVICING.
Burners
If the burner ports become clogged, the fryerwill not operate properly. If the burner iscracked, it must be replaced.
1. Remove burner(s) as outlined underBurners.
2. Check burner(s) for cracks and cloggedports.
3. If the ports are clogged, wash burner(s) inwarm, soapy water. If this does not removeobstructions, a #37 drill bit can be used(do not use in an electric drill; hand-turnonly).
Nozzles and Orifices
1. Remove the burners as outlined underBurners.

— 14 —F35641 (02-05)
EF SERIES GAS FRYERS
2. Hold the burner nozzle with channel locksand remove the orifice, (Figure 22). Checkthe orifice for obstructions or damage.
Figure 22
3. If the orifice is clogged, wash the orifice inwarm, soapy water. If this does not removeobstructions, a #37 drill bit can be used(do not use in an electric drill; hand-turnonly).
4. With channel locks, remove the burnernozzle (Figure 22).
5. Reverse procedure to install new burnernozzle and orifice.
COMBINATION VALVEREGULATOR ADJUSTMENT
WARNING: SHUT OFF THE GAS BEFORESERVICING.
Accurate gas pressure adjustments can onlybe made with the gas on and the burner lit. Ifthe incoming line pressure to the valve is lessthan the minimum stated, then the pressurecannot be set correctly.
The combination valve is preadjusted fornatural or propane gas as specified on therating plate. The natural gas rating is 4” W.C.,and the propane rating is 10" W.C.
1. Turn the gas control valve knob to OFF(Figure 23).
Figure 23
2. Remove the plug from the submanifoldand install pressure gauge at this point(Figure 24).
Figure 24
3. Turn on the gas and light the pilot asoutlined under Lighting Pilot.
4. Turn the gas control valve knob to ON.
5. Set the thermostat so the burners willcome on.

— 15 — F35641 (02-05)
EF SERIES GAS FRYERS
6. Read the pressure gauge. The manifoldpressure reading should match thepressure rating on the data plate.
A. To adjust, remove the cap coveringthe manifold pressure adjustmentscrew (Figure 25). Turn the recessedmanifold pressure adjustment screwcounterclockwise to decreasepressure or clockwise to increasepressure.
Figure 25
7. Install the cap and check for properoperation.

— 16 —F35641 (02-05)
EF SERIES GAS FRYERS
CONTROL SYSTEMDESCRIPTION
1. The thermopile (PG) provides the totalcontrol voltage for this system.
A. One side of the thermopile isconnected to the common (C) of thehigh limit (HL).
B. The other side of the thermopile isconnected to the normally open (NO)contacts of the high limit.
C. The common of the high limit (belowthe high limit trip temp.) is connectedthrough the normally closed (NC)contacts of the high limit, through wire3 to the combination valve pilotconnection common.
D. The other side of the pilot valve isconnected through wire 4 to wire 1 tothe high limit normally open contactswhich hold the pilot valve open.
1) If the high limit trips, connection ismade from the common to thenormally open contacts, turningoff pilot valve voltage. The gasvalve closes.
2. Thermostat Control.
A. One side of the millivolt supply isconnected through the high limitsystem, as described above, to thethermostat common (wire 3) of thecombination valve.
B. The other side of the thermopile isconnected from the normally opencontacts of the high limit to thethermostat through wire 1.
C. When the thermostat calls for heat(closed circuit) power from thethermopile is then connected to theother combination valve thermostatconnection through wire 2.
D. If the high limit trips, the thermopile isconnected across zero ohms, theoutput voltage of the thermopile dropsto 0.0 millivolts, and the thermostatcoil of the combination valve dropsout, shutting the thermostat valve.
3. Total Shutdown.
A. When the high limit trips, 0.0 millivoltswill read across both coils of thecombination valve, causing bothvalves to close.
B. Pilot relight cannot be accomplisheduntil oil cools sufficiently to allow highlimit to close.
C If any wire in the system is cut orbroken, the system will shut down.
ELECTRICAL OPERATION

— 17 — F35641 (02-05)
EF SERIES GAS FRYERS
SYSTEM CONDITION QUICKCHECK PROCEDURES
1. Use the Pilot Lighting procedure andcheck millivolts (mV) at wires 3 and 4.
A. lf the pilot lights, then pilot combinationvalve and high limit are good.
B. If the pilot will not stay lit, check highlimit and open the thermopile circuit. Itshould read 300 mV; if there are Øvolts, check high limit. If the high limitis good, replace combination valve.
C. Check for voltage at disconnectedthermopile. It should read 300 mV; ifthere are Ø volts, replace thermopile.Check high limit. If the high limit isgood, replace combination valve.
2. Turn on thermostat; burners should light.
A. lf the burner does not light, check thefollowing:
1) Voltage at combination valve atwires 2 and 4.
2) If correct voltage is present, thencheck combination valve.
3) If there are Ø volts, check voltagebetween wire 3 of combination valveand wire 1 of thermostat. If correctvoltage is present, then checkresistance of the thermostatcontacts and continuity of wires3 & 2.
SCHEMATIC
Figure 26
COMPONENT FUNCTION
• Thermostat - Millivolt type with capillarybulb, single-throw break on temperaturerise. Temperature range of 200°F to400° F.
• Thermopile - Millivolt control with 24"capillary. Rated to generate 500 millivolts.
• Combination Valve - Regulates gas flowto burner and pilot. Provides pilot safety.
• High Limit - Prevents overheating of fryerin the event of thermostat failure. Opensat 465°F and automatically resets at415°F.

— 18 —F35641 (02-05)
EF SERIES GAS FRYERS
TROUBLESHOOTING
SYMPTOM
The temperature of theshortening drops, orexcessive recovery time isrequired.
Pilot won’t stay lit. Fryershuts off.
Rapid shorteningbreakdown, crumbs andspecks in frying compound.
CAUSE
Insufficient gas supply tounit.
Ventilation system pullingheat out of heat exchangerand flue box.
Overloading fryer capacity.Malfunctioning thermopileor loose/dirty connection inthermopile.
Malfunctioning shutoffvalve.
Pilot burner orifice and airopenings need cleaning.Excessive temperaturesettings (over 375° F).
Shortening not beingfiltered regularly.
Incorrect preparation ofbreaded food.
REMEDY
Adjust gas supply at gas combinationvalve.
Relocate fryer.
Adjust loads accordingly.Check thermopile function andconnections. Adjust or replace asrequired.
Replace shutoff valve.
Clean burner orifice and air openingsas required.Adjust temperature setting.
Adjust filtering schedule.
Do not use salt.
Allow breading time to adhere to food.
Do not allow loose flour to fall intoshortening from hands.
Do not add strainings or drippingsfrom meat fats to shortening.
Use correct shortening and followtemperature recommendations.
Take out 10% to 15% of theshortening.
Check thermostat settings withthermometer periodically.

— 19 — F35641 (02-05)
EF SERIES GAS FRYERS
SYMPTOM
Leaking tank.
Pilot burner flamesadjusted properly, butfluctuates to very low andblows out easily.
CAUSE
Foam-over by depletedshortening permits oil todrip from the tank surface,giving appearance ofleaking.
Careless drainingprocedures.
Carbon buildup causesrapid attack on tank bypromoting acid formulation.Gas pressure too low.
Gas pressure too low atsubmanifold.
REMEDY
Replace shortening.
Gas control valve knob should be inPILOT or OFF position beforedraining oil. Burners heating an emptytank will damage tank joints.
Clean tank surfaces.
Check gas pressure on submanifoldfitting when fryer is in operation.
Check other equipment attached tosame gas line.
Adjust gas pressure at submanifold tonot less than 4.0” W.C. (natural andmixed gas) or 10.0” W.C. for propanegas.

F35641 (02-05) PRINTED IN U.S.A.