service manual, tcc · 2 7. carefully lift the bag and set the bag into the dispenser. 8. rest...
TRANSCRIPT
NSF International requires the following water connection:1. A quick disconnect or additional coiled tubing (at least 2x the depth of the unit) so that the machine can be moved for cleaning underneath.2. Thisequipmentistobeinstalledwithadequatebackflowprotectiontocomplywithapplicable federal, state and local codes..3. Waterpipeconnectionsandfixturesdirectlyconnectedtoapotablewatersupplyshallbesized, installed and maintained in accordance with federal, state, and local codes.
1
ISO 9001 REGISTERED
Important Safeguards/ConventionsService Manual, TCC
This appliance is designed for commercial use. Any servicing other than cleaning and maintenance should be performed by an authorized Wilbur Curtis service center. •DoNOTimmersetheunitinwateroranyotherliquid •Nevercleanwithscouringpowders,bleachorharshimplements.
Conventions:
WARNINGS–Tohelpavoidpersonalinjury ImportantNotes/Cautions
SanitationRequirements
Curtis TCC Units are Factory Pre-Set and Ready to Go… Right out of the Carton.Generallytherewillneverbeareasontochangefactorysettings.However,shouldyouneedtomakeslightadjustmentstomeetyourteaneeds,adjustmentinstructionsareprovidedlaterinthismanual. System Requirements:
•WaterSource30–90PSI(MinimumFlowRateof1GPM).Ifincomingwatersupplyisgreaterthan90PSI,additionalregulationisrequiredtomeettherange.
•Waterpipeconnectionsandfixturesdirectlyconnectedtoapotablewatersupplyshallbesized,installedandmaintainedinaccordancewithfederal,state,andlocalcodes.
SETUP STEPSTheunitshouldbelevel(lefttorightandfronttoback),locatedonasolidcountertop.ConnectawaterlinefromthewaterfiltertotheTCCserver.NOTE:Sometypeofwaterfiltrationdevicemustbeusedtomaintainatrouble-freeoperation.(Inareaswithextremelyhardwater,wesuggestthatasedimentaryandtaste&odorfilterbeinstalled.)Thiswillprolongthelifeofyoursystemandenhanceteaquality. INSTALLATION1. Remove dispenser from carton.2.Runawaterlinetotheinletfittingbehindthedispenser.Flushthenewwater-
line to remove foreign particles.3.Connecta¼”flaredflexibleorcopperwaterlinetothemalefittingontheback
of the dispenser.
4.Locatethewatersupplyvalvebehindtheunittoverifypositionisturnedon.CAUTION:Werecommendedthatthewatersupplyvalve,behindunit,beturnedoffduringnon-business hours.
Wilbur Curtis Company, inC.
WILBUR CURTIS COMPANYMontebello, CA 90640
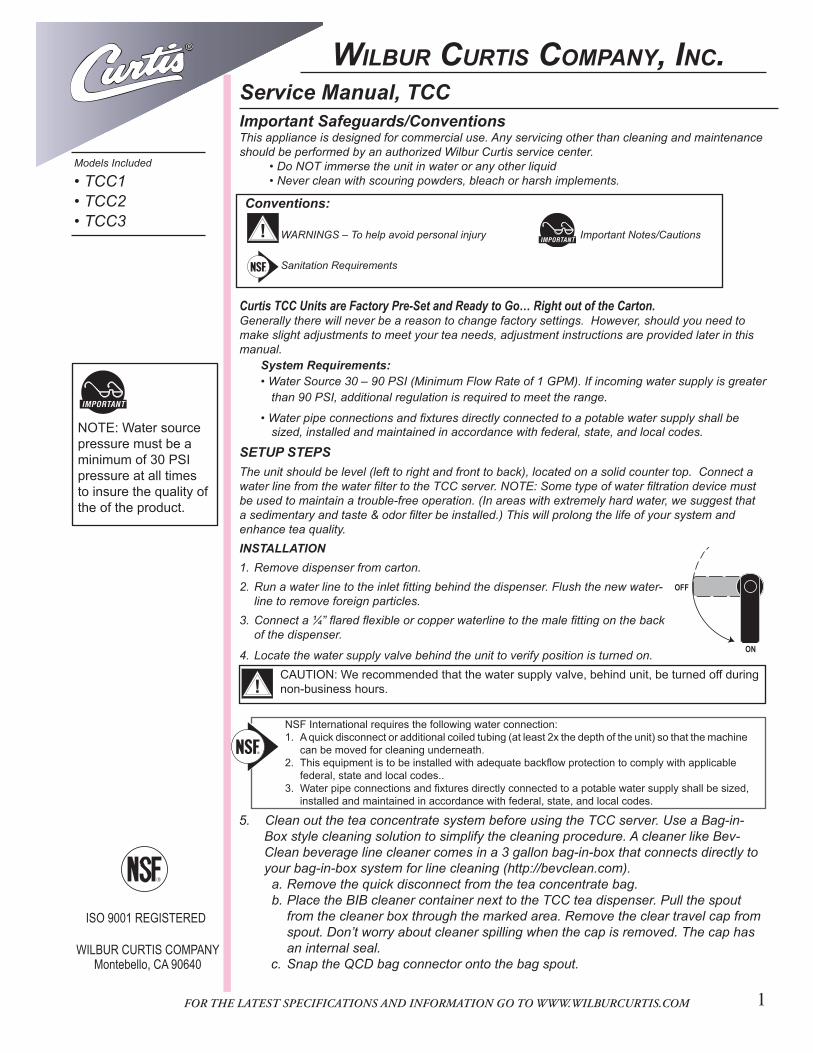
ModelsIncluded
•TCC1•TCC2•TCC3
NOTE: Water source pressure must be a minimum of 30 PSI pressure at all times toinsurethequalityofthe of the product.
5. Clean out the tea concentrate system before using the TCC server. Use a Bag-in-Boxstylecleaningsolutiontosimplifythecleaningprocedure.AcleanerlikeBev-Cleanbeveragelinecleanercomesina3gallonbag-in-boxthatconnectsdirectlytoyourbag-in-boxsystemforlinecleaning(http://bevclean.com).
a.Removethequickdisconnectfromtheteaconcentratebag. b.PlacetheBIBcleanercontainernexttotheTCCteadispenser.Pullthespout
fromthecleanerboxthroughthemarkedarea.Removethecleartravelcapfrom spout.Don’tworryaboutcleanerspillingwhenthecapisremoved.Thecaphas an internal seal.
c.SnaptheQCDbagconnectorontothebagspout.
OFF
ON

2
7. Carefully lift the bag and set the bag into the dispenser.
8. Rest tubing on top of the bag. Route tubing to opposite product intake –holeonfloorofdispenser(seeillustration,left).
9. Replacethetopcover.
10. Dispensebeveragefromfaucetuntildarkerproductstartstoappear(~5seconds).
11. TheTCCserverisnowreadytodispensetea.
3. Pullofftheshipping cap that covers the spout on the bag.
4. PlacetheQCDnextto the spout.
5. SlideQCDsideways, over the bag spout. QCDsnapsinplace.
6. PushQCDplungerinto bag spout until plunger topisflushwithtopof QCD.A“click”willbe heardwhenitisfully inserted.
LOAD PRODUCTBag-In-Box1.PlaceateaconcentratebagonthecounternexttotheTCCdispenser.2. RemovethetopcoverfromtheTCCdispenserandpulloutthehosewiththeQCD
bag connector.
d. Graspingthebagconnector(asshowninLoadProduct,step6),pushtheslidingprobeallthewayintothe bagspout.A“click”willbeheardwhenitisfullyinserted.e. Oncethecleaningsolutionboxisconnected,openthedispensingvalveonthedispenserandrunliquid throughthevalveuntilthesanitizer(clearliquid)isdetected.Thedispensinglineisnowclean.f. Disengagethebagconnectorbysnappingtheconnectorprobeoutandremovetheconnectorfromthespout.g. ReattachtheteaconcentrateBIB.h. Opendispensingvalveondispenseruntilteaflowsfreely.
WATER PRESSURE AND MIXING VALVEThetamper-proofsealantonthe’adjustmentknob-to-body’threadsofthepres-sureregulatorisafactory-calibrated,pre-setpressure‘indexmark’.Itisremov-ableifthebrixtestdemandsabsolutepreciseness.However,thepressureregu-latorshouldrarelybechanged.Primarytaste/brixadjustmentsshouldbedoneviathemixingvalvebyturningtherodandtastingthefinishedproduct.98%offlavoradjustmentsshouldbedoneinthismanner.Thepurposeoftheregulatoristoprovideuniformwaterpressuresotheventuri-stylemixingdevicecanproduceastableanduniformblendofconcentrateandwaterand,alsotoprotectthehydraulicsofthedispensingunitfrom“linepres-sure”.Itisnottheprimaryadjustmentforthebrixlevel.Fromourtesting,ithasbeenshownthatexactPSIonthegagedoesnotdirectlycorrelatetoabrixlevelfromunittounitandfrominstallationlocationtoinstallationlocation.Secondarily,iftheprimaryadjustmentdoesn’tprovidetheidealbrixlevel,callCurtisCareforinstructionsonhowtoadjusttheregulator.Asarule,verylittletasteadjustmentisachievedviathepressureregulator.

3
MIXING VALVE ADJUSTMENT:Forcustomerswhowishtoadjusttheflavorofthedrink,themixingvalvechangesthewatertoconcentrateratio.Thisvalveisverysensitive.Onlyslightrotationofthemixingrodisneededtochangetheratio(1/16thto1/8thofaturn).Thestandardsetup,astheunitcomesfromthefactory,isapproximately7:1ratio,whichwillgiveyoua5to8percentbrixbasedonthesweettea concentrate. 1.Toadjustthevalve,tiltthedispenseronit’sside.2.Lookunderneaththeunitandlocatetheadjustingrod.3.Turncounter-clockwiseforstrongerdrink–turnclockwiseforweakerdrink.Tastethetea
witheachadjustmenttodeterminethedesiredconsistency.CAUTION–Donotrotateadjustingrodmorethan2fullturnsfromclosedposition.Moreturnswillcausetheadjustmentrodtodisengagefromthemixingvalve,witharesultingleak.
TEA TIPS1. Neverholdfinisheddispensedteaformorethaneighthoursatroomtemperature. Discardanyunusedteaaftereighthours2. Dispenseonlyenoughteathatyoureasonablyexpecttosellwithinafewhours.3. Toprotectteaflavorandtoavoidbacterialcontaminationandgrowth,cleanand sanitizeteabrewing,storageanddispensingequipmentatleastonceaday.
WARNING DO NOT refrigerate unused tea overnight for later
consumption.
CLEANINGSTRAINER CLEAN-OUT1. Turnoffthewaterflowrunningfromthefacilitytothestrainer.2. Useplierstograbthehousingofthestrainerandwithanadjustablewrench,removethecap.3. Takeoutthewirestrainerandcleanoutthecontents.Useaspiralbristledbrushtocleaninsidethestrainer.4. Rinse the strainer and replace it into the housing.5. Returnthecaptothehousingandturnonthewaterline.
DAILY CLEANINGRegularcleaningoftheTCCdispenserisessentialinmaintainingthehighestqualityicedteayourequipmentis
capable of producing.1. Wipeanyspills,dustordebrisfromtheexteriorsurfaces,withadampcloth.Applyastainlesssteelpolishto
prevent scratches.2.Turnoffwatersupplyatvalvebehindunit.3.Openthedispensingfaucettorelievepressureinthedispensinglines.4.Removethetopcoverandcleanwithdetergentsolution.5. Clean the faucet assembly. a. Unscrewthehandleassemblyfromthefaucetandremove. b. Clean the faucet cap and silicone seat cup. c. Use a spiral brush to clean inside the faucet body.6.Rinseanddrypartsthatwereremoved.Assemblethemtotheunit.

4
WEEKLY CLEANING & SANITIZINGUse a concentrated cleaning solution to simplify the cleaning procedure. This procedure requires a one gallon container of a cleaning solution containing hot water and a granulated concentrated cleaner (a cleaner like Coffee Dispenser Cleaner Corporation #12580, Urnex or equivalent) and a one gallon container of clean hot water.1. Turn on water supply to the dispenser.2. Remove the quick disconnect from the tea
concentrate bag.3. Pull the cap off of the QCD (see detail drawing)
and place this end of the line into the container containing the cleaning solution.
4. Place a large empty container under the dispenser faucet.
5. Open the front faucet and dispense at least half of the cleaning solution.
6. Allow the dispenser to sit overnight before flushing cleaning solution.
7. Flush the system by filling a one gallon container with clean hot water (no cleaning solution) and open the faucet and dispense at least one gallon of the hot water or until all the cleaning solution has been flushed from the system.
8. Remove the QCD from the flushing container and replace the cap. Reconnect the QCD to the Bag in the Box tea concentrate and dispense several cups to prime the concentrate line or until consistency of the product is correct.
SANITIZINGUseaBag-in-Boxstylecleaningsolutiontosimplifythesanitizingprocedure.AproductlikeBevClean(http://bevclean.com)beveragelinesanitizercomesina3gallonbag-in-boxthatconnectsdirectlytoyourbag-in-boxsystemforlinesanitizing.1.Removethequickdisconnectfromtheteaconcentratebag.2. PlacetheBIBsanitizercontainernexttotheTCCteadispenser.Pullthespoutfromthesanitizerboxthroughthe
markedarea.Removethecleartravelcapfromspout.Don’tworryaboutspillingsanitizerwhenthecapisre-moved. The cap has an internal seal.
3. SnaptheQCDbagconnectorontothebagspout.4. Graspingthebagconnector(asshowninLoadProduct,step6),pushtheslidingprobeallthewayintothebag
spout.A“click”willbeheardwhenitisfullyinserted.5. Oncethecleaningsolutionboxisconnected,openthedispensingvalveonthedispenserandrunliquidthrough
thevalveuntilthesanitizer(clearliquid)isdetected.
DONOTFLUSH.Allowthesanitizingsolutiontositinthetealinesovernightbeforeproceedingwithlineflushingsteps6through8,below.
6. RemovetheQCDfromtheBIBcleaner.Unsnaptheconnectorprobe,pullingoutandremovingtheconnectorfrom the spout.7. Flushthelinewithwarmwatertoremoveanycleaningsolution.7. ReattachtheteaconcentrateBIBproduct.8. Openthedispensingfaucetinfrontofthedispenserandallowwatertorunoutuntilteaflowsfromthefaucet.
9. Repeattheprocessforanyadditionalfaucetsondispenser.Note:Muliti-outletmanifoldsareavailableforsanitizinguptoeightbeveragelineswithonebag-in-boxsanitizer.Thisallowsyoutocleanallsystemsatonetime.
8.875”(22.5 cm)
24”(61.0 cm)
8.875”(22.5 cm)
18.25”(46.4 cm)
12.875”(32.7 cm)
10”(25.4 cm) 9.25”
(23.5 cm)
11.25”(28.6 cm)
2.125”(5.4 cm)
8.875”(22.5 cm)
24”(61.0 cm)
8.875”(22.5 cm)
18.25”(46.4 cm)
12.875”(32.7 cm)
2.125” [5.4 cm]
3.75”(9.5 cm)
11.25”(28.6 cm)
10”(25.4 cm) 9.25”
(23.5 cm)
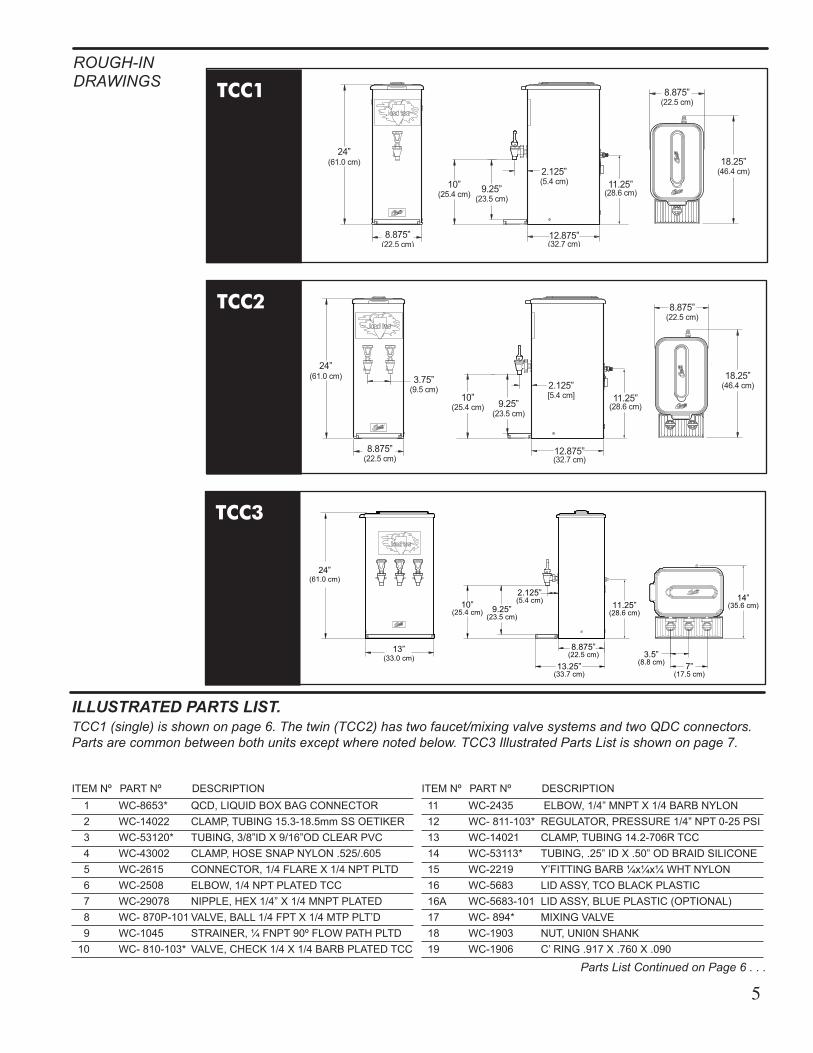
ROUGH-INDRAWINGS TCC1
TCC2
TCC3
5
ILLUSTRATED PARTS LIST.TCC1(single)isshownonpage6.Thetwin(TCC2)hastwofaucet/mixingvalvesystemsandtwoQDCconnectors.Partsarecommonbetweenbothunitsexceptwherenotedbelow.TCC3IllustratedPartsListisshownonpage7.
1 2 3 4 56 78 910
WC-8653*WC-14022WC-53120*WC-43002WC-2615WC-2508WC-29078WC-870P-101WC-1045WC-810-103*
QCD, LIQUID BOX BAG CONNECTORCLAMP,TUBING15.3-18.5mmSSOETIKERTUBING,3/8”IDX9/16”ODCLEARPVCCLAMP,HOSESNAPNYLON.525/.605CONNECTOR, 1/4 FLARE X 1/4 NPT PLTDELBOW, 1/4 NPT PLATED TCCNIPPLE,HEX1/4”X1/4MNPTPLATEDVALVE,BALL1/4FPTX1/4MTPPLT’DSTRAINER, ¼ FNPT 90º FLOW PATH PLTDVALVE,CHECK1/4X1/4BARBPLATEDTCC
DESCRIPTIONPART NºITEM Nº11121314151616A171819
WC-2435WC-811-103*WC-14021WC-53113*WC-2219WC-5683WC-5683-101WC-894*WC-1903WC-1906
ELBOW,1/4”MNPTX1/4BARBNYLONREGULATOR,PRESSURE1/4”NPT0-25PSICLAMP,TUBING14.2-706RTCCTUBING,.25”IDX.50”ODBRAIDSILICONEY’FITTINGBARB¼x¼x¼ WHT NYLONLIDASSY,TCOBLACKPLASTICLID ASSY, BLUE PLASTIC (OPTIONAL)MIXINGVALVENUT,UNI0NSHANKC’RING.917X.760X.090
DESCRIPTIONPART NºITEM Nº
PartsListContinuedonPage6...
3.5”(8.8 cm) 7”
(17.5 cm)
24”(61.0 cm)
13”(33.0 cm)
10”(25.4 cm) 9.25”
(23.5 cm)
2.125”(5.4 cm)
13.25”(33.7 cm)
8.875”(22.5 cm)
11.25”(28.6 cm)
14”(35.6 cm)

6
ILLUSTRATED PARTSTCC1 SHOWN, TCC2 COMPONENTS ARE SIMILAR
1
4
3
89
1216
1718192021
22
25
23
24
15
29101311
2627282930
WC-37288*WC-37293WC-53117-101WC-29079WC-8654
KIT,CHECKVALVE,CLAMPS&INSTRKIT,CHECKVALVE(2VALVES&INSTR)TUBE, BOTTLE ADAPTER (OPTIONALNIPPLE,HEX1/4”NPTX1/4NPTNYLONCONNECTOR,SCHOLLEL’(ICEDCOF)
DESCRIPTIONPART NºITEM Nº
*RecommendedPartstoStock
202122232425
WC-4320WC-1829WC-37222*WC-43084*WC-37312*DTP-08
O’RING,.487IDX.103CSFAUCET ASSY, TCCKIT,FAUCETWIREREINFORCEDCUPO-RING,.070”IDX.070”WBUNA-NKIT,ADJUSTINGROD&O-RINGTCCDRIPTRAY,8”
DESCRIPTIONPART NºITEM Nº
264
227
567
14
ICED COFFEE CON-CENTRATE ONLY
30

7
ILLUSTRATED PARTSTCC3 ALLPARTSAREIDENTICALTOTCC1&TCC2,EXCEPTWHERENOTED
1
4
3
16
26
27 2
56789
29
10
1211
13
14
15
1718192021
22
23
24
25
28

DOs and DON’TsINSTALLATION
1. Doconnectdispensertoafilteredwater-line.
2. Doflushfiltersbeforeconnectingtodis-penser.
3.Dosamplefinisheddrinkbeforemakingadjustments.
4. Domakeveryslightdrinkadjustmentsthen sample.
5. Don’tforgettoflushfiltersbeforeinstalla-tion.
6. Don’tmakeanypressureregulatoradjust-mentsonurn(DoNOTattempttoadjusttheurnregulator.IfaregulatoradjustmentisrequiredcallCURTISCARE).
7. Don’t forget to get sample approval from customer.
OPERATION
1. Dofullyactivatefaucethandlewhendis-pensing drinks.
2. Do clean & sanitize dispensing assembly monthly.
3.Dokeepdispenserprimedwithconcen-trate at all times.
4. Doreloadimmediatelywhenoutofcon-centrate.
5. Doflushandcleanlinesregularly.
6. Don’t forget to clean & sanitize faucet seat cup
7. Dofollowallcleaningandsanitizingproce-dures,removeandstoreconcentrateifurnwillnotbeusedforanextendedperiodoftime;ie:morethantwodays.
8

SYMPTOM POSSIBLECAUSE SOLUTION
TROUBLESHOOTING GUIDE
DifficultyprimingtheTCCteadispenser.
Adjustingrodonmixingvalveis turned in too far.
Openupthevalve1/4turncounterclockwise.
Tea does not dispense from faucet.
Water line is turned off. Turnonwaterlinevalve.
Onlywaterflowingfromfau-cet,notea.
1.TeaconcentrateBIBisoutof product.
2.TheteaBIBlineiskinked.
3.TheteaBIBlineisclogged.
4. The check valve in the tea concentrate line may be stuck closed.
5.Theadjustmentscrewmay be turned in or closed.
1. Replace the tea concen-trateBIB.
2. Trace the tea line and straighten out kinked hose.
3.Blowouthosetocleanblockageorreplacewithanewhose.
4. Loosen the clamps and remove the check valve. Clean or replace it.
5.Openthemixingvalvetoresumeproductflow.
Faucetisdrippingconstantly. 1. The faucet seat cup may have hardened particles keeping the faucet from sealing.
2. There may be a tear or cut in the seat cup.
3.Waterpressuremaybetoo high.
1.Disassembleandcleantheseatcup(seecleaningsection).
2. Replace the seat cup.
3.CallCURTISCAREforinstructionsonadjustingthewaterregulator.
Finishedteaisweak. 1.Themixingvalveisoutofadjustment.
2. The product check valve may be stuck.
1.Openthemixingvalvetoincrease tea concentrate flow.
2. Remove and clean the checkvalve.Makesurecheck valve is installed withcorrectflowdirection.
9

SYMPTOM POSSIBLECAUSE SOLUTION
TROUBLESHOOTING GUIDE
Productflowingfromthefau-cet is too foamy or bubbly.
1. The clamps at the check valve may not be tight.
2. TheclampontheQCDconnector may be loose.
3. TeaconcentrateproductmayhaveairintheBIB.
4.TheO-ringontheQCDiswornout.
1. Reconnect tubing and tighten clamps.
2.MakesurethebarbedendoftheQCDfittingispushed in on the hose and the clamp is tight.
3.TurntheBIBsothefittingfacesupwardandopenthe faucet until all the bubbles are released.
4.ReplacethewornO-ringorinstallanewQCD.
10

11

Printed in U.S.A. 2/09 F-3480 Rev K
WILBUR CURTIS CO., INC.6913AccoSt.,Montebello,CA90640-5403USAPhone:800/421-6150 Fax:323-837-2410 TechnicalServicePhone:800/995-0417(M-F5:30A-4:00PPST) E-Mail:[email protected] WebSite:www.wilburcurtis.com
FOR THE LATEST SPECIFICATION INFORMATION GO TO WWW.WILBURCURTIS.COM
Product Warranty InformationTheWilburCurtisCompanycertifiesthatitsproductsarefreefromdefectsinmaterialandworkmanshipundernormaluse.Thefollowinglimitedwarrantiesandconditionsapply:
2Years,Parts,fromOriginalDateofPurchaseonallfittingsandtubing.
1Year,Labor,fromOriginalDateofPurchaseonallfittingsandtubing.
StainlessSteelcomponentsarewarrantedfortwo(2)yearsfromdateofpurchaseagainstleakingorpittingandreplacementpartsarewarrantedforninety(90)daysfromdateofpurchaseorfortheremainderofthelimitedwarrantyperiodoftheequipmentinwhichthe component is installed.Allin-warrantyservicecallsmusthavepriorauthorization.ForAuthorization,calltheTechnicalSupportDepartmentat1-800-995-0417.EffectivedateofthispolicyisApril1,2003.Additionalconditionsmayapply.Gotowww.wilburcurtis.comtoviewthefullproductwarrantyinformation.
CONDITIONS & EXCEPTIONSThewarrantycoversoriginalequipmentattimeofpurchaseonly.TheWilburCurtisCompany,Inc.,assumesnoresponsibilityforsubstitutereplacementpartsinstalledonCurtisequipmentthathavenotbeenpurchasedfromtheWilburCurtisCompany,Inc.TheWilburCurtisCompanywillnotacceptanyresponsibilityifthefollowingconditionsarenotmet.Thewarrantydoesnotcoverandisvoidunderthefollowingcircumstances:
1) Improper operation of equipment: Theequipmentmustbeusedforitsdesignedandintendedpurposeandfunction. 2) Improper installation of equipment: Thisequipmentmustbeinstalledbyaprofessionaltechnicianandmustcomplywith alllocalelectrical,mechanicalandplumbingcodes. 3) Improper voltage: Equipmentmustbeinstalledatthevoltagestatedontheserialplatesuppliedwiththisequipment. 4) Improper water supply: Thisincludes,butisnotlimitedto,excessiveorlowwaterpressure,andinadequateorfluctuating waterflowrate. 5) Adjustments and cleaning: Theresettingofsafetythermostatsandcircuitbreakers,programmingandtemperatureadjust- mentsaretheresponsibilityoftheequipmentowner.Theownerisresponsibleforpropercleaningandregularmaintenance ofthisequipment. 6) Damaged in transit: Equipmentdamagedintransitistheresponsibilityofthefreightcompanyandaclaimshouldbemade withthecarrier. 7) Abuse or neglect (including failure to periodically clean or remove lime accumulations): The manufacturer is not responsibleforvariationinequipmentoperationduetoexcessivelimeorlocalwaterconditions.Theequipmentmust bemaintainedaccordingtothemanufacturer’srecommendations. 8) Replacement of items subject to normal use and wear: Thisshallinclude,butisnotlimitedto,lightbulbs,sheardisks, “0”rings,gaskets,siliconetube,canisterassemblies,whipperchambersandplates,mixingbowls,agitationassembliesand whipperpropellers. 9) Repairs and/or Replacements aresubjecttoourdecisionthattheworkmanshiporpartswerefaultyandthedefects showedupundernormaluse.Alllaborshallbeperformedduringregularworkinghours.Overtimechargesaretherespon sibilityoftheowner.Chargesincurredbydelays,waitingtime,oroperatingrestrictionsthathindertheservicetechnician’s abilitytoperformserviceistheresponsibilityoftheowneroftheequipment.Thisincludesinstitutionalandcorrectional facilities.TheWilburCurtisCompanywillallowupto100miles,roundtrip,perin-warrantyservicecall.
RETURN MERCHANDISE AUTHORIZATION: AllclaimsunderthiswarrantymustbesubmittedtotheWilburCurtisCompanyTechnicalSupportDepartmentpriortoperforminganyrepairworkorreturnofthisequipmenttothefactory.Allreturnedequip-mentmustberepackagedproperlyintheoriginalcarton.Nounitswillbeacceptediftheyaredamagedintransitduetoimproperpackaging. NO UNITS OR PARTS WILL BE ACCEPTED WITHOUT A RETURN MERCHANDISE AUTHORIZATION (RMA). RMA NUMBER MUST BE MARKED ON THE CARTON OR SHIPPING LABEL. Allin-warrantyservicecallsmustbeperformedbyanauthorizedserviceagent.CalltheWilburCurtisTechnicalSupportDepartmenttofindanagentnearyou.
12EAR 7135 . 2/12/9 . revK . ecn 10262