service learning project bundle
TRANSCRIPT

1
Engineering Applications: Service Learning Project
Fall 2014
Aza Tulepbergenov, Boise State University
2
Azamat Tulepbergenov Anthony Keith Samuel Pritchard Hector Hernandez
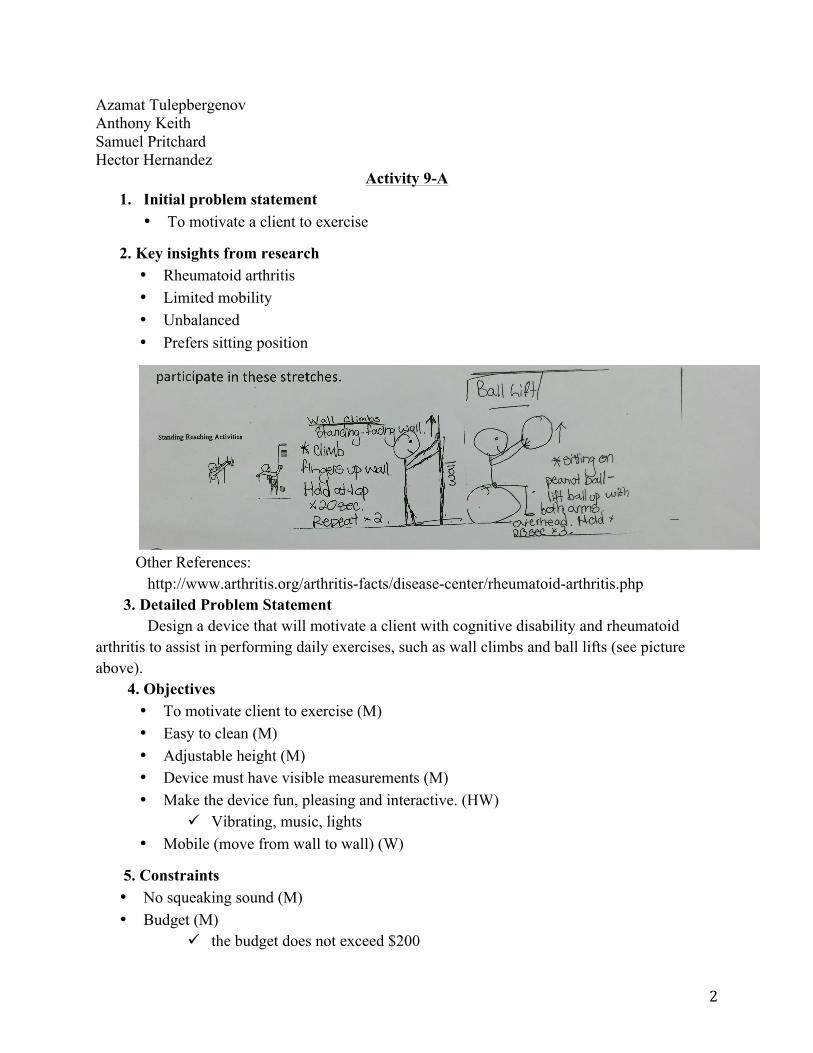
Activity 9-A 1. Initial problem statement
• To motivate a client to exercise
2. Key insights from research • Rheumatoid arthritis • Limited mobility • Unbalanced • Prefers sitting position
Other References: http://www.arthritis.org/arthritis-facts/disease-center/rheumatoid-arthritis.php 3. Detailed Problem Statement Design a device that will motivate a client with cognitive disability and rheumatoid arthritis to assist in performing daily exercises, such as wall climbs and ball lifts (see picture above). 4. Objectives
• To motivate client to exercise (M) • Easy to clean (M) • Adjustable height (M) • Device must have visible measurements (M) • Make the device fun, pleasing and interactive. (HW)
! Vibrating, music, lights • Mobile (move from wall to wall) (W)
5. Constraints • No squeaking sound (M) • Budget (M)
! the budget does not exceed $200

3
• Time (M) ! must be completed by end of semester
• Size/Weight (W) ! make device light enough to carry, but sturdy enough not to break
• Ecofriendly (W)
6. Client approval
Activity 9-B: Concept Design Recall a detailed problem statement from Activity 9-A: “Design a device that will motivate a client with cognitive disability and rheumatoid arthritis to assist in performing daily exercises, such as wall climbs.”
1. List of functions. In this section we break down the detailed problem statement into list of functions: Function Requirement
Motivate a client to start exercises Make a device attractive to a client
Motivate a client to engage in wall climbs Ensure that client will not give up after few tries
Reward a client upon completion of exercises Reward a client with something that she likes (music, vibrating, etc.)
2. Brainstorm design options to satisfy specific functions. In this section we came up
with several design options that would satisfy specific functions listed above.
Function / Design options
Option A Option B Option C Option D

4
Motivate to start exercises
yellow ladder with a single bar and metrics included
spacious structure
yellow ladder with several bars and metrics included
vertical bars such as ones in the picture
Motivate to engage in exercises
vibration
vibrating gloves
sound
moving handle
Reward a client upon completion
different shapes on the sides
toy piano that plays music
buttons
lights
3. Overall Solutions Table. In this section we put together several design options and
made four overall solutions.
Solution 1 Solution 2 Solution 3 Solution 4
yellow ladder with a single bar with metrics included
spacious structure
yellow ladder with several bars
vertical bars such as ones in the picture with metrics included

5
vibration, moving handle
sound
sound
vibration, moving handle
different shapes on the sides
buttons
lights
different shapes on the sides
4. Additional details to more fully describe certain solutions. Solution 1: This solution would be made out of PVC pipes. It has a piano on one end and a wooden board with different shapes attached to it on the other end. The track behind the PVC pipes will allow the bar to go up and down and the removable bolt makes it stay on one spot on the track.
Solution 4: This solution would also be made out of PVC material. The skeleton of the device would be vertical C-shaped bars (as ones shown in the picture) mounted to the wall. The clamps would allow the bar to move up and down or stay in place. The vibrating apparatus will be held by clamps.

6
5. Solutions and evaluations against objectives and Constraints ** the solutions with the most (*) is the best given solution.
Objectives with metrics
Solution 1 To start exercises - yellow ladder with one bar and metrics included To engage - vibration, moving handle Reward - different shapes on the sides
Solution 2 To start exercises - yellow ladder with several bars and metrics included To engage - sound Reward - lights
Solution 3 To start exercises - spacious structure To engage - sound Reward - buttons
Solution 4 To start exercises - vertical bars with metrics included such as ones in the picture To engage - vibration, moving handle Reward - different shapes on the sides
To motivate a client to exercise. -Make a device attractive
**** **** ** ****
Make device fun, pleasing interactive. -Reward a client with something that she likes (music, vibrating, etc.)
**** *** *** ****
Easy to clean **** *** ** ****
Adjustable height
*** *** * ****
Device must have visible measurements
**** *** * ****
Constraints with metrics

7
No squeaking sound
**** **** **** ****
Budget (does not exceed $200)
**** *** ** ****
Size/Weight -Make device light enough to carry, but sturdy enough not to break
*** *** ** ****
Time -Must be complete by end of semester
*** *** ** ****
6. After close examining four overall solutions with project’s objectives and constraints, we
narrowed down our choices to two solutions to carry forward to the next step. Our ultimate choices are Solution 1 and Solution 4 (please see table from step 3). As one can see from the previous step, Solutions 1 and 4 received higher ratings (more stars) than the rest of solutions. For example, we believe that Solutions 1 and 4 each would cost less than $200; moreover, we also believe that vibration would bring the client more motivation to do exercises than sound would.
Activity 9-C If you recall from Activity 9-B, the most viable solutions were Solution 1 and Solution 4 (please see Figure 1). Only one prototype instead of two was built and tested; that is Solution 4 was built and tested. Figure 1
Solution 1 Solution 4
yellow ladder with a single bar with metrics included
vertical C-shaped bars such as ones in the picture with metrics included

8
vibration, moving handle
vibration, moving handle
different shapes on the sides
different shapes on the sides
The functional model of the Solution 4 was built, using PVC pipes and elbow-connectors. Note that, in a functional model “at least a portion of the product features is constructed to function as intended in the final design.” (Lab Manual, 9-15) The functional model that was built included the vertical bars and a moving handle.
30 inches
30 inches
30 inches
Clamps

9
Written description of a functional model: This model is made out of PVC material. The skeleton of the device is vertical C-shaped bars (as ones shown in the picture above). The toy piano held by a horizontal pole between the two C-shaped bars is a substitute to the vibrating device that we intend to use in the final design. The clamps allow the model to have an adjustable height. The increments are separated two inches apart. Note that in the final design the shower bars will be used instead of PVC pipes. Also note that the different shapes on the sides (as in Figure 1) were not used due to time constraint. Figure 2 Function / Objectives / Constraints (include priority)
Test Results Design Modifications required
Motivate a client to exercise (M)
The device was placed on the wall as it were mounted. In order to mimic the final design, one of client’s favorite toys (namely the piano) was used.
The client showed direct signs of satisfaction and attractiveness to the functional model. Client was eager to start exercising.
Paint the vertical C-shaped bars into yellow in order to make it more attractive to the client.
Adjustable Height (M)
The piano was first placed at the height that the client could reach. Then, the piano had been moved up, forcing the client to reach up for it.
The client gained satisfaction from the piano at the starting height, and then reached up to the next height.
Overall the testing of a functional model was successful. Although, the slight changes in design dimensions are required.
No squeaking sound (M)
The client exerted forces on the model while using it.
No squeaking sound has been produced.
No further modifications required.
Overall, the functional model of Solution 4 proved its worthiness. The tests were successful and helped the team to obtain better insights of what the client wanted. As you could see from the Figure 2, the test results were positive and supported team’s ideas. The functional model performed its main function; that is to motivate a client to do wall climbs. Therefore, the team decided to carry on the Solution 4. The tests revealed some areas of further improvement. The dimensions that were used in the functional model will be revisited. For example, the vertical C-shaped bars will be placed 2 feet apart instead of 2.5 feet. The new mounting height will be 4 feet away from the floor level. Meeting with a client was utterly beneficial for both the client and the team. Mutual expectations has been established between the two sides. The team has confirmed with a client details regarding mounting device to the wall.

10
Activity 9-D: Detailed Design
As determined in Activity 9-C, the solution 4 was chosen as the ultimate solution for the initial problem statement. Detailed Product Plan The main skeleton of the structure consists of three main parts: shower bars, pins and a support-structure for a specific toy. Part 1: Shower bars Figure 1
Shower bars can be seen in Figure 1. Note that, there are total of two identical shower bars used in this design. The vertical length of each piece is 432 inches (36 feet). They are made of stainless steel. The Home Depot was a provider for such structure. The changes to shower bars included: the drilled holes 3/8 inches in diameter, 2 inches apart. These modifications allow the device to be height-adjustable. Part 2: Pins Figure 2
The pins are intended to fix the support-structure for a specific toy at a certain height. The diameter of vertical part of a pin is 5/16 inches; the length is 2 ¾ inches. The Home Depot was also a main provider for such structure. Part 3: Support-structure for a specific toy Figure 3

11
Option A: Toy piano holder
Pair of trigger clamps such as shown above is intended to hold the toy piano. The regulators allow adjusting the bottom jaw of the clamp depending on client’s preferences. The clamps are made of carbonized steel, which make them sturdy. The Home Depot was a main provider for such structure. Some modifications have been made to the clamps: the 5/16 inches holes were drilled at the bottom, middle and top of each clamp. It allows attaching clamps to the shower bars via pins. Option B: Toy snake holder
The 36 inches black metal pipe was bought from the Home Depot. It then was reduced to 31 inches; the two 5/16 inches holes were drilled 2 inches from top and bottom of the pipe respectively. It allows attaching the pipe to shower bars via pins. The pipe was then painted in yellow, as it is client’s favorite color. The toy snake is intended to wrap around the pipe. Option C: Buzzer-button holder
The 36 in. X 12.5 in. wooden lamina has a scaled pocket. The buzzer-button is intended to go inside this compartment. The further modifications are required for this piece: four holes will be drilled at each of four corners of the lamina; the lamina as well as the pocket will be primed and painted yellow after the drilling would be done. The holes would allow the lamina to attach to the shower bars via pins. Note that, the wooden lamina was obtained on team’s own expense.
12
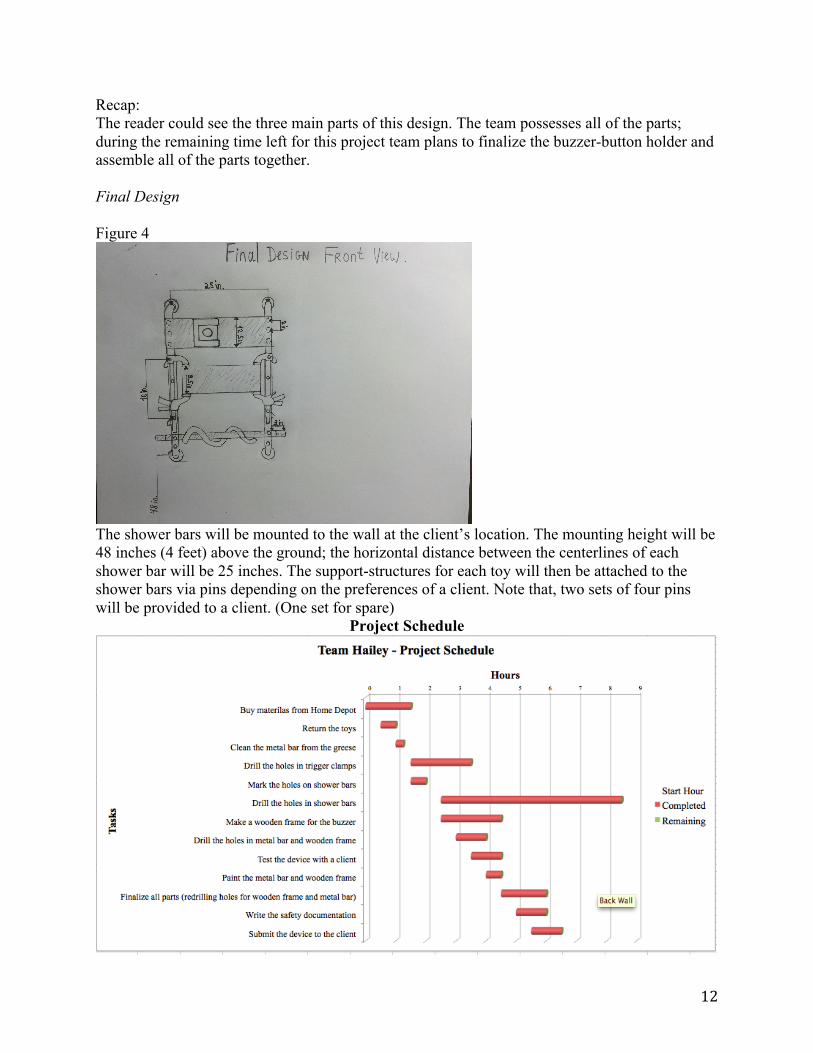
Recap: The reader could see the three main parts of this design. The team possesses all of the parts; during the remaining time left for this project team plans to finalize the buzzer-button holder and assemble all of the parts together. Final Design Figure 4
The shower bars will be mounted to the wall at the client’s location. The mounting height will be 48 inches (4 feet) above the ground; the horizontal distance between the centerlines of each shower bar will be 25 inches. The support-structures for each toy will then be attached to the shower bars via pins depending on the preferences of a client. Note that, two sets of four pins will be provided to a client. (One set for spare)
Project Schedule

13
Project Budget
Pictures of the final project
Final Project (front view)

14
Client is engaged in playing piano (and exercising!)
Client is engaged in playing piano (and exercising!)

15
Team with a client
Key features 1) The holes on the wooden piece are drilled with an extra space making it easy for client’s helpers to put the pins in and out of the device. (see picture below) 2) Team provided the client with 2 sets of 4 pins (8 total) 3) The spring clamp is intended to prevent a buzzer button from sliding from the pocket. 4) Support structures for vibrating tube and buzzer button are colored yellow (client’s favorite color)

16
Maintenance/Repair Documentation for Team Hailey’s motivational device
Introduction: The purpose of this document is to walk the client through the process of assembling the device. The necessary safety precautions will also be addressed in this document.
The skeleton of the device consists of two shower bars placed 25 inches apart on the wall in the specified room. Note, due to author’s preferences, the skeleton of the device shall be addressed as “main body” for future reference. Then 3 different parts are attached to the main body with the help of complementary pins. For further use, those 3 different parts are referred as “support-structures.” The content The Main Body, Pins and Support-Structures Part 1: Shower bars (2 total) Figure 1

17
Shower bars can be seen in Figure 1. Note that, there are total of two identical shower bars used in this design. The vertical length of each piece is 432 inches (36 feet). They are made of stainless steel. The Home Depot was a provider for such structure. The changes to shower bars included: the drilled holes 3/8 inches in diameter, 2 inches apart. These modifications allow the device to be height-adjustable. Part 2: Pins (8 total) Figure 2
The pins are intended to fix the support-structure for a specific toy at a certain height. The diameter of vertical part of a pin is 5/16 inches; the length is 2 ¾ inches. The Home Depot was also a main provider for such structure. Part 3: Support-structure for a specific toy Figure 3 Option A: Toy piano holder (2 total)

18
Pair of trigger clamps such as shown above is intended to hold the toy piano. The regulators allow adjusting the bottom jaw of the clamp depending on client’s preferences. The clamps are made of carbonized steel, which make them sturdy. The Home Depot was a main provider for such structure. Some modifications have been made to the clamps: the 5/16 inches holes were drilled at the bottom, middle and top of each clamp. It allows attaching clamps to the shower bars via pins. Option B: Toy snake holder (1 total)
The 36 inches black metal pipe was bought from the Home Depot. It then was reduced to 31 inches; the two 5/16 inches holes were drilled 2 inches from top and bottom of the pipe respectively. It allows attaching the pipe to shower bars via pins. The pipe was then painted in yellow, as it is client’s favorite color. The toy snake is intended to wrap around the pipe. Option C: Buzzer-button holder (1 total)
The 36 in. X 12.5 in. wooden lamina has a scaled pocket. The buzzer-button is intended to go inside this compartment. The further modifications are required for this piece: four holes will be drilled at each of four corners of the lamina; the lamina as well as the pocket will be primed and painted yellow after the drilling would be done. The holes would allow the lamina to attach to the shower bars via pins. Note that, the wooden lamina was obtained on team’s own expense. Assembling the parts

19
Step 1 Choose which support-structure and the mounting height you want to use. Then attach the toy to the main body and push the pins through the holes in the bar. Step 2 Close the pins. Step 3 Repeat step 1 and 2 for the other end on the second shower bar Special instructions for toy piano holder:
1) Attach the clamps to the shower bars 2) Place the piano between the jaws 3) Adjust the bottom jaw using “bottom leverage” (see picture below)
Changing toys Step 1 Choose which support structure and toy you want to use Step 2 Open the pins Step 3 Take the current structure out of the main body and repeat steps 1 and 2 from “Assembling the parts” Disassembling the parts Step 1 Open the pins Step 2 Accurately pull the pins out of the shower bars Step 3 Remove the toy Safety instructions
1. Avoid hanging from any of the support-structures 2. Keep the pins in a safe from the children place 3. Don’t eat the parts 4. Be careful! Don’t let user press “upper leverage” as the clamps may open and toy piano
may fall out
To open the clamps press this “upper leverage” To close clamps press this “bottom leverage”
20
Cleaning instructions The device is very easy to clean, using only a disinfecting wipe. Avoid exposing device to water. If you have any questions, please contact me: Aza Tulepbergenov [email protected]
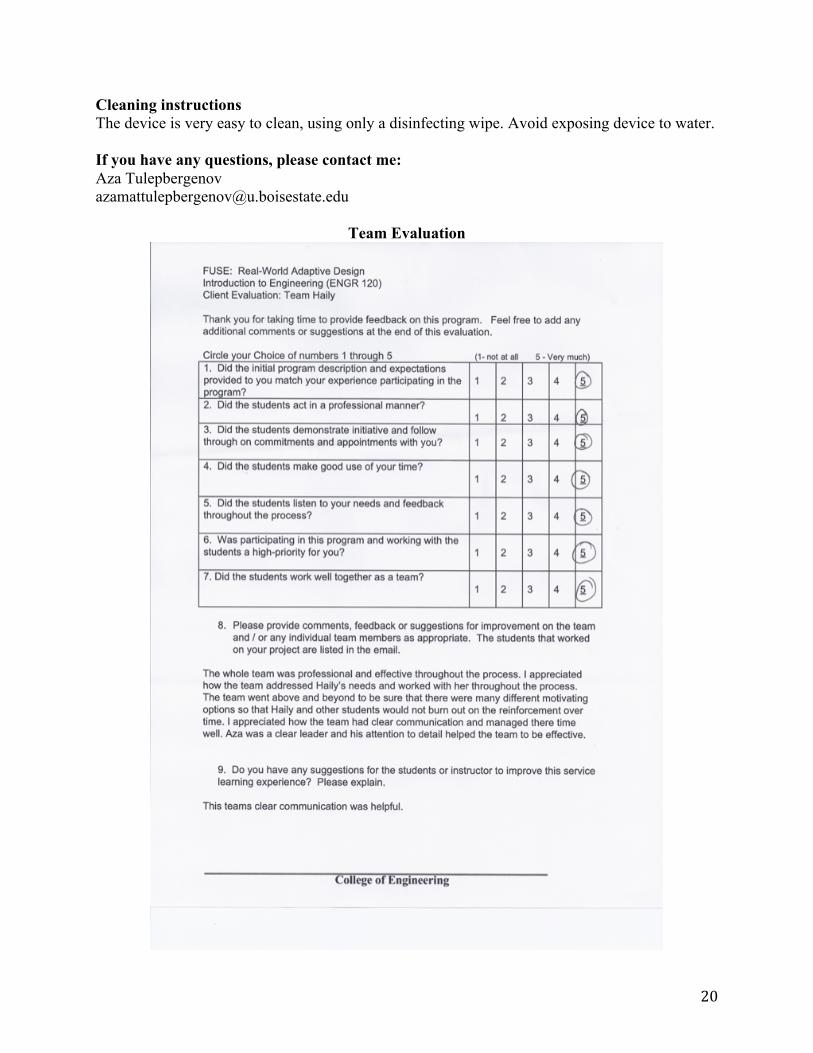
Team Evaluation

21
Photo Release Form