series 9.x and 10.x software - rf technologies – rf …€¦ · · 2017-11-07first name or the...
TRANSCRIPT

Quick Start Reference Guide Series 9.x and 10.x Software

NOTE: This quick reference should only be used by persons who have read the Software User Guide and received training on the use of the System. It is not intended as a substitute for reading the User Guide. Always refer to the User Guide for complete instructions and warnings. For Technical Support call 800-669-9946.
© 2017 RF Technologies, Inc. All specifications subject to change without notice. All Rights Reserved. No Part of this work may be reproduced or copied in any form or by any means without written permission from RF Technologies, Inc.

Contents
Safe Place Quick Start Reference Guide Page 1 of 36 0510-0477-E
CONTENTS
CONTENTS ................................................................................. 1
USER FUNCTIONS ..................................................................... 3 Login ...................................................................................... 3 Auto-Enrolled Transmitter ..................................................... 4 Pre-Enroll .............................................................................. 5 Manual Admit ........................................................................ 6 Update Record ...................................................................... 7 Adjust .................................................................................... 7 Escort .................................................................................... 8 Transfer ................................................................................. 8 Discharge .............................................................................. 8
ALERTS ...................................................................................... 9 Red Alerts.............................................................................. 9
Cut Band ....................................................................... 11 Band Off ........................................................................ 11 Door .............................................................................. 12 No Signal ...................................................................... 12 No Signal Guidelines .................................................... 13 Mismatch ...................................................................... 16 Link ............................................................................... 17 Discharge ...................................................................... 17
Yellow Alerts ....................................................................... 18 Check Band .................................................................. 18 Device Fault .................................................................. 19 Low Battery ................................................................... 20
Quick Look Display Alarms ................................................. 21 ADMINISTRATIVE FUNCTIONS .............................................. 23
Configuration ....................................................................... 23

Contents
Page 2 of 36 Safe Place Quick Start Reference Guide
0510-0477-E
Users ................................................................................... 25 Add Users ..................................................................... 25 Remove Users .............................................................. 26 Edit User Types ............................................................ 27
Rooms ................................................................................. 28 Add Rooms ................................................................... 28 Remove Rooms ............................................................ 29
Reports ................................................................................ 29 Change My Settings ............................................................ 30
MAINTENANCE AND TROUBLESHOOTING ......................... 31 Manual Transmitter Removal .............................................. 31 Manual Transfer .................................................................. 32 Transmitter ID Ranges ........................................................ 33
Add a Transmitter ......................................................... 34 Remove a Transmitter .................................................. 34
REVISION HISTORY................................................................. 35

User Functions
Safe Place Quick Start Reference Guide Page 3 of 36 0510-0477-E
USER FUNCTIONS
The User Functions available will depend on your software licenses.
NOTE: On any of the following screens, highlighted fields are required.
Login
1. Select Login 2. Enter your Login and Password or use
your identification card (NOTE: this information is case sensitive)
3. Press Enter or click OK 4. The User Functions window opens

User Functions
Page 4 of 36 Safe Place Quick Start Reference Guide
0510-0477-E
5. If password protection is disabled, the Main window is displayed. To access the user functionality, click the Functions button and the User Functions window opens.
Auto-Enrolled Transmitter
To enter and make transmitters active in the system (protected) without a patient name or specific unit being assigned to them:
1. Login then select Name an Auto-Enrolled Transmitter
2. Select the desired transmitter from the
list to complete the admission information 3. Use at least one identifier in either the
First Name or the Last Name field 4. Using the drop-down, select the Unit the
patient is assigned to 5. Using the drop-down, select the
appropriate Room number

User Functions
Safe Place Quick Start Reference Guide Page 5 of 36 0510-0477-E
6. Click Save 7. When the admit process is complete,
click OK
Pre-Enroll
To allocate transmitters to specific patients before being admitted:
1. Login then select Pre-Enroll
2. Use at least one identifier in either the
First Name or the Last Name field 3. If you would like to assign a transmitter,
enter the Transmitter ID number or select from the Transmitters tab
4. Using the drop-down, select the Unit the patient is assigned to
5. Using the drop-down, select the appropriate Room number
6. Click Save 7. The transmitter(s) will now appear in the
Census with a status of Pre-Enroll 8. When the admit process is complete,
click OK 9. Band the correct patient with the pre-
enrolled transmitter within the allotted time (default is 48 hours)

User Functions
Page 6 of 36 Safe Place Quick Start Reference Guide
0510-0477-E
Pre-Enroll Expired
A white Pre-Enroll Expired alarm message is generated if the time expires before banding. You must Clear the alarm and Pre-Enroll the transmitter again, making sure that it is properly banded within the configured time.
Cancel a Pre-Enroll
To cancel a pre-enrolled patient transmitter:
1. Login then select Discharge 2. Click on the desired pre-enrolled
transmitter 3. Select Start Discharge 4. Click Confirm
Manual Admit
To admit a patient and enable the system to associate the transmitter with information of the patient being admitted:
1. Login then select Manual Admit
2. Use at least one identifier in either the
First Name or the Last Name field 3. If you would like to assign a transmitter,
enter the Transmitter ID number or select from the Transmitters tab

User Functions
Safe Place Quick Start Reference Guide Page 7 of 36 0510-0477-E
4. Using the drop-down, select the Unit the patient is assigned to
5. Using the drop-down, select the appropriate Room number
6. Click Save 7. When the admit process is complete,
click OK
Update Record
To change patient information:
1. Login then select Update Record 2. Click on the desired patient 3. Make the changes to the patient
information 4. Click Save
Adjust
To re-fit or change the banding material, or to re-calibrate the transmitter following a Check Band or Band Off Alarm:
1. Login then select Adjust 2. Click on the desired patient 3. Click Start Adjust 4. Adjust time starts when you click
Confirm
NOTE: When performing an Adjust, ensure the transmitter is re-banded and clasps secured within 3 minutes to avoid No Signal Alarms.
Do NOT adjust a band after the time allowed. Doing so will cause a Cut Band Alarm.

User Functions
Page 8 of 36 Safe Place Quick Start Reference Guide
0510-0477-E
Escort
To temporarily move a patient from a unit to an un-monitored area (i.e. Radiology):
1. Login then select Escort 2. Click on the desired patient 3. Select the Escort Destination 4. Set the Escort Duration (hours or days) 5. Select Start Escort 6. Click Confirm
Transfer
To move a patient from one protected unit to another protected unit:
1. Login then select Transfer 2. Click on the desired patient 3. Select the Destination (Unit) 4. Select the Transfer Time (15 minute
increments) 5. Select Start Transfer 6. Click Confirm
Discharge
To discharge a patient:
1. Login then select Discharge 2. Click on the desired patient 3. Select Start Discharge 4. Click Confirm
NOTE: Do NOT remove a band after the time allowed has expired. Doing so will initiate a Cut Band Alarm. If the transmitter remains un-banded following a Cut Band Alarm, No Signal Alarms will follow.

Alerts
Safe Place Quick Start Reference Guide Page 9 of 36 0510-0477-E
ALERTS
This guide is not a complete list of alerts (commonly referred to as alarms or events), but some of the ones experienced more frequently. Alerts are displayed sequentially as they occur, by priority, and are color coded according to the alert type.
NOTE: With any alert, always follow your facility’s policies/procedures to ensure patient safety and secure the area.
Red Alerts Red alerts are High Priority and include:
Cut Band Band Off Door No Signal Mismatch Link Discharge
How to Respond
1. Ensure patient safety. 2. Locate the device or proceed to the
door or exit in alarm. 3. Verify that no patient emergency exists. 4. For a Mismatch or Link alert, move the
Infant transmitter out of proximity of the Mother or Baby Check transmitter.
Alerts
Page 10 of 36 Safe Place Quick Start Reference Guide
0510-0477-E
5. Verify transmitter is applied correctly and without signs of damage to banding material or transmitter metal teeth. Ensure that both clamps are securely fastened with banding material in place on both sides. For Smart Sense transmitters: Do
not open the Smart Sense Transmitter, doing so will result in a Cut Band Alarm
6. Reset the alarming device For an Exit Alarm Control unit enter
the four-digit security code in the keypad or use your card reader access card (if applicable)
If the Door Alarm was generated by a Door/Window with Manual Reset device, you must press the manual reset button after the door/window is closed to reset
7. Clear the alarm at the Client computer. Click anywhere in the alert
message box
Select an Event cause from the Event window
If necessary, use your access card or enter login/password then select OK or press Enter
8. For Smart Sense transmitters only: Initiate an Adjust function to re-
calibrate the Smart Sense transmitter.
Adjust the infant’s transmitter
Alerts
Safe Place Quick Start Reference Guide Page 11 of 36 0510-0477-E
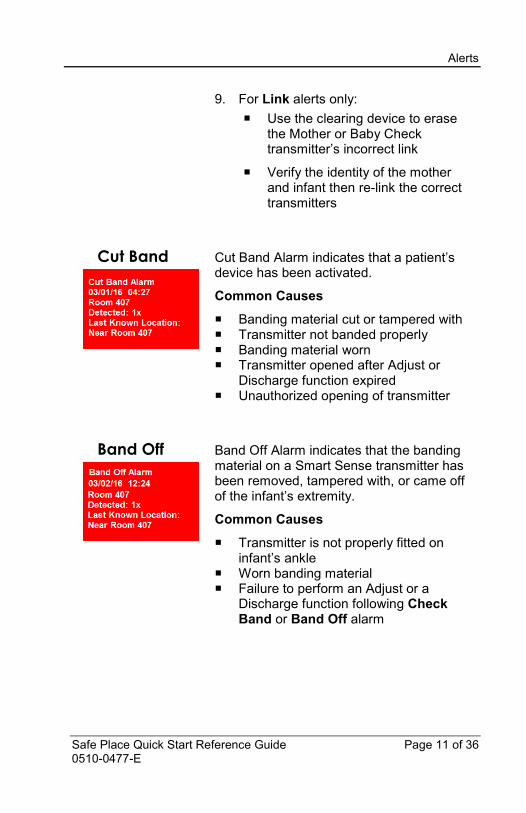
9. For Link alerts only: Use the clearing device to erase
the Mother or Baby Check transmitter’s incorrect link
Verify the identity of the mother and infant then re-link the correct transmitters
Cut Band
Cut Band Alarm indicates that a patient’s device has been activated.
Common Causes
Banding material cut or tampered with Transmitter not banded properly Banding material worn Transmitter opened after Adjust or
Discharge function expired Unauthorized opening of transmitter
Band Off
Band Off Alarm indicates that the banding material on a Smart Sense transmitter has been removed, tampered with, or came off of the infant’s extremity.
Common Causes
Transmitter is not properly fitted on infant’s ankle
Worn banding material Failure to perform an Adjust or a
Discharge function following Check Band or Band Off alarm

Alerts
Page 12 of 36 Safe Place Quick Start Reference Guide
0510-0477-E
Door
Door Alarm indicates that a transmitter has been activated at a door or exit.
Common Causes
Active transmitter has come too close to open door
Escort or Transfer function not initiated or completed properly
Radio frequency noise interference near a door
Door/Exit was open during a Cut Band Alarm
No Signal
No Signal alarm indicates that a signal from a patient’s transmitter has been lost.
NOTE: In older versions of the software, this alarm was labelled as Check Transmitter.
Common Causes
Transmitter not banded properly Banding material worn Transmitter out of range of antenna Patient not back from Escort or Transfer
function in allowed time Discharged improperly Failure to re-band a transmitter with
banding material following a Cut Band Alarm
Failure to re-band or failure to secure transmitter clasps within approximately 3 minutes when performing an Adjust function
Device Fault occurring in the system RF interference

Alerts
Safe Place Quick Start Reference Guide Page 13 of 36 0510-0477-E
Troubleshoot Dialog
A Troubleshooter dialog box appears after 3 consecutive No Signal alarms.
Select from the following actions then follow the directions for the applicable action:
Help Close Discharge Transmitter Transmitter in Use Transmitter not in Use
For example: The Safe Place System will alert the user if the system cannot discharge a transmitter due to No Signal.
Follow the instructions in the dialog box to properly Discharge the patient transmitter.
NOTE: The same is true for an escort, transfer, or adjust function when no signal is received.
No Signal Guidelines
The following guidelines apply to the Smart Sense, Standard Infant, and Patient transmitters.
Single No Signal Alarm
For a random, single No Signal/Check Transmitter alarm:
1. Ensure that the patient is safe and within the Safe Place monitored area.

Alerts
Page 14 of 36 Safe Place Quick Start Reference Guide
0510-0477-E
2. Assess the banding material and clasps to determine if either are worn. If so, replace them.
3. Clear the alarm at the computer.
Multiple No Signal Alarms
When there are multiple No Signal/Check Transmitter alarms and the transmitter is NOT in use (un-banded):
1. Locate the transmitter in alarm. 2. Clear the alarm at the computer. 3. Band the transmitter with approved
banding material on both sides and securely clasp.
4. Wait 60 seconds. 5. Perform a Discharge function. 6. Remove banding material. 7. If discharge expires after following steps
3-6, contact super user to perform a "Hard" removal of the transmitter.
When there are multiple No Signal/Check Transmitter alarms and the transmitter is IN use (applied to a patient):
1. Ensure that the patient is safe and within the Safe Place monitored area. If patient is not within the area - see the last section below for Escort and Transfer functions, or return the patient to the monitored area.
2. Clear the alarm at the computer. 3. Perform an Adjust function. 4. Obtain a new piece of approved
banding material and return to the bedside.

Alerts
Safe Place Quick Start Reference Guide Page 15 of 36 0510-0477-E
5. Replace banding material during the Adjust period and ensure that clasps are securely fastened on both sides.
6. If a new a No Signal/Check Transmitter alarm occurs for the same patient, following steps 1 and 2, obtain a new transmitter.
7. Band the patient with the new transmitter.
8. Re-band the transmitter removed from patient with a piece of approved banding material, ensuring that both clasps are securely fastened.
9. Wait 60 seconds. 10. Perform a Discharge function. 11. Remove banding material. 12. If Discharge expires after following
steps 8-11, contact super user to perform a "Hard" removal of transmitter.
13. Admit the transmitter applied in step 7.
When there are multiple No Signal/Check Transmitter alarms following a Discharge function:
1. Locate the transmitter that is in alarm. 2. Clear all existing alarms for this
transmitter. 3. Re-band with a piece of approved
banding material, ensuring that both clasps are securely fastened.
4. Wait 60 seconds. 5. Perform a Discharge function. 6. Remove banding material. 7. If a new No Signal/Check Transmitter
alarms occur - contact Technical Support (1-800-669-9946).

Alerts
Page 16 of 36 Safe Place Quick Start Reference Guide
0510-0477-E
When there are multiple No Signal/Check Transmitter alarms following an Escort or Transfer function:
1. Determine location and safety of patient.
2. If patient is out of the monitored area in an Escort - contact a super user to request a "Hard" removal of the transmitter from the system. Transmitter will alarm at the door upon return to the unit and doors with locks will lock. Transmitter will re-enroll upon return to the unit and a Door alarm may sound. Patient will have to be re-entered (admitted) in the system.
3. If patient is out of the monitored area in process of a Transfer - contact a system super user to manually Transfer the patient through the system maintenance menu.
Mismatch
Mismatch Alarm indicates that transmitters not assigned to each other have been activated.
Common Causes
An Infant transmitter comes in close proximity of a Mother or Baby Check transmitter that is linked to a different Infant transmitter

Alerts
Safe Place Quick Start Reference Guide Page 17 of 36 0510-0477-E
Link
Link Alarm indicates that a transmitter has already been linked to another transmitter.
Common Causes
There is a problem linking the Infant transmitter to a Mother or Baby Check transmitter because the Infant transmitter has already been linked to another Mother or Baby Check transmitter
Discharge
If “Confirm Discharge” and “Require Mom/Infant match before discharge” are both enabled during configuration (refer to the Software Administrator Guide for your system), the following discharge alarm can occur if the proper discharge procedure is not followed for linked Baby Check/Infant transmitters of linked Mother/Infant transmitters.
How to Respond
1. Re-band the infant transmitter. 2. Clear the alarm at the computer by
selecting the Event Cause. 3. Wait 1 minute for the infant transmitter
to establish communications with the computer
Common Causes
Banding material removed from the infant transmitter before matching to the Baby Check tag
Banding material removed from the infant transmitter before matching to the Mother transmitter
A Mother transmitter is discharged before the Infant transmitter is discharged

Alerts
Page 18 of 36 Safe Place Quick Start Reference Guide
0510-0477-E
If the Infant transmitter is in a discharge state and the Mother transmitter is discharged BEFORE the banding material is removed from the Infant transmitter, the following occurs:
A Match Alarm is triggered for the Mother transmitter.
The alarm clears itself after approximately 10 seconds and a Discharge Complete message is triggered for the Mother transmitter.
Once the banding material is cut on the Infant transmitter, a Discharge Complete message triggers for the Infant transmitter.
Yellow Alerts
Yellow Alerts are medium priority and include:
Check Band Device Fault Low Battery
Check Band
Check Band Alarm is the initial indication that the banding material on a Smart Sense Transmitter is removed, tampered with, or comes off of the infant’s extremity.
How to Respond
1. Ensure patient safety. 2. Click anywhere in the Check Band
Alarm message box. 3. Select one of the following options:
Start Adjust – initiates the Adjust function for the alarming infant’s transmitter.

Alerts
Safe Place Quick Start Reference Guide Page 19 of 36 0510-0477-E
Close – closes the dialog window but does not clear the alarm or re-calibrate the infant’s transmitter.
NOTE: If the Check Band Alarm is not addressed by requesting an Adjust or a Discharge function, it may escalate to a red Band Off Alarm (per your facility’s configuration preferences).
NOTE: Following a Check Band Alarm, perform an Adjust function to re-calibrate the transmitter. Ensure the transmitter is banded properly without an air gap between the transmitter and skin, yet allowing the band and the transmitter to be turned on the ankle. Over-tightening the band could cause injury to the infant.
Common Causes
Transmitter is not properly fitted on infant’s ankle
Worn banding material Failure to perform an Adjust or a
Discharge following Check Band or Band Off Alarm
Device Fault
Device Fault alarm indicates that a device is not communicating with the system.
How to Respond
1. View event information at the Client computer by clicking anywhere in the Device Fault alarm message box.
2. Note any information that may be helpful when communicating the event to your System Administrator.
3. Click Close and contact your System Administrator.

Alerts
Page 20 of 36 Safe Place Quick Start Reference Guide
0510-0477-E
Common Causes
Radio frequency noise interference on system
Faulty wiring to a device Loss of power to the system Invalid network address Device disabled due to device
tampering System failed to receive check-in signal
for a monitored device (Antenna, Exit Alarm Controllers, or Safe Place Computers)
Computer turned off, logged off or Safe Place software improperly shut down.
NOTE: If Device Fault alarm persists, contact your Super User or call Technical Support 24 hours at 800-669-9946.
Low Battery
This alert is a configurable option. The notification can be located on the bottom of the Main Window as a Low Battery indicator or as an alert in the Alert message box.
You cannot clear a Low Battery Alert; the alert remains for the duration of time that the transmitter is enrolled in the system. It does not disappear until the transmitter is discharged from the system and removed.
The transmitter, that signaled for a Low Battery, will not Auto-Enroll if reused. Contact your System Administrator once the transmitter has been discharged.

Alerts
Safe Place Quick Start Reference Guide Page 21 of 36 0510-0477-E
Quick Look Display Alarms
The following chart shows the correlation between how alerts are displayed on the Quick Look Display, the color of the alert and what is displayed in the Alert Message box on the Client computer.
Quick Look Color Client Computer Band Red Cut Band Alarm BndOff Red Band Off Alarm ChkBnd Yellow Check Band Exit Red Door Alarm Exit Red Exit Link Red Link Alarm Match Red No Discharge Match Band Red Discharge Cut Band Match Red Mismatch Alarm NO SIG Red No Signal

Alerts
Page 22 of 36 Safe Place Quick Start Reference Guide
0510-0477-E
This page intentionally left blank

Administrative Functions
Safe Place Quick Start Reference Guide Page 23 of 36 0510-0477-E
ADMINISTRATIVE FUNCTIONS
Configuration
1. Select Login 2. The User Functions window opens 3. Select Administrative Functions
4. The Administrative Functions window
opens
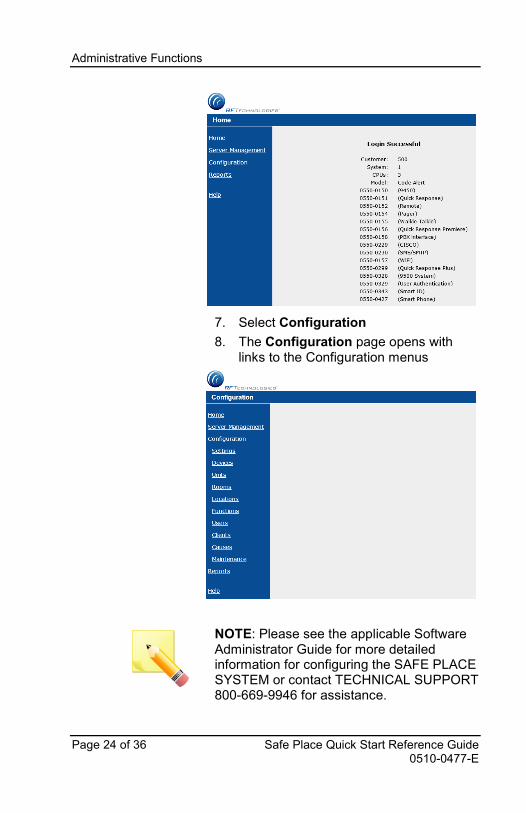
5. Select Configuration 6. The System Management page opens
with links to the System Management menus
Administrative Functions
Page 24 of 36 Safe Place Quick Start Reference Guide
0510-0477-E
7. Select Configuration 8. The Configuration page opens with
links to the Configuration menus
NOTE: Please see the applicable Software Administrator Guide for more detailed information for configuring the SAFE PLACE SYSTEM or contact TECHNICAL SUPPORT 800-669-9946 for assistance.

Administrative Functions
Safe Place Quick Start Reference Guide Page 25 of 36 0510-0477-E
Users User configuration allows you to add and remove users from the system, as well as edit the types of users that can be assigned within the system.
Add Users 1. Login then select Administrative Functions
2. Select Configuration 3. Select Configuration again 4. Select Users 5. The Configuration - Users window opens 6. Click Add… 7. The Configuration – Users –
Properties window opens
8. Enter the user’s First and Last Name 9. Enter the user’s Login 10. Enter and re-enter the user’s Password 11. The new user’s ID Badge may be
activated at this time by clicking in the Swipe Card field and swiping the Badge
12. Assign functions to the user To automatically assign functions,

Administrative Functions
Page 26 of 36 Safe Place Quick Start Reference Guide
0510-0477-E
select the user type from the User Types field
To manually assign functions, highlight the allowed functions for the user from the Available Functions field then click Add>>
13. Click Save or Save & New to enter another user
14. Click Close when done
Remove Users
1. Login then select Administrative Functions
2. Select Configuration 3. Select Configuration again 4. Select Users 5. The Configuration - Users window
opens
6. Scroll to find the User name to be
removed and click to highlight the name 7. Click Remove 8. The User name will be deleted from the
user’s list 9. Click Ok in the configuration popup 10. Click Close

Administrative Functions
Safe Place Quick Start Reference Guide Page 27 of 36 0510-0477-E
Edit User Types
1. Login then select Administrative Functions
2. Select Configuration 3. Select Configuration again 4. Select Users 5. The Configuration - Users window
opens 6. Click Edit User Types… 7. The Configuration – Users – Edit User
Types window opens
8. Click on the User Type that needs to be
modified 9. To add functions, from the Available
Functions field, highlight the desired function(s) to be added then click Add>>
10. To remove functions, from the Assigned Functions field, highlight the desired function(s) to be removed then click <<Remove
11. Click Save then click Close

Administrative Functions
Page 28 of 36 Safe Place Quick Start Reference Guide
0510-0477-E
Rooms Room configuration allows you to add and remove rooms from the system.
Add Rooms 1. Login then select Administrative Functions
2. Select Configuration 3. Select Configuration again 4. Click Rooms 5. The Configuration - Rooms window
opens 6. Click Add…
7. From the Unit pull-down, select the unit in which the room is located
8. In the Name field, enter the room information
9. If applicable, assign Devices from the Available list to the room
10. Click Save 11. Select New if adding additional rooms 12. Click Close when done

Administrative Functions
Safe Place Quick Start Reference Guide Page 29 of 36 0510-0477-E
Remove Rooms
1. Login then select Administrative Functions
2. Select Configuration 3. Select Configuration again 4. Click Rooms 5. The Configuration - Rooms window
opens 6. Scroll to find the Room to be removed
and click to highlight the name 7. Click Remove 8. The Room name will be deleted from the
rooms list 9. Click Ok in the configuration popup 10. Click Close 11. To exit this menu click on the X in the
upper right corner
Reports
1. Login then select Administrative Functions
2. Select Reports 3. Select the system report you would like
from the list 4. Click Report to view the results on
screen 5. Click the Print button to printout a copy
of the report or the Save button to save a copy to the computer
6. Click Close when done

Administrative Functions
Page 30 of 36 Safe Place Quick Start Reference Guide
0510-0477-E
Change My Settings
Once a user has been set up with a login and password his/her properties can be viewed from the Home page providing the login is successful.
1. Login then select Administrative Functions
2. Select Configuration 3. The System Management Home page
opens with an option to view settings
4. Click My Settings 5. Click in the Password field, delete the
old password then type in a new password
6. Click in the second Password field and repeat the above step
7. To activate your ID Badge, click in the Swipe Card field then swipe your badge through the card reader or present your badge to the small black carder reader
8. The Swipe Card field will fill with black dots indicating your ID Badge has been activated
9. Click Save 10. To exit this menu click on the X in the
upper right corner

Maintenance and Troubleshooting
Safe Place Quick Start Reference Guide Page 31 of 36 0510-0477-E
MAINTENANCE AND TROUBLESHOOTING
Manual Transmitter Removal
If a transfer or discharge did not complete properly, you may use the Person/Asset Maintenance area to manually remove the patient and transmitter completely from the system.
NOTE: Only named transmitters appear in the Maintenance Menu.
1. Login then select Administrative Functions
2. Select Configuration 3. Select Configuration again 4. Select Maintenance 5. Select Person / Asset 6. The Configuration – Maintenance –
Person / Asset window opens
7. Locate the Person/Asset transmitter that
needs to be removed 8. Click the Delete checkbox for that
Person/Asset transmitter 9. Click Save 10. To exit this menu, click on the X in the
upper right corner

Maintenance and Troubleshooting
Page 32 of 36 Safe Place Quick Start Reference Guide
0510-0477-E
Manual Transfer
Follow these steps if a patient has been transferred to a new unit and the patient’s transmitter information does not post on the receiving unit’s Census Screen or the transferring unit receives the Transfer Expired message.
1. Login then select Administrative Functions
2. Select Configuration 3. Select Configuration again 4. Select Maintenance 5. Select Person / Asset 6. The Configuration – Maintenance –
Person / Asset window opens.
7. Locate the Person/Asset that needs to
be moved to another Unit 8. Check the Transfer checkbox for that
Person/Asset’s name 9. Select a New Unit from the pull-down 10. Click Save 11. To exit this menu, click on the X in the
upper right corner

Maintenance and Troubleshooting
Safe Place Quick Start Reference Guide Page 33 of 36 0510-0477-E
Transmitter ID Ranges
It is important to verify the ID ranges every time transmitters are replaced, added or removed.
1. Login then select Administrative Functions
2. Select Configuration 3. Select Configuration again 4. Select Settings 5. Select Global 6. Select Transmitter ID Ranges 7. The Configuration – Settings –
Transmitter ID Ranges window opens
8. The transmitter ID (from the side of the transmitter) should match the transmitter minimum and maximum in the setting.
NOTE: If the transmitter has a leading zero (#016 as an example), the transmitter ID should be noted as 16 in the settings. The transmitter will not be monitored if the leading zero is present.

Maintenance and Troubleshooting
Page 34 of 36 Safe Place Quick Start Reference Guide
0510-0477-E
Add a Transmitter
To add a transmitter to the system:
1. Login then select Administrative Functions
2. Select Configuration 3. Select Configuration again 4. Select Settings 5. Select Global 6. Select Transmitter ID Ranges 7. The Configuration – Settings –
Transmitter ID Ranges window opens 8. Enter the Transmitter ID number into
the Minimum and Maximum fields 9. Select the transmitter Type from the
drop-down list 10. Click Save
Remove a Transmitter
To remove a transmitter from the system:
1. Login then select Administrative Functions
2. Select Configuration 3. Select Configuration again 4. Select Settings 5. Select Global 6. Select Transmitter ID Ranges 7. The Configuration – Settings –
Transmitter ID Ranges window opens 8. Click the Delete checkbox next to the
Transmitter ID range you wish to delete 9. A dialog box opens asking if you are
sure you want to delete this range, click OK to confirm
10. Click Save

Revision History
Safe Place Quick Start Reference Guide Page 35 of 36 0510-0477-E
REVISION HISTORY
Revision Change A Release
B Updated to support Baby Check Transmitter
C Updated to include Software Series 10.x information
D Updated format and graphics Updated Alerts section for clarity
E Updated format and logos Updated Alerts section include “No Signal Guidelines” and Discharge alerts

Revision History
Page 36 of 36 Safe Place Quick Start Reference Guide
0510-0477-E
This page intentionally left blank


3125 North 126th Street, Brookfield, WI 53005 Phone 800.669.9946 fax 262.790.1784 www.rft.com
0510-0477-E Release Date: 02/2017