selecttech bd1090i dumbbells - download.nautilus.com · introduction congratulations on the your...
TRANSCRIPT

Owner’s Manual and Workout Guide
SelectTech® BD1090i Dumbbells
This product is compliant with the applicable CE requirements.
® ®

Introduction
Congratulations on the your purchase of the Bowflex® SelectTech® Dumbbell set. This innovative dumbbell is a versatile training tool that will help you reach your fitness goal. This product has been carefully engineered and manufactured to provide a wide array of weight options starting at 4.5 kg (10 lbs) and going all the way up to 40.8 kg (90 lbs). In order to utilize this product to its fullest extent, it is critical that you read and fully understand this owner’s manual prior to using the SelectTech® dumbbell.
To validate warranty support, keep the original proof of purchase and record the following information:
Serial Number ___________________________ Serial Number __________________________
Date of Purchase ____________________
To register your product warranty, contact your local distributor.
To find your local distributor, go to: www.bowflexinternational.com
If you have questions or problems with your product, please contact your local Bowflex® distributor.
Nautilus, Inc., (800) NAUTILUS / (800) 628-8458, www.NautilusInc.com - Customer Service: North America (800) 605-3369, [email protected] | outside U.S. +01-360-859-5180, [email protected] |Printed in China | © 2006 Nautilus, Inc.
Important Safety Instructions ...................................... 3 Safety Warning Labels and Serial Number.... 3
Product Specifications .................................................. 4Features ........................................................................... 4
SelectTech® Operation .................................................. 5 Getting to know your Bowflex®
SelectTech® Dumbbells ............................... 5 Understanding the locking mechanism function........................................................... 6 Testing proper locking mechanism function........................................................... 6
Maintenance ................................................................... 8 Dumbbell stand ............................................................... 8 Troubleshooting guide ................................................... 9 Locking Mechanism Test .................................. 10
Leg Exercises .................................................................. 11 Wide squats ........................................................ 11 Calf raises ............................................................ 11 Stationary lunges ............................................... 11 Stiff-leg dead lift ................................................. 12 Reverse lunge ..................................................... 12
Chest Exercises .............................................................. 13 Flat chest press .................................................. 13 Incline chest press............................................. 13 Flat chest fly ........................................................ 13 Incline chest fly ................................................. 14 Decline chest fly ................................................. 14
Arm Exercises ................................................................. 15 Standing curls ..................................................... 15 Concentration curls ........................................... 15 Incline bench curls ............................................ 15 Scott curls - standing concentration curls ... 16 Overhead triceps extension ............................. 16 Triceps kickback ................................................. 16 Lying triceps extension ..................................... 17 Hammer curls ...................................................... 17
Back Exercises ............................................................... 18 Single arm row - alternating rows .................. 18 Wide rows ........................................................... 18 Dead lifts .............................................................. 18
Abdominal Exercises ..................................................... 19 Ab crunch ............................................................ 19 Reverse crunch .................................................. 19 Twisting side crunch .......................................... 19
Shoulder Exercises ........................................................ 20 Standing shoulder press ................................... 20 Lateral raise ........................................................ 20 Seated overhead press ..................................... 20 Front raise ........................................................... 21 Rear delt row ...................................................... 21 Shrugs .................................................................. 21
Muscle Chart .................................................................. 22
Table of Contents
2

Important Safety Instructions
This icon means a potentially hazardous situation which, if not avoided, could result in death or serious injury.
Before using this equipment, obey the following warnings:
Serial number
Read and understand the complete Owner's Manual. Keep Owner’s Manual for future reference. Read and understand all Warnings on this machine. If at any time the Warning stickers become loose, unreadable or dislodged, contact your local distributor for replacement stickers.
• Children must not be let on or near to this machine. Moving parts and other features of the machine can be dangerous to children.
• Not intended for use by anyone under 14 years of age.• Consult a physician before starting an exercise program. Stop exercising if you feel pain or tightness in your
chest, become short of breath, or feel faint. Contact your doctor before using the machine again.• This machine is for home use only.• Periodically inspect and test the locking mechanism for correct function. Follow the test procedures included in
this manual. • Do not operate this machine outdoors or in moist or wet locations.• Before you start your workout, make sure that your surroundings are free from possible interference and third
parties. Your workout free space should be 0.6 m (24“) more than the maximum reach of the exercise in all directions.
• Do not over exert yourself during exercise. Operate the machine in the manner described in this manual.• Do not try to force the Adjustment Knob to turn when the Dumbbell has been removed from the Dumbbell base.• Do not let the Dumbbells fall freely to the ground. Damage to the product and possible personal injury can occur.• Do not let the Dumbbells forcefully hit together during operation. Damage to the product and possible personal
injury can occur.• Do not lean on the Dumbbell handles or use them to support your body weight, such as using them as a base to
perform a push up. Damage to the product and possible personal injury can occur.• Do not try to disassemble your Dumbbell handles, or base assembly. The product is not designed to be serviced
by the customer. Contact your local distributor for repair information.• The Dumbbells are very heavy. If you are not using the optional Dumbbell Stand, put the Dumbbell assembly
directly on the floor for best support.
Safety Warning Labels and Serial NumberRecord serial number in the Serial Number field at the beginning of this manual.
Note: Each dumbbell base has a unique serial number.
Do not drop
3

Product Specifications and Features
DIMENSIONS: 44.4 cm x 24.2 cm x 25.3 cm (17.5” L x 9.5” W x 10” H)
ASSEMBLED UNIT WEIGHT: 41.9 kg (92.3 lbs)
SHIPPING PACKAGE WEIGHT: 45.9 kg (101.1 lbs)
FeaturesA. Handle grip
B. Adjustment knob
C. Weight plates
1. 1 kg (2.5 lbs)
2. 2 kg (5 lbs)
3. 3 kg (7.5 lbs)
4. 4kg (10 lbs)
5. 7kg (15 lbs)
D. Weight locking tab
E. Base
F. Lifting handle
444
253
242
A
C1
C1
C2
C3C4
C5C2
C3
C4
C5
E
D
F
F
B
D
4

Operation
Getting to know your Bowflex® SelectTech® DumbbellsThe Bowflex® SelectTech® dumbbells are shipped fully assembled, one dumbbell to a box. After carefully removing the dumbbell from its box, there are some initial steps that should be taken to familiarize you with the function of the product, and to make sure that all features of the dumbbell operate correctly.
Do not drop the dumbbell. Dropping the dumbbell will damage the weight plates and/or the locking mechanism, and can cause the weight plates to disengage (drop) from the handle without warning. This can cause serious injury, and will void the warranty.
1. After you remove the dumbbell from its protective packaging, inspect the products and packaging material for damage.
2. Push down slightly on the handle assembly to make sure it is fully seated in the base. Rotate each adjustment knob several full rotations to make sure it turns freely in both directions. Make sure there is a click at each weight increment of the adjustment knob. This click will help you align the knob correctly to make a weight selection.
3. The weight increments range from 4 to 41 kg (10 lbs to 90 lbs) on both adjustment knobs. To properly select a given weight (9 kg [20 lbs] for example), rotate both adjustment knobs until that number (9) is aligned with the arrow located on the outward edge of the Bowflex® nameplate (Fig.1).
4. After you make sure that the adjustment knob turns correctly, turn each adjustment so that the number 4 is aligned with the arrow in the Bowflex® nameplate.
5. With both adjustment knobs set to 4, pull the handle straight up from the dumbbell. This will remove only the handle from the base, and let all of the weight plates stay in the base (Fig. 2). The handle without plates gives the initial weight of 4 kg (10 lbs).
6. You may increase the selected weight by rotating each adjustment knob clockwise.
NOTICE: When you remove the dumbbell from the base or return it to the base, use a vertical motion, perpendicular to the base. Do not tilt the dumbbell or move it laterally (parallel to the base) until it is fully clear of the unselected weight plates.
Note: The dumbbell handle and weight plates are symmetrical. The handle is inserted with either end facing the user, provided that you have selected the same weight number on both ends of the dumbbell.
Do not lean on the dumbbell handles or use them to support your body weight , such as using them as a base to perform a push up. Doing so will damage the weight plates and/or the locking mechanisms, and can cause the weight plates to disengage (drop) from the handle without warning. This can cause serious injury, and will void the warranty.
Inspect the dumbbells prior to each use. Do not use a dumbbell with worn or damaged parts. Contact your local distributor for repair information.
There are 17 weight increments:
4 7 9 11 14 16 18 20 23 25 27 30 32 34 36 39 4110 lbs 15 lbs 20 lbs 25 lbs 30 lbs 35 lbs 40 lbs 45 lbs 50 lbs 55 lbs 60 lbs 65 lbs 70 lbs 75 lbs 80 lbs 85 lbs 90 lbs
Note: Weight increments represent estimated values only. Exact values can vary due to manufacturing variances.
Figure 2
Figure 1
5

Operation
Understanding the locking mechanism functionThe Bowflex® SelectTech® Dumbbell features an exclusive locking mechanism designed to ensure proper and complete selection of the weight plates as well as to ensure weight plate retention during the workout.
Fully understand the function of this mechanism and do tests of the mechanism regularly to make sure it operates correctly.
The locking mechanism supplies two key functions:
1. The mechanism will only let the adjustment knobs turn when the dumbbell handle fully engages the dumbbell base. The mechanism prevents deselecting (dropping) weight plates from the dumbbell when it is NOT in the dumbbell base.
2. The mechanism will lock the dumbbell handle to the base if the adjustment knobs do not fully engage the weight plate selection. The mechanism prevents partial selection of the weight plates in which the locking pin is not fully engaged and does not fully hold the plates.
Given the importance of this locking mechanism, it is critical that you understand how it operates, and periodically test it to make sure it is functioning correctly.
Testing proper locking mechanism function
1. With the dumbbell handle set in the dumbbell base, turn both adjustment knobs to the number 4. You will know you have fully and correctly selected the number when you feel the adjustment knob settle into a notch (known as a detent). You will also hear a slight, but audible, clicking noise that corresponds with the detent locations for each number.
2. You should be able to withdraw the handle from the base leaving all the weight plates behind.
3. With the handle removed from the base, grab one adjustment knob with your other hand and gently attempt to turn the knob, the knob should not rotate. A locking pin in the mechanism will have engaged the rotational assembly when the unit was withdrawn from the base. Perform this test with all adjustment knobs.
Do not use too much force to try to turn the locked adjustment knob. Too much force can damage the locking mechanism.
4. After confirming the proper function of the locking mechanism as described above, return and fully insert the dumbbell handle back into the base assembly.
5. With the handle back in the base, turn the adjustment knob on one side to a position that is between the numbers 4 and 7. This represents an incomplete weight selection where the adjustment knob has not fully selected a weight and the knob is in-between the selection detents (clicks).
6. With the selection knob in this improper position, gently attempt to lift up on the handle to remove it from the base. You should find that the handle is locked to the base and cannot be removed with light pressure, as it can normally.
7. Return the improperly selected adjustment knob to a full and proper weight selection and assure that the dumbbell handle can once again be removed.
8. Repeat this test for all adjustment knobs.
6

Operation
9. Assure the entire dumbbell handle assembly is properly tightened. Do this by setting the adjustment knobs to 4 kilograms and removing the handle assembly from the base. Grab both adjustment knobs and very slightly push and pull the knobs toward and away from the handle grip. The knobs should not exhibit free play and all of the selection discs should feel tightly connected.
10. You have now tested the function of the locking mechanism. We suggest you repeat this test monthly to make sure that the locking mechanism operates correctly.
Do not engage the locking mechanism and use the handle to try to lift the dumbbell and base together. To lift thedumbbell and base together, engage the locking mechanism and use the lift handles molded into the base assembly.
If the dumbbell locking mechanism operates unsatisfactorily in the test procedure above, do the following:
1. Stop use of the product immediately until approved service is available.
2. Contact your Bowflex® retailer for service.
7
Maintenance
Bowflex® SelectTech® Dumbbell maintenance Equipment must be regularly examined for damage and repairs. The owner is responsible to make sure that regular maintenance is done. Worn or damaged components must be replaced immediately or the equipment removed from service until the repair is made. Only manufacturer supplied components can be used to maintain and repair the equipment.
The Bowflex® SelectTech® Dumbbell is a very low maintenance product. However, there are steps that you should take to keep the product performing and looking its very best.
1. Should your SelectTech® Dumbbell handle assembly, plates or base become soiled you may clean them with a cloth lightly dampened with warm water and a small amount of mild soap. Wipe dry with a separate cloth.
2. The SelectTech® Dumbbell is internally lubricated and will not require further internal lubrication. The contact between weight plates and selection discs is not lubricated but has naturally low friction. This generally will not require any lubrication. Should you feel it necessary to lubricate the weight plates and/or selection discs, use only a silicon lubricant, preferably “food grade”.
Do not use any solvents, harsh detergents, chemicals or bleach on this product − doing so may damage the materials, resulting in degradation of the product’s performance or strength.
Do not attempt to disassemble the dumbbell handle or base assembly. These items are not designed to be user serviced. Doing so will void the manufacturers warranty. Contact your local distributor for service.
Optional exercise bench is available separately.
Additional products are available from Nautilus, Inc. at www.bowflexinternational.com
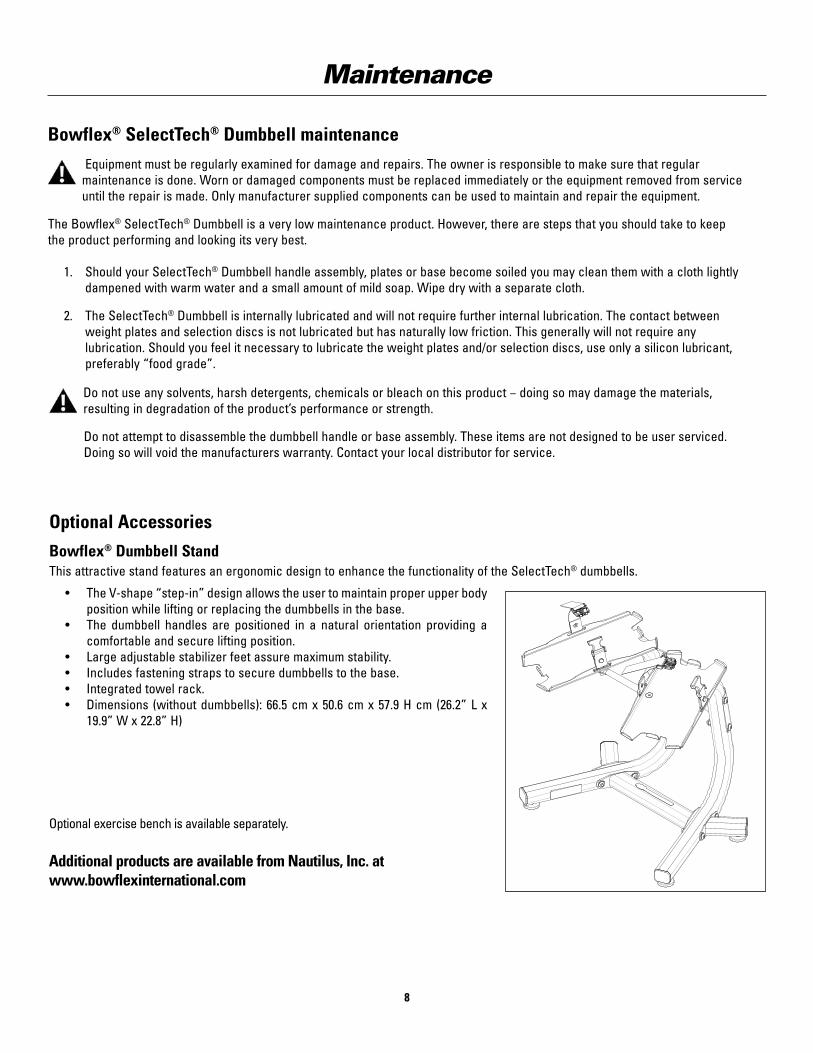
Optional AccessoriesBowflex® Dumbbell Stand This attractive stand features an ergonomic design to enhance the functionality of the SelectTech® dumbbells.
• TheV-shape“step-in”designallowstheusertomaintainproperupperbodyposition while lifting or replacing the dumbbells in the base.
• The dumbbell handles are positioned in a natural orientation providing acomfortable and secure lifting position.
• Largeadjustablestabilizerfeetassuremaximumstability.• Includesfasteningstrapstosecuredumbbellstothebase.• Integratedtowelrack.• Dimensions (withoutdumbbells): 66.5cmx50.6cmx57.9Hcm (26.2”Lx
19.9” W x 22.8” H)
8

Troubleshooting
Problem Solution
Dumbbell handle does not fully insert into base when no plates are selected (handle has no plates attached).
1. Make certain that both adjustment knobs are set directly to the number 4.
Dumbbell handle does not fully insert into base when plates are selected (handle has plates attached).
1. Check to see if you have selected different weights on each side of the dumbbell (for example one adjustment knob is set to 4 and the other is set to 7). If this is the case, you must replace the dumbbell in the base with the same orientation from which it was withdrawn. This is to allow the plates to settle back into the correct and vacant openings in the base.
2. Verifythattheplatesnotselected(thoseplatesremaininginthedumbbell base) are in their correct spots and have not been moved to a different support slot. This may be blocking the dumbbell from fitting back into the base.
Adjustment knob will not turn while handle is in base.
1. Check to assure that the dumbbell handle is fully depressed into the dumbbell base. If not fully depressed, the locking mechanism will not be released and may be keeping the adjustment knobs from rotating.
2. Check to see if any weight plates have been forced into the base assembly backwards with the “support tongue” facing the grip of the dumbbell handle. All weight plates must have the locking tab facing away from the grip of the dumbbell handle.
3. Check to see if there is any dirt, debris or other obstruction in the dumbbell base. You may need to remove the weight plates from the base to accomplish this check. Remember to put each weight plate back in its appropriate location.
9

After replacing any part of your Bowflex® SelectTech® Dumbbell, be sure to perform the following procedures before using your Dumbbell for any exercises:
This is a functional test of the weight plate locking mechanism.
1. With the dumbbell handle set in the dumbbell base, turn both adjustment knobs to the lowest number (Figure 1). You will know you have fully and correctly selected the number when you feel the adjustment knob settle into a notch (known as a detent). You will also hear a slight, but audible, clicking noise that corresponds with the detent locations for each number.
2. You should be able to withdraw the handle from the base leaving all the weight plates behind (Figure 2).
3. With the handle removed from the base, grab one adjustment knob with your other hand and firmly attempt to turn the knob; the knob should not rotate.
4. Place the dumbbell back into the base, and turn the adjustment knob to the next lowest weight setting. Lift the dumbbell from the base approximately 1 inch (2.5 cm).
5. With the handle still above the base, grab one adjustment knob with your other hand and firmly attempt to turn the knob; the knob should not rotate. A locking pin in the mechanism will have engaged the rotational assembly when the unit was withdrawn from the base. Perform this test with all adjustment knobs.
6. Repeat this test for all weight settings on your dumbbells.
If any of the knobs rotate outside of the cradle, do not use the dumbbell, and contact your Bowflex® retailer.
SelectTech® Dumbbell locking mechanism test
Troubleshooting
Figure 2
Figure 1
10

Leg Exercises
Wide Squats
START
Calf Raises
START
Note: Optional accessories shown in photos.
FINISH
FINISH
Stationary Lunges
START FINISH
11
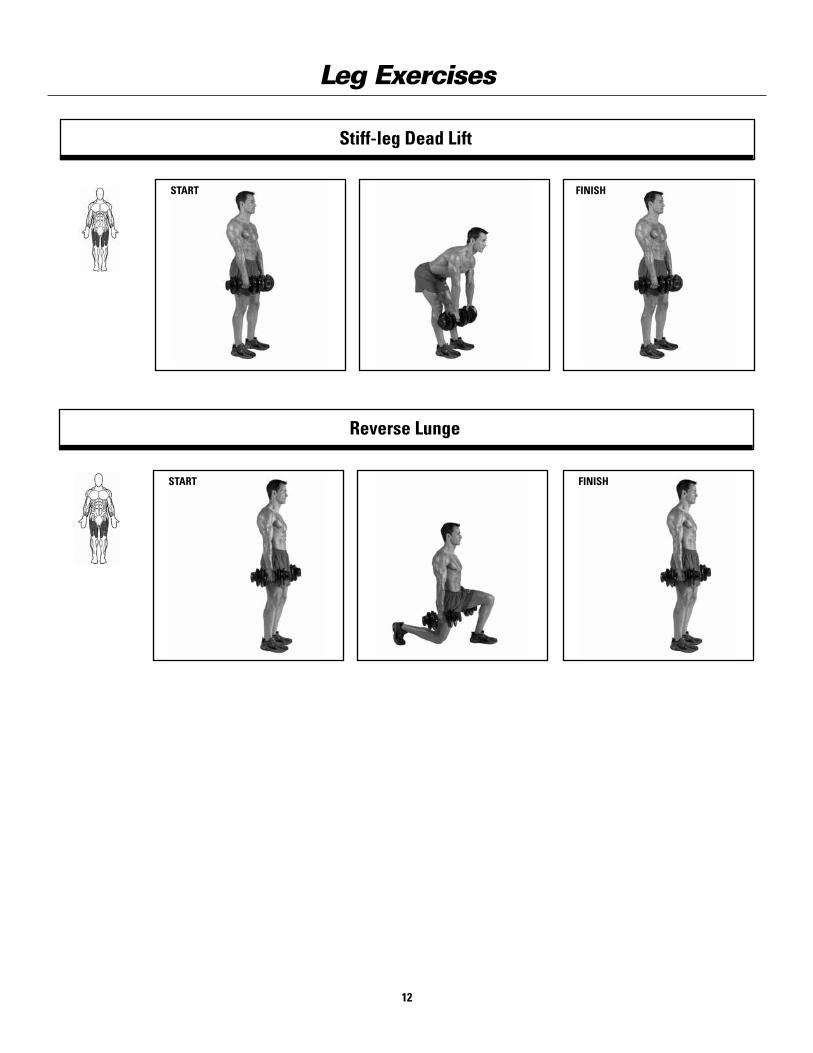
Leg Exercises
Stiff-leg Dead Lift
START
Reverse Lunge
START
FINISH
FINISH
12

Chest Exercises
Flat Chest Press
Incline Chest Press
START
START
Flat Chest Fly
START
Note: Optional accessories shown in photos.
FINISH
FINISH
Note: Optional accessories shown in photos.
FINISH
Note: Optional accessories shown in photos. 13

Chest Exercises
Incline Chest Fly
START FINISH
Decline Chest Press
START FINISH
Note: Optional accessories shown in photos.
Note: Optional accessories shown in photos.
14

Arm Exercises
Standing Curls
Concentration Curls
START
START FINISH
FINISH
Incline Bench Curls
START FINISH
Note: Optional accessories shown in photos.
Note: Optional accessories shown in photos.15

Arm Exercises
Scott Curls — Standing Concentration Curls
START
Overhead Triceps Extension
Triceps Kickback
START
START
FINISH
Note: Optional accessories shown in photos.
FINISH
FINISH
Note: Optional accessories shown in photos.
16

Arm Exercises
Lying Triceps Extension
Hammer Curls
START
START FINISH
FINISH
Note: Optional accessories shown in photos.
17

Back Exercises
Single Arm Row — Alternating Rows
Wide Rows
START
START FINISH
FINISH
Note: Optional accessories shown in photos.
Dead Lifts
START FINISH
18

Abdominal Exercises
Ab Crunch
Reverse Crunch
START
START FINISH
Note: Optional accessories shown in photos.
FINISH
Note: Optional accessories shown in photos.
Twisting Side Crunch
START FINISH
Note: Optional accessories shown in photos.19

Shoulder Exercises
Standing Shoulder Press
Lateral Raise
START
START FINISH
FINISH
Seated Overhead Press
START FINISH
Note: Optional accessories shown in photos.
20

Shoulder Exercises
Front Raise
START
Rear Delt Row
Shrugs
START
START
FINISH
FINISH
FINISH
21

Muscle Chart
Sternocleidomastoid
Pectoralis Major
Anterior Deltoid
Medial Deltoid
Biceps
Brachialis
External Obliques
Brachioradialis
Pronator Teres
Flexor Carpi Radialis
Tensor Fasciae Latae
Iliopsoas
Pectineus
Quadriceps:
•RectusFemoris•VastusLateralis•VastusMedialis
Peroneus Longus
Extensor Digitorum Longus
Tibialis Anterior
Posterior Deltoid
Infraspinatus
Teres Major
Triceps
Latissimus Dorsi
Gluteus Medius
Gluteus Maximus
Adductor Magnus
Hamstrings:
•BicepsFemoris•Semitendinosus
•Semimembranosus
Trapezius
Serratus Anterior
Rectus Abdominus
Flexor Digitorum
Superficialis
Adductor Longus
Iliotibial Tract
Gracilis
Sartorius
Gastrocnemius
Soleus
22

This page intentionally left blank.
23

Nautilus® Bowflex® Schwinn® Fitness Universal®
8000763.092512.A
EN