selecting basic shapes
TRANSCRIPT

Squares, rectangles, triangles, cones, cylinders, cir-cles, ovals...these are the basic shapes that will aid youin drawing objects more accurately. This techniquecan be used when doing a still life, a landscape, andpractically any other object or subject you wish to
draw. As you progress through this book, you will seehow this style of drawing can aid you in producing amore accurate presentation of the subjects. First,examine the object you want to draw, and determinewhat basic shapes make it up.
Basic Shapes
10

11
Most paintings can be broken down into basic shapes.
See how this famous painting by Cézanne can be broken
down into basic shapes.
“...treat nature by means of the cylinder, thesphere, the cone...”, Paul Cézanne
Basic Shapes
Still Life with Soup Tureen, Paul Cézanne
12
Getting Started
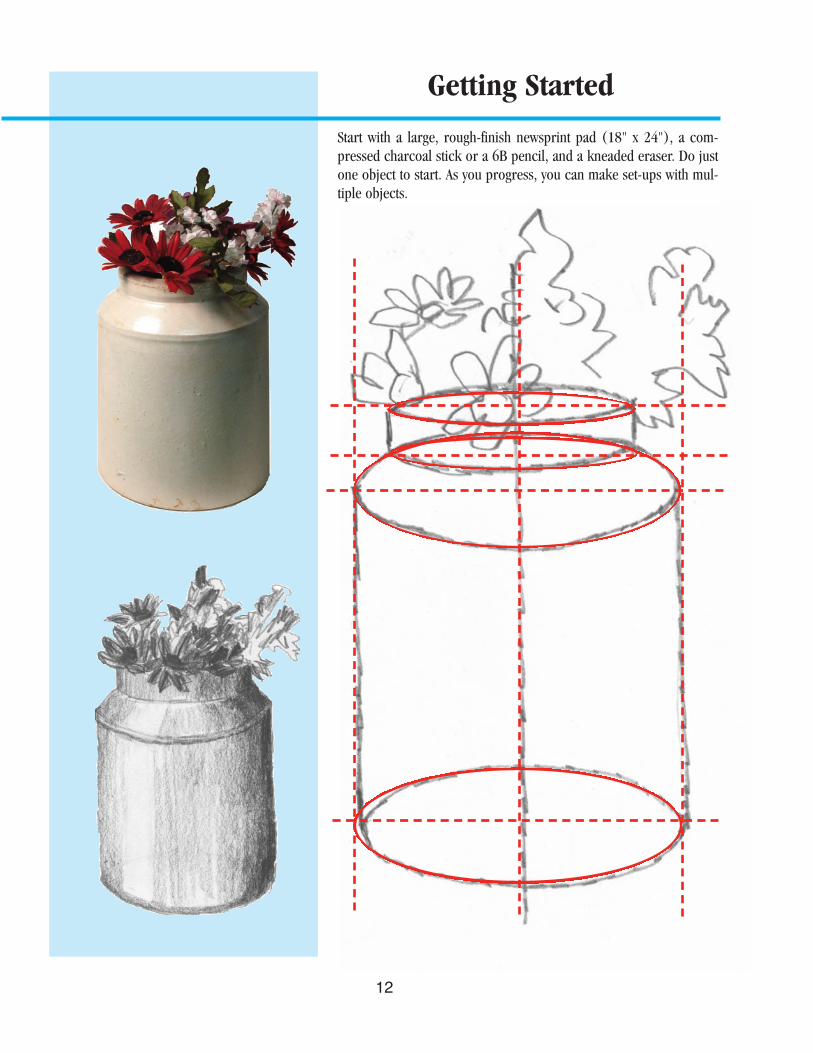
Start with a large, rough-finish newsprint pad (18" x 24"), a com-pressed charcoal stick or a 6B pencil, and a kneaded eraser. Do justone object to start. As you progress, you can make set-ups with mul-tiple objects.

Method:
1. Look at the object you want to draw. Determine whatbasic shapes are needed to render the object.
2. Start by roughly locating where on your picture planeyou want the object to appear.
3. Draw a center line, top line, and bottom line.
4. Place a line where one shape changes to another shape.(see dash rules above)
5. Draw in the basic shapes.
6. Select the lines you want in your final drawing.
7. Draw the complete shape. This avoids connecting theshapes later in the drawing and improves placement.
Selecting Basic Shapes
13
Center line
Top line
Bottomline

14
By reducing objects to basic shapes, an artist can drawa more accurate rendering of an object. If you justmake a drawing of the outline of a vase, you will noticethat the left side and right side do not match (Art A).But if we use basic shapes and a center line, both sideswill look similar (Art B).
The basic shapes technique is applied to preliminarysketches, which are done before the finish is created.Producing sketches beforehand allows for more finiteadjustments. Be sure to sketch the same size as the fin-ish will be, or in proportion to the finish, so you canscale the sketch to size.
The picture plane is the finished surface—whether itbe paper, canvas, or gesso board. Locate your object inthe picture plane. To begin, draw a center vertical line,and place the object in the center. Divide the line intothe same number of shapes as the object. Keep the left-to-right distances from the center line the same on bothsides of the drawing. With tracing paper, draw over Art
B, adding the smoothing lines that give the object itsshape and form. Practice with other objects on thenewsprint pad. Do many sketches. Another way to solvethis drawing is to put in the guides and trace only oneside of the object. Then, flip the paper over and tracethe side you had drawn onto the other side of theobject. Each side should be a mirror image of the other.
Art B
Symmetry
Art A

Adding Dimension
15
Lightly drawn sketch lines
Use basic shapes to define your drawing. This will adddimension to the objects, simplify the drawing, and aidin the placement of objects on the picture plane, mak-ing the objects truer and more accurate. Adjust the
positioning of the objects in the final, and eliminate thesketch lines by painting over them or erasing thembefore you paint. Sketch lines should be lightly drawnso as not to leave an impression.

16
Examine the objects you are going to draw, and reducethem to basic shapes. Then combine the shapes to cre-ate the finished objects. Add detail and shading. Shapes
can be modified to produce a better drawing. Note thatthe basic shape of the pear is a round circle with atapered rectangle.
Combining Simple Shapes
Method:1. Look at the object you want to draw. Determine what basic shapes areneeded to render the object (circle and tapered rectangle).
2. Draw in the basic shapes. Draw the shapes completely, not just the partsthat touch, but parts that are hiddenby other parts.
3. Select the lines you want in your finaldrawing.
4. Round off the shapes, and blend theforms into each other.

Combining Simple Shapes
17
These preliminary sketches of vases show the trial linesand the basic shapes that were used to create the draw-ings. The sketches can now be refined and transferred
to a heavy paper for painting. Look at the center linesand the outlines. These lines define the basic forms ofthe vases.

When sketching a group of shapes, it is best to draweach shape fully. In this manner, all of the curves andstraight lines are more accurate, and you don’t have to
draw the objects to fit into each other. Remember todraw the objects lightly so they can be erased or cov-ered in your final.
1. Set up some small boxesand jars, and arrange them as a still life.
2. Use simple objects.
Sketching a Group
18

Overlapping Shapes
19
Overlapping means to extend over and coverpartly. When partially obscuring an object byplacing another object in front of it, the objectwill appear to be farther back in the pictureplane. This will add dimension to your drawing.Do not overlap too much, as the item in the backmay become hard to distinguish.
Remember, when drawing the overlappingshapes, draw the entire object; the excess linescan be erased or painted over.

Do several sketches of the objects, in groups and individually.Take your best group sketch, and set up to do a sustainedsketch, incorporating a light source and shadows. The lightsource is on the bumpy texture of the gourds, as well as on theside, and the shadow is opposite the light source. Try doingsome sketches from memory without looking at the objects.
Axis
Axis
Axis
20
Shadow oppositelight source
In this preliminary sketch of gourds, circles, andtapered cylinders were used to define the basic shapes.Note that the center lines (axis lines) are at variousangles. These lines are important in creating the com-position of the drawing and indicating where the stems
will be. They add interest and character and avoid theobjects leaning in the same direction. Many sketch linesare used to locate the objects for a good composition.Make placement corrections at this point before goingto the final.