securing your as400 in an open environment - … your as400 in an open environment.pdfsoftware,...
TRANSCRIPT

Securing Your AS400 in an Open Environment
MaddenCo, Inc. July 2003
Copyright © 2000 by MaddenCo, Inc
All rights reserved.

Please understand that MaddenCo has expended substantial sums in developing and maintaining its software, systems and related materials, and as a result, it has and will continue to have substantial proprietary interest and valuable trade secrets therein. Also understand that MaddenCo's software, systems, related materials and the "ideas" represented by software, as well as the physical materials, are valuable trade secrets and are strictly confidential material, and important, and that its confidentiality gravely affects the successful conduct of the business of MaddenCo.
2
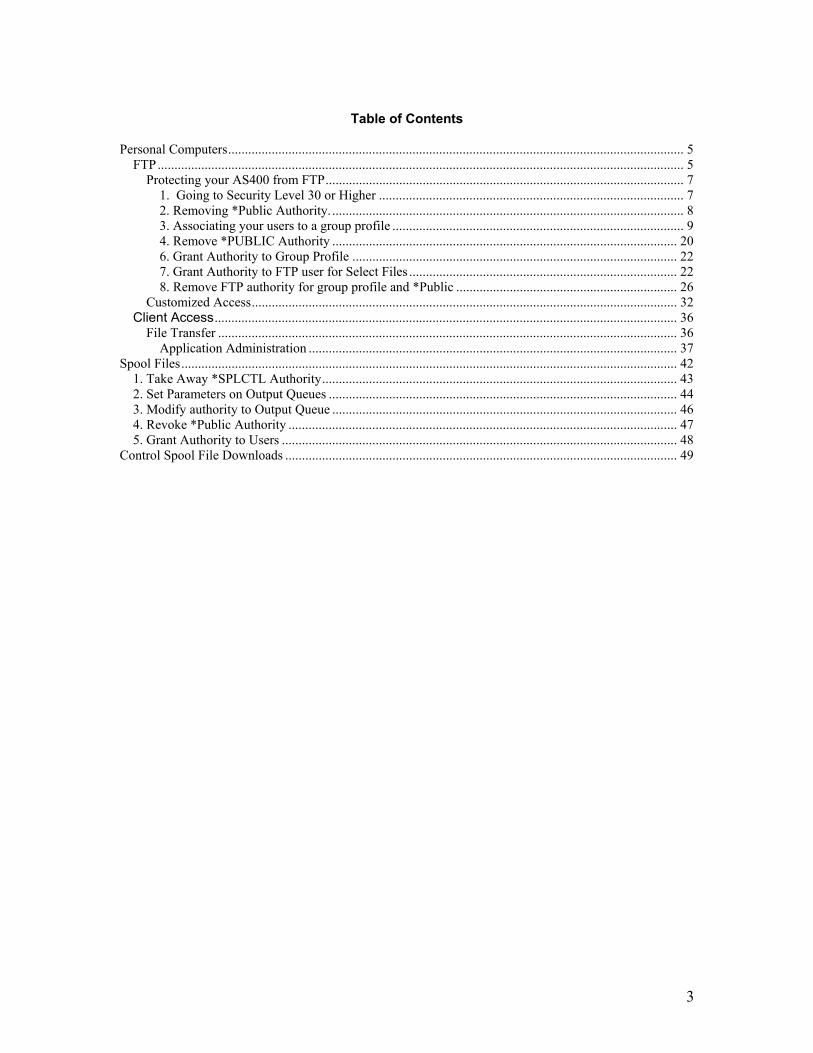
Table of Contents
Personal Computers........................................................................................................................................ 5
FTP............................................................................................................................................................. 5 Protecting your AS400 from FTP........................................................................................................... 7
1. Going to Security Level 30 or Higher ........................................................................................... 7 2. Removing *Public Authority. ......................................................................................................... 8 3. Associating your users to a group profile ....................................................................................... 9 4. Remove *PUBLIC Authority ....................................................................................................... 20 6. Grant Authority to Group Profile ................................................................................................. 22 7. Grant Authority to FTP user for Select Files ................................................................................ 22 8. Remove FTP authority for group profile and *Public .................................................................. 26
Customized Access............................................................................................................................... 32 Client Access.......................................................................................................................................... 36
File Transfer ......................................................................................................................................... 36 Application Administration .............................................................................................................. 37
Spool Files.................................................................................................................................................... 42 1. Take Away *SPLCTL Authority.......................................................................................................... 43 2. Set Parameters on Output Queues ........................................................................................................ 44 3. Modify authority to Output Queue ....................................................................................................... 46 4. Revoke *Public Authority .................................................................................................................... 47 5. Grant Authority to Users ...................................................................................................................... 48
Control Spool File Downloads ..................................................................................................................... 49
3

4

In the past, your internal network most likely consisted of a controller, modem, AS400 and twinax terminals. Keeping your system secure consisted of taking away the command line, assigning your users to specific Menus and setting the limit capabilities parameter in the user profile to *YES. A security level of 20 was acceptable since your users had no direct access to your data nor did the outside world without you assisting in getting them connected. Now, most companies have made the move to an Ethernet environment. Networks now consist of Personal computers, hubs, switches, Ethernet terminals, an AS400, routers, firewalls etc. Companies secure themselves by using firewalls and configuring VPN’s to only allow access to connections for which they configure. They use encryption to secure themselves from network sniffers. But what about your internal users and your vendors and/or customers? What potential security risk have you created by using personal computers or allowing vendors and/or customers access to your system. In this document we will discuss these issues and show you what steps you can take to protect your data.
Personal Computers FTP If your AS400 is attached to your network, all personal computers that are attached to the network could possibly have access to all objects on your AS400. Even if the personal computer is not configured for an AS400 Session. All a user needs is a valid user profile and password. How can this be? File Transfer Protocol (FTP) is all that is needed to download your most valuable information to the PC and then the user can save it, email it etc.. File Transfer Protocol (FTP) is a TCP/IP service included with the AS400's TCP/IP and is also a service that runs under Windows NT 3.51's TCP/IP and Windows NT 4.0's Internet Information Server (IIS). In addition, Windows for Workgroups (WFW), Windows 95, 98, 2000 , XP and Windows NT, Unix, Linx, and most other operating systems also provide a command-line FTP client program. The FTP process is the same for any platform: You connect to the server, log on with a user profile and password, transfer files with FTP transfer commands, and close the FTP session. Anyone can pickup a book on FTP at a local bookstore or can find help on the internet. If the user knows very little about your files, all they have to do is a DIR command and it will show them a list of files on the AS400. The following is a sample script to show how simple it is to download a file from the AS400 to a PC.
5

In the above example I went to a dos prompt and typed:
ftp s103g31m
kim xxxxxxx(Password) cd qs36f get tmcust This downloaded the entire customer file to my pc in 36 seconds. There is some key information that I must have up front in order to accomplish this, such as the system name, library name and file name. But this information is not difficult to get. The system name is presented on every sign on screen and I could use a DIR command to list all of the libraries on the AS400 and look at the files in the libraries. You can also say get TM* and it will down load all files starting with TM. Most of your are probably thinking that you are not to concerned. Your personal computers are located at your headquarters. These employees have access to this information without downloading it. But what about your vendors? If you use the Open Road Retread Interface, you have given them a User Id and Password to your system so that they can FTP files to your system. What other vendors have you given User id’s and passwords to? How about your customers? How many of them have access through Limited Order Entry? (FYI: If MaddenCo ASP Users access your system, they do not know the user passwords. Also, our asp system is secured.)
6

Protecting your AS400 from FTP There are several steps that will need to be taken to protect your files from FTP.
1) Up the security level on your AS400 to 30 or higher. 2) Remove *Public Authority. 3) Associate your user profiles to a group profile. 4) Take away *public authority for all objects in QS36F. 5) Create an “FTP” user profile that is not part of the group. 6) Grant authority to the group user profile for all objects in QS36F. 7) Grant authority for the “FTP” user to files that need to be downloaded. 8) Remove FTP authority for the group profile and *Public. (V5R1M0).
1. Going to Security Level 30 or Higher The system value QSECURITY controls the system security level on the AS400. The possible values are 10, 20, 30, 40, and 50 and these correspond to different levels of security with 50 being the highest protection. You can view your current security level by typing: DSPSYSVAL SYSVAL(QSECURITY). You can change the security level by executing the CHGSYSVAL command. For instance to change to level 40, you would enter: CHGSYSVAL SYSVAL(QSECURITY) VALUE(‘40’) When you change the security level it does not take effect until your next IPL. Until then, your current system security level will remain in effect. The following is a list of the different security levels and the affect it will have on your system. Security Level 10 This level could be considered security level 0, or physically secure only. Your security consist of your AS400 being locked in a room. If a user has access to a workstation he can enter a user profile with no password and gain access to the system. If the user profile does not exist, the system will automatically create it. Security Level 20 This level adds password security. At level 20 a user must have a user profile and a valid password to gain access to the system. Level 20 institutes minimum security by requiring that users know a valid user profile and password. Once signed on the system the user has all object authority. However, with the security features built into the Tire Dealer System, this level is adequate if you use only green screen terminals.
7

Security Level 30 Security Level 30 by default supports resource security. This means that users do not receive *ALLOBJ authority by default. Resource security allows objects to be accessed only by users who have authority to them. If you go from level 10 or 20 to level 30 some thought and planning will be required. Moving to level 30 will automatically revoke special authority to users and may deny them access to MaddenCo programs and files. Security Level 40 Security Level 40 was introduced in OS/400 V1R3. The need for level 40 centers around a security flaw on the System 38 that the AS400 inherited. This flaw allowed some programmers access to objects for which they were not authorized. If you are considering going to level 30 you might as well go to level 40. It requires no extra work on your part and will enhance your overall security. Security Level 50 This security level will add overhead to your system. This means that you could see a performance hit. When running at level 50, your system validates parameters that are passed, imposes certain message restrictions, removes pointers from messages, prevents control modification and maintains the QTEMP library. You should understand the full effect of this level before turning this on. Which level you decide to go to is up to you. In order to implement the seven steps listed above, you will need to go to a minimum level of 30.
2. Removing *Public Authority. Once you go to Security Level 30 or higher you will need to take *public authority away for any file that you want to control access to. For the Tire Dealer System this will be any file in library QS36F. If you do not remove this authority, all users will have access to this data. If you have other software loaded on your system, you may want to remove *public authority from their files as well. A good example is the Optimum Solutions payroll package. You should contact your vendors to obtain the information necessary to secure the data related to their product. To take *public authority away for the Tire Dealer System files, type the following: RVKOBJAUT OBJ(QS36F/*ALL) OBJTYPE(*FILE) USER(*PUBLIC) AUT(*ALL) Once this has completed, no user will have access to any of the files used by the Tire Dealer System software. You will now need to give authority to users that will be using the software. You can do this one of two ways. You can either give authority to each individual user on your system, or you can associate your users to a group profile and then grant access to the objects for just the group profile.
8

3. Associating your users to a group profile This can be accomplished easily through operations navigator. Operations Navigator is an add on that is available on your OS/400 Client Access CD for the PC. You will need to load Application Administration in order to access these functions. Application Administration is available on Client Access V5R1M0 or higher. Once loaded you will need to start Operations Navigator. You can do this by clicking the icon shown below or by going to the Client Access folder.
9

Collecting Inventory Information
Before you can create a group profile and associate users to it, you must run a collection program that will go out to the AS400 and read through your user profiles and create a table of users and groups that already exist. As you change or add user profiles on the AS400, this table will be updated as well. Therefore, you only have to collect this data once. In order to collect this data you must first start Operations Navigator. You should then click Management Central, Endpoint Systems and then Right click on the AS400 System. You should then choose Inventory and then Collect. A sample screen is shown below:
10
In the collect inventory screen, you should uncheck all options except users and groups and then click OK.
11

You can click the inventory icon under Task Activity to see when your job is completed.
12

Adding a Group Profile
Once your data collection has completed, you can create a group profile. You can do this by Clicking My Connections, The AS400 System, Users and Groups and then Right Click on Groups and then left click New Group.
13

Type in the group name that you want to create and the description. You can then select each user that you want to be part of your group. You should skip all user profiles beginning with a Q. These are IBM provided user profiles. You should also skip the Connect user profile; this is used to connect a MaddenCo employee to your system.
14

You will then see your group has been added.
15

What did this do?
If you look on your AS400, you will see that a user profile has been created for the group profile name that you have chosen. The profile has a user class of *USER and Special Authority of *NONE. It looks like any other user profile on your system.
16

User assigned to a group profile
If you look at a profile that you have assigned to the group, you will see that the profile has changed. It now says MADDENCO for the GROUP PROFILE parameter.
17

Changing a Group Profile
If you need to add or remove users from your group profile you will need to click Management Central, Endpoint Systems, The AS400 System, Group Inventory and then right click on the group profile that you would like to modify and choose edit. You should then double click Selected users.
18

You then need to click the appropriate box depending on adding or removing a user from the group. If you are only adding or removing one or two users, you may find it quicker to edit the user profile using the WRKUSRPRF command on the AS400. If you are not on V5R1M0 or higher, you will need to use the WRKUSRPRF command to create the group profile and to edit the users that will need to be assigned to the group profile.
19

4. Remove *PUBLIC Authority
If you were to display authority for a physical file in your QS36F library, you will most likely see that *PUBLIC has authority *CHANGE. This means that all users have access to this data. We want to remove this access and only give authority to the group profile that we just created. To remove public authority use the following command: GRTOBJAUT OBJ(QS36F/*ALL) OBJTYPE(*FILE) USER(*PUBLIC) AUT(*EXCLUDE) This command will remove all authority for *Public for all files in library QS36F.
20
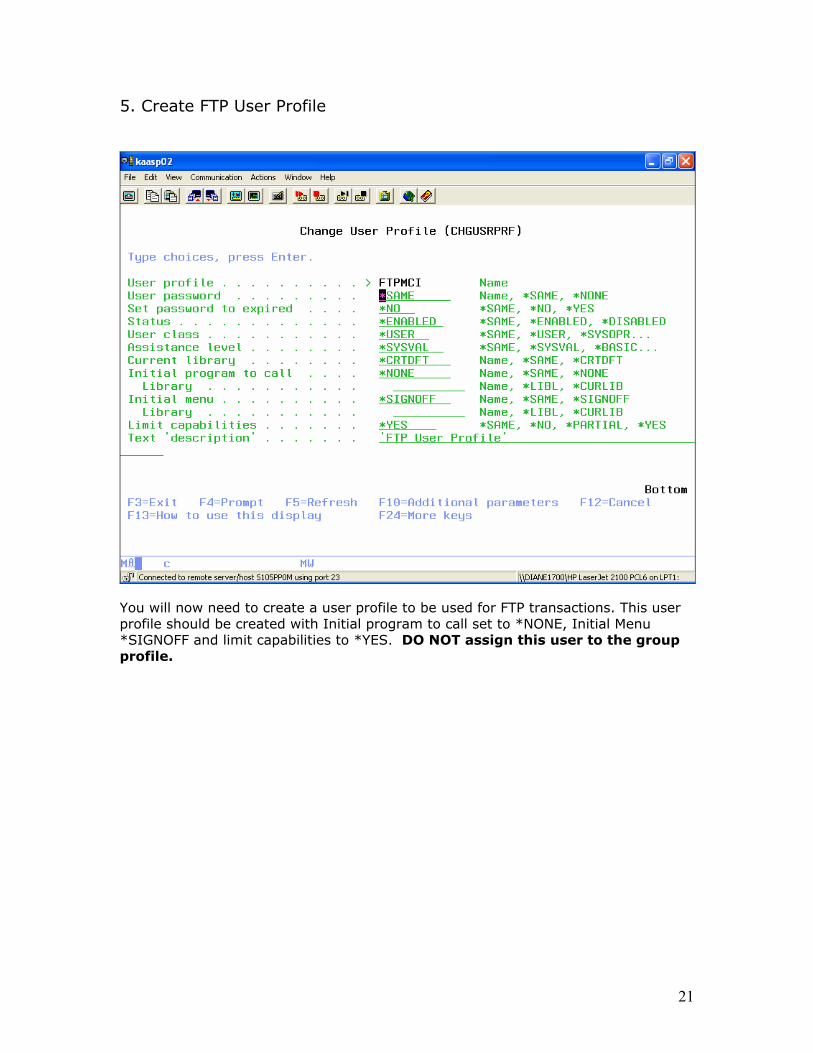
5. Create FTP User Profile
You will now need to create a user profile to be used for FTP transactions. This user profile should be created with Initial program to call set to *NONE, Initial Menu *SIGNOFF and limit capabilities to *YES. DO NOT assign this user to the group profile.
21

6. Grant Authority to Group Profile 7. Grant Authority to FTP user for Select Files Both of these steps can be accomplished by taking a menu option from within the Tire Dealer System Software. (Available 10/15/03)
From the Misc Tire Menu, you can take option 99, Grant authority to MCI files. This will read control record USER_MCI to obtain the name of the group profile and control record USER_FTP for the FTP user profile. It will grant authority for all users setup in USER_MCI to all files for the library name that is contained in control record DATLIBNM. If this control record does not exist, it will default to QS36F. It will read through the MaddenCo System table and determine which files can be sent or received through the FTP function. For these files it will grant authority to the FTP user profiles that are setup for control record USER_FTP. The command used to grant authority is listed below: If there are other libraries on your system that you wish to protect, you should use this command. GRTOBJAUT OBJ(QS36F/*ALL) OBJTYPE(*FILE) USER(MADDENCO) AUT(*ALL)
22
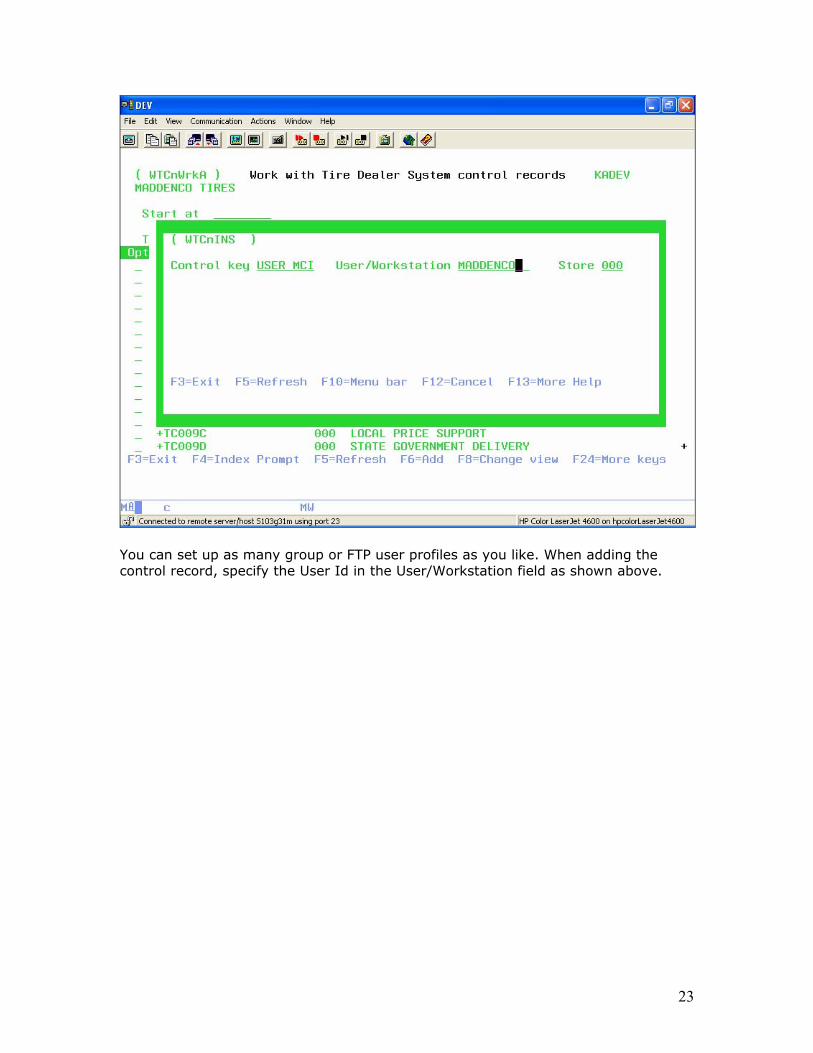
You can set up as many group or FTP user profiles as you like. When adding the control record, specify the User Id in the User/Workstation field as shown above.
23

If you display the authority after running the above option, it would look something like this:
Notice that MaddenCo has *all authority and *Public has *EXCLUDE. By giving MaddenCo *all, you have given every user profile associated to the MaddenCo profile access as well. This eliminates having to setup control keys or issue commands for each individual user profile
24

MaddenCo Interfaces If you are using an interface within the Tire Dealer System to send or receive transactions with vendors then you will want to review the following control records: %LIBNGDY – This contains the name of the library that will be used by the Roadware retread interface to write files from their server to your AS400. %LIBBIB – This is the library that is used by the Bib Tread retread interface to write files from their server to your AS400. %LIBPAR – This holds the name of the library that is used by the PAR interface to write files from their hand held units to your AS400. It is very important that you do not set these keys to use library QS36F if you are going to implement these security steps. When a file is created on your system from the interface the user Id that creates the file is given full access and *public is given some access. Once you remove *public authority from a file, then other users will not have access to this file and therefore the data will not be accessible to other users who may be processing these records through the Tire Dealer System. If you keep these files in separate libraries, you can leave the *public authority intact and everyone will have access.. NOTE: If you are using the Roadware Interface, you need to give them the user id and password prior to implementing these procedures. They will need to change their script at the same time you put this in place. Otherwise, they will not be able to transfer retread files to your AS400.
25

8. Remove FTP authority for group profile and *Public During the last step, we gave the FTPMCI user profile access to the files that can be transferred using the FTP function. This is the user profile that will be used throughout the software to issue FTP commands to send and receive files to and from the AS400. We have eliminated the threat of a vendor pulling down one of ours files by not giving the FTPMCI user profile access to any file other than the ones that will be sent back and forth by the Data Exchange Module. However, the MaddenCo user profile also has access to all files. We still pose a risk of an internal user or a customer gaining access to our files by using FTP on their personal computer. If you are on V5R1M0 operating system or higher, we can eliminate this by taking FTP authority away from these users. This can be accomplished by using Application Administration within Operations Navigator. To access Application Administration, you must be signed in with a user profile that has security officer access. Within this function you have three categories of “applications” that can be administered. Two of them, AS/400 Operations Navigator and Client Applications, will let you control what appears on user’s desktop. The third category lists host applications, which are OS/400 functions. This will let you control who can use FTP commands and other OS/400 functions. Before you can use these applications, they will need to be registered. You only have to register them once and they will be available at any PC that has Application Administration loaded through Client Access. Register Applications When you register an application, Application Administration creates the application's administrable functions on the AS400. This allows security administrators to manage which users have access to the application. To start Application Administration you will need to start Operations Navigator.
26
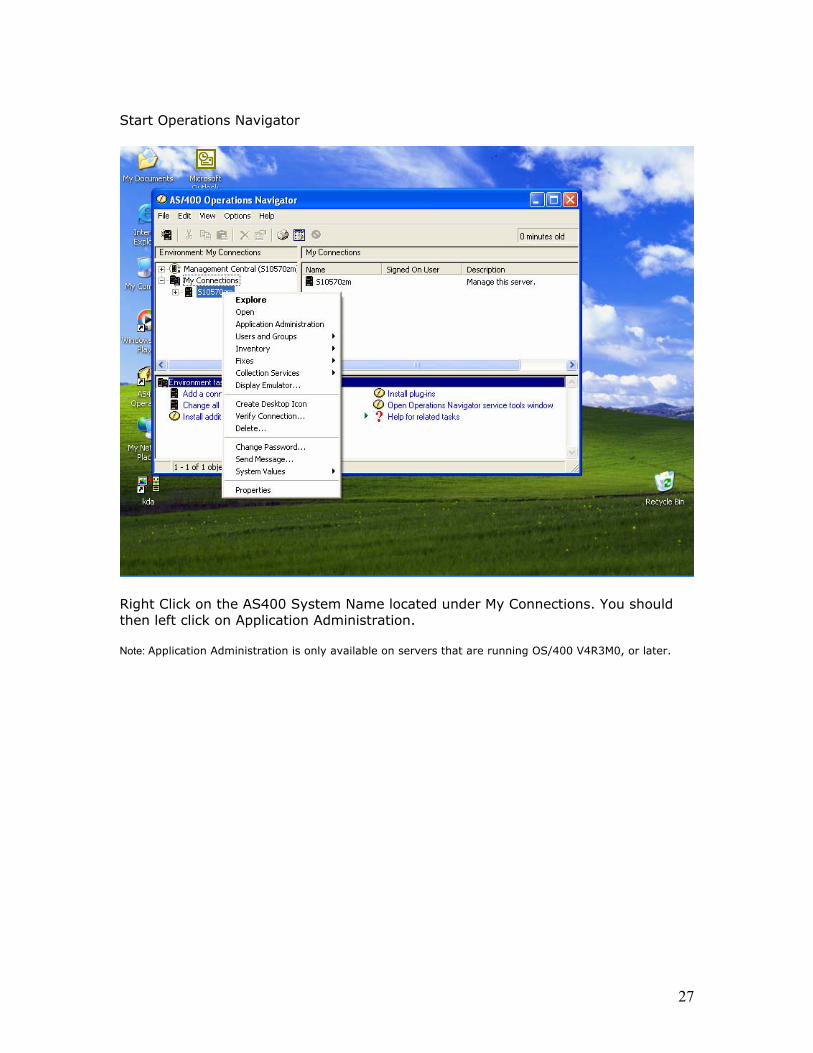
Start Operations Navigator
Right Click on the AS400 System Name located under My Connections. You should then left click on Application Administration. Note: Application Administration is only available on servers that are running OS/400 V4R3M0, or later.
27

To Register applications, click the APPLICATIONS button on the left of the screen.
28

The applications that can be registered are listed on the left of the screen. You should click each application and then click the ADD button. This will display the applications on the Right side and make these applications available to be administered. Once you have registered each application, click OK and you will be returned to the previous screen.
Once you register an application, all users are allowed access to the application's functions by default. Removing an application removes the application's administrable functions and associated access settings. This results in all users having access to the application's functions.
29

Left Click on Host Applications Note: Host Applications is only available for Client Access and OS/400 V5R1M0 or higher.
30

Click on + next to FTP Server. Notice that all of the FTP options have Default Access. Default Access - This gives access to this function for all users on your system. All Object Access - Indicates whether a user or group with all object system privilege is allowed access to the function. If selected, and the user or group has all object system privilege, this setting overrides all other access settings. Customized Access - Indicates whether users or groups are explicitly denied or allowed access to the function. For each of the functions listed under specific operations we will want to customize access to the options.
31
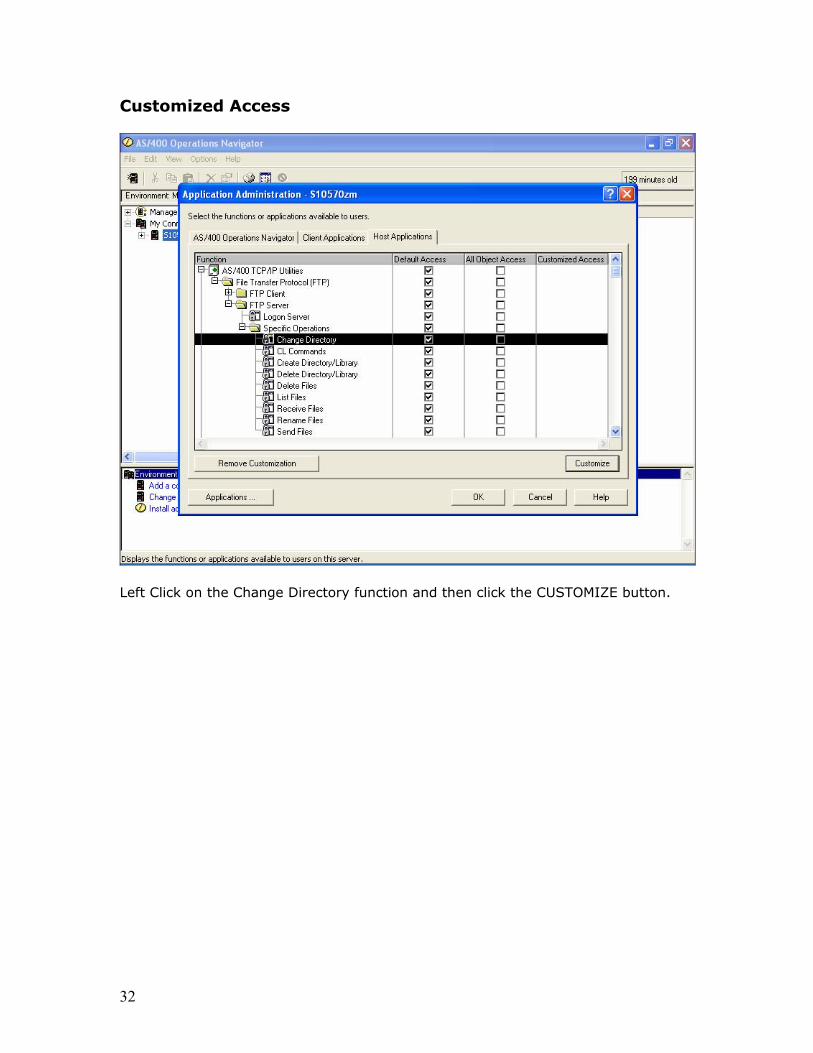
Customized Access
Left Click on the Change Directory function and then click the CUSTOMIZE button.
32

You will be presented with this screen which allows you to give and take away access for the selected function. You will first need to uncheck the Default access box under access. This will take everyone’s authority away. We then want to give access to the FTPMCI user profile that we created. You will need to click the + next to All users and locate the FTPMCI user profile.
33

You should now locate the ftp user that you created. You should then highlight the user and click add for the Access allowed function. This gives the ftp user access to the change directory command and removes authority for everyone else. If there are other users that you would like to give authority to this function, you should add them now as well. When you are done click OK.
34

You will need to repeat the above steps for each function located under Specific Operations. Once you have completed the options for the FTP Server, you should then do the same for the FTP Client. When you have finished click OK, if you do not, your changes will not be saved and will not take effect.
35

Client Access File Transfer If you are using Client Access for your emulation software to access the AS400 then your users may have the capability to transfer files to and from your AS400. Most companies secure this feature by using selective setup when doing the install on each PC, however, if you are not loading each PC yourself, then you have no guarantee that a full install of client access has not been done. However, this feature can be controlled by granting access through Application Administration as well. The concept is the same as discussed for FTP. You grant access only to the users that you want to have this capability.
36

Application Administration
You will need to start Operations Navigator, right click on the AS400 System and choose Application Administration. Then click Client Applications and you will see the above screen. You should then click the + next to AS400 Client Access Express.
37

You should then click the + next to Data Transfer, Download from Server, and Upload to server. Your screen should look like the screen above.
38

We will want to remove access for all users and grant access to only the users that we want to give authority to this function. For this example, click GUI Downloads and then click customize. You will see the screen above.
39

You will want to remove the check marks next to Default Access and Users with all object system privileges. This will remove access for everyone. You will then want to click the + next to all users and browse through and grant authority for anyone that will need to download a file. When you have finished, click OK. Note: If a user does not have access to a file, they will not be able to download that file. This just gives authority to use this function.
40

Notice that the Customized Access column now has an X for the option we modified. You will want to complete these steps for each option listed under Download from server and Upload to Server. When you have finished, click OK or your changes will not take affect and all users will have access to these functions.
41

Spool Files Another threat that exists with loading client access on a personal computer is direct access to all spool files. If operations navigator has been loaded on a personal computer then this user has access to all spool files on the AS400. If you are like most companies, financial statements, payroll registers and other confidential information will remain in output queues for days, weeks and even months on your system. The AS400 has the capability to control access to specific output queues. This job could become tedious because a lot of companies set reports to go to different printers based on workstation or store number instead of user. Therefore you may want to look at setting up specific output queues for confidential reports and control access to these queues only. There are only a few steps involved and you can be assured that your confidential information remains confidential.
42

1. Take Away *SPLCTL Authority
One of the first things you will need to verify is that users do not have *SPLCTL as a special authority. This authority gives the user access to all reports. It overrides any other authority you may setup to try and control this situation. Your every day users do not need *SPLCTL and there is no reason you can’t take it away. The picture above shows a user profile that is assigned *SPLCTL authority.
43

2. Set Parameters on Output Queues Next you will need to change some parameters on the output queues that you would like to protect. On a command line type in CHGOUTQ and press F4.
Type in the name of the queue that you would like to control access to and press F10 for additional parameters.
44

Page down until you come to the screen shown above. You will want to change 3 parameters. Display any file – If you set this to *NO, users can only display spool files in
this queue that they actually created. *YES will let them review all spool files if they have authority to this queue. Operator controlled – If set to *NO, then users with *JOBCTL authority in their user profile will not be able to access spool files on this output queue unless they have authority. If you set this to *YES, any user with *JOBCTL authority on their user profile will be able to access all spool files in this queue. Even if you set Display any file to *NO. Authority to Check – you should set this to *DTAAUT so that any user with authority to the output queue can answer messages associated with this queue. They can also place reports on hold, etc…
45

3. Modify authority to Output Queue
If you displayed the authority for the queue’s that you would like to protect, it would probably be similar to the screen above. The user who created the Queue, Kim in this case, has *ALL authority, and *public has *CHANGE. By giving *Public authority, you have given access to all users. We will want to revoke the *public authority and grant access for the users who will be sending reports to this out queue.
46
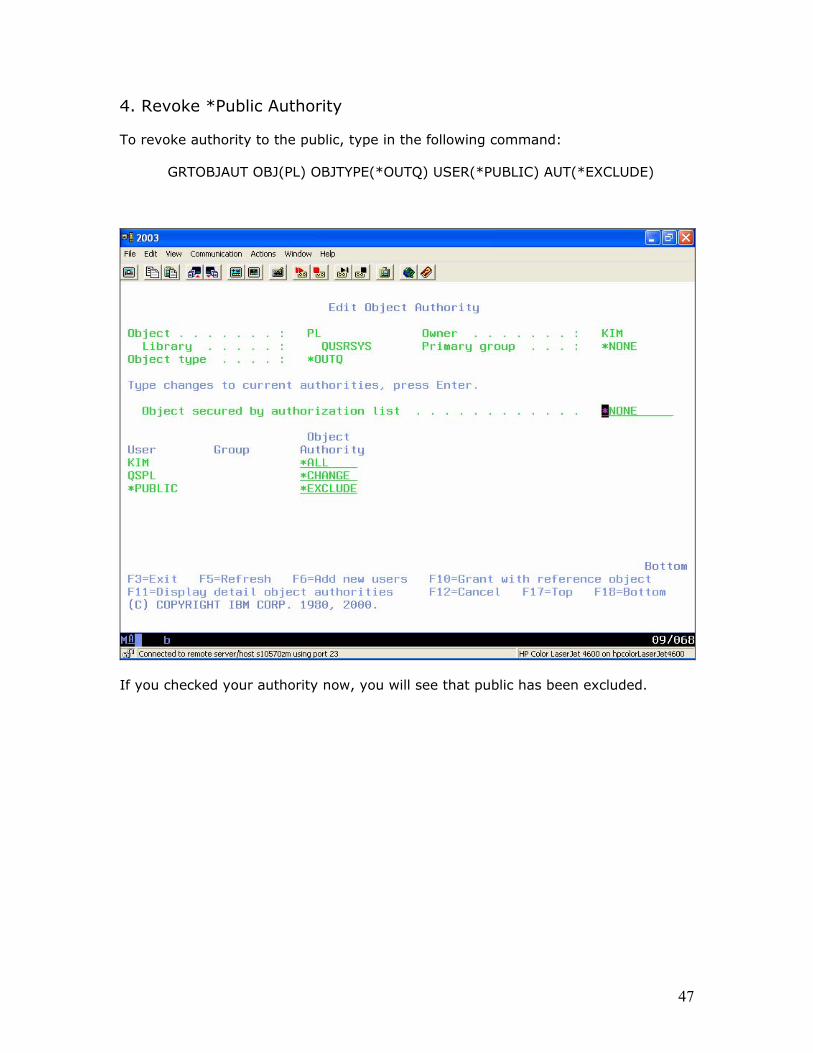
4. Revoke *Public Authority To revoke authority to the public, type in the following command: GRTOBJAUT OBJ(PL) OBJTYPE(*OUTQ) USER(*PUBLIC) AUT(*EXCLUDE)
If you checked your authority now, you will see that public has been excluded.
47

5. Grant Authority to Users You will now want to grant authority to users who will be using this output queue. You could create a group profile for your financial areas and grant access to the group profile, or you can give access to individual users. Users can only be assigned to one group profile, so if you create more than one, you will want to make sure you follow the steps in previous security steps for this group profile as well. To grant authority to an output queue use the following command. GRTOBJAUT OBJ(PL) OBJTYPE(*OUTQ) USER(GREG) AUT(*CHANGE)
If you check the authority again, you will see that user Greg now has authority to this output queue as well. However, Greg will only be able to access spool files that he creates. This is because we set the Display parameter above to *NO. This also assumes that he does not have *SPLCTL set on his user profile.
48

Control Spool File Downloads One of the items discussed in the download document is dragging and dropping spool files to your pc hard drive from the AS400. If a PC has been loaded with client access using the typical installation, the user then has access to this function. You can control which users have access through Application Administration. This is the same function we used earlier to take away authority to the FTP function.
When you start Application Administration you will see the following screen, you will want to select “Printer Output” and click Customize.
49

You will want to uncheck the Default Access and the Users with all object system privileges box. You should then add access for any user that will have authority to download files.
50

You will want to remove access to “Printers” for all of your users. This function is similar to the WRKOUTQ command on the AS400 and gives the user access to all printers. By removing this, the users will only have access to their spool files.
51

52
There are many other functions listed in Application Administration that we have not discussed. It is strongly recommended that you remove access to all functions for all users until you understand how they work. A good example is Active Jobs under Work Management. This function is the same as doing a WRKACTJOB command on your AS400. If a user has client access loaded on their PC, they may have the ability to hold or cancel a running job using this function. There are other functions available to delete files as well. By removing access to these functions, the user will not even know these functions exist, thus giving you a more secure environment.