secure email gateway v4 - clearswift - clearswift · secure email gateway – tls configuration...
TRANSCRIPT

SECURE Email Gateway v4.7 TLS configuration guide
November 2017

SECURE Email Gateway – TLS configuration guide
Page 2 of 40
Copyright
Published by Clearswift Ltd.
© 1995–2017 Clearswift Ltd.
All rights reserved.
The materials contained herein are the sole property of Clearswift Ltd unless otherwise
stated. The property of Clearswift may not be reproduced or disseminated or transmitted in
any form or by any means electronic, mechanical, photocopying, recording, or otherwise
stored in any retrievable system or otherwise used in any manner whatsoever, in part or in
whole, without the express permission of Clearswift Ltd.
Information in this document may contain references to fictional persons, companies,
products and events for illustrative purposes. Any similarities to real persons, companies,
products and events are coincidental and Clearswift shall not be liable for any loss suffered
as a result of such similarities.
The Clearswift Logo and Clearswift product names are trademarks of Clearswift Ltd. All other
trademarks are the property of their respective owners. Clearswift Ltd. (registered number
3367495) is registered in Britain with registered offices at 1310 Waterside, Arlington
Business Park, Theale, Reading, Berkshire RG7 4SA, England. Users should ensure that they
comply with all national legislation regarding the export, import, and use of cryptography.
Clearswift reserves the right to change any part of this document at any time.

SECURE Email Gateway – TLS configuration guide
Page 3 of 40
Contents
1 Introduction ........................................................................................................... 4
2 Understanding TLS ................................................................................................. 5
3 Clearswift’s Application of TLS ................................................................................. 6
3.1 Opportunistic TLS ............................................................................................ 6
3.2 Mandatory TLS ................................................................................................ 6
4 Getting Started ....................................................................................................... 9
5 Creating a Certificate Signing Request ..................................................................... 10
5.1 What is a CSR? ............................................................................................... 10
5.2 Creating a Private Key and CSR using OpenSSL ................................................. 10
5.2.1 Generating the Private Key ........................................................................ 11
5.2.2 Generating the CSR .................................................................................. 11
6 Using your CSR to purchase a Signed Certificate ...................................................... 13
7 What to do when you Receive Your Signed Certificate .............................................. 14
7.1 Importing the Signed Certificate and Private Key Pair ......................................... 14
8 TLS Endpoints ....................................................................................................... 16
8.1 Enabling Opportunistic TLS .............................................................................. 16
8.2 Defining a mandatory TLS Endpoint .................................................................. 16
9 Troubleshooting .................................................................................................... 21
9.1 Increasing SMTP Logging to Check TLS Connection ........................................... 21
10 Appendix A - Creating a Self Signed Certificate using Microsoft Windows ................ 22
10.1 Certificate Request .......................................................................................... 22
10.2 Exporting the Public Certificate and Private Key ................................................. 29
10.3 Exporting the Microsoft CA Certificate ............................................................... 36
10.4 Converting the Private Key from PFX to PEM Format .......................................... 38
11 Appendix B - Creating a Self-Signed Certificate ..................................................... 39
11.1 Creating a Gateway Based Certificate Authority ................................................. 39
11.1.1 Generating the CA Key and CA Certificate ................................................... 39
11.1.2 Signing the Certificate with the Gateway CA ............................................... 40

SECURE Email Gateway – TLS configuration guide
Page 4 of 40
1 Introduction
Although email is an integral part of modern business, it still relies on insecure transport protocols that were designed before anyone could predict how important email would become. However, network administrators can find some security and privacy assurance in the Transport Layer Security (TLS) encryption and authentication protocol. TLS is a variation of the tried-and-true Secure Sockets Layer (SSL) protocol that is used to protect Web traffic. Using TLS to encrypt communications between two email gateways has a number of security benefits:
1. Each email server authenticates to the other, making it harder to send spoofed email.
2. The traffic between the two servers is encrypted, protecting the email content from prying eyes while in transit.
3. The encryption of the conversation between the two hosts makes it exceedingly difficult for an attacker to tamper with the email's contents.
This document is applicable to Version 4.7 and greater of the SECURE Email Gateway.

SECURE Email Gateway – TLS configuration guide
Page 5 of 40
2 Understanding TLS
TLS protects the connection from your gateway to the first destination gateway. If there are intermediate hops when email is forwarded from one gateway to another, the protection afforded by TLS is lost after the first hop. For example, TLS is a good choice for two businesses that communicate frequently as long as both gateways communicate directly.
1
1 Reproduced from www.techschoolblog.com

SECURE Email Gateway – TLS configuration guide
Page 6 of 40
3 Clearswift’s Application of TLS
The Clearswift SECURE Email Gateway can establish criteria for Transport Layer Security (TLS) encryption of outbound and inbound connections based on the domain, server or IP address where messages are sent and received. TLS enables you to set up secure email communications between your Email Gateway and other TLS-enabled email servers. TLS supports two levels of security:
1. Encryption of the communications channel. 2. Optionally, strong authentication of one or both of the TLS client and TLS server,
using signed certificates, during a TLS conversation.
Note: In a TLS connection, the TLS client is the host server sending the message and the TLS server is the host server receiving the message. The Clearswift SECURE Email Gateway supports TLS in two forms:
Opportunistic TLS Mandatory TLS
It is quite common to configure both modes to run concurrently to ensure messages are sent securely whenever possible
3.1 Opportunistic TLS
When trying to deliver emails to a remote server the Gateway will check whether the server advertises a TLS capability. If the receiving server does support TLS and the handshake succeeds, the email will be delivered using an encrypted connection. When an SMTP client connects to the Gateway, the Gateway will advertise that it supports TLS. This allows the SMTP client to initiate a TLS handshake if it wishes to. If the handshake takes place and is successful, then the SMTP client will deliver emails to the Gateway using an encrypted connection. If the remote client or server does not support TLS, or if the TLS handshake fails, then the Gateway will establish an ESMTP in-the-clear connection with the remote client or server.
3.2 Mandatory TLS
In this form, the Clearswift Gateway mandates TLS if an IP address or host or domain is configured as an endpoint. The Gateway will attempt to establish a TLS connection that meets the requirements mandated by the endpoint configuration. If the remote SMTP client/server does not advertise TLS, the connection will not be established and no email will be exchanged with the remote SMTP client/server. If the remote machine advertises TLS, but does not meet one of the requirements of the configured endpoints, no email will be exchanged with the remote machine.

SECURE Email Gateway – TLS configuration guide
Page 7 of 40
The critical difference between Mandatory TLS and Opportunistic TLS, is that when using Mandatory TLS the Gateway will not fall back to transmitting in the clear if the remote client or server does not support TLS, or if the TLS handshake fails.
Example 1: Company A has a Clearswift SECURE Email Gateway. Company A and Company B wants to send/receive TLS encrypted email with each other. Both Company A and Company B have certificates from trusted Root Certification Authorities* or have exchanged public keys and have uploaded them into their respective SMTP (TLS-enabled) servers. Company A’s Email Gateway TLS configuration with Company B has a minimal encryption setting of 128-bits. Company B is running their TLS with 40-bits. Company A’s Clearswift SECURE Email Gateway will not create a connection with Company B’s endpoint and no email will be exchanged because it is Company A’s policy to mandate a minimum of 128-bits.
Example 2: Company A has a Clearswift SECURE Email Gateway. Company A wants to send secure, encrypted email to Company B using Mandatory TLS. Company A has configured Company B as an endpoint and Company A is advertising TLS. Company B is not advertising TLS. Company A will not create a connection with Company B and no mail will be exchanged. This is important to note because in an Opportunistic TLS exchange, if TLS is not advertised by the accepting SMTP server, email will be sent across an unencrypted connection. Using Mandatory TLS, if the endpoint is not running TLS, the Email Gateway will not establish a connection with that endpoint and no email will be exchanged. If you are interested in further reading about TLS encryption, a complete description can be found in RFC 2246. More information can be gathered from:
http://www.linuxjournal.com/article/4823 - a Linux journal article on Sendmail and TLS.
http://httpd.apache.org/docs/2.0/ssl/ssl_intro.html - more technical but worth scanning.
* By default, the Certification Authorities certificate store is configured with a set of third-party CAs that meet the requirements of being a globally recognized trusted certificate authority.
To see the list of Trusted Certificate Authorities:
1. Click on the System tab. 2. Click on Encryption. 3. Click on Certificate Store.

SECURE Email Gateway – TLS configuration guide
Page 8 of 40

SECURE Email Gateway – TLS configuration guide
Page 9 of 40
4 Getting Started
There are a number of steps that you need to perform before configuring TLS on your Clearswift SECURE Email Gateway.
1. Make sure the organization on the other end of the connection is able and willing to set up TLS. If your Gateway is configured to use TLS, but the recipient's is not, no email will be exchanged.
2. Get a digital certificate to identify your Clearswift SECURE Email Gateway. While you can create your own self-signed certificate, using a certificate issued by a trusted organization (a Certificate Authority like VeriSign, Entrust, Thawte, etc.) will make it easier for email partners to trust your server's identity. Please note that the certificate that is installed by default on your Gateway, is signed by Clearswift’s CA. This is not a globally trusted Certificate Authority (CA).
3. Educate your users to recognize the presence or absence of the email header that tells them an email came in over a TLS connection. The following is an example of the received header from a message sent via TLS:
Received: from mail.clearswift.com (mail.clearswift.com [192.168.1.1]) by mail.abc.com (8.12.9/8.12.9) with ESMTP id h0UGn9P7001230 (version=TLSv1/SSLv3 cipher=EDHRSA-DES-CBC3-SHA bits=168 verify=OK) for; Tue 30 Jan 2009 15:39:10 -0500.
The portion of the header in bold type indicates that the message came in with 168 bit DES encryption from a server that presented a valid certificate.

SECURE Email Gateway – TLS configuration guide
Page 10 of 40
5 Creating a Certificate Signing Request
5.1 What is a CSR?
A CSR is essentially a Public Key containing specific information about your Email Gateway and organisation that is used to request a Certificate from your trusted CA (VeriSign, Entrust, Thawte, etc.). Before you can begin the process of obtaining a Certificate, you must generate a Private Key and CSR pair either from the Gateway command line or Microsoft Certificate Server. The CSR must be submitted to your Certificate Authority in order to obtain your signed certificate.
5.2 Creating a Private Key and CSR using OpenSSL
Log in to your Gateway via SSH or a KVM (keyboard/video) connection. When prompted, enter cs-admin for the username followed by the password you created during the initial Gateway set-up.
Then, choose Open Terminal Session from the Clearswift SECURE Email Gateway Console Menu.
Then, choose OK to login as a system user.
You will then be prompted for your password again.

SECURE Email Gateway – TLS configuration guide
Page 11 of 40
Then, switch to root using the sudo su - command.
5.2.1 Generating the Private Key
The utility "openSSL" is used to generate the private key and CSR. Type the following command at the prompt: openssl genrsa –out emailgateway.key 1024
This command generates a 1024 bit RSA private key and stores it in the file emailgateway.key. The key must be kept safe as it is used in conjunction with the signed certificate as detailed later in this document. Note: You must protect the private key by storing it in a secure location. It is not currently possible to integrate the private key through the Gateway web interface if it is password protected. Clearswift recommends restricting access to the server so that only authorised server administrators can access or read the private key file. 1024 bit refers to the encryption strength of the private key itself preventing the contents from being read. Clearswift also supports 2048 bit keys.
5.2.2 Generating the CSR
The following section provides details on creating a CSR on the Gateway which is the most commonly adopted approach. However, instructions are also available for creating the CSR on Microsoft Windows as detailed in Appendix A “Creating a CSR using Microsoft Certificate Server”. Type the following command at the prompt: openssl req –new –key emailgateway.key –out emailgateway.csr
This command will prompt for the following X.509 attributes of the certificate:

SECURE Email Gateway – TLS configuration guide
Page 12 of 40
When filling out the above CSR, most Certificate Authorities will require the common name field to be populated with the full qualified domain name of the Gateway (registered DNS name). However some endpoints insist that the common name matches the MX record value. Therefore it is best to talk to your partner to understand what their specific requirements are. The email address, challenge password or an optional company name are all optional parameters when generating the CSR. A public/private key pair has now been created. The private key (emailgateway.key) is stored locally on the server machine and is used for decryption. The public portion, in the form of a Certificate Signing Request (emailgateway.csr), will be for certificate enrolment. Below is a screenshot of the raw contents of the CSR in VI editor.

SECURE Email Gateway – TLS configuration guide
Page 13 of 40
6 Using your CSR to purchase a Signed Certificate
In order to obtain your signed certificate for use within the Gateway, the CSR created in the previous section must be submitted to the chosen Certificate Authority. An example of a typical Certificate Authority SSL submission form is displayed below:
Note: You should always consult your CA before purchasing your certificate to ensure it is suitable for SMTP TLS communication. Paste the contents of the CSR in the first window. If the CSR was created on the Gateway using OpenSSL, Apache-ModSSL can generally be used (consult your CA first) as the server software option. Once submitted, the CA will usually send back instructions via email for downloading the signed certificate and Root certificate. Ensure you have the original private key that was used to create the CSR in preparation for the next step. Note: It is also possible to create a self-signed certificate for testing purposes. Details of this procedure can be found in Appendix B “Creating a Self-Signed Certificate”.

SECURE Email Gateway – TLS configuration guide
Page 14 of 40
7 What to do when you Receive Your Signed Certificate
For the Clearswift SECURE Email Gateway to be able to use TLS it must be enabled within the web interface and the following items imported:
The private key and signed certificate to use when acting as a TLS client. The private key and signed certificate to use when acting as a TLS server. The CA’s root certificate.
7.1 Importing the Signed Certificate and Private Key Pair
1. Copy the root certificate, emailgateway.crt and emailgateway.key to the machine that is connected to the Gateway web user interface. Open the web interface and navigate to System, Encryption.
2. Click on TLS Configuration in the Encryption section. 3. Ensure that Use TLS Communications is enabled by highlighting the section,
clicking on Click here to change these settings and selecting the Enable Opportunistic TLS checkbox.

SECURE Email Gateway – TLS configuration guide
Page 15 of 40
4. Edit the Signing Certificate section and add the CA certificate by browsing to the folder where the root certificate was placed.
5. Edit the Server Certificate and Private Key section and add both the certificate and
key to the appropriate sections by browsing to the folder where you placed emailgateway.crt and emailgateway.key.
6. Edit the Client Certificate and Private Key section and add both the certificate and key to the appropriate sections by browsing to the folder where you placed emailgateway.crt and emailgateway.key.
7. Navigate back to System, Encryption and click on Certificate Store to open the CA store. Click Import certificate authority and browse to CA.crt adding it to the store list.

SECURE Email Gateway – TLS configuration guide
Page 16 of 40
8 TLS Endpoints
A TLS Endpoint defines a profile of TLS settings for the Email Gateway to use when establishing a TLS connection with a third party. The TLS Endpoint specifies:
One or more email servers with which these TLS settings are to be used. Whether encryption is required, and the level to enforce (or mandate). Whether to request a certificate from TLS clients.
Whether the certificate of connecting TLS clients and the server must validate successfully for the conversation to proceed.
8.1 Enabling Opportunistic TLS
1. From the System page, select Encryption. 2. Click on TLS Configuration 3. Ensure that Use TLS Communications is enabled by highlighting the section, clicking
on Click here to change these settings and selecting the Enable Opportunistic TLS checkbox.
8.2 Defining a mandatory TLS Endpoint
1. From the System page, click SMTP Settings. 2. Click Connections to display the Manage Connections page. The page lists any
previously defined Connections. These connections maybe a collection of internal servers, external servers that may be permitted to relay through the system and hosts/domains that will be forced to send and receive over TLS.

SECURE Email Gateway – TLS configuration guide
Page 17 of 40
3. Click New adjacent to the Connections heading. The Modify Connection page appears.
4. Edit the Overview information as required:
Move the pointer over the Overview area and click on Click here to change these settings.
Edit the Name of the Connection, to provide a meaningful name. Enter any Notes you want to add to describe the Connection. Click Save.

SECURE Email Gateway – TLS configuration guide
Page 18 of 40
5. In the Client hosts tab specify the host machines that will be sending email over TLS
Click on the Hosts tab. Click on New at the top of the "Hosts" area. The Add a New Host dialog
appears.
Specify the server or range of servers to which this TLS Endpoint applies. You can specify any of the following:
o A full IP address o The initial octets of an IP address range, followed by an asterisk, such
as nnn.nnn.nnn.* o A fully qualified hostname such as server1.a-
differentcompany.com 6. In the Sender Domains tab specify the domain names such as a-
differentcompany.com of these senders. 7. In the TLS settings table we need to enable to accept these connections over
TLS when the Email Gateway is acting as a TLS server: Move the pointer over the When Acting as a Server area and click on Click
here to change these settings.
Tick the Use Mandatory TLS for this connection profile box To specify a minimum encryption level, select the Encryption should meet
or exceed check box and enter the minimum number of bits to encrypt with. Choose a value in the range 40 to 256 bits.
Indicate whether you want to request a certificate from the TLS client. This option is for compatibility with some older mail servers where the TLS client does not automatically provide its certificate.
To validate the CN of the certificate subject, select the CN of the certificate must match checkbox and enter the CN that the certificate subject must match.
o If you select this option but do not specify a CN, the host name of the remote TLS host is used by default.
Click Save.

SECURE Email Gateway – TLS configuration guide
Page 19 of 40
8. Edit the settings to use when the Email Gateway is acting as a TLS client: Move the pointer over the When the Gateway is Acting as a Client area and
click on Click here to change these settings.
Tick the Use Mandatory TLS for this connection profile box Specify the TLS Version to be used on this outbound connection. By default
the profile will use the system default, which is defined in System > Encryption > TLS configuration
Specify the minimum cipher strength for this connection. It is possible to override the system default and select either High, Medium or Any grade ciphers.
Indicate whether for the conversation to proceed the TLS server's certificate must validate successfully.
o For example Not expired and Trusted To validate the SAN/CN of the certificate subject, select Validation requires
SAN/CN to match and enter the SAN/CN that the certificate must match. o SANs are checked first, then CN. o Wildcards are supported
Click Save.

SECURE Email Gateway – TLS configuration guide
Page 20 of 40
9. From the System page, click SMTP Settings Click on Mail Domains and Routing Click on the Email Routing tab.
Click on New at the top of the "Email Routes" area. The Add Email Route
dialog appears.
In the Domain field, enter the domain a-differentcompany.com Select the appropriate routing option either:
o Using DNS MX records o By either a hostname, DNS record or IP address
Unless otherwise specified leave the Port as 25 In the Use the outbound TLS configuration from this connection profile drop
down, select the appropriate connection profile previously created.
Click Add.

SECURE Email Gateway – TLS configuration guide
Page 21 of 40
9 Troubleshooting
9.1 Increasing SMTP Logging to Check TLS Connection
To ensure that TLS connection is successfully established, it is necessary to increase the SMTP logging level to Debug. To do this:
1. Navigate to System, SMTP Settings, General Settings. 2. In the Log Levels section, click on Click here to change these settings and
increase the SMTP logging levels:
When receiving messages – Debug When sending messages – Debug
3. Click on the Save button. 4. Apply the new configuration. 5. Finally, send and receive an email from the partner site you are testing and check
the logs for TLS activity by navigating to System, Logs & Alarms and then select the SMTP log.

SECURE Email Gateway – TLS configuration guide
Page 22 of 40
10 Appendix A - Creating a Self Signed Certificate using Microsoft Windows
This section describes the process for generating a self signed certificate on a Microsoft Windows OS with Certificate Services installed. To generate the CSR, open the certificate server web page, i.e. http://hostname/certsrv.
10.1 Certificate Request
In order to request a new certificate, click on the Request a certificate link.

SECURE Email Gateway – TLS configuration guide
Page 23 of 40
Select advanced certificate request from the list.
Then select Create and submit a request to this CA.

SECURE Email Gateway – TLS configuration guide
Page 24 of 40
Complete the relevant fields using a similar format to that displayed and click Submit. Note: Ensure that Mark keys as exportable is checked.

SECURE Email Gateway – TLS configuration guide
Page 25 of 40
Select Yes to request the certificate.

SECURE Email Gateway – TLS configuration guide
Page 26 of 40
Once issued, return to the home page of the certificate services URL and select View the status of a pending certificate request to check if the certificate is available.
Click the link to view the certificate request.
SECURE Email Gateway – TLS configuration guide
Page 27 of 40
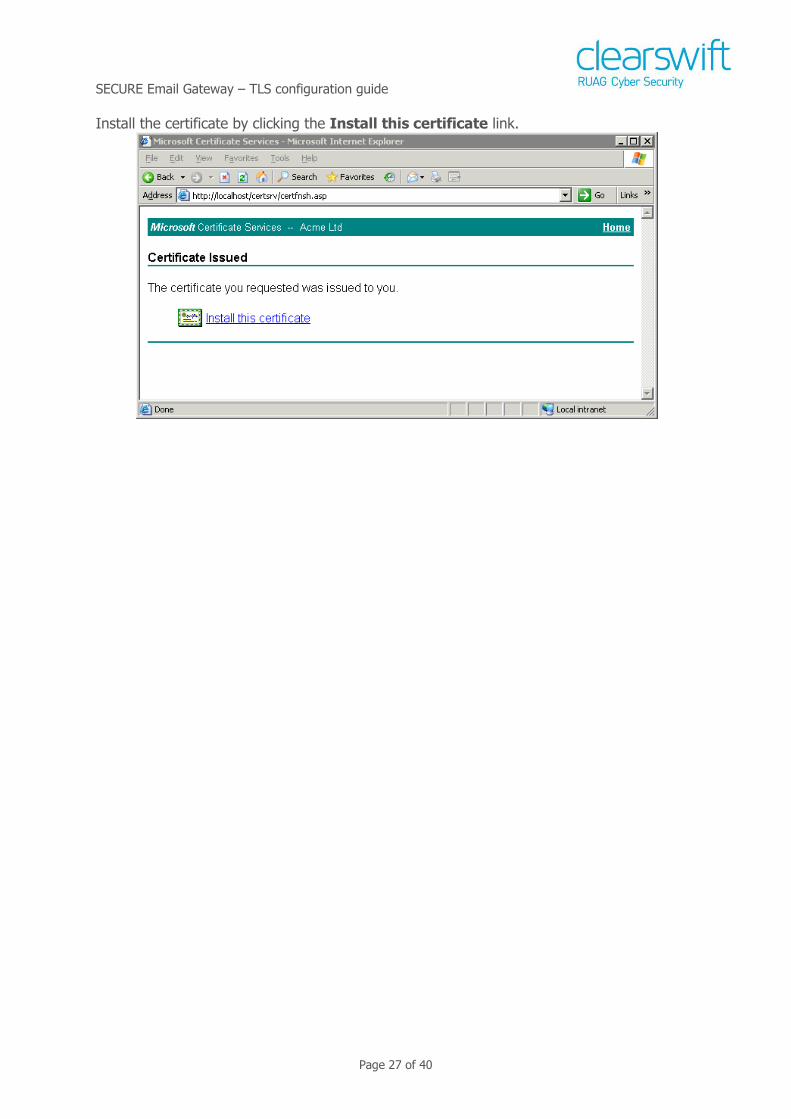
Install the certificate by clicking the Install this certificate link.

SECURE Email Gateway – TLS configuration guide
Page 28 of 40
If prompted, select Yes to trust the certificate so that it can be added to the local certificate store.

SECURE Email Gateway – TLS configuration guide
Page 29 of 40
10.2 Exporting the Public Certificate and Private Key
In the previous section, we were able to create a certificate request and install the issued certificate within the local certificate store. In order to import the certificate and private key into the Email Gateway, they must now be exported to Base 64 encoded X.509 files. Open the local certificate store and locate the certificate that was installed from the previous section as shown in the following example.
The certificate is shown above on the right column. Right click the certificate and select All Tasks, Export to run the export wizard.
SECURE Email Gateway – TLS configuration guide
Page 30 of 40
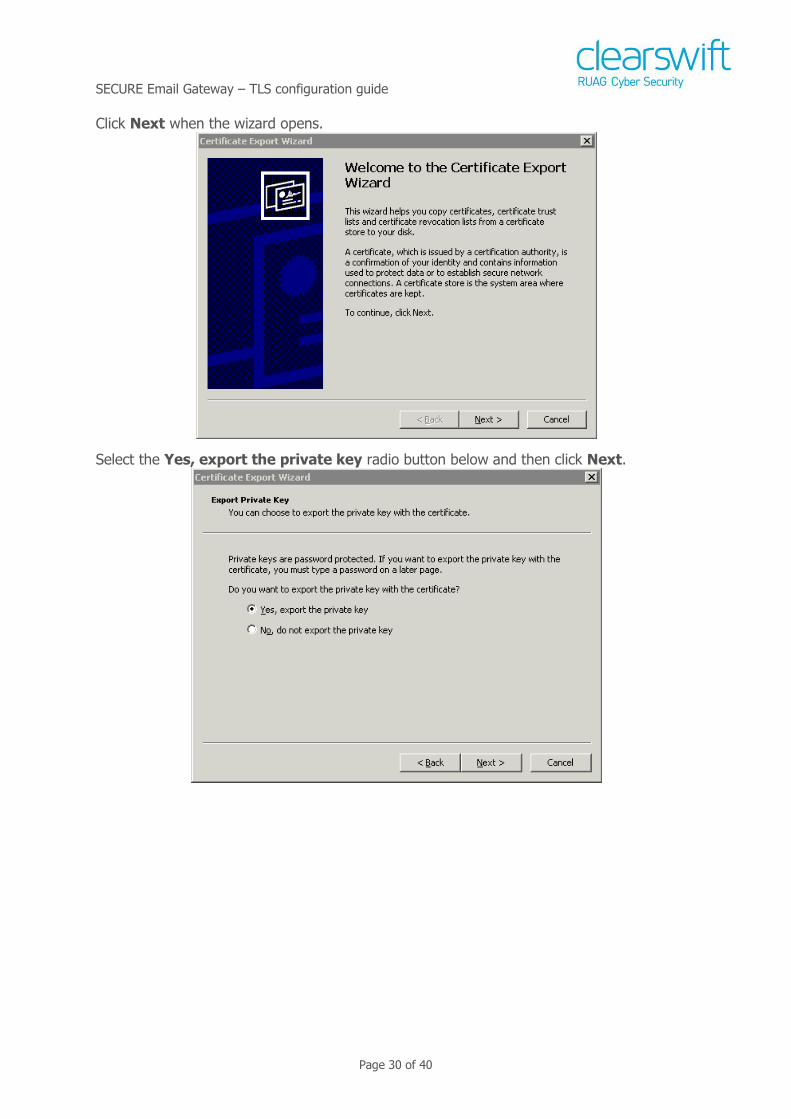
Click Next when the wizard opens.
Select the Yes, export the private key radio button below and then click Next.

SECURE Email Gateway – TLS configuration guide
Page 31 of 40
Ensure that all checkboxes are left unticked as depicted below and click Next.
Leave the password fields empty as the key needs to be imported into the Email Gateway without a password applied.

SECURE Email Gateway – TLS configuration guide
Page 32 of 40
Select an appropriate name and location to store the exported key and click Next.
Click Finish to complete the process.
The final stage is to export the public certificate. Right click the certificate again and select All Tasks, Export.

SECURE Email Gateway – TLS configuration guide
Page 33 of 40
This time, select No, do not export the private key and click Next.

SECURE Email Gateway – TLS configuration guide
Page 34 of 40
Select Base-63 encoded X.509 (.CER) from the list and click Next.

SECURE Email Gateway – TLS configuration guide
Page 35 of 40
Select an appropriate name and location to store the exported certificate and click Next.
Click Finish to complete the process.

SECURE Email Gateway – TLS configuration guide
Page 36 of 40
10.3 Exporting the Microsoft CA Certificate
You will need the CA certificate that was used to sign the certificates in the previous section. Open the Microsoft Certificate Server home page and select Download a CA certificate, certificate chain, or CRL.
Select the certificate and ensure Base 64 is checked. Click Download CA certificate.
Click Save.
SECURE Email Gateway – TLS configuration guide
Page 37 of 40
SECURE Email Gateway – TLS configuration guide
Page 38 of 40
10.4 Converting the Private Key from PFX to PEM Format
The private key must now be converted from PFX to PEM format using Openssl either from the Gateway console (installed by default) or on Windows by installing Openssl available from the following URL:
http://gnuwin32.sourceforge.net/packages/openssl.htm
If you are planning on converting the private key on the Gateway, you will need to ensure that SSH has been enabled both through the firewall (port 22) and on the Gateway to allow specific IP access (System Center, System Settings, SSH Access). The files can be copied across to the Gateway using WinSCP which can be downloaded from the following URL:
http://www.winscp.net/eng/download.php
You will need to provide the console user credentials in WinSCP to access the Gateway (it is recommended that you copy the key to /tmp). To access the Gateway command line remotely, you will need an SSH client such as putty that can be downloaded from the following URL:
http://the.earth.li/~sgtatham/putty/latest/x86/putty.exe
After following these steps, you should read Section 7.1 to import the key and certificate as described below.
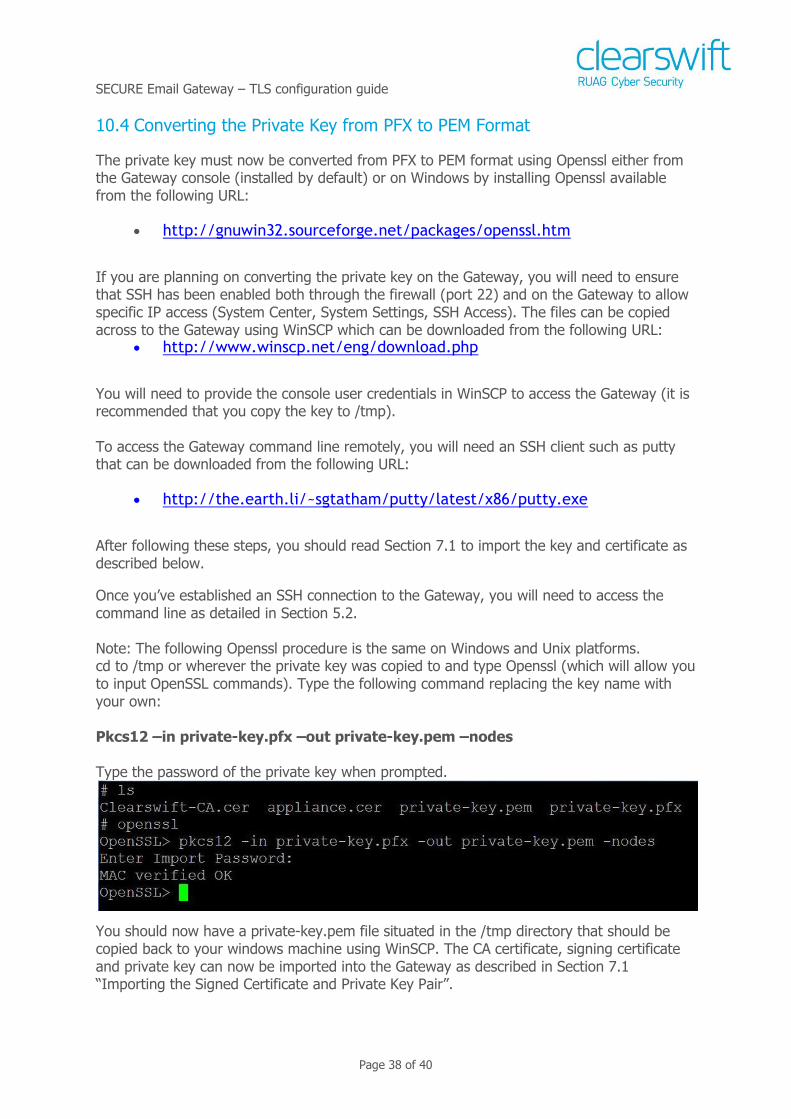
Once you’ve established an SSH connection to the Gateway, you will need to access the command line as detailed in Section 5.2. Note: The following Openssl procedure is the same on Windows and Unix platforms. cd to /tmp or wherever the private key was copied to and type Openssl (which will allow you to input OpenSSL commands). Type the following command replacing the key name with your own: Pkcs12 –in private-key.pfx –out private-key.pem –nodes Type the password of the private key when prompted.
You should now have a private-key.pem file situated in the /tmp directory that should be copied back to your windows machine using WinSCP. The CA certificate, signing certificate and private key can now be imported into the Gateway as described in Section 7.1 “Importing the Signed Certificate and Private Key Pair”.

SECURE Email Gateway – TLS configuration guide
Page 39 of 40
11 Appendix B - Creating a Self-Signed Certificate
The easiest way to test TLS with the Gateway without investing in certificates is to sign the certificate locally. This can be achieved by setting up a local Certificate Authority on the Gateway or from a windows machine with OpenSSL installed. OpenSSL for Windows is available via the following URL:
http://gnuwin32.sourceforge.net/packages/openssl.htm
Self signed certificates are not recommended for production use, but are useful for testing in preproduction or proof of concept environments. It is always recommended to purchase certificates from a commercial CA. The following sections provide details on creating and signing a certificate for testing purposes. The following procedure is identical for both Windows and Linux environments and assumes that a CSR has already been created using the procedure defined in Section 5.2 “Creating a Private Key and CSR using OpenSSL”.
11.1 Creating a Gateway Based Certificate Authority
To create a Certificate Authority on the Gateway, you will need to logon to the Gateway
(as detailed in Section 5.2) and carry out the following steps:
11.1.1 Generating the CA Key and CA Certificate
1. Type the following command at the prompt:
cd /tmp mkdir CA cd CA openssl genrsa –out CA.key 1024
openssl req –new –key CA.key –x509 –days 1095 –out CA.crt

SECURE Email Gateway – TLS configuration guide
Page 40 of 40
2. Input all the relevant data such as Country, Company, etc. in the relevant fields for the CA certificate.
3. You should now have the CA private key and certificate located in the /tmp/CA directory. These files are used to sign the certificate signing request as created in Section 5.2.2.
11.1.2 Signing the Certificate with the Gateway CA
1. You will need to copy the emailgateway.csr (as created in Section 5.2.2) to /tmp/CA.
2. From the directory /tmp/CA, run the following command:
openssl x509 –req –days 365 –in emailgateway.csr –CA CA.crt -CAkey CA.key –CAcreateserial –out emailgateway.crt
You should now have a signed certificate ‘emailgateway.crt’ situated in the /tmp/CA directory ready for use within the Gateway.
Follow the steps detailed in Section 7.1 to import the certificate and key for testing.