section 8.1 parallel lines - inetteacher.com · section 8.2 – perpendicular lines ... is it...
TRANSCRIPT

Grade 7 Mathematics Unit 8: Geometry
L. Brenton Page | 1
Section 8.1 – Parallel Lines What are Parallel Lines? Parallel lines are lines on the same flat surface that will never meet and are same distance apart over their entire length. For example,
To show that lines are parallel, we draw small arrows on them as seen below: Segment AB̅̅ ̅̅ above is parallel to Segment MN̅̅ ̅̅̅ above is parallel to segment CD̅̅ ̅̅ . segment OP̅̅ ̅̅ . We write AB̅̅ ̅̅ || CD̅̅ ̅̅ We write MN̅̅ ̅̅̅ || OP̅̅ ̅̅ Example 1: List the parallel lines in the figure below:

Grade 7 Mathematics Unit 8: Geometry
L. Brenton Page | 2
Example 2: List the pairs of parallel lines in the diagram below:
Example 3: Mark the parallel lines on the shapes provided below: a) b) c) Drawing Parallel Lines There are several ways we can draw parallel lines, the easiest of which is by using the sides of a ruler as seen below!

Grade 7 Mathematics Unit 8: Geometry
L. Brenton Page | 3
Examples:
1. Draw parallel lines to the following lines.
a) b)
2. Draw a line segment AB that measures 6.5 cm. Draw a line parallel to AB.
3. Simon sees two lines drawn on his desk that look parallel. How can he check to make sure that they actually are parallel?

Grade 7 Mathematics Unit 8: Geometry
L. Brenton Page | 4
Section 8.2 – Perpendicular Lines What are Perpendicular Lines?
Perpendicular lines are lines that intersect at 90 degree angles. For example,
To show that lines are perpendicular, a small square should be placed where the two lines intersect to indicate a 90° angle is formed. Segment AB̅̅ ̅̅ to the right is perpendicular to segment MN̅̅ ̅̅̅. We write AB̅̅ ̅̅ MN̅̅ ̅̅̅ Example 1: List the pairs of perpendicular lines in the diagram below:

Grade 7 Mathematics Unit 8: Geometry
L. Brenton Page | 5
Drawing Perpendicular Lines There are several ways to draw perpendicular lines. Two of the easiest are: #1 Using a Ruler and a Triangle
Draw a straight line. Place a triangle against the line as shown in the picture below and draw a line on the other side.
#2 Using a Ruler and a Protractor
Draw a straight line using a ruler and mark the center of the line. Using your protractor, line the center of your protractor up with the center of your line. Make a mark at the 90° angle. Join this mark with the center you marked on your line.
Examples:
1. Draw perpendicular lines to the following lines using whichever method you prefer.
a) b)

Grade 7 Mathematics Unit 8: Geometry
L. Brenton Page | 6
2. Draw a line segment JK̅ that measures 5.2 cm. Using a triangle, draw a line perpendicular to JK̅ and label it MN̅̅ ̅̅̅.
3. Draw a line segment PQ̅̅ ̅̅ that measures 4.8 cm. Using a protractor, draw a line perpendicular to PQ̅̅ ̅̅ and label it RS̅̅̅̅ .
4. Is it possible for two lines to be both perpendicular and parallel? Explain.

Grade 7 Mathematics Unit 8: Geometry
L. Brenton Page | 7
5. Is it possible for a line to be perpendicular to more than one line? Explain.
6. After learning about perpendicular lines in math class, Jeremy pointed out a picture to his brother which he believed demonstrated perpendicular lines. His brother said the lines were not perpendicular. How could Jeremy prove that his brother was wrong?

Grade 7 Mathematics Unit 8: Geometry
L. Brenton Page | 8
Section 8.3 – Perpendicular Bisector What is a Perpendicular Bisector?
To bisect means to divide into two equal parts. A perpendicular bisector is a line that intersects another line at a 90° angle and divides it into two equal pieces. There are several ways to construct perpendicular bisectors. #1 Paper Folding
Draw a line segment using a ruler. Label the segment XY̅̅̅̅ . Fold your paper so that endpoint X falls directly on endpoint Y (holding your paper up to the light may help). Lay your paper
flat and trace the fold line you just created with your pencil using a ruler.
We indicate that two or more lines are equal by marking the lines with the same symbol.
Grade 7 Mathematics Unit 8: Geometry
L. Brenton Page | 9
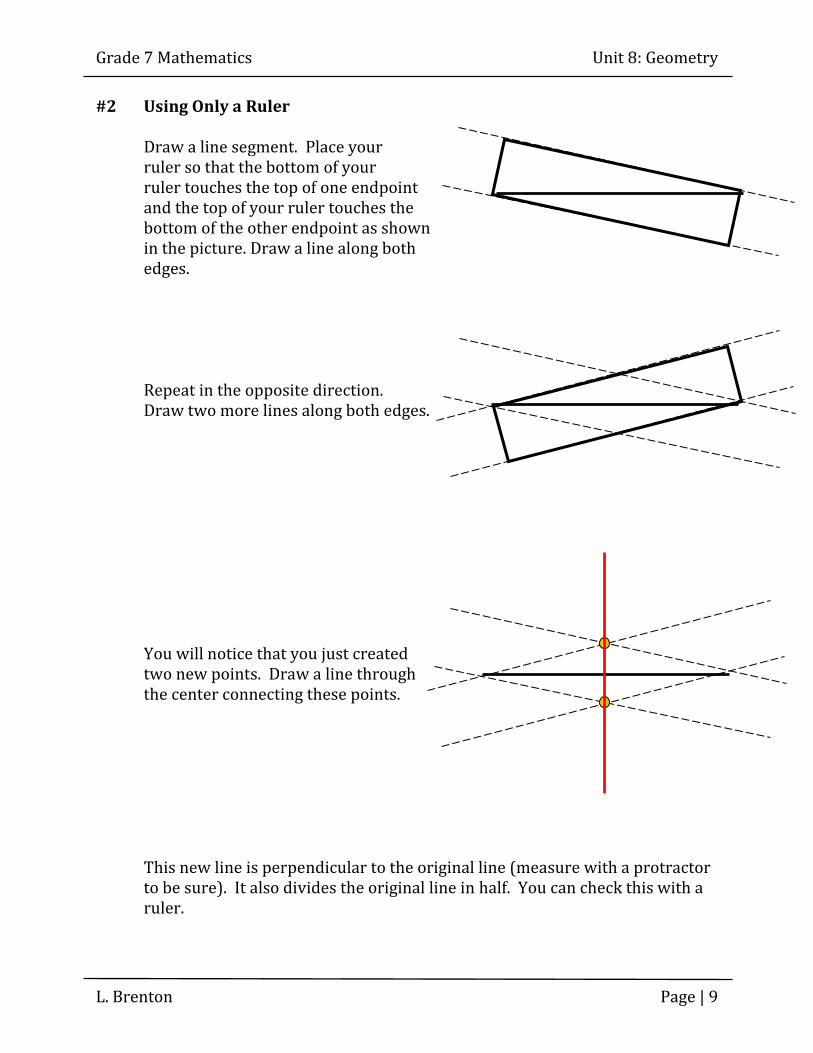
#2 Using Only a Ruler Draw a line segment. Place your
ruler so that the bottom of your ruler touches the top of one endpoint and the top of your ruler touches the bottom of the other endpoint as shown in the picture. Draw a line along both edges. Repeat in the opposite direction. Draw two more lines along both edges. You will notice that you just created two new points. Draw a line through the center connecting these points.
This new line is perpendicular to the original line (measure with a protractor to be sure). It also divides the original line in half. You can check this with a ruler.

Grade 7 Mathematics Unit 8: Geometry
L. Brenton Page | 10
Try it! #3 Using a Ruler and a Compass
Draw a line segment and label it EF̅̅̅̅ . Place the pointer of your compass on one endpoint and move the compass so that it is open more than half the length of the line. Make an arc from the top to the bottom of the line. Move your compass to the other endpoint and repeat. Connect the two points you just created.

Grade 7 Mathematics Unit 8: Geometry
L. Brenton Page | 11
Try It!!
#4 Using a Ruler and a Protractor
Using a ruler, draw a line segment and label it AB̅̅ ̅̅ . Mark the midpoint as O. Place the center of the protractor on the midpoint O and mark the 90°angle. Using the ruler, draw a line connecting this mark to the midpoint of the line. Label this segment OC̅̅ ̅̅ .

Grade 7 Mathematics Unit 8: Geometry
L. Brenton Page | 12
Try It!! Examples:
Draw a perpendicular bisector for a line that is: 12 cm 7.2 cm

Grade 7 Mathematics Unit 8: Geometry
L. Brenton Page | 13
What is an Angle Bisector? An angle bisector is a line that divides an angle into two equal parts. There are several ways to construct perpendicular bisectors. #1 Paper Folding
Draw an angle of any size. Fold your paper so that one side of the angle falls directly on the other side. Lay your paper flat and trace the fold line you just created with your pencil using a ruler.
#2 Using a Ruler and a Compass
Draw an angle of any size. Place the pointer of your compass on vertex. Make an arc from the top to the bottom of the line. Call these new points B and C. Move your compass to point A where the arc you drew intersects the angle. Do the same with point C. You will notice a new point. Draw a line connecting the vertex to the new point you just created.

Grade 7 Mathematics Unit 8: Geometry
L. Brenton Page | 14
#4 Using a Ruler and a Protractor Examples: Bisect the angles below using any method.
Using a ruler, draw an angle of any size. Using your protractor, measure the angle. Divide this measure by 2. Keep your protractor on the vertex of the angle as you did to measure it, and mark the angle you just calculated. Using the ruler, draw a line connecting the vertex to the point.

Grade 7 Mathematics Unit 8: Geometry
L. Brenton Page | 15
Examples: 1. Draw an angle that is:
a) 720 b) 1080 2. Draw a 960 angle. Bisect it using any method.
Grade 7 Mathematics Unit 8: Geometry
L. Brenton Page | 16
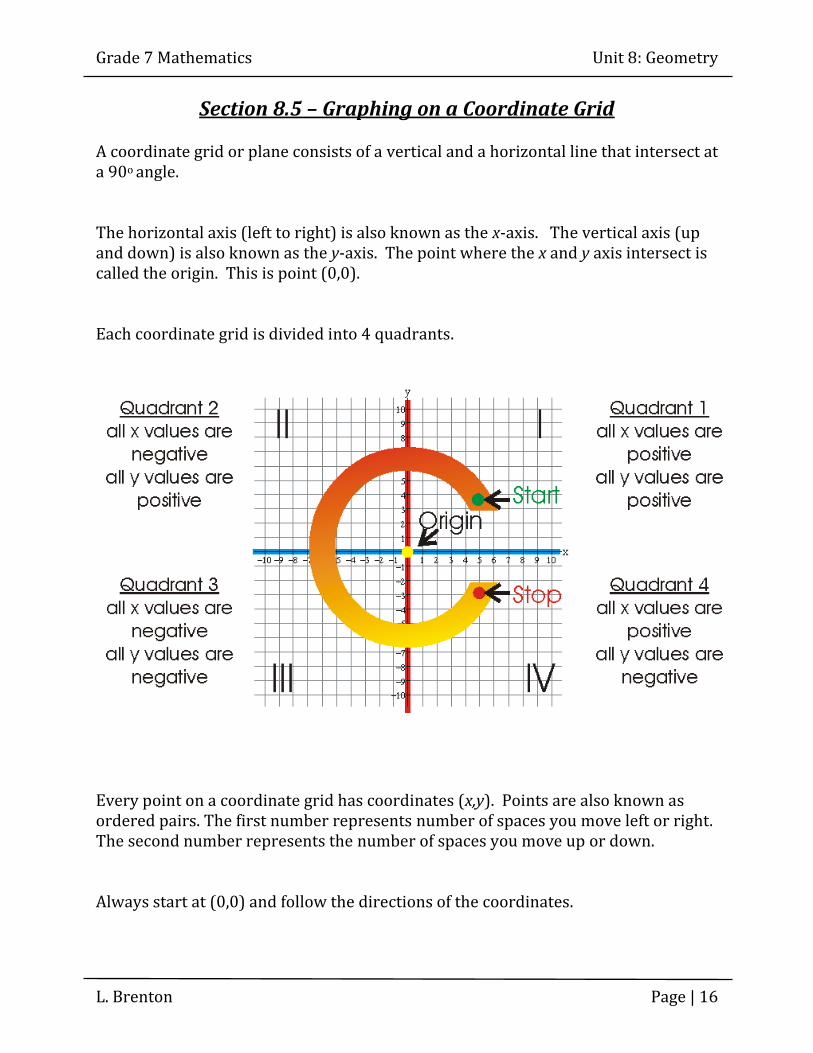
Section 8.5 – Graphing on a Coordinate Grid A coordinate grid or plane consists of a vertical and a horizontal line that intersect at a 90o angle. The horizontal axis (left to right) is also known as the x-axis. The vertical axis (up and down) is also known as the y-axis. The point where the x and y axis intersect is called the origin. This is point (0,0). Each coordinate grid is divided into 4 quadrants. Every point on a coordinate grid has coordinates (x,y). Points are also known as ordered pairs. The first number represents number of spaces you move left or right. The second number represents the number of spaces you move up or down. Always start at (0,0) and follow the directions of the coordinates.

Grade 7 Mathematics Unit 8: Geometry
L. Brenton Page | 17
Examples:
1. Plot the points and state the quadrant they are located in: A (2,5)
B(-3, 1)
C (0, 5)
D(-2,-6)
E(-8,0)
F (4,-6)
To plot the point (3,4):
The first number is the x coordinate. We find this number on the x axis (left to right). In this case x = 3. The second number is the y coordinate. We find this number on the y axis (up or down). In this case y = 4. Where these lines intersect is where we plot our point.

Grade 7 Mathematics Unit 8: Geometry
L. Brenton Page | 18
2. Write the coordinates of each point. A ____________________ B ____________________ C ____________________ D ____________________ E ____________________ 3. Plot the following:
L (-6, 1)
M (5, -2)
N (1, 7)
O (0, -4)

Grade 7 Mathematics Unit 8: Geometry
L. Brenton Page | 19
4. In which quadrant does each point lie? A ________ D ________ B ________ E ________ C ________ F ________
5. In which quadrant does each point lie?
a) P (-3, 7) Quadrant ________
b) Q (8, -6) Quadrant ________
c) R (-5, -7) Quadrant ________
d) S (6, 4) Quadrant ________

Grade 7 Mathematics Unit 8: Geometry
L. Brenton Page | 20
Section 8.6 – Graphing Translations and Reflections
Example: Slide quadrilateral DEFG
4 units left and 3 units down or [4L, 3D]
Give the coordinates of the new vertices. D’ ____________________
E’ ____________________
F’ ____________________
G’ ____________________
A translation is also known as a slide – it takes a figure
and slides it to a new position. A translation tells you to
move the object left or right, up or down. You take each
figure and move it according to the directions.
For example, if we want to translate ABC
6 units right, we simply move each vertex of
the triangle 6 units to the right by counting 6
spaces on the grid.
Each time we move a vertex, we indicate the
new point with a prime marking. Here the
new vertices are indicated as A’ B’ C’. The
original object is the pre-image. The new
object is called the image

Grade 7 Mathematics Unit 8: Geometry
L. Brenton Page | 21
Example: Reflect triangle ABC
across the x axis.
Give the coordinates of the new vertices. A’ ____________________
B’ ____________________
C’ ____________________
A reflection is also known as a flip – it produces a mirror
image when reflected across the line of reflection which
could be the x or y axis or another indicated line. The
object will fall directly on top of itself if you fold it along
the line of reflection.
For example, if we want to reflect ABC
across the y axis we count the number of
spaces from each vertex to the y axis. We then
count the same number of spaces from the y
axis on the other side and plot our new point.
A
B C

Grade 7 Mathematics Unit 8: Geometry
L. Brenton Page | 22
Examples:
1. Describe the transformations below:
A) B)
C) D) E) F) 2. Translate the rectangle ABCD
[5R, 5D] List the coordinates of the pre-image
and the image.

Grade 7 Mathematics Unit 8: Geometry
L. Brenton Page | 23
3. Reflect the triangle across the x axis.
List the coordinates of the pre-image
and the image.
4. Translate the figure 5 left and 5 down. Reflect your image across the x axis. Record the coordinates of the figure
after each transformation.

Grade 7 Mathematics Unit 8: Geometry
L. Brenton Page | 24
Section 8.7 – Graphing Rotations
Example:
Rotate the figure to the right 180o
clockwise.
List the coordinates of the new vertices. A’ ____________________
B’ ____________________
C’ ____________________
D’ ____________________
E’ ____________________
A rotation is also known as a turn – it takes a figure and
rotates it around a given point. A rotation tells you to
move the figure clockwise or counterclockwise 90o, 180o
or 270o.
For example, the triangle to the right has been
rotated 90o counterclockwise around the
point indicated. We can use tracing paper to
do this.

Grade 7 Mathematics Unit 8: Geometry
L. Brenton Page | 25
Examples:
1. Identify the angle and direction of rotation for each diagram below.
A) B)
2. Rotate the figure
270o counterclockwise.
List the coordinates of the image.