section 4 reintegration youth and...
TRANSCRIPT

ReintegrationYouth and
Family
SECTION 4

Global Safari
Lesson Time: 2 Hours Skill Level: Basic Number of Families: 8 Deployment Segment: Reunion/Reintegration Target Audience: Families with K-12 Youth Internet Required: No Life Skill Objectives:
• Communication: Practice sharing stories and experiences through multi-sensory technologies
• Teamwork: Build and apply teamwork skills to help manage the changing roles and ups and downs during reintegration
• Decision Making: Learn how to compromise within your Family to meet challenges
Resilience Skill Objectives: • Social: Practice good communication skills leading to comfortable exchange of ideas,
views, and experiences and use these skills to build better personal relationships • Family: Develop the skills necessary for more open expression and better Family
communication Science and Technology Objectives:
• Understand how digital technology can be used to express Family experiences through multi-sensory sharing
Activity Overview: Youth and Families will navigate through the Barefoot World Atlas app on the iPad 2 device to expand their knowledge of their world through a multi-sensory experience. Families then explore the local area using their senses and work together to create a multi-sensory local digital atlas using the SKIT! app on the iPad 2 device. Shout Out To Families! All aboard! We are about to embark on a global safari right at our fingertips. Discover the world through a multi-sensory experience and then learn to create your own. It will be an expedition for the senses. Prerequisites: None
1 Global Safari

Breakdown of Activities: Icebreaker Around the World (15 Minutes) Activity 1: Global Expedition (30 Minutes) Activity 2: Experience the World (60 Minutes) Talk It Over (10 Minutes) Closing & Cleanup (5 Minutes) Budget Range for Activity: $0 Space Needed: Outdoor Space (indoor space is optional for beginning of lesson with tables and chairs)
2 Global Safari

Before the Event Get Ready: Tasks for Lead Volunteer
• Do Volunteer Training with the additional Tech Discovery training (http://www.4-hmilitarypartnerships.org/p.aspx?tabid=187 )
• Practice the activities, review all materials and handouts Do Ahead: In coordination with the Military Point of Contact:
1. Schedule use of the Tech Discovery Tool Kit (2 Tool Kits = 8 Families). 2. Schedule use of the Mobile Technology Lab. 3. Contact volunteers and go through online training. 4. Borrow or buy supplies.
Copy:
• Family Letter (1 per Family) • Travel with Your Senses notes page (1 per Family)
Get from Tech Discovery Tool Kit:
• Laminated Life/Resilience Skill signs to post around the room (Communication, Teamwork, Decision Making, Family, and Social)
• 8 iPad 2 devices (1 per Family) which have the following apps updated:
o Barefoot World Atlas
o SKIT! o Check the photo privacy settings to ensure that photos can be accessed by the SKIT!
app • iPad/VGA connector • Wireless external speaker
3 Global Safari

Buy or Borrow Supplies Icebreaker: Around the World
• Nametags for all Family members, volunteers and anyone else who will be present (Tech Discovery Tool Kit)
• Sign-in sheet • Writing utensils
Activity 1: Global Expeditions • 8 iPad 2 devices (1 per Family) (Tech Discovery Tool Kit)
Activity 2: Experience the World
• Travel with Your Senses notes page (1 per Family) • Writing utensils (1 per Family) • 8 iPad 2 devices (1 per Family) (Tech Discovery Tool Kit) • iPad/VGA connector (Tech Discovery Tool Kit) • LCD projector • Wireless external speaker (Tech Discovery Tool Kit) • Extension cords as needed
4 Global Safari

Day of the Event Roles for Volunteers:
• Help Families with all activities and form a positive connection with the Families • Provide positive support for Families throughout the activities • Assist Families in setting positive goals • Facilitate problem solving and use teamwork when Families become frustrated or have
questions • Assist with setup and cleanup
Before the Families Arrive….
1. Orient volunteers to the overall objectives of the lesson, make sure they all have nametags and introduce themselves to each other before you get started.
2. Have Tech volunteer set up projection device and speaker. 3. Activity Orientation for all Volunteers (before the beginning of the event):
• Review each activity emphasizing application of each of the identified life skills (page 1)
• Cue volunteers where to look for the Life/Resilience Skill objectives in the directions and remind them of the importance of discussing them with Families during the activity
• Remind volunteers how these skills will help youth and Families manage reunion/reintegration issues and adjustments
• Have volunteers help set up for the event and get ready to welcome Families Set Up Your Space: Space: Tables and chairs
1. Post Life Skill/Resilience Skill Signs around the space. 2. Set up a greeting table with a sign-in sheet.
WHAT TO DO Global Safari As the Families Arrive….
• Have youth and Family members fill out the sign-in sheet and put on a nametag • Introduce yourself, your team of volunteers and others that might be in the room along
with their roles
5 Global Safari

Icebreaker: Around the World (15 Minutes) 1. Have everyone stand in one big circle. 2. Pick one person to begin. Have them say their name and pick a specific physical location
such as a country, city, river, lake, ocean, mountain, etc. from anywhere in the world. 3. The person next to them will say their name and then pick another location that begins
with the last letter of the location that was just given. For example: • First Person: Jim – Spain • Second Person: Sue – Nashville • Third Person: Shawn – Everest
4. Set a time limit for each person (i.e. 5 seconds). No location can be repeated. 5. Continue around the circle until everyone has introduced themselves and picked a
location. Activity 1: Global Expedition (30 Minutes) “Today we are embarking on a global expedition; we will experience the world highlighting a variety of our senses: sight, sound, touch, taste and smell.”
1. Hand out the iPad 2 devices and discuss the iPad 2 Rules and Regulations (read the following out loud and then ask for examples of what NOT to do from the Families): • Handle with care • Use 2 hands at all times • Keep it clean • If you break it, you buy it ($500.00)
2. Have each Family turn on the iPad 2 device and find the Barefoot World Atlas app. “Open the Barefoot World Atlas app on your iPad 2 device and let’s journey together to various parts of the world to discover unique features around the globe.” Lead Families through the following examples:
1. North America (Touch): Click on the “Yup’ik Mask” located in Alaska. While listening and reading to learn about the Yup’ik mask, pay attention to what other senses may have been utilized to create this description--sight, sound.
2. Mexico/Central America (Taste): Click on the “Chili Pepper” located in the Sierra Madre. While listening and reading to learn about the chili pepper, pay attention to what other senses may have been utilized to create this description--touch, smell.
3. Asia (Sight): Click on “George Mallory” located in the Himalaya Mountains. While listening and reading to learn about George Mallory, pay attention to what other senses may have been utilized to create this description--sound, touch.
4. Europe (Smell): Click on the “Lavender Field” located in France. While listening and reading to learn about the lavender field, pay attention to what other senses may have been utilized to create this description--touch, sight.
6 Global Safari

5. Africa (Sound): Click on “Victoria Falls” located near Zambia. While listening and reading to learn about Victoria Falls, pay attention to what other senses may have been utilized to create this description--touch, sight.
“Now, use this app to embark on your own Family Global Expedition by finding places and interesting features in the following exploration categories. Places you have:
• Lived • Traveled • Deployed • Dreamed of Vacationing • Never Discovered”
NOTE: If available, it would be helpful to write these categories on a whiteboard or chart paper. “Be sure to pay attention to the multi-sensory experience conveyed during your stop at each location and feature.” Debriefing Questions:
• What did you learn by discovering places and features around the globe? • How were senses (touch, taste, sight, smell, sound) used to participate in your global
expedition? • In what ways does a multi-sensory experience help you learn more about a new place or a
new thing? Activity 2: Experience the World (60 Minutes) “Now that we’ve taken an expedition around the world and learned how others have described various locations, we are going to experience the world ourselves through our senses. We’re going to start with experiencing our space using our different senses and then creating our own multi-sensory local digital atlas using the SKIT! app to describe what we hear, see, smell and touch in our own environment. Let’s get started!”
1. Distribute a Travel with Your Senses notes page and writing utensil to each Family. 2. Instruct Families to spread out around the area and explore (give boundaries if necessary)
using various senses--touch, sight, smell, sound. 3. Families should use the Travel with Your Senses notes page to take note of what they are
experiencing while using various senses. Remind them to be specific! Give them about 15 minutes to explore.
4. Reconvene the entire group and invite participants to share their multi-sensory experience (what they saw, smelled, heard and touched--go through each of the senses individually). The group sharing will help Families understand how others perceive their world through
7 Global Safari

various senses and encourage idea sharing that will assist with the next steps of the activity.
5. If you collected the iPad 2 devices after the last activity, hand them out again (1 per Family) reminding Family members about the iPad 2 Rules and Regulations (read the following out loud and then ask for different examples of what NOT to do from the Families) • Handle with care • Use 2 hands at all times • Keep it clean • If you break it, you buy it ($500.00)
6. “Now that you have explored the area using various senses, let’s learn how to use the iPad 2 devices to create your own multi-sensory local digital atlas using the SKIT! app. This is modeled after what you experienced while exploring the Barefoot World Atlas app with pictures and a voiceover. You will return to the space you just explored, using the iPad 2 camera to take pictures of the features you noticed of your location, noting the various senses to capture the experience. You will need to create four skits: one skit of each sense, describing what you heard, saw, smelled and touched. Work as a Family and have Family members take on different roles in each sense: director, photographer, scripting, voice over, etc.” Be sensitive to the fact that you may need to demonstrate how to use the camera on the iPad 2 device, including switching between cameras and saving to the photo gallery. “After you have taken some pictures, open the SKIT! app on the iPad 2 device and click on “Create a New Skit!” It will play a short one minute tutorial video explaining how to use the program. You will be able to insert the pictures that you took and then record a 20 second voice recording describing the sense that you are depicting in that image. Make sure that you save each skit with a title that identifies your Family name and the sense. Be creative and have fun!”
Allow Families to work for 30 minutes then bring the group back together and watch the skits that each Family created.
Talk It Over (10 Minutes)
1. To help you focus the discussion, briefly look at Life Skill, Resilience Skill, and Science and Technology Objectives on page 1.
2. Lead the entire group through the Talk It Over discussion. 3. Have a volunteer take comments/notes about group dynamics and specific Family
comments.
8 Global Safari

Share/Reflect • What did we do today during our global safari? • What was the end goal for the project you were working? • Was your Family communication effective? Did each Family member have a part? • How did you decide which roles Family members would take: recording, staging photos,
writing dialogue, taking pictures, etc.? Process
• How might you use your senses to share your experiences that occurred during your loved ones deployment?
• How did your Family make decisions throughout this activity? • Did you change roles in different parts of the activity? How did it feel to take on new
roles? How was it to see other Family members in new roles? • What was the most challenging part of your project? Why? How did you overcome the
challenge? Generalize
• What life skills do you think you developed while working on this project? (Remember to focus discussion back to the Life Skill Objectives on page 1 of this lesson.)
• How are these life skills important to you and your Family during reunion/reintegration? • What key points did you learn today?
Apply • How can you use the communication and teamwork skills learned today in your Family
life back home?
Debrief Families on Life/Resilience Skills: If sufficient application hasn’t already been made, point to the Life/Resilience Skill Signs that are posted around the space: Communication, Teamwork, Decision Making, Social and Family. As you point to each sign, ask:
• How have our activities today helped you develop your __________ skills? • Why do you think these skills are important?
Closing & Cleanup: (5 Minutes) “Today we spent time exploring our world by honing in on our individual senses of sight, hearing, touch, taste and smell. You worked together as a Family team communicating and making decisions to help complete your task of making skits. We hope that you take the skills you learned and use them to better communicate and share your experiences with your Family, particularly while going through this reunion/reintegration phase. When you share stories of experiences, utilize all of your senses to give others the complete picture and make them feel like they are there and not missing a thing! We hope you had fun on our global safari today!”
9 Global Safari

Post Event Lead Volunteer:
• Check to make sure that the space is clean • Have all equipment and supplies back into kits or packed up to return to appropriate
Military Point of Contact • Fill out report:
o Names of all volunteers o Number and names of youth and Family members (attach sign-in sheet) o Quotes from youth and Family members on activities o Other important notes on activities, volunteers and youth o Critical follow-ups (parents about behavior/worries about a particular youth,
inappropriate language from a volunteer etc.) Activity Developed for Tech Discovery Curriculum by: Amber Greeley, 4-H/OMK Program Specialist and State 4-H Military Liaison, University of Minnesota Extension Center for Youth Development Teresa Noon, OMK Project Director, 4-H Youth Development, University of Arizona Cooperative Extension The OMK Tech Discovery Curriculum was developed at the University of Minnesota Extension Center for Youth Development through a partnership of the Department of Defense, Office of the Secretary of Defense, Military Community & Family Policy, Office of Family Policy/Children and Youth and the United States Department of Agriculture, National Institute of Food and Agriculture, Institute of Youth, Family and Community, 4-H National Headquarters under Kansas State University special project number 2010-48713-21882. The University of Minnesota Extension is committed to the policy that all persons shall have equal access to its programs, facilities, and employment without regard to race, color, creed, religion, national origin, sex, age, marital status, disability, public assistance status, veteran status, or sexual orientation.
© 2014, Regents of the University of Minnesota. Rights reserved by Department of Defense, USDA/NIFA.
10 Global Safari

Global Safari Dear Family, Today we spent time exploring our world using the Barefoot World Atlas app, engaging in a multi-sensory experience by honing in on our individual senses of sight, hearing, touch, taste and smell. Then we explored our own local environment using a variety of senses while creating skits using an iPad 2. Through these activities you practiced communicating and making decisions as a Family team. These skills can be used to better communicate and share your experiences with your Family, particularly during this reintegration phase of deployment. Remember to make the sharing of your stories a multi-sensory experience which will help others gain a richer understanding of your experience. We also explored the benefits of social and Family resilience by practicing good communication skills leading to a comfortable exchange of ideas, views and experiences. These life and resilience skills encourage positive development as a military Family experiencing the reintegration of a Service Member. Thank you for participating in today’s Global Safari!! Best regards, Conversation Starters:
• If you could travel anywhere in the world, where would it be and why?
• In what ways do we differ in how we use our senses to experience our environment?
• How does using a variety of senses to describe an experience enhance how our Family understands each other during deployment and reintegration?
11 Global Safari

Travel with Your Senses
Sight (What do you see around you?):
Smell (What do you smell?):
Sound (What do you hear?):
Touch (What can you touch? How does it feel?):
12 Global Safari

Health Check
Time Needed: 2 Hours Skill Level: Basic
Number of Families: 8 Deployment Segment: Reunion/Reintegration
Target Audience: Families with K-12 Youth Internet Required: Yes
Life Skill Objectives:
• Decision Making: Make healthy choices to assist during periods of difficulties • Self-responsibility: Learn to take responsibility for personal health decisions
Resilience Skill Objectives:
• Spiritual: Identify ways to maintain Family well-being • Emotional: Learn to work together as a Family to maintain balance in busy lives
Science and Technology Objectives:
• Gain a basic understanding of health science concepts and where to locate resources on the Internet
Activity Overview: Families will work together to assess their overall health through a Family inventory and online resources. Families will also use iPad technology to help monitor their physical and emotional well-being. Shout Out To Families! Is your Family going in several directions at once? Do you feel like it’s difficult to take a moment and assess the health of your Family? If so, this workshop is just for you. In this workshop, Family members will assess their health and together learn ways to improve the overall health of their Family. Prerequisites: None Breakdown of Activities: Icebreaker The Actor & the Stoic (15 Minutes) Activity 1: Family Inventory (20 Minutes) Activity 2: Physically Fit! (30 Minutes) Activity 3: The 3 R’s: Relax, Rest, Relate (30 Minutes) Talk It Over (15 Minutes) Closing & Cleanup (10 Minutes)
1 Health Check

Budget Range for Activity: $0 Space Needed: Preferably a large indoor space (but a large outdoor space will work) in a location with few distractions and able to accommodate participants who are relaxing on floor/yoga mats at the end of the lesson.
2 Health Check

Before the Event Get Ready: Tasks for Lead Volunteer
• Do Volunteer Training with the additional Tech Discovery training (http://www.4-hmilitarypartnerships.org/p.aspx?tabid=187)
• Practice all activities, review materials and handouts • Become familiar with the Physical Activity Guidelines for Americans (by age and gender)
for overall health (www.health.gov/paguidelines/) • Prepare for the discussion of stress, relaxation and rest in Activity 3 by reviewing
Dartmouth University’s Health Promotion article: Relaxation, Stress & Sleep (www.dartmouth.edu/~healthed/relax/)
Do Ahead: In coordination with the Military Point of Contact:
1. Schedule use of the Tech Discovery Tool Kit (2 Tool Kits = 8 Families). 2. Schedule use of the Mobile Technology Lab. 3. Contact volunteers and go through online training. 4. Ensure wireless Internet access. 5. Review the workouts apps. 6. Review the Myth or Fact game
(http://www.eatright.org/nnm/games/MythOrFact/index.html). 7. Download and test the Military One Source Chill Drill #3 “Releasing Stress”
(http://www.militaryonesource.mil/deployment?content_id=269532). 8. Borrow or buy supplies.
Copy:
1. Family Letter (1 per Family) 2. Family Inventory handout (1 per Family)
Get from Tech Discovery Tool Kit:
• Laminated Life/Resilience Skill signs to post around your space (Decision Making, Self-responsibility, Spiritual, and Emotional)
• 8 iPad 2 devices (1 per Family) which has the following app updated:
o Workouts • Wireless external speaker
Get from Mobile Technology Lab:
• 1 laptop • Wireless router
3 Health Check

Buy or Borrow Supplies Icebreaker: The Actor & the Stoic
• Nametags for all Family members, volunteers and anyone else who will be present (Tech Discovery Tool Kit)
• Sign-in sheet • Writing utensils • Slips of paper (5 per person) • Timing device • 1 bowl/basket/container
Activity 1: Family Inventory
• Family Inventory handout (1 per Family) • Writing utensils
Activity 2: Physically Fit!
• 8 iPad 2 devices (1 per Family) (Tech Discovery Tool Kits) • Water (bottled or cups) (1 per person) • 1 laptop (Mobile Tech Lab) • LCD projector/screen • Wireless router (Mobile Tech Lab) • Ensure wireless Internet connection • Extension cords as needed
Activity 3: The 3 R’s: Relax, Rest and Relate
• Floor mats, throw rugs, or yoga mats (1 per person) • 1 laptop (Mobile Tech Lab) • Wireless router (Mobile Tech Lab) • Ensure wireless Internet connection • Wireless external speaker (Tech Discovery Tool Kit) • Extension cords as needed
4 Health Check

Day of the Event Roles for Volunteers:
• Help Families with all activities and form a positive connection with the Families • Provide positive support for Families throughout the activities • Assist Families in setting positive goals • Facilitate problem solving and use teamwork when Families become frustrated or have
questions • Assist with setup and cleanup
Before the Families Arrive….
1. Orient volunteers to the overall objectives of the lesson, make sure they all have nametags and introduce themselves to each other before you get started.
2. Have Tech volunteer set up and test laptop, LCD projection, speakers and wireless Internet connection.
3. Activity Orientation for all Volunteers (before the beginning of the event): • Review each activity emphasizing application of each of the identified life skills
(page 1) • Cue volunteers where to look for the Life/Resilience Skill objectives in the directions
and remind them of the importance of discussing them with Families during the activity
• Remind volunteers how these skills will help Families manage reunion/reintegration issues and adjustments
• Have volunteers help set up for the event and get ready to welcome Families Set Up Your Space: Space: Tables and chairs
1. Post Life Skill/Resilience Skill Signs around the space. 2. Set up a greeting table with a sign-in sheet.
WHAT TO DO Health Check As the Families Arrive….
• Have youth and Family members write their names on the sign-in sheet and put on a nametag
• Introduce yourself, your team of volunteers and others that might be in the room along with their roles
Icebreaker: The Actor & the Stoic (15 Minutes)
1. Divide Families into 2 teams. 2. Have each team come up with a team name somehow related to “exercise.” 3. Give each Family member 3 slips of paper.
5 Health Check

4. Each Family member should write down three different funny actions (one on each slip of paper), fold them in half and then place them all in the common bowl; for example: • Riding in a roller coaster • Combing out gum stuck in your hair • Giving your resistant dog a bath
5. The goal of this game is to get the members of the opposing team to smile in 10 seconds! 6. The play: two players from each team come to the front of our space. One team will be
the “actors” and the other the “stoics.” (You may need to define “stoic” - a person who can endure pain or hardship without showing their feelings or emotions.) If both the “stoics” keeps a straight face for the entire 10 seconds, their team receives a point. If not, the “actors” team receives a point.
7. Ask the first pair from each team to come to the front of the space. The pair with the youngest combined age will be the first “actors” and the other the “stoics.”
8. The “actors” pull out a slip of paper from the bowl. Without showing anyone what is on the slip, the “actors” begin acting what is described on the paper when the facilitator says “begin.”
9. The facilitator will time for the 10 seconds. 10. As a group, determine who was successful: the “actors” or the “stoics.” The facilitator
will have to be the final authority on a tie. 11. Start another round by inviting another pair from each team to the front. Alternate which
team will be the “actors” and which will be the “stoics.” The process repeats itself as time allows.
12. The team with the highest score at the end of play is the winner. Give them a roaring round of applause.
Debriefing Questions:
• Were some people better at hiding their emotions than others? Why? • Were some people better at making others laugh? How? • What did you learn about your own Family members?
Activity 1: Family Inventory (20 Minutes) NOTE to Facilitator: Be aware that some Family members may not be comfortable sharing their health concerns, status and goals with other Family members. They may not wish to reveal some of their current health issues with Family members, so give participants the chance to opt-out of the health inventory activity. “As we begin today, we want to start by looking at the health of our Family. Remember that ‘health’ doesn’t just mean our physical health, but also our mental health and how we take care of ourselves (like wearing seatbelts and having health insurance). We’re going to spend 15 minutes working within your Families on a Family Inventory. Use this inventory as a health check-in with your Family and a conversation starter.”
1. Distribute 1 Family Inventory handout and writing utensils. 2. After the Families have spent 15 minutes discussing the Family Inventory, wrap up with
the following information:
6 Health Check

“As a Family, you have engaged in a Family Inventory dialogue. Taking care of your overall health and supporting the health of the whole Family are some of the most important things you can do. As this inventory shows, health covers a lot. It is about making good choices and taking care of yourself. In our next two activities we will provide your Family with a few take away ideas and skills to develop and grow your health check.” Debriefing Questions:
• What did you learn about your Family during the Family Inventory discussion? • What is something you had never thought about before? • Would you be willing to share one of the items from the health check that your Family is
going to work on this year? Activity 2: Physically Fit! (30 Minutes) “Next we’re going to talk about our physical fitness in terms of taking care of our physical self through eating right and being physically active each day. Let’s start with a little physical activity to get us going!”
1. Hand out the iPad 2 devices and discuss the iPad 2 Rules and Regulations (read the following out loud and then ask for examples of what NOT to do from the Families) • Handle with care • Use 2 hands at all times • Keep it clean • If you break it, you buy it ($500.00)
2. Have each Family turn on the iPad 2 device and open the Workouts app. “As you can see, there are different levels and choices in this free app which can be downloaded for your personal iPad or phone. The Workouts app can be tailored to your goal of full or partial (i.e., specific body part) workouts. You can also tailor your workout by length, variety of routine and intensity (i.e., moderate, vigorous). Today, I would like you to select ‘Full’ for the full body and then click on ‘10’ for the length. However, this is a ‘challenge by choice’ activity. Meaning, please opt out of the activity if you have health conditions that put you at-risk during an intense workout. If you can’t participate, you can cheer others on. Spread out and gather your Family around the iPad 2 device and click ‘Start Complete Workout.’ Let’s get working!”
3. After all Families have completed the workout, bring them back together, collect the iPad 2 devices and encourage participants to drink some water. “Now that we’re energized, feeling good and have shared laughter, let’s come back together. Hopefully, you’re all drinking some water because it’s important to drink water before and after a workout (even if this was just a mini version of a workout). Don’t wait to be thirsty to drink water, and use caffeine drinks (e.g., energy, coffee) and sodas sparingly because they quickly dehydrate you.
“We all know that physical activity is important, but we must find ways to fit activity into our daily lives. Even if we can’t fit in an hour long workout every day for youth or 30
7 Health Check

minutes most days for adults, it’s important to find even incidental ways to be active. What are some small, simple ways we can each be active in our daily lives?”
Examples: Take the stairs instead of the elevator, take the dog for a walk, walk in place while watching TV, ride our bikes to work/store if possible.
4. “Let’s get back together again into our Family groups and play a game. Make sure you are seated so that everyone in your Family can see the screen. Good nutrition is a vital component to overall fitness, so I am going to ask you some questions, and you need to work with your Family to answer the questions. I’m going to project a quiz on the screen and you should work as a Family to complete the Myth or Fact game.” • Use the laptop and LCD projector to display the Myth or Fact game
(http://www.eatright.org/nnm/games/MythOrFact/index.html). • Go through each question of the quiz together. Have participants work with their
Families to come up with an answer and after everyone has an answer have Families shout out their answer. Then, display the correct answer for all to see and discuss the rationale for the correct response.
Debriefing Questions:
1. Which workout activity stretched you the most? Why? 2. Can you see your Family getting more active in the future? 3. How did you do as a Family on the Myth or Fact game? 4. What is something new you learned?
Activity 3: The 3 R’s: Relax, Rest and Relate (30 Minutes) NOTE: Be prepared for participants to take additional time sharing their stress symptoms which is typical when people are given the chance to discuss their concerns. However, DO NOT offer counseling or therapeutic advice. Instead, be ready to normalize their reactions and recommend that they discuss these concerns (if persistent) with their health provider, faith leader or the Military Family Life Consultant on site (if one is available). A resource for you (the facilitator) to prepare for the discussion of stress, relaxation and rest is Dartmouth University’s Health Promotion article: Relaxation, Stress & Sleep (www.dartmouth.edu/~healthed/relax/). “Your Family has now completed an inventory of health and well-being, and has tried out some neat physical activities which are all important elements of health. However, many times we forget that relaxation, rest and positive Family relations are also important to long-term health. Unmanaged stress and anxiety can happen to us anywhere and at any time. No matter our age or level of education, feeling worried, being moody and having physical stress symptoms (i.e., stomach aches, sleeplessness, or unhappiness) may be signs of unmanaged stress. “Keep in mind that stress is not necessarily bad - it keeps us ‘tuned up’ and ready to move through the day alert and prepared. But, unmanaged stress has long-term consequences for our health and relationships. “An easy way to manage our daily stress is to be mindful of our body’s reaction to it. Think about your reaction to stress. Do your hands get cold? Do you have headaches? Do you want to flee the room? The first step toward managing stress is to be aware of how it affects us. Now
8 Health Check

take five minutes and have each of your Family members describe how they know when they are stressed.” As Family members take turns describing how they know when they are stressed, move throughout the room, taking mental-notes of the things you are hearing. Without revealing the names of individuals, you might share this information when you reconvene the group in order to illustrate that everyone has stress indicators and that these are normal reactions. “Let’s regroup. Thanks for sharing in your Families how you each know when you feel stress. As I moved around I heard many of the same symptoms and signs of stress ranging from not being able to eat, eating too much, fidgeting, excess sleeping and not being able to catch a deep breath. Though each of us may cope in a unique way, there is general agreement that relaxation is helpful when managing stress. Using restful, guided deep breathing and relaxing imagery are known to be effective stress management techniques. I invite you now to get your mats and lay on them while I turn down the lights (outside you might choose a cool, shady spot for this activity). You may begin a 10 minute guided relaxation exercise from Military One Source. This audio file is available online as one of the Chill Drill services through Military One Source.” Play Chill Drill 3 “Releasing Stress” using the laptop and external speaker making sure the audio is not too loud but that all can hear (www.militaryonesource.mil/12038/MOS/Audio/Chill_Drills/3_Chill_Drill.mp3). “I hope that was enjoyable. You all seemed to be relaxed during this last activity.” Debriefing Questions:
1. What did you experience during the “Releasing Stress” guided activity? What did your body feel like? What were your thoughts?
2. Are there times during your day when stress management would be especially helpful? 3. How might you use guided breathing or guided imagery during those times? 4. Are there opportunities to do these activities with your Family?
Talk It Over: (15 Minutes)
1. To help you focus the discussion, briefly look at Life Skill, Resilience Skill, and Science and Technology Objectives on page 1.
2. Lead the entire group through the Talk It Over discussion. 3. Have a volunteer take comments/notes about group dynamics and specific Family
comments. Share/Reflect
• What was your goal for the lesson when we began? • What did you learn about your Family’s general health? • How does your Family make decisions regarding choices that impact the health of Family
members? • What did you learn about yourself by doing the project?
9 Health Check

Process • What were common themes or thoughts you had or that you heard throughout this
session? • What did you learn about making decisions?
Generalize • Why is good decision making important to your Family? • Will acting responsibly change your Family relationships? • When else have you had fun and learned something new at the same time?
Apply • What changes will you and/or your Family make after participating in these activities? • What will this lesson mean to your Family in everyday life? • How will you act differently in the future as a result of this experience? • What can you do to keep practicing and learning how to maintain a healthy Family?
Debrief Families on Life/Resilience Skills: Point to the Life/Resilience Skill Signs that are posted around the space: Decision Making, Self-responsibility, Spiritual and Emotional. As you point to each sign, ask:
• How have our activities today helped you develop your __________ skills? • Why do you think these skills are important?
Closing & Cleanup: (10 Minutes) “We would like to thank each Family for their active participation in all the activities today. Please make sure your areas are cleaned up. Return supplies to me and please dispose of any garbage appropriately.” Extend the Activity:
• T2 MoodTracker from the National Center for Telehealth & Technology is another free resource app for tablets, smart phones, devices that will remind you to monitor and manage your stress. This quick, easy application sends a stress tip and reminder to log your own stress and moods on a regular schedule that you determine. T2 MoodTracker also has a simple note-taking function so you can jot reminders to yourself for quick stress management and relaxation tips. Enjoy!
• Once a stress management, relaxation plan is underway it’s a good idea to do occasional “check ups” to see how the plan is helping. Try the stress check quiz, MindCheck (http://mindcheck.ca/mood-stress/stress-check).
10 Health Check

Post Event Lead Volunteer:
• Check to make sure that the space is clean • Inventory and put all equipment and supplies back into their respective kits and pack
them for return as directed; make sure all iPad 2 devices, connecter kits, cords and power chargers are returned to the Tech Discovery Tool Kit
• Return Tool Kits and supplied to appropriate Military Point of Contact • Fill out report
o Names of all volunteers o Number and names of youth and Family members (attach sign-in sheet) o Quotes from youth and Family members on activities o Other important notes on activities, volunteers and youth o Critical follow-ups (parents about behavior/worries about a particular youth,
inappropriate language from a volunteer etc.) Activity Developed for Tech Discovery Curriculum by: Stephanie Graf, Youth, Family and Community Development Program Leader, Cornell Cooperative Extension Association of Jefferson County Amber Greeley, 4-H/OMK Program Specialist and State 4-H Military Liaison, University of Minnesota Extension Center for Youth Development Elaine Johannes, Ph.D., Associate Professor and Extension Specialist - Youth Development, Kansas State Research and Extension Jim Deidrick, Military/Extension Program Specialist, DoD-USDA Partnerships, University of Minnesota Extension Center for Youth Development The OMK Tech Discovery Curriculum was developed at the University of Minnesota Extension Center for Youth Development through a partnership of the Department of Defense, Office of the Secretary of Defense, Military Community & Family Policy, Office of Family Policy/Children and Youth and the United States Department of Agriculture, National Institute of Food and Agriculture, Institute of Youth, Family and Community, 4-H National Headquarters under Kansas State University special project number 2010-48713-21882. The University of Minnesota Extension is committed to the policy that all persons shall have equal access to its programs, facilities, and employment without regard to race, color, creed, religion, national origin, sex, age, marital status, disability, public assistance status, veteran status, or sexual orientation.
© 2014, Regents of the University of Minnesota. Rights reserved by Department of Defense, USDA/NIFA.
11 Health Check

Health Check Dear Family, Today we learned that being healthy includes many areas of our lives. We also learned our Family’s health is one of the most important aspects of our lives. We completed a Family Inventory and engaged in a dialogue with our Family to assess our health. An extra copy of the Family Inventory is attached to this letter for later use. We had fun exploring several different ways to think about our health. There are a variety of options available through the workouts apps. We also learned how relaxation and rest improve our ability to relate to one another. We sampled one of the Chill Drills (i.e., Release the Stress) from Military One Source and identified other healthy living tools we can use in the future. While exploring these healthy options, we learned that self-responsibility and decision making are key components in our individual and Family’s overall health. The choices that we make now do affect our health in the future. It was fun to learn new techniques to help maintain balance and overall well-being in simple, quick, and easy to do ways. It doesn’t take a lot of time out of our busy schedules to find ways to incorporate “health checks.” Through these activities, we explored how our Family interacts as our loved ones return from a deployment, and how we make decisions together that can sometimes affect the whole Family. Participating in these activities together was a great way of spending time together and also learning how to incorporate health into our personal and Family daily lives! Best regards,
Conversation Starters • What are ways our Family can incorporate “health
checks” into our daily lives? • What is your favorite fun physical activity? Why is it fun
for you? • If you could do any kind of physical activity without any
limitations, what would you do? • How can we work towards making small changes in our
everyday life to promote a healthy lifestyle?
12 Health Check

Family Based Health Asset Inventory 1. Each member of my Family has had a health checkup within the past year.
2. Each member of my Family has had a dental checkup within the past year.
3. Each member of my Family has had an eye checkup within the past two years.
4. Each member of my Family has a written health record and history.
5. Each member of my Family has adequate health insurance.
6. My Family knows how and when to access community health services.
7. My Family knows how and when to access mental health services.
8. My Family has a first aid kit.
9. My Family has emergency numbers posted near each phone.
10. My home has an operating smoke detector, fire extinguisher, carbon monoxide detector, and escape plan.
11. Each Family member uses appropriate safety procedures and protective devices such as seatbelts, helmets, and eye or ear protection.
12. Family members who are not able to care for themselves are not left alone.
13. My Family does not share prescription medications.
14. Each member of my Family follows directions for use of medications.
15. Each Family member protects his/her skin from sun damage.
16. Our home is free of peeling paint.
17. My Family eats at least 5 meals together each week.
18. Each Family member maintains a healthy weight.
19. Each Family member eats foods that are low in fat.
20. Each Family member eats at least 2 servings of dairy foods, (milk, yogurt, cheese …) each day.
21. Each Family member eats at least 2 servings of whole grain bread or cereal each day.
22. Each member of my Family eats a total of 5 servings of fruits and vegetables each day.
23. Each member of my Family drinks at least 6 glasses of water each day.
24. Each member of my Family engages in at least 60 minutes of exercise each week.
25. Each member of my Family washes hands and all surfaces before handling food.
26. No Family member uses tobacco products.
27. Each sexually active member of my Family participates in safe sex practices.
28. Each Family member uses appropriate coping mechanisms, such as mediation, exercise, or talking with a caring friend.
Used with permission, Cooperative Extension Service, University of Kentucky - College of Agriculture, Family Health & Safety Organizer, Kerri Ashurst, Ph.D. 13
Health Check

iSurvive!
Lesson Time: 4 Hours Skill Level: Basic
Number of Families: 8 Deployment Segment: Reunion/Reintegration
Target Audience: Families with Pre-Teens and Teens Internet Required: Yes
Life Skill Objectives:
• Decision Making: Practice Family decision making while preparing for the unexpected in the event of an emergency
• Self-Responsibility: Understand the importance of taking responsibility for your health and safety when in unfamiliar situations
• Communication: Learn how to share your ideas and input with Family members to ensure safety and survival in emergency situations
Resilience Skill Objectives:
• Family: Explore how trust and communication enhances Family relationships; use open-ended questions to increase dialog, helping bridge divides, and bringing Family members closer together
• Social: Practice exchanging ideas, views, and experiences; use these skills to strengthen relationships within your Family
Science and Technology Objectives:
• Understand how to use technology to learn about emergency preparedness and survival Activity Overview: Youth and Families will learn the basics to being prepared in an emergency situation by exploring survival scenarios that encourage development of a survival plan and communicating the plan to all Family members. Family members will also learn how to make their own Survival Bracelet and the practical uses for the survival bracelet. After learning emergency survival basics, Families will also learn about resources available to support military Families through reintegration. Shout Out To Families! Is your Family prepared for an emergency should one strike? From wilderness survival and making survival bracelets, to learning how to prepare your own emergency survival kit and learning to access valuable military support resources--prepare to BE PREPARED! Prerequisites: None Breakdown of Activities: Icebreaker: We’re On the Ball (30 Minutes)
1 iSurvive!

Activity 1: iSurvive (60 Minutes) Activity 2: Survival Bracelets (60 Minutes) Activity 3: 72 Hour Survival Kit (40 Minutes) Activity 4: Military Family Survival (30 Minutes) Talk It Over (10 Minutes) Closing & Cleanup (10 Minutes) Budget Range for Activity: $2/person for Survival Bracelet materials Space Needed: Large room with tables and chairs; Families will be working as groups and extra space will make it easier to do icebreaker games where movement is required.
2 iSurvive!

Before the Event Get Ready: Tasks for Lead Volunteer
• Do Volunteer Training with the additional Tech Discovery training (http://www.4-hmilitarypartnerships.org/p.aspx?tabid=187)
• Practice the activities, review all materials and handouts Do Ahead: In coordination with the Military Point of Contact:
1. Schedule use of the Mobile Technology Lab. 2. Schedule use of the Tech Discovery Tool Kits (2 Tool Kits = 8 Families) 3. Ensure wireless Internet access. 4. Contact volunteers and go through online training. 5. Recruit a specialized Tech volunteer for Mobile Technology Lab setup and Internet
support. 6. Cut puzzle pieces and put in an envelope (one puzzle/envelope per Family). 7. Take two pieces from each puzzle and put them in a different group’s envelope - each
group should be missing pieces and have extra pieces for their puzzle. 8. Borrow or buy supplies.
Copy:
• Family Letter (1 per Family) • Survival Game Board (in color) & Puzzle Pieces (need to be pre-cut and packaged) (1 per
Family) • iSurvive Scavenger Hunt worksheet (1 per Family) • Military Family Resource Sheet (1 per Family) • How to Make a Paracord Survival Bracelet handout (1 per Family)
Get from Tech Discovery Tool Kit:
• Laminated Life/Resilience Skill signs to post around the room (Decision Making, Self-responsibility, Communication, Family and Social)
• iPad/VGA connector • 8 iPad 2 devices (1 per Family) which have the following apps updated:
o iSurvival
o Keynote Get from Mobile Technology Lab:
• 10 Laptops (1 per Family plus one for leader to use in demonstrations if needed) • Wireless router
3 iSurvive!

Buy or Borrow Supplies Icebreaker: We’re On the Ball
• Nametags for all Family members, volunteers and anyone else who will be present (Tech Discovery Tool Kit)
• Sign-in sheet • Writing utensils • Medium sized ball (that bounces easily) • Ball of yarn
Activity 1: iSurvive
• Printed Survival Puzzle & pre-cut/laminated puzzle pieces in envelope (1 per Family) • Printed iSurvive Scavenger Hunt worksheet (1 per Family) • 8 iPad 2 devices (1 per Family) (Tech Discovery Tool Kits) • LCD projector • Writing Utensils • iPad/VGA connector (Tech Discovery Tool Kit) • Extension cords/power strips as needed
Activity 2: Survival Bracelets
• 550 paracord (8-12 feet per person) o These can be purchased at most local craft/hobby stores (i.e. Michael’s, Hobby
Lobby, Military Surplus Stores) • ⅞ in. plastic fastener/side release buckle (1 set per person)
o These can be purchased at most local craft/hobby stores (i.e. Michael’s, Hobby Lobby, Military Surplus Stores)
• Lighter (1-2 for the group) • Scissors (1-2 pair for the group) • 8 iPad 2 devices (1 per Family) (Tech Discovery Tool Kits) • Wireless router (Mobile Tech Lab) • Ensure wireless Internet connection • How to Make a Paracord Survival Bracelet handout (1 per Family)
Activity 3: 72 Hour Survival Kit
• 8 iPad2 devices or laptops (1 per Family) (Tech Discovery Tool Kits) • Wireless router (Mobile Tech Lab) • Ensure wireless Internet connection
Activity 4: Military Family Survivor
• 8 iPad 2 devices or laptops (1 per Family) (Tech Discovery Tool Kits) • Military Family Resource Sheet (1 per Family) • Writing utensils • Large Post-It Notes or other poster board (1 per Family) • Markers
4 iSurvive!

Day of the Event Roles for Volunteers:
• Help Families with all activities and form a positive connection with the Families • Provide positive support for Families throughout the activities • Assist Families in setting positive goals • Facilitate problem solving and use teamwork when Families become frustrated or have
questions • Assist with setup and cleanup
Before the Families Arrive....
1. Orient volunteers to the overall objectives of the lesson, make sure they all have nametags and introduce themselves to each other before you get started.
2. Have Tech volunteer set up laptops, LCD projector and test the wireless Internet connection.
3. Activity Orientation for all Volunteers (before the beginning of the event): • Review each activity emphasizing application of each of the identified life skills
(page 1) • Cue volunteers where to look for the Life/Resilience Skill objectives in the directions
and remind them of the importance of discussing them with Families during the activity
• Remind volunteers how these skills will help youth and Families manage reunion/reintegration issues and adjustments
• Have volunteers help set up for the event and get ready to welcome Families Set Up Your Space: Space: Tables and chairs
1. Post Life Skill/Resilience Skill Signs around the room. 2. Set up a greeting table with a sign-in sheet.
WHAT TO DO iSurvive! As the Families Arrive….
• Have youth and Family members write their names on the sign-in sheet and put on a nametag
• Introduce yourself, your team of volunteers and others that might be in the room along with their roles
Icebreaker: We’re On the Ball (30 Minutes) Ball Bounce (15 min)
1. Invite Family members to stand in a large circle with one individual agreeing to stand in the center of the circle and be the ball bouncer.
2. The activity begins with the ball bouncer bouncing the ball from the center of the circle out to an individual standing as part of the outer circle. The ball bouncer holds the ball
5 iSurvive!

and says: “Hi, my name is (insert name), I would like to meet _________ (insert name; here’s where the nametags will come in handy)” and bounces the ball to that person in the outer circle.
3. The person who catches the ball then has 5 seconds to introduce themselves saying: “Hi, my name is (insert name), a fun fact about myself is (insert fun fact)” and tosses the ball back to the ball bouncer.
4. The ball bouncer repeats this procedure selecting random individuals around the circle. 5. When an individual is unprepared and unable to introduce themselves within 5 seconds,
that individual becomes the ball bouncer and the game continues. 6. The objective of this game is for all members of the circle to have an opportunity to
introduce themselves, but must do so within 5 seconds of catching the ball. “This icebreaker served as a fun way to get to know each other, but also required each person to be PREPARED to give a quick introduction. As we move through today’s experience, we will be learning about emergency preparedness. Our next ice breaker will encourage communication during an emergency situation.” Yarn Apocalypse (15 min)
1. Instruct Families to continue standing in a large circle with one individual agreeing to stand in the center of the circle and be the yarn tosser.
2. “Today, _______ (insert name) is standing in the middle of what is about to become a Yarn Apocalyse. He/she will begin by wrapping some yarn around his/her wrist and then tossing the ball of yarn from the center of the circle out to someone standing in the outer circle, saying his/her own name first and then the name of the individual to which he/she is throwing the yarn.
3. When you catch the ball of yarn, wrap some yarn around your wrist and then choose another person around the circle to throw the ball of yarn to saying your name first and then the name of the person who you are going to throw the yarn. You can choose whomever you want to toss the yarn to, but the only rule is that the yarn cannot be passed directly to the right or left of the person holding the yarn and cannot be thrown over the person in the center.”
4. The ball of yarn is then tossed and caught around the circle, ensuring all members of the circle have some yarn wrapped around their wrist and are part of the Yarn Apocalypse.
5. After everyone has yarn wrapped around their wrist, say: “We have now created a Yarn Apocalypse. To survive we must undo the yarn maze by accurately throwing the yarn to the person who threw it to you in the first place, unwinding it from their wrist and letting go.”
6. Continue undoing the yarn maze by throwing the yarn to the next person it is connected to remembering to say your name and then theirs.
“We survived the Yarn Apocalypse by developing a plan and communicating with our team. Communication and planning were essential in surviving the Yarn Apocalypse and they are in real life emergency situations as well.”
6 iSurvive!

Activity 1: iSurvive (60 Minutes) “We just learned the importance of communication and preparedness in surviving an emergency situation. During this next activity we are going to explore how to survive in different outdoor situations if you ever find yourself lost in unfamiliar terrain.”
1. Each Family receives one Survivor Game Board in an envelope of puzzle pieces. 2. Instruct Families to cooperate when assembling their puzzles. 3. As groups begin to assemble their puzzles, they will begin to notice pieces are missing
and will discover other groups have their missing pieces. Encourage trading and working together.
4. Once puzzles are assembled it should spell out the word “SURVIVAL.” 5. Randomly assign Families a survival zone (Desert, Tropical, Ocean, or Cold Weather)
and distribute the iSurvive Scavenger Hunt worksheet. 6. Hand out the iPad 2 devices and discuss the iPad 2 Rules and Regulations (read the
following out loud and then ask for examples of what NOT to do from the Families) • Handle with care • Use 2 hands at all times • Keep it clean • If you break it, you buy it ($500.00)
7. Open the iSurvival app on the iPad 2 device and use the Survival Guide (Chapters 1-19) to complete the iSurvive Scavenger Hunt. (Press on the corresponding sections of the guide to complete the SURVIVAL Worksheet. Chapter 13 - Desert Survival; Chapter 14 - Tropical Survival; Chapter 15 - Cold Weather Survival; Chapter 16 - Sea Survival; Chapter 5 - Shelters; Chapter 18 - Direction Finding; Chapter 19 - Signaling Techniques)
8. As a Family, use the iPad 2 device to create a short 5 slide presentation using the Keynote app, highlighting what you learned about your assigned survival zone during your iSurvive Scavenger Hunt. Families can use the iPad 2 device camera to take photos and then add any creative photos they choose to their slides.
9. To create a new project in the Keynote app, open the Keynote app on the iPad 2 device. 10. Press the “+” in the top left-hand corner of the screen to “Create Presentation.” 11. Press “Create Presentation.” 12. Next “Choose a Theme.” (Select any one of the 16 themes available.) 13. Follow the instructions on the screen--to add a photo, click on the photo icon at the lower
right of the photo to insert a photo from the Camera Roll. 14. To edit text, double-tap to edit and type from the iPad 2 device’s keyboard.
*Optional, add a transition by tapping the small thumbnail of the slide in the left-hand bar and choose “Effects and Options” to modify.
15. To add slides 2-5, press the white “+” at the bottom left of the screen and “Tap to add a Slide.”
16. Repeat the above steps 11&12. 17. When finished, press the triangle in the top right of the screen to view presentation. 18. Share short 5-slide Keynote presentations with the larger group by connecting the iPad2
device to the LCD Projector using the iPad/VGA connector.
7 iSurvive!

Debriefing Questions: • What did you learn about your survival zone that you did not already know? • How will you be able to use what you learned during the iSurvive Scavenger Hunt when
you and your Family travel or participate in outdoor activities together? • What piece of survival gear might you add to your car or backpack after participating in
this activity? • What did your Family learn about decision making in a survival situation? • What are some strategies for communicating with your Family to help you prepare for a
survival situation? Activity 2: Survival Bracelets (60 Minutes) “Survival Bracelets have become a popular fashion accessory, but did you know that these bracelets can actually be used for survival? Together we will explore practical uses for a paracord bracelet and make our own bracelets to take home and wear.
1. “What are practical uses for a paracord bracelet (other than fashion)? Use the iPad 2 device to discover Survival Bracelet uses.”
2. Open the Safari app on the iPad 2 device to research uses for Survival Bracelets. Here are some helpful websites:
• http://survival.outdoorlife.com/blogs/survivalist/2013/04/paracord-bracelets-10-practical-uses-other-fashion
• http://www.survivalbracelet.com/emergency-uses-for-paracord/. 3. “Now each of you will learn to make your own Paracord Bracelet.” 4. Distribute one plastic fastener/side release buckle and 12 ft of 550 paracord per person
and a copy of How to Make a Paracord Survival Bracelet to each Family. (Facilitator should know how to make a bracelet to assist with participant questions and troubleshooting.)
Activity 3: 72 Hour Survival Kit (40 Minutes) “If a disaster were to strike, are you and your Family ready? Disasters (natural or otherwise) and other hazards can strike at any moment and leave us at risk if we do not prepare ahead of time. In this activity, we will learn to prepare for the following emergency situation: your community is about to be stuck by an intense storm that is predicted to knock out all power and cause floods, fires and earthquakes. This storm will also cut off all basic services--electricity, gas, water, sewage and telephones. Your Family needs to be able to survive on your own for 72 hours (3 days) before help can reach you. Your task is to create a survival kit with enough food, water and essential supplies.”
1. Provide each Family with an iPad 2 device and have them use the Safari app to access the Internet.
2. Access the FEMA Readiness Web Site (http://www.ready.gov/) and click on the “Build A Kit” tab to explore suggestions for what to include in an Emergency Kit.
3. Instruct each Family that they have been given $200 of survivor money for the entire Family to purchase supplies that they feel would help them to assemble their emergency kit.
4. Use the Safari app to research survival kit supplies and prices (remember each Family cannot exceed the $200 limit).
8 iSurvive!
5. Open the iSurvival app and open “SurvivalKitChecklist” (located at the bottom of the screen).
6. Press the “+” in the top right of the screen and follow the directions on the screen: “Enter Name of Survival Item Here” and press “Add Item to List” (type using iPad 2 device keyboard). Continue this step to create a list of all supplies that your Family will purchase with your $200.
7. Have each Family share their list of emergency items purchased for their 72 hours of survival.
8. If there is extra time, Families can play the following internet games to reinforce what they have learned about packing an emergency survival kit:
• Pack It Up: http://www.ready.gov/pack-it-game • Disaster Master: http://www.ready.gov/kids/games
Debriefing Questions:
• What are the most important items to include in an emergency survival kit? • Did your Family members all agree on which items were most important? How did you
come to agreement? • Were you surprised by what items were needed to be included in an emergency survival
kit? • How many items could be realistically purchased for $200?
Activity 4: Military Family Survival (30 Minutes) “We know that military Families face some tough times going through a deployment including reintegration. There are lots of resources out there to help military kids, and we want you to continue to use them even though your loved one may already be home. We’re going to spend a little bit of time today showing you some resources that are available to you, letting you dig in and learn how to use them. We would also like you to share resources that have been helpful for your Family so that others can take advantage of them too!”
1. Give each Family an iPad 2 device or laptop to use. 2. Give each Family a Military Family Resource Sheet. 3. Instruct the Families to spend some time exploring the different websites and apps. 4. Ask Families to write any websites, apps or other resources that have been helpful to their
Family during deployment on the large Post-It Notes or posters in the room so that all can see them and write them down on their Resource Sheet.
Debriefing Questions:
• What new resources did you learn about today? • Is there a resource that you and your Family might use to help you during this time of
adjustment? If so, which one and why? Talk It Over: (10 Minutes)
1. To help you focus the discussion, briefly look at Life Skill, Resilience Skill, and Science and Technology Objectives on page 1.
2. Lead the entire group through the Talk It Over discussion. 3. Have a volunteer take comments/notes about group dynamics and specific Family
comments. 9
iSurvive!

Share/Reflect • Which of the activities was the most fun? The most challenging? • What surprised you about preparing for emergency situations? • How did Family members express their thoughts and ideas during your decision making? • What were your goals while participating in the various activities in this lesson?
Process • What did you learn about making Family decisions during emergency situations? • Why does it matter that you learned about surviving in emergency situations? • What new questions do you have about being prepared for emergency situations? • What advice would you give to friends and Family members relating to being prepared
and communicating during emergency situations? • What do you feel your Family needs to do to be better prepared during an emergency
situation? • What other things did you learn while participating in this activity; i.e. Family
communication? Generalize
• In what other areas of Family life is it advisable to have an emergency plan? • How will the skills you learned today be helpful in those situations?
Apply • What can you do to make better Family decisions? • Why was this activity important to your life? The life of your Family?
Debrief Families on Life/Resilience Skills: Point to the Life/Resilience Skill signs that are posted around your space: Decision Making, Self-responsibility, Communication, Social, and Family. As you point to each sign, ask:
• How have our activities today helped you develop your __________ skills? • Why do you think these skills are important?
Closing & Cleanup: (10 Minutes) “Today we learned about the importance of communicating and being prepared for emergency situations by exploring possible wilderness survival scenarios and learning how to create our own Family emergency supply kit. We also learned how to make paracord survival bracelets and the practical uses of survival bracelets. Finally, we learned about resources available specifically for military Families to support the needs of military Families experiencing deployment and reintegration. All of today’s resources are available on the web and can be accessed from home & work computers to continue to support your Family and enhance resilience during any situation. Thank you for participating in today’s activity. We hope you feel more prepared and empowered to handle emergency situations and have learned more about your Family’s communication and decision making.”
10 iSurvive!

Post Event Lead Volunteer:
• Check to make sure that the space is clean • Facilitator and volunteers will need to clean all projects created during the activities off
all of the iPad 2 devices within the iSurvive app and the Keynote app o To clean projects off iSurvive app: Open iSurvive app Press “SurvivalKitChecklist” Press “Edit” in top left corner Press each red circle & delete Close app
o To clean projects off Keynote app Open Keynote app Press “Presentations” in top left corner Press and hold presentation and projects will wiggle Press the trash can in the top left to delete Press “Delete Presentation.” (You can export projects to email, iTunes or
WebDAV by pressing the box-arrow symbol in the top left.) • Have all equipment and supplies back into kits or packed up to return to appropriate
Military Point of Contact • Fill out report:
o Names of all volunteers o Number and names of youth and Family members (attach sign-in sheet) o Quotes from youth and Family members on activities o Other important notes on activities, volunteers and youth o Critical follow-ups (parents about behavior/worries about a particular youth,
inappropriate language from a volunteer etc.) Activity Developed for Tech Discovery Curriculum by: Lead Author: Teresa Noon, OMK Project Director, 4-H Youth Development, University of Arizona Cooperative Extension Contributing Author: Amber Greeley, 4-H/OMK Program Specialist and State 4-H Military Liaison, University of Minnesota Extension Center for Youth Development The OMK Tech Discovery Curriculum was developed at the University of Minnesota Extension Center for Youth Development through a partnership of the Department of Defense, Office of the Secretary of Defense, Military Community & Family Policy, Office of Family Policy/Children and Youth and the United States Department of Agriculture, National Institute of Food and Agriculture, Institute of Youth, Family and Community, 4-H National Headquarters under Kansas State University special project number 2010-48713-21882.
The University of Minnesota Extension is committed to the policy that all persons shall have equal access to its programs, facilities, and employment without regard to race, color, creed, religion, national origin, sex, age, marital status, disability, public assistance status, veteran status, or sexual orientation.
© 2014, Regents of the University of Minnesota. Rights reserved by Department of Defense, USDA/NIFA.
11 iSurvive!

iSurvive! Dear Family, Today we learned about the importance of communicating and being prepared for emergency situations by exploring possible wilderness survival scenarios and learning how to create our own Family emergency supply kit. We also learned how to make paracord survival bracelets and the practical uses of survival bracelets. Finally, we learned about resources available specifically for military Families to support the needs of military Families experiencing deployment and reintegration. All of today’s resources are available on the web and can be accessed from home & work computers to continue to support your Family and enhance resilience during any situation. Thank you for participating in today’s activity. We hope you feel more prepared and empowered to handle emergency situations and have learned more about your Family’s communication and decision making. Best regards,
Conversation Starters • What are some ways our Family can be more prepared for an
emergency situation? • If you had $100 more to spend on your 72 Hr. Survival Kit,
what would you buy? Why? • What items do we already have at home that we could include
in our emergency survival kit? • Which military resources might be helpful for our Family?
For you individually?
12 iSurvive!

Survival Game Board
Directions: Print on color printer, laminate, then cut apart puzzle pieces (1 set per family). Place pieces into an envelope for each family. When assembling envelopes: remove 2 different pieces from each family’s envelope and put into the envelope for another family.
13 iSurvive!

iSurvive Scavenger Hunt Use the iSurvival app to SURVIVE one of the following scenarios (circle one):
Desert Survival Cold Weather Survival
Tropical Survival Sea Survival
Size Up the Situation
Use All Your Senses
Remember Where You Are
Vanquish Fear & Panic
Improvise
Value Living
Act Like Natives/Adapt to Environment
Live by Your Wits/Learn Basic Skills
Food & Shelter iSurvive Signaling iSurvive Navigation
iSURVIVE Questions: 1. Where Are We? _____________________________
2. What are the Dangers? _______________________
__________________________________________ __________________________________________
3. What Should We Have Packed? ________________ __________________________________________ __________________________________________ __________________________________________ __________________________________________
UNTIL WE ARE FOUND…
What Are Our Options? ____________________________________________________________________________________________________________________________________________________________________________________________________
Type of Signal
Smoke Fire Mirrors/Shiny Objects Flashlight Other: _______________
Find Our Way
Sun Shadows Stars Landmarks Moon Compass & Map
14 iSurvive!
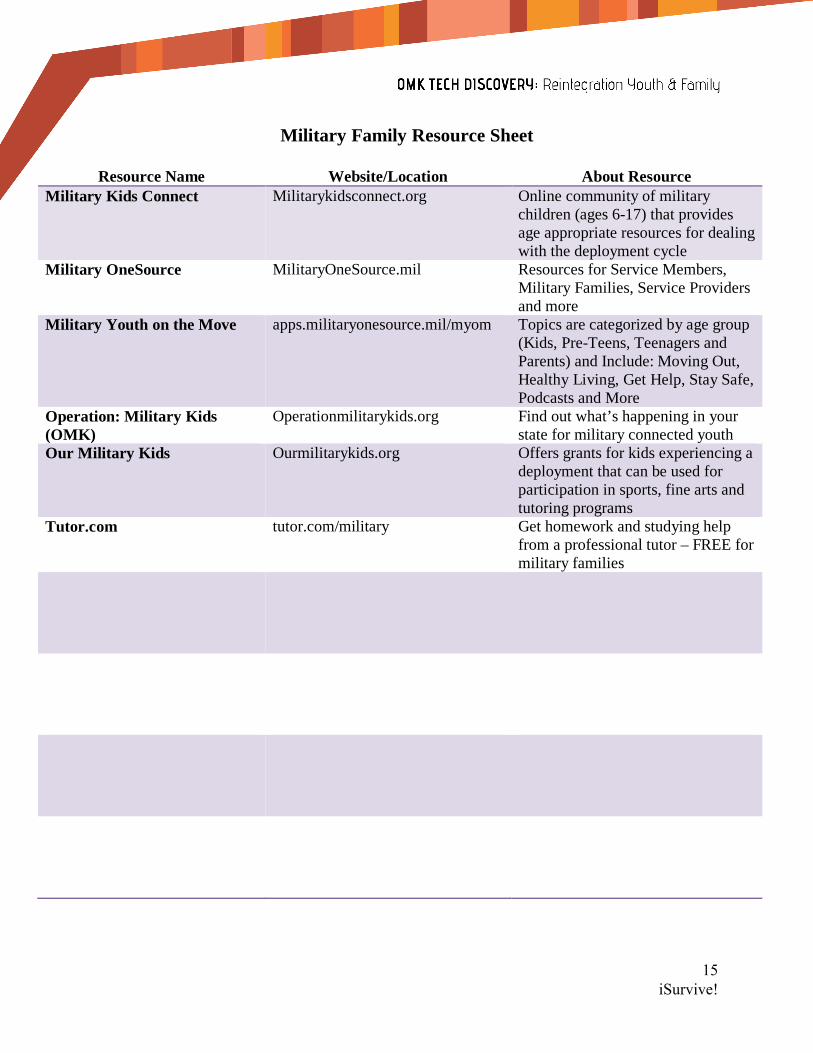
Military Family Resource Sheet
Resource Name Website/Location About Resource Military Kids Connect Militarykidsconnect.org Online community of military
children (ages 6-17) that provides age appropriate resources for dealing with the deployment cycle
Military OneSource MilitaryOneSource.mil Resources for Service Members, Military Families, Service Providers and more
Military Youth on the Move apps.militaryonesource.mil/myom Topics are categorized by age group (Kids, Pre-Teens, Teenagers and Parents) and Include: Moving Out, Healthy Living, Get Help, Stay Safe, Podcasts and More
Operation: Military Kids (OMK)
Operationmilitarykids.org Find out what’s happening in your state for military connected youth
Our Military Kids Ourmilitarykids.org Offers grants for kids experiencing a deployment that can be used for participation in sports, fine arts and tutoring programs
Tutor.com tutor.com/military Get homework and studying help from a professional tutor – FREE for military families
15 iSurvive!

How to Make a Paracord Survival Bracelet
Supplies Needed:
• 550 Paracord (8 -12 feet per person) These can be purchased at most local craft/hobby stores (i.e. Michael’s, Hobby Lobby, Military Surplus Stores)
• 7/8” Plastic Fastener/Side Release Buckle (1 per person) These can be purchased at most local craft/hobby stores (i.e. Michael’s, Hobby Lobby, Military Surplus Stores)
• Scissors (1-2 pairs for entire group) • Lighter (1-2 for entire group)
Step 1: Measure Paracord
a) Measure and cut 8-12 foot piece of paracord
b) Find the center of the cord by folding the cord section in half matching up the two ends; maintain this loop for Step 2 (For a thinner bracelet remove inside strands – “the guts”)
Step 2: Thread Cord Through Buckle
a) Look at the top of plastic fastener/buckle. b) Find the seam where side 1 & 2 connect.
(The seam should be on the right side of the fastener/buckle.)
16 iSurvive!

c) Insert cord loop into right side of fastener from the top to bottom
d) Pull through opening and then pull the long legs of cord through loop to secure a knot around the right side of the fastener.
e) Take loose ends of cord and pull through the left side of the fastener from top to bottom and pull to make a wrist-sized loop.
Step 3: Weaving the Bracelet
a) Insert wrist into wrist-sized loop to determine correct size. (Ensure bracelet is not too snug—stick one finger between the bracelet and your wrist for a looser fit.)
17 iSurvive!

b) Have a partner hold left side of fastener so you don’t lose your size. c) Unclip fastener, hold left side of fastener and cord in left hand. (Long legs of cord should
hang from back and short end with fastener should hang in front.) d) With right hand, take right hanging leg (A) and make a rabbit ear loop on the right side,
have hanging leg touching behind short double strings (C).
e) With left hand, take left hanging leg (B) and move it under the right hanging leg (A), over the short double string (C) and through the rabbit ear loop from front to back.
f) Hold one long leg of cord (A & B) in each hand and pull cords away from center to tighten cord around plastic fastener.
A
C
A
B
C
A B A B
18 iSurvive!

g) With left hand, take left hanging leg (B) and make a rabbit ear loop on left side, have hanging leg touching behind short double string (C).
h) With right hand, take right hanging leg (A) and move it under the left hanging leg (B),
over the short end (C) and through the rabbit ear loop from front to back.
i) Hold one long leg of cord (A & B) in each hand and pull cords away from center to tighten cord around plastic fastener.
j) Push weaves up towards buckle with right hand to make a tight weave.
B
C
B
C
A
A B
19 iSurvive!

k) Repeat steps d – j to continue bracelet weave to other end of the bracelet. Step 4: Finishing the Bracelet
a) Pull cords away from center to tighten cord around plastic fastener.
b) Cut remaining cord from each side of the bracelet.
20 iSurvive!

c) Using a lighter, heat up the cut ends of the cord to melt them to the bracelet. (This keeps the bracelet from coming undone.)
d) Caution: Paracord will be HOT. Allow bracelet to cool, before wearing on wrist.
Written for Tech Discovery Curriculum by: Teresa Noon, OMK Project Director, 4-H Youth Development, University of Arizona Cooperative Extension Amber Greeley, 4-H/OMK Program Specialist and State 4-H Military Liaison, University of Minnesota Extension Center for Youth Development
21 iSurvive!