section 1 water analysis guide - usabluebook
TRANSCRIPT
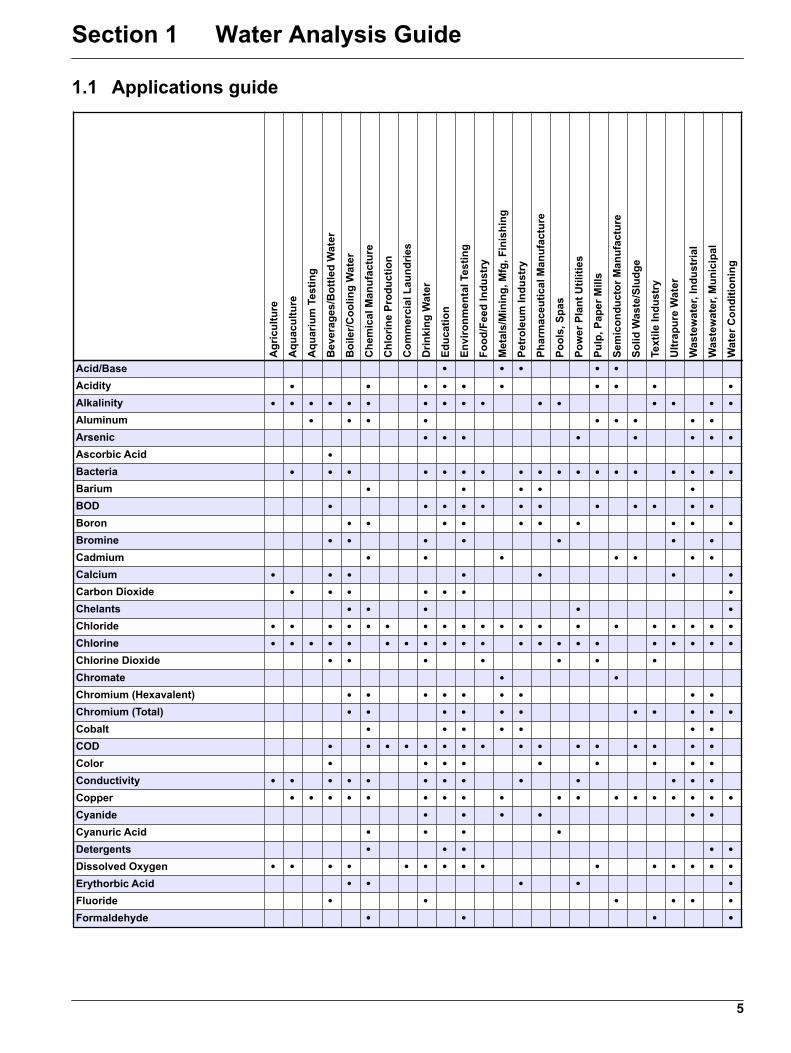
Section 1 Water Analysis Guide
1.1 Applications guide
Acid/BaseAcidityAlkalinityAluminumArsenicAscorbic AcidBacteriaBariumBODBoronBromineCadmiumCalciumCarbon DioxideChelantsChlorideChlorineChlorine DioxideChromateChromium (Hexavalent)Chromium (Total)CobaltCODColorConductivityCopperCyanideCyanuric AcidDetergentsDissolved OxygenErythorbic AcidFluorideFormaldehyde
Agr
icul
ture
Aqu
acul
ture
Aqu
ariu
m T
estin
g
Bev
erag
es/B
ottle
d W
ater
Boi
ler/C
oolin
g W
ater
Che
mic
al M
anuf
actu
re
Chl
orin
e Pr
oduc
tion
Com
mer
cial
Lau
ndrie
s
Drin
king
Wat
er
Educ
atio
n
Envi
ronm
enta
l Tes
ting
Food
/Fee
d In
dust
ry
Met
als/
Min
ing,
Mfg
, Fin
ishi
ng
Petr
oleu
m In
dust
ry
Phar
mac
eutic
al M
anuf
actu
re
Pool
s, S
pas
Pow
er P
lant
Util
ities
Pulp
, Pap
er M
ills
Sem
icon
duct
or M
anuf
actu
re
Solid
Was
te/S
ludg
e
Text
ile In
dust
ry
Ultr
apur
e W
ater
Was
tew
ater
, Ind
ustr
ial
Was
tew
ater
, Mun
icip
al
Wat
er C
ondi
tioni
ng
5
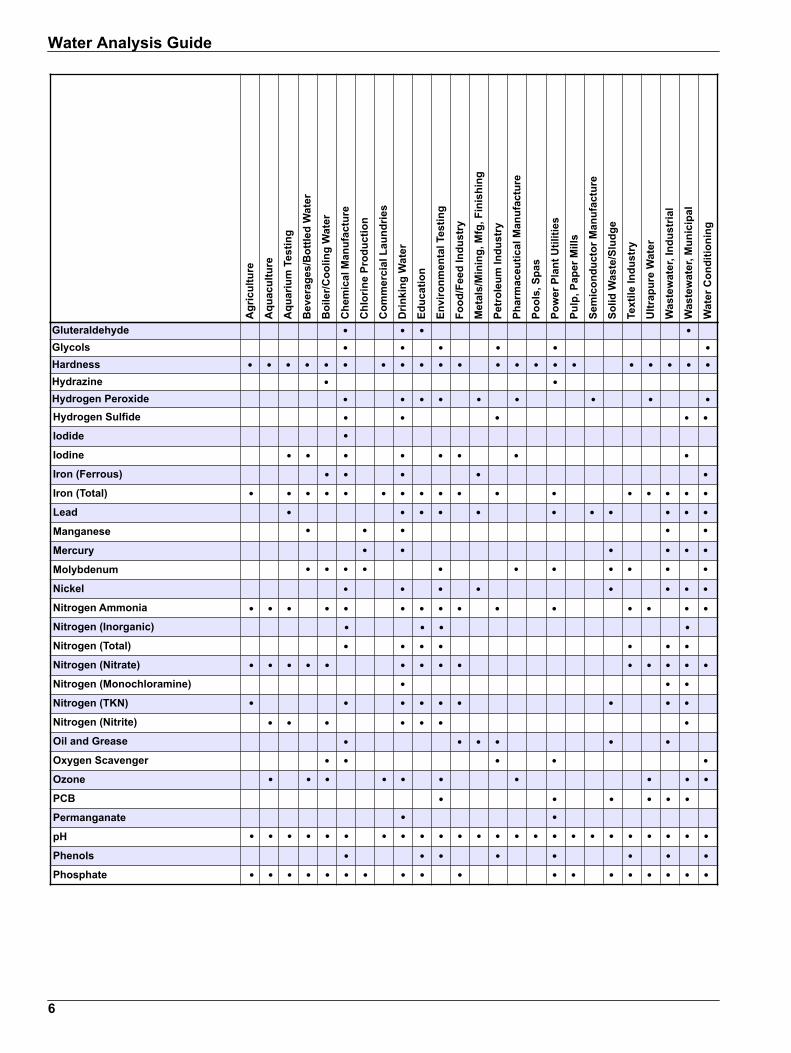
GluteraldehydeGlycolsHardnessHydrazineHydrogen PeroxideHydrogen Sulfide
Iodide
Iodine
Iron (Ferrous)
Iron (Total)
Lead
Manganese
Mercury
Molybdenum
Nickel
Nitrogen Ammonia
Nitrogen (Inorganic)
Nitrogen (Total)
Nitrogen (Nitrate)
Nitrogen (Monochloramine)
Nitrogen (TKN)
Nitrogen (Nitrite)
Oil and Grease
Oxygen Scavenger
Ozone
PCB
Permanganate
pH
Phenols
Phosphate
Agr
icul
ture
Aqu
acul
ture
Aqu
ariu
m T
estin
g
Bev
erag
es/B
ottle
d W
ater
Boi
ler/C
oolin
g W
ater
Che
mic
al M
anuf
actu
re
Chl
orin
e Pr
oduc
tion
Com
mer
cial
Lau
ndrie
s
Drin
king
Wat
er
Educ
atio
n
Envi
ronm
enta
l Tes
ting
Food
/Fee
d In
dust
ry
Met
als/
Min
ing,
Mfg
, Fin
ishi
ng
Petr
oleu
m In
dust
ry
Phar
mac
eutic
al M
anuf
actu
re
Pool
s, S
pas
Pow
er P
lant
Util
ities
Pulp
, Pap
er M
ills
Sem
icon
duct
or M
anuf
actu
re
Solid
Was
te/S
ludg
e
Text
ile In
dust
ry
Ultr
apur
e W
ater
Was
tew
ater
, Ind
ustr
ial
Was
tew
ater
, Mun
icip
al
Wat
er C
ondi
tioni
ng
Water Analysis Guide
6
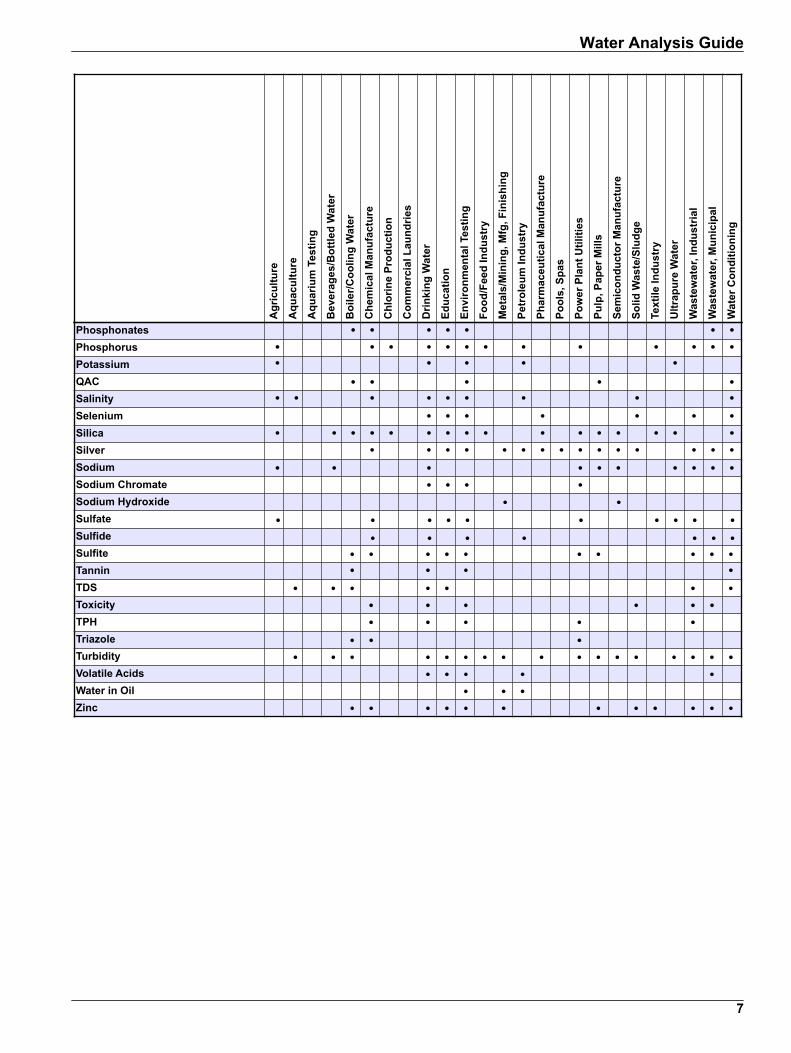
PhosphonatesPhosphorusPotassium
QACSalinitySeleniumSilicaSilverSodiumSodium ChromateSodium HydroxideSulfateSulfideSulfiteTanninTDSToxicityTPHTriazoleTurbidityVolatile AcidsWater in OilZinc
Agr
icul
ture
Aqu
acul
ture
Aqu
ariu
m T
estin
g
Bev
erag
es/B
ottle
d W
ater
Boi
ler/C
oolin
g W
ater
Che
mic
al M
anuf
actu
re
Chl
orin
e Pr
oduc
tion
Com
mer
cial
Lau
ndrie
s
Drin
king
Wat
er
Educ
atio
n
Envi
ronm
enta
l Tes
ting
Food
/Fee
d In
dust
ry
Met
als/
Min
ing,
Mfg
, Fin
ishi
ng
Petr
oleu
m In
dust
ry
Phar
mac
eutic
al M
anuf
actu
re
Pool
s, S
pas
Pow
er P
lant
Util
ities
Pulp
, Pap
er M
ills
Sem
icon
duct
or M
anuf
actu
re
Solid
Was
te/S
ludg
e
Text
ile In
dust
ry
Ultr
apur
e W
ater
Was
tew
ater
, Ind
ustr
ial
Was
tew
ater
, Mun
icip
al
Wat
er C
ondi
tioni
ng
Water Analysis Guide
7
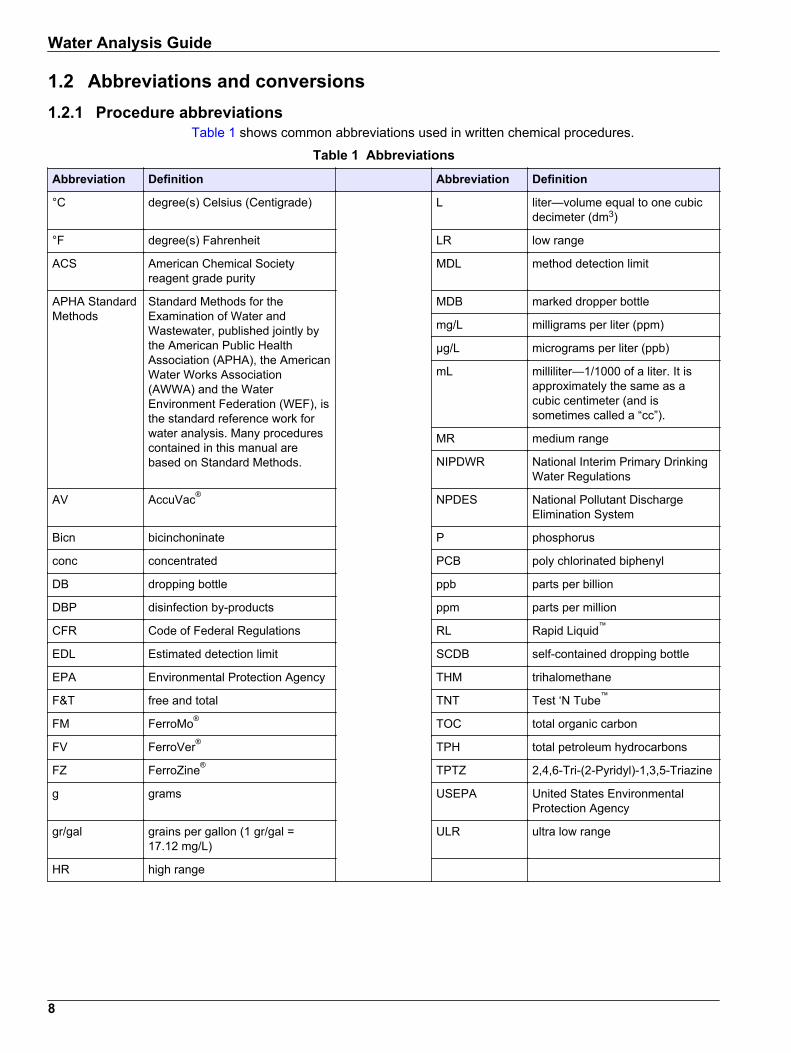
1.2 Abbreviations and conversions1.2.1 Procedure abbreviations
Table 1 shows common abbreviations used in written chemical procedures.
Table 1 Abbreviations
Abbreviation Definition Abbreviation Definition
°C degree(s) Celsius (Centigrade) L liter—volume equal to one cubicdecimeter (dm3)
°F degree(s) Fahrenheit LR low range
ACS American Chemical Societyreagent grade purity
MDL method detection limit
APHA StandardMethods
Standard Methods for theExamination of Water andWastewater, published jointly bythe American Public HealthAssociation (APHA), the AmericanWater Works Association(AWWA) and the WaterEnvironment Federation (WEF), isthe standard reference work forwater analysis. Many procedurescontained in this manual arebased on Standard Methods.
MDB marked dropper bottle
mg/L milligrams per liter (ppm)
µg/L micrograms per liter (ppb)
mL milliliter—1/1000 of a liter. It isapproximately the same as acubic centimeter (and issometimes called a “cc”).
MR medium range
NIPDWR National Interim Primary DrinkingWater Regulations
AV AccuVac® NPDES National Pollutant DischargeElimination System
Bicn bicinchoninate P phosphorus
conc concentrated PCB poly chlorinated biphenyl
DB dropping bottle ppb parts per billion
DBP disinfection by-products ppm parts per million
CFR Code of Federal Regulations RL Rapid Liquid™
EDL Estimated detection limit SCDB self-contained dropping bottle
EPA Environmental Protection Agency THM trihalomethane
F&T free and total TNT Test ‘N Tube™
FM FerroMo® TOC total organic carbon
FV FerroVer® TPH total petroleum hydrocarbons
FZ FerroZine® TPTZ 2,4,6-Tri-(2-Pyridyl)-1,3,5-Triazine
g grams USEPA United States EnvironmentalProtection Agency
gr/gal grains per gallon (1 gr/gal =17.12 mg/L)
ULR ultra low range
HR high range
Water Analysis Guide
8

1.2.2 Conversions
1.2.2.1 Chemical speciesTable 2 shows species conversion factors for many commonly used chemicals.
Table 2 Conversion factors
To convert from... To... Multiply by...
mg/L Al mg/L Al2O3 1.8895
mg/L B mg/L H3BO3 5.7
mg/L Ca-CaCO3 mg/L Ca2+ 0.4004
mg/L CaCO3 mg/L Ca2+ 0.4004
mg/L CaCO3 mg/L Mg2+ 0.2428
µg/L Carbohydrazide µg/L Hydroquinone 1.92
µg/L Carbohydrazide µg/L ISA 2.69
µg/L Carbohydrazide µg/L MEKO 3.15
mg/L Cr6+ mg/L CrO42– 2.231
mg/L Cr6+ mg/L Na2CrO4 3.115
mg/L Cr6+ mg/L Cr2O72– 2.077
mg/L Mg-CaCO3 mg/L Mg2+ 0.2428
mg/L Mn mg/L KMnO4 2.876
mg/L Mn mg/L MnO4– 2.165
mg/L Mo6+ mg/L MoO42– 1.667
mg/L Mo6+ mg/L Na2MoO4 2.146
mg/L N mg/L NH3 1.216
mg/L N mg/L NO3– 4.427
mg/L Cl2 mg/L NH2Cl 0.726
mg/L Cl2 mg/L N 0.197
mg/L NH3-N mg/L NH3 1.216
mg/L NH3-N mg/L NH4+ 1.288
mg/L NO2- mg/L NaNO2 1.5
mg/L NO2- mg/L NO2
––N 0.3045
mg/L NO2--N mg/L NaNO2 4.926
µg/L NO2--N µg/L NaNO2 4.926
mg/L NO2--N mg/L NO2
– 3.284
µg/L NO2--N µg/L NO2
– 3.284
mg/L NO3--N mg/L NO3
– 4.427
mg/L PO43- mg/L P 0.3261
µg/L PO43- µg/L P 0.3261
mg/L PO43- mg/L P2O5 0.7473
µg/L PO43- µg/L P2O5 0.7473
Water Analysis Guide
9

Table 2 Conversion factors (continued)
To convert from... To... Multiply by...
mg/L SiO2 mg/L Si 0.4674
µg/L SiO2 µg/L Si 0.4674
1.2.2.2 Hardness conversionTable 3 shows the factors to convert hardness from one unit of measure to another. Forexample, to convert mg/L CaCO3 to German parts/100,000 CaO, multiply the value inmg/L x 0.056.Note: meq/L = N × 1000
Table 3 Hardness conversion factors
Units of measure mg/LCaCO3
Britishgr/gal(Imperial)CaCO3
Americangr/gal(US)CaCO3
French parts/100,000 CaCO3
German parts/100,000 CaCO3
meq/L1
g/L CaO lb/ft3
CaCO3
mg/L CaCO3 1.0 0.07 0.058 0.1 0.056 0.02 5.6x10⁻⁴ 6.23x10⁻⁵
English gr/galCaCO3
14.3 1.0 0.83 1.43 0.83 0.286 8.0x10⁻³ 8.9x10⁻⁴
US gr/gal CaCO3 17.1 1.2 1.0 1.72 0.96 0.343 9.66x10⁻³ 1.07x10⁻³
Frenchp/100,000 CaCO3
10.0 0.7 0.58 1.0 0.56 0.2 5.6x10⁻³ 6.23x10⁻⁴
Germanp/100,000 CaO
17.9 1.25 1.04 1.79 1.0 0.358 1x10⁻² 1.12x10⁻³
meq/L 50.0 3.5 2.9 5.0 2.8 1.0 2.8x10⁻² 3.11x10⁻²
g/L CaO 1790.0 125.0 104.2 179.0 100.0 35.8 1.0 0.112
lb/ft3 CaCO3 16,100.0 1123.0 935.0 1610.0 900.0 321.0 9.0 1.0
1 epm/L or mval/L
1.3 Laboratory practices1.3.1 Temperature
Most methods are completed accurately when the sample temperature is between 20 and25 °C (68 to 77 °F). A note in the individual procedure shows any special temperaturerequirements.
1.3.2 MixingWhen reagent is added to a graduated cylinder or titration flask, swirl the sample gently.A gentle swirl motion decreases the risk of atmospheric contamination in carbon dioxideand other tests for gases.
1. Hold the cylinder (or flask) firmly with the tips of the thumb and first two fingers(Figure 1).
2. Hold the cylinder at a 45-degree angle and make a circular motion from the wrist.3. Move the cylinder in approximately 305-mm (12-in.) circles. Make enough rotation to
complete the mixing in a few turns.
Water Analysis Guide
10
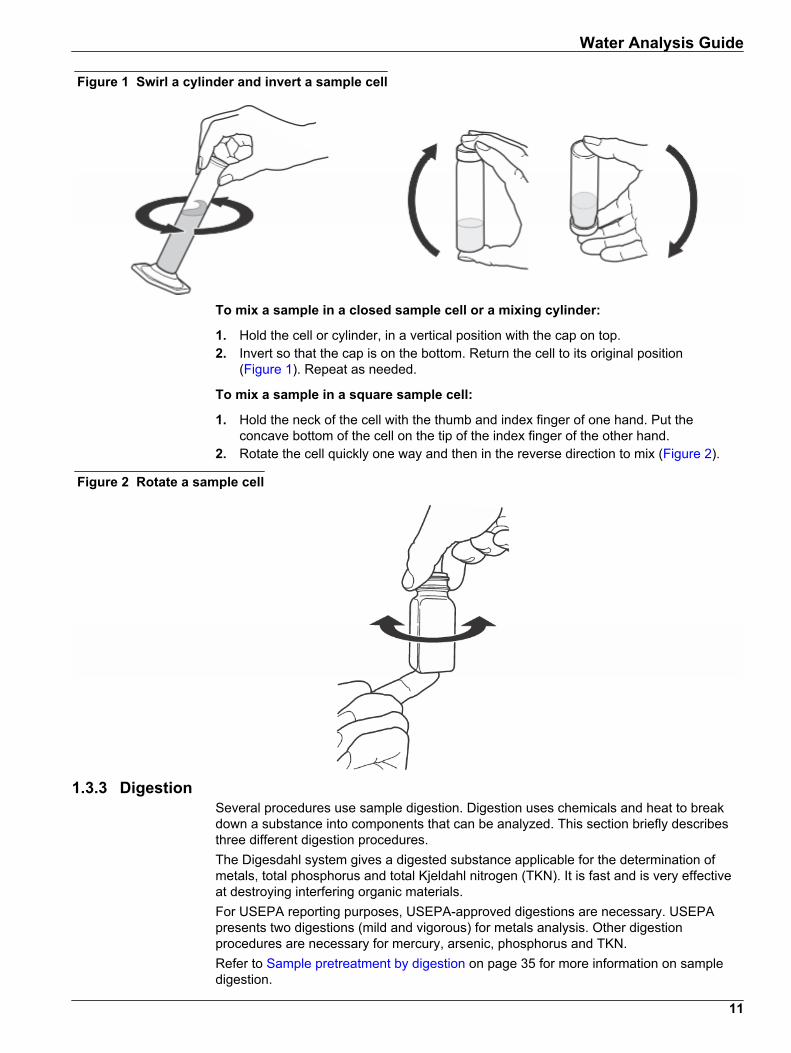
Figure 1 Swirl a cylinder and invert a sample cell
To mix a sample in a closed sample cell or a mixing cylinder:
1. Hold the cell or cylinder, in a vertical position with the cap on top.2. Invert so that the cap is on the bottom. Return the cell to its original position
(Figure 1). Repeat as needed.
To mix a sample in a square sample cell:
1. Hold the neck of the cell with the thumb and index finger of one hand. Put theconcave bottom of the cell on the tip of the index finger of the other hand.
2. Rotate the cell quickly one way and then in the reverse direction to mix (Figure 2).
Figure 2 Rotate a sample cell
1.3.3 DigestionSeveral procedures use sample digestion. Digestion uses chemicals and heat to breakdown a substance into components that can be analyzed. This section briefly describesthree different digestion procedures.The Digesdahl system gives a digested substance applicable for the determination ofmetals, total phosphorus and total Kjeldahl nitrogen (TKN). It is fast and is very effectiveat destroying interfering organic materials.For USEPA reporting purposes, USEPA-approved digestions are necessary. USEPApresents two digestions (mild and vigorous) for metals analysis. Other digestionprocedures are necessary for mercury, arsenic, phosphorus and TKN.Refer to Sample pretreatment by digestion on page 35 for more information on sampledigestion.
Water Analysis Guide
11

1.3.4 DistillationDistillation is an effective and safe method used to separate some chemical componentsfor analysis. The equipment that follows is recommended for distillation:
• General Purpose Distillation Apparatus (22653-00), shown in Figure 3• Arsenic Distillation Apparatus Set (22654-00)• Cyanide Distillation Apparatus Set (22658-00)• General Purpose Heater and Support Apparatus (22744-00, 115 VAC, 60 Hz)• General Purpose Heater and Support Apparatus (22744-02, 230 VAC, 50 Hz)
The Distillation Apparatus is applicable for water and wastewater that use samplepretreatment by distillation. Applications for the General Purpose Apparatus include:fluoride, albuminoid nitrogen, ammonia nitrogen, phenols, selenium and volatile acids.The General Purpose Heater and Support Apparatus gives efficient heating andanchoring of the glassware.
Figure 3 General purpose distillation apparatus
1.3.5 FiltrationFiltration separates particulates from an aqueous sample. Filtration uses a porousmedium that keeps particulates but lets liquids pass through. Filtration removes turbidityfrom water samples. Turbidity can interfere in colorimetric analyses.The two filtration methods most frequently used are vacuum and gravity filtration.
1.3.5.1 Vacuum filtrationVacuum filtration uses both suction and gravity to pull the liquid through the filter. Anaspirator or vacuum pump is used to make suction (Figure 4). Vacuum filtration is fasterthan gravity filtration alone.
Water Analysis Guide
12
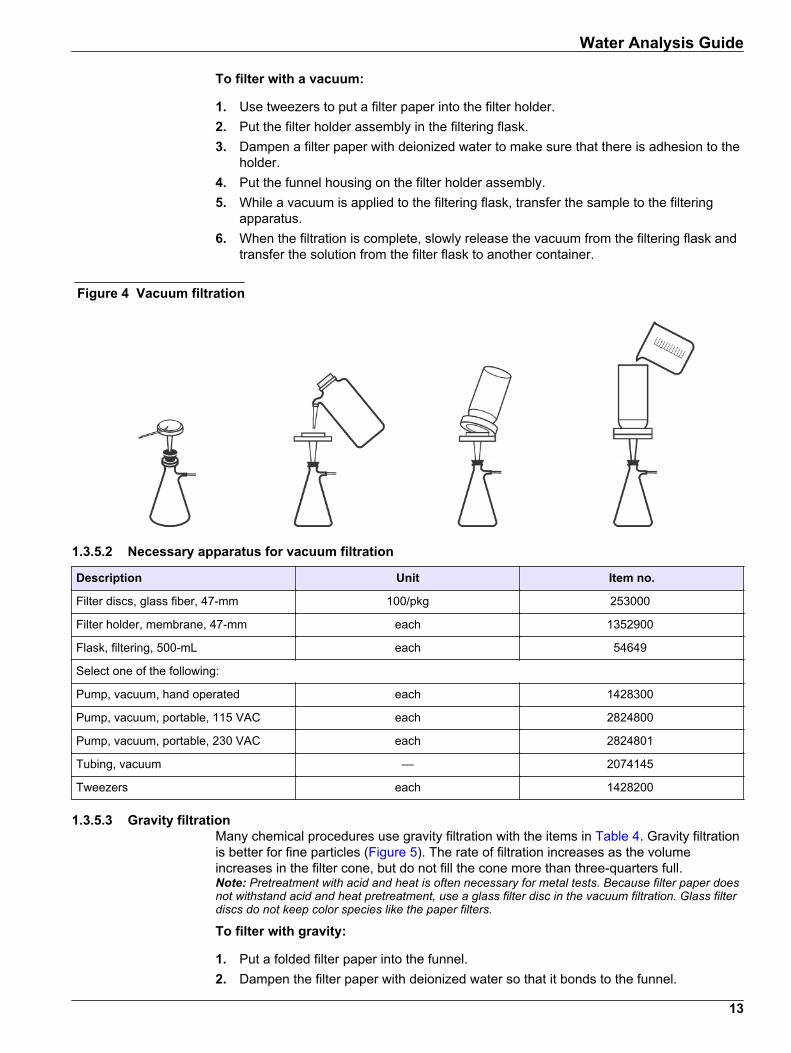
To filter with a vacuum:
1. Use tweezers to put a filter paper into the filter holder.2. Put the filter holder assembly in the filtering flask.3. Dampen a filter paper with deionized water to make sure that there is adhesion to the
holder.4. Put the funnel housing on the filter holder assembly.5. While a vacuum is applied to the filtering flask, transfer the sample to the filtering
apparatus.6. When the filtration is complete, slowly release the vacuum from the filtering flask and
transfer the solution from the filter flask to another container.
Figure 4 Vacuum filtration
1.3.5.2 Necessary apparatus for vacuum filtration
Description Unit Item no.
Filter discs, glass fiber, 47-mm 100/pkg 253000
Filter holder, membrane, 47-mm each 1352900
Flask, filtering, 500-mL each 54649
Select one of the following:
Pump, vacuum, hand operated each 1428300
Pump, vacuum, portable, 115 VAC each 2824800
Pump, vacuum, portable, 230 VAC each 2824801
Tubing, vacuum — 2074145
Tweezers each 1428200
1.3.5.3 Gravity filtrationMany chemical procedures use gravity filtration with the items in Table 4. Gravity filtrationis better for fine particles (Figure 5). The rate of filtration increases as the volumeincreases in the filter cone, but do not fill the cone more than three-quarters full.Note: Pretreatment with acid and heat is often necessary for metal tests. Because filter paper doesnot withstand acid and heat pretreatment, use a glass filter disc in the vacuum filtration. Glass filterdiscs do not keep color species like the paper filters.
To filter with gravity:
1. Put a folded filter paper into the funnel.2. Dampen the filter paper with deionized water so that it bonds to the funnel.
Water Analysis Guide
13

3. Put the funnel into an Erlenmeyer flask or graduated cylinder.4. Pour the sample into the funnel.
Table 4 Necessary apparatus for gravity filtration
Description Unit Item no.
Cylinder, graduated, 100-mL each 50842
Funnel, poly, 65-mm each 108367
Filter paper, 12.5-cm, pleated 100/pkg 189457
Flask, Erlenmeyer, 125-mL each 50543
Figure 5 Gravity filtration
1.3.6 Reagents
1.3.6.1 Reagent and standard stabilityIn general, reagents and standards have the maximum shelf life when they are put in alocation that is cool, dark and dry. The product label gives any special storage needs.It is always good laboratory practice to put the date on chemicals upon receipt and tomove supplies so that the older supplies are used first. When the reagent shelf life isunknown or in doubt, use a standard to measure reagent effectiveness.Absorption of moisture, carbon dioxide or other gases from the atmosphere, bacterialaction, high temperatures or light (with photosensitive compounds) may affect the reagentshelf life. In some cases, reaction with the storage container or interaction of reagentcomponents may occur.
1.3.6.2 Reagent blankIn several tests, the contribution of the reagent(s) to the final reading is of such amagnitude that it must be compensated for whenever the test is completed. Reagentblank refers to that portion of the test result contributed solely by the reagent. This makesa positive error in the test results.Reagents are made with the lowest possible blank. For most reagents, it is less than0.009 absorbance units. However, it is sometimes impossible or impractical to makereagents with such a low blank. When such reagents are used, it is best to find thereagent blank with the procedure that uses high-quality water (deionized, distilled, etc.) inplace of sample to “zero” the instrument. The resulting value is then shown in theconcentration units of the test and is subtracted from each sample determination thatuses the same reagent lot. Spectrophotometer and colorimeter software lets the reagent
Water Analysis Guide
14
blank value be kept and subtracted automatically from each sample value. The reagentblank needs to be found only at first use, when a new lot of reagent has been opened or ifcontamination is suspected.In most tests, the reagent blank is so small the instrument may be set to zero on either anuntreated portion of the original water sample or on deionized water. This will not result ina significant loss of accuracy unless the test is for very low levels of the species ofinterest. When a test is for very low levels of the species, it is best to use a reagent blankprepared as above.
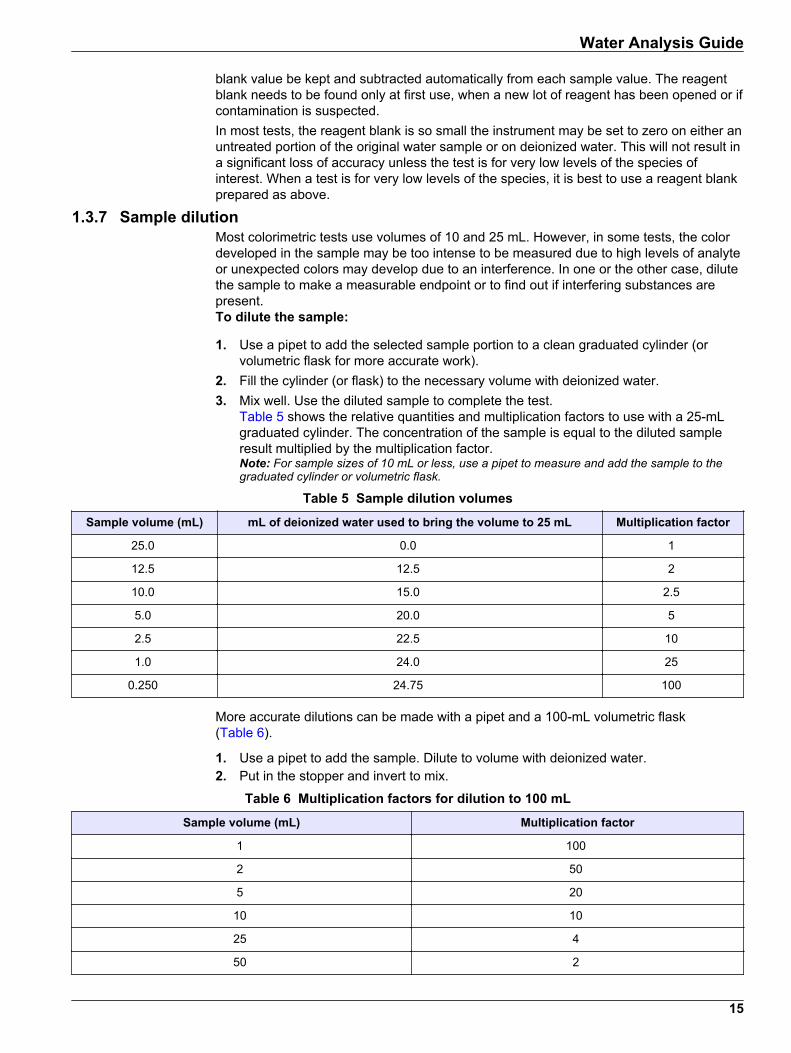
1.3.7 Sample dilutionMost colorimetric tests use volumes of 10 and 25 mL. However, in some tests, the colordeveloped in the sample may be too intense to be measured due to high levels of analyteor unexpected colors may develop due to an interference. In one or the other case, dilutethe sample to make a measurable endpoint or to find out if interfering substances arepresent.To dilute the sample:
1. Use a pipet to add the selected sample portion to a clean graduated cylinder (orvolumetric flask for more accurate work).
2. Fill the cylinder (or flask) to the necessary volume with deionized water.3. Mix well. Use the diluted sample to complete the test.
Table 5 shows the relative quantities and multiplication factors to use with a 25-mLgraduated cylinder. The concentration of the sample is equal to the diluted sampleresult multiplied by the multiplication factor.Note: For sample sizes of 10 mL or less, use a pipet to measure and add the sample to thegraduated cylinder or volumetric flask.
Table 5 Sample dilution volumes
Sample volume (mL) mL of deionized water used to bring the volume to 25 mL Multiplication factor
25.0 0.0 1
12.5 12.5 2
10.0 15.0 2.5
5.0 20.0 5
2.5 22.5 10
1.0 24.0 25
0.250 24.75 100
More accurate dilutions can be made with a pipet and a 100-mL volumetric flask(Table 6).
1. Use a pipet to add the sample. Dilute to volume with deionized water.2. Put in the stopper and invert to mix.
Table 6 Multiplication factors for dilution to 100 mL
Sample volume (mL) Multiplication factor
1 100
2 50
5 20
10 10
25 4
50 2
Water Analysis Guide
15

1.3.7.1 Sample dilution with interfering substancesSample dilution may affect the level at which a substance interferes. The effect of theinterferences decreases as the dilution increases. In other words, higher levels of aninterfering substance can be tolerated in the original sample if it is diluted before analysis.Example:Copper does not interfere at or below 100 mg/L for a 25-mL sample in a procedure. If thesample volume is diluted with an equal volume of water, what is the level at which copperwill not interfere?Total volume ÷ Sample volume = Dilution factor25 ÷ 12.5 = 2 Interference level × Dilution factor = Interference level in sample100 × 2 = 200 The level at which copper will not interfere in the diluted sample is at or below 200 mg/L.
1.3.8 AccuVac® Ampuls
C A U T I O N
Personal injury hazard. Glass ampules have sharp edges after they are opened. Use personalprotective equipment to work with glass ampules.
AccuVac Ampuls contain pre-measured powder or liquid vacuum-packed in optical-qualityglass ampules.To use AccuVac Ampuls:
1. Collect the sample in a beaker or other open container.2. Use one of the methods that follow to break the tip off the ampule:
• Use the optional AccuVac Snapper (2405200). Refer to Use the AccuVacSnapper on page 16 for instructions.
• Put the ampule tip well below the sample surface and break the tip off against thebeaker wall (Figure 6). The break must be far enough below the surface that airdoes not come in as the level of the sample drops.
3. Secure an ampule cap over the tip of the ampule. Invert the ampule several times todissolve the reagent. The cap protects from broken glass and supplies a grip to insertand remove the ampul from the cell holder. Wipe the ampule with a lint-free cloth toremove fingerprints.Note: Without the cap, the liquid stays in the ampule when the ampule is inverted.
4. Insert the ampule into the sample cell holder and read the results directly.
Figure 6 Use the AccuVac Ampuls
1.3.8.1 Use the AccuVac Snapper
1. Hold the snapper with the open end up.2. Gently slip the ampule into the snapper, point first, until the tip touches the ramp at
the bottom of the snapper.3. Hold the snapper between the index and middle finger (like a syringe). With the
ampule tip down, lower the snapper into the sample until the ampule shoulder is wet.
Water Analysis Guide
16

4. Push on the flat end of ampule with the thumb (as if depressing the plunger on asyringe) until the tip snaps (Figure 7). Let the ampule fill before the sample isremoved.
5. Rinse the wet end of the snapper and ampule with clean water, if necessary. Removethe ampule from the snapper.
6. Discard the ampule tip (kept in the snapper) in an applicable waste receptacle.
Figure 7 Use the AccuVac Snapper
1.3.9 PermaChem® pillowsPermaChem pillows use powdered reagents to minimize deterioration and the risk ofreagent spills (Figure 8). Hold the pillow away from the face as it is opened.
Figure 8 Open the PermaChem pillows
1.3.10 Sample cellsA set of sample cells are shipped with each photometric instrument. The same solution inboth cells gives the same absorbance (within ±0.002 Abs for properly matched cells). Formore information, refer to Match the sample cells on page 18.For accurate results, use only the sample cells specified in each procedure. Due todifferences in cell path lengths, sample cell substitution introduces bias in test results. Forexample, 25.4-mm (1-inch) square cells have a path length approximately 8% longer than25.4-mm (1-inch) round cells. Substitution of round cells for square cells introduces a biasin the reading.
1.3.10.1 Orientation of the sample cellsTo minimize measurement variability when a particular cell is used, always orient the cellin the same manner before it is put into the cell holder. The fill marks on the cells can beused as orientation guides to position the cells.
1.3.10.2 Maintain the sample cellsKeep the sample cells in the supplied boxes to protect them from scratches andbreakage. After use, empty and clean the sample cells. Do not leave color solutions in thesample cells for extended periods of time.
Water Analysis Guide
17
1.3.10.3 Clean the sample cells
C A U T I O N
Chemical exposure hazard. Obey laboratory safety procedures and wear all of thepersonal protective equipment appropriate to the chemicals that are handled. Refer to thecurrent material safety data sheets (MSDS) for safety protocols.
C A U T I O N
Chemical exposure hazard. Dispose of chemicals and wastes in accordance with local,regional and national regulations.
Most laboratory detergents are used at recommended concentrations. Neutral detergents,such as Liquinox, are safer to use when regular cleaning is necessary. To decrease thecleaning times, increase the temperature or use an ultrasonic bath. To complete thecleaning, rinse a few times with deionized water and then let the sample cell air dry.Sample cells may also be cleaned with acid, followed by a thorough rinse with deionizedwater.Note: Always use acid to clean sample cells that were used for low-level metal tests.
Special cleaning methods are necessary for individual procedures. When a brush is usedto clean sample cells, take extra care to avoid scratches on the interior surfaces of thesample cells.
1.3.10.4 Match the sample cellsThe sample cells supplied with the spectrophotometer instrument are distortion-free.Nicks and scratches from movement may cause an optical mismatch between twosample cells and introduce error into the test results. To prevent this type of error,optically match the sample cells.Note: Refer to the spectrophotometer user manual for the specific steps necessary to selectwavelengths and set the instrument to zero.
1. Set the instrument power switch to on. Make sure that the Display Lock is off or theReading mode is set to Continuous.
2. Select a wavelength of 510 nm or the wavelength to be used for the test.3. Pour at least 10 mL (25 mL for 25-mL cells) of deionized water into each of the two
sample cells.4. Put one sample cell into the cell holder with the fill mark toward the user.5. Set the instrument to zero.6. Put the other sample cell into the cell holder with the fill line toward the user.7. Let the value stabilize and then read the absorbance. Record the resulting
absorbance.8. Turn the cell 180° and do step 6 again. Try to get an absorbance value within
±0.002 Abs of the first cell. Record the orientation of the cell.If the sample cells cannot be matched to within ±0.002 Abs, they can still be used ifan adjustment is made for the difference. For example, if the second cell reads0.003 absorbance units higher than the first cell, adjust future readings (when thesetwo cells are used). Subtract 0.003 absorbance units (or the equivalent concentration)from the reading. Likewise, if the second cell reads –0.003 absorbance units, add0.003 absorbance units to the reading.
Water Analysis Guide
18
1.3.11 Other apparatus
1.3.11.1 Boiling aidsBoiling is necessary for some procedures. Under some conditions, bumping may occurand cause sample loss or injury. Bumping is caused by the sudden, almost explosive,conversion of water to steam as it is heated. Use of a boiling aid, such as boiling chips(1483531), decreases bumping.Make sure that the boiling aids do not contaminate the sample. Do not use boiling aids(except glass beads, 259600) more than once. Use a large sufficient flask or beaker togive significant head space above the solution. Loosely cover the sample during boiling toprevent splash, reduce the chance of contamination and minimize sample loss.Individual procedures recommend the specific boiling aid to use.
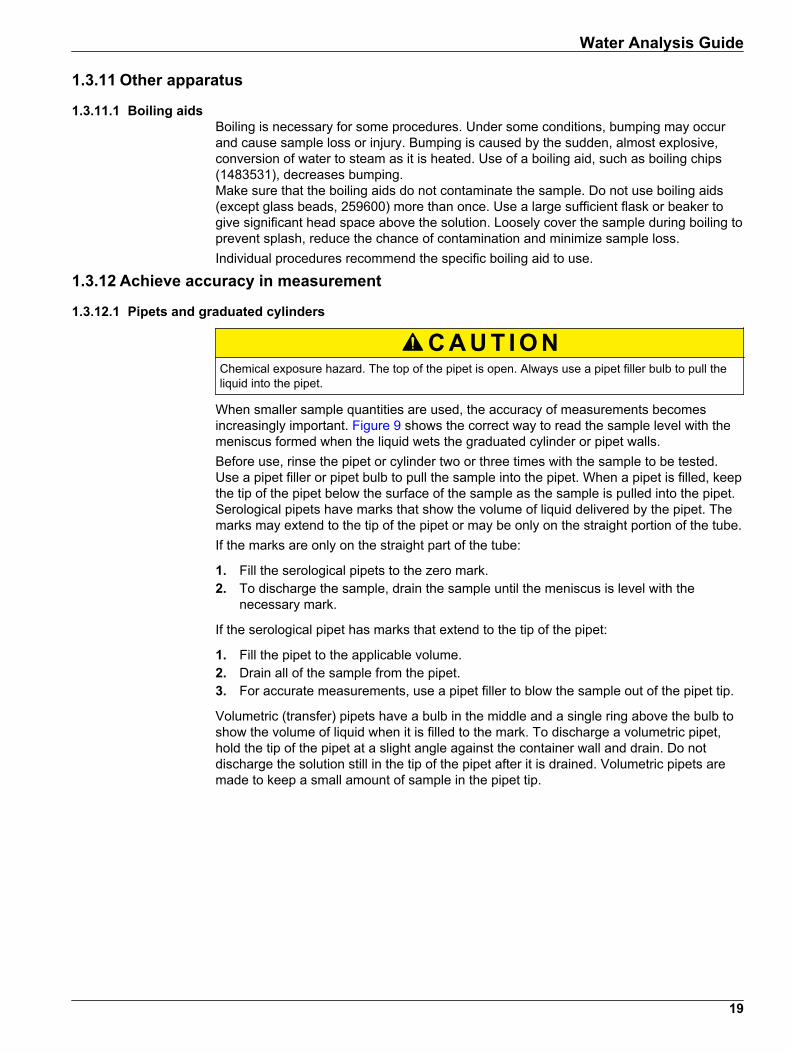
1.3.12 Achieve accuracy in measurement
1.3.12.1 Pipets and graduated cylinders
C A U T I O N
Chemical exposure hazard. The top of the pipet is open. Always use a pipet filler bulb to pull theliquid into the pipet.
When smaller sample quantities are used, the accuracy of measurements becomesincreasingly important. Figure 9 shows the correct way to read the sample level with themeniscus formed when the liquid wets the graduated cylinder or pipet walls.Before use, rinse the pipet or cylinder two or three times with the sample to be tested.Use a pipet filler or pipet bulb to pull the sample into the pipet. When a pipet is filled, keepthe tip of the pipet below the surface of the sample as the sample is pulled into the pipet.Serological pipets have marks that show the volume of liquid delivered by the pipet. Themarks may extend to the tip of the pipet or may be only on the straight portion of the tube.If the marks are only on the straight part of the tube:
1. Fill the serological pipets to the zero mark.2. To discharge the sample, drain the sample until the meniscus is level with the
necessary mark.
If the serological pipet has marks that extend to the tip of the pipet:
1. Fill the pipet to the applicable volume.2. Drain all of the sample from the pipet.3. For accurate measurements, use a pipet filler to blow the sample out of the pipet tip.
Volumetric (transfer) pipets have a bulb in the middle and a single ring above the bulb toshow the volume of liquid when it is filled to the mark. To discharge a volumetric pipet,hold the tip of the pipet at a slight angle against the container wall and drain. Do notdischarge the solution still in the tip of the pipet after it is drained. Volumetric pipets aremade to keep a small amount of sample in the pipet tip.
Water Analysis Guide
19

If droplets of the sample hold to the walls of the pipet, the pipet is dirty and will not supplythe correct amount of sample. Fully clean the pipet with a laboratory detergent or cleaningsolution and then rinse several times with deionized water.
Figure 9 Read the meniscus
1.3.12.2 Pour-Thru™ CellThe Pour-Thru Cell is an optional accessory that increases accuracy and makesmeasurements more convenient for the rapid liquid methods. Methods that use 25-mLsamples and sample cells can use the Pour-Thru Cell if specified in the procedure. ThePour-Thru Cell cannot be used with 10-mL sample sizes and reagents. The Pour-ThruCell cannot be used directly with a method unless it is specified in the procedure. Formore information, refer to the photometer user manual.Refer to the photometer user manual for installation and operation instructions.
• Pour the solution into the funnel of the installed Pour-Thru Cell Module. Do not spillsolution on the instrument.
• The funnel height and orientation may be adjusted. The funnel height increases thespeed of the sample flow through the cell. The higher the funnel, the faster the flow.
• To minimize air bubbles, adjust the funnel so that it drains fully with the final level ofliquid in the tube about 5 cm (2 inches) below the tip of the funnel.
• Take instrument readings after the solution has stopped flowing through the cell.• Always rinse the cell thoroughly with deionized water after each series of tests or as
often as specified in the procedure.
Occasionally, remove the Pour-Thru Cell to look for any accumulation of film on thewindows. If the windows are not clear (have a film), soak the cell in a detergent bath andrinse thoroughly with deionized water.
1.4 Chemical analysis1.4.1 Sample collection preservation and storage
Correct sampling and storage are critical for accurate testing. Sampling devices andcontainers must be thoroughly cleaned to prevent carryover from previous samples.Preserve the sample with the test-specific information about sample preservation.
1.4.1.1 Collect water samplesUse a clean container. Rinse the container several times with the water to be sampled,and then take the sample. Document the location and procedure used for each sampletaken. For example:From a tap—Take samples as close as possible to the source of the supply. Thisdecreases the influence of the distribution system on the sample. Make sure that there issufficient water to flush the system. Fill sample containers slowly with a gentle stream toavoid turbulence and air bubbles.
Water Analysis Guide
20

From a well—Let the pump run long enough to pull fresh groundwater into the system.Collect a sample from a tap near the well.From open waters—Take the sample as near the middle of the body of water as ispractical, at least several feet from the shore or edge of the tank. Take the sample underthe surface of the water. When a capped container is used, submerge it before the cap isremoved.
1.4.1.1.1 Types of containersDifferent containers are recommended for specific parameters.
• Polypropylene and Polyethylene• Quartz or TFE (tetrafluoroethylene, Teflon®)—higher quality and price• Glass—Glass supplies a good general-purpose container. Do not use soft-glass
containers to collect samples to be tested for metals in the µg/L range.
To find silver, put samples in dark containers such as amber or brown glass.Acid wash the sample containers to fully clean them before use.
1.4.1.1.2 Acid washingIf a procedure suggests acid washing, do the steps that follow:
1. Clean the glassware or plasticware with laboratory detergent. Phosphate-freedetergent is best. To find phosphates, always use phosphate-free detergent.
2. Rinse well with tap water.3. Rinse with a 1:1 hydrochloric acid solution or a 1:1 nitric acid solution. To test for lead
or other metals, nitric acid is best.4. Rinse well with deionized water. For chromium, 12–15 rinses may be necessary. To
test for ammonia and Kjeldahl nitrogen, make sure that the rinse water is ammonia-free.
5. Air dry the container. Protect the glassware from fumes and other sources ofcontamination during storage.
Use chromic acid or chromium-free substitutes to remove organic deposits from glasscontainers. Afterward, rinse thoroughly with water to remove all traces of chromium.Do not use metal contaminants from containers, distilled water or membrane filters.
1.4.1.1.3 Sample splitsSamples must often divided into separate containers for intra- or inter-laboratory use instudies, confirmation, alternative techniques or to keep additional sample for referenceand stability studies.It is very important that sample be divided done correctly:
• Collect a large volume of sample in a single container and transfer to smallercontainers. Do not fill the smaller containers individually from the water source.
• Fully mix samples that contain particulates or solids before they are divided so that allthe samples are homogeneous.
• If it is necessary to filter the sample before analysis or storage, filter all the samplebefore it is divided.
• Use the same kind of container for all the samples.• Analyze biologically active splits on the same day or as close to the same day as is
possible.• Preserve all splits in the same way. If this is not done, fully record the differing
methods.• When the sample is to be tested for volatile contaminants, fill containers so that they
overflow and then put on a cap carefully. Do not leave any head space or air in thecontainer.
Water Analysis Guide
21

1.4.1.2 Storage and preservationBecause chemical and biological processes continue after collection, analyze the sampleas soon as possible. This also reduces the chance for error and minimizes labor. Whenan immediate analysis is not possible, preserve the sample. Preservation methodsinclude pH control, chemical addition, refrigeration and freezing.Comparison of international drinking water and FDA bottled water guidelines gives anoverview of preservation methods and holding times for specific procedures.Preserve aluminum, cadmium, chromium, cobalt, copper, iron, lead, nickel, potassium,silver and zinc samples for at least 24 hours with the steps that follow.
1. Add approximately 2.5 mL Nitric Acid 1:1 solution (254049) per 1 L of sample until apH less than 2 is reached.
2. Use pH indicator paper or a pH meter to make sure that the pH is 2 or less. Addadditional pillows if necessary.
3. Adjust the sample pH before analysis. Increase the pH to 4.5 with Sodium HydroxideStandard Solution, 1 N or 5 N.
1.4.1.2.1 Sample preservationComparison of international drinking water and FDA bottled water guidelines gives anoverview of preservation methods and holding times* for specific procedures. Refer to Table 7.
Table 7 Necessary containers, preservation techniques and holding times
Parameter name Container1 Preservation2,3 Maximum holdingtime4
Bacterial tests
Coliform, fecal and total P, G Cool, 4 °C to less than 10 °C, 0.0008%Na2S2O3
6 hours
Fecal streptococci P, G Cool, 4 °C to less than 10 °C, 0.0008%Na2S2O3
6 hours
Aquatic toxicity tests
Toxicity, acute and chronic P, G Cool, 4 ≤ 6 °C 36 hours
Chemical tests
Acidity P, G Cool, 4 ≤ 6 °C 14 days
Alkalinity P, G Cool, 4 ≤ 6 °C 14 days
Ammonia P, G Cool, 4 ≤ 6 °C H2SO4 to pH less than 2 28 days
Biochemical oxygen demand(BOD)
P, G Cool, 4 ≤ 6 °C 48 hours
Biochemical oxygendemand, carbonaceous(CBOD)
P, G Cool, 4 ≤ 6 °C 48 hours
Boron P, PFTE or quartz HNO3 to pH less than 2 6 months
Bromide P, G Not necessary 28 days
Chemical oxygen demand(COD)
P, G Cool, 4 ≤ 6 °C, H2SO4 to pH less than 2 28 days
Chloride P, G Not necessary 28 days
Chlorine, total residual P, G Not necessary Analyze immediately
* This table was adapted from Table II in the Code of Federal Regulations, Vol 77, No. 97/Friday, May 18,2012/Rules and Regulations, pages 29806–29809. Most organic tests are not included.
Water Analysis Guide
22

Table 7 Necessary containers, preservation techniques and holding times (continued)
Parameter name Container1 Preservation2,3 Maximum holdingtime4
Color P, G Cool, 4 ≤ 6 °C 48 hours
Cyanide, total and amenableto chlorination
P, G Cool, 4 ≤ 6 °C, NaOH to pH higher than12, 0.6 g ascorbic acid5
14 days6
Fluoride P Not necessary 28 days
Hardness P, G HNO3 to pH less than 2, H2SO4 to pH lessthan 2
6 months
Hydrogen ion (pH) P, G Not necessary Analyze immediately
Kjeldahl and organic nitrogen P, G Cool, 4 ≤ 6 °C, H2SO4 to pH less than 2 28 days
Metals7
Chromium VI P, G Cool, 4 ≤ 6 °C, (NH4)2SO4 buffer to pH9.3 – 9.7
28 days8
Mercury P, G HNO3 to pH less than 2 28 days
Metals, except boron,chromium VI and mercury
P, G HNO3 to pH less than 2 6 months
Nitrate P, G Cool, 4 ≤ 6 °C 48 hours
Nitrate-nitrite P, G Cool, 4 ≤ 6 °C, H2SO4 to pH less than 2 28 days
Nitrite P, G Cool, 4 ≤ 6 °C 48 hours
Oil and grease G Cool, 4 ≤ 6 °C, HCl or H2SO4 to pH lessthan 2
28 days
Organic Carbon P, G Cool, 4 ≤ 6 °C, HCl or H2SO4 or H3PO4 topH less than 2
28 days
Orthophosphate P, G Filter immediately; Cool, 4 ≤ 6 °C 48 hours
Oxygen, dissolved probe G Bottle and top Not necessary Analyze immediately
Winkler G Bottle and top Fix on site and store in dark 8 hours
48. Phenols G only Cool, 4 ≤ 6 °C, H2SO4 to pH less than 2 28 days
Phosphorus, elemental G Cool, 4 ≤ 6 °C 48 hours
Phosphorus, total P, G Cool, 4 ≤ 6 °C, H2SO4 to pH less than 2 28 days
Residue, Total P, G Cool, 4 ≤ 6 °C 7 days
Residue, Filterable P, G Cool, 4 ≤ 6 °C 7 days
Residue, Nonfilterable (TSS) P, G Cool, 4 ≤ 6 °C 7 days
Residue, Settleable P, G Cool, 4 ≤ 6 °C 48 hours
Residue, Volatile P, G Cool, 4 ≤ 6 °C 7 days
Silica P, PFTE or quartz Cool, 4 ≤ 6 °C 28 days
Specific Conductance P, G Cool, 4 ≤ 6 °C 28 days
Sulfate P, G Cool, 4 ≤ 6 °C 28 days
Sulfide P, G Cool, 4 ≤ 6 °C, add zinc acetate plussodium hydroxide to pH higher than 9
7 days
Sulfite P, G Not necessary Analyze immediately
Surfactants P, G Cool, 4 ≤ 6 °C 48 hours
Water Analysis Guide
23
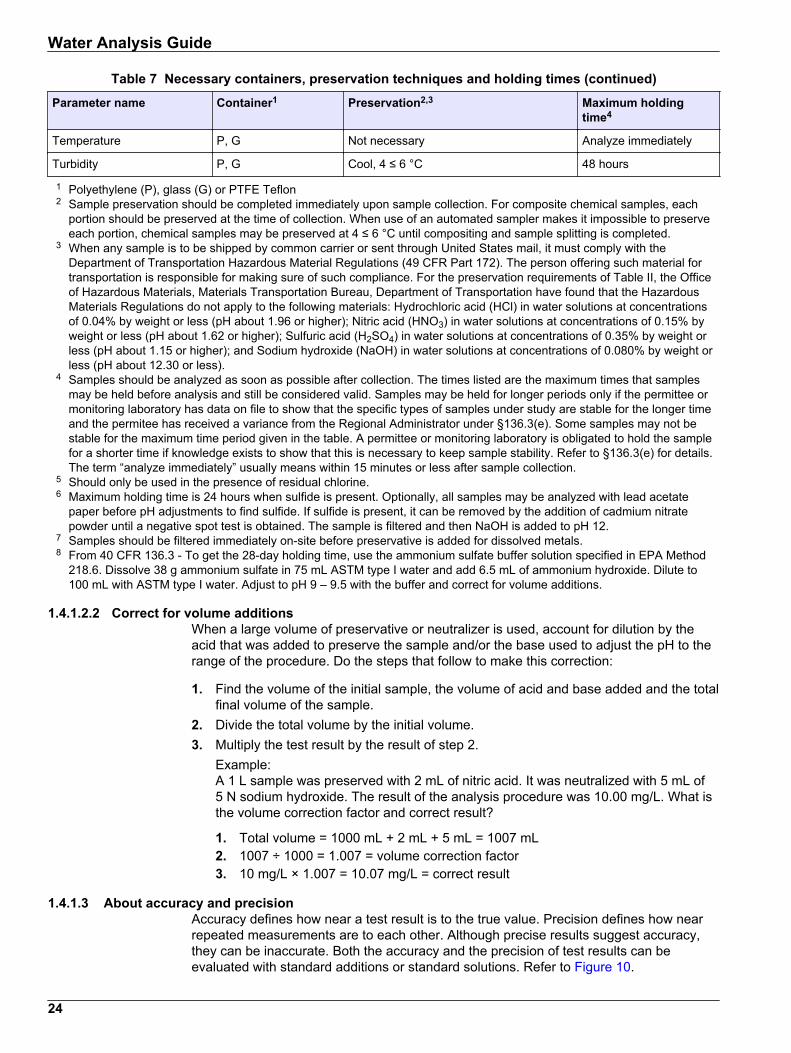
Table 7 Necessary containers, preservation techniques and holding times (continued)
Parameter name Container1 Preservation2,3 Maximum holdingtime4
Temperature P, G Not necessary Analyze immediately
Turbidity P, G Cool, 4 ≤ 6 °C 48 hours
1 Polyethylene (P), glass (G) or PTFE Teflon2 Sample preservation should be completed immediately upon sample collection. For composite chemical samples, each
portion should be preserved at the time of collection. When use of an automated sampler makes it impossible to preserveeach portion, chemical samples may be preserved at 4 ≤ 6 °C until compositing and sample splitting is completed.
3 When any sample is to be shipped by common carrier or sent through United States mail, it must comply with theDepartment of Transportation Hazardous Material Regulations (49 CFR Part 172). The person offering such material fortransportation is responsible for making sure of such compliance. For the preservation requirements of Table II, the Officeof Hazardous Materials, Materials Transportation Bureau, Department of Transportation have found that the HazardousMaterials Regulations do not apply to the following materials: Hydrochloric acid (HCl) in water solutions at concentrationsof 0.04% by weight or less (pH about 1.96 or higher); Nitric acid (HNO3) in water solutions at concentrations of 0.15% byweight or less (pH about 1.62 or higher); Sulfuric acid (H2SO4) in water solutions at concentrations of 0.35% by weight orless (pH about 1.15 or higher); and Sodium hydroxide (NaOH) in water solutions at concentrations of 0.080% by weight orless (pH about 12.30 or less).
4 Samples should be analyzed as soon as possible after collection. The times listed are the maximum times that samplesmay be held before analysis and still be considered valid. Samples may be held for longer periods only if the permittee ormonitoring laboratory has data on file to show that the specific types of samples under study are stable for the longer timeand the permitee has received a variance from the Regional Administrator under §136.3(e). Some samples may not bestable for the maximum time period given in the table. A permittee or monitoring laboratory is obligated to hold the samplefor a shorter time if knowledge exists to show that this is necessary to keep sample stability. Refer to §136.3(e) for details.The term “analyze immediately” usually means within 15 minutes or less after sample collection.
5 Should only be used in the presence of residual chlorine.6 Maximum holding time is 24 hours when sulfide is present. Optionally, all samples may be analyzed with lead acetate
paper before pH adjustments to find sulfide. If sulfide is present, it can be removed by the addition of cadmium nitratepowder until a negative spot test is obtained. The sample is filtered and then NaOH is added to pH 12.
7 Samples should be filtered immediately on-site before preservative is added for dissolved metals.8 From 40 CFR 136.3 - To get the 28-day holding time, use the ammonium sulfate buffer solution specified in EPA Method
218.6. Dissolve 38 g ammonium sulfate in 75 mL ASTM type I water and add 6.5 mL of ammonium hydroxide. Dilute to100 mL with ASTM type I water. Adjust to pH 9 – 9.5 with the buffer and correct for volume additions.
1.4.1.2.2 Correct for volume additionsWhen a large volume of preservative or neutralizer is used, account for dilution by theacid that was added to preserve the sample and/or the base used to adjust the pH to therange of the procedure. Do the steps that follow to make this correction:
1. Find the volume of the initial sample, the volume of acid and base added and the totalfinal volume of the sample.
2. Divide the total volume by the initial volume.3. Multiply the test result by the result of step 2.
Example:A 1 L sample was preserved with 2 mL of nitric acid. It was neutralized with 5 mL of5 N sodium hydroxide. The result of the analysis procedure was 10.00 mg/L. What isthe volume correction factor and correct result?
1. Total volume = 1000 mL + 2 mL + 5 mL = 1007 mL2. 1007 ÷ 1000 = 1.007 = volume correction factor3. 10 mg/L × 1.007 = 10.07 mg/L = correct result
1.4.1.3 About accuracy and precisionAccuracy defines how near a test result is to the true value. Precision defines how nearrepeated measurements are to each other. Although precise results suggest accuracy,they can be inaccurate. Both the accuracy and the precision of test results can beevaluated with standard additions or standard solutions. Refer to Figure 10.
Water Analysis Guide
24

Figure 10 Precision vs accuracy
1 Not accurate, not precise 3 Precise, not accurate
2 Accurate, not precise 4 Accurate and precise
1.4.1.4 Standard solutionsA standard solution may be ordered as a prepared reagent or it may be made in thelaboratory. It is a solution of a known composition and concentration. The accuracy of theanalysis system may be identified with a standard solution in place of the sample water ina procedure.
1.4.1.5 Standard additionsStandard additions is a common technique to identify the accuracy of the test results.Other names are “spiking” and “known additions.” The technique can identifyinterferences, bad reagents, faulty instruments and incorrect procedures.To complete the standard additions technique, add a measured small amount of astandard solution to the sample and do the test again. Use the same reagents, equipmentand technique. The result should be about 100% recovery. If not, there is an identifiableproblem.If the standard additions technique is satisfactory for the test, a standard additionsmethod section will be in the procedure under Accuracy Check. Complete the detailedinstructions given.If the result is approximately 100% recovery for each addition, everything is satisfactoryand the results are correct.If the result is not approximately 100% recovery for each addition, a problem is present.To identify if the cause is an interference, do the standard additions technique again withdeionized water as the sample. If the result is approximately 100% recovery for eachaddition, an interference exists.If the results show good recoveries with the deionized water, use this checklist to find theproblem:
1. Make sure that the steps in the procedure are done correctly:
a. Are the correct reagents used in the correct order?b. Is the correct time used to let the color develop?c. Is the correct glassware used?d. Is the glassware clean?e. Does the test need a specific sample temperature?f. Is the sample pH in the correct range?
Refer to the written procedure to answer these questions.2. Examine the performance of the instrument with the instructions in the user manual.
Water Analysis Guide
25

3. Examine the reagents. Repeat the standard additions technique with new, freshreagents. If the results are good, the original reagents were faulty.
4. If nothing else is wrong, the standard is almost certainly defective. Do the standardadditions technique again with a new standard.
If the problem is still not known, contact technical support. Contact information is providedon the website for all countries.
1.4.1.6 Troubleshoot a test when the results are in doubtIf the results from any chemistry are in doubt, do the steps that follow to troubleshoot.
1. Do a proof-of-accuracy check. Take a standard solution, which has a knownconcentration, through the same steps as the original sample. Include sampling andstorage, digestion and colorimetric determination, if applicable. If the results of thestandard solution check are correct, go to step 4. If there is a variation in theexpected results, go to step 2.
2. If the standard solutions check is not the same as the expected results, examine theinstrument set-up and method procedure with the steps that follow:
a. Make sure that the correct program number for the test is selected.b. Make sure that the units of concentration of the standard are the same as the
units shown. (One of the alternative forms of the analyte may be in the display.)For example: Molybdenum may be shown as Mo instead of MoO4.
c. Make sure that the sample cells specified in the procedures are used.d. Make sure that the reagents are correct for the sample size being analyzed.e. Make sure that the reagent blank value saved is for the current procedure. It may
be from a previous lot of reagents and therefore not representative of the currentreagent lot.
f. Make sure that the calibration curve adjustment (Standard Adjust) is currently inuse. The factory-stored default calibration should be used initially to examine thestandard.
g. Make sure that the dilution factor option is correct.
If the instrument setup is correct and the method procedure specifics are completedcorrectly, go to step 3.
3. If the standard solution check does not match the expected results, examine thereagents used in the test and the analytical technique with the steps that follow:
a. Find the age of the reagents used in the test. Many factors affect reagent shelflife (i.e., storage temperature, storage conditions, microbial contamination).Replace suspect reagents and do the standards check again.
b. Do a deionized or distilled water blank through the full process (include samplingand storage, digestion and colorimetric determination). Some chemicals will adda small amount of color to a test. This is typical. However, color developmenthigher than 10% of the range of the test may show a problem with one of thereagents or the dilution water.
c. To troubleshoot the procedure, delete the parts one by one. First, do the standardsolution, leave out preservation and storage, and do only digestion andcolorimetry. If this analysis is correct, examine the procedure used to keep thesample. Make sure that it is the procedure prescribed for the selected parameter.If the sample is acidified for storage, make sure that the correct acid is used andthe sample is adjusted to the proper pH level before the sample is examined.
If the standards check is still incorrect, do the standard on just the colorimetry. If theresults are correct, examine the digestion procedure. Make sure that the amount of
Water Analysis Guide
26
reagents used and the pH after the digestion are correct for the procedure. Refer tothe procedure for the parameter in question.
4. If the standard solution gives a correct value, but the results of the samplemeasurement are questionable, there may be an interference in the sample. To lookfor an interference:
a. Spike the sample. Use a standard addition test instead of a standard solution testto include any possible interferences.
b. To test cells that contain fresh sample water, add an amount of standard equal totwo times the concentration of the sample.
c. Do both samples with the same reagents, instruments and technique. The spikedsample should show an increase equal to the amount of standard added.
d. Calculate percent recovery as shown below. Ideally, the results should be 100%.The results from 90 to 110% are acceptable. Refer to the procedure notes forpossible interferences and ways to prevent them.
e. Do a series of dilutions on the sample. Make sure that the sample is within therange of the test. An out-of-range sample for the method may give erroneousresults because of under- or over-development of the color, too much turbidity oreven sample bleaching. Do a series of dilutions to look for this possibility.
f. If the cause of the interference cannot be found, dilute the sample past the pointof interference. This is often the most economical and efficient way to get thecorrect result. If it is not possible to dilute out an interference without diluting outthe parameter to be measured, use a different method, such as a differentchemistry or an ion-selective electrode to measure the parameter.
1.4.1.6.1 Calculate the percent recoveryTo calculate the percent recovery:
1. Measure the unknown sample concentration.2. Calculate the theoretical concentration of the spiked sample:
Theoretical concentration = (Cu × Vu) + (Cs × Vs) ÷ Vu + Vs
Where:Cu = measured concentration of the unknown sampleVu = volume of the unknown sampleCs = concentration of the standardVs = volume of the standard
3. Measure the spiked sample concentration.4. Divide the spiked sample concentration by the theoretical concentration and multiply
by 100.For example:A sample was tested for manganese and the result was 4.5 mg/L. A separate 97-mLportion of the same sample was spiked with 3 mL of a 100 mg/L standard solution ofmanganese. This spiked solution was examined again for manganese with the samemethod. The result was 7.1 mg/L.The theoretical concentration of the spiked sample is:(4.5 mg/L × 97 mL) + (100 mg/L × 3 mL) ÷ 97 mL + 3 mL = 7.4 mg/LThe percent spike recovery is:(7.1 mg/L ÷ 7.4 mg/L) x 100 = 96%
1.4.1.6.2 USEPA calculationThe USEPA uses a more stringent calculation requirement for percent recovery. Thisformula calculates the percent recovery only for the standard added to the spiked sampleand gives a lower value than the above calculation. A complete explanation for the
Water Analysis Guide
27

USEPA formula is shown in USEPA Publication SW-846. The USEPA percent recoveryformula is:%R = 100 (Xs – Xu) ÷ KWhere:Xs = measured value of the spiked sampleXu = measured value for the unspiked sample, adjusted for the dilution of the spikevolumeK = known value of the spike in the sampleFor example:A sample measures 10 mg/L. A separate 100-mL portion of the sample was spiked with5 mL of a 100-mg/L standard solution. The spiked solution was measured by the samemethod as the original sample. The result was 13.7 mg/L.Xs = 13.7 mg/LXu = (10 mg/L × 100 mL) ÷ 105 mL = 9.5 mg/LK = (5 mL × 100 mg/L) ÷ 105 mL = 4.8 mg/L%R = (100 × (13.7 mg/L – 9.5 mg/L)) ÷ 4.8 mg/L = 88%Acceptable percent recovery values are 80–120%.
1.4.1.7 Adjust the standard curveSpectrophotometers typically have many programs permanently installed in memory.Many programs include a pre-programmed calibration curve. Each curve is the result ofan extensive calibration completed under ideal conditions and is normally sufficient formost testing. Deviations from the curve can occur from compromised testing reagents,defective sample cells, incorrect test procedure, incorrect technique or other correctablecauses. Interfering substances or other causes may be beyond the control of the analyst.The pre-programmed curve may not be convenient in the situations that follow:
• Tests are done where the reagents are highly variable from lot to lot.• Tests are done where frequent calibration curve checks are necessary.• Tests are done where samples give a consistent test interference.• Think about the questions that follow before the calibration curve is adjusted:
• Will future test results be better when the curve is adjusted?• Are interfering substances consistent in all the samples tested?• Estimated detection limit, sensitivity, precision and test range information
provided with the procedure may not apply to an adjusted curve calibration.
The calibration curves can be adjusted with the steps found in the test procedure.Generally, add test reagents to a blank and standard solution. It is important to do theprocedure carefully. After the adjustment, it is wise to do standard solutions of severalconcentrations to make sure that the adjusted curve is satisfactory. Do standard additionson typical samples to find out if the adjusted curve is acceptable.To adjust a measurement is a two-step process. First, the instrument measures thesample with the pre-programmed calibration. Second, the instrument multiplies thismeasurement by an adjustment factor. The factor is the same for all concentrations. Theinstrument remembers the factor until the program is exited and shows the standardadjustment icon when it is used. To return to the pre-programmed curve at any time,select the original stored program from the main menu.
1.4.2 InterferencesInterferences are contaminants in a sample that can cause changes in colordevelopment, turbidity or unusual colors and odors, and thereby make errors in theresults. A list of common interferences is included in each procedure. Reagents areformulated to remove many interferences. To remove other interferences, pretreat thesample as instructed in the procedure.
Water Analysis Guide
28

Test strips are available for many of the common interferences. These test strips can beused to screen samples for the presence of interferences.
1. Repeat the test on a sample diluted with deionized water. Refer to Sample dilutionon page 15.
2. Correct the results for the dilution and compare them with those from the original test.3. If they are significantly different, make a second dilution and compare it against the
first.4. Repeat the dilutions until the same result (after volume corrections) is achieved twice
in succession.
For more information on interferences, refer to Standard additions on page 25. The APHAStandard Methods book (an excellent reference for water analysis) also showsinterferences in the general introduction section.
1.4.2.1 pH interferenceChemical reactions are often pH dependent. Reagents contain buffers to adjust the pH ofthe sample to the correct range. However, the reagent buffer may not be strong enoughfor samples that are highly buffered or have an extreme pH. The sampling and storagesection of each procedure gives the pH range for that test.Before the test, adjust the sample to the proper pH as instructed in the procedure or dothe steps that follow:
1. Measure the pH of the analyzed sample with a pH meter.Note: Use pH paper to test for chloride, potassium or silver to avoid contamination.
2. Prepare a reagent blank with deionized water as the sample. Add all reagentsspecified in the procedure. Timer sequences, etc., may be ignored.
3. Mix well.4. Measure the pH of the reagent blank with a pH meter.5. Compare the pH values of the analyzed sample with the reagent blank.6. If there is little difference in the values of the analyzed sample and the reagent blank,
the pH interference is not the problem. Do the accuracy check for the specificprocedure to more clearly identify the problem.
7. If there is a large difference between the value of the analyzed sample and thereagent blank, adjust the sample pH to the value of the reagent blank. Adjust thesample pH to this same pH for all future samples before analysis.
• Use the applicable acid, usually nitric acid, to lower the pH.• Use the applicable base, usually sodium hydroxide, to increase the pH.
If acid or base was added, adjust the final result for any dilution that was caused.Refer to Correct for volume additions on page 24.
8. Analyze the sample as done previously.9. Some purchased standards may be very acidic and do not work directly with test
procedures. Adjust the pH of these standards as described previously. Adjust the finalconcentration of the standard for the dilution. The standard solutions suggested in theprocedures are formulated so that no pH adjustment is necessary.
1.4.3 Method performance
1.4.3.1 Estimated detection limit (EDL)Ranges for chemical measurements have limits. The lower limit is important because itidentifies whether a measurement is different from zero. Many experts disagree about thedefinition of this detection limit and find that it can be difficult. The Code of FederalRegulations (40 CFR, Part 136, Appendix B) provides a procedure to find the MethodDetection Limit (MDL). The MDL is the lowest concentration that is different from zerowith a 99% level of confidence. A measurement below this MDL is highly suspect.
Water Analysis Guide
29

The MDL is not fixed. It is different for each reagent lot, instrument, analyst, sample type,etc. Therefore, a published MDL may be a useful guide, but is only accurate for a specificset of circumstances. Each analyst should find a more accurate MDL for each specificsample matrix with the same equipment, reagents and standards that will routinely beused for measurements.A sensitivity value (concentration change equivalent to an absorbance change of0.010 abs) is provided as an estimate of the lower detection limit of each test. Thesensitivity value may be used as an EDL for the purposes of MDL determination. It is agood starting concentration when a MDL is to be found.Note: Do not use the EDL as the MDL.
The conditions for MDL determination must be exactly the same as the conditions usedfor analysis. The EDL may be useful to the analyst as a starting point when a MDL is tobe found or as a way to compare methods. Measurements below the EDL may also bevaluable because they can show a trend, show the presence of analyte and/or providestatistical data. However, these values have a large uncertainty.
1.4.3.2 Method detection limit (MDL)This method is in accordance with the USEPA definition in 40 CFR, Part 136, Appendix Bin the 7-1-94 edition. The USEPA defines the method detection limit (MDL) as theminimum concentration that can be found with a 99% level of confidence that the trueconcentration is higher than zero. Since the MDL is different from analyst to analyst, it isimportant that the MDL be found under actual operating conditions.The procedure to find the MDL is based on replicate analyses at a concentration 1 to5 times the estimated detection limit. The MDL value is calculated from the standarddeviation of the replicate study results multiplied by the appropriate t value for a 99%confidence interval. For this definition, the MDL does not account for variation in samplecomposition and can only be achieved under ideal conditions.
1. Make an estimate of the detection limit. Use the sensitivity value stated in the Methodperformance section of the analysis procedure.
2. Prepare a laboratory standard of the analyte, 1 to 5 times the estimated detectionlimit, in deionized water that is free of the analyte.
3. Make an analysis of at least seven portions of the laboratory standard and recordeach result.
4. Calculate the average and the standard deviation(s) of the results.5. Calculate the MDL with the appropriate t value (Table 8) and the standard deviation
value:MDL = t × s
Table 8 Test portions and t values
Number of test portions t value
7 3.143
8 2.998
9 2.896
10 2.821
For example:The EDL to measure iron with an iron test is 0.003 mg/L. An analyst accuratelyprepared 1 L of a 0.010 mg/L (about 3x the EDL) laboratory standard with a mixtureof a 10-mg/L iron standard in iron-free deionized water.Eight portions of the standard were examined with the FerroZine method. The resultsare shown in Table 9.
Water Analysis Guide
30

Table 9 Samples and results
Sample # Result (mg/L)
1 0.009
2 0.010
3 0.009
4 0.010
5 0.008
6 0.011
7 0.010
8 0.009
Use a calculator program. The average concentration = 0.010 mg/L and the standarddeviation (s) = 0.0009 mg/L.Based on the USEPA definition, calculate the MDL:MDL for iron test = 2.998 (t) x 0.0009 (s)MDL = 0.003 mg/L (the same as the initial estimate)Note: Occasionally, the calculated MDL may be very different from the estimate of thedetection limit. To test how reasonable the calculated MDL is, repeat the procedure with astandard near the calculated MDL. The average result calculated for the second MDLderivation should agree with the initial calculated MDL. Refer to 40 CFR, Part 136, Appendix B(7-1-94), pages 635–637 for detailed procedures to make sure that the MDL determination iscorrect.
1. Put a laboratory blank (that contains deionized water without analyte) through thetest procedure to to make sure that the blank measurement is less than thecalculated MDL.
2. If the blank measurement is near the calculated MDL, repeat the MDL procedurewith a separate blank for analysis for each portion of standard solution analyzed.
3. Subtract the average blank measurement from each standard and use thecorrected standard values to calculate the average and standard deviation usedin the MDL.
1.4.3.3 PrecisionEvery chemical measurement has some degree of uncertainty. The quality of the entirecalibration curve determines the precision.Uncertainty in chemical measurements may be due to systematic errors and/or randomerrors. A systematic error is a mistake that is always the same for every measurementmade. For example, a blank can add to each measurement for a specific compound, andgives consistently high results (a positive bias). Random errors are different for every testand can add a positive or a negative variation in response. Random errors are most oftencaused by variation in analytical technique. Even with reliable reagents developed toprevent systematic errors, response variation occurs in all chemical measurements.
1.4.3.4 Estimate the precisionThe method performance section in each procedure gives an estimate of test precision.Most procedures use a replicate analysis estimate, based on real data. For precisionfound in this manner, the 95% confidence interval of the distribution is reported.In replicate analysis, the chemist prepares a specific concentration of the analyte in adeionized water matrix. The standard is analyzed seven individual times on a singleinstrument. The standard deviation is calculated and the 95% confidence interval of thedistribution is reported in the method. The reported value gives an estimate of the“scatter” of results at a particular point in the calibration curve.
Water Analysis Guide
31
Precision estimates are based on a deionized water matrix. Precision on real sampleswith varying matrices can be quite different from these estimates.If the concentration achieved from the use of a standard solution is not as expected orwhen the results are in doubt, refer to Troubleshoot a test.
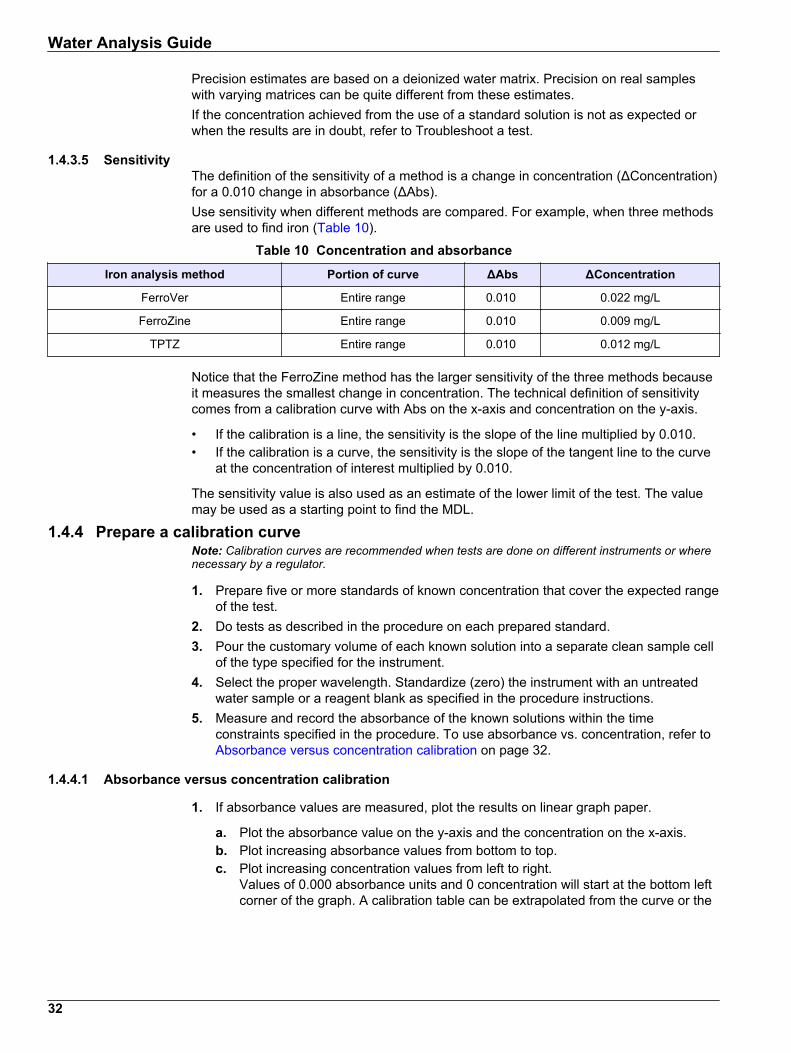
1.4.3.5 SensitivityThe definition of the sensitivity of a method is a change in concentration (ΔConcentration)for a 0.010 change in absorbance (ΔAbs).Use sensitivity when different methods are compared. For example, when three methodsare used to find iron (Table 10).
Table 10 Concentration and absorbance
Iron analysis method Portion of curve ΔAbs ΔConcentration
FerroVer Entire range 0.010 0.022 mg/L
FerroZine Entire range 0.010 0.009 mg/L
TPTZ Entire range 0.010 0.012 mg/L
Notice that the FerroZine method has the larger sensitivity of the three methods becauseit measures the smallest change in concentration. The technical definition of sensitivitycomes from a calibration curve with Abs on the x-axis and concentration on the y-axis.
• If the calibration is a line, the sensitivity is the slope of the line multiplied by 0.010.• If the calibration is a curve, the sensitivity is the slope of the tangent line to the curve
at the concentration of interest multiplied by 0.010.
The sensitivity value is also used as an estimate of the lower limit of the test. The valuemay be used as a starting point to find the MDL.
1.4.4 Prepare a calibration curveNote: Calibration curves are recommended when tests are done on different instruments or wherenecessary by a regulator.
1. Prepare five or more standards of known concentration that cover the expected rangeof the test.
2. Do tests as described in the procedure on each prepared standard.3. Pour the customary volume of each known solution into a separate clean sample cell
of the type specified for the instrument.4. Select the proper wavelength. Standardize (zero) the instrument with an untreated
water sample or a reagent blank as specified in the procedure instructions.5. Measure and record the absorbance of the known solutions within the time
constraints specified in the procedure. To use absorbance vs. concentration, refer to Absorbance versus concentration calibration on page 32.
1.4.4.1 Absorbance versus concentration calibration
1. If absorbance values are measured, plot the results on linear graph paper.
a. Plot the absorbance value on the y-axis and the concentration on the x-axis.b. Plot increasing absorbance values from bottom to top.c. Plot increasing concentration values from left to right.
Values of 0.000 absorbance units and 0 concentration will start at the bottom leftcorner of the graph. A calibration table can be extrapolated from the curve or the
Water Analysis Guide
32
concentration values can be read directly from the graph. Another alternative is tofind an equation for the line with the slope and y-intercept.
2. As an alternative, use the user program software in the spectrophotometer or acurve-fitting program (such as a spreadsheet software) to calculate the calibrationcurve.
1.4.5 Adapt procedures to other spectrophotometersTest procedures may be used with more than one spectrophotometer if calibration curvesare made that convert absorbance to concentration. Regardless of the spectrophotometerused, prepare the sample and calibration standards with the procedure and use theoptimum wavelength used in the procedure.To calibrate for a given analyte, a series of standards are prepared and measured tomake the calibration curve. The absorbance vs. concentration is plotted as described in Absorbance versus concentration calibration on page 32. Points on the graph areconnected with a smooth line (curved or straight). If necessary, use the curve to make acalibration table.
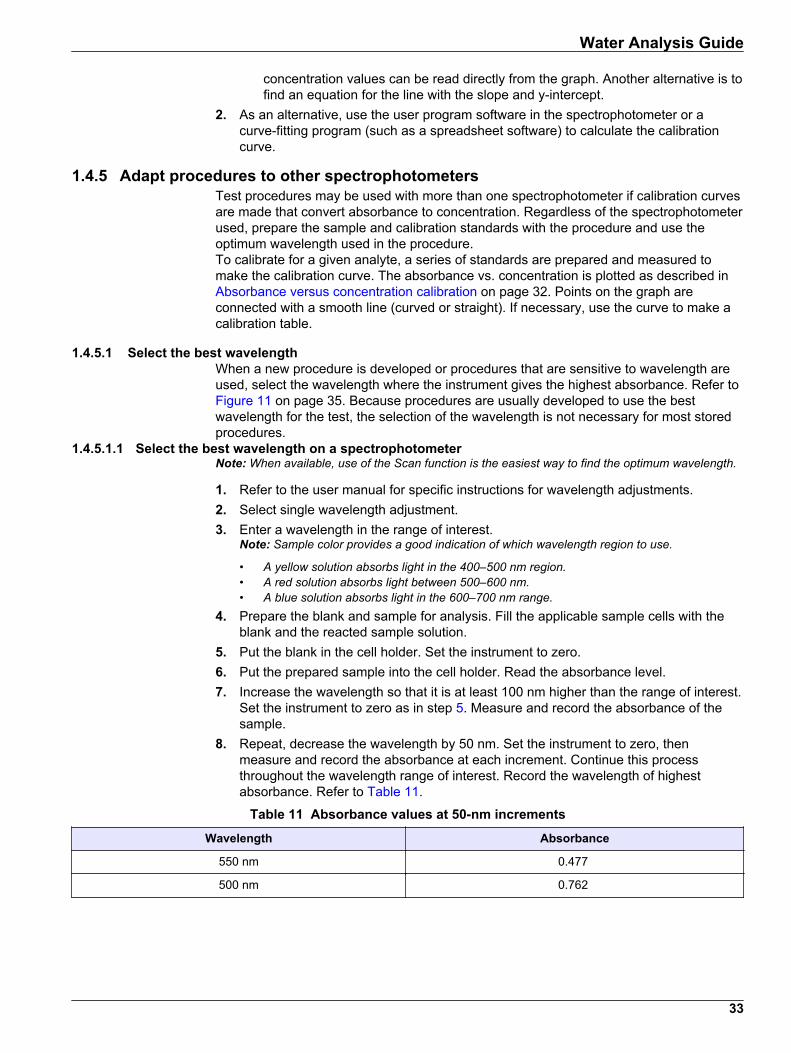
1.4.5.1 Select the best wavelengthWhen a new procedure is developed or procedures that are sensitive to wavelength areused, select the wavelength where the instrument gives the highest absorbance. Refer to Figure 11 on page 35. Because procedures are usually developed to use the bestwavelength for the test, the selection of the wavelength is not necessary for most storedprocedures.
1.4.5.1.1 Select the best wavelength on a spectrophotometerNote: When available, use of the Scan function is the easiest way to find the optimum wavelength.
1. Refer to the user manual for specific instructions for wavelength adjustments.2. Select single wavelength adjustment.3. Enter a wavelength in the range of interest.
Note: Sample color provides a good indication of which wavelength region to use.
• A yellow solution absorbs light in the 400–500 nm region.• A red solution absorbs light between 500–600 nm.• A blue solution absorbs light in the 600–700 nm range.
4. Prepare the blank and sample for analysis. Fill the applicable sample cells with theblank and the reacted sample solution.
5. Put the blank in the cell holder. Set the instrument to zero.6. Put the prepared sample into the cell holder. Read the absorbance level.7. Increase the wavelength so that it is at least 100 nm higher than the range of interest.
Set the instrument to zero as in step 5. Measure and record the absorbance of thesample.
8. Repeat, decrease the wavelength by 50 nm. Set the instrument to zero, thenmeasure and record the absorbance at each increment. Continue this processthroughout the wavelength range of interest. Record the wavelength of highestabsorbance. Refer to Table 11.
Table 11 Absorbance values at 50-nm increments
Wavelength Absorbance
550 nm 0.477
500 nm 0.762
Water Analysis Guide
33

Table 11 Absorbance values at 50-nm increments (continued)
Wavelength Absorbance
450 nm 0.355
400 nm 0.134
9. Adjust the wavelength to 50 nm more than the highest absorbance point on the initialsearch (step 8). Set the instrument to zero, then measure and record the absorbanceat each increment.Repeat, decreasing the absorbance in 5-nm steps. Set the instrument to zero, thenmeasure and record the absorbance at each increment. Continue until the entirerange of interest is measured. Refer to Table 12.
Table 12 Absorbance values at 5-nm increments
Wavelength Absorbance
520 nm 0.748
515 nm 0.759
510 nm 0.780
505 nm 0.771
500 nm 0.771
495 nm 0.651
490 nm 0.590
Make sure that there is enough difference in absorbance between samples with lowand high analyte concentrations. Measure two sample solutions that contain theexpected low and high concentrations of analyte at the optimum wavelength. Thechange in absorbance caused by increases/decreases in concentration depends onthe sensitivity of the procedure and the chemistry. Chemistries with small absorbancechanges are less sensitive, but tend to have larger ranges. Chemistries with largeabsorbance changes are more sensitive, but tend to have smaller ranges.
Water Analysis Guide
34
Figure 11 Select the best wavelength
1 Absorbance 2 Wavelength (nm)
1.5 Sample pretreatment by digestionSeveral procedures use sample digestion before the total metal content is found.Digestion uses acid and heat to break organo-metallic bonds and free ions for analysis.
1.5.1 USEPA-approved digestionsFor USEPA reporting, USEPA-approved digestions are necessary. There are twomethods for metals analysis: mild and vigorous.
1.5.1.1 USEPA mild digestion
1. Add concentrated nitric acid to the entire sample at the time of collection. Add 5 mL ofacid per liter (or quart) of sample.
2. Move 100 mL of well-mixed sample to a beaker or flask.3. Add 5 mL of distilled 1:1 hydrochloric acid (HCl).4. Increase the temperature of the liquid with a steam bath or hot plate until the volume
has been reduced to 15–20 mL. Do not boil.5. Use a filter to remove any insoluble material from the sample.6. Adjust the pH of the digested sample to pH 4. Add 5.0 N Sodium Hydroxide Standard
Solution a drop at a time. Mix thoroughly and examine the pH after each addition.7. Pour the reduced sample into a 100-mL volumetric flask.8. Use a small amount of demineralized water to rinse the beaker. Pour the rinse water
into the volumetric flask.9. Repeat the rinse process a few more times to remove all of the reduced sample from
the beaker.10. Add demineralized water to fill the volumetric flask to the 100-mL mark.11. Use the diluted sample in the test procedure. Record the results.
Water Analysis Guide
35
12. Prepare a blank: Repeat steps 1-11 with demineralized water instead of the sample.13. Subtract the results of the blank analysis from the results of the sample analysis.
1.5.1.2 USEPA vigorous digestionFor some samples mild digestion will not be sufficient. Use a vigorous digestion to makesure that all of the organo-metallic bonds are broken.
1. Use redistilled 1:1 Nitric Acid Solution to acidify the entire sample to a pH of less thanpH 2. Do not filter the sample before digestion.
2. Move an appropriate sample volume into a beaker and add 3 mL of concentratedredistilled nitric acid. Refer to Table 13.
3. Put the beaker on a hot plate and evaporate to near dryness. Make sure that thesample does not boil.
4. Cool the beaker and add another 3 mL of the concentrated re-distilled nitric acid.5. Put the cover on the beaker with a watch glass and return it to the hot plate. Increase
the temperature of the hot plate so that a gentle reflux occurs. Add additional acid, ifnecessary, until the digestion is complete (generally shown when the digestate is lightin color or does not change color or appearance with continued refluxing).
6. Again, evaporate to near dryness (do not bake) and cool the beaker. If any residue orprecipitate results from the evaporation, add redistilled 1:1 hydrochloric acid (5 mLper 100 mL of final volume). Refer to Table 13.
7. Warm the beaker. Adjust the sample to pH 4 by drop-wise addition of 5.0 N SodiumHydroxide Standard Solution. Mix thoroughly and examine the pH after each addition.
8. Pour the reduced sample into a 100-mL volumetric flask.9. Use a small amount of demineralized water to rinse the beaker. Pour the rinse water
into the volumetric flask.10. Repeat the rinse process a few more times to remove all of the reduced sample from
the beaker.11. Add demineralized water to fill the volumetric flask to the 100-mL mark.12. Use the diluted sample in the test procedure. Record the results.13. Multiply the result by the correction factor in Table 13.14. Prepare a blank: Repeat steps 1-13 with demineralized water instead of the sample.15. Subtract the results of the blank analysis from the results of the sample analysis.
Table 13 Vigorous digestion volumes
Expected metalconcentration
Suggested samplevolume for digestion
Suggested volume of1:1 HCl
Suggested finalvolume after digestion
Correction factor
1 mg/L 50 mL 10 mL 200 mL 4
10 mg/L 5 mL 10 mL 200 mL 40
100 mg/L 1 mL 25 mL 500 mL 500
1.5.2 General Digesdahl digestionMany samples may be digested with the Digesdahl Digestion Apparatus (2313020). It isdesigned to digest samples such as oils, wastewater, sludges, feeds, grains, platingbaths, food and soils. In this procedure, the sample is oxidized by a mixture of sulfuricacid and hydrogen peroxide. Less than 10 minutes is necessary for the digestion of a drysample. About 1 minute/mL is necessary for the digestion of liquid samples. The digestionis done in a special flat-bottomed, 100-mL volumetric flask. Aliquots (sample portions) areused for analysis with the colorimetric methods.Procedures for digestion with the Digesdahl Digestion Apparatus are based on the typeand form of the sample. Refer to the Digesdahl Digestion Apparatus Instruction manualsupplied with the Digesdahl Digestion Apparatus.
Water Analysis Guide
36

Digesdahl digestion is a process that yields a digest that can be used to find metals, totalphosphorus and total Kjeldahl nitrogen (TKN). It is faster than traditional methods, but hascomparable accuracy and precision. The digest can be used with colorimetric,turbidimetric or titrimetric tests.The procedures for the Digesdahl Digestion Apparatus vary with the sample type. Sampletypes include food products, feeds, grains, wastewater sludges, plating baths, planttissues, fertilizers, beverages and oils. Most procedures use a two-phase digestionprocess that uses concentrated sulfuric acid and 50% hydrogen peroxide. Sulfuric aciddehydrates and chars the sample. Hydrogen peroxide is added through the capillary flowfunnel to complete the decomposition. The analyst varies the volume of hydrogenperoxide used to control the digestion time (exposure to the hydrogen peroxide).Some samples are more difficult to digest completely (e.g., resistant or refractorymaterials, such as nicotinic acid). Several minutes of continued peroxide digestion arenecessary after clearing to get 100% nitrogen recovery. To make sure that there iscomplete sample digestion, think about variables such as sample size, solutiontemperature and sample contamination. Refer to the Digesdahl Manual (2313018) forcomplete information.
1.5.2.1 Frequently asked questions for digestion proceduresThis section provides answers to common questions about digestion.What should be done if the reading on the instrument is over-range?The concentration range tables found in digestion procedures are only guidelines. Use asmaller analysis volume and repeat the procedure. Record the new analysis volume anduse it in the calculation.Should a reagent blank be prepared each time reagents with the same lot numberare used?To decide, first find the reading of the reagent blank. Set the instrument to zero withdeionized or distilled water. If the reagent blank has an insignificant concentration readingand the reagents have the same lot number, a reagent blank does not have to beprepared every time. If the reagent blank shows a reading, analyze it daily or subtract thereading from the sample reading. If a reagent blank is not analyzed daily, set theinstrument to zero with deionized water.Does the exact sample amount and analysis volume given in each procedure needto be used?The sample amount and the analysis volume for each procedure are only suggestedguidelines. Digest any aqueous solution or suspension sample amount up to 40 mL. Lessthan 0.5 g of anhydrous material is necessary for solid or organic liquid samples—as aroutine practice, 0.25 g of sample is used.How can the initial amount of sample (necessary for digestion) and the analysisvolume to be used be refined?The amount of sample to be digested is a critical aspect of the digestion. The aliquot sizeof the digest to be used in the analysis is also very important. Tables are provided in eachmethod to find the amount of initial sample to be digested. In order to optimize thespecific test to be done, the equations that follow have been developed. Before theseequations are used, refer to the manual specifications for the sample type.To use the equations, find the approximate concentration (in ppm, mg/L or mg/kg). Next,find the range of the colorimetric test to be used (e.g., 0–50 mg/L) and the midpoint of thetest range. This midpoint range is optimum but can be lowered to accommodate very lowsample concentrations. To find the midpoint of the test range, subtract the lower limit ofthe range from the higher limit and then divide by 2.After these determinations are finished, use the equation that follows:A = (B × C × D) ÷ (E x F)Where:A = approximate concentration of sample
Water Analysis Guide
37

B = midpoint of colorimetric test rangeC = final volume of digestD = final volume of analysisE = sample amount to digestF = analysis volume of digestUse algebra to obtain the equations that follow:Equation 1 is E = (B × C × D) ÷ (A × F)Equation 2 is F = (B × C × D) ÷ (A × E)Both equations contain two unknown values, E and F. Some trial and error may benecessary to get the optimum values.Use equation 1: If the analysis is for copper, use the CuVer™ method with an initialsample that contains approximately 150 ppm Cu. The amount of sample necessary fordigestion and the aliquot volume to be used can be found as follows:Find the test range. In this example, the test range is thought to be 0–5.0 ppm and themidpoint is 2.5. When the Digesdahl system is used, the final volume of digest is 100 mLand the procedure calls for a final analysis volume of 25 mL.Therefore:A = 150 B = 2.5 C = 100 D = 25 E = unknownF = unknownSubstitute values into equation (1) gives:E = (2.5 × 100 × 25) ÷ (150 × F) or E = 41.7 ÷ FSince CuVer Copper Reagent is pH sensitive, a small analysis volume (0.5 mL) isnecessary so that pH adjustment would not be necessary.With this in mind, a 0.5-mL analysis volume would give:E = 41.7 ÷ 0.5 = 83.4 mL digestion sample amountBecause the maximum digestion sample amount is 40 mL for Digesdahl digestions, a 0.5-mL analysis volume is not acceptable for the range. This is where trial and error isnecessary. Next, try a 5.0-mL analysis volume and the equation gives:E = 41.7 ÷ 5.0 = 8.0 mL digestion sample amount(Round to the nearest whole number for ease of measure.)From the calculation, an 8.0 mL sample is digested and a 5.0-mL analysis volume istaken. A pH adjustment is necessary before analysis.Use equation 2: Equation 2 may be used when a minimum sample size is necessary orwhen a sample has already been digested for one parameter (such as copper) andmeasurement for another parameter (such as zinc) is necessary. Continue the examplefor copper, above, a zinc test may also be done. The undigested sample containsapproximately 3 ppm zinc and the Zincon method is used. The analysis volume can befound as follows.In this example, the Zincon method test range is thought to be 0–2.5 ppm so that themidpoint of the range is 1.25. Therefore values are:A = 3 B =1.25 C = 100 D = 50 E = 8 (as found above)
Water Analysis Guide
38

substitute: F = (1.25 × 100 × 50) ÷ (3 × 8) = 260 mLThis is an extreme example, but it shows the need to compare the values of D and F tomake sure that the analysis volume (F) is no more than the final analysis volume (D). If Fexceeds D, the analysis cannot be done. A test with a more applicable range isnecessary or a larger sample may be digested for this test. Care must also be taken tomake sure that the volume of digest taken for analysis (F) is higher than 0.1 mL becauseaccurately pipetting less than 0.1 mL is difficult.As a comparison, think of the zinc concentration as 75 ppm (A = 75 instead of 3) andsubstitute again to get:F = (1.25 × 100 × 50) ÷ (75 × 8) = 10.5 mLIn this case, the aliquot volume is less than the final analysis volume so analysis may bedone as specified in the procedure.Why is the factor in the calculation step 75, 2500 or 5000 (depends on the methodused) and where does the factor come from?In all cases, the factor is a correction for sample dilution. For example, in some tests thefactor is 2500. The Digesdahl digestion total volume is 100 mL, the analysis total volumeis 25 mL and 100 x 25 = 2500. The mL units are not included with the factor because theycancel out in the formula.When a slurry is analyzed, how is the total concentration on a dry basis reported?The sample must be analyzed for moisture content. For necessary apparatus, refer to Table 14 and Table 15.To find the dry basis weight:
1. Weigh an aluminum dish and record the weight as “A”.2. Weigh out approximately 2 g of solid sample into the dish. Record the exact weight
added as “B.”3. Put the dish in the oven (103–105 °C, 217–221 °F) for 2 hours.4. Put in a desiccator and cool to room temperature.5. Weigh the aluminum dish with the oven-dried sample. Record as “C.”
Note: The oven-dried material generally is not meant for additional testing and should bediscarded.
6. Use this formula to calculate the sample on a “dry basis.” Test result (dry basis) = (C– A) ÷ (B – A).Note: Multiply the test result on an “as is” basis, by the factor above, to report as “dry basis".
Table 14 Necessary apparatus for dry basis weight
Description Unit Item no.
Balance, analytical, 120-g 454 g 2936801
Desiccant, Drierite (without indicator) each 2285901
Desiccator, vacuum (uses ceramic plate) 100/pkg 2088800
Dish, moisture determination, aluminum, 63 x 17.5 mm each 2164000
Tongs, crucible each 56900
Oven, laboratory, 120 VAC each 1428900
or
Oven, laboratory, 240 VAC each 1428902
Table 15 Optional apparatus
Description Unit Item no.
Desiccator, without stopcock each 1428500
Water Analysis Guide
39

1.5.2.2 Adjust the pH1.5.2.2.1 For a metals procedure
Note: If aliquots smaller than 0.5 mL are analyzed, pH adjustment is not necessary.
1. Find the necessary volume of sample for analysis from the Sample and AnalysisVolume Tables after each digestion procedure. Use a pipet to add this volume into agraduated mixing cylinder.Note: To use a pipet to add a volume into a volumetric flask or a regular graduated cylinder isnecessary for some methods.
2. Dilute to about 20 mL with deionized water.3. Add one drop of 2,4 Dinitrophenol Indicator Solution.4. Add one drop of 8 N Potassium Hydroxide (KOH) Standard Solution (28232H). Swirl
after each addition until the first flash of yellow shows (pH 3). If the sample isanalyzed for potassium, use 5 N sodium hydroxide (245026) instead. Do not use apH meter if the sample is analyzed for potassium or silver.
5. Add one drop of 1 N KOH (2314426). Put the stopper in the cylinder and invertseveral times to mix. If the sample is analyzed for potassium, use 1 N sodiumhydroxide instead.Note: Use pH paper to make sure that the pH is 3. If it is higher than 4, do not adjust again withacid. Start over with a fresh aliquot.
6. Continue to add 1 N KOH in this manner until the first permanent yellow color shows(pH 3.5–4.0).
7. Look at the cylinder from the top against a white background. Compare the cylinder toa second cylinder filled to the same volume with deionized water.Note: High iron content will cause precipitation (brown cloud) which will co-precipitate othermetals. Do this procedure again with a smaller aliquot volume.
8. Add deionized water to the volume specified in the colorimetric procedure for theparameter under analysis.
9. Continue with the colorimetric procedure.
1.5.2.2.2 For the Total Kjeldahl Nitrogen colorimetric methodConsult the spectrophotometer or colorimeter procedure to complete the TKN analysis.The procedure that follows is only a guide to use if a procedure is not available.
1. Use a pipet to add an appropriate analysis volume to a graduated mixing cylinder.2. Add one drop of TKN Indicator (2251900).3. Add one drop of 8 N KOH Standard Solution (28232H), swirl after each addition until
the first flash of pale blue shows (pH 3).4. Add one drop of 1 N KOH (2314426). Put the stopper in the cylinder and invert
several times to mix.Note: Look at the cylinder from the top against a white background. Compare the cylinder to asecond cylinder filled to the same volume with deionized water.
5. Continue to add 1 N KOH in this manner until the first permanent blue color shows.6. Add deionized water to the volume shown in the colorimetric procedure for the
parameter under analysis.7. Continue with the colorimetric procedure.
1.6 Waste management and safetyThis section provides guidelines for laboratory waste management. These guidelines areonly a summary of basic USEPA requirements and do not relieve the user fromcompliance with the complete regulations contained in the Code of Federal Regulations(CFR). The regulations may change or additional state and local laws may apply. Wastegenerators are responsible for knowing and obeying all the laws and regulations thatapply to their operations.
Water Analysis Guide
40

1.6.1 Waste minimizationThe most effective way to decrease waste management problems and expense isthrough waste minimization. To do this:
• Use the smallest sample size that will make accurate results.• Where possible, do methods that use reagents that pose fewer hazards.• Purchase in smaller quantities to remove the need to dispose of out-dated materials.• Use biodegradable detergents to clean glassware and apparatus unless solvents or
acids are a specific requirement.
1.6.2 Regulatory overviewThe Resource Conservation and Recovery Act (RCRA) controls all solid waste disposalwith an emphasis on hazardous waste. Title 40 Code of Federal Regulations (CFR) part260 contains the federal hazardous waste disposal regulations issued in accordance withthe RCRA. The regulations create a system to identify hazardous wastes and track wastegeneration, transport and ultimate disposal from beginning to end. Each facility involvedin hazardous waste management must be registered with the USEPA, with the exceptionof conditionally exempt small quantity generators.Federal regulations recognize three categories of generators and those who make largeramounts of waste are under stricter control. The categories are:
• Conditionally exempt small quantity generator—less than 100 kg (220 lb) per month• Small quantity generator—between 100 kg (220 lb) and 1000 kg (2200 lb) per month• Large quantity generator—higher than 1000 kg (2200 lb) per month
1.6.3 Hazardous waste
1.6.3.1 DefinitionFor regulatory purposes, a hazardous waste is a material that is subject to specialconsideration by the USEPA under 40 CFR 261. State or local authorities may alsodesignate additional materials as hazardous waste in their areas.Many toxic compounds are not regulated, but improper management or disposal maylead to legal problems under CERCLA (Superfund) or common law tort.The definition given by 40 CFR 261 identifies a hazardous waste as a solid waste that isnot excluded from regulation and meets one or more of the criteria that follow:
• It is a discarded commercial chemical product, off-specification species, containerresidue or spill residue of materials specifically listed in 40 CFR 261.33 (P- and U-codes)
• It is a waste from a specific source listed in 40 CFR 261.32 (K-code)• It is a waste from a non-specific source listed in 40 CFR 261.31 (F-code), and/or• It shows any of the characteristics of hazardous waste that follow:
• Ignitability• Corrosivity• Reactivity• Toxicity
There are exceptions to these regulations. Look at the regulations to find applicableexclusions.
1.6.3.2 Sample codesHazardous wastes are managed by specific codes assigned in 40 CFR 261.20–261.33.These codes are provided to help identify hazardous waste. The generator is responsibleto make the actual waste code determination.
Water Analysis Guide
41

Selected characteristic waste codes for chemicals which may be generated with methodsfor water analysis are given in Table 16. A complete list of waste codes is found in40 CFR 261.20 through 40 CFR 261.33.
Table 16 Hazardous waste codes
Characteristic USEPA code Chemical abstract services (CAS) number Regulatory level (mg/L)
Corrosivity D002 — —
Ignitability D001 — —
Reactivity D003 — —
Arsenic D004 6440-38-2 5.0
Barium D005 6440-39-3 100.0
Benzene D018 71-43-2 0.5
Cadmium D006 7440-43-9 1.0
Chloroform D022 67-66-3 6.0
Chromium D007 7440-47-3 5.0
Lead D008 7439-92-1 5.0
Mercury D009 7439-97-6 0.2
Selenium D010 7782-49-2 1.0
Silver D011 7440-22-4 5.0
1.6.3.3 How to tell if waste is hazardousFederal laws do not require material testing to find out if waste is hazardous. If theproduct is not specifically shown in the regulations, apply product or generator knowledgeto find out if it is hazardous. Often, there is enough information on a Safety Data Sheet(SDS) to decide. Look for characteristics of a hazardous waste:
• The flash point is below 60 °C (140 °F) or it is classified by DOT as an oxidizer(D001).
• The pH of the material is less than or equal to pH 2, or higher than or equal to12.5 (D002).
• The material is unstable, reacts violently with water, may make toxic gases whenmixed with water (D003).
• It is toxic (D004–D043).
Use the chemical composition data to find out if a material is toxic based on theconcentration of certain contaminants (heavy metals and a number of organiccompounds). If the waste is a liquid, compare the concentration of contaminants to theconcentrations shown in 40 CFR 26. If the waste is a solid, make an analysis of thesample with the Toxicity Characteristic Leachability Procedure (TCLP) and then comparethe results to the concentrations in 40 CFR 261.24. Levels above the threshold amountsshould be thought of as hazardous.For more information about SDS usage, refer to Safety data sheets on page 45.Some tests use or make a number of chemicals that make the end product a hazardouswaste (e.g., the COD tests and Nessler reagent). Hazardous waste status may also resultfrom substances present in the sample.
1.6.3.4 DisposalHazardous waste must be managed and discarded according to federal, state and localregulations. The waste generator is responsible for hazardous waste determinations.Analysts should speak with their facility environmental compliance department for specificinstructions.
Water Analysis Guide
42

Most hazardous wastes should be moved by treatment, storage and disposal facilities(TSDF) that have USEPA permits. In some cases, the generator may treat the hazardouswaste, but may need a permit from the USEPA and/or state agency. Laboratories are notexempt from these regulations. If the facility is a “Conditionally Exempt Small QuantityGenerator,” special rules may apply. Look at 40 CFR 261 to find the laws and rules thatapply for a given generator.The most common acceptable treatment is elementary neutralization. This applies towastes that are hazardous only because they are corrosive or are listed only for thatreason. Many generated wastes may be treated with the steps that follow:
1. To neutralize acidic solutions, add a base such as sodium hydroxide. To neutralizebasic solutions, add an acid such as hydrochloric acid.
2. Slowly add the neutralizing agent while the solution is stirred.3. Monitor the pH.4. When the pH is at or near pH 7, the material is neutralized and may be flushed down
the drain.
For other chemical or physical treatments, such as cyanide destruction or evaporation, apermit may be necessary. Speak with the environmental department or local regulators tofind which rules apply to each facility.Laboratory chemicals may be mixed and disposed of with other hazardous wastesgenerated at a facility. They may also be collected in accordance with 40 CFR262.34 satellite accumulation rules. After collection, they may be disposed of in alabpack. Many environmental and hazardous waste companies offer labpacking services.These companies will inventory, sort, pack and arrange for proper disposal of hazardouswaste. Find companies that offer these services in the telephone book under “WasteDisposal—Hazardous” or contact state and local regulators for assistance.
1.6.4 Management of specific wasteRecycling programs for some forms of laboratory waste are available through HachCompany. To get information on recycling services, call 1-800-227-4224 or visitwww.hach.com.Several documents are also available to assist in the management of generated waste.To get the documents, call 1-800-227-4224 or 970-669-3050 and request the literaturecodes in Table 17.
Table 17 Waste management literature
Literature code Title
9323 Mercury Waste Disposal Firms
9324 RCRA Waste Disposal Information
9325 COD Waste Disposal Information
9326 COD Heavy Metal Concentrations
1.6.4.1 Special considerations for Cyanide-containing materialsSeveral procedures in this manual use reagents that contain cyanide compounds. Thesematerials are regulated as reactive waste (D003) by the Federal RCRA. Instructionsprovided with each procedure tell how to collect these materials for proper disposal. It isimperative that these materials be moved safely to prevent the release of hydrogencyanide gas (an extremely toxic material with the smell of bitter almonds). Most cyanidecompounds are stable and can be safely kept for disposal, in highly alkaline solutions (pH>11) such as 2 N sodium hydroxide. Never mix these wastes with other laboratory wastesthat may contain lower pH materials such as acids or even water.
Water Analysis Guide
43

If a cyanide-containing compound is spilled, avoid exposure to hydrogen cyanide gas. Dothe steps that follow to destroy the cyanide compounds in an emergency:
1. Use a fume hood, supplied air or self-contained breathing apparatus.2. Stir as the waste is added to a beaker that contains a strong solution of sodium
hydroxide and calcium hypochlorite or sodium hypochlorite (household bleach).3. Add an excess of hydroxide and hypochlorite. Let the solution stand for 24 hours.4. Neutralize the solution and flush it down the drain with a large amount of water. If the
solution contains other regulated materials such as chloroform or heavy metals, itmay still need to be collected for hazardous waste disposal. Do not flush untreatedhazardous wastes down the drain.
1.6.5 ResourcesMany sources of information on proper waste management are available. The USEPAhas a hotline number for questions about the Resource Conservation and Recovery Act(RCRA). The RCRA Hotline number is 1-800-424-9346. Copies of the applicableregulations are available. Federal hazardous waste regulations are found in 40 CFR260-99. Get this book from the U.S. Government Printing Office or an alternate vendor.Other documents that may be helpful to the hazardous waste manager in the laboratoryinclude:
• Task Force on Laboratory Waste Management. Laboratory Waste Management, AGuidebook; American Chemical Society, Department of Government Relations andScience Policy: Washington, DC 1994.
• Task Force on Laboratory Waste Management. Waste Management Manual forLaboratory Personnel; American Chemical Society, Department of GovernmentRelations and Science Policy: Washington, DC 1990.
• Task Force on Laboratory Waste Management. Less is Better; 2nd ed.; AmericanChemical Society, Department of Government Relations and Science Policy:Washington, DC 1993.
• Committee on Chemical Safety. Safety in Academic Chemistry Laboratories, 5th ed.;American Chemical Society: Washington, DC, 1990.
• Armour, Margaret-Ann. Hazardous Laboratory Chemicals Disposal Guide; CRCPress: Boca Raton, FL, 1991.
• Environmental Health and Safety Manager’s Handbook; Government Institutes, Inc.:Rockville, MD, 1988.
• Lunn, G.; Sansone, E.B. Destruction of Hazardous Chemicals in the Laboratory; JohnWiley and Sons: New York, 1990.
• National Research Council. Prudent Practices for Disposal of Chemicals fromLaboratories; National Academy Press: Washington, DC, 1983.
• National Research Council. Prudent Practices for Handling Hazardous Chemicals inLaboratories; National Academy Press: Washington, DC, 1981.
• Environmental Protection Agency, Office of Solid Waste and Emergency Response.The RCRA Orientation Manual; U.S. Government Printing Office: Washington, DC,1991.
• Environmental Protection Agency, Office of Solid Waste and Emergency Response.Understanding the Small Quantity Generator Hazardous Waste Rules: A Handbookfor Small Business; U.S. Government Printing Office: Washington, DC, 1986.
1.6.6 SafetySafety is the responsibility of every analyst. Many chemical procedures use potentiallyhazardous chemicals and equipment. It is important to use good laboratory techniquesand prevent accidents. The guidelines that follow apply to water analysis and are notintended to cover every aspect of safety.
Water Analysis Guide
44

1.6.6.1 Read labels carefullyRead each reagent label carefully. Note the precautions given. Do not remove or coverthe label on a container while it contains reagent. If a different reagent is put into alabeled container, the label must be changed. When a reagent or standard solution isprepared, label the container clearly. If a label is hard to read, replace the label promptlyaccording to the hazard communication program.Warning labels also show on some of the apparatus used with the test procedures. Theprotective shields with the Digesdahl Digestion Apparatus point out potential hazards.Make sure that these shields are installed during use and obey the precautions on thelabel.
1.6.6.2 Protective equipmentUse the applicable protective equipment for the chemicals and procedures. The SDScontains this information. Protective equipment may include:
• Eye protection, such as safety glasses or goggles, to protect from flying objects orchemical splashes.
• Gloves to protect skin from toxic or corrosive materials, sharp objects, very hot orvery cold materials or broken glass. Use tongs or finger cots when a hot apparatus istransferred.
• Laboratory coats or splash aprons to protect skin and clothing from splashes.• Footwear to protect feet from spills. Open toed shoes should not be worn in chemistry
settings.• Respirators may be necessary if sufficient ventilation, such as fume hoods, are not
available. Use fume hoods when directed to do so by the procedure or asrecommended in the SDS. For many procedures, adequate ventilation is enough ifthere is plenty of fresh air and air exhaust to protect against unnecessary exposure tochemicals.
1.6.6.3 First aid equipment and suppliesMost first aid instructions for chemical splashes in eyes or on skin call for a thorough flushwith water. Laboratories should have eyewash and shower stations. For field work, carrya portable eyewash unit. Laboratories should also have the necessary fire extinguishersand fume hoods.
1.6.6.4 General safety rulesObey these rules when work is done with toxic and hazardous chemicals:
• Never pipet by mouth. Always use a mechanical pipet or pipet bulb to avoid ingestionof chemicals.
• Follow test procedures carefully and observe all precautionary measures. Read theentire procedure before the procedure is started.
• Clean all spills promptly. Get proper training and have the right response equipmentto clean up spills. Refer to the safety director for more information.
• Do not smoke, eat or drink in an area where toxic or irritating chemicals are used.• Use reagents and equipment only as directed in the test procedure.• Do not use damaged labware and broken equipment.• Minimize all chemical exposures. Do not breathe vapors or let chemicals touch the
skin. Wash hands after chemicals are used.• Keep work areas neat and clean.• Do not block exits or access to emergency equipment.
1.6.7 Safety data sheetsSafety data sheets (SDS) describe the hazards of chemical products. This sectiondescribes the information found on the SDS and tells how to find important information forsafety and waste disposal. The information provided on the SDS applies to the product as
Water Analysis Guide
45

sold by a specific manufacturer. The properties of any mixtures made with this productwill be different.
1.6.7.1 How to get an SDSThe SDS is shipped to a customer with the first order of any chemical product. A newSDS may be sent when the information on the data sheet is updated. Review all newSDS documents for new information. To get another copy of an SDS, call1-800-227-4224 or download it directly from www.hach.com.
1.6.7.2 Sections of an SDSEach SDS has 10 sections. The sections and the information included are describedbelow.Header informationThe manufacturer order number, SDS date, change number, company address andtelephone number and emergency telephone numbers are shown at the top of the SDS.
1.6.7.2.1 Product identificationThis sections contains:
• Product name• Chemical Abstract Services (CAS) number• Chemical name• Chemical formula, if applicable• Chemical family to which the material belongs
1.6.7.2.2 IngredientsThis section shows each component in the product. It contains the information thatfollows for each component:
• PCT: Percent by weight of this component• CAS NO.: Chemical Abstract Services (CAS) registry number for this component• SARA: Superfund Amendments and Reauthorization Act, better known as the
“Community Right to Know Law,” tells if the component is shown in SARA 313. If thecomponent is shown and the facility uses more than the specified amount, report useto the USEPA every year.
• TLV: Threshold Limit Value. The maximum airborne concentration for an 8-hourexposure that is recommended by the American Conference of GovernmentalIndustrial Hygienists (ACGIH).
• PEL: Permissible Exposure Limit. The maximum airborne concentration for an 8-hourexposure that is regulated by the Occupational Safety and Health Administration(OSHA).
• HAZARD: Physical and health hazards of the component are explained.
1.6.7.2.3 Physical dataThe physical properties of the product are given in this section. The physical propertiesinclude the physical state, color, odor, solubility, boiling point, melting point, specificgravity, pH, vapor density, evaporation rate, corrosivity, stability and storage precautions.
1.6.7.2.4 Fire and explosion hazard and reactivity dataThis section contains the flash point and flammable limits of the material. It also includeshow to fight fires if the material catches on fire. Key terms in this section include:
• Flash point: The temperature at which a liquid will give off enough flammable vapor toignite.
• Flammability and ignitability are usually defined by the flash point.• Lower Flammable Limit (LFL or LEL): The lowest concentration that will cause a fire
or flash when an ignition source is present.• Upper Flammable Limit (UFL or UEL): The vapor concentration in air that has a
concentration that is too rich to burn.
Water Analysis Guide
46
• NFPA Codes: The National Fire Protection Association (NFPA) has a system to ratethe degree of hazards given by a chemical. These codes are usually put in a coloreddiamond. The codes range from 0 for minimal hazard to 4 for extreme hazard. Thecodes are grouped into the hazards that follow: health (blue), flammability (red),reactivity (yellow) and special hazards (white).
1.6.7.2.5 Health hazard dataThis section describes the pathways for a chemical to enter the body (i.e., ingestion,inhalation, skin contact). It also gives acute (immediate) and chronic (long-term) healtheffects. If the material causes cancer or genetic damage, it is specified in this section.
1.6.7.2.6 Precautionary measuresThis section contains special precautions for the material. The precautions may includespecial storage instructions, handling instructions, conditions to avoid and protectiveequipment necessary to use this material safely.
1.6.7.2.7 First aidFirst aid instructions for exposures to the chemical are given in this section. Be sure toread this section before a victim is induced to vomit. Some chemicals are better treated ifthe victim does not vomit. Get immediate medical attention for all chemical exposures.
1.6.7.2.8 Spill and disposal proceduresThis section describes safe practices for the clean up and disposal of spilled material. Formore information, refer to Hazardous waste on page 41. The waste generator isultimately responsible to meet the federal, state and local laws that apply to each facility.
1.6.7.2.9 Transportation dataDomestic and international shipping information is provided in this section. The shippingname, hazard class and ID number of the product are given.
1.6.7.2.10 ReferencesThis section shows the reference materials used to write the SDS.Refer to the Reference section that shows that this product has SARA 313 chemicals orCalifornia Proposition 65 List Chemicals, if applicable. Any special information about theproduct is found here.
1.6.7.3 OSHA chemical hygiene planThe Occupational Safety and Health Administration (OSHA) enforces laws controllingexposure to hazardous chemicals in laboratories. These regulations are found in Title29 CFR 1910.1450. The regulations apply to all employers who use hazardous chemicalsand make it necessary for employers to develop and use a written Chemical HygienePlan and to appoint a qualified person as the Chemical Hygiene Officer.
Water Analysis Guide
47

Water Analysis Guide
48

Aluminum DOC316.53.01002
Aluminon Method1 Method 80120.008 to 0.800 mg/L Al3+ (spectrophotometers)0.01 to 0.80 mg/L Al3+ (colorimeters)
Powder Pillows
Scope and application: For water and wastewater.1 Adapted from Standard Methods for the Examination of Water and Wastewater.
Test preparation
Instrument specific informationThe table in this section shows all of the instruments that have the program for this test. Table 1 shows sample cell and orientation requirements for reagent addition tests, suchas powder pillow or bulk reagent tests.To use the table, select an instrument, then read across to find the correspondinginformation for this test.
Table 1 Instrument-specific information for powder pillows
Instrument Sample cell orientation Sample cell
DR 6000 DR 3800 DR 2800 DR 2700
The fill line is to the right. 2495402
DR 5000 DR 3900
The fill line is toward the user.
DR 900 The orientation mark is toward the user. 2401906
Before startingInstall the instrument cap on the DR 900 cell holder before ZERO or READ is pushed.
The sample must be digested with heat and acid to make sure that all forms of the metal are measured. Use the mild orvigorous digestion. Refer to the Water Analysis Guide for more information.
Clean all glassware with 6.0 N (50%) hydrochloric acid, then rinse thoroughly with deionized water to remove contaminants.
The sample temperature must be between 20–25 °C (68–77 °F) for accurate results.
The Pour-Thru Cell can be used (for applicable instruments) if rinsed well with deionized water between the blank and theprepared samples.
For best results, measure the reagent blank value for each new lot of reagent. Replace the sample with deionized water inthe test procedure to get the reagent blank value. Subtract the reagent blank value from the sample results automaticallywith the reagent blank adjust option.
Review the Safety Data Sheets (MSDS/SDS) for the chemicals that are used and use any recommended personal protectiveequipment.
Dispose of reacted solutions according to local, state and federal regulations. Use the Safety Data Sheets for disposalinformation for unused reagents. Consult the environmental, health and safety staff for your facility and/or local regulatoryagencies for further disposal information.
1

Items to collect
Description Quantity
AluVer® 31 Aluminum Reagent Powder Pillow 1
Ascorbic Acid Powder Pillow 1
Bleaching 3 Reagent Powder Pillow 1
Cylinder, graduated mixing, 50-mL, with glass stopper 1
Sample cells. For information about sample cells, adapters or light shields, refer to Instrumentspecific information on page 1. 2
1 AluVer is a registered trademark of Hach Company.
Refer to Consumables and replacement items on page 6 for reorder information.
Sample collection and storage• Collect samples in clean glass or plastic bottles.• To preserve samples for later analysis, adjust the sample pH to less than 2 with
concentrated nitric acid (about 2 mL per liter). No acid addition is necessary if thesample is tested immediately.
• Keep preserved samples at room temperature for a maximum of 6 months.• Before analysis, adjust the pH to 3.5–4.5 with 5.0 N sodium hydroxide standard
solution.• Correct the test result for the dilution from the volume additions.
Powder pillow procedure
Start
1. Start program10 Aluminum Alumin. Forinformation about samplecells, adapters or lightshields, refer to Instrumentspecific informationon page 1.Note: Although the programname may vary betweeninstruments, the programnumber does not change.
2. Fill a graduated mixingcylinder to the 50-mL markwith sample.
3. Add the contents of oneAscorbic Acid PowderPillow.
4. Close the cylinder. Invertthe cylinder several times tomix.
2 Aluminum, Aluminon Method (0.800 mg/L)

5. Add one AluVer3 Aluminum reagent powderpillow.An orange to orange-redcolor shows if aluminum ispresent.
6. Start the instrumenttimer. A 1-minute reactiontime starts.
7. Invert the cylinderrepeatedly during the timer.Undissolved powder willcause inconsistent results.
8. Prepare the blank: Pour10 mL of the reacted sampleinto a sample cell.
9. Add one Bleaching3 Reagent powder pillow tothe blank.
10. Start the instrumenttimer. A 30-second reactiontime starts.
11. Swirl the sample cellvigorously. The solution willshow a light to mediumorange.
12. Start the instrumenttimer. A 15-minute reactiontime starts.
13. Prepare the sample:Pour 10 mL of solution fromthe cylinder into a secondsample cell.
14. When the timer expires,clean the blank.
15. Insert the blank into thecell holder.
Zero
16. Push ZERO. Thedisplay shows 0.00 or0.000 mg/L Al3+.
Aluminum, Aluminon Method (0.800 mg/L) 3

17. Clean the preparedsample.
18. Within five minutes afterthe timer expires, insert theprepared sample into thecell holder.
Read
19. Push READ. Resultsshow in mg/L Al3+.
20. Clean the graduatedcylinder and sample cellswith soapy water and abrush immediately after thetest. Rinse with deionizedwater.
InterferencesInterferingsubstance
Interference level
Acidity More than 300 mg/L as CaCO3. Pre-treat samples that have more than 300 mg/L acidity as CaCO3 asfollows:
1. Add one drop of m-Nitrophenol Indicator Solution to 50 mL of fresh sample.2. Add one drop of 5.0 N Sodium Hydroxide Standard Solution. Put the stopper on the cylinder. Invert
to mix. Repeat as often as necessary until the color changes from colorless to yellow.3. Add one drop of 5.25 N Sulfuric Acid Standard Solution to change the solution from yellow to
colorless. Use this treated sample in the test procedure.
Alkalinity 1000 mg/L as CaCO3. Pre-treat samples that have higher alkalinity concentrations as follows:
1. Add one drop of m-Nitrophenol Indicator Solution to 50 mL of fresh sample. A yellow color indicatesexcessive alkalinity.
2. Add one drop of 5.25 N Sulfuric Acid Standard Solution. Put the stopper on the cylinder. Invert tomix. If the yellow color continues, repeat until the sample becomes colorless. Use this treatedsample in the test procedure.
Fluoride Interferes at all levels. Refer to Fluoride interference on page 4.
Iron More than 20 mg/L
Phosphate More than 50 mg/L
Polyphosphate Polyphosphate interferes at all levels and causes negative errors and must not be present. The samplemust be pre-treated with acid hydrolysis before the test is started to convert polyphosphate toorthophosphate. Use the Phosphorus, Acid Hydrolyzable Digestion procedure.
Fluoride interferenceFluoride forms complexes with aluminum and interferes at all levels. If the fluorideconcentration of the sample is known, use Figure 1 to find the actual aluminumconcentration.To use the fluoride interference graph:
1. On the top of the graph, find the aluminum result from the test procedure.2. On the left side of the graph, find the fluoride concentration of the sample.3. Go along the grid lines to find the point on the graph where the values intersect.4. Go along the curved lines on either side of the intersect point to find the actual
aluminum concentration on the bottom of the graph.Example: The aluminum test result is 0.7 mg/L Al3+ and the fluoride concentration is1 mg/L F–. The 0.7 mg/L Al3+ grid line intersects with the 1 mg/L F– grid line between
4 Aluminum, Aluminon Method (0.800 mg/L)
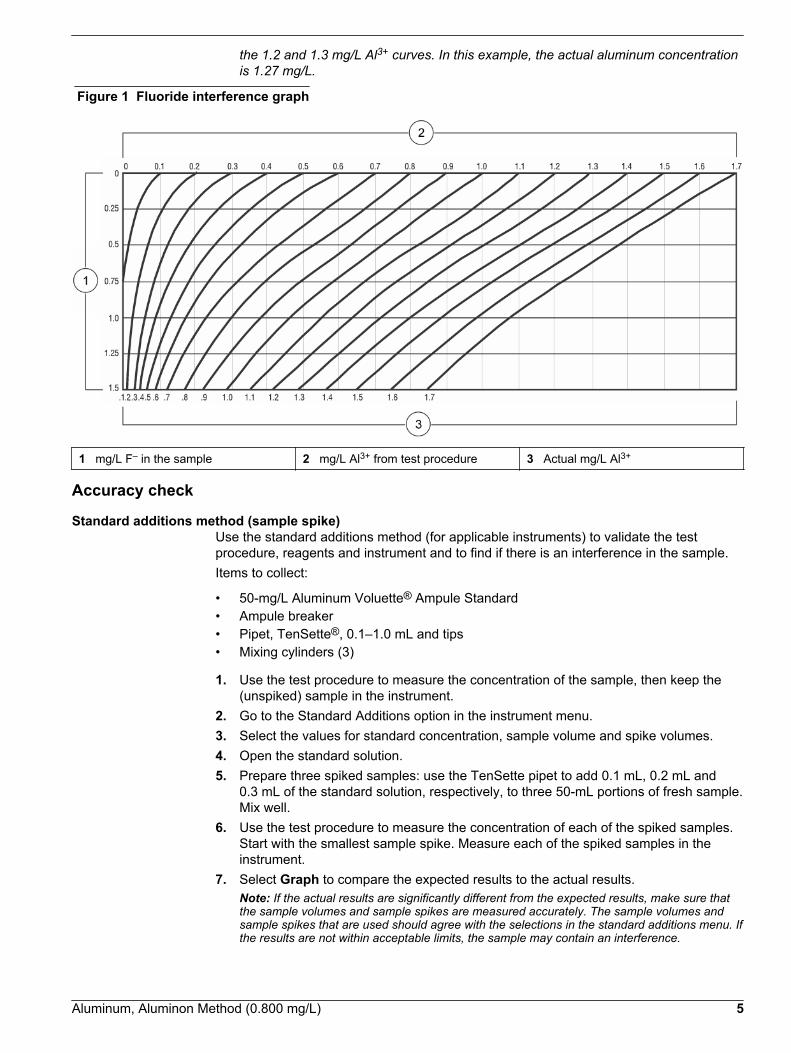
the 1.2 and 1.3 mg/L Al3+ curves. In this example, the actual aluminum concentrationis 1.27 mg/L.
Figure 1 Fluoride interference graph
1 mg/L F– in the sample 2 mg/L Al3+ from test procedure 3 Actual mg/L Al3+
Accuracy check
Standard additions method (sample spike)Use the standard additions method (for applicable instruments) to validate the testprocedure, reagents and instrument and to find if there is an interference in the sample.Items to collect:
• 50-mg/L Aluminum Voluette® Ampule Standard• Ampule breaker• Pipet, TenSette®, 0.1–1.0 mL and tips• Mixing cylinders (3)
1. Use the test procedure to measure the concentration of the sample, then keep the(unspiked) sample in the instrument.
2. Go to the Standard Additions option in the instrument menu.3. Select the values for standard concentration, sample volume and spike volumes.4. Open the standard solution.5. Prepare three spiked samples: use the TenSette pipet to add 0.1 mL, 0.2 mL and
0.3 mL of the standard solution, respectively, to three 50-mL portions of fresh sample.Mix well.
6. Use the test procedure to measure the concentration of each of the spiked samples.Start with the smallest sample spike. Measure each of the spiked samples in theinstrument.
7. Select Graph to compare the expected results to the actual results.Note: If the actual results are significantly different from the expected results, make sure thatthe sample volumes and sample spikes are measured accurately. The sample volumes andsample spikes that are used should agree with the selections in the standard additions menu. Ifthe results are not within acceptable limits, the sample may contain an interference.
Aluminum, Aluminon Method (0.800 mg/L) 5

Standard solution methodUse the standard solution method to validate the test procedure, reagents andinstrument.Items to collect:
• 100-mg/L aluminum standard solution• 250-mL volumetric flask, Class A• 1.00-mL volumetric pipet, Class A and pipet filler• Deionized water
1. Prepare a 0.4 mg/L aluminum standard solution as follows:
a. Use a pipet to add 1.00 mL of 100-mg/L aluminum standard solution into thevolumetric flask. (Alternate preparation: Use a pipet to add 0.8 mL of a 50-mg/Laluminum standard solution into a 100-mL volumetric flask.)
b. Dilute to the mark with deionized water. Mix well. Prepare this solution daily.2. Use the test procedure to measure the concentration of the prepared standard
solution.3. Compare the expected result to the actual result.
Note: The factory calibration can be adjusted slightly with the standard adjust option so that theinstrument shows the expected value of the standard solution. The adjusted calibration is thenused for all test results. This adjustment can increase the test accuracy when there are slightvariations in the reagents or instruments.
Method performanceThe method performance data that follows was derived from laboratory tests that weremeasured on a spectrophotometer during ideal test conditions. Users may get differentresults under different test conditions.
Program Standard Precision (95% Confidence Interval) SensitivityConcentration change per 0.010 Abs change
10 0.40 mg/L Al3+ 0.385–0.415 mg/L Al3+ 0.008 mg/L Al3+
Summary of methodAluminon indicator combines with aluminum in the sample to form a red-orange color.The intensity of color is proportional to the aluminum concentration. Ascorbic acid isadded before the AluVer 3 reagent to remove iron interference. To establish a reagentblank, the sample is divided after the addition of the AluVer 3. Bleaching 3 Reagent isthen added to one-half of the divided sample to bleach out the color of the aluminumaluminon complex. The AluVer 3 Aluminum Reagent, packaged in powder form, showsexceptional stability and is applicable for fresh water applications. The measurementwavelength is 522 nm for spectrophotometers or 520 nm for colorimeters.
Consumables and replacement itemsRequired reagents
Description Quantity/test Unit Item no.
Aluminum Reagent Set, includes: — 100 tests 2242000
AluVer® 31 Aluminum Reagent Powder Pillow 1 100/pkg 1429099
Ascorbic Acid Powder Pillow 1 100/pkg 1457799
Bleaching 3 Reagent Powder Pillow 1 100/pkg 1429449
Hydrochloric Acid, 6.0 N varies 500 mL 88449
Water, deionized varies 4 L 27256
1 AluVer is a registered trademark of Hach Company.
6 Aluminum, Aluminon Method (0.800 mg/L)

Required apparatus
Description Quantity/test Unit Item no.
Cylinder, graduated mixing, 50-mL, with glass stopper 1 each 189641
Recommended standards or Recommended standards and apparatus
Description Unit Item no.
Aluminum Standard Solution, 100-mg/L as Al3+ 100 mL 1417442
Aluminum Standard Solution, 10-mg/L as Al3+ 100 mL 2305842
Aluminum Standard Solution, 10-mL Voluette® Ampule, 50-mg/L as Al 16/pkg 1479210
Ampule Breaker, Voluette® ampules each 2196800
Optional reagents and apparatus
Description Unit Item no.
Flask, volumetric, Class A, 100-mL each 1457442
Flask, volumetric, Class A, 250-mL each 1457446
Liqui-Nox Phosphate-free detergent 946 mL 2088153
m-Nitrophenol Indicator Solution 100 mL 247632
Nitric Acid Solution, 1:1 500 mL 254049
Paper, pH, 0–14 pH range 100/pkg 2601300
Pipet, TenSette®, 0.1–1.0 mL each 1970001
Pipet tips for TenSette Pipet 1970001 50/pkg 2185696
Sodium Hydroxide, 5 N 50 mL 245026
Sulfuric Acid Standard Solution, 5.25 N 100 mL 244932
Test tube brush each 69000
Aluminum, Aluminon Method (0.800 mg/L) 7

HACH COMPANYWORLD HEADQUARTERSTelephone: (970) 669-3050FAX: (970) 669-2932
FOR TECHNICAL ASSISTANCE, PRICE INFORMATION AND ORDERING:Call 800-227-4224
Contact the HACH office or distributor serving you.www.hach.com [email protected]
In the U.S.A. –
Outside the U.S.A. –
On the Worldwide Web – ; E-mail –
toll-free
© Hach Company/Hach Lange GmbH, 1989–2013. All rights reserved. 04/2013, Edition 8
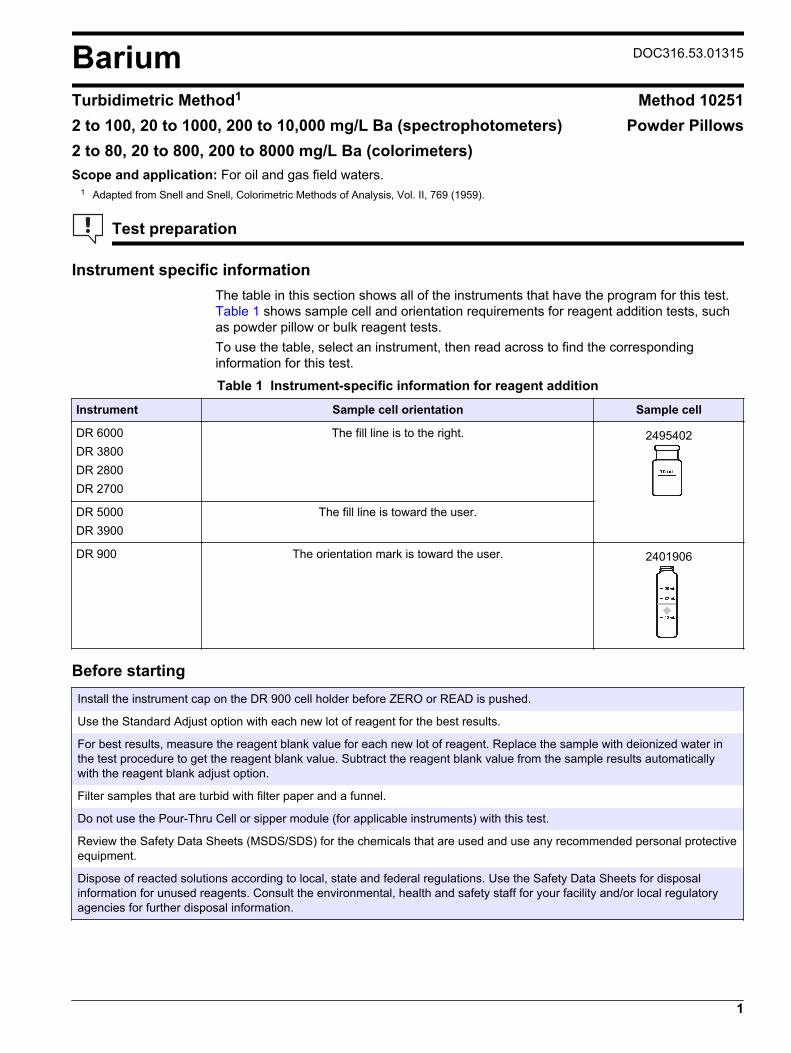
Barium DOC316.53.01315
Turbidimetric Method1 Method 102512 to 100, 20 to 1000, 200 to 10,000 mg/L Ba (spectrophotometers)2 to 80, 20 to 800, 200 to 8000 mg/L Ba (colorimeters)
Powder Pillows
Scope and application: For oil and gas field waters.1 Adapted from Snell and Snell, Colorimetric Methods of Analysis, Vol. II, 769 (1959).
Test preparation
Instrument specific informationThe table in this section shows all of the instruments that have the program for this test. Table 1 shows sample cell and orientation requirements for reagent addition tests, suchas powder pillow or bulk reagent tests.To use the table, select an instrument, then read across to find the correspondinginformation for this test.
Table 1 Instrument-specific information for reagent addition
Instrument Sample cell orientation Sample cell
DR 6000 DR 3800 DR 2800 DR 2700
The fill line is to the right. 2495402
DR 5000 DR 3900
The fill line is toward the user.
DR 900 The orientation mark is toward the user. 2401906
Before startingInstall the instrument cap on the DR 900 cell holder before ZERO or READ is pushed.
Use the Standard Adjust option with each new lot of reagent for the best results.
For best results, measure the reagent blank value for each new lot of reagent. Replace the sample with deionized water inthe test procedure to get the reagent blank value. Subtract the reagent blank value from the sample results automaticallywith the reagent blank adjust option.
Filter samples that are turbid with filter paper and a funnel.
Do not use the Pour-Thru Cell or sipper module (for applicable instruments) with this test.
Review the Safety Data Sheets (MSDS/SDS) for the chemicals that are used and use any recommended personal protectiveequipment.
Dispose of reacted solutions according to local, state and federal regulations. Use the Safety Data Sheets for disposalinformation for unused reagents. Consult the environmental, health and safety staff for your facility and/or local regulatoryagencies for further disposal information.
1

Items to collect
Description Quantity
BariVer™ 4 Barium Reagent Powder Pillows 1
Sample cells (For information about sample cells, adapters or light shields, refer to Instrumentspecific information on page 1.) 2
Refer to Consumables and replacement items on page 5 for reorder information.
Sample collection and storage• Collect samples in clean glass or plastic bottles.• To preserve samples for later analysis, adjust the sample pH to less than 2 with
concentrated nitric acid (about 2 mL per liter). No acid addition is necessary if thesample is tested immediately.
• Keep preserved samples at room temperature for a maximum of 6 months.• Before analysis, adjust the pH to 5 with 5.0 N sodium hydroxide standard solution.• Correct the test result for the dilution from the volume additions.
Powder pillow procedure
Start
1. Start program20 Barium. For informationabout sample cells,adapters or light shields,refer to Instrument specificinformation on page 1.Note: Although the programname may vary betweeninstruments, the programnumber does not change.
2. Prepare the blank: Addthe sample volume that isspecified for the test rangeto a clean sample cell:
• 2–80 mg/L: 10 mL• 20–800 mg/L: 1.0 mL• 200–8000 mg/L: 0.1 mL
Use a pipet to add the1.0 mL and 0.1 mL volumes.
3. If the sample volume isless than 10 mL, adddeionized water to the 10-mL line.
4. Swirl to mix.Refer to Set the dilutionfactor on page 3. A 10-mL graduated mixingcylinder can be used insteps 2 and 3.
5. Clean the blank. 6. Insert the blank into thecell holder.
Zero
7. Push ZERO. The displayshows 0 mg/L Ba2+.
8. Remove the sample fromthe cell holder.
2 Barium, Turbidimetric Method (multi-range: 100, 1000, 10,000 mg/L)

9. Prepare the sample:Add the contents of oneBariVer™ 4 Barium ReagentPowder Pillow to the samplecell.The solution will get cloudyif barium is in the sample.
10. Swirl to mix.The sample will becomecloudy if barium is in thesample. Accuracy is notaffected by undissolvedpowder.
11. Start the instrumenttimer. A 5-minute reactiontime starts.Do not move the sample cellduring the reaction period.
12. Clean the preparedsample.
13. Within 5 minutes afterthe timer expires, insert theprepared sample into thecell holder.
Read
14. Push READ. Resultsshow in mg/L Ba2+.
15. Clean the sample cellimmediately after each testwith soap, water and abrush.
InterferencesInterfering substance Interference level
Calcium 10,000 mg/L as CaCO3
Magnesium 100,000 mg/L as CaCO3
Silica 500 mg/L
Sodium Chloride 130,000 mg/L as NaCl
Strontium The interference level is dependent on the sample matrix and the barium concentration.When the barium concentration is zero, there is no interference from strontium. The bestresults occur when the barium concentration is less than 20 mg/L and when the strontiumconcentration (as mg/L) is equal to or less than the barium concentration.
Highly buffered samples orextreme sample pH
Can prevent the pH adjustment by the reagent(s) and cause incorrect results.
Set the dilution factorInstruments that have a dilution factor option can include the dilution factor in the resultand show the concentration of the original, undiluted sample. For example, if the sampleis diluted by a factor of 10, the instrument multiplies the result by 10 and shows thecalculated result in the instrument display.
1. Select Options>More>Dilution factor from the instrument menu.
Barium, Turbidimetric Method (multi-range: 100, 1000, 10,000 mg/L) 3

Note: Colorimeters include a dilution factor when the chemical form is set. Go toOptions>Advanced Options>Chemical Form and select LR, MR or HR.
2. Enter the dilution factor:
• 1 mL sample diluted to 10 mL: dilution factor is 10.• 0.1 mL sample diluted to 10 mL: dilution factor is 100.
3. Push OK to confirm. Push OK again.4. Push RETURN to go back to the measurement screen.
Accuracy check
Standard additions method (sample spike)Use the standard additions method (for applicable instruments) to validate the testprocedure, reagents and instrument and to find if there is an interference in the sample.Items to collect:
• Barium Standard Solution, 1000-mg/L Ba• Pipet, TenSette®, 0.1–1.0 mL• Pipet tips
1. Use the test procedure to measure the concentration of the sample, then keep the(unspiked) sample in the instrument.
2. Go to the Standard Additions option in the instrument menu.3. Select the values for standard concentration, sample volume and spike volumes.4. Open the standard solution.5. Prepare three spiked samples: use the TenSette pipet to add of the standard solution,
respectively, to three 10-mL portions of fresh sample. Mix well.6. Use the test procedure to measure the concentration of each of the spiked samples.
Start with the smallest sample spike. Measure each of the spiked samples in theinstrument.
7. Select Graph to compare the expected results to the actual results.Note: If the actual results are significantly different from the expected results, make sure thatthe sample volumes and sample spikes are measured accurately. The sample volumes andsample spikes that are used should agree with the selections in the standard additions menu. Ifthe results are not within acceptable limits, the sample may contain an interference.
Standard solution methodUse the standard solution method to validate the test procedure, reagents andinstrument.Items to collect:
• Barium Standard Solution, 1000-mg/L Ba• 100-mL volumetric flask, Class A• 5-mL volumetric pipet, Class A and pipet filler• Deionized water
1. Prepare a 50.0-mg/L barium standard solution as follows:
a. Use a pipet to add 5.00 mL of 1000-mg/L barium standard solution into thevolumetric flask.
b. Dilute to the mark with deionized water. Mix well. Prepare this solution daily.2. Use the test procedure to measure the concentration of the prepared standard
solution.3. Compare the expected result to the actual result.
Note: The factory calibration can be adjusted slightly with the standard adjust option so that theinstrument shows the expected value of the standard solution. The adjusted calibration is thenused for all test results. This adjustment can increase the test accuracy when there are slightvariations in the reagents or instruments.
4 Barium, Turbidimetric Method (multi-range: 100, 1000, 10,000 mg/L)

Method performanceThe method performance data that follows was derived from laboratory tests that weremeasured on a spectrophotometer during ideal test conditions. Users may get differentresults under different test conditions.
Program Standard Precision (95% Confidence Interval) SensitivityConcentration change per 0.010 Abs change
20 30 mg/L Ba 25–35 mg/L Ba 1 mg/L Ba
Summary of methodThe BariVer™ 4 Barium Reagent Powder combines with barium to form a barium sulfateprecipitate, which is held in suspension by a protective colloid. The amount of precipitateis proportional to the barium concentration. The measurement wavelength is 450 nm forspectrophotometers or 520 for colorimeters.
Consumables and replacement itemsRequired reagents
Description Quantity/test Unit Item no.
BariVer™ 4 Barium Reagent Powder Pillows 1 100/pkg 1206499
Recommended standards
Description Unit Item no.
Barium Standard Solution, 1000-mg/L Ba 100 mL 1461142
Water, deionized 4 L 27256
Optional reagents and apparatus
Description Unit Item no.
Brush, test tube each 69000
Filter paper, 12.5-cm 100/pkg 189457
Flask, volumetric, Class A, 100-mL each 1457442
Funnel, poly, 65-mm each 108367
Liqui-Nox Phosphate-free detergent 946 mL 2088153
Nitric Acid Solution, 1:1 500 mL 254049
Paper, pH, 0–14 pH range 100/pkg 2601300
Pipet, TenSette®, 0.1–1.0 mL each 1970001
Pipet tips for TenSette Pipet 1970001 50/pkg 2185696
Pipet tips for TenSette Pipet 1970001 1000/pkg 2185628
Pipet, volumetric 5.00-mL each 1451537
Pipet filler, safety bulb each 1465100
Sodium Hydroxide Standard Solution, 5.0 N 100 mLMDB 245032
Barium, Turbidimetric Method (multi-range: 100, 1000, 10,000 mg/L) 5

HACH COMPANYWORLD HEADQUARTERSTelephone: (970) 669-3050FAX: (970) 669-2932
FOR TECHNICAL ASSISTANCE, PRICE INFORMATION AND ORDERING:Call 800-227-4224
Contact the HACH office or distributor serving you.www.hach.com [email protected]
In the U.S.A. –
Outside the U.S.A. –
On the Worldwide Web – ; E-mail –
toll-free
© Hach Company/Hach Lange GmbH, 1989–2013. All rights reserved. 04/2013, Edition 8
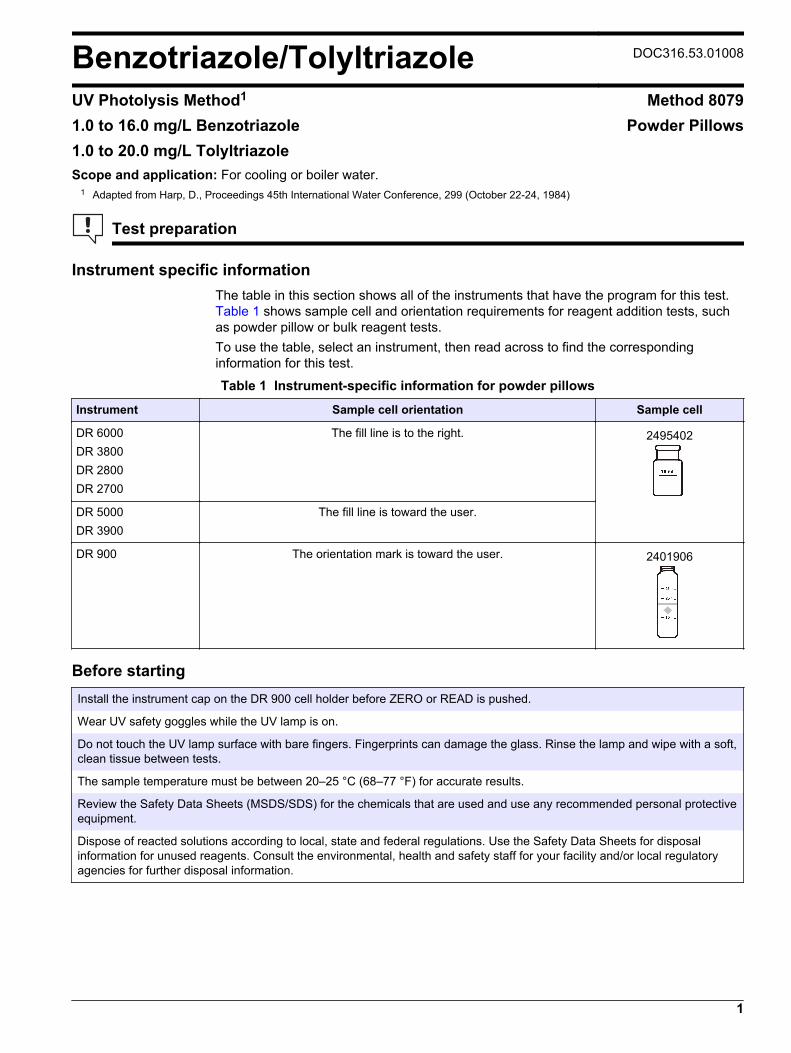
Benzotriazole/Tolyltriazole DOC316.53.01008
UV Photolysis Method1 Method 80791.0 to 16.0 mg/L Benzotriazole1.0 to 20.0 mg/L Tolyltriazole
Powder Pillows
Scope and application: For cooling or boiler water.1 Adapted from Harp, D., Proceedings 45th International Water Conference, 299 (October 22-24, 1984)
Test preparation
Instrument specific informationThe table in this section shows all of the instruments that have the program for this test. Table 1 shows sample cell and orientation requirements for reagent addition tests, suchas powder pillow or bulk reagent tests.To use the table, select an instrument, then read across to find the correspondinginformation for this test.
Table 1 Instrument-specific information for powder pillows
Instrument Sample cell orientation Sample cell
DR 6000 DR 3800 DR 2800 DR 2700
The fill line is to the right. 2495402
DR 5000 DR 3900
The fill line is toward the user.
DR 900 The orientation mark is toward the user. 2401906
Before startingInstall the instrument cap on the DR 900 cell holder before ZERO or READ is pushed.
Wear UV safety goggles while the UV lamp is on.
Do not touch the UV lamp surface with bare fingers. Fingerprints can damage the glass. Rinse the lamp and wipe with a soft,clean tissue between tests.
The sample temperature must be between 20–25 °C (68–77 °F) for accurate results.
Review the Safety Data Sheets (MSDS/SDS) for the chemicals that are used and use any recommended personal protectiveequipment.
Dispose of reacted solutions according to local, state and federal regulations. Use the Safety Data Sheets for disposalinformation for unused reagents. Consult the environmental, health and safety staff for your facility and/or local regulatoryagencies for further disposal information.
1

Items to collect
Description Quantity
Triazole Reagent Powder Pillows 1
Square mixing bottle, 25-mL 1
Ultra-violet lamp with power supply 1
UV safety goggles 1
Sample cells (For information about sample cells, adapters or light shields, refer to Instrumentspecific information on page 1.) 2
Refer to Consumables and replacement items on page 5 for reorder information.
Sample collection• Collect samples in clean glass or plastic bottles.• Analyze the samples as soon as possible for best results.
Powder pillow procedure with UV photolysis
Start
1. Start program30 Benzotriazole orprogram 730 Tolyltriazole.For information aboutsample cells, adapters orlight shields, refer to Instrument specificinformation on page 1.Note: Although the programname may vary betweeninstruments, the programnumber does not change.
2. Prepare the sample: Filla marked mixing bottle tothe 25-mL line with sample.
3. Add the contents of oneTriazole Reagent PowderPillow.
4. Swirl to mix.Make sure all of the powderis dissolved.
2 Benzotriazole/Tolyltriazole, UV Photolysis Method (Benzo 16.0 mg/L, Tolyl 20 mg/L)
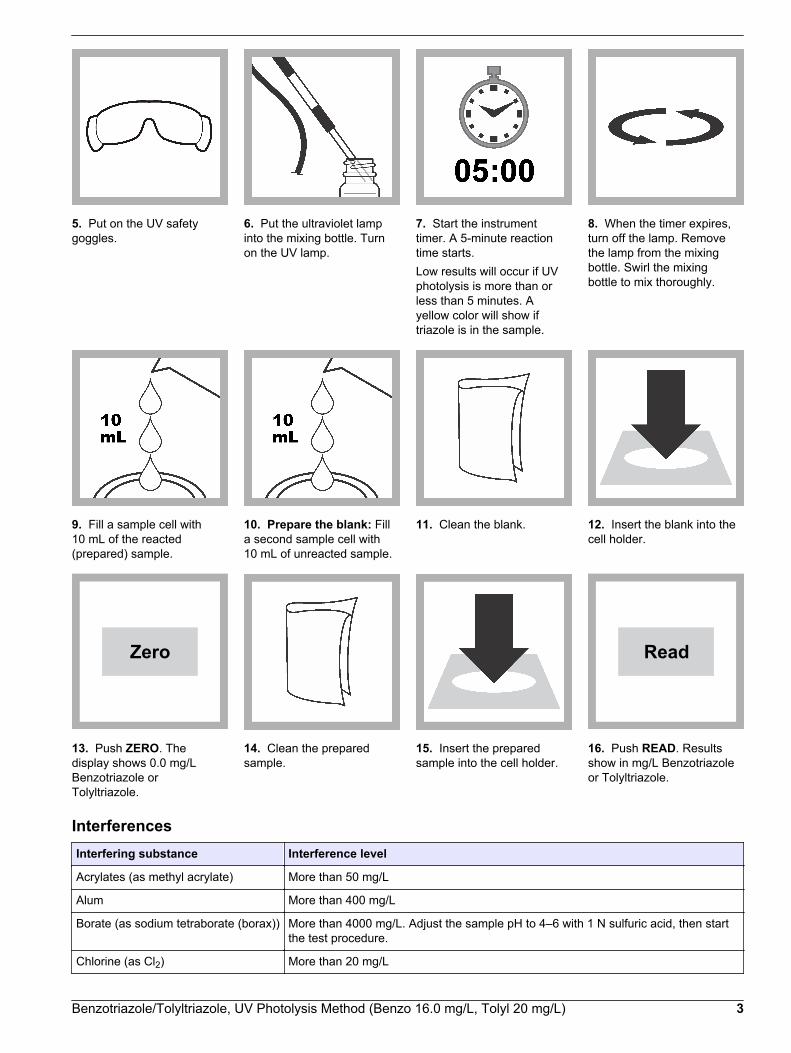
5. Put on the UV safetygoggles.
6. Put the ultraviolet lampinto the mixing bottle. Turnon the UV lamp.
7. Start the instrumenttimer. A 5-minute reactiontime starts.Low results will occur if UVphotolysis is more than orless than 5 minutes. Ayellow color will show iftriazole is in the sample.
8. When the timer expires,turn off the lamp. Removethe lamp from the mixingbottle. Swirl the mixingbottle to mix thoroughly.
9. Fill a sample cell with10 mL of the reacted(prepared) sample.
10. Prepare the blank: Filla second sample cell with10 mL of unreacted sample.
11. Clean the blank. 12. Insert the blank into thecell holder.
Zero
13. Push ZERO. Thedisplay shows 0.0 mg/LBenzotriazole orTolyltriazole.
14. Clean the preparedsample.
15. Insert the preparedsample into the cell holder.
Read
16. Push READ. Resultsshow in mg/L Benzotriazoleor Tolyltriazole.
InterferencesInterfering substance Interference level
Acrylates (as methyl acrylate) More than 50 mg/L
Alum More than 400 mg/L
Borate (as sodium tetraborate (borax)) More than 4000 mg/L. Adjust the sample pH to 4–6 with 1 N sulfuric acid, then startthe test procedure.
Chlorine (as Cl2) More than 20 mg/L
Benzotriazole/Tolyltriazole, UV Photolysis Method (Benzo 16.0 mg/L, Tolyl 20 mg/L) 3
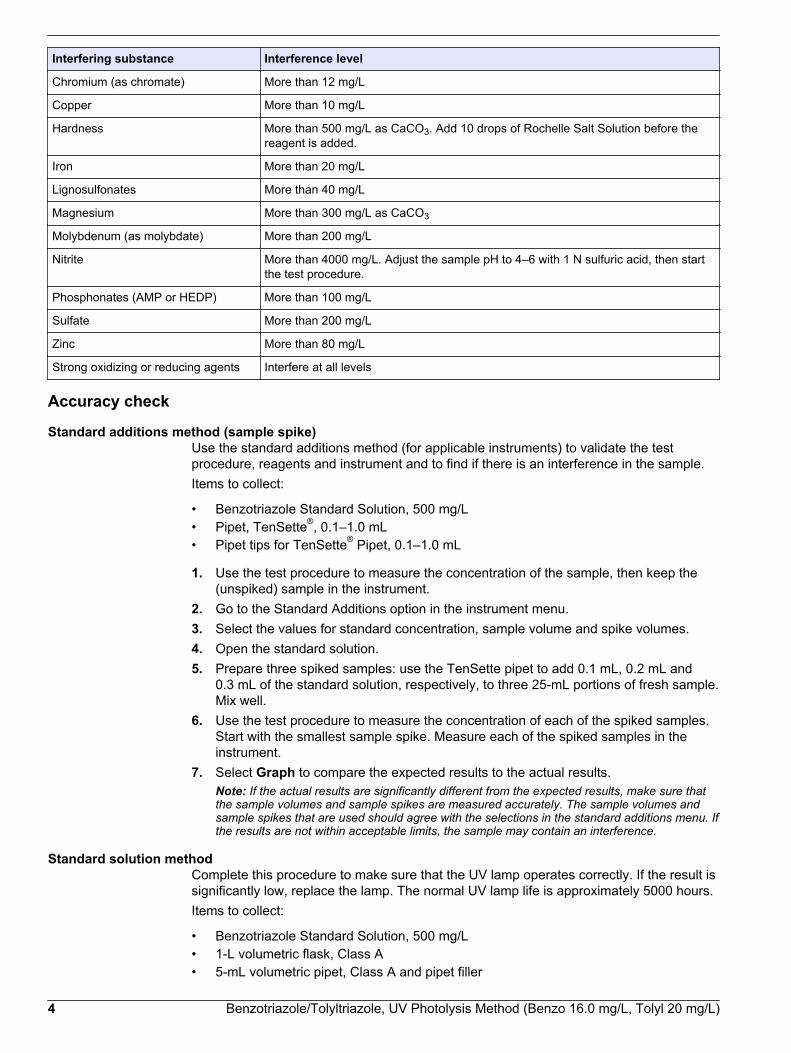
Interfering substance Interference level
Chromium (as chromate) More than 12 mg/L
Copper More than 10 mg/L
Hardness More than 500 mg/L as CaCO3. Add 10 drops of Rochelle Salt Solution before thereagent is added.
Iron More than 20 mg/L
Lignosulfonates More than 40 mg/L
Magnesium More than 300 mg/L as CaCO3
Molybdenum (as molybdate) More than 200 mg/L
Nitrite More than 4000 mg/L. Adjust the sample pH to 4–6 with 1 N sulfuric acid, then startthe test procedure.
Phosphonates (AMP or HEDP) More than 100 mg/L
Sulfate More than 200 mg/L
Zinc More than 80 mg/L
Strong oxidizing or reducing agents Interfere at all levels
Accuracy check
Standard additions method (sample spike)Use the standard additions method (for applicable instruments) to validate the testprocedure, reagents and instrument and to find if there is an interference in the sample.Items to collect:
• Benzotriazole Standard Solution, 500 mg/L• Pipet, TenSette®, 0.1–1.0 mL• Pipet tips for TenSette® Pipet, 0.1–1.0 mL
1. Use the test procedure to measure the concentration of the sample, then keep the(unspiked) sample in the instrument.
2. Go to the Standard Additions option in the instrument menu.3. Select the values for standard concentration, sample volume and spike volumes.4. Open the standard solution.5. Prepare three spiked samples: use the TenSette pipet to add 0.1 mL, 0.2 mL and
0.3 mL of the standard solution, respectively, to three 25-mL portions of fresh sample.Mix well.
6. Use the test procedure to measure the concentration of each of the spiked samples.Start with the smallest sample spike. Measure each of the spiked samples in theinstrument.
7. Select Graph to compare the expected results to the actual results.Note: If the actual results are significantly different from the expected results, make sure thatthe sample volumes and sample spikes are measured accurately. The sample volumes andsample spikes that are used should agree with the selections in the standard additions menu. Ifthe results are not within acceptable limits, the sample may contain an interference.
Standard solution methodComplete this procedure to make sure that the UV lamp operates correctly. If the result issignificantly low, replace the lamp. The normal UV lamp life is approximately 5000 hours.Items to collect:
• Benzotriazole Standard Solution, 500 mg/L• 1-L volumetric flask, Class A• 5-mL volumetric pipet, Class A and pipet filler
4 Benzotriazole/Tolyltriazole, UV Photolysis Method (Benzo 16.0 mg/L, Tolyl 20 mg/L)

• Deionized water
1. Prepare a 5.0 mg/L benzotriazole standard solution as follows:
a. Use a pipet to add 10.0 mL of 500-mg/L benzotriazole standard solution into thevolumetric flask.
b. Dilute to the mark with deionized water. Mix well. Prepare this solution daily.2. Use the test procedure to measure the concentration of the prepared standard
solution.3. Compare the expected result to the actual result.
Note: If the test result is significantly below 5 mg/L, replace the lamp.
Method performanceThe method performance data that follows was derived from laboratory tests that weremeasured on a spectrophotometer during ideal test conditions. Users may get differentresults under different test conditions.
Program Standard Precision (95% Confidence Interval) SensitivityConcentration change per 0.010 Abs change
30 10 mg/L benzotriazole 9.7–10.3 benzotriazole 0.2 mg/L benzotriazole
730 12 mg/L tolyltriazole 11.6-12.4 mg/L tolyltriazole 0.2 mg/L tolyltriazole
Summary of methodBenzotriazole or tolyltriazole, used in many applications as corrosion inhibitors for copperand copper alloys, are determined by a proprietary catalytic ultraviolet (UV) photolysisprocedure requiring less than 10 minutes to perform. The measurement wavelength is425 nm for spectrophotometers or 420 nm for colorimeters.
Consumables and replacement itemsRequired reagents
Description Quantity/test Unit Item no.
Triazole Reagent Powder Pillow 1 100/pkg 2141299
Required apparatus
Description Quantity/test Unit Item no.
UV safety goggles 1 each 2113400
Bottle, square, with 25 mL mark 1 each 1704200
Select one based on available voltage:
Lamp kit, UV, with power supply, 115 VAC, 60 Hz 1 each 2704500
Lamp kit, UV, with power supply, 230 VAC, 50 Hz 1 each 2704502
Recommended standards
Description Unit Item no.
Benzotriazole Standard Solution, 500-mg/L 100 mL 2141342
Benzotriazole/Tolyltriazole, UV Photolysis Method (Benzo 16.0 mg/L, Tolyl 20 mg/L) 5

Optional reagents and apparatus
Description Unit Item no.
Flask, volumetric, Class A, 1000-mL each 1457453
Paper, pH, 0–14 pH range 100/pkg 2601300
Pipet filler, safety bulb each 1465100
Pipet, TenSette®, 0.1–1.0 mL each 1970001
Pipet tips for TenSette Pipet 1970001 50/pkg 2185696
Pipet tips for TenSette Pipet 1970001 1000/pkg 2185628
Sulfuric Acid Standard Solution, 1 N 100 mLMDB 127032
Rochelle Salt Solution 29 mL 172533
Pipet, volumetric, Class A, 10-mL each 1451538
HACH COMPANYWORLD HEADQUARTERSTelephone: (970) 669-3050FAX: (970) 669-2932
FOR TECHNICAL ASSISTANCE, PRICE INFORMATION AND ORDERING:Call 800-227-4224
Contact the HACH office or distributor serving you.www.hach.com [email protected]
In the U.S.A. –
Outside the U.S.A. –
On the Worldwide Web – ; E-mail –
toll-free
© Hach Company/Hach Lange GmbH, 1989–2013. All rights reserved. 04/2013, Edition 8

Boron DOC316.53.01313
Carmine Method Method 102522 to 50 mg/L B Powder Pillows
Scope and application: For oil and gas field waters
Test preparation
Instrument specific informationThe table in this section shows all of the instruments that have the program for this test. Table 1 shows adapter and light shield requirements for the instruments that use them.To use the table, select an instrument, then read across to find the correspondinginformation for this test.
Table 1 Instrument-specific information for test tubes
Instrument Adapters Light shield
DR 6000 — —
DR 5000 — —
DR 900 4846400 Cover supplied with the instrument
DR 3900 — LZV849
DR 3800 — LZV646
DR 2800 —
Before startingInstall the instrument cap on the DR 900 cell holder before ZERO or READ is pushed.
DR 3900, DR 3800, DR 2800 and DR 2700: Install the light shield in Cell Compartment #2 before this test is started.
The reagent that is used in this test is corrosive. Use protection for eyes and skin and be prepared to flush any spills withrunning water.
Review the Safety Data Sheets (MSDS/SDS) for the chemicals that are used and use any recommended personal protectiveequipment.
Dispose of reacted solutions according to local, state and federal regulations. Use the Safety Data Sheets for disposalinformation for unused reagents. Consult the environmental, health and safety staff for your facility and/or local regulatoryagencies for further disposal information.
Items to collect
Description Quantity
BoroVer 3 Reagent Powder Pillow 1
Sufuric Acid, Concentrated 75 mL
Water, deionized 2 mL
Tubes, glass, 16 mm x 100 mm 2
Caps, white Teflon 2
Flask, poly, screw-on cap, 250-mL 1
Cylinder, graduated, poly, 100-mL 1
Light shield or adapter (For information about sample cells, adapters or light shields, refer to Instrument specific information on page 1.) 1
1

Items to collect (continued)Description Quantity
Select:
Pipet, 0.2 - 1.0 mL , BBP078 1
Pipet Tip, for BBP078 2
Pipet, 1.0 - 1.0 mL, BBP065 1
Pipet Tip for BBP065 2
OR
Pipet, TenSette, 0.1- to 1.0-mL 1
Pipet tips for 0.1- to 1.0-mL TenSette 2
Pipet, TenSette, 1.0- to 10.0-mL 1
Pipet tips for 1.0- to 10.0-mL TenSette 2
Refer to Consumables and replacement items on page 6 for reorder information.
Sample collectionCollect samples in clean polyethylene or polypropylene bottles.
Prepare the glass tubes for first useNew glass tubes can contain residual amounts of reactive boron from the glassmanufacturing process. For best results, precondition the tubes before the first use.Previously used tubes do not need to be preconditioned.
1. Prepare the BoroVer 3/Sulfuric Acid Solution.2. Add 3 to 4 mL of the prepared BoroVer 3/Sulfuric Acid Solution into the tubes.3. After 30 minutes, discard the solution.4. Rinse and dry the tubes before use.
Powder pillow procedure
Start
1. Start Boron HR. Refer to Instrument setupon page 5 forprogramming instructions.For information aboutsample cells, adapters orlight shields, refer to Instrument specificinformation on page 1.Note: Although the programname may vary betweeninstruments, the programnumber does not change.
2. Use a 100-mL graduatedcylinder to measure 75 mLof concentrated sulfuricacid. Pour the acid into aplastic 250-mL Erlenmeyerflask.
3. In a well-ventilated areaor fume hood, add thecontents of one BoroVer3 Reagent Powder Pillow tothe flask.
4. Swirl the flaskimmediately to mix. Swirl forup to 5 minutes to dissolvethe powder completely.
2 Boron, Carmine method (50 mg/L)

5. Prepare the blank:Remove the cap from aclean 16-mm tube. Add0.2 mL of deionized water.Refer to Prepare the glasstubes for first use on page 2and Clean the glass tubesafter use on page 4.Note: If a 3.5-mL pipet isnot available, 0.4 mL of DIwater can be used.
6. Prepare the sample:Remove the cap from aclean 16-mm tube. Add0.2 mL of sample.Note: If a 3.5-mL pipet isnot available, 0.4 mL ofsample can be used.
7. Add 3.5 mL of theBoroVer 3 Solution fromstep 4 to the preparedsample tube.Note: If a 3.5-mL pipet isnot available, 7.0 mL ofBoroVer 3 Solution can beused with 0.4 mL of sample.
8. Put the cap on theprepared sample and invertto mix.The solution in the tube willget warm.
9. Add 3.5 mL of theBoroVer 3 Solution fromstep 4 to the blank sampletube.Note: If a 3.5-mL pipet isnot available, 7.0 mL ofBoroVer 3 Solution can beused with 0.4 mL ofdeionized water.
10. Put the cap on theblank. Iinvert to mix.The solution in the tube willget warm.
11. Start the instrumenttimer. A 30-minute reactiontime starts.
12. When the timer expires,clean the blank.
13. Insert the blank into thecell holder.
Zero
14. Push ZERO. Thedisplay shows 0.0 mg/L BHR.
15. Clean the preparedsample.
16. Insert the preparedsample into the cell holder.
Boron, Carmine method (50 mg/L) 3
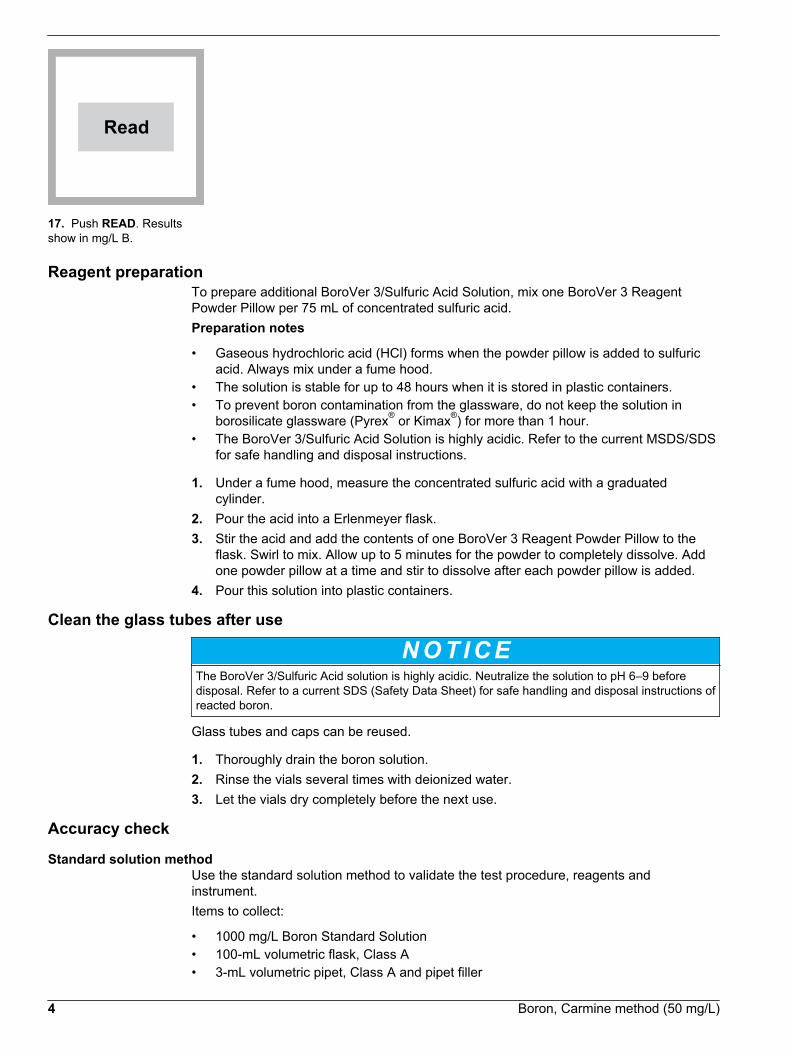
Read
17. Push READ. Resultsshow in mg/L B.
Reagent preparationTo prepare additional BoroVer 3/Sulfuric Acid Solution, mix one BoroVer 3 ReagentPowder Pillow per 75 mL of concentrated sulfuric acid.Preparation notes
• Gaseous hydrochloric acid (HCl) forms when the powder pillow is added to sulfuricacid. Always mix under a fume hood.
• The solution is stable for up to 48 hours when it is stored in plastic containers.• To prevent boron contamination from the glassware, do not keep the solution in
borosilicate glassware (Pyrex® or Kimax®) for more than 1 hour.• The BoroVer 3/Sulfuric Acid Solution is highly acidic. Refer to the current MSDS/SDS
for safe handling and disposal instructions.
1. Under a fume hood, measure the concentrated sulfuric acid with a graduatedcylinder.
2. Pour the acid into a Erlenmeyer flask.3. Stir the acid and add the contents of one BoroVer 3 Reagent Powder Pillow to the
flask. Swirl to mix. Allow up to 5 minutes for the powder to completely dissolve. Addone powder pillow at a time and stir to dissolve after each powder pillow is added.
4. Pour this solution into plastic containers.
Clean the glass tubes after use
N O T I C E
The BoroVer 3/Sulfuric Acid solution is highly acidic. Neutralize the solution to pH 6–9 beforedisposal. Refer to a current SDS (Safety Data Sheet) for safe handling and disposal instructions ofreacted boron.
Glass tubes and caps can be reused.
1. Thoroughly drain the boron solution.2. Rinse the vials several times with deionized water.3. Let the vials dry completely before the next use.
Accuracy check
Standard solution methodUse the standard solution method to validate the test procedure, reagents andinstrument.Items to collect:
• 1000 mg/L Boron Standard Solution• 100-mL volumetric flask, Class A• 3-mL volumetric pipet, Class A and pipet filler
4 Boron, Carmine method (50 mg/L)

• Deionized water
1. Prepare a 30.0 mg/L boron standard solution as follows:
a. Use a pipet to add 3.0 mL of 1000 mg/L boron standard solution into thevolumetric flask.
b. Dilute to the mark with deionized water. Mix well. Prepare this solution daily.2. Use the test procedure to measure the concentration of the prepared standard
solution.3. Compare the expected result to the actual result.
Note: The factory calibration can be adjusted slightly with the standard adjust option so that theinstrument shows the expected value of the standard solution. The adjusted calibration is thenused for all test results. This adjustment can increase the test accuracy when there are slightvariations in the reagents or instruments.
Method performanceThe method performance data that follows was derived from laboratory tests that weremeasured on a spectrophotometer during ideal test conditions. Users may get differentresults under different test conditions.
Program Standard Precision (95% Confidence Interval) SensitivityConcentration change per 0.010 Abs change
As entered 25 mg/L B 24.2–25.8 mg/L B 2.2 mg/L B
Instrument setupSome spectrophotometers do not have the Boron HR method in the stored programs.List. Use the instructions in this section to add the test.
1. Set the instrument power to on. The instrument will complete a self-check.2. From the Main Menu, go to User Programs>Program Options>New>Program
Number.3. Enter a program number. Push OK.4. Enter Boron_HR for the program name. Push Next.5. Set the program type to Single Wavelength. Push Next.6. Set the units to mg/L. Push Next.7. Enter 605 for the wavelength. Push Next.8. Enter 1 for the concentration resolution. Push Next.9. Enter B for the chemical form. Push Next.10. Select Enter Formula for Calibration. Push Next.11. Enter: C = a + bA.12. Enter: C = a + bA = cA2. Push OK.13. Enter the values for the equations.
Option Description
DR 2700 a = 0.0, b= 25.51, c = 4.12
DR 2800 a = 0.0, b= 25.51, c = 4.12
DR 3800 a = 0.0, b= 25.51, c = 4.12
DR 3900 a = 0.0, b= 25.51, c = 4.12
DR 6000 a = 0.0, b= 25.51, c = 4.12
DR 5000 a = 0.0, b = 25.02, c = 4.22
14. Push OK, then Done.15. In the User Program for Number Assigned screen, enter Upper Limit. Select EDIT.16. Enter ON>2. Push OK twice.
Boron, Carmine method (50 mg/L) 5

17. In the User Program for Number Assigned screen, enter Timer1. Select EDIT.18. Enter 1>30.00. Push OK twice.19. In the User Program for Number Assigned screen, enter Store.20. Record the User Program Number Assigned.
Summary of methodBoron is determined by its reaction with carminic acid in the presence of sulfuric acid toproduce a reddish to bluish color. The amount of color is directly proportional to the boronconcentration. The measurement wavelength is 605 nm for spectrophotometers or610 nm for colorimeters.
Consumables and replacement itemsRequired reagents
Description Quantity/test Unit Item no.
BoronVer® 3 Boron Reagent Powder Pillows 1pillow/10 tests 100/pkg 1417099
Sulfuric Acid, concentrated, ACS varies 500 mL 97949
Water, deionized varies 100 mL 27242
Required apparatus
Description Quantity/test Unit Item no.
Tubes, glass, 16 mm x 100 mm 1 6/pkg 2275806
Caps, white, Teflon lining, for 16-mm tubes 2 6/pkg 2241106
Cylinder, graduated, polypropylene, 100 mL 1 each 108142
Flask, Polymethylpentene, screw cap, 250 mL, 125 mL 1 each 2089846
Pipet, 0.2 –1.0 mL 1 each BBP078
Pipet Tip for BBP078 2 100/pkg BBP079
Pipet, 1.0–5.0 mL 1 each BBP065
Pipet Tip for BBP065 1 75/pkg BBP068
OR
Pipet, TenSette®, 0.1- to 1.0-mL 1 each 1970001
Pipet Tips, for TenSette Pipet 1970001 2 50/pkg 2185696
Pipet, TenSette 1.0–10.0 mL 1 each 1970010
Pipet Tips, for TenSette Pipet 1970010 varies 50/pkg 2199796
Tubes, glass, 16 mm x 100 mm 1 6/pkg 2275806
Optional reagents
Description Unit Item no.
Boron Standard Solution, 1000 mg/L as B 100 mL 191442
Optional apparatus
Description Unit Item no.
Gloves, chemical resistant, size 10 pair 2410105
Goggles, safety, standard each 2927902
Pipet tips for TenSette Pipet 1970001 1000/pkg 2185628
6 Boron, Carmine method (50 mg/L)

Consumables and replacement items (continued)Description Unit Item no.
Pipet tips for TenSette Pipet 1970010 250/pkg 2199725
Test tube rack each 1864100
Pipets, includes one BBP078 and BBP065 pipet plus tips each LZP320
Boron, Carmine method (50 mg/L) 7

HACH COMPANYWORLD HEADQUARTERSTelephone: (970) 669-3050FAX: (970) 669-2932
FOR TECHNICAL ASSISTANCE, PRICE INFORMATION AND ORDERING:Call 800-227-4224
Contact the HACH office or distributor serving you.www.hach.com [email protected]
In the U.S.A. –
Outside the U.S.A. –
On the Worldwide Web – ; E-mail –
toll-free
© Hach Company/Hach Lange GmbH, 1989–2013. All rights reserved. 04/2013, Edition 8

Bromine DOC316.53.01011
DPD Method1 Method 80160.05 to 4.50 mg/L Br2 Powder Pillows or AccuVac® Ampuls
Scope and application: For testing bromine residuals (including hypobromite, hypobromous acid andbromamines) used as disinfectants in process waters, treated water, estuary water and seawater.
1 Adapted from Standard Methods for the Examination of Water and Wastewater.
Test preparation
Instrument-specific informationThe tables in this section show all of the instruments that have the program for this test. Table 1 shows sample cell and orientation requirements for reagent addition tests, suchas powder pillow or bulk reagent tests. Table 2 shows sample cell and adapterrequirements for AccuVac Ampul tests.To use either table, select an instrument, then read across to find the correspondinginformation for this test.
Table 1 Instrument-specific information for powder pillows
Instrument Sample cell orientation Sample cell
DR 6000 DR 3800 DR 2800 DR 2700
The fill line is to the right. 2495402
DR 5000 DR 3900
The fill line is toward the user.
DR 900 The orientation mark is toward the user. 2401906
Table 2 Instrument-specific information for AccuVac Ampuls
Instrument Adapter Sample cell
DR 6000 DR 5000 DR 900
— 2427606
DR 3900 LZV846 (A)
DR 3800 DR 2800 DR 2700
LZV584 (C) 2122800
Before startingSamples must be analyzed immediately after collection and cannot be preserved for later analysis.
Install the instrument cap on the DR 900 cell holder before ZERO or READ is pushed.
1

For best results, measure the reagent blank value for each new lot of reagent. Replace the sample with deionized water inthe test procedure to get the reagent blank value. Subtract the reagent blank value from the sample results automaticallywith the reagent blank adjust option.
Review the Safety Data Sheets (MSDS/SDS) for the chemicals that are used and use any recommended personal protectiveequipment.
Dispose of reacted solutions according to local, state and federal regulations. Use the Safety Data Sheets for disposalinformation for unused reagents. Consult the environmental, health and safety staff for your facility and/or local regulatoryagencies for further disposal information.
Items to collectPowder pillows
Description Quantity
DPD Total Chlorine Reagent Powder Pillow, 10-mL 1
Sample cells. (For information about sample cells, adapters or light shields, refer to Instrument-specific information on page 1.) 2
Refer toConsumable and replacement items on page 6for reorder information.
AccuVac Ampuls
Description Quantity
DPD Total Chlorine Reagent AccuVac® Ampul 1
Beaker, 50-mL 1
Sample cells (For information about sample cells, adapters or light shields, refer to Instrument-specific information on page 1.) 1
Stopper for 18-mm tubes and AccuVac Ampuls 1
Refer toConsumable and replacement items on page 6for reorder information.
Sample collection• Analyze samples for bromine immediately after collection.• Bromine is a strong oxidizing agent and it is unstable in natural waters. It reacts
quickly with various inorganic compounds and more slowly with organic compounds.Many factors, including reactant concentrations, sunlight, pH, temperature andsalinity influence the decomposition of bromine in water.
• Collect samples in clean glass bottles. Avoid plastic containers since these may havea large bromine demand.
• Pre-treat glass sample containers to remove any bromine demand. Soak thecontainers in a dilute bleach solution (1 mL commercial bleach to 1 liter of deionizedwater) for at least 1 hour. Rinse thoroughly with deionized or distilled water. If samplecontainers are rinsed thoroughly with deionized or distilled water after use, onlyoccasional pre-treatment is necessary.
• Be sure to get a representative sample. If the sample is taken from a spigot or faucet,let the water flow for at least 5 minutes. Then let the container overflow with thesample several times and then put the cap on the sample container so that there isno headspace (air) above the sample. If a sample cell is used, rinse the cell severaltimes with the sample, then carefully fill to the 10-mL mark.
2 Bromine, DPD Method (4.50 mg/L)
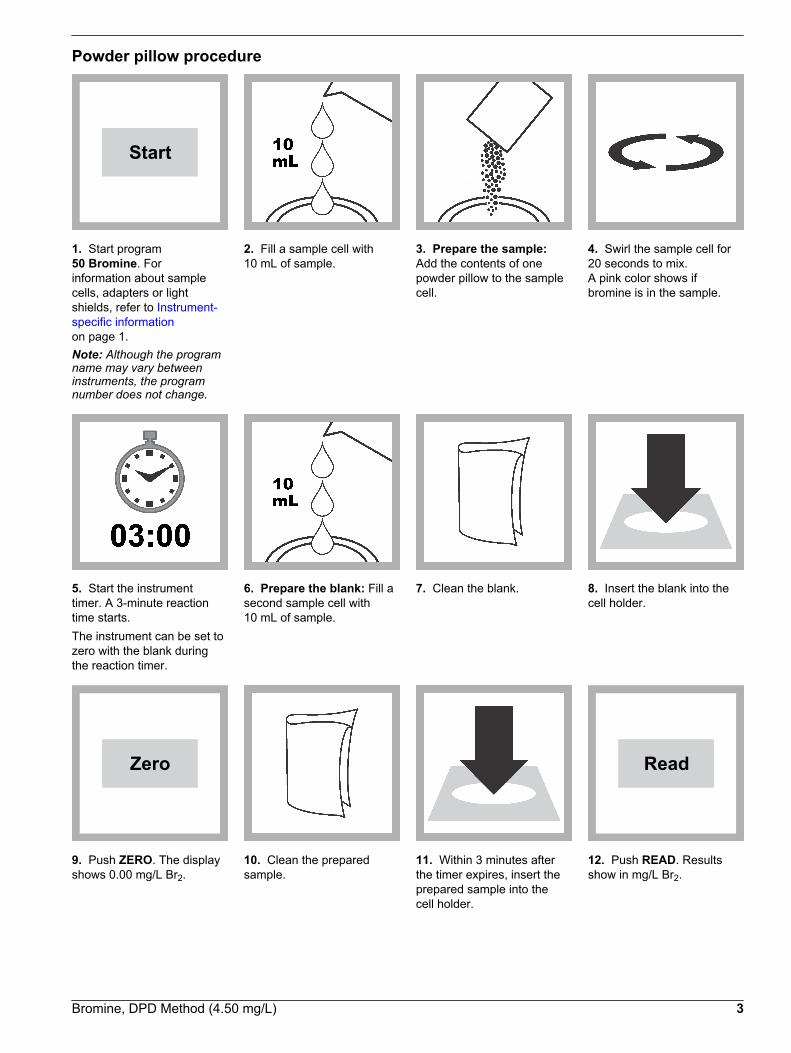
Powder pillow procedure
Start
1. Start program50 Bromine. Forinformation about samplecells, adapters or lightshields, refer to Instrument-specific informationon page 1.Note: Although the programname may vary betweeninstruments, the programnumber does not change.
2. Fill a sample cell with10 mL of sample.
3. Prepare the sample:Add the contents of onepowder pillow to the samplecell.
4. Swirl the sample cell for20 seconds to mix.A pink color shows ifbromine is in the sample.
5. Start the instrumenttimer. A 3-minute reactiontime starts.The instrument can be set tozero with the blank duringthe reaction timer.
6. Prepare the blank: Fill asecond sample cell with10 mL of sample.
7. Clean the blank. 8. Insert the blank into thecell holder.
Zero
9. Push ZERO. The displayshows 0.00 mg/L Br2.
10. Clean the preparedsample.
11. Within 3 minutes afterthe timer expires, insert theprepared sample into thecell holder.
Read
12. Push READ. Resultsshow in mg/L Br2.
Bromine, DPD Method (4.50 mg/L) 3

AccuVac Ampul procedure
Start
1. Start program55 Bromine AV. Forinformation about samplecells, adapters or lightshields, refer to Instrument-specific informationon page 1.Note: Although the programname may vary betweeninstruments, the programnumber does not change.
2. Prepare the blank: Fillthe sample cell with 10 mLof sample.
3. Prepare the sample:Collect at least 40 mL ofsample in a 50-mL beaker.Fill the AccuVac Ampul withsample. Keep the tipimmersed while the Ampulfills completely.
4. Quickly invert the Ampulseveral times to mix.A pink color shows ifbromine is in the sample.
5. Start the instrumenttimer. A 3-minute reactiontime starts.The instrument can be set tozero with the blank duringthe reaction timer.
6. Clean the blank. 7. Insert the blank into thecell holder.
Zero
8. Push ZERO. The displayshows 0.00 mg/L Br2.
9. Clean the AccuVacAmpul.
10. Within 3 minutes afterthe timer expires, insert theprepared sample AccuVacAmpul into the cell holder.
Read
11. Push READ. Resultsshow in mg/L Br2.
4 Bromine, DPD Method (4.50 mg/L)

InterferencesInterfering substance Interference level
Acidity More than 150 mg/L CaCO3. The full color may not develop or the color may fade instantly.Neutralize to pH 6–7 with 1 N Sodium Hydroxide. Measure the amount to be added on aseparate sample aliquot, then add the same amount to the sample that is tested. Correct thetest result for the dilution from the volume addition.
Alkalinity More than 250 mg/L CaCO3. The full color may not develop or the color may fade instantly.Neutralize to pH 6–7 with 1 N Sulfuric Acid. Measure the amount to add on a separate samplealiquot, then add the same amount to the sample that is tested. Correct the test result for thedilution from the volume addition.
Chlorine Interferes at all levels
Chlorine Dioxide Interferes at all levels
Chloramines, organic May interfere
Hardness No effect at less than 1000 mg/L as CaCO3
Iodine Interferes at all levels
Manganese, Oxidized(Mn4+, Mn7+) or Chromium,Oxidized (Cr6+)
Pre-treat the sample as follows:
1. Adjust the sample pH to 6–7.2. Add 3 drops of Potassium Iodide (30-g/L) to 25 mL of sample.3. Mix and wait 1 minute.4. Add 3 drops of Sodium Arsenite (5-g/L) and mix.5. Use the test procedure to measure the concentration of 10 mL of the treated sample.6. Subtract this result from the result without the treatment to obtain the correct bromine
concentration.
Monochloramine Interferes at all levels
Ozone Interferes at all levels
Peroxides May interfere
Highly buffered samples orextreme sample pH
Can prevent the correct pH adjustment of the sample by the reagents. Sample pretreatmentmay be necessary. Adjust to pH 6–7 with acid (Sulfuric Acid, 1.000 N) or base (SodiumHydroxide, 1.00 N).
Pollution prevention and waste managementIf sodium arsenite was added to the sample for manganese or chromium interferences,the reacted samples will contain arsenic and must be disposed of as a hazardous waste.Dispose of reacted solutions according to local, state and federal regulations.
Method performanceThe method performance data that follows was derived from laboratory tests that weremeasured on a spectrophotometer during ideal test conditions. Users may get differentresults under different test conditions.
Program Standard Precision (95% Confidence Interval) SensitivityConcentration change per 0.010 Abs change
50 2.80 mg/L Br2 2.75–2.85 mg/L Br2 0.05 mg/L Br2
55 2.80 mg/L Br2 2.71–2.89 mg/L Br2 0.05 mg/L Br2
Summary of methodBromine residuals reacts with DPD (N,N-diethyl-p-phenylenediamine) to form a pink colorwhich is proportional to the total bromine concentration. The measurement wavelength is530 nm for spectrophotometers or 520 nm for colorimeters.
Bromine, DPD Method (4.50 mg/L) 5
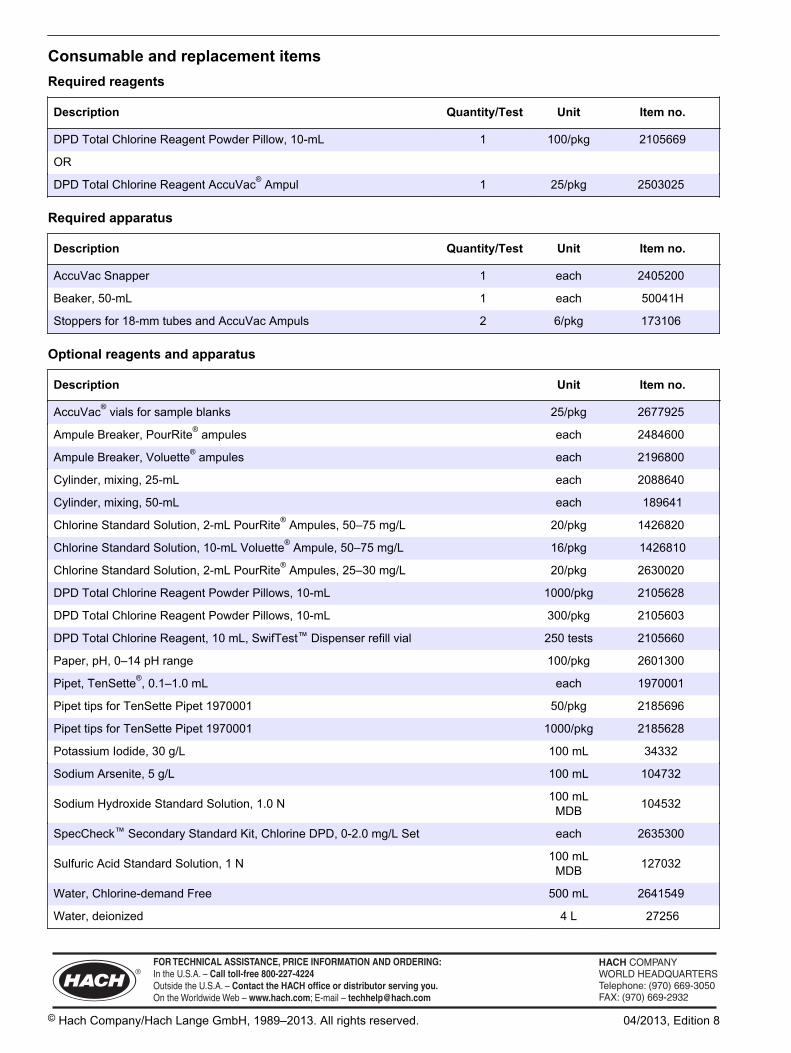
Consumable and replacement itemsRequired reagents
Description Quantity/Test Unit Item no.
DPD Total Chlorine Reagent Powder Pillow, 10-mL 1 100/pkg 2105669
OR
DPD Total Chlorine Reagent AccuVac® Ampul 1 25/pkg 2503025
Required apparatus
Description Quantity/Test Unit Item no.
AccuVac Snapper 1 each 2405200
Beaker, 50-mL 1 each 50041H
Stoppers for 18-mm tubes and AccuVac Ampuls 2 6/pkg 173106
Optional reagents and apparatus
Description Unit Item no.
AccuVac® vials for sample blanks 25/pkg 2677925
Ampule Breaker, PourRite® ampules each 2484600
Ampule Breaker, Voluette® ampules each 2196800
Cylinder, mixing, 25-mL each 2088640
Cylinder, mixing, 50-mL each 189641
Chlorine Standard Solution, 2-mL PourRite® Ampules, 50–75 mg/L 20/pkg 1426820
Chlorine Standard Solution, 10-mL Voluette® Ampule, 50–75 mg/L 16/pkg 1426810
Chlorine Standard Solution, 2-mL PourRite® Ampules, 25–30 mg/L 20/pkg 2630020
DPD Total Chlorine Reagent Powder Pillows, 10-mL 1000/pkg 2105628
DPD Total Chlorine Reagent Powder Pillows, 10-mL 300/pkg 2105603
DPD Total Chlorine Reagent, 10 mL, SwifTest™ Dispenser refill vial 250 tests 2105660
Paper, pH, 0–14 pH range 100/pkg 2601300
Pipet, TenSette®, 0.1–1.0 mL each 1970001
Pipet tips for TenSette Pipet 1970001 50/pkg 2185696
Pipet tips for TenSette Pipet 1970001 1000/pkg 2185628
Potassium Iodide, 30 g/L 100 mL 34332
Sodium Arsenite, 5 g/L 100 mL 104732
Sodium Hydroxide Standard Solution, 1.0 N 100 mLMDB 104532
SpecCheck™ Secondary Standard Kit, Chlorine DPD, 0-2.0 mg/L Set each 2635300
Sulfuric Acid Standard Solution, 1 N 100 mLMDB 127032
Water, Chlorine-demand Free 500 mL 2641549
Water, deionized 4 L 27256
HACH COMPANYWORLD HEADQUARTERSTelephone: (970) 669-3050FAX: (970) 669-2932
FOR TECHNICAL ASSISTANCE, PRICE INFORMATION AND ORDERING:Call 800-227-4224
Contact the HACH office or distributor serving you.www.hach.com [email protected]
In the U.S.A. –
Outside the U.S.A. –
On the Worldwide Web – ; E-mail –
toll-free
© Hach Company/Hach Lange GmbH, 1989–2013. All rights reserved. 04/2013, Edition 8
Chloramine (Mono) and Nitrogen,Free Ammonia
DOC316.53.01016
Indophenol Method1 Method 102000.04 to 4.50 mg/L Cl20.01 to 0.50 mg/L NH3–N
Powder Pillows
Scope and application: For the determination of free ammonia and monochloramine simultaneously in finishedchloraminated water. This product has not been evaluated to test for chlorine and chloramines in medicalapplications in the United States.
1 U.S. Patent 6,315,950
Test preparation
Instrument specific informationTable 1 shows all of the instruments that have the program for this test. The table alsoshows requirements that may vary between instruments, such as adapter and sample cellrequirements. To use this table, select an instrument, then read across to find thecorresponding information for this test.
Table 1 Instrument-specific information
Instrument Adapter Sample cell orientation Sample cell
DR 6000 A23618 The orientation key is toward the user. 4864302
DR 5000 The orientation key is toward the user.
DR 3900 LZV846 (A) The orientation key is away from the user.
DR 900 — The orientation key is toward the user.
DR 3800 LZV585 (B) The 1-cm path is aligned with the arrow on the adapter. 5940506
DR 2800
DR 2700
Before startingSamples must be analyzed immediately after collection and cannot be preserved for later analysis.
Install the instrument cap on the DR 900 cell holder before ZERO or READ is pushed.
In bright light conditions (e.g., direct sunlight), close the cell compartment on spectrophotometers, if applicable, with theprotective cover during measurements.
For best results, measure the reagent blank value for each new lot of reagent. Replace the sample with deionized water inthe test procedure to get the reagent blank value. Subtract the reagent blank value from the sample results automaticallywith the reagent blank adjust option.
Review the Safety Data Sheets (MSDS/SDS) for the chemicals that are used and use any recommended personal protectiveequipment.
Dispose of reacted solutions according to local, state and federal regulations. Use the Safety Data Sheets for disposalinformation for unused reagents. Consult the environmental, health and safety staff for your facility and/or local regulatoryagencies for further disposal information.
1

Items to collect
Description Quantity
Free Ammonia Reagent Solution 1 drop
Monochlor F Reagent Pillows 2
Sample cells (For information about sample cells, adapters or light shields, refer to Instrumentspecific information on page 1.) 2
Refer to Consumables and replacement items 01015 for reorder information.
Sample collection and storageCollect samples in clean glass bottles. Open the sample valve or spigot and let the waterflow for a minimum of 5 minutes. Rinse the sample bottle several times with the sampleand let the sample overflow each time, then cap the container so that there is no headspace (air) above the sample. Analyze samples immediately after collection.
Powder pillow procedure
Start
1. Start program 66,Monochloramine LR. Forinformation about samplecells, adapters or lightshields, refer to Instrumentspecific informationon page 1.Note: Although the programname may vary betweeninstruments, the programnumber does not change.
2. Fill two sample cells tothe 10-mL line with sample.Write Free Ammonia onone sample cell. WriteMonochloramine on thesecond sample cell.
3. Clean themonochloramine samplecell.
4. Insert themonochloramine samplecell into the cell holder.
Zero
5. Push ZERO. The displayshows 0.00 mg/L Cl2.
6. Remove the sample fromthe cell holder.
7. Add the contents of oneMonochlor F ReagentPowder Pillow to the samplefor monochloraminemeasurement.
8. Close the sample cell.Shake the sample cell forabout 20 seconds todissolve the reagent. Agreen color will show ifmonochloramine is present.
2 Chloramine (Mono) (4.50 mg/L) and Free Ammonia (0.50 mg/L), Indophenol Method

9. Add one drop of FreeAmmonia Reagent Solutionto the sample cell for freeammonia measurement.Close the reagent bottle tokeep the reagent stable.
10. Close the freeammonia sample cell.Invert the sample cell to mixthe reagent.If the sample gets cloudy bythe end of the reactionperiod, pre-treat the sampleand do the test again. Referto Interferenceson page 4.
11. Start the instrumenttimer. A 5-minute reactiontime starts.For samples colder than18 °C, refer to Table 2on page 4.
12. When the timer expires,clean the monochloraminesample cell.
13. Insert themonochloramine samplecell into the cell holder.
Read
14. Push READ. Resultsshow in mg/L Cl2.
Start
15. Exit program 66. Startprogram 388 N, AmmoniaFree.
Zero
16. Leave themonochloramine samplecell in the cell holder. PushZERO. The display willshow 0.00 mg/L NH3–N f.
17. Remove themonochloramine sample cellfrom the cell holder.
18. When the reaction timein step 11 is complete, addthe contents of oneMonochlor F Powder Pillowto the Free Ammoniasample cell.
19. Close the sample cell.Shake the sample cell forabout 20 seconds todissolve the reagent. Agreen color will show ifmonochloramine is present.
20. Start the instrumenttimer. A 5-minute reactiontime starts.For samples colder than18 °C, refer to Table 2on page 4.
Chloramine (Mono) (4.50 mg/L) and Free Ammonia (0.50 mg/L), Indophenol Method 3
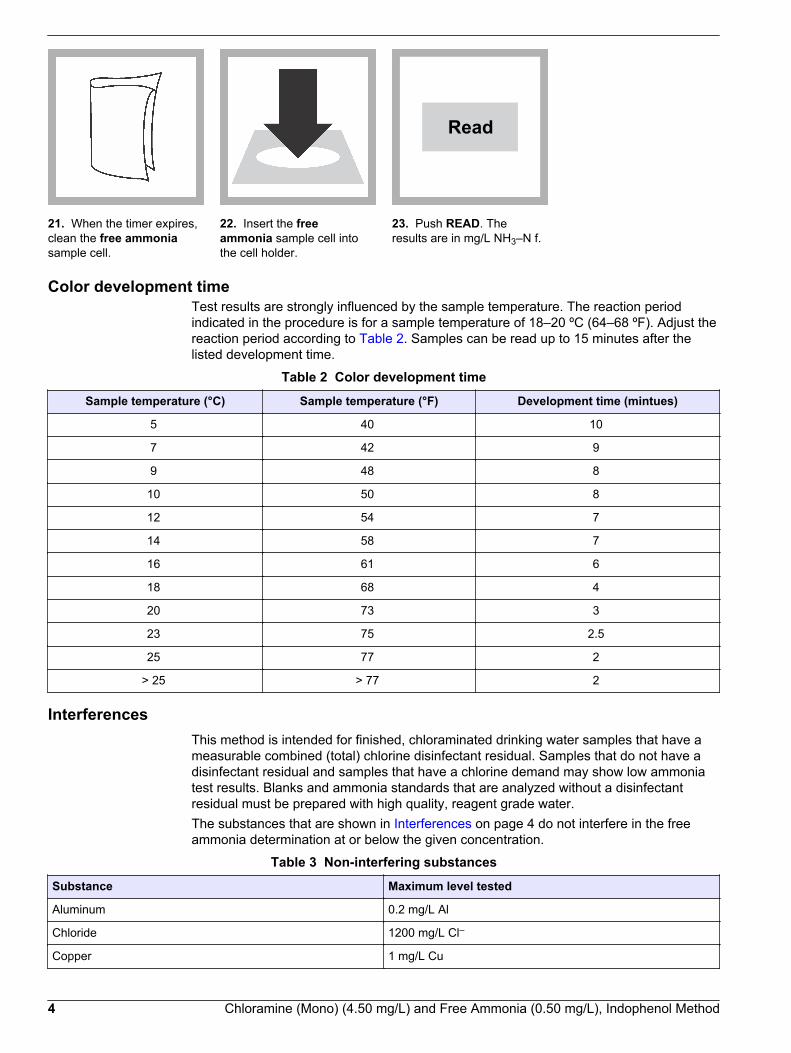
21. When the timer expires,clean the free ammoniasample cell.
22. Insert the freeammonia sample cell intothe cell holder.
Read
23. Push READ. Theresults are in mg/L NH3–N f.
Color development timeTest results are strongly influenced by the sample temperature. The reaction periodindicated in the procedure is for a sample temperature of 18–20 ºC (64–68 ºF). Adjust thereaction period according to Table 2. Samples can be read up to 15 minutes after thelisted development time.
Table 2 Color development time
Sample temperature (°C) Sample temperature (°F) Development time (mintues)
5 40 10
7 42 9
9 48 8
10 50 8
12 54 7
14 58 7
16 61 6
18 68 4
20 73 3
23 75 2.5
25 77 2
> 25 > 77 2
InterferencesThis method is intended for finished, chloraminated drinking water samples that have ameasurable combined (total) chlorine disinfectant residual. Samples that do not have adisinfectant residual and samples that have a chlorine demand may show low ammoniatest results. Blanks and ammonia standards that are analyzed without a disinfectantresidual must be prepared with high quality, reagent grade water.The substances that are shown in Interferences on page 4 do not interfere in the freeammonia determination at or below the given concentration.
Table 3 Non-interfering substances
Substance Maximum level tested
Aluminum 0.2 mg/L Al
Chloride 1200 mg/L Cl–
Copper 1 mg/L Cu
4 Chloramine (Mono) (4.50 mg/L) and Free Ammonia (0.50 mg/L), Indophenol Method

Table 3 Non-interfering substances (continued)
Substance Maximum level tested
Iron 0.3 mg/L Fe
Manganese 0.05 mg/L Mn
Nitrate 10 mg/L NO3––N
Nitrite 1 mg/L NO2––N
Phosphate 2 mg/L o-PO4
Silica 100 mg/L SiO2
Sulfate 1600 ppm as SO42–
Zinc 5 ppm Zn
Samples that contain high levels of both Total Hardness and Alkalinity may becomecloudy after the addition of the Free Ammonia Reagent Solution. If this occurs by the endof the first reaction period, the sample for Free Ammonia measurement must bepretreated as follows:
1. Measure 10 mL of sample into the sample cell for Free Ammonia.2. Add the contents of one Hardness Treatment Reagent Powder Pillow to the sample.3. Tighten the cap on the sample cell and invert until the reagent is dissolved.4. Remove the cap.5. Use the pretreated sample in the test procedure for the Free Ammonia sample.
Note: The sample for Monochloramine measurement does not need pretreatment.
Accuracy check
Standard solution methodItems to collect:
• Buffer Powder Pillow, pH 8.3 • Nitrogen, Ammonia Standard Solution, 100-mg/L as NH3–N• Chlorine Solution Ampules, 50–70 mg/L• 100-mL Class A volumetric flask• 50-mL graduated cylinder• Pipet, TenSette®, 0.1–1.0 mL and tips• Pipets, Volumetric, 2-mL Class A and Mohr, 5-mL• Pipet bulb• Organic-free water
1. Prepare a 4.5-mg/L (as Cl2) monochloramine standard immediately before use asfollows.
a. Add the contents of one Buffer Powder Pillow, pH 8.3 to approximately 50 mL oforganic-free water in a clean 100-mL Class A volumetric flask. Swirl to dissolvethe powder.
b. Use a Class A volumetric pipet to add 2.00 mL of Nitrogen, Ammonia StandardSolution, 100-mg/L as NH3–N into the flask.
c. Dilute to the mark with organic-free water. Mix well. This is a 2.00-mg/L bufferedammonia standard.
d. Use a graduated cylinder to add 50.00 mL of the buffered ammonia standard intoa clean 100-mL beaker. Add a stir bar.
e. Find the exact concentration of the Chlorine Solution Ampules, 50–70 mg/L fromthe label on the package.
f. Calculate the volume of the Chlorine Solution to add to the ammonia standard:mL chlorine solution required = 455/(free chlorine concentration).
Chloramine (Mono) (4.50 mg/L) and Free Ammonia (0.50 mg/L), Indophenol Method 5

g. Open an ampule and use a glass Mohr pipet to add the calculated amount ofChlorine Solution slowly to the ammonia standard in the beaker. Keep the beakeron a stir-plate at medium speed during the chlorine addition.
h. Stir the monochloramine solution for 1 minute after the Chlorine Solution additionis complete.
i. Quantitatively transfer the monochloramine solution to a clean 100-mL Class Avolumetric flask. Dilute to the mark with organic-free water and mix well. This is anominal 4.5-mg/L (as Cl2) monochloramine standard.
2. Use this standard within 1 hour of preparation. Use the test procedure to measure theconcentration of the monochloramine standard solution.
3. Compare the expected result to the actual result.Note: The factory calibration can be adjusted slightly with the standard adjust option so that theinstrument shows the expected value of the standard solution. The adjusted calibration is thenused for all test results. This adjustment can increase the test accuracy when there are slightvariations in the reagents or instruments.
Standard additions method (sample spike)Use the standard additions method (for applicable instruments) to validate the testprocedure, reagents and instrument and to find if there is an interference in the sample.Items to collect:
• Ammonium Nitrogen Standard Solution, 10 mg/L NH3–N• 50-mL mixing cylinders• Pipet, TenSette®, 0.1–1.0 mL and tips
1. Use the test procedure to measure the concentration of the sample, then keep the(unspiked) sample in the instrument.
2. Go to the Standard Additions option in the instrument menu.3. Select the values for standard concentration, sample volume and spike volumes.4. Open the standard solution.5. Prepare three spiked samples: use the TenSette pipet to add 0.3 mL, 0.6 mL and
1.0 mL of the standard solution, respectively, to three 50-mL portions of fresh sample.Mix well.
6. Use the test procedure to measure the concentration of each of the spiked samples.Start with the smallest sample spike. Measure each of the spiked samples in theinstrument.
7. Select Graph to compare the expected results to the actual results.Note: If the actual results are significantly different from the expected results, make sure thatthe sample volumes and sample spikes are measured accurately. The sample volumes andsample spikes that are used should agree with the selections in the standard additions menu. Ifthe results are not within acceptable limits, the sample may contain an interference.
Standard solution methodUse the standard solution method to validate the test procedure, reagents andinstrument.Items to collect:
• Ammonium Nitrogen Standard Solution, 10 mg/L NH3–N• 100-mL plastic volumetric flask with stopper, Class A• 2-mL volumetric pipet, Class A and pipet filler• Deionized water—must be free of ammonia, chlorine and chlorine demand, for
example 18 MΩ-cm water from a deionizer system.
1. Prepare a 0.20 mg/L ammonia nitrogen standard solution as follows:
a. Use a pipet to add 2.00 mL of 10 mg/L ammonia nitrogen standard solution intothe volumetric flask. (Alternate preparation: add 0.4 mL of a 50 mg/L ammonianitrogen standard solution to the volumetric flask.)
6 Chloramine (Mono) (4.50 mg/L) and Free Ammonia (0.50 mg/L), Indophenol Method

b. Dilute to the mark with deionized water. Mix well. Prepare this solution daily.2. Use the test procedure to measure the concentration of the prepared standard
solution.3. Compare the expected result to the actual result.
Note: The factory calibration can be adjusted slightly with the standard adjust option so that theinstrument shows the expected value of the standard solution. The adjusted calibration is thenused for all test results. This adjustment can increase the test accuracy when there are slightvariations in the reagents or instruments.
Method performanceThe method performance data that follows was derived from laboratory tests that weremeasured on a spectrophotometer during ideal test conditions. Users may get differentresults under different test conditions.
Program Standard Precision (95% Confidence Interval) SensitivityConcentration change per 0.010 Abs change
66 2.60 mg/L Cl2 2.58–2.62 mg/L Cl2 0.04 mg/L Cl2
388 0.20 mg/L NH3–N 0.19–0.21 mg/L NH3–N 0.01 mg/L NH3–N
Summary of methodMonochloramine (NH2Cl) and free ammonia (NH3 and NH4
+) can exist in the same watersample. Added hypochlorite combines with free ammonia to form more monochloramine.In the presence of a cyanoferrate catalyst, monochloramine in the sample reacts with asubstituted phenol to form an intermediate monoimine compound. The intermediatecouples with excess substituted phenol to form a green-colored indophenol, which isproportional to the amount of monochloramine present in the sample. Free ammonia isdetermined by comparing the color intensities, with and without added hypochlorite. Themeasurement wavelength is 655 nm for spectrophotometers or 610 nm for colorimeters.
Consumables and replacement itemsRequired reagents
Description Quantity/test Unit Item no.
Free Ammonia Reagent Set, includes: — 50/pkg 2879700
Free Ammonia Reagent Solution 1 drop 4 mL SCDB 2877336
Monochlor F Reagent Pillows 2 100/pkg 2802299
Recommended standards or Recommended standards and apparatus
Description Unit Item no.
Buffer Powder Pillow, pH 8.3 25/pkg 89868
Chlorine Standard Solution, 10-mL Voluette® Ampule, 50-75 mg/L 16/pkg 1426810
Chlorine Standard Solution, 2-mL PourRite® Ampule, 50-75 mg/L 20/pkg 1426820
Chlorine Standard Solution, 2-mL PourRite® Ampules, 25–30 mg/L 20/pkg 2630020
Hardness Treatment Reagent Pillows 50/pkg 2882346
Nitrogen Ammonia Standard Solution, 10-mg/L NH3–N 500 mL 15349
Nitrogen Ammonia Standard Solution, 10-mL Voluette® Ampule, 50-mg/L NH3–N 16/pkg 1479110
Nitrogen Ammonia Standard Solution, 100-mg/L as NH3–N 500 mL 2406549
PourRite® Ampule Breaker, 2-mL each 2484600
Ampule Breaker, Voluette® ampules each 2196800
Organic-free water 500 mL 2641549
Chloramine (Mono) (4.50 mg/L) and Free Ammonia (0.50 mg/L), Indophenol Method 7
Optional reagents and apparatus
Description Unit Item no.
Beaker, 100 mL, polypropylene each 108042
Beaker, glass, 100-mL each 50042H
Cylinder, mixing, 50-mL each 2088641
Flask, volumetric, Class A, 100-mL each 1457442
Free Ammonia Reagent Set 250/pkg 2879701
Monochloramine/Free Ammonia SpecCheck™ Kit each 2507500
Pipet filler, safety bulb each 1465100
Pipet, TenSette®, 0.1–1.0 mL each 1970001
Pipet tips for TenSette Pipet 1970001 50/pkg 2185696
Pipet tips for TenSette Pipet 1970001 1000/pkg 2185628
Pipet, Mohr, glass, 10-mL each 2093438
Pipet, volumetric, Class A, 2-mL each 1451536
Pipet, volumetric, Class A, 50-mL each 1451541
Scissors each 2883100
Stir bar, octagonal each 2095352
Stirrer, magnetic each 2881200
Thermometer, -10 to 110 °C each 187701
Wipes, disposable 280/pkg 2097000
HACH COMPANYWORLD HEADQUARTERSTelephone: (970) 669-3050FAX: (970) 669-2932
FOR TECHNICAL ASSISTANCE, PRICE INFORMATION AND ORDERING:Call 800-227-4224
Contact the HACH office or distributor serving you.www.hach.com [email protected]
In the U.S.A. –
Outside the U.S.A. –
On the Worldwide Web – ; E-mail –
toll-free
© Hach Company/Hach Lange GmbH, 1989–2013. All rights reserved. 04/2013, Edition 8
Chloramine (Mono) DOC316.53.01014
Indophenol Method1 Method 101720.1 to 10.0 mg/L Cl2 (HR) Test 'N Tube
Scope and application: For chloraminated drinking water and chlorinated wastewater. This product has not beenevaluated to test for chlorine and chloramines in medical applications in the United States.
1 Patent Pending
Test preparation
Instrument specific informationThe table in this section shows all of the instruments that have the program for this test. Table 1 shows adapter and light shield requirements for the instruments that use them.To use the table, select an instrument, then read across to find the correspondinginformation for this test.
Table 1 Instrument-specific information for test tubes
Instrument Adapters Light shield
DR 6000 — —
DR 5000 — —
DR 900 4846400 Cover supplied with the instrument
DR 3900 — LZV849
DR 3800 — LZV646
DR 2800 —
Before startingSamples must be analyzed immediately after collection and cannot be preserved for later analysis.
Install the instrument cap on the DR 900 cell holder before ZERO or READ is pushed.
DR 3900, DR 3800, DR 2800 and DR 2700: Install the light shield in Cell Compartment #2 before this test is started.
For best results, measure the reagent blank value for each new lot of reagent. Replace the sample with deionized water inthe test procedure to get the reagent blank value. Subtract the reagent blank value from the sample results automaticallywith the reagent blank adjust option.
Review the Safety Data Sheets (MSDS/SDS) for the chemicals that are used and use any recommended personal protectiveequipment.
Dispose of reacted solutions according to local, state and federal regulations. Use the Safety Data Sheets for disposalinformation for unused reagents. Consult the environmental, health and safety staff for your facility and/or local regulatoryagencies for further disposal information.
Items to collect
Description Quantity
Light shield (For information about sample cells, adapters or light shields, refer to Instrumentspecific information on page 1.) 1
High range Monochloramine Diluent Vials 1
Monochlor F Reagent Powder Pillow 1
Funnel, micro, poly 1
1

Items to collect (continued)Description Quantity
Pipet, Mohr glass, 2.00 mL 1
Test tube rack 1
Refer to Consumables and replacement items on page 5 for reorder information.
Sample collection and storageCollect samples in clean glass bottles. Open the sample valve or spigot and let the waterflow for a minimum of 5 minutes. Rinse the sample bottle several times with the sampleand let the sample overflow each time, then cap the container so that there is no headspace (air) above the sample. Analyze samples immediately after collection.
Test 'N Tube procedure
Start
1. Start program 67,Monochloramine HR TNT.For information aboutsample cells, adapters orlight shields, refer to Instrument specificinformation on page 1.Note: Although the programname may vary betweeninstruments, the programnumber does not change.
2. Remove the cap from aHR Monochloramine Diluentvial. Use a pipet to add2.0 mL of sample to thevial..
3. Put the cap on the vial.Invert to mix.
4. Clean the vial.
5. Insert the vial into the 16-mm cell holder.
Zero
6. Push ZERO. The displayshows 0.00 mg/L Cl2.
7. Remove the vial from thecell holder.
8. Add the contents of oneMonochlor F powder pillowto the sample.
2 Chloramine (Mono), Indophenol TNT Method (10.0 mg/L)
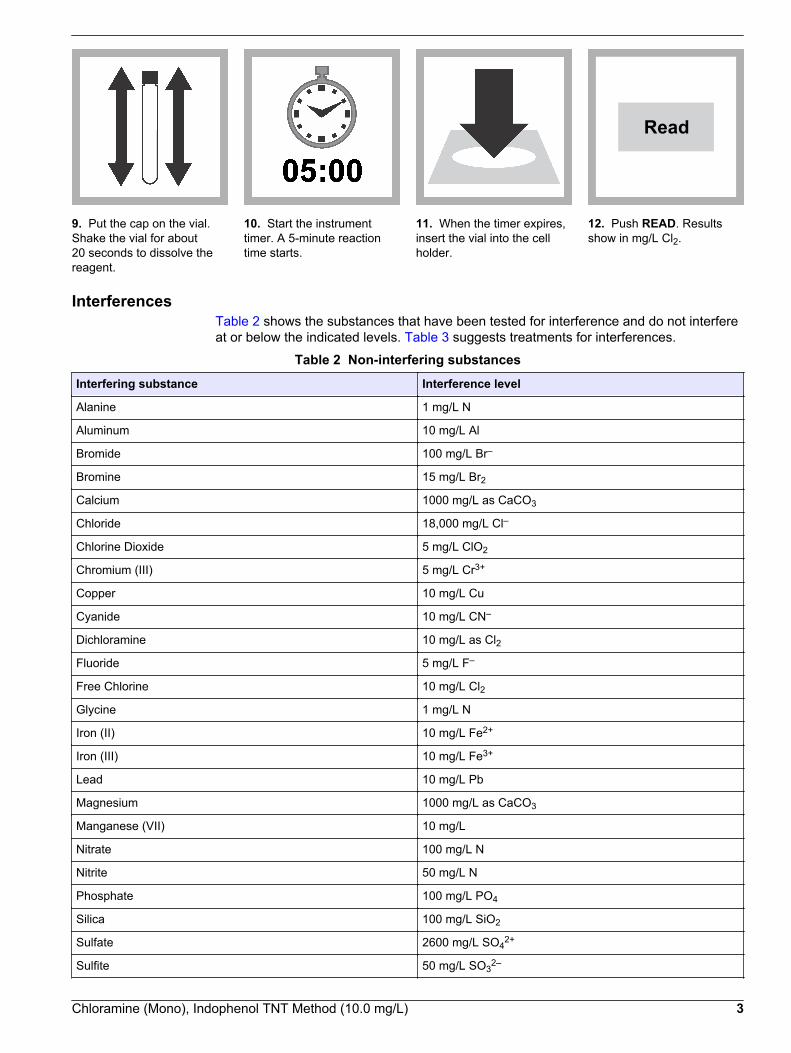
9. Put the cap on the vial.Shake the vial for about20 seconds to dissolve thereagent.
10. Start the instrumenttimer. A 5-minute reactiontime starts.
11. When the timer expires,insert the vial into the cellholder.
Read
12. Push READ. Resultsshow in mg/L Cl2.
InterferencesTable 2 shows the substances that have been tested for interference and do not interfereat or below the indicated levels. Table 3 suggests treatments for interferences.
Table 2 Non-interfering substances
Interfering substance Interference level
Alanine 1 mg/L N
Aluminum 10 mg/L Al
Bromide 100 mg/L Br–
Bromine 15 mg/L Br2
Calcium 1000 mg/L as CaCO3
Chloride 18,000 mg/L Cl–
Chlorine Dioxide 5 mg/L ClO2
Chromium (III) 5 mg/L Cr3+
Copper 10 mg/L Cu
Cyanide 10 mg/L CN–
Dichloramine 10 mg/L as Cl2
Fluoride 5 mg/L F–
Free Chlorine 10 mg/L Cl2
Glycine 1 mg/L N
Iron (II) 10 mg/L Fe2+
Iron (III) 10 mg/L Fe3+
Lead 10 mg/L Pb
Magnesium 1000 mg/L as CaCO3
Manganese (VII) 10 mg/L
Nitrate 100 mg/L N
Nitrite 50 mg/L N
Phosphate 100 mg/L PO4
Silica 100 mg/L SiO2
Sulfate 2600 mg/L SO42+
Sulfite 50 mg/L SO32–
Chloramine (Mono), Indophenol TNT Method (10.0 mg/L) 3
Table 2 Non-interfering substances (continued)
Interfering substance Interference level
Tyrosine 1 mg/L N
Urea 10 mg/L N
Zinc 5 mg/L Zn
Table 3 Interfering substances
Substance Effect Interference level Recommended treatment
Ozone – Above 1 mg/L Usually does not coexist with monochloramine.
Sulfide + A "rust" color develops if present. Usually does not coexist with monochloramine.
Thiocyanate – Above 0.5 mg/L This method will tolerate up to 2 mg/L.
Accuracy check
Standard solution methodItems to collect:
• Buffer Powder Pillow, pH 8.3 • Nitrogen, Ammonia Standard Solution, 100-mg/L as NH3–N• Chlorine Solution Ampules, 50–70 mg/L• 100-mL Class A volumetric flask• 50-mL graduated cylinder• Pipet, TenSette®, 0.1–1.0 mL and tips• Pipets, Volumetric, 2-mL Class A and Mohr, 5-mL• Pipet bulb• Organic-free water
1. Prepare a 4.5-mg/L (as Cl2) monochloramine standard immediately before use asfollows.
a. Add the contents of one Buffer Powder Pillow, pH 8.3 to approximately 50 mL oforganic-free water in a clean 100-mL Class A volumetric flask. Swirl to dissolvethe powder.
b. Use a Class A volumetric pipet to add 2.00 mL of Nitrogen, Ammonia StandardSolution, 100-mg/L as NH3–N into the flask.
c. Dilute to the mark with organic-free water. Mix well. This is a 2.00-mg/L bufferedammonia standard.
d. Use a graduated cylinder to add 50.00 mL of the buffered ammonia standard intoa clean 100-mL beaker. Add a stir bar.
e. Find the exact concentration of the Chlorine Solution Ampules, 50–70 mg/L fromthe label on the package.
f. Calculate the volume of the Chlorine Solution to add to the ammonia standard:mL chlorine solution required = 455/(free chlorine concentration).
g. Open an ampule and use a glass Mohr pipet to add the calculated amount ofChlorine Solution slowly to the ammonia standard in the beaker. Keep the beakeron a stir-plate at medium speed during the chlorine addition.
h. Stir the monochloramine solution for 1 minute after the Chlorine Solution additionis complete.
4 Chloramine (Mono), Indophenol TNT Method (10.0 mg/L)

i. Quantitatively transfer the monochloramine solution to a clean 100-mL Class Avolumetric flask. Dilute to the mark with organic-free water and mix well. This is anominal 4.5-mg/L (as Cl2) monochloramine standard.
2. Use this standard within 1 hour of preparation. Use the test procedure to measure theconcentration of the monochloramine standard solution.
3. Compare the expected result to the actual result.Note: The factory calibration can be adjusted slightly with the standard adjust option so that theinstrument shows the expected value of the standard solution. The adjusted calibration is thenused for all test results. This adjustment can increase the test accuracy when there are slightvariations in the reagents or instruments.
Method performanceThe method performance data that follows was derived from laboratory tests that weremeasured on a spectrophotometer during ideal test conditions. Users may get differentresults under different test conditions.
Program Standard Precision (95% Confidence Interval) SensitivityConcentration change per 0.010 Abs change
67 5.9 mg/L Cl2 5.6–6.2 mg/L Cl2 0.1 mg/L Cl2
Summary of methodIn the presence of a cyanoferrate catalyst, monochloramine (NH2Cl) in the sample reactswith a substituted phenol to form an intermediate monoimine compound. Theintermediate couples with excess substituted phenol to form a green-colored indophenol,which is proportional to the amount of monochloramine present in the sample. Themeasurement wavelength is 655 nm for spectrophotometers or 610 nm for colorimeters.
Consumables and replacement itemsRequired reagents
Description Quantity/Test Unit Item no.
Monochloramine, HR, Test 'N Tubes, includes: — — 2805145
HR Monochloramine Diluent Vials1 1 50/pkg —
Funnel, micro, poly 1 each 2584335
Monochlor F Reagent Pillows 1 50/pkg 2802246
1 Not sold separately
Required apparatus
Description Quantity/Test Unit Item no.
Pipet, Mohr, glass 2.00 mL 1 each 2093636
Pipet filler, safety bulb 1 each 1465100
Test tube rack 1 each 1864100
Recommended standards
Description Unit Item no.
Buffer Powder Pillow, pH 8.3 25/pkg 89868
Chlorine Standard Solution, 10-mL Voluette® Ampule, 50–75 mg/L 16/pkg 1426810
Chlorine Standard Solution, 2-mL PourRite® Ampules, 50–75 mg/L 20/pkg 1426820
Chlorine Standard Solution, 2-mL PourRite® Ampules, 25–30 mg/L 20/pkg 2630020
Nitrogen Ammonia Standard Solution, 100-mg/L as NH3–N 500 mL 2406549
Chloramine (Mono), Indophenol TNT Method (10.0 mg/L) 5
Consumables and replacement items (continued)Description Unit Item no.
Nitrogen, Ammonia Standard Solution, 1000-mg/L NH3-N 1 L 2354153
Organic-free water 500 mL 2641549
Optional reagents and apparatus
Description Unit Item no.
Ampule Breaker, PourRite® ampules each 2484600
Ampule Breaker, Voluette® ampules each 2196800
Beaker, glass, 100-mL each 50042H
Clippers each 96800
Flask, volumetric, Class A, 100-mL each 1457442
Monochloramine/Free Ammonia SpecCheck™ Kit each 2507500
Paper, pH, 0–14 pH range 100/pkg 2601300
Pipet, Mohr, glass, 5-mL each 2093437
Pipet, TenSette®, 0.1–1.0 mL each 1970001
Pipet tips for TenSette Pipet 1970001 50/pkg 2185696
Pipet tips for TenSette Pipet 1970001 1000/pkg 2185628
Pipet, volumetric, Class A, 2-mL each 1451536
Pipet, volumetric, Class A, 50-mL each 1451541
Rochelle Salt Solution 29 mL 172533
Shears each 2369400
Stir bar, octagonal each 2095352
Stirrer, magnetic each 2881200
HACH COMPANYWORLD HEADQUARTERSTelephone: (970) 669-3050FAX: (970) 669-2932
FOR TECHNICAL ASSISTANCE, PRICE INFORMATION AND ORDERING:Call 800-227-4224
Contact the HACH office or distributor serving you.www.hach.com [email protected]
In the U.S.A. –
Outside the U.S.A. –
On the Worldwide Web – ; E-mail –
toll-free
© Hach Company/Hach Lange GmbH, 1989–2013. All rights reserved. 04/2013, Edition 8

Chloramine (Mono) DOC316.53.01015
Indophenol Method1 Method 101710.04 to 4.50 mg/L Cl2 (LR) Powder Pillows
Scope and application: For chloraminated drinking water and chlorinated wastewater. This product has not beenevaluated to test for chlorine and chloramines in medical applications in the United States.
1 U.S. Patent 6,315,950
Test preparation
Instrument specific informationTable 1 shows all of the instruments that have the program for this test. The table alsoshows requirements that may vary between instruments, such as adapter and sample cellrequirements. To use this table, select an instrument, then read across to find thecorresponding information for this test.
Table 1 Instrument-specific information
Instrument Adapter Sample cell orientation Sample cell
DR 6000 A23618 The orientation key is toward the user. 4864302
DR 5000 The orientation key is toward the user.
DR 3900 LZV846 (A) The orientation key is away from the user.
DR 900 — The orientation key is toward the user.
DR 3800 LZV585 (B) The 1-cm path is aligned with the arrow on the adapter. 5940506
DR 2800
DR 2700
Before startingSamples must be analyzed immediately after collection and cannot be preserved for later analysis.
Install the instrument cap on the DR 900 cell holder before ZERO or READ is pushed.
In bright light conditions (e.g., direct sunlight), close the cell compartment on spectrophotometers, if applicable, with theprotective cover during measurements.
To measure chloramine (mono) and free ammonia on the same sample, use Method 10200 Nitrogen, Free Ammonia andChloramine (Mono).
For best results, measure the reagent blank value for each new lot of reagent. Replace the sample with deionized water inthe test procedure to get the reagent blank value. Subtract the reagent blank value from the sample results automaticallywith the reagent blank adjust option.
Review the Safety Data Sheets (MSDS/SDS) for the chemicals that are used and use any recommended personal protectiveequipment.
Dispose of reacted solutions according to local, state and federal regulations. Use the Safety Data Sheets for disposalinformation for unused reagents. Consult the environmental, health and safety staff for your facility and/or local regulatoryagencies for further disposal information.
1

Items to collect
Description Quantity
Monochlor F reagent pillows 1
Sample cells (For information about sample cells, adapters or light shields, refer to Instrumentspecific information on page 1.) 2
Refer to Consumables and replacement items on page 6 for reorder information.
Sample collection and storageCollect samples in clean glass bottles. Open the sample valve or spigot and let the waterflow for a minimum of 5 minutes. Rinse the sample bottle several times with the sampleand let the sample overflow each time, then cap the container so that there is no headspace (air) above the sample. Analyze samples immediately after collection.
Color development timeTest results are strongly influenced by the sample temperature. The reaction periodindicated in the procedure is for a sample temperature of 18–20 ºC (64–68 ºF). Adjust thereaction period according to Table 2. Samples can be read up to 15 minutes after thelisted development time.
Table 2 Color development time
Sample temperature (°C) Sample temperature (°F) Development time (mintues)
5 40 10
7 42 9
9 48 8
10 50 8
12 54 7
14 58 7
16 61 6
18 68 4
20 73 3
23 75 2.5
25 77 2
> 25 > 77 2
2 Chloramine (Mono), Indophenol Method (4.50 mg/L)

Indophenol method, powder pillows
Start
1. Start program 66,Monochloramine LR. Forinformation about samplecells, adapters or lightshields, refer to Instrumentspecific informationon page 1.Note: Although the programname may vary betweeninstruments, the programnumber does not change.
2. Fill the sample cell with10 mL of sample.
3. Clean the preparedsample.
4. Insert the blank into thecell holder.
Zero
5. Push ZERO. The displayshows 0.00 mg/L Cl2.
6. Remove the sample fromthe cell holder.
7. Add the contents of oneMonochlor F powder pillowto the sample cell.
8. Close the sample cell.Shake the sample cell forabout 20 seconds todissolve the reagent.
9. Start the instrumenttimer. A 5-minute reactiontime starts.For samples colder than18 °C, refer to Table 2on page 2.
10. Clean the preparedsample.
11. When the timer expires,insert the prepared sampleinto the cell holder.
Read
12. Push READ. Resultsshow in mg/L Cl2.
Chloramine (Mono), Indophenol Method (4.50 mg/L) 3

InterferencesTable 3 shows the substances that have been tested for interference and do not interfereat or below the indicated levels. Table 4 suggests treatments for interferences.
Table 3 Non-interfering substances
Interfering substance Interference level
Alanine 1 mg/L N
Aluminum 10 mg/L Al
Bromide 100 mg/L Br–
Bromine 15 mg/L Br2
Calcium 1000 mg/L as CaCO3
Chloride 18,000 mg/L Cl–
Chlorine Dioxide 5 mg/L ClO2
Chromium (III) 5 mg/L Cr3+
Copper 10 mg/L Cu
Cyanide 10 mg/L CN–
Dichloramine 10 mg/L as Cl2
Fluoride 5 mg/L F–
Free Chlorine 10 mg/L Cl2
Glycine 1 mg/L N
Iron (II) 10 mg/L Fe2+
Iron (III) 10 mg/L Fe3+
Lead 10 mg/L Pb
Nitrate 100 mg/L N
Nitrite 50 mg/L N
Phosphate 100 mg/L PO4
Silica 100 mg/L SiO2
Sulfate 2600 mg/L SO42+
Sulfite 50 mg/L SO32–
Tyrosine 1 mg/L N
Urea 10 mg/L N
Zinc 5 mg/L Zn
Table 4 Interfering substances
Substance Effect Interference level Recommended treatment
Magnesium + Above 400 mg/L CaCO3 Add 5 drops of Rochelle Salt Solution prior to testing. OR: usethe high range (HR) test.
Manganese (+7) – Above 3 mg/L Use the HR test; it will tolerate up to 10 mg/L.
Ozone – Above 1 mg/L Usually does not coexist with monochloramine.
Sulfide + A "rust" color develops if present. Usually does not coexist with monochloramine.
Thiocyanate – Above 0.5 mg/L This method will tolerate up to 2 mg/L.
4 Chloramine (Mono), Indophenol Method (4.50 mg/L)
Accuracy check
Standard solution methodItems to collect:
• Buffer Powder Pillow, pH 8.3 • Nitrogen, Ammonia Standard Solution, 100-mg/L as NH3–N• Chlorine Solution Ampules, 50–70 mg/L• 100-mL Class A volumetric flask• 50-mL graduated cylinder• Pipet, TenSette®, 0.1–1.0 mL and tips• Pipets, Volumetric, 2-mL Class A and Mohr, 5-mL• Pipet bulb• Organic-free water
1. Prepare a 4.5-mg/L (as Cl2) monochloramine standard immediately before use asfollows.
a. Add the contents of one Buffer Powder Pillow, pH 8.3 to approximately 50 mL oforganic-free water in a clean 100-mL Class A volumetric flask. Swirl to dissolvethe powder.
b. Use a Class A volumetric pipet to add 2.00 mL of Nitrogen, Ammonia StandardSolution, 100-mg/L as NH3–N into the flask.
c. Dilute to the mark with organic-free water. Mix well. This is a 2.00-mg/L bufferedammonia standard.
d. Use a graduated cylinder to add 50.00 mL of the buffered ammonia standard intoa clean 100-mL beaker. Add a stir bar.
e. Find the exact concentration of the Chlorine Solution Ampules, 50–70 mg/L fromthe label on the package.
f. Calculate the volume of the Chlorine Solution to add to the ammonia standard:mL chlorine solution required = 455/(free chlorine concentration).
g. Open an ampule and use a glass Mohr pipet to add the calculated amount ofChlorine Solution slowly to the ammonia standard in the beaker. Keep the beakeron a stir-plate at medium speed during the chlorine addition.
h. Stir the monochloramine solution for 1 minute after the Chlorine Solution additionis complete.
i. Quantitatively transfer the monochloramine solution to a clean 100-mL Class Avolumetric flask. Dilute to the mark with organic-free water and mix well. This is anominal 4.5-mg/L (as Cl2) monochloramine standard.
2. Use this standard within 1 hour of preparation. Use the test procedure to measure theconcentration of the monochloramine standard solution.
3. Compare the expected result to the actual result.Note: The factory calibration can be adjusted slightly with the standard adjust option so that theinstrument shows the expected value of the standard solution. The adjusted calibration is thenused for all test results. This adjustment can increase the test accuracy when there are slightvariations in the reagents or instruments.
Method performanceThe method performance data that follows was derived from laboratory tests that weremeasured on a spectrophotometer during ideal test conditions. Users may get differentresults under different test conditions.
Program Standard Precision (95% Confidence Interval) SensitivityConcentration change per 0.010 Abs change
66 2.60 mg/L Cl2 2.58–2.62 mg/L Cl2 0.04 mg/L Cl2
Chloramine (Mono), Indophenol Method (4.50 mg/L) 5

Summary of methodIn the presence of a cyanoferrate catalyst, monochloramine (NH2Cl) in the sample reactswith a substituted phenol to form an intermediate monoimine compound. Theintermediate couples with excess substituted phenol to form a green-colored indophenol,which is proportional to the amount of monochloramine present in the sample. Themeasurement wavelength is 655 nm for spectrophotometers or 610 nm for colorimeters.
Consumables and replacement itemsRequired reagents
Description Quantity/Test Unit Item no.
Monochlor F Reagent Pillows 1 50/pkg 2802246
Recommended standards
Description Unit Item no.
Buffer Powder Pillow, pH 8.3 25/pkg 89868
Chlorine Standard Solution, 10-mL Voluette® Ampule, 50–75 mg/L 16/pkg 1426810
Chlorine Standard Solution, 2-mL PourRite® Ampules, 50–75 mg/L 20/pkg 1426820
Chlorine Standard Solution, 2-mL PourRite® Ampules, 25–30 mg/L 20/pkg 2630020
Nitrogen Ammonia Standard Solution, 100-mg/L as NH3–N 500 mL 2406549
Nitrogen, Ammonia Standard Solution, 1000-mg/L NH3-N 1 L 2354153
Organic-free water 500 mL 2641549
Optional reagents and apparatus
Description Unit Item no.
Ampule Breaker, PourRite® ampules each 2484600
Ampule Breaker, Voluette® ampules each 2196800
Beaker, glass, 100-mL each 50042H
Flask, volumetric, Class A, 100-mL each 1457442
Monochlor F Reagent Powder Pillows 100/pkg 2802299
Monochloramine/Free Ammonia SpecCheck™ Kit each 2507500
Paper, pH, 0–14 pH range 100/pkg 2601300
Pipet, Mohr, glass, 5-mL each 2093437
Pipet, TenSette®, 0.1–1.0 mL each 1970001
Pipet tips for TenSette Pipet 1970001 50/pkg 2185696
Pipet tips for TenSette Pipet 1970001 1000/pkg 2185628
Pipet, volumetric, Class A, 2-mL each 1451536
Pipet, volumetric, Class A, 50-mL each 1451541
Rochelle Salt Solution 29 mL 172533
Shears each 2369400
Stir bar, octagonal each 2095352
Stirrer, magnetic each 2881200
Thermometer, non-mercury, -10 to +225 °C each 2635700
6 Chloramine (Mono), Indophenol Method (4.50 mg/L)

Chloramine (Mono), Indophenol Method (4.50 mg/L) 7

HACH COMPANYWORLD HEADQUARTERSTelephone: (970) 669-3050FAX: (970) 669-2932
FOR TECHNICAL ASSISTANCE, PRICE INFORMATION AND ORDERING:Call 800-227-4224
Contact the HACH office or distributor serving you.www.hach.com [email protected]
In the U.S.A. –
Outside the U.S.A. –
On the Worldwide Web – ; E-mail –
toll-free
© Hach Company/Hach Lange GmbH, 1989–2013. All rights reserved. 04/2013, Edition 8

Chlorine Dioxide DOC316.53.01020
Direct Reading Method Method 83451 to 50 mg/L ClO2 (MR)
Scope and application: For water and wastewater.
Test preparation
Instrument specific informationThe table in this section shows all of the instruments that have the program for this test. Table 1 shows sample cell and orientation requirements for reagent addition tests, suchas powder pillow or bulk reagent tests.To use the table, select an instrument, then read across to find the correspondinginformation for this test.
Table 1 Instrument-specific information for reagent addition
Instrument Sample cell orientation Sample cell
DR 6000 DR 3800 DR 2800 DR 2700
The fill line is to the right. 2495402
DR 5000 DR 3900
The fill line is toward the user.
DR 900 The orientation mark is toward the user. 2401906
Before startingSamples must be analyzed immediately after collection and cannot be preserved for later analysis.
Install the instrument cap on the DR 900 cell holder before ZERO or READ is pushed.
Gloves and goggles are recommended.
Items to collect
Description Quantity
Deionized water 10 mL
Sample cells (For information about sample cells, adapters or light shields, refer to Instrumentspecific information on page 1.) 2
Refer to Consumables and replacement items on page 3 for reorder information.
Sample collection• Samples must be analyzed immediately and cannot be preserved for later analysis.• Chlorine dioxide is a strong oxidizing agent and it is unstable in natural waters. It
reacts quickly with various inorganic compounds and more slowly with organic
1

compounds. Many factors, including reactant concentrations, sunlight, pH,temperature and salinity influence the decomposition of chlorine dioxide in water.
• Collect samples in clean glass bottles. Avoid plastic containers since these may havea large chlorine dioxide demand.
• Pre-treat glass sample containers to remove any chlorine dioxide demand. Soak thecontainers in a dilute bleach solution (1 mL commercial bleach to 1 liter of deionizedwater) for at least 1 hour. Rinse thoroughly with deionized or distilled water. If samplecontainers are rinsed thoroughly with deionized or distilled water after use, onlyoccasional pre-treatment is necessary.
• Be sure to get a representative sample. If the sample is taken from a spigot or faucet,let the water flow for at least 5 minutes. Then let the container overflow with thesample several times and then put the cap on the sample container so that there isno headspace (air) above the sample. If a sample cell is used, rinse the cell severaltimes with the sample, then carefully fill to the 10-mL mark.
Direct reading method
Start
1. Start program 73 ChlorDiox MR. For informationabout sample cells,adapters or light shields,refer to Instrument specificinformation on page 1.Note: Although the programname may vary betweeninstruments, the programnumber does not change.
2. Prepare the blank: Fillthe sample cell with 10 mLof deionized water.
3. Clean the blank. 4. Insert the blank into thecell holder.
Zero
5. Push ZERO. The displayshows 0 mg/L ClO2.
6. Prepare the sample: Filla second sample cell with10 mL of sample.
7. Clean the preparedsample.
8. Insert the preparedsample into the cell holder.
2 Chlorine Dioxide, Direct Read Method (50 mg/L)

Read
9. Push READ. Resultsshow in mg/L ClO2.
Accuracy check
Standard solution methodThe preparation of chlorine dioxide standards is difficult and hazardous. These standardsare explosive and volatile! Only a trained chemist should prepare the standards withappropriate safety equipment and precautions. The manufacturer does not recommendpreparation of chlorine dioxide standards. If independent standard preparation is required,refer to the instructions in Standard Methods for the Examination of Water andWastewater, Part 4500-ClO2 Chlorine Dioxide, under the headings "Stock chlorinedioxide solution" and "Standard chlorine dioxide solution".
Method performanceThe method performance data that follows was derived from laboratory tests that weremeasured on a spectrophotometer during ideal test conditions. Users may get differentresults under different test conditions.
Program Standard Precision (95% Confidence Interval) SensitivityConcentration change per 0.010 Abs change
73 43 mg/L ClO2 41–45 mg/L ClO2 0.3 mg/L ClO2
Summary of methodChlorine dioxide, a yellow gas, can be measured directly in a water solution. Themeasurement wavelength is 360 nm for spectrophotometers or 420 nm for colorimeters.
Consumables and replacement itemsRequired reagents and apparatus
Description Quantity/test Unit Item no.
Water, deionized varies 4 L 27256
Sample cell, 10 mL square, matched pair 2 2/pkg 2495402
Optional apparatus
Description Unit Item no.
Gloves, chemical resistant, size 9-9.5 pair 24101041
Safety goggles, vented each 2550700
Standard Methods Book, most current edition each 2270800
1 Other sizes available
Chlorine Dioxide, Direct Read Method (50 mg/L) 3

HACH COMPANYWORLD HEADQUARTERSTelephone: (970) 669-3050FAX: (970) 669-2932
FOR TECHNICAL ASSISTANCE, PRICE INFORMATION AND ORDERING:Call 800-227-4224
Contact the HACH office or distributor serving you.www.hach.com [email protected]
In the U.S.A. –
Outside the U.S.A. –
On the Worldwide Web – ; E-mail –
toll-free
© Hach Company/Hach Lange GmbH, 1989–2013. All rights reserved. 04/2013, Edition 8
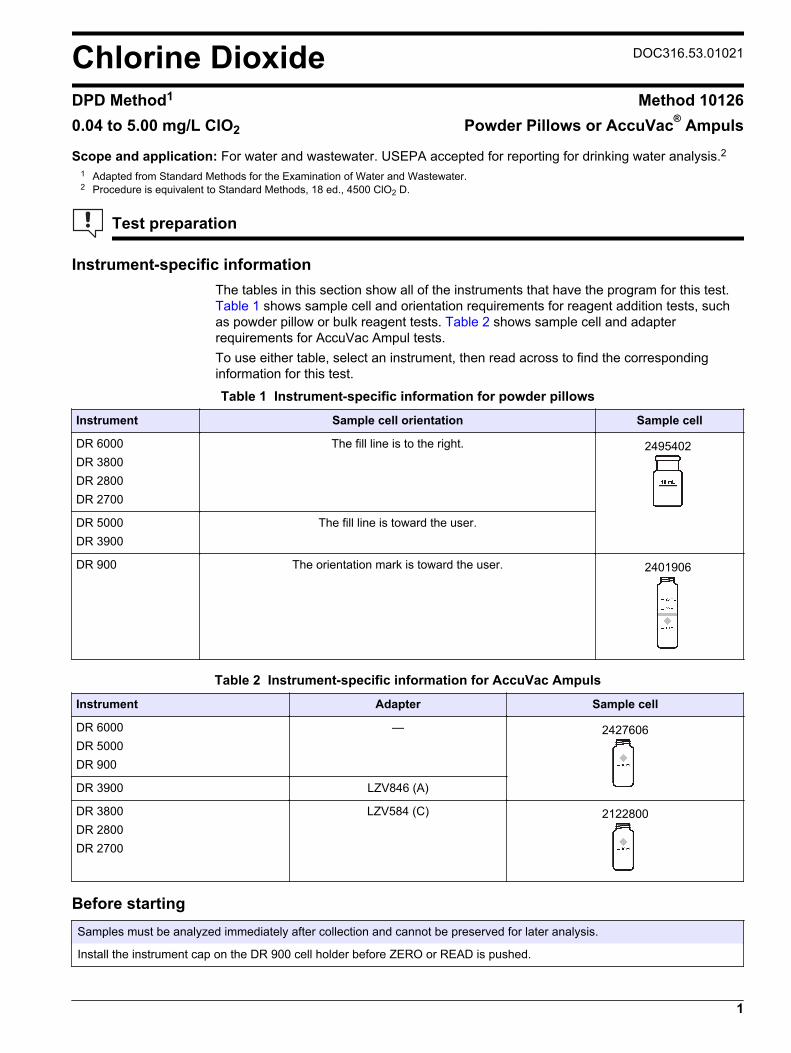
Chlorine Dioxide DOC316.53.01021
DPD Method1 Method 101260.04 to 5.00 mg/L ClO2 Powder Pillows or AccuVac® Ampuls
Scope and application: For water and wastewater. USEPA accepted for reporting for drinking water analysis.21 Adapted from Standard Methods for the Examination of Water and Wastewater.2 Procedure is equivalent to Standard Methods, 18 ed., 4500 ClO2 D.
Test preparation
Instrument-specific informationThe tables in this section show all of the instruments that have the program for this test. Table 1 shows sample cell and orientation requirements for reagent addition tests, suchas powder pillow or bulk reagent tests. Table 2 shows sample cell and adapterrequirements for AccuVac Ampul tests.To use either table, select an instrument, then read across to find the correspondinginformation for this test.
Table 1 Instrument-specific information for powder pillows
Instrument Sample cell orientation Sample cell
DR 6000 DR 3800 DR 2800 DR 2700
The fill line is to the right. 2495402
DR 5000 DR 3900
The fill line is toward the user.
DR 900 The orientation mark is toward the user. 2401906
Table 2 Instrument-specific information for AccuVac Ampuls
Instrument Adapter Sample cell
DR 6000 DR 5000 DR 900
— 2427606
DR 3900 LZV846 (A)
DR 3800 DR 2800 DR 2700
LZV584 (C) 2122800
Before startingSamples must be analyzed immediately after collection and cannot be preserved for later analysis.
Install the instrument cap on the DR 900 cell holder before ZERO or READ is pushed.
1

For best results, measure the reagent blank value for each new lot of reagent. Replace the sample with deionized water inthe test procedure to get the reagent blank value. Subtract the reagent blank value from the sample results automaticallywith the reagent blank adjust option.
If the chlorine dioxide concentration in the sample exceeds the upper limit of the test, the color may fade or the sample colormay change to yellow. Dilute the sample with a known volume of high quality, chlorine demand-free water and repeat thetest. Some loss of chlorine dioxide may occur due to the dilution. Multiply the result by the dilution factor.
Review the Safety Data Sheets (MSDS/SDS) for the chemicals that are used and use any recommended personal protectiveequipment.
Dispose of reacted solutions according to local, state and federal regulations. Use the Safety Data Sheets for disposalinformation for unused reagents. Consult the environmental, health and safety staff for your facility and/or local regulatoryagencies for further disposal information.
Items to collectPowder pillows
Description Quantity
DPD Free Chlorine Powder Pillow, 10-mL 1
Glycine Reagent 4 drops
Sample cells. (For information about sample cells, adapters or light shields, refer to Instrument-specific information on page 1.) 2
Stopper for 18-mm tubes and AccuVac Ampuls 2
Refer to Consumables and replacement items on page 7 for reorder information.
AccuVac Ampuls
Description Quantity
DPD Free Chlorine Reagent AccuVac® Ampul 1
Glycine Reagent 16 drops
Beaker, 50-mL 1
Sample cells (For information about sample cells, adapters or light shields, refer to Instrument-specific information on page 1.) 1
Stopper for 18-mm tubes and AccuVac Ampuls 1
Refer to Consumables and replacement items on page 7 for reorder information.
Sample collection• Samples must be analyzed immediately and cannot be preserved for later analysis.• Chlorine dioxide is a strong oxidizing agent and it is unstable in natural waters. It
reacts quickly with various inorganic compounds and more slowly with organiccompounds. Many factors, including reactant concentrations, sunlight, pH,temperature and salinity influence the decomposition of chlorine dioxide in water.
• Collect samples in clean glass bottles. Avoid plastic containers since these may havea large chlorine dioxide demand.
• Pre-treat glass sample containers to remove any chlorine dioxide demand. Soak thecontainers in a dilute bleach solution (1 mL commercial bleach to 1 liter of deionizedwater) for at least 1 hour. Rinse thoroughly with deionized or distilled water. If samplecontainers are rinsed thoroughly with deionized or distilled water after use, onlyoccasional pre-treatment is necessary.
• Be sure to get a representative sample. If the sample is taken from a spigot or faucet,let the water flow for at least 5 minutes. Then let the container overflow with the
2 Chlorine Dioxide, DPD Method (5.00 mg/L)
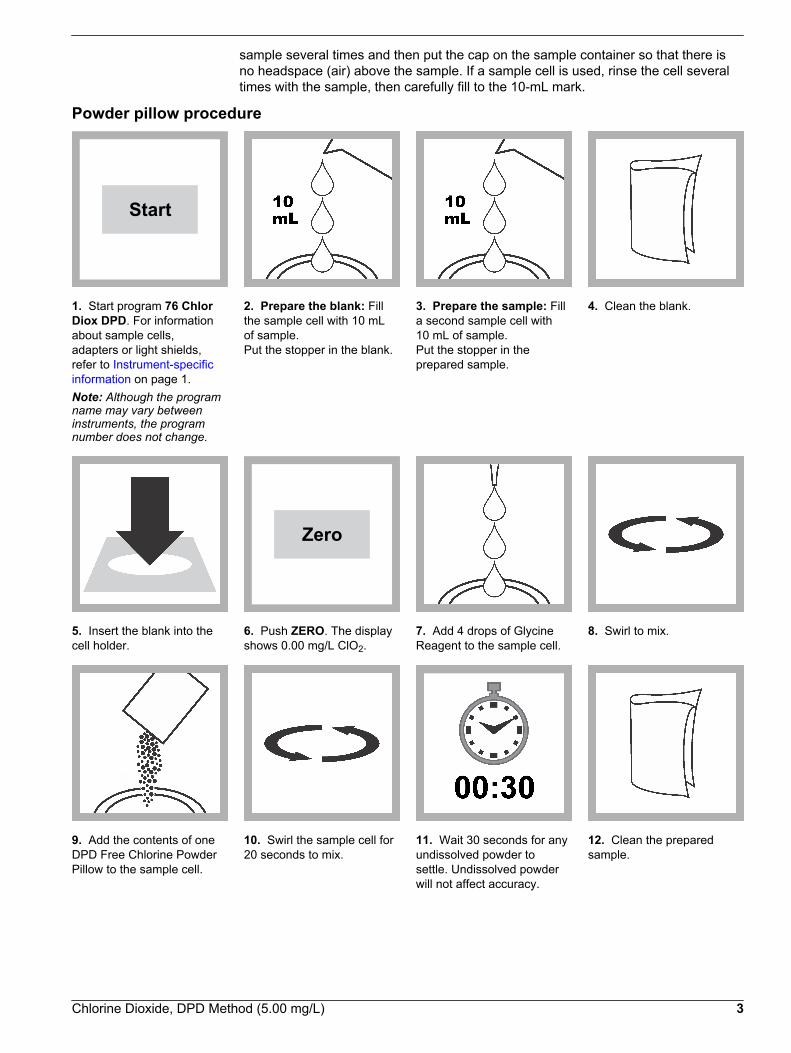
sample several times and then put the cap on the sample container so that there isno headspace (air) above the sample. If a sample cell is used, rinse the cell severaltimes with the sample, then carefully fill to the 10-mL mark.
Powder pillow procedure
Start
1. Start program 76 ChlorDiox DPD. For informationabout sample cells,adapters or light shields,refer to Instrument-specificinformation on page 1.Note: Although the programname may vary betweeninstruments, the programnumber does not change.
2. Prepare the blank: Fillthe sample cell with 10 mLof sample.Put the stopper in the blank.
3. Prepare the sample: Filla second sample cell with10 mL of sample.Put the stopper in theprepared sample.
4. Clean the blank.
5. Insert the blank into thecell holder.
Zero
6. Push ZERO. The displayshows 0.00 mg/L ClO2.
7. Add 4 drops of GlycineReagent to the sample cell.
8. Swirl to mix.
9. Add the contents of oneDPD Free Chlorine PowderPillow to the sample cell.
10. Swirl the sample cell for20 seconds to mix.
11. Wait 30 seconds for anyundissolved powder tosettle. Undissolved powderwill not affect accuracy.
12. Clean the preparedsample.
Chlorine Dioxide, DPD Method (5.00 mg/L) 3

13. Within one minute ofadding the reagent, insertthe prepared sample intothe cell holder.
Read
14. Push READ. Resultsshow in mg/L ClO2.
AccuVac Ampul procedure
Start
1. Start program 77 ChlorDiox DPD AV. Forinformation about samplecells, adapters or lightshields, refer to Instrument-specific informationon page 1.Note: Although the programname may vary betweeninstruments, the programnumber does not change.
2. Prepare the blank: Fillthe sample cell with 10 mLof sample.Put the stopper in the blank.
3. Clean the blank. 4. Insert the blank into thecell holder.
Zero
5. Push ZERO. The displayshows 0.00 mg/L ClO2.
6. Prepare the sample:Collect at least 40 mL ofsample in a 50-mL beaker.Add 16 drops of GlycineReagent to the sample inthe beaker.
7. Swirl to mix. 8. Fill the AccuVac Ampulwith the prepared sample.Keep the tip immersed whilethe Ampul fills completely.Close the Ampul.
4 Chlorine Dioxide, DPD Method (5.00 mg/L)
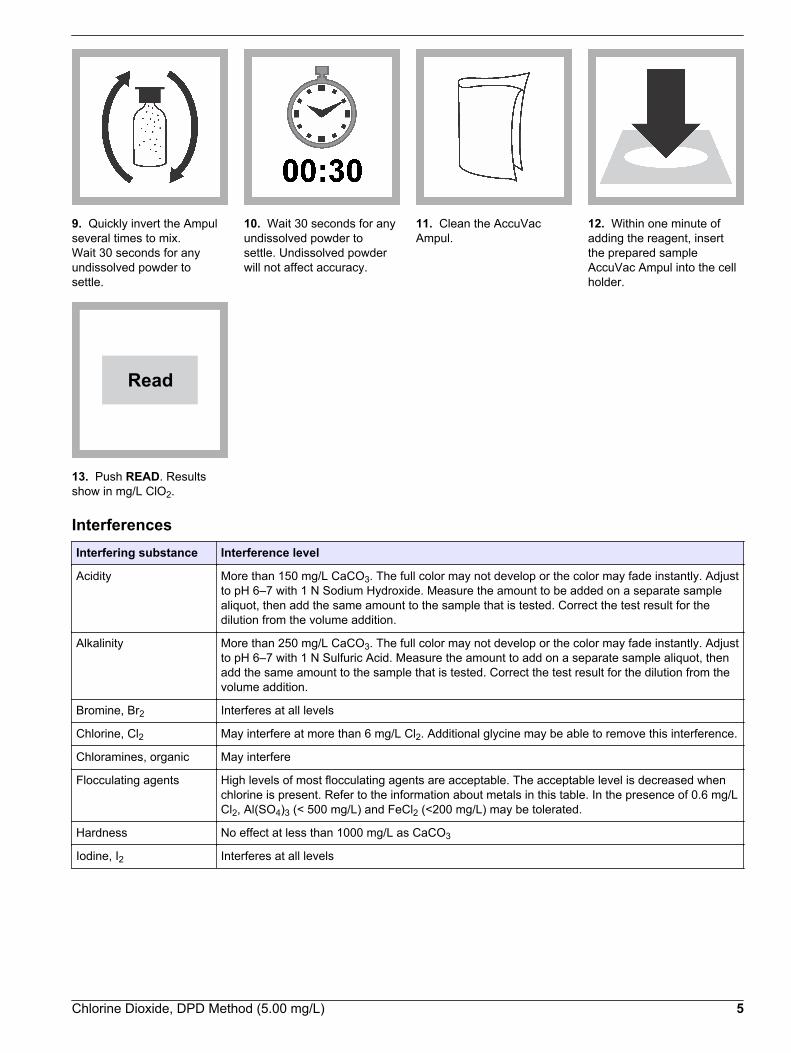
9. Quickly invert the Ampulseveral times to mix.Wait 30 seconds for anyundissolved powder tosettle.
10. Wait 30 seconds for anyundissolved powder tosettle. Undissolved powderwill not affect accuracy.
11. Clean the AccuVacAmpul.
12. Within one minute ofadding the reagent, insertthe prepared sampleAccuVac Ampul into the cellholder.
Read
13. Push READ. Resultsshow in mg/L ClO2.
InterferencesInterfering substance Interference level
Acidity More than 150 mg/L CaCO3. The full color may not develop or the color may fade instantly. Adjustto pH 6–7 with 1 N Sodium Hydroxide. Measure the amount to be added on a separate samplealiquot, then add the same amount to the sample that is tested. Correct the test result for thedilution from the volume addition.
Alkalinity More than 250 mg/L CaCO3. The full color may not develop or the color may fade instantly. Adjustto pH 6–7 with 1 N Sulfuric Acid. Measure the amount to add on a separate sample aliquot, thenadd the same amount to the sample that is tested. Correct the test result for the dilution from thevolume addition.
Bromine, Br2 Interferes at all levels
Chlorine, Cl2 May interfere at more than 6 mg/L Cl2. Additional glycine may be able to remove this interference.
Chloramines, organic May interfere
Flocculating agents High levels of most flocculating agents are acceptable. The acceptable level is decreased whenchlorine is present. Refer to the information about metals in this table. In the presence of 0.6 mg/LCl2, Al(SO4)3 (< 500 mg/L) and FeCl2 (<200 mg/L) may be tolerated.
Hardness No effect at less than 1000 mg/L as CaCO3
Iodine, I2 Interferes at all levels
Chlorine Dioxide, DPD Method (5.00 mg/L) 5
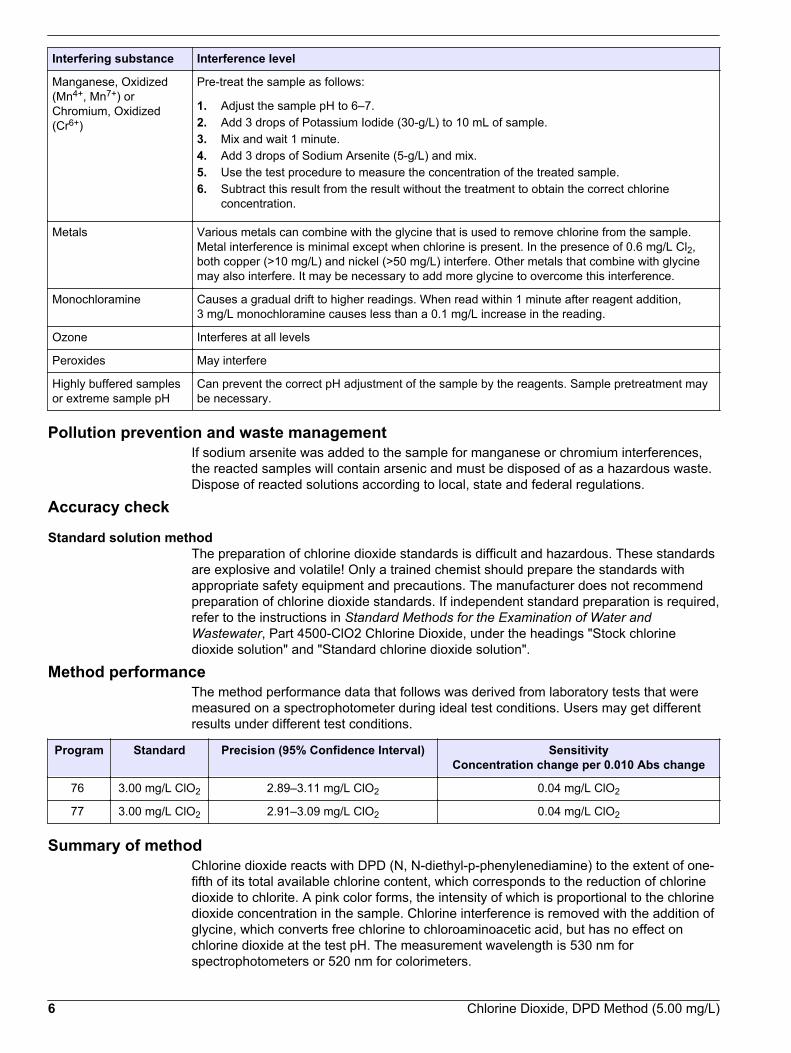
Interfering substance Interference level
Manganese, Oxidized(Mn4+, Mn7+) orChromium, Oxidized(Cr6+)
Pre-treat the sample as follows:
1. Adjust the sample pH to 6–7.2. Add 3 drops of Potassium Iodide (30-g/L) to 10 mL of sample.3. Mix and wait 1 minute.4. Add 3 drops of Sodium Arsenite (5-g/L) and mix.5. Use the test procedure to measure the concentration of the treated sample.6. Subtract this result from the result without the treatment to obtain the correct chlorine
concentration.
Metals Various metals can combine with the glycine that is used to remove chlorine from the sample.Metal interference is minimal except when chlorine is present. In the presence of 0.6 mg/L Cl2,both copper (>10 mg/L) and nickel (>50 mg/L) interfere. Other metals that combine with glycinemay also interfere. It may be necessary to add more glycine to overcome this interference.
Monochloramine Causes a gradual drift to higher readings. When read within 1 minute after reagent addition,3 mg/L monochloramine causes less than a 0.1 mg/L increase in the reading.
Ozone Interferes at all levels
Peroxides May interfere
Highly buffered samplesor extreme sample pH
Can prevent the correct pH adjustment of the sample by the reagents. Sample pretreatment maybe necessary.
Pollution prevention and waste managementIf sodium arsenite was added to the sample for manganese or chromium interferences,the reacted samples will contain arsenic and must be disposed of as a hazardous waste.Dispose of reacted solutions according to local, state and federal regulations.
Accuracy check
Standard solution methodThe preparation of chlorine dioxide standards is difficult and hazardous. These standardsare explosive and volatile! Only a trained chemist should prepare the standards withappropriate safety equipment and precautions. The manufacturer does not recommendpreparation of chlorine dioxide standards. If independent standard preparation is required,refer to the instructions in Standard Methods for the Examination of Water andWastewater, Part 4500-ClO2 Chlorine Dioxide, under the headings "Stock chlorinedioxide solution" and "Standard chlorine dioxide solution".
Method performanceThe method performance data that follows was derived from laboratory tests that weremeasured on a spectrophotometer during ideal test conditions. Users may get differentresults under different test conditions.
Program Standard Precision (95% Confidence Interval) SensitivityConcentration change per 0.010 Abs change
76 3.00 mg/L ClO2 2.89–3.11 mg/L ClO2 0.04 mg/L ClO2
77 3.00 mg/L ClO2 2.91–3.09 mg/L ClO2 0.04 mg/L ClO2
Summary of methodChlorine dioxide reacts with DPD (N, N-diethyl-p-phenylenediamine) to the extent of one-fifth of its total available chlorine content, which corresponds to the reduction of chlorinedioxide to chlorite. A pink color forms, the intensity of which is proportional to the chlorinedioxide concentration in the sample. Chlorine interference is removed with the addition ofglycine, which converts free chlorine to chloroaminoacetic acid, but has no effect onchlorine dioxide at the test pH. The measurement wavelength is 530 nm forspectrophotometers or 520 nm for colorimeters.
6 Chlorine Dioxide, DPD Method (5.00 mg/L)
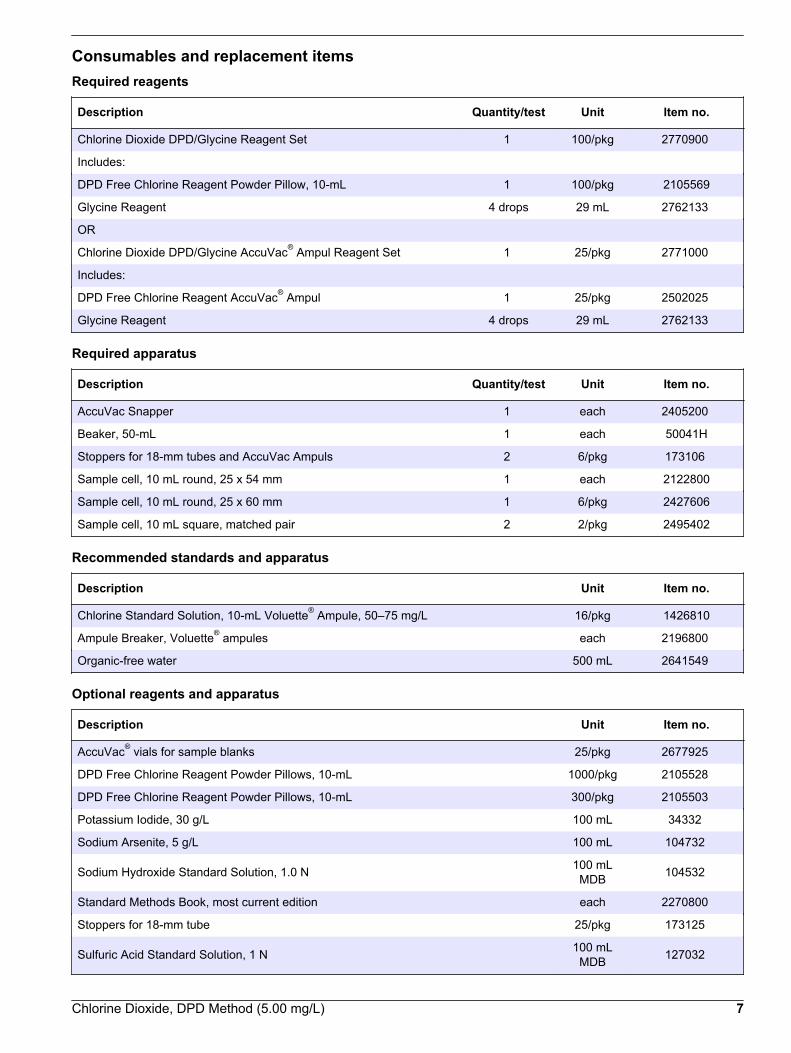
Consumables and replacement itemsRequired reagents
Description Quantity/test Unit Item no.
Chlorine Dioxide DPD/Glycine Reagent Set 1 100/pkg 2770900
Includes:
DPD Free Chlorine Reagent Powder Pillow, 10-mL 1 100/pkg 2105569
Glycine Reagent 4 drops 29 mL 2762133
OR
Chlorine Dioxide DPD/Glycine AccuVac® Ampul Reagent Set 1 25/pkg 2771000
Includes:
DPD Free Chlorine Reagent AccuVac® Ampul 1 25/pkg 2502025
Glycine Reagent 4 drops 29 mL 2762133
Required apparatus
Description Quantity/test Unit Item no.
AccuVac Snapper 1 each 2405200
Beaker, 50-mL 1 each 50041H
Stoppers for 18-mm tubes and AccuVac Ampuls 2 6/pkg 173106
Sample cell, 10 mL round, 25 x 54 mm 1 each 2122800
Sample cell, 10 mL round, 25 x 60 mm 1 6/pkg 2427606
Sample cell, 10 mL square, matched pair 2 2/pkg 2495402
Recommended standards and apparatus
Description Unit Item no.
Chlorine Standard Solution, 10-mL Voluette® Ampule, 50–75 mg/L 16/pkg 1426810
Ampule Breaker, Voluette® ampules each 2196800
Organic-free water 500 mL 2641549
Optional reagents and apparatus
Description Unit Item no.
AccuVac® vials for sample blanks 25/pkg 2677925
DPD Free Chlorine Reagent Powder Pillows, 10-mL 1000/pkg 2105528
DPD Free Chlorine Reagent Powder Pillows, 10-mL 300/pkg 2105503
Potassium Iodide, 30 g/L 100 mL 34332
Sodium Arsenite, 5 g/L 100 mL 104732
Sodium Hydroxide Standard Solution, 1.0 N 100 mLMDB 104532
Standard Methods Book, most current edition each 2270800
Stoppers for 18-mm tube 25/pkg 173125
Sulfuric Acid Standard Solution, 1 N 100 mLMDB 127032
Chlorine Dioxide, DPD Method (5.00 mg/L) 7

HACH COMPANYWORLD HEADQUARTERSTelephone: (970) 669-3050FAX: (970) 669-2932
FOR TECHNICAL ASSISTANCE, PRICE INFORMATION AND ORDERING:Call 800-227-4224
Contact the HACH office or distributor serving you.www.hach.com [email protected]
In the U.S.A. –
Outside the U.S.A. –
On the Worldwide Web – ; E-mail –
toll-free
© Hach Company/Hach Lange GmbH, 1989–2013. All rights reserved. 04/2013, Edition 8

Chlorine, Free DOC316.53.01023
USEPA DPD Method1 Method 80210.02 to 2.00 mg/L Cl2 Powder Pillows or AccuVac® Ampuls
Scope and application: For testing free chlorine (hypochlorous acid and hypochlorite ion) in water, treatedwaters, estuary and seawater. USEPA accepted for reporting for drinking water analyses.2 This product has notbeen evaluated to test for chlorine and chloramines in medical applications in the United States.
1 Adapted from Standard Methods for the Examination of Water and Wastewater.2 Procedure is equivalent to USEPA and Standard Method 4500-Cl G for drinking water.
Test preparation
Instrument-specific informationThe tables in this section show all of the instruments that have the program for this test. Table 1 shows sample cell and orientation requirements for reagent addition tests, suchas powder pillow or bulk reagent tests. Table 2 shows sample cell and adapterrequirements for AccuVac Ampul tests.To use either table, select an instrument, then read across to find the correspondinginformation for this test.
Table 1 Instrument-specific information for powder pillows
Instrument Sample cell orientation Sample cell
DR 6000 DR 3800 DR 2800 DR 2700
The fill line is to the right. 2495402
DR 5000 DR 3900
The fill line is toward the user.
DR 900 The orientation mark is toward the user. 2401906
Table 2 Instrument-specific information for AccuVac Ampuls
Instrument Adapter Sample cell
DR 6000 DR 5000 DR 900
— 2427606
DR 3900 LZV846 (A)
DR 3800 DR 2800 DR 2700
LZV584 (C) 2122800
1

Before startingSamples must be analyzed immediately after collection and cannot be preserved for later analysis.
Install the instrument cap on the DR 900 cell holder before ZERO or READ is pushed.
Do not use the same sample cells for free and total chlorine. If trace iodide from the total chlorine reagent is carried over intothe free chlorine determination, monochloramine will interfere. It is best to use separate, dedicated sample cells for free andtotal chlorine measurements.
If the test result is over-range, or if the sample temporarily turns yellow after the reagent addition, dilute the sample with aknown volume of high quality, chlorine demand-free water and repeat the test. Some loss of chlorine may occur due to thedilution. Multiply the result by the dilution factor. Additional methods are available to measure chlorine without dilution.
For best results, measure the reagent blank value for each new lot of reagent. Replace the sample with deionized water inthe test procedure to get the reagent blank value. Subtract the reagent blank value from the sample results automaticallywith the reagent blank adjust option.
An AccuVac Ampule for Blanks can be used to zero the instrument in the AccuVac test procedure.
Review the Safety Data Sheets (MSDS/SDS) for the chemicals that are used and use any recommended personal protectiveequipment.
Dispose of reacted solutions according to local, state and federal regulations. Use the Safety Data Sheets for disposalinformation for unused reagents. Consult the environmental, health and safety staff for your facility and/or local regulatoryagencies for further disposal information.
The SwifTest Dispenser for Free Chlorine can be used in place of the powder pillow in the test procedure.
Items to collectPowder pillows
Description Quantity
DPD Free Chlorine Reagent Powder Pillows, 10-mL 1
Sample cells. (For information about sample cells, adapters or light shields, refer to Instrument-specific information on page 1.) 2
Refer to Consumables and replacement items on page 6 for reorder information.
AccuVac Ampuls
Description Quantity
DPD Free Chlorine Reagent AccuVac Ampuls 1
Beaker, 50-mL 1
Sample cells (For information about sample cells, adapters or light shields, refer to Instrument-specific information on page 1.) 1
Stopper for 18-mm tubes and AccuVac Ampuls 1
Refer to Consumables and replacement items on page 6 for reorder information.
Sample collection• Samples must be analyzed immediately and cannot be preserved for later analysis.• Chlorine is a strong oxidizing agent and it is unstable in natural waters. It reacts
quickly with various inorganic compounds and more slowly with organic compounds.Many factors, including reactant concentrations, sunlight, pH, temperature andsalinity influence the decomposition of chlorine in water.
• Collect samples in clean glass bottles. Avoid plastic containers since these may havea large chlorine demand.
2 Chlorine, Free, DPD Method (2.00 mg/L)
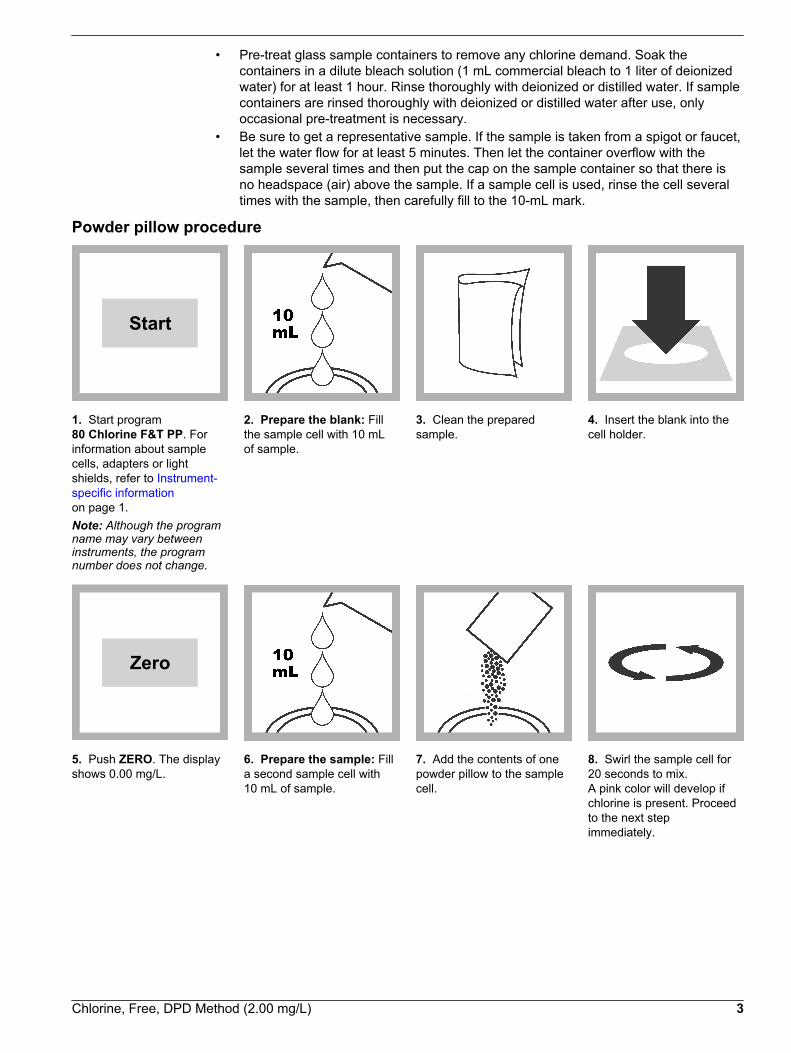
• Pre-treat glass sample containers to remove any chlorine demand. Soak thecontainers in a dilute bleach solution (1 mL commercial bleach to 1 liter of deionizedwater) for at least 1 hour. Rinse thoroughly with deionized or distilled water. If samplecontainers are rinsed thoroughly with deionized or distilled water after use, onlyoccasional pre-treatment is necessary.
• Be sure to get a representative sample. If the sample is taken from a spigot or faucet,let the water flow for at least 5 minutes. Then let the container overflow with thesample several times and then put the cap on the sample container so that there isno headspace (air) above the sample. If a sample cell is used, rinse the cell severaltimes with the sample, then carefully fill to the 10-mL mark.
Powder pillow procedure
Start
1. Start program80 Chlorine F&T PP. Forinformation about samplecells, adapters or lightshields, refer to Instrument-specific informationon page 1.Note: Although the programname may vary betweeninstruments, the programnumber does not change.
2. Prepare the blank: Fillthe sample cell with 10 mLof sample.
3. Clean the preparedsample.
4. Insert the blank into thecell holder.
Zero
5. Push ZERO. The displayshows 0.00 mg/L.
6. Prepare the sample: Filla second sample cell with10 mL of sample.
7. Add the contents of onepowder pillow to the samplecell.
8. Swirl the sample cell for20 seconds to mix.A pink color will develop ifchlorine is present. Proceedto the next stepimmediately.
Chlorine, Free, DPD Method (2.00 mg/L) 3

9. Clean the preparedsample.
10. Within 60 seconds ofadding the reagent, insertthe prepared sample intothe cell holder.
Read
11. Push READ. Resultsshow in mg/L Cl2.
AccuVac Ampul procedure
Start
1. Start program85 Chlorine F&T AV. Forinformation about samplecells, adapters or lightshields, refer to Instrument-specific informationon page 1.Note: Although the programname may vary betweeninstruments, the programnumber does not change.
2. Prepare the blank: Fillthe sample cell with 10 mLof sample.
3. Clean the blank. 4. Insert the blank into thecell holder.
Zero
5. Push ZERO. The displayshows 0.00 mg/L.
6. Prepare the sample:Collect at least 40 mL ofsample in a 50-mL beaker.Fill the AccuVac Ampul withsample. Keep the tipimmersed while the Ampulfills completely.
7. Quickly invert the Ampulseveral times to mix.
8. Clean the AccuVacAmpul.
4 Chlorine, Free, DPD Method (2.00 mg/L)
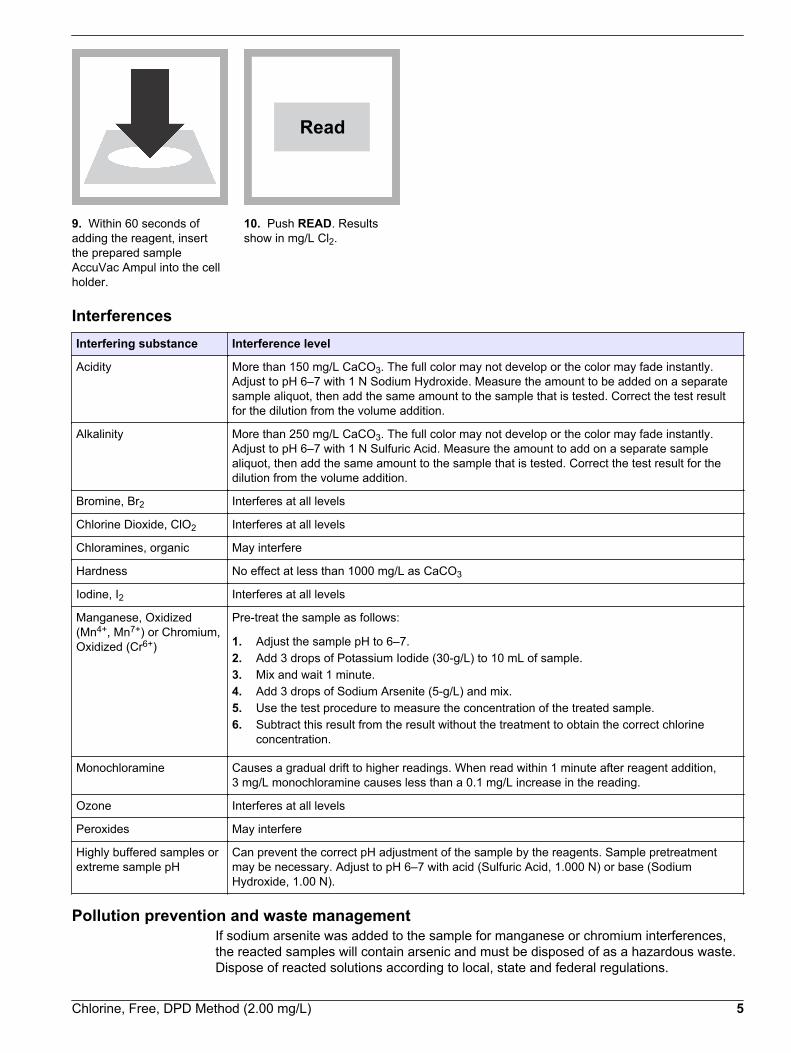
9. Within 60 seconds ofadding the reagent, insertthe prepared sampleAccuVac Ampul into the cellholder.
Read
10. Push READ. Resultsshow in mg/L Cl2.
InterferencesInterfering substance Interference level
Acidity More than 150 mg/L CaCO3. The full color may not develop or the color may fade instantly.Adjust to pH 6–7 with 1 N Sodium Hydroxide. Measure the amount to be added on a separatesample aliquot, then add the same amount to the sample that is tested. Correct the test resultfor the dilution from the volume addition.
Alkalinity More than 250 mg/L CaCO3. The full color may not develop or the color may fade instantly.Adjust to pH 6–7 with 1 N Sulfuric Acid. Measure the amount to add on a separate samplealiquot, then add the same amount to the sample that is tested. Correct the test result for thedilution from the volume addition.
Bromine, Br2 Interferes at all levels
Chlorine Dioxide, ClO2 Interferes at all levels
Chloramines, organic May interfere
Hardness No effect at less than 1000 mg/L as CaCO3
Iodine, I2 Interferes at all levels
Manganese, Oxidized(Mn4+, Mn7+) or Chromium,Oxidized (Cr6+)
Pre-treat the sample as follows:
1. Adjust the sample pH to 6–7.2. Add 3 drops of Potassium Iodide (30-g/L) to 10 mL of sample.3. Mix and wait 1 minute.4. Add 3 drops of Sodium Arsenite (5-g/L) and mix.5. Use the test procedure to measure the concentration of the treated sample.6. Subtract this result from the result without the treatment to obtain the correct chlorine
concentration.
Monochloramine Causes a gradual drift to higher readings. When read within 1 minute after reagent addition,3 mg/L monochloramine causes less than a 0.1 mg/L increase in the reading.
Ozone Interferes at all levels
Peroxides May interfere
Highly buffered samples orextreme sample pH
Can prevent the correct pH adjustment of the sample by the reagents. Sample pretreatmentmay be necessary. Adjust to pH 6–7 with acid (Sulfuric Acid, 1.000 N) or base (SodiumHydroxide, 1.00 N).
Pollution prevention and waste managementIf sodium arsenite was added to the sample for manganese or chromium interferences,the reacted samples will contain arsenic and must be disposed of as a hazardous waste.Dispose of reacted solutions according to local, state and federal regulations.
Chlorine, Free, DPD Method (2.00 mg/L) 5
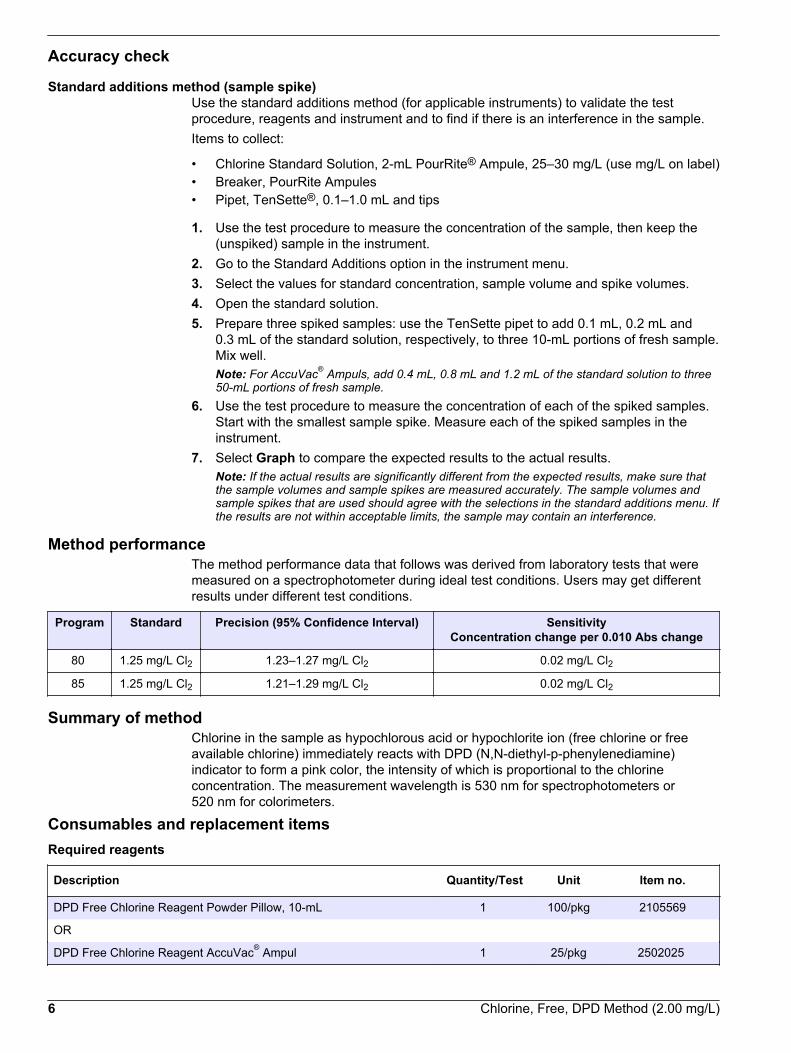
Accuracy check
Standard additions method (sample spike)Use the standard additions method (for applicable instruments) to validate the testprocedure, reagents and instrument and to find if there is an interference in the sample.Items to collect:
• Chlorine Standard Solution, 2-mL PourRite® Ampule, 25–30 mg/L (use mg/L on label)• Breaker, PourRite Ampules• Pipet, TenSette®, 0.1–1.0 mL and tips
1. Use the test procedure to measure the concentration of the sample, then keep the(unspiked) sample in the instrument.
2. Go to the Standard Additions option in the instrument menu.3. Select the values for standard concentration, sample volume and spike volumes.4. Open the standard solution.5. Prepare three spiked samples: use the TenSette pipet to add 0.1 mL, 0.2 mL and
0.3 mL of the standard solution, respectively, to three 10-mL portions of fresh sample.Mix well.Note: For AccuVac® Ampuls, add 0.4 mL, 0.8 mL and 1.2 mL of the standard solution to three50-mL portions of fresh sample.
6. Use the test procedure to measure the concentration of each of the spiked samples.Start with the smallest sample spike. Measure each of the spiked samples in theinstrument.
7. Select Graph to compare the expected results to the actual results.Note: If the actual results are significantly different from the expected results, make sure thatthe sample volumes and sample spikes are measured accurately. The sample volumes andsample spikes that are used should agree with the selections in the standard additions menu. Ifthe results are not within acceptable limits, the sample may contain an interference.
Method performanceThe method performance data that follows was derived from laboratory tests that weremeasured on a spectrophotometer during ideal test conditions. Users may get differentresults under different test conditions.
Program Standard Precision (95% Confidence Interval) SensitivityConcentration change per 0.010 Abs change
80 1.25 mg/L Cl2 1.23–1.27 mg/L Cl2 0.02 mg/L Cl2
85 1.25 mg/L Cl2 1.21–1.29 mg/L Cl2 0.02 mg/L Cl2
Summary of methodChlorine in the sample as hypochlorous acid or hypochlorite ion (free chlorine or freeavailable chlorine) immediately reacts with DPD (N,N-diethyl-p-phenylenediamine)indicator to form a pink color, the intensity of which is proportional to the chlorineconcentration. The measurement wavelength is 530 nm for spectrophotometers or520 nm for colorimeters.
Consumables and replacement itemsRequired reagents
Description Quantity/Test Unit Item no.
DPD Free Chlorine Reagent Powder Pillow, 10-mL 1 100/pkg 2105569
OR
DPD Free Chlorine Reagent AccuVac® Ampul 1 25/pkg 2502025
6 Chlorine, Free, DPD Method (2.00 mg/L)
Required apparatus
Description Quantity/Test Unit Item no.
AccuVac Snapper 1 each 2405200
Beaker, 50-mL 1 each 50041H
Stoppers for 18-mm tubes and AccuVac Ampuls 2 6/pkg 173106
Recommended standards
Description Unit Item no.
Chlorine Standard Solution, 2-mL PourRite® Ampules, 25–30 mg/L 20/pkg 2630020
Optional reagents and apparatus
Description Unit Item no.
AccuVac® vials for sample blanks 25/pkg 2677925
Ampule Breaker, PourRite® ampules each 2484600
Ampule Breaker, Voluette® ampules each 2196800
Water, Chlorine-demand Free 500 mL 2641549
Cylinder, mixing, 25-mL each 2088640
Cylinder, mixing, 50-mL each 189641
Chlorine Standard Solution, 2-mL PourRite® Ampules, 50–75 mg/L 20/pkg 1426820
Chlorine Standard Solution, 10-mL Voluette® Ampule, 50–75 mg/L 16/pkg 1426810
DPD Free Chlorine Reagent Powder Pillows, 10-mL 1000/pkg 2105528
DPD Free Chlorine Reagent Powder Pillows, 10-mL 300/pkg 2105503
DPD Free Chlorine Reagent, 10 mL, SwifTest™ Dispenser refill vial 250 tests 2105560
Paper, pH, 0–14 pH range 100/pkg 2601300
Pipet, TenSette®, 0.1–1.0 mL each 1970001
Pipet tips for TenSette Pipet 1970001 50/pkg 2185696
Pipet tips for TenSette Pipet 1970001 1000/pkg 2185628
Potassium Iodide, 30 g/L 100 mL 34332
Sodium Arsenite, 5 g/L 100 mL 104732
Sodium Hydroxide Standard Solution, 1.0 N 100 mLMDB 104532
SpecCheck™ Secondary Standard Kit, Chlorine DPD, 0-2.0 mg/L Set each 2635300
Sulfuric Acid Standard Solution, 1 N 100 mLMDB 127032
Chlorine, Free, DPD Method (2.00 mg/L) 7

HACH COMPANYWORLD HEADQUARTERSTelephone: (970) 669-3050FAX: (970) 669-2932
FOR TECHNICAL ASSISTANCE, PRICE INFORMATION AND ORDERING:Call 800-227-4224
Contact the HACH office or distributor serving you.www.hach.com [email protected]
In the U.S.A. –
Outside the U.S.A. –
On the Worldwide Web – ; E-mail –
toll-free
© Hach Company/Hach Lange GmbH, 1989–2013. All rights reserved. 04/2013, Edition 8
Chlorine, Free DOC316.53.01025
DPD Method1 Method 100690.1 to 10.0 mg/L Cl2 (HR) Powder Pillows
Scope and application: For determinations of higher levels of free chlorine (hypochlorous acid and hypochloriteion) in drinking water, cooling water and industrial process waters. This product has not been evaluated to test forchlorine and chloramines in medical applications in the United States.
1 Adapted from Standard Methods for the Examination of Water and Wastewater.
Test preparation
Instrument specific informationTable 1 shows all of the instruments that have the program for this test. The table alsoshows requirements that may vary between instruments, such as adapter and sample cellrequirements. To use this table, select an instrument, then read across to find thecorresponding information for this test.
Table 1 Instrument-specific information
Instrument Adapter Sample cell orientation Sample cell
DR 6000 A23618 The orientation key is toward the user. 4864302
DR 5000 The orientation key is toward the user.
DR 3900 LZV846 (A) The orientation key is away from the user.
DR 900 — The orientation key is toward the user.
DR 3800 LZV585 (B) The 1-cm path is aligned with the arrow on the adapter. 5940506
DR 2800
DR 2700
Before startingSamples must be analyzed immediately after collection and cannot be preserved for later analysis.
Install the instrument cap on the DR 900 cell holder before ZERO or READ is pushed.
In bright light conditions (e.g., direct sunlight), close the cell compartment on spectrophotometers, if applicable, with theprotective cover during measurements.
If the chlorine concentration is less than 2 mg/L, use Method 8021, program number 80.
Review the Safety Data Sheets (MSDS/SDS) for the chemicals that are used and use any recommended personal protectiveequipment.
Dispose of reacted solutions according to local, state and federal regulations. Use the Safety Data Sheets for disposalinformation for unused reagents. Consult the environmental, health and safety staff for your facility and/or local regulatoryagencies for further disposal information.
Items to collect
Description Quantity
DPD Free Chlorine Reagent Powder Pillows, 25-mL 1
Sample cells (For information about sample cells, adapters or light shields, refer to Instrumentspecific information on page 1.) 2
1

Refer to Consumables and replacement items on page 5 for reorder information.
Sample collection• Samples must be analyzed immediately and cannot be preserved for later analysis.• Chlorine is a strong oxidizing agent and it is unstable in natural waters. It reacts
quickly with various inorganic compounds and more slowly with organic compounds.Many factors, including reactant concentrations, sunlight, pH, temperature andsalinity influence the decomposition of chlorine in water.
• Collect samples in clean glass bottles. Avoid plastic containers since these may havea large chlorine demand.
• Pre-treat glass sample containers to remove any chlorine demand. Soak thecontainers in a dilute bleach solution (1 mL commercial bleach to 1 liter of deionizedwater) for at least 1 hour. Rinse thoroughly with deionized or distilled water. If samplecontainers are rinsed thoroughly with deionized or distilled water after use, onlyoccasional pre-treatment is necessary.
• Be sure to get a representative sample. If the sample is taken from a spigot or faucet,let the water flow for at least 5 minutes. Then let the container overflow with thesample several times and then put the cap on the sample container so that there isno headspace (air) above the sample. If a sample cell is used, rinse the cell severaltimes with the sample, then carefully fill to the 10-mL mark.
Powder pillow procedure
Start
1. Start program88 Chlorine F&T HR. Forinformation about samplecells, adapters or lightshields, refer to Instrumentspecific informationon page 1.Note: Although the programname may vary betweeninstruments, the programnumber does not change.
2. Prepare the blank: Fill asample cell to the 5-mLmark with sample.
3. Clean the blank. 4. Insert the blank into thecell holder.
2 Chlorine, Free, DPD Method (10 mg/L)
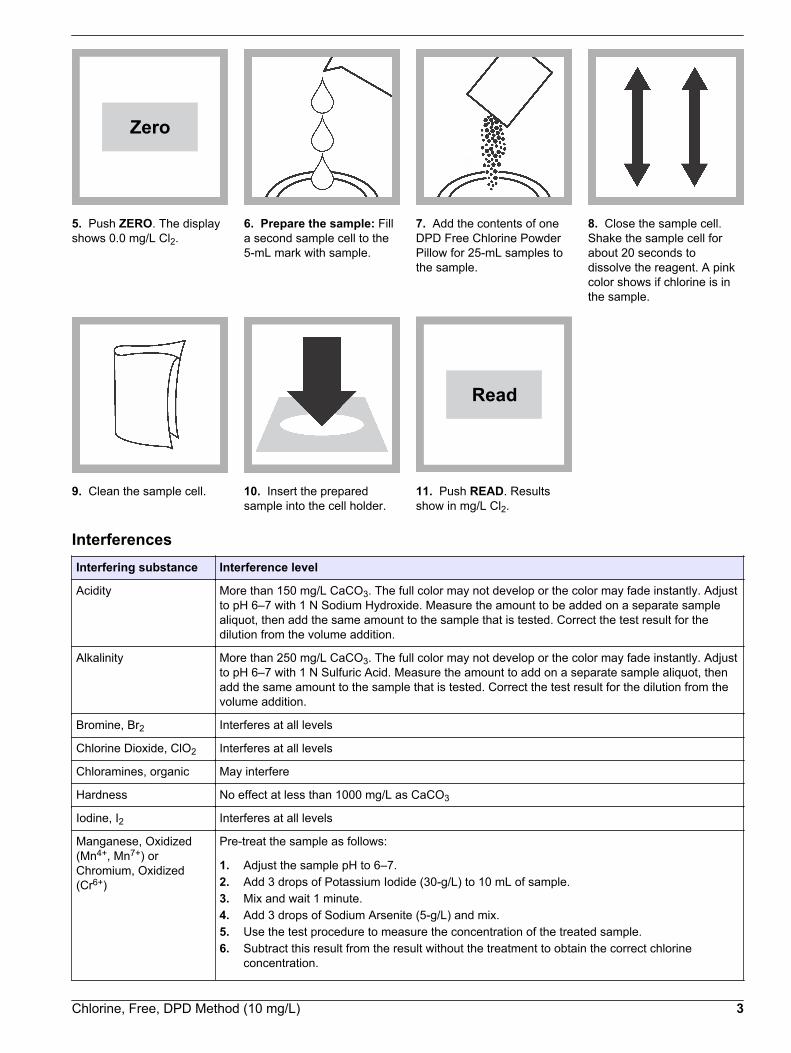
Zero
5. Push ZERO. The displayshows 0.0 mg/L Cl2.
6. Prepare the sample: Filla second sample cell to the5-mL mark with sample.
7. Add the contents of oneDPD Free Chlorine PowderPillow for 25-mL samples tothe sample.
8. Close the sample cell.Shake the sample cell forabout 20 seconds todissolve the reagent. A pinkcolor shows if chlorine is inthe sample.
9. Clean the sample cell. 10. Insert the preparedsample into the cell holder.
Read
11. Push READ. Resultsshow in mg/L Cl2.
InterferencesInterfering substance Interference level
Acidity More than 150 mg/L CaCO3. The full color may not develop or the color may fade instantly. Adjustto pH 6–7 with 1 N Sodium Hydroxide. Measure the amount to be added on a separate samplealiquot, then add the same amount to the sample that is tested. Correct the test result for thedilution from the volume addition.
Alkalinity More than 250 mg/L CaCO3. The full color may not develop or the color may fade instantly. Adjustto pH 6–7 with 1 N Sulfuric Acid. Measure the amount to add on a separate sample aliquot, thenadd the same amount to the sample that is tested. Correct the test result for the dilution from thevolume addition.
Bromine, Br2 Interferes at all levels
Chlorine Dioxide, ClO2 Interferes at all levels
Chloramines, organic May interfere
Hardness No effect at less than 1000 mg/L as CaCO3
Iodine, I2 Interferes at all levels
Manganese, Oxidized(Mn4+, Mn7+) orChromium, Oxidized(Cr6+)
Pre-treat the sample as follows:
1. Adjust the sample pH to 6–7.2. Add 3 drops of Potassium Iodide (30-g/L) to 10 mL of sample.3. Mix and wait 1 minute.4. Add 3 drops of Sodium Arsenite (5-g/L) and mix.5. Use the test procedure to measure the concentration of the treated sample.6. Subtract this result from the result without the treatment to obtain the correct chlorine
concentration.
Chlorine, Free, DPD Method (10 mg/L) 3

Interfering substance Interference level
Ozone Interferes at all levels
Peroxides May interfere
Highly buffered samplesor extreme sample pH
Can prevent the correct pH adjustment of the sample by the reagents. Sample pretreatment maybe necessary. Adjust to pH 6–7 with acid (Sulfuric Acid, 1.000 N) or base (Sodium Hydroxide,1.00 N).
Monochloramine interference
For conventional free chlorine disinfection (beyond the breakpoint), typicalmonochloramine concentrations are very low. If monochloramine is present in thesample, its interference in the free chlorine test depends on the sample temperature,relative amount of monochloramine to free chlorine and the time required to do theanalysis. Typical interference levels of monochloramine as mg/L Cl2 in the free chlorinetest are shown in Table 2 (1 minute test time). Measure the monochloramine levels withmethod 10200 for Chloramine (Mono) and Free Ammonia.
Table 2 Monochloramine interference at different sample temperatures
NH2Cl (as Cl2) 5 °C (41 °F) 10 °C (50 °F) 20 °C (68 °F) 30 °C (83 °F)
1.2 mg/L 0.15 0.19 0.30 0.29
2.2 mg/L 0.35 0.38 0.55 0.61
3.2 mg/L 0.38 0.56 0.69 0.73
Pollution prevention and waste managementIf sodium arsenite was added to the sample for manganese or chromium interferences,the reacted samples will contain arsenic and must be disposed of as a hazardous waste.Dispose of reacted solutions according to local, state and federal regulations.
Accuracy check
Standard additions method (sample spike)Use the standard additions method (for applicable instruments) to validate the testprocedure, reagents and instrument and to find if there is an interference in the sample.Items to collect:
• Chlorine Standard Solution, 2-mL PourRite® Ampule, 50–75 mg/L (use mg/L on label)• Breaker, PourRite Ampules• Pipet, TenSette®, 0.1–1.0 mL and tips• Mixing cylinders, 10-mL (3)
1. Use the test procedure to measure the concentration of the sample, then keep the(unspiked) sample in the instrument.
2. Go to the Standard Additions option in the instrument menu.3. Select the values for standard concentration, sample volume and spike volumes.4. Open the standard solution.5. Prepare three spiked samples: use the TenSette pipet to add 0.1 mL, 0.2 mL and
0.3 mL of the standard solution, respectively, to three 5-mL portions of fresh sample.Mix well.
6. Use the test procedure to measure the concentration of each of the spiked samples.Start with the smallest sample spike. Measure each of the spiked samples in theinstrument.
7. Select Graph to compare the expected results to the actual results.Note: If the actual results are significantly different from the expected results, make sure thatthe sample volumes and sample spikes are measured accurately. The sample volumes and
4 Chlorine, Free, DPD Method (10 mg/L)
sample spikes that are used should agree with the selections in the standard additions menu. Ifthe results are not within acceptable limits, the sample may contain an interference.
Method performanceThe method performance data that follows was derived from laboratory tests that weremeasured on a spectrophotometer during ideal test conditions. Users may get differentresults under different test conditions.
Program Standard Precision (95% Confidence Interval) SensitivityConcentration change per 0.010 Abs change
88 5.4 mg/L Cl2 5.3–5.5 mg/L Cl2 0.04 mg/L Cl2
Summary of methodThe range of analysis using the DPD method for free chlorine can be extended by addingmore indicator in proportion to sample volume. Thus, a larger fill powder pillow of DPDFree Chlorine Reagent is added to a 5-mL sample portion. Chlorine in the sample ashypochlorous acid or hypochlorite ion (free chlorine or free available chlorine)immediately reacts with DPD (N,N-diethyl-p-phenylenediamine) indicator to form a pinkcolor, the intensity of which is proportional to the chlorine concentration. Themeasurement wavelength is 530 nm for spectrophotometers or 520 nm for colorimeters.
Consumables and replacement itemsRequired reagents
Description Quantity/Test Unit Item no.
DPD Free Chlorine Reagent Powder Pillow, 25-mL 1 100/pkg 1407099
Recommended standards and apparatus
Description Unit Item no.
Ampule Breaker, PourRite® ampules each 2484600
Ampule Breaker, Voluette® ampules each 2196800
Chlorine Standard Solution, 2-mL PourRite® Ampules, 50–75 mg/L 20/pkg 1426820
Chlorine Standard Solution, 2-mL PourRite® Ampules, 25–30 mg/L 20/pkg 2630020
Chlorine Standard Solution, 10-mL Voluette® Ampule, 50–75 mg/L 16/pkg 1426810
SpecCheck™ Gel Secondary Standard Kit, Chlorine DPD, 0–10 mg/L 4/pkg 2893300
Optional reagents and apparatus
Description Unit Item no.
Cylinder, mixing, 25-mL each 2088640
DPD Free Chlorine Reagent Powder Pillows, 10-mL 1000/pkg 2105528
DPD Free Chlorine Reagent Powder Pillows, 10-mL 300/pkg 2105503
Paper, pH, 0–14 pH range 100/pkg 2601300
Pipet, TenSette®, 0.1–1.0 mL each 1970001
Pipet tips for TenSette Pipet 1970001 50/pkg 2185696
Pipet tips for TenSette Pipet 1970001 1000/pkg 2185628
Potassium Iodide, 30 g/L 100 mL 34332
Sodium Arsenite, 5 g/L 100 mL 104732
Chlorine, Free, DPD Method (10 mg/L) 5
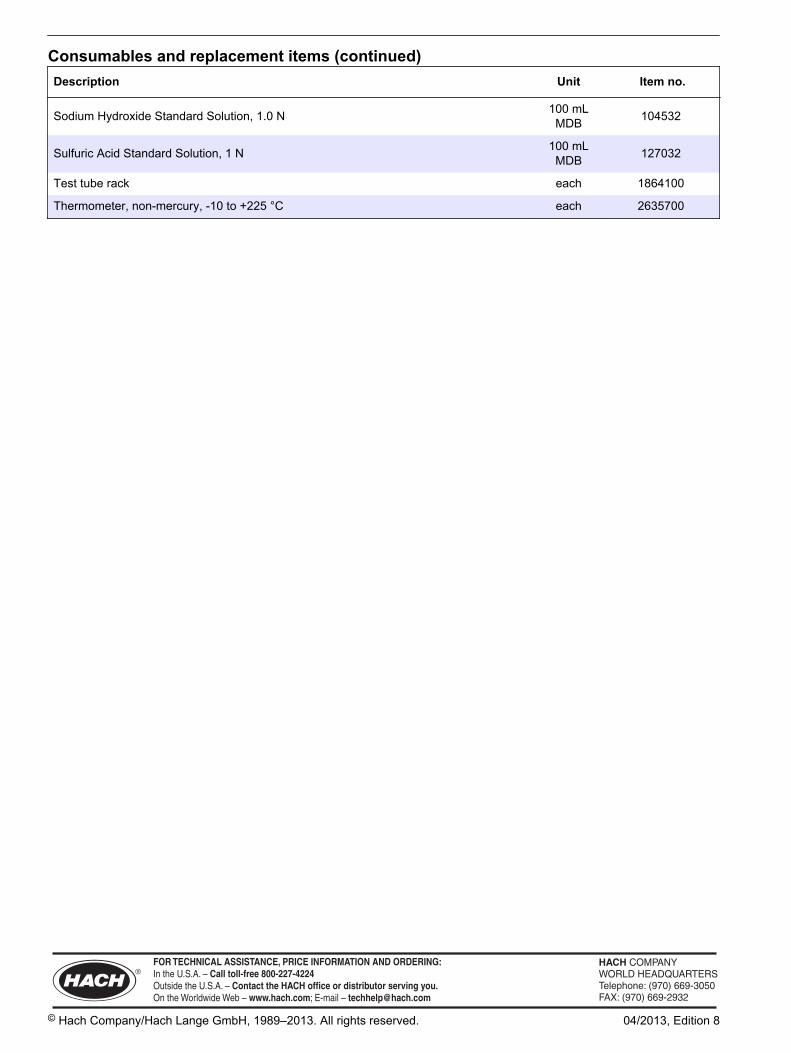
Consumables and replacement items (continued)Description Unit Item no.
Sodium Hydroxide Standard Solution, 1.0 N 100 mLMDB 104532
Sulfuric Acid Standard Solution, 1 N 100 mLMDB 127032
Test tube rack each 1864100
Thermometer, non-mercury, -10 to +225 °C each 2635700
HACH COMPANYWORLD HEADQUARTERSTelephone: (970) 669-3050FAX: (970) 669-2932
FOR TECHNICAL ASSISTANCE, PRICE INFORMATION AND ORDERING:Call 800-227-4224
Contact the HACH office or distributor serving you.www.hach.com [email protected]
In the U.S.A. –
Outside the U.S.A. –
On the Worldwide Web – ; E-mail –
toll-free
© Hach Company/Hach Lange GmbH, 1989–2013. All rights reserved. 04/2013, Edition 8

Chlorine, Free DOC316.53.01303
USEPA DPD Method2 Method 102451
0.05 to 4.00 mg/L Cl2 (MR) Powder Pillows
Scope and application: For free chlorine (hypochlorous acid and hypochlorite ion) measurements in water,treated waters, estuary and seawater. This product has not been evaluated to test for chlorine and chloramines inmedical applications in the United States.
1 USEPA accepted for reporting wastewater and drinking water analyses.2 Procedure is equivalent to USEPA method 330.5 for wastewater and Standard Method 4500-Cl G for drinking water.
Test preparation
Instrument specific informationThe table in this section shows all of the instruments that have the program for this test. Table 1 shows sample cell and orientation requirements for reagent addition tests, suchas powder pillow or bulk reagent tests.To use the table, select an instrument, then read across to find the correspondinginformation for this test.
Table 1 Instrument-specific information for reagent addition
Instrument Sample cell orientation Sample cell
DR 6000 DR 3800 DR 2800 DR 2700
The fill line is to the right. 2495402
DR 5000 DR 3900
The fill line is toward the user.
DR 900 The orientation mark is toward the user. 2401906
Before startingSamples must be analyzed immediately after collection and cannot be preserved for later analysis.
Install the instrument cap on the DR 900 cell holder before ZERO or READ is pushed.
Do not use the same sample cells for free and total chlorine. If trace iodide from the total chlorine reagent is carried over intothe free chlorine determination, monochloramine will interfere. It is best to use separate, dedicated sample cells for free andtotal chlorine measurements.
If the test result is over-range, or if the sample temporarily turns yellow after the reagent addition, dilute the sample with aknown volume of high quality, chlorine demand-free water and repeat the test. Some loss of chlorine may occur due to thedilution. Multiply the result by the dilution factor. Additional methods are available to measure chlorine without dilution.
For best results, measure the reagent blank value for each new lot of reagent. Replace the sample with deionized water inthe test procedure to get the reagent blank value. Subtract the reagent blank value from the sample results automaticallywith the reagent blank adjust option.
Cold waters can cause condensation on the sample cells during color development. Examine the sample cells forcondensation before measurements.
1

Review the Safety Data Sheets (MSDS/SDS) for the chemicals that are used and use any recommended personal protectiveequipment.
Dispose of reacted solutions according to local, state and federal regulations. Use the Safety Data Sheets for disposalinformation for unused reagents. Consult the environmental, health and safety staff for your facility and/or local regulatoryagencies for further disposal information.
Items to collect
Description Quantity
DPD Free Chlorine Reagent Powder Pillows, 25-mL 1
Sample cells (For information about sample cells, adapters or light shields, refer to Instrumentspecific information on page 1.) 2
Refer to Consumables and replacement items on page 5 for reorder information.
Sample collection• Samples must be analyzed immediately and cannot be preserved for later analysis.• Chlorine is a strong oxidizing agent and it is unstable in natural waters. It reacts
quickly with various inorganic compounds and more slowly with organic compounds.Many factors, including reactant concentrations, sunlight, pH, temperature andsalinity influence the decomposition of chlorine in water.
• Collect samples in clean glass bottles. Avoid plastic containers since these may havea large chlorine demand.
• Pre-treat glass sample containers to remove any chlorine demand. Soak thecontainers in a dilute bleach solution (1 mL commercial bleach to 1 liter of deionizedwater) for at least 1 hour. Rinse thoroughly with deionized or distilled water. If samplecontainers are rinsed thoroughly with deionized or distilled water after use, onlyoccasional pre-treatment is necessary.
• Be sure to get a representative sample. If the sample is taken from a spigot or faucet,let the water flow for at least 5 minutes. Then let the container overflow with thesample several times and then put the cap on the sample container so that there isno headspace (air) above the sample. If a sample cell is used, rinse the cell severaltimes with the sample, then carefully fill to the 10-mL mark.
2 Chlorine, Free, DPD Method (4.00 mg/L)

Powder pillow procedure
Start
1. Start program87 Chlorine, F&T PP MR.For information aboutsample cells, adapters orlight shields, refer to Instrument specificinformation on page 1.Note: Although the programname may vary betweeninstruments, the programnumber does not change.
2. Prepare the blank: Fillthe sample cell with 10 mLof sample.
3. Clean the blank. 4. Insert the blank into thecell holder.
Zero
5. Push ZERO. The displayshows 0.00 mg/L Cl2.
6. Prepare the sample: Filla second sample cell with10 mL of sample.
7. Add the contents of oneDPD Free Chlorine PowderPillow for 25-mL sample tothe prepared sample cell.
8. Close the preparedsample cell. Invert thesample cell several times tomix. A pink color shows ifchlorine is present. Go tothe next step immediately.
9. Clean the preparedsample.
10. Within one minute ofadding the reagent, insertthe prepared sample intothe cell holder.
Read
11. Push READ. Resultsshow in mg/L Cl2.
Chlorine, Free, DPD Method (4.00 mg/L) 3
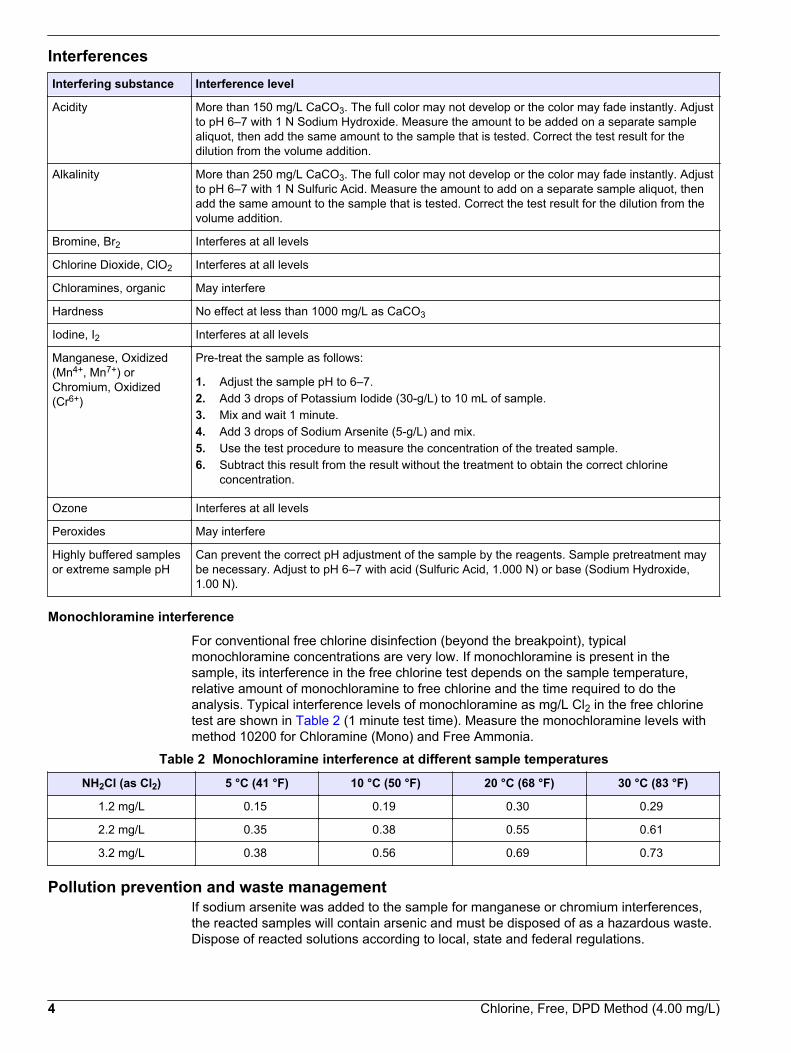
InterferencesInterfering substance Interference level
Acidity More than 150 mg/L CaCO3. The full color may not develop or the color may fade instantly. Adjustto pH 6–7 with 1 N Sodium Hydroxide. Measure the amount to be added on a separate samplealiquot, then add the same amount to the sample that is tested. Correct the test result for thedilution from the volume addition.
Alkalinity More than 250 mg/L CaCO3. The full color may not develop or the color may fade instantly. Adjustto pH 6–7 with 1 N Sulfuric Acid. Measure the amount to add on a separate sample aliquot, thenadd the same amount to the sample that is tested. Correct the test result for the dilution from thevolume addition.
Bromine, Br2 Interferes at all levels
Chlorine Dioxide, ClO2 Interferes at all levels
Chloramines, organic May interfere
Hardness No effect at less than 1000 mg/L as CaCO3
Iodine, I2 Interferes at all levels
Manganese, Oxidized(Mn4+, Mn7+) orChromium, Oxidized(Cr6+)
Pre-treat the sample as follows:
1. Adjust the sample pH to 6–7.2. Add 3 drops of Potassium Iodide (30-g/L) to 10 mL of sample.3. Mix and wait 1 minute.4. Add 3 drops of Sodium Arsenite (5-g/L) and mix.5. Use the test procedure to measure the concentration of the treated sample.6. Subtract this result from the result without the treatment to obtain the correct chlorine
concentration.
Ozone Interferes at all levels
Peroxides May interfere
Highly buffered samplesor extreme sample pH
Can prevent the correct pH adjustment of the sample by the reagents. Sample pretreatment maybe necessary. Adjust to pH 6–7 with acid (Sulfuric Acid, 1.000 N) or base (Sodium Hydroxide,1.00 N).
Monochloramine interference
For conventional free chlorine disinfection (beyond the breakpoint), typicalmonochloramine concentrations are very low. If monochloramine is present in thesample, its interference in the free chlorine test depends on the sample temperature,relative amount of monochloramine to free chlorine and the time required to do theanalysis. Typical interference levels of monochloramine as mg/L Cl2 in the free chlorinetest are shown in Table 2 (1 minute test time). Measure the monochloramine levels withmethod 10200 for Chloramine (Mono) and Free Ammonia.
Table 2 Monochloramine interference at different sample temperatures
NH2Cl (as Cl2) 5 °C (41 °F) 10 °C (50 °F) 20 °C (68 °F) 30 °C (83 °F)
1.2 mg/L 0.15 0.19 0.30 0.29
2.2 mg/L 0.35 0.38 0.55 0.61
3.2 mg/L 0.38 0.56 0.69 0.73
Pollution prevention and waste managementIf sodium arsenite was added to the sample for manganese or chromium interferences,the reacted samples will contain arsenic and must be disposed of as a hazardous waste.Dispose of reacted solutions according to local, state and federal regulations.
4 Chlorine, Free, DPD Method (4.00 mg/L)
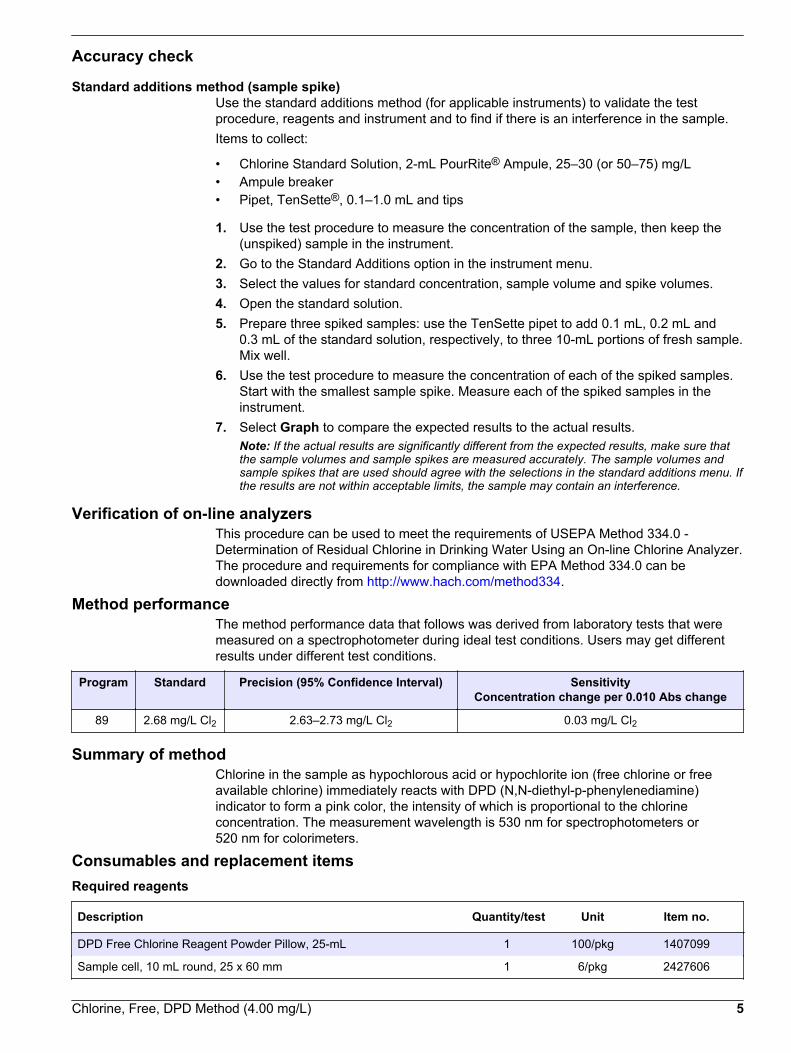
Accuracy check
Standard additions method (sample spike)Use the standard additions method (for applicable instruments) to validate the testprocedure, reagents and instrument and to find if there is an interference in the sample.Items to collect:
• Chlorine Standard Solution, 2-mL PourRite® Ampule, 25–30 (or 50–75) mg/L• Ampule breaker• Pipet, TenSette®, 0.1–1.0 mL and tips
1. Use the test procedure to measure the concentration of the sample, then keep the(unspiked) sample in the instrument.
2. Go to the Standard Additions option in the instrument menu.3. Select the values for standard concentration, sample volume and spike volumes.4. Open the standard solution.5. Prepare three spiked samples: use the TenSette pipet to add 0.1 mL, 0.2 mL and
0.3 mL of the standard solution, respectively, to three 10-mL portions of fresh sample.Mix well.
6. Use the test procedure to measure the concentration of each of the spiked samples.Start with the smallest sample spike. Measure each of the spiked samples in theinstrument.
7. Select Graph to compare the expected results to the actual results.Note: If the actual results are significantly different from the expected results, make sure thatthe sample volumes and sample spikes are measured accurately. The sample volumes andsample spikes that are used should agree with the selections in the standard additions menu. Ifthe results are not within acceptable limits, the sample may contain an interference.
Verification of on-line analyzersThis procedure can be used to meet the requirements of USEPA Method 334.0 -Determination of Residual Chlorine in Drinking Water Using an On-line Chlorine Analyzer.The procedure and requirements for compliance with EPA Method 334.0 can bedownloaded directly from http://www.hach.com/method334.
Method performanceThe method performance data that follows was derived from laboratory tests that weremeasured on a spectrophotometer during ideal test conditions. Users may get differentresults under different test conditions.
Program Standard Precision (95% Confidence Interval) SensitivityConcentration change per 0.010 Abs change
89 2.68 mg/L Cl2 2.63–2.73 mg/L Cl2 0.03 mg/L Cl2
Summary of methodChlorine in the sample as hypochlorous acid or hypochlorite ion (free chlorine or freeavailable chlorine) immediately reacts with DPD (N,N-diethyl-p-phenylenediamine)indicator to form a pink color, the intensity of which is proportional to the chlorineconcentration. The measurement wavelength is 530 nm for spectrophotometers or520 nm for colorimeters.
Consumables and replacement itemsRequired reagents
Description Quantity/test Unit Item no.
DPD Free Chlorine Reagent Powder Pillow, 25-mL 1 100/pkg 1407099
Sample cell, 10 mL round, 25 x 60 mm 1 6/pkg 2427606
Chlorine, Free, DPD Method (4.00 mg/L) 5
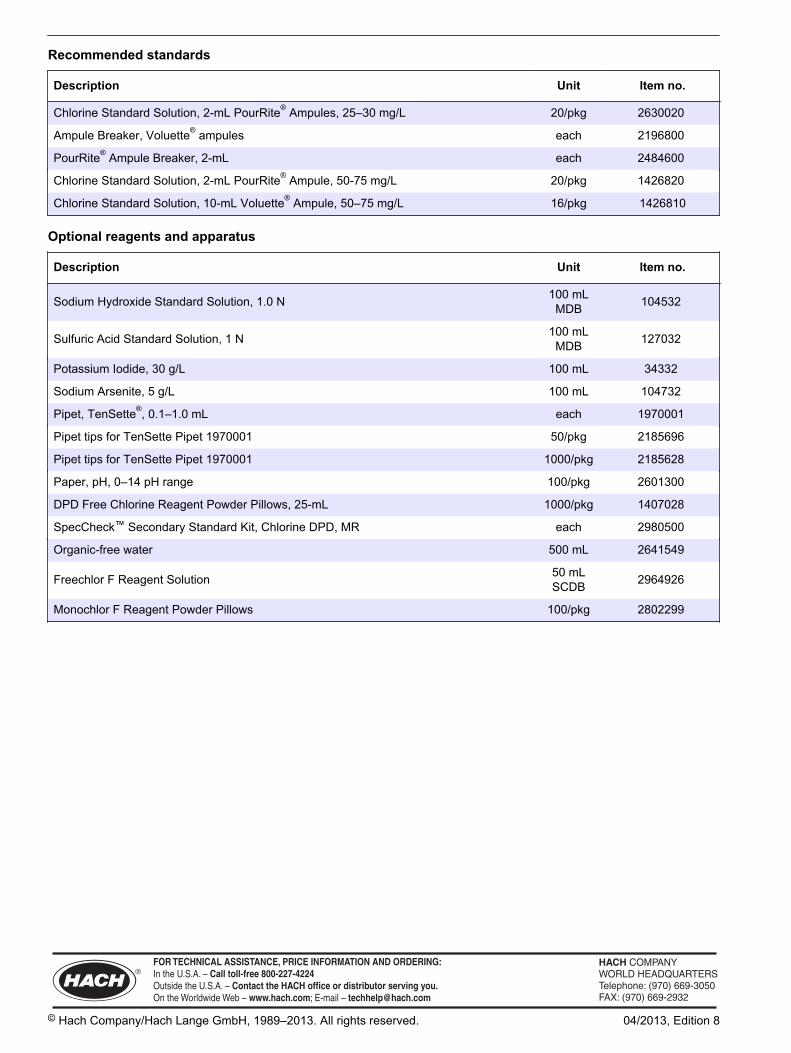
Recommended standards
Description Unit Item no.
Chlorine Standard Solution, 2-mL PourRite® Ampules, 25–30 mg/L 20/pkg 2630020
Ampule Breaker, Voluette® ampules each 2196800
PourRite® Ampule Breaker, 2-mL each 2484600
Chlorine Standard Solution, 2-mL PourRite® Ampule, 50-75 mg/L 20/pkg 1426820
Chlorine Standard Solution, 10-mL Voluette® Ampule, 50–75 mg/L 16/pkg 1426810
Optional reagents and apparatus
Description Unit Item no.
Sodium Hydroxide Standard Solution, 1.0 N 100 mLMDB 104532
Sulfuric Acid Standard Solution, 1 N 100 mLMDB 127032
Potassium Iodide, 30 g/L 100 mL 34332
Sodium Arsenite, 5 g/L 100 mL 104732
Pipet, TenSette®, 0.1–1.0 mL each 1970001
Pipet tips for TenSette Pipet 1970001 50/pkg 2185696
Pipet tips for TenSette Pipet 1970001 1000/pkg 2185628
Paper, pH, 0–14 pH range 100/pkg 2601300
DPD Free Chlorine Reagent Powder Pillows, 25-mL 1000/pkg 1407028
SpecCheck™ Secondary Standard Kit, Chlorine DPD, MR each 2980500
Organic-free water 500 mL 2641549
Freechlor F Reagent Solution 50 mLSCDB 2964926
Monochlor F Reagent Powder Pillows 100/pkg 2802299
HACH COMPANYWORLD HEADQUARTERSTelephone: (970) 669-3050FAX: (970) 669-2932
FOR TECHNICAL ASSISTANCE, PRICE INFORMATION AND ORDERING:Call 800-227-4224
Contact the HACH office or distributor serving you.www.hach.com [email protected]
In the U.S.A. –
Outside the U.S.A. –
On the Worldwide Web – ; E-mail –
toll-free
© Hach Company/Hach Lange GmbH, 1989–2013. All rights reserved. 04/2013, Edition 8

Chlorine, Free DOC316.53.01024
DPD Method1 Method 101020.09 to 5.00 mg/L Cl2 Test 'N Tube™ Vials
Scope and application: For testing higher levels of free chlorine (hypochlorous acid and hypochlorite ion) indrinking water, cooling water and industrial process water. This product has not been evaluated to test for chlorineand chloramines in medical applications in the United States.
1 Adapted from Standard Methods for the Examination of Water and Wastewater.
Test preparation
Instrument specific informationThe table in this section shows all of the instruments that have the program for this test. Table 1 shows adapter and light shield requirements for the instruments that use them.To use the table, select an instrument, then read across to find the correspondinginformation for this test.
Table 1 Instrument-specific information for test tubes
Instrument Adapters Light shield
DR 6000 — —
DR 5000 — —
DR 900 4846400 Cover supplied with the instrument
DR 3900 — LZV849
DR 3800 — LZV646
DR 2800 —
Before startingSamples must be analyzed immediately after collection and cannot be preserved for later analysis.
Install the instrument cap on the DR 900 cell holder before ZERO or READ is pushed.
DR 3900, DR 3800, DR 2800 and DR 2700: Install the light shield in Cell Compartment #2 before this test is started.
For best results, measure the reagent blank value for each new lot of reagent. Replace the sample with deionized water inthe test procedure to get the reagent blank value. Subtract the reagent blank value from the sample results automaticallywith the reagent blank adjust option.
Review the Safety Data Sheets (MSDS/SDS) for the chemicals that are used and use any recommended personal protectiveequipment.
Dispose of reacted solutions according to local, state and federal regulations. Use the Safety Data Sheets for disposalinformation for unused reagents. Consult the environmental, health and safety staff for your facility and/or local regulatoryagencies for further disposal information.
Items to collect
Description Quantity
Light shield (For information about sample cells, adapters or light shields, refer to Instrumentspecific information on page 1.) 1
Test 'N Tube™ DPD Free Chlorine Reagent 1
Wipes, disposable varies
1

Refer to Consumables and replacement items on page 5 for reorder information.
Sample collection• Samples must be analyzed immediately and cannot be preserved for later analysis.• Chlorine is a strong oxidizing agent and it is unstable in natural waters. It reacts
quickly with various inorganic compounds and more slowly with organic compounds.Many factors, including reactant concentrations, sunlight, pH, temperature andsalinity influence the decomposition of chlorine in water.
• Collect samples in clean glass bottles. Avoid plastic containers since these may havea large chlorine demand.
• Pre-treat glass sample containers to remove any chlorine demand. Soak thecontainers in a dilute bleach solution (1 mL commercial bleach to 1 liter of deionizedwater) for at least 1 hour. Rinse thoroughly with deionized or distilled water. If samplecontainers are rinsed thoroughly with deionized or distilled water after use, onlyoccasional pre-treatment is necessary.
• Be sure to get a representative sample. If the sample is taken from a spigot or faucet,let the water flow for at least 5 minutes. Then let the container overflow with thesample several times and then put the cap on the sample container so that there isno headspace (air) above the sample. If a sample cell is used, rinse the cell severaltimes with the sample, then carefully fill to the 10-mL mark.
Test 'N Tube procedure
Start
1. Start program89 Chlorine F&T TNT. Forinformation about samplecells, adapters or lightshields, refer to Instrumentspecific informationon page 1.Note: Although the programname may vary betweeninstruments, the programnumber does not change.
2. Prepare the blank: Fillan empty Test 'N Tube vialto the top of the label withsample.
3. Clean the blank vial. 4. Insert the blank vial intothe 16-mm cell holder.
2 Chlorine, Free, DPD TNT Method (5.00 mg/L)

Zero
5. Push ZERO. The displayshows 0.00 mg/L Cl2.
6. Prepare the sample:Remove the cap from aFree Chlorine DPD Test 'NTube. Fill the vial to the topof the label with sample.
7. Clean the sample vial. 8. Insert the sample vialinto the 16-mm cell holder.
Read
9. Push READ. Resultsshow in mg/L Cl2.
InterferencesInterfering substance Interference level
Acidity More than 150 mg/L CaCO3. The full color may not develop or the color may fade instantly. Adjustto pH 6–7 with 1 N Sodium Hydroxide. Measure the amount to be added on a separate samplealiquot, then add the same amount to the sample that is tested. Correct the test result for thedilution from the volume addition.
Alkalinity More than 250 mg/L CaCO3. The full color may not develop or the color may fade instantly. Adjustto pH 6–7 with 1 N Sulfuric Acid. Measure the amount to add on a separate sample aliquot, thenadd the same amount to the sample that is tested. Correct the test result for the dilution from thevolume addition.
Bromine, Br2 Interferes at all levels
Chlorine Dioxide, ClO2 Interferes at all levels
Chloramines, organic May interfere
Hardness No effect at less than 1000 mg/L as CaCO3
Iodine, I2 Interferes at all levels
Manganese, Oxidized(Mn4+, Mn7+) orChromium, Oxidized(Cr6+)
Pre-treat the sample as follows:
1. Adjust the sample pH to 6–7.2. Add 3 drops of Potassium Iodide (30-g/L) to 10 mL of sample.3. Mix and wait 1 minute.4. Add 3 drops of Sodium Arsenite (5-g/L) and mix.5. Use the test procedure to measure the concentration of the treated sample.6. Subtract this result from the result without the treatment to obtain the correct chlorine
concentration.
Chlorine, Free, DPD TNT Method (5.00 mg/L) 3

Interfering substance Interference level
Ozone Interferes at all levels
Peroxides May interfere
Highly buffered samplesor extreme sample pH
Can prevent the correct pH adjustment of the sample by the reagents. Sample pretreatment maybe necessary. Adjust to pH 6–7 with acid (Sulfuric Acid, 1.000 N) or base (Sodium Hydroxide,1.00 N).
Monochloramine interference
For conventional free chlorine disinfection (beyond the breakpoint), typicalmonochloramine concentrations are very low. If monochloramine is present in thesample, its interference in the free chlorine test depends on the sample temperature,relative amount of monochloramine to free chlorine and the time required to do theanalysis. Typical interference levels of monochloramine as mg/L Cl2 in the free chlorinetest are shown in Table 2 (1 minute test time). Measure the monochloramine levels withmethod 10200 for Chloramine (Mono) and Free Ammonia.
Table 2 Monochloramine interference at different sample temperatures
NH2Cl (as Cl2) 5 °C (41 °F) 10 °C (50 °F) 20 °C (68 °F) 30 °C (83 °F)
1.2 mg/L 0.15 0.19 0.30 0.29
2.2 mg/L 0.35 0.38 0.55 0.61
3.2 mg/L 0.38 0.56 0.69 0.73
Pollution prevention and waste managementIf sodium arsenite was added to the sample for manganese or chromium interferences,the reacted samples will contain arsenic and must be disposed of as a hazardous waste.Dispose of reacted solutions according to local, state and federal regulations.
Accuracy check
Standard additions method (sample spike)Use the standard additions method (for applicable instruments) to validate the testprocedure, reagents and instrument and to find if there is an interference in the sample.Items to collect:
• Chlorine Standard Solution, 2-mL PourRite® Ampule, 50–75 mg/L (use mg/L on label)• Breaker, PourRite Ampules• Pipet, TenSette®, 0.1–1.0 mL and tips
1. Use the test procedure to measure the concentration of the sample, then keep the(unspiked) sample in the instrument.
2. Go to the Standard Additions option in the instrument menu.3. Select the values for standard concentration, sample volume and spike volumes.4. Open the standard solution.5. Prepare three spiked samples: use the TenSette pipet to add 0.1 mL, 0.2 mL and
0.3 mL of the standard solution, respectively, to three 10-mL portions of fresh sample.Mix well.
6. Use the test procedure to measure the concentration of each of the spiked samples.Start with the smallest sample spike. Measure each of the spiked samples in theinstrument.
7. Select Graph to compare the expected results to the actual results.Note: If the actual results are significantly different from the expected results, make sure thatthe sample volumes and sample spikes are measured accurately. The sample volumes andsample spikes that are used should agree with the selections in the standard additions menu. Ifthe results are not within acceptable limits, the sample may contain an interference.
4 Chlorine, Free, DPD TNT Method (5.00 mg/L)

Method performanceThe method performance data that follows was derived from laboratory tests that weremeasured on a spectrophotometer during ideal test conditions. Users may get differentresults under different test conditions.
Program Standard Precision (95% Confidence Interval) SensitivityConcentration change per 0.010 Abs change
89 2.68 mg/L Cl2 2.63–2.73 mg/L Cl2 0.03 mg/L Cl2
Summary of methodChlorine in the sample as hypochlorous acid or hypochlorite ion (free chlorine or freeavailable chlorine) immediately reacts with DPD (N,N-diethyl-p-phenylenediamine)indicator to form a pink color, the intensity of which is proportional to the chlorineconcentration. The measurement wavelength is 530 nm for spectrophotometers or520 nm for colorimeters.
Consumables and replacement itemsRequired reagents
Description Quantity/Test Unit Item no.
Test 'N Tube™ DPD Free Chlorine Reagent 1 50/pkg 2105545
Recommended standards and apparatus
Description Unit Item no.
Chlorine Standard Solution, 10-mL Voluette® Ampule, 50–75 mg/L 16/pkg 1426810
Chlorine Standard Solution, 2-mL PourRite® Ampules, 50–75 mg/L 20/pkg 1426820
Chlorine Standard Solution, 2-mL PourRite® Ampules, 25–30 mg/L 20/pkg 2630020
Ampule Breaker, PourRite® ampules each 2484600
Ampule Breaker, Voluette® ampules each 2196800
Optional reagents and apparatus
Description Unit Item no.
Paper, pH, 0–14 pH range 100/pkg 2601300
Pipet, TenSette®, 0.1–1.0 mL each 1970001
Pipet tips for TenSette Pipet 1970001 50/pkg 2185696
Pipet tips for TenSette Pipet 1970001 1000/pkg 2185628
Potassium Iodide, 30 g/L 100 mL 34332
Sodium Arsenite, 5 g/L 100 mL 104732
Sodium Hydroxide Standard Solution, 1.0 N 100 mLMDB 104532
Sulfuric Acid Standard Solution, 1 N 100 mLMDB 127032
Test tube rack each 1864100
Thermometer, non-mercury, -10 to +225 °C each 2635700
Wipes, disposable 280/pkg 2097000
Chlorine, Free, DPD TNT Method (5.00 mg/L) 5

HACH COMPANYWORLD HEADQUARTERSTelephone: (970) 669-3050FAX: (970) 669-2932
FOR TECHNICAL ASSISTANCE, PRICE INFORMATION AND ORDERING:Call 800-227-4224
Contact the HACH office or distributor serving you.www.hach.com [email protected]
In the U.S.A. –
Outside the U.S.A. –
On the Worldwide Web – ; E-mail –
toll-free
© Hach Company/Hach Lange GmbH, 1989–2013. All rights reserved. 04/2013, Edition 8

Chlorine, Total DOC316.53.01027
USEPA DPD Method1 Method 81670.02 to 2.00 mg/L Cl2 Powder Pillows or AccuVac® Ampuls
Scope and application: For testing residual chlorine and chloramines in water, wastewater, estuary water andseawater; USEPA-accepted for reporting for drinking and wastewater analyses.2 This product has not beenevaluated to test for chlorine and chloramines in medical applications in the United States.
1 Adapted from Standard Methods for the Examination of Water and Wastewater.2 Procedure is equivalent to USEPA and Standard Method 4500-Cl G for drinking water and wastewater analysis.
Test preparation
Instrument-specific informationThe tables in this section show all of the instruments that have the program for this test. Table 1 shows sample cell and orientation requirements for reagent addition tests, suchas powder pillow or bulk reagent tests. Table 2 shows sample cell and adapterrequirements for AccuVac Ampul tests.To use either table, select an instrument, then read across to find the correspondinginformation for this test.
Table 1 Instrument-specific information for powder pillows
Instrument Sample cell orientation Sample cell
DR 6000 DR 3800 DR 2800 DR 2700
The fill line is to the right. 2495402
DR 5000 DR 3900
The fill line is toward the user.
DR 900 The orientation mark is toward the user. 2401906
Table 2 Instrument-specific information for AccuVac Ampuls
Instrument Adapter Sample cell
DR 6000 DR 5000 DR 900
— 2427606
DR 3900 LZV846 (A)
DR 3800 DR 2800 DR 2700
LZV584 (C) 2122800
1
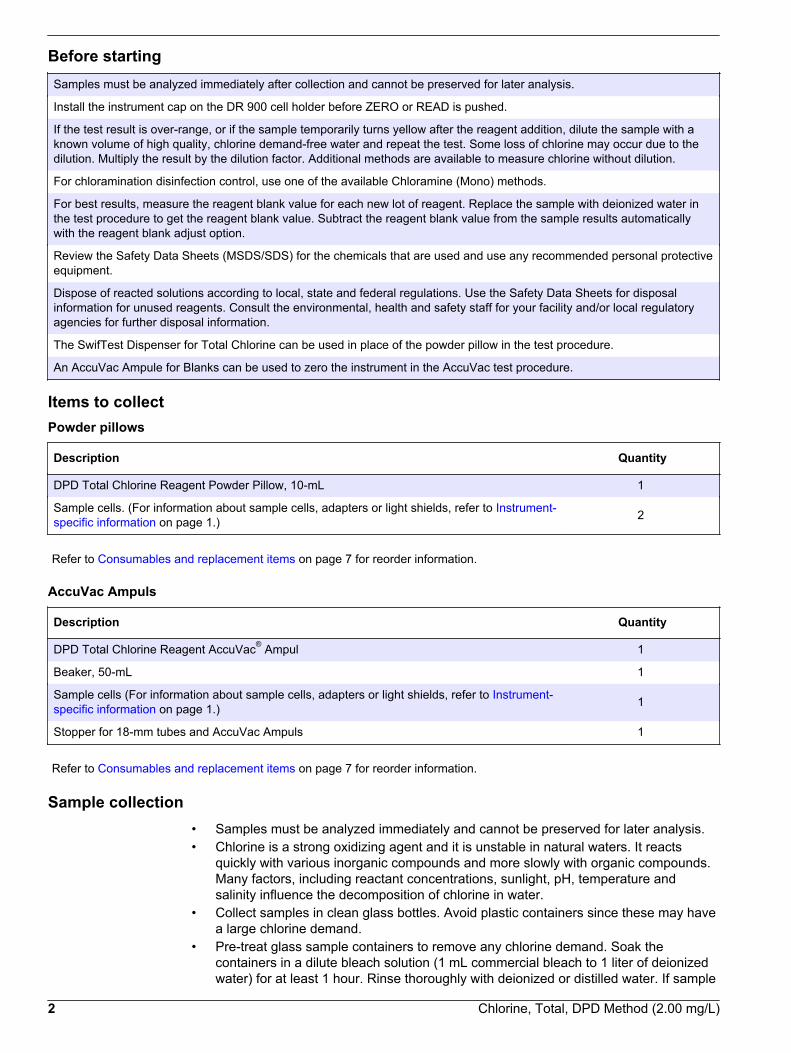
Before startingSamples must be analyzed immediately after collection and cannot be preserved for later analysis.
Install the instrument cap on the DR 900 cell holder before ZERO or READ is pushed.
If the test result is over-range, or if the sample temporarily turns yellow after the reagent addition, dilute the sample with aknown volume of high quality, chlorine demand-free water and repeat the test. Some loss of chlorine may occur due to thedilution. Multiply the result by the dilution factor. Additional methods are available to measure chlorine without dilution.
For chloramination disinfection control, use one of the available Chloramine (Mono) methods.
For best results, measure the reagent blank value for each new lot of reagent. Replace the sample with deionized water inthe test procedure to get the reagent blank value. Subtract the reagent blank value from the sample results automaticallywith the reagent blank adjust option.
Review the Safety Data Sheets (MSDS/SDS) for the chemicals that are used and use any recommended personal protectiveequipment.
Dispose of reacted solutions according to local, state and federal regulations. Use the Safety Data Sheets for disposalinformation for unused reagents. Consult the environmental, health and safety staff for your facility and/or local regulatoryagencies for further disposal information.
The SwifTest Dispenser for Total Chlorine can be used in place of the powder pillow in the test procedure.
An AccuVac Ampule for Blanks can be used to zero the instrument in the AccuVac test procedure.
Items to collectPowder pillows
Description Quantity
DPD Total Chlorine Reagent Powder Pillow, 10-mL 1
Sample cells. (For information about sample cells, adapters or light shields, refer to Instrument-specific information on page 1.) 2
Refer to Consumables and replacement items on page 7 for reorder information.
AccuVac Ampuls
Description Quantity
DPD Total Chlorine Reagent AccuVac® Ampul 1
Beaker, 50-mL 1
Sample cells (For information about sample cells, adapters or light shields, refer to Instrument-specific information on page 1.) 1
Stopper for 18-mm tubes and AccuVac Ampuls 1
Refer to Consumables and replacement items on page 7 for reorder information.
Sample collection• Samples must be analyzed immediately and cannot be preserved for later analysis.• Chlorine is a strong oxidizing agent and it is unstable in natural waters. It reacts
quickly with various inorganic compounds and more slowly with organic compounds.Many factors, including reactant concentrations, sunlight, pH, temperature andsalinity influence the decomposition of chlorine in water.
• Collect samples in clean glass bottles. Avoid plastic containers since these may havea large chlorine demand.
• Pre-treat glass sample containers to remove any chlorine demand. Soak thecontainers in a dilute bleach solution (1 mL commercial bleach to 1 liter of deionizedwater) for at least 1 hour. Rinse thoroughly with deionized or distilled water. If sample
2 Chlorine, Total, DPD Method (2.00 mg/L)

containers are rinsed thoroughly with deionized or distilled water after use, onlyoccasional pre-treatment is necessary.
• Be sure to get a representative sample. If the sample is taken from a spigot or faucet,let the water flow for at least 5 minutes. Then let the container overflow with thesample several times and then put the cap on the sample container so that there isno headspace (air) above the sample. If a sample cell is used, rinse the cell severaltimes with the sample, then carefully fill to the 10-mL mark.
Powder pillow procedure
Start
1. Start program80 Chlorine F&T PP. Forinformation about samplecells, adapters or lightshields, refer to Instrument-specific informationon page 1.Note: Although the programname may vary betweeninstruments, the programnumber does not change.
2. Fill a sample cell with10 mL of sample.
3. Prepare the sample:Add the contents of onepowder pillow to the samplecell.
4. Swirl the sample cell for20 seconds to mix.A pink color shows ifchlorine is present in thesample.
5. Start the instrumenttimer. A 3-minute reactiontime starts.Prepare the sample blankand set the instrument tozero during the reactiontime.
6. Prepare the blank: Fill asecond sample cell with10 mL of sample.
7. Clean the blank. 8. Insert the blank into thecell holder.
Chlorine, Total, DPD Method (2.00 mg/L) 3

Zero
9. Push ZERO. The displayshows 0.00 mg/L Cl2.
10. Clean the preparedsample.
11. Within 3 minutes afterthe timer expires, insert theprepared sample into thecell holder.
Read
12. Push READ. Resultsshow in mg/L Cl2.
AccuVac Ampul procedure
Start
1. Start program85 Chlorine F&T AV. Forinformation about samplecells, adapters or lightshields, refer to Instrument-specific informationon page 1.Note: Although the programname may vary betweeninstruments, the programnumber does not change.
2. Prepare the blank: Fillthe sample cell with 10 mLof sample.
3. Prepare the sample:Collect at least 40 mL ofsample in a 50-mL beaker.Fill the AccuVac Ampul withsample. Keep the tipimmersed while the Ampulfills completely.
4. Quickly invert the Ampulseveral times to mix.
5. Start the instrumenttimer. A 3-minute reactiontime starts.Prepare the sample blankand set the instrument tozero during the reactiontime.
6. Clean the blank. 7. Insert the blank into thecell holder.
Zero
8. Push ZERO. The displayshows 0.00 mg/L Cl2.
4 Chlorine, Total, DPD Method (2.00 mg/L)
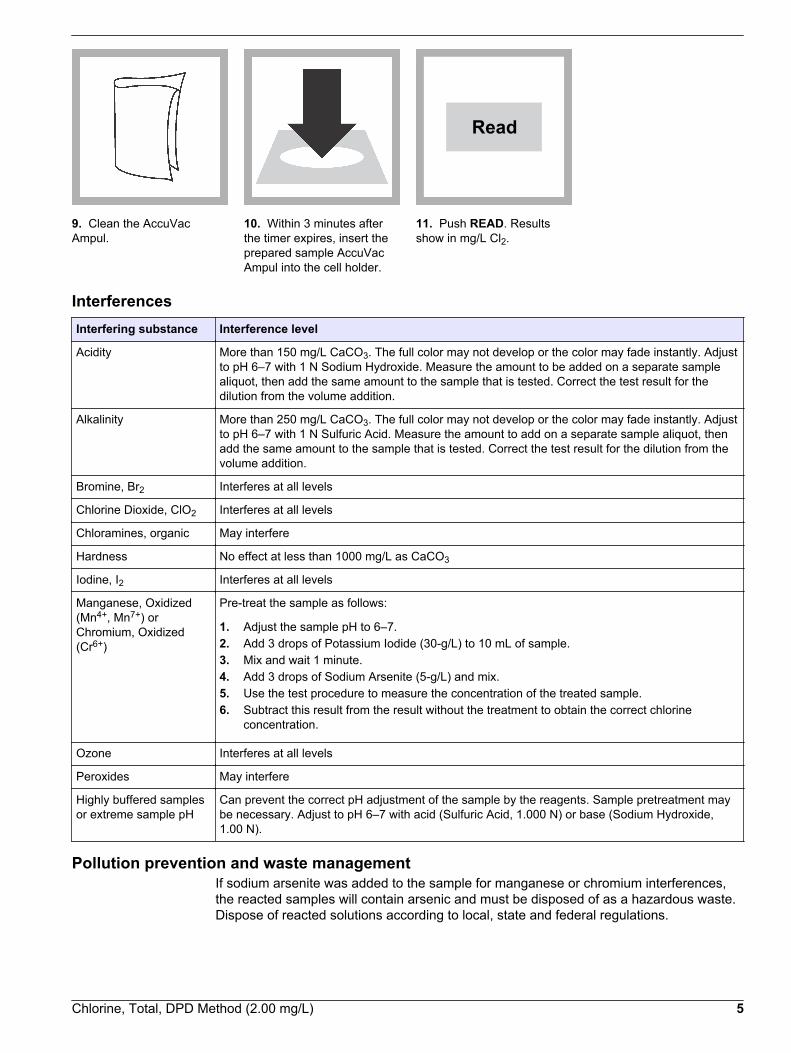
9. Clean the AccuVacAmpul.
10. Within 3 minutes afterthe timer expires, insert theprepared sample AccuVacAmpul into the cell holder.
Read
11. Push READ. Resultsshow in mg/L Cl2.
InterferencesInterfering substance Interference level
Acidity More than 150 mg/L CaCO3. The full color may not develop or the color may fade instantly. Adjustto pH 6–7 with 1 N Sodium Hydroxide. Measure the amount to be added on a separate samplealiquot, then add the same amount to the sample that is tested. Correct the test result for thedilution from the volume addition.
Alkalinity More than 250 mg/L CaCO3. The full color may not develop or the color may fade instantly. Adjustto pH 6–7 with 1 N Sulfuric Acid. Measure the amount to add on a separate sample aliquot, thenadd the same amount to the sample that is tested. Correct the test result for the dilution from thevolume addition.
Bromine, Br2 Interferes at all levels
Chlorine Dioxide, ClO2 Interferes at all levels
Chloramines, organic May interfere
Hardness No effect at less than 1000 mg/L as CaCO3
Iodine, I2 Interferes at all levels
Manganese, Oxidized(Mn4+, Mn7+) orChromium, Oxidized(Cr6+)
Pre-treat the sample as follows:
1. Adjust the sample pH to 6–7.2. Add 3 drops of Potassium Iodide (30-g/L) to 10 mL of sample.3. Mix and wait 1 minute.4. Add 3 drops of Sodium Arsenite (5-g/L) and mix.5. Use the test procedure to measure the concentration of the treated sample.6. Subtract this result from the result without the treatment to obtain the correct chlorine
concentration.
Ozone Interferes at all levels
Peroxides May interfere
Highly buffered samplesor extreme sample pH
Can prevent the correct pH adjustment of the sample by the reagents. Sample pretreatment maybe necessary. Adjust to pH 6–7 with acid (Sulfuric Acid, 1.000 N) or base (Sodium Hydroxide,1.00 N).
Pollution prevention and waste managementIf sodium arsenite was added to the sample for manganese or chromium interferences,the reacted samples will contain arsenic and must be disposed of as a hazardous waste.Dispose of reacted solutions according to local, state and federal regulations.
Chlorine, Total, DPD Method (2.00 mg/L) 5

Accuracy check
Standard additions method (sample spike)Use the standard additions method (for applicable instruments) to validate the testprocedure, reagents and instrument and to find if there is an interference in the sample.Items to collect:
• Chlorine Standard Solution, 2-mL PourRite® Ampule, 25–30 mg/L (use mg/L on label)• Breaker, PourRite Ampules• Pipet, TenSette®, 0.1–1.0 mL and tips
1. Use the test procedure to measure the concentration of the sample, then keep the(unspiked) sample in the instrument.
2. Go to the Standard Additions option in the instrument menu.3. Select the values for standard concentration, sample volume and spike volumes.4. Open the standard solution.5. Prepare three spiked samples: use the TenSette pipet to add 0.1 mL, 0.2 mL and
0.3 mL of the standard solution, respectively, to three 10-mL portions of fresh sample.Mix well.Note: For AccuVac® Ampuls, add 0.4 mL, 0.8 mL and 1.2 mL of the standard solution to three50-mL portions of fresh sample.
6. Use the test procedure to measure the concentration of each of the spiked samples.Start with the smallest sample spike. Measure each of the spiked samples in theinstrument.
7. Select Graph to compare the expected results to the actual results.Note: If the actual results are significantly different from the expected results, make sure thatthe sample volumes and sample spikes are measured accurately. The sample volumes andsample spikes that are used should agree with the selections in the standard additions menu. Ifthe results are not within acceptable limits, the sample may contain an interference.
Method performanceThe method performance data that follows was derived from laboratory tests that weremeasured on a spectrophotometer during ideal test conditions. Users may get differentresults under different test conditions.
Program Standard Precision (95% Confidence Interval) SensitivityConcentration change per 0.010 Abs change
80 1.25 mg/L Cl2 1.23–1.27 mg/L Cl2 0.02 mg/L Cl2
85 1.25 mg/L Cl2 1.21–1.29 mg/L Cl2 0.02 mg/L Cl2
Summary of methodChlorine can be present in water as free chlorine and as combined chlorine. Both formscan exist in the same water and be determined together as total chlorine. Free chlorine ispresent as hypochlorous acid and/or hypochlorite ion. Combined chlorine exists asmonochloramine, dichloramine, nitrogen trichloride and other chloro derivatives. Thecombined chlorine oxidizes iodide in the reagent to iodine. The iodine and free chlorinereact with DPD (N,N-diethyl-p-phenylenediamine) to form a pink color which isproportional to the total chlorine concentration.To find the concentration of combined chlorine, run a free chlorine test and a totalchlorine test. Subtract the results of the free chlorine test from the total chlorine test toobtain the combined chlorine concentration. The measurement wavelength is 530 nm forspectrophotometers or 520 nm for colorimeters.
6 Chlorine, Total, DPD Method (2.00 mg/L)
Consumables and replacement itemsRequired reagents
Description Quantity/Test Unit Item no.
DPD Total Chlorine Reagent Powder Pillow, 10-mL 1 100/pkg 2105669
OR
DPD Total Chlorine Reagent AccuVac® Ampul 1 25/pkg 2503025
Required apparatus
Description Quantity/Test Unit Item no.
AccuVac Snapper 1 each 2405200
Beaker, 50-mL 1 each 50041H
Stoppers for 18-mm tubes and AccuVac Ampuls 2 6/pkg 173106
Recommended standards
Description Unit Item no.
Chlorine Standard Solution, 10-mL Voluette® Ampule, 50–75 mg/L 16/pkg 1426810
Chlorine Standard Solution, 2-mL PourRite® Ampules, 50–75 mg/L 20/pkg 1426820
Chlorine Standard Solution, 2-mL PourRite® Ampules, 25–30 mg/L 20/pkg 2630020
Optional reagents and apparatus
Description Unit Item no.
AccuVac® vials for sample blanks 25/pkg 2677925
Ampule Breaker, PourRite® ampules each 2484600
Ampule Breaker, Voluette® ampules each 2196800
Water, Chlorine-demand Free 500 mL 2641549
Cylinder, mixing, 25-mL each 2088640
Cylinder, mixing, 50-mL each 189641
Chlorine Standard Solution, 2-mL PourRite® Ampules, 50–75 mg/L 20/pkg 1426820
Chlorine Standard Solution, 10-mL Voluette® Ampule, 50–75 mg/L 16/pkg 1426810
DPD Total Chlorine Reagent Powder Pillows, 10-mL 1000/pkg 2105628
DPD Total Chlorine Reagent Powder Pillows, 10-mL 300/pkg 2105603
DPD Total Chlorine Reagent, 10 mL, SwifTest™ Dispenser refill vial 250 tests 2105660
Paper, pH, 0–14 pH range 100/pkg 2601300
Pipet, TenSette®, 0.1–1.0 mL each 1970001
Pipet tips for TenSette Pipet 1970001 50/pkg 2185696
Pipet tips for TenSette Pipet 1970001 1000/pkg 2185628
Potassium Iodide, 30 g/L 100 mL 34332
Sodium Arsenite, 5 g/L 100 mL 104732
Sodium Hydroxide Standard Solution, 1.0 N 100 mLMDB 104532
SpecCheck™ Secondary Standard Kit, Chlorine DPD, 0-2.0 mg/L Set each 2635300
Chlorine, Total, DPD Method (2.00 mg/L) 7
Consumables and replacement items (continued)Description Unit Item no.
Sulfuric Acid Standard Solution, 1 N 100 mLMDB 127032
Water, deionized 4 L 27256
HACH COMPANYWORLD HEADQUARTERSTelephone: (970) 669-3050FAX: (970) 669-2932
FOR TECHNICAL ASSISTANCE, PRICE INFORMATION AND ORDERING:Call 800-227-4224
Contact the HACH office or distributor serving you.www.hach.com [email protected]
In the U.S.A. –
Outside the U.S.A. –
On the Worldwide Web – ; E-mail –
toll-free
© Hach Company/Hach Lange GmbH, 1989–2013. All rights reserved. 04/2013, Edition 8
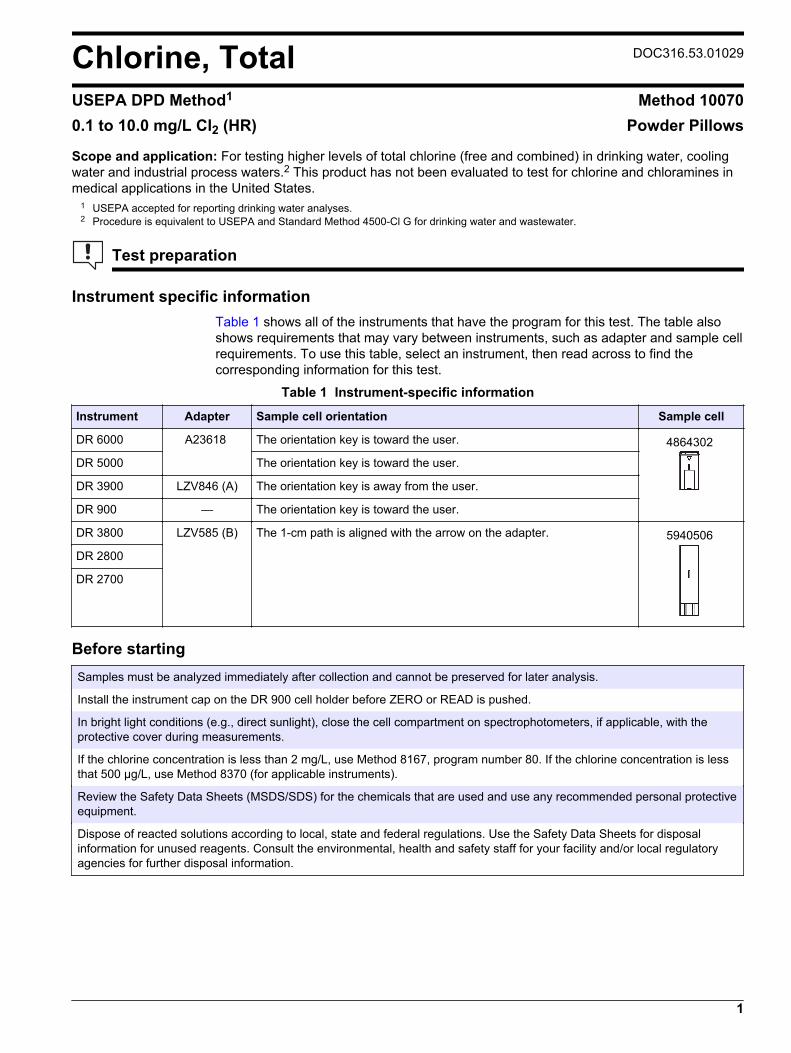
Chlorine, Total DOC316.53.01029
USEPA DPD Method1 Method 100700.1 to 10.0 mg/L Cl2 (HR) Powder Pillows
Scope and application: For testing higher levels of total chlorine (free and combined) in drinking water, coolingwater and industrial process waters.2 This product has not been evaluated to test for chlorine and chloramines inmedical applications in the United States.
1 USEPA accepted for reporting drinking water analyses.2 Procedure is equivalent to USEPA and Standard Method 4500-Cl G for drinking water and wastewater.
Test preparation
Instrument specific informationTable 1 shows all of the instruments that have the program for this test. The table alsoshows requirements that may vary between instruments, such as adapter and sample cellrequirements. To use this table, select an instrument, then read across to find thecorresponding information for this test.
Table 1 Instrument-specific information
Instrument Adapter Sample cell orientation Sample cell
DR 6000 A23618 The orientation key is toward the user. 4864302
DR 5000 The orientation key is toward the user.
DR 3900 LZV846 (A) The orientation key is away from the user.
DR 900 — The orientation key is toward the user.
DR 3800 LZV585 (B) The 1-cm path is aligned with the arrow on the adapter. 5940506
DR 2800
DR 2700
Before startingSamples must be analyzed immediately after collection and cannot be preserved for later analysis.
Install the instrument cap on the DR 900 cell holder before ZERO or READ is pushed.
In bright light conditions (e.g., direct sunlight), close the cell compartment on spectrophotometers, if applicable, with theprotective cover during measurements.
If the chlorine concentration is less than 2 mg/L, use Method 8167, program number 80. If the chlorine concentration is lessthat 500 µg/L, use Method 8370 (for applicable instruments).
Review the Safety Data Sheets (MSDS/SDS) for the chemicals that are used and use any recommended personal protectiveequipment.
Dispose of reacted solutions according to local, state and federal regulations. Use the Safety Data Sheets for disposalinformation for unused reagents. Consult the environmental, health and safety staff for your facility and/or local regulatoryagencies for further disposal information.
1
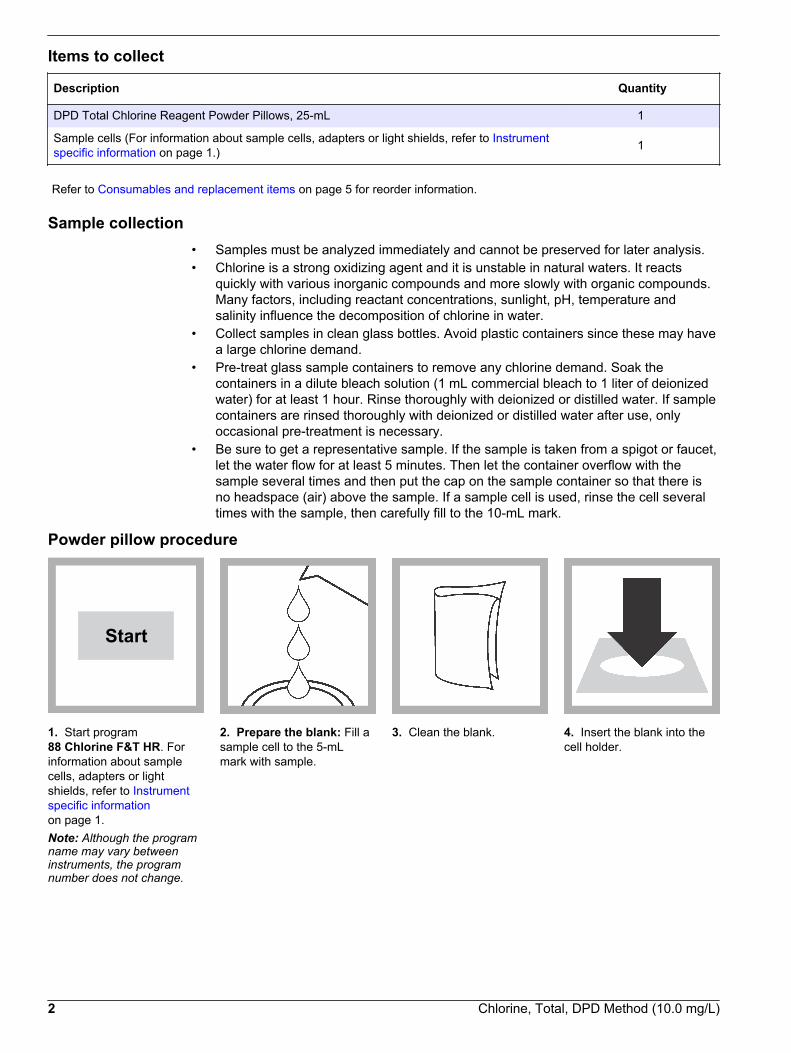
Items to collect
Description Quantity
DPD Total Chlorine Reagent Powder Pillows, 25-mL 1
Sample cells (For information about sample cells, adapters or light shields, refer to Instrumentspecific information on page 1.) 1
Refer to Consumables and replacement items on page 5 for reorder information.
Sample collection• Samples must be analyzed immediately and cannot be preserved for later analysis.• Chlorine is a strong oxidizing agent and it is unstable in natural waters. It reacts
quickly with various inorganic compounds and more slowly with organic compounds.Many factors, including reactant concentrations, sunlight, pH, temperature andsalinity influence the decomposition of chlorine in water.
• Collect samples in clean glass bottles. Avoid plastic containers since these may havea large chlorine demand.
• Pre-treat glass sample containers to remove any chlorine demand. Soak thecontainers in a dilute bleach solution (1 mL commercial bleach to 1 liter of deionizedwater) for at least 1 hour. Rinse thoroughly with deionized or distilled water. If samplecontainers are rinsed thoroughly with deionized or distilled water after use, onlyoccasional pre-treatment is necessary.
• Be sure to get a representative sample. If the sample is taken from a spigot or faucet,let the water flow for at least 5 minutes. Then let the container overflow with thesample several times and then put the cap on the sample container so that there isno headspace (air) above the sample. If a sample cell is used, rinse the cell severaltimes with the sample, then carefully fill to the 10-mL mark.
Powder pillow procedure
Start
1. Start program88 Chlorine F&T HR. Forinformation about samplecells, adapters or lightshields, refer to Instrumentspecific informationon page 1.Note: Although the programname may vary betweeninstruments, the programnumber does not change.
2. Prepare the blank: Fill asample cell to the 5-mLmark with sample.
3. Clean the blank. 4. Insert the blank into thecell holder.
2 Chlorine, Total, DPD Method (10.0 mg/L)

Zero
5. Push ZERO. The displayshows 0.0 mg/L Cl2.
6. Prepare the sample: Filla second sample cell to the5-mL mark with sample.
7. Add the contents of oneDPD Total Chlorine PowderPillow for 25-mL samples tothe sample.
8. Close the sample cell.Shake the sample cell about20 seconds to dissolve thereagent.
9. Start the instrumenttimer. A 3-minute reactiontime starts.
10. Clean the sample cell. 11. When the timer expires,insert the prepared sampleinto the cell holder.
Read
12. Push READ. Resultsshow in mg/L Cl2.
InterferencesInterfering substance Interference level
Acidity More than 150 mg/L CaCO3. The full color may not develop or the color may fade instantly.Adjust to pH 6–7 with 1 N Sodium Hydroxide. Measure the amount to be added on a separatesample aliquot, then add the same amount to the sample that is tested. Correct the test result forthe dilution from the volume addition.
Alkalinity More than 250 mg/L CaCO3. The full color may not develop or the color may fade instantly.Adjust to pH 6–7 with 1 N Sulfuric Acid. Measure the amount to add on a separate samplealiquot, then add the same amount to the sample that is tested. Correct the test result for thedilution from the volume addition.
Bromine, Br2 Interferes at all levels
Chlorine Dioxide, ClO2 Interferes at all levels
Chloramines, organic May interfere
Hardness No effect at less than 1000 mg/L as CaCO3
Iodine, I2 Interferes at all levels
Manganese, Oxidized(Mn4+, Mn7+) orChromium, Oxidized(Cr6+)
Pre-treat the sample as follows:
1. Adjust the sample pH to 6–7.2. Add 3 drops of Potassium Iodide (30-g/L) to 10 mL of sample.3. Mix and wait 1 minute.4. Add 3 drops of Sodium Arsenite (5-g/L) and mix.5. Use the test procedure to measure the concentration of the treated sample.6. Subtract this result from the result without the treatment to obtain the correct chlorine
concentration.
Chlorine, Total, DPD Method (10.0 mg/L) 3

Interfering substance Interference level
Ozone Interferes at all levels
Peroxides May interfere
Highly buffered samplesor extreme sample pH
Can prevent the correct pH adjustment of the sample by the reagents. Sample pretreatment maybe necessary.
Pollution prevention and waste managementIf sodium arsenite was added to the sample for manganese or chromium interferences,the reacted samples will contain arsenic and must be disposed of as a hazardous waste.Dispose of reacted solutions according to local, state and federal regulations.
Accuracy check
Standard additions method (sample spike)Use the standard additions method (for applicable instruments) to validate the testprocedure, reagents and instrument and to find if there is an interference in the sample.Items to collect:
• Chlorine Standard Solution, 2-mL PourRite® Ampule, 50–75 mg/L (use mg/L on label)• Ampule breaker• Pipet, TenSette®, 0.1–1.0 mL and tips
1. Use the test procedure to measure the concentration of the sample, then keep the(unspiked) sample in the instrument.
2. Go to the Standard Additions option in the instrument menu.3. Select the values for standard concentration, sample volume and spike volumes.4. Open the standard solution.5. Prepare three spiked samples: use the TenSette pipet to add 0.1 mL, 0.2 mL and
0.3 mL of the standard solution, respectively, to three 5-mL portions of fresh sample.Mix well.
6. Use the test procedure to measure the concentration of each of the spiked samples.Start with the smallest sample spike. Measure each of the spiked samples in theinstrument.
7. Select Graph to compare the expected results to the actual results.Note: If the actual results are significantly different from the expected results, make sure thatthe sample volumes and sample spikes are measured accurately. The sample volumes andsample spikes that are used should agree with the selections in the standard additions menu. Ifthe results are not within acceptable limits, the sample may contain an interference.
Method performanceThe method performance data that follows was derived from laboratory tests that weremeasured on a spectrophotometer during ideal test conditions. Users may get differentresults under different test conditions.
Program Standard Precision (95% Confidence Interval) SensitivityConcentration change per 0.010 Abs change
88 5.4 mg/L Cl2 5.3–5.5 mg/L Cl2 0.1 mg/L Cl2
Summary of methodThe range of analysis using the DPD method for total chlorine can be extended by addingmore indicator in proportion to sample volume. Thus, a larger fill powder pillow of DPDTotal Chlorine Reagent is added to a 5-mL sample portion. The combined chlorineoxidizes iodide in the reagent to iodine. The iodine reacts with DPD (N, N-diethyl-p-phenylenediamine) along with free chlorine present in the sample to form a pink colorwhich is proportional to the total chlorine concentration. The measurement wavelength is530 nm for spectrophotometers or 520 nm for colorimeters.
4 Chlorine, Total, DPD Method (10.0 mg/L)

Consumables and replacement itemsRequired reagents
Description Quantity/test Unit Item no.
DPD Total Chlorine Reagent Powder Pillow, 25-mL 1 100/pkg 1406499
Recommended standards
Description Unit Item no.
Chlorine Standard Solution, 2-mL PourRite® Ampule, 50-75 mg/L 20/pkg 1426820
Chlorine Standard Solution, 10-mL Voluette® Ampule, 50–75 mg/L 16/pkg 1426810
Optional reagents and apparatus
Description Unit Item no.
Ampule Breaker, Voluette® ampules each 2196800
PourRite® Ampule Breaker, 2-mL each 2484600
Cylinder, mixing, 25-mL each 189640
Pipet, TenSette®, 0.1–1.0 mL each 1970001
Pipet tips for TenSette Pipet 1970001 50/pkg 2185696
Pipet tips for TenSette Pipet 1970001 1000/pkg 2185628
Paper, pH, 0–14 pH range 100/pkg 2601300
Potassium Iodide, 30 g/L 100 mL 34332
Sodium Arsenite, 5 g/L 100 mL 104732
Sodium Hydroxide Standard Solution, 1.0 N 100 mLMDB 104532
Sulfuric Acid Standard Solution, 1 N 100 mLMDB 127032
Chlorine Standard Solution, 2-mL PourRite® Ampules, 25–30 mg/L 20/pkg 2630020
DPD Total Chlorine Reagent Powder Pillows, 25-mL 1000/pkg 1406428
Chlorine, Total, DPD Method (10.0 mg/L) 5

HACH COMPANYWORLD HEADQUARTERSTelephone: (970) 669-3050FAX: (970) 669-2932
FOR TECHNICAL ASSISTANCE, PRICE INFORMATION AND ORDERING:Call 800-227-4224
Contact the HACH office or distributor serving you.www.hach.com [email protected]
In the U.S.A. –
Outside the U.S.A. –
On the Worldwide Web – ; E-mail –
toll-free
© Hach Company/Hach Lange GmbH, 1989–2013. All rights reserved. 04/2013, Edition 8

Chlorine, Total, MR DOC316.53.01304
USEPA1 DPD Method2 Method 102500.05 to 4.00 mg/L Cl2 (MR) Powder Pillows
Scope and application: For testing residual chlorine and chloramines in water, wastewater, estuary water andseawater; USEPA-accepted for reporting drinking and wastewater analyses. This product has not been evaluatedto test for chlorine and chloramines in medical applications in the United States.
1 Procedure is equivalent to USEPA and Standard Method 4500-Cl G for drinking water and wastewater analyses.2 Adapted from Standard Methods for the Examination of Water and Wastewater.
Test preparation
Instrument specific informationThe table in this section shows all of the instruments that have the program for this test. Table 1 shows sample cell and adapter requirements for this test.To use the table, select an instrument, then read across to find the correspondinginformation.
Table 1 Instrument-specific information
Instrument Adapter Sample cell
DR 6000 — 2427606
DR 5000 A23618
DR 3900 LZV846 (A)
DR 3800 DR 2800 DR 2700
LZV584 (C)
DR 900 — 2401906
Before startingSamples must be analyzed immediately after collection and cannot be preserved for later analysis.
Install the instrument cap on the DR 900 cell holder before ZERO or READ is pushed.
If the test result is over-range, or if the sample temporarily turns yellow after the reagent addition, dilute the sample with aknown volume of high quality, chlorine demand-free water and repeat the test. Some loss of chlorine may occur due to thedilution. Multiply the result by the dilution factor. Additional methods are available to measure chlorine without dilution.
For best results, measure the reagent blank value for each new lot of reagent. Replace the sample with deionized water inthe test procedure to get the reagent blank value. Subtract the reagent blank value from the sample results automaticallywith the reagent blank adjust option.
A powder pillow for 25-mL samples is intentionally added to 10 mL of sample in this test to get the correct working range.
Review the Safety Data Sheets (MSDS/SDS) for the chemicals that are used and use any recommended personal protectiveequipment.
Dispose of reacted solutions according to local, state and federal regulations. Use the Safety Data Sheets for disposalinformation for unused reagents. Consult the environmental, health and safety staff for your facility and/or local regulatoryagencies for further disposal information.
1

For chloramination disinfection control, use one of the available Chloramine (Mono) methods.
Cold waters can cause condensation on the sample cells during color development. Examine the sample cells forcondensation before measurements.
Do not use the same sample cells for free and total chlorine. If trace iodide from the total chlorine reagent is carried over intothe free chlorine determination, monochloramine will interfere. It is best to use separate, dedicated sample cells for free andtotal chlorine measurements.
Items to collect
Description Quantity
DPD Total Chlorine Reagent powder pillow, 25-mL 1
Sample cells (For information about sample cells, adapters or light shields, refer to Instrumentspecific information on page 1.) 2
Refer to Consumables and replacement items on page 5 for reorder information.
Sample collection• Samples must be analyzed immediately and cannot be preserved for later analysis.• Chlorine is a strong oxidizing agent and it is unstable in natural waters. It reacts
quickly with various inorganic compounds and more slowly with organic compounds.Many factors, including reactant concentrations, sunlight, pH, temperature andsalinity influence the decomposition of chlorine in water.
• Collect samples in clean glass bottles. Avoid plastic containers since these may havea large chlorine demand.
• Pre-treat glass sample containers to remove any chlorine demand. Soak thecontainers in a dilute bleach solution (1 mL commercial bleach to 1 liter of deionizedwater) for at least 1 hour. Rinse thoroughly with deionized or distilled water. If samplecontainers are rinsed thoroughly with deionized or distilled water after use, onlyoccasional pre-treatment is necessary.
• Be sure to get a representative sample. If the sample is taken from a spigot or faucet,let the water flow for at least 5 minutes. Then let the container overflow with thesample several times and then put the cap on the sample container so that there isno headspace (air) above the sample. If a sample cell is used, rinse the cell severaltimes with the sample, then carefully fill to the 10-mL mark.
2 Chlorine, Total, DPD Method (4.00 mg/L)
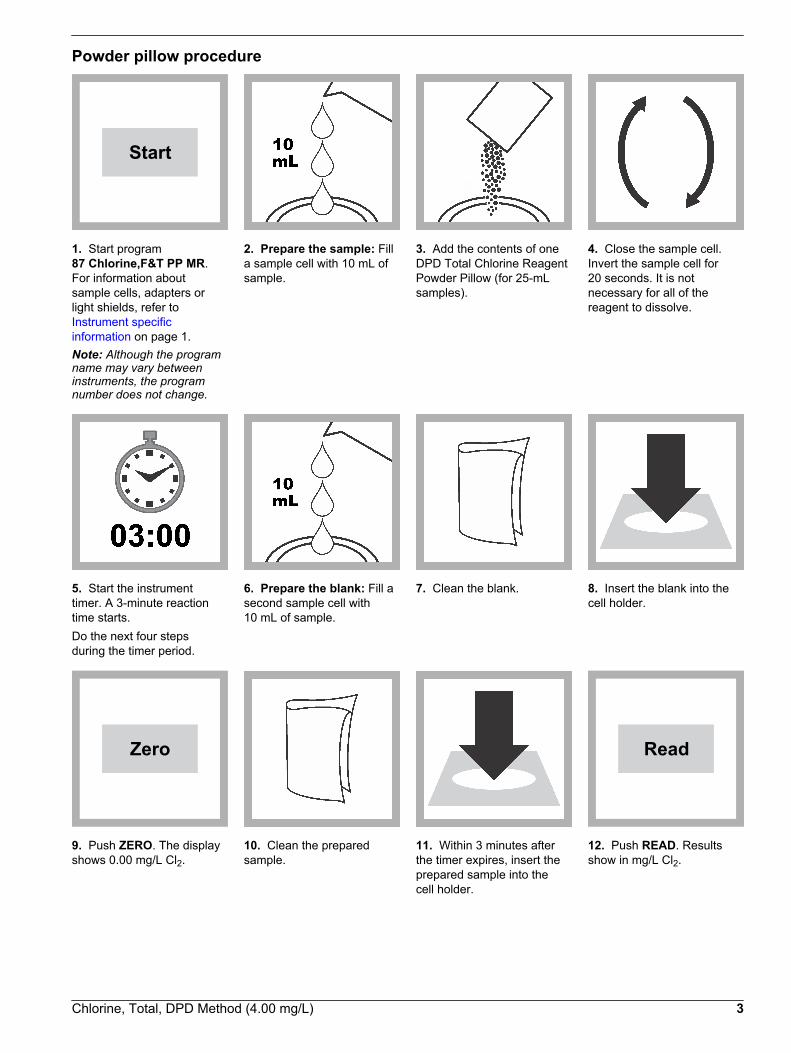
Powder pillow procedure
Start
1. Start program87 Chlorine,F&T PP MR.For information aboutsample cells, adapters orlight shields, refer to Instrument specificinformation on page 1.Note: Although the programname may vary betweeninstruments, the programnumber does not change.
2. Prepare the sample: Filla sample cell with 10 mL ofsample.
3. Add the contents of oneDPD Total Chlorine ReagentPowder Pillow (for 25-mLsamples).
4. Close the sample cell.Invert the sample cell for20 seconds. It is notnecessary for all of thereagent to dissolve.
5. Start the instrumenttimer. A 3-minute reactiontime starts.Do the next four stepsduring the timer period.
6. Prepare the blank: Fill asecond sample cell with10 mL of sample.
7. Clean the blank. 8. Insert the blank into thecell holder.
Zero
9. Push ZERO. The displayshows 0.00 mg/L Cl2.
10. Clean the preparedsample.
11. Within 3 minutes afterthe timer expires, insert theprepared sample into thecell holder.
Read
12. Push READ. Resultsshow in mg/L Cl2.
Chlorine, Total, DPD Method (4.00 mg/L) 3

InterferencesInterfering substance Interference level
Acidity More than 150 mg/L CaCO3. The full color may not develop or the color may fade instantly. Adjustto pH 6–7 with 1 N Sodium Hydroxide. Measure the amount to be added on a separate samplealiquot, then add the same amount to the sample that is tested. Correct the test result for thedilution from the volume addition.
Alkalinity More than 250 mg/L CaCO3. The full color may not develop or the color may fade instantly. Adjustto pH 6–7 with 1 N Sulfuric Acid. Measure the amount to add on a separate sample aliquot, thenadd the same amount to the sample that is tested. Correct the test result for the dilution from thevolume addition.
Bromine, Br2 Interferes at all levels
Chlorine Dioxide, ClO2 Interferes at all levels
Chloramines, organic May interfere
Hardness No effect at less than 1000 mg/L as CaCO3
Iodine, I2 Interferes at all levels
Manganese, Oxidized(Mn4+, Mn7+) orChromium, Oxidized(Cr6+)
Pre-treat the sample as follows:
1. Adjust the sample pH to 6–7.2. Add 3 drops of Potassium Iodide (30-g/L) to 10 mL of sample.3. Mix and wait 1 minute.4. Add 3 drops of Sodium Arsenite (5-g/L) and mix.5. Use the test procedure to measure the concentration of the treated sample.6. Subtract this result from the result without the treatment to obtain the correct chlorine
concentration.
Ozone Interferes at all levels
Peroxides May interfere
Highly buffered samplesor extreme sample pH
Can prevent the correct pH adjustment of the sample by the reagents. Sample pretreatment maybe necessary. Adjust to pH 6–7 with acid (Sulfuric Acid, 1.000 N) or base (Sodium Hydroxide,1.00 N).
Pollution prevention and waste managementIf sodium arsenite was added to the sample for manganese or chromium interferences,the reacted samples will contain arsenic and must be disposed of as a hazardous waste.Dispose of reacted solutions according to local, state and federal regulations.
Accuracy check
Standard additions method (sample spike)Use the standard additions method (for applicable instruments) to validate the testprocedure, reagents and instrument and to find if there is an interference in the sample.Items to collect:
• Chlorine Standard Solution, 2-mL PourRite® Ampule, 25–30 mg/L or 50–75 mg/L(use mg/L on label)
• Ampule breaker• Pipet, TenSette®, 0.1–1.0 mL and tips
1. Use the test procedure to measure the concentration of the sample, then keep the(unspiked) sample in the instrument.
2. Go to the Standard Additions option in the instrument menu.3. Select the values for standard concentration, sample volume and spike volumes.4. Open the standard solution.
4 Chlorine, Total, DPD Method (4.00 mg/L)

5. Prepare three spiked samples: use the TenSette pipet to add 0.1 mL, 0.2 mL and0.3 mL of the standard solution, respectively, to three 10-mL portions of fresh sample.Mix well.
6. Use the test procedure to measure the concentration of each of the spiked samples.Start with the smallest sample spike. Measure each of the spiked samples in theinstrument.
7. Select Graph to compare the expected results to the actual results.Note: If the actual results are significantly different from the expected results, make sure thatthe sample volumes and sample spikes are measured accurately. The sample volumes andsample spikes that are used should agree with the selections in the standard additions menu. Ifthe results are not within acceptable limits, the sample may contain an interference.
Verification of on-line analyzersThis procedure can be used to meet the requirements of USEPA Method 334.0 -Determination of Residual Chlorine in Drinking Water Using an On-line Chlorine Analyzer.The procedure and requirements for compliance with EPA Method 334.0 can bedownloaded directly from http://www.hach.com/method334.
Method performanceThe method performance data that follows was derived from laboratory tests that weremeasured on a spectrophotometer during ideal test conditions. Users may get differentresults under different test conditions.
Program Standard Precision (95% Confidence Interval) SensitivityConcentration change per 0.010 Abs change
87 2.10 mg/L Cl2 2.07–2.13 mg/L Cl2 0.02 mg/L Cl2
Summary of methodChlorine can be present in water as free chlorine and as combined chlorine. Both formscan exist in the same water and be determined together as total chlorine. Free chlorine ispresent as hypochlorous acid and/or hypochlorite ion. Combined chlorine exists asmonochloramine, dichloramine, nitrogen trichloride and other chloro derivatives. Thecombined chlorine oxidizes iodide in the reagent to iodine. The iodine and free chlorinereact with DPD (N,N-diethyl-p-phenylenediamine) to form a pink color which isproportional to the total chlorine concentration.To find the concentration of combined chlorine, run a free chlorine test and a totalchlorine test. Subtract the results of the free chlorine test from the total chlorine test toobtain the combined chlorine concentration. The measurement wavelength is 530 nm forspectrophotometers or 520 nm for colorimeters.
Consumables and replacement itemsRequired reagents
Description Quantity/test Unit Item no.
DPD Total Chlorine Reagent Powder Pillow, 25-mL 1 100/pkg 1406499
Recommended standards and apparatus
Description Unit Item no.
Chlorine Standard Solution, 2-mL PourRite® Ampules, 25–30 mg/L 20/pkg 2630020
Chlorine Standard Solution, 2-mL PourRite® Ampules, 50–75 mg/L 20/pkg 1426820
Chlorine Standard Solution, 10-mL Voluette® Ampule, 50–75 mg/L 16/pkg 1426810
Ampule Breaker, Voluette® ampules each 2196800
PourRite® Ampule Breaker, 2-mL each 2484600
Chlorine, Total, DPD Method (4.00 mg/L) 5

Optional reagents and apparatus
Description Unit Item no.
Beaker, 50-mL each 50041H
Cylinder, mixing, 25-mL each 2088640
Water, deionized 4 L 27256
Potassium Iodide, 30 g/L 100 mL 34332
Sodium Arsenite, 5 g/L 100 mL 104732
Sodium Hydroxide Standard Solution, 1.0 N 100 mLMDB 104532
Sulfuric Acid Standard Solution, 1 N 100 mLMDB 127032
Pipet, TenSette®, 0.1–1.0 mL each 1970001
Pipet tips for TenSette Pipet 1970001 50/pkg 2185696
Pipet tips for TenSette Pipet 1970001 1000/pkg 2185628
Paper, pH, 0–14 pH range 100/pkg 2601300
DPD Total Chlorine Reagent Powder Pillows, 25-mL 1000/pkg 1406428
SpecCheck™ Secondary Standard Kit, Chlorine DPD, MR each 2980500
Organic-free water 500 mL 2641549
HACH COMPANYWORLD HEADQUARTERSTelephone: (970) 669-3050FAX: (970) 669-2932
FOR TECHNICAL ASSISTANCE, PRICE INFORMATION AND ORDERING:Call 800-227-4224
Contact the HACH office or distributor serving you.www.hach.com [email protected]
In the U.S.A. –
Outside the U.S.A. –
On the Worldwide Web – ; E-mail –
toll-free
© Hach Company/Hach Lange GmbH, 1989–2013. All rights reserved. 04/2013, Edition 3

Chlorine, Total DOC316.53.01028
DPD Method1 Method 101010.09 to 5.00 mg/L Cl2 Test 'N Tube™ Vials
Scope and application: For testing higher levels of total (free plus combined) chlorine in drinking water, treatedwastewater, cooling water or industrial process water. This product has not been evaluated to test for chlorine andchloramines in medical applications in the United States.
1 Adapted from Standard Methods for the Examination of Water and Wastewater.
Test preparation
Instrument specific informationThe table in this section shows all of the instruments that have the program for this test. Table 1 shows adapter and light shield requirements for the instruments that use them.To use the table, select an instrument, then read across to find the correspondinginformation for this test.
Table 1 Instrument-specific information for test tubes
Instrument Adapters Light shield
DR 6000 — —
DR 5000 — —
DR 900 4846400 Cover supplied with the instrument
DR 3900 — LZV849
DR 3800 — LZV646
DR 2800 —
Before startingSamples must be analyzed immediately after collection and cannot be preserved for later analysis.
Install the instrument cap on the DR 900 cell holder before ZERO or READ is pushed.
DR 3900, DR 3800, DR 2800 and DR 2700: Install the light shield in Cell Compartment #2 before this test is started.
For best results, measure the reagent blank value for each new lot of reagent. Replace the sample with deionized water inthe test procedure to get the reagent blank value. Subtract the reagent blank value from the sample results automaticallywith the reagent blank adjust option.
For chloramination disinfection control, use one of the available Chloramine (Mono) methods.
Review the Safety Data Sheets (MSDS/SDS) for the chemicals that are used and use any recommended personal protectiveequipment.
Dispose of reacted solutions according to local, state and federal regulations. Use the Safety Data Sheets for disposalinformation for unused reagents. Consult the environmental, health and safety staff for your facility and/or local regulatoryagencies for further disposal information.
Items to collect
Description Quantity
Light shield (For information about sample cells, adapters or light shields, refer to Instrumentspecific information on page 1.) 1
Test 'N Tube™ DPD Total Chlorine Reagent 1
Wipes, disposable varies
1

Refer to Consumables and replacement items on page 5 for reorder information.
Sample collection• Samples must be analyzed immediately and cannot be preserved for later analysis.• Chlorine is a strong oxidizing agent and it is unstable in natural waters. It reacts
quickly with various inorganic compounds and more slowly with organic compounds.Many factors, including reactant concentrations, sunlight, pH, temperature andsalinity influence the decomposition of chlorine in water.
• Collect samples in clean glass bottles. Avoid plastic containers since these may havea large chlorine demand.
• Pre-treat glass sample containers to remove any chlorine demand. Soak thecontainers in a dilute bleach solution (1 mL commercial bleach to 1 liter of deionizedwater) for at least 1 hour. Rinse thoroughly with deionized or distilled water. If samplecontainers are rinsed thoroughly with deionized or distilled water after use, onlyoccasional pre-treatment is necessary.
• Be sure to get a representative sample. If the sample is taken from a spigot or faucet,let the water flow for at least 5 minutes. Then let the container overflow with thesample several times and then put the cap on the sample container so that there isno headspace (air) above the sample. If a sample cell is used, rinse the cell severaltimes with the sample, then carefully fill to the 10-mL mark.
DPD method for Test N' Tubes
Start
1. Start program89 Chlorine F&T TNT. Forinformation about samplecells, adapters or lightshields, refer to Instrumentspecific informationon page 1.Note: Although the programname may vary betweeninstruments, the programnumber does not change.
2. Prepare the blank: Fillan empty Test 'N Tube vialto the top of the label withsample.
3. Clean the blank vial. 4. Insert the blank vial intothe 16-mm cell holder.
2 Chlorine, Total, DPD TNT Method (5.00 mg/L)
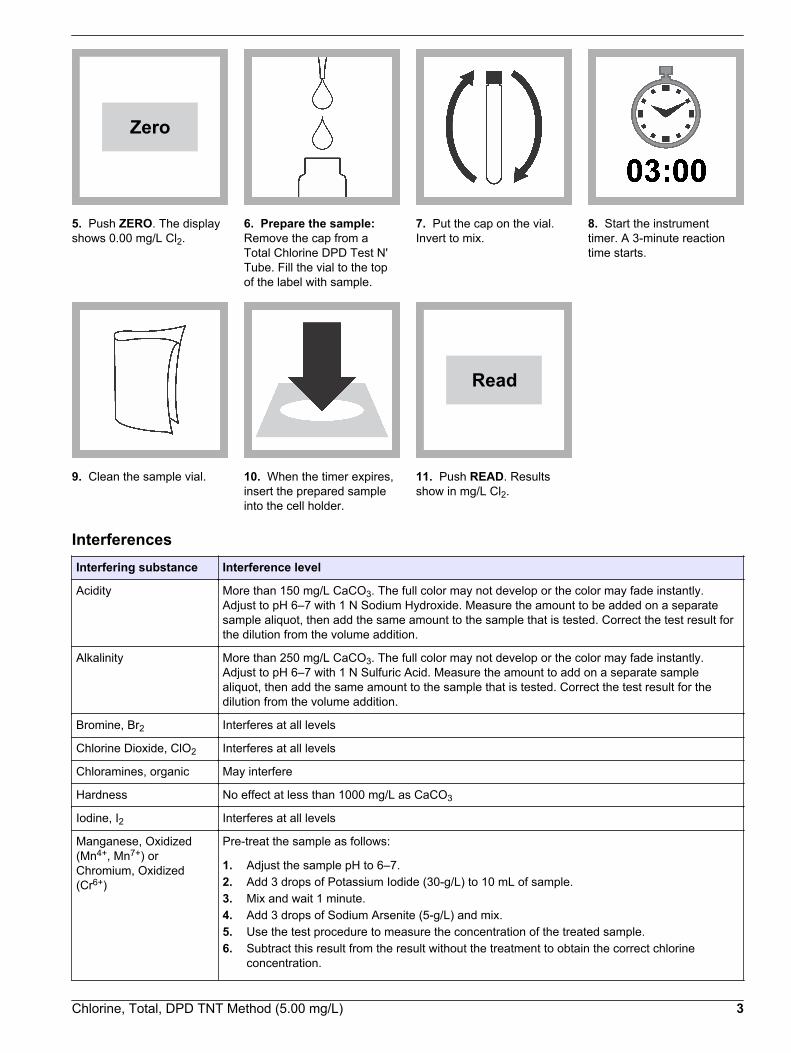
Zero
5. Push ZERO. The displayshows 0.00 mg/L Cl2.
6. Prepare the sample:Remove the cap from aTotal Chlorine DPD Test N'Tube. Fill the vial to the topof the label with sample.
7. Put the cap on the vial.Invert to mix.
8. Start the instrumenttimer. A 3-minute reactiontime starts.
9. Clean the sample vial. 10. When the timer expires,insert the prepared sampleinto the cell holder.
Read
11. Push READ. Resultsshow in mg/L Cl2.
InterferencesInterfering substance Interference level
Acidity More than 150 mg/L CaCO3. The full color may not develop or the color may fade instantly.Adjust to pH 6–7 with 1 N Sodium Hydroxide. Measure the amount to be added on a separatesample aliquot, then add the same amount to the sample that is tested. Correct the test result forthe dilution from the volume addition.
Alkalinity More than 250 mg/L CaCO3. The full color may not develop or the color may fade instantly.Adjust to pH 6–7 with 1 N Sulfuric Acid. Measure the amount to add on a separate samplealiquot, then add the same amount to the sample that is tested. Correct the test result for thedilution from the volume addition.
Bromine, Br2 Interferes at all levels
Chlorine Dioxide, ClO2 Interferes at all levels
Chloramines, organic May interfere
Hardness No effect at less than 1000 mg/L as CaCO3
Iodine, I2 Interferes at all levels
Manganese, Oxidized(Mn4+, Mn7+) orChromium, Oxidized(Cr6+)
Pre-treat the sample as follows:
1. Adjust the sample pH to 6–7.2. Add 3 drops of Potassium Iodide (30-g/L) to 10 mL of sample.3. Mix and wait 1 minute.4. Add 3 drops of Sodium Arsenite (5-g/L) and mix.5. Use the test procedure to measure the concentration of the treated sample.6. Subtract this result from the result without the treatment to obtain the correct chlorine
concentration.
Chlorine, Total, DPD TNT Method (5.00 mg/L) 3

Interfering substance Interference level
Ozone Interferes at all levels
Peroxides May interfere
Highly buffered samplesor extreme sample pH
Can prevent the correct pH adjustment of the sample by the reagents. Sample pretreatment maybe necessary.
Pollution prevention and waste managementIf sodium arsenite was added to the sample for manganese or chromium interferences,the reacted samples will contain arsenic and must be disposed of as a hazardous waste.Dispose of reacted solutions according to local, state and federal regulations.
Accuracy check
Standard additions method (sample spike)Use the standard additions method (for applicable instruments) to validate the testprocedure, reagents and instrument and to find if there is an interference in the sample.Items to collect:
• Chlorine Standard Solution, 2-mL PourRite® Ampule, 50–75 mg/L (use mg/L on label)• Ampule breaker• Pipet, TenSette®, 0.1–1.0 mL and tips
1. Use the test procedure to measure the concentration of the sample, then keep the(unspiked) sample in the instrument.
2. Go to the Standard Additions option in the instrument menu.3. Select the values for standard concentration, sample volume and spike volumes.4. Open the standard solution.5. Prepare three spiked samples: use the TenSette pipet to add 0.1 mL, 0.2 mL and
0.3 mL of the standard solution, respectively, to three 10-mL portions of fresh sample.Mix well.
6. Use the test procedure to measure the concentration of each of the spiked samples.Start with the smallest sample spike. Measure each of the spiked samples in theinstrument.
7. Select Graph to compare the expected results to the actual results.Note: If the actual results are significantly different from the expected results, make sure thatthe sample volumes and sample spikes are measured accurately. The sample volumes andsample spikes that are used should agree with the selections in the standard additions menu. Ifthe results are not within acceptable limits, the sample may contain an interference.
Method performanceThe method performance data that follows was derived from laboratory tests that weremeasured on a spectrophotometer during ideal test conditions. Users may get differentresults under different test conditions.
Program Standard Precision (95% Confidence Interval) SensitivityConcentration change per 0.010 Abs change
89 2.68 mg/L Cl2 2.63–2.73 mg/L Cl2 0.03 mg/L Cl2
Summary of methodChlorine can be present in water as free chlorine and as combined chlorine. Both formscan exist in the same water and be determined together as total chlorine. Free chlorine ispresent as hypochlorous acid and/or hypochlorite ion. Combined chlorine exists asmonochloramine, dichloramine, nitrogen trichloride and other chloro derivatives. Thecombined chlorine oxidizes iodide in the reagent to iodine. The iodine and free chlorinereact with DPD (N,N-diethyl-p-phenylenediamine) to form a pink color which isproportional to the total chlorine concentration.
4 Chlorine, Total, DPD TNT Method (5.00 mg/L)

To find the concentration of combined chlorine, run a free chlorine test and a totalchlorine test. Subtract the results of the free chlorine test from the total chlorine test toobtain the combined chlorine concentration. The measurement wavelength is 530 nm forspectrophotometers or 520 nm for colorimeters.
Consumables and replacement itemsRequired reagents
Description Quantity/test Unit Item no.
Test 'N Tube™ DPD Total Chlorine Reagent 1 50/pkg 2105645
Recommended standards and apparatus
Description Unit Item no.
Chlorine Standard Solution, 2-mL PourRite® Ampules, 50–75 mg/L 20/pkg 1426820
PourRite® Ampule Breaker, 2-mL each 2484600
Optional reagents and apparatus
Description Unit Item no.
Pipet, TenSette®, 0.1–1.0 mL each 1970001
Pipet tips for TenSette Pipet 1970001 50/pkg 2185696
Pipet tips for TenSette Pipet 1970001 1000/pkg 2185628
Paper, pH, 0–14 pH range 100/pkg 2601300
Ampule Breaker, Voluette® ampules each 2196800
Test tube rack each 1864100
Potassium Iodide, 30 g/L 100 mL 34332
Sodium Arsenite, 5 g/L 100 mL 104732
Sodium Hydroxide Standard Solution, 1.0 N 100 mLMDB 104532
Sulfuric Acid Standard Solution, 1 N 100 mLMDB 127032
Chlorine Standard Solution, 10-mL Voluette® Ampule, 50–75 mg/L 16/pkg 1426810
Chlorine Standard Solution, 2-mL PourRite® Ampule, 25-30 mg/L 20/pkg 2630020
Chlorine, Total, DPD TNT Method (5.00 mg/L) 5

HACH COMPANYWORLD HEADQUARTERSTelephone: (970) 669-3050FAX: (970) 669-2932
FOR TECHNICAL ASSISTANCE, PRICE INFORMATION AND ORDERING:Call 800-227-4224
Contact the HACH office or distributor serving you.www.hach.com [email protected]
In the U.S.A. –
Outside the U.S.A. –
On the Worldwide Web – ; E-mail –
toll-free
© Hach Company/Hach Lange GmbH, 1989–2013. All rights reserved. 04/2013, Edition 8

Chromium, Hexavalent DOC316.53.01033
USEPA1 1,5-Diphenylcarbohydrazide Method2 Method 80230.010 to 0.700 mg/L Cr6+ (spectrophotometers)0.01 to 0.60 mg/L Cr6+ (colorimeters)
Powder Pillows or AccuVac® Ampuls
Scope and application: For water and wastewater; USEPA accepted for reporting for wastewater analysis.31 Accepted USEPA and Standard Method 3500 Cr B.2 Adapted from Standard Methods for the Examination of Water and Wastewater.3 Procedure is equivalent to USGS method 1-1230-85 for wastewater.
Test preparation
Instrument-specific informationThe tables in this section show all of the instruments that have the program for this test. Table 1 shows sample cell and orientation requirements for reagent addition tests, suchas powder pillow or bulk reagent tests. Table 2 shows sample cell and adapterrequirements for AccuVac Ampul tests.To use either table, select an instrument, then read across to find the correspondinginformation for this test.
Table 1 Instrument-specific information for powder pillows
Instrument Sample cell orientation Sample cell
DR 6000 DR 3800 DR 2800 DR 2700
The fill line is to the right. 2495402
DR 5000 DR 3900
The fill line is toward the user.
DR 900 The orientation mark is toward the user. 2401906
Table 2 Instrument-specific information for AccuVac Ampuls
Instrument Adapter Sample cell
DR 6000 DR 5000 DR 900
— 2427606
DR 3900 LZV846 (A)
DR 3800 DR 2800 DR 2700
LZV584 (C) 2122800
1

Before startingInstall the instrument cap on the DR 900 cell holder before ZERO or READ is pushed.
For best results, measure the reagent blank value for each new lot of reagent. Replace the sample with deionized water inthe test procedure to get the reagent blank value. Subtract the reagent blank value from the sample results automaticallywith the reagent blank adjust option.
At high chromium levels, a precipitate forms. Sample dilution may be necessary.
Review the Safety Data Sheets (MSDS/SDS) for the chemicals that are used and use any recommended personal protectiveequipment.
The final samples are highly acidic.
Dispose of reacted solutions according to local, state and federal regulations. Use the Safety Data Sheets for disposalinformation for unused reagents. Consult the environmental, health and safety staff for your facility and/or local regulatoryagencies for further disposal information.
Items to collectPowder pillows
Description Quantity
ChromaVer ® 3 Chromium Reagent Powder Pillows, 5– or 10–mL 1
Sample cells. (For information about sample cells, adapters or light shields, refer to Instrument-specific information on page 1.) 2
Refer to Consumables and replacement items on page 6 for reorder information.
AccuVac Ampuls
Description Quantity
ChromaVer®3 AccuVac® Ampuls 1
Beaker, 50-mL 1
Sample cells (For information about sample cells, adapters or light shields, refer to Instrument-specific information on page 1.) 1
Stopper for 18-mm tubes and AccuVac Ampuls 1
Refer to Consumables and replacement items on page 6 for reorder information.
Sample collection and storage• Collect samples in clean glass or plastic bottles.• To preserve samples for later analysis, keep the samples at or below 6 °C (43 °F) for
up to 24 hours.• Let the sample temperature increase to room temperature before analysis.
2 Chromium, Hexavalent, 1,5-Diphenylcarbohydrazide Method (0.700 mg/L)

Powder pillow procedure
Start
1. Start program90 Chromium, Hex. Forinformation about samplecells, adapters or lightshields, refer to Instrument-specific informationon page 1.Note: Although the programname may vary betweeninstruments, the programnumber does not change.
2. Prepare the sample: Filla sample cell with 10 mL ofsample.
3. Add the contents of oneChromaVer® 3 ReagentPowder Pillow to the samplecell.
4. Swirl to mix.A purple color will show ifhexavalent chromium ispresent.
5. Start the instrumenttimer. A 5-minute reactiontime starts.
6. Prepare the blank: Fill asecond sample cell with10 mL of sample.
7. When the timer expires,clean the blank.
8. Insert the blank into thecell holder.
Zero
9. Push ZERO. The displayshows 0.00 or 0.000 mg/LCr6+*.
10. Clean the preparedsample.
11. Insert the preparedsample into the cell holder.
Read
12. Push READ. Resultsshow in mg/L Cr6+.
* Colorimeter display shows 0.00 mg/L.
Chromium, Hexavalent, 1,5-Diphenylcarbohydrazide Method (0.700 mg/L) 3

AccuVac Ampul procedure
Start
1. Start program95 Chromium, Hex. AV.For information aboutsample cells, adapters orlight shields, refer to Instrument-specificinformation on page 1.Note: Although the programname may vary betweeninstruments, the programnumber does not change.
2. Prepare the blank: Fillthe sample cell with 10 mLof sample.
3. Prepare the sample:Collect at least 40 mL ofsample in a 50-mL beaker.Fill the AccuVac Ampul withsample. Keep the tipimmersed while the Ampulfills completely.
4. Quickly invert the Ampulseveral times to mix.
5. Start the instrumenttimer. A 5-minute reactiontime starts.
6. When the timer expires,clean the blank.
7. Insert the blank into thecell holder.
Zero
8. Push ZERO. The displayshows 0.00 or 0.000 mg/LCr6+**.
9. Clean the AccuVacAmpul.
10. Insert the preparedsample AccuVac Ampul intothe cell holder.
Read
11. Push READ. Resultsshow in mg/L Cr6+.
** Colorimeter display shows 0.00 mg/L.
4 Chromium, Hexavalent, 1,5-Diphenylcarbohydrazide Method (0.700 mg/L)

InterferencesInterfering substance Interference level
Iron May interfere above 1 mg/L
Mercurous and Mercuric Ions Interfere slightly
Highly buffered samples orextreme sample pH
Can prevent the correct pH adjustment of the sample by the reagents. Sample pretreatmentmay be necessary.
Vanadium May interfere above 1 mg/L. Allow 10 minutes for the reaction period before reading.
Turbidity For turbid samples, treat the blank with the contents of one Acid Reagent Powder Pillow.This will make sure that any turbidity dissolved by the acid in the ChromaVer 3 ChromiumReagent will also be dissolved in the blank.
Accuracy check
Standard additions method (sample spike)Use the standard additions method (for applicable instruments) to validate the testprocedure, reagents and instrument and to find if there is an interference in the sample.Items to collect:
• 12.5-mg/L Hexavalent Chromium Standard Solution, 10-mL Voluette® Ampules• Ampule breaker• Pipet, TenSette®, 0.1–1.0 mL and tips• Mixing cylinders, 25-mL (3)
1. Use the test procedure to measure the concentration of the sample, then keep the(unspiked) sample in the instrument.
2. Go to the Standard Additions option in the instrument menu.3. Select the values for standard concentration, sample volume and spike volumes.4. Open the standard solution.5. Prepare three spiked samples: use the TenSette pipet to add 0.1 mL, 0.2 mL and
0.3 mL of the standard solution, respectively, to three 25-mL portions of fresh sample.Mix well.Note: For AccuVac® Ampuls, add 0.2 mL, 0.4 mL and 0.6 mL of the standard solution to three50-mL portions of fresh sample.
6. Use the test procedure to measure the concentration of each of the spiked samples.Start with the smallest sample spike. Measure each of the spiked samples in theinstrument.
7. Select Graph to compare the expected results to the actual results.Note: If the actual results are significantly different from the expected results, make sure thatthe sample volumes and sample spikes are measured accurately. The sample volumes andsample spikes that are used should agree with the selections in the standard additions menu. Ifthe results are not within acceptable limits, the sample may contain an interference.
Standard solution methodUse the standard solution method to validate the test procedure, reagents andinstrument.Items to collect:
• 50.0-mg/L Hexavalent Chromium Standard Solution• 500-mL volumetric flask, Class A• 5-mL volumetric pipet, Class A and pipet filler• Deionized water
1. Prepare a 0.50 mg/L hexavalent chromium standard solution as follows:
Chromium, Hexavalent, 1,5-Diphenylcarbohydrazide Method (0.700 mg/L) 5

a. Use a pipet to add 5.00 mL of 50.0 mg/L hexavalent chromium standard solutioninto the volumetric flask.
b. Dilute to the mark with deionized water. Mix well. Prepare this solution daily.2. Use the test procedure to measure the concentration of the prepared standard
solution.3. Compare the expected result to the actual result.
Note: The factory calibration can be adjusted slightly with the standard adjust option so that theinstrument shows the expected value of the standard solution. The adjusted calibration is thenused for all test results. This adjustment can increase the test accuracy when there are slightvariations in the reagents or instruments.
Method performanceThe method performance data that follows was derived from laboratory tests that weremeasured on a spectrophotometer during ideal test conditions. Users may get differentresults under different test conditions.
Program Standard Precision (95% Confidence Interval) SensitivityConcentration change per 0.010 Abs change
90 0.500 mg/L Cr6+ 0.497–0.503 mg/L Cr6+ 0.005 mg/L Cr6+
95 0.500 mg/L Cr6+ 0.496–0.504 mg/L Cr6+ 0.006 mg/L Cr6+
Summary of methodHexavalent chromium is determined by the 1,5-Diphenylcarbohydrazide method using asingle dry powder formulation called ChromaVer 3 Chromium Reagent. This reagentcontains an acidic buffer combined with 1,5-Diphenylcarbohydrazide, which reacts to givea purple color when hexavalent chromium is present. The measurement wavelength is540 nm for spectrophotometers or 560 nm for colorimeters.
Consumables and replacement itemsRequired reagents
Description Quantity/test Unit Item no.
ChromaVer® 3 Chromium Reagent Powder Pillow, 5– or 10–mL 1 100/pkg 1271099
OR
ChromaVer® 3 AccuVac® Ampul 1 25/pkg 2505025
Water, deionized varies 4 L 27256
Required apparatus
Description Quantity/test Unit Item no.
AccuVac Snapper 1 each 2405200
Beaker, 50-mL 1 each 50041H
Stoppers for 18-mm tubes and AccuVac Ampuls 2 6/pkg 173106
Recommended standards
Description Unit Item no.
Chromium, Hexavalent Standard Solution, 10-mL Voluette® Ampules, 12.5-mg/L Cr6+ 16/pkg 1425610
Chromium Hexavalent Standard Solution, 50.0-mg/L Cr6+ 100 mL 81042H
6 Chromium, Hexavalent, 1,5-Diphenylcarbohydrazide Method (0.700 mg/L)

Optional reagents and apparatus
Description Unit Item no.
Acid Reagent Powder Pillow 100/pkg 212699
Ampule Breaker, Voluette® ampules each 2196800
Flask, volumetric, Class A, 500-mL each 1457449
Pipet, volumetric 5.00-mL each 1451537
Pipet filler, safety bulb each 1465100
Sodium Hydroxide, 5 N 50 mL 245026
Chromium, Hexavalent, 1,5-Diphenylcarbohydrazide Method (0.700 mg/L) 7

HACH COMPANYWORLD HEADQUARTERSTelephone: (970) 669-3050FAX: (970) 669-2932
FOR TECHNICAL ASSISTANCE, PRICE INFORMATION AND ORDERING:Call 800-227-4224
Contact the HACH office or distributor serving you.www.hach.com [email protected]
In the U.S.A. –
Outside the U.S.A. –
On the Worldwide Web – ; E-mail –
toll-free
© Hach Company/Hach Lange GmbH, 1989–2013. All rights reserved. 04/2013, Edition 8
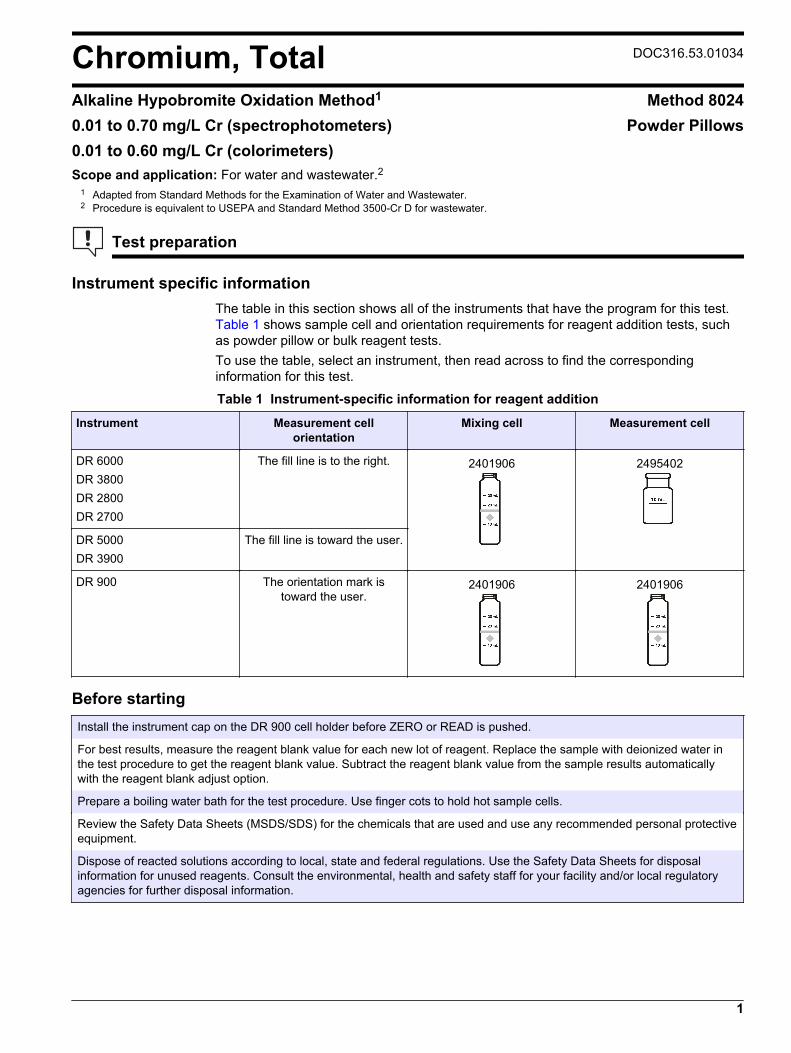
Chromium, Total DOC316.53.01034
Alkaline Hypobromite Oxidation Method1 Method 80240.01 to 0.70 mg/L Cr (spectrophotometers)0.01 to 0.60 mg/L Cr (colorimeters)
Powder Pillows
Scope and application: For water and wastewater.21 Adapted from Standard Methods for the Examination of Water and Wastewater.2 Procedure is equivalent to USEPA and Standard Method 3500-Cr D for wastewater.
Test preparation
Instrument specific informationThe table in this section shows all of the instruments that have the program for this test. Table 1 shows sample cell and orientation requirements for reagent addition tests, suchas powder pillow or bulk reagent tests.To use the table, select an instrument, then read across to find the correspondinginformation for this test.
Table 1 Instrument-specific information for reagent addition
Instrument Measurement cellorientation
Mixing cell Measurement cell
DR 6000 DR 3800 DR 2800 DR 2700
The fill line is to the right. 2401906 2495402
DR 5000 DR 3900
The fill line is toward the user.
DR 900 The orientation mark istoward the user.
2401906 2401906
Before startingInstall the instrument cap on the DR 900 cell holder before ZERO or READ is pushed.
For best results, measure the reagent blank value for each new lot of reagent. Replace the sample with deionized water inthe test procedure to get the reagent blank value. Subtract the reagent blank value from the sample results automaticallywith the reagent blank adjust option.
Prepare a boiling water bath for the test procedure. Use finger cots to hold hot sample cells.
Review the Safety Data Sheets (MSDS/SDS) for the chemicals that are used and use any recommended personal protectiveequipment.
Dispose of reacted solutions according to local, state and federal regulations. Use the Safety Data Sheets for disposalinformation for unused reagents. Consult the environmental, health and safety staff for your facility and/or local regulatoryagencies for further disposal information.
1

Items to collect
Description Quantity
Acid Reagent Powder Pillow 1
ChromaVer® 3 Chromium Reagent Powder Pillow, 25–mL 1
Chromium 1 Reagent Powder Pillow 1
Chromium 2 Reagent Powder Pillow 1
Hot plate 1
Water bath and rack 1
Finger cots 1 pair
Sample cell for mixing (For information about sample cells, adapters or light shields, refer to Instrument specific information on page 1.) 1
Sample cells for measurement (For information about sample cells, adapters or light shields,refer to Instrument specific information on page 1.) 2
Refer to Consumables and replacement items on page 6 for reorder information.
Sample collection and storage• Collect samples in clean glass or plastic bottles.• To preserve samples for later analysis, adjust the sample pH to less than 2 with
concentrated nitric acid (about 2 mL per liter). No acid addition is necessary if thesample is tested immediately.
• Keep preserved samples at room temperature for a maximum of 6 months.• Before analysis, adjust the pH to 4 with 5.0 N sodium hydroxide standard solution.• Correct the test result for the dilution from the volume additions.
Powder pillow procedure (alkaline hypobromite oxidation method)
Start
1. Start program100 Chromium, Total. Forinformation about samplecells, adapters or lightshields, refer to Instrumentspecific informationon page 1.Note: Although the programname may vary betweeninstruments, the programnumber does not change.
2. Fill a 25-mL sample cellwith 25 mL of sample
3. Prepare the sample:Add the contents of oneChromium 1 ReagentPowder Pillow.
4. Swirl to mix.
2 Chromium, Total, Alkaline Hypobromite Oxidation Method (0.70 mg/L)

5. Keep the sample cell capoff. Put the prepared samplein a boiling water bath.
6. Start the instrumenttimer. A 5-minute reactiontime starts.
7. When the timer expires,remove the preparedsample from the water bath.Put the cap on. Use runningwater to cool the sample cellto 25 °C.
8. Add the contents of oneChromium 2 ReagentPowder Pillow.
9. Close the sample cell.Invert the sample cell to mix.
10. Add the contents of oneAcid Reagent PowderPillow.
11. Swirl to mix. 12. Add the contents of oneChromaVer 3 ChromiumReagent Powder Pillow.
13. Swirl to mix. 14. Start the instrumenttimer. A 5-minute reactiontime starts.
15. During the reaction,pour 10-mL from the mixingbottle into a sample cell formeansurement. This is theprepared sample.
16. Prepare the blank:When the timer expires, fillthe second measurementcell with 10 mL of theoriginal sample.
Chromium, Total, Alkaline Hypobromite Oxidation Method (0.70 mg/L) 3
17. Clean the blank. 18. Insert the blank into thecell holder.
Zero
19. Push ZERO. Thedisplay shows 0.00 mg/L Cr.
20. Clean the preparedsample.
21. Insert the preparedsample into the cell holder.
Read
22. Push READ. Resultsshow in mg/L Cr.
InterferencesInterfering substance Interference level
Organic material May inhibit complete oxidation of trivalent chromium. If high levels of organic material are present,digestion may be required. Complete the analysis as described in this procedure on the digestedsample.
Turbidity For turbid samples, use the test procedure to prepare a 25-mL blank in the same way as theprepared sample, but do not the add the ChromaVer 3 Chromium Reagent Powder Pillow. Use thisprepared blank to zero the instrument.
Highly buffered samplesor extreme sample pH
Can prevent the correct pH adjustment of the sample by the reagents. Sample pretreatment maybe necessary.
Accuracy check
Standard additions method (sample spike)Use the standard additions method (for applicable instruments) to validate the testprocedure, reagents and instrument and to find if there is an interference in the sample.Items to collect:
• Trivalent Chromium Standard Solution, 50 mg/L Cr3+
• 5-mL volumetric pipet, Class A and pipet filler• Mixing cylinders (4), 25 mL• Deionized water• Pipet, TenSette®, 0.1–1.0 mL and tips
1. Prepare a 12.5 mg/L trivalent chromium standard solution as follows:
a. Use a pipet to add 5.00 mL of a 50 mg/L Cr3+ standard solution into a 25-mLmixing cylinder.
4 Chromium, Total, Alkaline Hypobromite Oxidation Method (0.70 mg/L)

b. Dilute to the 20-mL mark with deionized water. Mix well. Prepare this solutiondaily.
2. Use the test procedure to measure the concentration of the sample, then keep the(unspiked) sample in the instrument.
3. Go to the Standard Additions option in the instrument menu.4. Select the values for standard concentration, sample volume and spike volumes.5. Prepare three spiked samples: use the TenSette pipet to add 0.1 mL, 0.2 mL and
0.3 mL of the prepared standard solution, respectively, to three 25-mL portions offresh sample. Mix well.
6. Use the test procedure to measure the concentration of each of the spiked samples.Start with the smallest sample spike. Measure each of the spiked samples in theinstrument.
7. Select Graph to compare the expected results to the actual results.Note: If the actual results are significantly different from the expected results, make sure thatthe sample volumes and sample spikes are measured accurately. The sample volumes andsample spikes that are used should agree with the selections in the standard additions menu. Ifthe results are not within acceptable limits, the sample may contain an interference.
Standard solution methodUse the standard solution method to validate the test procedure, reagents andinstrument.Items to collect:
• Trivalent Chromium Standard Solution, Voluette® Ampule, 50 mg/L Cr3+
• 500-mL volumetric flask, Class A• 5-mL volumetric pipet, Class A and pipet filler• Deionized water
1. Prepare a 0.50 mg/L trivalent chromium standard solution as follows:
a. Use a pipet to add 5.00 mL of 50 mg/L trivalent chromium standard solution intothe volumetric flask.
b. Dilute to the mark with deionized water. Mix well. Prepare this solution daily.2. Use the test procedure to measure the concentration of the prepared standard
solution.3. Compare the expected result to the actual result.
Note: The factory calibration can be adjusted slightly with the standard adjust option so that theinstrument shows the expected value of the standard solution. The adjusted calibration is thenused for all test results. This adjustment can increase the test accuracy when there are slightvariations in the reagents or instruments.
Method performanceThe method performance data that follows was derived from laboratory tests that weremeasured on a spectrophotometer during ideal test conditions. Users may get differentresults under different test conditions.
Program Standard Precision (95% Confidence Interval) SensitivityConcentration change per 0.010 Abs change
100 0.500 mg/L Cr 0.47–0.53 mg/L Cr 0.005 mg/L Cr
Summary of methodTrivalent chromium in the sample is oxidized to the hexavalent form by hypobromite ionunder alkaline conditions. The sample is acidified. The total chromium content isdetermined by the 1,5-Diphenylcarbohydrazide method. Determine trivalent chromium bysubtracting the results of a separate hexavalent chromium test from the results of the totalchromium test. The measurement wavelength is 540 nm for spectrophotometers or560 nm for colorimeters.
Chromium, Total, Alkaline Hypobromite Oxidation Method (0.70 mg/L) 5

Consumables and replacement itemsRequired reagents
Description Quantity/test Unit Item no.
Chromium, total, Reagent Set 1 100/pkg 2242500
Includes:
Acid Reagent Powder Pillow 1 100/pkg 212699
ChromaVer® 3 Chromium Reagent Powder Pillow, 25-mL 1 100/pkg 1206699
Chromium 1 Reagent Powder Pillow 1 100/pkg 204399
Chromium 2 Reagent Powder Pillow 1 100/pkg 204499
Required apparatus
Description Quantity/test Unit Item no.
Hot plate, 3½-inch diameter, 120 VAC, 50/60 Hz 1 each 1206701
OR
Hot plate, stirrer, 220 - 240 VAC 1 each 2881602
Water bath and rack 1 each 195555
Recommended standards
Description Unit Item no.
Chromium Trivalent Standard Solution, 50-mg/L Cr3+ 100 mL 1415142
Optional reagents and apparatus
Description Unit Item no.
Finger cots 2/pkg 1464702
Flask, volumetric, Class A, 500-mL each 1457449
Pipet, volumetric 5.00-mL each 1451537
Pipet, TenSette®, 0.1–1.0 mL each 1970001
Pipet tips for TenSette Pipet 1970001 50/pkg 2185696
Pipet, volumetric Class A, 15-mL each 1451539
Pipet filler, safety bulb each 1465100
Cylinder, mixing, 25-mL each 189640
HACH COMPANYWORLD HEADQUARTERSTelephone: (970) 669-3050FAX: (970) 669-2932
FOR TECHNICAL ASSISTANCE, PRICE INFORMATION AND ORDERING:Call 800-227-4224
Contact the HACH office or distributor serving you.www.hach.com [email protected]
In the U.S.A. –
Outside the U.S.A. –
On the Worldwide Web – ; E-mail –
toll-free
© Hach Company/Hach Lange GmbH, 1989–2013. All rights reserved. 04/2013, Edition 8

Color, True and Apparent DOC316.53.01037
Platinum-Cobalt Standard Method1, 2, 3 Method 802515 to 500 color units
Scope and application: For water, wastewater and seawater; equivalent to NCASI method 253 and NCASIMethod Color 71.01 for pulp and paper effluent using 465 nm (requires pH adjustment).
1 Adapted from Standard Methods for the Examination of Water and Wastewater and National Council for Air and Stream Improvement(NCASI) Methods Manual.
2 Adapted from Wat. Res. Vol. 30, No. 11, pp. 2771–2775, 1996.3 NCASI Method 253 approved at 40 CFR part 136.
Test preparation
Instrument specific informationThe table in this section shows all of the instruments that have the program for this test. Table 1 shows sample cell and orientation requirements for reagent addition tests, suchas powder pillow or bulk reagent tests.To use the table, select an instrument, then read across to find the correspondinginformation for this test.
Table 1 Instrument-specific information for filtered sample
Instrument Sample cell orientation Sample cell
DR 6000 DR 3800 DR 2800 DR 2700
The fill line is to the right. 2495402
DR 5000 DR 3900
The fill line is toward the user.
DR 900 The orientation mark is toward the user. 2401906
Before startingInstall the instrument cap on the DR 900 cell holder before ZERO or READ is pushed.
The NCASI procedure is available only for spectrophotometers and requires pH adjustment to pH 7.6 with 1.0 N HCl or 1.0 NNaOH. If the overall volume change during the adjustment is more than 1%, start over and use a stronger acid or base. Useprogram 125 for the NCASI procedure.
One pH 8 buffer powder pillow (sodium phosphate/potassium phosphate) can be added to 50 mL of sample before the finalpH adjustment to minimize the volume change from the dilution. Mix thoroughly to dissolve before the final pH adjustment.
To test for apparent color, do not filter the sample or the deionized water blank.
For very low levels, use the Pour-Thru Cell (for applicable instruments) for the best results.
Review the Safety Data Sheets (MSDS/SDS) for the chemicals that are used and use any recommended personal protectiveequipment.
Dispose of reacted solutions according to local, state and federal regulations. Use the Safety Data Sheets for disposalinformation for unused reagents. Consult the environmental, health and safety staff for your facility and/or local regulatoryagencies for further disposal information.
1

Items to collect
Description Quantity
Buffer, pH 8.0 (optional) 1
Hydrochloric Acid Solution, 1.0 N (for program 125) varies
Sodium Hydroxide, 1.00 N (for program 125) varies
Water, deionized 100 mL
Filter apparatus: membrane filter, filter holder, filter flask and aspirator 1
Stopper, rubber, one hole number 7 1
Tubing, rubber 1
Sample cells (For information about sample cells, adapters or light shields, refer to Instrumentspecific information on page 1.) 2
Refer to Consumables and replacement items on page 4 for reorder information.
Sample collection and storage• Collect samples in clean glass or plastic bottles.• Analyze the samples as soon as possible for best results.• If prompt analysis is impossible, fill the bottle completely full, then tighten the cap on
the bottle. Avoid excessive agitation or prolonged contact with air.• To preserve samples for later analysis, keep the samples at or below 6 °C (43 °F) for
up to 48 hours.• Let the sample temperature increase to room temperature before analysis.
Platinum-Cobalt procedure
Start
1. Start program 120 Color,455 nm or program125 Color, 465 nm for theNCASI test. Colorimetersuse program 122 Color,420 nm. For informationabout sample cells,adapters or light shields,refer to Instrument specificinformation on page 1.Note: Although the programname may vary betweeninstruments, the programnumber does not change.
2. Collect 200 mL ofsample in a 400-mL beaker.NCASI: Adjust the pH asdescribed in Before startingon page 1.
3. Assemble the0.45 micron filter apparatus.NCASI: The NCASI testuses a 0.8-micron filter. A1.0 micron prefilter can beused first for samples thatare difficult to filter.
4. Pour approximately50 mL of deionized waterthrough the filter to rinse thefilter. Discard the rinsewater.
2 Color, True and Apparent, Platinum-Cobalt Method (500 units)

5. Pour another 50 mL ofdeionized water through thefilter.
6. Prepare the blank: Fillthe sample cell with 10 mLof filtered deionized waterfrom the previous step.Discard the excess water inthe flask.
7. Pour approximately50 mL of sample throughthe filter.
8. Prepare the sample: Filla second sample cell with10 mL of filtered sample.
9. Clean the blank. 10. Insert the blank into thecell holder.
Zero
11. Push ZERO. Thedisplay shows 0 units Pt-Co.
12. Clean the preparedsample.
13. Insert the preparedsample into the cell holder.
Read
14. Push READ. Resultsshow in units Pt-Co.
Accuracy check
Standard solution methodUse the standard solution method to validate the test procedure, reagents andinstrument.Items to collect:
• 500 Platinum-Cobalt Units Standard Solution• 100-mL volumetric flask, Class A• 50-mL volumetric pipet, Class A and pipet filler• Deionized water
1. Prepare a 250 platinum-cobalt units standard solution as follows:
a. Use a pipet to add 50.00 mL of 500 platinum-cobalt units standard solution intothe volumetric flask.
Color, True and Apparent, Platinum-Cobalt Method (500 units) 3
b. Dilute to the mark with deionized water. Mix well. Prepare this solution daily.2. Use the test procedure to measure the concentration of the prepared standard
solution.3. Compare the expected result to the actual result.
Note: The factory calibration can be adjusted slightly with the standard adjust option so that theinstrument shows the expected value of the standard solution. The adjusted calibration is thenused for all test results. This adjustment can increase the test accuracy when there are slightvariations in the reagents or instruments.
Method performanceThe method performance data that follows was derived from laboratory tests that weremeasured on a spectrophotometer during ideal test conditions. Users may get differentresults under different test conditions.
Program Standard Precision (95% Confidence Interval) SensitivityConcentration change per 0.010 Abs change
120 250 units Pt-Co 245–255 units Pt-Co 16 units Pt-Co
125 250 units Pt-Co 245–255 units Pt-Co 16 units Pt-Co
Summary of methodColor may be expressed as “apparent” or “true” color. The apparent color includes colorfrom dissolved materials plus color from suspended matter. The true color is determinedby removal of the suspended materials with a filter or a centrifuge. This procedure usesfiltration for true color analysis. To measure apparent color, do not filter the sample or thedeionized water blank. The same instrument program is used for both true and apparentcolor. The stored program is calibrated in color units based on the APHA-recommendedstandard of 1 color unit being equal to 1 mg/L platinum as chloroplatinate ion. Test resultsfor Programs 120 and 125 are measured at 455 and 465 nm, respectively inspectrophotometers. Test results for Program 122 are measured at 420 nm incolorimeters.
Consumables and replacement itemsRequired reagents
Description Quantity/test Unit Item no.
Hydrochloric Acid Solution, 1.0 N varies 1 L 2321353
Sodium Hydroxide, 1.00 N varies 1 L 104553
Water, deionized varies 4 L 27256
Required apparatus
Description Quantity/test Unit Item no.
Aspirator, vacuum pump 1 each 213100
Beaker, 400 mL 1 each 50048
Filter, membrane, 47-mm, 0.8-microns, Program 125 1 100/pkg 2640800
Filter holder, 47 mm, magnetic base 1 each 1352900
Filter, membrane, 47-mm, 0.45-microns, Program 120 1 100/pkg 1353000
Flask, filtering, 500-mL 1 each 54649
Stopper, poly, hollow 1 6/pkg 211907
Tubing, rubber, 7.9 x 2.4 mm varies 12 ft 56019
4 Color, True and Apparent, Platinum-Cobalt Method (500 units)
Recommended standards and apparatus
Description Unit Item no.
Buffer, pH 8.0 15/pkg 1407995
Color Standard Solution, 500 platinum-cobalt units 1 L 141453
Color Standard Solution, 15 platinum-cobalt units 1 L 2602853
Color Standard Solution, 500 platinum-cobalt units, 10-mL Voluette® Ampules 16/pkg 141410
Filter, glass microfiber, 47-mm, 1.0 micron 100/pk 2551400
Flask, volumetric, Class A, 100-mL each 1457442
Pipet, volumetric, Class A, 50-mL each 1451541
Pipet filler, safety bulb each 1465100
Color, True and Apparent, Platinum-Cobalt Method (500 units) 5

HACH COMPANYWORLD HEADQUARTERSTelephone: (970) 669-3050FAX: (970) 669-2932
FOR TECHNICAL ASSISTANCE, PRICE INFORMATION AND ORDERING:Call 800-227-4224
Contact the HACH office or distributor serving you.www.hach.com [email protected]
In the U.S.A. –
Outside the U.S.A. –
On the Worldwide Web – ; E-mail –
toll-free
© Hach Company/Hach Lange GmbH, 1989–2013. All rights reserved. 04/2013, Edition 8
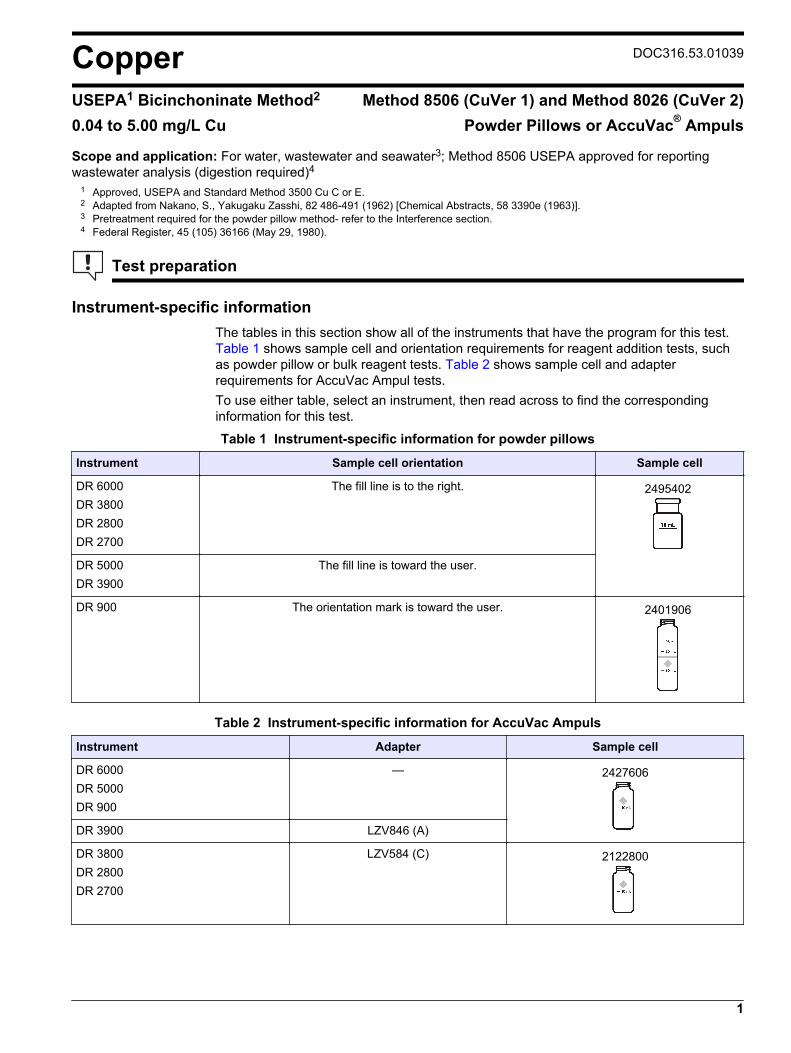
Copper DOC316.53.01039
USEPA1 Bicinchoninate Method2 Method 8506 (CuVer 1) and Method 8026 (CuVer 2)0.04 to 5.00 mg/L Cu Powder Pillows or AccuVac® Ampuls
Scope and application: For water, wastewater and seawater3; Method 8506 USEPA approved for reportingwastewater analysis (digestion required)4
1 Approved, USEPA and Standard Method 3500 Cu C or E.2 Adapted from Nakano, S., Yakugaku Zasshi, 82 486-491 (1962) [Chemical Abstracts, 58 3390e (1963)].3 Pretreatment required for the powder pillow method- refer to the Interference section.4 Federal Register, 45 (105) 36166 (May 29, 1980).
Test preparation
Instrument-specific informationThe tables in this section show all of the instruments that have the program for this test. Table 1 shows sample cell and orientation requirements for reagent addition tests, suchas powder pillow or bulk reagent tests. Table 2 shows sample cell and adapterrequirements for AccuVac Ampul tests.To use either table, select an instrument, then read across to find the correspondinginformation for this test.
Table 1 Instrument-specific information for powder pillows
Instrument Sample cell orientation Sample cell
DR 6000 DR 3800 DR 2800 DR 2700
The fill line is to the right. 2495402
DR 5000 DR 3900
The fill line is toward the user.
DR 900 The orientation mark is toward the user. 2401906
Table 2 Instrument-specific information for AccuVac Ampuls
Instrument Adapter Sample cell
DR 6000 DR 5000 DR 900
— 2427606
DR 3900 LZV846 (A)
DR 3800 DR 2800 DR 2700
LZV584 (C) 2122800
1
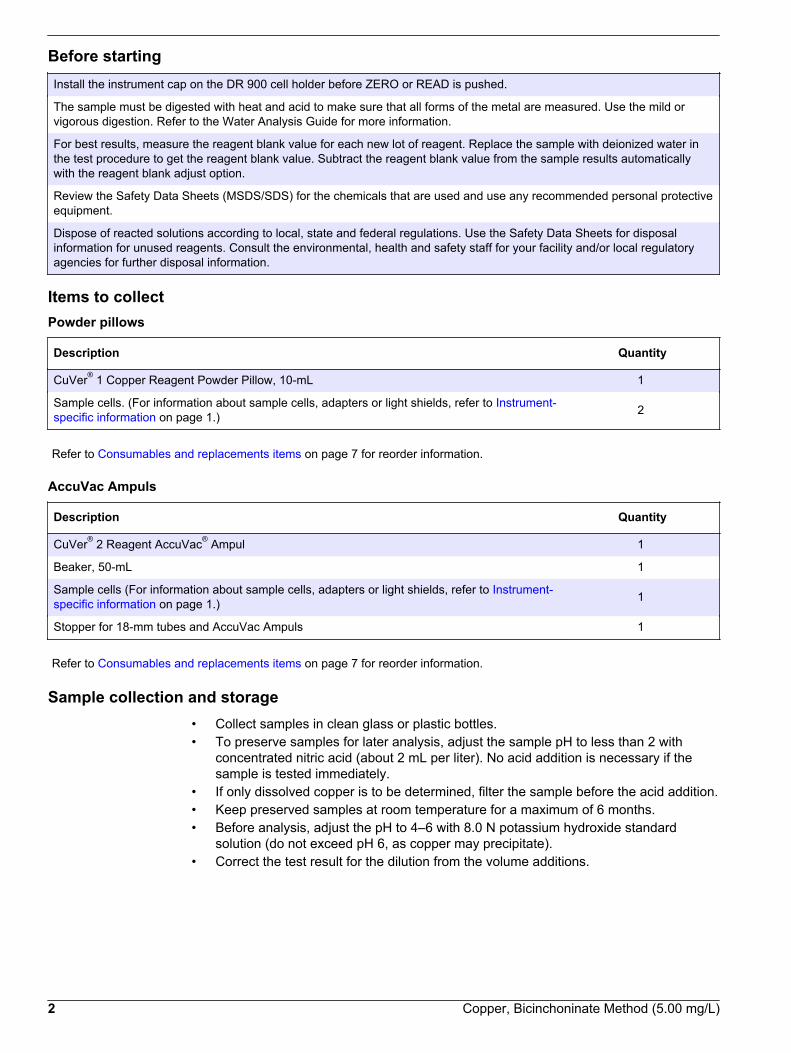
Before startingInstall the instrument cap on the DR 900 cell holder before ZERO or READ is pushed.
The sample must be digested with heat and acid to make sure that all forms of the metal are measured. Use the mild orvigorous digestion. Refer to the Water Analysis Guide for more information.
For best results, measure the reagent blank value for each new lot of reagent. Replace the sample with deionized water inthe test procedure to get the reagent blank value. Subtract the reagent blank value from the sample results automaticallywith the reagent blank adjust option.
Review the Safety Data Sheets (MSDS/SDS) for the chemicals that are used and use any recommended personal protectiveequipment.
Dispose of reacted solutions according to local, state and federal regulations. Use the Safety Data Sheets for disposalinformation for unused reagents. Consult the environmental, health and safety staff for your facility and/or local regulatoryagencies for further disposal information.
Items to collectPowder pillows
Description Quantity
CuVer® 1 Copper Reagent Powder Pillow, 10-mL 1
Sample cells. (For information about sample cells, adapters or light shields, refer to Instrument-specific information on page 1.) 2
Refer to Consumables and replacements items on page 7 for reorder information.
AccuVac Ampuls
Description Quantity
CuVer® 2 Reagent AccuVac® Ampul 1
Beaker, 50-mL 1
Sample cells (For information about sample cells, adapters or light shields, refer to Instrument-specific information on page 1.) 1
Stopper for 18-mm tubes and AccuVac Ampuls 1
Refer to Consumables and replacements items on page 7 for reorder information.
Sample collection and storage• Collect samples in clean glass or plastic bottles.• To preserve samples for later analysis, adjust the sample pH to less than 2 with
concentrated nitric acid (about 2 mL per liter). No acid addition is necessary if thesample is tested immediately.
• If only dissolved copper is to be determined, filter the sample before the acid addition.• Keep preserved samples at room temperature for a maximum of 6 months.• Before analysis, adjust the pH to 4–6 with 8.0 N potassium hydroxide standard
solution (do not exceed pH 6, as copper may precipitate).• Correct the test result for the dilution from the volume additions.
2 Copper, Bicinchoninate Method (5.00 mg/L)

Powder pillow procedure (Method 8506)
Start
1. Start program135 Copper, Bicin. Forinformation about samplecells, adapters or lightshields, refer to Instrument-specific informationon page 1.Note: Although the programname may vary betweeninstruments, the programnumber does not change.
2. Prepare the sample: Filla sample cell with 10 mL ofsample.
3. Add the contents of oneCuVer 1 Copper reagentpowder pillow.
4. Swirl to mix.
5. Start the instrumenttimer. A 2-minute reactiontime starts.The sample shows a purplecolor when copper in thesample mixes with thereagent powder.Undissolved powder doesnot affect accuracy.
6. Prepare the blank: Fill asecond sample cell with10 mL of sample.
7. Clean the blank. 8. Insert the blank into thecell holder.
Zero
9. Push ZERO. The displayshows 0.00 mg/L Cu.
10. Clean the preparedsample.
11. Within 30 minutes afterthe timer expires, insert theprepared sample into thecell holder.
Read
12. Push READ. Resultsshow in mg/L Cu.
Copper, Bicinchoninate Method (5.00 mg/L) 3

AccuVac Ampul procedure (Method 8026)
Start
1. Start program140 Copper, Bicin. AV. Forinformation about samplecells, adapters or lightshields, refer to Instrument-specific informationon page 1.Note: Although the programname may vary betweeninstruments, the programnumber does not change.
2. Prepare the blank: Fillthe sample cell with 10 mLof sample.
3. Prepare the sample:Collect at least 40 mL ofsample in a 50-mL beaker.Fill the AccuVac Ampul withsample. Keep the tipimmersed while the Ampulfills completely.
4. Quickly invert the Ampulseveral times to mix.
5. Start the instrumenttimer. A 2-minute reactiontime starts.The sample shows a purplecolor when copper in thesample mixes with thereagent powder.Undissolved powder doesnot affect accuracy.
6. When the timer expires,clean the blank.
7. Insert the blank into thecell holder.
Zero
8. Push ZERO. The displayshows 0.00 mg/L Cu.
9. Clean the AccuVacAmpul.
10. Within 30 minutes ofadding the reagent, insertthe prepared sampleAccuVac Ampul into the cellholder.
Read
11. Push READ. Resultsshow in mg/L Cu.
4 Copper, Bicinchoninate Method (5.00 mg/L)
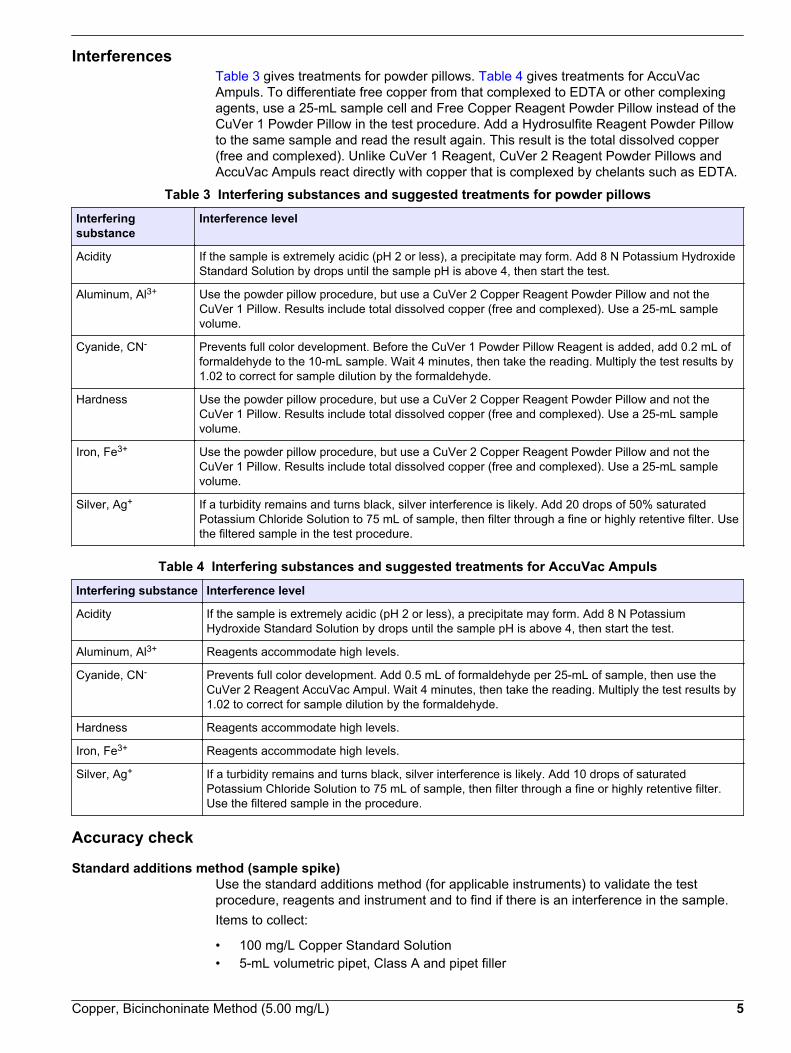
InterferencesTable 3 gives treatments for powder pillows. Table 4 gives treatments for AccuVacAmpuls. To differentiate free copper from that complexed to EDTA or other complexingagents, use a 25-mL sample cell and Free Copper Reagent Powder Pillow instead of theCuVer 1 Powder Pillow in the test procedure. Add a Hydrosulfite Reagent Powder Pillowto the same sample and read the result again. This result is the total dissolved copper(free and complexed). Unlike CuVer 1 Reagent, CuVer 2 Reagent Powder Pillows andAccuVac Ampuls react directly with copper that is complexed by chelants such as EDTA.
Table 3 Interfering substances and suggested treatments for powder pillows
Interferingsubstance
Interference level
Acidity If the sample is extremely acidic (pH 2 or less), a precipitate may form. Add 8 N Potassium HydroxideStandard Solution by drops until the sample pH is above 4, then start the test.
Aluminum, Al3+ Use the powder pillow procedure, but use a CuVer 2 Copper Reagent Powder Pillow and not theCuVer 1 Pillow. Results include total dissolved copper (free and complexed). Use a 25-mL samplevolume.
Cyanide, CN- Prevents full color development. Before the CuVer 1 Powder Pillow Reagent is added, add 0.2 mL offormaldehyde to the 10-mL sample. Wait 4 minutes, then take the reading. Multiply the test results by1.02 to correct for sample dilution by the formaldehyde.
Hardness Use the powder pillow procedure, but use a CuVer 2 Copper Reagent Powder Pillow and not theCuVer 1 Pillow. Results include total dissolved copper (free and complexed). Use a 25-mL samplevolume.
Iron, Fe3+ Use the powder pillow procedure, but use a CuVer 2 Copper Reagent Powder Pillow and not theCuVer 1 Pillow. Results include total dissolved copper (free and complexed). Use a 25-mL samplevolume.
Silver, Ag+ If a turbidity remains and turns black, silver interference is likely. Add 20 drops of 50% saturatedPotassium Chloride Solution to 75 mL of sample, then filter through a fine or highly retentive filter. Usethe filtered sample in the test procedure.
Table 4 Interfering substances and suggested treatments for AccuVac Ampuls
Interfering substance Interference level
Acidity If the sample is extremely acidic (pH 2 or less), a precipitate may form. Add 8 N PotassiumHydroxide Standard Solution by drops until the sample pH is above 4, then start the test.
Aluminum, Al3+ Reagents accommodate high levels.
Cyanide, CN- Prevents full color development. Add 0.5 mL of formaldehyde per 25-mL of sample, then use theCuVer 2 Reagent AccuVac Ampul. Wait 4 minutes, then take the reading. Multiply the test results by1.02 to correct for sample dilution by the formaldehyde.
Hardness Reagents accommodate high levels.
Iron, Fe3+ Reagents accommodate high levels.
Silver, Ag+ If a turbidity remains and turns black, silver interference is likely. Add 10 drops of saturatedPotassium Chloride Solution to 75 mL of sample, then filter through a fine or highly retentive filter.Use the filtered sample in the procedure.
Accuracy check
Standard additions method (sample spike)Use the standard additions method (for applicable instruments) to validate the testprocedure, reagents and instrument and to find if there is an interference in the sample.Items to collect:
• 100 mg/L Copper Standard Solution• 5-mL volumetric pipet, Class A and pipet filler
Copper, Bicinchoninate Method (5.00 mg/L) 5

• Mixing cylinder, 50 mL• Deionized water• Pipet, TenSette®, 0.1–1.0 mL and tips
1. Prepare a 12.5 mg/L copper standard solution as follows:
a. Use a pipet to add 5.00 mL of a 100 mg/L copper standard solution into a 50-mLmixing cylinder.
b. Dilute to the 40-mL mark with deionized water. Mix well. Prepare this solutiondaily.
2. Use the test procedure to measure the concentration of the sample, then keep the(unspiked) sample in the instrument.
3. Go to the Standard Additions option in the instrument menu.4. Select the values for standard concentration, sample volume and spike volumes.5. Prepare three spiked samples: use the TenSette pipet to add 0.1 mL, 0.2 mL and
0.3 mL of the prepared standard solution, respectively, to three 10-mL portions offresh sample. Mix well.Note: For AccuVac® Ampuls, add 0.2 mL, 0.4 mL and 0.6 mL of a 75 mg/L Copper VoluetteAmpule Standard to three 50-mL portions of fresh sample.
6. Use the test procedure to measure the concentration of each of the spiked samples.Start with the smallest sample spike. Measure each of the spiked samples in theinstrument.
7. Select Graph to compare the expected results to the actual results.Note: If the actual results are significantly different from the expected results, make sure thatthe sample volumes and sample spikes are measured accurately. The sample volumes andsample spikes that are used should agree with the selections in the standard additions menu. Ifthe results are not within acceptable limits, the sample may contain an interference.
Standard solution methodUse the standard solution method to validate the test procedure, reagents andinstrument.Items to collect:
• Copper Standard Solution, 100-mg/L• 100-mL volumetric flask, Class A• 4-mL volumetric pipet, Class A and pipet filler• Deionized water
1. Prepare a 4.00 mg/L copper standard solution as follows:
a. Use a pipet to add 4.00 mL of 100 mg/L copper standard solution into thevolumetric flask.
b. Dilute to the mark with deionized water. Mix well. Prepare this solution daily.2. Use the test procedure to measure the concentration of the prepared standard
solution.3. Compare the expected result to the actual result.
Note: The factory calibration can be adjusted slightly with the standard adjust option so that theinstrument shows the expected value of the standard solution. The adjusted calibration is thenused for all test results. This adjustment can increase the test accuracy when there are slightvariations in the reagents or instruments.
6 Copper, Bicinchoninate Method (5.00 mg/L)
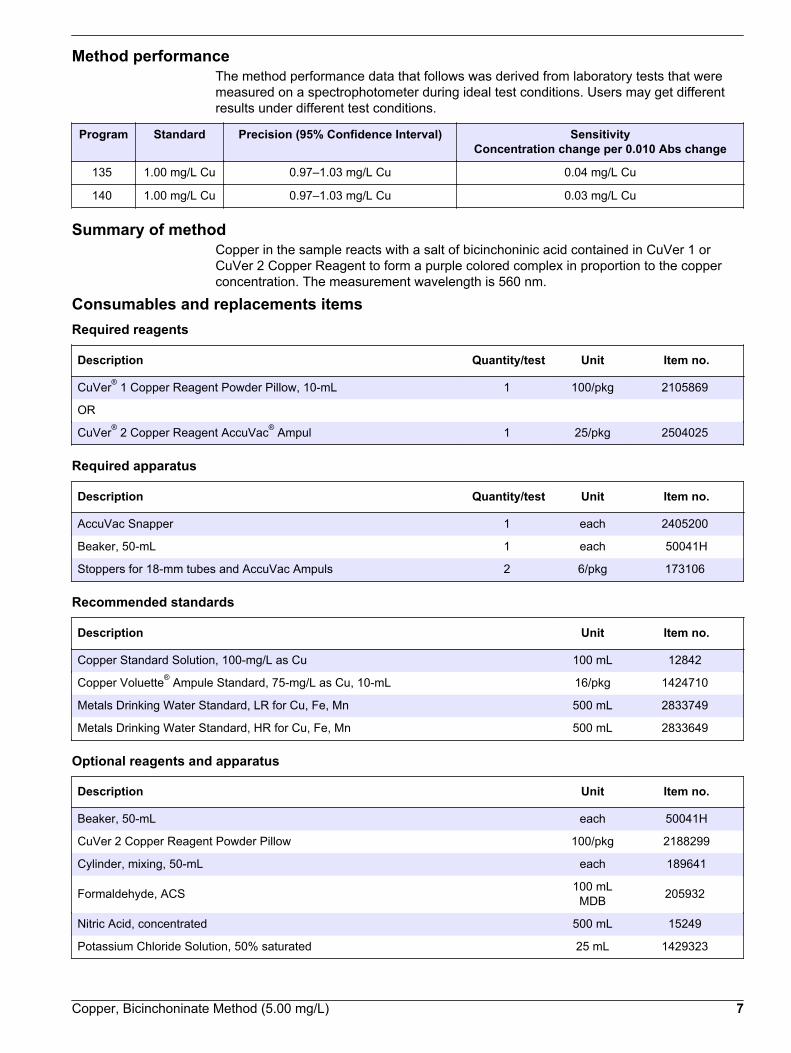
Method performanceThe method performance data that follows was derived from laboratory tests that weremeasured on a spectrophotometer during ideal test conditions. Users may get differentresults under different test conditions.
Program Standard Precision (95% Confidence Interval) SensitivityConcentration change per 0.010 Abs change
135 1.00 mg/L Cu 0.97–1.03 mg/L Cu 0.04 mg/L Cu
140 1.00 mg/L Cu 0.97–1.03 mg/L Cu 0.03 mg/L Cu
Summary of methodCopper in the sample reacts with a salt of bicinchoninic acid contained in CuVer 1 orCuVer 2 Copper Reagent to form a purple colored complex in proportion to the copperconcentration. The measurement wavelength is 560 nm.
Consumables and replacements itemsRequired reagents
Description Quantity/test Unit Item no.
CuVer® 1 Copper Reagent Powder Pillow, 10-mL 1 100/pkg 2105869
OR
CuVer® 2 Copper Reagent AccuVac® Ampul 1 25/pkg 2504025
Required apparatus
Description Quantity/test Unit Item no.
AccuVac Snapper 1 each 2405200
Beaker, 50-mL 1 each 50041H
Stoppers for 18-mm tubes and AccuVac Ampuls 2 6/pkg 173106
Recommended standards
Description Unit Item no.
Copper Standard Solution, 100-mg/L as Cu 100 mL 12842
Copper Voluette® Ampule Standard, 75-mg/L as Cu, 10-mL 16/pkg 1424710
Metals Drinking Water Standard, LR for Cu, Fe, Mn 500 mL 2833749
Metals Drinking Water Standard, HR for Cu, Fe, Mn 500 mL 2833649
Optional reagents and apparatus
Description Unit Item no.
Beaker, 50-mL each 50041H
CuVer 2 Copper Reagent Powder Pillow 100/pkg 2188299
Cylinder, mixing, 50-mL each 189641
Formaldehyde, ACS 100 mLMDB 205932
Nitric Acid, concentrated 500 mL 15249
Potassium Chloride Solution, 50% saturated 25 mL 1429323
Copper, Bicinchoninate Method (5.00 mg/L) 7
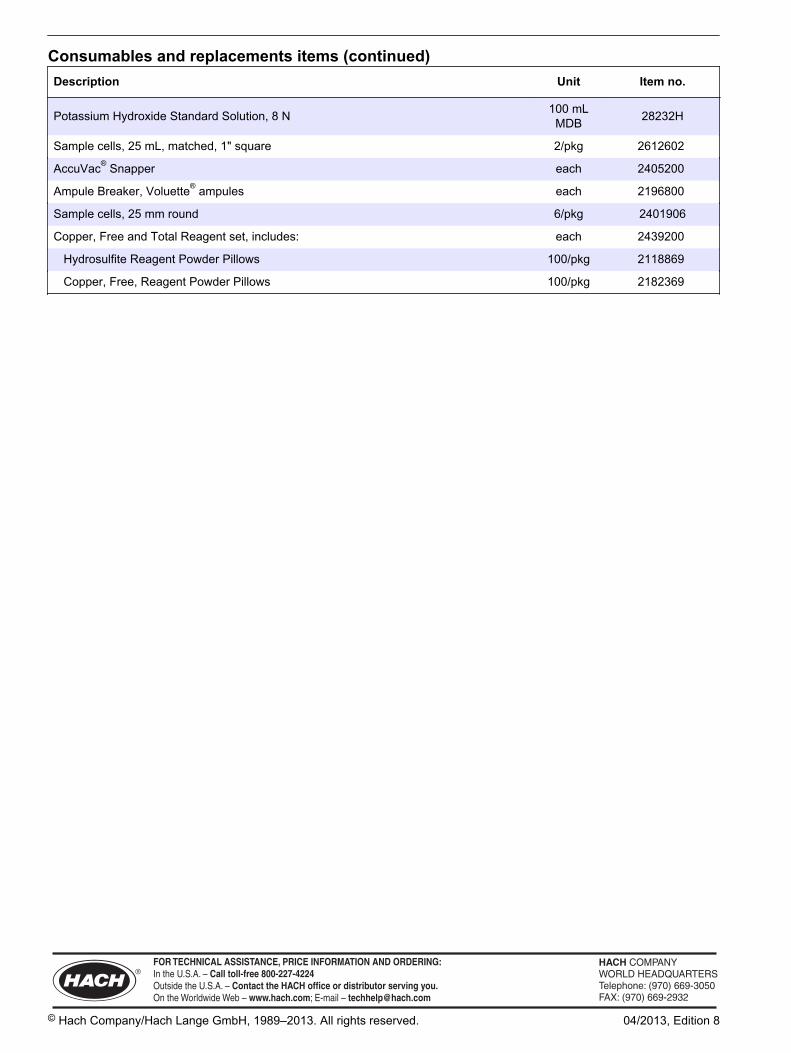
Consumables and replacements items (continued)Description Unit Item no.
Potassium Hydroxide Standard Solution, 8 N 100 mLMDB 28232H
Sample cells, 25 mL, matched, 1" square 2/pkg 2612602
AccuVac® Snapper each 2405200
Ampule Breaker, Voluette® ampules each 2196800
Sample cells, 25 mm round 6/pkg 2401906
Copper, Free and Total Reagent set, includes: each 2439200
Hydrosulfite Reagent Powder Pillows 100/pkg 2118869
Copper, Free, Reagent Powder Pillows 100/pkg 2182369
HACH COMPANYWORLD HEADQUARTERSTelephone: (970) 669-3050FAX: (970) 669-2932
FOR TECHNICAL ASSISTANCE, PRICE INFORMATION AND ORDERING:Call 800-227-4224
Contact the HACH office or distributor serving you.www.hach.com [email protected]
In the U.S.A. –
Outside the U.S.A. –
On the Worldwide Web – ; E-mail –
toll-free
© Hach Company/Hach Lange GmbH, 1989–2013. All rights reserved. 04/2013, Edition 8
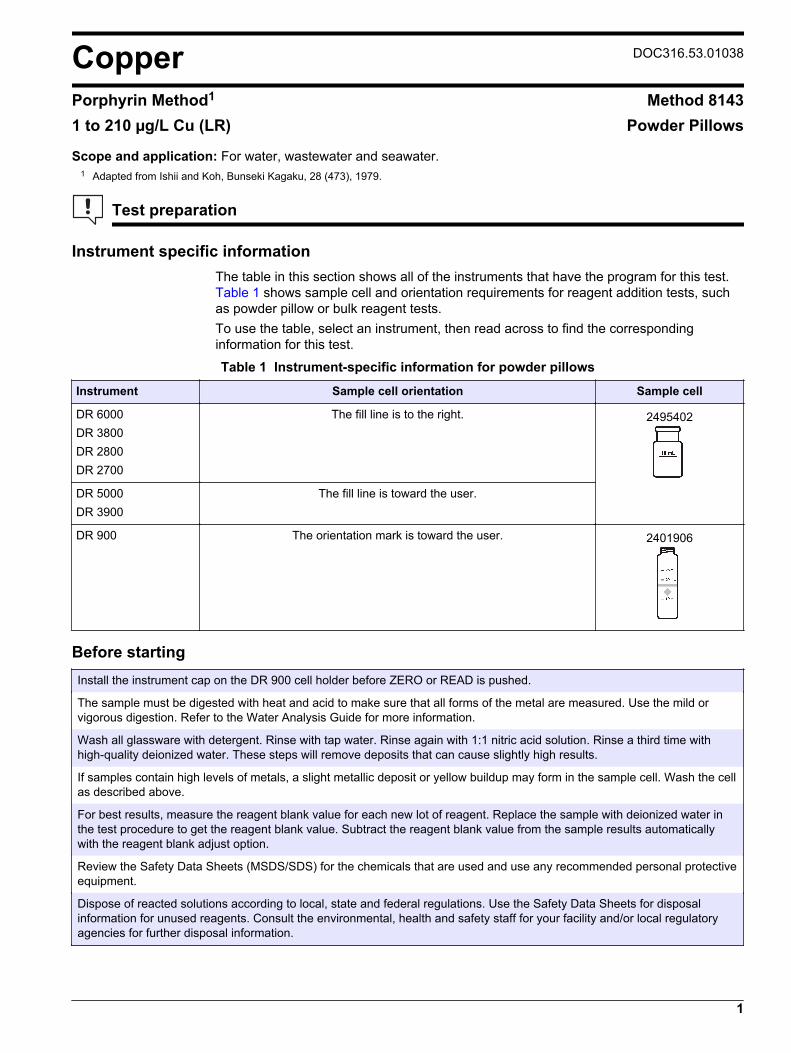
Copper DOC316.53.01038
Porphyrin Method1 Method 81431 to 210 µg/L Cu (LR) Powder Pillows
Scope and application: For water, wastewater and seawater.1 Adapted from Ishii and Koh, Bunseki Kagaku, 28 (473), 1979.
Test preparation
Instrument specific informationThe table in this section shows all of the instruments that have the program for this test. Table 1 shows sample cell and orientation requirements for reagent addition tests, suchas powder pillow or bulk reagent tests.To use the table, select an instrument, then read across to find the correspondinginformation for this test.
Table 1 Instrument-specific information for powder pillows
Instrument Sample cell orientation Sample cell
DR 6000 DR 3800 DR 2800 DR 2700
The fill line is to the right. 2495402
DR 5000 DR 3900
The fill line is toward the user.
DR 900 The orientation mark is toward the user. 2401906
Before startingInstall the instrument cap on the DR 900 cell holder before ZERO or READ is pushed.
The sample must be digested with heat and acid to make sure that all forms of the metal are measured. Use the mild orvigorous digestion. Refer to the Water Analysis Guide for more information.
Wash all glassware with detergent. Rinse with tap water. Rinse again with 1:1 nitric acid solution. Rinse a third time withhigh-quality deionized water. These steps will remove deposits that can cause slightly high results.
If samples contain high levels of metals, a slight metallic deposit or yellow buildup may form in the sample cell. Wash the cellas described above.
For best results, measure the reagent blank value for each new lot of reagent. Replace the sample with deionized water inthe test procedure to get the reagent blank value. Subtract the reagent blank value from the sample results automaticallywith the reagent blank adjust option.
Review the Safety Data Sheets (MSDS/SDS) for the chemicals that are used and use any recommended personal protectiveequipment.
Dispose of reacted solutions according to local, state and federal regulations. Use the Safety Data Sheets for disposalinformation for unused reagents. Consult the environmental, health and safety staff for your facility and/or local regulatoryagencies for further disposal information.
1

Items to collect
Description Quantity
Copper Masking Reagent Powder Pillows, 10-mL 1
Porphyrin 1 Reagent Powder Pillows, 10-mL 2
Porphyrin 2 Reagent Powder Pillows, 10-mL 2
Nitric Acid Solution, 1:1 varies
Sample cells (For information about sample cells, adapters or light shields, refer to Instrumentspecific information on page 1.) 2
Refer to Consumables and replacement items on page 5 for reorder information.
Sample collection and storage• Collect samples in acid-washed plastic bottles.• To preserve samples for later analysis, adjust the sample pH to less than 2 with
concentrated nitric acid (about 2 mL per liter). No acid addition is necessary if thesample is tested immediately.
• Keep preserved samples at room temperature for a maximum of 6 months.• Before analysis, adjust the pH to 2–6 with 5.0 N sodium hydroxide standard solution.• Correct the test result for the dilution from the volume additions.
Powder pillow procedure
Start
1. Start program145 Copper, Porphyrin.For information aboutsample cells, adapters orlight shields, refer to Instrument specificinformation on page 1.Note: Although the programname may vary betweeninstruments, the programnumber does not change.
2. Prepare the blank: Fillthe sample cell with 10 mLof sample.
3. Add the contents of oneCopper Masking Reagentpowder pillow to the samplecell to create the blank.
4. Swirl to dissolve thereagent.
2 Copper, Porphyrin Method (210 µg/L)
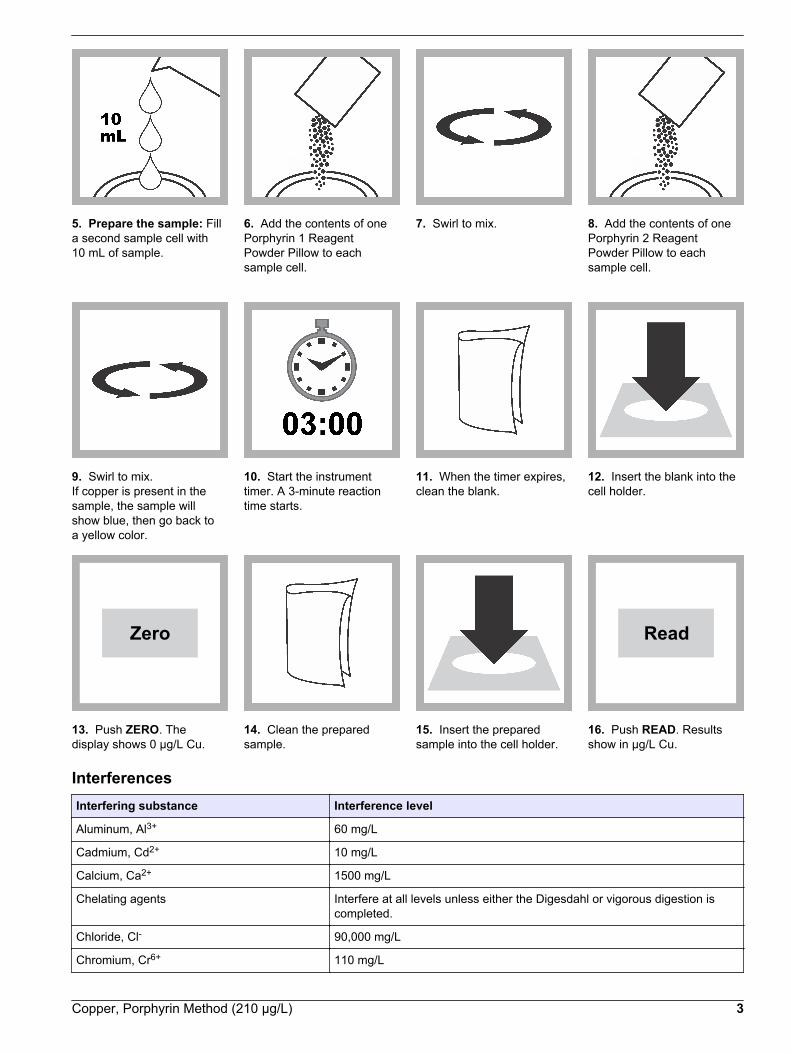
5. Prepare the sample: Filla second sample cell with10 mL of sample.
6. Add the contents of onePorphyrin 1 ReagentPowder Pillow to eachsample cell.
7. Swirl to mix. 8. Add the contents of onePorphyrin 2 ReagentPowder Pillow to eachsample cell.
9. Swirl to mix.If copper is present in thesample, the sample willshow blue, then go back toa yellow color.
10. Start the instrumenttimer. A 3-minute reactiontime starts.
11. When the timer expires,clean the blank.
12. Insert the blank into thecell holder.
Zero
13. Push ZERO. Thedisplay shows 0 µg/L Cu.
14. Clean the preparedsample.
15. Insert the preparedsample into the cell holder.
Read
16. Push READ. Resultsshow in µg/L Cu.
InterferencesInterfering substance Interference level
Aluminum, Al3+ 60 mg/L
Cadmium, Cd2+ 10 mg/L
Calcium, Ca2+ 1500 mg/L
Chelating agents Interfere at all levels unless either the Digesdahl or vigorous digestion iscompleted.
Chloride, Cl- 90,000 mg/L
Chromium, Cr6+ 110 mg/L
Copper, Porphyrin Method (210 µg/L) 3

Interfering substance Interference level
Cobalt, Co2+ 100 mg/L
Fluoride, F- 30,000 mg/L
Iron, Fe2+ 6 mg/L
Lead, Pb2+ 3 mg/L
Magnesium 10,000 mg/L
Manganese 140 mg/L
Mercury, Hg2+ 3 mg/L
Molybdenum 11 mg/L
Nickel, Ni2+ 60 mg/L
Potassium, K+ 60,000 mg/L
Sodium, Na+ 90,000 mg/L
Zinc, Zn2+ 9 mg/L
Highly buffered samples or extreme sample pH Can prevent the correct pH adjustment of the sample by the reagents.Sample pretreatment may be necessary.
Accuracy check
Standard additions method (sample spike)Use the standard additions method (for applicable instruments) to validate the testprocedure, reagents and instrument and to find if there is an interference in the sample.Items to collect:
• Copper Standard Solution, 4 mg/L (PourRite® Ampule or prepare from a dilution of ahigher concentration copper standard solution)
• Ampule breaker• Pipet, TenSette®, 0.1–1.0 mL and tips
1. Use the test procedure to measure the concentration of the sample, then keep the(unspiked) sample in the instrument.
2. Go to the Standard Additions option in the instrument menu.3. Select the values for standard concentration, sample volume and spike volumes.4. Open the standard solution.5. Prepare six spiked 10-mL samples: use the TenSette pipet to add 0.1 mL, 0.2 mL and
0.3 mL of the standard solution, respectively, to two 10-mL portions of fresh sample.Mix well.
6. Use the test procedure to measure the concentration of each of the spiked samples.Start with the smallest sample spike. Measure each of the spiked samples in theinstrument.
7. Select Graph to compare the expected results to the actual results.Note: If the actual results are significantly different from the expected results, make sure thatthe sample volumes and sample spikes are measured accurately. The sample volumes andsample spikes that are used should agree with the selections in the standard additions menu. Ifthe results are not within acceptable limits, the sample may contain an interference.
Standard solution methodUse the standard solution method to validate the test procedure, reagents andinstrument.Items to collect:
• Copper Standard Solution, 10 mg/L• 1000-mL volumetric flask, Class A
4 Copper, Porphyrin Method (210 µg/L)

• 15-mL volumetric pipet, Class A and pipet filler• Deionized water
1. Prepare a 150 µg/L copper standard solution as follows:
a. Use a pipet to add 15.00 mL of 10-mg/L copper standard solution into thevolumetric flask.
b. Dilute to the mark with deionized water. Mix well. Prepare this solution daily.2. Use the test procedure to measure the concentration of the prepared standard
solution.3. Compare the expected result to the actual result.
Note: The factory calibration can be adjusted slightly with the standard adjust option so that theinstrument shows the expected value of the standard solution. The adjusted calibration is thenused for all test results. This adjustment can increase the test accuracy when there are slightvariations in the reagents or instruments.
Method performanceThe method performance data that follows was derived from laboratory tests that weremeasured on a spectrophotometer during ideal test conditions. Users may get differentresults under different test conditions.
Program Standard Precision (95% Confidence Interval) SensitivityConcentration change per 0.010 Abs change
145 50 µg/L Cu 47–53 µg/L Cu 1 µg/L Cu
Summary of methodThe porphyrin method is very sensitive to trace amounts of free copper. The method isfree from most interferences and does not require any sample extraction or concentrationbefore analysis. Interferences from other metals are removed with the copper maskingreagent. The porphyrin indicator forms an intense, yellow-colored complex with any freecopper present in sample. The measurement wavelength is 425 nm forspectrophotometers or 420 nm for colorimeters.
Consumables and replacement itemsRequired reagents and apparatus
Description Quantity/test Unit Item no.
Nitric Acid Solution, 1:1 varies 500 mL 254049
Copper Reagent Set, Porphyrin, 10-mL 1 100/pkg 2603300
Includes:
Copper Masking Reagent Powder Pillow, 10-mL 1 100/pkg 2603449
Porphyrin 1 Reagent Powder Pillow, 10-mL 2 100/pkg 2603549
Porphyrin 2 Reagent Powder Pillow, 10-mL 2 100/pkg 2603649
Recommended standards
Description Unit Item no.
Copper Standard Solution, 4 mg/L, 2 mL Pour-Rite Ampules 20/pkg 2605720
Copper Standard Solution, 10-mg/L Cu 100 mL 12932
Water, deionized 4 L 27256
Copper, Porphyrin Method (210 µg/L) 5

Optional reagents and apparatus
Description Unit Item no.
Sodium Hydroxide Standard Solution, 5.0 N 100 mLMDB 245032
Pipet, TenSette®, 0.1–1.0 mL each 1970001
Pipet tips for TenSette Pipet 1970001 50/pkg 2185696
Pipet, volumetric Class A, 15-mL each 1451539
Flask, volumetric, Class A, 1000-mL each 1457453
Pipet filler, safety bulb each 1465100
Sample cells, 1" square matched set 8/pkg 2495408
Paper, pH, 0–14 pH range 100/pkg 2601300
HACH COMPANYWORLD HEADQUARTERSTelephone: (970) 669-3050FAX: (970) 669-2932
FOR TECHNICAL ASSISTANCE, PRICE INFORMATION AND ORDERING:Call 800-227-4224
Contact the HACH office or distributor serving you.www.hach.com [email protected]
In the U.S.A. –
Outside the U.S.A. –
On the Worldwide Web – ; E-mail –
toll-free
© Hach Company/Hach Lange GmbH, 1989–2013. All rights reserved. 04/2013, Edition 8

Cyanide DOC316.53.01040
Pyridine-Pyrazalone Method1 Method 80270.002 to 0.240 mg/L CN– Powder Pillows
Scope and application: For water, wastewater and seawater.1 Adapted from Epstein, Joseph, Anal. Chem. 19(4), 272 (1947).
Test preparation
Instrument specific informationThe table in this section shows all of the instruments that have the program for this test. Table 1 shows sample cell and orientation requirements for reagent addition tests, suchas powder pillow or bulk reagent tests.To use the table, select an instrument, then read across to find the correspondinginformation for this test.
Table 1 Instrument-specific information for powder pillows
Instrument Sample cell orientation Sample cell
DR 6000 DR 3800 DR 2800 DR 2700
The fill line is to the right. 2495402
DR 5000 DR 3900
The fill line is toward the user.
DR 900 The orientation mark is toward the user. 2401906
Before startingInstall the instrument cap on the DR 900 cell holder before ZERO or READ is pushed.
All samples to be analyzed for cyanide should be treated by acid distillation except when experience has shown that there isno difference in results obtained with or without distillation.
Use a water bath to keep the temperature for the reaction in this test at the optimum 25 °C for best results. Samples lessthan 23 °C need longer reaction times and samples more than 25 °C give low results.
The timing during the test procedure is critical. Open the necessary reagents before this procedure is started for best results.
For best results, measure the reagent blank value for each new lot of reagent. Replace the sample with deionized water inthe test procedure to get the reagent blank value. Subtract the reagent blank value from the sample results automaticallywith the reagent blank adjust option.
Review the Safety Data Sheets (MSDS/SDS) for the chemicals that are used and use any recommended personal protectiveequipment.
Dispose of reacted solutions according to local, state and federal regulations. Use the Safety Data Sheets for disposalinformation for unused reagents. Consult the environmental, health and safety staff for your facility and/or local regulatoryagencies for further disposal information.
1

Items to collect
Description Quantity
CyaniVer® Cyanide 3 Reagent Powder Pillow, 10-mL 1
CyaniVer® Cyanide 4 Reagent Powder Pillow, 10-mL 1
CyaniVer® Cyanide 5 Reagent Powder Pillow, 10-mL 1
Cylinder, graduated, 10-mL 1
Sample cells (For information about sample cells, adapters or light shields, refer to Instrumentspecific information on page 1.) 2
Refer to Consumables and replacement items on page 7 for reorder information.
Sample collection and storage• Collect samples in clean glass or plastic bottles.• The presence of oxidizing agents, sulfides and fatty acids can cause the loss of
cyanide during sample storage. Samples that contain these substances must bepretreated as described in the sections that follow before preservation with sodiumhydroxide. If the sample contains sulfide and is not pretreated, it must be analyzedwithin 24 hours.
• To preserve samples for later analysis, adjust the sample pH to a minimum pH12 with 5.0 N sodium hydroxide standard solution (about 4 mL per liter). Use a glassserological pipet and pipet filler. Measure the pH and add more sodium hydroxide ifnecessary.
• Keep the preserved samples at or below 6°C (43 °F) for up to 14 days.• Before analysis, adjust the pH to 7 with 2.5 N hydrochloric acid standard solution.• Let the sample temperature increase to room temperature before analysis.• Correct the test result for the dilution from the volume additions.
Oxidizing agentsOxidizing agents such as chlorine decompose cyanides during storage. To test for andremove oxidizing agents, pretreat the sample as follows:
1. Measure 25-mL of the sample and add one drop of 10-g/L m-Nitrophenol IndicatorSolution. Swirl to mix.
2. Add 2.5 N Hydrochloric Acid Standard Solution by drops until the color changes fromyellow to colorless. Swirl the sample thoroughly after the addition of each drop.
3. Add two drops of Potassium Iodide Solution, 30-g/L and two drops of Starch IndicatorSolution to the sample. Swirl to mix. The solution will turn blue if oxidizing agents arepresent.
4. If the color is blue, add two level, 1-g measuring spoonfuls of ascorbic acid per liter ofsample.
5. Remove a 25-mL portion of the treated sample and repeat steps 1 to 3. If the sampleturns blue, repeat steps 4 and 5.
6. If the 25-mL sample remains colorless, preserve the remaining sample to pH 12 forstorage with 5 N Sodium Hydroxide Standard Solution.
7. Complete the procedure given under Interfering Substances and Levels, ReducingAgents, to eliminate the effect of excess ascorbic acid, before the cyanide procedureis started.
SulfidesSulfides will quickly convert cyanide to thiocyanate (SCN–). To test for and removesulfide, pretreat the sample as follows:
1. Put a drop of sample on a disc of Hydrogen Sulfide Test Paper that has been wettedwith pH 4 Buffer Solution.
2 Cyanide, Pyridine-Pyrazalone Method (0.240 mg/L)

2. If the test paper darkens, add a 1-g measuring spoon of Lead Acetate to the sample.Repeat step 1.
3. If the test paper continues to turn dark, keep adding Lead Acetate until the sampletests negative for sulfide.
4. Filter the lead sulfide precipitate through Filter Paper and a Funnel. Preserve thesample for storage with 5 N Sodium Hydroxide Standard Solution or neutralize to apH of 7 for analysis.
Fatty acidsCAUTION Perform this operation under a ventilation hood and complete as quickly aspossible.When distilled, fatty acids will pass over with cyanide and under the alkaline conditions ofthe absorber, will form soaps. If the presence of fatty acid is suspected, use the followingpretreatment before preserving samples with sodium hydroxide.
1. Acidify 500 mL of sample to pH 6 or 7 with a 4:1 dilution of glacial Acetic Acid.2. Pour the sample into a 1000-mL separation funnel and add 50 mL of Hexane.3. Stopper the funnel and shake for 1 minute. Allow the layers to separate.4. Drain off the lower sample layer into a 600-mL beaker. If the sample is to be stored,
add enough 5 N Sodium Hydroxide Standard Solution to raise the pH to a minimumpH 12.
Powder pillow procedure
Start
1. Start program160 Cyanide. Forinformation about samplecells, adapters or lightshields, refer to Instrumentspecific informationon page 1.Note: Although the programname may vary betweeninstruments, the programnumber does not change.
2. Prepare the sample: Filla sample cell with 10 mL ofsample.
3. Add the contents of oneCyaniVer 3 CyanideReagent Powder Pillow.
4. Close the sample cell.Shake the sample cell for30 seconds. Let the samplecell sit for another30 seconds.
Cyanide, Pyridine-Pyrazalone Method (0.240 mg/L) 3

5. Add the contents of oneCyaniVer 4 CyanideReagent Powder Pillow.
6. Close the sample cell.Shake the sample cell for10 seconds. Immediately dothe next step. A delay ofmore than 30 seconds willproduce low test results.
7. Add the contents of oneCyaniVer 5 CyanideReagent powder Pillow.
8. Close the sample cell.Shake the sample cellvigorously.If cyanide is in the sample, apink color will show.
9. Start the instrumenttimer. A 30-minute reactiontime starts.The solution will show pink,then will show blue.Samples less than 25 °Crequire a longer reactiontime. Samples greater than25 °C give low test results..
10. Prepare the blank:When the timer expires, fill asecond sample cell with10 mL of sample.
11. Clean the blank. 12. Insert the blank into thecell holder.
Zero
13. Push ZERO. Thedisplay shows 0.000 mg/LCN–.
14. Clean the preparedsample.
15. Insert the preparedsample into the cell holder.
Read
16. Push READ. Resultsshow in mg/L CN–.
4 Cyanide, Pyridine-Pyrazalone Method (0.240 mg/L)

InterferencesInterferingsubstance
Interference level
Chlorine Large amounts of chlorine in the sample cause a milky white precipitate after the addition of the CyaniVer®5 Reagent. If chlorine or other oxidizing agents are known to be present, pretreat the sample before the testwith the procedure in this table for oxidizing agents.
Metals Nickel or cobalt in concentrations up to 1 mg/L do not interfere. Eliminate the interference from up to 20 mg/Lcopper and 5 mg/L iron: add the contents of one HexaVer Chelating Reagent Powder Pillow to a fresh portionof sample and mix. Use this treated sample in the test procedure. Prepare a reagent blank of deionized waterand reagents to zero the instrument.
Oxidizingagents
1. Adjust a 25-mL portion of the alkaline sample to pH 7–9 with 2.5 N Hydrochloric Acid Standard Solution.Count the number of drops of acid added.
2. Add two drops of Potassium Iodide Solution and two drops of Starch Indicator Solution to the sample.Swirl to mix. The sample will turn blue if oxidizing agents are present.
3. Add Sodium Arsenite Solution drop-wise until the sample turns colorless. Swirl the sample thoroughlyafter each drop. Count the number of drops.
4. Take another 25-mL sample and add the total number of drops of Hydrochloric Acid Standard Solutioncounted in step 1.
5. Subtract one drop from the amount of Sodium Arsenite Solution added in step 3. Add this amount to thesample and mix thoroughly. Use this treated sample in the cyanide test procedure.
Reducingagents
1. Adjust a 25-mL portion of the alkaline sample to pH 7–9 with 2.5 N Hydrochloric Acid Standard Solution.Count the number of drops added.
2. Add four drops of Potassium Iodide Solution and four drops of Starch Indicator Solution to the sample.Swirl to mix. The sample should be colorless.
3. Add Bromine Water drop-wise until a blue color shows. Swirl the sample thoroughly after each addition.Count the number of drops.
4. Take another 25-mL sample and add the total number of drops of Hydrochloric Acid Standard Solutioncounted in step 1.
5. Add the total number of drops of Bromine Water counted in step 3 to the sample and mix thoroughly.6. Use this treated sample in the cyanide test procedure.
Turbidity Large amounts of turbidity will cause high readings. Use filter paper and a funnel to filter highly turbid watersamples. Use the filtered sample for the blank and sample preparation in the test procedure. The test resultsshould then be recorded as soluble cyanide.
Acid distillationAll samples to be analyzed for cyanide should be treated by acid distillation except whenexperience has shown that there is no difference in results obtained with or withoutdistillation. With most compounds, a 1-hour reflux is adequate.If thiocyanate is present in the original sample, a distillation step is absolutely necessaryas thiocyanate causes a positive interference. High concentrations of thiocyanate canyield a substantial quantity of sulfide in the distillate. The “rotten egg” smell of hydrogensulfide will accompany the distillate when sulfide is present. The sulfide must be removedfrom the distillate prior to testing.If cyanide is not present, the amount of thiocyanate can be determined. The sample is notdistilled and the final reading is multiplied by 2.2. The result is mg/L SCN–.The distillate can be tested and treated for sulfide after the last step of the distillationprocedure by using the following lead acetate treatment procedure.
1. Put a drop of the distillate (already diluted to 250 mL) on a disc of Hydrogen SulfideTest Paper that has been wetted with pH 4 Buffer Solution.
2. If the test paper darkens, add 2.5 N Hydrochloric Acid Standard Solution by drops tothe distillate until a neutral pH is obtained.
3. Add a 1-g measuring spoon of Lead Acetate to the distillate and mix. Repeat step 1.
Cyanide, Pyridine-Pyrazalone Method (0.240 mg/L) 5

4. If the test paper continues to turn dark, keep adding lead acetate until the distillatetests negative for sulfide. Filter the black lead sulfide precipitate through filter paperand a funnel. Neutralize the liquid filtrate to pH 7 and immediately analyze forcyanide.
Distillation procedureThe following steps describe the distillation process using distillation apparatus andcyanide glassware offered by the manufacturer:
1. Set up the distillation apparatus for cyanide recovery, leaving off the thistle tube.Refer to the Distillation Apparatus Manual. Turn on the water and make certain it isflowing steadily through the condenser.
2. Fill the distillation apparatus cylinder to the 50-mL mark with 0.25 N SodiumHydroxide Standard Solution.
3. Fill a clean 250-mL graduated cylinder to the 250-mL mark with sample and pour itinto the distillation flask. Put a stir bar in the flask and attach the thistle tube.
4. Arrange the vacuum system as shown in the Distillation Apparatus Manual, but do notconnect the vacuum tubing to the gas bubbler. Turn on the water to the aspirator tofull flow and adjust the flow meter to 0.5 SCFH.
5. Connect the vacuum tubing to the gas bubbler, making certain that air flow ismaintained (check the flow meter) and that air is bubbling from the thistle tube andthe gas bubbler.
6. Turn the power switch on and set the stir control to 5. Using a 50-mL graduatedcylinder, pour 50 mL of 19.2 N Sulfuric Acid Standard Solution through the thistle tubeand into the distillation flask.
7. Using a water bottle, rinse the thistle tube with a small amount of deionized water.8. Allow the solution to mix for 3 minutes, then add 20 mL Magnesium Chloride Reagent
through the thistle tube and rinse again. Allow the solution to mix for 3 more minutes.9. Make sure that there is a constant flow of water through the condenser.10. Turn the heat control to 10.11. Carefully monitor the distillation flask at this point in the procedure. Once the sample
begins to boil, slowly lower the air flow to 0.3 SCFH. If the contents of the distillationflask begin to back up through the thistle tube, increase the air flow by adjusting theflow meter until the contents do not back up through the thistle tube. Boil the samplefor 1 hour.
12. After 1 hour, turn off the still, but maintain the air flow for 15 minutes more.13. After 15 minutes, remove the rubber stopper on the 500-mL vacuum flask to break
the vacuum and turn off the water to the aspirator. Turn off the water to thecondenser.
14. Remove the gas bubbler/cylinder assembly from the distillation apparatus. Separatethe gas bubbler from the cylinder and pour the contents of the cylinder into a 250-mL,Class A volumetric flask. Rinse the gas bubbler, cylinder and J-tube connector withdeionized water and add the washings to the volumetric flask.
15. Fill the flask to the mark with deionized water and mix thoroughly. Neutralize thecontents of the flask. Use the distilled sample in the test procedure for cyanide.
Pollution prevention and waste managementReacted samples may contain cyanide and must be disposed of as a hazardous waste. Itis imperative that these materials be handled safely to prevent the release of hydrogencyanide gas (an extremely toxic material with the smell of almonds). Most cyanidecompounds are stable and can be safely stored for disposal in highly alkaline solutions(pH >11) such as 2 N sodium hydroxide. Never mix these wastes with other laboratorywastes which may contain lower pH materials such as acids or even water. Dispose ofreacted solutions according to local, state and federal regulations.
6 Cyanide, Pyridine-Pyrazalone Method (0.240 mg/L)

Accuracy check
Standard solution methodUse the standard solution method to validate the test procedure, reagents andinstrument.Items to collect:
• 0.2503 g potassium cyanide• 1-L volumetric flask, Class A (2)• 2-mL volumetric pipet, Class A and pipet filler• Deionized water
1. Prepare a 100-mg/L cyanide stock solution as follows:
a. Add 0.2503 g of potassium cyanide into a 1-L volumetric flask.b. Dilute to the mark with deionized water. Mix well. Prepare the stock solution each
week.2. Prepare a 0.200 mg/L cyanide standard solution as follows:
a. Use a pipet to add 2.00 mL of the 100-mg/L cyanide stock solution into a 1-Lvolumetric flask.
b. Dilute to the mark with deionized water. Mix well. Prepare the standard solutionimmediately before use.
3. Use the test procedure to measure the concentration of the prepared standardsolution.
4. Compare the expected result to the actual result.Note: The factory calibration can be adjusted slightly with the standard adjust option so that theinstrument shows the expected value of the standard solution. The adjusted calibration is thenused for all test results. This adjustment can increase the test accuracy when there are slightvariations in the reagents or instruments.
Method performanceThe method performance data that follows was derived from laboratory tests that weremeasured on a spectrophotometer during ideal test conditions. Users may get differentresults under different test conditions.
Program Standard Precision (95% Confidence Interval) SensitivityConcentration change per 0.010 Abs change
160 0.100 mg/L CN– 0.090–0.110 mg/L CN– 0.002 mg/L CN–
Summary of methodThe Pyridine-Pyrazalone method used for cyanide measurements gives an intense bluecolor with free cyanide. A sample distillation is necessary to determine cyanide that iscomplexed with transition and heavy metals. The measurement wavelength is 612 nm forspectrophotometers or 610 nm for colorimeters.
Consumables and replacement itemsRequired reagents
Description Quantity/test Unit Item no.
Cyanide Reagent Set, CyaniVer, 10-mL 1 1 2430200
Includes:
CyaniVer® 3 Cyanide Reagent Powder Pillow, 10-mL 1 100/pkg 2106869
CyaniVer® 4 Cyanide Reagent Powder Pillow, 10-mL 1 100/pkg 2106969
CyaniVer® 5 Cyanide Reagent Powder Pillow, 10-mL 1 100/pkg 2107069
Cyanide, Pyridine-Pyrazalone Method (0.240 mg/L) 7
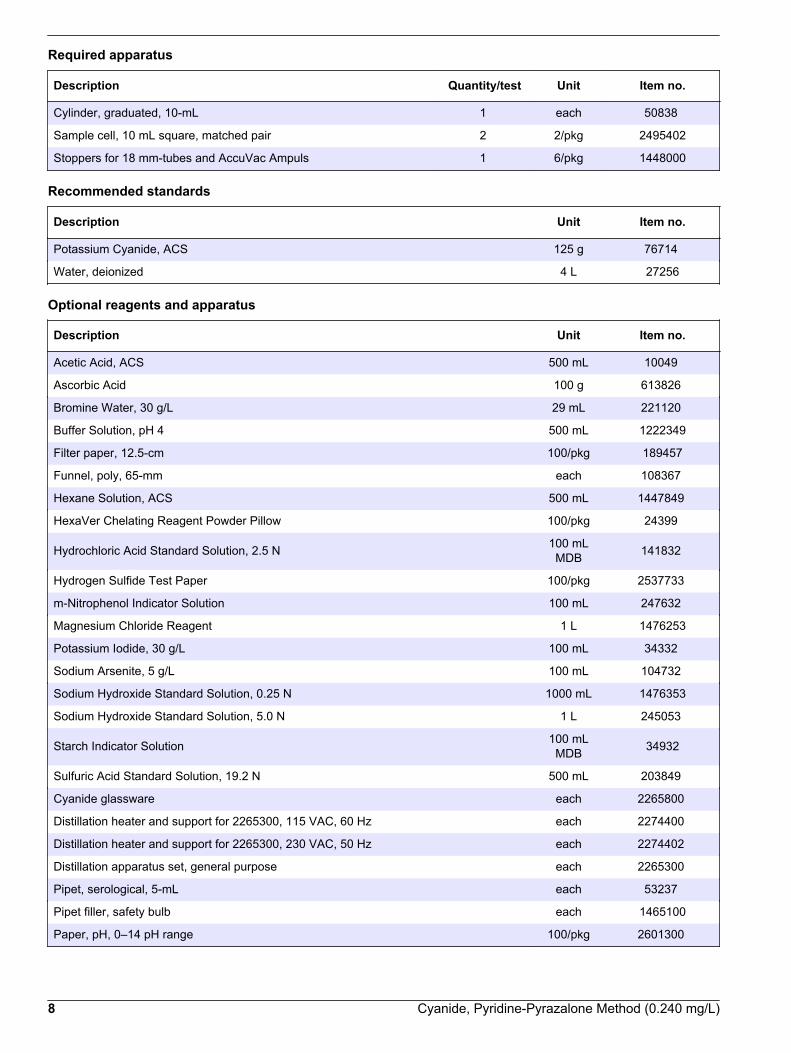
Required apparatus
Description Quantity/test Unit Item no.
Cylinder, graduated, 10-mL 1 each 50838
Sample cell, 10 mL square, matched pair 2 2/pkg 2495402
Stoppers for 18 mm-tubes and AccuVac Ampuls 1 6/pkg 1448000
Recommended standards
Description Unit Item no.
Potassium Cyanide, ACS 125 g 76714
Water, deionized 4 L 27256
Optional reagents and apparatus
Description Unit Item no.
Acetic Acid, ACS 500 mL 10049
Ascorbic Acid 100 g 613826
Bromine Water, 30 g/L 29 mL 221120
Buffer Solution, pH 4 500 mL 1222349
Filter paper, 12.5-cm 100/pkg 189457
Funnel, poly, 65-mm each 108367
Hexane Solution, ACS 500 mL 1447849
HexaVer Chelating Reagent Powder Pillow 100/pkg 24399
Hydrochloric Acid Standard Solution, 2.5 N 100 mLMDB 141832
Hydrogen Sulfide Test Paper 100/pkg 2537733
m-Nitrophenol Indicator Solution 100 mL 247632
Magnesium Chloride Reagent 1 L 1476253
Potassium Iodide, 30 g/L 100 mL 34332
Sodium Arsenite, 5 g/L 100 mL 104732
Sodium Hydroxide Standard Solution, 0.25 N 1000 mL 1476353
Sodium Hydroxide Standard Solution, 5.0 N 1 L 245053
Starch Indicator Solution 100 mLMDB 34932
Sulfuric Acid Standard Solution, 19.2 N 500 mL 203849
Cyanide glassware each 2265800
Distillation heater and support for 2265300, 115 VAC, 60 Hz each 2274400
Distillation heater and support for 2265300, 230 VAC, 50 Hz each 2274402
Distillation apparatus set, general purpose each 2265300
Pipet, serological, 5-mL each 53237
Pipet filler, safety bulb each 1465100
Paper, pH, 0–14 pH range 100/pkg 2601300
8 Cyanide, Pyridine-Pyrazalone Method (0.240 mg/L)

Consumables and replacement items (continued)Description Unit Item no.
Spoon, measuring, 1 g each 51000
Thermometer, non-mercury, -10 to +225 °C each 2635700
Cyanide, Pyridine-Pyrazalone Method (0.240 mg/L) 9

HACH COMPANYWORLD HEADQUARTERSTelephone: (970) 669-3050FAX: (970) 669-2932
FOR TECHNICAL ASSISTANCE, PRICE INFORMATION AND ORDERING:Call 800-227-4224
Contact the HACH office or distributor serving you.www.hach.com [email protected]
In the U.S.A. –
Outside the U.S.A. –
On the Worldwide Web – ; E-mail –
toll-free
© Hach Company/Hach Lange GmbH, 1989–2013. All rights reserved. 04/2013, Edition 8

Cyanuric Acid DOC316.53.01183
Turbidimetric Method Method 81395 to 50 mg/L (spectrophotometers)7 to 55 mg/L (colorimeters)
Powder Pillows
Scope and application: For water, pools and spas.
Test preparation
Instrument specific informationThe table in this section shows all of the instruments that have the program for this test. Table 1 shows sample cell and orientation requirements for reagent addition tests, suchas powder pillow or bulk reagent tests.To use the table, select an instrument, then read across to find the correspondinginformation for this test.
Table 1 Instrument-specific information for powder pillows
Instrument Sample cell orientation Sample cell
DR 6000 DR 3800 DR 2800 DR 2700
The fill line is to the right. 2495402
DR 5000 DR 3900
The fill line is toward the user.
DR 900 The orientation mark is toward the user. 2401906
Before startingInstall the instrument cap on the DR 900 cell holder before ZERO or READ is pushed.
Clean sample cells with soap, water and a brush soon after each test to prevent a build-up of film on the sample cells.
Filter samples that are turbid with filter paper and a funnel.
Do not use the Pour-Thru Cell or sipper module (for applicable instruments) with this test.
Review the Safety Data Sheets (MSDS/SDS) for the chemicals that are used and use any recommended personal protectiveequipment.
Dispose of reacted solutions according to local, state and federal regulations. Use the Safety Data Sheets for disposalinformation for unused reagents. Consult the environmental, health and safety staff for your facility and/or local regulatoryagencies for further disposal information.
1

Items to collect
Description Quantity
Bottle, mixing, square glass 1
Cyanuric Acid 2 Reagent Powder Pillow 1
Sample cells (For information about sample cells, adapters or light shields, refer to Instrumentspecific information on page 1.) 2
Refer to Consumables and replacement items on page 4 for reorder information.
Sample collection• Collect samples in clean glass or plastic bottles.• Samples must be analyzed within 24 hours.
Turbidimetric method
Start
1. Start program170 Cyanuric Acid. Forinformation about samplecells, adapters or lightshields, refer to Instrumentspecific informationon page 1.Note: Although the programname may vary betweeninstruments, the programnumber does not change.
2. Prepare the sample: Filla marked bottle to the 25-mL line with sample.For instruments thatmeasure with a 25-mLsample cell, prepare thesample in the sample cell.
3. Add the contents of oneCyanuric Acid 2 ReagentPowder Pillow.
4. Swirl to mix.After the reagent is added, awhite turbidity will show ifcyanuric acid is in thesample. Accuracy is notaffected by undissolvedpowder.
5. Start the instrumenttimer. A 3-minute reactiontime starts.
6. Prepare the blank: Fill asample cell with 10 mL ofunreacted sample.
7. Clean the blank. 8. Insert the blank into thecell holder.
2 Cyanuric Acid, Turbidimetric Method (50 mg/L)
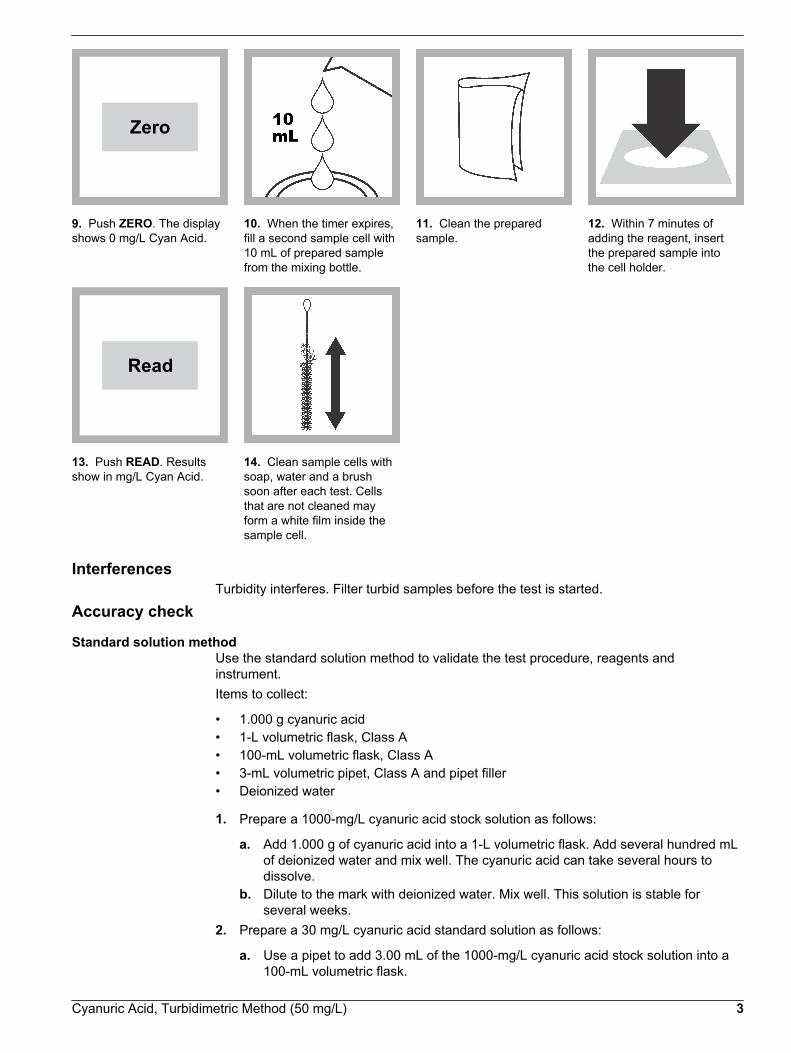
Zero
9. Push ZERO. The displayshows 0 mg/L Cyan Acid.
10. When the timer expires,fill a second sample cell with10 mL of prepared samplefrom the mixing bottle.
11. Clean the preparedsample.
12. Within 7 minutes ofadding the reagent, insertthe prepared sample intothe cell holder.
Read
13. Push READ. Resultsshow in mg/L Cyan Acid.
14. Clean sample cells withsoap, water and a brushsoon after each test. Cellsthat are not cleaned mayform a white film inside thesample cell.
InterferencesTurbidity interferes. Filter turbid samples before the test is started.
Accuracy check
Standard solution methodUse the standard solution method to validate the test procedure, reagents andinstrument.Items to collect:
• 1.000 g cyanuric acid• 1-L volumetric flask, Class A• 100-mL volumetric flask, Class A• 3-mL volumetric pipet, Class A and pipet filler• Deionized water
1. Prepare a 1000-mg/L cyanuric acid stock solution as follows:
a. Add 1.000 g of cyanuric acid into a 1-L volumetric flask. Add several hundred mLof deionized water and mix well. The cyanuric acid can take several hours todissolve.
b. Dilute to the mark with deionized water. Mix well. This solution is stable forseveral weeks.
2. Prepare a 30 mg/L cyanuric acid standard solution as follows:
a. Use a pipet to add 3.00 mL of the 1000-mg/L cyanuric acid stock solution into a100-mL volumetric flask.
Cyanuric Acid, Turbidimetric Method (50 mg/L) 3

b. Dilute to the mark with deionized water. Mix well. Prepare the standard solutioneach day.
3. Use the test procedure to measure the concentration of the prepared standardsolution.
4. Compare the expected result to the actual result.Note: The factory calibration can be adjusted slightly with the standard adjust option so that theinstrument shows the expected value of the standard solution. The adjusted calibration is thenused for all test results. This adjustment can increase the test accuracy when there are slightvariations in the reagents or instruments.
Method performanceThe method performance data that follows was derived from laboratory tests that weremeasured on a spectrophotometer during ideal test conditions. Users may get differentresults under different test conditions.
Program Standard Precision (95% ConfidenceInterval)
SensitivityConcentration change per 0.010 Abs change
170 10 mg/L cyanuric acid 7–13 mg/L cyanuric acid at 10 and 30 mg/L: 0.3 mg/L; at 50 mg/L: 0.4 mg/Lcyanuric acid
Summary of methodThe test for cyanuric acid uses the turbidimetric method. Cyanuric Acid 2 Reagentprecipitates any cyanuric acid in the sample and holds it in suspension. The amount ofturbidity caused by the suspended particles is directly proportional to the amount ofcyanuric acid in the sample. The measurement wavelength is 480 nm forspectrophotometers or 520 nm for colorimeters.
Consumables and replacement itemsRequired reagents
Description Quantity/test Unit Item no.
Cyanuric Acid 2 Reagent Powder Pillow 1 50/pkg 246066
Required apparatus
Description Quantity/test Unit Item no.
Bottle, square, with 25 mL mark 1 each 1704200
Sample cell, 10 mL square, matched pair 2 2/pkg 2495402
Recommended standards
Description Unit Item no.
Cyanuric Acid 25 g 712924
Water, deionized 4 L 27256
Optional reagents and apparatus
Description Unit Item no.
Balance, 600 g x 0.01 g, 100-240 VAC each 2937201
Brush, test tube each 69000
Filter paper, 12.5-cm 100/pkg 189457
Flask, volumetric, 100-mL each 2636642
4 Cyanuric Acid, Turbidimetric Method (50 mg/L)

Consumables and replacement items (continued)Description Unit Item no.
Flask, volumetric, Class A, 1000-mL each 2636653
Funnel, poly, 65-mm each 108367
Liqui-Nox Phosphate-free detergent 946 mL 2088153
Pipet, TenSette®, 1.0 to 10.0 mL each 1970010
Pipet tips for TenSette Pipet 1970010 50/pkg 2199796
Pipet, volumetric, Class A, 3-mL each 1451503
Pipet filler, safety bulb each 1465100
Cyanuric Acid, Turbidimetric Method (50 mg/L) 5

HACH COMPANYWORLD HEADQUARTERSTelephone: (970) 669-3050FAX: (970) 669-2932
FOR TECHNICAL ASSISTANCE, PRICE INFORMATION AND ORDERING:Call 800-227-4224
Contact the HACH office or distributor serving you.www.hach.com [email protected]
In the U.S.A. –
Outside the U.S.A. –
On the Worldwide Web – ; E-mail –
toll-free
© Hach Company/Hach Lange GmbH, 1989–2013. All rights reserved. 04/2013, Edition 8

Fluoride DOC316.53.01041
USEPA SPADNS Method1 Method 80290.02 to 2.00 mg/L F– Reagent Solution or AccuVac® Ampuls
Scope and application: For water, wastewater and seawater; USEPA accepted for reporting for drinking andwastewater analyses (distillation required).2
1 Adapted from Standard Methods for the Examination of Water and Wastewater, 4500-F B & D.2 Procedure is equivalent to USEPA method 340.1 for drinking water and wastewater.
Test preparation
Instrument-specific tableThe tables in this section show all of the instruments that have the program for this test. Table 1 shows sample cell and orientation requirements for reagent addition tests, suchas powder pillow or bulk reagent tests. Table 2 shows sample cell and adapterrequirements for AccuVac Ampul tests.To use either table, select an instrument, then read across to find the correspondinginformation for this test.
Table 1 Instrument-specific information for reagent solution
Instrument Sample cell orientation Sample cell
DR 6000 DR 3800 DR 2800 DR 2700
The fill line is to the right. 2495402
DR 5000 DR 3900
The fill line is toward the user.
DR 900 The fill line is toward the user. 2401906
Table 2 Instrument-specific information for AccuVac Ampuls
Instrument Adapter
DR 6000 DR 5000 DR 900
—
DR 3900 LZV846 (A)
DR 3800 DR 2800 DR 2700
LZV584 (C)
Before startingInstall the instrument cap on the DR 900 cell holder before ZERO or READ is pushed.
The sample and deionized water must be at the same temperature (±1 °C). Temperature adjustments can be made beforeor after the reagent addition.
1

Make sure that the sample cells are clean and dry before the test.
Measure the volume of the reagent accurately. Use a pipet if possible.
The reagent that is used in this test is corrosive and toxic. Use protection for eyes and skin and be prepared to flush anyspills with running water.
The SPADNS Reagent contains sodium arsenite. The reacted solutions must be disposed of according to local, state andfederal regulations.
Minor variations between lots of reagent become measurable above 1.5 mg/L. While results above 1.5 mg/L are usable formost purposes, for the best accuracy dilute the sample to a lower concentration.
Do not use the Pour-Thru Cell or sipper module (for applicable instruments) with this test.
Review the Safety Data Sheets (MSDS/SDS) for the chemicals that are used and use any recommended personal protectiveequipment.
Dispose of reacted solutions according to local, state and federal regulations. Use the Safety Data Sheets for disposalinformation for unused reagents. Consult the environmental, health and safety staff for your facility and/or local regulatoryagencies for further disposal information.
Items to collectReagent solution
Description Quantity
SPADNS Reagent Solution 4 mL
Deionized water 10 mL
Pipet, volumetric, 2-mL 1
Pipet, volumetric, 10-mL 1
Pipet filler bulb 1
Sample cells (For information about sample cells, adapters or light shields, refer to Instrument-specific table PPAV.) 2
Thermometer, –10 to 110 °C 1
Refer to Consumables and replacement items on page 6 for reorder information.
AccuVac Ampuls
Description Quantity
SPADNS Fluoride Reagent AccuVac® Ampuls 2
Deionized water 40 mL
Beaker, 50-mL 1
Stoppers for 18 mm tubes and AccuVac Ampuls 2
Refer to Consumables and replacement items on page 6 for reorder information.
Sample collection and storage• Collect samples in clean glass or plastic bottles.• Samples can be kept for up to 28 days.• Let the sample temperature increase to room temperature before analysis.
2 Fluoride, SPADNS Method (2.00 mg/L)
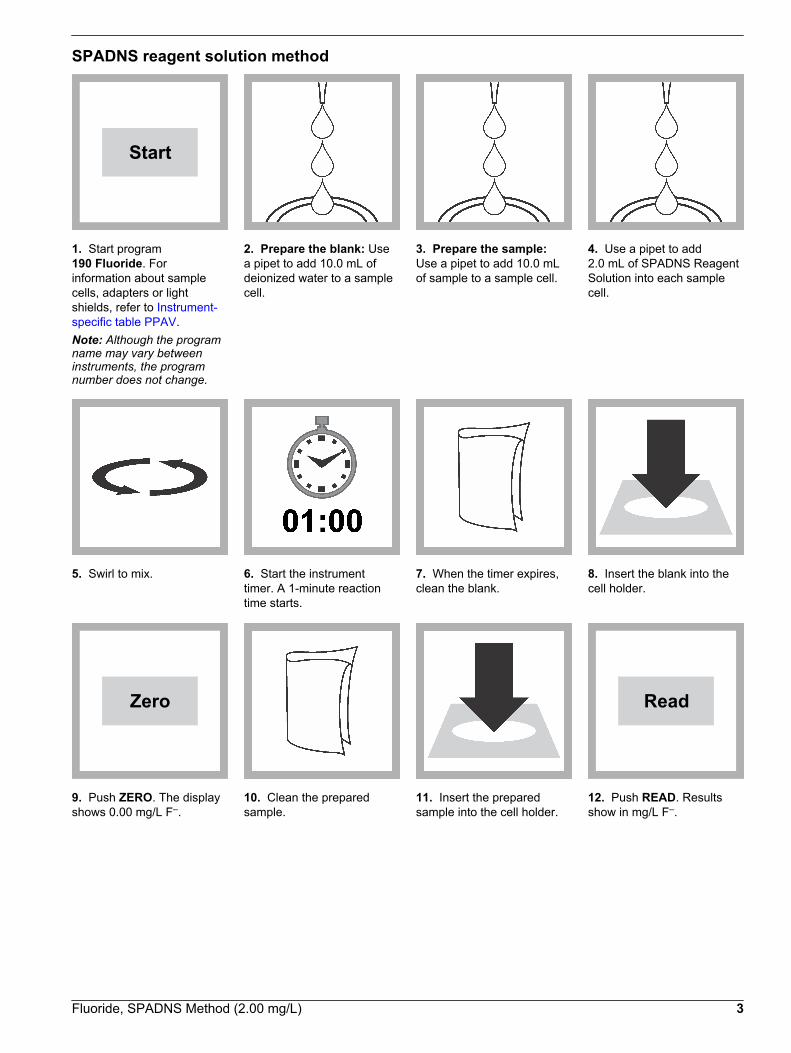
SPADNS reagent solution method
Start
1. Start program190 Fluoride. Forinformation about samplecells, adapters or lightshields, refer to Instrument-specific table PPAV.Note: Although the programname may vary betweeninstruments, the programnumber does not change.
2. Prepare the blank: Usea pipet to add 10.0 mL ofdeionized water to a samplecell.
3. Prepare the sample:Use a pipet to add 10.0 mLof sample to a sample cell.
4. Use a pipet to add2.0 mL of SPADNS ReagentSolution into each samplecell.
5. Swirl to mix. 6. Start the instrumenttimer. A 1-minute reactiontime starts.
7. When the timer expires,clean the blank.
8. Insert the blank into thecell holder.
Zero
9. Push ZERO. The displayshows 0.00 mg/L F–.
10. Clean the preparedsample.
11. Insert the preparedsample into the cell holder.
Read
12. Push READ. Resultsshow in mg/L F–.
Fluoride, SPADNS Method (2.00 mg/L) 3

AccuVac Ampul procedure
Start
1. Start program195 Fluoride AV. Forinformation about samplecells, adapters or lightshields, refer to Instrument-specific table PPAV.Note: Although the programname may vary betweeninstruments, the programnumber does not change.
2. Prepare the blank: Pourat least 40 mL of deionizedwater in a 50-mL beaker. Fillone SPADNS FluorideReagent AccuVac Ampulwith deionized water. Keepthe tip immersed while theAmpul fills completely.
3. Prepare the sample:Collect at least 40 mL ofsample in a 50-mL beaker.Fill the second SPADNSFluoride Reagent AccuVacAmpul with sample. Keepthe tip immersed while theAmpul fills completely.
4. Quickly invert the Ampulsseveral times to mix.
5. Start the instrumenttimer. A 1-minute reactiontime starts.
6. When the timer expires,clean the blank AccuVacAmpul.
7. Insert the blank AccuVacAmpul into the cell holder.
Zero
8. Push ZERO. The displayshows 0.00 mg/L F–.
9. Clean the AccuVacAmpul.
10. Insert the preparedsample AccuVac Ampul intothe cell holder.
Read
11. Push READ. Resultsshow in mg/L F–.
4 Fluoride, SPADNS Method (2.00 mg/L)
InterferencesThis test is sensitive to small amounts of contamination. Glassware must be very clean(acid rinse before each use). Repeat the test with the same glassware to make sure thatthe results are accurate.
Interfering substance Interference level
Alkalinity (as CaCO3) At 5000 mg/L, it causes a –0.1 mg/L F– error.
Aluminum At 0.1 mg/L, it causes a –0.1 mg/L F– error. To find whether there is an aluminum interference,read the concentration 1 minute after reagent addition, then again after 15 minutes. Anappreciable increase in concentration suggests aluminum interference. To remove the effect ofup to 3.0 mg/L aluminum, wait 2 hours, then take the final reading.
Chloride At 7000 mg/L, it causes a +0.1 mg/L F– error.
Chlorine SPADNS Reagent contains enough arsenite to remove up to 5 mg/L chlorine. For higherchlorine levels, add one drop of Sodium Arsenite Solution, 5.0 g/L, to 25 mL of sample toremove each additional 2 mg/L of Chlorine.
Iron, ferric At 10 mg/L, it causes a –0.1 mg/L F– error.
Phosphate, ortho At 16 mg/L, it causes a +0.1 mg/L F– error.
Sodium hexametaphosphate At 1.0 mg/L, it causes a +0.1 mg/L F– error.
Sulfate At 200 mg/L, it causes a +0.1 mg/L F– error.
DistillationTo eliminate most interferences, distill the sample, then use the distilled sample in the testprocedure.Prerequisite—prepare the distillation solution:
1. Measure 60 mL of deionized water into a 250-mL, glass Erlenmeyer flask.2. With constant stirring, add 120 mL of concentrated sulfuric acid. Caution: The
mixture will become very hot. Put the flask in an ice bath to decrease thetemperature of the solution.
Distillation procedure:
1. Set up the distillation apparatus for general purpose distillation. Refer to theDistillation Apparatus manual for proper assembly. Use a 125-mL Erlenmeyer flask tocollect the distillate.
2. Turn on the water and maintain a steady flow through the condenser.3. Use a 100-mL graduated cylinder to add 100 mL of sample into the distillation flask.
Add a magnetic stir bar and 5 glass beads.4. Turn the stirrer power switch on. Turn the stir control to 5.5. Use a 250-mL graduated cylinder to carefully add 150 mL of distillation solution into
the flask.Note: For samples with large amounts of chloride, add 5 mg of silver sulfate to the sample forevery mg/L of chloride in the sample.
6. With the thermometer inserted, turn the heat control to 10. The yellow pilot lamp is anindication that the heater is on.
7. When the temperature is 180 °C (356 °F) or when 100 mL of distillate has beencollected, turn the still off (takes about 1 hour).
8. Dilute the distillate to a volume of 100 mL, if necessary. Use the diluted distillate inthe test procedure.
Pollution prevention and waste managementReacted samples contain sodium arsenite and must be disposed of as a hazardouswaste. Dispose of reacted solutions according to local, state and federal regulations.
Fluoride, SPADNS Method (2.00 mg/L) 5

Accuracy check
Standard solution methodUse the standard solution method to validate the test procedure, reagents andinstrument.Items to collect:
• Standard solution within the test range
1. Use the test procedure to measure the concentration of the standard solution.2. Compare the expected result to the actual result.
Note: The factory calibration can be adjusted slightly with the standard adjust option so that theinstrument shows the expected value of the standard solution. The adjusted calibration is thenused for all test results. This adjustment can increase the test accuracy when there are slightvariations in the reagents or instruments.
Method performanceThe method performance data that follows was derived from laboratory tests that weremeasured on a spectrophotometer during ideal test conditions. Users may get differentresults under different test conditions.
Program Standard Precision (95% Confidence Interval) SensitivityConcentration change per 0.010 Abs change
190 1.00 mg/L F– 0.97–1.03 mg/L F– 0.024 mg/L F–
195 1.00 mg/L F– 0.92–1.08 mg/L F– 0.03 mg/L F–
Summary of methodThe SPADNS Method for fluoride determination involves the reaction of fluoride with ared zirconium-dye solution. The fluoride combines with part of the zirconium to form acolorless complex, thus bleaching the red color in an amount proportional to the fluorideconcentration. This method is accepted by the EPA for NPDES and NPDWR reportingpurposes when the samples have been distilled. Seawater and wastewater samplesrequire distillation. The measurement wavelength is 580 nm for spectrophotometers or610 nm for colorimeters.
Consumables and replacement itemsRequired reagents
Description Quantity/test Unit Item no.
SPADNS Reagent Solution 4 mL 500 mL 44449
OR
SPADNS Fluoride Reagent AccuVac® Ampul 2 25/pkg 2506025
Water, deionized varies 4 L 27256
Required apparatus (solution)
Description Quantity/test Unit Item no.
Pipet filler, safety bulb 1 each 1465100
Pipet, volumetric, Class A, 2.00-mL 1 each 1451536
Pipet, volumetric, Class A, 10.00-mL 1 each 1451538
Sample cell, 10 mL square, matched pair 2 2/pkg 2495402
Thermometer, -10 to 110 °C 1 each 187701
6 Fluoride, SPADNS Method (2.00 mg/L)
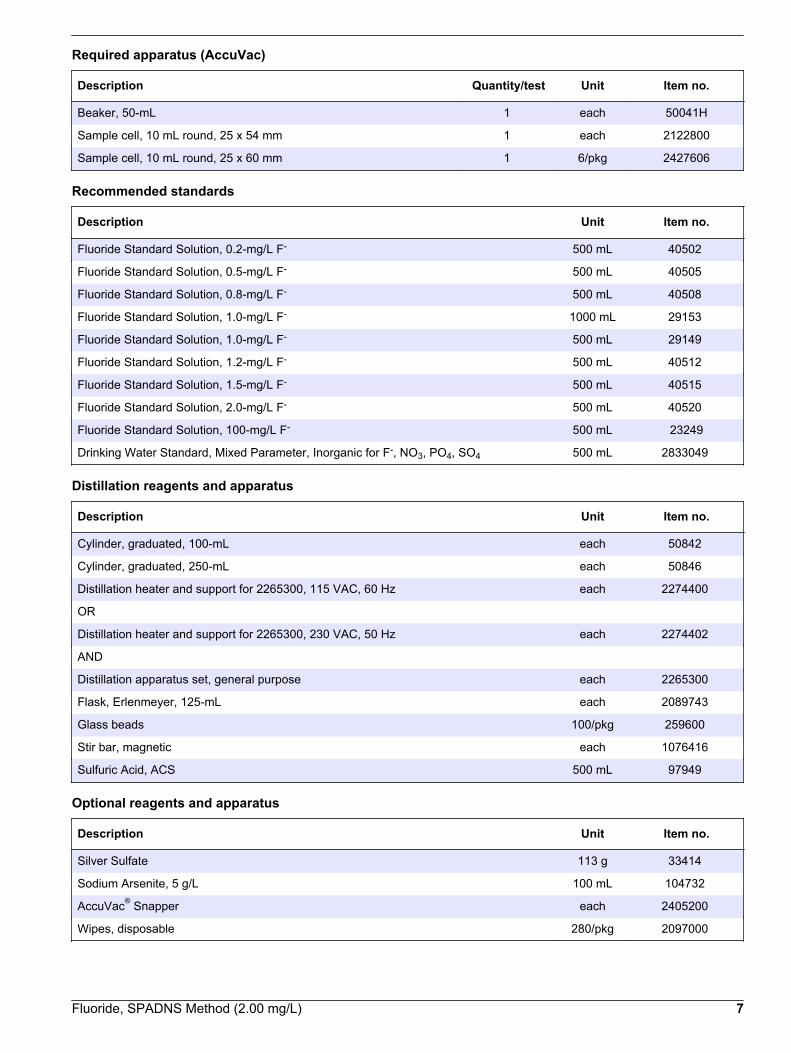
Required apparatus (AccuVac)
Description Quantity/test Unit Item no.
Beaker, 50-mL 1 each 50041H
Sample cell, 10 mL round, 25 x 54 mm 1 each 2122800
Sample cell, 10 mL round, 25 x 60 mm 1 6/pkg 2427606
Recommended standards
Description Unit Item no.
Fluoride Standard Solution, 0.2-mg/L F- 500 mL 40502
Fluoride Standard Solution, 0.5-mg/L F- 500 mL 40505
Fluoride Standard Solution, 0.8-mg/L F- 500 mL 40508
Fluoride Standard Solution, 1.0-mg/L F- 1000 mL 29153
Fluoride Standard Solution, 1.0-mg/L F- 500 mL 29149
Fluoride Standard Solution, 1.2-mg/L F- 500 mL 40512
Fluoride Standard Solution, 1.5-mg/L F- 500 mL 40515
Fluoride Standard Solution, 2.0-mg/L F- 500 mL 40520
Fluoride Standard Solution, 100-mg/L F- 500 mL 23249
Drinking Water Standard, Mixed Parameter, Inorganic for F-, NO3, PO4, SO4 500 mL 2833049
Distillation reagents and apparatus
Description Unit Item no.
Cylinder, graduated, 100-mL each 50842
Cylinder, graduated, 250-mL each 50846
Distillation heater and support for 2265300, 115 VAC, 60 Hz each 2274400
OR
Distillation heater and support for 2265300, 230 VAC, 50 Hz each 2274402
AND
Distillation apparatus set, general purpose each 2265300
Flask, Erlenmeyer, 125-mL each 2089743
Glass beads 100/pkg 259600
Stir bar, magnetic each 1076416
Sulfuric Acid, ACS 500 mL 97949
Optional reagents and apparatus
Description Unit Item no.
Silver Sulfate 113 g 33414
Sodium Arsenite, 5 g/L 100 mL 104732
AccuVac® Snapper each 2405200
Wipes, disposable 280/pkg 2097000
Fluoride, SPADNS Method (2.00 mg/L) 7

HACH COMPANYWORLD HEADQUARTERSTelephone: (970) 669-3050FAX: (970) 669-2932
FOR TECHNICAL ASSISTANCE, PRICE INFORMATION AND ORDERING:Call 800-227-4224
Contact the HACH office or distributor serving you.www.hach.com [email protected]
In the U.S.A. –
Outside the U.S.A. –
On the Worldwide Web – ; E-mail –
toll-free
© Hach Company/Hach Lange GmbH, 1989–2013. All rights reserved. 04/2013, Edition 8
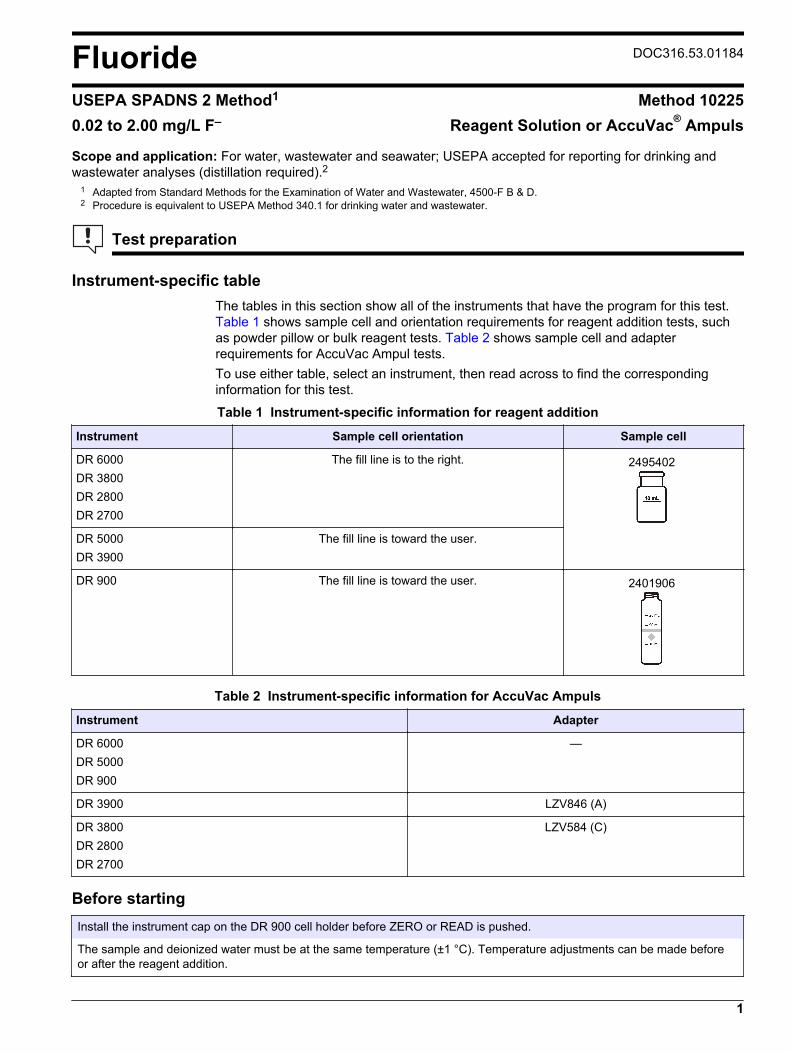
Fluoride DOC316.53.01184
USEPA SPADNS 2 Method1 Method 102250.02 to 2.00 mg/L F– Reagent Solution or AccuVac® Ampuls
Scope and application: For water, wastewater and seawater; USEPA accepted for reporting for drinking andwastewater analyses (distillation required).2
1 Adapted from Standard Methods for the Examination of Water and Wastewater, 4500-F B & D.2 Procedure is equivalent to USEPA Method 340.1 for drinking water and wastewater.
Test preparation
Instrument-specific tableThe tables in this section show all of the instruments that have the program for this test. Table 1 shows sample cell and orientation requirements for reagent addition tests, suchas powder pillow or bulk reagent tests. Table 2 shows sample cell and adapterrequirements for AccuVac Ampul tests.To use either table, select an instrument, then read across to find the correspondinginformation for this test.
Table 1 Instrument-specific information for reagent addition
Instrument Sample cell orientation Sample cell
DR 6000 DR 3800 DR 2800 DR 2700
The fill line is to the right. 2495402
DR 5000 DR 3900
The fill line is toward the user.
DR 900 The fill line is toward the user. 2401906
Table 2 Instrument-specific information for AccuVac Ampuls
Instrument Adapter
DR 6000 DR 5000 DR 900
—
DR 3900 LZV846 (A)
DR 3800 DR 2800 DR 2700
LZV584 (C)
Before startingInstall the instrument cap on the DR 900 cell holder before ZERO or READ is pushed.
The sample and deionized water must be at the same temperature (±1 °C). Temperature adjustments can be made beforeor after the reagent addition.
1

Measure the volume of the reagent accurately. Use a pipet if possible.
If the test result is over-range, dilute a fresh sample with a known volume of deionized water and repeat the test. Multiply theresult by the dilution factor.
Minor variations between lots of reagent become measurable above 1.5 mg/L. While results above 1.5 mg/L are usable formost purposes, for the best accuracy dilute the sample to a lower concentration.
The SPADNS 2 Reagent contains a non-toxic reducing agent to prevent chlorine interference. SPADNS 2 Reagent does notcontain sodium arsenite.
The reagent that is used in this test is corrosive. Use protection for eyes and skin and be prepared to flush any spills withrunning water.
Review the Safety Data Sheets (MSDS/SDS) for the chemicals that are used and use any recommended personal protectiveequipment.
Dispose of reacted solutions according to local, state and federal regulations. Use the Safety Data Sheets for disposalinformation for unused reagents. Consult the environmental, health and safety staff for your facility and/or local regulatoryagencies for further disposal information.
Items to collectReagent solution test
Description Quantity
Pipet filler, safety bulb 1
Pipet, volumetric, Class A, 2.00-mL 1
Pipet, volumetric, Class A, 10.00-mL 1
SPADNS 2 Reagent Solution 4 mL
Thermometer 1
Sample cells (For information about sample cells, adapters or light shields, refer to Instrument-specific table PPAV.) 2
Water, deionized 10 mL
Refer to Consumable and replacement items on page 6 for reorder information.
AccuVac Ampuls
Description Quantity
Beaker, 50-mL 1
SPADNS 2 Fluoride Reagent AccuVac® Ampul 1
Stoppers, for 18-mm tubes and AccuVac Ampuls 2
Water, deionized 40 mL
Refer to Consumable and replacement items on page 6 for reorder information.
Sample collection and storage• Collect samples in clean glass or plastic bottles.• Samples can be kept for up to 28 days.• Let the sample temperature increase to room temperature before analysis.
2 Fluoride, SPADNS 2 Method (2.00 mg/L)

Reagent solution test
Start
1. Start program190 Fluoride. Forinformation about samplecells, adapters or lightshields, refer to Instrument-specific table PPAV.Note: Although the programname may vary betweeninstruments, the programnumber does not change.
2. Prepare the sample:Use a pipet to add 10.0 mLof sample to a dry samplecell.
3. Prepare the blank: Usea pipet to add 10.0 mL ofdeionized water to a drysample cell.
4. Use a pipet to add2.0 mL of SPADNS2 reagent to each cell.
5. Swirl to mix. 6. Start the instrumenttimer. A 1-minute reactiontime starts.
7. When the timer expires,clean the blank.
8. Insert the blank into thecell holder.
Zero
9. Push ZERO. The displayshows 0.00 mg/L F–.
10. Clean the preparedsample.
11. Insert the preparedsample into the cell holder.
Read
12. Push READ. Resultsshow in mg/L F–.
Fluoride, SPADNS 2 Method (2.00 mg/L) 3

AccuVac Ampul test
Start
1. Start program195 Fluoride AV. Forinformation about samplecells, adapters or lightshields, refer to Instrument-specific table PPAV.Note: Although the programname may vary betweeninstruments, the programnumber does not change.
2. Prepare the sample:Collect at least 40 mL ofsample in a 50-mL beaker.Fill the AccuVac Ampul withsample. Keep the tipimmersed while the Ampulfills completely.
3. Prepare the blank: Pourat least 40 mL of deionizedwater into a 50-mL beaker.Fill an AccuVac Ampul withdeionized water. Keep thetip immersed while theAmpul fills completely.
4. Quickly invert the Ampulsseveral times to mix.
5. Start the instrumenttimer. A 1-minute reactiontime starts.
6. When the timer expires,clean the blank AccuVacAmpul.
7. Insert the blank AccuVacAmpul into the cell holder.
Zero
8. Push ZERO. The displayshows 0.00 mg/L F–.
9. Clean the AccuVacAmpul.
10. Insert the preparedsample AccuVac Ampul intothe cell holder.
Read
11. Push READ. Resultsshow in mg/L F–.
4 Fluoride, SPADNS 2 Method (2.00 mg/L)
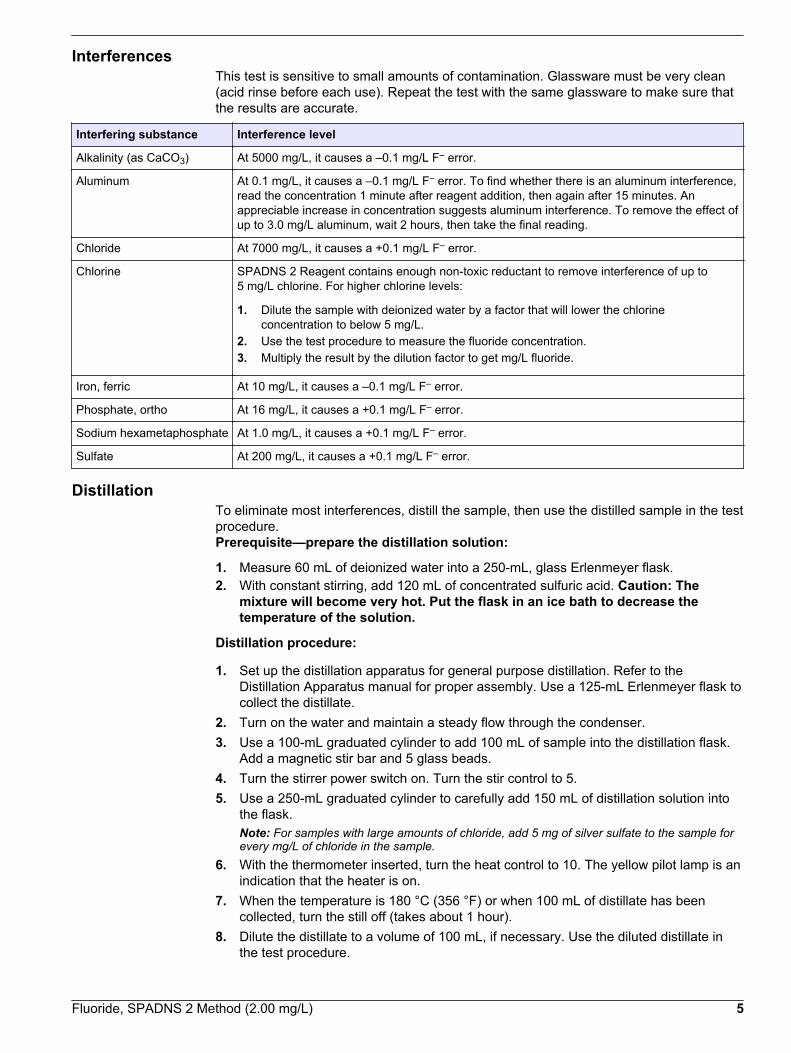
InterferencesThis test is sensitive to small amounts of contamination. Glassware must be very clean(acid rinse before each use). Repeat the test with the same glassware to make sure thatthe results are accurate.
Interfering substance Interference level
Alkalinity (as CaCO3) At 5000 mg/L, it causes a –0.1 mg/L F– error.
Aluminum At 0.1 mg/L, it causes a –0.1 mg/L F– error. To find whether there is an aluminum interference,read the concentration 1 minute after reagent addition, then again after 15 minutes. Anappreciable increase in concentration suggests aluminum interference. To remove the effect ofup to 3.0 mg/L aluminum, wait 2 hours, then take the final reading.
Chloride At 7000 mg/L, it causes a +0.1 mg/L F– error.
Chlorine SPADNS 2 Reagent contains enough non-toxic reductant to remove interference of up to5 mg/L chlorine. For higher chlorine levels:
1. Dilute the sample with deionized water by a factor that will lower the chlorineconcentration to below 5 mg/L.
2. Use the test procedure to measure the fluoride concentration.3. Multiply the result by the dilution factor to get mg/L fluoride.
Iron, ferric At 10 mg/L, it causes a –0.1 mg/L F– error.
Phosphate, ortho At 16 mg/L, it causes a +0.1 mg/L F– error.
Sodium hexametaphosphate At 1.0 mg/L, it causes a +0.1 mg/L F– error.
Sulfate At 200 mg/L, it causes a +0.1 mg/L F– error.
DistillationTo eliminate most interferences, distill the sample, then use the distilled sample in the testprocedure.Prerequisite—prepare the distillation solution:
1. Measure 60 mL of deionized water into a 250-mL, glass Erlenmeyer flask.2. With constant stirring, add 120 mL of concentrated sulfuric acid. Caution: The
mixture will become very hot. Put the flask in an ice bath to decrease thetemperature of the solution.
Distillation procedure:
1. Set up the distillation apparatus for general purpose distillation. Refer to theDistillation Apparatus manual for proper assembly. Use a 125-mL Erlenmeyer flask tocollect the distillate.
2. Turn on the water and maintain a steady flow through the condenser.3. Use a 100-mL graduated cylinder to add 100 mL of sample into the distillation flask.
Add a magnetic stir bar and 5 glass beads.4. Turn the stirrer power switch on. Turn the stir control to 5.5. Use a 250-mL graduated cylinder to carefully add 150 mL of distillation solution into
the flask.Note: For samples with large amounts of chloride, add 5 mg of silver sulfate to the sample forevery mg/L of chloride in the sample.
6. With the thermometer inserted, turn the heat control to 10. The yellow pilot lamp is anindication that the heater is on.
7. When the temperature is 180 °C (356 °F) or when 100 mL of distillate has beencollected, turn the still off (takes about 1 hour).
8. Dilute the distillate to a volume of 100 mL, if necessary. Use the diluted distillate inthe test procedure.
Fluoride, SPADNS 2 Method (2.00 mg/L) 5

Accuracy check
Standard solution methodUse the standard solution method to validate the test procedure, reagents andinstrument.Items to collect:
• Standard solution within the test range.
1. Use the test procedure to measure the concentration of the standard solution.2. Compare the expected result to the actual result.
Note: The factory calibration can be adjusted slightly with the standard adjust option so that theinstrument shows the expected value of the standard solution. The adjusted calibration is thenused for all test results. This adjustment can increase the test accuracy when there are slightvariations in the reagents or instruments.
Method performanceThe method performance data that follows was derived from laboratory tests that weremeasured on a spectrophotometer during ideal test conditions. Users may get differentresults under different test conditions.
Program Standard Precision (95% Confidence Interval) SensitivityConcentration change per 0.010 Abs change
190 1.00 mg/L F– 0.97–1.03 mg/L F– 0.024 mg/L F– at 1 mg/L
195 1.00 mg/L F– 0.92–1.08 mg/L F– 0.03 mg/L F– at 1 mg/L
Summary of methodThe SPADNS 2 Method for fluoride determination involves the reaction of fluoride with ared zirconium-dye solution. The fluoride combines with part of the zirconium to form acolorless complex that bleaches the red color in an amount proportional to the fluorideconcentration. This method is equivalent to the EPA method for NPDES and NPDWRreporting purposes when the samples have been distilled. Seawater and wastewatersamples require distillation. The measurement wavelength is 580 nm forspectrophotometers or 610 nm for colorimeters.
Consumable and replacement itemsRequired reagents
Description Quantity/Test Unit Item no.
SPADNS 2 Reagent Solution 4 mL 500 mL 2947549
OR
SPADNS 2 Fluoride Reagent AccuVac® Ampul 2 25/pkg 2527025
Water, deionized varies 4 L 27256
Required apparatus
Description Quantity/Test Unit Item no.
Pipet filler, safety bulb 1 each 1465100
Pipet, volumetric, Class A, 2.00-mL 1 each 1451536
Pipet, volumetric, Class A, 10.00-mL 1 each 1451538
Thermometer 1 each 2635700
Beaker, 50-mL 1 each 50041H
Stoppers for 18-mm tubes and AccuVac Ampuls 2 6/pkg 173106
6 Fluoride, SPADNS 2 Method (2.00 mg/L)

Recommended standards
Description Unit Item no.
Fluoride Standard Solution, 0.2-mg/L F- 500 mL 40502
Fluoride Standard Solution, 0.5-mg/L F- 500 mL 40505
Fluoride Standard Solution, 0.8-mg/L F- 500 mL 40508
Fluoride Standard Solution, 1.0-mg/L F- 1000 mL 29153
Fluoride Standard Solution, 1.0-mg/L F- 500 mL 29149
Fluoride Standard Solution, 1.2-mg/L F- 500 mL 40512
Fluoride Standard Solution, 1.5-mg/L F- 500 mL 40515
Fluoride Standard Solution, 2.0-mg/L F- 500 mL 40520
Fluoride Standard Solution, 100-mg/L F- 500 mL 23249
Drinking Water Standard, Mixed Parameter, Inorganic for F-, NO3, PO4, SO4 500 mL 2833049
Distillation reagents and apparatus
Description Unit Item no.
Cylinder, graduated, 100-mL each 50842
Cylinder, graduated, 250-mL each 50846
Distillation apparatus set, general purpose each 2265300
Distillation heater and support for 2265300, 115 VAC, 60 Hz each 2274400
Distillation heater and support for 2265300, 230 VAC, 50 Hz each 2274402
Flask, Erlenmeyer, 125-mL each 2089743
Flask, Erlenmeyer, 250-mL each 50546
Glass beads 100/pkg 259600
Stir bar, magnetic each 1076416
Sulfuric Acid, ACS 500 mL 97949
Optional reagents and apparatus
Description Unit Item no.
Silver Sulfate 113 g 33414
Balance, analytical, 80 g x 0.1 mg 100-240 VAC each 2936701
Paper, for weighing, 100 x 100 mm 500/pkg 1473885
Fluoride, SPADNS 2 Method (2.00 mg/L) 7

HACH COMPANYWORLD HEADQUARTERSTelephone: (970) 669-3050FAX: (970) 669-2932
FOR TECHNICAL ASSISTANCE, PRICE INFORMATION AND ORDERING:Call 800-227-4224
Contact the HACH office or distributor serving you.www.hach.com [email protected]
In the U.S.A. –
Outside the U.S.A. –
On the Worldwide Web – ; E-mail –
toll-free
© Hach Company/Hach Lange GmbH, 1989–2013. All rights reserved. 04/2013, Edition 8
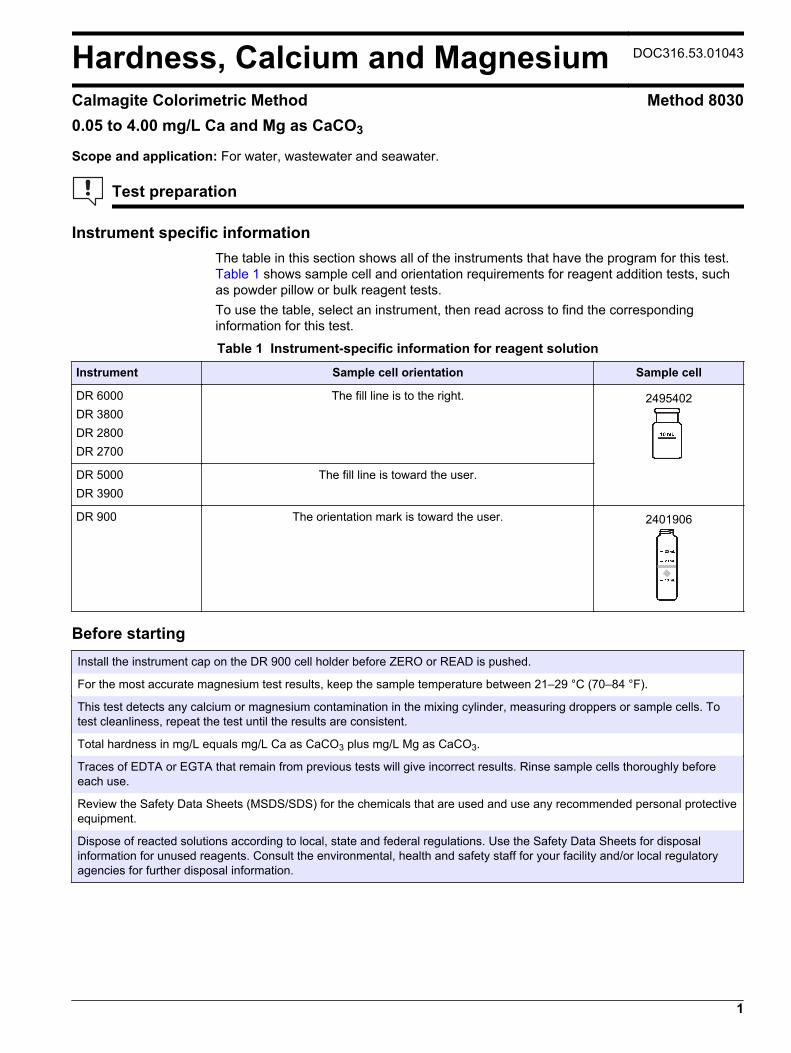
Hardness, Calcium and Magnesium DOC316.53.01043
Calmagite Colorimetric Method Method 80300.05 to 4.00 mg/L Ca and Mg as CaCO3
Scope and application: For water, wastewater and seawater.
Test preparation
Instrument specific informationThe table in this section shows all of the instruments that have the program for this test. Table 1 shows sample cell and orientation requirements for reagent addition tests, suchas powder pillow or bulk reagent tests.To use the table, select an instrument, then read across to find the correspondinginformation for this test.
Table 1 Instrument-specific information for reagent solution
Instrument Sample cell orientation Sample cell
DR 6000 DR 3800 DR 2800 DR 2700
The fill line is to the right. 2495402
DR 5000 DR 3900
The fill line is toward the user.
DR 900 The orientation mark is toward the user. 2401906
Before startingInstall the instrument cap on the DR 900 cell holder before ZERO or READ is pushed.
For the most accurate magnesium test results, keep the sample temperature between 21–29 °C (70–84 °F).
This test detects any calcium or magnesium contamination in the mixing cylinder, measuring droppers or sample cells. Totest cleanliness, repeat the test until the results are consistent.
Total hardness in mg/L equals mg/L Ca as CaCO3 plus mg/L Mg as CaCO3.
Traces of EDTA or EGTA that remain from previous tests will give incorrect results. Rinse sample cells thoroughly beforeeach use.
Review the Safety Data Sheets (MSDS/SDS) for the chemicals that are used and use any recommended personal protectiveequipment.
Dispose of reacted solutions according to local, state and federal regulations. Use the Safety Data Sheets for disposalinformation for unused reagents. Consult the environmental, health and safety staff for your facility and/or local regulatoryagencies for further disposal information.
1
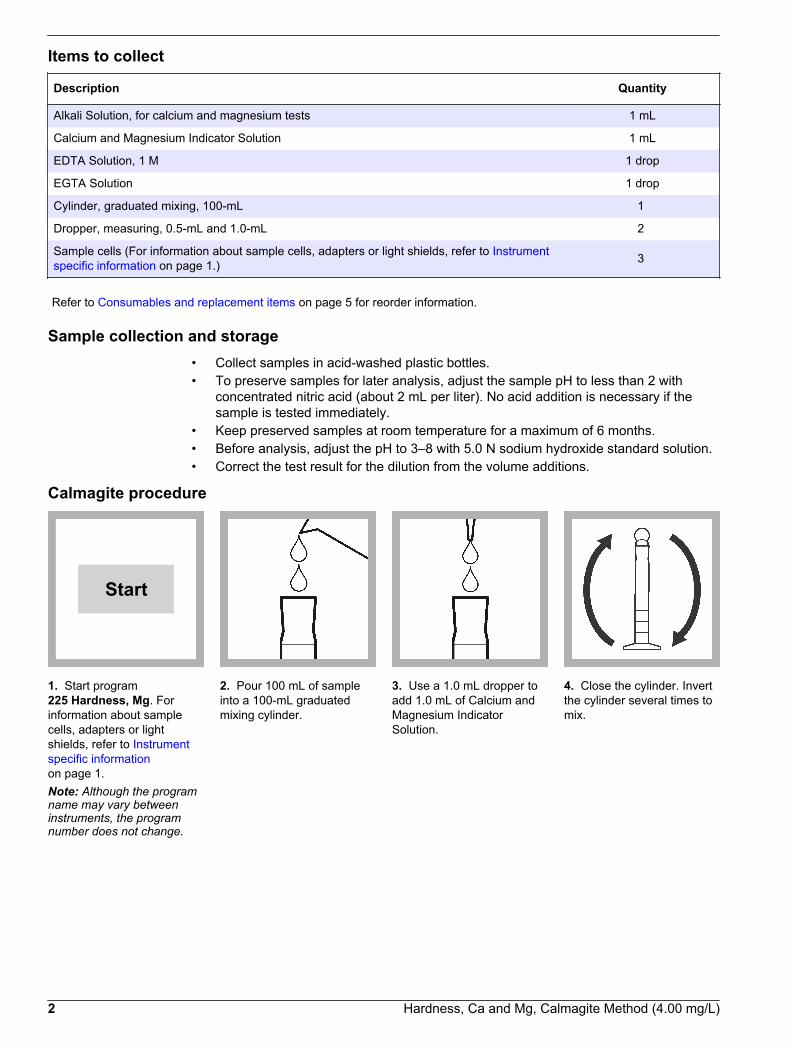
Items to collect
Description Quantity
Alkali Solution, for calcium and magnesium tests 1 mL
Calcium and Magnesium Indicator Solution 1 mL
EDTA Solution, 1 M 1 drop
EGTA Solution 1 drop
Cylinder, graduated mixing, 100-mL 1
Dropper, measuring, 0.5-mL and 1.0-mL 2
Sample cells (For information about sample cells, adapters or light shields, refer to Instrumentspecific information on page 1.) 3
Refer to Consumables and replacement items on page 5 for reorder information.
Sample collection and storage• Collect samples in acid-washed plastic bottles.• To preserve samples for later analysis, adjust the sample pH to less than 2 with
concentrated nitric acid (about 2 mL per liter). No acid addition is necessary if thesample is tested immediately.
• Keep preserved samples at room temperature for a maximum of 6 months.• Before analysis, adjust the pH to 3–8 with 5.0 N sodium hydroxide standard solution.• Correct the test result for the dilution from the volume additions.
Calmagite procedure
Start
1. Start program225 Hardness, Mg. Forinformation about samplecells, adapters or lightshields, refer to Instrumentspecific informationon page 1.Note: Although the programname may vary betweeninstruments, the programnumber does not change.
2. Pour 100 mL of sampleinto a 100-mL graduatedmixing cylinder.
3. Use a 1.0 mL dropper toadd 1.0 mL of Calcium andMagnesium IndicatorSolution.
4. Close the cylinder. Invertthe cylinder several times tomix.
2 Hardness, Ca and Mg, Calmagite Method (4.00 mg/L)

5. Use a 1.0 mL dropper toadd 1.0 mL of Alkali Solutionfor Calcium and MagnesiumTest.
6. Close the cylinder. Invertthe cylinder several times tomix.
7. Pour 10 mL of thesolution into each of threesample cells.
8. Blank preparation: Addone drop of 1 M EDTAsolution to the first samplecell.
9. Swirl to mix. 10. Magnesium sample:Add one drop of EGTASolution to the secondsample cell.
11. Swirl to mix. 12. Clean the blank.
13. Insert the blank into thecell holder.
Zero
14. Push ZERO. Thedisplay shows 0.00 mg/L MgCaCO3.
15. Clean the preparedsample.
16. Magnesium sample:Insert the preparedmagnesium sample cell intothe cell holder.
Hardness, Ca and Mg, Calmagite Method (4.00 mg/L) 3

Read
17. Push READ. Resultsshow in mg/L magnesium ascalcium carbonate. Thisvalue is the amount ofmagnesium in the sampleexpressed as CaCO3.
18. Do not remove thesample cell from theinstrument. Record or selectSTORE to save themagnesium results beforethe next step.
Start
19. Exit the magnesiumprogram. Start program220 Hardness, Ca.
Zero
20. Push ZERO. Thedisplay shows 0.00 mg/L MgCaCO3.
21. Calcium sample: Insertthe third sample cell into thecell holder.
Read
22. Push READ. Resultsshow in mg/L calcium ascalcium carbonate. Thisvalue is the amount ofcalcium in the sampleexpressed as CaCO3.
InterferencesInterfering substance Interference level
Ca >1.0 mg/L; Mg >0.25 mg/L For the most accurate calcium test result, run the test again on a diluted sample if the calciumis over 1.0 and the magnesium is over 0.25 mg/L as CaCO3. No retesting is needed if eitheris below those respective concentrations.
Chromium (Cr 3+) Above 0.25 mg/L
Copper (Cu 2+) Above 0.75 mg/L
EDTA Above 0.2 mg/L as CaCO3
EDTA or EGTA Traces remaining in sample cells from previous tests will give erroneous results. Rinse cellsthoroughly before use.
Iron (Fe 2+) Above 1.4 mg/L
Iron (Fe 3+) Above 2.0 mg/L
Manganese (Mn 2+) Above 0.20 mg/L
Zinc (Zn 2+) Above 0.050 mg/L
Accuracy check
Standard solution methodUse the standard solution method to validate the test procedure, reagents andinstrument.
4 Hardness, Ca and Mg, Calmagite Method (4.00 mg/L)

Items to collect:
• 2.00 mg/L (as CaCO3) Calcium Standard Solution
1. Use the test procedure to measure the concentration of the standard solution.2. Compare the expected result to the actual result.
Note: The factory calibration can be adjusted slightly with the standard adjust option so that theinstrument shows the expected value of the standard solution. The adjusted calibration is thenused for all test results. This adjustment can increase the test accuracy when there are slightvariations in the reagents or instruments.
Method performanceThe method performance data that follows was derived from laboratory tests that weremeasured on a spectrophotometer during ideal test conditions. Users may get differentresults under different test conditions.
Program Standard Precision (95% Confidence Interval) SensitivityConcentration change per 0.010 Abs change
220 2.00 mg/L Ca 1.90–2.10 mg/L Ca 0.05 mg/L Ca
225 2.00 mg/L Mg 1.92–2.08 mg/L Mg 0.05 mg/L Mg
Summary of methodThe colorimetric method for measuring hardness supplements the conventional titrimetricmethod because the colorimetric method can measure very low levels of calcium andmagnesium. Also, some metals that interfere in the titrimetric method may not interferewhen the sample is diluted to bring it within the range of this test. The indicator dye iscalmagite, which forms a purplish-blue color in a strongly alkaline solution and changes tored when it reacts with free calcium or magnesium.Calcium and magnesium determinations are made by chelation of calcium with EGTA toremove the red color from calcium and then chelation of calcium and magnesium withEDTA to remove the red color from both calcium and magnesium. The measurement ofthe red color in the different states is used to measure the calcium and magnesiumconcentrations. The measurement wavelength is 522 nm for spectrophotometers or520 nm for colorimeters.
Consumables and replacement itemsRequired reagents
Description Quantity/test Unit Item no.
Hardness Reagent Set, includes: — 100 tests 2319900
Alkali Solution, for calcium and magnesium tests 1 mL 100 mLMDB 2241732
Calcium and Magnesium Indicator Solution 1 mL 100 mLMDB 2241832
EDTA Solution, 1 M 2 drops 50 mLSCDB 2241926
EGTA Solution 1 drop 50 mLSCDB 2229726
Required apparatus
Description Quantity/test Unit Item no.
Cylinder, graduated mixing, 100-mL , tall form 1 each 2088642
Dropper, measuring, 0.5 and 1.0 mL plastic 2 20/pkg 2124720
Hardness, Ca and Mg, Calmagite Method (4.00 mg/L) 5

Optional reagents and apparatus
Description Unit Item no.
Nitric Acid, concentrated 500 mL 15249
Sodium Hydroxide Standard Solution, 5.0 N 100 mLMDB 245032
Paper, pH, 0–14 pH range 100/pkg 2601300
HACH COMPANYWORLD HEADQUARTERSTelephone: (970) 669-3050FAX: (970) 669-2932
FOR TECHNICAL ASSISTANCE, PRICE INFORMATION AND ORDERING:Call 800-227-4224
Contact the HACH office or distributor serving you.www.hach.com [email protected]
In the U.S.A. –
Outside the U.S.A. –
On the Worldwide Web – ; E-mail –
toll-free
© Hach Company/Hach Lange GmbH, 1989–2013. All rights reserved. 04/2013, Edition 8

Hydrazine DOC316.53.01046
p-Dimethylaminobenzaldehyde Method1 Method 81414 to 600 µg/L N2H4 (spectrophotometers)10 to 500 µg/L N2H4 (colorimeters)
Reagent Solution or AccuVac® Ampuls
Scope and application: For boiler water/feedwater.1 Adapted from ASTM Manual of Industrial Water, D1385-78, 376 (1979).
Test preparation
Instrument-specific tableThe tables in this section show all of the instruments that have the program for this test. Table 1 shows sample cell and orientation requirements for reagent addition tests, suchas powder pillow or bulk reagent tests. Table 2 shows sample cell and adapterrequirements for AccuVac Ampul tests.To use either table, select an instrument, then read across to find the correspondinginformation for this test.
Table 1 Instrument-specific information for reagent solution
Instrument Sample cell orientation Sample cell
DR 6000 DR 3800 DR 2800 DR 2700
The fill line is to the right. 2495402
DR 5000 DR 3900
The fill line is toward the user.
DR 900 The fill line is toward the user. 2401906
Table 2 Instrument-specific information for AccuVac Ampuls
Instrument Adapter
DR 6000 DR 5000 DR 900
—
DR 3900 LZV846 (A)
DR 3800 DR 2800 DR 2700
LZV584 (C)
Before startingSamples must be analyzed immediately after collection and cannot be preserved for later analysis.
Install the instrument cap on the DR 900 cell holder before ZERO or READ is pushed.
The sample temperature must be between 21 ± 4 °C (70 ± 7 °F) for accurate results.
1
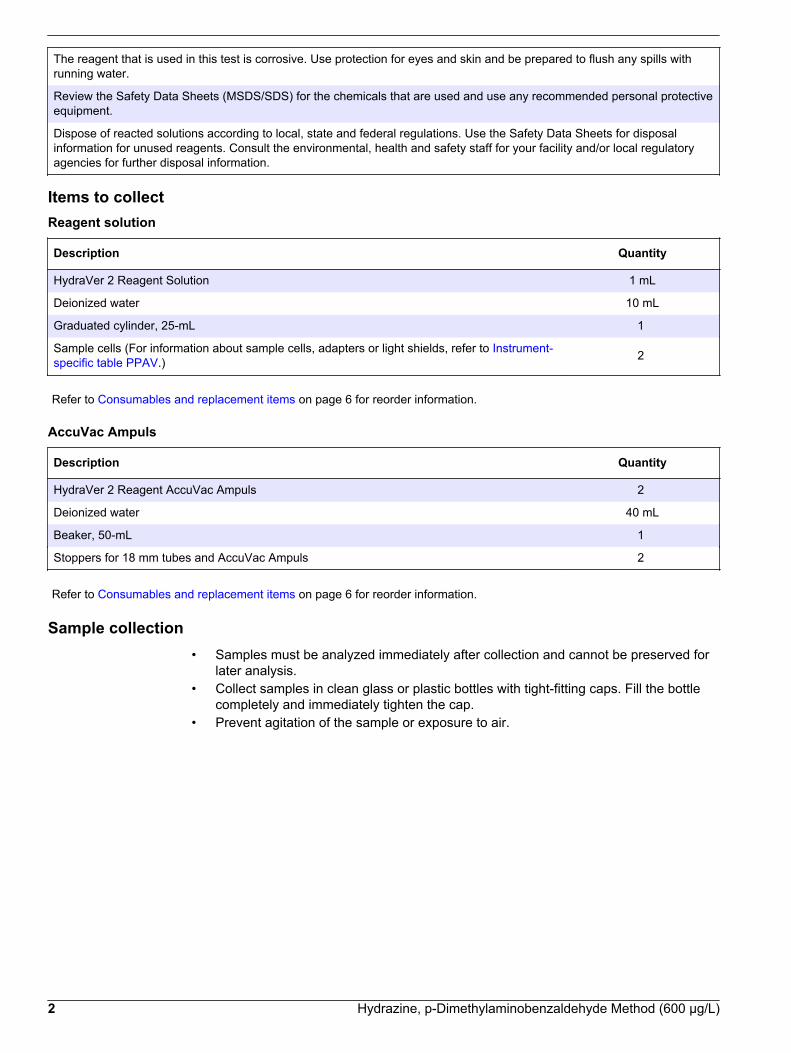
The reagent that is used in this test is corrosive. Use protection for eyes and skin and be prepared to flush any spills withrunning water.
Review the Safety Data Sheets (MSDS/SDS) for the chemicals that are used and use any recommended personal protectiveequipment.
Dispose of reacted solutions according to local, state and federal regulations. Use the Safety Data Sheets for disposalinformation for unused reagents. Consult the environmental, health and safety staff for your facility and/or local regulatoryagencies for further disposal information.
Items to collectReagent solution
Description Quantity
HydraVer 2 Reagent Solution 1 mL
Deionized water 10 mL
Graduated cylinder, 25-mL 1
Sample cells (For information about sample cells, adapters or light shields, refer to Instrument-specific table PPAV.) 2
Refer to Consumables and replacement items on page 6 for reorder information.
AccuVac Ampuls
Description Quantity
HydraVer 2 Reagent AccuVac Ampuls 2
Deionized water 40 mL
Beaker, 50-mL 1
Stoppers for 18 mm tubes and AccuVac Ampuls 2
Refer to Consumables and replacement items on page 6 for reorder information.
Sample collection• Samples must be analyzed immediately after collection and cannot be preserved for
later analysis.• Collect samples in clean glass or plastic bottles with tight-fitting caps. Fill the bottle
completely and immediately tighten the cap.• Prevent agitation of the sample or exposure to air.
2 Hydrazine, p-Dimethylaminobenzaldehyde Method (600 µg/L)

Reagent solution procedure
Start
1. Start program231 Hydrazine. Forinformation about samplecells, adapters or lightshields, refer to Instrument-specific table PPAV.Note: Although the programname may vary betweeninstruments, the programnumber does not change.
2. Prepare the blank: Usea graduated cylinder to pour10 mL of deionized waterinto a sample cell.
3. Prepare the sample:Use a graduated cylinder topour 10 mL of sample into asecond sample cell.
4. Add 0.5 mL of HydraVer2 Hydrazine Reagent toeach sample cell.A yellow color shows ifhydrazine is present in thesample. The blank may alsoshow a light yellow color.
5. Swirl to mix. 6. Start the instrumenttimer. A 12-minute reactiontime starts.Complete the blank zerosteps and insert theprepared sample during thereaction period.
7. Clean the blank. 8. Insert the blank into thecell holder.
Zero
9. Push ZERO. The displayshows 0 µg/L N2H4.
10. Clean the preparedsample.
11. Insert the preparedsample into the cell holder.
Read
12. Immediately after thetimer expires, push READ.Results show in µg/L N2H4.
Hydrazine, p-Dimethylaminobenzaldehyde Method (600 µg/L) 3
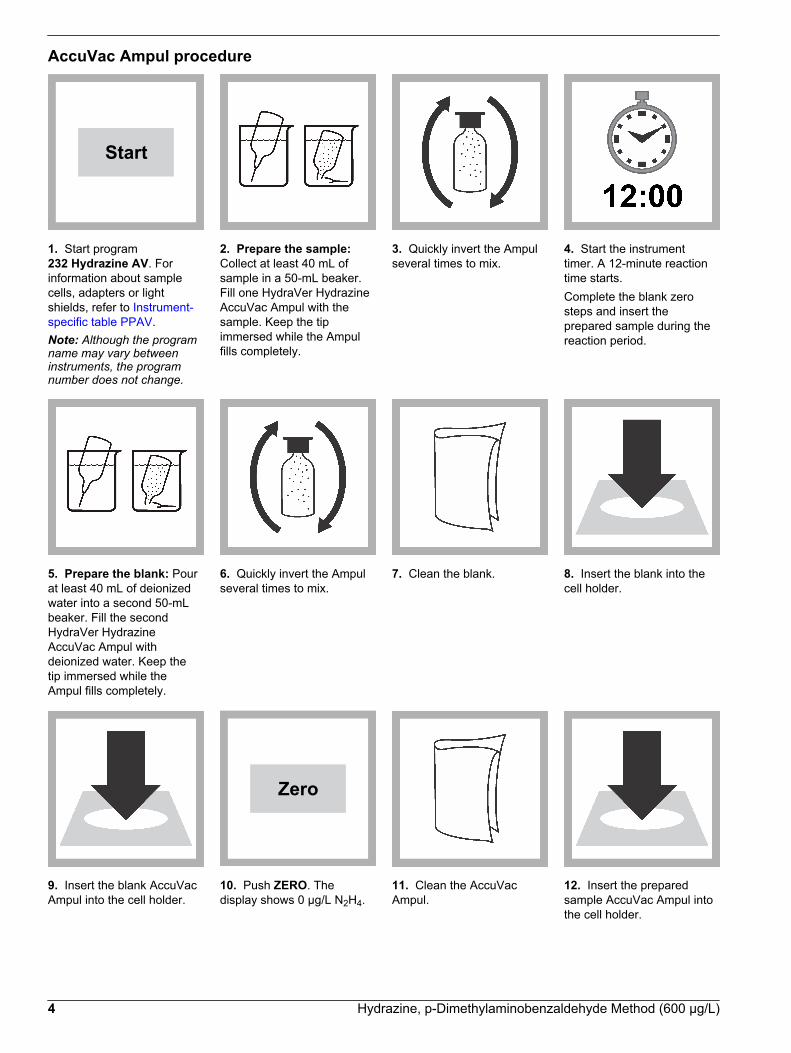
AccuVac Ampul procedure
Start
1. Start program232 Hydrazine AV. Forinformation about samplecells, adapters or lightshields, refer to Instrument-specific table PPAV.Note: Although the programname may vary betweeninstruments, the programnumber does not change.
2. Prepare the sample:Collect at least 40 mL ofsample in a 50-mL beaker.Fill one HydraVer HydrazineAccuVac Ampul with thesample. Keep the tipimmersed while the Ampulfills completely.
3. Quickly invert the Ampulseveral times to mix.
4. Start the instrumenttimer. A 12-minute reactiontime starts.Complete the blank zerosteps and insert theprepared sample during thereaction period.
5. Prepare the blank: Pourat least 40 mL of deionizedwater into a second 50-mLbeaker. Fill the secondHydraVer HydrazineAccuVac Ampul withdeionized water. Keep thetip immersed while theAmpul fills completely.
6. Quickly invert the Ampulseveral times to mix.
7. Clean the blank. 8. Insert the blank into thecell holder.
9. Insert the blank AccuVacAmpul into the cell holder.
Zero
10. Push ZERO. Thedisplay shows 0 µg/L N2H4.
11. Clean the AccuVacAmpul.
12. Insert the preparedsample AccuVac Ampul intothe cell holder.
4 Hydrazine, p-Dimethylaminobenzaldehyde Method (600 µg/L)

Read
13. Immediately after thetimer expires, push READ.Results show in µg/L N2H4.
InterferencesInterfering substance Interference level
Ammonia No interference up to 10 mg/L. May cause a positive interference of up to 20% at 20 mg/L.
Highly colored or turbidsamples
Prepare a 1:1 mixture of deionized water and household bleach. Add one drop of this mixture to25 mL of sample in a graduated mixing cylinder and invert to mix. Use this solution, instead ofdeionized water, to prepare the blank in the test procedure.
Morpholine No interference up to 10 mg/L.
Accuracy check
Standard solution methodUse the standard solution method to validate the test procedure, reagents andinstrument.Items to collect:
• Hydrazine sulfate, reagent grade• 1-L volumetric flask, Class A (2)• 10-mL volumetric pipet, Class A and pipet filler• Deionized water, oxygen-free
1. Prepare a 25-mg/L hydrazine stock solution as follows:
a. Add 0.1016 g of hydrazine sulfate into a 1-L volumetric flask.b. Dilute to the mark with oxygen-free deionized water. Mix well. Prepare the stock
solution each day.2. Prepare a 0.25 mg/L hydrazine standard solution as follows:
a. Use a pipet to add 10.00 mL of the 25-mg/L hydrazine stock solution into a 1-Lvolumetric flask.
b. Dilute to the mark with oxygen-free deionized water. Mix well. Prepare thestandard solution immediately before use.
3. Use the test procedure to measure the concentration of the prepared standardsolution.
4. Compare the expected result to the actual result.Note: The factory calibration can be adjusted slightly with the standard adjust option so that theinstrument shows the expected value of the standard solution. The adjusted calibration is thenused for all test results. This adjustment can increase the test accuracy when there are slightvariations in the reagents or instruments.
Hydrazine, p-Dimethylaminobenzaldehyde Method (600 µg/L) 5

Method performanceThe method performance data that follows was derived from laboratory tests that weremeasured on a spectrophotometer during ideal test conditions. Users may get differentresults under different test conditions.
Program Standard Precision (95% Confidence Interval) SensitivityConcentration change per 0.010 Abs change
231 250 µg/L N2H4 247–253 µg/L N2H4 4 µg/L N2H4
232 250 µg/L N2H4 246–254 µg/L N2H4 4 µg/L N2H4
Summary of methodHydrazine in the sample reacts with the p-dimethylaminobenzaldehyde from theHydraVer 2 Reagent to form a yellow color which is proportional to the hydrazineconcentration. The measurement wavelength is 455 nm for spectrophotometers or420 nm for colorimeters.
Consumables and replacement itemsRequired reagents
Description Quantity/test Unit Item no.
Water, deionized varies 4 L 27256
HydraVer® 2 Hydrazine Reagent 1 mL 100 mLMDB 179032
OR
HydraVer 2 Hydrazine Reagent AccuVac® Ampul 2 25/pkg 2524025
Required apparatus for reagent solution
Description Quantity/test Unit Item no.
Cylinder, graduated, 25-mL. 1 each 50840
Required apparatus for AccuVac Ampuls
Description Quantity/test Unit Item no.
Beaker, 50-mL 1 each 50041H
Stoppers for 18-mm tubes and AccuVac Ampuls 2 6/pkg 173106
Recommended standards
Description Unit Item no.
Hydrazine Sulfate, ACS 100 g 74226
Optional reagents and apparatus
Description Unit Item no.
Cylinder, mixing, 25-mL each 189640
Flask, volumetric, Class A, 1000-mL each 1457453
Pipet, volumetric, Class A, 10-mL each 1451538
Pipet filler, safety bulb each 1465100
AccuVac® Snapper each 2405200
6 Hydrazine, p-Dimethylaminobenzaldehyde Method (600 µg/L)

Hydrazine, p-Dimethylaminobenzaldehyde Method (600 µg/L) 7

HACH COMPANYWORLD HEADQUARTERSTelephone: (970) 669-3050FAX: (970) 669-2932
FOR TECHNICAL ASSISTANCE, PRICE INFORMATION AND ORDERING:Call 800-227-4224
Contact the HACH office or distributor serving you.www.hach.com [email protected]
In the U.S.A. –
Outside the U.S.A. –
On the Worldwide Web – ; E-mail –
toll-free
© Hach Company/Hach Lange GmbH, 1989–2013. All rights reserved. 04/2013, Edition 8
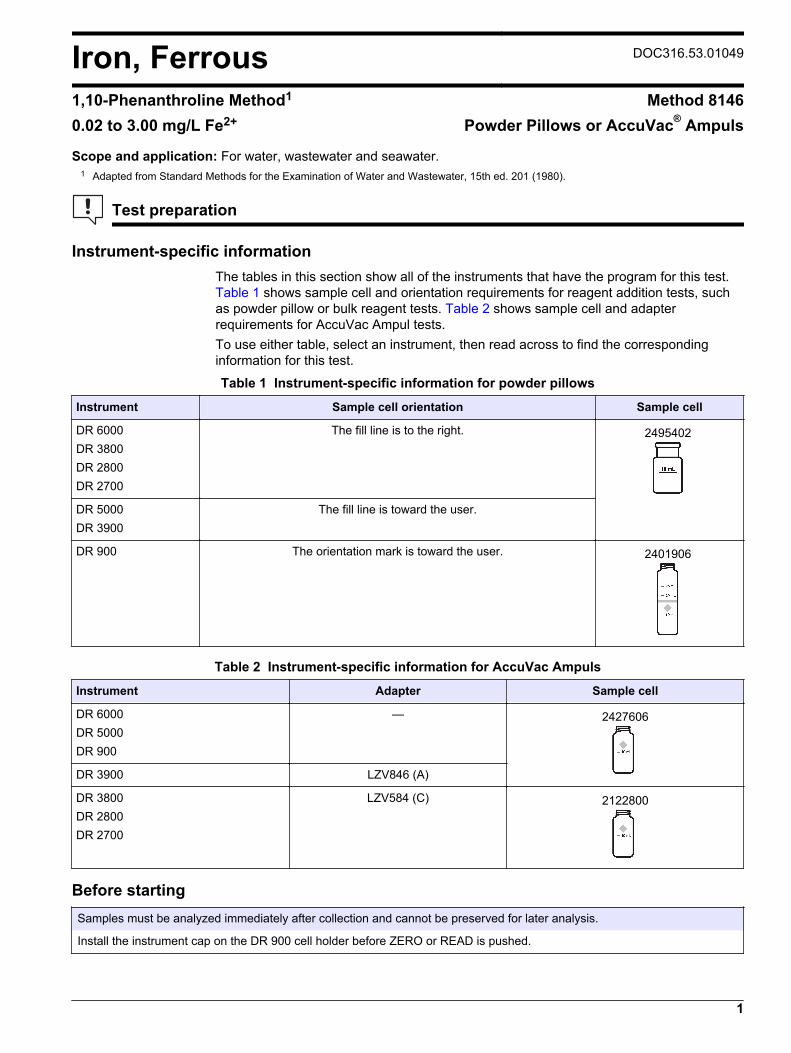
Iron, Ferrous DOC316.53.01049
1,10-Phenanthroline Method1 Method 81460.02 to 3.00 mg/L Fe2+ Powder Pillows or AccuVac® Ampuls
Scope and application: For water, wastewater and seawater.1 Adapted from Standard Methods for the Examination of Water and Wastewater, 15th ed. 201 (1980).
Test preparation
Instrument-specific informationThe tables in this section show all of the instruments that have the program for this test. Table 1 shows sample cell and orientation requirements for reagent addition tests, suchas powder pillow or bulk reagent tests. Table 2 shows sample cell and adapterrequirements for AccuVac Ampul tests.To use either table, select an instrument, then read across to find the correspondinginformation for this test.
Table 1 Instrument-specific information for powder pillows
Instrument Sample cell orientation Sample cell
DR 6000 DR 3800 DR 2800 DR 2700
The fill line is to the right. 2495402
DR 5000 DR 3900
The fill line is toward the user.
DR 900 The orientation mark is toward the user. 2401906
Table 2 Instrument-specific information for AccuVac Ampuls
Instrument Adapter Sample cell
DR 6000 DR 5000 DR 900
— 2427606
DR 3900 LZV846 (A)
DR 3800 DR 2800 DR 2700
LZV584 (C) 2122800
Before startingSamples must be analyzed immediately after collection and cannot be preserved for later analysis.
Install the instrument cap on the DR 900 cell holder before ZERO or READ is pushed.
1

For best results, measure the reagent blank value for each new lot of reagent. Replace the sample with deionized water inthe test procedure to get the reagent blank value. Subtract the reagent blank value from the sample results automaticallywith the reagent blank adjust option.
Review the Safety Data Sheets (MSDS/SDS) for the chemicals that are used and use any recommended personal protectiveequipment.
Dispose of reacted solutions according to local, state and federal regulations. Use the Safety Data Sheets for disposalinformation for unused reagents. Consult the environmental, health and safety staff for your facility and/or local regulatoryagencies for further disposal information.
Items to collectPowder pillows
Description Quantity
Ferrous Iron Reagent Powder Pillows, 25-mL 1
Sample cells. (For information about sample cells, adapters or light shields, refer to Instrument-specific information on page 1.) 2
Refer to Consumables and replacement items on page 6 for reorder information.
AccuVac Ampuls
Description Quantity
Ferrous Iron Reagent AccuVac Ampuls 1
Beaker, 50-mL 1
Sample cells (For information about sample cells, adapters or light shields, refer to Instrument-specific information on page 1.) 1
Stopper for 18-mm tubes and AccuVac Ampuls 1
Refer to Consumables and replacement items on page 6 for reorder information.
Sample collection• Samples must be analyzed immediately after collection and cannot be preserved for
later analysis.• Collect samples in clean glass or plastic bottles with tight-fitting caps. Fill the bottle
completely and immediately tighten the cap.• Prevent agitation of the sample or exposure to air.
2 Iron, Ferrous, 1,10-Phenanthroline Method (3.00 mg/L)

Powder pillow procedure
Start
1. Start program 255 Iron,Ferrous. For informationabout sample cells,adapters or light shields,refer to Instrument-specificinformation on page 1.Note: Although the programname may vary betweeninstruments, the programnumber does not change.
2. Prepare the blank: Fillthe sample cell with 10 mLof sample.
3. Prepare the sample: Filla mixing cylinder to the 25-mL line with sample.
4. Add the contents of oneFerrous Iron ReagentPowder Pillow to the mixingcylinder.An orange color shows ifferrous iron is present in thesample
5. Close the cylinder. Invertthe cylinder several times tomix.Undissolved powder doesnot affect accuracy.
6. Start the instrumenttimer. A 3-minute reactiontime starts.
7. When the timer expires,clean the blank.
8. Insert the blank into thecell holder.
Zero
9. Push ZERO. The displayshows 0.00 mg/L Fe2+.
10. Fill a second samplecell with 10 mL of thereacted prepared sample.
11. Clean the preparedsample.
12. Insert the preparedsample into the cell holder.
Iron, Ferrous, 1,10-Phenanthroline Method (3.00 mg/L) 3

Read
13. Push READ. Resultsshow in mg/L Fe2+.
AccuVac Ampul procedure
Start
1. Start program 257 Iron,Ferrous AV. For informationabout sample cells,adapters or light shields,refer to Instrument-specificinformation on page 1.Note: Although the programname may vary betweeninstruments, the programnumber does not change.
2. Prepare the blank: Fillthe sample cell with 10 mLof sample.
3. Prepare the sample:Collect at least 40 mL ofsample in a 50-mL beaker.Fill the AccuVac Ampul withsample. Keep the tipimmersed while the Ampulfills completely.
4. Quickly invert the Ampulseveral times to mix.
5. Start the instrumenttimer. A 3-minute reactiontime starts.
6. When the timer expires,clean the blank.
7. Insert the blank into thecell holder.
Zero
8. Push ZERO. The displayshows 0.00 mg/L Fe2+.
4 Iron, Ferrous, 1,10-Phenanthroline Method (3.00 mg/L)
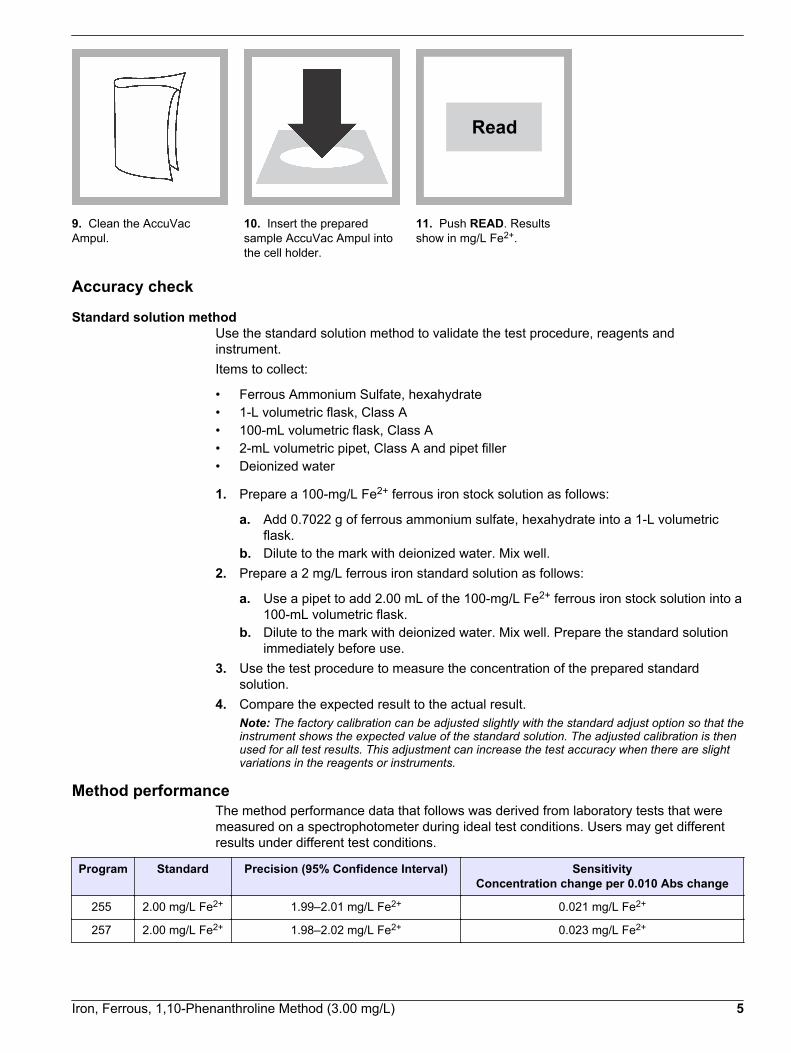
9. Clean the AccuVacAmpul.
10. Insert the preparedsample AccuVac Ampul intothe cell holder.
Read
11. Push READ. Resultsshow in mg/L Fe2+.
Accuracy check
Standard solution methodUse the standard solution method to validate the test procedure, reagents andinstrument.Items to collect:
• Ferrous Ammonium Sulfate, hexahydrate• 1-L volumetric flask, Class A• 100-mL volumetric flask, Class A• 2-mL volumetric pipet, Class A and pipet filler• Deionized water
1. Prepare a 100-mg/L Fe2+ ferrous iron stock solution as follows:
a. Add 0.7022 g of ferrous ammonium sulfate, hexahydrate into a 1-L volumetricflask.
b. Dilute to the mark with deionized water. Mix well. 2. Prepare a 2 mg/L ferrous iron standard solution as follows:
a. Use a pipet to add 2.00 mL of the 100-mg/L Fe2+ ferrous iron stock solution into a100-mL volumetric flask.
b. Dilute to the mark with deionized water. Mix well. Prepare the standard solutionimmediately before use.
3. Use the test procedure to measure the concentration of the prepared standardsolution.
4. Compare the expected result to the actual result.Note: The factory calibration can be adjusted slightly with the standard adjust option so that theinstrument shows the expected value of the standard solution. The adjusted calibration is thenused for all test results. This adjustment can increase the test accuracy when there are slightvariations in the reagents or instruments.
Method performanceThe method performance data that follows was derived from laboratory tests that weremeasured on a spectrophotometer during ideal test conditions. Users may get differentresults under different test conditions.
Program Standard Precision (95% Confidence Interval) SensitivityConcentration change per 0.010 Abs change
255 2.00 mg/L Fe2+ 1.99–2.01 mg/L Fe2+ 0.021 mg/L Fe2+
257 2.00 mg/L Fe2+ 1.98–2.02 mg/L Fe2+ 0.023 mg/L Fe2+
Iron, Ferrous, 1,10-Phenanthroline Method (3.00 mg/L) 5

Summary of methodThe 1,10-phenanthroline indicator in the Ferrous Iron Reagent reacts with ferrous iron(Fe2+) in the sample to form an orange color in proportion to the iron concentration. Ferriciron (Fe3+) does not react. The ferric iron concentration can be determined by subtractingthe ferrous iron concentration from the results of a total iron test. The measurementwavelength is 510 nm for spectrophotometers or 520 nm for colorimeters.
Consumables and replacement itemsRequired reagents
Description Quantity/test Unit Item no.
Ferrous Iron Reagent Powder Pillow, 25-mL 1 100/pkg 103769
OR
Ferrous Iron Reagent AccuVac® Ampul 1 25/pkg 2514025
Required apparatus
Description Quantity/test Unit Item no.
Beaker, 50-mL 1 each 50041H
Stoppers for 18 mm-tubes and AccuVac Ampuls 1 6/pkg 1448000
Recommended standards and apparatus
Description Unit Item no.
Balance, analytical, 80 g x 0.1 mg 100-240 VAC each 2936701
Ferrous Ammonium Sulfate, hexahydrate, ACS 113 g 1125614
Flask, volumetric, Class A, 1000-mL each 1457453
Pipet filler, safety bulb each 1465100
Pipet, volumetric, Class A, 1.00-mL each 1451535
Water, deionized 4 L 27256
Wipes, disposable 280/pkg 2097000
HACH COMPANYWORLD HEADQUARTERSTelephone: (970) 669-3050FAX: (970) 669-2932
FOR TECHNICAL ASSISTANCE, PRICE INFORMATION AND ORDERING:Call 800-227-4224
Contact the HACH office or distributor serving you.www.hach.com [email protected]
In the U.S.A. –
Outside the U.S.A. –
On the Worldwide Web – ; E-mail –
toll-free
© Hach Company/Hach Lange GmbH, 1989–2013. All rights reserved. 04/2013, Edition 8

Iron DOC316.53.01048
FerroZine® Method1 Method 81470.009 to 1.400 mg/L Fe Reagent Solution Pillows
Scope and application: For water and seawater.1 Adapted from Stookey, L.L., Anal. Chem., 42(7), 779 (1970).
Test preparation
Instrument specific informationThe table in this section shows all of the instruments that have the program for this test. Table 1 shows sample cell and orientation requirements for reagent addition tests, suchas powder pillow or bulk reagent tests.To use the table, select an instrument, then read across to find the correspondinginformation for this test.
Table 1 Instrument-specific information for powder pillows
Instrument Sample cell orientation Sample cell
DR 6000 DR 3800 DR 2800 DR 2700
The fill line is to the right. 2495402
DR 5000 DR 3900
The fill line is toward the user.
DR 900 The orientation mark is toward the user. 2401906
Before startingInstall the instrument cap on the DR 900 cell holder before ZERO or READ is pushed.
The sample must be digested with heat and acid to make sure that all forms of the metal are measured. Use the mild orvigorous digestion. Refer to the Water Analysis Guide for more information.
Clean all glassware with 6.0 N (50%) hydrochloric acid, then rinse thoroughly with deionized water to remove contaminants.
For best results, measure the reagent blank value for each new lot of reagent. Replace the sample with deionized water inthe test procedure to get the reagent blank value. Subtract the reagent blank value from the sample results automaticallywith the reagent blank adjust option.
If the sample contains rust, refer to Interferences on page 3.
Use clean clippers to open the solution pillows that are free of rust. Wipe with a dry towel. Do not allow the clippers tocontact the contents of the pillow.
As an alternative to the solution pillows, use 0.5 mL of FerroZine® Iron Reagent Solution in the test procedure.
The FerroZine Iron Reagent can crystallize or precipitate if kept at cold temperatures during shipment. The reagent quality isnot affected. Put the reagent in warm water to dissolve the precipitate.
1

Review the Safety Data Sheets (MSDS/SDS) for the chemicals that are used and use any recommended personal protectiveequipment.
Dispose of reacted solutions according to local, state and federal regulations. Use the Safety Data Sheets for disposalinformation for unused reagents. Consult the environmental, health and safety staff for your facility and/or local regulatoryagencies for further disposal information.
Items to collect
Description Quantity
FerroZine Iron Reagent Solution Pillows, OR 1
FerroZine Iron Reagent Solution 0.5 mL
Cylinder, 25-mL graduated mixing, with stopper 1
Clippers for solution pillows 1
Sample cells (For information about sample cells, adapters or light shields, refer to Instrumentspecific information on page 1.) 2
Refer to Consumables and replacement items on page 5 for reorder information.
Sample collection and storage• Collect samples in clean glass or plastic bottles.• To preserve samples for later analysis, adjust the sample pH to less than 2 with
concentrated nitric acid (about 2 mL per liter). No acid addition is necessary if thesample is tested immediately.
• To measure only dissolved iron, filter the sample immediately after collection andbefore acidification.
• Keep preserved samples at room temperature for a maximum of 6 months.• Before analysis, adjust the pH to 3–5 with 10% ammonium hydroxide solution. Do not
exceed pH 5 to prevent precipitation of the iron.• Correct the test result for the dilution from the volume additions.
Solution pillow or bulk solution procedure
Start
1. Start program 260 Iron,FerroZine. For informationabout sample cells,adapters or light shields,refer to Instrument specificinformation on page 1.Note: Although the programname may vary betweeninstruments, the programnumber does not change.
2. Prepare the blank: Fillthe sample cell with 10 mLof sample.
3. Prepare the sample: Filla mixing cylinder to the 25-mL line with sample.
4. Add the contents of oneFerroZine Iron ReagentSolution Pillow to the mixingcylinder.
2 Iron, FerroZine Method (1.400 mg/L)

5. Close the cylinder. Invertthe cylinder several times tomix.
6. Start the instrumenttimer. A 5-minute reactiontime starts.A purple color shows if ironis present in the sample.
7. When the timer expires,pour 10 mL of the preparedsample from the mixingcylinder into the secondsample cell.
8. Clean the blank.
9. Insert the blank into thecell holder.
Zero
10. Push ZERO. Thedisplay shows 0.000 mg/LFe.
11. Clean the preparedsample.
12. Insert the preparedsample into the cell holder.
Read
13. Push READ. Resultsshow in mg/L Fe.
InterferencesInterferingsubstance
Interference level
Strong chelants(EDTA)
Interfere at all levels. Use the FerroVer® or TPTZ methods for these samples. Use the TPTZ methodfor low iron concentrations.
Cobalt May give slightly high results
Copper May give slightly high results
Hydroxides Add the FerroZine® Iron Reagent to 25 mL of sample, then boil the sample for 1 minute in a boilingwater bath. Let the sample cool to 24 °C (75 °F), then start the instrument timer. Return the samplevolume to 25 mL with deionized water.
Iron, FerroZine Method (1.400 mg/L) 3
Interferingsubstance
Interference level
Magnetite (blackiron oxide) orFerrites
Add the FerroZine® Iron Reagent to 25 mL of sample, then gently boil the sample for 20 to 30 minutesin a boiling water bath.Note: Do not let the sample boil dry. A purple color will show if iron is present.
Let the sample cool to 24 °C (75 °F). Return the sample volume to 25 mL with deionized water.Continue with the test procedure after the timer step.
Rust Add the FerroZine® Iron Reagent to 25 mL of sample, then boil the sample for 1 minute in a boilingwater bath. Cool to 24 °C (75 °F), then start the instrument timer. Return the sample volume to 25 mLwith deionized water.
Accuracy check
Standard additions method (sample spike)Use the standard additions method (for applicable instruments) to validate the testprocedure, reagents and instrument and to find if there is an interference in the sample.Items to collect:
• Iron Voluette® Ampule Standard, 10 mg/L Fe• Ampule breaker• Pipet, TenSette®, 0.1–1.0 mL and tips
1. Use the test procedure to measure the concentration of the sample, then keep the(unspiked) sample in the instrument.
2. Go to the Standard Additions option in the instrument menu.3. Select the values for standard concentration, sample volume and spike volumes.4. Open the standard solution.5. Prepare three spiked samples: use the TenSette pipet to add 0.1 mL, 0.2 mL and
0.3 mL of the standard solution, respectively, to three 25-mL portions of fresh sample.Mix well.
6. Use the test procedure to measure the concentration of each of the spiked samples.Start with the smallest sample spike. Measure each of the spiked samples in theinstrument.
7. Select Graph to compare the expected results to the actual results.Note: If the actual results are significantly different from the expected results, make sure thatthe sample volumes and sample spikes are measured accurately. The sample volumes andsample spikes that are used should agree with the selections in the standard additions menu. Ifthe results are not within acceptable limits, the sample may contain an interference.
Standard solution methodUse the standard solution method to validate the test procedure, reagents andinstrument.Items to collect:
• Iron Standard Solution, 100-mg/L• 500-mL volumetric flask, Class A• 5-mL volumetric pipet, Class A and pipet filler• Deionized water
1. Prepare a 1.0 mg/L iron standard solution as follows:
a. Use a pipet to add 5.00 mL of 100 mg/L iron standard solution into the volumetricflask.
b. Dilute to the mark with deionized water. Mix well. Prepare this solution daily.2. Use the test procedure to measure the concentration of the prepared standard
solution.3. Compare the expected result to the actual result.
4 Iron, FerroZine Method (1.400 mg/L)

Note: The factory calibration can be adjusted slightly with the standard adjust option so that theinstrument shows the expected value of the standard solution. The adjusted calibration is thenused for all test results. This adjustment can increase the test accuracy when there are slightvariations in the reagents or instruments.
Method performanceThe method performance data that follows was derived from laboratory tests that weremeasured on a spectrophotometer during ideal test conditions. Users may get differentresults under different test conditions.
Program Standard Precision (95% Confidence Interval) SensitivityConcentration change per 0.010 Abs change
260 1.000 mg/L Fe 0.985–1.015 mg/L Fe 0.009 mg/L Fe
Summary of methodThe FerroZine® Iron Reagent forms a purple-colored complex with trace amounts of ironin samples that are buffered to a pH of 3.5. This method is applicable for determiningtrace levels of iron in chemical reagents and glycols and with digestion can be used toanalyze samples containing magnetite (black iron oxide) or ferrites. The measurementwavelength is 562 nm for spectrophotometers or 560 nm for colorimeters.
Consumables and replacement itemsRequired reagents
Description Quantity/test Unit Item no.
FerroZine® Iron Reagent Solution 0.5 mL 500 mL 230149
OR
FerroZine® Iron Reagent Solution Pillows 1 50/pkg 230166
Required apparatus
Description Quantity/test Unit Item no.
Clippers for solution pillows 1 each 96800
Cylinder, graduated mixing, 25 mL with stopper 1 each 2088640
Sample cell, 10 mL square, matched pair 2 2/pkg 2495402
Recommended standards and apparatus
Description Unit Item no.
Iron Standard Solution, 100 mg/L Fe 100 mL 1417542
Iron Standard Solution, 10 mL Voluette® ampule, 25 mg/L Fe 16/pkg 1425310
Metals Drinking Water Standard, LR for Cu, Fe, Mn 500 mL 2833749
Flask, volumetric, Class A, 500-mL each 1457449
Pipet, TenSette®, 0.1–1.0 mL each 1970001
Pipet tips for TenSette Pipet 1970001 50/pkg 2185696
Pipet tips for TenSette Pipet 1970001 1000/pkg 2185628
Pipet, volumetric 5.00-mL each 1451537
Pipet filler, safety bulb each 1465100
Iron, FerroZine Method (1.400 mg/L) 5

Optional reagents and apparatus
Description Unit Item no.
Ammonium Hydroxide, 10% 100 mLMDB 1473632
Hydrochloric Acid, 1:1, 6N 500 mL 88449
Nitric Acid, concentrated 500 mL 15249
HACH COMPANYWORLD HEADQUARTERSTelephone: (970) 669-3050FAX: (970) 669-2932
FOR TECHNICAL ASSISTANCE, PRICE INFORMATION AND ORDERING:Call 800-227-4224
Contact the HACH office or distributor serving you.www.hach.com [email protected]
In the U.S.A. –
Outside the U.S.A. –
On the Worldwide Web – ; E-mail –
toll-free
© Hach Company/Hach Lange GmbH, 1989–2013. All rights reserved. 04/2013, Edition 8

Iron, Total DOC316.53.01052
FerroMo Method1 Method 83650.01 to 1.80 mg/L Fe Powder Pillows
Scope and application: For cooling water that contains molybdate-based treatment.1 Adapted from G. Frederick Smith Chemical Co., The Iron Reagents, 3rd ed. (1980).
Test preparation
Instrument specific informationThe table in this section shows all of the instruments that have the program for this test. Table 1 shows sample cell and orientation requirements for reagent addition tests, suchas powder pillow or bulk reagent tests.To use the table, select an instrument, then read across to find the correspondinginformation for this test.
Table 1 Instrument-specific information for powder pillows
Instrument Sample cell orientation Sample cell
DR 6000 DR 3800 DR 2800 DR 2700
The fill line is to the right. 2495402
DR 5000 DR 3900
The fill line is toward the user.
DR 900 The orientation mark is toward the user. 2401906
Before startingInstall the instrument cap on the DR 900 cell holder before ZERO or READ is pushed.
The sample must be digested with heat and acid to make sure that all forms of the metal are measured. Use the mild orvigorous digestion. Refer to the Water Analysis Guide for more information.
Wash all glassware with detergent. Rinse with tap water. Rinse again with 1:1 hydrochloric acid solution. Rinse a third timewith high-quality deionized water. These steps will remove deposits that can cause slightly high results.
If the sample contains 100 mg/L or more molybdate (MoO42–), read the sample immediately after the instrument zero.
For best results, measure the reagent blank value for each new lot of reagent. Replace the sample with deionized water inthe test procedure to get the reagent blank value. Subtract the reagent blank value from the sample results automaticallywith the reagent blank adjust option.
Review the Safety Data Sheets (MSDS/SDS) for the chemicals that are used and use any recommended personal protectiveequipment.
Dispose of reacted solutions according to local, state and federal regulations. Use the Safety Data Sheets for disposalinformation for unused reagents. Consult the environmental, health and safety staff for your facility and/or local regulatoryagencies for further disposal information.
1

Items to collect
Description Quantity
FerroMo® Reagent 1 Powder Pillow 1
FerroMo® Reagent 2 Powder Pillow 1
Cylinder, graduated mixing, 25-mL with stopper 1
Cylinder, graduated mixing, 50-mL with stopper 1
Sample cells (For information about sample cells, adapters or light shields, refer to Instrumentspecific information on page 1.) 2
Refer to Consumables and replacement items on page 5 for reorder information.
Sample collection and storage• Collect samples in clean acid-washed glass or plastic bottles.• To preserve samples for later analysis, adjust the sample pH to less than 2 with
concentrated hydrochloric acid (about 2 mL per liter). No acid addition is necessary ifthe sample is tested immediately.
• To measure only dissolved iron, filter the sample through a 0.45 micron filter orequivalent medium immediately after collection and before acidification.
• Keep preserved samples at room temperature for a maximum of 6 months.• Before analysis, adjust the pH to 3–5 with 5.0 N sodium hydroxide standard solution.
Do not exceed pH 5 to prevent precipitation of the iron.• Correct the test result for the dilution from the volume additions.
Powder pillow procedure
Start
1. Start program 275 Iron,FerroMo. For informationabout sample cells,adapters or light shields,refer to Instrument specificinformation on page 1.Note: Although the programname may vary betweeninstruments, the programnumber does not change.
2. Prepare the sample: Filla 50-mL mixing cylinder with50 mL of sample.
3. Add the contents of oneFerroMo Iron Reagent1 Powder Pillow to themixing cylinder.
4. Close the cylinder. Invertseveral times to mix.
2 Iron, Total, FerroMo Method (1.80 mg/L)

5. Fill a clean 25-mL mixingcylinder to the 25-mL markwith the prepared sample.Use the rest of the sampleto prepare the blank.
6. Prepare the blank: Fill asecond sample cell with10 mL of the preparedsample.
7. Develop the sample:Add the contents of oneFerroMo Iron Reagent2 Powder Pillow to theprepared sample in the 25-mL mixing cylinder.
8. Close the cylinder. Invertthe cylinder several times tomix.A blue color will show if ironis present in the sample. Asmall amount of undissolvedreagent will not affect theresults of the test.
9. Start the instrumenttimer. A 3-minute reactiontime starts.
10. When the timer expires,pour 10 mL of thedeveloped sample into asample cell. This is theprepared sample for thetest.
11. Clean the blank. 12. Insert the blank into thecell holder.
Zero
13. Push ZERO. Thedisplay shows 0.00 mg/L Fe.
14. Clean the developedsample.
15. Insert the developedsample into the cell holder.
Read
16. Push READ. Resultsshow in mg/L Fe.
Iron, Total, FerroMo Method (1.80 mg/L) 3
InterferencesInterferingsubstance
Interference level
pH After the addition of reagent, a sample pH of less than 3 or more than 4 may inhibit color formation, causethe developed color to fade quickly or result in turbidity. Adjust the sample pH to between 3 and 8 in thegraduated cylinder before the addition of reagent:
1. Add by drops an applicable amount of iron-free acid or base such as 1.0 N Sulfuric Acid StandardSolution or 1.0 N Sodium Hydroxide Standard Solution.
2. Make a volume correction if significant volumes of acid or base are used.
Accuracy check
Standard additions method (sample spike)Use the standard additions method (for applicable instruments) to validate the testprocedure, reagents and instrument and to find if there is an interference in the sample.Items to collect:
• Iron Voluette® Ampule Standard, 50 mg/L Fe• Ampule breaker• Pipet, TenSette®, 0.1–1.0 mL and tips
1. Use the test procedure to measure the concentration of the sample, then keep the(unspiked) sample in the instrument.
2. Go to the Standard Additions option in the instrument menu.3. Select the values for standard concentration, sample volume and spike volumes.4. Open the standard solution.5. Prepare three spiked samples: use the TenSette pipet to add 0.1 mL, 0.2 mL and
0.3 mL of the standard solution, respectively, to three 50-mL portions of fresh sample.Mix well.
6. Use the test procedure to measure the concentration of each of the spiked samples.Start with the smallest sample spike. Measure each of the spiked samples in theinstrument.
7. Select Graph to compare the expected results to the actual results.Note: If the actual results are significantly different from the expected results, make sure thatthe sample volumes and sample spikes are measured accurately. The sample volumes andsample spikes that are used should agree with the selections in the standard additions menu. Ifthe results are not within acceptable limits, the sample may contain an interference.
Standard solution methodUse the standard solution method to validate the test procedure, reagents andinstrument.Items to collect:
• 100 mg/L iron standard solution• 100-mL volumetric flask, Class A• 1-mL volumetric pipet, Class A and pipet filler• Deionized water
1. Prepare a 1.00 mg/L iron standard solution as follows:
a. Use a pipet to add 1.0 mL of 100 mg/L iron standard solution into the volumetricflask.
b. Dilute to the mark with deionized water. Mix well. Prepare this solution daily.2. Use the test procedure to measure the concentration of the prepared standard
solution.3. Compare the expected result to the actual result.
4 Iron, Total, FerroMo Method (1.80 mg/L)
Note: The factory calibration can be adjusted slightly with the standard adjust option so that theinstrument shows the expected value of the standard solution. The adjusted calibration is thenused for all test results. This adjustment can increase the test accuracy when there are slightvariations in the reagents or instruments.
Method performanceThe method performance data that follows was derived from laboratory tests that weremeasured on a spectrophotometer during ideal test conditions. Users may get differentresults under different test conditions.
Program Standard Precision (95% Confidence Interval) SensitivityConcentration change per 0.010 Abs change
275 1.00 mg/L Fe 0.98–1.02 mg/L Fe 0.01 mg/L Fe
Summary of methodFerroMo Iron Reagent 1 contains a reducing agent combined with a masking agent. Themasking agent removes interference from high levels of molybdate. The reducing agentconverts precipitated or suspended iron, such as rust, to the ferrous state. FerroMo IronReagent 2 contains the indicator combined with a buffering agent. The indicator reactswith ferrous iron in the sample, buffered between pH 3 and 5, which results in a deepblue-purple color. The measurement wavelength is 590 nm for spectrophotometers or610 nm for colorimeters.
Consumables and replacement itemsRequired reagents
Description Quantity/test Unit Item no.
FerroMo® Iron Reagent Set 1 100/pkg 2544800
Includes:
FerroMo® Reagent 1 Powder Pillow 1 25/pkg 2543768
FerroMo® Reagent 2 Powder Pillow 1 50/pkg 2543866
Required apparatus
Description Quantity/test Unit Item no.
Cylinder, graduated mixing, 25 mL with stopper 1 each 2088640
Cylinder, graduated mixing, 50 mL, with stopper 1 each 2088641
Recommended standards
Description Unit Item no.
Iron Standard Solution, 100 mg/L Fe 100 mL 1417542
Iron Standard Solution, 1 mg/L Fe 500 mL 13949
Iron Standard Solution, 10 mL Voluette® ampule, 50 mg/L Fe. 16/pkg 1425410
Water, deionized 4 L 27256
Optional reagents and apparatus
Description Unit Item no.
Flask, volumetric, Class A, 100-mL each 1457442
Pipet, volumetric, Class A, 1.00-mL each 1451535
Pipet filler, safety bulb each 1465100
Iron, Total, FerroMo Method (1.80 mg/L) 5

Consumables and replacement items (continued)Description Unit Item no.
Sodium Hydroxide Standard Solution, 1.0 N 100 mLMDB 104532
Sodium Hydroxide Standard Solution, 5.0 N 100 mLMDB 245032
Sulfuric Acid Standard Solution, 1 N 100 mLMDB 127032
Hydrochloric Acid, 6.0 N 1:1, 50% 500 mL 88449
HACH COMPANYWORLD HEADQUARTERSTelephone: (970) 669-3050FAX: (970) 669-2932
FOR TECHNICAL ASSISTANCE, PRICE INFORMATION AND ORDERING:Call 800-227-4224
Contact the HACH office or distributor serving you.www.hach.com [email protected]
In the U.S.A. –
Outside the U.S.A. –
On the Worldwide Web – ; E-mail –
toll-free
© Hach Company/Hach Lange GmbH, 1989–2013. All rights reserved. 04/2013, Edition 8
Iron, Total DOC316.53.01053
USEPA1 FerroVer® Method2 Method 80080.02 to 3.00 mg/L Fe Powder Pillows or AccuVac® Ampuls
Scope and application: For water, wastewater and seawater; digestion is required for determining total iron.1 USEPA approved for reporting wastewater analysis, Federal Register, June 27, 1980; 45 (126:43459).2 Adapted from Standard Methods for the Examination of Water and Wastewater.
Test preparation
Instrument-specific informationThe tables in this section show all of the instruments that have the program for this test. Table 1 shows sample cell and orientation requirements for reagent addition tests, suchas powder pillow or bulk reagent tests. Table 2 shows sample cell and adapterrequirements for AccuVac Ampul tests.To use either table, select an instrument, then read across to find the correspondinginformation for this test.
Table 1 Instrument-specific information for powder pillows
Instrument Sample cell orientation Sample cell
DR 6000 DR 3800 DR 2800 DR 2700
The fill line is to the right. 2495402
DR 5000 DR 3900
The fill line is toward the user.
DR 900 The orientation mark is toward the user. 2401906
Table 2 Instrument-specific information for AccuVac Ampuls
Instrument Adapter Sample cell
DR 6000 DR 5000 DR 900
— 2427606
DR 3900 LZV846 (A)
DR 3800 DR 2800 DR 2700
LZV584 (C) 2122800
1
Before startingInstall the instrument cap on the DR 900 cell holder before ZERO or READ is pushed.
The reagent in this test procedure converts all soluble iron and most insoluble forms of iron in the sample to soluble ferrousiron for measurement. For regulatory reporting, however, the sample must be digested with heat and acid to make sure thatall forms of the metal are measured.
For best results, measure the reagent blank value for each new lot of reagent. Replace the sample with deionized water inthe test procedure to get the reagent blank value. Subtract the reagent blank value from the sample results automaticallywith the reagent blank adjust option.
For turbid samples, treat the blank with one 0.1-g scoop of RoVer Rust Remover. Swirl to dissolve.
Review the Safety Data Sheets (MSDS/SDS) for the chemicals that are used and use any recommended personal protectiveequipment.
Dispose of reacted solutions according to local, state and federal regulations. Use the Safety Data Sheets for disposalinformation for unused reagents. Consult the environmental, health and safety staff for your facility and/or local regulatoryagencies for further disposal information.
Items to collectPowder pillows
Description Quantity
FerroVer® Iron Reagent Powder Pillows, 10-mL1 1
Sample cells. (For information about sample cells, adapters or light shields, refer to Instrument-specific information on page 1.) 2
1 FerroVer is a registered trademark of Hach Company.
Refer to Consumables and replacement items on page 6 for reorder information.
AccuVac Ampuls
Description Quantity
FerroVer® Iron Reagent AccuVac® Ampul 1
Beaker, 50-mL 1
Sample cells (For information about sample cells, adapters or light shields, refer to Instrument-specific information on page 1.) 1
Stopper for 18-mm tubes and AccuVac Ampuls 1
Refer to Consumables and replacement items on page 6 for reorder information.
Sample collection and storage• Collect samples in clean glass or plastic bottles.• To measure only dissolved iron, filter the sample immediately after collection and
before acidification.• To preserve samples for later analysis, adjust the sample pH to less than 2 with
concentrated nitric acid (about 2 mL per liter). No acid addition is necessary if thesample is tested immediately.
• Keep preserved samples at room temperature for a maximum of 6 months.• Before analysis, adjust the pH to 3–5 with 5.0 N sodium hydroxide standard solution.• Correct the test result for the dilution from the volume additions.
2 Iron, Total, FerroVer Method (3.00 mg/L)
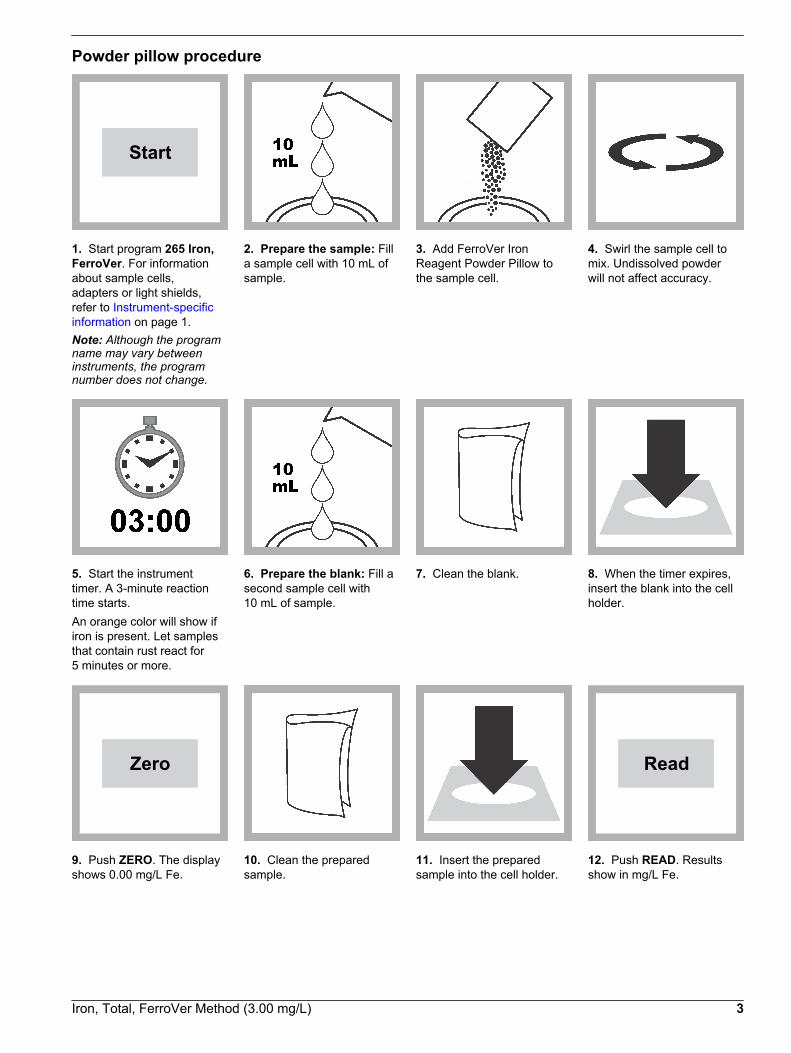
Powder pillow procedure
Start
1. Start program 265 Iron,FerroVer. For informationabout sample cells,adapters or light shields,refer to Instrument-specificinformation on page 1.Note: Although the programname may vary betweeninstruments, the programnumber does not change.
2. Prepare the sample: Filla sample cell with 10 mL ofsample.
3. Add FerroVer IronReagent Powder Pillow tothe sample cell.
4. Swirl the sample cell tomix. Undissolved powderwill not affect accuracy.
5. Start the instrumenttimer. A 3-minute reactiontime starts.An orange color will show ifiron is present. Let samplesthat contain rust react for5 minutes or more.
6. Prepare the blank: Fill asecond sample cell with10 mL of sample.
7. Clean the blank. 8. When the timer expires,insert the blank into the cellholder.
Zero
9. Push ZERO. The displayshows 0.00 mg/L Fe.
10. Clean the preparedsample.
11. Insert the preparedsample into the cell holder.
Read
12. Push READ. Resultsshow in mg/L Fe.
Iron, Total, FerroVer Method (3.00 mg/L) 3

AccuVac procedure
Start
1. Start program 267 Iron,FerroVer AV. Forinformation about samplecells, adapters or lightshields, refer to Instrument-specific informationon page 1.Note: Although the programname may vary betweeninstruments, the programnumber does not change.
2. Prepare the blank: Fillthe sample cell with 10 mLof sample.
3. Prepare the sample:Collect at least 40 mL ofsample in a 50-mL beaker.Fill the AccuVac Ampul withsample. Keep the tipimmersed while the Ampulfills completely.
4. Quickly invert the Ampulseveral times to mix.Undissolved powder will notaffect accuracy.
5. Start the instrumenttimer. A 3-minute reactiontime starts.An orange color will show ifiron is present. Let samplesthat contain rust react for5 minutes or more.
6. Clean the blank. 7. When the timer expires,insert the blank into the cellholder.
Zero
8. Push ZERO. The displayshows 0.00 mg/L Fe.
9. Clean the AccuVacAmpul.
10. Insert the preparedsample AccuVac Ampul intothe cell holder.
Read
11. Push READ. Resultsshow in mg/L Fe.
4 Iron, Total, FerroVer Method (3.00 mg/L)

InterferencesInterfering substance Interference level
Calcium, Ca2+ No effect at less than 10,000 mg/L as CaCO3.
Chloride, Cl– No effect at less than 185,000 mg/L.
Copper, Cu2+ No effect. Masking agent is contained in FerroVer Reagent.
High iron levels Inhibit color development. Dilute sample and re-test to verify results.
Iron oxide A mild, vigorous or Digesdahl digestion is necessary. After digestion, adjust the sample pH to 3–5 with sodium hydroxide, then analyze.
Magnesium No effect at 100,000 mg/L as CaCO3.
Molybdate molybdenum No effect at 50 mg/L as Mo.
High sulfide levels, S2– Pre-treat the sample in a fume hood or well-ventilated area before analysis:
1. Add 5 mL of hydrochloric acid, ACS to 100 mL of sample in a 250-mL Erlenmeyer flask.2. Boil for 20 minutes.3. Let the solution cool to room temperature.4. Adjust the pH to 3–5 with sodium hydroxide.5. Add deionized water until the volume is 100 mL.6. Use the treated sample in the test procedure.
Turbidity Pre-treat the sample before analysis:
1. Add 0.1 g scoop of RoVer® Rust Remover to the blank. Swirl to mix.2. If sample remains turbid, add three 0.2 g scoops of RoVer Rust Remover to a 75 mL sample.
Let stand 5 minutes.3. Filter through a glass membrane filter and filter holder.4. Use the treated sample in the test procedure.
Highly buffered samplesor extreme sample pH
Can prevent the correct pH adjustment of the sample by the reagents. Sample pretreatment maybe necessary. Adjust the pH to 3–5.
Accuracy check
Standard additions method (sample spike)Use the standard additions method (for applicable instruments) to validate the testprocedure, reagents and instrument and to find if there is an interference in the sample.Items to collect:
• Iron Voluette® Ampule Standard, 25 mg/L• Ampule Breaker• Pipet, TenSette®, 0.1–1.0 mL and tips
1. Use the test procedure to measure the concentration of the sample, then keep the(unspiked) sample in the instrument.
2. Go to the Standard Additions option in the instrument menu.3. Select the values for standard concentration, sample volume and spike volumes.4. Open the standard solution.5. Prepare three spiked samples: use the TenSette pipet to add 0.1 mL, 0.2 mL and
0.3 mL of the standard solution, respectively, to three 10-mL portions of fresh sample.Mix well.Note: For AccuVac® Ampuls, add 0.2 mL, 0.4 mL and 0.6 mL of the standard solution to three50-mL portions of fresh sample.
Iron, Total, FerroVer Method (3.00 mg/L) 5

6. Use the test procedure to measure the concentration of each of the spiked samples.Start with the smallest sample spike. Measure each of the spiked samples in theinstrument.
7. Select Graph to compare the expected results to the actual results.Note: If the actual results are significantly different from the expected results, make sure thatthe sample volumes and sample spikes are measured accurately. The sample volumes andsample spikes that are used should agree with the selections in the standard additions menu. Ifthe results are not within acceptable limits, the sample may contain an interference.
Standard solution methodUse the standard solution method to validate the test procedure, reagents andinstrument.Items to collect:
• Iron standard solution, 100 mg/L• 100-mL volumetric flask, Class A• 2-mL volumetric pipet, Class A and pipet filler• Deionized water
1. Prepare a 2.00 mg/L iron standard solution as follows:
a. Use a pipet to add 2 mL of the 100 mg/L iron standard solution into the volumetricflask.
b. Dilute to the mark with deionized water. Mix well. Prepare this solution daily.2. Use the test procedure to measure the concentration of the prepared standard
solution.3. Compare the expected result to the actual result.
Note: The factory calibration can be adjusted slightly with the standard adjust option so that theinstrument shows the expected value of the standard solution. The adjusted calibration is thenused for all test results. This adjustment can increase the test accuracy when there are slightvariations in the reagents or instruments.
Method performanceThe method performance data that follows was derived from laboratory tests that weremeasured on a spectrophotometer during ideal test conditions. Users may get differentresults under different test conditions.
Program Standard Precision (95% Confidence Interval) SensitivityConcentration change per 0.010 Abs change
265 2.00 mg/L Fe 1.99–2.01 mg/L Fe 0.021 mg/L Fe
267 2.00 mg/L Fe 1.98–2.02 mg/L Fe 0.023 mg/L Fe
Summary of methodFerroVer Iron Reagent converts all soluble iron and most insoluble forms of iron in thesample to soluble ferrous iron. The ferrous iron reacts with the 1-10 phenanthrolineindicator in the reagent to form an orange color in proportion to the iron concentration.The measurement wavelength is 510 nm for spectrophotometers or 520 nm forcolorimeters.
Consumables and replacement itemsRequired reagents
Description Quantity/Test Unit Item no.
FerroVer® Iron Reagent Powder Pillow, 10-mL 1 100/pkg 2105769
OR
FerroVer® Iron Reagent AccuVac® Ampul 1 25/pkg 2507025
6 Iron, Total, FerroVer Method (3.00 mg/L)
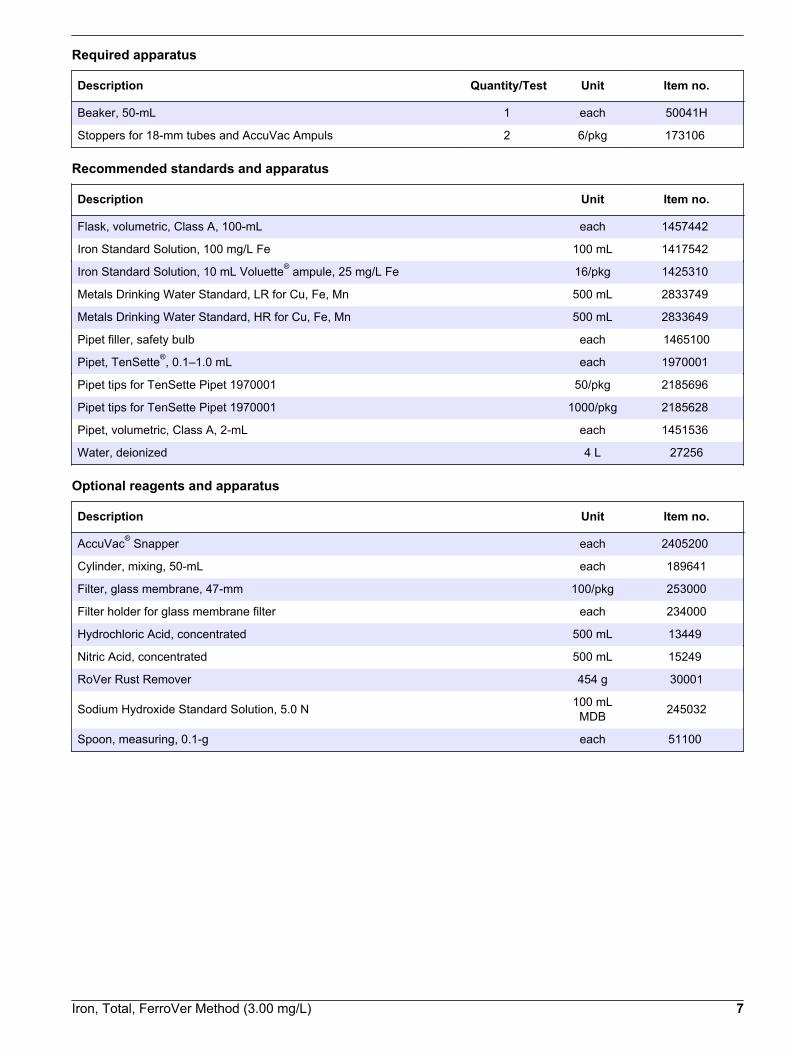
Required apparatus
Description Quantity/Test Unit Item no.
Beaker, 50-mL 1 each 50041H
Stoppers for 18-mm tubes and AccuVac Ampuls 2 6/pkg 173106
Recommended standards and apparatus
Description Unit Item no.
Flask, volumetric, Class A, 100-mL each 1457442
Iron Standard Solution, 100 mg/L Fe 100 mL 1417542
Iron Standard Solution, 10 mL Voluette® ampule, 25 mg/L Fe 16/pkg 1425310
Metals Drinking Water Standard, LR for Cu, Fe, Mn 500 mL 2833749
Metals Drinking Water Standard, HR for Cu, Fe, Mn 500 mL 2833649
Pipet filler, safety bulb each 1465100
Pipet, TenSette®, 0.1–1.0 mL each 1970001
Pipet tips for TenSette Pipet 1970001 50/pkg 2185696
Pipet tips for TenSette Pipet 1970001 1000/pkg 2185628
Pipet, volumetric, Class A, 2-mL each 1451536
Water, deionized 4 L 27256
Optional reagents and apparatus
Description Unit Item no.
AccuVac® Snapper each 2405200
Cylinder, mixing, 50-mL each 189641
Filter, glass membrane, 47-mm 100/pkg 253000
Filter holder for glass membrane filter each 234000
Hydrochloric Acid, concentrated 500 mL 13449
Nitric Acid, concentrated 500 mL 15249
RoVer Rust Remover 454 g 30001
Sodium Hydroxide Standard Solution, 5.0 N 100 mLMDB 245032
Spoon, measuring, 0.1-g each 51100
Iron, Total, FerroVer Method (3.00 mg/L) 7

HACH COMPANYWORLD HEADQUARTERSTelephone: (970) 669-3050FAX: (970) 669-2932
FOR TECHNICAL ASSISTANCE, PRICE INFORMATION AND ORDERING:Call 800-227-4224
Contact the HACH office or distributor serving you.www.hach.com [email protected]
In the U.S.A. –
Outside the U.S.A. –
On the Worldwide Web – ; E-mail –
toll-free
© Hach Company/Hach Lange GmbH, 1989–2013. All rights reserved. 04/2013, Edition 8
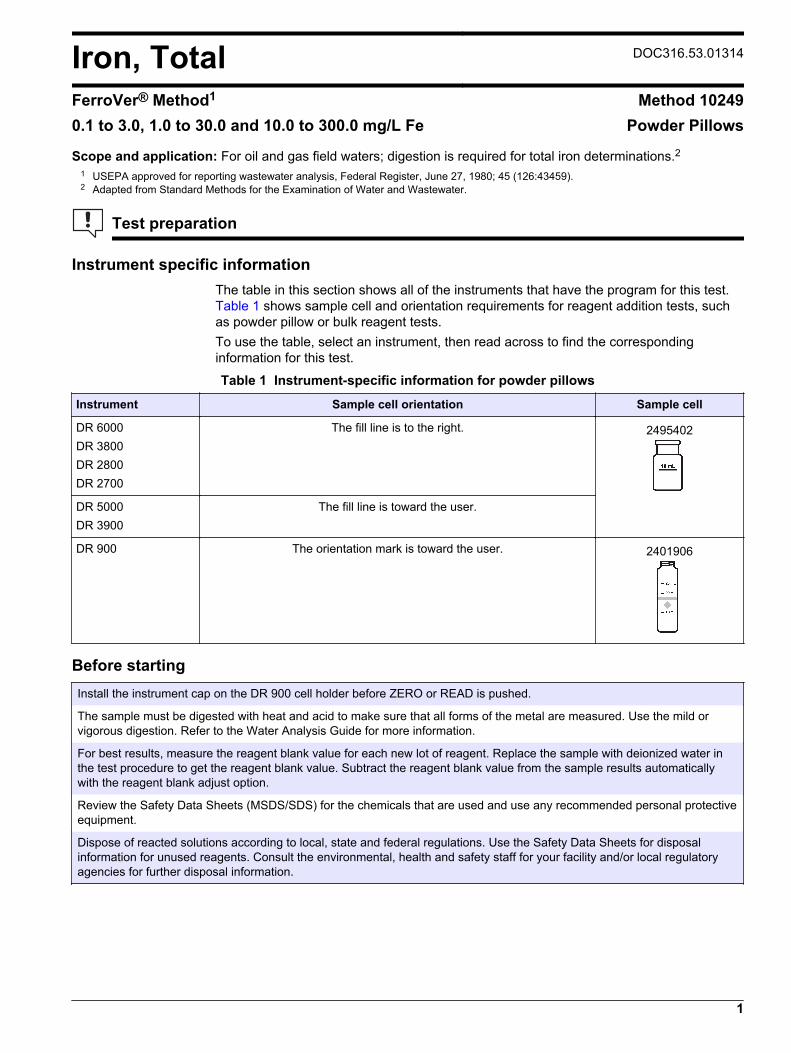
Iron, Total DOC316.53.01314
FerroVer® Method1 Method 102490.1 to 3.0, 1.0 to 30.0 and 10.0 to 300.0 mg/L Fe Powder Pillows
Scope and application: For oil and gas field waters; digestion is required for total iron determinations.21 USEPA approved for reporting wastewater analysis, Federal Register, June 27, 1980; 45 (126:43459).2 Adapted from Standard Methods for the Examination of Water and Wastewater.
Test preparation
Instrument specific informationThe table in this section shows all of the instruments that have the program for this test. Table 1 shows sample cell and orientation requirements for reagent addition tests, suchas powder pillow or bulk reagent tests.To use the table, select an instrument, then read across to find the correspondinginformation for this test.
Table 1 Instrument-specific information for powder pillows
Instrument Sample cell orientation Sample cell
DR 6000 DR 3800 DR 2800 DR 2700
The fill line is to the right. 2495402
DR 5000 DR 3900
The fill line is toward the user.
DR 900 The orientation mark is toward the user. 2401906
Before startingInstall the instrument cap on the DR 900 cell holder before ZERO or READ is pushed.
The sample must be digested with heat and acid to make sure that all forms of the metal are measured. Use the mild orvigorous digestion. Refer to the Water Analysis Guide for more information.
For best results, measure the reagent blank value for each new lot of reagent. Replace the sample with deionized water inthe test procedure to get the reagent blank value. Subtract the reagent blank value from the sample results automaticallywith the reagent blank adjust option.
Review the Safety Data Sheets (MSDS/SDS) for the chemicals that are used and use any recommended personal protectiveequipment.
Dispose of reacted solutions according to local, state and federal regulations. Use the Safety Data Sheets for disposalinformation for unused reagents. Consult the environmental, health and safety staff for your facility and/or local regulatoryagencies for further disposal information.
1

Items to collect
Description Quantity
FerroVer® Iron Reagent Powder Pillow, 10-mL 1
EDTA solution, 1M 2 drops
Sample cells (For information about sample cells, adapters or light shields, refer to Instrumentspecific information on page 1.) 1
Refer to Consumables and replacement items on page 6 for reorder information.
Sample collection and storage• Collect samples in clean glass or plastic bottles.• To preserve samples for later analysis, adjust the sample pH to less than 2 with
concentrated nitric acid (about 2 mL per liter). No acid addition is necessary if thesample is tested immediately.
• To measure only dissolved iron, filter the sample immediately after collection andbefore acidification.
• Keep preserved samples at room temperature for a maximum of 6 months.• Before analysis, adjust the pH to 3–5 with 5.0 N sodium hydroxide standard solution.• Correct the test result for the dilution from the volume additions.
Powder pillow procedure
Start
1. Start program 265 Iron,FerroVer. For informationabout sample cells,adapters or light shields,refer to Instrument specificinformation on page 1.Note: Although the programname may vary betweeninstruments, the programnumber does not change.
2. Fill a clean sample cellwith sample:
• Use 10 mL of samplefor the 0.02 to 3.0 mg/Lrange.
• Use 1.0 mL of samplefor the 0.2 to 30.0 mg/Lrange with a dilutionfactor of 10.
• Use 0.1 mL of samplefor the 2.0 to300.0 range with adilution factor of 100.
Note: Refer to Set thedilution factor on page 4.
3. If the sample volume isless than 10 mL, adddeionized water to the 10-mL line.
4. Swirl to mix.
2 Iron, Total, FerroVer Method (multi-range: 3.0, 30.0, 300.0 mg/L)

5. Add 2 drops of EDTASolution 1 M to the sample.
6. Swirl to mix. 7. Clean the sample cell. 8. Insert the sample cellinto the cell holder.
Zero
9. Push ZERO. The displayshows 0.0 mg/L Fe.
10. Remove the samplefrom the cell holder.
11. Add the contents of oneFerroVer Iron ReagentPowder Pillow to the samplecell.
12. Swirl to mix.Accuracy is not affected byundissolved powder.
13. Start the instrumenttimer. A 3-minute reactiontime starts.If iron is present in thesample, an orange color willshow.
14. When the timer expires,clean the sample cell.
15. Insert the sample cellinto the cell holder.
Read
16. Push READ. Resultsshow in mg/L Fe.
InterferencesInterferingsubstance
Interference level
Barium, Ba2+ The dilution of samples lowers most barium concentrations below interference levels. No effects areseen on analyzed samples that contain less than 50 mg/L of Ba. No effects are seen when a 1.0 or0.1 mL sample volume is used in the test procedure. A turbidity may show at higher levels. Use5 drops of EDTA Solution in the test procedure and allow the sample to react for 5 minutes.
Calcium, Ca2+ No effect at less than 10,000 mg/L as CaCO3.
Chloride, Cl– No effect at less than 185,000 mg/L.
Iron, Total, FerroVer Method (multi-range: 3.0, 30.0, 300.0 mg/L) 3

Interferingsubstance
Interference level
Copper, Cu2+ No effect. Masking agent is contained in FerroVer Reagent.
High iron levels Inhibit color development. Dilute sample and re-test to verify results.
Magnesium No effect at 100,000 mg/L as CaCO3.
Molybdatemolybdenum
No effect at 50 mg/L as Mo.
High sulfide levels,S2–
Pre-treat the sample in a fume hood or well-ventilated area before analysis:
1. Add 5 mL of hydrochloric acid, ACS to 100 mL of sample in a 250-mL Erlenmeyer flask.2. Boil for 20 minutes.3. Let the solution cool to room temperature.4. Adjust the pH to 3–5 with sodium hydroxide.5. Add deionized water until the volume is 100 mL.6. Use the treated sample in the test procedure.
Strontium, Sr2+ Strontium by itself does not interfere. Strontium in combination with Barium will cause a precipitate toform. The dilution of samples lowers most strontium concentrations below interference levels. Noeffects are seen on analyzed samples that contain less than 50 mg/L of combined Ba and Sr. Noeffects are seen when a 1.0 or 0.1 mL sample volume is used in the test procedure. A turbidity mayshow at higher levels. Use 5 drops of EDTA Solution in the test procedure and allow the sample toreact for 5 minutes.
Highly bufferedsamples or extremesample pH
Can prevent the correct pH adjustment of the sample by the reagents. Sample pretreatment may benecessary. Adjust the sample pH to 3–5 before the test is started. Correct the test result for thedilution from the volume addition.
Set the dilution factorInstruments that have a dilution factor option can include the dilution factor in the resultand show the concentration of the original, undiluted sample. For example, if the sampleis diluted by a factor of 10, the instrument multiplies the result by 10 and shows thecalculated result in the instrument display.
1. Select Options>More>Dilution factor from the instrument menu.Note: Colorimeters include a dilution factor when the chemical form is set. Go toOptions>Advanced Options>Chemical Form and select LR, MR or HR.
2. Enter the dilution factor:
• 1 mL sample diluted to 10 mL: dilution factor is 10.• 0.1 mL sample diluted to 10 mL: dilution factor is 100.
3. Push OK to confirm. Push OK again.4. Push RETURN to go back to the measurement screen.
Accuracy check
Standard additions method (sample spike)Use the standard additions method (for applicable instruments) to validate the testprocedure, reagents and instrument and to find if there is an interference in the sample.Items to collect:
• Iron Voluette® Ampule Standard, 25 mg/L• Ampule breaker• Pipet, TenSette®, 0.1–1.0 mL and tips
1. Use the test procedure to measure the concentration of the sample, then keep the(unspiked) sample in the instrument.
2. Go to the Standard Additions option in the instrument menu.
4 Iron, Total, FerroVer Method (multi-range: 3.0, 30.0, 300.0 mg/L)

3. Select the values for standard concentration, sample volume and spike volumes.4. Open the standard solution.5. Prepare three spiked samples: use the TenSette pipet to add 0.1 mL, 0.2 mL and
0.3 mL of the standard solution, respectively, to three 10-mL portions of fresh sample.Mix well.
6. Use the test procedure to measure the concentration of each of the spiked samples.Start with the smallest sample spike. Measure each of the spiked samples in theinstrument.
7. Select Graph to compare the expected results to the actual results.Note: If the actual results are significantly different from the expected results, make sure thatthe sample volumes and sample spikes are measured accurately. The sample volumes andsample spikes that are used should agree with the selections in the standard additions menu. Ifthe results are not within acceptable limits, the sample may contain an interference.
Standard solution methodUse the standard solution method to validate the test procedure, reagents andinstrument.Items to collect:
• Iron Standard Solution, 100 mg/L• 100-mL volumetric flask, Class A• 2-mL volumetric pipet, Class A and pipet filler• Deionized water
1. Prepare a 2.00 mg/L iron standard solution as follows:
a. Use a pipet to add 2.00 mL of 100 mg/L iron standard solution into the volumetricflask.
b. Dilute to the mark with deionized water. Mix well. Prepare this solution daily.2. Use the test procedure to measure the concentration of the prepared standard
solution.3. Compare the expected result to the actual result.
Note: The factory calibration can be adjusted slightly with the standard adjust option so that theinstrument shows the expected value of the standard solution. The adjusted calibration is thenused for all test results. This adjustment can increase the test accuracy when there are slightvariations in the reagents or instruments.
Method performanceThe method performance data that follows was derived from laboratory tests that weremeasured on a spectrophotometer during ideal test conditions. Users may get differentresults under different test conditions.
Program Standard Precision (95% Confidence Interval) SensitivityConcentration change per 0.010 Abs change
265 2.00 mg/L Fe 1.99–2.01 mg/L Fe 0.021 mg/L Fe
Summary of methodFerroVer Iron Reagent converts all soluble iron and most insoluble forms of iron in thesample to soluble ferrous iron. The ferrous iron reacts with the 1-10 phenanthrolineindicator in the reagent to form an orange color in proportion to the iron concentration.The measurement wavelength is 510 nm for spectrophotometers or 520 nm forcolorimeters.
Iron, Total, FerroVer Method (multi-range: 3.0, 30.0, 300.0 mg/L) 5
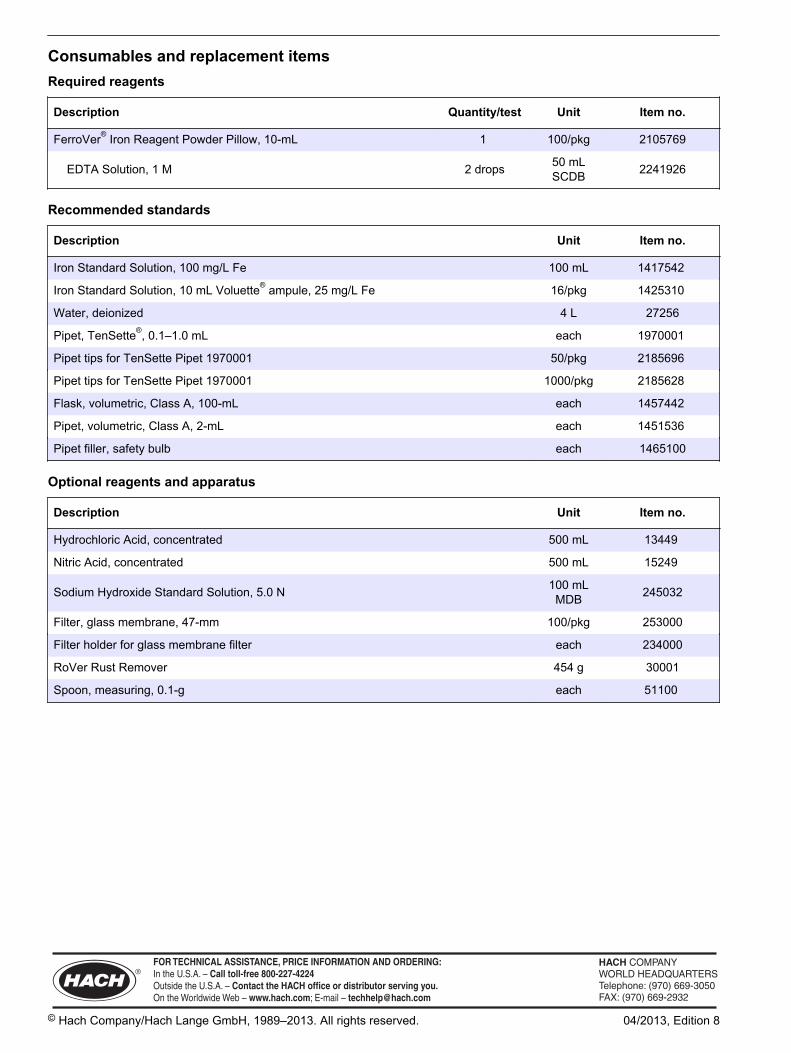
Consumables and replacement itemsRequired reagents
Description Quantity/test Unit Item no.
FerroVer® Iron Reagent Powder Pillow, 10-mL 1 100/pkg 2105769
EDTA Solution, 1 M 2 drops 50 mLSCDB 2241926
Recommended standards
Description Unit Item no.
Iron Standard Solution, 100 mg/L Fe 100 mL 1417542
Iron Standard Solution, 10 mL Voluette® ampule, 25 mg/L Fe 16/pkg 1425310
Water, deionized 4 L 27256
Pipet, TenSette®, 0.1–1.0 mL each 1970001
Pipet tips for TenSette Pipet 1970001 50/pkg 2185696
Pipet tips for TenSette Pipet 1970001 1000/pkg 2185628
Flask, volumetric, Class A, 100-mL each 1457442
Pipet, volumetric, Class A, 2-mL each 1451536
Pipet filler, safety bulb each 1465100
Optional reagents and apparatus
Description Unit Item no.
Hydrochloric Acid, concentrated 500 mL 13449
Nitric Acid, concentrated 500 mL 15249
Sodium Hydroxide Standard Solution, 5.0 N 100 mLMDB 245032
Filter, glass membrane, 47-mm 100/pkg 253000
Filter holder for glass membrane filter each 234000
RoVer Rust Remover 454 g 30001
Spoon, measuring, 0.1-g each 51100
HACH COMPANYWORLD HEADQUARTERSTelephone: (970) 669-3050FAX: (970) 669-2932
FOR TECHNICAL ASSISTANCE, PRICE INFORMATION AND ORDERING:Call 800-227-4224
Contact the HACH office or distributor serving you.www.hach.com [email protected]
In the U.S.A. –
Outside the U.S.A. –
On the Worldwide Web – ; E-mail –
toll-free
© Hach Company/Hach Lange GmbH, 1989–2013. All rights reserved. 04/2013, Edition 8

Iron, Total DOC316.53.01051
TPTZ Method1 Method 81120.012 to 1.800 mg/L Fe (spectrophotometers)0.04 to 1.80 mg/L Fe (colorimeters)
Powder Pillows or AccuVac® Ampuls
Scope and application: For water, wastewater and seawater.1 Adapted from G. Frederic Smith Chemical Co., The Iron Reagents, 3rd ed. (1980).
Test preparation
Instrument-specific informationThe tables in this section show all of the instruments that have the program for this test. Table 1 shows sample cell and orientation requirements for reagent addition tests, suchas powder pillow or bulk reagent tests. Table 2 shows sample cell and adapterrequirements for AccuVac Ampul tests.To use either table, select an instrument, then read across to find the correspondinginformation for this test.
Table 1 Instrument-specific information for powder pillows
Instrument Sample cell orientation Sample cell
DR 6000 DR 3800 DR 2800 DR 2700
The fill line is to the right. 2495402
DR 5000 DR 3900
The fill line is toward the user.
DR 900 The orientation mark is toward the user. 2401906
Table 2 Instrument-specific information for AccuVac Ampuls
Instrument Adapter Sample cell
DR 6000 DR 5000 DR 900
— 2427606
DR 3900 LZV846 (A)
DR 3800 DR 2800 DR 2700
LZV584 (C) 2122800
Before startingInstall the instrument cap on the DR 900 cell holder before ZERO or READ is pushed.
The sample must be digested with heat and acid to make sure that all forms of the metal are measured. Use the mild orvigorous digestion. Refer to the Water Analysis Guide for more information.
1

Wash all glassware with detergent. Rinse with tap water. Rinse again with 1:1 hydrochlorioc acid solution. Rinse a third timewith high-quality deionized water. These steps will remove deposits that can cause slightly high results.
For best results, measure the reagent blank value for each new lot of reagent. Replace the sample with deionized water inthe test procedure to get the reagent blank value. Subtract the reagent blank value from the sample results automaticallywith the reagent blank adjust option.
Review the Safety Data Sheets (MSDS/SDS) for the chemicals that are used and use any recommended personal protectiveequipment.
Dispose of reacted solutions according to local, state and federal regulations. Use the Safety Data Sheets for disposalinformation for unused reagents. Consult the environmental, health and safety staff for your facility and/or local regulatoryagencies for further disposal information.
Items to collectPowder pillows
Description Quantity
TPTZ Iron Reagent Powder Pillows, 10-mLS 2
Sample cells For information about sample cells, adapters or light shields, refer to Instrument-specific information on page 1. 2
Refer to Consumables and replacement items on page 7 for reorder information.
AccuVac Ampuls
Description Quantity
TPTZ Low Range Iron Reactent AccuVac Ampul 1
Beaker, 50-mL 1
Sample cells (For information about sample cells, adapters or light shields, refer to Instrument-specific information on page 1.) 1
Stopper for 18-mm tubes and AccuVac Ampuls 1
Refer to Consumables and replacement items on page 7 for reorder information.
Sample collection and storage• Collect samples in clean glass or plastic bottles.• To preserve samples for later analysis, adjust the sample pH to less than 2 with
concentrated nitric acid (about 2 mL per liter). No acid addition is necessary if thesample is tested immediately.
• To measure only dissolved iron, filter the sample immediately after collection andbefore acidification.
• Keep preserved samples at room temperature for a maximum of 6 months.• Before analysis, adjust the pH to 3–4 with 5.0 N sodium hydroxide standard solution.
Do not exceed pH 5 or iron may precipitate.• Correct the test result for the dilution from the volume additions.
2 Iron, Total, TPTZ Method (1.800 mg/L)

Powder pillow procedure
Start
1. Start program 270 Iron,TPTZ. For information aboutsample cells, adapters orlight shields, refer to Instrument-specificinformation on page 1.Note: Although the programname may vary betweeninstruments, the programnumber does not change.
2. Prepare the sample: Filla sample cell with 10 mL ofsample.
3. Add the contents of one10-mL TPTZ Iron ReagentPowder Pillow to theprepared sample .
4. Swirl the sample cell forat least 30 seconds to mix.
5. Start the instrumenttimer. A 3-minute reactiontime starts.Prepare the blank during thereaction time.
6. Prepare the blank: Fill asample cell with 10 mL ofdeionized water.
7. Add the contents of thecontents of one 10-mLTPTZ Iron Reagent PowderPillow to the blank. .
8. Swirl the sample cell forat least 30 seconds to mix.
9. When the timer expires,clean the blank.
10. Insert the blank into thecell holder.
Zero
11. Push ZERO. Thedisplay shows 0.000 mg/LFe.
12. Clean the preparedsample.
Iron, Total, TPTZ Method (1.800 mg/L) 3

13. Insert the preparedsample into the cell holder.
Read
14. Push READ. Resultsshow in mg/L Fe.
AccuVac Ampul procedure
Start
1. Start program 272 Iron,TPTZ AV. For informationabout sample cells,adapters or light shields,refer to Instrument-specificinformation on page 1.Note: Although the programname may vary betweeninstruments, the programnumber does not change.
2. Prepare the blank: Fillthe sample cell with 10 mLof sample.
3. Prepare the sample:Collect at least 40 mL ofsample in a 50-mL beaker.Fill the AccuVac Ampul withsample. Keep the tipimmersed while the Ampulfills completely.
4. Quickly invert the Ampulseveral times to mix.
5. Start the instrumenttimer. A 3-minute reactiontime starts.
6. When the timer expires,clean the blank.
7. Insert the blank into thecell holder.
Zero
8. Push ZERO. The displayshows 0.000 mg/L Fe.
4 Iron, Total, TPTZ Method (1.800 mg/L)

9. Clean the AccuVacAmpul.
10. Insert the preparedsample AccuVac Ampul intothe cell holder.
Read
11. Push READ. Resultsshow in mg/L Fe.
InterferencesInterferences were tested with an iron concentration of 0.5 mg/L Fe. The following do notinterfere with this method when present up to the levels shown.
Interfering substance Interference level
Cadmium 4.0 mg/L
Chromium3+ 0.25 mg/L
Chromium6+ 1.2 mg/L
Cobalt 0.05 mg/L
Copper 0.6 mg/L
Cyanide 2.8 mg/L
Manganese 50.0 mg/L
Mercury 0.4 mg/L
Molybdenum 4.0 mg/L
Nickel 1.0 mg/L
Nitrite Ion 0.8 mg/L
Color or turbidity If the sample, without a TPTZ Iron Reagent Powder Pillow, has a color or turbidity more than theblank (deionized water plus TPTZ Iron Reagent), then use the sample as the blank. Refer to thepowder pillow procedure.
pH After the addition of reagent, a sample pH of less than 3 or more than 4 may inhibit color formation.The developed color fades quickly or causes turbidity. Adjust the sample pH in the sample cellbefore the addition of reagent:
1. Use a pH meter or pH paper to measure the current pH.2. Add an applicable amount of iron-free acid or base such as 1.0 N Sulfuric Acid Standard
Solution or 1.0 N Sodium Hydroxide Standard Solution to adjust the sample pH to between3 and 4.1
3. Make a volume correction if significant volumes of acid or base are used.
1 Refer to Consumables and replacement items on page 7 for reorder information.
Accuracy check
Standard additions method (sample spike)Use the standard additions method (for applicable instruments) to validate the testprocedure, reagents and instrument and to find if there is an interference in the sample.Items to collect:
• Iron Standard Solution, 10 mg/L Fe
Iron, Total, TPTZ Method (1.800 mg/L) 5

• Pipet, TenSette®, 0.1–1.0 mL and pipet tips• Mixing cylinders, 50-mL (3) (for AccuVac Ampuls)
1. Use the test procedure to measure the concentration of the sample, then keep the(unspiked) sample in the instrument.
2. Go to the Standard Additions option in the instrument menu.3. Select the values for standard concentration, sample volume and spike volumes.4. Open the standard solution.5. Prepare three spiked samples: use the TenSette pipet to add 0.1 mL, 0.2 mL and
0.3 mL of the standard solution, respectively, to three 10-mL portions of fresh sample.Mix well.Note: For AccuVac® Ampuls, add 0.5 mL, 1.0 mL and 1.5 mL of the standard solution to three50-mL portions of fresh sample.
6. Use the test procedure to measure the concentration of each of the spiked samples.Start with the smallest sample spike. Measure each of the spiked samples in theinstrument.
7. Select Graph to compare the expected results to the actual results.Note: If the actual results are significantly different from the expected results, make sure thatthe sample volumes and sample spikes are measured accurately. The sample volumes andsample spikes that are used should agree with the selections in the standard additions menu. Ifthe results are not within acceptable limits, the sample may contain an interference.
Standard solution methodUse the standard solution method to validate the test procedure, reagents andinstrument.Items to collect:
• 100 mg/L iron standard solution• 500-mL volumetric flask, Class A• 5-mL volumetric pipet, Class A and pipet filler• Deionized water
1. Prepare a 1.00 mg/L iron standard solution as follows:
a. Use a pipet to add 5.00 mL of 100 mg/L iron standard solution into the volumetricflask.
b. Dilute to the mark with deionized water. Mix well. Prepare this solution daily.2. Use the test procedure to measure the concentration of the prepared standard
solution.3. Compare the expected result to the actual result.
Note: The factory calibration can be adjusted slightly with the standard adjust option so that theinstrument shows the expected value of the standard solution. The adjusted calibration is thenused for all test results. This adjustment can increase the test accuracy when there are slightvariations in the reagents or instruments.
Method performanceThe method performance data that follows was derived from laboratory tests that weremeasured on a spectrophotometer during ideal test conditions. Users may get differentresults under different test conditions.
Program Standard Precision (95% Confidence Interval) SensitivityConcentration change per 0.010 Abs change
270 1.000 mg/L Fe 0.989–1.011 mg/L Fe 0.011 mg/L Fe
272 1.000 mg/L Fe 0.984–1.016 mg/L Fe 0.012 mg/L Fe
6 Iron, Total, TPTZ Method (1.800 mg/L)

Summary of methodThe TPTZ Iron Reagent forms a deep blue-purple color with ferrous iron (Fe2+). Theindicator is combined with a reducing agent that converts precipitated or suspended iron,such as rust, to the ferrous state. The amount of ferric iron (Fe3+) can be determined asthe difference between the results of a ferrous iron test and the concentration of total iron.The measurement wavelength is 590 nm for spectrophotometers or 610 nm forcolorimeters.
Consumables and replacement itemsRequired reagents
Description Quantity/test Unit Item no.
TPTZ Iron Reagent Powder Pillow, 10-mL 1 100/pkg 2608799
OR
TPTZ Low Range Iron Reagent AccuVac® Ampul 1 25/pkg 2510025
Required apparatus
Description Quantity/test Unit Item no.
Beaker, 50-mL 1 each 50041H
Sample cell, 10 mL round, 25 x 54 mm 1 each 2122800
Sample cell, 10 mL round, 25 x 60 mm 1 6/pkg 2427606
Sample cell, 10 mL square, matched pair 2 2/pkg 2495402
Recommended standards
Description Unit Item no.
Iron Standard Solution, 100 mg/L Fe 100 mL 1417542
Iron Standard Solution, 10 mg/L Fe 500 mL 14049
Iron Standard Solution, 1 mg/L Fe 500 mL 13949
Metals Drinking Water Standard, LR for Cu, Fe, Mn 500 mL 2833749
Metals Drinking Water Standard, HR for Cu, Fe, Mn 500 mL 2833649
Water, deionized 4 L 27256
Optional reagents and apparatus
Description Unit Item no.
Cylinder, mixing, 50-mL each 189641
Nitric Acid, concentrated 500 mL 15249
Sodium Hydroxide Standard Solution, 5.0 N 50 mLSCDB 245026
Sulfuric Acid Standard Solution, 1 N 100 mLMDB 127032
Sodium Hydroxide Standard Solution, 1.0 N 100 mLMDB 104532
Stoppers for 18-mm tubes and AccuVac Ampuls 6/pkg 173106
Pipet, TenSette®, 0.1–1.0 mL each 1970001
Pipet tips for TenSette Pipet 1970001 50/pkg 2185696
Iron, Total, TPTZ Method (1.800 mg/L) 7

Consumables and replacement items (continued)Description Unit Item no.
Flask, volumetric, Class A, 500-mL each 1457449
Pipet, volumetric 5.00-mL each 1451537
Pipet filler, safety bulb each 1465100
HACH COMPANYWORLD HEADQUARTERSTelephone: (970) 669-3050FAX: (970) 669-2932
FOR TECHNICAL ASSISTANCE, PRICE INFORMATION AND ORDERING:Call 800-227-4224
Contact the HACH office or distributor serving you.www.hach.com [email protected]
In the U.S.A. –
Outside the U.S.A. –
On the Worldwide Web – ; E-mail –
toll-free
© Hach Company/Hach Lange GmbH, 1989–2013. All rights reserved. 04/2013, Edition 8
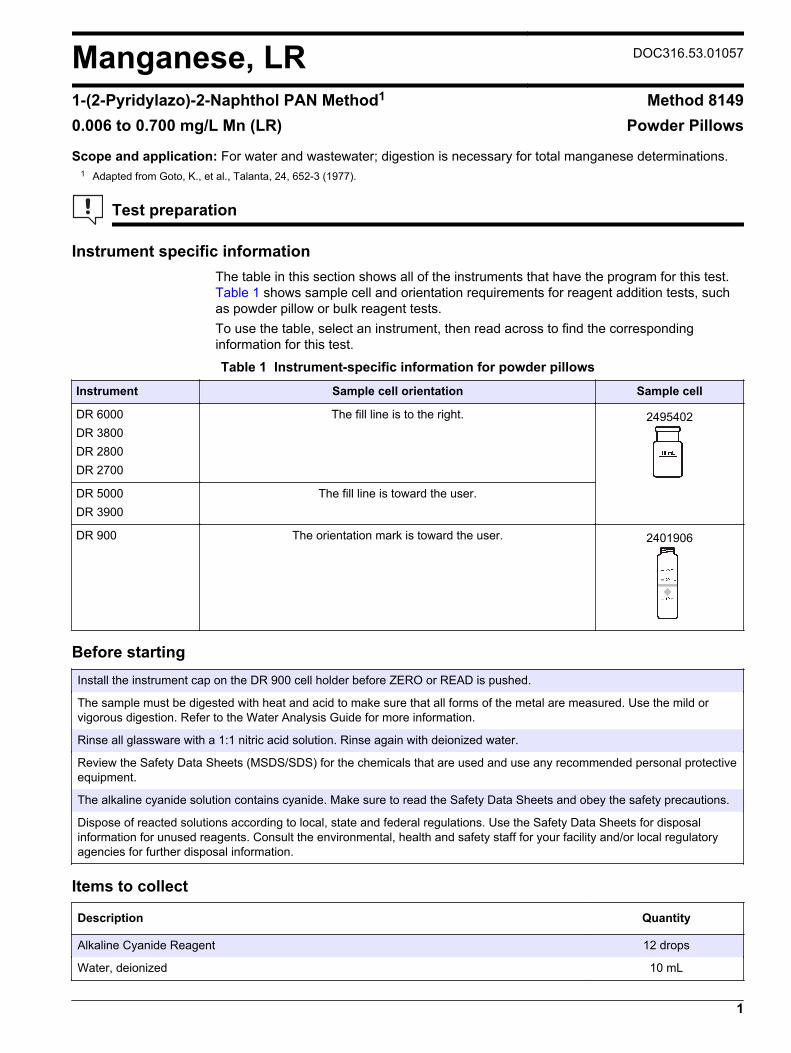
Manganese, LR DOC316.53.01057
1-(2-Pyridylazo)-2-Naphthol PAN Method1 Method 81490.006 to 0.700 mg/L Mn (LR) Powder Pillows
Scope and application: For water and wastewater; digestion is necessary for total manganese determinations.1 Adapted from Goto, K., et al., Talanta, 24, 652-3 (1977).
Test preparation
Instrument specific informationThe table in this section shows all of the instruments that have the program for this test. Table 1 shows sample cell and orientation requirements for reagent addition tests, suchas powder pillow or bulk reagent tests.To use the table, select an instrument, then read across to find the correspondinginformation for this test.
Table 1 Instrument-specific information for powder pillows
Instrument Sample cell orientation Sample cell
DR 6000 DR 3800 DR 2800 DR 2700
The fill line is to the right. 2495402
DR 5000 DR 3900
The fill line is toward the user.
DR 900 The orientation mark is toward the user. 2401906
Before startingInstall the instrument cap on the DR 900 cell holder before ZERO or READ is pushed.
The sample must be digested with heat and acid to make sure that all forms of the metal are measured. Use the mild orvigorous digestion. Refer to the Water Analysis Guide for more information.
Rinse all glassware with a 1:1 nitric acid solution. Rinse again with deionized water.
Review the Safety Data Sheets (MSDS/SDS) for the chemicals that are used and use any recommended personal protectiveequipment.
The alkaline cyanide solution contains cyanide. Make sure to read the Safety Data Sheets and obey the safety precautions.
Dispose of reacted solutions according to local, state and federal regulations. Use the Safety Data Sheets for disposalinformation for unused reagents. Consult the environmental, health and safety staff for your facility and/or local regulatoryagencies for further disposal information.
Items to collect
Description Quantity
Alkaline Cyanide Reagent 12 drops
Water, deionized 10 mL
1

Items to collect (continued)Description Quantity
Ascorbic Acid Powder Pillow 2
PAN Indicator Solution, 0.1% 12 drops
Stoppers for 18 mm-tubes and AccuVac Ampuls 2
Sample cells (For information about sample cells, adapters or light shields, refer to Instrumentspecific information on page 1.) 2
Refer to Consumables and replacement items on page 5 for reorder information.
Sample collection and storage• Collect samples in clean glass or plastic bottles.• To preserve samples for later analysis, adjust the sample pH to less than 2 with
concentrated nitric acid (about 2 mL per liter). No acid addition is necessary if thesample is tested immediately.
• Keep preserved samples at room temperature for a maximum of 6 months.• Before analysis, adjust the pH to 4–5 with 5.0 N sodium hydroxide standard solution.• Correct the test result for the dilution from the volume additions.
Powder pillow procedure
Start
1. Start Program290 Manganese, LR PAN.For information aboutsample cells, adapters orlight shields, refer to Instrument specificinformation on page 1.Note: Although the programname may vary betweeninstruments, the programnumber does not change.
2. Prepare the blank: Fillthe sample cell with 10 mLof deionized water.
3. Prepare the sample: Filla second sample cell with10 mL of sample.
4. Add the contents of oneAscorbic Acid Powder Pillowto each sample cell.
2 Manganese, PAN Method (0.700 mg/L)
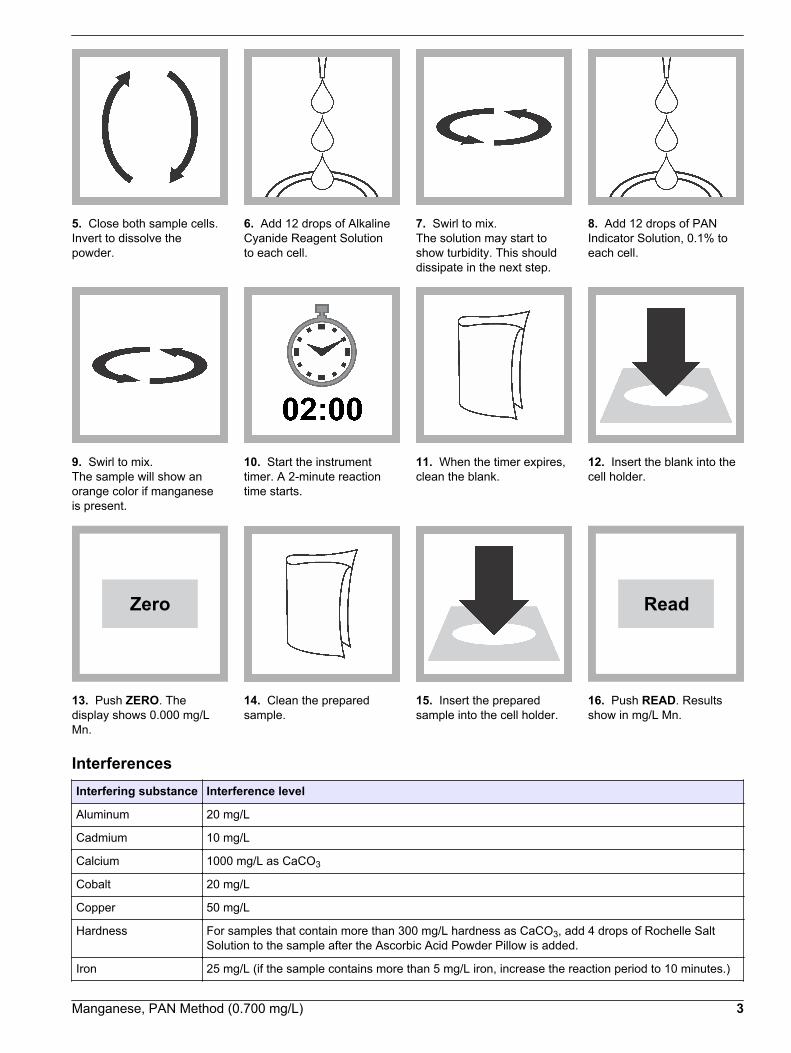
5. Close both sample cells.Invert to dissolve thepowder.
6. Add 12 drops of AlkalineCyanide Reagent Solutionto each cell.
7. Swirl to mix.The solution may start toshow turbidity. This shoulddissipate in the next step.
8. Add 12 drops of PANIndicator Solution, 0.1% toeach cell.
9. Swirl to mix.The sample will show anorange color if manganeseis present.
10. Start the instrumenttimer. A 2-minute reactiontime starts.
11. When the timer expires,clean the blank.
12. Insert the blank into thecell holder.
Zero
13. Push ZERO. Thedisplay shows 0.000 mg/LMn.
14. Clean the preparedsample.
15. Insert the preparedsample into the cell holder.
Read
16. Push READ. Resultsshow in mg/L Mn.
InterferencesInterfering substance Interference level
Aluminum 20 mg/L
Cadmium 10 mg/L
Calcium 1000 mg/L as CaCO3
Cobalt 20 mg/L
Copper 50 mg/L
Hardness For samples that contain more than 300 mg/L hardness as CaCO3, add 4 drops of Rochelle SaltSolution to the sample after the Ascorbic Acid Powder Pillow is added.
Iron 25 mg/L (if the sample contains more than 5 mg/L iron, increase the reaction period to 10 minutes.)
Manganese, PAN Method (0.700 mg/L) 3

Interfering substance Interference level
Lead 0.5 mg/L
Magnesium 300 mg/L as CaCO3
Nickel 40 mg/L
Zinc 15 mg/L
Accuracy check
Standard additions method (sample spike)Use the standard additions method (for applicable instruments) to validate the testprocedure, reagents and instrument and to find if there is an interference in the sample.Items to collect:
• Manganese PourRite® Ampule Standard, 10 mg/L Mn• Ampule breaker• Pipet, TenSette®, 0.1–1.0 mL and tips
1. Use the test procedure to measure the concentration of the sample, then keep the(unspiked) sample in the instrument.
2. Go to the Standard Additions option in the instrument menu.3. Select the values for standard concentration, sample volume and spike volumes.4. Open the standard solution.5. Prepare three spiked samples: use the TenSette pipet to add 0.1 mL, 0.2 mL and
0.3 mL of the standard solution, respectively, to three 10-mL portions of fresh sample.Mix well.
6. Use the test procedure to measure the concentration of each of the spiked samples.Start with the smallest sample spike. Measure each of the spiked samples in theinstrument.
7. Select Graph to compare the expected results to the actual results.Note: If the actual results are significantly different from the expected results, make sure thatthe sample volumes and sample spikes are measured accurately. The sample volumes andsample spikes that are used should agree with the selections in the standard additions menu. Ifthe results are not within acceptable limits, the sample may contain an interference.
Standard solution methodUse the standard solution method to validate the test procedure, reagents andinstrument.Items to collect:
• Manganese Voluette Standard Solution, 250 mg/L Mn• 1-L volumetric flask, Class A• 2.0-mL volumetric pipet, Class A and pipet filler• Deionized water
1. Prepare a 0.5 mg/L manganese standard solution as follows:
a. Use a pipet to add 2.0 mL of the 250 mg/L standard solution into the volumetricflask.
b. Dilute to the mark with deionized water. Mix well. Prepare this solution daily.2. Use the test procedure to measure the concentration of the prepared standard
solution.3. Compare the expected result to the actual result.
Note: The factory calibration can be adjusted slightly with the standard adjust option so that theinstrument shows the expected value of the standard solution. The adjusted calibration is thenused for all test results. This adjustment can increase the test accuracy when there are slightvariations in the reagents or instruments.
4 Manganese, PAN Method (0.700 mg/L)

Method performanceThe method performance data that follows was derived from laboratory tests that weremeasured on a spectrophotometer during ideal test conditions. Users may get differentresults under different test conditions.
Program Standard Precision (95% Confidence Interval) SensitivityConcentration change per 0.010 Abs change
290 0.500 mg/L Mn 0.491–0.509 mg/L Mn 0.006 mg/L Mn
Summary of methodThe PAN method is a highly sensitive and rapid procedure to measure low levels ofmanganese. An ascorbic acid reagent is used initially to reduce all oxidized forms ofmanganese to Mn2+. An alkaline-cyanide reagent is added to mask potentialinterferences. PAN Indicator is then added to combine with the Mn2+ to form an orange-colored complex. The measurement wavelength is 560 nm.
Consumables and replacement itemsRequired reagents
Description Quantity/Test Unit Item no.
Manganese Reagent Set, 10 mL, includes: — 50 tests 2651700
Alkaline Cyanide Reagent 12 drops 50 mL ,SCDB 2122326
Ascorbic Acid Powder Pillow 1 100/pkg 1457799
PAN Indicator Solution, 0.1% 12 drops 50 mLSCDB 2122426
Water, deionized varies 4 L 27256
Recommended standards and apparatus
Description Unit Item no.
Manganese Standard Solution, 10-mg/L Mn, 2 mL PourRite® ampule 20/pkg 2605820
Manganese Standard Solution, 250-mg/L Mn, 10-mL Voluette® ampule 16/pkg 1425810
Ampule Breaker, Voluette® ampules each 2196800
PourRite® Ampule Breaker, 2-mL each 2484600
Metals Drinking Water Standard, HR for Cu, Fe, Mn 500 mL 2833649
Optional reagents and apparatus
Description Unit Item no.
Cylinder, mixing, 25-mL each 2088640
Flask, volumetric, Class A, 1000-mL each 1457453
Manganese Standard Solution, 2-mL PourRite® Ampule, 25 mg/L 20/pkg 2112820
Nitric Acid, concentrated 500 mL 15249
Paper, pH, 0–14 pH range 100/pkg 2601300
Pipet filler, safety bulb each 1465100
Pipet, TenSette®, 0.1–1.0 mL each 1970001
Pipet, TenSette®, 1.0 to 10.0 mL each 1970010
Pipet tips for TenSette Pipet 1970001 50/pkg 2185696
Manganese, PAN Method (0.700 mg/L) 5
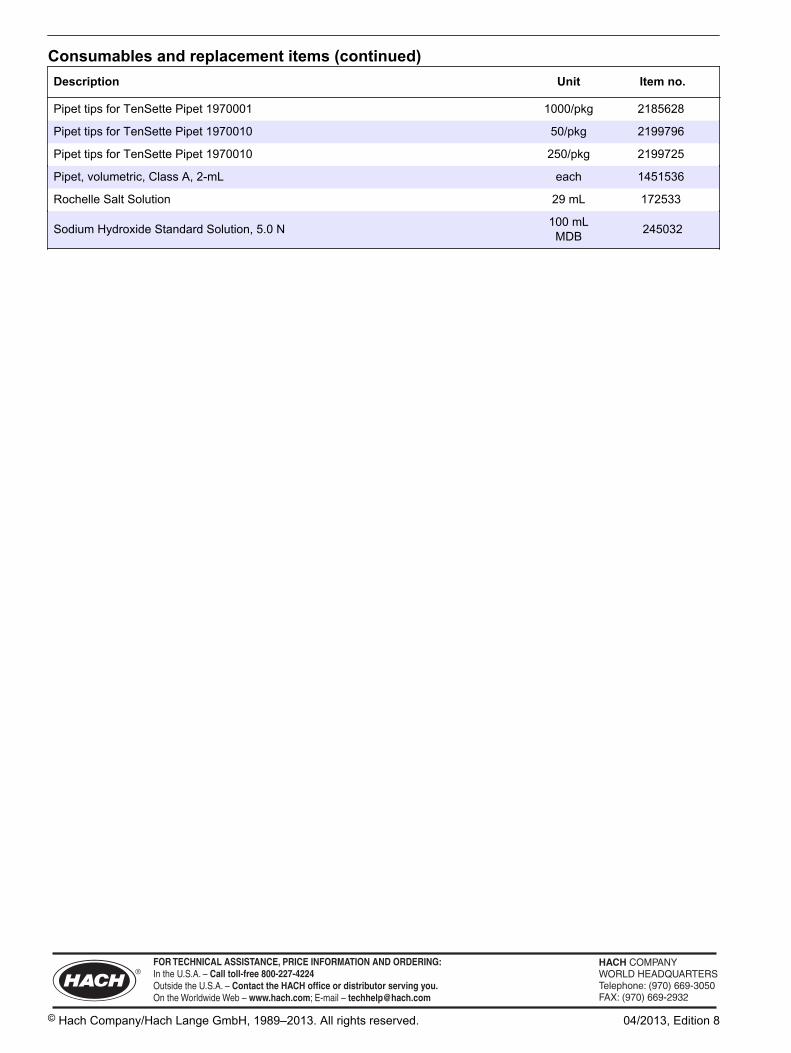
Consumables and replacement items (continued)Description Unit Item no.
Pipet tips for TenSette Pipet 1970001 1000/pkg 2185628
Pipet tips for TenSette Pipet 1970010 50/pkg 2199796
Pipet tips for TenSette Pipet 1970010 250/pkg 2199725
Pipet, volumetric, Class A, 2-mL each 1451536
Rochelle Salt Solution 29 mL 172533
Sodium Hydroxide Standard Solution, 5.0 N 100 mLMDB 245032
HACH COMPANYWORLD HEADQUARTERSTelephone: (970) 669-3050FAX: (970) 669-2932
FOR TECHNICAL ASSISTANCE, PRICE INFORMATION AND ORDERING:Call 800-227-4224
Contact the HACH office or distributor serving you.www.hach.com [email protected]
In the U.S.A. –
Outside the U.S.A. –
On the Worldwide Web – ; E-mail –
toll-free
© Hach Company/Hach Lange GmbH, 1989–2013. All rights reserved. 04/2013, Edition 8

Manganese DOC316.53.01058
USEPA1 Periodate Oxidation Method2 Method 80340.1 to 20.0 mg/L Mn (HR) Powder Pillows
Scope and application: For soluble manganese in water and wastewater.1 USEPA Approved for reporting wastewater analyses (digestion required). Federal Register, 44(116)34 193 (June 14, 1979).2 Adapted from Standard Methods for the Examination of Water and Wastewater.
Test preparation
Instrument specific informationThe table in this section shows all of the instruments that have the program for this test. Table 1 shows sample cell and orientation requirements for reagent addition tests, suchas powder pillow or bulk reagent tests.To use the table, select an instrument, then read across to find the correspondinginformation for this test.
Table 1 Instrument-specific information for powder pillows
Instrument Sample cell orientation Sample cell
DR 6000 DR 3800 DR 2800 DR 2700
The fill line is to the right. 2495402
DR 5000 DR 3900
The fill line is toward the user.
DR 900 The orientation mark is toward the user. 2401906
Before startingInstall the instrument cap on the DR 900 cell holder before ZERO or READ is pushed.
The sample must be digested with heat and acid to make sure that all forms of the metal are measured. Use the mild orvigorous digestion. Refer to the Water Analysis Guide for more information.
For best results, measure the reagent blank value for each new lot of reagent. Replace the sample with deionized water inthe test procedure to get the reagent blank value. Subtract the reagent blank value from the sample results automaticallywith the reagent blank adjust option.
Review the Safety Data Sheets (MSDS/SDS) for the chemicals that are used and use any recommended personal protectiveequipment.
Dispose of reacted solutions according to local, state and federal regulations. Use the Safety Data Sheets for disposalinformation for unused reagents. Consult the environmental, health and safety staff for your facility and/or local regulatoryagencies for further disposal information.
1
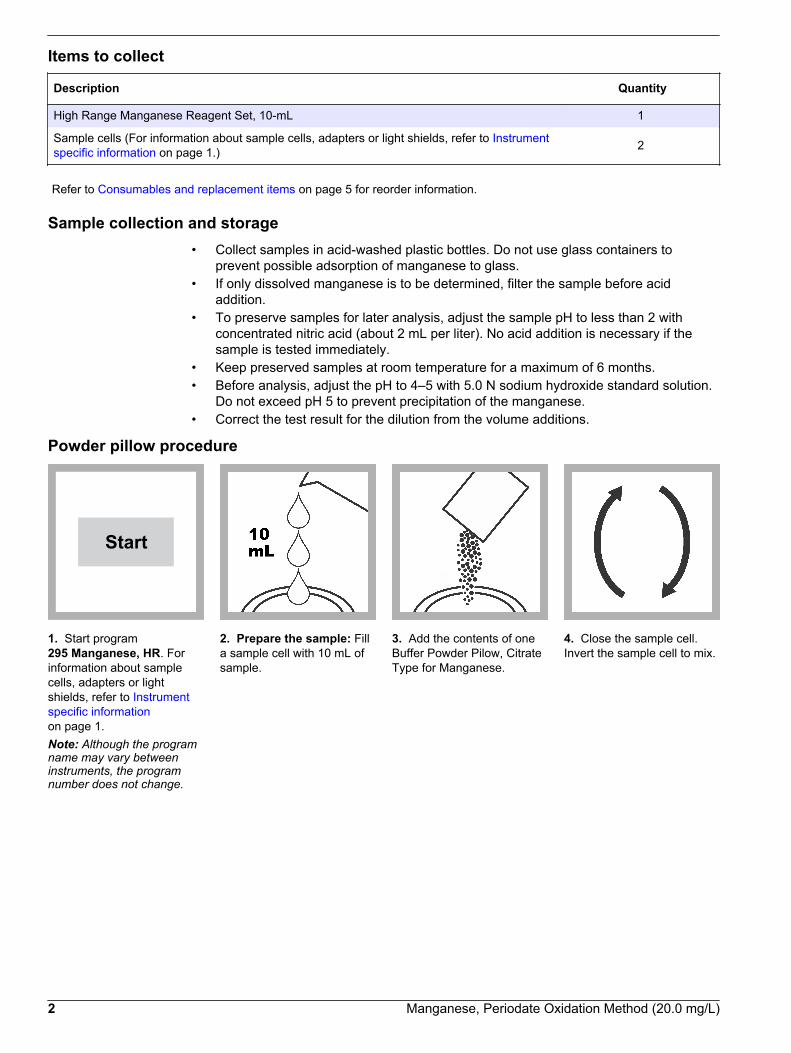
Items to collect
Description Quantity
High Range Manganese Reagent Set, 10-mL 1
Sample cells (For information about sample cells, adapters or light shields, refer to Instrumentspecific information on page 1.) 2
Refer to Consumables and replacement items on page 5 for reorder information.
Sample collection and storage• Collect samples in acid-washed plastic bottles. Do not use glass containers to
prevent possible adsorption of manganese to glass.• If only dissolved manganese is to be determined, filter the sample before acid
addition.• To preserve samples for later analysis, adjust the sample pH to less than 2 with
concentrated nitric acid (about 2 mL per liter). No acid addition is necessary if thesample is tested immediately.
• Keep preserved samples at room temperature for a maximum of 6 months.• Before analysis, adjust the pH to 4–5 with 5.0 N sodium hydroxide standard solution.
Do not exceed pH 5 to prevent precipitation of the manganese.• Correct the test result for the dilution from the volume additions.
Powder pillow procedure
Start
1. Start program295 Manganese, HR. Forinformation about samplecells, adapters or lightshields, refer to Instrumentspecific informationon page 1.Note: Although the programname may vary betweeninstruments, the programnumber does not change.
2. Prepare the sample: Filla sample cell with 10 mL ofsample.
3. Add the contents of oneBuffer Powder Pilow, CitrateType for Manganese.
4. Close the sample cell.Invert the sample cell to mix.
2 Manganese, Periodate Oxidation Method (20.0 mg/L)

5. Add the contents of oneSodium Periodate PowderPillow to the sample cell.
6. Close the sample cell.Invert to mix. A violet colorwill show if manganese ispresent in the sample.
7. Start the instrumenttimer. A 2-minute reactiontime starts.
8. Prepare the blank: Fill asecond sample cell with10 mL of sample.
9. When the timer expires,clean the blank.
10. Insert the blank into thecell holder.
Zero
11. Push ZERO. Thedisplay shows 0.0 mg/L Mn.
12. Clean the preparedsample.
13. Within eight minutesafter the timer expires, insertthe prepared sample intothe cell holder.
Read
14. Push READ. Resultsshow in mg/L Mn.
InterferencesInterfering substance Interference level
Calcium 700 mg/L
Chloride 70,000 mg/L
Iron 5 mg/L
Magnesium 100,000 mg/L
Highly buffered samples or extreme sample pH Can prevent the correct pH adjustment of the sample by the reagents.Sample pretreatment may be necessary.
Manganese, Periodate Oxidation Method (20.0 mg/L) 3

Accuracy check
Standard additions method (sample spike)Use the standard additions method (for applicable instruments) to validate the testprocedure, reagents and instrument and to find if there is an interference in the sample.Items to collect:
• Manganese Voluette® Ampule Standard, 250 mg/L Mn• Ampule breaker• Pipet, TenSette®, 0.1–1.0 mL and tips
1. Use the test procedure to measure the concentration of the sample, then keep the(unspiked) sample in the instrument.
2. Go to the Standard Additions option in the instrument menu.3. Select the values for standard concentration, sample volume and spike volumes.4. Open the standard solution.5. Prepare three spiked samples: use the TenSette pipet to add 0.1 mL, 0.2 mL and
0.3 mL of the standard solution, respectively, to three 10-mL portions of fresh sample.Mix well.
6. Use the test procedure to measure the concentration of each of the spiked samples.Start with the smallest sample spike. Measure each of the spiked samples in theinstrument.
7. Select Graph to compare the expected results to the actual results.Note: If the actual results are significantly different from the expected results, make sure thatthe sample volumes and sample spikes are measured accurately. The sample volumes andsample spikes that are used should agree with the selections in the standard additions menu. Ifthe results are not within acceptable limits, the sample may contain an interference.
Standard solution methodUse the standard solution method to validate the test procedure, reagents andinstrument.Items to collect:
• Manganese Standard Solution, 1000 mg/L• 1-L volumetric flask, Class A• 10-mL volumetric pipet, Class A and pipet filler• Deionized water
1. Prepare a 10.0 mg/L manganese standard solution as follows:
a. Use a pipet to add 10.00 mL of 1000 mg/L manganese standard solution into thevolumetric flask.
b. Dilute to the mark with deionized water. Mix well. Prepare this solution daily.2. Use the test procedure to measure the concentration of the prepared standard
solution.3. Compare the expected result to the actual result.
Note: The factory calibration can be adjusted slightly with the standard adjust option so that theinstrument shows the expected value of the standard solution. The adjusted calibration is thenused for all test results. This adjustment can increase the test accuracy when there are slightvariations in the reagents or instruments.
4 Manganese, Periodate Oxidation Method (20.0 mg/L)

Method performanceThe method performance data that follows was derived from laboratory tests that weremeasured on a spectrophotometer during ideal test conditions. Users may get differentresults under different test conditions.
Program Standard Precision (95% Confidence Interval) SensitivityConcentration change per 0.010 Abs change
295 10.0 mg/L Mn 9.6–10.4 mg/L Mn 0.1 mg/L Mn
Summary of methodManganese in the sample is oxidized to the purple permanganate state by sodiumperiodate, after buffering the sample with citrate. The purple color is directly proportionalto the manganese concentration. The measurement wavelength is 525 nm forspectrophotometers or 520 nm for colorimeters.
Consumables and replacement itemsRequired reagents
Description Quantity/test Unit Item no.
Manganese Reagent Set, High Range, 10-mL includes: 1 100/pkg 2430000
Buffer Powder Pillows, Citrate for Manganese, 10-mL 1 100/pkg 2107669
Sodium Periodate Powder Pillow for Manganese, 10-mL 1 100/pkg 2107769
Required apparatus
Description Quantity/test Unit Item no.
Sample cell, 10 mL square, matched pair 2 2/pkg 2495402
Stoppers for 18-mm tubes and AccuVac Ampuls 2 6/pkg 173106
Recommended standards and apparatus
Description Unit Item no.
Manganese Standard Solution, 1000 mg/L Mn 100 mL 1279142
Manganese Standard Solution, 250-mg/L Mn, 10-mL Voluette® ampule 16/pkg 1425810
Water, deionized 4 L 27256
Ampule Breaker, Voluette® ampules each 2196800
Optional reagents and apparatus
Description Unit Item no.
Manganese Standard Solution, 2-mL PourRite® Ampule, 25 mg/L 20/pkg 2112820
Manganese Standard Solution, 10-mg/L Mn, 2 mL PourRite® ampule 20/pkg 2605820
Paper, pH, 0–14 pH range 100/pkg 2601300
Pipet filler, safety bulb each 1465100
Pipet, TenSette®, 0.1–1.0 mL each 1970001
Pipet tips for TenSette Pipet 1970001 50/pkg 2185696
Pipet tips for TenSette Pipet 1970001 1000/pkg 2185628
Pipet, TenSette®, 1.0 to 10.0 mL each 1970010
Pipet tips for TenSette Pipet 1970010 250/pkg 2199725
Manganese, Periodate Oxidation Method (20.0 mg/L) 5

Consumables and replacement items (continued)Description Unit Item no.
Pipet tips for TenSette Pipet 1970010 50/pkg 2199796
PourRite® Ampule Breaker, 2-mL each 2484600
Sodium Hydroxide Standard Solution, 5.0 N 100 mLMDB 245032
Flask, volumetric, Class A, 1000-mL each 1457453
Pipet, volumetric, Class A, 10-mL each 1451538
HACH COMPANYWORLD HEADQUARTERSTelephone: (970) 669-3050FAX: (970) 669-2932
FOR TECHNICAL ASSISTANCE, PRICE INFORMATION AND ORDERING:Call 800-227-4224
Contact the HACH office or distributor serving you.www.hach.com [email protected]
In the U.S.A. –
Outside the U.S.A. –
On the Worldwide Web – ; E-mail –
toll-free
© Hach Company/Hach Lange GmbH, 1989–2013. All rights reserved. 04/2013, Edition 8

Molybdenum, HR DOC316.53.01061
Mercaptoacetic Acid Method1 Method 80360.2 to 40.0 mg/L Mo (HR) Powder Pillows or AccuVac® Ampuls
Scope and application: For water, wastewater, boiler and cooling waters.1 Adapted from Analytical Chemistry, 25(9) 1363 (1953).
Test preparation
Instrument-specific informationThe tables in this section show all of the instruments that have the program for this test. Table 1 shows sample cell and orientation requirements for reagent addition tests, suchas powder pillow or bulk reagent tests. Table 2 shows sample cell and adapterrequirements for AccuVac Ampul tests.To use either table, select an instrument, then read across to find the correspondinginformation for this test.
Table 1 Instrument-specific information for powder pillows
Instrument Sample cell orientation Sample cell
DR 6000 DR 3800 DR 2800 DR 2700
The fill line is to the right. 2495402
DR 5000 DR 3900
The fill line is toward the user.
DR 900 The orientation mark is toward the user. 2401906
Table 2 Instrument-specific information for AccuVac Ampuls
Instrument Adapter Sample cell
DR 6000 DR 5000 DR 900
— 2427606
DR 3900 LZV846 (A)
DR 3800 DR 2800 DR 2700
LZV584 (C) 2122800
Before startingInstall the instrument cap on the DR 900 cell holder before ZERO or READ is pushed.
For best results, measure the reagent blank value for each new lot of reagent. Replace the sample with deionized water inthe test procedure to get the reagent blank value. Subtract the reagent blank value from the sample results automaticallywith the reagent blank adjust option.
1

Filter samples that are turbid with filter paper and a funnel.
Review the Safety Data Sheets (MSDS/SDS) for the chemicals that are used and use any recommended personal protectiveequipment.
Dispose of reacted solutions according to local, state and federal regulations. Use the Safety Data Sheets for disposalinformation for unused reagents. Consult the environmental, health and safety staff for your facility and/or local regulatoryagencies for further disposal information.
Items to collectPowder pillows
Description Quantity
MolyVer® 1 Molybdenum Reagent Powder Pillow, 10-mL 1
MolyVer® 2 Molybdenum Reagent Powder Pillow, 10-mL 1
MolyVer® 3 Molybdenum Reagent Powder Pillow, 10-mL 1
Sample cells (For information about sample cells, adapters or light shields, refer to Instrument-specific information on page 1.) 2
Refer to Consumables and replacement items on page 7 for reorder information.
AccuVac Ampuls
Description Quantity
CDTA Solution, 0.4 M 4 drops
MolyVer® 6 Reagent AccuVac® Ampul 1
Beaker, 50 mL 1
Stopper for 18-mm tubes and AccuVac Ampuls 1
Sample cells (For information about sample cells, adapters or light shields, refer to Instrument-specific information on page 1.) 1
Refer to Consumables and replacement items on page 7 for reorder information.
Sample collection and storage• Collect samples in clean glass or plastic bottles.• To preserve samples for later analysis, adjust the sample pH to less than 2 with
concentrated nitric acid (about 2 mL per liter). No acid addition is necessary if thesample is tested immediately.
• Keep preserved samples at room temperature for a maximum of 6 months.• Before analysis, adjust the pH to 7 with 5.0 N sodium hydroxide standard solution.• Correct the test result for the dilution from the volume additions.
2 Molybdenum, Mercaptoacetic Acid Method (40.0 mg/L)

Powder pillow procedure
Start
1. Start program320 Molybdenum HR. Forinformation about samplecells, adapters or lightshields, refer to Instrument-specific informationon page 1.Note: Although the programname may vary betweeninstruments, the programnumber does not change.
2. Prepare the sample: Filla sample cell with 10 mL ofsample.
3. Add the contents of oneMolyVer 1 reagent powderpillow.
4. Swirl to mix.
5. Add the contents of oneMolyVer 2 reagent powderpillow.
6. Swirl to mix. 7. Add the contents of oneMolyVer 3 reagent powderpillow.
8. Swirl to mix.A yellow color will show ifmolybdate molybdenum ispresent.
9. Start the instrumenttimer. A 5-minute reactiontime starts.
10. Prepare the blank: Filla second sample cell with10 mL of sample.
11. When the timer expires,clean the blank.
12. Insert the blank into thecell holder.
Molybdenum, Mercaptoacetic Acid Method (40.0 mg/L) 3

Zero
13. Push ZERO. Thedisplay shows 0.0 mg/LMo6+.
14. Clean the preparedsample.
15. Insert the preparedsample into the cell holder.
Read
16. Push READ. Resultsshow in mg/L Mo6+.
AccuVac Ampul procedure
Start
1. Start program322 Molybdenum HR. Forinformation about samplecells, adapters or lightshields, refer to Instrument-specific informationon page 1.Note: Although the programname may vary betweeninstruments, the programnumber does not change.
2. Prepare the blank: Fillthe sample cell with 10 mLof sample.
3. Prepare the sample:Collect 40 mL of sample in a50-mL beaker.
4. Add Add four drops of0.4 M CDTA StandardSolution to the sample in thebeaker .
5. Swirl to mix. 6. Fill an AccuVac Ampulwith the treated sample.Keep the tip immersed whilethe Ampul fills completely.
7. Quickly invert the Ampulseveral times to mix.A yellow color will show ifmolybdate molybdenum ispresent.
8. Start the instrumenttimer. A 5-minute reactiontime starts.
4 Molybdenum, Mercaptoacetic Acid Method (40.0 mg/L)
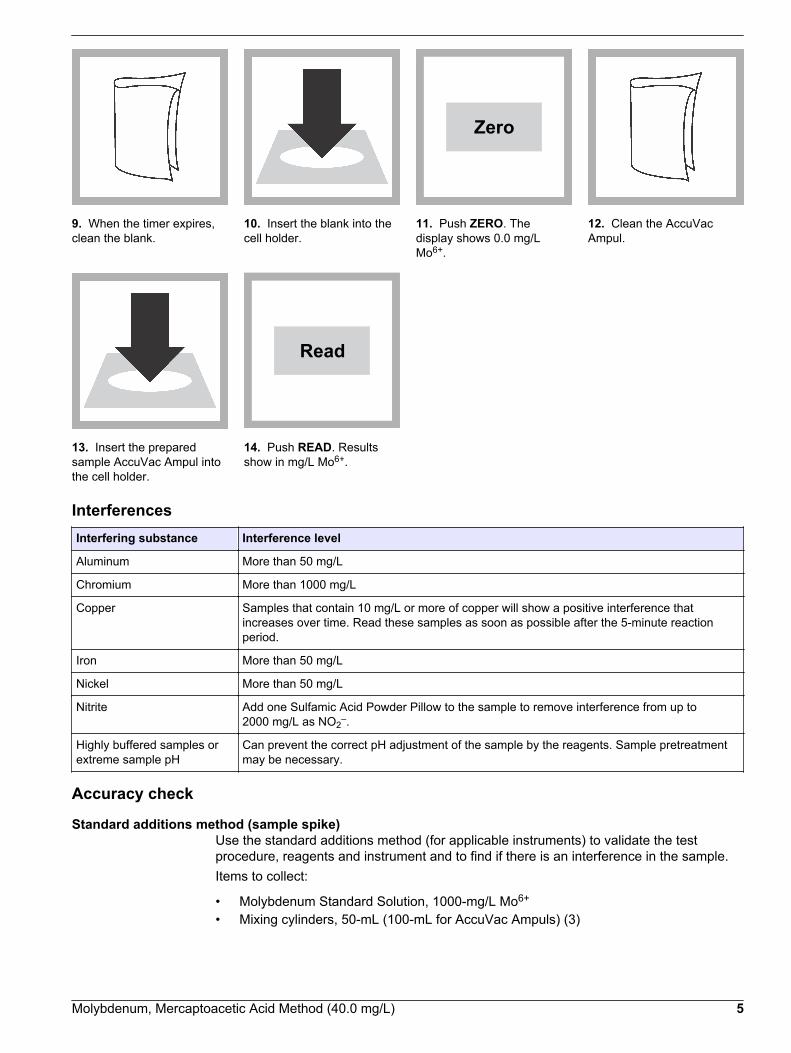
9. When the timer expires,clean the blank.
10. Insert the blank into thecell holder.
Zero
11. Push ZERO. Thedisplay shows 0.0 mg/LMo6+.
12. Clean the AccuVacAmpul.
13. Insert the preparedsample AccuVac Ampul intothe cell holder.
Read
14. Push READ. Resultsshow in mg/L Mo6+.
InterferencesInterfering substance Interference level
Aluminum More than 50 mg/L
Chromium More than 1000 mg/L
Copper Samples that contain 10 mg/L or more of copper will show a positive interference thatincreases over time. Read these samples as soon as possible after the 5-minute reactionperiod.
Iron More than 50 mg/L
Nickel More than 50 mg/L
Nitrite Add one Sulfamic Acid Powder Pillow to the sample to remove interference from up to2000 mg/L as NO2
–.
Highly buffered samples orextreme sample pH
Can prevent the correct pH adjustment of the sample by the reagents. Sample pretreatmentmay be necessary.
Accuracy check
Standard additions method (sample spike)Use the standard additions method (for applicable instruments) to validate the testprocedure, reagents and instrument and to find if there is an interference in the sample.Items to collect:
• Molybdenum Standard Solution, 1000-mg/L Mo6+
• Mixing cylinders, 50-mL (100-mL for AccuVac Ampuls) (3)
Molybdenum, Mercaptoacetic Acid Method (40.0 mg/L) 5

• Pipet, TenSette®, 0.1–1.0 mL and tips
1. Use the test procedure to measure the concentration of the sample, then keep the(unspiked) sample in the instrument.
2. Go to the Standard Additions option in the instrument menu.3. Select the values for standard concentration, sample volume and spike volumes.4. Open the standard solution.5. Prepare three spiked samples: use the TenSette pipet to add 0.2 mL, 0.4 mL and
0.6 mL of the standard solution, respectively, to three 30-mL portions of fresh sample.Mix well.Note: For AccuVac® Ampuls, add 0.4 mL, 0.8 mL and 1.2 mL of the standard solution to three60-mL portions of fresh sample.
6. Use the test procedure to measure the concentration of each of the spiked samples.Start with the smallest sample spike. Measure each of the spiked samples in theinstrument.
7. Select Graph to compare the expected results to the actual results.Note: If the actual results are significantly different from the expected results, make sure thatthe sample volumes and sample spikes are measured accurately. The sample volumes andsample spikes that are used should agree with the selections in the standard additions menu. Ifthe results are not within acceptable limits, the sample may contain an interference.
Standard solution methodUse the standard solution method to validate the test procedure, reagents andinstrument.Items to collect:
• Molybdenum Standard Solution, 10 mg/L Mo6+
1. Use the test procedure to measure the concentration of the standard solution.2. Compare the expected result to the actual result.
Note: The factory calibration can be adjusted slightly with the standard adjust option so that theinstrument shows the expected value of the standard solution. The adjusted calibration is thenused for all test results. This adjustment can increase the test accuracy when there are slightvariations in the reagents or instruments.
Method performanceThe method performance data that follows was derived from laboratory tests that weremeasured on a spectrophotometer during ideal test conditions. Users may get differentresults under different test conditions.
Program Standard Precision (95% Confidence Interval) SensitivityConcentration change per 0.010 Abs change
320 10 mg/L Mo6+ 9.7–10.3 mg/L Mo6+ 0.2 mg/L Mo6+
322 10 mg/L Mo6+ 9.7–10.3 mg/L Mo6+ 0.2 mg/L Mo6+
Summary of methodMolyVer 1 and 2 Reagents are added to buffer and condition the sample. MolyVer3 provides the mercaptoacetic acid which reacts with molybdate molybdenum to form ayellow color proportional to the molybdenum concentration. The measurementwavelength is 420 nm.
6 Molybdenum, Mercaptoacetic Acid Method (40.0 mg/L)

Consumables and replacement itemsRequired reagents
Description Quantity/test Unit Item no.
Molybdenum Reagent Set, 10-mL, includes: — 100 tests 2604100
MolyVer® 1 Molybdenum Reagent Powder Pillow, 10-mL 1 100/pkg 2604299
MolyVer® 2 Molybdenum Reagent Powder Pillow, 10-mL 1 100/pkg 2604399
MolyVer® 3 Molybdenum Reagent Powder Pillow, 10-mL 1 100/pkg 2604499
OR
MolyVer® 6 Reagent AccuVac® Ampul 1 25/pkg 2522025
CDTA Solution, 0.4 M 4 drops 15 mLSCDB 2615436
Required apparatus
Description Quantity/test Unit Item no.
AccuVac Snapper 1 each 2405200
Beaker, 50-mL 1 each 50041H
Stoppers for 18-mm tubes and AccuVac Ampuls 2 6/pkg 173106
Recommended standards
Description Unit Item no.
Molybdenum Standard Solution, 10-mg/L as Mo 100 mL 1418742
Molybdenum Standard Solution, 1000-mg/L as Mo 100 mL 1418642
Water, deionized 4 L 27256
Optional reagents and apparatus
Description Unit Item no.
Beaker, 50-mL each 50041H
Cylinder, mixing, 50-mL each 189641
Filter paper, 12.5-cm 100/pkg 189457
Funnel, poly, 65-mm each 108367
Pipet, TenSette®, 0.1–1.0 mL each 1970001
Pipet tips for TenSette Pipet 1970001 50/pkg 2185696
Sulfamic Acid Powder Pillows 100/pkg 105599
Molybdenum, Mercaptoacetic Acid Method (40.0 mg/L) 7

HACH COMPANYWORLD HEADQUARTERSTelephone: (970) 669-3050FAX: (970) 669-2932
FOR TECHNICAL ASSISTANCE, PRICE INFORMATION AND ORDERING:Call 800-227-4224
Contact the HACH office or distributor serving you.www.hach.com [email protected]
In the U.S.A. –
Outside the U.S.A. –
On the Worldwide Web – ; E-mail –
toll-free
© Hach Company/Hach Lange GmbH, 1989–2013. All rights reserved. 04/2013, Edition 8
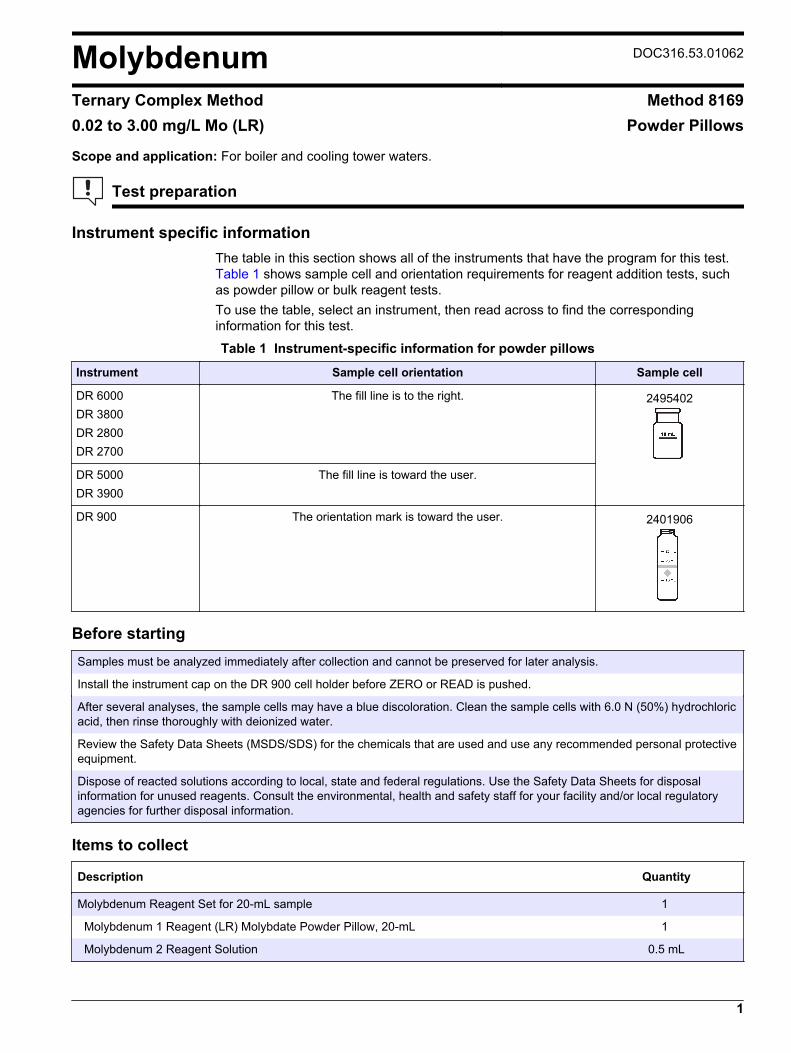
Molybdenum DOC316.53.01062
Ternary Complex Method Method 81690.02 to 3.00 mg/L Mo (LR) Powder Pillows
Scope and application: For boiler and cooling tower waters.
Test preparation
Instrument specific informationThe table in this section shows all of the instruments that have the program for this test. Table 1 shows sample cell and orientation requirements for reagent addition tests, suchas powder pillow or bulk reagent tests.To use the table, select an instrument, then read across to find the correspondinginformation for this test.
Table 1 Instrument-specific information for powder pillows
Instrument Sample cell orientation Sample cell
DR 6000 DR 3800 DR 2800 DR 2700
The fill line is to the right. 2495402
DR 5000 DR 3900
The fill line is toward the user.
DR 900 The orientation mark is toward the user. 2401906
Before startingSamples must be analyzed immediately after collection and cannot be preserved for later analysis.
Install the instrument cap on the DR 900 cell holder before ZERO or READ is pushed.
After several analyses, the sample cells may have a blue discoloration. Clean the sample cells with 6.0 N (50%) hydrochloricacid, then rinse thoroughly with deionized water.
Review the Safety Data Sheets (MSDS/SDS) for the chemicals that are used and use any recommended personal protectiveequipment.
Dispose of reacted solutions according to local, state and federal regulations. Use the Safety Data Sheets for disposalinformation for unused reagents. Consult the environmental, health and safety staff for your facility and/or local regulatoryagencies for further disposal information.
Items to collect
Description Quantity
Molybdenum Reagent Set for 20-mL sample 1
Molybdenum 1 Reagent (LR) Molybdate Powder Pillow, 20-mL 1
Molybdenum 2 Reagent Solution 0.5 mL
1

Items to collect (continued)Description Quantity
Cylinder, graduated mixing, 25-mL 1
Sample cells (For information about sample cells, adapters or light shields, refer to Instrumentspecific information on page 1.) 2
Refer to Consumables and replacement items on page 6 for reorder information.
Sample collection• Samples must be analyzed immediately after collection and cannot be preserved for
later analysis.• Collect samples in clean glass or plastic bottles.• Filter samples that are turbid with filter paper and a funnel.
Powder pillow procedure
Start
1. Start program315 Molybdenum LR. Forinformation about samplecells, adapters or lightshields, refer to Instrumentspecific informationon page 1.Note: Although the programname may vary betweeninstruments, the programnumber does not change.
2. Prepare the sample: Filla 25-mL mixing cylinder with20 mL of sample.
3. Add the contents of oneMolybdenum 1 ReagentPowder Pillow to the mixingcylinder.
4. Close the cylinder.Shake the cylinder tocompletely dissolve thereagent.
5. Fill a sample cell with10 mL of the preparedsample.
6. Develop the sample:Add 0.5 mL of Molybdenum2 Reagent Solution to theprepared sample cell.
7. Swirl to mix. 8. Start the instrumenttimer. A 2-minute reactiontime starts.
2 Molybdenum, Ternary Complex Method (3.00 mg/L)
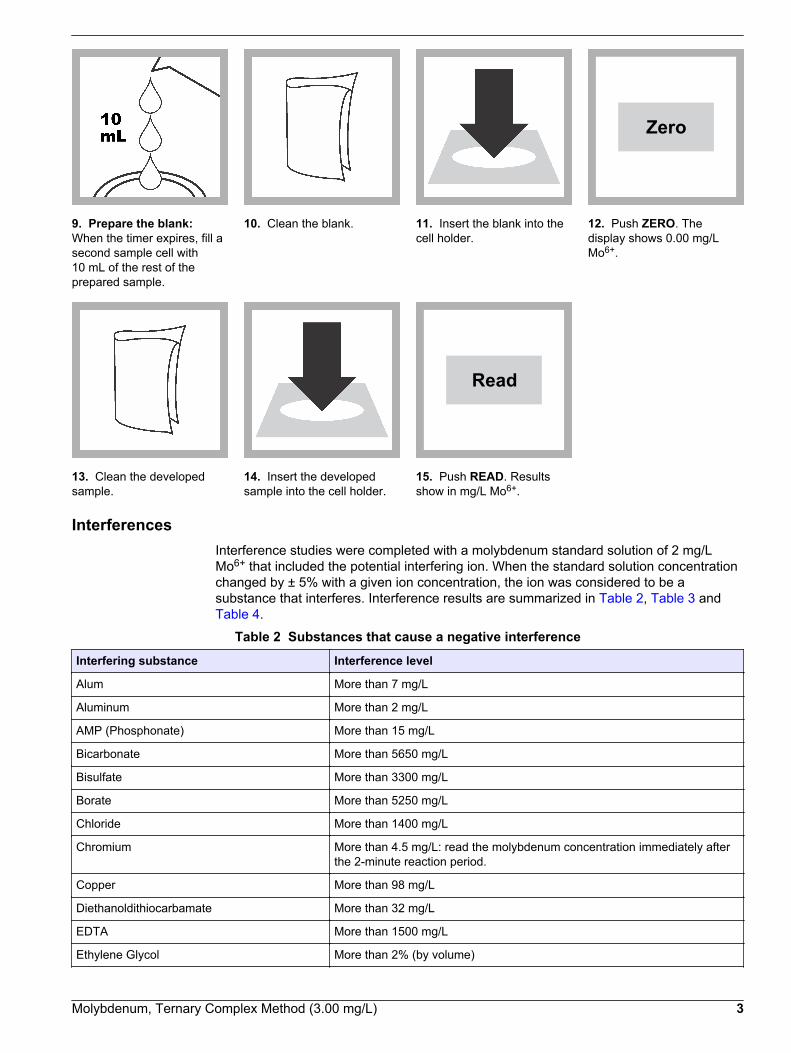
9. Prepare the blank:When the timer expires, fill asecond sample cell with10 mL of the rest of theprepared sample.
10. Clean the blank. 11. Insert the blank into thecell holder.
Zero
12. Push ZERO. Thedisplay shows 0.00 mg/LMo6+.
13. Clean the developedsample.
14. Insert the developedsample into the cell holder.
Read
15. Push READ. Resultsshow in mg/L Mo6+.
InterferencesInterference studies were completed with a molybdenum standard solution of 2 mg/LMo6+ that included the potential interfering ion. When the standard solution concentrationchanged by ± 5% with a given ion concentration, the ion was considered to be asubstance that interferes. Interference results are summarized in Table 2, Table 3 and Table 4.
Table 2 Substances that cause a negative interference
Interfering substance Interference level
Alum More than 7 mg/L
Aluminum More than 2 mg/L
AMP (Phosphonate) More than 15 mg/L
Bicarbonate More than 5650 mg/L
Bisulfate More than 3300 mg/L
Borate More than 5250 mg/L
Chloride More than 1400 mg/L
Chromium More than 4.5 mg/L: read the molybdenum concentration immediately afterthe 2-minute reaction period.
Copper More than 98 mg/L
Diethanoldithiocarbamate More than 32 mg/L
EDTA More than 1500 mg/L
Ethylene Glycol More than 2% (by volume)
Molybdenum, Ternary Complex Method (3.00 mg/L) 3

Table 2 Substances that cause a negative interference (continued)
Interfering substance Interference level
Highly buffered samples or extreme sample pH Can prevent the correct pH adjustment of the sample by the reagents.Sample pretreatment may be necessary. Adjust to pH 3–5 with acid (SulfuricAcid, 1.0 N) or base (Sodium Hydroxide, 1.0 N). Correct the test result forthe dilution from the volume additions.
Iron More than 200 mg/L
Lignin Sulfonate More than 105 mg/L
Nitrite More than 350 mg/L
Orthophosphate More than 4500 mg/L
Phosphonohydroxyacetic Acid More than 32 mg/L
Phosphonate HEDP Positive interference of about 10% up to 30 mg/L. As the concentrationincreases above 30 mg/L, a decrease in the molybdenum concentrationreading occurs (negative interference).
Sulfite More than 6500 mg/L
Table 3 Substances that cause a positive interference
Interfering substance Interference level
Benzotriazole More than 210 mg/L
Carbonate More than 1325 mg/L
Morpholine More than 6 mg/L
Phosphonate HEDP The presence of the phosphonate HEDP at concentrations up to 30 mg/L will increase the apparentmolybdenum concentration reading by approximately 10% (positive interference). Multiply the testresult by 0.9 to get the actual Mo6+ concentration.
Silica More than 600 mg/L
Table 4 Non-interfering substances
Interfering substance Interference level
Bisulfite 9600 mg/L
Calcium 720 mg/L
Chlorine 7.5 mg/L
Magnesium 8000 mg/L
Manganese 1600 mg/L
Nickel 250 mg/L
PBTC (phosphonate) 500 mg/L
Sulfate 12,800 mg/L
Zinc 400 mg/L
Accuracy check
Standard additions method (sample spike)Use the standard additions method (for applicable instruments) to validate the testprocedure, reagents and instrument and to find if there is an interference in the sample.Items to collect:
• Molybdenum Standard Solution, 1000 mg/L Mo6+
• Graduated cylinder, 250 mL
4 Molybdenum, Ternary Complex Method (3.00 mg/L)

• Pipet, TenSette®, 0.1–1.0 mL and tips• Erlenmeyer flasks (3)
1. Use the test procedure to measure the concentration of the sample, then keep the(unspiked) sample in the instrument.
2. Go to the Standard Additions option in the instrument menu.3. Select the values for standard concentration, sample volume and spike volumes.4. Open the standard solution.5. Prepare three spiked samples: use the TenSette pipet to add 0.1 mL, 0.2 mL and
0.3 mL of the standard solution, respectively, to three 200-mL portions of freshsample. Mix well.
6. Use the test procedure to measure the concentration of each of the spiked samples.Start with the smallest sample spike. Measure each of the spiked samples in theinstrument.
7. Select Graph to compare the expected results to the actual results.Note: If the actual results are significantly different from the expected results, make sure thatthe sample volumes and sample spikes are measured accurately. The sample volumes andsample spikes that are used should agree with the selections in the standard additions menu. Ifthe results are not within acceptable limits, the sample may contain an interference.
Standard solution methodUse the standard solution method to validate the test procedure, reagents andinstrument.Items to collect:
• Molybdenum Standard Solution, 10.00-mg/L• 50-mL volumetric flask, Class A• 10-mL volumetric pipet, Class A and pipet filler• Deionized water
1. Prepare a 2.00 mg/L molybdenum standard solution as follows:
a. Use a pipet to add 10.00 mL of 10.00 mg/L molybdenum standard solution intothe volumetric flask.
b. Dilute to the mark with deionized water. Mix well. Prepare this solution daily.2. Use the test procedure to measure the concentration of the prepared standard
solution.3. Compare the expected result to the actual result.
Note: The factory calibration can be adjusted slightly with the standard adjust option so that theinstrument shows the expected value of the standard solution. The adjusted calibration is thenused for all test results. This adjustment can increase the test accuracy when there are slightvariations in the reagents or instruments.
Method performanceThe method performance data that follows was derived from laboratory tests that weremeasured on a spectrophotometer during ideal test conditions. Users may get differentresults under different test conditions.
Program Standard Precision (95% Confidence Interval) SensitivityConcentration change per 0.010 Abs change
315 2.00 mg/L Mo6+ 1.94–2.06 mg/L Mo6+ 0.02 mg/L Mo6+
Summary of methodThe ternary complex method for molybdenum determination is a method in whichmolybdate molybdenum reacts with an indicator and a sensitizing agent to give a stableblue complex. The measurement wavelength is 610 nm.
Molybdenum, Ternary Complex Method (3.00 mg/L) 5

Consumables and replacement itemsRequired reagents
Description Quantity/test Unit Item no.
Molybdenum Reagent Set, 20-mL, includes: — 100 tests 2449400
Molybdenum 1 Reagent (LR) Molybdate Powder Pillow, 20-mL 1 100/pkg 2352449
Molybdenum 2 Reagent Solution 0.5 mL 50 mL MDB 2352512
Required apparatus
Description Quantity/test Unit Item no.
Cylinder, graduated mixing, 25-mL 1 each 189640
Sample cell, 10 mL square, matched pair 2 2/pkg 2495402
Recommended standards
Description Unit Item no.
Molybdenum Standard Solution, 10-mg/L as Mo 100 mL 1418742
Molybdenum Standard Solution, 1000-mg/L as Mo 100 mL 1418642
Water, deionized 4 L 27256
Optional reagents and apparatus
Description Unit Item no.
Cylinder graduated, 250-mL each 108146
Filter paper, 12.5-cm 100/pkg 189457
Funnel, poly, 65-mm each 108367
Pipet, TenSette®, 0.1–1.0 mL each 1970001
Pipet tips for TenSette Pipet 1970001 50/pkg 2185696
Flask, Erlenmeyer, 250-mL each 50546
Pipet, volumetric, Class A, 10-mL each 1451538
Pipet filler, safety bulb each 1465100
Hydrochloric Acid, 6.0 N 1:1, 50% 500 mL 88449
Sodium Hydroxide Standard Solution, 1.0 N 100 mLMDB 104532
Sulfuric Acid Standard Solution, 1 N 100 mLMDB 127032
HACH COMPANYWORLD HEADQUARTERSTelephone: (970) 669-3050FAX: (970) 669-2932
FOR TECHNICAL ASSISTANCE, PRICE INFORMATION AND ORDERING:Call 800-227-4224
Contact the HACH office or distributor serving you.www.hach.com [email protected]
In the U.S.A. –
Outside the U.S.A. –
On the Worldwide Web – ; E-mail –
toll-free
© Hach Company/Hach Lange GmbH, 1989–2013. All rights reserved. 04/2013, Edition 8

Nickel DOC316.53.01063
1-(2 Pyridylazo)-2-Napthol (PAN) Method1 Method 81500.006 to 1.000 mg/L Ni Powder Pillows
Scope and application: For water and wastewater.1 Adapted from Watanabe, H., Talanta, 21 295 (1974).
Test preparation
Instrument specific informationThe table in this section shows all of the instruments that have the program for this test. Table 1 shows sample cell and orientation requirements for reagent addition tests, suchas powder pillow or bulk reagent tests.To use the table, select an instrument, then read across to find the correspondinginformation for this test.
Table 1 Instrument-specific information for powder pillows
Instrument Sample cell orientation Sample cell
DR 6000 DR 3800 DR 2800 DR 2700
The fill line is to the right. 2495402
DR 5000 DR 3900
The fill line is toward the user.
DR 900 The orientation mark is toward the user. 2401906
Before startingInstall the instrument cap on the DR 900 cell holder before ZERO or READ is pushed.
The sample must be digested with heat and acid to make sure that all forms of the metal are measured. Use the mild orvigorous digestion. Refer to the Water Analysis Guide for more information.
For spectrophotometers, this method can measure the cobalt concentration on the same sample with Program Number 110.
Review the Safety Data Sheets (MSDS/SDS) for the chemicals that are used and use any recommended personal protectiveequipment.
Dispose of reacted solutions according to local, state and federal regulations. Use the Safety Data Sheets for disposalinformation for unused reagents. Consult the environmental, health and safety staff for your facility and/or local regulatoryagencies for further disposal information.
Items to collect
Description Quantity
EDTA Powder Pillow 2
Phthalate-Phosphate Reagent Powder Pillow 2
PAN Indicator Solution 0.3% 1 mL
1

Items to collect (continued)Description Quantity
Deionized water 25 mL
Sample cells (For information about sample cells, adapters or light shields, refer to Instrumentspecific information on page 1.) 2
Refer to Consumables and replacement items on page 6 for reorder information.
Sample collection and storage• Collect samples in clean glass or plastic bottles.• If the sample temperature is less than 10 °C (50 °F), warm the sample to room
temperature before analysis.• To preserve samples for later analysis, adjust the sample pH to less than 2 with
concentrated nitric acid (about 2 mL per liter). No acid addition is necessary if thesample is tested immediately.
• Keep preserved samples at room temperature for a maximum of 6 months.• Before analysis, adjust the pH to 3–8 with 5.0 N sodium hydroxide standard solution.
Do not exceed pH 8 to prevent precipitation of the metal.• Correct the test result for the dilution from the volume additions.
Powder pillow procedure
Start
1. Start program340 Nickel, PAN. Forinformation about samplecells, adapters or lightshields, refer to Instrumentspecific informationon page 1.Note: Although the programname may vary betweeninstruments, the programnumber does not change.
2. Prepare the blank: Fill asample cell with 10 mL ofdeionized water.
3. Prepare the sample: Filla second sample cell with10 mL of sample.
4. Add the contents of onePhthalate-PhosphateReagent Powder Pillow toeach cell.
2 Nickel, PAN Method (1.000 mg/L)

5. Close the sample cells.Immediately shake todissolve the reagent.If the sample contains iron,make sure that all thepowder is dissolved beforethe PAN Indicator is added.
6. Add 0.5 mL of 0.3% PANIndicator Solution to eachcell.
7. Close the sample cells.Invert several times to mix.
8. Start the instrumenttimer. A 15-minute reactiontime starts.During color developmentthe sample solution colormay vary from yellow-orange to dark red, basedon the chemical makeup ofthe sample. The blank willbe yellow.
9. When the timer expires,add the contents of oneEDTA Reagent PowderPillow to each cell.
10. Close the sample cells.Shake to dissolve thereagent powder.
11. Clean the blank. 12. Insert the blank into thecell holder.
Zero
13. Push ZERO. Thedisplay shows 0.00 mg/L Niand Co(spectrophotometers) ormg/L Ni (colorimeters) *.
14. Clean the preparedsample.
15. Insert the preparedsample into the cell holder.
Read
16. Push READ. Resultsshow in mg/L Ni and Co(spectrophotometers) ormg/L Ni (colorimeters).
* Spectrophotometers "zero" at 560 nm and 620 nm. Colorimeters "zero" at 560 nm.
Nickel, PAN Method (1.000 mg/L) 3

InterferencesInterfering substance Interference level
Al3+ 32 mg/L
Ca2+ 1000 mg/L as (CaCO3)
Cd2+ 20 mg/L
Cl– 8000 mg/L
Chelating agents (e.g., EDTA) Interfere at all levels. Use either the Digesdahl or vigorous digestion toremove this interference.
Cr3+ 20 mg/L
Cr6+ 40 mg/L
Cu2+ 15 mg/L
F– 20 mg/L
Fe3+ 10 mg/L
Fe2+ Interferes directly and must not be present.
K+ 500 mg/L
Mg2+ 400 mg/L
Mn2+ 25 mg/L
Mo6+ 60 mg/L
Na+ 5000 mg/L
Pb2+ 20 mg/L
Zn2+ 30 mg/L
Highly buffered samples or extreme sample pH Can prevent the correct pH adjustment of the sample by the reagents.Sample pretreatment may be necessary.
Accuracy check
Standard additions method (sample spike)Use the standard additions method (for applicable instruments) to validate the testprocedure, reagents and instrument and to find if there is an interference in the sample.Items to collect:
• 1000-mg/L Nickel Standard Solution• 100-mL volumetric flask, Class A• 5-mL volumetric pipet, Class A and pipet filler• Deionized water• Pipet, TenSette®, 0.1–1.0 mL and tips• Mixing cylinders, 25-mL (3)
1. Prepare a 50 mg/L nickel standard solution as follows:
a. Use a pipet to add 5.00 mL of a 1000 mg/L nickel standard solution into a 100-mLvolumetric flask.
b. Dilute to the mark with deionized water. Mix well. Prepare this solution daily.2. Use the test procedure to measure the concentration of the sample, then keep the
(unspiked) sample in the instrument.3. Go to the Standard Additions option in the instrument menu.4. Select the values for standard concentration, sample volume and spike volumes.
4 Nickel, PAN Method (1.000 mg/L)
5. Prepare three spiked samples: use the TenSette pipet to add 0.1 mL, 0.2 mL and0.3 mL of the prepared standard solution, respectively, to three 25-mL portions offresh sample. Mix well.
6. Use the test procedure to measure the concentration of each of the spiked samples.Start with the smallest sample spike. Measure each of the spiked samples in theinstrument.
7. Select Graph to compare the expected results to the actual results.Note: If the actual results are significantly different from the expected results, make sure thatthe sample volumes and sample spikes are measured accurately. The sample volumes andsample spikes that are used should agree with the selections in the standard additions menu. Ifthe results are not within acceptable limits, the sample may contain an interference.
Standard solution methodUse the standard solution method to validate the test procedure, reagents andinstrument.Items to collect:
• 1000-mg/L Nickel Standard Solution• 1-L volumetric flask, Class A• 100-mL volumetric flask, Class A• 10-mL volumetric pipet, Class A and pipet filler• 5-mL volumetric pipet, Class A and pipet filler• Deionized water
1. Prepare a 5.00-mg/L nickel stock solution as follows:
a. Use a pipet to add 5.00 mL of a 1000-mg/L nickel standard solution into a 1-Lvolumetric flask.
b. Dilute to the mark with deionized water. Mix well. Prepare the stock solution eachday.
2. Prepare a 0.5 mg/L nickel standard solution as follows:
a. Use a pipet to add 10.00 mL of the 5.00-mg/L nickel stock solution into a 100-mLvolumetric flask.
b. Dilute to the mark with deionized water. Mix well. Prepare the standard solutioneach day.
3. Use the test procedure to measure the concentration of the prepared standardsolution.
4. Compare the expected result to the actual result.Note: The factory calibration can be adjusted slightly with the standard adjust option so that theinstrument shows the expected value of the standard solution. The adjusted calibration is thenused for all test results. This adjustment can increase the test accuracy when there are slightvariations in the reagents or instruments.
Method performanceThe method performance data that follows was derived from laboratory tests that weremeasured on a spectrophotometer during ideal test conditions. Users may get differentresults under different test conditions.
Program Standard Precision (95% Confidence Interval) SensitivityConcentration change per 0.010 Abs change
340 0.500 mg/L Ni 0.492–0.508 mg/L Ni 0.006 mg/L Ni
Summary of methodAfter pyrophosphate is added to buffer the sample and mask any Fe3+, the nickel reactswith 1-(2-Pyridylazo)-2-Naphthol indicator. The indicator forms complexes with mostmetals present. After color development, EDTA is added to destroy all metal-PANcomplexes except nickel and cobalt. Spectrophotometers automatically adjust for cobalt
Nickel, PAN Method (1.000 mg/L) 5
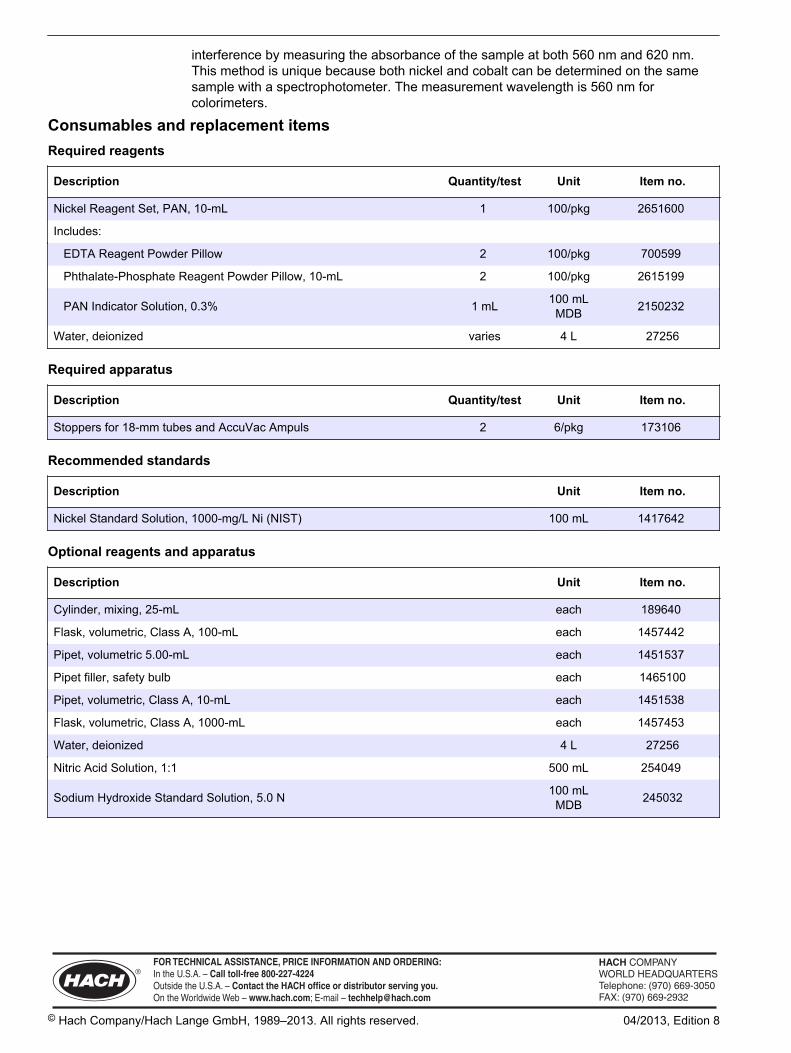
interference by measuring the absorbance of the sample at both 560 nm and 620 nm.This method is unique because both nickel and cobalt can be determined on the samesample with a spectrophotometer. The measurement wavelength is 560 nm forcolorimeters.
Consumables and replacement itemsRequired reagents
Description Quantity/test Unit Item no.
Nickel Reagent Set, PAN, 10-mL 1 100/pkg 2651600
Includes:
EDTA Reagent Powder Pillow 2 100/pkg 700599
Phthalate-Phosphate Reagent Powder Pillow, 10-mL 2 100/pkg 2615199
PAN Indicator Solution, 0.3% 1 mL 100 mLMDB 2150232
Water, deionized varies 4 L 27256
Required apparatus
Description Quantity/test Unit Item no.
Stoppers for 18-mm tubes and AccuVac Ampuls 2 6/pkg 173106
Recommended standards
Description Unit Item no.
Nickel Standard Solution, 1000-mg/L Ni (NIST) 100 mL 1417642
Optional reagents and apparatus
Description Unit Item no.
Cylinder, mixing, 25-mL each 189640
Flask, volumetric, Class A, 100-mL each 1457442
Pipet, volumetric 5.00-mL each 1451537
Pipet filler, safety bulb each 1465100
Pipet, volumetric, Class A, 10-mL each 1451538
Flask, volumetric, Class A, 1000-mL each 1457453
Water, deionized 4 L 27256
Nitric Acid Solution, 1:1 500 mL 254049
Sodium Hydroxide Standard Solution, 5.0 N 100 mLMDB 245032
HACH COMPANYWORLD HEADQUARTERSTelephone: (970) 669-3050FAX: (970) 669-2932
FOR TECHNICAL ASSISTANCE, PRICE INFORMATION AND ORDERING:Call 800-227-4224
Contact the HACH office or distributor serving you.www.hach.com [email protected]
In the U.S.A. –
Outside the U.S.A. –
On the Worldwide Web – ; E-mail –
toll-free
© Hach Company/Hach Lange GmbH, 1989–2013. All rights reserved. 04/2013, Edition 8

Nitrate DOC316.53.01066
Cadmium Reduction Method Method 80390.3 to 30.0 mg/L NO3
–N (HR) Powder Pillows or AccuVac® Ampuls
Scope and application: For water, wastewater and seawater.
Test preparation
Instrument-specific informationThe tables in this section show all of the instruments that have the program for this test. Table 1 shows sample cell and orientation requirements for reagent addition tests, suchas powder pillow or bulk reagent tests. Table 2 shows sample cell and adapterrequirements for AccuVac Ampul tests.To use either table, select an instrument, then read across to find the correspondinginformation for this test.
Table 1 Instrument-specific information for powder pillows
Instrument Sample cell orientation Sample cell
DR 6000 DR 3800 DR 2800 DR 2700
The fill line is to the right. 2495402
DR 5000 DR 3900
The fill line is toward the user.
DR 900 The orientation mark is toward the user. 2401906
Table 2 Instrument-specific information for AccuVac Ampuls
Instrument Adapter Sample cell
DR 6000 DR 5000 DR 900
— 2427606
DR 3900 LZV846 (A)
DR 3800 DR 2800 DR 2700
LZV584 (C) 2122800
Before startingInstall the instrument cap on the DR 900 cell holder before ZERO or READ is pushed.
For best results, measure the reagent blank value for each new lot of reagent. Replace the sample with deionized water inthe test procedure to get the reagent blank value. Subtract the reagent blank value from the sample results automaticallywith the reagent blank adjust option.
1
This method is technique-sensitive. Shaking time and technique influence the color development. For most accurate results,use a standard solution that is within the test range and run the test several times. Increase or decrease the shaking time toget the expected result. Use the adjusted shaking time for sample measurements.
The reagents that are used in this test contain cadmium. Rinse the sample cell immediately after use to remove all cadmiumparticles. Collect the reacted samples for proper disposal.
A deposit of unoxidized metal will remain at the bottom of the sample cell after the reagent dissolves. The deposit will notaffect results.
Review the Safety Data Sheets (MSDS/SDS) for the chemicals that are used and use any recommended personal protectiveequipment.
Dispose of reacted solutions according to local, state and federal regulations. Use the Safety Data Sheets for disposalinformation for unused reagents. Consult the environmental, health and safety staff for your facility and/or local regulatoryagencies for further disposal information.
Items to collectPowder pillows
Description Quantity
NitraVer® 5 Nitrate Reagent Powder Pillow, 10-mL 1
Sample cells. (For information about sample cells, adapters or light shields, refer to Instrument-specific information on page 1.) 2
Refer to Consumables and replacement items on page 8 for reorder information.
AccuVac Ampuls
Description Quantity
NitraVer® 5 Nitrate Reagent AccuVac® Ampul 1
Beaker, 50-mL 1
Sample cells (For information about sample cells, adapters or light shields, refer to Instrument-specific information on page 1.) 1
Stopper for 18-mm tubes and AccuVac Ampuls 1
Refer to Consumables and replacement items on page 8 for reorder information.
Sample collection and storage• Collect samples in clean glass or plastic bottles.• Analyze the samples as soon as possible for best results.• If prompt analysis is not possible, immediately filter and keep the samples at or below
6 °C (43 °F) for a maximum of 48 hours.• To preserve samples for up to 28 days, adjust the sample pH to 2 or less with
concentrated sulfuric acid (about 2 mL per liter) and keep at or below 6 °C (43 °F).The test results then include nitrate and nitrite.
• Let the sample temperature increase to room temperature before analysis.• Before analysis, adjust the pH to 7 with 5.0 N sodium hydroxide standard solution.• Correct the test result for the dilution from the volume additions.
2 Nitrate, Cadmium Reduction Method (30.0 mg/L)

Powder pillow procedure
C A U T I O N
Hazardous waste exposure. Prepared samples contain cadmium. Refer to the SDS for safe handling and disposalinstructions. Obey all local and regional disposal regulations.
Start
1. Start program 355 N,Nitrate HR PP. Forinformation about samplecells, adapters or lightshields, refer to Instrument-specific informationon page 1.Note: Although the programname may vary betweeninstruments, the programnumber does not change.
2. Prepare the sample: Filla sample cell with 10 mL ofsample.
3. Add . 4. Start the instrumenttimer. A 1-minute reactiontime starts.
5. Close the sample cell.Shake the cell vigorouslyuntil the timer expires. Somepowder may not dissolve.Undissolved powder will notaffect results.
6. Start the instrumenttimer. A 5-minute reactiontime starts.An amber color shows ifnitrate is present.
7. Prepare the blank:When the second timerexpires, fill a second samplecell with 10 mL of sample.
8. Clean the blank.
Nitrate, Cadmium Reduction Method (30.0 mg/L) 3

9. Insert the blank into thecell holder.
Zero
10. Push ZERO. Thedisplay shows 0.0 mg/LNO3
––N.
11. Clean the preparedsample.
12. Within one minute afterthe timer expires, insert theprepared sample into thecell holder.
Read
13. Push READ. Resultsshow in mg/L NO3
––N.
AccuVac Ampul procedure
C A U T I O N
Hazardous waste exposure. Prepared samples contain cadmium. Refer to the SDS for safe handling and disposalinstructions. Obey all local and regional disposal regulations.
Start
1. Start program 361 N,Nitrate HR AV. Forinformation about samplecells, adapters or lightshields, refer to Instrument-specific informationon page 1.Note: Although the programname may vary betweeninstruments, the programnumber does not change.
2. Prepare the sample:Collect at least 40 mL ofsample in a 50-mL beaker.
3. Tap the bottom of aNitraVer 5 Nitrate AccuVacAmpul to dislodge thepowder. Fill the Ampul withsample. Keep the tipimmersed while the Ampulfills completely.
4. Start the instrumenttimer. A 1-minute reactiontime starts.
4 Nitrate, Cadmium Reduction Method (30.0 mg/L)

5. Invert the Ampul 48 to52 times as the timer countsdown.
6. Start the instrumenttimer. A 5-minute reactiontime starts.Keep the sample still whilethe timer counts down. Anamber color shows if nitrateis present.
7. Prepare the blank:When the second timerexpires, fill a sample cellwith 10 mL of sample.
8. Clean the blank.
9. Insert the blank into thecell holder.
Zero
10. Push ZERO. Thedisplay shows 0.0 mg/LNO3
––N.
11. Clean the AccuVacAmpul.
12. Within one minute afterthe timer expires, insert theprepared sample AccuVacAmpul into the cell holder.
Read
13. Push READ. Resultsshow in mg/L NO3
––N.
InterferencesInterfering substance Interference level
Chloride Chloride concentrations above 100 mg/L cause low results. The test can be used at high chlorideconcentrations (seawater) if a calibration is made with standards that have the same chlorideconcentration as the samples (refer to Seawater calibration on page 6).
Ferric iron Interferes at all levels
Nitrate, Cadmium Reduction Method (30.0 mg/L) 5

Interfering substance Interference level
Nitrite Interferes at all levelsCompensate for nitrite interference as follows:
1. Add 30-g/L Bromine Water by drops to the sample until a yellow color remains.2. Add one drop of 30-g/L Phenol Solution to remove the color.3. Use the test procedure to measure the concentration of the treated sample. Report the results
as total nitrate and nitrite.
Highly buffered samplesor extreme sample pH
Can prevent the correct pH adjustment of the sample by the reagents. Sample pretreatment maybe necessary.
Strong oxidizing andreducing substances
Interfere at all levels
Seawater calibrationChloride concentrations above 100 mg/L cause low results. To use this method forsamples with high chloride concentrations, calibrate the instrument with nitrate standardsolutions that contain the same amount of chloride as the samples.Prepare calibration standards that contain chloride and 1.0, 3.0, 5.0 and 10.0 mg/L nitrate(as NO3
––N) as follows:
1. Prepare 1 liter of chloride water that has the same chloride concentration as thesamples.
a. Weigh the applicable amount of ACS-grade sodium chloride: (chlorideconcentration of samples in g/L) x (1.6485) = g of NaCl per liter.Note: 18.8 g/L is the typical chloride concentration of seawater.
b. Add the sodium chloride to a 1-liter volumetric flask.c. Dilute to the mark with deionized water. Mix thoroughly. Use this water as the
dilution water to prepare the nitrate standard solutions.2. Use a pipet to add 1.0, 3.0, 5.0 and 10.0 mL of a 100 mg/L nitrate-nitrogen (NO3
––N)standard solution into four different 100-mL Class A volumetric flasks.
3. Dilute to the mark with the prepared chloride water. Mix thoroughly.4. Complete the test procedure for each of the standard solutions and for the prepared
chloride water (for a 0-mg/L standard solution).5. Measure the absorbance of the standard solutions and enter a user calibration into
the instrument.6. Use the user program to measure samples that contain high concentrations of
chloride.
Accuracy check
Standard additions method (sample spike)Use the standard additions method (for applicable instruments) to validate the testprocedure, reagents and instrument and to find if there is an interference in the sample.Items to collect:
• 1000 mg/L Nitrate Nitrogen (NO3––N) Standard Solution
• 100-mL volumetric flask, Class A• 25-mL volumetric pipet, Class A and pipet filler• Deionized water• Pipet, TenSette®, 0.1–1.0 mL and tips
1. Prepare a 250 mg/L nitrate-nitrogen standard solution as follows:
a. Use a pipet to add 25 mL of a 1000 mg/L nitrate nitrogen standard solution into a100-mL volumetric flask.
6 Nitrate, Cadmium Reduction Method (30.0 mg/L)

b. Dilute to the mark with deionized water. Mix well. Prepare this solution daily.2. Use the test procedure to measure the concentration of the sample, then keep the
(unspiked) sample in the instrument.3. Go to the Standard Additions option in the instrument menu.4. Select the values for standard concentration, sample volume and spike volumes.5. Prepare three spiked samples: use the TenSette pipet to add 0.1 mL, 0.2 mL and
0.3 mL of the prepared standard solution, respectively, to three 10-mL portions offresh sample. Mix well.Note: For AccuVac® Ampuls, add 0.4 mL, 0.8 mL and 1.2 mL of the prepared standard solutionto three 50-mL portions of fresh sample.
6. Use the test procedure to measure the concentration of each of the spiked samples.Start with the smallest sample spike. Measure each of the spiked samples in theinstrument.
7. Select Graph to compare the expected results to the actual results.Note: If the actual results are significantly different from the expected results, make sure thatthe sample volumes and sample spikes are measured accurately. The sample volumes andsample spikes that are used should agree with the selections in the standard additions menu. Ifthe results are not within acceptable limits, the sample may contain an interference.
Standard solution methodUse the standard solution method to validate the test procedure, reagents andinstrument.Items to collect:
• Nitrate Nitrogen Standard, Solution, 10.0-mg/L NO3––N
1. Use the test procedure to measure the concentration of the standard solution.2. Compare the expected result to the actual result.
Note: The factory calibration can be adjusted slightly with the standard adjust option so that theinstrument shows the expected value of the standard solution. The adjusted calibration is thenused for all test results. This adjustment can increase the test accuracy when there are slightvariations in the reagents or instruments.
Method performanceThe method performance data that follows was derived from laboratory tests that weremeasured on a spectrophotometer during ideal test conditions. Users may get differentresults under different test conditions.
Program Standard Precision (95% ConfidenceInterval)
SensitivityConcentration change per 0.010 Abs change
355 10 mg/L NO3––N 9.3–10.7 mg/L NO3
––N 0.3 mg/L at 0 ppm, 0.5 mg/L at 10 ppm, 0.8 mg/L at 30 ppmNO3
––N
361 10 mg/L NO3––N 9.3–10.7 mg/L NO3
––N 0.5 mg/L at 0 ppm, 0.6 mg/L at 10 ppm, 0.8 mg/L at 30 ppmNO3
––N
Summary of methodCadmium metal reduces nitrate in the sample to nitrite. The nitrite ion reacts in an acidicmedium with sulfanilic acid to form an intermediate diazonium salt. The salt couples withgentisic acid to form an amber colored solution. The measurement wavelength is 500 nmfor spectrophotometers or 520 nm for colorimeters.
Pollution prevention and waste managementReacted samples contain cadmium and must be disposed of as a hazardous waste.Dispose of reacted solutions according to local, state and federal regulations.
Nitrate, Cadmium Reduction Method (30.0 mg/L) 7

Consumables and replacement itemsRequired reagents
Description Quantity/test Unit Item no.
NitraVer® 5 Nitrate Reagent Powder Pillows, 10-mL 1 100/pkg 2106169
OR
NitraVer® 5 Nitrate Reagent AccuVac® Ampul 1 25/pkg 2511025
Required apparatus (powder pillows)
Description Quantity/test Unit Item no.
Stopper, Neoprene, solid, size #1 2 12/pkg 1480801
OR
Stoppers for 18-mm tubes and AccuVac Ampuls 2 6/pkg 173106
Required apparatus (AccuVac)
Description Quantity/test Unit Item no.
Beaker, 50-mL 1 each 50041H
Recommended standards
Description Unit Item no.
Nitrate Nitrogen Standard Solution, 10.0-mg/L NO3--N 500 mL 30749
Nitrate Nitrogen Standard Solution 1000 mg/L NO3--N 500 mL 1279249
Wastewater Influent Standard, Mixed Parameter, for NH3-N, NO3-N, PO4, COD, SO4,TOC 500 mL 2833149
Water, deionized 4 L 27256
Optional reagents and apparatus
Description Unit Item no.
Bromine Water, 30 g/L 29 mL 221120
Cylinder, mixing, 50-mL each 2088641
Pipet, TenSette®, 0.1–1.0 mL each 1970001
Pipet, Volumetric, Class A, 0.5 mL each 1451534
Pipet, volumetric, Class A, 1.00-mL each 1451535
Pipet, volumetric, Class A, 2-mL each 1451536
Pipet, volumetric, Class A, 3-mL each 1451503
Pipet tips for TenSette Pipet 1970001 50/pkg 2185696
Pipet tips for TenSette Pipet 1970001 1000/pkg 2185628
Phenol Solution, 30-g/L 29 mL 211220
Pipet, volumetric, Class A, 25-mL each 1451540
Pipet filler, safety bulb each 1465100
AccuVac® Snapper each 2405200
Sodium Hydroxide, 5 N 50 mL 245026
8 Nitrate, Cadmium Reduction Method (30.0 mg/L)

Consumables and replacement items (continued)Description Unit Item no.
Sulfuric Acid, ACS 500 mL 97949
Flask, volumetric, Class A, 100-mL each 1457442
Nitrate, Cadmium Reduction Method (30.0 mg/L) 9

HACH COMPANYWORLD HEADQUARTERSTelephone: (970) 669-3050FAX: (970) 669-2932
FOR TECHNICAL ASSISTANCE, PRICE INFORMATION AND ORDERING:Call 800-227-4224
Contact the HACH office or distributor serving you.www.hach.com [email protected]
In the U.S.A. –
Outside the U.S.A. –
On the Worldwide Web – ; E-mail –
toll-free
© Hach Company/Hach Lange GmbH, 1989–2013. All rights reserved. 04/2013, Edition 8

Nitrate DOC316.53.01067
Cadmium Reduction Method Method 81920.01 to 0.50 mg/L NO3
––N (LR) Powder Pillows
Scope and application: For water, wastewater and seawater.
Test preparation
Instrument specific informationThe table in this section shows all of the instruments that have the program for this test. Table 1 shows sample cell and orientation requirements for reagent addition tests, suchas powder pillow or bulk reagent tests.To use the table, select an instrument, then read across to find the correspondinginformation for this test.
Table 1 Instrument-specific information for powder pillows
Instrument Sample cell orientation Sample cell
DR 6000 DR 3800 DR 2800 DR 2700
The fill line is to the right. 2495402
DR 5000 DR 3900
The fill line is toward the user.
DR 900 The orientation mark is toward the user. 2401906
Before startingInstall the instrument cap on the DR 900 cell holder before ZERO or READ is pushed.
For best results, measure the reagent blank value for each new lot of reagent. Replace the sample with deionized water inthe test procedure to get the reagent blank value. Subtract the reagent blank value from the sample results automaticallywith the reagent blank adjust option.
This method is technique-sensitive. Shaking time and technique influence the color development. For most accurate results,use a standard solution that is within the test range and run the test several times. Increase or decrease the shaking time toget the expected result. Use the adjusted shaking time for sample measurements.
The reagents that are used in this test contain cadmium. Rinse the sample cell immediately after use to remove all cadmiumparticles. Collect the reacted samples for proper disposal.
A deposit of unoxidized metal will remain at the bottom of the sample cell after the reagent dissolves. The deposit will notaffect results.
Review the Safety Data Sheets (MSDS/SDS) for the chemicals that are used and use any recommended personal protectiveequipment.
Dispose of reacted solutions according to local, state and federal regulations. Use the Safety Data Sheets for disposalinformation for unused reagents. Consult the environmental, health and safety staff for your facility and/or local regulatoryagencies for further disposal information.
1
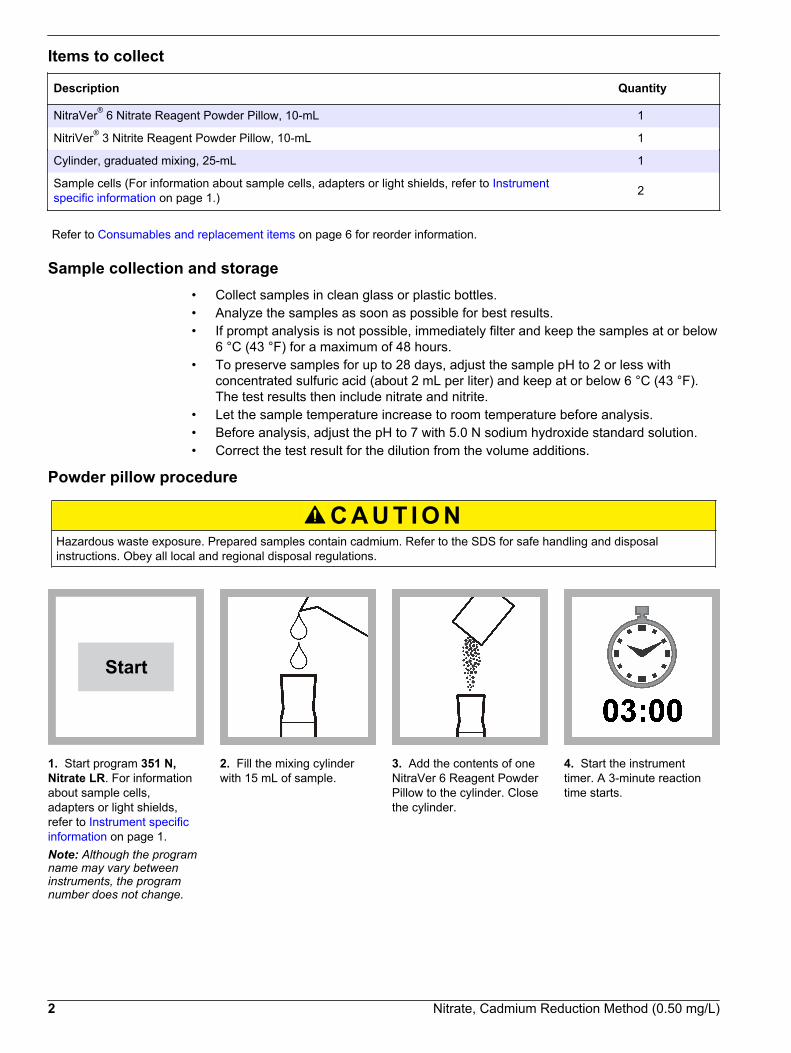
Items to collect
Description Quantity
NitraVer® 6 Nitrate Reagent Powder Pillow, 10-mL 1
NitriVer® 3 Nitrite Reagent Powder Pillow, 10-mL 1
Cylinder, graduated mixing, 25-mL 1
Sample cells (For information about sample cells, adapters or light shields, refer to Instrumentspecific information on page 1.) 2
Refer to Consumables and replacement items on page 6 for reorder information.
Sample collection and storage• Collect samples in clean glass or plastic bottles.• Analyze the samples as soon as possible for best results.• If prompt analysis is not possible, immediately filter and keep the samples at or below
6 °C (43 °F) for a maximum of 48 hours.• To preserve samples for up to 28 days, adjust the sample pH to 2 or less with
concentrated sulfuric acid (about 2 mL per liter) and keep at or below 6 °C (43 °F).The test results then include nitrate and nitrite.
• Let the sample temperature increase to room temperature before analysis.• Before analysis, adjust the pH to 7 with 5.0 N sodium hydroxide standard solution.• Correct the test result for the dilution from the volume additions.
Powder pillow procedure
C A U T I O N
Hazardous waste exposure. Prepared samples contain cadmium. Refer to the SDS for safe handling and disposalinstructions. Obey all local and regional disposal regulations.
Start
1. Start program 351 N,Nitrate LR. For informationabout sample cells,adapters or light shields,refer to Instrument specificinformation on page 1.Note: Although the programname may vary betweeninstruments, the programnumber does not change.
2. Fill the mixing cylinderwith 15 mL of sample.
3. Add the contents of oneNitraVer 6 Reagent PowderPillow to the cylinder. Closethe cylinder.
4. Start the instrumenttimer. A 3-minute reactiontime starts.
2 Nitrate, Cadmium Reduction Method (0.50 mg/L)

5. Shake the cylindervigorously during thereaction period. Somepowder may not dissolve.
6. When the timer expires,start the timer again. A 2-minute reaction time starts.
7. Prepare the sample:When the timer expires,carefully pour 10 mL ofsample into a sample cell.Do not transfer cadmiumparticles to the sample cell.
8. Add the contents of oneNitriVer 3 Reagent PowderPillow to the preparedsample cell.
9. Start the instrumenttimer. A 30-second reactiontime starts.
10. Close the sample cell.Shake the sample cellgently during the 30-secondtimer. A pink color shows ifnitrate is present in thesample.
11. Start the instrumenttimer. A 15-minute reactiontime starts.
12. Prepare the blank:When the timer expires, fill asecond sample cell with10 mL of the originalsample.
13. Clean the blank. 14. Insert the blank into thecell holder.
Zero
15. Push ZERO. Thedisplay shows 0.00 mg/LNO3
––N.
16. Clean the preparedsample.
Nitrate, Cadmium Reduction Method (0.50 mg/L) 3

17. Insert the preparedsample into the cell holder.
Read
18. Push READ. Resultsshow in mg/L NO3
––N.
InterferencesInterfering substance Interference level
Calcium 100 mg/L
Chloride Chloride concentrations above 100 mg/L cause low results. The test can be used at high chlorideconcentrations (seawater) if a calibration is made with standards that have the same chlorideconcentration as the samples (refer to Seawater calibration on page 4).
Ferric iron Interferes at all levels
Nitrite Interferes at all levelsCompensate for nitrite interference as follows:
1. Add 30-g/L Bromine Water by drops to the sample until a yellow color remains.2. Add one drop of 30-g/L Phenol Solution to remove the color.3. Use the test procedure to measure the concentration of the treated sample. Report the
results as total nitrate and nitrite.
Highly buffered samplesor extreme sample pH
Can prevent the correct pH adjustment of the sample by the reagents. Sample pretreatment maybe necessary.
Strong oxidizing andreducing substances
Interfere at all levels
Seawater calibrationChloride concentrations above 100 mg/L cause low results. To use this method forsamples with high chloride concentrations, calibrate the instrument with nitrate standardsolutions that contain the same amount of chloride as the samples.Prepare calibration standards that contain chloride and 1.0, 3.0, 5.0 and 10.0 mg/L nitrate(as NO3
––N) as follows:
1. Prepare 1 liter of chloride water that has the same chloride concentration as thesamples.
a. Weigh the applicable amount of ACS-grade sodium chloride: (chlorideconcentration of samples in g/L) x (1.6485) = g of NaCl per liter.Note: 18.8 g/L is the typical chloride concentration of seawater.
b. Add the sodium chloride to a 1-liter volumetric flask.c. Dilute to the mark with deionized water. Mix thoroughly. Use this water as the
dilution water to prepare the nitrate standard solutions.2. Use a pipet to add 1.0, 3.0, 5.0 and 10.0 mL of a 100 mg/L nitrate-nitrogen (NO3
––N)standard solution into four different 100-mL Class A volumetric flasks.
3. Dilute to the mark with the prepared chloride water. Mix thoroughly.4. Complete the test procedure for each of the standard solutions and for the prepared
chloride water (for a 0-mg/L standard solution).
4 Nitrate, Cadmium Reduction Method (0.50 mg/L)
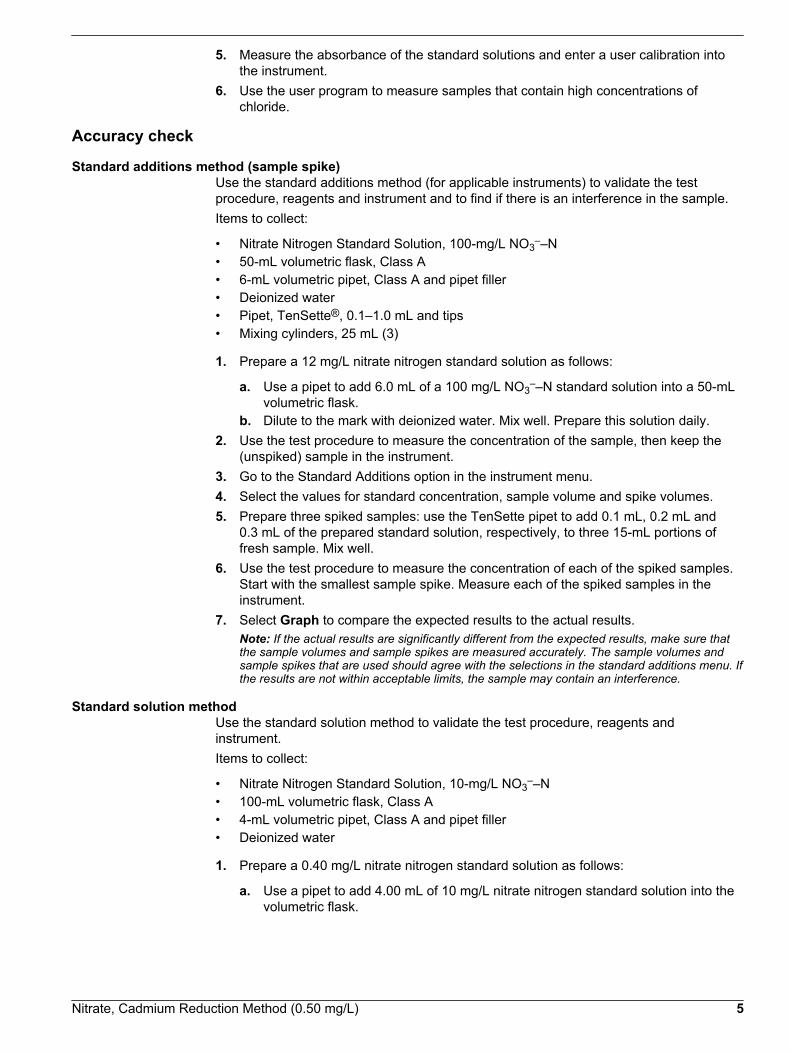
5. Measure the absorbance of the standard solutions and enter a user calibration intothe instrument.
6. Use the user program to measure samples that contain high concentrations ofchloride.
Accuracy check
Standard additions method (sample spike)Use the standard additions method (for applicable instruments) to validate the testprocedure, reagents and instrument and to find if there is an interference in the sample.Items to collect:
• Nitrate Nitrogen Standard Solution, 100-mg/L NO3––N
• 50-mL volumetric flask, Class A• 6-mL volumetric pipet, Class A and pipet filler• Deionized water• Pipet, TenSette®, 0.1–1.0 mL and tips• Mixing cylinders, 25 mL (3)
1. Prepare a 12 mg/L nitrate nitrogen standard solution as follows:
a. Use a pipet to add 6.0 mL of a 100 mg/L NO3––N standard solution into a 50-mL
volumetric flask. b. Dilute to the mark with deionized water. Mix well. Prepare this solution daily.
2. Use the test procedure to measure the concentration of the sample, then keep the(unspiked) sample in the instrument.
3. Go to the Standard Additions option in the instrument menu.4. Select the values for standard concentration, sample volume and spike volumes.5. Prepare three spiked samples: use the TenSette pipet to add 0.1 mL, 0.2 mL and
0.3 mL of the prepared standard solution, respectively, to three 15-mL portions offresh sample. Mix well.
6. Use the test procedure to measure the concentration of each of the spiked samples.Start with the smallest sample spike. Measure each of the spiked samples in theinstrument.
7. Select Graph to compare the expected results to the actual results.Note: If the actual results are significantly different from the expected results, make sure thatthe sample volumes and sample spikes are measured accurately. The sample volumes andsample spikes that are used should agree with the selections in the standard additions menu. Ifthe results are not within acceptable limits, the sample may contain an interference.
Standard solution methodUse the standard solution method to validate the test procedure, reagents andinstrument.Items to collect:
• Nitrate Nitrogen Standard Solution, 10-mg/L NO3––N
• 100-mL volumetric flask, Class A• 4-mL volumetric pipet, Class A and pipet filler• Deionized water
1. Prepare a 0.40 mg/L nitrate nitrogen standard solution as follows:
a. Use a pipet to add 4.00 mL of 10 mg/L nitrate nitrogen standard solution into thevolumetric flask.
Nitrate, Cadmium Reduction Method (0.50 mg/L) 5

b. Dilute to the mark with deionized water. Mix well. Prepare this solution daily.2. Use the test procedure to measure the concentration of the prepared standard
solution.3. Compare the expected result to the actual result.
Note: The factory calibration can be adjusted slightly with the standard adjust option so that theinstrument shows the expected value of the standard solution. The adjusted calibration is thenused for all test results. This adjustment can increase the test accuracy when there are slightvariations in the reagents or instruments.
Method performanceThe method performance data that follows was derived from laboratory tests that weremeasured on a spectrophotometer during ideal test conditions. Users may get differentresults under different test conditions.
Program Standard Precision (95% Confidence Interval) SensitivityConcentration change per 0.010 Abs change
351 0.40 mg/L NO3––N 0.35–0.45 mg/L NO3
––N 0.003 mg/L NO3––N
Summary of methodCadmium metal reduces nitrate in the sample to nitrite. The nitrite ion reacts in an acidicmedium with sulfanilic acid to form an intermediate diazonium salt. The salt couples withchromotropic acid to form a pink-colored product. The measurement wavelength is507 nm for spectrophotometers or 520 nm for colorimeters.
Pollution prevention and waste managementReacted samples contain cadmium and must be disposed of as a hazardous waste.Dispose of reacted solutions according to local, state and federal regulations.
Consumables and replacement itemsRequired reagents
Description Quantity/test Unit Item no.
Nitrate Reagent Set, low range, 10-mL 1 100/pkg 2429800
Includes:
NitraVer® 6 Nitrate Reagent Powder Pillow, 10-mL 1 100/pkg 2107249
NitriVer® 3 Nitrite Reagent Powder Pillow, 10-mL 1 100/pkg 2107169
Required apparatus
Description Quantity/test Unit Item no.
Cylinder, graduated mixing, 25 mL with stopper 1 each 2088640
Stoppers for 18-mm tubes and AccuVac Ampuls 2 6/pkg 173106
Recommended standards and apparatus
Description Unit Item no.
Flask, volumetric, Class A, 100-mL each 1457442
Nitrate Nitrogen Standard Solution, 10.0-mg/L NO3--N 500 mL 30749
Nitrate Nitrogen Standard Solution, 100 mg/L NO3--N 500 mL 194749
Water, deionized 4 L 27256
6 Nitrate, Cadmium Reduction Method (0.50 mg/L)

Optional reagents and apparatus
Description Unit Item no.
Bromine Water, 30 g/L 29 mL 221120
Pipet, TenSette®, 0.1–1.0 mL each 1970001
Pipet tips for TenSette Pipet 1970001 50/pkg 2185696
Pipet tips for TenSette Pipet 1970001 1000/pkg 2185628
Pipet, volumetric, Class A, 4.00-mL each 1451504
Flask, volumetric, 50-mL each 1457441
Pipet filler, safety bulb each 1465100
Phenol Solution, 30-g/L 29 mL 211220
Sodium Hydroxide Standard Solution, 5.0 N 1 L 245053
Sulfuric Acid, concentrated, ACS 500 mL 97949
Sodium Chloride, ACS 454 g 18201H
Pipet, TenSette®, 1.0 to 10.0 mL each 1970010
Pipet tips for TenSette Pipet 1970010 50/pkg 2199796
Nitrate, Cadmium Reduction Method (0.50 mg/L) 7

HACH COMPANYWORLD HEADQUARTERSTelephone: (970) 669-3050FAX: (970) 669-2932
FOR TECHNICAL ASSISTANCE, PRICE INFORMATION AND ORDERING:Call 800-227-4224
Contact the HACH office or distributor serving you.www.hach.com [email protected]
In the U.S.A. –
Outside the U.S.A. –
On the Worldwide Web – ; E-mail –
toll-free
© Hach Company/Hach Lange GmbH, 1989–2013. All rights reserved. 04/2013, Edition 8

Nitrate, MR DOC316.53.01069
Cadmium Reduction Method Method 81710.1 to 10.0 mg/L NO3
––N (MR, spectrophotometers)0.2 to 5.0 mg/L NO3
––N (MR, colorimeters)Powder Pillows or AccuVac®
Ampuls
Scope and application: For water, wastewater and seawater.
Test preparation
Instrument-specific informationThe tables in this section show all of the instruments that have the program for this test. Table 1 shows sample cell and orientation requirements for reagent addition tests, suchas powder pillow or bulk reagent tests. Table 2 shows sample cell and adapterrequirements for AccuVac Ampul tests.To use either table, select an instrument, then read across to find the correspondinginformation for this test.
Table 1 Instrument-specific information for powder pillows
Instrument Sample cell orientation Sample cell
DR 6000 DR 3800 DR 2800 DR 2700
The fill line is to the right. 2495402
DR 5000 DR 3900
The fill line is toward the user.
DR 900 The orientation mark is toward the user. 2401906
Table 2 Instrument-specific information for AccuVac Ampuls
Instrument Adapter Sample cell
DR 6000 DR 5000 DR 900
— 2427606
DR 3900 LZV846 (A)
DR 3800 DR 2800 DR 2700
LZV584 (C) 2122800
Before startingInstall the instrument cap on the DR 900 cell holder before ZERO or READ is pushed.
For best results, measure the reagent blank value for each new lot of reagent. Replace the sample with deionized water inthe test procedure to get the reagent blank value. Subtract the reagent blank value from the sample results automaticallywith the reagent blank adjust option.
1

This method is technique-sensitive. Shaking time and technique influence the color development. For most accurate results,use a standard solution that is within the test range and run the test several times. Increase or decrease the shaking time toget the expected result. Use the adjusted shaking time for sample measurements.
The reagents that are used in this test contain cadmium. Rinse the sample cell immediately after use to remove all cadmiumparticles. Collect the reacted samples for proper disposal.
A deposit of unoxidized metal will remain at the bottom of the sample cell after the reagent dissolves. The deposit will notaffect results.
Review the Safety Data Sheets (MSDS/SDS) for the chemicals that are used and use any recommended personal protectiveequipment.
Dispose of reacted solutions according to local, state and federal regulations. Use the Safety Data Sheets for disposalinformation for unused reagents. Consult the environmental, health and safety staff for your facility and/or local regulatoryagencies for further disposal information.
Items to collectPowder pillows
Description Quantity
NitraVer® Nitrate 5 Reagent powder pillow, 10-mL 1
Sample cells (For information about sample cells, adapters or light shields, refer to Instrument-specific information on page 1.) 2
Stopper, Neoprene #1 2
Refer to Consumables and replacement items on page 7 for reorder information.
AccuVac Ampuls
Description Quantity
NitraVer® Nitrate 5 Reagent AccuVac® Ampul 1
Beaker, 50 mL 1
Stoppers for 18-mm tubes and AccuVac Ampuls 1
Sample cells (For information about sample cells, adapters or light shields, refer to Instrument-specific information on page 1.) 1
Refer to Consumables and replacement items on page 7 for reorder information.
Sample collection and storage• Collect samples in clean glass or plastic bottles.• Analyze the samples as soon as possible for best results.• If prompt analysis is not possible, immediately filter and keep the samples at or below
6 °C (43 °F) for a maximum of 48 hours.• To preserve samples for up to 28 days, adjust the sample pH to 2 or less with
concentrated sulfuric acid (about 2 mL per liter) and keep at or below 6 °C (43 °F).The test results then include nitrate and nitrite.
• Let the sample temperature increase to room temperature before analysis.• Before analysis, adjust the pH to 7 with 5.0 N sodium hydroxide standard solution.• Correct the test result for the dilution from the volume additions.
2 Nitrate, Cadmium Reduction Method (10.0 mg/L)

Powder pillow procedure
Start
1. Start program 353 N,Nitrate MR PP. Forinformation about samplecells, adapters or lightshields, refer to Instrument-specific informationon page 1.Note: Although the programname may vary betweeninstruments, the programnumber does not change.
2. Prepare the sample: Filla sample cell with 10 mL ofsample.
3. Add the contents of onepowder pillow to the samplecell.
4. Start the instrumenttimer. A 1-minute reactiontime starts.
5. Close the sample cell.Shake the sample cellvigorously until the timerexpires. Some solid materialwill not dissolve.Undissolved powder will notaffect results.
6. Start the instrumenttimer. A 5-minute reactiontime starts.An amber color shows ifnitrate is present.
7. Prepare the blank: Fill asecond sample cell with10 mL of sample.
8. When the timer expires,clean the blank.
9. Insert the blank into thecell holder.
Zero
10. Push ZERO. Thedisplay shows 0.0 mg/LNO3
––N.
11. Clean the preparedsample.
12. Within 2 minutes afterthe timer expires, insert theprepared sample into thecell holder.
Nitrate, Cadmium Reduction Method (10.0 mg/L) 3
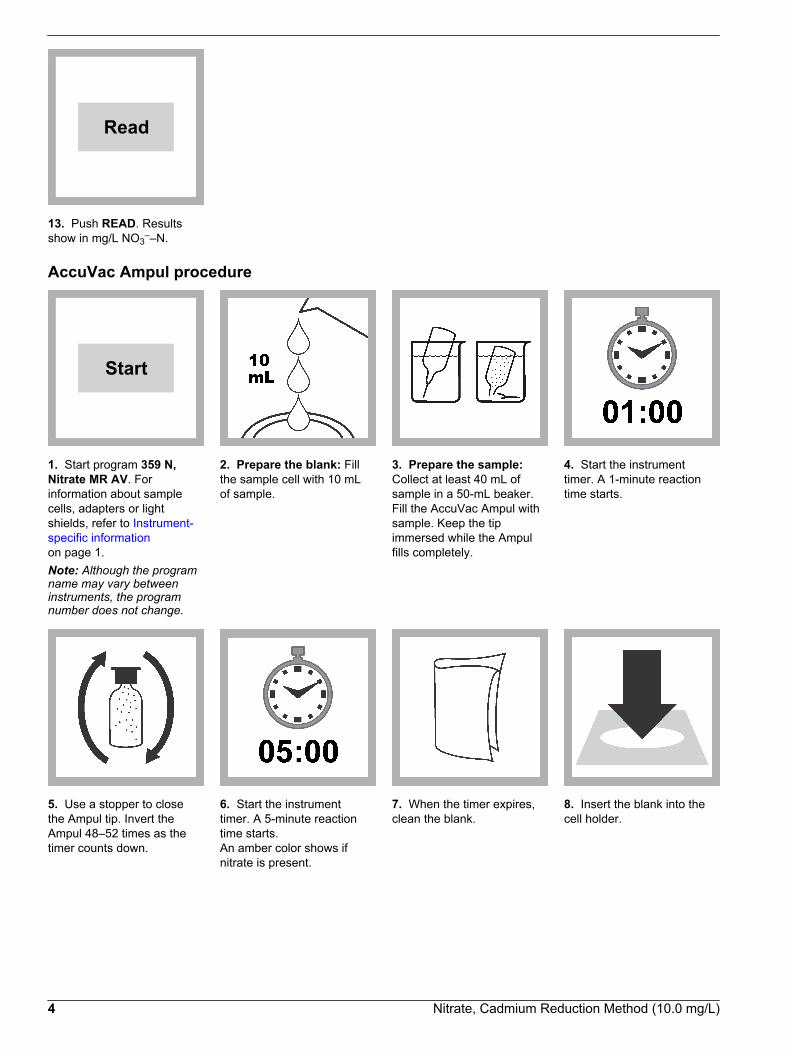
Read
13. Push READ. Resultsshow in mg/L NO3
––N.
AccuVac Ampul procedure
Start
1. Start program 359 N,Nitrate MR AV. Forinformation about samplecells, adapters or lightshields, refer to Instrument-specific informationon page 1.Note: Although the programname may vary betweeninstruments, the programnumber does not change.
2. Prepare the blank: Fillthe sample cell with 10 mLof sample.
3. Prepare the sample:Collect at least 40 mL ofsample in a 50-mL beaker.Fill the AccuVac Ampul withsample. Keep the tipimmersed while the Ampulfills completely.
4. Start the instrumenttimer. A 1-minute reactiontime starts.
5. Use a stopper to closethe Ampul tip. Invert theAmpul 48–52 times as thetimer counts down.
6. Start the instrumenttimer. A 5-minute reactiontime starts.An amber color shows ifnitrate is present.
7. When the timer expires,clean the blank.
8. Insert the blank into thecell holder.
4 Nitrate, Cadmium Reduction Method (10.0 mg/L)
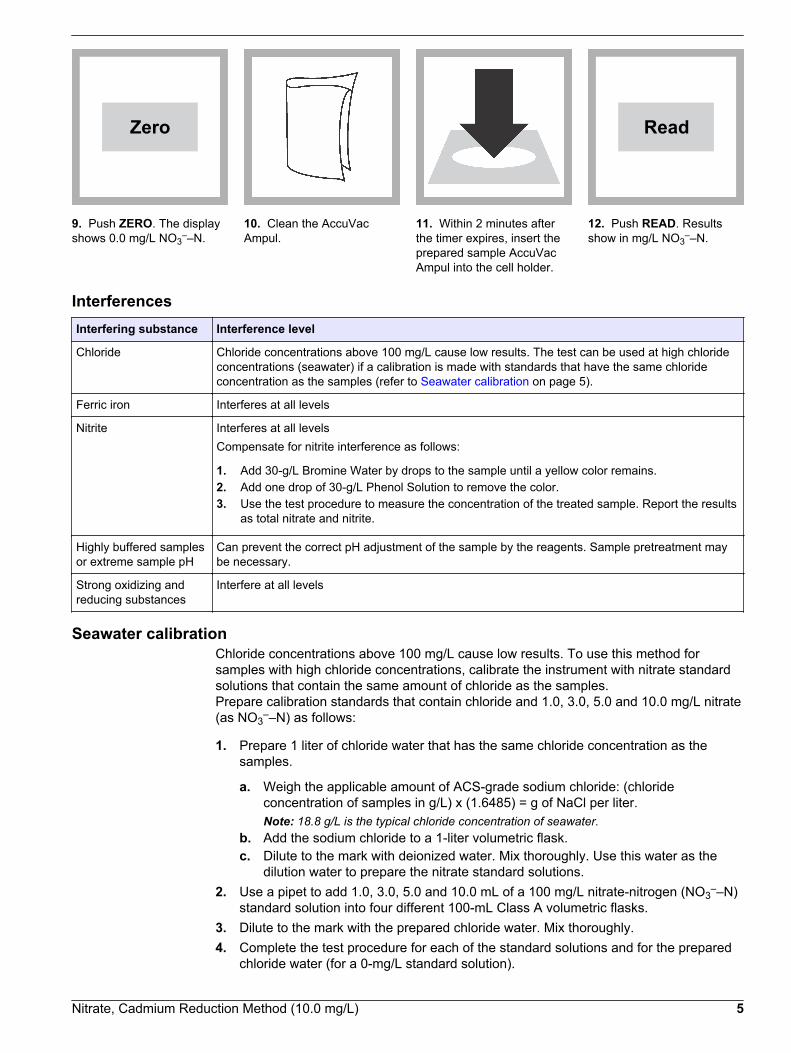
Zero
9. Push ZERO. The displayshows 0.0 mg/L NO3
––N.10. Clean the AccuVacAmpul.
11. Within 2 minutes afterthe timer expires, insert theprepared sample AccuVacAmpul into the cell holder.
Read
12. Push READ. Resultsshow in mg/L NO3
––N.
InterferencesInterfering substance Interference level
Chloride Chloride concentrations above 100 mg/L cause low results. The test can be used at high chlorideconcentrations (seawater) if a calibration is made with standards that have the same chlorideconcentration as the samples (refer to Seawater calibration on page 5).
Ferric iron Interferes at all levels
Nitrite Interferes at all levelsCompensate for nitrite interference as follows:
1. Add 30-g/L Bromine Water by drops to the sample until a yellow color remains.2. Add one drop of 30-g/L Phenol Solution to remove the color.3. Use the test procedure to measure the concentration of the treated sample. Report the results
as total nitrate and nitrite.
Highly buffered samplesor extreme sample pH
Can prevent the correct pH adjustment of the sample by the reagents. Sample pretreatment maybe necessary.
Strong oxidizing andreducing substances
Interfere at all levels
Seawater calibrationChloride concentrations above 100 mg/L cause low results. To use this method forsamples with high chloride concentrations, calibrate the instrument with nitrate standardsolutions that contain the same amount of chloride as the samples.Prepare calibration standards that contain chloride and 1.0, 3.0, 5.0 and 10.0 mg/L nitrate(as NO3
––N) as follows:
1. Prepare 1 liter of chloride water that has the same chloride concentration as thesamples.
a. Weigh the applicable amount of ACS-grade sodium chloride: (chlorideconcentration of samples in g/L) x (1.6485) = g of NaCl per liter.Note: 18.8 g/L is the typical chloride concentration of seawater.
b. Add the sodium chloride to a 1-liter volumetric flask.c. Dilute to the mark with deionized water. Mix thoroughly. Use this water as the
dilution water to prepare the nitrate standard solutions.2. Use a pipet to add 1.0, 3.0, 5.0 and 10.0 mL of a 100 mg/L nitrate-nitrogen (NO3
––N)standard solution into four different 100-mL Class A volumetric flasks.
3. Dilute to the mark with the prepared chloride water. Mix thoroughly.4. Complete the test procedure for each of the standard solutions and for the prepared
chloride water (for a 0-mg/L standard solution).
Nitrate, Cadmium Reduction Method (10.0 mg/L) 5

5. Measure the absorbance of the standard solutions and enter a user calibration intothe instrument.
6. Use the user program to measure samples that contain high concentrations ofchloride.
Accuracy check
Standard additions method (sample spike)Use the standard additions method (for applicable instruments) to validate the testprocedure, reagents and instrument and to find if there is an interference in the sample.Items to collect:
• Nitrate Nitrogen Standard Solution, 100 mg/L NO3–– N
• Ampule breaker• Pipet, TenSette®, 0.1–1.0 mL and tips
1. Use the test procedure to measure the concentration of the sample, then keep the(unspiked) sample in the instrument.
2. Go to the Standard Additions option in the instrument menu.3. Select the values for standard concentration, sample volume and spike volumes.4. Open the standard solution.5. Prepare three spiked samples: use the TenSette pipet to add 0.1 mL, 0.2 mL and
0.3 mL of the standard solution, respectively, to three 10-mL portions of fresh sample.Mix well.Note: For AccuVac® Ampuls, add 0.1 mL, 0.2 mL and 0.3 mL of a 500 mg/L NO3
––N standardsolution to three 50-mL portions of fresh sample.
6. Use the test procedure to measure the concentration of each of the spiked samples.Start with the smallest sample spike. Measure each of the spiked samples in theinstrument.
7. Select Graph to compare the expected results to the actual results.Note: If the actual results are significantly different from the expected results, make sure thatthe sample volumes and sample spikes are measured accurately. The sample volumes andsample spikes that are used should agree with the selections in the standard additions menu. Ifthe results are not within acceptable limits, the sample may contain an interference.
Standard solution methodUse the standard solution method to validate the test procedure, reagents andinstrument.Items to collect:
• Nitrate Nitrogen Standard Solution, 100 mg/L NO3–– N
• 100-mL volumetric flask, Class A• 5-mL volumetric pipet, Class A and pipet filler• Deionized water
1. Prepare a 5.0 mg/L nitrate-nitrogen standard solution as follows:
a. Use a pipet to add 5.0 mL of 100 mg/L nitrate-nitrogen standard solution into thevolumetric flask.
b. Dilute to the mark with deionized water. Mix well. Prepare this solution daily.2. Use the test procedure to measure the concentration of the prepared standard
solution.3. Compare the expected result to the actual result.
Note: The factory calibration can be adjusted slightly with the standard adjust option so that theinstrument shows the expected value of the standard solution. The adjusted calibration is thenused for all test results. This adjustment can increase the test accuracy when there are slightvariations in the reagents or instruments.
6 Nitrate, Cadmium Reduction Method (10.0 mg/L)
Method performanceThe method performance data that follows was derived from laboratory tests that weremeasured on a spectrophotometer during ideal test conditions. Users may get differentresults under different test conditions.
Program Standard Precision (95% Confidence Interval) SensitivityConcentration change per 0.010 Abs change
353 5.0 mg/L NO3––N 4.8–5.2 mg/L NO3
––N 0.04 mg/L NO3––N
359 5.0 mg/L NO3––N 4.6–5.4 mg/L NO3
––N 0.05 mg/L NO3––N
Summary of methodCadmium metal reduces nitrate in the sample to nitrite. The nitrite ion reacts in an acidicmedium with sulfanilic acid to form an intermediate diazonium salt. The salt couples withgentisic acid to form an amber colored solution. The measurement wavelength is 400 nmfor spectrophotometers or 420 nm for colorimeters.
Pollution prevention and waste managementReacted samples contain cadmium and must be disposed of as a hazardous waste.Dispose of reacted solutions according to local, state and federal regulations.
Consumables and replacement itemsRequired reagents
Description Quantity/test Unit Item no.
NitraVer® 5 Nitrate Reagent Powder Pillows, 10-mL 1 100/pkg 2106169
OR
NitraVer® 5 Nitrate Reagent AccuVac® Ampul 1 25/pkg 2511025
Required apparatus for powder pillows
Description Quantity/test Unit Item no.
Stopper, Neoprene, solid, size #2 2 12/pkg 1480802
Required apparatus for AccuVac Ampuls
Description Quantity/test Unit Item no.
Beaker, 50-mL 1 each 50041H
Stoppers for 18-mm tubes and AccuVac Ampuls 2 6/pkg 173106
Recommended standards
Description Unit Item no.
Drinking Water Standard, Mixed Parameter, Inorganic for F-, NO3, PO4, SO4 500 mL 2833049
Nitrate Nitrogen Standard Solution, 100-mg/L NH3-N 500 mL 194749
Nitrate Nitrogen Standard Solution, Voluette® Ampule, 500-mg/L NO3–N 16/pkg 1426010
Optional reagents and apparatus
Description Unit Item no.
Bromine Water, 30 g/L 29 mL 221120
Cylinder, mixing, 50-mL each 2088641
Nitrate, Cadmium Reduction Method (10.0 mg/L) 7

Consumables and replacement items (continued)Description Unit Item no.
Flask, volumetric, Class A, 100-mL each 1457442
Pipet, TenSette®, 0.1–1.0 mL each 1970001
Pipet tips for TenSette Pipet 1970001 50/pkg 2185696
Pipet tips for TenSette Pipet 1970001 1000/pkg 2185628
Pipet, volumetric 5.00-mL each 1451537
Pipet filler, safety bulb each 1465100
Phenol Solution, 30-g/L 29 mL 211220
Sodium Hydroxide Standard Solution, 5.0 N 1 L 245053
Sulfuric Acid, concentrated, ACS 500 mL 97949
Water, deionized 4 L 27256
HACH COMPANYWORLD HEADQUARTERSTelephone: (970) 669-3050FAX: (970) 669-2932
FOR TECHNICAL ASSISTANCE, PRICE INFORMATION AND ORDERING:Call 800-227-4224
Contact the HACH office or distributor serving you.www.hach.com [email protected]
In the U.S.A. –
Outside the U.S.A. –
On the Worldwide Web – ; E-mail –
toll-free
© Hach Company/Hach Lange GmbH, 1989–2013. All rights reserved. 04/2013, Edition 8

Nitrate, HR DOC316.53.01068
Chromotropic Acid Method Method 100200.2 to 30.0 mg/L NO3
––N (HR) Test ‘N Tube™ Vials
Scope and application: For water and wastewater.
Test preparation
Instrument specific informationThe table in this section shows all of the instruments that have the program for this test. Table 1 shows adapter and light shield requirements for the instruments that use them.To use the table, select an instrument, then read across to find the correspondinginformation for this test.
Table 1 Instrument-specific information for test tubes
Instrument Adapters Light shield
DR 6000 — —
DR 5000 — —
DR 900 4846400 Cover supplied with the instrument
DR 3900 — LZV849
DR 3800 — LZV646
DR 2800 —
Before startingInstall the instrument cap on the DR 900 cell holder before ZERO or READ is pushed.
DR 3900, DR 3800, DR 2800 and DR 2700: Install the light shield in Cell Compartment #2 before this test is started.
The vials must be mixed carefully for accurate results. Start each vial inversion with the vial in the vertical position, with thecap on the top. Turn the vial upside-down and wait for all of the solution to flow down to the cap. Return the vial to thevertical position and wait for all of the solution to flow down to the bottom of the vial. This mixing method equals oneinversion.
For best results, measure the reagent blank value for each new lot of reagent. Replace the sample with deionized water inthe test procedure to get the reagent blank value. Subtract the reagent blank value from the sample results automaticallywith the reagent blank adjust option.
Review the Safety Data Sheets (MSDS/SDS) for the chemicals that are used and use any recommended personal protectiveequipment.
Dispose of reacted solutions according to local, state and federal regulations. Use the Safety Data Sheets for disposalinformation for unused reagents. Consult the environmental, health and safety staff for your facility and/or local regulatoryagencies for further disposal information.
Items to collect
Description Quantity
Light shield (For information about sample cells, adapters or light shields, refer to Instrumentspecific information on page 1.) 1
NitraVer® X Nitrate Reagent Set, Test 'N Tube™ 1
Funnel, micro, poly 1
1
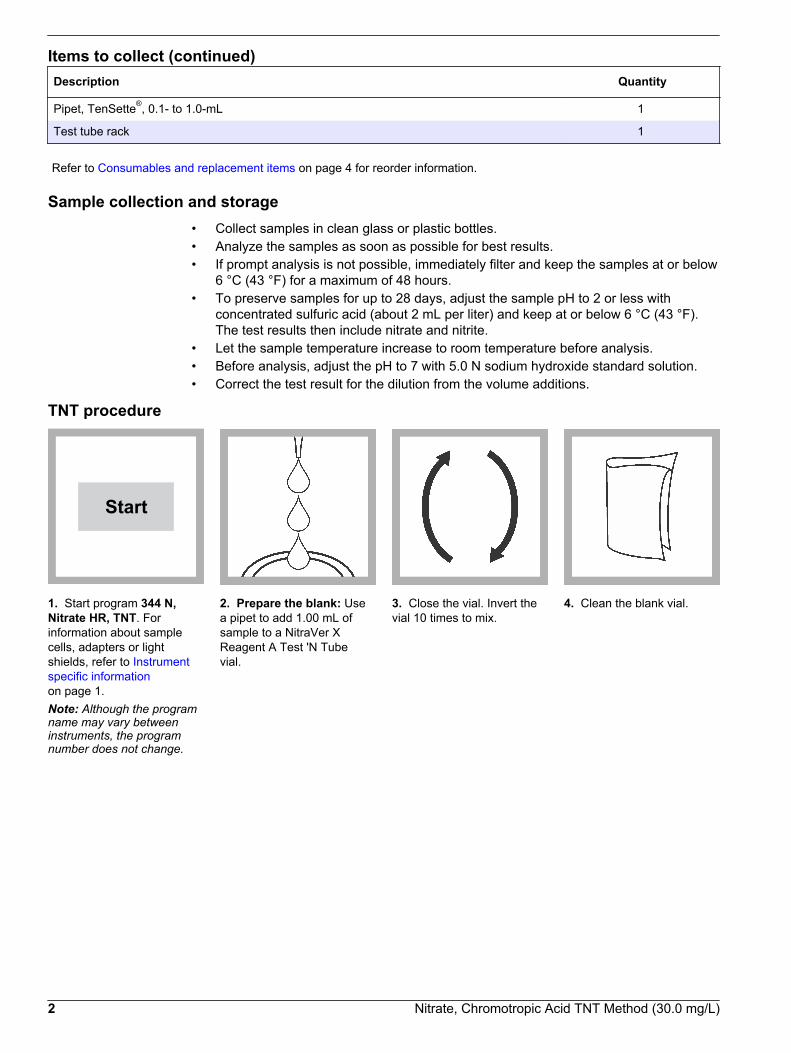
Items to collect (continued)Description Quantity
Pipet, TenSette®, 0.1- to 1.0-mL 1
Test tube rack 1
Refer to Consumables and replacement items on page 4 for reorder information.
Sample collection and storage• Collect samples in clean glass or plastic bottles.• Analyze the samples as soon as possible for best results.• If prompt analysis is not possible, immediately filter and keep the samples at or below
6 °C (43 °F) for a maximum of 48 hours.• To preserve samples for up to 28 days, adjust the sample pH to 2 or less with
concentrated sulfuric acid (about 2 mL per liter) and keep at or below 6 °C (43 °F).The test results then include nitrate and nitrite.
• Let the sample temperature increase to room temperature before analysis.• Before analysis, adjust the pH to 7 with 5.0 N sodium hydroxide standard solution.• Correct the test result for the dilution from the volume additions.
TNT procedure
Start
1. Start program 344 N,Nitrate HR, TNT. Forinformation about samplecells, adapters or lightshields, refer to Instrumentspecific informationon page 1.Note: Although the programname may vary betweeninstruments, the programnumber does not change.
2. Prepare the blank: Usea pipet to add 1.00 mL ofsample to a NitraVer XReagent A Test 'N Tubevial.
3. Close the vial. Invert thevial 10 times to mix.
4. Clean the blank vial.
2 Nitrate, Chromotropic Acid TNT Method (30.0 mg/L)

5. Insert the vial into the cellholder.
Zero
6. Push ZERO. The displayshows 0.0 mg/L NO3
––N.7. Remove the TNT vialfrom the cell holder.
8. Prepare the sample:Use a funnel to add thecontents of one NitraVer XReagent B Powder Pillow tothe vial.
9. Close the vial. Invert thevial 10 times to mix.Some solid matter will notdissolve.
10. Start the instrumenttimer. A 5-minute reactiontime starts.Do not invert the vial again.A yellow color shows ifnitrate is present.
11. Within 5 minutes afterthe timer expires, clean thevial. Insert the vial into thecell holder.
Read
12. Push READ. Resultsshow in mg/L NO3
––N.
InterferencesInterfering substance Interference level
Barium Negative interference at more than 1 mg/L.
Chloride Does not interfere at less than 1000 mg/L.
Nitrite A positive interference at concentrations more than 12 mg/L. To remove nitrite interference up to100 mg/L, add 400 mg (one full 0.5 g measuring spoon) of urea to 10 mL of sample. Swirl todissolve. Proceed with the nitrate test as usual.
Copper Positive interference at all levels.
Accuracy check
Standard additions method (sample spike)Use the standard additions method (for applicable instruments) to validate the testprocedure, reagents and instrument and to find if there is an interference in the sample.Items to collect:
• 500 mg/L Nitrate Nitrogen Standard Solution, Voluette® Ampule• Ampule breaker• Pipet, TenSette®, 0.1–1.0 mL and tips
Nitrate, Chromotropic Acid TNT Method (30.0 mg/L) 3

• 25-mL mixing cylinders (3)
1. Use the test procedure to measure the concentration of the sample, then keep the(unspiked) sample in the instrument.
2. Go to the Standard Additions option in the instrument menu.3. Select the values for standard concentration, sample volume and spike volumes.4. Open the standard solution.5. Prepare three spiked samples: use the TenSette pipet to add 0.1 mL, 0.2 mL and
0.3 mL of the standard solution, respectively, to three 25-mL portions of fresh sample.Mix well.
6. Use the test procedure to measure the concentration of each of the spiked samples.Start with the smallest sample spike. Measure each of the spiked samples in theinstrument.
7. Select Graph to compare the expected results to the actual results.Note: If the actual results are significantly different from the expected results, make sure thatthe sample volumes and sample spikes are measured accurately. The sample volumes andsample spikes that are used should agree with the selections in the standard additions menu. Ifthe results are not within acceptable limits, the sample may contain an interference.
Standard solution methodUse the standard solution method to validate the test procedure, reagents andinstrument.Items to collect:
• 10.0 mg/L Nitrate Nitrogen Standard Solution
1. Use the test procedure to measure the concentration of the standard solution.2. Compare the expected result to the actual result.
Note: The factory calibration can be adjusted slightly with the standard adjust option so that theinstrument shows the expected value of the standard solution. The adjusted calibration is thenused for all test results. This adjustment can increase the test accuracy when there are slightvariations in the reagents or instruments.
Method performanceThe method performance data that follows was derived from laboratory tests that weremeasured on a spectrophotometer during ideal test conditions. Users may get differentresults under different test conditions.
Program Standard Precision (95% Confidence Interval) SensitivityConcentration change per 0.010 Abs change
344 10.0 mg/L NO3––N 9.5–10.5 mg/L NO3
––N 0.2 mg/L NO3––N
Summary of methodNitrate in the sample reacts with chromotropic acid under strongly acidic conditions toyield a yellow product. The measurement wavelength is 410 nm for spectrophotometersor 420 nm for colorimeters.
Consumables and replacement itemsRequired reagents
Description Quantity/test Unit Item no.
NitraVer® X Nitrate Reagent Set, Test 'N Tube™ — 50 tests 2605345
4 Nitrate, Chromotropic Acid TNT Method (30.0 mg/L)

Required apparatus
Description Quantity/test Unit Item no.
Funnel, micro, poly 1 each 2584335
Pipet, TenSette®, 0.1- to 1.0-mL 1 each 1970001
Pipet Tips, for TenSette Pipet 1970001 2 50/pkg 2185696
Test tube rack 1 each 1864100
Recommended standards
Description Unit Item no.
Nitrate Nitrogen Standard Solution, 10.0-mg/L NO3--N 500 mL 30749
Nitrate Nitrogen Standard Solution, Voluette® Ampule, 500-mg/L NO3–N 16/pkg 1426010
Wastewater Influent Standard, Mixed Parameter, for NH3-N, NO3-N, PO4, COD, SO4,TOC 500 mL 2833149
Water, deionized 4 L 27256
Optional reagents and apparatus
Description Unit Item no.
Ampule Breaker, Voluette® ampules each 2196800
Cylinder, mixing, 25-mL each 2088640
Pipet tips for TenSette Pipet 1970001 1000/pkg 2185628
Sodium Hydroxide, 5 N 50 mL 245026
Spoon, measuring, 0.5-g each 90700
Sulfuric Acid, ACS 500 mL 97949
Urea, ACS grade 100 g 1123726
Nitrate, Chromotropic Acid TNT Method (30.0 mg/L) 5

HACH COMPANYWORLD HEADQUARTERSTelephone: (970) 669-3050FAX: (970) 669-2932
FOR TECHNICAL ASSISTANCE, PRICE INFORMATION AND ORDERING:Call 800-227-4224
Contact the HACH office or distributor serving you.www.hach.com [email protected]
In the U.S.A. –
Outside the U.S.A. –
On the Worldwide Web – ; E-mail –
toll-free
© Hach Company/Hach Lange GmbH, 1989–2013. All rights reserved. 04/2013, Edition 8

Nitrite DOC316.53.01074
USEPA Diazotization Method1 Method 85070.002 to 0.300 mg/L NO2
––N (LR, spectrophotometers)0.005 to 0.350 mg/L NO2
––N (LR, colorimeters)Powder Pillows or AccuVac®
Ampuls
Scope and application: For water, wastewater and seawater.1 USEPA approved for wastewater analysis, Federal Register, 44(85), 25505 (May 1, 1979).
Test preparation
Instrument-specific informationThe tables in this section show all of the instruments that have the program for this test. Table 1 shows sample cell and orientation requirements for reagent addition tests, suchas powder pillow or bulk reagent tests. Table 2 shows sample cell and adapterrequirements for AccuVac Ampul tests.To use either table, select an instrument, then read across to find the correspondinginformation for this test.
Table 1 Instrument-specific information for powder pillows
Instrument Sample cell orientation Sample cell
DR 6000 DR 3800 DR 2800 DR 2700
The fill line is to the right. 2495402
DR 5000 DR 3900
The fill line is toward the user.
DR 900 The orientation mark is toward the user. 2401906
Table 2 Instrument-specific information for AccuVac Ampuls
Instrument Adapter Sample cell
DR 6000 DR 5000 DR 900
— 2427606
DR 3900 LZV846 (A)
DR 3800 DR 2800 DR 2700
LZV584 (C) 2122800
1

Before startingInstall the instrument cap on the DR 900 cell holder before ZERO or READ is pushed.
For best results, measure the reagent blank value for each new lot of reagent. Replace the sample with deionized water inthe test procedure to get the reagent blank value. Subtract the reagent blank value from the sample results automaticallywith the reagent blank adjust option.
Review the Safety Data Sheets (MSDS/SDS) for the chemicals that are used and use any recommended personal protectiveequipment.
Dispose of reacted solutions according to local, state and federal regulations. Use the Safety Data Sheets for disposalinformation for unused reagents. Consult the environmental, health and safety staff for your facility and/or local regulatoryagencies for further disposal information.
Items to collectPowder pillows
Description Quantity
NitriVer® 3 Reagent Powder Pillows, 10-mL 1
Sample cells. (For information about sample cells, adapters or light shields, refer to Instrument-specific information on page 1.) 2
Refer to Consumables and replacement items on page 6 for reorder information.
AccuVac Ampuls
Description Quantity
NitriVer® 3 Reagent AccuVac® Ampuls 1
Beaker, 50-mL 1
Sample cells (For information about sample cells, adapters or light shields, refer to Instrument-specific information on page 1.) 1
Stopper for 18-mm tubes and AccuVac Ampuls 1
Refer to Consumables and replacement items on page 6 for reorder information.
Sample collection and storage• Collect samples in clean glass or plastic bottles.• To preserve samples for later analysis, keep the samples at or below 6 °C (43 °F) for
up to 48 hours.• Let the sample temperature increase to room temperature before analysis.
2 Nitrite, Diazotization Method (0.300 mg/L)

Powder pillow procedure
Start
1. Start program 371 N,Nitrite LR PP. Forinformation about samplecells, adapters or lightshields, refer to Instrument-specific informationon page 1.Note: Although the programname may vary betweeninstruments, the programnumber does not change.
2. Prepare the sample: Filla sample cell with 10 mL ofsample.
3. Add the contents of oneNitriVer 3 Reagent PowderPillow.
4. Swirl to mix.A pink color shows if nitriteis present in the sample.
5. Start the instrumenttimer. A 20-minute reactiontime starts.
6. Prepare the blank:When the timer expires, fill asecond sample cell with10 mL of sample.
7. Clean the blank. 8. Insert the blank into thecell holder.
Zero
9. Push ZERO. The displayshows 0.000 mg/L NO2
––N.10. Clean the preparedsample.
11. Insert the preparedsample into the cell holder.
Read
12. Push READ. Resultsshow in mg/L NO2
––N.
Nitrite, Diazotization Method (0.300 mg/L) 3

AccuVac Ampul procedure
Start
1. Start program 375 N,Nitrite LR AV. Forinformation about samplecells, adapters or lightshields, refer to Instrument-specific informationon page 1.Note: Although the programname may vary betweeninstruments, the programnumber does not change.
2. Prepare the sample:Collect at least 40 mL ofsample in a 50-mL beaker.Fill the AccuVac Ampul withsample. Keep the tipimmersed while the Ampulfills completely.
3. Quickly invert the Ampulseveral times to mix.A pink color shows if nitriteis present in the sample.
4. Start the instrumenttimer. A 20-minute reactiontime starts.
5. Prepare the blank:When the timer expires, fill asample cell with 10 mL ofsample.
6. Clean the blank. 7. Insert the blank into thecell holder.
Zero
8. Push ZERO. The displayshows 0.000 mg/L NO2
––N.
9. Clean the AccuVacAmpul.
10. Insert the preparedsample AccuVac Ampul intothe cell holder.
Read
11. Push READ. Resultsshow in mg/L NO2
––N.
InterferencesInterfering substance Interference level
Antimonous ions Interfere by causing precipitation
Auric ions Interfere by causing precipitation
4 Nitrite, Diazotization Method (0.300 mg/L)

Interfering substance Interference level
Bismuth ions Interfere by causing precipitation
Chloroplatinate ions Interfere by causing precipitation
Cupric ions Cause low results
Ferric ions Interfere by causing precipitation
Ferrous ions Cause low results
Lead ions Interfere by causing precipitation
Mercurous ions Interfere by causing precipitation
Metavanadate ions Interfere by causing precipitation
Nitrate Very high levels of nitrate (>100 mg/L nitrate as N) appear to undergo a slightamount of reduction to nitrite, either spontaneously or during the course of thetest. A small amount of nitrite will be found at these levels.
Silver ions Interfere by causing precipitation
Strong oxidizing and reducing substances Interfere at all levels
Accuracy check
Standard solution methodUse the standard solution method to validate the test procedure, reagents andinstrument.Items to collect:
• 0.150 mg/L NO2––N standard solution (Nitrite standard solutions are difficult to
prepare. Use the instructions in Standard Methods for the Examination of Water andWastewater, Method 4500—NO2-B)
1. Use the test procedure to measure the concentration of the standard solution.2. Compare the expected result to the actual result.
Note: The factory calibration can be adjusted slightly with the standard adjust option so that theinstrument shows the expected value of the standard solution. The adjusted calibration is thenused for all test results. This adjustment can increase the test accuracy when there are slightvariations in the reagents or instruments.
Method performanceThe method performance data that follows was derived from laboratory tests that weremeasured on a spectrophotometer during ideal test conditions. Users may get differentresults under different test conditions.
Program Standard Precision (95% Confidence Interval) SensitivityConcentration change per 0.010 Abs change
371 0.150 mg/L NO2––N 0.147–0.153 mg/L NO2
––N 0.002 mg/L NO2––N
375 0.150 mg/L NO2––N 0.147–0.153 mg/L NO2
––N 0.002 mg/L NO2––N
Summary of methodNitrite in the sample reacts with sulfanilic acid to form an intermediate diazonium salt.This couples with chromotropic acid to produce a pink colored complex directlyproportional to the amount of nitrite present. The measurement wavelength is 507 nm forspectrophotometers or 520 nm for colorimeters.
Nitrite, Diazotization Method (0.300 mg/L) 5
Consumables and replacement itemsRequired reagents
Description Quantity/test Unit Item no.
NitriVer® 3 Nitrite Reagent Powder Pillow, 10-mL 1 100/pkg 2107169
OR
NitriVer® 3 Nitrite Reagent AccuVac® Ampul 1 25/pkg 2512025
Required apparatus
Description Quantity/test Unit Item no.
Beaker, 50-mL 1 each 50041H
Recommended standards, reagents and apparatus
Description Unit Item no.
Balance, analytical, 80 g x 0.1 mg 100-240 VAC each 2936701
AccuVac® vials for sample blanks 25/pkg 2677925
AccuVac® Snapper each 2405200
AccuVac® Drainer each 4103600
Standard Methods Book, most current edition each 2270800
Sodium Nitrite, ACS 454 g 245201
Water, deionized 4 L 27256
HACH COMPANYWORLD HEADQUARTERSTelephone: (970) 669-3050FAX: (970) 669-2932
FOR TECHNICAL ASSISTANCE, PRICE INFORMATION AND ORDERING:Call 800-227-4224
Contact the HACH office or distributor serving you.www.hach.com [email protected]
In the U.S.A. –
Outside the U.S.A. –
On the Worldwide Web – ; E-mail –
toll-free
© Hach Company/Hach Lange GmbH, 1989–2013. All rights reserved. 04/2013, Edition 8

Nitrite DOC316.53.01073
Diazotization Method Method 100190.003 to 0.500 mg/L NO2
––N (LR) Test ‘N Tube™ Vials
Scope and application: For water, wastewater and seawater.
Test preparation
Instrument specific informationThe table in this section shows all of the instruments that have the program for this test. Table 1 shows adapter and light shield requirements for the instruments that use them.To use the table, select an instrument, then read across to find the correspondinginformation for this test.
Table 1 Instrument-specific information for test tubes
Instrument Adapters Light shield
DR 6000 — —
DR 5000 — —
DR 900 4846400 Cover supplied with the instrument
DR 3900 — LZV849
DR 3800 — LZV646
DR 2800 —
Before startingInstall the instrument cap on the DR 900 cell holder before ZERO or READ is pushed.
DR 3900, DR 3800, DR 2800 and DR 2700: Install the light shield in Cell Compartment #2 before this test is started.
For best results, measure the reagent blank value for each new lot of reagent. Replace the sample with deionized water inthe test procedure to get the reagent blank value. Subtract the reagent blank value from the sample results automaticallywith the reagent blank adjust option.
Review the Safety Data Sheets (MSDS/SDS) for the chemicals that are used and use any recommended personal protectiveequipment.
Dispose of reacted solutions according to local, state and federal regulations. Use the Safety Data Sheets for disposalinformation for unused reagents. Consult the environmental, health and safety staff for your facility and/or local regulatoryagencies for further disposal information.
Items to collect
Description Quantity
Light shield (For information about sample cells, adapters or light shields, refer to Instrumentspecific information on page 1.) 1
Test 'N Tube™ NitriVer® 3 Nitrite Reagent Set 1
Pipet, TenSette® 1.0 to 10.0 mL with tips varies
Refer to Consumables and replacement items on page 4 for reorder information.
Sample collection and storage• Collect samples in clean glass or plastic bottles.
1

• To preserve samples for later analysis, keep the samples at or below 6 °C (43 °F) forup to 48 hours.
• Let the sample temperature increase to room temperature before analysis.
Test 'N Tube procedure
Start
1. Start program 345 N,Nitrite LR TNT. Forinformation about samplecells, adapters or lightshields, refer to Instrumentspecific informationon page 1.Note: Although the programname may vary betweeninstruments, the programnumber does not change.
2. Prepare the sample: Filla Test 'N Tube NitriVer3 Nitrite vial with 5 mL ofsample.
3. Put the cap on the vial.Shake to dissolve thepowder. A pink color showsif nitrite-nitrogen is presentin the sample .
4. Start the instrumenttimer. A 20-minute reactiontime starts.
5. Prepare the blank:When the timer expires, filland empty Test 'N Tube vialwith 5 mL of sample.
6. Clean the blank vial. 7. Insert the blank vial intothe 16-mm cell holder.
Zero
8. Push ZERO. The displayshows 0.000 mg/L NO2
––N.
9. Clean the sample vial. 10. Insert the sample vialinto the 16-mm cell holder.
Read
11. Push READ. Resultsshow in mg/L NO2
––N.
2 Nitrite, Diazotization TNT Method (0.500 mg/L)
InterferencesInterfering substance Interference level
Antimonous ions Interfere by causing precipitation
Auric ions Interfere by causing precipitation
Bismuth ions Interfere by causing precipitation
Chloroplatinate ions Interfere by causing precipitation
Cupric ions Cause low results
Ferric ions Interfere by causing precipitation
Ferrous ions Cause low results
Lead ions Interfere by causing precipitation
Mercurous ions Interfere by causing precipitation
Metavanadate ions Interfere by causing precipitation
Nitrate Very high levels of nitrate (>100 mg/L nitrate as N) appear to undergo a slightamount of reduction to nitrite, either spontaneously or during the course of thetest. A small amount of nitrite will be found at these levels.
Silver ions Interfere by causing precipitation
Strong oxidizing and reducing substances Interfere at all levels
Accuracy check
Standard solution methodUse the standard solution method to validate the test procedure, reagents andinstrument.Items to collect:
• 0.300 mg/L NO2––N standard solution (Nitrite standard solutions are difficult to
prepare. Use the instructions in Standard Methods for the Examination of Water andWastewater, Method 4500—NO2-B)
1. Use the test procedure to measure the concentration of the standard solution.2. Compare the expected result to the actual result.
Note: The factory calibration can be adjusted slightly with the standard adjust option so that theinstrument shows the expected value of the standard solution. The adjusted calibration is thenused for all test results. This adjustment can increase the test accuracy when there are slightvariations in the reagents or instruments.
Method performanceThe method performance data that follows was derived from laboratory tests that weremeasured on a spectrophotometer during ideal test conditions. Users may get differentresults under different test conditions.
Program Standard Precision (95% Confidence Interval) SensitivityConcentration change per 0.010 Abs change
345 0.300 mg/L NO2––N 0.294–0.306 mg/L NO2
––N 0.003 mg/L NO2––N
Summary of methodNitrite in the sample reacts with sulfanilic acid to form an intermediate diazonium salt.This couples with chromotropic acid to produce a pink colored complex directlyproportional to the amount of nitrite present. The measurement wavelength is 507 nm forspectrophotometers or 520 nm for colorimeters.
Nitrite, Diazotization TNT Method (0.500 mg/L) 3
Consumables and replacement itemsRequired reagents
Description Quantity/test Unit Item no.
NitriVer® 3 Nitrite Reagent Set, Test 'N Tube™ 1 50/pkg 2608345
Required apparatus
Description Quantity/test Unit Item no.
Pipet, TenSette®, 1.0- to 10.0-mL 1 each 1970010
Pipet Tips, for TenSette Pipet 1970010 varies 50/pkg 2199796
Recommended standards, reagents and apparatus
Description Unit Item no.
Standard Methods Book, most current edition each 2270800
Balance, analytical, 80 g x 0.1 mg 100-240 VAC each 2936701
Pipet tips for TenSette Pipet 1970010 250/pkg 2199725
Sodium Nitrite, ACS 454 g 245201
Water, deionized 4 L 27256
HACH COMPANYWORLD HEADQUARTERSTelephone: (970) 669-3050FAX: (970) 669-2932
FOR TECHNICAL ASSISTANCE, PRICE INFORMATION AND ORDERING:Call 800-227-4224
Contact the HACH office or distributor serving you.www.hach.com [email protected]
In the U.S.A. –
Outside the U.S.A. –
On the Worldwide Web – ; E-mail –
toll-free
© Hach Company/Hach Lange GmbH, 1989–2013. All rights reserved. 04/2013, Edition 8

Nitrite DOC316.53.01075
Ferrous Sulfate Method1 Method 81532 to 250 mg/L NO2
– (HR, spectrophotometers)2 to 150 mg/L NO2
– (HR, colorimeters)™Powder Pillows
Scope and application: For cooling systems.1 Adapted from McAlpine, R. and Soule, B., Qualitative Chemical Analysis, New York, 476, 575 (1933).
Test preparation
Instrument specific informationThe table in this section shows all of the instruments that have the program for this test. Table 1 shows sample cell and orientation requirements for reagent addition tests, suchas powder pillow or bulk reagent tests.To use the table, select an instrument, then read across to find the correspondinginformation for this test.
Table 1 Instrument-specific information for powder pillow
Instrument Sample cell orientation Sample cell
DR 6000 DR 3800 DR 2800 DR 2700
The fill line is to the right. 2495402
DR 5000 DR 3900
The fill line is toward the user.
DR 900 The orientation mark is toward the user. 2401906
Before startingInstall the instrument cap on the DR 900 cell holder before ZERO or READ is pushed.
For best results, measure the reagent blank value for each new lot of reagent. Replace the sample with deionized water inthe test procedure to get the reagent blank value. Subtract the reagent blank value from the sample results automaticallywith the reagent blank adjust option.
Review the Safety Data Sheets (MSDS/SDS) for the chemicals that are used and use any recommended personal protectiveequipment.
Dispose of reacted solutions according to local, state and federal regulations. Use the Safety Data Sheets for disposalinformation for unused reagents. Consult the environmental, health and safety staff for your facility and/or local regulatoryagencies for further disposal information.
Items to collect
Description Quantity
NitriVer® 2 Nitrite Reagent Powder Pillows, 10-mL 1
Deionized water varies
1

Items to collect (continued)Description Quantity
Stopper, Neoprene, solid #1 2
Sample cells (For information about sample cells, adapters or light shields, refer to Instrumentspecific information on page 1.) 2
Refer to Consumables and replacement items on page 4 for reorder information.
Sample collection and storage• Collect samples in clean glass or plastic bottles.• To preserve samples for later analysis, keep the samples at or below 6 °C (43 °F) for
up to 48 hours.• Let the sample temperature increase to room temperature before analysis.
Powder pillow procedure
Start
1. Start program 373 N,Nitrite HR PP. Forinformation about samplecells, adapters or lightshields, refer to Instrumentspecific informationon page 1.Note: Although the programname may vary betweeninstruments, the programnumber does not change.
2. Prepare the sample: Filla sample cell with 10 mL ofsample.
3. Add the contents of oneNitriVer 2 Nitrite ReagentPowder Pillow. A greenish-brown color starts to show ifnitrite is present in thesample.
4. Close the sample cell.Shake to dissolve thereagent.
5. Start the instrumenttimer. A 10-minute reactiontime starts.To prevent low results,leave the sample cell on aflat surface. Do not moveor disturb the sample cellduring the reaction period.
6. Prepare the blank: Fill asecond sample cell with10 mL of sample.
7. Clean the blank. 8. Insert the blank into thecell holder.
2 Nitrite, Ferrous Sulfate Method (250 mg/L)
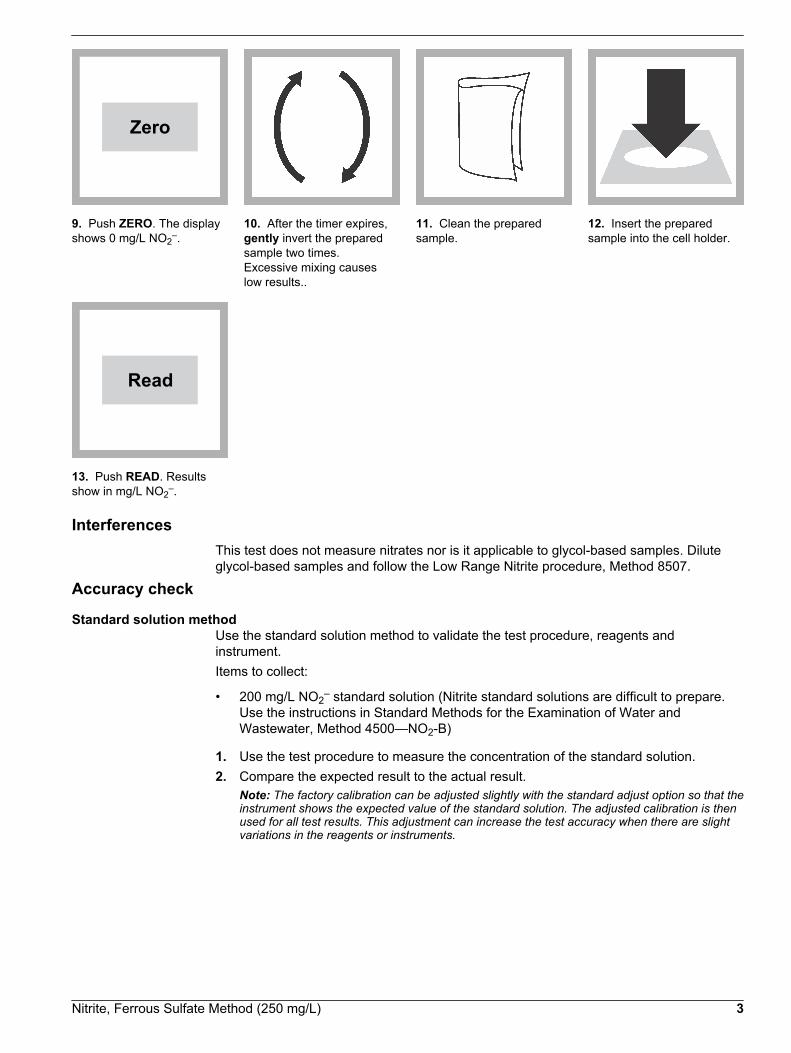
Zero
9. Push ZERO. The displayshows 0 mg/L NO2
–.10. After the timer expires,gently invert the preparedsample two times.Excessive mixing causeslow results..
11. Clean the preparedsample.
12. Insert the preparedsample into the cell holder.
Read
13. Push READ. Resultsshow in mg/L NO2
–.
InterferencesThis test does not measure nitrates nor is it applicable to glycol-based samples. Diluteglycol-based samples and follow the Low Range Nitrite procedure, Method 8507.
Accuracy check
Standard solution methodUse the standard solution method to validate the test procedure, reagents andinstrument.Items to collect:
• 200 mg/L NO2– standard solution (Nitrite standard solutions are difficult to prepare.
Use the instructions in Standard Methods for the Examination of Water andWastewater, Method 4500—NO2-B)
1. Use the test procedure to measure the concentration of the standard solution.2. Compare the expected result to the actual result.
Note: The factory calibration can be adjusted slightly with the standard adjust option so that theinstrument shows the expected value of the standard solution. The adjusted calibration is thenused for all test results. This adjustment can increase the test accuracy when there are slightvariations in the reagents or instruments.
Nitrite, Ferrous Sulfate Method (250 mg/L) 3

Method performanceThe method performance data that follows was derived from laboratory tests that weremeasured on a spectrophotometer during ideal test conditions. Users may get differentresults under different test conditions.
Program Standard Precision (95% Confidence Interval) SensitivityConcentration change per 0.010 Abs change
373 200 mg/L NO2– 191–209 mg/L NO2
– 1.4 mg/L NO2–
Summary of methodThe method uses ferrous sulfate in an acidic medium to reduce nitrite to nitrous oxide.Ferrous ions combine with the nitrous oxide to form a greenish-brown complex in directproportion to the nitrite present. The measurement wavelength is 585 nm forspectrophotometers or 560 nm for colorimeters.
Consumables and replacement itemsRequired reagents
Description Quantity/test Unit Item no.
NitriVer® 2 Nitrite Reagent Powder Pillow, 10-mL 1 100/ pkg 2107569
Required apparatus
Description Quantity/test Unit Item no.
Stopper, Neoprene, solid, size #1 2 12/pkg 1480801
Optional reagents and apparatus
Description Unit Item no.
Balance, analytical, 80 g x 0.1 mg 100-240 VAC each 2936701
Standard Methods Book, most current edition each 2270800
Water, deionized 4 L 27256
Sodium Nitrite, ACS 454 g 245201
HACH COMPANYWORLD HEADQUARTERSTelephone: (970) 669-3050FAX: (970) 669-2932
FOR TECHNICAL ASSISTANCE, PRICE INFORMATION AND ORDERING:Call 800-227-4224
Contact the HACH office or distributor serving you.www.hach.com [email protected]
In the U.S.A. –
Outside the U.S.A. –
On the Worldwide Web – ; E-mail –
toll-free
© Hach Company/Hach Lange GmbH, 1989–2013. All rights reserved. 04/2013, Edition 8
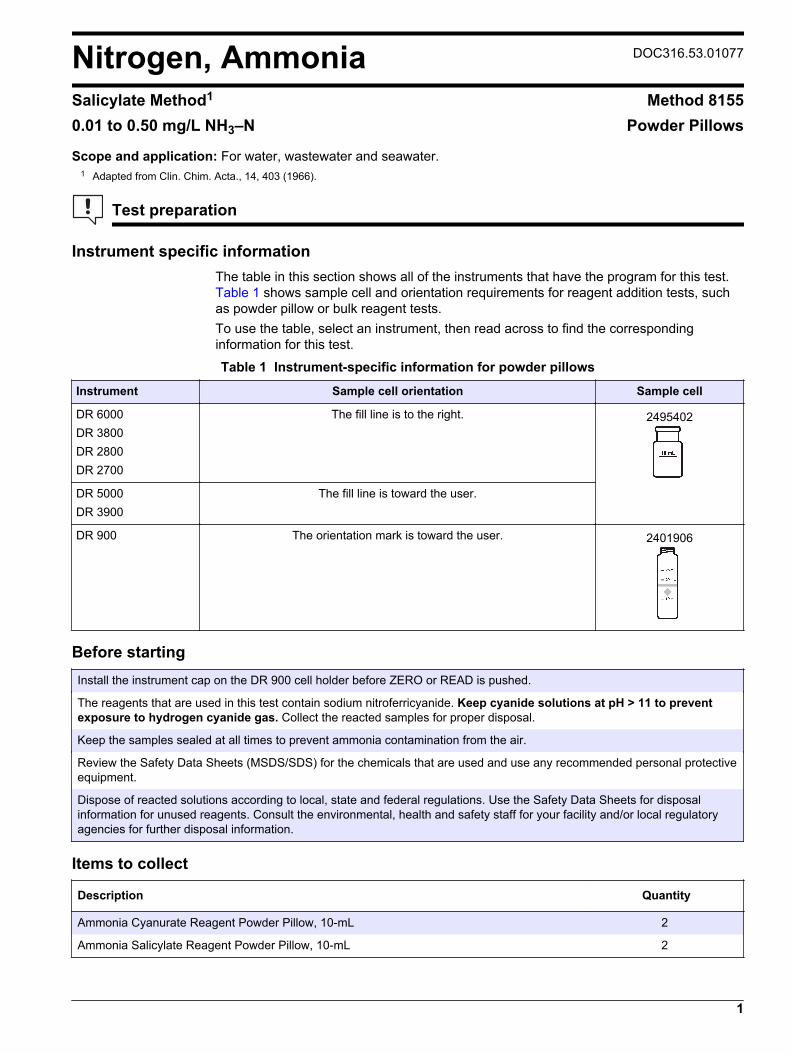
Nitrogen, Ammonia DOC316.53.01077
Salicylate Method1 Method 81550.01 to 0.50 mg/L NH3–N Powder Pillows
Scope and application: For water, wastewater and seawater.1 Adapted from Clin. Chim. Acta., 14, 403 (1966).
Test preparation
Instrument specific informationThe table in this section shows all of the instruments that have the program for this test. Table 1 shows sample cell and orientation requirements for reagent addition tests, suchas powder pillow or bulk reagent tests.To use the table, select an instrument, then read across to find the correspondinginformation for this test.
Table 1 Instrument-specific information for powder pillows
Instrument Sample cell orientation Sample cell
DR 6000 DR 3800 DR 2800 DR 2700
The fill line is to the right. 2495402
DR 5000 DR 3900
The fill line is toward the user.
DR 900 The orientation mark is toward the user. 2401906
Before startingInstall the instrument cap on the DR 900 cell holder before ZERO or READ is pushed.
The reagents that are used in this test contain sodium nitroferricyanide. Keep cyanide solutions at pH > 11 to preventexposure to hydrogen cyanide gas. Collect the reacted samples for proper disposal.
Keep the samples sealed at all times to prevent ammonia contamination from the air.
Review the Safety Data Sheets (MSDS/SDS) for the chemicals that are used and use any recommended personal protectiveequipment.
Dispose of reacted solutions according to local, state and federal regulations. Use the Safety Data Sheets for disposalinformation for unused reagents. Consult the environmental, health and safety staff for your facility and/or local regulatoryagencies for further disposal information.
Items to collect
Description Quantity
Ammonia Cyanurate Reagent Powder Pillow, 10-mL 2
Ammonia Salicylate Reagent Powder Pillow, 10-mL 2
1

Items to collect (continued)Description Quantity
Stoppers for 18-mm tubes and AccuVac Ampuls 2
Sample cells (For information about sample cells, adapters or light shields, refer to Instrumentspecific information on page 1.) 2
Refer to Consumables and replacement items on page 5 for reorder information.
Sample collection and storage• Collect samples in clean glass or plastic bottles.• If the sample contains chlorine, add one drop of 0.1 N sodium thiosulfate to 1 liter of
sample to remove each 0.3 mg/L of chlorine.• To preserve samples for later analysis, adjust the sample pH to less than 2 with
concentrated sulfuric acid (about 2 mL per liter). No acid addition is necessary if thesample is tested immediately.
• Keep the preserved samples at or below 6 °C (43 °F) for up to 28 days.• Let the sample temperature increase to room temperature before analysis.• Before analysis, adjust the pH to 7 with 5.0 N sodium hydroxide standard solution.• Correct the test result for the dilution from the volume additions.
Powder pillow procedure
Start
1. Start program 385 N,Ammonia, Salic. Forinformation about samplecells, adapters or lightshields, refer to Instrumentspecific informationon page 1.Note: Although the programname may vary betweeninstruments, the programnumber does not change.
2. Prepare the blank: Fill asample cell with 10 mL ofdeionized water.
3. Prepare the sample: Filla second sample cell with10 mL of sample.
4. Add the contents of oneAmmonia Salicylate powderpillow to each sample cell.
2 Nitrogen-Ammonia, Salicylate Method (0.50 mg/L)

5. Close the sample cell.Shake to dissolve thereagent.
6. Start the instrumenttimer. A 3-minute reactiontime starts.
7. After the timer expires,add the contents of oneAmmonia Cyanurate powderpillow to each sample cell.
8. Close the sample cell.Shake to dissolve thereagent.
9. Start the instrumenttimer. A 15-minute reactiontime starts.A green color shows whenammonia-nitrogen ispresent.
10. When the timer expires,clean the blank.
11. Insert the blank into thecell holder.
Zero
12. Push ZERO. Thedisplay shows 0.00 mg/LNH3–N.
13. Clean the preparedsample.
14. Insert the preparedsample into the cell holder.
Read
15. Push READ. Resultsshow in mg/L NH3–N.
InterferencesInterfering substance Interference level
Calcium 1000 mg/L as CaCO3
Iron All levels. Correct for iron interference as follows:
1. Use one of the Iron, Total procedures to measure the iron concentration of the sample.2. Use an iron standard solution to add iron to the deionized water blank so that the blank has the
same iron concentration as the sample. The iron interference will be zeroed out from the testresult.
Magnesium 6000 mg/L as CaCO3
Nitrogen-Ammonia, Salicylate Method (0.50 mg/L) 3
Interfering substance Interference level
Monochloramine Monochloramine that is in chloraminated drinking water interferes directly at all levels and gives highresults. Use a Free Ammonia and Monochloramine method to determine free ammonia in thesesample matrices.
Nitrate 100 mg/L as NO3––N
Nitrite 12 mg/L as NO2––N
pH Adjust acidic or basic samples to approximately pH 7. Use 1 N sodium hydroxide standard solutionfor acidic samples and 1 N hydrochloric acid standard solution for basic samples.
Phosphate 100 mg/L as PO43––P
Sulfate 300 mg/L as SO42–
Sulfide Sulfide will intensify the color. Remove sulfide interference as follows:
1. Measure approximately 350 mL of sample in a 500-mL Erlenmeyer flask.2. Add the contents of one Sulfide Inhibitor Reagent Powder Pillow. Swirl to mix.3. Filter the sample through a folded filter paper and filter funnel.4. Use the filtered sample in the test procedure.
Other Substances Less common interferences such as hydrazine and glycine cause intensified colors in the preparedsample. Turbidity and color will give incorrect high values. Samples with severe interferences requiredistillation. Use the distillation procedure that is supplied with the distillation set.
Accuracy check
Standard additions method (sample spike)Use the standard additions method (for applicable instruments) to validate the testprocedure, reagents and instrument and to find if there is an interference in the sample.Items to collect:
• Ammonia Nitrogen Standard Solution, 10 mg/L as NH3–N• 25-mL mixing cylinders (3)• Pipet, TenSette®, 0.1–1.0 mL and tips
1. Use the test procedure to measure the concentration of the sample, then keep the(unspiked) sample in the instrument.
2. Go to the Standard Additions option in the instrument menu.3. Select the values for standard concentration, sample volume and spike volumes.4. Open the standard solution.5. Prepare three spiked samples: use the TenSette pipet to add 0.2 mL, 0.4 mL and
0.6 mL of the standard solution, respectively, to three 25-mL portions of fresh sample.Mix well.
6. Use the test procedure to measure the concentration of each of the spiked samples.Start with the smallest sample spike. Measure each of the spiked samples in theinstrument.
7. Select Graph to compare the expected results to the actual results.Note: If the actual results are significantly different from the expected results, make sure thatthe sample volumes and sample spikes are measured accurately. The sample volumes andsample spikes that are used should agree with the selections in the standard additions menu. Ifthe results are not within acceptable limits, the sample may contain an interference.
Standard solution methodUse the standard solution method to validate the test procedure, reagents andinstrument.Items to collect:
• Ammonia Nitrogen Standard Solution, 10 mg/L as NH3–N
4 Nitrogen-Ammonia, Salicylate Method (0.50 mg/L)

• 100-mL volumetric flask, Class A• 4-mL volumetric pipet, Class A and pipet filler• Deionized water
1. Prepare a 0.40 mg/L ammonia nitrogen standard solution as follows:
a. Use a pipet to add 4 mL of the 10 mg/L ammonia nitrogen standard solution intothe volumetric flask. (Alternate preparation: pipet 0.8 mL of a 50-mg/L ammonianitrogen standard solution into a 100-mL volumetric flask.)
b. Dilute to the mark with deionized water. Mix well. Prepare this solution daily.2. Use the test procedure to measure the concentration of the prepared standard
solution.3. Compare the expected result to the actual result.
Note: The factory calibration can be adjusted slightly with the standard adjust option so that theinstrument shows the expected value of the standard solution. The adjusted calibration is thenused for all test results. This adjustment can increase the test accuracy when there are slightvariations in the reagents or instruments.
Method performanceThe method performance data that follows was derived from laboratory tests that weremeasured on a spectrophotometer during ideal test conditions. Users may get differentresults under different test conditions.
Program Standard Precision (95% Confidence Interval) SensitivityConcentration change per 0.010 Abs change
385 0.40 mg/L NH3–N 0.38–0.42 mg/L NH3–N 0.004 mg/L NH3–N
Summary of methodAmmonia compounds combine with chlorine to form monochloramine. Monochloraminereacts with salicylate to form 5-aminosalicylate. The 5-aminosalicylate is oxidized in thepresence of a sodium nitroprusside catalyst to form a blue-colored compound. The bluecolor is masked by the yellow color from the excess reagent to give a final green-coloredsolution. The measurement wavelength is 655 nm for spectrophotometers or 610 nm forcolorimeters.
Pollution prevention and waste managementThe ammonia salicylate reagent contains sodium nitroferricyanide and must be disposedof as a hazardous waste. Dispose of reacted solutions according to local, state andfederal regulations.
Consumables and replacement itemsRequired reagents
Description Quantity/Test Unit Item no.
Nitrogen Ammonia, reagent set, 10-mL, includes: — 100 tests 2668000
Ammonia Cyanurate Reagent Powder Pillow, 10-mL 2 100/pkg 2653199
Ammonia Salicylate Reagent Powder Pillow, 10-mL 2 100/pkg 2653299
Recommended standards and apparatus
Description Unit Item no.
Flask, volumetric, Class A, 100-mL each 1457442
Nitrogen Ammonia Standard Solution, 10-mg/L NH3–N 500 mL 15349
Nitrogen Ammonia Standard Solution, 10-mL Voluette® Ampule, 50-mg/L NH3–N 16/pkg 1479110
Pipet, TenSette®, 0.1–1.0 mL each 1970001
Nitrogen-Ammonia, Salicylate Method (0.50 mg/L) 5

Consumables and replacement items (continued)Description Unit Item no.
Pipet tips for TenSette Pipet 1970001 50/pkg 2185696
Pipet tips for TenSette Pipet 1970001 1000/pkg 2185628
Pipet, volumetric, Class A, 4.00-mL each 1451504
Stoppers for 18-mm tubes and AccuVac Ampuls 6/pkg 173106
Wastewater, Effluent Inorganics, for NH3-N, NO3-N, PO4, COD, SO4, TOC 500 mL 2833249
Water, deionized 4 L 27256
Optional reagents and apparatus
Description Unit Item no.
Ampule Breaker, Voluette® ampules each 2196800
Cylinder, mixing, 25-mL each 2088640
Distillation heater and support for 2265300, 115 VAC, 60 Hz each 2274400
Distillation apparatus set, general purpose each 2265300
Flask, Erlenmeyer, 500-mL each 50549
Funnel, poly, 65-mm each 108367
Distillation heater and support for 2265300, 230 VAC, 50 Hz each 2274402
Paper, filter, folded, 12.5-cm 100/pkg 189457
Pipet, serological, 2-mL each 53236
Sodium Hydroxide, 5 N 50 mL 245026
Sulfide Inhibitor Reagent Powder Pillow 100/pkg 241899
Sulfuric Acid, concentrated, ACS 500 mL 97949
HACH COMPANYWORLD HEADQUARTERSTelephone: (970) 669-3050FAX: (970) 669-2932
FOR TECHNICAL ASSISTANCE, PRICE INFORMATION AND ORDERING:Call 800-227-4224
Contact the HACH office or distributor serving you.www.hach.com [email protected]
In the U.S.A. –
Outside the U.S.A. –
On the Worldwide Web – ; E-mail –
toll-free
© Hach Company/Hach Lange GmbH, 1989–2013. All rights reserved. 04/2013, Edition 8

Nitrogen, Ammonia DOC316.53.01079
Salicylate Method Method 100310.4 to 50.0 mg/L NH3–N (HR) Test ‘N Tube™ Vials
Scope and application: For water, wastewater and seawater.
Test preparation
Instrument specific informationThe table in this section shows all of the instruments that have the program for this test. Table 1 shows adapter and light shield requirements for the instruments that use them.To use the table, select an instrument, then read across to find the correspondinginformation for this test.
Table 1 Instrument-specific information for test tubes
Instrument Adapters Light shield
DR 6000 — —
DR 5000 — —
DR 900 4846400 Cover supplied with the instrument
DR 3900 — LZV849
DR 3800 — LZV646
DR 2800 —
Before startingInstall the instrument cap on the DR 900 cell holder before ZERO or READ is pushed.
DR 3900, DR 3800, DR 2800 and DR 2700: Install the light shield in Cell Compartment #2 before this test is started.
Small sample sizes (such as 0.1 mL) may not be representative of the entire sample. Mix the sample well before the test oruse a different portion of the sample to repeat the test.
The reagents that are used in this test contain sodium nitroferricyanide. Keep cyanide solutions at pH > 11 to preventexposure to hydrogen cyanide gas. Collect the reacted samples for proper disposal.
Keep the samples sealed at all times to prevent ammonia contamination from the air.
To prevent airborne cross-contamination of the blank, complete the preparation of the blank before samples and standardsare opened. If the sample or standard containers are open, move to a separate area of the lab to prepare the blank.
Review the Safety Data Sheets (MSDS/SDS) for the chemicals that are used and use any recommended personal protectiveequipment.
Dispose of reacted solutions according to local, state and federal regulations. Use the Safety Data Sheets for disposalinformation for unused reagents. Consult the environmental, health and safety staff for your facility and/or local regulatoryagencies for further disposal information.
Items to collect
Description Quantity
Light shield (For information about sample cells, adapters or light shields, refer to Instrumentspecific information on page 1.) 1
High Range Test 'N Tube™ AmVer® 3 Nitrogen Ammonia Reagent Set 2
1

Items to collect (continued)Description Quantity
Funnel, micro (for reagent addition) 1
Pipet, TenSette® 0.1 to 1.0 mL, with tips varies
Refer to Consumables and replacement items on page 5 for reorder information.
Sample collection and storage• Collect samples in clean glass or plastic bottles.• Analyze the samples as soon as possible for best results.• If chlorine is known to be present, add one drop of 0.1 N Sodium Thiosulfate to 1 L of
sample for each 0.3 mg/L Cl2.• To preserve samples for later analysis, adjust the sample pH to less than 2 with
concentrated hydrochloric acid (about 2 mL per liter). No acid addition is necessary ifthe sample is tested immediately.
• Keep the preserved samples at or below 6 °C (43 °F) for up to 28 days.• Let the sample temperature increase to room temperature before analysis.• Before analysis, adjust the pH to 7 with 5.0 N sodium hydroxide standard solution.• Correct the test result for the dilution from the volume additions.
Test 'N Tube procedure
Start
1. Start program 343 N,Ammonia HR TNT. Forinformation about samplecells, adapters or lightshields, refer to Instrumentspecific informationon page 1.Note: Although the programname may vary betweeninstruments, the programnumber does not change.
2. Prepare the blank: Add0.1 mL of ammonia-freewater to one AmVer™Diluent Reagent Test 'NTube for High RangeAmmonia Nitrogen.
3. Prepare the sample:Add 0.1 mL of sample toone AmVer™ DiluentReagent Test 'N Tube forHigh Range AmmoniaNitrogen.
4. Add the contents of oneAmmonia SalicylateReagent Powder Pillow for5-mL samples to each vial.
2 Nitrogen-Ammonia, Salicylate TNT Method (50.0 mg/L)

5. Add the contents of oneAmmonia CyanurateReagent Powder Pillow toeach vial.
6. Put the caps on bothvials. Shake thoroughly todissolve the powder.
7. Start the instrumenttimer. A 20-minute reactiontime starts.
8. Clean the blank vial.
9. Insert the blank vial intothe 16-mm cell holder.
Zero
10. Push ZERO. Thedisplay shows 0.0 mg/LNH3–N.
11. Clean the sample vial. 12. Insert the sample vialinto the 16-mm cell holder.
Read
13. Push READ. Resultsshow in mg/L NH3–N.
InterferencesInterfering substance Interference level
Calcium 50,000 mg/L as CaCO3
Iron All levels. Correct for iron interference as follows:
1. Use one of the Iron, Total procedures to measure the iron concentration of the sample.2. Use an iron standard solution to add iron to the deionized water blank so that the blank has the
same iron concentration as the sample. The iron interference will be zeroed out from the testresult.
Magnesium 300,000 mg/L as CaCO3
Monochloramine Monochloramine that is in chloraminated drinking water interferes directly at all levels and gives highresults. Use a Free Ammonia and Monochloramine method to determine free ammonia in thesesample matrices.
Nitrogen-Ammonia, Salicylate TNT Method (50.0 mg/L) 3

Interfering substance Interference level
Nitrate 5000 mg/L as NO3––N
Nitrite 600 mg/L as NO2––N
pH Adjust acidic or basic samples to approximately pH 7. Use 1 N sodium hydroxide standard solutionfor acidic samples and 1 N hydrochloric acid standard solution for basic samples.
Phosphate 5000 mg/L as PO43––P
Sulfate 6000 mg/L as SO42–
Sulfide Sulfide will intensify the color. Remove sulfide interference as follows:
1. Measure approximately 350 mL of sample in a 500-mL Erlenmeyer flask.2. Add the contents of one Sulfide Inhibitor Reagent Powder Pillow. Swirl to mix.3. Filter the sample through a folded filter paper and filter funnel.4. Use the filtered sample in the test procedure.
Other Substances Less common interferences such as hydrazine and glycine cause intensified colors in the preparedsample. Turbidity and color will give incorrect high values. Samples with severe interferences requiredistillation. Use the distillation procedure that is supplied with the distillation set.
Accuracy check
Standard additions method (sample spike)Use the standard additions method (for applicable instruments) to validate the testprocedure, reagents and instrument and to find if there is an interference in the sample.Items to collect:
• Nitrogen, Ammonia Ampule Standard, 150-mg/L NH3–N• Ampule breaker• Pipet, TenSette®, 0.1–1.0 mL and tips• 25-mL mixing cylinders (3)
1. Use the test procedure to measure the concentration of the sample, then keep the(unspiked) sample in the instrument.
2. Go to the Standard Additions option in the instrument menu.3. Select the values for standard concentration, sample volume and spike volumes.4. Open the standard solution.5. Prepare three spiked samples: use the TenSette pipet to add 0.2 mL, 0.4 mL and
0.6 mL of the standard solution, respectively, to three 25-mL portions of fresh sample.Mix well.
6. Use the test procedure to measure the concentration of each of the spiked samples.Start with the smallest sample spike. Measure each of the spiked samples in theinstrument.
7. Select Graph to compare the expected results to the actual results.Note: If the actual results are significantly different from the expected results, make sure thatthe sample volumes and sample spikes are measured accurately. The sample volumes andsample spikes that are used should agree with the selections in the standard additions menu. Ifthe results are not within acceptable limits, the sample may contain an interference.
Standard solution methodUse the standard solution method to validate the test procedure, reagents andinstrument.Items to collect:
• 100-mg/L Ammonia Nitrogen standard• 50-mL volumetric flask, Class A• 20-mL volumetric pipet, Class A and pipet filler
4 Nitrogen-Ammonia, Salicylate TNT Method (50.0 mg/L)

• Deionized water
1. Prepare a 40.0 mg/L ammonia nitrogen standard solution as follows:
a. Use a pipet to add 20.0 mL of 100 mg/L ammonia nitrogen standard solution intothe volumetric flask.
b. Dilute to the mark with deionized water. Mix well. Prepare this solution daily.2. Use the test procedure to measure the concentration of the prepared standard
solution.3. Compare the expected result to the actual result.
Note: The factory calibration can be adjusted slightly with the standard adjust option so that theinstrument shows the expected value of the standard solution. The adjusted calibration is thenused for all test results. This adjustment can increase the test accuracy when there are slightvariations in the reagents or instruments.
Method performanceThe method performance data that follows was derived from laboratory tests that weremeasured on a spectrophotometer during ideal test conditions. Users may get differentresults under different test conditions.
Program Standard Precision (95% Confidence Interval) SensitivityConcentration change per 0.010 Abs change
343 40.00 mg/L NH3–N 38.1–41.9 mg/L NH3–N 0.312 mg/L NH3–N
Summary of methodAmmonia compounds combine with chlorine to form monochloramine. Monochloraminereacts with salicylate to form 5-aminosalicylate. The 5-aminosalicylate is oxidized in thepresence of a sodium nitroprusside catalyst to form a blue colored compound. The bluecolor is masked by the yellow color from the excess reagent present to give a green-colored solution. The measurement wavelength is 655 nm for spectrophotometers or610 nm for colorimeters.
Pollution prevention and waste managementThe ammonia salicylate reagent contains sodium nitroferricyanide and must be disposedof as a hazardous waste. Dispose of reacted solutions according to local, state andfederal regulations.
Consumables and replacement itemsRequired reagents
Description Quantity/test Unit Item no.
Nitrogen Ammonia, Reagent Set, High Range Test 'N Tube™ AmVer™ 2 25 tests 2606945
Required apparatus
Description Quantity/test Unit Item no.
Funnel, micro, poly 1 each 2584335
Pipet, TenSette®, 0.1- to 1.0-mL 1 each 1970001
Pipet Tips, for TenSette Pipet 1970001 2 50/pkg 2185696
Test tube rack 1 each 1864100
Nitrogen-Ammonia, Salicylate TNT Method (50.0 mg/L) 5

Recommended standards
Description Unit Item no.
Nitrogen, Ammonia Standard Solution, 10-mg/L NH3-N 500 mL 15349
Nitrogen, Ammonia Standard Solution, 100-mg/L NH3-N 500 mL 2406549
Nitrogen, Ammonia Standard Solution, 10-mL Voluette® Ampules, 150 mg/L 16/pkg 2128410
Nitrogen Ammonia Standard Solution, 10-mL Voluette® Ampule, 50-mg/L NH3–N 16/pkg 1479110
Wastewater, Effluent Inorganics, for NH3-N, NO3-N, PO4, COD, SO4, TOC 500 mL 2833249
Water, deionized 4 L 27256
Optional reagents and apparatus
Description Unit Item no.
Cylinder, mixing, 25-mL each 2088640
Distillation apparatus set, general purpose each 2265300
Filter paper, folded, 12.5-cm 100/pkg 69257
Pipet tips for TenSette Pipet 1970001 1000/pkg 2185628
Ampule Breaker, Voluette® ampules each 2196800
Distillation heater and support for 2265300, 115 VAC, 60 Hz each 2274400
Distillation heater and support for 2265300, 230 VAC, 50 Hz each 2274402
Funnel, poly, 65-mm each 108367
Pipet, serological, 2-mL each 50549
Pipet filler, safety bulb each 1465100
Hydrochloric Acid, concentrated 500 mL 13449
Hydrochloric Acid Standard Solution, 1 N 1000 mL 2321353
Sodium Hydroxide Standard Solution, 1.0 N 100 mLMDB 104532
Sulfide Inhibitor Reagent Powder Pillow 100/pkg 241899
Sodium Hydroxide Standard Solution, 5.0 N 50 mLSCDB 245026
Sodium Thiosulfate, 0.1 N 100 mL 32332
HACH COMPANYWORLD HEADQUARTERSTelephone: (970) 669-3050FAX: (970) 669-2932
FOR TECHNICAL ASSISTANCE, PRICE INFORMATION AND ORDERING:Call 800-227-4224
Contact the HACH office or distributor serving you.www.hach.com [email protected]
In the U.S.A. –
Outside the U.S.A. –
On the Worldwide Web – ; E-mail –
toll-free
© Hach Company/Hach Lange GmbH, 1989–2013. All rights reserved. 04/2013, Edition 8

Nitrogen, Ammonia DOC316.53.01080
Salicylate Method1 Method 100230.02 to 2.50 mg/L NH3–N (LR) Test ‘N Tube™ Vials
Scope and application: For water, wastewater and seawater.1 Adapted from Clin. Chim. Acta, 14, 403 (1966).
Test preparation
Instrument specific informationThe table in this section shows all of the instruments that have the program for this test. Table 1 shows adapter and light shield requirements for the instruments that use them.To use the table, select an instrument, then read across to find the correspondinginformation for this test.
Table 1 Instrument-specific information for test tubes
Instrument Adapters Light shield
DR 6000 — —
DR 5000 — —
DR 900 4846400 Cover supplied with the instrument
DR 3900 — LZV849
DR 3800 — LZV646
DR 2800 —
Before startingInstall the instrument cap on the DR 900 cell holder before ZERO or READ is pushed.
DR 3900, DR 3800, DR 2800 and DR 2700: Install the light shield in Cell Compartment #2 before this test is started.
The reagents that are used in this test contain sodium nitroferricyanide. Keep cyanide solutions at pH > 11 to preventexposure to hydrogen cyanide gas. Collect the reacted samples for proper disposal.
Keep the samples sealed at all times to prevent ammonia contamination from the air.
Review the Safety Data Sheets (MSDS/SDS) for the chemicals that are used and use any recommended personal protectiveequipment.
Dispose of reacted solutions according to local, state and federal regulations. Use the Safety Data Sheets for disposalinformation for unused reagents. Consult the environmental, health and safety staff for your facility and/or local regulatoryagencies for further disposal information.
Items to collect
Description Quantity
Light shield (For information about sample cells, adapters or light shields, refer to Instrumentspecific information on page 1.) 1
Nitrogen Ammonia, Reagent Set, Low Range Test 'N Tube™ AmVer™ 2
Funnel, micro, poly 1
Pipet, TenSette®, 1.0- to 10.0-mL 1
Pipet Tips, for TenSette Pipet 1970010 2
1
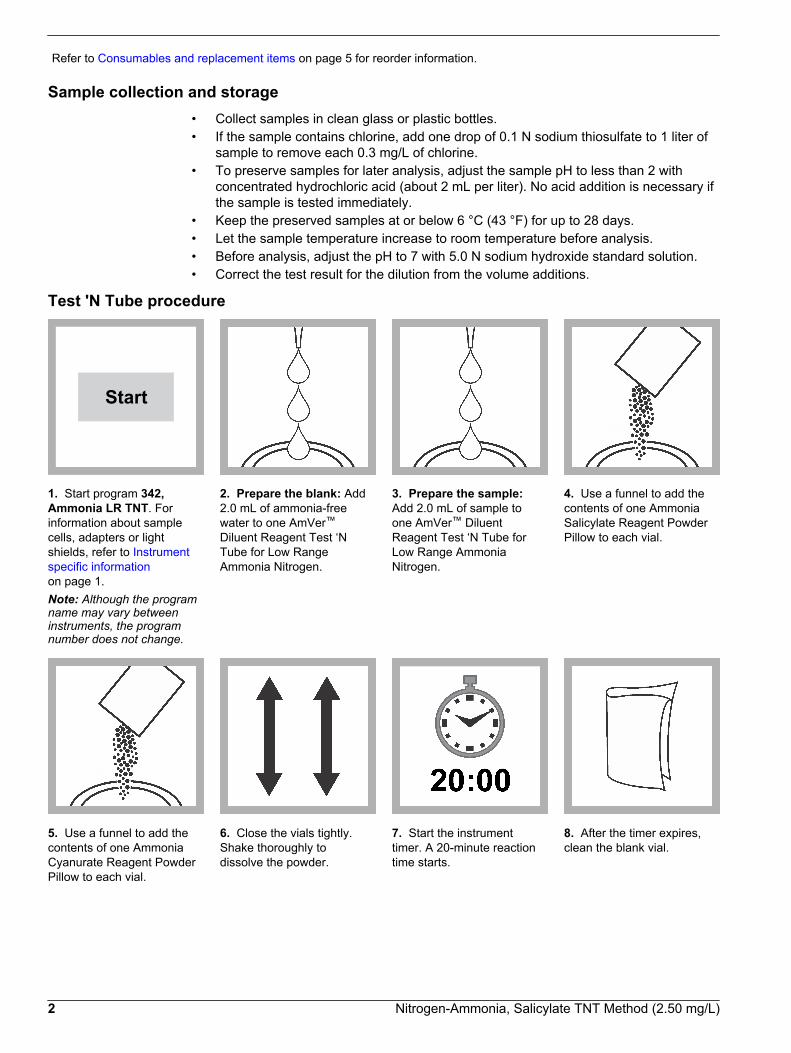
Refer to Consumables and replacement items on page 5 for reorder information.
Sample collection and storage• Collect samples in clean glass or plastic bottles.• If the sample contains chlorine, add one drop of 0.1 N sodium thiosulfate to 1 liter of
sample to remove each 0.3 mg/L of chlorine.• To preserve samples for later analysis, adjust the sample pH to less than 2 with
concentrated hydrochloric acid (about 2 mL per liter). No acid addition is necessary ifthe sample is tested immediately.
• Keep the preserved samples at or below 6 °C (43 °F) for up to 28 days.• Let the sample temperature increase to room temperature before analysis.• Before analysis, adjust the pH to 7 with 5.0 N sodium hydroxide standard solution.• Correct the test result for the dilution from the volume additions.
Test 'N Tube procedure
Start
1. Start program 342,Ammonia LR TNT. Forinformation about samplecells, adapters or lightshields, refer to Instrumentspecific informationon page 1.Note: Although the programname may vary betweeninstruments, the programnumber does not change.
2. Prepare the blank: Add2.0 mL of ammonia-freewater to one AmVer™Diluent Reagent Test ‘NTube for Low RangeAmmonia Nitrogen.
3. Prepare the sample:Add 2.0 mL of sample toone AmVer™ DiluentReagent Test ‘N Tube forLow Range AmmoniaNitrogen.
4. Use a funnel to add thecontents of one AmmoniaSalicylate Reagent PowderPillow to each vial.
5. Use a funnel to add thecontents of one AmmoniaCyanurate Reagent PowderPillow to each vial.
6. Close the vials tightly.Shake thoroughly todissolve the powder.
7. Start the instrumenttimer. A 20-minute reactiontime starts.
8. After the timer expires,clean the blank vial.
2 Nitrogen-Ammonia, Salicylate TNT Method (2.50 mg/L)

9. Insert the blank vial intothe cell holder.
Zero
10. Push ZERO. Thedisplay shows 0.00 mg/LNH3–N.
11. Clean the sample vial. 12. Insert the sample vialinto the cell holder.
Read
13. Push READ. Resultsshow in mg/L NH3–N.
InterferencesInterfering substance Interference level
Calcium 2500 mg/L as CaCO3
Iron All levels. Correct for iron interference as follows:
1. Use one of the Iron, Total procedures to measure the iron concentration of the sample.2. Use an iron standard solution to add iron to the deionized water blank so that the blank has the
same iron concentration as the sample. The iron interference will be zeroed out from the testresult.
Magnesium 15,000 mg/L as CaCO3
Monochloramine Monochloramine that is in chloraminated drinking water interferes directly at all levels and gives highresults. Use a Free Ammonia and Monochloramine method to determine free ammonia in thesesample matrices.
Nitrate 250 mg/L as NO3––N
Nitrite 30 mg/L as NO2––N
pH Adjust acidic or basic samples to approximately pH 7. Use 1 N sodium hydroxide standard solutionfor acidic samples and 1 N hydrochloric acid standard solution for basic samples.
Phosphate 250 mg/L as PO43––P
Sulfate 300 mg/L as SO42–
Nitrogen-Ammonia, Salicylate TNT Method (2.50 mg/L) 3

Interfering substance Interference level
Sulfide Sulfide will intensify the color. Remove sulfide interference as follows:
1. Measure approximately 350 mL of sample in a 500-mL Erlenmeyer flask.2. Add the contents of one Sulfide Inhibitor Reagent Powder Pillow. Swirl to mix.3. Filter the sample through a folded filter paper and filter funnel.4. Use the filtered sample in the test procedure.
Other Substances Less common interferences such as hydrazine and glycine cause intensified colors in the preparedsample. Turbidity and color will give incorrect high values. Samples with severe interferences requiredistillation. Use the distillation procedure that is supplied with the distillation set.
Accuracy check
Standard additions method (sample spike)Use the standard additions method (for applicable instruments) to validate the testprocedure, reagents and instrument and to find if there is an interference in the sample.Items to collect:
• 50 mg/L Nitrogen-Ammonia Standard Solution, 10-mL Voluette® Ampule• Ampule breaker• Pipet, TenSette®, 0.1–1.0 mL and tips• 25-mL mixing cylinders (3)
1. Use the test procedure to measure the concentration of the sample, then keep the(unspiked) sample in the instrument.
2. Go to the Standard Additions option in the instrument menu.3. Select the values for standard concentration, sample volume and spike volumes.4. Open the standard solution.5. Prepare three spiked samples: use the TenSette pipet to add 0.1 mL, 0.2 mL and
0.3 mL of the standard solution, respectively, to three 25-mL portions of fresh sample.Mix well.
6. Use the test procedure to measure the concentration of each of the spiked samples.Start with the smallest sample spike. Measure each of the spiked samples in theinstrument.
7. Select Graph to compare the expected results to the actual results.Note: If the actual results are significantly different from the expected results, make sure thatthe sample volumes and sample spikes are measured accurately. The sample volumes andsample spikes that are used should agree with the selections in the standard additions menu. Ifthe results are not within acceptable limits, the sample may contain an interference.
Standard solution methodUse the standard solution method to validate the test procedure, reagents andinstrument.Items to collect:
• 1.0 mg/L Nitrogen-Ammonia Standard Solution
1. Use the test procedure to measure the concentration of the standard solution.2. Compare the expected result to the actual result.
Note: The factory calibration can be adjusted slightly with the standard adjust option so that theinstrument shows the expected value of the standard solution. The adjusted calibration is thenused for all test results. This adjustment can increase the test accuracy when there are slightvariations in the reagents or instruments.
4 Nitrogen-Ammonia, Salicylate TNT Method (2.50 mg/L)

Method performanceThe method performance data that follows was derived from laboratory tests that weremeasured on a spectrophotometer during ideal test conditions. Users may get differentresults under different test conditions.
Program Standard Precision (95% Confidence Interval) SensitivityConcentration change per 0.010 Abs change
342 1.00 mg/L NH3–N 0.90–1.10 mg/L NH3–N 0.014 mg/L NH3–N
Summary of methodAmmonia compounds combine with chlorine to form monochloramine. Monochloraminereacts with salicylate to form 5-aminosalicylate. The 5-aminosalicylate is oxidized in thepresence of a sodium nitroprusside catalyst to form a blue colored compound. The bluecolor is masked by the yellow color from the excess reagent present to give a green-colored solution. The measurement wavelength is 655 nm for spectrophotometers or610 nm for colorimeters.
Pollution prevention and waste managementThe ammonia salicylate reagent contains sodium nitroferricyanide and must be disposedof as a hazardous waste. Dispose of reacted solutions according to local, state andfederal regulations.
Consumables and replacement itemsRequired reagents
Description Quantity/test Unit Item no.
Nitrogen Ammonia, Reagent Set, Low Range Test 'N Tube™ AmVer™ 2 25 tests 2604545
Required apparatus
Description Quantity/test Unit Item no.
Funnel, micro, poly 1 each 2584335
Pipet, TenSette®, 1.0- to 10.0-mL 1 each 1970010
Pipet Tips, for TenSette Pipet 1970010 varies 50/pkg 2199796
Test tube rack 1 each 1864100
Recommended standards and apparatus
Description Unit Item no.
Nitrogen Ammonia Standard Solution, 1.0-mg/L NH3–N 500 mL 189149
Nitrogen Ammonia Standard Solution, 10-mL Voluette® Ampule, 50-mg/L NH3–N 16/pkg 1479110
Wastewater, Effluent Inorganics, for NH3-N, NO3-N, PO4, COD, SO4, TOC 500 mL 2833249
Water, deionized 4 L 27256
Optional reagents and apparatus
Description Unit Item no.
Cylinder, mixing, 25-mL each 2088640
Distillation apparatus set, general purpose each 2265300
Funnel, poly, 65-mm each 108367
Paper, filter, folded, 12.5-cm 100/pkg 189457
Nitrogen-Ammonia, Salicylate TNT Method (2.50 mg/L) 5
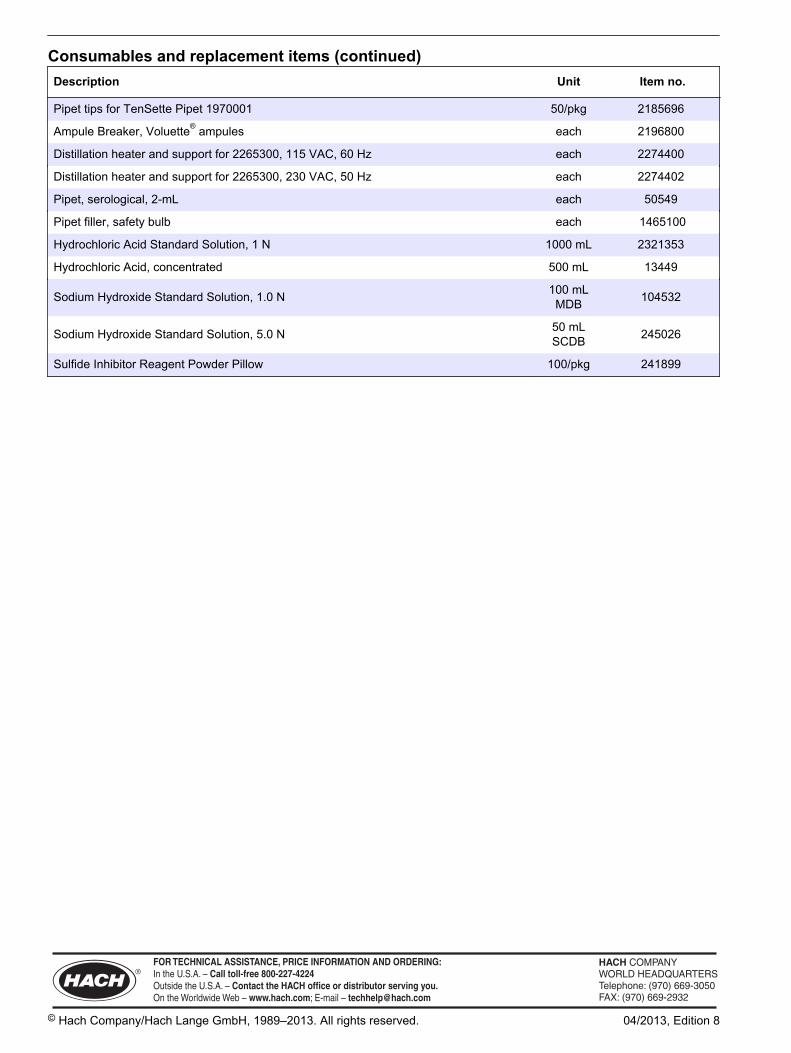
Consumables and replacement items (continued)Description Unit Item no.
Pipet tips for TenSette Pipet 1970001 50/pkg 2185696
Ampule Breaker, Voluette® ampules each 2196800
Distillation heater and support for 2265300, 115 VAC, 60 Hz each 2274400
Distillation heater and support for 2265300, 230 VAC, 50 Hz each 2274402
Pipet, serological, 2-mL each 50549
Pipet filler, safety bulb each 1465100
Hydrochloric Acid Standard Solution, 1 N 1000 mL 2321353
Hydrochloric Acid, concentrated 500 mL 13449
Sodium Hydroxide Standard Solution, 1.0 N 100 mLMDB 104532
Sodium Hydroxide Standard Solution, 5.0 N 50 mLSCDB 245026
Sulfide Inhibitor Reagent Powder Pillow 100/pkg 241899
HACH COMPANYWORLD HEADQUARTERSTelephone: (970) 669-3050FAX: (970) 669-2932
FOR TECHNICAL ASSISTANCE, PRICE INFORMATION AND ORDERING:Call 800-227-4224
Contact the HACH office or distributor serving you.www.hach.com [email protected]
In the U.S.A. –
Outside the U.S.A. –
On the Worldwide Web – ; E-mail –
toll-free
© Hach Company/Hach Lange GmbH, 1989–2013. All rights reserved. 04/2013, Edition 8

Nitrogen, Total Inorganic DOC316.53.01090
Titanium Trichloride Reduction Method Method 100210.2 to 25.0 mg/L N Test ‘N Tube™ Vials
Scope and application: For water, wastewater and seawater.
Test preparation
Instrument specific informationThe table in this section shows all of the instruments that have the program for this test. Table 1 shows adapter and light shield requirements for the instruments that use them.To use the table, select an instrument, then read across to find the correspondinginformation for this test.
Table 1 Instrument-specific information for test tubes
Instrument Adapters Light shield
DR 6000 — —
DR 5000 — —
DR 900 4846400 Cover supplied with the instrument
DR 3900 — LZV849
DR 3800 — LZV646
DR 2800 —
Before startingInstall the instrument cap on the DR 900 cell holder before ZERO or READ is pushed.
DR 3900, DR 3800, DR 2800 and DR 2700: Install the light shield in Cell Compartment #2 before this test is started.
For safety, wear gloves to break open the reagent ampules.
The reagents that are used in this test contain sodium nitroferricyanide. Keep cyanide solutions at pH > 11 to preventexposure to hydrogen cyanide gas. Collect the reacted samples for proper disposal.
Review the Safety Data Sheets (MSDS/SDS) for the chemicals that are used and use any recommended personal protectiveequipment.
Dispose of reacted solutions according to local, state and federal regulations. Use the Safety Data Sheets for disposalinformation for unused reagents. Consult the environmental, health and safety staff for your facility and/or local regulatoryagencies for further disposal information.
Items to collect
Description Quantity
Total Inorganic Nitrogen Pretreatment Reagent Set (TiCl3 Reduction Method) 1
Test 'N Tube AmVer™ Nitrogen-Ammonia Reagent Set 1
Centrifuge 1
Funnel, micro 1
Light shield or adapter (For information about sample cells, adapters or light shields, refer to Instrument specific information on page 1.) 1
Pipet, TenSette®, 0.1- to 1.0-mL, with pipet tips 1
Pipet, volumetric, Class A, 1.00-mL 1
1

Items to collect (continued)Description Quantity
Test tube rack 1
Water, deionized 1 mL
Refer to Consumables and replacement items on page 6 for reorder information.
Sample collection and storage• Collect samples in clean glass or plastic bottles.• Analyze the samples as soon as possible for best results.• If the sample contains chlorine, add one drop of 0.1 N sodium thiosulfate to 1 liter of
sample to remove each 0.3 mg/L of chlorine.• To preserve samples for later analysis, adjust the sample pH to less than 2 with
concentrated hydrochloric acid (about 2 mL per liter). No acid addition is necessary ifthe sample is tested immediately.
• Keep the preserved samples at or below 6 °C (43 °F) for up to 28 days.• Let the sample temperature increase to room temperature before analysis.• Before analysis, adjust the pH to 7 with 5.0 N sodium hydroxide standard solution.• Correct the test result for the dilution from the volume additions.
Test 'N Tube procedure
Start
1. Start program 346 NInorganic TNT. Forinformation about samplecells, adapters or lightshields, refer to Instrumentspecific informationon page 1.Note: Although the programname may vary betweeninstruments, the programnumber does not change.
2. Add 1 mL of TotalInorganic NitrogenPretreatment Baseconcentrate into two TotalInorganic NitrogenPretreatment Diluent vials.
3. Prepare the sample:Add 1 mL of sample to oneof the vials.
4. Prepare the blank: Add1 mL of deionized water tothe second vial.
2 Nitrogen, Total Inorganic, Titanium Trichloride Reduction TNT Method (25.0 mg/L)

5. Put the caps on bothvials. Shake for 30 secondsto mix.
6. Add the contents of oneTotal Inorganic NitrogenReductant ampule to theprepared sample vial. Addthe contents of anotherTotal Inorganic NitrogenReductant ampule to theblank vial.A black precipitate will formimmediately.
7. Put the caps on bothvials. Shake gently for at30 seconds to mix.The precipitate should beblack after shaking.Excessive shaking willcause the precipitate tochange to a white color andgive low test results.
8. Let the vials stand for atleast one minute.
9. Put the vials in acentrifuge.
10. Start the instrumenttimer. A 3-minute reactiontime starts.Put the vials in a centrifugeand run the centrifuge to forthree minutes. If nocentrifuge is available, letthe vials sit for 30 minutesso the solids settle at thebottom of the vials.
11. After the timer expires,add 2 mL of preparedsample from the centrifugeto an AmVer DiluentReagent Test 'N Tube forLow Range AmmoniaNitrogen.Do not disturb the sedimentin the bottom of the vials.
12. Add 2 mL of blank fromthe centrifuge to a secondAmVer Diluent ReagentTest 'N Tube for Low RangeAmmonia Nitrogen.
13. Add the contents of oneAmmonia SalicylateReagent Powder Pillow (for5-mL samples) to each vial.
14. Add the contents of oneAmmonia CyanurateReagent Powder Pillow )for5-mL samples) to each vial.
15. Put the caps on bothvials. Shake to dissolve thepowder completely. A greencolor shows if nitrogen ispresent.
16. Start the instrumenttimer. A 20-minute reactiontime starts.
Nitrogen, Total Inorganic, Titanium Trichloride Reduction TNT Method (25.0 mg/L) 3

17. When the timer expires,clean the blank vial.
18. Insert the blank vial intothe 16-mm cell holder.
Zero
19. Push ZERO. Thedisplay shows 0.0 mg/L N.
20. Clean the sample vial.
21. Insert the sample vialinto the 16-mm cell holder.
Read
22. Push READ. Resultsshow in mg/L N.
InterferencesThe substances in Table 2 may interfere when present. The substances in Table 3 do notinterfere below the levels listed.
Table 2 Interfering substances
Interfering substance Interference level
Calcium Causes a positive interference at 1000 mg/L as CaCO3
Manganese (IV) Causes a negative interference at 3 mg/L
Magnesium Causes a positive interference at 1000 mg/L as CaCO3
Sulfide Causes a negative interference at 3 mg/L
Sulfate Causes a negative interference at 250 mg/L
Table 3 Non-interfering substances
Interfering substance Interference level
Al3+ 8 mg/L
Ba2+ 40 mg/L
Cu2+ 40 mg/L
Fe3+ 8 mg/L
Zn2+ 80 mg/L
F– 40 mg/L
PO43--P 8 mg/L
SiO2 80 mg/L
EDTA 80 mg/L
4 Nitrogen, Total Inorganic, Titanium Trichloride Reduction TNT Method (25.0 mg/L)

Accuracy check
Standard additions method (sample spike)Use the standard additions method (for applicable instruments) to validate the testprocedure, reagents and instrument and to find if there is an interference in the sample.Items to collect:
• Nitrate Nitrogen PourRite Ampule Standard, 500-mg/L NO3––N
• Ampule breaker• Pipet, TenSette®, 0.1–1.0 mL and tips• 25-mL mixing cylinders (3)
1. Use the test procedure to measure the concentration of the sample, then keep the(unspiked) sample in the instrument.
2. Go to the Standard Additions option in the instrument menu.3. Select the values for standard concentration, sample volume and spike volumes.4. Open the standard solution.5. Prepare three spiked samples: use the TenSette pipet to add 0.1 mL, 0.2 mL and
0.3 mL of the standard solution, respectively, to three 25-mL portions of fresh sample.Mix well.
6. Use the test procedure to measure the concentration of each of the spiked samples.Start with the smallest sample spike. Measure each of the spiked samples in theinstrument.
7. Select Graph to compare the expected results to the actual results.Note: If the actual results are significantly different from the expected results, make sure thatthe sample volumes and sample spikes are measured accurately. The sample volumes andsample spikes that are used should agree with the selections in the standard additions menu. Ifthe results are not within acceptable limits, the sample may contain an interference.
Standard solution methodUse the standard solution method to validate the test procedure, reagents andinstrument.Items to collect:
• 10.0-mg/L Nitrate Nitrogen Standard Solution
1. Use the test procedure to measure the concentration of the standard solution.2. Compare the expected result to the actual result.
Note: The factory calibration can be adjusted slightly with the standard adjust option so that theinstrument shows the expected value of the standard solution. The adjusted calibration is thenused for all test results. This adjustment can increase the test accuracy when there are slightvariations in the reagents or instruments.
Method performanceThe method performance data that follows was derived from laboratory tests that weremeasured on a spectrophotometer during ideal test conditions. Users may get differentresults under different test conditions.
Program Standard Precision (95% Confidence Interval) SensitivityConcentration change per 0.010 Abs change
346 20.0 mg/L NO3––N 19.6–20.4 mg/L NO3
––N 0.2 mg/L NO3––N
Species recoveryThe total inorganic nitrogen test is designed to provide an estimate of the total nitrite,nitrate and ammonia nitrogen load in a water or wastewater sample. This test is mostapplicable to the monitoring of samples taken from an industrial process stream or awastewater treatment stream where it is important to track the inorganic nitrogen load asit passes through the treatment process. The test does show different recoveries of each
Nitrogen, Total Inorganic, Titanium Trichloride Reduction TNT Method (25.0 mg/L) 5

of the three nitrogen species, as shown in Table 4. The test is not recommended for usewhen quantifying only one of the three species. In that case, specific procedures for eachparticular analyte would be more appropriate.
Table 4 Species recovery
Nitrogen form Percent recovery
NH3–N 112%
NO3––N 100%
NO2––N 77%
Summary of methodTitanium (III) ions reduce nitrate and nitrite to ammonia in a basic environment. Aftercentrifugation to remove solids, the ammonia is combined with chlorine to formmonochloramine. Monochloramine reacts with salicylate to form 5-aminosalicylate. The 5-aminosalicylate is oxidized in the presence of a sodium nitroprusside catalyst to form ablue colored compound. The blue color is masked by the yellow color from the excessreagent present to give a final green colored solution. The measurement wavelength is655 nm for spectrophotometers or 610 nm for colorimeters.
Consumables and replacement itemsRequired reagents
Description Quantity/test Unit Item no.
Nitrogen, Total Inorganic, Pretreatment Reagent Set (TiCl3 ReductionMethod) — 25 tests 2604945
Nitrogen Ammonia, Reagent Set, Low Range Test 'N Tube™ AmVer™ 2 25 tests 2604545
Water, deionized varies 100 mL 27242
Required apparatus
Description Quantity/test Unit Item no.
Centrifuge, 115 VAC, 6 x 15 mL 1 each 2676500
OR
Centrifuge, 220 VAC, 6 x 15 mL 1 each 2676502
Funnel, micro, poly 1 each 2584335
Pipet, TenSette®, 0.1- to 1.0-mL 1 each 1970001
Pipet Tips, for TenSette Pipet 1970001 2 50/pkg 2185696
Test tube rack 1 each 1864100
Gloves, nitrile, large (other sizes available) 1 pair 100/pkg 2550503
Recommended standards and apparatus
Description Unit Item no.
Flask, volumetric, 50-mL each 1457441
Nitrate Nitrogen Standard Solution, 10.0-mg/L NO3--N 500 mL 30749
Nitrate Nitrogen Standard Solution, 2-mL PourRite® Ampule, 500 mg/L 20/pkg 1426020
Pipet filler, safety bulb each 1465100
Pipet, TenSette®, 0.1–1.0 mL each 1970001
Pipet tips for TenSette Pipet 1970001 50/pkg 2185696
6 Nitrogen, Total Inorganic, Titanium Trichloride Reduction TNT Method (25.0 mg/L)

Consumables and replacement items (continued)Description Unit Item no.
Pipet tips for TenSette Pipet 1970001 1000/pkg 2185628
Pipet tips for TenSette Pipet 1970010 250/pkg 2199725
Water, deionized 4 L 27256
Optional reagents and apparatus
Description Unit Item no.
Cylinder, mixing, 25-mL each 2088640
Hydrochloric Acid, concentrated 500 mL 13449
Sodium Hydroxide Standard Solution, 5.0 N 50 mLSCDB 245026
Sodium Thiosulfate, 0.1 N 100 mL 32332
Pipet, volumetric, Class A, 1.00-mL each 1451535
PourRite® Ampule Breaker, 2-mL each 2484600
Ampule Breaker, Voluette® ampules each 2196800
Nitrate Nitrogen Standard Solution, 1-mg/L NH3-N 500 mL 204649
Nitrate Nitrogen Standard Solution, 100-mg/L NH3-N 500 mL 194749
Nitrate Nitrogen Standard Solution, 1000-mg/L NH3-N 500 mL 1279249
Nitrate Nitrogen Standard Solution, 15-mg/L NH3-N 100 mLMDB 2415132
Nitrogen, Total Inorganic, Titanium Trichloride Reduction TNT Method (25.0 mg/L) 7

HACH COMPANYWORLD HEADQUARTERSTelephone: (970) 669-3050FAX: (970) 669-2932
FOR TECHNICAL ASSISTANCE, PRICE INFORMATION AND ORDERING:Call 800-227-4224
Contact the HACH office or distributor serving you.www.hach.com [email protected]
In the U.S.A. –
Outside the U.S.A. –
On the Worldwide Web – ; E-mail –
toll-free
© Hach Company/Hach Lange GmbH, 1989–2013. All rights reserved. 04/2013, Edition 8

Nitrogen, Total Kjeldahl DOC316.53.01091
Nessler Method1 Method 80751 to 150 mg/L TKN Reagent Solution
Scope and application: For water, wastewater and sludge; digestion is required.1 Adapted from Hach, et. al., Journal of Association of Official Analytical Chemists, 70(5) 783-787 (1987); Hach, et. al., Journal of
Agricultural and Food Chemistry, 33(6) 1117-1123 (1985); Standard Methods for the Examination of Water and Wastewater.
Test preparation
Instrument specific informationThe table in this section shows all of the instruments that have the program for this test. Table 1 shows sample cell and orientation requirements for reagent addition tests, suchas powder pillow or bulk reagent tests.To use the table, select an instrument, then read across to find the correspondinginformation for this test.
Table 1 Instrument-specific information for powder pillows
Instrument Sample cell orientation Sample cell
DR 6000 DR 3800 DR 2800 DR 2700
The fill line is to the right. 2495402
DR 5000 DR 3900
The fill line is toward the user.
DR 900 The orientation mark is toward the user. 2401906
Before startingInstall the instrument cap on the DR 900 cell holder before ZERO or READ is pushed.
For best results, measure the reagent blank value for each new lot of reagent. Replace the sample with deionized water inthe test procedure to get the reagent blank value. Subtract the reagent blank value from the sample results automaticallywith the reagent blank adjust option.
If the Pour-Thru Cell is used (for applicable instruments), clean the cell periodically. Pour a few sodium thiosulfatepentahydrate crystals into the cell funnel or rinse the cell with a solution of sodium thiosulfate. Flush the crystals through thefunnel and cell with enough deionized water to dissolve. Rinse the cell with deionized water.
The Nessler reagent contains mercuric iodide. Both the reacted sample and blank will contain mercury. Do not pour thesesolutions down the drain. Collect the reacted samples and the blank for proper disposal.
Hold the reagent droppers and dropper bottles vertically, not at an angle, when the reagent is added.
Use the Standard Adjust option with each new lot of reagent for the best results.
Review the Safety Data Sheets (MSDS/SDS) for the chemicals that are used and use any recommended personal protectiveequipment.
Dispose of reacted solutions according to local, state and federal regulations. Use the Safety Data Sheets for disposalinformation for unused reagents. Consult the environmental, health and safety staff for your facility and/or local regulatoryagencies for further disposal information.
1

Items to collect
Description Quantity
Boiling chips, silicon carbide 2-3
Cylinder, graduated mixing, 25-mL 2
Finger cots 2
Digesdahl Digestion Apparatus 1
Hydrogen Peroxide, 50% 20 mL
Mineral Stabilizer 6 drops
Nessler Reagent 2 mL
Polyvinyl Alcohol Dispersing Agent 6 drops
Potassium Hydroxide (KOH) Standard Solution, 1.0 N varies
Potassium Hydroxide (KOH) Standard Solution, 8.0 N varies
Sulfuric Acid, ACS, concentrated 6 mL
TKN Indicator Solution 2 drops
Pipet, TenSette, 0.1–1.0 mL, plus tips 1
Safety shield 1
Sample cells (For information about sample cells, adapters or light shields, refer to Instrumentspecific information on page 1.) 2
Refer to Consumables and replacement items on page 7 for reorder information.
Sample collection and storage• Collect samples in clean glass or plastic bottles.• To preserve samples for later analysis, adjust the sample pH to less than 2 with
concentrated sulfuric acid (about 2 mL per liter). No acid addition is necessary if thesample is tested immediately.
• Keep the preserved samples at or below 6 °C (43 °F) for up to 28 days.• Let the sample temperature increase to room temperature before analysis.• Before analysis, adjust the pH to 3–5 with 5.0 N sodium hydroxide standard solution.• Correct the test result for the dilution from the volume additions.
2 Nitrogen, Total Kjeldahl, Nessler Method (150 mg/L)

Nessler method
Start
1. Start program399 Nitrogen, TKN. Forinformation about samplecells, adapters or lightshields, refer to Instrumentspecific informationon page 1.Note: Although the programname may vary betweeninstruments, the programnumber does not change.
2. Prepare the sample:Use the Digesdahl DigestionApparatus InstructionManual to digest the sampleamount. Refer to Digestedsample volumeson page 5.
3. Prepare the blank:Digest an equal amount ofdeionized water for use asthe blank .
4. Use a pipet to move ananalysis volume of thedigested sample to agraduated mixing cylinder.Refer to Digested samplevolumes on page 5.
5. Use a pipet to transfer anequal amount of digesteddeionized water to a secondgraduated mixing cylinder.
6. Add one drop of TKNIndicator to eacy cylinder.
7. If the aliquot is less that1 mL, go to step 8. If thealiquot is greater than 1 mL,add drops of 8.0 KOH toeach cylinder until the firstflash of blue color shows.Put the stopper in thecylinder and invert aftereach addition.
8. Add 1.0 N KOH to eachcylinder, one drop at a time.Mix after each addition.Continue until the firstpermanent blue colorshows.
9. Fill both cylinders to the20-mL mark with deionizedwater.
10. Add three drops ofMineral Stabilizer to eachcylinder.
11. Put the stoppers in thecylinders and invert to mix.
12. Add three drops ofPolyvinyl Alcohol DispersingAgent to each cylinder.
Nitrogen, Total Kjeldahl, Nessler Method (150 mg/L) 3

13. Put the stoppers in thecylinders and invert to mix.
14. Fill both cylinders to the25-mL mark with deionizedwater.
15. Put the stoppers in thecylinders and invert severaltimes to mix.
16. Use a pipet to add1.00 mL of Nessler Reagentto each cylinder.
17. Put the stoppers in thecylinders and invert to mix.The solution should not behazy. Any turbidity (haze)will cause incorrect results.
18. Start the instrumenttimer. A 2-minute reactiontime starts.
19. When the timer expires,pour the contents of eachcylinder into separatesample cells.
20. Clean the blank.
21. Insert the blank into thecell holder.
Zero
22. Push ZERO. Thedisplay shows 0 mg/L TKN.
23. Clean the preparedsample.
24. Insert the preparedsample into the cell holder.
4 Nitrogen, Total Kjeldahl, Nessler Method (150 mg/L)

Read
25. Push READ. Resultsshow in mg/L TKN.
26. Calculate the sampleTKN in ppm:TKN = (75 x A) ÷ (B x C)Where:
• A = mg/L read from thedisplay
• B = g (or mL of water)sample taken for thedigestion
• C = mL analysis volumeof the digested sample
Digested sample volumesTable 2 Aqueous samples (solutions or suspensions in water—less than 1% solids)
Expected nitrogen concentration (mg/L) Analysis volume (mL)
0.5–28 10
2–112 5
11–560 2
45–2250 1
425–22500 0.5
Table 3 Dry samples
Expected nitrogen concentration (mg/L) Analysis volume (mL)
42–2200 10
106–5600 5
350–18,000 2
1000–56,000 1
4200–220,000 0.5
Table 4 Oils and fats
Expected nitrogen concentration (mg/L) Analysis volume (mL)
85–4500 10
210–11,000 5
2100–110,000 1
Nitrogen, Total Kjeldahl, Nessler Method (150 mg/L) 5

Accuracy check
Digestion methodTo validate the digestion method, use the Primary Standards for Kjeldahl Nitrogen thatare given in the Accuracy Check section of the Digesdahl® Digestion ApparatusInstruction Manual. Use the accuracy check procedure to find the digestion efficiency andthe amount of bound nitrogen that is released during digestion.Use the digested Kjeldahl standard in the Nessler test procedure to measure the TKN ofthe primary standard. The TKN value should be within ± 3% of the value of the preparedKjeldahl standard.
Standard solution methodItems to collect:
• 1.0-mg/L NH3–N standard solution• TKN indicator• Dropper• 25-mL graduated mixing cylinders (2)• Deionized water• Mineral Stabilizer• Polyvinyl Alcohol Dispersing agent
1. Add one drop of TKN Indicator to each 25-mL graduated mixing cylinder.2. Fill one cylinder to the 20-mL mark with deionized water. Fill the other cylinder to the
20-mL mark with a 1.0-mg/L NH3–N standard solution.3. Add 3 drops of Mineral Stabilizer to each cylinder. Invert several times to mix.4. Add 3 drops of Polyvinyl Alcohol Dispersing agent to each cylinder. Invert several
times to mix.5. Continue with the TKN procedure to measure the concentration of the standard
solution. Accurate calibrations will show 26–27 mg/L TKN.Note: The factory calibration can be adjusted slightly with the standard adjust option so that theinstrument shows the expected value of the standard solution. The adjusted calibration is thenused for all test results. This adjustment can increase the test accuracy when there are slightvariations in the reagents or instruments.
Method performanceThe method performance data that follows was derived from laboratory tests that weremeasured on a spectrophotometer during ideal test conditions. Users may get differentresults under different test conditions.
Program Standard Precision (95% Confidence Interval) SensitivityConcentration change per 0.010 Abs change
399 76 mg/L NH3–N 70–82 mg/L NH3–N 1 mg/L NH3–N
Summary of methodThe term Total Kjeldahl Nitrogen refers to the combination of ammonia and organicnitrogen. However, only the organic nitrogen compounds that are present as organicallybound nitrogen in the trinegative state are determined in this test. Nitrogen in this form isconverted into ammonium salts by the action of sulfuric acid and hydrogen peroxide. Theammonia is then analyzed by a modified Nessler method test. The measurementwavelength is 460 nm for spectrophotometers or 420 nm for colorimeters.
Pollution prevention and waste managementThe Nessler reagent contains mercuric iodide. The reacted samples and blanks willcontain mercury and must be disposed of as a hazardous waste. Dispose of reactedsolutions according to local, state and federal regulations.
6 Nitrogen, Total Kjeldahl, Nessler Method (150 mg/L)

Consumables and replacement itemsRequired reagents
Description Quantity/test Unit Item no.
Nitrogen Reagent Set, 0-150 mg/L, Nessler Method — 250 tests 2495300
Includes:
Hydrogen Peroxide, 50% 20 mL 490 mL 2119649
Mineral Stabilizer 6 drops 50 mLSCDB 2376626
Nessler Reagent 2 mL 500 mL 2119449
Polyvinyl Alcohol Dispersing Agent 6 drops 50 mLSCDB 2376526
Potassium Hydroxide Standard Solution, 1.0 N varies 50 mLSCDB 2314426
Potassium Hydroxide Standard Solution, 8.0 N varies 100 mLMDB 28232H
Sulfuric Acid, concentrated, ACS varies 500 mL 97949
TKN Indicator Solution 2 drops 50 mLSCDB 2251926
Required apparatus
Description Quantity/test Unit Item no.
Boiling chips, silicon carbide 2-3 500 g 2055734
Cylinder, graduated mixing, 25-mL 2 each 2636240
Digesdahl® Digestion Apparatus, 115 VAC 1 each 2313020
OR
Digesdahl® Digestion Apparatus, 220 VAC 1 each 2313021
Finger cots 2 2/pkg 1464702
Pipet, TenSette®, 0.1- to 1.0-mL 1 each 1970001
Pipet Tips, for TenSette Pipet 1970001 2 50/pkg 2185696
Safety shield 1 each 5003000
Recommended standards
Description Unit Item no.
Kjeldahl Nitrogen Primary Standard Set set of 3 2277800
Nitrogen Ammonia Standard Solution, 1.0-mg/L NH3–N 500 mL 189149
Nitrogen, Ammonia Standard Solution, 10-mL Voluette® Ampules, 150 mg/L 16/pkg 2128410
Wastewater Influent Standard, Mixed Parameter, for NH3-N, NO3-N, PO4, COD, SO4,TOC 500 mL 2833149
Optional reagents and apparatus
Description Unit Item no.
Sodium Thiosulfate, Pentahydrate 454 g 46001
Pour-Thru Cell Kit (DR 2700, DR 2800) each 5940400
Nitrogen, Total Kjeldahl, Nessler Method (150 mg/L) 7

Consumables and replacement items (continued)Description Unit Item no.
Pour-Thru Cell Kit (DR 5000) each LZV479
PourRite® Ampule Breaker, 2-mL each 2484600
Ampule Breaker, Voluette® ampules each 2196800
Paper, for weighing, 100 x 100 mm 500/pkg 1473885
Pipet, TenSette®, 1.0 to 10.0 mL each 1970010
Pipet tips for TenSette Pipet 1970010 50/pkg 2199796
Pipet tips for TenSette Pipet 1970010 250/pkg 2199725
Pipet tips for TenSette Pipet 1970001 1000/pkg 2185628
Nitrogen Ammonia Standard Solution, 10-mg/L NH3–N 500 mL 15349
Nitrogen Ammonia Standard Solution, 100-mg/L as NH3–N 500 mL 2406549
Nitrogen, Ammonia Standard Solution, 1000-mg/L NH3-N 1 L 2354153
Nitrogen Ammonia Standard Solution, 10-mL Voluette® Ampule, 50-mg/L NH3–N 16/pkg 1479110
Balance, analytical, 80 g x 0.1 mg 100-240 VAC each 2936701
Nitrogen Ammonia Standard Solution, 2-mL PourRite® Ampules, 50 mg/L 20/pkg 1479120
HACH COMPANYWORLD HEADQUARTERSTelephone: (970) 669-3050FAX: (970) 669-2932
FOR TECHNICAL ASSISTANCE, PRICE INFORMATION AND ORDERING:Call 800-227-4224
Contact the HACH office or distributor serving you.www.hach.com [email protected]
In the U.S.A. –
Outside the U.S.A. –
On the Worldwide Web – ; E-mail –
toll-free
© Hach Company/Hach Lange GmbH, 1989–2013. All rights reserved. 04/2013, Edition 8
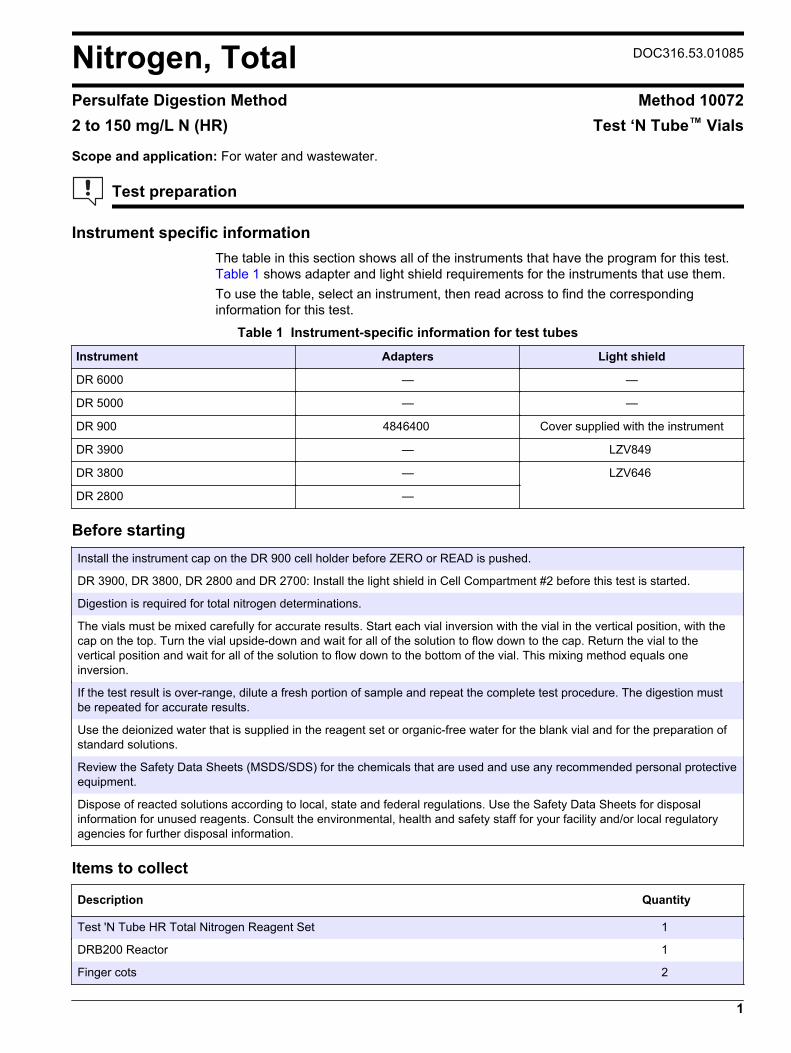
Nitrogen, Total DOC316.53.01085
Persulfate Digestion Method Method 100722 to 150 mg/L N (HR) Test ‘N Tube™ Vials
Scope and application: For water and wastewater.
Test preparation
Instrument specific informationThe table in this section shows all of the instruments that have the program for this test. Table 1 shows adapter and light shield requirements for the instruments that use them.To use the table, select an instrument, then read across to find the correspondinginformation for this test.
Table 1 Instrument-specific information for test tubes
Instrument Adapters Light shield
DR 6000 — —
DR 5000 — —
DR 900 4846400 Cover supplied with the instrument
DR 3900 — LZV849
DR 3800 — LZV646
DR 2800 —
Before startingInstall the instrument cap on the DR 900 cell holder before ZERO or READ is pushed.
DR 3900, DR 3800, DR 2800 and DR 2700: Install the light shield in Cell Compartment #2 before this test is started.
Digestion is required for total nitrogen determinations.
The vials must be mixed carefully for accurate results. Start each vial inversion with the vial in the vertical position, with thecap on the top. Turn the vial upside-down and wait for all of the solution to flow down to the cap. Return the vial to thevertical position and wait for all of the solution to flow down to the bottom of the vial. This mixing method equals oneinversion.
If the test result is over-range, dilute a fresh portion of sample and repeat the complete test procedure. The digestion mustbe repeated for accurate results.
Use the deionized water that is supplied in the reagent set or organic-free water for the blank vial and for the preparation ofstandard solutions.
Review the Safety Data Sheets (MSDS/SDS) for the chemicals that are used and use any recommended personal protectiveequipment.
Dispose of reacted solutions according to local, state and federal regulations. Use the Safety Data Sheets for disposalinformation for unused reagents. Consult the environmental, health and safety staff for your facility and/or local regulatoryagencies for further disposal information.
Items to collect
Description Quantity
Test 'N Tube HR Total Nitrogen Reagent Set 1
DRB200 Reactor 1
Finger cots 2
1

Items to collect (continued)Description Quantity
Funnel, micro 1
Light shield or adapter (For information about sample cells, adapters or light shields, refer to Instrument specific information on page 1.) 1
Pipet, TenSette®, 0.1- to 1.0-mL, with pipet tips 1
Pipet, TenSette®, 1.0- to 10.0-mL, with pipet tips 1
Test tube rack 1
Refer to Consumables and replacement items on page 7 for reorder information.
Sample collection and storage• Collect samples in clean glass or plastic bottles.• Analyze the samples as soon as possible for best results.• To preserve samples for later analysis, adjust the sample pH to less than 2 with
concentrated sulfuric acid (about 2 mL per liter). No acid addition is necessary if thesample is tested immediately.
• Keep the preserved samples at or below 6 °C (43 °F) for up to 28 days.• Let the sample temperature increase to room temperature before analysis.• Before analysis, adjust the pH to 7 with 5.0 N sodium hydroxide standard solution.• Correct the test result for the dilution from the volume additions.
Persulfate digestion for Test 'N Tubes
1. Start theDRB200 Reactor. Set thetemperature to 105 °C.
2. Use a funnel to add thecontents of one TotalNitrogen Persulfate ReagentPowder Pillow to each oftwo HR Total NitrogenHydroxide DigestionReagent vials.Make sure to clean anyreagent that gets on the lipof the vials or on the vialthreads.
3. Prepare the sample:Add 0.5 mL of sample toone of the vials.
4. Prepare the blank: Add0.5 mL of deionized water(included in the kit) to thesecond vial.Use only water that is free ofall nitrogen-containingspecies as a substitute forthe provided deionizedwater.
2 Nitrogen, Total, Persulfate Digestion TNT Method (150 mg/L)
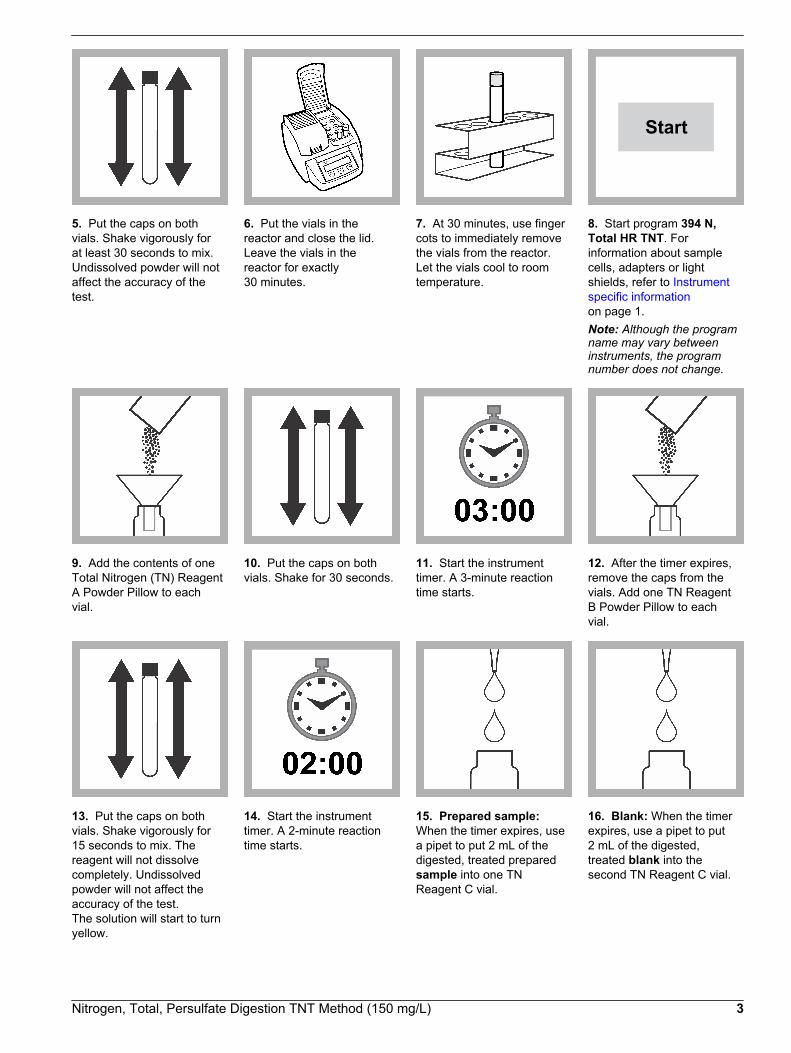
5. Put the caps on bothvials. Shake vigorously forat least 30 seconds to mix.Undissolved powder will notaffect the accuracy of thetest.
6. Put the vials in thereactor and close the lid.Leave the vials in thereactor for exactly30 minutes.
7. At 30 minutes, use fingercots to immediately removethe vials from the reactor.Let the vials cool to roomtemperature.
Start
8. Start program 394 N,Total HR TNT. Forinformation about samplecells, adapters or lightshields, refer to Instrumentspecific informationon page 1.Note: Although the programname may vary betweeninstruments, the programnumber does not change.
9. Add the contents of oneTotal Nitrogen (TN) ReagentA Powder Pillow to eachvial.
10. Put the caps on bothvials. Shake for 30 seconds.
11. Start the instrumenttimer. A 3-minute reactiontime starts.
12. After the timer expires,remove the caps from thevials. Add one TN ReagentB Powder Pillow to eachvial.
13. Put the caps on bothvials. Shake vigorously for15 seconds to mix. Thereagent will not dissolvecompletely. Undissolvedpowder will not affect theaccuracy of the test.The solution will start to turnyellow.
14. Start the instrumenttimer. A 2-minute reactiontime starts.
15. Prepared sample:When the timer expires, usea pipet to put 2 mL of thedigested, treated preparedsample into one TNReagent C vial.
16. Blank: When the timerexpires, use a pipet to put2 mL of the digested,treated blank into thesecond TN Reagent C vial.
Nitrogen, Total, Persulfate Digestion TNT Method (150 mg/L) 3

17. Put the caps on bothvials. Invert 10 times to mix.Use slow, deliberationinversions for completerecovery. The vials will bewarm to the touch.
18. Start the instrumenttimer. A 5-minute. reactiontime starts.The yellow color willintensify.
19. When the timer expires,clean the blank vial.
20. Insert the blank vial intothe 16-mm cell holder.
Zero
21. Push ZERO. Thedisplay shows 0 mg/L N.
22. Clean the sample vial. 23. Insert the sample vialinto the 16-mm cell holder.
Read
24. Push READ. Resultsshow in mg/L N.
Blanks for colorimetric measurementThe reagent blank can be used for up to 7 days for measurements that use the same lotof reagents. Keep the reagent blank in the dark at room temperature (18–25 °C). If asmall amount of white floc appears within a week, discard the reagent blank and preparea new one.
InterferencesThe substances in the Table 2 have been tested and found not to interfere up to theindicated levels (in mg/L). Interfering substances that resulted in a concentration changeof ±10% appear in the Table 3.
Table 2 Non-interfering substances
Interfering substance Interference level
Barium 10.4 mg/L
Calcium 1200 mg/L
Chromium (3+) 2 mg/L
Iron 8 mg/L
Lead 26.4 µg/L
Magnesium 2000 mg/L
Organic Carbon 600 mg/L
Phosphorus 400 mg/L
Silica 600 mg/L
4 Nitrogen, Total, Persulfate Digestion TNT Method (150 mg/L)

Table 2 Non-interfering substances (continued)
Interfering substance Interference level
Silver 3.6 mg/L
Tin 6 mg/L
Table 3 Interfering substances
Interfering substance Interference level
Bromide > 240 mg/L; positive interference
Chloride > 3000 mg/L; positive interference
This test performed with standard nitrogen solutions prepared from the followingcompounds obtained 95% recovery:
• Ammonium chloride• Ammonium sulfate• Ammonium acetate• Glycine• Urea
Ammonium chloride or nicotinic-PTSA spikes in domestic influent, effluent and the ASTMstandard specification for substitute wastewater (D 5905-96) also resulted in ≥ 95%recovery.The large amounts of nitrogen-free organic compounds in some samples may decreasedigestion efficiency by consuming some of the persulfate reagent. Samples known tocontain high levels of organics should be diluted and re-run to verify digestion efficiency.
Accuracy check
Digestion methodFor proof of accuracy use Primary Standards for Kjeldahl Nitrogen. This method generallygives 95–100% recovery on organic nitrogen standards. Analysts have found Ammonia-PTSA (p-Toluenesulfonate) to be the most difficult to digest. Other compounds may yielddifferent percent recoveries.Items to collect:
• Primary Standard for Kjeldahl Nitrogen (Ammonia-PTSA, Glycine-PTSA or Nicotinic-PTSA)
• 1-L volumetric flask, Class A• Deionized water (use the deionized water supplied in the reagent set or water that is
free of all organic and nitrogen-containing species)
1. Prepare a 120-mg/L N equivalent standard.
a. Weigh the applicable standard:
• Ammonia-PTSA: 1.6208 g• Glycine-PTSA: 2.1179 g• Nicotinic-PTSA: 2.5295 g
b. Use a funnel to add the standard to the volumetric flask.c. Add deionized water to the flask and mix to dissolve the standard.d. Dilute to the mark with deionized water. Mix well.
2. Use the test procedure to measure the concentration of the nitrogen standard.Calculate the percent recovery as follows:% recovery = [(measured concentration)/120] x 100 Note: The minimum expected % recovery for each standard is 95%.
Nitrogen, Total, Persulfate Digestion TNT Method (150 mg/L) 5

Standard additions method (sample spike)Use the standard additions method (for applicable instruments) to validate the testprocedure, reagents and instrument and to find if there is an interference in the sample.Items to collect:
• Ammonia Nitrogen Standard Solution, 1000-mg/L as NH3–N• Ampule breaker• Pipet, TenSette®, 0.1–1.0 mL and tips• 25-mL mixing cylinders (3)
1. Use the test procedure to measure the concentration of the sample, then keep the(unspiked) sample in the instrument.
2. Go to the Standard Additions option in the instrument menu.3. Select the values for standard concentration, sample volume and spike volumes.4. Open the standard solution.5. Prepare three spiked samples: use the TenSette pipet to add 0.1 mL, 0.2 mL and
0.3 mL of the standard solution, respectively, to three 25-mL portions of fresh sample.Mix well.
6. Use the test procedure to measure the concentration of each of the spiked samples.Start with the smallest sample spike. Measure each of the spiked samples in theinstrument.
7. Select Graph to compare the expected results to the actual results.Note: If the actual results are significantly different from the expected results, make sure thatthe sample volumes and sample spikes are measured accurately. The sample volumes andsample spikes that are used should agree with the selections in the standard additions menu. Ifthe results are not within acceptable limits, the sample may contain an interference.
Standard solution methodUse the standard solution method to validate the test procedure, reagents andinstrument.Items to collect:
• 100-mg/L ammonia nitrogen standard solution
1. Use the test procedure to measure the concentration of the standard solution.2. Compare the expected result to the actual result.
Note: The factory calibration can be adjusted slightly with the standard adjust option so that theinstrument shows the expected value of the standard solution. The adjusted calibration is thenused for all test results. This adjustment can increase the test accuracy when there are slightvariations in the reagents or instruments.
Method performanceThe method performance data that follows was derived from laboratory tests that weremeasured on a spectrophotometer during ideal test conditions. Users may get differentresults under different test conditions.
Program Standard Precision (95% Confidence Interval) SensitivityConcentration change per 0.010 Abs change
394 100 mg/L NH3–N 98–102 mg/L N 0.5 mg/L N
Summary of methodAn alkaline persulfate digestion converts all forms of nitrogen to nitrate. Sodiummetabisulfite is added after the digestion to eliminate halogen oxide interferences. Nitratethen reacts with chromotropic acid under strongly acidic conditions to form a yellowcomplex. The measurement wavelength is 410 nm for spectrophotometers or 420 nm forcolorimeters.
6 Nitrogen, Total, Persulfate Digestion TNT Method (150 mg/L)
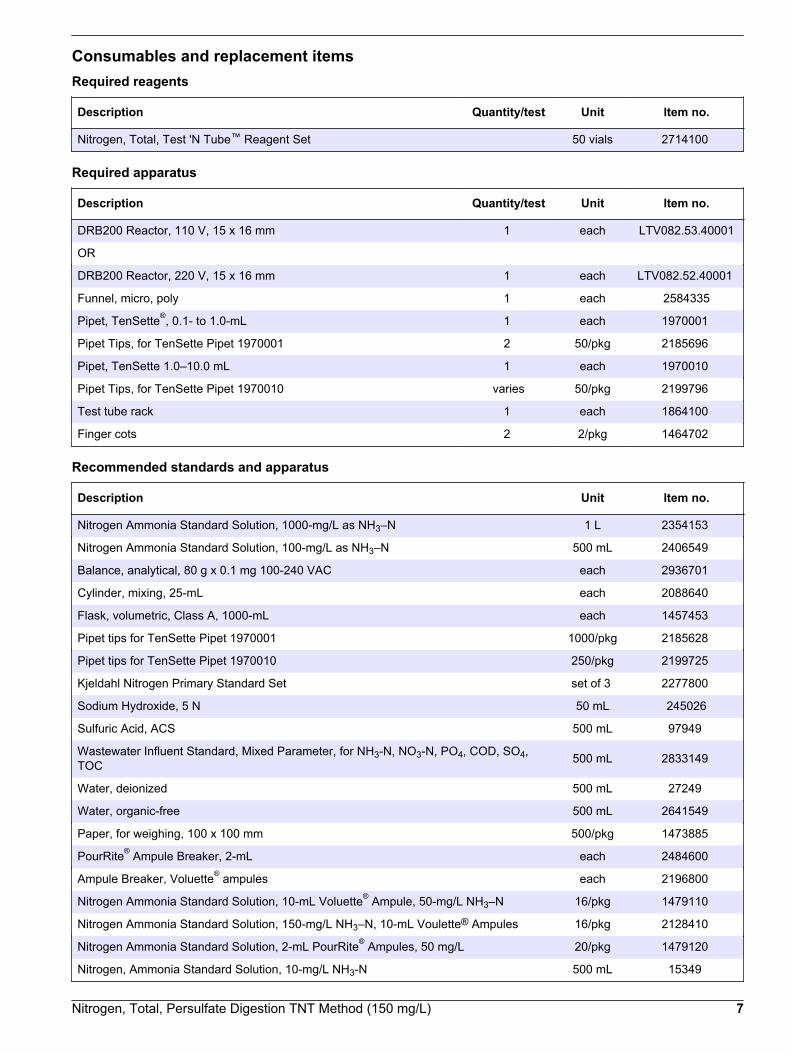
Consumables and replacement itemsRequired reagents
Description Quantity/test Unit Item no.
Nitrogen, Total, Test 'N Tube™ Reagent Set 50 vials 2714100
Required apparatus
Description Quantity/test Unit Item no.
DRB200 Reactor, 110 V, 15 x 16 mm 1 each LTV082.53.40001
OR
DRB200 Reactor, 220 V, 15 x 16 mm 1 each LTV082.52.40001
Funnel, micro, poly 1 each 2584335
Pipet, TenSette®, 0.1- to 1.0-mL 1 each 1970001
Pipet Tips, for TenSette Pipet 1970001 2 50/pkg 2185696
Pipet, TenSette 1.0–10.0 mL 1 each 1970010
Pipet Tips, for TenSette Pipet 1970010 varies 50/pkg 2199796
Test tube rack 1 each 1864100
Finger cots 2 2/pkg 1464702
Recommended standards and apparatus
Description Unit Item no.
Nitrogen Ammonia Standard Solution, 1000-mg/L as NH3–N 1 L 2354153
Nitrogen Ammonia Standard Solution, 100-mg/L as NH3–N 500 mL 2406549
Balance, analytical, 80 g x 0.1 mg 100-240 VAC each 2936701
Cylinder, mixing, 25-mL each 2088640
Flask, volumetric, Class A, 1000-mL each 1457453
Pipet tips for TenSette Pipet 1970001 1000/pkg 2185628
Pipet tips for TenSette Pipet 1970010 250/pkg 2199725
Kjeldahl Nitrogen Primary Standard Set set of 3 2277800
Sodium Hydroxide, 5 N 50 mL 245026
Sulfuric Acid, ACS 500 mL 97949
Wastewater Influent Standard, Mixed Parameter, for NH3-N, NO3-N, PO4, COD, SO4,TOC 500 mL 2833149
Water, deionized 500 mL 27249
Water, organic-free 500 mL 2641549
Paper, for weighing, 100 x 100 mm 500/pkg 1473885
PourRite® Ampule Breaker, 2-mL each 2484600
Ampule Breaker, Voluette® ampules each 2196800
Nitrogen Ammonia Standard Solution, 10-mL Voluette® Ampule, 50-mg/L NH3–N 16/pkg 1479110
Nitrogen Ammonia Standard Solution, 150-mg/L NH3–N, 10-mL Voulette® Ampules 16/pkg 2128410
Nitrogen Ammonia Standard Solution, 2-mL PourRite® Ampules, 50 mg/L 20/pkg 1479120
Nitrogen, Ammonia Standard Solution, 10-mg/L NH3-N 500 mL 15349
Nitrogen, Total, Persulfate Digestion TNT Method (150 mg/L) 7

HACH COMPANYWORLD HEADQUARTERSTelephone: (970) 669-3050FAX: (970) 669-2932
FOR TECHNICAL ASSISTANCE, PRICE INFORMATION AND ORDERING:Call 800-227-4224
Contact the HACH office or distributor serving you.www.hach.com [email protected]
In the U.S.A. –
Outside the U.S.A. –
On the Worldwide Web – ; E-mail –
toll-free
© Hach Company/Hach Lange GmbH, 1989–2013. All rights reserved. 04/2013, Edition 8

Nitrogen, Total DOC316.53.01086
Persulfate Digestion Method Method 100710.5 to 25.0 mg/L N (LR) Test ‘N Tube™ Vials
Scope and application: For water and wastewater.
Test preparation
Instrument specific informationThe table in this section shows all of the instruments that have the program for this test. Table 1 shows adapter and light shield requirements for the instruments that use them.To use the table, select an instrument, then read across to find the correspondinginformation for this test.
Table 1 Instrument-specific information for test tubes
Instrument Adapters Light shield
DR 6000 — —
DR 5000 — —
DR 900 4846400 Cover supplied with the instrument
DR 3900 — LZV849
DR 3800 — LZV646
DR 2800 —
Before startingInstall the instrument cap on the DR 900 cell holder before ZERO or READ is pushed.
DR 3900, DR 3800, DR 2800 and DR 2700: Install the light shield in Cell Compartment #2 before this test is started.
Digestion is required for total nitrogen determinations.
The vials must be mixed carefully for accurate results. Start each vial inversion with the vial in the vertical position, with thecap on the top. Turn the vial upside-down and wait for all of the solution to flow down to the cap. Return the vial to thevertical position and wait for all of the solution to flow down to the bottom of the vial. This mixing method equals oneinversion.
If the test result is over-range, dilute a fresh portion of sample and repeat the complete test procedure. The digestion mustbe repeated for accurate results.
Use the deionized water that is supplied in the reagent set or organic-free water for the blank vial and for the preparation ofstandard solutions.
Review the Safety Data Sheets (MSDS/SDS) for the chemicals that are used and use any recommended personal protectiveequipment.
Dispose of reacted solutions according to local, state and federal regulations. Use the Safety Data Sheets for disposalinformation for unused reagents. Consult the environmental, health and safety staff for your facility and/or local regulatoryagencies for further disposal information.
Items to collect
Description Quantity
Test 'N Tube LR Total Nigtrogen Reagent Set 1
DRB200 Reactor 1
Finger cots 2
1
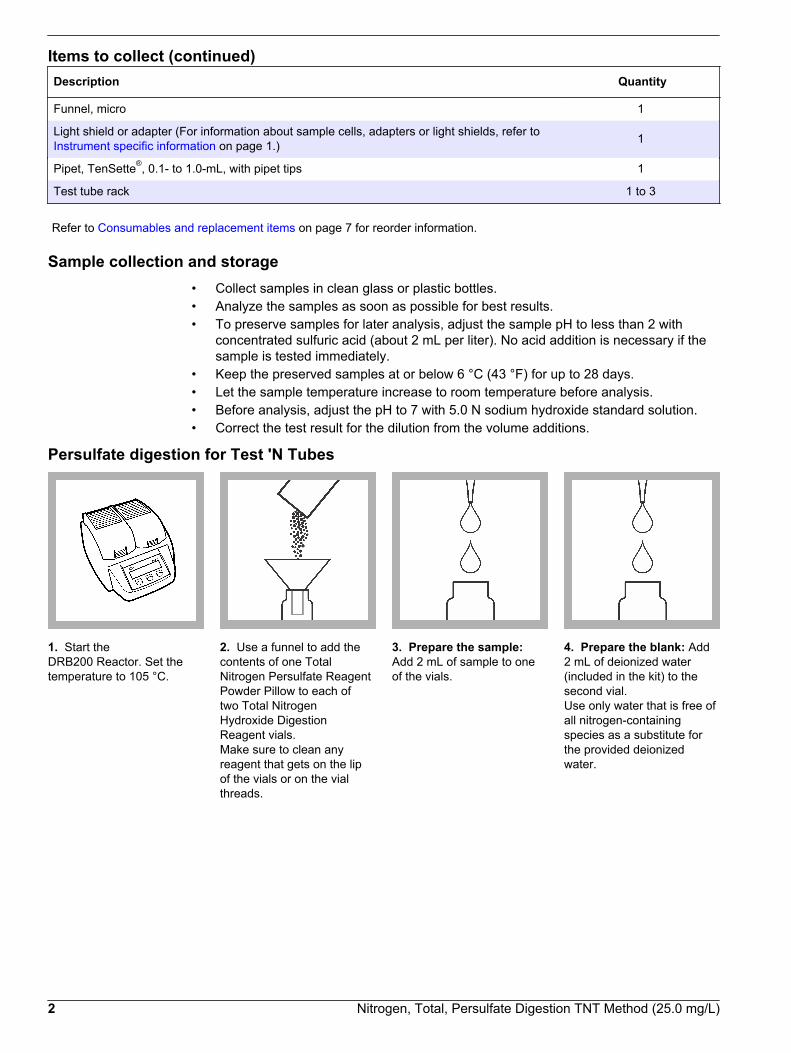
Items to collect (continued)Description Quantity
Funnel, micro 1
Light shield or adapter (For information about sample cells, adapters or light shields, refer to Instrument specific information on page 1.) 1
Pipet, TenSette®, 0.1- to 1.0-mL, with pipet tips 1
Test tube rack 1 to 3
Refer to Consumables and replacement items on page 7 for reorder information.
Sample collection and storage• Collect samples in clean glass or plastic bottles.• Analyze the samples as soon as possible for best results.• To preserve samples for later analysis, adjust the sample pH to less than 2 with
concentrated sulfuric acid (about 2 mL per liter). No acid addition is necessary if thesample is tested immediately.
• Keep the preserved samples at or below 6 °C (43 °F) for up to 28 days.• Let the sample temperature increase to room temperature before analysis.• Before analysis, adjust the pH to 7 with 5.0 N sodium hydroxide standard solution.• Correct the test result for the dilution from the volume additions.
Persulfate digestion for Test 'N Tubes
1. Start theDRB200 Reactor. Set thetemperature to 105 °C.
2. Use a funnel to add thecontents of one TotalNitrogen Persulfate ReagentPowder Pillow to each oftwo Total NitrogenHydroxide DigestionReagent vials.Make sure to clean anyreagent that gets on the lipof the vials or on the vialthreads.
3. Prepare the sample:Add 2 mL of sample to oneof the vials.
4. Prepare the blank: Add2 mL of deionized water(included in the kit) to thesecond vial.Use only water that is free ofall nitrogen-containingspecies as a substitute forthe provided deionizedwater.
2 Nitrogen, Total, Persulfate Digestion TNT Method (25.0 mg/L)

5. Put the caps on bothvials. Shake vigorously forat least 30 seconds to mix.Undissolved powder will notaffect the accuracy of thetest.
6. Put the vials in thereactor and close the lid.Leave the vials in thereactor for exactly30 minutes.
7. At 30 minutes, use fingercots to immediately removethe vials from the reactor.Let the vials cool to roomtemperature.
Start
8. Start program 350 N,Total LR TNT. Forinformation about samplecells, adapters or lightshields, refer to Instrumentspecific informationon page 1.Note: Although the programname may vary betweeninstruments, the programnumber does not change.
9. Add the contents of oneTotal Nitrogen (TN) ReagentA Powder Pillow to eachvial.
10. Put the caps on bothvials. Shake for 15 seconds.
11. Start the instrumenttimer. A 3-minute reactiontime starts.
12. After the timer expires,remove the caps from thevials. Add one TN ReagentB Powder Pillow to eachvial.
13. Put the caps on bothvials. Shake for 15 secondsto mix. The reagent will notdissolve completely.Undissolved powder will notaffect the accuracy of thetest.The solution will start to turnyellow.
14. Start the instrumenttimer. A 2-minute reactiontime starts.
15. Prepared sample:When the timer expires, usea pipet to put 2 mL of thedigested, treated preparedsample into one TNReagent C vial.
16. Blank: When the timerexpires, use a pipet to put2 mL of the digested,treated blank into thesecond TN Reagent C vial.
Nitrogen, Total, Persulfate Digestion TNT Method (25.0 mg/L) 3

17. Put the caps on bothvials. Invert 10 times to mix.Use slow, deliberationinversions for completerecovery. The vials will bewarm to the touch.
18. Start the instrumenttimer. A 5-minute reactiontime starts.The yellow color willintensify.
19. When the timer expires,clean the blank vial.
20. Insert the blank vial intothe 16-mm cell holder.
Zero
21. Push ZERO. Thedisplay shows 0.0 mg/L N.Multiple samples can bemeasured after "zero" is setwith the blank.
22. Clean the sample vial. 23. Insert the sample vialinto the 16-mm cell holder.
Read
24. Push READ. Resultsshow in mg/L N.
Blanks for colorimetric measurementThe reagent blank can be used for up to 7 days for measurements that use the same lotof reagents. Keep the reagent blank in the dark at room temperature (18–25 °C). If asmall amount of white floc appears within a week, discard the reagent blank and preparea new one.
InterferencesThe substances in the Table 2 have been tested and found not to interfere up to theindicated levels (in mg/L). Interfering substances that resulted in a concentration changeof ±10% appear in the Table 3.
Table 2 Non-interfering substances
Interfering substance Interference level
Barium 2.6 mg/L
Calcium 300 mg/L
Chromium (3+) 0.5 mg/L
Iron 2 mg/L
Lead 6.6 µg/L
Magnesium 500 mg/L
Organic Carbon 150 mg/L
Phosphorus 100 mg/L
4 Nitrogen, Total, Persulfate Digestion TNT Method (25.0 mg/L)
Table 2 Non-interfering substances (continued)
Interfering substance Interference level
Silica 150 mg/L
Silver 0.9 mg/L
Tin 1.5 mg/L
Table 3 Interfering substances
Interfering substance Interference level
Bromide > 60 mg/L; positive interference
Chloride > 1000 mg/L; positive interference
This test performed with standard nitrogen solutions prepared from the followingcompounds obtained 95% recovery:
• Ammonium chloride• Ammonium sulfate• Ammonium acetate• Glycine• Urea
Ammonium chloride or nicotinic-PTSA spikes in domestic influent, effluent and the ASTMstandard specification for substitute wastewater (D 5905-96) also resulted in ≥ 95%recovery.The large amounts of nitrogen-free organic compounds in some samples may decreasedigestion efficiency by consuming some of the persulfate reagent. Samples known tocontain high levels of organics should be diluted and re-run to verify digestion efficiency.
Accuracy check
Digestion methodFor proof of accuracy use Primary Standards for Kjeldahl Nitrogen. This method generallygives 95–100% recovery on organic nitrogen standards. Analysts have found Ammonia-PTSA (p-Toluenesulfonate) to be the most difficult to digest. Other compounds may yielddifferent percent recoveries.Items to collect:
• Primary Standard for Kjeldahl Nitrogen (Ammonia-PTSA, Glycine-PTSA or Nicotinic-PTSA)
• 1-L volumetric flask, Class A• Deionized water (use the deionized water supplied in the reagent set or water that is
free of all organic and nitrogen-containing species)
1. Prepare a 25-mg/L N equivalent standard.
a. Weigh the applicable standard:
• Ammonia-PTSA: 0.3379 g• Glycine-PTSA: 0.4416 g• Nicotinic-PTSA: 0.5274 g
b. Use a funnel to add the standard to the volumetric flask.c. Add deionized water to the flask and mix to dissolve the standard.d. Dilute to the mark with deionized water. Mix well.
2. Use the test procedure to measure the concentration of the nitrogen standard.Calculate the percent recovery as follows:% recovery = [(measured concentration)/25] x 100 Note: The minimum expected % recovery for each standard is 95%.
Nitrogen, Total, Persulfate Digestion TNT Method (25.0 mg/L) 5

Standard additions method (sample spike)Use the standard additions method (for applicable instruments) to validate the testprocedure, reagents and instrument and to find if there is an interference in the sample.Items to collect:
• Ammonia Nitrogen Standard Solution, 1000-mg/L as NH3–N• Ampule breaker• Pipet, TenSette®, 0.1–1.0 mL and tips• 50-mL mixing cylinders (3)
1. Use the test procedure to measure the concentration of the sample, then keep the(unspiked) sample in the instrument.
2. Go to the Standard Additions option in the instrument menu.3. Select the values for standard concentration, sample volume and spike volumes.4. Open the standard solution.5. Prepare three spiked samples: use the TenSette pipet to add 0.1 mL, 0.2 mL and
0.3 mL of the standard solution, respectively, to three 50-mL portions of fresh sample.Mix well.
6. Use the test procedure to measure the concentration of each of the spiked samples.Start with the smallest sample spike. Measure each of the spiked samples in theinstrument.
7. Select Graph to compare the expected results to the actual results.Note: If the actual results are significantly different from the expected results, make sure thatthe sample volumes and sample spikes are measured accurately. The sample volumes andsample spikes that are used should agree with the selections in the standard additions menu. Ifthe results are not within acceptable limits, the sample may contain an interference.
Standard solution methodUse the standard solution method to validate the test procedure, reagents andinstrument.Items to collect:
• 10-mg/L ammonia nitrogen standard solution
1. Use the test procedure to measure the concentration of the standard solution.2. Compare the expected result to the actual result.
Note: The factory calibration can be adjusted slightly with the standard adjust option so that theinstrument shows the expected value of the standard solution. The adjusted calibration is thenused for all test results. This adjustment can increase the test accuracy when there are slightvariations in the reagents or instruments.
Method performanceThe method performance data that follows was derived from laboratory tests that weremeasured on a spectrophotometer during ideal test conditions. Users may get differentresults under different test conditions.
Program Standard Precision (95% Confidence Interval) SensitivityConcentration change per 0.010 Abs change
350 10 mg/L NH3–N 9.6–10.4 mg/L N 0.5 mg/L N
Summary of methodAn alkaline persulfate digestion converts all forms of nitrogen to nitrate. Sodiummetabisulfite is added after the digestion to eliminate halogen oxide interferences. Nitratethen reacts with chromotropic acid under strongly acidic conditions to form a yellowcomplex. The measurement wavelength is 410 nm for spectrophotometers or 420 nm forcolorimeters.
6 Nitrogen, Total, Persulfate Digestion TNT Method (25.0 mg/L)

Consumables and replacement itemsRequired reagents
Description Quantity/test Unit Item no.
Nitrogen, Total, LR, Test 'N Tube™ Reagent Set 50 vials 2672245
Required apparatus
Description Quantity/test Unit Item no.
DRB200 Reactor, 110 V, 15 x 16 mm 1 each LTV082.53.40001
OR
DRB200 Reactor, 220 V, 15 x 16 mm 1 each LTV082.52.40001
Funnel, micro, poly 1 each 2584335
Pipet, TenSette®, 0.1- to 1.0-mL 1 each 1970001
Pipet Tips, for TenSette Pipet 1970001 2 50/pkg 2185696
Test tube rack 1 each 1864100
Finger cots 2 2/pkg 1464702
Recommended standards
Description Unit Item no.
Nitrogen, Ammonia Standard Solution, 1000-mg/L NH3-N 1 L 2354153
Nitrogen Ammonia Standard Solution, 10-mg/L NH3–N 500 mL 15349
Kjeldahl Nitrogen Primary Standard Set set of 3 2277800
Wastewater Influent Standard, Mixed Parameter, for NH3-N, NO3-N, PO4, COD, SO4,TOC 500 mL 2833149
Water, deionized 500 mL 27249
Water, organic-free 500 mL 2641549
Optional reagents and apparatus
Description Unit Item no.
Balance, analytical, 80 g x 0.1 mg 100-240 VAC each 2936701
Cylinder, mixing, 50-mL each 2088641
Flask, volumetric, Class A, 1000-mL each 1457453
Sodium Hydroxide, 5 N 50 mL 245026
Sulfuric Acid, ACS 500 mL 97949
Ampule Breaker, PourRite® ampules each 2484600
Ampule Breaker, Voluette® ampules each 2196800
Nitrogen Ammonia Standard Solution, 1.0-mg/L NH3–N 500 mL 189149
Nitrogen, Ammonia Standard Solution, 100-mg/L NH3-N 500 mL 2406549
Nitrogen, Ammonia Standard Solution, 2-mL PourRite Ampule, 50 mg/L 20/pkg 1479120
Nitrogen, Ammonia Standard Solution, 10-mL Voluette Ampules, 50 mg/L 16/pkg 1479110
Nitrogen, Ammonia Standard Solution, 10-mL Voluette® Ampules, 150 mg/L 16/pkg 2128410
Pipet, TenSette®, 1.0 to 10.0 mL each 1970010
Nitrogen, Total, Persulfate Digestion TNT Method (25.0 mg/L) 7

Consumables and replacement items (continued)Description Unit Item no.
Pipet tips for TenSette Pipet 1970010 50/pkg 2199796
Pipet tips for TenSette Pipet 1970010 250/pkg 2199725
Pipet tips for TenSette Pipet 1970001 1000/pkg 2185628
HACH COMPANYWORLD HEADQUARTERSTelephone: (970) 669-3050FAX: (970) 669-2932
FOR TECHNICAL ASSISTANCE, PRICE INFORMATION AND ORDERING:Call 800-227-4224
Contact the HACH office or distributor serving you.www.hach.com [email protected]
In the U.S.A. –
Outside the U.S.A. –
On the Worldwide Web – ; E-mail –
toll-free
© Hach Company/Hach Lange GmbH, 1989–2013. All rights reserved. 04/2013, Edition 8


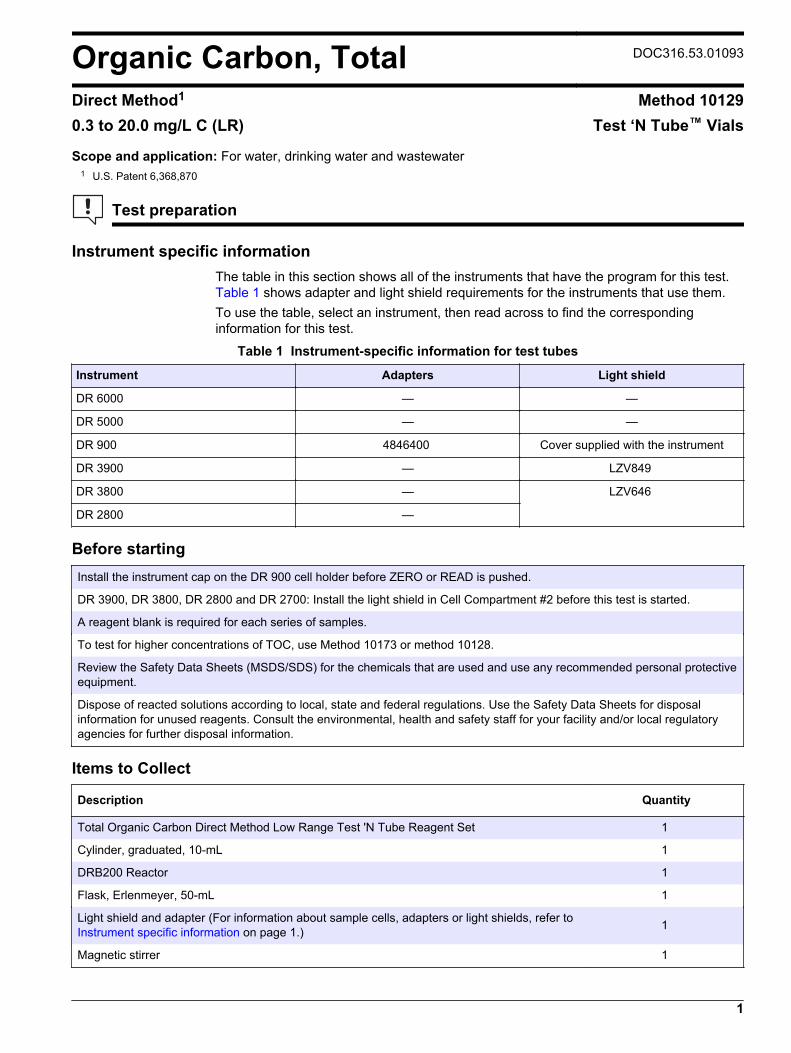
Organic Carbon, Total DOC316.53.01093
Direct Method1 Method 101290.3 to 20.0 mg/L C (LR) Test ‘N Tube™ Vials
Scope and application: For water, drinking water and wastewater1 U.S. Patent 6,368,870
Test preparation
Instrument specific informationThe table in this section shows all of the instruments that have the program for this test. Table 1 shows adapter and light shield requirements for the instruments that use them.To use the table, select an instrument, then read across to find the correspondinginformation for this test.
Table 1 Instrument-specific information for test tubes
Instrument Adapters Light shield
DR 6000 — —
DR 5000 — —
DR 900 4846400 Cover supplied with the instrument
DR 3900 — LZV849
DR 3800 — LZV646
DR 2800 —
Before startingInstall the instrument cap on the DR 900 cell holder before ZERO or READ is pushed.
DR 3900, DR 3800, DR 2800 and DR 2700: Install the light shield in Cell Compartment #2 before this test is started.
A reagent blank is required for each series of samples.
To test for higher concentrations of TOC, use Method 10173 or method 10128.
Review the Safety Data Sheets (MSDS/SDS) for the chemicals that are used and use any recommended personal protectiveequipment.
Dispose of reacted solutions according to local, state and federal regulations. Use the Safety Data Sheets for disposalinformation for unused reagents. Consult the environmental, health and safety staff for your facility and/or local regulatoryagencies for further disposal information.
Items to Collect
Description Quantity
Total Organic Carbon Direct Method Low Range Test 'N Tube Reagent Set 1
Cylinder, graduated, 10-mL 1
DRB200 Reactor 1
Flask, Erlenmeyer, 50-mL 1
Light shield and adapter (For information about sample cells, adapters or light shields, refer to Instrument specific information on page 1.) 1
Magnetic stirrer 1
1

Items to Collect (continued)Description Quantity
Paper, pH 1
Pipet, TenSette®, 0.1- to 1.0-mL, with pipet tips 1
Pipet, TenSette®, 1.0- to 10.0-mL, with pipet tips 1
Stir bar, magnetic 1
Test tube rack 1
Water, organic-free 3.0 mL
Wipes, disposable 1
Refer to Consumables and replacement items on page 7 for reorder information.
Sample collection• Collect samples in clean glass bottles.• Homogenize samples that contain solids to get a representative sample.• Rinse the sample bottle several times with the sample to be collected.• Fill the bottle completely full, then tighten the cap on the bottle.• Analyze the samples as soon as possible for best results.• Acid preservation is not recommended.
Test 'N Tube procedure
1. Start theDRB200 Reactor. Select theTOC program.
2. Add 10 mL of sample toa 50-mL Erlenmeyer flask.Put the stir bar in theErlenmeyer flask.
3. Add 0.4 mL of BufferSolution to the Erlenmeyerflask, pH 2.0. Use pH paperto make sure that thesample pH is 2.
4. Put the flask on a stirplate. Stir at a moderatespeed for 10 minutes.
2 Organic Carbon, Total, Direct TNT Method (20.0 mg/L)

5. Put a label that says"Reagent Blank" on oneLow Range Acid Digestionvial. Put a lable that says"Sample" on a second LowRange Acid Digestion vial.Add the contents of oneTOC Persulfate PowderPillow to each AcidDigestion Vial.
6. Prepare the blank: Add3.0 mL of organic-free waterto the blank vial.
7. Prepare the sample:Add 3.0 mL of sample fromthe Erlenmeyer flask to thesample vial.
8. Use deionized water torinse two blue Low RangeIndicator Ampules. Cleanthe ampules with a wipe. Donot touch the sides of theampules after they areclean. Hold the ampules bythe top.
9. Put one unopenedampule into each AcidDigestion Vial. Snap the topoff of the ampule when thescore aligns with the top ofthe vial. Let the ampulesdrop into the vials.Do not invert or tilt thevials after the ampule isinside.
10. Close the vials tightly.Insert them into the reactor.
11. Close the reactor. Letthe vials react for 2 hours at103 to 105 °C.
12. After two hours, removethe vials from the reactor.Put them in a test tube rackto cool for one hour. Makesure that the vials stay in anupright position at all times.The liquid in the blankshould show a dark bluecolor.
Organic Carbon, Total, Direct TNT Method (20.0 mg/L) 3

Start
13. Start program427 Organic Carbon LR.For information aboutsample cells, adapters orlight shields, refer to Instrument specificinformation on page 1.Note: Although the programname may vary betweeninstruments, the programnumber does not change.
14. Clean the blank vial. 15. Insert the blank vial intothe 16-mm cell holder.
Zero
16. Push ZERO. Thedisplay shows 0.0 mg/L C.
17. Clean the sample vial. 18. Insert the sample vialinto the 16-mm cell holder.
Read
19. Push READ. Resultsshow in mg/L C.
InterferencesIf the sample contains more than 600 mg/L CaCO3 alkalinity, add sulfuric acid to lowerthe sample pH to less than 7, then start the test procedure.Most sample turbidity is either dissolved during the digestion stage or settled during thecooling period. Sample turbidities up to 50 NTU have been tested without interference.The table that follows shows the substances that were tested for interference and did notinterfere up to the levels shown.
Interfering substance Interference level
Aluminum 10 mg/L Al
Ammonia Nitrogen 1000 mg/L as N
ASTM Wastewater No effect
Bromide 500 mg/L Br–
Bromine 25 mg/L Br2
Calcium 2000 mg/L as CaCO3
Chloride 500 mg/L Cl–
Chlorine 10 mg/L Cl2
Chlorine Dioxide 6 mg/L ClO2
4 Organic Carbon, Total, Direct TNT Method (20.0 mg/L)

Interfering substance Interference level
Copper 10 mg/L Cu
Cyanide 10 mg/L CN–
Iodide 50 mg/L I–
Iron (II) 10 mg/L Fe2+
Iron (III) 10 mg/L Fe3+
Magnesium 2000 mg/L as CaCO3
Manganese (VII) 1 mg/L Mn
Monochloramine 14 mg/L NH2Cl as Cl2
Nitrite 500 mg/L NO2-
Ozone 2 mg/L O3
Phosphate 3390 mg/L PO43-
Silica 100 mg/L SiO2
Sulfate 5000 mg/L SO42-
Sulfide 20 mg/L S2-
Sulfite 50 mg/L SO32-
Zinc 5 mg/L Zn
Reagent blank waterWater that is used for the reagent blank must contain less than 0.05 mg/L carbon. If theorganic-free water container is left open for extended periods, the water can absorbcarbon dioxide (CO2) from the atmosphere and contaminate the blank. To remove thedissolved CO2 from the organic-free water, acidify the water and stir for 10 minutes as inthe test procedure.Generally, water that is stored in plastic containers is not suitable for low-range TOCblanks. Water that is stored in plastic can become contaminated with organic compoundsfrom the container walls. These leached organic compounds usually cannot be removedby the acid-sparge process.
Accuracy check
Standard additions method (sample spike)Use the standard additions method (for applicable instruments) to validate the testprocedure, reagents and instrument and to find if there is an interference in the sample.Items to collect:
• TOC Standard Solution Ampule, 1000 mg/L C• 100-mL volumetric flask, Class A• 15-mL volumetric pipet and pipet filler• Organic-free water• Pipet, TenSette®, 0.1–1.0 mL and tips
1. Prepare a 150-mg/L total organic carbon standard solution as follows:
a. Use a pipet to add 15.00 mL of a 1000 mg/L TOC standard solution into thevolumetric flask.
b. Dilute to the mark with organic-free water. Mix well. Prepare this solution daily.2. Use the test procedure to measure the concentration of the sample, then keep the
(unspiked) sample in the instrument.3. Go to the Standard Additions option in the instrument menu.
Organic Carbon, Total, Direct TNT Method (20.0 mg/L) 5

4. Select the values for standard concentration, sample volume and spike volumes.5. Prepare three spiked samples: use the TenSette pipet to add 0.1 mL, 0.2 mL and
0.3 mL of the prepared standard solution, respectively, to three Acid Digestion Vials.6. Add the contents of one TOC Persulfate Powder Pillow to each vial.7. Add 3.0 mL of sample to each vial. Swirl to mix.8. Use the test procedure to measure the concentration of each of the spiked samples.
Start with the smallest sample spike. Measure each of the spiked samples in theinstrument.
9. Select Graph to compare the expected results to the actual results.Note: If the actual results are significantly different from the expected results, make sure thatthe sample volumes and sample spikes are measured accurately. The sample volumes andsample spikes that are used should agree with the selections in the standard additions menu. Ifthe results are not within acceptable limits, the sample may contain an interference.
Standard solution methodUse the standard solution method to validate the test procedure, reagents andinstrument.Items to collect:
• TOC Standard Solution Ampule 1000 mg/L C• 1-L volumetric flask, Class A• 10-mL volumetric pipet, Class A and pipet filler• Organic-free reagent water
1. Prepare a 10.0 mg/L C standard solution as follows:
a. Use a pipet to add 10.00 mL of 1000 mg/L total organic carbon standard solutioninto the volumetric flask.
b. Dilute to the mark with organic-free reagent water. Mix well. Prepare this solutiondaily.
2. Use the test procedure to measure the concentration of the prepared standardsolution.
3. Compare the expected result to the actual result.Note: The factory calibration can be adjusted slightly with the standard adjust option so that theinstrument shows the expected value of the standard solution. The adjusted calibration is thenused for all test results. This adjustment can increase the test accuracy when there are slightvariations in the reagents or instruments.
Method performanceThe method performance data that follows was derived from laboratory tests that weremeasured on a spectrophotometer during ideal test conditions. Users may get differentresults under different test conditions.
Program Standard Precision (95% Confidence Interval) SensitivityConcentration change per 0.010 Abs change
427 10.0 mg/L C 9.1–10.9 mg/L C 0.2 mg/L C
Summary of methodThe total organic carbon (TOC) concentration is determined by first sparging the sampleunder slightly acidic conditions to remove the inorganic carbon. In the outside vial,organic carbon in the sample is digested by persulfate and acid to form carbon dioxide.During digestion, the carbon dioxide diffuses into a pH indicator reagent in the innerampule. The absorption of carbon dioxide into the indicator forms carbonic acid. Carbonicacid changes the pH and thus the color of the indicator solution. The amount of colorchange is related to the original amount of carbon present in the sample. Themeasurement wavelengths are 598 and 430 nm for spectrophotometers or 610 nm forcolorimeters.
6 Organic Carbon, Total, Direct TNT Method (20.0 mg/L)

Consumables and replacement itemsRequired reagents
Description Quantity/test Unit Item no.
pH Paper 1 5/pkg 39133
Water, Organic-free 3.0 mL 500 mL 2641549
Reagent Set, Total Organic Carbon Direct Method Low Range Test 'NTube™ — 50 vials 2760345
Includes:
Acid Digestion Solution Vials, Low Range TOC (not sold separately) 1 50/pkg —
Buffer Solution, Sulfate (not sold separately; see alternate size below) 0.4 mL 25 mL 45233
Funnel, micro, poly 1 each 2584335
Indicator Ampule, Low Range TOC (not sold separately) 1 10/pkg —
TOC Persulfate Powder Pillows (not sold separately) 1 50/pkg —
Required apparatus
Description Quantity/test Unit Item no.
Cylinder, graduated, 10-mL 1 each 50838
DRB200 Reactor, 110 V, 15 x 16 mm 1 each LTV082.53.40001
OR
DRB200 Reactor, 220 V, 15 x 16 mm 1 each LTV082.52.40001
Flask, Erlenmeyer, 50-mL 1 each 50541
Magnetic Stirrer 1 each 2881200
Pipet, TenSette®, 0.1- to 1.0-mL 1 each 1970001
Pipet Tips, for TenSette Pipet 1970001 2 50/pkg 2185696
Pipet, TenSette 1.0–10.0 mL 1 each 1970010
Pipet Tips, for TenSette Pipet 1970010 varies 50/pkg 2199796
Stir bar, magnetic 1 each 4531500
Test tube rack 1 each 1864100
Wipes, Disposable 1 280/pkg 2097000
Recommended standards
Description Unit Item no.
TOC Standard Solution Ampule (KHP Standard, 1000-mg/L C) 5/pkg 2791505
Optional reagents and apparatus
Description Unit Item no.
Balance, analytical, 80 g x 0.1 mg 100-240 VAC each 2936701
Buffer Solution, Sulfate pH 2.0 500 mL 45249
Flask, volumetric, Class A, 1000-mL each 1457453
Flask, volumetric, Class A, 100-mL each 1457442
Paper, for weighing, 100 x 100 mm 500/pkg 1473885
Organic Carbon, Total, Direct TNT Method (20.0 mg/L) 7
Consumables and replacement items (continued)Description Unit Item no.
Pipet filler, safety bulb each 1465100
Pipet tips for TenSette Pipet 1970001 1000/pkg 2185628
Pipet tips for TenSette Pipet 1970010 250/pkg 2199725
Pipet, volumetric Class A, 15-mL each 1451539
Pipet, volumetric, Class A, 10-mL each 1451538
Potassium Acid Phthalate, ACS 500 g 31534
Sulfuric Acid Standard Solution, 5.25 N 100 mL 244932
HACH COMPANYWORLD HEADQUARTERSTelephone: (970) 669-3050FAX: (970) 669-2932
FOR TECHNICAL ASSISTANCE, PRICE INFORMATION AND ORDERING:Call 800-227-4224
Contact the HACH office or distributor serving you.www.hach.com [email protected]
In the U.S.A. –
Outside the U.S.A. –
On the Worldwide Web – ; E-mail –
toll-free
© Hach Company/Hach Lange GmbH, 1989–2013. All rights reserved. 04/2013, Edition 8

Organic Carbon, Total DOC316.53.01094
Direct Method1 Method 1017315 to 150 mg/L C (MR) Test ‘N Tube™ Vials
Scope and application: For water, drinking water and wastewater1 U.S. Patent 6,368,870
Test preparation
Instrument specific informationThe table in this section shows all of the instruments that have the program for this test. Table 1 shows adapter and light shield requirements for the instruments that use them.To use the table, select an instrument, then read across to find the correspondinginformation for this test.
Table 1 Instrument-specific information for test tubes
Instrument Adapters Light shield
DR 6000 — —
DR 5000 — —
DR 900 4846400 Cover supplied with the instrument
DR 3900 — LZV849
DR 3800 — LZV646
DR 2800 —
Before startingInstall the instrument cap on the DR 900 cell holder before ZERO or READ is pushed.
DR 3900, DR 3800, DR 2800 and DR 2700: Install the light shield in Cell Compartment #2 before this test is started.
A reagent blank is required for each series of samples.
To test for higher concentrations of TOC, use Method 10128. To test for lower concentrations of TOC, use Method 10129.
Review the Safety Data Sheets (MSDS/SDS) for the chemicals that are used and use any recommended personal protectiveequipment.
Dispose of reacted solutions according to local, state and federal regulations. Use the Safety Data Sheets for disposalinformation for unused reagents. Consult the environmental, health and safety staff for your facility and/or local regulatoryagencies for further disposal information.
Items to collect
Description Quantity
Total Organic Carbon Direct Method Mid Range Test 'N Tube Reagent Set 1
Cylinder, graduated, 10-mL 1
DRB200 Reactor 1
Flask, Erlenmeyer, 50-mL 1
Light shield and adapter (For information about sample cells, adapters or light shields, refer to Instrument specific information on page 1.) 1
Magnetic stirrer 1
1

Items to collect (continued)Description Quantity
Paper, pH 1
Pipet, TenSette®, 0.1- to 1.0-mL, with pipet tips 1
Pipet, TenSette®, 1.0- to 10.0-mL, with pipet tips 1
Stir bar, magnetic 1
Test tube rack 1
Water, organic-free 3.0 mL
Wipes, disposable 1
Refer to Consumables and replacement items on page 7 for reorder information.
Sample collection• Collect samples in clean glass bottles.• Homogenize samples that contain solids to get a representative sample.• Rinse the sample bottle several times with the sample to be collected.• Fill the bottle completely full, then tighten the cap on the bottle.• Analyze the samples as soon as possible for best results.• Acid preservation is not recommended.
Test 'N Tube procedure
1. Start theDRB200 Reactor. Select theTOC program.
2. Add 10 mL of sample toa 50-mL Erlenmeyer flask.Put the stir bar in theErlenmeyer flask.
3. Add 0.4 mL of BufferSolution to the Erlenmeyerflask, pH 2.0. Use pH paperto make sure that thesample pH is 2.
4. Put the flask on a stirplate. Stir at a moderatespeed for 10 minutes.
2 Organic Carbon, Total, Direct TNT Method (150 mg/L)

5. Add the contents of oneTOC Persulfate PowderPillow to each AcidDigestion Vial. Put a labelthat says "Reagent Blank"on one Mid Range AcidDigestion vial. Put a lablethat says "Sample" on asecond Mid Range AcidDigestion vial.
6. Prepare the blank: Add1.0 mL of organic-free waterto the blank vial.
7. Prepare the sample:Add 1.0 mL of sample fromthe Erlenmeyer flask to thesample vial.
8. Use deionized water torinse two blue Mid/HighRange Indicator Ampules.Clean the ampules with awipe. Do not touch the sidesof the ampules after theyare clean. Hold the ampulesby the top.
9. Put one unopenedampule into each AcidDigestion Vial. Snap the topoff of the ampule when thescore aligns with the top ofthe vial. Let the ampulesdrop into the vials.Do not invert or tilt the vialsafter the ampule is inside.
10. Close the vials tightly.Insert them into the reactor.
11. Close the reactor. Letthe vials react for 2 hours at103 to 105 °C.
12. After two hours, removethe vials from the reactor.Put them in a test tube rackto cool for one hour. Theliquid in the blank shouldshow a dark blue color.
Organic Carbon, Total, Direct TNT Method (150 mg/L) 3
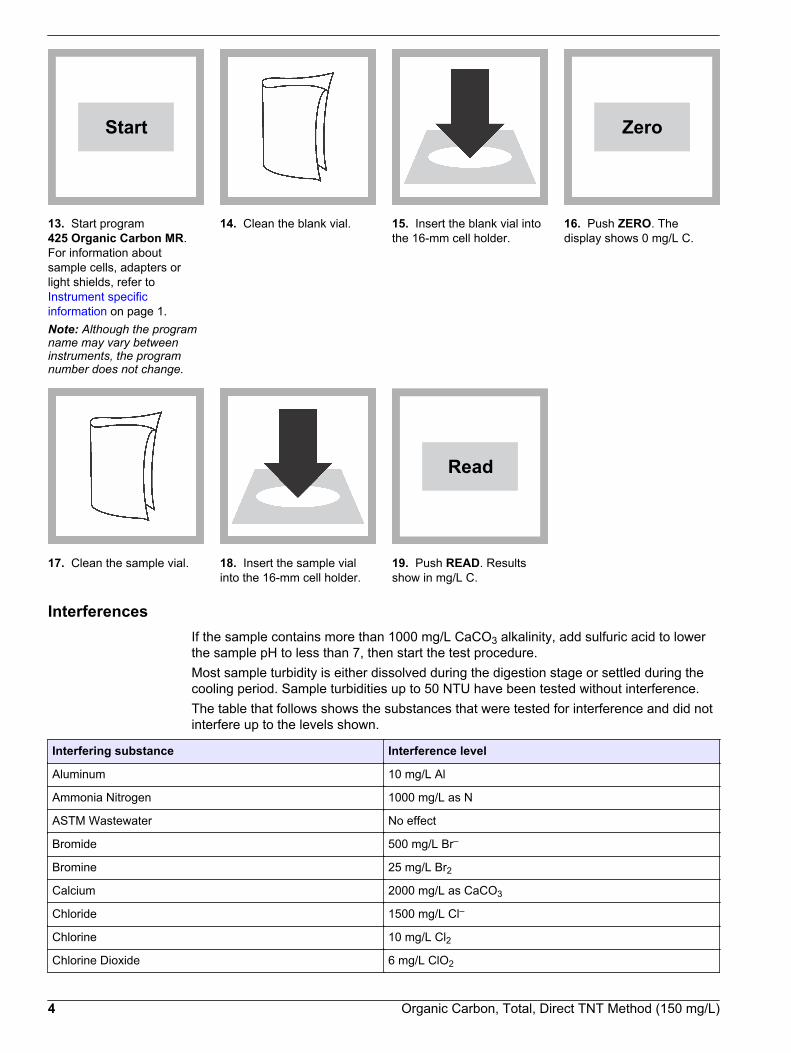
Start
13. Start program425 Organic Carbon MR.For information aboutsample cells, adapters orlight shields, refer to Instrument specificinformation on page 1.Note: Although the programname may vary betweeninstruments, the programnumber does not change.
14. Clean the blank vial. 15. Insert the blank vial intothe 16-mm cell holder.
Zero
16. Push ZERO. Thedisplay shows 0 mg/L C.
17. Clean the sample vial. 18. Insert the sample vialinto the 16-mm cell holder.
Read
19. Push READ. Resultsshow in mg/L C.
InterferencesIf the sample contains more than 1000 mg/L CaCO3 alkalinity, add sulfuric acid to lowerthe sample pH to less than 7, then start the test procedure.Most sample turbidity is either dissolved during the digestion stage or settled during thecooling period. Sample turbidities up to 50 NTU have been tested without interference.The table that follows shows the substances that were tested for interference and did notinterfere up to the levels shown.
Interfering substance Interference level
Aluminum 10 mg/L Al
Ammonia Nitrogen 1000 mg/L as N
ASTM Wastewater No effect
Bromide 500 mg/L Br–
Bromine 25 mg/L Br2
Calcium 2000 mg/L as CaCO3
Chloride 1500 mg/L Cl–
Chlorine 10 mg/L Cl2
Chlorine Dioxide 6 mg/L ClO2
4 Organic Carbon, Total, Direct TNT Method (150 mg/L)

Interfering substance Interference level
Copper 10 mg/L Cu
Cyanide 10 mg/L CN–
Iodide 50 mg/L I–
Iron (II) 10 mg/L Fe2+
Iron (III) 10 mg/L Fe3+
Magnesium 2000 mg/L as CaCO3
Manganese (VII) 1 mg/L Mn
Monochloramine 14 mg/L NH2Cl as Cl2
Nitrite 500 mg/L NO2-
Ozone 2 mg/L O3
Phosphate 3390 mg/L PO43-
Silica 100 mg/L SiO2
Sulfate 5000 mg/L SO42-
Sulfide 20 mg/L S2-
Sulfite 50 mg/L SO32-
Zinc 5 mg/L Zn
Reagent blank waterWater that is used for the reagent blank must contain less than 0.05 mg/L carbon. If theorganic-free water container is left open for extended periods, the water can absorbcarbon dioxide (CO2) from the atmosphere and contaminate the blank. To remove thedissolved CO2 from the organic-free water, acidify the water and stir for 10 minutes as inthe test procedure.Generally, water that is stored in plastic containers is not suitable for low-range TOCblanks. Water that is stored in plastic can become contaminated with organic compoundsfrom the container walls. These leached organic compounds usually cannot be removedby the acid-sparge process.
Accuracy check
Standard additions method (sample spike)Use the standard additions method (for applicable instruments) to validate the testprocedure, reagents and instrument and to find if there is an interference in the sample.Items to collect:
• TOC Standard Solution Ampule, 1000 mg/L C• 50-mL volumetric flask, Class A• 15-mL volumetric pipet and pipet filler• Organic-free water• Pipet, TenSette®, 0.1–1.0 mL and tips
1. Prepare a 300-mg/L total organic carbon standard solution as follows:
a. Use a pipet to add 15.00 mL of a 1000 mg/L TOC standard solution into thevolumetric flask.
b. Dilute to the mark with organic-free water. Mix well. Prepare this solution daily.2. Use the test procedure to measure the concentration of the sample, then keep the
(unspiked) sample in the instrument.3. Go to the Standard Additions option in the instrument menu.
Organic Carbon, Total, Direct TNT Method (150 mg/L) 5

4. Select the values for standard concentration, sample volume and spike volumes.5. Prepare three spiked samples: use the TenSette pipet to add 0.1 mL, 0.2 mL and
0.3 mL of the prepared standard solution, respectively, to three Acid Digestion Vials.6. Add the contents of one TOC Persulfate Powder Pillow to each vial.7. Add 1.0 mL of sample to each vial. Swirl to mix.8. Use the test procedure to measure the concentration of each of the spiked samples.
Start with the smallest sample spike. Measure each of the spiked samples in theinstrument.
9. Select Graph to compare the expected results to the actual results.Note: If the actual results are significantly different from the expected results, make sure thatthe sample volumes and sample spikes are measured accurately. The sample volumes andsample spikes that are used should agree with the selections in the standard additions menu. Ifthe results are not within acceptable limits, the sample may contain an interference.
Standard solution methodUse the standard solution method to validate the test procedure, reagents andinstrument.Items to collect:
• TOC Standard Solution Ampule 1000 mg/L C• 50-mL volumetric flask, Class A• 5-mL volumetric pipet, Class A and pipet filler• Organic-free reagent water
1. Prepare a 100 mg/L C standard solution as follows:
a. Use a pipet to add 5.00 mL of 1000 mg/L total organic carbon standard solutioninto the volumetric flask.
b. Dilute to the mark with organic-free reagent water. Mix well. Prepare this solutiondaily.
2. Use the test procedure to measure the concentration of the prepared standardsolution.
3. Compare the expected result to the actual result.Note: The factory calibration can be adjusted slightly with the standard adjust option so that theinstrument shows the expected value of the standard solution. The adjusted calibration is thenused for all test results. This adjustment can increase the test accuracy when there are slightvariations in the reagents or instruments.
Method performanceThe method performance data that follows was derived from laboratory tests that weremeasured on a spectrophotometer during ideal test conditions. Users may get differentresults under different test conditions.
Program Standard Precision (95% Confidence Interval) SensitivityConcentration change per 0.010 Abs change
425 70 mg/L C 68–72 mg/L C 1.2 mg/L C
Summary of methodThe total organic carbon (TOC) concentration is determined by first sparging the sampleunder slightly acidic conditions to remove the inorganic carbon. In the outside vial,organic carbon in the sample is digested by persulfate and acid to form carbon dioxide.During digestion, the carbon dioxide diffuses into a pH indicator reagent in the innerampule. The absorption of carbon dioxide into the indicator forms carbonic acid. Carbonicacid changes the pH and thus the color of the indicator solution. The amount of colorchange is related to the original amount of carbon in the sample. The measurementwavelengths are 598 and 430 nm for spectrophotometers or 610 nm for colorimeters.
6 Organic Carbon, Total, Direct TNT Method (150 mg/L)
Consumables and replacement itemsRequired reagents
Description Quantity/test Unit Item no.
pH Paper 1 5/pkg 39133
Water, Organic-free 3.0 mL 500 mL 2641549
Reagent Set, Total Organic Carbon Direct Method Mid Range Test 'NTube™ — 50 vials 2815945
Includes:
Acid Digestion Solution Vials, High Range TOC (not sold separately) 1 50/pkg —
Buffer Solution (not sold separately; see alternate size below) 0.4 mL 25 mL —
Funnel, micro, poly 1 each 2584335
Indicator Ampule, MR/HR TOC (not sold separately) 1 10/pkg —
TOC Persulfate Powder Pillows (not sold separately) 1 50/pkg —
Required apparatus
Description Quantity/test Unit Item no.
Cylinder, graduated, 10-mL 1 each 50838
DRB200 Reactor, 110 V, 15 x 16 mm 1 each LTV082.53.40001
OR
DRB200 Reactor, 220 V, 15 x 16 mm 1 each LTV082.52.40001
Flask, Erlenmeyer, 50-mL 1 each 50541
Magnetic Stirrer 1 each 2881200
Pipet, TenSette®, 0.1- to 1.0-mL 1 each 1970001
Pipet Tips, for TenSette Pipet 1970001 2 50/pkg 2185696
Pipet, TenSette 1.0–10.0 mL 1 each 1970010
Pipet Tips, for TenSette Pipet 1970010 varies 50/pkg 2199796
Stir bar, magnetic 1 each 4531500
Test tube rack 1 each 1864100
Wipes, Disposable 1 280/pkg 2097000
Recommended standards
Description Unit Item no.
TOC Standard Solution Ampule (KHP Standard, 1000-mg/L C) 5/pkg 2791505
Optional reagents and apparatus
Description Unit Item no.
Balance, analytical, 80 g x 0.1 mg 100-240 VAC each 2936701
Buffer Solution, Sulfate pH 2.0 500 mL 45249
Flask, volumetric, 50-mL each 1457441
Flask, volumetric, Class A, 1000-mL each 1457453
Pipet tips for TenSette Pipet 1970001 1000/pkg 2185628
Organic Carbon, Total, Direct TNT Method (150 mg/L) 7

Consumables and replacement items (continued)Description Unit Item no.
Pipet tips for TenSette Pipet 1970010 250/pkg 2199725
Paper, for weighing, 100 x 100 mm 500/pkg 1473885
Pipet, volumetric Class A, 15-mL each 1451539
Pipet, volumetric, Class A, 5.00-mL each 1451537
Pipet filler, safety bulb each 1465100
Potassium Acid Phthalate, ACS 500 g 31534
Sulfuric Acid Standard Solution, 5.25 N 100 mL 244932
HACH COMPANYWORLD HEADQUARTERSTelephone: (970) 669-3050FAX: (970) 669-2932
FOR TECHNICAL ASSISTANCE, PRICE INFORMATION AND ORDERING:Call 800-227-4224
Contact the HACH office or distributor serving you.www.hach.com [email protected]
In the U.S.A. –
Outside the U.S.A. –
On the Worldwide Web – ; E-mail –
toll-free
© Hach Company/Hach Lange GmbH, 1989–2013. All rights reserved. 04/2013, Edition 8

Organic Carbon, Total DOC316.53.01095
Direct Method1 Method 10128100 to 700 mg/L C (HR, spectrophotometers)20 to 700 mg/L C (HR, colorimeters)
Test ‘N Tube™ Vials
Scope and application: For wastewater and industrial water1 U.S. Patent 6,368,870
Test preparation
Instrument specific informationThe table in this section shows all of the instruments that have the program for this test. Table 1 shows adapter and light shield requirements for the instruments that use them.To use the table, select an instrument, then read across to find the correspondinginformation for this test.
Table 1 Instrument-specific information for test tubes
Instrument Adapters Light shield
DR 6000 — —
DR 5000 — —
DR 900 4846400 Cover supplied with the instrument
DR 3900 — LZV849
DR 3800 — LZV646
DR 2800 —
Before startingInstall the instrument cap on the DR 900 cell holder before ZERO or READ is pushed.
DR 3900, DR 3800, DR 2800 and DR 2700: Install the light shield in Cell Compartment #2 before this test is started.
A reagent blank is required for each series of samples.
To test for lower concentrations of TOC, use Method 10128 or Method 10129.
Review the Safety Data Sheets (MSDS/SDS) for the chemicals that are used and use any recommended personal protectiveequipment.
Dispose of reacted solutions according to local, state and federal regulations. Use the Safety Data Sheets for disposalinformation for unused reagents. Consult the environmental, health and safety staff for your facility and/or local regulatoryagencies for further disposal information.
Items to collect
Description Quantity
Total Organic Carbon Direct Method High Range Test 'N Tube Reagent Set 1
Cylinder, graduated, 10-mL 1
DRB200 Reactor 1
Flask, Erlenmeyer, 50-mL 1
Light shield or adapter (For information about sample cells, adapters or light shields, refer to Instrument specific information on page 1.) 1
Magnetic stirrer 1
1

Items to collect (continued)Description Quantity
Paper, pH 1
Pipet, TenSette®, 0.1- to 1.0-mL, with pipet tips 1
Pipet, TenSette®, 1.0- to 10.0-mL, with pipet tips 1
Stir bar, magnetic 1
Test tube rack 1
Water, organic-free 0.3 mL
Wipes, disposable 1
Refer to Consumables and replacement items on page 7 for reorder information.
Sample collection• Collect samples in clean glass bottles.• Homogenize samples that contain solids to get a representative sample.• Rinse the sample bottle several times with the sample to be collected.• Fill the bottle completely full, then tighten the cap on the bottle.• Analyze the samples as soon as possible for best results.• Acid preservation is not recommended.
Organic Carbon Total HR
1. Start theDRB200 Reactor. Select theTOC program.
2. Add 10 mL of sample toa 50-mL Erlenmeyer flask.Put the stir bar in theErlenmeyer flask.
3. Add 0.4 mL of BufferSolution to the Erlenmeyerflask, pH 2.0. Use pH paperto make sure that thesample pH is 2.
4. Put the flask on a stirplate. Stir at a moderatespeed for 10 minutes.
2 Organic Carbon, Total, Direct TNT Method (700 mg/L)

5. Add the contents of oneTOC Persulfate PowderPillow to each AcidDigestion Vial. Put a labelthat says "Reagent Blank"on one High Range AcidDigestion vial. Put a labelthat says "Sample" on asecond High Range AcidDigestion vial.
6. Prepare the blank: Add0.3 mL of organic-free waterto the blank vial.
7. Prepare the sample:Add 0.3 mL of sample fromthe Erlenmeyer flask to thesample vial.
8. Use deionized water torinse two blue Mid/HighRange Indicator Ampules.Clean the ampules with awipe. Do not touch the sidesof the ampules after theyare clean. Hold the ampulesby the top.
9. Put one unopenedampule into each AcidDigestion Vial. Snap the topoff of the ampule when thescore aligns with the top ofthe vial. Let the ampulesdrop into the vials.Do not invert or tilt the vialsafter the ampule is inside.
10. Close the vials tightly.Insert them into the reactor.
11. Close the reactor. Letthe vials react for 2 hours at103 to 105 °C.
12. After two hours, removethe vials from the reactor.Keep the vials in an uprightposition at all times. Putthem in a test tube rack tocool for one hour. The liquidin the blank should show adark blue color.
Organic Carbon, Total, Direct TNT Method (700 mg/L) 3

Start
13. Start program426 Organic Carbon HR.For information aboutsample cells, adapters orlight shields, refer to Instrument specificinformation on page 1.Note: Although the programname may vary betweeninstruments, the programnumber does not change.
14. Clean the blank vial. 15. Insert the blank vial intothe 16-mm cell holder.
Zero
16. Push ZERO. Thedisplay shows 0 mg/L C.
17. Clean the sample vial. 18. Insert the sample vialinto the 16-mm cell holder.
Read
19. Push READ. Resultsshow in mg/L C.
InterferencesIf the sample contains more than 1000 mg/L CaCO3 alkalinity, add sulfuric acid to lowerthe sample pH to less than 7, then start the test procedure.Most sample turbidity is either dissolved during the digestion stage or settled during thecooling period. Sample turbidities up to 50 NTU have been tested without interference.The table that follows shows the substances that were tested for interference and did notinterfere up to the levels shown.
Interfering substance Interference level
Aluminum 10 mg/L Al
Ammonia Nitrogen 1000 mg/L as N
ASTM Wastewater No effect
Bromide 500 mg/L Br–
Bromine 25 mg/L Br2
Calcium 2000 mg/L as CaCO3
Chloride 5000 mg/L Cl–
Chlorine 10 mg/L Cl2
Chlorine Dioxide 6 mg/L ClO2
4 Organic Carbon, Total, Direct TNT Method (700 mg/L)

Interfering substance Interference level
Copper 10 mg/L Cu
Cyanide 10 mg/L CN–
Iodide 50 mg/L I–
Iron (II) 10 mg/L Fe2+
Iron (III) 10 mg/L Fe3+
Magnesium 2000 mg/L as CaCO3
Manganese (VII) 1 mg/L Mn
Monochloramine 14 mg/L NH2Cl as Cl2
Nitrite 500 mg/L NO2-
Ozone 2 mg/L O3
Phosphate 3390 mg/L PO43-
Silica 100 mg/L SiO2
Sulfate 5000 mg/L SO42-
Sulfide 20 mg/L S2-
Sulfite 50 mg/L SO32-
Zinc 5 mg/L Zn
Reagent blank waterWater that is used for the reagent blank must contain less than 0.05 mg/L carbon. If theorganic-free water container is left open for extended periods, the water can absorbcarbon dioxide (CO2) from the atmosphere and contaminate the blank. To remove thedissolved CO2 from the organic-free water, acidify the water and stir for 10 minutes as inthe test procedure.Generally, water that is stored in plastic containers is not suitable for low-range TOCblanks. Water that is stored in plastic can become contaminated with organic compoundsfrom the container walls. These leached organic compounds usually cannot be removedby the acid-sparge process.
Accuracy check
Standard additions method (sample spike)Use the standard additions method (for applicable instruments) to validate the testprocedure, reagents and instrument and to find if there is an interference in the sample.Items to collect:
• TOC Standard Solution Ampule, 1000 mg/L C• 50-mL volumetric flask, Class A• 15-mL volumetric pipet and pipet filler• Organic-free water• Pipet, TenSette®, 0.1–1.0 mL and tips
1. Prepare a 300-mg/L total organic carbon standard solution as follows:
a. Use a pipet to add 15.00 mL of a 1000 mg/L TOC standard solution into thevolumetric flask.
b. Dilute to the mark with organic-free water. Mix well. Prepare this solution daily.2. Use the test procedure to measure the concentration of the sample, then keep the
(unspiked) sample in the instrument.3. Go to the Standard Additions option in the instrument menu.
Organic Carbon, Total, Direct TNT Method (700 mg/L) 5

4. Select the values for standard concentration, sample volume and spike volumes.5. Prepare three spiked samples: use the TenSette pipet to add 0.1 mL, 0.2 mL and
0.3 mL of the prepared standard solution, respectively, to three Acid Digestion Vials.6. Add the contents of one TOC Persulfate Powder Pillow to each vial.7. Add 0.3 mL of sample to each vial. Swirl to mix.8. Use the test procedure to measure the concentration of each of the spiked samples.
Start with the smallest sample spike. Measure each of the spiked samples in theinstrument.
9. Select Graph to compare the expected results to the actual results.Note: If the actual results are significantly different from the expected results, make sure thatthe sample volumes and sample spikes are measured accurately. The sample volumes andsample spikes that are used should agree with the selections in the standard additions menu. Ifthe results are not within acceptable limits, the sample may contain an interference.
Standard solution methodUse the standard solution method to validate the test procedure, reagents andinstrument.Items to collect:
• TOC Standard Solution Ampule 1000 mg/L C• 50-mL volumetric flask, Class A• 15-mL volumetric pipet, Class A and pipet filler• Organic-free reagent water
1. Prepare a 300 mg/L C standard solution as follows:
a. Use a pipet to add 15.00 mL of 1000 mg/L total organic carbon standard solutioninto the volumetric flask.
b. Dilute to the mark with organic-free reagent water. Mix well. Prepare this solutiondaily.
2. Use the test procedure to measure the concentration of the prepared standardsolution.
3. Compare the expected result to the actual result.Note: The factory calibration can be adjusted slightly with the standard adjust option so that theinstrument shows the expected value of the standard solution. The adjusted calibration is thenused for all test results. This adjustment can increase the test accuracy when there are slightvariations in the reagents or instruments.
Method performanceThe method performance data that follows was derived from laboratory tests that weremeasured on a spectrophotometer during ideal test conditions. Users may get differentresults under different test conditions.
Program Standard Precision (95% Confidence Interval) SensitivityConcentration change per 0.010 Abs change
426 350 mg/L C 337–363 mg/L C 4 mg/L C
Summary of methodThe total organic carbon (TOC) concentration is determined by first sparging the sampleunder slightly acidic conditions to remove the inorganic carbon. In the outside vial,organic carbon in the sample is digested by persulfate and acid to form carbon dioxide.During digestion, the carbon dioxide diffuses into a pH indicator reagent in the innerampule. The absorption of carbon dioxide into the indicator forms carbonic acid. Carbonicacid changes the pH and thus the color of the indicator solution. The amount of colorchange is related to the original amount of carbon in the sample. The measurementwavelengths are 598 and 430 nm for spectrophotometers or 610 nm for colorimeters.
6 Organic Carbon, Total, Direct TNT Method (700 mg/L)

Consumables and replacement itemsRequired reagents
Description Quantity/test Unit Item no.
pH Paper 1 5/pkg 39133
Water, Organic-free 3.0 mL 500 mL 2641549
Total Organic Carbon Direct Method High Range Test ’N Tube™
Reagent Set — 50 vials 2760445
Includes:
Acid Digestion Solution Vials, High Range TOC (not sold separately) 1 50/pkg —
Buffer Solution, Sulfate (not sold separately; see alternate size below) 0.4 mL 25 mL —
Funnel, micro, poly 1 each 2584335
Indicator Ampules, MR/HR TOC (not sold separately) 1 10/pkg —
TOC Persulfate Powder Pillows (not sold separately) 1 50/pkg —
Required apparatus
Description Quantity/test Unit Item no.
Cylinder, graduated, 10-mL 1 each 50838
DRB200 Reactor, 110 V, 15 x 16 mm 1 each LTV082.53.40001
OR
DRB200 Reactor, 220 V, 15 x 16 mm 1 each LTV082.52.40001
Flask, Erlenmeyer, 50-mL 1 each 50541
Magnetic Stirrer 1 each 2881200
Pipet, TenSette®, 0.1- to 1.0-mL 1 each 1970001
Pipet Tips, for TenSette Pipet 1970001 2 50/pkg 2185696
Pipet, TenSette 1.0–10.0 mL 1 each 1970010
Pipet Tips, for TenSette Pipet 1970010 varies 50/pkg 2199796
Stir bar, magnetic 1 each 4531500
Test tube rack 1 each 1864100
Wipes, Disposable 1 280/pkg 2097000
Recommended standards
Description Unit Item no.
TOC Standard Solution Ampule (KHP Standard, 1000-mg/L C) 5/pkg 2791505
Optional reagents and apparatus
Description Unit Item no.
Balance, analytical, 80 g x 0.1 mg 100-240 VAC each 2936701
Buffer Solution, Sulfate pH 2.0 500 mL 45249
Flask, volumetric, 50-mL each 1457441
Flask, volumetric, Class A, 1000-mL each 1457453
Pipet, volumetric Class A, 15-mL each 1451539
Organic Carbon, Total, Direct TNT Method (700 mg/L) 7

Consumables and replacement items (continued)Description Unit Item no.
Pipet filler, safety bulb each 1465100
Pipet tips for TenSette Pipet 1970001 1000/pkg 2185628
Pipet tips for TenSette Pipet 1970010 250/pkg 2199725
Potassium Acid Phthalate, ACS 500 g 31534
Sulfuric Acid Standard Solution, 5.25 N 100 mL 244932
Paper, for weighing, 100 x 100 mm 500/pkg 1473885
HACH COMPANYWORLD HEADQUARTERSTelephone: (970) 669-3050FAX: (970) 669-2932
FOR TECHNICAL ASSISTANCE, PRICE INFORMATION AND ORDERING:Call 800-227-4224
Contact the HACH office or distributor serving you.www.hach.com [email protected]
In the U.S.A. –
Outside the U.S.A. –
On the Worldwide Web – ; E-mail –
toll-free
© Hach Company/Hach Lange GmbH, 1989–2013. All rights reserved. 04/2013, Edition 8
Oxygen Demand, Chemical DOC316.53.01099
USEPA1 Reactor Digestion Method2 Method 80000.7 to 40.03 mg/L COD (ULR); 3 to 150 mg/L COD (LR); 20 to 1500 mg/LCOD (HR); 200 to 15,000 mg/L COD (HR Plus)
Scope and application: For water and wastewater. Digestion is required.1 Ranges 3 to 150 mg/L COD and 20 to 1500 mg/L COD are USEPA approved for wastewater analyses (Standard Method 5220 D), Federal
Register, April 21, 1980, 45(78), 26811-26812.2 Jirka, A.M.; Carter, M.J., Analytical Chemistry, 1975, 47(8), 1397.3 The ULR is only available with spectrophotometers that can measure at a wavelength of 350 nm.
Test preparation
Instrument specific informationThe table in this section shows all of the instruments that have the program for this test. Table 1 shows adapter and light shield requirements for the instruments that use them.To use the table, select an instrument, then read across to find the correspondinginformation for this test.
Table 1 Instrument-specific information for test tubes
Instrument Adapters Light shield
DR 6000 — —
DR 5000 — —
DR 900 4846400 Cover supplied with the instrument
DR 3900 — LZV849
DR 3800 — LZV646
DR 2800 —
Before startingInstall the instrument cap on the DR 900 cell holder before ZERO or READ is pushed.
DR 3900, DR 3800, DR 2800 and DR 2700: Install the light shield in Cell Compartment #2 before this test is started.
The reagent that is used in this test is corrosive and toxic. Use protection for eyes and skin and be prepared to flush anyspills with running water.
The reagents that are used in this test contain mercury. Collect the reacted samples for proper disposal.
Review the Safety Data Sheets (MSDS/SDS) for the chemicals that are used and use any recommended personal protectiveequipment.
Run one blank with each set of samples. Run all tests (the samples and the blank) with the same lot of vials. The lot numberis on the container label. Refer to Blanks for colorimetric determination on page 4.
Store unused (light sensitive) vials in a closed box.
If the samples contain high concentrations of chloride, refer to the Alternate reagents section.
Dispose of reacted solutions according to local, state and federal regulations. Use the Safety Data Sheets for disposalinformation for unused reagents. Consult the environmental, health and safety staff for your facility and/or local regulatoryagencies for further disposal information.
1

Items to collect
Description Quantity
Beaker, 250-mL 1
Blender 1
COD Digestion Reagent vials varies
DRB200 Reactor 1
Light shield or adapter (For information about sample cells, adapters or light shields, refer to Instrument specific information on page 1.) 1
Magnetic stirrer and stir bar 1
Opaque shipping container for storage of unused, light-sensitive reagent vials varies
Pipet, TenSette, 0.1- to 1.0-mL, with pipet tips (for use with the 200–15,000 mg/L range) 1
Pipet, volumetric, 2.00-mL 2
Pipet filler safety bulb 1
Test tube rack 2
Refer to Consumables and replacement items on page 7 for reorder information.
Sample collection and storage• Collect samples in clean glass bottles. Use plastic bottles only if they are known to be
free of organic contamination.• Test biologically active samples as soon as possible.• Homogenize samples that contain solids to get a representative sample.• To preserve samples for later analysis, adjust the sample pH to less than 2 with
concentrated sulfuric acid (about 2 mL per liter). No acid addition is necessary if thesample is tested immediately.
• Keep the preserved samples at or below 6 °C (43 °F) for up to 28 days.• Correct the test result for the dilution from the volume additions.
Reactor digestion procedure
1. Put 100 mL of sample ina blender. Blend for30 seconds or untilhomogenized.For samples with largeamounts of solids, increasethe homogenization time. Ifthe sample does not containsuspended solids, omitsteps 1 and 2.
2. For the 200–15,000 mg/Lrange or to improveaccuracy and reproducibilityof the other ranges, pour thehomogenized sample into a250-mL beaker and gentlystir with a magnetic stirplate.
3. Set the DRB200 Reactorpower to on. Preheat to150 °C.Refer to the DRB200 UserManual for selecting pre-programmed temperatureapplications.
4. Prepare the sample:Remove the cap from a vialfor the selected range. Holdthe vial at an angle of45 degrees. Use a cleanpipet to add 2.00 mL ofsample to the vial.For 250–15,000 mg/L vials:Use a TenSette Pipet to add0.20 mL of sample to thevial.
2 Oxygen Demand, Chemical, Dichromate Method (multi-range: 40.0, 150, 1500, 15,000 mg/L)

5. Prepare the blank:Remove the cap from asecond vial for the selectedrange. Hold the vial at anangle of 45 degrees. Use aclean pipet to add 2.00 mLof deionized water to thevial.For 250–15,000 mg/L vials:Use a TenSette Pipet to add0.20 mL of deionized waterto the vial.
6. Close the vials tightly.Rinse the vials with waterand wipe with a clean papertowel.
7. Hold the vials by the cap,over a sink. Invert gentlyseveral times to mix.The vials get very hotduring mixing.
8. Put the vials in thepreheated DRB200 reactor.Close the lid.
9. Heat the vials for2 hours.
10. Set the reactor power tooff. Let the vials cool in thereactor for about20 minutes. The vials shouldcool to 120 °C or less.
11. Invert each vial severaltimes while it is still warm.
12. Put the vials in a tuberack to cool to roomtemperature.
Oxygen Demand, Chemical, Dichromate Method (multi-range: 40.0, 150, 1500, 15,000 mg/L) 3

Colorimetric procedure
Start
1. Start program 431 CODULR, 430 COD LR or435 COD HR. Forinformation about samplecells, adapters or lightshields, refer to Instrumentspecific informationon page 1.Note: Although the programname may vary betweeninstruments, the programnumber does not change.
2. Clean the blank. 3. Insert the blank into thecell holder.
Zero
4. Push ZERO. The displayshows 0 or 0.0 mg/L COD.
5. Clean the preparedsample.
6. Insert the preparedsample into the cell holder.
Read
7. Push READ. Resultsshow in mg/L COD.
8. If using High Range PlusCOD digestion reagentvials, multiply the result by10. For the most accurateresults with samples near1500 or 15,000 mg/L COD,repeat the analysis with adiluted sample.
Blanks for colorimetric determinationThe blank vial can be used again and again for measurements that use the same lot ofreagent vials. Measure the absorbance of the blank vial over time and prepare a newblank vial when the absorbance changes.
1. Put the instrument in the absorbance mode at the applicable wavelength. Refer to Table 3 on page 7.
2. Add 5 mL of deionized water into an empty vial.3. Put the vial in the instrument and zero the instrument.4. Put the blank vial that is used in the test procedure into the instrument and record the
absorbance value.5. Keep the blank vial in the dark.6. Prepare a new blank when the absorbance has changed by approximately
0.01 absorbance units.
4 Oxygen Demand, Chemical, Dichromate Method (multi-range: 40.0, 150, 1500, 15,000 mg/L)

InterferencesChloride is the primary interference in this test procedure. Each COD vial containsmercuric sulfate that removes chloride interference to the level specified in Column 1 of Table 2. Dilute samples that have higher chloride concentrations to the level given inColumn 2.Note: For best results, use the low range and ultra-low range vials for samples that have highchloride concentrations (near maximum concentration) and low COD concentrations.
If sample dilution causes the COD concentration to be too low for accuratemeasurements, add 0.50 g of mercuric sulfate (HgSO4) to each COD vial before thesample is added. The additional mercuric sulfate will increase the maximum chlorideconcentration to the level given in Column 3.Note: Bromide interference is not removed with mercuric sulfate.
Table 2 Chloride concentration limits in the sample
Vial range Column 1 (maximum mg/LCl–)
Column 2 (mg/L Cl– fordiluted samples)
Column 3 (maximum mg/LCl– with mercuric sulfate)
ULR1 (0.7–40.0 mg/L) 2000 1000 N/A
LR (3–150 mg/L) 2000 1000 8000
HR (20–1500 mg/L) 2000 1000 4000
HR Plus (200–15,000 mg/L) 20,000 10,000 40,000
1 The ULR is only available for spectrophotometers that can measure at a wavelength of 350 nm.
Accuracy check
Standard solution methodItems to collect:
• 1000 mg/L COD standard solution• 100-mL volumetric flask, Class A• Volumetric pipets, Class A and pipet filler• Deionized water• Potassium acid phthalate (KHP), dried overnight at 120 °C (HR Plus only)
0.7 to 40.0 mg/L ULR
1. Prepare a 30-mg/L COD standard solution as follows:
a. Use a pipet to add 3.00 mL of the 1000 mg/L standard solution into a 100-mLvolumetric flask.
b. Dilute to the mark with deionized water. Mix well.2. Use the test procedure to measure the concentration of the standard solution.3. Compare the expected result to the actual result.
Note: The factory calibration can be adjusted slightly with the standard adjust option so that theinstrument shows the expected value of the standard solution. The adjusted calibration is thenused for all test results. This adjustment can increase the test accuracy when there are slightvariations in the reagents or instruments.
Oxygen Demand, Chemical, Dichromate Method (multi-range: 40.0, 150, 1500, 15,000 mg/L) 5

3 to 150 mg/L LR
1. Prepare a 100-mg/L COD standard solution as follows:
a. Use a pipet to add 10 mL of the 1000 mg/L standard solution into a 100-mLvolumetric flask.
b. Dilute to the mark with deionized water. Mix well.2. Use the test procedure to measure the concentration of the standard solution.3. Compare the expected result to the actual result.
Note: The factory calibration can be adjusted slightly with the standard adjust option so that theinstrument shows the expected value of the standard solution. The adjusted calibration is thenused for all test results. This adjustment can increase the test accuracy when there are slightvariations in the reagents or instruments.
20 to 1500 mg/L HR
1. Use the test procedure with a 300-mg/L, 800 mg/L or 1000 mg/L COD standardsolution to measure the concentration of the standard solution.
2. Compare the expected result to the actual result.Note: The factory calibration can be adjusted slightly with the standard adjust option so that theinstrument shows the expected value of the standard solution. The adjusted calibration is thenused for all test results. This adjustment can increase the test accuracy when there are slightvariations in the reagents or instruments.
200 to 15,000 mg/L HR Plus
1. Prepare a 10,000 mg/L COD standard solution as follows:
a. Dissolve 8.500 g of dried KHP in 1000-mL of organic-free deionized water.2. Use the test procedure to measure the concentration of the standard solution.3. Compare the expected result to the actual result.
Note: The factory calibration can be adjusted slightly with the standard adjust option so that theinstrument shows the expected value of the standard solution. The adjusted calibration is thenused for all test results. This adjustment can increase the test accuracy when there are slightvariations in the reagents or instruments.
Alternate reagentsMercury-free COD2 Reagents are available as a mercury-free alternative. Thesereagents are fully compatible with test procedures and stored programs in theinstruments. Chloride and ammonia determinations are recommended for accurateresults.
N O T I C E
COD2 reagents are not approved for USEPA reporting purposes. Because COD2 reagents do notcontain mercury as a masking agent, they exhibit a positive interference from chloride. Moreinformation is available for use with specific applications.
Method performanceThe method performance data that follows was derived from laboratory tests that weremeasured on a spectrophotometer during ideal test conditions. Users may get differentresults under different test conditions.
Program Standard Precision (95% Confidence Interval) SensitivityConcentration change per 0.010 Abs change
431 (ULR) 30 mg/L COD 28.8–31.2 mg/L COD 0.5 mg/L COD
430 (LR) 80 mg/L COD 77–83 mg/L COD 3 mg/L COD
435 (HR) 800 mg/L COD 785–815 mg/L COD 23 mg/L COD
435 (HR Plus) 8000 mg/L COD 7850–8150 mg/L COD 230 mg/L COD
6 Oxygen Demand, Chemical, Dichromate Method (multi-range: 40.0, 150, 1500, 15,000 mg/L)

Summary of methodThe results in mg/L COD are defined as the milligrams of O2 consumed per liter ofsample under the conditions of this procedure. The sample is heated for 2 hours withsulfuric acid and a strong oxidizing agent, potassium dichromate. Oxidizable organiccompounds react, reducing the dichromate ion (Cr2O7
2–) to green chromic ion (Cr3+).When the 0.7–40.0 or the 3–150 mg/L colorimetric method is used, the amount of Cr6+
that remains is measured. When the 20–1500 mg/L or 200–15,000 mg/L colorimetricmethod is used, the amount of Cr3+ that is produced is measured. The COD reagent alsocontains silver and mercury ions. Silver is a catalyst, and mercury is used to complexchloride interferences.Test results are measured at the wavelengths that are specified in Table 3.
Table 3 Range-specific test wavelengths
Range in mg/L COD Wavelength
0.7 to 40.0 mg/L 350 nm (for applicable instruments)
3 to 150 mg/L 420 nm
20 to 1500 620 nm (610 nm for colorimeters)
2000 to 15,000 mg/L 620 nm (610 nm for colorimeters)
Pollution prevention and waste managementReacted samples contain mercury, silver and chromium and must be disposed of as ahazardous waste. Dispose of reacted solutions according to local, state and federalregulations. Users in the United States can use the ez COD Recycling Service fordisposal of COD vials. Refer to Consumables and replacement items on page 7.
Consumables and replacement itemsRequired reagents
Description Quantity/test Unit Item no.
COD, Ultra Low Range, 0.7 to 40 mg/L 1-2 vials 25/pkg 2415825
COD, Low Range, 3 to 150 mg/L 1-2 vials 25/pkg 2125825
COD, High Range, 20 to 1500 mg/L 1-2 vials 25/pkg 2125925
COD, High Range Plus, 200 to 15,000 mg/L 1-2 vials 25/pkg 2415925
Water, deionized varies 4 L 27256
Alternate reagents and package sizes
Description Quantity/test Unit Item no.
COD2, Low Range, 0 to 150 mg/L COD 1-2 vials 25/pkg 2565025
COD2, High Range, 0 to 1500 mg/L COD 1-2 vials 25/pkg 2565125
COD2, High Range, 0 to 1500 mg/L COD 1-2 vials 150/pkg 2565115
COD2, High Range Plus, 0 to 15,000 mg/L COD 1-2 vials 25/pkg 2834325
COD Digestion Reagent Vials, 3 to 150 mg/L COD 1-2 vials 150/pkg 2125815
COD Digestion Reagent Vials, 200 to 1500 mg/L COD 1-2 vials 150/pkg 2125915
COD Digestion Reagent Vials, ULR 0.7-40.0 mg/L 1-2 vials 150/pkg 2415815
COD Digestion Reagent Vials, HR plus,200-25,000 mg/L 1-2 vials 150/pkg 2415915
Oxygen Demand, Chemical, Dichromate Method (multi-range: 40.0, 150, 1500, 15,000 mg/L) 7
Required apparatus
Description Quantity/test Unit Item no.
Blender, 2-speed, 120 VAC 1 each 2616100
OR
Blender, 2-speed, 240 VAC 1 each 2616102
DRB200 Reactor, 110 V, 15 x 16 mm 1 each LTV082.53.40001
OR
DRB200 Reactor, 220 V, 15 x 16 mm 1 each LTV082.52.40001
Pipet filler, safety bulb 1 each 1465100
Pipet, volumetric, Class A, 2.00-mL 1 each 1451536
Recommended standards and apparatus
Description Unit Item no.
Beaker, 250-mL each 50046H
COD Standard Solution, 300-mg/L 200 mL 1218629
COD Standard Solution, 300-mg/L 500mL 1218649
COD Standard Solution, 800-mg/L 200 mL 2672629
COD Standard Solution, 1000-mg/L 200 mL 2253929
Oxygen Demand Standard (BOD, COD, TOC), 10-mL ampules 16/pkg 2833510
Pipet, TenSette®, 0.1–1.0 mL each 1970001
Pipet tips for TenSette Pipet 1970001 50/pkg 2185696
Pipet tips for TenSette Pipet 1970001 1000/pkg 2185628
Potassium Acid Phthalate, ACS 500 g 31534
Stir bar, octagonal each 2095352
Stirrer, electromagnetic, 120 VAC, with electrode stand each 4530001
Stirrer, electromagnetic, 230 VAC, with electrode stand each 4530002
Test tube rack each 1864100
Wipes, disposable 70/pkg 2096900
Optional reagents and apparatus
Description Unit Item no.
Balance, analytical, 80 g x 0.1 mg 100-240 VAC each 2936701
Flask, volumetric, Class A, 1000-mL each 1457453
Flask, volumetric, Class A, 100-mL each 1457442
Mercuric Sulfate 28 g 191520
Pipet, volumetric, Class A, 3-mL each 1451503
Pipet, volumetric, Class A, 10-mL each 1451538
Sulfuric Acid, ACS 500 mL 97949
Wastewater Influent Standard, Mixed Parameter, for NH3-N, NO3-N, PO4, COD, SO4,TOC 500 mL 2833149
8 Oxygen Demand, Chemical, Dichromate Method (multi-range: 40.0, 150, 1500, 15,000 mg/L)

Consumables and replacement items (continued)Description Unit Item no.
EZ COD™ Recycling Service with 5-gal bucket-mail back option (For US customers only.20 and 55 gallon sizes are also available. ) each 2895405
EZ COD™ Recycling Service with 5-gal bucket- pick up option. (For US customers only.20 and 55 gallon sizes are also available. ) each 2895405P
Finger cots 2/pkg 1464702
Gloves, chemical resistant, size 9-9.5 pair 24101041
Paper, for weighing, 100 x 100 mm 500/pkg 1473885
Safety goggles, vented each 2550700
Wastewater, Effluent Inorganics, for NH3-N, NO3-N, PO4, COD, SO4, TOC 500 mL 2833249
1 Other sizes available
Oxygen Demand, Chemical, Dichromate Method (multi-range: 40.0, 150, 1500, 15,000 mg/L) 9

HACH COMPANYWORLD HEADQUARTERSTelephone: (970) 669-3050FAX: (970) 669-2932
FOR TECHNICAL ASSISTANCE, PRICE INFORMATION AND ORDERING:Call 800-227-4224
Contact the HACH office or distributor serving you.www.hach.com [email protected]
In the U.S.A. –
Outside the U.S.A. –
On the Worldwide Web – ; E-mail –
toll-free
© Hach Company/Hach Lange GmbH, 1989–2013. All rights reserved. 04/2013, Edition 8

Oxygen Demand, Chemical DOC316.53.01101
Manganese III Reactor Digestion Method (with chloride removal) Method 1006730 to 1000 mg/L COD Mn Test ‘N Tube™ Vials
Scope and application: For water and wastewater
Test preparation
Instrument specific informationThe table in this section shows all of the instruments that have the program for this test. Table 1 shows adapter and light shield requirements for the instruments that use them.To use the table, select an instrument, then read across to find the correspondinginformation for this test.
Table 1 Instrument-specific information for test tubes
Instrument Adapters Light shield
DR 6000 — —
DR 5000 — —
DR 900 4846400 Cover supplied with the instrument
DR 3900 — LZV849
DR 3800 — LZV646
DR 2800 —
Before startingInstall the instrument cap on the DR 900 cell holder before ZERO or READ is pushed.
DR 3900, DR 3800, DR 2800 and DR 2700: Install the light shield in Cell Compartment #2 before this test is started.
To find if the sample contains chloride, use Quantab® Titrator Strips for low range chloride.
If the sample COD is expected to exceed 1000 mg/L, dilute the sample. Refer to Multiplication factors for sample dilutionson page 6.
Run one blank with each set of samples. Run all tests (the samples and the blank) with the same lot of vials. The lot numberis on the container label.
The reagent blank vial can be used for multiple tests. Fill a clean COD vial with deionized water and use this vial to zero theinstrument, then measure the absorbance of the reagent blank vial. The absorbance value should be approximately 1.41–1.47. Prepare a new reagent blank vial when the absorbance is outside of this range.
To oxidize resistant organics, samples can be digested for up to four hours. Digest the blank for the same time period as thesamples.
Make sure that the filter disc is not in the center of the vial during the Zero and Read steps. Make sure that the filter disc ismore than 20 mm (0.8 in.) or less than 10 mm (0.4 in.) from the bottom of the vial. If necessary, move the filter disk by gentlyswirling or by lightly tapping the vial on a table top.
The Chloride Removal Cartridge can be used only once.
If the sample boils during the digestion, the vial is not properly sealed. Test results will be invalid.
Spilled reagent will affect test accuracy and is hazardous. Do not run tests with spilled vials.
The maximum range of the VPD gauge is 40 inches of water; it will not indicate the full vacuum level obtained. Full vacuumis 20–25 inches of mercury; this can be measured at the vacuum pump with a gauge calibrated for inches of mercury.
1

Review the Safety Data Sheets (MSDS/SDS) for the chemicals that are used and use any recommended personal protectiveequipment.
Dispose of reacted solutions according to local, state and federal regulations. Use the Safety Data Sheets for disposalinformation for unused reagents. Consult the environmental, health and safety staff for your facility and/or local regulatoryagencies for further disposal information.
Items to collect
Description Quantity
Blender 1
DRB200 Reactor 1
Forceps, extra fine 1
Light shield and adapter (For information about sample cells, adapters or light shields, refer to Instrument specific information on page 1.) 1
Manganese III COD Reagent Vials, 20 to 1000 mg/L COD 1
Pipet, TenSette, 0.1- to 1.0-mL, with pipet tips 1
Pipet, TenSette, 10.0 to 10.0-mL, with pipet tips 1
Sulfuric Acid, concentrated ACS 1 mL
Test tube rack 1
Vacuum pretreatment device 1
Vacuum pump 1
Vial, glass, for sample and acid 2
Water, deionized varies
Refer to Consumables and replacement items on page 7 for reorder information.
Sample collection and storage• Collect samples in clean glass bottles. Use plastic bottles only if they are known to be
free of organic contamination.• Test biologically active samples as soon as possible.• Homogenize samples that contain solids to get a representative sample.• To preserve samples for later analysis, adjust the sample pH to less than 2 with
concentrated sulfuric acid (about 2 mL per liter). No acid addition is necessary if thesample is tested immediately.
• Keep the preserved samples at or below 6 °C (43 °F) for up to 28 days.• Correct the test result for the dilution from the volume additions.
2 Oxygen Demand, Chemical, Manganese III Method with chloride removal (1000 mg/L)

Acidified sample preparation
1. Set the DRB200 Reactorpower to on. Preheat to150 °C or set to the CODprogram.
2. Put 100 mL of sample ina blender. Blend for30 seconds or untilhomogenized.If suspended solids arepresent, continue to mix thesample while the sample ismoved to the mixing cell forthe prepared sample.
3. Prepare the blank: Usea pipet to add 9.0 mL ofdeionized water to a glassmixing cell.
4. Prepare the sample:Use a pipet to add 9.0 mL ofhomogenized sample to asecond glass mixing cell.
5. Use a pipet or dispenserto add 1.0 mL ofconcentrated Sulfuric Acidto both mixing cells.
6. Close the mixing cellstightly. Invert several times.The cells get hot duringmixing. Let the mixing cellscool to room temperature.Go to the Vacuumpretreatment procedureon page 4.
Oxygen Demand, Chemical, Manganese III Method with chloride removal (1000 mg/L) 3

Vacuum pretreatment procedure
1. Attach the vacuumpretreatment device (VPD)to a vacuum pump that cancreate a vacuum of 20–25 inches of mercury.Do not use an aspirator typevacuum.
2. Write a sample identifieron each vial. Insert the MnIII COD vials in thenumbered holes in the VPDbase. Remove the capsfrom the vials.
3. Put the VPD top on thebase. Insert a fresh ChlorideRemoval Cartridge (CRC)directly above each Mn IIICOD Reagent Vial. Closeany open holes in the VPDwith the supplied stoppers.
4. Start the vacuum pump.Adjust the vacuum regulatorvalve on top of the VPD untilthe internal gauge reads20 inches of water.
5. Prepare the blank: Usea pipet to add 0.60 mL ofacidified blank into the CRC.It should take 30–45 seconds to pull the liquidthrough the CRC into thevial.Note: If the liquid does notflow through the CRC,increase the vacuum untilthe flow starts, then reducethe vacuum back to20 inches of water.
6. Prepare the sample:Use a pipet to add 0.60 mLof each acidified sample intothe CRC.
7. Close the vacuumregulator valve completelyto achieve full vacuum. Afterone minute of full vacuum,move the VPD back andforth several times toremove drops that cling tothe CRC.
8. Open the VPD regulatorto release the vacuum. Turnthe pump off. Remove theVPD top and set it aside.Dispose of the usedChloride RemovalCartridges.Go to Sample preparationand measurementon page 5.
4 Oxygen Demand, Chemical, Manganese III Method with chloride removal (1000 mg/L)
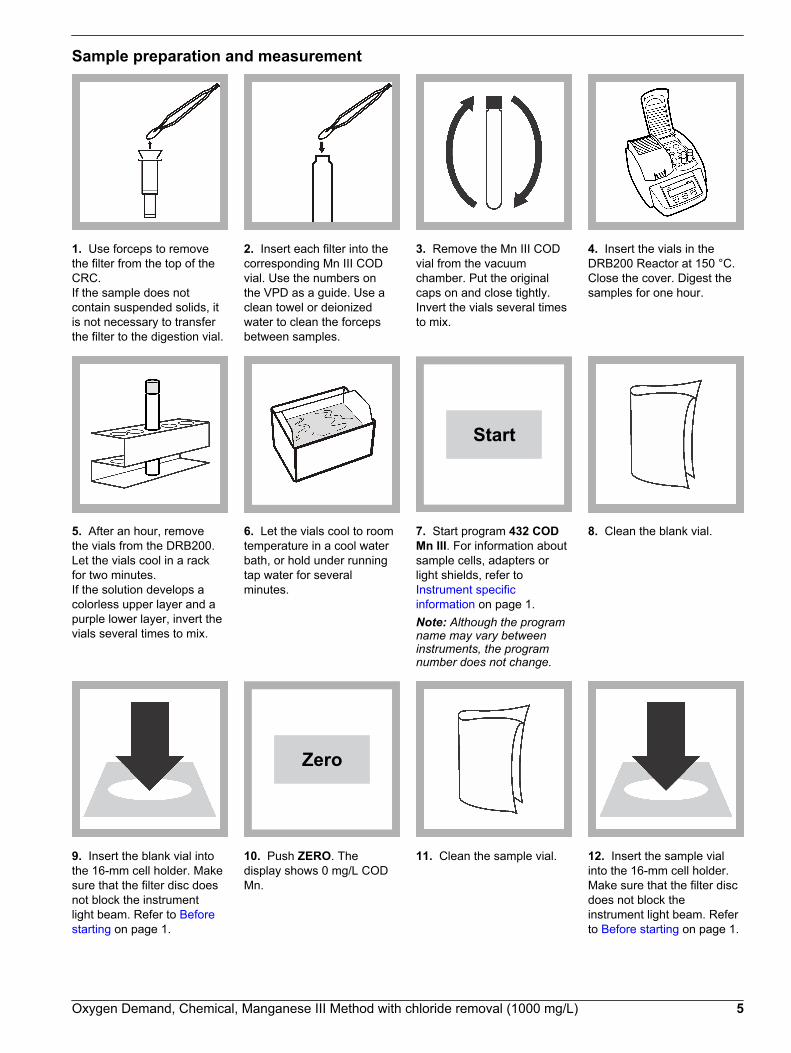
Sample preparation and measurement
1. Use forceps to removethe filter from the top of theCRC.If the sample does notcontain suspended solids, itis not necessary to transferthe filter to the digestion vial.
2. Insert each filter into thecorresponding Mn III CODvial. Use the numbers onthe VPD as a guide. Use aclean towel or deionizedwater to clean the forcepsbetween samples.
3. Remove the Mn III CODvial from the vacuumchamber. Put the originalcaps on and close tightly.Invert the vials several timesto mix.
4. Insert the vials in theDRB200 Reactor at 150 °C.Close the cover. Digest thesamples for one hour.
5. After an hour, removethe vials from the DRB200.Let the vials cool in a rackfor two minutes.If the solution develops acolorless upper layer and apurple lower layer, invert thevials several times to mix.
6. Let the vials cool to roomtemperature in a cool waterbath, or hold under runningtap water for severalminutes.
Start
7. Start program 432 CODMn III. For information aboutsample cells, adapters orlight shields, refer to Instrument specificinformation on page 1.Note: Although the programname may vary betweeninstruments, the programnumber does not change.
8. Clean the blank vial.
9. Insert the blank vial intothe 16-mm cell holder. Makesure that the filter disc doesnot block the instrumentlight beam. Refer to Beforestarting on page 1.
Zero
10. Push ZERO. Thedisplay shows 0 mg/L CODMn.
11. Clean the sample vial. 12. Insert the sample vialinto the 16-mm cell holder.Make sure that the filter discdoes not block theinstrument light beam. Referto Before starting on page 1.
Oxygen Demand, Chemical, Manganese III Method with chloride removal (1000 mg/L) 5

Read
13. Push READ. Resultsshow in mg/L COD Mn.
Multiplication factors for sample dilutionsIf the sample COD is expected to exceed 1000 mg/L, dilute the sample as shown in Table 2. For other dilutions not shown, add the sample volume and the deionized waterand divide by the sample volume to obtain the multiplication factor. All dilutions requirethat the ratio of sample to sulfuric acid remain at 9:1.Note: Mixing concentrated sulfuric acid and water is not additive. Adding 1.0 mL of concentratedsulfuric acid to 9.0 mL of sample does not result in a final volume of 10.0 mL. This factor is built intothe calibration curve.
Table 2 Multiplication factors
Sample (mL) Deionized water (mL) Range (mg/L COD) Multiplication factor
6.0 3.0 30–1500 1.5
3.0 6.0 60–3000 3
1.0 8.0 180–9000 9
0.5 8.5 360–18,000 18
For best results, use a minimum of 0.5 mL sample for the dilution. If the sample valuesexceed 18,000 mg/L COD, use a separate sample dilution, then start the sample chlorideremoval procedure.Example: Dilute the sample to a range of 90–4500 mg/L COD.Sample Volume (2.0 mL) + Deionized water (7.0 mL) = Total Volume (9.0 mL)Multiplication factor = (total volume)/(sample volume) = 9.0 mL/2.0 mL = 4.5 Standard test range is 50 to 1000 mg/L COD.Example test range = 4.5(50) to 4.5(1000) = 225 to 4500 mg/L COD
InterferencesInorganic materials may also be oxidized by trivalent manganese and constitute a positiveinterference when present in significant amounts. Chloride is the most commoninterference and is removed by sample pretreatment with the Chloride RemovalCartridge. If chloride is known to be absent or present in insignificant levels, thepretreatment can be omitted. A simple way to examine if chloride will affect test results isto run routine samples with and without the chloride removal, then compare results. Otherinorganic interferences (i.e., nitrite, ferrous iron, sulfide) are not usually present insignificant amounts. If necessary, these interferences can be corrected after finding theirconcentrations with separate methods and adjusting the final COD test resultsaccordingly.Ammonia nitrogen is known to interfere in the presence of chloride; it does not interfere ifchloride is absent.
6 Oxygen Demand, Chemical, Manganese III Method with chloride removal (1000 mg/L)
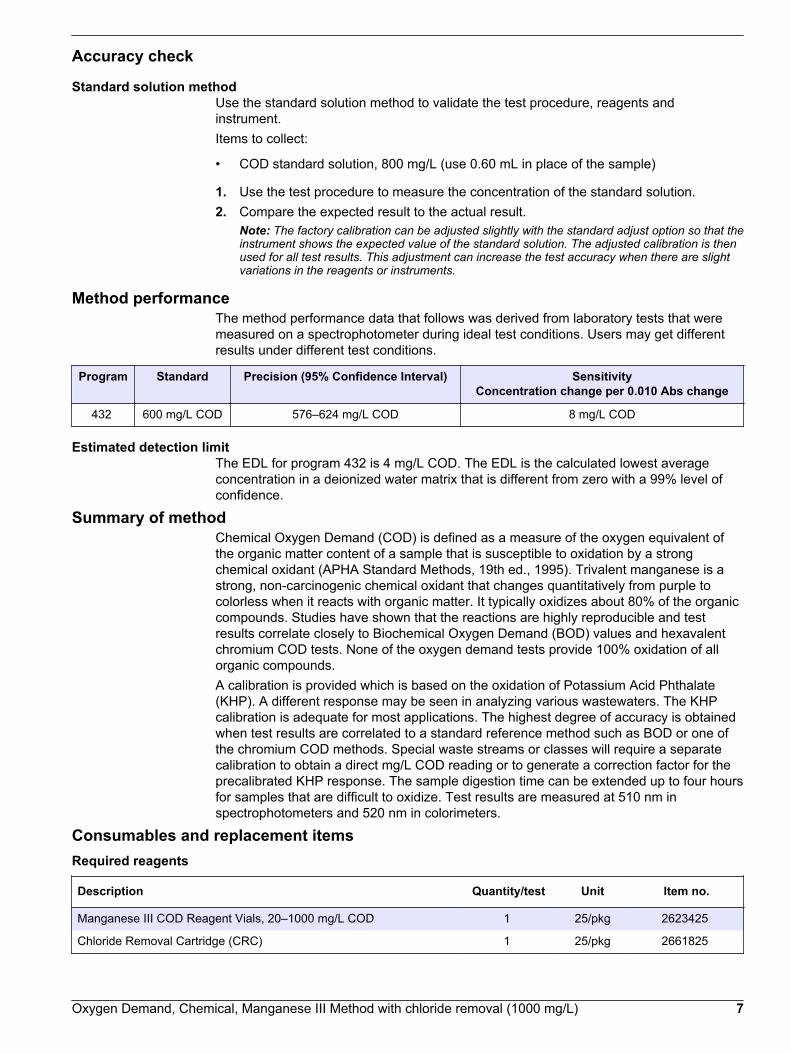
Accuracy check
Standard solution methodUse the standard solution method to validate the test procedure, reagents andinstrument.Items to collect:
• COD standard solution, 800 mg/L (use 0.60 mL in place of the sample)
1. Use the test procedure to measure the concentration of the standard solution.2. Compare the expected result to the actual result.
Note: The factory calibration can be adjusted slightly with the standard adjust option so that theinstrument shows the expected value of the standard solution. The adjusted calibration is thenused for all test results. This adjustment can increase the test accuracy when there are slightvariations in the reagents or instruments.
Method performanceThe method performance data that follows was derived from laboratory tests that weremeasured on a spectrophotometer during ideal test conditions. Users may get differentresults under different test conditions.
Program Standard Precision (95% Confidence Interval) SensitivityConcentration change per 0.010 Abs change
432 600 mg/L COD 576–624 mg/L COD 8 mg/L COD
Estimated detection limitThe EDL for program 432 is 4 mg/L COD. The EDL is the calculated lowest averageconcentration in a deionized water matrix that is different from zero with a 99% level ofconfidence.
Summary of methodChemical Oxygen Demand (COD) is defined as a measure of the oxygen equivalent ofthe organic matter content of a sample that is susceptible to oxidation by a strongchemical oxidant (APHA Standard Methods, 19th ed., 1995). Trivalent manganese is astrong, non-carcinogenic chemical oxidant that changes quantitatively from purple tocolorless when it reacts with organic matter. It typically oxidizes about 80% of the organiccompounds. Studies have shown that the reactions are highly reproducible and testresults correlate closely to Biochemical Oxygen Demand (BOD) values and hexavalentchromium COD tests. None of the oxygen demand tests provide 100% oxidation of allorganic compounds.A calibration is provided which is based on the oxidation of Potassium Acid Phthalate(KHP). A different response may be seen in analyzing various wastewaters. The KHPcalibration is adequate for most applications. The highest degree of accuracy is obtainedwhen test results are correlated to a standard reference method such as BOD or one ofthe chromium COD methods. Special waste streams or classes will require a separatecalibration to obtain a direct mg/L COD reading or to generate a correction factor for theprecalibrated KHP response. The sample digestion time can be extended up to four hoursfor samples that are difficult to oxidize. Test results are measured at 510 nm inspectrophotometers and 520 nm in colorimeters.
Consumables and replacement itemsRequired reagents
Description Quantity/test Unit Item no.
Manganese III COD Reagent Vials, 20–1000 mg/L COD 1 25/pkg 2623425
Chloride Removal Cartridge (CRC) 1 25/pkg 2661825
Oxygen Demand, Chemical, Manganese III Method with chloride removal (1000 mg/L) 7

Consumables and replacement items (continued)Description Quantity/test Unit Item no.
Sulfuric Acid, concentrated, ACS 75 mL 2.5 L 97909
Water, deionized varies 4 L 27256
Required apparatus
Description Quantity/test Unit Item no.
Blender, 2-speed, 120 VAC 1 each 2616100
Cap, with inert Teflon liner, for mixing bottle varies 12/pkg 2401812
Cell, mixing 2 each 2427700
DRB200 Reactor, 110 V, 15 x 16 mm 1 each LTV082.53.40001
DRB200 Reactor, 220 V, 15 x 16 mm 1 each LTV082.52.40001
Forceps, extra fine point 1 each 2669600
Pipet, TenSette®, 1.0- to 10.0-mL 1 each 1970010
Pipet Tips, for TenSette Pipet 1970010 varies 50/pkg 2199796
Pipet, TenSette®, 0.1- to 1.0-mL 1 each 1970001
Pipet Tips, for TenSette Pipet 1970001 2 50/pkg 2185696
Test tube rack 1 each 1864100
Vacuum Pretreatment Device (VPD) 1 each 4900000
Vacuum Pump, 1.2 CFM 115 V 1 each 2824800
Recommended standards
Description Unit Item no.
COD Standard Solution, 800-mg/L 200 mL 2672629
Oxygen Demand Standard (BOD, COD, TOC), 10-mL ampules 16/pkg 2833510
Potassium Acid Phthalate, ACS 500 g 31534
Wastewater Influent Standard, Mixed Parameter, for NH3-N, NO3-N, PO4, COD, SO4,TOC 500 mL 2833149
Optional reagents and apparatus
Description Unit Item no.
Dispenser, automatic, 1.0–5.0 mL each 2563137
Titrator Strips, Quantab®, for low range chloride 40 tests 2744940
Finger cots 2/pkg 1464702
Paper, pH, 0–14 pH range 100/pkg 2601300
COD Standard Solution, 300-mg/L 200 mL 1218629
COD Standard Solution, 300-mg/L 500mL 1218649
COD Standard Solution, 1000-mg/L 200 mL 2253929
Standard Methods Book, most current edition each 2270800
Pipet tips for TenSette Pipet 1970010 250/pkg 2199725
Pipet tips for TenSette Pipet 1970001 1000/pkg 2185628
8 Oxygen Demand, Chemical, Manganese III Method with chloride removal (1000 mg/L)

Oxygen Demand, Chemical, Manganese III Method with chloride removal (1000 mg/L) 9

HACH COMPANYWORLD HEADQUARTERSTelephone: (970) 669-3050FAX: (970) 669-2932
FOR TECHNICAL ASSISTANCE, PRICE INFORMATION AND ORDERING:Call 800-227-4224
Contact the HACH office or distributor serving you.www.hach.com [email protected]
In the U.S.A. –
Outside the U.S.A. –
On the Worldwide Web – ; E-mail –
toll-free
© Hach Company/Hach Lange GmbH, 1989–2013. All rights reserved. 04/2013, Edition 8

Oxygen, Dissolved DOC316.53.01096
HRDO Method Method 81660.3 to 15.0 mg/L O2 (HR) AccuVac® Ampuls
Scope and application: For water and wastewater
Test preparation
Instrument-specific tableThe tables in this section show all of the instruments that have the program for this test. Table 2 shows sample cell and adapter requirements for AccuVac Ampul tests.To use the table, select an instrument, then read across to find the correspondinginformation for this test.
Table 1 Instrument-specific information for AccuVac Ampuls
Instrument Adapter Sample cell
DR 6000 DR 5000 DR 900
— 2427606
DR 3900 LZV846 (A)
DR 3800 DR 2800 DR 2700
LZV584 (C) 2122800
Before startingSamples must be analyzed immediately after collection and cannot be preserved for later analysis.
Install the instrument cap on the DR 900 cell holder before ZERO or READ is pushed.
Review the Safety Data Sheets (MSDS/SDS) for the chemicals that are used and use any recommended personal protectiveequipment.
Dispose of reacted solutions according to local, state and federal regulations. Use the Safety Data Sheets for disposalinformation for unused reagents. Consult the environmental, health and safety staff for your facility and/or local regulatoryagencies for further disposal information.
Items to collect
Description Quantity
High Range Dissolved Oxygen AccuVac® Ampuls 1
Polypropylene beaker, 50-mL 1
Stoppers, for 18-mm tubes and AccuVac Ampuls 1
Sample cells (For information about sample cells, adapters or light shields, refer to Instrument-specific table on page 1.) 1
Refer to Consumables and replacement items on page 4 for reorder information.
1

Sample collectionGood sample collection and handling technique are important to get meaningful results.The dissolved oxygen content of the water that is tested can change with depth,turbulence, temperature, sludge deposits, light, microbial action, mixing, travel time andother factors. A single dissolved oxygen test rarely reflects the accurate overall conditionof a body of water. Several samples taken at different times, locations and depths arerecommended for most reliable results.The main consideration with sample collection is to prevent contamination of the samplewith atmospheric oxygen.
• Samples must be analyzed immediately after collection, although only a small errorresults if the reading on a capped ampule is taken several hours later. Theabsorbance will decrease by approximately 3% during the first hour and will notchange significantly afterwards.
• Make sure to put the cap on the ampule before the ampule is removed from thesample.
AccuVac® Ampul procedure
Start
1. Start program445 Oxygen, Dis HR AV.For information aboutsample cells, adapters orlight shields, refer to Instrument-specific tableon page 1.Note: Although the programname may vary betweeninstruments, the programnumber does not change.
2. Prepare the blank: Fillthe sample cell with 10 mLof sample.
3. Fill a blue Ampul capwith sample.
4. Prepare the sample:Collect at least 40 mL ofsample in a 50-mL beaker.Fill the AccuVac Ampul withsample. Keep the tipimmersed while the Ampulfills completely.
5. Hold the Ampul with thetip down. Immediately putthe Ampul into the Ampulcap.The cap preventscontamination fromatmospheric oxygen.
6. Shake the Ampul for30 seconds.A small amount ofundissolved reagent will notaffect results.
7. Start the instrumenttimer. A 2-minute reactiontime starts.The oxygen that hasdegassed during aspirationdissolves again and reacts.
8. When the timer expires,shake the Ampul for30 seconds.Let all of the bubblesdissipate before the nextstep.
2 Oxygen, Dissolved, HRDO Method (15.0 mg/L)

9. Clean the blank. 10. Insert the blank into thecell holder.
Zero
11. Push ZERO. Thedisplay shows 0.0 mg/L O2.
12. Clean the AccuVacAmpul.
13. Insert the preparedsample AccuVac Ampul intothe cell holder.
Read
14. Push READ. Resultsshow in mg/L O2.
InterferencesInterfering substance Interference level
Cr3+ More than 10 mg/L
Cu2+ More than 10 mg/L
Fe2+ More than 10 mg/L
Mg2+ Magnesium is commonly present in seawater and causes a negative interference. If the samplecontains more than 50% seawater, the oxygen concentration obtained by this method will be 25%less than the true oxygen concentration. If the sample contains less than 50% seawater, theinterference will be less than 5%.
Mn2+ More than 10 mg/L
Ni2+ More than 10 mg/L
NO2- More than 10 mg/L
Accuracy check
Comparison methodTo validate the test results, measure the concentration of the same sample with adissolved oxygen meter or with a titrimetric method.
Method performanceThe method performance data that follows was derived from laboratory tests that weremeasured on a spectrophotometer during ideal test conditions. Users may get differentresults under different test conditions.
Program Standard Precision (95% Confidence Interval) SensitivityConcentration change per 0.010 Abs change
445 6.7 mg/L O2 6.2–7.3 mg/L O2 0.09 mg/L O2
Oxygen, Dissolved, HRDO Method (15.0 mg/L) 3

Summary of methodThe High Range Dissolved Oxygen AccuVac Ampul contains reagent vacuum-sealed in aglass Ampul. When the AccuVac Ampul is opened in a sample that contains dissolvedoxygen, the solution forms a yellow color which turns purple. The purple colordevelopment is proportional to the concentration of dissolved oxygen. The measurementwavelength is 535 nm for spectrophotometers or 520 nm for colorimeters.
Consumables and replacement itemsRequired reagents
Description Quantity/test Unit Item no.
High Range Dissolved Oxygen AccuVac® Ampuls 1 25/pkg 2515025
Required apparatus
Description Quantity/test Unit Item no.
Beaker, polypropylene, 50-mL, low form 1 each 108041
Optional reagents, apparatus and meters
Description Unit Item no.
AccuVac® Snapper each 2405200
AccuVac® Sampler each 2405100
AccuVac® vials for sample blanks 25/pkg 2677925
Stoppers for 18-mm tubes and AccuVac Ampuls 6/pkg 173106
HQ30d Meter with Standard LDO Dissolved Oxygen Probe (1 meter cable; additionalprobes and cable lengths are available) each HQ30d53301000
HQ40d Meter with Standard LDO Probe (1 meter cable; additional probes and cablelengths are available) each HQ40d53301000
HACH COMPANYWORLD HEADQUARTERSTelephone: (970) 669-3050FAX: (970) 669-2932
FOR TECHNICAL ASSISTANCE, PRICE INFORMATION AND ORDERING:Call 800-227-4224
Contact the HACH office or distributor serving you.www.hach.com [email protected]
In the U.S.A. –
Outside the U.S.A. –
On the Worldwide Web – ; E-mail –
toll-free
© Hach Company/Hach Lange GmbH, 1989–2013. All rights reserved. 04/2013, Edition 8

Oxygen, Dissolved DOC316.53.01098
Indigo Carmine Method Method 83166 to 800 µg/L O2 (LR, spectrophotometers)10 to 1000 µg/L O2 (LR, colorimeters)
AccuVac® Ampuls
Scope and application: For boiler feedwater
Test preparation
Instrument-specific tableThe tables in this section show all of the instruments that have the program for this test. Table 2 shows sample cell and adapter requirements for AccuVac Ampul tests.To use the table, select an instrument, then read across to find the correspondinginformation for this test.
Table 1 Instrument-specific information for AccuVac Ampuls
Instrument Adapter Sample cell
DR 6000 DR 5000 DR 900
— 2427606
DR 3900 LZV846 (A)
DR 3800 DR 2800 DR 2700
LZV584 (C) 2122800
Before startingSamples must be analyzed immediately after collection and cannot be preserved for later analysis.
Install the instrument cap on the DR 900 cell holder before ZERO or READ is pushed.
The dissolved oxygen reading is only stable for 30 seconds. After 30 seconds, the Ampul solution will absorb oxygen fromthe air.
Review the Safety Data Sheets (MSDS/SDS) for the chemicals that are used and use any recommended personal protectiveequipment.
Dispose of reacted solutions according to local, state and federal regulations. Use the Safety Data Sheets for disposalinformation for unused reagents. Consult the environmental, health and safety staff for your facility and/or local regulatoryagencies for further disposal information.
Items to collect
Description Quantity
Low Range Dissolved Oxygen AccuVac® Ampuls 1
Polypropylene beaker, 50-mL 1
Stoppers, for 18-mm tubes and AccuVac Ampuls 1
Sample cells (For information about sample cells, adapters or light shields, refer to Instrument-specific table on page 1.) 1
Refer to Consumables and replacement items on page 3 for reorder information.
1
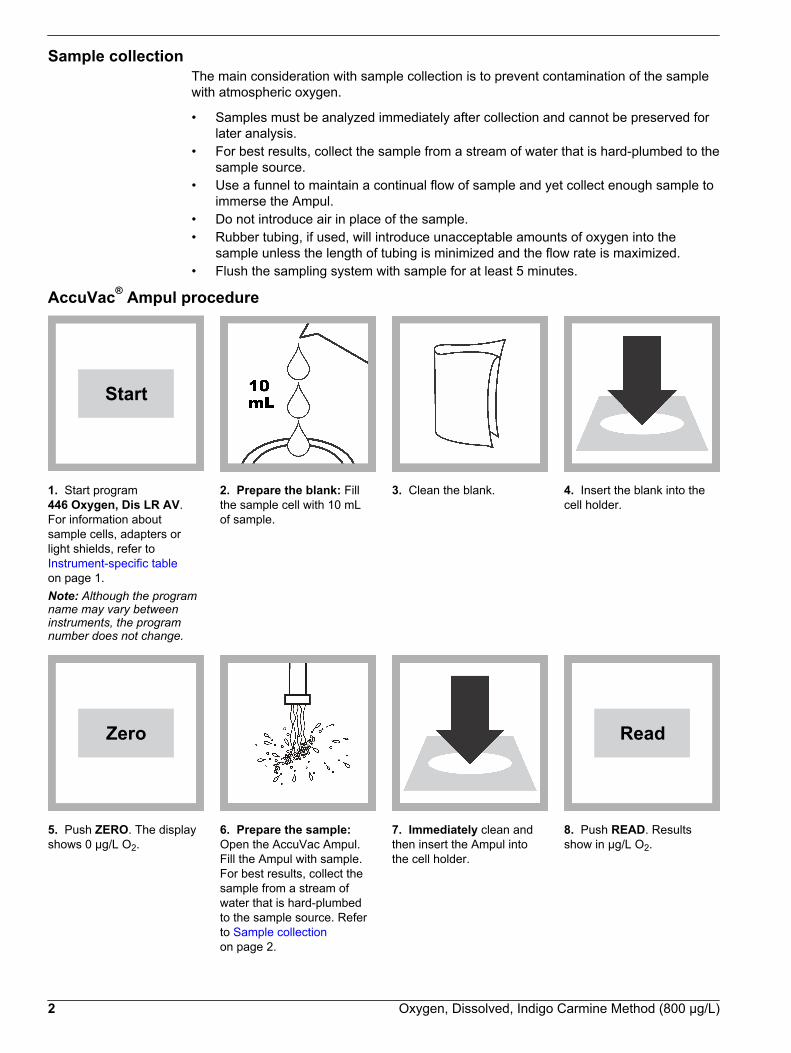
Sample collectionThe main consideration with sample collection is to prevent contamination of the samplewith atmospheric oxygen.
• Samples must be analyzed immediately after collection and cannot be preserved forlater analysis.
• For best results, collect the sample from a stream of water that is hard-plumbed to thesample source.
• Use a funnel to maintain a continual flow of sample and yet collect enough sample toimmerse the Ampul.
• Do not introduce air in place of the sample.• Rubber tubing, if used, will introduce unacceptable amounts of oxygen into the
sample unless the length of tubing is minimized and the flow rate is maximized.• Flush the sampling system with sample for at least 5 minutes.
AccuVac® Ampul procedure
Start
1. Start program446 Oxygen, Dis LR AV.For information aboutsample cells, adapters orlight shields, refer to Instrument-specific tableon page 1.Note: Although the programname may vary betweeninstruments, the programnumber does not change.
2. Prepare the blank: Fillthe sample cell with 10 mLof sample.
3. Clean the blank. 4. Insert the blank into thecell holder.
Zero
5. Push ZERO. The displayshows 0 µg/L O2.
6. Prepare the sample:Open the AccuVac Ampul.Fill the Ampul with sample.For best results, collect thesample from a stream ofwater that is hard-plumbedto the sample source. Referto Sample collectionon page 2.
7. Immediately clean andthen insert the Ampul intothe cell holder.
Read
8. Push READ. Resultsshow in µg/L O2.
2 Oxygen, Dissolved, Indigo Carmine Method (800 µg/L)
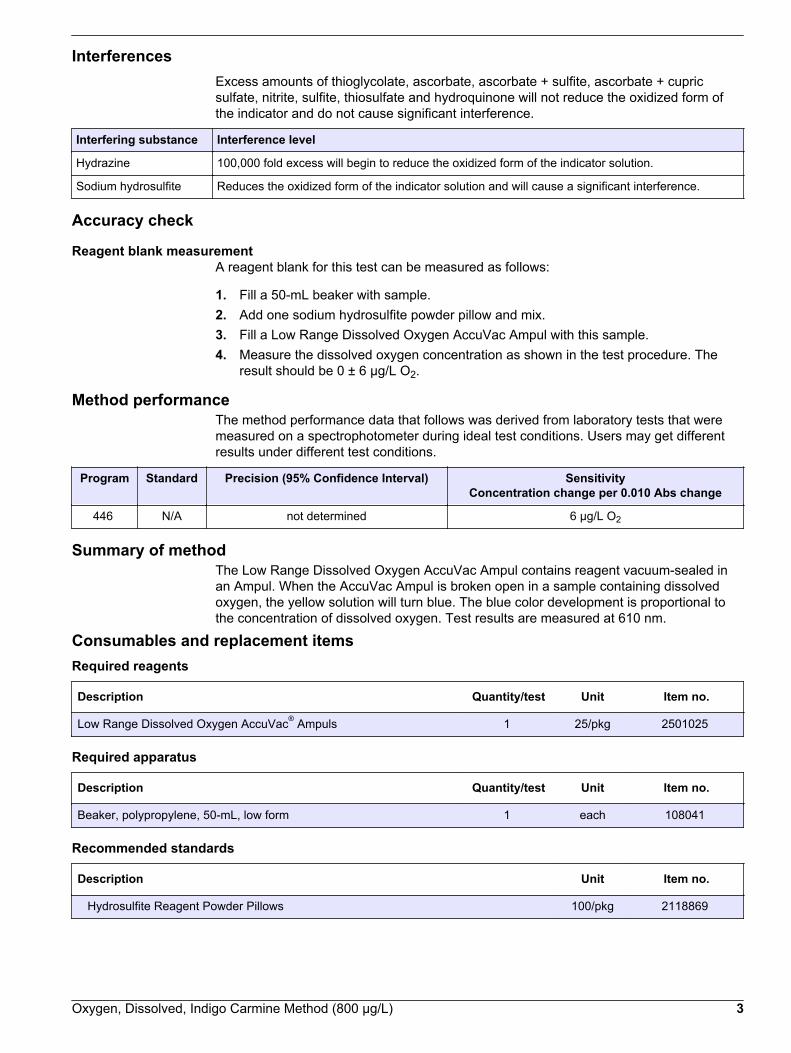
InterferencesExcess amounts of thioglycolate, ascorbate, ascorbate + sulfite, ascorbate + cupricsulfate, nitrite, sulfite, thiosulfate and hydroquinone will not reduce the oxidized form ofthe indicator and do not cause significant interference.
Interfering substance Interference level
Hydrazine 100,000 fold excess will begin to reduce the oxidized form of the indicator solution.
Sodium hydrosulfite Reduces the oxidized form of the indicator solution and will cause a significant interference.
Accuracy check
Reagent blank measurementA reagent blank for this test can be measured as follows:
1. Fill a 50-mL beaker with sample.2. Add one sodium hydrosulfite powder pillow and mix.3. Fill a Low Range Dissolved Oxygen AccuVac Ampul with this sample.4. Measure the dissolved oxygen concentration as shown in the test procedure. The
result should be 0 ± 6 µg/L O2.
Method performanceThe method performance data that follows was derived from laboratory tests that weremeasured on a spectrophotometer during ideal test conditions. Users may get differentresults under different test conditions.
Program Standard Precision (95% Confidence Interval) SensitivityConcentration change per 0.010 Abs change
446 N/A not determined 6 µg/L O2
Summary of methodThe Low Range Dissolved Oxygen AccuVac Ampul contains reagent vacuum-sealed inan Ampul. When the AccuVac Ampul is broken open in a sample containing dissolvedoxygen, the yellow solution will turn blue. The blue color development is proportional tothe concentration of dissolved oxygen. Test results are measured at 610 nm.
Consumables and replacement itemsRequired reagents
Description Quantity/test Unit Item no.
Low Range Dissolved Oxygen AccuVac® Ampuls 1 25/pkg 2501025
Required apparatus
Description Quantity/test Unit Item no.
Beaker, polypropylene, 50-mL, low form 1 each 108041
Recommended standards
Description Unit Item no.
Hydrosulfite Reagent Powder Pillows 100/pkg 2118869
Oxygen, Dissolved, Indigo Carmine Method (800 µg/L) 3

Optional reagents and apparatus
Description Unit Item no.
AccuVac® Snapper each 2405200
AccuVac® Sampler each 2405100
AccuVac® vials for sample blanks 25/pkg 2677925
Stoppers for 18-mm tubes and AccuVac Ampuls 6/pkg 173106
HACH COMPANYWORLD HEADQUARTERSTelephone: (970) 669-3050FAX: (970) 669-2932
FOR TECHNICAL ASSISTANCE, PRICE INFORMATION AND ORDERING:Call 800-227-4224
Contact the HACH office or distributor serving you.www.hach.com [email protected]
In the U.S.A. –
Outside the U.S.A. –
On the Worldwide Web – ; E-mail –
toll-free
© Hach Company/Hach Lange GmbH, 1989–2013. All rights reserved. 04/2013, Edition 8
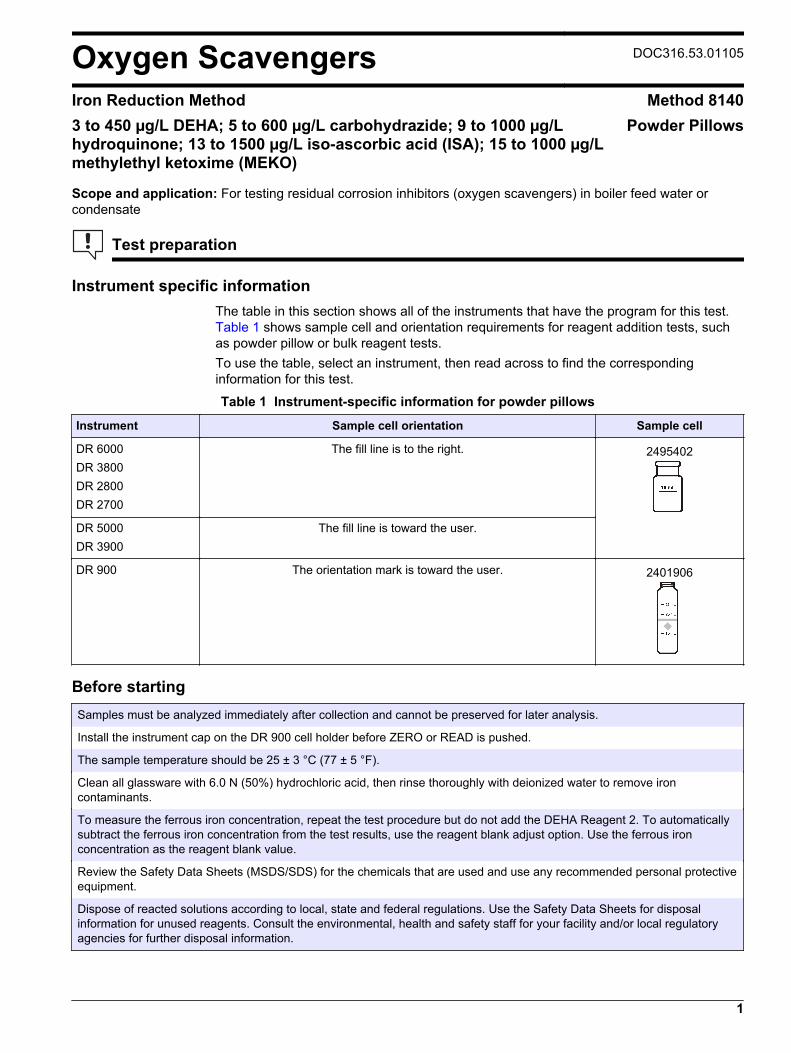
Oxygen Scavengers DOC316.53.01105
Iron Reduction Method Method 81403 to 450 µg/L DEHA; 5 to 600 µg/L carbohydrazide; 9 to 1000 µg/Lhydroquinone; 13 to 1500 µg/L iso-ascorbic acid (ISA); 15 to 1000 µg/Lmethylethyl ketoxime (MEKO)
Powder Pillows
Scope and application: For testing residual corrosion inhibitors (oxygen scavengers) in boiler feed water orcondensate
Test preparation
Instrument specific informationThe table in this section shows all of the instruments that have the program for this test. Table 1 shows sample cell and orientation requirements for reagent addition tests, suchas powder pillow or bulk reagent tests.To use the table, select an instrument, then read across to find the correspondinginformation for this test.
Table 1 Instrument-specific information for powder pillows
Instrument Sample cell orientation Sample cell
DR 6000 DR 3800 DR 2800 DR 2700
The fill line is to the right. 2495402
DR 5000 DR 3900
The fill line is toward the user.
DR 900 The orientation mark is toward the user. 2401906
Before startingSamples must be analyzed immediately after collection and cannot be preserved for later analysis.
Install the instrument cap on the DR 900 cell holder before ZERO or READ is pushed.
The sample temperature should be 25 ± 3 °C (77 ± 5 °F).
Clean all glassware with 6.0 N (50%) hydrochloric acid, then rinse thoroughly with deionized water to remove ironcontaminants.
To measure the ferrous iron concentration, repeat the test procedure but do not add the DEHA Reagent 2. To automaticallysubtract the ferrous iron concentration from the test results, use the reagent blank adjust option. Use the ferrous ironconcentration as the reagent blank value.
Review the Safety Data Sheets (MSDS/SDS) for the chemicals that are used and use any recommended personal protectiveequipment.
Dispose of reacted solutions according to local, state and federal regulations. Use the Safety Data Sheets for disposalinformation for unused reagents. Consult the environmental, health and safety staff for your facility and/or local regulatoryagencies for further disposal information.
1
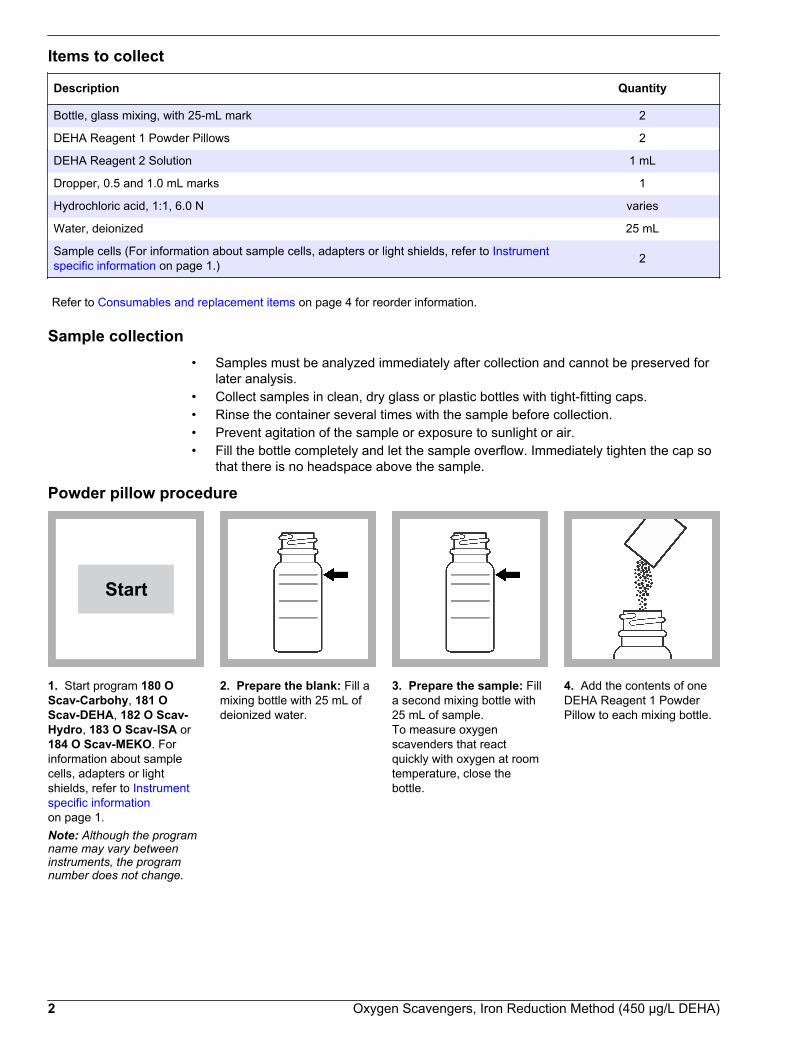
Items to collect
Description Quantity
Bottle, glass mixing, with 25-mL mark 2
DEHA Reagent 1 Powder Pillows 2
DEHA Reagent 2 Solution 1 mL
Dropper, 0.5 and 1.0 mL marks 1
Hydrochloric acid, 1:1, 6.0 N varies
Water, deionized 25 mL
Sample cells (For information about sample cells, adapters or light shields, refer to Instrumentspecific information on page 1.) 2
Refer to Consumables and replacement items on page 4 for reorder information.
Sample collection• Samples must be analyzed immediately after collection and cannot be preserved for
later analysis.• Collect samples in clean, dry glass or plastic bottles with tight-fitting caps.• Rinse the container several times with the sample before collection.• Prevent agitation of the sample or exposure to sunlight or air.• Fill the bottle completely and let the sample overflow. Immediately tighten the cap so
that there is no headspace above the sample.
Powder pillow procedure
Start
1. Start program 180 OScav-Carbohy, 181 OScav-DEHA, 182 O Scav-Hydro, 183 O Scav-ISA or184 O Scav-MEKO. Forinformation about samplecells, adapters or lightshields, refer to Instrumentspecific informationon page 1.Note: Although the programname may vary betweeninstruments, the programnumber does not change.
2. Prepare the blank: Fill amixing bottle with 25 mL ofdeionized water.
3. Prepare the sample: Filla second mixing bottle with25 mL of sample.To measure oxygenscavenders that reactquickly with oxygen at roomtemperature, close thebottle.
4. Add the contents of oneDEHA Reagent 1 PowderPillow to each mixing bottle.
2 Oxygen Scavengers, Iron Reduction Method (450 µg/L DEHA)

5. Swirl to mix. 6. Use a pipet to add0.5 mL of DEHA Reagent2 Solution to each bottle.
7. Swirl to mix.Put both mixing bottles in adark location. A purple colorshows if an oxygenscavender is present in thesample.
8. Start the instrumenttimer. A 10-minute (2-minutefor hydroquinone) reactiontime starts.Keep the mixing bottles inthe dark during the reactionperiod.
9. When the timer expires,transfer the blank andprepared samples to thesample cells.
10. Clean the blank. 11. Insert the blank into thecell holder.
Zero
12. Push ZERO. Forgreater accuracy, read theresult immediately after thetimer expires.
13. Clean the preparedsample.
14. Insert the preparedsample into the cell holder.
Read
15. Push READ. Resultsshow in µg/L.
InterferencesSubstances which reduce ferric iron will interfere. Substances which complex ironstrongly may also interfere.
Interfering substance Interference level
Borate (as Na2B4O7) More than 500 mg/L
Cobalt More than 0.025 mg/L
Copper More than 8.0 mg/L
Ferrous Iron All levels. Measure and subtract (refer to Before starting on page 1)
Oxygen Scavengers, Iron Reduction Method (450 µg/L DEHA) 3

Interfering substance Interference level
Hardness (as CaCO3) More than 1000 mg/L
Light Light may interfere. Keep sample cells in the dark during color development.
Lignosulfonates More than 0.05 mg/L
Manganese More than 0.8 mg/L
Molybdenum More than 80 mg/L
Nickel More than 0.8 mg/L
Phosphate More than 10 mg/L
Phosphonates More than 10 mg/L
Sulfate More than 1000 mg/L
Temperature Sample temperatures below 22 °C or above 28 °C (72 °F or 82 °F) may affect test accuracy.
Zinc More than 50 mg/L
Method performanceThe method performance data that follows was derived from laboratory tests that weremeasured on a spectrophotometer during ideal test conditions. Users may get differentresults under different test conditions.
Program Standard Precision (95% Confidence Interval) SensitivityConcentration change per 0.010 Abs change
180 299 µg/L 295–303 µg/L 4 µg/L
181 226 µg/L 223–229 µg/L 3 µg/L
182 600 µg/L 591–609 µg/L 8 µg/L
183 886 µg/L 873–899 µg/L 12 µg/L
184 976 µg/L 962–990 µg/L 14 µg/L
Summary of methodDiethylhydroxylamine (DEHA) or other oxygen scavengers in the sample react with ferriciron in DEHA Reagent 2 Solution to produce ferrous ion in an amount that is equivalent tothe DEHA concentration. This solution then reacts with DEHA 1 Reagent, which forms apurple color with ferrous iron that is proportional to the concentration of the oxygenscavenger. This method reacts with all oxygen scavengers and does not differentiatewhen the sample contains more than one type of oxygen scavenger. The measurementwavelength is 562 nm for spectrophotometers or 560 nm for colorimeters.
Consumables and replacement itemsRequired reagents
Description Quantity/test Unit Item no.
Hydrochloric Acid, 6.0 N varies 500 mL 88449
Water, deionized varies 4 L 27256
Oxygen Scavenger Reagent Set — — 2446600
Includes:
DEHA Reagent 1 Powder Pillows 2 100/pkg 2167969
DEHA Reagent 2 Solution 1 mL 100 mL 2168042
4 Oxygen Scavengers, Iron Reduction Method (450 µg/L DEHA)
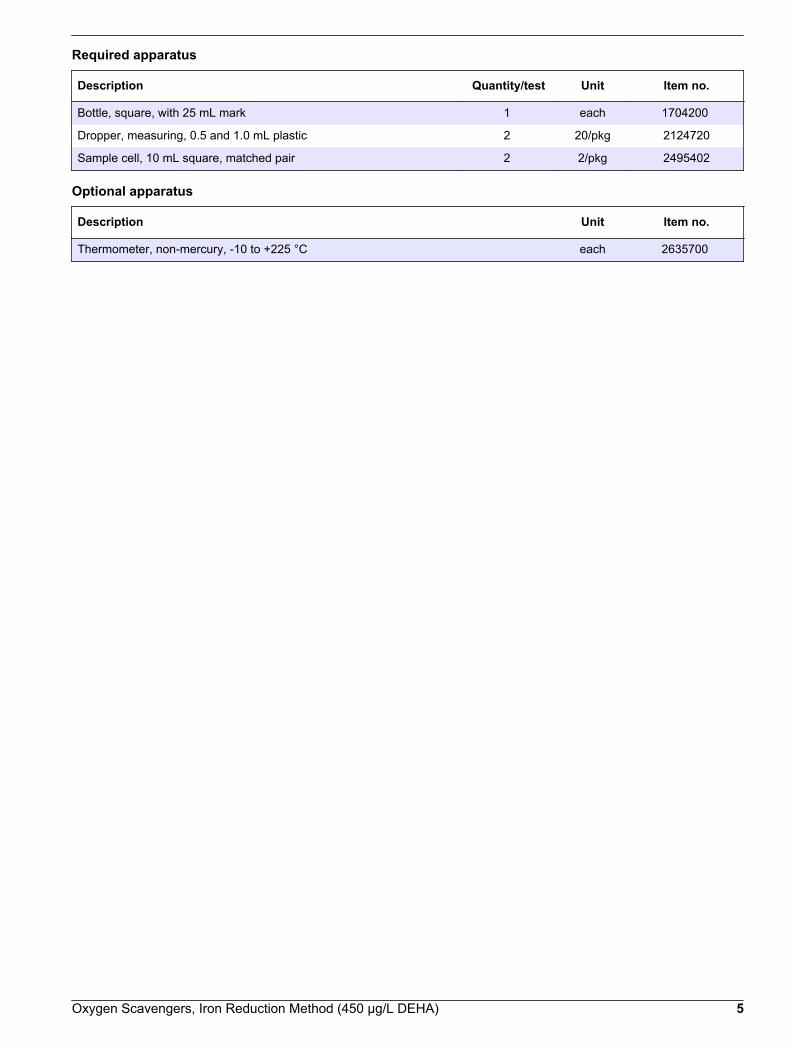
Required apparatus
Description Quantity/test Unit Item no.
Bottle, square, with 25 mL mark 1 each 1704200
Dropper, measuring, 0.5 and 1.0 mL plastic 2 20/pkg 2124720
Sample cell, 10 mL square, matched pair 2 2/pkg 2495402
Optional apparatus
Description Unit Item no.
Thermometer, non-mercury, -10 to +225 °C each 2635700
Oxygen Scavengers, Iron Reduction Method (450 µg/L DEHA) 5

HACH COMPANYWORLD HEADQUARTERSTelephone: (970) 669-3050FAX: (970) 669-2932
FOR TECHNICAL ASSISTANCE, PRICE INFORMATION AND ORDERING:Call 800-227-4224
Contact the HACH office or distributor serving you.www.hach.com [email protected]
In the U.S.A. –
Outside the U.S.A. –
On the Worldwide Web – ; E-mail –
toll-free
© Hach Company/Hach Lange GmbH, 1989–2013. All rights reserved. 04/2013, Edition 8

Ozone DOC316.53.01106
Indigo Method Method 83110.01 to 0.25 mg/L O3 (LR), 0.01 to 0.75 mg/L O3 (MR),0.01 to 1.50 mg/L O3 (HR)
AccuVac® Ampuls
Scope and application: For water.
Test preparation
Instrument-specific informationThe table in this section shows all of the instruments that have the program for this test. Table 1 shows the adapter requirement for AccuVac Ampul tests.To use the table, select an instrument, then read across to find the correspondinginformation for this test.
Table 1 Instrument-specific information for AccuVac Ampuls
Instrument Adapter
DR 6000 DR 5000 DR 900
—
DR 3900 LZV846 (A)
DR 3800 DR 2800 DR 2700
LZV584 (C)
Before startingSamples must be analyzed immediately after collection and cannot be preserved for later analysis.
Install the instrument cap on the DR 900 cell holder before ZERO or READ is pushed.
Use tap water or deionized water for the blank (ozone-free water).
In this method, the instrument is intentionally zeroed on the sample, not the blank.
Review the Safety Data Sheets (MSDS/SDS) for the chemicals that are used and use any recommended personal protectiveequipment.
Dispose of reacted solutions according to local, state and federal regulations. Use the Safety Data Sheets for disposalinformation for unused reagents. Consult the environmental, health and safety staff for your facility and/or local regulatoryagencies for further disposal information.
Items to collectAccuVac Ampuls
Description Quantity
Ozone AccuVac® Ampules, 0-0.25 mg/L 2
Ozone AccuVac® Ampules, 0-0.75 mg/L 2
Ozone AccuVac® Ampules, 0-1.5 mg/L 2
Beaker, 50 mL 1
Stoppers, for 18-mm tubes and AccuVac Ampuls 2
Water, ozone-free varies
1

Refer to Consumables and replacement items on page 3 for reorder information.
Sample collection• Samples must be analyzed immediately after collection and cannot be preserved for
later analysis.• The most important consideration during sample collection is to prevent the escape of
ozone from the sample.• Collect the sample gently and analyze immediately. Do not shake or stir the sample
or allow the sample temperature to increase.• Do not transfer the sample from one container to another unless absolutely
necessary.
AccuVac Ampul procedureNote: For this procedure, the zero step is done on the prepared sample, and the read step on theblank.
Start
1. Start program454 Ozone LR AV,455 Ozone MR AV or456 Ozone HR AV. Forinformation about samplecells, adapters or lightshields, refer to Instrument-specific informationon page 1.Note: Although the programname may vary betweeninstruments, the programnumber does not change.
2. Prepare the blank: Pourat least 40 mL of ozone-freewater in a 50-mL beaker. Fillan Indigo Ozone ReagentAccuVac Ampul with theozone-free water. Keep thetip immersed while theAmpul fills fully.
3. Prepare the sample:Pour at least 40 mL ofsample in a 50-mL beaker.Fill an Indigo OzoneReagent AccuVac Ampulwith the sample. Keep thetip immersed while theAmpul fills fully.
4. Quickly invert the Ampulsseveral times to mix.Some of the blue color willbe bleached if ozone ispresent.
5. Clean the preparedsample AccuVac Ampul.
6. Insert the preparedsample AccuVac Ampul intothe cell holder.
Zero
7. Push ZERO. The displayshows 0.00 mg/L O3.
8. Clean the blank AccuVacAmpul.
2 Ozone, Indigo Method (multi-range: 0.25, 0.75, 1.50 mg/L)

9. Insert the blank AccuVacAmpul into the cell holder.
Read
10. Push READ. Resultsshow in mg/L O3.
Reagent stabilityThe indigo reagent is light-sensitive. Keep the unused AccuVac Ampuls in the dark. Theindigo solution decomposes slowly under room light after the AccuVac Ampul is filled.The filled blank Ampul can be used for multiple measurements during the same day.
Method performanceThe method performance data that follows was derived from laboratory tests that weremeasured on a spectrophotometer during ideal test conditions. Users may get differentresults under different test conditions.
Program Standard Precision (95% Confidence Interval) SensitivityConcentration change per 0.010 Abs change
454 0.15 mg/L O3 0.14–0.16 mg/L O3 0.01 mg/L O3
455 0.45 mg/L O3 0.43–0.47 mg/L O3 0.01 mg/L O3
456 1.00 mg/L O3 0.97–1.03 mg/L O3 0.01 mg/L O3
Summary of methodThe reagent formulation adjusts the sample pH to 2.5 after the Ampule has filled. Theindigo reagent reacts immediately and quantitatively with ozone. The blue color of indigois bleached in proportion to the amount of ozone present in the sample. Other reagents inthe formulation prevent chlorine interference. No transfer of sample is needed in theprocedure, therefore ozone loss due to sampling is eliminated. The measurementwavelength is 600 nm for spectrophotometers or 610 nm for colorimeters.
Consumables and replacement itemsRequired reagents
Description Quantity/test Unit Item no.
Ozone AccuVac® Ampules, 0-0.25 mg/L 2 25/pkg 2516025
Ozone AccuVac® Ampules, 0-0.75 mg/L 2 25/pkg 2517025
Ozone AccuVac® Ampules, 0-1.5 mg/L 2 25/pkg 2518025
Required apparatus
Description Quantity/test Unit Item no.
AccuVac Snapper 1 each 2405200
Beaker, 50-mL 1 each 50041H
Stoppers for 18-mm tubes and AccuVac Ampuls 2 6/pkg 173106
Beaker, polypropylene, 50-mL, low form 1 each 108041
Ozone, Indigo Method (multi-range: 0.25, 0.75, 1.50 mg/L) 3

Optional reagents and apparatus
Description Unit Item no.
Water, deionized 4 L 27256
SpecCheck™ Gel Secondary Standard Kit, Ozone, 0–0.75 mg/L set each 2708000
HACH COMPANYWORLD HEADQUARTERSTelephone: (970) 669-3050FAX: (970) 669-2932
FOR TECHNICAL ASSISTANCE, PRICE INFORMATION AND ORDERING:Call 800-227-4224
Contact the HACH office or distributor serving you.www.hach.com [email protected]
In the U.S.A. –
Outside the U.S.A. –
On the Worldwide Web – ; E-mail –
toll-free
© Hach Company/Hach Lange GmbH, 1989–2013. All rights reserved. 04/2013, Edition 8
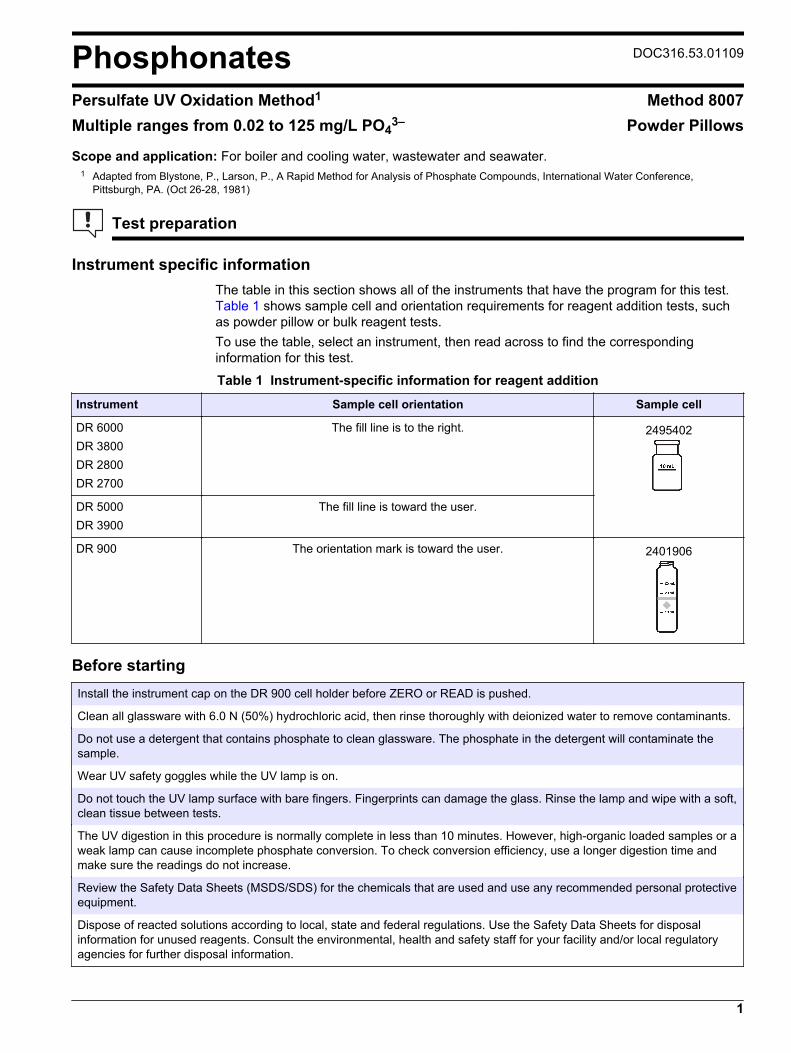
Phosphonates DOC316.53.01109
Persulfate UV Oxidation Method1 Method 8007Multiple ranges from 0.02 to 125 mg/L PO4
3– Powder Pillows
Scope and application: For boiler and cooling water, wastewater and seawater.1 Adapted from Blystone, P., Larson, P., A Rapid Method for Analysis of Phosphate Compounds, International Water Conference,
Pittsburgh, PA. (Oct 26-28, 1981)
Test preparation
Instrument specific informationThe table in this section shows all of the instruments that have the program for this test. Table 1 shows sample cell and orientation requirements for reagent addition tests, suchas powder pillow or bulk reagent tests.To use the table, select an instrument, then read across to find the correspondinginformation for this test.
Table 1 Instrument-specific information for reagent addition
Instrument Sample cell orientation Sample cell
DR 6000 DR 3800 DR 2800 DR 2700
The fill line is to the right. 2495402
DR 5000 DR 3900
The fill line is toward the user.
DR 900 The orientation mark is toward the user. 2401906
Before startingInstall the instrument cap on the DR 900 cell holder before ZERO or READ is pushed.
Clean all glassware with 6.0 N (50%) hydrochloric acid, then rinse thoroughly with deionized water to remove contaminants.
Do not use a detergent that contains phosphate to clean glassware. The phosphate in the detergent will contaminate thesample.
Wear UV safety goggles while the UV lamp is on.
Do not touch the UV lamp surface with bare fingers. Fingerprints can damage the glass. Rinse the lamp and wipe with a soft,clean tissue between tests.
The UV digestion in this procedure is normally complete in less than 10 minutes. However, high-organic loaded samples or aweak lamp can cause incomplete phosphate conversion. To check conversion efficiency, use a longer digestion time andmake sure the readings do not increase.
Review the Safety Data Sheets (MSDS/SDS) for the chemicals that are used and use any recommended personal protectiveequipment.
Dispose of reacted solutions according to local, state and federal regulations. Use the Safety Data Sheets for disposalinformation for unused reagents. Consult the environmental, health and safety staff for your facility and/or local regulatoryagencies for further disposal information.
1

Items to collect
Description Quantity
Bottle, square, with 25-mL mark 1
Cylinder, graduated mixing, 50-mL 1
Goggles, UV safety 1
Pipet, serological, 10-mL 1
PhosVer® 3 Phosphate Reagent Powder Pillows, 10-mL 2
Potassium Persulfate Powder Pillow for Phosphonate 1
Pipet filler, safety bulb 1
Sample cells (For information about sample cells, adapters or light shields, refer to Instrumentspecific information on page 1.) 2
Water, deionized varies
UV lamp with power supply 1
Refer to Consumables and replacement items on page 7 for reorder information.
Sample collection and storage• Collect samples in clean glass or plastic bottles that have been cleaned with
1:1 hydrochloric acid and rinsed with deionized water.• Do not use a commerical detergent to clean the sample bottles. The phosphate in the
detergent will contaminate the sample.• To preserve samples for later analysis, adjust the sample pH to less than 2 with
concentrated sulfuric acid (about 2 mL per liter). No acid addition is necessary if thesample is tested immediately.
• Keep the preserved samples at or below 6 °C (43 °F) for up to 24 hours.• Let the sample temperature increase to room temperature before analysis.• Before analysis, adjust the pH to 7 with 5.0 N sodium hydroxide standard solution.• Correct the test result for the dilution from the volume additions.
Persulfate UV oxidation for powder pillows
Start
1. Start program501 Phosphonates. Forinformation about samplecells, adapters or lightshields, refer to Instrumentspecific informationon page 1.Note: Although the programname may vary betweeninstruments, the programnumber does not change.
2. Select the sample sizefrom Select the samplevolume and multiplieron page 4. Use a pipet toadd the correct volume ofsample into a 50-mLgraduated cylinder.If necessary, dilute thesample to 50-mL withdeionized water and mixwell.
3. Prepare the blank: Fill asample cell to the 10-mLmark with the diluted samplefrom step 2.
4. Prepare the digestedsample: Fill a mixing bottleto the 25-mL mark with thediluted sample from step 2.
2 Phosphonates, Persulfate UV Oxidation Method (125.0 mg/L)

5. Add the contents of onePotassium Persulfate forPhosphonate Powder Pillowto the 25-mL sample.
6. Swirl to mix. 7. Put on the UV safetygoggles.
8. Put the ultraviolet lampinto the mixing bottle. Turnon the UV lamp.
9. Start the instrumenttimer. A 10-minute reactiontime starts.Phosphonates areconverted toorthophosphate in this step.
10. When the timer expires,turn off the UV lamp.Remove the UV lamp fromthe sample.
11. Prepare the sample:Fill a second sample cell tothe 10-mL mark with thedigested sample.
12. Add the contents of onePhosVer 3 PhosphateReagent Powder Pillow toboth the blank and theprepared sample.
13. Immediately swirl bothcells vigorously for 20–30 seconds to mix. Somepowder may not dissolve.A blue color shows ifphosphate is present. Boththe sample and the blankmay show color.
14. Start the instrumenttimer. A 2-minute reactiontime starts.If the sample is colder than15 °C, wait» four minutes forcolor development.
15. When the timer expires,clean the blank.Complete the rest of thesteps in this procedurewithin three minutes.
16. Insert the blank into thecell holder.
Phosphonates, Persulfate UV Oxidation Method (125.0 mg/L) 3
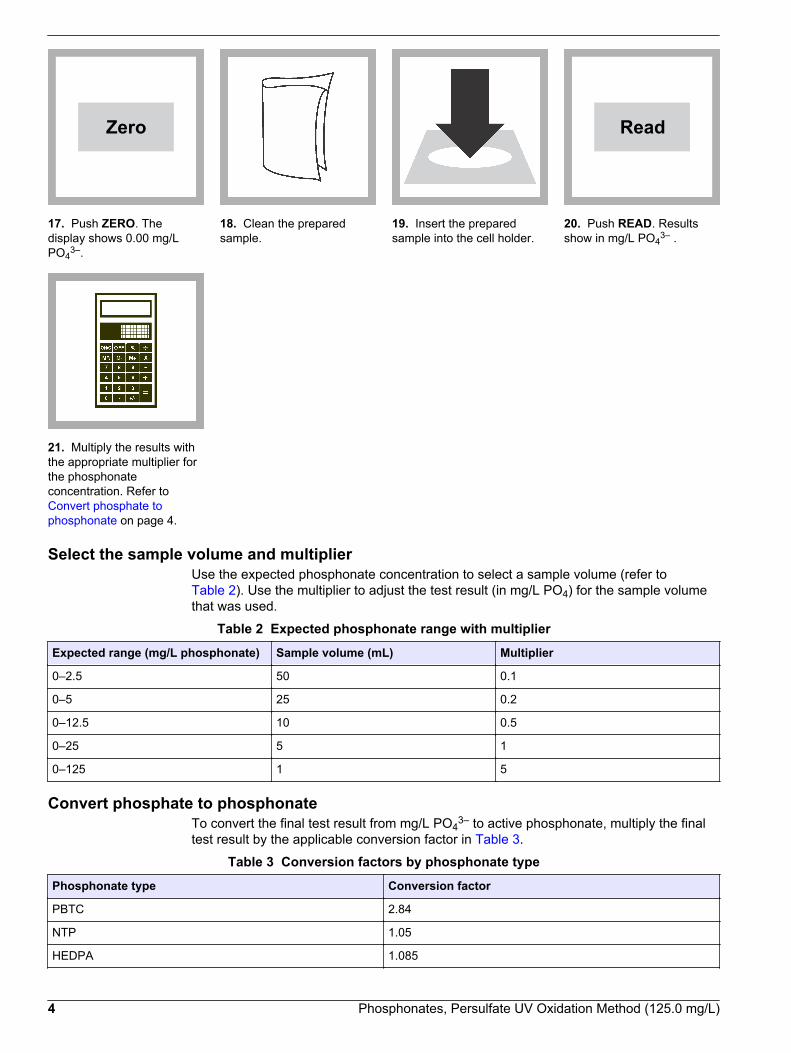
Zero
17. Push ZERO. Thedisplay shows 0.00 mg/LPO4
3–.
18. Clean the preparedsample.
19. Insert the preparedsample into the cell holder.
Read
20. Push READ. Resultsshow in mg/L PO4
3– .
21. Multiply the results withthe appropriate multiplier forthe phosphonateconcentration. Refer to Convert phosphate tophosphonate on page 4.
Select the sample volume and multiplierUse the expected phosphonate concentration to select a sample volume (refer to Table 2). Use the multiplier to adjust the test result (in mg/L PO4) for the sample volumethat was used.
Table 2 Expected phosphonate range with multiplier
Expected range (mg/L phosphonate) Sample volume (mL) Multiplier
0–2.5 50 0.1
0–5 25 0.2
0–12.5 10 0.5
0–25 5 1
0–125 1 5
Convert phosphate to phosphonateTo convert the final test result from mg/L PO4
3– to active phosphonate, multiply the finaltest result by the applicable conversion factor in Table 3.
Table 3 Conversion factors by phosphonate type
Phosphonate type Conversion factor
PBTC 2.84
NTP 1.05
HEDPA 1.085
4 Phosphonates, Persulfate UV Oxidation Method (125.0 mg/L)

Table 3 Conversion factors by phosphonate type (continued)
Phosphonate type Conversion factor
EDTMPA 1.148
HMDTMPA 1.295
DETPMPA 1.207
HPA 1.49
InterferencesInterference levels decrease as the sample size increases. For example, copper does notinterfere at or below 100 mg/L for a 5.00 mL sample. If the sample volume is increased to10 mL, copper will begin to interfere above 50 mg/L.
Interfering substance Interference level (5 mL sample)
Aluminum 100 mg/L
Arsenate Interferes at all levels
Benzotriazole 10 mg/L
Bicarbonate 1000 mg/L
Bromide 100 mg/L
Calcium 5000 mg/L
CDTA 100 mg/L
Chloride 5000 mg/L
Chromate 100 mg/L
Copper 100 mg/L
Cyanide 100 mg/L (Increase the UV digestion to 30 minutes.)
Diethanoldithiocarbamate 50 mg/L
EDTA 100 mg/L
Iron 200 mg/L
Nitrate 200 mg/L
NTA 250 mg/L
Orthophosphate 15 mg/L
Phosphites and organophosphorus compounds Reacts quantitatively. Meta- and polyphosphates do not interfere.
Silica 500 mg/L
Silicate 100 mg/L
Sulfate 2000 mg/L
Sulfide Interferes at all levels
Sulfite 100 mg/L
Thiourea 10 mg/L
Highly buffered samples or extreme sample pH Can prevent the correct pH adjustment of the sample by the reagents.Sample pretreatment may be necessary.
Phosphonates, Persulfate UV Oxidation Method (125.0 mg/L) 5

Accuracy check
Digestion methodTo validate the full procedure with the digestion, prepare a solution that has a knownconcentration of a phosphonate compound. Use the test procedure to measure theconcentration of the phosphonate solution.
Standard solution methodTo validate the colorimetric portion of the procedure (without digestion), use a phosphatestandard solution for the sample and deionized water for the blank. Add the PhosVer3 reagent directly to 10 mL of the phosphate standard solution and to the blank. Theexpected result is 10 times the value of the standard solution due to a built-in dilutionfactor of 10 in the calibration.Items to collect:
• Phosphate Standard Solution, 1 mg/L (the expected result is 10 mg/L if 10 mL isused)
1. Use the test procedure to measure the concentration of the standard solution.2. Compare the expected result to the actual result.
Note: The factory calibration can be adjusted slightly with the standard adjust option so that theinstrument shows the expected value of the standard solution. The adjusted calibration is thenused for all test results. This adjustment can increase the test accuracy when there are slightvariations in the reagents or instruments.
Method performanceThe method performance data that follows was derived from laboratory tests that weremeasured on a spectrophotometer during ideal test conditions. Users may get differentresults under different test conditions.
Program Standard Precision (95% Confidence Interval) SensitivityConcentration change per 0.010 Abs change
501 2.00 mg/L PO43– 1.97–2.03 mg/L PO4
3– Refer to Sensitivity on page 6.
SensitivityThe sensitivity depends on the sample volume. Sensitivity is expressed as PO4
3– in Table 4. To express as a specific phosphonate, refer to Table 3 on page 4.
Table 4 Sensitivity per sample volume
Range (mg/L phosphonate) Sample volume (mL) Concentration change per 0.010 Abs change
0–2.5 50 0.02 mg/L PO43–
0–5 25 0.04 mg/L PO43–
0–12.5 10 0.10 mg/L PO43–
0–25 5 0.20 mg/L PO43–
0–125 1 1.00 mg/L PO43–
Summary of methodThis method is directly applicable to boiler and cooling tower samples. The procedure isbased on a UV-catalyzed oxidation of phosphonate to orthophosphate. Theorthophosphate reacts with the molybdate in the PhosVer 3 reagent to form a mixedphosphate/molybdate complex. This complex is reduced by the ascorbic acid in thePhosVer 3, which gives a blue color that is proportional to the amount of phosphonate inthe original sample. The orthophosphate in the original sample is removed when theblank is used to set the zero concentration. The measurement wavelength is 880 nm forspectrophotometers or 610 nm for colorimeters.
6 Phosphonates, Persulfate UV Oxidation Method (125.0 mg/L)
Consumables and replacement itemsRequired reagents
Description Quantity/test Unit Item no.
Water, deionized varies 4 L 27256
Phosphonate Reagent Set, 10-mL 1 100 tests 2429700
Includes:
PhosVer® 3 Phosphate Reagent Powder Pillow, 10-mL 1 100/pkg 2106069
Potassium Persulfate Powder Pillow for Phosphonate 1 100/pkg 2084769
Required apparatus
Description Quantity/test Unit Item no.
Bottle, square, with 25 mL mark 1 each 1704200
Beaker, polypropylene, 50-mL, low form 1 each 108041
Cylinder, graduated mixing, 50-mL, with glass stopper 1 each 189641
UV safety goggles 1 each 2113400
Pipet, serological, graduated, 10-mL 1 each 53238
Pipet filler, safety bulb 1 each 1465100
UV lamp with power supply, 115 VAC 1 each 2082800
OR
UV lamp with power supply, 230 VAC 1 each 2082802
Recommended standards
Description Unit Item no.
Phosphate Standard Solution, 1-mg/L as PO4 500 mL 256949
Optional reagents and apparatus
Description Unit Item no.
Hydrochloric Acid, 1:1, 6N 500 mL 88449
Sulfuric Acid, concentrated, ACS 500 mL 97949
Thermometer, non-mercury, -10 to +225 °C each 2635700
Paper, pH, 0–14 pH range 100/pkg 2601300
Ampule Breaker, Voluette® ampules each 2196800
PhosVer 3 Phosphate Reagent Powder Pillows, 10 mL 1000/pkg 2106028
UV Lamp, shortwave, pencil type each 2671000
Power supply, 115 V/60 Hz each 2670700
Power supply, 220 V/50 Hz each 2670702
Phosphate Standard Solution, 3-mg/L as PO4 946 mL 2059716
Phosphate Standard Solution, 10-mg/L 946 mL 1420416
Phosphate Standard Solution, 15-mg/L 100 mL 1424342
Phosphate Standard Solution, 30-mg/L 946 mL 1436716
Phosphonates, Persulfate UV Oxidation Method (125.0 mg/L) 7

Consumables and replacement items (continued)Description Unit Item no.
Phosphate Standard Solution, 50-mg/L, 10-mL Voluette® Ampules 16/pkg 17110
Phosphate Standard Solution, 100-mg/L 100 mL 1436832
Phosphate Standard Solution, 10-mL Ampule, 500 mg/L 16/pkg 1424210
Phosphate Standard Solution, 500-mg/L 100 mL 1424232
HACH COMPANYWORLD HEADQUARTERSTelephone: (970) 669-3050FAX: (970) 669-2932
FOR TECHNICAL ASSISTANCE, PRICE INFORMATION AND ORDERING:Call 800-227-4224
Contact the HACH office or distributor serving you.www.hach.com [email protected]
In the U.S.A. –
Outside the U.S.A. –
On the Worldwide Web – ; E-mail –
toll-free
© Hach Company/Hach Lange GmbH, 1989–2013. All rights reserved. 04/2013, Edition 8

Phosphorus, Acid Hydrolyzable DOC316.53.01110
USEPA1 Acid Digestion Method2 Method 8180
Scope and application: For water, wastewater, and seawater.1 USEPA Accepted for wastewater analyses.2 Adapted from Standard Methods for the Examination of Water and Wastewater 4500-P B & E.
Test preparation
Before startingClean all glassware with 6.0 N (50%) hydrochloric acid, then rinse thoroughly with deionized water to remove contaminants.
The results of a reactive phosphorus test after acid-hydrolyzable digestion includes the combination of orthophosphate andthe acid-hydrolyzable (condensed) phosphate. To find the condensed phosphate concentration, subtract the result of anorthophosphate test without digestion from the result with digestion. Make sure that both results are in the same units, eithermg/L PO4
3– or mg/L P. To find the organic phosphorus concentration, subtract the result of a acid hydrolyzable test from theresult of a total phosphorus test.
Review the Safety Data Sheets (MSDS/SDS) for the chemicals that are used and use any recommended personal protectiveequipment.
Dispose of reacted solutions according to local, state and federal regulations. Use the Safety Data Sheets for disposalinformation for unused reagents. Consult the environmental, health and safety staff for your facility and/or local regulatoryagencies for further disposal information.
Items to collect
Description Quantity
Sodium Hydroxide Solution, 5.0 N 2 mL
Sulfuric Acid Solution, 5.25 N 2 mL
Water, deionized varies
Cylinder, graduated, 25-mL 1
Flask, Erlenmeyer, 125-mL 1
Hot plate 1
Refer to Consumables and replacement items on page 3 for reorder information.
Sample collection and storage• Collect samples in clean glass or plastic bottles that have been cleaned with
1:1 hydrochloric acid and rinsed with deionized water.• Do not use a detergent that contains phosphate to clean the sample bottles. The
phosphate in the detergent will contaminate the sample.• Analyze the samples as soon as possible for best results.• If prompt analysis is not possible, immediately filter and keep the samples at or below
6 °C (43 °F) for a maximum of 48 hours.• Let the sample temperature increase to room temperature before analysis.
1

Acid digestion
1. Use a graduated cylinderto add 25-mL of sample intothe 125-mL Elenmeyerflask.
2. Add 2.0 mL of 5.25 NSulfuric Acid Solution to theflask.
3. Boil the sample gently for30 minutes. Do not let theflask boil dry.For the best recovery,concentrate the sample toless than 20 mL. Afterconcentration, maintain thevolume of sample near20 mL by adding smallamounts of deionized water.Do not exceed 20 mL.
4. Let the sample cool toroom temperature. Add2.0 mL of 5.0 N SodiumHydroxide Solution to theflask.
5. Swirl to mix. 6. Pour the sample into a25-mL graduated cylinder.Adjust the volume to 25 mLby rinsing the flask withdeionized water and pouringthe rinse water into thecylinder.
Start
7. Proceed with a reactivephosphorous test of theexpected acid hydrolyzablephosphorous concentrationrange.
• 480 P React. Mo• 482 P React. Mo AV• 485 P React. Amino• 490 P React. PV• 492 P React. PV AV• 535 P React. PV TNT• 540 P React. HT TNT
Extend the colordevelopment time to10 minutes for the PhosVer3 method.
2 Phosphorus, Acid Hydrolyzable, Acid Digestion
InterferencesInterfering substance Interference level
Alkaline or highlybuffered samples
If the pH of the sample after the acid is added is not below pH 1, add additional acid.
Turbidity Use 50 mL of sample and double the reagent quantities. Use a portion of the digested sample tozero the instrument in the reactive phosphorus procedure. This compensates for any color orturbidity destroyed by this procedure.
Summary of methodPhosphates present in condensed inorganic forms (meta-, pyro- or other polyphosphates)must be converted to reactive orthophosphate before analysis. Pretreatment of thesample with acid and heat hydrolyzes the condensed inorganic forms to orthophosphate.This procedure must be followed by one of the reactive phosphorus (orthophosphate)analysis methods to determine the phosphorus content of the sample. If the ascorbic acid(PhosVer 3) method is used to measure the reactive phosphorus, this method is USEPAaccepted for NPDES reporting.
Consumables and replacement itemsRequired reagents
Description Quantity/test Unit Item no.
Sodium Hydroxide Solution, 5.0 N 2 mL 100 mLMDB 245032
Sulfuric Acid Solution, 5.25 N 2 mL 100 mLMDB 244932
Water, deionized varies 4 L 27256
Required apparatus
Description Quantity/test Unit Item no.
Cylinder, graduated, 25-mL. 1 each 50840
Flask, Erlenmeyer, 125-mL 2 each 50543
Hot plate, 7 inches x 7 inches, digital, 120 VAC 1 each 2881500
Hot plate, stirrer, 220 - 240 VAC 1 each 2881602
Required apparatus (field applications)
Description Quantity/test Unit Item no.
Heatab cookit, with 1 box Heatabs — each 220600
Heatab replacements — 21/pkg 220700
Optional reagents and apparatus
Description Unit Item no.
Sodium Hydroxide Standard Solution, 5.0 N 1 L 245053
Sulfuric Acid, concentrated, ACS 500 mL 97949
Paper, pH, 0–14 pH range 100/pkg 2601300
Filter paper, folded, 12.5-cm 100/pkg 69257
Funnel, poly, 65-mm each 108367
Phosphorus, Acid Hydrolyzable, Acid Digestion 3

Consumables and replacement items (continued)Description Unit Item no.
Thermometer, non-mercury, -10 to +225 °C each 2635700
Hydrochloric Acid, 6.0 N 1:1, 50% 500 mL 88449
Bottle, sampling, with cap, low density polyethylene, 250-mL 12/pkg 2087076
HACH COMPANYWORLD HEADQUARTERSTelephone: (970) 669-3050FAX: (970) 669-2932
FOR TECHNICAL ASSISTANCE, PRICE INFORMATION AND ORDERING:Call 800-227-4224
Contact the HACH office or distributor serving you.www.hach.com [email protected]
In the U.S.A. –
Outside the U.S.A. –
On the Worldwide Web – ; E-mail –
toll-free
© Hach Company/Hach Lange GmbH, 1989–2013. All rights reserved. 04/2013, Edition 8

Phosphorus, Acid Hydrolyzable DOC316.53.01111
PhosVer® 3 with Acid Hydrolysis Method Method 81800.06 to 3.50 mg/L PO4
3– Test ‘N Tube™ Vials
Scope and application: For water, wastewater and seawater.
Test preparation
Instrument specific informationThe table in this section shows all of the instruments that have the program for this test. Table 1 shows adapter and light shield requirements for the instruments that use them.To use the table, select an instrument, then read across to find the correspondinginformation for this test.
Table 1 Instrument-specific information for test tubes
Instrument Adapters Light shield
DR 6000 — —
DR 5000 — —
DR 900 4846400 Cover supplied with the instrument
DR 3900 — LZV849
DR 3800 — LZV646
DR 2800 —
Before startingInstall the instrument cap on the DR 900 cell holder before ZERO or READ is pushed.
DR 3900, DR 3800, DR 2800 and DR 2700: Install the light shield in Cell Compartment #2 before this test is started.
For best results, measure the reagent blank value for each new lot of reagent. Replace the sample with deionized water inthe test procedure to get the reagent blank value. Subtract the reagent blank value from the sample results automaticallywith the reagent blank adjust option.
Clean all glassware with 6.0 N (50%) hydrochloric acid, then rinse thoroughly with deionized water to remove contaminants.
The reagent that is used in this test is corrosive. Use protection for eyes and skin and be prepared to flush any spills withrunning water.
Review the Safety Data Sheets (MSDS/SDS) for the chemicals that are used and use any recommended personal protectiveequipment.
Dispose of reacted solutions according to local, state and federal regulations. Use the Safety Data Sheets for disposalinformation for unused reagents. Consult the environmental, health and safety staff for your facility and/or local regulatoryagencies for further disposal information.
Items to collect
Description Quantity
Total and Acid Hydrolyzable Phosphorus Reagent Set 1
DRB200 Reactor 1
Funnel, micro 1
Light shield or adapter (For information about sample cells, adapters or light shields, refer to Instrument specific information on page 1.) 1
1
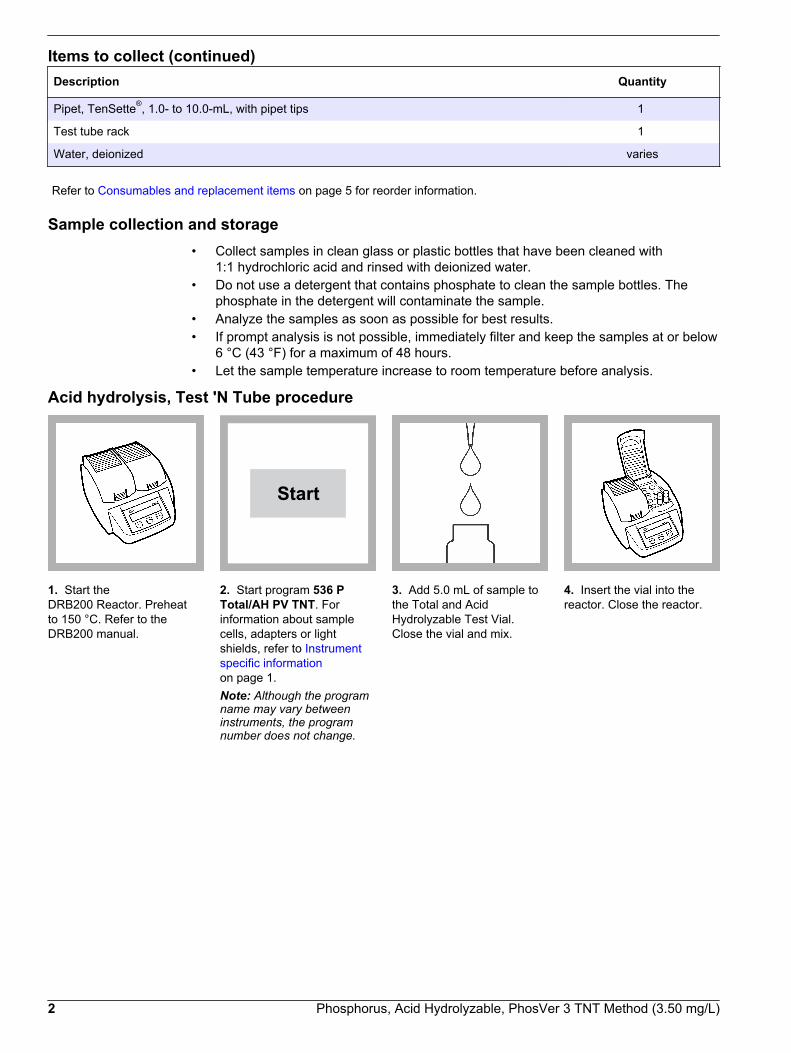
Items to collect (continued)Description Quantity
Pipet, TenSette®, 1.0- to 10.0-mL, with pipet tips 1
Test tube rack 1
Water, deionized varies
Refer to Consumables and replacement items on page 5 for reorder information.
Sample collection and storage• Collect samples in clean glass or plastic bottles that have been cleaned with
1:1 hydrochloric acid and rinsed with deionized water.• Do not use a detergent that contains phosphate to clean the sample bottles. The
phosphate in the detergent will contaminate the sample.• Analyze the samples as soon as possible for best results.• If prompt analysis is not possible, immediately filter and keep the samples at or below
6 °C (43 °F) for a maximum of 48 hours.• Let the sample temperature increase to room temperature before analysis.
Acid hydrolysis, Test 'N Tube procedure
1. Start theDRB200 Reactor. Preheatto 150 °C. Refer to theDRB200 manual.
Start
2. Start program 536 PTotal/AH PV TNT. Forinformation about samplecells, adapters or lightshields, refer to Instrumentspecific informationon page 1.Note: Although the programname may vary betweeninstruments, the programnumber does not change.
3. Add 5.0 mL of sample tothe Total and AcidHydrolyzable Test Vial.Close the vial and mix.
4. Insert the vial into thereactor. Close the reactor.
2 Phosphorus, Acid Hydrolyzable, PhosVer 3 TNT Method (3.50 mg/L)

5. Start the instrumenttimer. A 30-minute reactiontime starts.
6. When the timer expires,carefully remove the vialfrom the reactor. Set the vialin a test tube rack. Let thevial cool to roomtemperature.
7. Add 2 mL of 1.00 NSodium Hydroxide to thevial. Cap the vial and shaketo mix.
8. Clean the vial.
9. Insert the vial into the 16-mm cell holder.
Zero
10. Push ZERO. Thedisplay shows 0.00 mg/LPO4
3–.
11. Add the contents of onePhosVer 3 Powder Pillow tothe vial.
12. Put the cap on the vial.Shake for 20 to 30 seconds.The powder will notcompletely dissolve .
13. Start the instrumenttimer. A 2-minute reactiontime starts.Read the results within twoto eight minutes after addingthe PhosVer 3 reagent.
14. Clean the vial. 15. Insert the vial into the16-mm cell holder.
Read
16. Push READ. Resultsshow in mg/L PO4
3–.
InterferencesInterfering substance Interference level
Aluminum More than 200 mg/L
Arsenate Interferes at any level.
Chromium More than 100 mg/L
Copper More than 10 mg/L
Phosphorus, Acid Hydrolyzable, PhosVer 3 TNT Method (3.50 mg/L) 3

Interfering substance Interference level
Sulfide More than 9 mg/L sulfide. Remove sulfide interference as follows:
1. Measure 25 mL of sample into a 50-mL beaker.2. Add Bromine Water drop-wise with constant swirling until a permanent yellow color remains.3. Add Phenol Solution drop-wise with constant swirling until the yellow color just disappears.
Use this sample in the test procedure.
Iron More than 100 mg/L
Nickel More than 300 mg/L
Highly buffered samplesor extreme sample pH
Can prevent the correct pH adjustment of the sample by the reagents. Sample pretreatment maybe necessary.
Silica More than 50 mg/L
Silicate More than 10 mg/L
Turbidity or color May cause inconsistent results. The acid in the powder pillow can dissolve some of thesuspended particles and the desorption of orthophosphate from the particles can vary. For highlyturbid or colored samples, add the contents of one Phosphate Pretreatment Powder Pillow to25 mL of sample. Mix well. Use this solution to zero the instrument.
Zinc More than 80 mg/L
Accuracy check
Standard additions method (sample spike)Use the standard additions method (for applicable instruments) to validate the testprocedure, reagents and instrument and to find if there is an interference in the sample.Items to collect:
• Phosphate 2-mL Ampule Standard, 50-mg/L as PO43–
• Ampule breaker• Pipet, TenSette®, 0.1–1.0 mL and tips• Mixing cylinders, 25-mL (3)
1. Use the test procedure to measure the concentration of the sample, then keep the(unspiked) sample in the instrument.
2. Go to the Standard Additions option in the instrument menu.3. Select the values for standard concentration, sample volume and spike volumes.4. Open the standard solution.5. Prepare three spiked samples: use the TenSette pipet to add 0.1 mL, 0.2 mL and
0.3 mL of the standard solution, respectively, to three 25-mL portions of fresh sample.Mix well.
6. Use the test procedure to measure the concentration of each of the spiked samples.Start with the smallest sample spike. Measure each of the spiked samples in theinstrument.
7. Select Graph to compare the expected results to the actual results.Note: If the actual results are significantly different from the expected results, make sure thatthe sample volumes and sample spikes are measured accurately. The sample volumes andsample spikes that are used should agree with the selections in the standard additions menu. Ifthe results are not within acceptable limits, the sample may contain an interference.
Standard solution methodUse the standard solution method to validate the test procedure, reagents andinstrument.
4 Phosphorus, Acid Hydrolyzable, PhosVer 3 TNT Method (3.50 mg/L)

Items to collect:
• 3.0-mg/L phosphate standard solution
1. Use the test procedure to measure the concentration of the standard solution.2. Compare the expected result to the actual result.
Note: The factory calibration can be adjusted slightly with the standard adjust option so that theinstrument shows the expected value of the standard solution. The adjusted calibration is thenused for all test results. This adjustment can increase the test accuracy when there are slightvariations in the reagents or instruments.
Method performanceThe method performance data that follows was derived from laboratory tests that weremeasured on a spectrophotometer during ideal test conditions. Users may get differentresults under different test conditions.
Program Standard Precision (95% Confidence Interval) SensitivityConcentration change per 0.010 Abs change
536 3.00 mg/L PO43– 2.93–3.07 mg/L PO4
3– 0.06 mg/L PO43–
Summary of methodPhosphates in condensed inorganic forms (meta-, pyro-, or other polyphosphates) areconverted to reactive orthophosphate before measurement. The sample is pretreated withacid and heat to hydrolyze the condensed inorganic forms to orthophosphate.Orthophosphate reacts with molybdate in an acid medium to produce a mixedphosphate/molybdate complex. Ascorbic acid then reduces the complex, which gives anintense molybdenum blue color. The measurement wavelength is 880 nm forspectrophotometers or 610 nm for colorimeters.
Pollution prevention and waste managementReacted samples contain molybdenum and must be disposed of as a hazardous waste.Dispose of reacted solutions according to local, state and federal regulations.
Consumables and replacement itemsRequired reagents
Description Quantity/test Unit Item no.
Water, deionized varies 100 mL 27242
Total and Acid Hydrolyzable Phosphorus Reagent Set — 50 tests 2742745
Includes:
PhosVer® 3 Phosphate Reagent Powder Pillow, 10-mL 1 50/pkg 2106046
Potassium Persulfate Powder Pillows 1 pillow 50/pkg 2084766
Sodium Hydroxide, 1.54 N varies 100 mL 2743042
Sodium Hydroxide Standard Solution, 1.00 N 2 mL 100 mL 104542
Total and Acid Hydrolyzable Test Vials (not sold separately) 1 50/pkg —
Required apparatus
Description Quantity/test Unit Item no.
DRB200 Reactor, 110 V, 15 x 16 mm 1 each LTV082.53.40001
DRB200 Reactor, 220 V, 15 x 16 mm 1 each LTV082.52.40001
Funnel, micro, poly 1 each 2584335
Pipet, volumetric, Class A, 2.00-mL 1 each 1451536
Phosphorus, Acid Hydrolyzable, PhosVer 3 TNT Method (3.50 mg/L) 5
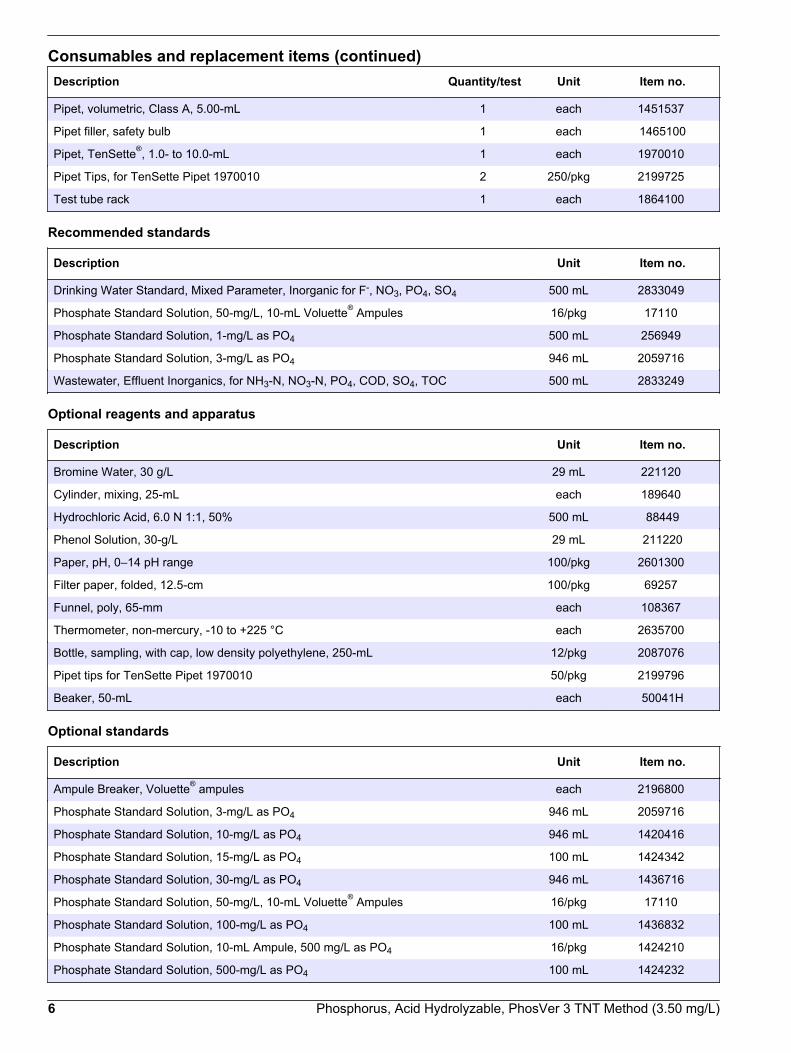
Consumables and replacement items (continued)Description Quantity/test Unit Item no.
Pipet, volumetric, Class A, 5.00-mL 1 each 1451537
Pipet filler, safety bulb 1 each 1465100
Pipet, TenSette®, 1.0- to 10.0-mL 1 each 1970010
Pipet Tips, for TenSette Pipet 1970010 2 250/pkg 2199725
Test tube rack 1 each 1864100
Recommended standards
Description Unit Item no.
Drinking Water Standard, Mixed Parameter, Inorganic for F-, NO3, PO4, SO4 500 mL 2833049
Phosphate Standard Solution, 50-mg/L, 10-mL Voluette® Ampules 16/pkg 17110
Phosphate Standard Solution, 1-mg/L as PO4 500 mL 256949
Phosphate Standard Solution, 3-mg/L as PO4 946 mL 2059716
Wastewater, Effluent Inorganics, for NH3-N, NO3-N, PO4, COD, SO4, TOC 500 mL 2833249
Optional reagents and apparatus
Description Unit Item no.
Bromine Water, 30 g/L 29 mL 221120
Cylinder, mixing, 25-mL each 189640
Hydrochloric Acid, 6.0 N 1:1, 50% 500 mL 88449
Phenol Solution, 30-g/L 29 mL 211220
Paper, pH, 0–14 pH range 100/pkg 2601300
Filter paper, folded, 12.5-cm 100/pkg 69257
Funnel, poly, 65-mm each 108367
Thermometer, non-mercury, -10 to +225 °C each 2635700
Bottle, sampling, with cap, low density polyethylene, 250-mL 12/pkg 2087076
Pipet tips for TenSette Pipet 1970010 50/pkg 2199796
Beaker, 50-mL each 50041H
Optional standards
Description Unit Item no.
Ampule Breaker, Voluette® ampules each 2196800
Phosphate Standard Solution, 3-mg/L as PO4 946 mL 2059716
Phosphate Standard Solution, 10-mg/L as PO4 946 mL 1420416
Phosphate Standard Solution, 15-mg/L as PO4 100 mL 1424342
Phosphate Standard Solution, 30-mg/L as PO4 946 mL 1436716
Phosphate Standard Solution, 50-mg/L, 10-mL Voluette® Ampules 16/pkg 17110
Phosphate Standard Solution, 100-mg/L as PO4 100 mL 1436832
Phosphate Standard Solution, 10-mL Ampule, 500 mg/L as PO4 16/pkg 1424210
Phosphate Standard Solution, 500-mg/L as PO4 100 mL 1424232
6 Phosphorus, Acid Hydrolyzable, PhosVer 3 TNT Method (3.50 mg/L)

Phosphorus, Acid Hydrolyzable, PhosVer 3 TNT Method (3.50 mg/L) 7

HACH COMPANYWORLD HEADQUARTERSTelephone: (970) 669-3050FAX: (970) 669-2932
FOR TECHNICAL ASSISTANCE, PRICE INFORMATION AND ORDERING:Call 800-227-4224
Contact the HACH office or distributor serving you.www.hach.com [email protected]
In the U.S.A. –
Outside the U.S.A. –
On the Worldwide Web – ; E-mail –
toll-free
© Hach Company/Hach Lange GmbH, 1989–2013. All rights reserved. 04/2013, Edition 8

Phosphorus, Reactive(Orthophosphate)
DOC316.53.01113
Amino Acid Method1 Method 81780.23 to 30.00 mg/L PO4
3– Reagent Solution
Scope and application: For water, wastewater and seawater.1 Adapted from Standard Methods for the Examination of Water and Wastewater.
Test preparation
Instrument specific informationThe table in this section shows all of the instruments that have the program for this test. Table 1 shows sample cell and orientation requirements for reagent addition tests, suchas powder pillow or bulk reagent tests.To use the table, select an instrument, then read across to find the correspondinginformation for this test.
Table 1 Instrument-specific information for reagent solution
Instrument Sample cell orientation Sample cell
DR 6000 DR 3800 DR 2800 DR 2700
The fill line is to the right. 2495402
DR 5000 DR 3900
The fill line is toward the user.
DR 900 The orientation mark is toward the user. 2401906
Before startingInstall the instrument cap on the DR 900 cell holder before ZERO or READ is pushed.
For best results, measure the reagent blank value for each new lot of reagent. Replace the sample with deionized water inthe test procedure to get the reagent blank value. Subtract the reagent blank value from the sample results automaticallywith the reagent blank adjust option.
The contents of one Amino Acid Reagent Powder Pillow can be used as an alternative to the 1 mL of Amino Acid ReagentSolution in the test procedure.
Review the Safety Data Sheets (MSDS/SDS) for the chemicals that are used and use any recommended personal protectiveequipment.
Dispose of reacted solutions according to local, state and federal regulations. Use the Safety Data Sheets for disposalinformation for unused reagents. Consult the environmental, health and safety staff for your facility and/or local regulatoryagencies for further disposal information.
1
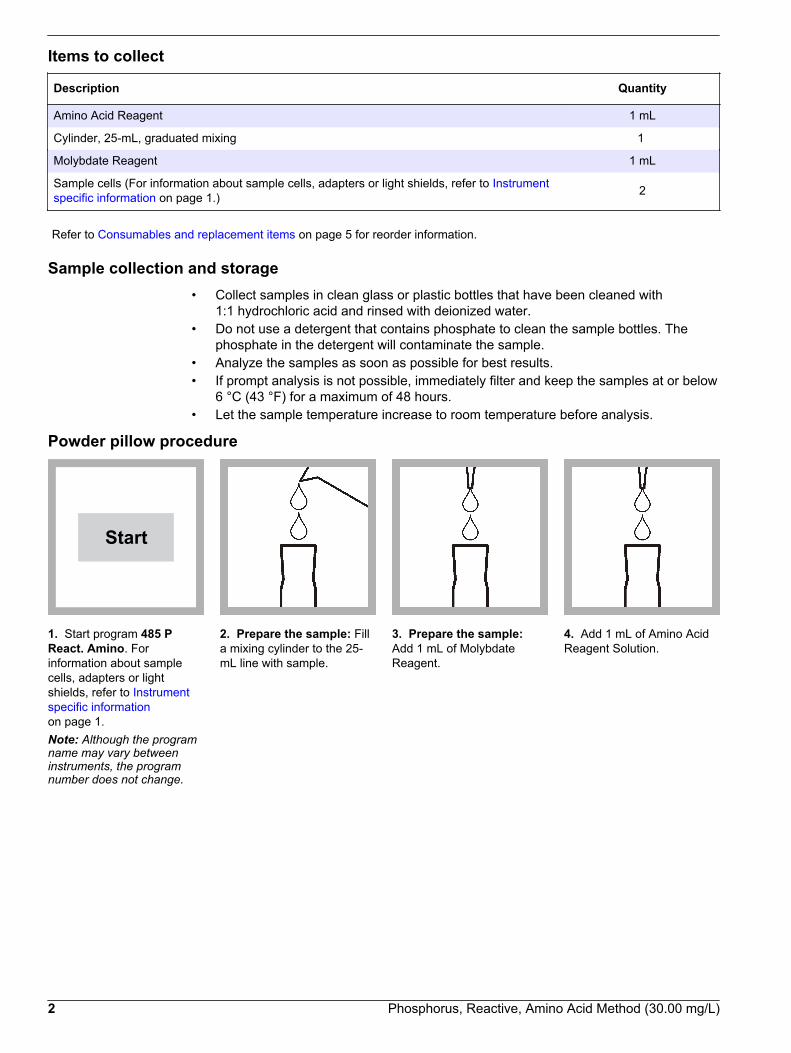
Items to collect
Description Quantity
Amino Acid Reagent 1 mL
Cylinder, 25-mL, graduated mixing 1
Molybdate Reagent 1 mL
Sample cells (For information about sample cells, adapters or light shields, refer to Instrumentspecific information on page 1.) 2
Refer to Consumables and replacement items on page 5 for reorder information.
Sample collection and storage• Collect samples in clean glass or plastic bottles that have been cleaned with
1:1 hydrochloric acid and rinsed with deionized water.• Do not use a detergent that contains phosphate to clean the sample bottles. The
phosphate in the detergent will contaminate the sample.• Analyze the samples as soon as possible for best results.• If prompt analysis is not possible, immediately filter and keep the samples at or below
6 °C (43 °F) for a maximum of 48 hours.• Let the sample temperature increase to room temperature before analysis.
Powder pillow procedure
Start
1. Start program 485 PReact. Amino. Forinformation about samplecells, adapters or lightshields, refer to Instrumentspecific informationon page 1.Note: Although the programname may vary betweeninstruments, the programnumber does not change.
2. Prepare the sample: Filla mixing cylinder to the 25-mL line with sample.
3. Prepare the sample:Add 1 mL of MolybdateReagent.
4. Add 1 mL of Amino AcidReagent Solution.
2 Phosphorus, Reactive, Amino Acid Method (30.00 mg/L)

5. Close the cylinder. Invertthe cylinder several times tomix.A blue color shows ifphosphate is present in thesample.
6. Start the instrumenttimer. A 10-minute reactiontime starts.Prepare the blank while thetimer is counting down.
7. Prepare the blank: Fill asample cell with 10 mL ofuntreated sample.
8. When the timer expires,clean the blank.
9. Insert the blank into thecell holder.
Zero
10. Push ZERO. Thedisplay shows 0.00 mg/LPO4
3–.
11. Fill a second samplecell with 10-mL of theprepared sample.
12. Clean the preparedsample.
13. Insert the preparedsample into the cell holder.
Read
14. Push READ. Resultsshow in mg/L PO4
3–.
InterferencesInterferingsubstance
Interference level
Calcium More than 10,000 mg/L as CaCO3
Chloride More than 150,000 mg/L Cl–
Colored samples Add 1 mL of 10 N Sulfuric Acid Standard Solution to another 25-mL sample. Use this instead ofuntreated sample as the blank to zero the instrument. Use a pipet and pipet filler to measure thesulfuric acid standard.
High salt levels (Na+) May cause low results. To eliminate this interference, dilute the sample until two successive dilutionsgive about the same result.
Magnesium More than 40,000 mg/L as CaCO3
Phosphorus, Reactive, Amino Acid Method (30.00 mg/L) 3

Interferingsubstance
Interference level
Nitrite (NO2–) Bleaches the blue color. Remove nitrite interference by adding 0.05 g of sulfamic acid to 25 mL
sample. Swirl to mix. Use this treated sample in the test procedure.
Phosphates, highlevels (PO4
3–)As the concentration of phosphate increases, the color changes from blue to green, then to yellowand finally to brown. The brown color may suggest a concentration as high as 100,000 mg/L PO4
3–. Ifa color other than blue is formed, dilute the sample and retest.
Sulfide (S2–) Sulfide interferes. For samples with sulfide concentration less than 5 mg/L sulfide interference maybe removed by oxidation with Bromine Water as follows:
1. Measure 50 mL of sample into an Erlenmeyer flask.2. Add Bromine Water drop-wise with constant swirling until permanent yellow color develops.3. Add Phenol Solution by drops until the yellow color just disappears. Use this treated sample in
the test procedure.
Temperature For best results, sample temperature should be 21 ±3 °C (70 ±5 °F).
Turbidity May give inconsistent results for two reasons. Some suspended particles may dissolve because ofthe acid used in the test. Also, desorption of orthophosphate from particles may occur. For highlyturbid samples, add 1 mL of 10 N Sulfuric Acid Standard Solution to another 25-mL sample. Use thisinstead of untreated sample as the blank to zero the instrument. Use a pipet and pipet filler tomeasure the sulfuric acid standard.
Highly bufferedsamples or extremesample pH
Can prevent the correct pH adjustment of the sample by the reagents. Sample pretreatment may benecessary.
Accuracy check
Standard additions method (sample spike)Use the standard additions method (for applicable instruments) to validate the testprocedure, reagents and instrument and to find if there is an interference in the sample.Items to collect:
• Phosphate 2-mL Ampule Standard, 500-mg/L PO43–
• Ampule breaker• Pipet, TenSette®, 0.1–1.0 mL and tips• Mixing cylinders, 25-mL (3)
1. Use the test procedure to measure the concentration of the sample, then keep the(unspiked) sample in the instrument.
2. Go to the Standard Additions option in the instrument menu.3. Select the values for standard concentration, sample volume and spike volumes.4. Open the standard solution.5. Prepare three spiked samples: use the TenSette pipet to add 0.1 mL, 0.2 mL and
0.3 mL of the standard solution, respectively, to three 25-mL portions of fresh sample.Mix well.
6. Use the test procedure to measure the concentration of each of the spiked samples.Start with the smallest sample spike. Measure each of the spiked samples in theinstrument.
7. Select Graph to compare the expected results to the actual results.Note: If the actual results are significantly different from the expected results, make sure thatthe sample volumes and sample spikes are measured accurately. The sample volumes andsample spikes that are used should agree with the selections in the standard additions menu. Ifthe results are not within acceptable limits, the sample may contain an interference.
Standard solution methodUse the standard solution method to validate the test procedure, reagents andinstrument.
4 Phosphorus, Reactive, Amino Acid Method (30.00 mg/L)

Items to collect:
• 10-mg/L Phosphate Standard Solution
1. Use the test procedure to measure the concentration of the standard solution.2. Compare the expected result to the actual result.
Note: The factory calibration can be adjusted slightly with the standard adjust option so that theinstrument shows the expected value of the standard solution. The adjusted calibration is thenused for all test results. This adjustment can increase the test accuracy when there are slightvariations in the reagents or instruments.
Method performanceThe method performance data that follows was derived from laboratory tests that weremeasured on a spectrophotometer during ideal test conditions. Users may get differentresults under different test conditions.
Program Standard Precision (95% Confidence Interval) SensitivityConcentration change per 0.010 Abs change
485 10.00 mg/L PO43– 9.86–10.14 mg/L PO4
3– 0.20 mg/L PO43–
Summary of methodIn a highly acidic solution, ammonium molybdate reacts with orthophosphate to formmolybdophosphoric acid. This complex is then reduced by the amino acid reagent to yieldan intensely colored molybdenum blue compound. The measurement wavelength is530 nm for spectrophotometers or 520 nm for colorimeters.
Consumables and replacement itemsRequired reagents
Description Quantity/test Unit Item no.
High Range Reactive Phosphorus Reagent Set — 100 tests 2244100
Includes:
Amino Acid Reagent 1 mL 100 mLMDB 193432
Molybdate Reagent 1 mL 100 mLMDB 223632
Required apparatus
Description Quantity/test Unit Item no.
Cylinder, graduated mixing, 25-mL 1 each 189640
Recommended standards and apparatus
Description Unit Item no.
Phosphate Standard Solution, 10-mg/L as PO4 946 mL 1420416
Phosphate Standard Solution, 2-mL PourRite® Ampule, 500-mg/L PO43– 16/pkg 1424220
Wastewater, Effluent Inorganics, for NH3-N, NO3-N, PO4, COD, SO4, TOC 500 mL 2833249
Wastewater Influent Standard, Mixed Parameter, for NH3-N, NO3-N, PO4, COD, SO4,TOC 500 mL 2833149
Water, deionized 4 L 27256
Ampule Breaker, PourRite® ampules each 2484600
Phosphorus, Reactive, Amino Acid Method (30.00 mg/L) 5

Optional reagents and apparatus
Description Unit Item no.
Amino Acid Reagent Powder Pillow 100/pkg 80499
Bromine Water, 30 g/L 29 mL 221120
Flask, Erlenmeyer, 125-mL each 50543
Hydrochloric Acid, 6.0 N 1:1, 50% 500 mL 88449
Phenol Solution, 30-g/L 29 mL 211220
Sulfamic Acid, 454 g each 234401
Sulfuric Acid Standard Solution, 10 N 1000 mL 93153
Pipet, TenSette®, 0.1–1.0 mL each 1970001
Pipet tips for TenSette Pipet 1970001 50/pkg 2185696
Pipet tips for TenSette Pipet 1970001 1000/pkg 2185628
Paper, pH, 0–14 pH range 100/pkg 2601300
Filter paper, folded, 12.5-cm 100/pkg 69257
Funnel, poly, 65-mm each 108367
Thermometer, non-mercury, -10 to +225 °C each 2635700
Bottle, sampling, with cap, low density polyethylene, 250-mL 12/pkg 2087076
Optional standards
Description Unit Item no.
Ampule Breaker, Voluette® ampules each 2196800
Phosphate Standard Solution, 3-mg/L as PO4 946 mL 2059716
Phosphate Standard Solution, 15-mg/L as PO4 100 mL 1424342
Phosphate Standard Solution, 30-mg/L as PO4 946 mL 1436716
Phosphate Standard Solution, 50-mg/L, 10-mL Voluette® Ampules 16/pkg 17110
Phosphate Standard Solution, 100-mg/L as PO4 100 mL 1436832
Phosphate Standard Solution, 10-mL Ampule, 500 mg/L as PO4 16/pkg 1424210
Phosphate Standard Solution, 500-mg/L as PO4 100 mL 1424232
HACH COMPANYWORLD HEADQUARTERSTelephone: (970) 669-3050FAX: (970) 669-2932
FOR TECHNICAL ASSISTANCE, PRICE INFORMATION AND ORDERING:Call 800-227-4224
Contact the HACH office or distributor serving you.www.hach.com [email protected]
In the U.S.A. –
Outside the U.S.A. –
On the Worldwide Web – ; E-mail –
toll-free
© Hach Company/Hach Lange GmbH, 1989–2013. All rights reserved. 04/2013, Edition 8

Phosphorus, Reactive(Orthophosphate)
DOC316.53.01115
Molybdovanadate Method1 Method 81140.3 to 45.0 mg/L PO4
3– Reagent Solution or AccuVac® Ampuls
Scope and application: For water and wastewater.1 Adapted from Standard Methods for the Examination of Water and Wastewater.
Test preparation
Instrument-specific informationThe tables in this section show all of the instruments that have the program for this test. Table 1 shows sample cell and orientation requirements for reagent addition tests, suchas powder pillow or bulk reagent tests. Table 2 shows sample cell and adapterrequirements for AccuVac Ampul tests.To use either table, select an instrument, then read across to find the correspondinginformation for this test.
Table 1 Instrument-specific information for reagent solution
Instrument Sample cell orientation Sample cell
DR 6000 DR 3800 DR 2800 DR 2700
The fill line is to the right. 2495402
DR 5000 DR 3900
The fill line is toward the user.
DR 900 The orientation mark is toward the user. 2401906
Table 2 Instrument-specific information for AccuVac Ampuls
Instrument Adapter Sample cell
DR 6000 DR 5000 DR 900
— 2427606
DR 3900 LZV846 (A)
DR 3800 DR 2800 DR 2700
LZV584 (C) 2122800
Before startingInstall the instrument cap on the DR 900 cell holder before ZERO or READ is pushed.
For best results, the sample temperature should be 20–25 °C (68–77 °F).
1

Review the Safety Data Sheets (MSDS/SDS) for the chemicals that are used and use any recommended personal protectiveequipment.
Dispose of reacted solutions according to local, state and federal regulations. Use the Safety Data Sheets for disposalinformation for unused reagents. Consult the environmental, health and safety staff for your facility and/or local regulatoryagencies for further disposal information.
Items to collectReagent solution
Description Quantity
Molybdovanadate reagent 1.0 mL
Sample cells (For information about sample cells, adapters or light shields, refer to Instrument-specific information on page 1.) 2
Refer to Consumables and replacement items on page 6 for reorder information.
AccuVac Ampuls
Description Quantity
Molybdovanadate reagent AccuVac® Ampuls 2
Beaker, 50-mL 1
Stoppers for 18 mm tubes and AccuVac Ampuls 2
Refer to Consumables and replacement items on page 6 for reorder information.
Sample collection and storage• Collect samples in clean glass or plastic bottles that have been cleaned with
1:1 hydrochloric acid and rinsed with deionized water.• Do not use a detergent that contains phosphate to clean the sample bottles. The
phosphate in the detergent will contaminate the sample.• Analyze the samples as soon as possible for best results.• If prompt analysis is not possible, immediately filter and keep the samples at or below
6 °C (43 °F) for a maximum of 48 hours.• Let the sample temperature increase to room temperature before analysis.
2 Phosphorus, Reactive, Molybdovanadate Method (45.0 mg/L)

Reagent solution procedure
Start
1. Start program 480 PReact. Mo. For informationabout sample cells,adapters or light shields,refer to Instrument-specificinformation on page 1.Note: Although the programname may vary betweeninstruments, the programnumber does not change.
2. Prepare the blank: Fill asample cell with 10 mL ofdeionized water.
3. Prepare the sample: Filla second sample cell with10 mL of sample.
4. Add 0.5 mL ofMolybdovanadate reagent toeach cell.
5. Swirl to mix. 6. Start the instrumenttimer. A 7-minute reactiontime starts.If the sample concentrationis greater than 30 mg/LPO4
3–, read at exactly7 minutes or make a1:1 dilution of the sampleand repeat the test.
7. When the timer expires,clean the blank.
8. Insert the blank into thecell holder.
Zero
9. Push ZERO. The displayshows 0.0 mg/L PO4
3–.10. Clean the preparedsample.
11. Insert the preparedsample into the cell holder.
Read
12. Push READ. Resultsshow in mg/L PO4
3–.
Phosphorus, Reactive, Molybdovanadate Method (45.0 mg/L) 3

AccuVac Ampuls procedure
Start
1. Start program 482 PReact. Mo. AV. Forinformation about samplecells, adapters or lightshields, refer to Instrument-specific informationon page 1.Note: Although the programname may vary betweeninstruments, the programnumber does not change.
2. Prepare the blank: Pourat least 40 mL of deionizedwater into a 50-mL beaker.Fill an AccuVac Ampul withdeionized water. Keep thetip immersed while theAmpul fills completely.
3. Prepare the sample:Collect at least 40 mL ofsample in a 50-mL beaker.Fill the AccuVac Ampul withsample. Keep the tipimmersed while the Ampulfills completely.
4. Start the instrumenttimer. A 7-minute reactiontime starts.If the sample concentrationis greater than 30 mg/LPO4
3–, read at exactly7 minutes or make a1:1 dilution of the sampleand repeat the test.
5. When the timer expires,clean the blank AccuVacAmpul.
6. Insert the blank AccuVacAmpul into the cell holder.
Zero
7. Push ZERO. The displayshows 0.0 mg/L PO4
3–.8. Clean the AccuVacAmpul.
9. Insert the preparedsample AccuVac Ampul intothe cell holder.
Read
10. Push READ. Resultsshow in mg/L PO4
3–.
4 Phosphorus, Reactive, Molybdovanadate Method (45.0 mg/L)

InterferencesTable 3 shows the interferences and interference levels. Table 4 shows the substancesthat do not interfere at or below the indicated levels.
Table 3 Interfering substances
Interfering substance Interference level
Arsenate Causes a positive interference if the sample is warm when the reagent is added. The sample canbe gently warmed to room temperature without interference.
Iron, ferrous Causes a blue color which interferes at more than 100 mg/L.
Molybdate Causes a negative interference at more than 1000 mg/L.
Silica Causes a positive interference if the sample is warm when the reagent is added. The sample canbe gently warmed to room temperature without interference.
Sulfide Causes a negative interference. Correct for this interference as follows:
1. Measure 50 mL of sample into an Erlenmeyer flask.2. Add Bromine Water drop-wise with constant swirling until a permanent yellow color remains.3. Add Phenol Solution drop-wise until the yellow color just disappears.
Use this sample in the test procedure.
Highly buffered samplesor extreme sample pH
Can prevent the correct pH adjustment of the sample by the reagents. Sample pretreatment maybe necessary. The pH should be approximately 7.
Fluoride, thorium,bismuth, thiosulfate orthiocyanate
Causes a negative interference.
Temperature Temperatures below 18 °C (64 °F) cause a negative interference. Temperatures above 25 °C(77 °F) cause a positive interference. The sample can be gently warmed to room temperaturewithout interference.
Table 4 Substances that do not interfere at less than 1000 mg/L
Pyrophosphate Tetraborate Selenate Benzoate
Citrate Oxalate Lactate Tartrate
Formate Salicylate Al3+ Fe3+
Mg2+ Ca2+ Ba2+ Sr2+
Li+ Na+ K+ NH4+
Cd2+ Mn2+ NO3– NO2
–
SO42– SO3
2– Pb2+ Hg+
Hg2+ Sn2+ Cu2+ Ni2+
Ag+ U4+ Zr4+ AsO3–
Br– CO32– ClO4
– CN–
IO3– SiO4
4– — —
Accuracy check
Standard additions method (sample spike)Use the standard additions method (for applicable instruments) to validate the testprocedure, reagents and instrument and to find if there is an interference in the sample.Items to collect:
• Phosphate standard solution, 500 mg/L PO43– ampule
• Ampule breaker• Pipet, TenSette®, 0.1–1.0 mL and tips
Phosphorus, Reactive, Molybdovanadate Method (45.0 mg/L) 5

• Mixing cylinders, 25-mL (3)
1. Use the test procedure to measure the concentration of the sample, then keep the(unspiked) sample in the instrument.
2. Go to the Standard Additions option in the instrument menu.3. Select the values for standard concentration, sample volume and spike volumes.4. Open the standard solution.5. Prepare three spiked samples: use the TenSette pipet to add 0.1 mL, 0.2 mL and
0.3 mL of the standard solution, respectively, to three 25-mL portions of fresh sample.Mix well.Note: For AccuVac® Ampuls, add 0.1 mL, 0.2 mL and 0.3 mL of the standard solution to three25-mL portions of fresh sample.
6. Use the test procedure to measure the concentration of each of the spiked samples.Start with the smallest sample spike. Measure each of the spiked samples in theinstrument.
7. Select Graph to compare the expected results to the actual results.Note: If the actual results are significantly different from the expected results, make sure thatthe sample volumes and sample spikes are measured accurately. The sample volumes andsample spikes that are used should agree with the selections in the standard additions menu. Ifthe results are not within acceptable limits, the sample may contain an interference.
Standard solution methodUse the standard solution method to validate the test procedure, reagents andinstrument.Items to collect:
• 10 mg/L phosphate standard solution
1. Use the test procedure to measure the concentration of the standard solution.2. Compare the expected result to the actual result.
Note: The factory calibration can be adjusted slightly with the standard adjust option so that theinstrument shows the expected value of the standard solution. The adjusted calibration is thenused for all test results. This adjustment can increase the test accuracy when there are slightvariations in the reagents or instruments.
Method performanceThe method performance data that follows was derived from laboratory tests that weremeasured on a spectrophotometer during ideal test conditions. Users may get differentresults under different test conditions.
Program Standard Precision (95% Confidence Interval) SensitivityConcentration change per 0.010 Abs change
480 30.0 mg/L PO43– 29.6–30.4 mg/L PO4
3– 0.3 mg/L PO43–
482 30.0 mg/L PO43– 29.7–30.3 mg/L PO4
3– 0.3 mg/L PO43–
Summary of methodIn the molybdovanadate method, orthophosphate reacts with molybdate in an acidmedium to produce a mixed phosphate/molybdate complex. In the presence of vanadium,yellow molybdovanadophosphoric acid is formed. The intensity of the yellow color isproportional to the phosphate concentration. The measurement wavelength is 430 nm forspectrophotometers or 420 nm for colorimeters.
Consumables and replacement itemsNote: Product and Article numbers may vary for some selling regions. Contact the appropriatedistributor or refer to the company website for contact information.
6 Phosphorus, Reactive, Molybdovanadate Method (45.0 mg/L)

Required reagents
Description Quantity/Test Unit Item no.
Molybdovanadate Reagent 1.0 mL 100 mLMDB 2076032
OR
Molybdovanadate Reagent AccuVac® Ampul 2 25/pkg 2525025
Water, deionized varies 4 L 27256
Required apparatus
Description Quantity/Test Unit Item no.
AccuVac Snapper 1 each 2405200
Beaker, 50-mL 1 each 50041H
Stoppers for 18-mm tubes and AccuVac Ampuls 2 6/pkg 173106
Recommended standards and apparatus
Description Unit Item no.
Ampule Breaker, Voluette® ampules each 2196800
Phosphate Standard Solution, 10-mg/L as PO4 946 mL 1420416
Phosphate Standard Solution, 10-mL Ampule, 500 mg/L as PO4 16/pkg 1424210
Wastewater Influent Standard, Mixed Parameter, for NH3-N, NO3-N, PO4, COD, SO4,TOC 500 mL 2833149
Optional reagents and apparatus
Description Unit Item no.
AccuVac® Drainer each 4103600
Bottle, sampling, with cap, low density polyethylene, 250-mL 12/pkg 2087076
Bromine Water, 30-g/L 29 mL 221120
Cylinder, mixing, 25-mL each 2088640
Hydrochloric Acid, 6.0 N 1:1, 50% 500 mL 88449
Paper, pH, 0–14 pH range 100/pkg 2601300
Phenol Solution, 30-g/L 29 mL 211220
Phosphate Standard Solution, 3-mg/L as PO4 946 mL 2059716
Phosphate Standard Solution, 15-mg/L as PO4 100 mL 1424342
Phosphate Standard Solution, 30-mg/L as PO4 946 mL 1436716
Phosphate Standard Solution, 50-mg/L, 10-mL Voluette® Ampules 16/pkg 17110
Phosphate Standard Solution, 100-mg/L as PO4 100 mL 1436832
Phosphate Standard Solution, 500-mg/L as PO4 100 mL 1424232
Pipet, TenSette®, 0.1–1.0 mL each 1970001
Pipet, TenSette®, 1.0 to 10.0 mL each 1970010
Pipet tips for TenSette Pipet 1970001 50/pkg 2185696
Phosphorus, Reactive, Molybdovanadate Method (45.0 mg/L) 7

Consumables and replacement items (continued)Description Unit Item no.
Pipet tips for TenSette Pipet 1970001 1000/pkg 2185628
Thermometer, non-mercury, -10 to +225 °C each 2635700
HACH COMPANYWORLD HEADQUARTERSTelephone: (970) 669-3050FAX: (970) 669-2932
FOR TECHNICAL ASSISTANCE, PRICE INFORMATION AND ORDERING:Call 800-227-4224
Contact the HACH office or distributor serving you.www.hach.com [email protected]
In the U.S.A. –
Outside the U.S.A. –
On the Worldwide Web – ; E-mail –
toll-free
© Hach Company/Hach Lange GmbH, 1989–2013. All rights reserved. 04/2013, Edition 8

Phosphorus, Reactive(Orthophosphate)
DOC316.53.01116
Molybdovanadate Method1 Method 81141.0 to 100.0 mg/L PO4
3– (HR) Test ‘N Tube™ Vials
Scope and application: For water and wastewater.1 Adapted from Standard Methods for the Examination of Water and Wastewater.
Test preparation
Instrument specific informationThe table in this section shows all of the instruments that have the program for this test. Table 1 shows adapter and light shield requirements for the instruments that use them.To use the table, select an instrument, then read across to find the correspondinginformation for this test.
Table 1 Instrument-specific information for test tubes
Instrument Adapters Light shield
DR 6000 — —
DR 5000 — —
DR 900 4846400 Cover supplied with the instrument
DR 3900 — LZV849
DR 3800 — LZV646
DR 2800 —
Before startingInstall the instrument cap on the DR 900 cell holder before ZERO or READ is pushed.
DR 3900, DR 3800, DR 2800 and DR 2700: Install the light shield in Cell Compartment #2 before this test is started.
The blank vial that is prepared in the test procedure can be used more than once. At room temperature, the reagent blank isstable for a maximum of three weeks. Prepare a new blank vial when a new lot of reagent is used.
The 7-minute reaction time in the test procedure is for samples that are at 23 °C (73 °F). If the sample temperature is 13 °C(55 °F), wait 15 minutes. If the sample temperature is 33 °C (91 °F), wait 2 minutes.
The reagent that is used in this test is corrosive. Use protection for eyes and skin and be prepared to flush any spills withrunning water.
Review the Safety Data Sheets (MSDS/SDS) for the chemicals that are used and use any recommended personal protectiveequipment.
Dispose of reacted solutions according to local, state and federal regulations. Use the Safety Data Sheets for disposalinformation for unused reagents. Consult the environmental, health and safety staff for your facility and/or local regulatoryagencies for further disposal information.
Items to collect
Description Quantity
High Range Reactve Phosphorus Test 'N Tube Vials 1
Light shield or adapter (For information about sample cells, adapters or light shields, refer to Instrument specific information on page 1.) 1
1

Items to collect (continued)Description Quantity
Pipet, TenSette®, 1.0- to 10.0-mL, with pipet tips 1
Test tube rack 1
Water, deionized 5 mL
Refer to Consumables and replacement items on page 5 for reorder information.
Sample collection and storage• Collect samples in clean glass or plastic bottles that have been cleaned with
1:1 hydrochloric acid and rinsed with deionized water.• Do not use a detergent that contains phosphate to clean the sample bottles. The
phosphate in the detergent will contaminate the sample.• Analyze the samples as soon as possible for best results.• If prompt analysis is not possible, immediately filter and keep the samples at or below
6 °C (43 °F) for a maximum of 48 hours.• Let the sample temperature increase to room temperature before analysis.
Molybdovanadate method for Test 'N Tubes
Start
1. Start program 540 PReact. HR TNT. Forinformation about samplecells, adapters or lightshields, refer to Instrumentspecific informationon page 1.Note: Although the programname may vary betweeninstruments, the programnumber does not change.
2. Prepare the blank: Add5.0 mL of deionized water toa Reactive High RangePhosphorus Test 'N TubeVial.
3. Put the cap on the vial.Invert to mix.
4. Prepare the sample:Add 5.0 mL of sample to asecond Reactive HighRange Phosphorus Test 'NTube Vial.
2 Phosphorus, Reactive, Molybdovanadate TNT Method (100.0 mg/L)

5. Put the cap on the vial.Invert to mix.
6. Start the instrumenttimer. A 7-minute reactiontime starts.Measure the preparedsample within two minutesafter the timer expires.
7. When the timer expires,clean the blank.
8. Insert the blank into thecell holder.
Zero
9. Push ZERO. The displayshows 0.0 mg/L PO4
3–.10. Clean the sample vial. 11. Insert the sample vial
into the 16-mm cell holder.
Read
12. Push READ. Resultsshow in mg/L PO4
3–.
InterferencesTable 2 shows the interferences and interference levels. Table 3 shows the substancesthat do not interfere at or below the indicated levels.
Table 2 Interfering substances
Interfering substance Interference level
Arsenate Causes a positive interference if the sample is warm when the reagent is added. The sample canbe gently warmed to room temperature without interference.
Iron, ferrous Causes a blue color which interferes at more than 100 mg/L.
Molybdate Causes a negative interference at more than 1000 mg/L.
Silica Causes a positive interference if the sample is warm when the reagent is added. The sample canbe gently warmed to room temperature without interference.
Sulfide Causes a negative interference. Correct for this interference as follows:
1. Measure 50 mL of sample into an Erlenmeyer flask.2. Add Bromine Water drop-wise with constant swirling until a permanent yellow color remains.3. Add Phenol Solution drop-wise until the yellow color just disappears.
Use this sample in the test procedure.
Highly buffered samplesor extreme sample pH
Can prevent the correct pH adjustment of the sample by the reagents. Sample pretreatment maybe necessary. The pH should be approximately 7.
Phosphorus, Reactive, Molybdovanadate TNT Method (100.0 mg/L) 3

Table 2 Interfering substances (continued)
Interfering substance Interference level
Fluoride, thorium,bismuth, thiosulfate orthiocyanate
Causes a negative interference.
Temperature Temperatures below 18 °C (64 °F) cause a negative interference. Temperatures above 25 °C(77 °F) cause a positive interference. The sample can be gently warmed to room temperaturewithout interference.
Table 3 Substances that do not interfere at less than 1000 mg/L
Pyrophosphate Tetraborate Selenate Benzoate
Citrate Oxalate Lactate Tartrate
Formate Salicylate Al3+ Fe3+
Mg2+ Ca2+ Ba2+ Sr2+
Li+ Na+ K+ NH4+
Cd2+ Mn2+ NO3– NO2
–
SO42– SO3
2– Pb2+ Hg+
Hg2+ Sn2+ Cu2+ Ni2+
Ag+ U4+ Zr4+ AsO3–
Br– CO32– ClO4
– CN–
IO3– SiO4
4– — —
Accuracy check
Standard additions method (sample spike)Use the standard additions method (for applicable instruments) to validate the testprocedure, reagents and instrument and to find if there is an interference in the sample.Items to collect:
• 10-mL Voluette® Ampule of Phosphate Standard Solution, 500-mg/L PO43–
• Ampule breaker• Pipet, TenSette®, 0.1–1.0 mL and tips• Mixing cylinders, 10-mL (3)
1. Use the test procedure to measure the concentration of the sample, then keep the(unspiked) sample in the instrument.
2. Go to the Standard Additions option in the instrument menu.3. Select the values for standard concentration, sample volume and spike volumes.4. Open the standard solution.5. Prepare three spiked samples: use the TenSette pipet to add 0.1 mL, 0.2 mL and
0.3 mL of the standard solution, respectively, to three 10-mL portions of fresh sample.Mix well.
6. Use the test procedure to measure the concentration of each of the spiked samples.Start with the smallest sample spike. Measure each of the spiked samples in theinstrument.
7. Select Graph to compare the expected results to the actual results.Note: If the actual results are significantly different from the expected results, make sure thatthe sample volumes and sample spikes are measured accurately. The sample volumes andsample spikes that are used should agree with the selections in the standard additions menu. Ifthe results are not within acceptable limits, the sample may contain an interference.
4 Phosphorus, Reactive, Molybdovanadate TNT Method (100.0 mg/L)

Standard solution methodUse the standard solution method to validate the test procedure, reagents andinstrument.Items to collect:
• 50-mg/L PO43– standard solution
1. Use the test procedure to measure the concentration of the standard solution.2. Compare the expected result to the actual result.
Note: The factory calibration can be adjusted slightly with the standard adjust option so that theinstrument shows the expected value of the standard solution. The adjusted calibration is thenused for all test results. This adjustment can increase the test accuracy when there are slightvariations in the reagents or instruments.
Method performanceThe method performance data that follows was derived from laboratory tests that weremeasured on a spectrophotometer during ideal test conditions. Users may get differentresults under different test conditions.
Program Standard Precision (95% Confidence Interval) SensitivityConcentration change per 0.010 Abs change
540 50.0 mg/L PO43– 49.1–50.9 mg/L PO4
3– 0.7 mg/L PO43–
Summary of methodOrthophosphate reacts with molybdate in an acid medium to produce a mixedphosphate/molybdate complex. In the presence of vanadium, yellowmolybdovanadophosphoric acid forms. The intensity of the yellow color is proportional tothe phosphate concentration. Test results are measured at 420 nm.
Pollution prevention and waste managementReacted samples contain molybdenum and must be disposed of as a hazardous waste.Dispose of reacted solutions according to local, state and federal regulations.
Consumables and replacement itemsRequired reagents
Description Quantity/test Unit Item no.
High Range Reactive Phosphorus Test ’N Tube™ Reagent Set — 50 vials 2767345
Includes:
Reactive High Range Phosphorus Test ’N Tube Vials (not soldseparately) 1 50/pkg —
Water, deionized varies 100 mL 27242
Required apparatus
Description Quantity/test Unit Item no.
Pipet, TenSette®, 1.0- to 10.0-mL 1 each 1970010
Pipet Tips, for TenSette Pipet 1970010 varies 50/pkg 2199796
Test tube rack 1 each 1864100
Phosphorus, Reactive, Molybdovanadate TNT Method (100.0 mg/L) 5
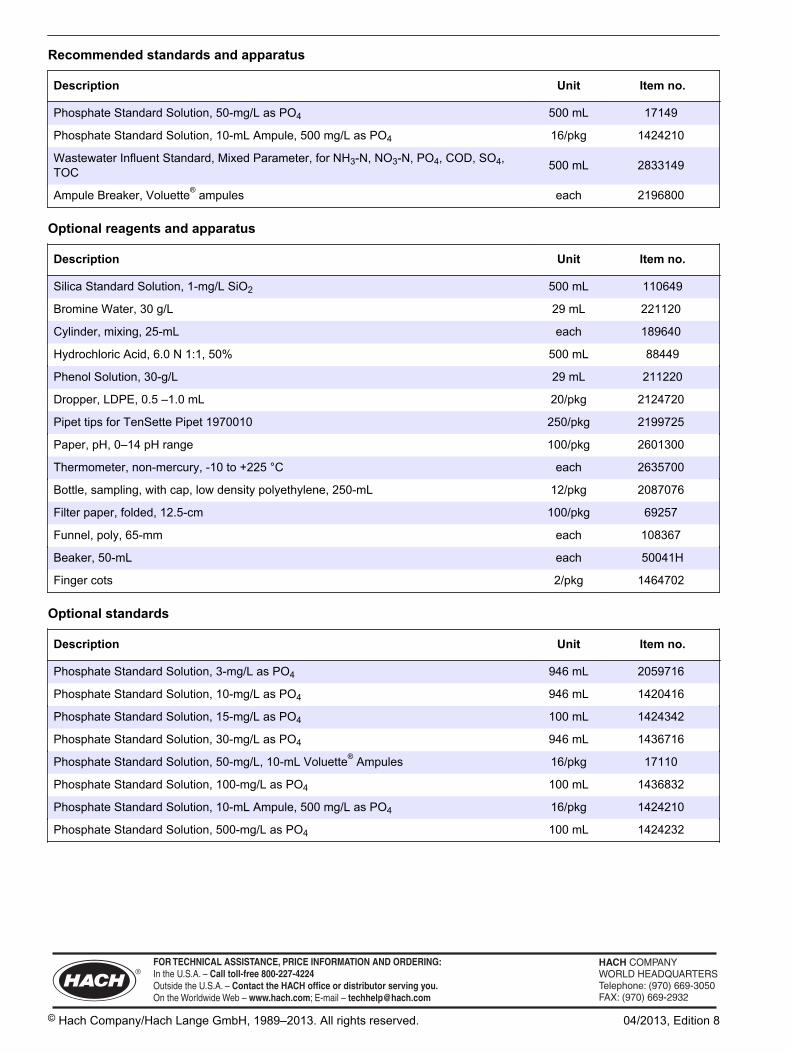
Recommended standards and apparatus
Description Unit Item no.
Phosphate Standard Solution, 50-mg/L as PO4 500 mL 17149
Phosphate Standard Solution, 10-mL Ampule, 500 mg/L as PO4 16/pkg 1424210
Wastewater Influent Standard, Mixed Parameter, for NH3-N, NO3-N, PO4, COD, SO4,TOC 500 mL 2833149
Ampule Breaker, Voluette® ampules each 2196800
Optional reagents and apparatus
Description Unit Item no.
Silica Standard Solution, 1-mg/L SiO2 500 mL 110649
Bromine Water, 30 g/L 29 mL 221120
Cylinder, mixing, 25-mL each 189640
Hydrochloric Acid, 6.0 N 1:1, 50% 500 mL 88449
Phenol Solution, 30-g/L 29 mL 211220
Dropper, LDPE, 0.5 –1.0 mL 20/pkg 2124720
Pipet tips for TenSette Pipet 1970010 250/pkg 2199725
Paper, pH, 0–14 pH range 100/pkg 2601300
Thermometer, non-mercury, -10 to +225 °C each 2635700
Bottle, sampling, with cap, low density polyethylene, 250-mL 12/pkg 2087076
Filter paper, folded, 12.5-cm 100/pkg 69257
Funnel, poly, 65-mm each 108367
Beaker, 50-mL each 50041H
Finger cots 2/pkg 1464702
Optional standards
Description Unit Item no.
Phosphate Standard Solution, 3-mg/L as PO4 946 mL 2059716
Phosphate Standard Solution, 10-mg/L as PO4 946 mL 1420416
Phosphate Standard Solution, 15-mg/L as PO4 100 mL 1424342
Phosphate Standard Solution, 30-mg/L as PO4 946 mL 1436716
Phosphate Standard Solution, 50-mg/L, 10-mL Voluette® Ampules 16/pkg 17110
Phosphate Standard Solution, 100-mg/L as PO4 100 mL 1436832
Phosphate Standard Solution, 10-mL Ampule, 500 mg/L as PO4 16/pkg 1424210
Phosphate Standard Solution, 500-mg/L as PO4 100 mL 1424232
HACH COMPANYWORLD HEADQUARTERSTelephone: (970) 669-3050FAX: (970) 669-2932
FOR TECHNICAL ASSISTANCE, PRICE INFORMATION AND ORDERING:Call 800-227-4224
Contact the HACH office or distributor serving you.www.hach.com [email protected]
In the U.S.A. –
Outside the U.S.A. –
On the Worldwide Web – ; E-mail –
toll-free
© Hach Company/Hach Lange GmbH, 1989–2013. All rights reserved. 04/2013, Edition 8

Phosphorus, Reactive(Orthophosphate)
DOC316.53.01119
USEPA1 PhosVer 3® (Ascorbic Acid) Method2 Method 80480.02 to 2.50 mg/L PO4
3– Powder Pillows or AccuVac® Ampuls
Scope and application: For water, wastewater and seawater.1 USEPA Accepted for reporting for wastewater analyses. Procedure is equivalent to USEPA and Standard Method 4500-P-E for
wastewater.2 Adapted from Standard Methods for the Examination of Water and Wastewater.
Test preparation
Instrument-specific informationThe tables in this section show all of the instruments that have the program for this test. Table 1 shows sample cell and orientation requirements for reagent addition tests, suchas powder pillow or bulk reagent tests. Table 2 shows sample cell and adapterrequirements for AccuVac Ampul tests.To use either table, select an instrument, then read across to find the correspondinginformation for this test.
Table 1 Instrument-specific information for powder pillows
Instrument Sample cell orientation Sample cell
DR 6000 DR 3800 DR 2800 DR 2700
The fill line is to the right. 2495402
DR 5000 DR 3900
The fill line is toward the user.
DR 900 The orientation mark is toward the user. 2401906
Table 2 Instrument-specific information for AccuVac Ampuls
Instrument Adapter Sample cell
DR 6000 DR 5000 DR 900
— 2427606
DR 3900 LZV846 (A)
DR 3800 DR 2800 DR 2700
LZV584 (C) 2122800
1
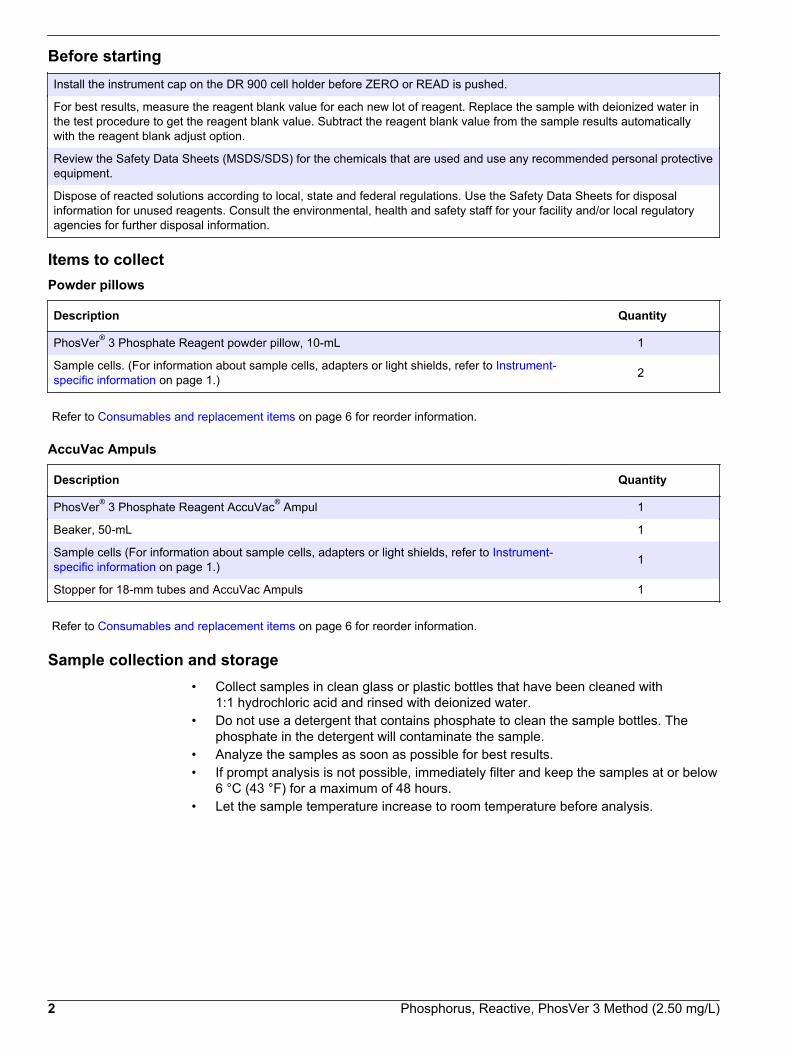
Before startingInstall the instrument cap on the DR 900 cell holder before ZERO or READ is pushed.
For best results, measure the reagent blank value for each new lot of reagent. Replace the sample with deionized water inthe test procedure to get the reagent blank value. Subtract the reagent blank value from the sample results automaticallywith the reagent blank adjust option.
Review the Safety Data Sheets (MSDS/SDS) for the chemicals that are used and use any recommended personal protectiveequipment.
Dispose of reacted solutions according to local, state and federal regulations. Use the Safety Data Sheets for disposalinformation for unused reagents. Consult the environmental, health and safety staff for your facility and/or local regulatoryagencies for further disposal information.
Items to collectPowder pillows
Description Quantity
PhosVer® 3 Phosphate Reagent powder pillow, 10-mL 1
Sample cells. (For information about sample cells, adapters or light shields, refer to Instrument-specific information on page 1.) 2
Refer to Consumables and replacement items on page 6 for reorder information.
AccuVac Ampuls
Description Quantity
PhosVer® 3 Phosphate Reagent AccuVac® Ampul 1
Beaker, 50-mL 1
Sample cells (For information about sample cells, adapters or light shields, refer to Instrument-specific information on page 1.) 1
Stopper for 18-mm tubes and AccuVac Ampuls 1
Refer to Consumables and replacement items on page 6 for reorder information.
Sample collection and storage• Collect samples in clean glass or plastic bottles that have been cleaned with
1:1 hydrochloric acid and rinsed with deionized water.• Do not use a detergent that contains phosphate to clean the sample bottles. The
phosphate in the detergent will contaminate the sample.• Analyze the samples as soon as possible for best results.• If prompt analysis is not possible, immediately filter and keep the samples at or below
6 °C (43 °F) for a maximum of 48 hours.• Let the sample temperature increase to room temperature before analysis.
2 Phosphorus, Reactive, PhosVer 3 Method (2.50 mg/L)
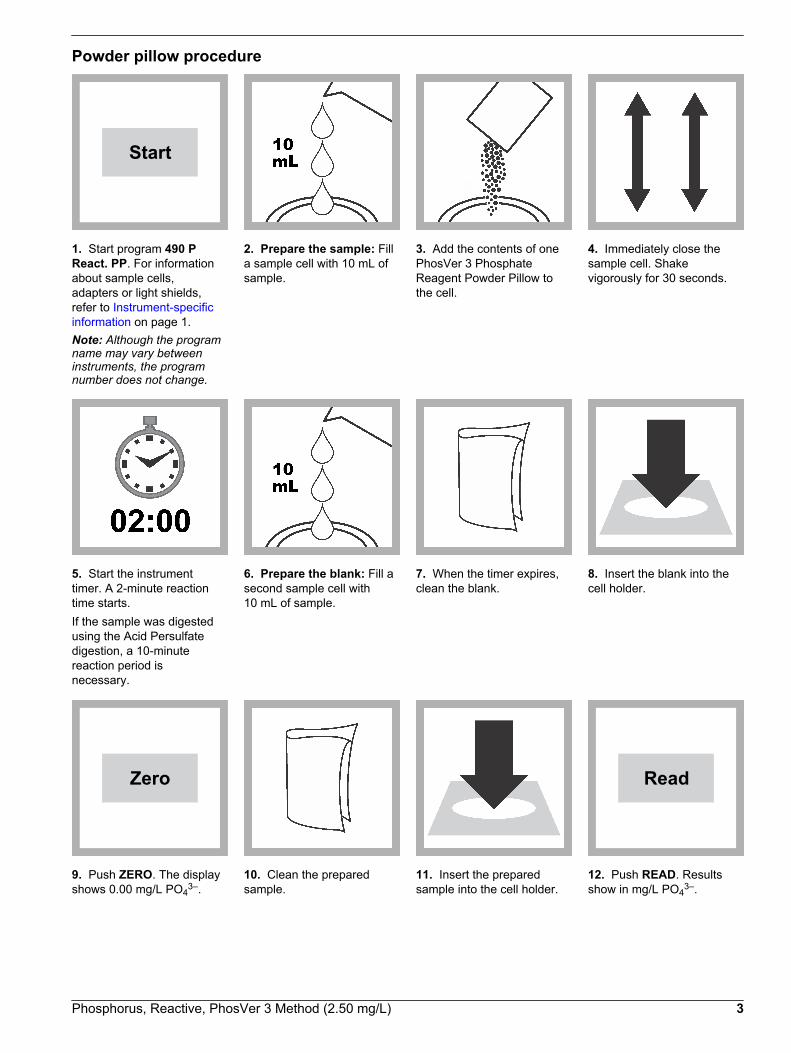
Powder pillow procedure
Start
1. Start program 490 PReact. PP. For informationabout sample cells,adapters or light shields,refer to Instrument-specificinformation on page 1.Note: Although the programname may vary betweeninstruments, the programnumber does not change.
2. Prepare the sample: Filla sample cell with 10 mL ofsample.
3. Add the contents of onePhosVer 3 PhosphateReagent Powder Pillow tothe cell.
4. Immediately close thesample cell. Shakevigorously for 30 seconds.
5. Start the instrumenttimer. A 2-minute reactiontime starts.If the sample was digestedusing the Acid Persulfatedigestion, a 10-minutereaction period isnecessary.
6. Prepare the blank: Fill asecond sample cell with10 mL of sample.
7. When the timer expires,clean the blank.
8. Insert the blank into thecell holder.
Zero
9. Push ZERO. The displayshows 0.00 mg/L PO4
3–.10. Clean the preparedsample.
11. Insert the preparedsample into the cell holder.
Read
12. Push READ. Resultsshow in mg/L PO4
3–.
Phosphorus, Reactive, PhosVer 3 Method (2.50 mg/L) 3

AccuVac Ampul procedure
Start
1. Start program 492 PReact. PV AV. Forinformation about samplecells, adapters or lightshields, refer to Instrument-specific informationon page 1.Note: Although the programname may vary betweeninstruments, the programnumber does not change.
2. Prepare the blank: Fillthe sample cell with 10 mLof sample.
3. Prepare the sample:Collect at least 40 mL ofsample in a 50-mL beaker.Fill the AccuVac Ampul withsample. Keep the tipimmersed while the Ampulfills completely.
4. Close the AccuVacAmpul. Shake forapproximately 30 seconds.Accuracy is not affected byundissolved powder.
5. Start the instrumenttimer. A 2-minute reactiontime starts.If the sample was digestedusing the Acid Persulfatedigestion, a 10-minutereaction period isnecessary.
6. When the timer expires,clean the blank.
7. Insert the blank into thecell holder.
Zero
8. Push ZERO. The displayshows 0.00 mg/L PO4
3–.
9. Clean the AccuVacAmpul.
10. Insert the preparedsample AccuVac Ampul intothe cell holder.
Read
11. Push READ. Resultsshow in mg/L PO4
3–.
4 Phosphorus, Reactive, PhosVer 3 Method (2.50 mg/L)

InterferencesInterfering substance Interference level
Aluminum More than 200 mg/L
Arsenate Interferes at any level.
Chromium More than 100 mg/L
Copper More than 10 mg/L
Hydrogen Sulfide Interferes at any level.
Iron More than 100 mg/L
Nickel More than 300 mg/L
Highly buffered samples orextreme sample pH
Can prevent the correct pH adjustment of the sample by the reagents. Sample pretreatmentmay be necessary. A pH range of 2–10 is recommended.
Silica More than 50 mg/L
Silicate More than 10 mg/L
Turbidity or color May cause inconsistent results. The acid in the powder pillow can dissolve some of thesuspended particles and the desorption of orthophosphate from the particles can vary. Forhighly turbid or colored samples, add the contents of one Phosphate Pretreatment PowderPillow to 25 mL of sample. Mix well. Use this solution to zero the instrument.
Zinc More than 80 mg/L
Accuracy check
Standard additions method (sample spike)Use the standard additions method (for applicable instruments) to validate the testprocedure, reagents and instrument and to find if there is an interference in the sample.Items to collect:
• Phosphate standard solution, 50 mg/L PO43– ampule
• Ampule breaker• Pipet, TenSette®, 0.1–1.0 mL and tips• Mixing cylinders, 25-mL (3)
1. Use the test procedure to measure the concentration of the sample, then keep the(unspiked) sample in the instrument.
2. Go to the Standard Additions option in the instrument menu.3. Select the values for standard concentration, sample volume and spike volumes.4. Open the standard solution.5. Prepare three spiked samples: use the TenSette pipet to add 0.1 mL, 0.2 mL and
0.3 mL of the standard solution, respectively, to three 10-mL portions of fresh sample.Mix well.Note: For AccuVac® Ampuls, add 0.2 mL, 0.4 mL and 0.6 mL of the standard solution to three50-mL portions of fresh sample.
6. Use the test procedure to measure the concentration of each of the spiked samples.Start with the smallest sample spike. Measure each of the spiked samples in theinstrument.
7. Select Graph to compare the expected results to the actual results.Note: If the actual results are significantly different from the expected results, make sure thatthe sample volumes and sample spikes are measured accurately. The sample volumes andsample spikes that are used should agree with the selections in the standard additions menu. Ifthe results are not within acceptable limits, the sample may contain an interference.
Phosphorus, Reactive, PhosVer 3 Method (2.50 mg/L) 5
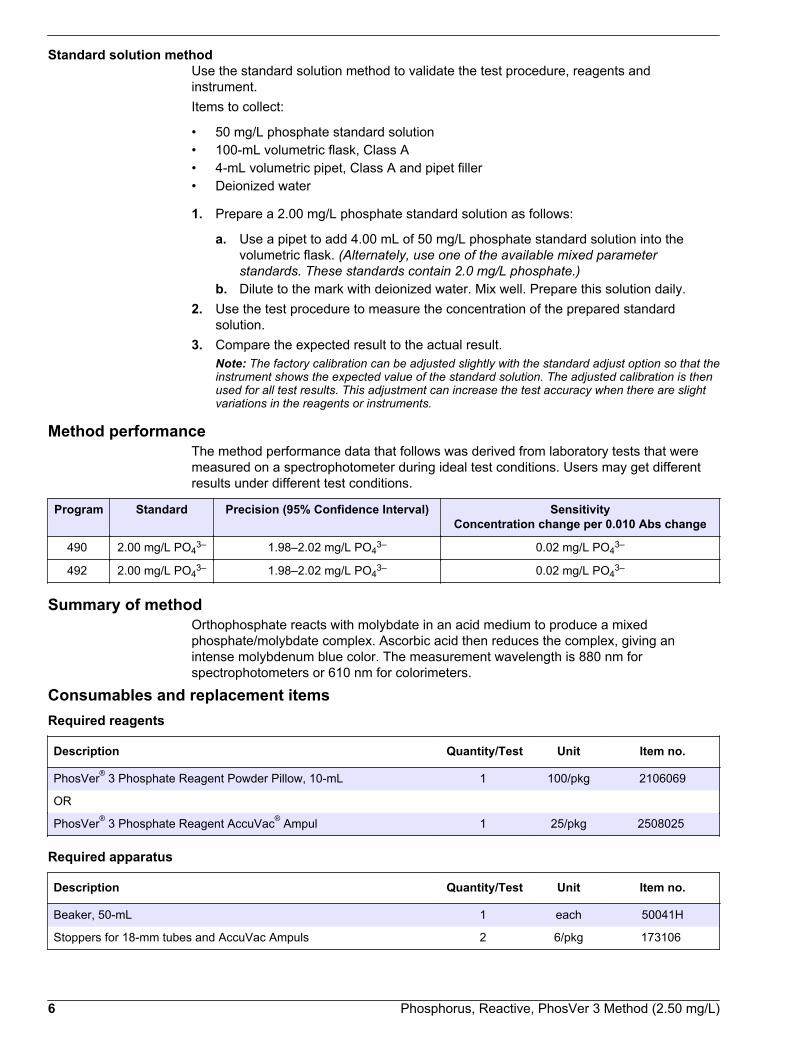
Standard solution methodUse the standard solution method to validate the test procedure, reagents andinstrument.Items to collect:
• 50 mg/L phosphate standard solution• 100-mL volumetric flask, Class A• 4-mL volumetric pipet, Class A and pipet filler• Deionized water
1. Prepare a 2.00 mg/L phosphate standard solution as follows:
a. Use a pipet to add 4.00 mL of 50 mg/L phosphate standard solution into thevolumetric flask. (Alternately, use one of the available mixed parameterstandards. These standards contain 2.0 mg/L phosphate.)
b. Dilute to the mark with deionized water. Mix well. Prepare this solution daily.2. Use the test procedure to measure the concentration of the prepared standard
solution.3. Compare the expected result to the actual result.
Note: The factory calibration can be adjusted slightly with the standard adjust option so that theinstrument shows the expected value of the standard solution. The adjusted calibration is thenused for all test results. This adjustment can increase the test accuracy when there are slightvariations in the reagents or instruments.
Method performanceThe method performance data that follows was derived from laboratory tests that weremeasured on a spectrophotometer during ideal test conditions. Users may get differentresults under different test conditions.
Program Standard Precision (95% Confidence Interval) SensitivityConcentration change per 0.010 Abs change
490 2.00 mg/L PO43– 1.98–2.02 mg/L PO4
3– 0.02 mg/L PO43–
492 2.00 mg/L PO43– 1.98–2.02 mg/L PO4
3– 0.02 mg/L PO43–
Summary of methodOrthophosphate reacts with molybdate in an acid medium to produce a mixedphosphate/molybdate complex. Ascorbic acid then reduces the complex, giving anintense molybdenum blue color. The measurement wavelength is 880 nm forspectrophotometers or 610 nm for colorimeters.
Consumables and replacement itemsRequired reagents
Description Quantity/Test Unit Item no.
PhosVer® 3 Phosphate Reagent Powder Pillow, 10-mL 1 100/pkg 2106069
OR
PhosVer® 3 Phosphate Reagent AccuVac® Ampul 1 25/pkg 2508025
Required apparatus
Description Quantity/Test Unit Item no.
Beaker, 50-mL 1 each 50041H
Stoppers for 18-mm tubes and AccuVac Ampuls 2 6/pkg 173106
6 Phosphorus, Reactive, PhosVer 3 Method (2.50 mg/L)

Recommended standards
Description Unit Item no.
Phosphate Standard Solution, 10-mL Voluette® Ampul, 50-mg/L as PO4 16/pkg 17110
Phosphate Standard Solution, 50-mg/L as PO4 500 mL 17149
Phosphate Standard Solution, 1-mg/L as PO4 500 mL 256949
Drinking Water Standard, Mixed Parameter, Inorganic for F-, NO3, PO4, SO4 500 mL 2833049
Wastewater, Effluent Inorganics, for NH3-N, NO3-N, PO4, COD, SO4, TOC 500 mL 2833249
Water, deionized 4 L 27256
Optional reagents and apparatus
Description Unit Item no.
AccuVac® Drainer each 4103600
AccuVac® Snapper each 2405200
AccuVac® vials for sample blanks 25/pkg 2677925
Ampule Breaker, Voluette® ampules each 2196800
Bottle, sampling, with cap, low density polyethylene, 250-mL 12/pkg 2087076
Cylinder, mixing, 50-mL each 189641
Flask, volumetric, Class A, 100-mL each 1457442
Hydrochloric Acid, 6.0 N 1:1, 50% 500 mL 88449
Paper, pH, 0–14 pH range 100/pkg 2601300
Phosphate Treatment Powder Pillow 100/pkg 1450199
Phosphate Standard Solution, 10-mg/L as PO4 946 mL 1420416
Phosphate Standard Solution, 15-mg/L as PO4 100 mL 1424342
Phosphate Standard Solution, 100-mg/L as PO4 100 mL 1436832
Phosphate Standard Solution, 10-mL Ampule, 500 mg/L as PO4 16/pkg 1424210
Phosphate Standard Solution, 500-mg/L as PO4 100 mL 1424232
Pipet, TenSette®, 0.1–1.0 mL each 1970001
Pipet, TenSette®, 1.0 to 10.0 mL each 1970010
Pipet tips for TenSette Pipet 1970001 50/pkg 2185696
Pipet tips for TenSette Pipet 1970001 1000/pkg 2185628
Pipet tips for TenSette Pipet 1970010 50/pkg 2199796
Pipet tips for TenSette Pipet 1970010 250/pkg 2199725
Pipet, volumetric, Class A, 4.00-mL each 1451504
Phosphorus, Reactive, PhosVer 3 Method (2.50 mg/L) 7

HACH COMPANYWORLD HEADQUARTERSTelephone: (970) 669-3050FAX: (970) 669-2932
FOR TECHNICAL ASSISTANCE, PRICE INFORMATION AND ORDERING:Call 800-227-4224
Contact the HACH office or distributor serving you.www.hach.com [email protected]
In the U.S.A. –
Outside the U.S.A. –
On the Worldwide Web – ; E-mail –
toll-free
© Hach Company/Hach Lange GmbH, 1989–2013. All rights reserved. 04/2013, Edition 8

Phosphorus, Reactive(Orthophosphate)
DOC316.53.01118
USEPA PhosVer® 3 Method1 Method 80480.06 to 5.00 mg/L PO4
3– (0.02 to 1.60 mg/L P) Test ‘N Tube™ Vials
Scope and application: For water, wastewater and seawater.1 USEPA accepted for reporting wastewater analysis. Procedure is equivalent to USEPA and Standard Method 4500-P E for wastewater.
Test preparation
Instrument specific informationThe table in this section shows all of the instruments that have the program for this test. Table 1 shows adapter and light shield requirements for the instruments that use them.To use the table, select an instrument, then read across to find the correspondinginformation for this test.
Table 1 Instrument-specific information for test tubes
Instrument Adapters Light shield
DR 6000 — —
DR 5000 — —
DR 900 4846400 Cover supplied with the instrument
DR 3900 — LZV849
DR 3800 — LZV646
DR 2800 —
Before startingInstall the instrument cap on the DR 900 cell holder before ZERO or READ is pushed.
DR 3900, DR 3800, DR 2800 and DR 2700: Install the light shield in Cell Compartment #2 before this test is started.
For best results, measure the reagent blank value for each new lot of reagent. Replace the sample with deionized water inthe test procedure to get the reagent blank value. Subtract the reagent blank value from the sample results automaticallywith the reagent blank adjust option.
Review the Safety Data Sheets (MSDS/SDS) for the chemicals that are used and use any recommended personal protectiveequipment.
Dispose of reacted solutions according to local, state and federal regulations. Use the Safety Data Sheets for disposalinformation for unused reagents. Consult the environmental, health and safety staff for your facility and/or local regulatoryagencies for further disposal information.
Items to collect
Description Quantity
PhosVer® 3 Reagent Powder Pillow 1
Reactive Phosphorus Test 'N Tube Vial 1
Funnel, micro 1
Light shield or adapter (For information about sample cells, adapters or light shields, refer to Instrument specific information on page 1.) 1
1

Items to collect (continued)Description Quantity
Pipet, TenSette®, 1.0- to 10.0-mL, with pipet tips 1
Test tube rack 1
Refer to Consumables and replacement items on page 4 for reorder information.
Sample collection and storage• Collect samples in clean glass or plastic bottles that have been cleaned with
1:1 hydrochloric acid and rinsed with deionized water.• Do not use a detergent that contains phosphate to clean the sample bottles. The
phosphate in the detergent will contaminate the sample.• Analyze the samples as soon as possible for best results.• If prompt analysis is not possible, immediately filter and keep the samples at or below
6 °C (43 °F) for a maximum of 48 hours.• Let the sample temperature increase to room temperature before analysis.
Test 'N Tube procedure
Start
1. Start program 535 PReact. PV TNT. Forinformation about samplecells, adapters or lightshields, refer to Instrumentspecific informationon page 1.Note: Although the programname may vary betweeninstruments, the programnumber does not change.
2. Add 5.0 mL of sample toa Reactive Phosphorus Test'N Tube Vial.
3. Put the cap on the vial.Invert to mix.
4. Clean the vial.
5. Insert the vial into the 16-mm cell holder.
Zero
6. Push ZERO. The displayshows 0.00 mg/L PO4
3–.7. Add the contents of onePhosVer 3 PhosphatePowder Pillow.
8. Put the cap on the vial.Shake for at least20 seconds. The powder willnot dissolve completely.
2 Phosphorus, Reactive, PhosVer 3 TNT Method (5.00 mg/L)

9. Start the instrumenttimer. A 2-minute reactiontime starts.Measure the samplebetween two and eightminutes after adding thePhosVer 3 reagent.
10. When the timer expires,clean the vial.
11. Insert the vial into the16-mm cell holder.
Read
12. Push READ. Resultsshow in mg/L PO4
3–.
InterferencesInterfering substance Interference level
Aluminum More than 200 mg/L
Arsenate Interferes at any level.
Chromium More than 100 mg/L
Copper More than 10 mg/L
Sulfide More than 6 mg/L. Remove sulfide interference as follows:
1. Measure 25 mL of sample into a 50-mL beaker.2. Swirl continuously and add bromine water by drops until a permanent yellow color is seen.3. Swirl continuously and add phenol solution by drops only until the yellow color is removed.
Use this treated sample in the test procedure.
Iron More than 100 mg/L
Nickel More than 300 mg/L
Highly buffered samplesor extreme sample pH
Can prevent the correct pH adjustment of the sample by the reagents. Sample pretreatment maybe necessary.
Silica More than 50 mg/L
Silicate More than 10 mg/L
Turbidity or color May cause inconsistent results. The acid in the powder pillow can dissolve some of thesuspended particles and the desorption of orthophosphate from the particles can vary. For highlyturbid or colored samples, add the contents of one Phosphate Pretreatment Powder Pillow to25 mL of sample. Mix well. Use this solution to zero the instrument.
Zinc More than 80 mg/L
Accuracy check
Standard additions method (sample spike)Use the standard additions method (for applicable instruments) to validate the testprocedure, reagents and instrument and to find if there is an interference in the sample.Items to collect:
• Phosphate 2-mL Ampule Standard, 50-mg/L as PO43–
• Ampule breaker• Pipet, TenSette®, 0.1–1.0 mL and tips
Phosphorus, Reactive, PhosVer 3 TNT Method (5.00 mg/L) 3

• Mixing cylinders, 25-mL (3)
1. Use the test procedure to measure the concentration of the sample, then keep the(unspiked) sample in the instrument.
2. Go to the Standard Additions option in the instrument menu.3. Select the values for standard concentration, sample volume and spike volumes.4. Open the standard solution.5. Prepare three spiked samples: use the TenSette pipet to add 0.1 mL, 0.2 mL and
0.3 mL of the standard solution, respectively, to three 25-mL portions of fresh sample.Mix well.
6. Use the test procedure to measure the concentration of each of the spiked samples.Start with the smallest sample spike. Measure each of the spiked samples in theinstrument.
7. Select Graph to compare the expected results to the actual results.Note: If the actual results are significantly different from the expected results, make sure thatthe sample volumes and sample spikes are measured accurately. The sample volumes andsample spikes that are used should agree with the selections in the standard additions menu. Ifthe results are not within acceptable limits, the sample may contain an interference.
Standard solution methodUse the standard solution method to validate the test procedure, reagents andinstrument.Items to collect:
• 3.0-mg/L phosphate standard solution
1. Use the test procedure to measure the concentration of the standard solution.2. Compare the expected result to the actual result.
Note: The factory calibration can be adjusted slightly with the standard adjust option so that theinstrument shows the expected value of the standard solution. The adjusted calibration is thenused for all test results. This adjustment can increase the test accuracy when there are slightvariations in the reagents or instruments.
Method performanceThe method performance data that follows was derived from laboratory tests that weremeasured on a spectrophotometer during ideal test conditions. Users may get differentresults under different test conditions.
Program Standard Precision (95% Confidence Interval) SensitivityConcentration change per 0.010 Abs change
535 3.00 mg/L PO43– 2.94–3.06 mg/L PO4
3– 0.06 mg/L PO43–
Summary of methodOrthophosphate reacts with molybdate in an acid medium to produce a mixedphosphate/molybdate complex. Ascorbic acid then reduces the complex, giving anintense molybdenum blue color. The measurement wavelength is 880 nm forspectrophotometers or 610 nm for colorimeters.
Consumables and replacement itemsRequired reagents
Description Quantity/test Unit Item no.
Reactive Phosphorus Test ’N Tube™ Reagent Set — 50 tests 2742545
Includes:
PhosVer® 3 Phosphate Reagent Powder Pillow, 10-mL 1 50/pkg 2106046
Reactive Phosphorus Test ‘N Tube Dilution Vials (not sold separately) 1 50/pkg —
4 Phosphorus, Reactive, PhosVer 3 TNT Method (5.00 mg/L)

Required apparatus
Description Quantity/test Unit Item no.
Funnel, micro, poly 1 each 2584335
Pipet, TenSette®, 1.0- to 10.0-mL 1 each 1970010
Pipet Tips, for TenSette Pipet 1970010 varies 50/pkg 2199796
Test tube rack 1 each 1864100
Recommended standards and apparatus
Description Unit Item no.
Phosphate Standard Solution, PourRite® Ampule, 50-mg/L as PO43–, 2-mL 20/pkg 17120H
Phosphate Standard Solution, 50-mg/L as PO4 500 mL 17149
Phosphate Standard Solution, 1-mg/L as PO4 500 mL 256949
Phosphate Standard Solution, 3-mg/L as PO4 946 mL 2059716
Drinking Water Standard, Mixed Parameter, Inorganic for F-, NO3, PO4, SO4 500 mL 2833049
Wastewater, Effluent Inorganics, for NH3-N, NO3-N, PO4, COD, SO4, TOC 500 mL 2833249
Ampule Breaker, PourRite® ampules each 2484600
Optional reagents and apparatus
Description Unit Item no.
Bromine Water, 30-g/L 29 mL 221120
Hydrochloric Acid, 6.0 N 1:1, 50% 500 mL 88449
Phenol Solution, 30-g/L 29 mL 211220
Pipet, TenSette®, 0.1–1.0 mL each 1970001
Pipet tips for TenSette Pipet 1970001 50/pkg 2185696
Pipet tips for TenSette Pipet 1970001 1000/pkg 2185628
Filter paper, folded, 12.5-cm 100/pkg 69257
Funnel, poly, 65-mm each 108367
Thermometer, non-mercury, -10 to +225 °C each 2635700
Bottle, sampling, with cap, low density polyethylene, 250-mL 12/pkg 2087076
Beaker, 50-mL each 50041H
Optional standards
Description Unit Item no.
Ampule Breaker, Voluette® ampules each 2196800
Phosphate Standard Solution, 10-mg/L as PO4 946 mL 1420416
Phosphate Standard Solution, 15-mg/L as PO4 100 mL 1424342
Phosphate Standard Solution, 50-mg/L, 10-mL Voluette® Ampules 16/pkg 17110
Phosphate Standard Solution, 100-mg/L as PO4 100 mL 1436832
Phosphate Standard Solution, 10-mL Ampule, 500 mg/L as PO4 16/pkg 1424210
Phosphate Standard Solution, 500-mg/L as PO4 100 mL 1424232
Phosphorus, Reactive, PhosVer 3 TNT Method (5.00 mg/L) 5

HACH COMPANYWORLD HEADQUARTERSTelephone: (970) 669-3050FAX: (970) 669-2932
FOR TECHNICAL ASSISTANCE, PRICE INFORMATION AND ORDERING:Call 800-227-4224
Contact the HACH office or distributor serving you.www.hach.com [email protected]
In the U.S.A. –
Outside the U.S.A. –
On the Worldwide Web – ; E-mail –
toll-free
© Hach Company/Hach Lange GmbH, 1989–2013. All rights reserved. 04/2013, Edition 8

Phosphorus, Total, Digestion DOC316.53.01112
USEPA1 Acid Persulfate Digestion Method2 Method 8190
Scope and application: For water, wastewater and seawater.1 USEPA Accepted for wastewater analyses when used with the ascorbic acid (PhosVer 3) method.2 Adapted from Standard Methods for the Examination of Water and Wastewater 4500-P B & E.
Test preparation
Before startingClean all glassware with 6.0 N (50%) hydrochloric acid, then rinse thoroughly with deionized water to remove contaminants.
Review the Safety Data Sheets (MSDS/SDS) for the chemicals that are used and use any recommended personal protectiveequipment.
Dispose of reacted solutions according to local, state and federal regulations. Use the Safety Data Sheets for disposalinformation for unused reagents. Consult the environmental, health and safety staff for your facility and/or local regulatoryagencies for further disposal information.
Items to collect
Description Quantity
Potassium Persulfate Powder Pillow 1
Sodium Hydroxide Solution, 5.0 N 2 mL
Sulfuric Acid Solution, 5.25 N 2 mL
Water, deionized varies
Cylinder, graduated, 25-mL 1
Flask, Erlenmeyer, 125-mL 1
Hot plate 1
Refer to Consumables and replacement items on page 3 for reorder information.
Sample collection and storage• Collect samples in clean glass or plastic bottles.• Analyze the samples as soon as possible for best results.• To preserve samples for later analysis, adjust the sample pH to less than 2 with
concentrated sulfuric acid (about 2 mL per liter). No acid addition is necessary if thesample is tested immediately.
• Keep the preserved samples at or below 6 °C (43 °F) for up to 28 days.• Let the sample temperature increase to room temperature before analysis.• Before analysis, adjust the pH to 7 with 5.0 N sodium hydroxide standard solution.• Correct the test result for the dilution from the volume additions.
1
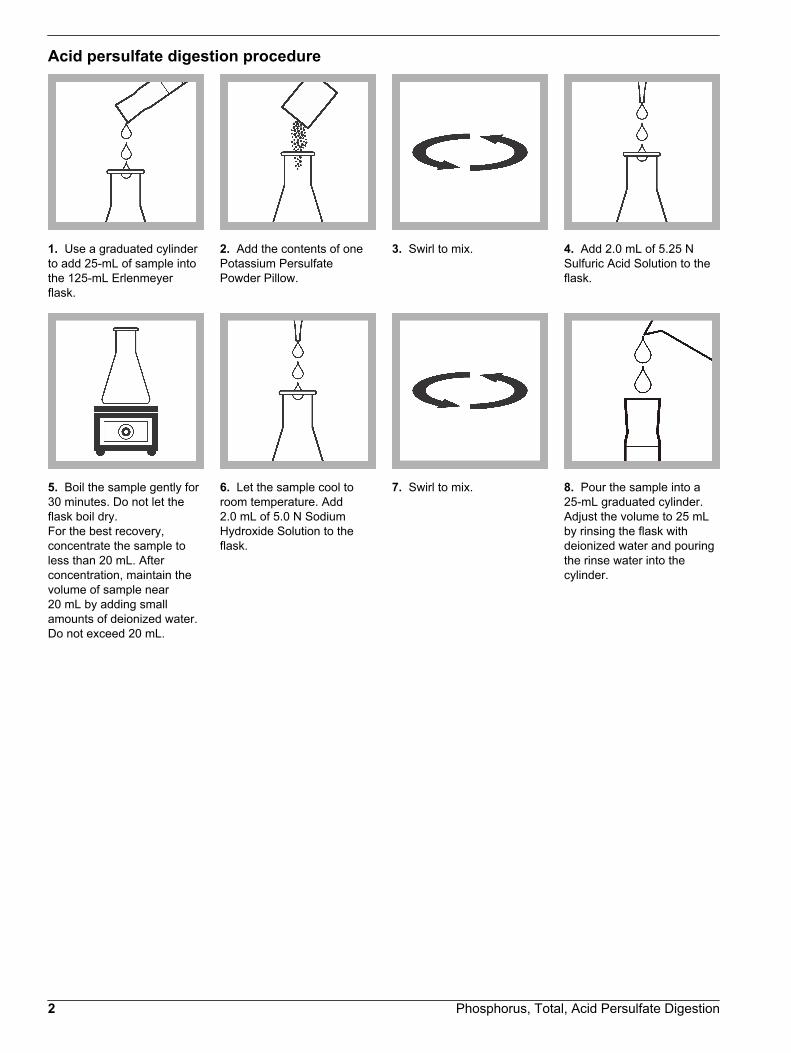
Acid persulfate digestion procedure
1. Use a graduated cylinderto add 25-mL of sample intothe 125-mL Erlenmeyerflask.
2. Add the contents of onePotassium PersulfatePowder Pillow.
3. Swirl to mix. 4. Add 2.0 mL of 5.25 NSulfuric Acid Solution to theflask.
5. Boil the sample gently for30 minutes. Do not let theflask boil dry.For the best recovery,concentrate the sample toless than 20 mL. Afterconcentration, maintain thevolume of sample near20 mL by adding smallamounts of deionized water.Do not exceed 20 mL.
6. Let the sample cool toroom temperature. Add2.0 mL of 5.0 N SodiumHydroxide Solution to theflask.
7. Swirl to mix. 8. Pour the sample into a25-mL graduated cylinder.Adjust the volume to 25 mLby rinsing the flask withdeionized water and pouringthe rinse water into thecylinder.
2 Phosphorus, Total, Acid Persulfate Digestion

Start
9. Proceed with a reactivephosphorous test of theexpected acid hydrolyzablephosphorous concentrationrange.
• 480 P React. Mo• 482 P React. Mo AV• 485 P React. Amino• 490 P React. PV• 492 P React. PV AV• 535 P React. PV TNT• 540 P React. HT TNT
Extend the colordevelopment time to10 minutes for the PhosVer3 method.
InterferencesInterfering substance Interference level
Alkaline or highlybuffered samples
If the pH of the sample after the acid is added is not below pH 1, add additional acid.
Turbidity Use 50 mL of sample and double the reagent quantities. Use a portion of the digested sample tozero the instrument in the reactive phosphorus procedure. This compensates for any color orturbidity destroyed by this procedure.
Summary of methodPhosphates in organic and condensed inorganic forms (meta-, pyro- or otherpolyphosphates) must be converted to reactive orthophosphate before analysis.Pretreatment of the sample with acid and heat provides the conditions for hydrolysis ofthe condensed inorganic forms. Organic phosphates are converted to orthophosphate byheating with acid and persulfate. Organically bound phosphates are thus determinedindirectly by subtracting the result of an acid hydrolyzable phosphorus test from the totalphosphorus result. This procedure must be followed by one of the reactive phosphorus(orthophosphate) analysis methods for determining the phosphorus content of thesample. If the ascorbic acid (PhosVer 3) method is used to measure the reactivephosphorus, this method is USEPA accepted for NPDES reporting.
Consumables and replacement itemsRequired reagents
Description Quantity/test Unit Item no.
Potassium Persulfate Powder Pillows 1 100/pkg 245199
Sodium Hydroxide Solution, 5.0 N 2 mL 100 mLMDB 245032
Phosphorus, Total, Acid Persulfate Digestion 3

Consumables and replacement items (continued)Description Quantity/test Unit Item no.
Sulfuric Acid Solution, 5.25 N 2 mL 100 mLMDB 244932
Water, deionized varies 4 L 27256
Required apparatus
Description Quantity/test Unit Item no.
Cylinder, graduated, 25-mL. 1 each 50840
Flask, Erlenmeyer, 125-mL 2 each 50543
Hot plate, 7 inches x 7 inches, digital, 120 VAC 1 each 2881500
Hot plate, stirrer, 220 - 240 VAC 1 each 2881602
Optional reagents and apparatus
Description Unit Item no.
Sodium Hydroxide Standard Solution, 5.0 N 1 L 245053
Sulfuric Acid, concentrated, ACS 500 mL 97949
Paper, pH, 0–14 pH range 100/pkg 2601300
Thermometer, non-mercury, -10 to +225 °C each 2635700
Hydrochloric Acid, 6.0 N 1:1, 50% 500 mL 88449
Bottle, sampling, with cap, low density polyethylene, 250-mL 12/pkg 2087076
HACH COMPANYWORLD HEADQUARTERSTelephone: (970) 669-3050FAX: (970) 669-2932
FOR TECHNICAL ASSISTANCE, PRICE INFORMATION AND ORDERING:Call 800-227-4224
Contact the HACH office or distributor serving you.www.hach.com [email protected]
In the U.S.A. –
Outside the U.S.A. –
On the Worldwide Web – ; E-mail –
toll-free
© Hach Company/Hach Lange GmbH, 1989–2013. All rights reserved. 04/2013, Edition 8

Phosphorus, Total DOC316.53.01123
Molybdovanadate with Acid Persulfate Digestion Method1 Method 101271.0 to 100.0 mg/L PO4
3– (HR) Test ‘N Tube™ Vials
Scope and application: For water and wastewater.1 Adapted from Standard Methods for the Examination of Water and Wastewater, (4500 B-C).
Test preparation
Instrument specific informationThe table in this section shows all of the instruments that have the program for this test. Table 1 shows adapter and light shield requirements for the instruments that use them.To use the table, select an instrument, then read across to find the correspondinginformation for this test.
Table 1 Instrument-specific information for test tubes
Instrument Adapters Light shield
DR 6000 — —
DR 5000 — —
DR 900 4846400 Cover supplied with the instrument
DR 3900 — LZV849
DR 3800 — LZV646
DR 2800 —
Before startingInstall the instrument cap on the DR 900 cell holder before ZERO or READ is pushed.
DR 3900, DR 3800, DR 2800 and DR 2700: Install the light shield in Cell Compartment #2 before this test is started.
Reagent blanks can be used more than once, but should not be used more than one day.
The reagent that is used in this test is corrosive. Use protection for eyes and skin and be prepared to flush any spills withrunning water.
Review the Safety Data Sheets (MSDS/SDS) for the chemicals that are used and use any recommended personal protectiveequipment.
Dispose of reacted solutions according to local, state and federal regulations. Use the Safety Data Sheets for disposalinformation for unused reagents. Consult the environmental, health and safety staff for your facility and/or local regulatoryagencies for further disposal information.
Items to collect
Description Quantity
Total High Range Phosphorus Test 'N Tube Reagent Set 1
DRB200 Reactor 1
Funnel, micro 1
Light shield or adapter (For information about sample cells, adapters or light shields, refer to Items to collect on page 1.) 1
Pipet, TenSette®, 1.0- to 10.0-mL, with pipet tips 1
1
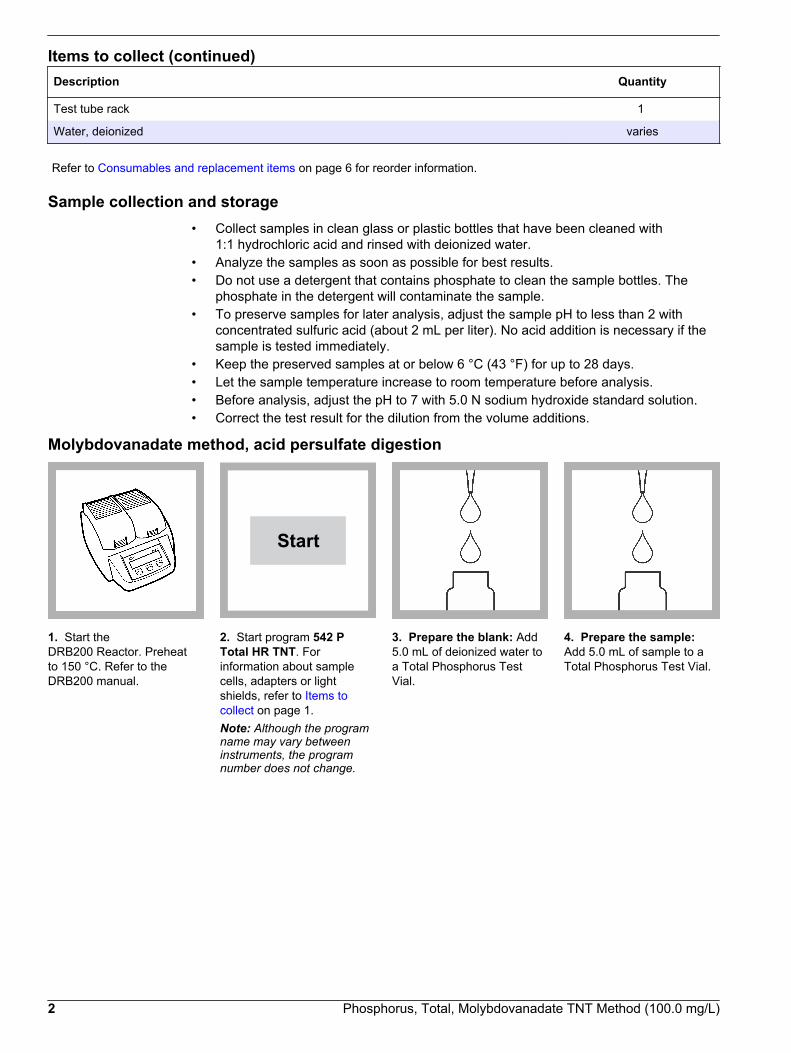
Items to collect (continued)Description Quantity
Test tube rack 1
Water, deionized varies
Refer to Consumables and replacement items on page 6 for reorder information.
Sample collection and storage• Collect samples in clean glass or plastic bottles that have been cleaned with
1:1 hydrochloric acid and rinsed with deionized water.• Analyze the samples as soon as possible for best results.• Do not use a detergent that contains phosphate to clean the sample bottles. The
phosphate in the detergent will contaminate the sample.• To preserve samples for later analysis, adjust the sample pH to less than 2 with
concentrated sulfuric acid (about 2 mL per liter). No acid addition is necessary if thesample is tested immediately.
• Keep the preserved samples at or below 6 °C (43 °F) for up to 28 days.• Let the sample temperature increase to room temperature before analysis.• Before analysis, adjust the pH to 7 with 5.0 N sodium hydroxide standard solution.• Correct the test result for the dilution from the volume additions.
Molybdovanadate method, acid persulfate digestion
1. Start theDRB200 Reactor. Preheatto 150 °C. Refer to theDRB200 manual.
Start
2. Start program 542 PTotal HR TNT. Forinformation about samplecells, adapters or lightshields, refer to Items tocollect on page 1.Note: Although the programname may vary betweeninstruments, the programnumber does not change.
3. Prepare the blank: Add5.0 mL of deionized water toa Total Phosphorus TestVial.
4. Prepare the sample:Add 5.0 mL of sample to aTotal Phosphorus Test Vial.
2 Phosphorus, Total, Molybdovanadate TNT Method (100.0 mg/L)
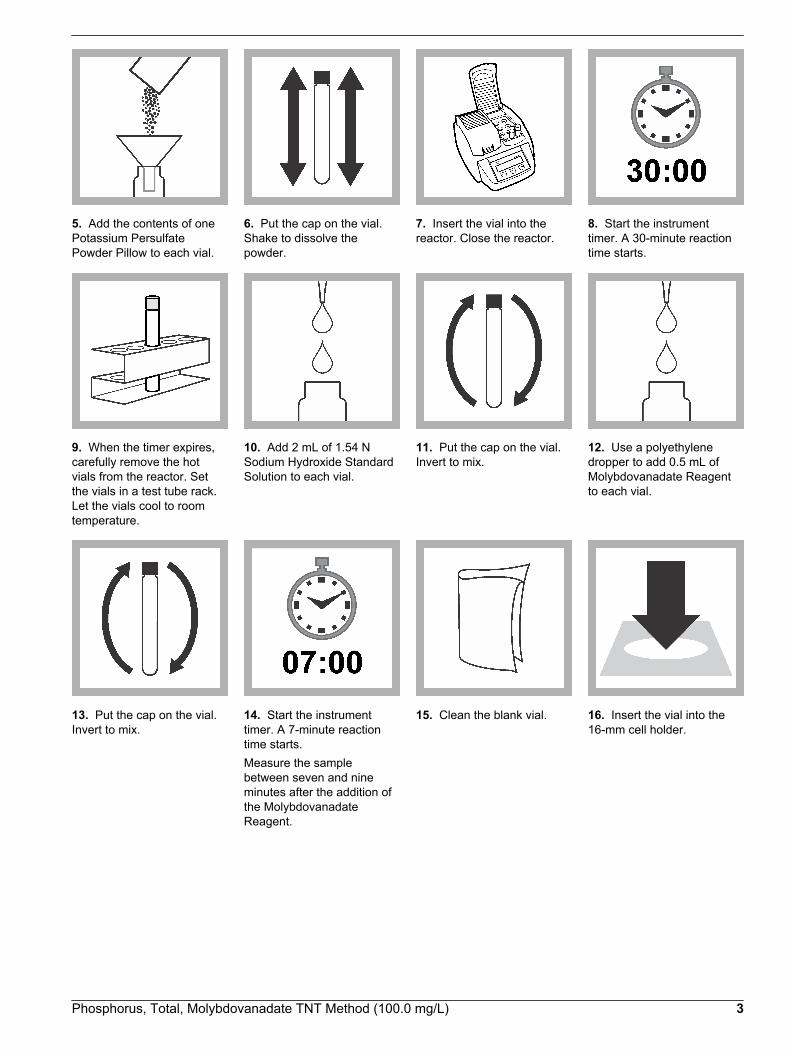
5. Add the contents of onePotassium PersulfatePowder Pillow to each vial.
6. Put the cap on the vial.Shake to dissolve thepowder.
7. Insert the vial into thereactor. Close the reactor.
8. Start the instrumenttimer. A 30-minute reactiontime starts.
9. When the timer expires,carefully remove the hotvials from the reactor. Setthe vials in a test tube rack.Let the vials cool to roomtemperature.
10. Add 2 mL of 1.54 NSodium Hydroxide StandardSolution to each vial.
11. Put the cap on the vial.Invert to mix.
12. Use a polyethylenedropper to add 0.5 mL ofMolybdovanadate Reagentto each vial.
13. Put the cap on the vial.Invert to mix.
14. Start the instrumenttimer. A 7-minute reactiontime starts.Measure the samplebetween seven and nineminutes after the addition ofthe MolybdovanadateReagent.
15. Clean the blank vial. 16. Insert the vial into the16-mm cell holder.
Phosphorus, Total, Molybdovanadate TNT Method (100.0 mg/L) 3

Zero
17. Push ZERO. Thedisplay shows 0.0 mg/LPO4
3–.
18. Clean the sample vial. 19. Insert the vial into the16-mm cell holder.
Read
20. Push READ. Resultsshow in mg/L PO4
3–.
InterferencesTable 2 shows the interferences and interference levels. Table 3 shows the substancesthat do not interfere at or below the indicated levels.
Table 2 Interfering substances
Interfering substance Interference level
Arsenate Causes a positive interference if the sample is warm when the reagent is added. Let thesample temperature decrease to room temperature after the digestion.
Iron, ferrous Causes a blue color which interferes at more than 100 mg/L.
Molybdate Causes a negative interference at more than 1000 mg/L.
Silica Causes a positive interference if the sample is warm when the reagent is added. Let thesample temperature decrease to room temperature after the digestion.
Highly buffered samples orextreme sample pH
Can prevent the correct pH adjustment of the sample by the reagents. Sample pretreatmentmay be necessary.
Fluoride, thorium, bismuth,thiosulfate or thiocyanate
Causes a negative interference.
Turbidity Sample turbidity can cause inconsistent results because the acid in the reagents can dissolvesome of the suspended particles and because of variable desorption of orthophosphate fromthe particles.
Temperature Temperatures below 18 °C (64 °F) cause a negative interference. Temperatures above 25 °C(77 °F) cause a positive interference. Let the sample temperature decrease to roomtemperature after the digestion.
Table 3 Substances that do not interfere at less than 1000 mg/L
Pyrophosphate Tetraborate Selenate Benzoate
Citrate Oxalate Lactate Tartrate
Formate Salicylate Al3+ Fe3+
Mg2+ Ca2+ Ba2+ Sr2+
Li+ Na+ K+ NH4+
Cd2+ Mn2+ NO3– NO2
–
SO42– SO3
2– Pb2+ Hg+
Hg2+ Sn2+ Cu2+ Ni2+
Ag+ U4+ Zr4+ AsO3–
Br– CO32– ClO4
– CN–
IO3– SiO4
4– — —
4 Phosphorus, Total, Molybdovanadate TNT Method (100.0 mg/L)

Accuracy check
Standard additions method (sample spike)Use the standard additions method (for applicable instruments) to validate the testprocedure, reagents and instrument and to find if there is an interference in the sample.Items to collect:
• Phosphate 10-mL Ampule Standard, 500-mg/L as PO43–
• Ampule breaker• Pipet, TenSette®, 0.1–1.0 mL and tips• Mixing cylinders, 10-mL (3)
1. Use the test procedure to measure the concentration of the sample, then keep the(unspiked) sample in the instrument.
2. Go to the Standard Additions option in the instrument menu.3. Select the values for standard concentration, sample volume and spike volumes.4. Open the standard solution.5. Prepare three spiked samples: use the TenSette pipet to add 0.1 mL, 0.2 mL and
0.3 mL of the standard solution, respectively, to three 10-mL portions of fresh sample.Mix well.
6. Use the test procedure to measure the concentration of each of the spiked samples.Start with the smallest sample spike. Measure each of the spiked samples in theinstrument.
7. Select Graph to compare the expected results to the actual results.Note: If the actual results are significantly different from the expected results, make sure thatthe sample volumes and sample spikes are measured accurately. The sample volumes andsample spikes that are used should agree with the selections in the standard additions menu. Ifthe results are not within acceptable limits, the sample may contain an interference.
Standard solution methodUse the standard solution method to validate the test procedure, reagents andinstrument.Items to collect:
• 50-mg/L phosphate standard solution
1. Use the test procedure to measure the concentration of the standard solution.2. Compare the expected result to the actual result.
Note: The factory calibration can be adjusted slightly with the standard adjust option so that theinstrument shows the expected value of the standard solution. The adjusted calibration is thenused for all test results. This adjustment can increase the test accuracy when there are slightvariations in the reagents or instruments.
Method performanceThe method performance data that follows was derived from laboratory tests that weremeasured on a spectrophotometer during ideal test conditions. Users may get differentresults under different test conditions.
Program Standard Precision (95% Confidence Interval) SensitivityConcentration change per 0.010 Abs change
542 50 mg/L PO43– 49.4–50.6 mg/L PO4
3– 0.7 mg/L PO43–
Summary of methodPhosphates present in organic and condensed inorganic forms (meta-, pyro- or otherpolyphosphates) must be converted to reactive orthophosphate before analysis.Pretreatment of the sample with acid and heat provides the conditions for hydrolysis ofthe condensed inorganic forms. Organic phosphates are converted to orthophosphatesby heating with acid and persulfate. Orthophosphate reacts with molybdate in an acid
Phosphorus, Total, Molybdovanadate TNT Method (100.0 mg/L) 5
medium to produce a mixed phosphate/molybdate complex. In the presence of vanadium,yellow molybdovanadophosphoric acid forms. The intensity of the yellow color isproportional to the phosphate concentration. Test results are measured at 420 nm.
Pollution prevention and waste managementReacted samples contain molybdenum and must be disposed of as a hazardous waste.Dispose of reacted solutions according to local, state and federal regulations.
Consumables and replacement itemsRequired reagents
Description Quantity/test Unit Item no.
Total High Range Phosphorus Test ’N Tube™ Reagent Set — 50 vials 2767245
Includes:
Molybdovanadate Reagent (not sold separately) 0.5 mL 25 mL —
Potassium Persulfate Powder Pillows 1 pillow 50/pkg 2084766
Sodium Hydroxide, 1.54 N varies 100 mL 2743042
Total Phosphorus Test Vials (not sold separately) 1 50/pkg —
Water, deionized varies 100 mL 27242
Required apparatus
Description Quantity/test Unit Item no.
DRB200 Reactor, 110 V, 15 x 16 mm 1 each LTV082.53.40001
DRB200 Reactor, 220 V, 15 x 16 mm 1 each LTV082.52.40001
Dropper, measuring, 0.5 and 1.0 mL plastic 2 20/pkg 2124720
Funnel, micro, poly 1 each 2584335
Light shield, DR 3900 1 each LZV849
Light shield, DR 3800, DR 2800, DR 2700 1 each LZV646
Pipet, TenSette®, 1.0- to 10.0-mL 1 each 1970010
Pipet Tips, for TenSette Pipet 1970010 2 250/pkg 2199725
Test tube rack 1 each 1864100
Recommended standards and apparatus
Description Unit Item no.
Phosphate Standard Solution, 10-mL Ampule, 500 mg/L as PO4 16/pkg 1424210
Phosphate Standard Solution, 50-mg/L as PO4 500 mL 17149
Wastewater Influent Standard, Mixed Parameter, for NH3-N, NO3-N, PO4, COD, SO4,TOC 500 mL 2833149
Ampule Breaker, Voluette® ampules each 2196800
Optional reagents and apparatus
Description Unit Item no.
Hydrochloric Acid, 6.0 N 1:1, 50% 500 mL 88449
Sodium Hydroxide Standard Solution, 5.0 N 1 L 245053
Sulfuric Acid, concentrated, ACS 500 mL 97949
6 Phosphorus, Total, Molybdovanadate TNT Method (100.0 mg/L)

Consumables and replacement items (continued)Description Unit Item no.
Molybdovanadate Reagent 100 mL 2076032
Pipet tips for TenSette Pipet 1970010 50/pkg 2199796
Pipet, TenSette®, 0.1–1.0 mL each 1970001
Pipet tips for TenSette Pipet 1970001 50/pkg 2185696
Pipet tips for TenSette Pipet 1970001 1000/pkg 2185628
Paper, pH, 0–14 pH range 100/pkg 2601300
Water, deionized 4 L 27256
Thermometer, non-mercury, -10 to +225 °C each 2635700
Finger cots 2/pkg 1464702
Bottle, sampling, with cap, low density polyethylene, 250-mL 12/pkg 2087076
Cylinder, mixing, 25-mL each 189640
Funnel, micro each 2584335
Optional standards
Description Unit Item no.
Phosphate Standard Solution, 30-mg/L as PO4 946 mL 1436716
Phosphate Standard Solution, 100-mg/L as PO4 100 mL 1436832
Phosphate Standard Solution, 10-mL Voluette® Ampul, 50-mg/L as PO4 16/pkg 17110
Phosphate Standard Solution, 500-mg/L as PO4 100 mL 1424232
Phosphorus, Total, Molybdovanadate TNT Method (100.0 mg/L) 7

HACH COMPANYWORLD HEADQUARTERSTelephone: (970) 669-3050FAX: (970) 669-2932
FOR TECHNICAL ASSISTANCE, PRICE INFORMATION AND ORDERING:Call 800-227-4224
Contact the HACH office or distributor serving you.www.hach.com [email protected]
In the U.S.A. –
Outside the U.S.A. –
On the Worldwide Web – ; E-mail –
toll-free
© Hach Company/Hach Lange GmbH, 1989–2013. All rights reserved. 04/2013, Edition 8
Phosphorus, Total DOC316.53.01121
USEPA1 PhosVer® 3 with Acid Persulfate Digestion Method Method 81900.06 to 3.50 mg/L PO4
3– (0.02 to 1.10 mg/L P) Test ‘N Tube™ Vials
Scope and application: For water, wastewater and seawater.1 USEPA accepted for reporting wastewater analyses (Standard Methods 4500-P E).
Test preparation
Instrument specific informationThe table in this section shows all of the instruments that have the program for this test. Table 1 shows adapter and light shield requirements for the instruments that use them.To use the table, select an instrument, then read across to find the correspondinginformation for this test.
Table 1 Instrument-specific information for test tubes
Instrument Adapters Light shield
DR 6000 — —
DR 5000 — —
DR 900 4846400 Cover supplied with the instrument
DR 3900 — LZV849
DR 3800 — LZV646
DR 2800 —
Before startingInstall the instrument cap on the DR 900 cell holder before ZERO or READ is pushed.
DR 3900, DR 3800, DR 2800 and DR 2700: Install the light shield in Cell Compartment #2 before this test is started.
For best results, measure the reagent blank value for each new lot of reagent. Replace the sample with deionized water inthe test procedure to get the reagent blank value. Subtract the reagent blank value from the sample results automaticallywith the reagent blank adjust option.
The test range for total phosphate is limited to 0.06 to 3.5 mg/L PO43–. Test results that are more than 3.5 mg/L can be used
to estimate dilution ratios, but should NOT be used for reporting purposes. If the test result is more than 3.5 mg/L, dilute thesample and repeat the digestion and the colorimetric test.
Clean all glassware with 6.0 N (50%) hydrochloric acid, then rinse thoroughly with deionized water to remove contaminants.
The reagent that is used in this test is corrosive. Use protection for eyes and skin and be prepared to flush any spills withrunning water.
Review the Safety Data Sheets (MSDS/SDS) for the chemicals that are used and use any recommended personal protectiveequipment.
Dispose of reacted solutions according to local, state and federal regulations. Use the Safety Data Sheets for disposalinformation for unused reagents. Consult the environmental, health and safety staff for your facility and/or local regulatoryagencies for further disposal information.
Items to collect
Description Quantity
Total Phosphorus Test 'N Tube Reagent Set 1
DRB200 Reactor 1
1

Items to collect (continued)Description Quantity
Funnel, micro 1
Light shield or adapter (For information about sample cells, adapters or light shields, refer to Instrument specific information on page 1.) 1
Pipet, TenSette®, 1.0- to 10.0-mL, with pipet tips 1
Test tube rack 1
Water, deionized varies
Refer to Consumables and replacement items on page 5 for reorder information.
Sample collection and storage• Collect samples in clean glass or plastic bottles that have been cleaned with
1:1 hydrochloric acid and rinsed with deionized water.• Analyze the samples as soon as possible for best results.• Do not use a detergent that contains phosphate to clean the sample bottles. The
phosphate in the detergent will contaminate the sample.• To preserve samples for later analysis, adjust the sample pH to less than 2 with
concentrated sulfuric acid (about 2 mL per liter). No acid addition is necessary if thesample is tested immediately.
• Keep the preserved samples at or below 6 °C (43 °F) for up to 28 days.• Let the sample temperature increase to room temperature before analysis.• Before analysis, adjust the pH to 7 with 5.0 N sodium hydroxide standard solution.• Correct the test result for the dilution from the volume additions.
Acid persulfate digestion for Test 'N Tubes
1. Start theDRB200 Reactor. Preheatto 150 °C. Refer to theDRB200 manual.
Start
2. Start program 536 PTotal/AH PV TNT. Forinformation about samplecells, adapters or lightshields, refer to Instrumentspecific informationon page 1.Note: Although the programname may vary betweeninstruments, the programnumber does not change.
3. Add 5.0 mL of sample tothe Total Phosphorus TestVial.
4. Add the contents of onePotassium PersulfatePowder Pillow forPhosphonate to the vial.
2 Phosphorus, Total, PhosVer 3 TNT Method (3.50 mg/L)

5. Put the cap on the vial.Shake to dissolve thepowder.
6. Insert the vial into thereactor. Close the reactor.
7. Start the instrumenttimer. A 30-minute reactiontime starts.
8. When the timer expires,carefully remove the vialfrom the reactor. Set the vialin a test tube rack. Let thevial cool to roomtemperature.
9. Add 2 mL of 1.54 NSodium Hydroxide StandardSolution to the vial.
10. Put the cap on the vial.Invert to mix.
11. Clean the vial. 12. Insert the vial into the16-mm cell holder.
Zero
13. Push ZERO. Thedisplay shows 0.00 mg/LPO4
3–.
14. Add the contents of onePhosVer 3 Powder Pillow tothe vial.
15. Put the cap on the vial.Shake to mix for 20–30 seconds. The powder willnot dissolve completely.
16. Start the instrumenttimer. A 2-minute reactiontime starts.Measure the sample withintwo to eight minutes afterthe timer expires.
Phosphorus, Total, PhosVer 3 TNT Method (3.50 mg/L) 3

17. Clean the vial. 18. Insert the vial into the16-mm cell holder.
Read
19. Push READ. Resultsshow in mg/L PO4
3–.
InterferencesInterfering substance Interference level
Aluminum More than 200 mg/L
Arsenate Interferes at any level.
Chromium More than 100 mg/L
Copper More than 10 mg/L
Sulfide More than 90 mg/L
Iron More than 100 mg/L
Nickel More than 300 mg/L
Highly buffered samples orextreme sample pH
Can prevent the correct pH adjustment of the sample by the reagents. Sample pretreatmentmay be necessary.
Silica More than 50 mg/L
Silicate More than 10 mg/L
Turbidity or color May cause inconsistent results. The acid in the powder pillow can dissolve some of thesuspended particles and the desorption of orthophosphate from the particles can vary. Forhighly turbid or colored samples, add the contents of one Phosphate Pretreatment PowderPillow to 25 mL of sample. Mix well. Use this solution to zero the instrument.
Zinc More than 80 mg/L
Accuracy check
Standard additions method (sample spike)Use the standard additions method (for applicable instruments) to validate the testprocedure, reagents and instrument and to find if there is an interference in the sample.Items to collect:
• Phosphate 10-mL Ampule Standard, 50-mg/L as PO43–
• Ampule breaker• Pipet, TenSette®, 0.1–1.0 mL and tips• Mixing cylinders, 25-mL (3)
1. Use the test procedure to measure the concentration of the sample, then keep the(unspiked) sample in the instrument.
2. Go to the Standard Additions option in the instrument menu.3. Select the values for standard concentration, sample volume and spike volumes.4. Open the standard solution.
4 Phosphorus, Total, PhosVer 3 TNT Method (3.50 mg/L)
5. Prepare three spiked samples: use the TenSette pipet to add 0.1 mL, 0.2 mL and0.3 mL of the standard solution, respectively, to three 25-mL portions of fresh sample.Mix well.
6. Use the test procedure to measure the concentration of each of the spiked samples.Start with the smallest sample spike. Measure each of the spiked samples in theinstrument.
7. Select Graph to compare the expected results to the actual results.Note: If the actual results are significantly different from the expected results, make sure thatthe sample volumes and sample spikes are measured accurately. The sample volumes andsample spikes that are used should agree with the selections in the standard additions menu. Ifthe results are not within acceptable limits, the sample may contain an interference.
Standard solution methodUse the standard solution method to validate the test procedure, reagents andinstrument.Items to collect:
• 3.0-mg/L phosphate standard solution
1. Use the test procedure to measure the concentration of the standard solution.2. Compare the expected result to the actual result.
Note: The factory calibration can be adjusted slightly with the standard adjust option so that theinstrument shows the expected value of the standard solution. The adjusted calibration is thenused for all test results. This adjustment can increase the test accuracy when there are slightvariations in the reagents or instruments.
Method performanceThe method performance data that follows was derived from laboratory tests that weremeasured on a spectrophotometer during ideal test conditions. Users may get differentresults under different test conditions.
Program Standard Precision (95% Confidence Interval) SensitivityConcentration change per 0.010 Abs change
536 3.00 mg/L PO43– 2.93–3.07 mg/L PO4
3– 0.06 mg/L PO43–
Summary of methodPhosphates present in organic and condensed inorganic forms (meta-, pyro- or otherpolyphosphates) must be converted to reactive orthophosphate before analysis.Pretreatment of the sample with acid and heat provides the conditions for hydrolysis ofthe condensed inorganic forms. Organic phosphates are converted to orthophosphatesby heating with acid and persulfate. Orthophosphate reacts with molybdate in an acidmedium to produce a mixed phosphate/molybdate complex. Ascorbic acid then reducesthe complex, giving an intense molybdenum blue color. The measurement wavelength is880 nm for spectrophotometers or 610 nm for colorimeters.
Pollution prevention and waste managementReacted samples contain molybdenum and must be disposed of as a hazardous waste.Dispose of reacted solutions according to local, state and federal regulations.
Consumables and replacement itemsRequired reagents
Description Quantity/test Unit Item no.
Water, deionized varies 100 mL 27242
Total Phosphorus Test ’N Tube™ Reagent Set 1 50 tests 2742645
Includes:
PhosVer® 3 Phosphate Reagent Powder Pillow, 10-mL 1 50/pkg 2106046
Phosphorus, Total, PhosVer 3 TNT Method (3.50 mg/L) 5

Consumables and replacement items (continued)Description Quantity/test Unit Item no.
Potassium Persulfate Powder Pillows 1 pillow 50/pkg 2084766
Sodium Hydroxide, 1.54 N varies 100 mL 2743042
Total and Acid Hydrolyzable Test Vials (not sold separately) 1 50/pkg —
Required apparatus
Description Quantity/test Unit Item no.
DRB200 Reactor, 110 V, 15 x 16 mm 1 each LTV082.53.40001
DRB200 Reactor, 220 V, 15 x 16 mm 1 each LTV082.52.40001
Funnel, micro, poly 1 each 2584335
Light shield, DR 3900 1 each LZV849
Light shield, DR 3800, DR 2800, DR 2700 1 each LZV646
Pipet, TenSette®, 1.0- to 10.0-mL 1 each 1970010
Pipet Tips, for TenSette Pipet 1970010 2 250/pkg 2199725
Test tube rack 1 each 1864100
Recommended standards and apparatus
Description Unit Item no.
Drinking Water Standard, Mixed Parameter, Inorganic for F-, NO3, PO4, SO4 500 mL 2833049
Phosphate Standard Solution, 50-mg/L, 10-mL Voluette® Ampules 16/pkg 17110
Phosphate Standard Solution, 1-mg/L as PO4 500 mL 256949
Phosphate Standard Solution, 3-mg/L as PO4 946 mL 2059716
Wastewater, Effluent Inorganics, for NH3-N, NO3-N, PO4, COD, SO4, TOC 500 mL 2833249
Ampule Breaker, Voluette® ampules each 2196800
Optional reagents and apparatus
Description Unit Item no.
Cylinder, mixing, 25-mL each 189640
Pipet, volumetric, Class A, 2-mL each 1451536
Hydrochloric Acid, 6.0 N 1:1, 50% 500 mL 88449
Sodium Hydroxide Standard Solution, 5.0 N 1 L 245053
Sulfuric Acid, concentrated, ACS 500 mL 97949
Pipet, TenSette®, 0.1–1.0 mL each 1970001
Pipet tips for TenSette Pipet 1970001 50/pkg 2185696
Pipet tips for TenSette Pipet 1970001 1000/pkg 2185628
Bottle, sampling, with cap, low density polyethylene, 250-mL 12/pkg 2087076
Paper, pH, 0–14 pH range 100/pkg 2601300
Water, deionized 4 L 27256
Thermometer, non-mercury, -10 to +225 °C each 2635700
Finger cots 2/pkg 1464702
6 Phosphorus, Total, PhosVer 3 TNT Method (3.50 mg/L)

Optional standards
Description Unit Item no.
Phosphate Standard Solution, 10-mg/L as PO4 946 mL 1420416
Phosphate Standard Solution, 15-mg/L as PO4 100 mL 1424342
Phosphate Standard Solution, 100-mg/L as PO4 100 mL 1436832
Phosphate Standard Solution, 10-mL Ampule, 500 mg/L as PO4 16/pkg 1424210
Phosphate Standard Solution, 500-mg/L as PO4 100 mL 1424232
Phosphorus, Total, PhosVer 3 TNT Method (3.50 mg/L) 7

HACH COMPANYWORLD HEADQUARTERSTelephone: (970) 669-3050FAX: (970) 669-2932
FOR TECHNICAL ASSISTANCE, PRICE INFORMATION AND ORDERING:Call 800-227-4224
Contact the HACH office or distributor serving you.www.hach.com [email protected]
In the U.S.A. –
Outside the U.S.A. –
On the Worldwide Web – ; E-mail –
toll-free
© Hach Company/Hach Lange GmbH, 1989–2013. All rights reserved. 04/2013, Edition 8
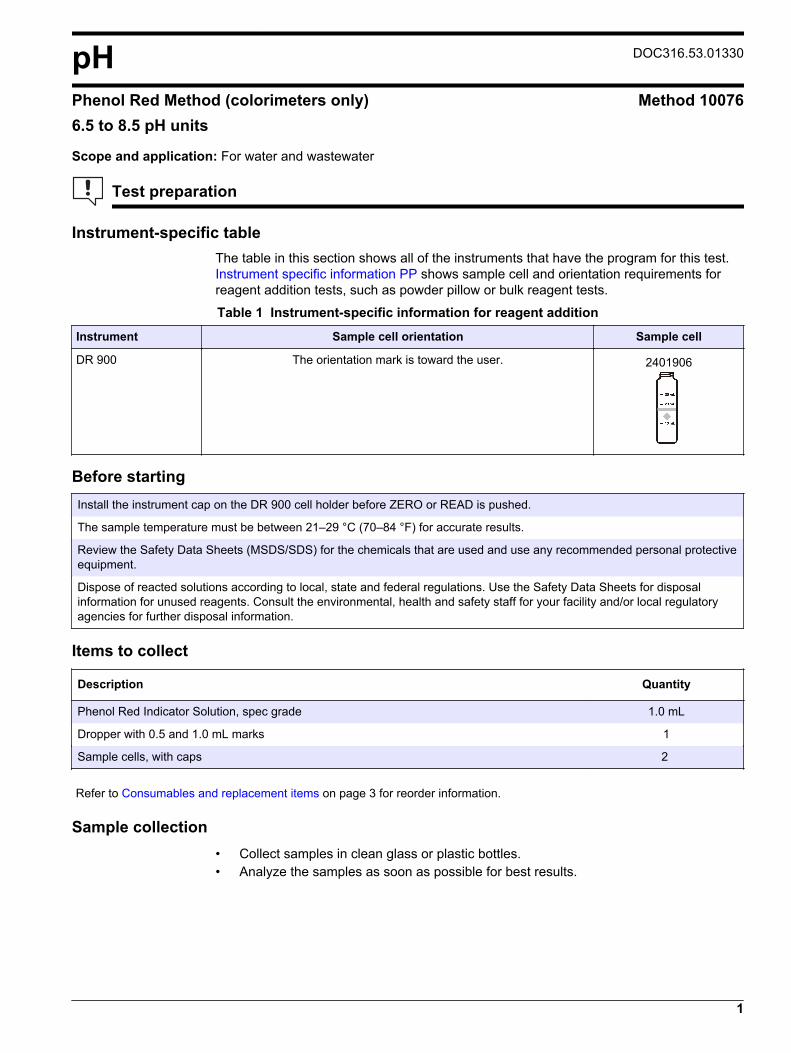
pH DOC316.53.01330
Phenol Red Method (colorimeters only) Method 100766.5 to 8.5 pH units
Scope and application: For water and wastewater
Test preparation
Instrument-specific tableThe table in this section shows all of the instruments that have the program for this test. Instrument specific information PP shows sample cell and orientation requirements forreagent addition tests, such as powder pillow or bulk reagent tests.
Table 1 Instrument-specific information for reagent addition
Instrument Sample cell orientation Sample cell
DR 900 The orientation mark is toward the user. 2401906
Before startingInstall the instrument cap on the DR 900 cell holder before ZERO or READ is pushed.
The sample temperature must be between 21–29 °C (70–84 °F) for accurate results.
Review the Safety Data Sheets (MSDS/SDS) for the chemicals that are used and use any recommended personal protectiveequipment.
Dispose of reacted solutions according to local, state and federal regulations. Use the Safety Data Sheets for disposalinformation for unused reagents. Consult the environmental, health and safety staff for your facility and/or local regulatoryagencies for further disposal information.
Items to collect
Description Quantity
Phenol Red Indicator Solution, spec grade 1.0 mL
Dropper with 0.5 and 1.0 mL marks 1
Sample cells, with caps 2
Refer to Consumables and replacement items on page 3 for reorder information.
Sample collection• Collect samples in clean glass or plastic bottles.• Analyze the samples as soon as possible for best results.
1
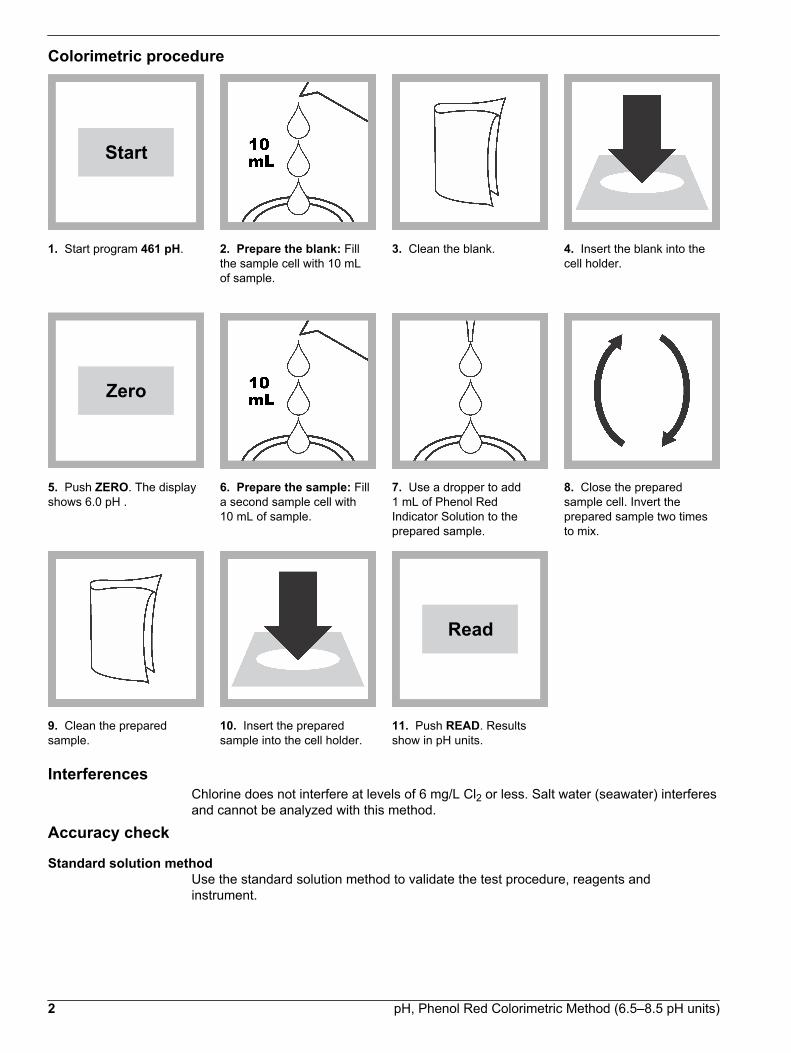
Colorimetric procedure
Start
1. Start program 461 pH. 2. Prepare the blank: Fillthe sample cell with 10 mLof sample.
3. Clean the blank. 4. Insert the blank into thecell holder.
Zero
5. Push ZERO. The displayshows 6.0 pH .
6. Prepare the sample: Filla second sample cell with10 mL of sample.
7. Use a dropper to add1 mL of Phenol RedIndicator Solution to theprepared sample.
8. Close the preparedsample cell. Invert theprepared sample two timesto mix.
9. Clean the preparedsample.
10. Insert the preparedsample into the cell holder.
Read
11. Push READ. Resultsshow in pH units.
InterferencesChlorine does not interfere at levels of 6 mg/L Cl2 or less. Salt water (seawater) interferesand cannot be analyzed with this method.
Accuracy check
Standard solution methodUse the standard solution method to validate the test procedure, reagents andinstrument.
2 pH, Phenol Red Colorimetric Method (6.5–8.5 pH units)

Items to collect:
• pH 7.0 buffer solution, clear
1. Use the test procedure to measure the concentration of the standard solution.2. Compare the expected result to the actual result.
Note: The factory calibration can be adjusted slightly with the standard adjust option so that theinstrument shows the expected value of the standard solution. The adjusted calibration is thenused for all test results. This adjustment can increase the test accuracy when there are slightvariations in the reagents or instruments.
Method performanceThe method performance data that follows was derived from laboratory tests that weremeasured on a spectrophotometer during ideal test conditions. Users may get differentresults under different test conditions.
Program Standard Precision (95% Confidence Interval) SensitivityConcentration change per 0.010 Abs change
461 pH 7.0 buffer solution < 0.1 pH units not applicable
Summary of methodThis method uses a sulfonphthalein indicator (Phenol Red) to determine pHcolorimetrically. Test results are measured at 520 nm. This method is available forcolorimeters only.
Consumables and replacement itemsRequired reagents
Description Quantity/test Unit Item no.
Phenol Red Indicator Solution, spec grade 1.0 mL 50 mL 2657512
Sample Cells, 10-20-25 mL, w/ cap 2 6/pkg 2401906
Required apparatus
Description Quantity/test Unit Item no.
Dropper, measuring, 0.5 and 1.0 mL plastic 1 20/pkg 2124720
Optional reagents and apparatus
Description Unit Item no.
pH 7.0 Buffer Solution 500 mL 1222249
Thermometer, -20 to 110 °C, Non-Mercury each 2635702
pH, Phenol Red Colorimetric Method (6.5–8.5 pH units) 3

HACH COMPANYWORLD HEADQUARTERSTelephone: (970) 669-3050FAX: (970) 669-2932
FOR TECHNICAL ASSISTANCE, PRICE INFORMATION AND ORDERING:Call 800-227-4224
Contact the HACH office or distributor serving you.www.hach.com [email protected]
In the U.S.A. –
Outside the U.S.A. –
On the Worldwide Web – ; E-mail –
toll-free
© Hach Company/Hach Lange GmbH, 1989–2013. All rights reserved. 04/2013, Edition 8

Silica DOC316.53.01132
Heteropoly Blue Method1 Method 81860.010 to 1.600 mg/L SiO2 (LR, spectrophotometers)0.01 to 1.60 mg/L SiO2 (LR, colorimeters)
Powder Pillows
Scope and application: For boiler and ultrapure water.1 Adapted from Standard Methods for the Examination of Water and Wastewater.
Test preparation
Instrument specific informationThe table in this section shows all of the instruments that have the program for this test. Table 1 shows sample cell and orientation requirements for reagent addition tests, suchas powder pillow or bulk reagent tests.To use the table, select an instrument, then read across to find the correspondinginformation for this test.
Table 1 Instrument-specific information for powder pillows
Instrument Sample cell orientation Sample cell
DR 6000 DR 3800 DR 2800 DR 2700
The fill line is to the right. 2495402
DR 5000 DR 3900
The fill line is toward the user.
DR 900 The orientation mark is toward the user. 2401906
Before startingInstall the instrument cap on the DR 900 cell holder before ZERO or READ is pushed.
The reaction times in the test procedure are for samples that are at 20 °C (68 °F). If the sample temperature is 10 °C (50 °F),wait 8 minutes for the first (4-minute) reaction time and 2 minutes for the second (1-minute) reaction time. If the sampletemperature is 30 °C (86 °F), wait 2 minutes for the first (4-minute) reaction time and 30 seconds for the second (1-minute)reaction time.
To test for very low concentrations, use the ULR rapid liquid method for the best results.
Review the Safety Data Sheets (MSDS/SDS) for the chemicals that are used and use any recommended personal protectiveequipment.
Dispose of reacted solutions according to local, state and federal regulations. Use the Safety Data Sheets for disposalinformation for unused reagents. Consult the environmental, health and safety staff for your facility and/or local regulatoryagencies for further disposal information.
1

Items to collect
Description Quantity
Amino Acid F Reagent powder pillows, 10-mL 1
Citric acid powder pillows, 10-mL 2
Molybdate 3 Reagent solution 1 mL
Sample cells (For information about sample cells, adapters or light shields, refer to Instrumentspecific information on page 1.) 2
Refer to Consumables and replacement items on page 5 for reorder information.
Sample collection• Collect samples in clean plastic bottles with tight-fitting caps. Do not use glass
bottles, which will contaminate the sample.• Analyze the samples as soon as possible for best results.• If prompt analysis is not possible, keep the samples at or below 6 °C (43 °F) for up to
28 days.• Let the sample temperature increase to room temperature before analysis.
Powder pillow procedure
Start
1. Start program 651 SilicaLR. For information aboutsample cells, adapters orlight shields, refer to Instrument specificinformation on page 1.Note: Although the programname may vary betweeninstruments, the programnumber does not change.
2. Prepare the blank: Fill asample cell with 10 mL ofsample.
3. Prepare the sample: Filla second sample cell with10 mL of sample.
4. Add 14 drops ofMolybdate 3 reagentsolution to each cell.
2 Silica, Heteropoly Blue Method (1.600 mg/L)
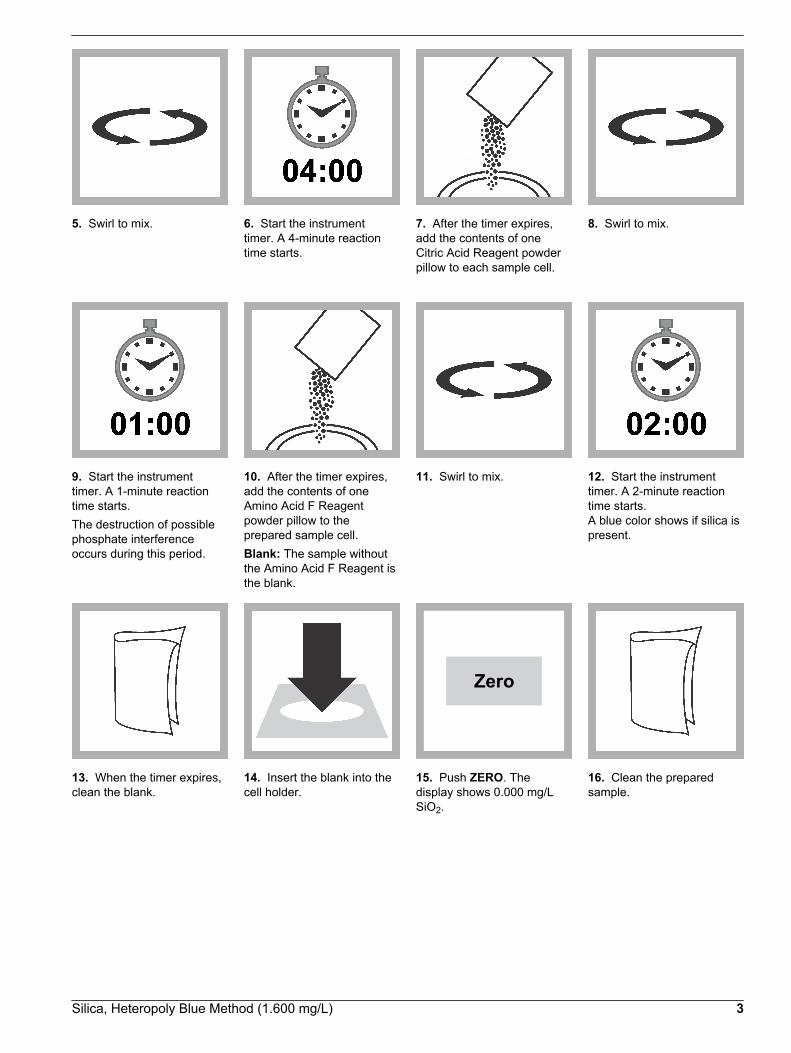
5. Swirl to mix. 6. Start the instrumenttimer. A 4-minute reactiontime starts.
7. After the timer expires,add the contents of oneCitric Acid Reagent powderpillow to each sample cell.
8. Swirl to mix.
9. Start the instrumenttimer. A 1-minute reactiontime starts.The destruction of possiblephosphate interferenceoccurs during this period.
10. After the timer expires,add the contents of oneAmino Acid F Reagentpowder pillow to theprepared sample cell.Blank: The sample withoutthe Amino Acid F Reagent isthe blank.
11. Swirl to mix. 12. Start the instrumenttimer. A 2-minute reactiontime starts.A blue color shows if silica ispresent.
13. When the timer expires,clean the blank.
14. Insert the blank into thecell holder.
Zero
15. Push ZERO. Thedisplay shows 0.000 mg/LSiO2.
16. Clean the preparedsample.
Silica, Heteropoly Blue Method (1.600 mg/L) 3

17. Insert the preparedsample into the cell holder.
Read
18. Push READ. Resultsshow in mg/L SiO2.
InterferencesInterferingsubstance
Interference level
Color Does not interfere when the original sample is used to zero the instrument.
Iron Large amounts of both ferrous and ferric iron interfere.
Phosphate Does not interfere at levels less than 50 mg/L PO4. At 60 mg/L PO4, an interference of –2% occurs. At75 mg/L PO4, the interference is –11%.
Slow reacting formsof silica
Occasionally a sample contains silica which reacts very slowly with molybdate. The nature of these"molybdate-unreactive" forms is not known. A pretreatment with sodium bicarbonate, then sulfuric acidwill make these forms reactive to molybdate. The pretreatment is given in Standard Methods for theExamination of Water and Wastewater under Silica-Digestion with Sodium Bicarbonate. A longerreaction time with the sample and the molybdate and acid reagents (before the citric acid is added) canhelp as an alternative to the bicarbonate pretreatment.
Sulfides Interfere at all levels.
Turbidity Does not interfere when the original sample is used to zero the instrument.
Accuracy check
Standard additions method (sample spike)Use the standard additions method (for applicable instruments) to validate the testprocedure, reagents and instrument and to find if there is an interference in the sample.Items to collect:
• Silica Standard Solution, 25 mg/L SiO2• Pipet, TenSette®, 0.1–1.0 mL• Pipet tips
1. Use the test procedure to measure the concentration of the sample, then keep the(unspiked) sample in the instrument.
2. Go to the Standard Additions option in the instrument menu.3. Select the values for standard concentration, sample volume and spike volumes.4. Open the standard solution.5. Prepare three spiked samples: use the TenSette pipet to add 0.1 mL, 0.2 mL and
0.3 mL of the standard solution, respectively, to three 10-mL portions of fresh sample.Mix well.
6. Use the test procedure to measure the concentration of each of the spiked samples.Start with the smallest sample spike. Measure each of the spiked samples in theinstrument.
7. Select Graph to compare the expected results to the actual results.Note: If the actual results are significantly different from the expected results, make sure thatthe sample volumes and sample spikes are measured accurately. The sample volumes and
4 Silica, Heteropoly Blue Method (1.600 mg/L)

sample spikes that are used should agree with the selections in the standard additions menu. Ifthe results are not within acceptable limits, the sample may contain an interference.
Standard solution methodUse the standard solution method to validate the test procedure, reagents andinstrument.Items to collect:
• Silica Standard Solution, 1.00 mg/L SiO2
1. Use the test procedure to measure the concentration of the standard solution.2. Compare the expected result to the actual result.
Note: The factory calibration can be adjusted slightly with the standard adjust option so that theinstrument shows the expected value of the standard solution. The adjusted calibration is thenused for all test results. This adjustment can increase the test accuracy when there are slightvariations in the reagents or instruments.
Method performanceThe method performance data that follows was derived from laboratory tests that weremeasured on a spectrophotometer during ideal test conditions. Users may get differentresults under different test conditions.
Program Standard Precision (95% Confidence Interval) SensitivityConcentration change per 0.010 Abs change
651 1.000 mg/L SiO2 0.990–1.010 mg/L SiO2 0.012 mg/L SiO2
Summary of methodSilica and phosphate in the sample react with molybdate ion under acidic conditions toform yellow silicomolybdic acid complexes and phosphomolybdic acid complexes.Addition of citric acid destroys the phosphate complexes. An amino acid is then added toreduce the yellow silicomolybdic acid to an intense blue color, which is proportional to thesilica concentration. The measurement wavelength is 815 nm for spectrophotometers or610 nm for colorimeters.
Consumables and replacement itemsRequired reagents
Description Quantity/Test Unit Item no.
Silica Reagent Set, low range, includes: — 100 tests 2459300
Amino Acid F Reagent Powder Pillow, 10-mL 1 100/pkg 2254069
Citric Acid Powder Pillow, 10-mL 2 100/pkg 2106269
Molybdate 3 Reagent Solution 1 mL 50 mL 199526
Recommended standards and apparatus
Description Unit Item no.
Silica Standard Solution, 1-mg/L SiO2 500 mL 110649
Silica Standard Solution, 25-mg/L as SiO2 236 mL 2122531
Water, deionized 4 L 27256
Silica, Heteropoly Blue Method (1.600 mg/L) 5
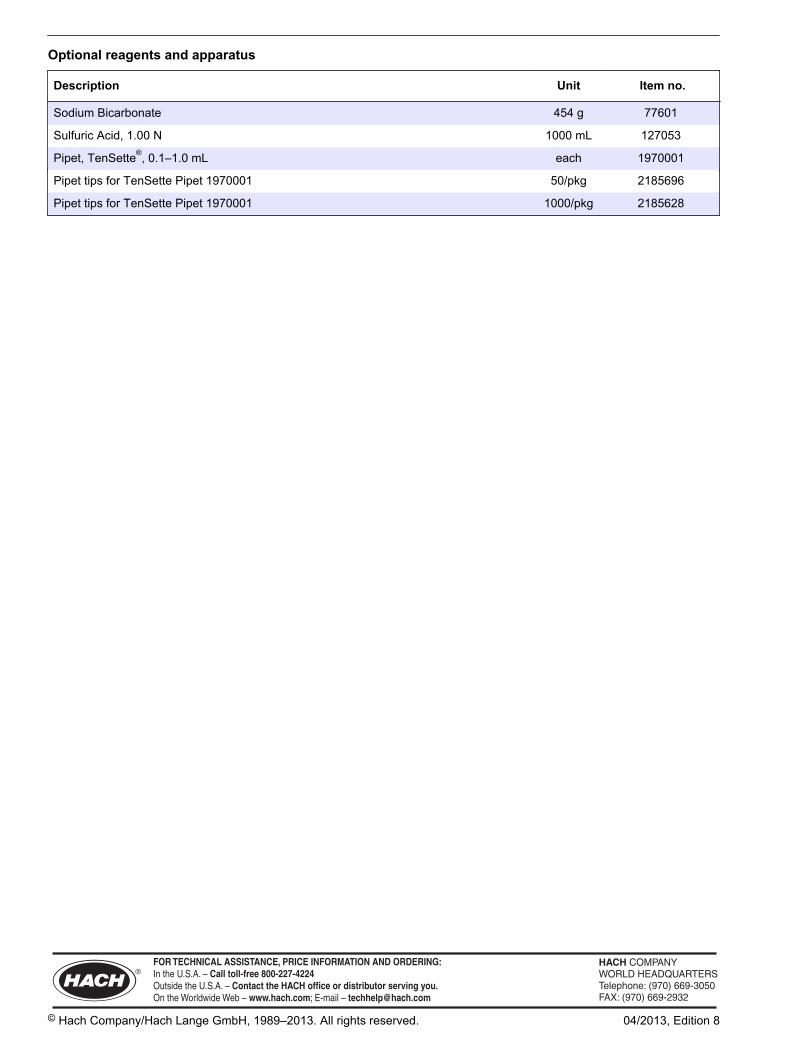
Optional reagents and apparatus
Description Unit Item no.
Sodium Bicarbonate 454 g 77601
Sulfuric Acid, 1.00 N 1000 mL 127053
Pipet, TenSette®, 0.1–1.0 mL each 1970001
Pipet tips for TenSette Pipet 1970001 50/pkg 2185696
Pipet tips for TenSette Pipet 1970001 1000/pkg 2185628
HACH COMPANYWORLD HEADQUARTERSTelephone: (970) 669-3050FAX: (970) 669-2932
FOR TECHNICAL ASSISTANCE, PRICE INFORMATION AND ORDERING:Call 800-227-4224
Contact the HACH office or distributor serving you.www.hach.com [email protected]
In the U.S.A. –
Outside the U.S.A. –
On the Worldwide Web – ; E-mail –
toll-free
© Hach Company/Hach Lange GmbH, 1989–2013. All rights reserved. 04/2013, Edition 8

Silica DOC316.53.01133
Silicomolybdate Method Method 81851 to 100 mg/L SiO2 (HR, spectrophotometers)1 to 75 mg/L SiO2 (HR, colorimeters)
Powder Pillows
Scope and application: For water and seawater.
Test preparation
Instrument specific informationThe table in this section shows all of the instruments that have the program for this test. Table 1 shows sample cell and orientation requirements for reagent addition tests, suchas powder pillow or bulk reagent tests.To use the table, select an instrument, then read across to find the correspondinginformation for this test.
Table 1 Instrument-specific information for powder pillows
Instrument Sample cell orientation Sample cell
DR 6000 DR 3800 DR 2800 DR 2700
The fill line is to the right. 2495402
DR 5000 DR 3900
The fill line is toward the user.
DR 900 The orientation mark is toward the user. 2401906
Before startingInstall the instrument cap on the DR 900 cell holder before ZERO or READ is pushed.
The sample temperature must be between 15–25 °C (59–77 °F) for accurate results.
Use the Standard Adjust option with each new lot of reagent for the best results.
Review the Safety Data Sheets (MSDS/SDS) for the chemicals that are used and use any recommended personal protectiveequipment.
Dispose of reacted solutions according to local, state and federal regulations. Use the Safety Data Sheets for disposalinformation for unused reagents. Consult the environmental, health and safety staff for your facility and/or local regulatoryagencies for further disposal information.
Items to collect
Description Quantity
High Range SIlica Reagent Set 1
Sample cells (For information about sample cells, adapters or light shields, refer to Instrumentspecific information on page 1.) 2
1

Refer to Consumables and replacement items on page 4 for reorder information.
Sample collection• Collect samples in clean plastic bottles with tight-fitting caps. Do not use glass
bottles, which will contaminate the sample.• Analyze the samples as soon as possible for best results.• If prompt analysis is not possible, keep the samples at or below 6 °C (43 °F) for up to
28 days.• Let the sample temperature increase to room temperature before analysis.
Powder pillow procedure
Start
1. Start program 656 SilicaHR. For information aboutsample cells, adapters orlight shields, refer to Instrument specificinformation on page 1.Note: Although the programname may vary betweeninstruments, the programnumber does not change.
2. Prepare the sample: Filla sample cell with 10 mL ofsample.
3. Add the contents of oneMolybdate Reagent PowderPillow for High Range Silicato the sample cell.
4. Swirl until the reagent iscompletely dissolved.
5. Add the contents of oneAcid Reagent Powder Pillowfor High Range Silica.A yellow color shows if silicaor phosphorus is present inthe sample.
6. Swirl to mix. 7. Start the instrumenttimer. A 10-minute reactiontime starts.
8. When the timer expires,add the contents of oneCitric Acid Powder Pillow tothe sample cell.Any yellow color caused byphosphorous is removedduring this step.
2 Silica, Silicomolybdate Method (100 mg/L)

9. Start the instrumenttimer. A 2-minute reactiontime starts.Complete the rest of theprocedure within threeminutes after the timerexpires.
10. Prepare the blank: Filla second sample cell with10 mL of the originalsample.
11. When the timer expires,clean the blank.
12. Insert the blank into thecell holder.
Zero
13. Push ZERO. Thedisplay shows 0 mg/L SiO2.
14. Clean the preparedsample.
15. Insert the preparedsample into the cell holder.
Read
16. Push READ. Resultsshow in mg/L SiO2.
InterferencesInterferingsubstance
Interference level
Color Does not interfere when the original sample is used to zero the instrument.
Iron Large amounts of both ferrous and ferric iron interfere.
Phosphate Does not interfere at levels less than 50 mg/L PO4. At 60 mg/L PO4, an interference of –2% occurs. At75 mg/L PO4, the interference is –11%.
Slow reacting formsof silica
Occasionally a sample contains silica which reacts very slowly with molybdate. The nature of these"molybdate-unreactive" forms is not known. A pretreatment with sodium bicarbonate, then sulfuric acidwill make these forms reactive to molybdate. The pretreatment is given in Standard Methods for theExamination of Water and Wastewater under Silica-Digestion with Sodium Bicarbonate. A longerreaction time with the sample and the molybdate and acid reagents (before the citric acid is added) canhelp as an alternative to the bicarbonate pretreatment.
Sulfides Interfere at all levels.
Turbidity Does not interfere when the original sample is used to zero the instrument.
Accuracy check
Standard additions method (sample spike)Use the standard additions method (for applicable instruments) to validate the testprocedure, reagents and instrument and to find if there is an interference in the sample.Items to collect:
• Silica Standard Solution, 1000 mg/L
Silica, Silicomolybdate Method (100 mg/L) 3

• Pipet, TenSette®, 0.1–1.0 mL• Pipet tips
1. Use the test procedure to measure the concentration of the sample, then keep the(unspiked) sample in the instrument.
2. Go to the Standard Additions option in the instrument menu.3. Select the values for standard concentration, sample volume and spike volumes.4. Open the standard solution.5. Prepare three spiked samples: use the TenSette pipet to add 0.1 mL, 0.2 mL and
0.3 mL of the standard solution, respectively, to three 10-mL portions of fresh sample.Mix well.
6. Use the test procedure to measure the concentration of each of the spiked samples.Start with the smallest sample spike. Measure each of the spiked samples in theinstrument.
7. Select Graph to compare the expected results to the actual results.Note: If the actual results are significantly different from the expected results, make sure thatthe sample volumes and sample spikes are measured accurately. The sample volumes andsample spikes that are used should agree with the selections in the standard additions menu. Ifthe results are not within acceptable limits, the sample may contain an interference.
Standard solution methodUse the standard solution method to validate the test procedure, reagents andinstrument.Items to collect:
• Silica Standard Solution, 50 mg/L
1. Use the test procedure to measure the concentration of the standard solution.2. Compare the expected result to the actual result.
Note: The factory calibration can be adjusted slightly with the standard adjust option so that theinstrument shows the expected value of the standard solution. The adjusted calibration is thenused for all test results. This adjustment can increase the test accuracy when there are slightvariations in the reagents or instruments.
Method performanceThe method performance data that follows was derived from laboratory tests that weremeasured on a spectrophotometer during ideal test conditions. Users may get differentresults under different test conditions.
Program Standard Precision (95% Confidence Interval) SensitivityConcentration change per 0.010 Abs change
656 50 mg/L SiO2 48–52 mg/L SiO2 1.0 mg/L SiO2
Summary of methodSilica and phosphate in the sample react with molybdate ion under acidic conditions toform yellow silicomolybdic acid complexes and phosphomolybdic acid complexes.Addition of citric acid destroys the phosphate complexes. Silica is then determined bymeasuring the remaining yellow color. The measurement wavelength is 452 nm forspectrophotometers or 420 nm for colorimeters.
Consumables and replacement itemsRequired reagents
Description Quantity/test Unit Item no.
Water, deionized varies 4 L 27256
High Range Silica Reagent Set, 10-mL — 100 tests 2429600
4 Silica, Silicomolybdate Method (100 mg/L)

Consumables and replacement items (continued)Description Quantity/test Unit Item no.
Includes:
Acid Reagent Powder Pillows for High Range Silica, 10-mL 1 100/pkg 2107469
Citric Acid Powder Pillow, 10-mL 2 100/pkg 2106269
Molybdate Reagent Powder Pillows for High Range Silica, 10-mL 1 100/pkg 2107369
Recommended standards
Description Unit Item no.
Silica Standard Solution, 50-mg/L as SiO2 200 mL 111729
Silica Standard Solution, 1000-mg/L as SiO2 500 mL 19449
Optional reagents and apparatus
Description Unit Item no.
Sodium Bicarbonate 454 g 77601
Sulfuric Acid Standard Solution, 1 N 100 mLMDB 127032
Bottle, sampling, with cap, low density polyethylene, 250-mL 12/pkg 2087076
Thermometer, non-mercury, -10 to +225 °C each 2635700
Silica, Silicomolybdate Method (100 mg/L) 5

HACH COMPANYWORLD HEADQUARTERSTelephone: (970) 669-3050FAX: (970) 669-2932
FOR TECHNICAL ASSISTANCE, PRICE INFORMATION AND ORDERING:Call 800-227-4224
Contact the HACH office or distributor serving you.www.hach.com [email protected]
In the U.S.A. –
Outside the U.S.A. –
On the Worldwide Web – ; E-mail –
toll-free
© Hach Company/Hach Lange GmbH, 1989–2013. All rights reserved. 04/2013, Edition 8

Sulfate DOC316.53.01135
USEPA1 SulfaVer 4 Method2 Method 80512 to 70 mg/L SO4
2– Powder Pillows or AccuVac® Ampuls
Scope and application: For water, wastewater and seawater.1 USEPA accepted for reporting wastewater analyses. Procedure is equivalent to USEPA method 375.4 for wastewater.2 Adapted from Standard Methods for the Examination of Water and Wastewater.
Test preparation
Instrument-specific informationThe tables in this section show all of the instruments that have the program for this test. Table 1 shows sample cell and orientation requirements for reagent addition tests, suchas powder pillow or bulk reagent tests. Table 2 shows sample cell and adapterrequirements for AccuVac Ampul tests.To use either table, select an instrument, then read across to find the correspondinginformation for this test.
Table 1 Instrument-specific information for powder pillow
Instrument Sample cell orientation Sample cell
DR 6000 DR 3800 DR 2800 DR 2700
The fill line is to the right. 2495402
DR 5000 DR 3900
The fill line is toward the user.
DR 900 The orientation mark is toward the user. 2401906
Table 2 Instrument-specific information for AccuVac Ampuls
Instrument Adapter Sample cell
DR 6000 DR 5000 DR 900
— 2427606
DR 3900 LZV846 (A)
DR 3800 DR 2800 DR 2700
LZV584 (C) 2122800
Before startingInstall the instrument cap on the DR 900 cell holder before ZERO or READ is pushed.
Use the Standard Adjust option with each new lot of reagent for the best results.
1

For best results, calibrate the instrument with each new lot of reagent. Refer to Calibration on page 6.
For best results, measure the reagent blank value for each new lot of reagent. Replace the sample with deionized water inthe test procedure to get the reagent blank value. Subtract the reagent blank value from the sample results automaticallywith the reagent blank adjust option.
Filter samples that are turbid with filter paper and a funnel.
Do not use the Pour-Thru Cell or sipper module (for applicable instruments) with this test.
The reagents that are used in this test contain barium chloride. Collect the reacted samples for proper disposal.
An AccuVac Ampule for Blanks can be used to zero the instrument in the AccuVac test procedure.
Review the Safety Data Sheets (MSDS/SDS) for the chemicals that are used and use any recommended personal protectiveequipment.
Dispose of reacted solutions according to local, state and federal regulations. Use the Safety Data Sheets for disposalinformation for unused reagents. Consult the environmental, health and safety staff for your facility and/or local regulatoryagencies for further disposal information.
Items to collectPowder pillows
Description Quantity
SulfaVer® 4 Reagent Powder Pillows, 10-mL 1
Sample Cells (Refer to Instrument-specific information on page 1. ) 2
Refer to Consumables and replacement items on page 7 for reorder information.
AccuVac Ampuls
Description Quantity
SulfaVer® 4 Reagent AccuVac® ampuls 1
Beaker, 50-mL 1
Sample Cells (Refer to Instrument-specific information on page 1. ) 1
Stopper 1
Refer to Consumables and replacement items on page 7 for reorder information.
Sample collection and storage• Collect samples in clean glass or plastic bottles.• To preserve samples for later analysis, keep the samples at or below 6 °C (43 °F) for
up to 28 days.• Let the sample temperature increase to room temperature before analysis.
2 Sulfate, SulfaVer 4 Method (70 mg/L)

SulfaVer 4 powder pillow procedure
Start
1. Start program680 Sulfate. For informationabout sample cells,adapters or light shields,refer to Instrument-specificinformation on page 1.Note: Although the programname may vary betweeninstruments, the programnumber does not change.
2. Prepare the sample: Filla sample cell with 10 mL ofsample.
3. Add the contents of onepowder pillow to the samplecell.
4. Swirl the sample cell tomix. Undissolved powderwill not affect accuracy.White turbidity will form ifsulfate is present.
5. Start the instrumenttimer. A five-minute reactiontime starts.Do not disturb the cellduring this time.
6. Prepare the blank: Fill asecond sample cell with10 mL of sample.
7. When the timer expires,clean the blank.
8. Insert the blank into thecell holder.
Zero
9. Push ZERO. The displayshows 0 mg/L SO4
2–.10. Clean the preparedsample.
11. Within five minutes afterthe timer expires, insert theprepared sample into thecell holder.
Read
12. Push READ. Resultsshow in mg/L SO4
2–.
Sulfate, SulfaVer 4 Method (70 mg/L) 3

13. Clean the sample cellswith soap and a brush.
SulfaVer 4 AccuVac® Ampuls procedure
Start
1. Start program685 Sulfate AV. Forinformation about samplecells, adapters or lightshields, refer to Instrument-specific informationon page 1.Note: Although the programname may vary betweeninstruments, the programnumber does not change.
2. Prepare the sample:Collect at least 40 mL ofsample in a 50-mL beaker.Fill the AccuVac Ampul withsample. Keep the tipimmersed while the Ampulfills completely.
3. Close the Ampul andquickly invert the Ampulseveral times to mix.Undissolved powder will notaffect accuracy.White turbidity will form ifsulfate is present.
4. Start the instrumenttimer. A five-minute reactiontime starts.Do not disturb the cellduring this time.
5. Prepare the blank: Fillthe sample cell with 10 mLof sample.
6. When the timer expires,clean the blank AccuVacAmpul.
7. Insert the blank AccuVacAmpul into the cell holder.
Zero
8. Push ZERO. The displayshows 0 mg/L SO4
2–.
4 Sulfate, SulfaVer 4 Method (70 mg/L)

9. Clean the AccuVacAmpul.
10. Within five minutes afterthe timer expires, insert theprepared sample AccuVacAmpul into the cell holder.
Read
11. Push READ. Resultsshow in mg/L SO4
2–.
InterferencesInterfering substance Interference level
Barium Interferes at all levels. The higher the barium concentration when compared to the sulfateconcentration, the higher the error. Samples with high barium concentrations will generally give aresult that is 20% lower than the actual sulfate concentration.
Calcium More than 20,000 mg/L as CaCO3
Chloride More than 40,000 mg/L as Cl–
Magnesium More than 10,000 mg/L as CaCO3
Silica More than 500 mg/L SiO2
Accuracy check
Standard additions method (sample spike)Use the standard additions method (for applicable instruments) to validate the testprocedure, reagents and instrument and to find if there is an interference in the sample.Items to collect:
• Sulfate Ampule Standard Solution, 2500 mg/L sulfate• Ampule breaker• Pipet, TenSette®, 0.1–1.0 mL and tips• Mixing cylinders (3), 25
1. Use the test procedure to measure the concentration of the sample, then keep the(unspiked) sample in the instrument.
2. Go to the Standard Additions option in the instrument menu.3. Select the values for standard concentration, sample volume and spike volumes.4. Open the standard solution.5. Prepare three spiked samples: use the TenSette pipet to add 0.1 mL, 0.2 mL and
0.3 mL of the standard solution, respectively, to three 25-mL portions of fresh sample.Mix well.Note: For AccuVac® Ampuls, add 0.2 mL, 0.4 mL and 0.6 mL of the standard solution to three50-mL portions of fresh sample.
6. Use the test procedure to measure the concentration of each of the spiked samples.Start with the smallest sample spike. Measure each of the spiked samples in theinstrument.
7. Select Graph to compare the expected results to the actual results.Note: If the actual results are significantly different from the expected results, make sure thatthe sample volumes and sample spikes are measured accurately. The sample volumes and
Sulfate, SulfaVer 4 Method (70 mg/L) 5

sample spikes that are used should agree with the selections in the standard additions menu. Ifthe results are not within acceptable limits, the sample may contain an interference.
Standard solution methodUse the standard solution method to validate the test procedure, reagents andinstrument.Items to collect:
• Sulfate standard solution, 1000 mg/L• 100-mL volumetric flask, Class A• 7-mL volumetric pipet, Class A and pipet filler• Deionized water
1. Prepare a 70 mg/L sulfate standard solution as follows:
a. Use a pipet to add 7.0 mL of 1000 mg/L sulfate standard solution into thevolumetric flask.
b. Dilute to the mark with deionized water. Mix well. Prepare this solution daily.2. Use the test procedure to measure the concentration of the prepared standard
solution.3. Compare the expected result to the actual result.
Note: The factory calibration can be adjusted slightly with the standard adjust option so that theinstrument shows the expected value of the standard solution. The adjusted calibration is thenused for all test results. This adjustment can increase the test accuracy when there are slightvariations in the reagents or instruments.
CalibrationA calibration is recommended for the SulfaVer 4 method for the best accuracy. Completethe following steps to enter a new calibration curve in the instrument. Perform thisprocedure for each new lot of reagent.Items to collect:
• Sulfate standard solution, 1000 mg/L• 100-mL volumetric flasks (7), Class A• 1–10 mL TenSette pipet and tips• Deionized water
1. Prepare seven calibration standard solutions (10, 20, 30, 40, 50, 60 and 70 mg/LSO4
2–) as follows:
a. Use a pipet to add 1, 2, 3, 4, 5, 6 and 7 mL of the 1000-mg/L sulfate standardsolution into seven different 100-mL volumetric flasks.
b. Dilute each flask to the mark with deionized water. Mix well.2. Use the test procedure to measure the concentration of each standard solution.3. Refer to the user manual for the instrument to enter the calibration into the instrument
as a user program.
Method performanceThe method performance data that follows was derived from laboratory tests that weremeasured on a spectrophotometer during ideal test conditions. Users may get differentresults under different test conditions.
Program Standard Precision (95% Confidence Interval) SensitivityConcentration change per 0.010 Abs change
680 40 mg/L SO42– 30–50 mg/L SO4
2– 0.4 mg/L SO42–
685 40 mg/L SO42– 32–48 mg/L SO4
2– 0.7 mg/L SO42–
6 Sulfate, SulfaVer 4 Method (70 mg/L)

Summary of methodSulfate ions in the sample react with barium in the SulfaVer 4 and form a precipitate ofbarium sulfate. The amount of turbidity formed is proportional to the sulfate concentration.The measurement wavelength is 450 nm for spectrophotometers or 520 nm forcolorimeters.
Pollution prevention and waste managementReacted samples contain barium and must be disposed of as a hazardous waste.Dispose of reacted solutions according to local, state and federal regulations.
Consumables and replacement itemsRequired reagents
Description Quantity/test Unit Item no.
SulfaVer® 4 Reagent Powder Pillows, 10-mL 1 100/pkg 2106769
OR
SulfaVer® 4 Sulfate Reagent AccuVac® Ampuls 1 25/pkg 2509025
Required apparatus
Description Quantity/test Unit Item no.
AccuVac Snapper 1 each 2405200
Beaker, 50-mL 1 each 50041H
Sample cell, 10 mL round, 25 x 54 mm 1 each 2122800
Sample cell, 10 mL round, 25 x 60 mm 1 6/pkg 2427606
Sample cell, 10 mL square, matched pair 2 2/pkg 2495402
Stoppers for 18-mm tubes and AccuVac Ampuls 2 6/pkg 173106
Recommended standards
Description Unit Item no.
Sulfate Standard Solution, 1000-mg/L as SO4 500 mL 2175749
Sulfate Standard Solution, 2500-mg/L, 10-mL Ampules as SO4 16/pkg 1425210
Drinking Water Standard, Mixed Parameter, Inorganic for F-, NO3, PO4, SO4 500 mL 2833049
Optional reagents and apparatus
Description Unit Item no.
Cylinder, mixing, 25-mL each 189640
Cylinder, mixing, 50-mL each 189641
Blank AccuVac Ampules 25/pkg 2677825
Ampule Breaker, Voluette® ampules each 2196800
Pipet, TenSette®, 0.1–1.0 mL each 1970001
Pipet tips for TenSette Pipet 1970001 50/pkg 2185696
Pipet, TenSette®, 1.0 to 10.0 mL each 1970010
Pipet tips for TenSette Pipet 1970010 50/pkg 2199796
Flask, volumetric, Class A, 100-mL each 1457442
Sulfate, SulfaVer 4 Method (70 mg/L) 7

HACH COMPANYWORLD HEADQUARTERSTelephone: (970) 669-3050FAX: (970) 669-2932
FOR TECHNICAL ASSISTANCE, PRICE INFORMATION AND ORDERING:Call 800-227-4224
Contact the HACH office or distributor serving you.www.hach.com [email protected]
In the U.S.A. –
Outside the U.S.A. –
On the Worldwide Web – ; E-mail –
toll-free
© Hach Company/Hach Lange GmbH, 1989–2013. All rights reserved. 04/2013, Edition 8
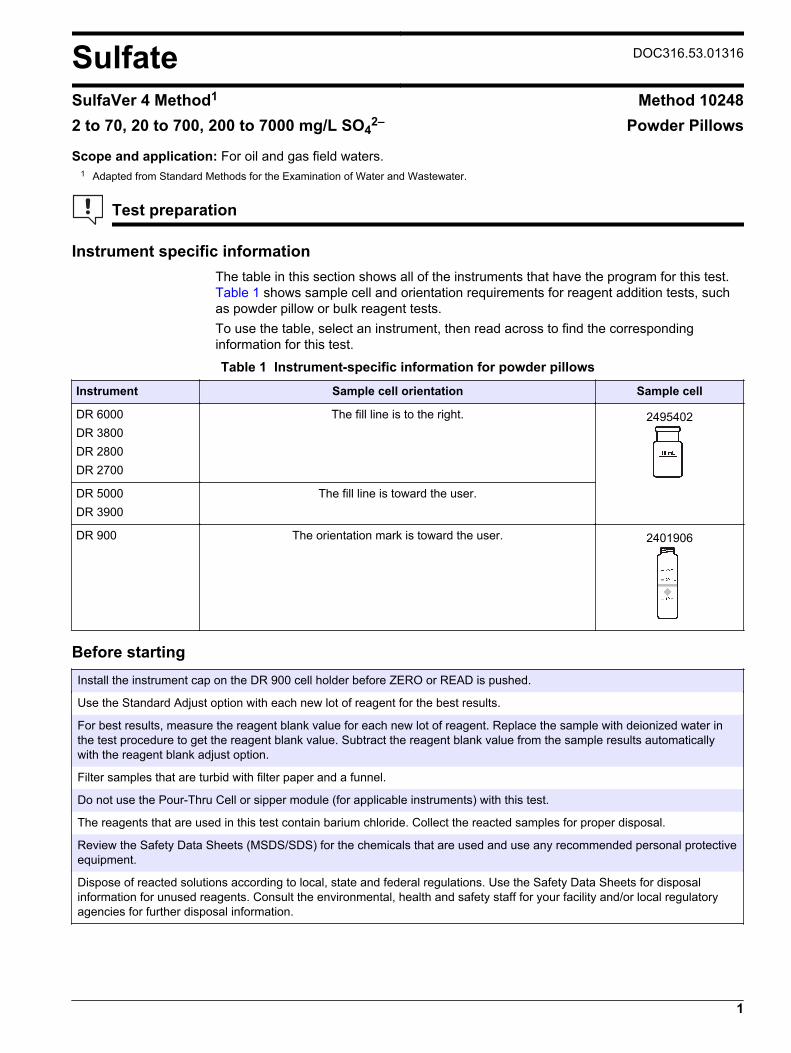
Sulfate DOC316.53.01316
SulfaVer 4 Method1 Method 102482 to 70, 20 to 700, 200 to 7000 mg/L SO4
2– Powder Pillows
Scope and application: For oil and gas field waters.1 Adapted from Standard Methods for the Examination of Water and Wastewater.
Test preparation
Instrument specific informationThe table in this section shows all of the instruments that have the program for this test. Table 1 shows sample cell and orientation requirements for reagent addition tests, suchas powder pillow or bulk reagent tests.To use the table, select an instrument, then read across to find the correspondinginformation for this test.
Table 1 Instrument-specific information for powder pillows
Instrument Sample cell orientation Sample cell
DR 6000 DR 3800 DR 2800 DR 2700
The fill line is to the right. 2495402
DR 5000 DR 3900
The fill line is toward the user.
DR 900 The orientation mark is toward the user. 2401906
Before startingInstall the instrument cap on the DR 900 cell holder before ZERO or READ is pushed.
Use the Standard Adjust option with each new lot of reagent for the best results.
For best results, measure the reagent blank value for each new lot of reagent. Replace the sample with deionized water inthe test procedure to get the reagent blank value. Subtract the reagent blank value from the sample results automaticallywith the reagent blank adjust option.
Filter samples that are turbid with filter paper and a funnel.
Do not use the Pour-Thru Cell or sipper module (for applicable instruments) with this test.
The reagents that are used in this test contain barium chloride. Collect the reacted samples for proper disposal.
Review the Safety Data Sheets (MSDS/SDS) for the chemicals that are used and use any recommended personal protectiveequipment.
Dispose of reacted solutions according to local, state and federal regulations. Use the Safety Data Sheets for disposalinformation for unused reagents. Consult the environmental, health and safety staff for your facility and/or local regulatoryagencies for further disposal information.
1

Items to collect
Description Quantity
SulfaVer® 4 Reagent Powder Pillows, 10-mL 1
Sample cells (For information about sample cells, adapters or light shields, refer to Instrumentspecific information on page 1.) 1
Refer to Consumables and replacement items on page 5 for reorder information.
Sample collection and storage• Collect samples in clean glass or plastic bottles.• To preserve samples for later analysis, keep the samples at or below 6 °C (43 °F) for
up to 28 days.• Let the sample temperature increase to room temperature before analysis.
Powder pillow procedure
Start
1. Start program680 Sulfate. For informationabout sample cells,adapters or light shields,refer to Instrument specificinformation on page 1.Note: Although the programname may vary betweeninstruments, the programnumber does not change.
2. Add the sample volumethat is specified for the testrange to a sample cell:
• 2–70 mg/L: 10 mL• 20–700 mg/L: 1.0 mL• 200–7,000 mg/L:
0.1 mL
Use a TenSette Pipet orglass pipet to measure0.1 mL or 1.0 mL.
3. If the sample volume isless than 10-mL adddeionized water to the 10-mL line.For the dilution factor, referto Set the dilution factoron page 3.
4. Swirl to mix.
5. Clean the blank. 6. Insert the blank into thecell holder.
Zero
7. Push ZERO. The displayshows 0 mg/L SO4
2–.8. Add the contents of oneSulfaVer 4 Reagent PowderPillow to the sample cell.The sample will get cloudy ifsulfate is present in thesample.
2 Sulfate, SulfaVer 4 (multi-range: 70, 700, 7000 mg/L)

9. Swirl the sample cell tomix. Undissolved powderwill not affect accuracy.
10. Start the instrumenttimer. A 5-minute reactiontime starts.Do not move the sample cellduring the reaction period.
11. Clean the preparedsample.
12. Within five minutes afterthe timer expires, insert theprepared sample into thecell holder.
Read
13. Push READ. Resultsshow in mg/L SO4
2–.14. Clean the sample cellimmediately after each testwith soap, water and abrush.
InterferencesInterfering substance Interference level
Barium Interferes at all levels. The higher the barium concentration when compared to the sulfateconcentration, the higher the error. Samples with high barium concentrations will generally give aresult that is 20% lower than the actual sulfate concentration.
Calcium More than 20,000 mg/L as CaCO3
Chloride More than 40,000 mg/L as Cl–
Magnesium More than 10,000 mg/L as CaCO3
Silica More than 500 mg/L SiO2
Set the dilution factorInstruments that have a dilution factor option can include the dilution factor in the resultand show the concentration of the original, undiluted sample. For example, if the sampleis diluted by a factor of 10, the instrument multiplies the result by 10 and shows thecalculated result in the instrument display.
1. Select Options>More>Dilution factor from the instrument menu.Note: Colorimeters include a dilution factor when the chemical form is set. Go toOptions>Advanced Options>Chemical Form and select LR, MR or HR.
2. Enter the dilution factor:
• 1 mL sample diluted to 10 mL: dilution factor is 10.• 0.1 mL sample diluted to 10 mL: dilution factor is 100.
Sulfate, SulfaVer 4 (multi-range: 70, 700, 7000 mg/L) 3

3. Push OK to confirm. Push OK again.4. Push RETURN to go back to the measurement screen.
Accuracy check
Standard additions method (sample spike)Use the standard additions method (for applicable instruments) to validate the testprocedure, reagents and instrument and to find if there is an interference in the sample.Items to collect:
• Sulfate Ampule Standard Solution, 2500 mg/L sulfate• Ampule breaker• Pipet, TenSette®, 0.1–1.0 mL and tips• Mixing cylinders (3), 25 mL
1. Use the test procedure to measure the concentration of the sample, then keep the(unspiked) sample in the instrument.
2. Go to the Standard Additions option in the instrument menu.3. Select the values for standard concentration, sample volume and spike volumes.4. Open the standard solution.5. Prepare three spiked samples: use the TenSette pipet to add 0.1 mL, 0.2 mL and
0.3 mL of the standard solution, respectively, to three 25-mL portions of fresh sample.Mix well.
6. Use the test procedure to measure the concentration of each of the spiked samples.Start with the smallest sample spike. Measure each of the spiked samples in theinstrument.
7. Select Graph to compare the expected results to the actual results.Note: If the actual results are significantly different from the expected results, make sure thatthe sample volumes and sample spikes are measured accurately. The sample volumes andsample spikes that are used should agree with the selections in the standard additions menu. Ifthe results are not within acceptable limits, the sample may contain an interference.
Standard solution methodUse the standard solution method to validate the test procedure, reagents andinstrument.Items to collect:
• Sulfate standard solution, 1000 mg/L• 100-mL volumetric flask, Class A• 5-mL volumetric pipet, Class A and pipet filler• Deionized water
1. Prepare a 50 mg/L sulfate standard solution as follows:
a. Use a pipet to add 5.0 mL of 1000 mg/L sulfate standard solution into thevolumetric flask.
b. Dilute to the mark with deionized water. Mix well. Prepare this solution daily.2. Use the test procedure to measure the concentration of the prepared standard
solution.3. Compare the expected result to the actual result.
Note: The factory calibration can be adjusted slightly with the standard adjust option so that theinstrument shows the expected value of the standard solution. The adjusted calibration is thenused for all test results. This adjustment can increase the test accuracy when there are slightvariations in the reagents or instruments.
4 Sulfate, SulfaVer 4 (multi-range: 70, 700, 7000 mg/L)
Method performanceThe method performance data that follows was derived from laboratory tests that weremeasured on a spectrophotometer during ideal test conditions. Users may get differentresults under different test conditions.
Program Standard Precision (95% Confidence Interval) SensitivityConcentration change per 0.010 Abs change
680 40 mg/L SO42– 30–50 mg/L SO4
2– 0.4 mg/L SO42–
Summary of methodSulfate ions in the sample react with barium in the SulfaVer 4 and form a precipitate ofbarium sulfate. The amount of turbidity formed is proportional to the sulfate concentration.The measurement wavelength is 450 nm for spectrophotometers or 520 nm forcolorimeters.
Pollution prevention and waste managementReacted samples contain barium and must be disposed of as a hazardous waste.Dispose of reacted solutions according to local, state and federal regulations.
Consumables and replacement itemsRequired reagents
Description Quantity/test Unit Item no.
SulfaVer® 4 Reagent Powder Pillows, 10-mL 1 100/pkg 2106769
Recommended standards
Description Unit Item no.
Sulfate Standard Solution, 1000-mg/L as SO4 500 mL 2175749
Sulfate Standard Solution, 2500-mg/L, 10-mL Ampules as SO4 16/pkg 1425210
Optional reagents and apparatus
Description Unit Item no.
Cylinder, mixing, 25-mL each 189640
Cylinder, mixing, 50-mL each 189641
Ampule Breaker, Voluette® ampules each 2196800
Pipet, volumetric 5.00-mL each 1451537
Pipet Filler 1 1465000
Pipet, TenSette®, 0.1–1.0 mL each 1970001
Pipet tips for TenSette Pipet 1970001 50/pkg 2185696
Pipet, TenSette®, 1.0 to 10.0 mL each 1970010
Pipet tips for TenSette Pipet 1970010 50/pkg 2199796
Flask, volumetric, Class A, 100-mL each 1457442
Sulfate, SulfaVer 4 (multi-range: 70, 700, 7000 mg/L) 5

HACH COMPANYWORLD HEADQUARTERSTelephone: (970) 669-3050FAX: (970) 669-2932
FOR TECHNICAL ASSISTANCE, PRICE INFORMATION AND ORDERING:Call 800-227-4224
Contact the HACH office or distributor serving you.www.hach.com [email protected]
In the U.S.A. –
Outside the U.S.A. –
On the Worldwide Web – ; E-mail –
toll-free
© Hach Company/Hach Lange GmbH, 1989–2013. All rights reserved. 04/2013, Edition 8

Sulfide DOC316.53.01136
USEPA1 Methylene Blue Method2 Method 81315 to 800 µg/L S2– (spectrophotometers)0.01 to 0.70 mg/L (colorimeters)
Reagent Solution
Scope and application: For testing total sulfides, H2S, HS–, and certain metal sulfides in groundwater,wastewater, brines and seawater.
1 USEPA approved for reporting wastewater analysis. Procedure is equivalent to Standard Method 4500-S2– D.2 Adapted from Standard Methods for the Examination of Water and Wastewater.
Test preparation
Instrument specific informationThe table in this section shows all of the instruments that have the program for this test. Table 1 shows sample cell and orientation requirements for reagent addition tests, suchas powder pillow or bulk reagent tests.To use the table, select an instrument, then read across to find the correspondinginformation for this test.
Table 1 Instrument-specific information for reagent addition
Instrument Sample cell orientation Sample cell
DR 6000 DR 3800 DR 2800 DR 2700
The fill line is to the right. 2495402
DR 5000 DR 3900
The fill line is toward the user.
DR 900 The orientation mark is toward the user. 2401906
Before startingSamples must be analyzed immediately after collection and cannot be preserved for later analysis.
Install the instrument cap on the DR 900 cell holder before ZERO or READ is pushed.
Some sulfide loss can occur if dilution is necessary.
Review the Safety Data Sheets (MSDS/SDS) for the chemicals that are used and use any recommended personal protectiveequipment.
Dispose of reacted solutions according to local, state and federal regulations. Use the Safety Data Sheets for disposalinformation for unused reagents. Consult the environmental, health and safety staff for your facility and/or local regulatoryagencies for further disposal information.
1

Items to collect
Description Quantity
Sulfide 1 Reagent 1–2 mL
Sulfide 2 Reagent 1–2 mL
Water, deionized 10–25 mL
Pipet, serological, 10-mL 1
Pipet Filler, safety bulb 1
Sample cells (For information about sample cells, adapters or light shields, refer to Instrumentspecific information on page 1.) 2
Stoppers 2
Refer to Consumables and replacement items on page 5 for reorder information.
Sample collection• Samples must be analyzed immediately after collection and cannot be preserved for
later analysis.• Collect samples in clean glass or plastic bottles with tight-fitting caps. Fill the bottle
completely and immediately tighten the cap.• Prevent agitation of the sample or exposure to air.
Methylene Blue Method
Start
1. Start program690 Sulfide. For informationabout sample cells,adapters or light shields,refer to Instrument specificinformation on page 1.Note: Although the programname may vary betweeninstruments, the programnumber does not change.
2. Prepare the blank: Fill asample cell with deionizedwater. Use 10 mL forspectrophotometers and25 mL for colorimeters.
3. Prepare the sample:Use a pipet to add sampleto a second sample cell.Use 10 mL forspectrophotometers and25 mL for colorimeters.Do not mix the sample morethan necessary to preventsulfide loss.
4. Use a dropper to add0.5 mL Sulfide 1 Reagent toeach cell.
2 Sulfide, Methylene Blue Method (800 µg/L)

5. Swirl to mix. 6. Use the dropper to addSulfide 2 Reagent to eachcell. Use 0.5 mL forspectrophotometers and1.0 mL for colorimeters.
7. Close the sample cell.Invert the sample cell to mix.A pink color will developinitially. If sulfide is present,the solution becomes blue.
8. Start the instrumenttimer. A five-minute reactiontime starts.
9. When the timer expires,clean the blank.
10. Insert the blank into thecell holder.
Zero
11. Push ZERO. Thedisplay shows 0 µg/L or0.00 mg/L S2–.
12. Clean the preparedsample.
13. Insert the preparedsample into the cell holder.
Read
14. Push READ. Resultsshow in µg/L or mg/L S2–.
Soluble sulfidesTo measure soluble sulfides, use a centrifuge to separate the solids. To make anestimate of the amount of insoluble sulfides in the sample, subtract the soluble sulfideconcentration from the total (with solids) sulfide concentration.
1. Fill a centrifuge tube completely with sample and immediately cap the tube.2. Put the tube in a centrifuge and run the centrifuge to separate the solids.3. Use the supernatent as the sample in the test procedure.
Sulfide, Methylene Blue Method (800 µg/L) 3
InterferencesInterferingsubstance
Interference level
Barium Concentrations more than 20 mg/L react with the sulfuric acid in Sulfide 1 Reagent and form a BaSO4(barite) precipitate. To correct for this interference:
1. Dilute the sample in the test procedure as follows:
• Spectrophotometers: use a 0.1-mL or 1.0-mL sample volume and add deionized water to the 10-mL mark.
• Colorimeters: use a 0.25-mL or 2.5-mL sample volume and add deionized water to the 25-mLmark.
2. Let the sample fully react with both reagents.3. After the 5 minute reaction period, pour the sample into a 50-mL beaker.4. Pull the sample into a Luer-Lock syringe (10 cc for spectrophotometers; 60 cc for colorimeters).5. Put a 0.45-μm filter disc on the Luer-Lock tip and filter the sample into a clean sample cell for
measurement. Use deionized water to prepare the blank.
Strong reducingsubstances suchas sulfite,thiosulfate andhydrosulfite
Prevent the full color development or reduce the blue color
Sulfide, highlevels
High concentrations of sulfide can inhibit the full color development. Use a diluted sample in the testprocedure. Some sulfide loss can occur when the sample is diluted.
Turbidity Pre-treat the sample to remove sulfide, then use the pre-treated sample as the blank in the test procedure.Prepare a sulfide-free blank as follows:
1. Measure 25 mL of sample into a 50-mL Erlenmeyer flask.2. Add 30-g/L Bromine Water by drops with constant swirling until a yellow color remains.3. Add 30-g/L Phenol Solution by drops with constant swirling until the yellow color is removed.4. Use this solution to replace the deionized water blank in the test procedure.
Method performanceThe method performance data that follows was derived from laboratory tests that weremeasured on a spectrophotometer during ideal test conditions. Users may get differentresults under different test conditions.
Program Standard Precision (95% Confidence Interval) SensitivityConcentration change per 0.010 Abs change
690 520 µg/L S2– 504–536 µg/L S2– 5 µg/L S2–
Summary of methodHydrogen sulfide and acid-soluble metal sulfides react with N,N-dimethyl-p-phenylenediamine sulfate to form methylene blue. The intensity of the blue color isproportional to the sulfide concentration. High sulfide levels in oil field waters may bedetermined after proper dilution. The measurement wavelength is 665 nm forspectrophotometers or 610 nm for colorimeters.
Pollution prevention and waste managementReacted samples contain hexavalent chromium and must be disposed of as a hazardouswaste. Dispose of reacted solutions according to local, state and federal regulations.
4 Sulfide, Methylene Blue Method (800 µg/L)
Consumables and replacement itemsRequired reagents
Description Quantity/test Unit Item no.
Water, deionized varies 4 L 27256
Sulfide Reagent Set — — 2244500
Includes:
Sulfide 1 Reagent 1–2 mL 100 mLMDB 181632
Sulfide 2 Reagent 1 –2 mL 100 mLMDB 181732
Required apparatus
Description Quantity/test Unit Item no.
Pipet, serological, graduated, 10-mL 1 each 53238
Pipet filler, safety bulb 1 each 1465100
Stoppers for 18-mm tubes and AccuVac Ampuls 2 6/pkg 173106
Optional reagents and apparatus
Description Unit Item no.
Bromine Water, 30-g/L 29 mL 221120
Phenol Solution, 30-g/L 29 mL 211220
Stoppers for 18-mm tube 25/pkg 173125
Flask, Erlenmeyer, 50 mL each 50541
Sulfide, Methylene Blue Method (800 µg/L) 5

HACH COMPANYWORLD HEADQUARTERSTelephone: (970) 669-3050FAX: (970) 669-2932
FOR TECHNICAL ASSISTANCE, PRICE INFORMATION AND ORDERING:Call 800-227-4224
Contact the HACH office or distributor serving you.www.hach.com [email protected]
In the U.S.A. –
Outside the U.S.A. –
On the Worldwide Web – ; E-mail –
toll-free
© Hach Company/Hach Lange GmbH, 1989–2013. All rights reserved. 04/2013, Edition 8
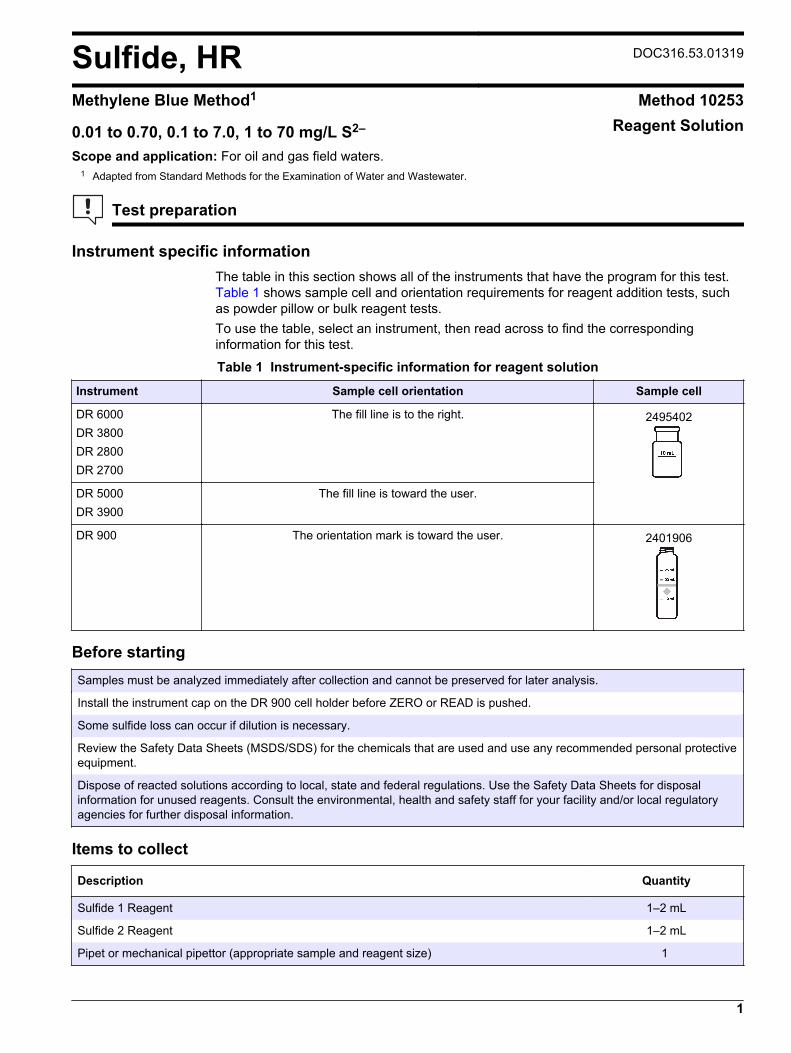
Sulfide, HR DOC316.53.01319
Methylene Blue Method1 Method 10253
0.01 to 0.70, 0.1 to 7.0, 1 to 70 mg/L S2– Reagent Solution
Scope and application: For oil and gas field waters.1 Adapted from Standard Methods for the Examination of Water and Wastewater.
Test preparation
Instrument specific informationThe table in this section shows all of the instruments that have the program for this test. Table 1 shows sample cell and orientation requirements for reagent addition tests, suchas powder pillow or bulk reagent tests.To use the table, select an instrument, then read across to find the correspondinginformation for this test.
Table 1 Instrument-specific information for reagent solution
Instrument Sample cell orientation Sample cell
DR 6000 DR 3800 DR 2800 DR 2700
The fill line is to the right. 2495402
DR 5000 DR 3900
The fill line is toward the user.
DR 900 The orientation mark is toward the user. 2401906
Before startingSamples must be analyzed immediately after collection and cannot be preserved for later analysis.
Install the instrument cap on the DR 900 cell holder before ZERO or READ is pushed.
Some sulfide loss can occur if dilution is necessary.
Review the Safety Data Sheets (MSDS/SDS) for the chemicals that are used and use any recommended personal protectiveequipment.
Dispose of reacted solutions according to local, state and federal regulations. Use the Safety Data Sheets for disposalinformation for unused reagents. Consult the environmental, health and safety staff for your facility and/or local regulatoryagencies for further disposal information.
Items to collect
Description Quantity
Sulfide 1 Reagent 1–2 mL
Sulfide 2 Reagent 1–2 mL
Pipet or mechanical pipettor (appropriate sample and reagent size) 1
1

Items to collect (continued)Description Quantity
Sample cells (For information about sample cells, adapters or light shields, refer to Instrumentspecific information on page 1.) 2
Stoppers 2
Water, deionized 10 mL
Refer to Consumables and replacement items on page 5 for reorder information.
Sample collection• Samples must be analyzed immediately after collection and cannot be preserved for
later analysis.• Collect samples in clean glass or plastic bottles with tight-fitting caps. Fill the bottle
completely and immediately tighten the cap.• Prevent agitation of the sample or exposure to air.
Methylene Blue method
Start
1. Start program691 Sulfide HR. Forinformation about samplecells, adapters or lightshields, refer to Instrumentspecific informationon page 1.Note: Although the programname may vary betweeninstruments, the programnumber does not change.
2. Prepare the blank: Fill asample cell with deionizedwater. Use 10 mL forspectrophotometers and25 mL for colorimeters.
3. Prepare the sample:Add the sample volume thatis specified for the testrange to a clean samplecell. Refer to Table 2on page 3.Use a pipet to measuresmall volumes.
4. Spectrophotometers:Add deionized water to the10-mL line. Colorimeters:Add deionized water to the25-mL line.To prevent sulfide loss, donot mix the sample morethan necessary.
2 Sulfide, Methylene Blue Method (multi-range: 0.80, 8.00, 80.00 mg/L)

5. Add Sulfide 1 Reagent toeach sample cell. Use0.5 mL of reagent forspectrophotometers. Use1.0 mL of reagent forcolorimeters.
6. Swirl to mix. 7. Add Sulfide 2 Reagent toeach sample cell. Use0.5 mL of reagent forspectrophotometers. Use1.0 mL of reagent forcolorimeters.
8. Close both sample cellswith a stopper. Invert to mix.The solution shows pink andthen blue if sulfide is in thesample.
9. Start the instrumenttimer. A 5-minute reactiontime starts.
10. When the timer expires,clean the blank.
11. Insert the blank into thecell holder.
Zero
12. Push ZERO. Thedisplay shows 0 mg/L S2–.
13. Clean the preparedsample.
14. Insert the preparedsample into the cell holder.
Read
15. Push READ. Resultsshow in mg/L S2–.
Select a sample volumeTable 2 Sample volumes and ranges
Range Spectrophotometer volume Colorimeter volume
0.01–0.70 mg/L (LR) 10 mL 25 mL
0.1–7.0 mg/L (MR) 1.0 mL 2.5 mL
1–70 mg/L (HR) 0.1 mL 0.25 mL
Set the dilution factorInstruments that have a dilution factor option can include the dilution factor in the resultand show the concentration of the original, undiluted sample. For example, if the sample
Sulfide, Methylene Blue Method (multi-range: 0.80, 8.00, 80.00 mg/L) 3

is diluted by a factor of 10, the instrument multiplies the result by 10 and shows thecalculated result in the instrument display.
1. Select Options>More>Dilution factor from the instrument menu.Note: Colorimeters include a dilution factor when the chemical form is set. Go toOptions>Advanced Options>Chemical Form and select LR, MR or HR.
2. Enter the dilution factor:
• 1 mL sample diluted to 10 mL: dilution factor is 10.• 0.1 mL sample diluted to 10 mL: dilution factor is 100.
3. Push OK to confirm. Push OK again.4. Push RETURN to go back to the measurement screen.
Soluble sulfidesTo measure soluble sulfides, use a centrifuge to separate the solids. To make anestimate of the amount of insoluble sulfides in the sample, subtract the soluble sulfideconcentration from the total (with solids) sulfide concentration.
1. Fill a centrifuge tube completely with sample and immediately cap the tube.2. Put the tube in a centrifuge and run the centrifuge to separate the solids.3. Use the supernatent as the sample in the test procedure.
InterferencesInterferingsubstance
Interference level
Barium Concentrations more than 20 mg/L react with the sulfuric acid in Sulfide 1 Reagent and form a BaSO4(barite) precipitate. To correct for this interference:
1. Dilute the sample in the test procedure as follows:
• Spectrophotometers: use a 0.1-mL or 1.0-mL sample volume and add deionized water to the 10-mL mark.
• Colorimeters: use a 0.25-mL or 2.5-mL sample volume and add deionized water to the 25-mLmark.
2. Let the sample fully react with both reagents.3. After the 5 minute reaction period, pour the sample into a 50-mL beaker.4. Pull the sample into a Luer-Lock syringe (10 cc for spectrophotometers; 60 cc for colorimeters).5. Put a 0.45-μm filter disc on the Luer-Lock tip and filter the sample into a clean sample cell for
measurement. Use deionized water to prepare the blank.
Strong reducingsubstances suchas sulfite,thiosulfate andhydrosulfite
Prevent the full color development or reduce the blue color
Sulfide, highlevels
High concentrations of sulfide can inhibit the full color development. Use a diluted sample in the testprocedure. Some sulfide loss can occur when the sample is diluted.
Turbidity Pre-treat the sample to remove sulfide, then use the pre-treated sample as the blank in the test procedure.Prepare a sulfide-free blank as follows:
1. Measure 25 mL of sample into a 50-mL Erlenmeyer flask.2. Add 30-g/L Bromine Water by drops with constant swirling until a yellow color remains.3. Add 30-g/L Phenol Solution by drops with constant swirling until the yellow color is removed.4. Use this solution to replace the deionized water blank in the test procedure.
4 Sulfide, Methylene Blue Method (multi-range: 0.80, 8.00, 80.00 mg/L)
Accuracy check
Standard solution methodSulfide standard solutions are not stable and must be prepared by the user. Refer toStandard Methods, 4500S2– for preparation and standardization instructions.
Method performanceThe method performance data that follows was derived from laboratory tests that weremeasured on a spectrophotometer during ideal test conditions. Users may get differentresults under different test conditions.
Program Standard Precision (95% Confidence Interval) SensitivityConcentration change per 0.010 Abs change
691 0.52 mg/L S2– 0.50–0.54 µg/L S2– 0.005 mg/L S2–
Summary of methodHydrogen sulfide and acid-soluble metal sulfides react with N,N-dimethyl-p-phenylenediamine sulfate to form methylene blue. The intensity of the blue color isproportional to the sulfide concentration. High sulfide levels in oil field waters may bedetermined after proper dilution. The measurement wavelength is 665 nm forspectrophotometers or 610 nm for colorimeters.
Pollution prevention and waste managementReacted samples contain hexavalent chromium and must be disposed of as a hazardouswaste. Dispose of reacted solutions according to local, state and federal regulations.
Consumables and replacement itemsRequired reagents
Description Quantity/test Unit Item no.
Water, deionized varies 4 L 27256
Sulfide Reagent Set — — 2244500
Includes:
Sulfide 1 Reagent 1–2 mL 100 mLMDB 181632
Sulfide 2 Reagent 1–2 mL 100 mLMDB 181732
Required apparatus
Description Quantity/test Unit Item no.
Pipet, TenSette®, 0.1- to 1.0-mL 1 each 1970001
Pipet Tips, for TenSette Pipet 1970001 2 50/pkg 2185696
Pipet, TenSette 1.0–10.0 mL 1 each 1970010
Pipet Tips, for TenSette Pipet 1970010 varies 50/pkg 2199796
Pipet, 0.2 –1.0 mL 1 each BBP078
Pipet Tip for BBP078 2 100/pkg BBP079
Pipet, 1.0–5.0 mL 1 each BBP065
Pipet Tip for BBP065 1 75/pkg BBP068
Sulfide, Methylene Blue Method (multi-range: 0.80, 8.00, 80.00 mg/L) 5

Optional reagents and apparatus
Description Unit Item no.
Beaker, 50-mL each 50041H
Bromine Water, 30-g/L 29 mL 221120
Cylinder, graduated mixing, 10 mL 1 2088638
Flask, Erlenmeyer, 50 mL each 50541
Phenol Solution, 30-g/L 29 mL 211220
Pipet, serological, 10-mL 1 53238
Pipet filler, safety bulb each 1465100
Syringe, 10 cc, Luer-Lock tip 1 2202400
Syringe, 60 cc, Luer-Lock tip 1 2258700
Syringe filter, 0.45 µm, 33 mm PVDF 50/pkg 2513603
HACH COMPANYWORLD HEADQUARTERSTelephone: (970) 669-3050FAX: (970) 669-2932
FOR TECHNICAL ASSISTANCE, PRICE INFORMATION AND ORDERING:Call 800-227-4224
Contact the HACH office or distributor serving you.www.hach.com [email protected]
In the U.S.A. –
Outside the U.S.A. –
On the Worldwide Web – ; E-mail –
toll-free
© Hach Company/Hach Lange GmbH, 1989–2013. All rights reserved. 04/2013, Edition 8

Surfactants, Anionic (Detergents) DOC316.53.01138
Crystal Violet Method1 Method 80280.002 to 0.275 mg/L as LAS (spectrophotometers)0.020 to 0.300 mg/L as LAS (colorimeters)Scope and application: For water, wastewater and seawater.
1 Adapted from Analytical Chemistry, 38, 791 (1966).
Test preparation
Instrument-specific informationThe table in this section shows all of the instruments that have the program for this test. Instrument specific information PP shows sample cell and orientation requirements forreagent addition tests, such as powder pillow or bulk reagent tests.To use the table, select an instrument, then read across to find the correspondinginformation for this test.
Table 1 Instrument-specific information
Instrument Sample cell orientation Sample cell
DR 6000 DR 3800 DR 2800 DR 2700
The fill line is to the right. 2612602
DR 5000 DR 3900
The fill line is toward the user.
DR 900 The orientation mark is toward the user. 2401906
Before startingInstall the instrument cap on the DR 900 cell holder before ZERO or READ is pushed.
This procedure must be done in a well-ventilated area or fume hood.
Acetone can be used to clean benzene from glassware.
To prevent the formation of water droplets in the sample cells, use only dry sample cells and discard the first few mL ofbenzene. Additionally, it can help to transfer the liquid from the funnel to a sample cell, let it sit for a few seconds and decantto a second cell for the measurement.
Excessive shaking can cause an emulsion to form, which makes the phases separate more slowly. If this occurs, removemost of the water layer, then gently mix the contents of the funnel with a clean Teflon®-coated rod or other inert tool.
Spilled reagent will affect test accuracy and is hazardous to the skin and other materials.
For best results, measure the reagent blank value for each new lot of reagent. Replace the sample with deionized water inthe test procedure to get the reagent blank value. Subtract the reagent blank value from the sample results automaticallywith the reagent blank adjust option.
In bright light conditions (e.g., direct sunlight), close the cell compartment on spectrophotometers, if applicable, with theprotective cover during measurements.
Do not use the Pour-Thru Cell or sipper module (for applicable instruments) with this test.
1

Review the Safety Data Sheets (MSDS/SDS) for the chemicals that are used and use any recommended personal protectiveequipment.
Dispose of reacted solutions according to local, state and federal regulations. Use the Safety Data Sheets for disposalinformation for unused reagents. Consult the environmental, health and safety staff for your facility and/or local regulatoryagencies for further disposal information.
Items to collect
Description Quantity
Benzene, ACS 40 mL
Buffer Solution, sulfate-type 10 mL
Detergent Reagent Powder Pillows 1
Clippers (for powder pillows) 1
Cylinder, graduated, 25-mL 1
Cylinder, graduated, 50-mL 1
Cylinder, graduated, 500-mL 1
Funnel, separatory, 500-mL 1
Sample cells (For information about sample cells, adapters or light shields, refer to Instrument-specific information on page 1.) 2
Support Ring, 4-inch 1
Support Ring Stand, 5 x 8 inch base 1
Refer to Consumables and replacement items on page 6 for reorder information.
Sample collection and storage• Collect samples in clean glass or plastic bottles.• Analyze the samples as soon as possible for best results.• To preserve samples for later analysis, keep the samples at or below 6 °C (43 °F) for
up to 48 hours.• Let the sample temperature increase to room temperature before analysis.
2 Surfactants, Anionic (Detergents), Crystal Violet Method (0.275 mg/L)
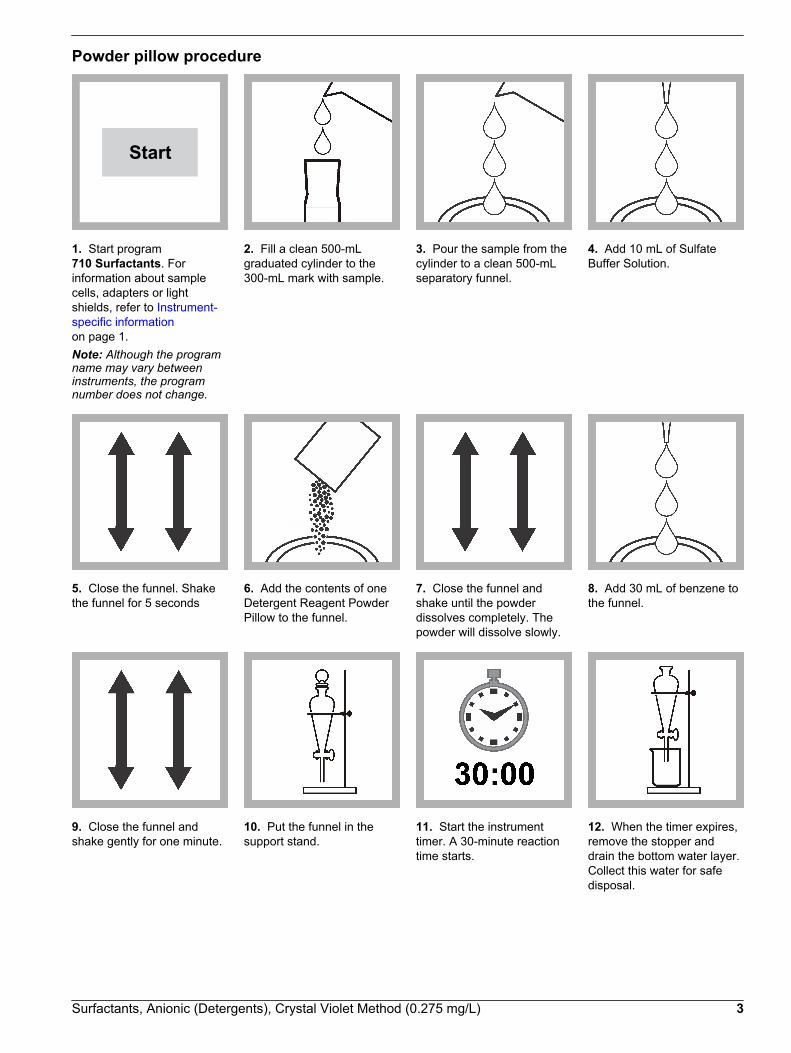
Powder pillow procedure
Start
1. Start program710 Surfactants. Forinformation about samplecells, adapters or lightshields, refer to Instrument-specific informationon page 1.Note: Although the programname may vary betweeninstruments, the programnumber does not change.
2. Fill a clean 500-mLgraduated cylinder to the300-mL mark with sample.
3. Pour the sample from thecylinder to a clean 500-mLseparatory funnel.
4. Add 10 mL of SulfateBuffer Solution.
5. Close the funnel. Shakethe funnel for 5 seconds
6. Add the contents of oneDetergent Reagent PowderPillow to the funnel.
7. Close the funnel andshake until the powderdissolves completely. Thepowder will dissolve slowly.
8. Add 30 mL of benzene tothe funnel.
9. Close the funnel andshake gently for one minute.
10. Put the funnel in thesupport stand.
11. Start the instrumenttimer. A 30-minute reactiontime starts.
12. When the timer expires,remove the stopper anddrain the bottom water layer.Collect this water for safedisposal.
Surfactants, Anionic (Detergents), Crystal Violet Method (0.275 mg/L) 3

13. Prepare the sample:Drain the top benzene layerinto a clean sample cell.Close the sample cell.Do not filter the benzenelayer before colormeasurement. Filtrationremoves the blue color.
14. Prepare the blank: Fillanother sample cell to the10-mL mark with purebenzene. Close the samplecell.
15. Clean the blank. 16. Insert the blank into thecell holder.
Zero
17. Push ZERO. Thedisplay shows 0.000 mg/LLAS.
18. Clean the preparedsample.
19. Insert the preparedsample into the cell holder.
Read
20. Push READ. Resultsshow in mg/L LAS.
InterferencesInterfering substance Interference level
Chloride High amounts of chloride, such as in brines and seawater, cause low results.
Perchlorate ions Interfere at all levels
Periodate ions Interfere at all levels
Accuracy check
Standard additions method (sample spike)Use the standard additions method (for applicable instruments) to validate the testprocedure, reagents and instrument and to find if there is an interference in the sample.Items to collect:
• Detergent Voluette® Ampule Standard, 60-mg/L LAS• Ampule breaker• Pipet, TenSette®, 0.1–1.0 mL and tips
1. Use the test procedure to measure the concentration of the sample, then keep the(unspiked) sample in the instrument.
2. Go to the Standard Additions option in the instrument menu.3. Select the values for standard concentration, sample volume and spike volumes.4. Open the standard solution.
4 Surfactants, Anionic (Detergents), Crystal Violet Method (0.275 mg/L)

5. Prepare three spiked samples: use the TenSette pipet to add 0.1 mL, 0.2 mL and0.3 mL of the standard solution, respectively, to three 300-mL portions of freshsample. Mix well.
6. Use the test procedure to measure the concentration of each of the spiked samples.Start with the smallest sample spike. Measure each of the spiked samples in theinstrument.
7. Select Graph to compare the expected results to the actual results.Note: If the actual results are significantly different from the expected results, make sure thatthe sample volumes and sample spikes are measured accurately. The sample volumes andsample spikes that are used should agree with the selections in the standard additions menu. Ifthe results are not within acceptable limits, the sample may contain an interference.
Standard solution methodUse the standard solution method to validate the test procedure, reagents andinstrument.Items to collect:
• Detergent Voluette® Ampule Standard, 60 mg/L LAS• 1-L volumetric flask, Class A• 3-mL volumetric pipet, Class A and pipet filler• Deionized water
1. Prepare a 0.180 mg/L LAS standard solution as follows:
a. Use a pipet to add 3.0 mL of 60 mg/L LAS standard solution into the volumetricflask.
b. Dilute to the mark with deionized water. Mix well. Prepare this solution daily.2. Use the test procedure to measure the concentration of the prepared standard
solution.3. Compare the expected result to the actual result.
Note: The factory calibration can be adjusted slightly with the standard adjust option so that theinstrument shows the expected value of the standard solution. The adjusted calibration is thenused for all test results. This adjustment can increase the test accuracy when there are slightvariations in the reagents or instruments.
Method performanceThe method performance data that follows was derived from laboratory tests that weremeasured on a spectrophotometer during ideal test conditions. Users may get differentresults under different test conditions.
Program Standard Precision (95% Confidence Interval) SensitivityConcentration change per 0.010 Abs change
710 0.180 mg/L LAS 0.172–0.188 mg/L LAS 0.002 mg/L LAS
Summary of methodDetergents, ABS (alkyl benzene sulfonate) or LAS (linear alkylate sulfonate) aredetermined by association with crystal violet dye and extraction of the ion-pair complexinto benzene. The measurement wavelength is 605 nm for spectrophotometers or 610 nmfor colorimeters.
Pollution prevention and waste managementReacted samples contain benzene and must be disposed of as a hazardous waste.Dispose of reacted solutions according to local, state and federal regulations.
Surfactants, Anionic (Detergents), Crystal Violet Method (0.275 mg/L) 5

Consumables and replacement itemsRequired reagents
Description Quantity/test Unit Item no.
Detergents Reagent Set — — 2446800
Includes:
Benzene, ACS 40 mL 4 liters 1444017
Buffer Solution, sulfate-type 10 mL 500 mL 45249
Detergent Reagent Powder Pillows 1 pillow 25/pkg 100868
Required apparatus
Description Quantity/test Unit Item no.
Clippers for solution pillows 1 each 96800
Cylinder, graduated, 25-mL. 1 each 50840
Cylinder, graduated , 50-mL 1 each 50841
Cylinder, graduated, 500-mL 1 each 50849
Funnel, separatory, 500-mL 1 each 52049
Support Ring, 4-inch 1 each 58001
Support, Ring Stand, 5 x 8 inch base 1 each 56300
Recommended standards
Description Unit Item no.
Detergent Standard Solution, 10-mL Voluette® Ampule, 60-mg/L LAS 16/pkg 1427110
Optional reagents and apparatus
Description Unit Item no.
Acetone, ACS 500 mL 1442949
Beaker, 600 mL each 50052
Flask, volumetric, Class A, 1000-mL each 1457453
Pipet filler, safety bulb each 1465100
Pipet, TenSette®, 0.1–1.0 mL each 1970001
Pipet tips for TenSette Pipet 1970001 50/pkg 2185696
Pipet, volumetric, Class A, 3-mL each 1451503
HACH COMPANYWORLD HEADQUARTERSTelephone: (970) 669-3050FAX: (970) 669-2932
FOR TECHNICAL ASSISTANCE, PRICE INFORMATION AND ORDERING:Call 800-227-4224
Contact the HACH office or distributor serving you.www.hach.com [email protected]
In the U.S.A. –
Outside the U.S.A. –
On the Worldwide Web – ; E-mail –
toll-free
© Hach Company/Hach Lange GmbH, 1989–2013. All rights reserved. 04/2013, Edition 8

Suspended Solids DOC316.53.01139
Photometric Method1 Method 80065 to 750 mg/L TSS
Scope and application: For water and wastewater.1 Adapted from Sewage and Industrial Wastes, 31, 1159 (1959).
Test preparation
Instrument specific informationThe table in this section shows all of the instruments that have the program for this test. Table 1 shows sample cell and orientation requirements for reagent addition tests, suchas powder pillow or bulk reagent tests.To use the table, select an instrument, then read across to find the correspondinginformation for this test.
Table 1 Instrument-specific information for reagent addition
Instrument Sample cell orientation Sample cell
DR 6000 DR 3800 DR 2800 DR 2700
The fill line is to the right. 2495402
DR 5000 DR 3900
The fill line is toward the user.
DR 900 The orientation mark is toward the user. 2401906
Before startingInstall the instrument cap on the DR 900 cell holder before ZERO or READ is pushed.
Do not use the Pour-Thru Cell or sipper module (for applicable instruments) with this test.
Items to collect
Description Quantity
Beaker, 600-mL, polypropylene 1
Blender 1
Cylinder, 500-mL polypropylene, graduated 1
Sample cells (For information about sample cells, adapters or light shields, refer to Instrumentspecific information on page 1.) 2
Refer to Consumables and replacement items on page 3 for reorder information.
Sample collection and storage• Collect samples in clean glass or plastic bottles.
1

• To preserve samples for later analysis, keep the samples at or below 6 °C (43 °F) forup to 7 days.
• Let the sample temperature increase to room temperature before analysis.
Photometric procedure
Start
1. Start program630 Suspended Solids. Forinformation about samplecells, adapters or lightshields, refer to Instrumentspecific informationon page 1.Note: Although the programname may vary betweeninstruments, the programnumber does not change.
2. Blend 500 mL of samplein a blender at high speedfor exactly two minutes.
3. Pour the blended sampleinto a 600-ml beaker.
4. Prepare the sample:Stir the sample andimmediately pour 10 mL ofthe blended sample into asample cell.
5. Prepare the blank: Fill asecond sample cell with10 mL of tap water ordeionized water.
6. Clean the blank. 7. Insert the blank into thecell holder.
Zero
8. Push ZERO. The displayshows 0 mg/L TSS.
9. Swirl the preparedsample to remove any gasbubbles and uniformlysuspend any residue.
10. Clean the preparedsample.
11. Insert the preparedsample into the cell holder.
Read
12. Push READ. Resultsshow in mg/L TSS.
2 Suspended Solids, Photometric Method (750 mg/L)

InterferencesSamples that absorb strongly at the measurement wavelength, such as blue dyes, maygive false, high-bias readings. A user-entered calibration is advised for these samples.
Accuracy check
Standard solution methodCalibration for this test is based on the gravimetric technique with parallel sewagesamples from a municipal sewage plant. For most samples, this calibration suppliessatisfactory results. When higher accuracy is required, run parallel spectrophotometricand gravimetric determinations with portions of the same sample. Make the newcalibration on the particular sample using a gravimetric technique as a basis.
Summary of methodThis method of determining total suspended solids (TSS) is a simple, direct measurementwhich does not require the filtration or ignition/weighing steps that gravimetric proceduresdo. The USEPA specifies the gravimetric method for solids determinations, while thismethod is often used for checking in-plant processes. The measurement wavelength is810 nm for spectrophotometers or 610 nm for colorimeters.
Consumables and replacement itemsRequired apparatus
Description Quantity/test Unit Item no.
Beaker, 600-mL, polypropylene 1 each 108052
Blender, 2-speed, 120 VAC 1 each 2616100
Blender, 2-speed, 240 VAC 1 each 2616102
Cylinder, graduated, 500-mL, polypropylene 1 each 108149
Suspended Solids, Photometric Method (750 mg/L) 3

HACH COMPANYWORLD HEADQUARTERSTelephone: (970) 669-3050FAX: (970) 669-2932
FOR TECHNICAL ASSISTANCE, PRICE INFORMATION AND ORDERING:Call 800-227-4224
Contact the HACH office or distributor serving you.www.hach.com [email protected]
In the U.S.A. –
Outside the U.S.A. –
On the Worldwide Web – ; E-mail –
toll-free
© Hach Company/Hach Lange GmbH, 1989–2013. All rights reserved. 04/2013, Edition 8

Tannin and Lignin DOC316.53.01140
Tyrosine Method1 Method 81930.1 to 9.0 mg/L Tannins (as Tannic Acid) Reagent Solution
Scope and application: For water, wastewater and boiler water.1 Adapted from Kloster, M.B., Journal American Water Works Association, Vol. 66, No. 1, p. 44 (1974).
Test preparation
Instrument specific informationThe table in this section shows all of the instruments that have the program for this test. Table 1 shows sample cell and orientation requirements for reagent addition tests, suchas powder pillow or bulk reagent tests.To use the table, select an instrument, then read across to find the correspondinginformation for this test.
Table 1 Instrument-specific information for reagent addition
Instrument Sample cell orientation Sample cell
DR 6000 DR 3800 DR 2800 DR 2700
The fill line is to the right. 2495402
DR 5000 DR 3900
The fill line is toward the user.
DR 900 The orientation mark is toward the user. 2401906
Before startingInstall the instrument cap on the DR 900 cell holder before ZERO or READ is pushed.
Measure the volume of the reagent accurately. Use a pipet if possible.
Filter samples that are turbid with filter paper and a funnel. The test results are then mg/L soluble tannic acid.
The Pour-Thru Cell can be used (for applicable instruments) if rinsed well with deionized water between the blank and theprepared samples.
Review the Safety Data Sheets (MSDS/SDS) for the chemicals that are used and use any recommended personal protectiveequipment.
Dispose of reacted solutions according to local, state and federal regulations. Use the Safety Data Sheets for disposalinformation for unused reagents. Consult the environmental, health and safety staff for your facility and/or local regulatoryagencies for further disposal information.
Items to collect
Description Quantity
Tannin and Lignin Reagent Set:
Sodium Carbonate Solution 10 mL
1

Items to collect (continued)Description Quantity
TanniVer™ 3 Tannin-Lignin Reagent 1 mL
Cylinder, graduated mixing, 25-mL 2
Pipet Filler 1
Pipet, volumetric Class A, 5.0-mL 1
Pipet, volumetric Class A, 0.5-mL 1
Sample cells (For information about sample cells, adapters or light shields, refer to Instrumentspecific information on page 1.) 2
Water, deionized 25 mL
Refer to Consumables and replacement items on page 4 for reorder information.
Sample collection• Collect samples in clean glass or plastic bottles.
Tyrosine procedure
Start
1. Start program720 Tannin & Lignin. Forinformation about samplecells, adapters or lightshields, refer to Instrumentspecific informationon page 1.Note: Although the programname may vary betweeninstruments, the programnumber does not change.
2. Prepare the blank:Fill a 25-mL mixing cylinderto the 25-mL mark withdeionized water.
3. Prepare the sample:Fill a second 25-mL mixingcylinder to the 25-mL markwith sample.
4. Pipet 0.5 mL ofTanniVer™ 3 Tannin-LigninReagent into each cylinder.
2 Tannin and Lignin, Tyrosine Method (9.0 mg/L)

5. Close the two cylinders.Invert both cylinders severaltimes to mix.
6. Add 5.0 mL of SodiumCarbonate Solution intoeach cylinder.
7. Close the two cylinders.Invert both cylinders severaltimes to mix.A blue color will develop iftannins and/or lignins arepresent.
8. Pour 10 mL of eachsolution into two samplecells.
9. Start the instrumenttimer. A 25-minute reactiontime starts.
10. When the timer expires,clean the blank.
11. Insert the blank into thecell holder.
Zero
12. Push ZERO. Thedisplay shows 0.0 mg/LTannins (as Tannic Acid).
13. Clean the preparedsample.
14. Insert the preparedsample into the cell holder.
Read
15. Push READ. Resultsshow in mg/L Tannins (asTannic Acid).
InterferencesInterferingsubstance
Interference level
Ferrous iron Causes a positive interference. (2 mg/L of ferrous iron produces a color equivalent to about 1 mg/L oftannic acid.) To remove interference of ferrous iron up to 20 mg/L, add one 0.2 g scoop of SodiumPyrophosphate to the sample before the test.
Sulfite To remove sulfite interference, add 1 mL of formaldehyde1 to the sample before the sample test.
1 Refer to Consumables and replacement items on page 4 for reorder information.
Tannin and Lignin, Tyrosine Method (9.0 mg/L) 3

Accuracy check
Standard solution methodUse the standard solution method to validate the test procedure, reagents andinstrument.Items to collect:
• 0.200 g tannic acid, analytical grade• 1-L volumetric flask, Class A• 500-mL volumetric flask, Class A• 15-mL volumetric pipet, Class A and pipet filler• Deionized water
1. Prepare a 200-mg/L tannic acid stock solution as follows:
a. Add 0.200 g of tannic acid into a 1-L volumetric flask.b. Dilute to the mark with deionized water. Mix well. Prepare the stock solution each
month.2. Prepare a 6.0 mg/L tannic acid standard solution as follows:
a. Use a pipet to add 15.00 mL of the 200-mg/L tannic acid stock solution into a500-mL volumetric flask.
b. Dilute to the mark with deionized water. Mix well. Prepare the standard solutioneach day.
3. Use the test procedure to measure the concentration of the prepared standardsolution.
4. Compare the expected result to the actual result.Note: The factory calibration can be adjusted slightly with the standard adjust option so that theinstrument shows the expected value of the standard solution. The adjusted calibration is thenused for all test results. This adjustment can increase the test accuracy when there are slightvariations in the reagents or instruments.
Method performanceThe method performance data that follows was derived from laboratory tests that weremeasured on a spectrophotometer during ideal test conditions. Users may get differentresults under different test conditions.
Program Standard Precision (95% Confidence Interval) SensitivityConcentration change per 0.010 Abs change
720 6.0 mg/L tannic acid 5.8–6.2 mg/L tannic acid 0.1 mg/L tannic acid
Summary of methodThis test measures all hydroxylated aromatic compounds, including tannin, lignin, phenoland cresol. This method produces a blue color proportional to the amount of thesecompounds in the sample. The results are reported as total tannin and lignin andexpressed as mg/L tannic acid. The measurement wavelength is 700 nm forspectrophotometers or 610 nm for colorimeters.
Consumables and replacement itemsRequired reagents
Description Quantity/test Unit Item no.
Water, deionized varies 4 L 27256
Tannin and Lignin Reagent Set 1 Up to100 tests 2244600
4 Tannin and Lignin, Tyrosine Method (9.0 mg/L)

Consumables and replacement items (continued)Description Quantity/test Unit Item no.
Includes:
Sodium Carbonate Solution 10 mL 500 mL 67549
TanniVer™ 3 Tannin-Lignin Reagent 1 mL 100 mL 256032
Required apparatus
Description Quantity/test Unit Item no.
Cylinder, graduated mixing, 25 mL with stopper 2 each 2088640
Pipet filler, safety bulb 1 each 1465100
Pipet, volumetric, Class A, 5.00-mL 1 each 1451537
Pipet, volumetric, Class A, 0.5-mL 1 each 1451534
Recommended standards
Description Unit Item no.
Tannic Acid, Analytical Grade 113 g 79114
Optional reagents and apparatus
Description Unit Item no.
Flask, volumetric, Class A, 1000-mL each 1457453
Flask, volumetric, Class A, 500-mL each 1457449
Formaldehyde, ACS 100 mLMDB 205932
Pipet, volumetric Class A, 15-mL each 1451539
Sodium Pyrophosphate 50 g 1429525
Pipet, TenSette®, 0.1–1.0 mL each 1970001
Pipet tips for TenSette Pipet 1970001 1000/pkg 2185628
Balance, analytical, 80 g x 0.1 mg 100-240 VAC each 2936701
Paper, for weighing, 100 x 100 mm 500/pkg 1473885
Spatula, micro each 1225600
Tannin and Lignin, Tyrosine Method (9.0 mg/L) 5

HACH COMPANYWORLD HEADQUARTERSTelephone: (970) 669-3050FAX: (970) 669-2932
FOR TECHNICAL ASSISTANCE, PRICE INFORMATION AND ORDERING:Call 800-227-4224
Contact the HACH office or distributor serving you.www.hach.com [email protected]
In the U.S.A. –
Outside the U.S.A. –
On the Worldwide Web – ; E-mail –
toll-free
© Hach Company/Hach Lange GmbH, 1989–2013. All rights reserved. 04/2013, Edition 8
Toxicity DOC316.53.01141
ToxTrak™ Method1, 2 Method 100170 to 100% inhibition Test ‘N Tube™ Vials
Scope and application: For drinking water, wastewater and natural waters.1 Liu, D., Bull. Environ. Contm. Toxicol. 26, 145-149 (1981)2 Environmental Technology Verification ETV Program evaluated, November, 2003
Test preparation
Instrument specific informationThe table in this section shows all of the instruments that have the program for this test. Table 1 shows adapter and light shield requirements for the instruments that use them.To use the table, select an instrument, then read across to find the correspondinginformation for this test.
Table 1 Instrument-specific information for test tubes
Instrument Adapters Light shield
DR 6000 — —
DR 5000 — —
DR 900 4846400 Cover supplied with the instrument
DR 3900 — LZV849
DR 3800 — LZV646
DR 2800 —
Before startingInstall the instrument cap on the DR 900 cell holder before ZERO or READ is pushed.
DR 3900, DR 3800, DR 2800 and DR 2700: Install the light shield in Cell Compartment #2 before this test is started.
Do not leave the tubes in the instrument during incubation. Make sure that all samples and control cells have similarconditions of temperature and light during the reaction.
If the samples contain chlorine, add two drops of sodium thiosulfate to each blank and sample before the test is started.
Review the Safety Data Sheets (MSDS/SDS) for the chemicals that are used and use any recommended personal protectiveequipment.
Dispose of reacted solutions according to local, state and federal regulations. Use the Safety Data Sheets for disposalinformation for unused reagents. Consult the environmental, health and safety staff for your facility and/or local regulatoryagencies for further disposal information.
Items to collect
Description Quantity
Bacterial Count Broth Tube 1 tube
Pipet, transfer, sterile 2
Test 'N Tube, with cap 1
Sodium Thiosulfate varies
ToxTrak™ Reagent Powder Pillows 2
ToxTrak™ Accelerator Solution 4 drops
1

Items to collect (continued)Description Quantity
Water, deionized varies
Clippers 1
Incubator 1
Pipet, volumetric, Class A, 5.00 mL and pipet filler 1
Refer to Consumables and replacement items on page 6 for reorder information.
Sample collection• Collect samples in clean glass or plastic bottles.• If the sample is drinking water, take the control sample from a reservoir of tap water
that is known to be free of toxins if possible.
Inoculum development with indigenous biomass
1. Use one of the supplieddropper pipets to add1.0 mL of source culture(indigenous biomass) to aTotal Bacteria Count BrothTube.Commercial sources offreeze-dried bacteria mayalso be used.
2. Incubate the tubecontents at 35 °C (95 °F)until the broth is visiblyturbid (approximately12 hours).The culture can be kept forseveral days in theincubator or at roomtemperature. Use before72 hours for best results.
2 Toxicity, ToxTrak Method (% Inhibition)
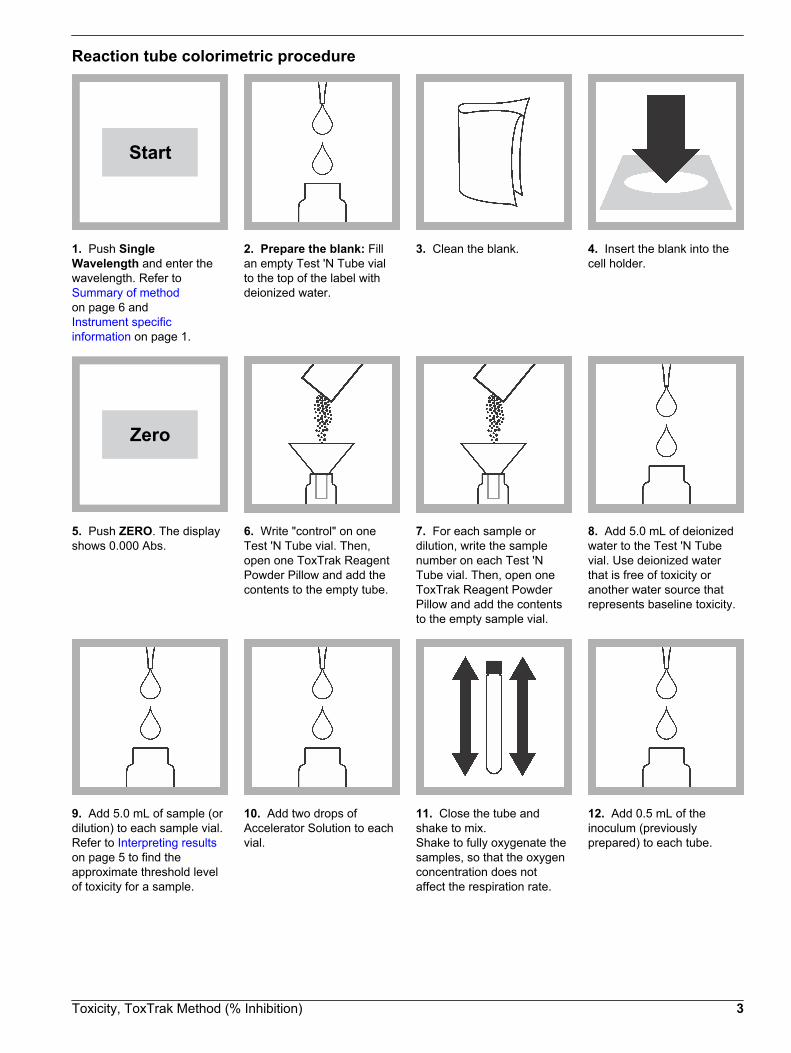
Reaction tube colorimetric procedure
Start
1. Push SingleWavelength and enter thewavelength. Refer to Summary of methodon page 6 and Instrument specificinformation on page 1.
2. Prepare the blank: Fillan empty Test 'N Tube vialto the top of the label withdeionized water.
3. Clean the blank. 4. Insert the blank into thecell holder.
Zero
5. Push ZERO. The displayshows 0.000 Abs.
6. Write "control" on oneTest 'N Tube vial. Then,open one ToxTrak ReagentPowder Pillow and add thecontents to the empty tube.
7. For each sample ordilution, write the samplenumber on each Test 'NTube vial. Then, open oneToxTrak Reagent PowderPillow and add the contentsto the empty sample vial.
8. Add 5.0 mL of deionizedwater to the Test 'N Tubevial. Use deionized waterthat is free of toxicity oranother water source thatrepresents baseline toxicity.
9. Add 5.0 mL of sample (ordilution) to each sample vial.Refer to Interpreting resultson page 5 to find theapproximate threshold levelof toxicity for a sample.
10. Add two drops ofAccelerator Solution to eachvial.
11. Close the tube andshake to mix.Shake to fully oxygenate thesamples, so that the oxygenconcentration does notaffect the respiration rate.
12. Add 0.5 mL of theinoculum (previouslyprepared) to each tube.
Toxicity, ToxTrak Method (% Inhibition) 3
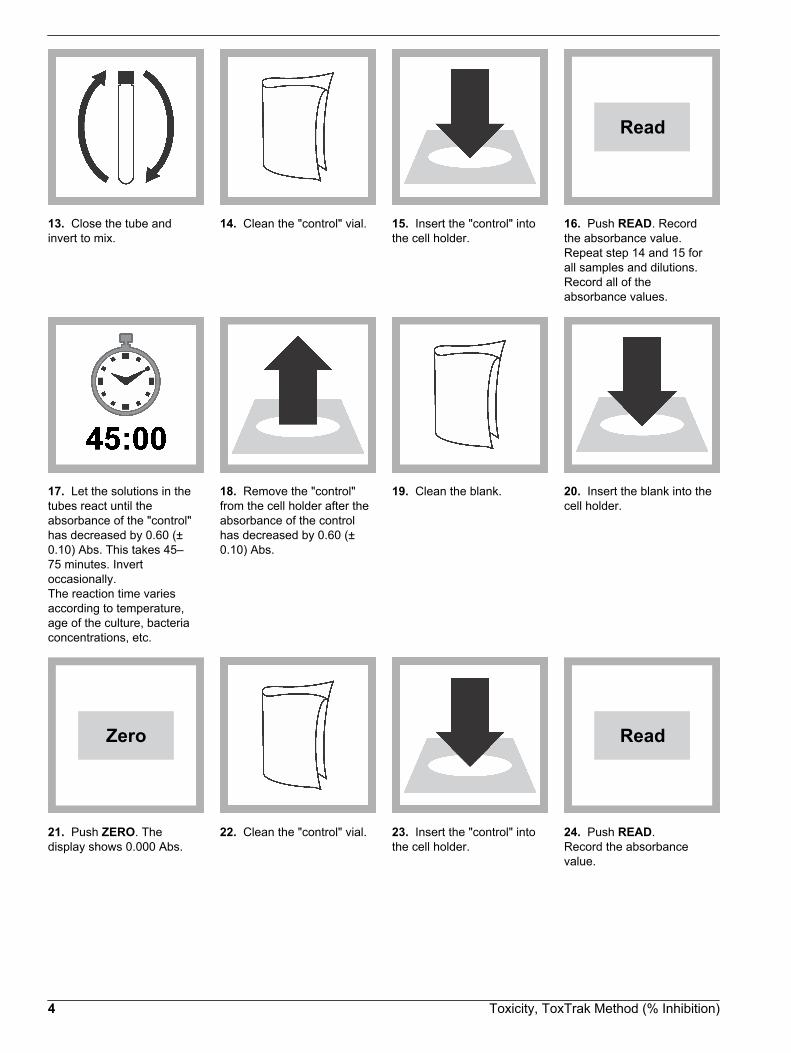
13. Close the tube andinvert to mix.
14. Clean the "control" vial. 15. Insert the "control" intothe cell holder.
Read
16. Push READ. Recordthe absorbance value.Repeat step 14 and 15 forall samples and dilutions.Record all of theabsorbance values.
17. Let the solutions in thetubes react until theabsorbance of the "control"has decreased by 0.60 (±0.10) Abs. This takes 45–75 minutes. Invertoccasionally.The reaction time variesaccording to temperature,age of the culture, bacteriaconcentrations, etc.
18. Remove the "control"from the cell holder after theabsorbance of the controlhas decreased by 0.60 (±0.10) Abs.
19. Clean the blank. 20. Insert the blank into thecell holder.
Zero
21. Push ZERO. Thedisplay shows 0.000 Abs.
22. Clean the "control" vial. 23. Insert the "control" intothe cell holder.
Read
24. Push READ.Record the absorbancevalue.
4 Toxicity, ToxTrak Method (% Inhibition)

25. Clean each sample ordilution vial.
26. Insert each sample ordilution into the cell holder.
Read
27. Push Read.Record all absorbancevalues.
28. Calculate the %Inhibition. Refer to Calculatethe Inhibition on page 5.
Calculate the InhibitionCalculate the % Inhibition:% I = 1–(ΔAsample/ΔAcontrol) x 100where: Δ A = Initial absorbance value–Final absorbance valueExample:Absorbance of control: initial = 1.500 abs, final = 0.900 abs; ΔAcontrol = 0.600Absorbance of sample: initial = 1.700 abs, final = 1.300 abs; ΔAsample = 0.400% I = 1–(0.400/0.600) x 100 = 33%
Interpreting resultsThe results as percent inhibition (% I) are a relative measurement. The results do notrepresent a true quantitative measurement of toxic concentration. The percent inhibitiondoes not necessarily increase in direct proportion to the concentration of toxins.Results below 10% are not reliable, but can be used to make an estimate of toxicity whenthe results are consistent. If a sample shows less than 10% inhibition, repeat the testseveral times. Look at the series of data points to find the likelihood of toxicity. Refer to Table 2.Some toxins will increase respiration and give a negative percent inhibition on this and allother respiration-based toxicity tests. After repeated testing, samples that always give apercent inhibition that is more negative than –10% should be considered toxic.
Table 2 Interpreting results that are less than 10% inhibition
Data points: percent inhibition Conclusion
7%, 9%, 5%, 8%, 5% May be slightly toxic
7%, -4%, -5%, 5%, 1% Most likely not toxic
-7%, -9%, -5%, -8%, -5% May be slightly toxic
Lowest observable effect concentration (LOEC)Due to the many variables involved in the test, the limit of detection is approximately 10%inhibition. This correlates to the Lowest Observable Effect Concentration (LOEC).No observed effect concentration (NOEC)To determine the minimum inhibition concentration of a toxin:
1. Dilute 1 mL of sample to 10 mL with deionized water.2. Run the test and find the percent inhibition for the dilution.3. Dilute 1 mL of the sample dilution from step 1 to 10 mL with deionized water.4. Run the test and find the percent inhibition for the dilution.5. Continue to make serial 1:10 dilutions of the sample (1:10, 1:100, 1:1000, etc.) until a
level is reached that gives 0% inhibition in the final calculation.
Toxicity, ToxTrak Method (% Inhibition) 5

When 0% inhibition is found, the dilution represents the approximate threshold levelof toxicity for a sample. This is the No Observed Effect Concentration (NOEC).
Disposal of test culturesUse one of the methods that follow to dispose of active bacterial cultures:
• Autoclave used test containers at 121 °C (250 °F) for 15 minutes at 15 pounds ofpressure. Once the containers are sterile, pour the contents down the drain withrunning water. The reaction tubes may be washed and reused.
• Sterilize test containers with a 1:10 dilution of commercial laundry bleach. Pour thetest container contents and test containers into the bleach solution. Allow 10–15 minutes of contact time with the bleach solution. Then pour the liquid down thedrain and wash the reaction tubes for reuse.
Summary of methodThis method is based on the reduction of resazurin, a redox-active dye, by bacterialrespiration. When it is reduced, resazurin changes color from blue to pink. Toxicsubstances can inhibit the rate of resazurin reduction. A chemical accelerant has beenadded to shorten the reaction time. The measurement wavelength is 603 nm forspectrophotometers or 610 nm for colorimeters.
Consumables and replacement itemsRequired reagents
Description Quantity/test Unit Item no.
Water, deionized varies 500 mL 27249
ToxTrak™ Reagent Set 1 25/set 2597200
Includes:
Media Set, Total Bacteria Count Tubes 1 15/pkg 2277700
Pipet, transfer, sterile 1 15/pkg 2232512
Sodium Thiosulfate Standard Solution, 0.0246 N varies 100 mL 2409232
ToxTrak™ Reagent Powder Pillows 2 50/pkg 2560766
ToxTrak™ Accelerator Solution 4 drops 15 mLSCDB 2560836
Tubes, glass, 16 mm x 100 mm 1 6/pkg 2275806
Caps, white, Teflon lining, for 16-mm tubes 2 6/pkg 2241106
Required apparatus
Description Quantity/test Unit Item no.
Clippers 1 each 93600
Dropper, measuring, 0.5 and 1.0 mL plastic 2 20/pkg 2124720
Forceps, flat square tip 1 each 1453700
Incubator, Dri-Bath, 12 well, 120 VAC 1 each 2281400
Pipet, volumetric, Class A, 5.00-mL 1 each 1451537
Pipet filler, safety bulb 1 each 1465100
6 Toxicity, ToxTrak Method (% Inhibition)

Optional reagents and apparatus
Description Unit Item no.
Pipet, TenSette®, 0.1–1.0 mL each 1970001
Pipet tips for TenSette Pipet 1970001 50/pkg 2185696
Pipet, TenSette®, 1.0 to 10.0 mL each 1970010
Pipet tips for TenSette Pipet 1970010 50/pkg 2199796
Test tube rack each 1864100
Pipet tips for TenSette Pipet 1970001 1000/pkg 2185628
Pipet tips for TenSette Pipet 1970010 250/pkg 2199725
BOD seed (polyseed) 50/pkg 2918700
Laboratory pen, permanent marker each 2092000
Toxicity, ToxTrak Method (% Inhibition) 7

HACH COMPANYWORLD HEADQUARTERSTelephone: (970) 669-3050FAX: (970) 669-2932
FOR TECHNICAL ASSISTANCE, PRICE INFORMATION AND ORDERING:Call 800-227-4224
Contact the HACH office or distributor serving you.www.hach.com [email protected]
In the U.S.A. –
Outside the U.S.A. –
On the Worldwide Web – ; E-mail –
toll-free
© Hach Company/Hach Lange GmbH, 1989–2013. All rights reserved. 04/2013, Edition 8

Turbidity DOC316.53.01332
Absorptometric Method1 Method 823721 to 1000 FAU
Scope and application: For water, wastewater and seawater.1 Adapted from FWPCA Methods for Chemical Analysis of Water and Wastes, 275 (1969).
Test preparation
Instrument-specific tableThe table in this section shows all of the instruments that have the program for this test. Instrument specific information PP shows sample cell and orientation requirements forreagent addition tests, such as powder pillow or bulk reagent tests.
Table 1 Instrument-specific information for reagent addition
Instrument Sample cell orientation Sample cell
DR 900 The orientation mark is toward the user. 2401906
Before startingInstall the instrument cap on the DR 900 cell holder before ZERO or READ is pushed.
For samples with high color or turbidity, use a filtered portion of sample instead of the deionized water for the blank.
Review the Safety Data Sheets (MSDS/SDS) for the chemicals that are used and use any recommended personal protectiveequipment.
Dispose of reacted solutions according to local, state and federal regulations. Use the Safety Data Sheets for disposalinformation for unused reagents. Consult the environmental, health and safety staff for your facility and/or local regulatoryagencies for further disposal information.
Items to collect
Description Quantity
Sample cells 2
Refer to Consumables and replacement items on page 3 for reorder information.
Sample collection and storage• Collect samples in clean glass or plastic bottles.• To preserve samples for later analysis, keep the samples at or below 6 °C (43 °F) for
up to 48 hours.• Let the sample temperature increase to room temperature before analysis.
1

Absorbtometric method
Start
1. Start program 745 FAU. 2. Prepare the blank: Fill asample cell with 10 mL ofdeionized water.
3. Clean the blank. 4. Insert the blank into thecell holder.
Zero
5. Push ZERO. The displayshows 0 FAU.
6. Prepare the sample: Filla second sample cell with10 mL of sample.Mix the sample well before itis added to the sample cell.
7. Clean the preparedsample.
8. Insert the preparedsample into the cell holder.
Read
9. Push READ. Resultsshow in FormazinAttenuation Units (FAU).
InterferencesInterfering substance Interference level
Air bubbles Interfere at all levels. Use the Degassing Kit or an ultrasonic bath to degas the samples.
Color Interferes if the color absorbs light at the measurement wavelength.
Temperature extremes May interfere by changing the turbidity of the sample. Analyze samples as soon as possible aftercollection. Analyze at the same temperature as the original sample.
2 Turbidity, Absorptometric Method (1000 FAU)

Accuracy check
Standard solution methodUse the standard solution method to validate the test procedure, reagents andinstrument.Items to collect:
• 4000 NTU Formazin Stock Solution• 100-mL volumetric flask, Class A• 5-mL volumetric pipet, Class A and pipet filler• Deionized water
1. Prepare a 200 FAU formazin standard solution as follows:
a. Use a pipet to add 5.00 mL of 4000 NTU formazin standard solution into thevolumetric flask. As an alternative, use a 200 NTU StablCal™ Standard Solution.
b. Dilute to the mark with deionized water. Mix well. Prepare this solution daily.2. Use the test procedure to measure the concentration of the prepared standard
solution.3. Compare the expected result to the actual result.
Note: The factory calibration can be adjusted slightly with the standard adjust option so that theinstrument shows the expected value of the standard solution. The adjusted calibration is thenused for all test results. This adjustment can increase the test accuracy when there are slightvariations in the reagents or instruments.
Method performanceThe method performance data that follows was derived from laboratory tests that weremeasured on a spectrophotometer during ideal test conditions. Users may get differentresults under different test conditions.
Program Standard Precision (95% Confidence Interval) SensitivityConcentration change per 0.010 Abs change
745 200 FAU 195–205 FAU 21 FAU
Summary of methodThis turbidity test measures an optical property of the sample which results fromscattering and absorption of light by particles in the sample. The amount of turbiditymeasured depends on variables such as the size, shape, color and refractive propertiesof the particles. This procedure is calibrated using formazin turbidity standards and thereadings are in terms of Formazin Attenuation Units (FAU). This test cannot be used forUSEPA reporting purposes, but it may be used for daily in-plant monitoring. One FAU isequivalent to one Nephelometric Turbidity Unit (NTU) of Formazin. However, the opticalmethod of measurement for FAU is very different from the nephelometric (NTU) method(1 NTU = 1 FTU = 1 FAU when traced to formazin primary standards). Test results aremeasured at 520 nm.
Consumables and replacement itemsRecommended standards and apparatus
Description Quantity/test Unit Item no.
Formazin Stock Solution, 4000 NTU 1 500 mL 246149
Silicone Oil 1 15 mL DB 126936
StablCal Stabilized Turbidity Standard, 200 NTU 1 500 mL 2660449
Water, deionized varies 4 L 27256
Turbidity, Absorptometric Method (1000 FAU) 3

Optional reagents and apparatus
Description Unit Item no.
Bath, ultrasonic each 2489500
Bottle, wash, 250 mL each 62031
Flask, volumetric, Class A, 100-mL each 1457442
Flask, filter, 500 mL each 54649
Filter holder each 1352900
Filter pump, aspirator each 213100
Oiling cloth, for applying silicone oil each 2687300
Pipet filler, safety bulb each 1465100
Pipet, volumetric 5.00-mL each 1451537
Sample Degassing Kit each 4397500
Stopper, rubber, one-hole, No. 7 6/pkg 211907
Tubing, rubber, 5/16-in. inside diameter 3.66 m(12 ft) 56019
Tweezers, plastic each 1428200
HACH COMPANYWORLD HEADQUARTERSTelephone: (970) 669-3050FAX: (970) 669-2932
FOR TECHNICAL ASSISTANCE, PRICE INFORMATION AND ORDERING:Call 800-227-4224
Contact the HACH office or distributor serving you.www.hach.com [email protected]
In the U.S.A. –
Outside the U.S.A. –
On the Worldwide Web – ; E-mail –
toll-free
© Hach Company/Hach Lange GmbH, 1989–2013. All rights reserved. 04/2013, Edition 8
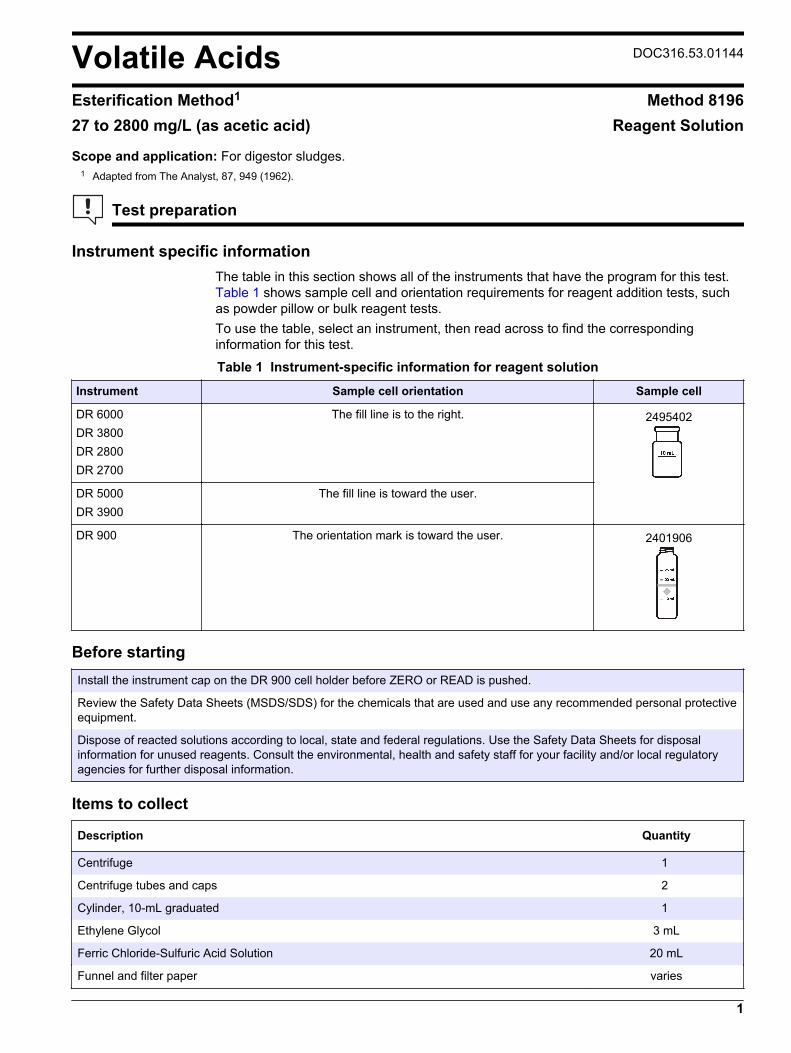
Volatile Acids DOC316.53.01144
Esterification Method1 Method 819627 to 2800 mg/L (as acetic acid) Reagent Solution
Scope and application: For digestor sludges.1 Adapted from The Analyst, 87, 949 (1962).
Test preparation
Instrument specific informationThe table in this section shows all of the instruments that have the program for this test. Table 1 shows sample cell and orientation requirements for reagent addition tests, suchas powder pillow or bulk reagent tests.To use the table, select an instrument, then read across to find the correspondinginformation for this test.
Table 1 Instrument-specific information for reagent solution
Instrument Sample cell orientation Sample cell
DR 6000 DR 3800 DR 2800 DR 2700
The fill line is to the right. 2495402
DR 5000 DR 3900
The fill line is toward the user.
DR 900 The orientation mark is toward the user. 2401906
Before startingInstall the instrument cap on the DR 900 cell holder before ZERO or READ is pushed.
Review the Safety Data Sheets (MSDS/SDS) for the chemicals that are used and use any recommended personal protectiveequipment.
Dispose of reacted solutions according to local, state and federal regulations. Use the Safety Data Sheets for disposalinformation for unused reagents. Consult the environmental, health and safety staff for your facility and/or local regulatoryagencies for further disposal information.
Items to collect
Description Quantity
Centrifuge 1
Centrifuge tubes and caps 2
Cylinder, 10-mL graduated 1
Ethylene Glycol 3 mL
Ferric Chloride-Sulfuric Acid Solution 20 mL
Funnel and filter paper varies
1

Items to collect (continued)Description Quantity
Hot Plate 1
Hydroxylamine Hydrochloride Solution, 100-g/L 1 mL
Pipet filler 1
Pipet, 2-mL 1
Pipet, Class A volumetric, 0.50-mL1 1
Pipet, Class A volumetric, 10-mL 1
Sample cells (For information about sample cells, adapters or light shields, refer to Instrumentspecific information on page 1.) 2
Sodium Hydroxide Standard Solution, 4.5 N 4 mL
Sulfuric Acid Standard Solution, 19.2 N 0.4 mL
Water bath and rack 1
Water, deionized 20.5 mL
1 A TenSette Pipet can be used in place of individual pipets in this procedure.
Refer to Consumables and replacement items on page 5 for reorder information.
Sample collection and storage• Collect samples in clean glass or plastic bottles.• To preserve samples for later analysis, keep the samples at or below 6 °C (43 °F) for
up to 24 hours.• Let the sample temperature increase to room temperature before analysis.
Esterification method
Start
1. Start program770 Volatile Acids. Forinformation about samplecells, adapters or lightshields, refer to Instrumentspecific informationon page 1.Note: Although the programname may vary betweeninstruments, the programnumber does not change.
2. Prepare the blank: Usea pipet to add 0.5 mL ofdeionized water to a samplecell.
3. Use a filter or acentrifuge to separate10 mL of sample.
4. Prepare the sample:Use a pipet to add 0.5 mL ofthe filtrate or supernatant toa second sample cell.
2 Volatile Acids, Esterification Method (2800 mg/L)

5. Add 1.5 mL of EthyleneGlycol to each sample cell.
6. Swirl to mix. 7. Add 0.2 mL of 19.2 NSulfuric Acid to each samplecell.
8. Swirl to mix.
9. Put both cells into aboiling water bath.The sample cells can alsobe boiled in a 500-mLbeaker.
10. Start the instrumenttimer. A 3-minute reactiontime starts.
11. When the timer expires,use a cold water bath tocool the samples to 25 °C(the cells will feel cold).
12. Add 0.5 mL ofHydroxylamineHydrochloride Solution toeach sample cell.
13. Swirl to mix. 14. Add 2.0 mL of 4.5 NSodium Hydroxide StandardSolution to each cell.
15. Swirl to mix. 16. Add 10 mL of FerricChloride Sulfuric AcidSolution to each samplecell.
17. Swirl to mix. 18. Add 10 mL of deionizedwater to each sample cell.
19. Close both cells. Invertboth cells to mix.
20. Transfer 10 mL of theblank solution to a cleansample cell.
Volatile Acids, Esterification Method (2800 mg/L) 3

21. Transfer 10 mL of theprepared sample solution toa clean sample cell.
22. Start the instrumenttimer. A second 3-minutereaction time starts.Set the instrument to zeroduring this reaction time.
23. When the timer expires,clean the blank.
24. Insert the blank into thecell holder.
Zero
25. Push ZERO. Thedisplay shows 0 mg/LHOAC.
26. Clean the preparedsample.
27. Insert the preparedsample into the cell holder.
Read
28. Push READ. Resultsshow in mg/L HOAC.
Accuracy check
Standard additions method (sample spike)Use the standard additions method (for applicable instruments) to validate the testprocedure, reagents and instrument and to find if there is an interference in the sample.Items to collect:
• Volatile Acid Voluette® Ampule Standard, 62,500-mg/L as acetic acid• Ampule breaker• Pipet, TenSette®, 0.1–1.0 mL and tips• Mixing cylinders, 25-mL (3)
1. Use the test procedure to measure the concentration of the sample, then keep the(unspiked) sample in the instrument.
2. Go to the Standard Additions option in the instrument menu.3. Select the values for standard concentration, sample volume and spike volumes.4. Open the standard solution.5. Prepare three spiked samples: use the TenSette pipet to add 0.1 mL, 0.2 mL and
0.3 mL of the standard solution, respectively, to three 25-mL portions of fresh sample.Mix well.
6. Use the test procedure to measure the concentration of each of the spiked samples.Start with the smallest sample spike. Measure each of the spiked samples in theinstrument.
7. Select Graph to compare the expected results to the actual results.Note: If the actual results are significantly different from the expected results, make sure thatthe sample volumes and sample spikes are measured accurately. The sample volumes and
4 Volatile Acids, Esterification Method (2800 mg/L)

sample spikes that are used should agree with the selections in the standard additions menu. Ifthe results are not within acceptable limits, the sample may contain an interference.
Standard solution methodUse the standard solution method to validate the test procedure, reagents andinstrument.Items to collect:
• Volatile Acid Voluette® Ampule Standard, 62,500-mg/L as acetic acid• 500-mL volumetric flask, Class A• 4-mL volumetric pipet, Class A and pipet filler• Deionized water
1. Prepare a 500 mg/L volatile acids standard solution as follows:
a. Use a pipet to add 4.00 mL of 62,500-mg/L as acetic acid standard solution intothe volumetric flask.
b. Dilute to the mark with deionized water. Mix well. Prepare this solution daily.2. Use the test procedure to measure the concentration of the prepared standard
solution.3. Compare the expected result to the actual result.
Note: The factory calibration can be adjusted slightly with the standard adjust option so that theinstrument shows the expected value of the standard solution. The adjusted calibration is thenused for all test results. This adjustment can increase the test accuracy when there are slightvariations in the reagents or instruments.
Method performanceThe method performance data that follows was derived from laboratory tests that weremeasured on a spectrophotometer during ideal test conditions. Users may get differentresults under different test conditions.
Program Standard Precision (95% Confidence Interval) SensitivityConcentration change per 0.010 Abs
change
770 1350 mg/L as acetic acid(HOAC)
1218–1482 mg/L as acetic acid(HOAC)
27 mg/L as acetic acid (HOAC)
Summary of methodThe volatile acids test is designed specifically to determine volatile acids in digestorsludges. The method is based on esterification of the carboxylic acids present in thesample and subsequent determination of the esters by the ferric hydroxamate reaction.All volatile acids present are reported as their equivalent mg/L as acetic acid. Themeasurement wavelength is 495 nm for spectrophotometers or 520 nm for colorimeters.
Consumables and replacement itemsRequired reagents
Description Quantity/test Unit Item no.
Water, deionized varies 4 L 27256
Volatile Acid Reagent Set 1 90 tests 2244700
Includes:
Ethylene Glycol 3 mL 1000 mL 203953
Ferric Chloride-Sulfuric Acid Solution 20 mL 1000 mL 204253
Hydroxylamine Hydrochloride Solution, 100-g/L 1 mL 100 mL 81842
Volatile Acids, Esterification Method (2800 mg/L) 5

Consumables and replacement items (continued)Description Quantity/test Unit Item no.
Sodium Hydroxide Standard Solution, 4.5 N 4 mL 1000 mL 204053
Sulfuric Acid Standard Solution, 19.2 N 0.4 mL 1000 mL 203832
Required apparatus
Description Quantity/test Unit Item no.
Centrifuge, 115 VAC, 6 x 15 mL 1 each 2676500
Centrifuge tubes, 15-mL 2 10/pkg 2278739
Centrifuge tube caps 2 20/pkg 2585220
Cylinder, graduated, 10-mL 1 each 50838
Filter paper, folded, 12.5-cm 1 100/pkg 189457
Funnel, poly, 65-mm 1 each 108367
Hot plate, 7 inches x 7 inches, digital, 120 VAC 1 each 2881500
Hot Plate, 7-inch digital, 240 VAC 1 each 2881502
Pipet filler, safety bulb 1 each 1465100
Pipet, serological, 2-mL 1 each 53236
Pipet, volumetric, Class A, 0.5-mL 1 each 1451534
Pipet, volumetric, Class A, 10.00-mL 1 each 1451538
Cell holder assembly 1 each 4788000
Evaporating dish, 125 mm x 65 mm 1 each 2764700
Sample cell, 10 mL square, matched pair 2 2/pkg 2495402
Recommended standards and apparatus
Description Unit Item no.
Volatile Acids Standard Solution, 10-mL Voluette® Ampule, 62,500-mg/L as HOAC 16/pkg 14270-10
Ampule Breaker, Voluette® ampules each 2196800
Optional reagents and apparatus
Description Unit Item no.
Cylinder, mixing, 25-mL each 189640
Water bath and rack each 195555
Pipet, TenSette®, 1.0 to 10.0 mL each 1970010
Pipet tips for TenSette Pipet 1970010 250/pkg 2199725
Pipet tips for TenSette Pipet 1970010 50/pkg 2199796
Pipet, TenSette®, 0.1–1.0 mL each 1970001
Pipet tips for TenSette Pipet 1970001 50/pkg 2185696
Pipet tips for TenSette Pipet 1970001 1000/pkg 2185628
Flask, volumetric, Class A, 500-mL each 1457449
Finger cots 2/pkg 1464702
6 Volatile Acids, Esterification Method (2800 mg/L)

Volatile Acids, Esterification Method (2800 mg/L) 7

HACH COMPANYWORLD HEADQUARTERSTelephone: (970) 669-3050FAX: (970) 669-2932
FOR TECHNICAL ASSISTANCE, PRICE INFORMATION AND ORDERING:Call 800-227-4224
Contact the HACH office or distributor serving you.www.hach.com [email protected]
In the U.S.A. –
Outside the U.S.A. –
On the Worldwide Web – ; E-mail –
toll-free
© Hach Company/Hach Lange GmbH, 1989–2013. All rights reserved. 04/2013, Edition 8

Zinc DOC316.53.01145
USEPA1 Zincon Method2 Method 80090.01 to 3.00 mg/L Zn Powder Pillows
Scope and application: For water and wastewater. Digestion is required for a total zinc analysis.1 USEPA approved for wastewater analyses 3500 Zn B: Federal Register, 45(105) 36166 (May 29, 1980).2 Adapted from Standard Methods for the Examination of Water and Wastewater.
Test preparation
Instrument specific informationThe table in this section shows all of the instruments that have the program for this test. Table 1 shows sample cell and orientation requirements for reagent addition tests, suchas powder pillow or bulk reagent tests.To use the table, select an instrument, then read across to find the correspondinginformation for this test.
Table 1 Instrument-specific information for powder pillows
Instrument Sample cell orientation Sample cell
DR 6000 DR 3800 DR 2800 DR 2700
The fill line is to the right. 2495402
DR 5000 DR 3900
The fill line is toward the user.
DR 900 The orientation mark is toward the user. 2401906
Before startingInstall the instrument cap on the DR 900 cell holder before ZERO or READ is pushed.
Clean all glassware with 6.0 N (50%) hydrochloric acid, then rinse thoroughly with deionized water to remove contaminants.
Use only glass-stoppered mixing cylinders in this procedure.
Make sure that the dropper that is used in this procedure is plastic. Droppers that have rubber bulbs can contaminate thereagent.
The reagents that are used in this test contain potassium cyanide. Keep cyanide solutions at pH > 11 to preventexposure to hydrogen cyanide gas. Collect the reacted samples for proper disposal.
Review the Safety Data Sheets (MSDS/SDS) for the chemicals that are used and use any recommended personal protectiveequipment.
Do not use the Pour-Thru Cell or sipper module (for applicable instruments) with this test.
Dispose of reacted solutions according to local, state and federal regulations. Use the Safety Data Sheets for disposalinformation for unused reagents. Consult the environmental, health and safety staff for your facility and/or local regulatoryagencies for further disposal information.
1

Items to collect
Description Quantity
Cyclohexanone 0.5 mL
ZincoVer® 5 Reagent Powder Pillow, 20-mL 1
Cylinder, graduated mixing, 25-mL 1
Sample cells (For information about sample cells, adapters or light shields, refer to Instrumentspecific information on page 1.) 2
Refer to Consumables and replacement items on page 6 for reorder information.
Sample collection and storage• Collect samples in clean glass or plastic bottles that have been cleaned with
1:1 hydrochloric acid and rinsed with deionized water.• To preserve samples for later analysis, adjust the sample pH to less than 2 with
concentrated nitric acid (about 2 mL per liter). No acid addition is necessary if thesample is tested immediately.
• Keep preserved samples at room temperature for a maximum of 6 months.• Before analysis, adjust the pH to 4–5 with 5.0 N sodium hydroxide standard solution.
Do not exceed pH 5 as zinc can precipitate.• Correct the test result for the dilution from the volume additions.
Powder pillow procedure
Start
1. Start program 780 Zinc.For information aboutsample cells, adapters orlight shields, refer to Instrument specificinformation on page 1.Note: Although the programname may vary betweeninstruments, the programnumber does not change.
2. Fill a 25-mL graduatedmixing cylinder with 20 mLof sample.
3. Add the contents of oneZincoVer 5 Reagent PowderPillow to the mixing cylinder.
4. Close the cylinder. Invertthe cylinder several times todissolve the powdercompletely. Inconsistentreadings may result if all theparticles are not dissolved.The sample should beorange. If the sample isbrown or blue, the zincconcentration is too high oran interfering metal ispresent. Dilute the sampleand repeat the test.
2 Zinc, Zincon Method (3.00 mg/L)

5. Blank preparation: Pour10 mL of the solution into asample cell.
6. Prepared sample: Use aplastic dropper to add0.5 mL of cyclohexanone tothe solution that is still in themixing cylinder.
7. Start the instrumenttimer. A 30-second reactiontime starts.
8. During the reactionperiod, close the mixingcylinder and vigorouslyshake the prepared sample.The sample shows reddish-orange, brown or blue,depending on the zincconcentration.
9. Start the instrumenttimer. A 3-minute reactiontime starts.During the reaction period,complete the next step.
10. Pour the preparedsample solution from themixing cylinder into asecond sample cell.
11. When the timer expires,clean the blank.
12. Insert the blank into thecell holder.
Zero
13. Push ZERO. Thedisplay shows 0.00 mg/L Zn.
14. Clean the preparedsample.
15. Insert the preparedsample into the cell holder.
Read
16. Push READ. Resultsshow in mg/L Zn.
InterferencesInterfering substance Interference level
Aluminum More than 6 mg/L
Cadmium More than 0.5 mg/L
Copper More than 5 mg/L
Iron (ferric) More than 7 mg/L
Manganese More than 5 mg/L
Zinc, Zincon Method (3.00 mg/L) 3

Interfering substance Interference level
Nickel More than 5 mg/L
Organic Material Large amounts may interfere. Pretreat the sample with a mild digestion.
Highly buffered samples orextreme sample pH
Can prevent the correct pH adjustment of the sample by the reagents. Samplepretreatment may be necessary. Adjust the pH to 4–5.
Amino-tri(methylene phosphonicacid) (AMP)
Samples that contain AMP cause a negative interference. Digest the sample to removethis interference (use the total phosphorus hot plate digestion, Method 8190).Note: Be sure to adjust the pH of the sample after the digestion to pH 4–5 with sodium hydroxidebefore the zinc analysis.
DigestionFor total zinc determinations, the sample must be digested with heat and acid to makesure that all forms of the metal are measured. The steps that follow can be used for amild digestion.Note: The following procedure is the USEPA mild digestion procedure. Refer to the Water AnalysisGuide for more digestion procedures.
1. Add concentrated nitric acid to the sample with a glass serological pipet and pipetfiller:
• If the sample was acidified for preservation, add 3 mL of nitric acid to 1 liter of thepreserved sample.
• If the sample was not acidified for preservation, add 5 mL of nitric acid to 1 liter ofsample.
2. Transfer 100 mL of acidified sample to a 250-mL Erlenmeyer flask.3. Add 5 mL of 1:1 hydrochloric acid.4. Put the sample on a hot plate at 95 °C (203 °F) until 15–20 mL of the sample
remains. Make sure that the sample does not boil.5. Put the cooled sample through a 0.45-µm filter to remove any insoluble material.6. Adjust the pH of the digested sample to pH 4–5 with 5.0 N sodium hydroxide. Do not
exceed pH 5 as zinc may precipitate.7. Quantitatively transfer the sample to a 100-mL volumetric flask and dilute to the mark
with deionized water.
Accuracy check
Standard additions method (sample spike)Use the standard additions method (for applicable instruments) to validate the testprocedure, reagents and instrument and to find if there is an interference in the sample.Items to collect:
• 25 mg/L Zinc Voluette® Ampule Standard Solution• Ampule breaker• Pipet, TenSette®, 0.1–1.0 mL and tips• Mixing cylinders, 25-mL (3)
1. Use the test procedure to measure the concentration of the sample, then keep the(unspiked) sample in the instrument.
2. Go to the Standard Additions option in the instrument menu.3. Select the values for standard concentration, sample volume and spike volumes.4. Open the standard solution.5. Prepare three spiked samples: use the TenSette pipet to add 0.1 mL, 0.2 mL and
0.3 mL of the standard solution, respectively, to three 20-mL portions of fresh sample.Mix well.
4 Zinc, Zincon Method (3.00 mg/L)
6. Use the test procedure to measure the concentration of each of the spiked samples.Start with the smallest sample spike. Measure each of the spiked samples in theinstrument.
7. Select Graph to compare the expected results to the actual results.Note: If the actual results are significantly different from the expected results, make sure thatthe sample volumes and sample spikes are measured accurately. The sample volumes andsample spikes that are used should agree with the selections in the standard additions menu. Ifthe results are not within acceptable limits, the sample may contain an interference.
Standard solution methodUse the standard solution method to validate the test procedure, reagents andinstrument.Items to collect:
• 100 mg/L zinc standard solution• 1-L volumetric flask, Class A• 10-mL volumetric pipet, Class A and pipet filler• Deionized water
1. Prepare a 1.00 mg/L zinc standard solution as follows:
a. Use a pipet to add 10.00 mL of 100 mg/L zinc standard solution into thevolumetric flask.
b. Dilute to the mark with deionized water. Mix well. Prepare this solution daily.2. Use the test procedure to measure the concentration of the prepared standard
solution.3. Compare the expected result to the actual result.
Note: The factory calibration can be adjusted slightly with the standard adjust option so that theinstrument shows the expected value of the standard solution. The adjusted calibration is thenused for all test results. This adjustment can increase the test accuracy when there are slightvariations in the reagents or instruments.
Method performanceThe method performance data that follows was derived from laboratory tests that weremeasured on a spectrophotometer during ideal test conditions. Users may get differentresults under different test conditions.
Program Standard Precision (95% Confidence Interval) SensitivityConcentration change per 0.010 Abs change
780 1.00 mg/L Zn 0.97–1.03 mg/L Zn 0.013 mg/L Zn
Summary of methodZinc and other metals in the sample are complexed with cyanide. Adding cyclohexanonecauses a selective release of zinc. The zinc reacts with 2-carboxy-2'-hydroxy-5'-sulfoformazyl benzene (zincon) indicator to form a blue-colored species. The blue color ismasked by the brown color from the excess indicator. The intensity of the blue color isproportional to the amount of zinc present. The measurement wavelength is 620 nm forspectrophotometers or 610 nm for colorimeters.
Pollution prevention and waste managementReacted samples contain potassium cyanide and must be disposed of as a hazardouswaste. Dispose of reacted solutions according to local, state and federal regulations.
Zinc, Zincon Method (3.00 mg/L) 5

Consumables and replacement itemsRequired reagents
Description Quantity/test Unit Item no.
Zinc Reagent Set, 20-mL sample size, includes: — 100 tests 2429300
Cyclohexanone 0.5 mL 100 mLMDB 1403332
ZincoVer® 5 Reagent Powder Pillow, 20-mL 1 100/pkg 2106669
Required apparatus
Description Quantity/test Unit Item no.
Cylinder, graduated mixing, 25 mL with stopper 1 each 2088640
Recommended standards
Description Unit Item no.
Water, deionized 4 L 27256
Zinc Standard Solution, 100-mg/L 100 mL 237842
Zinc Standard Solution, 10-mg/L Voluette® Ampule, 25-mL as Zn 16/pkg 1424610
Zinc Standard Solution, 1000-mg/L 100 mL 1417742
Optional reagents and apparatus
Description Unit Item no.
Flask, Erlenmeyer, 250-mL each 50546
Hot plate, 120 V each 1206701
Hydrochloric Acid, 6.0 N 1:1, 50% 500 mL 88449
Nitric Acid, concentrated 500 mL 15249
Pipet, TenSette®, 0.1–1.0 mL each 1970001
Pipet tips for TenSette Pipet 1970001 50/pkg 2185696
Ampule Breaker, Voluette® ampules each 2196800
Pipet, volumetric, Class A, 10-mL each 1451538
Pipet filler, safety bulb each 1465100
Flask, volumetric, Class A, 1000-mL each 1457453
HACH COMPANYWORLD HEADQUARTERSTelephone: (970) 669-3050FAX: (970) 669-2932
FOR TECHNICAL ASSISTANCE, PRICE INFORMATION AND ORDERING:Call 800-227-4224
Contact the HACH office or distributor serving you.www.hach.com [email protected]
In the U.S.A. –
Outside the U.S.A. –
On the Worldwide Web – ; E-mail –
toll-free
© Hach Company/Hach Lange GmbH, 1989–2013. All rights reserved. 04/2013, Edition 8