seasonal public groundwater supply handbook - michigan · seasonal public groundwater supply ....
TRANSCRIPT
DEQ Environmental Assistance Center www.michigan.gov/deq Telephone: 1-800-662-9278 (05/2015)
MICHIGAN DEPARTMENT OF ENVIRONMENTAL QUALITY OFFICE OF DRINKING WATER AND MUNICIPAL ASSISTANCE
Seasonal Public Groundwater Supply
Handbook
2
Introduction Michigan’s Safe Drinking Water Act, 1976 PA 399, as amended (Act 399), and the administrative rules promulgated thereunder, require that all seasonal public drinking water supplies conduct Michigan Department of Environmental Quality-approved Start-Up Procedures for Seasonal Noncommunity Public Water Supplies for each water supply and certify that the procedures have been completed before serving water to the public. This is required every year beginning in 2016. This document provides a detailed description of the start-up procedures generally associated with noncommunity public water supplies, classified as seasonal supplies. Every seasonal system is unique and these procedures should be tailored to fit the individual supply’s needs. More complex and larger distribution systems may need to work with their local health department (LHD) representative on an individualized start-up procedure. Definition of a Seasonal Supply A seasonal public drinking water supply is one that is not operated on a year-round basis and starts up and shuts down at the beginning and end of each operating season. Examples of seasonal supplies may include campgrounds, golf courses, ice cream parlors, parks, beaches, and marinas. Each LHD classifies seasonal systems individually, based upon the unique operations of each supply. Many year-round supplies have seasonality to their operation, but are not classified as seasonal systems. However, if part of a water supply is depressurized, many of the start-up procedures remain relevant to the water supply’s operations, including the disinfection and collection of at least two “pre-opening,” special-purpose bacteriological samples collected at least 24 hours apart. Contact your LHD if you are unsure if your noncommunity public water supply (NCWS) is seasonal, and for specific requirements for your system. Certification Under Act 399, certification is required each year upon completion of the start-up procedures. Certification is to be submitted promptly to your LHD representative. The Michigan Department of Environmental Quality (DEQ) has provided a Start-Up Certification for Seasonal Noncommunity Public Water Supply form, which can also be obtained from your LHD representative or located electronically, along with the Start-Up Procedures for Seasonal Noncommunity Public Water Supplies, on the DEQ’s Web site at http://www.michigan.gov/deqnoncommunitywatersupply. Failure to Conduct Approved Start-Up Procedures or Submit Certification Failure of a seasonal NCWS to conduct the state-approved start-up procedures prior to serving water to the public will result in a Coliform Treatment Technique Violation, increased monitoring, and potential fines. Failure of a seasonal supply to submit the start-up certification form will result in a reporting violation and potential fines. Risks Involved With Seasonally Operating a Public Drinking Water Supply Many seasonal water supplies drain/depressurize their water supply system over the winter months to prevent freezing damage. When all or part of the drinking water system is depressurized, it increases the risk of introducing contamination into the drinking water supply. Buried water lines that are no longer pressurized are subject to intrusion of surface or near-surface water and any contaminants that may be in that water. An unpressurized distribution system is vulnerable to backsiphonage/backpressure. Seasonal supplies that leave their water system completely pressurized also have risks. Stagnation of the water in the well or distribution system from non-use can lead to deterioration of water quality. Freezing water lines can lead to damage that could introduce contaminants. Although a “shut-down” procedure is not required, it is strongly encouraged to leave piping and components in a sanitary condition at the end of the operating season and for all water outlets to be kept closed or capped off after the “winterization” process.
3
Hand Pump Wells Hand pumps are not pressurized and are typically available for use year-round. If the hand pump is used seasonally, complete the start-up procedures and submit the start-up certification form to the LHD. Disinfection is not required as part of a start-up procedure of seasonal hand pump wells unless work was performed on the well. Summary of Seasonal Supply Start-Up Procedures Certification that the approved start-up procedures have been completed and the water is safe for public consumption is to be completed by the owner or a person designated by the owner. The owner is ultimately responsible for submitting the certification and providing safe drinking water. Timing of Start-Up Procedures The start-up of the water supply system should begin well in advance of the anticipated first day of public use. The start-up procedures may need to be performed more than once if coliform bacteria is found to be present in any of the pre-opening samples. Allow plenty of time for potential repairs, repeating these procedures, and for possible additional sampling before your anticipated opening day. Pre-Opening Tasks There are nine start-up tasks required for all seasonal supplies to complete prior to opening to the public:
1. Evaluate the wellhead and surroundings. 2. Evaluate the water system. 3. Evaluate for cross connections between the water system and sources of contamination. 4. Inspect air gaps and backflow preventers. 5. Test backflow assemblies. 6. Flush the supply. 7. Disinfect any depressurized portions of the supply. 8. Obtain at least two pre-opening non-detect bacteriological samples, collected 24 hours apart,
according to the sample siting plan. 9. Certify and submit the completed start-up certification form and water sample test results to the
LHD prior to opening to the public. Any deficiencies observed should be corrected and details of the work performed should be provided to the LHD with the certification.
Presence of Bacteria If either of the two pre-opening bacteriological sample results are total coliform positive or E. coli positive, contact your LHD. Do not serve water to the public until you have consulted with your LHD. You must contact your LHD immediately if results are E. coli positive. Detailed Seasonal Supply Start-Up Procedures The following describes the approved start-up procedures in detail for a seasonal NCWS. Consult with your LHD for start-up procedures on supplies not depicted in this document, or for procedures that better fit your operations. Contact the LHD regarding any questions relating to these procedures. Information regarding any replacements, repairs, and/or upgrades should be relayed to your LHD. 1. Evaluate the Wellhead (or Hand Pump) and Surroundings
A seasonal supply that has been left unattended for several months may not be in the same condition as it was at time of shut-down. The following items should be assessed when placing a seasonal supply back into operation: a) Inspect the wellhead and casing for any damage, including cracks. Ensure the ground surface
surrounding the casing is sloped away to prevent water from pooling around the well.
4
b) Inspect the well cap to make sure it is tightly attached and free of openings that would allow for insects or animals to crawl inside the well. Ensure the vent on the well cap is downturned and screened.
c) Inspect the electrical conduit to make sure it is tight and that no wires are exposed. d) Physically clear all vegetation that may have grown around the wellhead. Do not spray
herbicides or insecticides around the wellhead. e) Ensure that no chemicals or other potential contaminants are stored near the wellhead. This area
should not be used to exercise pets. f) For hand pumps, make sure the pump base and handle are in good condition and check the
packing nut and packing for wear. Check nuts and bolts for tightness. The concrete slab should not be cracked and burrows under the slab should be filled.
2. Evaluate the Water System
Well houses or well equipment rooms must be kept clean and must not be used as storage areas for items that are unnecessary to the operation and maintenance of the water supply, such as gas cans and paint cans. Evaluate the water storage/pressure tank(s) for signs of cracks, excessive corrosion, or other defects. Tanks should be drained of any stagnant water and disinfected (see Task 7) as necessary to remove any sediment from the base of the tank. Once the system is powered up and the tank is filled with water, check to make sure it is not waterlogged. Waterlogged tanks have been directly associated with positive bacteriological samples. Listen for the pump “short cycling” (turning on and off too rapidly or too frequently). Also, listen to the well pump motor to detect unusual noises, vibrations, or excessive heat. If repairs or replacement of water system equipment are needed, contact your Michigan registered water well contractor or licensed master plumber. Inspect all gauges and controls to make sure they are functioning properly. Evaluate the well equipment and distribution system pipes, valves, and faucets for leaks. Leaks provide potential conduits for contaminants to enter the supply when the system is drained or when pressure is lost. See Appendix A for information on performing a leak test. Eliminate any dead-end lines, as they are difficult to properly flush and disinfect and often contribute to positive bacteriological samples. Consult with a licensed plumber prior to completing work on the distribution system to determine if a plumbing permit is required. Make necessary replacements/repairs and notify the LHD. Care must be taken to not introduce contaminants into the water system if any plumbing is repaired or replaced, and disinfection of the work is necessary.
3. Evaluate the System for Cross Connections
A cross connection is an actual or potential connection between a potable (drinking) water supply and any source or supply not intended for potable use. An unprotected cross connection may introduce bacteria, wastewater, or chemicals into the water system by way of backpressure or backsiphonage. A water supply should be aware of their cross connections and ensure proper protection is in place. Your LHD representative can be a resource for identifying cross connections at your supply.
The following is a list of common items found at water supplies that may have cross connections with the potential for contamination. If these items exist at your water supply, assurance should be made that approved backflow prevention is in good working order (Task 4).
• Hose bibs, water risers, and other threaded faucets (including mops/janitor sinks) • Dump station towers • Urinals and toilets • Chemical dispensers • Boilers or fire suppression systems • Beverage and ice makers • Lawn irrigation systems • Water softener drain lines • Swimming pools
5
4. Visually Inspect All Air Gaps and Backflow Preventers Check all air gaps to ensure they are still in place between the drinking water system and potential contaminant. Check all existing backflow preventers to see if they are in good repair and not leaking.
5. Have All Testable Backflow Assemblies Tested by a Certified Tester
If your supply has testable backflow preventers, contact a certified backflow assembly tester to conduct the test(s) per any nationally recognized test procedure or those in the DEQ’s Cross Connection Rules Manual. Any backflow preventer that fails a test must be repaired, re-tested, and pass a test before being placed into service. Maintain test results on file and submit a copy to the LHD.
6. Flush the Supply
The flushing process involves opening all water fixtures to allow stagnant water and debris to leave the pipes. The scouring action of moving water helps to flush out dirt, loose scale, insects, sand, and/or biofilm. This debris can interfere with the chlorination process by using up available chlorine and preventing the chlorine from coming in contact with the bacteria that may be lodged in the debris. Debris in the system may also contribute to positive bacteriological sample results. Flushing is an essential part of the seasonal supply start-up procedures. The entire supply must be flushed for a totally depressurized supply – from the wellhead to all ends of the distribution system. Supplies that partially depressurize will need to ensure that their drained lines are thoroughly flushed. Seasonal supplies that do not depressurize should also include flushing to address stagnant water issues. Generally, the longer the flushing time, the better. Flushing of a system will depend on the well and pump capacity, the size of the distribution system, and the number of fixtures. Effective scouring of a large distribution system requires adequate flow rates. Therefore, the supply may need to be flushed in sections. The water should run clear. Prior to flushing, all faucet strainers, showerheads, and other attachments should be removed and cleaned. Flushing must be performed before and after chlorine treatment of the system. Flushing of the distribution system should start with the pressure tank first and end at the taps farthest from the well. Flushing of a distribution system should include, at a minimum, the following items: pressure tank, hot water tank, water treatment system, and system plumbing. When flushing for an extended period of time, avoid overloading your on-site wastewater disposal system by flushing water to the ground surface. Hoses may be used to flush the system; however, be sure not to create cross connections, soil erosion, or a nuisance condition. See Appendix A for specific flushing examples and tips.
7. Disinfect the Depressurized Portion of the Supply
Disinfection is used to rid the system of any bacteria or biofilms that may have been introduced during the off-season. Chlorine solution is commonly prepared by using either calcium hypochlorite (a dry granular or tablet form) or sodium hypochlorite (a liquid form) that has been dissolved in clean water. The disinfection process requires specific knowledge and has associated electrical and chemical safety hazards. Extreme caution is needed during any disinfection process. Any persons in the facility during the disinfection process should be advised to avoid contact with the water to prevent possible exposure to high chlorine levels. Do not allow children or pets in the area while the well or distribution system is being disinfected. Disinfection of the Depressurized Distribution For purposes of this document, the distribution system includes the pressure tank, water heater, water treatment equipment, piping system, and fixtures. The preferred method for disinfection of a depressurized distribution system is to add the chlorine solution directly into the water system in the well house or room, and avoid opening up the well. A chlorine injection pump may also be used.
6
Contact your local plumbing inspector for any requirements regarding disinfection of the distribution system when closed to the public. The concentration of chlorine introduced into the system will depend on the following: complexity and length of the piping, natural properties of the water (including hardness and pH), and whether the system is free of bacteria, debris, biofilm, or other materials. Appendix B has additional information on disinfection. Chlorinate the distribution system as follows: 1. Assure that all water treatment equipment is in the “bypass” position. 2. Turn on the outlet closest to the pressure tank until the strong smell of chlorine can be detected
(or check with a test kit). 3. Turn the outlet off and proceed to the next closest outlet. Continue this process until all fixtures
and pipes have been filled with the chlorinated water. Both hot and cold water piping and fixtures must be turned on (separately) until the chlorine smell can be detected.
4. After chlorinated water is in the entire distribution system, the chlorine should remain for the appropriate time period without use (time depends on concentration). This contact time will provide disinfectant contact time to destroy bacteria in the system. Faucets and toilet flush valves may be bagged to prevent accidental water use during this contact time. It is very important that any persons in the facility during this process should be advised to avoid contact with the water to prevent possible exposure to high chlorine levels.
5. Flush the chlorine from the system after proper contact time. The chlorinated water should not be discharged into a septic tank/tile field system. It is suggested that a hose be attached to an outside tap, and the chlorinated water discharged into the yard away from the drain field. Do not discharge to a lake, stream, or other body of water.
6. Continue to run the water until all traces of chlorine are gone from the system. It is recommended that a chlorine test kit be used for verification. Allow the water to run an additional one to two hours to assure that all traces of chlorine have been removed from the system.
7. Put water treatment equipment back online. 8. Collect a bacteriological water sample as designated in your sample siting plan for the
pre-opening sample (Task 8). 9. After 24 hours, collect a second bacteriological sample as designated in your sample siting plan
for the pre-opening sample (Task 8). 10. If test results are coliform positive, consult with your LHD as the entire process may have to be
repeated.
Disinfection of the Well Only a Michigan registered well drilling contractor can disinfect a public water supply well. Disinfection of the water well (including hand pumps) is not a typical seasonal start-up procedure unless work was performed on the well. If well disinfection is needed, disinfection of the distribution system should be performed at the same time. Your water well contractor should provide details of the process that they will be using. Due to the effect of the chlorine on minerals in the water (such as iron) and biofilms that may be present, the water may be turbid or discolored after disinfection. Extended pumping normally clears the water of turbidity. If chlorination and flushing of a distribution system is not successful in removing coliform contamination, contact your LHD.
8. Collect Two Non-Detect Bacteriological Samples 24 Hours Apart
After properly conducting the above-listed start-up procedures as applicable, the owner is responsible for collecting at least two pre-opening bacteriological water samples at the supply’s designated sampling location(s) within the distribution system. Larger water supplies may be required to collect more than one set of pre-opening samples at multiple locations throughout the water supply, as required by the LHD. Ensure that there is no chlorine residual (if the supply was disinfected) before collecting the sample. A field test kit may be used to check for any chlorine residual.
7
Collect one sample, then wait at least 24 hours and collect a second bacteriological sample. Circle “9-Other” for “Sampling Purpose” on the laboratory Request for Water Analysis form for both samples, along with the supply’s Water Supply Serial Number (WSSN). These samples are not considered routine samples. Each sample must be received and analyzed by the laboratory within 30 hours of the collection time. If any sample exceeds this 30 hour time, it will not be a valid sample and you will have to re-sample. Supplies should use whatever shipping method assures the samples will arrive within 30 hours (e.g., UPS, Federal Express). Both samples shall be non-detect for coliform bacteria before water can be served to the public. These two consecutive total coliform samples must be “not detect” to complete the tasks necessary to start up for the season. If coliform or E. coli bacteria are present in the samples, additional flushing and/or disinfection may be required. See Appendix C for proper sampling protocol and understanding water sample results. During pre-opening sample collection, do not collect other water samples such as nitrate. The other analysis must be performed when the supply is open to the public. The nitrate compliance sample can be collected with the routine bacteriological water samples.
9. Certify and Submit Form With Water Sample Results to the LHD
After completing the start-up tasks and receiving your supply’s two “non-detect” 24-hour-apart sample results, complete and submit the annual Start-Up Certification for Seasonal Noncommunity Public Water Supply form, along with your two sample results, to your LHD (if you are using the DEQ State Drinking Water Laboratory, the results are automatically delivered to your LHD). This form is available at your LHD or found electronically on the DEQ’s Web site at http://www.michigan.gov/deqnoncommunitywatersupply. The start-up certification form must be submitted prior to opening to the public.
Be sure to include details on any deficiencies observed while performing the start-up procedures and details regarding any corrections made.
Supply Operation After Certification Collection of Routine Samples After opening your seasonal NCWS to the public, you are required to collect “routine” bacteriological samples per your sample siting plan at a frequency determined by your LHD. The standard routine sampling frequency for seasonal supplies is monthly, with quarterly sampling possible for seasonal supplies meeting all reduction criteria. Place a reminder on your calendar for the days you intend to collect the routine coliform bacteria samples and other required sampling parameters, such as nitrate. It is recommended to collect samples early in the compliance period, or at your most vulnerable period, if necessary. Ensure that bacteriological samples are received at the certified laboratory within 30 hours of the collection of the sample or they will not be valid. Michigan’s Environmental Justice Policy promotes the fair, non-discriminatory treatment and meaningful involvement of Michigan’s residents regarding the development, implementation, and enforcement of environmental laws, regulations, and policies by this state. Fair, non-discriminatory treatment intends that no group of people, including racial, ethnic, or low-income populations, will bear a disproportionately greater burden resulting from environmental laws, regulations, policies, and decision-making. Meaningful involvement of residents ensures an appropriate opportunity to participate in decisions about a proposed activity that will affect their environment and/or health. This publication is intended for guidance only and may be impacted by changes in legislation, rules, policies, and procedures adopted after the date of publication. Although this publication makes every effort to teach users how to meet applicable compliance obligations, use of this publication does not constitute the rendering of legal advice.
8
Appendix A: Leak Testing and Flushing Leak Testing A leak check can be conducted once the system has been repressurized as follows:
1. Fill the entire system with water. 2. Close all taps/water outlets. 3. Switch off the power supply to the well pump. 4. Read the system’s pressure gauge and write down the initial system pressure (do not open any
water outlets or use the water). 5. After one hour, read the pressure gauge again and document the system pressure. 6. Pressure loss over this one-hour time span may indicate leaks. 7. Locate and repair leaks (practice sanitary repairs and check if plumbing permit is required).
Pressure Tank Flushing Galvanized Tanks: These outdated, older style tanks normally have an inlet and outlet above the bottom of the tank. This design leaves a basin at the bottom where scale and other sediment accumulate. Flushing is the most effective way to clean galvanized tanks. Removal of an old galvanized tank and replacing it with a bladder/diaphragm-type tank is the most practical, efficient way to prevent or correct a coliform bacteria problem that may be related to the tank. Bladder/Diaphragm Tanks: These tanks normally have only one pipe entering the tank. This opening serves as both the inlet and outlet for the tank and is located at the bottom center of the tank. These tanks are flushed out during each pump cycle, since the tank is nearly emptied of all water when the pump runs. Most of the sediment or scale that may have entered the tank with the water is flushed out as the water is discharged from the tank. On older tanks, the integrity of the rubber bladder may deteriorate, causing a leak, which will result in a “waterlogged” tank. This allows water to seep between the bladder and the tank, making it difficult to flush. Also, bacteria may grow in the tank causing further problems; therefore, it is necessary to check for a waterlogged tank. Water Heater Flushing Hot water tanks have a basin at the bottom of the water heater tank that allows for the collection of scale and other debris that may have been introduced into the tank from the well or minerals in the water. However, thorough cleaning of most domestic water heaters is not possible, since there are no access openings into the tank. The only way to attempt cleaning is by flushing, using the boiler drain (faucet) near the bottom of the tank. Flushing may remove much of the debris in the tank, but complete removal of all material cannot be assured. Follow the manufacturer’s recommendation for flushing the water heater. Water Treatment Equipment Flushing Water treatment systems commonly include water softeners, reverse osmosis systems, iron removal systems, hydrogen sulfide treatment systems, and cartridge filters. Naturally-occurring organic and inorganic nutrients, which are present in many water supplies, will concentrate in these treatment systems and may facilitate bacterial growth. Follow the manufacturer’s recommended cleaning procedures for any treatment equipment. Assure any cartridge filters or other water treatment equipment in the water system are clean, filters/parts are replaced as needed, and that the units are functioning properly. Verify that all water treatment chemicals are NSF 61-approved, within the expiration date, and stored properly. Check that test kit reagents have not expired and that the required safety equipment is on hand. Contact your LHD immediately if any permitted and required water treatment units are no longer functioning.
9
Distribution and Fixture Flushing Some recommendations to flushing a water supply include:
1. Put water treatment equipment (such as water softeners or filters) in the bypass position. 2. Remove and clean faucet aerators or similar devices on the outlets and replace as needed. 3. Start with the outlet closest to the source of water (pressure tank). Each outlet (hot and cold) in
the distribution system needs to be individually flushed, one at a time. Outlets include, but are not limited to, sinks, outside taps, bathtubs, shower heads, toilets, laundry sinks, dishwashers, refrigerator ice makers, and clothes washing machines.
4. Turn on the outlet to full volume and flush it until the water being discharged is free of any debris or turbidity.
5. If the outlet is a mixing-type fixture (hot and cold water using the same outlet), flush each side separately.
6. Turn off that outlet and proceed to the next closest outlet. Repeat the flushing process. 7. Continue this process, one outlet at a time, until all outlets have been flushed.
10
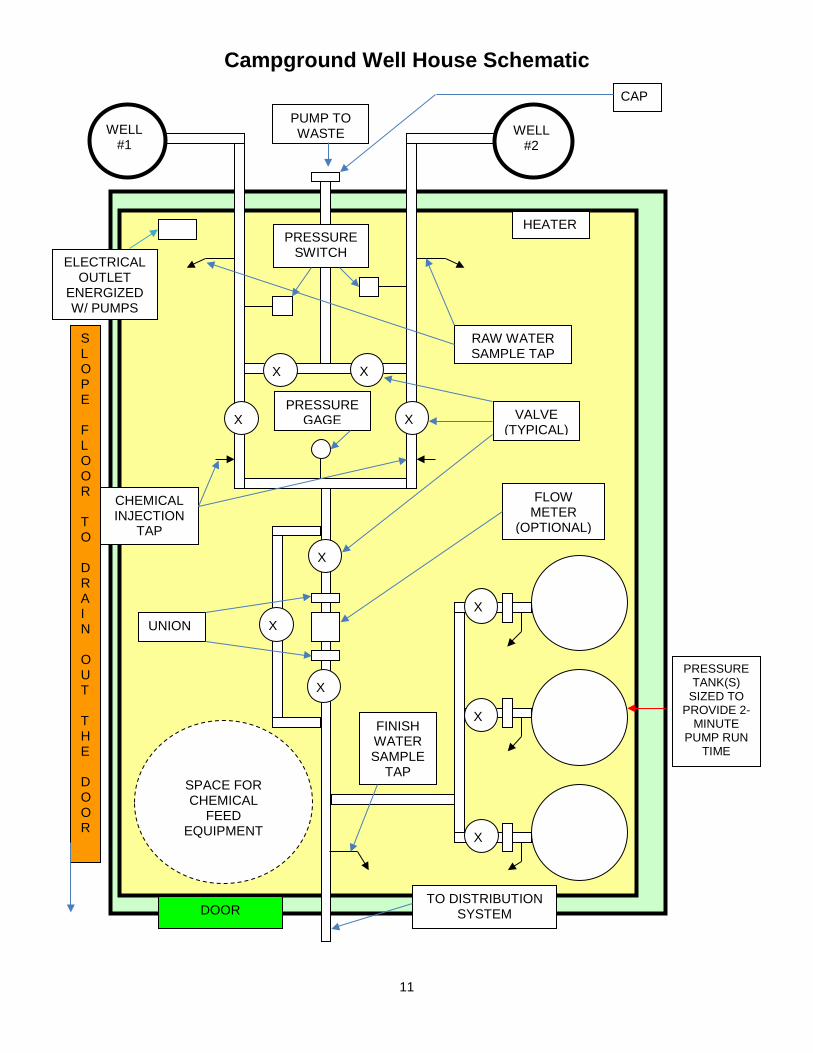
Appendix B: Disinfection Excessive chlorine will change the pH of the water, may cause plumbing corrosion, and actually reduce the effectiveness of the chlorine. Too little chlorine will not provide enough disinfectant to destroy all microorganisms that may be present. In general, when chlorinating the distribution system, you must estimate the total length of water pipes and calculate the total volume of water in the plumbing. If the system is believed to be reasonably clean, then 5 parts per million (ppm) is a good disinfecting concentration. If contamination is expected, then a higher concentration should be used (50-200 ppm). About one and one-half cups of 5.25 percent, unscented household bleach for every 1,000 gallons of water in the system will provide a chlorine concentration of 5 ppm; and one gallon of bleach for every 1,000 gallons of supply water will provide a chlorine concentration of 50 ppm. Note: no one shall have access to the water when using these concentrations of chlorine. Chlorinating the Water Treatment Equipment Follow the manufacturer’s recommendations for cleaning and disinfection of water treatment equipment with chlorine. If instructions are not readily available, contact the manufacturer or a water treatment company. The brine (salt) tank associated with a water softener should be cleaned. Water softener salt may contain sand and other impurities that accumulate as sludge in the bottom of the tank as the salt dissolves. The sludge that builds up should be removed periodically to prevent this from becoming a place to harbor bacteria, which may then contaminate the distribution system piping when the water softener regenerates. Chlorination With a Positive Displacement Feed Pump A positive displacement chlorine feed pump shall not be installed permanently on the drinking water system without approval from the DEQ. A positive displacement chlorinator is a type of piston, diaphragm, gear, or screw pump that delivers a constant volume of chlorine into the water system with each stroke. The amount of chlorine introduced is controlled by the solution pump stroke and frequency of stroke. These pumps are equipped with an electric motor, piston, diaphragm, suction and injection valves, chemical holding tank, and foot valve. Advantages of this type of injection pump are its ability to deliver the disinfectant over a wide range of injection rates, time, and ease of adjustment. The concentration of chlorine should be measured at various places in the distribution system, especially at the furthest end of the system, to make sure an adequate level of available chlorine remains after the chlorine demand of the supply is satisfied. The chlorine can be tested with a field test kit. Once the chlorine residual is obtained, the chlorinator must be disconnected from the system. The illustration on Page 12 is an example of an above-grade room that houses pumping equipment, which provides for disinfection of the entire water system, as required in Michigan’s Campground Rules, pursuant to the Public Health Code, 1978 PA 368, as amended, R 325.1559. This example is intended for one-time use when the system is closed to the public.
11
Campground Well House Schematic
WELL #2
WELL #1
X
X
X
X
X
X
X
DOOR
PUMP TO WASTE
RAW WATER SAMPLE TAP
HEATER
SPACE FOR CHEMICAL
FEED EQUIPMENT
VALVE (TYPICAL)
PRESSURE TANK(S)
SIZED TO PROVIDE 2-
MINUTE PUMP RUN
TIME
PRESSURE SWITCH
ELECTRICAL OUTLET
ENERGIZED W/ PUMPS
PRESSURE GAGE
CHEMICAL INJECTION
TAP
FLOW METER
(OPTIONAL)
UNION
FINISH WATER SAMPLE
TAP
TO DISTRIBUTION SYSTEM
SLOPE FLOOR TO DRAIN OUT THE DOOR
CAP
X
X
X
12
Appendix C: Coliform Sampling Tips Preferred Sampling Taps:
• The sampling tap is in a clean location • The tap is in frequent use • The flow of water from the tap is easily controlled • The tap is located where it may be flushed as part of the sampling procedure • The tap location is easily accessible • The sample bottle can easily fit under the tap
Sampling Taps to Avoid
• Taps with swivel/swing type spouts • Faucets with leaks around the valve stem • Taps with leaks around the base of the spout • Taps with unclean aerators or other accessories (such as filters) attached to the spout • Taps located in areas that are not cleaned or maintained • Taps that are subject to splash or contamination (e.g., bathroom sink or a janitor’s mop sink) • Taps with threaded bibs • Taps that do not have a uniform stream of water • Mixing (hot and cold) faucets • Frost-free hydrants with buried stop and waste valves • Faucets that were recently installed or repaired that have not yet been treated with chlorine
Sample at locations identified in your sample siting plan. Pre-Opening Coliform Bacteria Water Sample Collection Procedures
1. Use LHD-designated sample tap The total coliform rule requires bacteriological samples to be collected from locations in the distribution system representative of drinking water taps. Your LHD representative has identified the sampling location for your two (or more, as required) pre-opening samples in the last sanitary survey report or correspondence sent to you. If unsure where you are to collect the samples, contact your LHD.
2. Flush the sampling tap Turn on the sampling tap to the maximum extent possible and let the water run for at least five minutes or for at least one pump cycle (i.e., the pump has run at least twice).
3. Check for chlorine residual If the water system has been recently treated with chlorine, use a chlorine test kit to assure that no chlorine residual is present. If chlorine residual is present, the water system needs further flushing before a sample is collected.
4. Reduce the flow of water before collecting the sample Reduce the flow of water at the sampling tap to a steady pencil thin stream with no splash occurring. This will allow for a controlled filling of the water bottle.
5. Collect the bacteriological sample Use only sterile bottles specifically prepared and designated for collecting water samples for coliform bacteria analysis. If the cap of the sampling bottle is loose or dropped, or if the integrity of the sample bottle is in question, discard the sample bottle. Do not rinse the sample bottle. The bottle is treated with sodium thiosulfate, which inactivates small amounts of chlorine that may still be present in the water. Remove the seal and cap from the sample bottle and hold the cap, facing downward. Do not touch the rim or inside of the cap or sample bottle. Do not set the cap on any surface. Collect the water sample immediately after removing the cap. Keep the stream of water from the tap completely inside the mouth of the sample bottle. Fill the sample bottle to the designated 100 millimeter line. Do not allow the sample container to overflow. Do not pour any water out of the sample bottle. If you think you made a mistake in collecting the sample, discard that bottle and get a new one. Tightly recap the sample bottle immediately after collecting the water.
13
6. Shake the sample bottle Gently and briefly shake the sample bottle to dissolve the sodium thiosulfate tablet or residue in the container.
7. Complete the water sample report form It is critical that specifics of the sampling event be provided along with the sample. Your drinking water laboratory will provide a sample collection form, which is to be completed and returned with the sample. The following items must be included on the sample collection form: WSSN, source identification, date and time of collection, sample tap used, sample collector’s name, and sample purpose (i.e., for pre-opening seasonal start-up, circle “9-Other” for “Sampling Purpose” on the laboratory Request for Water Analysis form).
8. Promptly mail or deliver the water sample to the certified laboratory The sample must be received and analyzed by the laboratory within 30 hours of your collection time or it will be invalidated and you will have to re-sample.
9. Collect the second bacteriological sample Collect the second bacteriological sample 24 hours after collecting the first sample, following the steps above.
Bacteriological Analysis Evaluation of the bacteriological quality of drinking water is performed using “coliform” testing. Coliform bacteria are found in the intestinal tracts of warm-blooded animals, surface water, some soils, and decaying vegetation. Coliform bacteria are used as “indicator” organisms. If they are present, pathogenic or disease-causing organisms could be present. A positive result may indicate that a water supply is not properly protected from contamination. If the laboratory analysis detects coliform bacteria, the sample is also analyzed for E. coli, an organism that always originates from mammal or bird intestinal tracts. If E. coli is detected, it is more likely that the water supply may contain disease-causing organisms resulting from fecal contamination. Results: ND – This means “Not Detected”; no coliform organisms were detected in the water sample. The sample met the state drinking water standard for bacteriological quality at the time of sampling (similar results may be reported as negative, absent, or zero). POS – This means “Positive”; coliform organisms were present in the water sample. EC-POS – This means “E. coli detected”; E. coli organisms were detected in the water sample. E. coli organisms are found in the intestines of warm-blooded animals and, as such, their presence in a water supply is considered an indication of sewage contamination. Contact your LHD immediately. Comments – Coliform organisms may die during sample holding time (time from collection to testing). The laboratory will comment that results may not be representative or valid if sample holding time is longer than 30 hours. Re-sampling is required for compliance, as any sample over the 30-hour hold time will not be accepted.