sd5bcbw series spectra ii™ c2423m (5/00) · the spectra ii dome can do either one full pattern...
TRANSCRIPT

SD5BCBW SeriesSpectra II™
Color/Black & WhiteDome Systems
Operation andProgramming Manual
C2423M (5/00)
®
Pelco • 3500 Pelco Way • Clovis, CA 93612-5699 USA • Pelco Online @ www.pelco.comIn North America and Canada: Tel (800) 289-9100 • FAX (800) 289-9150 • DataFAX (800) 289-9108
International Customers: Tel +1(559) 292-1981 • FAX +1(559) 348-1120 • DataFAX +1(559) 292-0435PelcoEurope BV • Dillenburg Center, Dillenburgstraat 5F • 5652 AM Eindhoven • The Netherlands
Tel +31(40) 251-9870 • FAX +31(40) 251-9835

2 Pelco Manual C2423M (5/00)
CONTENTS
Section Page
IMPORTANT SAFEGUARDS AND WARNINGS................................................................ 3OPERATION ...................................................................................................................... 4
POWER-UP DISPLAY ............................................................................................... 4OPERATING YOUR SPECTRA II COLOR/BLACK & WHITE DOME ........................ 4OPERATING NOTES ................................................................................................. 5
PAN AND TILT FUNCTIONS .............................................................................. 5AUTO FLIP......................................................................................................... 5SCAN SPEED .................................................................................................... 5PRESET FUNCTIONS ....................................................................................... 5RANDOM, FRAME, AND AUTO SCANNING .................................................... 5ZONES ............................................................................................................... 5PATTERNS ........................................................................................................ 6ALARMS ............................................................................................................ 6AUXILIARY OUTPUTS ...................................................................................... 7PARK.................................................................................................................. 7IR FILTER .......................................................................................................... 7AUTO IRIS ......................................................................................................... 7
PROGRAMMING ............................................................................................................... 8PROGRAMMING GUIDE - SPECTRA II COLOR/BLACK & WHITE ......................... 8ACCESSING MAIN MENU (PRESET 95) .................................................................. 9ALARMS ...................................................................................................................10ALARM DWELL ........................................................................................................ 10ALARM PATTERN .................................................................................................... 10ALARM PRIORITY .................................................................................................... 11ALARM RESUME ..................................................................................................... 11AUTO FLIP ................................................................................................................12AUTO FOCUS MODE ...............................................................................................12AUTO IRIS ................................................................................................................13AUTO IR LEVEL .......................................................................................................14AUX MODE ............................................................................................................... 14BACKLIGHT COMPENSATION ................................................................................ 15GAIN/AGC................................................................................................................. 16
AGC MODE ...................................................................................................... 16GAIN ................................................................................................................. 16
IR FILTER MODE ...................................................................................................... 17LIMIT STOPS ............................................................................................................17
TURNING LIMIT STOPS ON OR OFF .............................................................18PROGRAMMING LIMIT STOPS ....................................................................... 18
Manual Limit Stops ...................................................................................18Scan Limit Stops ....................................................................................... 18
LINE SYNCHRONIZATION ....................................................................................... 18PARK TIME MINUTES ..............................................................................................19PATTERN LENGTH .................................................................................................. 19POWER-UP MODE ...................................................................................................20PROPORTIONAL PAN ..............................................................................................20RESET CAMERA ...................................................................................................... 21SCAN SPEED ........................................................................................................... 22SHARPNESS ............................................................................................................22SHUTTER SPEED .................................................................................................... 23SLOW SHUTTER MODE ..........................................................................................24WHITE BALANCE .....................................................................................................25ZONES ...................................................................................................................... 25ZONE BLANK ........................................................................................................... 26ZOOM LIMIT ............................................................................................................. 26
MAINTENANCE ................................................................................................................27DOME CLEANING .................................................................................................... 27SERVICE MANUAL .................................................................................................. 27
SPECIFICATIONS............................................................................................................. 27WARRANTY AND RETURN INFORMATION ....................................................................28

Pelco Manual C2423M (5/00) 3
IMPORTANT SAFEGUARDS AND WARNINGS
Prior to installation and use of this product, the following WARNINGS should be observed.
1. Installation and servicing should only be done by qualified service personnel and con-form to all local codes.
2. Unless the unit is specifically marked as a NEMA Type 3, 3R, 3S, 4, 4X, 6, or 6P en-closure, it is designed for indoor use only and it must not be installed where exposedto rain and moisture.
3. Only use replacement parts recommended by Pelco.
4. After replacement/repair of this unit’s electrical components, conduct a resistancemeasurement between line and exposed parts to verify the exposed parts have notbeen connected to line circuitry.
5. The installation method and materials should be capable of supporting four times theweight of the enclosure, pan/tilt, camera and lens combination.
The product and/or manual may bear the following marks:
Please thoroughly familiarize yourself with the information in this manual prior to installationand operation.
MEASURES DE SECURITE IMPORTANTES
Avant d’installer ou d’utiliser ce produit, les mesures de sécurité suivantes sont à prendre:
1. Toute installation et réparation devraient être entreprises par un technicien qualifié etconformes au codes locaux.
2. A moins que cet equipement indique avoir un boitié agrée NEMA de type 3, 3R, 3S, 4,4X, 6 ou 6P, il est uniquement conçu pour utilisation intérieure et ne peut donc pasêtre en contact de pluie ou d’humidité.
3. Utiliser seulement les pièces de rechanges recommandées par Pelco.
4. Après toute installation ou réparation de la partie électrique de ce produit, unerésistance entre le courant et la partie exposée devrait être installée afin de vérifierque la partie électrique n’aie pas été en contact d’un court circuit.
5. L’installation entreprise et le matériel utilisé devraient supporter quatre fois le poids duboitié, de la tourelle, de la caméra, et de la lentille.
Ce produit et/ou le manuel pourrait inclurent les symbols suivants:
Nous vous prions de bien vous familiarisez avec la manuel avant d’entreprendre toute in-stallation.
CAUTION:
RISK OF ELECTRIC SHOCK.DO NOT OPEN.
CAUTION:
RISQUE DE CHOQUE ÉLECTRIQUE.NE PAS OUVRIR.
Ce symbol indique qu’un voltagedangereux pouvant provoquer un chockélectrique est présant dans cette unité.
Ce symbol indique qu’il y a des mesuresd’installation et d’entretient importantesinclus dans le manuel de cet équipement.
This symbol indicates that dangerous voltageconstituting a risk of electric shock is presentwithin this unit.
This symbol indicates that there are importantoperating and maintenance instructions in theliterature accompanying this unit.
4 Pelco Manual C2423M (5/00)
OPERATION
POWER-UP DISPLAY
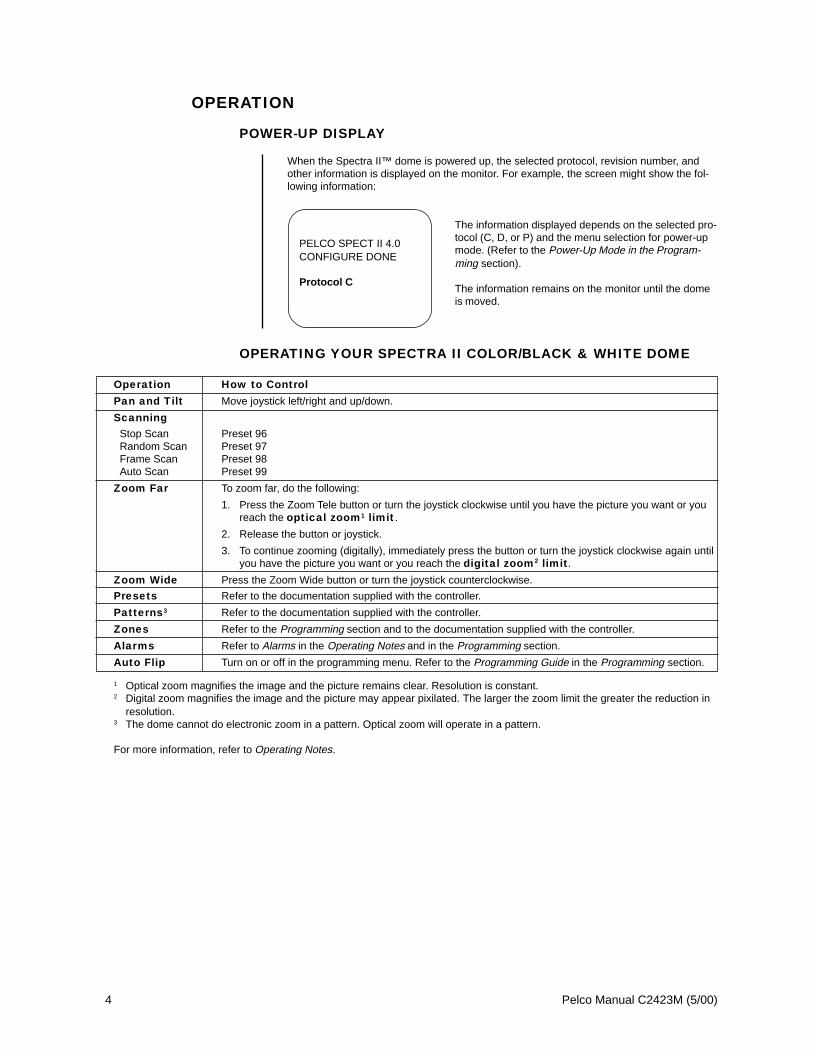
When the Spectra II™ dome is powered up, the selected protocol, revision number, andother information is displayed on the monitor. For example, the screen might show the fol-lowing information:
The information displayed depends on the selected pro-tocol (C, D, or P) and the menu selection for power-upmode. (Refer to the Power-Up Mode in the Program-ming section).
The information remains on the monitor until the domeis moved.
OPERATING YOUR SPECTRA II COLOR/BLACK & WHITE DOME
Operation How to Control
Pan and Tilt Move joystick left/right and up/down.
ScanningStop Scan Preset 96Random Scan Preset 97Frame Scan Preset 98Auto Scan Preset 99
Zoom Far To zoom far, do the following:
1. Press the Zoom Tele button or turn the joystick clockwise until you have the picture you want or youreach the optical zoom1 limit.
2. Release the button or joystick.
3. To continue zooming (digitally), immediately press the button or turn the joystick clockwise again untilyou have the picture you want or you reach the digital zoom2 limit.
Zoom Wide Press the Zoom Wide button or turn the joystick counterclockwise.
Presets Refer to the documentation supplied with the controller.
Patterns3 Refer to the documentation supplied with the controller.
Zones Refer to the Programming section and to the documentation supplied with the controller.
Alarms Refer to Alarms in the Operating Notes and in the Programming section.
Auto Flip Turn on or off in the programming menu. Refer to the Programming Guide in the Programming section.
1 Optical zoom magnifies the image and the picture remains clear. Resolution is constant.2 Digital zoom magnifies the image and the picture may appear pixilated. The larger the zoom limit the greater the reduction in
resolution.3 The dome cannot do electronic zoom in a pattern. Optical zoom will operate in a pattern.
For more information, refer to Operating Notes.
PELCO SPECT II 4.0CONFIGURE DONE
Protocol C

Pelco Manual C2423M (5/00) 5
OPERATING NOTES
PAN AND TILT FUNCTIONS
Controller Type Pan TiltFixed speed Speed determined by controller Speed determined by controllerVariable speed 0.1 to 80° per second, depending on joystick position 0.1 to 40° per second, depending on joystick position
Turbo Mode 150° per second 200° per secondPreset Mode 250° per second Does not affect the tilt speed
If the proportional pan mode is enabled (refer to Proportional Pan in the Programming sec-tion), the pan and tilt speeds will depend on the amount of zoom. At telephoto zoom set-tings, the pan and tilt speeds will be slower for a given amount of joystick deflection than atwide zoom settings. This keeps the image from moving too fast on the monitor when thereis a large amount of zoom. This slowing does not happen when going to a preset, but doesoccur in turbo mode when high zoom is selected. The minimum pan and tilt speeds are 0.1degree per second at full zoom.
AUTO FLIPWhen the camera tilts downward and goes just beyond the vertical position, the dome ro-tates 180 degrees. When the dome rotates (flips), the camera starts moving upward aslong as you continue to hold the joystick in the down position. Once you let go of the joy-stick after the dome rotates, joystick control returns to normal operation. The auto-flip fea-ture is useful for following a person who passes directly beneath the camera. Refer to AutoFlip in the Programming section.
SCAN SPEEDScan speed is adjustable from 1 to 40 degrees per second through the programming menu.
PRESET FUNCTIONSThe Spectra II dome is capable of going to 64 preset locations, each with a 20-character la-bel. The presets are numbered 1-32 and 35-66. Refer to the documentation for your controlsystem for programming presets.
When a preset operation is performed, the amount of error in moving to the pan and tiltposition is 1/2 degree. If you command the dome to go to an undefined preset, erraticoperation may result.
Presets 33 and 34 are fixed commands, meaning that you cannot program them. Preset 33is the “flip” command, which will pan the dome drive 180 degrees. Preset 34 is the “pan zero”command, which will direct the dome drive to the factory-determined zero reference point.
RANDOM, FRAME, AND AUTO SCANNINGCall preset 97 (30) to start random scanning. Call preset 98 (31) to activate frame scanning(three seconds of scanning followed by a three-second pause). Call preset 99 (32) to startauto (continuous) scanning. Scan limit stops are controlled by software. Refer to the LimitStops section to program the scan limit stops. When the dome reaches a scan limit stop, itreverses direction. Call preset 96 (29) to stop a scan. Any pan/tilt or lens command also willstop a scan.
ZONESThe Spectra II dome is capable of eight zones, each with a 20-character label. Dependingon the controller, you can define the zone size and define any zone as “blanked” for videowhen the camera pans into the zone area. If zone labels are turned off, the system displaysthe message, VIDEO BLANK, to indicate the video is being blanked and is not failing. (Re-fer to Zone Blank in the Programming section for instructions.)
NOTE: For AmericanDynamics controllers withonly 32 presets, set switchSW1-7 on the dome drive inthe ON position. WhenSW1-7 is ON, preset
99 becomes 3298 becomes 3197 becomes 3096 becomes 2995 becomes 2893 becomes 2692 becomes 2591 becomes 2490 becomes 2389 becomes 2288 becomes 21
If the limit stops are turnedoff (refer to the Limit Stopssection), presets 23-26 canbe used as regular presets.

6 Pelco Manual C2423M (5/00)
PATTERNSThe Spectra II dome can do either one full pattern (1.5, 3, or 6 minutes long) or two halfpatterns (.75, 1.5, or 3 minutes long). This pattern can consist of any standard pan and tiltor lens command. Presets, flip, and turbo are not allowed in a pattern. Zone scan can beenabled while running a pattern.
Refer to the documentation for your control system to program and run patterns.
ALARMSThe Spectra II dome has seven alarm inputs, which can be designated as either high or lowpriority through its programming menu.
When an alarm is received, the dome does one of the following:
• Moves to the preset position that corresponds to the alarm number. For example, ifalarm 3 is activated, the dome moves to preset 3.
• Runs a half pattern or full pattern as programmed in the Alarm Pattern menu.
• If the activated alarm inputs have the same priority–all low or all high–then the domewill sequence between the presets that correspond to the alarm numbers.
• If the activated alarm inputs have different priorities–for example, one is high and fourare low–the dome goes only to the high. It remains fixed on the high and only goes tothe low after the high has been cleared.
In certain situations, the dome will respond as follows:
• If a preset has not been set, but an alarm is connected, the dome will go to a factorypreset that will not be the desired position.
• If one alarm is a preset and another is a pattern and both are received, the dome willalternate between them.
An alarm clears by returning to its former (off) state.
Depending on choices made on the programming menu, the dome can respond to an alarmby running one of the patterns below. (Refer to Patterns in the Programming section formore information.)
• Run full pattern• Run half pattern 1• Run half pattern 2
When sequencing between presets, the dwell time depends on the time set on the AlarmDwell menu for that preset. After the dwell time expires, the dome immediately does one ofthe following:
• If the resume feature was selected on the programming menu and there are no otheralarms activated, the dome resumes its prior activity. So, it might return to its previousposition or resume a scan or pattern.
• If there are other alarms activated, the dome goes to them.
If you move the joystick to pan or tilt the dome, or if you issue a lens command while thereis an alarm, the pan and tilt or lens command overrides the alarm. Sixty seconds after thelast pan and tilt or lens command, the dome will return to the alarm preset if the alarm isstill active.
NOTE: The dome cannotdo electronic zoom in apattern. Optical zoom willoperate in a pattern.

Pelco Manual C2423M (5/00) 7
AUXILIARY OUTPUTSAn AUX 1 command from the controller will activate the relay in the dome and operate thedevice that is connected to the relay. The relay will remain latched until a clear command isissued.
An AUX 2 command from the controller will place a ground at the output of AUX 2 to oper-ate the device that is connected to it. The output will remain latched until a clear commandis issued.
The output relay can also be programmed so that it is activated when any alarm input is ac-tivated. When latching (toggling) is selected on the programming menu, giving the AUX 1command from the controller changes the state of the AUX (for example, if it was on, thisturns it off.) The clear command from the controller will turn the AUX off in the latching ortoggle mode.
PARKIf the dome does not receive any commands for a specified period of time (refer to ParkTime Minutes in the Programming section), the dome will go to preset 1 and park. If thetime specified is zero, or if preset 1 has not been programmed, the dome will not park.The default is zero minutes.
IR FILTERThe Spectra II color/black and white dome has an IR (infrared) cut filter in the lens thatswitches in and out, automatically or manually, depending on how the dome is pro-grammed. Automatic operation is controlled by the Auto IR Level setting. Manual operationis controlled by presets 88 (filter IN) and 89 (filter OUT).
The dome also has two settings that enhance viewing in low light: the Auto IR Level andSlow Shutter Mode.
The IR filter level is the light level at which the lens switches IN or OUT. When the filter isIN, the camera produces a color picture. When the IR filter switches OUT, the picturechanges to black and white, increasing visibility in low light conditions.
The slow shutter mode electronically extends the shutter time, providing greater sensitivityin low light conditions. The picture may appear rough or smeared, depending on the dis-tance and motion of the viewed image. This feature operates with the IR filter IN or OUT.
LOW LIGHT does not mean NO LIGHT. Some type of illumination is required(street light, IR light, etc.). The camera is not sensitive to IR light when the IR cutfilter is IN.
AUTO IRISIf auto iris is in the auto mode, it remains that way until you manually open or close the iris.The dome will return to auto iris when it is panned or tilted more than 15 degrees. If there isnot enough light for a good picture when the iris is wide open, you can increase the gain ofthe camera to improve the picture.
To increase the gain:1. Hold down the Iris Open button until the iris is wide open.2. Release the button.3. Within one second, hold down the button again. This starts increasing the camera
gain. Hold down the button until a desirable picture is obtained or the maximum gain isreached.

8 Pelco Manual C2423M (5/00)
PROGRAMMING
Programming Guide - Spectra II Color/Black & White
1. Access main menu (preset 95).2. Make main menu selections.
Joystick: Move up or down to position cursor orto toggle between selections.
Iris Open: EnterIris Close: Cancel
PRESETSThe following presets arereserved for special functions.
Preset Function1 Park
1-7 Alarms, if used33 Flip command34 Pan zero
command88 IR filter IN89 IR filter OUT
90-91 Manual limit stops92-93 Scan limit stops
95 Select cameraprogrammingmenu
96 Stop a scan97 Random scanning98 Frame scanning99 Start auto
scanning
For detailed instructions, refer to the following sections.Menu items are listed alphabetically.
MAIN MENU
<Camera><Line Sync><Power Up><Aux><Alarms, Zone Blank><Other>EXIT
Sharpness Menu
Sharpness 15Exit
Camera Menu
Backlight comp OffZoom limit x72Reset camera<Gain/AGC><Auto-iris><Next>Exit
Line Sync Menu
Line sync OnLine sync phase 0Exit
Power-Up Menu
Power Up DefaultExit
Aux Menu
Aux 1 mode NormalAux 2 mode NormalExit
Alarms, Zone Blank Menu
Alarm resume OffAlarm dwell sec 5<Alarm priority><Alarm pattern><Zone blank>Exit
Other Menu
Auto flip OnProportional pan OnLimit stops OffPark time minutes 0Scan speed deg/s 25Pattern length 1.5 minExit
Gain/AGC Menu
AGC mode AutoGain 6Exit
Auto-Iris Menu
Auto-iris mode AutoAuto-iris level 7Exit
Next Menu
Slow shutter mode AutoShutter speed AutoAuto focus mode Auto<IR Filter><Sharpness><White balance>PreviousExit
Alarm Priority Menu
Alarm 1 Low2 Low3 Low4 Low5 Low6 Low7 Low
Exit
Alarm Pattern Menu
Alarm 1No Pattern2No Pattern3No Pattern4No Pattern5No Pattern6No Pattern7No Pattern
Exit
Zone Blank Menu
Video Blank Zone 1Off2Off3Off4Off5Off6Off7Off8Off
Exit
IR Filter Menu
IR Filter mode AutoAuto IR Level DuskExit
White Balance Menu
Auto white bal OnRed bal level - -Blue bal level - -Exit
Pelco Manual C2423M (5/00) 9
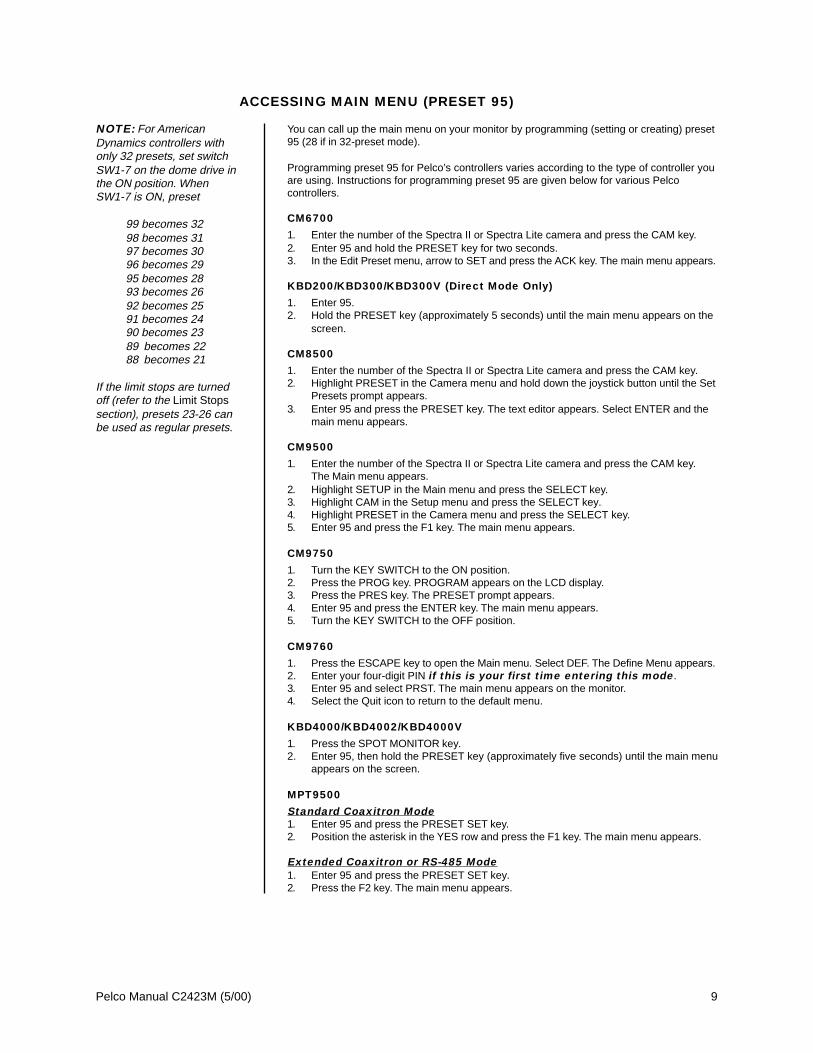
ACCESSING MAIN MENU (PRESET 95)
You can call up the main menu on your monitor by programming (setting or creating) preset95 (28 if in 32-preset mode).
Programming preset 95 for Pelco’s controllers varies according to the type of controller youare using. Instructions for programming preset 95 are given below for various Pelcocontrollers.
CM6700
1. Enter the number of the Spectra II or Spectra Lite camera and press the CAM key.2. Enter 95 and hold the PRESET key for two seconds.3. In the Edit Preset menu, arrow to SET and press the ACK key. The main menu appears.
KBD200/KBD300/KBD300V (Direct Mode Only)
1. Enter 95.2. Hold the PRESET key (approximately 5 seconds) until the main menu appears on the
screen.
CM8500
1. Enter the number of the Spectra II or Spectra Lite camera and press the CAM key.2. Highlight PRESET in the Camera menu and hold down the joystick button until the Set
Presets prompt appears.3. Enter 95 and press the PRESET key. The text editor appears. Select ENTER and the
main menu appears.
CM9500
1. Enter the number of the Spectra II or Spectra Lite camera and press the CAM key.The Main menu appears.
2. Highlight SETUP in the Main menu and press the SELECT key.3. Highlight CAM in the Setup menu and press the SELECT key.4. Highlight PRESET in the Camera menu and press the SELECT key.5. Enter 95 and press the F1 key. The main menu appears.
CM9750
1. Turn the KEY SWITCH to the ON position.2. Press the PROG key. PROGRAM appears on the LCD display.3. Press the PRES key. The PRESET prompt appears.4. Enter 95 and press the ENTER key. The main menu appears.5. Turn the KEY SWITCH to the OFF position.
CM9760
1. Press the ESCAPE key to open the Main menu. Select DEF. The Define Menu appears.2. Enter your four-digit PIN if this is your first time entering this mode.3. Enter 95 and select PRST. The main menu appears on the monitor.4. Select the Quit icon to return to the default menu.
KBD4000/KBD4002/KBD4000V
1. Press the SPOT MONITOR key.2. Enter 95, then hold the PRESET key (approximately five seconds) until the main menu
appears on the screen.
MPT9500
Standard Coaxitron Mode1. Enter 95 and press the PRESET SET key.2. Position the asterisk in the YES row and press the F1 key. The main menu appears.
Extended Coaxitron or RS-485 Mode1. Enter 95 and press the PRESET SET key.2. Press the F2 key. The main menu appears.
NOTE: For AmericanDynamics controllers withonly 32 presets, set switchSW1-7 on the dome drive inthe ON position. WhenSW1-7 is ON, preset
99 becomes 3298 becomes 3197 becomes 3096 becomes 2995 becomes 2893 becomes 2692 becomes 2591 becomes 2490 becomes 2389 becomes 2288 becomes 21
If the limit stops are turnedoff (refer to the Limit Stopssection), presets 23-26 canbe used as regular presets.

10 Pelco Manual C2423M (5/00)
ALARMS
The Spectra II dome has seven alarm inputs, which can be designated as either high or low pri-ority. The high priority setting is significant when more than one alarm is activated. If priority inalarms is not required, leave all alarms in the low setting. Refer to the Alarm Priority section.
If presets 1-7 are not used for alarms, they can be used as regular presets. However, if theyare being used for alarms, they should not be used for anything else.
Also refer to the Alarm Dwell, Alarm Pattern, Alarm Resume, and Pattern Length sectionsto program alarm conditions.
ALARM DWELL
NOTE: Pattern length is seton the secondary menuentitled Other.
NOTE: To make the patternrun to its end when an alarmactivates it, make alarmdwell time longer thanpattern length. Thus, if thealarm goes away before theend of the pattern, thepattern will continue until thedwell times out.
Main Menu
<Camera><Line Sync><Power Up><Aux><Alarms, Zone Blank><Other>EXIT
Alarms, Zone Blank Menu
Alarm resume OffAlarm dwell sec 5<Alarm priority><Alarm pattern><Zone blank>Exit
Alarms, Zone Blank Menu
Alarm resume OffAlarm dwell sec 5<Alarm priority><Alarm pattern><Zone blank>Exit
Main Menu
<Camera><Line Sync><Power Up><Aux><Alarms, Zone Blank><Other>EXIT
This is the minimum time the Spectra II will stay at an alarm even if the alarm is present forless than this amount of time.
To change the alarm dwell:1. Program preset 95 (28). The main menu appears.2. Position the cursor (>) beside Alarms, Zone Blank.3. Press the Iris Open button to enter the Alarms, Zone Blank menu.4. Position the cursor (>) beside Alarm Dwell Sec.5. Press the Iris Open button. The cursor moves to the right, beside the number of sec-
onds for the alarm dwell time.6. Move the joystick up or down and hold to cycle through 1-200 seconds in one-second
increments.7. SELECT - Press the Iris Open button on your keyboard to select your choice.
CANCEL - Press the Iris Close button if you do not want to change the setting.
ALARM PATTERN
You can choose one of the following for each of the seven alarm inputs:Full Pat (run full pattern) Half Pat 2 (run half pattern 2)Half Pat 1 (run half pattern 1) No Pattern
In response to an alarm, the Spectra II dome can do either one full pattern (1.5, 3, or 6 min-utes long) or two half patterns (.75, 1.5, or 3 minutes long).
To change the alarm pattern:1. Program preset 95 (28). The main menu appears.2. Position the cursor (>) beside Alarms, Zone Blank.3. Press the Iris Open button to enter the Alarms, Zone Blank menu.4. Position the cursor (>) beside Alarm Pattern.5. Press the Iris Open button to enter the Alarm Pattern menu.
Alarm Pattern Menu
Alarm 1No Pattern2No Pattern3No Pattern4No Pattern5No Pattern6No Pattern7No Pattern
Exit

Pelco Manual C2423M (5/00) 11
6. Position the cursor (>) beside the number of the alarm input for which you want to setthe pattern.
7. Press the Iris Open button. The cursor moves to the right, beside the words Full Pat,Half Pat 1, Half Pat 2, or No Pattern.
8. Move the joystick up or down to toggle between the choices.9. SELECT - Press the Iris Open button on your keyboard to select your choice.
CANCEL - Press the Iris Close button if you do not want to change the setting.
Main Menu
<Camera><Line Sync><Power Up><Aux><Alarms, Zone Blank><Other>EXIT
NOTE: The Spectra IIColor/Black and Whitecamera cannot do electroniczoom in a pattern. Opticalzoom will operate in apattern.
This feature lets you set alarm priority inputs as one of the following:High - A high priority alarm will not release to a low priority alarm.Low - Alarms will release or sequence between low priority alarms only if no high
priority alarm exists.
To change alarm priority:1. Program preset 95 (28). The main menu appears.2. Position the cursor (>) beside Alarms, Zone Blank.3. Press the Iris Open button to enter the Alarms, Zone Blank menu.4. Position the cursor (>) beside Alarm Priority.5. Press the Iris Open button to enter the Alarm Priority menu.6. Position the cursor (>) beside the number of the alarm input for which you want to set
the priority.7. Press the Iris Open button. The cursor moves to the right, beside the word High or Low.8. Move the joystick up or down to toggle between the words High and Low.9. SELECT - Press the Iris Open button on your keyboard to select your choice.
CANCEL - Press the Iris Close button if you do not want to change the setting.
ALARM RESUME
Alarms, Zone Blank Menu
Alarm resume OffAlarm dwell sec 5<Alarm priority><Alarm pattern><Zone blank>Exit
Alarm Priority Menu
Alarm 1 Low2 Low3 Low4 Low5 Low6 Low7 Low
Exit
This mode lets the dome resume its previous activity (scan, pattern, or previous position)after all alarms are cleared.
There are two alarm resume modes:On - Alarm resume mode is enabled.Off - Alarm resume mode is disabled.
To change the alarm resume mode:1. Program preset 95 (28). The main menu appears.2. Position the cursor (>) beside Alarms, Zone Blank.3. Press the Iris Open button to enter the Alarms, Zone Blank menu.4. Position the cursor (>) beside Alarm Resume.5. Press the Iris Open button. The cursor moves to the right, beside the word On or Off.6. Move the joystick up or down to toggle between On or Off.7. SELECT - Press the Iris Open button on your keyboard to select your choice.
CANCEL - Press the Iris Close button if you do not want to change the setting.
Alarms, Zone Blank Menu
Alarm resume OffAlarm dwell sec 5<Alarm priority><Alarm pattern><Zone blank>Exit
Main Menu
<Camera><Line Sync><Power Up><Aux><Alarms, Zone Blank><Other>EXIT
ALARM PRIORITY

12 Pelco Manual C2423M (5/00)
AUTO FLIP
There are two auto flip modes:On - Auto flip mode is enabled.Off - Auto flip mode is disabled.
To change the auto flip mode:1. Program preset 95 (28). The main menu appears.2. Position the cursor (>) beside Other.3. Press the Iris Open button to enter the Other menu.4. Position the cursor (>) beside Auto Flip.5. Press the Iris Open button. The cursor moves to the right, beside the word On or Off.6. Move the joystick up or down to toggle between On and Off.7. SELECT - Press the Iris Open button on your keyboard to select your choice.
CANCEL - Press the Iris Close button if you do not want to change the setting.
AUTO FOCUS MODE
Main Menu
<Camera><Line Sync><Power Up><Aux><Alarms, Zone Blank><Other>EXIT
Main Menu
<Camera><Line Sync><Power Up><Aux><Alarms, Zone Blank><Other>EXIT
Other Menu
Auto flip OnProportional pan OnLimit stops OffPark time minutes 0Scan speed deg/s 25Pattern length 1.5 minExit
There are two auto focus modes:Auto - If auto focus is in the auto mode, pressing the Focus Far or Focus Near button
will place the focus in the manual mode. The dome will return to auto focus ifyou pan or tilt the unit or do a zoom function.
Off - If the mode is set to off, the dome will operate in the manual mode with one ex-ception. If you issue a command to go to a preset, auto focus will turn on andremain on until you press the Focus Far or Focus Near button.
To change the mode:1. Program preset 95 (28). The main menu appears.2. Position the cursor (>) beside Camera.3. Press the Iris Open button to enter the Camera menu.4. Position the cursor (>) beside Next.5. Press the Iris Open button to go to the Next menu.6. Position the cursor (>) beside Auto Focus Mode.7. Press the Iris Open button. The cursor moves to the right, beside the word Auto or Off.8. Move the joystick up or down to toggle between Auto and Off.9. SELECT - Press the Iris Open button on your keyboard to select your choice.
CANCEL - Press the Iris Close button if you do not want to change the setting.
Next Menu
Slow shutter mode AutoShutter speed AutoAuto focus mode Auto<Sharpness><White balance>PreviousExit
Camera Menu
Backlight comp OffZoom limit x72Reset camera<Gain/AGC><Auto-iris><Next>Exit
NOTE: Auto focus is auto-matically turned off whenthe shutter time is longerthan 1/8 of a second.

Pelco Manual C2423M (5/00) 13
AUTO IRIS
The following are the settings for auto iris:ModeLevel
To change the settings for auto iris:1. Program preset 95 (28). The main menu appears.2. Position the cursor (>) beside Camera.3. Press the Iris Open button to enter the Camera menu.4. Position the cursor (>) beside Auto-Iris.5. Press the Iris Open button. The Auto Iris menu appears.6. Position the cursor (>) and select one of the following settings:
MODE - The cursor moves to one of two choices:Auto - The iris is automatically adjusted to produce a constant video output as deter-mined by the Level setting.Off - Auto iris is disabled, and control is always manual.
Move the joystick up or down to toggle between Auto and Off. Press the Iris Openbutton to select the choice, or press the Iris Close button if you do not want to changethe setting.
LEVEL - The cursor moves to a numeric value, which the dome uses to try tomaintain a certain light level. Changing the value of the Level setting will change thevideo level to which the auto iris adjusts. This setting should be adjusted if the videolevel in the auto iris mode is too bright or too dark. Move the joystick up or down to avalue. Press the Iris Open button to select the value, or press the Iris Close button ifyou do not want to change the setting.
Main Menu
<Camera><Line Sync><Power Up><Aux><Alarms, Zone Blank><Other>EXIT
Auto-Iris Menu
Auto-iris mode AutoAuto-iris level 7Exit
Camera Menu
Backlight comp OffZoom limit x72Reset camera<Gain/AGC><Auto-iris><Next>Exit

14 Pelco Manual C2423M (5/00)
AUTO IR LEVEL
The IR level setting determines when the IR filter will switch IN or OUT. Following are theavailable settings for the Auto IR Level:
Dusk = 1/60 second shutter speed2 = 1/60 second shutter speed3 = 1/30 second shutter speedDark = 1/15 second shutter speed
Slow shutter operation affects the auto IR level setting.If slow shutter is set for manual operation, only two settings for the IR level are available:Dusk and 2.If slow shutter is set for automatic operation, all four IR level settings are available.If the IR level is set at 3 or Dark and the slow shutter is turned off, the IR level will auto-matically reset to 2.To program the slow shutter mode, refer to the Slow Shutter Mode section.
To change the auto lR level settings:1. Program preset 95 (28). The main menu appears.2. Position the cursor (>) beside Camera.3. Press the Iris Open button to enter the Camera menu.4. Position the cursor (>) beside Next.5. Press the Iris Open button to enter the Next menu.6. Position the cursor (>) beside IR Filter.7. Press the Iris Open button to enter the IR Filter menu.8. Position the cursor (>) beside Auto IR level.9. Press the Iris Open button. The cursor moves to the right.
10. Move the joystick up or down to toggle between the four level settings.11. SELECT - Press the Iris Open button on your keyboard to select your choice.
CANCEL - Press the Iris Close button if you do not want to change the setting.
Next Menu
Slow shutter mode AutoShutter speed AutoAuto focus mode Auto<IR Filter><Sharpness><White balance>PreviousExit
Main Menu
<Camera><Line Sync><Power Up><Aux><Alarms, Zone Blank><Other>EXIT
Camera Menu
Backlight comp OffZoom limit x72Reset camera<Gain/AGC><Auto-iris><Next>Exit
IR Filter Menu
IR Filter mode AutoAuto IR Level DuskExit
AUX MODE
Aux Menu
Aux 1 mode NormalAux 2 mode NormalExit
Main Menu
<Camera><Line Sync><Power Up><Aux><Alarms, Zone Blank><Other>EXIT
There are three settings for AUX mode:Normal - Controller operated.Latching - Pressing the AUX key turns on the AUX and the next press of the AUX key
turns it off.Alarm - Any alarm input activates the AUX.
Refer to your controller manual for operating instructions.
To change the AUX mode:1. Program preset 95 (28). The main menu appears.2. Position the cursor (>) beside AUX.3. Press the Iris Open button to enter the AUX menu.
Pelco Manual C2423M (5/00) 15
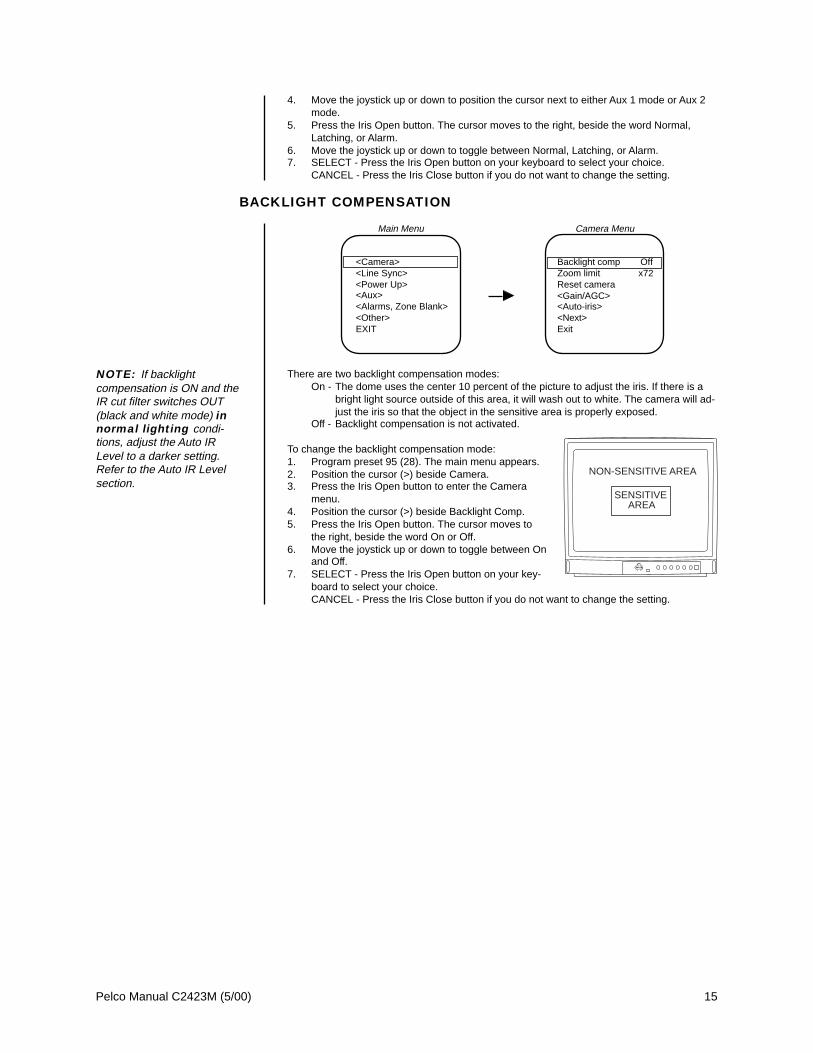
There are two backlight compensation modes:On - The dome uses the center 10 percent of the picture to adjust the iris. If there is a
bright light source outside of this area, it will wash out to white. The camera will ad-just the iris so that the object in the sensitive area is properly exposed.
Off - Backlight compensation is not activated.
To change the backlight compensation mode:1. Program preset 95 (28). The main menu appears.2. Position the cursor (>) beside Camera.3. Press the Iris Open button to enter the Camera
menu.4. Position the cursor (>) beside Backlight Comp.5. Press the Iris Open button. The cursor moves to
the right, beside the word On or Off.6. Move the joystick up or down to toggle between On
and Off.7. SELECT - Press the Iris Open button on your key-
board to select your choice.CANCEL - Press the Iris Close button if you do not want to change the setting.
Main Menu
<Camera><Line Sync><Power Up><Aux><Alarms, Zone Blank><Other>EXIT
Camera Menu
Backlight comp OffZoom limit x72Reset camera<Gain/AGC><Auto-iris><Next>Exit
NON-SENSITIVE AREA
SENSITIVE AREA
4. Move the joystick up or down to position the cursor next to either Aux 1 mode or Aux 2mode.
5. Press the Iris Open button. The cursor moves to the right, beside the word Normal,Latching, or Alarm.
6. Move the joystick up or down to toggle between Normal, Latching, or Alarm.7. SELECT - Press the Iris Open button on your keyboard to select your choice.
CANCEL - Press the Iris Close button if you do not want to change the setting.
BACKLIGHT COMPENSATION
NOTE: If backlightcompensation is ON and theIR cut filter switches OUT(black and white mode) innormal lighting condi-tions, adjust the Auto IRLevel to a darker setting.Refer to the Auto IR Levelsection.

16 Pelco Manual C2423M (5/00)
Main Menu
<Camera><Line Sync><Power Up><Aux><Alarms, Zone Blank><Other>EXIT
Camera Menu
Backlight comp OffZoom limit x72Reset camera<Gain/AGC><Auto-iris><Next>Exit
Gain/AGC Menu
AGC mode AutoGain 6Exit
Gain - The amount of amplification the camera places on its video information in order toobtain a full 1-volt peak-to-peak video signal out.
AGC - Automatic Gain Control.
AGC MODEThere are two AGC settings :
Auto Mode - Automatically adjusts the gain.Off Mode - In the off mode the AGC is off.
To change the AGC mode:1. Program preset 95 (28). The main menu appears.2. Position the cursor (>) beside Camera.3. Press the Iris Open button to enter the Camera menu.4. Position the cursor (>) beside Gain/AGC.5. Press the Iris Open button to enter the Gain/AGC menu.6. Position the cursor (>) beside AGC mode.7. Press the Iris Open button. The cursor moves to the right, beside the word Auto or Off.8. Move the joystick up or down to choose between Auto or Off.9. SELECT - Press the Iris Open button on your keyboard to select your choice.
CANCEL - Press the Iris Close button if you do not want to change the setting.
GAINThe gain adjusts the signal level of the video output. Increasing the gain in low light condi-tions will increase the level of noise in the picture.
To change the gain:1. Program preset 95 (28). The main menu appears.2. Position the cursor (>) beside Camera.3. Press the Iris Open button to enter the Camera menu.4. Position the cursor (>) beside Gain/AGC.5. Press the Iris Open button to enter the Gain/AGC menu.6. Position the cursor (>) beside Gain.7. Press the Iris Open button. The cursor moves to the right, beside the current gain
setting (a numeric value).8. Move the joystick up or down to change the gain. As you change the gain, the picture
on your monitor gets brighter or darker.9. SELECT - Press the Iris Open button on your keyboard to select your choice.
CANCEL - Press the Iris Close button if you do not want to change the setting.
GAIN/AGC

Pelco Manual C2423M (5/00) 17
Next Menu
Slow shutter mode AutoShutter speed AutoAuto focus mode Auto<IR Filter><Sharpness><White balance>PreviousExit
Main Menu
<Camera><Line Sync><Power Up><Aux><Alarms, Zone Blank><Other>EXIT
Camera Menu
Backlight comp OffZoom limit x72Reset camera<Gain/AGC><Auto-iris><Next>Exit
IR Filter Menu
IR Filter mode AutoAuto IR Level DuskExit
IR FILTER MODE
There are two settings for the IR filter mode:Auto - IR filter switches in and out automatically. Do the following to setup the IR filter
for automatic operation:CAMERA SETTING SETUPIR Filter AutoAGC mode AutoShutter Speed Auto
IMPORTANT: The AGC mode and shutter speed must be set to Auto for the IRfilter to operate automatically. If the AGC mode or shutter speed is changed toa manual setting, the IR filter setting automatically switches to OFF.
Off - IR filter is manually operated. The following presets are used to manuallyoperate the IR filter:
Preset 88 (21) - Filter IN (color)Preset 89 (22) - Filter OUT (black & white)
To change the lR filter mode:1. Program preset 95 (28). The main menu appears.2. Position the cursor (>) beside Camera.3. Press the Iris Open button to enter the Camera menu.4. Position the cursor (>) beside Next.5. Press the Iris Open button to enter the Next menu.6. Position the cursor (>) beside IR Filter.7. Press the Iris Open button to enter the IR Filter menu.8. Position the cursor (>) beside IR Filter mode.9. Press the Iris Open button. The cursor moves to the right, beside the word Auto or Off.
10. Move the joystick up or down to toggle between Auto and Off.11. SELECT - Press the Iris Open button on your keyboard to select your choice.
CANCEL - Press the Iris Close button if you do not want to change the setting.If the IR filter is set to Auto , check the AGC mode and shutter speed settings .Both must be programmed for automatic operation for the IR filter to function automati-cally. Refer to the Gain/AGC and Shutter Speed sections for programming information.
LIMIT STOPS
Main Menu
<Camera><Line Sync><Power Up><Aux><Alarms, Zone Blank><Other>EXIT
Other Menu
Auto flip OnProportional pan OnLimit stops OffPark time minutes 0Scan speed deg/s 25Pattern length 1.5 minExit
There are two types of limit stops:Manual limit stops - A manual (joystick) pan operation stops when a limit stop is reached.Scan limit stops - The dome reverses direction during random, frame, or auto scan-
ning when a limit stop is reached.
Limit stops are controlled by software. To set limit stops:1. Turn on the limit stop mode.2. Program the limit stops.

18 Pelco Manual C2423M (5/00)
NOTE: Programmingpreset 90 (23) disables themanual limit stops untilpreset 91 (24) is set.
TURNING LIMIT STOPS ON OR OFFTo change the limit stop mode:1. Program preset 95 (28). The main menu appears.2. Position the cursor (>) beside Other.3. Press the Iris Open button to enter the Other menu.4. Position the cursor (>) beside Limit Stops.5. Press the Iris Open button. The cursor moves to the right, beside the word On or Off.6. Move the joystick up or down to toggle between On and Off.7. SELECT - Press the Iris Open button on your keyboard to select your choice.
CANCEL - Press the Iris Close button if you do not want to change the setting.
PROGRAMMING LIMIT STOPSManual Limit StopsRefer to the documentation for your control system for programming presets, and then dothe following:1. Make sure limit stops are turned ON, and then exit the menu.2. Push the joystick left until you reach the limit you want the camera to go to on the left.3. Program preset 90 (23).4. Push the joystick right to the limit you want the camera to go to on the right.5. Program preset 91 (24).
Setting presets 90 (23) and 91 (24) to the same point disables manual limit stops.
Scan Limit StopsRefer to the documentation for your control system for programming presets, and then dothe following:1. Make sure limit stops are turned ON, and then exit the menu.2. Push the joystick left until you reach the limit you want the camera to go to on the left.3. Program preset 92 (25).4. Push the joystick right to the limit you want the camera to go to on the right.5. Program preset 93 (26).
Setting presets 92 (25) and 93 (26) to the same point disables scan limit stops.
LINE SYNCHRONIZATION
Main Menu
<Camera><Line Sync><Power Up><Aux><Alarms, Zone Blank><Other>EXIT
Line Sync Menu
Line sync OnLine sync phase 0Exit
If cameras are out of phase with each other, they may produce what appears to be vertical rollwhen switching between cameras.
There are two settings for line synchronization:On - Adjust the synchronization of the power line voltage so that it is in phase with other
cameras.Off - The dome synchronizes to an internal clock.
To change the line synchronization settings:1. Program preset 95 (28). The main menu appears.2. Position the cursor (>) beside Line Sync.3. Press the Iris Open button. The Line Sync menu appears.4. Position the cursor (>) beside one of the choices. Press the Iris Open button.
LINE SYNC - The cursor moves to one of two choices: ON or OFF. Move the joystick up ordown to toggle between them. Press the Iris Open button to select the choice. If you changed toOFF, the camera may reset itself as it adjusts to the new synchronization. If the camera resets,it will only affect the line synchronization. It will not change any other camera parameters, suchas auto focus or auto iris. Press the Iris Close button if you do not want to change the setting.
NOTE: On power-up, theauto scan tilt angle will bewhatever angle the camerawas at when the right scanlimit was set.

Pelco Manual C2423M (5/00) 19
LINE SYNC PHASE - The cursor moves to a numeric value. Move the joystick up or downto change the value. Press the Iris Open button to select the choice. The value represents thephase angle in tenths of a degree between 0 degrees and 359 degrees. For example, 900 is90 degrees, 1200 is 120 degrees, and 2400 is 240 degrees. Press the Iris Open button onyour keyboard to select your choice. The Line Sync setting will change to ON. The cameramay reset or the picture on your monitor may wiggle when you change the phase angle. If thecamera resets, it will only affect the line synchronization. It will not change any other cameraparameters, such as auto focus or auto iris. Press the Iris Close button if you do not want tochange the setting.
PARK TIME MINUTES
This feature causes the dome to park at preset 1 after a programmed number of minutes ofcontrol inactivity. The time can be set from 1 minute to 720 minutes (12 hours), or it can be setto zero, which disables this feature.
To change the park time:1. Program preset 95 (28). The main menu appears.2. Position the cursor (>) beside Other.3. Press the Iris Open button to enter the Other menu.4. Position the cursor (>) beside Park Time Minutes.5. Press the Iris Open button. The cursor moves to the right, beside the current park time.6. Move the joystick up or down to change the park time.7. SELECT - Press the Iris Open button on your keyboard to select your choice.
CANCEL - Press the Iris Close button if you do not want to change the setting.
NOTE: Preset 1 must beprogrammed for the dome topark.
Main Menu
<Camera><Line Sync><Power Up><Aux><Alarms, Zone Blank><Other>EXIT
Other Menu
Auto flip OnProportional pan OnLimit stops OffPark time minutes 0Scan speed deg/s 25Pattern length 1.5 minExit
PATTERN LENGTH
CAUTION: If thelength is changed,all patterns that
were stored are erased.
Main Menu
<Camera><Line Sync><Power Up><Aux><Alarms, Zone Blank><Other>EXIT
Other Menu
Auto flip OnProportional pan OnLimit stops OffPark time minutes 0Scan speed deg/s 25Pattern length 1.5 minExit
The Spectra II dome can do the following:One full pattern - 1.5, 3, or 6 minutes long.
orTwo half patterns - .75, 1.5, or 3 minutes long.
This pattern can consist of any standard pan and tilt or lens command. Presets, flip, andturbo are not allowed in a pattern. Zone scan can be enabled while running a pattern.
To set the pattern length:1. Program preset 95 (28). The main menu appears.2. Position the cursor (>) beside Other.3. Press the Iris Open button to enter the menu entitled Other.4. Position the cursor (>) beside Pattern Length.5. Press the Iris Open button. The cursor moves to the right, beside the number of
minutes (1.5, 3, or 6).6. Move the joystick up or down to toggle through the number of minutes (1.5, 3, or 6).7. SELECT - Press the Iris Open button on your keyboard to select your choice.
CANCEL - Press the Iris Close button if you do not want to change the setting.

20 Pelco Manual C2423M (5/00)
Main Menu
<Camera><Line Sync><Power Up><Aux><Alarms, Zone Blank><Other>EXIT
Other Menu
Auto flip OnProportional pan OnLimit stops OffPark time minutes 0Scan speed deg/s 25Pattern length 1.5 minExit
There are two proportional pan modes:On - Enables the proportional pan mode. The amount of zoom controls the pan and
tilt. At telephoto zoom settings, the pan and tilt speeds will be slower for a givenamount of joystick deflection than at wide zoom settings. This keeps the imagefrom moving too fast on the monitor when there is a large amount of zoom.
Off - Disables proportional pan mode. The pan speed will not depend on the amountof zoom.
To change the proportional pan mode:1. Program preset 95 (28). The main menu appears.2. Position the cursor (>) beside Other.
This feature lets the dome resume a desired condition following power-up. The menuincludes the following choices.
Default - On power-up, the dome goes through a configuration cycle and stops atzero reference, showing “Configuration Done,” address, and mode set-tings on the screen.
Park - The dome moves to preset 1 when the power-up sequence finishes.The only text on the screen is the preset label (if any is programmed).
Scan Auto - The dome initiates scan mode when the power-up sequence finishes.Again, there is no text.
Scan Frame - The dome initiates a frame scan when the power-up sequence finishes.Scan Rand - The dome initiates a random scan when the power-up sequence finishes.Full Pat - The dome initiates its programmed pattern when the power-up sequence
finishes. The length can be set to 1.5, 3, or 6 minutes.Half Pat 1 - The dome initiates the first half-pattern when the power-up sequence
finishes. The length can be set to .75, 1.5, or 3 minutes.Half Pat 2 - The dome initiates the second half-pattern when the power-up sequence
finishes. The length can be set to .75, 1.5, or 3 minutes.
The default setting is Default.
To select the power-up mode:1. Program preset 95 (28). The main menu appears.2. Position the cursor (>) beside Power Up Mode.3. Press the Iris Open button to enter the Power Up Mode menu.4. Press the Iris Open button to move the cursor to the right.5. Move the joystick up or down to cycle through the selections. Stop on the item you
want to select.6. SELECT - Press the Iris Open button on your keyboard to select your choice.
CANCEL - Press the Iris Close button if you do not want to change the setting.
PROPORTIONAL PAN
Main Menu
<Camera><Line Sync><Power Up><Aux><Alarms, Zone Blank><Other>EXIT
Power-Up Menu
Power Up DefaultExit
POWER-UP MODE

Pelco Manual C2423M (5/00) 21
3. Press the Iris Open button to enter the Other menu.4. Position the cursor (>) beside Proportional Pan.5. Press the Iris Open button. The cursor moves to the right, beside the word On or Off.6. Move the joystick up or down to toggle between On and Off.7. SELECT - Press the Iris Open button on your keyboard to select your choice.
CANCEL - Press the Iris Close button if you do not want to change the setting.
RESET CAMERA
Main Menu
<Camera><Line Sync><Power Up><Aux><Alarms, Zone Blank><Other>EXIT
Camera Menu
Backlight comp OffZoom limit x72Reset camera<Gain/AGC><Auto-iris><Next>Exit
Resetting the camera returns the settings to their defaults.
Default Settings
Backlight comp OffZoom limit X72Gain/AGC
AGC mode AutoGain 6
Auto-irisMode AutoLevel 7
Slow shutter mode AutoShutter speed AutoAuto focus mode AutoIR Filter
IR filter mode AutoAuto IR level Dusk
Sharpness 15White balance
Auto white bal OnRed bal level No defaultBlue bal level No default
When the camera is reset, the following settings are not changed: park time, auto flip dis-able, limit stops, zoom limit, and proportional panning.
Turning off power to the Spectra II dome does not reset the camera. Camera settings areretained in memory. When the power is turned back on, the settings will be the same asthey were when the power was turned off.
To reset the camera:1. Program preset 95 (28). The main menu appears.2. Position the cursor (>) beside Camera.3. Press the Iris Open button to enter the Camera menu.4. Position the cursor (>) beside Reset Camera.5. Press the Iris Open button to reset the camera.

22 Pelco Manual C2423M (5/00)
SCAN SPEED
Next Menu
Slow shutter mode AutoShutter speed AutoAuto focus mode Auto<IR Filter><Sharpness><White balance>PreviousExit
Main Menu
<Camera><Line Sync><Power Up><Aux><Alarms, Zone Blank><Other>EXIT
Main Menu
<Camera><Line Sync><Power Up><Aux><Alarms, Zone Blank><Other>EXIT
Camera Menu
Backlight comp OffZoom limit x72Reset camera<Gain/AGC><Auto-iris><Next>Exit
Other Menu
Auto flip OnProportional pan OnLimit stops OffPark time minutes 0Scan speed deg/s 25Pattern length 1.5 minExit
The scan speed is adjustable from 1-40 degrees per second. This occurs in three scanmodes: auto, random, and frame scan.
To change the scan speed:1. Program preset 95 (28). The main menu appears.2. Position the cursor (>) beside Other.3. Press the Iris Open button to enter the Other menu.4. Position the cursor (>) beside Scan Speed deg/s.5. Press the Iris Open button. The cursor moves to the right, beside the number of degrees.6. Move the joystick up or down to toggle through the number of degrees (1-40) until you
reach the number you want. (If set on a low number, the scan will appear to barelymove but is still functioning.)
7. SELECT - Press the Iris Open button on your keyboard to select your choice.CANCEL - Press the Iris Close button if you do not want to change the setting.
SHARPNESS
Sharpness Menu
Sharpness 15Exit
Do the following to manually adjust the sharpness of the picture:1. Program preset 95 (28). The main menu appears.2. Position the cursor (>) beside Camera.3. Press the Iris Open button to enter the Camera menu.4. Position the cursor (>) beside Next.5. Press the Iris Open button to go to the Next menu.6. Position the cursor (>) beside Sharpness.7. Press the Iris Open button. The Sharpness menu opens.8. Press the Iris Open button. The cursor moves to the right, beside the sharpness value.9. Move the joystick up or down to toggle through available sharpness values. As the
numeric value changes, the sharpness of the picture on the monitor changes.10. SELECT - Press the Iris Open button on your keyboard to select your choice.
CANCEL - Press the Iris Close button if you do not want to change the setting.

Pelco Manual C2423M (5/00) 23
SHUTTER SPEED
Next Menu
Slow shutter mode AutoShutter speed AutoAuto focus mode Auto<IR Filter><Sharpness><White balance>PreviousExit
Main Menu
<Camera><Line Sync><Power Up><Aux><Alarms, Zone Blank><Other>EXIT
Camera Menu
Backlight comp OffZoom limit x72Reset camera<Gain/AGC><Auto-iris><Next>Exit
There are several electronic shutter speed settings:Auto1/41/81/151/301/601/1251/1801/2501/5001/10001/20001/40001/10,000
In the Auto setting the camera controls the shutter speed automatically. Increasing the shut-ter speed lowers the light sensitivity, but rapidly moving objects will be less blurred as thespeed is increased.
To change the electronic shutter speed settings:1. Program preset 95 (28). The main menu appears.2. Position the cursor (>) beside Camera.3. Press the Iris Open button to enter the Camera menu.4. Position the cursor (>) beside Next.5. Press the Iris Open button to go to the Next menu.6. Position the cursor (>) beside Shutter Speed.7. Press the Iris Open button.8. The cursor moves to the right, beside the current shutter speed.9. Move the joystick up or down to choose the shutter speed.
10. SELECT - Press the Iris Open button on your keyboard to select your choice.CANCEL - Press the Iris Close button if you do not want to change the setting.

24 Pelco Manual C2423M (5/00)
SLOW SHUTTER MODE
Next Menu
Slow shutter mode AutoShutter speed AutoAuto focus mode Auto<IR Filter><Sharpness><White balance>*PreviousExit
Main Menu
<Camera><Line Sync><Power Up><Aux><Alarms, Zone Blank><Other>EXIT
Camera Menu
Backlight comp OffZoom limit x72Reset camera<Gain/AGC><Auto-iris><Next>Exit
Slow shutter mode slows the frame rate, producing a digital color picture sensitive to lowlight conditions. The picture may appear rough or smeared, depending on the distance andmotion of the viewed image.
There are two settings in the slow shutter mode:Auto - Slow shutter mode is enabled.Off - Slow shutter mode is disabled.
To change the slow shutter mode:1. Program preset 95 (28). The main menu appears.2. Position the cursor (>) beside Camera.3. Press the Iris Open button to enter the Camera menu.4. Position the cursor (>) beside Next.5. Press the Iris Open button to go to the Next menu.6. Position the cursor (>) beside Slow Shutter mode.7. Press the Iris Open button.8. The cursor moves to the right.9. Move the joystick up or down to toggle between Auto and Off.
10. SELECT - Press the Iris Open button on your keyboard to select your choice.CANCEL - Press the Iris Close button if you do not want to change the mode.

Pelco Manual C2423M (5/00) 25
WHITE BALANCE
Next Menu
Slow shutter mode AutoShutter speed AutoAuto focus mode Auto<IR Filter><Sharpness><White balance>PreviousExit
Main Menu
<Camera><Line Sync><Power Up><Aux><Alarms, Zone Blank><Other>EXIT
Camera Menu
Backlight comp OffZoom limit x72Reset camera<Gain/AGC><Auto-iris><Next>Exit
White Balance Menu
Auto white bal OnRed bal level - -Blue bal level - -Exit
The settings for white balance are as follows:
Auto white balRed bal levelBlue bal level
To change the white balance settings:1. Program preset 95 (28). The main menu appears.2. Position the cursor (>) beside Camera.3. Press the Iris Open button to enter the Camera menu.4. Position the cursor (>) beside Next.5. Press the Iris Open button to go to the Next menu.6. Position the cursor (>) beside White Balance.7. Press the Iris Open button. The White Balance menu appears.8. Position the cursor (>) beside one of the following choices and press the Iris Open button.
AUTO WHITE BALANCE - The cursor moves to one of two choices: Auto or Off.Move the joystick up or down to toggle between them. Press the Iris Open button toselect the choice, or press the Iris Close button if you do not want to change the setting.
RED BALANCE and BLUE BALANCE LEVELS - The cursor moves to a numericvalue, ranging from 0 through 255. Move the joystick up or down to a value. As youchange the value, you can see the color change on your monitor. Press the Iris Openbutton to select the value, or press the Iris Close button if you do not want to change thesetting. If Auto White Balance is on, it changes to off when you select a new value.
ZONES
The Spectra II dome is capable of eight zones, each with a 20-character label. Dependingon the controller, you can define the zone size and define any zone as “blanked” for videowhen the camera pans into the zone area.
Zones can be programmed to overlap each other, although this is not recommended. If youprogram two zones to overlap, the title of the zone with the highest priority (zone 8 is thehiest, zone 1 is the lowest) will be displayed in the overlap area. The same applies to zoneblanking. For other information on programming zones, refer to the documentation for yourcontrol system.

26 Pelco Manual C2423M (5/00)
NOTE: The Spectra IIColor/Black and Whitecamera cannot do electroniczoom in a pattern. Opticalzoom will operate in apattern.
Main Menu
<Camera><Line Sync><Power Up><Aux><Alarms, Zone Blank><Other>EXIT
Camera Menu
Backlight comp OffZoom limit x72Reset camera<Gain/AGC><Auto-iris><Next>Exit
ZOOM LIMIT
The Spectra II is a 72X zoom camera (18X optical zoom and 4X electronic zoom) can be setfor 18X, 36X, 54X, or 72X.
To change the zoom limit:1. Program preset 95 (28). The main menu appears.2. Position the cursor (>) beside Camera.3. Press the Iris Open button to enter the Camera menu.4. Position the cursor (>) beside Zoom Limit.5. Press the Iris Open button. The cursor moves to the right, beside the current zoom limit.6. Move the joystick up or down to choose the zoom limit.7. SELECT - Press the Iris Open button on your keyboard to select your choice.
CANCEL - Press the Iris Close button if you do not want to change the setting.
Main Menu
<Camera><Line Sync><Power Up><Aux><Alarms, Zone Blank><Other>EXIT
Zone Blank Menu
Video Blank Zone 1Off2Off3Off4Off5Off6Off7Off8Off
Exit
Alarms, Zone Blank Menu
Alarm resume OffAlarm dwell sec 5<Alarm priority><Alarm pattern><Zone blank>Exit
This feature lets you define any of eight zones as blanked for video when the camera pansinto the zone area. There are two choices:
On - Enables video blanking.Off - Disables video blanking.
To change the blank zone setting:1. Program preset 95 (28). The main menu appears.2. Position the cursor (>) beside Alarms, Zone Blank.3. Press the Iris Open button to enter the Alarms, Zone Blank menu.4. Position the cursor (>) beside Zone Blank.5. Press the Iris Open button to enter the Zone Blank menu.6. Position the cursor (>) beside the number of the zone for which you want to set the
blank option.7. Press the Iris Open button. The cursor moves to the right, beside the word On or Off.8. Move the joystick up or down to toggle between the words On and Off.9. SELECT - Press the Iris Open button on your keyboard to select your choice.
CANCEL - Press the Iris Close button if you do not want to change the setting.
ZONE BLANK

Pelco Manual C2423M (5/00) 27
SPECIFICATIONS
MECHANICALPan Movement: 360° continuous pan rotationVertical Tilt: Unobstructed +2° to -92°Manual Pan/Tilt Speeds*
Pan: 0.1°-80°/sec manual operation, 150°/sec turboTilt: 0.1°-40°/sec
Preset SpeedsPan: 250°/secTilt: 200°/sec
* For variable-speed operation an appropriate controller is required. With fixed-speed control-lers, pan/tilt speed is 24°/sec. The CM6700 controller with the KBD200 keyboard has pro-grammable fixed speeds.
CAMERASignal Format: NTSC (model DD5BCBW)
PAL (model DD5BCBW-X)Scanning System: 2:1 interlaceImage Sensor: 1/4-inch interline transfer CCD
MAINTENANCE
DOME CLEANING
Clean the acrylic dome as necessary to maintain a clear picture. Be careful not to scratch thesurfaces of the dome.
Exterior Surface - Clean the dome’s exterior surface with a nonabrasive cleaning cloth andcleaning agent that is safe for acrylic. Either liquid or spray cleaner/wax suitable for fine furni-ture is acceptable.
Interior Surface (Except Chrome or Gold) - Clean the same as the exterior surface.
Interior Surface (Chrome or Gold) - The inside surface of a chrome or gold dome is easilyscratched. Use the following precautions to maintain the dome’s surface.
1. Always handle the dome from the outside of its circular flange.
2. Never touch the coated inside surface. The acid in your fingerprints will eventually etchthe coating if the fingerprints are not carefully removed according to the recommendedcleaning procedure in item 5.
3. If dust or other contaminants accumulate on the dome’s interior, remove the debris withcompressed air. Compressed air cans are available from photographic equipment or elec-tronic supply dealers.
4. If heavy residue accumulates and cannot be removed with air pressure, rinse with waterand immediately dry with air pressure so that water spots will not remain. Avoid wiping thecoated surface with direct hand pressure - it will easily abrade unless extreme care istaken. Once scratched, the dome cannot be recoated.
5. If internal wiping is necessary, avoid hand rubbing. Instead, make a wick as follows:
Use a very soft paper towel. Roll a section into a tightly wound tube. Tear the tube in half,and wet the fuzzy end of the wick with a solution of isopropyl alcohol diluted with water.Hold the dome with its opening facing downward and wipe the interior of the dome withthe wet end of the wick. Use a circular motion, starting from the outside and spiraling intothe center. Use a new wick for each two passes over the dome.
SERVICE MANUAL
If you need to service your unit, obtain a service manual in one of the following ways:• Go to Pelco’s web site at ftp://www.pelco.com and find service manual C1455SM-B.• Contact Pelco’s Literature Department and request service manual C1455SM-B.

28 Pelco Manual C2423M (5/00)
® Pelco, the Pelco logo, Spectra, Genex, Legacy, and PelcoVision are registered trademarks of Pelco. © Copyright 2000, Pelco. All rights reserved.™ Esprit, Spectra II, and Camclosure are trademarks of Pelco. U.S. Patent No. 5,931,432.
WARRANTYPelco will repair or replace, without charge, any merchandise proved defectivein material or workmanship for a period of one year after the date of shipment.Exceptions to this warranty are as noted below:
• Three years on Genex® Series (multiplexers, server, and keyboard).• Two years on cameras and all standard motorized or fixed focal length lenses.• Two years on Legacy®, Camclosure™ Camera Systems, CM6700/CM8500/
CM9500/CM9750/CM9760 Matrix, PelcoVision®, DF5 Series and DF8 FixedDome products.
• Two years on Spectra® and Esprit™, including when used in continuousmotion applications.
• Two years on WW5700 series window wiper (excluding wiper blades).• Six months on all pan and tilts, scanners or preset lenses used in continuous
motion applications (that is, preset scan, tour and auto scan modes).
Pelco will warrant all replacement parts and repairs for 90 days from the date ofPelco shipment. All goods requiring warranty repair shall be sent freight prepaidto Pelco, Clovis, California. Repairs made necessary by reason of misuse, alter-ation, normal wear, or accident are not covered under this warranty.
Pelco assumes no risk and shall be subject to no liability for damages or lossresulting from the specific use or application made of the Products. Pelco’s li-ability for any claim, whether based on breach of contract, negligence, infringe-ment of any rights of any party or product liability, relating to the Products shallnot exceed the price paid by the Dealer to Pelco for such Products. In no eventwill Pelco be liable for any special, incidental or consequential damages (includ-ing loss of use, loss of profit and claims of third parties) however caused, whetherby the negligence of Pelco or otherwise.
The above warranty provides the Dealer with specific legal rights. The Dealermay also have additional rights, which are subject to variation from state to state.
If a warranty repair is required, the Dealer must contact Pelco at (800) 289-9100or (559) 292-1981 to obtain a Repair Authorization number (RA), and providethe following information:
1. Model and serial number2. Date of shipment, P.O. number, Sales Order number, or Pelco invoice number3. Details of the defect or problem
If there is a dispute regarding the warranty of a product which does not fallunder the warranty conditions stated above, please include a written explana-tion with the product when returned.
Method of return shipment shall be the same or equal to the method by whichthe item was received by Pelco.
RETURNSIn order to expedite parts returned to the factory for repair or credit, please callthe factory at (800) 289-9100 or (559) 292-1981 to obtain an authorization num-ber (CA number if returned for credit, and RA number if returned for repair).Goods returned for repair or credit should be clearly identified with the assignedCA/RA number and freight should be prepaid. All merchandise returned for creditmay be subject to a 20% restocking and refurbishing charge.
Ship freight prepaid to: Pelco3500 Pelco WayClovis, CA 93612-5699
WARRANTY AND RETURN INFORMATION
REVISION HISTORY
Manual # Date CommentsC2423M 5/00 Original version.
Effective PixelsNTSC: 768 (H) x 494 (V)PAL: 752 (H) x 582 (V)
HorizontalResolution: >470 TV lines
LensMinimum f-stop: F1.4
Focal Length: 4.1 mm to 73.8 mm opticalZoom Ratio: 18X optical zoom, 4X electronic zoomDigital Slow Shutter: Auto/manual speed selectionHorizontal
Angle of View: 48° (at 4.1 mm wide zoom), 2.7° (at 73.8 mm telephoto zoom)MTBF: >500,000 cycles at room temperature (zoom, focus, irs)Focus: Automatic and manual overrideSensitivity: .2 lux at 1/4-second shutter speed (color)
.2 lux at 1/60-second shutter speed (black & white)Sync System: AC line lock, phase adjustable via remote control*White Balance: Automatic with manual override*Shutter Speed Automatic (electronic iris)/manual
NTSC: 1/4 to 1/10,000*Color/B&W PAL: 1/3 to 1/10,000*
Iris Control: Automatic with manual override*Gain Control: Automatic with manual override*Video Output
NTSC: .714V ± .07V (100 IRE ± 10 IRE)PAL: .7V ± .07V
Signal to Noise Ratio: >46 dB
* Manual control of camera setup functions can be done with CM6700, CM8500, CM9500,CM9760 and MPT9500 controllers, but not with CM7500, MPT9000 or KBD9000 controllers.
(Design and product specifications subject to change without notice.)