scroll saw 90w - datalocation.co.uk · en 6 replaced immediately. • use the scroll saw machine on...
TRANSCRIPT

SCROLL SAW 90WSSM4002
Original Instructions

EN
2
Fig. A
Fig. B
EN
3
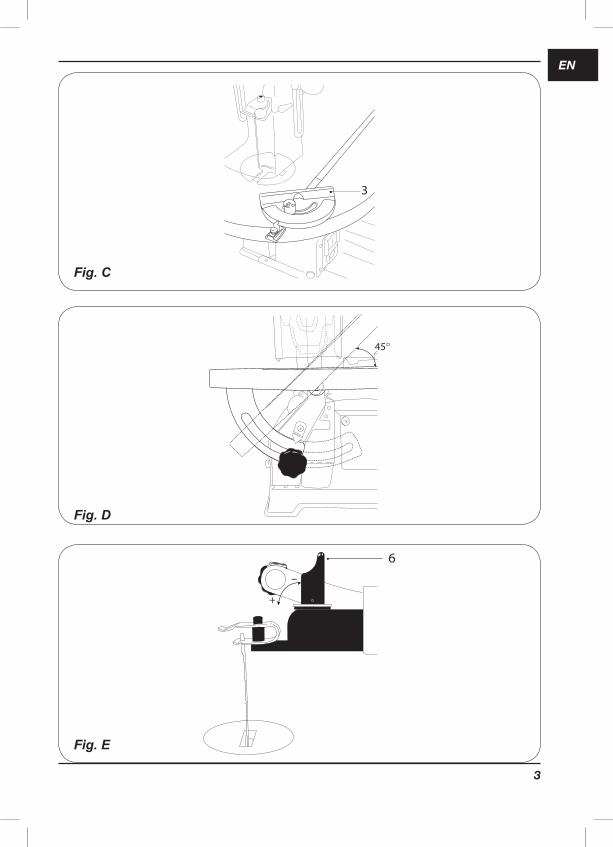
Fig. C
Fig. E
Fig. D

EN
4
Fig. F
Fig. H
Fig. G

EN
5
SCROLL SAW MACHINE FFZ-400R
Thank you for buying this Rhyas product.By doing so you now have an excellent product, delivered by one of Europe’s leading suppliers.All products delivered to you by Rhyas are manufactured according to the highest standards of performance and safety. As part of our philosophy we also provide an excellent customer service, backed by our comprehensive warranty.We hope you will enjoy using this product for many years to come.
The numbers in the following text refer to the pictures on page 2-3
Read the operating instructions carefully before using this device. Familiarise yourself with its functions and basic operation. Service the device as per the instructions to ensure that it always functions properly. The operating instructions and the accompanying documentation must be kept in the vicinity of the device.
IntroductionThis scroll saw is great for making toys, puzzles, games, fretwork and jewelry. Because of its cutting capacity it is a handy do-it-yourself tool. It cuts wood up to 40 mm thick as well as plastics and non-ferrous metals.
Contents1. Machine data2. Safety instruction3. Installing accesoires4. Operation5. Maintenance
1. MACHINE DATATechnical data
Voltage 230 V~Frequency 50 HzPower consumption 90 WSpeed count w/o load/min 1440/min.Max saw depth 90° 40 mmMax saw depth 45° 10 mmWeight 12.5 kgLpa (sound pressure) w/load 73 dB(A)Lpa (sound pressure) w/o load 86 dB(A)
Contents of the package1 Scroll saw1 Protective cover2 Screw for installing the protective cover10 Saw blades2 Adapters for universal saw blades2 Allen key1 Dust blow pipe3 Rubber feet3 Screws with nuts and rings for installing the
rubber feet1 Cross guide1 Operating manual1 Safety instructions1 Guarantee card
Check the machine, loose parts and accessories for transport damage.
FeaturesFig.A1. On/off switch2. Locking nut3. Cross guide4. Saw blade holder5. Protective cover6. Spanner7. Dust blow pipe8. Rubber feet
2. SAFETY INSTRUCTIONSExplanation of the symbols
Denotes risk of personal injury, loss of life or damage to the tool in case of non-observance of the instructions in this manual.
Denotes risk of electric shock.
Wear ear and eye protection
Specific safety instructions• Wear safety goggles and a dust mask.• This scroll saw machine is for indoor use only.• Ensure that the teeth of the saw point
downwards prior to using the machine.• If teeth of the saw blade are missing or
are damaged, then the saw blade must be

EN
6
replaced immediately.• Use the scroll saw machine on a stable and flat
surface.• Never exert pressure on the sides of the saw
blade because it may break.• Check wooden work pieces for possible
protruding nails etc. and remove these.• Do not touch the sawing surface with your
hands.• Never leave the sawing machine unattended
while it is running.• Do not remove any wood debris etc, in the
vicinity of the saw with your hands while it is running. Turn the machine off before removing the wood debris.
Immediately switch off the machine when• Interruption in the mains plug, mains lead or
mains lead damage.• Defect switch.• Smoke or stench of scorched isolation.
Electrical safetyWhen using electric machines always observe the safety regulations applicable in your country to reduce the risk of fire, electric shock and personal injury. Read the following safety instructions and also the enclosed safety instructions.
Always check that the power supply corresponds to the voltage on the rating plate.
Mains connectionOnly use earthed sockets with earthing wire connected per the regulations.
Replacing the mains connection cableThe mains connection cable may only be replaced by a special cable in a specialised workshop.
Replacing cables or plugsDispose of old cables or plugs immediately after replacing them. It is dangerous to connect the plug of a loose cable to a wall socket.
Using extension cablesOnly use an approved extension cable, corresponding to the machine power use. The wires must have a minimum cross section of 1.5 mm2. If the cable is on a reel, it must be fully paid out.
3. INSTALLING ACCESSORIESAlways disconnect the machine from the main power supply before carrying out any maintenance work
Installing the protective coverFig.B• Before commissioning the machine, the
protective cover (5) must be installed.• Insert the screw from the inside left, then
affix the washer and the safety ring from the right side. The safety ring (A) may be left out optionally.
• Screw the knurled nut in tight.
Installing the cross guideFig.CThe cross guide (3) allows material to be bevelled, and can be simultaneously used to support the material as it is fed through the saw.
Mounting the rubber feetFig. GThe enclosed rubber feet contribute to a steady position of the scroll saw on your worktable
• Place the rubber foot on its place• Connect the rubber foot with help of the
enclosed bolt, ring and nut• Tighten the nut with a wrench
Sawdust blowerFig. HThe sawdust blower keeps the workpiece clean for more accurate scroll cuts. For best results, always direct air flow from the blower tube at blade and workpiece. To adjust, simply bend to desired position.
Installation• Place the sawdust blower on the hole on top of
the machine• Turn the blow pipe clockwise into the hole

EN
7
4. OPERATIONAlways observe the safety instructions and obey the relevant regulations.
Start - Push the green ON-switch to start the machineStop - Push the red OFF-switch to stop the machine
Tilting the tableFig.DThe scroll saw table can be tilted through 45°. To do so:• Lock the locking arm underneath the table.• Manually tilt the table until the desired angle
has been reached (see the graduated scale on the machine).
• Retighten the locking arm.
Adapters for universal saw bladesFig. FThe enclosed adapters should only be used with universal (= without pins on the end) saw blades
• Unscrew the Allen screws on the adapter counterclockwise
• Slide the universal saw into the gap between the Allen screws
• Tighten the Allen screws clockwise so the saw is clamped
• Install the saw blade (see INSTALLING THE SAW BLADE)
Installing the saw bladeFig.E
Always disconnect the machine from the main power supply before carrying out any maintenance work
Use universal saw blades from any better DIY shop or machine shop.
• Select the correct blade for the kind of wood to be cut.
• Push the spanner upwards. (6).• Push the saw blade through the slot, with the
teeth pointing downwards. Make sure that the bolt of the saw blade (or saw-blade adapter) slides into the lower saw blade holder.
• Pull the saw blade up, so that the upper bolt (or saw-blade adapter) slides into the upper holder.
• Tighten the tensioner button until the saw blade has the required tension.
• Remove all tools and other objects from the saw table. Activate the current and allow the saw blade to run before starting to saw. The saw blade should run quietly.
Removing the saw blade
Always disconnect the machine from the mains before carrying out any maintenance work.
• Loosen the spanner until the spring is slack.• Carefully push down the upper saw-blade
holder and slightly lift the blade in order to facilitate its removal.
• Allow the blade to drop down slightly and push it forward, in order to loosen it from the lower holder.
Basic scroll saw operations and tips• There is a learning curve for each person who
wants to use this saw. During that period of time it is expected that some blades will break until you learn how to use the saw and receive the greatest benefit from the blades.
• Blades wear faster when: • cutting plywood, which is very abrasive; • when sawing wood which is thicker than the
blade stroke; • when sawing hardwood; • when side pressure is placed on the blade The saw blade saws only during the downward
stroke.• Using both hands, slowly and with minimum
pressure push the workpiece across the table towards the saw blade. This will prevent the blade from breaking or twisting.
• For optimal results, the saw blade must be sharp.
• Use the proper saw blade. The selection of the saw-blade depends on the thickness of the wood and the cut you would like to achieve. Keep the following in mind as a general rule: The thinner and harder the wood, the finer the teeth of the saw blade. Use a small blade to saw sharp curves.

EN
8
5. MAINTENANCEAlways disconnect the machine from the mains before carrying out any maintenance work.
The machine is designed to function faultlessly for a long period and with a minimum of maintenance. Extend its lifespan by regularly cleaning the machine and treating it correctly.
CleaningRegularly clean the machine with a soft cloth, preferably after each use. Keep the ventilator slot free of dust and other deposits. Remove any tenacious deposits with a soft cloth moistened with soap. Do not use solvents (petrol, alcohol, ammonia, etc.) as they will damage the plastic parts.
LubricationThe machine does not need lubricating.
FaultsIf a fault arises (due to e.g. element wear), contact the service address listed on the warranty card.
EnvironmentTo prevent damage during transport, the appliance is delivered in a solid packaging which consists largely of reusable material. Therefore please make use of options for recycling the packaging.
Damaged and/or disposed of electrical or electronic devices must be dropped off at recycling stations intended for that purpose.
WarrantyRead the warranty conditions on the separately supplied warranty card.

EN
9

EN
10
Spare parts list SSM1005
No. Description Position 209882 Blade spanner 17 - 20209865 Sawblade holder (upper) 28209866 Connection plate + bearing 33+34209867 Lower arm 39209868 Sawblade holder (lower) 41209883 Blowpipe complete 42 - 44209884 Protection cover 47209885 Air cell 49209886 Knob 51209872 Cam 52209876 Mitre guide complete 68 - 71

EN
11
80
81
Art
ikel
: SS
M 1
005
Mo
del
: FF
Z-4
00R
Vers
ie :
050
105-
2

EN
12
GENERAL SAFETY INSTRUCTIONS
Warning!Read all instructions. Failure to follow all instruc tions listed below may result in electric shock, fire and/or serious injury. The term “power tool” in all of the warnings listed below refers to your mains operated (corded) power tool or battery operated (cordless) power tool. Save these instructions.
1) Work areaa. Keep work area clean and well lit. Cluttered and dark
areas invite accidents.b. Do not operate power tools in explosive atmos pheres,
such as in the presence of flam mable liquids, gasses or dust. Power tools cre ate sparks which may ignite the dust of fumes.
c. Keep children and bystanders away while operating a power tool. Distractions can cause you to lose control.
2) Electrical safetya. Power tool plugs must match the outlet. Never modify
the plug in any way. Do not use any adapter plugs which earthed (grounded) power tools. Unmodified plugs and matching outlets will reduce risk of electric shock.
b. Avoid body contact with earthed or grounded surfaces such as pipes, radiators, ranges and refrigerators. There is an increased risk of elec tric shock if your body is earthed or grounded.
c. Do not expose power tools to rain or wet conditions. Water entering a power tool will increase the risk of electric shock.
d. Do not abuse the cord. Never use the cord for carrying, pulling or unplugging the power tool. Keep cord away from heat, oil, sharp edges or moving parts. Damaged or entangled cords increase the risk of electric shock.
e. When operating a power tool outdoors, use an extension cord suitable for outdoor use. Use of a cord suitable for outdoor use redu ces the risk of electric shock. Always use tool in con junction with a residual circuit breaker device.
3) Personal safetya. Stay alert, watch what you are doing and use common
sense when operating a power tool. Do not use a power tool while you are tired or under the influence of drugs, alcohol or medi ca tion. A moment of inattention while opera ting power tools may result in serious personal injury.
b. Use safety equipment. Always wear eye protection. Safety equipment such as dust mask, non-skid safety shoes, hard hat, or hearing protection used for appropriate conditions will reduce personal injuries.
c. Avoid accidental starting. Ensure the switch is in the off position before plugging in. Carrying power tools with your finger on the switch or plugging in power tools that have the switch on invites accidents.
d. Remove any adjusting key or wrench before turning the power tool on. A wrench or a key left attached to a rotating part of the power tool may result in personal injury.
e. Do not overreach. Keep proper footing and balance at all times. This enables better con trol of the power tool in unexpected situations.
f. Dress properly. Do not wear loose clothing or jewellery. Keep your hair, clothing and gloves away from moving parts. Loose clothes, jewel lery or long hair can be caught in moving parts.
g. If devices are provided for the connection of dust extraction and collection facilities, ensure these are connected and properly used. Use of these devices can reduce dust related hazards.
h. Use clamps or a vice to hold work. It’s safer than using your hand and it frees both hands to operate tool.
4) Power tool use and carea. Do not force the power tool. Use the correct power
tool for your application. The correct power tool will do the job better and safer at the rate for which it was designed.
b. Do not use the power tool if the switch does not turn it on and off. Any power tool that cannot be controlled with the switch is dangerous and must be repaired.
c. Disconnect the plug from the power source before making any adjustments, changing accessories, or storing power tools. Such preventive safety measures reduce the risk of starting the power tool accidentally.
d. Store idle power tools out of the reach of children and do not allow persons unfamiliar with the power tool or these instructions to operate the power tool. Power tools are dangerous in the hands of untrained users.
e. Maintain power tools. Check for misalign ment or binding of moving parts, breakage of parts and any other condition that may affect the po wer tools operation. If dama ged, have the po wer tool repaired before use. Many acci dents are caused by poorly maintained power tools.
f. Keep cutting tools sharp and clean. Properly maintained cutting tools with sharp cutting edges are less likely to bind and are easier to control.
g. Use the power tool, accessories and tool bits etc., in accordance with these instructions and in the manner intended for the particular type of power tool, taking into account the working conditions and the work to be performed. Use of the power tool for operations different from intended could result in hazardous situation.

(EN) We declare under our sole responsibility that this product is in conformity with directive 2011/65/EU of the European parliament and of the council of 9 June on the restriction of the use of certain hazardous substances in electrical and electronic equipment is in conformity and accordance with the following standards and regulations:
EN
13
EN 55014-1, EN 55014-2-16, EN 51044-1, EN 50144-2, EN 61000-3-2, EN 61000-3-3
2006/42/EC, 2006/95/EC, 2004/108/EC, 2002/96/EC, 2006/95/EC
Zwolle, 01-05-2014 W. DekensCEO Mactool Industrial BV
It is our policy to continuously improve our products and we therefore reserve the right to change the product specification without prior notice.
Mactool Industrial BV • Lingenstraat 6 • 8028 PM • Zwolle The Netherlands
DECLARATION OF CONFORMITYSSM4002
h. Damaged switches must be replaced at a cus to mer service repair centre. Do not use power tools that cannot be switched on and off.
i. Do not leave power tools unattended while they are switched on. Always switch off the tool and wait until it has come to a full standstill before leaving.
j. If the mains cable has been damaged, it must be replaced with a special mains cable. These can be obtained from the manufacturer or the manufacturer’s custo mer service department. The mains cable may only be replaced by the manufacturer, the manufacturer’s customer service department or equally qualified persons.
5) Battery tool use and carea. Ensure the switch is in the off position before inserting
battery pack. Inserting the battery pack into power tools that have the switch on invites accidents.
b. Recharge only with the charger specified by the manufacturer. A charger that is suitable for one type of battery pack may create a risk of fire when used with another battery pack.
c. Use power tools only with specifically desig nated battery packs. Use of any other battery packs may create a risk of injury and fire.
d. When battery pack is not in use, keep it away from other metal objects like paper clips, coins, keys, nails, screws, or other small metal objects that can make a connection from one terminal to another. Shorting the battery terminals together may cause burns of a fire.
e. Under abusive conditions, liquid may be ejected from the battery; avoid contact. If contact accidentally occurs, flush with water. If liquid contacts eyes, additionally seek medical help. Liquid ejected from the battery may cause irritations or burns.
6) Servicea. Please use a qualified expert who uses original
replacement parts to repair your power tool. This will ensure proper functioning of the power tool.
b. Caution! The use of any accessories or additional tools other than those recommended in this manual may lead to an increased risk of injury. Only use original replacement parts.


1405-02