screenhunter 7 help file - wisdom soft · screenhunter 7.0 pro help file © 2017 wisdom software...
TRANSCRIPT

ScreenHunter 7.0 Pro Help File
© 2017 Wisdom Software Inc. All rights reserved. Designated trademarks and brands are the property of their respective owners. Notice of Non-Liability Wisdom Software Inc. and the authors assume no liability for errors or omissions, or for damages, resulting from the use of this file or the information contained in this file.

ScreenHunter 7 Pro Help File © 2017 Wisdom Software Inc. All rights reserved. 2
Table of Contents
1. Welcome to ScreenHunter 7 03
Installation Getting Started for First Time Users
Features of Different Versions
2. Main Screen and Desktop Toolbar 11 Capture Tab Save Image Tab Save Video Tab Option Tab Tools Tab
3. Image Editor 45
Bitmap Tools Bitmap Features Object Tools Object Features File Formats
4. Registration & Licensing 69 Registration Benefits

ScreenHunter 7 Pro Help File © 2017 Wisdom Software Inc. All rights reserved. 3
1. Welcome to ScreenHunter 7
An all-in-one image capture and video recording package
ScreenHunter 7 Pro is the most comprehensive and advanced version of this software we offer, combining image capture and video recording into one groundbreaking package.
What's New in ScreenHunter?
New Screen Recorder Newly designed screen recorder for high quality recording Save videos to MPEG-4 or FLV, which have no size limit Record webcam anywhere with flexible sizes Recording can stop automatically at an assigned length
New & Enhanced Capture Features
It supports full screen capture up to 8K for multiple monitors and records 4K videos for a
single monitor. Capture while you’re recording the screen Capture covered or hidden windows
Schedule multiple captures or record any time you set up
A combination of a bitmap image editor and vector object editor
On top of capturing as a bitmap, you can add drawing objects such as arrows and
bubbles you can keep editing
Other New and Enhanced Features
New desktop toolbar for easy access
Magnify your screen, draw directly on the screen on your presentation
Save your choices to profiles for easy portability Fast and native compatibility with Windows 10

ScreenHunter 7 Pro Help File © 2017 Wisdom Software Inc. All rights reserved. 4
Installation
System Requirements
Windows Vista or later
To install
Download and run the setup package, and follow the onscreen instructions.
To uninstall
Uninstall from your Windows Control Panel, Uninstall a program on Windows 7 or, Settings, Apps & Features on Windows 10.

ScreenHunter 7 Pro Help File © 2017 Wisdom Software Inc. All rights reserved. 5
Getting Started for First Time Users
ScreenHunter is designed so that it is always on standby, ready for you to take action. Screenhunter
has five main tabs:
The Capture tab is for assigning how you want to capture for both images and videos.
The Save Image tab lets you change image capture settings, and the Save Video tab allows you to
change the settings for how videos are recorded.
The Options tab provides customization methods and the Tools tab provides other useful tools.
The following two examples are quick guides that show how to capture a rectangular area image and
record a video. You can mix and match settings and features to suit your capture needs.
Example #1: Capture Image
Step #1: Download & Install
Download and save the setup package, then run to install.
To run, you can press Windows + E to open Windows Explorer, then locate the downloaded file
and double-click on it. After installing, run ScreenHunter 7 Pro from the Windows Start menu, or the icon
on your desktop.
Step #2: Using the capture tab
You can pick a hotkey to start
A hotkey is a keyboard shortcut that allows you to capture quicker. F6 is ScreenHunter’s default image
capture hotkey; however, you can choose any key combination or a single key as your hotkey. You can always click the Capture Now button to capture.
In this example, we selected the Rectangular area in the Screen group and changed the settings by clicking the button on the right.
In the Add group, select Cursor.

ScreenHunter 7 Pro Help File © 2017 Wisdom Software Inc. All rights reserved. 6
Step #3: Choose Where to Save Your Capture: "Save Image"
In this example, we went to the Save Image tab, and selected Clipboard to copy the capture
to the Windows Clipboard, and selected Editor so we can edit the capture directly after.
In the Image Files group, select PNG to save as a PNG file.
Selecting Automatic for the filename creates an automatic name for the file. To change the
format, click the filename button to the right.
Step #4: Capture
To capture, click Capture Now, which is the camera button at the top
- or
Press your hotkey on your keyboard, F6 in this case, to capture immediately.
Click and hold down the mouse button, then drag to select an area on screen.

ScreenHunter 7 Pro Help File © 2017 Wisdom Software Inc. All rights reserved. 7
Release the mouse button to capture.
If you have selected the Adjust feature on the Rectangular Area Settings dialog, the selected
area is then highlighted. You can use your mouse or arrow keys to adjust the size of the area
and click the camera button to capture an image. Also, you can press Enter or the Space bar on your keyboard to capture.
Step #5: Get Your Screenshot
Find your capture. In this case, it is on your Desktop. If you used another location to save your captures, open Windows Explorer
(press Windows + E). Go to your file folder assigned in Step #3 to pick up your file. The capture is also copied to your Clipboard so that you can paste to another program, such
as MS Word by using Ctrl+V or pasting.
To Cancel
Press the Esc key or right-click the mouse button at any time to cancel. In the Adjust mode, you can
click the cancel button on screen to cancel.
Example #2: Record Video
Recording a video uses many similar settings and operations as capturing an image.
Step #1 & #2 are the same as Capturing an Image.
Step #3: Choose Where to Save Video: "Save Video”

ScreenHunter 7 Pro Help File © 2017 Wisdom Software Inc. All rights reserved. 8
In this example, on the Save Video tab, check Sound to record audio in your video, and
choose a Quality and your specific Frame rate. In the Video File group, check MP4 to save as an MPEG-4 file. Select Automatic for the filename and click the filename button to the right if you want to
change the format.
Step #4: Record
Click Record Now to record, which is the video button at the top.
- or -
Press your hotkey on your keyboard, F8 by default, to start
recording.
Press the left mouse button down and drag to select an area on the screen, then release the
mouse button.
If you have selected the Adjust feature on the Rectangular Area Capture Settings dialog, by
releasing your mouse, the selected area is then highlighted. You can use your mouse or arrow
keys to adjust the size of the area and click the video button to start recording.

ScreenHunter 7 Pro Help File © 2017 Wisdom Software Inc. All rights reserved. 9
To Stop
When recording has started, the Record Now button will be changed to a Stop
button. You can click it to stop, or you can press the stop hotkey or Esc to stop. When recording, the flashing indicator can be shown and you may click the
Stop button at the bottom to stop.
Step #5 is the same as Capture Image.
Just to Note:
These are a couple of very basic ways to use ScreenHunter, but we have developed ScreenHunter to
adapt to whatever your needs may be. Discover features that are perfect for your needs, whether it be
scheduling a certain time every day to capture changing stocks or recording a video interview with a
person across the country. The possibilities are endless with ScreenHunter.

ScreenHunter 7 Pro Help File © 2017 Wisdom Software Inc. All rights reserved. 10
Features of Different Versions
http://www.wisdom-soft.com/screen-recorder/screen-capture.htm

ScreenHunter 7 Pro Help File © 2017 Wisdom Software Inc. All rights reserved. 11
2. Main Window and Desktop Toolbar
The Main Window includes top buttons and tabs.
Top Buttons
These buttons are accessible from all tabs.
Capture Now
Press this button to immediately capture an image with the current settings.
Record Now
Press this button to immediately record a video with the current settings.

ScreenHunter 7 Pro Help File © 2017 Wisdom Software Inc. All rights reserved. 12
Toggle Webcam
Click to show and click again to hide the webcam.
Open Image Editor
Show Image Editor where you can modify and alter any image.
ScreenZoom
ScreenZoom magnifies your screen and enables you to draw on it. When using ScreenZoom with
a hotkey, it zooms to the quadrant where your mouse is situated, making it a useful tool for
presentations. Right-click or press Esc to cancel.
Show Desktop Toolbar
Allow the ScreenHunter desktop toolbar to be visible.
Profile Manager
Show the Profile Manager dialog. Profiles save all current settings to a location you can access later to create the same capture effect.
Help File Access the help file.
Exit ScreenHunter 7 Pro
Tabs
Screenhunter has five main tabs:
Capture – How you want to capture an image or record a video.
Save Image – How you want to save the image.
Save Video – How you want to save the video.
Options – Customize your ScreenHunter experience.
Tools – Other useful tools.
When running, the ScreenHunter icon will appear in the system tray or notifications
area.

ScreenHunter 7 Pro Help File © 2017 Wisdom Software Inc. All rights reserved. 13
Desktop Toolbar
Desktop Toolbar is a miniature window of the ScreenHunter
Main Window. It is anchored to the top or bottom edge of your
desktop screen, and it contains buttons that give you quick
access to capture and record.
To open the toolbar, move your mouse over the little bar on the top (or bottom) edge. When it is open,
you can click anywhere on the toolbar (other than the buttons) to move the toolbar. After it is moved, it
will reside in the closest top or bottom edge of your desktop.
ScreenHunter 7 Pro Help File © 2017 Wisdom Software Inc. All rights reserved. 14
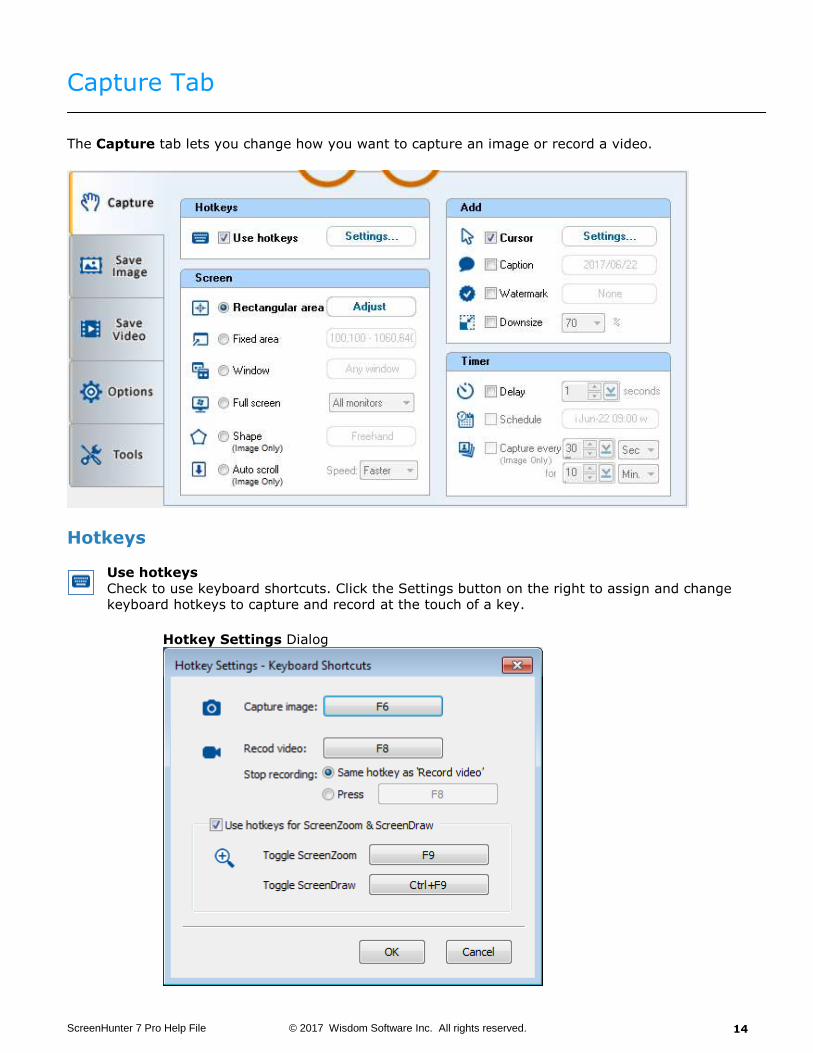
Capture Tab
The Capture tab lets you change how you want to capture an image or record a video.
Hotkeys
Use hotkeys
Check to use keyboard shortcuts. Click the Settings button on the right to assign and change keyboard hotkeys to capture and record at the touch of a key.
Hotkey Settings Dialog

ScreenHunter 7 Pro Help File © 2017 Wisdom Software Inc. All rights reserved. 15
ScreenZoom is used to magnify the screen and draw. ScreenDraw is used to draw on the screen without magnifying.
Screen Group
What you want to capture.
Rectangular area
Capture an image or record a video in a rectangular area. The Magnifier and Highlight colors
may be customized on the Options tab.
Rectangular Area Settings Dialog
Any size Allows you to capture any area.
Adjust
Make the rectangular area adjustable before capturing or recording, so you
can further adjust the area using the mouse and keyboard.
Lock the aspect ratio

ScreenHunter 7 Pro Help File © 2017 Wisdom Software Inc. All rights reserved. 16
Locks the area’s aspect ratio.
1:1 (Square)
4:3 (Standard TV) 16:9 (Wide screen) Custom Capture an area with any aspect ratio (1-20).
Fixed size Set a fixed rectangular area in pixels. The max size is full screen.
Fixed area
Capture a fixed area on the screen and click the button on
the right to preview and set. When selected, more timer features
are unlocked in the Timer group.
The area can be defined by clicking the fixed area size button on
the right. Use the mouse and keyboard to adjust the area. You can
also press Enter or Space to set.
This feature is useful for monitoring and capturing something that
changes constantly, such as stock prices.
Window
Capture an entire window or an object on a window.
Highlight colors may be customized on the Options tab.
Additional options are available by clicking the settings button on
the right.
Window Capture Settings Dialog
Any window, button, menu, etc. Capture an entire window or an object on a window.

ScreenHunter 7 Pro Help File © 2017 Wisdom Software Inc. All rights reserved. 17
Multiple
Check to capture more than one object, such as cascading menu blocks, buttons
and windows.
When capturing multiple objects, click the left mouse button to add an object, and then press Enter or Space bar on your keyboard to finish.
This is for image only.
Active window
Capture a currently active window. The active window is the window that is
currently in focus and with which you are interacting. When selected, additional timer features are unlocked in the Timer group.
Specific window
Capture a specific window, even if it is minimized or covered.
Click to refresh and show available windows.
This list may change when a window on your machine is closed or updated.
Full screen
Capture the full screen. When selected, additional timer features are unlocked in the Timer
group.
Multiple monitors are for image only. Full screen recording will always record the main monitor.
Shape
Capture a non-rectangular area. This is for image only.
Shape Capture Settings Dialog
Additional options are available by clicking the settings button on the right.

ScreenHunter 7 Pro Help File © 2017 Wisdom Software Inc. All rights reserved. 18
Background color refers to the color that the negative space will be shaded in.
Auto scroll
ScreenHunter scrolls down windows or webpages while capturing. Scrolling is application
dependent, so auto scroll may not work with all applications, such as windows that have constantly changing content.
This is for image only.
Speed
Choose the scrolling speed that works for your machine and scrolling window content.
Add Group
What you want to add to the image capture or recorded video.
Cursor
Add the mouse pointer.
Mouse Click Settings Dialog
This is for video only, and has no effects while capturing an image.

ScreenHunter 7 Pro Help File © 2017 Wisdom Software Inc. All rights reserved. 19
Check Show click effect when recording video when you need to show where mouse clicks occur in a recorded video. You can choose one of the following shapes.
Circle
Select Solid if you want the circle to be filled.
Square
Focus
Color can be chosen from Red, Yellow, Green or Blue.
Caption
Select to add a text annotation.
Caption Settings Dialog Click the button on the right to show.

ScreenHunter 7 Pro Help File © 2017 Wisdom Software Inc. All rights reserved. 20
Caption Text
Check to include the text you want to add. A date and time format can be selected from
the dropdown list.
Order
Highlight an item in the box and click the up or down buttons on the right to
change the sequence.
Visual Options
You can choose the text font, color, background color and transparency percent of the caption and the position of the caption.
Watermark Check to add a watermark.

ScreenHunter 7 Pro Help File © 2017 Wisdom Software Inc. All rights reserved. 21
Watermark Settings Dialog
Image File Click the folder icon on the right to choose an image file to use as the watermark.
Visual Options
Choose different scale and transparency options for the watermark.
Position
Choose a position for the watermark to appear in the image or video.
Downsize
Check to downscale down the capture. Choose a scale from the dropdown list on the right.

ScreenHunter 7 Pro Help File © 2017 Wisdom Software Inc. All rights reserved. 22
Timer Group
Check only if you need to use timed features.
Delay
Check to set a delay from the moment the hotkey is pressed to the time the image gets captured
or the recording is started. The maximum delay time is 100 seconds.
This takes effect only when the hotkey is pressed. It has no effect when the Capture Now or
Record Now button is pressed as these are always immediate.
Schedule
Check to capture according to a schedule. It will be enabled when Fixed area, Active window or Specific window is selected in Window, or Full screen is selected in the Screen group.
Scheduled Capture Settings Dialog
Type
Capture an image or record a video.
Start at Set the starting time for the recurrence.
Click the drop-down to select the date. Type or press the up and down arrows to set the hour, minute and second.
Schedule
Choose from the following options,

ScreenHunter 7 Pro Help File © 2017 Wisdom Software Inc. All rights reserved. 23
Once - Only capture or record once.
Every day - Capture or record every day.
Weekly – Check the days you want. Monthly - Choose a day in the month and month intervals.
End Choose how your scheduled captures will finish.
Forever - No end date.
End at – End at a specific date and time.
The text on the button will show the main information of your selection on the Scheduled Capture Settings dialog, in this format: (type) (date time) (schedule).
(type): i - image; v – video
(date time): month-day hour : minute (schedule): o - Once; e – Every day; w – Weekly; m - Monthly
For example: this translates to capturing an image, starting at July 1st at 9:30, and every day afterwards.
If you want to start to capture immediately after ScreenHunter starts up, select the following on the Scheduled Capture Settings dialog.
Set End at to any date and time in the past Set Start at to the exact same as End at, date and time.
Auto-capture (for image only)
Automatically capture images at given intervals. It will be enabled when Fixed area, Active window or Specific window is selected in Window, or Full screen is selected in the Screen group.
Choose your interval time and unit for auto-capture and assign a duration of capture.
To stop auto-capturing after it starts
Press the Capture Now button again. The button will only be enabled when auto-
capturing.
-Or-
Press the image capture hotkey again if hotkeys are enabled.
If the interval is set to no more than 10 seconds, no messages are displayed after each capture.

ScreenHunter 7 Pro Help File © 2017 Wisdom Software Inc. All rights reserved. 24
Save Image Tab
The Save Image tab lets you change image capture settings.
Effects Group
Select what to add to your capture.
Border
Check to add a border to your image capture. Click the Settings button on the right to assign
and change.
Border Settings dialog

ScreenHunter 7 Pro Help File © 2017 Wisdom Software Inc. All rights reserved. 25
Visual Options Enter the total border width (1 – 40 pixels).
Style Choose from the Shadow, Glow, Fade and Frame effects.
Shadow
Glow
Fade
Frame

ScreenHunter 7 Pro Help File © 2017 Wisdom Software Inc. All rights reserved. 26
Color Check to add a color effect. Click the Settings button on the right to assign and change.
You can change the Brightness and Contrast of the capture, or Invert the color.
Send Image To Group
Choose where you need to send your capture to.
Editor
Check to copy the capture to Image Editor to show and edit. Click the Open button on the right
to show Image Editor.
Clipboard
Check to copy the capture to the standard Windows Clipboard to be pasted in other programs,
such as Microsoft Word.
Printer
Check to print the capture directly.
Click the print settings button on the right to change. The currently selected setting
information is shown on the button. (s) stands for Smooth zooming. Printed image is previewed as it is printed on paper.
The sample image will be replaced by your capture in the future.

ScreenHunter 7 Pro Help File © 2017 Wisdom Software Inc. All rights reserved. 27
Print size options
Original image size
Select to print the image in the original image size, pixel by pixel on the page.
Since the normal image captured on the screen has a resolution of the screen,
usually 96 dpi (dot per inch) or 120 dpi, and a modern printer can have 600 dpi or
more, the image may look small in the original size.
Fit to page
Select to zoom the image to the page size, keeping the aspect ratio.
Zoom to
Select to print the image zoomed to your choice. The maximum will be the size that fits the page size.
Smooth zooming
Check to use high quality zooming when zoomed.
Position options
Choose a position for the capture to appear on the paper.
Add title Enter a title only if you want have a title on the printed paper.
Filename
Check to include the filename if the capture is saved to a file.

ScreenHunter 7 Pro Help File © 2017 Wisdom Software Inc. All rights reserved. 28
Add to the bottom
Check to show the title at the bottom. If unchecked, it will show at the top.
Printer Settings... Click to set up and change the printer.
Print Now
Click to print directly to the printer using the current settings.
This button is only available when loaded from Image Editor.
Print Multiple Copies...
Click to show the print dialog where you can set the number of copies before printing. This button is only available when loaded from Image Editor.
Check to send the captured image as an attachment using the default email program on your PC.
Send automatically Send the capture as an attachment directly to the default email program outbox.
Show the default email dialog before sending
Show the email before sending, allowing you to add and change the email. E.g. if you use
Outlook as your email on your PC, it loads the Outlook email dialog box.
To
Enter the recipient email addresses. Use ';' or ',' to separate multiple email recipients.
CC
Enter the CC email recipients. Use ';' or ',' to separate multiple email recipients.
Send a Test Email
Press this button to check the correctness of all the mailing recipients and send an email

ScreenHunter 7 Pro Help File © 2017 Wisdom Software Inc. All rights reserved. 29
to your email outbox with a sample image file attached. The attachment will be replaced by your capture in the future.
Image Files Group
Check to save the captured image to an image file, or multiple files.
Format
JPG - JPEG file. The JPEG Quality factor from 1 to 100, with 100 being the highest quality PNG - Portable Network Graphics file
PDF - Adobe PDF file GIF - GIF file BMP - Bitmap file
Filename has 3 choices: Automatic, Ask me or Set name. They are only available when at least one
file type is checked above.
Automatic naming Select to automatically save the captured image with a generated filename.

ScreenHunter 7 Pro Help File © 2017 Wisdom Software Inc. All rights reserved. 30
Filename Options Check to include the text you want to add to your filename.
Note
Check to add a note text.
Automatic number
Check to add an automatically generated sequence number.
Number of digits
Check if you want to have a fixed number of digits, such as 2 for 01, 02, 3 for
001, 002, etc.
Next number
ScreenHunter will keep increasing after each capture. You may enter any number to set, but it cannot be greater than the End at number.
End at
Check to set an end number. When the end number is reached, it will stop taking screenshots.
Order
You can highlight an item in the list box and click the up and down
buttons on the right to change the sequence.

ScreenHunter 7 Pro Help File © 2017 Wisdom Software Inc. All rights reserved. 31
No space in filename
Check to remove all spaces between characters in the filename.
Overwrite Options When File Exists
These options are only for actions when a newly generated filename already exists in the
target folder.
Never overwrite (generate a new filename)
Select to always generate a new filename automatically.
Ask
Select to ask.
Overwrite Select to overwrite all the time.
Ask me
Select if you want to be asked each time. A dialog box will be displayed after each capture. You
can change the file format, name and location.
Set name
Select if you need to use this filename for all captures. It will overwrite the file if it exists.
Folder The default location where the captured images will be saved.
Open Image File Location Click to open the location where the image files are saved.
Select Image File Location Click to assign or create a folder to save captured images.

ScreenHunter 7 Pro Help File © 2017 Wisdom Software Inc. All rights reserved. 32
Save Video Tab
The Save Video tab lets you change the settings for the recorded video file.
Sound Group
Sound
Check to add sound to the recorded video. Click the Settings button on the right to assign and change.
Sound Settings dialog
Recording Devices Group Add recording devices of your choice.

ScreenHunter 7 Pro Help File © 2017 Wisdom Software Inc. All rights reserved. 33
Speakers
Check to add to record from a playback device, such as speakers.
Mic & more
Check to add to record from a microphone or other devices.
Amplify by – volume will be boosted by x times. 1 means no boost.
Sound Quality Group Choose sound quality from Best, Better, Good and Fair.
Channels Group Choose from Stereo and Mono.
System Tools Group Use these tools provided by Windows.
Audio Devices – show the Sound dialog of Windows Control Panel.
Sound Recorder / Test – show the Windows Sound Recorder.
Video Quality Group
Quality
Set recorded video quality. The range is from 1 to 100, 1 being the lowest and 100 being the
highest.
Frame rate
Frame rate is set in FPS (Frames Per Second), which is the number of frames recorded per second. The supported range is from 1 to 100, 1 being the lowest and 100 being the highest.
Video Length Group
Auto-stop
Stop recording at a given length and save to a video file.
Video File Group
Choose the video file options.

ScreenHunter 7 Pro Help File © 2017 Wisdom Software Inc. All rights reserved. 34
Format
MP4 – Save to an MPEG-4 video file. FLV - Save to a Flash video file
Filename has 3 choices: Automatic, Ask me or Fixed name. They have the same meanings and operations as those of the image file above.

ScreenHunter 7 Pro Help File © 2017 Wisdom Software Inc. All rights reserved. 35
Options Tab
The Options tab provides more options to further customize your ScreenHunter.
General
Start minimized
Check to hide the main ScreenHunter window when ScreenHunter is launched.
This option change will take effect when ScreenHunter is restarted.
Show tooltips
Check to show tooltips. This option change will take effect when ScreenHunter is restarted.
Show in the system tray when minimized, not on the taskbar
When Capturing
Hide the main window
Check to hide the ScreenHunter main window capturing.
Show crosshairs
Check to show the screen-wide crosshairs when capturing.
Show flashing indicator while recording
Check to show the flashing indicator when recording, except the full screen recording.

ScreenHunter 7 Pro Help File © 2017 Wisdom Software Inc. All rights reserved. 36
Press the Esc key to stop recording
When the Esc key is pressed during recording, it will stop and save the video.
Highlight color Select the color used to draw the crosshairs and highlight boxes.
Magnifier
Magnifier size
Select the area size around the mouse pointer to be zoomed.
Magnifying times Select how much larger you would like the new image to be, choosing from 3 or 6 times.
After Capture
Play a sound Check to play a sound. Images and videos have a different sound.
Show a brief message Check to show a self-closing message displayed beside the ScreenHunter desktop toolbar. Choose a duration from 5, 10 and 30 seconds.
Show the saved file names
Check to show the saved file names and locations.
Bring Image Editor to front
Check to bring Image Editor to stay on top of all the other Windows, only when Editor is checked on
the Save Image tab.
Play recorded video
Check to play recorded video using your default video player.
Image Editor

ScreenHunter 7 Pro Help File © 2017 Wisdom Software Inc. All rights reserved. 37
Show a message when saving objects to an image file Check to show the warning dialog when saving to an image file format (other than .shf) if it contains
any drawing objects.
Use last folder
Check to use the last used folder as the location to save your images or videos.

ScreenHunter 7 Pro Help File © 2017 Wisdom Software Inc. All rights reserved. 38
Tools Tab
The Tools tab provides more useful tools.
Tools Group
Webcam
When you have a webcam installed, ScreenHunter can capture your webcam image
or record your webcam to a video. When the webcam is visible on your screen, click anywhere on the
webcam to move.
Click this button to show. Press again or Esc to exit. Right click on the webcam image to show more
options.
Click on the Settings… button on the right to show the Webcam Settings dialog. You can pick a webcam from the top-left drop-down list.

ScreenHunter 7 Pro Help File © 2017 Wisdom Software Inc. All rights reserved. 39
Click the Options… button to choose more options for the webcam.
Properties are webcam dependent and different webcams have different
property dialog boxes. Therefore, some properties may not be supported,
such as Horizontal Flip.
Choose a supported webcam size from the Size drop-down.
Show Image Editor where you can modify and alter any image. Refer to the next section for more.
ScreenZoom
ScreenZoom magnifies your screen and enables you to draw on it. When using
ScreenZoom with a hotkey, it zooms to the quadrant where your mouse is situated.
This can be integrated into your presentation, discussion and training sessions, etc. You also can
"freeze" the screen and directly draw on it by using ScreenDraw.

ScreenHunter 7 Pro Help File © 2017 Wisdom Software Inc. All rights reserved. 40
To cancel,
Press the ScreenZoom or ScreenDraw hotkey again
Right-click the mouse
The Esc key
The Space key
Click on the Hotkey button on the right to show the ScreenZoom Settings dialog.
Click on the Hotkey Settings button on the dialog to show the Hotkey Setttings dialog,
which is the same as when you click the Settings… button in the Hotkeys group on the Capture tab.
Change pen color:
You can press these keys on your keyboard to change the pen color when it is in the
ScreenZoom or ScreenDraw mode.
Change pen width:
You can press the arrow keys on your keyboard to change the pen width when it is in the
ScreenZoom or ScreenDraw mode. The width can be between 2 to 14 pixels.
Show Color Picker.

ScreenHunter 7 Pro Help File © 2017 Wisdom Software Inc. All rights reserved. 41
For a screen-wide color picker, in the Pick on screen group, hold this button down and drag the mouse to pick a color anywhere on the screen.

ScreenHunter 7 Pro Help File © 2017 Wisdom Software Inc. All rights reserved. 42
Scan an image from the scanner selected on the right.
Click Settings… to select your scanner.
The Sources list will show the scanner drivers installed on the PC.
Show the Profile Manager dialog. Profiles save all current settings to a location you can access later to
create the same capture effect.
Save current setting to a new profile…
The currently selected settings on the tabs will be used to create a profile with your name
choices.
You may select a profile, Change the profile name and Export to a file, or Import from
your hard drive.
Profile files are in XML format.

ScreenHunter 7 Pro Help File © 2017 Wisdom Software Inc. All rights reserved. 43
You may click the Up and Down buttons to change the order.
Click to delete a profile.
Help Group
Getting Started Show the short guide of the external HTML file.
User Guide Show the external ScreenHunter help file.
Online Support Center
Go to the online Support Center on the web.

ScreenHunter 7 Pro Help File © 2017 Wisdom Software Inc. All rights reserved. 44
License Group
Buy
Show the license key dialog and enter your purchased license key.
If it has been licensed, this link will be grayed out.
Upgrade
Go to the latest download page on web.
Wisdom-soft.com
Go to the Wisdom Software website.
About ScreenHunter 7 Pro Show the About box.

ScreenHunter 7 Pro Help File © 2017 Wisdom Software Inc. All rights reserved. 45
3. Image Editor
ScreenHunter Image Editor is an intuitive and versatile multiple image editor. It is a unique
combination of a bitmap and vector object editor.
The Image Editor interface is made up of four major elements: the menu & toolbar, tools panel (bitmap
tools and objects tools), properties panel and main workspace.
It comes with an array of bitmap editing features, such as cropping to shape and advanced image
processing. Additionally, you will find object features that allow you to add drawing objects such as arrows and bubbles and add text, boxes, highlighting cycles, symbols and speech bubbles.
Menu
Depending on your bitmap or object selection, unavailable menu items will be disabled (grayed out).
File
A standard file menu. Edit
For both bitmap and objects View
For visibility and zooming

ScreenHunter 7 Pro Help File © 2017 Wisdom Software Inc. All rights reserved. 46
Bitmap
More bitmap-related operations
Objects
More vector object-related operations
Bitmap Tools

ScreenHunter 7 Pro Help File © 2017 Wisdom Software Inc. All rights reserved. 47
ScreenHunter Image Editor combines the functionality of photo-editing, painting and vector-drawing in
one easy-to-use interface.
It has a powerful set of features for color and artistic effects, as well as a number of ways to retouch
your bitmap screenshots, including cropping, resizing, border adding and rotation.
Bitmap Tools Panel
Pixel Selection Tools
Pixel selection tools draw selection marquees that define the area of selected pixels. After you draw the selection marquee, you can move, cut, copy, or apply other adjustments, or delete pixels.
The Rectangular area selection tool selects a rectangular area in an image.
The Freehand area selection tool selects a freehand area of pixels in an image.
Cropping and Resizing Tools
After an area is selected by one of the selection tools, you can click this Crop selection tool to crop.
Crop to shape or resize image...
Click this button to crop a selected area or the entire image to shape or resize.
Select the options on the following dialog and click OK to finish.
Crop to shape You can crop to a shape from the list as "cookie cutters".

ScreenHunter 7 Pro Help File © 2017 Wisdom Software Inc. All rights reserved. 48
If no area is selected, it will apply to the whole image.
E.g.
Resize the whole image
Resize the entire image to your preference.
Keep aspect ratio, zoomed
o To this width
Resize to match the width set on the right.
o To this height
Resize to match the height set on the right.
o Percentage
Resize to the percentage set on the right.
Zoomed to this fixed size
Zoomed to the size set below, regardless of the aspect ratio.
Add space to sides, not zoomed Enter the number of pixels to the sizes you want to add space.
Paint Tools
The Flood fill tool fills the pixels that you click, and neighboring pixels of similar color, with the Flood fill color and Opacity set below.
Flood fill tolerance Neighboring pixels are only filled if their values fall within this range. So it can be used as a magic wand.

ScreenHunter 7 Pro Help File © 2017 Wisdom Software Inc. All rights reserved. 49
E.g. Click on the clouds
(1) Original picture
(2) Flood fill white with
5% tolerance.
(3) Flood fill white with 40% tolerance.
The Brush tool is for painting brush strokes on the image. It uses the width, color and opacity set below.
Brush width
Flood fill color You can click and pick any color on your screen using the color picker.
Brush color You can click and pick any color on your screen using the color picker.
The Flood fill and Brush Opacity (5%: Mostly transparent - 100%: Complete opaque)

ScreenHunter 7 Pro Help File © 2017 Wisdom Software Inc. All rights reserved. 50
Bitmap Features
More bitmap editing features are available from the Bitmap menu.
Bitmap Menu
Add Border... Please refer to the Save Image Tab chapter, Add Border section.
Rotate... On the Rotation dialog, you can choose a degree to rotate and a background color.
Rotation will always apply to the whole image, not a selection.
Brightness & Contrast... You can make a selection and then apply the brightness & contrast changes through the dialog.

ScreenHunter 7 Pro Help File © 2017 Wisdom Software Inc. All rights reserved. 51
If no selection is made, it will apply to the whole image.
RGB & Hue... You can make a selection and then apply the color changes through the dialog.
Smoothness...
You can make a selection and then apply the smoothness changes through the dialog.

ScreenHunter 7 Pro Help File © 2017 Wisdom Software Inc. All rights reserved. 52
Gamma Correction...
You can make a selection and then apply the Gamma Correction through the dialog.
Threshold...

ScreenHunter 7 Pro Help File © 2017 Wisdom Software Inc. All rights reserved. 53
You can make a selection and then apply the Threshold changes through the dialog.
Artistic Effects Sub Menu

ScreenHunter 7 Pro Help File © 2017 Wisdom Software Inc. All rights reserved. 54
Add Noise You can add noise for a selection or the whole image.
Each time you choose the menu, it will add noise on top of the current image.
Patterned Glass
Dilate

ScreenHunter 7 Pro Help File © 2017 Wisdom Software Inc. All rights reserved. 55
Edge
Emboss

ScreenHunter 7 Pro Help File © 2017 Wisdom Software Inc. All rights reserved. 56
Erode
Jitter

ScreenHunter 7 Pro Help File © 2017 Wisdom Software Inc. All rights reserved. 57
Median
Mix Two Images...
You can mix two images together to make one new image. You can choose a mix type from the drop-down box.
This menu item will be available only when there are two or more images open in the image editor.

ScreenHunter 7 Pro Help File © 2017 Wisdom Software Inc. All rights reserved. 58

ScreenHunter 7 Pro Help File © 2017 Wisdom Software Inc. All rights reserved. 59
Object Tools
Rather than painting directly on an image, you can draw a vector object on a layer that is over the
image. Object drawing is a shape-based process where every line, shape and text is editable.
Object Tools and Properties Panel
ScreenHunter has many tools for drawing vector objects. You can draw basic shapes, arrows, freehand
paths, load symbols and pictures. Once an object is created or selected, the Properties panel displays the properties of the currently selected object.
The Object selection tool selects one or more objects.
Before you can do anything with any object, you must use this tool to select it.
Once an object is selected, the properties panel displays the properties of the object and you can make
changes on the panel.
To select an object, you can
Click the object Drag a selection area around the objects To add an object to the selection, hold down the Shift key and click the object To toggle an object in the selection, hold down the Ctrl key and click the object
All objects can be converted to the bitmap. Once they are converted and painted, they become part of
the bitmap and cannot be edited.
Objects
Arrow or Line
To draw a vector object,
1. Click the object tool, e.g. arrow or line tool. It will appear as pressed down.
2. Point your mouse to a starting point on the image and press down the left mouse button.
3. Hold the mouse button and drag it across to the end point and release the button.
4. You can change the properties on the properties panel.
Rectangle

ScreenHunter 7 Pro Help File © 2017 Wisdom Software Inc. All rights reserved. 60
You can add text to any rectangles, round rectangles, ellipses, bubbles and shapes.
To add & edit text on an object,
Click the text icon or,
Press the Enter key or
Press the Space key or Press Ctrl + Alt + T
Round rectangle
To adjust the roundness, drag the yellow handle and move.
You can add a drop shadow to any rectangles, round rectangles, ellipses and pictures.
Ellipse Please see the Rectangle and Round Rectangle tool for operation details.

ScreenHunter 7 Pro Help File © 2017 Wisdom Software Inc. All rights reserved. 61
Bubble
It uses the same way to add text as for rectangles above.
Polygon
You can change angle, sides color, etc., on the Properties Panel.
Drag the yellow handle to change the angle.

ScreenHunter 7 Pro Help File © 2017 Wisdom Software Inc. All rights reserved. 62
Freehand line
To adjust the curves, drag a blue handle and move.
Symbol
Symbols are like icons that you can place anywhere as an object. When the Symbol tool is
clicked, you can choose a symbol from the Symbol Picker dialog. Click the Symbol group
dropdown to show the available symbols.
To change a symbol that has been created, you can double-click on the symbol or click the Change Symbol button on the Properties Panel to change.
Picture
A picture can be loaded as a picture object. You can resize and move anywhere on the image.

ScreenHunter 7 Pro Help File © 2017 Wisdom Software Inc. All rights reserved. 63
On the Properties Panel,
When Lock size is checked, the picture will be kept in the original size and not resizable. When Lock aspect ratio is checked, the picture can be resized but the width and height
aspect ratio will be locked. Check Drop shadow to add a drop shadow.
You can add a drop shadow to any rectangles, round rectangles, ellipses and pictures.

ScreenHunter 7 Pro Help File © 2017 Wisdom Software Inc. All rights reserved. 64
Object Features
More object editing features are available from the Object menu.
Object Menu
Convert Objects to Bitmap
When one or more objects are selected, you can convert them to bitmap.
Once they are converted and painted, they become part of the bitmap and they are not editable
anymore.
Bring to Front, Bring Forward, Send Backward, Send Back
If there is more than one object and they overlap, ScreenHunter stacks objects based on the order in which they were created, placing the most recently created object on the top of the stack.
You can change the order by selecting the object and choosing the menu items.
E.g. for the blue start object order:
Bring to Front Send Backward

ScreenHunter 7 Pro Help File © 2017 Wisdom Software Inc. All rights reserved. 65
Send Back
Bring Forward
Align and Make Same measurement functions
You can select more than one object and apply the alignment functions.
Alignment menu items are only available when there is more than one object selected.
The red color handles indicate the anchor object.
Align Left
Align Center Vertically
Align Right
Align Top

ScreenHunter 7 Pro Help File © 2017 Wisdom Software Inc. All rights reserved. 66
Align Center Horizontally
Align Bottom

ScreenHunter 7 Pro Help File © 2017 Wisdom Software Inc. All rights reserved. 67
File Formats
You can save your capture in any of the main file formats. You can also read other image files in Image
Editor.
Displaying the File Extensions
For Windows Vista and Windows 7 & 8
1. Click Start.
2. Type folder options. Click the line Folder Options that appears at the top of the Start
menu.
3. Click the View tab at the top of the Folder Options dialog.
4. In the Advanced settings group, click to uncheck Hide extensions for known file types. 5. Click OK.
For Windows 10
1. Click Start.
2. Type folder options. Click the line File Explorer Options that appears at the top of the
Start menu.
The rest is the same.
Main File Format
Extension File Format
.SHF
ScreenHunter File
An SHF file is a graphics file created by ScreenHunter. It keeps all
graphics objects, such as arrows, labels and text boxes editable.
SHF files created with ScreenHunter 6 can be read and modified in
ScreenHunter 7.
.JPG
JPEG is a commonly used graphic file format.
JPG uses lossy compression. Lossy means that some image quality
is lost when the JPG data is compressed and saved, and this quality
can never be recovered. You can choose 1-100% for the quality
factor, with 100 being the least loss possible.
.PNG
PNG, or Portable Network Graphic, is a newer format, designed to
be both a lossless and royalty-free web graphic format.
ScreenHunter 7 creates small size PNG files.

ScreenHunter 7 Pro Help File © 2017 Wisdom Software Inc. All rights reserved. 68
.GIF
GIF, or Graphics Interchange Format, is a popular web graphic
format. GIFs contain a maximum of 256 colors.
ScreenHunter 7 creates high quality GIF images.
You can use another our product, MotionGIF, to create animated
GIF files.
.PDF PDF, Portable Document format is a common format to use to view
and print. To view a file in PDF format, you need Adobe Reader, a
free application by Adobe Systems.
.BMP Windows Bitmap, the Microsoft Windows graphic file format, is a
common file format used to display bitmap images.
Other Image Files Supported to Read
Extension File Format
.ICO Windows Icon
.CUR Windows Cursor
.ANI Animated Cursor or Animated GIF
.DIB Microsoft Device Independent Bitmap
.RLE Microsoft Run Length Encoding

ScreenHunter 7 Pro Help File © 2017 Wisdom Software Inc. All rights reserved. 69
4. Registration & Licensing
Registration Benefits
Our software is licensed in a "try before you buy" fashion. All our paid versions have a 15-day fully
functional trial period. When you buy a license, a license key will be emailed to you. There is no need
to reinstall when you become a registered user.
As a registered user, you will get:
A license key that will remove all "Unlicensed" and "Expired" stamps in the software, and unlock
the features. All trial limitations for the version are immediately removed.
There is a one-time only charge, no annual fees required.
Free upgrades for all minor builds and discounts on our products.
Free high priority technical support for three months.
An unlicensed copy of our software may be used only for the purposes of evaluation. You can make as
many copies of the unlicensed copy; give exact copies of the original unlicensed copy to anyone; and
distribute the unlicensed copy in its unmodified form via electronic means. There is no charge for any of
the above.
Using an unlicensed copy of a product after the evaluation period is in violation of federal and
international copyright laws.
Prices
For pricing, please visit http://www.wisdom-soft.com/order/pricing.htm
How to Order
You can order online at http://www.wisdom-soft.com for immediate license key delivery, 24/7, or place
your order using other means.