scratch 2.0 making games and cartoons. detailed...
TRANSCRIPT
~~~***~~~
Scratch 2.0 Programming.
Making games and cartoons.
Detailed step by step guide for children.
Golikov Denis & Golikov Artem
~~~***~~~
Copyright Golikov Denis & Golikov Artem 2015
All rights reserved.
Smashwords Edition, License Notes.
This e‐book is licensed for your personal enjoyment only. This e‐book may not be re‐sold or given away to other people. If you would like to share this book with another person, please purchase an additional copy for each recipient. If you’re reading this book and did not purchase it, or it was not purchased for your use only, then please return to your favorite e‐book retailer and
purchase your own copy. Thank you for respecting the work of this author.
Table of Contents.
Description.
How the book was created.
Acknowledgement.
Introduction for Parents. How to work with the book.
Introduction for Children. How to work with the book.
Chapter 1. How Scratch is built. The first program.
Chapter 2. Making the first program more expanded.
Chapter 3. Cyclical program flow.
Chapter 4. First simple cartoon.
Chapter 5. Soccer.
Chapter 6. Let’s learn X coordinate.
Chapter 7. Let’s learn Y coordinates.
Chapter 8. Cartoon "Flying Cat and Bat".
Chapter 9. Maze game.
Chapter 10. Ghost cartoon.
Chapter 11. "A kitten on a minefield" game.
Chapter 12. "Wizard" game.
Chapter 13. Mathematician cat.
Chapter 14. "Cat with jetpack" game.
Chapter 15. A platformer game.
Chapter 16. "Catch delicacies" game.
Annex 1. Scratch 2 concepts.
Annex 2. Scratch 2.0 Blocks. Reference book.
Annex 3. Negative numbers.
Annex 4. Degrees.
Annex 5. Coordinates X and Y.
Annex 6. Decimal fractions.
Annex 7. Percent.
Annex 8. Functions.
Description.
The goal of the book is an introduction into programming and mathematics for middle school students.
The material is written for student self‐study for Grade 5‐6 students who have basic skills of operating a computer. Children have to be able to use a mouse, start using labels, etc., as well as count to 480, multiply and divide. More complex mathematical notions (negative numbers, decimal fractions, coordinate axis, degrees) will be explained in the pages of the book.
Scratch is a new free programming environment that allows children 10 years old and older to create their own stories, cartoons, games and other creations. This program allows children to express themselves creatively with a computer. Scratch was specifically created as a new learning environment for teaching school students programming.
You can create cartoons in Scratch, play with various objects, change them, move them on the screen and set up forms of interaction between objects. The programs are created with multi‐colored blocks the same way as Lego construction sets are made of multi‐colored bricks. Scratch was created in 2006 under the supervision of Mitchel Resnick by a Lifelong Kindergarten group in the MIT Media Lab. Each chapter requires about 20‐30 minutes to study. It is not recommended to study more than two chapters per day.
How the book was created.
I am 38 years old. My background is in Computer Engineering, not in Programming. My son, Artem, got into programming on Scratch at 7 years of age. I started looking for books on Scratch on the Internet for children of 7‐9 years old, but I could not find anything. All Scratch textbooks are for 13‐15 year old children, though there is nothing difficult about Scratch. With basic Math knowledge it is possible to use more than half of Scratch's capabilities to make cool games and cartoons. After Artem had mastered Scratch, he got very upset because he learned they would not be studying it in school and that other children who were his friends and classmates, would never learn about this interesting program. I made a decision to sacrifice my Sunday evenings to organize a club of programmers to use Scratch. A year ago my son and I started teaching a club of young programmers Scratch for kids 9‐11 years old. For each class Artem would think of a new game that would use new Scratch blocks. As a result, we have collected enough material for a whole book. In the fall of 2013 new children came to the club and the book was tested with them. The children made a few comments, I explained complex points in more detail, and now the book is published. Some children have already studied the whole book and are asking for a continuation! The children like studying the book because everything is explained in great detail and does not require their parents' participation. The parents also like it because they can do their chores in the meantime.
Acknowledgement.
I would like to thank the creators of Scratch for a fantastic opportunity to reveal creativeness in new ways and teach children how to handle new technologies.
Great thanks to Mariya Konopatova for frontispiece and Kitten’s icons. Follow the link below to see her works http://komixsisters.ru.
Thanks to the guys who helped to test this book’s chapters.
Thanks to those who were empathetic and sent their feedback.
Links.
All the examples from the book are published on the website
http://scratch.mit.edu/users/scratch_book/
You can ask questions of the authors by e‐mailing
Introduction for Parents. How to work with the book.
The major principle of teaching a child how to program is the creation of a complex game by the child that will consist of many minor structures called scripts. The operational mode of each script has a lot of in detail. After the creation of such a game a child can spend some time playing and simultaneously changing it, either simplifying or complicating it.
Each chapter contains a quiz for the child to verify whether he/she has grasped the idea of programming a game and several tasks for improvement. Each game in the book is a complete program and its improvement may become an ongoing process. It will help beginners work out complex applications and improve memory and analytical thinking.
Remember that game creation presupposes computer painting skills for your child. Early versions of Scratch included a simple picture editor similar to standard Paint. But Scratch 2.0 (described here) also features a vector editor. a. It really matters. Games are more attractive. It is easier to change the characters and learning has become much more fun. This book contains a great deal of information on how to operate a vector editor. Some kids find it difficult to create vector characters, but after learning new drawing skills they may show off their professionally created games. Be advised that all game characters are easily modified and may be changed by pupils without the author’s notice. At the classes of The Young Programmers’ Club the most scrupulous children were willing to create three copies of characters depicted in the book. The majority of children want to draw them in their unique way. If the programming of characters’ behavior makes it hard for children to improvise and modify the program at their own discretion, they may reveal their creativeness while working with backdrops and characters. Poor Cat has seen so many scenes!
There are two ways to work with Scratch. You may work using your browser or download the offline editor and create programs without accessing the Internet. If you are planning to use the Internet, please read the first part of the Introduction. If you select to work offline, go straight to the second part of the Introduction.
Be advised that all examples shown in this book were created in offline mode.
How to download and install the offline Scratch editor.
This is an easy task. Go to http://scratch.mit.edu/scratch2download/. First download and install Adobe AIR. If you are using Microsoft Windows – click on the "Windows – Download".
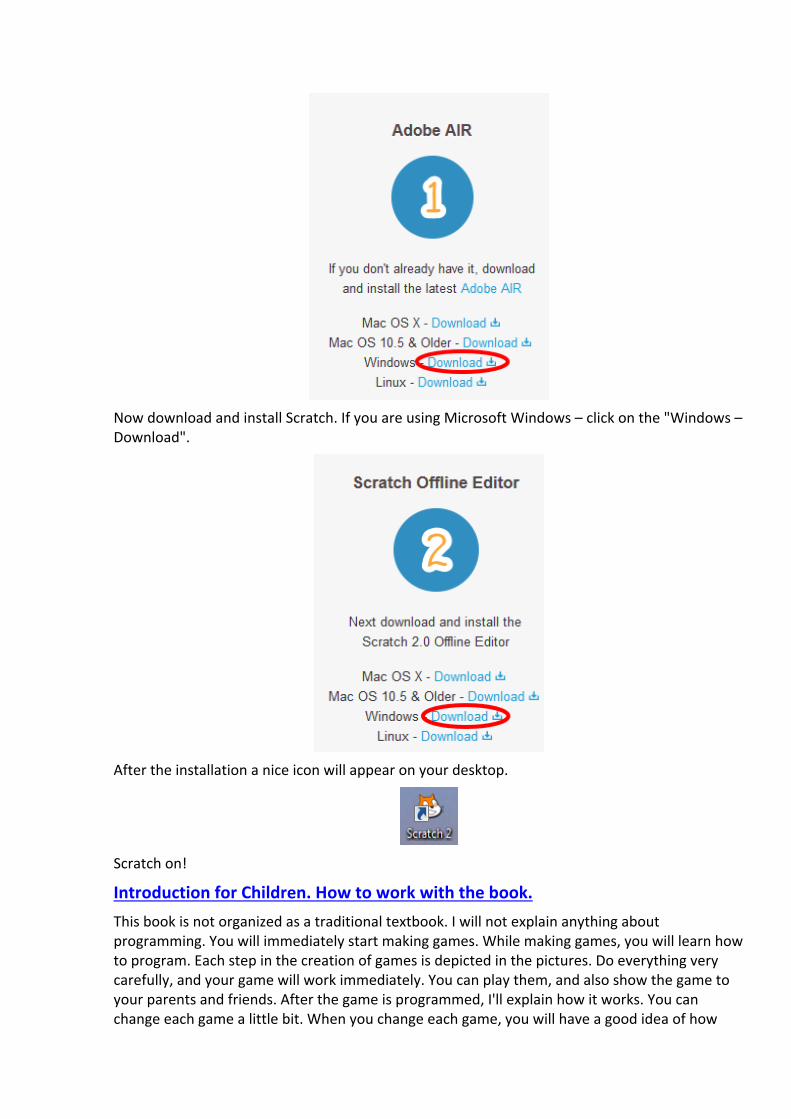
Now download and install Scratch. If you are using Microsoft Windows – click on the "Windows – Download".
After the installation a nice icon will appear on your desktop.
Scratch on!
Introduction for Children. How to work with the book.
This book is not organized as a traditional textbook. I will not explain anything about programming. You will immediately start making games. While making games, you will learn how to program. Each step in the creation of games is depicted in the pictures. Do everything very carefully, and your game will work immediately. You can play them, and also show the game to your parents and friends. After the game is programmed, I'll explain how it works. You can change each game a little bit. When you change each game, you will have a good idea of how
they work and learn programming very quickly. You can create your own game. Sometimes you will have a lot to draw with the mouse. Do not worry if you get ugly drawings. I do not know how to draw beautifully. If you practice, you will learn how to paint beautifully. You will learn very well, if you know how to count to 1000, and know how to multiply two‐digit numbers. If not, you can still start making games. Mathematical concepts that you need are explained in the application. Go ahead! Program with Scratch! It is easy!
Chapter 1. How Scratch is built. The first program.
Start Scratch from your icon on the desktop.
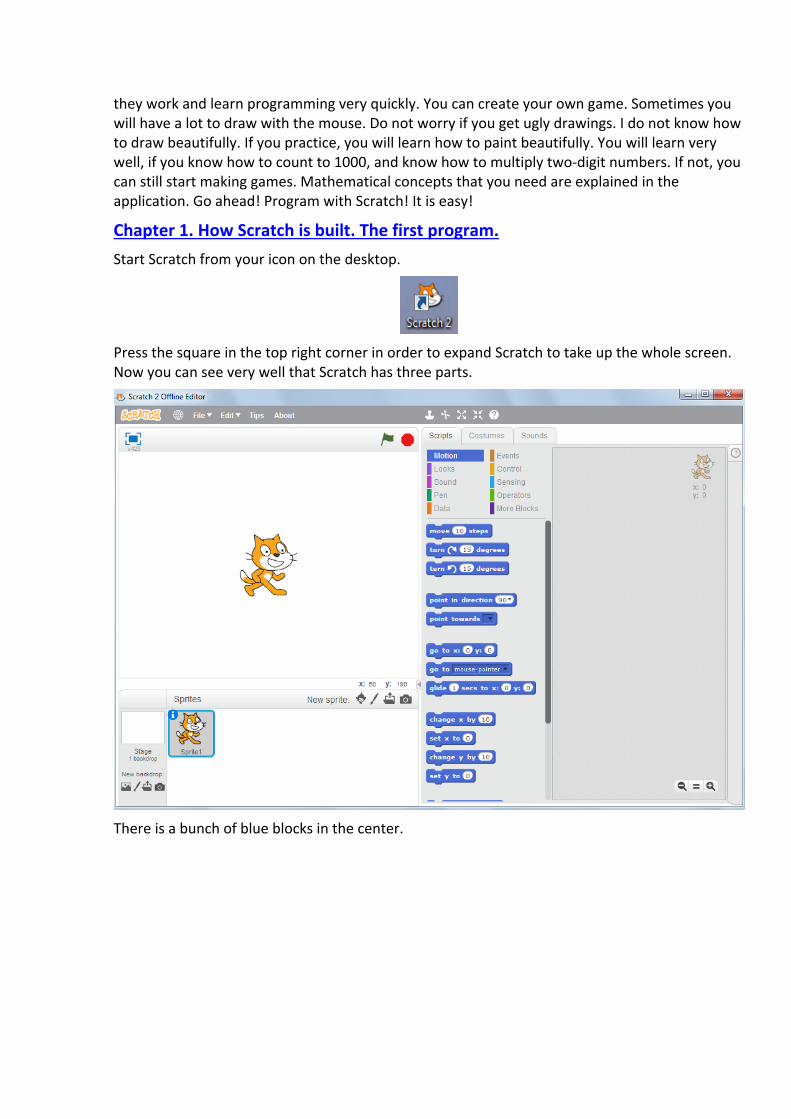
Press the square in the top right corner in order to expand Scratch to take up the whole screen. Now you can see very well that Scratch has three parts.
There is a bunch of blue blocks in the center.
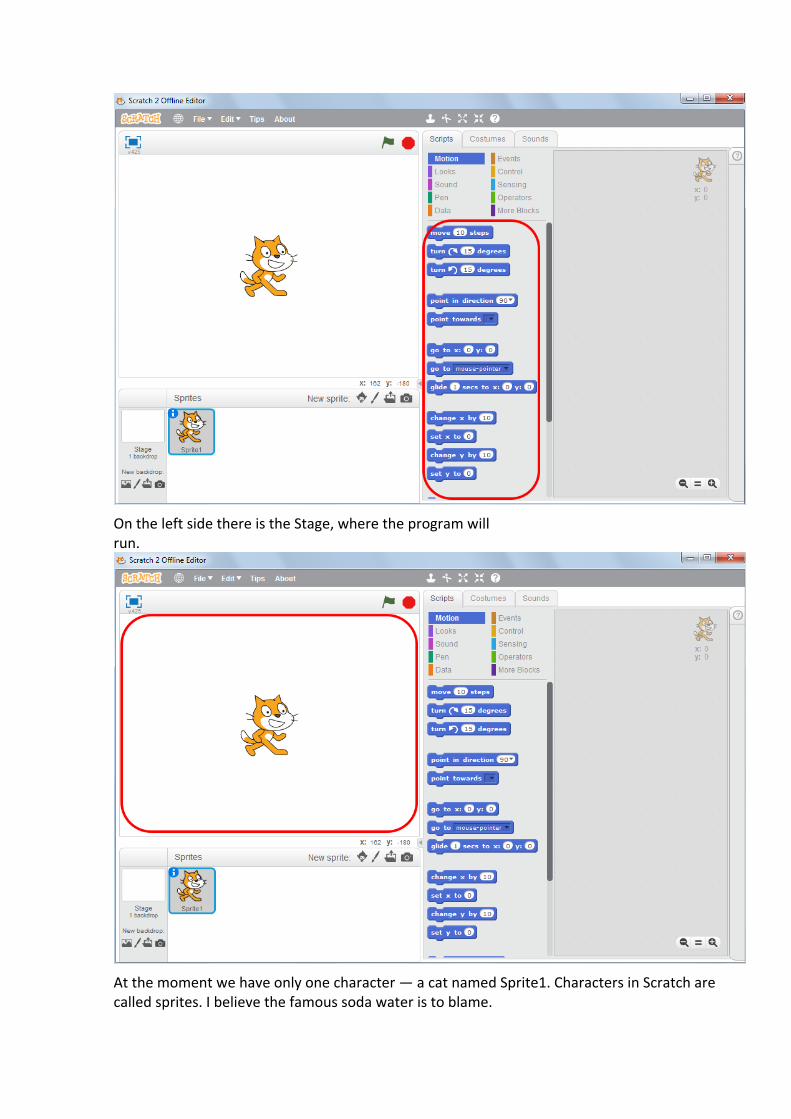
On the left side there is the Stage, where the program will run.
At the moment we have only one character — a cat named Sprite1. Characters in Scratch are called sprites. I believe the famous soda water is to blame.
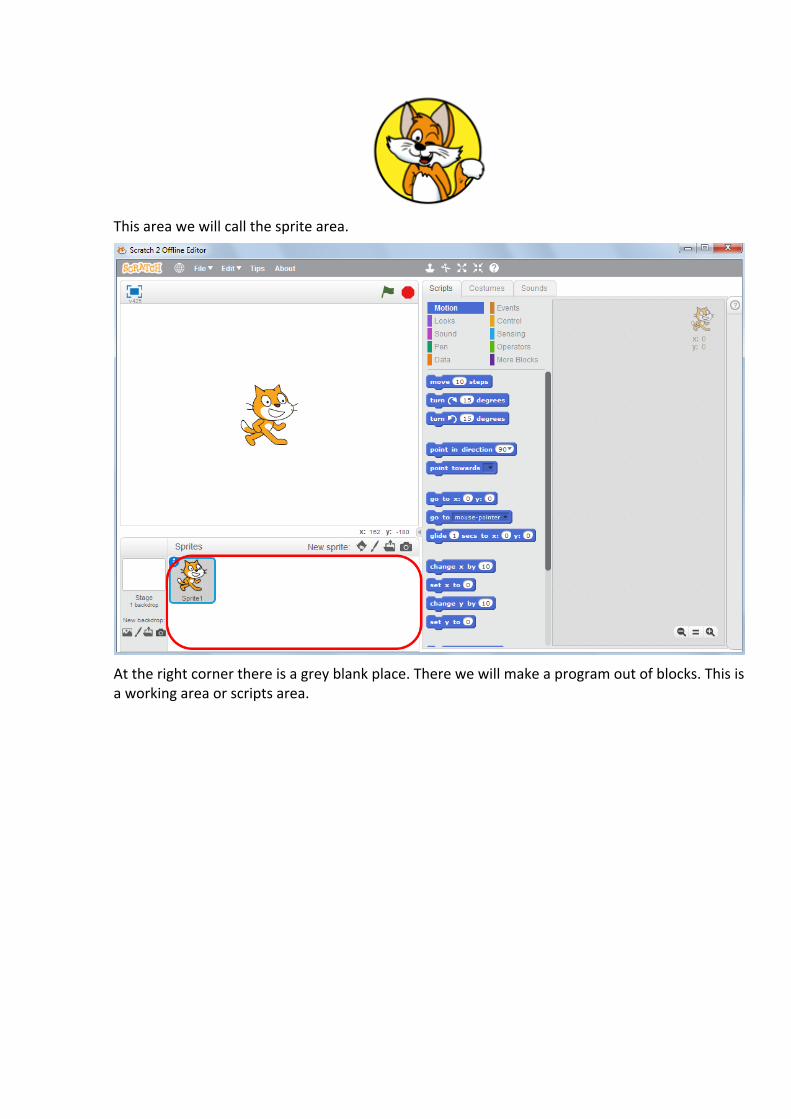
This area we will call the sprite area.
At the right corner there is a grey blank place. There we will make a program out of blocks. This is a working area or scripts area.
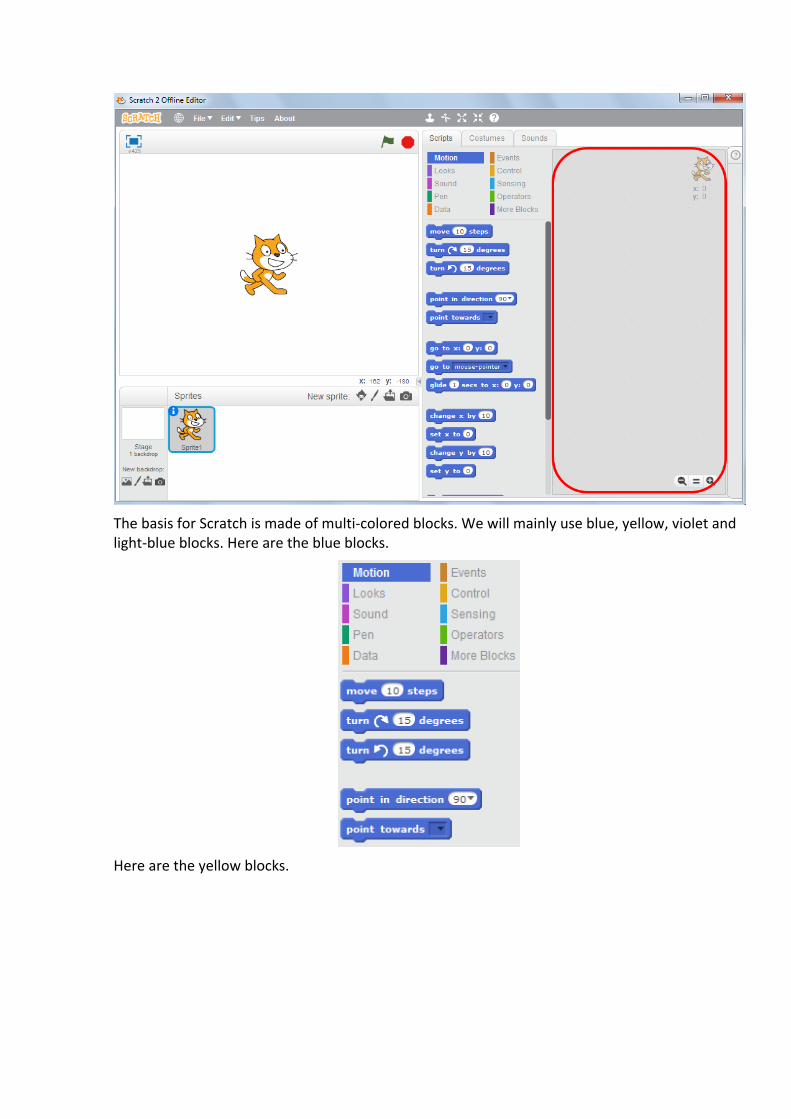
The basis for Scratch is made of multi‐colored blocks. We will mainly use blue, yellow, violet and light‐blue blocks. Here are the blue blocks.
Here are the yellow blocks.
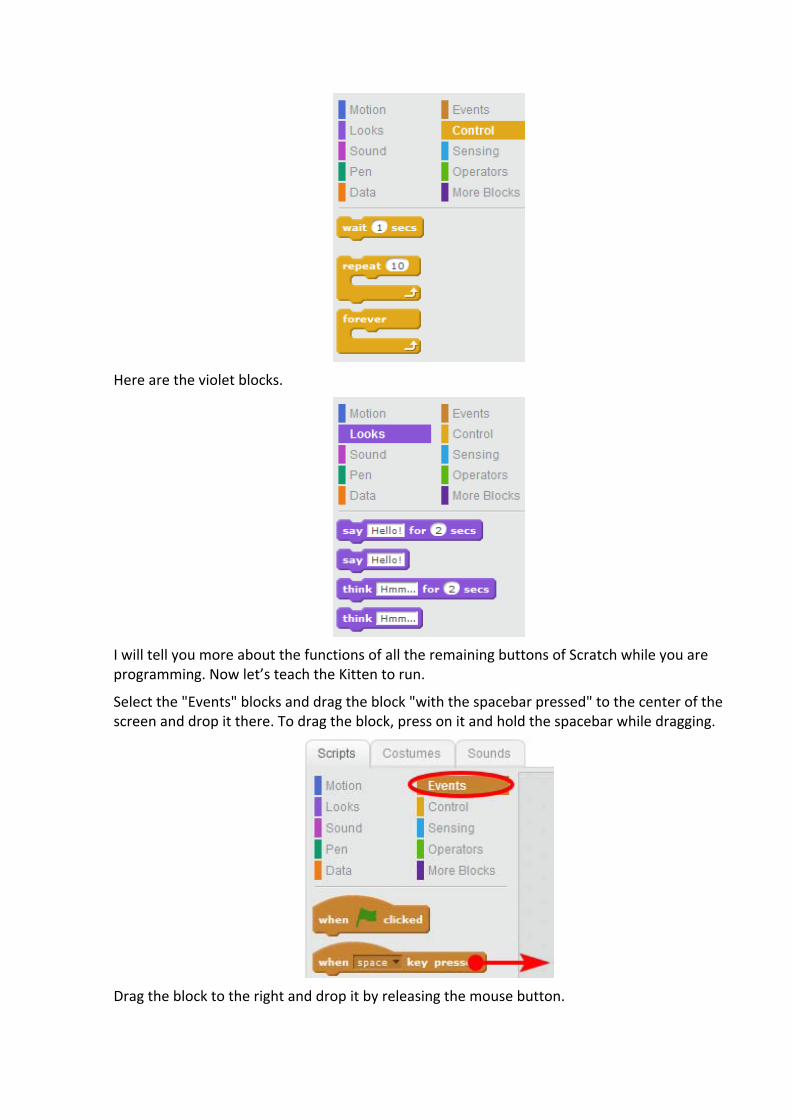
Here are the violet blocks.
I will tell you more about the functions of all the remaining buttons of Scratch while you are programming. Now let’s teach the Kitten to run.
Select the "Events" blocks and drag the block "with the spacebar pressed" to the center of the screen and drop it there. To drag the block, press on it and hold the spacebar while dragging.
Drag the block to the right and drop it by releasing the mouse button.

Now select the blue "Motion" blocks and drag the "move 10 steps" block to the right.
Fix it under the brown block "by pressing the space key ".
When the blue block is ready to be attached to the brown one – there is a white strip visible. Release the mouse button and it will be attached.
Well done! You’ve managed to create your first program or script as some may call it.
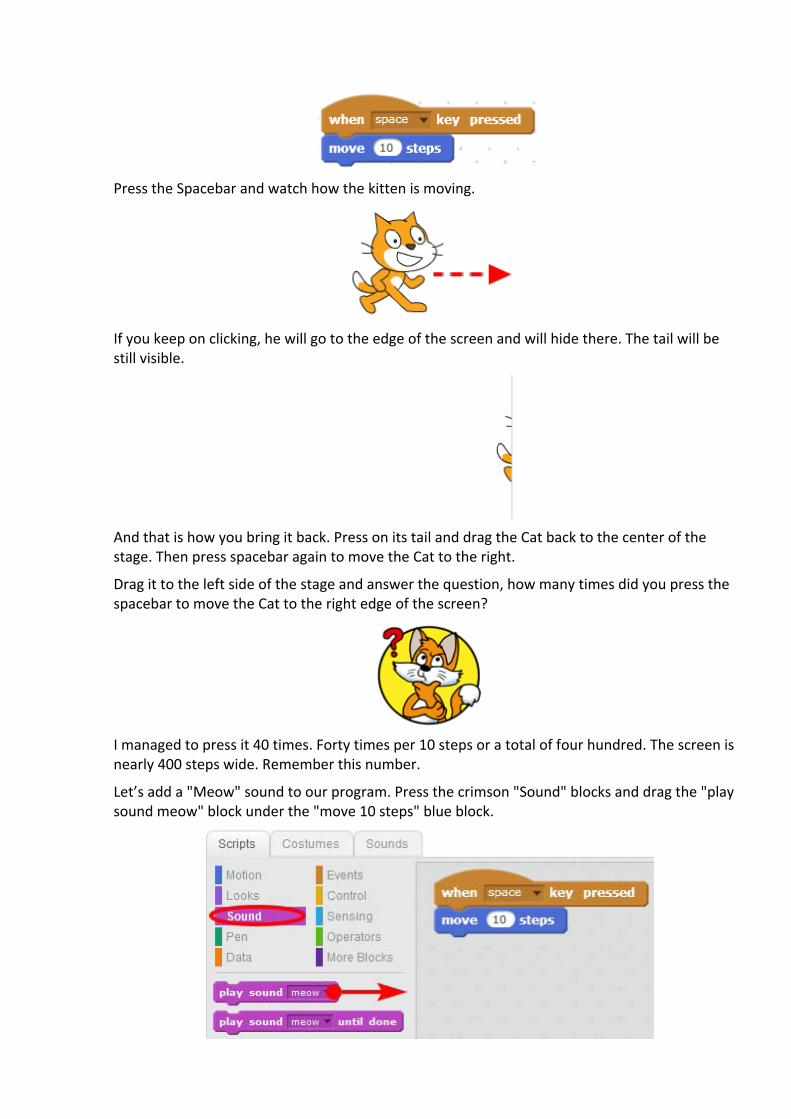
Press the Spacebar and watch how the kitten is moving.
If you keep on clicking, he will go to the edge of the screen and will hide there. The tail will be still visible.
And that is how you bring it back. Press on its tail and drag the Cat back to the center of the stage. Then press spacebar again to move the Cat to the right.
Drag it to the left side of the stage and answer the question, how many times did you press the spacebar to move the Cat to the right edge of the screen?
I managed to press it 40 times. Forty times per 10 steps or a total of four hundred. The screen is nearly 400 steps wide. Remember this number.
Let’s add a "Meow" sound to our program. Press the crimson "Sound" blocks and drag the "play sound meow" block under the "move 10 steps" blue block.
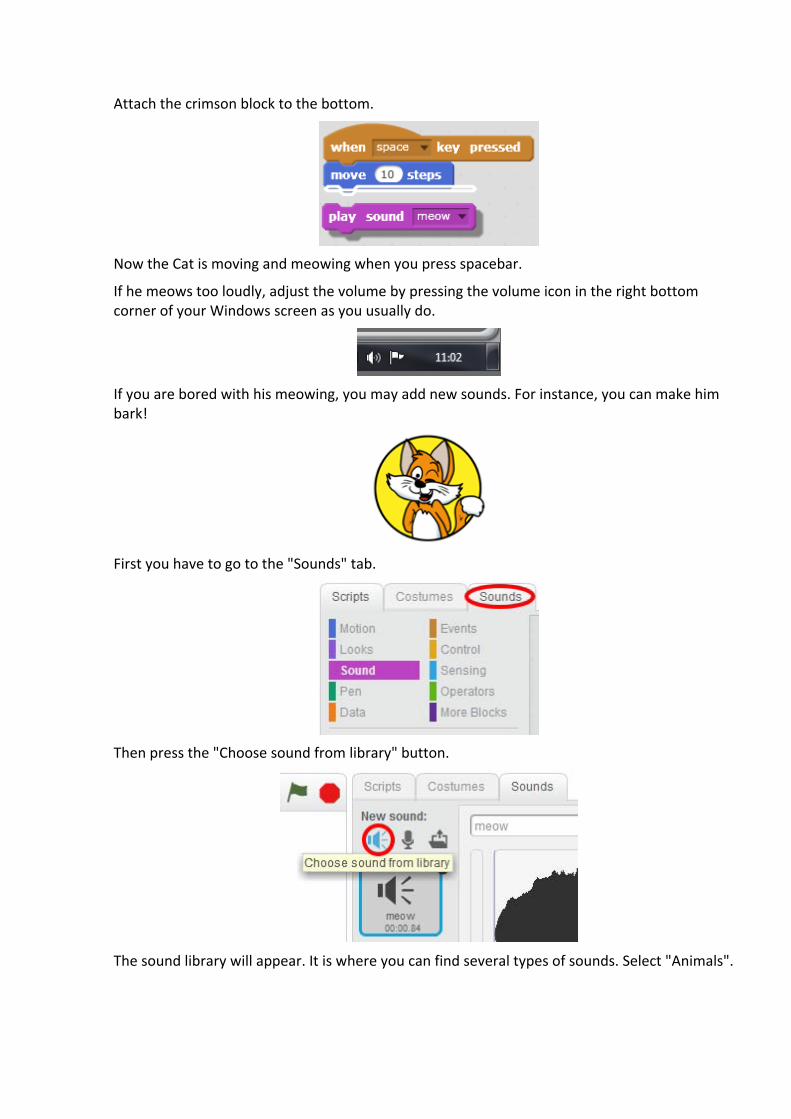
Attach the crimson block to the bottom.
Now the Cat is moving and meowing when you press spacebar.
If he meows too loudly, adjust the volume by pressing the volume icon in the right bottom corner of your Windows screen as you usually do.
If you are bored with his meowing, you may add new sounds. For instance, you can make him bark!
First you have to go to the "Sounds" tab.
Then press the "Choose sound from library" button.
The sound library will appear. It is where you can find several types of sounds. Select "Animals".
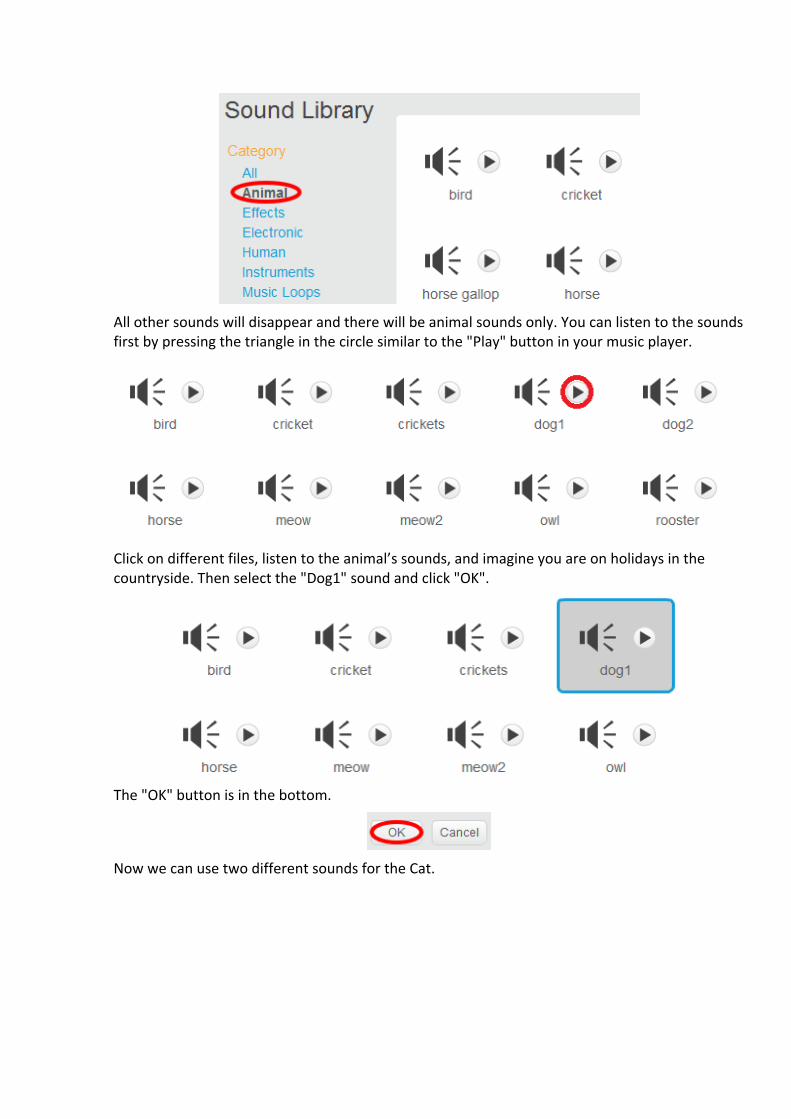
All other sounds will disappear and there will be animal sounds only. You can listen to the sounds first by pressing the triangle in the circle similar to the "Play" button in your music player.
Click on different files, listen to the animal’s sounds, and imagine you are on holidays in the countryside. Then select the "Dog1" sound and click "OK".
The "OK" button is in the bottom.
Now we can use two different sounds for the Cat.
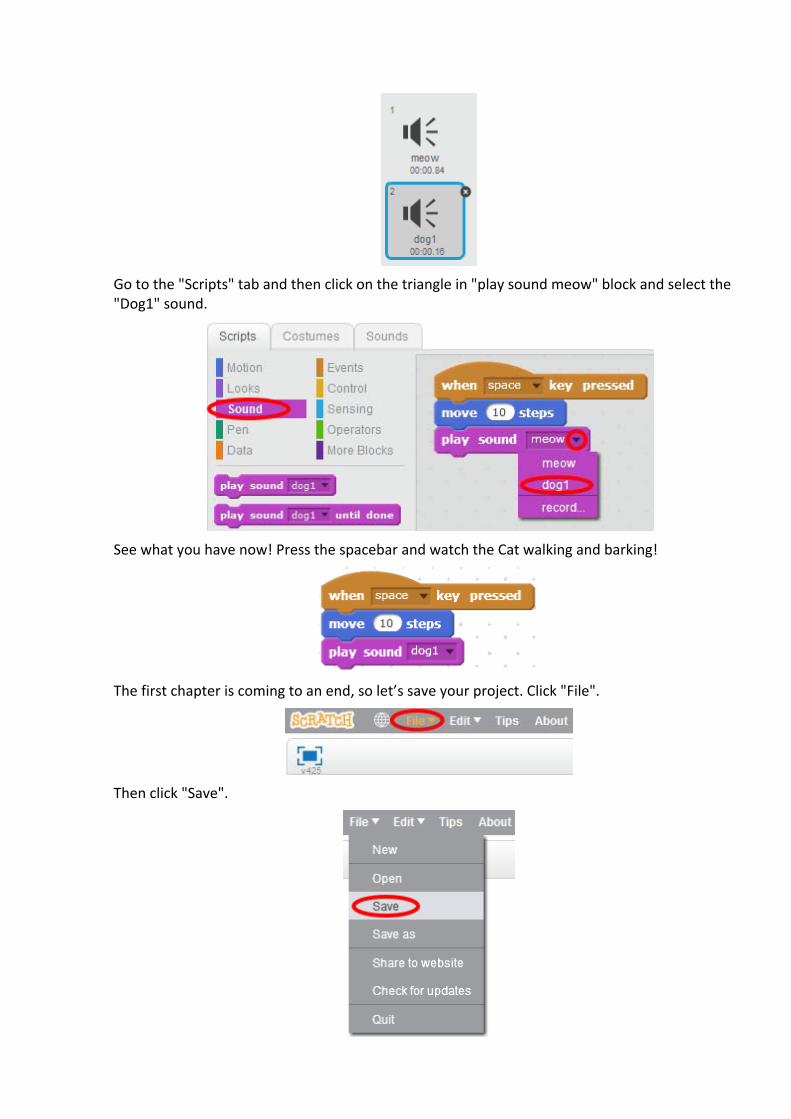
Go to the "Scripts" tab and then click on the triangle in "play sound meow" block and select the "Dog1" sound.
See what you have now! Press the spacebar and watch the Cat walking and barking!
The first chapter is coming to an end, so let’s save your project. Click "File".
Then click "Save".
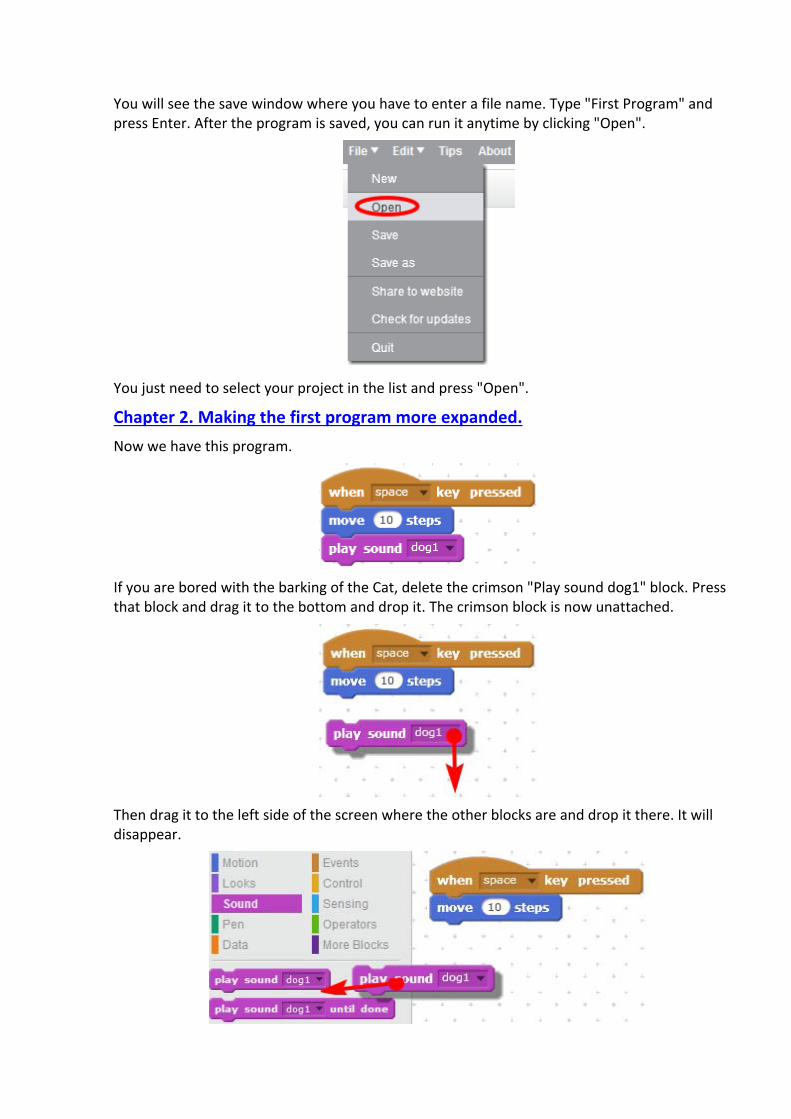
You will see the save window where you have to enter a file name. Type "First Program" and press Enter. After the program is saved, you can run it anytime by clicking "Open".
You just need to select your project in the list and press "Open".
Chapter 2. Making the first program more expanded.
Now we have this program.
If you are bored with the barking of the Cat, delete the crimson "Play sound dog1" block. Press that block and drag it to the bottom and drop it. The crimson block is now unattached.
Then drag it to the left side of the screen where the other blocks are and drop it there. It will disappear.
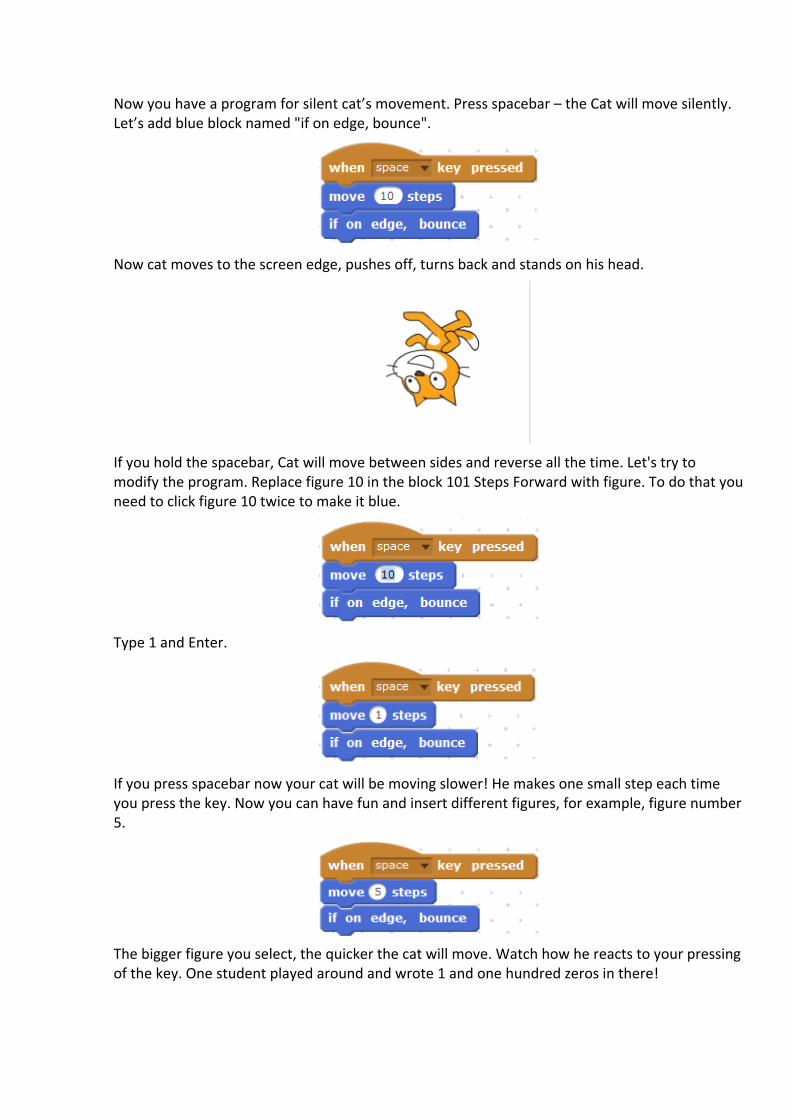
Now you have a program for silent cat’s movement. Press spacebar – the Cat will move silently. Let’s add blue block named "if on edge, bounce".
Now cat moves to the screen edge, pushes off, turns back and stands on his head.
If you hold the spacebar, Cat will move between sides and reverse all the time. Let's try to modify the program. Replace figure 10 in the block 101 Steps Forward with figure. To do that you need to click figure 10 twice to make it blue.
Type 1 and Enter.
If you press spacebar now your cat will be moving slower! He makes one small step each time you press the key. Now you can have fun and insert different figures, for example, figure number 5.
The bigger figure you select, the quicker the cat will move. Watch how he reacts to your pressing of the key. One student played around and wrote 1 and one hundred zeros in there!