scouts on the water! the bronze helmsman · the aspects of the bronze helmsman badge that are...
TRANSCRIPT
Scouts on the water! The Bronze Helmsman
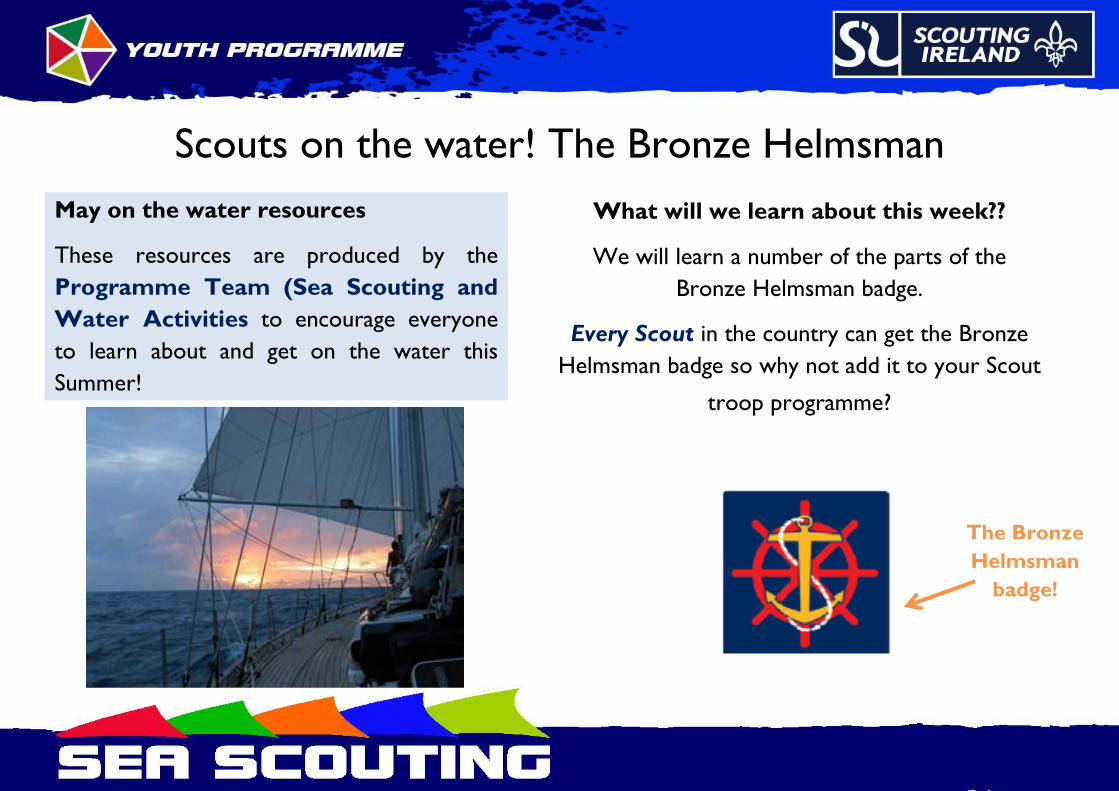
May on the water resources
These resources are produced by the
Programme Team (Sea Scouting and
Water Activities to encourage everyone
to learn about and get on the water this
Summer!
What will we learn about this week??
We will learn a number of the parts of the
Bronze Helmsman badge.
Every Scout in the country can get the Bronze
Helmsman badge so why not add it to your Scout
troop programme?
The Bronze
Helmsman
badge!
Contents The aspects of the Bronze Helmsman badge that are covered in this
resource are:
Ropework – Bowline and sheer lashing
Anchor types
Understanding longitude and latitude, and identify a position
Explaining the main features and symbols on a chart
Identifying the main terms used to denote direction from your boat
Discovering the basic rules regarding rights of way for the crafts which
may used by your Troop
Discovering what an “Ensign” is and where it is flown
Considering the different ways that you can support your local rescue
service
Being aware of the basic principles of a marine engine and the difference
between 2 and 4 stroke
Not all elements of the badge are covered here as some are practical.
Consult the Nautical Progress Scheme documents for more information
Click on the Scout Shop
logo above to order your
Bronze Helmsman
badges!
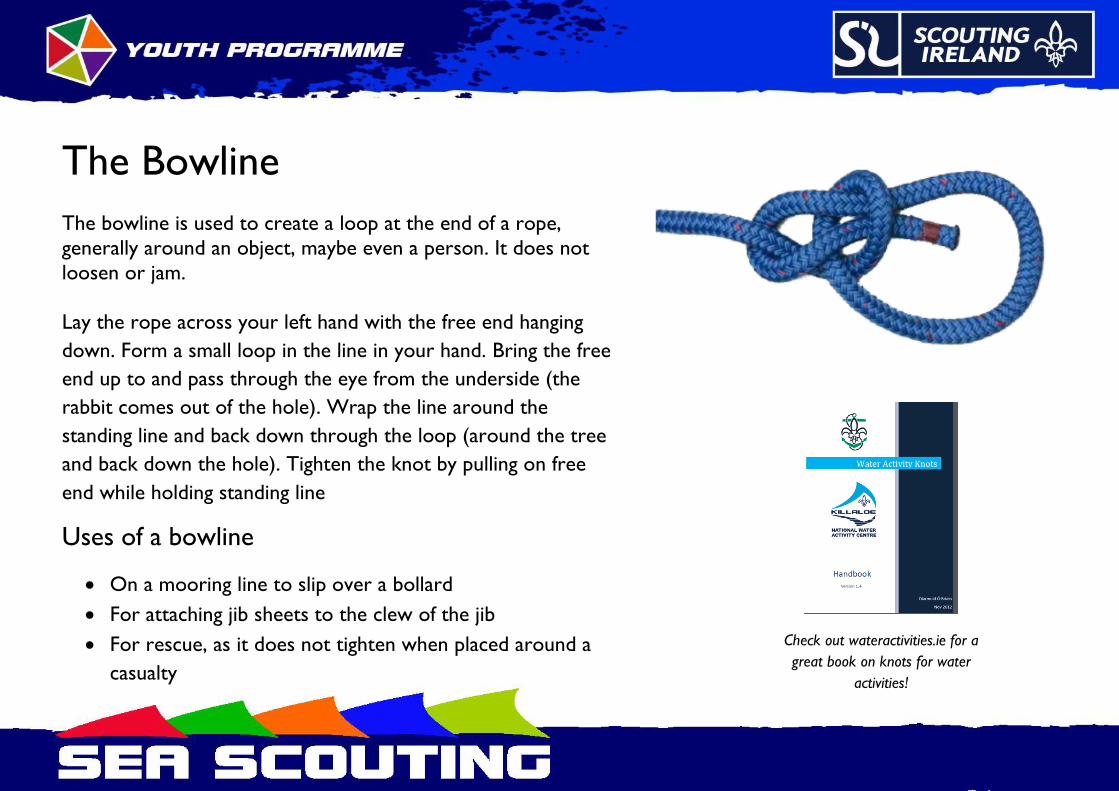
The Bowline The bowline is used to create a loop at the end of a rope,
generally around an object, maybe even a person. It does not
loosen or jam.
Lay the rope across your left hand with the free end hanging
down. Form a small loop in the line in your hand. Bring the free
end up to and pass through the eye from the underside (the
rabbit comes out of the hole). Wrap the line around the
standing line and back down through the loop (around the tree
and back down the hole). Tighten the knot by pulling on free
end while holding standing line
Uses of a bowline
On a mooring line to slip over a bollard
For attaching jib sheets to the clew of the jib
For rescue, as it does not tighten when placed around a
casualty
Check out wateractivities.ie for a
great book on knots for water
activities!
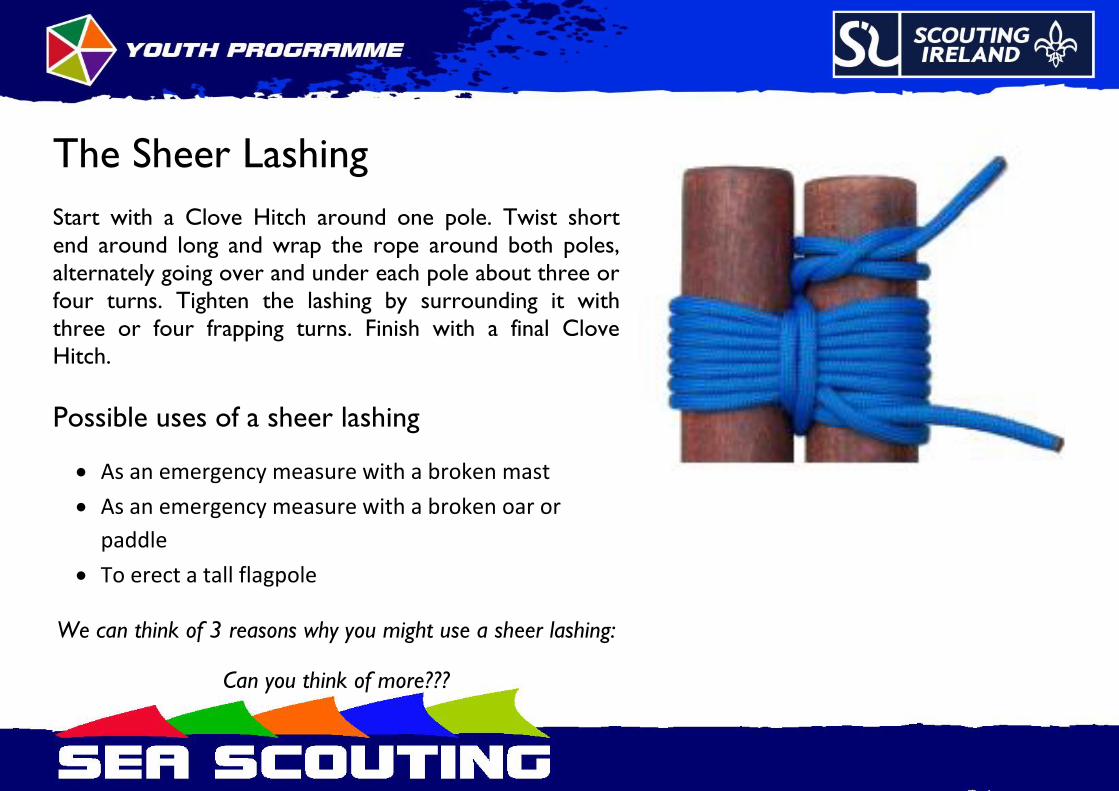
The Sheer Lashing
Start with a Clove Hitch around one pole. Twist short
end around long and wrap the rope around both poles,
alternately going over and under each pole about three or
four turns. Tighten the lashing by surrounding it with
three or four frapping turns. Finish with a final Clove
Hitch.
Possible uses of a sheer lashing
As an emergency measure with a broken mast
As an emergency measure with a broken oar or
paddle
To erect a tall flagpole
We can think of 3 reasons why you might use a sheer lashing:
Can you think of more???
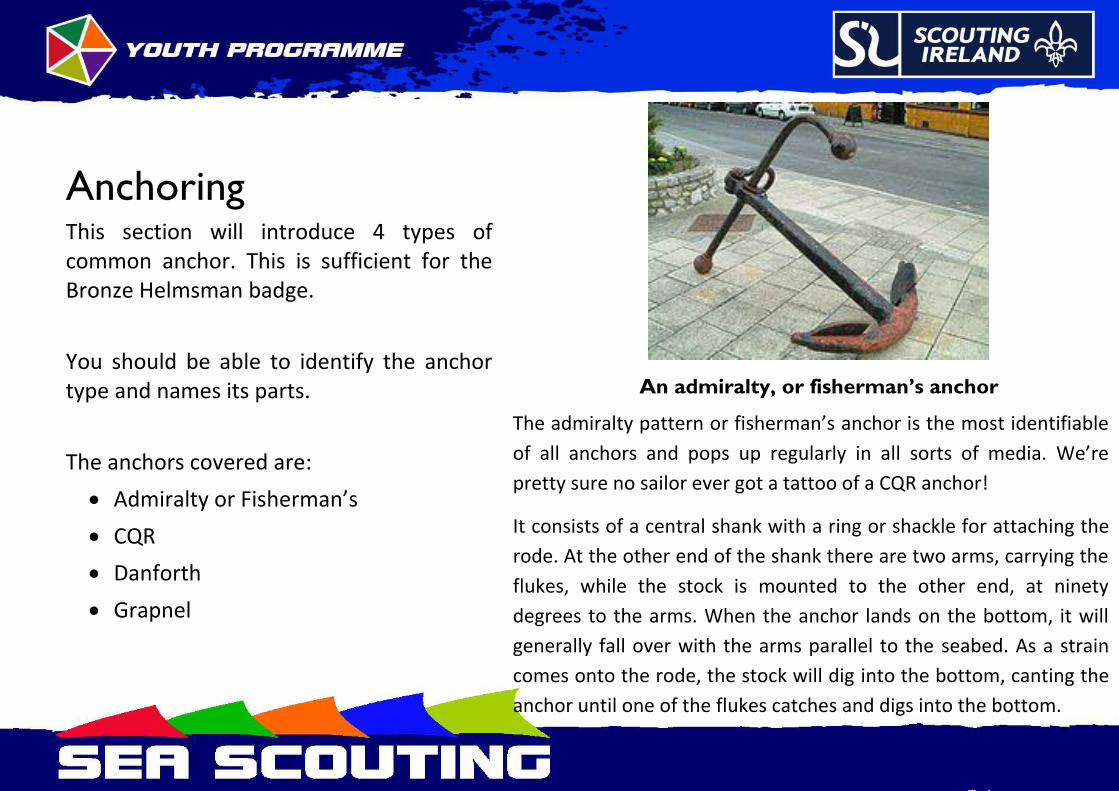
Anchoring This section will introduce 4 types of common anchor. This is sufficient for the Bronze Helmsman badge.
You should be able to identify the anchor type and names its parts.
The anchors covered are:
Admiralty or Fisherman’s
CQR
Danforth
Grapnel
An admiralty, or fisherman’s anchor
The admiralty pattern or fisherman’s anchor is the most identifiable
of all anchors and pops up regularly in all sorts of media. We’re
pretty sure no sailor ever got a tattoo of a CQR anchor!
It consists of a central shank with a ring or shackle for attaching the
rode. At the other end of the shank there are two arms, carrying the
flukes, while the stock is mounted to the other end, at ninety
degrees to the arms. When the anchor lands on the bottom, it will
generally fall over with the arms parallel to the seabed. As a strain
comes onto the rode, the stock will dig into the bottom, canting the
anchor until one of the flukes catches and digs into the bottom.
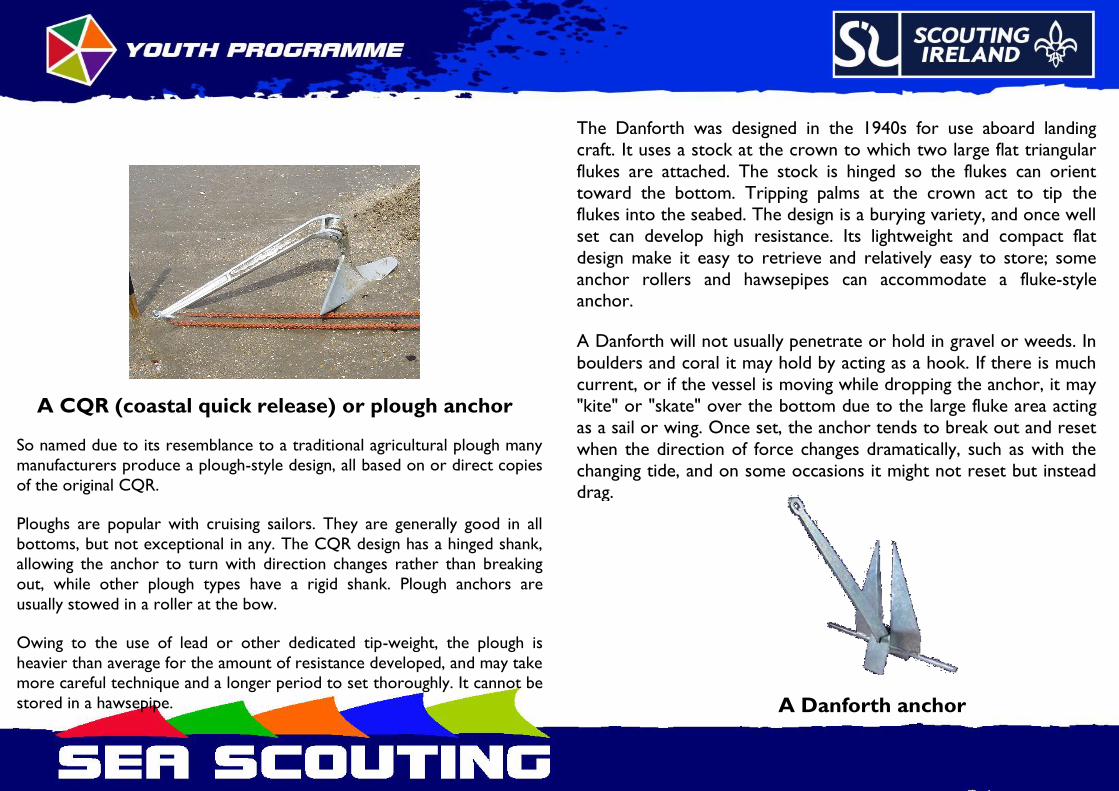
A CQR (coastal quick release) or plough anchor
So named due to its resemblance to a traditional agricultural plough many
manufacturers produce a plough-style design, all based on or direct copies
of the original CQR.
Ploughs are popular with cruising sailors. They are generally good in all
bottoms, but not exceptional in any. The CQR design has a hinged shank,
allowing the anchor to turn with direction changes rather than breaking
out, while other plough types have a rigid shank. Plough anchors are
usually stowed in a roller at the bow.
Owing to the use of lead or other dedicated tip-weight, the plough is
heavier than average for the amount of resistance developed, and may take
more careful technique and a longer period to set thoroughly. It cannot be
stored in a hawsepipe.
A Danforth anchor
The Danforth was designed in the 1940s for use aboard landing
craft. It uses a stock at the crown to which two large flat triangular
flukes are attached. The stock is hinged so the flukes can orient
toward the bottom. Tripping palms at the crown act to tip the
flukes into the seabed. The design is a burying variety, and once well
set can develop high resistance. Its lightweight and compact flat
design make it easy to retrieve and relatively easy to store; some
anchor rollers and hawsepipes can accommodate a fluke-style anchor.
A Danforth will not usually penetrate or hold in gravel or weeds. In
boulders and coral it may hold by acting as a hook. If there is much
current, or if the vessel is moving while dropping the anchor, it may
"kite" or "skate" over the bottom due to the large fluke area acting
as a sail or wing. Once set, the anchor tends to break out and reset
when the direction of force changes dramatically, such as with the
changing tide, and on some occasions it might not reset but instead drag.

A grapnel anchor
A traditional design, the grapnel is merely a shank with four or more
tines. It has a benefit in that, no matter how it reaches the bottom, one
or more tines will be aimed to set. A grapnel is often quite light, and may
have additional uses as a tool to recover gear lost overboard. Its weight
also makes it relatively easy to move and carry, however its shape is
generally not very compact and it may be difficult to stow unless a
collapsing model is used.
Grapnels rarely have enough fluke area to develop much hold in sand,
clay, or mud. It is not unknown for the anchor to foul on its own rode,
or to foul the tines with refuse from the bottom, preventing it from
digging in. On the other hand, it is quite possible for this anchor to find
such a good hook that, without a trip line from the crown, it is impossible to retrieve.
Test yourself!
Identify the flukes on each of the 4
anchor types
Discover what a trip line is and what
purpose it serves
Do you know anything about
permanent forms of anchorage?
Do you think it is important to know
what weight an anchor is?
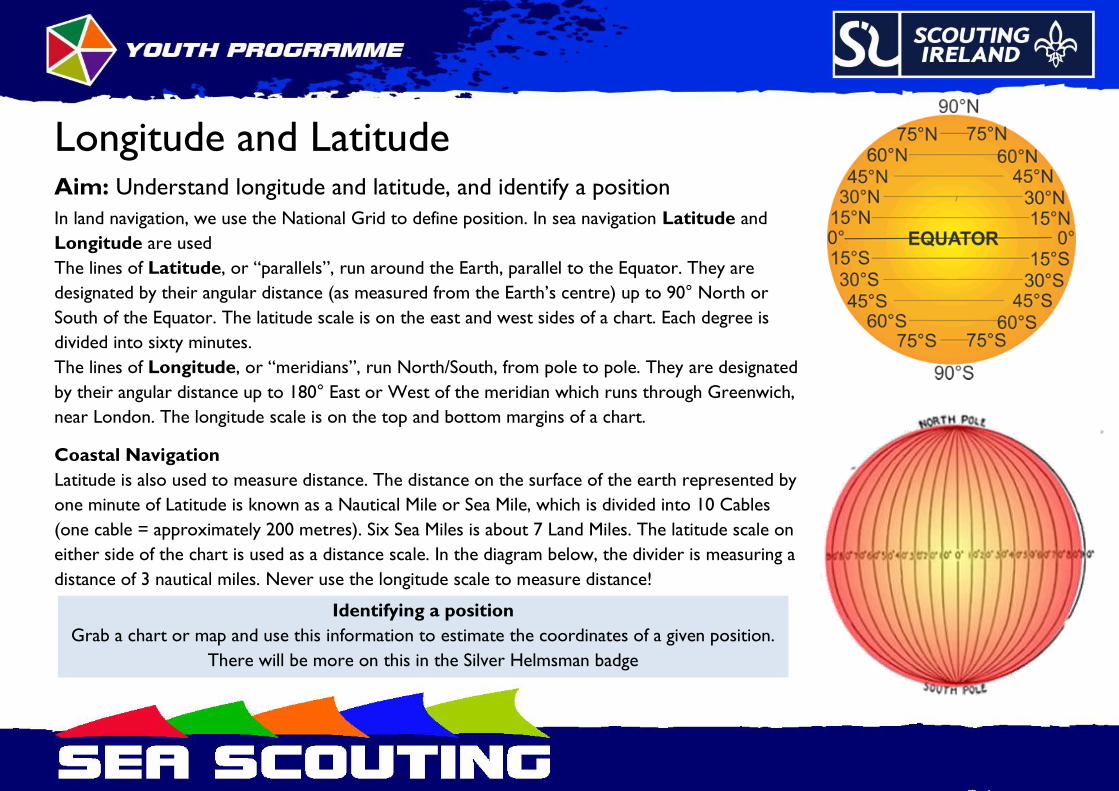
Longitude and Latitude Aim: Understand longitude and latitude, and identify a position
In land navigation, we use the National Grid to define position. In sea navigation Latitude and
Longitude are used
The lines of Latitude, or “parallels”, run around the Earth, parallel to the Equator. They are
designated by their angular distance (as measured from the Earth’s centre) up to 90° North or
South of the Equator. The latitude scale is on the east and west sides of a chart. Each degree is
divided into sixty minutes.
The lines of Longitude, or “meridians”, run North/South, from pole to pole. They are designated
by their angular distance up to 180° East or West of the meridian which runs through Greenwich,
near London. The longitude scale is on the top and bottom margins of a chart.
Coastal Navigation
Latitude is also used to measure distance. The distance on the surface of the earth represented by
one minute of Latitude is known as a Nautical Mile or Sea Mile, which is divided into 10 Cables
(one cable = approximately 200 metres). Six Sea Miles is about 7 Land Miles. The latitude scale on
either side of the chart is used as a distance scale. In the diagram below, the divider is measuring a
distance of 3 nautical miles. Never use the longitude scale to measure distance!
Identifying a position
Grab a chart or map and use this information to estimate the coordinates of a given position.
There will be more on this in the Silver Helmsman badge
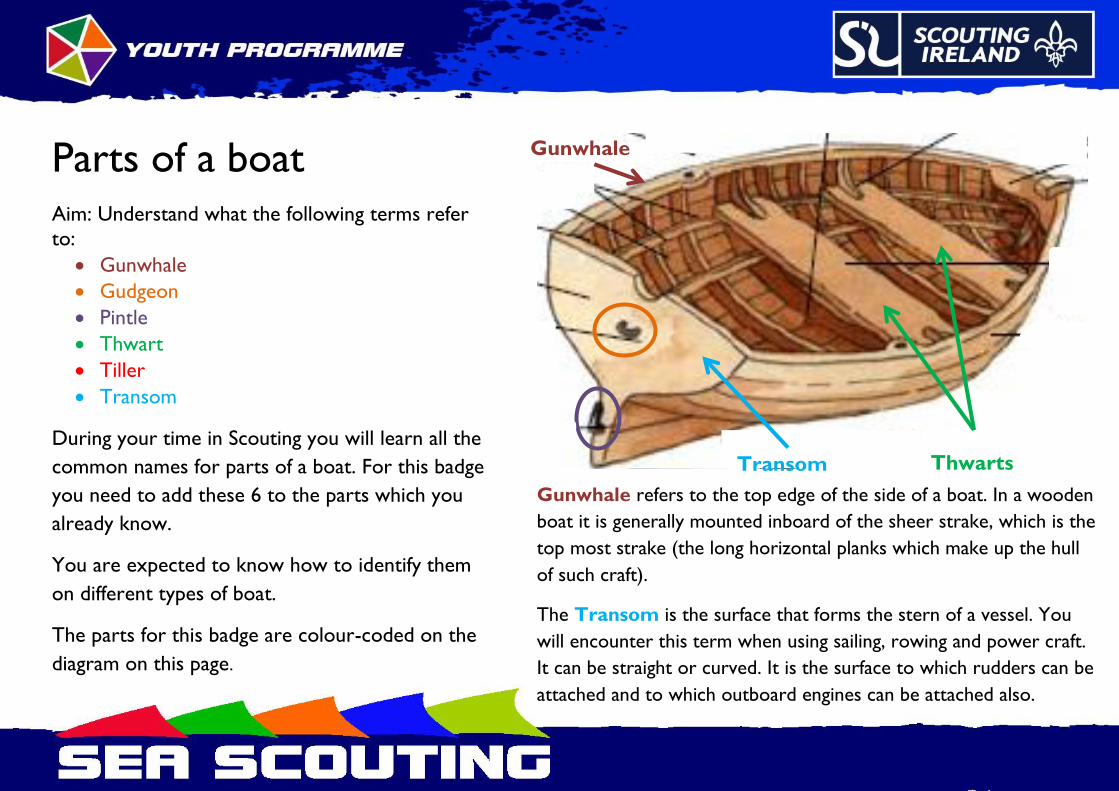
Parts of a boat
Aim: Understand what the following terms refer
to:
Gunwhale
Gudgeon
Pintle
Thwart
Tiller
Transom
During your time in Scouting you will learn all the
common names for parts of a boat. For this badge
you need to add these 6 to the parts which you
already know.
You are expected to know how to identify them
on different types of boat.
The parts for this badge are colour-coded on the
diagram on this page.
Gunwhale refers to the top edge of the side of a boat. In a wooden
boat it is generally mounted inboard of the sheer strake, which is the
top most strake (the long horizontal planks which make up the hull
of such craft).
The Transom is the surface that forms the stern of a vessel. You
will encounter this term when using sailing, rowing and power craft.
It can be straight or curved. It is the surface to which rudders can be
attached and to which outboard engines can be attached also.
Gunwhale
Thwarts Transom

A gudgeon is a socket-like, cylindrical fitting used to
enable a pivoting (swinging) connection to a second
component which slots into it, called a pintle fitting
(easy to remember because it looks like a pin). Gudgeon
and pintle connections are most often used in Scout
boating to secure rudders to both rowing and sailing
craft.
A Thwart is a strut placed crosswise (left/right) in a
boat, to brace it across. In canoes and rowing boats it
can also serve as a seat and this is the most common
way your will come across this term in Scout boating.
A Tiller is a lever attached to a rudder of a boat that allows
steering. The tiller can be used by the helmsman directly
pulling or pushing it, but it may also be moved remotely using
tiller lines or a ship's wheel. You will encounter this term
when using sailing, rowing and power craft. The diagram on
the previous page had no rudder and hence no tiller. See
pictures below for examples of tillers
Using a tiller (the
black rod) with
tiller extension on
a 420 sailing dinghy
Simple tiller on a wooden boat
A tiller is also used
to steer some
outboard engines
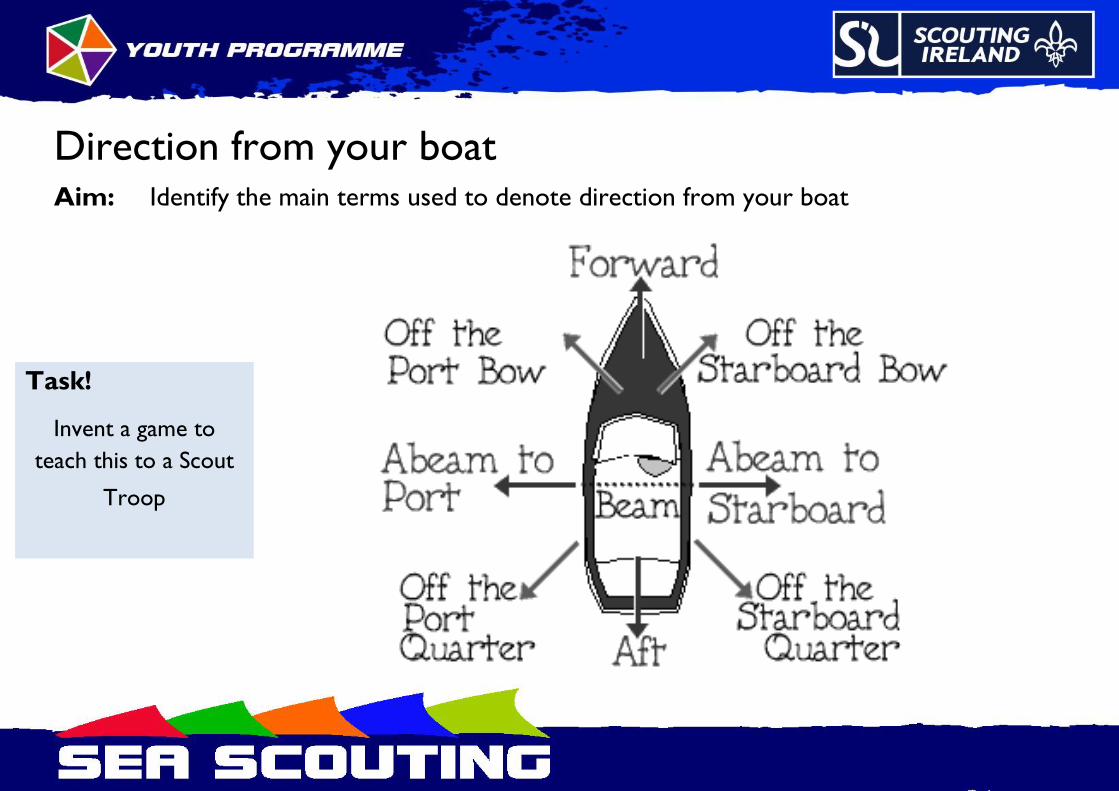
Direction from your boat Aim: Identify the main terms used to denote direction from your boat
Task!
Invent a game to
teach this to a Scout
Troop
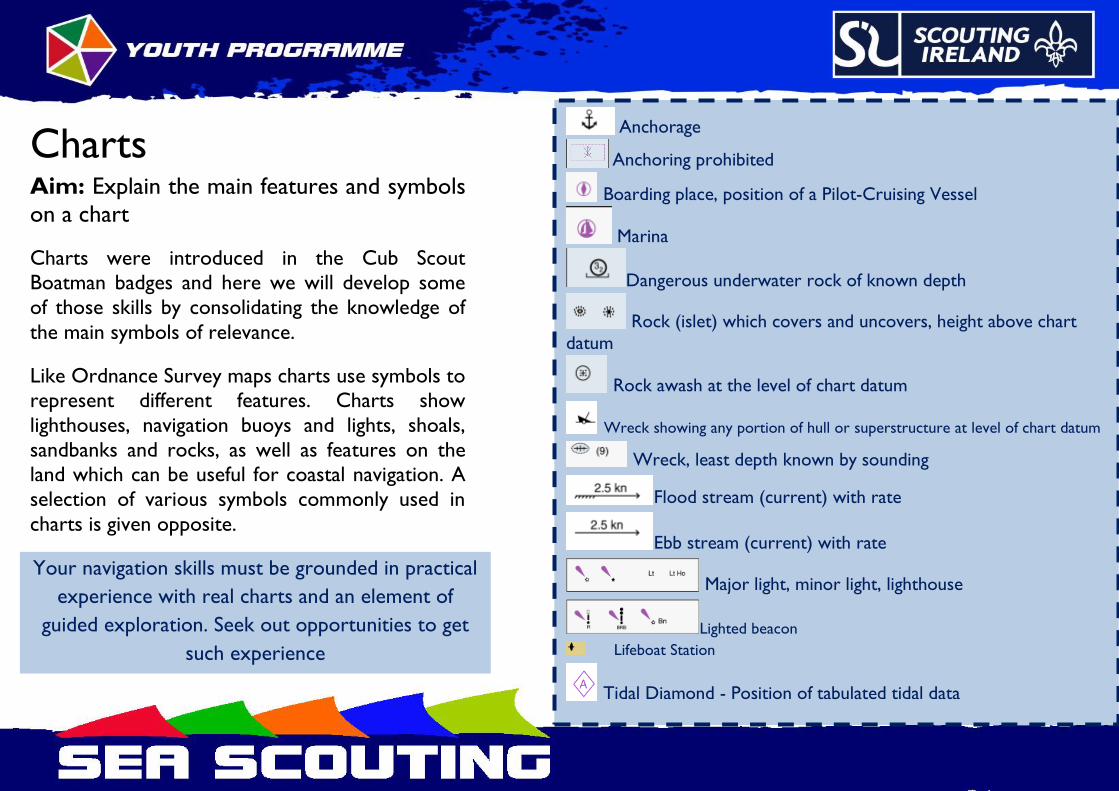
Charts Aim: Explain the main features and symbols
on a chart
Charts were introduced in the Cub Scout
Boatman badges and here we will develop some
of those skills by consolidating the knowledge of
the main symbols of relevance.
Like Ordnance Survey maps charts use symbols to
represent different features. Charts show
lighthouses, navigation buoys and lights, shoals,
sandbanks and rocks, as well as features on the
land which can be useful for coastal navigation. A
selection of various symbols commonly used in
charts is given opposite.
Anchorage
Anchoring prohibited
Boarding place, position of a Pilot-Cruising Vessel
Marina
Dangerous underwater rock of known depth
Rock (islet) which covers and uncovers, height above chart
datum
Rock awash at the level of chart datum
Wreck showing any portion of hull or superstructure at level of chart datum
Wreck, least depth known by sounding
Flood stream (current) with rate
Ebb stream (current) with rate
Major light, minor light, lighthouse
Lighted beacon
Lifeboat Station
Tidal Diamond - Position of tabulated tidal data
Your navigation skills must be grounded in practical
experience with real charts and an element of
guided exploration. Seek out opportunities to get
such experience
Rights of way – The absolute
basics! Aim: Discover the basic rules regarding rights of way
for the crafts used by your Troop
So the rules relating to rights of way on the water can
often be very complex and specify situations you are
unlikely to find yourself in. So here we have laid out
some of the absolute basics.
You will need to be familiar with the specifics of the
craft you are using and area in which you will do your
boating, whether that be at sea, or on inland waterways.
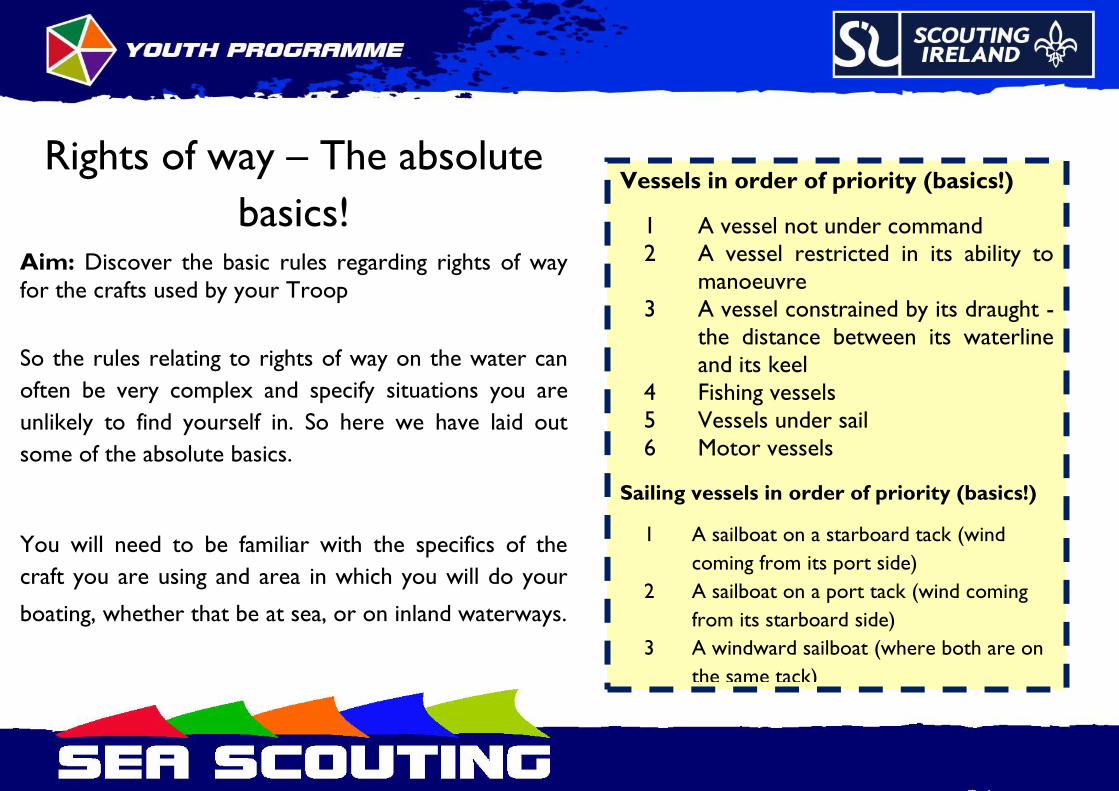
Vessels in order of priority (basics!)
1 A vessel not under command
2 A vessel restricted in its ability to
manoeuvre
3 A vessel constrained by its draught -
the distance between its waterline
and its keel
4 Fishing vessels
5 Vessels under sail
6 Motor vessels
Sailing vessels in order of priority (basics!)
1 A sailboat on a starboard tack (wind
coming from its port side)
2 A sailboat on a port tack (wind coming
from its starboard side)
3 A windward sailboat (where both are on
the same tack)

The International Regulations for Prevention of Collisions at Sea,
more often known as the “Rules of the Road at Sea”, regulate the
movement of vessels, so as to avoid a collision. As this can be tricky
area, we list some basic principles you should be aware of:
Two boats on a converging course should both turn to
starboard and when in a channel keep to the starboard side,
thus passing each other port to port
When diverting course, the avoiding action should be early,
substantial and safe
An over-taking boat should stay well clear of a boat being
overtaken
Power gives way to sail unless the sailboat is overtaking
Paddlers should give way to vessels under oars
Do not create a wake which causes unnecessary danger to
other boats or people
Task!
Grab some model boats and act
out some scenarios with other
Scouts

Ensigns
Aim: Discover what an “Ensign” is and where it is
flown
An ensign is a form of national flag used at sea. Ensigns
have to be approved by the Chief Herald of Ireland.
The Scouting Ireland Sea Scout Ensign is a blue flag
with the Irish tricolour in the canton, defaced with the
Scouting Ireland emblem on the fly side. (Do you know
the names of the parts of a flag? Why not do some
research?)
It is to be flown as the flag with the highest preference
and on a flagpole with a gaff and yardarm, it should be
flown at the peak of the gaff. (Do you know the names
of the parts of a nautical flagpole? Why not do some
research?)
An ensign should never be carried on parade nor
should the tricolour and an Ensign be flown at the
same time.
The Scouting Ireland ensign
Did you know?
On rare occasion, the Chief Herald of Ireland has
given permission for white, rather than blue, ensigns
to be assigned. Two examples of this are Malahide
Yacht Club and the Royal Irish Yacht Club.
The white Ensign of the Royal
Irish Yacht Club
Members belonging to a yacht club or organisation
may fly their club's unique pennant/burgee both
while underway and at anchor. Vessels may fly the
pennant/burgee from the main masthead or from
the masthead of a flagpole on land as appropriate.
Scouting Ireland Sea Scout
pennant
Did you know? Scouting Ireland’s Programme
Commissioner (Sea Scouting & Water Activities) may
fly the Commissioner’s burgee when he/she is on
board. It is a swallow-tail version of the Sea Scout
pennant.
The current Programme Commissioner (Sea
Scouting & Water Activities) is Stephen Taylor
Scouting Ireland
Commissioner’s burgee
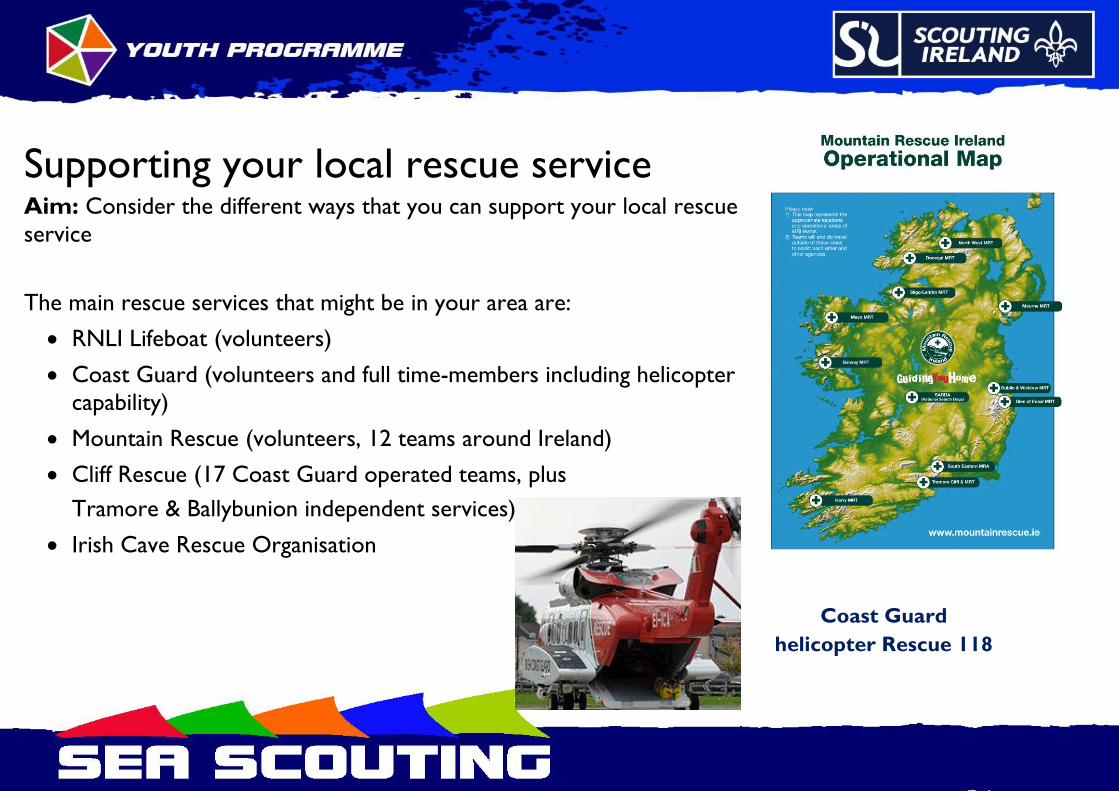
Supporting your local rescue service Aim: Consider the different ways that you can support your local rescue
service
The main rescue services that might be in your area are:
RNLI Lifeboat (volunteers)
Coast Guard (volunteers and full time-members including helicopter
capability)
Mountain Rescue (volunteers, 12 teams around Ireland)
Cliff Rescue (17 Coast Guard operated teams, plus
Tramore & Ballybunion independent services)
Irish Cave Rescue Organisation
Coast Guard
helicopter Rescue 118
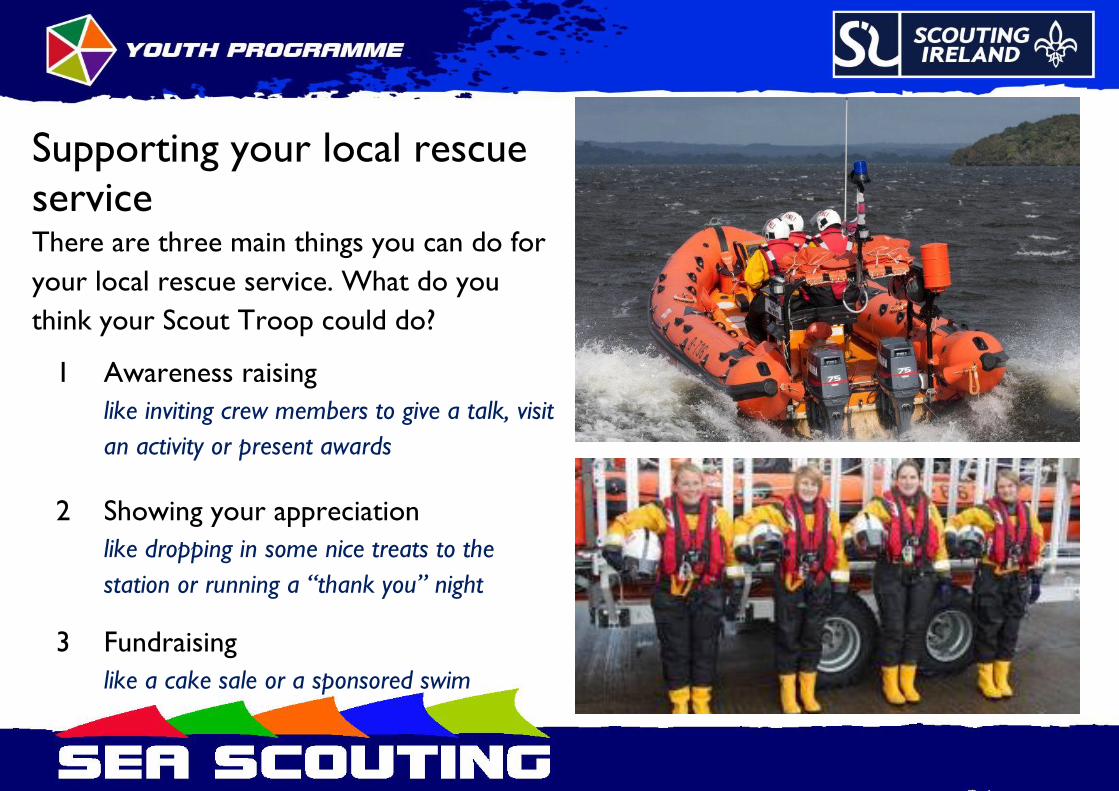
Supporting your local rescue
service There are three main things you can do for
your local rescue service. What do you
think your Scout Troop could do?
1 Awareness raising
like inviting crew members to give a talk, visit
an activity or present awards
2 Showing your appreciation
like dropping in some nice treats to the
station or running a “thank you” night
3 Fundraising
like a cake sale or a sponsored swim

Marine engines
Aim: Be aware of the basic principles of a
marine engine and the difference between 2 and
4 stroke
This information is not currently in any Scouting
Ireland publication so here is your chance to
learn!
A marine engine generally works by propulsion,
that is to say the boat moves forward by virtue
of the motion of a propeller.
It is likely that the engines you will encounter will
typically use a manual pull-cord start system, with
throttle and gearshift controls mounted on the
body of the motor, and a tiller for steering.
Remember!
It is vitally important that if you are not familiar with a particular
engine type you should seek advice from someone who is. This is
particularly important in terms of safety precautions to be taken, the
fuel mix and transportation of the engine
The difference between 2 and 4 stroke engine – the
basics!
A 2 stroke engine is so-called because its basic process has two parts:
1. Fuel/air enters the engine and mixes
2. Ignition takes place and fumes go out an exhaust
- A 2 stroke engine is usually more powerful than a 4 stroke
- It is a lot louder
- It is a more simple design and easier to fix
A 4 stroke engine is so-called because its basic process has four distinct
parts:
1. Fuel goes and air enters the engine
2. They mix
3. Ignition takes place
4. Fumes go out an exhaust
- A 4 stroke engine is usually more economical
-It makes less noise
- It has more parts than a 2 stroke
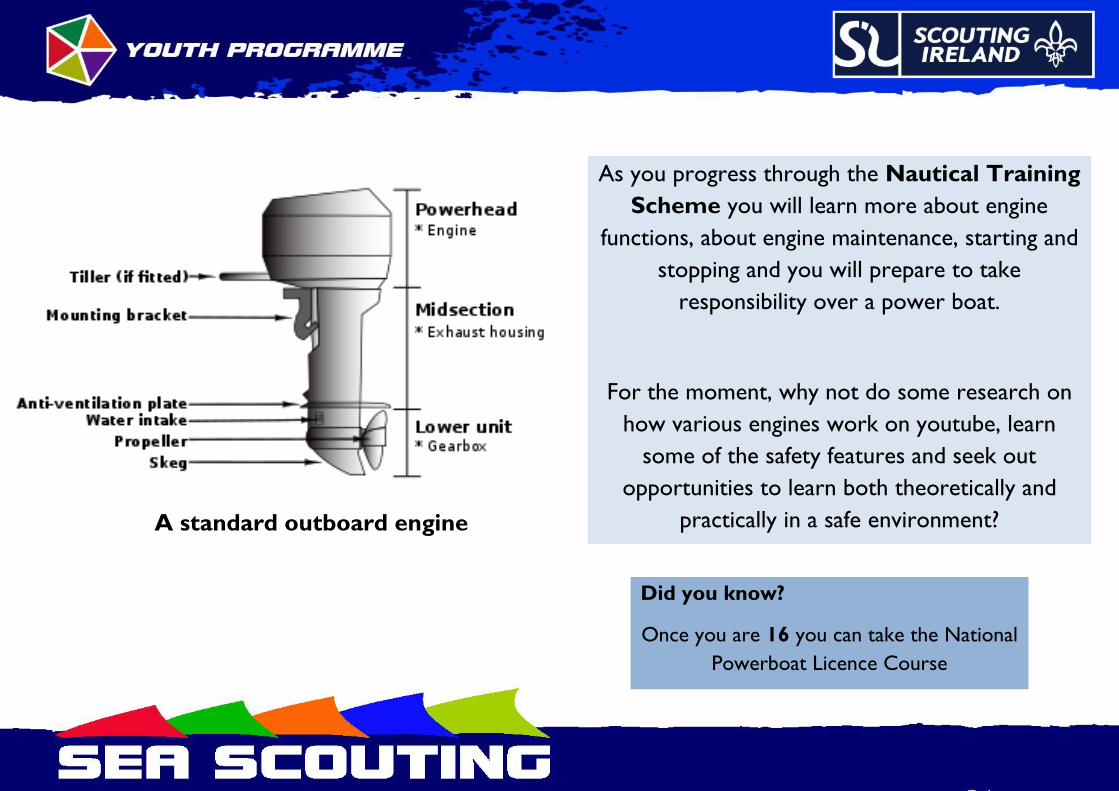
A standard outboard engine
As you progress through the Nautical Training
Scheme you will learn more about engine
functions, about engine maintenance, starting and
stopping and you will prepare to take
responsibility over a power boat.
For the moment, why not do some research on
how various engines work on youtube, learn
some of the safety features and seek out
opportunities to learn both theoretically and
practically in a safe environment?
Did you know?
Once you are 16 you can take the National
Powerboat Licence Course
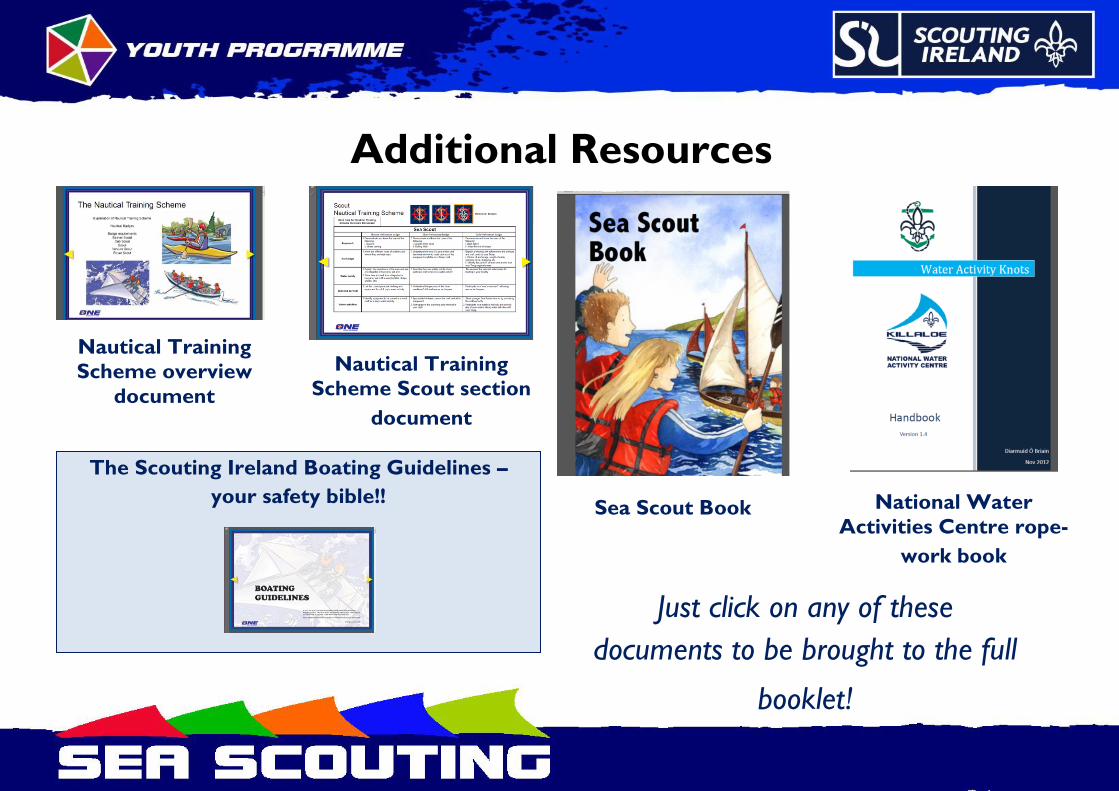
Additional Resources
Nautical Training
Scheme overview
document
Nautical Training
Scheme Scout section
document
Sea Scout Book
National Water
Activities Centre rope-
work book
The Scouting Ireland Boating Guidelines –
your safety bible!!
Just click on any of these
documents to be brought to the full
booklet!