scouter’s guide to troop quartermaster and equipment · pdf filescouter’s guide to...
TRANSCRIPT

Scouter’s Guide to
Troop Quartermaster and Equipment Chair
Camping and Other Outdoor Activities
September 2012
NOTE: THIS IS NOT AN OFFICIAL BOY SCOUTS OF AMERICA PUBLICATION

1
Scouter’s Guide:
Troop Quartermaster and Equipment Chair
(Not an official Boy Scouts of America publication)
Forward This guide started as a handout for the local Boy Scout Roundtable meeting. As we started researching and putting it together, we quickly realized that it might fill a greater void in information that had not been collected before in one publication. We’ve never found an official BSA guide on the subject, though all units have equipment. We believe this guide should be useful to a lot of different units, both small and large. It is a collection of many different web articles, manufacturer’s owner manuals, user guides, experiences of long-time scoutmasters and leaders and hard earned common sense. Some of the information was learned from simply walking around while at different camporees and scouting events, talking with and looking at other troop’s trailer and of course, from roundtable meeting discussions. This Scouter’s Guide is by no means an exhaustive study, but it should be a great starting point and reference for a newly elected Quartermaster and Troop Equipment Chair (or Scoutmaster!) Remember the old adage "Take care of your gear and your gear will take care of you." We hope you find it as useful as we did!
Introduction Lord Baden Powell (BP) came from a long background with the British Army and was very familiar with the important position of the Quartermaster (QM) and Quartermaster Corp. In land armies, a quartermaster is either an individual soldier or a unit who specializes in distributing supplies and provisions to troops. “Quarters” is the military term for what you live in and use to support your mission. As such, the Quartermaster is the master of the unit’s quarters and equipment. If you are the newly elected Troop Quartermaster or Troop Equipment Chair, welcome and thank you. You have a large responsibility that will have a direct impact in the unit over the term of your service. And service is what Quartermastering is all about. Service is defined as: At someone's service, ready to be of help or use to someone; at one's disposal, be of service, to be helpful or useful, If we can be of service, do not hesitate to call is the very essences of the Scouting spirit. Do your best and Be Prepared!
(Not an official Boy Scouts of America publication)
2
Table of Contents Chapter
1
2
3
4
Subject title Forward Introduction Table of Contents Responsibilities of the Quartermaster and the Equipment Chair
Duties of the Troop Quartermaster (Youth) Duties of the Troop Equipment Chair (Adult) Monthly Reports to the Troop Committee What is important about the Quartermaster position? Safety Damage to property
Storage
Categories of Equipment Troop Equipment and gear Patrol Gear Special use items Consumables Food Pantry
Donated and Worn Equipment Military Surplus Equipment Organized and inventoried storage space(s)
Getting it all there! The Troop Trailer
What should you consider for the hauling job Don’t forget the legal paperwork Minimum Equipment Organizing the trailer(s) Sample Trailer Map Building Your Camp Kitchen Suggestions and Ideas
Equipment Care, Cleaning and Repair Care and Cleaning of Tents
Helpful hints related to Tents Care and Cleaning of Food and Drink Coolers
Helpful hints related to Food and Drink Coolers Care and Cleaning of Pots, Pans and Utensils Care and Cleaning of Water Jugs Care and Cleaning of Dutch Ovens Care and Cleaning of Liquid fuel Lanterns and Stoves
Helpful hints related to Liquid fuel Lanterns and Stoves Care and Cleaning of Propane Lanterns
Helpful hints related to Propane Lanterns Care and Cleaning of Propane Stoves
Helpful hints related to Propane Stoves
Page No. 1 1 2
4 4 4 4 5 5 5
6 6 6 6 6 6 6 7 7 7
8 8 9 9 9
10 11 12
14 14 14 17 17 18 18 19 19 19 20 20 21 22

3
5
6
7
8
9
Care and maintenance of 20 lbs. Propane Tanks How to safely transport Propane Tanks to and from the campsite Proper disposal of propane tanks
Odds and ends – Other tips from around the campfire
Tips for preventing troop trailer theft Thief Deterrent Equipment
Preparing your Trailer for Winter Storage Trailer Loading and Towing Guide
Introduction The Tow Vehicle Vehicle and Trailer Brakes The Hitch The Trailer Ball and Safety Chains Trailer Lighting and Connections Tires and Wheel Bearings Hitching up your Trailer Judging Tongue Weight Recommended Hitch Weight Percentages Loading the Trailer Placing the Load Determining Maximum Gross Trailer Weight Cargo Capacity equals GVWR minus the Empty Trailer Weight Weighing the Trailer Your Responsibilities as a Driver Driving in Windy Conditions Wind blast from Passing Truck Trailing Tactics More Towing Tips General Trailer Maintenance Trailer Maintenance Schedule
Forms for the Quartermaster Patterns and Plans for Troop Equipment
22 22 23 23
24 25
28
29 29 30 30 31 31 31 32 32 33 33 33 33 34 34 35 35 35 36 36 37 38 40
42
46

4
Chapter 1 Responsibilities of the Quartermaster and the Equipment Chair
In Scouting, the Quartermaster is responsible for maintaining all the normal camping supplies in a Scout troop. This may include, but is not limited to, camping supplies, tents, "patrol boxes" (containers holding patrol food and cooking supplies), stoves, camp fuel (propane, etc.), tarps, camping trailers, dining flies, shelters, etc. The troop has a varied collection of gear and provisions that need to get to the campsite and events for use. Without a sharp and attentive Quartermaster, the campout or event can quickly turn into an opportunity for improvement. It is the troop committee's responsibility, in cooperation with the Scoutmaster, to secure adequate numbers of tents, cook-kits, and other outdoor gear. Each patrol has a Patrol box/container in the back of the trailer. The troop Quartermaster is responsible for storage and control of all troop equipment, ensuring that an accurate inventory of troop equipment is maintained, and that equipment is stored in a clean, neat and orderly manner. The Troop Committee Equipment Chair works closely with the troop Quartermaster to maintain the troop's equipment with adequate repair and storage, and also provide recommendations to the troop committee on equipment purchases. Because of the cost of larger equipment, a troop money-earning project will usually be organized to procure and maintain these items. The Equipment Chair should work closely with the troop Quartermaster to maintain the troop's equipment with adequate repair and storage. Duties of the Troop Quartermaster (Youth)
Keep records of patrol and troop equipment.
Keep equipment in good repair.
Keep equipment storage area neat and clean.
Issue equipment and see that it is returned in good order.
Suggest new or replacement items.
Work with the troop committee member responsible for equipment.
Set a good example.
Wear the Scout uniform correctly.
Live by the Scout Oath and Law.
Show and help develop Scout spirit. Duties of the Troop Equipment Chair (Adult)
Supervises and helps the troop procure camping equipment.
Works with the Troop Quartermaster on inventory, proper storage and maintenance of all troop equipment.
Makes periodic safety checks on all troop’s camping gear, and encourages troop in the safe use of all outdoor equipment.
Makes periodic safety checks of the Troop trailer(s).
Reports to the troop committee at each meeting. Monthly Reports to Troop Committee: The Equipment Chair should report the status of new and existing troop equipment and of troop needs, new procedures for safe use and storage of equipment.

5
Why is the Quartermaster position important? The Quartermaster directly supports many of the primary aims of Scouting. Using the outdoors to put into practice the time-tested lessons of developing tomorrow’s leaders utilizing the Patrol method and positive adult association.
Patrols. The patrol method gives Scouts an experience in group living and participating citizenship. It places a certain amount of responsibility on young shoulders and teaches boys how to accept it.
Outdoors. Boy Scouting is designed to take place outdoors. It is in the outdoors that Scouts share responsibilities and learn to live with each other. It is here that the skills and activities practiced at troop meetings come alive with purpose.
Adult Association. Boys learn from the example set by their adult leaders. Troop leadership may be male or female, and associations with adults of high character is encouraged at this stage of a young man's development.
Leadership Development. Boy Scouting encourages boys to learn and practice leadership skills. Every Scout has the opportunity to participate in both shared leadership and total leadership situations. Understanding the concepts of leadership helps a boy accept the leadership roles of others and guides him toward the citizenship aim of Scouting.
Safety Safety is the primary concern with tools and equipment. The troop furnishes compressed-gas (propane) stoves and lanterns for all camping trips. These items are operated under the supervision of knowledgeable adults and in accordance with the Guide to Safe Scouting and the regulations of the camping trip facilities. Lanterns and/or stoves shall not be operated inside tents under any circumstances. All axes, saws, and hatchets shall be kept in an approved sheath when not in use. The troop quartermaster ensures that only equipment which has the required safety sheath is issued. Damage to property Willful damage to property is a violation of the Scout Law. "A Scout is trustworthy." Any Scout willfully damaging troop, patrol or personal equipment is subject to committee disciplinary action and afforded the opportunity to replace damaged equipment. Accidental damage to equipment is investigated by the troop Quartermaster under the supervision of the Adult Equipment Chair. If it is determined that the accident was a result of negligence, the negligent party is afforded an opportunity to replace the damaged equipment. Gear damaged or worn through normal wear and tear is replaced by the troop as recommended by the Quartermaster.
6
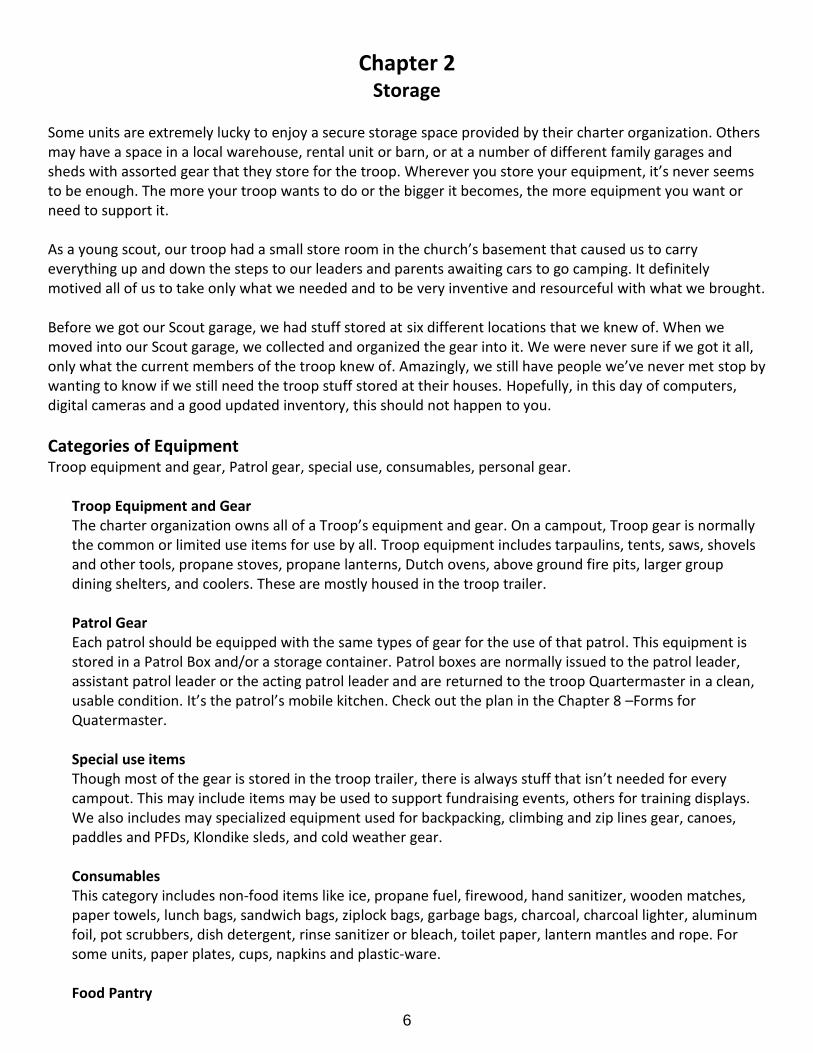
Chapter 2 Storage
Some units are extremely lucky to enjoy a secure storage space provided by their charter organization. Others may have a space in a local warehouse, rental unit or barn, or at a number of different family garages and sheds with assorted gear that they store for the troop. Wherever you store your equipment, it’s never seems to be enough. The more your troop wants to do or the bigger it becomes, the more equipment you want or need to support it. As a young scout, our troop had a small store room in the church’s basement that caused us to carry everything up and down the steps to our leaders and parents awaiting cars to go camping. It definitely motived all of us to take only what we needed and to be very inventive and resourceful with what we brought. Before we got our Scout garage, we had stuff stored at six different locations that we knew of. When we moved into our Scout garage, we collected and organized the gear into it. We were never sure if we got it all, only what the current members of the troop knew of. Amazingly, we still have people we’ve never met stop by wanting to know if we still need the troop stuff stored at their houses. Hopefully, in this day of computers, digital cameras and a good updated inventory, this should not happen to you.
Categories of Equipment Troop equipment and gear, Patrol gear, special use, consumables, personal gear.
Troop Equipment and Gear The charter organization owns all of a Troop’s equipment and gear. On a campout, Troop gear is normally the common or limited use items for use by all. Troop equipment includes tarpaulins, tents, saws, shovels and other tools, propane stoves, propane lanterns, Dutch ovens, above ground fire pits, larger group dining shelters, and coolers. These are mostly housed in the troop trailer. Patrol Gear Each patrol should be equipped with the same types of gear for the use of that patrol. This equipment is stored in a Patrol Box and/or a storage container. Patrol boxes are normally issued to the patrol leader, assistant patrol leader or the acting patrol leader and are returned to the troop Quartermaster in a clean, usable condition. It’s the patrol’s mobile kitchen. Check out the plan in the Chapter 8 –Forms for Quatermaster. Special use items Though most of the gear is stored in the troop trailer, there is always stuff that isn’t needed for every campout. This may include items may be used to support fundraising events, others for training displays. We also includes may specialized equipment used for backpacking, climbing and zip lines gear, canoes, paddles and PFDs, Klondike sleds, and cold weather gear. Consumables This category includes non-food items like ice, propane fuel, firewood, hand sanitizer, wooden matches, paper towels, lunch bags, sandwich bags, ziplock bags, garbage bags, charcoal, charcoal lighter, aluminum foil, pot scrubbers, dish detergent, rinse sanitizer or bleach, toilet paper, lantern mantles and rope. For some units, paper plates, cups, napkins and plastic-ware. Food Pantry

7
We maintain a food pantry that includes flour, salt, pepper, various seasonings, sugars, popcorn, oils, syrup, crack barrel stuff, brownie mix, cake mix, Bisquik, bug juice mix, coffee, creamer, and bags of cereals. These are the food items with longer shelf-lives. Unopened jellies, catsup and mustard also get added to this category. Once these items get opened, they are either used up, thrown out or like leftover milks, breads, and juices are given to a family upon return. These items will not last until the next campout and we don’t want science projects in our trailer the next time we open it up!
Donated and Worn Equipment We occasionally have people approach the troop that volunteer to purchase something for the good of the troop. We normally ask them what they have in mind then bring this idea to the troop committee for consideration and approval. We do not purchase any items without committee consideration, as it may have additional requirements, licensing, or special qualifications or may be deemed inappropriate for the troop. We also have a number of well-meaning people donate old camping equipment after their kids have moved out or scout’s that have replaced equipment with new stuff. We have also had some local outfitters and companies that donate old equipment that may have some life left in them. Bless them! Some of it is still useful; while other stuff may be downright dangerous to even think of using it by scouts or scouters. We ask the Quartermaster, Equipment Chair and Scoutmaster look the stuff over before we make it available to our Troop’s inventory or swap bag. Also don’t forget to send them a Thank-you note for their contribution and efforts. Military Surplus Equipment Some of the best equipment, clothing, and supplies are available as military surplus. This equipment is made for the military to last and for hard use. A lot of equipment is out there that can be useful to scout camping. Organized and inventoried storage space(s)
An accurate inventory is essential. Create a simple spreadsheet or a small database and list all of your gear. Include a descriptive item name, quality, purchase date and original cost, estimated replacement value, current storage location and current condition. You should also include a picture of the item. Not only is a picture useful to new scouts but would also be useful if the item is stolen. When taking the picture remember to include something in the shot that gives a relative size relationship-a ruler, or someone’s feet or hands. Whether you use wood or metal shelving or roll-around wire racks is up to you and your troop’s budget. We have a nice work bench with some wooden shelves above and below the work surface. It works great for repairing and maintaining equipment.
The bulk of our storage is on tall Commercial/Industrial Storage Shelving. They measure 48"W x 18"D x 72"L, cost about $100 each and roll to where we need them. The shelves are easy to adjust to different heights, can be rolled together to take up less space and we can change out what is loaded into the trailer by rolling the unit to the trailer as needed. You cannot do that with the built-in shelves of the work bench. When we need shelving to support our spaghetti dinner, we can off load gear for a short time and easily move the shelves to where they’re needed.
Some equipment lends itself to hanging from the wall, while other can be hung in the overhead and rafters. Built-ins pretty much lock you into where they are set, portable works great for us. Bottom line, use what works for you and your situation!

8
Chapter 3 Getting it all there! The Troop Trailer
Troop trailers come in many, many different sizes. What your unit has is normally the result of the needs of the troop at the time it was purchased. We currently have three different trailers. A small aluminum 5’x 8’ utility trailer with wood side boards, a 6’x10’ enclosed trailer and a homemade canoe trailer that was converted from our previous enclosed troop trailer with a welder. Some troops have a fleet of trailers
Open top utility trailer
Enclosed two wheel trailer
Enclosed four wheel trailer
5th wheel trailer (This is their travelling Day Camp)
What should you consider for the hauling job: Type and size, cost and maintenance, weight capacity, towing vehicle and security.
Type: Open top utility trailer Sizes: 4’x6’, 7’x10’
Weight cap: Towing Vehicle: Cars, mini-vans with 1 7/8” or 2’ ball
Pros: Small, light duty, versatile, can handle odd shapes, just need a basic trailer hitch.
Cons: Not very secure or water proof, must be covered with a tarp, straps ropes & bungees or custom cover.
Best use: Day events, smaller campouts, and summer camp when you don’t need all of the troops equipment. Use it for lots things – quick, convenient, and easy to handle.
Type: Enclosed two wheel equipment trailer Sizes: 4’ to 6’ ft wide, 6’ up to 12’ long
Weight cap: Varies on size and manufacturer. Towing Vehicle: Full sized van, truck or SUV.
Pros: Very versatile, just enough space. Cons: Need a little bigger tow vehicle
Best use: The work horse of the unit. Water proof, secure, carries enough equipment for 20-40 person campout.

9
Type: Enclosed four wheel equipment trailer Sizes: 7’ to 8.5’ ft wide, 12’ up to 24’ long
Weight cap: Varies on size and manufacturer. Towing Vehicle: Full sized van, truck or SUV.
Pros: Roomy, water proof, secure. Lots of capacity.
Cons: Heavy, takes more room to park it, Need a larger tow vehicle and possibly electric trailer brakes and stabilizer bars.
Best use: If you need the room and have the vehicle to haul it – go for it! If that vehicle is no longer available, you could be left wanting.
Type: Fifth wheeled trailer Sizes: 8.5’ wide, 24’ up to 52’ long
Weight cap: 5,200lb up to 7,000lbs Towing Vehicle: Pickup truck with 5th wheel hitch.
Pros: Lots of space. With a rear ramp, easy to load bikes and ATV.
Cons: Requires a fifth wheel hitch, wider mirrors, special wiring and a heavy duty truck to move it.
Best use: Mobile district/council headquarters, Disaster Coordination or special event support.
Type: Specialized trailers - Canoes/Kayaks, food vending, pioneering kit, bicycle carrier, etc.
Sizes: Varies, usually home-made or a modified commercially made.
Weight cap: Varies. Towing Vehicle: Varies, but try to use a 2” ball hitch
Pros: You can build and modify it to your needs. Hard to carry 6 canoes in an enclosed trailer.
Cons: You can build and modify it to your needs. Talk with a professional before you add something that may be dangerous or unstable
Best use: These are usually specifically built to fill a particular need.
Don’t forget the legal paperwork Put a copy of the trailer’s registration in the trailer where everyone knows it to be. We put it in a sealed ziplock, just inside the side door, taped to the wall. Also while you are checking the lights and tires, check that the license plate is current and is securely mounted and also lighted.
Minimum Equipment Spare tire, key to unlock it, an axle jack, four-way lug wrench, tire chocks, spare light bulbs or light assembly for the trailer. Verify you can actually change the tire with what you are carrying in the trailer. We also carry an assortment of trailer electrical connectors that will fit your trailer to most tow vehicles. It can really be a show stopper to not be able to go camping because the driver or troop doesn’t have the connector. We also carry a few cans of Fix-A-Flat and the folding emergency reflectors. We have even purchased a few 2” ball, 2” hitch adapters of different heights so we are not stuck without some options of different tow vehicles.
Organizing the trailer(s) We try to arrange gear by what is used first to the used the least, and pack by the first out, last in theory. We also try to condition everyone as to where each item should go, so you know where to find it the next time - great theory, but sometimes a challenge. The have a running joke in the troop that if you are looking for something it’s in the red and white bin. We have seven of them, all the same size and make, with no unique outside markings except a duct tape label on top cover. We have since numbered them on all side and top with large numbers and placed a list on the back door of the trailer to us give a better starting point to finding what we are looking for. The First Aid Kit is on the right rear, top shelf of the trailer– go get it!!
10
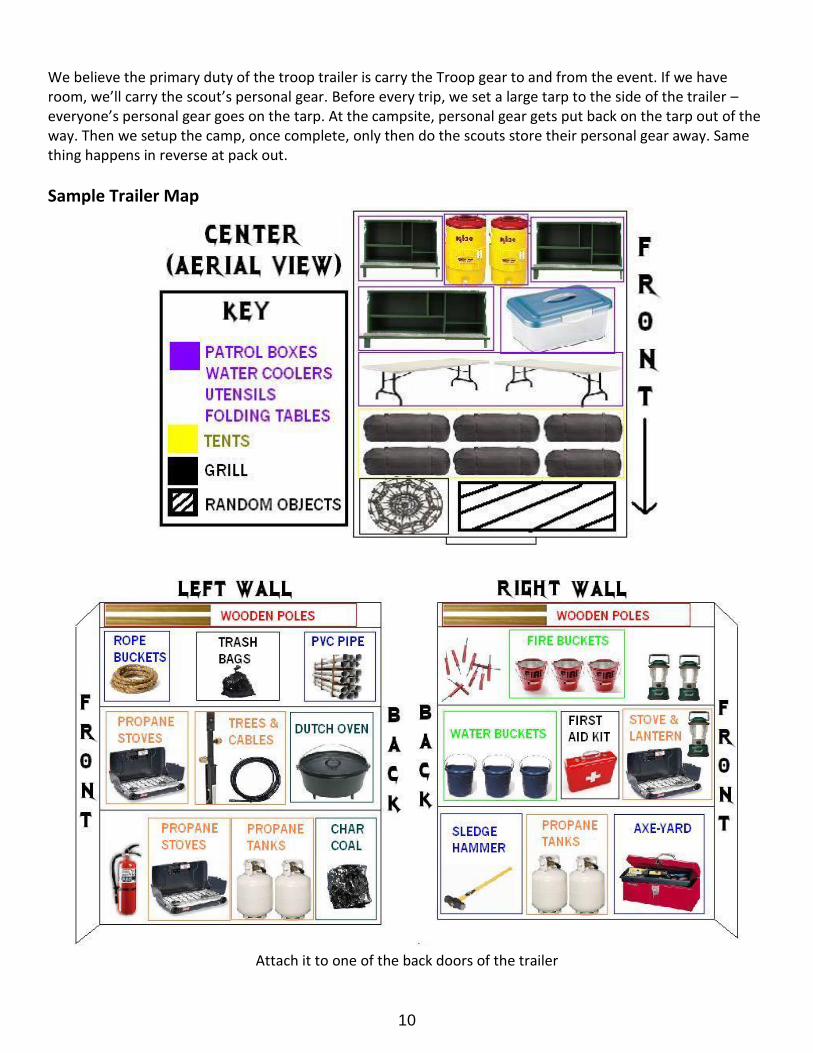
We believe the primary duty of the troop trailer is carry the Troop gear to and from the event. If we have room, we’ll carry the scout’s personal gear. Before every trip, we set a large tarp to the side of the trailer – everyone’s personal gear goes on the tarp. At the campsite, personal gear gets put back on the tarp out of the way. Then we setup the camp, once complete, only then do the scouts store their personal gear away. Same thing happens in reverse at pack out.
Sample Trailer Map
Attach it to one of the back doors of the trailer
11
Building Your Camp Kitchen Making Your List Occasional you may as a patrol review what you are including in your Patrol Box. Maybe your cooking style has changed and you may need different items. The first step in building your camp kitchen is to make a list of what you want in it. When making your list, always remember to include anything that you might possibly ever want in your kitchen. You can always pare the list down or put off buying non-essential items. A good way to get started is to go through your kitchen at home and consider each item you use.
Is there a camp kitchen equivalent of it?
Is it practical to take camping?
Would you even want to take it camping?
Do you really need all of it? As you consider each item, and ask yourself these questions, make a list of the camp kitchen equivalents of the items that you want to have. Don't forget to include a container to hold it all. When you get to your collection of dishes and flatware, you need to make a decision. Do you want real ones in your camp kitchen, or do you want to use disposables? Real dishes and flatware are friendlier to the environment, but disposables require much less cleanup and reduce the risk of contagion. Prioritizing Your List Now, go through your list and label each item on your list as either essential, or not essential but nice to have. Check off:
o Everything you already own that is exclusively part of your camp kitchen. o Everything you already own in your regular kitchen, that you don't mind taking camping. o Anything you need to purchase or can borrow from friends or family.
Putting it All Together Starting with the most essential items, buy what you can afford of the items not yet checked off. Over time, you can slowly acquire the non-essential items, the items that you are borrowing, and the items that you borrow from your regular kitchen. Eventually you'll have a complete kitchen in a box, complete with everything, always ready to go. Stocking Your Kitchen There will be items that you will need in order for your camp kitchen to function, but that get used up, and so are not a permanent part of it. I recommend keeping a master list of the items you commonly use. Before each camping trip you can refer to this list, and make a note to buy more of any particular item that you may be low on. Planning Your Meals Planning your meals ahead of time is an essential part of keeping your camp kitchen running smoothly. If you plan your meals ahead of time, you have done all of the thinking before you even leave, and there is less chance of forgetting things. Well before the event decide what each day's meals will be, being sure not to forget beverages. Then compile a list of ingredients to use as your shopping list when you go to the store.

12
Go through your shopping list, and make a note of any ingredients that you want to take with you rather than buying for the occasion. You might want to do this if the item is an obscure or specialty item not readily available in most stores, such as a favorite brand of sauce mix. Or the item might be something that is only sold in quantities vastly larger than what you will need, such as spices or grains. Be sure to pack any of these types of ingredients and also check them off on your shopping list.
Suggestions and Ideas Here are some suggestions and ideas that you might want to consider.
When choosing items for your camp kitchen, consider making choices that you would not normally make. For example, I normally do not use non-stick pans. However, I chose a non-stick frying pan for my camp kitchen because it does make cleanup a lot easier. (If you do choose a non-stick pan, I recommend making a cloth case for it, so that it will be protected from scratches when in transit.) I also don't normally cook with aluminum pans, but I chose an aluminum stockpot for weight and cost considerations.
When choosing items also keep in mind how everything will fit together in the container, and be flexible about your choices. For example, I really don't need a ten quart stockpot in my kitchen, as a six quart pot would easily hold the largest quantity of food I would ever want to make. But I chose a ten quart pot anyway because it was large enough that my whistling kettle fit inside, allowing me to make more efficient use of my packing space.
To the best of your ability, try to wash the dishes as soon as possible after eating. The longer you let them sit, the harder they'll be to clean.
If you go to a lot of weekend camping events you might want to keep a list of your favorite combinations of meals, already broken down by ingredients into shopping lists. This way, rather than having to plan the meals for the weekend and then form the shopping list, you can just select the combination you want, and go.
For longer events, consider adding a clothesline, clothespins, and laundry soap to your camp kitchen. That way you can do laundry in your dishpan(s) and reduce the amount of clothing you need to take with you.
A Starter List of Items for Your Camp Kitchen
__ camp stove __ propane tank & hose __ griddle __ stove lighter __ cooler(s) __ drink cooler __ propane lantern __ propane tank tree __ stockpot with lid
__ paring knife __ colander __ mixing bowl __ measuring cup __ spatula __ rubber spatula __ cooking spoon __ frying pan __ coffee pot
__ grater __ salt & pepper shakers __ sugar container __ coffee mug(s) __ dishpan(s) __ dish towel(s) __ cutting board __ vegetable peeler __ large knife
__ hot pad(s) __ apron __ vinyl tablecloth __ table __ tote locker __ ladle __ can opener __ bottle opener __ scissors
Recommended Stock List
__ sponge __ scrubbie __ dish soap __ bleach
__ vegetable zipper bags __ paper towels __ bamboo skewers __ zipper bags
__ plastic cups __ aluminum foil __ lantern mantles __ trash bags
__ paper bowls __ plastic flatware __ paper plates

13
The Boy Scouts of America has offered a lot of great equipment through the Scout Stuff website. Some of those items include a couple of kits that put a lot of the above gear in a nested or organized kit for use by Patrols and whole Troops. Keep the kit together as purchased or add to it to fit your needs. Chef’s Tool Kit - $30 at the ScoutStuff website No matter where the trail takes you, you can still make the most of mealtimes. Deluxe camping tool set provides seven full-size cooking tools for preparing gourmet meals on the go. Kit is highlighted by three high-quality grilling components-the spatula, fork, and tongs-made of stainless steel with wooden handles. Set packs and transports easily when pieces are stored and wrapped in the included canvas case.
1 Ladle 1 Spatula 1 Spoon 1 Fork 1 Slicing Knife 1 Paring Knife 1 Can Opener 1 Vegetable Peeler 1 Nylon Case
Trail Chef Aluminum Cook Kit - $80 at the ScoutStuff website There's enough heavy-duty aluminum cookware here to prepare dinner for a whole troop. The 19-piece cook kit includes: 8-qt. pot, 4-qt. pot and lid, 2-qt. pot and lid, 10 1/2" fry pan, 9" fry pan, Two fry pan handles, Cocoa pot and lid, Four 9" plates, Four 8-oz. plastic cups Style of components may vary slightly from photo.
NOTE: If your cook kit is Teflon coated, use non-metallic chef tools. Unless you like the extra plastic shavings in your diet!

14
Chapter 4 Equipment Care, Cleaning and Repair
Care and Cleaning of Tents 1. Do Not Use Washing Machine or Dryer to Clean Tents!!! 2. Always Hang and Let Tent Fly Dry at Home regardless if you think it’s Dry or Not. It will have had
condensation on the inside Even If You Can’t Feel It. 3. If tent is wet, set up tent and allow it to dry outside, weather permitting. In case of inclement weather,
allow tent to dry in garage or basement (day/strong light during drying is essential). 4. This is to be performed regardless if outside tent floor is muddy. Lay down plastic ground cloth first to
ensure lime from concrete floor doesn’t come in contact with wet tent during drying period. Avoid allowing tent to dry in contact with any oil spots in garage as well (hanging upside down spread out by four corners is acceptable practice).
5. If tent is muddy hose it off, brush clean and let dry. This is a lot of work so try not to allow tent to fall into this condition.
6. Sweep/brush off all debris from inside and outside of tent, including outside tent floor. 7. Sweep/brush off all debris from tent fly. 8. Use only mild soap and water, if necessary, to clean inside tent floor if dirty and allow it to dry. Do NOT use
bleach or other harsh cleaners. If any part of tent or tent fly is ripped or torn, do NOT attempt to repair it. Bring it to the attention of the troop Quartermasters and Equipment Chair at the next troop meeting.
9. If any of the tent pole, tent peg, or main tent bags is dirty, wash using mild soap & water and allow to dry. No dirt is to remain in any of these bags.
10. All 12 tent pegs are to be taken out, dirt removed, and placed back in CLEAN tent peg bag head first (points up toward bag opening so they do not put holes in the bottom).
11. All tent poles are to be taken out, dirt removed, allowed to dry disassembled so air can reach inside of poles, and placed back in clean pole bag. INSPECT shock cording for each tent poll to ensure reliability. Anything that seems to be worn must be reported.
12. After placing poles in pole bag, place tent peg bag into pole bag and tighten pull cord or tie. 13. Do not put pole bag into the tent bag. The pole bag will be rolling in the tent first. 14. Fold tent in half (or thirds depending upon the tent you have) lengthwise so that you end up with a width
that is slightly less that the size of your tent bag. 15. Fold clean and dried tent fly similar to tent and place this on top of the folded tent. 16. Place the tent bag at one end of the tent/fly and TIGHTLY roll tent up around the tent poles. 17. The entire roll should now fit easily into the tent bag. 18. Sweep/brush off all debris from ground cloth. If necessary, hose off ground cloth and let dry. Fold ground
cloth and place in tent bag. This should be the last item placed in tent bag 19. Bring to next troop meeting and check it back in with the Quartermaster.
Helpful hints related to Tents Air Tents and Bedding Air your tents and sleeping bags in the sun before and after your trip to freshen them up and reduce the potential for mildew growth. Keep all food items out of the tent. Critters love those snacks as much as you do, but they don’t know how to work the zipper so they go through the tent and pack material. Keep the all food out of your tent. Field mice, raccoons, and their big brothers –

15
bears are not what you want to wake up to in the middle of the night. Their teeth and claws go right through the tent and backpack cloth. And guess who is going to be expected to pay for the repairs! Give Air an Escape Route Open doors and windows in order to allow air to escape as the tent is collapsed. Letting the air escape as the tent is collapsed will make rolling and storing it easier. Rolling the tent toward the open doors and windows will help too. Fold Your Tent It may be easier to fold the tent along original fold lines. However, after a few years, this becomes more difficult as the lines fade. A good rule of thumb is to fold the tent about the same length as the tent poles before you roll it up. Store Your Tent Roll your tent lightly and neatly with poles and stakes (in their bags) rolled into the tent body. This technique uses the tent poles as a structure to help roll the tent. A slow, tight roll of the tent is one of the easiest ways to compact the tent for an easy fit into the storage bag. Leave the door zipper open to help let air escape. Do not snap poles together Expend poles section by sections. Using care here will greatly extend the life of your poles, aiding in splintering protection and keeping the structure of your tent sturdy. When collapsing your sock-corded poles, collapse them near the center first to ease the stress on the cord. Try to avoid pulling the poles as this can tear the shock-cord or the tent body. Often it is easier to push the pole through the pole sleeve. Even your tent appreciates the shade If your tent will be set up for a week or longer, it may be wise to place the tent where it may get an ideal amount of shade from the surrounding area. In order to extend the life of your tent, avoid extended UV exposure. UV rays can damage all fabrics over time. If there is no shade available, your rainfly will help protect the body of your tent from damage by the elements. Cleanliness is… Sweep out your tent. Make sure that rocks, leaves, dirt and branches are all out of the tent before packing it. If at all possible, only take down your tent when it is completely dry after a rainstorm or morning dew. Wait until it dries, so you will not have to worry about drying the tent at a later time. You can use a sponge and mild soap to wipe off a dirty tent. Do not use a washing machine to clean your tent. And always let it air dry before re-packing. Your tent must be stored dry. If you must close camp in the rain, open your tent and set it up as soon as possible to avoid mildew and odors. When your tent is stored between camping trips, a cool, dry place is ideal. Depending upon the temperature and climate, your tent may gather some moisture on the inside. This can usually be avoided by opening the tent to allow ventilation. The easiest way to ventilate is to open all nylon windows and allow the screen to protect you when possible. Please note that if you are in inclement weather, condensation is not leakage. Under hard ground conditions, stakes may bend. Tent stake replacements are available, but not always handy at a campsite. A tent may also be tied using guylines, to rocks or other stable objects as a temporary fix.
16
Do not pull up stakes with the tent body or stake loop. Use a stake puller or the end of a mallet to remove stubborn stakes. Ripped stake loops can be sewn into the tent again, but be sure to seam seal the stitching. Stuck or Broken Zippers - Preventing and repairing blow-outs. Question: I seem to be forever breaking zippers: on my tent door, my right gaiter, and now my favorite day pack. Don't they make stronger zippers and can how do I make the ones I have last longer? Here is what is suggested: Zippers are the most under-appreciated workhorse-fastener on today's outdoor equipment. They are used and abused to such a level it is often a wonder they last as long as they do. The most important thing you can do is treat your zippers with care. In the field, brush them off before pulling the slider. At home, clean the teeth with water and a toothbrush, or a vacuum cleaner. I don't recommend using a silicon lubricant on the zipper's teeth since that only serves to attract more dirt. Pull your zipper sides together when closing your pack or tent door. Slow your zipping pace when closing a zipper, especially around tight corners. The most common reason coiled zippers (the one's found on most gear these days) won't close is a worn slider-a slider is the bit of hardware with the tab on it that you pull on to close or open the zipper's teeth. If the teeth of your zipper stay open after a pass by the slider, reach for your pliers. Work the slider back up to the top of the zipper or the point where the zipper would be open if it was working-take your time, this can be a challenge. Now, gently squeeze one side and then the other of the slider, using equal pressure (don't over squeeze as you can jam the slider or even crush the zipper coils). Try the zipper again. Do this several more times until the coils remain closed after a pass by the slider. If this fails to work, you need a new slider and should consult your nearest specialty outdoor store for advice. Occasionally the looped wires form the zipper tracks will bend or separate under duress. Carefully straighten the damaged coils with a knife or needle. No More Mold Have you ever pulled a tent out of the stuff sack and it smells like vomit? That's the smell of moisture breaking down the waterproof coating. Even a few drops of condensation can cause mildew to grow, so never store a wet tent. After a rainy or humid night, drape the fly over a tree and turn the tent on its side to let the sun dry the bottom. At home, hang the tent on a clothesline or shower rod. Once it's dry, store it loosely in a cotton pillowcase or mesh storage sack. Eliminate mildew Kill black-spotted mildew with this cleaning regimen, which will remove the mold, though not the stain. Mix one cup of Lysol household cleaner into one gallon of hot water (1:16 solution). Pitch the tent and clean it inside and out. Do not rinse–let it dry. Another mix to try is to cleanse the fabric by mixing one-cup table salt and one-cup lemon juice (concentrate is okay) into one gallon of hot water. Scrub the tent inside and out with this solution, then rinse the entire tent with a garden hose. Remove pine sap Scrub off sticky stuff with a sponge soaked in mineral oil, then rinse the spot thoroughly with hot water to remove the residue. Restoring the floor Just as seam tape will eventually crack and peel, so will the waterproof coating on your tent floor. You can restore the floor and get a few more seasons' use out of it by using a pot scrubber to rub off as many loose flakes as possible. Then sponge off the floor so it is completely clean and allow it to dry. Using a foam brush

17
apply McNett Tent Sure or some other DWR product that is designed specifically for restoring tent floor waterproof coatings (available at most outdoor stores). Maintain a waterproof barrier Invest in a footprint designed for your tent, or build your own using Tyvek or painter's plastic. Even a thin barrier will extend the life of the tent floor and prevent ground soaking during heavy rain. In addition, keep DEET-based bug dope away from the tent fabric. Exposure to that solvent will eat away at the nylon's water-proof coating.
Care and Cleaning of Food and Drink Coolers Clean both the inside and outside with a solution of mild soap and warm water.
If the product has a faucet, be sure to rinse with hot soapy water and drain completely.
Use baking soda and water to remove tough stains.
Remove odors with a diluted solution of chlorine bleach and water. If odor persists, wipe interior with a cloth saturated with vanilla extract, then leave in cloth in cooler overnight.
Always air dry with the lid open before storing.
Helpful hints related to Food and Drink Coolers
To achieve five-day performance in the newer Xtreme coolers you must use it properly. Use plenty of ice and pre-chill items before you put them in the cooler. The following guidelines will allow you to achieve extreme performance.
27 lbs. for the 36 qt wheeled ice chest (model 6251-707) 37.5 lbs. for the 50 qt wheeled ice chest (model 6263-707) 43.5 lbs. for the 58 qt ice chest (model 6273-707)
Coleman recommends using .75 lbs. of ice per rated quart of the coolant and highly recommend using cubed ice. For best performance, always pre-chill food and drinks. Two six packs or one gallon of liquid will use approximately 2.5 lbs. of ice just to cool from room temperature. So plan ahead and cool off everything before you head out. You can even empty a few trays of ice into the cooler to pre-chill its interior. Put the ice in last Cold air travels down, so if you want your beverage well chilled, load cans and bottles first, then cover with ice. Do not store cooler in hot location. When storing cooler, avoid hot places such as the garage or the trunk of a car. If this is unavoidable, bring the cooler inside at least 24 hours before use. Keep the cooler out of the sun. Ice lasts up to twice as long when the cooler is in the shade. Choose cube or block ice. Use cube ice to quickly cool food and drink, block ice to keep it cold longer. Don't drain cold water.

18
Recently melted ice keeps food and drinks cold. Melted ice water preserves ice better than empty air space. Close lid quickly after opening. Do not leave the lid open longer than necessary. Use separate coolers. Use one for beverages you'll want frequently, another for the bulk of the food. The latter will keep ice longer because it will be open less frequently. Protect perishable foods. Place perishable foods like meat and dairy products directly on ice. Sealed plastic containers will keep food dry. Use dry ice to keep food frozen. Place the dry ice on top of the food. Be sure that the dry ice is wrapped in heavy layers of newspaper. Do not let dry ice come in direct contact with the interior liner or your hands.
Care and Cleaning of Pots, Pans and Utensils Utensil kits Thoroughly wash, rinse and sanitize. Wash all utensils with hot water and soap. Use pointed object to clean caked-on food or grease from all joints, cracks or crevices. Pots, pans, and dishes: Clean with pot and pans with Brillo until they shine unless it is a Teflon coated pan. If there is significant tarnish or caked or burned on food, fill pot with clean water, add 4 tablespoons of “BAKING SODA”, and boil for ten minutes. Repeat as necessary until CLEAN. Dry both inside and outside as they will be stacked. Burnt food on Pots For a pan with a thick layer of burned on food, pour a thick layer of baking soda in it, just moisten with water. Let stand overnight; scrub it clean the next day.
Sponges and other cleaning materials, such as plastic scouring pad: Clean with a strong solution of bleach and water to avoid bacteria growth, rinse out the bleach solution completely, and then allow to dry completely. They must be dry before repacking them into a clean re-sealable bag/container. Dish towels: Launder, dry, and place in plastic bag. Bring to next meeting. Wash basins: Clean INSIDE AND OUTSIDE with soap and hot water. Dry thoroughly - inside and outside. It does no good to clean only the insides and then stack them with the outside either wet and/or dirty.
Care and Cleaning of Water Jugs: (The water jugs consist of the jug AND the lid)
NOTE: DO NOT USE DISH SOAP ON THE INSIDE OF THE JUG. Soap on the inside will leave a residue with a horrible taste and will cause digestive tract problems on the next camping trip.

19
1. Add 2 to 3 cups of water and small amount of bleach (about a tablespoon) to the jug, close the jug tightly, and shake the jug vigorously to swirl the bleach solution onto all surfaces inside the jug, including the inside of the cap. Leave the bleach solution in the jug for about 5 minutes.
2. Take great care not to spill this solution, since it will ruin fabrics. 3. Shake again, then empty jug. 4. Let the jug sit OPEN for at least 2 days. This allows the chlorine to evaporate and jug to dry completely. 5. Cap the jug loosely (so you don't lose the cap).
Care and Cleaning of Dutch ovens Cast iron cookware like Dutch ovens are at their best when they are seasoned or cured, which means it has developed a baked-on patina of oil which helps prevent rusting and also gives the cooking surface nonstick properties. To clean cast iron cookware without removing the seasoning, use a stiff brush, hot water and no soap or detergent, which can eat away at the seasoning. After washing, you should dry the pan (air-drying can cause it to rust) and lightly coat it with a little vegetable oil while it's still warm. If your cast iron cookware develops rust spot, these can be scoured off with fine-gauge sandpaper or steel wool, and the pan can be re-seasoned. 1. Brush off all exterior charcoal first. 2. Scrub all parts with water and cleaning brush or plastic scouring pad. DO NOT USE SOAP!
Cast iron is porous and any soap will seep into the iron and then back out into your next meal. 3. Loosen stubborn stuck-on food by boiling water in the pan for a few (5) minutes. Again NO SOAP! 4. Wipe dry or dry with heat. Do NOT air dry; this will allow rust. 5. Coat inside of pot and underbelly of lid with a small amount of cooking oil. Apply oil with cooking brush or
oiled soaked paper towel of good quality. Cheap towels will fray and cause more of a cleanup issue. 6. Place on stove top and let sit on high heat for 5 minutes. 7. Allow oven to COOL OFF for about 15-20 minutes before removing from stove top. 8. Bring to next meeting.
Care and Cleaning of Liquid Fuel Lanterns and Stoves With a liquid fuel lantern, transfer as much fuel as possible out of the fuel tank and back into the fuel can to prevent a lacquer buildup on the tank's fuel tube. Keep in mind that storing a liquid fuel appliance with fuel in the tank can eventually cause a buildup on the fuel tube, which restricts fuel flow to the generator and burner. When it's time to take out your lantern, remember to oil the pump cup on the tank's pump plunger at least twice a year with a light machine oil. This allows the cup to seal against the inside of the pump barrel and insures the pump will work smoothly and push air into the tank properly.
Helpful hints related to Liquid Fuel Lanterns and Stoves
Why does my lantern only stay lit a few seconds before going out or make a hissing sound but not light? If a liquid fuel lantern lights for only a few seconds then goes out, it could be one of a few problems.
If the lantern lights for a few seconds then goes out and there is no sound of air passing through the generator, there is either no pressure in the fuel tank or the generator is clogged. Make sure the tank is pumped up at least 35 times before lighting the lantern. If there is still no fuel flow, try cleaning the tip of the generator. If you lantern has a tip-cleaning lever, turn it clockwise three or four times and leave it in the down position. If your lantern does not have a tip cleaning lever, turn the knob from off to on three or four times. Both of these actions run a small needle through the hole in the tip of the

20
generator and should remove any small blockage. If you still get no fuel flow to the mantles, the generator will need to be replaced.
If the lantern lights for a few seconds then goes out but you still hear air passing through the generator, there is either not enough fuel in the tank or the fuel and air tube in the tank has a lacquer build-up that is preventing the fuel from reaching the generator. Make sure the fuel tank is three-quarters full before lighting the lantern. A low fuel level can make it difficult for the fuel and air tube to draw fuel properly. If there is plenty of fuel in the tank and the lantern still will not light and continue to burn, the fuel and air tube may have a lacquer build-up preventing fuel to be drawn from the tank.
If a lantern is stored for long periods with fuel in the tank, it can cause a coating of lacquer to build up on the fuel and air tube. The tube has a small hole at the bottom that draws in the fuel. If it is obstructed, the fuel will pass into the generator and mantles in surges. You can sometimes clean the fuel and air tube by pouring out the fuel in the tank then filling it about halfway with denatured alcohol. Do not use rubbing alcohol as it has water in it and do not pump up the tank or open the valve while the alcohol is in the tank. Let the lantern sit for 24 hours then shake the tank and pour out the alcohol. Rinse the tank with clean Coleman Fuel and refill with fresh fuel. If the lantern's light still pulsates, you will need to replace the fuel and air tube.
We suggest that if you are storing your lantern for more than two weeks, pour the fuel in the tank back into the fuel can. This will eliminate the build-up of lacquer on the fuel and air tube.
Why can't I pump pressure into the tank of my stove? The pump plunger must be turned one full turn counter-clockwise before pumping up the stove. There is an air stem inside the pump plunger that seals the pump closed during use and guides the plunger straight up and down inside the pump barrel. The air stem must be partially unscrewed from the check valve at the base of the pump barrel before any air will pass into the tank.
You must also be sure that the pump cup on the end of the pump plunger is lubricated so that it seals against the sides of the barrel and pushes air into the tank.
At the beginning of every season it is a good idea to remove the pump plunger from the tank and oil the pump cup. If the cup is leather, take your thumb and spread it out, then soak it in a good leather oil for a few minutes. It the cup is neoprene, oil it with a light machine oil such as 3 in 1 or a light motor oil.
When you re-insert the cup into the pump barrel, make sure the outside edge of the cup is not creased or deformed.
Care and Cleaning of Propane Lanterns The benefits of regular cleanings include better fuel efficiency, flame control and no rust or corrosion.
Although there isn't a set schedule for cleaning your lantern, you should clean it whenever it is dirty and before storing your lantern at the end of camping season.
Under most conditions, lanterns can be wiped out with warm water and dishwashing soap and then dried before storing.
After cleaning, proper storage of your propane lantern is also important.
Put it into the storage container or plastic bag, sealing with a twist tie to prevent spiders or other insects from crawling in the unit, which can block the fuel and airflow.
Helpful hints related to Propane Lanterns
How do I replace and install a mantle? Remove any old mantle residue. Following the instructions found on the mantle package, tie or clip the mantle to the lantern.

21
NOTE: Mantles are cloth and when new they are soft. Before you can use your lantern, it is necessary to burn
the mantle with a match or lighter. When the mantles are burned for the first time, the cloth fibers burn away and leave a natural source chemical ash that, when heated, produces a bright incandescent light. If you try to burn your new mantles with the fuel from the lantern, the mantle is likely to tear. Once the mantle is burned, you can light your lantern.
At first use, we recommend that you light your lantern with a match to allow the mantle to heat up and shape themselves. Using the electronic ignition on the first lighting can cause the mantle to break. How long should I wait to relight my lantern after shutting it down? Coleman recommends waiting five minutes or more before attempting to re-light a lantern with a hot burner assembly. It is easier to ignite fuel vapor after the lantern has cooled than it is when the burner assembly is still hot. If you need to light the lantern sooner and it is an electronic ignition model, the lantern will light easier using a match than with the electronic ignition.
Care and Cleaning of Propane Stoves The benefits of regular cleanings include better fuel efficiency, flame control and no rust or corrosion. Although there isn't a set schedule for cleaning your stove, you should clean it whenever it is dirty or after a boil-over that causes buildup in the burners. Annual cleanings are recommended before storing your stove at the end of camping season.
Under most conditions, stoves can be wiped out with warm water and dishwashing soap or baking soda and water, then dried before storing. For a deeper cleaning, here are a few suggestions:
If there has been a boil-over, remove the screw from the center of each burner and lift off the burner rings and bowl to check the manifold for fluid or food debris. If there is a build-up, clean it with dishwashing soap and warm water before rinsing with clean water.
If the stove has a massive amount of grease and dirt build-up inside the case, on the grill or burners, you can take the stove to a car wash and use a high-pressure hose on it. Don't use any type of tire, oven or engine cleaner because it can damage the paint on the inside of the case and the metal of the grate and manifold.
If a stove has been cleaned with any type of water hose, turn the stove upside down to ensure all the water is removed from inside the manifold. Any water left inside the manifold can cause it to rust and disturb the flow of fuel to the burner, preventing the stove from burning properly.
NOTE: It is strongly suggest you do not use oven cleaner. Oven cleaner can remove the paint and aluminized
coating from the metal of the stove and discolor or rust the steel. After cleaning, proper storage of your propane stove is also important.
Put it into a plastic bag, sealing with a twist tie to prevent spiders or other insects from crawling in the unit, which can block the fuel and airflow.
Maintenance
1. Clean entire outside with plastic scouring pad and scouring powder or other degreaser. The object is to remove all the dirt and grease that builds up on the inside and outside of the stove.
2. Clean inside hood and wings with plastic scouring pad and scouring powder or other degreaser.
22
3. Remove inside grill and clean the reflective splash guard as above. 4. Inspect the hoses and piping for cuts, gouges, dents and rusting and replace, if necessary.
Helpful hints related to Propane Stoves A 20-pound propane tank is the standard tank size for most backyard grills and Troop camp stoves.
Use your propane stoves and lanterns almost 20 times longer without refueling with the 5 or 8 Ft. High-Pressure Propane Hose and Adapter. This accessory is all you need to hook a 20-lb. tank to your camp stove or lantern for high-pressure fuel.
Add a Propane Tee to expand to two outlets or a Propane Tree to expand to three outlets.
Shut off your propane tanks when in use. You may have a small leak or loose fitting,
Make a Camp stove grill reinforcements. Heating large pots full of water tends to warp the grill on our Coleman stoves. One solution is:
1. Bend a piece of ½” x 38 inch rebar in the middle into a rounded “V” that will support two legs on the back and the bend to the front of the stove.
2. Place across stove over the grill rails for support. 3. This prevents the grill from warping when hot and heavy pots are used.
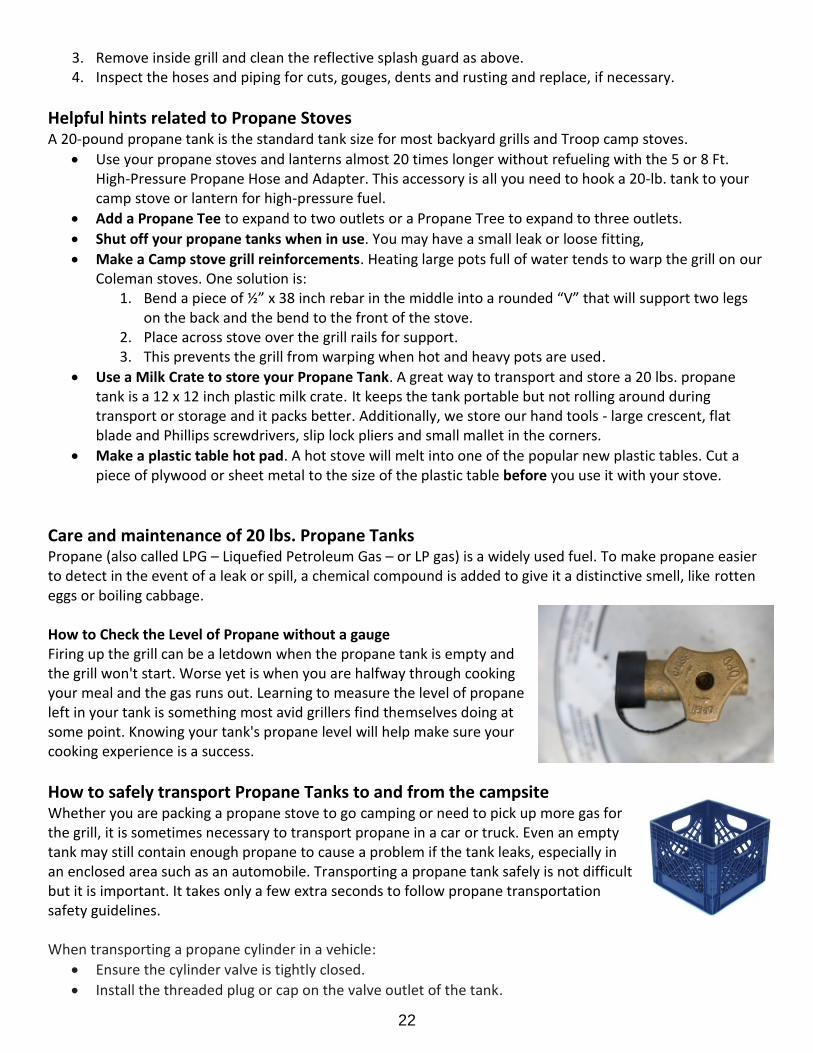
Use a Milk Crate to store your Propane Tank. A great way to transport and store a 20 lbs. propane tank is a 12 x 12 inch plastic milk crate. It keeps the tank portable but not rolling around during transport or storage and it packs better. Additionally, we store our hand tools - large crescent, flat blade and Phillips screwdrivers, slip lock pliers and small mallet in the corners.
Make a plastic table hot pad. A hot stove will melt into one of the popular new plastic tables. Cut a piece of plywood or sheet metal to the size of the plastic table before you use it with your stove.
Care and maintenance of 20 lbs. Propane Tanks Propane (also called LPG – Liquefied Petroleum Gas – or LP gas) is a widely used fuel. To make propane easier to detect in the event of a leak or spill, a chemical compound is added to give it a distinctive smell, like rotten eggs or boiling cabbage. How to Check the Level of Propane without a gauge Firing up the grill can be a letdown when the propane tank is empty and the grill won't start. Worse yet is when you are halfway through cooking your meal and the gas runs out. Learning to measure the level of propane left in your tank is something most avid grillers find themselves doing at some point. Knowing your tank's propane level will help make sure your cooking experience is a success.
How to safely transport Propane Tanks to and from the campsite Whether you are packing a propane stove to go camping or need to pick up more gas for the grill, it is sometimes necessary to transport propane in a car or truck. Even an empty tank may still contain enough propane to cause a problem if the tank leaks, especially in an enclosed area such as an automobile. Transporting a propane tank safely is not difficult but it is important. It takes only a few extra seconds to follow propane transportation safety guidelines. When transporting a propane cylinder in a vehicle:
Ensure the cylinder valve is tightly closed.
Install the threaded plug or cap on the valve outlet of the tank.

23
Always transport and store propane cylinders in an upright, vertical position in order that the safety release valve will function properly. (We use a milk crate - the cylinder just fits and it keeps it stable.)
Secure the tank in an upright, vertical position in the rear passenger compartment of your vehicle.
Open all vehicle windows for ventilation and REFRAIN FROM SMOKING during transportation.
If transporting a propane cylinder in the trunk of a vehicle, ensure that it’s well secured in an upright, vertical position and the trunk lid is left open for ventilation until your return home.
If you are taking your tank to be refilled, make sure it's free of rust, leaks, and other damage.
Never refill a propane tank yourself; and dispose of one only in hazmat collection sites.
Inspect the propane cylinder for cuts, gouges, dents and rusting and replace, if necessary.
Check hose connections for leaks by brushing a 50% liquid dish soap and 50% water solution onto all hose connections and valves. Look for bubbles everywhere you applied the water and soap. Any bubbling where you applied the mix indicates propane gas is escaping. Turn off the valve, then repair or replace the hoses and fittings. Do not use the propane-fueled equipment until the leaks are corrected.
Never use matches or lighters to check for leaks.
Never store propane tanks indoors or near any heat source.
Proper disposal of propane tanks
To properly dispose of an EMPTY 16.4 oz. propane cylinder: 1. Take the EMPTY cylinder outdoors away from any open flame or ignition source as they can ignite
leaking gas. 2. Attach the EMPTY cylinder to an appliance. 3. In an outdoor, well-ventilated area, open the control valve on the appliance and light the burner(s). 4. Operate the appliance until the flame completely extinguishes. 5. Turn the appliance control valve off and let appliance cool. 6. Detach the EMPTY cylinder. 7. Dispose of the EMPTY cylinder in an OUTDOOR trash container for the next normal trash collection. 8. If the cylinders are properly "burned off" with an appliance, less than 1 gram of fuel remains, meaning
the cylinders can be discarded with household trash.
Odds and ends – Other tips from around the campfire Old sled hammer (hardwood) handle: use it as a carry yoke for two young scouts to carry water jugs. Slip it into the jugs handle and keep it level while carrying. Store things where they make sense or in the same location, so scouts and leaders get use to finding them there. It also helps to tell you when the item is missing.
24
Chapter 5
Tips for preventing troop trailer theft Imagine this: Your troop is ready to depart for a campout. All the Scouts and adult volunteers have arrived at the meeting site on time, and the weather is perfect. But something’s missing: your troop trailer, and so is the hundreds or even thousands of dollars in gear inside it. There is no way to truly stop a determined thief, but the point of security is to make it difficult enough to steal your stuff that the thieves will move on to easier targets. This is why we lock the doors on our houses and cars. It’s not a foolproof way of stopping a theft; it just keeps us from being the low-hanging fruit that is easily picked by someone that is looking for an easy ‘score’. For most troops the single most expensive piece of equipment that could get stolen is the trailer itself and in many cases this is probably what the thief is really after. Here are some devices that can be used to make it more difficult for the would-be thief to drive away with your Scout trailer. These are given as examples only. I don’t specifically recommend any particular brand but I do recommend the usage of BOTH wheel locks and coupler locks at the same time. Think of your security as layers of protection. Acts of theft don’t get much lower than stealing from a Scout unit. But it happens all the time. That’s why you should take steps now to safeguard your unit’s trailer and its contents. Try some of these recommendations to ward off potential thieves:
1. Purchase a wheel lock. An insurance and risk management specialist at the national BSA headquarters, recommends checking with a boat dealership to buy a device like the ones police officers use on illegally parked cars. The wheel lock is a visible deterrent and does not allow the trailer to be moved.
2. Block the doors. If you can’t park your trailer in a secure garage, park your trailer so that its rear doors butt up against a wall or some other permanent structure. Combining that with a wheel lock will make it much tougher for a thief.
3. Don’t store any gear inside. It may not be practical for all troops, but some units keep all of its gear at a separate location(s). If thieves take off with the trailer, you still have most of your gear.
4. Paint the top of your trailer with large identifying information. This way, if it is stolen it can be identified from the air, where most of those who would steal it would not think to look.
5. Think before you park. Rather than parking the trailer at a church lot that’s empty and dark most nights, many Scouters said their trailer lives at the home of an adult leader. It’s just like real estate, location, location, location. Locked inside a fenced private property may be better than an unsecure parking lot.
6. Make friends in high places. If you don’t want to or can’t park at a Scouter’s home or at your meeting site, ask your local police department if they’ll let you store your trailer there “As far as I know, that’s a pretty good spot, everyone should consider it! Our Troop’s trailer is parked at the local National Guard armory. It has a spot among the motor pool in a fenced yard with full military surveillance. A lot of towns have a National Guard post and many would be happy to store your trailer.
7. Get insured. Nothing is 100 percent safe. So insure your trailer and its contents from theft or damage. It might be money well spent.
8. Go highly decorated. As opposed to leaving it, many think the more highly decorated it is the less likely they are to steal it. A highly decorated trailer is going to be much easier for anyone looking for it to identify if it is stolen. There are so many plain colored ones being pulled around it would be very hard to identify which one was stolen at a quick glance. A cool design for your trailer can be an important

25
recruiting tool and instill a sense of pride for your troop. When asked, law enforcement often say thieves love plain white, (or whatever stock color) trailers because they are easier to resell. A trailer with lots of large BSA type logo’s on the side is hard to hide, and hard to cover up the logos. If you have no troop identifying markings on the outside, would-be thieve can put a couple of large decals or a cheap paint job on it and does not look like your trailer anymore. You’ve just made it easier for the thieves!
9. Don’t forget the trailer roof. Paint your unit’s identification on the trailer roof in large letters and numbers in a contrasting color. Remember, law enforcement use aircraft a lot, most thieves wouldn’t think to look at your trailer’s roof, but when looking for a stolen trailer, the eyes in the sky can.
10. Lock it down. You can never have too many locks. “When we built our troop shed and pad behind our charter organization, a heavy chain was cemented into the foundation. So, besides being locked to the pad, the trailer doors are secured with heavy duty discus locks and the hitch with a coupler lock.” Just for added security, think of taking a “ball” from a hitch and cut the threaded part off, then place it into the trailer’s receiver and lock it in so that a thief cannot pull up with an undersized ball or shaft and hook-up to the trailer and drive away. An inexpensive way to add security.
Trailers are also stolen that are stored by backing them into a parking space, making it easy to hook up for travel. The thieves come in with a flat-bed truck with a winch and simply pull it onto the truck and take off. The hitch/ball locks won’t do anything to prevent this. Park it so someone can’t easily pull it onto a flat-bed with a winch, by possible use of wheel locks/boots or parking in front of it. Another thing to think about is to get receiver lock. They fit up inside the receiver and would be EXTREMELY difficult to cut off. When we lost the keys to one of our super heavy duty locks, I had a guy from work come out with a battery operated grinder and he removed the lock in 15 seconds or less. He said he wouldn’t have been able to do that with the receiver lock. You want as many layers as possible.
Thief Deterrent Equipment Wheel Locks
Heavy Duty Wheel Lock Protect your unattended trailer with Blaylock's heavy duty wheel lock. Costs approx. $100.
Adjustable Wheel Lock (Denver Boot) Adjustable Wheel Lock. Fits nearly all 10" - 18" wheels. Easy to install and includes all tools needed. Cost approx. $170
Coupler Locks
Universal Coupler Lock Cost approx. $46.00 each
Deluxe 3/4" Span Coupler Lever Cost approx. $9.00 each
Some thieves may instead decide to go after the contents of the trailer. This is where good padlocks come into play. Most padlocks that are in general use today can easily be cut off by a good pair of bolt cutters.
26
So what’s the answer? It depends. How much is the stuff inside your trailer worth? How easy will it be to replace it? If all you’re storing in your trailer is your klondike derby sled then buying an expensive lock to protect the contents is probably not a very high priority and a $12 lock from Menards will suffice. If on the other hand you are storing all of the gear (tents, stoves, chuck boxes, etc.) for several patrols then it might be worth spending a little more to get a high quality padlock. Again, these locks here are listed as examples only and are not provided as recommendations. You should talk to a reputable locksmith for that. Another thing to think about in securing your troop trailer is the storage location of the trailer. If the trailer is stored in a low-traffic area, thieves can afford to take more time to get past the security mechanisms you have put in place. A trailer stored in the back parking lot of a church that only sees traffic on Sunday and Wednesday evening gives plenty of opportunity to cut through many layers of security. A trailer parked at a storage facility with security personnel, security cameras, and limited access gives thieves less opportunity but at significantly more cost. Simply storing the trailer in your driveway may seem like a reasonable solution but as at least one of troops in the stories linked above found out, that wasn’t good enough. Storing it inside a garage or warehouse would be an excellent way to add additional layers of security by keeping it out of sight of passers-by as well as being able to lock the doors to the building. Wouldn’t it be nice if someone would offer up a secure space for all the local troops to store their trailers? Until that happens, perhaps there is someone in the troop who works for a company that has some extra space that’s not being used. Sometimes a troop gets lucky and a kind soul donates a large sum of money to replace their equipment. Other times, people pitch in used gear to get the boys back out in the woods. But this should not be your troop’s plan for dealing with a loss like this. It is much better to follow the Boy Scott motto and just “Be Prepared” by protecting your equipment that has been donated or purchased by funds raised by the boys.
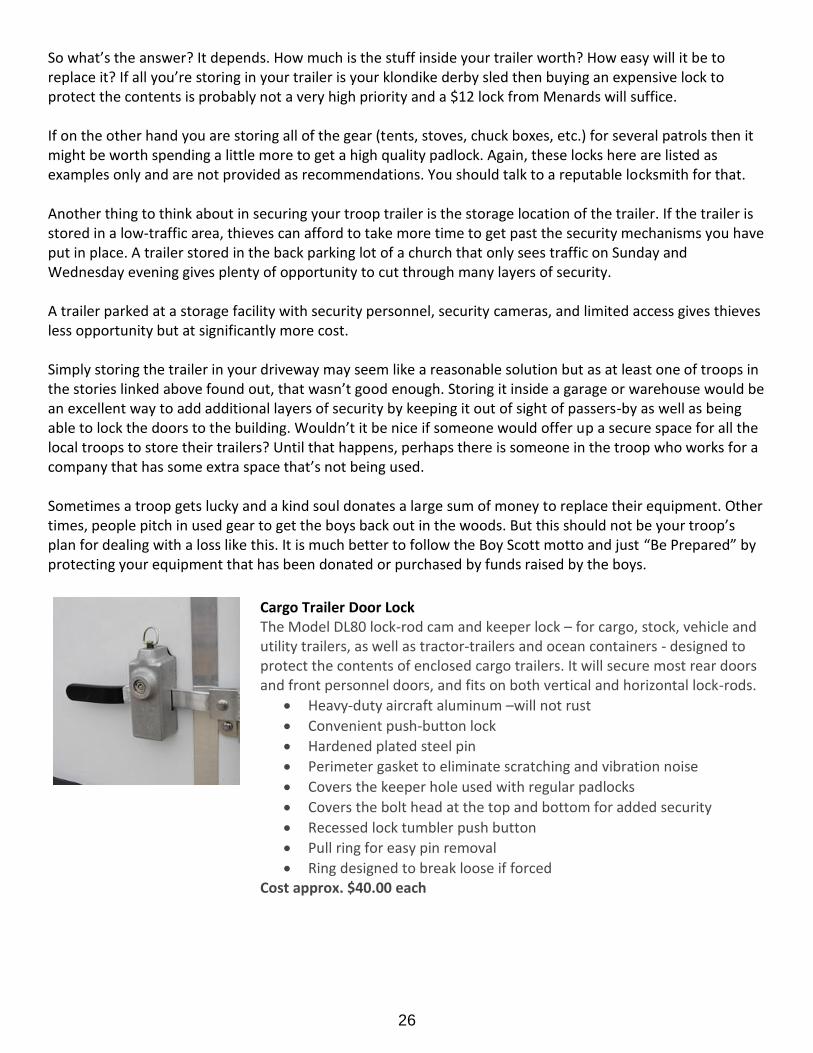
Cargo Trailer Door Lock
The Model DL80 lock-rod cam and keeper lock – for cargo, stock, vehicle and utility trailers, as well as tractor-trailers and ocean containers - designed to protect the contents of enclosed cargo trailers. It will secure most rear doors and front personnel doors, and fits on both vertical and horizontal lock-rods.
Heavy-duty aircraft aluminum –will not rust
Convenient push-button lock
Hardened plated steel pin
Perimeter gasket to eliminate scratching and vibration noise
Covers the keeper hole used with regular padlocks
Covers the bolt head at the top and bottom for added security
Recessed lock tumbler push button
Pull ring for easy pin removal
Ring designed to break loose if forced Cost approx. $40.00 each
27
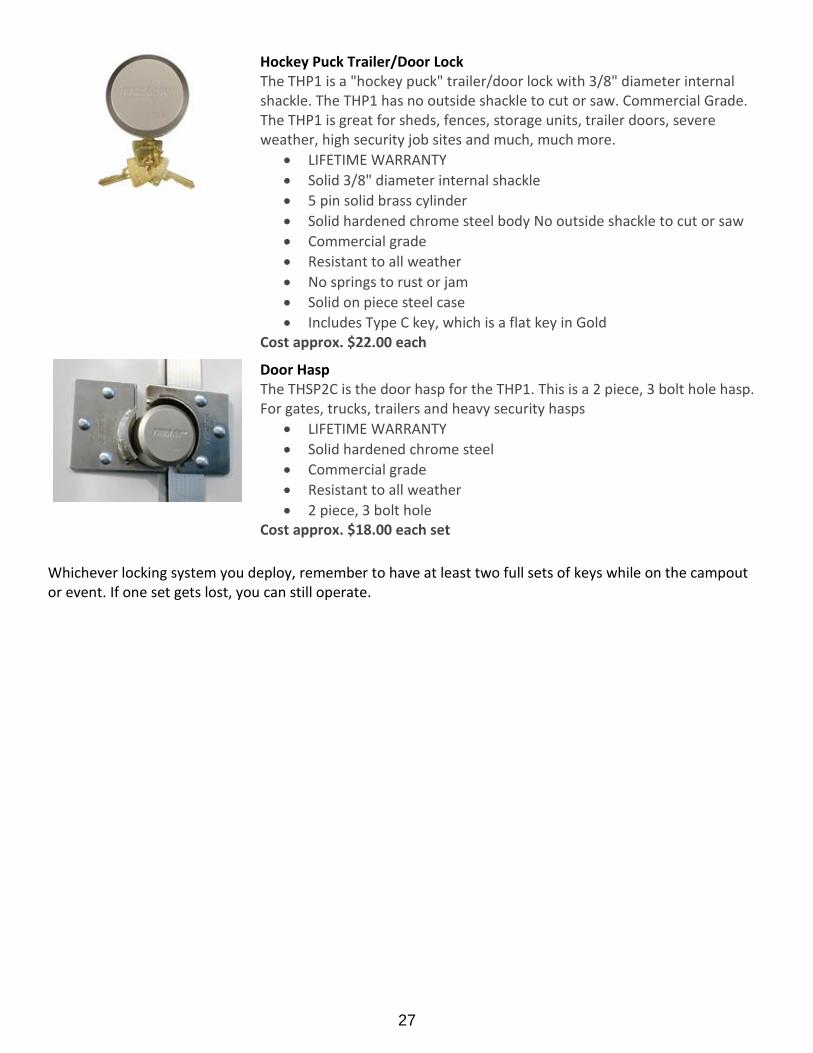
Hockey Puck Trailer/Door Lock
The THP1 is a "hockey puck" trailer/door lock with 3/8" diameter internal shackle. The THP1 has no outside shackle to cut or saw. Commercial Grade. The THP1 is great for sheds, fences, storage units, trailer doors, severe weather, high security job sites and much, much more.
LIFETIME WARRANTY
Solid 3/8" diameter internal shackle
5 pin solid brass cylinder
Solid hardened chrome steel body No outside shackle to cut or saw
Commercial grade
Resistant to all weather
No springs to rust or jam
Solid on piece steel case
Includes Type C key, which is a flat key in Gold Cost approx. $22.00 each
Door Hasp
The THSP2C is the door hasp for the THP1. This is a 2 piece, 3 bolt hole hasp. For gates, trucks, trailers and heavy security hasps
LIFETIME WARRANTY
Solid hardened chrome steel
Commercial grade
Resistant to all weather
2 piece, 3 bolt hole Cost approx. $18.00 each set
Whichever locking system you deploy, remember to have at least two full sets of keys while on the campout or event. If one set gets lost, you can still operate.

28
Chapter 6
Preparing your Trailer for Winter Storage Before you park the trailer for the winter or long storage, you have some work to be done. If you storing your trailer inside an unheated garage:
Inflate Tires. Inflate the tires to the recommended pressure for cold weather and cover them to protect them from the sun. To prevent flat spots, either move the trailer a few times over the storage period, or place on jack stands under the axles so there is no weight on the tires.
Remove Perishables and Liquids. To prevent insects or rodents from being drawn to the trailer, remove all perishable items. Also remove anything that could freeze. Liquids expand while freezing, sometimes shattering the container.
Clean Trailer. Thoroughly clean the inside and the outside of the trailer. Clean the food coolers and place a box of baking soda inside to absorb odors. (Nothing like finding a milk jug science project in the Spring to help remember this one!)
Inspect the Trailer. Inspect the trailer for cracks or breaks in the exterior. Check the undercarriage for areas where rodents could enter. Seal all openings completely.
If you storing your trailer outside, do the items listed above, but also add these:
Cover Trailer. Cover the trailer completely to protect the interior and exterior from sun damage. Use a trailer cover fabric that is breathable to inhibit the growth of mildew and mold.
Places Blocks under your tires. The wood acts as a barrier between the tires and the ground surface they are being stored on. The first step is to make sure the trailer is as level as possible so more weight isn't on one tire than the others. Ensure the blocking you use is wider than the tires tread and longer than the tires overall footprint.
Consider the storage surface area. Storage surface areas can cause your tires to age prematurely. You don't want to leave the tires in contact to any heat producing material or petroleum based material like asphalt. You don't want them exposed to constant cold or moisture, like sitting directly on the frozen ground. Also consider where the water will be when it melts, you don’t want to find your trailer up to it axles in water and mud.
Cover the tires. The proper storage steps would be to clean the tires, cover them to protect them from harmful sunlight and UV rays and inflate them to the pressure indicated on the sidewall of the tires.
Ideally you should attempt to get the weight off of tires when the trailer will be in storage for a period of time. But, this is not always practical or possible. If the weight can't be removed, at a minimum you should try to move the trailer every three months to prevent tire flat spots and ozone cracking at the tire sidewall flex point. Flat spots will usually disappear after the tires warm up and travel for a distance, unless the vehicle hasn't been moved for six months or more.
29
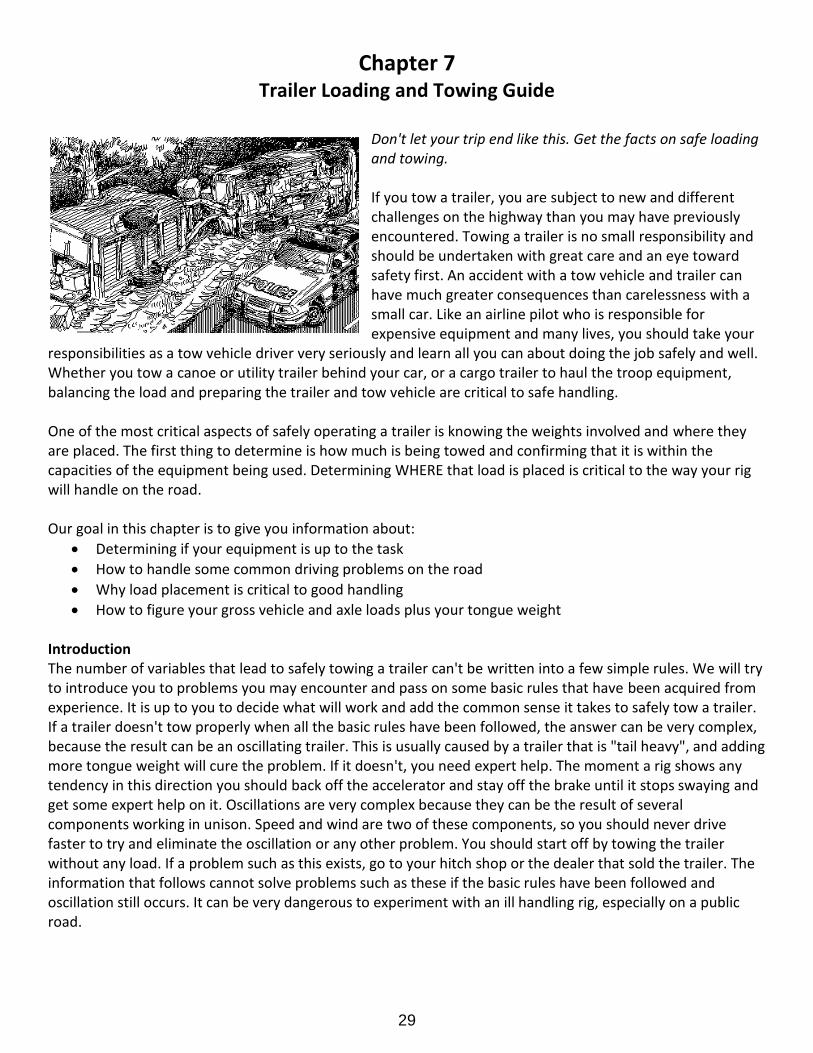
Chapter 7 Trailer Loading and Towing Guide
Don't let your trip end like this. Get the facts on safe loading and towing. If you tow a trailer, you are subject to new and different challenges on the highway than you may have previously encountered. Towing a trailer is no small responsibility and should be undertaken with great care and an eye toward safety first. An accident with a tow vehicle and trailer can have much greater consequences than carelessness with a small car. Like an airline pilot who is responsible for expensive equipment and many lives, you should take your
responsibilities as a tow vehicle driver very seriously and learn all you can about doing the job safely and well. Whether you tow a canoe or utility trailer behind your car, or a cargo trailer to haul the troop equipment, balancing the load and preparing the trailer and tow vehicle are critical to safe handling. One of the most critical aspects of safely operating a trailer is knowing the weights involved and where they are placed. The first thing to determine is how much is being towed and confirming that it is within the capacities of the equipment being used. Determining WHERE that load is placed is critical to the way your rig will handle on the road. Our goal in this chapter is to give you information about:
Determining if your equipment is up to the task
How to handle some common driving problems on the road
Why load placement is critical to good handling
How to figure your gross vehicle and axle loads plus your tongue weight Introduction The number of variables that lead to safely towing a trailer can't be written into a few simple rules. We will try to introduce you to problems you may encounter and pass on some basic rules that have been acquired from experience. It is up to you to decide what will work and add the common sense it takes to safely tow a trailer. If a trailer doesn't tow properly when all the basic rules have been followed, the answer can be very complex, because the result can be an oscillating trailer. This is usually caused by a trailer that is "tail heavy", and adding more tongue weight will cure the problem. If it doesn't, you need expert help. The moment a rig shows any tendency in this direction you should back off the accelerator and stay off the brake until it stops swaying and get some expert help on it. Oscillations are very complex because they can be the result of several components working in unison. Speed and wind are two of these components, so you should never drive faster to try and eliminate the oscillation or any other problem. You should start off by towing the trailer without any load. If a problem such as this exists, go to your hitch shop or the dealer that sold the trailer. The information that follows cannot solve problems such as these if the basic rules have been followed and oscillation still occurs. It can be very dangerous to experiment with an ill handling rig, especially on a public road.

30
The Tow Vehicle If you haven't already purchased a tow vehicle you can tailor its specifications to your towing needs. Most likely, however, you already have the vehicle you will be using to tow and have based your trailer purchase on its capabilities. It might be wise to ask yourself at this point if the tow vehicle is really big enough to have the brakes and suspension it takes to safely tow your trailer. There isn't any good way to overcome a problem such as this short of trading up to a vehicle with more capacity. If the suspension isn't heavy enough, the brakes probably leave something to be desired. You can get this type of information from manufactures of trailers, trucks, and automobiles but they tend to be optimistic, quoting maximum capacities rather than recommended capacities. Remember also that a half-ton pickup may be able to carry 1000 pounds of weight in the bed, but probably cannot support 1000 pounds at the hitch without special modifications to the suspension. So if you hook up your twenty-four foot cargo trailer to your nice, new half-ton pickup and the headlights are aimed at birds roosting in the trees, there should be a clear message that something is wrong.
You can't always correct the problem by moving the load if the tow vehicle isn't capable of handling the required hitch weight. Moving the load back in the trailer could make for a very unstable and dangerous condition, and leaving too much weight on the hitch can also cause a dangerous situation where the tow vehicle doesn't have enough weight on the front wheels to control your rig. When you hit the brakes, the
trailer dives lifting the front end even more, and you lose most of your braking and steering at the same time. Several types of weight redistribution hitches are available that can dramatically help your handling by spreading the forces to both axles, but they cannot compensate for inadequate towing capacity or overloading.
(LEFT) Trailer "Dive" during heavy braking increases the effect of tongue weight.
(RIGHT) Weight distributing hitch transfers loads to frame and to both axles of tow vehicle for safer stops and smoother ride.
Talk to a qualified hitch installation shop about your particular needs. Also contact the manufacture of your trailer to see what they recommend. This leads to the first and most basic rule of trailer towing: The tow vehicle and hitch must be capable of safely handling at least 15% of the gross weight of the trailer (total weight of trailer plus contents). Fifth wheel trailers usually have up to 25% of the gross weight on the hitch. Vehicle and Trailer Brakes Although it is beyond the scope of these instructions to cover everything, we should mention brakes. If you can't get to the top of a hill from lack of power you can usually pull over and it may cause an inconvenience but not a disaster. If the brakes fail going down a hill you have a problem that can cause a disaster. You can't have too much brake. Disk brakes are better than drum brakes. Four electric brakes on your trailer are better than two. New pads are better than old pads, you get the idea. You should be able to stop your rig on a hill without the trailer brakes. If you can't, you'd better pay a lot more attention to that corroded connector you have been hooking up your trailer with. When learning, get on a lonely road without any traffic and try practicing panic stops. Of course, you shouldn't just slam on your brakes. You should try to slowly shorten your stopping distance by applying more pressure.

31
Don't take it to the point that you lose control, just enough to get a feeling what it takes to make a quick stop and the distances involved. My guess is that you will find yourself leaving more room in front of you once you make this test. Don't ride the brakes going down hills as this overheats brakes, causing them to lose effectiveness. Use the engine and lower gears to control the downhill speed on long hills. Learn how electric brakes work and how to adjust the modern day controllers that actuate them. Remember that the slightest pressure to the brake pedal will apply the electric brakes. Keep your foot off the brake pedal unless you intend to use them. They shouldn't be allowed to be on for extended periods. The basic drag of these electric brakes are set with the control, not how hard you press the pedal. A pendulum type control will electronically adds more brake as you stop, but if you have your controller turned all the way up, the slightest pressure on the pedal could lock your trailer brakes. The Hitch Before towing anything, have your hitch inspected by a qualified hitch installation company, and have them determine what the maximum tongue weight can be. This is usually 10% of the hitch's rated capacity. Note, I said hitch, not ball. A ball is rated by its towing capacity. A hitch is rated by not only its towing capacity but also by the tongue weight. Again, the safest way to accomplish this is to take your vehicle to a shop that specializes in installing hitches. If they don't have a welder, go to another shop. Hitch problems are usually fixed by welding, not with a couple of nuts and bolts. If you have a bumper type hitch, don't tow anything your wife can't lift onto the ball. The biggest error you can make is "cheaping out" and not going to a qualified shop. The Trailer Ball and Safety Chains
The ball should be located so the trailer sits level when connected to the tow vehicle. The vehicle should be able to accept this weight without a major change of attitude. The ball should be lightly greased so the hitch rotates smoothly on it. Safety chains should be long enough for tight turns and be crossed (right to left and left to right). This will help create a "saddle" if you have a tongue failure and will help maintain control while stopping. Don't allow these chains to drag on the pavement, because they can
be ground to an unsafe condition in a very short amount of time. Always inspect the hitch and tongue for cracks when hooking up. Rust is your enemy and can cause premature failures. Check lights and brakes each time the trailer is hooked up. Try to do things in the same order each time and use a checklist. Don't forget to retract the jack. Don't ever hook a trailer up half way or you may forget to finish the job. Don't start if you can't finish, and don't ever leave the receptor pin out for a minute. Trailer Lighting and Connections
All your lights must work to be legal and safe. The weakest link is the connector. They corrode easily and need constant attention to keep the system working. (Be careful when cleaning connectors not to short them out.) If I had more time I'd manufacture a good one, because I'm sure there is a market for one. The wiring to the connector should
be carefully routed so that it can't come apart in tight turns or chafe through and short out. Remember, electric brakes also run through this connector. Have an observer confirm your brake lights, blinkers and running lights are working properly each time you hook up.

32
Tires and Wheel Bearings TIRES... Tires have to be checked frequently with a trailer because a flat can go unnoticed on multiple axle trailers while it is being towed. Running with a flat can cause it to catch fire and burn up your rig. With multiple axles or tandem wheels it is hard sometimes to see a flat tire as the other tires are supporting the weight of the rig and the flat spot is less noticeable. A quick check can be made by "thumping" each tire with a tire iron or rod to make sure they all sound the same. Each time you gas up, walk around the trailer and give a quick check by feeling each tire with the back of your hand. A tire that is getting low will be hotter than the rest. There is no substitute, however, for actually measuring tire pressures to make sure they are all within safe limits. This should definitely be done before each trip. NOTE: The most common causes of tire failure are overloading and under inflation. Both result in excess flexing of the sidewall which causes heat buildup and eventual failure. Continuing to run with a flat can cause it to catch fire. WHEELS AND LUG NUTS... Trailers have higher wheel loading than passenger cars or trucks. Tandem axles do not steer, and wheels are subjected to high twisting side loads in tight, slow turns. This causes the wheel to flex which tends to loosen wheel lug nuts over time. Always check lug nut torque before each trip. A suitable torque wrench only costs about $30 and is a worthwhile investment considering the value of your trailer. Wheel lug nut torque is usually much higher than that specified for passenger car wheels. Check your particular trailer's recommended specifications. Most are in the 90-95 ft.-lb. range. On a new trailer, check the torque on all wheels after the first 25-50 miles of towing. Also recheck any wheel that has been removed and replaced after towing 25 to 50 miles. Do not drive a loaded trailer with a missing lug nut or damaged lug bolt.
Torqueing order for various wheel lug nut patterns as suggested by a trailer manufacturer in their owner's manual.
Wheel lug nuts are usually torqued in a "star" pattern for 5- and 10-bolt wheels, crossing over to opposite sides as you work around the wheel. A "cross" pattern is used for 4-, 6- and 8-bolt wheels. Shown above are some suggested orders for tightening nuts on various bolt patterns. Using the numbers on the above diagram, a popular alternate for the 5-bolt pattern would be a 1-2-5-4-3 star pattern. WHEEL BEARINGS... Axle wheel bearings also occasionally need attention. Feel with the back of your hand at the hub to check for one that may be running hotter than the rest. (Be careful. If the bearing is adjusted too tight or is running without grease it can get VERY hot!) A hot bearing needs immediate attention. Most often either more grease or proper adjustment will ease the problem, but replacement may be necessary. A warm bearing that is suddenly cooled by being immersed in water tends to suck water into the inside as the air cools and shrinks. The water causes the bearings to rust and fail. Spring-loaded pressurized bearing caps are recommended to eliminate this problem. They are cheap and work great. Hitching up your Trailer Hitching up a trailer to your tow vehicle is usually a one-person job, but it is easier if someone helps you. Here are a few of the basic steps:
1. Back your tow vehicle as close as possible to the trailer. It is easier and safer to do this than it is to pick up and pull the trailer to your car or truck.

33
2. Release the coupler locking device. 3. Raise the front end of the trailer. Place coupler directly over the hitch ball then lower it until it is seated
on the hitch ball, covering it completely. 4. Check under the coupling to ensure the ball clamp is below the ball and not riding on top of it. 5. Latch the coupler to the hitch ball. Make sure it is locked in place by lifting up the trailer tongue. If the
coupler comes loose from the ball, unlatch it and go back to Step 3 above. 6. Make sure your jack is fully raised. 7. If you have a weight distributing hitch with spring bars, follow the above procedures. Then attach the
spring bar chain to the trailer and tighten it until your trailer and car are in a normal, level position. 8. If your trailer has a surge brake breakaway cable or chain, attach the cable or chain to your tow
vehicle, allowing enough slack for you to make tight turns. 9. Attach the safety chains. 10. Connect the trailer wiring harness to the lighting system of your tow vehicle and check its operation.
Judging Tongue Weight The desired hitch weight is 10% of the total loaded trailer weight. If scales are not readily available, you may estimate your total loaded hitch weight by comparing a known weight to the hitch weight. The proper way, however, to accurately measure tongue weight is by taking your loaded trailer to a local scale, such as those found at gravel companies or highway weigh station scales. Weigh the trailer and then the tongue separately and the tongue should be 10% of total loaded trailer weight. 10% tongue weight is necessary for safe towing and handling of trailer. To obtain the correct tongue weight, the trailer must be setting level to the ground. Recommended Hitch Weight Percentages
TYPE OF TRAILER PERCENT OF WT. ON TONGUE
Single Axle 10% minimum/15% maximum
Tandem Axle 9% to 15%
Loading the Trailer You should load 60% of your cargo’s weight in the front of the trailer. This will put approximately 10% of the loaded trailer weight on the hitch. If there is insufficient hitch weight the trailer will not tow properly. It could be unstable, difficult to control, and make towing unsafe. Proper weight distribution is imperative and diagramed below.
Always secure the trailer to tow vehicle when loading or unloading, especially from the rear of trailer. Placing the Load It would be overly simplistic to say, "put the heavy items over the axles". Sometimes a lot of little items can far outweigh one big one. Don't put big, heavy items in a place where they can't be securely tied down. Of course, it would be easy to say everything should be securely tied down but it would be also unrealistic. Start with top heavy items if you have them. That's usually a good place to start because you must have plenty of room available to properly tie them down. Tying them straight down is not secure enough. They need to be tied off at several angles or they could fall over in an abrupt change in speed or direction. You need room to accomplish this. Smaller items can be used to fill the spaces around them later.

34
Once you have the heavy items located, check the tongue weight with a scale. If the load is radically off, make the changes necessary to get close. The smaller items can be loaded in such a way that they balance out the load. They should be located so that they will stay put. Placing them next to items that have already been tied down helps, but your main concern should be to not lose the balance of the trailer. Don't forget you can also get one side of a trailer a lot heavier than the other without a little planning. This can cause a very serious problem when cornering, even causing the trailer to turn over in a sudden turn. Top heavy loads can cause problems not only in cornering but also in hard braking. They have a tendency to make the trailer "dive" in hard braking conditions. This suddenly increases tongue weight and can decrease front axle loading just when you need steering and those big front disc brakes the most. Center top heavy items or arrange the remainder of the load to act as a counter weight to minimize this effect.
Top heavy loads can cause trailer "dive" under hard braking, possibly reducing steering and braking control.
Never place heavy objects on add-on devices hung on the rear bumper or placed across the tongue frame. A bicycle may be fine to hang out in back, but not a motorcycle. This places heavy objects where they will dramatically affect handling in corners or bumps. Heavy weights placed well behind the axle can also aggravate swaying in turns. It is not possible in this booklet to cover every conceivable loading or trailering situation. The best advice is to use good common sense and to always allow plenty of margin for safety. Determining Maximum Gross Trailer Weight Your trailer's springs, axles, tires and chassis were all designed to handle a certain maximum load. This load consists of the empty trailer itself, plus the added weight of cargo that you add. This is called the Gross Vehicle Weight Rating or GVWR. In addition, each axle has a maximum weight that it was designed to support. This is called the Gross Axle Weight Rating or GAWR. The total of all axle loads plus the tongue weight should not exceed the GVWR. Cargo Capacity equals GVWR minus the Empty Trailer Weight Overloading a trailer beyond its rated capacity, even though it may be well balanced and seem to handle fine, is a very dangerous practice. Eventually something is bound to fail with dramatic and unpleasant results. Overloading places excess strain not only on your tow vehicle causing possible failures at the hitch or in your capacity to safely bring it to a stop in an emergency, it also overloads the trailer's frame, axles, bearings and tires. Be leery of home-made trailers. It is amazing how many bad ideas can be incorporated into this group. Do you really want to risk lives, your own included, to save a few bucks on a trailer? How many trailers have you seen fishtailing down the road that were manufactured by a credible company? Probably not many. If you now own an ill-handling, no-name misfit, either get it fixed by a professional or get rid of it by junking it. It's unethical to sell or use a trailer that could cause a serious accident. Good cargo trailers are usually designed to maintain a proper tongue weight if they are loaded evenly. It is up to you to find out what the maximum gross weight of your trailer should be. Trailers made by reputable manufacturers should contain a tag or instructions which list loading limits. This can be more of a problem if

35
you have a trailer built twenty years ago by a company that no longer exists and the tag or instructions are missing. If you cannot obtain actual figures from the original manufacturer, take it to a reputable trailer sales or repair facility and get an expert to give his best estimate of its capacity. Load your trailer well below the maximum for the first tow with a new rig or while you are learning. Keep track of the weights of the individual items as you load them. When in doubt guess high, adjust the load so that you have around 12% to 15% of your best estimated total weight on the hitch. Attach the trailer to the tow vehicle and note how much the rear end drops. (If it looks excessive, check the tow vehicle's load capabilities again.) Weighing the Trailer Though it is not necessary to weigh your trailer every time you load it, it is a good idea in the beginning to have a good cross-check to your estimates. Once you have a feel for it, a good estimate is usually close enough unless you are loading to near your trailer's maximum limits. A 1000-pound error in total weight is only a 150 pound (15%) error in tongue weight. Weigh the trailer by having just the trailer wheels on the scale. You do not need to disconnect it from the vehicle. Add this weight to the weight at the tongue that is attained with the tongue scale and you have your gross trailer weight. Knowing the total weight and the tongue weigh allows you to calculate the percentage of weight on the hitch. While you're there the first time, it would be a good idea to also check the vehicle weight at each axle to make sure it is not loaded beyond the manufacturer's specifications. Your Responsibilities as a Driver What I'm trying to convince you of is that towing a trailer has a responsibility similar to properly driving your car. You wouldn't think of letting your children drive on the road without the proper training, and you shouldn't take a fully loaded trailer that could be improperly loaded onto a busy road to learn with. It is a skill that has to be developed and a responsibility that shouldn't be taken lightly. If you're towing a travel trailer for the first time, you have to start learning with a full load. Drive only when traffic is light and don't drive where traffic conditions might force you into driving faster than you are comfortable with. Get a friend with this type of experience to help you learn. Don't be embarrassed to ask questions or park when it is windy. Learn what it takes to keep from ruining your transmission when pulling heavy loads up a hill or burning your brakes up going down the other side. It is a skill that you can take pride in. The hardest skill to learn is to know when not to tow a trailer. Driving In Windy Conditions
Wind can create havoc when towing a trailer, causing oscillations or sudden pulling to one side. Thirty mile an hour crosswinds can blow you off the road if there is a sudden gust. For example, say a hard gust of wind hits your rig from the left. Your rig pitches to the right and moves towards right. In order to stay on the road you turn left. With the rig leaning to the right, the centrifugal force generated by the left
turn can be the added ingredient that puts you on your side, or worse yet, down the side of a ravine. The only way to help lower the risk traveling in these conditions is to slow down. This eliminates the centrifugal force that happens when you correct, and if the wind did blow you over it wouldn't be such a violent crash. The safest way is not to drive in extremely windy conditions. That's what the professional haulers do, and so should you. Park it until it's safe to continue. Wind can also have a dramatic effect on your fuel mileage when towing a heavy load. Plan your fuel stops accordingly.

36
NOTE: Several types of trailer sway control braces are available that can minimize the effects of wind gusts and passing trucks. Wind blast from Passing Trucks An interesting thing happens when being passed by faster moving buses or large trucks. Large vehicles develop a high pressure wave of air in front of them and low pressure area to their rear as they go down the highway. This is variable and is dependent on the shape of the truck and the existing wind conditions. The effect is such that as the truck comes up to pass on your left, first your trailer and then your tow vehicle will be pushed to your right by the truck's "bow wave". As the truck passes, the low pressure zone will then pull you back to the left. You must steer first left and then right to counter the effect. It's not particularly dangerous, but it does keep you on your toes. Trailering Tactics With a trailer in tow, you’re operating a vehicle combination that is longer, heavier and sometimes wider and taller, than you’re used to. So you’ll have to make some compensating adjustments in your normal driving practices. The following is advice in trailering tactics:
1. Take a “Shakedown Cruise”. At least one short trial run before your first trip will help familiarize you with your trailer’s operating characteristics. It will also allow you to check the trailer’s lights, brakes, hitch, etc., and let you know they are all working properly.
2. Slow down. Moderate to slower driving speeds put less strain on your tow vehicle and trailer and make for safer traveling.
3. Allow extra time and space between your rig and traffic. You will need both when passing and stopping, especially if your trailer is not equipped with brakes.
4. Check rear view mirrors. Doing this frequently will let you know that your trailer is riding properly. We recommend outside rear view mirrors on both sides of your tow vehicle.
5. Swing wider. You need to make wider swings (turns) at curves and corners because your trailer’s wheels are generally closer to the inside of a turn than the wheels on your tow vehicle.
6. Pass with extra care and caution. It takes more time and distance to get around a slower vehicle and return to the correct lane when you’ve got a trailer in tow.
7. Watch the wind direction and speed. To avoid swaying, be prepared for sudden changes in air pressure and wind buffeting when larger vehicles pass from either direction. Slow down a bit and keep a firm hold on your steering wheel. Aim straight down your lane.
8. Conserve fuel. You’ll go farther on a tank of gas at moderate speeds. Higher speeds increase wind resistance against the trailer and reduce fuel mileage.
9. Avoid sudden stops and starts. This can cause skidding, sliding, or jack-knifing, even if your trailer has brakes. Avoid quick stops while turning. Smooth, gradual starts and stops will improve your gas mileage.
10. Signal your intentions. Let surrounding vehicles know what you intend to do well in advance before you stop, turn, change lanes, or pass.
11. Shift to a lower gear. A lower gear will help ease the load on the transmission and engine when going over steep hills, sand, gravel, or dirt roads. If your tow vehicle has an “overdrive” gear, shifting out of overdrive to a lower gear may improve your gas mileage.
12. Always be courteous. Make it as easy as possible for faster moving vehicles to pass you. Keep to the right of the road and prepare to slow down if passing vehicles need extra time to return to their proper lane.
13. Don’t tailgate. Allow at least one car and trailer length between you and the vehicle ahead for each 10 mph on your speedometer. Three seconds should be the minimum distance.

37
14. If a problem occurs don’t panic. Stay calm and cool. Say you experience a sudden bumping or fishtailing. It may indicate a flat tire. Don’t jam on the brakes or mash the accelerator in an attempt to drive out of it. Instead, come to a stop slowly as you keep driving in as straight a line as possible. If conditions permit, coast to a very slow speed and try to avoid braking, except when your wheels are straight ahead and your trailer and tow vehicle are in line with each other.
15. If your trailer begins to fishtail as you accelerate to highway speed, back off the accelerator a bit. This should stop the fishtailing. If it begins again as you increase speed, stop and check you load. It probably isn’t distributed evenly from side to side, or it is too far back to put a sufficient load on the hitch ball. It is recommended that 10% of the trailer load be on the hitch. Redistribute the load as necessity dictates before continuing on the highway.
More Towing Tips
Handling Trailer Sway... If swaying occurs, steer as little as possible while you slow down. Because of your natural lag in reaction time, quick steering movements will actually make things worse and cause the oscillation to increase. Application of the trailer brake usually tends to help keep the vehicles aligned, while heavy braking with the tow vehicle may reduce trailer stability. Until the problem is identified and solved, travel at reduced speeds.
Heavy items loaded to one side of the trailer can cause oscillation or handling problems in turns.
Watch your Trailer's Wheels in Turns...
The longer the trailer, the wider you must swing in a turn to make sure the trailer wheels clear the inside curb.
Something Else to Think About... A temporary increase in loading occurs during dips or bumps in the road. A severe dip causes increased weight to suddenly be placed on hitch, axles and tires. Though hitch manufacturers take this into consideration in their designs, an overloaded or old, cracked and rusted hitch or tongue can be suddenly stressed beyond
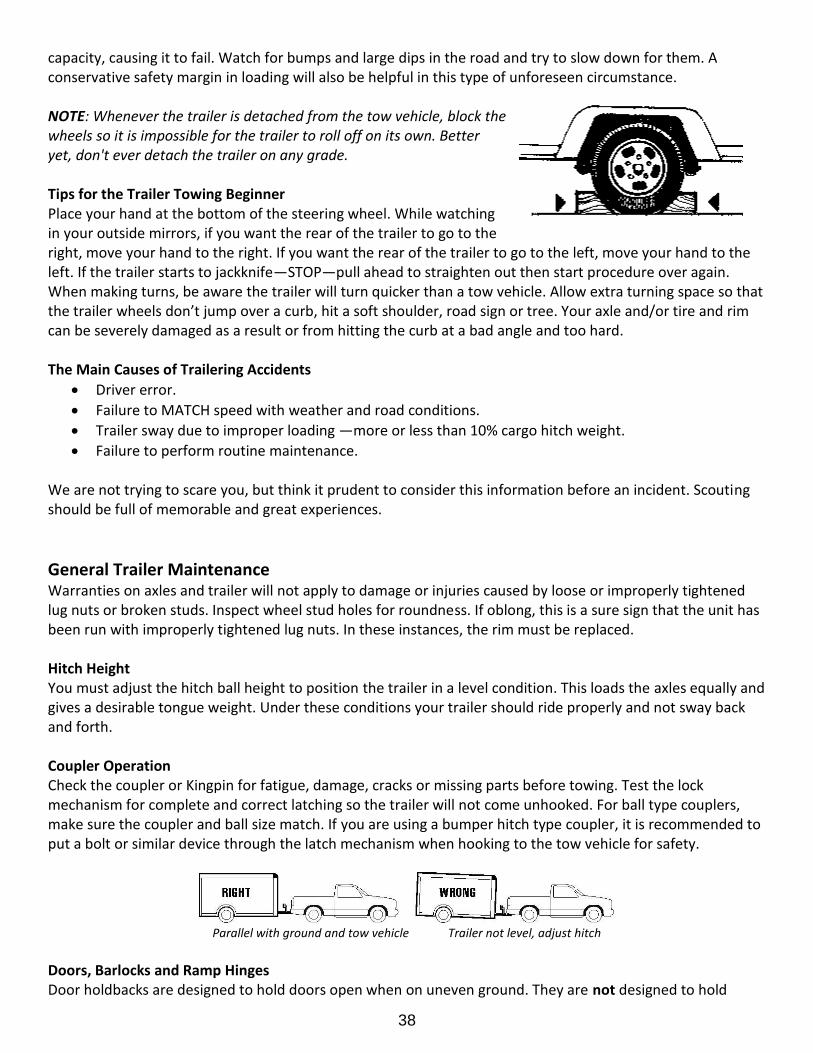
38
capacity, causing it to fail. Watch for bumps and large dips in the road and try to slow down for them. A conservative safety margin in loading will also be helpful in this type of unforeseen circumstance. NOTE: Whenever the trailer is detached from the tow vehicle, block the wheels so it is impossible for the trailer to roll off on its own. Better yet, don't ever detach the trailer on any grade. Tips for the Trailer Towing Beginner Place your hand at the bottom of the steering wheel. While watching in your outside mirrors, if you want the rear of the trailer to go to the right, move your hand to the right. If you want the rear of the trailer to go to the left, move your hand to the left. If the trailer starts to jackknife—STOP—pull ahead to straighten out then start procedure over again. When making turns, be aware the trailer will turn quicker than a tow vehicle. Allow extra turning space so that the trailer wheels don’t jump over a curb, hit a soft shoulder, road sign or tree. Your axle and/or tire and rim can be severely damaged as a result or from hitting the curb at a bad angle and too hard. The Main Causes of Trailering Accidents
Driver error.
Failure to MATCH speed with weather and road conditions.
Trailer sway due to improper loading —more or less than 10% cargo hitch weight.
Failure to perform routine maintenance. We are not trying to scare you, but think it prudent to consider this information before an incident. Scouting should be full of memorable and great experiences.
General Trailer Maintenance Warranties on axles and trailer will not apply to damage or injuries caused by loose or improperly tightened lug nuts or broken studs. Inspect wheel stud holes for roundness. If oblong, this is a sure sign that the unit has been run with improperly tightened lug nuts. In these instances, the rim must be replaced. Hitch Height You must adjust the hitch ball height to position the trailer in a level condition. This loads the axles equally and gives a desirable tongue weight. Under these conditions your trailer should ride properly and not sway back and forth. Coupler Operation Check the coupler or Kingpin for fatigue, damage, cracks or missing parts before towing. Test the lock mechanism for complete and correct latching so the trailer will not come unhooked. For ball type couplers, make sure the coupler and ball size match. If you are using a bumper hitch type coupler, it is recommended to put a bolt or similar device through the latch mechanism when hooking to the tow vehicle for safety.
Parallel with ground and tow vehicle Trailer not level, adjust hitch
Doors, Barlocks and Ramp Hinges Door holdbacks are designed to hold doors open when on uneven ground. They are not designed to hold

39
doors open under windy conditions. Lubricate all door and ramp hinges every 3 months with a SAE 30 weight engine oil. WD-40 and similar lubricants will free hinges, however, they will also lose all lubricating qualities within a short period of time. Use a conventional grease gun tip to apply grease at ramp hinges. Spare tire and tire cover Check the air pressure before each trip. Is it tightly attached to the attachment lugs. Is the support bracket securely attached, check the welds or bolts. Pull the cover off the spare and inspect it. We found a bee nest that made a side of the road tire change pretty interesting. Make sure the cover fits snugly and will not get sucked off driving down the road. Frame Maintenance Cargo trailers take the worst kind of abuse on the underneath, frame side. Anything thrown up by the tow vehicle will chip away at the frame coating. It is suggested that inspections are made periodically and any bare spots be touched up with a matching trailer frame paint. Roof Vents Roof vents on trailers are designed to allow light into the trailer during the daytime along with fresh air. Also warm air will escape when the vent is open. However, your roof vent is not designed to be open when traveling. Make sure that all vents are closed prior to towing over the road. Roof Maintenance Inspect the roof coating once a year. Check for shrinking or cracked sealant that will lead to roof leak. Use high quality self-leveling caulk which is available through Pace or local RV dealers if it need repair. Do not allow excessive snow build-up on the roof. Brush snow off of roof after a heavy snow. The excessive weight may damage trailer. Do not walk on trailer’s roof unless you know your trailer has the extra support for that purpose. Exterior Skin Maintenance Clean exterior aluminum streaks with Black Streak Remover. Wash exterior often with a soft brush and a quality RV or Trailer Wash and Wax solution. Floor Treatment To promote longevity and ease of clean-up on your plywood floor we suggest painting it with a good quality oil-based porch and deck enamel. This will seal the floor and make oil clean-up and sweeping-out much easier. Consider installing kitchen /bathroom floor tiles to give a more durable surface. White and Chrome Wheel Maintenance New wheels do require much care to maintain their factory appearance. We strongly suggest you take a few reasonable steps to protect your investment. Typical road soils trap moisture which can cause corrosion over a period of time. Brake dust is also corrosive and can cause pitting of the wheels finish. These soils must be removed regularly, possibly weekly, depending on your driving habits. After cleaning, always apply a coat of soft non-abrasive cream wax to help prevent surface corrosion. Surface corrosion or rust can be prevented with proper care and is not covered under warranty. Tires, Rims and Lug Nuts Larger trailers are equipped with quality tubeless tires. The recommended air pressure is found on the tire sidewall. Always replace tires with the same designated type and size. It is extremely important to apply and maintain proper wheel mounting torque on your trailer axle. Torque is a measure of the amount of tightening applied to a fastener (nut or bolt) and is expressed as length x force. For example, a force of 90 pounds applied

40
at the end of wrench one foot long will yield 90 lbs.-ft. of torque. Torque wrenches are the best method to assure the proper amount of torque is being applied to a fastener. Be sure to always use only the fasteners matched to the cone angle of your wheel (usually 60° or 90°). The proper procedure for attaching your wheels is:
1. Start all bolts or nuts by hand to prevent cross threading. 2. Tighten bolts or nuts in the following sequence. 3. The tightening of the fasteners should be done in stages. Following the recommended sequence,
tighten fasteners per wheel torque chart below. Wheel nuts/bolts should be torqued before first road use and after each wheel removal. Check and re-torque after the first 10 miles, 25 miles, and again at 50 miles. Check periodically thereafter. Torque Stages
WHEEL TORQUE REQUIREMENTS
AXLE SIZE WHEEL SIZE STUD SIZE STEEL WHEEL TORQUE 2000# 13" 1/2” 50#-75# 3500# 15" 1/2” 90#-120# 5200# 15" 1/2” 90#-120# 6000# 16" 9/16” 90#-120#
TRAILERS TOW VEHICLES
Class I 2,000 lbs. (GTW)200 lbs.
(TW)
Class II 3,500 lbs. (GTW)300 lbs.
(TW)
Class IV 5,000–10,000 lbs. (GTW)500–1,000 lbs. (TW)
Class V 10,000–14,000 lbs. (GTW)1,400 lbs. (TW)
Mid–Size Cars/Small Pick-ups
Class I Sport frame Sport frame Deluxe
Class II Frame Hitch
Minivans Class I Sport frame
Class II Frame Hitch
Full-Size Cars, Pick-ups, Vans, Utility Vehicles
Class I Sport frame
Class II Frame Hitch
Class IV Weight-Distributing Hitch
Class IV Weight-Distributing Hitch
Trailer Maintenance Schedule
Item Function Required Every Trip 3000 Mi 3 Months
6000 Mi 6 Months
12000 Mi 12 Months
Coupler Check for fatigue & latching operation
•
Safety Chains Check for dragging & possible strength loss
•
BREAKAWAY SYSTEM (If Installed)
Check battery charge & switch operation cable for damage
•
Lug nuts Check for correct torque •
Pigtail Check for dragging & stress •
Lights Check that all are operating •

41
Tires Check pressure & unusual wear
•
Wheels Inspect for cracks indentations •
Trailer Brakes (If installed)
Check for operation •
Brake Adjustment
Adjust for optimum performance
•
Hinges Lubricate •
Axle & Spring Bolts
Check for correct torque & elongation of the shackle link holes
•
Stabilizer Jack-Screw (If installed)
Lubricate threaded rod •
Hydraulic Fluid (If installed)
Check fluid level •
Inspect Frame Welds
Check for cracking •
Roof Sealant Inspect for cracks or drying out
•
Jacks Lubricate •
Bearings Repack •
42
Chapter 8 Forms for the Quartermaster
Master Troop Inventory (PDF) – Contains a master list of ALL troop equipment, the quantities, if a photo is available, Condition, storage location, purchase date and cost and the estimated replacement cost. Quartermaster’s Request (PDF) – Contains a Consumable Equipment/Supplies Purchase Request, Report of Loss or Damage to Troop/Patrol Equipment, Request Purchase of Other Equipment/Supplies (New/ Replacement) and is to be submitted to the Troop Committee for Review and Approval. Quartermaster’s Trip Checklist (PDF) – Contains a Pre-Departure Checklist, Campsite Arrival Checklist, Campsite Departure Checklist, and Post-Campout Checklist that should be completed by the Troop Quartermaster or his substitute for each camping trip. Vehicle/Trailer Safety Checklist (PDF) – Pre-trip Checklist recommended for drivers’ vehicles and the trailer. Troop/Patrol and Individual Equipment Checklist: First Aid, Weekend and Summer camp (PDF) Sample Patrol Equipment Inventories from around the web.
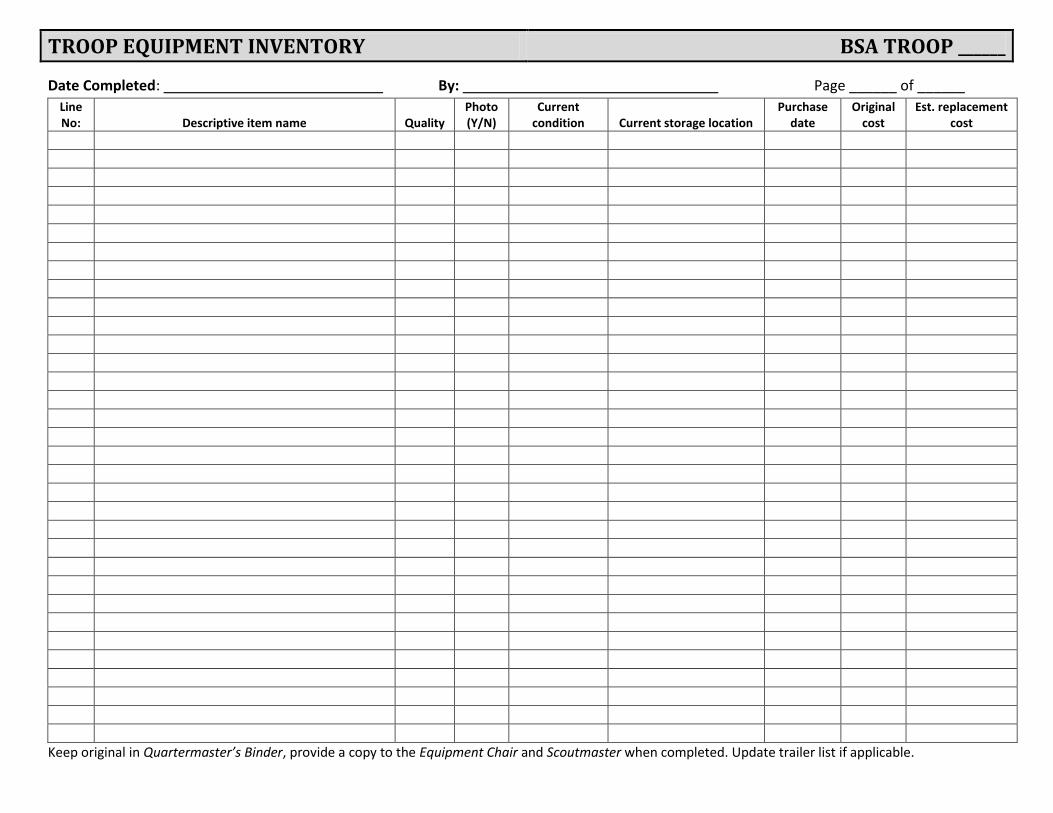
TROOP EQUIPMENT INVENTORY BSA TROOP ______
Date Completed: By: Page ______ of ______
Line No: Descriptive item name Quality
Photo (Y/N)
Current condition Current storage location
Purchase date
Original cost
Est. replacement cost
Keep original in Quartermaster’s Binder, provide a copy to the Equipment Chair and Scoutmaster when completed. Update trailer list if applicable.
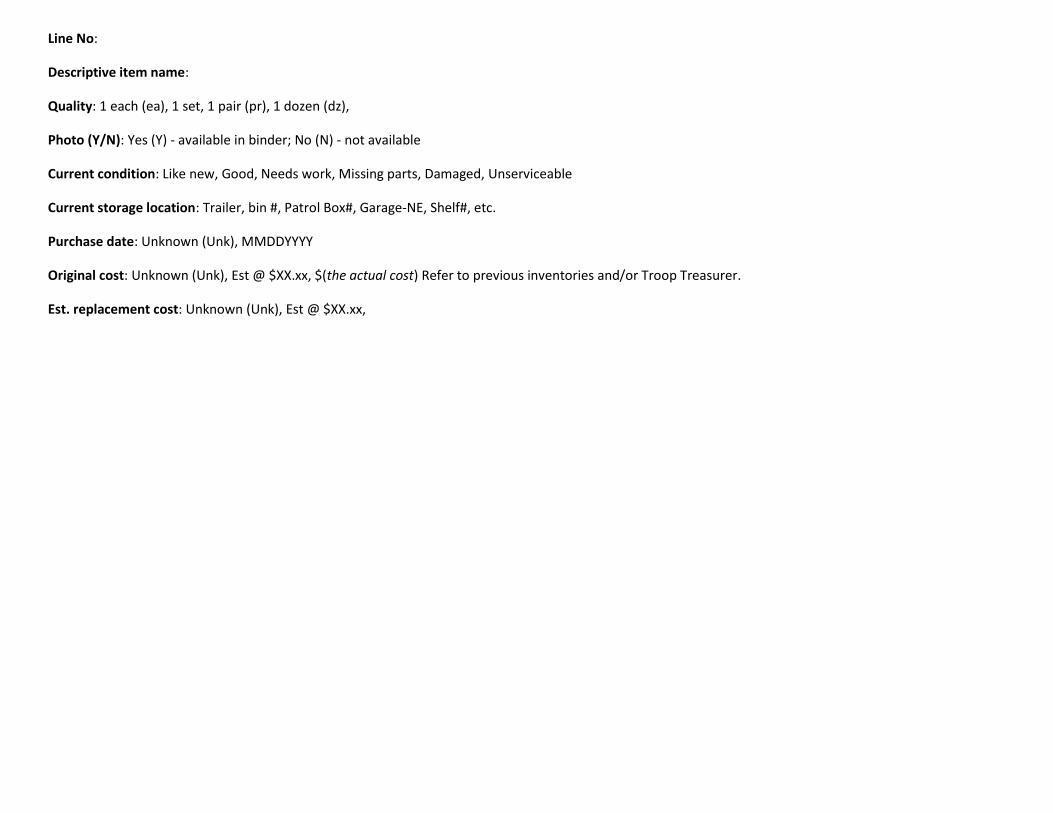
Line No:
Descriptive item name:
Quality: 1 each (ea), 1 set, 1 pair (pr), 1 dozen (dz),
Photo (Y/N): Yes (Y) - available in binder; No (N) - not available
Current condition: Like new, Good, Needs work, Missing parts, Damaged, Unserviceable
Current storage location: Trailer, bin #, Patrol Box#, Garage-NE, Shelf#, etc.
Purchase date: Unknown (Unk), MMDDYYYY
Original cost: Unknown (Unk), Est @ $XX.xx, $(the actual cost) Refer to previous inventories and/or Troop Treasurer.
Est. replacement cost: Unknown (Unk), Est @ $XX.xx,

QUARTERMASTER’S REQUEST BSA TROOP ________ The Troop Quartermaster requests the purchase of the following equipment and/or supplies for Troop or Patrol use.
Consumable Equipment/Supplies: Request Approved
__ small bottles of propane
Refil l large bottles of propane
Spare mantles for two mantle lantern
Spare globes for two mantle lantern
Spare mantles for NorthStar lantern
Spare globes for NorthStar lantern
Box of Strike Anywhere Matches/Lighter
20lb bag of Charcoal Briquettes
Report of Loss or Damage to Troop / Patrol Equipment Replacement Approved
Lost/Damaged Item: Est. Cost:
Suspected Cause of Damage: Worn out In transit Non-malicious accident Maliciously by:
Recommended Action:
Replacement Approved
Lost/Damaged Item: Est. Cost:
Suspected Cause of damage/loss: Worn out In transit Non-malicious accident Maliciously by:
Recommended Action:
Request Purchase of Other Equipment / Supplies (New / Replacement) Request Approved
Item: Est. Cost:
Reason(s) for Purchase:
Request Approved
Item: Est. Cost:
Reason(s) for Purchase:
Submitted to the Troop Committee for Review and Approval on (MMDDYYYY)
Troop Quartermaster:
Troop Equipment Chair:
NOTE: The Quartermaster is not authorized to purchase any equipment or supplies
including consumables without prior approval of the Troop Committee or for consumables by their designated representative.
Submit receipts to the Troop Treasurer for reimbursement or issuance of a check if the
total cost is known. Request for Purchases of New Equipment
need review and approval of the Troop
Committee prior to purchase.

QUARTERMASTER’S – TRIP CHECKLIST BSA TROOP ________ This checklist should be completed by the Troop Quartermaster or his substitute for each camping trip.
Overnight Trip to:
Dates:
Pre - Departure Checklist Date Completed
Make sure trailer has ___ full small bottles of propane, buy if needed
Make sure trailer has ___ full large bottles of propane, refill as needed
Check lantern mantles and globes, buy if needed
Check tire pressure
Trailer properly loaded with weight evenly distributed
Ensure gear in trailer is properly tied down or secure
Check trailer lights (turn signals and brakes)
Stow trailer chocks, close trailer top vent and check both door locks are secure
Campsite Arrival Checklist
Set trailer chocks and unlock both trailer door locks
Supervise unloading of Troop and Patrol Equipment
Stow the trailer hitch and pin in front of trailer, lock the trailer receiver
Campsite Departure Checklist
Supervise loading of Troop and Patrol Equipment
Supervise taking of Patrol Equipment Inventories prior to departure
Review and Sign-off on Patrol Equipment Inventories prior to departure
Trailer properly loaded with weight evenly distributed
Final campsite inspection for any equipment/gear (nothing left behind)
Ensure gear in trailer is properly tied down or secure
Check trailer lights (turn signals and brakes)
Stow trailer chocks, top vent is closed and check both door locks are secure
Post - Trip Checklist
Set trailer chocks and unlock both trailer door locks
Stow the trailer hitch and pin in front of trailer, lock the trailer receiver
Ensure that any wet tents/equipment are sent home with someone to dry and return
Follow-up with Patrols on replenishment of consumables
Ensure water jugs and ice coolers are empty and left open to dry
Check that NO perishable foods or wet towels are left behind in larder or trailer
Prepare any Quartermaster’s Request Forms
Open trailer top vent and lock both trailer doors
Troop Quartermaster:
Equipment Chair:

VEHICLE/TRAILER SAFETY CHECKLIST BSA TROOP ____
Driver(s) Owner’s Name:
Address: City: St:
Driver’s License No: State: Renewal Date:
Telephone No: (Home) (Work) (Cell)
Insurance Company: Amt of liability coverage: $
Other authorized drivers of same vehicle (this trip only) and drivers license numbers:
Vehicle Make/Model of Vehicle: Model Year:
Color: License Plate No: No. of Seat Belts:
Basic Safety Check Seat Belts used by every passenger
Windshield Wipers operate
Wiper Fluid in reservoir
Horn works
Safety/Emissions Sticker current
Headlights (high/low beam) operating
Turn Signals / Brake Lights operating
Mirrors present & adjusted
Tire in good condition; Spare present/filled
Tire Jack and Tools available
Brakes okay
Exhaust System okay
Permission Slips for every passenger
Trip Request approved
Maps/Directions to event
Plan in case separated from group
Vehicle Towing Trailer Maintenance Checklist (Up to Date)
Hitch Ball Tight
Hitch Ball Lubricated
Hitch Secured in Receiver
Safety Chains Crossed and Attached*
Coupler Properly Latched onto Ball
D-Pin or Bolt through Coupler Latch
Load Distributed Correctly and Securely
Trailer Level when Hooked Up
Trailer Lights Working Correctly
Lug Nuts Checked and Tightened
Inspect Tires for Cuts
Tire Pressure Checks
Block Tires when Loading and Unloading
Doors closed/locked * If safety chains are too long, twist to shorten
Additional Safety Check First Aid Kit available
Flashlight/Batteries
Fire Extinguisher
Emer. Flares/Reflectors
Mobile Comm: FRS Radio/Batteries
Cellphone #: _____________
Notes:
_

EQUIPMENT CHECKLISTS: FIRST AID, WEEKEND AND SUMMER CAMP Individual Equipment Checklist
Minimum Personal First Aid Equipment
Adhesive Bandages Elastic Bandages Moleskin Sunburn cream
Gauze Pads Poison Ivy Lotion Needle/Thread Emergency Money
Adhesive Tape Triangular Bandages Scissors Pencil and Paper
Roller Bandages Antibacterial Soap Safety Pins Burn Ointment
Butterfly Bandages Protective Gloves Tweezers CPR Mouth Shield
Essential Personal Weekend Camping Equipment
Daypack Sleeping Bag/Extra Blanket 5’x7’Tarp or Sleep Pad Hat/Stocking Cap
Extra Set of Clothes/Socks Class A & C Uniform Personal First Aid Kit (above) Work/Winter Gloves
Boots/Camp Shoes Toiletries (Unscented) Small Sewing Kit Flashlight/Extra Batteries
Pocket Knife Insect Repellent Compass/Area Map Jacket/Coat(Fall -Spring)
Personal Plate/Bowl Kit Fork, Spoon, Knife Unbreakable Mug Sweatshirt w/Hood
Boy Scout Book/Pencil Sunscreen Raingear/Poncho Canteen/Water Bottle
Optional Personal Weekend Camping Equipment
Swim Trunks/Towel Sunglasses Lip Balm Folding Camp Chair
Camera /Extra batteries Hiking Stick/Scout Stave Inflatable Sleep Pad Pil low
6’-10’ Duct Tape 50’ Parachute Cord Game/Book Multi-Purpose Tool
Essential Personal Summer Camp Personal Equipment
Int./Ext. Frame Pack Canteen/Water Bottle Hat Area Map & Compass
4-5 Sets of Clothes/Socks Fire Starter/Matches Personal First Aid Kit Flashlight/Ex. Batteries
Toiletries (Unscented) Swim Trunks/Towel Emergency Candles Raingear/Poncho
Sunscreen/Sunglasses Unbreakable Spoon Unbreakable Mug Sweatshirt w/Hood
Boy Scout Book/Pencil Class A & C Uniforms Pocket Knife Emergency Whistle
Shower Shoes/Tongs Insect Repellent Mosquito Netting Work/Winter Gloves
Optional Personal Summer Camp Personal Equipment
Paper/Pen/Envelopes Merit Badge Booklets Lip Balm Pil low
Camera/Extra Batteries Hiking Stick/Scout Stave Binoculars Folding Camp Chair
NOTE: Put your name on your personal equipment.
Troop/Patrol Equipment Checklist
Essential Patrol/Troop First Aid Equipment
Emergency Blanket Ice Packs Elastic Bandages Adhesive Bandages
Protective Gloves Heat Packs Poison Ivy Lotion Gauze Pads
Burn Ointment Snakebite Kit CPR Mouth Shield Adhesive Tape
Scissors Tweezers Safety Pins Triangular Bandages
Wire Mesh /SAM Splints First Aid Booklet Antibacterial Soap Roller Bandages
Essential Patrol/Troop Weekend Camping Equipment
Patrol Pot/Pan Kit Bio-Degradable Soap Sheathed Axe Troop Shelter - Large
Knife/Utensil Kit Griddle Camp Saw U.S. & Troop Flags
Hand Wash Basin Camp Stove- Propane Folding Shovel 3 - 5 gal. Water Jugs
3 - Pans(Wash/Rinse/Sanitize) Stove Fuel - Propane Hot Gloves/Tongs Nylon Cord/Rope (50’)
Sm. Bottle Bleach Patrol/Troop Ice Cooler Folding Legged Gril l Hammer or Mallet
55 gal. Trash Bags Roll of Aluminum Foil Plastic Pot Scrubber Spare Tent Stakes
Roll of 2” Duct Tape Knife Sharpening Kit Multi-Purpose Tool Tarps/Poles/Ropes
Optional Patrol/Troop Weekend Camping Equipment
Dutch Oven Folding Tripod Charcoal & Chimney Reflective Oven
Essential Patrol/Troop Summer Camp Equipment
Propane Lantern Toilet Paper in Ziploc U.S. & Troop Flags Roll of 2” Duct Tape
Lantern Fuel (4oz./day) Patrol First Aid Kit 55 gal Trash Bags Bio-Degradable Soap
3-Clipbrds & Bulletin Brd Folding Shovel Nylon Cord (100 ft.) 2-5 gal Water Jugs
Emergency Contact List Chef Knife/Utensil Kit Spare Tarps Seasoning Kit
Optional Patrol/Troop Summer Camp Equipment
Camp Oven GPS Handheld /Batteries Weather Radio Multi-Purpose Tool
Tents (4-6 person) Fire Starter/Matches
NOTE: No Personal Electronic Equipment will be allowed without the expressed permission of the Scoutmaster/Event Adult Leader.

43
Sample Equipment Inventories from around the web.
Organization
Maps/directions for drivers Collect driver’s cell phone numbers Medical form for each attendee List of attendee’s Itinerary
Troop Gear
Sisal twine Tents (2 extra) Stoves (2 extra) Sleeping bag (2 extra) Extra tent stakes (12) Shovel First Aid kit Lanterns (2) Extra mantels American flag Troop flag Brush/dust pans Hatchet Saw 3.5# axe 2.5# axe File Hammer
As Required
Lashing poles Rope Rope whipping material Large dining fly Broom
Camp Kitchen Supplies
Cooking utensils Stove (1) Large single burner Large double burners Water jugs (2) Large pot for heating water Coffee pot Misc pots Wash tubs (3) Tables(4)
Consumables
Hand sanitizer Wooden matches Paper towels Propane (small) Propane (large – 2) Garbage bags, 55 gal. Pot scrubbers (blue pads for Teflon Coating) Rinse sanitizer or bleach Dishwashing soap Toilet Paper (2 rolls) Firewood (Purchase near campsite)
As Required
Charcoal Charcoal lighter Dutch oven Aluminum foil Ice chest Ice
Patrol Box Staples (Check before shopping for food): Bug Juice, Hot Cocoa Small Packages of Sugar & Flour Pam Pepper, Salt Ketchup, Mustard Peanut Butter Matches Newspaper (for the Charcoal Chimney)
Toilet Paper, Paper Towels Garbage Bags (Many!) Zip-Lock Bags (gallon size) Aluminum foil Sponges, Scrubbers, Handy Wipes Charcoal Dish Soap Bleach Fuel for Stove and Lantern
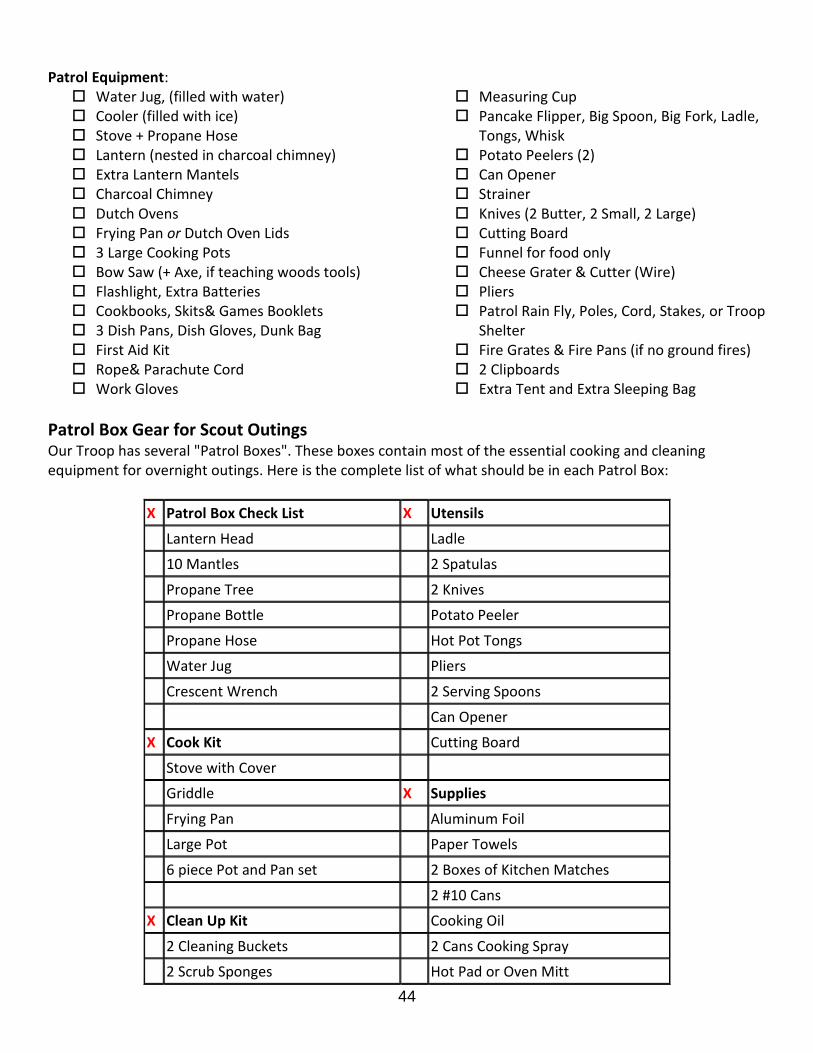
44
Patrol Equipment:
Water Jug, (filled with water) Cooler (filled with ice) Stove + Propane Hose Lantern (nested in charcoal chimney) Extra Lantern Mantels Charcoal Chimney Dutch Ovens Frying Pan or Dutch Oven Lids 3 Large Cooking Pots Bow Saw (+ Axe, if teaching woods tools) Flashlight, Extra Batteries Cookbooks, Skits& Games Booklets 3 Dish Pans, Dish Gloves, Dunk Bag First Aid Kit Rope& Parachute Cord Work Gloves
Measuring Cup Pancake Flipper, Big Spoon, Big Fork, Ladle,
Tongs, Whisk Potato Peelers (2) Can Opener Strainer Knives (2 Butter, 2 Small, 2 Large) Cutting Board Funnel for food only Cheese Grater & Cutter (Wire) Pliers Patrol Rain Fly, Poles, Cord, Stakes, or Troop
Shelter Fire Grates & Fire Pans (if no ground fires) 2 Clipboards Extra Tent and Extra Sleeping Bag
Patrol Box Gear for Scout Outings Our Troop has several "Patrol Boxes". These boxes contain most of the essential cooking and cleaning equipment for overnight outings. Here is the complete list of what should be in each Patrol Box:
X Patrol Box Check List X Utensils
Lantern Head Ladle
10 Mantles 2 Spatulas
Propane Tree 2 Knives
Propane Bottle Potato Peeler
Propane Hose Hot Pot Tongs
Water Jug Pliers
Crescent Wrench 2 Serving Spoons
Can Opener
X Cook Kit Cutting Board
Stove with Cover
Griddle X Supplies
Frying Pan Aluminum Foil
Large Pot Paper Towels
6 piece Pot and Pan set 2 Boxes of Kitchen Matches
2 #10 Cans
X Clean Up Kit Cooking Oil
2 Cleaning Buckets 2 Cans Cooking Spray
2 Scrub Sponges Hot Pad or Oven Mitt
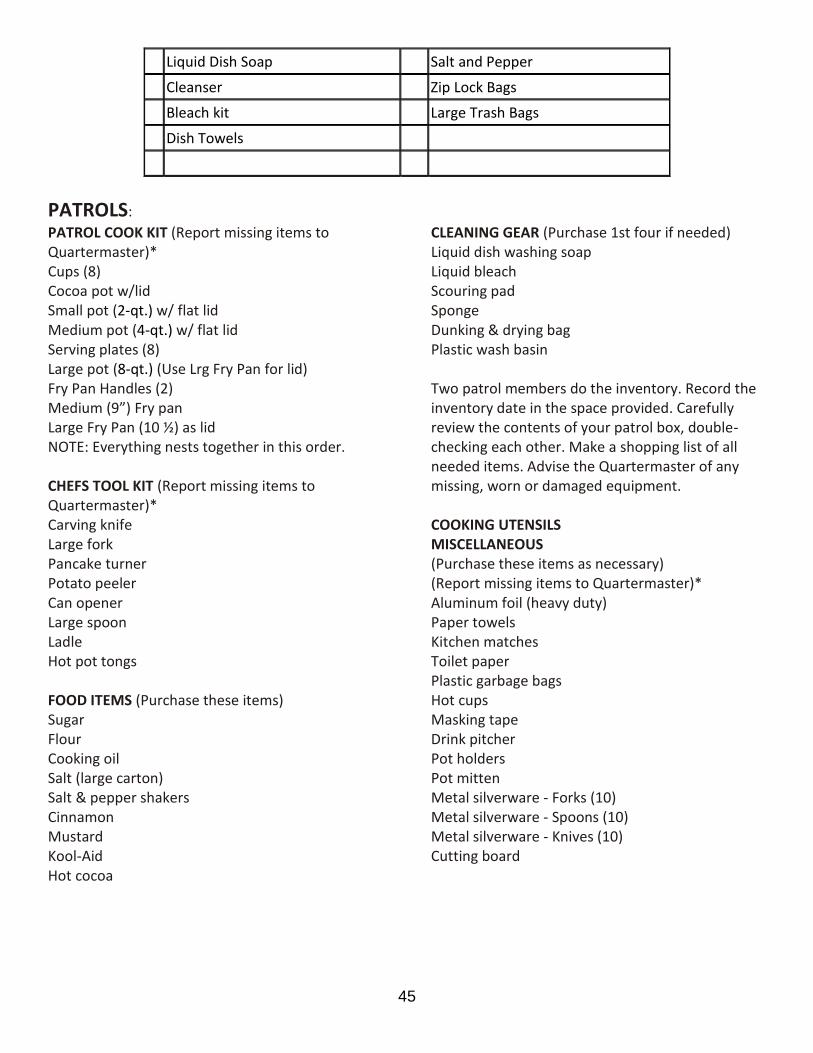
45
Liquid Dish Soap Salt and Pepper
Cleanser Zip Lock Bags
Bleach kit Large Trash Bags
Dish Towels
PATROLS:
PATROL COOK KIT (Report missing items to Quartermaster)* Cups (8) Cocoa pot w/lid Small pot (2-qt.) w/ flat lid Medium pot (4-qt.) w/ flat lid Serving plates (8) Large pot (8-qt.) (Use Lrg Fry Pan for lid) Fry Pan Handles (2) Medium (9”) Fry pan Large Fry Pan (10 ½) as lid NOTE: Everything nests together in this order. CHEFS TOOL KIT (Report missing items to Quartermaster)* Carving knife Large fork Pancake turner Potato peeler Can opener Large spoon Ladle Hot pot tongs FOOD ITEMS (Purchase these items) Sugar Flour Cooking oil Salt (large carton) Salt & pepper shakers Cinnamon Mustard Kool-Aid Hot cocoa
CLEANING GEAR (Purchase 1st four if needed) Liquid dish washing soap Liquid bleach Scouring pad Sponge Dunking & drying bag Plastic wash basin Two patrol members do the inventory. Record the inventory date in the space provided. Carefully review the contents of your patrol box, double-checking each other. Make a shopping list of all needed items. Advise the Quartermaster of any missing, worn or damaged equipment. COOKING UTENSILS MISCELLANEOUS (Purchase these items as necessary) (Report missing items to Quartermaster)* Aluminum foil (heavy duty) Paper towels Kitchen matches Toilet paper Plastic garbage bags Hot cups Masking tape Drink pitcher Pot holders Pot mitten Metal silverware - Forks (10) Metal silverware - Spoons (10) Metal silverware - Knives (10) Cutting board

46
Chapter 9 Patterns and Plans for Troop Equipment
Scouting has always enjoyed a wealth of talented and skilled leaders and scouts that share their ideas with other scouts and scouters. This chapter is a small collection of some of those ideas. Use them, improve them, modify them to your needs, then share them with others to make us all better. The best ideas are light, durable, and easy to use. Ask yourself: Can it fold up or breakdown? Is it easy to store? Does it offer multiple uses?
#2 Patrol Kitchen Box (from The Patrol Sketchbook by Ishkotekay, 1992)
#3 Camp Table(from The Patrol Sketchbook by Ishkotekay, 1992)
Aircraft Style Trailer Chocks
Various Lantern Stands
Campsite Information Center
Folding Camp Oven
Hand washing station
Outdoor Flag Stand
Portable Flag Pole
5 gal bucket ideas

47

48

49

50

51

52

53
Camp uses for the 5-Gallon Bucket
One of my favorite things, especially for camp, is the versatile, indestructible five-gallon plastic buckets.
Where can you get plastic bucket? Ask nicely, and your local hamburger-and-fries restaurant will save their buckets for you. You could also check with your neighborhood plasterers and painters, too. They often use premixed drywall compound and paint that comes in buckets. And, remember to get the lids as well.
Prep: Clean out the bucket with water and household bleach. Then, leave it in bright sunshine for a day or two, perhaps with some charcoal, baking soda or kitty litter in it to get rid of any lingering smells. It won't smell any worse than the average Scout after a weekend camp. Now, it's ready to use.
If the bucket originally stored food, you could be used to carry drinking water at camp if it has only maintained in a food-safe condition. If you don’t know, don’t assume treat it as if it contained materials like drywall compound, don t keep drinking water in it.
But, talking of water, try this at camp. Paint the outside of a bucket matte black. Fill it with water and leave it out in the sun as water warmer. It not only saves time and fuel when you need boiling water, but also provides warm water for a quick wash of hands and faces before supper (in a separate basin, of course).
To help you do your camp laundry, build a camp washing machine: a bucket with a toilet plunger through the lid as an agitator. The bucket washing machine is manually (and vigorously) operated and, depending on the operator's enthusiasm can safely clean even delicate garments.
Use plastic buckets for storage. Stash your camp tools in one place--hand axe, tent stakes, ropes, twine, trowel, brush, clothes pegs, and mallet. Or keep together all your camp kitchen items; cooking utensils, plates and bowls, cups and mugs, staples like salt and pepper, dish washing supplies, cutting board, pots and pans, and mixing bowls.
A bucket is also a dry place for your campfire kit wooden kitchen matches (in a cleaned out peanut butter jar), wax paper (cereal box liners) or candle stubs, kindling, charcoal, and a small grill. And remember to set out a couple of buckets full of water to serve as fire extinguishers.
Use another bucket as a container for your kitchen table -- a roll-up lathe-strip table set on top of two horizontal poles lashed in parallel between two trees. After you've erected the table, use its bucket as a food or drink cooler either stored in a stream or covered with a damp cloth in the shade. If you'd rather, use the bucket as a stool to sit at the table in comfort. Or get another bucket and set up a bench at the table with the buckets as bench legs.
On a canoe trip, a tightly sealed bucket is an ideal water- and animal-proof food locker. You might also use one or two sealed buckets as outriggers on your canoe to help you convert it into a sailing craft. Or how about four buckets as raft pontoons?
Back home, a bucket can be a mini patrol box that acts as a base for the patrol flag and provides rugged storage for handbooks, pencils, or notepaper. After each patrol decorates their bucket, stack the buckets

54
one on top of the other to build an impressive troop totem pole. And keep a few buckets to organize your games equipment.
Scouts might try running a weekend camp where campers are limited to the personal gear (including bedrolls) they can pack in one bucket. No backpacks or additional bundles allowed, but the camp organizers provide food and water.
The beat of bucket tom-toms will establish a dramatic atmosphere at your campfire. If you cut the buckets to different lengths, you'll change the tone of each drum. And a bucket makes a fine resonating sound box for a broom-handle string bass drum.
You can use a bucket as a planter or a mini-garden. Use another as a composter. Bucket gardening is perfectly sized for apartment dwellers that have balconies.
And, to repay the supportive parents in your group, offer to organize a winter emergency kit for their car trunk. Assemble in a bucket all the items they might need for a winter roadside emergency; starter cables, windshield scraper, old coat, galoshes, gloves, tire chains, and sand. You provide the bucket and a list of suggested items, they supply the items, and you put everything together.
A tightly sealed 5-gallon bucket is an ideal waterproof food container. It will also keep wild animals away.
If you are going fishing, bring along a 5-gallon bucket to hold all the fish you plan to catch.
Put sports equipment in one, tapes in another. Use one for clean rags and one for dirty rags.
Buckets are easily labeled, big enough to fit things in and small enough to move around with ease. Need help reaching something? Flip a bucket over, and you've got a step stool.
Don't forget about washing the car, boat or trailer. Buckets make perfect soapy water containers.
If you check at the local hardware store, there are a number of Tool Organizer and inserts made to fit in or around the mighty 5-gallon bucket.
Half the fun with buckets is dreaming up new ways to use them. Collect a few for your patrol and figure out your own. You'll recycle the buckets and develop yourself mentally at the same time.
One man’s trash may be another man’s treasure!


Scouter’s Guide
to Troop Quartermaster and Equipment Chair
Camping and Other Outdoor Activities