science fair help use this file to look up how to use powerpoint and excel for your science fair...
TRANSCRIPT

Science Fair HelpUse this file to look up how to use
PowerPoint and Excel for your Science Fair project.
Two ways to switch to SLIDE SHOW
1. Click the SLIDE SHOW icon at the bottom left corner.
2. MENU BAR > SLIDE SHOW > PLAY FROM START
Remember, press the ESC key to exit PowerPoint before quitting. Do NOT save changes to Powerpoint.
Switch to SLIDE SHOW mode to use this file.

How to Use this PowerPoint1. Read all of this slide before going on.2. If there is a page number by the title of the
slide, that means there are more pages to read about that same topic.
3. You may click the HOME picture at any time to return to the Table of Contents
4. Raise your hand if you need help. While waiting for the teacher, use a quiet 6-inch voice and ask your neighbor for help.
Remember, press the ESC key to exit PowerPoint before quitting. Do NOT save changes to Powerpoint.
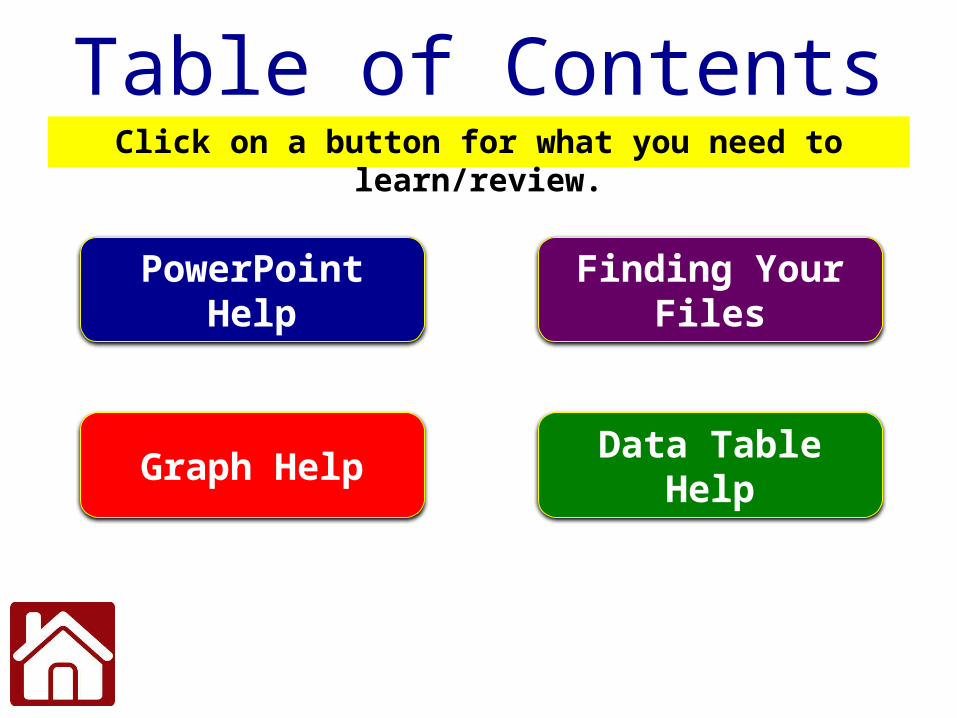
Table of ContentsClick on a button for what you need to learn/review.
PowerPoint Help
Data Table HelpGraph Help
Finding Your Files

PowerPoint HelpClick on a button for what you need to learn/review.
Finding Your File
Typing Your Information
Text doesn’t fit on my slide
⌘Z Undo
Rotating Text Boxes
Adding Text Boxes

Adding Text Boxes
⌘Z Undo
1. Click the HOME tab in the Toolbar
2. Click the Text tool and choose Text Box
3. Click and dragyour mouseto draw the text box.
4. Type in the text box
Back to PowerPoint Help

Rotating Text Boxes
⌘Z Undo
1. Click on the text box to see the “handles.”
2. Click and drag any handle to change size.
3. Click and drag the top CIRCLE HANDLE to rotate your text box.
Back to PowerPoint Help
Use to rotate
Click to see an example
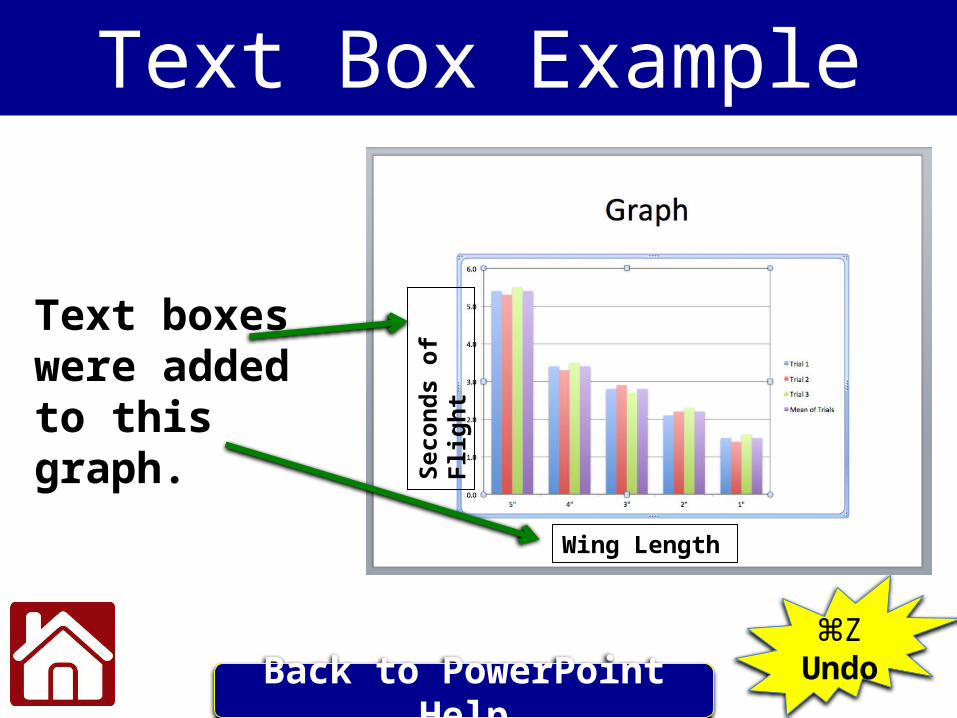
Text Box Example
⌘Z Undo
Text boxes were added to this graph.
Back to PowerPoint Help
Wing Length
Seco
nds
of F
light

Finding Your File
⌘Z Undo
1. Control Key > Student Folder
2. Click the top of the 2nd column (DATE
MODIFIED) to see your most recent files.
3. Open the file you are looking
for…
example: witley scifair or witley
data tableBack to PowerPoint Help

Typing Your Info
⌘Z Undo
1. Click in the big text box underneath the title and type.
2. Don’t change the font or the font size.3. If you have more information that fits on
one slide, go back to the PowerPoint Help and read about “Text Doesn’t Fit.”
Back to PowerPoint Help

Text Doesn’t Fit p. 1
⌘Z Undo
Back to PowerPoint Help
If you have more information than fits on one slide (like Procedures), PowerPoint will start shrinking your text to make it fit. If this happens, just continue to type all your text and then follow the instructions on the next few slides (click mouse to advance).
READ ALL of these slides about fitting the text before going back to your Powerpoint.
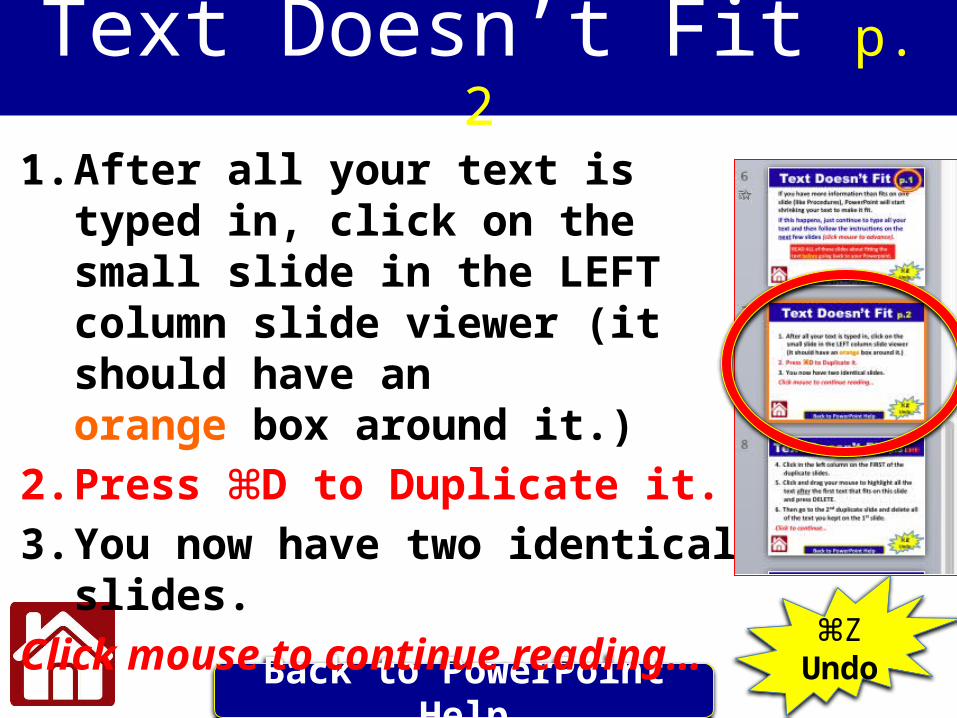
Text Doesn’t Fit p. 2
⌘Z Undo
Back to PowerPoint Help
1. After all your text is typed in, click on the small slide in the LEFT column slide viewer (it should have anorange box around it.)
2. Press ⌘D to Duplicate it.3. You now have two identical slides.Click mouse to continue reading…
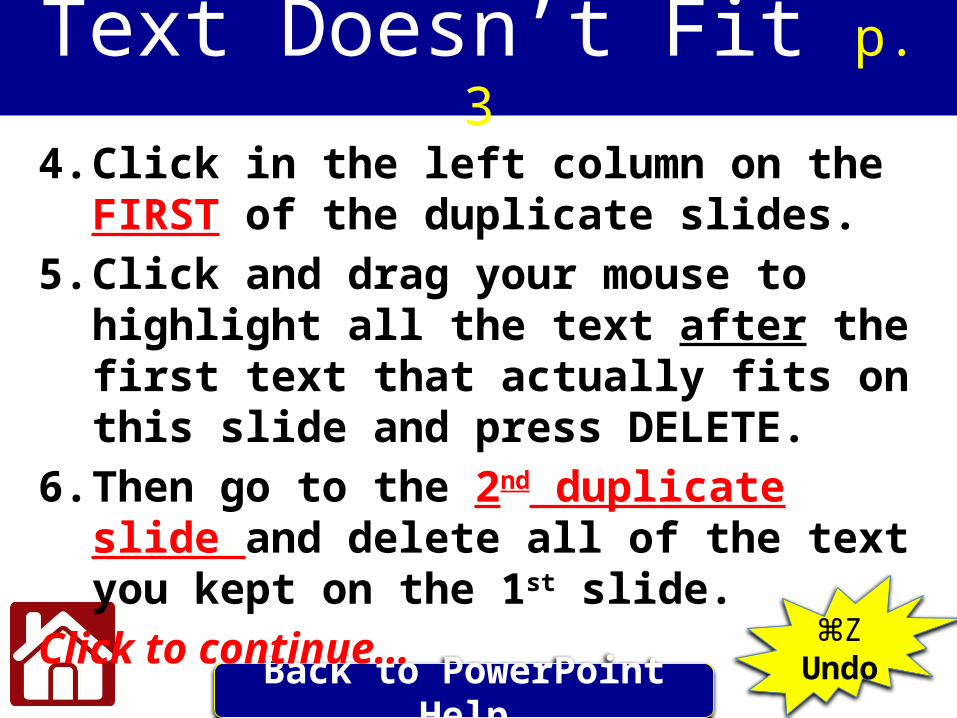
Text Doesn’t Fit p. 3
⌘Z Undo
Back to PowerPoint Help
4. Click in the left column on the FIRST of the duplicate slides.
5. Click and drag your mouse to highlight all the text after the first text that actually fits on this slide and press DELETE.
6. Then go to the 2nd duplicate slide and delete all of the text you kept on the 1st slide.
Click to continue…

Text Doesn’t Fit p. 4
⌘Z Undo
Back to PowerPoint Help
7. Go back the first of this series of slides and write p. 1 after the title to show this is page 1.
8. Example: Procedures p. 19. Number the next page as p. 210.If you still need to make another duplicate
page to hold your text, number that one p. 311.Click the next three slides to see an example…
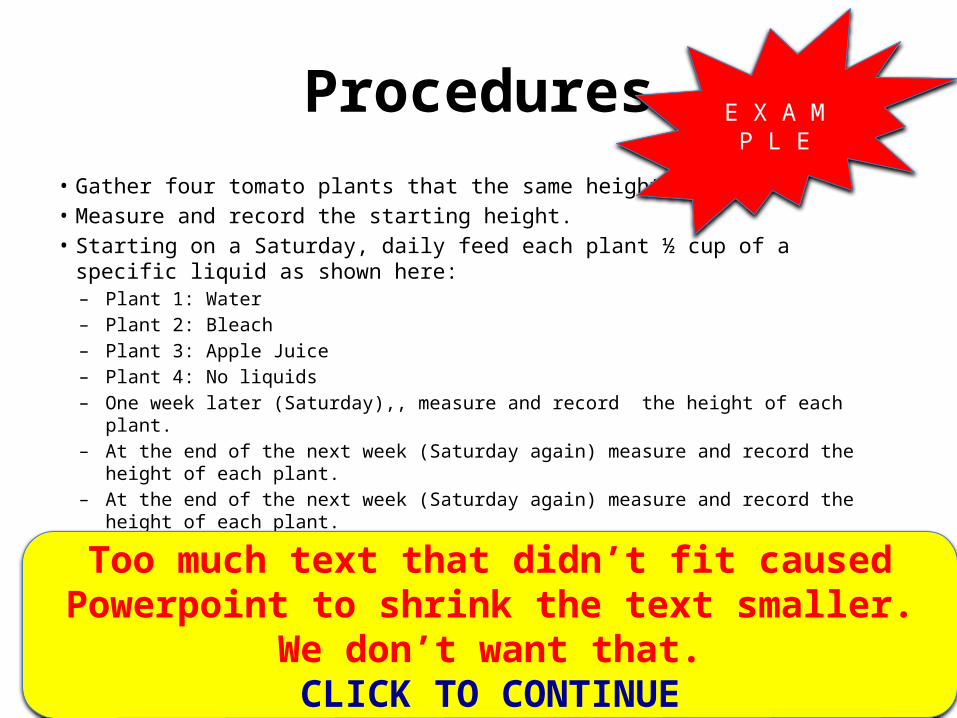
Procedures• Gather four tomato plants that the same height.• Measure and record the starting height.• Starting on a Saturday, daily feed each plant ½ cup of a specific liquid as shown
here:– Plant 1: Water– Plant 2: Bleach– Plant 3: Apple Juice– Plant 4: No liquids– One week later (Saturday),, measure and record the height of each plant.– At the end of the next week (Saturday again) measure and record the height of each
plant.– At the end of the next week (Saturday again) measure and record the height of each
plant.– Enter all heights into the data table for weeks 1, 2 and 3.– Add up the 3 height measurements for each plant to record the total growth in height.– Create a chart that show the test results.
Too much text that didn’t fit caused Powerpoint to shrink the text smaller. We don’t want that.
CLICK TO CONTINUE
E X A M P L E

Procedures p. 1
• Gather four tomato plants that the same height.
• Measure and record the starting height.• Starting on a Saturday, daily feed each plant ½
cup of a specific liquid as shown here:– Plant 1: Water– Plant 2: Bleach– Plant 3: Apple Juice– Plant 4: No liquids
After the slide was DUPLICATED, text was deleted after the liquid list and p. 1 was added
to the title.CLICK TO CONTINIUE
E X A M P L E

Procedures p. 2
• One week later (Saturday),, measure and record the height of each plant.
• At the end of the next week (Saturday again) measure and record the height of each plant.
• At the end of the next week (Saturday again) measure and record the height of each plant.
• Enter all heights into the data table for weeks 1, 2 and 3.
• Add up the 3 height measurements for each plant to record the total growth in height.
P. 2 was added to the title and the first text up to the end of the liquid
list was deleted.Now the information fits on two
slides.Click HOUSE to go back to the
TABLE OF CONTENTS
E X A M P L E

Data Table Help
Finding Your File
⌘Z Undo
Changing Column or Row Width/Height
Create Data Table
Formulas for SUM or AVERAGE
Making a Graph

Finding Your File
⌘Z Undo
Back to Data Table Help
1. Control Key > Student Folder
2. Click the top of the 2nd column (DATE
MODIFIED) to see your most recent files.
3. Open (your last name) data table
example: witley data table
4. Click on the data table sheet/tab
at the bottom
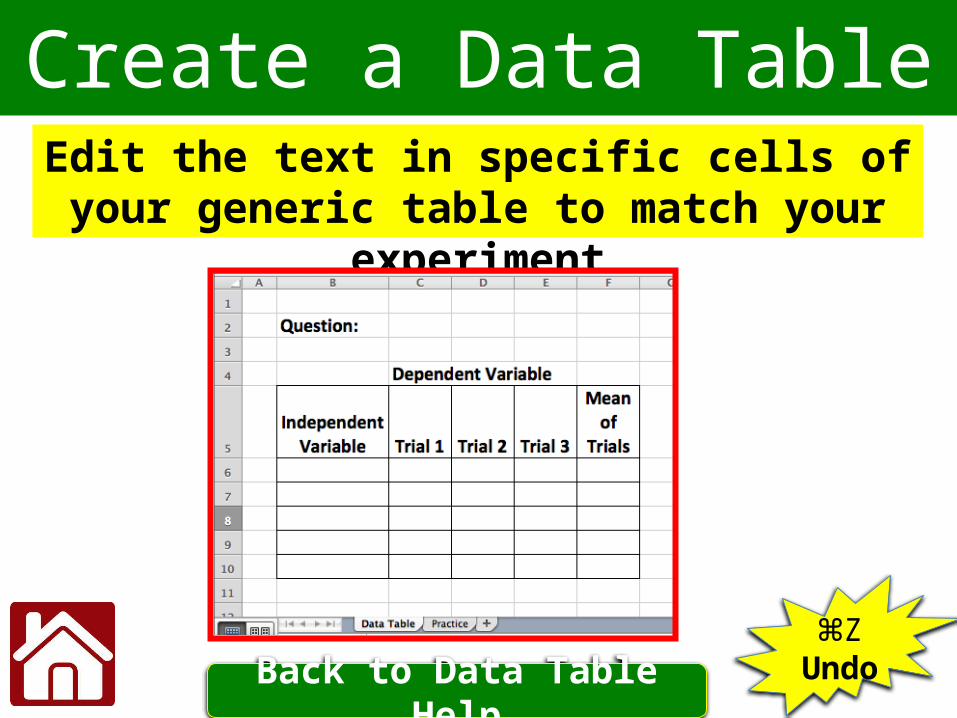
Create a Data Table
⌘Z Undo
Back to Data Table Help
Edit the text in specific cells of your generic table to match your experiment
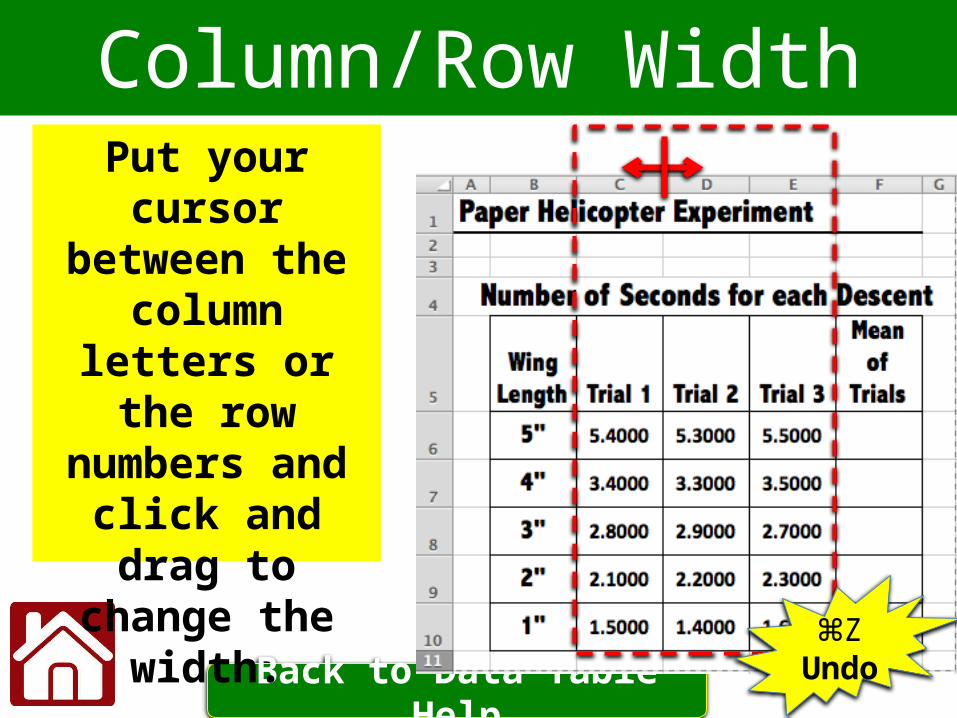
Column/Row Width
Back to Data Table Help
Put your cursor between the
column letters or the row numbers and click and drag
to change the width.
⌘Z Undo
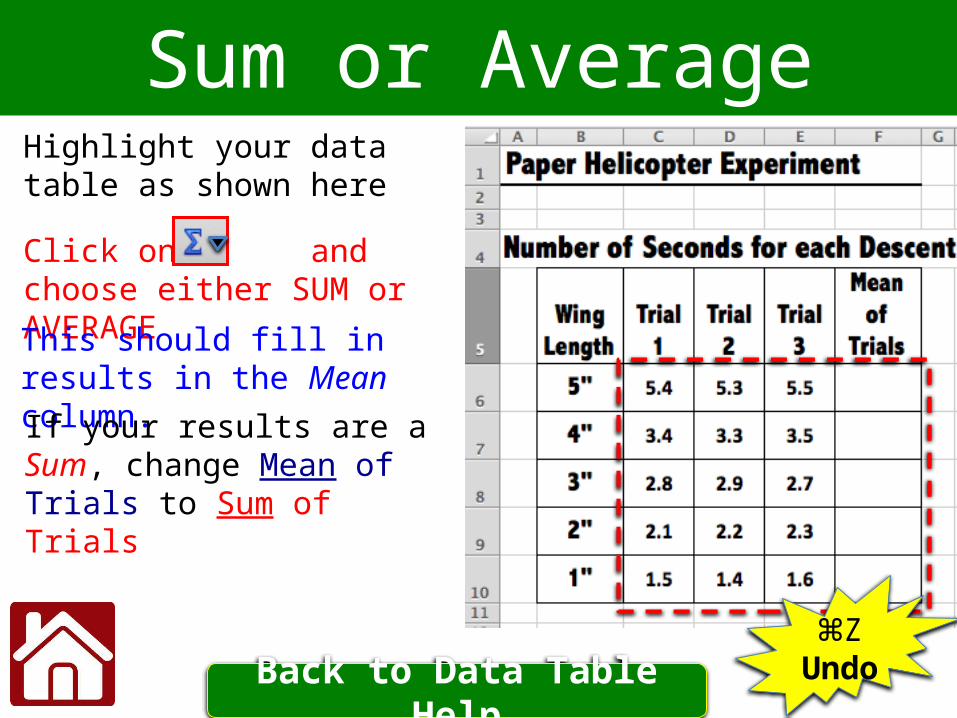
Sum or Average
Back to Data Table Help
Highlight your data table as shown here
Click on and choose either SUM or AVERAGE
This should fill in results in the Mean column.
⌘Z Undo
If your results are a Sum, change Mean of Trials to Sum of Trials
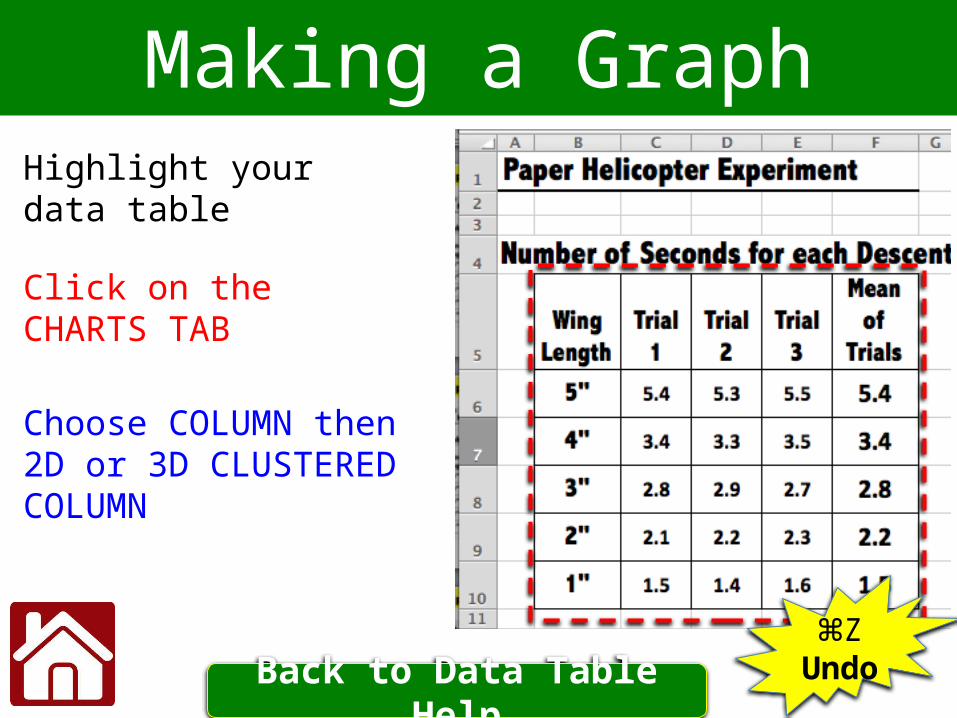
Making a Graph
Back to Data Table Help
Highlight your data table
Click on the CHARTS TAB
Choose COLUMN then 2D or 3D CLUSTERED COLUMN
⌘Z Undo

Resize and Center Graph
Click and Drag to draw a Textbox anywhere on your slide.
In it, type what you need.
Wing Length
Back to Data Table Help
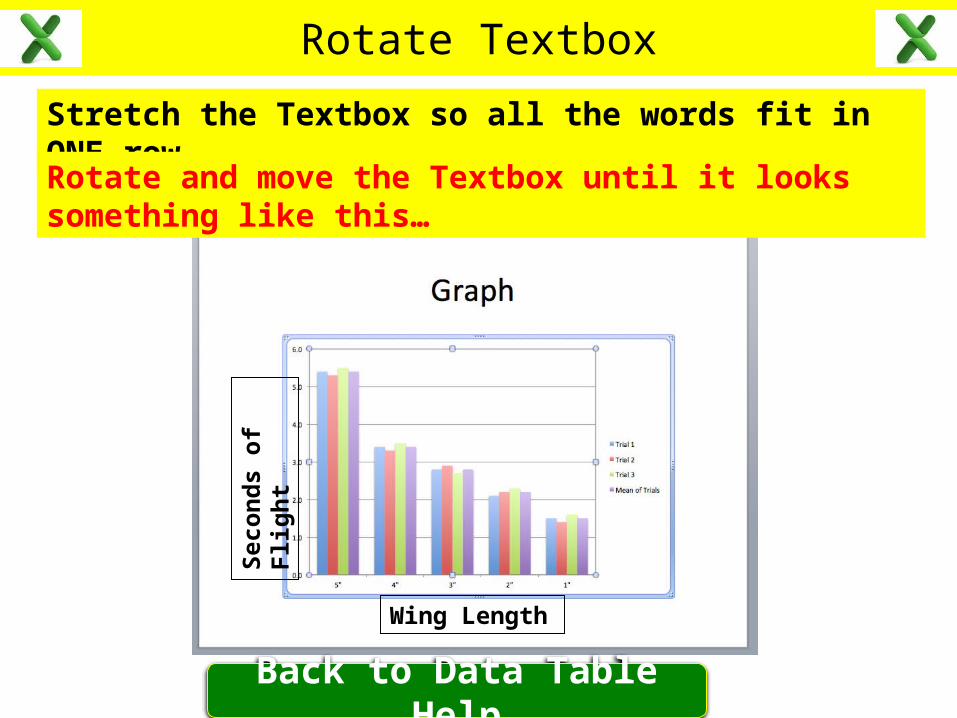
Rotate Textbox
Wing Length
Stretch the Textbox so all the words fit in ONE row.
Rotate and move the Textbox until it looks something like this…
Seco
nds
of F
light
Back to Data Table Help
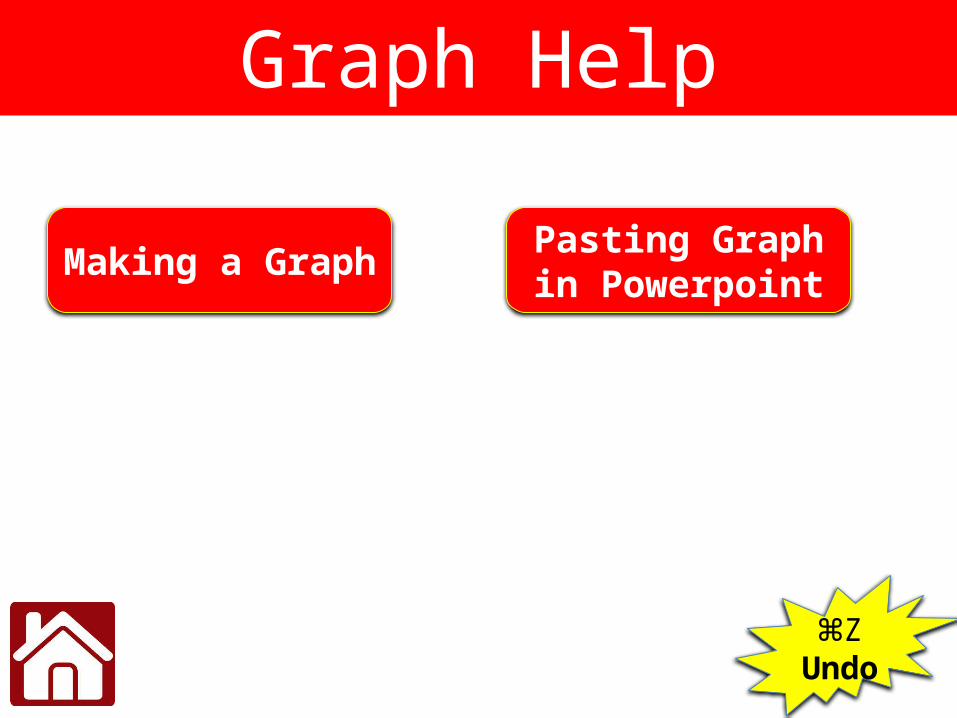
Graph Help
Making a Graph
⌘Z Undo
Pasting Graph in Powerpoint
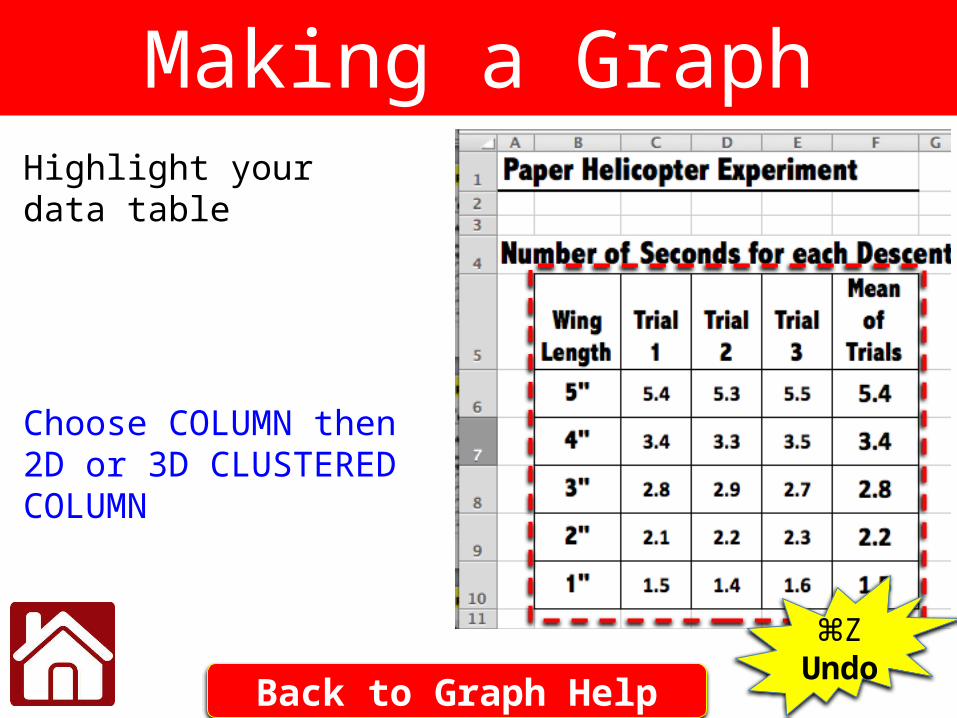
Making a GraphHighlight your data table
Choose COLUMN then 2D or 3D CLUSTERED COLUMN
⌘Z Undo
Back to Graph Help

Pasting Graph in Powerpoint
Back to Graph Help
Click on the BLUE BORDER of your Graph and COPY it ⌘C
Go to PowerPoint, click on the GRAPH slide, PASTE IT ⌘V
Choose COLUMN then 2D or 3D CLUSTERED COLUMN
⌘Z Undo