science and technology resource pack grade 6: … · science and technology resource pack grade 6:...
TRANSCRIPT

Science and Technology Resource Pack
Grade 6: Structures and Mechanisms
Motion: Motion - Go - Round
Integrated
(Integrated with other subject areas)
Pilot Edition
A RESOURCE PACKAGE FOR TEACHERS BY TEACHERS

6I – Structures and Mechanisms Pilot Edition Page 2 of 112
© 2000 Toronto District School Board Reproduction of this document for use by staff in the Toronto District School Board is encouraged. For anyone other than Toronto District School Board staff, no part of this publication may be reproduced, stored in a retrieval system, or transmitted in any form or by any other means, electronic, mechanical, photocopying, recording, or otherwise, without the prior written permission of the Toronto District School Board. This permission must be requested and obtained in writing from:
Toronto District School Board Library and Learning Resources 3 Tippett Road Tel: (416) 397-2595 Toronto, ON M3H 2V1 Fax: (416) 395-5173
Every reasonable precaution has been taken to trace the owners of copyrighted material and to make due acknowledgement. Any omission will gladly be rectified in future printings. This document has been reviewed for equity. In implementing this resource, individual teachers will model and encourage respect for racial, cultural, and language diversity. Teachers will foster inclusion by modifying activities, procedures, and materials as necessary to promote equal access and safety for all students.

6I – Structures and Mechanisms Pilot Edition Page 3 of 112
Project Leader Roland van Oostveen
Management Team Joe Hogan Brian Jeynes Sidney McKay Bev Wright
Developers Nick Azami Suzanne Gumbs-Fleming Michael Oda Prakash Singh Vijaya Balchandani Alison Gaymes-Basnett Jeff Orlando Jackie Smith Laurie Behan Mary Ann Iacobucci Sandra Alfieri Page Glen Svarich Hindy Bieler Joan Jamieson Heather Randle Lisa Sweeting Leesa Blake Catherine Kling Jodi Rees Sandy Szeto Monique Bulgin Judith Kramer Carolynn Rogers Bret Taylor Jodi Cleveland Val Krebs Kerry Russ Sandy Thompson Lina Constantini-Kefsenid Brenda Kusmenko Kelly Ryan Lorraine Vernon Barbara Cook Lisa Laliberte Stacey Sabetti Nicole Vosper Paul Cressman D. Elizabeth Lau Judit Sastre Jane Wadden Timothy Crew Catherine Little Josephine Scavuzzo Catherine Watts Jennifer Diceman Paula Marchese Paul Seaman Sean West Caroline Dobkin-Kurtz Karen Matchett-Sirota Susan Seeley Vonda Williams Debbie Donsky Bob McDonald Sandee Sharpe Margaret Wise-Hellmuth Allison Edwards Kelly McKaye Carol Sheardown Andrew Wood Marcia Freeman Suzanne Muir Elizabeth Sherk Shelly Zorzit Cherril George Peter Murphy Lynn Short Jodi Greenwood David Nelson
Project Advisors Joan Annette Geoff Day Eva Meriorg Jane Wadden Leesa Blake Barb Glassier Marilynn Pascale Rob Wager Ray Bowers Doug Hayhoe Maxine Rehder Peter Williams John Caranci Dennis Hitchmough Linda Somers
Science and Technology Resource Centre Personnel Carla Atkins Craig Hall Jeff Kemp Wendy Stainton Pam Cumming Barb Hickey
Editors, Formatters, Artwork, and General Assistance Gitta Berg Christel Kleitsch Liz Nivins Bev Wright Gail Ferreira Ng-A-Kien Karen Lawson Ken Sutton David Friend Evelyn Maksimovich Jon van Oostveen Christy Hayhoe Sandra Manley Deanne Walle
The acknowledgements recognize all staff and others who participated in the development of several Resource Packs during 1999/2000.

6I – Structures and Mechanisms Pilot Edition Page 4 of 112
TABLE OF CONTENTS
Science and Technology Expectation Sheets 6
Connections Page 9
Unit Outline 10
Unit Overview/Safety Page 13
Materials List 14
ACTIVITIES
Activity 1 Examining Motion I 16
Activity 2 Examining Motion II 18
Worksheet 2-1 20
Activity 3 Hoopla! 21
Worksheet 3-1 23
Activity 4 Cog in Motion 24
Activity 5 Classy Levers 26
Worksheet 5-1 29
Worksheet 5-2 30
Worksheet 5-3 31
Activity 6 More Cog in Motion 32
Worksheet 6-1 34
Activity 7 Scavenger Hunt 35
Worksheet 7-1 39
Activity 8 Systems & Linkages 40
Activity 9 Monotonous Rhythmic Machines 42
Activity 10 Crazy Machines! 44
Worksheet 10-1 46
Activity 11 What Do These Do? 47
Overhead 49
Worksheet 11-1 50
Worksheet 11-2 51
Activity 12 May the Force Be With You 57
Worksheet 12-1 60

6I – Structures and Mechanisms Pilot Edition Page 5 of 112
Activity 13 The Rubbing Force 61
Activity Cards 65
Worksheet 13-1 68
Activity 14 Designed to Play 69
Activity 15 Constructing Cogland 71
Worksheet 15-1 73
Activity 16 Cogland in Motion 74
APPENDICES 75

6I – Structures and Mechanisms Pilot Edition Page 6 of 112
EXPECTATIONS IN THE ONTARIO CURRICULUM
Overview:
In previous grades, students will have had many experiences observing different kinds of motion. Students in Grade 6 will learn to classify these kinds of motion as linear (e.g., a sliding door), rotational (e.g., a Ferris wheel or carousel), reciprocating (e.g., a self-inking stamp), and oscillating (e.g., a swing). They will learn to analyze and predict the motion of objects, devices, and systems by understanding the forces that act on them and that determine the magnitude, speed, and direction of movement. Students will make different mechanisms that move in different ways, and will learn how mechanisms change one type of motion to another. By observing the effects of motion, students will continue to develop their understanding of stability in systems. Students will also be introduced to the concept of kinetic energy.
Overall Expectations
By the end of Grade 6, students will: • demonstrate an understanding of different kinds of motion (linear, rotational, reciprocating,
oscillating); • design and make mechanical devices, and investigate how mechanisms change one type of
motion into another and transfer energy from one form to another; • identify modifications to improve the design and method of production of systems that have
mechanisms that move in different ways.
Expectations in the Ontario Curriculum Correlated with the Unit Activities Ministry
Code Expectations Activities that Address the Expectations
1 2 3 4 5 6 7 8 9 10 11 12 13 14 15 16
Understanding Basic Concepts By the end of Grade 6, students will:
6s81 describe, using their observations, ways in which mechanical devices and systems produce a linear output from a rotary input
x
x
x
x
6s82 describe, using their observations, the purposes or uses of three classes of simple levers
x
x
6s83 demonstrate an understanding of how linkages transmit motion and force
x
x

6I – Structures and Mechanisms Pilot Edition Page 7 of 112
Ministry
Code Expectations Activities that Address the Expectations
1 2 3 4 5 6 7 8 9 10 11 12 13 14 15 16
6s84 demonstrate awareness that a moving mass has kinetic energy that can be transferred to a stationary object
x
6s85 demonstrate awareness that friction transforms kinetic energy into heat energy
6s86 investigate ways of reducing friction so that an object can be moved more easily
x
x
Developing Skills of Inquiry, Design, and Communication By the end of Grade 6, students will:
6s87 design and make mechanical devices that change the direction and speed of an input to produce a desired output, and that perform a useful function
x
x
6s88 formulate questions about and identify needs and problems related to structures and mechanisms in the environment, and explore possible answers and solutions
x
6s89 plan investigations for some of these answers and solutions, identifying variables that need to be held constant to ensure a fair test, and identifying criteria for assessing solutions
6s90 use appropriate vocabulary, including correct science and technology terminology, in describing their investigations and observations
x
x
x
x
6s91 compile data gathered through investigation in order to record and present results, using tally charts, tables, labelled graphs, and scatter plots produced by hand or with a computer
x
x

6I – Structures and Mechanisms Pilot Edition Page 8 of 112
Ministry
Code Expectations Activities that Address the Expectations
1 2 3 4 5 6 7 8 9 10 11 12 13 14 15 16
6s92 communicate the procedures and results of investigations for specific purposes and to specific audiences, using media works, written notes and descriptions, charts, drawings, and oral presentations
x
x
Relating Science and Technology to the World Outside the School By the end of Grade 6, students will:
6s93 make use of the physical and aesthetic properties of natural and manufactured materials when designing a product
x
6s94 show awareness of the effect on a design of the unavailability of specific materials
x
6s95 write a plan outlining the different materials and processes involved in producing a product
x
6s96 identify various criteria for selecting a product
x
6s97 describe modifications that could improve the action of a variety of devices in the home
x
6s98 show an understanding of the impact of moving mechanisms on the environment and on living things
6s99 compare qualitatively the effort required to move a load a given distance, using different devices and systems
x
6s100 describe how different devices and systems have been used by different cultures to meet similar needs

6I – Structures and Mechanisms Pilot Edition Page 9 of 112
CONNECTIONS PAGE
Motion – Go - Round
Note: All expectations listed here may be found in the sections listed in the resource binder Curriculum Expectations, Grades 1–8, Ontario Ministry of Education and Training, 1998.
Language 6e21 6e32 6e33 6e44 6e61
Mathematics 6m42 6m78 6m102 6m121
Visual Arts 6a32 6a36 6a38
Health and Physical Education
6p18
Music 6a17 6a23
6I – Structures and Mechanisms Pilot Edition Page 10 of 112
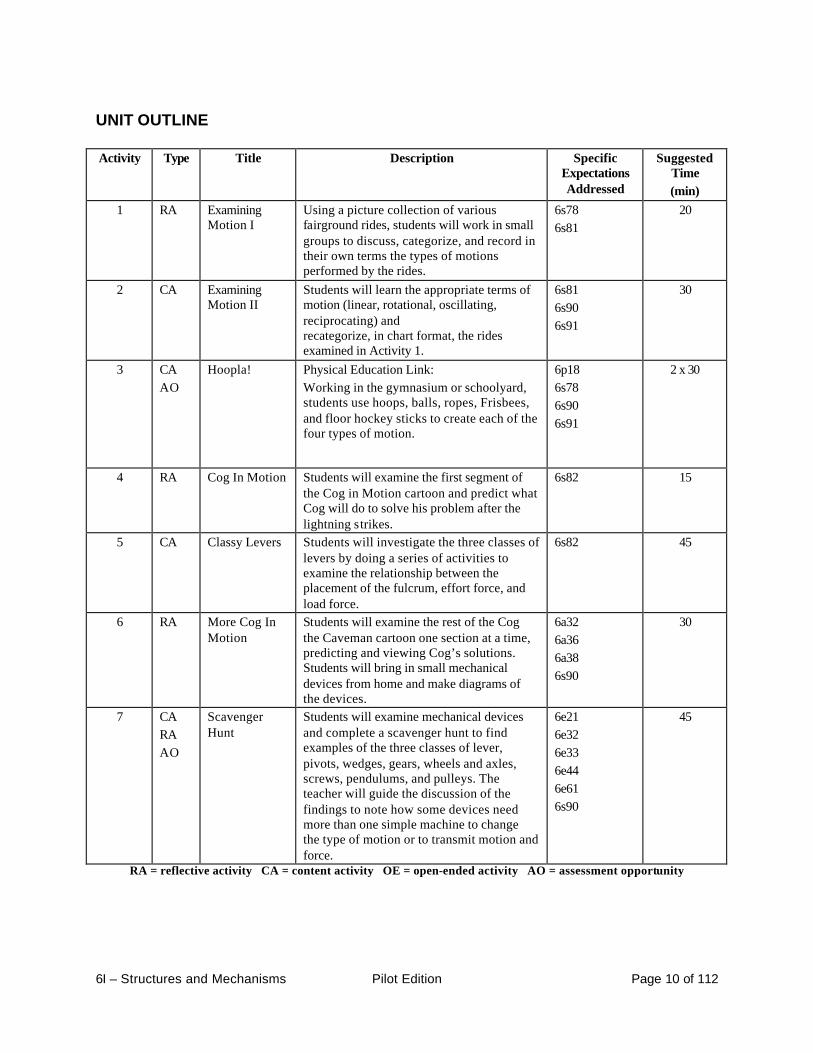
UNIT OUTLINE Activity Type Title Description Specific
Expectations Addressed
Suggested Time (min)
1
RA
Examining Motion I
Using a picture collection of various fairground rides, students will work in small groups to discuss, categorize, and record in their own terms the types of motions performed by the rides.
6s78 6s81
20
2 CA Examining Motion II
Students will learn the appropriate terms of motion (linear, rotational, oscillating, reciprocating) and recategorize, in chart format, the rides examined in Activity 1.
6s81 6s90 6s91
30
3 CA AO
Hoopla! Physical Education Link: Working in the gymnasium or schoolyard, students use hoops, balls, ropes, Frisbees, and floor hockey sticks to create each of the four types of motion.
6p18 6s78 6s90 6s91
2 x 30
4
RA Cog In Motion Students will examine the first segment of the Cog in Motion cartoon and predict what Cog will do to solve his problem after the lightning strikes.
6s82
15
5 CA Classy Levers Students will investigate the three classes of levers by doing a series of activities to examine the relationship between the placement of the fulcrum, effort force, and load force.
6s82 45
6 RA More Cog In Motion
Students will examine the rest of the Cog the Caveman cartoon one section at a time, predicting and viewing Cog’s solutions. Students will bring in small mechanical devices from home and make diagrams of the devices.
6a32 6a36 6a38 6s90
30
7 CA RA AO
Scavenger Hunt
Students will examine mechanical devices and complete a scavenger hunt to find examples of the three classes of lever, pivots, wedges, gears, wheels and axles, screws, pendulums, and pulleys. The teacher will guide the discussion of the findings to note how some devices need more than one simple machine to change the type of motion or to transmit motion and force.
6e21 6e32 6e33 6e44 6e61 6s90
45
RA = reflective activity CA = content activity OE = open-ended activity AO = assessment opportunity

6I – Structures and Mechanisms Pilot Edition Page 11 of 112
Activity Type Title Description Specific Expectations Addressed
Suggested Time (min)
8
RA CA AO
Systems & Linkages
The teacher will use two devices to demonstrate systems of machines that change one motion to another, and linkages that transmit motion and force. Students will be asked to sketch a device, then suggest improvements for it.
6a32 6a36 6a38 6e44 6s81 6s83 6s88 6s97
30
9 RA OE
Monotonous Rhythmic Machines
Music Link: Students will work in groups to create a people machine by linking together various body parts as a series of gears, levers, etc. They will add rhythmic sound effects and repetitious movement to create a rhythmical moving machine.
6a17 30
10 RA CA AO
Crazy Machines!
Language Link: In small groups, students will examine the diagram of a Rube Goldberg machine on pp. 36-37 of Science & Technology/Motion by Addison Wesley, looking for cause and effect. Students will complete a chart identifying cause and effect.
6s83
45
11 CA AO
What Do These Do?
Students will construct a simple cam, cam follower, and crank. After playing with them, the students will explain how these might be used to perform a task.
6s81 6s87
2 x 45
12 CA RA AO
May the Force Be With You
Students will be given a sheet listing eight statements about kinetic energy and force. Working in small groups, they will create tasks to determine whether these statements are true or false.
6m121 6s84 6s92 6s99
45
13 CA The Rubbing Force
Students will work in groups and rotate through stations at which they will use spring scales to measure the effects of friction on moving objects. They will make changes to surfaces to reduce or increase friction by adding lubricant, changing surface material, using ball bearings, etc.
6m102 6m42 6s86
2 x 45
14 CA Designed to Play
Music Link: Students will examine a variety of musical instruments to determine how machinery is involved in the making of music.
6a23 6m78 6s86
30
RA = reflective activity CA = content activity OE = open-ended activity AO = assessment opportunity

6I – Structures and Mechanisms Pilot Edition Page 12 of 112
Activity Type Title Description Specific
Expectations Addressed
Suggested Time (min)
15 OE RA
Constructing Cogland
SPICE Model for Design: At the end of the cartoon sequence (Activities 4 and 6), Cog sets out to create an amusement park. Cog needs help with the design and construction of rides for Cogland. Using the SPICE model, students will work in pairs to design and construct a prototype of a ride for Cogland.
6a32 6s87 6s93 6s94 6s95 6s96
5 x 45
16 RA AO
Cogland In Motion
Students will position their rides from Activity 15 in a theme park setting entitled Cogland. As they “walk” about the theme park, students will examine the rides and identify the types of motion, systems, and linkages at work. Each pair will make a 5-minute presentation of the design process and ride.
6s92 2 x 45
RA = reflective activity CA = content activity OE = open-ended activity AO = assessment opportunity
Activities that encompass Understanding Basic Concepts, Developing Skills of Inquiry, Design, and Communication, and Relating Science and Technology to the World Outside the School use the following headings:
Reflective Activities (RA) • to find out and record what the students already know at the beginning of the process • to determine what students have learned through their work with the unit. These later
reflective activities provide opportunities for meta-cognitive studies and should mirror (in some way) the initial reflective activity.
Content Activities (CA) • to relate, in unambiguous but not authoritarian ways, alternative conceptions of the concepts
under study
Open-Ended Activities (OE) • to allow the students to design their own technological solutions to problems (SPICE
methodologies) or to devise their own scientific investigations of phenomena (OLDER methodologies)

6I – Structures and Mechanisms Pilot Edition Page 13 of 112
UNIT OVERVIEW/SAFETY PAGE
Unit Overview
Through a series of cross-curricular activities, the students will build on their knowledge of motion and simple machines learned in earlier grades. They will design and construct a mechanical device that changes the direction and speed of an input to produce a desired output and that performs a useful function. Each device will be an amusement park style ride. Students will watch as Cog the Caveman accidentally learns about labour-saving devices for work, then sees the potential of these devices for play. After many explorations of kinds of motion, simple mechanical devices, systems, linkages, kinetic energy, and friction, students will design and construct a working prototype for Cog’s theme park, “
Safety Considerations • Students will be bringing in mechanical devices from home (Activities 6 and 7). Discuss safe
handling practices of sharp, pointed, heavy, and breakable objects with students before these activities.
• Students may be using construction tools in Activity 15. Instruct students on how to use tools (drills and hammers) carefully and safely before this activity. During the activity, supervise students carefully at all times.
• Check all equipment before an activity to make sure it is safe to use. • Ensure that students wear safety glasses and gloves whenever necessary.

6I – Structures and Mechanisms Pilot Edition Page 14 of 112
MATERIALS LIST
Non-Consumable Materials Included in the Resource Pack
Books • Make it Work! Machines • The Way Things Work • Machines • Science & Technology/Motion 6 (6) Other Items • carpet pieces (2) • clothesline pulley • collection of pictures of fairground rides • Cog cartoon transparencies • double-sheave pulley • hand-crank drills (2) • drill bits (3.17mm diameter) (6) • floor tile (2 pieces) • fulcrums (6 small, 1 large) • set of gears (plastic) (6) • hammers (2) • 100g hook weights (6) • Lineman’s pliers (2) • manual egg beater • marbles (15) • measuring tape • mechanical can opener • small metal toy cars (3) • nail clippers • needle-nose pliers (2) • “Newton’s Cradle” or “Hall’s Carriage” (1) • rack-and-pinion corkscrew • ramps (4) • Robertson screw driver • safety glasses (6) • single sheave pulleys (4) • spring scales (10 N - 10) • stopwatch • wooden blocks (4)

6I – Structures and Mechanisms Pilot Edition Page 15 of 112
Consumable Materials Included in the Resource Pack • aluminum foil tray • brass fasteners (2 packages) • butcher cord • corks (7) • masking tape • 2.5cm (1") finishing nails (1 box) • 5cm (2") finishing nails (1 box) • nuts and bolts (1 container) • ping-pong balls (3) • sandpaper (6 sheets assorted) • Robertson screws (1 box) • jumbo straws (1 box) • thin straws (1 box) • thumb tacks (1 box) • vegetable oil (1 bottle)
Materials Supplied by the School, Teacher, and Students (Found Materials) • balls from gym cupboard (different sizes) • cards numbered from 1 to 5 (6 sets) • chalkboard felt eraser • chart paper • construction materials as necessary • dominoes • elastic bands (box) • graph paper • hoops, skipping ropes, utility balls, frisbees, and floor hockey sticks • markers • mechanical devices brought from home • metal metre sticks with grooves • metre sticks • paint can • paper clips (2 boxes) • plastic ruler • scissors • shoeboxes or tissue boxes • tape • various musical instruments CDs • The Way Things Work (supplied by Ministry) • Eyewitness Encyclopedia of Science (supplied by Ministry) Optional Materials • dictionaries, picture dictionaries, Lego Activity Centre 9603

6I – Structures and Mechanisms Pilot Edition Page 16 of 112
ACTIVITY 1
EXAMINING MOTION I
OVERVIEW Using a picture collection of various fairground rides, students will work in small groups to discuss, categorize, and record in their own terms the types of motions performed by the rides. These motions may include: going around, circling, swaying, swinging, up and down, side to side, back and forth, etc. (20 min)
BACKGROUND INFORMATION Teacher reference: see p. 5 of Science & Technology/Motion (Ontario Edition, Addison Wesley) for explanations of the different types of motion. This book is included in the Resource Pack.
MATERIALS • picture collection* and picture books from the school library showing rides • chart paper and marker for each group *included in Resource Pack
TEACHER PREPARATION Prepare a list of rides at local theme parks, fairs, etc., which students may have experienced. Try to include rides with rotational, oscillating, linear, and reciprocating motion.
INSTRUCTIONAL STRATEGIES
Reflections
“Put Yourself on the Line” (an energizer used to group students): • Have a short discussion of various kinds of amusement park rides. Encourage students to
(briefly) share their experiences. • After discussing for a few minutes, draw an imaginary line down the centre of the room.
Have the students stand on the line according to their experience of rides, from the “I’ve been
• Start from one end of the line and number off the students to create an appropriate number of
groups with mixed levels of experience. Students will work in these groups during the Activity Time. You may wish to record the student groups in order to use the same groups in later activities.
Expectations6s78 6s81

6I – Structures and Mechanisms Pilot Edition Page 17 of 112
Activity Time • Tell students that they are going to investigate the various motions performed by amusement
park rides. • Give students some examples of rides with motion. Playground rides make good examples,
such as the seesaw, which moves up and down. Do not yet introduce the terms “linear,” “rotational,” “oscillating,” or “reciprocal.” The point of this activity is for students to form their own categories of types of motion.
• Provide each group of students with several pictures of various amusement park rides, chart paper, and markers. Instruct students to create a chart categorizing the types of motion they see. The various rides should be listed under the type(s) of motion produced.
Wrapping Up • Have students display their charts around the room. Compare each group’s categories and
placement of rides. • After a short examination of the charts, ask students to select appropriate words to describe
the different types of motion found. These terms could be something like, “rides that go around in a circle,” or “rides that move from side to side.” Print these on cards or on the chalkboard for future reference.
Building on the Experience • Ask students to perform some of the motions they observed. This will help students with
little English to understand the vocabulary being used. • Discuss other examples of each motion found from the classroom, gym, playground, and
home. For example, the hands of a clock move in a circle, and guitar strings vibrate (oscillate) back and forth when plucked.
ASSESSMENT SUGGESTIONS/STRATEGIES Observe individual contributions during the group task to assess collaborative skills and understanding of the basic concepts. A teacher-developed checklist may be helpful for tracking purposes.
6I – Structures and Mechanisms Pilot Edition Page 18 of 112
Expectations6s81
6s90 - 91 ACTIVITY 2
EXAMINING MOTION II
OVERVIEW Students will learn the appropriate terms of motion (linear, rotational, oscillating, reciprocating) and recategorize, in chart format, the rides examined in Activity 1. (30 min)
BACKGROUND INFORMATION
Teacher reference: see p. 5 of Science & Technology/Motion (Ontario Edition, Addison Wesley) for explanations of the different types of motion. This book is included in the Resource Pack. • linear: in a straight line • oscillating: swinging back and forth in an arc, like a pendulum • reciprocating: back and forth in a straight line (not an arc) • rotational: circular movement
MATERIALS • picture collection* and picture books from the school library showing rides • group charts from Activity 1 • Worksheet 2-1 *included in Resource Pack
TEACHER PREPARATION • Prepare handouts of Worksheet 2-1 (one per student). • Create a reference chart using the terms selected by the students to teach the meanings of the
appropriate terms for the four types of motion.
INSTRUCTIONAL STRATEGIES
Reflections
Using the students’ charts from Activity 1, review the types of motion found by students, and the terms for each chosen by the students.

6I – Structures and Mechanisms Pilot Edition Page 19 of 112
Activity Time • Introduce the appropriate terms of motion by matching them to the terms selected by
students, where possible. For example, if students have chosen the sentence, “rides that go around in a circle,” to designate one type of motion, this could be linked to “rotational motion.”
• Practise using the new terminology by asking students for examples of each type of motion. • Have students use the teacher-made chart as a reference. Working individually, students
should complete the chart on Worksheet 2-1 to recategorize the amusement park rides using the new terms. Have pictures and group charts available for reference.
Wrapping Up Play a version of the Suitcase Game. One student begins, “In my rotational box, I have... one Ferris wheel.” The next student must repeat, “In my rotational box, I have... one Ferris wheel and one electric beater,” adding one more item. Items do not necessarily have to be rides. Each student must try to remember the list and add one more correct item to the list. When a student is unable to repeat or add to the list, a new suitcase must be started with a different motion. Note: Examples of reciprocal motion could include a saw or an electric knife.
Building on the Experience • Ask students to develop a set of graphics using arrows to represent each type of motion, and
add these to their charts. • Have students start an individual glossary of technical terms and maintain it throughout the
unit.
ASSESSMENT SUGGESTIONS/STRATEGIES
Completed charts could be assessed to determine the student’s understanding of the basic concepts of motion and the new terms. At the end of the unit, add these charts to the portfolios.

6I – Structures and Mechanisms Pilot Edition Page 20 of 112
WORKSHEET 2-1
EXAMINING MOTION
Name: _______________________ Date: ______________________
Complete the chart given here. Use the new terms you have learned to regroup the amusement park rides you grouped in the last activity.
Amusement Park Rides Linear Motion Rotational
Motion Oscillating
Motion Reciprocating
Motion

6I – Structures and Mechanisms Pilot Edition Page 21 of 112
Expectations6p18 6s78
6s90 - 91
ACTIVITY 3
HOOPLA!
OVERVIEW Working in the gymnasium or schoolyard, students use hoops, balls, ropes, Frisbees, and floor hockey sticks to create each of the four types of motion. Students will rotate through five stations, each station having different equipment. During the last rotation, students will record their findings through sketches, photos, or video. (2 x 30 min)
MATERIALS • Worksheet 3-1 (one per student) • 2 - 3 hoops (Station 1) • 2 - 3 skipping ropes (Station 2) • 2 - 3 utility balls (Station 3) • 2 - 3 Frisbees (Station 4) • 2 - 3 floor hockey sticks (Station 5)
TEACHER PREPARATION • Prepare handouts of Worksheet 3-1 for this activity (one per student). • Place equipment in selected areas for each station. • For the last rotation, prepare recording materials (worksheets, pens or pencils, camera(s) and
film, or video camera(s)).
INSTRUCTIONAL STRATEGIES
Reflections
Review the four types of motion discussed in Activity 2. Use the terms linear, rotary, oscillating, and reciprocating. Have one or two students demonstrate each motion.
Activity Time • Explain to the students that their task is to work together at each station to find a way of
creating each of the four motions using the pieces of equipment provided. • Challenge students to find more than one solution or to find the most unique method of
creating the motions. • Remind students that they are responsible for their own safety and for that of other students
while using the equipment. • Allow 5-10 minutes for students to complete their explorations at each station. • Give a signal for students to rotate to the next station, where they will repeat the explorations
using different equipment. • During the last rotation, ask students to individually record their findings at that station by
completing the worksheet. If available, cameras could be used to take sequential pictures of each process, or actions could be recorded with a video camera.

6I – Structures and Mechanisms Pilot Edition Page 22 of 112
Wrapping Up • Have each group demonstrate its method of producing the four motions at the last station. • Discuss any problems students had in creating certain motions with particular equipment.
Ask any students who solved these problems to demonstrate their methods. • Give other students the opportunity to show any different or unique ways they found of
producing the motions using the same equipment. (If photos or videos were taken, these can be viewed at a later date.)
Building on the Experience • Add another station in which students are provided with a hoop, a rope, a ball, and a hockey
stick, and are challenged to use at least two pieces of equipment together to create each motion or combination of motions.
• Have students use the equipment to create their own game in which each of the four motions must be an integral part of the action.
ASSESSMENT SUGGESTIONS/STRATEGIES • Observe individual students as they work with their groups to assess their skills in
collaboration, participation, problem solving, and movement in the manipulation of equipment.
• Note students’ abilities to orally communicate the results of their explorations. • Examine the completed activity sheets to assess students’ comprehension and application of
the concepts, as well as their ability to communicate the results of the explorations graphically or in writing.

6I – Structures and Mechanisms Pilot Edition Page 23 of 112
WORKSHEET 3-1
HOOPLA!
Name: _______________________ Date: _______________________
At your last station, complete this worksheet. Use drawings and descriptions to show how your group created each type of motion.
LINEAR MOTION ROTATIONAL MOTION
OSCILLATING MOTION RECIPROCATING MOTION

6I – Structures and Mechanisms Pilot Edition Page 24 of 112
Expectations6s82 ACTIVITY 4
COG IN MOTION
OVERVIEW Students will examine the first segment of the Cog in Motion cartoon and predict what Cog will do to solve his problem after the lightning strikes. (15 min)
BACKGROUND INFORMATION • effort: the force applied to move a load • force: a push or pull which causes acceleration, a change in the shape of an object, or a
reaction. A force cannot be seen—only its effects can be seen. • fulcrum: the point or support about which a lever turns • lever: a bar used to lift or move heavy weights. The bar turns about a pivot or fulcrum. • load: the weight lifted or moved by a machine • machine: a device made for a special purpose to help in doing work • pivot: a rod that allows an object to rotate around it
MATERIALS • Cog in Motion cartoon (transparencies 1 & 2)* *included in Resource Pack
TEACHER PREPARATION Set up an overhead projector.
INSTRUCTIONAL STRATEGIES
Reflections
Ask students what they think a lever is and what it is used for. Have students record their initial thoughts about levers using the “Think – Pair – Share” co-operative learning strategy
Activity Time • As a class, examine the first segment of the Cog cartoon. Ask students what Cog’s problem is
(to move the rock) and why he is having difficulty (it is too heavy). • Ask students to predict what Cog might do with the debris from the trees after the lightning
strikes. After several ideas have been suggested, examine Cog’s answer to see if any of the predictions were correct.
• Elicit from the students the name of the simple machine that Cog has invented (lever) and have them explain how it works. Use the picture to introduce the terms fulcrum, load force, and effort force.

6I – Structures and Mechanisms Pilot Edition Page 25 of 112
Wrapping Up • Have the students draw their own cartoon showing a lever. Students should label the parts of
the lever as a reference for Activity 5. • As a class, make a list on the chalkboard of commonly used levers and the jobs that they do.
Some examples include nail clippers, forks, wheelbarrows, tongs, and baseball bats. (See Glossary, p. 79, for more examples.)
Building on the Experience • Have students use their rulers (lever), pencils (fulcrum), and erasers or coins (load, effort) to
explore how the position of the fulcrum relates to the balance of different masses. Ask questions such as, “Where is the fulcrum if two objects of equal mass are balanced on the lever?” and “Where is the fulcrum if one mass is heavier than the other?”
• Before starting, ask students to explain why shooting coins and erasers around the room is a safety hazard and cannot be permitted.
ASSESSMENT SUGGESTIONS/STRATEGIES
Note students’ prior knowledge of levers through the “Think Pair – Share” strategy, and through contributions to the class discussion.

6I – Structures and Mechanisms Pilot Edition Page 26 of 112
Expectations6s82 ACTIVITY 5
CLASSY LEVERS
OVERVIEW Students will investigate the three classes of levers while doing a series of activities to examine the relationship between the placement of the fulcrum, effort force, and load force. (45 min)
BACKGROUND INFORMATION
Teacher reference: see Science & Technology/Motion (Ontario Edition, Addison Wesley) pp. 24-27 for an explanation of the three classes of levers. These books are provided in the Resource Pack.
MATERIALS • Worksheets 5-1, 5-2, and 5-3 • Cog transparencies from the last activity* • 100g hook weights* (Note: If you need more, check at the Resource Centre near you.) • 6 metre sticks • 6 spring scales* • 6 fulcrums* • string • tape *included in Resource Pack
TEACHER PREPARATION • Read the background information reference. • Prepare handouts of each activity page for each student. • Be prepared to sketch a seesaw, wheelbarrow, and tongs on the chalkboard. • Put together equipment for six groups. (Each should have: 1 metre stick, 1 fulcrum,
1 spring scale, 2 100g weights, 1 set small hook weights (groups will have to share these), tape, and 2 pieces of string, approx. 15cm each.)
• If necessary, be prepared to explain how to use a spring scale to measure force.
INSTRUCTIONAL STRATEGIES
Reflections
Review the terms fulcrum, load force, and effort force using the Cog picture from the last activity.

6I – Structures and Mechanisms Pilot Edition Page 27 of 112
Activity Time • Tell the students that they will be investigating the three classes of levers. They will
determine the differences between each class of lever. They will also determine how each lever works the most efficiently.
• If necessary, demonstrate how to use the spring scale. • Instruct students to prepare three charts in their notebooks, similar to those given below.
These charts will be filled out as students complete the worksheets. • Have students follow the diagrams and written instructions on Worksheets 5-1, 5-2, and 5-3
to perform the investigations, complete the charts, and answer the questions. First-Class Lever Chart (to go with Worksheet 5-1)
Mass Needed to Balance Stick Position of Fulcrum Prediction Actual
Illustration
50cm
25cm
Second-Class Lever Chart (to go with Worksheet 5-2)
Upward Force Needed to Lift 100g Mass
Position of Mass
Prediction Actual
Illustration
50cm
25cm
75cm

6I – Structures and Mechanisms Pilot Edition Page 28 of 112
Third-Class Lever Chart (to go with Worksheet 5-3)
Upward Force Needed to Lift 100g Mass
Position of Effort
(Spring Scale)
Prediction Actual
Illustration
50cm
25cm
75cm
Wrapping Up • Have a short discussion of each group’s findings about the three classes of levers. • Sketch simple pictures of a seesaw, wheelbarrow, and tongs (these could be pre-prepared).
Ask students to match each with the correct class of lever and explain why they think it belongs to that class.
Building on the Experience • Ask the school custodians to demonstrate to the students any levers they use to do their work
around the school. Some examples could include wheelbarrows, two-wheeled dollies, or jacks.
• Find and classify as many examples of levers as possible in the classroom.
ASSESSMENT SUGGESTIONS/STRATEGIES • Observe students as they manipulate the equipment and collaborate with their partners.
Assess their comprehension of the task, ability to follow instructions, and contributions to the group investigations.
• Evaluate student responses on the worksheets for the investigations.

6I – Structures and Mechanisms Pilot Edition Page 29 of 112
WORKSHEET 5-1
CLASSY LEVERS
Name: _______________________ Date: ________________________
Procedure • Your teacher will instruct you how to prepare three charts in your notebook, one for each
type of lever. You will record your observations on these charts. • Make two small loops of string. These will be used to hang weights from the metre stick, and
to attach the spring scale. Later, you will use tape to secure the string in the correct position for each investigation.
First-Class Lever
1. Place the metre stick on the fulcrum so that the fulcrum tip is at the 50 cm mark on the metre stick.
2. Tape a loop of string at each end of the metre stick, one at the 0 cm mark and the other at the 100cm mark.
3. Hang a 100g mass on the loop at the 0 mark on the stick.
4. Predict what mass you need to hang on the other end of the stick to raise the 100g load and balance the stick. Record your prediction on the first chart you have prepared.
5. Add masses to the other end of the metre stick until the stick is balanced. Record the mass on your chart.
6. Sketch the lever showing the placement of the fulcrum. Label the Load Force and the Effort Force.
7. Remove the masses and move the fulcrum to the 25cm mark on the metre stick.
8. Repeat steps 3-6 and record your results.

6I – Structures and Mechanisms Pilot Edition Page 30 of 112
WORKSHEET 5-2
CLASSY LEVERS 2
Name: _______________________ Date: ________________________
Second-Class Lever
1. Rearrange the parts of your lever to look like the picture above.
2. Move one of the string loops to the 50cm mark of the metre stick. Secure it with tape. The end of the stick without a string loop should rest on the fulcrum at the 0cm mark.
3. Hang a 100g mass from the loop at the 50cm mark.
4. Predict the amount of force it will take to lift the weight from the end of the metre stick, at the 100cm mark. Record your prediction on the second chart you have prepared.
5. Hold the stick at the fulcrum so that it does not slip off.
6. Attach the spring scale through the loop at the far end of the stick and raise the lever to test your prediction.
7. Complete the second chart in the same way as you did the first one. Remember to include a labelled sketch.
8. Repeat steps 3-7 twice more, moving the 100g mass first to the 25cm mark and then to the 75cm mark.

6I – Structures and Mechanisms Pilot Edition Page 31 of 112
WORKSHEET 5-3
CLASSY LEVERS 3
Name: _______________________ Date: ________________________
Third-Class Lever
1. Rearrange the parts of your lever to look like the picture above. The fulcrum should be at
the 0cm mark. There should be string loops at the 50cm mark and at the 100cm mark.
2. Hang the 100g mass from the loop at the 100cm mark.
3. Predict the amount of upward force it will take to lift the weight from the 50cm mark of the metre stick.
4. Hold the stick at the fulcrum so that it does not fall off.
5. Attach the spring scale through the loop at the 50cm mark and raise the lever to test your prediction.
6. Complete the third chart in the same way as you did the other ones.
7. Repeat steps 3-6 twice more, moving the spring scale to the 25cm mark, then to the 75cm mark.

6I – Structures and Mechanisms Pilot Edition Page 32 of 112
Expectations6a32 6a36 6a38 6s90
ACTIVITY 6
MORE COG IN MOTION
OVERVIEW Students will examine the rest of the Cog the Caveman cartoon one section at a time. For each problem, students will predict how Cog might solve it using a simple machine, then view Cog’s accidental solutions. As a follow-up, students will be assigned the task of finding samples of small mechanical devices (including toys) at home. They will make labelled diagrams of two of these devices, and bring the devices in to school for Activity 7. (30 min)
BACKGROUND INFORMATION
Teacher reference: see Science & Technology/Motion (Ontario Edition, Addison Wesley), p. 21 for information on the six types of simple machines (books included in the Resource Pack).
MATERIALS • four pictures of amusement park rides • Cog cartoons on transparencies and/or in print* • Worksheet 6-1 *included in Resource Pack
TEACHER PREPARATION • Make a copy of Worksheet 6-1 for each student. • Find four pictures of amusement park rides. Choose rides that show examples of different
classes of levers, fulcrums, different kinds of motion, and load and effort forces.
INSTRUCTIONAL STRATEGIES
Reflections In a large-group setting, hold up pictures of four amusement park rides, one at a time. Ask students to describe the rides using words such as load, effort, fulcrum, classes of levers, and different kinds of motion.
Activity Time • Have students get into their groups (established in Activity 1) and number off to use the co-
operative strategy called Numbered Heads Together. • Show each cartoon sequence until the problem arises. • Have each group predict how Cog might solve the problem. One person from each group can
share the group’s ideas. • Continue with the cartoon sequence, showing Cog’s solution. Ask students to state the
solution in appropriate scientific terminology, reinforcing the vocabulary already learned. • Repeat this procedure until all of the cartoons have been viewed and discussed.

6I – Structures and Mechanisms Pilot Edition Page 33 of 112
Wrapping Up • In the large group, review the simple machines, motions, and combinations of such that Cog
used. • Assign homework: have students bring in two examples of simple devices or toys that use
levers and/or combine kinds of motion. Students should make diagrams of these devices using the worksheet for this activity.
• Review the safety issues around the safe handling of sharp, pointed, heavy, and breakable objects.
Building on the Experience
Have students prepare a list of simple machines and devices used for work that can also be used for fun. Cog discovered some of these when solving his problems.
ASSESSMENT SUGGESTIONS/STRATEGIES
When students describe Cog’s solution using the appropriate vocabulary, this will give a good indication of their understanding and application of the principles involved with levers.

6I – Structures and Mechanisms Pilot Edition Page 34 of 112
WORKSHEET 6-1
MORE MOTION
Name: _______________________ Date: ________________________
1. In the space given below, sketch two devices that use simple machines to create motion.
2. Label the parts you recognize (gear, lever, fulcrum, etc.).
3. Draw arrows to show where the Effort Force and the Load Force would be exerted. If necessary, draw more than one view of the object to show all the parts to be labelled.

6I – Structures and Mechanisms Pilot Edition Page 35 of 112
Expectations6e21
6e32 – 33 6e44 6e61 6s90
ACTIVITY 7
SCAVENGER HUNT
OVERVIEW With a partner, students will examine devices brought from home, as well as a few provided in the Resource Pack and classroom. They will complete a scavenger hunt to find examples of the three classes of lever, pivots, wedges, gears, wheels and axles, screws, pendulums, and pulleys. Part of the activity includes finding the meaning of unknown words either from other students, from a dictionary, or from a reference book. After an appropriate amount of time, students will be called together to discuss their findings and to place one example of each kind on a large class chart. The teacher will guide the discussion of the findings to note how some devices need more than one simple machine to change the type of motion or to transmit motion and force. (45 min)
BACKGROUND INFORMATION Teacher references: • See Science & Technology/Motion (Ontario Edition, Addison Wesley), p. 21 for a description
of the six simple machines, and pp. 28-29 for descriptions of combined simple machines. • The Web site http://www.fi.edu/qa97/spotlight3/spotlight3/html provides further
information. • Also see the Glossary, p. 79, under “simple machines” for common examples. • axle: a shaft or rod on which a wheel turns • gear: a toothed wheel that meshes with other gears to transmit motion or change the rate or
direction of motion. • lever: a bar used to lift or move heavy weights. The bar turns about a pivot or fulcrum. • pendulum: a mass hung from a fixed point and allowed to swing freely to and fro under the
influence of gravity • pulley: a wheel over which a rope passes in order to make lifting or pulling an object easier • ramp: a simple machine which is a sloping plane surface (inclined plane) • screw: a cylinder with a spiral ridge (inclined plane) running around the outside • simple machine: There are six simple machines: ramp (inclined plane), wedge, lever, screw,
pulley, and wheel and axle. • wedge: a device tapering to a sharp edge or point, used to split materials such as wood • wheel: a circular object that rotates on an axle in a machine

6I – Structures and Mechanisms Pilot Edition Page 36 of 112
Simple Machines

6I – Structures and Mechanisms Pilot Edition Page 37 of 112
MATERIALS • any reference books on mechanisms as listed in the Resource section of this unit (borrowed
from the school library) • any reference books from the Resource Pack* • any reference CDs from the Resource Pack and/or library • any dictionaries and picture dictionaries • devices brought from home by students • extra devices (clothesline pulley*, manual egg beater*, mechanical can opener*, nail
clippers*, rack-and-pinion corkscrew*, hand-crank drills*, set of plastic gears*, Lineman’s pliers*, needle-nose pliers*, nuts and bolts*, hammer*, scissors*, can opener*)
*included in Resource Pack
TEACHER PREPARATION • Ensure the reference material available to students clearly explains the meaning of terms
such as pulley, pivot, gear. • If you expect students to be unfamiliar with almost all the terms being used, be prepared to
give a short explanation of each. • If students have not yet done Activity 5, be prepared to give an example and diagram of the
three classes of lever (see Activity 5). • Make copies of Worksheet 7-1 for each student. • Spread out the devices brought from home and those from the Resource Pack around the
classroom so that the students are not crowded when examining them. • Leave reference material out for students to use.
INSTRUCTIONAL STRATEGIES
Reflections • Depending on the level of knowledge of the class, give a short explanation of each type of
simple machine (wedge, lever, screw, ramp, pulley, wheel, and axle). Put a simple sketch of each on the chalkboard and leave it up throughout the activity. Terms such as pendulum, gear, and pivot may be left for students to research for themselves.
• Ask students what they remember about the three classes of lever from Activity 5. Have three students draw the three classes of lever on the chalkboard.
• In a large group, play “What am I?” Read the following definitions and have students state the class of lever, simple machine, or type of motion that is being described. - My fulcrum is between the object being lifted and the force pushing down. (First-Class Lever)
- Pushing a load up me is easier than lifting it. (Ramp) - I have teeth and can mesh with others like me. (Gear) - The closer the load is to the fulcrum, the easier it is to lift with me. (Second-Class Lever - wheelbarrow)
- I am a simple machine made up of a wheel and a rope. (Pulley)

6I – Structures and Mechanisms Pilot Edition Page 38 of 112
Activity Time • Explain the scavenger hunt to students. There are three parts to the hunt, as given on the
worksheet. In Part 1, students find each item on the list and check it off. In Part 2, students choose one or more devices (depending on available time) and fill out the chart showing the simple machines contained in, and the types of motion performed by, each device. In Part 3, students write down two new terms they have learned, along with their meanings.
• Assign partners. • Hand out worksheets (one per student). Explain that each student in a partnership will record
on his or her own sheet. • Allow 20 minutes for students to carry out the scavenger hunt. If any students finish early,
tell them to go back and complete the chart in Part 2 for as many devices as possible. You may wish to have a prize for students with the most correct devices in their chart.
Wrapping Up • On chart paper, draw four large intersecting circles, and label each with a different type of
motion (linear, rotational, oscillating, reciprocal). Explain to students that this is a Venn diagram. Each circle represents a different kind of motion. Intersecting areas represent more than one type of motion.
• Have each pair of students state a mechanical device observed, then draw or write the name of the device in the appropriate circle or overlapping area on the Venn diagram.
• Tell students that some devices need more than one simple machine to change the type of motion or to transmit motion and force. Ask students to find examples.
Building on the Experience
Have students create more clues for the game “What am I?”
ASSESSMENT SUGGESTIONS/STRATEGIES • The completed worksheets will give an idea as to how well each student has understood the
concepts. • The oral explanation each pair gives for placing a device in a particular category will also
give a fair assessment of the pair’s understanding.

6I – Structures and Mechanisms Pilot Edition Page 39 of 112
WORKSHEET 7-1
SCAVENGER HUNT
Name: _______________________ Date: ___________________
Part 1
Find at least one example of each item on the list. Put a check mark next to each item when you find it.
� first-class lever � second-class lever � third-class lever � pendulum � pivot / fulcrum
� wheel & axle � pulley � screw � gear � wedge
Part 2
Device
What Is it For?
Items from List in Part 1 Found
in this Device
Types of Motion Performed by
this Device
Part 3
Write down two new terms you have learned. Find out what these terms mean. New Word I Learned Meaning of Word
6I – Structures and Mechanisms Pilot Edition Page 40 of 112
Expectations6s81 6s83 6s88 6s97
ACTIVITY 8
SYSTEMS & LINKAGES
OVERVIEW The teacher will select two appropriate devices to demonstrate systems of machines that change one motion to another (e.g., linear output from rotary input) and linkages which transmit motion and force. Students will be asked to sketch and label one device as it is. Next, students will work with a partner to determine how one of these devices could be improved or used to do a different task, and what modifications would be needed. Finally, students will sketch and label their new creation. (30 min)
BACKGROUND INFORMATION
• linkage: a system of levers that transmit motion and force
MATERIALS • paper and drawing materials for sketches
TEACHER PREPARATION Find two examples of systems of machines and have them available for all to see. For example, nail clippers have a linkage between two levers to transfer force. Screws transform rotational motion into linear motion. Rack-and-pinions also produce a linear output from a rotary input.
INSTRUCTIONAL STRATEGIES
Reflections Hold up one device that illustrates a system of machines that change one motion to another. Have students describe the motion with the appropriate vocabulary. Do the same for the next device.

6I – Structures and Mechanisms Pilot Edition Page 41 of 112
ACTIVITY TIME • Assign partners. Explain to students that partners can discuss the activity together, but each
person will complete his or her own sketches and descriptions on separate pages. • Have students sketch and label one of the two devices. Students should describe what the
device is used for. • Next, have the student pairs discuss and write down suggestions for improving this device, or
for using it to do a different task. Tell students to explain exactly what needs to be changed. • Finally, have students sketch, label, and describe the purpose of their new creation.
Wrapping Up
In the large group, have one person from each pair share a sketch of the new device and explain how it works.
Building on the Experience • Send students out in small groups to find systems of machines in the school. • Ask students to bring in pictures of devices that have systems of machines and make a class
collage out of them.
ASSESSMENT SUGGESTIONS/STRATEGIES • From the drawings and descriptions handed in by students, the teacher can note students’
skills of sketching, labelling, and use of appropriate terminology. • From the newly created device, the teacher can observe students’ understanding of how
systems of machines change one kind of motion into another.

6I – Structures and Mechanisms Pilot Edition Page 42 of 112
Expectations6a17 ACTIVITY 9
MONOTONOUS RHYTHMIC MACHINES
OVERVIEW Five students will be invited to connect in such a way as to resemble a moving train with appropriate sound effects. From this, the teacher will direct the class to conclude that the sound and movement of machinery while operating is rhythmical and repetitious. Students will then work in groups to create a people machine by linking together various body parts as a series of gears, levers, etc. They will add rhythmic sound effects and repetitious movement to create a rhythmical moving machine. At least three of the four kinds of motion should be present in each machine. (30 min)
BACKGROUND INFORMATION • monotonous: a description of sound that continues in the same tone • repetitious: repeating • rhythmical: moving with a regular beat
MATERIALS No materials are needed for this activity.
TEACHER PREPARATION • You may wish to consult with the music teacher. • Have students in mind who are likely to demonstrate a good model for the opening train
activity.
INSTRUCTIONAL STRATEGIES
Reflections In a whole-class setting, call upon five students to connect in such a way as to resemble a moving train with appropriate sound effects. Ask the class to identify the kinds of motion present and what, if anything, repeats.
Activity Time • Have students get into groups to create a rhythmic machine with sound effects. The same
groups established in Activity 1 could be used. • Explain to students that each machine should have the following:
- each member connected to the machine using various body parts - three of the four kinds of motion - appropriate repeating sound effects and motions

6I – Structures and Mechanisms Pilot Edition Page 43 of 112
Wrapping Up Call the class together and have each group demonstrate its machine. One student from each group can explain the machine using appropriate vocabulary.
Building on the Experience
Equip students with tape recorders, if possible, and have them search the school for repetitive rhythmic machines.
ASSESSMENT SUGGESTIONS/STRATEGIES
The person from each group who explains the machine can be evaluated for his or her understanding of the vocabulary and of the concepts involved.

6I – Structures and Mechanisms Pilot Edition Page 44 of 112
Expectations6s83 ACTIVITY 10
CRAZY MACHINES!
OVERVIEW In small groups, students will examine the diagram of a Rube Goldberg machine on pp. 36-37 of Science & Technology/Motion by Addison Wesley (six copies included in the Resource Pack), looking for cause and effect. Students will complete a chart where cause and effect are identified in the humorous and ridiculous set of motions that Goldberg uses to accomplish a simple task. (45 min)
BACKGROUND INFORMATION • cause: something producing a result • effect: the result of a cause; something made to happen by an event, person, or thing
MATERIALS • Worksheet 10-1 • six copies of the book Science & Technology/Motion (Ontario Edition, Addison Wesley)* • demonstration equipment, such as dominoes and a ping-pong ball* *included in Resource Pack
TEACHER PREPARATION • Make copies of Worksheet 10-1 (one per student). • Set up a little demonstration of cause and effect (e.g., set up 10 dominoes so that when the
last one falls, it causes a ping-pong ball to move).
INSTRUCTIONAL STRATEGIES
Reflections • Ask students to define the terms cause and effect. • Help direct their thoughts by doing a demonstration of an action causing a reaction (e.g., use
the dominoes and ping-pong ball as mentioned above). Identify the cause (your finger pushing over a domino) and the effect (all the dominoes fall down; a ping-pong ball moves).
• Explain to students that a linkage is when more than one lever work together in a device. Show a nail clipper as an example of linkage.

6I – Structures and Mechanisms Pilot Edition Page 45 of 112
Activity Time • Place students into six small groups. Hand out one Motion book for each group and a
worksheet for each person. • In their small groups, tell the students to examine the picture of a Rube Goldberg machine on
pp. 36-37. Ask them to note the reaction or effect caused by each action. • Have each student in the group complete his or her own chart of cause and effect on the
worksheet. Tell students to look for linkages that transmit motion and force.
Wrapping Up In the large group, ask students how they would alter the Goldberg machine, and how they would build their own machine.
Building on the Experience Have students design on paper and/or create their own Rube Goldberg machine. Suggestions for such machines are found on pp. 38-39 in the Science & Technology/Motion book.
ASSESSMENT SUGGESTIONS/STRATEGIES
The completed worksheet will show each group’s understanding of cause and effect and of how linkages transmit motion and force.

6I – Structures and Mechanisms Pilot Edition Page 46 of 112
WORKSHEET 10-1
CRAZY MACHINES!
Name: _______________________ Date: ________________________
Look at pp. 36-37 of the Science & Technology/Motion book. Check out the series of actions in the Rube Goldberg machine illustrated here. Fill in the rest of the diagram below showing the causes and effects that make the machine work. Each action needs to be listed only once, since each effect is also the next cause.

6I – Structures and Mechanisms Pilot Edition Page 47 of 112
Expectations6s81 6s87
ACTIVITY 11
WHAT DO THESE DO?
OVERVIEW Students will follow written instructions and diagrams to construct a simple cam, cam follower, and crank. Each working model will be mounted in a small box. After playing with them, the students will explain how these models might be used to perform a task (e.g., release a hammer to break an egg). (2 x 45 min)
BACKGROUND INFORMATION • cam: a fixed wheel with one or more projections or an off-centre axle that converts rotary
into reciprocal motion • cam follower: a rod that sits on a cam and is moved back and forth by the motion of the cam
as it rotates • crank: rod attached to a wheel by a pivot; used in the conversion of rotary motion to
reciprocal motion • pivot: a rod that allows an object to rotate around it • reciprocal: (reciprocating) back and forth in a straight line • rotary: (rotational) circular movement
MATERIALS • transparencies of instructions and diagrams (overhead, Worksheets 11-1 and 11-2) • a shoebox or tissue box for each student • jumbo drinking straws* • cardboard from cardboard boxes (both heavy and lighter cardboard) • a box of paper clips • scissors • tape • rulers • copies of Worksheets 11-1 and 11-2 for each student.
TEACHER PREPARATION • Make your own sample of the model so that you are able to help the students when they are
having difficulty. • Copy the worksheets onto transparencies. • Make copies of all the worksheets for students and staple them together. • Have students bring in a small box, either a shoebox or a tissue box, and any size cardboard
box (not a cereal box). • Set out the construction materials on a table or series of desks. • Be prepared to explain the terms cam, cam follower, and crank to students. Use the diagrams
provided on the blackline master, the overhead, and the worksheets.

6I – Structures and Mechanisms Pilot Edition Page 48 of 112
INSTRUCTIONAL STRATEGIES
Reflections
As a whole class, look at the transparencies of the diagrams of the machine on the overhead (Overhead, Worksheet 11-1). Ask students to guess how the machine works.
Activity Time • Introduce the class to the terms of cam, cam follower, and crank. Help students to identify
them in the diagrams. • Tell the class that it is now their turn to construct their own machine. • As a class, read the list of instructions from the transparencies on the overhead projector.
Discuss any instructions that are not understood by students. • Allow students to work alone or with a partner. • Instruct students to gather the materials they will need. Each student should have
one shoebox or tissue box, three straws, heavy cardboard for wheels, lighter cardboard for rod, crank, and bracket, two paper clips, scotch tape, scissors, and a ruler. Each student should also have his or her own set of instructions and diagrams.
• Once students have completed their model, ask them to think of a way their model could be part of a larger machine that performs a particular task. Encourage students to be imaginative.
Wrapping Up • Call the class together. Have students assemble in small groups with their models before
them. (The groups established in Activity 1 could be used again here.) • Use the “Numbered Heads Together” strategy to have students answer the following types of
questions. -What happens when an axle is placed closer to the edge of a wheel? -What motion can be created when this happens? -In what machines is a cam used? -In what machines are a drive wheel and crank used?
Building on the Experience • The sewing machine is a good example of cams and cranks at work along with other
mechanisms. Ask students to research on such a machine, exploring the history and evolution of the invention.
• Have students design a Rube Goldberg-type machine with cams, cam followers, and cranks.
ASSESSMENT SUGGESTIONS/STRATEGIES Many observations can be made throughout the construction and diagrams drawn of the mechanical device. Notes can be taken on the following: • the student’s willingness to persevere with a complex task • the student’s skill of following written directions • the carefulness with which the device is constructed • whether or not the device works • the student’s creativity when extending the basic device

6I – Structures and Mechanisms Pilot Edition Page 49 of 112
ACTIVITY 11 – OVERHEAD

6I – Structures and Mechanisms Pilot Edition Page 50 of 112
WORKSHEET 11-1
WHAT DO THESE DO?
Name: _______________________ Date: ________________________
Procedure
Carefully examine the two views of the machine below. 1. In view 1, you see a simple version of a cam and a cam follower. What do you think
happens when the horizontal straw is rotated?
2. In view 2, you see a drive wheel, crank, and rod. What do you think happens when the drive wheel is rotated?
Use the diagrams and follow the directions to build your own working model and see if your predictions were correct.

6I – Structures and Mechanisms Pilot Edition Page 51 of 112
WORKSHEET 11-2
CONSTRUCTION PAGE 1
Materials and Tools Needed • 1 shoebox or Kleenex box • 3 straws • heavy cardboard for wheels • lighter cardboard for rod, crank, and bracket
• 2 paper clips • scotch tape • scissors • ruler
To Construct a Cam and Cam Follower 1. Cut two circles out of heavy cardboard. One should be about 5 cm in diameter, the other
about 6 cm in diameter.
2. In the small circle, use scissors to poke a hole 1 cm from the edge. Make the hole large enough for a straw to fit through snugly.
3. Slide one straw through the hole. The straw is your axle, and the circle is your cam. (After your machine is assembled and adjusted properly, you may wish to tape the straw to the circle so that it does not slide.)
4. In the larger circle, use scissors to poke a hole in the centre large enough for a straw.
5. Take another straw and snip one end to make four slits.
6. Slide the straw into the hole of the circle. Bend back the four tabs and tape the straw securely to the large circle. This is your cam follower.
WORKSHEET 11-2 CONTINUED à

6I – Structures and Mechanisms Pilot Edition Page 52 of 112
CONSTRUCTION PAGE 2
7. Look at view 1 of the machine on Worksheet 11-1. You will be poking holes in the sides of your box to fit the horizontal straw (the axle you made in Step 3) through. Measure down from the sides of the box and in from the edges to make sure that the horizontal straw (the axle) will be straight. Make marks on the sides of the box where you will poke holes.
8. Poke holes in your box for the horizontal straw (the cam axle). Make the holes just large
enough for your straw to turn easily without being too loose.
9. Poke a hole in the top of the box. It should be the same distance back from the edge as you used for the side holes. This will make sure that the cam follower will sit right on top of the cam.
10. Slide the straws into the holes from the inside of the box.
WORKSHEET 11-2 CONTINUED à

6I – Structures and Mechanisms Pilot Edition Page 53 of 112
CONSTRUCTION PAGE 3
11. Cut the third straw in half. This will make a handle to turn the axle. Bend the straw twice to
look like this.
12. Pinch the longer end slightly and slide it into the end of the axle sticking out of the box.
13. Turn the handle and try your machine. Fix the placement of the parts so that it works well. Can you figure out a way to keep the cam axle from sliding out of position?
WORKSHEET 11-2 CONTINUED à
6I – Structures and Mechanisms Pilot Edition Page 54 of 112
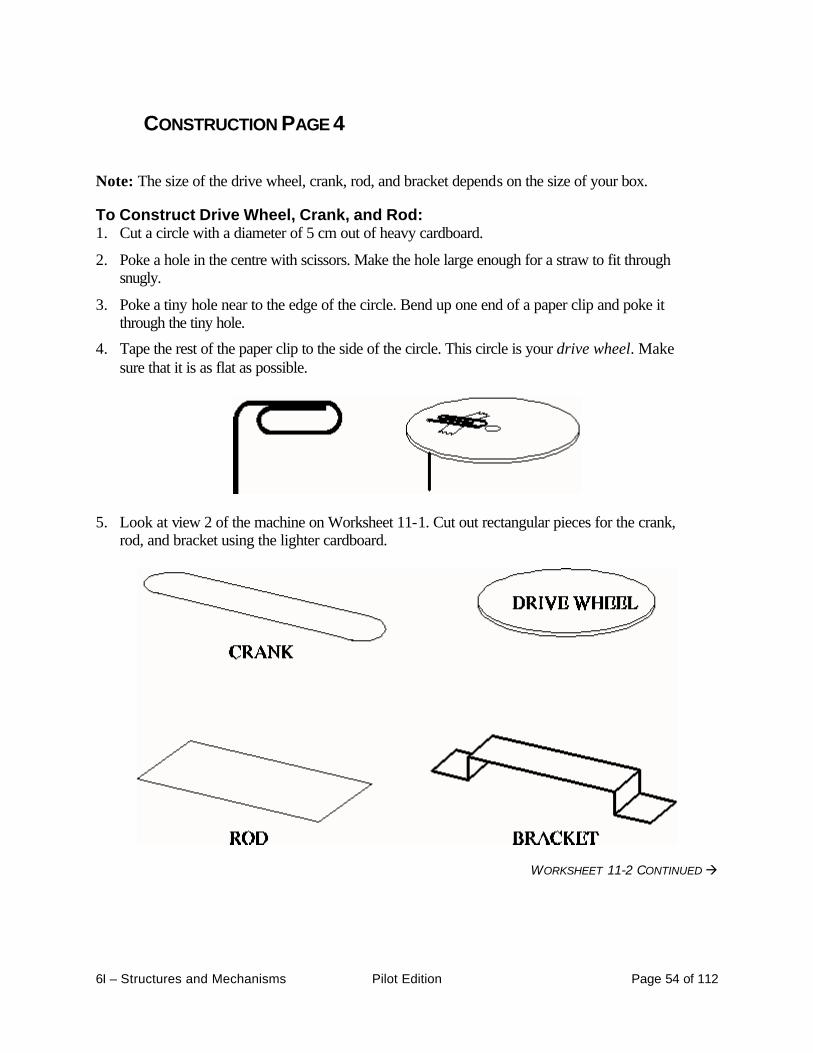
CONSTRUCTION PAGE 4
Note: The size of the drive wheel, crank, rod, and bracket depends on the size of your box.
To Construct Drive Wheel, Crank, and Rod: 1. Cut a circle with a diameter of 5 cm out of heavy cardboard.
2. Poke a hole in the centre with scissors. Make the hole large enough for a straw to fit through snugly.
3. Poke a tiny hole near to the edge of the circle. Bend up one end of a paper clip and poke it through the tiny hole.
4. Tape the rest of the paper clip to the side of the circle. This circle is your drive wheel. Make sure that it is as flat as possible.
5. Look at view 2 of the machine on Worksheet 11-1. Cut out rectangular pieces for the crank,
rod, and bracket using the lighter cardboard.
WORKSHEET 11-2 CONTINUED à

6I – Structures and Mechanisms Pilot Edition Page 55 of 112
CONSTRUCTION PAGE 5
6. Poke tiny holes at each end of the crank. You will be attaching paper clips as pivots.
7. Poke a small hole in one end of the rod and attach another bent paper clip in the same manner as in steps 3 and 4.
8. Put the parts together by sliding the paper clip ends through the holes in either end of the crank. One end of the crank will attach to the paper clip on the drive wheel. The other end will attach to the paper clip on the rod. Bend the paper clips slightly to keep the crank from falling off. It must stay loose enough to rotate freely.
9. To attach this system to the machine, snip the ends of the axle straw that’s sticking out of the
side of the box to make tabs (as you did with the cam follower).
10. Gently push the drive wheel onto the axle until the tabs poke through. Bend them back and tape them to the wheel as smoothly as possible.
WORKSHEET 11-2 CONTINUED à

6I – Structures and Mechanisms Pilot Edition Page 56 of 112
CONSTRUCTION PAGE 6
11. Bend the cardboard bracket into shape and tape it to the box as a guide for the rod.
12. Use the handle to turn the axle and try your machine. You may need to make adjustments for
your machine to work smoothly.

6I – Structures and Mechanisms Pilot Edition Page 57 of 112
Expectations6m121 6s84 6s92 6s99
ACTIVITY 12
MAY THE FORCE BE WITH YOU!
OVERVIEW Students will be given a sheet listing eight statements about kinetic energy and force. Working in small groups, they will create tasks to determine whether these statements are true or false. The students will use only the equipment designated for their group. Each student will complete an activity log of the investigations by the group. At the end of the investigations, each group will be asked to defend, by demonstration and with words, why one of the statements is true or false. (45 min)
BACKGROUND INFORMATION • force: a push or pull which causes acceleration, a change in the shape of an object or a
reaction. A force cannot be seen, only its effects can be seen. • kinetic energy: the energy an object has when it is in motion. The faster the motion, the
greater the kinetic energy. • mass: a measure of the amount of matter or material in an object • stationary: not moving Answers to Worksheet 12-1 1-T, 2-T, 3-F, 4-T, 5-T, 6-F, 7-T, 8-F
MATERIALS • marbles* • 3 small metal toy cars* • 2 metal metre sticks with grooves • elastics • dominoes • 3 ping-pong balls* • Newton’s Cradle*
• two sizes of balls from the gym cupboard (3 balls in total)
• 6 sets of cards with numbers 1 to 5 on each card
• pen and paper for each student • Worksheet 12-1
*included in Resource Pack
TEACHER PREPARATION • Be prepared to explain the terms force, mass, and kinetic energy. • Have the materials ready for the equipment manager of each group to pick up what is needed. Group 1 – marbles and metal metre sticks with grooves
Group 2 – 3 small metal toy cars Group 3 – dominoes Group 4 – elastics and 3 ping-pong balls
Group 5 – Newton’s cradle Group 6 – two sizes of balls (3 balls in total)

6I – Structures and Mechanisms Pilot Edition Page 58 of 112
• Make copies of Worksheet 12-1 for each student. • Make a transparency of Worksheet 12-1. • Set up the overhead projector. INSTRUCTIONAL STRATEGIES
Reflections • Place students in small groups. Appoint an “equipment manager” for each group to be in
charge of materials. • With the students sitting in small groups, ask, “What happens when a moving object hits a
• Give each group one of the sets of numbered cards. Have each group member take a number. • Ask each person in the group to share a personal story with the group that illustrates his or
her answer to the question. Start with the student holding the highest number and continue in order. Students could be given the right to pass if this is a practice the class does on a regular basis.
Activity Time • Ask students to define the terms force, mass, and kinetic energy. If they can’t give
satisfactory replies, explain the terms. Give as many real examples as you can to help illustrate the terms.
• With the students sitting in small groups, put the overhead on. Read a statement from the list of eight true or false statements on the worksheet. Tell students that it will be their job as part of a group to discuss each statement and check it True or False.
• Tell students that after predicting the answer, they will design a method of proving each statement using the equipment assigned to their group.
• Explain that each student needs to record what the group decided and did to come to a conclusion for each statement.
• Ask students from each group to describe how they will use the equipment in their group safely.
• Ask the equipment manager of each group to get the group’s equipment. Hand out Worksheet 12-1 to each student.
• Let the students get to work.
Wrapping Up As a whole class, but with the students still sitting in their investigation groups, take up the student True or False page on the overhead projector. Have each group explain an answer for at least one of the statements, backing up the answer with a demonstration using the group’s equipment.

6I – Structures and Mechanisms Pilot Edition Page 59 of 112
Building on the Experience • Have students research how energy is transferred in circus acts. • Have students make their own Newton’s cradle. • Have students research how kinetic energy changes into electric energy. • Have students research how a skilful pool player makes use of kinetic energy. • Have students do research on Isaac Newton.
ASSESSMENT SUGGESTIONS/STRATEGIES
The presentation given by each group should give a clear indication of how the group understood the concepts and was able to check this understanding.

6I – Structures and Mechanisms Pilot Edition Page 60 of 112
WORKSHEET 12-1
MAY THE FORCE BE WITH YOU!
Name: _______________________ Date: ________________________
1. Read each statement with your group and mark it True or False in the Before Testing column.
2. With your group, decide how to test each statement using your equipment. You may not have time to test all the statements, but discuss and test at least five.
3. As you find an answer through your testing, mark each statement True or False again in the After Testing column.
4. Compare your Before Testing and After Testing answers.
Before Testing
T/F
Statements About Kinetic Energy After Testing
T/F 1 A moving mass has kinetic energy which can be
transferred, or passed on, to a stationary (not moving) object.
2 The more mass a moving object has, the more kinetic energy it can transfer to a stationary (not moving) object.
3 A stationary object of greater mass cannot be moved by a moving object with less mass.
4 An object will keep moving if no other force acts on it to stop it.
5 When two objects of equal mass and force going in opposite directions collide, all motion stops.
6 When two objects collide at an angle, the object with greater mass does not change direction.
7 A force applied to an object moves the object in the same direction as the force.
8 When two objects of the same material, but different mass, collide with a third object, they both change direction and travel an equal distance.

6I – Structures and Mechanisms Pilot Edition Page 61 of 112
Expectations6m42
6m102 6s86
ACTIVITY 13
THE RUBBING FORCE
OVERVIEW Students will work in groups and rotate through stations at which they will use spring scales to measure the effects of friction on moving objects. They will make changes to surfaces to reduce or increase friction by adding lubricant, changing surface material, using ball bearings, etc. Students will then record quantitative results as appropriate to the activity. (2 x 45 min)
BACKGROUND INFORMATION • ball bearings: loose steel balls in a track that change sliding friction into rolling friction • friction: the resistance to motion between two surfaces moving over each other. If
the moving force is not strong enough, friction prevents motion. • lubricant: a substance used between two moving parts to reduce friction • ramp: a simple machine which is a sloping plane surface (inclined plane) • resistance: a force which opposes a change in motion or shape • spring scale: an instrument for measuring weight (force). The force of an object stretches
the spring and the weight is read on the scale.
MATERIALS • ramps* • aluminium foil tray* • clothesline pulley* • elastic bands • marbles* • sandpaper* • 4 spring scales* • masking tape* • carpet pieces* • pencil eraser • measuring tape* • plastic ruler • paint can • chalkboard felt eraser • vegetable oil* • graph paper • floor tiles* • Worksheet 13-1 • stopwatch* • Activity Cards • wooden blocks* • string *included in Resource Pack
TEACHER PREPARATION • Make copies of the Activity Cards for each student. Alternately, you may wish to make only
one copy of the Activity Cards, cut them in half, and laminate them as station cards, leaving one at each station for all students to use. If you do this, make sure students record their steps in sufficient detail on Worksheet 13-1.
• Be prepared to explain the term friction. • If necessary, be prepared to explain how to use a spring scale to measure force. • Have the materials ready for each station.

6I – Structures and Mechanisms Pilot Edition Page 62 of 112
Station 1 - aluminum foil tray, vegetable oil, water, block with eye hook, spring scale Station 2 - 10 marbles, paint can, a large heavy book, spring scale Station 3 - ramp, carpet piece, floor tile, block with eye screws, spring scale Station 4 - ramp, block with eye screw, spring scale Station 5 - ramp, block with eye screw, stopwatch, sandpaper, 3 elastic bands Station 6 - clothesline pulley, pencil eraser, ruler, chalkboard felt eraser
INSTRUCTIONAL STRATEGIES
Reflections • Ask the class to describe the difference between sliding down a playground slide in shorts
and sliding down in long pants. Have one student explain why there is a difference. Attempt to draw out the word friction if it doesn’t come readily.
• If students are unfamiliar with the term friction, explain it. • Tell students that today’s activity will explore how friction affects the kinetic energy of a
moving object.
Activity Time • Hand out Worksheet 13-1. All students will record their results on these sheets. Hand out the
other Activity Cards. Have each group go to a station. • Have each group follow the instructions on each station card. After an appropriate amount of
time (5-10 minutes), give a signal for students to rotate to the next station. Have students rotate in a clockwise manner.
• The first three stations require students to draw graphs. Depending on how much time is available, you may wish to have students complete the graphs afterward, or as homework. Make sure graph paper is available to students as needed. Blank sample graphs are shown on the next page.

6I – Structures and Mechanisms Pilot Edition Page 63 of 112
Activity 13 Sample Graphs

6I – Structures and Mechanisms Pilot Edition Page 64 of 112
Wrapping Up After each group has completed the entire circuit, ask each group to suggest ways in which to improve the functioning of a bicycle, Rollerblades, a toboggan, etc.
Building on the Experience • Have students go out into the playground and go down a slide whilesitting on different
surfaces. Ask them to determine which surface works the best, and why they think it does. Some examples of surfaces could include plastic bags, fabric, and cardboard.
• Have students explore how the brakes on their bicycles work all the way from the handlebar to the rim.
• Ask students to explore how changing the shape of an object can reduce or increase friction.
ASSESSMENT SUGGESTIONS/STRATEGIES • Worksheet 13-1 will indicate how well the student has recorded the data, using the
appropriate terms of measurement and labels for the graphs. • The suggestions that groups make during the wrap-up will give some indication of the
understanding each group has of friction and reasons and ways to reduce or increase it.

6I – Structures and Mechanisms Pilot Edition Page 65 of 112
ACTIVITY CARDS
STATION 1: LUBRICANTS CARD 1
Materials • 1 aluminum tray • wooden block • water • spring scale • vegetable oil
Method 1. Place the wooden block at one end of the foil tray. 2. Attach the spring scale to the hook on the block and drag the block across the tray. 3. Read the scale to determine the amount of force needed to move the block as you drag it.
Record this on Worksheet 13-4. 4. Pour enough water into the tray to just cover the bottom. Drag the block again. 5. Measure and record the force needed. 6. Remove the water from the tray and replace it with a coating of vegetable oil. 7. Drag the block once more. 8. Measure and record the force needed. 9. Draw a labelled bar graph showing the force needed to move the block using different
lubricants (none, water, vegetable oil). Your x-axis should be Lubricants and your y-axis should be Force Needed (N).
STATION 2: BALL BEARINGS CARD 2
Materials • large paint can • 10 marbles • heavy book • spring scale
Method 1. Place the book on top of the paint can. 2. Carefully hook the spring scale over the spine or cover of the book and gently pull to turn
the book on the can. 3. Read the spring scale as you pull, and note the amount of force needed to turn the book.
Record this on Worksheet 13-4. 4. Remove the book and place five marbles into the rim on top of the can. 5. Put the book on top and turn it again with the scale. Measure and record the amount of
force required. 6. Repeat with 10 marbles on the can. Measure and record the amount of force required. 7. Keep measuring force, using a different number of marbles each time. Use your data to
draw a line graph with Number of Marbles on the x-axis and Force Needed (N) on the y-axis.

6I – Structures and Mechanisms Pilot Edition Page 66 of 112
ACTIVITY CARDS CONTINUED
STATION 3: SURFACE MATERIALS CARD 3
Materials • ramp • wooden block • floor tile • spring scale • square of carpet
Method 1. Set up the ramp to make a steep incline. 2. Place the wooden block at the bottom of the ramp. 3. Attach the spring scale and drag the block slowly up the ramp. Note the amount of force
needed to drag the block to the top. Record this on Worksheet 13-4. 4. Place the square of floor tile on the ramp. 5. Slowly drag the block to the top again. Measure and record the amount of force required. 6. Replace the floor tile with the square of carpet and drag the block once more. Measure and
record the force needed. 7. Use your data to draw a bar graph, showing the amount of force needed to drag a block
on each type of surface (plain, floor tile, and carpet). Your x-axis should be Type of Surface and your y-axis should be Force Needed (N).
STATION 4: MODIFY THE OBJECT CARD 4
Materials • ramp • wooden block • elastic band • spring scale
Method 1. Set up the ramp to make a steep incline. 2. Place the block at the bottom of the ramp so that the block is lying on its largest surface. 3. Attach the spring scale and slowly drag the block to the top. Read the scale as you drag the
block, and note the amount of force needed to move the block. Record this on Worksheet 13-4.
4. Place the block on its narrow side and drag it to the top again. Measure and record the amount of force required.
5. Wrap an elastic around the block close to the end without the screw eye. Hook the scale to the elastic.
6. Set the block on end and drag it to the top once more. Measure and record the amount of force required.

6I – Structures and Mechanisms Pilot Edition Page 67 of 112
ACTIVITY CARDS CONTINUED
STATION 5 : SLOW DOWN CARD 5
Materials • ramp • wooden block • elastics • tape • sandpaper • stopwatch
Method 1. Set up the ramp to make a very steep incline. 2. Place the block at the top and let it slide down the ramp. Use the stopwatch to measure the
amount of time it takes the block to reach the bottom. Record this on Worksheet 13-4. 3. Tape the sandpaper to the bottom of the block and let it slide down again. Time it and
record the number of seconds it took the block to reach the bottom. (Be sure to use the same starting and ending places.)
4. Remove the sandpaper and wrap three elastics around the block. Let it slide down once more. Time and record the results.
STATION 6 : STOP CARD 6
Materials • clothesline pulley • felt chalkboard eraser • plastic ruler • pencil eraser
Method 1. Spin the pulley as fast as you can. Place the felt edge of the chalkboard eraser on the flat
side of the wheel and press gently until the wheel stops spinning.
2. Spin the pulley again using the same amount of force. Place the end of the plastic ruler on the wheel in the same place as the brush, and press gently until the wheel stops.
3. Repeat, using the pencil eraser as a brake to stop the pulley.
4. Use a star rating to show braking efficiency. Give three stars to the best brake, two to the second best, and one star to the worst. Record the results on Worksheet 13-4.

6I – Structures and Mechanisms Pilot Edition Page 68 of 112
WORKSHEET 13-1
STUDENT RECORDING SHEET
Name: _______________________ Date: ________________________ Use this sheet to record your observations at each station.
1. Draw a picture of what you did at each station. If you run out of space, use the back of this sheet.
2. Beside your drawing, record the force needed for each test you did. Don’t forget to explain exactly what you did for each force measurement!
Station 1: Lubricants
Station 2: Ball Bearings
Station 3: Surface Materials
Station 4: Modify the Object
Station 5: Slow Down
Station 6: Stop

6I – Structures and Mechanisms Pilot Edition Page 69 of 112
Expectations6a23 6m78 6s86
ACTIVITY 14
DESIGNED TO PLAY
OVERVIEW Students will examine a variety of musical instruments to determine how machinery is involved in the making of music. Some examples include trumpet valves, rotary valves on the French horn, the series of levers on clarinet and flute, tuning pegs on stringed instruments, and hammers on piano strings. The music or classroom teacher will demonstrate how lubricants such as valve oil, slide oil, and cork grease are used in these instruments. (30 min)
BACKGROUND INFORMATION • lubricant: a substance used between two moving parts to reduce friction
MATERIALS • trumpet • flute • French horn • snare drum • clarinet • piano • ukulele or guitar *included in Resource Pack
TEACHER PREPARATION • Collect the instruments or plan on taking the class to the music room. • Ask the music teacher to assist with this activity or act as a consultant. • Have the lubricants ready for a demonstration.
INSTRUCTIONAL STRATEGIES
Reflections Ask students to brainstorm for mechanical devices they might expect to find in musical instruments.
Activity Time • Piston valve: Remove one valve from a trumpet. Ask students to explain how they think the
valve works. Draw attention to the need for a lubricant as the metal valve moves within the metal casing.

6I – Structures and Mechanisms Pilot Edition Page 70 of 112
• Rotary valve: Take the cap off the French horn and have students note the motion when the
lever is pressed. It may also be visible from the outside. • Linkages: Demonstrate how the keys on a clarinet are linked and cause others
to go down when one is pressed or released. Ask students which class of lever is used.
• Gears/Screws: Turn a peg on a guitar and tell students to observe the rotary motion. Pluck the string to demonstrate kinetic energy and the transference of energy from the linear motion of your finger to the oscillating motion of the string.
• Hammers: Open the lid or front of the piano and strike a key to demonstrate a transfer of kinetic energy.
• Allow students to examine the musical instruments, looking for more simple machines.
• Ask students to tell and record the purpose of each type of simple machine.
Wrapping Up Body sculpture: • Place students into small groups. • Instruct each group to connect and form a sculpture of one instrument. Each
sculpture should also demonstrate the actions of the group’s particular instrument.
• Allow practice time, then ask each group to demonstrate the instrument.
Building on the Experience Ask students to categorize other instruments from school and home into the classifications used in the activity: hammers, gears, linkages, rotary valves, and piston valves.
ASSESSMENT SUGGESTIONS/STRATEGIES
Observe informally the vocabulary used in the discussions by individual students and the mechanical systems demonstrated in the sculpting activity.

6I – Structures and Mechanisms Pilot Edition Page 71 of 112
Expectations6s87
6s92 - 96 ACTIVITY 15
CONSTRUCTING COGLAND
OVERVIEW In the cartoon sequence (Activities 4 and 6), Cog realizes that all work and no play makes Cog a dull man. At the end of the sequence, he sets out to create an amusement park. Cog needs help with the design and construction of rides for Cogland.
Using the SPICE model, students will work in pairs to design and construct a prototype of a ride for Cogland. The ride must incorporate linkages and/or systems to produce the desired motion safely. After doing some investigations with their partners, students will draw up sketches of their preliminary ideas and concepts and pick the best idea to develop on the planning sheet. Upon approval of a plan, the pair will construct, test, and make changes as needed. Upon completion, the student partners will use the rubric on the Evaluation Page and reflect on how well the requirements were met. (5 x 45 min)
MATERIALS • dependent upon the design of each partner group • students are free to bring in items from home to add variety to the kinds of materials
available for use • Worksheet 15-1 • any other useful construction materials (handcrank drills,* drill bits,* corks,* nails,*
hammers,* safety glasses,* nuts and bolts,* elastics, cord*) *included in Resource Pack
TEACHER PREPARATION • Familiarize yourself with the SPICE model (see Appendices, pp. 103 and 105). • Have transparencies on the SPICE model ready. • Encourage students to bring in materials from home, such as wood, cardboard, straws, string,
plastic, tape, Styrofoam, etc. • Have copies of Worksheet 15-1 ready for each pair. • Have the Cog cartoon transparencies available. • Set up the overhead projector.
INSTRUCTIONAL STRATEGIES
Reflections As a large group, revisit the Cog cartoons, ending with the sequence where he realizes that he wants to have some fun with these newly discovered devices. This is the Situation, S, in SPICE.

6I – Structures and Mechanisms Pilot Edition Page 72 of 112
Activity Time Using the transparencies for SPICE, walk students through the route they will take to complete this performance task with their partners. Hand out Worksheet 15-1.
The SPICE Model for Design
Situation • What is happening?
Problem • Tell students they are to design and construct a prototype of a ride for Cogland. The ride
must incorporate linkages and/or systems to produce the desired motion safely.
Investigation/Ideas • Have students work in pairs to consider the different aspects of the problem. For example,
they should consider the type, size, materials, strength, efficiency, appearance, and safety of the ride that is needed.
• Instruct students to do brainstorming and research before developing three ideas for a ride. • Have students make sketches of their preliminary ideas and concepts and keep all related
papers in a design portfolio, which can be a simple folder.
Choose/Construct • At this stage, instruct each pair to pick the best idea and complete a planning sheet outlining
the tools, materials, and methods that will be used, along with sketches. • Upon approval of the plan, students will construct, test, and make changes as needed.
Evaluate • As a class, decide which criteria will be used to evaluate the projects. • Put each pair together with a different pair of students. Have each pair briefly evaluate the
other’s project, determining how well it succeeds in meeting the criteria.
Wrapping Up
The main wrap-up for this unit will occur after all construction and evaluation is complete. (See Activity 16.)
Building on the Experience Create signs for the theme park and rides.
ASSESSMENT SUGGESTIONS/STRATEGIES Throughout the SPICE process, the teacher has many opportunities to assess what the students know and understand about motion, what they can do with that knowledge, and how they apply it in their finished product. (See the ASAP Design Rubric, Appendices, p. 92.)

6I – Structures and Mechanisms Pilot Edition Page 73 of 112
WORKSHEET 15-1
CONSTRUCTING COGLAND
Through a series of accidents, Cog has discovered that machines and motion can be fun. Cog has decided to be the first person to build an amusement park. Unfortunately, he has no rides and little technical knowledge to build them. Now that you have the knowledge, Cog wants you to help. Your task is to design and build a working model of an amusement park ride for Cogland. You are going to use an organizational method called SPICE to help you with the design process.
Materials • All parts must be constructed from readily available materials such as cardboard, straws,
string, wood, nails, and screws. • Try to use natural materials such as sticks, twigs, and stones, since that is what Cog himself
would use. Note: Purchased, pre-constructed parts may not be used.
Size • The completed ride must be no larger than 30 cm x 30 cm x 30 cm.
Construction 1. The machine must have moving parts with at least one system or linkage to change one type
of motion to another.
2. The machine must be powered by hand or elastic (no electric motors).
3. Two or three small people should be made out of pipe cleaners or other materials and placed on the ride. These will show where the passengers sit, and give an idea of the relative size of the ride.
4. The rides must be safe for passengers. Include harnesses, seat belts, cages, or other safety features in the model.
5. The ride should look attractive and exciting, and should have a sign showing its name.
Safety • The methods of construction and materials used must be safe for the builders and the
bystanders.
Completion Dates: The design will be completed by: __________________ Construction will be completed by: __________________

6I – Structures and Mechanisms Pilot Edition Page 74 of 112
Expectations6s92 ACTIVITY 16
COGLAND IN MOTION
OVERVIEW Students will position their rides from Activity 15 in a theme park setting entitled Cogland. As they “walk” about the theme park, students will examine the rides and identify the types of motion, systems, and linkages at work. Each pair will make a 5-minute presentation including: the design portfolio collected, the design and construction of the ride, and a demonstration of how the ride works. (2 x 45 min)
MATERIALS
No materials are needed.
TEACHER PREPARATION
Prepare a place either in the classroom or close by in the hall for the theme park to be situated.
INSTRUCTIONAL STRATEGIES
Reflections
Give students a few minutes to examine the fairground rides created by the other members of the class.
Activity Time
Give students time to prepare a 5-minute presentation of the ride from the initial idea to its completion and evaluation. Have partner groups make presentations to the whole class.
Wrapping Up
Popcorn Style: • At the end of the presentations, ask students to describe what they have learned about
motion. Have students raise a hand any time they want to state something, and let the discussion flow quickly. Encourage students to use the terms kinds of motion, force, friction, simple machines, classes of levers, and kinetic energy.
ASSESSMENT SUGGESTIONS/STRATEGIES As each pair makes a presentation, the teacher can take note of all aspects of each presentation, such as: • the manner and skill with which students communicate the procedures and results of
investigations • students’ understanding of the underlying concepts • the effectiveness of students’ use of media works, written notes and descriptions, charts or
drawings • students’ evaluation of their playground ride • ASAP performance tasks, located in the Appendices, pp. 81 and 84
6I – Structures and Mechanisms Pilot Edition Page 75 of 112
APPENDICES

6I – Structures and Mechanisms Pilot Edition Page 76 of 112
APPENDIX I: RESOURCES Related Resources 77 Glossary 79
APPENDIX II: ASSESSMENT ASAP Performance Task: A Clothes Encounter 81 ASAP Performance Task: Tectionary 84 ASAP Test Items 86 ASAP Rubrics 90 Evaluation of Group Learning Skills 97 Evaluation of Group Learning Skills Chart 98 Group Learning Evaluation Chart 99 Class Participation Checklist 100 Class Checklist for Co-operative Learning Skills 101 Student Activity Checklist 102
APPENDIX III: DESIGN AND INQUIRY TOOLS Designing with SPICE 103 Inquiry with OLDER 104 Design and Technology Folio (SPICE) 105 Investigation Folio (OLDER) 109

6I – Structures and Mechanisms Pilot Edition Page 77 of 112
APPENDIX I: RESOURCES
RELATED RESOURCES
Fiction Dahl, Roald. Charlie and the Chocolate Factory.
Non-Fiction Ardley, Neil. The Science Book of Energy. Toronto: Double Day Canada Ltd., 1992. Ardley, Neil. The Science Book of Gravity. Toronto: Double Day Canada Ltd., 1992. Ardley, Neil. The Science Book of Machines. Toronto: Double Day Canada Ltd., 1992. Ardley, Neil. The Science Book of Motion. Toronto: Double Day Canada Ltd., 1992. Catherall, Ed. Friction. East Sussex: Wayland Publishers Ltd., 1983. Catherall, Ed. Levers and Ramps. East Sussex: Wayland Publishers Ltd., 1982. Catherall, Ed. Wheels. East Sussex: Wayland Publishers Ltd., 1982. Gibson, Gary. Science for Fun Pushing and Pulling. Brookfield: Copper Beech Books, 1995. Murphy, Bryan. Experiment with Movement. London: Two-Can Publishing Ltd., 1991. Williams, John. Machines. East Sussex: Wayland Publishers Ltd.
Teacher Resources Moore, Nancy. Design and Technology System Resource. Barrie: Exclusive Educational
Products, 1997. Macauley, David. The Way Things Work. Boston: Houghton Mifflin, 1988. Rhodes, Sheila. Springboards to Technology. Toronto: The Metropolitan Toronto School Board,
1993. (Out of Print)
CD Encyclopedia of Science. Eyewitness Series, Irwin Publishing, 1995.
Video Understanding Force and Energy. Markham: Ethos Ltd. (15 min)
Videos from the TDSB Learning Resources Centre Machines (14 min.) Order #199505 Machines (15 min.) Order #50385 Using Simple Machines (13 min.) Order #51162 Machines (20 min.) Order #52409 Simple Machines (20 min.) Order #52674 Simple Machines (15 min.) Order #900847
CD-ROM Encyclopedia of Science. Eyewitness Series, Irwin Publishing, 1995.

6I – Structures and Mechanisms Pilot Edition Page 78 of 112
Web Sites http://sccao.oise.utoronto.ca/tdsb
Field Trips • The Ontario Science Centre • Black Creek Pioneer Village • The amusement park Centreville on Centre Island • Canada’s Wonderland

6I – Structures and Mechanisms Pilot Edition Page 79 of 112
GLOSSARY axle a shaft or rod on which a wheel turns
ball bearings steel balls in a track that change sliding friction into rolling friction
cam a fixed wheel with one or more projections or an off-centre axle that
converts rotary into reciprocal motion
cam follower a rod that sits on a cam and is moved back and forth by the motion of the
cam as it rotates
crank rod attached to a wheel by a pivot; used in the conversion of rotary motion
to reciprocal motion
cogwheel a wheel with teeth that transfers motion to another cogwheel
effort the force applied to move a load
force a push or pull which causes acceleration, a change in the shape of an
object or a reaction. A force cannot be seen, only its affects can be seen.
friction the resistance to motion between two surfaces moving over each other. If
the moving force is not strong enough, friction prevents motion.
fulcrum the point or support about which a lever turns
gear a toothed wheel that meshes with other gears to transmit motion or change
the rate or direction of motion
inclined plane a simple machine which is a sloping plane surface. Examples include:
ladder, escalator, hill, roller coaster, stairs, wheelchair ramp, gangplank,
dump truck, unloading ramp, parkade.
kinetic energy the energy an object has when it is in motion. The faster the motion, the
greater the kinetic energy.
lever a bar used to lift or move heavy weights. The bar turns about a pivot or
fulcrum. Examples include: teeter-totter, oar, rake, hoe, bat, pick, fork,
screwdriver, snow shovel, hammer, bottle opener, light switch, pancake
turner, stapler, crowbar, scissors, car jack.
linear in a straight line
linkage a system of levers that transmit motion an force
load the weight lifted or moved by a machine
lubricant substance used between two moving parts to reduce friction
machine a device made for a special purpose to help in doing work
mass a measure of the amount of material or matter in an object
oscillating swinging back and forth in an arc like a pendulum

6I – Structures and Mechanisms Pilot Edition Page 80 of 112
pendulum a mass hung from a fixed point and allowed to swing freely to and fro
under the influence of gravity
pivot a rod that allows an object to rotate around it
pulley a wheel over which a rope passes in order to make lifting or pulling an
object easier. Examples include: fan belt, elevators, steam shovels,
flagpole, clothesline pulleys, derricks, cranes, lifts, pulleys, gears, old-
fashioned well, block and tackle, winch, wire stretchers, venetian blinds.
ramp see inclined plane
reciprocating back and forth in a straight line
resistance a force which opposes a change in motion or shape
rotational circular movement
screw a cylinder with a spiral ridge (inclined plane) running around the outside.
Examples include: different sizes of screws for metal or wood, drill, meat
grinder, bolts, nuts, cork screw, swivel chair, jar lid.
spring scale an instrument for measuring weight (force). The force of an object
stretches the spring and the weight is read on the scale.
stationary not moving
wedge a device tapering to a sharp edge or to a point, used to split materials such
as wood. Examples include: paper cutter, scissors, crowbar, chisel, axe,
prying tools, can opener, door wedge, pins, needles, nails.
wheel a circular object that rotates on an axle in a machine. Examples of wheel-
and-axles include: windmill, bicycle, roller skate, vehicles, rolling pin, egg
beater, helicopter, old-fashioned telephone dial, fishing reel, record player,
tapes, doorknob, pencil sharpener, bobbins, fans, casters.

6I – Structures and Mechanisms Pilot Edition Page 81 of 112
APPENDIX II: ASSESSMENT
ASAP PERFORMANCE TASK: A CLOTHES ENCOUNTER
Overview: Students are asked to design and build a clothesline for an environmentally friendly subdivision. The clothesline must go around trees and shrubs and be raised and lowered. Natural and manufactured products which are rust-proof, environmentally friendly, and easily accessible, must be used. Materials: pulley gears, string, Popsicle sticks, glue, glue gun, found materials (e.g., shoeboxes, sticks, leaves, etc.), Lego/Construx, art straws, etc., gloves Time Required: 3 x 40-minute periods - 1 week Type of Activity: hands-on design; report Student Grouping: pair/share or groups of 3 – 4 Safety: Remind class to use gloves when using glue guns. Teacher Tips: 1. Prior knowledge should include an understanding of: how friction transfers kinetic energy
into heat energy; how to reduce friction; how a moving mass has kinetic energy that can be transferred to a stationary object; ways in which systems produce a linear output from a rotary input.
2. Prior skills to be developed include: designing and making a mechanical device that can
change direction and speed of an input to produce a desired output and that can perform a useful function; planning an investigation related to structures and mechanisms in the environment; compiling data and presenting results to a specific audience.
3. Communication skills could be assessed by:
• paper-and-pencil report (final report to the company) • oral descriptions/presentations • student/teacher conference
6I – Structures and Mechanisms Pilot Edition Page 82 of 112
ASAP PERFORMANCE TASK: A CLOTHES ENCOUNTER (CONTINUED)
Evaluation: Students can be evaluated on:
understanding basic concepts - identifying how the clothesline functions; the changes in direction and speed of an input to produce a desired output; how friction in the mechanism is produced and can be reduced; the simple machines involved in the raising, lowering, rotary, and linear movement of the clothesline. design skills - initiating and planning; performing and recording; analyzing, synthesizing and evaluating. communication skills - clarity and precision of evidence; clarity and precision of vocabulary; clarity and precision of measurement.

6I – Structures and Mechanisms Pilot Edition Page 83 of 112
STUDENT WORKSHEET: A CLOTHES ENCOUNTER
Your company has been hired by a building company to design a clothesline for a new environmentally friendly subdivision. The mature trees have been left in every backyard; thus, the clothesline will have to go around the trees. The clothesline will need to be lowered and raised. You have been asked to use natural and manufactured products in your final design. The clothesline must not rust or be visible when it is not in use. When you are preparing your report for the building company, consider:
• the properties of natural and manufactured materials you will use • how you reduced friction in your design • how the design of your clothesline differs from a conventional (regular) clothesline • why the company should accept your design (e.g., safety, reliability, durability) • the resources you used, the equipment the company will need to purchase to assemble
your clothesline, and how they could market your product • what changes could be made to improve your design

6I – Structures and Mechanisms Pilot Edition Page 84 of 112
ASAP PERFORMANCE TASK: TECTIONARY
Overview: Students are asked to research and create a technology dictionary for Canadian elementary school students. The dictionary will include technological diagrams and descriptions of terms and tools. Students are asked to include a marketing strategy outlining materials and processes involved in producing a product. Materials: recycled paper products, editing products (tape, binding, spirals, etc.), dictionaries, encyclopedias, access to Internet, computer programs (draw, word processing) Time Required: 2 x 40 minutes Type of Activity: research Student Grouping: individual; pair/share Teacher Tips : 1. The school librarian could be involved in this task, providing books, research techniques, and
time and access to the Internet. 2. The teacher should give a preliminary list to get the students started and to ensure that all the
necessary terms are included (e.g., screw, crank and slider, rack and pinion, cam and cam follower, levers, fixed pivot, moving pivot, fulcrum, ball bearings, lubricant).
3. Prior knowledge should include an understanding of: ways in which mechanical devices and
systems produce a linear output from a rotary input; the purposes of the three classes of levers; systems of levers; technological terms and systems.
4. Prior skills to be developed include: initiating and planning, using appropriate vocabulary,
including correct technology terminology; researching information; communicating for specific purposes to specific audiences.
5. Communication skills could be assessed by:
• paper-and-pencil reports • student/teacher conference
Evaluation: Students can be evaluated on:
understanding basic concepts - describing and illustrating technology terms (e.g. crank and slide, etc.) design and inquiry skills - initiating and planning; researching and recording; synthesizing communication skills - clarity and precision of vocabulary
6I – Structures and Mechanisms Pilot Edition Page 85 of 112
STUDENT WORKSHEET: TECTIONARY You have been commissioned by a Canadian dictionary company to create a “Technology Dictionary for Canadian Elementary School Students.” This dictionary will be produced on recycled paper products and will include diagrams and explanations of functions or uses for technology terms and tools these students need to know. Diagrams could be hand drawn, computer generated from a draw program, photocopied or scanned from magazines. Include a marketing strategy for this dictionary, based on the sources of materials to be used and your intended audience.

6I – Structures and Mechanisms Pilot Edition Page 86 of 112
ASAP TEST ITEMS 1. Put F for first-class, S for second-class and T for third-class in the boxes to identify the
levers listed below:
wheelbarrow tongs seesaw potato masher garlic press tweezers
corkscrew shovel fork hammer bottle opener nutcracker
2. Identify the first-, second- and third-class levers shown in the diagrams below.
_______________ _______________ ______________
a. Label the fulcrum, the effort, and the resistance on each diagram above.
b. When the load on the lever is moved closer to the fulcrum, what happens to the effort?
c. For which class of lever is the resistance less than the effort?

6I – Structures and Mechanisms Pilot Edition Page 87 of 112
d. Name two tools which are first-class, second-class, and third-class levers.
First-class levers Second-class levers Third-class levers 1.
1. 1.
2.
2. 2.
3. a. Predict the amount of force required to pull a brick along a smooth surface like a desk (or table). Write your prediction in the table below.
b. Attach a piece of string to the brick and pull it along the desk, using a spring scale to measure the force required. Record the amount of force in the table.
Brick on the Desk Brick on the Pencils
Predicted Force Actual Force Predicted Force Actual Force
c. Predict the amount of force required to pull the brick along on top of some pencils, as in the diagram below.
d. Test your prediction and record your observation in the table above.
e. Explain any differences you observed.

6I – Structures and Mechanisms Pilot Edition Page 88 of 112
4. a. Fill three plastic bags with different amounts of gravel. Tie string around the neck of
each bag. Predict the amount of force required to lift each bag, then use a spring scale to test your prediction. Record your predictions and the actual results in the table below.
Lifting Straight Up Using Inclined Plane
Prediction Actual Prediction Actual Bag 1
Bag 2
Bag 3
b. Set up an inclined plane at a height of 30 cm. c. Predict the amount of force required to pull each bag of gravel up the plane, then measure
the actual force with a spring scale. Record your predictions and the actual forces in the table.
d. Explain any differences you observed.
e. How could you reduce friction so that the object could be moved more easily?

6I – Structures and Mechanisms Pilot Edition Page 89 of 112
5. Record, in the table below, the amount of force required to pull a brick up a ramp from the
bottom to the top. (Use spring scales to measure the force.)
Surface Force Required Plain
With sand
With flour
With sawdust
With powdered soap
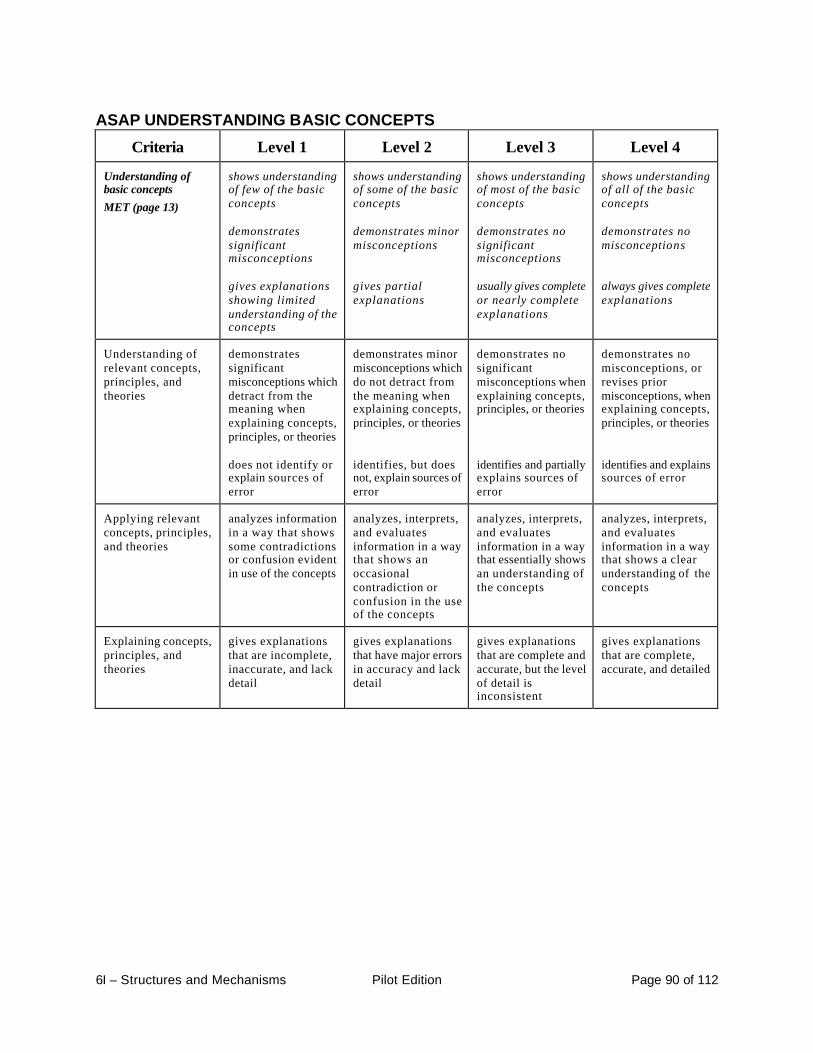
6I – Structures and Mechanisms Pilot Edition Page 90 of 112
ASAP UNDERSTANDING BASIC CONCEPTS
Criteria
Level 1
Level 2
Level 3
Level 4 Understanding of basic concepts
MET (page 13)
shows understanding of few of the basic concepts demonstrates significant misconceptions gives explanations showing limited understanding of the concepts
shows understanding of some of the basic concepts demonstrates minor misconceptions gives partial explanations
shows understanding of most of the basic concepts demonstrates no significant misconceptions usually gives complete or nearly complete explanations
shows understanding of all of the basic concepts demonstrates no misconceptions always gives complete explanations
Understanding of relevant concepts, principles, and theories
demonstrates significant misconceptions which detract from the meaning when explaining concepts, principles, or theories does not identify or explain sources of error
demonstrates minor misconceptions which do not detract from the meaning when explaining concepts, principles, or theories identifies, but does not, explain sources of error
demonstrates no significant misconceptions when explaining concepts, principles, or theories identifies and partially explains sources of error
demonstrates no misconceptions, or revises prior misconceptions, when explaining concepts, principles, or theories identifies and explains sources of error
Applying relevant concepts, principles, and theories
analyzes information in a way that shows some contradictions or confusion evident in use of the concepts
analyzes, interprets, and evaluates information in a way that shows an occasional contradiction or confusion in the use of the concepts
analyzes, interprets, and evaluates information in a way that essentially shows an understanding of the concepts
analyzes, interprets, and evaluates information in a way that shows a clear understanding of the concepts
Explaining concepts, principles, and theories
gives explanations that are incomplete, inaccurate, and lack detail
gives explanations that have major errors in accuracy and lack detail
gives explanations that are complete and accurate, but the level of detail is inconsistent
gives explanations that are complete, accurate, and detailed

6I – Structures and Mechanisms Pilot Edition Page 91 of 112
ASAP INQUIRY RUBRIC
Criteria
Level 1
Level 2
Level 3
Level 4
MET (page 13)
applies few of the required skills and strategies
applies some of the required sk ills and strategies
applies most of the required skills and strategies
applies all (or almost all) of the required skills and strategies
Initiating and Planning Understanding the need Making a plan
states questions in an untestable form and identifies few of the components needed for a fair test no set of procedures is attempted, or the procedures are incoherent or unworkable does not identify or control variables
restates questions in a testable form that identifies some components needed for a fair test develops a set of procedures that are limited in their appropriateness, efficiency, clarity, and/or completeness identifies and controls some variables
restates questions a testable form that identifies most components needed for a fair test develops a set of procedures that are appropriate, but are limited in their efficiency, clarity, or completeness identifies and controls most major variables
restates questions in a testable form that identifies the components needed for a fair test develops a set of procedures that are appropriate, efficient, clear, or complete identifies and controls major variables
Performing and Recording Carrying out the plan
does not follow any procedures to conduct a fair test data are not recorded or is irrelevant display of information is disorganized, not precise, accurate, or complete units are not indicated
follows most identified procedures to conduct a fair test data are of limited relevance, is limited in scope, and/or contains major inaccuracies display of information is somewhat organized, and somewhat precise, accurate, and complete units are often incorrect or are not included
follows identified procedures to conduct a fair test, and makes some modifications data are relevant and sufficient in scope and detail, but not extensive display of information is organized and mostly precise, accurate, and complete most units are included
follows identified procedures to conduct a fair test, and justifies modifications data are relevant and may be extensive in scope and detail display of information is organized, precise, accurate, and complete all units are included
Analyzing and Interpreting Looking back
relevant data are not analyzed or explained conclusion/inference is absent, incoherent, illogical, or irrelevant, and not supported by the data conclusion does not address the original task
relevant data are partly identified and explained, without analysis conclusion/inference is not well-supported by the data or is partially supported by the data and is not clearly stated conclusion partly addresses the original task
relevant data are identified and explained, with partial analysis conclusion/inference is valid, understandable and supported by the data conclusion addre sses the original task
relevant data are identified, analyzed and explained conclusion/inference is valid, clearly stated, and supported by the data conclusion addresses the original task

6I – Structures and Mechanisms Pilot Edition Page 92 of 112
ASAP DESIGN RUBRIC
Criteria
Level 1
Level 2
Level 3
Level 4
MET (page 13) Inquiry and design skills
applies few of the required skills and strategies
applies some of the required skills and strategies
applies most of the required skills and strategies
applies all of the required skills and strategies
Initiating and Planning Understanding the need Making a plan
does not demonstrate an understanding of the problem no plan is attempted for designing a product, or the plan is incoherent or unworkable does not take into account predetermined criteria
demonstrates a partial understanding of the problem develops a plan for designing a product that is limited in appropriateness, efficiency, clarity, and completeness identifies and takes into account some predetermined criteria
demonstrates a basic understanding of the problem develops a plan for designing a product that is appropriate, clear, and complete identifies and takes into account most predetermined criteria
demonstrates a thorough understand-ing of the problem develops a reproducible plan for desig ning a product that is appropriate, efficient, clear, and complete identifies and takes into account all predetermined criteria
Performing and Recording Carrying out the plan
does not follow a plan to build a product needs assistance to select appropriate materials and equipment to build a product tests the product and records results that are irrelevant or not related to predetermined criteria makes no modifications or retesting of the product display of information is disorganized, not precise, accurate, or complete units are not indicated
follows most steps in a plan to build a product selects appropriate materials and equipment to build a product tests the product and records results that are limited in scope, contain major inaccuracies, or have limited relevance to predetermined criteria makes modifications, but does not retest product display of information is somewhat organized, and somewhat precise, accurate, and complete units are often incorrect or are not included
follows all steps in a plan to build a product, and makes required modifications selects appropriate materials and equipment to enhance the performance and design of the product tests the product and records results with sufficient scope and detail that are relevant to predetermined criteria makes and records modifications and retests product display of information is organized and mostly precise, accurate, and complete most units are included
follows all steps in a plan to build a product, and makes and records required modifications selects appropriate materials and equipment, and adapts materials to enhance the performance and design of the product tests the product and records results with extensive scope and detail that are relevant to predetermined criteria makes, records, and justifies modifications, and retests product display of information is organized, precise, accurate, and complete all units are included

6I – Structures and Mechanisms Pilot Edition Page 93 of 112
ASAP DESIGN RUBRIC CONTINUED
Criteria
Level 1
Level 2
Level 3
Level 4 Analyzing and Interpreting Looking back
relevant criteria are not analyzed or explained conclusion/inference is absent, incoherent, illogical, or irrelevant, and not supported by the performance of the design product does not address the original problem
relevant criteria are partly identified and explained, without analysis conclusion/inference is not well-supported by performance of the design or is partially supported by the performance of the design and is not clearly stated product partly addresses the original problem
relevant criteria are identified and explained, with partial analysis conclusion/inference is valid, understandable, and supported by the performance of the design product addresses the original problem
relevant criteria are identified, analyzed, and explained conclusion/inference is valid, clearly stated, and well-supported by the performance of the design product fully addresses the original problem

6I – Structures and Mechanisms Pilot Edition Page 94 of 112
ASAP COMMUNICATION RUBRIC
Criteria
Level 1
Level 2
Level 3
Level 4
Communication of required knowledge MET (page 13)
communicates with little clarity and precision rarely uses appropriate science and technology terminology and units of measurement
communicates with some clarity and precision sometimes uses appropriate science and technology terminology and units of measurement
generally communicates with clarity and precision usually uses appropriate science and technology terminology and units of measurement
consistently communicates with clarity and precision consistently uses appropriate science and technology terminology and units of measurement
Clarity and precision of supporting evidence
communicates information without stating the question or problem that was solved, and states conclusions that are not supported with adequate evidence uses tables, charts, and/or diagrams, but their purpose is unclear
communicates information describing the question or problem that was solved, and states conclusions with some supporting evidence uses some tables, charts, and/or diagrams, and their purpose is clear
communicates information describing the question or problem that was solved, and states conclusions with an adequate amount of evidence uses tables, charts, and/or diagrams, where appropriate, and their purpose is clear
communicates information, clearly describing the question or problem that was solved, and states conclusions with specific and detailed evidence uses tables, charts, and/ or diagrams in appro -priate contexts, and their purpose is clear
Clarity and precision of vocabulary, including mechanics
uses colloquial language in place of proper science or technology terminology major errors in spelling and/or grammar that interfere with meaning
uses some colloquial language in place of proper scie nce or tech-nology terminology major errors in spelling and/or grammar, but meaning is clear
usually uses proper science or technology terminology in proper context minor errors in spelling and/or grammar, but meaning is clear
consistently uses proper science or technology termino-logy in proper context no errors in spelling and/or grammar, and meaning is clear
Clarity and precision with measuring
records numerical data inaccurately and inconsistently, which affects the results of the investigation attempts calculations, but they are incomplete and/or incorrect uses incorrect SI units or often does not include any units or symbols constructs graphs with assistance
records numerical data consistently, but with some errors in accuracy which affects the results of the investigation completes calculations, but some calculations are incorrect, leading to erroneous conclusions uses SI units using words or a mixture of words and symbols with some incorrect units constructs graphs with some assistance
records numerical data consistently, but with minor errors in accuracy which do not affect the results of the investigation completes calculations with some minor errors which do not lead to erroneous conclusions uses SI units with symbols with an occasional incorrect unit constructs graphs with some minor errors
records numerical data consistently and accurately completes calculations correctly consistently uses correct SI units with symbols constructs accurate graphs

6I – Structures and Mechanisms Pilot Edition Page 95 of 112
ASAP RELATING SCIENCE AND TECHNOLOGY RUBRIC
Criteria
Level 1
Level 2
Level 3
Level 4 Relating of science and technology to each other and the world outside the school
MET (page 13)
shows little understanding of connections between science and technology in familiar contexts shows little understanding of connections between science and technology and the world outside the school
shows some understanding of connections between science and technology in familiar contexts shows some understanding of connections between science and technology and the world outside the school
shows understanding of connections between science and technology in familiar contexts shows understanding of connections between science and technology and the world outside the school
shows understanding of connections between science and technology in both familiar and unfamiliar contexts shows understanding of connections between science and technology and the world outside the school, as well as their implications
Interpreting and apply ing concepts
shows little evidence of interpreting and applying concepts and principles in familiar situations
shows some evidence of interpreting and applying concepts and principles in familiar situations
shows sufficient evidence of interpreting and applying concepts in familiar situations
shows evidence of interpreting, applying, and evaluating concepts in familiar, as well as some new, situations
Making informed decisions
needs assistance to distinguish between fact and opinion when making connections in social, environmental, economic, and/or political contexts
needs some assistance to distinguish between fact and opinion when making connections in social, environmental, economic, and/or political contexts
distinguishes between fact and opinion when making connections in social, environmental, political, and/or economic contexts
distinguishes between fact and opinion, and considers their merit when making connections in social, environmental, political, and/or economic contexts
Perceptions and influence of Science and Technology
needs assistance to identify and explain the factors that influence people’s perceptions of science and technology in daily life identifies few instances of how science and technology are used in daily life
identifies some factors that influence people’s perceptions of science and technology in daily life identifies some instances of how science and technology are used in daily life
identifies the factors that influence people’s perceptions of science and technology in daily life identifies ways science and technology are used in daily life
identifies and evaluates the factors that influence people’s perceptions of science and technology in daily life identifies and evaluates the influence science and technology have on daily life

6I – Structures and Mechanisms Pilot Edition Page 96 of 112
ASAP USING TOOLS, EQUIPMENT, AND MATERIALS RUBRIC
Criteria
Level 1
Level 2
Level 3
Level 4 Inquiry and design skills (including skills in the safe use of tools, equipment, and materials)
MET (Page 13)
uses tools, equipment, and materials correctly, only with assistance
uses tools, equipment, and materials correctly with some assistance
uses tools, equipment, and materials correctly with only occasional assistance
uses tools, equipment, and materials correctly with little or no assistance
Choosing and using tools and equipment
needs assistance to choose and accurately use appropriate tools and equipment in order to gather and analyze data or construct products
needs some assistance to choose and accurately use appropriate tools and equipment in order to gather and analyze data or construct products
chooses and uses appropriate tools and equipment accurately and with only minor errors in order to gather and analyze data or construct products
chooses and uses appropriate tools and technologies accurately and proficiently in order to gather and analyze data or construct products
Choosing and using materials
needs continuous assistance to choose appropriate materials and use them efficiently and effectively
needs some assistance to choose appropriate materials and use them efficiently and effectively
chooses appropriate materials, and uses them efficiently and effectively, requiring only occasional assistance
chooses appropriate materials, and uses them efficiently and effectively
Caring for tools, materials, and equipment
needs continuous assistance and supervision to follow appropriate and safe procedures for cleaning, maintaining, and storing tools, materials, and equipment being used
needs occasional reminders to follow appropriate and safe procedures for cleaning, maintaining, and storing tools, materials, and equipment being used
needs few reminders to follow appropriate and safe procedures for cleaning, maintaining, and storing tools, materials, and equipment being used
follows appropriate and safe procedures for cleaning, maintaining, and storing of tools, materials, and equipment being used
Understanding safety considerations
does not follow safety considerations without constant supervision
follows some safety considerations, but needs some supervision
follows most safety considerations, but needs occasional supervision
follows all safety considerations without supervision

6I – Structures and Mechanisms Pilot Edition Page 97 of 112
EVALUATION OF GROUP LEARNING SKILLS
Social Skills That Contribute to Effective Group Collaboration
At a beginning level of group interaction, all students can be expected to: • stay on task • speak clearly enough to be understood • be involved in activity • make eye contact when speaking • take on an assigned role • show positive body language • listen to others • contribute to a group activity • ask questions • ask for help In time, all students can be expected to: • offer assistance • show responsibility • respond to ideas of others • seek consensus • contribute ideas • be inclusive • offer solutions • encourage others to participate • initiate activities • support ideas and feelings of others • coordinate activities • handle disagreements positively • organize activity • summarize discussion points • mediate disagreements • make others feel good about themselves • recognize/credit others • live up to work commitments © Scarborough Board of Education, 1996.

6I – Structures and Mechanisms Pilot Edition Page 98 of 112
EVALUATION OF GROUP LEARNING SKILLS CHART Name: ________________________ Date: ____________ Course: _________ Evaluator: Teacher Peer Self
Stays focused on task
Rarely Sometimes Often Always O O O O
Fulfills assigned role
Rarely Sometimes Often Always O O O O
Contributes ideas and solutions
Rarely Sometimes Often Always O O O O
Works well with others (listens, shares, & supports)
Rarely Sometimes Often Always O O O O
Shows interest and involvement
Rarely Sometimes Often Always O O O O
Additional skills developed by teachers and students
Rarely Sometimes Often Always O O O O
Overall Evaluation and Additional Comments
© Scarborough Board of Education, 1996

6I – Structures and Mechanisms Pilot Edition Page 99 of 112
GROUP LEARNING EVALUATION CHART Evaluator: Teacher Peer Self
Names of Students
in the Group
Stays focused on task
Fulfills assigned role
Shows interest and involvement
Additional skills developed by teachers and students
© Scarborough Board of Education, 1996
6I – Structures and Mechanisms Pilot Edition Page 100 of 112
CLASS PARTICIPATION CHECKLIST
Student participation in the classroom setting can be assessed if observable student behaviour is used as a criterion. Put a “/” under the student’s name in the column for the observed behaviour when it occurs, and an “x” for the opposite behaviour.
Student Names
Observable Behaviours
Takes part in class or group discussions
Asks questions
Answers teacher and student questions
Listens when students or the teacher speaks
Makes constructive or positive comments to other students
Becomes involved in planned activities
Avoids interrupting a lesson or student presentation

6I – Structures and Mechanisms Pilot Edition Page 101 of 112
CLASS CHECKLIST FOR CO-OPERATIVE LEARNING SKILLS Student participation in the classroom setting can be assessed if observable student behaviour is used as a criterion. Put a “/” under the student’s name in the column for the observed behaviour when it occurs, and an “ for the opposite behaviour.
Student Names
Observable Behaviours
Stays focused on task
Fulfils assigned role
Contributes ideas and solutions to the group
Listens to others
Encourages others
Shares with others
Shows interest and involvement

6I – Structures and Mechanisms Pilot Edition Page 102 of 112
STUDENT ACTIVITY CHECKLIST
Student activities or assigned tasks can be tracked using the checklist below. Put a “/” under the student’s name in the column for the activity or task when it is done, and an “L” if the activity or task is not done on time.
Student Names
Activities or Tasks

6I – Structures and Mechanisms Pilot Edition Page 103 of 112
POSSIBILITIES OPPORTUNITIES
PROBLEMS Clarify and define the
Opportunity or Problem. This will provide a more
accurate setting for your ideas.
IDEAS INVESTIGATION
Research the Situation. Identify the requirements,
available resources and restrictions. Develop some criteria. Create
lots of ideas!
CHOOSE CREATE
Pick the best idea; develop a plan, then go
ahead and do it. Test all or any part of your
solution if it seems appropriate.
EVALUATE Look back at your
criteria and reflect on how well you achieved them. Always consider
what improvements could be made if you
did it all again.
Backtracking The circumstances
may have to be observed more closely or over a longer period of time to
define the range of possibilities.
Backtracking Ongoing evaluation
may reveal significant concerns. This could
cause a return to earlier stages to rethink a
definition, criteria, or your ideas.
Side Trip New technologies or
areas of knowledge may have to be explored.
Skills may be identified that require time to
learn at some stage.
Side Trip Skills, materials, or equipment may be
inadequate. Things can go wrong! Mini-problems
may have to be solved. Consider other ways
of doing it.
Side Trip More information may
be needed to understand the Situation. Other people or different
sources of information may have to be
consulted.
SITUATION Observe circumstances
carefully. Look for any Possibilities. Opportunities and Problems always occur
within a context. Ideas can POP into your
head anytime!
Backtracking New insights may arise suggesting a rethinking of the wording of your
definition. Problems may even begin to look like
Opportunities.
APPENDIX III: DESIGN AND INQUIRY TOOLS
DESIGNING WITH SPICE

6I – Structures and Mechanisms Pilot Edition Page 104 of 112
LIMIT Identify the variables involved in the event. Limit the number of variables to the test
variable(s) most likely to cause the event (hypothesis).
DEVISE Devise a
correlational study or experiment
to test the test variable(s) selected (hypothesis) and collect the data.
EVALUATE Organize,
analyze the data, and come to a conclusion.
Apply your conclusion to the test variable(s)
(hypothesis).
REPORT AND RECYCLE
Communicate the investigation to others, and if
the conclusion does not support the hypothesis,
select another test variable(s) and redesign the
test.
Backtracking The circumstances
may have to be observed more closely or over a longer period of time to
define the test variable(s) in a clearer way.
Backtracking Ongoing evaluation
may reveal significant concerns. This could
cause a return to earlier stages to rethink a
test variable(s) or test design.
Side Trip New insights or
areas of knowledge may have to be explored.
Skills may be identified that require time to
learn at some stage.
Side Trip Skills, materials, or equipment may be
inadequate. Things can go wrong! Mini-problems
may have to be solved. Consider other test
designs.
Side Trip More information may
be needed to understand the event. Other
people or different sources of information
may have to be consulted.
OBSERVATION Look around for things that create questions in
your mind. Identify questions that for you
require explanation.
Backtracking New insights may arise suggesting a rethinking of the design of the test.
INQUIRY WITH OLDER

6I – Structures and Mechanisms Pilot Edition Page 105 of 112
Design and Technology Folio (SPICE)
Name: _______________________________________________________________
Grade: _______________________________________________________________
Date: ________________________________________________________________
Teacher:______________________________________________________________
Situation:
What is happening in this situation?
______________________________________________________________________________
______________________________________________________________________________
______________________________________________________________________________
Problem: Write what your project must do:
Design and build a…
______________________________________________________________________________
______________________________________________________________________________
______________________________________________________________________________
______________________________________________________________________________

6I – Structures and Mechanisms Pilot Edition Page 106 of 112
Ideas:
Draw a picture of your chosen idea or design:

6I – Structures and Mechanisms Pilot Edition Page 107 of 112
Construction:
This is what I need:
______________________________________________________________________________
______________________________________________________________________________
______________________________________________________________________________
______________________________________________________________________________
______________________________________________________________________________
______________________________________________________________________________
______________________________________________________________________________
______________________________________________________________________________
Construction:
How I will make it:
______________________________________________________________________________
______________________________________________________________________________
______________________________________________________________________________
______________________________________________________________________________
______________________________________________________________________________
______________________________________________________________________________
______________________________________________________________________________
______________________________________________________________________________

6I – Structures and Mechanisms Pilot Edition Page 108 of 112
Evaluation/Discovery Log:
I liked these things about my design:
______________________________________________________________________________
______________________________________________________________________________
______________________________________________________________________________
______________________________________________________________________________
______________________________________________________________________________
______________________________________________________________________________
______________________________________________________________________________
______________________________________________________________________________
______________________________________________________________________________
Evaluation/Discovery Log:
This is what I learned when working on this project:
______________________________________________________________________________
______________________________________________________________________________
______________________________________________________________________________
______________________________________________________________________________
______________________________________________________________________________
______________________________________________________________________________
______________________________________________________________________________
______________________________________________________________________________

6I – Structures and Mechanisms Pilot Edition Page 109 of 112

6I – Structures and Mechanisms Pilot Edition Page 110 of 112
Investigation FolioInvestigation Folio (OLDER)(OLDER)
Name:
Grade:
Date:
Teacher:
Limit: What question will you choose to investigate?
Observations: What is happening in this situation? What variables can be measured or changed in your investigation?
Limit: Write what you think will happen:

6I – Structures and Mechanisms Pilot Edition Page 111 of 112
Devise a Plan: How will you find the answer to your question?

6I – Structures and Mechanisms Pilot Edition Page 112 of 112
Data Chart Title: Cause Variable: Result Variable:
Graph Title: Graph your data here: (Remember to include a line of best fit if there is a pattern.)
Res
ult V
aria
ble:
Cause Variable:

6I – Structures and Mechanisms Pilot Edition Page 113 of 112
Evaluate: What did you find out about your ideas?
Revise/Learning Log: The things I really liked about my plan…
Revise/Learning Log: How could I do a better job?
Revise/Learning Log: The things I learned when working on this investigation…