scia engineer 14 · 2015-09-01 · allplan scia engineer 14 is compatible only with: allplan 2009.0...
TRANSCRIPT

Server Installation Manual
Scia Engineer 14

Scia Engineer
2
All information in this document is subject to modification without prior notice. No part or this manual may be reproduced, stored in a database or retrieval system or published, in any form or in any way, electronically, mechanically, by print, photo print, microfilm or any other means without prior written permission from the publisher. Scia is not responsible for any direct or indirect damage because of imperfections in the documentation and/or the software.
© Copyright 2014 Nemetschek Scia nv. All rights reserved.

Scia Engineer
3
Release: Scia Engineer 14 Manual: Installation Guide Revision: 05/2014
Nemetschek Scia Offices
Latest version is available on: http://nemetschek-scia.com/en/contact/offices Belgium Headquarters Nemetschek Scia nv Industrieweg 1007 B-3540 Herk-de-Stad Tel.: +32 13 55 17 75 Fax: +32 13 55 41 75 E-mail: [email protected] Support Phone CAE (Scia Engineer) Tel: +32 13 55 09 90 CAD (Allplan) Tel: +32 13 55 09 80 CIM (Scia Steel, Scia Steel Manager) Tel: +32 13 55 09 70 Concrete (Precast Manager) Tel: +32 13 35 03 15 Support Email: [email protected] Austria Scia Datenservice Ges.m.b.H Dresdnerstrasse 68/2/6/9 A-1200 Wien Tel.: +43 1 7433232-11 Fax: +43 1 7433232-20 [email protected] Support Tel: +43 1 7433232-12 E-mail: [email protected] Brazil Nemetschek do Brasil Rua Dr. Luiz Migliano, 1896 – sala 702, CEP SP -05711-001 São Paulo Brasil Tel: +55 11 4314-5880 E-mail: [email protected]
Czech Republic Nemetschek Scia s.r.o. Evropská 2591/33E 160 00 Praha 6 Tel.: +420 226 205 600 Fax: +420 226 201 673 E-mail: [email protected] Nemetschek Scia s.r.o. Slavickova 827/1a 638 00 Brno Tel.: +420 530 501 570 Fax: +420 226 201 673 E-mail: [email protected] Finland Nemetschek Scia Finland Linnoitustie 5 FI-02600 ESPOO Tel.: +358 207 698 600 Fax: +358 207 - 698 699 Email: [email protected] France Nemetschek Scia sarl Centre d’Affaires 29, Grand’ Rue FR-59100 Roubaix France Tel.: +33 3.28.33.28.67 Fax: +33 3.28.33.28.69 [email protected] Germany Scia Software GmbH Emil-Figge-Strasse 76-80 D-44227 Dortmund Tel.: +49 231/9742586 Fax: +49 231/9742587 [email protected]
Netherlands Nemetschek Scia bv Wassenaarweg 40 NL- 6843 NW Arnhem Tel.: +31 26 320 12 30 Fax: +31 26 320 12 39 [email protected] Slovakia Nemetschek Scia s.r.o. Topol’ová 8 SK - 010 03 Žilina Tel.: +421 415 003 070-1 Fax: +421 415 003 072 [email protected] Switzerland Nemetschek Scia Switzerland Dürenbergstr. 24 CH-3212 Gurmels Tel.: +41 26 341 74 11 Fax: +41 26 341 74 13 [email protected] UAE Nemetschek Scia Middle East Dubai Silicon Oasis HQ Building P.O. Box 341041, Dubai, U.A.E. Tel.: +971 4 5015744 Fax: +971 4 5015777 [email protected] USA Nemetschek Scia North America 7150 Riverwood Drive Columbia, MD (USA) Tel.: +1 443-542-0638 Fax: +1 410-290-8050 [email protected]

Scia Engineer
4
Table of contents
Table of contents ............................................................................................ 4
1. Introduction ............................................................................................. 5
1.1 Welcome ......................................................................................... 5
1.2 System Requirements ................................................................... 5
2. First installation of the protection on the server .................................. 7
2.1 Installation of FlexNET .................................................................. 7
2.2 Activation of licences .................................................................... 8
2.3 Configuration of the Server ........................................................ 10
3. Update of the server for a new version ............................................... 14
4. Extra options on the server .................................................................. 16
4.1 Checking the status of license server ....................................... 16
4.2 Deactivating the license file ........................................................ 16
5. Installation of Scia Engineer on the client pc’s .................................. 17
5.1 Installation of Scia Engineer ....................................................... 17
5.2 Start Scia Engineer ...................................................................... 20
5.3 Update .......................................................................................... 23
6. Uninstalling Scia Engineer ................................................................... 24
6.1 Uninstalling with Add/Remove Programs in Windows ............. 24
6.2 Uninstalling without Add/Remove Programs ............................ 26
7. Troubleshoot – on the client computer ............................................... 27
7.1 Language module not found ....................................................... 27
7.2 User Access Control ................................................................... 28
8. Troubleshoot – on the server ............................................................... 29
8.1 TCP Ports – Server setup ............................................................ 29
8.2 Impossible to activate license using Remote desktop ............. 29
8.3 Changing the TCP Port ............................................................... 30
8.4 Working with versions older than Scia Engineer 2010.0 .......... 31
8.5 Lmadmin does not start automatically ...................................... 32
8.6 Activation manager having problems with proxy setttings ..... 33
8.7 Configuring the firewall on server side ..................................... 34

Scia Engineer
5
1. Introduction
1.1 Welcome
Welcome to the Scia Engineer Installation Guide. Scia Engineer is a calculation program running under Windows 7 & Windows 8 with a large range of application: from the check of simple frames to the advanced design of complex projects in steel, concrete, wood…
The program treats the calculation of 2D/3D frames, including the profile check and the connection check for steel constructions. Apart from frames, it is also possible to dimension plate structures, including advanced concrete calculations.
This manual describes the procedures for a correct installation of the application with a network protection on the server, and Scia Engineer installed locally on the client’s computer. To install Scia Engineer on the server, it is necessary to be on the console (so not with remote desktop) to activate the licence.
The text is concluded with the de-install procedure in chapter 6 and with the most common troubleshoots in chapter 7 and 8.
1.2 System Requirements
To install Scia Engineer it is recommended that your system qualifies the following requirements:
Hardware
Processor Pentium IV - 3Ghz (Advised: DualCore 2.3 Ghz and higher)
RAM 2 GB (Advised: > 4 GB)
Graphics Controller 256 MB, supporting OpenGL
Disk space for installation, projects and temporary files
5GB
Minimum resolution 1280 x 800

Scia Engineer
6
Software
Scia Engineer on Macintosh
To run the Scia Engineer software on Mac OS X virtualization software has to be used. Parallels Desktop 7
is recommended for this. When Parallels Desktop 7 is used, a Windows operating system may be installed as a
virtual machine and Windows applications are used alongside Mac OS X applications. In this way, the user
has 2 operating systems at the same time.
Standalone protection Windows 2003 server 32 bit Windows 2008 server 64 bit Windows 2012 server 64 bit Windows 7 32/64 bit Windows 8 32/64 bit
It is advised to install the latest Service Pack for these Operating Systems.
Floating protection Windows 2003 server 32 bit Windows 2008 server 64 bit Windows 2012 server 64 bit Windows 7 32/64 bit Windows 8 32/64 bit
It is advised to install the latest Service Pack for these Operating Systems.
Allplan Scia Engineer 14 is compatible only with:
Allplan 2009.0Allplan 2011.1Allplan 2012.0Allplan 2014.0
Allplan Precast 2010.0
However one should first install Allplan and then Scia Engineer, otherwise the proper installation for the Allplan
patch won't be recognised.
Revit Scia Engineer 14 is compatible with Revit 2012, 2013, 2014
The Revit link is available on www.nemetschek-scia.com/revit
Etabs Scia Engineer 14 is compatible with Etabs 9.2
IFC Scia Engineer 14 is compatible only with IFC version 2x3
SDNF Scia Engineer 14 is compatible only with Version 2.0 and Version 3.0
Tekla Scia Engineer 14 is compatible only with: Tekla version 15, 16, 17, 18 and 19.0 – 32/64 bit

Scia Engineer
7
2. First installation of the protection on the server
The network protection can be installed on each computer in the network. This means that it does not have to be the domain or file server. Each of the authorised modules can have a different amount of licenses, which can be started simultaneously. Before Scia Engineer is started, the user can determine (in a separate protection setup utility) which modules he/she wishes to use in the session and which modules he/she wishes to remain available for the other users.
On the license server, a setup of FlexNet (for Scia Engineer 14, the version of FlexNET must be 2.2 or higher) will be installed. This setup contains drivers for the Scia network dongle which used for the floating protection. If you wish to change the license to another computer, then all you need is to install FlexNET on the other pc, deactivate the license on the older server, and activate it on the new pc.
It is advised to install always the latest version of FlexNET. This can be found on the following site: http://nemetschek-scia.com/en/support/downloads/latest-version-flexnet
The installation procedure for the protection on the server consists of the following steps:
Installation of the FlexNET network Protection (which automatically includes the old FlexID installation)
Activation of licences
Configuration and start of the FlexNet Server
2.1 Installation of FlexNET
1. Download the latest SciaFlexNET from our webstie: http://nemetschek-scia.com/en/support/downloads/latest-version-flexnet
2. Unzip this file and double click on Setup.exe to start the installation
3. Install FlexNET by following the instructions on the screen.
4. By default FlexNet is installed in the folder C:\Program Files (x86)\Common Files\Scia\LicenceServer\FlexnetServer. It will add the following programs to your server, which are needed in the next steps:
a. Scia Activation Manager (ActivationUtility.exe)
b. FlexNET License Administrator (lmadmin.exe)

Scia Engineer
8
2.2 Activation of licences
1. Attach the FlexID dongle (the USB dongle for your server license) to the server.
2. The Lock ID (the special internal ID number for the lock) is stored in a .lid-file (this is the file you’ll need in the next step to link this specific dongle to the server), which has been send to you by email. If you didn’t receive this file, this file can be requested by sending an email to [email protected] with:
o Your company name
o Your name and return email address
o The (list of) LID-number(s) (6 number figure(s), starting with ‘6’)
3. Execute the Scia Activation Manager (ActivationUtility.exe)
Press [Read Licence ID] If you are using proxy settings, then configure Network Settings for the activation to work. If this still won’t work, then check section 8.6.
The Lock ID is stored in a SCIAxxxxxx.lid-file, where x represents the number of your dongle. This number is indicated on the dongle as shown below:
Dongle File:
SCIA630505.lid
Choose the correct lid-file and press [Open]
Note
The data in this file together with the presence of the dongle itself on the server will be converted to a license file. This license file will be used by the FlexNET License administrator to send out licenses to start Scia Engineer.

Scia Engineer
9
4. The number of your license file will appear in the FlexNET activation utility window.
Select this number and press [Activate licence]
Attention
It is not possible to activate the license file using remote desktop (to try and push this command, see also section 8.2). For problems with proxy settings, check 8.6.
5. Afterwards you will receive a warning message about returning the licence before activating it on another server. Click on [OK] and the circle in front of the license number will become green and the license file has been activated.
Press [Close]

Scia Engineer
10
2.3 Configuration of the Server
From version 2010.0 the network protection uses FlexNET. In versions before 2010.0 (2009.0, 2008.1, Esa Prima Win, …) FlexLM has been used instead of FlexNET. FlexLM is actually the same as FlexNET, but an older version of it, and it uses ‘LMTOOLS’ instead of the ‘Activation Manager’ For Scia Engineer 14, the version of FlexNET has to be at least 2.2.0. The FlexNET software can also be configured to provide ‘old’ licenses (see 8.4)
1) Start the FlexNET license administrator
a) OPTION 1: Execute the FlexNET license administrator (can be found under ‘Start Programs Scia License Server FlexNET license administrator’ )
b) OPTION 2: Open an internet browser and navigate to http://serveraddress:8080 (e.g. http://localhost:8080)
Note
If the service ‘lmadmin.exe’ is not started, then you will not be able to connect in step 1. You can see more information in 8.5 about lmadmin.exe (this is the service that is being managed by the FlexNET license administrator.

Scia Engineer
11
2) Click on [Administration] and sign in (for the first login use "admin" for username and password)
3) Go to "Vendor daemon configuration" and click [Administer]
4) First stop the server before adapting the settings

Scia Engineer
12
5) In the "General configuration" section it is necessary to have the correct path to license file (by default this is scia\Scia_Software.lic). It can also be changed to refer to a *.DAT file (to configure FlexNET for old versions of Scia Engineer & EsaPrimaWin, see section 8.4 for how to do this). The path for the vendor daemon (Scia.exe) should be scia/scia.
The Vendor daemon port is the port which is used for communication between scia.exe and lmadmin.exe. It is not used for communication between Scia Engineer and the license server. Restart retries specifies whether the license server will be automatically started after restart of license server machine (also restart after sleep mode). Put here the value 1 to enable automatic restart of license server.
6) In the “vendor daemon log” section, it is possible to modify the position of log files or show the log file:

Scia Engineer
13
7) Changes in configuration must be saved:
8) Once the daemon is configured correctly, it can be started using the "Start" button.
DELETED NUMBER 10
Note
When the user wants to use another TCP port (e.g. 7182), it is possible to change this under “Server configuration -> License Server Configuration -> License Server Manger port” (see image). But after changing the port, you will have to restart lmadmin.exe (you can change it in the services, or you can restart the server).
Scia Engineer
14
3. Update of the server for a new version
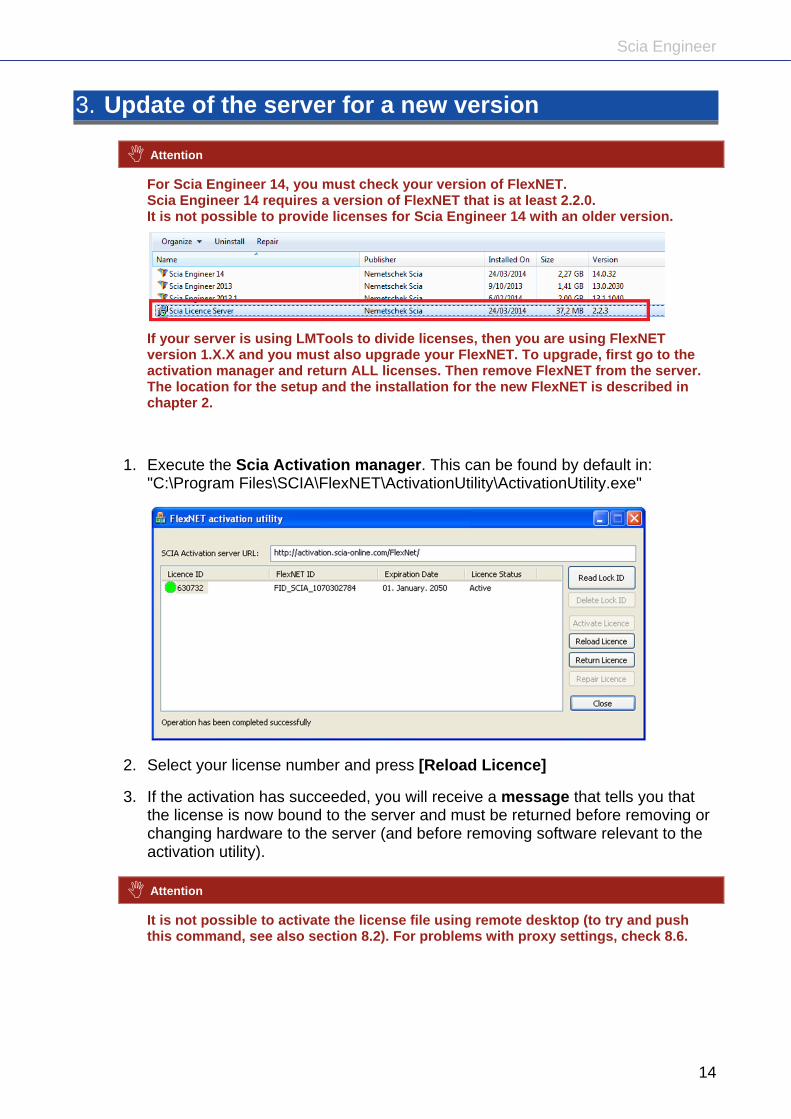
Attention
For Scia Engineer 14, you must check your version of FlexNET. Scia Engineer 14 requires a version of FlexNET that is at least 2.2.0. It is not possible to provide licenses for Scia Engineer 14 with an older version.
If your server is using LMTools to divide licenses, then you are using FlexNET version 1.X.X and you must also upgrade your FlexNET. To upgrade, first go to the activation manager and return ALL licenses. Then remove FlexNET from the server. The location for the setup and the installation for the new FlexNET is described in chapter 2.
1. Execute the Scia Activation manager. This can be found by default in: "C:\Program Files\SCIA\FlexNET\ActivationUtility\ActivationUtility.exe"
2. Select your license number and press [Reload Licence]
3. If the activation has succeeded, you will receive a message that tells you that the license is now bound to the server and must be returned before removing or changing hardware to the server (and before removing software relevant to the activation utility).
Attention
It is not possible to activate the license file using remote desktop (to try and push this command, see also section 8.2). For problems with proxy settings, check 8.6.

Scia Engineer
15
4. Now you must execute the [Reread License Files] option in the FlexNET license administration:

Scia Engineer
16
4. Extra options on the server
4.1 Checking the status of license server
The status of Scia License server can be checked on the "Dashboard" of the web based interface. It is possible to see alerts and warnings here and to see which licenses are available at the server. There are provided information about availability, expiration or current users (Hosts) for each module.
4.2 Deactivating the license file
Deactivating of the license file is necessary when changing the dongle from one server to another. In this case it is necessary to deactivate the license file on the original server before activating this license on the new server. You can deactivate the license following the next steps:
1. Using Windows Explorer, go to the folder C:\Program Files (x86)\Common Files\SCIA\Protection\ActivationUtility
2. Execute the file ActivationUtility.exe
3. Select the License file number and press [Return License]
4. Press [Close]

Scia Engineer
17
5. Installation of Scia Engineer on the client pc’s
5.1 Installation of Scia Engineer
1. You can start the installation using the web setup from our site:
Go to our download page:
http://update.nemetschek-scia.com/
And run the web setup.
2. In the dialog box which appears, select the language for installation:
The language chosen for installation is also the default language that will be used for the help files of Scia Engineer.
3. The Welcome screen for installation appears. Press [Next] to continue.
4. In the dialog Customer Information the User Name and Company Name can be inputted. The Company Name will appear automatically in the document of Scia Engineer. Press [Next] to continue.
5. In the dialog Choose Destination Location the folder where the files will be installed can be specified. By default the destination folder is created in Program Files. It is advised to use this default location.
Scia Engineer
18
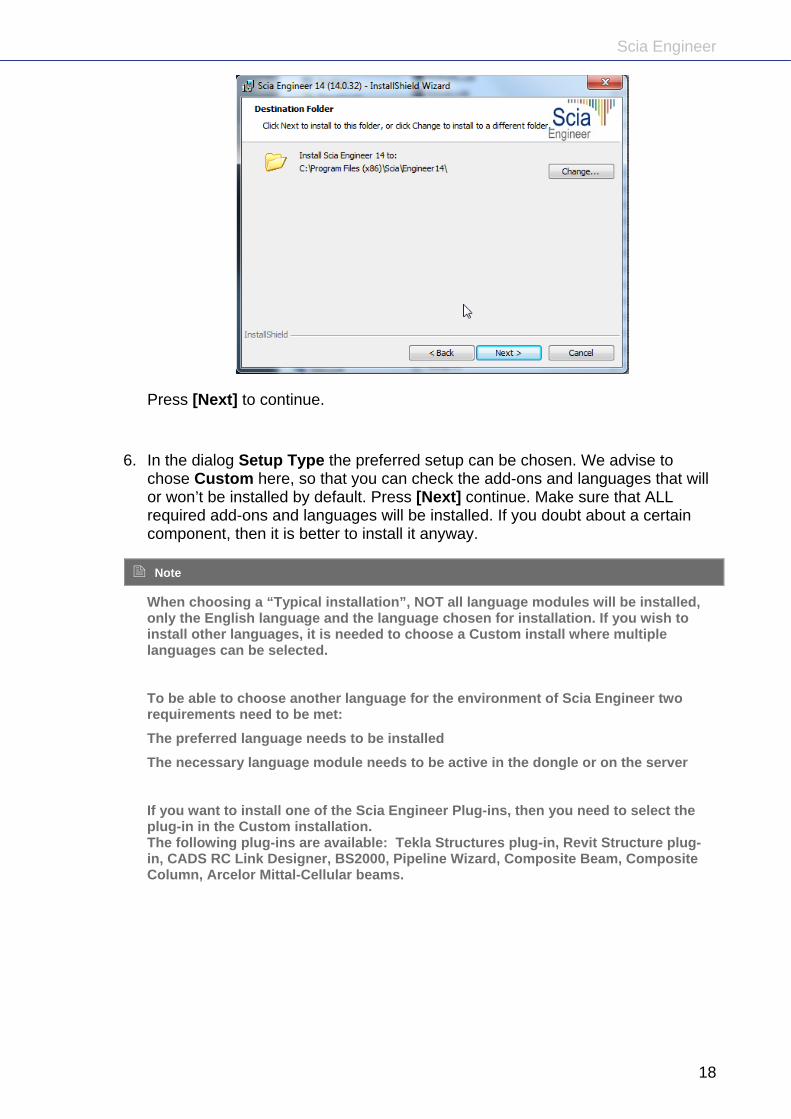
Press [Next] to continue.
6. In the dialog Setup Type the preferred setup can be chosen. We advise to chose Custom here, so that you can check the add-ons and languages that will or won’t be installed by default. Press [Next] continue. Make sure that ALL required add-ons and languages will be installed. If you doubt about a certain component, then it is better to install it anyway.
Note
When choosing a “Typical installation”, NOT all language modules will be installed, only the English language and the language chosen for installation. If you wish to install other languages, it is needed to choose a Custom install where multiple languages can be selected.
To be able to choose another language for the environment of Scia Engineer two requirements need to be met:
The preferred language needs to be installed
The necessary language module needs to be active in the dongle or on the server
If you want to install one of the Scia Engineer Plug-ins, then you need to select the plug-in in the Custom installation. The following plug-ins are available: Tekla Structures plug-in, Revit Structure plug-in, CADS RC Link Designer, BS2000, Pipeline Wizard, Composite Beam, Composite Column, Arcelor Mittal-Cellular beams.
Scia Engineer
19
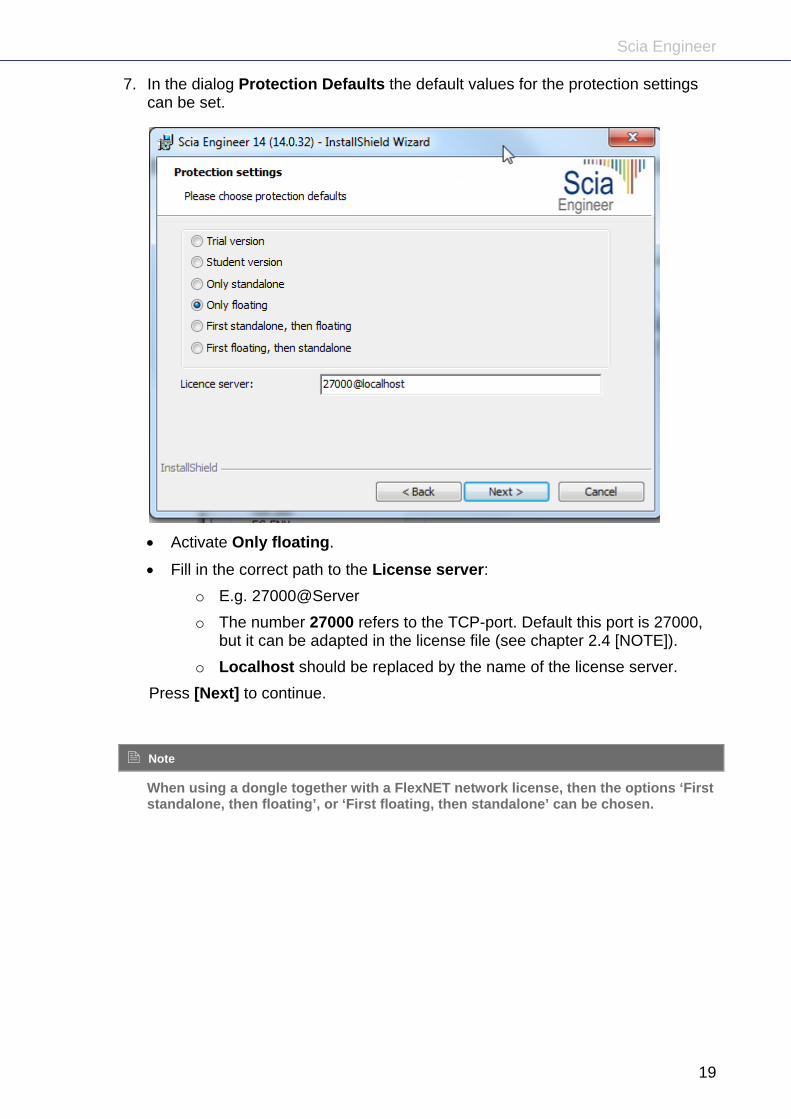
7. In the dialog Protection Defaults the default values for the protection settings can be set.
Activate Only floating.
Fill in the correct path to the License server:
o E.g. 27000@Server
o The number 27000 refers to the TCP-port. Default this port is 27000, but it can be adapted in the license file (see chapter 2.4 [NOTE]).
o Localhost should be replaced by the name of the license server.
Press [Next] to continue.
Note
When using a dongle together with a FlexNET network license, then the options ‘First standalone, then floating’, or ‘First floating, then standalone’ can be chosen.

Scia Engineer
20
8. In the dialog Application Defaults the default values for the national code can be set.
Choose the default setting for your national code and measuring system. Press [Next] to continue.
9. The last window shows an overview of the selected settings. Press [Install] to start the installation process.
10. After installation, the message appears that Scia Engineer has been installed successfully. Press [Finish] to end the installation procedure.
5.2 Start Scia Engineer
Double click on the Scia Engineer 14 symbol to start the program.
When the protection update succeeded Scia Engineer will start up and the installation is finished.
If Scia Engineer does not start immediately, the following screen will appear and follow the steps below to update the protection:

Scia Engineer
21
1. Scia Engineer cannot start without a correct protection. Press [Settings] to run the protection setup to update the protection.
2. The Protection setup will be displayed
Activate the option Only floating and fill in the correct path to the License server:
E.g. 27000@SERVER
The number 27000 refers to the TCP-port. Default this port is 27000, but it can be adapted in the FlexNET License Administrator (see chapter 2.3.[NOTE]).
SERVER should be replaced by the name of the license server (which you can see under the tab ‘System Information’ in the FlexNET License Administrator).
Press [Apply / Refresh]

Scia Engineer
22
3. The available commercial modules will appear in the window:
4. Press [OK] to close the protection Setup
5. Double click on the Scia Engineer 14 symbol to start the program.
6. When the protection update succeeded Scia Engineer will start up and the installation is finished.
Scia Engineer
23
5.3 Update
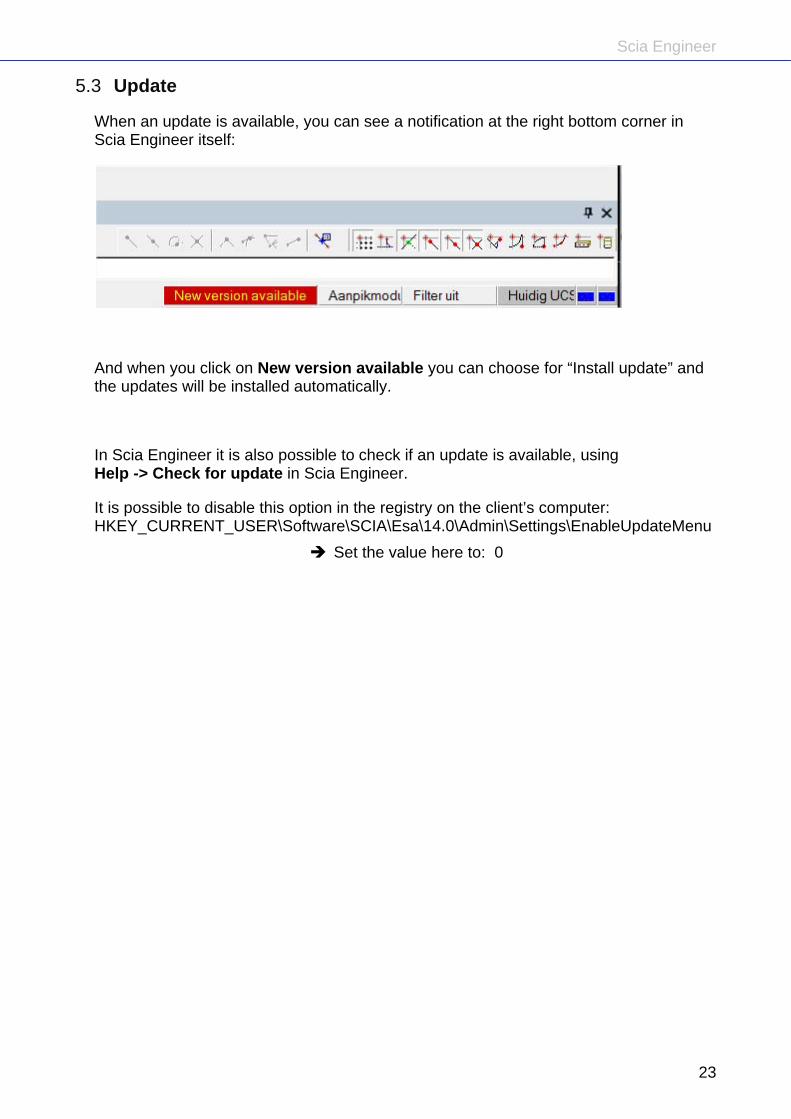
When an update is available, you can see a notification at the right bottom corner in Scia Engineer itself:
And when you click on New version available you can choose for “Install update” and the updates will be installed automatically.
In Scia Engineer it is also possible to check if an update is available, using Help -> Check for update in Scia Engineer.
It is possible to disable this option in the registry on the client’s computer: HKEY_CURRENT_USER\Software\SCIA\Esa\14.0\Admin\Settings\EnableUpdateMenu
Set the value here to: 0

Scia Engineer
24
6. Uninstalling Scia Engineer
6.1 Uninstalling with Add/Remove Programs in Windows
Scia Engineer can be uninstalled like any other windows based software application:
1. Go to Add or Remove Programs through Start > Settings > Control Panel > Add or Remove Programs.
2. A list with installed software applications will appear. Select Scia Engineer and press [Change/Remove]
3. In the dialog box that appears choose the option Remove
4. Press [Next] to start the uninstall procedure.
After completing the uninstalling, some settings remain in the Registry of windows. These traces can be deleted manually. Deleting these entries can be necessary when problems occur with a new installation.
1. Open the Run dialog box through Start > Run
2. Type regedit and press [OK] Take note, for this step it is required to have at least Power-User rights!

Scia Engineer
25
3. The Registry Editor appears.
4. Go to the following key’s and delete them using the Delete button. HKEY_CURRENT_USER\Software\SCIA\ESA\* HKEY_LOCAL_MACHINE\Software\SCIA\ESA\* Where * represents the version number.
5. Close the Registry Editor through File > Exit
After completing the uninstalling, some folders remain on your hard disk and can be deleted manually:
32 bits computer: C:\Program Files\SCIA\ESA**
64 bits computer: C:\Program Files (x86)\SCIA\Engineer**
Also the following folders remain on your hard disk and can be deleted:
Windows XP: C:\Documents and Settings\#USER#\ESA**
C:\Documents and Settings\#USER#\My Documents\ESA**
Windows Vista and Windows 7: C:\Users\#User#\Esa**
C:\Users\#User#\Documents\Esa**
Where ** represents the version number
Attention
These folders can be deleted using Windows Explorer. Please note that the first folder can contain projects so the user must be absolutely sure if he/she wishes to delete these folders.

Scia Engineer
26
6.2 Uninstalling without Add/Remove Programs
Sometimes Scia Engineer cannot be uninstalled using “Add/Remove programs” of Windows. Sometimes this give an error message or Scia Engineer is not added to Add/Remove Programs. This way, it is not possible to uninstall the software.
This problem can occur with every Windows based program.
To easily uninstall Scia Engineer, use the following procedure:
Go to ‘Start’ -> ‘Run’
In the dialog that appears, type the following command:
msiexec /x {F892EFDE-D4B3-48B2-8293-4024BBCA666E}
This will execute the same procedures as uninstalling through Add/Remove Programs.

Scia Engineer
27
7. Troubleshoot – on the client computer
A complete list of Frequent Asked Questions can be found on our website: http://nemetschek-scia.com/en/support/faq
7.1 Language module not found
When starting up Scia Engineer the following message appears:
If this message appears, it means that Scia Engineer does not find the correct language to start up.
To use a certain language, you need the module for this language and you have to install this language. Probably you have chosen a different language during your installation then the language of your modules.
You can install an extra language in the setup for “Programs and Features” in Windows. Select Scia Engineer 14 here and choose for “Change”. With this option you can change the installation of the program and select an extra language which will be installed.
DELETED THE PREVIOUS 7.2

Scia Engineer
28
7.2 User Access Control
If UAC (User Access Control) is enabled the following message will appear at the end of the installation:
Choose “Install this driver software anyway” to end the installation.
Note
For using Scia Engineer, standard user rights suffice. Here, no Administrator rights are needed.
However, the user must have read/write permission for the user folder of Scia Engineer:
Windows XP: C:\Documents and Settings\#USER#\ESA**
Windows Vista, Windows 7: C:\USERS\#USER#\ESA**
Where ** represents the version number and #USER# represents the user login name

Scia Engineer
29
8. Troubleshoot – on the server
8.1 TCP Ports – Server setup
For servers with a windows version older than windows7 the used ports in FlexNET (default 27000) should be opened.
When using a Windows7 server, it is necessary to add exceptions in the Windows firewall for: lmgrd.exe, scia.exe and lmadmin.exe
8.2 Impossible to activate license using Remote desktop
Remote desktop does not recognize the dongles from the remote system (in this case the FlexID dongle is not recognized). It is possible to log in on the console session of the server and then the dongle will be recognized, using the following command:
For Windows XP SP3 or higher, Windows Vista SP1 or higher, Windows Server 2008 and Windows 7:
mstsc /v:servername /admin
For all older versions of Windows:
mstsc /v:servername /console
More info:
/v:ServerName[:Port]
Specifies the remote computer and, optionally, the port number to which you want to connect.
/console or /admin
Connects to the console session of the specified Windows Server 2003 family operating system.

Scia Engineer
30
8.3 Changing the TCP Port
When the user wants to use another TCP port (e.g. 7182), it is possible to change this by the following steps:
1. Start the internet browser and navigate to http://serveraddress:8080 (e.g. http://localhost:8080)
2. Click on [Administration] and sign in (for the first login use "admin" for username and password)
3. Go to "Vendor daemon configuration" and click [Administer].
4. And go to “Server configuration -> License Server Configuration -> License Server Manager port”. You can change the Port here:
5. Afterwards, you must restart the service lmadmin.exe or restart the server.

Scia Engineer
31
8.4 Working with versions older than Scia Engineer 2010.0
With the “SCIA_Software.lic” file, the users can work with Scia Engineer 2010.1 and newer. But if the users prefer to work also with older versions of Scia Engineer or with Esa Prima Win, the old dat-file should be copied to the folder of the “SCIA_Software.lic” file, by default: "C:\Program Files (x86)\Common Files\Scia\LicenceServer\FlexnetServer\scia”
Afterwards the datfile should be adapted and the first 2 rows should be changed into:
Change “MYSERVER” in the name of the server.
Don’t change the FLEXID number (this depends on the number of your dongle)
Remove the port number at the end of the first row
Change the second line into: VENDOR SCIA scia/scia
And refer to this datfile in lmadmin (instead of: “scia\SCIA_Software.lic”). This can be done in the FlexNET Licence Administrator. To do this, follow the next steps:
1. Start the internet browser and navigate to http://serveraddress:8080 (e.g. http://localhost:8080)
2. Click on [Administration] and sign in (for the first login use "admin" for username and password)
3. Go to "Vendor daemon configuration" and click [Administer].
4. And refer here to the Licence file or Directory, not to te lic-file, but to the dat-file:
With those adaptations it is possible to work with older versions of Scia Engineer and with the new versions also.

Scia Engineer
32
8.5 Lmadmin does not start automatically
When restarting the server, the lmadmin service should start up automatic.
If this service does not start up automatic, please add a shortcut to lmadmin.exe (C:\Program Files\Common Files\Scia\LicenceServer\FlexNetServer) in the startup menu of Windows.
In some cases lmadmin.exe can be blocked due to other programs. The key in such a situation is to find what is blocking it.
One example can be shown for some Windows Server operating systems. These operating systems sometimes have ‘Data Execution Prevention’ activated by default for almost all programs. You can access and change it in the following manner: - If you would go to the computer properties
- Then you can configure data execution prevention by following the steps indicated in the next image:

Scia Engineer
33
8.6 Activation manager having problems with proxy setttings
If you are working behind proxy settings, and the activation manager does not work after adjusting the proxy settings in the activation manager.
In this case, it is possible to use a configuration file for the ActivationUtility.exe. Usually we have a bypass of calling HTTP status 101 - continue. Some proxies do not accept it and then activation fails.
To create this configuration file, you must follow the next steps:
a) Create a new file in notepad, and put in it the following content: <configuration> <system.net> <settings> <servicePointManager expect100Continue="false" /> </settings> </system.net> </configuration>
b) Save the file in the folder of ActivationUtility.exe C:\Program Files (x86)\Common Files\Scia\LicenceServer\ActivationUtility
c) Rename the file you created to: ActivationUtility.exe.config (make sure that the old file extension is gone)
Scia Engineer
34
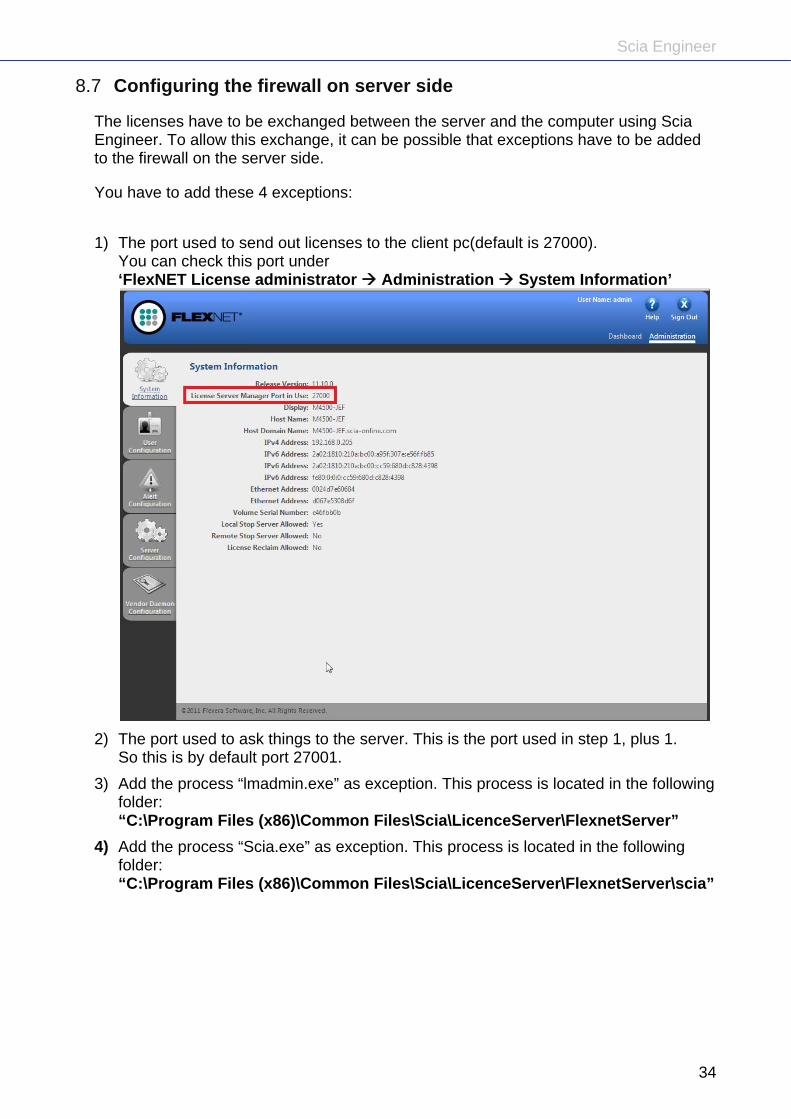
8.7 Configuring the firewall on server side
The licenses have to be exchanged between the server and the computer using Scia Engineer. To allow this exchange, it can be possible that exceptions have to be added to the firewall on the server side.
You have to add these 4 exceptions:
1) The port used to send out licenses to the client pc(default is 27000). You can check this port under ‘FlexNET License administrator Administration System Information’
2) The port used to ask things to the server. This is the port used in step 1, plus 1. So this is by default port 27001.
3) Add the process “lmadmin.exe” as exception. This process is located in the following folder: “C:\Program Files (x86)\Common Files\Scia\LicenceServer\FlexnetServer”
4) Add the process “Scia.exe” as exception. This process is located in the following folder: “C:\Program Files (x86)\Common Files\Scia\LicenceServer\FlexnetServer\scia”