quartz.net scheduler in depth · what is quartz.net? quartz .net is an open source job scheduler...
TRANSCRIPT

Copyright 2012, Javier Vilalta
Quartz.Net Scheduler in Depth
2 Copyright 2012, Javier Vilalta
Introduction
What is a Job Scheduler? Wikipedia defines a job scheduler as:
“A job scheduler is a software application that is in charge of unattended background executions,
commonly known for historical reasons as batch processing.”
If we paraphrase this definition a little, we can say that a job scheduler is an application that lets us do
unattended job processing.
Job schedulers are all around us, since they are included in many systems that we use every day. Here
are a few examples of systems that provide some sort of job scheduler:
Operating systems (task scheduler in windows or cron in linux)
Databases (SQL Agent in SQL Server)
What is Quartz.Net? Quartz .Net is an open source job scheduler for the .Net platform. It is has been ported to run on
the .Net framework from the original Quartz Java version. Quartz.Net is written in C# and is a straight
code port, with the Java code being basically translated to C#. The Quartz.Net scheduler can be run as a
standalone scheduler or it can also be embedded in your application.
Development of Quartz.Net 1.0 was originally done on Sourceforge, and the latest build for the 1.0
version can still be downloaded from there (http://sourceforge.net/projects/quartznet/files/quartznet/).
However, for version 2.0, development of Quartz.Net has moved to Github
(https://github.com/quartznet/quartznet). The binaries are still available on Sourceforge. You can
download the latest binary release of Quartz.Net 2.0 from
http://sourceforge.net/projects/quartznet/files/quartznet/
The core Quartz.Net library is also available as a NuGet package and you can visit the Quartz.Net page
on NuGet here: http://nuget.org/packages/Quartz.
Why Use Quartz.Net? Operating systems and databases all have some sort of task scheduling capability. Why should you
consider using Quartz instead of these built-in schedulers? Here are some reasons:
You want to limit the total number of jobs that run at the same time
You need more than one server to run all the jobs
You want a central point of control for all jobs and servers
System Requirements .Net Framework 3.5 or higher
Windows XP SP3 or higher operating system

3 Copyright 2012, Javier Vilalta
Visual Studio 2008 or 2010
4 Copyright 2012, Javier Vilalta
Part 1 – Quick Start This quick start guide is designed to get you up and running as fast as possible. To do this we will skip
most of the details and focus on:
downloading and installing Quartz.Net
downloading the sample code
getting a Quartz.Net server instance configured and running
scheduling and running a built-in job
creating a simple custom job
scheduling and running the custom job
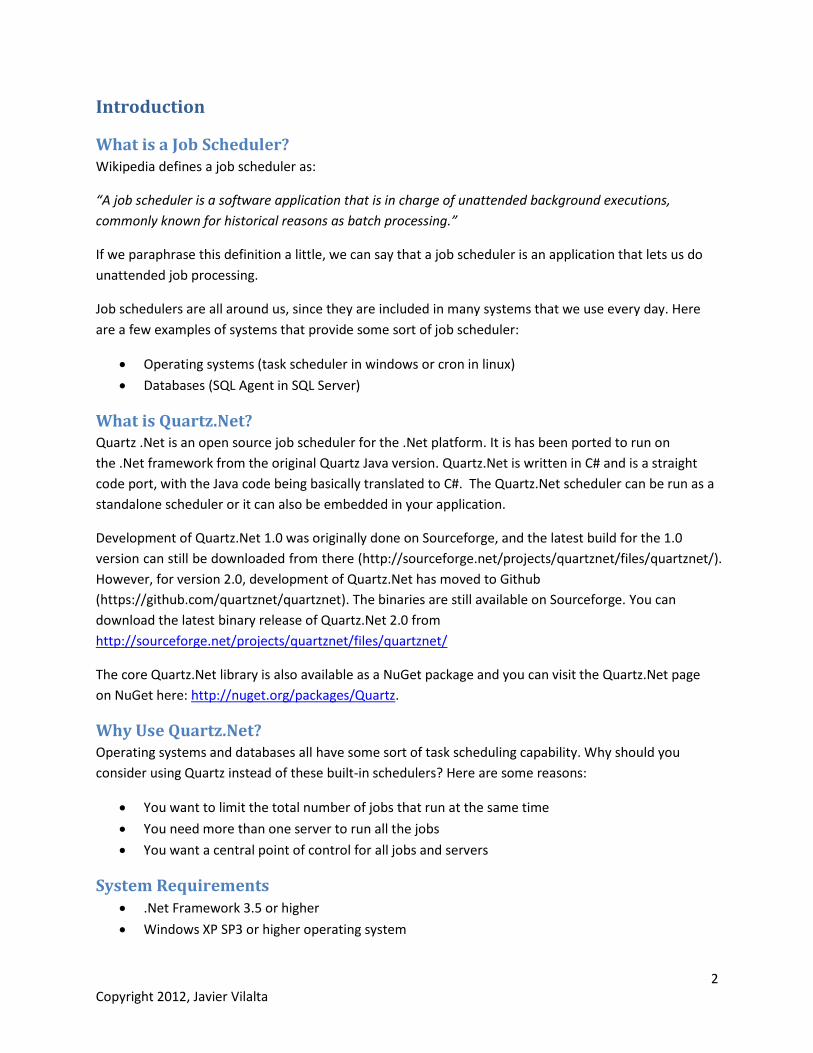
Downloading and Setting Up Quartz.Net Download the code samples from https://github.com/jvilalta/QuartzNetBook/downloads. You can unzip
the file to any folder on your hard drive, but we will be using c:\QuartzNetBook throughout the book.
Once unzipped, your folder structure underneath the installation directory c:\QuartzNetBook will look
like this:
Figure 1
Find the server folder and open a command prompt in that folder.
Figure 2

5 Copyright 2012, Javier Vilalta
To run the scheduler, simply execute Quartz.Server.exe by typing Quartz.Server.exe in the command
window.
Figure 3
Once you execute the command, the scheduler will start running. If your operating system brings up a
prompt about the windows firewall, click on unblock so that you can connect to the scheduler using the
built-in remoting support (we will take a look at this later on).

6 Copyright 2012, Javier Vilalta
As the scheduler is starting, you will see several informational messages scroll by in the command
prompt window. The last message on the screen should say “Running, press Control+C to exit”.
Figure 4
To stop the scheduler, press Control-C, and watch as the scheduler shuts down. Once the scheduler
completes the shutdown process, you should be back at the command prompt, and the last line
outputted by the scheduler will say “Stopped”.
Figure 5

7 Copyright 2012, Javier Vilalta
Leave the scheduler shut down for now, as we will now take a look at how to configure the scheduler.
Keep in mind as you work through the configuration examples that any configuration changes made
while the scheduler is running will not be applied to the scheduler until after it is restarted.
A Quick Look at Configuration For the quick start we’ll look at the simplest way of configuring Quartz.Net. The default setup of
Quartz.Net includes a quartz.config file that holds the configuration parameters for the scheduler. Let’s
take a look at the sample configuration file.
# You can configure your scheduler in either <quartz> configuration section
# or in quartz properties file
# Configuration section has precedence
quartz.scheduler.instanceName = ServerScheduler
# configure thread pool info
quartz.threadPool.type = Quartz.Simpl.SimpleThreadPool, Quartz
quartz.threadPool.threadCount = 10
quartz.threadPool.threadPriority = Normal
# job initialization plugin handles our xml reading, without it defaults are
used
quartz.plugin.xml.type = Quartz.Plugin.Xml.XMLSchedulingDataProcessorPlugin,
Quartz
quartz.plugin.xml.fileNames = ~/quartz_jobs.xml
# export this server to remoting context
quartz.scheduler.exporter.type = Quartz.Simpl.RemotingSchedulerExporter,
Quartz
quartz.scheduler.exporter.port = 555
quartz.scheduler.exporter.bindName = QuartzScheduler
quartz.scheduler.exporter.channelType = tcp
quartz.scheduler.exporter.channelName = httpQuartz
This is the standard configuration that comes with the Quartz.Net distribution. It creates a scheduler
that can run up to 10 jobs at a time. It also tells the scheduler factory that it should load the jobs
described in the quartz_jobs.xml file into the scheduler. If we wanted to be able to run more than 10
jobs at a time, then we can change the value of quartz.threadPool.threadCount to say 15. This would tell
the scheduler to execute up to 15 jobs at a time. If you wanted to load jobs into the scheduler from a file
other than the default, all you have to do is change the value of quartz.plugin.xml.fileNames. We’ll
discuss configuration in depth later in the book, and in the following section you’ll get a chance to
schedule a job using the quartz_jobs.xml file.
Running an Executable or Batch File Using the Built-in Native Job Quartz.Net provides a built-in job that lets you execute any file that can be run from a command prompt.
The built-in job that allows you to do this is called the NativeJob. Let’s take a look at how we can execute
a batch file using the NativeJob. To illustrate the use of this job type, we will be running a batch file that
writes the current date and time to a text file.

8 Copyright 2012, Javier Vilalta
Configuring the Scheduler
First, we will configure the Quartz.Net scheduler so that it knows that it must execute the job that runs
our batch file. To do this, we will be using the default job configuration mechanism, which is simply an
xml file where we include all the jobs that the scheduler needs to run.
Here is what a barebones quartz_jobs.xml file looks like:
<?xml version="1.0" encoding="UTF-8"?>
<!-- This file contains job definitions in schema version 2.0 format -->
<job-scheduling-data
xmlns="http://quartznet.sourceforge.net/JobSchedulingData"
xmlns:xsi="http://www.w3.org/2001/XMLSchema-instance" version="2.0">
<processing-directives>
<overwrite-existing-data>true</overwrite-existing-data>
</processing-directives>
<schedule>
</schedule>
</job-scheduling-data>
We will add our job configuration data inside the <schedule> element in the above file. This is what
the above file will look like after we add the configuration information to tell the scheduler to run our
batch file:
<?xml version="1.0" encoding="UTF-8"?>
<!-- This file contains job definitions in schema version 2.0 format -->
<job-scheduling-data
xmlns="http://quartznet.sourceforge.net/JobSchedulingData"
xmlns:xsi="http://www.w3.org/2001/XMLSchema-instance" version="2.0">
<processing-directives>
<overwrite-existing-data>true</overwrite-existing-data>
</processing-directives>
<schedule>
<job>
<name>nativeJobExample</name>
<group>nativeJobExampleGroup</group>
<description>Sample job for Quartz Server</description>
<job-type>Quartz.Job.NativeJob, Quartz</job-type>
<job-data-map>
<entry>
<key>command</key>
<value>native_job_example.bat</value>
</entry>
<entry>
<key>consumeStreams</key>
<value>true</value>
</entry>
</job-data-map>
</job>
<trigger>
<simple>
<name>nativeJobExampleSimpleTrigger</name>
<group>nativeJobExampleSimpleTriggerGroup</group>
<description>Simple trigger to simply fire sample job</description>

9 Copyright 2012, Javier Vilalta
<job-name>nativeJobExample</job-name>
<job-group>nativeJobExampleGroup</job-group>
<misfire-instruction>SmartPolicy</misfire-instruction>
<repeat-count>5</repeat-count>
<repeat-interval>10000</repeat-interval>
</simple>
</trigger>
</schedule>
</job-scheduling-data>
If you’d like to follow along this explanation, all of the files we are examining are located in the
c:\QuartzNetBook\samples\quickstart folder.
As you can see, we’ve added two new elements under <schedule>: a <job> element and a <trigger>
element. In order to get a job to execute under Quartz.Net, a trigger must be attached to it. The job
describes the work to be done and the trigger tells the scheduler when this job should execute.
The <job> Element
Let us take a closer look at the <job> section now. This section describes the job that we want to
execute in detail.
First, we give the job a name using the <name> element. Then we assign it to a group using the <group>
element. We will highlight later on why these two items are important, but for now think of them as
uniquely identifying a job.
Next in the <job> section is the <description> element, which describes in a friendly format what
the job does. The <job-type> element tells the scheduler the name of the .NET class that must be
instantiated to execute this job.
After the <job-type> element comes the <job-data-map> element.
The <job-data-map> Element
The <job-data-map> element is a container for all of the name-value pairs of data that you want to
pass in to the job. These name value pairs become part of the job context during execution, thus
allowing you to use the same job type but have it execute with different parameters. In this example we
are passing in the name of the batch file that we want to execute. If we wanted to configure two
different jobs different batch files to run, then we only need to change the name of the file that we are
passing in to the job.
Inside the <job-data-map> we find one or more <entry> elements, which correspond to each name-
value pair. Each <entry> element will have a <key> element and a <value> element. As you can tell
from the names, the key element is the string that will be used to look up the value once inside the job.
The value element is the actual value that is returned from the job data map.

10 Copyright 2012, Javier Vilalta
In our example, the key is “command”, which tells that job that the value is the name of the batch file
that we want to run. The native job supports other parameters, but we’ll skip those since they’re not
important to running our example.
The <trigger> Element
It’s time now to take a deeper look at the <trigger> element. We will look at how to define and add
triggers to our job. Triggers are responsible for kicking off jobs.
First, let’s look at how we define triggers. The Quartz.Net distribution includes two types of triggers:
simple triggers and cron triggers. In our example we’ll use a simple trigger. A simple trigger is a trigger
that fires a certain number of times with a certain delay between each firing. We’ll discuss cron triggers
later.
In order to define a simple trigger we must start off with the <simple> tag, which serves as a container
for the simple trigger. Next, we give our trigger a name using the <name> element and assign it to a
group using the <group> element. You can also specify a description for the trigger using the
<description> element. This is all the same as what we did for the job itself. These elements are also
used for common across all trigger types, including cron triggers.
The <repeat-count> element will define how many times a simple trigger will repeat. The <repeat-
interval> element specifies how much time (in milliseconds) will pass between trigger firings. These
two elements together are what in essence define a simple trigger.
Sometimes the scheduler is busy running jobs, so some triggers might not be able to fire a job. When
this happens, it’s called a misfire. The <misfire-instruction> element tells the scheduler what to
do. For our example the misfire policy isn’t important, so we’ll skip it for now and will talk about them in
depth later.
Linking the Trigger to the Job
Finally, we must link the job and the trigger together so that we can get our job to fire. This is done by
setting the <job-name> element to the same value that we set the job’s <name> element and by
setting the <job-group> to the same value that we set the job’s <group> element. These two values
uniquely identify a job, so both of them must be provided in order to assign a trigger to a job.
Executing the Batch File
Now let’s take a quick look at the batch file before we execute it using the scheduler. First, copy the
native_job_example.bat and quartz_jobs.xml files from c:\QuartzNetBook\samples\quickstart to
c:\QuartzNetBook\server. There is a quartz_jobs.xml file already there, so when prompted to ask if you
want to overwrite the file, go ahead and select the option to replace the file.
Before we run the batch file, take a look at what it does. Right click on the native_job_example.bat file
and select edit. You will see that all it does is write the current date and time to a text file called
run_times.txt. It’s a pretty simple file but it helps us to visualize what is going on behind the scenes
when the scheduler is running. Double click on the file to execute it. If the file runs successfully you will
11 Copyright 2012, Javier Vilalta
find a file named run_times.txt in the same directory (c:\QuartzNetBook\server). Open the file by
double clicking on it. The file should contain one line with the current date and time.
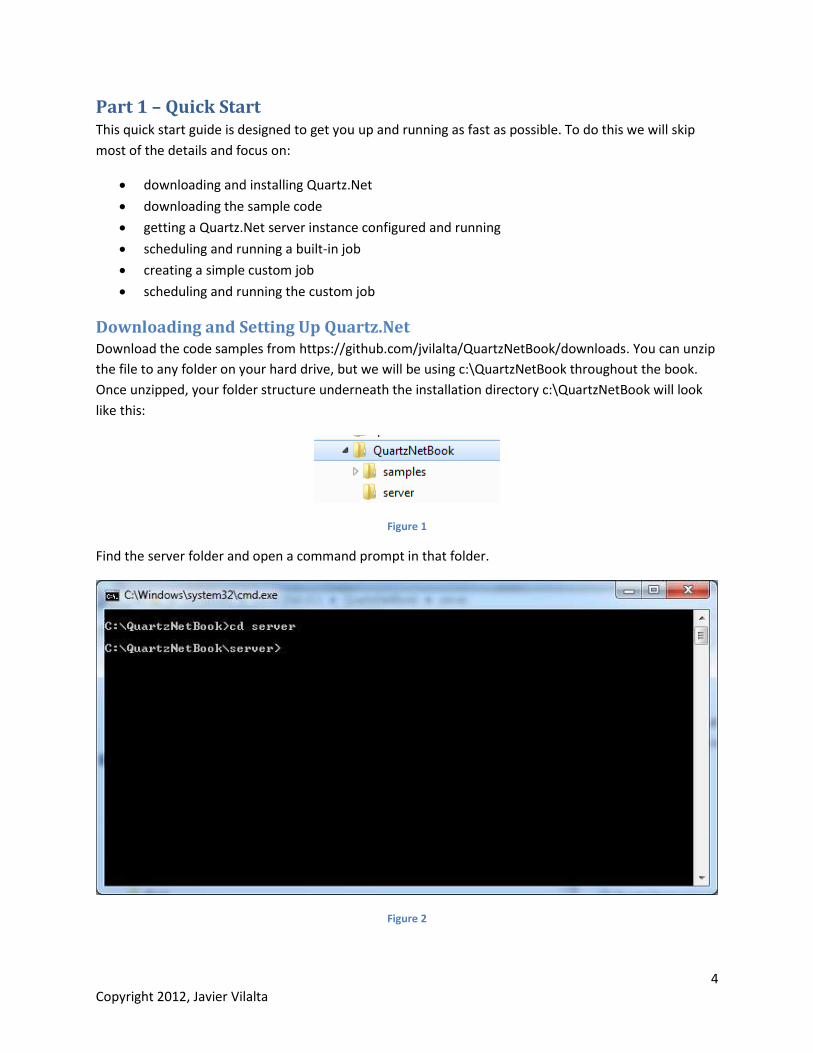
It’s time now to have the scheduler run the file. We’ll do that from the command prompt so that we can
see what the scheduler is doing. Open a command prompt at c:\QuartzNetBook\server and start the
scheduler by typing Quartz.Server.exe and pressing Enter.
Figure 6
If all goes well the scheduler should start up again like before. However, now it will run our batch file
every 10 seconds. You will know that the job is running because the scheduler will keep writing output
to the command prompt. The job is configured to run 5 times, so after about a minute, the job will
complete its execution and the scheduler will stop writing to the command prompt.
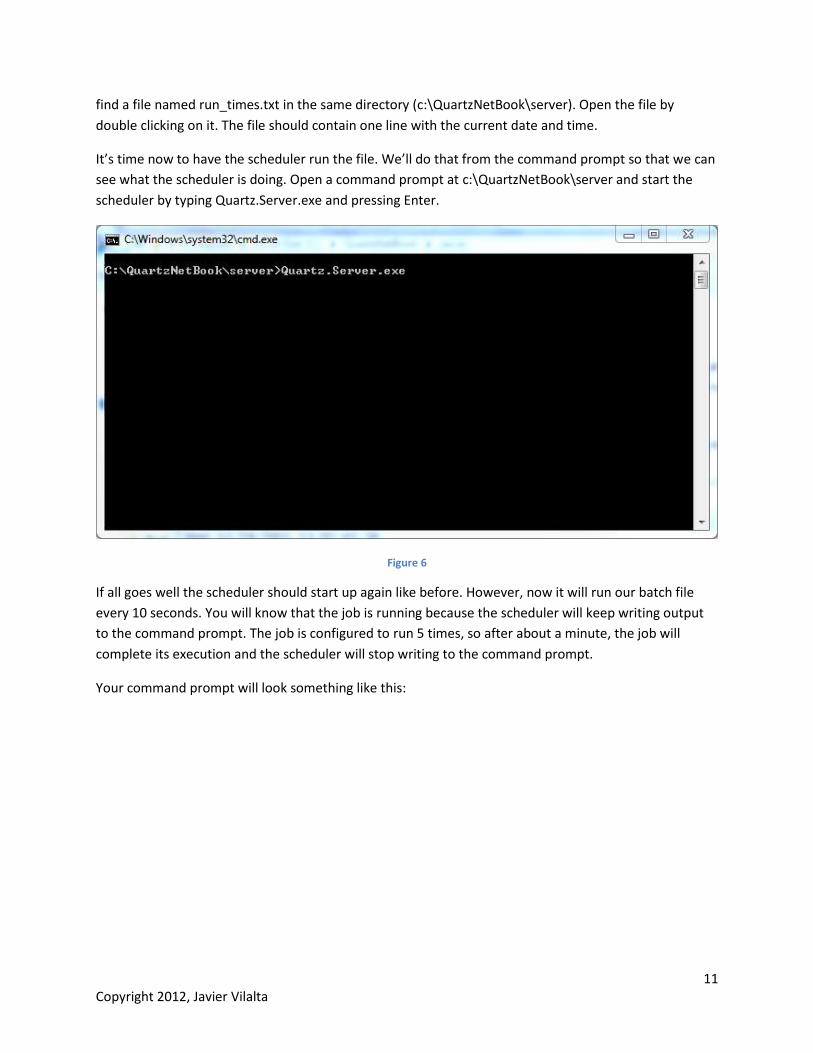
Your command prompt will look something like this:
12 Copyright 2012, Javier Vilalta
Figure 7
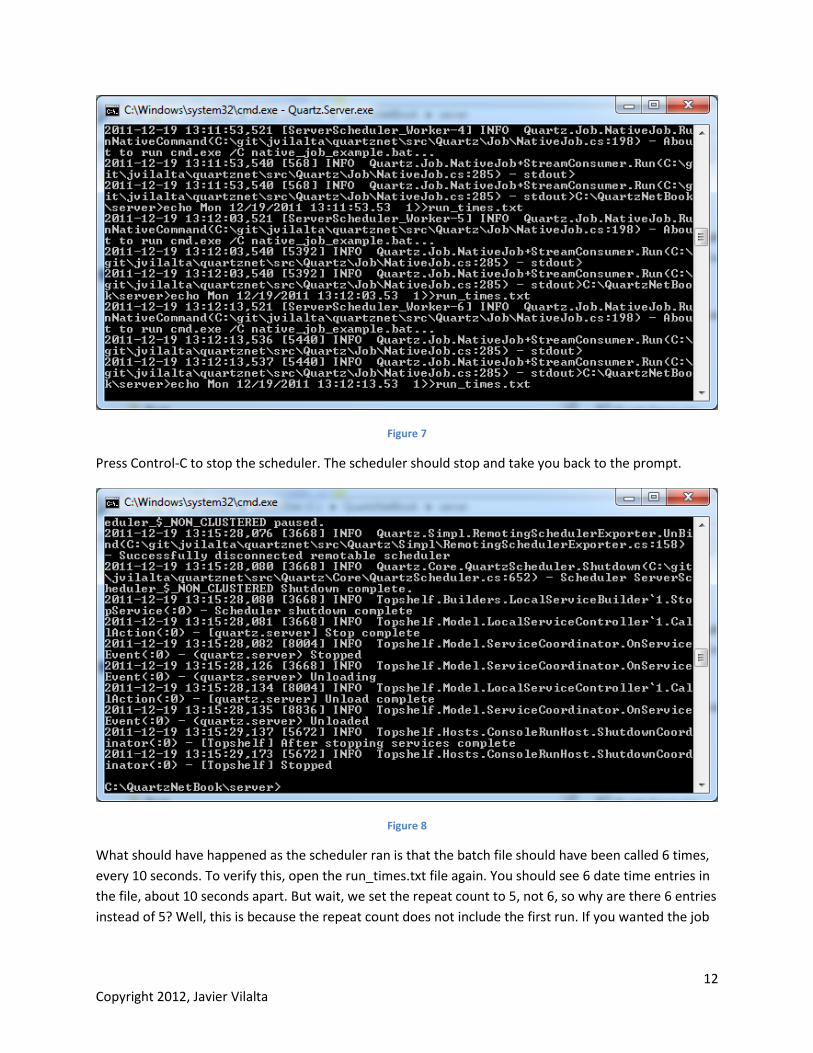
Press Control-C to stop the scheduler. The scheduler should stop and take you back to the prompt.
Figure 8
What should have happened as the scheduler ran is that the batch file should have been called 6 times,
every 10 seconds. To verify this, open the run_times.txt file again. You should see 6 date time entries in
the file, about 10 seconds apart. But wait, we set the repeat count to 5, not 6, so why are there 6 entries
instead of 5? Well, this is because the repeat count does not include the first run. If you wanted the job

13 Copyright 2012, Javier Vilalta
to run 5 times, you would set the repeat count to 4 and this way you would get one initial run plus 4
repeat runs.
Creating a Custom Job Now that we have scheduled one of the built-in jobs, it’s time to create our own custom job. In order to
create a custom job, we need to implement the IJob interface. This is a very simple interface, since it
only requires us to implement one method. Here’s the IJob interface definition:
public interface IJob
{
void Execute(IJobExecutionContext context);
}
As you can see, we only need to implement the Execute method. In this method is where our job’s code
to “do something" will be written.
The QuickStartJob
The custom job we will implement will be a simple one. This job will do the same work as our previous
batch file: it will write the current date and time to a text file. First, let’s open the
QuartzNetBookSamples.sln solution file using Visual Studio 2010. Once in Visual Studio, open the
QuickStart project. In it you will find the QuickStartJob.cs file. This is the file that holds the code for our
simple, yet custom job.
Figure 9
Here is the code for the QuickStartJob.cs file:
using System;
using System.IO;
using Quartz;
namespace QuickStart
{
public class QuickStartJob : IJob
{

14 Copyright 2012, Javier Vilalta
public void Execute(IJobExecutionContext context)
{
var fileName = "QuickStartJob_runs.txt";
using (StreamWriter writer =
new StreamWriter(File.Open(fileName, FileMode.Append)))
{
writer.WriteLine(DateTime.Now.ToString());
writer.Flush();
writer.Close();
}
}
}
}
As you can see, we have implemented the Execute method with what would be the equivalent
functionality of our batch file.
Now let’s update the quartz_jobs.xml file so that in addition to running the batch file, the scheduler also
runs our custom job.
Updating the Job Configuration File (quartz_jobs.xml)
In order to get the scheduler to run our custom job, we need to add it to the quartz_jobs.xml. We also
need to add a trigger so that the job gets executed, but this is a fairly straightforward process.
First, we’ll add the job by adding the following xml snippet just before the </schedule> tag:
<job>
<name>quickStartJobExample</name>
<group>quickStartJobExampleGroup</group>
<description>My first Quartz.Net job</description>
<job-type>QuickStart.QuickStartJob, QuickStart</job-type>
</job>
Before we move on to adding the trigger, I’d like to highlight the fact that since we have created a new
job in a separate dll, the <job-type> element must reference that new assembly.
Now, let’s add the trigger. We’re going to be adding the same kind of trigger as in the previous example,
but we’ll have to reference the new job we’ve created. Underneath the job element that we’ve just
added, let’s add the following trigger element:
<trigger>
<simple>
<name>quickStartJobExampleSimpleTrigger</name>
<group>quickStartJobExampleSimpleTriggerGroup</group>
<description>Trigger that fires the QuickStartJob</description>
<job-name>quickStartJobExample</job-name>
<job-group>quickStartJobExampleGroup</job-group>
<misfire-instruction>SmartPolicy</misfire-instruction>
<repeat-count>5</repeat-count>
<repeat-interval>10000</repeat-interval>

15 Copyright 2012, Javier Vilalta
</simple>
</trigger>
Notice that the <job-name> and <job-group> elements refer to the same name and group that we
specified in the job xml snippet above. These two elements are the means by which Quartz.Net ties the
trigger to the job.
Executing our Custom Job
Now it is time to try executing our new custom job. We’ve already updated the quartz_jobs.xml file, but
there is one step that we need to follow before we can have Quartz.Net schedule and execute our job.
We need to move our quickstart.dll file to a directory where Quartz.Net can find it. Since Quartz.net is
a .Net application, all of the rules that the CLR follows when trying to locate an assembly apply here. To
make this as simple as possible, just copy the quickstart.dll file from your build folder to the Quartz.Net
folder. If you’re following the conventions we’ve been using so far, you’ll want to copy the quickstart.dll
file to c:\QuartzNetBook\server.
It’s time to execute our new job. In the Quartz.Net command line prompt window you’ve got open, go
ahead and start the server by typing Quartz.Server.exe. The Quartz.Net server will start up and after
about a minute or so, both jobs will finish executing. You should now have two files in the
c:\QuartzNetBook\server folder. Run_times.txt is the file that is created by the native job. It will have 5
new entries in it with the date and time, all about ten seconds apart. QuickStartJob_runs.txt is the file
that was created by our new custom job and it should also have 5 entries in it, all about 10 seconds
apart.
If this is not the case, look through the output of the scheduler to see what might have happened. If
Quartz.Net was not able to locate your assembly or if there was an issue with the quartz_jobs.xml file,
you will see one or several error messages in the console output.
Installing Quartz.Net as a Windows Service So far, all of the examples that we have presented require you to start the Quartz.Net scheduler
manually in a command prompt. For most production uses, this will not be acceptable and more than
likely you will be installing Quartz.Net as a windows service. Fortunately, Quartz.Net supports this
scenario without requiring you to do much.
To install Quartz.Net as a windows service, open a command prompt as administrator and change to
the Quartz.Net directory: c:\QuartzNetBook\server. You should be in the same directory that has the
Quartz.Server.exe file. The Quartz.Net server can be installed by typing the following in the command
line:
Quartz.Server.exe install
If all goes well, you should see output similar to this in your window:

16 Copyright 2012, Javier Vilalta
Figure 10
If your install completed successfully, then it’s time to finish configuring the service in the service
management console.
To open the service management console, type this in the command line:
services.msc
The services management window should open and it will be similar to the following:
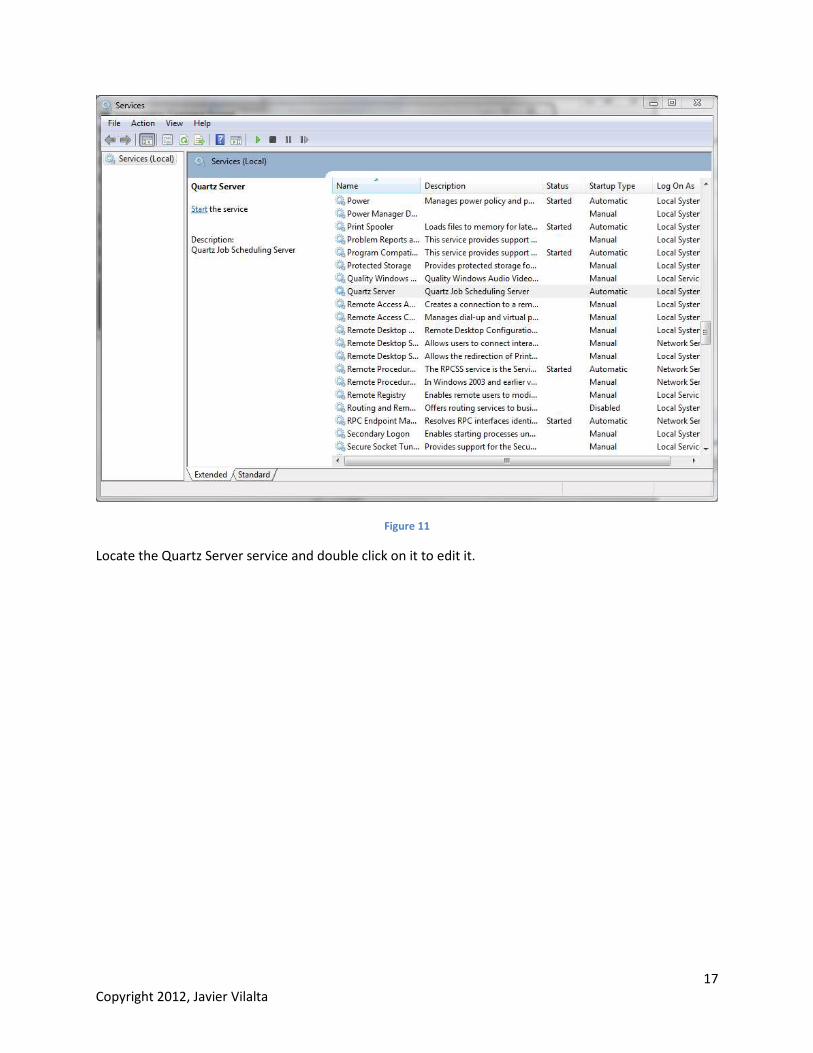
17 Copyright 2012, Javier Vilalta
Figure 11
Locate the Quartz Server service and double click on it to edit it.

18 Copyright 2012, Javier Vilalta
Figure 12
What you edit next depends on your requirements, but if you’re just following the tutorial, you might
want to change the startup type from automatic to manual, so that the server isn’t running all the time.
Additionally you might want to change the identity of the service if special permissions are required.
Uninstalling the Quartz.Net Service To uninstall Quartz.Net as a windows service, open a command prompt as administrator and change to
the Quartz.Net directory: c:\QuartzNetBook\server. You should be in the same directory that has the
Quartz.Server.exe file. The Quartz.Net server can be uninstalled by typing the following in the command
line:
Quartz.Server.exe uninstall
If all goes well, you should see output similar to this in your window:

19 Copyright 2012, Javier Vilalta
Figure 13
Embedding Quartz.Net in Your Application So far we have seen that you can run Quartz.net directly from the command line. We also described
how to install Quartz.Net as a windows service so that it is running all the time. Finally, we will describe
how to embed Quartz.Net so that it runs within your application. While it’s possible to embed
Quartz.Net in an ASP.Net application, it’s not recommended because web applications can be
unceremoniously terminated by IIS. If you’ve embedded Quartz.Net in a web application and it gets
abruptly terminated, well, bad things could happen.
So that we can illustrate the process of embedding Quartz.Net without spending too much time on the
application itself, I’ve chosen to create a simple command line application that does nothing more than
start the scheduler and wait until you press a key to terminate.
The code for this console application can be found under
c:\QuartzNetBook\samples\QuartzNetBookSamples. Double click on the QuartzNetBookSamples.sln
solution file to open it.

20 Copyright 2012, Javier Vilalta
Figure 14
The EmbeddedScheduler project contains the code for our embedded scheduler. Let’s open Program.cs
and take a look inside. Here’s the listing for the Main method of Program.cs.
1 static void Main(string[] args)
2 {
3 var factory = new StdSchedulerFactory();
4 var scheduler = factory.GetScheduler();
5 scheduler.Start();
6 while (!scheduler.IsStarted)
7 {
8 Console.WriteLine("Waiting for scheduler to start.");
9 Thread.Sleep(1000);
10 }
11 Console.WriteLine("IsStarted={0}", scheduler.IsStarted);
12 Console.WriteLine("InstanceId={0}", scheduler.SchedulerInstanceId);
13 Console.WriteLine("SchedulerName={0}", scheduler.SchedulerName);
14 Console.WriteLine("The scheduler is running. Press any key to stop");
15 Console.ReadKey();
16 Console.WriteLine("Shutting down scheduler");
17 scheduler.Shutdown(false);
18 while (!scheduler.IsShutdown)
19 {
20 Console.WriteLine("Waiting for scheduler to shutdown.");
21 Thread.Sleep(1000);
22 }
23 Console.WriteLine("IsShutdown={0}", scheduler.IsShutdown);
24 Console.WriteLine("The scheduler has been shutdown.");
25 }
Analyzing the Embedded Scheduler Program
Now we will look at the Program.cs listing above in detail.

21 Copyright 2012, Javier Vilalta
Initializing and Starting the Scheduler
On line 3 we instantiate the standard scheduler factory. This factory is included in the Quartz.Net
distribution and among other things, it is responsible for reading the configuration information for the
scheduler. You may have noticed that there is a quartz.config file included in the EmbeddedSchdeduler
project. Behind the scenes, the StdSchedulerFactory is reading this file and configuring the scheduler.
Next we ask the factory to create a scheduler for us and we store a reference to it. Storing a reference to
the scheduler throughout the lifetime of your application is critical to make sure that the scheduler does
not get garbage collected. If you do not hold a reference to the scheduler, it will stop running as soon as
it goes out of scope.
After all this setup, we can now start the scheduler. This is shown on line 5. Lines 6-10 are just there to
give the scheduler some time to start up, since it might not start up immediately. Lines 11-14 print out
some scheduler information and then we stop and wait until the user presses a key. At this point the
scheduler is fully operational and can be used by the application. In your application you will likely move
on to your application’s main screen or loop.
Shutting Down the Scheduler
When you’re ready to stop the scheduler, you call the shutdown method on it, as shown on line 17. If
you pass in true instead of false, the shutdown method will wait for all running jobs to complete. In the
example we are asking the scheduler to terminate immediately.

22 Copyright 2012, Javier Vilalta
Feedback You can send any feedback, questions or comments on this draft version to [email protected] or follow
the progress of this book at http://jayvilalta.com/blog