sas 9.3 intelligence platform - sas customer support knowledge
TRANSCRIPT
SAS® 9.3 Intelligence PlatformMigration Guide
SAS® Documentation
The correct bibliographic citation for this manual is as follows: SAS Institute Inc 2011. SAS® 9.3 Intelligence Platform: Migration Guide. Cary, NC: SAS Institute Inc.
SAS® 9.3 Intelligence Platform: Migration Guide
Copyright © 2011, SAS Institute Inc., Cary, NC, USA.
All rights reserved. Produced in the United States of America.
For a hardcopy book: No part of this publication may be reproduced, stored in a retrieval system, or transmitted, in any form or by any means, electronic, mechanical, photocopying, or otherwise, without the prior written permission of the publisher, SAS Institute Inc.
For a Web download or e-book: Your use of this publication shall be governed by the terms established by the vendor at the time you acquire this publication.
The scanning, uploading, and distribution of this book via the Internet or any other means without the permission of the publisher is illegal and punishable by law. Please purchase only authorized electronic editions and do not participate in or encourage electronic piracy of copyrighted materials. Your support of others' rights is appreciated.
U.S. Government Restricted Rights Notice: Use, duplication, or disclosure of this software and related documentation by the U.S. government is subject to the Agreement with SAS Institute and the restrictions set forth in FAR 52.227–19, Commercial Computer Software-Restricted Rights (June 1987).
SAS Institute Inc., SAS Campus Drive, Cary, North Carolina 27513.
Electronic book 4, August 2012
SAS® Publishing provides a complete selection of books and electronic products to help customers use SAS software to its fullest potential. For more information about our e-books, e-learning products, CDs, and hard-copy books, visit the SAS Publishing Web site at support.sas.com/publishing or call 1-800-727-3228.
SAS® and all other SAS Institute Inc. product or service names are registered trademarks or trademarks of SAS Institute Inc. in the USA and other countries. ® indicates USA registration.
Other brand and product names are registered trademarks or trademarks of their respective companies.
Contents
What's New in Migration for the SAS 9.3 Intelligence Platform . . . . . . . . . . . . . . . . . . viiAccessibility Features of the SAS Intelligence Platform Deployment Tools . . . . . . . . . . ixRecommended Reading . . . . . . . . . . . . . . . . . . . . . . . . . . . . . . . . . . . . . . . . . . . . . . . . . . xi
Chapter 1 • Introduction . . . . . . . . . . . . . . . . . . . . . . . . . . . . . . . . . . . . . . . . . . . . . . . . . . . . . . . . . . 1Approaches for Upgrading to SAS 9.3 . . . . . . . . . . . . . . . . . . . . . . . . . . . . . . . . . . . . . . . 2What is Promotion? . . . . . . . . . . . . . . . . . . . . . . . . . . . . . . . . . . . . . . . . . . . . . . . . . . . . . 2Promotion Tools . . . . . . . . . . . . . . . . . . . . . . . . . . . . . . . . . . . . . . . . . . . . . . . . . . . . . . . . 2What Can Be Promoted? . . . . . . . . . . . . . . . . . . . . . . . . . . . . . . . . . . . . . . . . . . . . . . . . . 3Special Considerations for Promoting Metadata from Earlier SAS
Versions to SAS 9.3 . . . . . . . . . . . . . . . . . . . . . . . . . . . . . . . . . . . . . . . . . . . . . . . . . . 3What is Migration? . . . . . . . . . . . . . . . . . . . . . . . . . . . . . . . . . . . . . . . . . . . . . . . . . . . . . . 7Comparing Promotion and Migration . . . . . . . . . . . . . . . . . . . . . . . . . . . . . . . . . . . . . . . . 7Migration Tools . . . . . . . . . . . . . . . . . . . . . . . . . . . . . . . . . . . . . . . . . . . . . . . . . . . . . . . . 8What Can Be Migrated? . . . . . . . . . . . . . . . . . . . . . . . . . . . . . . . . . . . . . . . . . . . . . . . . . . 8High-Level SAS Migration Requirements . . . . . . . . . . . . . . . . . . . . . . . . . . . . . . . . . . . . 9Choosing an Approach for Upgrading to SAS 9.3 . . . . . . . . . . . . . . . . . . . . . . . . . . . . . 11What Is Covered in This Document? . . . . . . . . . . . . . . . . . . . . . . . . . . . . . . . . . . . . . . . 12Migrating to SAS Enterprise Miner . . . . . . . . . . . . . . . . . . . . . . . . . . . . . . . . . . . . . . . . 12Migrating to SAS Model Manager . . . . . . . . . . . . . . . . . . . . . . . . . . . . . . . . . . . . . . . . . 12Migrating to SAS Forecast Server . . . . . . . . . . . . . . . . . . . . . . . . . . . . . . . . . . . . . . . . . 12Migrating SAS Solutions . . . . . . . . . . . . . . . . . . . . . . . . . . . . . . . . . . . . . . . . . . . . . . . . 12Migrating SAS Content to SAS 9.3 . . . . . . . . . . . . . . . . . . . . . . . . . . . . . . . . . . . . . . . . 13
Chapter 2 • Designing Your Migration . . . . . . . . . . . . . . . . . . . . . . . . . . . . . . . . . . . . . . . . . . . . . 15Overview of Designing Your Migration . . . . . . . . . . . . . . . . . . . . . . . . . . . . . . . . . . . . . 16Review High-Level SAS Migration Requirements . . . . . . . . . . . . . . . . . . . . . . . . . . . . 18Assess Your Hardware and Third-Party Software . . . . . . . . . . . . . . . . . . . . . . . . . . . . . 18Memory Requirement on z/OS . . . . . . . . . . . . . . . . . . . . . . . . . . . . . . . . . . . . . . . . . . . . 18Change to SAS 9.2 Internal Account Password Hashing . . . . . . . . . . . . . . . . . . . . . . . . 18Choose to Use SAS Internal Accounts . . . . . . . . . . . . . . . . . . . . . . . . . . . . . . . . . . . . . . 19Avoiding Path Conflicts with the SAS Application Server Configuration . . . . . . . . . . 20Location for the SAS Content Server Repository . . . . . . . . . . . . . . . . . . . . . . . . . . . . . . 20DataFlux Data Management Server Consideration . . . . . . . . . . . . . . . . . . . . . . . . . . . . 20Inventorying Your Current SAS Deployment . . . . . . . . . . . . . . . . . . . . . . . . . . . . . . . . 21Middle-Tier Considerations . . . . . . . . . . . . . . . . . . . . . . . . . . . . . . . . . . . . . . . . . . . . . . 33Obtain a Valid SAS 9.3 Deployment Plan . . . . . . . . . . . . . . . . . . . . . . . . . . . . . . . . . . . 36Schedule User Downtime . . . . . . . . . . . . . . . . . . . . . . . . . . . . . . . . . . . . . . . . . . . . . . . . 36
Chapter 3 • Performing Pre-migration Tasks . . . . . . . . . . . . . . . . . . . . . . . . . . . . . . . . . . . . . . . . 37Overview of Performing Pre-migration Tasks . . . . . . . . . . . . . . . . . . . . . . . . . . . . . . . . 37Back Up Your Current SAS System . . . . . . . . . . . . . . . . . . . . . . . . . . . . . . . . . . . . . . . . 40Apply Any Required SAS Maintenance . . . . . . . . . . . . . . . . . . . . . . . . . . . . . . . . . . . . . 40Completing the Pre-migration Checklists . . . . . . . . . . . . . . . . . . . . . . . . . . . . . . . . . . . . 41Installing Third-Party Software . . . . . . . . . . . . . . . . . . . . . . . . . . . . . . . . . . . . . . . . . . . 46Creating SAS Software Depots . . . . . . . . . . . . . . . . . . . . . . . . . . . . . . . . . . . . . . . . . . . 49Create the Migration Package . . . . . . . . . . . . . . . . . . . . . . . . . . . . . . . . . . . . . . . . . . . . . 67
Chapter 4 • Installing SAS 9.3 and Migrating Your SAS Content . . . . . . . . . . . . . . . . . . . . . . . . 71
Overview of Installing SAS and Migrating Your Content . . . . . . . . . . . . . . . . . . . . . . . 71Preparing to Install and to Configure . . . . . . . . . . . . . . . . . . . . . . . . . . . . . . . . . . . . . . . 71Install and Migrate SAS Interactively . . . . . . . . . . . . . . . . . . . . . . . . . . . . . . . . . . . . . . 76Automating SAS 9.3 Client Installation across Multiple Machines . . . . . . . . . . . . . . . . 97
Chapter 5 • Performing Post-migration Tasks . . . . . . . . . . . . . . . . . . . . . . . . . . . . . . . . . . . . . . . 99Overview of Performing Post-migration Tasks . . . . . . . . . . . . . . . . . . . . . . . . . . . . . . . 99Review SAS Deployment Wizard Documents, Reports, and Logs . . . . . . . . . . . . . . . 100Metadata Server Tier Post-migration Tasks . . . . . . . . . . . . . . . . . . . . . . . . . . . . . . . . . 102Server Tier Post-migration Tasks . . . . . . . . . . . . . . . . . . . . . . . . . . . . . . . . . . . . . . . . . 110Middle-Tier Post-migration Tasks . . . . . . . . . . . . . . . . . . . . . . . . . . . . . . . . . . . . . . . . 121
Chapter 6 • Validating Your SAS Migrated Deployment . . . . . . . . . . . . . . . . . . . . . . . . . . . . . . 127Overview of Validating Your SAS Migrated Deployment . . . . . . . . . . . . . . . . . . . . . 127Validate the SAS 9.3 Servers . . . . . . . . . . . . . . . . . . . . . . . . . . . . . . . . . . . . . . . . . . . . 128About the SAS Deployment Tester . . . . . . . . . . . . . . . . . . . . . . . . . . . . . . . . . . . . . . . 130Validating the SAS Clients . . . . . . . . . . . . . . . . . . . . . . . . . . . . . . . . . . . . . . . . . . . . . . 131Validating the SAS 9.3 Middle Tier and Web Clients . . . . . . . . . . . . . . . . . . . . . . . . . 134
Chapter 7 • What's Next? . . . . . . . . . . . . . . . . . . . . . . . . . . . . . . . . . . . . . . . . . . . . . . . . . . . . . . . 143Overview of What's Next . . . . . . . . . . . . . . . . . . . . . . . . . . . . . . . . . . . . . . . . . . . . . . . 143First-Priority Setup Tasks . . . . . . . . . . . . . . . . . . . . . . . . . . . . . . . . . . . . . . . . . . . . . . . 144Standard Setup Tasks . . . . . . . . . . . . . . . . . . . . . . . . . . . . . . . . . . . . . . . . . . . . . . . . . . 148Optional Setup Tasks . . . . . . . . . . . . . . . . . . . . . . . . . . . . . . . . . . . . . . . . . . . . . . . . . . 148Ongoing System Administration Tasks . . . . . . . . . . . . . . . . . . . . . . . . . . . . . . . . . . . . 150Best Practices for Ensuring the Integrity of Your System . . . . . . . . . . . . . . . . . . . . . . 151
Appendix 1 • SAS Migration Utility Reference . . . . . . . . . . . . . . . . . . . . . . . . . . . . . . . . . . . . . . 153SAS Migration Utility Overview . . . . . . . . . . . . . . . . . . . . . . . . . . . . . . . . . . . . . . . . . 153Which Version of the Migration Utility Do I Use? . . . . . . . . . . . . . . . . . . . . . . . . . . . 154smu Command Syntax . . . . . . . . . . . . . . . . . . . . . . . . . . . . . . . . . . . . . . . . . . . . . . . . . 154smu Command Syntax Description . . . . . . . . . . . . . . . . . . . . . . . . . . . . . . . . . . . . . . . 155smu Command Notes . . . . . . . . . . . . . . . . . . . . . . . . . . . . . . . . . . . . . . . . . . . . . . . . . . 159smu Command Examples . . . . . . . . . . . . . . . . . . . . . . . . . . . . . . . . . . . . . . . . . . . . . . . 161Running the Migration Utility Using a Properties File . . . . . . . . . . . . . . . . . . . . . . . . 164
Appendix 2 • Configuration Options by Prompt Level . . . . . . . . . . . . . . . . . . . . . . . . . . . . . . . 171Overview of Configuration Options by Prompt Level . . . . . . . . . . . . . . . . . . . . . . . . . 171Configuration Options by Prompt Level . . . . . . . . . . . . . . . . . . . . . . . . . . . . . . . . . . . 172
Appendix 3 • Product-Specific SAS Migration Utility Properties . . . . . . . . . . . . . . . . . . . . . . . 179Product-Specific SAS Migration Utility Properties Overview . . . . . . . . . . . . . . . . . . . 179Multiple Product Properties . . . . . . . . . . . . . . . . . . . . . . . . . . . . . . . . . . . . . . . . . . . . . 180SAS Analytics Platform Properties . . . . . . . . . . . . . . . . . . . . . . . . . . . . . . . . . . . . . . . 180SAS BI Dashboard Properties . . . . . . . . . . . . . . . . . . . . . . . . . . . . . . . . . . . . . . . . . . . 181SAS Grid Control Server Properties . . . . . . . . . . . . . . . . . . . . . . . . . . . . . . . . . . . . . . . 182SAS Information Delivery Portal Properties . . . . . . . . . . . . . . . . . . . . . . . . . . . . . . . . 182SAS Marketing Automation SAS Tier Properties . . . . . . . . . . . . . . . . . . . . . . . . . . . . 184SAS Marketing Automation SAS Middle-Tier Properties . . . . . . . . . . . . . . . . . . . . . . 185SAS Marketing Optimization SAS Tier Properties . . . . . . . . . . . . . . . . . . . . . . . . . . . 186SAS Marketing Optimization SAS Middle Tier Properties . . . . . . . . . . . . . . . . . . . . . 188SAS OLAP Web Viewer Properties . . . . . . . . . . . . . . . . . . . . . . . . . . . . . . . . . . . . . . . 189SAS Shared Services - Web Infrastructure Platform Database Properties . . . . . . . . . . 190SAS Web Report Studio Properties . . . . . . . . . . . . . . . . . . . . . . . . . . . . . . . . . . . . . . . 191Xythos Properties . . . . . . . . . . . . . . . . . . . . . . . . . . . . . . . . . . . . . . . . . . . . . . . . . . . . . 192
iv Contents
Glossary . . . . . . . . . . . . . . . . . . . . . . . . . . . . . . . . . . . . . . . . . . . . . . . . . . . . . 195Index . . . . . . . . . . . . . . . . . . . . . . . . . . . . . . . . . . . . . . . . . . . . . . . . . . . . . . . . 201
Contents v

vi Contents
What's New in Migration for the SAS 9.3 Intelligence Platform
Overview
The SAS 9.3 Intelligence Platform: Migration Guide describes the migration approach for upgrading your SAS Intelligence Platform 9.1.3 or 9.2 content and configuration to SAS 9.3. It describes the various phases of design, execution, and validation of your migration using the SAS migration tools.
Changes for SAS 9.3 Migration
Changes in SAS 9.3 regarding migration include the following:
• SAS 9.3 is installed in a SASHOME directory.
• No baseline is required to migrate SAS 9.2. (SAS 9.1.3 still requires SP4.)
• Different versions of the SAS Migration Utility are used, depending on which version of SAS you are migrating from.
• Several new migration utility properties have been added.
• The SAS 9.3 middle tier is supported only on 64-bit operating systems.
• SAS Deployment Wizard no longer uses a separate System Requirements Wizard.
• The versions of various clients that shipped with SAS 9.2 (SAS Enterprise Guide, SAS Add-In for Microsoft Office, and JMP) are compatible with SAS 9.3 deployments.
Port Remapping
In the October 2011 release of SAS 9.3, you can designate different ports for your SAS 9.3 deployment using the SAS Deployment Wizard. For more information, see the instructions for how to remap ports on page 85.
vii
Enhanced Analysis Report
In the October 2011 release of SAS 9.3, the migration utility analysis report has been enhanced to create a list of all products configured in the current SAS deployment. For more information, see the List of Configured Products in Your Current SAS Deployment on page 32.
New Text-Based Interface for SAS Deployment Tools
In the March 2012 release of SAS 9.3, the SAS Deployment Wizard, SAS Deployment Manager, and the SAS Download Manager can be run on operating systems that do not have windowing systems. For more information, see “Prerequisites for Creating a SAS Software Depot” on page 54.
viii Migration
Accessibility Features of the SAS Intelligence Platform Deployment Tools
OverviewFor this release, the SAS 9.3 Intelligence Platform deployment tools have not been tested for compliance with U.S. Section 508 standards and W3C Web content accessibility guidelines. If you have specific questions about the accessibility of SAS products, send them to [email protected] or call SAS Technical Support.
ix

x Accessibility Features of the SAS Intelligence Platform Deployment Tools
Recommended Reading
Here is the recommended reading list for this title:
• The migration guide for your SAS solution.
• SAS 9.3 Guide to Software Updates.
• SAS Enterprise Miner: Administration and Configuration.
• SAS Forecast Server 12.1: Migration Guide available at http://support.sas.com/documentation/onlinedoc/forecast/index.html .
• SAS Intelligence Platform: Application Server Administration Guide.
• SAS Intelligence Platform: Data Administration Guide.
• SAS Intelligence Platform: Desktop Application Adminstration Guide.
• SAS Intelligence Platform: Installation and Configuration Guide.
• SAS Intelligence Platform: Middle-Tier Administration Guide.
• SAS Intelligence Platform: Overview.
• SAS Intelligence Platform: Security Administration Guide.
• SAS Intelligence Platform: System Administration Guide.
• SAS Intelligence Platform: Web Application Administration Guide.
• SAS Model Manager: Migration Guide.
• SAS offers instructor-led training and self-paced e-learning courses to help you administer the SAS Intelligence Platform. For more information about the courses available, see support.sas.com/admintraining.
For a complete list of SAS publications, go to support.sas.com/bookstore. If you have questions about which titles you need, please contact a SAS Publishing Sales Representative:
SAS Publishing SalesSAS Campus DriveCary, NC 27513-2414Phone: 1-800-727-3228Fax: 1-919-677-8166E-mail: [email protected] address: support.sas.com/bookstore
xi

xii Recommended Reading
Chapter 1
Introduction
Approaches for Upgrading to SAS 9.3 . . . . . . . . . . . . . . . . . . . . . . . . . . . . . . . . . . . . . 2
What is Promotion? . . . . . . . . . . . . . . . . . . . . . . . . . . . . . . . . . . . . . . . . . . . . . . . . . . . . 2
Promotion Tools . . . . . . . . . . . . . . . . . . . . . . . . . . . . . . . . . . . . . . . . . . . . . . . . . . . . . . . 2
What Can Be Promoted? . . . . . . . . . . . . . . . . . . . . . . . . . . . . . . . . . . . . . . . . . . . . . . . . 3
Special Considerations for Promoting Metadata from Earlier SAS Versions to SAS 9.3 . . . . . . . . . . . . . . . . . . . . . . . . . . . . . . . . . . . . . . . . . . . . . . . . 3
Special Considerations for Promoting Content to SAS 9.3 from an Earlier SAS Version . . . . . . . . . . . . . . . . . . . . . . . . . . . . . . . . . . . . . . . . . . 3
Promoting Personal Folders from SAS 9.2 to SAS 9.3 . . . . . . . . . . . . . . . . . . . . . . . 4Restriction on Specifying Locations for SAS 9.1.3 or SAS 9.2
Folders in a SAS 9.3 Custom Repository . . . . . . . . . . . . . . . . . . . . . . . . . . . . . . . . 5Promoting Dashboard Objects from SAS 9.1.3 or SAS 9.2 to SAS 9.3 . . . . . . . . . . . 5Promoting Portal Content from SAS 9.1.3 or SAS 9.2 to SAS 9.3 . . . . . . . . . . . . . . 5Converting Data Explorations to Reports after Promotion
from SAS 9.1.3 or SAS 9.2 to SAS 9.3 . . . . . . . . . . . . . . . . . . . . . . . . . . . . . . . . . . 5Additional Considerations for Promoting Content from SAS 9.1.3 to SAS 9.3 . . . . 6
What is Migration? . . . . . . . . . . . . . . . . . . . . . . . . . . . . . . . . . . . . . . . . . . . . . . . . . . . . . 7
Comparing Promotion and Migration . . . . . . . . . . . . . . . . . . . . . . . . . . . . . . . . . . . . . 7
Migration Tools . . . . . . . . . . . . . . . . . . . . . . . . . . . . . . . . . . . . . . . . . . . . . . . . . . . . . . . . 8
What Can Be Migrated? . . . . . . . . . . . . . . . . . . . . . . . . . . . . . . . . . . . . . . . . . . . . . . . . 8
High-Level SAS Migration Requirements . . . . . . . . . . . . . . . . . . . . . . . . . . . . . . . . . . 9
Choosing an Approach for Upgrading to SAS 9.3 . . . . . . . . . . . . . . . . . . . . . . . . . . . 11
What Is Covered in This Document? . . . . . . . . . . . . . . . . . . . . . . . . . . . . . . . . . . . . . 12
Migrating to SAS Enterprise Miner . . . . . . . . . . . . . . . . . . . . . . . . . . . . . . . . . . . . . . 12
Migrating to SAS Model Manager . . . . . . . . . . . . . . . . . . . . . . . . . . . . . . . . . . . . . . . 12
Migrating to SAS Forecast Server . . . . . . . . . . . . . . . . . . . . . . . . . . . . . . . . . . . . . . . 12
Migrating SAS Solutions . . . . . . . . . . . . . . . . . . . . . . . . . . . . . . . . . . . . . . . . . . . . . . . 12
Migrating SAS Content to SAS 9.3 . . . . . . . . . . . . . . . . . . . . . . . . . . . . . . . . . . . . . . . 13A High-Level View of Migration . . . . . . . . . . . . . . . . . . . . . . . . . . . . . . . . . . . . . . . 13Step 1: Design Your Migration . . . . . . . . . . . . . . . . . . . . . . . . . . . . . . . . . . . . . . . . . 13Step 2: Perform Pre-migration Tasks . . . . . . . . . . . . . . . . . . . . . . . . . . . . . . . . . . . . 13Step 3: Install SAS 9.3 and Migrate Your SAS Content . . . . . . . . . . . . . . . . . . . . . 14Step 4: Perform Post-migration Tasks . . . . . . . . . . . . . . . . . . . . . . . . . . . . . . . . . . . 14
1
Step 5: Validate Your Migration . . . . . . . . . . . . . . . . . . . . . . . . . . . . . . . . . . . . . . . 14
Approaches for Upgrading to SAS 9.3You have several approaches for upgrading to SAS 9.3. You can do one of the following:
• Promote—install SAS 9.3 and upgrade portions of your current SAS content.
• Migrate—install SAS 9.3 and upgrade all your current SAS content.
• Use a combination of migration and promotion.
The terms “promotion” and “migration” are explained in the following sections. This subject is discussed in more depth in “Choosing an Approach for Upgrading to SAS 9.3” on page 11.
What is Promotion?Promotion is the movement of selected content from a source system to an already configured target system. Sometimes called “partial promotion,” promotion of metadata content is typically used to support movement across development, test, and production environments.
Promotion capabilities in SAS 9.3 are embedded within the SAS folder structure. The ability of SAS 9.3 to import earlier versions of SAS content means that partial promotion can be leveraged as part of a strategy for upgrading content from earlier versions of SAS to SAS 9.3.
Some important enhancements have been made to support promotion in SAS 9.3. These enhancements include the ability to do the following:
• promote more types of metadata objects
• target particular metadata objects to promote incremental changes
• schedule batch promotions
Promotion supports the following:
• movement of selected content
• cross-platform movement of content
Promotion does not support the following:
• some types of SAS content
• configuration (either in metadata or in files)
Promotion ToolsPartial promotion can be used as one manner in which to upgrade one’s content to a later version of SAS. The Export SAS Package, Import SAS Package wizards, and batch tools
2 Chapter 1 • Introduction
support partial promotion. For more information, see Chapter 18, “Promotion Tools Overview,” in SAS Intelligence Platform: System Administration Guide.
What Can Be Promoted?The following list enumerates the type of SAS content that you can migrate using the promotion tools. (In SAS 9.3, a larger number of object types can be imported and exported.)
• cubes (in SAS 9.2 and later)
• data explorations
• documents
• external files
• folders
• generated transformations
• information maps
• job flows
• jobs
• libraries
• mining results
• notes
• reports
• scheduled jobs
• stored processes
• tables
• portal content
For more information, see Chapter 12, “Promoting Portal Content,” in SAS Intelligence Platform: Web Application Administration Guide.
Special Considerations for Promoting Metadata from Earlier SAS Versions to SAS 9.3
Special Considerations for Promoting Content to SAS 9.3 from an Earlier SAS Version
You can export a package from a SAS 9.1.3 or SAS 9.2 metadata server and import it to a SAS 9.3 metadata server. This capability is useful in the following situations:
• You are upgrading from SAS 9.1.3 or SAS 9.2 to SAS 9.3, but you chose not to use the SAS Migration Utility. For details, see SAS Intelligence Platform: Migration Guide.
Special Considerations for Promoting Metadata from Earlier SAS Versions to SAS 9.3 3
• You are running SAS 9.3 in parallel with SAS 9.1.3 or SAS 9.2, and you want to update your SAS 9.3 system with new content that you created in the earlier release.
The following information is important when you promote content to SAS 9.3 from an earlier version.
• the need to correctly promote personal folders from SAS 9.2 to SAS 9.3
• special considerations for promoting folders, dashboard objects, portal content, and data explorations from SAS 9.1.3 or SAS 9.2 to SAS 9.3
• additional considerations for promoting content from SAS 9.1.3 to SAS 9.3
Promoting Personal Folders from SAS 9.2 to SAS 9.3
Options for Correctly Promoting Personal Folders from SAS 9.2In SAS 9.2, users’ personal folders are located by default under a parent folder called Users. The name of this folder in your SAS 9.3 deployment depends on which approach you use to upgrade:
• If you upgrade using the SAS Migration Utility, then the name of the folder (Users) is retained in SAS 9.3. You can promote users’ personal folders along with your other content without the need for additional steps.
• If you choose not to use the SAS Migration Utility, then your SAS 9.3 deployment contains the new default name for the parent folder, which is User Folders. In this situation, you must use one of the approaches described in this section to correctly promote the content of your personal folders.
CAUTION:If you do not use the SAS Migration Utility to upgrade from SAS 9.2 to SAS 9.3, be sure to follow the instructions in this section to ensure that your users’ personal folders will work properly after promotion.
You can use either of the following approaches to correctly promote your users’ personal folders:
• “Option 1: Promote Personal Folders to the New Location in SAS 9.3” in Chapter 21 of SAS Intelligence Platform: System Administration Guide
• “Option 2: Configure SAS 9.3 to Recognize the “Users” Folder Name, and Promote the Existing Folder” in Chapter 21 of SAS Intelligence Platform: System Administration Guide
Option 1: Promote Personal Folders to the New Location in SAS 9.3You can promote users’ personal folders from SAS .2 to the new location (User Folders) in SAS 9.3. To do so, you must promote the personal folders separately from other metadata. In addition, you must promote the personal folders without promoting the Users folder itself. Follow these steps:
1. Use SAS Management Console to connect to the SAS 9.2 metadata server, and select the Users node in the SAS Folders tree.
2. In the right pane, select all of the personal folders that you want to export. (Press CTRL to enable the selection of multiple items.) Then right-click the mouse, select Export SAS Package, and complete the export.
3. Use SAS Management Console to connect to the SAS 9.3 metadata server. Select the User Folders node in the SAS Folders tree, and import the package.
4 Chapter 1 • Introduction
Option 2: Configure SAS 9.3 to Recognize the “Users” Folder Name, and Promote the Existing FolderIf you do not want to switch to the new folder name (User Folders) for personal folders, you can reconfigure SAS to use the previous folder name (Users). For instructions, contact SAS Technical Support.
Restriction on Specifying Locations for SAS 9.1.3 or SAS 9.2 Folders in a SAS 9.3 Custom Repository
In SAS 9.3, the import wizard and the batch import tool enable you to reorganize content as part of the promotion process. You can do so by specifying new folder locations for individual objects or folders that you are importing.
When you are importing SAS 9.1.3 or SAS 9.2 content to a custom repository, you cannot use this feature to change the location of a folder. However, you can use the feature to change the location of individual objects in the custom repository.
Promoting Dashboard Objects from SAS 9.1.3 or SAS 9.2 to SAS 9.3Dashboard objects (including dashboards, indicators, indicator data, ranges, indicator configurations, and dashboard components) can be promoted only within the same release. To move these objects from a SAS 9.1.3 or SAS 9.2 deployment to a SAS 9.3 deployment, you must use the SAS Migration Utility.
Promoting Portal Content from SAS 9.1.3 or SAS 9.2 to SAS 9.3To promote portal pages, page templates, portlet instances, and the portal's application and user permissions trees from SAS 9.1.3 or SAS 9.2, use the content promotion tool for the SAS Information Delivery Portal 4.3. See “About the Portal Promotion Tools” in Chapter 12 of SAS Intelligence Platform: Web Application Administration Guide.
Converting Data Explorations to Reports after Promotion from SAS 9.1.3 or SAS 9.2 to SAS 9.3
In SAS 9.3, SAS Web OLAP Viewer is discontinued. After you have promoted your data explorations to SAS 9.3 from SAS 9.1.3 or SAS 9.2, you can convert the bookmarks in your data explorations to SAS reports. The reports can then be viewed and edited using SAS Web Report Studio 4.3.
To ensure that the data explorations can be converted successfully, do the following when you promote them:
• Import the information maps on which the data explorations depend to the same path in which they were located in the SAS 9.1.3 or SAS 9.2 environment.
Or, if you choose to import the information maps to a different location, import the information maps first and then import the data explorations in a separate package. When you import the data explorations, be sure to specify the correct location for the information maps.
• Rebuild any OLAP cubes that the data explorations depend on.
To perform the conversion, follow the manual steps that are described in “Manually Convert Data Explorations to Reports” on page 117.
Special Considerations for Promoting Metadata from Earlier SAS Versions to SAS 9.3 5
Additional Considerations for Promoting Content from SAS 9.1.3 to SAS 9.3
Types of Objects That Can Be Promoted from 9.1.3 to SAS 9.3In SAS 9.1.3, only the following types of objects can be exported: data explorations, deployed jobs, documents, external files, folders, generated transformations, information maps, jobs, jobs flows, libraries, mining results, notes, reports, stored processes, and tables. In SAS 9.2 and 9.3, a larger number of object types can be imported and exported.
Ensuring the Correct Software Version When Exporting from SAS 9.1.3If you use BI Manager in SAS Management Console to perform the export, then the SAS 9.1.3 environment must have SAS Foundation Services 1.4. To check for this version:
• On Windows, go to Settings ð Control Panel ð Add or Remove Programs and find the entry for SAS Foundation Services 1.4.
• On UNIX machines, go the home directory of the user who maintains the SAS installation. Enter the following command:
more vpd.properties | grep Foundation
The following string should be present in the output that is displayed:
SAS Foundation Services 1.4
If you use SAS Data Integration Studio to perform the export, then you must have SAS Data Integration Studio 3.4. To check the version, click Help ð About SAS Data Integration Studio, and make sure that Version=3.4 is displayed in the window.
Promoting Tables and Libraries from SAS 9.1.3 to SAS 9.3If you use SAS Management Console to export tables and libraries from a SAS 9.1.3 system, the tables and libraries must be in folders. To move them to folders, right-click the BI Manager node and select Collect Ungrouped Library Metadata. BI Manager places pointers to the libraries and tables in a folder called Shared Data, from which you can perform the export.
When you use the Import SAS Package Wizard to import tables from SAS 9.1.3, the following options are disabled: Keep target columns not found in the source, Include source columns not found in the target, and Change Analysis. For more information, see “Use the Import Wizard’s Change Analysis Feature to Resolve Column Differences in Tables and External Files” in Chapter 19 of SAS Intelligence Platform: System Administration Guide.
Promoting Prompts from SAS 9.1.3 to SAS 9.3When you import a prompt from a SAS 9.1.3 system, the following special considerations apply:
• The default values for multiple-value prompts are saved in reverse order.
• If the prompt's static (custom) list of values contains a row that is invalid in SAS 9.3 (for example, if a row contains blank or null unformatted values), then the row is deleted.
6 Chapter 1 • Introduction
• If the prompt's static (custom) list of values contains duplicate formatted values, then each formatted value is appended with its corresponding unformatted value, which is enclosed in square brackets ([]).
Promoting OLAP Cubes from SAS 9.1.3 to SAS 9.3To promote OLAP cubes from SAS 9.1.3 to SAS 9.3, use the ExportCubes and ImportCubes batch tools. For detailed instructions, see “Importing and Exporting SAS OLAP Cubes” in the SAS OLAP Server: User's Guide.
Promoting Metadata from SAS 9.1.3 to SAS 9.3 By Using the Batch Import ToolYou can use the batch import and export tools only with a SAS 9.2 or SAS 9.3 metadata server. You can use the batch import tool to import a package that was created by the export wizard in SAS 9.1.3. For details, see “Using the Batch Import Tool to Import a Package That Was Created in SAS 9.1.3” in Chapter 20 of SAS Intelligence Platform: System Administration Guide.
CAUTION:Use of the batch import tool to import SAS 9.1.3 packages can result in a significant number of broken metadata associations, such as tables with no associated library, jobs with missing tables, transformations within jobs with missing mappings, and expressions within mappings with missing columns. As a best practice, you should use the batch import tool to import a SAS 9.1.3 package only if the resources associated with the imported objects have the same values in the two environments. Otherwise, it is strongly recommended that you use the import wizard in either SAS Management Console or SAS Data Integration Studio.
What is Migration?Migration is a process in which your SAS content and configuration from an earlier SAS release is upgraded to run in a later SAS release. When performed successfully, migration attempts to preserve as much of your current content and configuration as possible, reduce the number of manual migration tasks, and minimize system downtime.
You can migrate with the SAS automated migration tools in the following scenarios:
• SAS 9.1.3 to SAS 9.3
• SAS 9.2 to SAS 9.3
• SAS 9.3 to SAS 9.3
For more information about the use cases for SAS 9.3 to SAS 9.3 migration, see “About Using the SAS Migration Utility to Copy an Existing Deployment” in Chapter 28 of SAS Intelligence Platform: System Administration Guide.
.
Comparing Promotion and MigrationThe following table summarizes the differences between promotion and migration:
Comparing Promotion and Migration 7
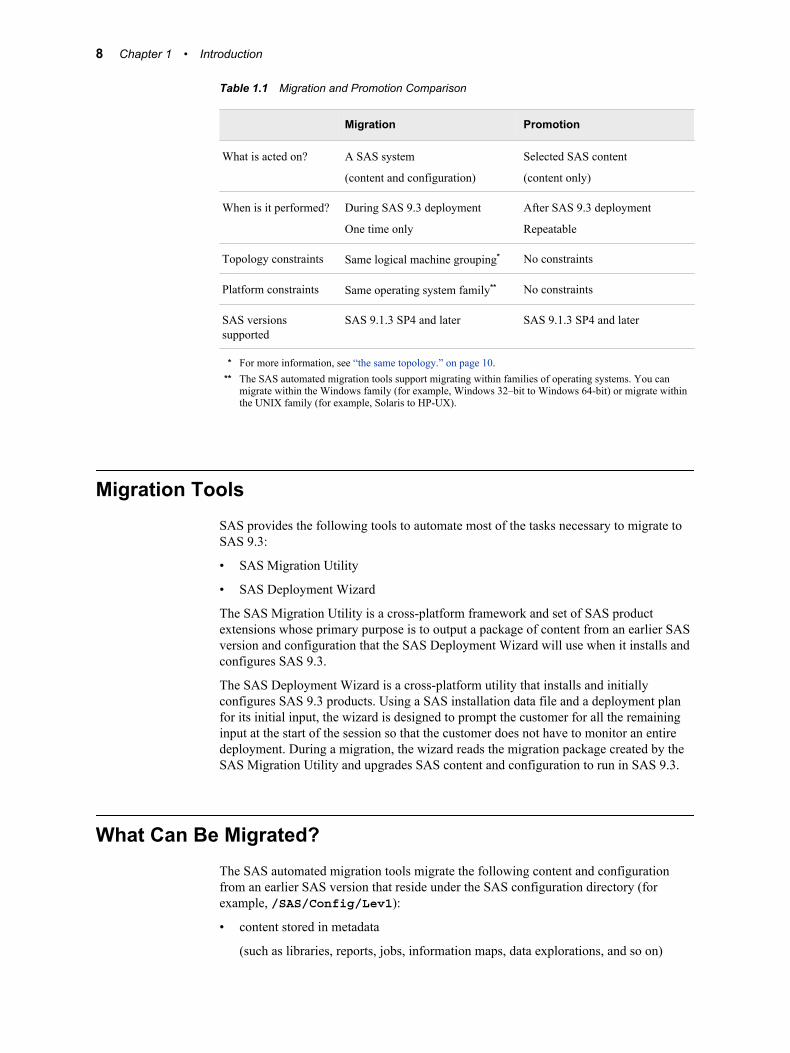
Table 1.1 Migration and Promotion Comparison
Migration Promotion
What is acted on? A SAS system
(content and configuration)
Selected SAS content
(content only)
When is it performed? During SAS 9.3 deployment
One time only
After SAS 9.3 deployment
Repeatable
Topology constraints Same logical machine grouping* No constraints
Platform constraints Same operating system family** No constraints
SAS versions supported
SAS 9.1.3 SP4 and later SAS 9.1.3 SP4 and later
* For more information, see “the same topology.” on page 10.** The SAS automated migration tools support migrating within families of operating systems. You can
migrate within the Windows family (for example, Windows 32–bit to Windows 64-bit) or migrate within the UNIX family (for example, Solaris to HP-UX).
Migration ToolsSAS provides the following tools to automate most of the tasks necessary to migrate to SAS 9.3:
• SAS Migration Utility
• SAS Deployment Wizard
The SAS Migration Utility is a cross-platform framework and set of SAS product extensions whose primary purpose is to output a package of content from an earlier SAS version and configuration that the SAS Deployment Wizard will use when it installs and configures SAS 9.3.
The SAS Deployment Wizard is a cross-platform utility that installs and initially configures SAS 9.3 products. Using a SAS installation data file and a deployment plan for its initial input, the wizard is designed to prompt the customer for all the remaining input at the start of the session so that the customer does not have to monitor an entire deployment. During a migration, the wizard reads the migration package created by the SAS Migration Utility and upgrades SAS content and configuration to run in SAS 9.3.
What Can Be Migrated?The SAS automated migration tools migrate the following content and configuration from an earlier SAS version that reside under the SAS configuration directory (for example, /SAS/Config/Lev1):
• content stored in metadata
(such as libraries, reports, jobs, information maps, data explorations, and so on)
8 Chapter 1 • Introduction
• content in the WebDAV repository
(such as report definitions and documents)
• configuration stored in metadata
(such as for servers, users, groups, ACTs, and so on)
• certain server configuration files
(such as adminusers.txt and trustedusers.txt)
• Web application configuration
(such as deployment properties and configuration files)
The SAS automated migration tools do not migrate the following SAS content and configuration:
• tables (outside of the configuration directory)
• deployed jobs (outside of the configuration directory)
• stored processes (outside of the configuration directory)
For more information, see “Migrating Content Stored outside the SAS Configuration Directory” on page 111.
• certain SAS Application Server configuration files
autoexec files (appserver_autoexec.sas) and sasv9.cfg files are not migrated. For more information, see “Update SAS Server Configuration Files” on page 111.
• SAS middle-tier configuration information
For more information, see “Review the SAS Middle-Tier Configuration” on page 121.
• custom portlet code
For more information, see Developing Portlets for the SAS Information Delivery Portal 4.2, available at http://support.sas.com/documentation/cdl/en/prtltidpdg/61650/PDF/default/prtltidpdg.pdf.
• custom metadata
A custom metadata definition is a metadata definition that you create using the SAS Open Metadata Interface, SAS Java Metadata Interface, or SAS metadata DATA step functions. (Custom metadata is not created when using SAS Management Console wizards and wizards provided by other SAS platform products and solutions.)
High-Level SAS Migration RequirementsMigrating, using the SAS automated migration tools, requires the following:
specific versions of SAS.The SAS automated migration tools support migration for the following versions of SAS:
• SAS 9.1.3 to SAS 9.3.
For SAS 9.1.3, the baseline SAS maintenance level must be SP4 and Xythos must be at 4.0.48 or later.
High-Level SAS Migration Requirements 9
Note: For SAS 9.1.3 z/OS systems, before you migrate, make sure that you have applied the hot fix described in this SAS Note: http://tsdsrv05.unx.sas.com:7777/docs/sasnotes/fusion/30/981.html
• SAS 9.2 to SAS 9.3.
• SAS 9.3 to SAS 9.3.
For more information about the use cases for SAS 9.3 to SAS 9.3 migration, see “About Using the SAS Migration Utility to Copy an Existing Deployment” in Chapter 28 of SAS Intelligence Platform: System Administration Guide.
• SAS 9.1.3 to SAS 9.2.
For more information, see the SAS Intelligence Platform: 9.1.3 to 9.2 Migration Guide.
For additional information about specific SAS offerings, refer to http://support.sas.com/migration/utilitynotes.
Later in this document, you will be instructed to create a migration analysis report for each tier of your SAS deployment. One purpose of this report is to help you identify those SAS components that must be upgraded before you can migrate to SAS 9.3. For more information, see “Inventorying Your Current SAS Deployment” on page 21.
full system migration all at the same time.All your content and configuration from your earlier SAS version is migrated to SAS 9.3 at the same time.
the same topology.Your SAS architecture must continue to be distributed across logical machines in the same fashion. Because a logical machine corresponds to a single SAS configuration directory, this directory can be relocated to a different physical machine during migration.
Redistributing logical machines on different physical machines increases the level of complexity for your migration. Common issues involve port conflicts and physical files residing outside of the configuration directory tree. Understand this complexity and plan for it when designing your migration.
Note: You can add new SAS 9.3 products during a migration. Make sure the new product components are contained in your SAS order and deployment plan file.
certain changes to the middle tier.• The SAS middle tier is supported only on 64-bit operating systems.
• The SAS Deployment Wizard will change the Web application server vendor to the one selected in your SAS 9.3 deployment plan.
• Apache Tomcat is replaced with JBoss Application Server.
• Xythos and Apache HTTP WebDAV servers are replaced with SAS Content Server.
• When you migrate to SAS 9.3, the SAS Migration Utility enables you to change database vendors. For more information, see “Database type for SAS Web Infrastructure Platform” on page 91.
the same operating system family.
Your SAS 9.3 components must run on the same operating system family as they did in your earlier SAS version.
10 Chapter 1 • Introduction
You can migrate within the Windows family (for example, Windows 32-bit to Windows 64-bit) or migrate within the UNIX family (for example, Solaris to HP-UX).
The SAS Migration Utility uses the CPORT and CIMPORT procedures to change file formats when migrating within operating system families. For more information, see Chapter 29, “MIGRATE Procedure” in Base SAS Procedures Guide, Chapter 14, “CPORT Procedure” in Base SAS Procedures Guide, and Chapter 10, “CIMPORT Procedure” in Base SAS Procedures Guide.
For more information about post-migration tasks when migrating from one version of an operating system to another, see “Overview of Performing Post-migration Tasks” on page 99.
Note: On UNIX, SAS 9.3 should be installed on a file system that supports large files (files that are greater than 2GB in size).
Choosing an Approach for Upgrading to SAS 9.3You should review your goals for upgrading and develop an upgrade plan that best fits your enterprise environment. Selecting the approach might require trade-offs. You will have to balance the benefits and challenges of the upgrade options with your goals and priorities. There are several approaches for upgrading to SAS 9.3:
• Promote—install SAS 9.3 and upgrade portions of your current SAS content.
The Export and Import SAS Package wizards or batch tools provide you with a great deal of flexibility. Promotion enables you to move gradually to SAS 9.3 if you have additional hardware on which to run SAS 9.3 separate from earlier SAS versions. Consider using promotion to upgrade to SAS 9.3 in the following cases:
• You want to change your SAS topology or operating systems.
• You have made minimal configuration changes to your earlier SAS deployment.
• You want to move only selected content from your earlier SAS version.
• Migrate—install SAS 9.3 and upgrade all your current SAS content.
Using the SAS Migration Utility with the SAS Deployment Wizard to migrate to SAS 9.3 has some definite advantages, as you will achieve the most automation as possible using this method. Consider using migration to upgrade to SAS 9.3 in the following cases:
• You want to retain your SAS topology.
• You have made significant configuration changes to your earlier SAS deployment (such as customizations to users and groups, ACTs, or server configurations).
• You want to move all content from your earlier SAS version.
• Use a combination of migration and promotion.
Migration and promotion are not mutually exclusive. You might choose to migrate to a 9.3 deployment and run it in parallel with your earlier SAS version and periodically refresh the 9.3 content through partial promotion. This enables you to continue to use your earlier SAS version in production while you validate your migrated SAS content and become familiar with the new features of SAS 9.3.
Choosing an Approach for Upgrading to SAS 9.3 11
What Is Covered in This Document?This document describes the migration approach for upgrading your earlier SAS content and configuration to SAS 9.3. It describes the various phases of design, execution, and validation of your migration using the SAS migration tools.
For more information about promotion, see Chapter 18, “Promotion Tools Overview,” in SAS Intelligence Platform: System Administration Guide.
Migrating to SAS Enterprise MinerIf you are migrating to SAS Enterprise Miner, then you should also consult SAS Enterprise Miner: Administration and Configuration.
Migrating to SAS Model ManagerIf you are migrating to SAS Model Manager, then you should also consult the SAS Model Manager: Migration Guide.
Migrating to SAS Forecast ServerIf you are migrating to SAS Forecast Server, then you should also consult the SAS Forecast Server 12.1: Migration Guide, available at http://support.sas.com/documentation/onlinedoc/forecast/index.html.
Migrating SAS SolutionsAs a part of the migration design step, consult the migration documents specific to any SAS solutions that you are running. The following list is a sampling of some of the migration documents available. For a complete listing, consult the SAS Central Document Library at http://support.sas.com/cdlsearch?ct=80000:
• SAS IT Resource Management: Migration Guide
• SAS Detail Data Store for Insurance 5.41 Upgrade and Data Migration Guide, available at http://support.sas.com/documentation/onlinedoc/dds/insurance.html
• SAS Credit Scoring for Banking 5.1: Migration Guide, available at http://support.sas.com/documentation/onlinedoc/csbank/index.html
• SAS Customer Analytics for Banking 5.1: Migration Guide, available at http://support.sas.com/documentation/onlinedoc/securedoc/index_cab.html
12 Chapter 1 • Introduction

• SAS AppDev Studio Eclipse Plug-ins: Migration Guide
Migrating SAS Content to SAS 9.3
A High-Level View of MigrationThe following list summarizes the steps required to install SAS 9.3 and migrate earlier SAS version content on a single machine or in a distributed, heterogeneous environment:
1. Design your migration.
2. Perform pre-migration tasks.
3. Install SAS 9.3 and migrate your content from an earlier SAS version.
4. Perform post-migration tasks.
5. Validate your migration.
The sections that follow provide brief descriptions of each of these tasks. Subsequent chapters in the guide provide the step-by-step instructions that you will need to perform them.
For SAS solutions, see the product's documentation for additional information about migration and promotion.
Step 1: Design Your MigrationDesigning your migration means reviewing the SAS 9.3 requirements (hardware, software, and migration) against your current SAS deployment, and developing a plan for how to get your SAS content—your data and configuration—integrated into a SAS 9.3 system.
One of the migration tools that SAS provides, the SAS Migration Utility, generates a migration analysis report. Using this report, you can analyze every machine in your current SAS deployment to answer these crucial design questions:
• Which SAS products currently reside on each machine?
• (In the case of SAS 9.1.3 systems) are all my SAS products at the correct maintenance level?
• What SAS content will I have to manually migrate?
• Should I use internal SAS accounts where I can?
Step 2: Perform Pre-migration TasksLooking at your migration design, you might have identified some of your SAS 9.1.3 products that require maintenance before you can migrate them. Also, some of your hardware might need to be upgraded or operating systems patched and third-party software updated.
During the pre-migration task phase, you will create a migration package that contains your current SAS data and configuration to use the SAS Migration Utility. The other major SAS migration tool, the SAS Deployment Wizard, uses your migration package as input to move your earlier SAS content successfully to SAS 9.3.
Migrating SAS Content to SAS 9.3 13
In addition to the SAS migration package, the wizard also relies on the presence of another package—SAS Software Depot—that contains SAS 9.3 installation files. You create a SAS Software Depot when you download your SAS 9.3 order, or from removable media that you receive directly from SAS.
Step 3: Install SAS 9.3 and Migrate Your SAS ContentStep three is when you use the SAS Deployment Wizard to install SAS 9.3 and to migrate your current SAS content and configuration that you packaged using the SAS Migration Utility in step two.
Step 4: Perform Post-migration TasksStep four consists of performing manual tasks like running authorization differences reports and moving content that the migration utility did not migrate.
Step 5: Validate Your MigrationAn important final step in migration is validating that your SAS 9.3 servers, clients, middle tier, and Web clients are functioning and can use migrated content from your earlier SAS version.
For a discussion of functionality changes in SAS 9.3, see SAS 9.3 Guide to Software Updates.
14 Chapter 1 • Introduction
Chapter 2
Designing Your Migration
Overview of Designing Your Migration . . . . . . . . . . . . . . . . . . . . . . . . . . . . . . . . . . . 16
Review High-Level SAS Migration Requirements . . . . . . . . . . . . . . . . . . . . . . . . . . 18
Assess Your Hardware and Third-Party Software . . . . . . . . . . . . . . . . . . . . . . . . . . 18
Memory Requirement on z/OS . . . . . . . . . . . . . . . . . . . . . . . . . . . . . . . . . . . . . . . . . . 18
Change to SAS 9.2 Internal Account Password Hashing . . . . . . . . . . . . . . . . . . . . . 18
Choose to Use SAS Internal Accounts . . . . . . . . . . . . . . . . . . . . . . . . . . . . . . . . . . . . 19
Avoiding Path Conflicts with the SAS Application Server Configuration . . . . . . . 20
Location for the SAS Content Server Repository . . . . . . . . . . . . . . . . . . . . . . . . . . . 20
DataFlux Data Management Server Consideration . . . . . . . . . . . . . . . . . . . . . . . . . 20
Inventorying Your Current SAS Deployment . . . . . . . . . . . . . . . . . . . . . . . . . . . . . . 21Overview of Inventorying Your Current SAS Deployment . . . . . . . . . . . . . . . . . . . 21Complete a Migration Utility Checklist . . . . . . . . . . . . . . . . . . . . . . . . . . . . . . . . . . 21Prepare Your Metadata Repositories . . . . . . . . . . . . . . . . . . . . . . . . . . . . . . . . . . . . 23Managing the Query Cache Library Folder . . . . . . . . . . . . . . . . . . . . . . . . . . . . . . . 24SAS Migration Utility Requirements . . . . . . . . . . . . . . . . . . . . . . . . . . . . . . . . . . . . 25Download the SAS Migration Utility . . . . . . . . . . . . . . . . . . . . . . . . . . . . . . . . . . . . 26Develop a Common SAS Migration Utility Properties File . . . . . . . . . . . . . . . . . . . 27Review Product-Specific SAS Migration Utility Properties . . . . . . . . . . . . . . . . . . 28Create a Migration Analysis Report . . . . . . . . . . . . . . . . . . . . . . . . . . . . . . . . . . . . . 28View and Analyze Your Migration Analysis Report . . . . . . . . . . . . . . . . . . . . . . . . 31View and Analyze the Migration Log . . . . . . . . . . . . . . . . . . . . . . . . . . . . . . . . . . . 33A Note about SAS Tables Stored under the SAS Configuration Directory . . . . . . . 33
Middle-Tier Considerations . . . . . . . . . . . . . . . . . . . . . . . . . . . . . . . . . . . . . . . . . . . . . 33Overview of Middle-Tier Considerations . . . . . . . . . . . . . . . . . . . . . . . . . . . . . . . . . 33Support for 64-Bit Middle Tier Only . . . . . . . . . . . . . . . . . . . . . . . . . . . . . . . . . . . . 33Review Web Application Server Configuration Documentation . . . . . . . . . . . . . . . 33Choose to Automatically Configure Your Web Application Server . . . . . . . . . . . . 34Choose Whether to Automatically Deploy the SAS Web Applications . . . . . . . . . . 35Add a Second Middle-Tier Machine . . . . . . . . . . . . . . . . . . . . . . . . . . . . . . . . . . . . 35
Obtain a Valid SAS 9.3 Deployment Plan . . . . . . . . . . . . . . . . . . . . . . . . . . . . . . . . . 36
Schedule User Downtime . . . . . . . . . . . . . . . . . . . . . . . . . . . . . . . . . . . . . . . . . . . . . . . 36
15
Overview of Designing Your MigrationDesigning your migration is the first of five steps required to install SAS 9.3 and migrate your current SAS content:
ð 1. Design your migration
2. Perform pre-migration tasks.
3. Install SAS 9.3 and migrate your content from an earlier SAS version.
4. Perform post-migration tasks.
5. Validate your migration.
Designing your migration means reviewing the SAS 9.3 requirements (hardware, software, and migration) against your current SAS deployment, and developing a plan for how to get your SAS content (your data and configuration) integrated into a SAS 9.3 system. Depending on your SAS deployment, you might find these documents helpful:
• For a discussion of functionality changes in SAS 9.3, see SAS 9.3 Guide to Software Updates.
• For SAS solutions, see the product's documentation for additional information about migration and promotion. For more information, see “Migrating SAS Solutions” on page 12.
• If you are migrating to SAS Enterprise Miner 7.1, then you should also consult the SAS Enterprise Miner: Administration and Configuration.
• If you are migrating to SAS Model Manager 3.1, then you should also consult the SAS Model Manager: Migration Guide.
One of the migration tools that SAS provides, the SAS Migration Utility, generates a migration analysis report. Using this report, you can analyze every machine in your current SAS deployment to answer these crucial design questions:
• Which SAS products reside on each machine?
Knowing exactly which products reside on which machines is essential for your SAS representative to know in order to provide you with the correct SAS 9.3 deployment plan (required to install SAS 9.3).
• If I am migrating from 9.1.3, are all my SAS 9.1.3 products at the correct maintenance level?
All your SAS 9.1.3 products must be at the correct maintenance level in order for the SAS Migration Utility to generate a valid migration package for migrating to SAS 9.3. (There is no particular maintenance level requirement for SAS 9.2 deployments.)
At the end of the migration design phase, you will have accomplished the following:
16 Chapter 2 • Designing Your Migration
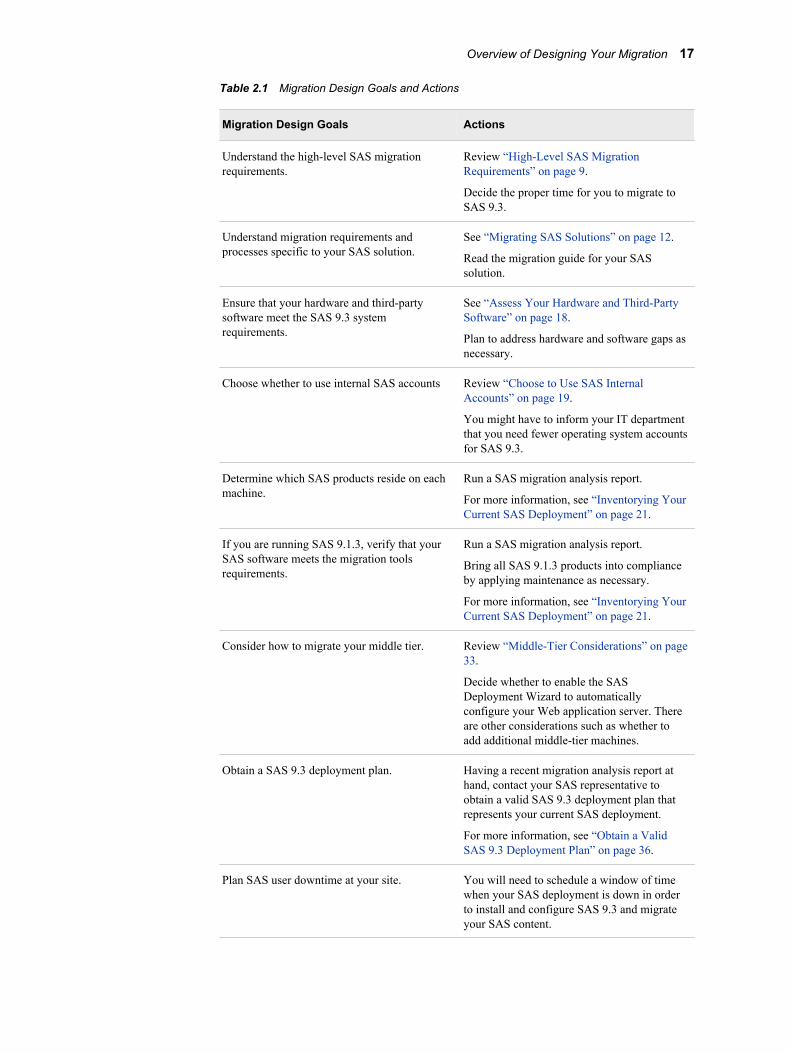
Table 2.1 Migration Design Goals and Actions
Migration Design Goals Actions
Understand the high-level SAS migration requirements.
Review “High-Level SAS Migration Requirements” on page 9.
Decide the proper time for you to migrate to SAS 9.3.
Understand migration requirements and processes specific to your SAS solution.
See “Migrating SAS Solutions” on page 12.
Read the migration guide for your SAS solution.
Ensure that your hardware and third-party software meet the SAS 9.3 system requirements.
See “Assess Your Hardware and Third-Party Software” on page 18.
Plan to address hardware and software gaps as necessary.
Choose whether to use internal SAS accounts Review “Choose to Use SAS Internal Accounts” on page 19.
You might have to inform your IT department that you need fewer operating system accounts for SAS 9.3.
Determine which SAS products reside on each machine.
Run a SAS migration analysis report.
For more information, see “Inventorying Your Current SAS Deployment” on page 21.
If you are running SAS 9.1.3, verify that your SAS software meets the migration tools requirements.
Run a SAS migration analysis report.
Bring all SAS 9.1.3 products into compliance by applying maintenance as necessary.
For more information, see “Inventorying Your Current SAS Deployment” on page 21.
Consider how to migrate your middle tier. Review “Middle-Tier Considerations” on page 33.
Decide whether to enable the SAS Deployment Wizard to automatically configure your Web application server. There are other considerations such as whether to add additional middle-tier machines.
Obtain a SAS 9.3 deployment plan. Having a recent migration analysis report at hand, contact your SAS representative to obtain a valid SAS 9.3 deployment plan that represents your current SAS deployment.
For more information, see “Obtain a Valid SAS 9.3 Deployment Plan” on page 36.
Plan SAS user downtime at your site. You will need to schedule a window of time when your SAS deployment is down in order to install and configure SAS 9.3 and migrate your SAS content.
Overview of Designing Your Migration 17
Review High-Level SAS Migration RequirementsReview the SAS migration requirements that are listed in “High-Level SAS Migration Requirements” on page 9.
If the SAS migration requirements are not in sync with your site's needs, consider the partial promotion alternative. For more information, see “Approaches for Upgrading to SAS 9.3” on page 2.
Assess Your Hardware and Third-Party SoftwarePart of designing your migration is to evaluate how your hardware and third-party software—operating systems, Web application servers, Java runtimes, and so on—match the requirements for SAS 9.3.
Migration from any version of SAS requires additional disk space equal to at least twice the amount of disk space that you currently use for your metadata repositories and WebDAV content. For example, if your current SAS metadata repositories and WebDAV content currently occupy 2GB of disk space, you will need at a minimum an additional 4GB of disk space to migrate to SAS 9.3.
The SAS 9.3 middle tier no longer supports 32-bit operating systems. Therefore, your site must plan for using a 64-bit machine for hosting the SAS middle tier.
Consult the following Web sites for the latest SAS 9.3 system requirements and any alert-level SAS Notes:
• SAS 9.3 system requirements:
http://support.sas.com/resources/sysreq/index.html
• SAS Notes for alert status installation problems:
http://support.sas.com/notes/index.html.
Memory Requirement on z/OSThe user account under which the SAS Migration Utility and the SAS Deployment Wizard run needs to have sufficient memory allocation.
We recommend that the value for the z/OS MEMLIMIT and ASSIZEMAX options be 2GB, respectively.
Change to SAS 9.2 Internal Account Password Hashing
In SAS 9.2, the only method available to hash passwords for internal SAS accounts was the MD5 hash algorithm. In order to comply with the FIPS 140-2 standard, SAS 9.3
18 Chapter 2 • Designing Your Migration
supports SHA256, and it is available only when you have licensed SAS/SECURE. Although SAS 9.3 deployments using SAS/SECURE generate no new password hashes with MD5, during a migration the existing password hash is in MD5 and must remain in MD5 to be validated. For an internal account in SAS 9.3 that contains SAS/SECURE, the only way to stop using the MD5 hash is to change the password to a new value. This causes SAS 9.3 to generate and store a new SHA256 hash and to move the existing MD5 hash to the history list.
The history list maintains a maximum of five password hashes to prevent a person from using any of the previous five passwords as a new password. This enforcement is optional. The MD5 hashes will move through the history list as a person changes passwords over time, being replaced by SHA256 hashes. In order to remove all MD5 hashes from the history list, a user would have to change passwords five times.
During a migration, the SAS Deployment Wizard gives you the opportunity to change the passwords for your SAS internal accounts. For more information, see Unrestricted Administrator on page 86.
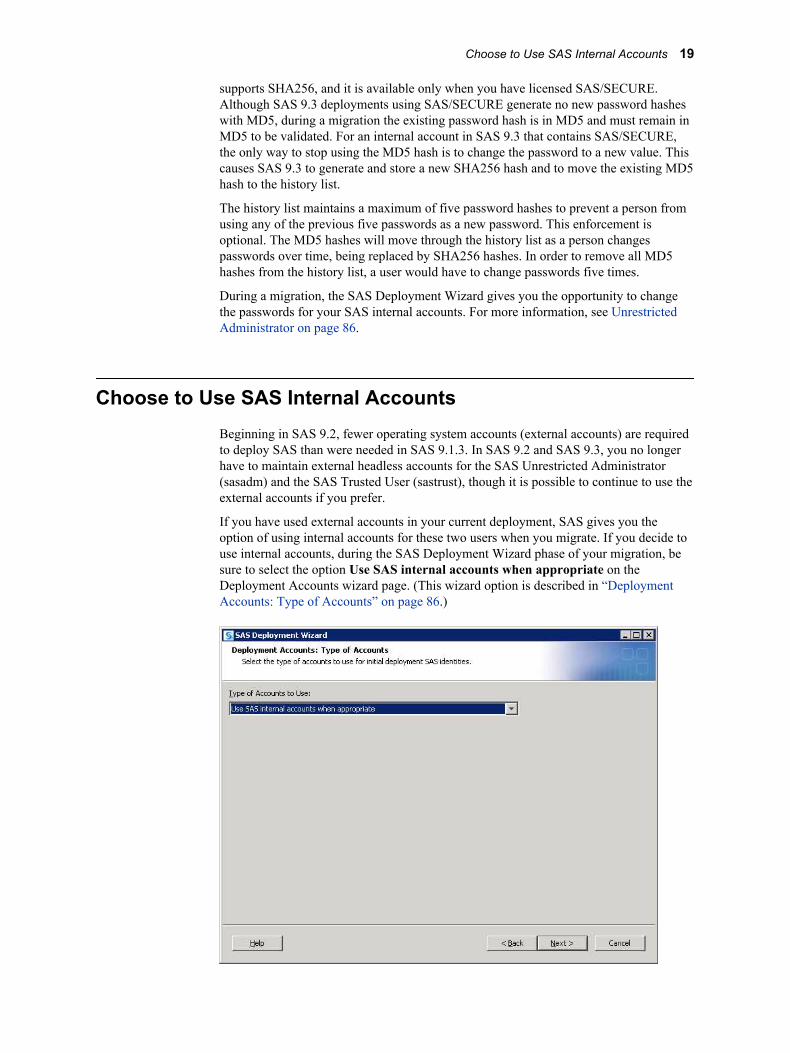
Choose to Use SAS Internal AccountsBeginning in SAS 9.2, fewer operating system accounts (external accounts) are required to deploy SAS than were needed in SAS 9.1.3. In SAS 9.2 and SAS 9.3, you no longer have to maintain external headless accounts for the SAS Unrestricted Administrator (sasadm) and the SAS Trusted User (sastrust), though it is possible to continue to use the external accounts if you prefer.
If you have used external accounts in your current deployment, SAS gives you the option of using internal accounts for these two users when you migrate. If you decide to use internal accounts, during the SAS Deployment Wizard phase of your migration, be sure to select the option Use SAS internal accounts when appropriate on the Deployment Accounts wizard page. (This wizard option is described in “Deployment Accounts: Type of Accounts” on page 86.)
Choose to Use SAS Internal Accounts 19
For more information, see “Internal User Accounts” in Chapter 2 of SAS Intelligence Platform: Installation and Configuration Guide.
Also, two external accounts are no longer used:
• SAS Guest User (sasguest)
• SAS Web Administrator (saswebad)
Avoiding Path Conflicts with the SAS Application Server Configuration
There is a path conflict when SAS data package directories share the same configuration path as the current SAS application server.
To avoid a situation where SAS Application Server configuration files such as sasv9.cfg are inadvertently overwritten, the SAS Migration Utility does not migrate directories that have path conflicts. Check the migration utility and the analysis report for any path conflicts, and manually resolve these issues.
Location for the SAS Content Server RepositoryIn SAS 9.3, you have the option of storing your SAS Content Server repository data in the database configured for the SAS Web Infrastructure Platform. (When running the wizard, you select your SAS Web Infrastructure Platform database type on the SAS Web Infrastructure Platform: Database Type wizard page on page 91.)
To access this SAS Deployment Wizard option during migration, be sure to choose either the Typical or Custom prompting levels. For more information, see Chapter 9, "Administering the SAS Content Server," in SAS Intelligence Platform: Middle-Tier Administration Guide.
DataFlux Data Management Server ConsiderationDataFlux Data Management Server deploys differently than SAS products.
DataFlux Data Management Server writes its configuration to a subdirectory under SAS Home. Most SAS 9.3 products write their configurations to a directory outside of SAS Home. (For example, to C:\SAS\Config.)
Therefore, if you plan you have different deployments of DataFlux Data Management Server on the same machine, you must specify a new SAS Home for each instance.
20 Chapter 2 • Designing Your Migration
Inventorying Your Current SAS Deployment
Overview of Inventorying Your Current SAS DeploymentA key to successfully migrating your SAS content—data and configuration—is knowing exactly what SAS products you are running on each machine at your site. SAS provides a tool to help you do just that. The SAS Migration Utility sweeps a machine to locate your current SAS content and performs a validation to ensure that the content can be reliably migrated. During this analyze phase, the migration utility also generates a migration analysis report. Using this report, you can determine those SAS products found on your current SAS system to be eligible for automatic migration with the SAS Deployment Wizard.
You can obtain The SAS Migration Utility in two ways: by downloading it separately from the SAS Support Web site or by locating the version that is shipped with your SAS 9.3 order. Later in this manual when you are instructed to build a migration package, make sure that you use the version of the migration utility that is shipped with your SAS 9.3 order. For more information, see “Create the Migration Package” on page 67.
Here are the steps for inventorying your current SAS deployment:
1. “Complete a Migration Utility Checklist” on page 21
2. “Prepare Your Metadata Repositories” on page 23
3. “Managing the Query Cache Library Folder” on page 24
4. “SAS Migration Utility Requirements” on page 25
5. “Download the SAS Migration Utility” on page 26
6. “Develop a Common SAS Migration Utility Properties File” on page 27
7. “Review Product-Specific SAS Migration Utility Properties” on page 28
8. “Create a Migration Analysis Report” on page 28
9. “View and Analyze Your Migration Analysis Report” on page 31
10. “View and Analyze the Migration Log” on page 33
Complete a Migration Utility ChecklistThe SAS Migration Utility relies on a set of input values such as where you have installed SAS and SAS Metadata Server connection information. We recommend that you compile a list of the necessary input values before you run the migration utility.
Note: If you have not installed SAS in the same directory on each machine, then complete the following table for every machine in your current SAS deployment.
Inventorying Your Current SAS Deployment 21
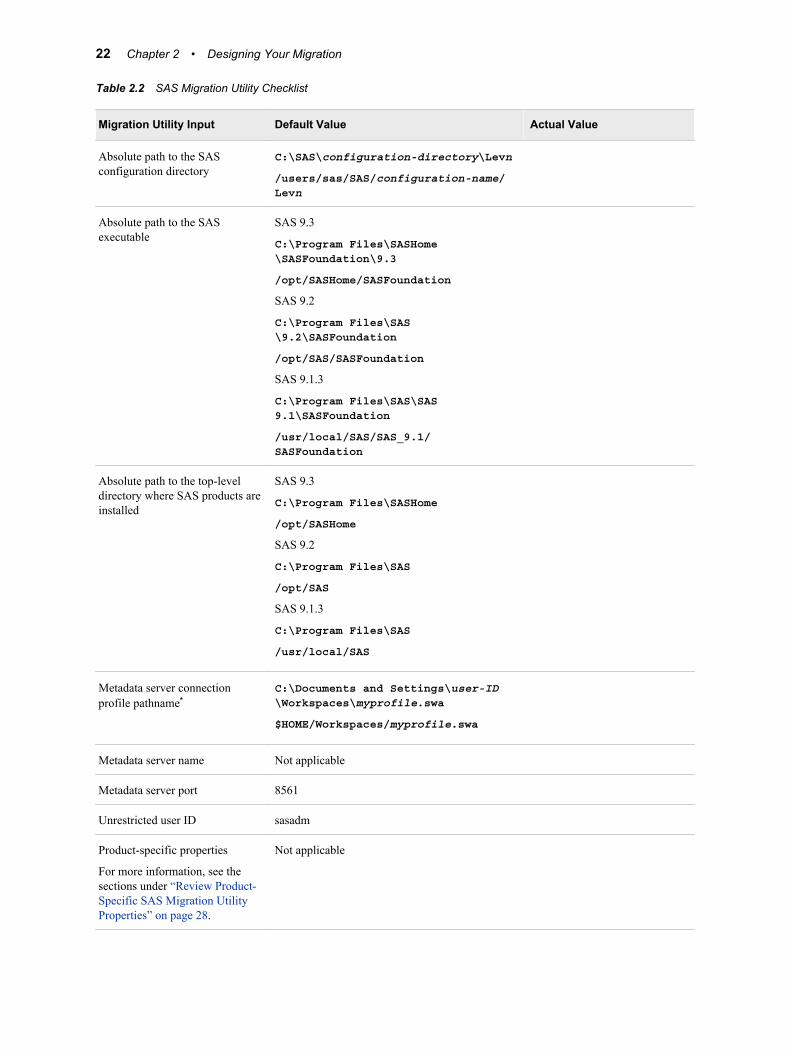
Table 2.2 SAS Migration Utility Checklist
Migration Utility Input Default Value Actual Value
Absolute path to the SAS configuration directory
C:\SAS\configuration-directory\Levn
/users/sas/SAS/configuration-name/Levn
Absolute path to the SAS executable
SAS 9.3
C:\Program Files\SASHome\SASFoundation\9.3
/opt/SASHome/SASFoundation
SAS 9.2
C:\Program Files\SAS\9.2\SASFoundation
/opt/SAS/SASFoundation
SAS 9.1.3
C:\Program Files\SAS\SAS 9.1\SASFoundation
/usr/local/SAS/SAS_9.1/SASFoundation
Absolute path to the top-level directory where SAS products are installed
SAS 9.3
C:\Program Files\SASHome
/opt/SASHome
SAS 9.2
C:\Program Files\SAS
/opt/SAS
SAS 9.1.3
C:\Program Files\SAS
/usr/local/SAS
Metadata server connection profile pathname*
C:\Documents and Settings\user-ID\Workspaces\myprofile.swa
$HOME/Workspaces/myprofile.swa
Metadata server name Not applicable
Metadata server port 8561
Unrestricted user ID sasadm
Product-specific properties
For more information, see the sections under “Review Product-Specific SAS Migration Utility Properties” on page 28.
Not applicable
22 Chapter 2 • Designing Your Migration
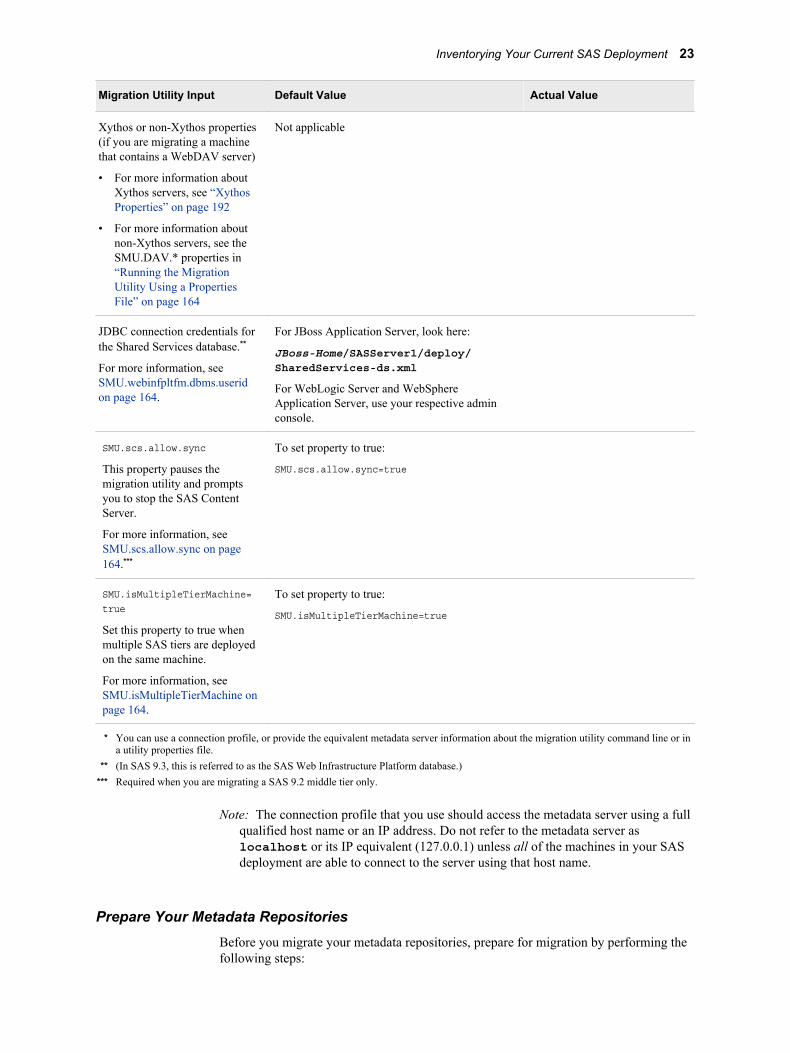
Migration Utility Input Default Value Actual Value
Xythos or non-Xythos properties (if you are migrating a machine that contains a WebDAV server)
• For more information about Xythos servers, see “Xythos Properties” on page 192
• For more information about non-Xythos servers, see the SMU.DAV.* properties in “Running the Migration Utility Using a Properties File” on page 164
Not applicable
JDBC connection credentials for the Shared Services database.**
For more information, see SMU.webinfpltfm.dbms.userid on page 164.
For JBoss Application Server, look here:
JBoss-Home/SASServer1/deploy/SharedServices-ds.xml
For WebLogic Server and WebSphere Application Server, use your respective admin console.
SMU.scs.allow.sync
This property pauses the migration utility and prompts you to stop the SAS Content Server.
For more information, see SMU.scs.allow.sync on page 164.***
To set property to true:
SMU.scs.allow.sync=true
SMU.isMultipleTierMachine=true
Set this property to true when multiple SAS tiers are deployed on the same machine.
For more information, see SMU.isMultipleTierMachine on page 164.
To set property to true:
SMU.isMultipleTierMachine=true
* You can use a connection profile, or provide the equivalent metadata server information about the migration utility command line or in a utility properties file.
** (In SAS 9.3, this is referred to as the SAS Web Infrastructure Platform database.)*** Required when you are migrating a SAS 9.2 middle tier only.
Note: The connection profile that you use should access the metadata server using a full qualified host name or an IP address. Do not refer to the metadata server as localhost or its IP equivalent (127.0.0.1) unless all of the machines in your SAS deployment are able to connect to the server using that host name.
Prepare Your Metadata RepositoriesBefore you migrate your metadata repositories, prepare for migration by performing the following steps:
Inventorying Your Current SAS Deployment 23
1. Before you begin preparing your metadata repositories, back them up by using the %OMABAKUP macro without specifying the REORG option.
For more information, see “Using the %OMABAKUP Macro to Perform Backups and Restores” in the SAS Intelligence Platform: System Administration Guide for either SAS 9.1.3 or SAS 9.2.
2. In SAS Data Integration Studio, check in all objects from project repositories.
For more information, see “Administering SAS Data Integration Studio” in SAS Intelligence Platform: Desktop Application Administration Guide appropriate for your version at http://support.sas.com/documentation/onlinedoc/etls.
3. Delete any unused directory objects such as libraries, stored processes, and deployed jobs.
4. Delete any servers or spawner definitions that are not being used.
5. Remove user directories for users that no longer exist.
6. If you imported user definitions from an enterprise source using the import macros, rerun these macros and reconcile new and deleted users.
7. If you are migrating from SAS 9.1.3, rename the SAS Administrators group, if you have one.
8. Run the %OMABAKUP macro again, and this time specify the REORG option.
For more information, see “Using the %OMABAKUP Macro to Perform Backups and Restores” in the SAS Intelligence Platform: System Administration Guide for either SAS 9.1.3 or SAS 9.2.
9. Delete any orphaned metadata objects.
The SAS Migration Utility analysis report on your metadata tier will help you to identify orphaned objects. So you might want to perform this step later, after reviewing the report.
10. Document any custom settings in your metadata, such as the following:
• additional users and group profiles under your Foundation Services deployments
• server start up commands
• configuration settings for servers
Note: The migration utility ignores metadata repositories with a state of OFFLINE or READONLY.
Managing the Query Cache Library FolderBefore migrating to SAS 9.3, you should remove data sets from the query cache library folder. Temporary data sets should be deleted, and any permanent data sets should be moved to a new folder and re-registered within SAS Management Console with the appropriate library. Temporary data sets slow down migration. SAS Web Report Studio 4.3 deletes all other libraries (such as other data sets inappropriately placed in this folder for temporary data) when it first executes with SAS 9.3.
By default, the query cache library file system folder resides in the SAS configuration directory in the wrstemp subdirectory (for example, SAS-configuration-directory\Levn\SASApp\Data\wrstemp).
24 Chapter 2 • Designing Your Migration
If a path other than the default was specified, you can locate the query cache library folder by examining WebReportStudioProperties.xml, located in the WEB-INF folder under the Web container for SAS Web Report Studio. You can verify this value in SAS Management Console by right-clicking the library, choosing Properties, and confirming the value displayed in the Options tab. (The Options tab also shows the file system folder path for the query cache library in the selected items display.)
You can identify temporary data sets in the query cache library folder as those files beginning with the characters cdt (for example, cdt_domain_na_0003_094417.sas7bdat).
Note: As a best practice, we recommend that you review all table names before removing them to make sure that the tables are not used for another purpose.
SAS Migration Utility RequirementsHere are the requirements for installing and running the SAS Migration Utility:
• The migration utility must be run on every machine that is running the current version of the SAS Intelligence Platform. (Run the migration utility on machines that contain the SAS server tier or middle tier only. Do not run the migration utility on machines that contain SAS clients only.)
For SAS multiple-machine deployments, we recommend that you copy the utility to shared network storage that is accessible from every SAS machine to avoid having to copy the migration utility separately on each machine. You can then log in to each machine and execute the utility from this shared network storage location.
• On SAS multiple machine deployments, run the migration utility first on the machine hosting the SAS Metadata Server.
• The user account with which you run the migration utility (the SAS installer account) must have Read access to all directories under the current SAS configuration directory for each machine.
• On SAS multiple-machine deployments, the migration utility must be able to write to (and read from) its output directory.
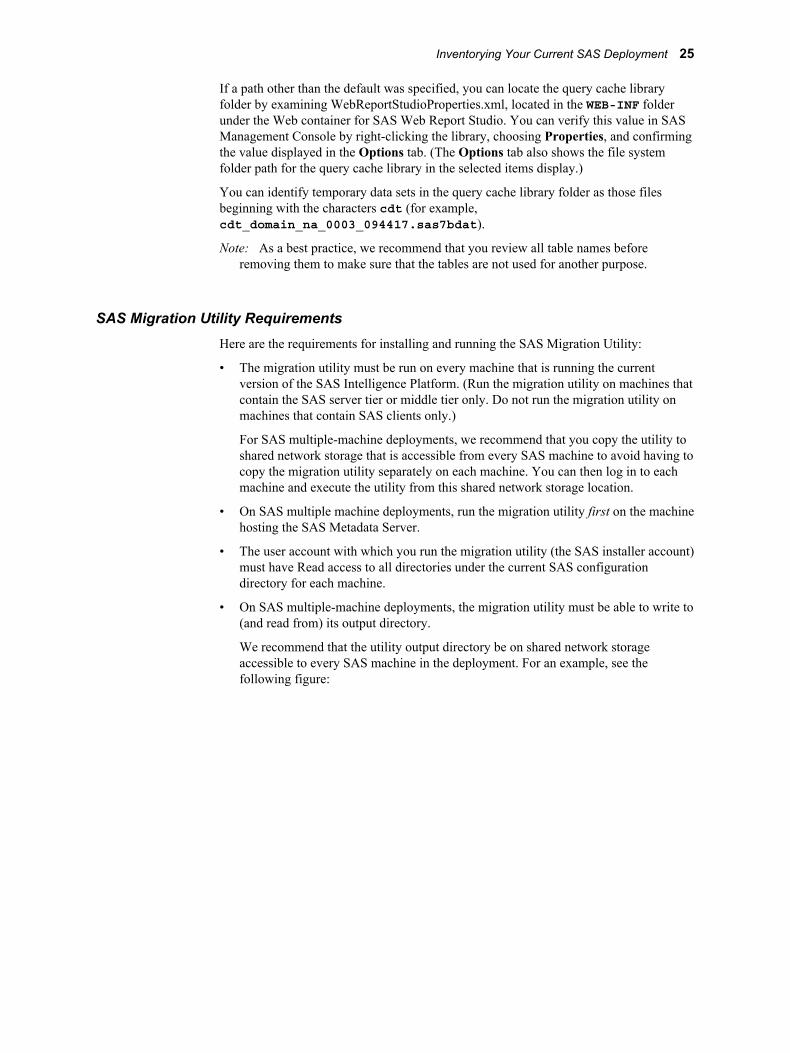
We recommend that the utility output directory be on shared network storage accessible to every SAS machine in the deployment. For an example, see the following figure:
Inventorying Your Current SAS Deployment 25
Figure 2.1 Sample Migration Utility Directory Structure
If no shared storage is available, then you must copy the migration package to each successive machine to have the migration utility add the machine's content to the migration package. (The metadata server must be packaged first.) If you use File Transport Protocol (FTP) to copy the migration package, make sure that you specify the file transfer type to binary.
• The migration utility requires that each SAS machine contain the appropriate version of the Java Runtime Environment (JRE), documented at http://support.sas.com/resources/thirdpartysupport/index.html. (You can also download the necessary JRE from this Web site.)
If you receive error messages about a failure to find the path to the Java executable, make sure that you have the proper JRE version installed.
• Modify the PATH environment variable such that the directory containing the Java binary is the first JRE found. Verify your setting by executing the following command from the UNIX shell prompt: which java.
Download the SAS Migration UtilityYou do not have to wait for your SAS 9.3 order to arrive to begin using the SAS Migration Utility. Simply go to the SAS product download site to download the migration utility:
1. Ensure that you have met the requirements listed in the topic “SAS Migration Utility Requirements” on page 25.
2. On a machine that has Internet access, point a Web browser to the following URL:
http://www.sas.com/apps/demosdownloads/setupintro.jsp
3. Search for the SAS Migration Utility.
Note: SAS also supplies a migration utility template file (smu.properties.template) that provides examples for how to use various properties. You can find the template file at the same URL where you download the SAS Migration Utility: http://www.sas.com/apps/demosdownloads/setupintro.jsp.
26 Chapter 2 • Designing Your Migration
4. After you have downloaded the migration utility, move the utility to a storage location that is accessible to your current SAS deployment (such as a shared network drive).
There is a unique SAS Migration Utility for each supported operating system family. If your current SAS deployment is a multi-platform deployment, you will have to download the appropriate migration utility for the operating systems on which you have deployed SAS: Windows, UNIX, and z/OS.
Note: This version of the SAS Migration Utility is provided for users who have not yet received their SAS 9.3 software, and are interested in assessing the scope of migration for their currently installed products. When you receive your SAS 9.3 software, you should use the version of the SAS Migration Utility that is included with the order to perform the migration, guaranteeing compatibility with the versions of the products ordered.
5. On UNIX and z/OS, remember to assign Execute permissions before running the downloaded file.
For more information, refer to your UNIX or z/OS documentation.
Develop a Common SAS Migration Utility Properties FileAs the SAS Migration Utility is run from an operating system prompt or command line, typing a set of invocation options can be error prone. If you deployed SAS in a similar manner across multiple machines, you can benefit from creating a common migration utility properties file and reduce the amount of input you must enter on the migration utility command line.
Note: SAS supplies a migration utility template file (smu.properties.template) that provides examples for how to use various properties. You can find the template file at the same URL where you download the SAS Migration Utility: http://www.sas.com/apps/demosdownloads/setupintro.jsp. SAS also ships the template with the SAS Software Depot in the smu subdirectory underneath utilities. For more information, see “Running the Migration Utility Using a Properties File” on page 164.
Follow these steps to create a common migration utility properties file:
1. Complete a migration utility checklist listed in the topic “Complete a Migration Utility Checklist” on page 21.
2. Add any necessary product-specific migration utility properties. (See the topic “Review Product-Specific SAS Migration Utility Properties” on page 28.)
3. Make sure that you have Write access to a migration utility executable directory that is network-shared and accessible from each machine on which you are running SAS.
4. Referring to your completed migration utility checklist and to the following table, use a text editor to add the required migration utility properties to your properties file.
5. Save your properties file in the migration utility executable directory.
Inventorying Your Current SAS Deployment 27
Table 2.3 Required SAS Migration Utility Properties
Required Migration Utility Property Example
SMU.config.dir SMU.config.dir=C:\\SAS\\BIServer\\Lev1
SMU.config.dir=/users/sas/SAS/biserver/Lev1
SMU.config.dir=/usr/lpp/SAS/config/Lev1
SMU.SASROOT SMU.SASROOT=C:\\Program Files\\SAS\\SASFoundation\\9.2*
SMU.SASROOT=/opt/SAS/SASFoundation
SMU.SASROOT=/usr/lpp/SAS/config/Lev1/SASMain
SMU.SASHOME SMU.SASHOME=C:\\Program Files\\SAS
SMU.SASHOME=/opt/SAS
SMU.SASHOME=/usr/lpp/SAS/config
SMU.profile SMU.profile=C:\\SMU\\profiles\\myprofile.swa
SMU.profile=/smu/profiles/myprofile.swa
SMU.Output.Dir SMU.Output.Dir=C:\\SMU\\92_Deployment
SMU.Output.Dir=/smu/92_deployment
SMU.Output.Dir=/u/cpdsask/SMU/SMU_Package
SMU.webinfpltfm.dbms.userid**
SMU.webinfpltfm.dbms.password
SMU.webinfpltfm.dbms.userid=myDatabaseUserID
SMU.webinfpltfm.dbms.password={SAS002}DBCC571245AD0B31433834F80BD2B99E16B3C969
SMU.scs.allow.sync** SMU.scs.allow.sync=true
SMU.isMultipleTierMachine*** SMU.isMultipleTierMachine=true
* Paths containing spaces in properties files do not require double quotes.** Required when you are migrating a SAS 9.2 middle tier only.
*** Required when multiple SAS tiers are deployed on the same machine.
Review Product-Specific SAS Migration Utility PropertiesSome SAS products have unique properties that the SAS Migration Utility uses when creating a migration analysis report, or later in the process when the utility builds a migration package. For more information, see “Product-Specific SAS Migration Utility Properties Overview” on page 179.
Create a Migration Analysis ReportThe SAS Migration Utility has two execution modes: an analyze mode and a package mode. Before creating a migration package that the SAS Deployment Wizard uses to perform the actual migration, we recommend that you run the migration utility in analyze mode in order to create a migration analysis report. This report is useful in
28 Chapter 2 • Designing Your Migration
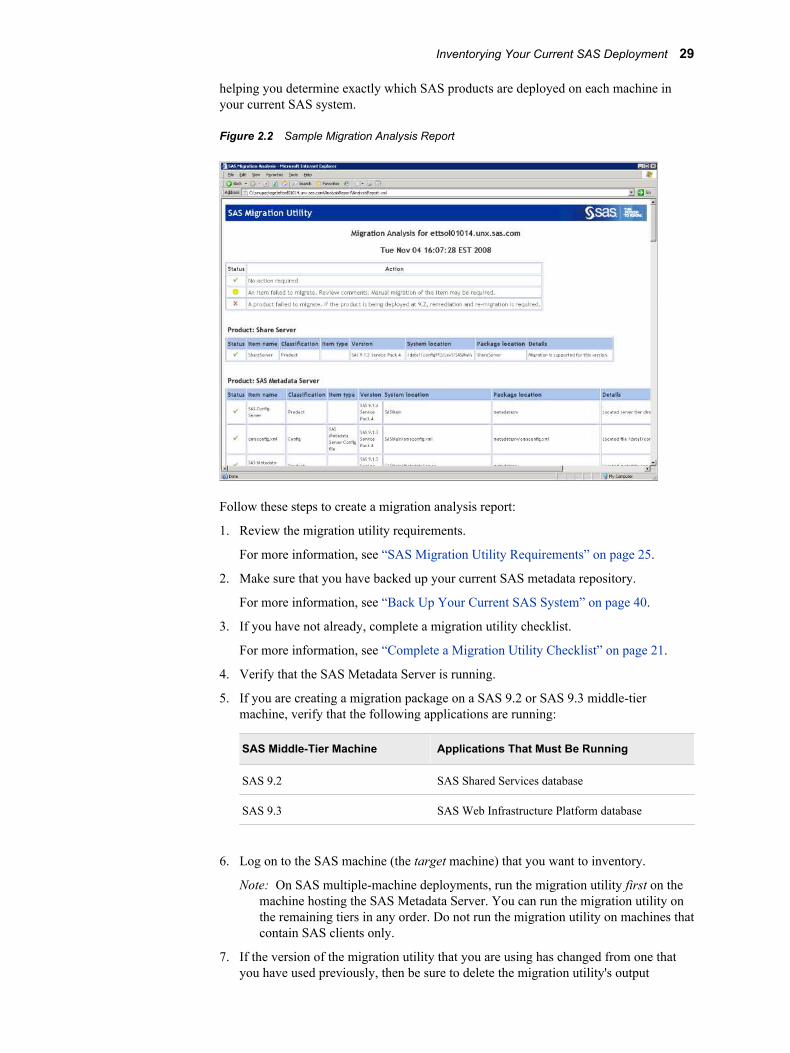
helping you determine exactly which SAS products are deployed on each machine in your current SAS system.
Figure 2.2 Sample Migration Analysis Report
Follow these steps to create a migration analysis report:
1. Review the migration utility requirements.
For more information, see “SAS Migration Utility Requirements” on page 25.
2. Make sure that you have backed up your current SAS metadata repository.
For more information, see “Back Up Your Current SAS System” on page 40.
3. If you have not already, complete a migration utility checklist.
For more information, see “Complete a Migration Utility Checklist” on page 21.
4. Verify that the SAS Metadata Server is running.
5. If you are creating a migration package on a SAS 9.2 or SAS 9.3 middle-tier machine, verify that the following applications are running:
SAS Middle-Tier Machine Applications That Must Be Running
SAS 9.2 SAS Shared Services database
SAS 9.3 SAS Web Infrastructure Platform database
6. Log on to the SAS machine (the target machine) that you want to inventory.
Note: On SAS multiple-machine deployments, run the migration utility first on the machine hosting the SAS Metadata Server. You can run the migration utility on the remaining tiers in any order. Do not run the migration utility on machines that contain SAS clients only.
7. If the version of the migration utility that you are using has changed from one that you have used previously, then be sure to delete the migration utility's output
Inventorying Your Current SAS Deployment 29
directory. (For example, in the past, you might have downloaded and run an earlier version of the migration utility to create an analysis report. If so, delete the output created by the older migration utility.)
8. Change to the SAS Migration Utility executable directory.
9. Use the common migration utility properties file and the common connection profile you have developed, unless the target machine requires any special modifications (for example, SAS is installed on a machine-specific path).
For more information, see “Develop a Common SAS Migration Utility Properties File” on page 27.
10. Add any necessary product-specific migration utility properties to your properties file. (See “Review Product-Specific SAS Migration Utility Properties” on page 28.)
11. Invoke the migration utility to run in analyze mode, using the following command from an operating system prompt or command line. If you are running the migration utility on a SAS 9.1.3 WebDAV tier, be sure to use the -davtier option or SMU.isdavtier property:
SAS 9.1.3 on Windowssmu -s -a -analyze -properties absolute pathname to property file -replace
SAS 9.2 on Windows 32-bitsmu92_32 -analyze -properties absolute pathname to property file -replace
SAS 9.2 on Windows 64-bitsmu92_x64 -analyze -properties absolute pathname to property file -replace
SAS 9.3 on Windows 32-bitsmu93_32 -analyze -properties absolute pathname to property file -replace
SAS 9.3 on Windows 64-bitsmu93_x64 -analyze -properties absolute pathname to property file -replace
SAS 9.1.3 on UNIX./smu.sh -- -analyze -properties absolute pathname to property file -replace
SAS 9.2 on UNIX./smu92 -- -analyze -properties absolute pathname to property file -replace
SAS 9.3 on UNIX./smu93 -- -analyze -properties absolute pathname to property file -replace
SAS 9.1.3 on z/OS./smu.zos -- -analyze -properties absolute pathname to property file -replace
SAS 9.2 on z/OS./smu92.zos -- -analyze -properties absolute pathname to property file -replace
SAS 9.3 on z/OS./smu93.zos -- -analyze -properties absolute pathname to property file -replace
30 Chapter 2 • Designing Your Migration
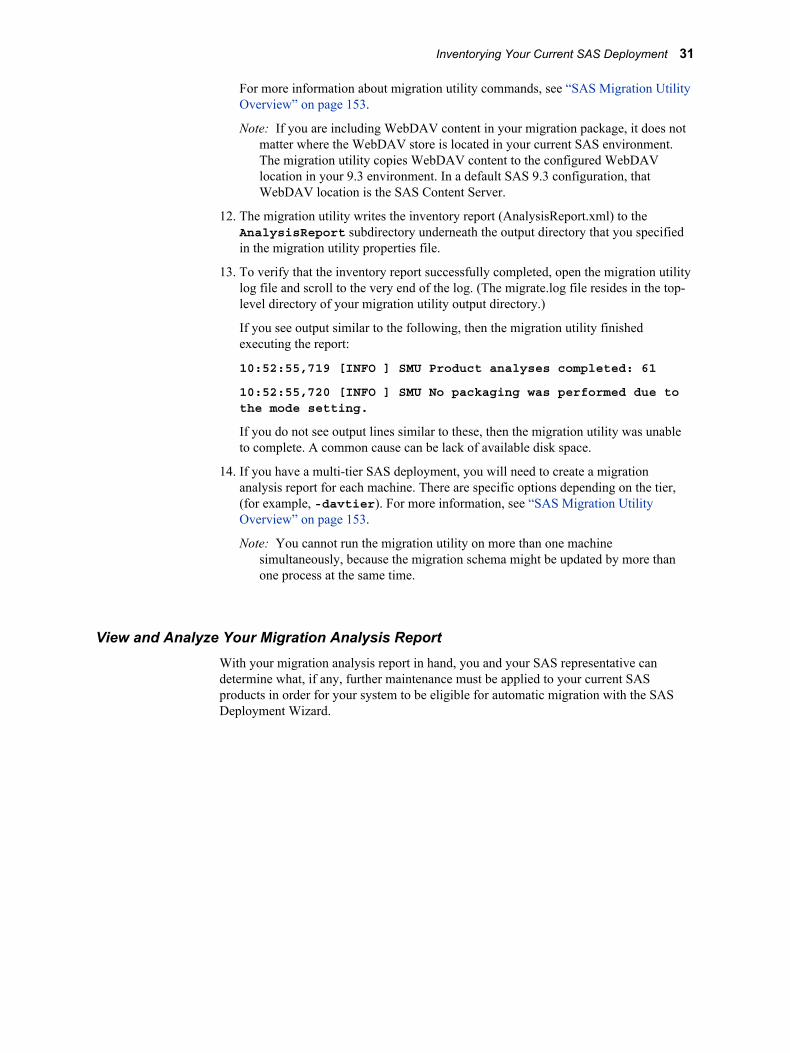
For more information about migration utility commands, see “SAS Migration Utility Overview” on page 153.
Note: If you are including WebDAV content in your migration package, it does not matter where the WebDAV store is located in your current SAS environment. The migration utility copies WebDAV content to the configured WebDAV location in your 9.3 environment. In a default SAS 9.3 configuration, that WebDAV location is the SAS Content Server.
12. The migration utility writes the inventory report (AnalysisReport.xml) to the AnalysisReport subdirectory underneath the output directory that you specified in the migration utility properties file.
13. To verify that the inventory report successfully completed, open the migration utility log file and scroll to the very end of the log. (The migrate.log file resides in the top-level directory of your migration utility output directory.)
If you see output similar to the following, then the migration utility finished executing the report:
10:52:55,719 [INFO ] SMU Product analyses completed: 61
10:52:55,720 [INFO ] SMU No packaging was performed due to the mode setting.
If you do not see output lines similar to these, then the migration utility was unable to complete. A common cause can be lack of available disk space.
14. If you have a multi-tier SAS deployment, you will need to create a migration analysis report for each machine. There are specific options depending on the tier, (for example, -davtier). For more information, see “SAS Migration Utility Overview” on page 153.
Note: You cannot run the migration utility on more than one machine simultaneously, because the migration schema might be updated by more than one process at the same time.
View and Analyze Your Migration Analysis ReportWith your migration analysis report in hand, you and your SAS representative can determine what, if any, further maintenance must be applied to your current SAS products in order for your system to be eligible for automatic migration with the SAS Deployment Wizard.
Inventorying Your Current SAS Deployment 31
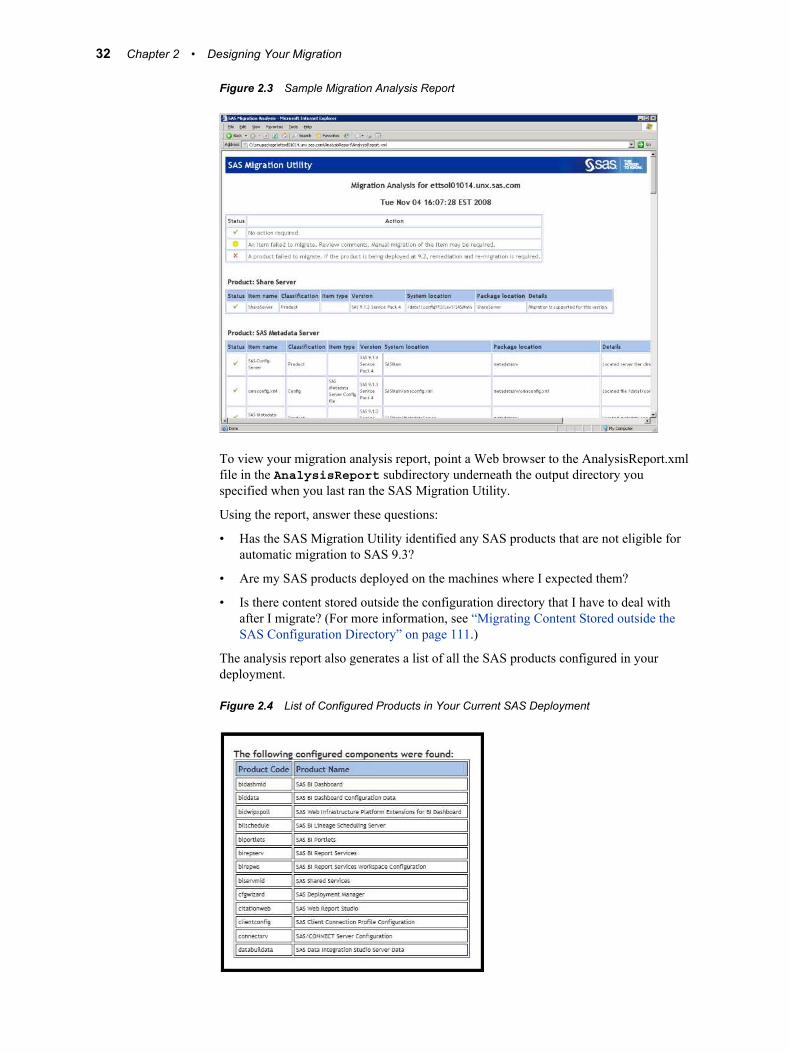
Figure 2.3 Sample Migration Analysis Report
To view your migration analysis report, point a Web browser to the AnalysisReport.xml file in the AnalysisReport subdirectory underneath the output directory you specified when you last ran the SAS Migration Utility.
Using the report, answer these questions:
• Has the SAS Migration Utility identified any SAS products that are not eligible for automatic migration to SAS 9.3?
• Are my SAS products deployed on the machines where I expected them?
• Is there content stored outside the configuration directory that I have to deal with after I migrate? (For more information, see “Migrating Content Stored outside the SAS Configuration Directory” on page 111.)
The analysis report also generates a list of all the SAS products configured in your deployment.
Figure 2.4 List of Configured Products in Your Current SAS Deployment
32 Chapter 2 • Designing Your Migration

This list of configured products can be helpful in creating a SAS 9.3 deployment plan to use with the SAS Deployment Wizard during the installation and migration task of your SAS 9.3 migration.
For more explanation on analysis report messages, go to http://support.sas.com/migration/utilitynotes
View and Analyze the Migration LogIn addition to studying your migration analysis report, the log file produced by the SAS Migration Utility can also detect possible problems with your content. The migration utility creates a log in the output directory for each machine on which it is run (for example, C:\migration_package\web_tier\migrate.log).
A Note about SAS Tables Stored under the SAS Configuration Directory
Even though the SAS automated migration tools migrate SAS tables that reside under the current SAS configuration directory and in a SASEnvironment or Data folder, the best practice is to store your SAS tables outside the SAS configuration directory. Migrating large amounts of data encountered under the configuration directory slows migration utility performance.
Middle-Tier Considerations
Overview of Middle-Tier ConsiderationsThe following topics are contained in this section:
• “Support for 64-Bit Middle Tier Only” on page 33
• “Review Web Application Server Configuration Documentation” on page 33
• “Choose to Automatically Configure Your Web Application Server” on page 34
• “Choose Whether to Automatically Deploy the SAS Web Applications” on page 35
• “Add a Second Middle-Tier Machine” on page 35
Support for 64-Bit Middle Tier OnlyThe SAS 9.3 middle tier is supported on 64-bit operating systems only.
Review Web Application Server Configuration DocumentationSAS provides post-installation documentation that describes how to configure your Web application server. For example, some of the topics include information about how to run your Web application server on different ports, install SAS with one user account, install your Web application server with a different user account, and so on. For more information about configuration steps for your Web application server, go to http://support.sas.com/resources/thirdpartysupport/v93 and search for the product name of your Web application server.
Middle-Tier Considerations 33
Choose to Automatically Configure Your Web Application ServerThe SAS Deployment Wizard gives you the option of automatically building and configuring the SAS Web applications as well as configuring a Web application server for use with SAS 9.3. (To use this wizard feature, make sure that your Web application server is not running before you start the wizard. For WebSphere, it is necessary to stop all deployment manager servers, all node agent servers, and all application servers before running the wizard.)
When the SAS Deployment Wizard configures the SAS 9.3 middle tier, by default, it automatically creates and configures an instance of a Web application server to host the SAS Web applications. The wizard creates a series of configuration files that enable you to run an instance of your Web application server with the SAS Web applications. The automatic configuration feature and the automatic deployment feature (described later) provide the opportunity to enable the automatic configuration of your Web application server, but not deploy the applications if you prefer to review the configuration to ensure it meets your site's needs. You can then deploy the SAS Web applications afterward.
Some of the configuration tasks performed by the SAS Deployment Wizard include setting options such as the following:
• HTTP ports
• optimized JVM options
• a mail session
• JAAS login modules for SAS services
• JMS queues
• a JDBC data source
Depending on the Web application server that you are using, the SAS Deployment Wizard modifies your Web application server configuration differently:
• WebLogic
No changes to the WebLogic installation directory. The deployment wizard creates a sample domain in the SAS configuration directory.
• WebSphere
Creates deployment manager and application server profiles in the WebSphere installation directory.
Note: On z/OS systems, the SAS Deployment Wizard cannot automatically create a server profile. You must do this manually. For more information, go to http://support.sas.com/resources/thirdpartysupport/v93 and search for “WebSphere”.
• JBoss
Creates a Web application server instance in the JBoss installation directory. The deployment wizard adds a start-stop script to the JBoss bin directory. JAR files for the SAS Drivers for JDBC are copied to the JBoss lib directory.
If during SAS Deployment Wizard execution, you choose to disable this feature, the wizard generates instructions that describe how to perform these configuration steps manually after you finish running the wizard.
34 Chapter 2 • Designing Your Migration
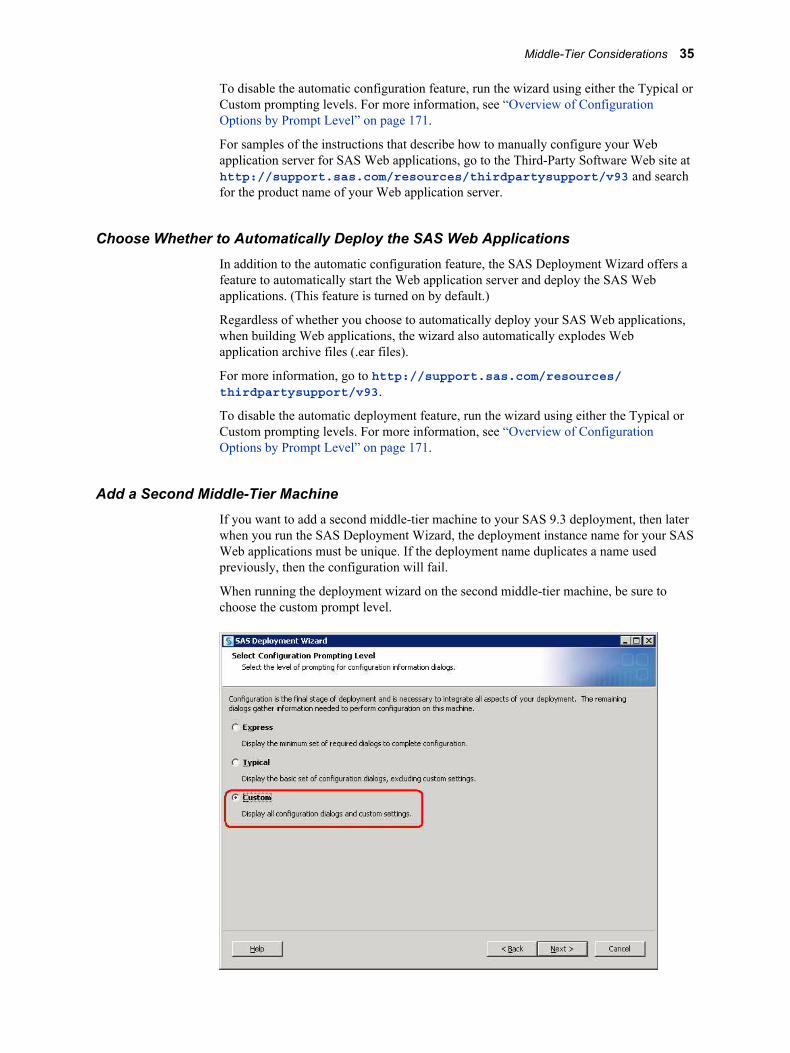
To disable the automatic configuration feature, run the wizard using either the Typical or Custom prompting levels. For more information, see “Overview of Configuration Options by Prompt Level” on page 171.
For samples of the instructions that describe how to manually configure your Web application server for SAS Web applications, go to the Third-Party Software Web site at http://support.sas.com/resources/thirdpartysupport/v93 and search for the product name of your Web application server.
Choose Whether to Automatically Deploy the SAS Web ApplicationsIn addition to the automatic configuration feature, the SAS Deployment Wizard offers a feature to automatically start the Web application server and deploy the SAS Web applications. (This feature is turned on by default.)
Regardless of whether you choose to automatically deploy your SAS Web applications, when building Web applications, the wizard also automatically explodes Web application archive files (.ear files).
For more information, go to http://support.sas.com/resources/thirdpartysupport/v93.
To disable the automatic deployment feature, run the wizard using either the Typical or Custom prompting levels. For more information, see “Overview of Configuration Options by Prompt Level” on page 171.
Add a Second Middle-Tier MachineIf you want to add a second middle-tier machine to your SAS 9.3 deployment, then later when you run the SAS Deployment Wizard, the deployment instance name for your SAS Web applications must be unique. If the deployment name duplicates a name used previously, then the configuration will fail.
When running the deployment wizard on the second middle-tier machine, be sure to choose the custom prompt level.
Middle-Tier Considerations 35
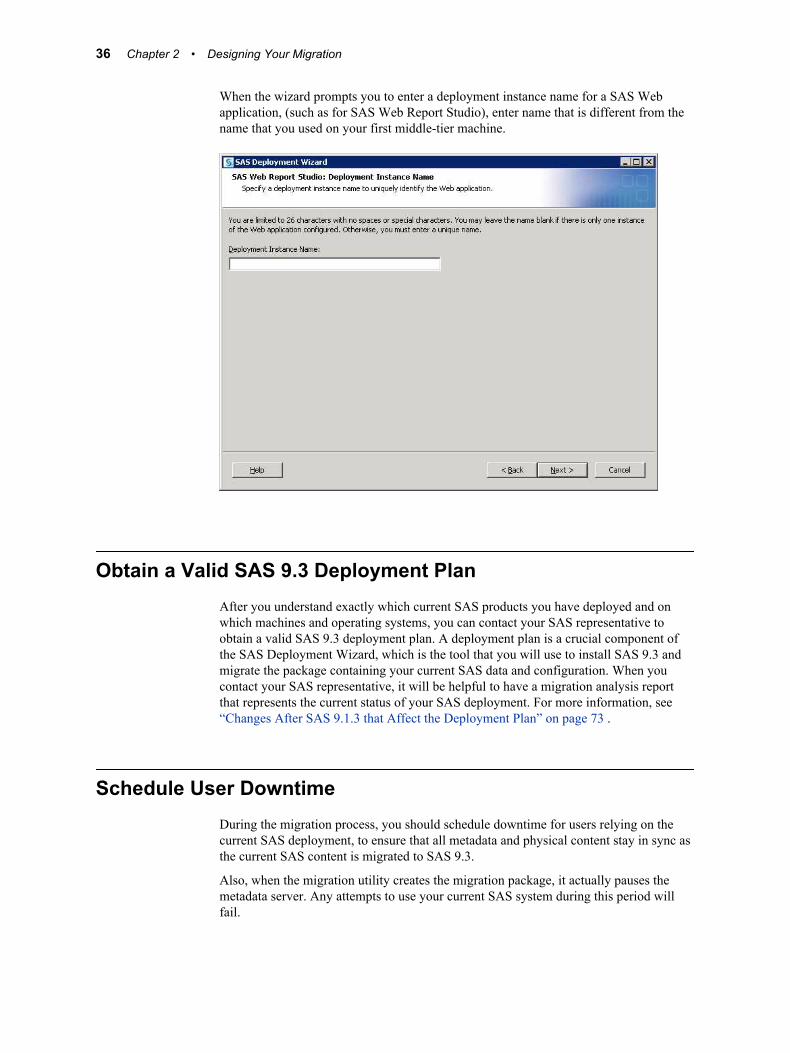
When the wizard prompts you to enter a deployment instance name for a SAS Web application, (such as for SAS Web Report Studio), enter name that is different from the name that you used on your first middle-tier machine.
Obtain a Valid SAS 9.3 Deployment PlanAfter you understand exactly which current SAS products you have deployed and on which machines and operating systems, you can contact your SAS representative to obtain a valid SAS 9.3 deployment plan. A deployment plan is a crucial component of the SAS Deployment Wizard, which is the tool that you will use to install SAS 9.3 and migrate the package containing your current SAS data and configuration. When you contact your SAS representative, it will be helpful to have a migration analysis report that represents the current status of your SAS deployment. For more information, see “Changes After SAS 9.1.3 that Affect the Deployment Plan” on page 73 .
Schedule User DowntimeDuring the migration process, you should schedule downtime for users relying on the current SAS deployment, to ensure that all metadata and physical content stay in sync as the current SAS content is migrated to SAS 9.3.
Also, when the migration utility creates the migration package, it actually pauses the metadata server. Any attempts to use your current SAS system during this period will fail.
36 Chapter 2 • Designing Your Migration
Chapter 3
Performing Pre-migration Tasks
Overview of Performing Pre-migration Tasks . . . . . . . . . . . . . . . . . . . . . . . . . . . . . . 37
Back Up Your Current SAS System . . . . . . . . . . . . . . . . . . . . . . . . . . . . . . . . . . . . . . 40
Apply Any Required SAS Maintenance . . . . . . . . . . . . . . . . . . . . . . . . . . . . . . . . . . . 40
Completing the Pre-migration Checklists . . . . . . . . . . . . . . . . . . . . . . . . . . . . . . . . . 41Overview of Completing the Pre-migration Checklists . . . . . . . . . . . . . . . . . . . . . . 41Complete the External User Account Checklist . . . . . . . . . . . . . . . . . . . . . . . . . . . . 41Important Notes on User Accounts and Authentication . . . . . . . . . . . . . . . . . . . . . . 42Complete the New Server Ports Checklist . . . . . . . . . . . . . . . . . . . . . . . . . . . . . . . . 44Review SAS 9.3 Documentation . . . . . . . . . . . . . . . . . . . . . . . . . . . . . . . . . . . . . . . 44SAS BI Dashboard 4.2 (and Earlier) Migration Note . . . . . . . . . . . . . . . . . . . . . . . . 45Determine the Path to Database JDBC JAR Files . . . . . . . . . . . . . . . . . . . . . . . . . . 45Determine the User ID Associated with Scheduled Flows . . . . . . . . . . . . . . . . . . . . 45Permission Considerations When User Accounts or Groups Change . . . . . . . . . . . 46
Installing Third-Party Software . . . . . . . . . . . . . . . . . . . . . . . . . . . . . . . . . . . . . . . . . 46Overview of Installing Third-Party Software . . . . . . . . . . . . . . . . . . . . . . . . . . . . . . 46Install Third-Party Products Using the Software Web Site . . . . . . . . . . . . . . . . . . . 46Install Third-Party Products Using the SAS Software Depot . . . . . . . . . . . . . . . . . . 47Moving Platform Suite for SAS Custom Calendars . . . . . . . . . . . . . . . . . . . . . . . . . 48
Creating SAS Software Depots . . . . . . . . . . . . . . . . . . . . . . . . . . . . . . . . . . . . . . . . . . 49Overview of Creating SAS Software Depots . . . . . . . . . . . . . . . . . . . . . . . . . . . . . . 49About SAS Software Depots . . . . . . . . . . . . . . . . . . . . . . . . . . . . . . . . . . . . . . . . . . 50Benefits of a SAS Software Depot . . . . . . . . . . . . . . . . . . . . . . . . . . . . . . . . . . . . . . 51Best Practices for SAS Software Depots . . . . . . . . . . . . . . . . . . . . . . . . . . . . . . . . . 53Prerequisites for Creating a SAS Software Depot . . . . . . . . . . . . . . . . . . . . . . . . . . 54Create a Depot By Using the SAS Download Manager . . . . . . . . . . . . . . . . . . . . . . 55Create a Depot by Using the SAS Deployment Wizard . . . . . . . . . . . . . . . . . . . . . . 61
Create the Migration Package . . . . . . . . . . . . . . . . . . . . . . . . . . . . . . . . . . . . . . . . . . . 67
Overview of Performing Pre-migration TasksYou must now carry out any pre-migration tasks that you identified in your migration design phase, along with some new tasks that are a part of all SAS migrations. Performing pre-migration tasks is the second of five steps required to install SAS 9.3 and migrate your current SAS content:
1. Design your migration.
37
ð 2. Perform pre-migration tasks.
3. Install SAS 9.3 and migrate your content from an earlier SAS version.
4. Perform post-migration tasks.
5. Validate your migration.
Looking back at your migration design, you might have identified some of your current SAS products that require maintenance before you can migrate them. Also, some of your hardware might need to be upgraded or operating systems patched and third-party software updated.
During the pre-migration task phase, you will create a migration package that contains your current SAS data and configuration using the SAS Migration Utility. The other major SAS migration tool, the SAS Deployment Wizard, uses your migration package as input to move your current SAS content successfully to SAS 9.3.
In addition to the SAS migration package, the wizard also relies on the presence of another package—SAS Software Depot—that contains SAS 9.3 installation files. You create a SAS Software Depot when you download your SAS 9.3 order, or from removable media that you receive directly from SAS.
38 Chapter 3 • Performing Pre-migration Tasks
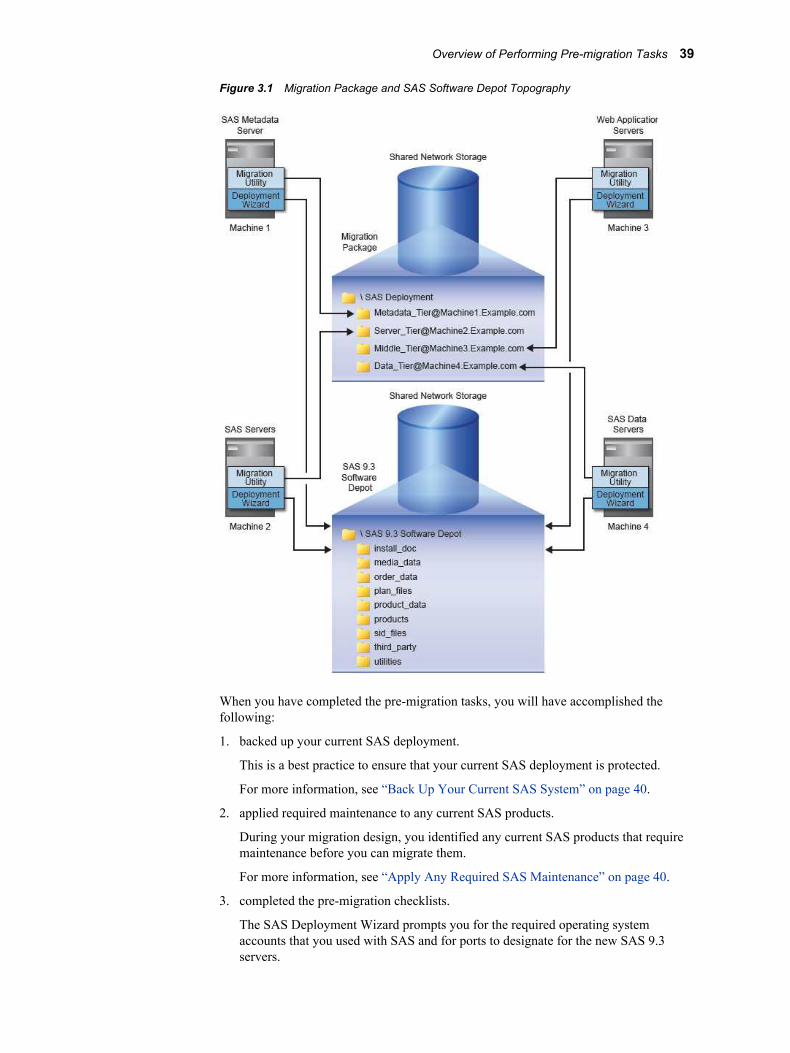
Figure 3.1 Migration Package and SAS Software Depot Topography
When you have completed the pre-migration tasks, you will have accomplished the following:
1. backed up your current SAS deployment.
This is a best practice to ensure that your current SAS deployment is protected.
For more information, see “Back Up Your Current SAS System” on page 40.
2. applied required maintenance to any current SAS products.
During your migration design, you identified any current SAS products that require maintenance before you can migrate them.
For more information, see “Apply Any Required SAS Maintenance” on page 40.
3. completed the pre-migration checklists.
The SAS Deployment Wizard prompts you for the required operating system accounts that you used with SAS and for ports to designate for the new SAS 9.3 servers.
Overview of Performing Pre-migration Tasks 39
For more information, see “Completing the Pre-migration Checklists” on page 41.
4. installed third-party software required for SAS 9.3.
SAS provides a third-party software site that tells you what to install, how to get it, and how to install it.
For more information, see “Installing Third-Party Software” on page 46.
5. created a SAS 9.3 Software Depot.
The SAS Software Depot contains the SAS installation files used by the SAS Deployment Wizard to install and configure SAS 9.3.
For more information, see “Creating SAS Software Depots” on page 49.
6. created a migration package.
Using the SAS Migration Utility, you create a package containing your current SAS data and configuration that the SAS Deployment Wizard uses.
For more information, see “Create the Migration Package” on page 67.
Back Up Your Current SAS SystemAs a best practice, we recommend that you make sure that you have an up-to-date operating system backup of your current SAS deployment. If you have a multi-machine deployment, this means your SAS Metadata Server machine, server tier, middle tier, and data tier.
On each machine, make sure that you have backed up the following directories:
• SAS installation directory (SAS Home) and all of its child directories (for example, C:\Program Files\SAS).
• SAS configuration directory and all of its child directories (for example, C:\SAS\configuration-directory\Levn).
On the metadata server machine, back up the earlier listed directories plus all metadata repositories.
For more information, see Chapter 11, “Best Practices for Backing Up and Restoring Your SAS Content,” in SAS Intelligence Platform: System Administration Guide.
For all backups that you make, follow your site's established backup procedures.
CAUTION:As you would with any backup, run these backups through your site's validation procedures to be confident of their integrity before proceeding with your SAS migration.
Apply Any Required SAS MaintenanceWhen you designed your SAS migration, you might have discovered that one or more of your current SAS products are ineligible for migration and require that maintenance patches be applied. Your SAS representative can help you get the necessary maintenance
40 Chapter 3 • Performing Pre-migration Tasks
that your products require. Follow the instructions provided for this, and make sure that all the affected products have been patched.
Note: After you have applied the necessary maintenance, we recommend that you rerun the migration analysis report on all your affected SAS machines and use the report to verify that all of your current SAS products are now eligible for migration.
For more information, see “Create a Migration Analysis Report” on page 28.
Note: For SAS 9.1.3 z/OS systems, before you migrate, make sure that you have applied the hot fix described in this SAS Note: http://support.sas.com/kb/30/981.html.
Completing the Pre-migration Checklists
Overview of Completing the Pre-migration ChecklistsLocate the SAS pre-installation checklist that you will use to deploy your SAS 9.3 software.
If your SAS representative created a custom deployment plan for your site, then use the checklist that came with the custom plan.
If you are using a standard deployment plan, then use the checklist that came with the standard plan. Standard deployment plans are stored by default in the SAS Software Depot. However, you can download the latest SAS 9.3 standard deployment plans that also contain a corresponding architectural diagram and pre-installation checklist at http://support.sas.com/installcenter/plans.
After you locate the appropriate checklist for your order, complete it and have it available to refer to when you run the SAS Deployment Wizard later in the migration process.
Here is additional information that you should consult that will help you to complete your checklist:
• “Complete the External User Account Checklist” on page 41
• “Important Notes on User Accounts and Authentication” on page 42
• “Complete the New Server Ports Checklist” on page 44
• “Review SAS 9.3 Documentation” on page 44
• “SAS BI Dashboard 4.2 (and Earlier) Migration Note” on page 45
• “Determine the Path to Database JDBC JAR Files” on page 45
• “Determine the User ID Associated with Scheduled Flows” on page 45
• “Permission Considerations When User Accounts or Groups Change” on page 46
Complete the External User Account ChecklistIn the third maintenance release for SAS 9.2, you have the option of using SAS internal accounts to minimize the number of headless operating system accounts required to deploy SAS. For more information, see “Choose to Use SAS Internal Accounts” on page 19.
Completing the Pre-migration Checklists 41
Also, make sure that you review important information in the topic “Important Notes on User Accounts and Authentication” on page 42.
Note: If you are migrating to new machines, make sure that the external accounts that you plan to use are present. For more information, see the section on users, groups, and ports in the SAS Intelligence Platform: Installation Guide, available at either http://support.sas.com/913administration or http://support.sas.com/92administration.
Important Notes on User Accounts and AuthenticationConsider the following items when working with user accounts during the migration process:
• Identities must be unique. You cannot reassign an existing system identity that is associated with a metadata persona in either the current SAS or SAS 9.3 configuration. For example, if the operating system user account sasguest is associated in metadata with the SAS Guest persona in your SAS 9.1.3 system, you cannot also associate sasguest in SAS 9.3 with the SAS Anonymous Web User.
• On UNIX systems, the SAS Deployment Wizard requires that you supply the root password during configuration. Certain SAS products and features use functionality that requires SAS to check user ID authentication and file access authorizations. This in turn necessitates that certain files within your SAS installation have setuid permissions and be owned by root.
• On UNIX and z/OS, the SAS installer account requires permission to invoke the chown command on the directories and files being migrated. If the installer account does not have this permission, then you must manually run the permission scripts using the root account after the SAS Deployment Wizard finishes executing. These scripts reside under SAS-configuration-directory/Levn/Temp.
On Windows, migrated files will be owned by the identity running the SAS Deployment Wizard regardless of their ownership on the current SAS system, but will retain the same effective permissions as on the current SAS system.
• The SAS automated migration tools detect machine name changes for the metadata server during the migration process and automatically changes host name domains in all logins and for the necessary file permissions.
For example, if the metadata server host name changed from “myhost” to “mynewhost,” then all domain logins that are qualified with “myhost” are automatically changed to “mynewhost.” (The tools change “myhost\sasadm” and “myhost\sastrust” to “mynewhost\sasadm” and “mynewhost\sastrust.”)
• The SAS automated migration tools do not automatically change the following:
• required external user account IDs
(For example, the tools do not automatically change “myhost\ebiadmin” to “myhost\sasadm” or “ebiadmin” to “sasadm.”)
You must specify these new external accounts when prompted for them in the deployment wizard in order to change the SAS metadata. To change the file permissions, use the temp scripts.
For more information, see “Determine the User ID Associated with Scheduled Flows” on page 45.
• required operating system group (UNIX only)
42 Chapter 3 • Performing Pre-migration Tasks

(For example, the tools do not automatically change the primary group of the SAS Installer user from “sas913” to “sas.”)
To change the file permissions that involve group membership, use the temp scripts. (There are no SAS metadata changes required when you change an operating system user group.)
For more information, see “Determine the User ID Associated with Scheduled Flows” on page 45.
• If your UNIX system uses an authentication method other than /etc/passwd or /etc/shadow, then you must configure authentication before you begin your SAS software deployment, or SAS 9.3 will not function properly. For more information, see the Configuration Guide for SAS 9.3 Foundation for UNIX Environments.
• The SAS Anonymous Web User is used to grant clients access to applicable SAS Web Infrastructure Platform applications such as SAS BI Web Services and the Stored Process Web Application.
• The user ID under which the SAS Content Server is running has to have Write permission for the migration package directory. If the migration package is created on a Windows shared directory, the content server user would have to have permission to write to the network device.
Alternatively, you can create the migration package with the content server shut down and the content repository copy will be created using the migration utility's user identity. Similarly, the migration utility user must have Write permission for the migration package directory. In this situation, the migration utility user must also have Write permission on the content server repository directory. (Note that shutting down the Web application server might have impacts on other parts of the SAS middle tier for which you are creating a migration package.)
Running the Web application server as a Windows service under the Local System Account requires that the migration package to be written on the local machine, if you create the package with the content server running.
• The SAS Deployment Wizard prompts you for a SAS Spawned Server account. The user ID and password that you supply are assigned as the launch credentials for any new SAS servers that are being introduced in the SAS version to which you are migrating (for example, the pooled workspace server which was introduced in SAS 9.2 or any server not present on the source system). The deployment wizard stores these new launch credentials in metadata as follows:
• If you supply a user ID that already exists in metadata, the migrated password in that login is overwritten with the password that you supply.
For more information, see “Password Policies” in Chapter 2 of SAS Intelligence Platform: Installation and Configuration Guide.
• If you supply a user ID that does not already exist in metadata, the credentials that you supply are stored in a new login on the Accounts tab of the SAS General Servers group.
For more information, see “Launch Credentials” in Chapter 12 of SAS Intelligence Platform: Security Administration Guide.
• The migration process does not change any existing launch credential assignments. For example, if the SAS 9.1.3 stored process server has a login (for example, spsrv) as its designated launch credential, that assignment is preserved. If the spsrv account is not valid on the SAS 9.3 machine, the stored process server will not work in the SAS 9.3 environment (until you change that server's launch credential).
Completing the Pre-migration Checklists 43
Complete the New Server Ports ChecklistComplete the ports section of the pre-install checklist to use later, during the installation and migration step, when the SAS Deployment Wizard prompts you for ports to designate for the new SAS servers. The deployment wizard uses the same ports when migrating the current SAS servers. For information about changing the ports that you use, see the SAS Deployment Wizard Port Remap page on page 85.
Note: If you are migrating to new machines, make sure that the ports that you plan to use are unused. For more information, see the section on users, groups, and ports in the SAS Intelligence Platform: Installation Guide. For SAS 9.1.3 go to http://support.sas.com/documentation/configuration/biig.pdf. For SAS 9.2, go to http://support.sas.com/documentation/cdl/en/biig/60946/HTML/default/viewer.htm#a003070263.htm.
Review SAS 9.3 DocumentationIt is very important to review all the different documents associated with deploying your SAS 9.3 software. There can be late-breaking information, or instructions specific to a particular configuration might be too narrow for inclusion in the SAS Intelligence Platform: Migration Guide.
Your review should include these documents:
• QuickStart Guide
This document is shipped with your SAS software. Follow its instructions.
The QuickStart Guides are also available online:
• Windows: http://support.sas.com/documentation/installcenter/93/win/index.html
• UNIX: http://support.sas.com/documentation/installcenter/93/unx/index.html
• z/OS: http://support.sas.com/documentation/installcenter/93/mvs/index.html
• software order e-mail (SOE)
This e-mail is sent to your site to announce the software and detail the order. It also enumerates the initial installation steps and, for SAS 9.3, contains instructions for using Electronic Software Delivery (ESD), if applicable. The SID file also contains your site's SAS license (SETINIT).
• SAS order information (SOI)
After you download your order to an existing SAS Software Depot, you can use the SAS order information (SOI) file to determine what products were in your order and when the order was placed. The SOI is in your SAS Software Depot in install_doc/order-number/soi.html.
• SAS software summary
In the same depot location as the SOI, the SAS software summary is a more detailed list of the software included in your order. Unlike the SAS order information sheet, which only lists the software you have specifically ordered, this document also describes the included software that supports your order. The software summary is in
44 Chapter 3 • Performing Pre-migration Tasks
your SAS Software Depot in install_doc/order- number/ordersummary.html.
Note: The SAS Deployment Wizard installs only what is listed in the deployment plan. The order summary might list more products than the deployment plan. For more information, see “About Deployment Plans” in Chapter 5 of SAS Intelligence Platform: Installation and Configuration Guide.
• system requirements
Available at http://support.sas.com/resources/sysreq/index.html
• SAS Notes
Outstanding SAS Notes for alert status installation problems are available at
http://support.sas.com/notes/index.html
• Installation Instructions for Release 5.2 of the SAS Performance Management Solutions
Available at these locations:
• http://support.sas.com/documentation/onlinedoc/fm
• http://support.sas.com/documentation/onlinedoc/hcm
• http://support.sas.com/documentation/onlinedoc/stm
SAS BI Dashboard 4.2 (and Earlier) Migration NoteThis topic concerns SAS BI Dashboard 4.2 (and earlier) running on UNIX.
Before running the SAS Deployment Wizard, identify the SAS 9.2 common data directory. By default, the common data directory is located in the Data directory under the SAS configuration directory (for example, /SAS/Config/Lev1/Data. If the SAS 9.2 common data directory is not contained under your SAS 9.2 configuration directory, then be sure to choose the deployment wizard Custom prompting level. For more information, see “Overview of Configuration Options by Prompt Level” on page 171.
When the wizard prompts for the Common Data Directory, enter the absolute path of your SAS 9.2 common data directory. You should also ensure that the 9.3 installer has Write permission to this location.
Determine the Path to Database JDBC JAR FilesThe database required by the SAS Web Infrastructure Platform uses JDBC for communication. Determine the path to the database JDBC driver JAR files. During the installation and migration step, the SAS Deployment Wizard prompts you for them.
Determine the User ID Associated with Scheduled FlowsAfter migration, you will need to reschedule all of your SAS flows. (See “Server Tier Post-migration Tasks” on page 110.) To do this you will need to know the user ID under which each flow is scheduled to run.
Follow these steps to determine the user ID associated with scheduled flows:
1. Log on to Platform Flow Manager.
2. Select the user ID tab.
Completing the Pre-migration Checklists 45
3. For each user ID, note the flows associated with it.
Permission Considerations When User Accounts or Groups ChangeThe SAS automated migration tools are shipped with scripts that are used to assign the proper permissions to files and directories under the SAS configuration directory. If you are using required operating system user accounts and group names in SAS 9.3 that are different from the ones on your current SAS system, then you must make sure that the permissions reflect these changes.
During configuration, the SAS Deployment Wizard invokes the levconfig extension (a part of the migration package) which converts certain temporary files into corresponding permission script files (*.bat and *.sh files). The deployment wizard persists these permission script files in the SAS 9.3 configuration directory (under Levn/Temp) and then invokes them during configuration.
You have to do one of the following procedures:
• Before running the SAS Deployment Wizard, do the following:
Replace occurrences of a current SAS external user account (for example, “ebiadmin”) with the SAS 9.3 external user account (for example, “sasadm”) in the *.tmp files in the levconfig\levconfig1 directory of the migration package
(for example, /smu_package/host1.example.com/levconfig/levconfig1).
• Or, after running the SAS Deployment Wizard, do the following:
Replace occurrences of a current SAS required external account with the SAS 9.3 required external account in the permission scripts residing in SAS 9.3-configuration-directory/Levn/Temp, and rerun these scripts.
Installing Third-Party Software
Overview of Installing Third-Party SoftwareIn the pre-installation checklists that accompany your SAS 9.3 order, you are instructed to install required third-party software. The checklists point you to supplemental instructions for other third-party software. If your order contains alternate or supplemental instructions for certain products, these products are listed in product readme files found in your SAS Software Depot under install_doc/order-number/ReadmeFiles.
The following topics are contained in this section:
• “Install Third-Party Products Using the SAS Software Depot” on page 47
• “Install Third-Party Products Using the Software Web Site” on page 46
• “Moving Platform Suite for SAS Custom Calendars” on page 48
Install Third-Party Products Using the Software Web SiteSAS maintains a third-party software Web site to help you do the following:
46 Chapter 3 • Performing Pre-migration Tasks
• determine what version of the product to install
• obtain the product, if you do not already have it
• find installation instructions
• learn about any patches required
Note: Some third-party software ships with your SAS order. For more information, see “Install Third-Party Products Using the SAS Software Depot” on page 47. If you are installing Platform Process Manager, Platform LSF, or Platform Grid Management Service, you must use the installation instructions and installation programs provided in your SAS order. For more information, see “Installing Platform Suite for SAS” in Chapter 4 of SAS Intelligence Platform: Installation and Configuration Guide.
To install the Java Development Kit or a Web application server, complete these steps:
1. Go to the Third-Party Software site at http://support.sas.com/resources/thirdpartysupport/index.html.
2. Select the link for the product (or type of product) that you are installing.
There are columns that either have links directly to the vendor's site, or an indication that the third-party software ships with SAS.
3. Install the product.
For most installations, you can use the instructions provided by the vendor. For products that are more complex to install (such as the Web application servers) the Third-Party Software site contains links to brief installations instructions. These instructions are not meant to replace the vendor documentation. However, they will enable you to create a simple configuration that will work well with your SAS software.
Note to users in Russia: SAS cannot export the Java Runtime Environment (JRE) to Russia. You will need to locate the appropriate link on the Third-Party Software Web site and download the JRE. Install it in the default location, and it will be ready for use when you install your SAS software.
Install Third-Party Products Using the SAS Software DepotIn the pre-installation checklists that accompany your SAS 9.3 order, you are instructed to install required third-party software. The checklists point you to supplemental instructions for other third-party software. If your order contains alternate or supplemental instructions for certain products, these products are listed in product readme files found in your SAS Software Depot under: install_doc/order-number/ReadmeFiles.
Some third-party products are shipped with SAS 9.3. Such products’ installation files and documentation are located in the SAS Software Depot under the third_party directory.
Installing Third-Party Software 47
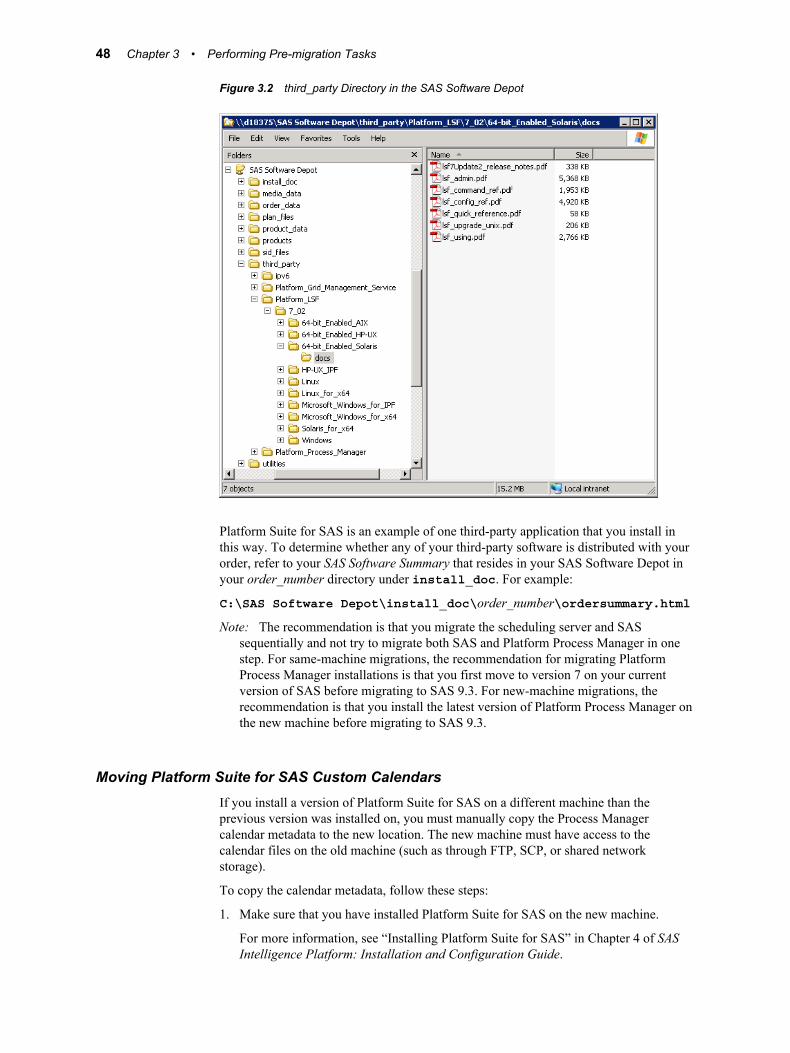
Figure 3.2 third_party Directory in the SAS Software Depot
Platform Suite for SAS is an example of one third-party application that you install in this way. To determine whether any of your third-party software is distributed with your order, refer to your SAS Software Summary that resides in your SAS Software Depot in your order_number directory under install_doc. For example:
C:\SAS Software Depot\install_doc\order_number\ordersummary.html
Note: The recommendation is that you migrate the scheduling server and SAS sequentially and not try to migrate both SAS and Platform Process Manager in one step. For same-machine migrations, the recommendation for migrating Platform Process Manager installations is that you first move to version 7 on your current version of SAS before migrating to SAS 9.3. For new-machine migrations, the recommendation is that you install the latest version of Platform Process Manager on the new machine before migrating to SAS 9.3.
Moving Platform Suite for SAS Custom CalendarsIf you install a version of Platform Suite for SAS on a different machine than the previous version was installed on, you must manually copy the Process Manager calendar metadata to the new location. The new machine must have access to the calendar files on the old machine (such as through FTP, SCP, or shared network storage).
To copy the calendar metadata, follow these steps:
1. Make sure that you have installed Platform Suite for SAS on the new machine.
For more information, see “Installing Platform Suite for SAS” in Chapter 4 of SAS Intelligence Platform: Installation and Configuration Guide.
48 Chapter 3 • Performing Pre-migration Tasks
2. Log on to the old Process Manager machine.
3. Change to the calendar subdirectory that is directly under the work directory.
For example:
• Windows:
cd C:\Program Files\Platform Computing\Platform Process Manager\work\calendar
• UNIX:
cd /opt/Platform Computing/Platform Process Manager/work/calendar
4. Copy all files except those ending in @sys to the corresponding calendar directory on the new machine.
Creating SAS Software Depots
Overview of Creating SAS Software DepotsThe following topics are contained in this section:
• “About SAS Software Depots” on page 50
• “Benefits of a SAS Software Depot” on page 51
• “Best Practices for SAS Software Depots” on page 53
• “Prerequisites for Creating a SAS Software Depot” on page 54
• “Create a Depot By Using the SAS Download Manager” on page 55
• “Create a Depot by Using the SAS Deployment Wizard” on page 61
There are two ways that you can create a SAS software depot:
• download SAS software.
When you download a SAS order, the SAS Download Manager automatically creates a SAS Software Depot on your system.
For more information, see “Create a Depot By Using the SAS Download Manager” on page 55.
• run the SAS Deployment Wizard.
Creating SAS Software Depots is an option on one of the wizard pages.
For more information, see “Create a Depot by Using the SAS Deployment Wizard” on page 61.
Before you create your depot, it can be helpful to understand exactly what a depot is, as well as a depot’s benefits and the best practices for creating and maintaining a depot. For more information, see the following topics:
• “About SAS Software Depots” on page 50
• “Benefits of a SAS Software Depot” on page 51
• “Best Practices for SAS Software Depots” on page 53
Creating SAS Software Depots 49

• “Prerequisites for Creating a SAS Software Depot” on page 54
About SAS Software DepotsA SAS Software Depot is a file system that consists of a collection of SAS installation files that represents one or more orders. The depot is organized in a specific format that is meaningful to the SAS Deployment Wizard, which is the tool that is used to install and configure SAS. The depot contains the SAS Deployment Wizard executable, one or more deployment plans, SAS installation data files, order data, and product data.
Figure 3.3 SAS Software Depot File Structure
Before you can install SAS, you must first have a software depot to install from. During a SAS software download, the SAS Download Manager downloads your order, verifies it, and automatically creates a SAS Software Depot. If you receive your SAS order in the form of physical media, then you create a depot using the SAS Deployment Wizard.
50 Chapter 3 • Performing Pre-migration Tasks
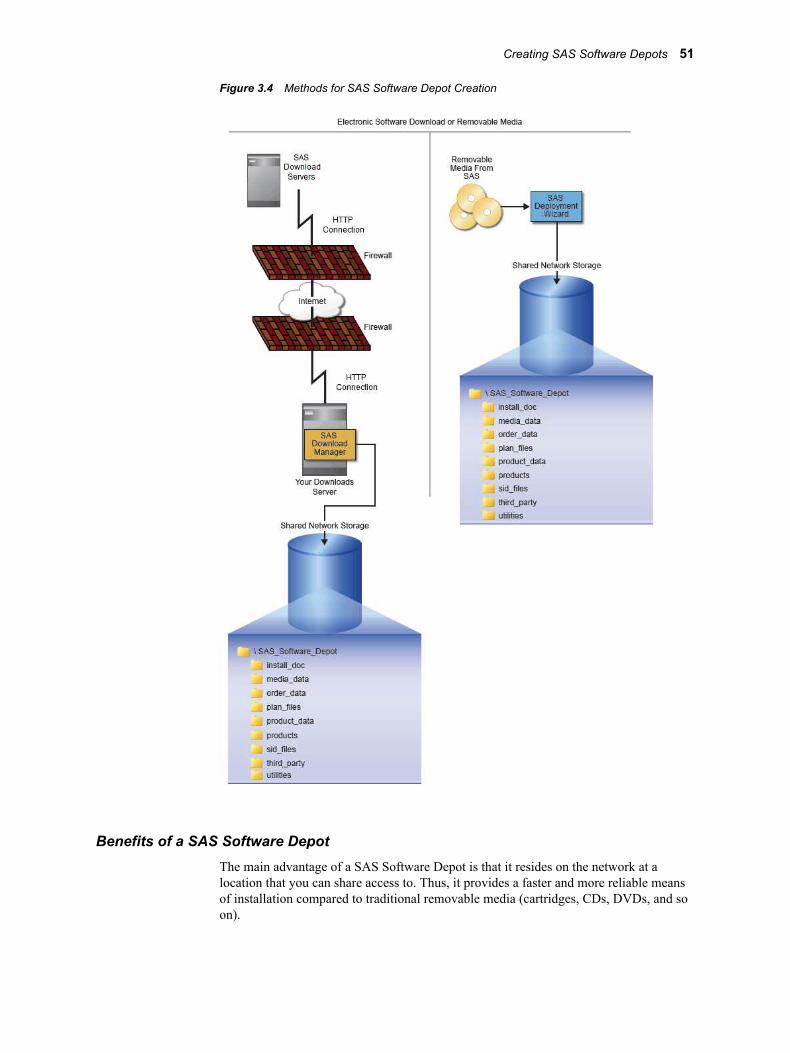
Figure 3.4 Methods for SAS Software Depot Creation
Benefits of a SAS Software DepotThe main advantage of a SAS Software Depot is that it resides on the network at a location that you can share access to. Thus, it provides a faster and more reliable means of installation compared to traditional removable media (cartridges, CDs, DVDs, and so on).
Creating SAS Software Depots 51
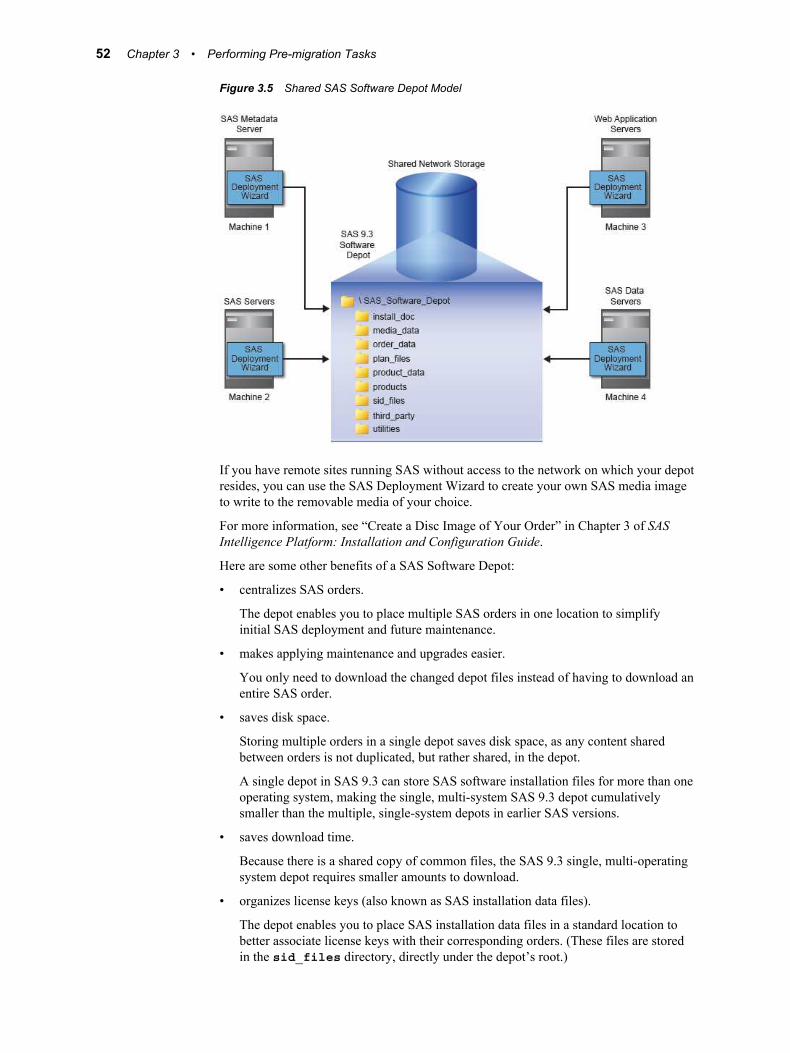
Figure 3.5 Shared SAS Software Depot Model
If you have remote sites running SAS without access to the network on which your depot resides, you can use the SAS Deployment Wizard to create your own SAS media image to write to the removable media of your choice.
For more information, see “Create a Disc Image of Your Order” in Chapter 3 of SAS Intelligence Platform: Installation and Configuration Guide.
Here are some other benefits of a SAS Software Depot:
• centralizes SAS orders.
The depot enables you to place multiple SAS orders in one location to simplify initial SAS deployment and future maintenance.
• makes applying maintenance and upgrades easier.
You only need to download the changed depot files instead of having to download an entire SAS order.
• saves disk space.
Storing multiple orders in a single depot saves disk space, as any content shared between orders is not duplicated, but rather shared, in the depot.
A single depot in SAS 9.3 can store SAS software installation files for more than one operating system, making the single, multi-system SAS 9.3 depot cumulatively smaller than the multiple, single-system depots in earlier SAS versions.
• saves download time.
Because there is a shared copy of common files, the SAS 9.3 single, multi-operating system depot requires smaller amounts to download.
• organizes license keys (also known as SAS installation data files).
The depot enables you to place SAS installation data files in a standard location to better associate license keys with their corresponding orders. (These files are stored in the sid_files directory, directly under the depot’s root.)
52 Chapter 3 • Performing Pre-migration Tasks
• identifies multiple orders.
The depot supports the SAS Deployment Wizard’s feature that enables you to customize order descriptions and enter notes to better identify multiple orders residing in a single depot.
Because depots contain your personal SAS software order, it is important to use best practices around securing and backing up your depot.
Best Practices for SAS Software DepotsFor customers who download SAS, their SAS Software Depot is the only copy of their SAS order. The depot contains the files from which SAS is initially installed. For this reason, it is important to use these best practices when managing your depot:
• Keep your depot.
When you keep your SAS 9.3 depot, applying maintenance and upgrades becomes easier because you only need to download the changed depot files instead of having to download an entire SAS order.
• Perform routine backups.
As with your SAS production system, it is important to routinely back up your SAS Software Depot and verify the integrity of these backups.
Note: Another important reason for securing and backing up your SAS Software Depot is that there are limits on the number of times that you can download your order from SAS.
• Secure the depot location.
Problems such as data loss, virus infection, and file corruption can compromise your investment in SAS. It is thus imperative that you have a comprehensive security policy in place to protect your depot.
• Store SAS installation data files with your depot.
The SAS installation data file for your orders contains information that is integral to successfully deploying SAS and applying future SAS hotfixes. As you get these data files from SAS—such as the file that contains your permanent SAS license key—it is important that you store them with your depot in the sid_files directory.
CAUTION:Be careful to use the correct installation data file that contains the SAS products that you are planning to install. Using an incorrect file can cause installation failure for SAS add-on products or other errors later when attempting to run SAS.
• Create a depot administrator.
Consider designating one or a few users to serve as SAS Software Depot administrators. Persons needing to deploy SAS software or to apply future SAS software maintenance require depot Read and Execute privileges. Depot administration tasks such as initially creating the depot, storing SAS installation data files, and updating order details require depot Write privileges. Separating depot administration from routine depot usage is a best practice that will further protect your SAS Software Depot.
Before creating a depot, make sure that you have met the necessary requirements described in “Prerequisites for Creating a SAS Software Depot” on page 54.
Creating SAS Software Depots 53
Prerequisites for Creating a SAS Software DepotBefore you start creating a SAS Software Depot, make sure that you have met the following prerequisites:
• Choose a machine that has the following:
• Internet access.
If you are downloading your SAS order, you will need a machine that can access the secure SAS download Web site. Also, ideally this machine should be networked so that you can perform deployments directly from the machine, without having to physically relocate the depot to another machine.
• Java SDK for z/OS installed (z/OS only).
For more information, go to http://support.sas.com/resources/thirdpartysupport/index.html.
• a Windowing environment.
If you will be creating the depot on a UNIX or a z/OS system, make sure that a windowing environment (such as the Common Desktop Environment or X11) is installed.
Starting with the March 2012 release of SAS 9.3, the SAS Deployment Wizard and the SAS Download Manager can be run on operating systems that do not have windowing systems. For more information, see the SAS Deployment Wizard and SAS Deployment Manager User's Guide, available at http://support.sas.com/documentation/installcenter/en/ikdeploywizug/64204/PDF/default/user.pdf.
Note: You have the option of creating a SAS Software Depot on a UNIX or Windows machine and transferring the depot to a z/OS environment using the SAS Software Depot Copy Utility. For more information, see the Configuration Guide for SAS 9.3 Foundation for z/OS, available at http://support.sas.com/documentation/installcenter/en/ikfdtnmvscg/64313/PDF/default/config.pdf.
• Designate a target directory.
Decide where you will create the SAS Software Depot. It is helpful if this directory can be shared on a network and accessible to all of the machines on which you will be installing software from the depot.
Note: SAS recommends that you not copy a depot from one location to another. Choose a permanent location before you create the depot.
• Grant required access permissions.
The SAS installer user must have Write access on the depot target directory.
Windows Vista and later requires that you run the SAS Download Manager installation program using administrator privileges.
• Check disk space requirements.
Make sure you have enough free disk space available on the target directory.
Finally, just before creating a depot, the SAS Deployment Wizard and the SAS Download Manager both present you with an estimate for required disk space.
54 Chapter 3 • Performing Pre-migration Tasks

Create a Depot By Using the SAS Download ManagerA SAS Software Depot contains SAS order data, initial SAS installation data files, order data, and product data. The depot also contains the SAS Deployment Wizard executable—the tool required to install and initially configure SAS.
Note: There is no expiration date for downloading your SAS order. However, if the time period for your initial SAS installation data file has expired, you will have to obtain a current SAS installation data file before you can run the SAS Deployment Wizard.
Before you can create a depot by using the SAS Download Manager, you must first download and install the manager itself. The installer automatically launches the SAS Download Manager after installing it. Therefore, the following procedure actually consists of three logical sections:
1. downloading the SAS Download Manager
2. installing the SAS Download Manager
For z/OS, see Installation Instructions for SAS 9.3 Electronic Software Delivery for Planning Installations on z/OS, available at http://support.sas.com/documentation/installcenter/en/ikinstallesdplanningii/64436/PDF/default/install_esd_planning.pdf.
Although these sections flow one after the other, at the end of each section, you can stop and resume the process later.
Follow these steps to download a SAS software order and automatically create a depot by using the SAS Download Manager:
1. Locate your software order e-mail sent by SAS. In this e-mail, find the URL for the secure SAS Web site from where you will download the SAS Download Manager.
Note: It is very important that you locate your original software order e-mail for the correct order and SAS installation key to download the software. You cannot use a renewal order number. The renewal order is a license update and it cannot be used to download software. If you cannot locate your original software order e-mail, contact your SAS Installation Representative or SAS Contracts at the following URLs:
• http://support.sas.com/adminservices/contact.html
• http://support.sas.com/techsup/license
2. Ensure that you have fulfilled the necessary requirements described in “Prerequisites for Creating a SAS Software Depot” on page 54.
3. Log on to the machine as a SAS Software Depot administrator or a user with depot Read, Write, and Execute privileges.
Note: Consider designating one or a few users to serve as SAS Software Depot administrators. Persons needing to deploy SAS software or to apply future SAS software maintenance require depot Read and Execute privileges. Depot administration tasks such as initially creating the depot, storing SAS installation data files, and updating order details require depot Write privileges. Windows Vista and later requires that you run the SAS Download Manager installation program using administrator privileges.
4. Launch a Web browser and navigate to the secure URL specified in your software order e-mail.
Creating SAS Software Depots 55
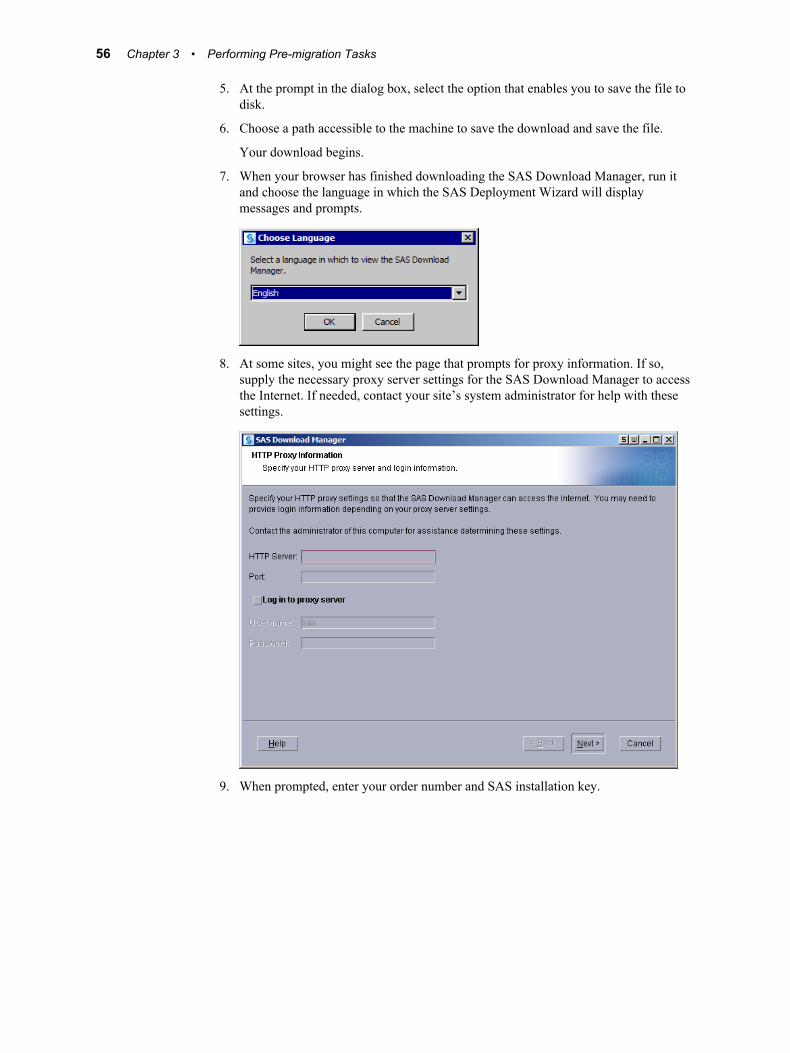
5. At the prompt in the dialog box, select the option that enables you to save the file to disk.
6. Choose a path accessible to the machine to save the download and save the file.
Your download begins.
7. When your browser has finished downloading the SAS Download Manager, run it and choose the language in which the SAS Deployment Wizard will display messages and prompts.
8. At some sites, you might see the page that prompts for proxy information. If so, supply the necessary proxy server settings for the SAS Download Manager to access the Internet. If needed, contact your site’s system administrator for help with these settings.
9. When prompted, enter your order number and SAS installation key.
56 Chapter 3 • Performing Pre-migration Tasks
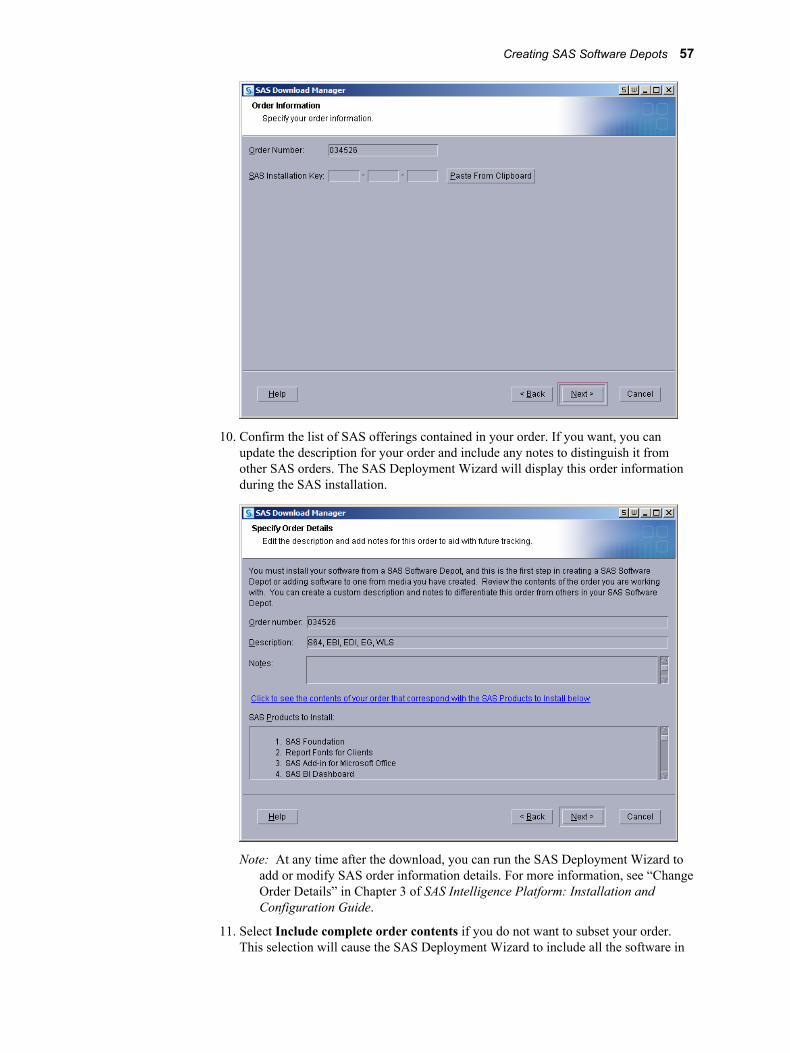
10. Confirm the list of SAS offerings contained in your order. If you want, you can update the description for your order and include any notes to distinguish it from other SAS orders. The SAS Deployment Wizard will display this order information during the SAS installation.
Note: At any time after the download, you can run the SAS Deployment Wizard to add or modify SAS order information details. For more information, see “Change Order Details” in Chapter 3 of SAS Intelligence Platform: Installation and Configuration Guide.
11. Select Include complete order contents if you do not want to subset your order. This selection will cause the SAS Deployment Wizard to include all the software in
Creating SAS Software Depots 57

the order. For more information, see “Subsetting SAS Software Orders” in Chapter 3 of SAS Intelligence Platform: Installation and Configuration Guide.
12. Specify a location where you want to download SAS and build the SAS Software Depot.
For more information, see “Prerequisites for Creating a SAS Software Depot” on page 54.
13. If the directory you specify does not exist, the wizard prompts you. If you want it to create the directory for you, click Yes.
58 Chapter 3 • Performing Pre-migration Tasks
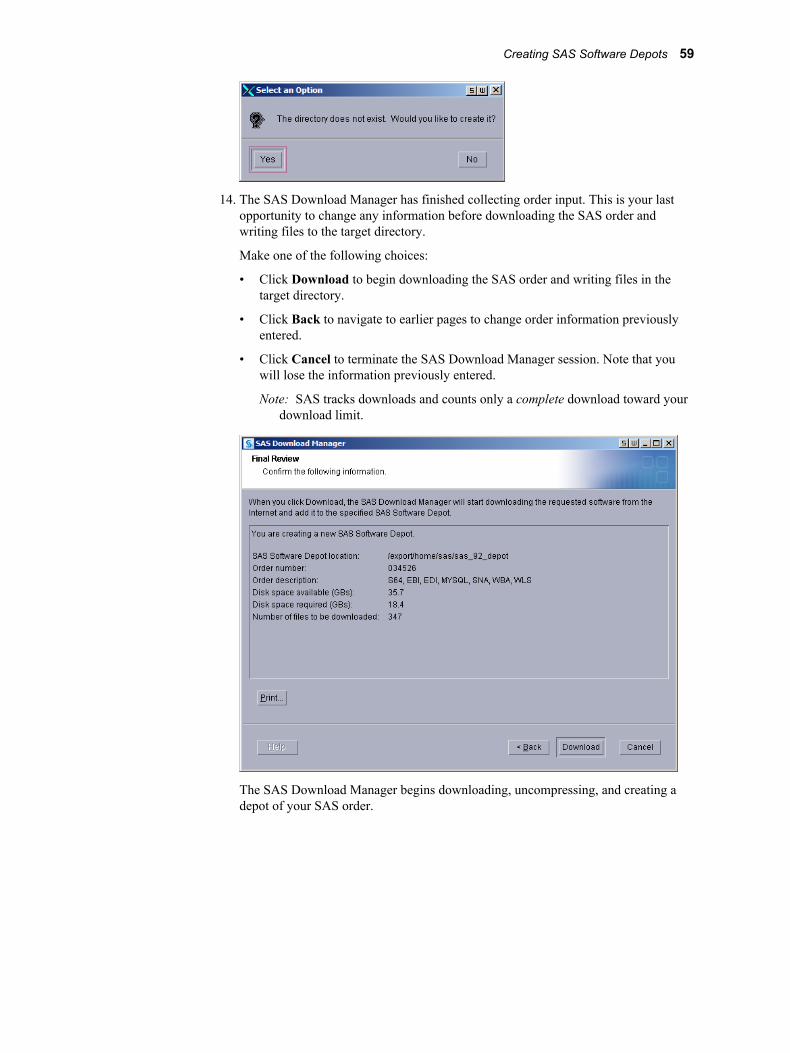
14. The SAS Download Manager has finished collecting order input. This is your last opportunity to change any information before downloading the SAS order and writing files to the target directory.
Make one of the following choices:
• Click Download to begin downloading the SAS order and writing files in the target directory.
• Click Back to navigate to earlier pages to change order information previously entered.
• Click Cancel to terminate the SAS Download Manager session. Note that you will lose the information previously entered.
Note: SAS tracks downloads and counts only a complete download toward your download limit.
The SAS Download Manager begins downloading, uncompressing, and creating a depot of your SAS order.
Creating SAS Software Depots 59
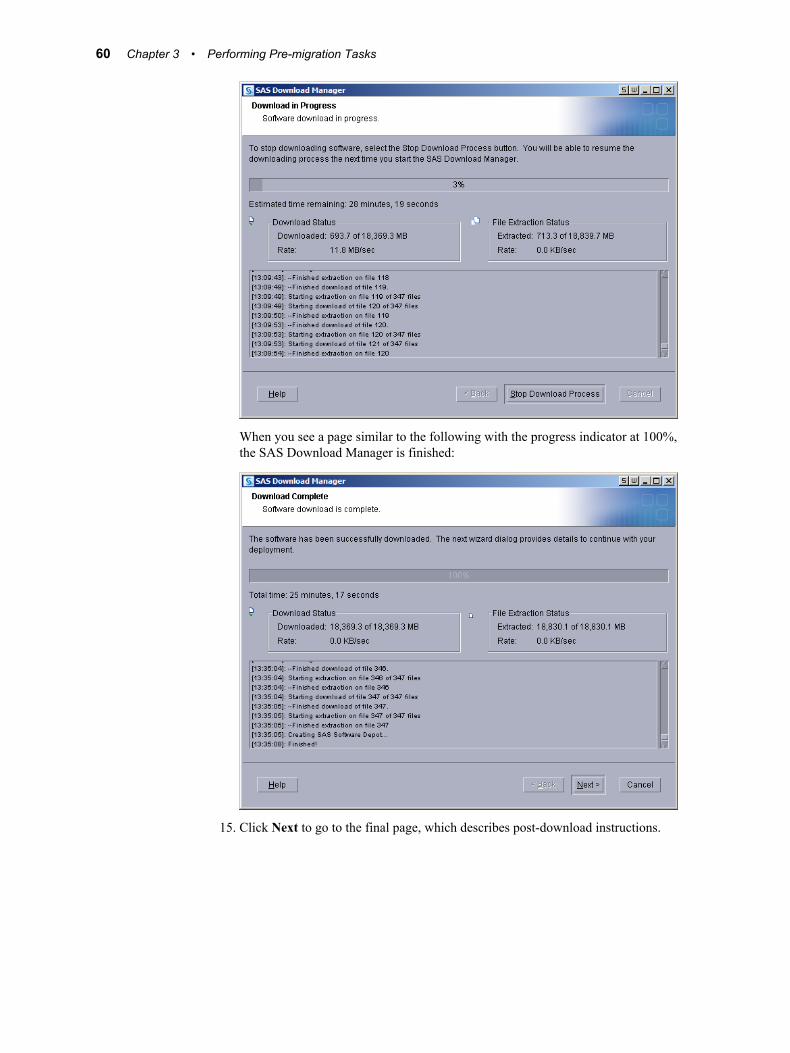
When you see a page similar to the following with the progress indicator at 100%, the SAS Download Manager is finished:
15. Click Next to go to the final page, which describes post-download instructions.
60 Chapter 3 • Performing Pre-migration Tasks
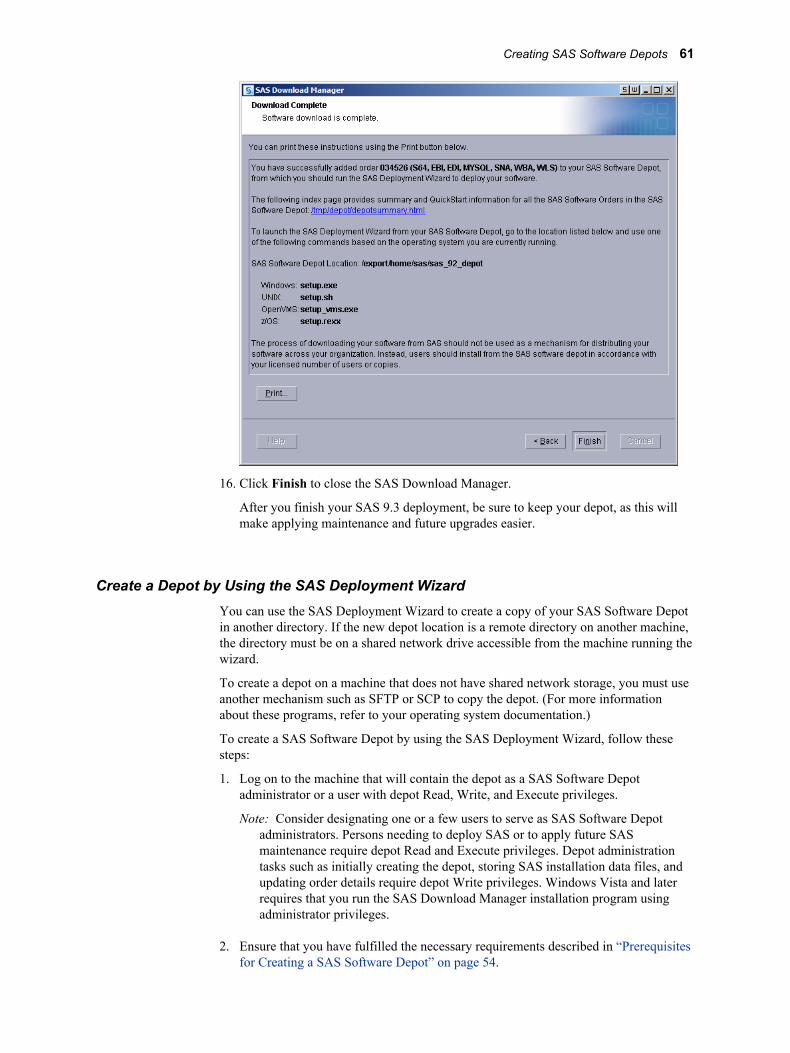
16. Click Finish to close the SAS Download Manager.
After you finish your SAS 9.3 deployment, be sure to keep your depot, as this will make applying maintenance and future upgrades easier.
Create a Depot by Using the SAS Deployment WizardYou can use the SAS Deployment Wizard to create a copy of your SAS Software Depot in another directory. If the new depot location is a remote directory on another machine, the directory must be on a shared network drive accessible from the machine running the wizard.
To create a depot on a machine that does not have shared network storage, you must use another mechanism such as SFTP or SCP to copy the depot. (For more information about these programs, refer to your operating system documentation.)
To create a SAS Software Depot by using the SAS Deployment Wizard, follow these steps:
1. Log on to the machine that will contain the depot as a SAS Software Depot administrator or a user with depot Read, Write, and Execute privileges.
Note: Consider designating one or a few users to serve as SAS Software Depot administrators. Persons needing to deploy SAS or to apply future SAS maintenance require depot Read and Execute privileges. Depot administration tasks such as initially creating the depot, storing SAS installation data files, and updating order details require depot Write privileges. Windows Vista and later requires that you run the SAS Download Manager installation program using administrator privileges.
2. Ensure that you have fulfilled the necessary requirements described in “Prerequisites for Creating a SAS Software Depot” on page 54.
Creating SAS Software Depots 61
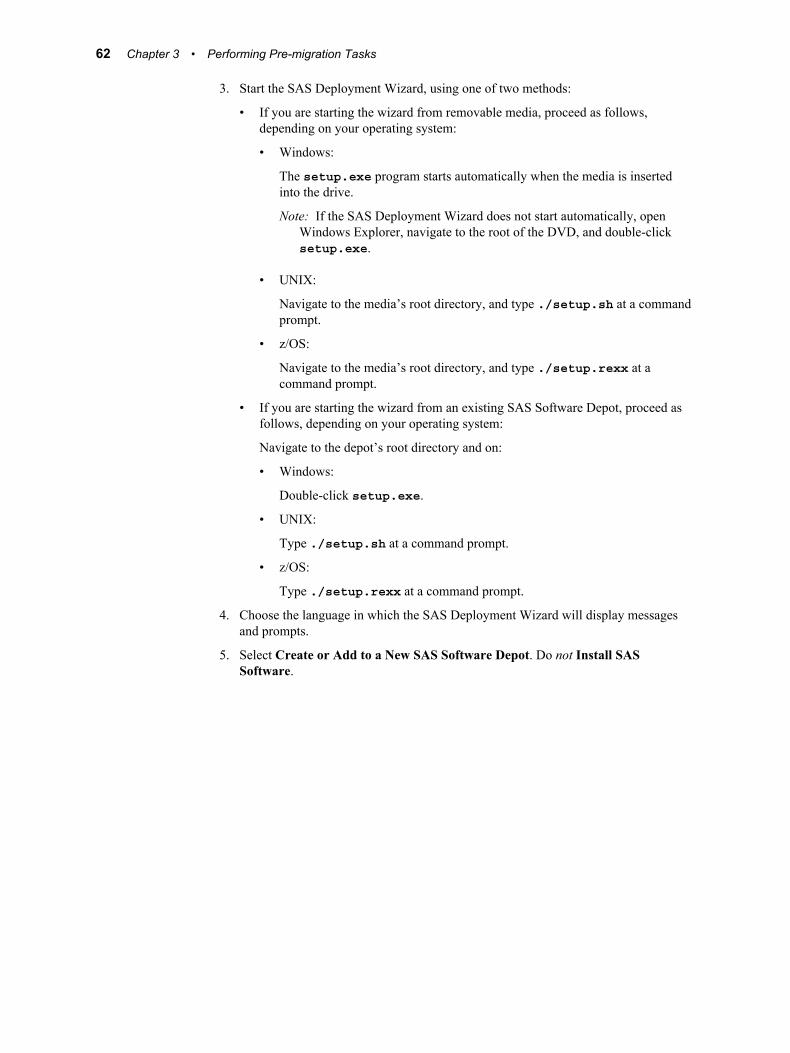
3. Start the SAS Deployment Wizard, using one of two methods:
• If you are starting the wizard from removable media, proceed as follows, depending on your operating system:
• Windows:
The setup.exe program starts automatically when the media is inserted into the drive.
Note: If the SAS Deployment Wizard does not start automatically, open Windows Explorer, navigate to the root of the DVD, and double-click setup.exe.
• UNIX:
Navigate to the media’s root directory, and type ./setup.sh at a command prompt.
• z/OS:
Navigate to the media’s root directory, and type ./setup.rexx at a command prompt.
• If you are starting the wizard from an existing SAS Software Depot, proceed as follows, depending on your operating system:
Navigate to the depot’s root directory and on:
• Windows:
Double-click setup.exe.
• UNIX:
Type ./setup.sh at a command prompt.
• z/OS:
Type ./setup.rexx at a command prompt.
4. Choose the language in which the SAS Deployment Wizard will display messages and prompts.
5. Select Create or Add to a New SAS Software Depot. Do not Install SAS Software.
62 Chapter 3 • Performing Pre-migration Tasks
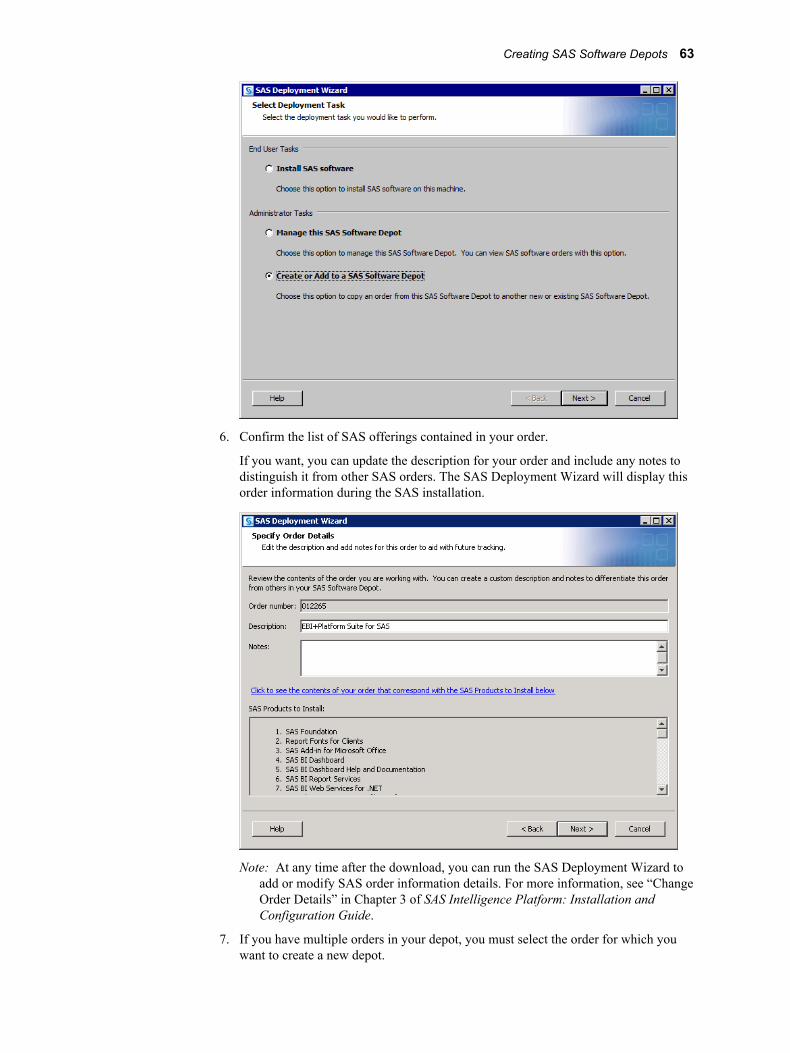
6. Confirm the list of SAS offerings contained in your order.
If you want, you can update the description for your order and include any notes to distinguish it from other SAS orders. The SAS Deployment Wizard will display this order information during the SAS installation.
Note: At any time after the download, you can run the SAS Deployment Wizard to add or modify SAS order information details. For more information, see “Change Order Details” in Chapter 3 of SAS Intelligence Platform: Installation and Configuration Guide.
7. If you have multiple orders in your depot, you must select the order for which you want to create a new depot.
Creating SAS Software Depots 63
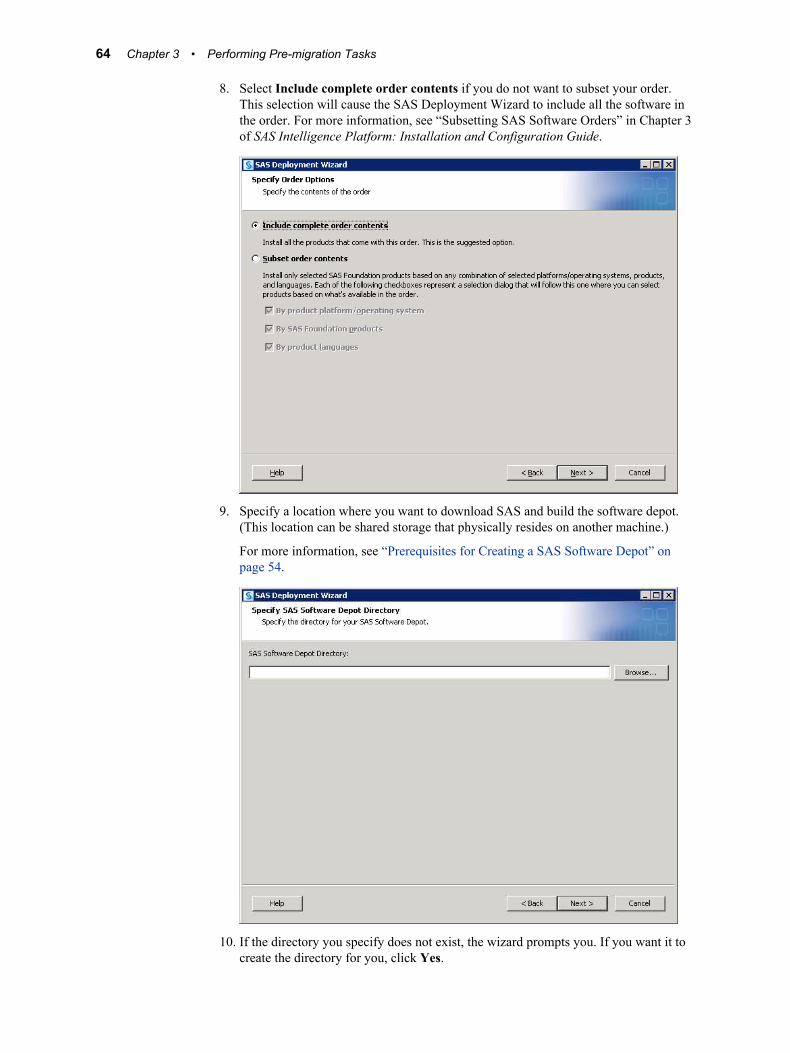
8. Select Include complete order contents if you do not want to subset your order. This selection will cause the SAS Deployment Wizard to include all the software in the order. For more information, see “Subsetting SAS Software Orders” in Chapter 3 of SAS Intelligence Platform: Installation and Configuration Guide.
9. Specify a location where you want to download SAS and build the software depot. (This location can be shared storage that physically resides on another machine.)
For more information, see “Prerequisites for Creating a SAS Software Depot” on page 54.
10. If the directory you specify does not exist, the wizard prompts you. If you want it to create the directory for you, click Yes.
64 Chapter 3 • Performing Pre-migration Tasks
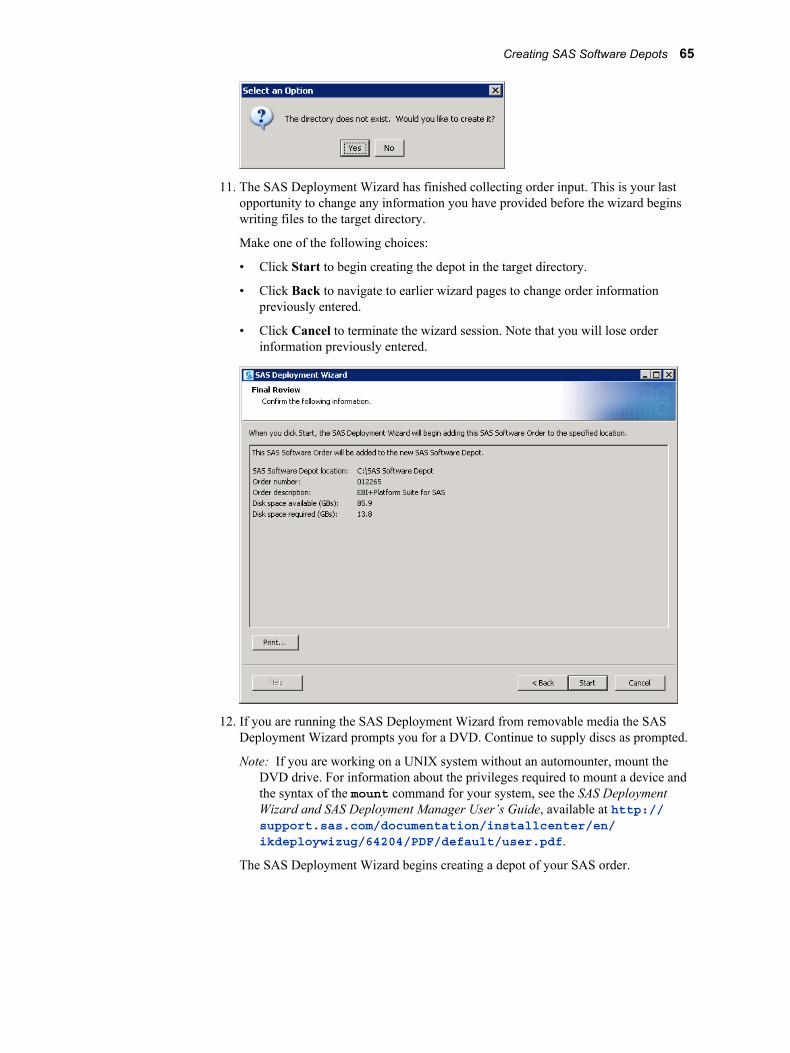
11. The SAS Deployment Wizard has finished collecting order input. This is your last opportunity to change any information you have provided before the wizard begins writing files to the target directory.
Make one of the following choices:
• Click Start to begin creating the depot in the target directory.
• Click Back to navigate to earlier wizard pages to change order information previously entered.
• Click Cancel to terminate the wizard session. Note that you will lose order information previously entered.
12. If you are running the SAS Deployment Wizard from removable media the SAS Deployment Wizard prompts you for a DVD. Continue to supply discs as prompted.
Note: If you are working on a UNIX system without an automounter, mount the DVD drive. For information about the privileges required to mount a device and the syntax of the mount command for your system, see the SAS Deployment Wizard and SAS Deployment Manager User’s Guide, available at http://support.sas.com/documentation/installcenter/en/ikdeploywizug/64204/PDF/default/user.pdf.
The SAS Deployment Wizard begins creating a depot of your SAS order.
Creating SAS Software Depots 65
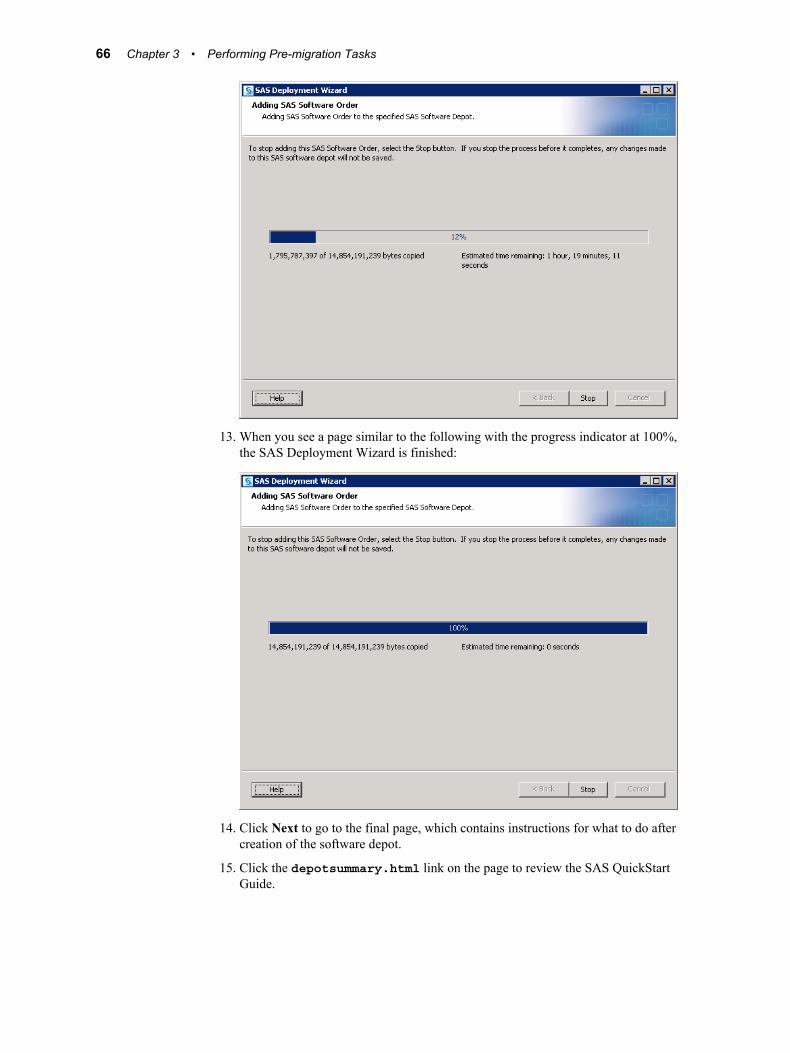
13. When you see a page similar to the following with the progress indicator at 100%, the SAS Deployment Wizard is finished:
14. Click Next to go to the final page, which contains instructions for what to do after creation of the software depot.
15. Click the depotsummary.html link on the page to review the SAS QuickStart Guide.
66 Chapter 3 • Performing Pre-migration Tasks
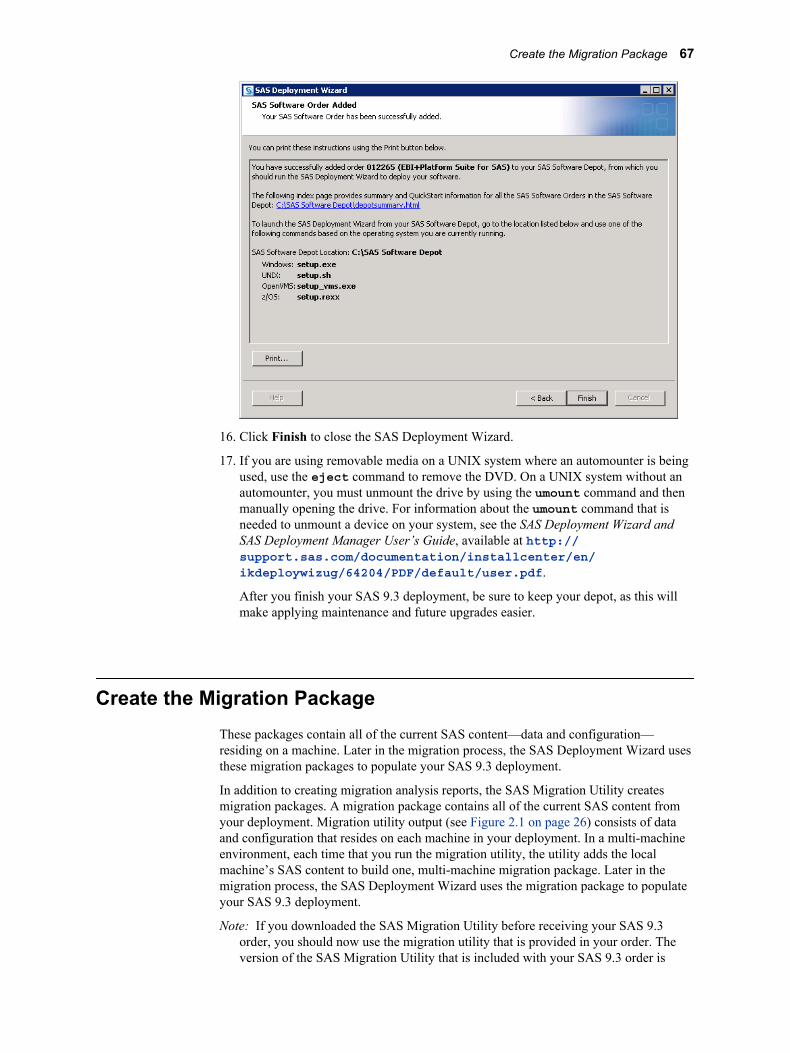
16. Click Finish to close the SAS Deployment Wizard.
17. If you are using removable media on a UNIX system where an automounter is being used, use the eject command to remove the DVD. On a UNIX system without an automounter, you must unmount the drive by using the umount command and then manually opening the drive. For information about the umount command that is needed to unmount a device on your system, see the SAS Deployment Wizard and SAS Deployment Manager User’s Guide, available at http://support.sas.com/documentation/installcenter/en/ikdeploywizug/64204/PDF/default/user.pdf.
After you finish your SAS 9.3 deployment, be sure to keep your depot, as this will make applying maintenance and future upgrades easier.
Create the Migration PackageThese packages contain all of the current SAS content—data and configuration—residing on a machine. Later in the migration process, the SAS Deployment Wizard uses these migration packages to populate your SAS 9.3 deployment.
In addition to creating migration analysis reports, the SAS Migration Utility creates migration packages. A migration package contains all of the current SAS content from your deployment. Migration utility output (see Figure 2.1 on page 26) consists of data and configuration that resides on each machine in your deployment. In a multi-machine environment, each time that you run the migration utility, the utility adds the local machine’s SAS content to build one, multi-machine migration package. Later in the migration process, the SAS Deployment Wizard uses the migration package to populate your SAS 9.3 deployment.
Note: If you downloaded the SAS Migration Utility before receiving your SAS 9.3 order, you should now use the migration utility that is provided in your order. The version of the SAS Migration Utility that is included with your SAS 9.3 order is
Create the Migration Package 67
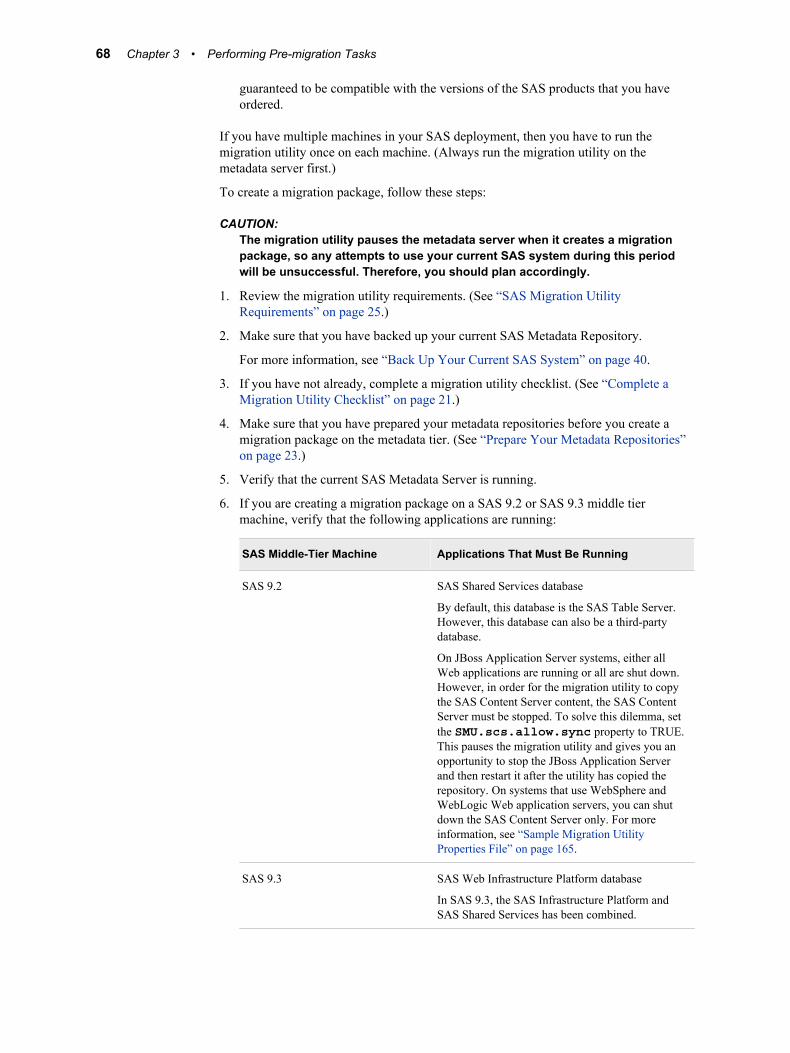
guaranteed to be compatible with the versions of the SAS products that you have ordered.
If you have multiple machines in your SAS deployment, then you have to run the migration utility once on each machine. (Always run the migration utility on the metadata server first.)
To create a migration package, follow these steps:
CAUTION:The migration utility pauses the metadata server when it creates a migration package, so any attempts to use your current SAS system during this period will be unsuccessful. Therefore, you should plan accordingly.
1. Review the migration utility requirements. (See “SAS Migration Utility Requirements” on page 25.)
2. Make sure that you have backed up your current SAS Metadata Repository.
For more information, see “Back Up Your Current SAS System” on page 40.
3. If you have not already, complete a migration utility checklist. (See “Complete a Migration Utility Checklist” on page 21.)
4. Make sure that you have prepared your metadata repositories before you create a migration package on the metadata tier. (See “Prepare Your Metadata Repositories” on page 23.)
5. Verify that the current SAS Metadata Server is running.
6. If you are creating a migration package on a SAS 9.2 or SAS 9.3 middle tier machine, verify that the following applications are running:
SAS Middle-Tier Machine Applications That Must Be Running
SAS 9.2 SAS Shared Services database
By default, this database is the SAS Table Server. However, this database can also be a third-party database.
On JBoss Application Server systems, either all Web applications are running or all are shut down. However, in order for the migration utility to copy the SAS Content Server content, the SAS Content Server must be stopped. To solve this dilemma, set the SMU.scs.allow.sync property to TRUE. This pauses the migration utility and gives you an opportunity to stop the JBoss Application Server and then restart it after the utility has copied the repository. On systems that use WebSphere and WebLogic Web application servers, you can shut down the SAS Content Server only. For more information, see “Sample Migration Utility Properties File” on page 165.
SAS 9.3 SAS Web Infrastructure Platform database
In SAS 9.3, the SAS Infrastructure Platform and SAS Shared Services has been combined.
68 Chapter 3 • Performing Pre-migration Tasks
7. Log on to the current SAS machine (the target machine) whose SAS content you want to migrate.
Note: On SAS multiple machine deployments, run the migration utility first on the machine hosting the SAS Metadata Server.
8. If the version of the migration utility that you are using has changed from one that you have used previously, then be sure to delete the migration utility’s output directory.
9. Change to the SAS Migration Utility executable directory. By default, this is the utilities directory in your SAS Software Depot.
10. Use the common migration utility properties file and the common connection profile you have developed, unless the target machine requires any special modifications.
(For example, SAS is installed on a nonstandard path.)
For more information, see “Develop a Common SAS Migration Utility Properties File” on page 27.
11. Add any necessary product-specific migration utility properties to your properties file. (See “Review Product-Specific SAS Migration Utility Properties” on page 28.)
12. If you have migration packages from any earlier migration utility invocations, delete or move these packages before rerunning the migration utility.
13. Invoke the migration utility on the machine with the metadata server, using the following command from an operating system prompt or command line that is appropriate for your version of SAS and your operating system.
Note: On UNIX and z/OS, if you have not already, remember to assign file Execute permissions to smu.sh and smu.zos before attempting to run the migration utility. For more information, refer to your UNIX or z/OS documentation.
If you have a multi-tier SAS deployment, you will need to run the migration utility once on each machine. (Do not run the migration utility on machines that only contain SAS clients.) There are specific migration utility options, depending on the tier. For more information, see “SAS Migration Utility Overview” on page 153.
Note: You cannot run the migration utility on more than one machine simultaneously, because the migration schema might be updated by more than one process at the same time.
Use the -replace option if the migration utility writes to the output directory used in earlier invocations. If you are migrating on a SAS 9.1.3 WebDAV machine, make sure that you specify -davtier on the command line or use the appropriate WebDAV properties:
SAS 9.1.3 on Windowssmu -s -a -properties absolute pathname to property file -replace
SAS 9.2 on Windows 32-bitsmu92_32 -properties absolute pathname to property file -replace
SAS 9.2 on Windows 64-bitsmu92_x64 -properties absolute pathname to property file -replace
SAS 9.3 on Windows 32-bitsmu93_32 -properties absolute pathname to property file -replace
Create the Migration Package 69
SAS 9.3 on Windows 64-bitsmu93_x64 -properties absolute pathname to property file -replace
SAS 9.1.3 on UNIX./smu.sh -- -properties absolute pathname to property file -replace
SAS 9.2 on UNIX./smu92 -- -properties absolute pathname to property file -replace
SAS 9.3 on UNIX./smu93 -- -properties absolute pathname to property file -replace
SAS 9.1.3 on z/OS./smu.zos -- -properties absolute pathname to property file -replace
SAS 9.2 on z/OS./smu92.zos -- -properties absolute pathname to property file -replace
SAS 9.3 on z/OS./smu93.zos -- -properties absolute pathname to property file -replace
• For more information about migration utility commands, see “SAS Migration Utility Overview” on page 153.
For more information about migration utility properties files, see “Develop a Common SAS Migration Utility Properties File” on page 27.
14. Review the migration analysis report to ensure that the migration package was properly created. Point a Web browser to AnalysisReport.xml in the AnalysisReport subdirectory underneath the output directory you specified in the migration utility properties file.
15. After you have created the migration package, make a backup of the package. Backups are especially recommended in multi-tier deployments. If the package creation fails for one tier, you can restore the package to the last successful version, without having to rerun the migration utility on every tier again.
16. If you have a multi-tier SAS deployment, you will need to run the migration utility on each machine. (Do not run the migration utility on machines that contain only SAS clients.) There are specific migration utility options, depending on the tier. For more information, see “SAS Migration Utility Overview” on page 153.
Note: You cannot run the migration utility on more than one machine simultaneously, because the migration schema might be updated by more than one process at the same time.
70 Chapter 3 • Performing Pre-migration Tasks
Chapter 4
Installing SAS 9.3 and Migrating Your SAS Content
Overview of Installing SAS and Migrating Your Content . . . . . . . . . . . . . . . . . . . . 71
Preparing to Install and to Configure . . . . . . . . . . . . . . . . . . . . . . . . . . . . . . . . . . . . . 71Overview of Preparing to Install and to Configure . . . . . . . . . . . . . . . . . . . . . . . . . 71SAS Deployment Wizard Options . . . . . . . . . . . . . . . . . . . . . . . . . . . . . . . . . . . . . . 72About Deployment Plans . . . . . . . . . . . . . . . . . . . . . . . . . . . . . . . . . . . . . . . . . . . . . 72Changes After SAS 9.1.3 that Affect the Deployment Plan . . . . . . . . . . . . . . . . . . . 73Installation Order Rules for Multiple Machine Deployments . . . . . . . . . . . . . . . . . 74SAS Installation Directory (SAS Home) Considerations . . . . . . . . . . . . . . . . . . . . . 75Content Repository Considerations . . . . . . . . . . . . . . . . . . . . . . . . . . . . . . . . . . . . . 75Installer Write Permission to the Content Server Migration Package on UNIX . . . 76
Install and Migrate SAS Interactively . . . . . . . . . . . . . . . . . . . . . . . . . . . . . . . . . . . . 76
Automating SAS 9.3 Client Installation across Multiple Machines . . . . . . . . . . . . . 97
Overview of Installing SAS and Migrating Your Content
This is the third of five tasks required to install SAS 9.3 and migrate your current SAS content:
1. Design your migration.
2. Perform pre-migration tasks.
ð 3. Install SAS 9.3 and migrate your content from an earlier SAS version.
4. Perform post-migration tasks.
5. Validate your migration.
Preparing to Install and to Configure
Overview of Preparing to Install and to ConfigureThe following topics are contained in this section:
• “SAS Deployment Wizard Options” on page 72
71
• “About Deployment Plans” on page 72
• “Changes After SAS 9.1.3 that Affect the Deployment Plan” on page 73
• “Installation Order Rules for Multiple Machine Deployments” on page 74
• “SAS Installation Directory (SAS Home) Considerations” on page 75
• “Content Repository Considerations” on page 75
• “Installer Write Permission to the Content Server Migration Package on UNIX” on page 76
SAS Deployment Wizard OptionsThe SAS Deployment Wizard is a cross-platform utility that installs and configures many SAS products. Using a SAS installation data file and a deployment plan for its initial input, the wizard is designed to prompt the customer for all the remaining input at the start of the session so that the customer does not have to monitor an entire deployment.
There are two major ways that you can run the SAS Deployment Wizard:
• interactively
This is a standard method of providing input via fields on wizard pages with a back and next button navigation method. You can choose from three levels of configuration prompting: Custom (all prompts), Typical (basic set of prompts), and Express (minimum set of prompts). For more information, see “Install and Migrate SAS Interactively” on page 76.
• non-interactively
A record and playback feature enables you to automate a SAS installation for use on multiple machines. This feature is designed for large-scale enterprise deployments to prevent users from having to manually provide input on every page each time the SAS Deployment Wizard is run on a machine. For more information, see “Automating SAS 9.3 Client Installation across Multiple Machines” on page 97.
About Deployment PlansA deployment plan describes what software should be installed and configured on each machine in a SAS deployment. A deployment plan is an XML file that is used as input to the SAS Deployment Wizard. There are two types of deployment plans: standard and custom. A standard deployment plan describes a common configuration. Standard deployment plans are stored by default in the SAS Software Depot. A custom deployment plan is created by a SAS representative specifically for a site.
• If a SAS representative created a custom deployment plan for you, an XML file (or a ZIP file containing an XML file) will have been e-mailed to you.
• If your SAS representative recommended that you use a standard deployment plan, you just need the name of the deployment plan that you will use; you will download the actual deployment plan with your SAS custom order (or included in your custom media that is shipped to you.) During the installation, the standard deployment plan will be available from a drop-down list in the SAS installation program.
• Your deployment plan must be a valid SAS 9.3 plan. The SAS Deployment Wizard does not accept plans from earlier SAS releases.
At the end of the SAS deployment, the SAS Deployment Wizard makes a copy of the deployment plan it used. The deployment plan can be helpful when you want to add
72 Chapter 4 • Installing SAS 9.3 and Migrating Your SAS Content
another SAS product or change your SAS configuration. The wizard stores a copy of the deployment plan in the SAS configuration directory in the utilities directory, and inserts a date and time stamp to the deployment plan filename. For example:
C:\SAS\Config\Lev1\Utilities\plan.2009-02-17-11.04.xml
To download the latest SAS 9.3 standard deployment plans, go to http://support.sas.com/installcenter/plans.
If you do not have the deployment plans from your previous SAS deployments, the migration utility analysis report can help you determine what SAS products are configured in your current SAS deployment. For more information, see Figure 2.4 on page 32.
Changes After SAS 9.1.3 that Affect the Deployment PlanWhen you work with your SAS representative to develop a custom deployment plan, or if you are choosing among the standard deployment plans available to you in your SAS 9.3 Software Depot, remember that there have been some deployment plan changes between SAS 9.1.3 and SAS 9.3. The following table enumerates these changes:
Table 4.1 Changes After SAS 9.1.3 That Affect the Deployment Plan
Prior to SAS 9.3 In SAS 9.3
Standard deployment plans are not shipped with the SAS Software Depot.
Standard deployment plans are shipped with the SAS Software Depot (and also available at http://support.sas.com/installcenter/plans).
No architectural diagrams and pre-installation checklists that match the standard deployment plans are supplied by SAS.
Architectural diagrams and pre-installation checklists that match the standard deployment plans are supplied by SAS (available at http://support.sas.com/installcenter/plans).
The deployment plan used to deploy SAS is not stored in the SAS configuration directory.
The deployment plan used to deploy SAS is stored in the SAS configuration directory (under SAS-config-dir/Levn/Utilities).
SAS Web Infrastructure Kit is included. The SAS Web Infrastructure Kit has been replaced by the SAS Web Infrastructure Platform.
Xythos and Apache HTTP WebDAV servers are included.
Xythos and Apache servers are replaced with the SAS Content Server.
Apache Tomcat is included. Apache Tomcat is replaced with the JBoss Application Server.
A separate deployment plan entry is required for SAS Foundation Services Manager.
No separate entry is required for SAS Foundation Services Manager (part of SAS Management Console).
SAS Query and Reporting Services and SAS Reporting Services are included.
These components are replaced with SAS BI Reporting Services.
Preparing to Install and to Configure 73
Prior to SAS 9.3 In SAS 9.3
SAS Web Report Studio scheduling requires Platform Process Manager.
SAS In-Process Scheduler can be used for SAS Web Report Studio scheduling.
By default, certain deployment plans contain both SAS Web Report Studio and SAS Web Report Viewer.
By default, certain deployment plans contain SAS Web Report Studio only.
The Java Runtime Environment (JRE) is required in deployment plans.
The JRE is no longer included in deployment plans.
SAS Add-In for Microsoft Office is optional in deployment plans (when part of the order).
SAS Add-In for Microsoft Office is required in deployment plans (when part of the order).
Note: In the SAS Deployment Wizard, you can deselect SAS Add-In for Microsoft Office to avoid errors when deploying on machines without Microsoft Office.
SAS Deployment Tester is optional in deployment plans.
SAS Deployment Tester is required in deployment plans.
SAS Pooled Workspace Server is not available. SAS Pooled Workspace Server is new after SAS 9.1.3.
SAS Framework Data Server is not available. SAS Framework Data Server is new in SAS 9.3.
SAS 9.2 Table Server is included. SAS Table Server is replaced by SAS Framework Data Server in SAS 9.3.
SAS 9.2 Web OLAP Viewer for Java is included.
This functionality is added to SAS Web Report Studio.
SAS In-Process Scheduler is not available. SAS In-Process Scheduler is new in SAS 9.2 and later.
SAS Distributed In-Process Scheduler is not available.
SAS Distributed In-Process Scheduler is new in SAS 9.3.
SAS Shared Services is included. SAS Shared Services is a part of the SAS Web Infrastructure Platform in SAS 9.3.
SAS Online Doc for the Web is included. SAS Online Doc for the Web is canceled in SAS 9.3.
Windows 32-bit SAS middle tier is included. The SAS middle-tier is supported on 64-bit systems only for SAS 9.3.
Installation Order Rules for Multiple Machine DeploymentsBe aware that if you are deploying SAS on a multiple-machine, distributed system, you must install software on your computers in a particular order:
• Always install SAS software on the metadata server machine first.
74 Chapter 4 • Installing SAS 9.3 and Migrating Your SAS Content

• Install SAS Application Servers (such as workspace or stored process servers) on machines other than the metadata server machine.
• Install the middle tier with SAS Foundation Services (that is, Remote Services).
• Install the middle tier with SAS Web Infrastructure Platform.
• Install the middle tier with other Web applications (such as SAS BI Dashboard, SAS Web Report Studio, and so on).
• Install software on machines that will host only clients last.
SAS Installation Directory (SAS Home) ConsiderationsAlthough your SAS Home and SAS configuration directories can share the same parent directory, one directory should not reside inside another. Defining the configuration directory under the SAS Home directory, or vice versa, can lead to file permission issues arising from the need to manage installed files differently than site-specific configurations.
CAUTION:Users running SAS on 64-bit Linux machines, must keep any 32-bit SAS Foundation products in a separate installation directory (SAS Home). Intermixing 32-bit SAS Foundation products with 64-bit SAS products in the same SAS Home location is not supported and might cause SAS to run improperly.
Note: SAS Home should not be a directory within your SAS Software Depot.
Note: On z/OS, the length of the SAS Home path cannot exceed 54 characters.
Content Repository ConsiderationsBefore deploying SAS 9.3, consider where certain content repositories will reside:
• SAS Web Infrastructure Platform database
By default, SAS Framework Data Server is an internal data server format used as the default storage for SAS Web Infrastructure Platform Services. You have the option of using other third-party databases if you choose. For more information, see “Database type for SAS Web Infrastructure Platform” on page 91.
The SAS Framework Data Server requires that its configuration path be local to the machine. The configuration path should not be on an NFS shared disk. If you want to put your configuration path on a shared disk, then you must make sure that you specify a local path for the data framework server content directory. Setting the data framework server content directory path is possible only on the SAS Deployment Wizard custom configuration prompting level. For more information, see “Overview of Configuration Options by Prompt Level” on page 171.
• SAS Content Server repository
In SAS 9.3, you can choose to move to your SAS Content Server repository to the new SAS Web Infrastructure Platform database, or use the machine file system. The SAS Framework Data Server replaces the SAS Table Server, and is the default data store for the SAS Web Infrastructure Platform database. You also have an option to use several third-party databases for the SAS Web Infrastructure Platform database. For more information, see “Database type for SAS Web Infrastructure Platform” on page 91.
Preparing to Install and to Configure 75
If you want to use the SAS Web Infrastructure Platform database as your SAS Content Server repository, be sure to run the SAS Deployment Wizard using either the typical or custom prompting levels. For more information, see “Overview of Configuration Options by Prompt Level” on page 171.
• SAS Metadata Server
We recommend that your metadata repositories reside either on a local file system or a high-performance, high-availability network file system. For more information about metadata repositories, see “About SAS Metadata Repositories” in Chapter 16 of SAS Intelligence Platform: System Administration Guide.
Installer Write Permission to the Content Server Migration Package on UNIX
The user ID under which the SAS Deployment Wizard runs must have Write permission for the SAS Content Server directories in the migration package on UNIX. Before running the deployment wizard, change the SCS directory and its child directories from 750 (rwxr-----) to 755 (rwxr--r--).
As a best practice, after running the deployment wizard, be sure to reset the permission for these two directories to their previous values.
Install and Migrate SAS InteractivelyInstalling and migrating SAS interactively with the SAS Deployment Wizard consists of two main phases:
• providing installation information such as the following:
• deployment plan location
• machine type (metadata server machine, server machine, and so on)
• SAS components to be installed on the machine
• valid paths to any required pre-installed, third-party software
• providing migration and configuration information such as the following:
• migration package location
• prompting level
• configuration directory name
• required user account credentials
This topic describes some of the more important configuration dialog boxes that you will encounter during the migration and configuration phase of a SAS 9.3 deployment. The type and number of configuration-related dialog boxes that you will see depend on the prompt level that you choose, the SAS tier that you are currently migrating, and the contents of your SAS 9.3 custom order. For information about all SAS Deployment Wizard prompts, see the online Help for the wizard page in question.
Note: Starting with the March 2012 release of SAS 9.3, the deployment wizard can be run on operating systems that do not have windowing systems. For more information, see the SAS Deployment Wizard and SAS Deployment Manager User's
76 Chapter 4 • Installing SAS 9.3 and Migrating Your SAS Content
Guide, available at http://support.sas.com/documentation/installcenter/en/ikdeploywizug/64204/PDF/default/user.pdf.
To migrate and configure SAS interactively, follow these steps:
1. Verify that you have performed the earlier required steps outlined in “Overview of Installing SAS and Migrating Your Content” on page 71.
Note: A few pages into the SAS installation, the SAS Deployment Wizard prompt you for paths to the requested third-party software. You must have the necessary third-party software installed on the current machine, or the SAS Deployment Wizard will not let you continue with the installation. In this situation, you will have to end the SAS Deployment Wizard session and install the required third-party software before you can continue.
2. If you use any garbage collection scripts, temporarily suspend these scripts during SAS Deployment Wizard execution. If any wizard temporary files are deleted during wizard execution, configuration failures can occur.
3. Ensure that you have the list of required user IDs available. For more information, see “Completing the Pre-migration Checklists” on page 41.
4. If you are deploying a middle-tier machine, make sure that you have read and understood the information in “Middle-Tier Considerations” on page 33.
5. Review information about where to source certain SAS content repositories described in “Content Repository Considerations” on page 75.
6. Review information about SAS Deployment Wizard configuration prompting levels described in “Overview of Configuration Options by Prompt Level” on page 171.
7. If you are deploying SAS on multiple machines, make sure that you are following the process described in “Installation Order Rules for Multiple Machine Deployments” on page 74.
8. Log on to the machine with a user ID that meets the requirements for the appropriate operating system:
• Windows
We recommend that you use the same account that was used to deploy your current SAS version. This account must be a member of the Administrators group.
• UNIX
We recommend that you use the same account that was used to deploy your current SAS version. Do not use root.
• z/OS
We recommend that you use the same account that was used to deploy your current SAS version.
9. Unless you plan to use different ports for the SAS servers to which you are migrating, make sure that the SAS servers are not running on the machine on which you are currently migrating.
Note: In situations where you are rerunning the deployment wizard to address configuration errors, make sure that there are no SAS 9.3 servers running. On UNIX and z/OS, you can run the following command: ./sas.servers status. If any SAS 9.3 servers are running, shut them down with the following command: ./sas.servers stop.
• Windows
Install and Migrate SAS Interactively 77
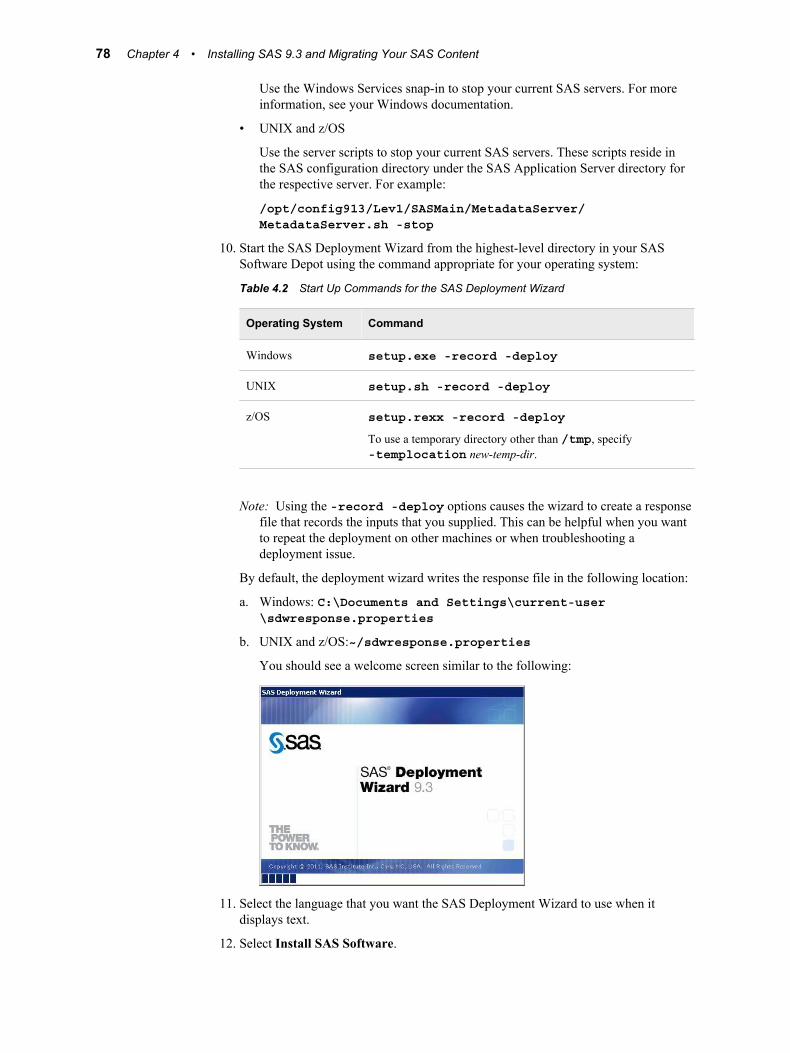
Use the Windows Services snap-in to stop your current SAS servers. For more information, see your Windows documentation.
• UNIX and z/OS
Use the server scripts to stop your current SAS servers. These scripts reside in the SAS configuration directory under the SAS Application Server directory for the respective server. For example:
/opt/config913/Lev1/SASMain/MetadataServer/MetadataServer.sh -stop
10. Start the SAS Deployment Wizard from the highest-level directory in your SAS Software Depot using the command appropriate for your operating system:
Table 4.2 Start Up Commands for the SAS Deployment Wizard
Operating System Command
Windows setup.exe -record -deploy
UNIX setup.sh -record -deploy
z/OS setup.rexx -record -deploy
To use a temporary directory other than /tmp, specify -templocation new-temp-dir.
Note: Using the -record -deploy options causes the wizard to create a response file that records the inputs that you supplied. This can be helpful when you want to repeat the deployment on other machines or when troubleshooting a deployment issue.
By default, the deployment wizard writes the response file in the following location:
a. Windows: C:\Documents and Settings\current-user\sdwresponse.properties
b. UNIX and z/OS:~/sdwresponse.properties
You should see a welcome screen similar to the following:
11. Select the language that you want the SAS Deployment Wizard to use when it displays text.
12. Select Install SAS Software.
78 Chapter 4 • Installing SAS 9.3 and Migrating Your SAS Content
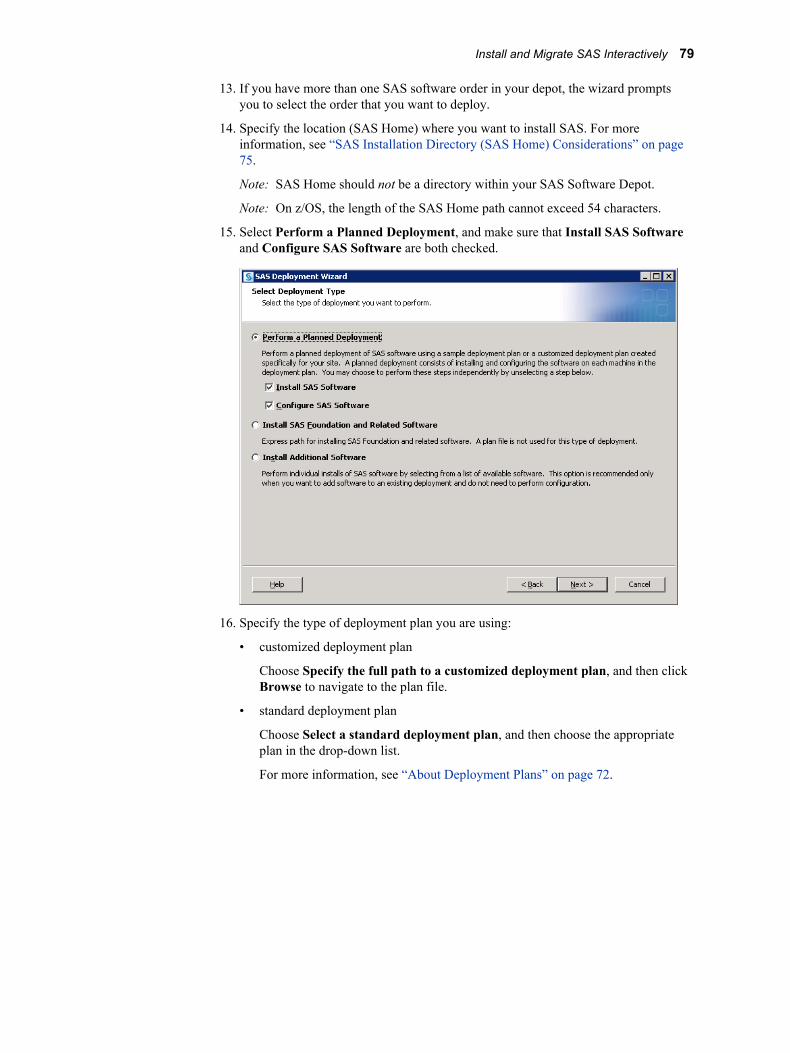
13. If you have more than one SAS software order in your depot, the wizard prompts you to select the order that you want to deploy.
14. Specify the location (SAS Home) where you want to install SAS. For more information, see “SAS Installation Directory (SAS Home) Considerations” on page 75.
Note: SAS Home should not be a directory within your SAS Software Depot.
Note: On z/OS, the length of the SAS Home path cannot exceed 54 characters.
15. Select Perform a Planned Deployment, and make sure that Install SAS Software and Configure SAS Software are both checked.
16. Specify the type of deployment plan you are using:
• customized deployment plan
Choose Specify the full path to a customized deployment plan, and then click Browse to navigate to the plan file.
• standard deployment plan
Choose Select a standard deployment plan, and then choose the appropriate plan in the drop-down list.
For more information, see “About Deployment Plans” on page 72.
Install and Migrate SAS Interactively 79
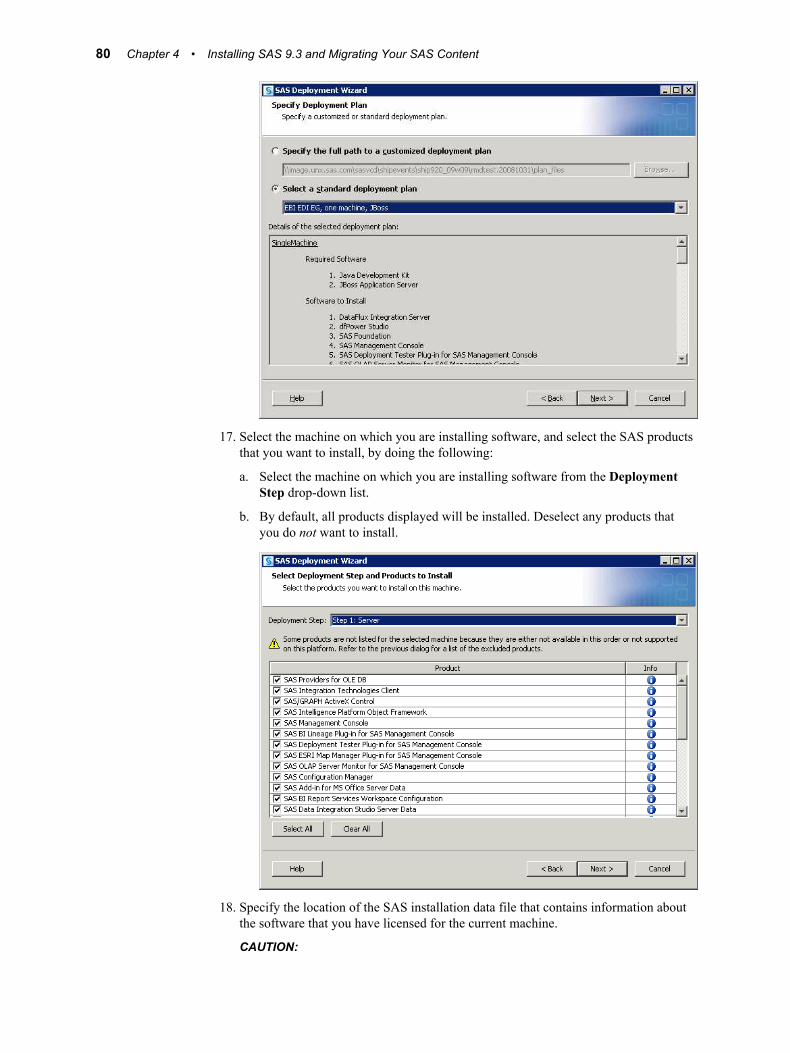
17. Select the machine on which you are installing software, and select the SAS products that you want to install, by doing the following:
a. Select the machine on which you are installing software from the Deployment Step drop-down list.
b. By default, all products displayed will be installed. Deselect any products that you do not want to install.
18. Specify the location of the SAS installation data file that contains information about the software that you have licensed for the current machine.
CAUTION:
80 Chapter 4 • Installing SAS 9.3 and Migrating Your SAS Content
Be careful to use the installation data file that contains the SAS products you are planning to install. Using the incorrect file can cause errors such as add-on products failing to install or other errors later when using SAS.
19. Deselect any languages that you do not want SAS to support. By default, SAS attempts to support all languages that your machine's operating system is configured for.
20. Select the locale that affects how SAS displays text, numbers, currencies, dates, times, and sorts data. If you want to configure SAS as a Unicode server, do that here.
For more information, see “Locale and Encoding Considerations” in Chapter 5 of SAS Intelligence Platform: Installation and Configuration Guide.
21. The deployment wizard prompts you to do one of the following:
(z/OS only) No Java Runtime EnvironmentSelect to have the deployment wizard install your software on z/OS without a Java Runtime Environment (JRE).
(UNIX and Windows only) Use the recommended Java Runtime Environment(Recommended) select to have the deployment wizard install the required JRE on this machine.
On UNIX, specify in the text box where you want the deployment wizard to extract the JRE.
Select an existing Java Runtime EnvironmentSelect to specify the path to a JRE that you have already installed on this machine.
For more information, see http://support.sas.com/resources/thirdpartysupport/v93/jres.html.
22. On Windows, on the Select Microsoft Office Applications page, choose the Microsoft Office applications for which you want the SAS Add-In for Microsoft Office activated.
When the Office application is launched, the activated SAS add-in automatically loads, and users see either a SAS tab on the Ribbon (Microsoft Office 2010 and 2007) or a SAS menu and toolbars (Microsoft Office 2003). To activate the SAS Add-In for Microsoft Office in Microsoft Excel, Word, PowerPoint, or Outlook after the installation, you can run SwitcherUtility.exe. For more information, see the Help for the SAS Add-In for Microsoft Office.
23. If you use a third-party database and SAS/ACCESS is a part of your order, select the software version for the third-party database.
The deployment wizard uses your selection to configure SAS/ACCESS for the correct version of the third-party database.
Make sure that you perform any additional configuration on your system, such as installing the third-party database client and configuring the system environment for access to the native client libraries. For more information about the correct environment variables, go to the SAS Install Center at http://support.sas.com/documentation/installcenter/93, and use the operating system and SAS version to locate the appropriate SAS Foundation Configuration Guide.
24. (UNIX only) If your system uses Pluggable Authentication Modules (PAM), select Use PAM Authentication. In addition, you might also need to update your PAM configuration files in order for SAS 9.2 to use PAM authentication. For more
Install and Migrate SAS Interactively 81
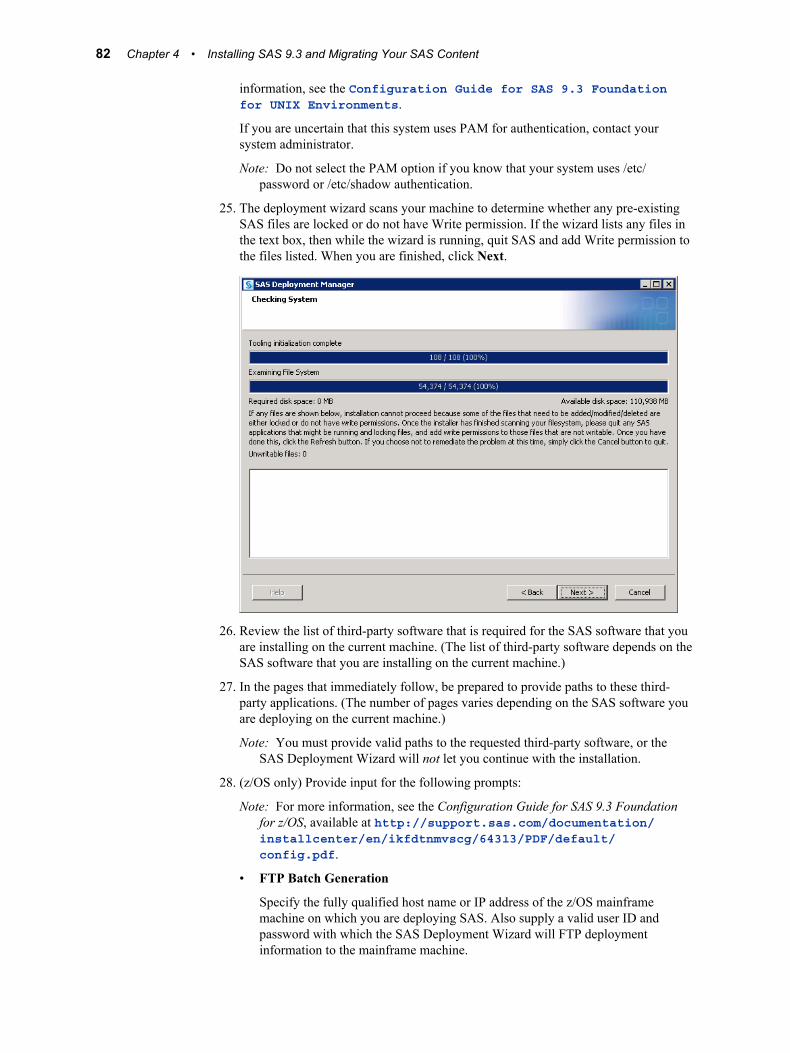
information, see the Configuration Guide for SAS 9.3 Foundation for UNIX Environments.
If you are uncertain that this system uses PAM for authentication, contact your system administrator.
Note: Do not select the PAM option if you know that your system uses /etc/password or /etc/shadow authentication.
25. The deployment wizard scans your machine to determine whether any pre-existing SAS files are locked or do not have Write permission. If the wizard lists any files in the text box, then while the wizard is running, quit SAS and add Write permission to the files listed. When you are finished, click Next.
26. Review the list of third-party software that is required for the SAS software that you are installing on the current machine. (The list of third-party software depends on the SAS software that you are installing on the current machine.)
27. In the pages that immediately follow, be prepared to provide paths to these third-party applications. (The number of pages varies depending on the SAS software you are deploying on the current machine.)
Note: You must provide valid paths to the requested third-party software, or the SAS Deployment Wizard will not let you continue with the installation.
28. (z/OS only) Provide input for the following prompts:
Note: For more information, see the Configuration Guide for SAS 9.3 Foundation for z/OS, available at http://support.sas.com/documentation/installcenter/en/ikfdtnmvscg/64313/PDF/default/config.pdf.
• FTP Batch Generation
Specify the fully qualified host name or IP address of the z/OS mainframe machine on which you are deploying SAS. Also supply a valid user ID and password with which the SAS Deployment Wizard will FTP deployment information to the mainframe machine.
82 Chapter 4 • Installing SAS 9.3 and Migrating Your SAS Content
• Specify Jobcard Information
Specify the job account, programmer-name, message class, message level, time, and region values. For more information, consult your z/OS documentation.
• Media Type
Select the check box if installing from cartridge tape media. Leave the check box deselected if you are installing from a DVD or from the Internet.
• Select Installation Action
Choose A - Install a new SAS system.
• Specify New Installation Qualifier
Specify the path where you want to install SAS. You can also choose to require Storage Management Subsystem (SMS) parameters. For more information, consult your z/OS documentation.
• Specify IBM's SMS Parameters
If you chose to require Storage Management Subsystem (SMS) parameters in the previous page, enter them here. For more information, consult your z/OS documentation.
• Specify Parameters
These are all parameters that are used in various DD statements throughout the installation. For more information, consult your IBM JCL documentation.
• Specify Entry Point
Specify the parameters for various ways that SAS can be run with different performance implications. Choose SAS (default ENTRY point) to run the unbundled configuration. Choose SASB to run the bundled configuration. Choose SASLPA to run the bundled configuration with some modules installed in the Link Pack Area (LPA).
• Specify Parameters
Specify additional parameters for DD statements. VOLDISK designates the VOLSER that the installed data sets will go to. For more information, consult your IBM JCL documentation.
• Specify Parameters
Specify parameters used for reblocking the SAS load modules to a library with an optimum block size.
29. Specify the amount of information to provide the SAS Deployment Wizard for configuring the SAS software you are installing on the current machine. Choose one of the three prompting levels:
• Express
displays the minimum number of wizard pages needed to complete the SAS configuration.
• Typical
displays the basic set of wizard pages needed to complete the SAS configuration.
• Custom
displays all the wizard pages needed to complete the SAS configuration.
Install and Migrate SAS Interactively 83
Refer to “Overview of Configuration Options by Prompt Level” on page 171 for more information about the SAS Deployment Wizard prompting levels.
30. Specify Configuration Information
Choose a path where the SAS Deployment Wizard will write SAS 9.3 configuration files and logs and the level you want to deploy. (For example, Lev1 = production.) This path should differ from your current SAS configuration path.
Note: The last digit of the default port number reflects the configuration level that you select in the SAS Deployment Wizard. For example, when you select Lev1, the default port for the metadata server is 8561. If you choose another level, such as Lev2, the wizard changes the default port to 8562. During a migration, this setting pertains only to ports for servers that are introduced after SAS 9.1.3. The deployment wizard will retain the port settings from your current SAS servers. For information about how to change port numbers, see the instructions for how to remap ports on page 85.
For more information, see “Overview of the Configuration Directory Structure” in Chapter 2 of SAS Intelligence Platform: System Administration Guide.
Note: Although your SAS Home and SAS configuration directories can share the same parent directory, one directory should not reside inside another. Defining the configuration directory under the SAS Home directory, or vice versa, can lead to file permission issues arising from the need to manage installed files differently from site-specific configurations.
On z/OS, the mount point must exist; the SAS Deployment Wizard will create the necessary subdirectories.
If you are deploying the SAS Framework Data Server, then SAS configuration path should be a path local to the machine. The configuration path should not be on an NFS shared disk. If you want to put your configuration path on a shared disk, then you must make sure that you specify a local path for the Framework Data Server content directory. You can set the content directory on the Framework Data Server Invocation Options page. This page is available only on the custom configuration prompting level.
31. Select Products to Configure
Migrating via the SAS Deployment Wizard should be performed only once per tier for a deployment. You cannot selectively choose products to migrate. You must migrate all products targeted for the current machine.
Note: Additional configuration steps might not be needed on a machine when you use a deployment plan that calls for multiple steps. This can depend on whether the multiple steps were triggered by a sequencing issue across different machines in the plan or whether the multiple steps were needed to configure multiple instances of the same product.
32. Local Machine Name
Enter the complete name of the local host in Fully-qualified Local Host Name. The fully qualified local host name typically takes the form of the local host name plus the domain name server (for example, myserver.example.com). Enter a short host name in Short Local Host Name. The short local host name is the abbreviated, more common method of referring to the host, usually only a single word.
33. Migration Information
Choose Perform Migration and enter the path to the package that you created with the SAS Migration Utility. This path should be to the top level directory of the
84 Chapter 4 • Installing SAS 9.3 and Migrating Your SAS Content
migration package (for example: C:\SMU\913_Deployment). (This path should match the value of the SMU.Output.Dir property.)
Note: Migrating via the SAS Deployment Wizard should be performed only once per tier for a deployment. (Also, you cannot selectively choose products to migrate. You must migrate all products targeted for the current machine.) If SAS components are unconfigured for a particular tier, you cannot migrate them a second time by choosing Perform Migration. In this situation, you have to perform a standard, non-migrated configuration using the deployment wizard (unless you want to unconfigure the entire SAS deployment).
CAUTION:The Perform Migration check box should not be selected when running the SAS Deployment Wizard on any client tiers. The Perform Migration check box should be selected only when there is content available in the SAS Migration Utility package for that machine.
34. Remap Ports
By default, the deployment wizard assumes that ports used in your current SAS deployment will be identical to the ports used in your SAS 9.3 deployment. Use this page if you want to specify different ports in your SAS 9.3 deployment.
The deployment wizard displays the port being used in your current SAS deployment (Port from Source column). To specify a different port to use for SAS 9.3, click the Port for Target cell in the appropriate row for the SAS product and enter the new port number.
Ports that appear in boldface indicate a potential port conflict. In some cases, servers such as the SASApp and SASMeta logical workspace servers can share the same port.
35. If you are performing a multiple machine deployment, and are migrating a machine other than the metadata server, the wizard prompts you to select the machine to migrate.
Note: If you have already deployed the metadata tier and you have only a total of two tiers, the deployment wizard automatically selects the remaining tier for you.
36. Provide the remaining migration and configuration information as the wizard prompts you for it.
Note: This topic describes some of the more important pages that you will encounter during the migration and configuration phase of a SAS 9.2 deployment. The options for which the SAS Deployment Wizard prompts you depend on which SAS products are identified in your deployment plan and, in multiple machine deployments, which machine you are currently deploying. For information about all SAS Deployment Wizard prompts, see the online Help for the wizard page in question.
Authentication DomainAccept the default value (DefaultAuth), unless the deployment that you are migrating uses a different SAS authentication domain for servers on this machine.
For example, if the metadata server is on Windows and the workspace server is on UNIX, the workspace server might be assigned to a SAS authentication domain named UnixAuth. For more information, see “Manage Authentication Domains” in Chapter 2 of SAS Management Console: Guide to Users and Permissions.
Install and Migrate SAS Interactively 85
Note: Authentication domain assignments from the original deployment are always preserved. This prompt affects only new servers that are introduced in the SAS version to which you are migrating.
Windows Options (run as managed scripts or services)On Windows, choose how to run your SAS servers either by using management scripts or running them as Windows services. If you choose the script option, then the user account that runs the object spawner must meet the following requirements on the object spawner machine:
• be the administrator or a member of the Windows Administrator's group
• have the following Windows local user rights:
• Adjust memory quotas for a process
• Replace a process level token
SAS Metadata ServerIf you have any changes for the metadata server, enter them in this page.
The deployment wizard creates a separate server context (SASMeta) for the metadata server and the other servers required to perform metadata server utility functions, such as backup and promotion. A server context is a SAS IOM server concept that describes how SAS Application Servers manage client requests. A SAS Application Server has an awareness (or context) of how it is being used and makes decisions based on that awareness. The server context name is prepended to all server names defined in the server context. Therefore, we recommend that you not change the logical server or server prefix (SASMeta).
For more information, see “Overview of the SAS Metadata Server and Its Initial Configuration” in Chapter 2 of SAS Intelligence Platform: System Administration Guide.
Deployment Accounts: Type of AccountsSelect whether to use internal accounts when appropriate. Internal user accounts are accounts known only to SAS and are created and authenticated internally in metadata rather than externally. For more information, see “Choose to Use SAS Internal Accounts” on page 19.
Note: On Windows, whenever the deployment wizard prompts you for an external account, always enter a domain-qualified user account (for example, myDomain\myAccount).
Unrestricted AdministratorFor external accounts: Enter user ID and password for an account known to the host that will serve as an unrestricted administrator for the purpose of configuring the SAS metadata server. On Windows, enter a domain-qualified user ID. If your SAS 9.3 operating system user account is different from the one you use for your earlier version of SAS, then you must be sure to make the corresponding file permissions changes. For more information, see “Determine the User ID Associated with Scheduled Flows” on page 45.
For internal accounts: enter the password for the account known to SAS that will serve as an unrestricted administrator for the purpose of configuring the SAS metadata server. For more information, see “Change to SAS 9.2 Internal Account Password Hashing” on page 18.
Trusted UserFor external accounts: Enter the user ID and password for an account known to the host that will enable the SAS server and spawner components to communicate securely with each other. On Windows, enter a domain-qualified
86 Chapter 4 • Installing SAS 9.3 and Migrating Your SAS Content
user ID. If your SAS 9.3 operating system user account is different from the one you use for your earlier version of SAS, then you must be sure to make the corresponding file permissions changes. For more information, see “Determine the User ID Associated with Scheduled Flows” on page 45.
For internal accounts: enter the password for the account known to SAS that will enable the SAS server and spawner components to communicate securely with each other. For more information, see “Change to SAS 9.2 Internal Account Password Hashing” on page 18.
SAS BI Web Services: Authentication MethodSelect the method by which users of SAS BI Web Services are authenticated:
• SAS Authentication is managed by the metadata server.
• Web Authentication is managed by the Web application server using container-based authentication or a third-party product. Selecting Web authentication has these effects:
• partially configures Web authentication for Java BI Web Services.For more information, see “Securing SAS BI Web Services for Java ” in Chapter 10 of SAS Intelligence Platform: Middle-Tier Administration Guide.
• has no effect on the BI Web applications (such as SAS Web Report Studio, SAS Web Information Portal, and so on). You will have to configure Web authentication for these BI Web applications.
• prevents you from being offered a chance to set up an anonymous Web user (as this is incompatible with Web authentication).
Anonymous Web Access
When using SAS authentication you can select this option to set up a SAS identity for anonymous access to certain Web services and Web applications that support this feature. Currently, SAS BI Web Services for Java and .NET and the SAS Stored Process Web Application are the only components that support this feature.
For more information, see “Using the SAS Anonymous Web User with SAS Authentication” in Chapter 3 of SAS Intelligence Platform: Middle-Tier Administration Guide.
External Account: Anonymous Web User(Optional) Enter the user ID and password for an account to be used to grant clients access to applicable SAS Web Infrastructure Platform applications such as SAS BI Web Services and the Stored Process Web Application. On Windows, enter a domain qualified user ID. When SAS authentication is being used and the user has not preemptively specified credentials, the client will be given access to these Web applications under the anonymous user account.
For more information, see “Using the SAS Anonymous Web User with SAS Authentication” in Chapter 3 of SAS Intelligence Platform: Middle-Tier Administration Guide.
External account: SAS Spawned Servers AccountEnter the user ID and password for the external account to be used to start the pooled workspace server and the stored process server. On Windows, enter a domain qualified user ID. For migration purposes, you must use the same operating system accounts and passwords that you had in SAS 9.1.3.
For more information, see “Important Notes on User Accounts and Authentication” on page 42.
Install and Migrate SAS Interactively 87
Create Common DirectoriesSelect to create common directories for server and spawner logs, user-specific files, and temporary work tables and files.
When you select this option, the deployment wizard creates the specified directory (Logs, Users, and Temp) under the SAS configuration directory.
Client-side Credentials PolicySelect this option to set the policy to allow users to save their user IDs and passwords in client-side connection profiles on the metadata server for desktop applications. This input sets the value for OMA_SASSEC_LOCAL_PW_SAVE in omaconfig.xml.
For more information, see “Reference Information for omaconfig.xml” in Chapter 25 of SAS Intelligence Platform: System Administration Guide.
E-mail ServerEnter the port and host name for an SMTP e-mail server that the SAS Metadata Server uses to send e-mail alerts to an administrator if journaling issues arise. The SAS Deployment Wizard also uses this e-mail server as the default for the SAS Application Server to provide e-mail services to various SAS clients. For example, with SAS Data Integration Studio, you can use a Publish to Email transformation to alert users about various data changes. In order for SAS BI Dashboard to send alerts by e-mail to dashboard users and administrators, the port and host name must be configured for the e-mail server.
For more information, see “Adding or Modifying E-Mail Settings for SAS Application Servers” in Chapter 11 of SAS Intelligence Platform: Application Server Administration Guide.
SAS Pooled Workspace ServerEnter the name of the logical pooled workspace server and the pooled workspace in metadata. You also need to enter the name of the machine on which the pooled workspace server runs and the port on which the object spawner will listen for client requests to launch pooled workspace servers. The machine name should match the name specified to the object spawner.
The pooled workspace server is a new SAS post-9.1.3 server. For more information, see “Overview of Workspace Servers and Stored Process Servers” in Chapter 3 of SAS Intelligence Platform: Application Server Administration Guide.
SAS Pooled Workspace Server DependenciesMake sure that you choose an application server context that exists in the foundation repository, or SAS components dependent on the pooled workspace server (such as SAS BI Dashboard) will not be able to access the server.
SAS Framework Data ServerEnter the name of the logical Framework Data Server in metadata. You also need to enter the name of the machine on which the Framework Data Server runs and the TCP/IP port on which the Framework Data Server will listen to. For more information, see the SAS Intelligence Platform: Middle-Tier Administration Guide.
Note: When performing a SAS 9.3 to SAS 9.3 migration, the name of the Framework Data Server on the target system must be unique.
Metadata Utility SAS DATA Step Batch ServerEnter the various values required to configure a SAS DATA step batch server. The directory fields identify where the deployed SAS program is stored and the name of the deployed SAS DATA step program job. Access to this server is
88 Chapter 4 • Installing SAS 9.3 and Migrating Your SAS Content
limited to members of the SAS Administrators group, and its use is limited to metadata server backup.
For more information, see “Contents of the Metadata Server Subdirectory (SASMeta)” in Chapter 23 of SAS Intelligence Platform: System Administration Guide.
Query Cache Library
Enter the physical location on the file system where the SAS library will exist for temporary files used when creating optimized tables for query look up.
In Query Cache Libref, enter the SAS library reference which SAS will use to refer to the query optimizer SAS library. The name must be eight characters or shorter and should be unique from other librefs used within this repository. Librefs must start with a letter or underscore and contain only letters, numerals, or underscores. The typical installation libref name is wrstemp. The libref will be used in conjunction with the server context name to form the SAS library name for the optimizer library.
Select Enable Query Cache to allow the query optimizer to run. If this selection is not made, then the query optimizer will not attempt to optimize queries and will not create temporary data sets for improving performance during rendering. A typical installation will have this selection turned on. The temporary files created within the query cache library will be visible to anyone with Read permission on the Renderer Optimizer directory, so if you have security concerns with the authorization on this folder you might want to leave the optimizer off.
For more information, see “Using the Query Cache ” in Chapter 4 of SAS Intelligence Platform: Web Application Administration Guide.
Output Management LibraryEnter the physical location on the file system where the SAS library will exist for burst set definition tables for reports which will be distributed by e-mail. A burst definition table will contain e-mail addresses, channels, and possibly by group information.
In Output Management Library Libref, enter the SAS library reference that SAS will use to refer to the output management SAS library. The name must be eight characters or shorter and should be unique from other librefs used within this Repository. Librefs must start with a letter or underscore and contain only letters, numerals, or underscores. The typical installation libref name is wrstemp. The libref will be used in conjunction with the server context name to form the SAS library name for the distribution library.
For more information, see “Verifying Permissions for the Distribution Library ” in Chapter 7 of SAS Intelligence Platform: Web Application Administration Guide.
Web Application Server: Automatic ConfigurationSelect this option for the deployment wizard to automatically build and configure the SAS Web applications as well as configuring a sample Web application server for use with SAS 9.2. (To use this wizard feature, be sure that your Web application server is not running before proceeding. For WebSphere, it is necessary to stop all deployment manager servers, all node agent servers, and all application servers before continuing with your SAS 9.2 deployment.) For more information, see “Middle-Tier Considerations” on page 33.
If you choose not to automatically configure your Web application server, you will still be prompted for Web application server information, and deployment stages such as Configure Products, Deploy Web Applications, and Start Web
Install and Migrate SAS Interactively 89
Application Servers will execute to create instructions for manual deployment. When configuration is complete, follow these manual instructions on how to configure your server and deploy your Web applications. If you manually configure WebLogic, a reference domain will be created in your SAS configuration area, but no servers will be started. If you manually configure JBoss, sample start scripts will be created, but not launched.
For more information, go to http://support.sas.com/resources/thirdpartysupport/v93 and search for the product name of your Web application server.
Web Application Server: Multiple Managed ServersSelect to have the deployment wizard automatically configure multiple managed servers for you using SAS best practices for choosing the server to deploy each application to.
In some situations it might be preferable to split the SAS Web applications across multiple managed servers. This is usually done for performance reasons.
If you chose to manually configure your Web application servers, you will be provided with recommended configuration settings in a generated instructions file (Instructions.html) when the SAS Deployment Wizard completes.
More advanced performance configuration considerations are documented in the SAS Intelligence Platform: Middle-Tier Administration Guide.
Web Application Server: Managed ServerEnter a logical name for your managed server. This name will be displayed in your Web application server administrative console and used in administrative scripting.
CAUTION:The managed server name must be unique. Non-unique names will cause your Web configuration to fail.
In HTTP Port, enter the unsecured port on which the managed server will listen.
In HTTPS Port, enter the SSL port to be assigned to the managed server.
In RMI Port, enter a port using these considerations:
• WebSphere
This maps to the RMI BOOTSTRAP port. Each server contains an administrative services component and a separate and unique port is required for each Web application server.
• JBoss
This maps to the default JNDI port. Clients connecting to applications running on JBoss, such as the JBoss shutdown command, would use this port.
• WebLogic
No RMI port is required for WebLogic.
In Configured Protocol, select the communication protocol for the administration server: HTTP or HTTPS. Automated configuration through the SAS Deployment Wizard only supports the HTTP protocol. If you perform a manual configuration, you can set up HTTPS.
In Additional JVM Options, enter any additional Java options that you want the managed server JVM (Java Virtual Machine) to use. These JVM options are tagged onto the end of the managed server's command line. Options that are deployment wizard defaults can be overridden in this way.
90 Chapter 4 • Installing SAS 9.3 and Migrating Your SAS Content
For more information, go to http://support.sas.com/resources/thirdpartysupport/v93and search for the product name of your Web application server.
Database type for SAS Web Infrastructure PlatformIf you want to use a database other than the SAS Framework Data Server to store SAS Web Infrastructure Platform data, then choose the type of database here. In SAS 9.3, the following third-party databases are supported: DB2, MySQL, Oracle, PostgresSQL, and SQLServer.
In Initial JVM Heap Size, enter the desired initial heap size for the Web Infrastructure Platform's database importer application using the JVM option format.
In Max JVM Heap Size, enter the desired maximum heap size for the Web Infrastructure Platform's database importer application using the JVM option format.
SAS Web Infrastructure Platform database propertiesEnter the host name, fully qualified host name, or IP address for the host where the database is installed. Specify the port that the database server is listening to and the name of the database that will contain the SAS Web Infrastructure Platform tables.
Note: Third-party databases often have particular requirements that you need to know about, such as database name limits, minimum tablespace sizes, and so on. If you have not already, make sure that you review “Configuring an Alternative Database for SAS Web Infrastructure Platform Services,” available at http://support.sas.com/resources/thirdpartysupport/v93/appservers/SharedServicesAlternativeDatabase.pdf.
Choose Automatically create tables and load data to have the deployment wizard automatically create tables and load the selected pre-existing database with initial data.
Choose Use Catalog to indicate whether the database catalog needs to be specified in order to uniquely locate a table in the database. The database catalog should be specified if using one of the following databases: MySQL, SAS Framework Data Server, or SQL Server.
Choose Use Schema Pattern to indicate whether the database schema needs to be specified in order to uniquely locate a table in the database. The database schema should be specified if using either DB2 or Oracle.
In the case of MySQL, the SAS Web Infrastructure Platform configuration process will also create a new MySQL database in addition to creating tables and loading data. The new database is named according to the value specified in the Database Name field.
Note: If you are using MySQL, do not specify a pre-existing MySQL database or the configuration will fail. For more information, see “Configuring an Alternative Database for SAS Web Infrastructure Platform Services,” available at http://support.sas.com/resources/thirdpartysupport/v93/appservers/SharedServicesAlternativeDatabase.pdf.
For more information, see “JDBC Data Sources” in Chapter 4 of SAS Intelligence Platform: Middle-Tier Administration Guide.
Install and Migrate SAS Interactively 91
SAS Web Infrastructure Platform JDBC PropertiesEnter the user account and its password for accessing the database used with your SAS Web Infrastructure Platform tables.
If you have selected to automatically configure the SAS Web Infrastructure Platform database, this user account must have the ability to create tables and insert records. If you are not automatically configuring the SAS Web Infrastructure Platform database, this user account must have the ability to insert, update and delete records. The default user account is the SAS Trusted User account (sasadm@saspw). For more information, see “JDBC Data Sources” in Chapter 4 of SAS Intelligence Platform: Middle-Tier Administration Guide.
In Directory containing JDBC driver jars enter the appropriate JDBC driver JAR files and your selected RDBMS database and version. Inappropriate or additional jar files will cause configuration failures, so just copy the minimum required JAR files to the JDBC driver JAR files directory.
Web Application Server: Automatic DeploymentSelect to automatically deploy SAS 9.2 Web applications to the Web application server. For more information, see “Middle-Tier Considerations” on page 33.
Regardless of whether you choose to automatically deploy your SAS Web applications, when building Web applications, the wizard also automatically explodes Web application archive files (.EAR files).
If you choose not to automatically deploy SAS Web applications, the deployment wizard writes manual deployment instructions to Instructions.html during the Web application deployment stage, that you will need to complete after the wizard finishes executing. For more information, go to http://support.sas.com/resources/thirdpartysupport/v93/appservers/index.html and select the product name of your Web application server.
External Account: Web Application Server AdministratorYou are prompted for this information if your site uses the WebSphere or WebLogic Web application server. Enter the user ID and password for the administrator account for either the WebSphere Application Server or the WebLogic Server. On Windows, be sure to enter a domain-qualified user ID.
• For WebSphere, the Web application server administrator user ID is the administrator account specified when WebSphere Admin Security was enabled.
• For WebLogic, the Web application server administrator user ID is used to configure the WebLogic default security realm. When the deployment wizard automatically configures your Web application server, the wizard uses these credentials to create the administrator account and the WebLogic domain.
If you choose to manually configure your Web application server, you will need to create this administrator account (using the credentials you define here) with the WebLogic administrative tools.
For more information about configuring Web application servers to support the SAS middle tier, go to http://support.sas.com/resources/thirdpartysupport/v93and select “IBM WebSphere” or “Oracle WebLogic”.
92 Chapter 4 • Installing SAS 9.3 and Migrating Your SAS Content
Web Application Server: Proxy InformationIf you are using SAS Information Delivery Portal RSS feeds, then you will have to provide proxy server information. Enter the fully qualified host name for the proxy server and its port that your site uses to access the Internet.
For NonProxy Hosts enter the DNS names of all the machines that should not be accessed through the proxy server. Be sure to include other machines where application servers are configured as part of a common WebLogic Domain or are part of a WebSphere cell. Separate each machine name with a vertical line character (|). Use an asterisk (*) as a wildcard for an entire subnet. For example, *.subnet.com excludes all machines with a DNS name that ends with .subnet.com.
If your site does not allow Internet access on production systems, refer to configuration information available at http://support.sas.com/resources/thirdpartysupport/v93 and select your Web application server.
WebSphere Application Server: NodeIn Profile Name, enter a profile name, or accept the default (SAShostname01). The profile name is used for the directory that contains the node agent and the SAS Web application server.
The node agent name is required, but cannot be configured using the deployment wizard.
In Node Name, enter a node name or accept the default (SAShostnameNode). The node name is the WebSphere node that contains one or more of the Web application servers.
In Additional JVM Options, enter any additional Java options that you want the Web application servers to use.
IP MulticastAccept these IP multicast settings or enter new ones.
A multicast group communications protocol is used to communicate among middle-tier SAS applications in a single SAS deployment (the set of applications connected to the same metadata server). The combination of multicast IP address and multicast UDP port should be different for each SAS deployment and also different from those used by other multicast applications at your site. The defaults are most appropriate for deployments in a firewall-isolated data center environment.
For more information, see “Designating Ports and Multicast Addresses” in Chapter 2 of SAS Intelligence Platform: Installation and Configuration Guide.
SAS Remote Services Application: JVMEnter the desired initial heap size for the remote services application using the JVM option format.
In Max JVM Heap Size, enter the desired maximum heap size for the remote services application using the JVM option format.
In Additional JVM Options, enter any additional Java options that you want the Remote Services VM to use. For example, you might want to add -Dmulticast_udp_ip_ttl=1 to restrict multicast traffic to a single subnet based on your network topology.
For more information, see SAS 9.3 Web Applications: Tuning for Performance and Scalability, available at http://support.sas.com/resources/
Install and Migrate SAS Interactively 93
thirdpartysupport/v93/appservers/WebTierScalabilityAndPerformance.pdf.
SAS Web Report Studio: SchedulingChoose whether to enable scheduling for SAS Web Report Studio. If Platform Suite for SAS is in your deployment plan, then you have a choice between using Platform Process Manager, provided by Platform Computing, Inc., or SAS In-Process Services.
For more information, see Chapter 2, “Setting Up Scheduling Using Platform Suite for SAS,” in Scheduling in SAS, or Chapter 5, “Setting Up Scheduling Using SAS In-Process Scheduling,” in Scheduling in SAS.
SAS Content Server: Repository DirectoryEnter the location on the disk for the actual contents of the content repository.
Use the check box on this page if you want to use the database configured for the SAS Web Infrastructure Platform to store SAS Content Server content. Selecting the SAS Web Infrastructure Platform database type is discussed on on page 91.
The content server is a new post-SAS 9.1.3 server. For more information, see Chapter 9, “Administering the SAS Content Server,” in SAS Intelligence Platform: Middle-Tier Administration Guide.
SAS Web Parts for Microsoft SharePoint: DetailsWe recommend that you accept the defaults.
The Web URL is the address of the Web application where the SAS Web Parts solution is deployed.
The Site URL is the site collection where the feature is activated. A Web application can have multiple site collections and a site collection can contain multiple sites. In most instances the URLs are the same (a site collection at the root of the Web application), but they can also be different.
For more information, contact your site's SharePoint administrator.
The SAS User ID is the metadata identity that you use to implement shared identity mode. For more information, see “Configure User Access for SAS Web Parts for Microsoft SharePoint” in Chapter 5 of SAS Intelligence Platform: Installation and Configuration Guide.
SAS Information Delivery Portal unchallenged accessWhen unchallenged access is enabled, users can access the portal and interact with selected content without providing a user ID and password.
Enter a user ID that SAS will use to grant unchallenged access to portal users. (On Windows, be sure to qualify the User ID as appropriate. For example, myDomain\sasguest.)
Deselect Display Search Menu for Unchallenged Access if you want to suppress the search link from displaying in the main portal banner.
Specify what should appear in the portal banner for unchallenged users:
• logoff
Display the Log Off link.
• logon
Display the Log On link (which users can click to display the SAS Logon Manager).
• hide
94 Chapter 4 • Installing SAS 9.3 and Migrating Your SAS Content
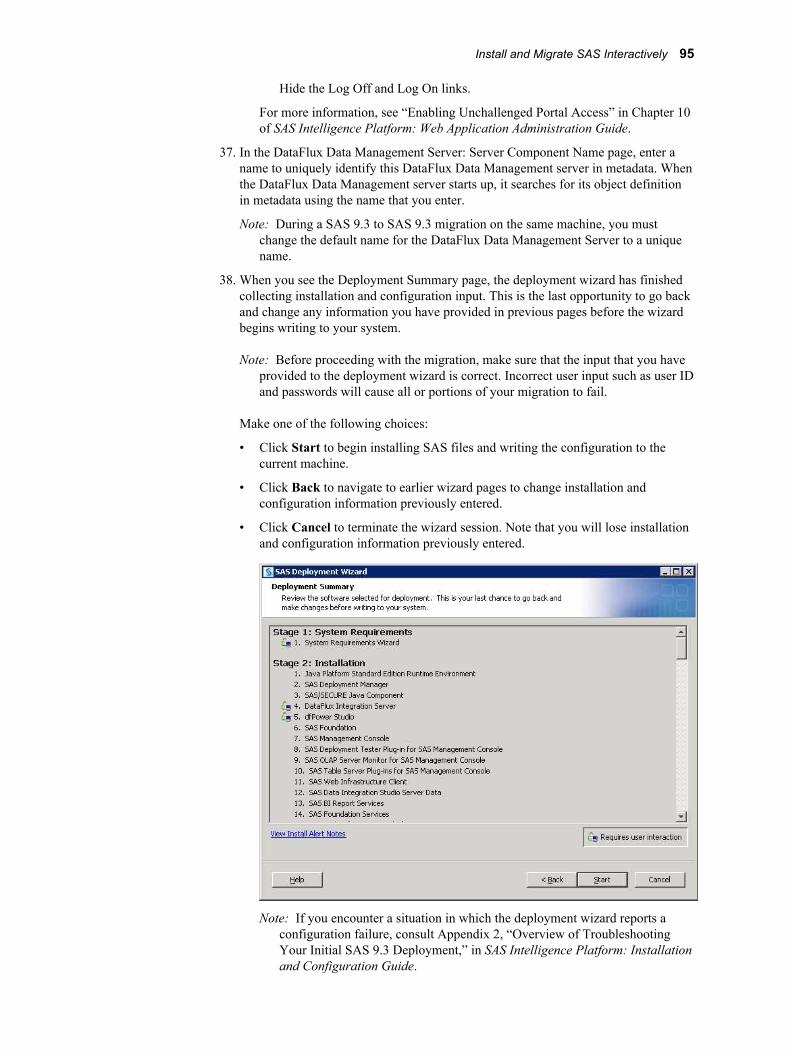
Hide the Log Off and Log On links.
For more information, see “Enabling Unchallenged Portal Access” in Chapter 10 of SAS Intelligence Platform: Web Application Administration Guide.
37. In the DataFlux Data Management Server: Server Component Name page, enter a name to uniquely identify this DataFlux Data Management server in metadata. When the DataFlux Data Management server starts up, it searches for its object definition in metadata using the name that you enter.
Note: During a SAS 9.3 to SAS 9.3 migration on the same machine, you must change the default name for the DataFlux Data Management Server to a unique name.
38. When you see the Deployment Summary page, the deployment wizard has finished collecting installation and configuration input. This is the last opportunity to go back and change any information you have provided in previous pages before the wizard begins writing to your system.
Note: Before proceeding with the migration, make sure that the input that you have provided to the deployment wizard is correct. Incorrect user input such as user ID and passwords will cause all or portions of your migration to fail.
Make one of the following choices:
• Click Start to begin installing SAS files and writing the configuration to the current machine.
• Click Back to navigate to earlier wizard pages to change installation and configuration information previously entered.
• Click Cancel to terminate the wizard session. Note that you will lose installation and configuration information previously entered.
Note: If you encounter a situation in which the deployment wizard reports a configuration failure, consult Appendix 2, “Overview of Troubleshooting Your Initial SAS 9.3 Deployment,” in SAS Intelligence Platform: Installation and Configuration Guide.
Install and Migrate SAS Interactively 95
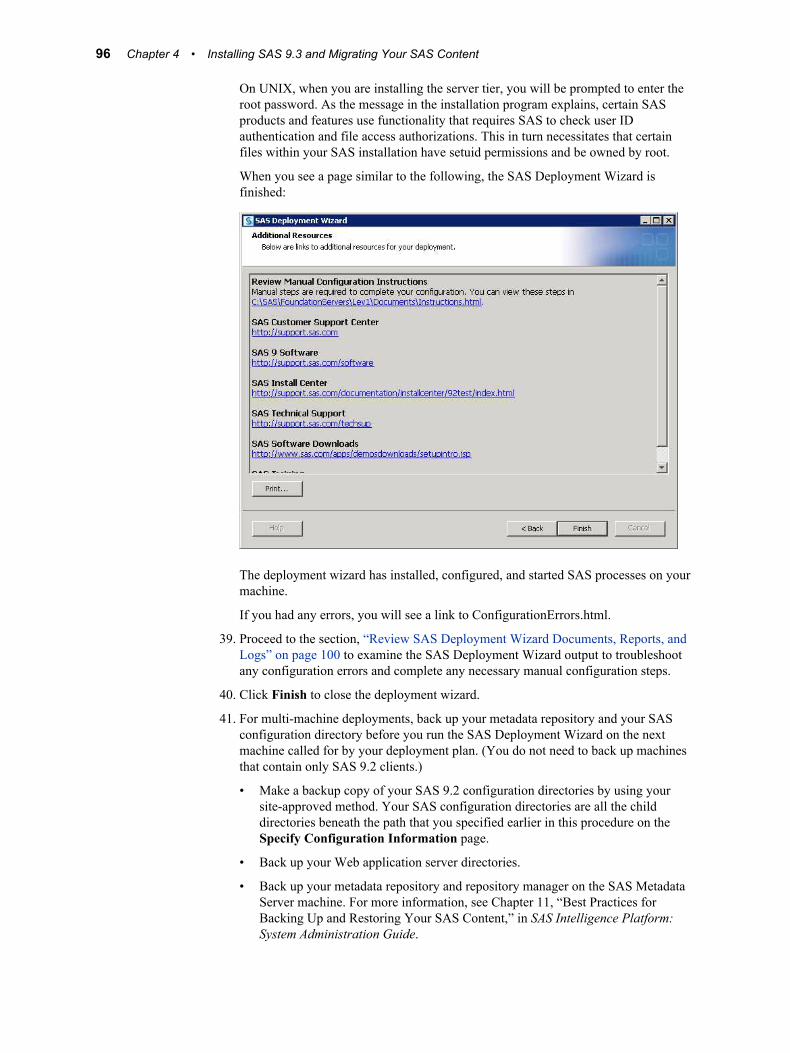
On UNIX, when you are installing the server tier, you will be prompted to enter the root password. As the message in the installation program explains, certain SAS products and features use functionality that requires SAS to check user ID authentication and file access authorizations. This in turn necessitates that certain files within your SAS installation have setuid permissions and be owned by root.
When you see a page similar to the following, the SAS Deployment Wizard is finished:
The deployment wizard has installed, configured, and started SAS processes on your machine.
If you had any errors, you will see a link to ConfigurationErrors.html.
39. Proceed to the section, “Review SAS Deployment Wizard Documents, Reports, and Logs” on page 100 to examine the SAS Deployment Wizard output to troubleshoot any configuration errors and complete any necessary manual configuration steps.
40. Click Finish to close the deployment wizard.
41. For multi-machine deployments, back up your metadata repository and your SAS configuration directory before you run the SAS Deployment Wizard on the next machine called for by your deployment plan. (You do not need to back up machines that contain only SAS 9.2 clients.)
• Make a backup copy of your SAS 9.2 configuration directories by using your site-approved method. Your SAS configuration directories are all the child directories beneath the path that you specified earlier in this procedure on the Specify Configuration Information page.
• Back up your Web application server directories.
• Back up your metadata repository and repository manager on the SAS Metadata Server machine. For more information, see Chapter 11, “Best Practices for Backing Up and Restoring Your SAS Content,” in SAS Intelligence Platform: System Administration Guide.
96 Chapter 4 • Installing SAS 9.3 and Migrating Your SAS Content
42. When you have completed any manual configuration tasks, and you have made the necessary backups, repeat the steps listed in this topic on each machine defined in your deployment plan.
43. Be sure to restart any servers that you stopped for purposes of creating a backup.
44. When you are finished installing and migrating SAS on each machine called for in your deployment plan, proceed to “Overview of Performing Post-migration Tasks” on page 99.
Automating SAS 9.3 Client Installation across Multiple Machines
The SAS Deployment Wizard provides a record and playback feature that enables you to automate a SAS installation across multiple machines. This feature is designed for large-scale enterprise deployments where SAS 9.3 clients need to be deployed across many machines. Using the record and playback feature prevents users from having to manually provide input on every page every time the SAS Deployment Wizard is run on a machine. For more information, see “Automating the SAS Installation on Multiple Machines” in Chapter 5 of SAS Intelligence Platform: Installation and Configuration Guide.
Automating SAS 9.3 Client Installation across Multiple Machines 97

98 Chapter 4 • Installing SAS 9.3 and Migrating Your SAS Content
Chapter 5
Performing Post-migration Tasks
Overview of Performing Post-migration Tasks . . . . . . . . . . . . . . . . . . . . . . . . . . . . . 99
Review SAS Deployment Wizard Documents, Reports, and Logs . . . . . . . . . . . . . 100
Metadata Server Tier Post-migration Tasks . . . . . . . . . . . . . . . . . . . . . . . . . . . . . . 102Overview of Metadata Server Tier Post-migration Tasks . . . . . . . . . . . . . . . . . . . 102Running and Reviewing the Authorization Differences Reports . . . . . . . . . . . . . . 102Update Third-Party Software Server Definitions . . . . . . . . . . . . . . . . . . . . . . . . . . 110
Server Tier Post-migration Tasks . . . . . . . . . . . . . . . . . . . . . . . . . . . . . . . . . . . . . . . 110Overview of Server Tier Post-migration Tasks . . . . . . . . . . . . . . . . . . . . . . . . . . . 110z/OS Burst Set and Optimizer Library Considerations . . . . . . . . . . . . . . . . . . . . . . 110Update SAS Server Configuration Files . . . . . . . . . . . . . . . . . . . . . . . . . . . . . . . . . 111Migrating Content Stored outside the SAS Configuration Directory . . . . . . . . . . . 111Update Stored Process Archive Package Paths . . . . . . . . . . . . . . . . . . . . . . . . . . . 116Update Stored Process WebDAV Paths . . . . . . . . . . . . . . . . . . . . . . . . . . . . . . . . . 116About Migrated OLAP Cubes . . . . . . . . . . . . . . . . . . . . . . . . . . . . . . . . . . . . . . . . 116Manually Convert Data Explorations to Reports . . . . . . . . . . . . . . . . . . . . . . . . . . 117Redeploy Jobs for Scheduling . . . . . . . . . . . . . . . . . . . . . . . . . . . . . . . . . . . . . . . . 118Verify Migrated Jobs with Data Quality Transformations . . . . . . . . . . . . . . . . . . . 118Reschedule Flows . . . . . . . . . . . . . . . . . . . . . . . . . . . . . . . . . . . . . . . . . . . . . . . . . . 118Modify Migrated Information Maps to Enable SAS Web
Report Studio Optimization . . . . . . . . . . . . . . . . . . . . . . . . . . . . . . . . . . . . . . . . . 119Post-migration Tasks for DataFlux Data Management Server
(SAS 9.3 to SAS 9.3) . . . . . . . . . . . . . . . . . . . . . . . . . . . . . . . . . . . . . . . . . . . . . . 120
Middle-Tier Post-migration Tasks . . . . . . . . . . . . . . . . . . . . . . . . . . . . . . . . . . . . . . 121Overview of Middle-Tier Post-migration Tasks . . . . . . . . . . . . . . . . . . . . . . . . . . . 121Review the SAS Middle-Tier Configuration . . . . . . . . . . . . . . . . . . . . . . . . . . . . . 121Review Role Changes to SAS Web Report Studio . . . . . . . . . . . . . . . . . . . . . . . . 121Redefine Themes and Branding . . . . . . . . . . . . . . . . . . . . . . . . . . . . . . . . . . . . . . . 122Notes about Migrated SAS Web Report Studio User Folders . . . . . . . . . . . . . . . . 122BI Dashboard Post-Migration Tasks . . . . . . . . . . . . . . . . . . . . . . . . . . . . . . . . . . . 122Resetting SAS Web Application URLs . . . . . . . . . . . . . . . . . . . . . . . . . . . . . . . . . 124Reviewing Your WebDAV Configuration . . . . . . . . . . . . . . . . . . . . . . . . . . . . . . . 124Update SAS Information Delivery Portal URLs . . . . . . . . . . . . . . . . . . . . . . . . . . 125
Overview of Performing Post-migration TasksThis is the fourth of five tasks required to install SAS 9.3 and migrate your current SAS content:
99
1. Design your migration.
2. Perform pre-migration tasks.
3. Install SAS 9.3 and migrate your content from an earlier SAS version.
ð 4. Perform post-migration tasks.
5. Validate your migration.
The actual manual post-migration tasks that you should perform depend on which SAS products you are migrating. Regardless of the SAS products that make up your deployment, you should follow the steps listed in Instructions.html and review any configuration errors in ConfigurationErrors.html and in the configuration logs. For more information, see “Review SAS Deployment Wizard Documents, Reports, and Logs” on page 100.
The remaining post-migration tasks are grouped according to the tier:
• “Metadata Server Tier Post-migration Tasks” on page 102
• “Server Tier Post-migration Tasks” on page 110
• “Middle-Tier Post-migration Tasks” on page 121
For a discussion of functionality changes in SAS 9.3, see SAS 9.3 Guide to Software Updates.
Review SAS Deployment Wizard Documents, Reports, and Logs
During configuration of SAS 9.3 the SAS Deployment Wizard creates various documents that can help you identify any remaining configuration tasks and errors. Use the following documents to perform any manual configuration steps and correct any configuration errors:
• Instructions.html
contains a list of SAS manual steps that must be performed to complete your deployment. Instructions.html resides under the SAS configuration directory in the Levn/Documents subdirectory (for example: C:\SAS\Config92\Lev1\Documents).
• DeploymentSummary.html
contains a list of the deployment tasks performed by the SAS Deployment Wizard and a brief status for each. The deployment summary is one source for a list of all the SAS products installed and configured in addition to information such as servers started, Web applications built, and Web applications deployed. DeploymentSummary.html resides under the SAS configuration directory in the Levn/Documents subdirectory (for example: C:\SAS\Config92\Lev1\Documents).
• ConfigurationErrors.html
contains a list of configuration errors that require further attention. ConfigurationErrors.html resides under the SAS configuration directory in the Levn/Documents subdirectory (for example: C:\SAS\Config92\Lev1\Documents).
• Configuration logs (as needed)
100 Chapter 5 • Performing Post-migration Tasks
provide a finer list of errors for each SAS component that the SAS Deployment Wizard migrates and configures. There is one log file for each SAS component. The configuration logs reside under the SAS configuration directory in the Levn/Logs/Configure subdirectory (for example: C:\SAS\Config92\Lev1\Logs\Configure).
• SDW_YYYY-MM-DD-HH-MM-SS.log
logs SAS Deployment Wizard messages, which can be used for general troubleshooting. The deployment wizard log is written to the following path:
• Windows:
\Documents and Settings\user\Local Settings\Application Data\SAS\SASDeploymentWizard
• Windows (Vista only):
\Users\user\AppData\Local\SAS\SASDeploymentWizard
• UNIX:
home-directory/.SASAppData/SASDeploymentWizard
• logCrossplatformOutput.log
Generated when migrating from one version of an operating system to another (within families: Windows to Windows or UNIX to UNIX). Outlines parameters passed to MIGRATE and CIMPORT along with the corresponding logs generated by these two SAS procedures. logCrossplatformOutput.log resides under the SAS configuration directory in the Levn/Logs/Configure subdirectory (for example: C:\SAS\Config92\Lev1\Logs\Configure).
• logPermissionsOutput.log
Generated when migrating from one version of an operating system to another (within families: Windows to Windows or UNIX to UNIX). The result of applying all permission migration commands is logged to this file. It shows which commands failed along with the console error for the same. logPermissionsOutput.log resides under the SAS configuration directory in the Levn/Logs/Configure subdirectory (for example: C:\SAS\Config92\Lev1\Logs\Configure).
• Levn/Temp subdirectory
All the failed permission commands that are run during the migration are persisted in this subdirectory. You should review the output in this directory. If you encounter any failed attempts, you should make the necessary modification and rerun the commands. For example, if the command failed due to an invalid user on the target machine, either create the user and rerun the command file or change the user ID to the actual new user and rerun the command file.
• Levn/Temp/unmoved subdirectory
All files that have not been migrated by PROC MIGRATE are written here. Typically, a file is written here because it is unsupported by PROC MIGRATE or the file is corrupt. Refer to logCrossPlatformOutput.log to further diagnose the problem.
Review SAS Deployment Wizard Documents, Reports, and Logs 101
Metadata Server Tier Post-migration Tasks
Overview of Metadata Server Tier Post-migration TasksThe following topics are contained in this section:
• “Running and Reviewing the Authorization Differences Reports” on page 102
• “Update Third-Party Software Server Definitions” on page 110
Running and Reviewing the Authorization Differences Reports
Overview of Running and Reviewing the Authorization Differences ReportsThe following topics are contained in this section:
• “Impact of Migration on Access Controls” on page 102
• “About the Authorization Differences Reports” on page 102
• “Run Authorization Differences Reports” on page 103
• “Identities Whose Access Has Changed” on page 107
• “Identities Who Are Removed or Added ” on page 108
• “Causes of Authorization Differences” on page 108
• “Addressing Authorization Differences” on page 109
Impact of Migration on Access ControlsThe migration process preserves all metadata layer permission settings. However, the migration process can alter effective access to some metadata objects. The differences in effective access are caused by differences in access control inheritance. Access control inheritance for a migrated object can differ from access control inheritance for the corresponding original object for either or both of these reasons:
• changes in the access control inheritance rules. The rules that govern access control inheritance are slightly different in 9.2 and later than they were in 9.1. For example, in SAS 9.3 tables, cubes, libraries, and OLAP schemas inherit permissions from only their parent folders. Permissions that these objects formerly inherited through their parent application server are no longer applicable.
• relocation of objects. The migration process relocates some objects. For example, the process moves each ungrouped library into its own folder under SAS Folders\Shared Data. Another example is folders in custom repositories. Permissions can change for custom repository folders because in SAS 9.2 and later they become parented by the root folder of the foundation repository. When an object is moved to a new location, access to that object might change, because the object's new parent might have different settings than its old parent did.
About the Authorization Differences ReportsSAS provides reports that identify differences in access between your SAS 9.1.3 or SAS 9.2 environment and your SAS 9.3 environment. You should run these reports after your
102 Chapter 5 • Performing Post-migration Tasks
migration has finished. For more information, see “Run Authorization Differences Reports” on page 103. Here are some key points about the reports:
• There are five reports, each for a specific type of object (libraries, tables, folders, OLAP schemas, and cubes). These are the objects that are most likely to have authorization differences.
• The reports identify differences in effective permissions. Effective permissions are a calculation of the net effect of all applicable permission settings in the metadata authorization layer.
• Each report lists only those objects that have authorization differences. The reports are not inventory listings.
• Each report lists objects by folder location and in alphabetical order within each folder location. For each object that has access distinctions, a separate table of changes is displayed.
Note: Even if a report has a long list of objects, it is usually the case that only a few folder locations are involved. Most libraries, tables, cubes, and schemas do not have explicit settings. Instead, these objects inherit settings from their parent folders. The migration process does not add or remove permissions that have been set on these objects.
• The reports do not reflect additional access or any changes that have been granted to the SAS Administrators group or to the SAS Administrator in a SAS 9.3 environment. This group either includes only the original SAS Administrator (sasadm) or includes both the original SAS Administrator and the members of your original SAS Administrators group.
• The reports do not provide the reason why a particular access difference occurs.
Note: If there are differences in Name field values and Display Name field values between SAS 9.1.3 or SAS 9.2 and SAS 9.3, you might see output similar to the following: Removed: SAS Trusted UserAdded: sastrust
Run Authorization Differences ReportsA good practice is to run the authorization differences reports on the SAS Metadata Server machine. Authorization differences reports list changes to metadata object inheritance relationships for libraries, tables, OLAP schema, and cubes. You manually run these reports after the SAS Deployment Wizard has finished executing on your SAS 9.3 migrated system.
Metadata Server Tier Post-migration Tasks 103
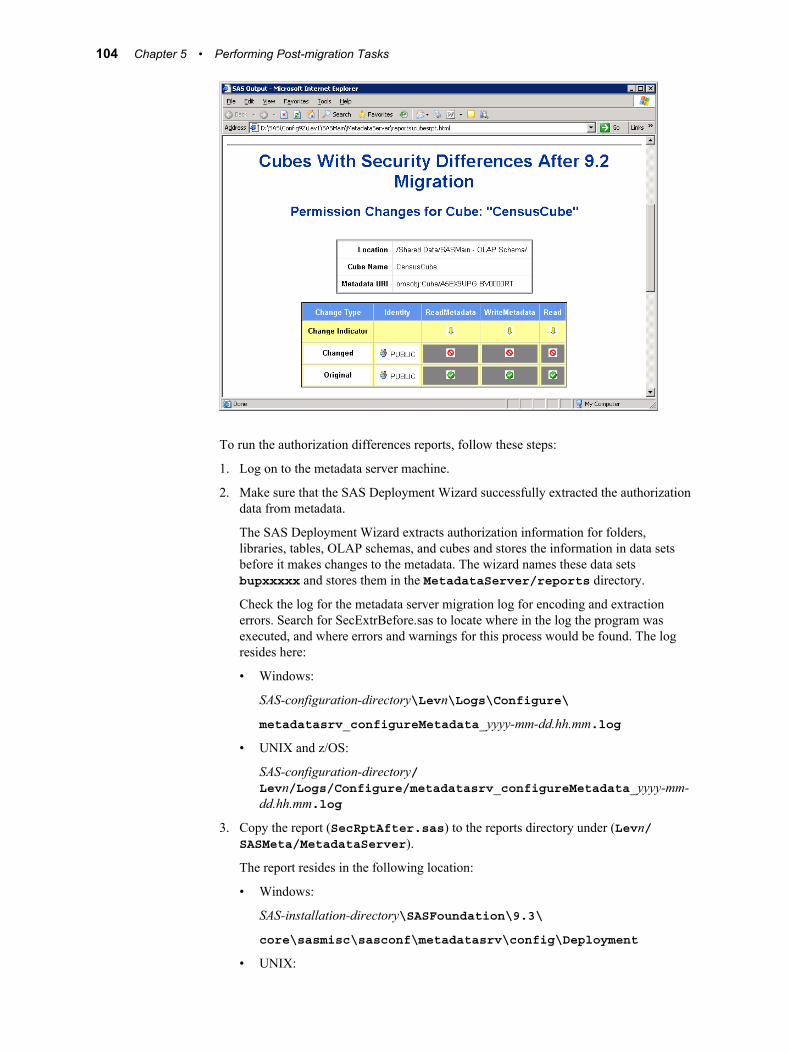
To run the authorization differences reports, follow these steps:
1. Log on to the metadata server machine.
2. Make sure that the SAS Deployment Wizard successfully extracted the authorization data from metadata.
The SAS Deployment Wizard extracts authorization information for folders, libraries, tables, OLAP schemas, and cubes and stores the information in data sets before it makes changes to the metadata. The wizard names these data sets bupxxxxx and stores them in the MetadataServer/reports directory.
Check the log for the metadata server migration log for encoding and extraction errors. Search for SecExtrBefore.sas to locate where in the log the program was executed, and where errors and warnings for this process would be found. The log resides here:
• Windows:
SAS-configuration-directory\Levn\Logs\Configure\
metadatasrv_configureMetadata_yyyy-mm-dd.hh.mm.log
• UNIX and z/OS:
SAS-configuration-directory/Levn/Logs/Configure/metadatasrv_configureMetadata_yyyy-mm-dd.hh.mm.log
3. Copy the report (SecRptAfter.sas) to the reports directory under (Levn/SASMeta/MetadataServer).
The report resides in the following location:
• Windows:
SAS-installation-directory\SASFoundation\9.3\
core\sasmisc\sasconf\metadatasrv\config\Deployment
• UNIX:
104 Chapter 5 • Performing Post-migration Tasks
SAS-installation-directory/SASFoundation/9.3/
misc/base/sasconf/metadatasrv/config/Deployment
• z/OS:
SAS-installation-directory/SASFoundation/9.3/
base/sasconf/metadatasrv/config/Deployment
For example, on Windows, the command would resemble the following:
copy "C:\Program Files\SAS\SASFoundation\9.3\core\sasmisc\sasconf\
metadatasrv\config\Deployment\SecRptAfter.sas"
C:\SAS\Config\Lev1\SASMeta\MetadataServer\reports
4. Using a text editor, open SecRptAfter.sas, add metadata server connection information and the report directory path, and then save the file. This information should be on the first two lines of the file. The report directory path should be an absolute path. The following examples use common SAS configuration paths, but this path can be specific to your site. The user credentials that you specify must be for an unrestricted user. (Either the user ID is listed in adminUsers.txt with an asterisk beside it, or the user ID is a member of the Metadata Server: Unrestricted role.)
Note: Depending on your operating system, the path must end with either a backslash (\, Windows) or with a forward slash (/, UNIX and z/OS).
• Windows:
options metaserver=localhost metaport=8561 metauser="mydomain\myuserid" metapass="mypassword";
%let rptdir="SAS-config-dir\Levn\SASMeta\MetadataServer\reports\";
• UNIX:
options metaserver=localhost metaport=8561 metauser="myuserid" metapass="mypassword";
%let rptdir="SAS-config-dir/Levn/SASMeta/MetadataServer/reports/";
• z/OS:
options metaserver=localhost metaport=8561 metauser="myuserid" metapass="mypassword";
%let rptdir="SAS-config-dir/Levn/SASMeta/MetadataServer/reports/";
filename sampsrc "SAS-install-dir/SASFoundation/9.3/base";
5. Open an operating system command prompt, change directory to the reports directory, and then run the report using the appropriate SAS invocation for your operating system.
On Windows and UNIX, we recommend that you run the reports using the UTF-8 encoding option. Use a non-UTF-8 execution command only when an error during extraction of the report files indicates that UTF-8 could not be used.
Here is an example that shows how to run the SAS command for UTF-8 systems:
• Windows:
Metadata Server Tier Post-migration Tasks 105
"C:\Program Files\SAS\SASFoundation\9.3\sas" -config "C:\Program Files\SAS\SASFoundation\9.3\nls\u8\SASV9.CFG" -sysin SecRptAfter.sas
• UNIX:
/usr/local/SAS2/SASFoundation/9.3/bin/sas_u8 -sysin SecRptAfter.sas
• z/OS:
On z/OS, there is no UTF-8 option. The report always uses the default session encoding.
Here is an example that shows how to run the SAS command for non-UTF-8 systems:
• Windows:
"C:\Program Files\SAS\SASFoundation\9.3\sas" -config "C:\Program Files\SAS\SASFoundation\9.3\SASV9.CFG" -sysin SecRptAfter.sas
• UNIX:
/usr/local/SAS2/SASFoundation/9.3/sas -sysin SecRptAfter.sas
• z/OS:
/usr/lpp/SAS/Installs/MITB/SAS92/SASFoundation/9.3/sas.sh
-input /u/mitbsas/ServerConfig93E/Lev1/SASMeta/MetadataServer/reports/SecRptAfter.sas
-log /u/mitbsas/ServerConfig93E/Lev1/SASMeta/MetadataServer/reports/SecRptAfter.log
The report generates data sets and reports in the reports directory. Log output will also be in the report directory.
6. Open the HTML output in a Web browser to view the reports.
• librpt.html - Security changes for libraries
• ptabrpt.html - Security changes for tables
• oschsrpt.html - Security changes for OLAP schemas
• cubesrpt.html - Security changes for cubes
• fldrrpt.html - Security changes for folders
Note: On z/OS, contact the administrator for the HTTP server and request that the reports directory be available. As an alternative, you can copy the HTML and GIF files from the reports directory to another location that is already available through the HTTP server. You might want to restrict access to these reports, so consider the security of the directories to which they are copied and the audience which might access them.
Rerunning the reports can be useful when you are making authorization changes and want to analyze the effects of your changes. In these situations, be sure to copy the original reports so that you can compare newer versions of the reports with your original reports.
106 Chapter 5 • Performing Post-migration Tasks
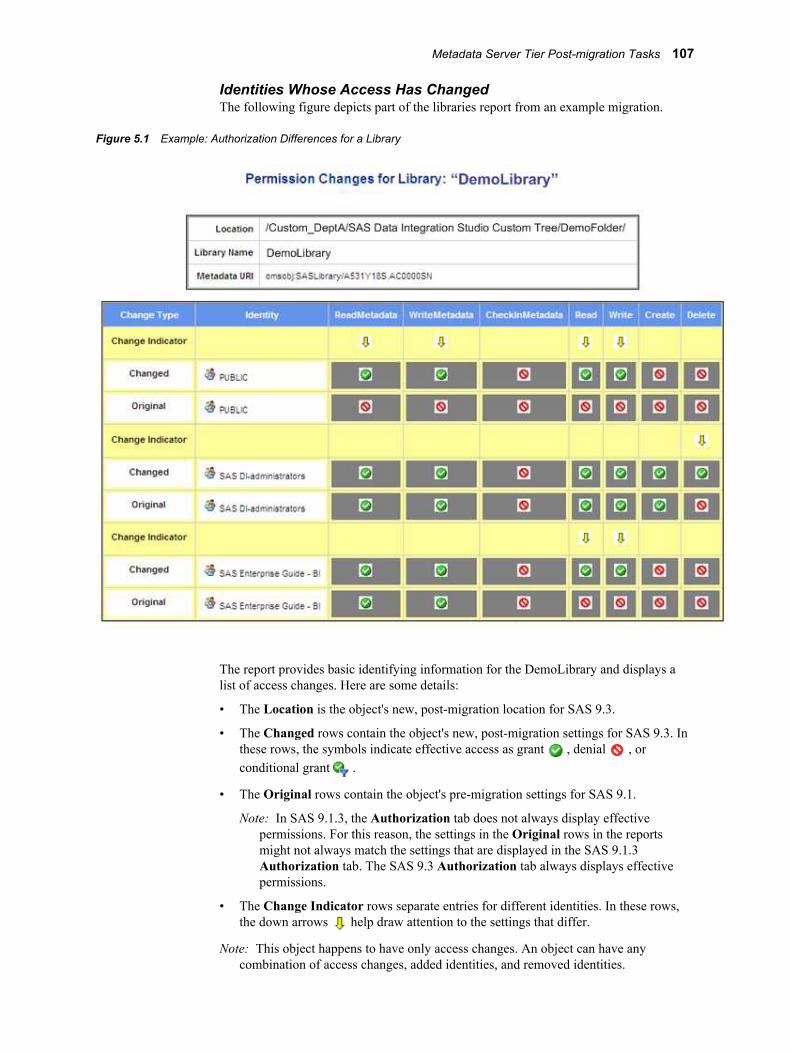
Identities Whose Access Has ChangedThe following figure depicts part of the libraries report from an example migration.
Figure 5.1 Example: Authorization Differences for a Library
The report provides basic identifying information for the DemoLibrary and displays a list of access changes. Here are some details:
• The Location is the object's new, post-migration location for SAS 9.3.
• The Changed rows contain the object's new, post-migration settings for SAS 9.3. In these rows, the symbols indicate effective access as grant , denial , or conditional grant .
• The Original rows contain the object's pre-migration settings for SAS 9.1.
Note: In SAS 9.1.3, the Authorization tab does not always display effective permissions. For this reason, the settings in the Original rows in the reports might not always match the settings that are displayed in the SAS 9.1.3 Authorization tab. The SAS 9.3 Authorization tab always displays effective permissions.
• The Change Indicator rows separate entries for different identities. In these rows, the down arrows help draw attention to the settings that differ.
Note: This object happens to have only access changes. An object can have any combination of access changes, added identities, and removed identities.
Metadata Server Tier Post-migration Tasks 107
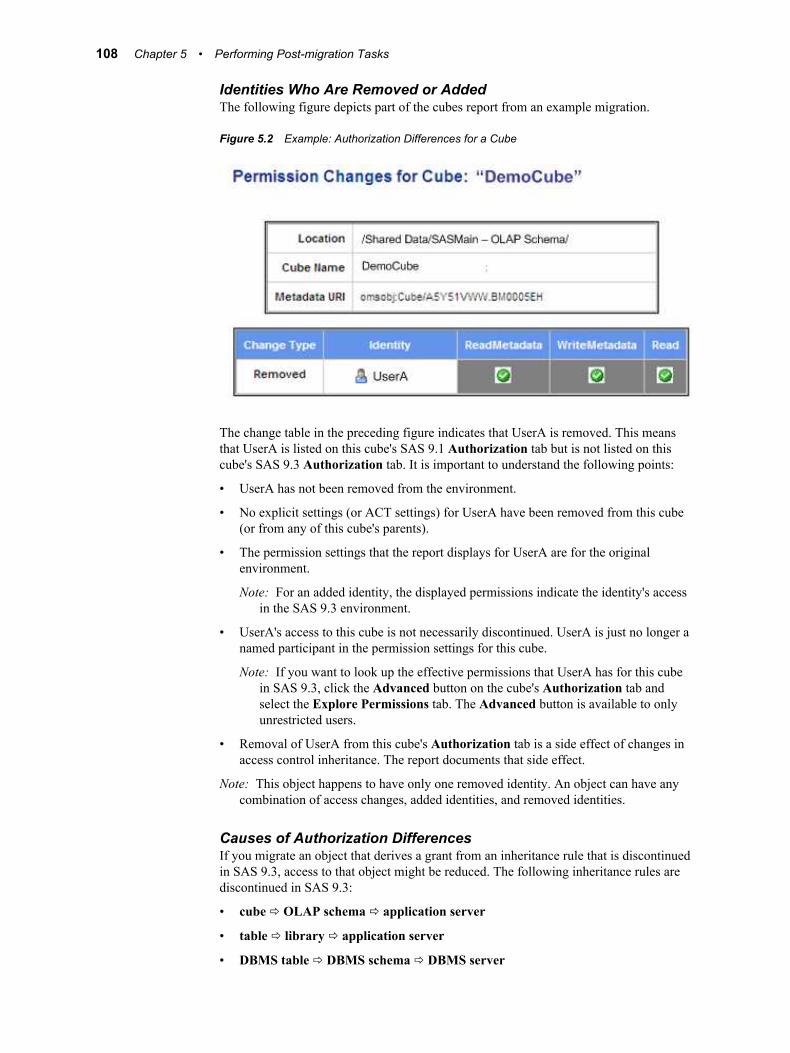
Identities Who Are Removed or AddedThe following figure depicts part of the cubes report from an example migration.
Figure 5.2 Example: Authorization Differences for a Cube
The change table in the preceding figure indicates that UserA is removed. This means that UserA is listed on this cube's SAS 9.1 Authorization tab but is not listed on this cube's SAS 9.3 Authorization tab. It is important to understand the following points:
• UserA has not been removed from the environment.
• No explicit settings (or ACT settings) for UserA have been removed from this cube (or from any of this cube's parents).
• The permission settings that the report displays for UserA are for the original environment.
Note: For an added identity, the displayed permissions indicate the identity's access in the SAS 9.3 environment.
• UserA's access to this cube is not necessarily discontinued. UserA is just no longer a named participant in the permission settings for this cube.
Note: If you want to look up the effective permissions that UserA has for this cube in SAS 9.3, click the Advanced button on the cube's Authorization tab and select the Explore Permissions tab. The Advanced button is available to only unrestricted users.
• Removal of UserA from this cube's Authorization tab is a side effect of changes in access control inheritance. The report documents that side effect.
Note: This object happens to have only one removed identity. An object can have any combination of access changes, added identities, and removed identities.
Causes of Authorization DifferencesIf you migrate an object that derives a grant from an inheritance rule that is discontinued in SAS 9.3, access to that object might be reduced. The following inheritance rules are discontinued in SAS 9.3:
• cube ð OLAP schema ð application server
• table ð library ð application server
• DBMS table ð DBMS schema ð DBMS server
108 Chapter 5 • Performing Post-migration Tasks
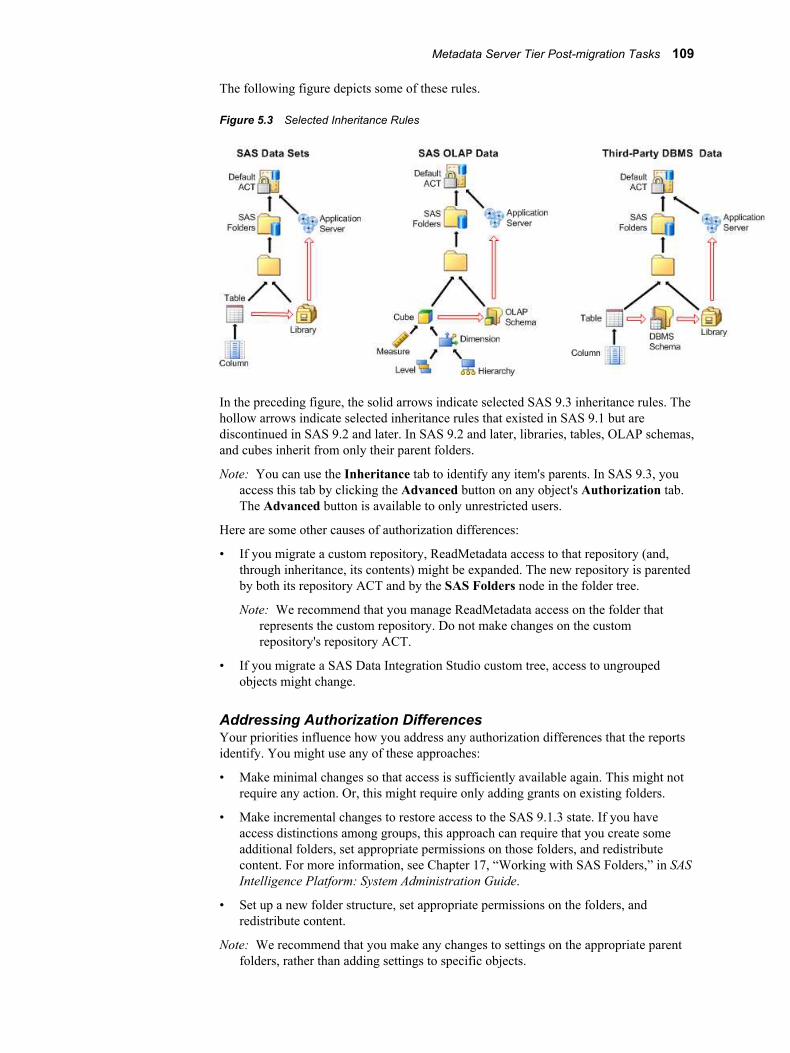
The following figure depicts some of these rules.
Figure 5.3 Selected Inheritance Rules
In the preceding figure, the solid arrows indicate selected SAS 9.3 inheritance rules. The hollow arrows indicate selected inheritance rules that existed in SAS 9.1 but are discontinued in SAS 9.2 and later. In SAS 9.2 and later, libraries, tables, OLAP schemas, and cubes inherit from only their parent folders.
Note: You can use the Inheritance tab to identify any item's parents. In SAS 9.3, you access this tab by clicking the Advanced button on any object's Authorization tab. The Advanced button is available to only unrestricted users.
Here are some other causes of authorization differences:
• If you migrate a custom repository, ReadMetadata access to that repository (and, through inheritance, its contents) might be expanded. The new repository is parented by both its repository ACT and by the SAS Folders node in the folder tree.
Note: We recommend that you manage ReadMetadata access on the folder that represents the custom repository. Do not make changes on the custom repository's repository ACT.
• If you migrate a SAS Data Integration Studio custom tree, access to ungrouped objects might change.
Addressing Authorization DifferencesYour priorities influence how you address any authorization differences that the reports identify. You might use any of these approaches:
• Make minimal changes so that access is sufficiently available again. This might not require any action. Or, this might require only adding grants on existing folders.
• Make incremental changes to restore access to the SAS 9.1.3 state. If you have access distinctions among groups, this approach can require that you create some additional folders, set appropriate permissions on those folders, and redistribute content. For more information, see Chapter 17, “Working with SAS Folders,” in SAS Intelligence Platform: System Administration Guide.
• Set up a new folder structure, set appropriate permissions on the folders, and redistribute content.
Note: We recommend that you make any changes to settings on the appropriate parent folders, rather than adding settings to specific objects.
Metadata Server Tier Post-migration Tasks 109
Update Third-Party Software Server DefinitionsYour SAS 9.3 migrated system can contain metadata describing third-party servers, such as Web application and database servers. These server definitions are stored in SAS metadata repositories and might need to be modified on the SAS 9.3 system using SAS Management Console to reflect changes to the new system. Examples of such changes might include new host names, ports, connection attributes, or security information. A list of migrated third-party metadata is provided in your SAS Migration Utility analysis report. To view your migration analysis report, point a Web browser to the AnalysisReport.xml file in the AnalysisReport subdirectory underneath the output directory you specified when you last ran the SAS Migration Utility.
Refer to your Instructions.html file for more information about what steps you might need to perform. Instructions.html resides under the SAS configuration directory in the Levn\Documents subdirectory (or example, C:\SAS\Config93\Lev1\Documents).
Server Tier Post-migration Tasks
Overview of Server Tier Post-migration TasksThe following topics are contained in this section:
• “z/OS Burst Set and Optimizer Library Considerations” on page 110
• “Update SAS Server Configuration Files” on page 111
• “Migrating Content Stored outside the SAS Configuration Directory” on page 111
• “Update Stored Process Archive Package Paths” on page 116
• “Update Stored Process WebDAV Paths” on page 116
• “About Migrated OLAP Cubes” on page 116
• “Manually Convert Data Explorations to Reports” on page 117
• “Redeploy Jobs for Scheduling” on page 118
• “Verify Migrated Jobs with Data Quality Transformations” on page 118
• “Reschedule Flows” on page 118
• “Modify Migrated Information Maps to Enable SAS Web Report Studio Optimization” on page 119
• “Post-migration Tasks for DataFlux Data Management Server (SAS 9.3 to SAS 9.3)” on page 120
z/OS Burst Set and Optimizer Library ConsiderationsIf the burst set library is pre-assigned in z/OS, attempting to distribute using an existing burst set in that library generates a message that the table could not be read (or a blank list) when you select Recipients and Distribution Rules. Attempting to create a new burst set while the library is pre-assigned generates exceptions, similar to the following:
110 Chapter 5 • Performing Post-migration Tasks
An error occurred in processing the page request. createBurstSet() (com.sas.report.output.management.OutputManagementException: The physical data is not available [ java.sql.SQLException: Unable to execute for an undetermined reason. SQL passthru expression contained these errors: ERROR: Libname WRSDIST is not assigned.
[ java.sql.SQLException: SQL passthru expression contained these errors: ERROR: Libname WRSDIST is not assigned. ] ] ) SQL passthru expression contained these errors: ERROR: Libname WRSDIST is not assigned.
Root Cause: java.sql.SQLException: SQL passthru expression contained these errors: ERROR: Libname WRSDIST is not assigned.
In actuality, the library is pre-assigned, but the message states that it is not. Removing the pre-assigned flag returns functionality to normal.
Update SAS Server Configuration FilesAs mentioned earlier, certain SAS Application Server configuration files such as autoexec files (appserver_autoexec.sas) and sasv9.cfg files are not migrated. At some point, you might need to tune these files with configuration settings (such as Java options) appropriate for your site. For more information, see “Optional Setup Tasks” on page 148.
Although the command to start SAS and any settings in config or autoexec files are not migrated, load balancing configuration and metadata information for SAS servers is migrated. (Load balancing here should not be confused with server clustering-the management of multiple Web application servers on the SAS middle tier.) The same server load-balancing algorithms that were present in SAS 9.1.3 are available and still used. The new load-balancing algorithms are for servers or configurations that did not exist in SAS 9.1.3. For more information about the load balancing algorithms available in SAS 9.3, see “Understanding the Load-Balancing Algorithms” in Chapter 7 of SAS Intelligence Platform: Application Server Administration Guide.
Migrating Content Stored outside the SAS Configuration Directory
About Migrating Content Stored outside the SAS Configuration DirectorySAS content stored outside the configuration directory remains in its current location. Examples of SAS content include the following:
• external files. See “Migrate External SAS Data Integration Studio Content” on page 113.
• libraries. See “Migrate Libraries Stored outside the SAS Configuration Directory” on page 113.
• stored processes. See “Migrate Stored Processes Stored outside the SAS Configuration Directory” on page 114.
Note: If you are migrating from Windows 32-bit operating systems to Windows 64-bit operating systems, there are some particular post-migration steps that you must perform, such as converting your custom formats catalog before rebuilding your
Server Tier Post-migration Tasks 111
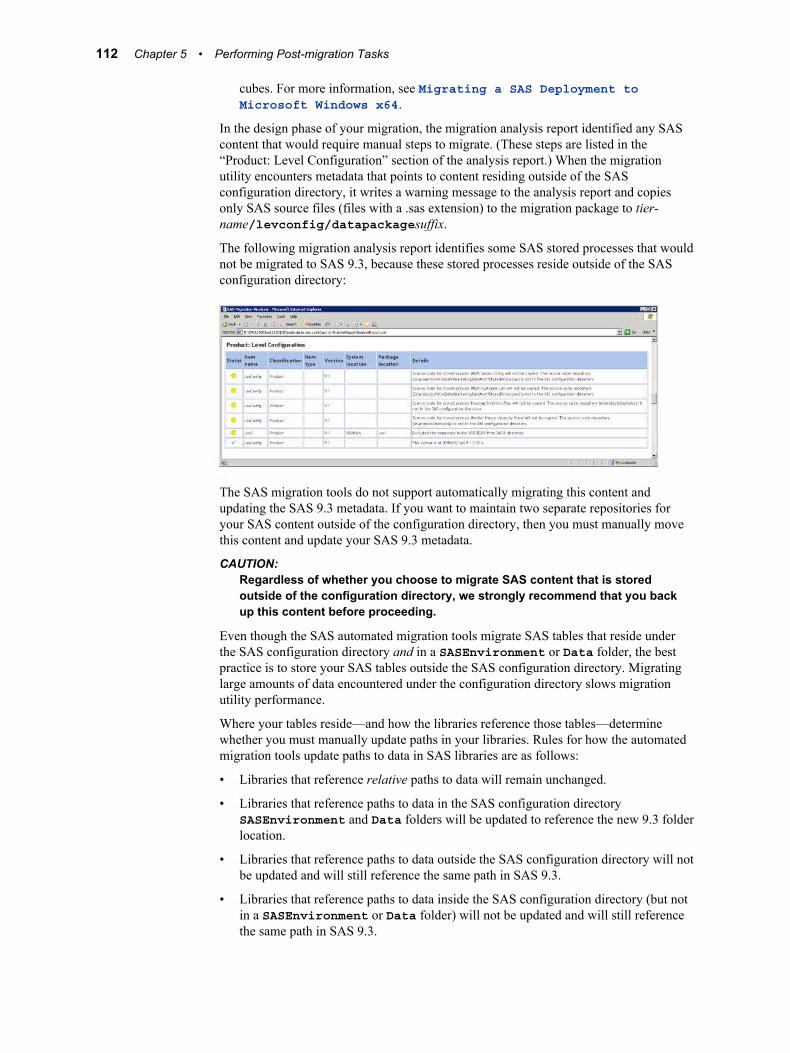
cubes. For more information, see Migrating a SAS Deployment to Microsoft Windows x64.
In the design phase of your migration, the migration analysis report identified any SAS content that would require manual steps to migrate. (These steps are listed in the “Product: Level Configuration” section of the analysis report.) When the migration utility encounters metadata that points to content residing outside of the SAS configuration directory, it writes a warning message to the analysis report and copies only SAS source files (files with a .sas extension) to the migration package to tier-name/levconfig/datapackagesuffix.
The following migration analysis report identifies some SAS stored processes that would not be migrated to SAS 9.3, because these stored processes reside outside of the SAS configuration directory:
The SAS migration tools do not support automatically migrating this content and updating the SAS 9.3 metadata. If you want to maintain two separate repositories for your SAS content outside of the configuration directory, then you must manually move this content and update your SAS 9.3 metadata.
CAUTION:Regardless of whether you choose to migrate SAS content that is stored outside of the configuration directory, we strongly recommend that you back up this content before proceeding.
Even though the SAS automated migration tools migrate SAS tables that reside under the SAS configuration directory and in a SASEnvironment or Data folder, the best practice is to store your SAS tables outside the SAS configuration directory. Migrating large amounts of data encountered under the configuration directory slows migration utility performance.
Where your tables reside—and how the libraries reference those tables—determine whether you must manually update paths in your libraries. Rules for how the automated migration tools update paths to data in SAS libraries are as follows:
• Libraries that reference relative paths to data will remain unchanged.
• Libraries that reference paths to data in the SAS configuration directory SASEnvironment and Data folders will be updated to reference the new 9.3 folder location.
• Libraries that reference paths to data outside the SAS configuration directory will not be updated and will still reference the same path in SAS 9.3.
• Libraries that reference paths to data inside the SAS configuration directory (but not in a SASEnvironment or Data folder) will not be updated and will still reference the same path in SAS 9.3.
112 Chapter 5 • Performing Post-migration Tasks
Migrate External SAS Data Integration Studio ContentThe SAS Migration Utility is able to migrate all your SAS Data Integration Studio 3.4 jobs and job flows because these are objects that are stored in metadata. However, if any of your jobs or job flows point to files that reside outside of the SAS configuration directory, (such as source code files), then you have to manually migrate these external files.
For more information, see “Migrate Content Stored outside the SAS Configuration Directory” in Chapter 21 of SAS 9.3 Guide to Software Updates.
Migrate Libraries Stored outside the SAS Configuration DirectoryThe SAS 9.3 migration tools do not support automatically migrating content that is stored outside the SAS configuration directory. (This is true, even when the target machine running SAS 9.3 is the same as the current SAS machine.) For more information, see the “What Can Be Migrated?” on page 8.
If you want to maintain two separate repositories for your SAS libraries outside of the configuration directory, then you must manually move these libraries and update your SAS 9.3 metadata.
CAUTION:If you do not update the file and library paths to a new SAS 9.3 location, future changes made with SAS 9.3 will be written to the current SAS libraries.
To manually migrate SAS libraries that reside outside the SAS 9.3 configuration directory, follow these steps:
1. Using the method prescribed by your site, back up your current SAS libraries.
Note: As you would with any backup, run these backups through your site's validation procedures to be confident of their integrity before proceeding with your SAS migration.
2. If you have decided to create a new library repository, create the new location and copy your current SAS libraries to this new location. This new location must be accessible to the SAS Application Servers associated with these libraries.
3. Log on to SAS Management Console as an unrestricted user (such as sasadm).
4. In the left pane, in the Plug-ins tab, expand the Data Library Manager icon.
5. Expand the Libraries folder.
6. Right-click the library, and select Properties from the pop-up menu.
7. In the Properties dialog box, select the Options tab.
8. In the Available items list, select the current SAS library path, and then select Edit.
Server Tier Post-migration Tasks 113

9. In the dialog box that appears, modify the path to the new SAS 9.3 library that you created earlier.
10. Click OK to save the path.
11. In the Properties dialog box, select the new path, and click OK to select this repository as the repository for the selected library.
In the Properties dialog box, click OK to save the change to the library.
12. Repeat this process for each library that you want to change.
Note: Because you have already defined the new path, you will skip steps 8–10.
Migrate Stored Processes Stored outside the SAS Configuration DirectoryThe SAS migration tools do not support automatically migrating content that is stored outside the SAS configuration directory. (However, the migration utility does package any .sas files pointed to by metadata outside of the current SAS configuration directory.) If you want to maintain two separate repositories for your SAS stored processes outside of the configuration directory, then you must manually move these stored processes and update your SAS 9.3 metadata.
To manually migrate SAS stored processes that reside outside the SAS 9.3 configuration directory, follow these steps:
114 Chapter 5 • Performing Post-migration Tasks
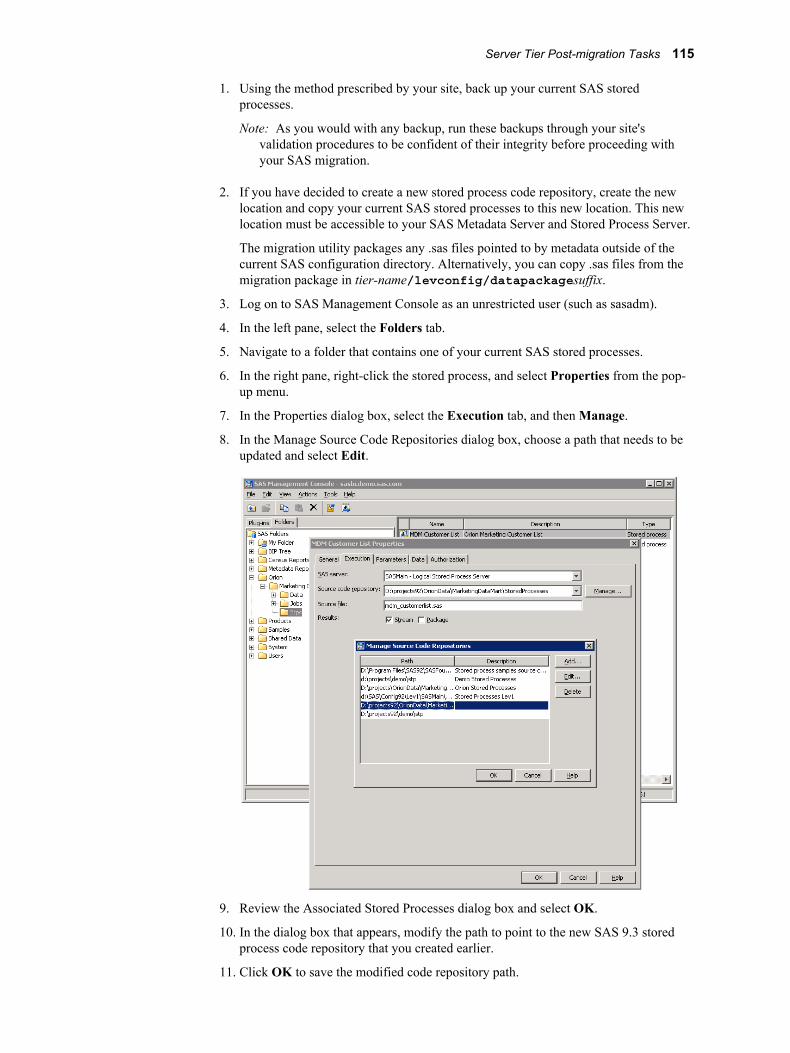
1. Using the method prescribed by your site, back up your current SAS stored processes.
Note: As you would with any backup, run these backups through your site's validation procedures to be confident of their integrity before proceeding with your SAS migration.
2. If you have decided to create a new stored process code repository, create the new location and copy your current SAS stored processes to this new location. This new location must be accessible to your SAS Metadata Server and Stored Process Server.
The migration utility packages any .sas files pointed to by metadata outside of the current SAS configuration directory. Alternatively, you can copy .sas files from the migration package in tier-name/levconfig/datapackagesuffix.
3. Log on to SAS Management Console as an unrestricted user (such as sasadm).
4. In the left pane, select the Folders tab.
5. Navigate to a folder that contains one of your current SAS stored processes.
6. In the right pane, right-click the stored process, and select Properties from the pop-up menu.
7. In the Properties dialog box, select the Execution tab, and then Manage.
8. In the Manage Source Code Repositories dialog box, choose a path that needs to be updated and select Edit.
9. Review the Associated Stored Processes dialog box and select OK.
10. In the dialog box that appears, modify the path to point to the new SAS 9.3 stored process code repository that you created earlier.
11. Click OK to save the modified code repository path.
Server Tier Post-migration Tasks 115
12. In the Properties dialog box, click OK to save the stored process.
Update Stored Process Archive Package PathsThe SAS automated migration tools update stored process archive package paths that point to locations inside the SAS configuration directory.
The SAS Migration Utility cannot update any paths that reside outside of the configuration directory. The migration utility flags such problematic paths in its migration analysis report. In SAS 9.3, stored process archive package paths are no longer modeled by metadata but are stored in prompt metadata. Therefore, after the SAS Deployment Wizard finishes executing, you will need to manually update the _ARCHIVE_PATH prompt for all affected stored processes using SAS Management Console. For more information, see “Developing Stored Processes with Package Results ” in Chapter 4 of SAS Stored Processes: Developer's Guide and the prompt Help in SAS Management Console online Help.
Update Stored Process WebDAV PathsFor SAS 9.1.3, if you published stored process result packages to a Xythos WebDAV server, then the SAS automated migration tools are able to automatically migrate these paths to the new SAS 9.3 WebDAV server, known as the SAS Content Server. In SAS 9.1.3, if you used a WebDAV server other than Xythos, (such as Apache HTTP), then you must manually update these WebDAV paths.
In its migration analysis report. the SAS Migration Utility flags all stored process WebDAV publish paths that are not for Xythos. In SAS 9.2 and later, stored process WebDAV paths are no longer modeled by metadata but are stored in prompt metadata. Therefore, using SAS Management Console, you will need to update the _COLLECTION_URL prompt for all affected stored processes. For more information, see “Developing Stored Processes with Package Results ” in Chapter 4 of SAS Stored Processes: Developer's Guide and the prompt Help in SAS Management Console online Help.
About Migrated OLAP CubesFor SAS 9.1.3 cubes, the deployment wizard creates SAS code files that you can run to rebuild your SAS 9.1.3 cubes to run in SAS 9.3. The deployment wizard writes these files to the SAS-configuration-directory\Levn\SASMain\OLAPServer\OLAP directory. You can run these SAS files to rebuild your cubes without having to specify a new SAS 9.3 path for your cube repository.
In SAS 9.3, SAS 9.2 cube files maintain their physical status in metadata. The OLAP procedure does not overwrite a cube repository if it finds files already present. Instead, PROC OLAP creates a new folder with a unique name for the new cube. For this reason, OLAP cubes that were built in SAS 9.2 can be used in SAS 9.3 without rebuilding them, although some situations might require action on your part:
• If your SAS 9.2 cubes were built using relative paths, you can move the physical files from one location to another and avoid rebuilding the cubes.
• If your SAS 9.2 cubes were built in a common, network-accessible location, no action is required.
• If your SAS 9.2 cubes are using new hardware in SAS 9.3, you must rebuild the cubes.
116 Chapter 5 • Performing Post-migration Tasks
If there is no change to the path, then you can rebuild the cube by first submitting PROC OLAP with the DELETE_PHYSICAL option to ensure all physical files are removed. Then, you re-submit PROC OLAP to create the physical files from the existing metadata definition. If the physical files are not accessible, the first PROC OLAP step might generate an error or warning, but ignore this and the cube can be built.
Note: Cubes that you build in SAS 9.3 are not supported on SAS 9.2 OLAP Servers.
Manually Convert Data Explorations to ReportsIn the November 2010 release of SAS 9.2, (which contains the release of SAS Web Report Studio 4.3), data explorations are now maintained as reports. When you upgrade or migrate, the SAS deployment tools automatically convert each bookmark in the data exploration into a report that you can view and edit using SAS Web Report Studio 4.3.
Note: If the conversion for any data exploration fails, you will receive a warning in the Instructions.html file. Because data explorations can have dependencies on OLAP cubes, make sure the cubes have been built after you migrate and before you run the scripts described later in this topic. For more information, see “About Migrated OLAP Cubes” on page 116.
To convert the data explorations manually, complete the following steps:
1. Read “Before You Convert” in Chapter 50 of SAS 9.3 Guide to Software Updates.
2. Do one of the following:
• After performing a migration or promotion, run the manualLoadContent-OrderNumber.bat/.sh script.
• After performing an upgrade, run the manualUpdateContent-OrderNumber.bat/.sh.
Note: Before execution, you will need to edit the script to replace the SPECIFY_ADMIN_PASSWORD_HERE and SPECIFY_TRUSTED_PASSWORD_HERE values with the correct passwords before executing it. It is strongly recommended that you specify a value encoded by SAS for the password.
For more information, such as where the script is located and where its log file is written, see “Update Content Manually for the SAS Content Server” in Chapter 9 of SAS Intelligence Platform: Middle-Tier Administration Guide.
3. Manually run the script (manualAdjustUrls-OrderNumber.bat/.sh) to adjust URLs and references to metadata that has moved either during migration or an upgrade.
For more information, such as where the script is located and where its log file is written, see “Adjust Directive URLs Manually” in Chapter 9 of SAS Intelligence Platform: Middle-Tier Administration Guide.
4. Validate that the conversion script was successful by running SAS Web Report Studio and loading one of the newly created reports.
For more information, see the SAS Web Report Studio: User's Guide.
SAS Web Report Studio upgrades the generated reports when you save them. However, if you want to upgrade all the generated reports at once, rerun the appropriate script specified in step 1.
Server Tier Post-migration Tasks 117
After the conversion to bookmarks, the newly created reports follow this naming convention: data-exploration-name_bookmark-name-report.srx
If the bookmark name contains spaces, the resulting report name contains no spaces. For example, assume you have a data exploration named Sales Forecast that contains two bookmarks: Region A and Region B. The resulting report filenames after the upgrade or migration are: Sales Forecast_RegionA-report.srx and Sales Forecast_RegionB-report.srx, respectively.
Note: If the resulting report name is longer than 60 characters, then the portion of the name that precedes -report.srx is truncated.
If the data exploration contains conditional highlighting that includes an image, the image is removed from the conditional highlight. If a collection portlet in the SAS Information Delivery Portal pages contains links to the data explorations, these links are removed and replaced with links to the newly created reports. The converted links become visible to users when they refresh the collection or reopen the portal. For more information, see “Before You Convert” in Chapter 50 of SAS 9.3 Guide to Software Updates.
Any Information Map Viewer portlets are converted to report portlets, and the associate data exploration is converted to a report and associated to the converted report portlet.
Redeploy Jobs for SchedulingAll jobs that were deployed for scheduling or were deployed as stored processes should be redeployed in the SAS 9.3 environment. From the SAS Data Integration Studio desktop, you can select Tools ð Redeploy Jobs for Scheduling or Tools ð Redeploy Jobs to Stored Processes.
For more information about migrated jobs, see “Updates to Jobs and Transformations during Migration” in Chapter 21 of SAS 9.3 Guide to Software Updates.
Verify Migrated Jobs with Data Quality TransformationsIf jobs that include the Create Match Code transformation do not run successfully after migration, verify that the appropriate Quality Knowledge Base (QKB) location value (DQSETUPLOC value), is specified on the global options window for SAS Data Integration Studio.
For more information, see Chapter 21, “SAS Data Integration Studio,” in SAS 9.3 Guide to Software Updates.
Reschedule FlowsAfter migrating to SAS 9.3, owners of scheduled flows will need to submit them to the scheduling server used by the SAS 9.3 system. To reschedule flows, follow these steps:
1. Determine the user IDs associated with each SAS 9.1.3 flow. (Locate the checklist you completed earlier in “Apply Any Required SAS Maintenance” on page 40 .)
2. If you have migrated any SAS Web applications, such as SAS Web Report Studio, verify that scheduling is enabled (Configuration Manager ð Web Report Studio 4.3 ð Properties ð Settings ð Application ð Scheduling).
118 Chapter 5 • Performing Post-migration Tasks
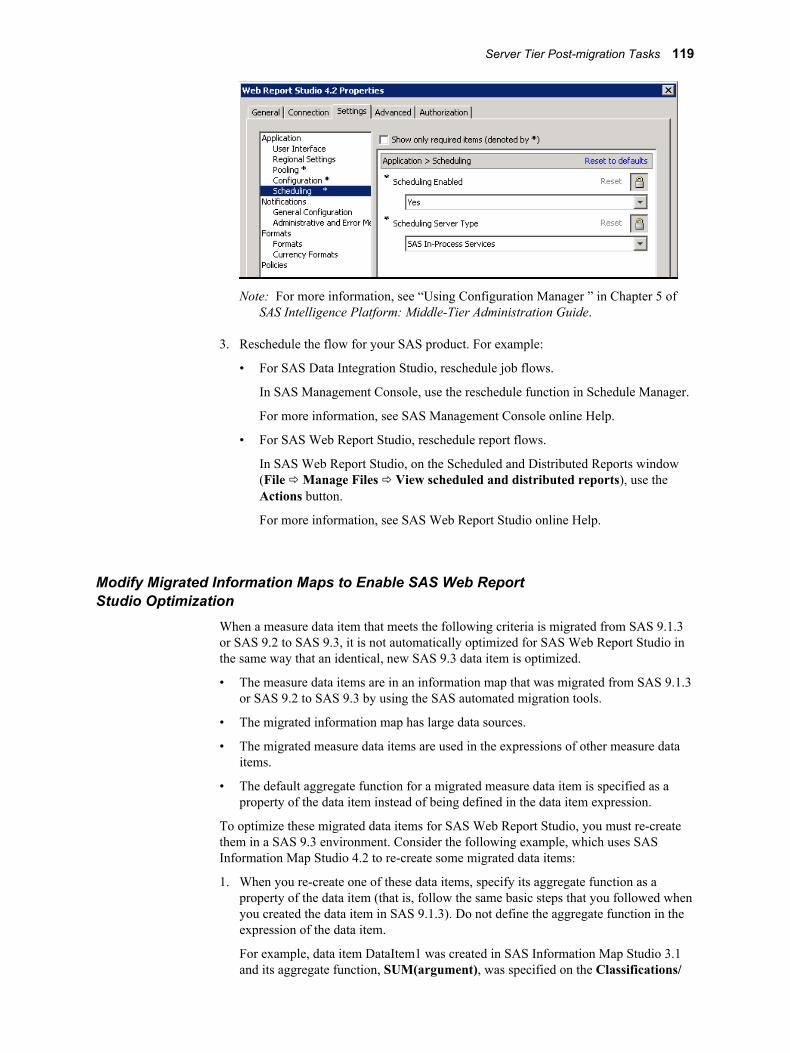
Note: For more information, see “Using Configuration Manager ” in Chapter 5 of SAS Intelligence Platform: Middle-Tier Administration Guide.
3. Reschedule the flow for your SAS product. For example:
• For SAS Data Integration Studio, reschedule job flows.
In SAS Management Console, use the reschedule function in Schedule Manager.
For more information, see SAS Management Console online Help.
• For SAS Web Report Studio, reschedule report flows.
In SAS Web Report Studio, on the Scheduled and Distributed Reports window (File ð Manage Files ð View scheduled and distributed reports), use the Actions button.
For more information, see SAS Web Report Studio online Help.
Modify Migrated Information Maps to Enable SAS Web Report Studio Optimization
When a measure data item that meets the following criteria is migrated from SAS 9.1.3 or SAS 9.2 to SAS 9.3, it is not automatically optimized for SAS Web Report Studio in the same way that an identical, new SAS 9.3 data item is optimized.
• The measure data items are in an information map that was migrated from SAS 9.1.3 or SAS 9.2 to SAS 9.3 by using the SAS automated migration tools.
• The migrated information map has large data sources.
• The migrated measure data items are used in the expressions of other measure data items.
• The default aggregate function for a migrated measure data item is specified as a property of the data item instead of being defined in the data item expression.
To optimize these migrated data items for SAS Web Report Studio, you must re-create them in a SAS 9.3 environment. Consider the following example, which uses SAS Information Map Studio 4.2 to re-create some migrated data items:
1. When you re-create one of these data items, specify its aggregate function as a property of the data item (that is, follow the same basic steps that you followed when you created the data item in SAS 9.1.3). Do not define the aggregate function in the expression of the data item.
For example, data item DataItem1 was created in SAS Information Map Studio 3.1 and its aggregate function, SUM(argument), was specified on the Classifications/
Server Tier Post-migration Tasks 119
Formats tab. In SAS Information Map Studio 4.2, re-create this data item and select SUM(argument) on the Classifications, Aggregations, Formats tab.
Note: Copying and pasting the information map or data items, or just updating the existing data items will not cause optimization to occur. You must create brand new data items.
2. Delete the old measure data item or name the new one with a unique name.
3. Go through your reports and modify any references to point to the new data items that you created.
Note: Neither new nor migrated measure data items are optimized for SAS Web Report Studio if the aggregate functions of the data items are defined in the data item expressions. If one of these data items is also referenced by the expression of another data item, then you can optimize it if you can change to specifying its aggregate function as a property of the data item.
For more information, see SAS Information Map Studio 4.3 online Help and the Base SAS Guide to Information Maps.
Post-migration Tasks for DataFlux Data Management Server (SAS 9.3 to SAS 9.3)
When performing a SAS 9.3 to SAS 9.3 migration, complete these post-migration steps to finish your migration of DataFlux Data Management Server:
1. Update values in app.cfg for the Quality Knowledge Base installation directory.
For more information, see the DataFlux Migration Guide, which is provided as part of the DataFlux migration assessment service.
2. Enable licensing for the new Data Management Server.
For more information, see the DataFlux Migration Guide, which is provided as part of the DataFlux migration assessment service.
3. Using a text editor, do the following to dmserver.cfg:
• Update the SOAP port to the port number for the Data Management Server that was specified for it on the SAS Deployment Wizard Port Remap page on page 85.
• Add the following for the WLP port:
DMSERVER/WLP/SVR/LISTEN_PORT=WLP-port
where WLP-port is the new WLP port.
dmserver.cfg resides in the SAS-install-dir/dmserver directory (for example, /var/sashome/dmserver).
4. Start the new Data Management Server by entering the following command from a Windows command prompt or a UNIX console:
SAS-install-dir/dmserver/bin/dmsadmin start
5. Contents of the Data Management Server batch_jobs and data_services directories are not copied over to the target system as part of the migration process. Therefore, you must manually move these directories.
For more information, see the DataFlux Migration Guide, which is provided as part of the DataFlux migration assessment service.
120 Chapter 5 • Performing Post-migration Tasks
6. Using SAS Management Console, associate a resource template for the Data Management Server. For more information, see SAS Management Console online Help and search for “resource template.”
7. Update Jobs that used the source DM server to use the new target DM Server.
Jobs that include Data Quality transformations that reference the DataFlux Data Management Server require the new target server definition. Therefore, open each job and select the new server definition in the Data Quality transformation.
For more information, see “Working with Data Quality Transformations” in Chapter 26 of SAS Data Integration Studio: User's Guide.
8. Delete the old Data Management Server definition in SAS Management Console after all jobs have been updated. For more information, see SAS Management Console online Help and search for “delete server.”
Middle-Tier Post-migration Tasks
Overview of Middle-Tier Post-migration TasksThe following topics are contained in this section:
• “Review the SAS Middle-Tier Configuration” on page 121
• “Review Role Changes to SAS Web Report Studio” on page 121
• “Redefine Themes and Branding” on page 122
• “Notes about Migrated SAS Web Report Studio User Folders” on page 122
• “BI Dashboard Post-Migration Tasks” on page 122
• “SAS BI Dashboard and JDBC DSX Files” on page 123
• “Resetting SAS Web Application URLs” on page 124
• “Reviewing Your WebDAV Configuration” on page 124
• “Update SAS Information Delivery Portal URLs” on page 125
Review the SAS Middle-Tier ConfigurationThe automated migration tools do not preserve any of the SAS middle-tier configuration information. The deployment of the SAS 9.3 middle tier is always “out of the box.” Many of the defaults have changed, and any customizations should be reviewed with respect to SAS 9.3 Web administration guidelines before they are implemented. Do not assume that the defaults used in SAS 9.1.3 or SAS 9.2 middle-tier configuration are appropriate for SAS 9.3. For more information, see SAS Intelligence Platform: Middle-Tier Administration Guide.
Review Role Changes to SAS Web Report StudioSAS Web Report Studio 4.3 uses the user roles that are implemented in SAS 9.3. For information about SAS 9.3 roles, see “Availability of Application Features in a New Deployment” in Chapter 2 of SAS Intelligence Platform: Security Administration Guide.
Middle-Tier Post-migration Tasks 121

You should review your migrated SAS Web Report Studio users and their re-mapped roles to determine whether you should make any changes. The capabilities for most of your SAS Web Report Studio migrated users should remain the same. However, any SAS Web Report Studio 3.1 advanced users lose the ability to manage distribution lists. To review roles and to manually re-apply any lost capabilities, refer to the SAS Intelligence Platform: Web Application Administration Guide.
Redefine Themes and BrandingSAS 9.2 and later includes a new theme infrastructure that is used by Web applications such as SAS Web Report Studio and the SAS Information Delivery Portal. If you created custom themes for your SAS Web applications in SAS 9.1.3, then you can migrate certain components of your themes to the new theme infrastructure.
In previous releases, SAS Logon Manager used the same graphics and configuration files as other SAS Web applications. In the second maintenance release for SAS 9.3, SAS Logon Manager uses graphics from a separate directory and is also configured with a separate template file. For more information, see “Migrating Custom Themes ” in Chapter 11 of SAS Intelligence Platform: Middle-Tier Administration Guide.
For information about migrating custom themes created with SAS Theme Designer for Flex, see “Migrate and Update Custom Themes Automatically” in SAS Theme Designer for Flex: User's Guide, available at http://support.sas.com/documentation/cdl/en/flexthemedesignug/65088/HTML/default/viewer.htm#n01c94tuyvd288n1otqnjw82670h.htm.
The product-specific branding that was available in SAS Web Report Studio 3.1 and SAS Web Report Studio 4.2 are no longer supported, and there are no provisions for migrating older branding changes to the new themes in version 4.3. This means that the branded areas must be redefined in the new themes infrastructure.
Notes about Migrated SAS Web Report Studio User FoldersSAS 9.2 and later secures a user’s folders by using a custom Access Control Template (the Private User Folder ACT). This ACT is designed to allow administrators, System Services, and the user access to a particular user’s folder and to prevent other users’ access.
In SAS 9.1.3, SAS Web Report Studio manages user folders at the application layer. As part of this management, explicit permissions are added to the user’s 9.1.3 SAS Web Report Studio home folder to achieve privacy.
Because SAS 9.2 and later no longer uses these explicit permissions, during migration to SAS 9.3, these explicit permissions are automatically removed, and all users’ home folders are relocated to the SAS 9.3 home folder location.
After migration, reports and folders are relocated and properly secured, and require no additional post-migration action.
For more information, see “About the SAS Folder Structure” in Chapter 17 of SAS Intelligence Platform: System Administration Guide.
BI Dashboard Post-Migration Tasks
About SAS BI Dashboard 4.3With version 4.3, SAS BI Dashboard has been completely rewritten. There are some major usage differences between version 4.3 and version 4.2.
122 Chapter 5 • Performing Post-migration Tasks
SAS BI Dashboard 4.3 is displayed in the Adobe Flash Player. This change makes the dashboard environment much more user-friendly, interactive, and feature-rich. The way you display your dashboard content is also different in the new version. For example, in version 4.2, it was very common to have multiple dashboard portlets on a single portal page. With version 4.3, each dashboard portlet renders an Adobe Flash Player, which means that using multiple portlets causes performance problems and can possibly cause your browser to crash.
For this reason, you should use only one dashboard portlet on a portal page at a time. Although the dashboard portlet displays a single dashboard at a time, version 4.3 is designed to allow much greater flexibility for displaying multiple indicators in a single dashboard. With version 4.2, you had very little control over the position of the different indicators in a dashboard. In version 4.3, you can position indicators with exact pixel placement.
When you upgrade to version 4.3 from version 4.2, your 4.2 content is converted. Everything is moved, including ranges, data models (called indicator data objects in version 4.3), indicators, and dashboards. However, you should plan to take advantage of the new interactive features in version 4.3 by creating new dashboard objects. (You can use your existing indicators, data, and ranges.)
Also, you should modify portal pages that contain multiple dashboardsso that they display a single dashboard in version 4.3. Start by creating a dashboard that would occupy the whole portal page, and then position the indicators as you would like.
Location of Dashboards and IndicatorsAfter you upgrade to SAS BI Dashboard 4.3, update the URLs for all SAS BI Dashboard static links, StM data (in indicator data), and custom graph indicators that use stored processes. You update these URLs in the SAS BI Dashboard Image Web address field. See your SAS BI Dashboard online Help for more information.
After migration, dashboards and any objects in the dashboard (such as indicators, models, and ranges) are metadata objects and are saved in SAS Folders, so any dashboards that you created prior to SAS BI Dashboard 4.3 are saved as metadata objects. The default location for these metadata objects is the Products\BIDashboard 4.3 directory. This directory contains the DashboardConfigs, IndicatorDefinitions, ModelConfigs, and RangeDefinitions subdirectories.
CAUTION:Do not move the contents of these folders into different folders. If the contents of these folders are moved to different folders, these objects cannot be used with their dashboards.
SAS BI Dashboard and JDBC DSX FilesIf your SAS BI Dashboard relies on any data sources specified in JDBC data source XML (DSX) files, then you must manually migrate these data sources.
You have two options for migrating your data:
• Move the data under metadata control.
• Continue to use a SAS libref that points to the workspace server's file system.
If you use this libref method, then you must manually fix the librefs in JDBC DSX files.
For more information, see “Working with Data Source XML (.dsx) Files” in Chapter 14 of SAS Intelligence Platform: Web Application Administration Guide.
Middle-Tier Post-migration Tasks 123
Resetting SAS Web Application URLsWhen migrating from SAS 9.1.3 to SAS 9.3, attributes required to access your SAS Web applications can change. For example, SAS middle-tier machine names and the ports on which a Web application listens for client requests can change.
After migrating, be sure to review the URLs for your migrated SAS Web applications to make sure that they are still valid. For a list of these applications, see the Portal-WebApplications.html file that resides in the Documents subdirectory under your SAS 9.3 configuration path.
Reviewing Your WebDAV Configuration
About Reviewing Your WebDAV ConfigurationThe SAS automated migration tools migrate SAS 9.1.3 WebDAV repository access control lists (ACLs) except for those ACLs under the /sasfolders directory. Migrating WebDAV ACLs under the /sasfolders directory has these effects:
• causes performance degradation during migration and increases repository disk space unnecessarily
• compromises WebDAV security by allowing access to user IDs other than the SAS Administrator and the SAS Trusted User
(In SAS 9.1.3, the ACLs are located by default in the SAS configuration path under sasdav/wrs.)
The automated SAS migration tools update certain references to identities, so that these references are based on the identity's name, instead of on the identity's user ID. This change affects only WebDAV access control entries (ACEs) and WebDAV personal repository names. The following table provides an example for the user William Jones who has a login with a user ID of WIN\wsj.
Table 5.1 Example of a Migrated WebDAV Personal Repository Name and ACE Entry
WebDAV Attribute
Example Values
Before Migration (SAS 9.1.3) After Migration (SAS 9.3)
WebDAV personal repository name
wsj.WIN William Jones
WebDAV person identifier in an ACE
WIN\wsj person/William Jones
Note: SAS 9.2 and later uses the name value from the user’s metadata definition (not the display name value), because the name value should be stable over time.
Review WebDAV Report Repository PermissionsAfter migration, you should review your WebDAV security settings and make the changes appropriate for your site and its security needs. For more information, see
124 Chapter 5 • Performing Post-migration Tasks
“Implementing Authorization for the SAS Content Server ” in Chapter 9 of SAS Intelligence Platform: Middle-Tier Administration Guide.
Note about Migrated WebDAV Content DatestampsThe SAS automated migration tools replace creation dates on content with the date on which the migration occurred. The migration tools preserve modification dates on content. For this reason, migrated WebDAV content can have a creation date that is later than its modification date.
Update SAS Information Delivery Portal URLsSome additional steps must be performed after the SAS Deployment Wizard executes to ensure that links within the SAS Information Delivery Portal have migrated appropriately. To facilitate this process, SAS supplies a script that you should run to perform these tasks. Refer to Instructions.html for more information.
Instructions.html resides under the SAS configuration directory in the Levn/Documents subdirectory (for example, C:\SAS\Config92\Lev1\Documents).
Middle-Tier Post-migration Tasks 125

126 Chapter 5 • Performing Post-migration Tasks
Chapter 6
Validating Your SAS Migrated Deployment
Overview of Validating Your SAS Migrated Deployment . . . . . . . . . . . . . . . . . . . 127
Validate the SAS 9.3 Servers . . . . . . . . . . . . . . . . . . . . . . . . . . . . . . . . . . . . . . . . . . . 128
About the SAS Deployment Tester . . . . . . . . . . . . . . . . . . . . . . . . . . . . . . . . . . . . . . 130
Validating the SAS Clients . . . . . . . . . . . . . . . . . . . . . . . . . . . . . . . . . . . . . . . . . . . . . 131Overview of Validating the SAS Clients . . . . . . . . . . . . . . . . . . . . . . . . . . . . . . . . 131Validate SAS Enterprise Guide 4.3 . . . . . . . . . . . . . . . . . . . . . . . . . . . . . . . . . . . . 131Validate SAS Information Map Studio 4.2 . . . . . . . . . . . . . . . . . . . . . . . . . . . . . . . 132Validate SAS Data Integration Studio 4.2 . . . . . . . . . . . . . . . . . . . . . . . . . . . . . . . 133
Validating the SAS 9.3 Middle Tier and Web Clients . . . . . . . . . . . . . . . . . . . . . . . 134Overview of Validating the SAS 9.3 Middle Tier and Web Clients . . . . . . . . . . . 134Start SAS Remote Services and Your Java Application Server . . . . . . . . . . . . . . . 134Validate the SAS Stored Process Web Application . . . . . . . . . . . . . . . . . . . . . . . . 135Validate SAS Web Report Studio 4.3 . . . . . . . . . . . . . . . . . . . . . . . . . . . . . . . . . . . 136Validate the SAS Information Delivery Portal 4.3 . . . . . . . . . . . . . . . . . . . . . . . . . 140
Overview of Validating Your SAS Migrated Deployment
This is the fifth of five tasks required to install SAS 9.3 and migrate your current SAS content.
1. Design your migration.
2. Perform pre-migration tasks.
3. Install SAS 9.3 and migrate your content from an earlier SAS version.
4. Perform post-migration tasks.
ð 5. Validate your migration.
The topics in this section describe in step-by-step fashion how to validate your SAS 9.3 servers, clients, middle tier, and Web clients.
• “Validate the SAS 9.3 Servers” on page 128
• “Validating the SAS Clients” on page 131
• “Validating the SAS 9.3 Middle Tier and Web Clients” on page 134
127
For a discussion of functionality changes in SAS 9.3, see SAS 9.3 Guide to Software Updates.
Validate the SAS 9.3 ServersThere are a few simple steps required to confirm that the various SAS servers you have deployed are running properly. The following table summarizes server validation information:
Table 6.1 Validation Summary for the SAS Server Tier
Server Validation Method
Metadata server Successful login using the SAS Management Console.
Metadata utility (SASMeta) workspace server
The metadata utility workspace server can be used only by those members of the SAS Administrators group who have an external account that is known to the server's host and is associated with their SAS identity. If the server is on Windows and uses credential-based host authentication, the account must have the Log on as a batch job user right.
Right-click the validate command in SAS Management Console using external account credentials that meet the criteria described above. Default path:
Server Manager ð SASMeta ð Logical Workspace Server.
Object spawner If either the stored process server or one of the workspace servers validates (see below), then the object spawner is running.
OLAP server Right-click the validate command in SAS Management Console. Default path:
Server Manager ð SASMain ð Logical OLAP Server.* install: CALS-TBL id="TMIG31"
Pooled workspace server
Right-click the validate command in SAS Management Console. Default path:
Server Manager ð SASMain ð Logical Pooled Workspace Server.*
Stored process server Right-click the validate command in SAS Management Console. Default path:
Server Manager ð SASMain ð Logical Stored Process Server.*
Workspace server Right-click the validate command in SAS Management Console using external account credentials. Default path:
Server Manager ð SASMain ð Logical Workspace Server.*
DATA step batch server
Successful launch of SAS when running the sasbatch script.
On z/OS, use the Schedule Manager's Deploy SAS DATA Step Program to browse the appserver_autoexec_usermods.sas file created in the AppServer context.
128 Chapter 6 • Validating Your SAS Migrated Deployment
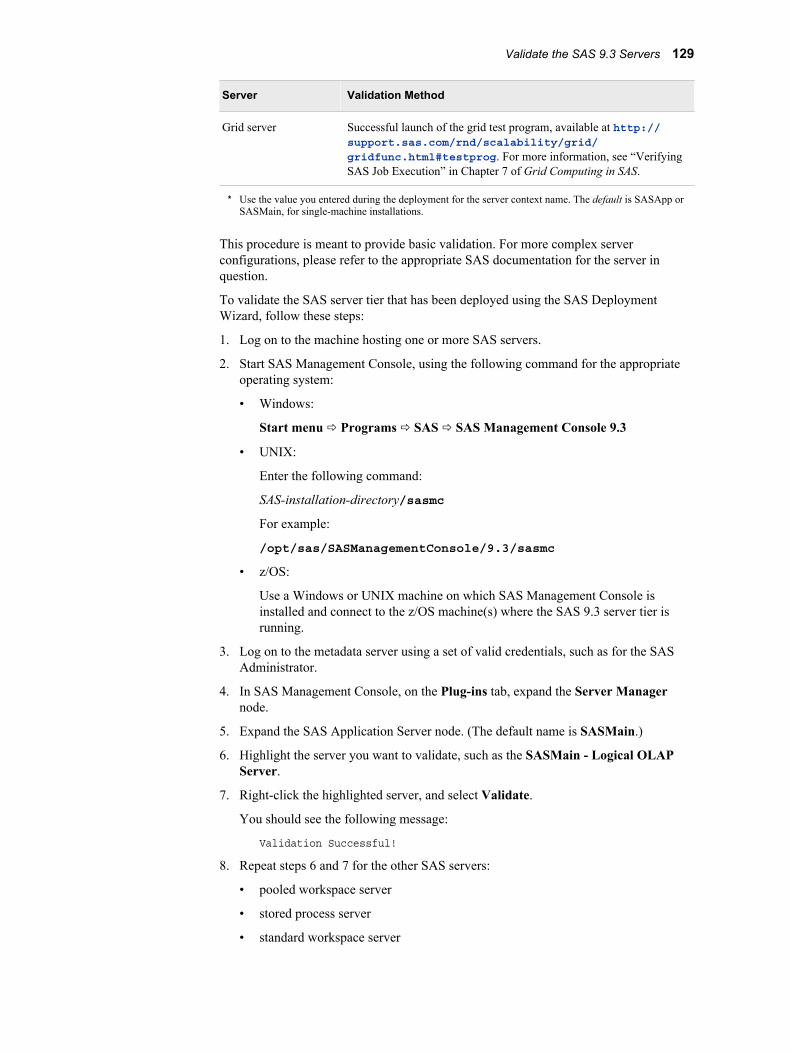
Server Validation Method
Grid server Successful launch of the grid test program, available at http://support.sas.com/rnd/scalability/grid/gridfunc.html#testprog. For more information, see “Verifying SAS Job Execution” in Chapter 7 of Grid Computing in SAS.
* Use the value you entered during the deployment for the server context name. The default is SASApp or SASMain, for single-machine installations.
This procedure is meant to provide basic validation. For more complex server configurations, please refer to the appropriate SAS documentation for the server in question.
To validate the SAS server tier that has been deployed using the SAS Deployment Wizard, follow these steps:
1. Log on to the machine hosting one or more SAS servers.
2. Start SAS Management Console, using the following command for the appropriate operating system:
• Windows:
Start menu ð Programs ð SAS ð SAS Management Console 9.3
• UNIX:
Enter the following command:
SAS-installation-directory/sasmc
For example:
/opt/sas/SASManagementConsole/9.3/sasmc
• z/OS:
Use a Windows or UNIX machine on which SAS Management Console is installed and connect to the z/OS machine(s) where the SAS 9.3 server tier is running.
3. Log on to the metadata server using a set of valid credentials, such as for the SAS Administrator.
4. In SAS Management Console, on the Plug-ins tab, expand the Server Manager node.
5. Expand the SAS Application Server node. (The default name is SASMain.)
6. Highlight the server you want to validate, such as the SASMain - Logical OLAP Server.
7. Right-click the highlighted server, and select Validate.
You should see the following message:
Validation Successful!
8. Repeat steps 6 and 7 for the other SAS servers:
• pooled workspace server
• stored process server
• standard workspace server
Validate the SAS 9.3 Servers 129
9. When validating the workspace server, if you are prompted for credentials, we suggest that you enter the credentials for the Server Invoker (sassrv). Alternatively, you can enter a user ID and password that meet all of these requirements:
• The account is known to the host of the standard workspace server.
(An ID that ends in @saspw does not meet this requirement.)
• The account has the Windows right Log on as a batch job (if the server is on Windows).
• The account has a corresponding metadata identity.
10. To validate the DATA step batch server on Windows and UNIX, SAS should successfully launch when you run the following command, appropriate for the server host operating system:
• Windows:
Start menu ð Run ð sas-configuration-directory\sasbatch.bat
For example:
Start menu ð Run ð C:\SAS\AllServers\Lev1\SASMain\BatchServer\sasbatch.bat
• UNIX:
Enter the following command:
SAS-configuration-directory/SASMain/BatchServer/sasbatch.sh
For example:
/opt/sas/AllServers/Lev1/SASMain/BatchServer/sasbatch.sh
11. To validate the DATA step batch server on z/OS, use the Schedule Manager's Deploy SAS DATA Step Program to browse appserver_autoexec_usermods.sas file created in the AppServer context. When the JCL pane comes up and contains JCL, then the deployment of the batch server is successful.
a. From SAS Management Console, right-click on the Schedule Manager plug-in (Plug-ins tab) and choose Deploy SAS DATA Step Program.
b. Click Browse and navigate to the appserver_autoexec_usermods.sas file under a server context such as SASMain (for example, SAS-configuration-directory/Levn/SASMain).
c. You should see JCL in the bottom list box.
12. To verify that your grid servers are operational, follow the steps located in “Verifying SAS Job Execution” in Chapter 7 of Grid Computing in SAS.
13. Repeat these steps on each machine in your deployment plan on which you have deployed one or more SAS servers.
About the SAS Deployment TesterSAS 9.3 is shipped with a SAS Management Console plug-in that you can use to test your SAS deployment. For more information, see the SAS Management Console Help
130 Chapter 6 • Validating Your SAS Migrated Deployment
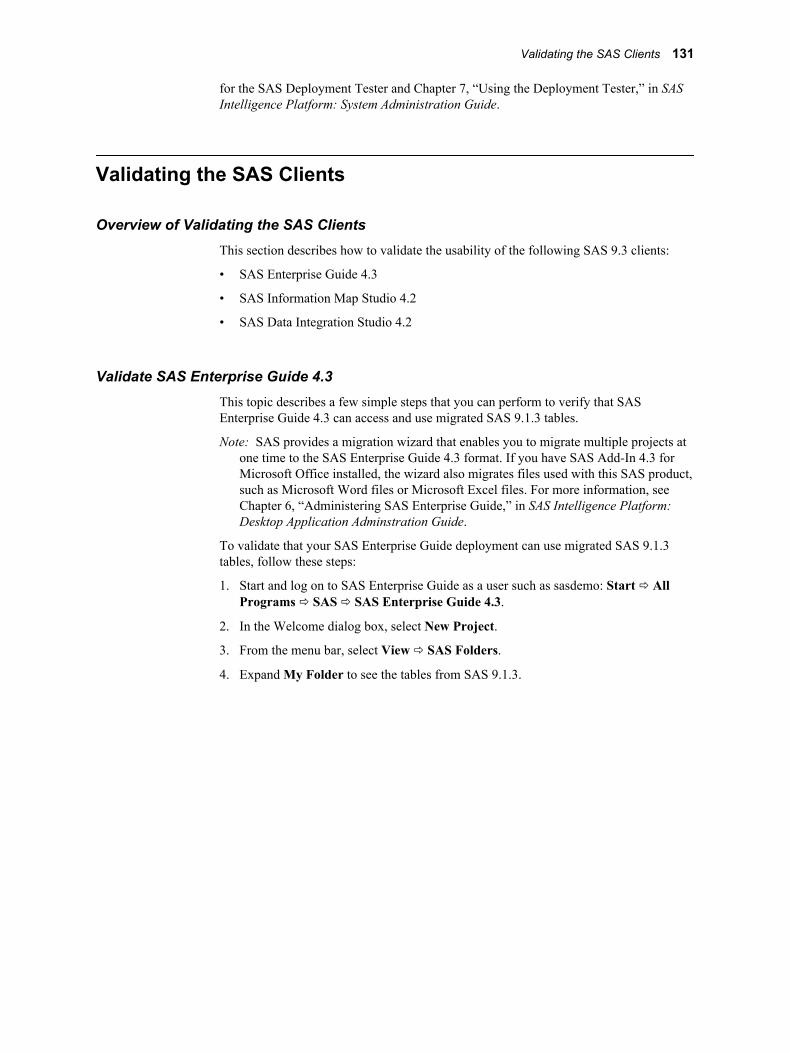
for the SAS Deployment Tester and Chapter 7, “Using the Deployment Tester,” in SAS Intelligence Platform: System Administration Guide.
Validating the SAS Clients
Overview of Validating the SAS ClientsThis section describes how to validate the usability of the following SAS 9.3 clients:
• SAS Enterprise Guide 4.3
• SAS Information Map Studio 4.2
• SAS Data Integration Studio 4.2
Validate SAS Enterprise Guide 4.3This topic describes a few simple steps that you can perform to verify that SAS Enterprise Guide 4.3 can access and use migrated SAS 9.1.3 tables.
Note: SAS provides a migration wizard that enables you to migrate multiple projects at one time to the SAS Enterprise Guide 4.3 format. If you have SAS Add-In 4.3 for Microsoft Office installed, the wizard also migrates files used with this SAS product, such as Microsoft Word files or Microsoft Excel files. For more information, see Chapter 6, “Administering SAS Enterprise Guide,” in SAS Intelligence Platform: Desktop Application Adminstration Guide.
To validate that your SAS Enterprise Guide deployment can use migrated SAS 9.1.3 tables, follow these steps:
1. Start and log on to SAS Enterprise Guide as a user such as sasdemo: Start ð All Programs ð SAS ð SAS Enterprise Guide 4.3.
2. In the Welcome dialog box, select New Project.
3. From the menu bar, select View ð SAS Folders.
4. Expand My Folder to see the tables from SAS 9.1.3.
Validating the SAS Clients 131
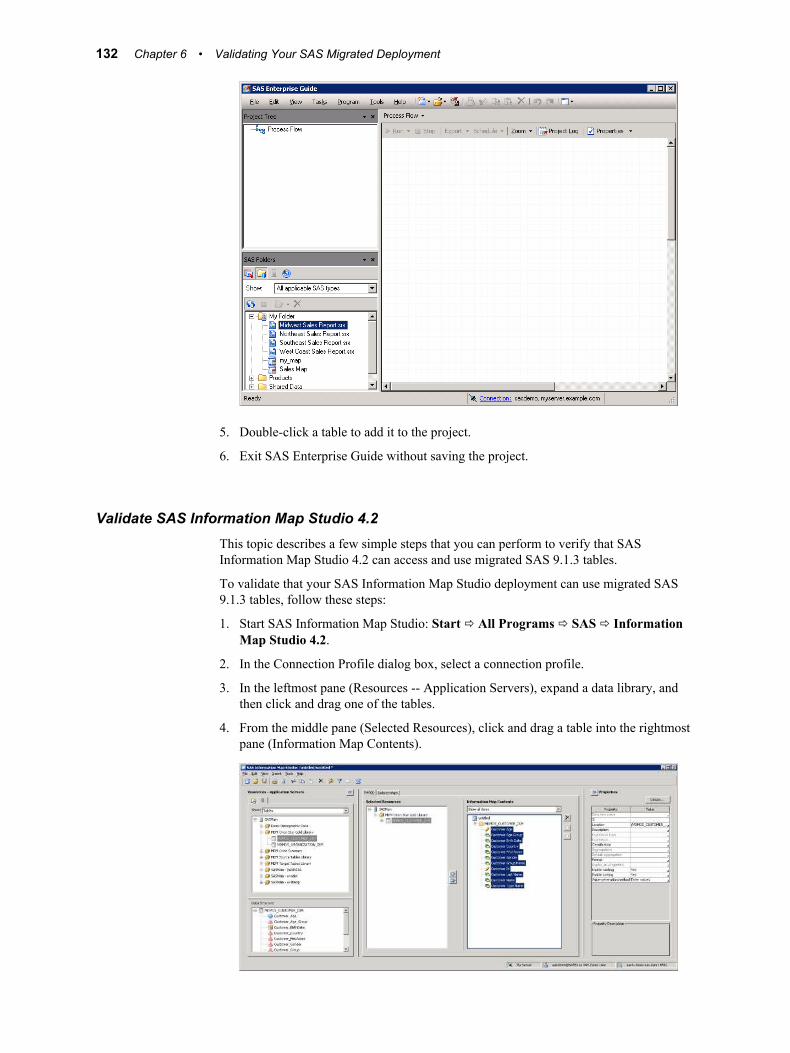
5. Double-click a table to add it to the project.
6. Exit SAS Enterprise Guide without saving the project.
Validate SAS Information Map Studio 4.2This topic describes a few simple steps that you can perform to verify that SAS Information Map Studio 4.2 can access and use migrated SAS 9.1.3 tables.
To validate that your SAS Information Map Studio deployment can use migrated SAS 9.1.3 tables, follow these steps:
1. Start SAS Information Map Studio: Start ð All Programs ð SAS ð Information Map Studio 4.2.
2. In the Connection Profile dialog box, select a connection profile.
3. In the leftmost pane (Resources -- Application Servers), expand a data library, and then click and drag one of the tables.
4. From the middle pane (Selected Resources), click and drag a table into the rightmost pane (Information Map Contents).
132 Chapter 6 • Validating Your SAS Migrated Deployment
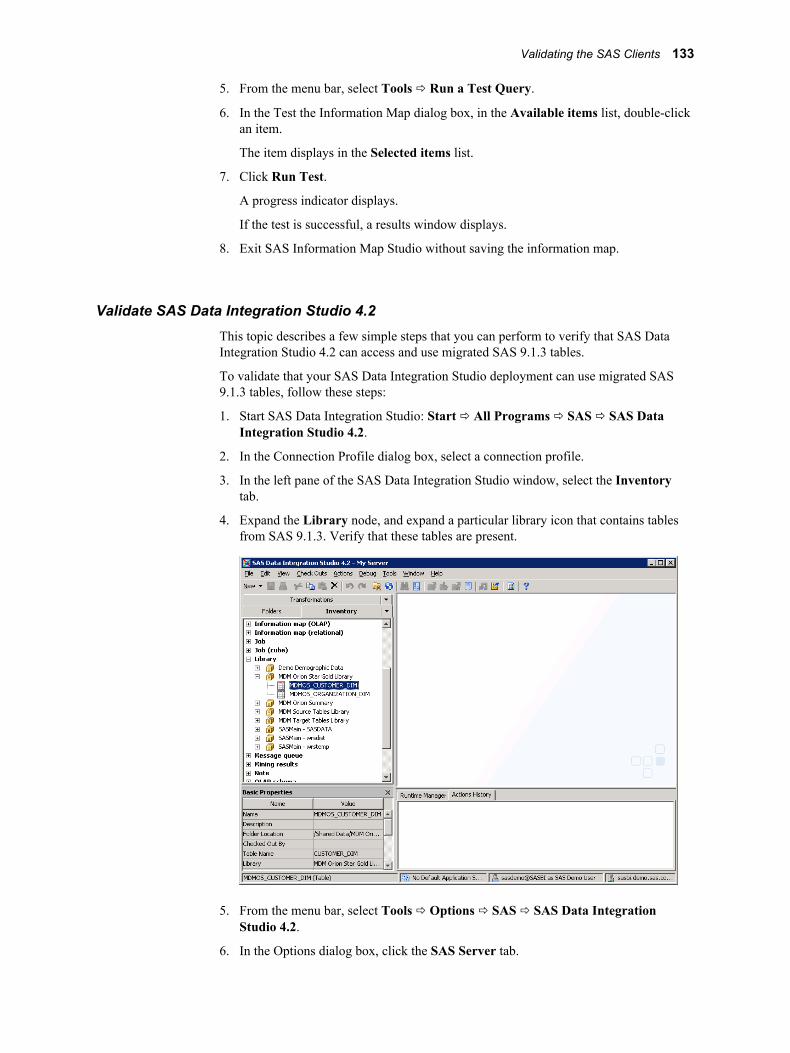
5. From the menu bar, select Tools ð Run a Test Query.
6. In the Test the Information Map dialog box, in the Available items list, double-click an item.
The item displays in the Selected items list.
7. Click Run Test.
A progress indicator displays.
If the test is successful, a results window displays.
8. Exit SAS Information Map Studio without saving the information map.
Validate SAS Data Integration Studio 4.2This topic describes a few simple steps that you can perform to verify that SAS Data Integration Studio 4.2 can access and use migrated SAS 9.1.3 tables.
To validate that your SAS Data Integration Studio deployment can use migrated SAS 9.1.3 tables, follow these steps:
1. Start SAS Data Integration Studio: Start ð All Programs ð SAS ð SAS Data Integration Studio 4.2.
2. In the Connection Profile dialog box, select a connection profile.
3. In the left pane of the SAS Data Integration Studio window, select the Inventory tab.
4. Expand the Library node, and expand a particular library icon that contains tables from SAS 9.1.3. Verify that these tables are present.
5. From the menu bar, select Tools ð Options ð SAS ð SAS Data Integration Studio 4.2.
6. In the Options dialog box, click the SAS Server tab.
Validating the SAS Clients 133
7. In the Server drop-down list, choose the SAS application server that you migrated, and click Test Connection.
If the connection is properly functioning, you should see an alert box that displays the following message:
Connection to the server was successful.
8. Exit SAS Data Integration Studio.
Validating the SAS 9.3 Middle Tier and Web Clients
Overview of Validating the SAS 9.3 Middle Tier and Web ClientsThis section describes how to validate reports and stored processes that you have migrated in the following SAS 9.3 Web clients:
• SAS 9.3 Stored Process Web Application
• SAS Web Report Studio 4.3
• SAS Information Delivery Portal 4.3
Start SAS Remote Services and Your Java Application ServerIn order to validate your SAS Web clients, you will need to make sure that SAS Remote Services and your Java application server are running. You will also need to know your Java application server's default listening port.
On Windows, check the Services snap-in to see whether SAS Remote Services and your Java application server are running. If not, start them in this order:
1. SAS Remote Services
2. your Java application server
On UNIX, enter the following command to see whether SAS Remote Services is running:
SAS-installation-directory/Lev1/Web/Applications/remoteservices.sh status
If SAS Remote Services is not running, enter the following command:
SAS-installation-directory/Lev1/Web/Applications/remoteservices.sh start
Navigate to the installation directory for the Java application server used at your site and run the start up script for the server.
The default listening ports for the SAS 9.3 supported Java application servers are as follows:
• WebLogic Server: 7001
• WebSphere Application Server: 9080
134 Chapter 6 • Validating Your SAS Migrated Deployment
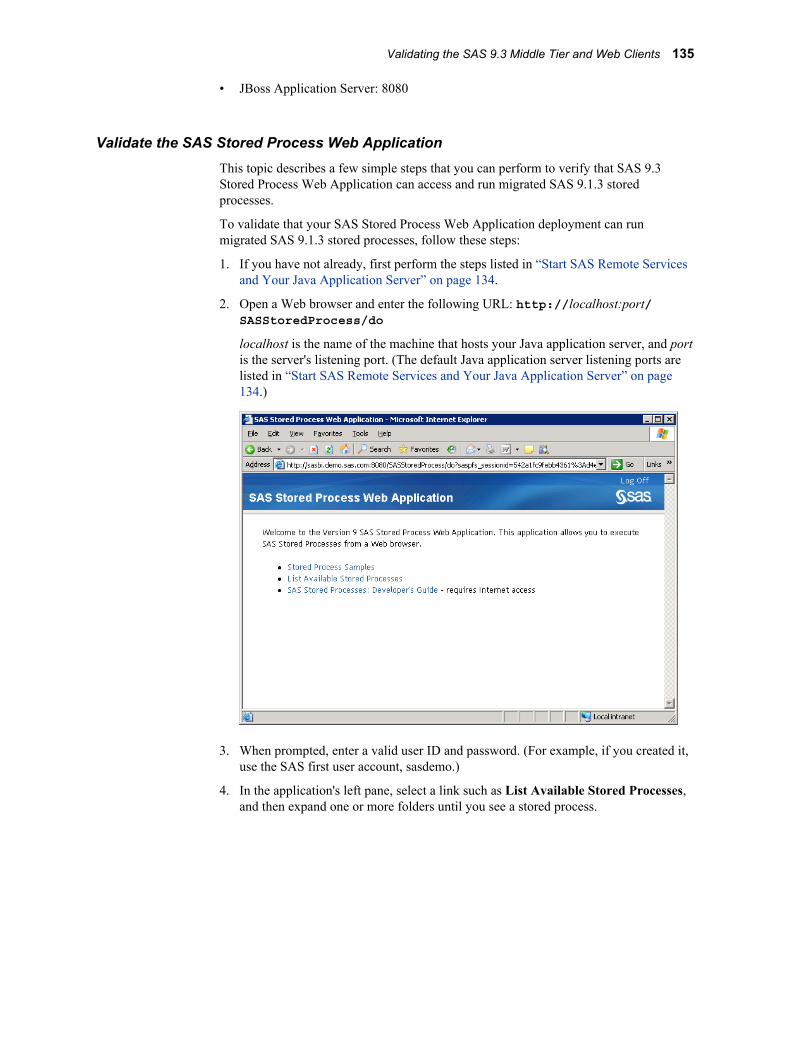
• JBoss Application Server: 8080
Validate the SAS Stored Process Web ApplicationThis topic describes a few simple steps that you can perform to verify that SAS 9.3 Stored Process Web Application can access and run migrated SAS 9.1.3 stored processes.
To validate that your SAS Stored Process Web Application deployment can run migrated SAS 9.1.3 stored processes, follow these steps:
1. If you have not already, first perform the steps listed in “Start SAS Remote Services and Your Java Application Server” on page 134.
2. Open a Web browser and enter the following URL: http://localhost:port/SASStoredProcess/do
localhost is the name of the machine that hosts your Java application server, and port is the server's listening port. (The default Java application server listening ports are listed in “Start SAS Remote Services and Your Java Application Server” on page 134.)
3. When prompted, enter a valid user ID and password. (For example, if you created it, use the SAS first user account, sasdemo.)
4. In the application's left pane, select a link such as List Available Stored Processes, and then expand one or more folders until you see a stored process.
Validating the SAS 9.3 Middle Tier and Web Clients 135
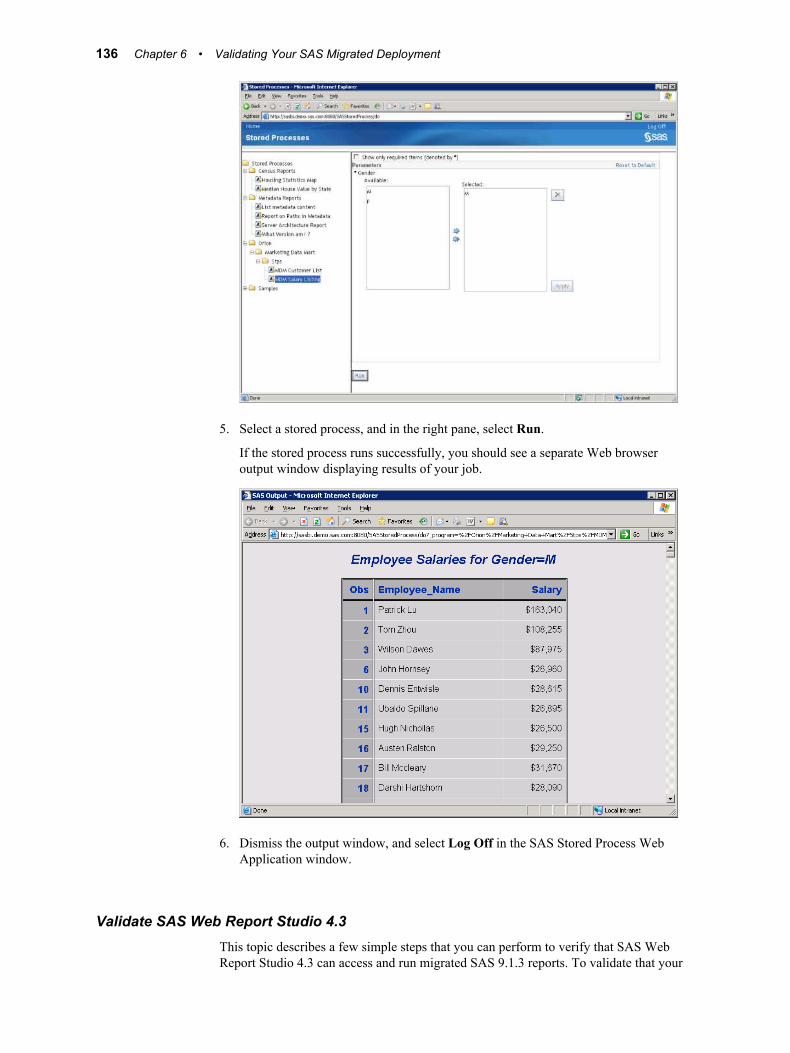
5. Select a stored process, and in the right pane, select Run.
If the stored process runs successfully, you should see a separate Web browser output window displaying results of your job.
6. Dismiss the output window, and select Log Off in the SAS Stored Process Web Application window.
Validate SAS Web Report Studio 4.3This topic describes a few simple steps that you can perform to verify that SAS Web Report Studio 4.3 can access and run migrated SAS 9.1.3 reports. To validate that your
136 Chapter 6 • Validating Your SAS Migrated Deployment
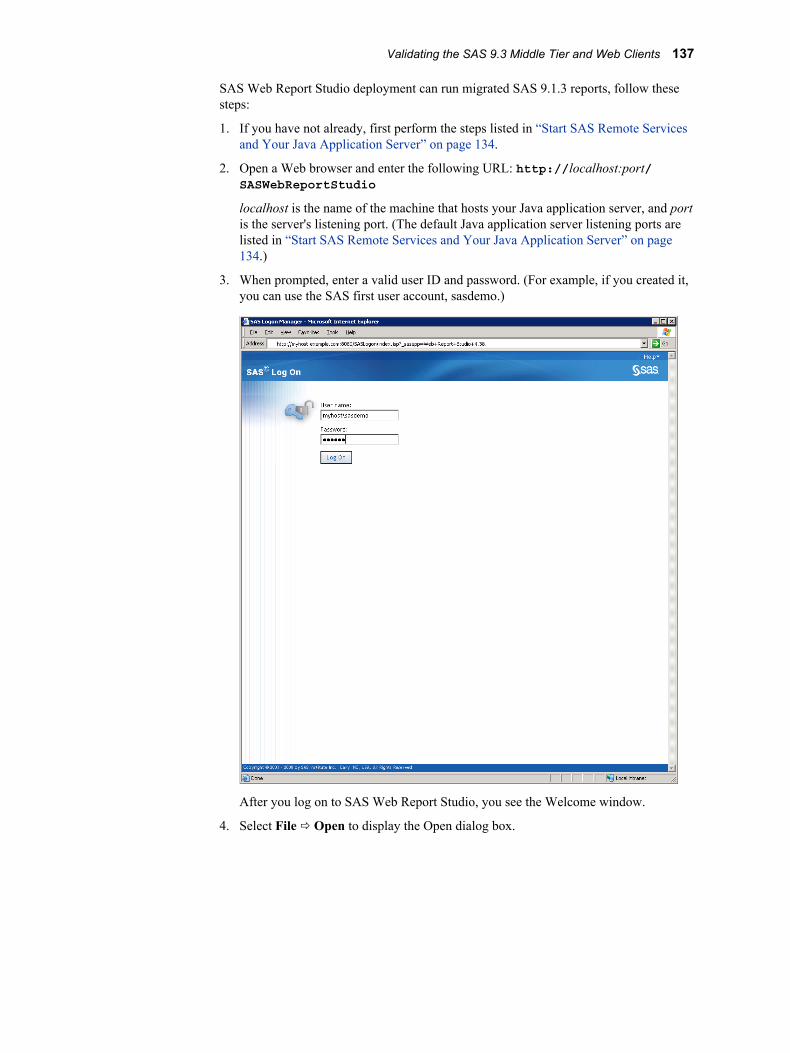
SAS Web Report Studio deployment can run migrated SAS 9.1.3 reports, follow these steps:
1. If you have not already, first perform the steps listed in “Start SAS Remote Services and Your Java Application Server” on page 134.
2. Open a Web browser and enter the following URL: http://localhost:port/SASWebReportStudio
localhost is the name of the machine that hosts your Java application server, and port is the server's listening port. (The default Java application server listening ports are listed in “Start SAS Remote Services and Your Java Application Server” on page 134.)
3. When prompted, enter a valid user ID and password. (For example, if you created it, you can use the SAS first user account, sasdemo.)
After you log on to SAS Web Report Studio, you see the Welcome window.
4. Select File ð Open to display the Open dialog box.
Validating the SAS 9.3 Middle Tier and Web Clients 137
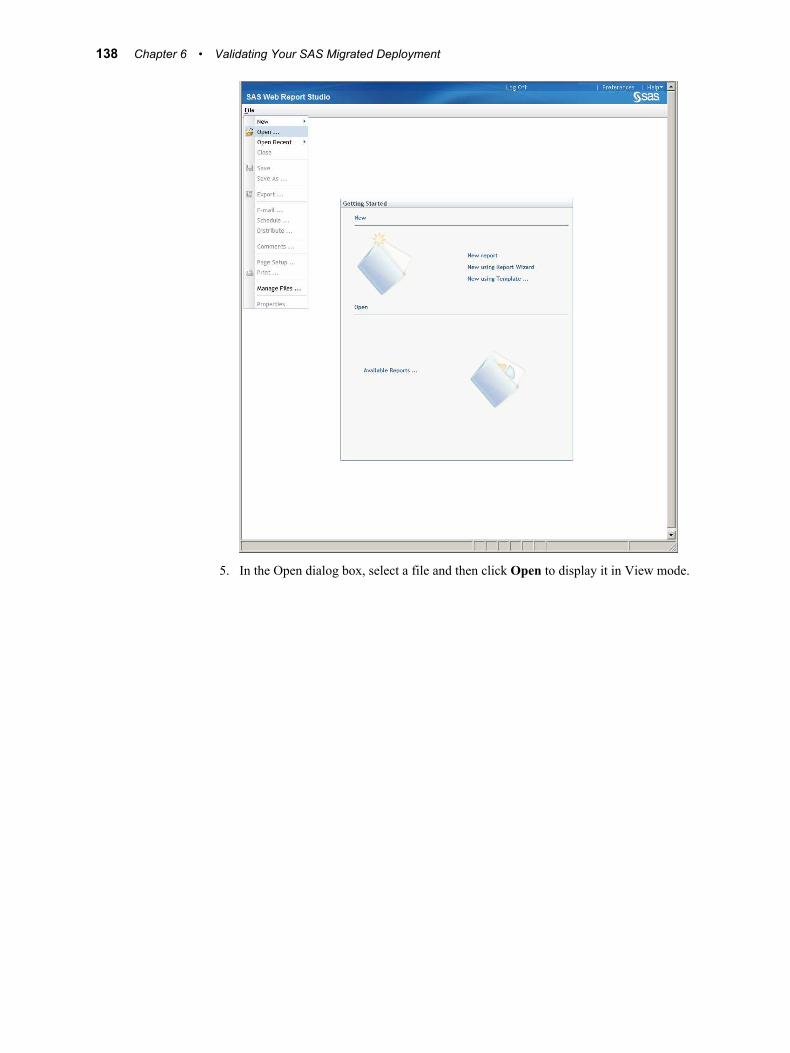
5. In the Open dialog box, select a file and then click Open to display it in View mode.
138 Chapter 6 • Validating Your SAS Migrated Deployment
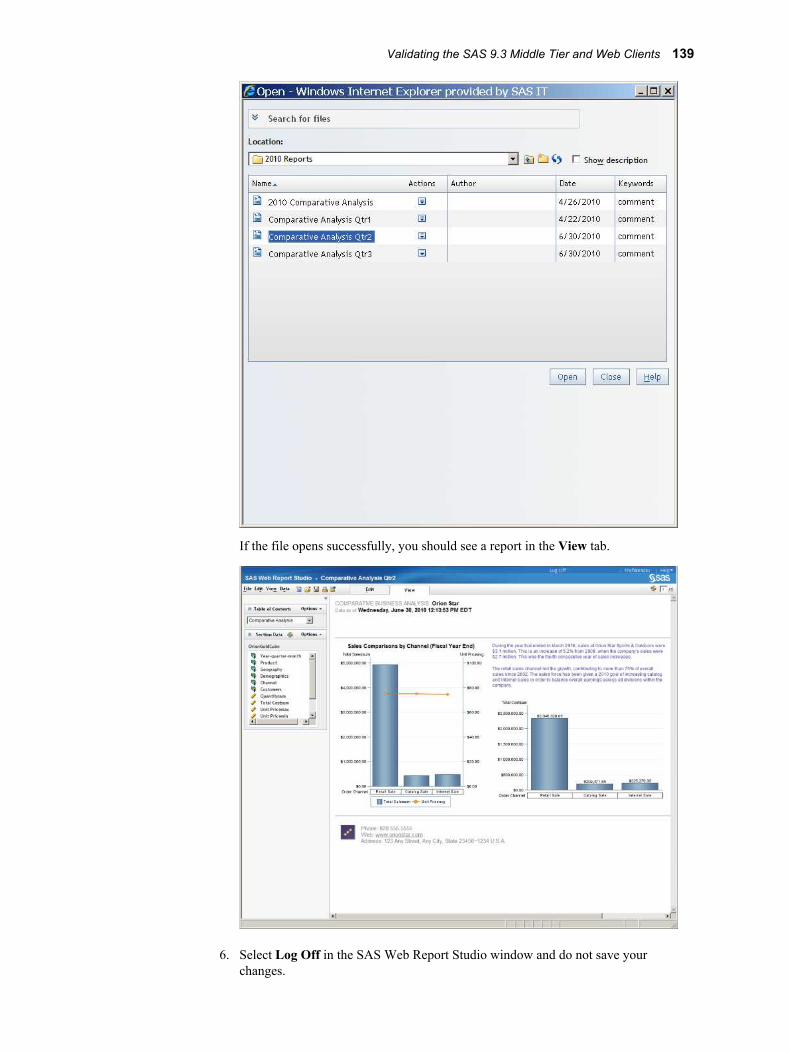
If the file opens successfully, you should see a report in the View tab.
6. Select Log Off in the SAS Web Report Studio window and do not save your changes.
Validating the SAS 9.3 Middle Tier and Web Clients 139
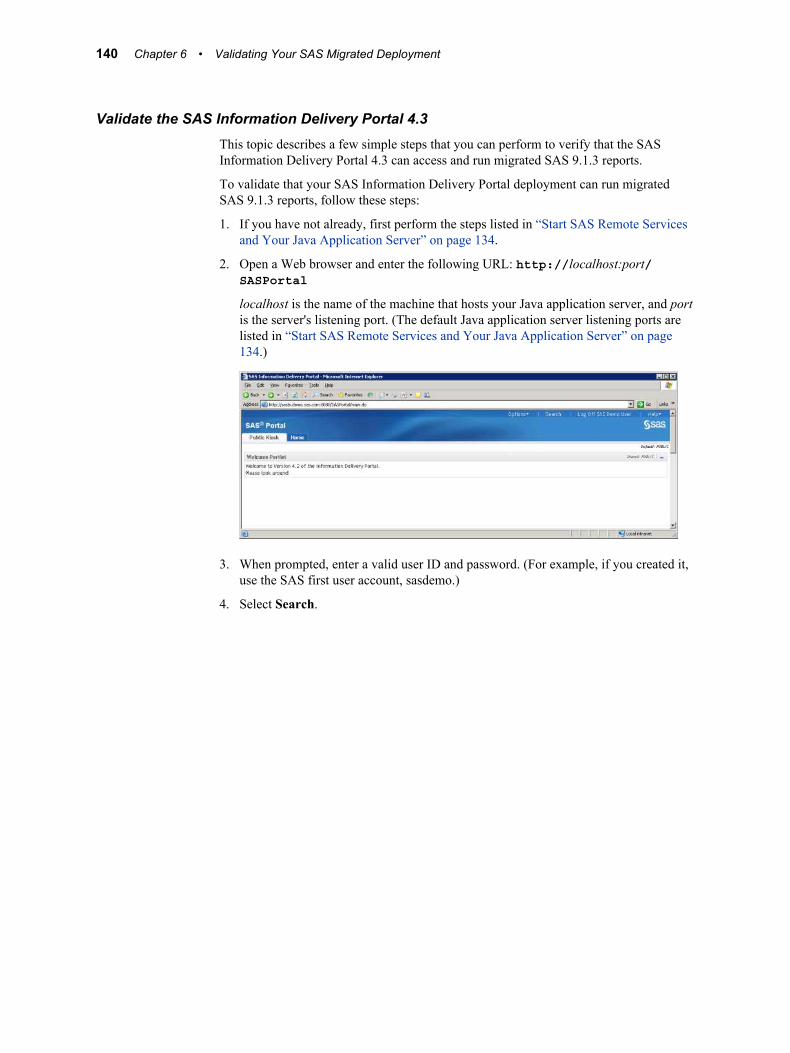
Validate the SAS Information Delivery Portal 4.3This topic describes a few simple steps that you can perform to verify that the SAS Information Delivery Portal 4.3 can access and run migrated SAS 9.1.3 reports.
To validate that your SAS Information Delivery Portal deployment can run migrated SAS 9.1.3 reports, follow these steps:
1. If you have not already, first perform the steps listed in “Start SAS Remote Services and Your Java Application Server” on page 134.
2. Open a Web browser and enter the following URL: http://localhost:port/SASPortal
localhost is the name of the machine that hosts your Java application server, and port is the server's listening port. (The default Java application server listening ports are listed in “Start SAS Remote Services and Your Java Application Server” on page 134.)
3. When prompted, enter a valid user ID and password. (For example, if you created it, use the SAS first user account, sasdemo.)
4. Select Search.
140 Chapter 6 • Validating Your SAS Migrated Deployment
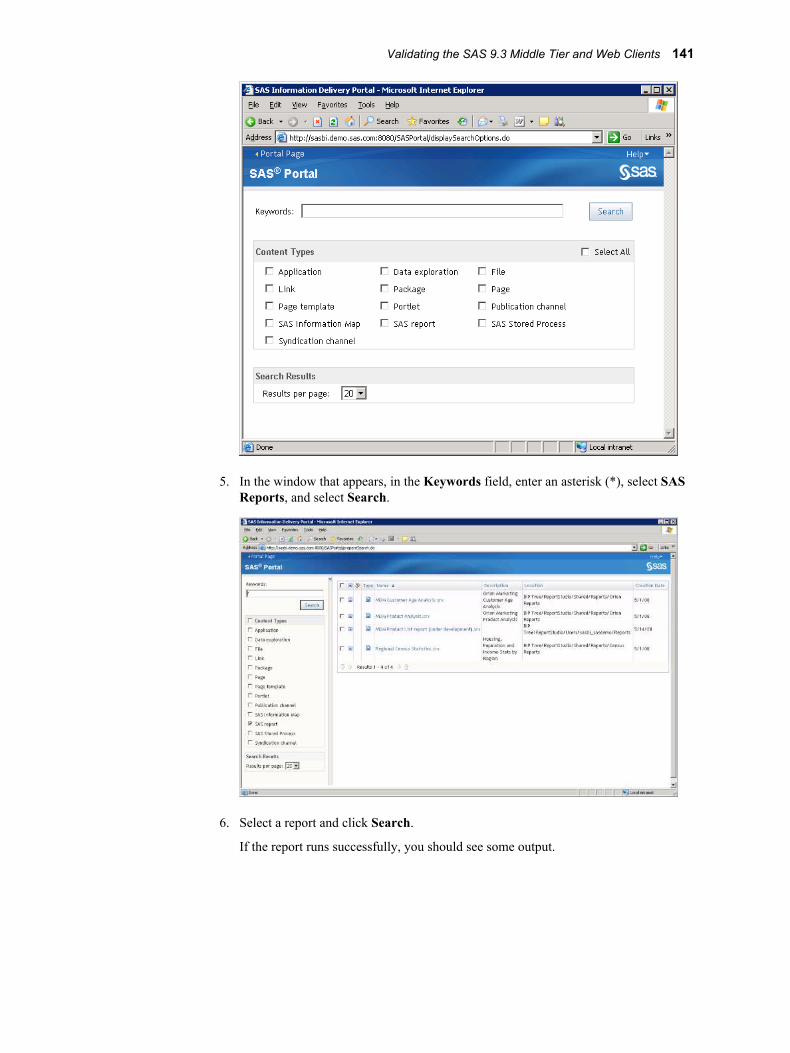
5. In the window that appears, in the Keywords field, enter an asterisk (*), select SAS Reports, and select Search.
6. Select a report and click Search.
If the report runs successfully, you should see some output.
Validating the SAS 9.3 Middle Tier and Web Clients 141
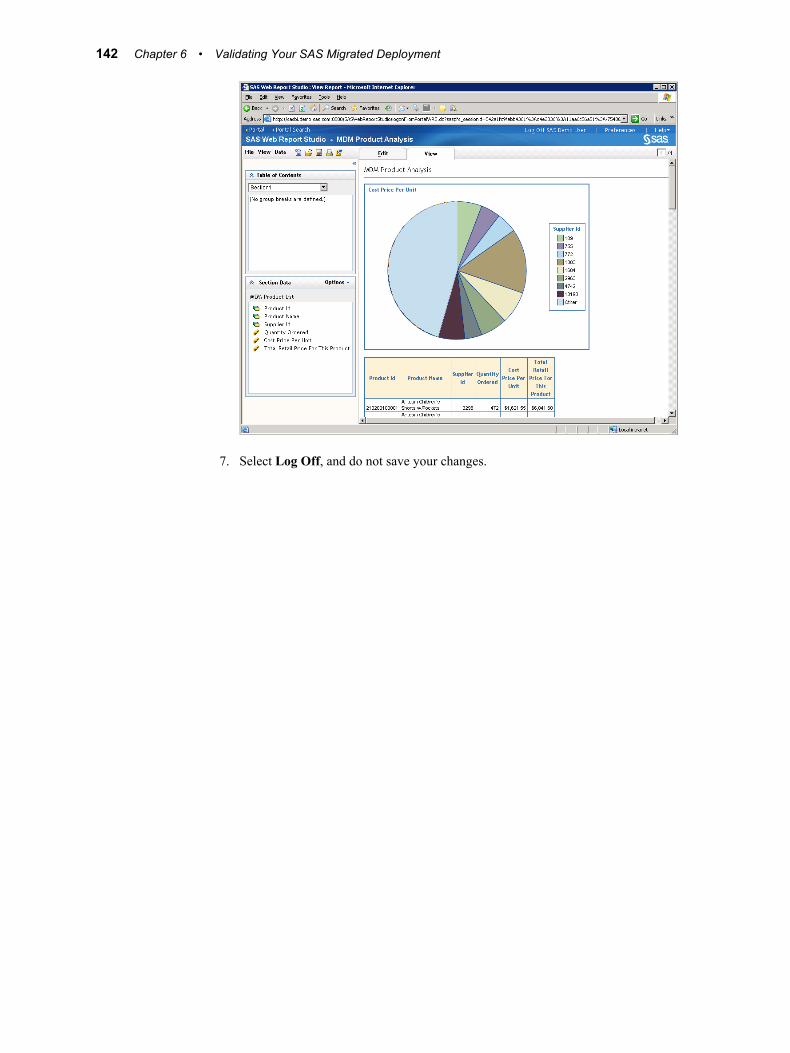
7. Select Log Off, and do not save your changes.
142 Chapter 6 • Validating Your SAS Migrated Deployment
Chapter 7
What's Next?
Overview of What's Next . . . . . . . . . . . . . . . . . . . . . . . . . . . . . . . . . . . . . . . . . . . . . . 143
First-Priority Setup Tasks . . . . . . . . . . . . . . . . . . . . . . . . . . . . . . . . . . . . . . . . . . . . . 144Summary of First-Priority Setup Tasks . . . . . . . . . . . . . . . . . . . . . . . . . . . . . . . . . 144Recommended Operating System Protections for Windows Machines . . . . . . . . . 145Default Operating System Protections for UNIX and z/OS Machines . . . . . . . . . . 146
Standard Setup Tasks . . . . . . . . . . . . . . . . . . . . . . . . . . . . . . . . . . . . . . . . . . . . . . . . . 148
Optional Setup Tasks . . . . . . . . . . . . . . . . . . . . . . . . . . . . . . . . . . . . . . . . . . . . . . . . . 148
Ongoing System Administration Tasks . . . . . . . . . . . . . . . . . . . . . . . . . . . . . . . . . . 150
Best Practices for Ensuring the Integrity of Your System . . . . . . . . . . . . . . . . . . . 151Allow Only the Metadata Server to Access Your Metadata Repositories . . . . . . . 151Use Best Practices for Working with SAS Folders . . . . . . . . . . . . . . . . . . . . . . . . 151
Overview of What's NextAfter you have validated your migrated data, here are several steps that you should perform:
• Complete high-priority tasks such as securing your SAS configuration directories. For more information, see “First-Priority Setup Tasks” on page 144.
• Follow the best practices for ensuring the integrity of your system. For more information, see “Best Practices for Ensuring the Integrity of Your System” on page 151.
• Consider whether you need to perform any optional tasks such as adjusting server logging. For more information, see “Optional Setup Tasks” on page 148.
• Review the list of ongoing system administration tasks. For more information, see “Ongoing System Administration Tasks” on page 150.
143
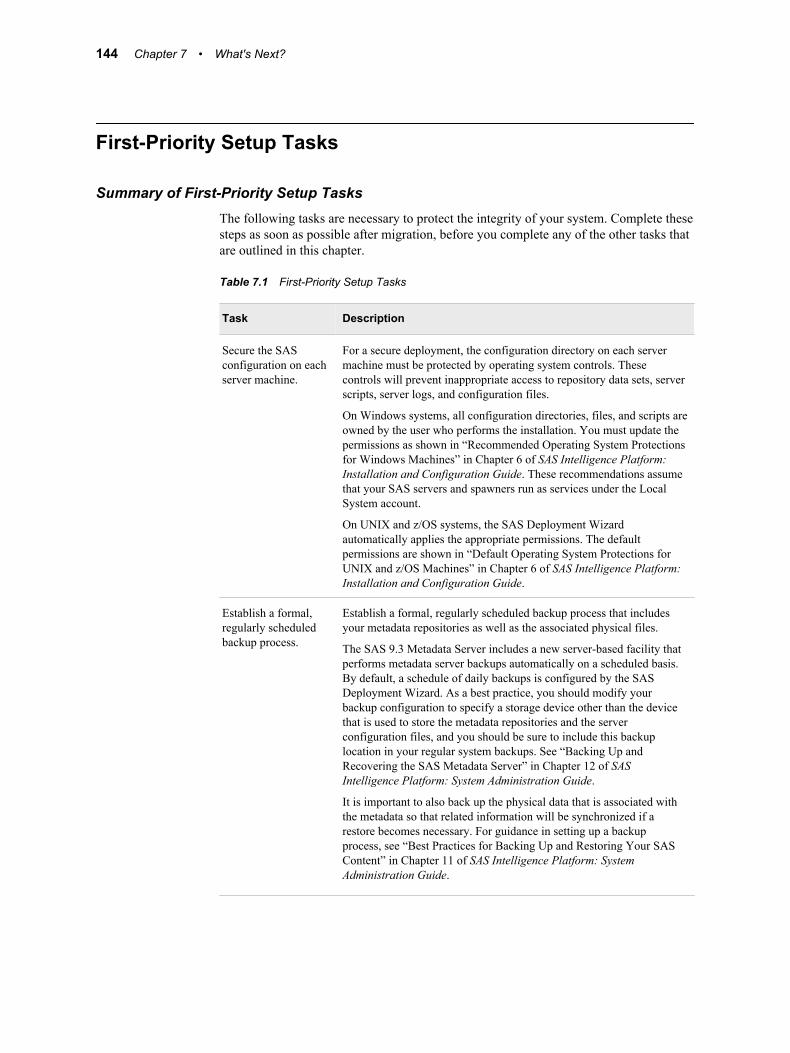
First-Priority Setup Tasks
Summary of First-Priority Setup TasksThe following tasks are necessary to protect the integrity of your system. Complete these steps as soon as possible after migration, before you complete any of the other tasks that are outlined in this chapter.
Table 7.1 First-Priority Setup Tasks
Task Description
Secure the SAS configuration on each server machine.
For a secure deployment, the configuration directory on each server machine must be protected by operating system controls. These controls will prevent inappropriate access to repository data sets, server scripts, server logs, and configuration files.
On Windows systems, all configuration directories, files, and scripts are owned by the user who performs the installation. You must update the permissions as shown in “Recommended Operating System Protections for Windows Machines” in Chapter 6 of SAS Intelligence Platform: Installation and Configuration Guide. These recommendations assume that your SAS servers and spawners run as services under the Local System account.
On UNIX and z/OS systems, the SAS Deployment Wizard automatically applies the appropriate permissions. The default permissions are shown in “Default Operating System Protections for UNIX and z/OS Machines” in Chapter 6 of SAS Intelligence Platform: Installation and Configuration Guide.
Establish a formal, regularly scheduled backup process.
Establish a formal, regularly scheduled backup process that includes your metadata repositories as well as the associated physical files.
The SAS 9.3 Metadata Server includes a new server-based facility that performs metadata server backups automatically on a scheduled basis. By default, a schedule of daily backups is configured by the SAS Deployment Wizard. As a best practice, you should modify your backup configuration to specify a storage device other than the device that is used to store the metadata repositories and the server configuration files, and you should be sure to include this backup location in your regular system backups. See “Backing Up and Recovering the SAS Metadata Server” in Chapter 12 of SAS Intelligence Platform: System Administration Guide.
It is important to also back up the physical data that is associated with the metadata so that related information will be synchronized if a restore becomes necessary. For guidance in setting up a backup process, see “Best Practices for Backing Up and Restoring Your SAS Content” in Chapter 11 of SAS Intelligence Platform: System Administration Guide.
144 Chapter 7 • What's Next?
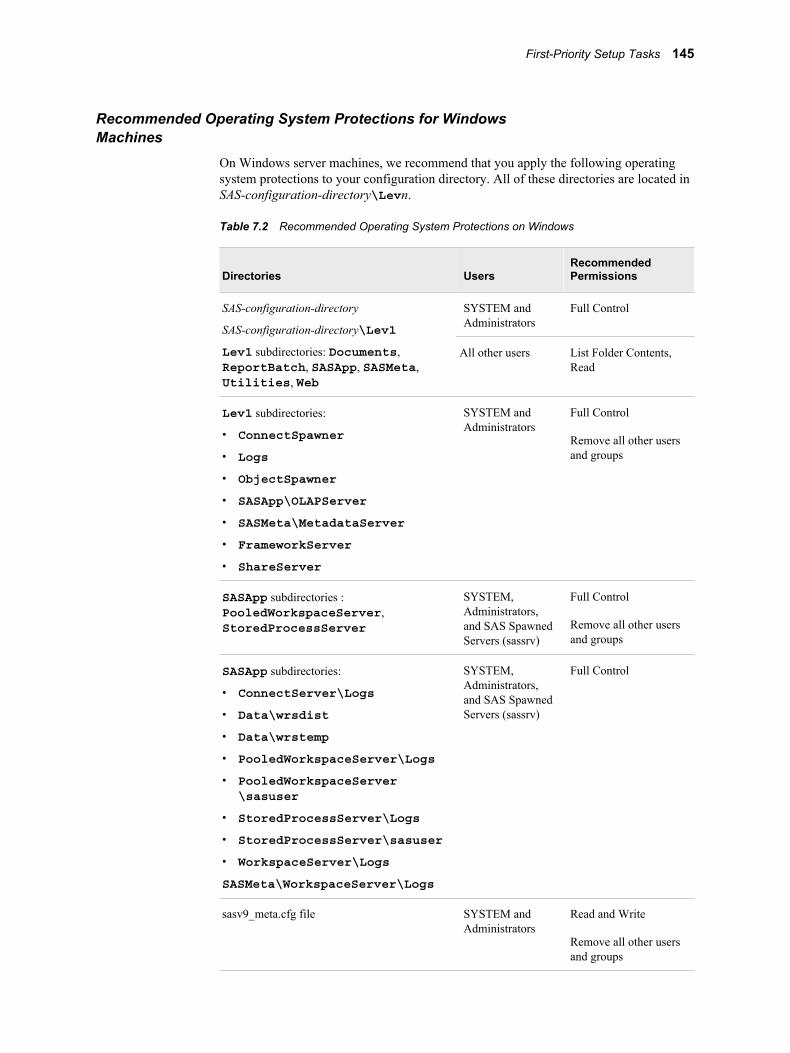
Recommended Operating System Protections for Windows Machines
On Windows server machines, we recommend that you apply the following operating system protections to your configuration directory. All of these directories are located in SAS-configuration-directory\Levn.
Table 7.2 Recommended Operating System Protections on Windows
Directories UsersRecommended Permissions
SAS-configuration-directory
SAS-configuration-directory\Lev1
Lev1 subdirectories: Documents, ReportBatch, SASApp, SASMeta, Utilities, Web
SYSTEM and Administrators
Full Control
All other users List Folder Contents, Read
Lev1 subdirectories:
• ConnectSpawner
• Logs
• ObjectSpawner
• SASApp\OLAPServer
• SASMeta\MetadataServer
• FrameworkServer
• ShareServer
SYSTEM and Administrators
Full Control
Remove all other users and groups
SASApp subdirectories : PooledWorkspaceServer, StoredProcessServer
SYSTEM, Administrators, and SAS Spawned Servers (sassrv)
Full Control
Remove all other users and groups
SASApp subdirectories:
• ConnectServer\Logs
• Data\wrsdist
• Data\wrstemp
• PooledWorkspaceServer\Logs
• PooledWorkspaceServer\sasuser
• StoredProcessServer\Logs
• StoredProcessServer\sasuser
• WorkspaceServer\Logs
SASMeta\WorkspaceServer\Logs
SYSTEM, Administrators, and SAS Spawned Servers (sassrv)
Full Control
sasv9_meta.cfg file SYSTEM and Administrators
Read and Write
Remove all other users and groups
First-Priority Setup Tasks 145
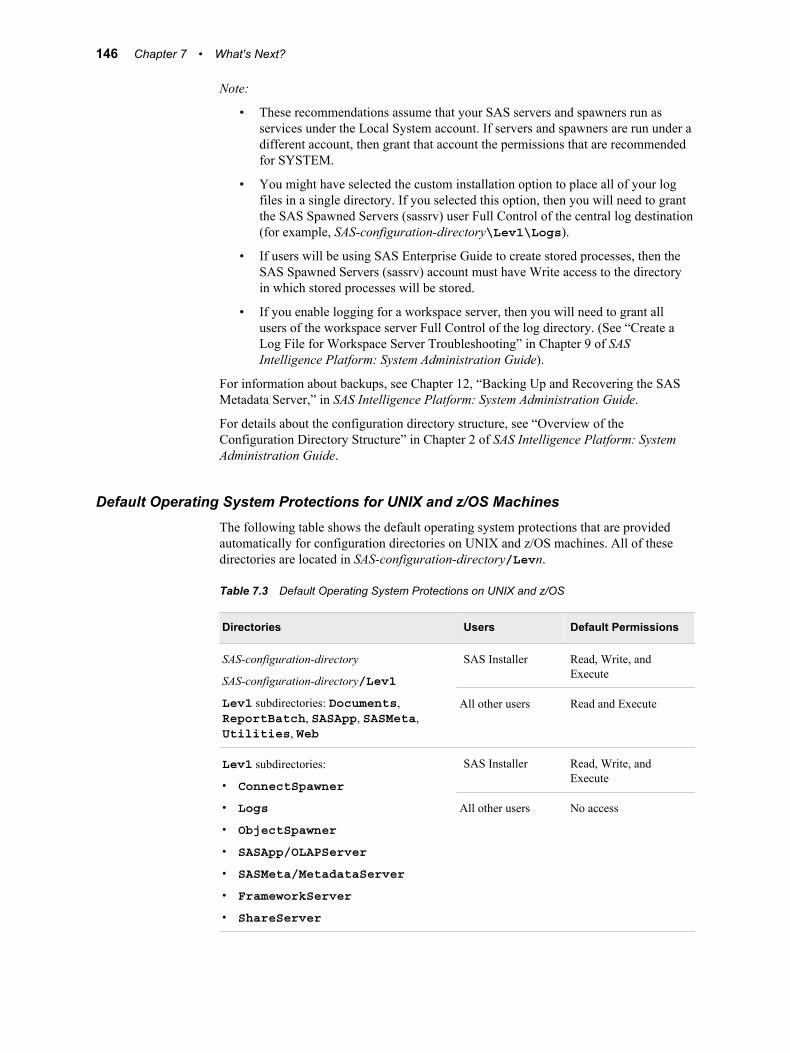
Note:
• These recommendations assume that your SAS servers and spawners run as services under the Local System account. If servers and spawners are run under a different account, then grant that account the permissions that are recommended for SYSTEM.
• You might have selected the custom installation option to place all of your log files in a single directory. If you selected this option, then you will need to grant the SAS Spawned Servers (sassrv) user Full Control of the central log destination (for example, SAS-configuration-directory\Lev1\Logs).
• If users will be using SAS Enterprise Guide to create stored processes, then the SAS Spawned Servers (sassrv) account must have Write access to the directory in which stored processes will be stored.
• If you enable logging for a workspace server, then you will need to grant all users of the workspace server Full Control of the log directory. (See “Create a Log File for Workspace Server Troubleshooting” in Chapter 9 of SAS Intelligence Platform: System Administration Guide).
For information about backups, see Chapter 12, “Backing Up and Recovering the SAS Metadata Server,” in SAS Intelligence Platform: System Administration Guide.
For details about the configuration directory structure, see “Overview of the Configuration Directory Structure” in Chapter 2 of SAS Intelligence Platform: System Administration Guide.
Default Operating System Protections for UNIX and z/OS MachinesThe following table shows the default operating system protections that are provided automatically for configuration directories on UNIX and z/OS machines. All of these directories are located in SAS-configuration-directory/Levn.
Table 7.3 Default Operating System Protections on UNIX and z/OS
Directories Users Default Permissions
SAS-configuration-directory
SAS-configuration-directory/Lev1
Lev1 subdirectories: Documents, ReportBatch, SASApp, SASMeta, Utilities, Web
SAS Installer Read, Write, and Execute
All other users Read and Execute
Lev1 subdirectories:
• ConnectSpawner
• Logs
• ObjectSpawner
• SASApp/OLAPServer
• SASMeta/MetadataServer
• FrameworkServer
• ShareServer
SAS Installer Read, Write, and Execute
All other users No access
146 Chapter 7 • What's Next?
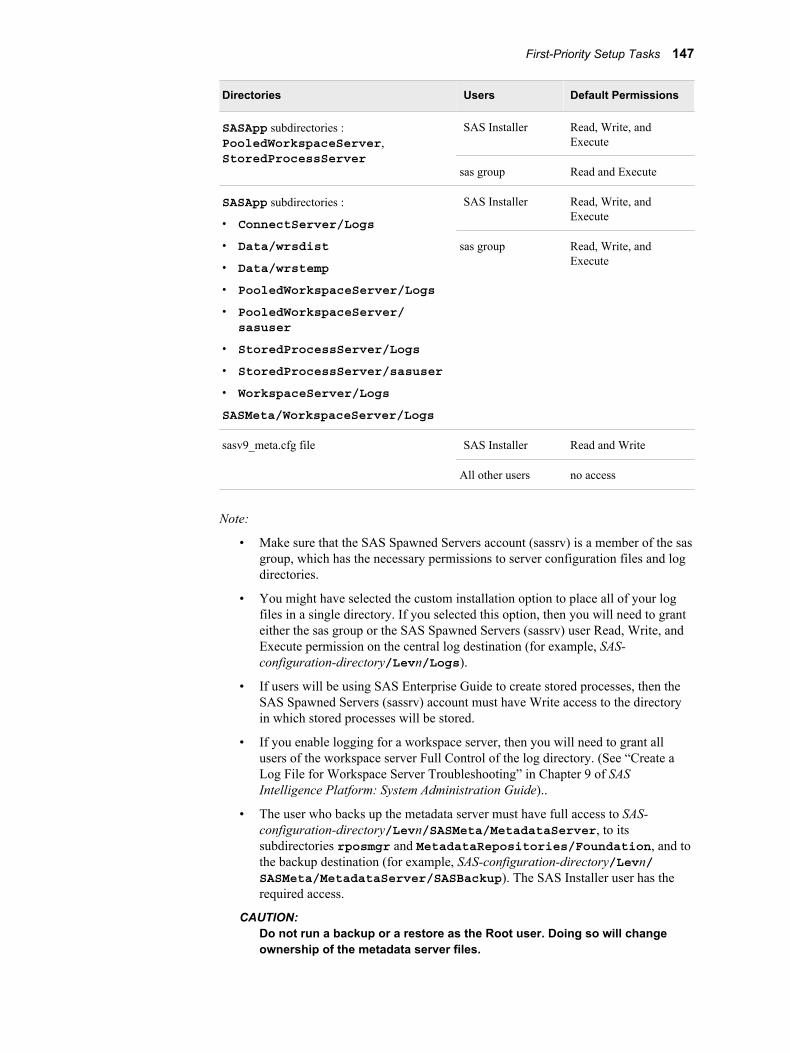
Directories Users Default Permissions
SASApp subdirectories : PooledWorkspaceServer, StoredProcessServer
SAS Installer Read, Write, and Execute
sas group Read and Execute
SASApp subdirectories :
• ConnectServer/Logs
• Data/wrsdist
• Data/wrstemp
• PooledWorkspaceServer/Logs
• PooledWorkspaceServer/sasuser
• StoredProcessServer/Logs
• StoredProcessServer/sasuser
• WorkspaceServer/Logs
SASMeta/WorkspaceServer/Logs
SAS Installer Read, Write, and Execute
sas group Read, Write, and Execute
sasv9_meta.cfg file SAS Installer Read and Write
All other users no access
Note:
• Make sure that the SAS Spawned Servers account (sassrv) is a member of the sas group, which has the necessary permissions to server configuration files and log directories.
• You might have selected the custom installation option to place all of your log files in a single directory. If you selected this option, then you will need to grant either the sas group or the SAS Spawned Servers (sassrv) user Read, Write, and Execute permission on the central log destination (for example, SAS-configuration-directory/Levn/Logs).
• If users will be using SAS Enterprise Guide to create stored processes, then the SAS Spawned Servers (sassrv) account must have Write access to the directory in which stored processes will be stored.
• If you enable logging for a workspace server, then you will need to grant all users of the workspace server Full Control of the log directory. (See “Create a Log File for Workspace Server Troubleshooting” in Chapter 9 of SAS Intelligence Platform: System Administration Guide)..
• The user who backs up the metadata server must have full access to SAS-configuration-directory/Levn/SASMeta/MetadataServer, to its subdirectories rposmgr and MetadataRepositories/Foundation, and to the backup destination (for example, SAS-configuration-directory/Levn/SASMeta/MetadataServer/SASBackup). The SAS Installer user has the required access.
CAUTION:Do not run a backup or a restore as the Root user. Doing so will change ownership of the metadata server files.
First-Priority Setup Tasks 147
• For information about backups, see Chapter 12, “Backing Up and Recovering the SAS Metadata Server,” in SAS Intelligence Platform: System Administration Guide.
For details about the configuration directory structure, see “Overview of the Configuration Directory Structure” in Chapter 2 of SAS Intelligence Platform: System Administration Guide.
Standard Setup TasksThe following administration tasks are essential to enable the users in your organization to begin using SAS Intelligence Platform client applications to access and analyze your data.
Table 7.4 Standard Setup Tasks
Task Description
Add users and manage access.
Standard security setup activities include the following:
• creating SAS administrators and regular SAS users
• managing access to metadata, data, and application functionality
For details, see “Selected Tasks” in Chapter 4 of SAS Intelligence Platform: Security Administration Guide.
Establish connectivity to your data sources.
To enable the client applications in the SAS Intelligence Platform to access your data sources (including SAS data sets, third-party relational databases, and data from Enterprise Resource Planning systems), you must create metadata objects that represent your data. For example, to enable users to access data in a library of SAS data sets, you must define metadata objects that represent the SAS library and each of the tables in the library. For details, see “Connecting to Common Data Sources” in Chapter 2 of SAS Intelligence Platform: Data Administration Guide.
Set up your metadata folder structure.
SAS Intelligence Platform clients use a hierarchy of SAS folders to store metadata for content such as libraries, tables, OLAP schemas, jobs, information maps, and reports. The initial structure provides private folders for individual users and provides a separate area for shared data. Within these folders, you should create a customized folder structure that meets your specific needs. For details, see “Working with SAS Folders” in Chapter 17 of SAS Intelligence Platform: System Administration Guide.
Note: Be sure to secure access to the folders as described in the SAS Intelligence Platform: Security Administration Guide.
Optional Setup TasksIt might be necessary for you to modify your initial configuration to meet specific requirements in your environment. Optional administration and configuration tasks include the following.
148 Chapter 7 • What's Next?
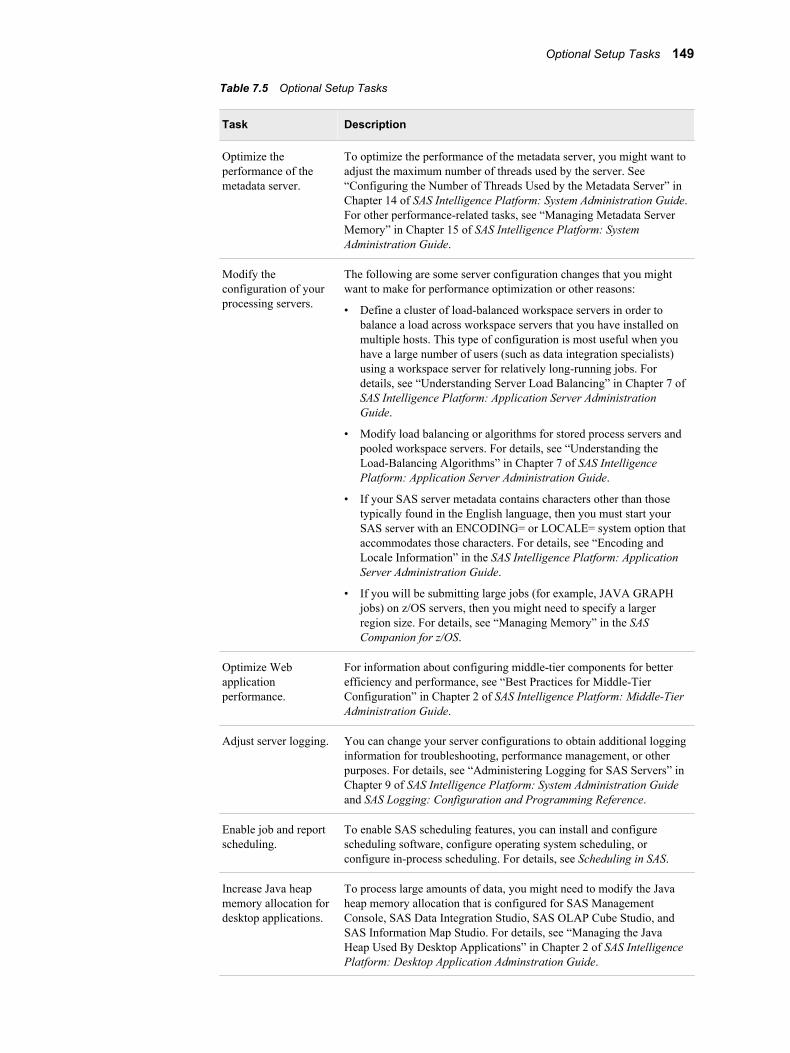
Table 7.5 Optional Setup Tasks
Task Description
Optimize the performance of the metadata server.
To optimize the performance of the metadata server, you might want to adjust the maximum number of threads used by the server. See “Configuring the Number of Threads Used by the Metadata Server” in Chapter 14 of SAS Intelligence Platform: System Administration Guide. For other performance-related tasks, see “Managing Metadata Server Memory” in Chapter 15 of SAS Intelligence Platform: System Administration Guide.
Modify the configuration of your processing servers.
The following are some server configuration changes that you might want to make for performance optimization or other reasons:
• Define a cluster of load-balanced workspace servers in order to balance a load across workspace servers that you have installed on multiple hosts. This type of configuration is most useful when you have a large number of users (such as data integration specialists) using a workspace server for relatively long-running jobs. For details, see “Understanding Server Load Balancing” in Chapter 7 of SAS Intelligence Platform: Application Server Administration Guide.
• Modify load balancing or algorithms for stored process servers and pooled workspace servers. For details, see “Understanding the Load-Balancing Algorithms” in Chapter 7 of SAS Intelligence Platform: Application Server Administration Guide.
• If your SAS server metadata contains characters other than those typically found in the English language, then you must start your SAS server with an ENCODING= or LOCALE= system option that accommodates those characters. For details, see “Encoding and Locale Information” in the SAS Intelligence Platform: Application Server Administration Guide.
• If you will be submitting large jobs (for example, JAVA GRAPH jobs) on z/OS servers, then you might need to specify a larger region size. For details, see “Managing Memory” in the SAS Companion for z/OS.
Optimize Web application performance.
For information about configuring middle-tier components for better efficiency and performance, see “Best Practices for Middle-Tier Configuration” in Chapter 2 of SAS Intelligence Platform: Middle-Tier Administration Guide.
Adjust server logging. You can change your server configurations to obtain additional logging information for troubleshooting, performance management, or other purposes. For details, see “Administering Logging for SAS Servers” in Chapter 9 of SAS Intelligence Platform: System Administration Guideand SAS Logging: Configuration and Programming Reference.
Enable job and report scheduling.
To enable SAS scheduling features, you can install and configure scheduling software, configure operating system scheduling, or configure in-process scheduling. For details, see Scheduling in SAS.
Increase Java heap memory allocation for desktop applications.
To process large amounts of data, you might need to modify the Java heap memory allocation that is configured for SAS Management Console, SAS Data Integration Studio, SAS OLAP Cube Studio, and SAS Information Map Studio. For details, see “Managing the Java Heap Used By Desktop Applications” in Chapter 2 of SAS Intelligence Platform: Desktop Application Adminstration Guide.
Optional Setup Tasks 149
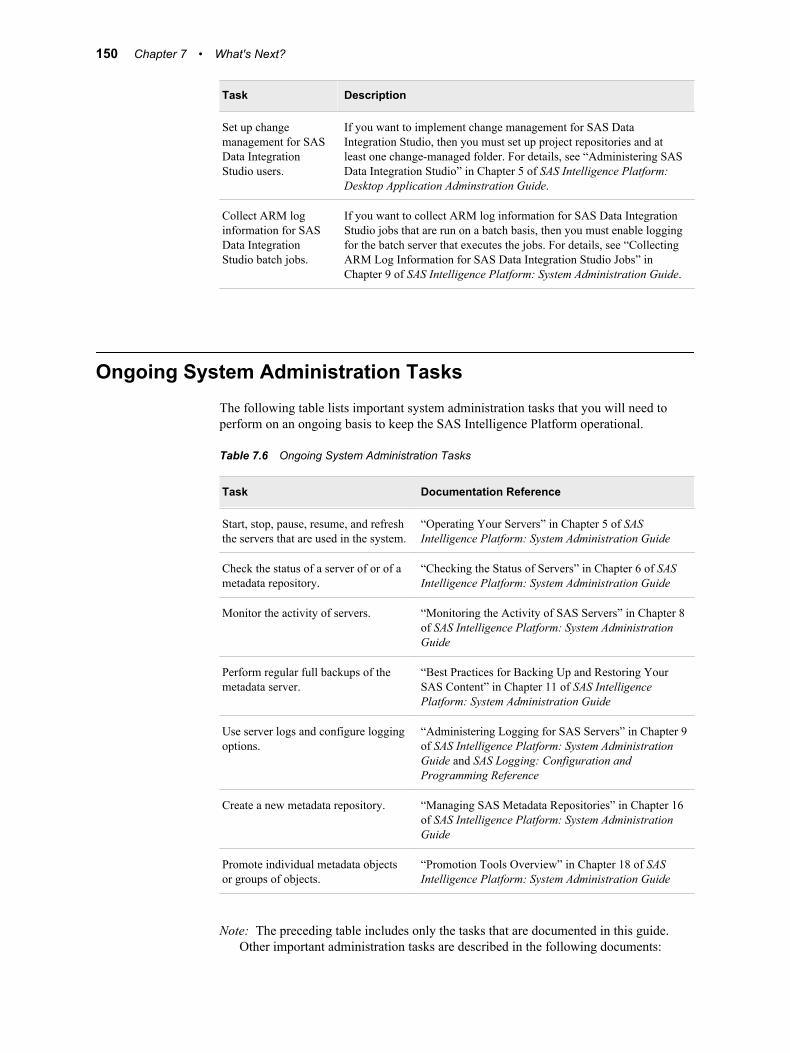
Task Description
Set up change management for SAS Data Integration Studio users.
If you want to implement change management for SAS Data Integration Studio, then you must set up project repositories and at least one change-managed folder. For details, see “Administering SAS Data Integration Studio” in Chapter 5 of SAS Intelligence Platform: Desktop Application Adminstration Guide.
Collect ARM log information for SAS Data Integration Studio batch jobs.
If you want to collect ARM log information for SAS Data Integration Studio jobs that are run on a batch basis, then you must enable logging for the batch server that executes the jobs. For details, see “Collecting ARM Log Information for SAS Data Integration Studio Jobs” in Chapter 9 of SAS Intelligence Platform: System Administration Guide.
Ongoing System Administration TasksThe following table lists important system administration tasks that you will need to perform on an ongoing basis to keep the SAS Intelligence Platform operational.
Table 7.6 Ongoing System Administration Tasks
Task Documentation Reference
Start, stop, pause, resume, and refresh the servers that are used in the system.
“Operating Your Servers” in Chapter 5 of SAS Intelligence Platform: System Administration Guide
Check the status of a server of or of a metadata repository.
“Checking the Status of Servers” in Chapter 6 of SAS Intelligence Platform: System Administration Guide
Monitor the activity of servers. “Monitoring the Activity of SAS Servers” in Chapter 8 of SAS Intelligence Platform: System Administration Guide
Perform regular full backups of the metadata server.
“Best Practices for Backing Up and Restoring Your SAS Content” in Chapter 11 of SAS Intelligence Platform: System Administration Guide
Use server logs and configure logging options.
“Administering Logging for SAS Servers” in Chapter 9 of SAS Intelligence Platform: System Administration Guide and SAS Logging: Configuration and Programming Reference
Create a new metadata repository. “Managing SAS Metadata Repositories” in Chapter 16 of SAS Intelligence Platform: System Administration Guide
Promote individual metadata objects or groups of objects.
“Promotion Tools Overview” in Chapter 18 of SAS Intelligence Platform: System Administration Guide
Note: The preceding table includes only the tasks that are documented in this guide. Other important administration tasks are described in the following documents:
150 Chapter 7 • What's Next?
• Appendix 2, “Checklist for a More Secure Deployment,” in SAS Intelligence Platform: Security Administration Guide to ensure that your environment remains secure on an ongoing basis.
• SAS Intelligence Platform: Data Administration Guide.
• SAS Intelligence Platform: Application Server Administration Guide.
• SAS Intelligence Platform: Desktop Application Adminstration Guide.
• SAS Intelligence Platform: Web Application Administration Guide.
• SAS Intelligence Platform: Middle-Tier Administration Guide.
• Scheduling in SAS.
• SAS/SHARE User's Guide.
• SAS/CONNECT User's Guide.
Best Practices for Ensuring the Integrity of Your System
Allow Only the Metadata Server to Access Your Metadata Repositories
The MetadataRepositories and rpsomgr subdirectories, which are located in the SAS configuration directory, are critical to the operation of your system. These data sets contain metadata that defines your servers, users, access levels, enterprise data sources, and data structures. They also contain metadata for resources that are created and used by SAS applications, including information maps, OLAP cubes, report definitions, stored process definitions, and jobs.
To safeguard the integrity of your system:
• Never move, delete, modify, or directly read the data sets in the MetadataRepositories and rpsomgr directories. These data sets should be accessed only by metadata server processes.
• Do not place other files in these directories.
• Maintain a daily schedule of metadata server backups, as described in “Backing Up and Recovering the SAS Metadata Server” in Chapter 12 of SAS Intelligence Platform: System Administration Guide.
Use Best Practices for Working with SAS FoldersThe folders that appear in the Folders tab of SAS Management console are used by client applications to store business intelligence content and system information. Inappropriate renaming, deleting, or moving of these folders or their contents could cause client applications to malfunction.
When interacting with folders in SAS Management Console, be sure to follow the best practices that are provided in “Working with SAS Folders” in Chapter 17 of SAS Intelligence Platform: System Administration Guide. If you need to move or copy the contents of these folders, use the procedures that are provided in “Promotion Tools Overview” in Chapter 18 of SAS Intelligence Platform: System Administration Guide.
Best Practices for Ensuring the Integrity of Your System 151

152 Chapter 7 • What's Next?
Appendix 1
SAS Migration Utility Reference
SAS Migration Utility Overview . . . . . . . . . . . . . . . . . . . . . . . . . . . . . . . . . . . . . . . . 153
Which Version of the Migration Utility Do I Use? . . . . . . . . . . . . . . . . . . . . . . . . . 154
smu Command Syntax . . . . . . . . . . . . . . . . . . . . . . . . . . . . . . . . . . . . . . . . . . . . . . . . 154
smu Command Syntax Description . . . . . . . . . . . . . . . . . . . . . . . . . . . . . . . . . . . . . . 155
smu Command Notes . . . . . . . . . . . . . . . . . . . . . . . . . . . . . . . . . . . . . . . . . . . . . . . . . 159
smu Command Examples . . . . . . . . . . . . . . . . . . . . . . . . . . . . . . . . . . . . . . . . . . . . . . 161Example 1: Basic, Two-Phase Migration Utility Invocation . . . . . . . . . . . . . . . . . 161Example 2: Two-Phase Migration Utility Invocation with Output Preferences . . . 161Example 3: Report-Only Migration Utility Invocation . . . . . . . . . . . . . . . . . . . . . 162Example 4: Migration Utility Invocation Using a Properties File . . . . . . . . . . . . . 162Example 5: Migration Utility Invocation Using a Properties
File on the WebDAV Tier . . . . . . . . . . . . . . . . . . . . . . . . . . . . . . . . . . . . . . . . . . 163
Running the Migration Utility Using a Properties File . . . . . . . . . . . . . . . . . . . . . . 164Overview of Running the Migration Utility Using a Properties File . . . . . . . . . . . 164Run the Migration Utility Using a Properties File . . . . . . . . . . . . . . . . . . . . . . . . . 164Sample Migration Utility Properties File . . . . . . . . . . . . . . . . . . . . . . . . . . . . . . . . 165
SAS Migration Utility OverviewThe SAS Migration Utility is an Ant-based framework and set of SAS product extensions whose primary purpose is to output a package of your current SAS content—data and configuration—that the SAS Deployment Wizard will use when it installs and configures SAS 9.3. The migration utility framework consists of a two-phase process: an analyze phase, and a package phase.
In the analyze phase, the migration utility locates the SAS content required for migration, performs a validation to ensure the content can be reliably migrated, and saves the required information for the migration utility package phase. During the analyze phase, the migration utility also generates a migration analysis report that you can use to inventory and enumerate those SAS products found on your current SAS system to be eligible for automatic migration with the deployment wizard.
In the package phase, the migration utility searches the system and copies SAS content into a migration package that will be used by the deployment wizard as it installs and configures SAS 9.3.
153
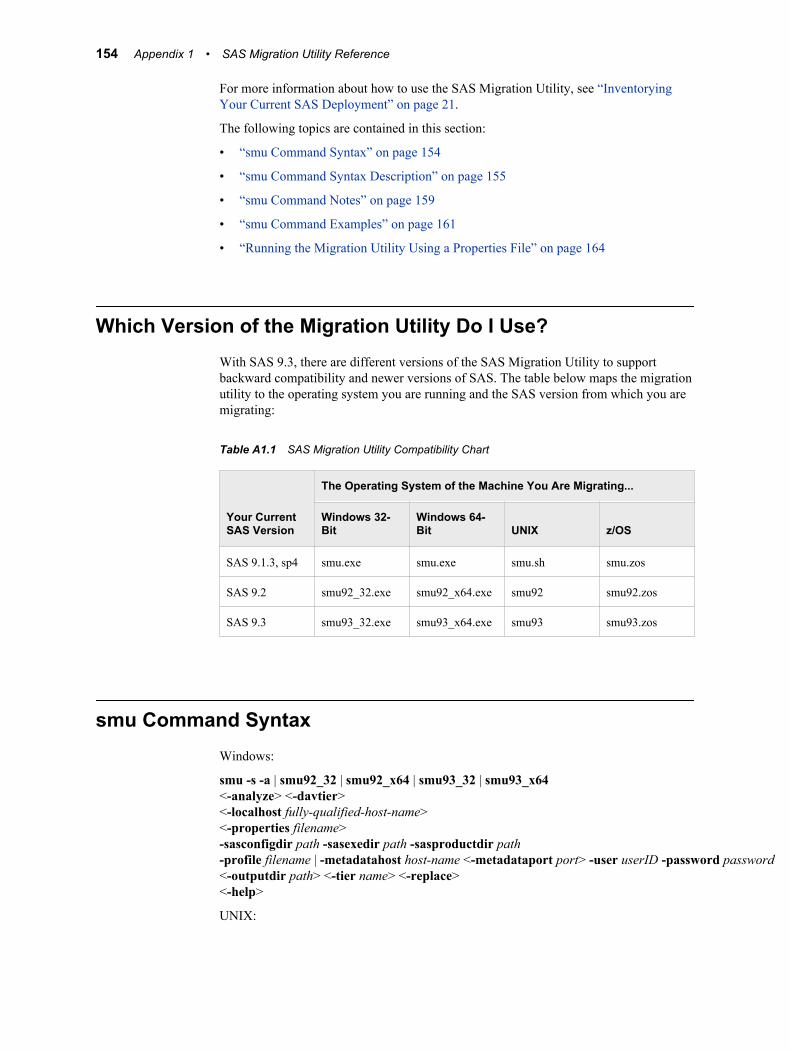
For more information about how to use the SAS Migration Utility, see “Inventorying Your Current SAS Deployment” on page 21.
The following topics are contained in this section:
• “smu Command Syntax” on page 154
• “smu Command Syntax Description” on page 155
• “smu Command Notes” on page 159
• “smu Command Examples” on page 161
• “Running the Migration Utility Using a Properties File” on page 164
Which Version of the Migration Utility Do I Use?With SAS 9.3, there are different versions of the SAS Migration Utility to support backward compatibility and newer versions of SAS. The table below maps the migration utility to the operating system you are running and the SAS version from which you are migrating:
Table A1.1 SAS Migration Utility Compatibility Chart
Your Current SAS Version
The Operating System of the Machine You Are Migrating...
Windows 32-Bit
Windows 64-Bit UNIX z/OS
SAS 9.1.3, sp4 smu.exe smu.exe smu.sh smu.zos
SAS 9.2 smu92_32.exe smu92_x64.exe smu92 smu92.zos
SAS 9.3 smu93_32.exe smu93_x64.exe smu93 smu93.zos
smu Command SyntaxWindows:
smu -s -a | smu92_32 | smu92_x64 | smu93_32 | smu93_x64<-analyze> <-davtier><-localhost fully-qualified-host-name><-properties filename>-sasconfigdir path -sasexedir path -sasproductdir path-profile filename | -metadatahost host-name <-metadataport port> -user userID -password password<-outputdir path> <-tier name> <-replace><-help>
UNIX:
154 Appendix 1 • SAS Migration Utility Reference
smu.sh - - | smu92 - - | smu93 - - <-analyze> <-davtier><-localhost fully-qualified-host-name><-properties filename>-sasconfigdir path -sasexedir path -sasproductdir path-profile filename | -metadatahost host-name <-metadataport port> -user userID -password password<-outputdir path> <-tier name> <-replace><-help>
z/OS:
smu.zos - - | smu92.zos - - | smu93.zos - -<-analyze> <-davtier><-localhost fully-qualified-host-name><-properties filename>-sasconfigdir path -sasexedir path -sasproductdir path-profile filename | -metadatahost host-name <-metadataport port> -user userID -password password<-outputdir path> <-tier name> <-replace><-help>
smu Command Syntax Description-s -a
is required by smu when running on Windows only. The later versions of the migration utility (smu92* and smu93*) do not require the -s and -a options to run.
Default: None
Required: Yes (for smu.exe only)
Equivalent Property: Not applicable
- -is required by the migration utility when running on UNIX and z/OS. These are two hyphens (- -) without any space between them.
Default: None
Required: Yes (for smu.zos only)
Equivalent Property: Not applicable
-analyzespecifies that the migration utility only perform the first of its two execution phases: analyze. In the analyze phase, the migration utility locates the current SAS content required for migration, performs a validation to ensure the content can be reliably migrated, and saves the required information for the migration utility package phase. During the analyze phase, the migration utility also generates a migration analysis report that you can use to inventory and enumerate those SAS products found on your current SAS system to be eligible for automatic migration with the SAS Deployment Wizard.
Default: None
Required: No
Equivalent Property: Not applicable
When not specified, the migration utility performs both of its two phases, analyze and package. In the package phase, the migration utility uses information saved by
smu Command Syntax Description 155
the analyze phase to search the system and copy current SAS content into a migration package.
-davtier(SAS 9.1.3 only) specifies that the migration utility should include any local WebDAV content it locates. -davtier should be specified only when running the migration utility on the WebDAV tier. If -davtier is not specified, the migration utility ignores any local WebDAV content it locates.
Default: None
Required: No
Equivalent Property: SMU.isdavtier
-localhost fully-qualified-host-nameexplicitly sets the machine host name on which the migration utility is running.
Use -localhost for machines that have multiple network interfaces or a dynamic name. host-name should be a fully qualified host name for the machine. For example: -localhost myserver.example.com
Default: None
Required: No
Equivalent Property: SMU.localhost
-properties pathnamespecifies the absolute path and filename to a file that contains inputs for the migration utility in the form of Java-like properties. For example: -properties "C:\SAS Software Depot\utilities\smu\smu.properties".
For more information, see “Running the Migration Utility Using a Properties File” on page 164.
Enclose any paths containing spaces in double quotation marks.
Default: None
Required: No
Equivalent Property:Not applicable
-sasconfigdir pathspecifies the path to the current SAS configuration directory.
The default SAS 9.1.3 configuration directory used by the SAS 9.1.3 Configuration Wizard is as follows:
• Windows:
C:\SAS\configuration-directory\Lev1
• UNIX:
/users/sas/SAS/configuration-name/Lev1
Enclose any paths containing spaces in double quotation marks.
Default: None
Required: Yes
Equivalent Property: SMU.config.dir
-sasexedir pathspecifies the current SAS path to the SAS executable (on Windows) or the top level SAS installation directory on (UNIX). If you are running the migration utility on a
156 Appendix 1 • SAS Migration Utility Reference
machine that does not contain the SAS executable or script, use -sasproductdir instead.
The default SAS 9.1.3 directory for used by the SAS 9.1.3 Configuration Wizard is as follows:
• Windows:
C:\Program Files\SAS\SAS 9.1
• UNIX:
/usr/local/SAS/SAS_9.1
Enclose any paths containing spaces in double quotation marks.
Default: None
Required: No, when -sasproductdir is used
Equivalent Property: SMU.SASROOT
-sasproductdir pathspecifies the pathname to the top-level directory where the current SAS products are installed.
The default SAS 9.1.3 top-level product directory used by the SAS 9.1.3 Configuration Wizard is as follows:
• Windows:
C:\Program Files\SAS
• UNIX:
/usr/local/SAS
Enclose any paths containing spaces in double quotation marks.
Default: None
Required: No, when -sasexedir is used
Equivalent Property: SMU.SASHOME
-profile filenamespecifies the absolute pathname of a valid current SAS client connection profile that contains connection parameters containing unrestricted user credentials for the current SAS Metadata Server of the SAS deployment to be migrated. (A SAS client connection profile is used by clients such as SAS Management Console, SAS Information Map Studio, SAS Data Integration Studio, and SAS OLAP Cube Studio.)
Unless you specify an absolute path to the profile, the migration utility checks the machine's default SAS client connection profile directory.
By default, SAS stores connection profiles here:
• Windows:
C:\Documents and Settings\user-ID\Workspaces
• UNIX and z/OS:
$HOME/Workspaces
Enclose any paths containing spaces in double quotation marks.
Default: SAS connection profile directory (see earlier paths)
smu Command Syntax Description 157
Required: No. (See “smu Command Notes” on page 159.)
Equivalent Property: SMU.profile
“Running the Migration Utility Using a Properties File” on page 164
-metadatahost host-namespecifies the name of the machine on which the current SAS Metadata Server resides. host-name is either a fully qualified host name or an IP address for the metadata server machine.
Default: None.
Required: No. (See “smu Command Notes” on page 159.)
Equivalent Property: SMU.host.metadata
See “Running the Migration Utility Using a Properties File” on page 164.
-metadataport portspecifies the port the migration utility uses to connect to the SAS Metadata Server. If no port is specified, the migration utility uses 8561 by default.
Default: 8561
Required: No
Equivalent Property: SMU.port.metadata
-user <domain\>userID -password passwordspecifies the user ID and password for sasadm or another unrestricted user ID on the current SAS Metadata Server. The migration utility accepts passwords that are encrypted using PROC PWENCODE.
(Specify the unrestricted user ID in the manner in which you would when you normally run SAS. For example, if SAS has stored the user ID as domain-qualified, and you specify it with the migration utility as unqualified, the connection fails.)
Default: None
Required: No. (See “smu Command Notes” on page 159.)
Equivalent Properties: SMU.user, SMU.password
See “Running the Migration Utility Using a Properties File” on page 164.
-outputdir path -replacespecifies the absolute path to the parent output directory where the migration utility should write its output. If the directory does not exist, the migration utility creates it for you.
If the specified directory already exists and contains information from a previous migration utility invocation, the migration utility returns an error, unless you specify the -replace option.
The migration utility writes the analysis report to SMU.Output.Dir/tier/AnalysisReport.
Enclose any paths containing spaces in double quotation marks.
Default: None
Required: Yes
Equivalent Property: SMU.Output.Dir
158 Appendix 1 • SAS Migration Utility Reference
-tier name -replacespecifies a name for the subdirectory (under the parent directory) where the migration utility writes its migration analysis report and the migration package. In addition, the migration utility appends an at sign (@) and the fully qualified host name to the specified tier name directory (for example, [email protected]).
If the specified directory already exists and contains information from a previous migration utility invocation, the migration utility returns an error, unless you specify the -replace option.
If you omit -tier, the migration utility creates a directory using the fully qualified host name.
Enclose any paths containing spaces in double quotation marks.
Default: fully qualified host name
Required: No
Equivalent Property: Not applicable
-helpdisplays the list of migration utility options and a brief description for each.
Default: None
Required: No
Equivalent Property: Not applicable
“Running the Migration Utility Using a Properties File” on page 164
smu Command NotesFollow these notes when running the SAS Software Migration Utility:
• The SAS Migration Utility command line has a 254-character limit. Command line input that exceeds this length causes the utility to fail. If your input exceeds 254 characters, use a migration utility properties file. For more information, see “Running the Migration Utility Using a Properties File” on page 164.
• The current SAS Metadata Server must be running when you invoke the migration utility.
• On SAS multiple-machine deployments, run the migration utility first on the machine hosting the SAS Metadata Server.
• You must run the migration utility from its executable directory.
By default, this is the utilities directory in your SAS Software Depot.
Note: On UNIX and z/OS, if you have not already, remember to assign file Execute permissions to smu.sh before attempting to run the migration utility. For more information, refer to your UNIX or z/OS documentation.
• The migration utility must be run on every machine that is running SAS using the same output directory (SMU.Output.Dir).
smu Command Notes 159
For SAS multiple-machine deployments, we recommend that you install the utility on shared network storage that is accessible from every SAS machine to avoid having to install the migration utility separately on each machine.
• On SAS multiple-machine deployments, the migration utility must be able to write to (and read from) its output directory.
We recommend that the utility output directory be on shared network storage accessible to every SAS machine in the deployment.
• When specifying the metadata server to connect to, it is a best practice to use a fully qualified host name or an IP address. Do not refer to the metadata server as localhost or its IP equivalent (127.0.0.1), unless all of the machines in your SAS deployment are able to connect to the server using that host name.
• On the migration utility command line, enclose any paths containing spaces in double quotation marks. (Paths containing spaces in properties files do not require double quotation marks.)
Note: A backslash immediately followed by a double quotation marks (\") is not allowed in the migration utility command line. Avoid ending Windows paths with a trailing backslash on the command line. (This limitation does not apply to migration utility property files.)
• Metadata server connection information must be provided to the migration utility through one of the following methods:
• the connection-related command-line options (-metadatahost, -user, and so on.)
Note: The migration utility accepts passwords that are encrypted using PROC PWENCODE.
• a migration utility properties file.
• a SAS client connection profile.
(The client connection profile must be created and saved on the machine on which you are running the migration utility.)
• The machine on which you run the migration utility must have a Java Runtime Environment (JRE) 1.4.2 Update 9 (or later).
You can download the necessary JRE from the SAS Third-Party Software Web site .
• On UNIX, modify the PATH environment variable such that the directory containing the Java binary is the first JRE found. Verify your setting by executing from the UNIX shell prompt: which java
• It is recommended that you use the -replace command-line option when invoking the migration utility. This ensures that output from any previous migration utility invocations that specified the same output directory and tier directory is overwritten.
• When migrating from SAS 9.1.3, to create a migration package on the WebDAV tier, use -davtier or SMU.isdavtier.
There are certain WebDAV properties for which there are no command-line equivalents: the SMU.DAV.* properties use standard WebDAV extraction and SMU.WFS.XythosHome causes the migration utility to extract WebDAV content using a Xythos-specific mechanism that is more efficient. For more information, see “Running the Migration Utility Using a Properties File” on page 164.
160 Appendix 1 • SAS Migration Utility Reference
smu Command Examples
Example 1: Basic, Two-Phase Migration Utility InvocationIn this example on Windows (64-bit), the migration utility executes both its phases—creating a migration analysis report and a migration package. The migration utility uses information in the connection profile named md1234.swa to communicate with the SAS Metadata Server:
• Migrating from SAS 9.1.3
smu -s -a -profile md1234 -sasconfigdir C:\SAS\BIServer\Lev1 -sasproductdir "C:\Program Files\SAS"-outputdir C:\SMU_packages\host1234 -replace
• Migrating from SAS 9.2 (64-bit)
smu92_x64 -profile md1234 -sasconfigdir C:\SAS\BIServer\Lev1 -sasproductdir "C:\Program Files\SAS"-outputdir C:\SMU_packages\host1234 -replace
• Migrating from SAS 9.3 (64-bit)
smu93_x64 -profile md1234 -sasconfigdir C:\SAS\BIServer\Lev1 -sasproductdir "C:\Program Files\SASHome"-outputdir C:\SMU_packages\host1234 -replace
-replace is specified to make sure that any output from a previous migration utility session—that might have specified the same output directory and tier name—is overwritten.
Example 2: Two-Phase Migration Utility Invocation with Output Preferences
In this example on Windows (32-bit), the migration utility executes both its phases and creates a migration analysis report and a migration package in an output directory named [email protected] that is a child of a parent directory named C:\SMU_packages. The migration utility uses information in the connection profile named md1234.swa to communicate with the SAS Metadata Server:
• Migrating from SAS 9.1.3
smu -s -a -profile md1234 -sasconfigdir C:\SAS\BIServer\Lev1-sasproductdir "C:\Program Files\SAS"-outputdir "C:\SMU_packages" -tier server_tier -replace
• Migrating from SAS 9.2 (32-bit)
smu92_32 -profile md1234 -sasconfigdir C:\SAS\BIServer\Lev1-sasproductdir "C:\Program Files\SAS"-outputdir "C:\SMU_packages" -tier server_tier -replace
• Migrating from SAS 9.3 (32-bit)
smu93_32 -profile md1234 -sasconfigdir C:\SAS\BIServer\Lev1-sasproductdir "C:\Program Files\SASHome"-outputdir "C:\SMU_packages" -tier server_tier -replace
smu Command Examples 161
-replace is specified to make sure that any output from a previous migration utility session—that might have specified the same output directory and tier name—is overwritten.
Example 3: Report-Only Migration Utility InvocationIn this example on UNIX, the migration utility executes its analyze phase only, and creates a migration analysis report in an output directory named [email protected] that is a child of a parent directory named/home/sas/smu_packages. The migration utility uses information in the connection profile named md1234.swa to communicate with the SAS Metadata Server. The migration utility writes the analysis report to SMU.Output.Dir/tier/AnalysisReport:
• Migrating from SAS 9.1.3
./smu.sh -- -sasconfigdir /users/sas/SAS/sas_913/config/Lev1-sasproductdir /usr/local/SAS/SAS_9.1 -profile md1234-outputdir "/home/sas/smu_packages" -tier server_tier-replace -analyze
• Migrating from SAS 9.2
./smu92 -- -sasconfigdir /opt/SAS/config/Lev1-sasproductdir /opt/SAS -profile md1234-outputdir "/home/sas/smu_packages" -tier server_tier-replace -analyze
• Migrating from SAS 9.3
./smu93 -- -sasconfigdir /opt/SAS/config/Lev1-sasproductdir /opt/SASHome -profile md1234-outputdir "/home/sas/smu_packages" -tier server_tier-replace -analyze
-replace is specified to make sure that any output from a previous migration utility session—that might have specified the same output directory and tier name—is overwritten.
Example 4: Migration Utility Invocation Using a Properties FileIn this example on UNIX, the migration utility executes both its phases and creates a migration analysis report and a migration package. All of the required inputs are supplied to the migration utility in the form of properties contained in a text file named myhost.properties:
• Migrating from SAS 9.1.3
./smu.sh ---properties/opt/sas_9.3/SAS_Software_Depot/utilities/smu/myhost.properties
-replace
• Migrating from SAS 9.2
./smu92 ---properties/opt/sas_9.3/SAS_Software_Depot/utilities/smu2/myhost.properties
-replace
162 Appendix 1 • SAS Migration Utility Reference
• Migrating from SAS 9.3
./smu93 ---properties/opt/sas_9.3/SAS_Software_Depot/utilities/smu3/myhost.properties
-replace
-replace is specified to make sure that any output from a previous migration utility session—that might have used the same properties file—is overwritten. For more information, see “Running the Migration Utility Using a Properties File” on page 164.
Example 5: Migration Utility Invocation Using a Properties File on the WebDAV Tier
In this example on UNIX, the migration utility executes both its phases and creates a migration analysis report and a migration package on the machine that contains WebDAV content. All of the required inputs are supplied to the migration utility in the form of properties contained in a text file named myhost.properties:
• Migrating from SAS 9.1.3
./smu.sh ---properties/opt/sas_9.3/SAS_Software_Depot/utilities/smu/myhost.properties
-davtier -replace
• Migrating from SAS 9.2
./smu92 ---properties/opt/sas_9.3/SAS_Software_Depot/utilities/smu2/myhost.properties
-replace
• Migrating from SAS 9.3
./smu93 ---properties/opt/sas_9.3/SAS_Software_Depot/utilities/smu3/myhost.properties
-replace
The properties file contains either the SMU.DAV.* properties or the SMU.WFS.XythosHome property. The SMU.WFS.XythosHome property causes the migration utility to extract DAV content using a Xythos-specific mechanism that is more efficient than using standard DAV extraction with the SMU.DAV.* properties.
-replace is specified to make sure that any output from a previous migration utility session—that might have used the same properties file—is overwritten. For more information, see “Running the Migration Utility Using a Properties File” on page 164.
smu Command Examples 163
Running the Migration Utility Using a Properties File
Overview of Running the Migration Utility Using a Properties FileThe following topics are contained in this section:
• “smu Command Syntax” on page 154
• “Overview of Running the Migration Utility Using a Properties File” on page 164
• “Run the Migration Utility Using a Properties File” on page 164
• “Sample Migration Utility Properties File” on page 165
Run the Migration Utility Using a Properties FileAn alternative to supplying SAS Software Migration Utility invocation options on the command line is to provide these options in the form of a properties file. You do this by creating a file containing values for the various migration utility properties you want to use and saving this file in the same directory where the migration utility batch or script file resides. For information about product-specific properties, see “Review Product-Specific SAS Migration Utility Properties” on page 28 .
Note: SAS supplies a migration utility template file (smu.properties.template) that provides examples for how to use various properties. You can find this file in your SAS Software Depot in the smu subdirectory underneath utilities.
When you run the migration utility, you reference your properties file with the -properties command-line option. For example:
smu -s -a -properties "C:\SAS Software Depot\utilities\smu\mid_tier.properties" -replace
smu92_32 -properties "C:\SAS Software Depot\utilities\smu2\mid_tier.properties" -replace
smu92_x64 -properties "C:\SAS Software Depot\utilities\smu2\mid_tier.properties" -replace
smu93_32 -properties "C:\SAS Software Depot\utilities\smu3\mid_tier.properties" -replace
smu93_x64 -properties "C:\SAS Software Depot\utilities\smu3\mid_tier.properties" -replace
The migration utility enables you to use a combination of properties and command-line options. For example:
smu -s -a -analyze -profile myhost-properties "C:\SAS Software Depot\utilities\smu\mid_tier.properties" -replace
smu92_32 -analyze -profile myhost-properties "C:\SAS Software Depot\utilities\smu2\mid_tier.properties" -replace
smu92_x64 -analyze -profile myhost-properties "C:\SAS Software Depot\utilities\smu2\mid_tier.properties" -replace
smu93_32 -analyze -profile myhost-properties "C:\SAS Software Depot\utilities\smu3\mid_tier.properties" -replace
smu93_x64 -analyze -profile myhost-properties "C:\SAS Software Depot\utilities\smu3\mid_tier.properties" -replace
164 Appendix 1 • SAS Migration Utility Reference
In migration utility properties files, when specifying Windows paths or domains as a part of a user ID, you must escape any backslashes (\) with another backslash character. For example:
SMU.config.dir=C:\\SAS\\config\\913BIPlatform\\Lev1SMU.user=mydomain\\sasadm
The migration utility recognizes the pound sign (#) as the comment character, when it is used as the first character in a line.
Sample Migration Utility Properties FileBelow is the listing of a sample migration utility properties file with comments that describe each property:
Note: Migration utility properties are case-sensitive.
# Sample smu.properties file## Specifies the absolute path of the current SAS configuration directory that# the migration utility reads from. This should usually be the "Lev" directory.# It usually contains a SASMain, Data, and product directories.#SMU.config.dir=C:\\SAS\\MetadataServer\\Lev1SMU.config.dir=/users/sas/SAS/913BIPlatform/Lev1
# Specifies the path to sas.exe that is used by the current SAS Metadata Server.# Required if SMU.SASHOME is not used.#SMU.SASROOT=C:\\Program Files\\SAS\\SAS 9.1SMU.SASROOT=/usr/local/SAS/SAS_9.1
# Specifies the pathname to the top-level directory where the current SAS # products are installed.#SMU.SASHOME=C:\\Program Files\\SASSMU.SASHOME=/usr/local/SAS
# Specifies the path of the current SAS configuration directory that the# migration utility ignores. This property can be used for sites that have# enormous amounts of data to migrate. The specified path can be absolute# or relative to the SAS configuration directory.
# levconfig.exclude.dir.12BYTE.1=AppData# levconfig.exclude.dir.12BYTE.2=C:\\SAS\\Config93\Lev1\\SASApp# \\SASEnvironment\\test\\test1# levconfig.exclude.dir.12BYTE.3=/opt/SAS/Config/Lev1/SASApp# /SASEnvironment/test/test1
# The metadata server host. This must be defined for the migration utility to# run successfully. The port defaults to 8561. If a different metadata port# was used, set SMU.port.metadata to the correct port.#
Running the Migration Utility Using a Properties File 165
SMU.host.metadata=metadata.example.com#SMU.port.metadata=8561
# The metadata server administrative user and password. This must be an # unrestricted user so all data can be read for metadata extraction. The # password can be regular text or you can encode it using PROC PWENCODE with# the {sas001} method (SAS 9.1.3) or with the {sas002} method (SAS 9.2 and # later).##SMU.user=mydomain\\adminuserSMU.user=adminuserSMU.password={SAS002}FA0C32065CB6E9B3352EEF8431205759
# A workspace profile is acceptable as an alternative to providing the host,# port, user and password (if the password is in the profile). This can be just# the profile name--which will look in the default location and the current # working directory--or a full path to the profile.##SMU.profile=MyServer
# Specifies the absolute path to the directory where migration utility should# write its output (package). The migration utility creates this directory # when you run the utility on the metadata server tier. When you run the utility# on the metadata server tier without specifying an output directory, the utility # creates the directory for you in the current working directory with a name of # YYYYmmmDDHHmmss (for example, # 2011Dec30095705).## When you run the migration utility on a SAS tier, the output directory should# already contain the migration package from the metadata tier and packages from# any other tiers on which you ran the utility. The packages from every tier in# your SAS deployment should be included under the same output directory.## SMU.Output.Dir=/home/sas/smu_packages/metadata_tier# SMU.Output.Dir=C:\\SMU_packages\\metadata_tier
# Causes the migration utility to extract any WebDAV content that it locates.# Use either the SMU.DAV.* properties or the SMU.WFS.XythosHome property. If# you want to re-use this properties file, we recommend that you not use # SMU.isdavtier but instead specify -davtier on the smu command line.##SMU.isdavtier=true
# Specifies the absolute path where the Xythos Web File Server is installed.# Specifying this property causes the WebDAV content to be extracted using a# Xythos-specific mechanism that is more efficient than using standard DAV # extraction.##SMU.WFS.XythosHome=C:\\Program Files\\SAS\\xythos\\2.2#SMU.WFS.XythosHome=/usr/local/SAS/xythos/2.2
166 Appendix 1 • SAS Migration Utility Reference
# The host where the Xythos server is running. This is used to help migrate# items in a Xythos DAV server to the SAS Content Server. If this is omitted, the# migration process uses a best guess as to which server represents the Xythos# server.##SMU.xythoshost=davnode.example.com
# The port on which the Xythos server is listening. This was 8300 in SAS 9.1.3# by default. If your site uses a different port, specify it here. This # property is used to help migrate items in a Xythos DAV server to the SAS # Content Server. When you omit this property, the migration utilty uses the# default port (8300).##SMU.xythosport=8301
# If a non-Xythos WebDAV server is being used at a site, (such as Apache HTTP# Server) and you want to migrate this content, use these properties.## Specify user credentials with sufficient read permission with which the # migration utility can content to the WebDAV server to extract content.##SMU.DAV.User=#SMU.DAV.Password=
# The DAV URL for the root of the WebDAV data.##SMU.DAV.URL=http://davnode.example.com:8300/sasdav
# Explicitly sets the machine host name on which the migration utility is# running. Use for machines that have multiple network interfaces or a dynamic# name. Specify a fully qualified host name for the machine.## SMU.localhost=myserver.example.com
# Specify the user ID and password with which the migration utility can open a# JDBC connection to the Shared Services database. (In SAS 9.3, this is # referred to as the Web Infrastructure Platform database.) # # For sites using the JBoss Application server, the connection credentials are# stored here:# # <JBoss-home>/SASServer1/deploy/SharedServices-ds.xml# # For sites using WebLogic Server or Websphere Application Server, use the# respective admin console to determine the correct JDBC connection credentials.# # You can use regular text to specify the password or encode it using proc# pwencode with the {sas002} method.##SMU.webinfpltfm.dbms.userid=myDatabaseUserID#SMU.webinfpltfm.dbms.password={SAS002}DBCC571245AD0B31433834F80BD2B99E16B3C969
Running the Migration Utility Using a Properties File 167
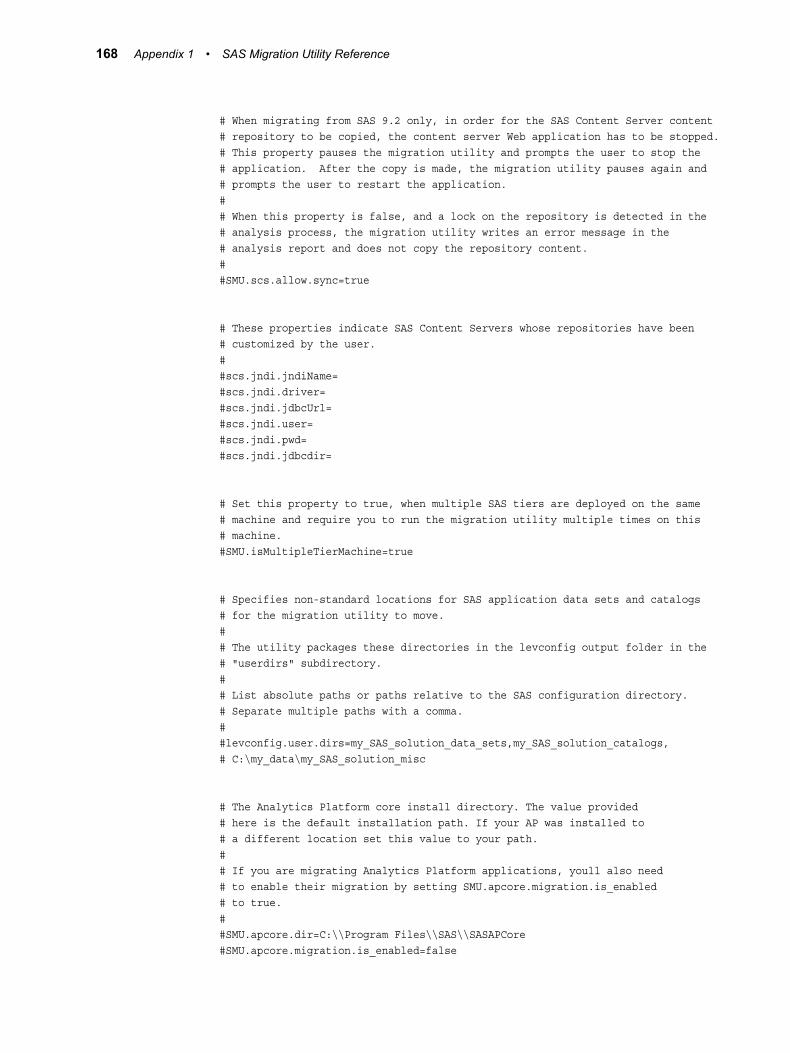
# When migrating from SAS 9.2 only, in order for the SAS Content Server content # repository to be copied, the content server Web application has to be stopped. # This property pauses the migration utility and prompts the user to stop the # application. After the copy is made, the migration utility pauses again and # prompts the user to restart the application.## When this property is false, and a lock on the repository is detected in the# analysis process, the migration utility writes an error message in the # analysis report and does not copy the repository content.##SMU.scs.allow.sync=true
# These properties indicate SAS Content Servers whose repositories have been# customized by the user. ##scs.jndi.jndiName=#scs.jndi.driver=#scs.jndi.jdbcUrl=#scs.jndi.user=#scs.jndi.pwd=#scs.jndi.jdbcdir=
# Set this property to true, when multiple SAS tiers are deployed on the same# machine and require you to run the migration utility multiple times on this# machine.#SMU.isMultipleTierMachine=true
# Specifies non-standard locations for SAS application data sets and catalogs# for the migration utility to move.## The utility packages these directories in the levconfig output folder in the # "userdirs" subdirectory.## List absolute paths or paths relative to the SAS configuration directory. # Separate multiple paths with a comma.##levconfig.user.dirs=my_SAS_solution_data_sets,my_SAS_solution_catalogs,# C:\my_data\my_SAS_solution_misc
# The Analytics Platform core install directory. The value provided# here is the default installation path. If your AP was installed to# a different location set this value to your path.## If you are migrating Analytics Platform applications, youll also need# to enable their migration by setting SMU.apcore.migration.is_enabled# to true.##SMU.apcore.dir=C:\\Program Files\\SAS\\SASAPCore#SMU.apcore.migration.is_enabled=false
168 Appendix 1 • SAS Migration Utility Reference
# This property is used by the SAS Deployment Wizard to verify the version of# the migration utility that was used to create a migration package.## DO NOT CHANGE THIS VALUE.#SMU.version=2.0SMU.SAS.version=9.2
Running the Migration Utility Using a Properties File 169

170 Appendix 1 • SAS Migration Utility Reference
Appendix 2
Configuration Options by Prompt Level
Overview of Configuration Options by Prompt Level . . . . . . . . . . . . . . . . . . . . . . 171
Configuration Options by Prompt Level . . . . . . . . . . . . . . . . . . . . . . . . . . . . . . . . . 172
Overview of Configuration Options by Prompt Level
Shortly after you begin running the SAS Deployment Wizard to interactively install and initially configure SAS, you will be asked to choose between three wizard prompting levels. These levels are as follows:
• Express
displays the minimum number of wizard pages needed to complete the SAS configuration.
• Typical
displays the basic set of wizard pages needed to complete the SAS configuration.
• Custom
displays all the wizard pages needed to complete the SAS configuration.
171
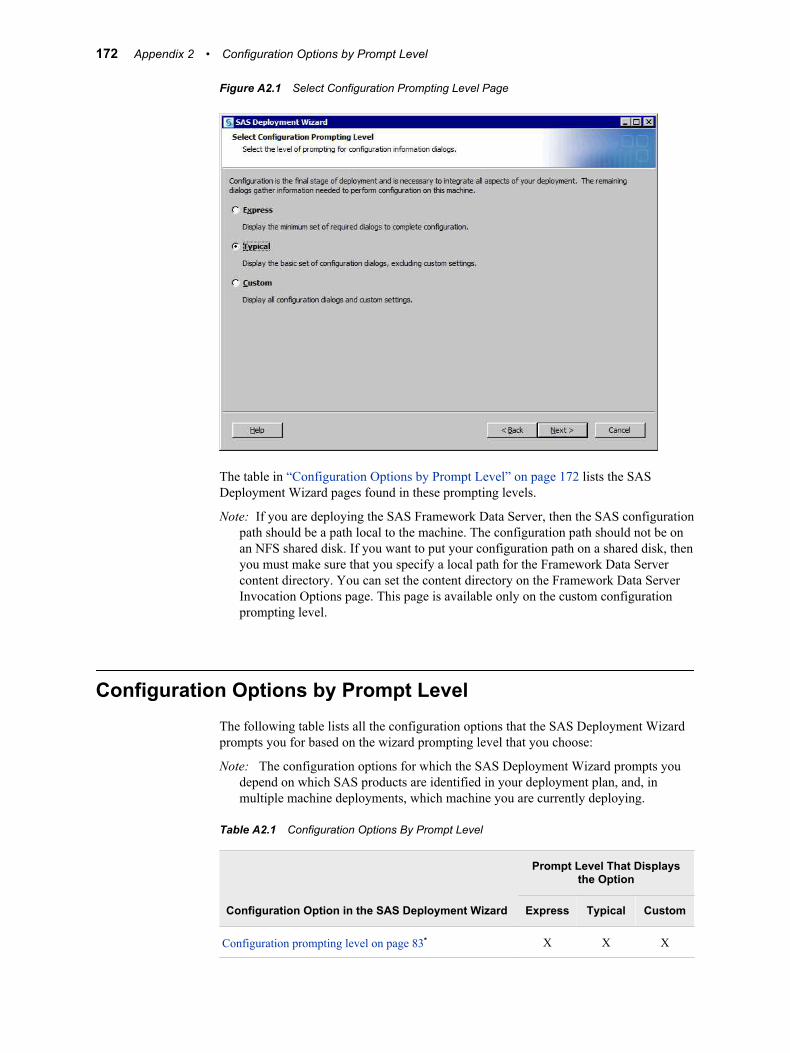
Figure A2.1 Select Configuration Prompting Level Page
The table in “Configuration Options by Prompt Level” on page 172 lists the SAS Deployment Wizard pages found in these prompting levels.
Note: If you are deploying the SAS Framework Data Server, then the SAS configuration path should be a path local to the machine. The configuration path should not be on an NFS shared disk. If you want to put your configuration path on a shared disk, then you must make sure that you specify a local path for the Framework Data Server content directory. You can set the content directory on the Framework Data Server Invocation Options page. This page is available only on the custom configuration prompting level.
Configuration Options by Prompt LevelThe following table lists all the configuration options that the SAS Deployment Wizard prompts you for based on the wizard prompting level that you choose:
Note: The configuration options for which the SAS Deployment Wizard prompts you depend on which SAS products are identified in your deployment plan, and, in multiple machine deployments, which machine you are currently deploying.
Table A2.1 Configuration Options By Prompt Level
Configuration Option in the SAS Deployment Wizard
Prompt Level That Displays the Option
Express Typical Custom
Configuration prompting level on page 83* X X X
172 Appendix 2 • Configuration Options by Prompt Level
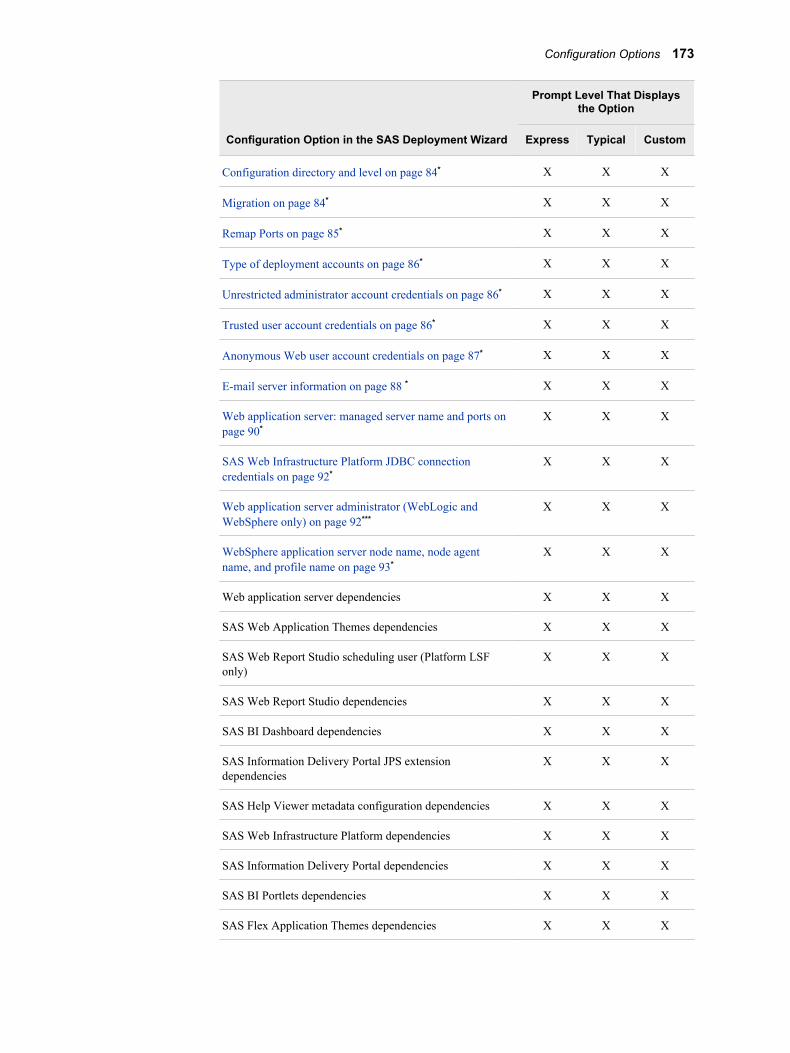
Configuration Option in the SAS Deployment Wizard
Prompt Level That Displays the Option
Express Typical Custom
Configuration directory and level on page 84* X X X
Migration on page 84* X X X
Remap Ports on page 85* X X X
Type of deployment accounts on page 86* X X X
Unrestricted administrator account credentials on page 86* X X X
Trusted user account credentials on page 86* X X X
Anonymous Web user account credentials on page 87* X X X
E-mail server information on page 88 * X X X
Web application server: managed server name and ports on page 90*
X X X
SAS Web Infrastructure Platform JDBC connection credentials on page 92*
X X X
Web application server administrator (WebLogic and WebSphere only) on page 92***
X X X
WebSphere application server node name, node agent name, and profile name on page 93*
X X X
Web application server dependencies X X X
SAS Web Application Themes dependencies X X X
SAS Web Report Studio scheduling user (Platform LSF only)
X X X
SAS Web Report Studio dependencies X X X
SAS BI Dashboard dependencies X X X
SAS Information Delivery Portal JPS extension dependencies
X X X
SAS Help Viewer metadata configuration dependencies X X X
SAS Web Infrastructure Platform dependencies X X X
SAS Information Delivery Portal dependencies X X X
SAS BI Portlets dependencies X X X
SAS Flex Application Themes dependencies X X X
Configuration Options 173
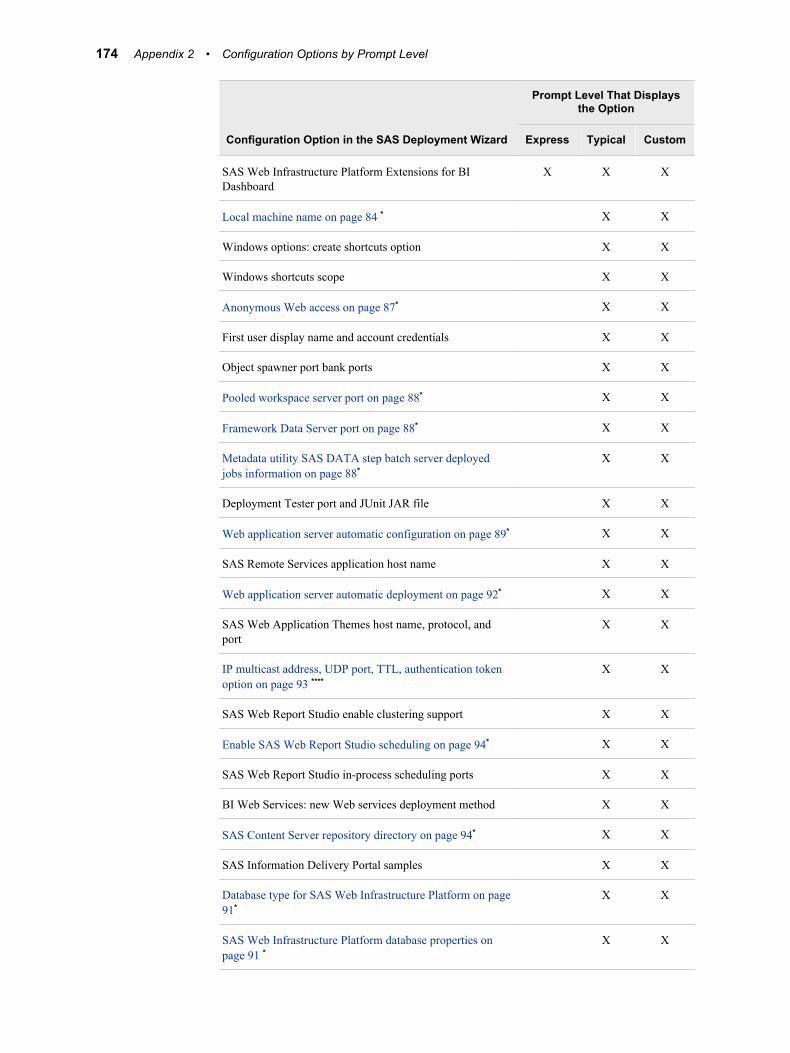
Configuration Option in the SAS Deployment Wizard
Prompt Level That Displays the Option
Express Typical Custom
SAS Web Infrastructure Platform Extensions for BI Dashboard
X X X
Local machine name on page 84 * X X
Windows options: create shortcuts option X X
Windows shortcuts scope X X
Anonymous Web access on page 87* X X
First user display name and account credentials X X
Object spawner port bank ports X X
Pooled workspace server port on page 88* X X
Framework Data Server port on page 88* X X
Metadata utility SAS DATA step batch server deployed jobs information on page 88*
X X
Deployment Tester port and JUnit JAR file X X
Web application server automatic configuration on page 89* X X
SAS Remote Services application host name X X
Web application server automatic deployment on page 92* X X
SAS Web Application Themes host name, protocol, and port
X X
IP multicast address, UDP port, TTL, authentication token option on page 93 ****
X X
SAS Web Report Studio enable clustering support X X
Enable SAS Web Report Studio scheduling on page 94* X X
SAS Web Report Studio in-process scheduling ports X X
BI Web Services: new Web services deployment method X X
SAS Content Server repository directory on page 94* X X
SAS Information Delivery Portal samples X X
Database type for SAS Web Infrastructure Platform on page 91*
X X
SAS Web Infrastructure Platform database properties on page 91 *
X X
174 Appendix 2 • Configuration Options by Prompt Level
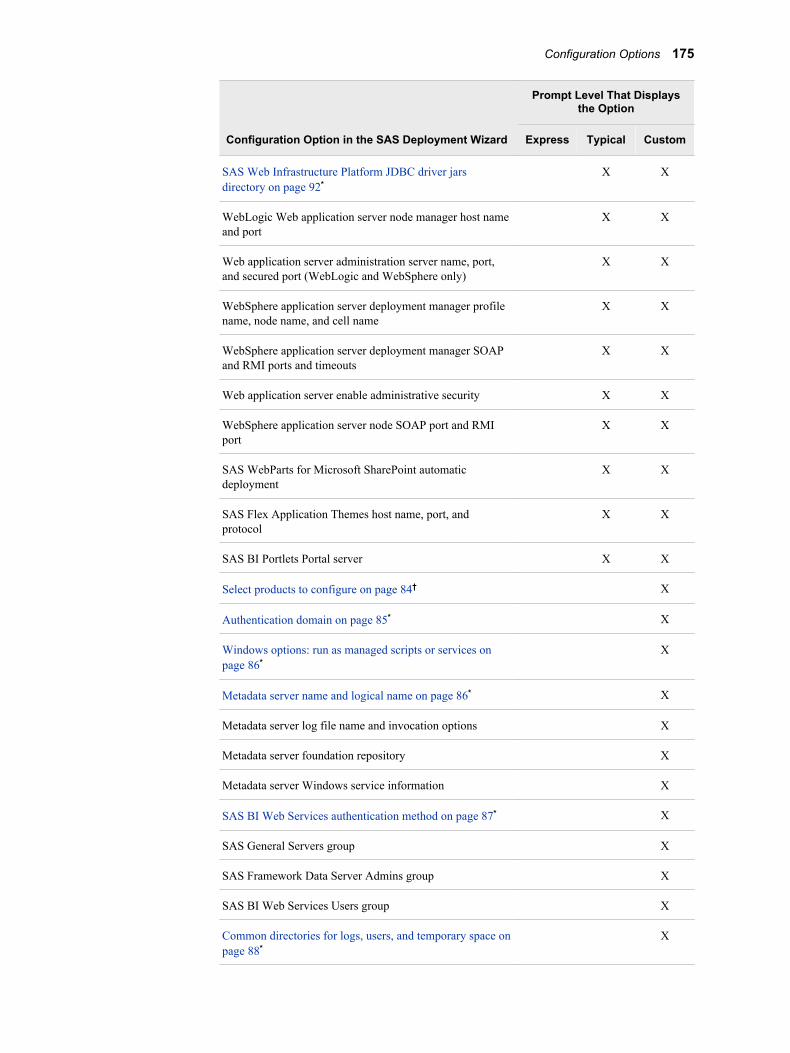
Configuration Option in the SAS Deployment Wizard
Prompt Level That Displays the Option
Express Typical Custom
SAS Web Infrastructure Platform JDBC driver jars directory on page 92*
X X
WebLogic Web application server node manager host name and port
X X
Web application server administration server name, port, and secured port (WebLogic and WebSphere only)
X X
WebSphere application server deployment manager profile name, node name, and cell name
X X
WebSphere application server deployment manager SOAP and RMI ports and timeouts
X X
Web application server enable administrative security X X
WebSphere application server node SOAP port and RMI port
X X
SAS WebParts for Microsoft SharePoint automatic deployment
X X
SAS Flex Application Themes host name, port, and protocol
X X
SAS BI Portlets Portal server X X
Select products to configure on page 84† X
Authentication domain on page 85* X
Windows options: run as managed scripts or services on page 86*
X
Metadata server name and logical name on page 86* X
Metadata server log file name and invocation options X
Metadata server foundation repository X
Metadata server Windows service information X
SAS BI Web Services authentication method on page 87* X
SAS General Servers group X
SAS Framework Data Server Admins group X
SAS BI Web Services Users group X
Common directories for logs, users, and temporary space on page 88*
X
Configuration Options 175

Configuration Option in the SAS Deployment Wizard
Prompt Level That Displays the Option
Express Typical Custom
Client-side connection profile credentials policy on page 88*
X
Object spawner invocation options and log file name X
Pooled workspace server name, logical name, and host name on page 88*
X
Pooled workspace server invocation options and log file name
X
Stored process log file name X
OLAP server schema name X
OLAP server invocation options and log file name X
OLAP server Windows service information X
SAS/SHARE server invocation options, server short name, and log file name
X
SAS/SHARE server Windows service information X
SAS/CONNECT server invocation options and log file name
X
Framework Data Server name and host name on page 88* X
Framework Data Server content directory, invocation options and log file name
X
Framework Data Server Windows service information X
Metadata utility SAS DATA step batch server name, logical name, invocation options, and deployed jobs information on page 88*
X
Deployment Tester host name X
Query cache library directory and libref on page 89* X
Output management library information on page 89* X
Web application server administration server protocol and additional JVM options
X
WebSphere application server protocol for deployment manager - node agent protocol and ports
X
Secure JMS resources (WebLogic and JBoss only) X
Web application server: proxy information on page 93* X
176 Appendix 2 • Configuration Options by Prompt Level
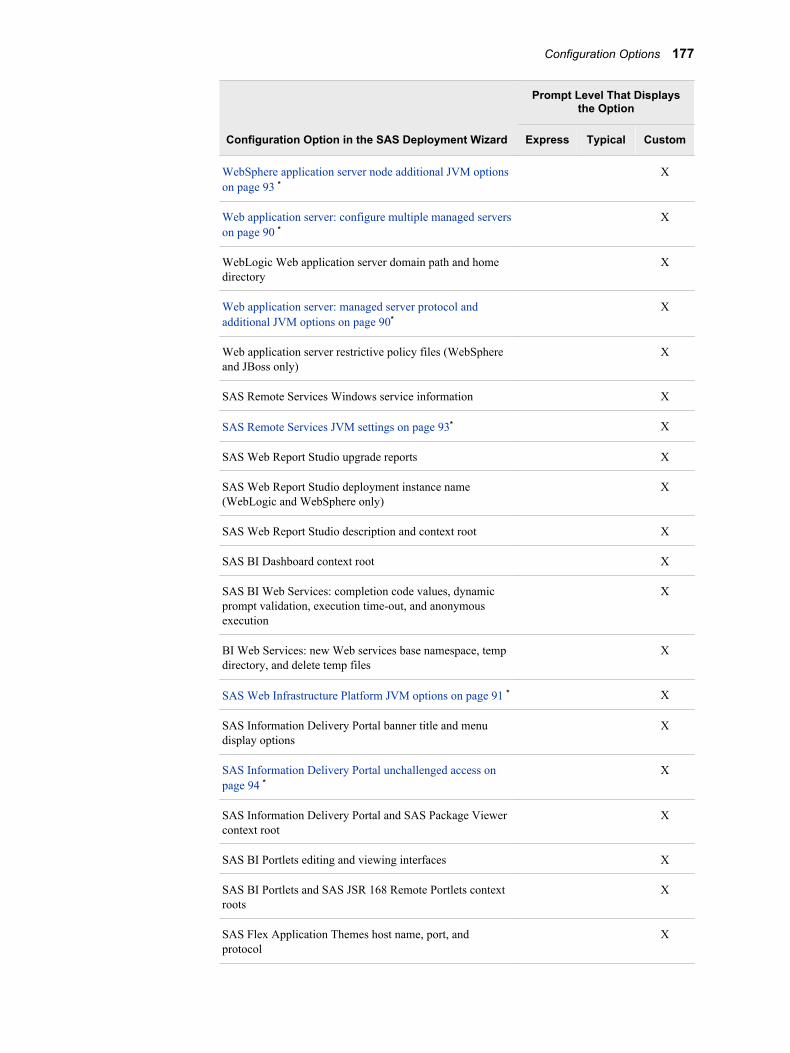
Configuration Option in the SAS Deployment Wizard
Prompt Level That Displays the Option
Express Typical Custom
WebSphere application server node additional JVM options on page 93 *
X
Web application server: configure multiple managed servers on page 90 *
X
WebLogic Web application server domain path and home directory
X
Web application server: managed server protocol and additional JVM options on page 90*
X
Web application server restrictive policy files (WebSphere and JBoss only)
X
SAS Remote Services Windows service information X
SAS Remote Services JVM settings on page 93* X
SAS Web Report Studio upgrade reports X
SAS Web Report Studio deployment instance name (WebLogic and WebSphere only)
X
SAS Web Report Studio description and context root X
SAS BI Dashboard context root X
SAS BI Web Services: completion code values, dynamic prompt validation, execution time-out, and anonymous execution
X
BI Web Services: new Web services base namespace, temp directory, and delete temp files
X
SAS Web Infrastructure Platform JVM options on page 91 * X
SAS Information Delivery Portal banner title and menu display options
X
SAS Information Delivery Portal unchallenged access on page 94 *
X
SAS Information Delivery Portal and SAS Package Viewer context root
X
SAS BI Portlets editing and viewing interfaces X
SAS BI Portlets and SAS JSR 168 Remote Portlets context roots
X
SAS Flex Application Themes host name, port, and protocol
X
Configuration Options 177
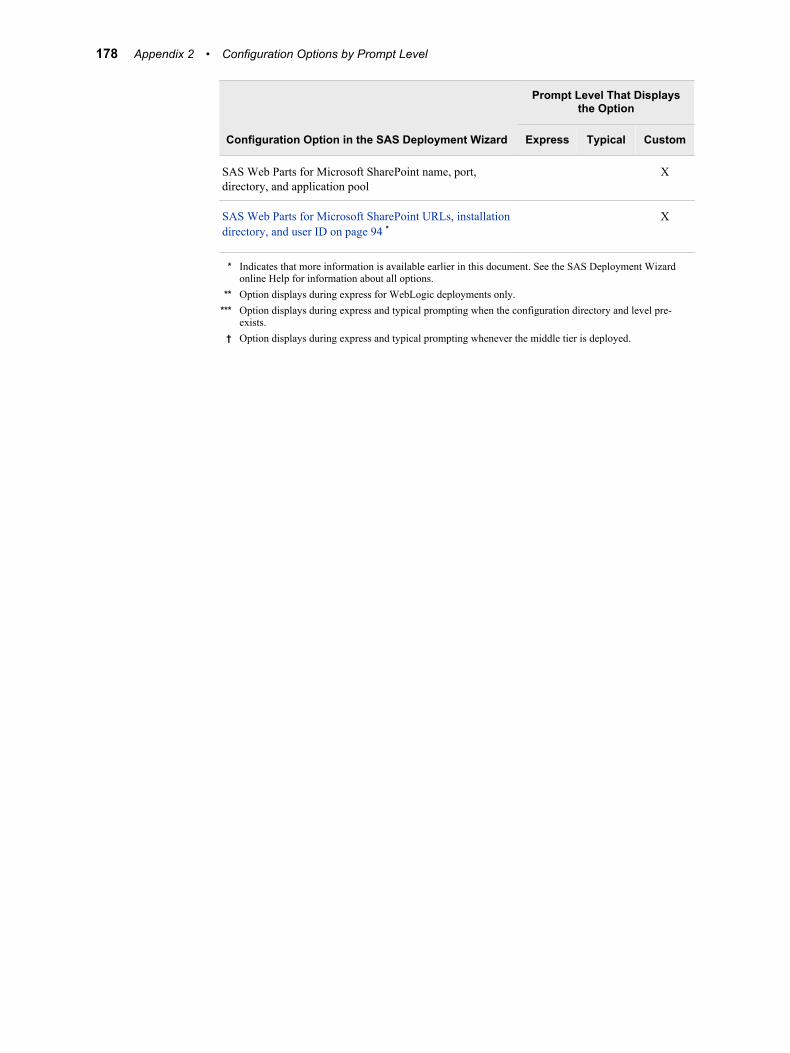
Configuration Option in the SAS Deployment Wizard
Prompt Level That Displays the Option
Express Typical Custom
SAS Web Parts for Microsoft SharePoint name, port, directory, and application pool
X
SAS Web Parts for Microsoft SharePoint URLs, installation directory, and user ID on page 94 *
X
* Indicates that more information is available earlier in this document. See the SAS Deployment Wizard online Help for information about all options.
** Option displays during express for WebLogic deployments only.*** Option displays during express and typical prompting when the configuration directory and level pre-
exists.† Option displays during express and typical prompting whenever the middle tier is deployed.
178 Appendix 2 • Configuration Options by Prompt Level
Appendix 3
Product-Specific SAS Migration Utility Properties
Product-Specific SAS Migration Utility Properties Overview . . . . . . . . . . . . . . . . 179
Multiple Product Properties . . . . . . . . . . . . . . . . . . . . . . . . . . . . . . . . . . . . . . . . . . . 180
SAS Analytics Platform Properties . . . . . . . . . . . . . . . . . . . . . . . . . . . . . . . . . . . . . . 180
SAS BI Dashboard Properties . . . . . . . . . . . . . . . . . . . . . . . . . . . . . . . . . . . . . . . . . . 181
SAS Grid Control Server Properties . . . . . . . . . . . . . . . . . . . . . . . . . . . . . . . . . . . . 182
SAS Information Delivery Portal Properties . . . . . . . . . . . . . . . . . . . . . . . . . . . . . . 182
SAS Marketing Automation SAS Tier Properties . . . . . . . . . . . . . . . . . . . . . . . . . . 184
SAS Marketing Automation SAS Middle-Tier Properties . . . . . . . . . . . . . . . . . . . 185
SAS Marketing Optimization SAS Tier Properties . . . . . . . . . . . . . . . . . . . . . . . . . 186
SAS Marketing Optimization SAS Middle Tier Properties . . . . . . . . . . . . . . . . . . 188
SAS OLAP Web Viewer Properties . . . . . . . . . . . . . . . . . . . . . . . . . . . . . . . . . . . . . 189
SAS Shared Services - Web Infrastructure Platform Database Properties . . . . . 190
SAS Web Report Studio Properties . . . . . . . . . . . . . . . . . . . . . . . . . . . . . . . . . . . . . 191
Xythos Properties . . . . . . . . . . . . . . . . . . . . . . . . . . . . . . . . . . . . . . . . . . . . . . . . . . . . 192
Product-Specific SAS Migration Utility Properties Overview
Some SAS 9.1.3 products have unique properties that the SAS Migration Utility uses when creating a migration analysis report, or later in the process when the utility builds a migration package. Consult the topics in this section for migration utility properties that your SAS 9.1.3 product might depend on.
• “SAS Analytics Platform Properties” on page 180
• “SAS BI Dashboard Properties ” on page 181
• “SAS Grid Control Server Properties ” on page 182
• “SAS Information Delivery Portal Properties ” on page 182
• “SAS Marketing Automation SAS Tier Properties ” on page 184
• “SAS Marketing Automation SAS Middle-Tier Properties” on page 185
179
• “SAS Marketing Optimization SAS Tier Properties” on page 186
• “SAS Marketing Optimization SAS Middle Tier Properties” on page 188
• “SAS OLAP Web Viewer Properties ” on page 189
• “SAS Shared Services - Web Infrastructure Platform Database Properties” on page 190
• “SAS Web Report Studio Properties ” on page 191
• “Xythos Properties” on page 192
Multiple Product PropertiesThe following table describes a property that can be specified for multiple SAS applications. The SAS Migration Utility uses this property when creating a migration analysis report, or later in the process when the utility builds a migration package. To use this property, add it to your migration utility properties file. For more information, see “Running the Migration Utility Using a Properties File” on page 164.
The following table describes the levconfig.users.dirs property:
Table A3.1 levconfig.user.dirs Property
Property levconfig.user.dirs
Examples One product:
levconfig.user.dirs=C:\\SAS\\Config\\Lev1\\Applications\\SASCustomerIntelligence 5.4
Multiple products:
levconfig.user.dirs=C:\\SAS\\Config\\Lev1\\Applications\\SASCustomerIntelligence 5.4,
C:\\SAS\\Config\\Lev1\\Applications\\SASMarketingOptimization5.4
When to Use This property must always be used if the SAS application data directories are located under a SAS configuration directory (for example C:\SAS\config\Lev1).
SAS Products That Use This Property
SAS Customer Intelligence, SAS Marketing Optimization
SAS Analytics Platform PropertiesThe following tables describe unique properties for the SAS Analytics Platform applications that the SAS Migration Utility uses when creating a migration analysis report, or later in the process when the utility builds a migration package. To use these properties, add them to your migration utility properties file. For more information, see “Running the Migration Utility Using a Properties File” on page 164.
180 Appendix 3 • Product-Specific SAS Migration Utility Properties
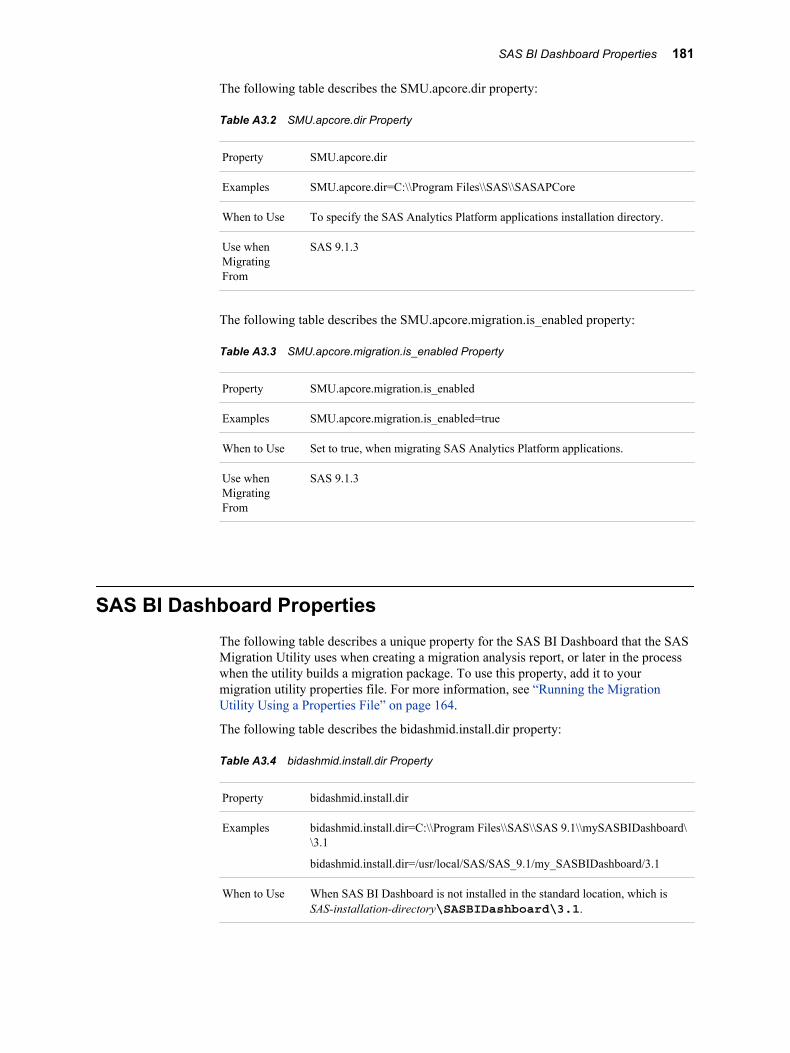
The following table describes the SMU.apcore.dir property:
Table A3.2 SMU.apcore.dir Property
Property SMU.apcore.dir
Examples SMU.apcore.dir=C:\\Program Files\\SAS\\SASAPCore
When to Use To specify the SAS Analytics Platform applications installation directory.
Use when Migrating From
SAS 9.1.3
The following table describes the SMU.apcore.migration.is_enabled property:
Table A3.3 SMU.apcore.migration.is_enabled Property
Property SMU.apcore.migration.is_enabled
Examples SMU.apcore.migration.is_enabled=true
When to Use Set to true, when migrating SAS Analytics Platform applications.
Use when Migrating From
SAS 9.1.3
SAS BI Dashboard PropertiesThe following table describes a unique property for the SAS BI Dashboard that the SAS Migration Utility uses when creating a migration analysis report, or later in the process when the utility builds a migration package. To use this property, add it to your migration utility properties file. For more information, see “Running the Migration Utility Using a Properties File” on page 164.
The following table describes the bidashmid.install.dir property:
Table A3.4 bidashmid.install.dir Property
Property bidashmid.install.dir
Examples bidashmid.install.dir=C:\\Program Files\\SAS\\SAS 9.1\\mySASBIDashboard\\3.1
bidashmid.install.dir=/usr/local/SAS/SAS_9.1/my_SASBIDashboard/3.1
When to Use When SAS BI Dashboard is not installed in the standard location, which is SAS-installation-directory\SASBIDashboard\3.1.
SAS BI Dashboard Properties 181
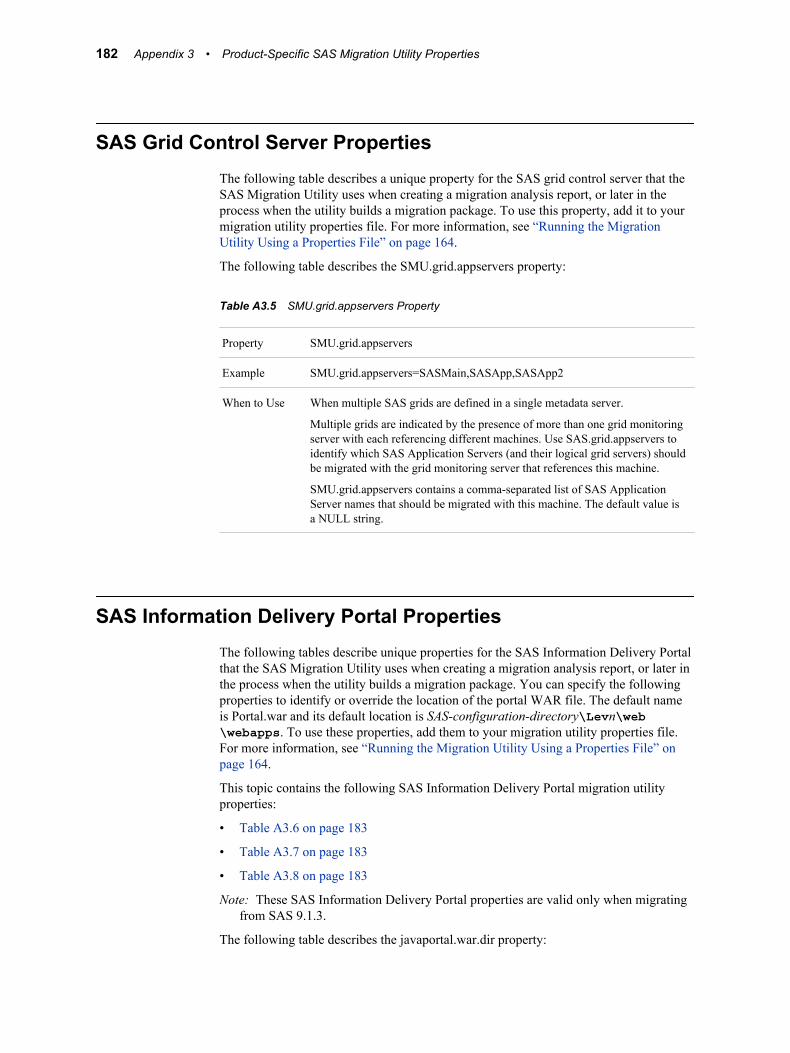
SAS Grid Control Server PropertiesThe following table describes a unique property for the SAS grid control server that the SAS Migration Utility uses when creating a migration analysis report, or later in the process when the utility builds a migration package. To use this property, add it to your migration utility properties file. For more information, see “Running the Migration Utility Using a Properties File” on page 164.
The following table describes the SMU.grid.appservers property:
Table A3.5 SMU.grid.appservers Property
Property SMU.grid.appservers
Example SMU.grid.appservers=SASMain,SASApp,SASApp2
When to Use When multiple SAS grids are defined in a single metadata server.
Multiple grids are indicated by the presence of more than one grid monitoring server with each referencing different machines. Use SAS.grid.appservers to identify which SAS Application Servers (and their logical grid servers) should be migrated with the grid monitoring server that references this machine.
SMU.grid.appservers contains a comma-separated list of SAS Application Server names that should be migrated with this machine. The default value is a NULL string.
SAS Information Delivery Portal PropertiesThe following tables describe unique properties for the SAS Information Delivery Portal that the SAS Migration Utility uses when creating a migration analysis report, or later in the process when the utility builds a migration package. You can specify the following properties to identify or override the location of the portal WAR file. The default name is Portal.war and its default location is SAS-configuration-directory\Levn\web\webapps. To use these properties, add them to your migration utility properties file. For more information, see “Running the Migration Utility Using a Properties File” on page 164.
This topic contains the following SAS Information Delivery Portal migration utility properties:
• Table A3.6 on page 183
• Table A3.7 on page 183
• Table A3.8 on page 183
Note: These SAS Information Delivery Portal properties are valid only when migrating from SAS 9.1.3.
The following table describes the javaportal.war.dir property:
182 Appendix 3 • Product-Specific SAS Migration Utility Properties
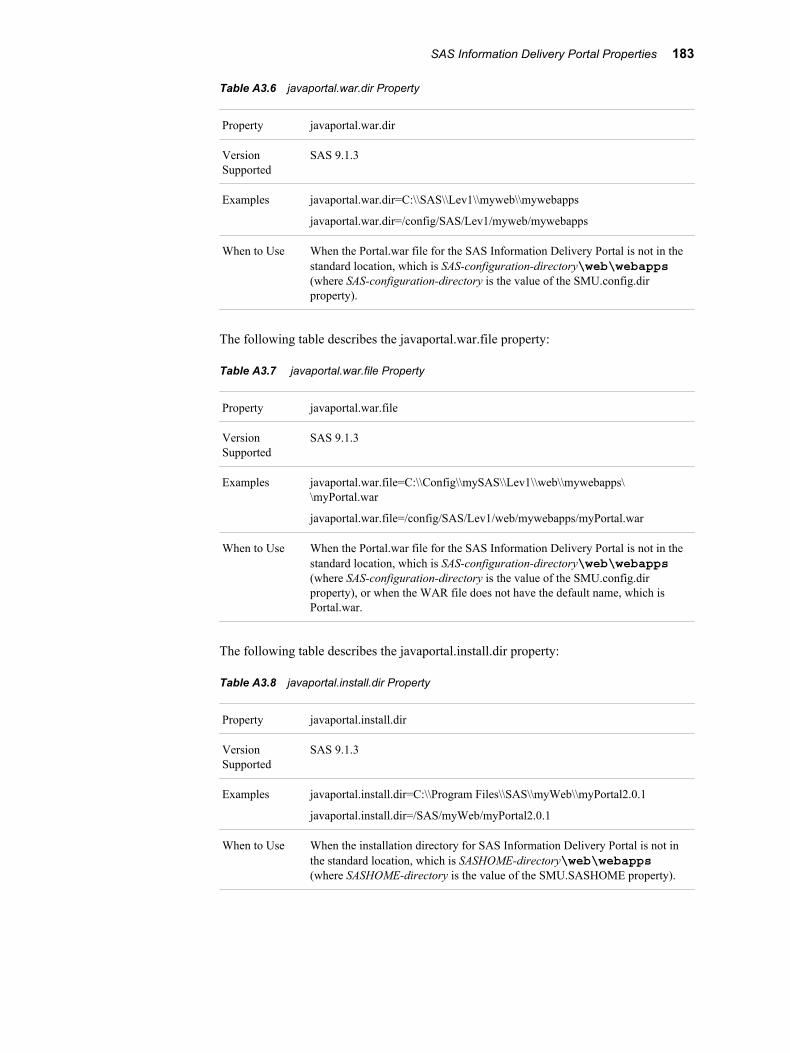
Table A3.6 javaportal.war.dir Property
Property javaportal.war.dir
Version Supported
SAS 9.1.3
Examples javaportal.war.dir=C:\\SAS\\Lev1\\myweb\\mywebapps
javaportal.war.dir=/config/SAS/Lev1/myweb/mywebapps
When to Use When the Portal.war file for the SAS Information Delivery Portal is not in the standard location, which is SAS-configuration-directory\web\webapps (where SAS-configuration-directory is the value of the SMU.config.dir property).
The following table describes the javaportal.war.file property:
Table A3.7 javaportal.war.file Property
Property javaportal.war.file
Version Supported
SAS 9.1.3
Examples javaportal.war.file=C:\\Config\\mySAS\\Lev1\\web\\mywebapps\\myPortal.war
javaportal.war.file=/config/SAS/Lev1/web/mywebapps/myPortal.war
When to Use When the Portal.war file for the SAS Information Delivery Portal is not in the standard location, which is SAS-configuration-directory\web\webapps (where SAS-configuration-directory is the value of the SMU.config.dir property), or when the WAR file does not have the default name, which is Portal.war.
The following table describes the javaportal.install.dir property:
Table A3.8 javaportal.install.dir Property
Property javaportal.install.dir
Version Supported
SAS 9.1.3
Examples javaportal.install.dir=C:\\Program Files\\SAS\\myWeb\\myPortal2.0.1
javaportal.install.dir=/SAS/myWeb/myPortal2.0.1
When to Use When the installation directory for SAS Information Delivery Portal is not in the standard location, which is SASHOME-directory\web\webapps (where SASHOME-directory is the value of the SMU.SASHOME property).
SAS Information Delivery Portal Properties 183

SAS Marketing Automation SAS Tier PropertiesThe following tables describe unique properties for SAS Marketing Automation for the SAS tier that the SAS Migration Utility uses when creating a migration analysis report, or later in the process when the utility builds a migration package. To use these properties, add them to your migration utility properties file. For more information, see “Running the Migration Utility Using a Properties File” on page 164.
This topic contains the following SAS Marketing Automation SAS tier migration utility properties:
• Table A3.9 on page 184
• Table A3.10 on page 184
• Table A3.11 on page 185
• Table A3.12 on page 185
• Table A3.13 on page 185
The following table describes the emasvrproces.install.dir property:
Table A3.9 emasvrproces.install.dir Property
Property emasvrproces.install.dir
Examples emasvrproces.install.dir=C:\\Program Files\\mySAS\\SAS 9.1\\Mktauto\\Cmacros
emasvrproces.install.dir=/mySAS/SAS_9.1/myMktauto/myCmacros
When to Use If the SAS Marketing Automation compiled macros are installed in a different directory than the default installation directory. Be sure to specify an absolute file system path.
The following table describes the emasvrproces.appserver.context.directory property:
Table A3.10 emasvrproces.appserver.context.directory Property
Property emasvrproces.appserver.context.directory
Examples emasvrproces.appserver.context.directory=C:\\SAS\\Config\\Lev1\\mySASMain
emasvrproces.appserver.context.directory=/SAS/Config/Lev1/mySASMain
When to Use If the SAS Application Server context directory differs from the default SAS Application Server directory (SASMain).
The following table describes the emasvrproces.appserver.autoexec.directory.and.name property:
184 Appendix 3 • Product-Specific SAS Migration Utility Properties
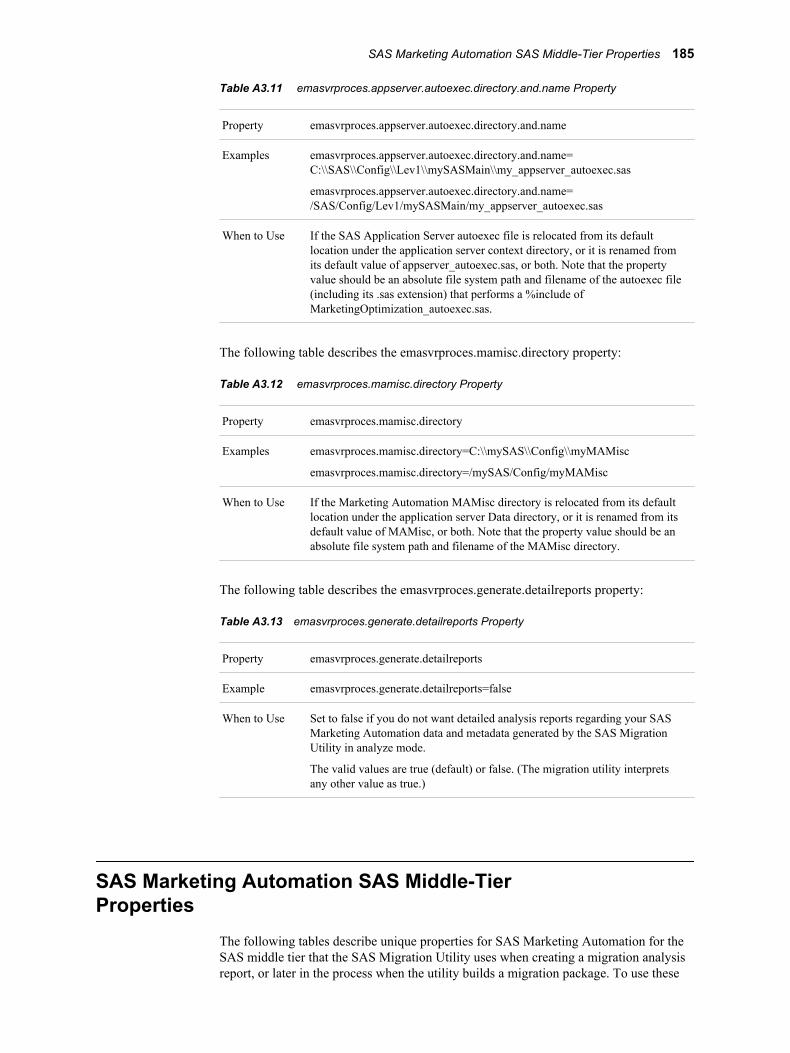
Table A3.11 emasvrproces.appserver.autoexec.directory.and.name Property
Property emasvrproces.appserver.autoexec.directory.and.name
Examples emasvrproces.appserver.autoexec.directory.and.name=C:\\SAS\\Config\\Lev1\\mySASMain\\my_appserver_autoexec.sas
emasvrproces.appserver.autoexec.directory.and.name=/SAS/Config/Lev1/mySASMain/my_appserver_autoexec.sas
When to Use If the SAS Application Server autoexec file is relocated from its default location under the application server context directory, or it is renamed from its default value of appserver_autoexec.sas, or both. Note that the property value should be an absolute file system path and filename of the autoexec file (including its .sas extension) that performs a %include of MarketingOptimization_autoexec.sas.
The following table describes the emasvrproces.mamisc.directory property:
Table A3.12 emasvrproces.mamisc.directory Property
Property emasvrproces.mamisc.directory
Examples emasvrproces.mamisc.directory=C:\\mySAS\\Config\\myMAMisc
emasvrproces.mamisc.directory=/mySAS/Config/myMAMisc
When to Use If the Marketing Automation MAMisc directory is relocated from its default location under the application server Data directory, or it is renamed from its default value of MAMisc, or both. Note that the property value should be an absolute file system path and filename of the MAMisc directory.
The following table describes the emasvrproces.generate.detailreports property:
Table A3.13 emasvrproces.generate.detailreports Property
Property emasvrproces.generate.detailreports
Example emasvrproces.generate.detailreports=false
When to Use Set to false if you do not want detailed analysis reports regarding your SAS Marketing Automation data and metadata generated by the SAS Migration Utility in analyze mode.
The valid values are true (default) or false. (The migration utility interprets any other value as true.)
SAS Marketing Automation SAS Middle-Tier Properties
The following tables describe unique properties for SAS Marketing Automation for the SAS middle tier that the SAS Migration Utility uses when creating a migration analysis report, or later in the process when the utility builds a migration package. To use these
SAS Marketing Automation SAS Middle-Tier Properties 185
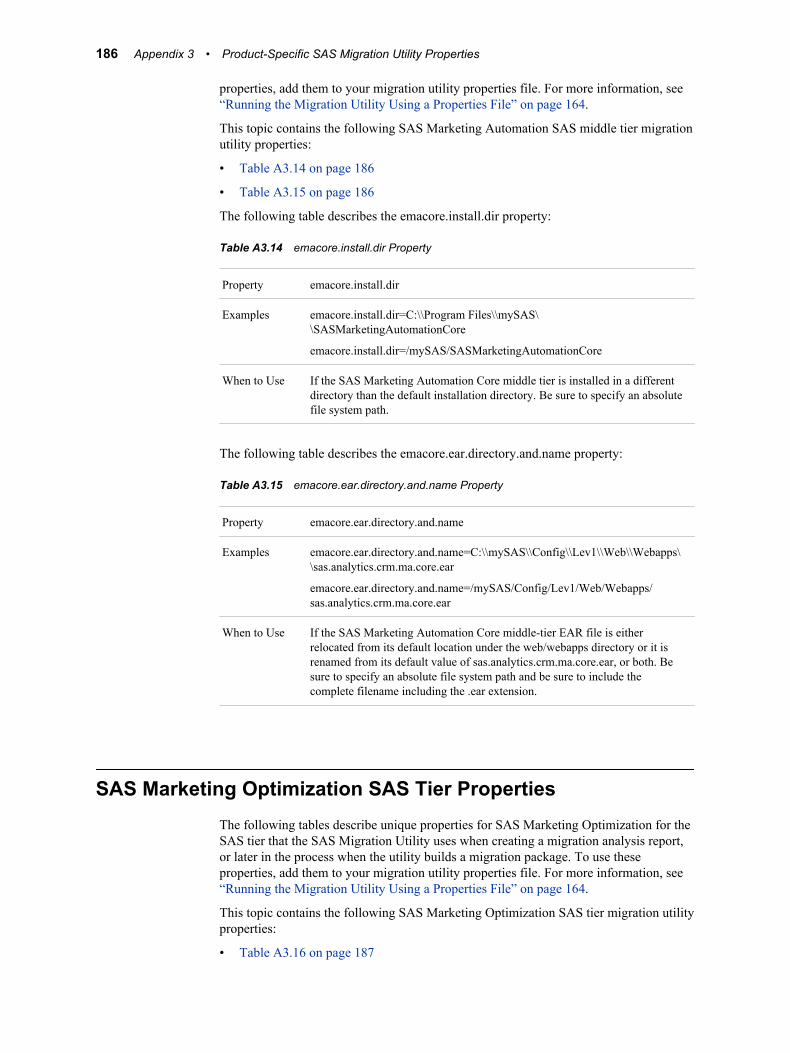
properties, add them to your migration utility properties file. For more information, see “Running the Migration Utility Using a Properties File” on page 164.
This topic contains the following SAS Marketing Automation SAS middle tier migration utility properties:
• Table A3.14 on page 186
• Table A3.15 on page 186
The following table describes the emacore.install.dir property:
Table A3.14 emacore.install.dir Property
Property emacore.install.dir
Examples emacore.install.dir=C:\\Program Files\\mySAS\\SASMarketingAutomationCore
emacore.install.dir=/mySAS/SASMarketingAutomationCore
When to Use If the SAS Marketing Automation Core middle tier is installed in a different directory than the default installation directory. Be sure to specify an absolute file system path.
The following table describes the emacore.ear.directory.and.name property:
Table A3.15 emacore.ear.directory.and.name Property
Property emacore.ear.directory.and.name
Examples emacore.ear.directory.and.name=C:\\mySAS\\Config\\Lev1\\Web\\Webapps\\sas.analytics.crm.ma.core.ear
emacore.ear.directory.and.name=/mySAS/Config/Lev1/Web/Webapps/sas.analytics.crm.ma.core.ear
When to Use If the SAS Marketing Automation Core middle-tier EAR file is either relocated from its default location under the web/webapps directory or it is renamed from its default value of sas.analytics.crm.ma.core.ear, or both. Be sure to specify an absolute file system path and be sure to include the complete filename including the .ear extension.
SAS Marketing Optimization SAS Tier PropertiesThe following tables describe unique properties for SAS Marketing Optimization for the SAS tier that the SAS Migration Utility uses when creating a migration analysis report, or later in the process when the utility builds a migration package. To use these properties, add them to your migration utility properties file. For more information, see “Running the Migration Utility Using a Properties File” on page 164.
This topic contains the following SAS Marketing Optimization SAS tier migration utility properties:
• Table A3.16 on page 187
186 Appendix 3 • Product-Specific SAS Migration Utility Properties
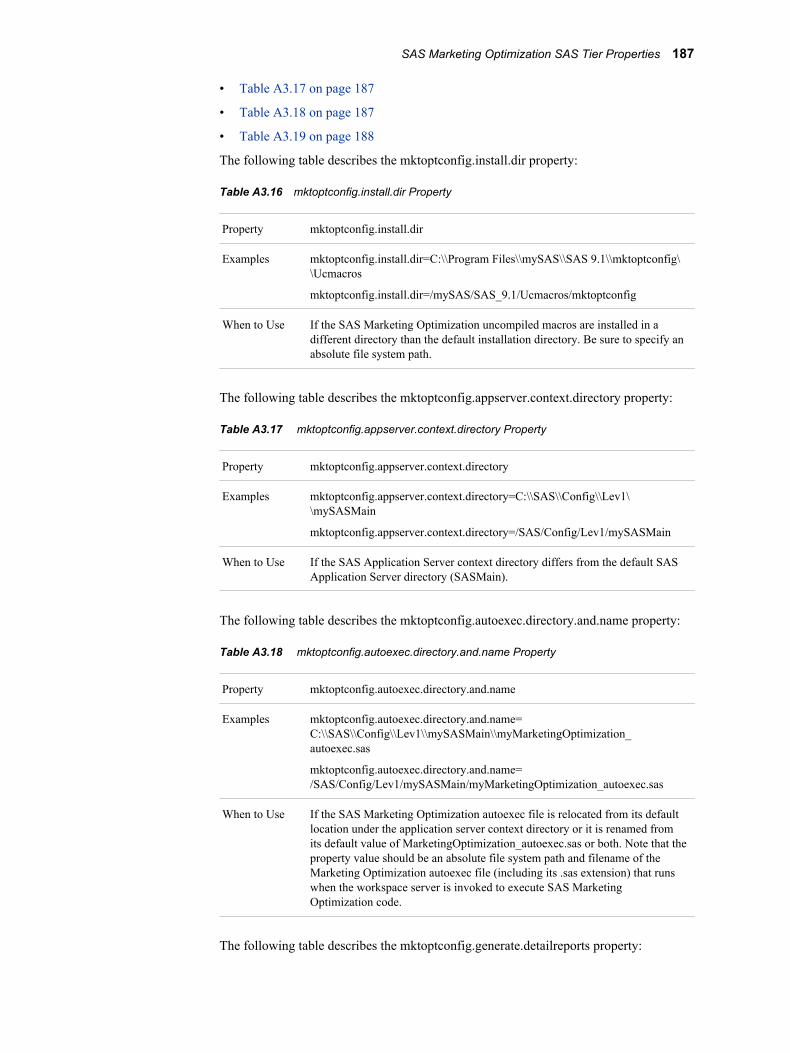
• Table A3.17 on page 187
• Table A3.18 on page 187
• Table A3.19 on page 188
The following table describes the mktoptconfig.install.dir property:
Table A3.16 mktoptconfig.install.dir Property
Property mktoptconfig.install.dir
Examples mktoptconfig.install.dir=C:\\Program Files\\mySAS\\SAS 9.1\\mktoptconfig\\Ucmacros
mktoptconfig.install.dir=/mySAS/SAS_9.1/Ucmacros/mktoptconfig
When to Use If the SAS Marketing Optimization uncompiled macros are installed in a different directory than the default installation directory. Be sure to specify an absolute file system path.
The following table describes the mktoptconfig.appserver.context.directory property:
Table A3.17 mktoptconfig.appserver.context.directory Property
Property mktoptconfig.appserver.context.directory
Examples mktoptconfig.appserver.context.directory=C:\\SAS\\Config\\Lev1\\mySASMain
mktoptconfig.appserver.context.directory=/SAS/Config/Lev1/mySASMain
When to Use If the SAS Application Server context directory differs from the default SAS Application Server directory (SASMain).
The following table describes the mktoptconfig.autoexec.directory.and.name property:
Table A3.18 mktoptconfig.autoexec.directory.and.name Property
Property mktoptconfig.autoexec.directory.and.name
Examples mktoptconfig.autoexec.directory.and.name=C:\\SAS\\Config\\Lev1\\mySASMain\\myMarketingOptimization_autoexec.sas
mktoptconfig.autoexec.directory.and.name=/SAS/Config/Lev1/mySASMain/myMarketingOptimization_autoexec.sas
When to Use If the SAS Marketing Optimization autoexec file is relocated from its default location under the application server context directory or it is renamed from its default value of MarketingOptimization_autoexec.sas or both. Note that the property value should be an absolute file system path and filename of the Marketing Optimization autoexec file (including its .sas extension) that runs when the workspace server is invoked to execute SAS Marketing Optimization code.
The following table describes the mktoptconfig.generate.detailreports property:
SAS Marketing Optimization SAS Tier Properties 187
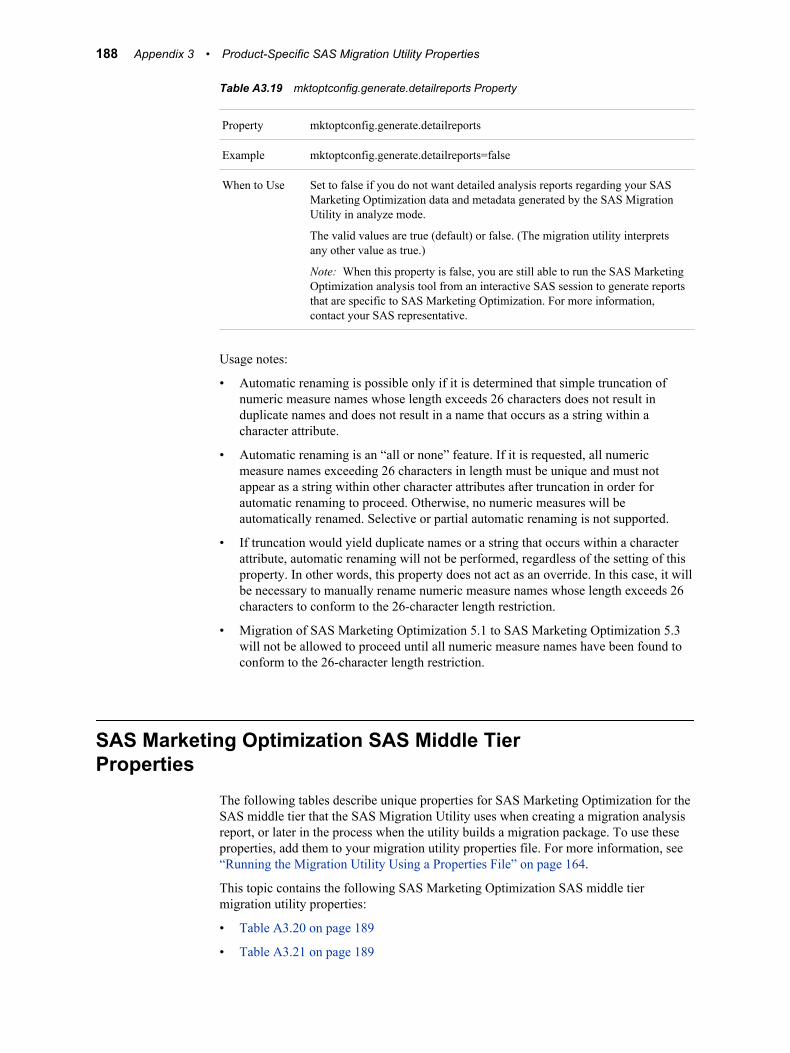
Table A3.19 mktoptconfig.generate.detailreports Property
Property mktoptconfig.generate.detailreports
Example mktoptconfig.generate.detailreports=false
When to Use Set to false if you do not want detailed analysis reports regarding your SAS Marketing Optimization data and metadata generated by the SAS Migration Utility in analyze mode.
The valid values are true (default) or false. (The migration utility interprets any other value as true.)
Note: When this property is false, you are still able to run the SAS Marketing Optimization analysis tool from an interactive SAS session to generate reports that are specific to SAS Marketing Optimization. For more information, contact your SAS representative.
Usage notes:
• Automatic renaming is possible only if it is determined that simple truncation of numeric measure names whose length exceeds 26 characters does not result in duplicate names and does not result in a name that occurs as a string within a character attribute.
• Automatic renaming is an “all or none” feature. If it is requested, all numeric measure names exceeding 26 characters in length must be unique and must not appear as a string within other character attributes after truncation in order for automatic renaming to proceed. Otherwise, no numeric measures will be automatically renamed. Selective or partial automatic renaming is not supported.
• If truncation would yield duplicate names or a string that occurs within a character attribute, automatic renaming will not be performed, regardless of the setting of this property. In other words, this property does not act as an override. In this case, it will be necessary to manually rename numeric measure names whose length exceeds 26 characters to conform to the 26-character length restriction.
• Migration of SAS Marketing Optimization 5.1 to SAS Marketing Optimization 5.3 will not be allowed to proceed until all numeric measure names have been found to conform to the 26-character length restriction.
SAS Marketing Optimization SAS Middle Tier Properties
The following tables describe unique properties for SAS Marketing Optimization for the SAS middle tier that the SAS Migration Utility uses when creating a migration analysis report, or later in the process when the utility builds a migration package. To use these properties, add them to your migration utility properties file. For more information, see “Running the Migration Utility Using a Properties File” on page 164.
This topic contains the following SAS Marketing Optimization SAS middle tier migration utility properties:
• Table A3.20 on page 189
• Table A3.21 on page 189
188 Appendix 3 • Product-Specific SAS Migration Utility Properties
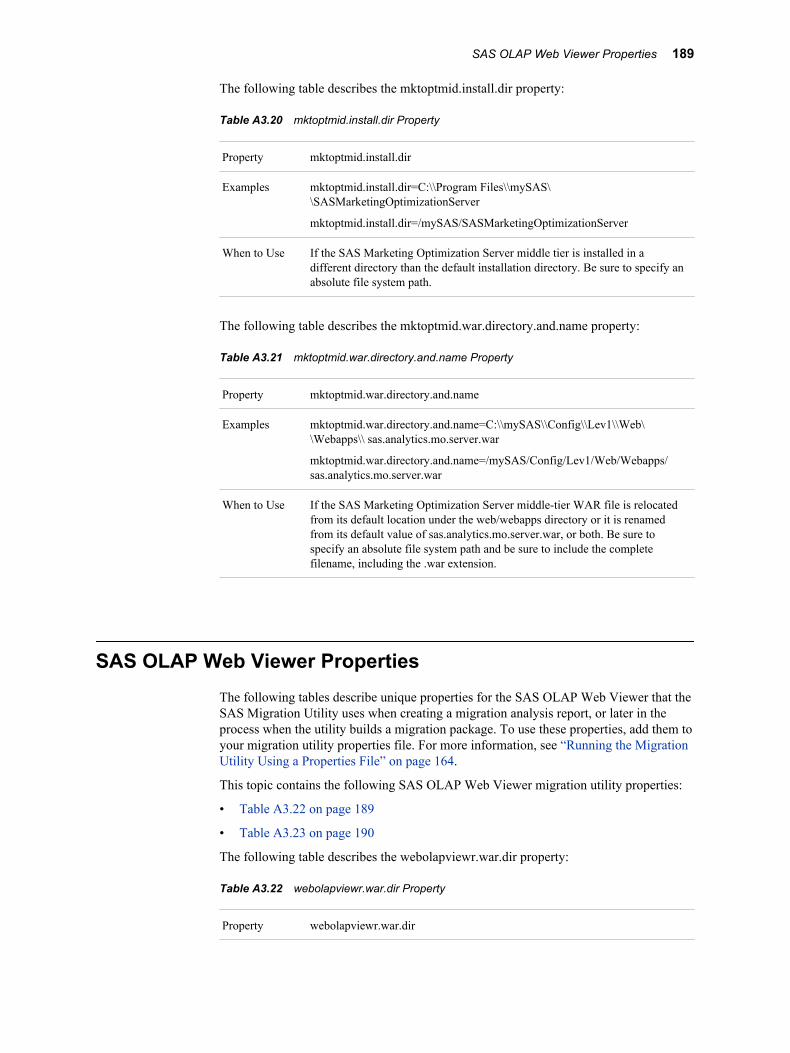
The following table describes the mktoptmid.install.dir property:
Table A3.20 mktoptmid.install.dir Property
Property mktoptmid.install.dir
Examples mktoptmid.install.dir=C:\\Program Files\\mySAS\\SASMarketingOptimizationServer
mktoptmid.install.dir=/mySAS/SASMarketingOptimizationServer
When to Use If the SAS Marketing Optimization Server middle tier is installed in a different directory than the default installation directory. Be sure to specify an absolute file system path.
The following table describes the mktoptmid.war.directory.and.name property:
Table A3.21 mktoptmid.war.directory.and.name Property
Property mktoptmid.war.directory.and.name
Examples mktoptmid.war.directory.and.name=C:\\mySAS\\Config\\Lev1\\Web\\Webapps\\ sas.analytics.mo.server.war
mktoptmid.war.directory.and.name=/mySAS/Config/Lev1/Web/Webapps/sas.analytics.mo.server.war
When to Use If the SAS Marketing Optimization Server middle-tier WAR file is relocated from its default location under the web/webapps directory or it is renamed from its default value of sas.analytics.mo.server.war, or both. Be sure to specify an absolute file system path and be sure to include the complete filename, including the .war extension.
SAS OLAP Web Viewer PropertiesThe following tables describe unique properties for the SAS OLAP Web Viewer that the SAS Migration Utility uses when creating a migration analysis report, or later in the process when the utility builds a migration package. To use these properties, add them to your migration utility properties file. For more information, see “Running the Migration Utility Using a Properties File” on page 164.
This topic contains the following SAS OLAP Web Viewer migration utility properties:
• Table A3.22 on page 189
• Table A3.23 on page 190
The following table describes the webolapviewr.war.dir property:
Table A3.22 webolapviewr.war.dir Property
Property webolapviewr.war.dir
SAS OLAP Web Viewer Properties 189
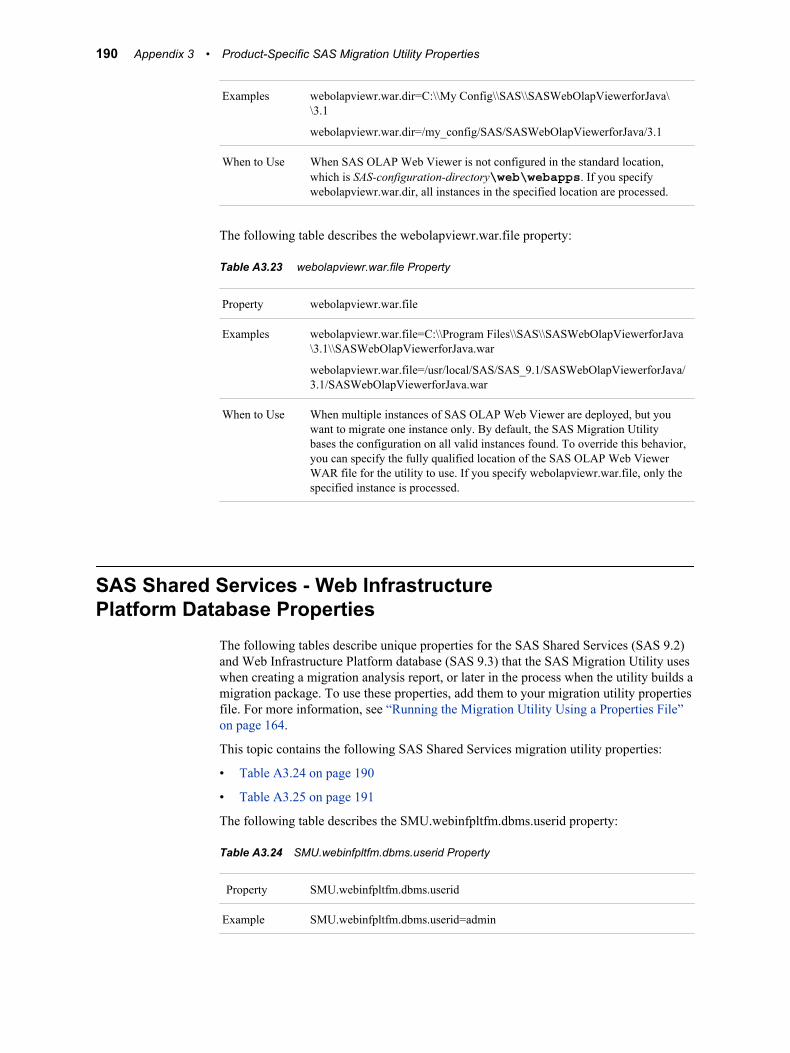
Examples webolapviewr.war.dir=C:\\My Config\\SAS\\SASWebOlapViewerforJava\\3.1
webolapviewr.war.dir=/my_config/SAS/SASWebOlapViewerforJava/3.1
When to Use When SAS OLAP Web Viewer is not configured in the standard location, which is SAS-configuration-directory\web\webapps. If you specify webolapviewr.war.dir, all instances in the specified location are processed.
The following table describes the webolapviewr.war.file property:
Table A3.23 webolapviewr.war.file Property
Property webolapviewr.war.file
Examples webolapviewr.war.file=C:\\Program Files\\SAS\\SASWebOlapViewerforJava\3.1\\SASWebOlapViewerforJava.war
webolapviewr.war.file=/usr/local/SAS/SAS_9.1/SASWebOlapViewerforJava/3.1/SASWebOlapViewerforJava.war
When to Use When multiple instances of SAS OLAP Web Viewer are deployed, but you want to migrate one instance only. By default, the SAS Migration Utility bases the configuration on all valid instances found. To override this behavior, you can specify the fully qualified location of the SAS OLAP Web Viewer WAR file for the utility to use. If you specify webolapviewr.war.file, only the specified instance is processed.
SAS Shared Services - Web Infrastructure Platform Database Properties
The following tables describe unique properties for the SAS Shared Services (SAS 9.2) and Web Infrastructure Platform database (SAS 9.3) that the SAS Migration Utility uses when creating a migration analysis report, or later in the process when the utility builds a migration package. To use these properties, add them to your migration utility properties file. For more information, see “Running the Migration Utility Using a Properties File” on page 164.
This topic contains the following SAS Shared Services migration utility properties:
• Table A3.24 on page 190
• Table A3.25 on page 191
The following table describes the SMU.webinfpltfm.dbms.userid property:
Table A3.24 SMU.webinfpltfm.dbms.userid Property
Property SMU.webinfpltfm.dbms.userid
Example SMU.webinfpltfm.dbms.userid=admin
190 Appendix 3 • Product-Specific SAS Migration Utility Properties
When to Use To export the SAS Shared Services database to the migration package. Specify a valid user ID with which the migration utility can use a JDBC connection to access the database. For more information, see “Complete a Migration Utility Checklist” on page 21.
The following table describes the SMU.webinfpltfm.dbms.password property:
Table A3.25 SMU.webinfpltfm.dbms.password Property
Property SMU.webinfpltfm.dbms.password
Example SMU.webinfpltfm.dbms.password={SAS002}DBCC571245AD0B31433834F80BD2B99E16B3C969
When to Use The password for the user ID with which the migration utility uses a JDBC connection to access the SAS Shared Services database. You can use regular text or encode the password using PROC PWENCODE and the {sas002} method.
SAS Web Report Studio PropertiesThe following tables describe unique properties for SAS Web Report Studio that the SAS Migration Utility uses when creating a migration analysis report, or later in the process when the utility builds a migration package. To use these properties, add them to your migration utility properties file. For more information, see “Running the Migration Utility Using a Properties File” on page 164.
This topic contains the following SAS Web Report Studio migration utility properties:
• Table A3.26 on page 191
• Table A3.27 on page 191
The following table describes the citationweb.war.dir property:
Table A3.26 citationweb.war.dir Property
Property citationweb.war.dir
Examples citationweb.war.dir=C:\\My Config\\SAS\\SASWebReportStudio\\3.1
citationweb.war.dir=/my_config/SAS/SASWebReportStudio/3.1
When to Use When SAS Web Report Studio is not configured in the standard location, which is SAS-configuration-directory\web\webapps.
The following table describes the citationweb.war.file property:
Table A3.27 citationweb.war.file Property
Property citationweb.war.file
SAS Web Report Studio Properties 191
Examples citationweb.war.file=C:\\Program Files\\SAS\\SASWebReportStudio\3.1\\SASWebReportStudio.war
citationweb.war.file=/usr/local/SAS/SAS_9.1/SASWebReportStudio/3.1/SASWebReportStudio.war
When to Use When migrating multiple instances of SAS Web Report Studio, the SAS Migration Utility, by default, bases the resulting configuration on the first instance found. To override this behavior, you can specify the fully qualified location of the SAS Web Report Studio WAR file or folder for the utility to use.
Xythos PropertiesThe following tables describe unique properties for Xythos that the SAS Migration Utility uses when creating a migration analysis report, or later in the process when the utility builds a migration package. To use these properties, add them to your migration utility properties file. For more information, see “Running the Migration Utility Using a Properties File” on page 164.
Note: If you are using a WebDAV server other than Xythos, then specify the SMU.DAV.* properties. For more information, see the SMU.DAV.* properties in “Running the Migration Utility Using a Properties File” on page 164.
This topic contains the following Xythos migration utility properties:
• Table A3.28 on page 192
• Table A3.29 on page 192
• Table A3.29 on page 192
The following table describes the SMU.WFS.XythosHome property:
Table A3.28 SMU.WFS.XythosHome Property
Property SMU.WFS.XythosHome
Example SMU.WFS.XythosHome=C:\\Program Files\\SAS\\xythos\\2.2
SMU.WFS.XythosHome=/usr/local/SAS/xythos/2.2
When to Use Use when you need to migrate Xythos content. SMU.WFS.XythosHome specifies the absolute path where the Xythos Web File Server is installed. Specifying this property causes the migration utility to extract WebDAV content using a mechanism that is specific to Xythos, which is more efficient than using standard WebDAV extraction.
The following table describes the SMU.xythoshost property:
Table A3.29 SMU.xythoshost Property
Property SMU.xythoshost
Example SMU.xythoshost=davnode.example.com
192 Appendix 3 • Product-Specific SAS Migration Utility Properties
When to Use SMU.xythoshost identifies the machine on which the Xythos server is running. Use when migrating items in a Xythos DAV server to the SAS Content Server.
The following table describes the SMU.xythosport property:
Table A3.30 SMU.xythosport Property
Property SMU.xythosport
Example SMU.xythosport=8301
When to Use SMU.xythosport identifies the port on which the Xythos server is listening. If your site uses a different port than the default (8300), then use SMU.xythosport.
Xythos Properties 193

194 Appendix 3 • Product-Specific SAS Migration Utility Properties

Glossary
authenticationSee client authentication.
authentication domaina SAS internal category that pairs logins with the servers for which they are valid. For example, an Oracle server and the SAS copies of Oracle credentials might all be classified as belonging to an OracleAuth authentication domain.
client authenticationthe process of verifying the identity of a person or process for security purposes.
connection profilea client-side definition of where a metadata server is located. The definition includes a computer name and a port number. In addition, the connection profile can also contain user connection information.
data setSee SAS data set.
deployto install an instance of operational SAS software and related components. The deployment process often includes configuration and testing as well.
foundation servicesSee SAS Foundation Services.
identitySee metadata identity.
Integrated Windows authenticationa Microsoft technology that facilitates use of authentication protocols such as Kerberos. In the SAS implementation, all participating components must be in the same Windows domain or in domains that trust each other.
Internet Protocol Version 6See IPv6.
IPv6a protocol that specifies the format for network addresses for all computers that are connected to the Internet. This protocol, which is the successor of Internet Protocol
195
Version 4, uses hexadecimal notation to represent 128-bit address spaces. The format can consist of up to eight groups of four hexadecimal characters, delimited by colons, as in FE80:0000:0000:0000:0202:B3FF:FE1E:8329. As an alternative, a group of consecutive zeros could be replaced with two colons, as in FE80::0202:B3FF:FE1E:8329. Short form: IPv6
IWASee Integrated Windows authentication.
metadata identitya metadata object that represents an individual user or a group of users in a SAS metadata environment. Each individual and group that accesses secured resources on a SAS Metadata Server should have a unique metadata identity within that server.
middle tierin a SAS business intelligence system, the architectural layer in which Web applications and related services execute. The middle tier receives user requests, applies business logic and business rules, interacts with processing servers and data servers, and returns information to users.
migrateto populate a new deployment of SAS software with the content, data, or metadata (or a combination of these) from an existing deployment. Migrating might include upgrading to a new software release, converting data or metadata, or other changes to ensure compatibility.
object spawnera program that instantiates object servers that are using an IOM bridge connection. The object spawner listens for incoming client requests for IOM services. When the spawner receives a request from a new client, it launches an instance of an IOM server to fulfill the request. Depending on which incoming TCP/IP port the request was made on, the spawner either invokes the administrator interface or processes a request for a UUID (Universal Unique Identifier).
planned deploymenta method of installing and configuring a SAS business intelligence system. This method requires a deployment plan that contains information about the different hosts that are included in the system and the software and SAS servers that are to be deployed on each host. The deployment plan then serves as input to the SAS Deployment Wizard.
promotionthe process of copying selected metadata and associated content within or between planned deployments of SAS software. This process is repeatable for a particular deployment.
SAS Application Servera logical entity that represents the SAS server tier, which in turn comprises servers that execute code for particular tasks and metadata objects.
SAS authenticationa form of authentication in which the target SAS server is responsible for requesting or performing the authentication check. SAS servers usually meet this responsibility by asking another component (such as the server's host operating system, an LDAP provider, or the SAS Metadata Server) to perform the check. In a few cases (such as SAS internal authentication to the metadata server), the SAS server performs the
196 Glossary
check for itself. A configuration in which a SAS server trusts that another component has pre-authenticated users (for example, Web authentication) is not part of SAS authentication.
SAS data seta file whose contents are in one of the native SAS file formats. There are two types of SAS data sets: SAS data files and SAS data views. SAS data files contain data values in addition to descriptor information that is associated with the data. SAS data views contain only the descriptor information plus other information that is required for retrieving data values from other SAS data sets or from files whose contents are in other software vendors' file formats.
SAS Deployment Managera cross-platform utility that manages SAS deployments. The SAS Deployment Manager supports functions such as updating passwords for your SAS deployment, rebuilding SAS Web applications, and removing configurations.
SAS Deployment Wizarda cross-platform utility that installs and initially configures many SAS products. Using a SAS installation data file and, when appropriate, a deployment plan for its initial input, the wizard prompts the customer for other necessary input at the start of the session, so that there is no need to monitor the entire deployment.
SAS Foundation Servicesa set of core infrastructure services that programmers can use in developing distributed applications that are integrated with the SAS platform. These services provide basic underlying functions that are common to many applications. These functions include making client connections to SAS application servers, dynamic service discovery, user authentication, profile management, session context management, metadata and content repository access, activity logging, event management, information publishing, and stored process execution.
SAS IOM workspacein the IOM object hierarchy for a SAS Workspace Server, an object that represents a single session in SAS.
SAS Management Consolea Java application that provides a single user interface for performing SAS administrative tasks.
SAS Metadata Servera multi-user server that enables users to read metadata from or write metadata to one or more SAS Metadata Repositories.
SAS OLAP Servera SAS server that provides access to multidimensional data. The data is queried using the multidimensional expressions (MDX) language.
SAS Pooled Workspace Servera SAS Workspace Server that is configured to use server-side pooling. In this configuration, the SAS object spawner maintains a collection of workspace server processes that are available for clients.
SAS Software Depota file system that consists of a collection of SAS installation files that represents one or more orders. The depot is organized in a specific format that is meaningful to the
Glossary 197
SAS Deployment Wizard, which is the tool that is used to install and initially configure SAS. The depot contains the SAS Deployment Wizard executable, one or more deployment plans, a SAS installation data file, order data, and product data.
SAS Stored Process Servera SAS IOM server that is launched in order to fulfill client requests for SAS Stored Processes.
SAS Workspace Servera SAS IOM server that is launched in order to fulfill client requests for IOM workspaces.
SAS/CONNECT servera server that provides SAS/CONNECT services to a client. When SAS Data Integration Studio generates code for a job, it uses SAS/CONNECT software to submit code to remote computers. SAS Data Integration Studio can also use SAS/CONNECT software for interactive access to remote libraries.
SASHOME directorythe file location where an instance of SAS software is installed on a computer. The location of the SASHOME directory is established at the initial installation of SAS software by the SAS Deployment Wizard. That location becomes the default installation location for any other SAS software you install on the same machine.
SAS/SHARE serverthe result of an execution of the SERVER procedure, which is part of SAS/SHARE software. A server runs in a separate SAS session that services users' SAS sessions by controlling and executing input and output requests to one or more SAS libraries.
server contexta SAS IOM server concept that describes how SAS Application Servers manage client requests. A SAS Application Server has an awareness (or context) of how it is being used and makes decisions based on that awareness. For example, when a SAS Data Integration Studio client submits code to its SAS Application Server, the server determines what type of code is submitted and directs it to the correct physical server for processing (in this case, a SAS Workspace Server).
servleta Java program that runs on a Web server. Servlets are a complementary technology to applets, which run in Web browsers. Unlike applet code, servlet code does not have to be downloaded to a Web browser. Instead, servlets send HTML or other appropriate content back to a browser or to another type of Web-based client application.
servlet containerthe component of a Web server that manages the lifecycle of servlets, mapping a URL to a particular servlet and ensuring that the URL requester has the correct access rights. All servlet containers must support HTTP as a protocol for requests and responses, but they can also support additional protocols such as HTTPS.
single sign-onan authentication model that enables users to access a variety of computing resources without being repeatedly prompted for their user IDs and passwords. For example, single sign-on can enable a user to access SAS servers that run on different platforms without interactively providing the user's ID and password for each platform. Single sign-on can also enable someone who is using one application to launch other
198 Glossary
applications based on the authentication that was performed when the user initially logged on.
spawnerSee object spawner.
SSOSee single sign-on.
trusted usera privileged service account that can act on behalf of other users on a connection to the metadata server.
unrestricted identitya user or group that has all capabilities and permissions in the metadata environment due to membership in the META: Unrestricted Users Role (or listing in the adminUsers.txt file with a preceding asterisk).
upgradea type of software update that introduces new functionality. An upgrade generally involves a new release number. See also hot fix.
Web applicationan application that is accessed via a Web browser over a network such as the Internet or an intranet. SAS Web applications are Java Enterprise Edition (JEE) applications that are delivered via Web application archive (WAR) files. The applications can depend on Java and non-Java Web technologies.
Web authenticationa configuration in which users of Web applications and Web services are verified at the Web perimeter and the metadata server trusts that verification.
Web-distributed authoring and versioninga set of extensions to the HTTP protocol that enables users to collaboratively edit and manage files on remote Web servers. Short form: WebDAV.
WebDAVSee Web-distributed authoring and versioning.
WebDAV serveran HTTP server that supports the collaborative authoring of documents that are located on the server. The server supports the locking of documents, so that multiple authors cannot make changes to a document at the same time. It also associates metadata with documents in order to facilitate searching. The SAS business intelligence applications use this type of server primarily as a report repository. Common WebDAV servers include the Apache HTTP Server (with its WebDAV modules enabled), Xythos Software's WebFile Server, and Microsoft Corporation's Internet Information Server (IIS).
workspaceSee SAS IOM workspace.
Glossary 199

200 Glossary
Index
Numbers64-bit middle tier 33
Aaccess control lists (ACLs)
for WebDAV repositories 124access controls
effects of migration on inheritance 102, 108
viewing differences after migration 107adding a middle-tier machine 35administration
setup tasks 144administration tasks
standard setup tasks 148administration tasks, ongoing 150authentication 42authorization differences reports 102
causes and solutions for differences108, 109
reading reports 107running reports 103
automatic configuration of Web application servers 34
automatic deployment of Web applications 35
Bbacking up systems
SAS 9.1.3 40batch import tool
importing metadata from SAS 9.1.3 7branding, redefining 122burst set library errors (z/OS) 110
Ccalendar metadata, moving 48checklists
for external user accounts 41for new server ports 44for SAS Migration Utility input 21
configurationautomatic for Web application servers
34information needed by SAS
Deployment Wizard 85logs 100modifying to optimize performance 148options for SAS Deployment Wizard
172reviewing for WebDAV 124updating files 111
configuration directoriesSee also SAS configuration directoryprotections on Windows 145
Configuration Errors.html file 100connectivity 148cubes
promoting from SAS 9.1.3 7
Ddata quality transformations 118data sources
establishing connectivity to 148datestamps for WebDAV content 125deployment plans 36, 72DeploymentSummary.html file 100designing a migration 16DSX files for SAS BI Dashboard 123
Eexternal user accounts
checklist for 41
Fflows 45
201
determining user IDs for 45rescheduling 118
foldersbest practices for SAS folders 151metadata folder structure 148migrating for SAS Web Report Studio
users 122moving SAS 9.1.3 tables and libraries to
6query cache library folder 24
full promotion 2
Ggrid control server
properties for SAS Migration Utility182
Hhardware
assessing for migration 18
Iimporting
metadata from SAS 9.1.3 7inheritance of access controls 102, 108installation
automating for clients on multiple machines 97
interactive 76order rules for multiple-machine
deployments 74SAS 9.2 71third-party software 47
Instructions.html file 100integrity, system 151interactive installation and migration 76inventorying a SAS deployment 21
JJava application servers
See also Web application serversstarting for validation 134
Java Development Kit (JDK)installing from Third-Party Software
Web site 47Java Runtime Environment (JRE)
in Russia 47requirement for SAS Metadata Utility
26JBoss servers
configuration for 34
JDBC DSX files for SAS BI Dashboard123
jobsredeploying for scheduling 118verifying after migration 118
Llibraries
migrating from outside the configuration directory 113
moving SAS 9.1.3 libraries to folders 6logs
configuration 100migration 33
Mmaintenance patches 40metadata
importing from SAS 9.1.3 7promoting from SAS 9.1.3 3promoting from SAS 9.1.3 to 9.2 6setting up folder structure 148
metadata repositoriesbest practices for access 151preparing for migration 23
metadata server tierpost-migration tasks 102
middle tieradding a second machine 35migration considerations 33post-migration tasks 121validation 134
migrationbasic steps 13compared to promotion 7content types eligible for 8defined 7designing 16interactive 76post-migration tasks 99pre-migration tasks 37requirements for 9SAS 9.1.3 content 71tools for 8validating 127
migration analysis reports 28migration logs 33migration packages 38
creating 67multiple-machine deployments
automating client installation 97order of installation 74
202 Index
Oobjects
promoting from earlier versions to 9.3 6OLAP cubes
promoting from SAS 9.1.3 7operating system
protections for configuration directories on Windows 145
optimizing performancechanges to initial configuration 148
order of installation 74
Ppartial promotion 2permissions 146
effects of migration 102reviewing for WebDAV 124viewing changes after migration 107
plan files 36, 72Platform Process Manager 48Platform Suite for SAS
moving calendar metadata 48ports checklist 44post-migration tasks 99pre-migration tasks 37promotion
compared to migration 7content types eligible for 3defined 2ensuring correct software version when
exporting from SAS 9.1.3 6importing metadata from SAS 9.1.3 7metadata, from SAS 9.1.3 to 9.2 6moving SAS 9.1.3 tables and libraries to
folders 6OLAP cubes from SAS 9.1.3 7prompts from SAS 9.1.3 6SAS 9.1.3 metadata 3tools for 2
promptspromoting from SAS 9.1.3 6
properties, application-specificgrid control server 182multiple applications 180SAS Analytics Platform 180SAS BIDashboard 181SAS Customer Intelligence 180SAS Information Delivery Portal 182SAS Marketing Automation 184, 185SAS Marketing Optimization 180, 186,
188SAS OLAP Web Viewer 189SAS Shared Services 190SAS Web Report Studio 191
Web Infrastructure Platform Database190
Xythos 192properties, general 165properties file for SAS Migration Utility
27, 164
Qquery cache library folder 24
Rrequirements
for migration 9for SAS Migration Utility 25
roles for SAS Web Report Studio 121
SSAS 9.1.3
correct software version when exporting from 6
importing metadata from 7moving tables and libraries to folders 6promoting metadata to 9.2 6promoting OLAP cubes from 7promoting prompts from 6
SAS 9.2promoting metadata from 9.1.3 6
SAS Analytics Platformproperties for SAS Migration Utility
180SAS BI Dashboard
JDBC DSX files 123properties for SAS Migration Utility
181SAS configuration directory 111
migrating content stored outside the directory 111
SAS Customer Intelligenceproperties for SAS Migration Utility
180SAS Data Integration Studio
migrating content from outside the configuration directory 113
validating 133SAS Deployment Tester 130SAS Deployment Wizard 8
configuration for Web application servers 34
configuration information needed 85configuration options 172creating SAS Software Depots 61documents and reports 100information needed for z/OS 82
Index 203
interactive operation 72interactive prompting levels 171non-interactive operation 72
SAS Download Managercreating SAS Software Depots 55
SAS Enterprise Guidevalidating 131
SAS flowsSee flows
SAS Information Delivery Portalproperties for SAS Migration Utility
182updating URLs for 125validating 140
SAS Information Map Studiovalidating 132
SAS installation data filesspecifying location 80
SAS Marketing Automationproperties for SAS Migration Utility
184, 185SAS Marketing Optimization
properties for SAS Migration Utility180, 186, 188
SAS Migration Utility 8, 153creating a migration analysis report 28creating migration packages 67downloading 26input values checklist 21inventorying a SAS deployment 21migration logs 33properties, application-specific 179properties, general 165properties file 27, 164requirements 25smu command syntax 154
SAS OLAP Web Viewerproperties for SAS Migration Utility
189SAS Remote Services
starting for validation 134SAS Shared Services
application properties for SAS Migration Utility 190
SAS Software Depots 50benefits of 51best practices for 53creating with SAS Deployment Wizard
61creating with SAS Download Manager
55installing third-party software 47prerequisites for creating 54
SAS Stored Process Web Applicationvalidating 135
SAS Web Report Studio
migrated user folders 122properties for SAS Migration Utility
191reviewing user roles 121validating 136
schedulingredeploying jobs for 118rescheduling flows 118
securityprotections for configuration directories
on Windows 145standard setup tasks 148
server tierpost-migration tasks 110
serversupdating definitions for third-party
software 110validating 128
setup tasks 144, 148permissions 146standard 148
smu commandexamples 161notes 159syntax 154
standard setup tasks 148stored processes
migrating from outside the configuration directory 114
updating archive package and WebDAV paths 116
validating the SAS Stored Process Web Application 135
system integrity 151
Ttables
moving SAS 9.1.3 tables to folders 6temporary directory
changing 76themes, redefining 122third-party software
assessing for migration 18installing from Third-Party Software
Web site 46installing with a SAS Software Depot
47updating server definitions 110
Third-Party Software Web site 46tools for promotion 2
UUNIX
smu command syntax 154
204 Index
upgrading to SAS 9.2, approaches for 11URLs
resetting for Web applications after migrating 124
updating for SAS Information Delivery Portal 125
user accountsauthentication 42checklist for external user accounts 41
user IDs for flows 45user roles for SAS Web Report Studio
121users
access management 148adding 148
Vvalidation
of middle-tier and Web clients 134of SAS clients 131of servers 128SAS Deployment Tester 130
WWeb application servers 33
automatic configuration 34configuration documentation for 33installing from Third-Party Software
Web site 47
starting for validation 134Web applications
automatic deployment 35resetting URLs after migrating 124validation 134
Web Infrastructure Platform Databaseapplication properties for SAS
Migration Utility 190WebDAV servers
reviewing configuration 124updating paths for stored processes 116
Weblogic serversconfiguration for 34
WebSphere serversconfiguration for 34
Windowssmu command syntax 154
XXythos
properties for SAS Migration Utility192
Zz/OS
burst set library errors 110information for SAS Deployment
Wizard 82smu command syntax 155
Index 205

206 Index