sap business objects universe integration with sap … · step 1: business objects universe –...
TRANSCRIPT
SAP BUSINESS OBJECTS UNIVERSE
INTEGRATION WITH SAP HANA DECEMBER 13, 2017 KAUSTUBH SATPUTE LEAVE A COMMENT EDIT
SAP Business Objects Universe integration with SAP HANA Universes are a middle layer
between certain sources (SAP HANA in our case) and some Business objects reporting tools.
These are the tools that do not have direct connectivity via standard connections to SAP HANA
sources. SAP Web Intelligence is a tool which was highly dependent on SAP Business Objects
Universe as a middle layer when connecting to SAP HANA. This is because Web Intelligence
(Commonly called WebI) had no native connectivity options to SAP HANA until the latest
version. But with the advent of Business Objects 4.1 SP3 (Service Pack 3), even SAP Web
Intelligence also connects directly to SAP HANA eliminating the need for universes as a middle
layer completely.
So, if you are working/going to work on a new project that is on Business Objects 4.1 SP3, you
won’t need to create a universe and probably don’t need the below tutorial. Unfortunately, most
projects out there have been running for a while now and their WebI reports did not have the
liberty of connecting directly to SAP HANA back then. Consequently, since Business Objects
Universe was a key component of creating Webi Reports, it exists in huge numbers in projects
that have been running for years. Thus it makes it an important topic to know
Step 1: Business Objects Universe – Creating a Relational Connection
A Business Objects Universe is created in the IDT (Information design tool). It should be
available under the SAP Business Intelligence folder in the start menu as marked below.

The below application when it opens up, should look like as shown below.
Firstly, we would need the tool to be connected to the business objects server so that everything
we create here can be published to the online Business Objects repository.
To do this, click on the green plus sign or the black downward arrow marked below.

Click on the Insert session button marked below.

The below dialog box opens which asks for your Business Objects server details. Provide your
system name, username, password and Authentication method as provided to you by your SAP
security team.
After the details are filled, press OK to confirm.

The BO repository connection has now been established as seen below.

Now, we need a “Project” to organize our work under. A “Project” is nothing but a folder in this
case where our work will be grouped. Right Click somewhere inside the blank area of the “Local
Projects” pane and then select New Project.
It would ask you to name the project. Give it a meaningful name.

Press “Finish” when done.

As seen below, the “Project” TEACHMEHANA has been created. Now, we can finally start
building our Relational connection.
To do this, right click on the TEACHMEHANA project, navigate to New Relational Connection.
Give it a technical name and a description as shown in the example below and then press “Next”.

The next step requires you to choose the Middle-ware driver. Since we need to connect to the
SAP HANA database, we expand the SAP section.

Under the SAP section, you would find different SAP sources. In our case, choose the SAP
HANA database 1.0 and expand it. There is an option to choose JDBC and ODBC.
Select JDBC and press “Next”.
The next step asks for your HANA system credentials. Provide your username, password, host
name and instance number.

Press “Finish” to confirm when done.

1
1
A new relational connection has now been created as seen below. But right now, this connection
is local and not published to the repository.
Local connections have the extension .cnx but what we need is a secure connection that is
published on the repository.
To create a secured connection, right click on our .cnx connection that we just created and then
click “Publish Connection to Repository”.

This opens up the window where you see the connection details to which the connection is going
to be published to. In case you have multiple BO systems connected, you can choose where to
publish it to at this step.
Press Next.

On the SAP Business Objects Repository of your project, you would have different folders.
Choose the folder where you wish to publish this and then press “Finish”.

As seen below, the system confirms that the connection was published successfully. Now, this becomes a
secured connection with the file extension “.cns”. The system prompt also asks if you wish to create a
shortcut to this newly created cns connection on the same project folder.
Press Yes to confirm.

As seen below, now the cns secured relational connection is available inside the “project” folder.

Step 2A: SAP Business Objects Information design tool – Creating a Data
Foundation (BO Version < 4.1)
Note: This explanation is of SAP Business Objects Information Design tool version less than 4.1.
If you are on 4.1 version, skip to Step 2B.
The next step to create a universe, is to create a “Data Foundation”. Right click on your project
folder and then navigate to New Data Foundation.

It asks you for the technical name and description of this data foundation.

I name this TMH_DF_OLD since this is the older method for creating data foundation (i.e for
versions 4.1 and before).
Since there is only a single source of data, select “Single Source” and press “Next”

It now requires you to choose a relational connection to connection to the underlying data source.
Choose the secured connection always which is the “.cns” one.
Press Finish when done.

As seen below, the data foundation has been created successfully. Also, a connection pane opens
up. Expand the connection to see the SAP HANA schemas below.
As you see below, in this case, you don’t see the SAP HANA packages and the underlying views
directly. You only have access to the schemas which house the tables and view metadata as well.

If you have gone through my HANA and SQL tutorials, you would already know that the
“_SYS_BIC” schema contains the metadata for all the SAP HANA information views that we
model under different packages. Expand this schema as I’ve done in the example below.
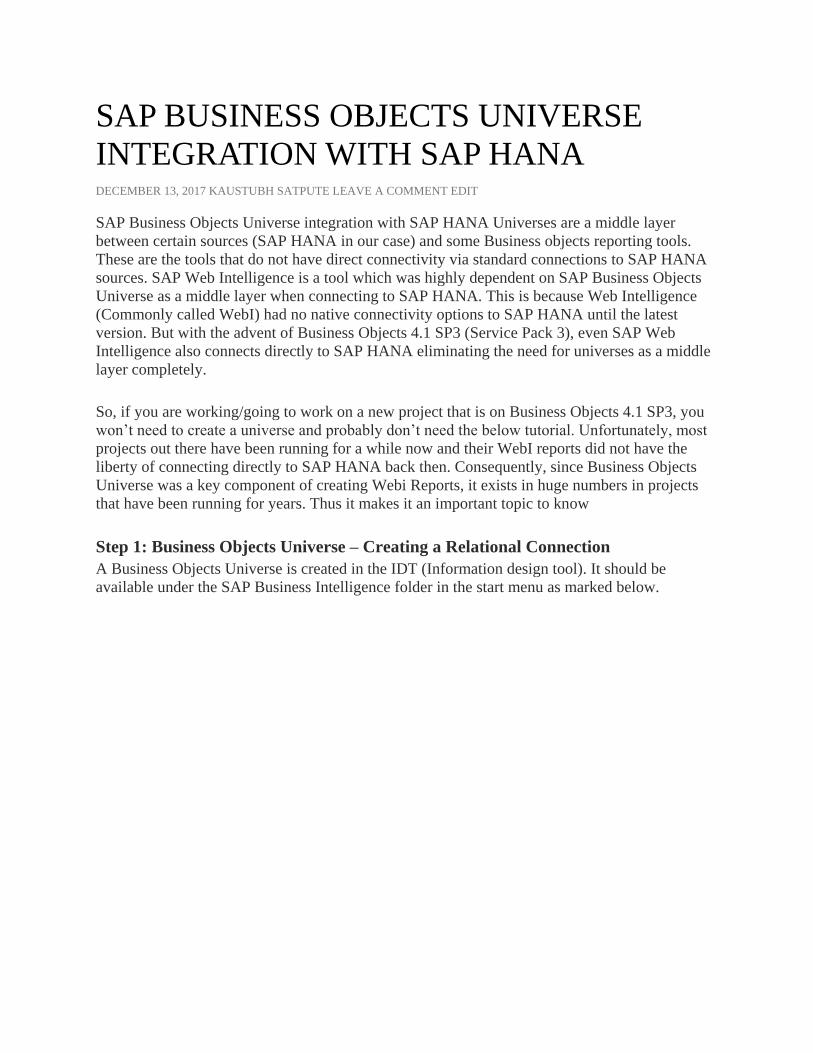
Now scroll down and find your SAP HANA information view on which you wish to create the
SAP HANA universe. This is a bit of a mess since all the information views from your entire
SAP HAAN system are in this schema and it might take a while to find it. This has been made
better in the consequent SAP Business Objects versions which we will learn soon but for now,
double click on your view once you find it.
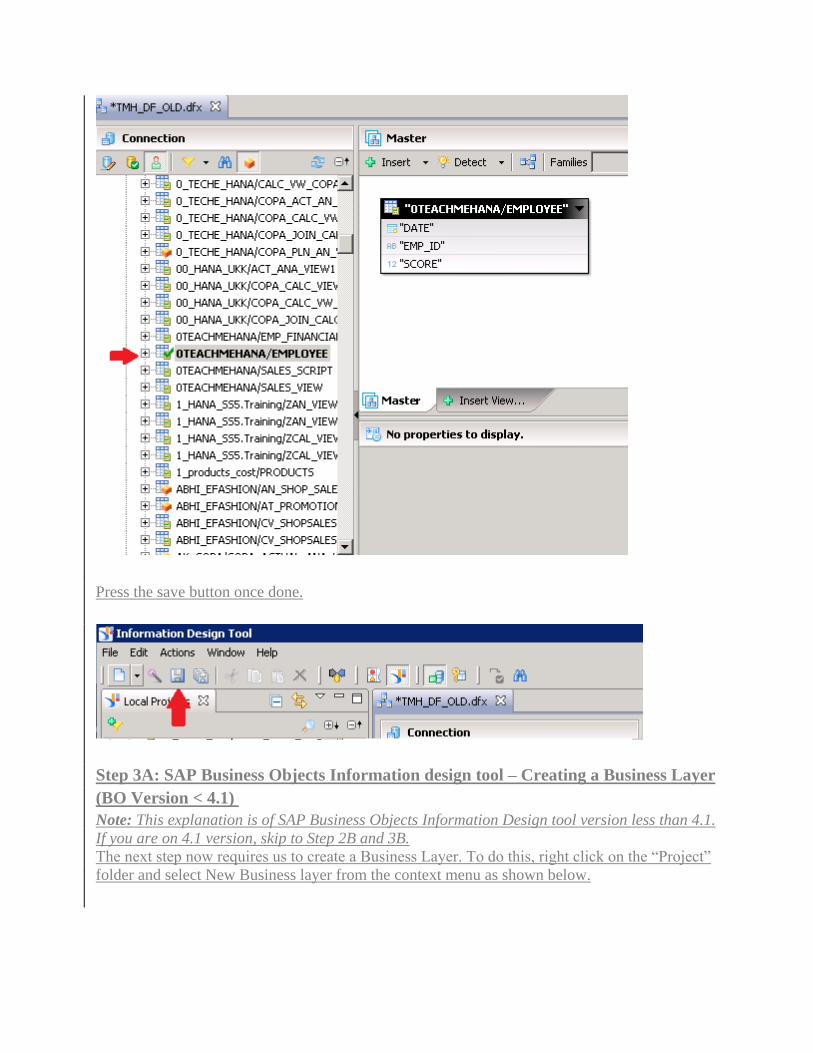
Press the save button once done.
Step 3A: SAP Business Objects Information design tool – Creating a Business Layer
(BO Version < 4.1)
Note: This explanation is of SAP Business Objects Information Design tool version less than 4.1.
If you are on 4.1 version, skip to Step 2B and 3B.
The next step now requires us to create a Business Layer. To do this, right click on the “Project”
folder and select New Business layer from the context menu as shown below.

Select the type of data source as “Relational Data Foundation” and press “Next”.

Again, you are now required to enter a technical name for this business layer and a description.
Since this is the older method, I name the business layer as TMH_UNIV_OLD.
Press Next when done.

It would ask you to select a data foundation. Since we only have one data foundation here, it
shows up. If you have multiple, choose the data foundation on which you wish to build the report
on later.
Press Finish when done.

As you press finish, the new business layer now appears.
You are now one step away from converting this Business layer to a universe by publishing it to
the repository. But before we get there, let’s see how to create a data foundation and business
layer on Business objects versions 4.1 and above.
Once we have both these business layers, we will publish them together.
If you are not interested in the explanation of versions 4.1 and above and just want to learn how
to publish the older universe version, skip to Step 4.
Otherwise, read on..
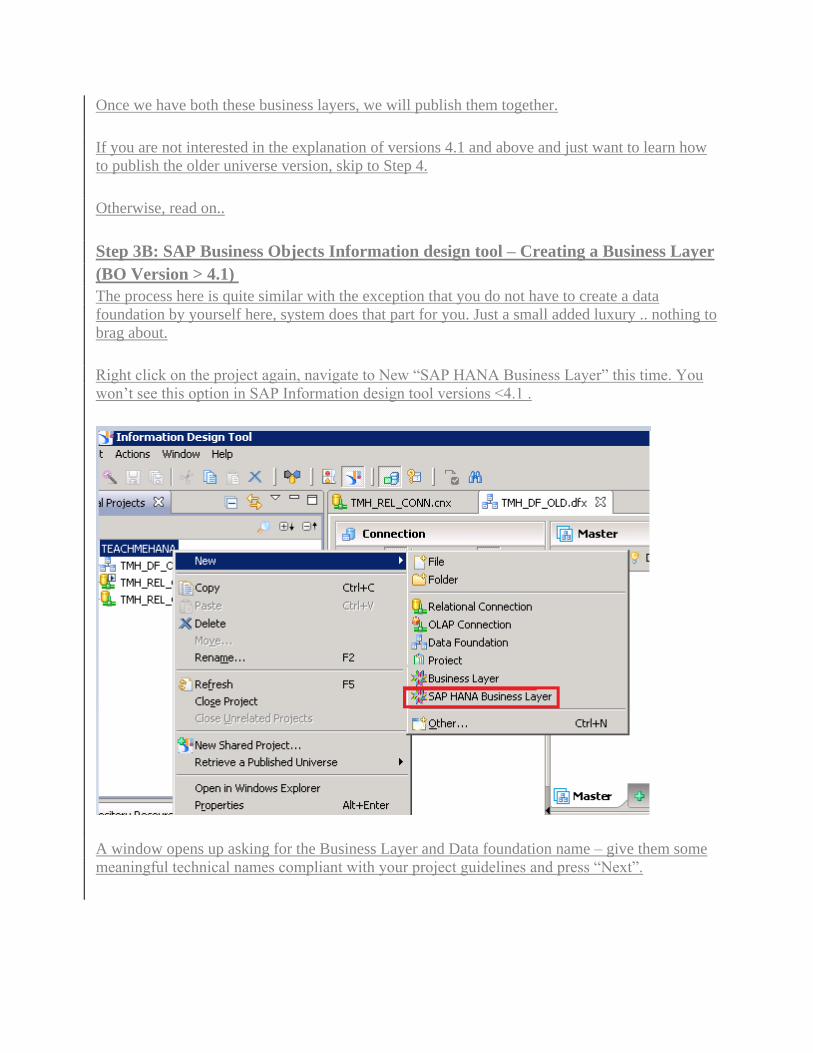
Step 3B: SAP Business Objects Information design tool – Creating a Business Layer
(BO Version > 4.1)
The process here is quite similar with the exception that you do not have to create a data
foundation by yourself here, system does that part for you. Just a small added luxury .. nothing to
brag about.
Right click on the project again, navigate to New “SAP HANA Business Layer” this time. You
won’t see this option in SAP Information design tool versions <4.1 .
A window opens up asking for the Business Layer and Data foundation name – give them some
meaningful technical names compliant with your project guidelines and press “Next”.

We already created a relational connection earlier which we can use here. But, we needed the
secure connection (.cns which we had published to the repository earlier). Instead the system
only shows us the local .cnx. For now, we compromise and pick this connection as the system
gives us no choice. We would need to switch the connection later once the business layer has
been created.

Click the checkbox and press “Next”.

Now, instead of having to go through the clutter of _SYS_BIC schema in the older IDT versions,
we now have the luxury of having the SAP HANA package tree hierarchy at our disposal.
Expand the schema where your view is contained.

For example, let’s choose our employee view. Press finish.

As you see below, a TMH_UNIV_NEW data foundation(.dfx) and a business layer (.blx) have
been auto generated. This version now saved us the time of creating a data foundation.
1
Now, since we used a local .cnx connection to create this business layer and underlying data
foundation, now comes the time to switch the connection to a secure .cns type. Only then would
we be allowed to publish our business layer to the repository to create the universe.

To do this, double click on the new data foundation we just created – TMH_UNIV_NEW.
The data foundation opens up as shown below. Click on the “Edit Connection” button

This shows you the list of available connections. We would need to select the secured connection
here and press “Finish”.
Press the “Save” button to save your changes.

Step 4: SAP Business Objects Information design tool – Publishing a Business
Layer
Finally, we reach the magical step where we publish the business layers which creates a
universe. This step is fairly straightforward. Just right click on your business layer and press
Publish -> “To a Repository”
Here, there are different validations/check you can perform based on your project guidelines
about universes, if any. Otherwise, press “Next”

Choose the folder where you wish to publish this universe. In this example, we continue the
shameless self promotion and name another folder as TEACHMEHANA. We will publish our
Business Objects artifacts here from now on. Double click on the folder to go inside.
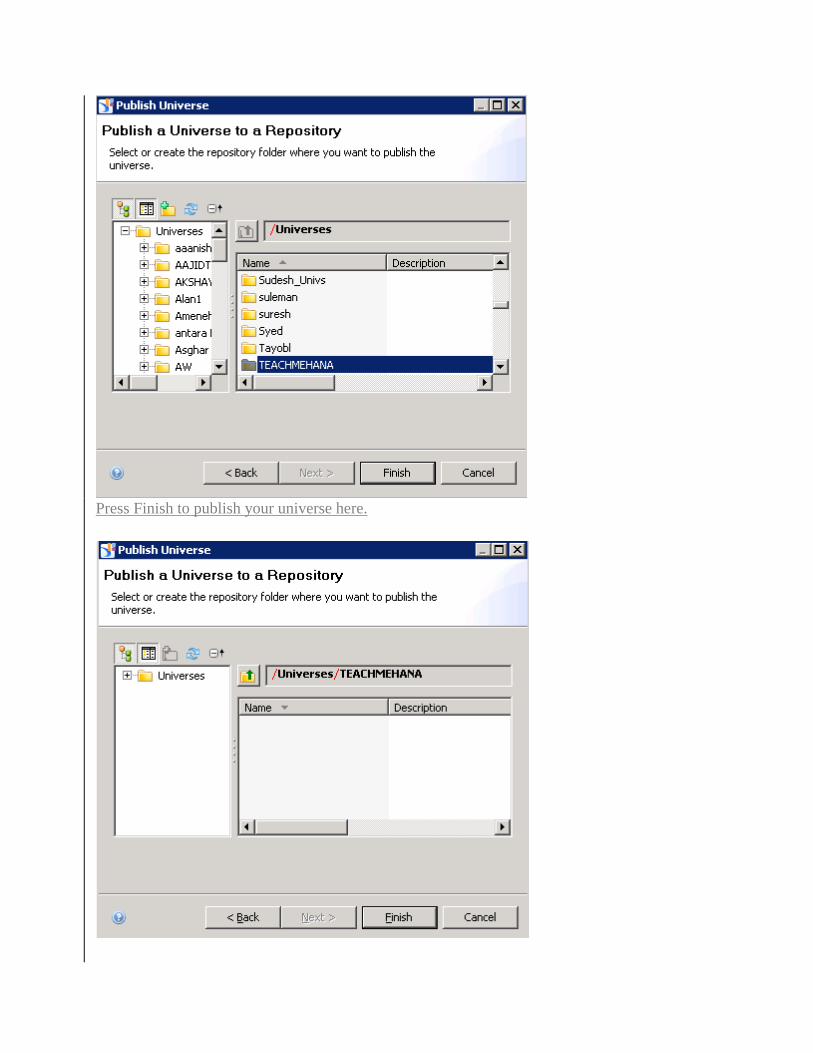
Press Finish to publish your universe here.

The Business Objects Information design tool congratulates you on this monumental
achievement. The universe is now saved on the repository with the same name as the business
layer with an extension of .unx
Let’s do the same for the business layer we created with the new process.
Ignoring the validation window, we reach the below step where I already navigated to our
TEACHMEHANA folder where we saved our last universe. You can see it resting in the folder
below under the unx extension as explained before.
Press finish to save this new universe as well.

IDT confirms that the publish was successful.