sap business intelligence (bi) - bloomsburg … 2012 sap business intelligence (bi 7) reporting...
TRANSCRIPT

1
2012
SAP Business Intelligence (BI 7) Reporting Training
Award Report
Created by the Budget Office Modified by the Grant Accounting Office -3/1/2012 Bloomsburg University

2
Contents
Business Intelligence 7.0 (BI) Reports ......................................................................................................................................... 4
BI Logon ...................................................................................................................................................................................... 5
Entering Variables ...................................................................................................................................................................... 7
Data Update ............................................................................................................................................................................... 8
Tab Layout .................................................................................................................................................................................. 8
Tab Descriptions ......................................................................................................................................................................... 9
Summary Tab.................................................................................................................................................................................. 9
Budget Tab ................................................................................................................................................................................... 10
Commitments Tab ........................................................................................................................................................................ 11
Actuals Tab ................................................................................................................................................................................... 11
Payments Tab ............................................................................................................................................................................... 12
Dashboard Tab ............................................................................................................................................................................. 13
Toolbar Icons ............................................................................................................................................................................ 14
Toolbar Button Icons .................................................................................................................................................................... 14
Open Saved User-Defined Views ........................................................................................................................................... 15
Save User-Defined Views .............................................................................................................................................................. 15
Back ....................................................................................................................................................................................... 16
Back to Start .......................................................................................................................................................................... 16
Variables ....................................................................................................................................................................................... 16
Display ................................................................................................................................................................................ 17
Filter Values ........................................................................................................................................................................... 18
Export to Excel ....................................................................................................................................................................... 18
Create Adobe .pdf Document ....................................................................................................................................................... 19
Adobe .pdf Document ................................................................................................................................................................... 19
Properties ..................................................................................................................................................................................... 20
Dropdown Filters and Navigational Menus .................................................................................................................................. 20
Navigation Pane - Swap/Replace Characteristics ................................................................................................................. 21

3
Navigation Pane - Add Drilldown in Rows ............................................................................................................................. 21
Filter Pane ..................................................................................................................................................................................... 22
Full Window .......................................................................................................................................................................... 24
Views ........................................................................................................................................................................................ 25
BI Jump Functionality ............................................................................................................................................................... 27
Contact Information ................................................................................................................................................................. 29
APPENDIX A .............................................................................................................................................................................. 30
QUICK REFERENCE OF BI TOOLBAR ICONS ................................................................................................................................... 30

4
Business Intelligence 7.0 (BI) Reports The SAP BI budget and award reports are run from the database known as the Business Warehouse (BW). It is
important to note that BI is refreshed once daily each morning. The update is generally completed by 8 am. This
means that the reports will include no transactions from the day the report is physically processed.
In order to assist with your financial reporting needs, most users have been set up with their own unique
personalization. The intent of the personalization is that a user will not need to enter any variables when processing
reports. However, if a user wishes to select a different variable they can still do that.
The BI reporting tool offers a number of added benefits for our users:
1. There are no longer numerous User IDs and passwords to remember – BI reports are accessed using the
Employee Self Service (ESS) portal. Because of the integrated sign-on, the only user ID and password
necessary is your Bloomsburg Domain logon and password.
2. BI reports are tabular in nature so most of your financial data can be retrieved by running one single report.
3. BI offers users the ability to “jump” (drilldown) into SAP for the detail for the financial data being viewed.

5
BI Logon Users will logon to BI through Employee
Self Service (ESS) in the same manner as
they do currently to access their pay
statements and enter leave requests.
1. Go to the ESS portal. You may already have this saved in your Favorites. If not, you can go to the Human Resources and Labor Relations website @ http://bloomu.edu/node/837 and select “Employee Self Service” on the left pane.
2. Select “Log Into ESS” on the right side under Quick Links.
3. Enter your University domain user ID ([email protected]) and password and click “Enter Portal”
4. You will now see a Business Intelligence tab as one of your options. Click on the tab
If the Business Intelligence tab
is not displayed, please
contact the Grant Accounting
office @ x4022

6
On the Business Intelligence tab, each
User will have two sub-tabs – Campus
Reports and Manage Saved Views.
The Campus Reports will contain the
Reports which are available campus wide.
The Manage Saved Views tab will be
used for two purposes. It will enable a
user to directly access a personal view
they have created. These views will appear
in the “Favorites” folder. The procedure for
creating personal views is explained on
Page…… This tab will also be used to access
custom views created for you by the Grant Accounting
office.
Now that you are familiar with the BI Reporting
Portal, let’s open a report and get familiar with
Navigating a BI report!
To open the Award Report, simply click on it!

7
Entering Variables
Variable Entry Screen
After clicking on the Award Report link, a Variable Entry screen will appear. Most users have already been set up with their own unique personalization based on the funds centers they are responsible for. If your personalization is up-to-date and accurate, you will not need to change any of these values. Simply click the OK button to execute your report. After clicking OK, a turning wheel will indicate the report is running. If you are not seeing any variables listed, you can enter the variables yourself. Some variables can be typed in directly. Others must be selected by using
the Selection Button - reference the screen shot to the right. When typing directly into the field it is recommended that you click on the Check Button
to verify the values you entered are valid. You can enter more than one item by separating them with a semi-colon. For example, if you are entering data in the funds center field: 1011030201;1011030202
Entering values with the Selection Button
1. Click on the Selection button to open a dialog box for the variable value options.
2. Select the value from the list by clicking on the block to the left of the value. In this example, multiple values can be selected.
3. Click the Add button to add the values to the list. 4. After clicking add, notice the Selection values are
added to the right. 5. Click OK when all the selection values are added
If you want your variables to be saved (personalized) or if there are additions/changes that need to be made, please contact the Grant Accounting office at x4022.

8
Data Update
Query Description and Last Update
A. For each tab selected, the description of the query will display. B. The Last Data Update date and time will also display. This is the day and time the SAP BI reports were last
updated with SAP data. Keep this date and time in mind when viewing BI reports. BI is a reporting platform and does not contain real-time data. Typically, your reports contain all the prior day information by 6:30 AM each morning.
Tab Layout
Tab Layout
BI reports are tabular in nature. The tabs have been created to categorize data for financial managers and enable them to meet their reporting needs. To navigate from tab to tab, click on the appropriate tabs. Please note that a user should click one-time only. BI will display a processing wheel until processing is complete. The active tab will be darker than the others. Tabs are arranged in a logical order. Summary or high level data is first, followed by more detailed or specific Tabs. Specialty tabs (i.e. Payments, and Dashboard) can be found at the end. The Summary tab is the most commonly viewed report. More information on this, as well as the Specialty tabs, can be found in the sections that follow. Features described on the Summary tab section (i.e. drop down boxes, arrows, etc.) are also available on most other tabs.

9
Tab Descriptions
The Summary tab shows the budget status and is the most commonly viewed report.
A. Users can click on any of the dropdown boxes to select data B. It is important to note that if multiple funds or funds centers were included on the variable selection, that
the data rolls into one total. The user will need to select each individual fund or funds center from the drop down box in order to view the data separately.
C. The most commonly viewed Commitment Item Category is “Total Expenses” which shows the personnel budget, operating budget and operating reserves (CI 6xx, 7xx, 82x, and 90x) . This is the default but can be changed by selecting from other categories in the drop down box such as “ Personnel” and “Non- Personnel”.
Summary Tab

10
D. Anytime there is an arrow displayed, this means the category can be expanded to display additional information.
By expanding “Current Budget”, you can view the budget source. To collapse the data, click on the arrow again.
By expanding “Commitments”, you can view funds reservation, purchase requisition, and purchase order data. You can drill down into each category to view additional details.
By expanding “Actuals”, you can view categories shown below.
The Budget Tab displays all budget entries: Enter (Original Budget), Carry Forwards, Transfers, Supplements, and Returns. All of these items make up your “Current Budget”.
Budget Tab

11
The Commitments Tab displays all open commitments. The following detail is displayed
Example:
The Actuals Tab displays all actuals or paid items. The Fund and Funds Center are shown. The additional items are also displayed: Commitment, Posting Date, Doc #’s, Doc Text, Vendor, and Actuals.
Click on the arrow before Actuals, report will run and then show payment type.
Commitments Tab
Actuals Tab

12
Payments Tab
The payments tab will display all paid invoices to vendors where the expense was posted to the funds center.
A. A dropdown is available for Vendor B. A dropdown filter is available for document #. This will allow the user to quickly filter to a single document if
the document number is known. C. The View Payee button will show the Payee of the check. The Payee and the vendor do not always match. D. View Line Item Text button will show the text that was printed on the check. E. Outstanding Checks button will filter for all records where there is a check number but the check has not
been cleared. F. Posting Date is when the expense was entered in SAP and posted as an expense. G. Payment Method will show if the invoice was paid by Check or ACH transfer. If # is in the column, this
means the expense was posted but the invoice was not paid yet. H. Payment Date is the date the check was printed or the ACH transfer was executed. I. Check # displays the check number. There will be no check number for ACH transactions. J. Check Cleared will display the date the check cleared the bank. K. Invoice Amount is the total invoice. This amount may not match the expense posted to your funds center(s).
The expenses on an invoice be shared by multiple funds centers.

13
Dashboard Tab
The Dashboard tab provides a dashboard report based on variables selected on the the summary tab.
A. The percent of the current fiscal year is displayed based on remaining pays. B. Dropdown boxes allow filtering on Fund and Funds Center. C. The most recent posting date of non-personnel expenses scroll by expense dollars in descending order. D. The bar graph displays actual expenses in green and commitments in yellow in descending order. E. The speedometer graphs display the dollars and percent of budget remaining. The dotted blue line
represents the % of the fisal year passed. If the solid line passes the dotted line, expenses and commitments are exceeding the rate of time.
F. Displays operating expense and chargebacks by month. Commitments are not included in this graph G. Displays current/prior YTD variances by Commitment item group

14
Toolbar Icons
Toolbar Button Icons
A. OPEN - Access and open any previously saved used-defined views. B. SAVE - Save a user-defined View after implementing formatting and criteria changes. C. UNDO - Undo last navigation change. Each click will back out another step / change. Allow time for each
screen refresh. NOTE: THIS ACTION MAY TAKE SEVERAL MINUTES. Vartan Way (Sytec) IS CURRENTLY WORKING ON A SOLUTION.
D. RESET - This will undo all user navigation and filter changes and return the view to the way it was delivered. NOTE: THIS ACTION MAY TAKE SEVERAL MINUTES. VARTAN WAY (SYTEC) IS CURRENTLY WORKING ON A SOLUTION.
E. VARIABLE SCREEN - This will return the user to the Initial Variable Screen to change your selections. F. DISPLAY - This will show all variable and filter selections that are currently in effect. G. FITLER VALUES - Hide/Display Variable (report-wide) and Dynamic (tab only) Filter Values. The report defaults
to display variable and filter values. H. EXCEL - This will allow you to export the current view to Excel for further processing. I. PDF PRINT - This will convert the current view to a PDF format to allow you to either print the view or save
the PDF file. J. PROPERTIES - This will display the properties of the current view. Toggle on / off. K. FAST FILTER AND NAVIGATION - Display Fast Filter Dropdowns, Fast Menus, and Fast Navigation Buttons. The
report defaults to display fast filter dropdowns and menus. L. NAVIGATION PANE - This will allow you full access to the building blocks of the current view. Toggle on / off. M. FILTER PANE - This will allow you full access to apply / remove filters on the data. Toggle on / off. N. EXCEPTIONS - Add or edit the formatting of cells based on report values - i.e. cells in red when dollar amount
is negative. O. CONDITIONS - Limit display of data that meets particular user-defined criteria. P. FULL WINDOW VIEW - Open the report detail or chart in a full window to aid scrolling. Q. DOCUMENTATION - Access the report documentation and/or tab specific notes.

15
Open Saved User-Defined Views
Click on the Open User Defined Views icon on the
toolbar to open the views you had previously saved.
A. Make certain you are on the favorites tab. This is where all your user-defined views should be saved.
B. Click on the view you want to open C. You will notice after clicking on the view the name
will appear. Verify you have the correct view selected. Ignore the technical name.
D. Click the OK button to open the view.
Save User-Defined Views
After making navigational or filter changes to a report, you may wish to save those changes for future reference. Saved Views can
save considerable time. Click on the Save User-Defined Views to create a new user-defined view.
A. The Save Variable Values will be checked by default. Uncheck this box before saving.
B. On the Favorites tab… C. You will notice all the views you have saved. You can click
on one to overwrite it (with the same name) or double-click on a folder to save in a folder. Tip: Folders can be created on the Manage Saved Views tab of the portal.
D. Type the Description of your view. E. After typing the Description, click OK to save the user-
defined view.
Folders can be created to organize your “Favorite” views. Go to the Manage Saved Views tab under Business Intelligence on the portal.

16
Back
NOTE: THIS ACTION MAY TAKE SEVERAL MINUTES. VARTAN WAY (SYTEC) ARE CURRENTLY WORKING ON A SOLUTION.
Click on the Back icon to undo your last navigation or filter. Each time you click the Back button you will undo one step. You can click multiple times to undo multiple steps but you must wait for the screen to refresh after each click.
DO NOT use your browser’s back button or your browser’s context menu back button.
Browser Back Button Browser Context Menu
BI Toolbar Button BI Context Menu
Back to Start
NOTE: THIS ACTION MAY TAKE SEVERAL MINUTES. VARTAN WAY (SYTEC) ARE CURRENTLY WORKING ON A SOLUTION.
Clicking the Back to Start button will remove all navigation steps and return the report to the original navigational state. It will also remove any dynamic filters that we added since the report was executed.
Variables Use the Variables Icon to quickly
reprocess the report with new values. A. Click on the Variables icon
to call the variable screen to change variable
values. B. The variable dialog box will open. C. Change the variable values.
D. Click OK

17
The Display button will show toolbar icon legend, all variable and filter selections, query filters, general information, and any query documents.
1. Click on Display button on toolbar 2. Icon Legend will explain the use for each toolbar button 3. Variables and Filters will display all variable values, including blank variable values, as well as dynamic filters
on the active tab. 4. Static Filters/Query Filters will display variable values as well as filter values that are in the query design. 5. General Query information will display who created the query, the technical name of the query and web
template, who last modified the query, the current user, last update, etc.
Query Documents displays any documents that are attached to the query.
Display

18
Filter Values A. Variable Filters: This will display the variable values entered when you ran the report. B. Dynamic Filters: This will display any filtering done on the current tab. Dynamic filters only apply to the tab
you are viewing while Variable Filters are the same for all tabs.
C. To hide the display of the Variable and Dynamic filters, click on the icon.
Export to Excel
The Export to Excel button can be used to easily export
the data table to Microsoft Excel. A. Click on the Export to Excel icon button.
B. A new dialog box will open. You can either save the
file or open it. (Note: This dialog box will vary depending on the web browser you use.
C. If you Open the file, you may be prompted to allow the file to open – depending on your version of Excel and security settings. Click on Yes button indicating you trust the file.

19
Create Adobe .pdf Document
A. Click on the Export to .pdf button
B. Make any desired settings changes in the Export Dialog box. You can change from Black and White to color, change orientation (landscape or portrait), change margins, and even add text to the header or footer.
C. Click OK to complete export.
Adobe .pdf Document
After exporting to Adobe .pdf, you will be able to Print or Save the document for future reference. One of the new improvements to .pdf printing is that columns and/or rows headings will repeat for all pages.
20
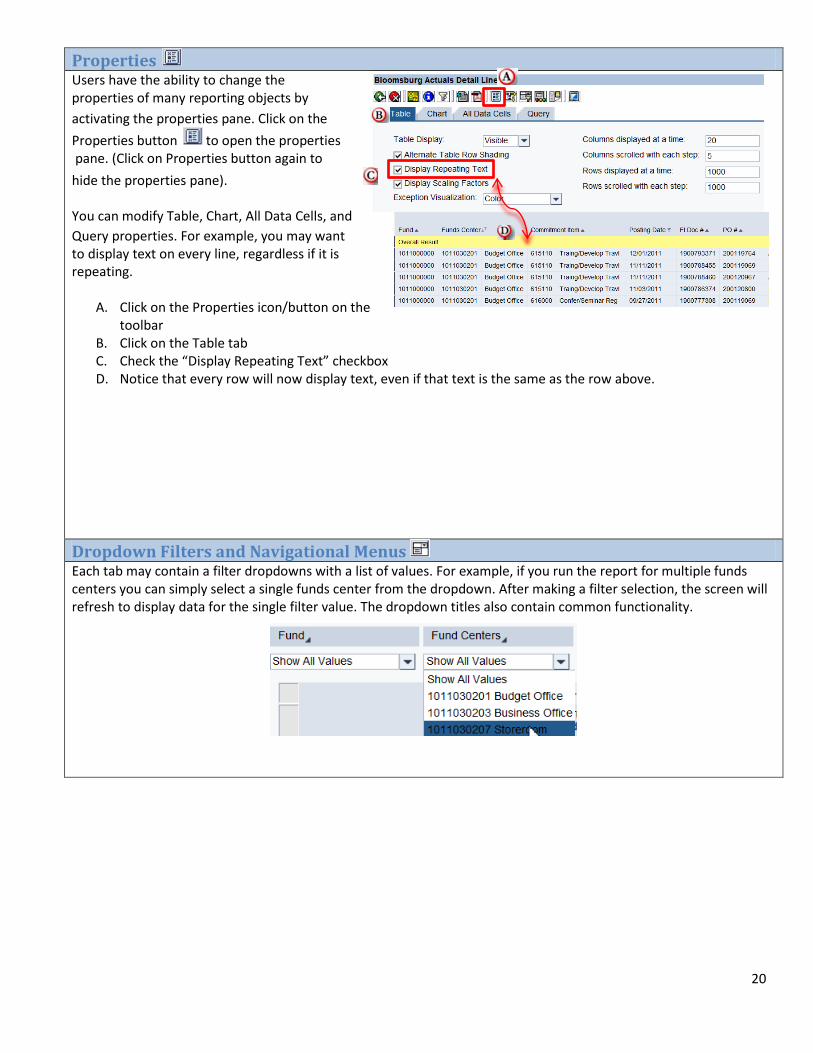
Properties
Users have the ability to change the properties of many reporting objects by
activating the properties pane. Click on the
Properties button to open the properties pane. (Click on Properties button again to
hide the properties pane). You can modify Table, Chart, All Data Cells, and
Query properties. For example, you may want to display text on every line, regardless if it is repeating.
A. Click on the Properties icon/button on the toolbar
B. Click on the Table tab C. Check the “Display Repeating Text” checkbox D. Notice that every row will now display text, even if that text is the same as the row above.
Dropdown Filters and Navigational Menus
Each tab may contain a filter dropdowns with a list of values. For example, if you run the report for multiple funds centers you can simply select a single funds center from the dropdown. After making a filter selection, the screen will refresh to display data for the single filter value. The dropdown titles also contain common functionality.

21
Navigation Pane - Swap/Replace Characteristics Clicking on this icon will open a menu box to the left of your report display. Use the
Navigation Pane to add, remove, or replace characteristics or key figures in rows or columns. To swap (replace) one characteristic with another one, single-click on the characteristic you want (Funds Center in this example) and drag-and-drop it on top of the characteristic you want to replace. You can drag from the Navigation Pane to the table, from the table to The Navigation pane, or even move characteristics within the table or navigation pane.
Navigation Pane - Add Drilldown in Rows To Add a Drilldown to rows, click on the desired characteristic to add from the list of Free Characteristics. Drag to the new location until a dark line appears. The line will indicate where the characteristic will be added. Release and wait for the screen to refresh. The new free characteristic will be added to the rows. You can also remove characteristics by clicking on the characteristic you want to remove and dragging it to the free characteristic section of the navigation pane.
Click and
Drag
Result –
Characteristics are
swapped
Click and
Drag
Result –
Characteristic is
added to the

22
Filter Pane - Dialog Selection
The Filter Pane provides functionality to filter characteristics and key figures by using a dialog box or utilizing the drag-and-drop functionality.
Clicking on the Filter Pane icon will open a filter window to the left of your report data. Please note that if you have the Navigation Pane
displayed, the filter pane will be displayed below it.
1. The Filter Pane will display to the left of the data table with all available
characteristics and key figures. 2. To filter on a characteristic (Commitment
Item in this example) select Edit from the dropdown box.
3. A new dialog window will open for the characteristic selected.
4. Find the value(s) you want to include or exclude in your filter and select the
value(s) by clicking on the block to the left. 5. After making your selections, click on the
Add button to move values to the Selections table on the right.
6. After clicking the Add button, the added values will display on the Selections table. 7. When complete, click the OK button to
transfer the filter. 8. After clicking the OK button to transfer the
filter values, the dropdown will display the filtered value and the report data reflects only the data selected.
9. You can also exclude values by selecting the value and
clicking the red square. 10. After clicking the OK button to transfer the filter values, the
dropdown will display the filtered value. An “!” before the value indicates the value is excluded from the report.

23
Filter Pane - Drag and Drop Instead of using the filter dialog box to select filter values, you can also drag and drop values to include or exclude them from the results.
To filter to a single value, click on the value and drag-and-drop it onto the Filter Pane. The Filter Pane will highlight in teal when you hover over it with the selected value. Drop on Filter Pane and wait for screen to refresh. After dropping the value onto the Filter Pane, you will notice the data table will display only the single value and the Filter Dropdown on the Filter Pane will also indicate there is a filter. Tip: The Filters tab will always display any filter values. To Exclude a value from the data, click on the value and drag-and-drop it in the grey filter pane section “Drag from table and drop items here to remove/exclude filter value(s)”. An “!” before the value indicates the value is excluded.
If you find yourself completing any of the above navigation on a regular basis, you can save yourself time by
saving the layout as a personal view. See Page 18 for saving a personal view. Note that saving a personal view
saves all the tabs of the report in the layout they are in when the view is saved so make sure the entire report is
exactly as you want it.
Click and
Drag
Click and
Drag

24
Full Window
If you data list is very long, you may wish to open the data table in a full window. You will still have the ability to use the BI Context Menu but the other web items will be removed from the full window view. Simply click on the Full
Window button to open a new window. There are several tools that will help maximize the display area and assist with scrolling while locking the column and row headings.
A. You can adjust the display area by entering the number of rows and columns to display at one time. Simply enter a number and press Enter on your keyboard. You can set the rows and columns to a display area that best fits your computer’s screen size and resolution.
B. Use the scroll buttons to scroll through the data. Column and row headings will display with each step. C. You can also use the scroll bar on the right and/or bottom of the screen to scroll through pages.
To Exit a BI report simply click the black X in the upper right hand corner of the Report.

25
Views Global Views
Each tab may contain multiple views in a dropdown list. Simply click on the dropdown arrow to display a list of views built on the query. Click on the desired view and wait for the screen to refresh with the new view. Refer to Appendix A for a description of views for each report and tab.
Manage Saved Views
The Manage Saved Views tab on the Business Intelligence menu will be used for two purposes. It will enable a user to directly access a personal view they have created. These views will appear in the “Favorites” folder (The procedure for creating personal views is explained beginning on page 9). This tab will also be used to access custom views created for you by the Accounting or Budget Offices. The custom views will appear in the “Portfolio” folder. On the Manage Saved Views tab, it is important to note:
1. No one will be able to see your personal views except you so feel free to create as many as necessary to meet your financial needs.
2. When saving a personal view, make sure each tab in the report is in the format you like. Saving a view as personal will save the entire report in the format it appears as when you saved it.

26
Currently the Portfolio folder does not appear by default. Programmers are working on a resolution for this but in the interim, you can navigate to your portfolio by:
1. Click on the Context Menu next to Favorites
2. Select Go To then select Public Folders 3. Click on the Millersville folder to display
custom reports assigned to you.
NOTE: This folder is currently empty. The Budget and Accounting Offices will be working with users in the coming months to ensure all custom view are created as needed and that your financial reporting needs are met.

27
BI Jump Functionality BI provides users the ability to “jump” into the details which make up amounts displayed on reports. On the summary tab of the Budget Report, a user can drill in to all of the amounts displayed. Summary amounts will allow the user to “jump” into the detailed transactions. Detailed transactions will allow users to “jump” into the actual documents such as the Funds Reservation, Purchase Order, Journal Entry, Budget Document and Payment Details. Directions for jumping into the details are included below. Because the options for “jumping” vary depending where you are located on the report, a flowchart is included on the next page to help users navigate.
1. To view actual revenue and/or expense document a. Right click on the Actuals column and select Goto. (By clicking on the total you will see results for all
commitment items displayed. By clicking on an individual commitment item line, you will see only results for that commitment item.)
b. Because you were on the Actual Amount, you will select Actuals Detail Lines.
c. A new window will open and display a summary of all of the transactions
d. You can drill into the accounting document by right clicking on a FI Doc#, select Goto, and select SAP FB03-Display Accounting Document.
2. To view budget documents
a. Right click in the Current Budget column and select Goto and Budget Detail Lines. You can drill into the budget document by right clicking on Doc#(BCS), select Goto, and select Budget Detail Lines
3. To view funds reservations, purchase requisitions, or purchase orders
a. Right click in the Commitments column and select Goto and Commitment Detail Lines. You can drill
into the document by right clicking on Doc#, select Goto, and select the SAP transaction applicable to your drill down.

28

29
Contact Information
Please contact the following with assistance with Budget reports, logging on, training, etc.: BUDGET OFFICE: Audra Halye x4700 [email protected] Barbara Meyer x4029 [email protected]
ACCOUNTING OFFICE: Debra Newman x4584 [email protected] GRANTS OFFICE: Julie Kaschak x4022 [email protected]
PURCHASING OFFICE: Jeff Mandel x4045 [email protected]

30
APPENDIX A
QUICK REFERENCE OF BI TOOLBAR ICONS
A. OPEN - Access and open any previously saved used-defined views.
B. SAVE - Save a user-defined View after implementing formatting and criteria changes.
C. UNDO - Undo last navigation change. Each click will back out another step / change. Allow time
for each screen refresh. NOTE: THIS ACTION MAY TAKE SEVERAL MINUTES. VARTAN WAY
(SYTEC)CURRENTLY WORKING ON A SOLUTION.
D. RESET - This will undo all user navigation and filter changes and return the view to the way it
was delivered. NOTE: THIS ACTION MAY TAKE SEVERAL MINUTES. VARTAN WAY
(SYTEC)CURRENTLY WORKING ON A SOLUTION.
E. VARIABLE SCREEN - This will return the user to the Initial Variable Screen to change your
selections.
F. DISPLAY - This will show all variable and filter selections that are currently in effect.
G. FITLER VALUES - Hide/Display Variable (report-wide) and Dynamic (tab only) Filter Values. The
report defaults to display variable and filter values.
H. EXCEL - This will allow you to export the current view to Excel for further processing.
I. PDF PRINT - This will convert the current view to a pdf format to allow you to either print the
view or save the pdf file.
J. PROPERTIES - This will display the properties of the current view. Toggle on / off.
K. FAST FILTER AND NAVIGATION - Display Fast Filter Dropdowns, Fast Menus, and Fast Navigation
Buttons. The report defaults to display fast filter dropdowns and menus.
L. NAVIGATION PANE - This will allow you full access to the building blocks of the current view.
Toggle on / off.
M. FILTER PANE - This will allow you full access to apply / remove filters on the data. Toggle on / off.
N. EXCEPTIONS - Add or edit the formatting of cells based on report values - i.e. cells in red when
dollar amount is negative.
O. CONDITIONS - Limit display of data that meets particular user-defined criteria.
P. FULL WINDOW VIEW - Open the report detail or chart in a full window to aid scrolling.
Q. DOCUMENTATION - Access the report documentation and/or tab specific notes.