sanwits user’s guide 2018 - optumsandiego.com · the user can view the client profile by...
TRANSCRIPT

SanWITS User’s Guide 2018
Behavioral Health Services - Substance Use Disorders
County of San Diego – Health & Human Services Agency
Version 1.1
Dated: 9-25-18

TABLE OF CONTENTS
CHAPTER 1: SANWITS INTRODUCTION ............................................................................................. 1
CHAPTER 2: CALOMS INTRODUCTION .............................................................................................. 2
CHAPTER 3: LOGGING INTO SANWITS .............................................................................................. 3
First Time Users .............................................................................................................................. 3
Returning Users .............................................................................................................................. 5
Assigned to One Facility ................................................................................................................. 6
Assigned to Multiple Facilities........................................................................................................ 7
Reset Password .............................................................................................................................. 7
CHAPTER 4: HOME PAGE BASICS .................................................................................................... 10
CHAPTER 5: SEARCH FOR CLIENT PROFILE ....................................................................................... 13
Client Profiles ............................................................................................................................... 13
Provider’s Participant ID............................................................................................................... 14
Client Search Basics ...................................................................................................................... 14
Search Examples ........................................................................................................................... 15
Pending Referral Search ............................................................................................................... 15
Next Step ...................................................................................................................................... 16
CHAPTER 6: CREATE A CLIENT PROFILE ........................................................................................... 17
Add Client ..................................................................................................................................... 18
Client Profile ................................................................................................................................. 18
Alternate Names .......................................................................................................................... 19

Additional Information ................................................................................................................. 20
Contact Info .................................................................................................................................. 21
Collateral Contacts ....................................................................................................................... 22
Other Numbers............................................................................................................................. 23
History .......................................................................................................................................... 23
CHAPTER 7 : CONTACTS SCREEN...................................................................................................... 24
CHAPTER 8: EPISODE, INTAKE, ACTIVITY LIST ................................................................................. 29
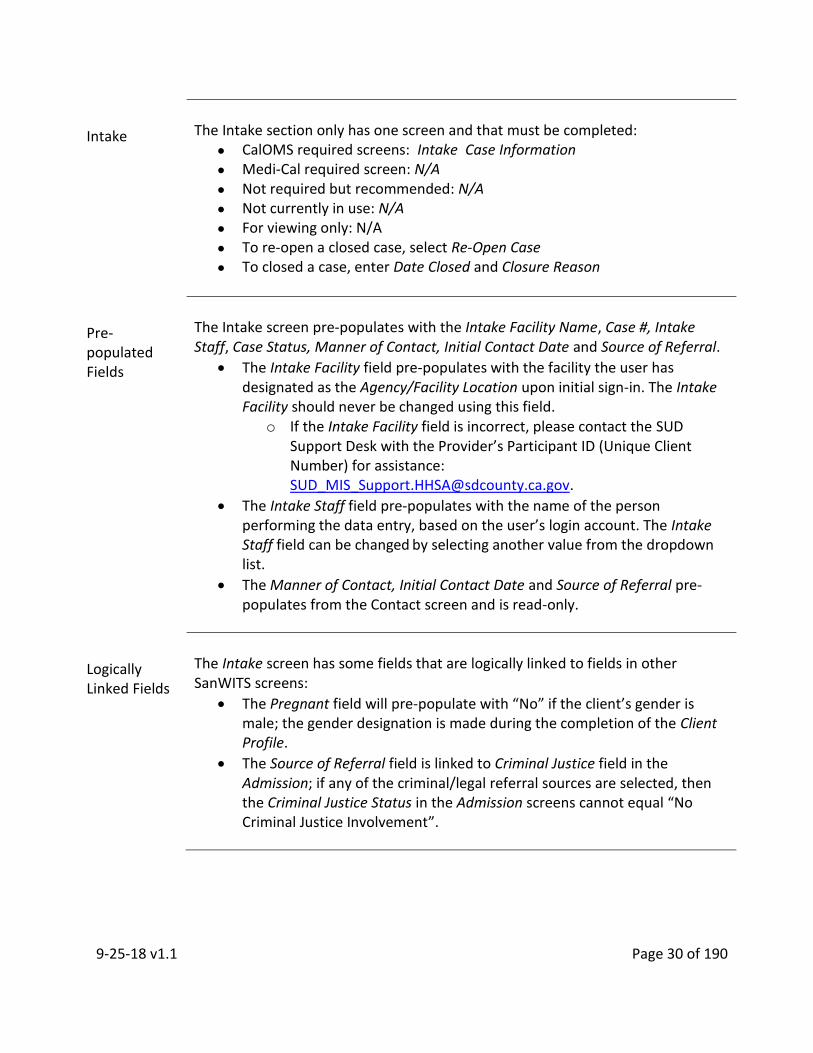
Intake ............................................................................................................................................ 30
Episode List ................................................................................................................................... 32
CHAPTER 9: PAYOR GROUP ENROLLMENT ...................................................................................... 33
Payor Group Enrollment .............................................................................................................. 33
CHAPTER 10: AUTHORIZATION (For Residential Providers Only) .................................................... 37
CHAPTER 11: ASAM ......................................................................................................................... 43
CHAPTER 12: ADMISSION ................................................................................................................ 46
Prior Episode Data ........................................................................................................................ 47
Admission Profile.......................................................................................................................... 47
Admission Administration ............................................................................................................ 48
Alcohol & Drug Use ...................................................................................................................... 49
Tobacco/ Nicotine ........................................................................................................................ 50
Family/Social ................................................................................................................................ 51
Employment ................................................................................................................................. 52
Legal/Criminal .............................................................................................................................. 53
Medical/ Physical Health/ Mental Health .................................................................................... 53

Generate Report ........................................................................................................................... 56
CHAPTER 13: DIAGNOSIS ................................................................................................................. 57
Diagnosis ...................................................................................................................................... 57
Corrections ................................................................................................................................... 59
Mark As Principal .......................................................................................................................... 59
Diagnosis Summary ...................................................................................................................... 60
CHAPTER 14: PROGRAM ENROLLMENT ........................................................................................... 61
CHAPTER 15: RESIDENTIAL UNIT MANAGEMENT (For Residential Providers Only) ....................... 65
Assigning Client Bed ..................................................................................................................... 66
Current Bed Management ........................................................................................................... 69
Bed Re-Assignment ...................................................................................................................... 71
Bed Assignment History ............................................................................................................... 74
Creating ........................................................................................................................................ 77
Census Correction ........................................................................................................................ 79
CHAPTER 16: RESIDENTIAL UNIT DASHBOARD (For Residential Providers Only) ............................ 82
Client Bed Status .......................................................................................................................... 82
Adding Leave ................................................................................................................................ 83
Adding Note/ Encounter .............................................................................................................. 85
Moving a Client ............................................................................................................................ 85
CHAPTER 17: GROUP LIST ............................................................................................................... 86
Creating a Group Profile ............................................................................................................... 87
Roster ........................................................................................................................................... 88
Group Session Notes .................................................................................................................... 91
Taking Attendance ....................................................................................................................... 94
Creating an Encounter .................................................................................................................. 96
Clearing an Error........................................................................................................................... 98
CHAPTER 18: ENCOUNTERS ............................................................................................................. 99
Encounter Profile........................................................................................................................ 100
Note Type ................................................................................................................................... 101
Service ........................................................................................................................................ 102
Group Session ID ........................................................................................................................ 102
Census ID .................................................................................................................................... 102
Visit Type .................................................................................................................................... 104
Medi-Cal Billable ........................................................................................................................ 104
Interpreter .................................................................................................................................. 104
Language .................................................................................................................................... 104
Administrative Actions ............................................................................................................... 106
Release to Billing ........................................................................................................................ 107
Finalize Encounter ...................................................................................................................... 107
CHAPTER 19: ANNUAL UPDATES .................................................................................................. 110
Guidelines ................................................................................................................................... 111
CalOMS Annual Update/Follow-up Profile ................................................................................ 112
Alcohol & Drug Use .................................................................................................................... 113
Family / Social ............................................................................................................................ 114
Employment ............................................................................................................................... 114
Legal / Criminal ........................................................................................................................... 115

Medical/ Physical Health/ Mental Health .................................................................................. 115
CHAPTER 20: DISCHARGING AND CLOSING AN EPISODE .............................................................. 119
Client Program Enrollment ......................................................................................................... 120
Discharge Protocols and Data Collection ................................................................................... 121
Discharge Profile ........................................................................................................................ 121
Alcohol & Drug Use .................................................................................................................... 122
Tobacco / Nicotine ..................................................................................................................... 123
Family / Social ............................................................................................................................ 124
Employment ............................................................................................................................... 125
Legal / Criminal ........................................................................................................................... 125
Medical/ Physical Health/Mental Health ................................................................................... 126
Closed Case................................................................................................................................. 129
CHAPTER 21: CALOMS ERRORS ..................................................................................................... 130
How to Read the Error Report .................................................................................................... 130
Error Code 037 and 044 ............................................................................................................. 133
Error Code 061 ........................................................................................................................... 135
Error Code 158 ........................................................................................................................... 137
Error Code 201 ........................................................................................................................... 138
Error Code 212 ........................................................................................................................... 140
Error Code 247 ........................................................................................................................... 142
Error Code 369 ........................................................................................................................... 145
Error Code 374 ........................................................................................................................... 146
Error Code 470 ........................................................................................................................... 149

Error Code 471 ........................................................................................................................... 150
Error Code 472 ........................................................................................................................... 151
Error Code 473 ........................................................................................................................... 152
Error Code 560 ........................................................................................................................... 153
CHAPTER 22: PROVIDER DRUG MEDI-CAL BILLING ....................................................................... 155
Billing Unit .................................................................................................................................. 155
NPI Verification .......................................................................................................................... 156
Review Claim Items .................................................................................................................... 156
Create Agency Batches ............................................................................................................... 158
Claim Batch List .......................................................................................................................... 160
Claim Items ................................................................................................................................. 160
Claim Batch Profile ..................................................................................................................... 161
Send to Clearing House .............................................................................................................. 161
Supplemental Billing ................................................................................................................... 161
Late Billing .................................................................................................................................. 162
Voided/ Disallowed Services ...................................................................................................... 163
Service Replacement/ Rebill ...................................................................................................... 164
Cleanup Claim Item List .............................................................................................................. 164
Cleanup Claim Batch List ............................................................................................................ 164
Cleanup Unbilled Batches .......................................................................................................... 164
ADDENDUM ................................................................................................................................... 165
ADDENDUM 1: FACILITY INPATIENT UNIT SET-UP (For Residential Providers Only)..................... 167
Creating a Unit............................................................................................................................ 167
Adding a Room ........................................................................................................................... 169
Adding a Bed .............................................................................................................................. 170
Bed Corrections .......................................................................................................................... 172
Room Corrections ....................................................................................................................... 173
ADDENDUM 2: DRUG TEST RESULTS ............................................................................................ 175
Requirement ............................................................................................................................... 175
Add Test Results ......................................................................................................................... 176
Drug Test Result Profile .............................................................................................................. 176
Blood .......................................................................................................................................... 178
Alcohol/ Marijuana Content ....................................................................................................... 178
ADDENDUM 3: CLIENT CONSENTS ................................................................................................ 180
Existing Consents ........................................................................................................................ 180
New Consents ............................................................................................................................. 180
Client Disclosure Agreement ...................................................................................................... 180
Regulations ................................................................................................................................. 182
Consent Options ......................................................................................................................... 183
Revoke Consent .......................................................................................................................... 183
Consented Clients....................................................................................................................... 183
DDC Clients ................................................................................................................................. 183
ADDENDUM 4: REFERRALS ........................................................................................................... 185
Consent ...................................................................................................................................... 185
Sending a Referral ...................................................................................................................... 185
Referred By ................................................................................................................................. 186

Referred To ................................................................................................................................. 187
Client Referral List ...................................................................................................................... 188
Referrals Out .............................................................................................................................. 188
Accepting a Referral ................................................................................................................... 189
Referral Alert .............................................................................................................................. 189
Referrals In ................................................................................................................................. 189
DDC Referrals ............................................................................................................................. 191

9-25-18 v1.1 Page 1 of 190
CHAPTER 1: SANWITS INTRODUCTION
Overview
Web Infrastructure for Treatment Services (WITS) is a collaborative information technology approach to the planning, administration, and monitoring of Substance Use Treatment Programs. SanWITS is San Diego’s version of WITS. Sponsored by State Substance Use Disorder Agencies and SAMHSA’s Center for Substance Use Treatment (CSAT), WITS is designed to meet the growing demand to capture client treatment data, share information among agencies, and satisfy mandatory government reporting requirements. The application was developed using the rules set forth by 42 CFR Part 2 and HIPAA.
Features
WITS features numerous clinical, administrative, and reporting modules that are organized by workflow. FEI.com partners with County and State Behavioral Health divisions, to customize WITS so it complies with both State and county-specific business rules.
Data Collection
SanWITS is used to collect CalOMS, Drug Medi-Cal (DMC) and Dependency Drug Court data. Contracted treatment providers are set up by agency and facility to ensure users have access to only the information they need to do their job.
BHIS
CalOMS and Drug Medi-Cal (DMC) billing are extracted from SanWITS and uploaded to the State through the Behavioral Health Information Services (BHIS) web site.

9-25-18 v1.1 Page 2 of 190
CHAPTER 2: CALOMS INTRODUCTION
Overview
Collecting data for CalOMS (California Outcomes Measurement System), is a major function of SanWITS. Client demographic information is collected along with treatment data at an admission, annual update and discharge to build a comprehensive picture of the client’s behavior with alcohol/drug use, employment, education, legal system, physical/mental health, and personal life. CalOMS use the treatment data for improving outcomes, supporting effective funding and for legally mandated federal and state reporting requirements. Data entry accuracy is essential to prevent CalOMS errors as well as prevent inaccuracies in reporting to the County and DCHS. CalOMS data collection forms are available and should be used to assist users with data accuracy.
Resources
More information about CalOMS can be found on the State of California Department of Health Care Services (DHCS) website. DCHS created guides to assist Counties and providers with their data entry.
9-25-18 v1.1 Page 3 of 190
CHAPTER 3: LOGGING INTO SANWITS
Overview
In this chapter we will review how to login to SanWITS for first time users, returning users and how to reset your password.
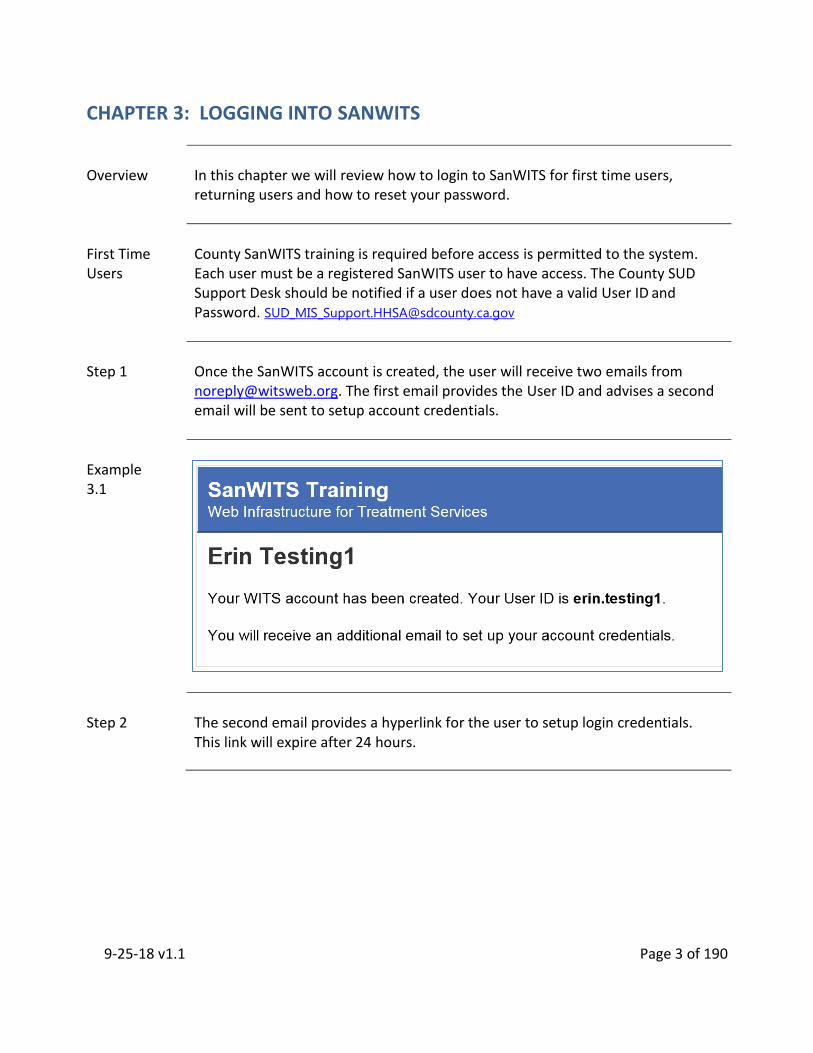
First Time Users
County SanWITS training is required before access is permitted to the system. Each user must be a registered SanWITS user to have access. The County SUD Support Desk should be notified if a user does not have a valid User ID and Password. [email protected]
Step 1
Once the SanWITS account is created, the user will receive two emails from [email protected]. The first email provides the User ID and advises a second email will be sent to setup account credentials.
Example 3.1
Step 2
The second email provides a hyperlink for the user to setup login credentials. This link will expire after 24 hours.

9-25-18 v1.1 Page 4 of 190
Example 3.2
Step 3
After the hyperlink is selected, the user will be directed to a webpage to setup their credentials. This includes selecting a security question with a corresponding answer, selecting and confirming a four character password as well as selecting and confirming a four character PIN. Important: Security question and answer allow the user to use the Forgot Password link (self-reset password) on the log-in page
Example 3.3
Step 4
After the user’s credentials have been saved, SanWITS will notify the user in the next screen that the setup was successful.

9-25-18 v1.1 Page 5 of 190
Example 3.4
Step 5
Finally, the user is ready to access SanWITS. Type the following web address in your internet browser and save the link to favorites: https://sandiego.witsweb.org/.
A warning screen will appear.
Read the warning then click OK to proceed to the Login screen.
Example 3.5
Returning Users
Type the following web address in your internet browser: https://sandiego.witsweb.org/.
The Login screen will populate.
Enter all corresponding data for User ID, Password, and PIN and select Login.

9-25-18 v1.1 Page 6 of 190
Example 3.6
Assigned to One Facility
After logging in to SanWITS, users assigned to one facility will begin the session starting at the Home page.
Example 3.7

9-25-18 v1.1 Page 7 of 190
Assigned to Multiple Facilities
After logging in to SanWITS, users assigned to multiple facilities will begin the session starting at the Change Facility page.
From the New Facility field, select the desired facility and select Go.
The user will be taken to the the facility’s Home page.
Example 3.8
Reset Password
If the user forgets their password, the login screen has a Forgot Password hyperlink.
Step 1
Select the hyperlink to start the process of resetting the password.

9-25-18 v1.1 Page 8 of 190
Example 3.9
Step 2
Next the user will be taken to a new screen to enter the User ID.
Example 3.10
Step 3
After the User ID is entered, the next screen will ask the user’s security question.

9-25-18 v1.1 Page 9 of 190
Example 3.11
Step 4
Next the user will get a screen to indicate an email will be sent with details to reset the account.
Example 3.12
Step 5
After the email is received and the hyperlink is selected, the user will be taken to the same screen first time users see when initially setting up their credentials.
Follow the same steps outlined at the beginning of this chapter for First Time Users.

9-25-18 v1.1 Page 10 of 190
CHAPTER 4: HOME PAGE BASICS
Overview
In this chapter we will cover basic information to assist users with becoming familiar with the SanWITS Home page which is made up of a header, body and navigation pane.
Navigating Screens
While navigating between screens in SanWITS, it is important to use the arrows or the options in the navigation pane.
Using the back arrow in your internet browser will not allow you to return to a previous screen.
Header
The header is located at the top of SanWITS screens. Most of the information in the header remains the same throughout the application. The header consists of the following:
SanWITS logo and version
Agency/Facility location of the user
Client name and unique number
User’s name with link to logout and/or change the user’s credentials
SSRS Reports link
Snapshot link (creates a read-only window)
Example 4.1
Body
The body is the center of the screen where information is displayed. The body will change depending on which screen the user is attempting to access.
Blue highlighted warning: Generated to reflect pending referrals and/or clients on waiting list; this highlighted warning is not always present.
Announcements: Generated by BHS staff or the user’s agency staff administrator; the announcements are not always present.
Alerts: Generated by BHS staff to alert the user about pending referrals received and pending cases in need of an annual update.
Schedule: The information displayed in these sections change based on other client data.

9-25-18 v1.1 Page 11 of 190
Example 4.2
Navigation Pane
The navigation pane is on the left side of the SanWITS screen. Users will spend most of their time using the navigation pane to guide their work in SanWITS. Users are assigned different levels of access based on their need for information, which is determined by the user’s administrator. Each user’s level of access will determine what is visible and accessible in the navigation pane. The menu option may expand when a chevron arrow is indicated. The navigation pane may include:
Agency
Client List
System Administration
Reports

9-25-18 v1.1 Page 12 of 190
Example 4.3

9-25-18 v1.1 Page 13 of 190
CHAPTER 5: SEARCH FOR CLIENT PROFILE
Overview
The Client Profile connects the client with all of their activities in a given agency. Each client should have one profile per agency. To reduce the number of duplicate client records, SanWITS does not allow a social security number to be used more than once or a Provider’s Participant ID (Unique Client Number) to be used by more than one client.
Client Profiles
Client profiles contain unique identifiable information such as the client’s name, alias, mother’s name, date of birth, SSN, Medi-Cal number, place of birth, contact information, ethnicity, disabilities, preferred language, veteran status, collateral contact information, etc.
Example 5.1

9-25-18 v1.1 Page 14 of 190
Provider’s Participant ID
Using data that makes up the client profile, SanWITS assigns a unique client number to each client profile, also known as the Provider’s Participant ID (PPID). The Provider’s Participant ID (PPID) or Unique Client Number (UCN) is a 10 character ID created based on the following:
First initial of the first, middle and birth last name, (the system will enter a zero if there is no middle name).
Gender (1-male and 2-female).
Date of birth.
If you carefully search for a client before adding them to the database, you will rarely have a duplicate Provider’s Participant ID (Unique Client Number).
Client Search Basics
To find a client profile, select Client List from the left navigation pane. There are many fields available in SanWITS to facilitate searching for clients.
Search for the client at least three ways to avoid adding a client that already exists.
Avoid making searches too specific; typographical errors made during data entry prior to a search can affect locating the client profile when client searches are too specific.
Remember to use the Clear button to clear data between searches.
Any search requires that all personal information provided by the client is accurate.
Any search requires that all previously saved client information in SanWITS is correct.
Example 5.2

9-25-18 v1.1 Page 15 of 190
Search Examples
1. Search by SSN: This involves entering a known SSN. If a match is identified,
the client list will populate with the match. If no match is identified, a blue alert will populate that indicates “No results match your search criteria”.
2. Search by DOB: This involves entering a known date of birth (DOB). If a match is identified, the client list will populate with the match. If no match is identified, a blue alert will populate that indicates “No results match your search criteria”.
3. Search by name: This involves entering a known client name or alias. If a match is identified, the client list will populate with the match. If no match is identified, a blue alert will populate that indicates “No results match your search criteria”.
4. Search by Unique Client Number aka Provider’s Participant ID: This
involves entering a known Unique Client Number. If a match is identified, the client list will populate with the match. If no match is identified, a blue alert will populate that indicates “No results match your search criteria”.
5. Using wild card: This involves entering partial information with the wild
card (*) to search for a client. Although the wild card option is typically used while searching with a client’s name, SanWITS allows using the wild card to search for SSN and Provider’s Participant ID (Unique Client Number).
Best practice suggestion is to use the first three characters of the name, SSN, or Unique Client Number with an asterisk (*) at the end when searching.
If a match is identified, the client list will populate with the match.
If no match is identified, a blue alert will populate that indicates “No results match your search criteria”.
Pending Referral Search
After searching for a client’s profile, the user should then check the facility’s Referrals section for pending referrals received from other agencies.
Follow the steps outlined in Addendum 3 for how to search for a client in the Referrals section.
Additional information about referrals is available in this Addendum.
9-25-18 v1.1 Page 16 of 190
Next Step
After searching for a client’s profile and checking pending referrals for the client profile, the user will advance to the next appropriate chapter based on one of two things:
If the user was unsuccessful locating a client through client search and pending referral efforts, advance to Chapter 6 to create a new client profile;
If the user was successful locating a client, select the action icon to open the client’s profile, then advance to Chapter 7 to create a contact screen.

9-25-18 v1.1 Page 17 of 190
CHAPTER 6: CREATE A CLIENT PROFILE
Overview
If a client search is unsuccessful in locating a possible client profile, the next step is to create a new client profile by adding the client to SanWITS.
Data Collection
The Client Profile screens have required CalOMS fields. Data used to create a new client profile should be obtained directly from the client.
The CalOMS Client Profile Form can be used to collect information from the client.
The paper CalOMS Client Profile Form follows the same layout as the SanWITS screens for Client Profile.
Refer to the CalOMS TX Data Collection Guide regarding acceptable values for each field.
SanWITS Fields
Each screen contains fields for data that are identified by four different colors.
Bright yellow: system required; can be CalOMS and/or County of San Diego data.
Light yellow: required; can be CalOMS and/or County of San Diego data.
White: non-required.
Grey: non-fillable by the user; either system generated or auto-populated; cannot be changed as is or when case is closed.
Navigation Buttons
Use the arrow button to move from screen to screen through the Client Profile. Select one of the following navigation buttons to take actions when necessary:
Cancel: Returns the user to the previous screen or mode without saving the data entered into the screen.
Save: Serves two functions; first saves data after completing required fields; second, used to add multiple records to certain screens.
Finish: Saves any unsaved data and returns user to the first screen of the module or Activity List.

9-25-18 v1.1 Page 18 of 190
Client Profile Screens
The Client Profile section has required and optional screens to be completed:
CalOMS required screens: Client Profile and Additional Information
Medi-Cal required screen: Payor Group Enrollment
Not required but recommended: Alternate Names, Contact Info, Collateral Contacts, Other Numbers
Not currently in use: Allergies, Client External History
For viewing only: History
Add Client
After an unsuccessful client search, the user should stay in the same Client Search screen; there is white hyperlink labeled Add Client. Click on the hyperlink to start the process for creating a profile for a new client.
Example 6.1
Client Profile
Next the user will be taken to the Client Profile screen.
Notice that many of the fields on the Client Profile screen are also on the Client Search screen.
This data will be used to search your client’s profile in the future; therefore it is important that the information entered here is accurate and complete. Inaccurate and incomplete data impact future users as well as reporting for your agency, the County and the State.
9-25-18 v1.1 Page 19 of 190
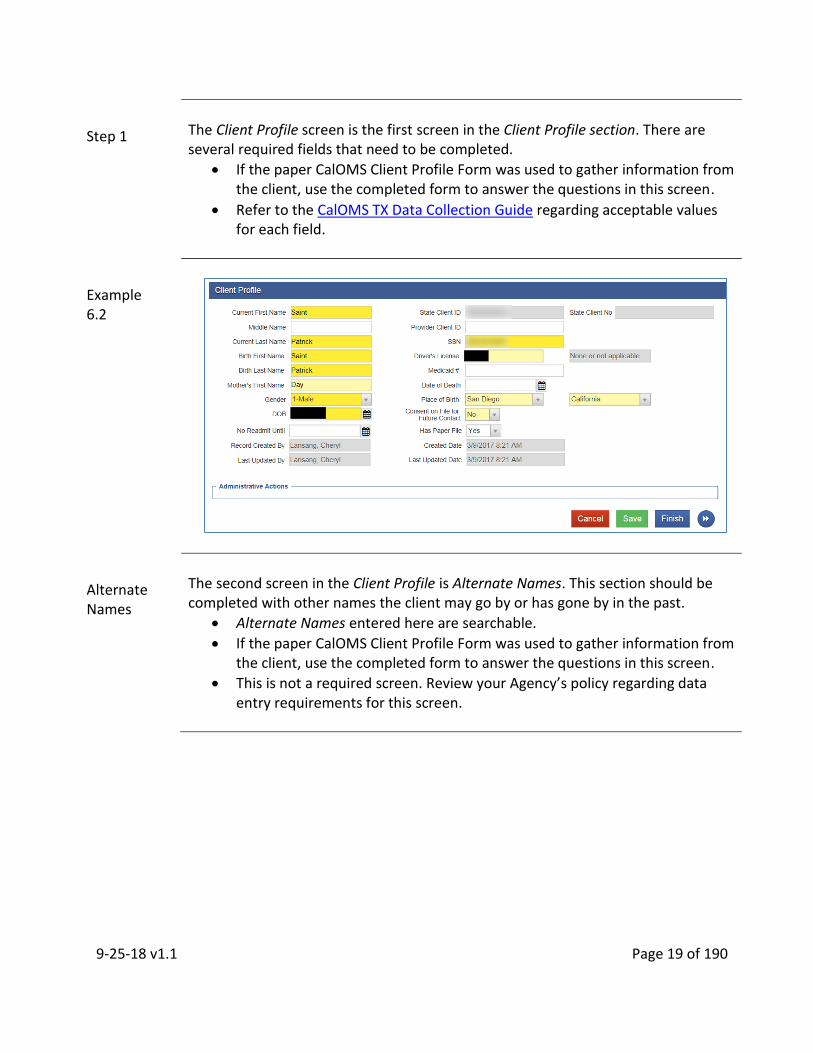
Step 1
The Client Profile screen is the first screen in the Client Profile section. There are several required fields that need to be completed.
If the paper CalOMS Client Profile Form was used to gather information from the client, use the completed form to answer the questions in this screen.
Refer to the CalOMS TX Data Collection Guide regarding acceptable values for each field.
Example 6.2
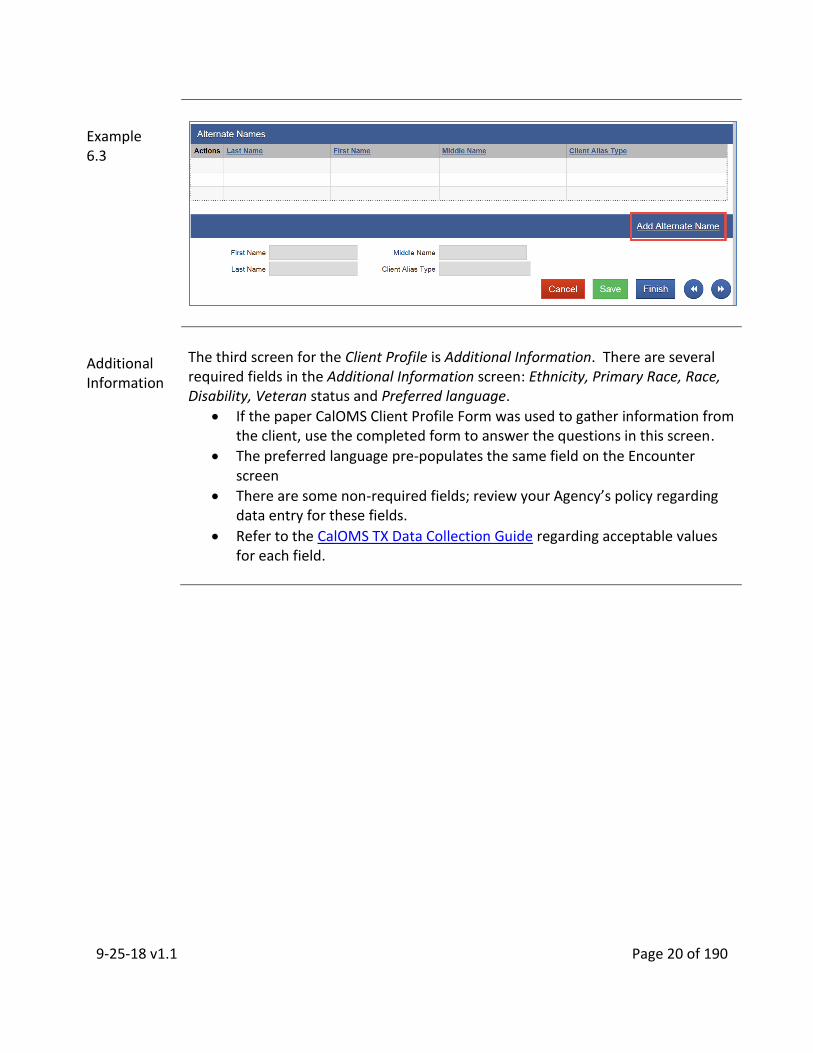
Alternate Names
The second screen in the Client Profile is Alternate Names. This section should be completed with other names the client may go by or has gone by in the past.
Alternate Names entered here are searchable.
If the paper CalOMS Client Profile Form was used to gather information from the client, use the completed form to answer the questions in this screen.
This is not a required screen. Review your Agency’s policy regarding data entry requirements for this screen.
9-25-18 v1.1 Page 20 of 190
Example 6.3
Additional Information
The third screen for the Client Profile is Additional Information. There are several required fields in the Additional Information screen: Ethnicity, Primary Race, Race, Disability, Veteran status and Preferred language.
If the paper CalOMS Client Profile Form was used to gather information from the client, use the completed form to answer the questions in this screen.
The preferred language pre-populates the same field on the Encounter screen
There are some non-required fields; review your Agency’s policy regarding data entry for these fields.
Refer to the CalOMS TX Data Collection Guide regarding acceptable values for each field.

9-25-18 v1.1 Page 21 of 190
Example 6.4
Contact Info
The fourth screen in the Client Profile is the Contact Info screen.
If the paper CalOMS Admissions Form was used to gather information from the client, use the completed form to answer the questions in this screen.
Review your Agency’s policy regarding data entry requirements for this screen.
Select the Add Address hyperlink to enter a new address. o It is highly recommended to add the Client address as it is required to
bill DMC. o For Homeless clients, use facility address.

9-25-18 v1.1 Page 22 of 190
Example 6.5
Collateral Contacts
The fifth screen in the Client Profile is the Collateral Contact screen.
If the paper CalOMS Admissions Form was used to gather information from the client, use the completed form to answer the questions in this screen.
Review your Agency’s policy regarding data entry requirements for this screen.
Select the Add Contact hyperlink to enter a new contact.
Example 6.6

9-25-18 v1.1 Page 23 of 190
Other Numbers
The sixth screen in the Client Profile is the Other Numbers screen. This screen is for documenting the client’s various court and petition numbers.
If the paper CalOMS Admissions Form was used to gather information from the client, use the completed form to answer the questions in this screen.
Review your Agency’s policy regarding data entry requirements
Court numbers entered in this screen are searchable.
Select the Add Other Number hyperlink to enter a court or petition number.
Example 6.7
Saving Data
The user should now save any data by selecting Save.
History
The seventh screen in the Client Profile is the History screen. Client History lists all changes made to the client’s SanWITS record.
This is a read-only screen. No data can be added or deleted.
Example 6.8
Generate Report
The header contains a hyperlink Generate Report which allows the user to produce a report from the current screen or module.

9-25-18 v1.1 Page 24 of 190
CHAPTER 7 : CONTACTS SCREEN
Overview
The contact screen records communication and contact with a client in order to capture data elements for DMC-ODS. The contact record will be linked to the Intake to start a new episode. Questions regarding the Quality Management requirements should be directed to your management staff or BHS QM Specialists at [email protected]
SanWITS Fields
Each screen contains fields for data that are identified by four different colors.
Bright yellow: system required; can be CalOMS and/or County of San Diego data.
Light yellow: required; can be CalOMS and/or County of San Diego data.
White: non-required.
Grey: non-fillable by the user; either system generated or auto-populated; cannot be changed as is or when case is closed.
Navigation Buttons
Select one of the following navigation buttons to take actions when necessary:
Cancel: Returns the user to the previous screen or mode without saving the data entered into the screen.
Save: Serves two functions; first saves data after completing required fields; second, used to add multiple records to certain screens.
Finish: Saves any unsaved data and returns user to the first screen of the module or Activity List.
Contacts Screen
A Client Profile must exist before a Contact record can be created. The first time the client has contact with the provider, a contact record should be created. There can be multiple contacts created before an episode is opened. A new contact record will need to be created each time a client contacts the provider. Once a contact record has been linked to an Intake, no new contacts will need to be created.
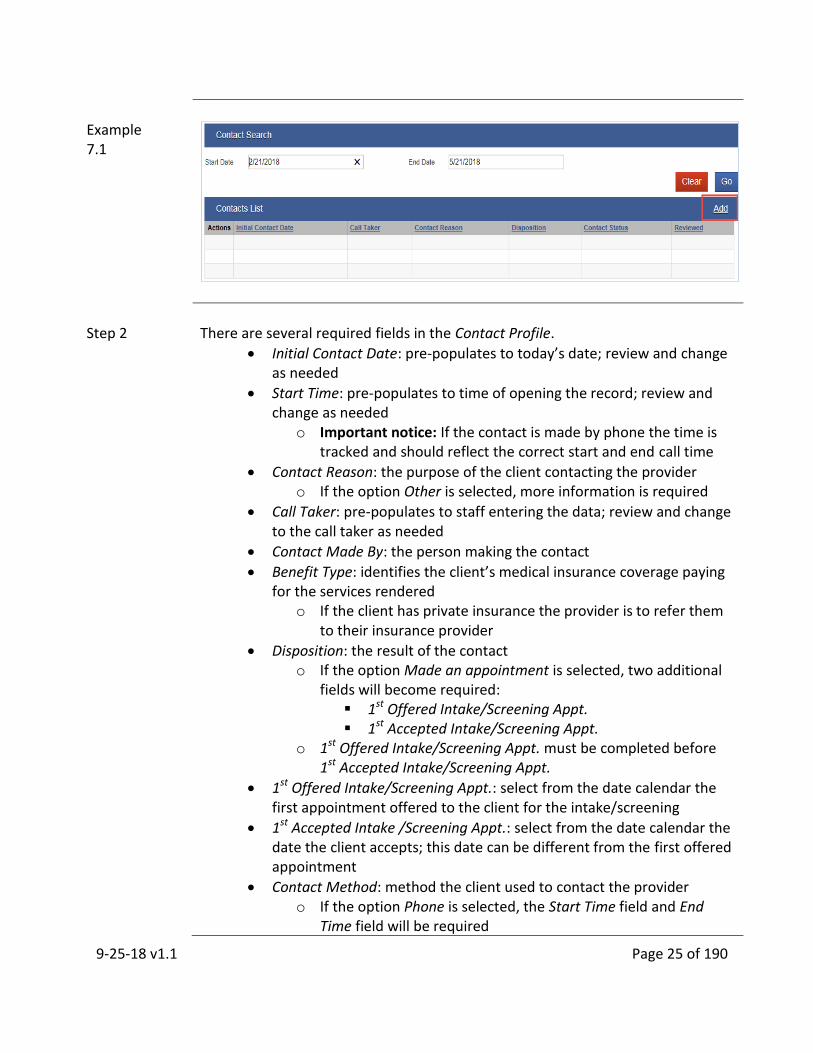
Step 1
Select Contacts from the navigation pane to open the Contact Profile screen.
New clients should have no information in this screen.
Select the hyperlink Add to start the process
9-25-18 v1.1 Page 25 of 190
Example 7.1
Step 2
There are several required fields in the Contact Profile.
Initial Contact Date: pre-populates to today’s date; review and change as needed
Start Time: pre-populates to time of opening the record; review and change as needed
o Important notice: If the contact is made by phone the time is tracked and should reflect the correct start and end call time
Contact Reason: the purpose of the client contacting the provider o If the option Other is selected, more information is required
Call Taker: pre-populates to staff entering the data; review and change to the call taker as needed
Contact Made By: the person making the contact
Benefit Type: identifies the client’s medical insurance coverage paying for the services rendered
o If the client has private insurance the provider is to refer them to their insurance provider
Disposition: the result of the contact o If the option Made an appointment is selected, two additional
fields will become required: 1st Offered Intake/Screening Appt. 1st Accepted Intake/Screening Appt.
o 1st Offered Intake/Screening Appt. must be completed before 1st Accepted Intake/Screening Appt.
1st Offered Intake/Screening Appt.: select from the date calendar the first appointment offered to the client for the intake/screening
1st Accepted Intake /Screening Appt.: select from the date calendar the date the client accepts; this date can be different from the first offered appointment
Contact Method: method the client used to contact the provider o If the option Phone is selected, the Start Time field and End
Time field will be required
9-25-18 v1.1 Page 26 of 190
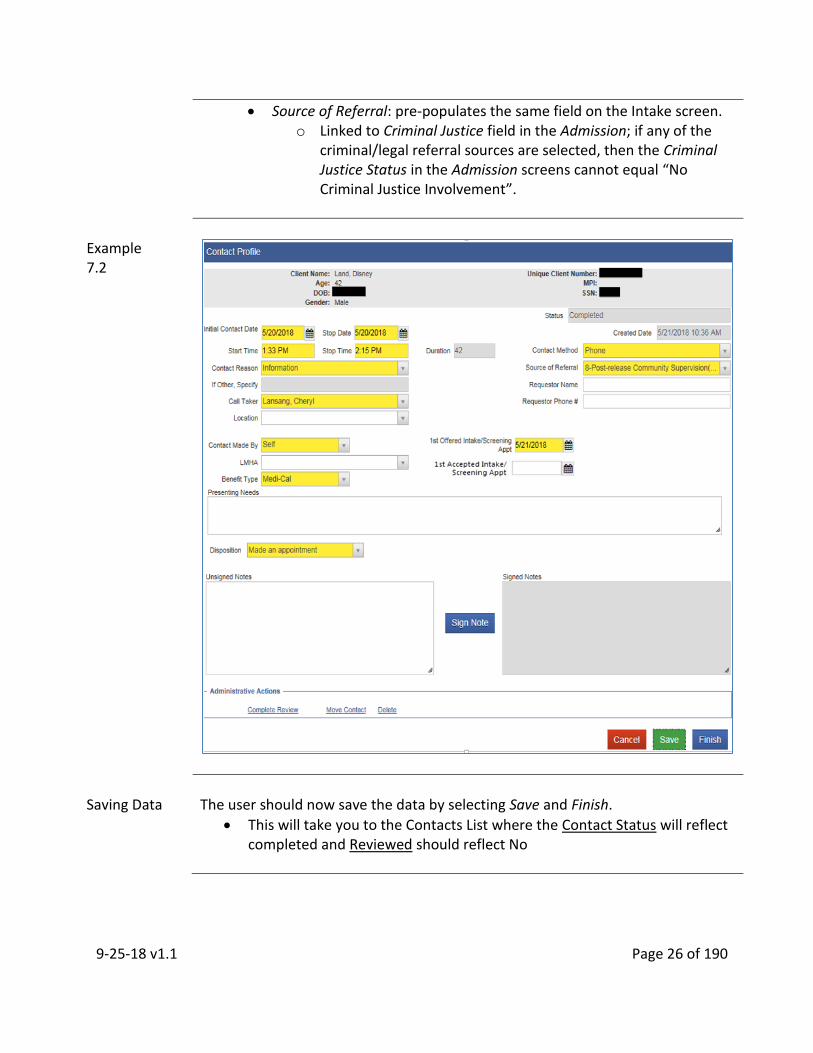
Source of Referral: pre-populates the same field on the Intake screen. o Linked to Criminal Justice field in the Admission; if any of the
criminal/legal referral sources are selected, then the Criminal Justice Status in the Admission screens cannot equal “No Criminal Justice Involvement”.
Example 7.2
Saving Data
The user should now save the data by selecting Save and Finish.
This will take you to the Contacts List where the Contact Status will reflect completed and Reviewed should reflect No

9-25-18 v1.1 Page 27 of 190
Completing Review
Completing the Review allows the contact to be linked to an Intake
When the client returns for the 1st Intake/Screening Appt., a complete review of the contact profile is required for accuracy.
After the user reviews the data captured in the Contact Profile, the user should select the Complete Review administrative action.
After the Complete Review administrative action has been selected, the Contact Profile will become read-only and can no longer be modified.
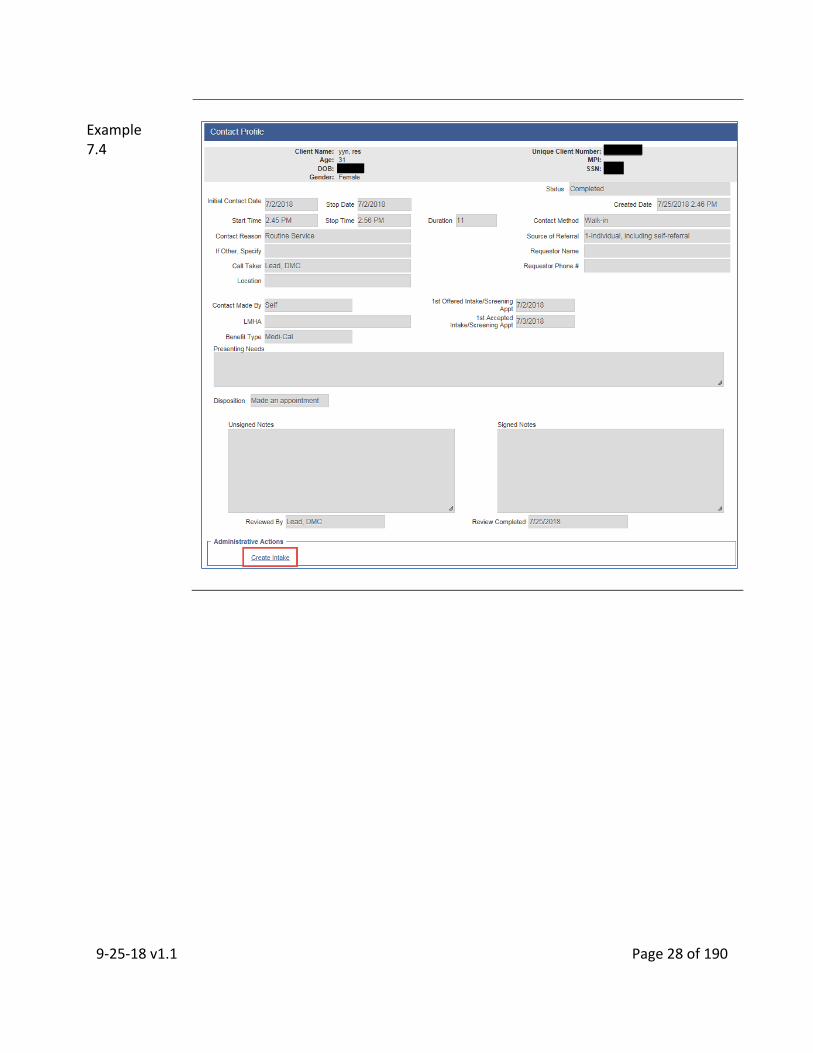
Create Intake
The user should now create an Intake by selecting Create Intake function found in one of two of the following locations:
Client List screen
Contact Profile screen
Example 7.3
9-25-18 v1.1 Page 28 of 190
Example 7.4

9-25-18 v1.1 Page 29 of 190
CHAPTER 8: EPISODE, INTAKE, ACTIVITY LIST
Overview
A treatment episode as defined by the CalOMS TX Data Collection Guide is “a planned series of treatment service types occurring consecutively, e.g., admission to and discharge from detoxification followed by admission to and discharge from outpatient services. However, a treatment episode may also be a single treatment service, e.g., admission to and discharge from outpatient treatment with no further SUD treatment services planned for the client”.
A new client episode begins when the Client Intake is created from the Contacts screen.
Data Collection
The Intake screen has system required fields. Data used to create the Intake should be obtained directly from the client.
The SanWITS Intake Form can be used to collect information from the client.
The paper CalOMS Intake Form follows the same layout as the SanWITS screen for Intake.
Refer to the CalOMS TX Data Collection Guide regarding acceptable values for each field.
SanWITS Fields
Each screen contains fields for data that are identified by four different colors.
Bright yellow: system required; can be CalOMS and/or County of San Diego data.
Light yellow: required; can be CalOMS and/or County of San Diego data.
White: non-required.
Grey: non-fillable by the user; either system generated or auto-populated; cannot be changed as is or when case is closed.
Navigation Buttons
Select one of the following navigation buttons to take actions when necessary:
Cancel: Returns the user to the previous screen or mode without saving the data entered into the screen.
Save: Serves two functions; first saves data after completing required fields; second, used to add multiple records to certain screens.
Finish: Saves any unsaved data and returns user to the first screen of the module or Activity List.
9-25-18 v1.1 Page 30 of 190
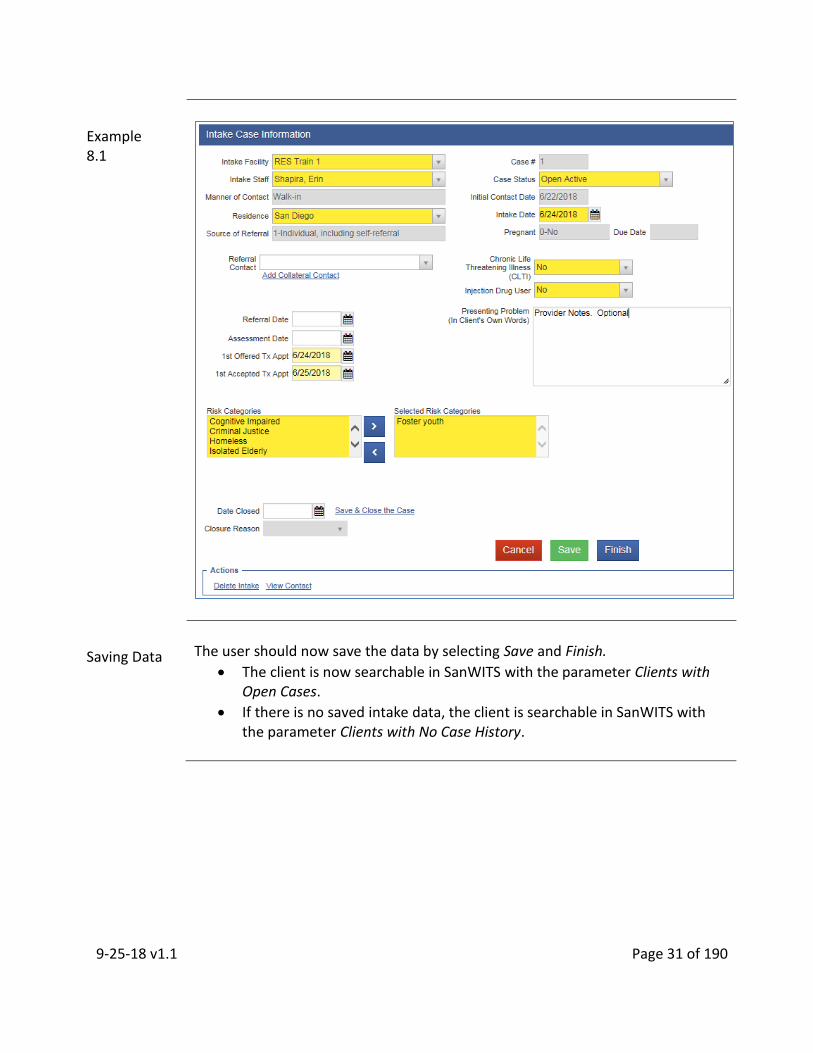
Intake
The Intake section only has one screen and that must be completed:
CalOMS required screens: Intake Case Information
Medi-Cal required screen: N/A
Not required but recommended: N/A
Not currently in use: N/A
For viewing only: N/A
To re-open a closed case, select Re-Open Case
To closed a case, enter Date Closed and Closure Reason
Pre-populated Fields
The Intake screen pre-populates with the Intake Facility Name, Case #, Intake Staff, Case Status, Manner of Contact, Initial Contact Date and Source of Referral.
The Intake Facility field pre-populates with the facility the user has designated as the Agency/Facility Location upon initial sign-in. The Intake Facility should never be changed using this field.
o If the Intake Facility field is incorrect, please contact the SUD Support Desk with the Provider’s Participant ID (Unique Client Number) for assistance: [email protected].
The Intake Staff field pre-populates with the name of the person performing the data entry, based on the user’s login account. The Intake Staff field can be changed by selecting another value from the dropdown list.
The Manner of Contact, Initial Contact Date and Source of Referral pre-populates from the Contact screen and is read-only.
Logically Linked Fields
The Intake screen has some fields that are logically linked to fields in other SanWITS screens:
The Pregnant field will pre-populate with “No” if the client’s gender is male; the gender designation is made during the completion of the Client Profile.
The Source of Referral field is linked to Criminal Justice field in the Admission; if any of the criminal/legal referral sources are selected, then the Criminal Justice Status in the Admission screens cannot equal “No Criminal Justice Involvement”.
9-25-18 v1.1 Page 31 of 190
Example 8.1
Saving Data
The user should now save the data by selecting Save and Finish.
The client is now searchable in SanWITS with the parameter Clients with Open Cases.
If there is no saved intake data, the client is searchable in SanWITS with the parameter Clients with No Case History.

9-25-18 v1.1 Page 32 of 190
Activity List
After saving the client’s Intake data, the Client Activity List will open.
The user can view the status of the completed activity.
The status should reflect either Completed or In Progress (Details).
An In Progress (Details) status means required fields are incomplete or there are invalid values; this status prevents saved data from being sent to the State.
The user should select the (Details) hyperlink to review the pending items and take appropriate action to resolve the In Progress status.
Activities that are In Progress should be resolved right away. In Progress activities prevent submission of data to DHCS or will result in rejected data.
Example 8.2
Episode List
Each Client Activity List will display on the client’s Episode List as one client episode. Episode List can reflect more than one treatment episode.
Only one active treatment episode can be open at a time.
When a client enters and enrolls in treatment, a new episode must be opened.
Each episode is numbered.
Example 8.3
9-25-18 v1.1 Page 33 of 190
CHAPTER 9: PAYOR GROUP ENROLLMENT
Overview
Payor Group Enrollment is required to process billing in SanWITS. For Outpatient and Opioid Treatment Programs, payor group enrollment is only required if the BHS Contracted clients is a Medi-Cal recipient. For Residential programs, two payor group enrollment will be required if the BHS Contracted client is a Medi-Cal recipient and only one is required if BHS Contracted client is non Medi-Cal.
SanWITS Fields
Each screen contains fields for data that are identified by four different colors.
Bright yellow: system required; can be CalOMS and/or County of San Diego data.
Light yellow: required; can be CalOMS and/or County of San Diego data.
White: non-required.
Grey: non-fillable by the user; either system generated or auto-populated; cannot be changed as is or when case is closed.
Navigation Buttons
Select one of the following navigation buttons to take actions when necessary:
Cancel: Returns the user to the previous screen or mode without saving the data entered into the screen.
Save: Serves two functions; first saves data after completing required fields; second, used to add multiple records to certain screens.
Payor Group Enrollment
Entries for Payor Group Enrollment will vary between Residential, Outpatient and Opioid Treatment Programs For Residential Programs, there will be 2 types of Payor Group Enrollments:
1. Benefit Plan Enrollment – this will need to be added if the BHS County contracted client is a Medi-Cal recipient
2. Government Contract Enrollment – there will be 3 different types of Government Contract Enrollment. One will need to be added for all BHS County Contracted clients.
For Outpatient and Opioid Treatment Programs, a Benefit Plan Enrollment will need to be added if the BHS County contracted client is a Medi-Cal recipient
9-25-18 v1.1 Page 34 of 190
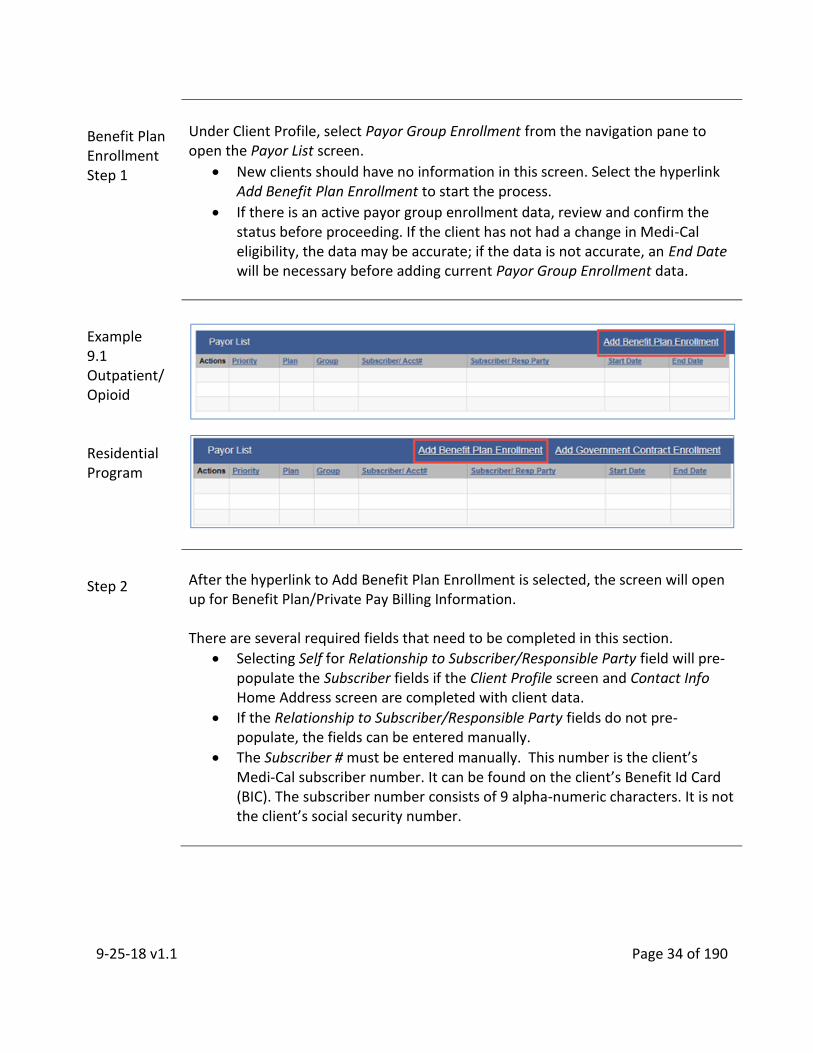
Benefit Plan Enrollment Step 1
Under Client Profile, select Payor Group Enrollment from the navigation pane to open the Payor List screen.
New clients should have no information in this screen. Select the hyperlink Add Benefit Plan Enrollment to start the process.
If there is an active payor group enrollment data, review and confirm the status before proceeding. If the client has not had a change in Medi-Cal eligibility, the data may be accurate; if the data is not accurate, an End Date will be necessary before adding current Payor Group Enrollment data.
Example 9.1 Outpatient/Opioid Residential Program
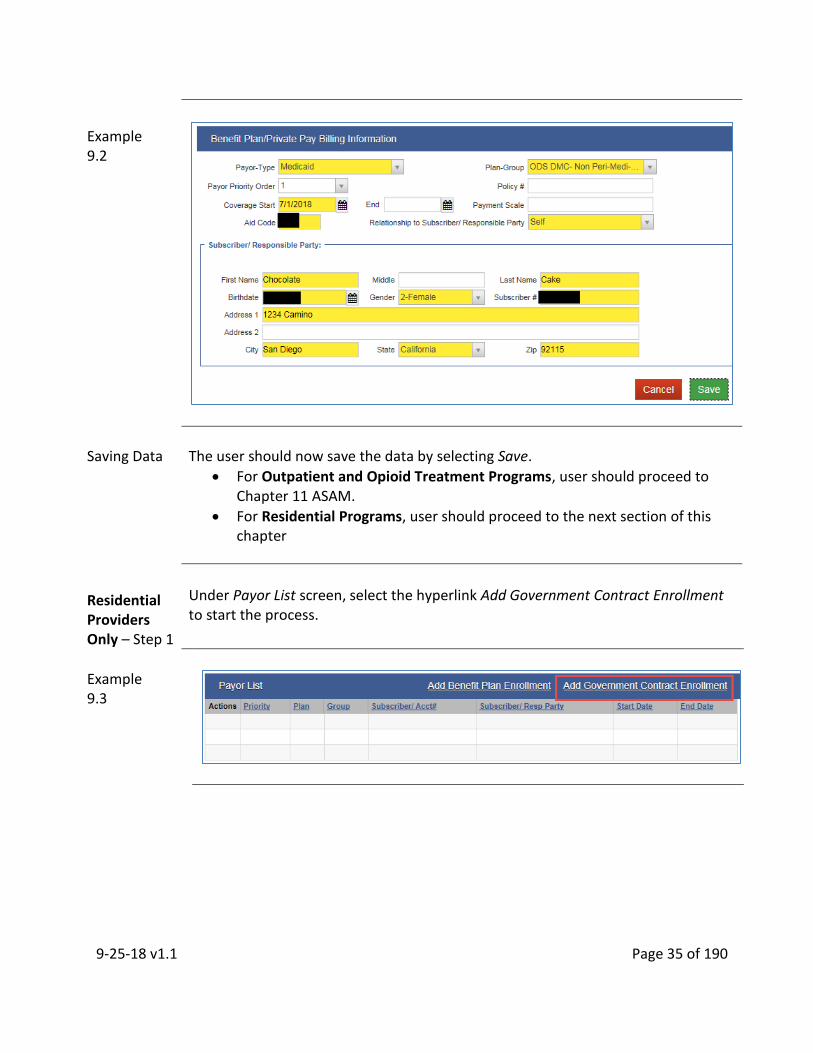
Step 2
After the hyperlink to Add Benefit Plan Enrollment is selected, the screen will open up for Benefit Plan/Private Pay Billing Information. There are several required fields that need to be completed in this section.
Selecting Self for Relationship to Subscriber/Responsible Party field will pre-populate the Subscriber fields if the Client Profile screen and Contact Info Home Address screen are completed with client data.
If the Relationship to Subscriber/Responsible Party fields do not pre-populate, the fields can be entered manually.
The Subscriber # must be entered manually. This number is the client’s Medi-Cal subscriber number. It can be found on the client’s Benefit Id Card (BIC). The subscriber number consists of 9 alpha-numeric characters. It is not the client’s social security number.
9-25-18 v1.1 Page 35 of 190
Example 9.2
Saving Data
The user should now save the data by selecting Save.
For Outpatient and Opioid Treatment Programs, user should proceed to Chapter 11 ASAM.
For Residential Programs, user should proceed to the next section of this chapter
Residential Providers Only – Step 1
Under Payor List screen, select the hyperlink Add Government Contract Enrollment to start the process.
Example 9.3

9-25-18 v1.1 Page 36 of 190
Step 2
After the hyperlink to Add Government Contract Enrollment is selected, the screen will open up for Government Contract Billing Information. There are several required fields that need to be completed in this section.
The Contract and Subscriber # fields will be pre-populated
There are 3 types of Plan-Group. Select one of the following. 1. ODS Residential-DMC Billable: to be assigned to residential clients
that are DMC billable 2. ODS Residential-County Billable: to be assigned to residential clients
that will be billed/invoiced to the County 3. ODS Residential-Justice Override County Billable: to be assigned to all
Court Mandated residential clients if the recommended level of care does not match the actual level of care. This should also be indicated on the ASAM clinical override field.
The start date should match the Admission Date
Example 9.4
Saving Data
The user should now save the data by selecting Save.

9-25-18 v1.1 Page 37 of 190
CHAPTER 10: AUTHORIZATION (For Residential Providers Only)
Overview
Under Organized Delivery System (ODS) - an Authorization is required for Residential Stays.
Requesting Authorization
From the navigation pane, select Client Profile > Authorization.
Select Add New Authorization Record to request an authorization for a new client
A Client Profile, Contact Screen, Intake Screen, and Payor Group Enrollment should be completed in SanWITS before requesting a provisional authorization
Example 10.1
Authorization
Upon opening the Authorization screen, it has several required fields.
Group Enrollment: this will be based on the Government Contract selected on the Payor Group Enrollment
Status: pre-populated to Active but will grey out and system populate to provisional when saved
Plan: should always say ODS Residential
Authorization#: is greyed out and is system populated after authorization is saved
Effective Date: pre-populates with today’s date and must be updated to reflect correct date needed.
End Date: should reflect amount of days requesting authorization
Saving Data
User should now save data by selecting Save

9-25-18 v1.1 Page 38 of 190
Example 10.2
Adding a Service
A Service will need to be added to the authorization request. To add a service, select Add Service. Authorized Services screen has required and non-required fields.
Service: select the service by clicking on the drop down arrow
Authorization #: pre-populated and is read-only
# Authorized Units: enter number of days requesting
# Used Units: Optional field and should be left blank
Saving Data
The user should now save the data by selecting Save and Finish.
Example 10.3
9-25-18 v1.1 Page 39 of 190
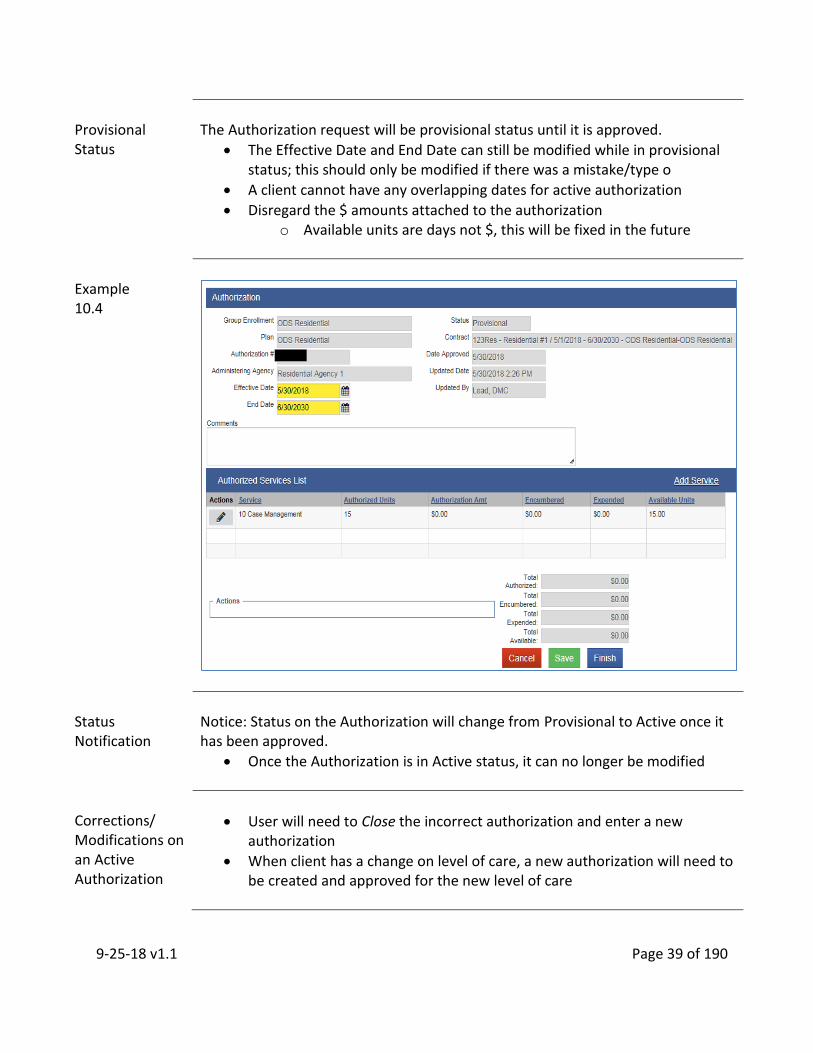
Provisional Status
The Authorization request will be provisional status until it is approved.
The Effective Date and End Date can still be modified while in provisional status; this should only be modified if there was a mistake/type o
A client cannot have any overlapping dates for active authorization
Disregard the $ amounts attached to the authorization o Available units are days not $, this will be fixed in the future
Example 10.4
Status Notification
Notice: Status on the Authorization will change from Provisional to Active once it has been approved.
Once the Authorization is in Active status, it can no longer be modified
Corrections/ Modifications on an Active Authorization
User will need to Close the incorrect authorization and enter a new authorization
When client has a change on level of care, a new authorization will need to be created and approved for the new level of care

9-25-18 v1.1 Page 40 of 190
Authorization Dashboard
Once an Authorization has been created, the user can view the Authorization status by selecting Authorization Dashboard from the navigation pane.
Authorization Dashboard Search Basics
There are many fields available in Authorization Dashboard Search screen. The Provider Agency will be prepopulated and read-only.
Avoid making searches too specific by using wild card (*); typographical errors made during data entry prior to a search can affect locating the bed assignment when client searches are too specific.
Remember to use the Clear button to clear data between searches.
Any search requires that all previously saved client information in SanWITS is correct.
Example 10.5
9-25-18 v1.1 Page 41 of 190
Search Examples
1. Search by Client Name: This involves entering a known client name or
alias. If a match is identified, the authorization dashboard list will populate with the match.
2. Search by Authorization #: This involves entering a known authorization #. If a match is identified, the authorization dashboard list will populate with the match.
3. Search by Auth End Date: This involves entering a specific authorization
end date. If a match is identified, the authorization dashboard list will populate with the match.
4. Search by Auth Status: This involves selecting the authorization status
from the drop down list. If a match is identified, the authorization dashboard list will populate with the match.
5. Search by Facility: If the user has access to other facilities, the user can by
selecting a facility. If a match is identified, the authorization dashboard list will populate with the match.
6. Search by Payor Group: This involves selecting the payor group. If a match is identified, the authorization dashboard list will populate with the match.
7. Search by Change Request Status By: Change Request are not used in
SanWITS at this time.
8. Using wild card: This involves entering partial information with the wild card (*) to search for a client. Although the wild card option is typically used while searching with a client’s name, SanWITS allows using the wild card to search for unique client number and authorization number.
a. Best practice suggestion is to use the first three characters of the name with an asterisk (*) at the end when searching.
b. If a match is identified, the client list will populate with the match.

9-25-18 v1.1 Page 42 of 190
Authorization Dashboard List
By selecting Go, the Authorization Dashboard will display the list of authorizations based on the selected parameters. If no other parameters are entered, in addition to the defaulted provider agency, the list will display all authorizations under the provider agency.
The list can be exported into excel by selecting the Export hyperlink
Sort by selecting the column name hyperlink
User can view the read-only authorization details by selecting the Auth # hyperlink
User can view the client profile by selecting the Client Name hyperlink
Auth End Date in red font indicates that the authorization is expired

9-25-18 v1.1 Page 43 of 190
CHAPTER 11: ASAM
Overview
SanWITS has a screen for capturing the ASAM Criteria assessment data for clients.
Requirement
Questions regarding the ASAM Criteria should be directed to your management staff or BHS QM Specialists at [email protected].
ASAM List
To view a previously entered ASAM record or to add a new ASAM record, select Client Profile > Activity List > ASAM to open ASAM List screen
Previously entered records will be listed
Select the hyperlink Add ASAM to start the process for adding a new ASAM record
Example 11.1
Type of Assessment
Type of Assessment a required field used to identify and categorize when the assessment is administered. The drop-down menu has three options.
Initial LOC Assessment
Full Assessment
Re-Assessment
ASAM Dimension
The six ASAM dimensions are listed with three blank fields to enter data for each dimension.
Level of Risk: required field with drop down menu; options are 0-4
Level of Care: Optional field with drop down menu
Comments: Optional text box field

9-25-18 v1.1 Page 44 of 190
Example 11.2
Cumulative Level of Care
There are five fields to capture the data decision made for a client’s Level of Care.
Recommended Level of Care: required field with drop down menu
Actual Level of Care: required field with drop down menu
Additional Level of Care: optional field with drop down menu
Clinical Override: field becomes required when the Actual Level of Care and the Recommended Level of Care do not match; drop down menu
Comments: text field becomes required when the Clinical Override field is completed; user must enter text to justify their reasoning for the clinical override.
Example 11.3
Assessment Date
Assessment Date field defaults to today’s date and is a required field. This date should be updated to correspond with the actual ASAM Criteria assessment date.
Program
Program is an optional field to capture the client’s Program Enrollment.
9-25-18 v1.1 Page 45 of 190
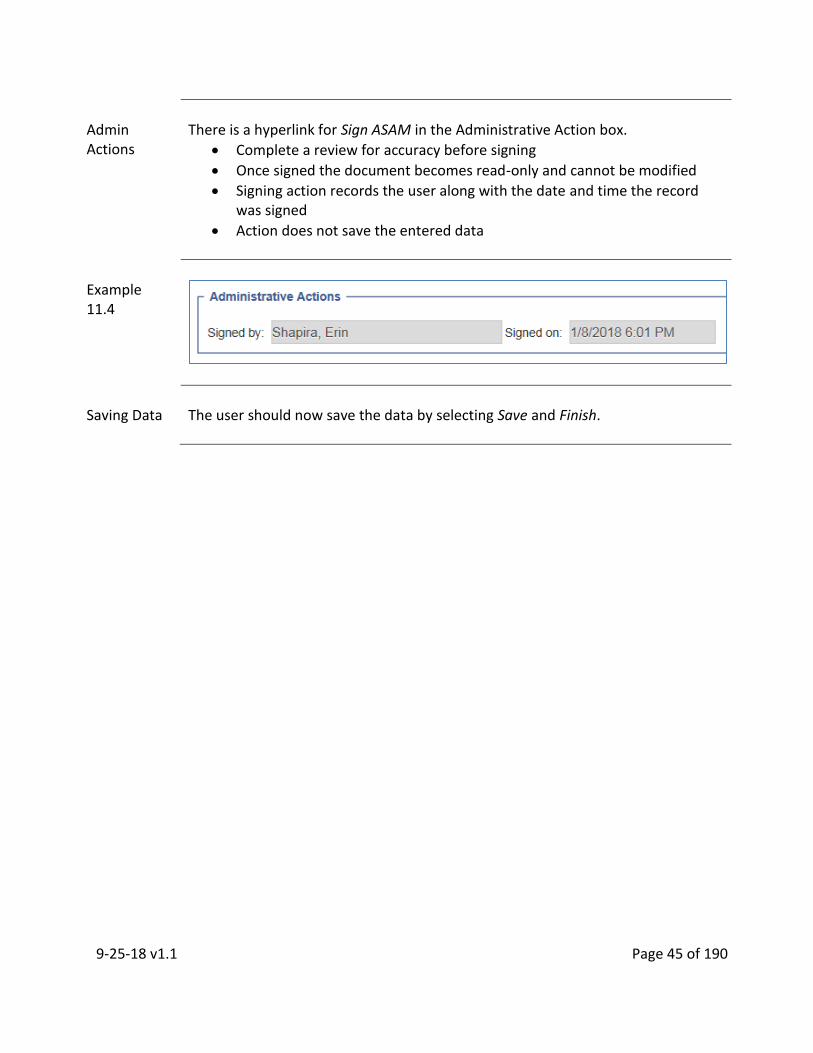
Admin Actions
There is a hyperlink for Sign ASAM in the Administrative Action box.
Complete a review for accuracy before signing
Once signed the document becomes read-only and cannot be modified
Signing action records the user along with the date and time the record was signed
Action does not save the entered data
Example 11.4
Saving Data
The user should now save the data by selecting Save and Finish.

9-25-18 v1.1 Page 46 of 190
CHAPTER 12: ADMISSION
Overview
The admission process serves two functions: admitting the client into the user’s facility for treatment services and building an Admission Profile with CalOMS data that is sent to the State.
Data Collection
The Admission has several required CalOMS fields. Data used to create the Admission should be obtained directly from the client.
The CalOMS Admission Form can be used to collect information from the client.
The paper CalOMS Admission Form follows the same layout as the SanWITS screens for Admission.
Refer to the CalOMS TX Data Collection Guide regarding acceptable values for each field.
SanWITS Fields
Each screen contains fields for data that are identified by four different colors.
Bright yellow: system required; can be CalOMS and/or County of San Diego data.
Light yellow: required; can be CalOMS and/or County of San Diego data.
White: non-required.
Grey: non-fillable by the user; either system generated or auto-populated; cannot be changed as is or when case is closed.
Navigation Buttons
Use the arrow button to move from screen to screen through the Admission. Select one of the following navigation buttons to take actions when necessary:
Cancel: Returns the user to the previous screen or mode without saving the data entered into the screen.
Save: Serves two functions; first saves data after completing required fields; second, used to add multiple records to certain screens.
Finish: Saves any unsaved data and returns user to the first screen of the module or Activity List.
9-25-18 v1.1 Page 47 of 190
Prior Episode Data
When initiating the Admission, if there is data in a prior episode, SanWITS will ask if the user wants to bring forward the client’s previous admission record. By selecting “Yes” the new admission record will open pre-populated with the answers from the previous admission. It is important to review the data and update according to the new admission information collected from the client.
Admission Screens
The Admission section has required and optional screens to be completed:
CalOMS required: Admission Profile, Admission Administration, Alcohol & Drug Use, Tobacco/Nicotine, Family/Social, Employment, Legal/Criminal, and Medical/Physical Health/Mental Health
Medi-Cal required: Health
Not required but recommended: ASAM, Diagnosis, Treatment Team
Not currently in use: N/A
For viewing only: N/A
Admission Profile
The Admission Profile screen is the first screen in the Admission. There are several required fields that need to be completed.
If the paper CalOMS Admissions Form was used to gather information from the client, use the completed form to answer the questions in this screen.
Refer to the CalOMS TX Data Collection Guide regarding acceptable values for each field.
Mark as Deleted does not delete the Admission. If an error has been made, please contact the SUD Support Desk at [email protected] for assistance.

9-25-18 v1.1 Page 48 of 190
Example 12.1
Admission Administration
The Admission Administration screen follows the profile. There are two system required fields that need to be completed.
If the paper CalOMS Admissions Form was used to gather information from the client, use the completed form to answer the questions in this screen.
Refer to the CalOMS TX Data Collection Guide regarding acceptable values for each field.
The Special Population Program field collects data on specific populations for the County of San Diego
o Select Non BHS Contract if client is not a BHS Contracted client o If client is a BHS Contracted client, select the Special Population
Program that they participate in, and if None, select None

9-25-18 v1.1 Page 49 of 190
Example 12.2
Alcohol & Drug Use
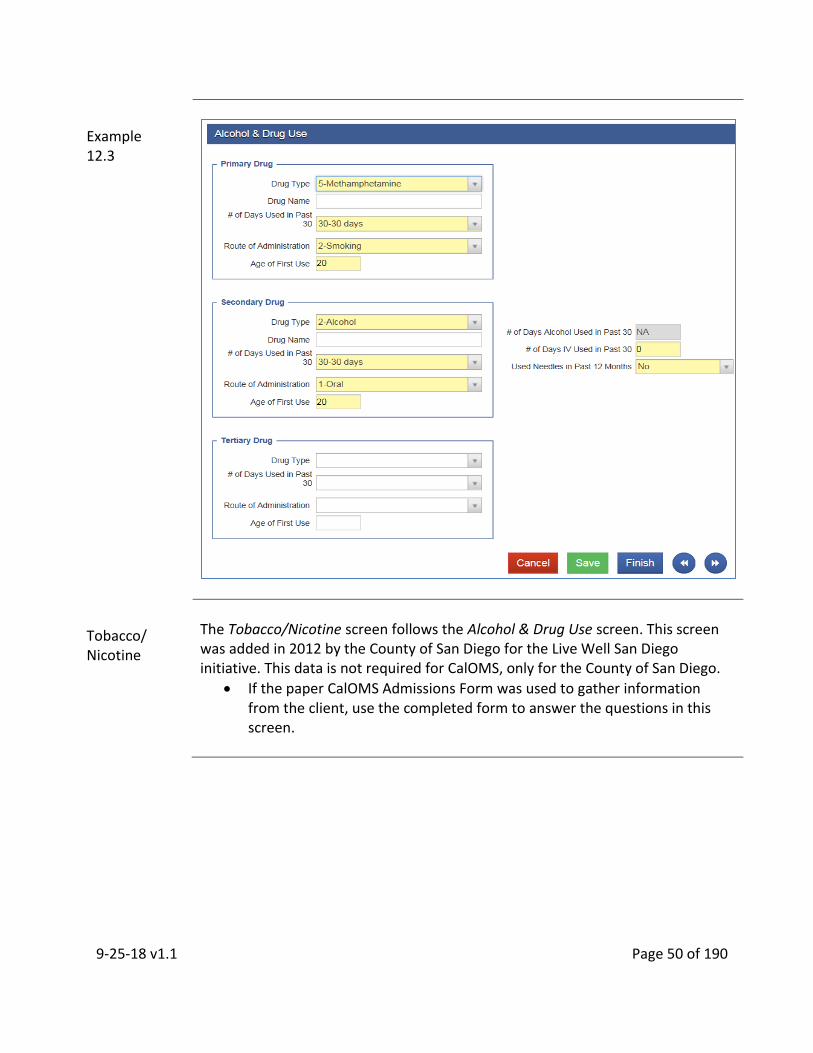
The Alcohol & Drug Use screen follows the Admission Administration screen. There are several required fields that need to be completed.
If the paper CalOMS Admissions Form was used to gather information from the client, use the completed form to answer the questions in this screen.
Refer to the CalOMS TX Data Collection Guide regarding acceptable values for each field.
If None is entered for Secondary Drug Type, None or NA should be selected for all required fields under Secondary Drug
9-25-18 v1.1 Page 50 of 190
Example 12.3
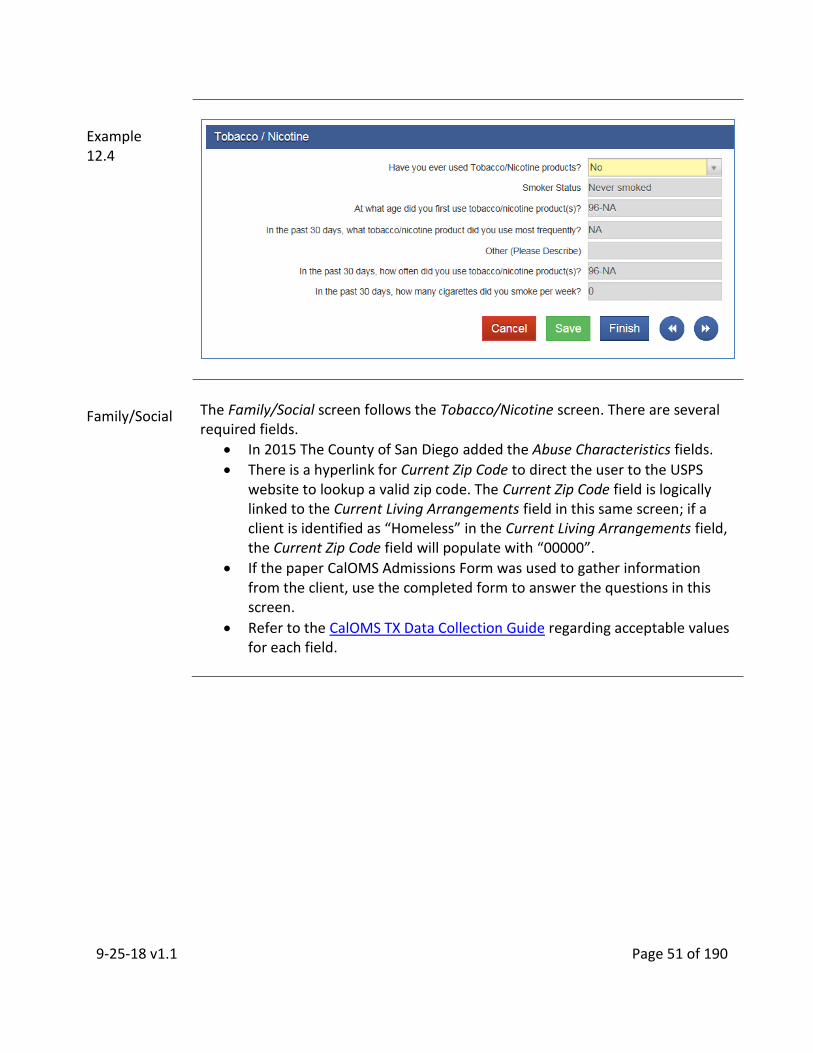
Tobacco/ Nicotine
The Tobacco/Nicotine screen follows the Alcohol & Drug Use screen. This screen was added in 2012 by the County of San Diego for the Live Well San Diego initiative. This data is not required for CalOMS, only for the County of San Diego.
If the paper CalOMS Admissions Form was used to gather information from the client, use the completed form to answer the questions in this screen.
9-25-18 v1.1 Page 51 of 190
Example 12.4
Family/Social
The Family/Social screen follows the Tobacco/Nicotine screen. There are several required fields.
In 2015 The County of San Diego added the Abuse Characteristics fields.
There is a hyperlink for Current Zip Code to direct the user to the USPS website to lookup a valid zip code. The Current Zip Code field is logically linked to the Current Living Arrangements field in this same screen; if a client is identified as “Homeless” in the Current Living Arrangements field, the Current Zip Code field will populate with “00000”.
If the paper CalOMS Admissions Form was used to gather information from the client, use the completed form to answer the questions in this screen.
Refer to the CalOMS TX Data Collection Guide regarding acceptable values for each field.

9-25-18 v1.1 Page 52 of 190
Example 12.5
Employment
The Employment screen follows the Family/Social screen. There are several system required fields.
In 2008 The County of San Diego added the field for Graduated from High School.
There is no logic linking the field for Graduated from High School and the field for Highest Grade Completed. Both must be completed.
If the paper CalOMS Admissions Form was used to gather information from the client, use the completed form to answer the questions in this screen.
Refer to the CalOMS TX Data Collection Guide regarding acceptable values for each field.
Example 12.6
9-25-18 v1.1 Page 53 of 190
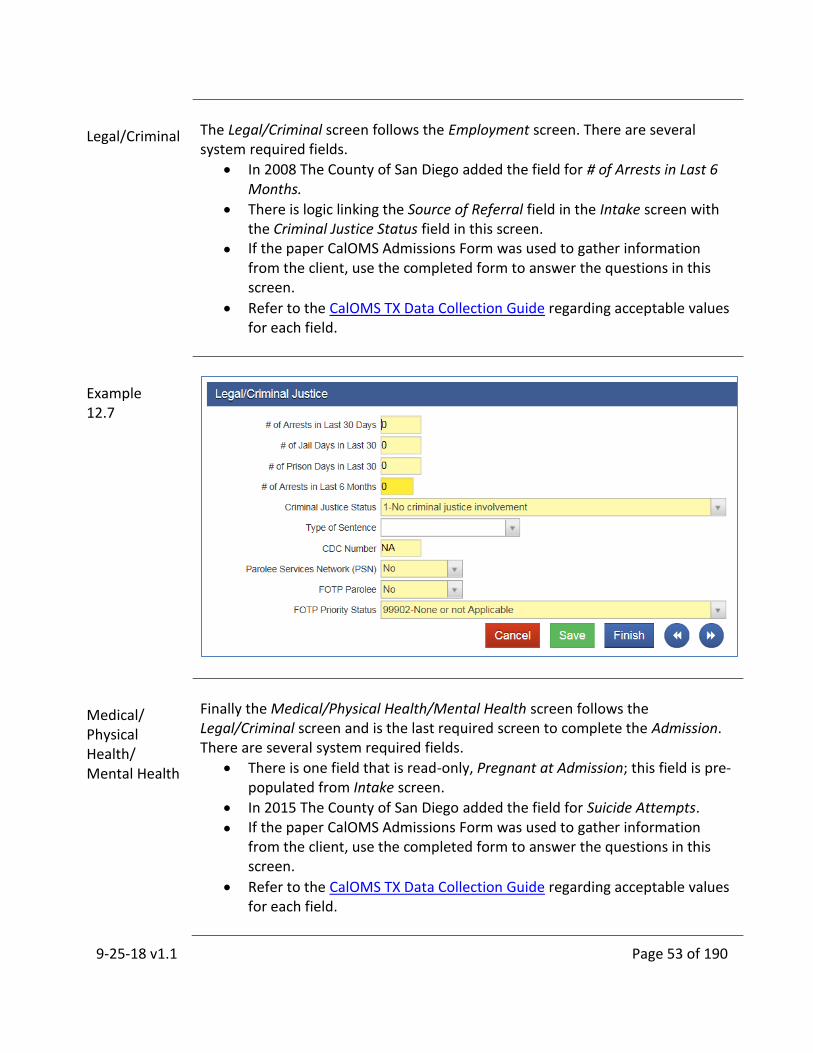
Legal/Criminal
The Legal/Criminal screen follows the Employment screen. There are several system required fields.
In 2008 The County of San Diego added the field for # of Arrests in Last 6 Months.
There is logic linking the Source of Referral field in the Intake screen with the Criminal Justice Status field in this screen.
If the paper CalOMS Admissions Form was used to gather information from the client, use the completed form to answer the questions in this screen.
Refer to the CalOMS TX Data Collection Guide regarding acceptable values for each field.
Example 12.7
Medical/ Physical Health/ Mental Health
Finally the Medical/Physical Health/Mental Health screen follows the Legal/Criminal screen and is the last required screen to complete the Admission. There are several system required fields.
There is one field that is read-only, Pregnant at Admission; this field is pre-populated from Intake screen.
In 2015 The County of San Diego added the field for Suicide Attempts.
If the paper CalOMS Admissions Form was used to gather information from the client, use the completed form to answer the questions in this screen.
Refer to the CalOMS TX Data Collection Guide regarding acceptable values for each field.
9-25-18 v1.1 Page 54 of 190
Example 12.8
Saving Data
The user should now save the data by selecting Save and Finish.
Activity List
After saving the client’s admission data and selecting Finish, the user will be taken to the Client Activity List.
The user can review the status of the completed activity.
The status should reflect either Completed or In Progress (Details).
An In Progress (Details) status means required fields are incomplete or there are invalid values; this status will prevent saved data from being sent to the State.
The user should select the (Details) hyperlink to review the pending items and take appropriate action to resolve the In Progress status.
Activities that are In Progress should be resolved right away. In Progress activities prevent submission of data to DHCS or will result in rejected data.
Example 12.9

9-25-18 v1.1 Page 55 of 190
Record Status
Once the required fields are complete with valid values, the saved data is then ready to send to the State in the next upload. SanWITS data is sent to the State via electronic uploads at least once a month. There is nothing the user needs to do for this process.
Check Record Status
To check the status of an Admission record, the user will need to review the first screen of the Admission, Admission Profile.
The Record Status box provides information regarding staff who created/updated the record, date the record was created/updated, form serial number of the record, and date it was last uploaded to the State.
CalOMS Form Serial Number is also known as the FSN. This field is pre-populated by SanWITS using a unique string of alpha-numerical characters. The Form Serial Number identifies the client record with the State. If changes are made to the record, the data will be sent to the State and matched by the Form Serial Number. When a client’s annual update and/or discharge record is sent to the State, the record will match up with the admission record based on the Form Serial Number.
If the field for Last Upload to State Date is blank, there has not been an upload of this record.
If the field for Last Upload to State Date is populated with a date prior to the Last Updated Date, there has not been an upload since the last date the record was changed/updated.
If the field for Last Upload to State Date is populated with a date on or after the Last Updated Date, the record/data has been sent to the State.

9-25-18 v1.1 Page 56 of 190
Example 12.10
Generate Report
The header contains a hyperlink Generate Report which allows the user to produce a report from the current screen or module.

9-25-18 v1.1 Page 57 of 190
CHAPTER 13: DIAGNOSIS
Overview
Diagnosis is a subsection in the Admission. The subsection is not required to complete an Admission but the Diagnosis is required to bill DMC.
SanWITS Fields
Each screen contains fields for data that are identified by four different colors.
Bright yellow: system required; can be CalOMS and/or County of San Diego data.
Light yellow: required; can be CalOMS and/or County of San Diego data.
White: non-required.
Grey: non-fillable by the user; either system generated or auto-populated; cannot be changed as is or when case is closed.
Navigation Buttons
Select one of the following navigation buttons to take actions when necessary:
Cancel: Returns the user to the previous screen or mode without saving the data entered into the screen.
Save: Serves two functions; first saves data after completing required fields; second, used to add multiple records to certain screens.
Finish: Saves any unsaved data and returns user to the first screen of the module or Activity List.
Diagnosis
DHCS requires providers to diagnose each client to identify medical necessity in order to bill DMC for treatment services.
Step 1
Select Admission > Diagnosis from the navigation pane to open the Client Diagnosis screen. Select the Edit Diagnosis hyperlink to edit the data.
Completing this screen will save time when creating encounters for claims.
Initial Diagnosis will need to be created via Admission > Diagnosis to pre-populate in the encounter screen

9-25-18 v1.1 Page 58 of 190
Example 13.1
Step 2
Once enabled for editing, the Client Diagnosis screen has several required fields: Type, Diagnosis, and Principal Diagnosis.
The user must determine the Type of diagnosis: behavioral, medical, or psychosocial.
The user must identify a Diagnosis.
The user must identify if the selected Diagnosis is the client’s Principal Diagnosis.
The Behavioral Diagnosis identified as Principal Diagnosis will pre-populate to the encounter screen.
Example 13.2
Saving Data
The user should save the data by selecting Save and Finish.

9-25-18 v1.1 Page 59 of 190
Corrections
A client’s diagnosis should only be changed if an error was made. If corrections are necessary, the user must go to the source of the diagnosis for editing.
Example: If a diagnosis is created in the Admission section, corrections cannot be made to the record via the Diagnosis Summary screen; the user must open the Diagnosis screen in the Admissions section for the Edit Diagnosis function.
Mark As Principal
If the client’s diagnosis is not identified as the Principal Diagnosis, an edit may be necessary. Select either path to start the process:
Admission > Diagnosis > Client Diagnosis
Diagnosis List > Review > Client Diagnosis
Step 1
From the Client Diagnosis screen, select the hyperlink to Edit Diagnosis.
Example 13.3
Step 2
Select the action icon for the diagnosis that needs to be changed and select the option Mark As Principal.
Example 13.4
Saving Data
The user should select Finish for the changes, then save the data by selecting Save and Finish.

9-25-18 v1.1 Page 60 of 190
Diagnosis Summary
Once a principal diagnosis is created for a client, the Diagnosis Summary populates on the Client Activity List.
The Diagnosis Summary lists all the principal diagnosis records created for a client and the source of each diagnosis.
If additional diagnosis are identified during the course of the client’s treatment, a new diagnosis record can be created from the Diagnosis Summary Screen or the Diagnosis List.
Example 13.5

9-25-18 v1.1 Page 61 of 190
CHAPTER 14: PROGRAM ENROLLMENT
Overview
Program Enrollment records the client’s enrollment in a specific treatment modality. Previously, the Program Enrollment module was a subsection of the Admission module. Now, the Program Enrollment is a standalone module located on the navigation pane.
SanWITS Fields
Each screen contains fields for data that are identified by four different colors.
Bright yellow: system required; can be CalOMS and/or County of San Diego data.
Light yellow: required; can be CalOMS and/or County of San Diego data.
White: non-required.
Grey: non-fillable by the user; either system generated or auto-populated; cannot be changed as is or when case is closed.
Navigation Buttons
Select one of the following navigation buttons to take actions when necessary:
Cancel: Returns the user to the previous screen or mode without saving the data entered into the screen.
Save: Serves two functions; first saves data after completing required fields; second, used to add multiple records to certain screens.
Finish: Saves any unsaved data and returns user to the first screen of the module or Activity List.
Program Enrollment
DHCS has guidelines regarding allowable treatment services that can be billed to DMC. Billable services vary depending on the program or modality each client is enrolled.
For Residential Programs, a program enrollment is only required for BHS Contracted clients
For Outpatient and Opioid Treatment Programs, a program enrollment is required for BHS Contracted clients and for Non-BHS Contracted clients who are part of a group
Step 1
Select Program Enroll from the navigation pane to open the Program Enrollment List screen.
New clients should have no information in this screen.
Select the hyperlink Add Enrollment to start the process.
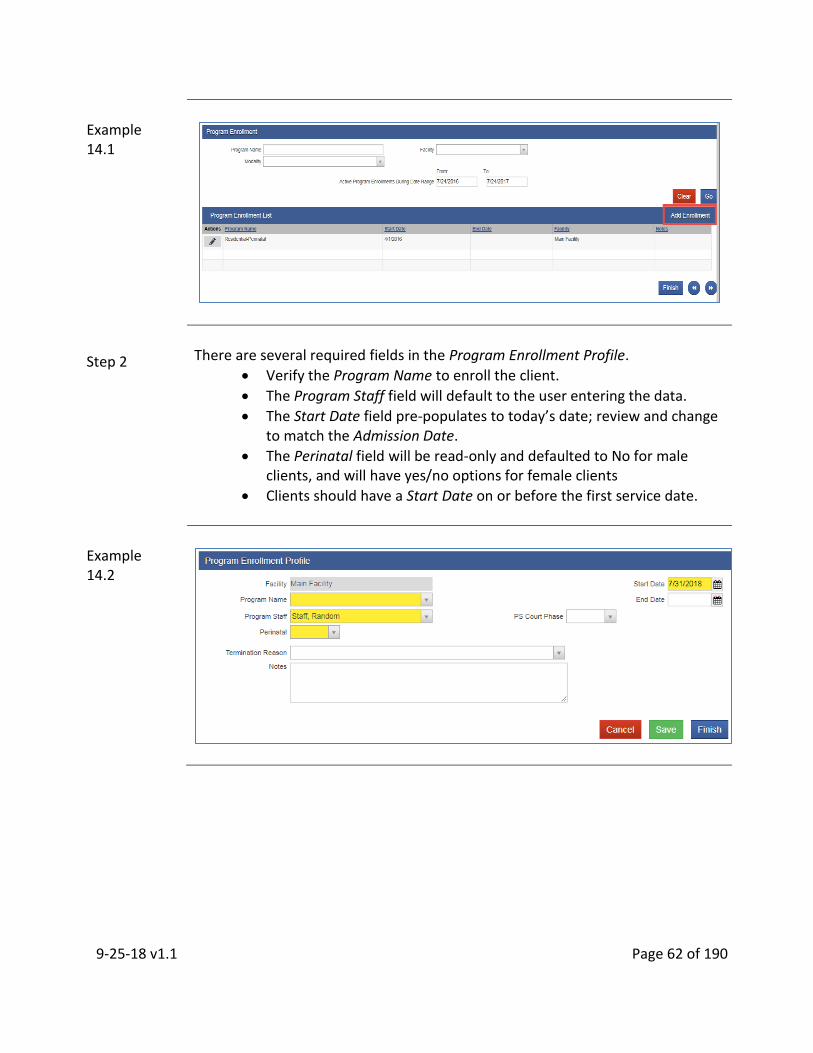
9-25-18 v1.1 Page 62 of 190
Example 14.1
Step 2
There are several required fields in the Program Enrollment Profile.
Verify the Program Name to enroll the client.
The Program Staff field will default to the user entering the data.
The Start Date field pre-populates to today’s date; review and change to match the Admission Date.
The Perinatal field will be read-only and defaulted to No for male clients, and will have yes/no options for female clients
Clients should have a Start Date on or before the first service date.
Example 14.2

9-25-18 v1.1 Page 63 of 190
Saving Data
The user should now save the data by selecting Save and Finish.
For Outpatient and Opioid Treatment Programs, user should proceed to Chapter 17 Group List
For Residential Programs, user should proceed to the Chapter 15 Residential Unit Management
o If user is only changing the client’s level of care, user should proceed to the next section of this chapter
Residential Providers Changing Level of Care
When the client has a change in level of care within the same facility, the user will need to end the current Program Enrollment by completing the required fields.
End Date and End Time: Last day for the current level of care
Termination Reason: Select #9 Transferred to another program at this facility
Next Step: Options to assign the client to a different bed or keep the client in the same bed is available
Example 14.3

9-25-18 v1.1 Page 64 of 190
Saving Data
The user should now save the data by selecting Save.
If the option to keep the client under the same bed is selected, a new Program Enrollment Profile screen will open. Select the new level of care under the Program Name and Start Date will be the first day under the new level of care.
If the option to assign the client to another bed is selected, a new Program Enrollment Profile screen will open. Select the new level of care under the Program Name and Start Date will be the first day under the new level of care.
o When the program enrollment data is saved, the Bed Assignment screen will open.
Assigning a Bed
There are two methods to assign a vacant bed to a client. Method 1 is the preferred method.
Method 1: From the bed assignment screen, under the Room # column, the user can select the room # hyperlink. This will allow the user to view the details about the room and the other occupants within the room
Method 2: From the bed assignment screen, under the Actions column, the user can hover over the pencil icon and click on the Assign hyperlink that corresponds with the room and bed you want to assign; this method should only be used if you are already aware of the room details such as upper and lower bunks, the other occupants, etc.
Example 14.4
9-25-18 v1.1 Page 65 of 190
CHAPTER 15: RESIDENTIAL UNIT MANAGEMENT (For Residential Providers Only)
Overview
The Residential Unit Management was implemented to assist in managing the residential beds to ensure that there are sufficient residential beds available to serve all of our clients. This section will also allow the user to create bulk encounters for bed day services from the daily census.
Data Collection
The Residential Unit Management has several sections to ensure that data is being captured to obtain current and historical information on bed availability
Current Bed Management is used to view the current occupancy. This section also allows the user to move individuals between beds.
Bed Assignment History is used to see the history of all clients who have been in any bed. This is useful for infection control.
Residential Unit Census is used to do a census at midnight for reporting and billing purposes.
SanWITS Fields
Each screen contains fields for data that are identified by four different colors.
Bright yellow: system required; can be CalOMS and/or County of San Diego data.
Light yellow: required; can be CalOMS and/or County of San Diego data.
White: non-required.
Grey: non-fillable by the user; either system generated or auto-populated; cannot be changed as is or when case is closed.
Navigation Buttons
Select one of the following navigation buttons to take actions when necessary:
Clear: Removes previous search parameter entered.
Go: Populates the data within the search parameter
9-25-18 v1.1 Page 66 of 190
Assigning Client Bed
Assigning a client to a bed occurs during the creation of Program Enrollment. By saving the program enrollment, it will prompt a bed assignment. The Bed Assignment screen will default to all available and active beds with bed status of Vacant, for all units that accept the program where the client is enrolled
There must be an available bed to complete a program enrollment for a client.
There cannot be overlapping program enrollment dates when assigning a client into a bed
Bed Assignment list will display all vacant beds for that day within the selected inpatient unit. If no unit is selected, it will display all vacant beds for the facility.
Virtual Bed defaults to No. It will need to be changed to Yes to include virtual beds
There are two methods to assign a vacant bed to a client. Method 1 is the preferred method.
Method 1: From the bed assignment screen, under the Room # column, the user can select the room # hyperlink. This will allow the user to view the details about the room and the other occupants within the room
Method 2: From the bed assignment screen, under the Actions column, the user can hover over the pencil icon and click on the Assign hyperlink that corresponds with the room and bed you want to assign; this method should only be used if you are already aware of the room details such as upper and lower bunks, the other occupants, etc.

9-25-18 v1.1 Page 67 of 190
Example 15.1

9-25-18 v1.1 Page 68 of 190
Client Bed Details/ Attributes
The Client Bed Details/Attributes screen follows the Bed Assignment screen. This screen is accessed by selecting Assign from the Bed Assignment List or the Bed Re-Assignment List. It can also be viewed by clicking the Bed # hyperlink on the Current Bed Management List. There are several client bed attribute fields that can be completed and one required field
Client’s characteristics
Medical Acuity
Violence
Expected Date of Discharge (Required field) Important: This date is used for referral purposes and should be updated if the client’s discharge date changes
Example 15.2
Saving Data
User should now save the data by selecting Save.
SanWITS will now confirm with the user that they are assigning the selected bed to the client. Select Yes to confirm.
Select Finish on the Bed Assignment page to complete bed assignment
Example 15.3

9-25-18 v1.1 Page 69 of 190
Current Bed Management
Under Residential Unit Management from the navigation pane, select Current Bed Management to view the current occupancy and move individuals between beds.
Getting Started
The first screen in the Current Bed Management section is Current Bed Management Search and Current Bed Management List.
The Agency defaults to the current user’s agency and is read-only
The Facility defaults to the current user’s facility and can be changed to any other facility that the user has access to
Bed Search Basics
There are many fields available in Current Bed Management Search screen to facilitate searching for bed assignments.
Avoid making searches too specific by using wild card (*); typographical errors made during data entry prior to a search can affect locating the bed assignment when client searches are too specific.
Remember to use the Clear button to clear data between searches.
Any search requires that all previously saved client information in SanWITS is correct.
Example 15.4

9-25-18 v1.1 Page 70 of 190
Search Examples
1. Search by Facility: If the user has access to other facilities, the user can
select another facility. The list of rooms and beds listed under the selected facility will populate regardless of its status.
2. Search by Inpatient Unit: This involves selecting the inpatient unit. The list of rooms and beds listed under the selected unit and facility will populate regardless of its status.
3. Search by Room #: This involves entering a known room #. If a match is
identified, the list of beds will populate with the match.
4. Search by Bed Status: This involves selecting the bed status. The list of rooms and beds that has the selected bed status and facility will populate.
5. Search by Client Name: This involves entering a known client name or
alias. If a match is identified, the current bed management list will populate with the match.
6. Search by Expected Date of Discharge: This involves entering a known
expected date of discharge. If a match is identified, the current bed management list will populate with the match.
7. Search by Bed #: This involves entering a known bed #. If a match is
identified, the current bed management list will populate with the match.
8. Using wild card: This involves entering partial information with the wild card (*) to search for a client. Although the wild card option is typically used while searching with a client’s name, SanWITS allows using the wild card to search for room # and bed #.
Best practice suggestion is to use the first three characters of the name with an asterisk (*) at the end when searching.
If a match is identified, the client list will populate with the match.

9-25-18 v1.1 Page 71 of 190
Current Bed Management List
By selecting Go, the Current Bed Management List will display the current state of the bed based on the selected parameters. If no other parameters are entered in addition to the defaulted agency and facility, the list will display all current state of the beds under the selected facility.
List can be exported into excel by selecting the Export hyperlink
Sort by selecting the column name hyperlink
User can view the room details in read-only mode by selecting the room # hyperlink
User can view the bed details based on today’s information
User can move the client to another vacant bed in any unit that accepts the same program that the client is currently enrolled in
Example 15.5
Bed Re-Assignment
After selecting the Move option, the user will be taken to the Bed Re-Assignment screen.
The user can view all beds (excluding beds from unavailable and inactive rooms) within the selected inpatient unit. User will need to change the Inpatient Unit in the search section and select Go to view available beds in other units.
Sort by selecting the column name hyperlink
User can view the room details in read-only mode by selecting the room # hyperlink
Client can either be re-assigned to another vacant bed or can swap beds with another client

9-25-18 v1.1 Page 72 of 190
Example 15.6
Bed Search Basics
There are many fields available in Current Bed Management Search screen to facilitate searching for bed assignments.
Avoid making searches too specific by using wild card (*); typographical errors made during data entry prior to a search can affect locating the bed assignment when client searches are too specific.
Remember to use the Clear button to clear data between searches.
Client Bed Re-Assignment
After searching for bed availability, the user can re-assign the client to a vacant bed that accepts the same program that the client is currently enrolled in. The user can hover over the pencil icon and select Assign.
The Client Bed Attributes screen will open and will be pre-populated with the client bed attributes from the previous bed assignment except the Assignment Date.
The Bed Assignment Date will default to today’s date, review and change as needed. Once the bed has been assigned, this field will be greyed out as read-only.

9-25-18 v1.1 Page 73 of 190
Example 15.7
Saving Data
User should now save the data by selecting Save.
SanWITS will now confirm with the user that they are assigning the selected bed to the client. Select Yes for completing the bed assignment
Example 15.8
Client Bed Swap
After searching for bed availability, the user can have the client swap beds with another client that accepts the same program that the client is currently enrolled in. The user can hover over the pencil icon and select Swap.
SanWITS will advise that you are about to swap beds between two clients. Bed assignment date and time will be required. It can be modified but cannot be future-dated. SanWITS will ask if you want to continue. Select Yes.
Example 15.9

9-25-18 v1.1 Page 74 of 190
Bed Assignment History
Under Residential Unit Management from the navigation pane, select Bed Assignment History to view the history of beds, rooms and assignments. This feature can also be used to view all the rooms and beds that a client has been assigned to.
The history is useful for infection control
Getting Started
The first screen in the Bed Assignment History section is Bed Assignment History Search and Bed Assignment History List.
The Agency defaults to the current user’s agency and is read-only
The Facility defaults to the current user’s facility and can be changed to any other facility that the user has access to
Bed History Search Basics
There are many fields available in Bed Assignment History Search screen to facilitate searching for bed history.
Avoid making searches too specific by using wild card (*); typographical errors made during data entry prior to a search can affect locating the bed assignment when client searches are too specific.
Remember to use the Clear button to clear data between searches.
Any search requires that all previously saved client information in SanWITS is correct.
Example 15.10

9-25-18 v1.1 Page 75 of 190
Search Examples
1. Search by Facility: If the user has access to other facilities, the user can
select another facility. If a match is identified, the history of room and bed assignment listed under the selected facility will populate.
2. Search by Inpatient Unit: This involves selecting the inpatient unit. If a match is identified, the history of room and bed assignment listed under the selected inpatient unit and facility will populate.
3. Search by Room #: This involves entering a known room #. If a match is
identified, the history of beds listed under the specified room and facility will populate.
4. Search by Bed Assignment Date: This involves entering a specific date for
bed assignment. If a match is identified, the history of bed assigned under the specified bed assignment date and facility will populate.
5. Search by Level of Care Type: This involves selecting the Level of Care
Type. If a match is identified, the history of room and bed assignment under the selected level of care type and facility will populate.
6. Search by Program Enrollment Start Date: This involves entering a specific
program enrollment start date. If a match is identified, the history of room and bed assignment under the specified program enrollment start date and facility will populate.
7. Search by Client Name: This involves entering a known client name or
alias. If a match is identified, the history of room and bed assignment will populate with the match.
8. Search by Bed #: This involves entering a known bed #. If a match is
identified, the history of room and bed assignment will populate with the match.
9. Using wild card: This involves entering partial information with the wild
card (*) to search for a client. Although the wild card option is typically used while searching with a client’s name, SanWITS allows using the wild card to search for room # and bed #.
a. Best practice suggestion is to use the first three characters of the name with an asterisk (*) at the end when searching.
b. If a match is identified, the client list will populate with the match.
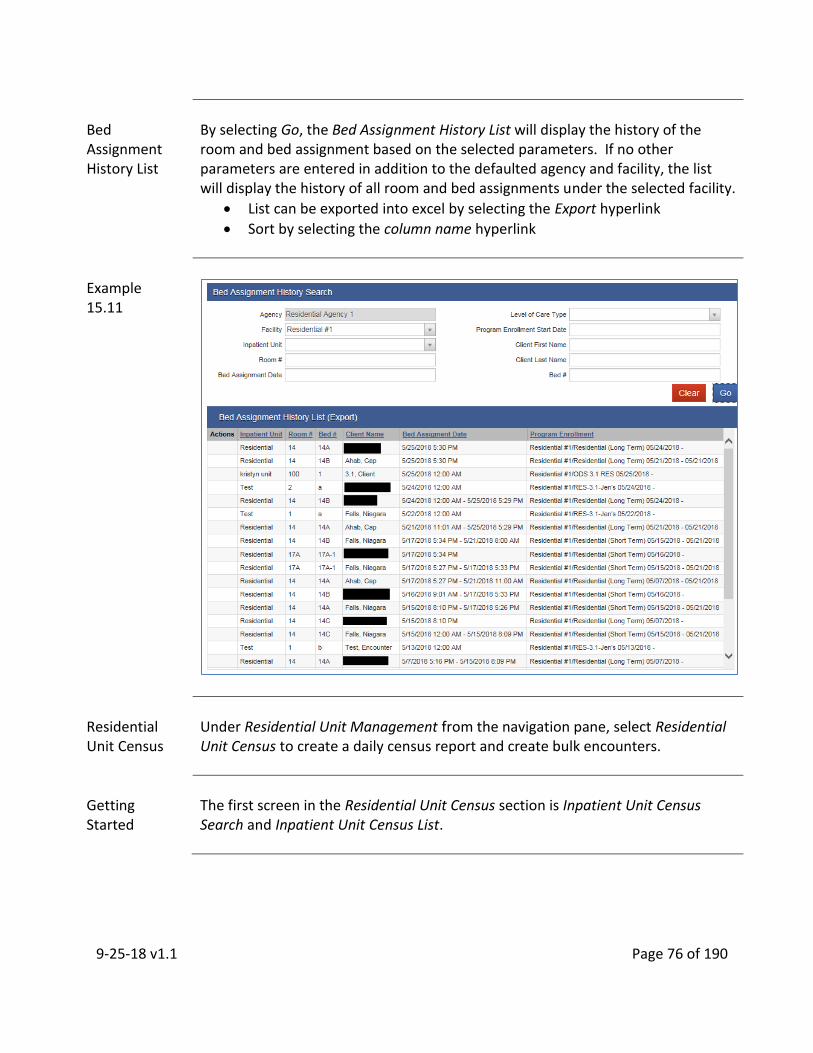
9-25-18 v1.1 Page 76 of 190
Bed Assignment History List
By selecting Go, the Bed Assignment History List will display the history of the room and bed assignment based on the selected parameters. If no other parameters are entered in addition to the defaulted agency and facility, the list will display the history of all room and bed assignments under the selected facility.
List can be exported into excel by selecting the Export hyperlink
Sort by selecting the column name hyperlink
Example 15.11
Residential Unit Census
Under Residential Unit Management from the navigation pane, select Residential Unit Census to create a daily census report and create bulk encounters.
Getting Started
The first screen in the Residential Unit Census section is Inpatient Unit Census Search and Inpatient Unit Census List.

9-25-18 v1.1 Page 77 of 190
Inpatient Unit Census Search
To find a prior created census, select the Inpatient Unit from the drop down list. Select Go.
Enter a staff to limit the based on the staff who created the census
Enter a specific census date to view specific census
Inpatient Unit Census List
By selecting Go, the Inpatient Unit Census List will display the census list based on the selected parameters. If no parameters are entered, the list will display all census.
Sort by selecting the column name hyperlink
Creating a Daily Census
Daily census are created by selecting Add New Daily Census from the Inpatient Unit Census List
An Inpatient Unit should be selected for the census
Staff will default to the current user and will be read-only
Sate will default to yesterday’s date but is editable
Time will always be set to 11:59:59 PM and will be read-only
Example 15.12
Step 1
Select the Inpatient Unit
Inpatient Unit Census will list all the clients with open bed assignment within the inpatient unit
Clients with open leave record will need to be ended to be included in the census
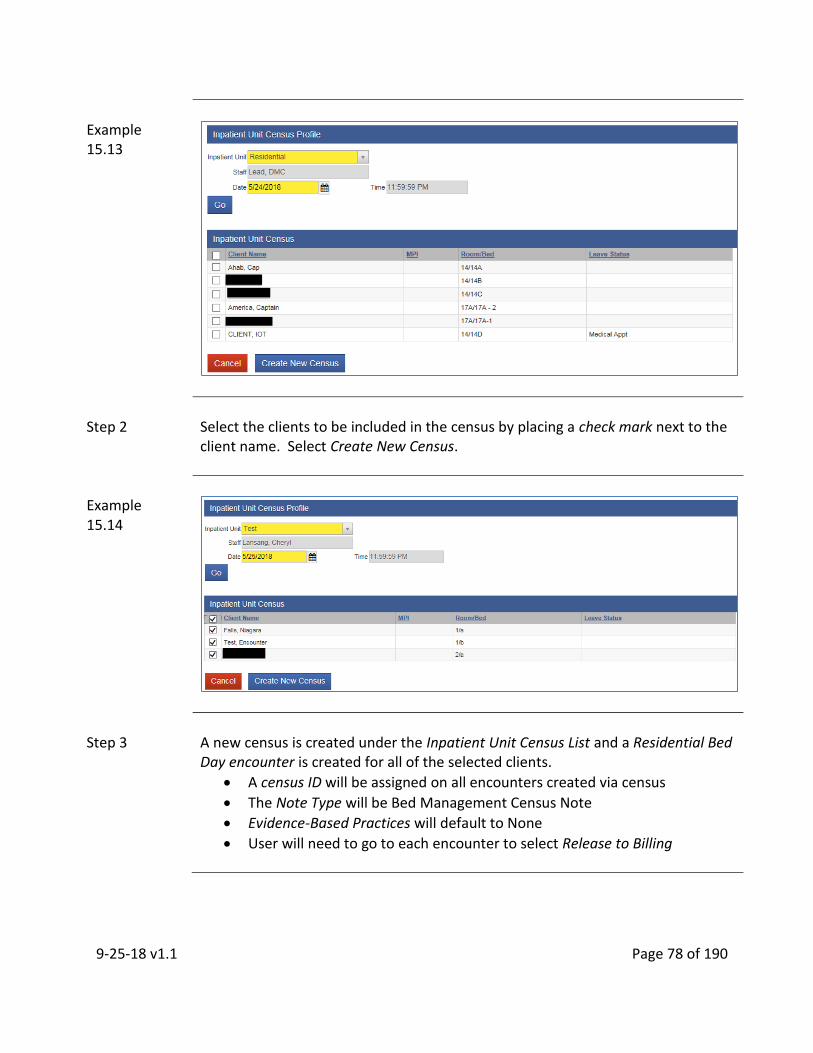
9-25-18 v1.1 Page 78 of 190
Example 15.13
Step 2
Select the clients to be included in the census by placing a check mark next to the client name. Select Create New Census.
Example 15.14
Step 3
A new census is created under the Inpatient Unit Census List and a Residential Bed Day encounter is created for all of the selected clients.
A census ID will be assigned on all encounters created via census
The Note Type will be Bed Management Census Note
Evidence-Based Practices will default to None
User will need to go to each encounter to select Release to Billing

9-25-18 v1.1 Page 79 of 190
Example 15.15
Census Correction
To make a correction on an existing census, under the Inpatient Unit Census List, hover over the pencil icon next to the census that requires correction. Select Review.

9-25-18 v1.1 Page 80 of 190
Example 15.16
Creating new census/ override
After selecting the clients for the new updated census, the user can select Update Census.
An encounter will be created for any client added into the census
If a client from the existing census need to be removed, the encounter created via census will need to be deleted
o If the encounter created from the census has not been “Released to Billing”, user will need to manually delete the encounter from the client record
o If the encounter created from the census has been “Released to Billing”, an error message will populate and you will not be able to delete the client from census.

9-25-18 v1.1 Page 81 of 190
Example 15.17

9-25-18 v1.1 Page 82 of 190
CHAPTER 16: RESIDENTIAL UNIT DASHBOARD (For Residential Providers Only)
Overview
The Residential Unit Dashboard is the primary screen for the user to view clients on the unit, move clients in between beds, add leave or create new client notes, and create encounter services for case management. In order for bed management to work properly it must be used in real time.
Getting Started
The first screen in the Residential Unit Dashboard section is Inpatient Unit Dashboard Search and Inpatient Unit Dashboard Details.
The user can select a facility if they have multiple facility access
The Inpatient Unit is a required field
Client Bed Status
The user can search by selecting an Inpatient Unit. User can also select a specific facility if they have multiple facility assignments. Select Go.
The list of clients with the current bed assignment will display
Sort by selecting the column name hyperlink
The user can view the client profile by selecting the client name hyperlink
The user can view the bed details and add/modify client’s characteristics, medical acuity, violence and expected date of discharge
The user can view the client program enrollment profile by selecting the program enrollment hyperlink
The user can track when the client goes on leave by selecting Add Leave from the action menu. To track when client returns from leave, the user can enter the expected return date and time. The client information will be displayed in red font if client does not return by the expected return date and time.
The user can add Notes to the client record
The user can move the client to another vacant bed in any unit that accepts the same program that the client is currently enrolled in or swap with another client under the same program that the client is currently enrolled in

9-25-18 v1.1 Page 83 of 190
Example 16.1
Adding Leave
From the Inpatient Unit Dashboard Details, hover over the pencil icon and select Add Leave to open Client Leave Details screen. There are several required fields that need to be completed.
Leave Type: System required field
Description: Read only field. Will pre-populate when user saves the entered required fields. Description is based on selected leave type
Leave Start Date and Time: System required field
Hold Client’s bed: System required field. Defaults to Yes. o Providers will need to Add Leave for clients who are expected to
be on leave for 24hrs or more. o Providers can hold the bed for up to 7 days. After 7 days, user
should discharge the client. Questions regarding client leave past 7 days should be directed to your COR.
Expected Return Date and Time: To track when client returns from leave. The client information will display in red font to alert the user that the client has not returned by the given expected return date and time

9-25-18 v1.1 Page 84 of 190
Example 16.2
Saving Data
The user should now save the data by selecting Save and Finish.
Review/ Modify Leave
From the Inpatient Unit Dashboard Details, click on the hyperlink under Leave Status column to open Client Leave Details. Enter the Leave End Date and Leave End Time to clear the alert. This should be completed in real time for accuracy of daily census and billing.
Example 16.3
Saving Data
The user should now save the data by selecting Save and Finish.

9-25-18 v1.1 Page 85 of 190
Adding Note/ Encounter
From the Inpatient Unit Dashboard Details, hover over the pencil icon and select Notes to open Notes List screen.
Select the hyperlink Add New Misc. Note to add additional notes to the client record
Select the hyperlink Add New Encounter Note to open the encounter screen. This will allow the user to create an encounter for the client
Print Notes
To review clients note, hover over the pencil icon and select Review
Example 16.4
Moving a Client
From the Inpatient Unit Dashboard, hover over the pencil icon and select Move to open Bed Re-Assignment screen.
The user can view all beds (excluding beds from unavailable and inactive rooms) within the selected inpatient unit. User will need to change the Inpatient Unit in the search section and select Go to view available beds in other units.
Sort by selecting the column name hyperlink
The user can view the room details in read-only mode by selecting the room # hyperlink
Client can either be re-assigned to another vacant bed or can swap beds with another client; see section for Current Bed Management for details

9-25-18 v1.1 Page 86 of 190
CHAPTER 17: GROUP LIST
Overview
The Group List feature which consists of Group Session and Group Type was enhanced specifically for ODS Outpatient Group Counseling. To ensure that services delivered in a group session are calculated with the appropriate claim charge amount, the Group module must be used to create encounters for individual participants of the group. There is an indicator field on the Group Session Profile that will generate the rate for either ODS Outpatient or OTP clients during the release to billing process. The Group List module also allows clinicians to easily track clients that are seen in a group setting.
ODS Calculation Change
The DHCS Drug Med-Cal Billing Manual was updated June 2017 to reflect ODS Group changes for Outpatient Service.
Under ODS o Outpatient group services are billed in 15 minute increments o OTP group services are billed in 10 minute increments
SanWITS has a field for travel duration and session duration. Documentation Duration will need to be zero under the Group Session and will need to be documented on the client’s individual encounter.
Questions regarding the Quality Management documentation requirements should be directed to your management staff or BHS QM Specialists at [email protected].
Questions regarding DMC ODS Group size requirements, please refer to the SUDPOH
SanWITS Fields
Each screen contains fields for data that are identified by four different colors.
Bright yellow: system required; can be CalOMS and/or County of San Diego data.
Light yellow: required; can be CalOMS and/or County of San Diego data.
White: non-required.
Grey: non-fillable by the user; either system generated or auto-populated; cannot be changed as is or when case is closed.
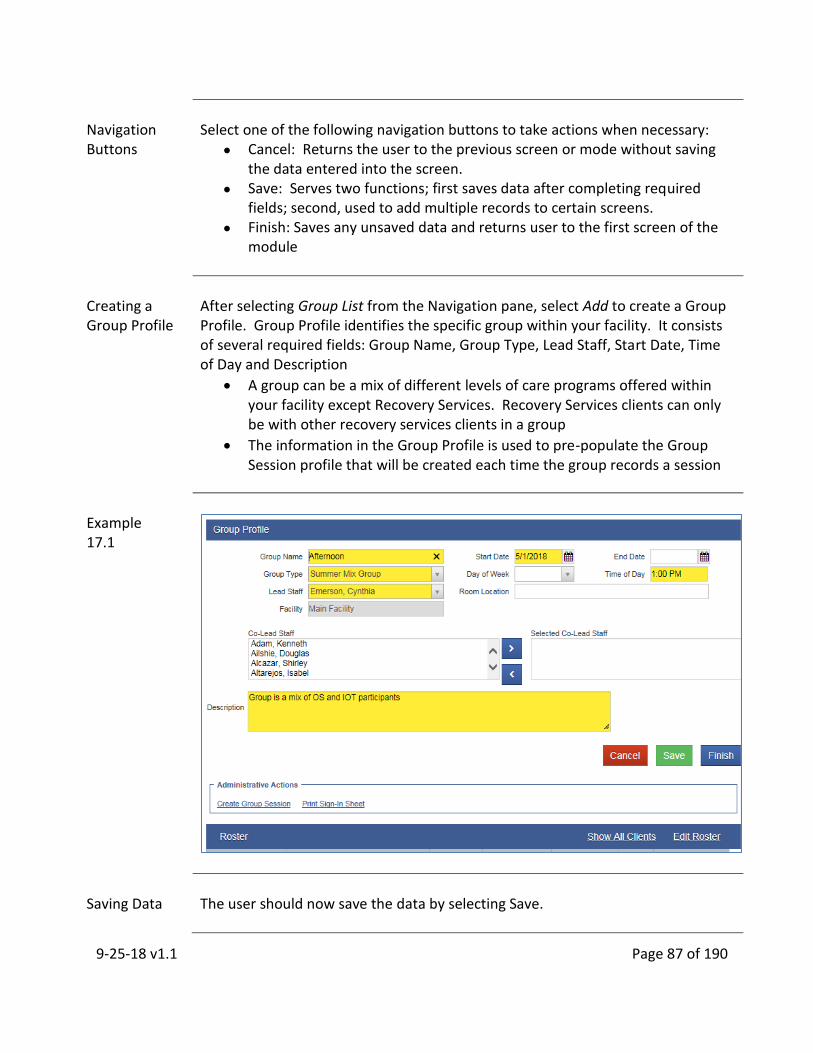
9-25-18 v1.1 Page 87 of 190
Navigation Buttons
Select one of the following navigation buttons to take actions when necessary:
Cancel: Returns the user to the previous screen or mode without saving the data entered into the screen.
Save: Serves two functions; first saves data after completing required fields; second, used to add multiple records to certain screens.
Finish: Saves any unsaved data and returns user to the first screen of the module
Creating a Group Profile
After selecting Group List from the Navigation pane, select Add to create a Group Profile. Group Profile identifies the specific group within your facility. It consists of several required fields: Group Name, Group Type, Lead Staff, Start Date, Time of Day and Description
A group can be a mix of different levels of care programs offered within your facility except Recovery Services. Recovery Services clients can only be with other recovery services clients in a group
The information in the Group Profile is used to pre-populate the Group Session profile that will be created each time the group records a session
Example 17.1
Saving Data
The user should now save the data by selecting Save.
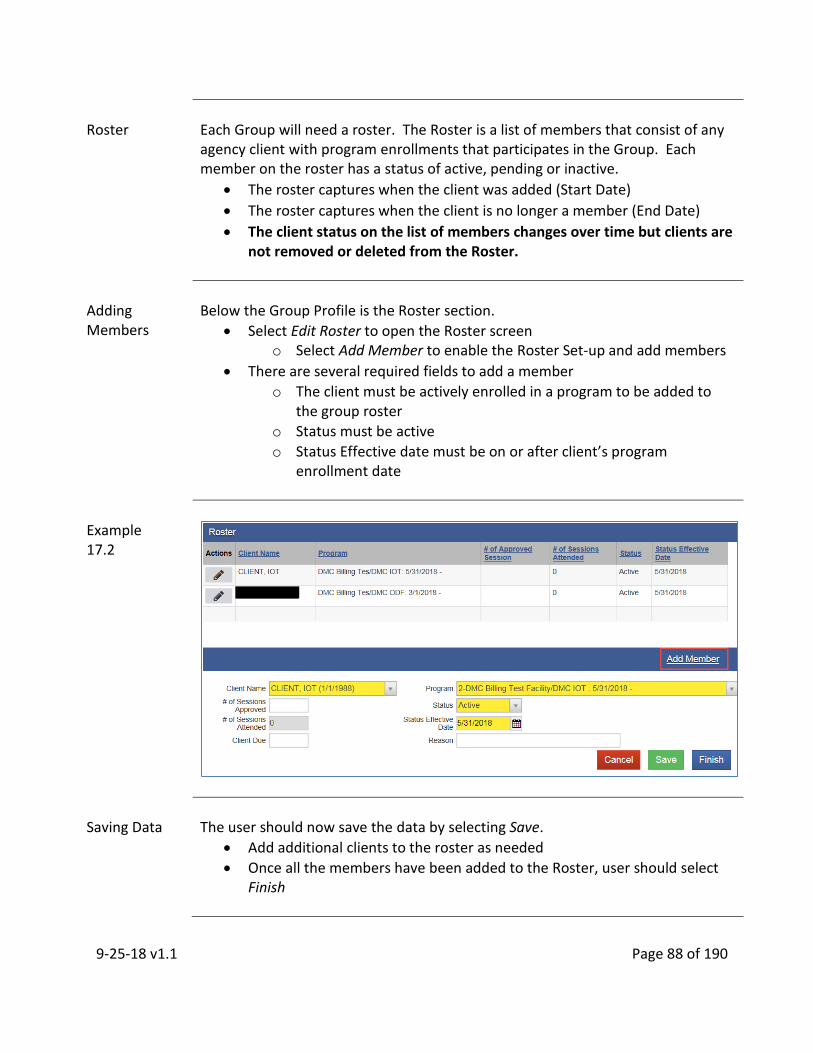
9-25-18 v1.1 Page 88 of 190
Roster
Each Group will need a roster. The Roster is a list of members that consist of any agency client with program enrollments that participates in the Group. Each member on the roster has a status of active, pending or inactive.
The roster captures when the client was added (Start Date)
The roster captures when the client is no longer a member (End Date)
The client status on the list of members changes over time but clients are not removed or deleted from the Roster.
Adding Members
Below the Group Profile is the Roster section.
Select Edit Roster to open the Roster screen o Select Add Member to enable the Roster Set-up and add members
There are several required fields to add a member
o The client must be actively enrolled in a program to be added to the group roster
o Status must be active
o Status Effective date must be on or after client’s program enrollment date
Example 17.2
Saving Data
The user should now save the data by selecting Save.
Add additional clients to the roster as needed
Once all the members have been added to the Roster, user should select Finish

9-25-18 v1.1 Page 89 of 190
Managing Group Roster
From the Group Profile, user can see a view of all the members that includes the Client Name, Program Enrollment Start Date, Client Due, # of Approved Sessions, # of Sessions Attended, Status and Status Effective Date.
List will default to client’s with active status
Sort roster by selecting the column name hyperlink
Select Show All Clients to show all clients regardless of status
Add members or make changes to existing roster by selecting Edit Roster o From the Roster screen, hover over the pencil icon next to the
clients name that needs to be modified and select Review. This will enable the Roster fields for the selected client
o Select the appropriate Status. If client has been discharge, select Inactive
o Status Effective Date should be the date the selected status becomes effective
o Reason field will become required if Inactive is selected as Status
Example 17.3
Saving Data
The user should now save the changes by selecting Save and Finish.
Sign-In Sheet
Under Administrative Actions, select Print Sign-In Sheet as needed for sessions
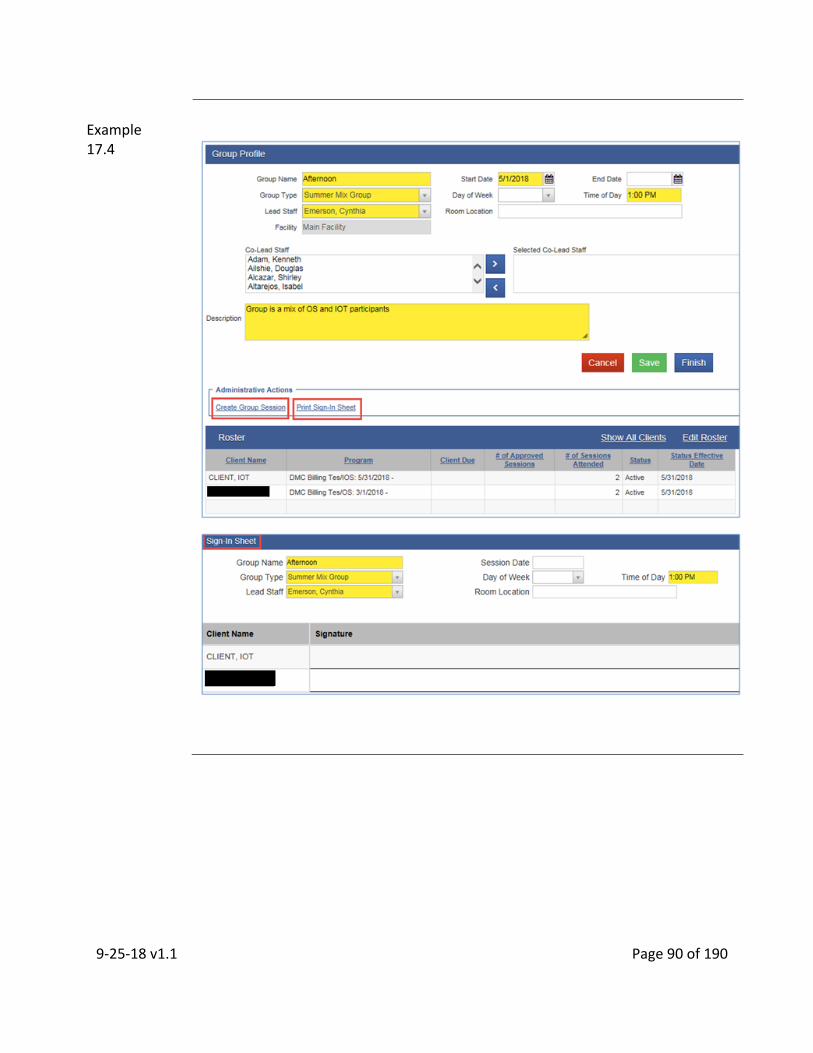
9-25-18 v1.1 Page 90 of 190
Example 17.4

9-25-18 v1.1 Page 91 of 190
Group Session Notes
Group Session Notes are created every time the group meets and the Group Profile is used to pre-populate the Group Name, Group Type, Start Time and list of members. Group Session Notes have several required fields and will pre-populate to the bulk encounters created via Group Session.
Session Note can be edited to describe the events during the group session
When a Session is created, a Session Roster is also created that lists all the active members from the Group Roster.
The Session Roster will be used to track attendance for the session
Billing for Group Session
ODS Group claim charges are calculated differently than pre-ODS.
Group Session billing should always be done via Group module

9-25-18 v1.1 Page 92 of 190
Step 1
Complete the required fields on the Group Session Notes section.
Group Name and Group Type will be read-only and pre-populated from your Group Profile
Note Type should be DMC Billable if any participant in the group is going to be billed to DMC
Billable Field this field should be Yes if any participant will be billed to DMC
Calculate ODS units field will ensure that when individual encounters for the attendees of this session are created, that the claim charge is calculated according to the ODS requirements
o For Opioid Treatment Programs, this field should be No o For Outpatient and Recovery Services Programs, this field should
be Yes and End Time field will become required once Yes is selected
Documentation Duration should be zero. Documentation time will be entered on the client’s individual encounter created via Group List.
Total Duration for Group Session equals Travel Duration plus Session Duration 1. Travel Duration
o For Opioid Treatment Programs, zero must be entered. OTP cannot bill for travel time
o For Outpatient and Recovery Services Programs, travel time should be entered, if applicable. If there is no travel time, zero must be entered. For questions regarding policies for travel, please contact BHS QM Specialists at [email protected].
2. Session Duration is the duration in minutes for the group session
Lead Staff will be the rendering staff
Start Date is the date of the group session
Start Time and End Time is required. When a client is late or left the group session early, the time will be reflected on the client’s individual encounter created via Group List
The # of Service Units/Sessions will always be 1
Select your location
Service o For Outpatient and Opioid Treatment Programs, select *Group
ODS o For Recovery Services Programs, select *Recovery Service Group
Under the Note section, it is not required to save the Group Session Notes but it will be required to create the bulk encounters. This note will be included on the encounters created via Group

9-25-18 v1.1 Page 93 of 190
Example 17.5
Saving Data
The user should now save the data by selecting Save.
Once the Group Session notes is created, it will enable the user to create misc. notes and bulk encounters under the Attendees
Step 2
Select the attendees for the Group Session by placing a check mark next to the client’s name.
Step 3
An action column exists on the Attendees section. There are several action items that can be performed in the attendees section such as Mark as Present, Mark as No Show, Mark as Excused, Create Encounter and Clear Errors.
Next to Perform Action, click on the drop down arrow, select the appropriate action item then select Perform Action
The first action should always be marking the attendees as Present
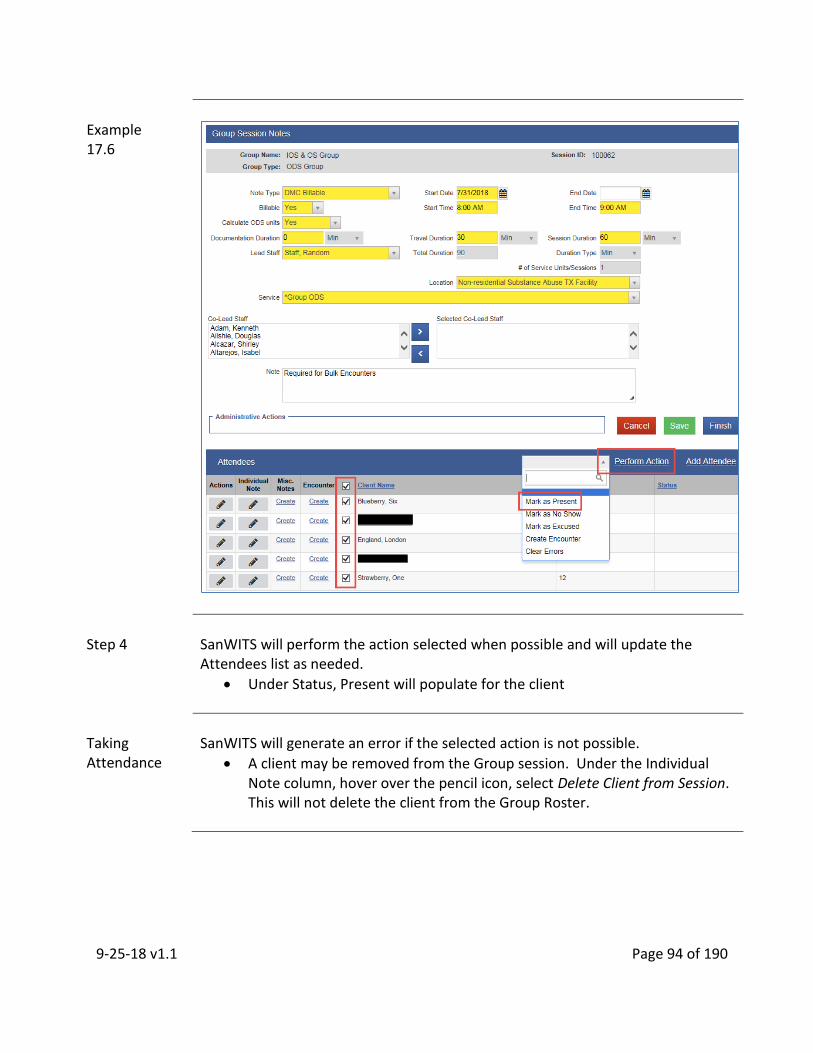
9-25-18 v1.1 Page 94 of 190
Example 17.6
Step 4
SanWITS will perform the action selected when possible and will update the Attendees list as needed.
Under Status, Present will populate for the client
Taking Attendance
SanWITS will generate an error if the selected action is not possible.
A client may be removed from the Group session. Under the Individual Note column, hover over the pencil icon, select Delete Client from Session. This will not delete the client from the Group Roster.

9-25-18 v1.1 Page 95 of 190
Example 17.7
Action Confirmation
SanWITS will ask to confirm that you want to delete. Select Yes.
Clearing an Error
When an error occurs when marking clients as present, click on the hyperlink Error Details to view the error. Once error is fixed or verified, place a check mark next to the client’s name.
Select Clear Errors from the drop down field then click on Perform Action
Example 17.8
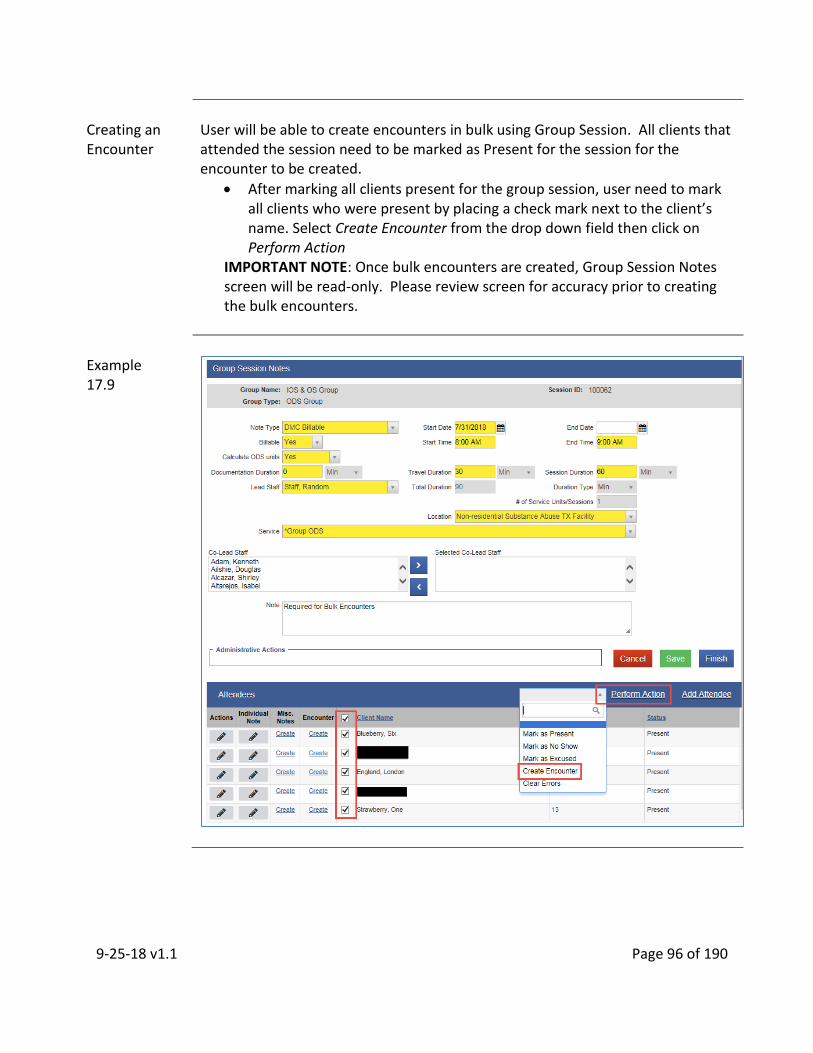
9-25-18 v1.1 Page 96 of 190
Creating an Encounter
User will be able to create encounters in bulk using Group Session. All clients that attended the session need to be marked as Present for the session for the encounter to be created.
After marking all clients present for the group session, user need to mark all clients who were present by placing a check mark next to the client’s name. Select Create Encounter from the drop down field then click on Perform Action
IMPORTANT NOTE: Once bulk encounters are created, Group Session Notes screen will be read-only. Please review screen for accuracy prior to creating the bulk encounters.
Example 17.9

9-25-18 v1.1 Page 97 of 190
Encounter Background Task
As the system generates the encounter notes for each attendee, the screen will display this information message.
Click the refresh link to know when the task is complete
Example 17.10

9-25-18 v1.1 Page 98 of 190
Encounter Created
Once the bulk encounters has been created, under the Encounter column, the hyperlink View will populate for the clients where the bulk encounters were created
Click View to go into the encounter screen
Required fields should be pre-populated based on the Group Session Notes except for the Pregnant/Postpartum field
o No changes should be made to the encounters created via group module with the exceptions listed below. If client falls into one of the criteria listed below, modify encounter as needed
1. If the client is not DMC 2. If the client was late or left the group session early 3. If the language used is different from the preferred
language
Example 17.11
Clearing an Error
When an error occurs during the creation of bulk encounters, click on the hyperlink Error Details to view the error. Once error is fixed or verified, place a check mark next to the client’s name.
Select Clear Errors from the drop down field then click on Perform Action
If an encounter need to be created, place a check mark next to the client’s name, select Create an Encounter from the drop down field, then click on Perform Action.
o The encounter should have the same session ID as the group session notes.
IMPORTANT NOTE: All encounters for the group session will need to be created prior to clicking on Release to Billing on each encounter. For additional assistance on correcting errors, please contact [email protected].
9-25-18 v1.1 Page 99 of 190
CHAPTER 18: ENCOUNTERS
Overview
Encounters are the individual client services that have been delivered and documented within a treatment episode. In the past Encounters only documented DMC billable services. Starting in 2017, the County required all client services, be documented with Encounters.
Before an Encounter can be created, the Program Enrollment must be completed.
Data entry for encounters should be completed on a daily basis.
SanWITS Fields
Each screen contains fields for data that are identified by four different colors.
Bright yellow: system required; can be CalOMS and/or County of San Diego data.
Light yellow: required; can be CalOMS and/or County of San Diego data.
White: non-required.
Grey: non-fillable by the user; either system generated or auto-populated; cannot be changed as is or when case is closed.
Navigation Buttons
Use the arrow button to move from screen to screen through the Encounters. Select one of the following navigation buttons to take actions when necessary:
Cancel: Returns the user to the previous screen or mode without saving the data entered into the screen.
Save: Serves two functions; first saves data after completing required fields; second, used to add multiple records to certain screens.
Finish: Saves any unsaved data and returns user to the first screen of the module or Activity List.
Encounter Screens
The Encounter section has required and optional screens to be completed:
CalOMS required: N/A
County of San Diego required: Profile/Encounter
Medi-Cal required: Profile/Encounter
Not required but recommended: Encounter Note and Services/Ancillary Services Rendered
Not currently in use: N/A
For viewing only: Encounter Search/Encounter List/Add Encounter

9-25-18 v1.1 Page 100 of 190
Getting Started
The first screen in the Encounters section is Encounter Search / Encounter List / Add Encounter. Select Encounters from the navigation pane to open the screen.
Encounter Start Date field defaults to one year prior to the current date in the Encounters Search section.
Adjust the date range to reflect the previously entered Encounters.
New clients should have no information in this screen.
Select the hyperlink Add Encounter to start the process.
Example 18.1
Encounter Profile
The Profile screen is next in the Encounter process. There are several required fields.

9-25-18 v1.1 Page 101 of 190
Example 18.2
Note Type
The Note Type field has four available values.
DMC Billable: Used to document services that will be billed to DMC
County Billable: Used to document services that will be billed to the County
Bed Management Census Note: Used to document residential bed days created via census and will need to be changed to DMC Billable, County Billable or Non Billable
Non Billable: Used to document services that are not billable to DMC or the County

9-25-18 v1.1 Page 102 of 190
Service
The Service field has several acceptable values. The same Service cannot be billed on the same day. Different Service can be billed on the same day. Questions regarding which Service to select should be directed to your facility staff.
Non billable services are identified with Note Type as Non billable and Billable field as No.
Group Session ID
The Group Session ID field is read-only and is used when an encounter is created from the Group Session bulk encounters. This field will be used during the billing process.
Census ID
The Census ID field is read-only and is used when an encounter is created from Residential Unit Census.
Start Date and End Date
The Start Date field is a required field and the End Date field is optional except for OTP dosing. All services cannot span multiple dates, the best practice would be to enter the End Date
For Opioid Treatment Programs, dosing can be billed in consecutive days with the same National Drug Code (NDC) number. An end date is required to bill for consecutive days and should be end dated by the close of the month.
Start Time and End Time
The Start Time and End Time are not required fields.
Group Services - For encounters created via group module, start time and end time will be pre populated to match the group session
o If client came late or left early, the start time and/or end time will need to be corrected along with the session duration on the individual’s encounter

9-25-18 v1.1 Page 103 of 190
Total Duration (All encounters except Residential Bed Day encounters via census)
The Total Duration field is a read only field based on the sum of Travel Duration, Documentation Duration and Session Duration. This field exists on all encounters except for Residential Bed Day and Dosing. Duration will need to be entered in minutes.
1. Travel Duration – enter time in minutes, if applicable. If there is no travel time, zero must be entered.
o For encounters created via Group Session, this field will pre-populated from the Group Session Notes
o For Opioid Treatment Programs, enter zero. OTP cannot bill for travel
2. Documentation Duration – enter time in minutes, if applicable. If there is no documentation time, zero must be entered
o For encounters created via Group Session, this field will pre-populated as zero from the Group Session Notes. Modify as needed for each individual client
o For Opioid Treatment Programs, enter zero. OTP cannot bill for documentation
3. Session Duration – enter time in minutes
o For encounters created via Group Session, this field will pre-populate from Group Session Notes and will need to be modified if the client came late or left early
Duration (Residential Bed Day and Dosing)
The Duration field is not required for Residential Bed Day and Dosing services and should be left blank.
Contact Type
The Contact Type field is required and has five acceptable values
No Show
Face to Face
Phone
Telehealth
No Contact
Special Indicator
The Pregnant/Postpartum field is a special indicator for reporting purposes.
Select Yes, if applicable
9-25-18 v1.1 Page 104 of 190
# of Service Units
The # of Service Units/Sessions field is a read only field except for dosing.
For dosing, the # of Service Units/Sessions should reflect the nunmber of consecutive days that the user is billing
Visit Type
The Visit Type field corresponds with the Service field. This means that the acceptable values for Visit Type changes depending on the type of Service selected.
For questions regarding Visit Type, please contact the QM Help Desk at: [email protected]
Medi-Cal Billable
This field is the indicator for whether an Encounter is Medi-Cal billable or not. This field is logically linked to the client’s DMC Payor Group Enrollment
If the Payor-Type is Medi-Cal, the Medi-Cal Billable field in the Encounter screen will default to blank.
If the Payor-Type is anything other than Medi-Cal or no Payor Group Enrollment, the Medi-Cal Billable field in the Encounter screen will not be visible.
DMC Billable: the user must make sure the field indicates “Yes” except for Residential Bed Day encounters, this field should say “No”
County Billable and Nonbillable: the user must make sure the field says “No”.
Interpreter
The Interpreter field is a required field and has three acceptable values available in the drop-down menu:
No Interpreter Needed
Yes – Internal
Yes – External
Language
The Language field is a required field and is prepopulated from the Client Profile screen. This field can be modified by selecting acceptable values available in the drop-down menu.
9-25-18 v1.1 Page 105 of 190
Evidence-Based Practices
The Evidence-Based Practices field is a required field and has four acceptable values available:
None
Motivational Interviewing
Relapse Prevention
Other
For Residential Bed Day encounters created via census, this will default to None. Modify as needed.
Diagnosis
The diagnosis field is a read only field and is required to release to billing.
The diagnosis will need to be entered via Admissions to pre-populate on the encounters
Rendering Staff
The rendering staff is the staff who provided the service. Rendering staff will need to have a valid National Provider Identifier (NPI).
If your rendering staff is not listed on the drop down list, please contact [email protected]
For Residential Bed Day encounters, the rendering staff could be any staff with a valid NPI

9-25-18 v1.1 Page 106 of 190
Encounter Note
The Encounter Note is the next screen in the Encounter. Currently this screen is not required.
The Encounter Note can be used to document the client’s progress with treatment plan goals, objectives and interventions.
The Encounter Note can also be used to document notes regarding the services provided to the client identified in the Encounter.
Example 18.3
Administrative Actions
The final step for Encounters includes selecting an acceptable Administrative Action. The options available will change depending on the Billable field in the Encounter. This is why it is important to save the Encounter prior to selecting an Administrative Action to ensure the correct options are visible.
Example 18.4
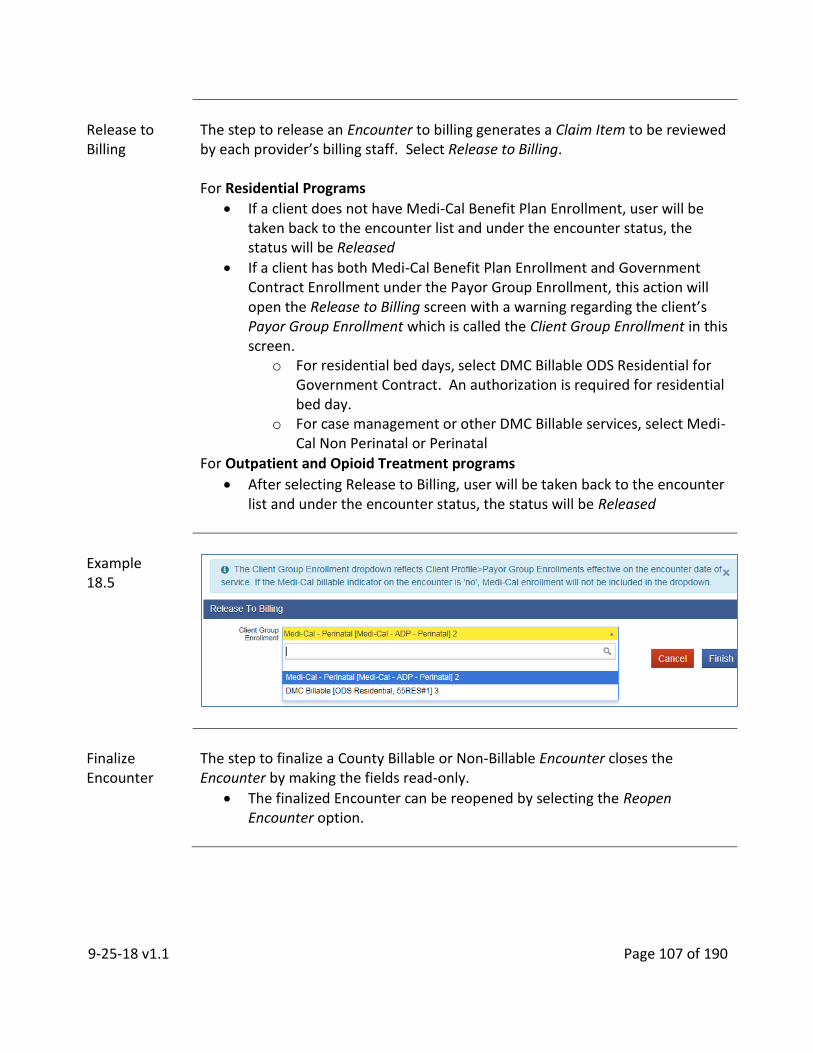
9-25-18 v1.1 Page 107 of 190
Release to Billing
The step to release an Encounter to billing generates a Claim Item to be reviewed by each provider’s billing staff. Select Release to Billing. For Residential Programs
If a client does not have Medi-Cal Benefit Plan Enrollment, user will be taken back to the encounter list and under the encounter status, the status will be Released
If a client has both Medi-Cal Benefit Plan Enrollment and Government Contract Enrollment under the Payor Group Enrollment, this action will open the Release to Billing screen with a warning regarding the client’s Payor Group Enrollment which is called the Client Group Enrollment in this screen.
o For residential bed days, select DMC Billable ODS Residential for Government Contract. An authorization is required for residential bed day.
o For case management or other DMC Billable services, select Medi-Cal Non Perinatal or Perinatal
For Outpatient and Opioid Treatment programs
After selecting Release to Billing, user will be taken back to the encounter list and under the encounter status, the status will be Released
Example 18.5
Finalize Encounter
The step to finalize a County Billable or Non-Billable Encounter closes the Encounter by making the fields read-only.
The finalized Encounter can be reopened by selecting the Reopen Encounter option.

9-25-18 v1.1 Page 108 of 190
Example 18.6
Encounter List
After selecting Finish for Finalize Encounter, the user will return to the Encounter List screen where the status of the released and finalized encounters can be verified.
Released: Billable, finalized
Not Released: Billable and Non-billable, not finalized
Non Billable: Non-billable, finalized

9-25-18 v1.1 Page 109 of 190
Example 18.7
Billing Staff
The Release to Billing process is complete for the billing staff to now review each claim item outlined in Chapter 22.
Generate Report
The header contains a hyperlink Generate Report which allows the user to produce a report from the current screen or module.

9-25-18 v1.1 Page 110 of 190
CHAPTER 19: ANNUAL UPDATES
Overview
The annual update is the second data collection point for CalOMS treatment data. Data collected in the annual update is very similar to the data collected during the admission.
Data Collection
The Annual Update has several required CalOMS fields. Data used to create the Annual Update should be obtained directly from the client.
The CalOMS Annual Update Form can be used to collect information from the client.
The paper CalOMS Annual Update Form follows the same layout as the SanWITS screens for Annual Update.
Refer to the CalOMS TX Data Collection Guide regarding acceptable values for each field.
SanWITS Fields
Each screen contains fields for data that are identified by four different colors.
Bright yellow: system required; can be CalOMS and/or County of San Diego data.
Light yellow: required; can be CalOMS and/or County of San Diego data.
White: non-required.
Grey: non-fillable by the user; either system generated or auto-populated; cannot be changed as is or when case is closed.
Navigation Buttons
Use the arrow button to move from screen to screen through the Annual Update. Select one of the following navigation buttons to take actions when necessary:
Cancel: Returns the user to the previous screen or mode without saving the data entered into the screen.
Save: Serves two functions; first saves data after completing required fields; second, used to add multiple records to certain screens.
Finish: Saves any unsaved data and returns user to the first screen of the module or Activity List.

9-25-18 v1.1 Page 111 of 190
Guidelines
CalOMS Treatment data must be submitted by the County to DHCS for each client annually.
Annual updates are required for clients in treatment for eleven months or more, continuously in one provider and one service modality with no break in services exceeding 30 days.
The annual update may be completed as early as 60 days prior to the admission anniversary date but no later than 30 days from the participant’s admission anniversary date.
There must be matching admission for the client prior to submitting any annual update data.
Annual updates should be completed only if the record is open and the client is still in treatment.
Do not complete an annual update on a client that has been discharged or is no longer in treatment.
A SanWITS alert is set for any client with an open admission date of 335 days when there is no annual update; this is to alert users of pending annual updates.
The alert will be visible from the SanWITS Home Page to all staff with the role “Clinical (Full Access)”.
Methods
There are two ways to initiate the annual update. First is via the Alert List on the Home Page. Second is by searching for the client and taking action on the active episode.
Alert List Method
To respond to the annual update alert, hover over the pencil icon and click on the Review hyperlink that corresponds with the client record you want to update.
The user will then be in the client’s CalOMS Annual Update/Follow-up List.
The user must select the hyperlink Add New Annual Update Record to begin the process.
Once the update is completed, the client will be removed from the alert list immediately.
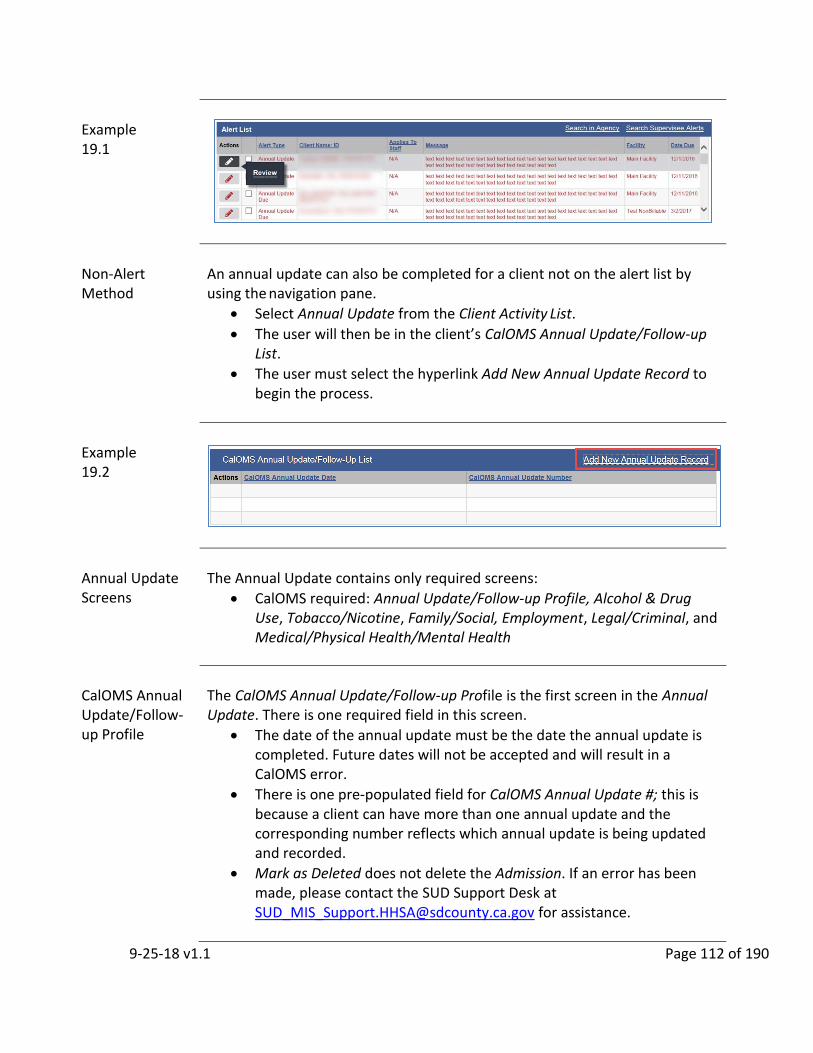
9-25-18 v1.1 Page 112 of 190
Example 19.1
Non-Alert Method
An annual update can also be completed for a client not on the alert list by using the navigation pane.
Select Annual Update from the Client Activity List.
The user will then be in the client’s CalOMS Annual Update/Follow-up List.
The user must select the hyperlink Add New Annual Update Record to begin the process.
Example 19.2
Annual Update Screens
The Annual Update contains only required screens:
CalOMS required: Annual Update/Follow-up Profile, Alcohol & Drug Use, Tobacco/Nicotine, Family/Social, Employment, Legal/Criminal, and Medical/Physical Health/Mental Health
CalOMS Annual Update/Follow-up Profile
The CalOMS Annual Update/Follow-up Profile is the first screen in the Annual Update. There is one required field in this screen.
The date of the annual update must be the date the annual update is completed. Future dates will not be accepted and will result in a CalOMS error.
There is one pre-populated field for CalOMS Annual Update #; this is because a client can have more than one annual update and the corresponding number reflects which annual update is being updated and recorded.
Mark as Deleted does not delete the Admission. If an error has been made, please contact the SUD Support Desk at [email protected] for assistance.

9-25-18 v1.1 Page 113 of 190
Example 19.3
Alcohol & Drug Use
The Alcohol & Drug Use screen follows the CalOMS Annual Update/Follow-up Profile screen. There are several required fields. Data used to create the Annual Update should be obtained directly from the client.
If the paper CalOMS Annual Update Form was used to gather information from the client, use the completed form to answer the questions in this screen.
Refer to the CalOMS TX Data Collection Guide regarding acceptable values for each field.
Example 19.4
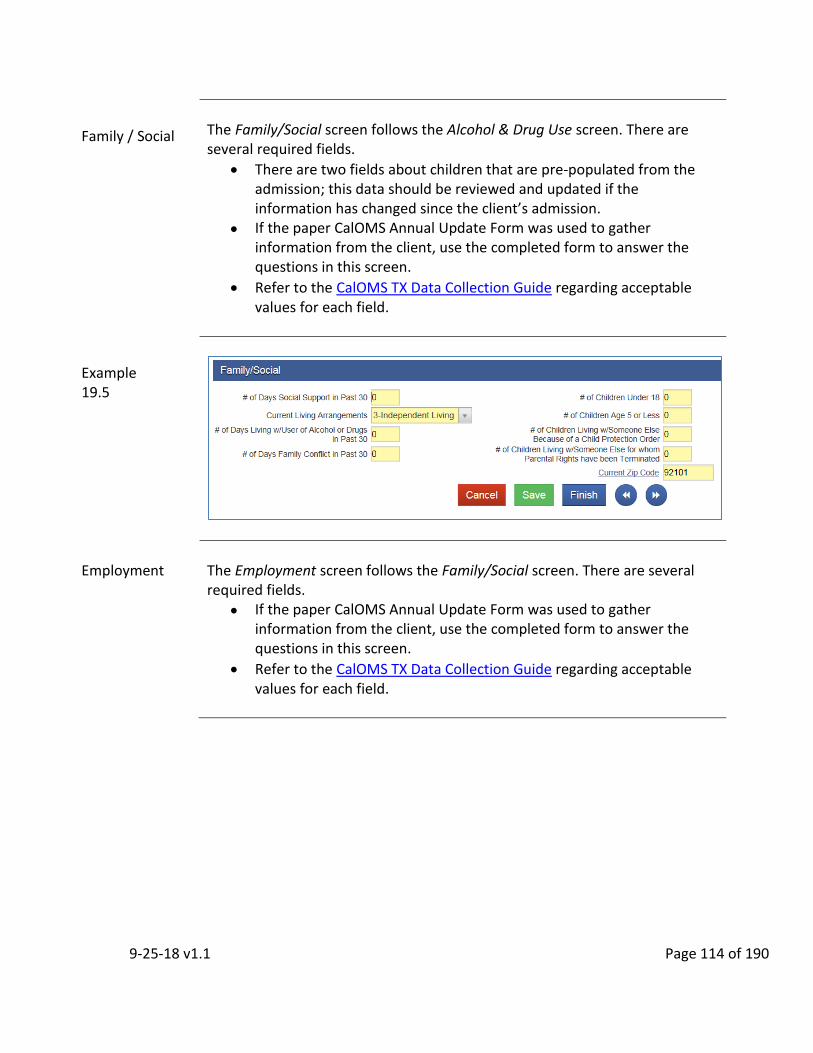
9-25-18 v1.1 Page 114 of 190
Family / Social
The Family/Social screen follows the Alcohol & Drug Use screen. There are several required fields.
There are two fields about children that are pre-populated from the admission; this data should be reviewed and updated if the information has changed since the client’s admission.
If the paper CalOMS Annual Update Form was used to gather information from the client, use the completed form to answer the questions in this screen.
Refer to the CalOMS TX Data Collection Guide regarding acceptable values for each field.
Example 19.5
Employment
The Employment screen follows the Family/Social screen. There are several required fields.
If the paper CalOMS Annual Update Form was used to gather information from the client, use the completed form to answer the questions in this screen.
Refer to the CalOMS TX Data Collection Guide regarding acceptable values for each field.

9-25-18 v1.1 Page 115 of 190
Example 19.6
Legal / Criminal
The Legal/Criminal screen follows the Employment screen. There are several required fields.
If the paper CalOMS Annual Update Form was used to gather information from the client, use the completed form to answer the questions in this screen.
Refer to the CalOMS TX Data Collection Guide regarding acceptable values for each field.
Example 19.7
Medical/ Physical Health/ Mental Health
Finally the Medical/Physical Health/Mental Health screen is the last required screen to complete the Annual Update. There are several required fields on this screen.
If the paper CalOMS Annual Update Form was used to gather information from the client, use the completed form to answer the questions in this screen.
Refer to the CalOMS TX Data Collection Guide regarding acceptable values for each field.
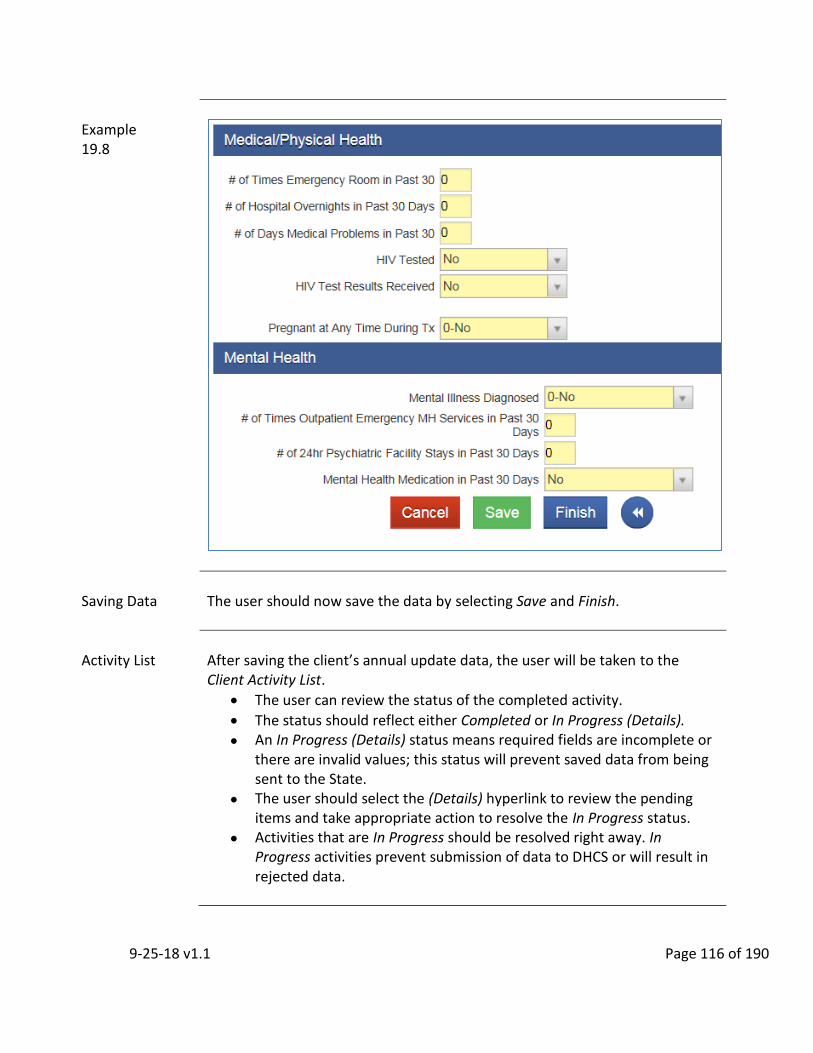
9-25-18 v1.1 Page 116 of 190
Example 19.8
Saving Data
The user should now save the data by selecting Save and Finish.
Activity List
After saving the client’s annual update data, the user will be taken to the Client Activity List.
The user can review the status of the completed activity.
The status should reflect either Completed or In Progress (Details).
An In Progress (Details) status means required fields are incomplete or there are invalid values; this status will prevent saved data from being sent to the State.
The user should select the (Details) hyperlink to review the pending items and take appropriate action to resolve the In Progress status.
Activities that are In Progress should be resolved right away. In Progress activities prevent submission of data to DHCS or will result in rejected data.

9-25-18 v1.1 Page 117 of 190
Example 19.9
Record Status
Once the required fields are complete with valid values, the saved data is then ready to send to the State in the next upload. SanWITS data is sent to the State via electronic uploads at least once a month. There is nothing the user needs to do for this process.
Check Record Status
To check the status of an annual update record, the user will need to review the first screen of the Annual Update, CalOMS Annual Update/Follow-up Profile screen. The Record Status box provides information regarding staff who
created/updated the record, date the record was created/updated, form serial number of the record, and date it was last uploaded to the State.
CalOMS Form Serial Number is also known as the FSN. This field is pre-populated by SanWITS using a unique string of alpha-numerical characters. The Form Serial Number identifies the client record with the State. If changes are made to the record, the data will be sent to the State and matched by the Form Serial Number. When a client’s annual update and/or discharge record is sent to the State, the record will match up with the admission record based on the Form Serial Number.
If the field for Last Upload to State Date is blank, there has not been an upload of this record.
If the field for Last Upload to State Date is populated with a date prior to the Last Updated Date, there has not been an upload since the last date the record was changed/updated.
If the field for Last Upload to State Date is populated with a date on or after the Last Updated Date, the record/data has been sent to the State.

9-25-18 v1.1 Page 118 of 190
Example 19.10
Generate Report
The header contains a hyperlink Generate Report which allows the user to produce a report from the current screen or module.

9-25-18 v1.1 Page 119 of 190
CHAPTER 20: DISCHARGING AND CLOSING AN EPISODE
Overview
In this chapter we will focus on the third and final CalOMS data collection point for clients, Discharge. Like the Admission, the Discharge process serves two functions: discharging the client from a treatment facility and closing a CalOMS episode.
Data Collection
The Discharge has several required CalOMS fields. Data used to create the Discharge should be obtained directly from the client.
The CalOMS Discharge Form can be used to collect information from the client.
The paper CalOMS Discharge Form follows the same layout as the SanWITS screens for Discharge.
Refer to the CalOMS TX Data Collection Guide regarding acceptable values for each field.
SanWITS Fields
Each screen contains fields for data that are identified by four different colors.
Bright yellow: system required; can be CalOMS and/or County of San Diego data.
Light yellow: required; can be CalOMS and/or County of San Diego data.
White: non-required.
Grey: non-fillable by the user; either system generated or auto-populated; cannot be changed as is or when case is closed.
Navigation Buttons
Use the arrow button to move from screen to screen through the Discharge. Select one of the following navigation buttons to take actions when necessary:
Cancel: Returns the user to the previous screen or mode without saving the data entered into the screen.
Save: Serves two functions; first saves data after completing required fields; second, used to add multiple records to certain screens.
Finish: Saves any unsaved data and returns user to the first screen of the module or Activity List.
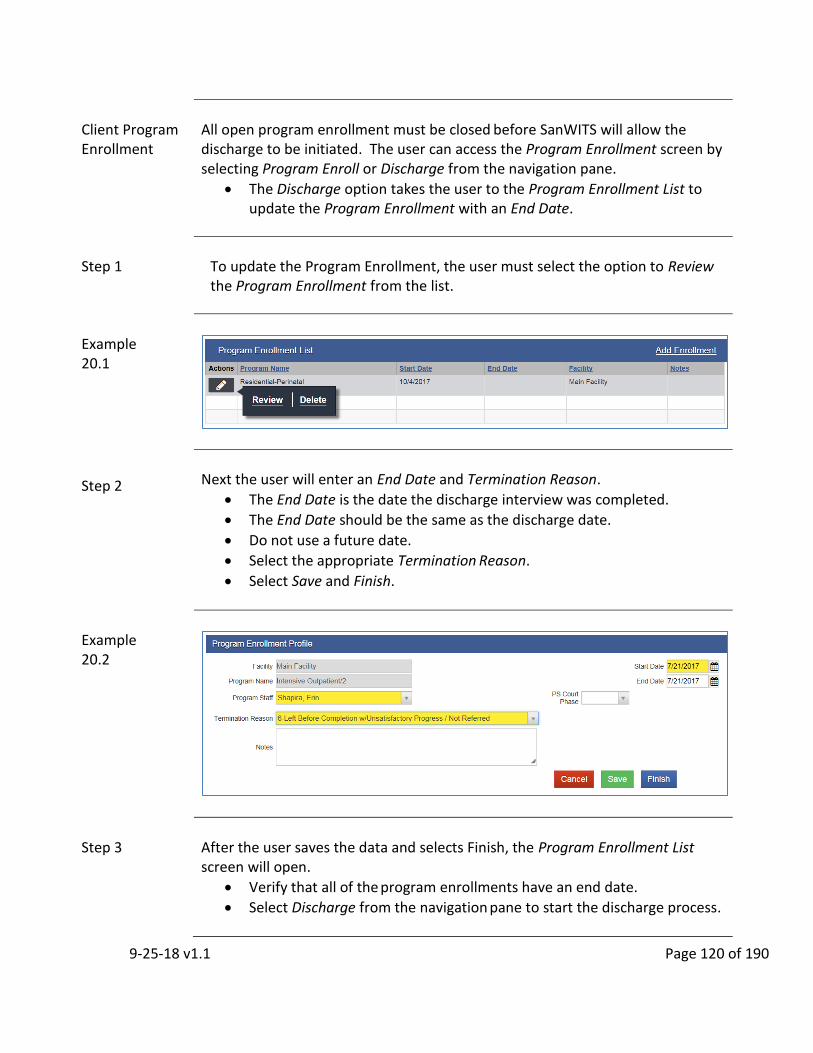
9-25-18 v1.1 Page 120 of 190
Client Program Enrollment
All open program enrollment must be closed before SanWITS will allow the discharge to be initiated. The user can access the Program Enrollment screen by selecting Program Enroll or Discharge from the navigation pane.
The Discharge option takes the user to the Program Enrollment List to update the Program Enrollment with an End Date.
Step 1
To update the Program Enrollment, the user must select the option to Review the Program Enrollment from the list.
Example 20.1
Step 2
Next the user will enter an End Date and Termination Reason.
The End Date is the date the discharge interview was completed.
The End Date should be the same as the discharge date.
Do not use a future date.
Select the appropriate Termination Reason.
Select Save and Finish.
Example 20.2
Step 3
After the user saves the data and selects Finish, the Program Enrollment List screen will open.
Verify that all of the program enrollments have an end date.
Select Discharge from the navigation pane to start the discharge process.

9-25-18 v1.1 Page 121 of 190
Example 20.3
Discharge Protocols and Data Collection
Discharge information must be collected for all clients regardless of discharge status.
There are a number of possible circumstances that prevent conducting a discharge interview to collect required data.
Refer to the CalOMS TX Data Collection Guide for protocols and instruction for each discharge status and required data to collect for each status
Discharge Screens
The Discharge section only contains required screens.
CalOMS required: Admission Profile, Admission Administration, Alcohol & Drug Use, Tobacco/Nicotine, Family/Social, Employment, Legal/Criminal, and Medical/Physical Health/Mental Health, Program Enroll
Discharge Profile
The Discharge Profile screen is the first screen in the Discharge. There are several required fields that need to be completed.
The Discharge Date is the date the discharge interview was completed.
The Discharge Date will pre-populate based on the End Date of the Program Enrollment.
The Discharge Status definitions and sample scenarios should be reviewed in the CalOMS TX Data Collection Guide prior to selecting an appropriate discharge status.
Mark as Deleted does not delete the Discharge. If an error has been made, please contact the SUD Support Desk at [email protected] for assistance.
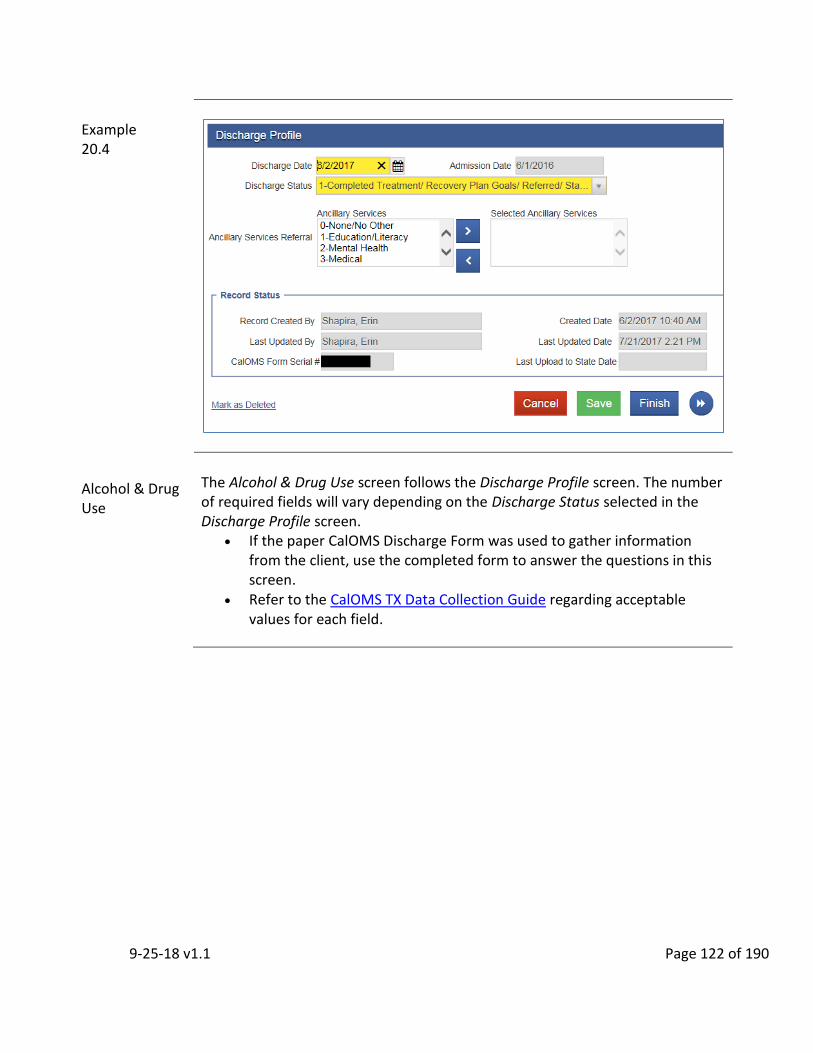
9-25-18 v1.1 Page 122 of 190
Example 20.4
Alcohol & Drug Use
The Alcohol & Drug Use screen follows the Discharge Profile screen. The number of required fields will vary depending on the Discharge Status selected in the Discharge Profile screen.
If the paper CalOMS Discharge Form was used to gather information from the client, use the completed form to answer the questions in this screen.
Refer to the CalOMS TX Data Collection Guide regarding acceptable values for each field.
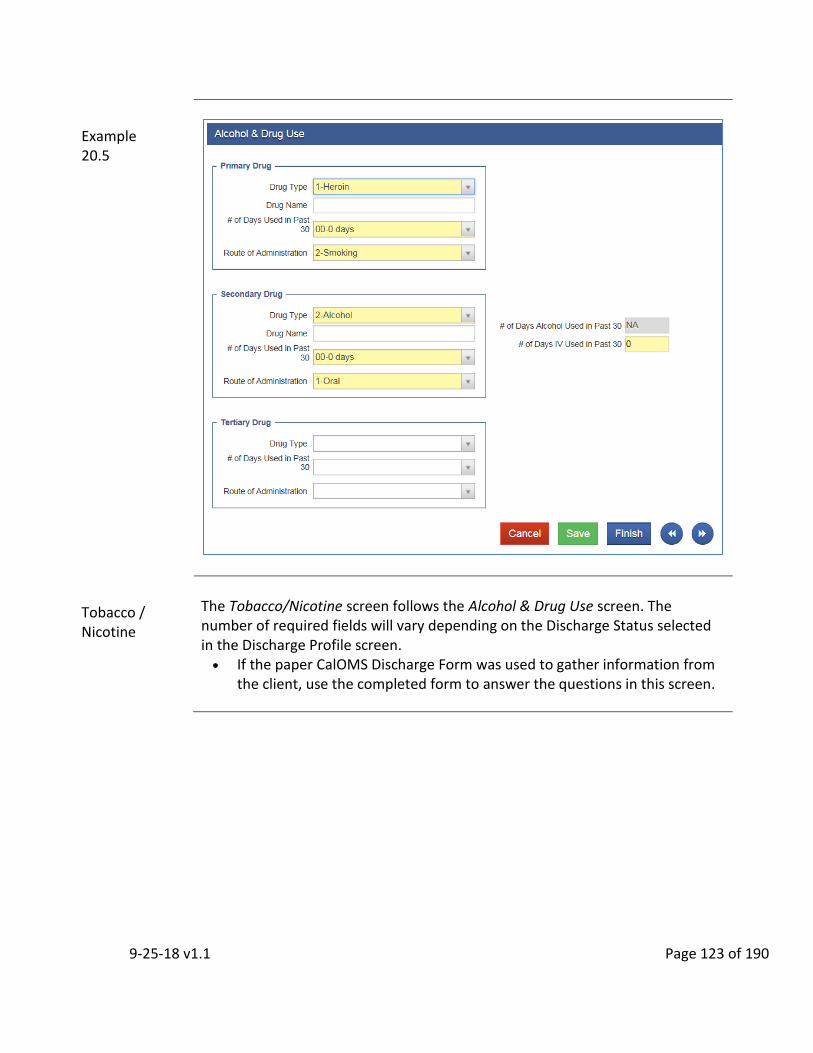
9-25-18 v1.1 Page 123 of 190
Example 20.5
Tobacco / Nicotine
The Tobacco/Nicotine screen follows the Alcohol & Drug Use screen. The number of required fields will vary depending on the Discharge Status selected in the Discharge Profile screen. If the paper CalOMS Discharge Form was used to gather information from
the client, use the completed form to answer the questions in this screen.

9-25-18 v1.1 Page 124 of 190
Example 20.6
Family / Social
The Family/Social screen follows the Tobacco/Nicotine screen. The number of required fields will vary depending on the Discharge Status selected in the Discharge Profile screen.
If the paper CalOMS Discharge Form was used to gather information from the client, use the completed form to answer the questions in this screen.
Refer to the CalOMS TX Data Collection Guide regarding acceptable values for each field.
Example 20.7

9-25-18 v1.1 Page 125 of 190
Employment
The Employment screen follows the Family/Social screen. The number of required fields will vary depending on the Discharge Status selected in the Discharge Profile screen.
If the paper CalOMS Discharge Form was used to gather information from the client, use the completed form to answer the questions in this screen.
Refer to the CalOMS TX Data Collection Guide regarding acceptable values for each field.
Example 20.8
Legal / Criminal
The Legal/Criminal screen follows the Employment screen. The number of required fields will vary depending on the Discharge Status selected in the Discharge Profile screen.
If the paper CalOMS Discharge Form was used to gather information from the client, use the completed form to answer the questions in this screen.
Refer to the CalOMS TX Data Collection Guide regarding acceptable values for each field.
Example 20.9

9-25-18 v1.1 Page 126 of 190
Medical/ Physical Health/Mental Health
Finally, the Medical/Physical Health/Mental Health screen follows the Legal/Criminal screen and is the last required screen to complete the Discharge. The number of required fields will vary depending on the Discharge Status selected in the Discharge Profile screen.
There is one field that is read-only, Pregnant at Admission; this field is pre-populated from the Intake screen.
If the paper CalOMS Discharge Form was used to gather information from the client, use the completed form to answer the questions in this screen.
Refer to the CalOMS TX Data Collection Guide regarding acceptable values for each field.
Example 20.10

9-25-18 v1.1 Page 127 of 190
Saving Data
The user should now save the data by selecting Save and Finish.
SanWITS will now advise the user that the client is discharged and ask if the case should also be closed. Select Yes.
When the State accepts the discharge, the CalOMS record is closed.
Example 20.11
Activity List
After saving the client’s discharge data and closes the case, the user will be taken to the Client Activity List.
The user can review the status of the completed activity. The status should reflect either Completed or In Progress (Details). An In Progress (Details) status means required fields are incomplete or
there are invalid values; this status will prevent saved data from being sent to the State.
The user should select the (Details) hyperlink to review the pending items and take appropriate action to resolve the In Progress status.
Activities that are In Progress should be resolved right away. In Progress activities prevent submission of data to DHCS or will result in rejected data.
Example 20.12

9-25-18 v1.1 Page 128 of 190
Record Status
Once the required fields are complete with valid values, the saved data is then ready to send to the State in the next upload. SanWITS data is sent to the State via electronic uploads at least once a month. There is nothing the user needs to do for this process.
Check Status
To check the status of a Discharge record, the user will need to review the first screen of the Discharge, Discharge Profile screen.
To check the status of a Discharge record, the user will need to review the first screen of the Discharge, the Discharge Profile.
The Record Status box provides information regarding staff who created/updated the record, date the record was created/updated, form serial number of the record, and date it was last uploaded to the State.
CalOMS Form Serial Number is also known as the FSN. This field is pre-populated by SanWITS using a unique string of alpha-numerical characters. The Form Serial Number identifies the client record with the State. If changes are made to the record, the data will be sent to the State and matched by the Form Serial Number. When a client’s annual update and/or discharge record is sent to the State, the record will match up with the admission record based on the Form Serial Number.
If the field for Last Upload to State Date is blank, there has not been an upload of this record.
If the field for Last Upload to State Date is populated with a date prior to the Last Updated Date, there has not been an upload since the last date the record was changed/updated.
If the field for Last Upload to State Date is populated with a date on or after the Last Updated Date, the record/data has been sent to the State.

9-25-18 v1.1 Page 129 of 190
Example 20.13
Closed Case
When the case is closed, the fields will be grey and read-only.
Generate Report
The header contains a hyperlink Generate Report which allows the user to produce a report from the current screen or module.
9-25-18 v1.1 Page 130 of 190
CHAPTER 21: CALOMS ERRORS This chapter will define CalOMS errors, explain the Error Report, provide tips to prevent creating an error, and give a step-by-step instruction for correcting the most common errors. CalOMS errors are generated when erroneous data is sent from SanWITS to the State’s data system, CalOMS. After the data has been uploaded to the State an Error Submission Detail Report is generated. The errors are then sent out to our providers to be reviewed and corrected within 2 weeks from the receipt date. Once the corrections have been made, the providers are required to reply to the CalOMS Error report email notifying the County that the errors have been corrected. In some cases, modifications have been made to SanWITS to prevent data entry that result in errors. While future errors may be prevented, old errors must still be fixed.
How to Read the Error Report
Overview
The Error Report is an Excel spreadsheet that contains the following column headings: Provider ID, Status, Report Month, Type of Form, Transaction Date, Form Serial Number, and Provider’s Participant ID.
Provider ID
The Provider Identification Number is a six-digit number consisting of a two- digit county code and a four-digit facility identification number.
Status
This column describes the action taken by the State’s CalOMS to the record submitted. “Rejected” means that the record was not accepted and incorporated into the State’s CalOMS system and must be corrected before it will be accepted.
Report Month
This is the month that the action (admission, annual update, or discharge) was effective based on the date entered by the provider.
9-25-18 v1.1 Page 131 of 190
Type of Form
This information describes the type of transaction being reported and must be included in each record submitted to the State. There are nine possible entries to report the type of form, three pertaining to admission, three pertaining to discharges, and three pertaining to annual update: The allowable values for type of form are: 1– Admission 2– Resubmission of admission 3– Deletion of admission 4– Discharge 5– Resubmission of Discharge 6– Deletion of discharge 7– Annual Update 8– Resubmission of annual update 9– Deletion of annual update
Transaction Date
This was the date and time the County submitted the transaction to the State’s CalOMS system. The transaction date and time includes month, day, year, hour, minute, and seconds.
Form Serial Number
Form serial numbers can be 8 characters in length and is generated by SanWITS automatically as an identifier for each record. This number can be used to locate the record on SanWITS for correction.
Provider’s Participant ID
This number is the client identification number automatically created by SanWITS. It is based on the first initial, last initial, gender code, and participant’s date of birth. Enter this number in the Client ID field of the Client List screen to search for this specific record in SanWITS.
Errors
Errors for each record are listed in the rows immediately below the Provider ID number and continue until the next Provider ID number is listed.

9-25-18 v1.1 Page 132 of 190
Example 21.1
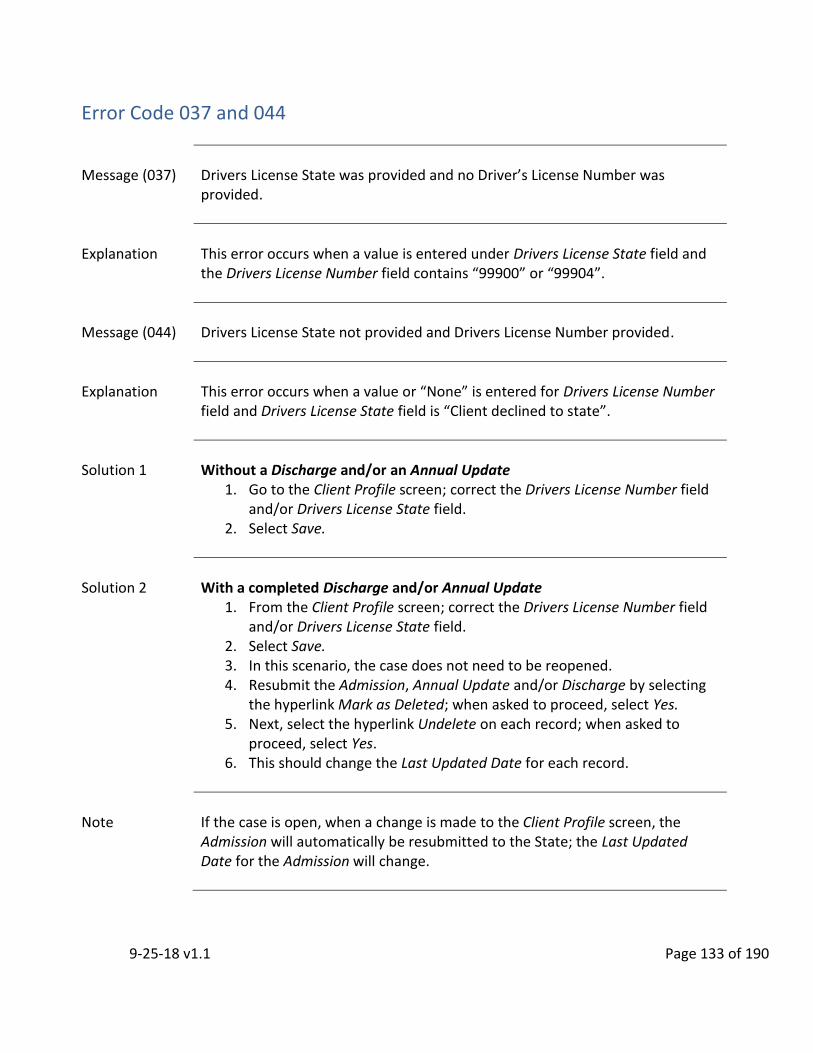
9-25-18 v1.1 Page 133 of 190
Error Code 037 and 044
Message (037)
Drivers License State was provided and no Driver’s License Number was provided.
Explanation
This error occurs when a value is entered under Drivers License State field and the Drivers License Number field contains “99900” or “99904”.
Message (044)
Drivers License State not provided and Drivers License Number provided.
Explanation
This error occurs when a value or “None” is entered for Drivers License Number field and Drivers License State field is “Client declined to state”.
Solution 1
Without a Discharge and/or an Annual Update
1. Go to the Client Profile screen; correct the Drivers License Number field and/or Drivers License State field.
2. Select Save.
Solution 2
With a completed Discharge and/or Annual Update
1. From the Client Profile screen; correct the Drivers License Number field and/or Drivers License State field.
2. Select Save. 3. In this scenario, the case does not need to be reopened. 4. Resubmit the Admission, Annual Update and/or Discharge by selecting
the hyperlink Mark as Deleted; when asked to proceed, select Yes. 5. Next, select the hyperlink Undelete on each record; when asked to
proceed, select Yes. 6. This should change the Last Updated Date for each record.
Note
If the case is open, when a change is made to the Client Profile screen, the Admission will automatically be resubmitted to the State; the Last Updated Date for the Admission will change.
9-25-18 v1.1 Page 134 of 190
Prevention
If “99902” is entered in the Drivers License Number field, the Drivers License State field will grey out and default to “None” or “Not Applicable”.
Refer to the CalOMS TX Data Collection Guide regarding acceptable values for each field.

9-25-18 v1.1 Page 135 of 190
Error Code 061
Message
Provider’s Participant ID provided in discharge record does not match the Provider’s Participant ID provided at admission.
Explanation
This occurs when the Provider’s Participant ID (Unique Number) which consists of initials of last name, first name, middle name (if applicable), gender and DOB, is changed in SanWITS but the Admission was never resubmitted to the State to reflect the change.
Solution 1
Without a Discharge and/or an Annual Update that has been accepted by the State
1. In this scenario, it is not necessary to reopen the case. 2. Resubmit the Admission, Annual Update and/or Discharge by selecting
the hyperlink Mark as Deleted; when asked to proceed, select Yes. 3. Next, select the hyperlink Undelete for each record; when asked to
proceed, select Yes. 4. This should change the Last Updated Date for each record.
Solution 2
With a Discharge and/or Annual update that has been accepted by the State.
1. In this scenario, it is not necessary to reopen the case. 2. Select the hyperlink Mark as Delete for the Discharge and the Annual
Update; when asked to proceed, select Yes; then wait until accepted by the State.
3. Email the SUD Support Desk at [email protected] to let us know the Discharge and/or an Annual Update is Marked as Delete and provide the reason for this action. We will reply to your email once the action gets accepted by the State.
4. After the action is accepted by the State, resubmit the Admission by selecting the hyperlink Mark as Deleted; when asked to proceed, select Yes.
5. Next, select the hyperlink Undelete on Admission; when asked to proceed, select Yes.
6. Then resubmit Annual Update and/or Discharge by selecting the hyperlink Undelete; when asked to proceed, select Yes.
7. This should change the Last Updated Date for each record.
9-25-18 v1.1 Page 136 of 190
Note
If the case is open when a change is made to the Client Profile screen, the Admission will automatically be resubmitted to the State; the Last Updated Date for the Admission will change.
Prevention
Review the client’s episode to determine if it has an Annual Update and/or Discharge and if the case is closed.
o If there is no Annual Update and/or Discharge or the Annual Update and/or Discharge have not been accepted by the State and the case is open, then make the correction to the Client Profile; the Admission will be resubmitted automatically with the next extract; if an Annual Update and/or Discharge exists, it will need to be resubmitted.
o If an Annual Update and/or Discharge has already been accepted by the State, follow the steps in Solution 2 to prevent getting error 061.

9-25-18 v1.1 Page 137 of 190
Error Code 158
Message (158)
Annual Update Date must be earlier than the Transaction Date.
Explanation
Annual Updates cannot be future dated.
Solution 1
1. In this scenario, it is not necessary to reopen the case. 2. Resubmit the Annual Update after the Annual Update Date by selecting
the hyperlink Mark as Deleted; when asked to proceed, select Yes. 3. Next, select the hyperlink Undelete; when asked to proceed, select Yes. 4. This should change the Last Updated Date for the record.
Prevention
Do not complete the Annual Update record in SanWITS earlier than the Annual Update Date.
Do not complete the Annual Update prior to 60 days from the anniversary date of the Admission.
Example 21.2
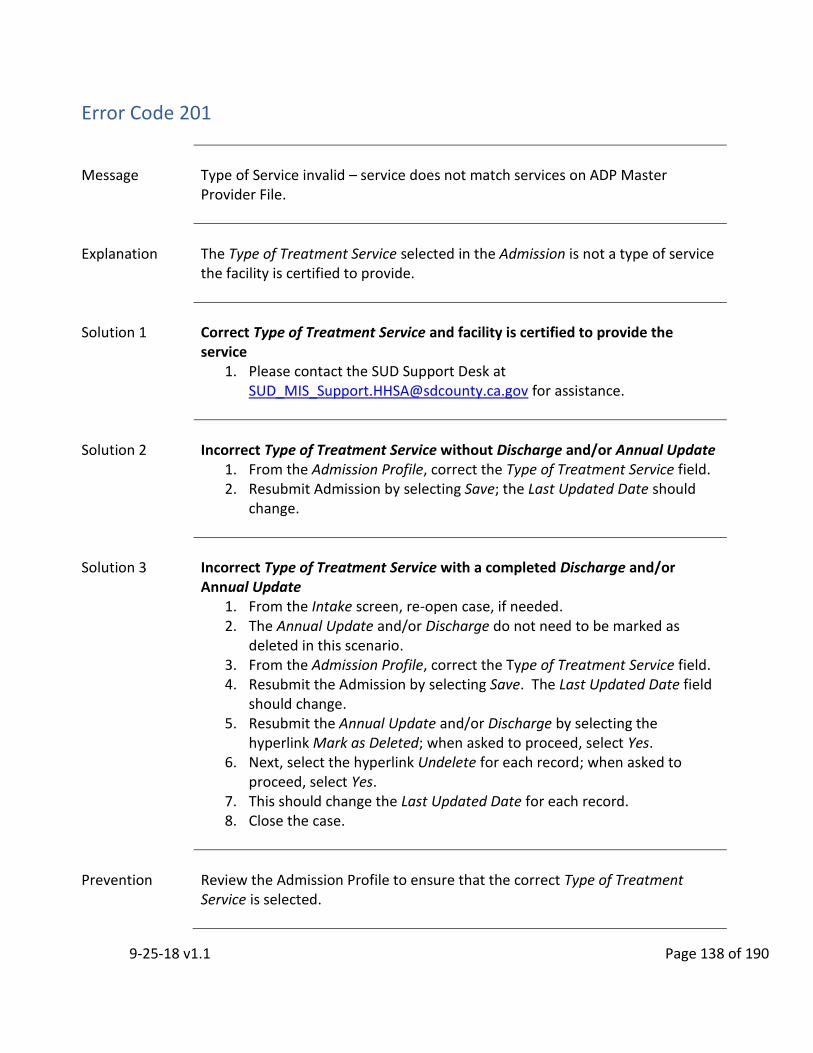
9-25-18 v1.1 Page 138 of 190
Error Code 201
Message
Type of Service invalid – service does not match services on ADP Master Provider File.
Explanation
The Type of Treatment Service selected in the Admission is not a type of service the facility is certified to provide.
Solution 1
Correct Type of Treatment Service and facility is certified to provide the service
1. Please contact the SUD Support Desk at [email protected] for assistance.
Solution 2
Incorrect Type of Treatment Service without Discharge and/or Annual Update
1. From the Admission Profile, correct the Type of Treatment Service field. 2. Resubmit Admission by selecting Save; the Last Updated Date should
change.
Solution 3
Incorrect Type of Treatment Service with a completed Discharge and/or Annual Update
1. From the Intake screen, re-open case, if needed. 2. The Annual Update and/or Discharge do not need to be marked as
deleted in this scenario. 3. From the Admission Profile, correct the Type of Treatment Service field. 4. Resubmit the Admission by selecting Save. The Last Updated Date field
should change. 5. Resubmit the Annual Update and/or Discharge by selecting the
hyperlink Mark as Deleted; when asked to proceed, select Yes. 6. Next, select the hyperlink Undelete for each record; when asked to
proceed, select Yes. 7. This should change the Last Updated Date for each record. 8. Close the case.
Prevention
Review the Admission Profile to ensure that the correct Type of Treatment Service is selected.

9-25-18 v1.1 Page 139 of 190
Example 21.3

9-25-18 v1.1 Page 140 of 190
Error Code 212
Message
Medication Prescribed invalid – Medication is Meth or LAMM and provider has no license for narcotic replacement.
Explanation
The Medication Prescribed as Part of TX field on the Medical/Physical Health screen in the Admission is incorrect. The CalOMS TX Data Collection Guide defines this field as “medication prescribed by the provider for the individual’s treatment”.
Solution 1
Without a Discharge and/or an Annual Update
1. From the Medical/Physical Health screen in the Admission, change Medication Prescribed as Part of TX field.
2. Resubmit the Admission by selecting Save; the Last Updated Date field should change.
Solution 2
With a completed Discharge and/or an Annual Update
1. From the Intake screen, re-open case, if needed. 2. The Annual Update and/or Discharge do not need to be marked as
deleted in this scenario. 3. From the Medical/Physical Health screen in the Admission, change
Medication Prescribed as Part of TX field. 4. Resubmit the Admission by selecting Save; the Last Updated Date field
should change. 5. Resubmit the Annual Update and/or Discharge by selecting the
hyperlink Mark as Deleted; when asked to proceed, select Yes. 6. Next, select the hyperlink Undelete for each record; when asked to
proceed, select Yes. 7. This should change the Last Updated Date for each record. 8. Close the case.
Prevention
If your program does not provide narcotic replacement services for the County of San Diego, this field should always be answered as “None”.

9-25-18 v1.1 Page 141 of 190
Example 21.4

9-25-18 v1.1 Page 142 of 190
Error Code 247
Message
Secondary Drug invalid - cannot be 99901.
Explanation
According to the CalOMS TX Data Collection Guide, the value 99901 is only allowable for a primary drug at discharge when the discharge is an administrative discharge. “This value is not allowed for secondary drug at any data collection point.” The error can occur on either the Admission, Annual Update or Discharge and can be identified by Type of Form included on the CalOMS Error Report.
Solution 1
Admission error without an Annual Update and/or a Discharge
1. From the Alcohol & Drug Use screen in the Admission, correct the Drug Type field for the Secondary Drug.
2. Resubmit the Admission by selecting Save; the Last Updated Date field should change.
Solution 2
Admission error with an Annual Update and/or a Discharge
1. From the Intake screen, re-open the case, if needed. 2. The Annual Update and/or Discharge do not need to be marked as
deleted in this scenario. 3. From the Alcohol & Drug Use screen in the Admission, correct the Drug
Type field for the Secondary Drug. 4. Resubmit the Admission by selecting Save; the Last Updated Date field
should change. 5. Resubmit the Annual Update and/or Discharge by selecting the
hyperlink Mark as Deleted; when asked to proceed, select Yes. 6. Next, select the hyperlink Undelete for each record; when asked to
proceed, select Yes. 7. This should change the Last Updated Date for each record. 8. If the client is discharged, close the case.
9-25-18 v1.1 Page 143 of 190
Solution 3
Annual Update error without a Discharge
1. From the Alcohol & Drug Use screen in the Annual Update, correct the Drug Type field for the Secondary Drug.
2. Resubmit the Annual Update by selecting Save; the Last Updated Date field should change.
Solution 4
Annual Update error with a Discharge
1. From the Intake screen, re-open the case, if needed. 2. From the Alcohol & Drug Use screen in the Annual Update, correct the
Drug Type field for the Secondary Drug. 3. Resubmit the Annual Update by selecting Save; the Last Updated Date
field should change. 4. Resubmit the Discharge by selecting the hyperlink Mark as Deleted;
when asked to proceed, select Yes. 5. Next, select the hyperlink Undelete for the Discharge; when asked to
proceed, select Yes. 6. This should change the Last Updated Date for the record. 7. Close the case.
Solution 5
Discharge error
1. From the Intake screen, re-open the case, if needed. 2. From the Alcohol & Drug Use screen in the Discharge, correct the Drug
Type field for the Secondary Drug. 3. Resubmit the Discharge by selecting Save; the Last Updated Date field
should change. 4. Close the case.
Prevention
The acceptable values for the Drug Type field include a corresponding number with the name of the drug. This error can occur when the user enters “9” for marijuana in field.
There are other acceptable values that include “9” besides marijuana.
If the user enters “9” and uses the tab key to continue to the next SanWITS field, “99901-Unknown” will be the value entered in the Drug Type field because it is the first option for “9”.

9-25-18 v1.1 Page 144 of 190
Example 21.5
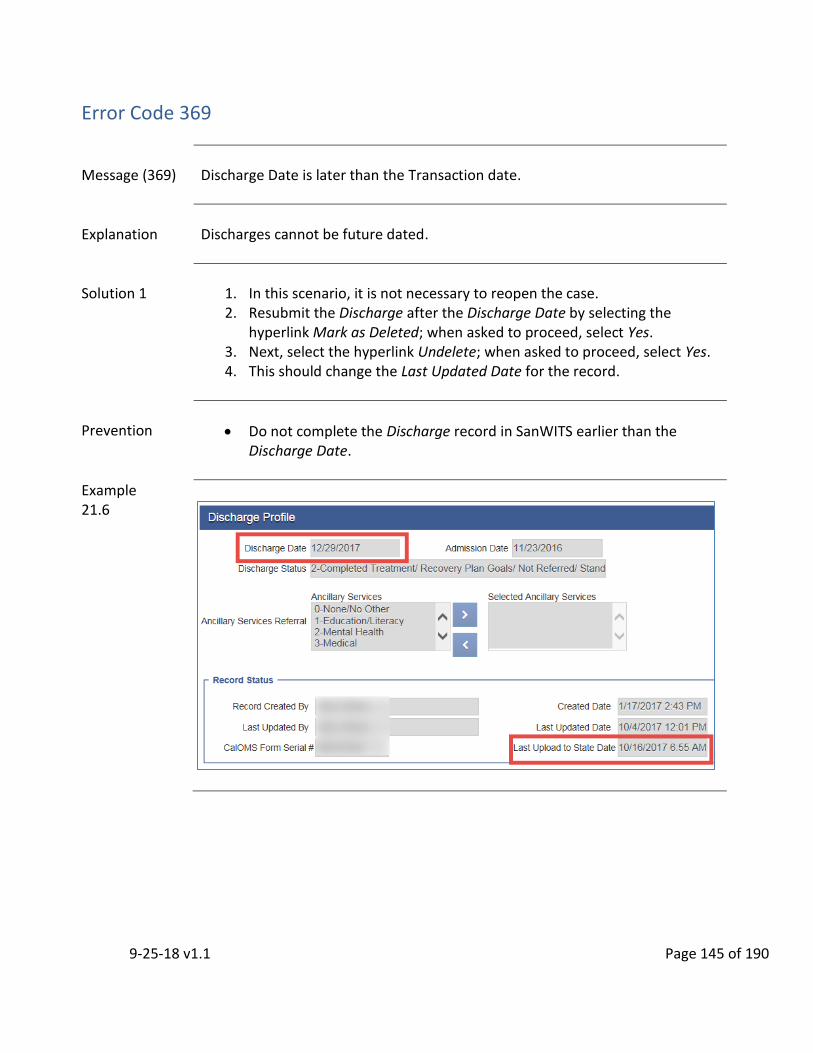
9-25-18 v1.1 Page 145 of 190
Error Code 369
Message (369)
Discharge Date is later than the Transaction date.
Explanation
Discharges cannot be future dated.
Solution 1
1. In this scenario, it is not necessary to reopen the case. 2. Resubmit the Discharge after the Discharge Date by selecting the
hyperlink Mark as Deleted; when asked to proceed, select Yes. 3. Next, select the hyperlink Undelete; when asked to proceed, select Yes. 4. This should change the Last Updated Date for the record.
Prevention
Do not complete the Discharge record in SanWITS earlier than the Discharge Date.
Example 21.6
9-25-18 v1.1 Page 146 of 190
Error Code 374
Message
Unmatched Discharge record. No admission record found with matching FSN, Provider ID, Admission date and Service Type.
Explanation
The Admission was never accepted by the State due to outstanding errors that were never fixed.
The Admission Date was changed after it was accepted by the State. The new Admission Date, which is now being submitted with the Discharge, does not match the original Admission.
The Intake Facility was changed after the Admission was accepted by the State. The new Intake Facility, which is now being submitted with the Discharge does not match the original Provider ID.
Solution 1
With an Annual Update and/or a Discharge that has been accepted by the State. (This commonly occurs if the Admission Date is changed after the Annual Update and/or Discharge has been accepted by the State.)
1. In this scenario, it is not necessary to reopen the case. 2. Select the hyperlink Mark as Delete for the Discharge and/or the Annual
Update; when asked to proceed, select Yes; then wait until accepted by the State.
3. Email the SUD Support Desk at [email protected] to let us know the Discharge and/or an Annual Update is Marked as Delete and provide the reason for this action. We will reply to your email once the action gets accepted by the State.
4. After the action is accepted by the State, resubmit the Admission by selecting the hyperlink Mark as Deleted; when asked to proceed, select Yes.
5. Next, select the hyperlink to Undelete on Admission; when asked to proceed, select Yes.
6. This should change the Last Updated Date for the record. 7. Select the hyperlink to Undelete the Annual Update and/or Discharge;
when asked to proceed, select Yes. 8. This should change the Last Updated Date for each record.

9-25-18 v1.1 Page 147 of 190
Solution 2
Without an Annual Update and/or a Discharge that has been accepted by the State. (This commonly occurs if the Admission record was rejected and not corrected for Error 201, Error 212, Error 037, Error 044, or if the Intake Facility was changed after the Admission was accepted.)
1. From the Intake screen, re-open the case, if needed. 2. Make the necessary corrections to the Admission or Client Profile.
(Contact the SUD Support Desk at [email protected] if the error is due to changing the Intake Facility).
3. Select Save. The Last Updated Date field should change. 4. Resubmit the Annual Update and/or Discharge by selecting the
hyperlink Mark as Deleted; when asked to proceed select Yes. 5. Next, select the hyperlink Undelete for each record; when asked to
proceed, select Yes. 6. This should change the Last Updated Date for each record. 7. Close the case.
Prevention
Do not change the Intake Facility. If the selected Intake Facility is incorrect, please contact the SUD Support Desk at [email protected] for assistance.
Always correct all CalOMS Errors as soon as possible.
If the Admission Date needs to be corrected after an Annual Update and/or Discharge has been accepted by the State, follow Solution 1.
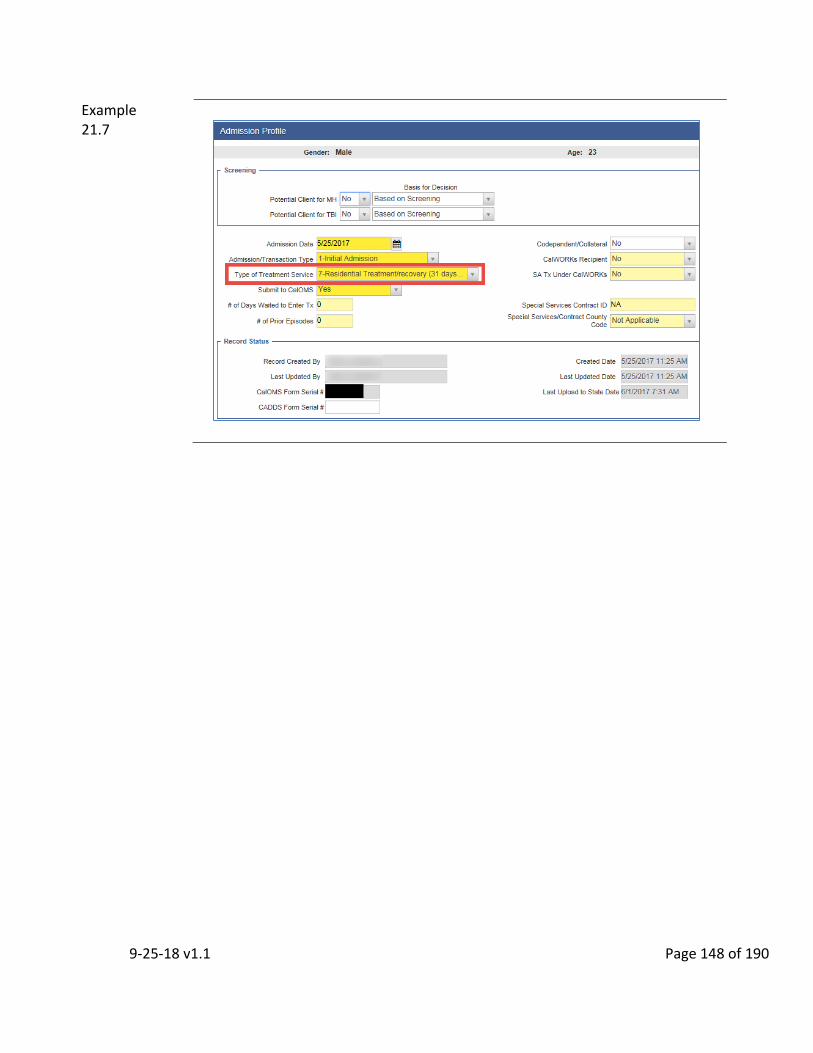
9-25-18 v1.1 Page 148 of 190
Example 21.7

9-25-18 v1.1 Page 149 of 190
Error Code 470
Message
Duplicate Admission Record -- based on SYS-2, ADM-1 through ADM-4, CID-3, CID-4, CID-9, CID-10, CID-11 and CID-14.
Explanation
According the CalOMS TX Data Dictionary “If Admission is supplied, the record cannot be a “data” duplicate. A data duplicate is an admission with the same values.” This means that the record sent to the State matches a record that has already been accepted for the client. The information in the following fields was resubmitted exactly the same: ADM-1 = Date of Admission ADM-3 = Provider ID ADM-2 = Admission Transaction Type ADM-4 = Type of Treatment Service CID-3 = Gender CID-10 = Birth Last Name CID-4 = Date of Birth CID-11 = Place of Birth CID-9 = Birth First Name CID-14 = Mother’s First Name
Solution
Duplicate errors are “message errors” that cannot be corrected, fixed and/or resent to the State.
Prevention
Do not create a new Episode to correct an Episode that has an existing error. Errors need to be fixed on the actual episode that has the error.
9-25-18 v1.1 Page 150 of 190
Error Code 471
Message
Resubmission of Admission exactly duplicates original submission.
Explanation
According the CalOMS TX Data Dictionary “If an exact Resubmission of Admission is submitted, the record will be rejected. For an exact match, all fields except Form Type and Transaction Date and Time must match.” This means that the record sent to the State matches a record that has already been accepted for the client.
Solution
Duplicate errors are “message errors” that cannot be corrected, fixed and/or resent to the State.
Prevention
If staff are only viewing the record, click Cancel when done.
Every time the Save button is selected, the Last Updated Date is changed; this action resubmits the Admission whether data was changed or not.
When non-CalOMS data fields are changed and saved, the Admission will be resubmitted to the State creating a duplicate record that will be rejected.
o Examples are the Special Population and Suicide Attempts fields.

9-25-18 v1.1 Page 151 of 190
Error Code 472
Message
Resubmission of Discharge exactly duplicates original submission
Explanation
According the CalOMS TX Data Dictionary “If an exact Resubmission of Discharge is submitted, the record will be rejected” For an exact match, all fields except Form Type and Transaction Date and Time must match.” This means that the record sent to the State matches a record that has already been accepted for the client.
Solution
Duplicate errors are “message errors” that cannot be corrected, fixed and/or resent to the State.
Prevention
If staff are only viewing the record, click Cancel when done.
Unlike Error 471, selecting the Save button when data has not changed will not resubmit the Discharge.
When non-CalOMS data fields are changed and saved, the Discharge will be resubmitted to the State creating a duplicate record that will be rejected.
o Example of field that is not CalOMS required is # of Arrests in Last 6 Months.

9-25-18 v1.1 Page 152 of 190
Error Code 473
Message
Resubmission of Annual Update exactly duplicates original submission.
Explanation
According the CalOMS TX Data Dictionary “If an exact Resubmission of Annual Update is submitted, the record will be rejected. For an exact match, all fields except Form Type and Transaction Date and Time must match.”
This means that the record sent to the State matches a record that has already been accepted for the client.
Solution
Duplicate errors are “message errors” that cannot be corrected, fixed and/or resent to the State.
Prevention
If staff are only viewing the record, click Cancel when done.
Unlike Error 471, selecting the Save button when data has not changed will not resubmit the Annual Update.
When non-CalOMS data fields are changed and saved, the Annual Update will be resubmitted to the State creating a duplicate record that will be rejected.

9-25-18 v1.1 Page 153 of 190
Error Code 560
Message
Resubmission of Admission Prohibited -- matching discharge or annual update records found.
Explanation
According the CalOMS TX Data Dictionary “If a Resubmission of Admission record is submitted when a matching Discharge or a matching Annual Update record exist in the system for the original Admission, the record will be rejected.”
This error can be accompanied by:
Error 471: Saving the Admission without changes to Admission data or changes to non-CalOMS required fields.
Error 374: Admission data changes to CalOMS required fields such as Admission Date, Service Type, Provider ID and FSN along with the Discharge resubmitted creates an unmatched Discharge.
Error 061: Client Profile changes to the client name, DOB, and/or gender, along with the Discharge resubmitted creates an unmatched Provider’s Participant ID.
Solution 1
If no Admission data was changed or if the data changed was to a non-CalOMS required field (accompanied by Error 471):
1. No further action is needed.
Solution 2
If Error 560 is a result of re-opening a closed Episode to re-admit a client:
1. Contact the SUD Support Desk at [email protected] for assistance.

9-25-18 v1.1 Page 154 of 190
Solution 3
If the admission data was changed for a CalOMS required field (it can occur independently or be accompanied by Error 061 and Error 374):
1. In this scenario, it is not necessary to reopen the case. 2. Select the hyperlink Mark as Delete for the Discharge and the Annual
Update; when asked to proceed, select Yes; then wait until accepted by the State.
3. Email the SUD Support Desk at [email protected] to let us know the Discharge and/or an Annual Update is Marked as Delete and provide the reason for this action. We will reply to your email once the action gets accepted by the State.
4. After the action is accepted by the State, resubmit the Admission by selecting the hyperlink Mark as Deleted; when asked to proceed, select Yes.
5. Next, select the hyperlink Undelete on Admission; when asked to proceed, select Yes.
6. This should change the Last Updated Date for the record. 7. Resubmit the Annual Update and/or Discharge by selecting the
hyperlink Undelete; when asked to proceed, select Yes. 8. This should change the Last Updated Date for each record.
Prevention
Do not open a closed Episode to re-admit a client.
Do not re-open closed cases that need corrections and/or changes to a Client Profile. The Client Profile screens can be changed and/or corrected when a case is closed.
Before resubmitting an Admission, verify if there is an Annual Update and/or Discharge in place and if it has been accepted by the State.
o If there is no Annual Update and/or Discharge or the Annual Update and/or Discharge has not been accepted by the State, it is safe to make the changes to the Admission and resubmit the data.
o If there is an Annual Update and/or Discharge, and you are unsure if it has been accepted by the State, contact the SUD Support Desk at [email protected] for assistance.
Remember, users can always email the SanWITS SUD Support Desk at [email protected] or call at (619)584-5040 for assistance with correcting errors.
9-25-18 v1.1 Page 155 of 190
CHAPTER 22: PROVIDER DRUG MEDI-CAL BILLING
Overview
Before billing DMC for client encounters, there are several items that must be completed first:
The Client Profile must be completed including Payor Group Enrollment.
Rendering Staff and Facility/Service Location NPI must be entered into SanWITS.
The Admission must reflect the client is a Medi-Cal Beneficiary on screen 7.
The Diagnosis and Program Enrollment must be added to the client’s Admission.
Daily Encounters should be updated with status Release to Billing.
SanWITS Fields
Each screen contains fields for data that are identified by four different colors.
Bright yellow: system required; can be CalOMS and/or County of San Diego data.
Light yellow: required; can be CalOMS and/or County of San Diego data.
White: non-required.
Grey: non-fillable by the user; either system generated or auto-populated; cannot be changed as is or when case is closed.
Navigation Buttons
Use the arrow button to move from screen to screen through the Billing screens. Select one of the following navigation buttons to take actions when necessary:
Cancel: Returns the user to the previous screen or mode without saving the data entered into the screen.
Save: Serves two functions; first saves data after completing required fields; second, used to add multiple records to certain screens.
Finish: Saves any unsaved data and returns user to the first screen of the module or Activity List.
Billing Unit
For billing, billing-related reports, and billing-related trainings, contact the Billing Unit at [email protected].
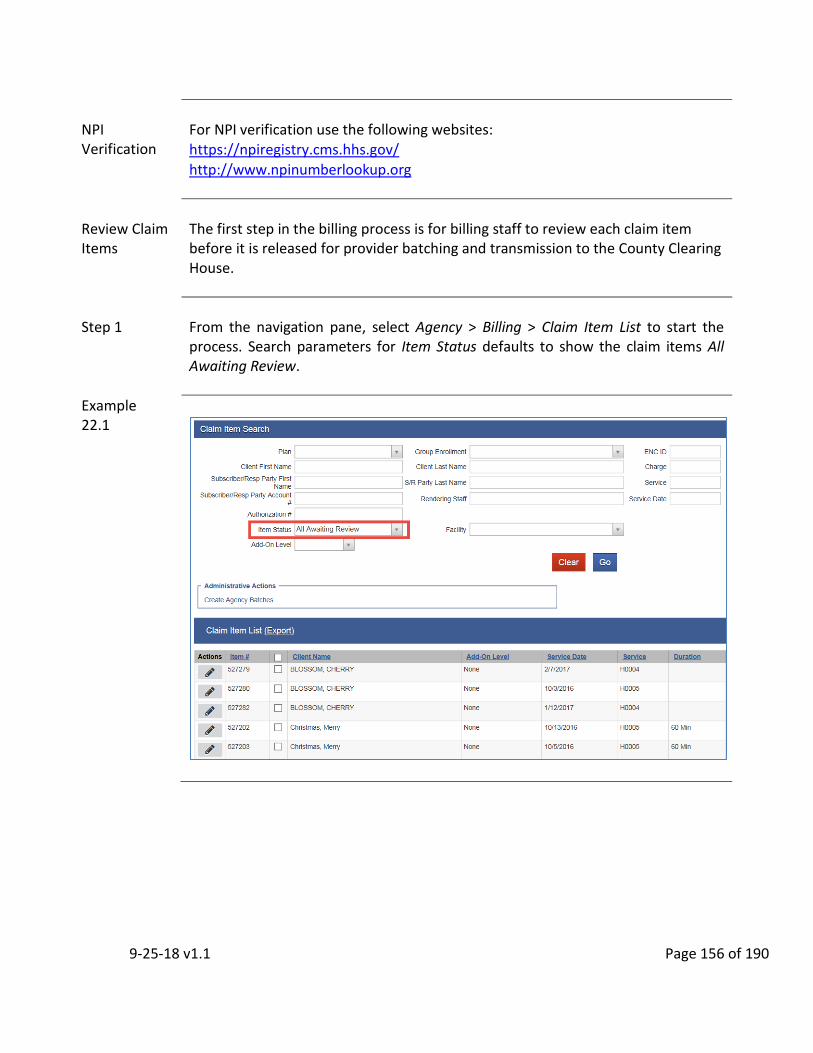
9-25-18 v1.1 Page 156 of 190
NPI Verification
For NPI verification use the following websites: https://npiregistry.cms.hhs.gov/
http://www.npinumberlookup.org
Review Claim Items
The first step in the billing process is for billing staff to review each claim item before it is released for provider batching and transmission to the County Clearing House.
Step 1
From the navigation pane, select Agency > Billing > Claim Item List to start the process. Search parameters for Item Status defaults to show the claim items All Awaiting Review.
Example 22.1
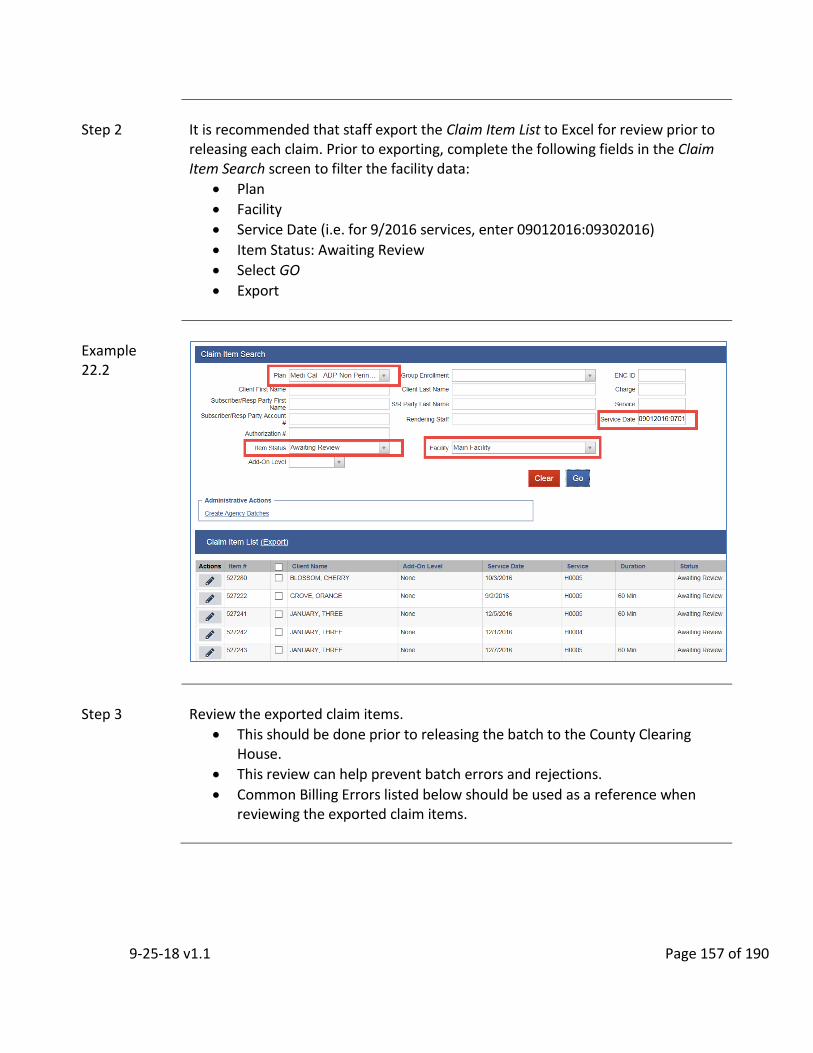
9-25-18 v1.1 Page 157 of 190
Step 2
It is recommended that staff export the Claim Item List to Excel for review prior to releasing each claim. Prior to exporting, complete the following fields in the Claim Item Search screen to filter the facility data:
Plan
Facility
Service Date (i.e. for 9/2016 services, enter 09012016:09302016)
Item Status: Awaiting Review
Select GO
Export
Example 22.2
Step 3
Review the exported claim items.
This should be done prior to releasing the batch to the County Clearing House.
This review can help prevent batch errors and rejections.
Common Billing Errors listed below should be used as a reference when reviewing the exported claim items.
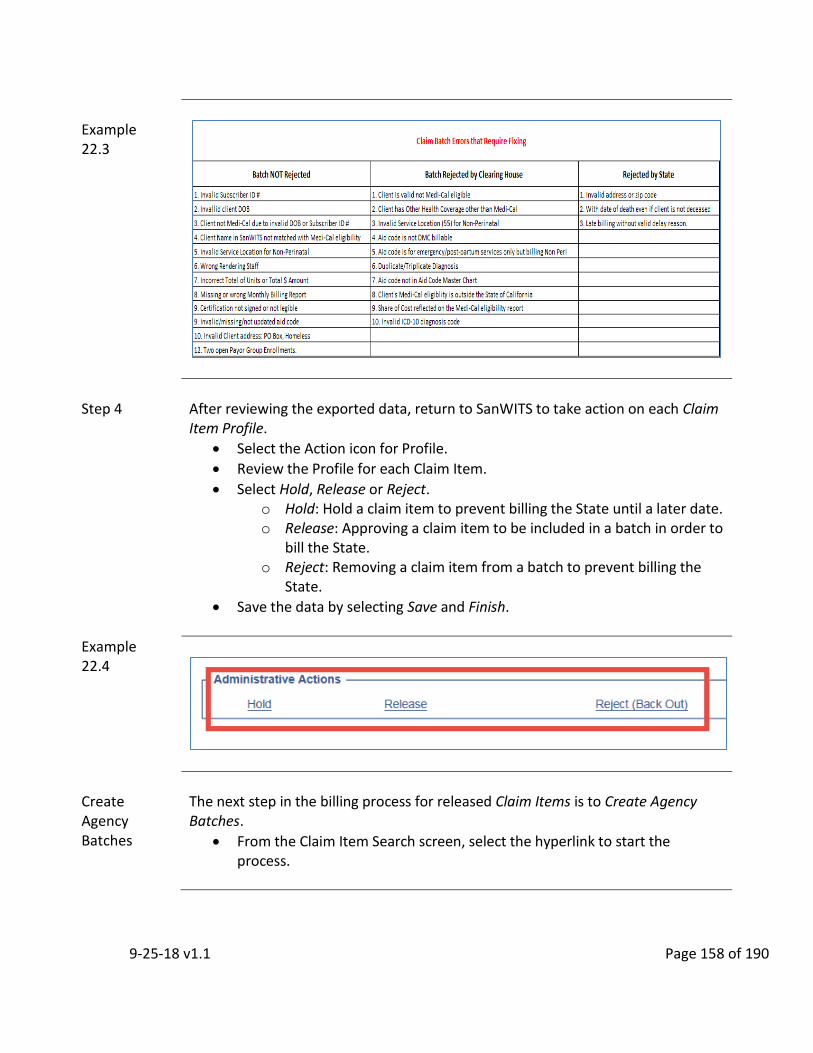
9-25-18 v1.1 Page 158 of 190
Example 22.3
Step 4
After reviewing the exported data, return to SanWITS to take action on each Claim Item Profile.
Select the Action icon for Profile.
Review the Profile for each Claim Item.
Select Hold, Release or Reject. o Hold: Hold a claim item to prevent billing the State until a later date. o Release: Approving a claim item to be included in a batch in order to
bill the State. o Reject: Removing a claim item from a batch to prevent billing the
State.
Save the data by selecting Save and Finish.
Example 22.4
Create Agency Batches
The next step in the billing process for released Claim Items is to Create Agency Batches.
From the Claim Item Search screen, select the hyperlink to start the process.
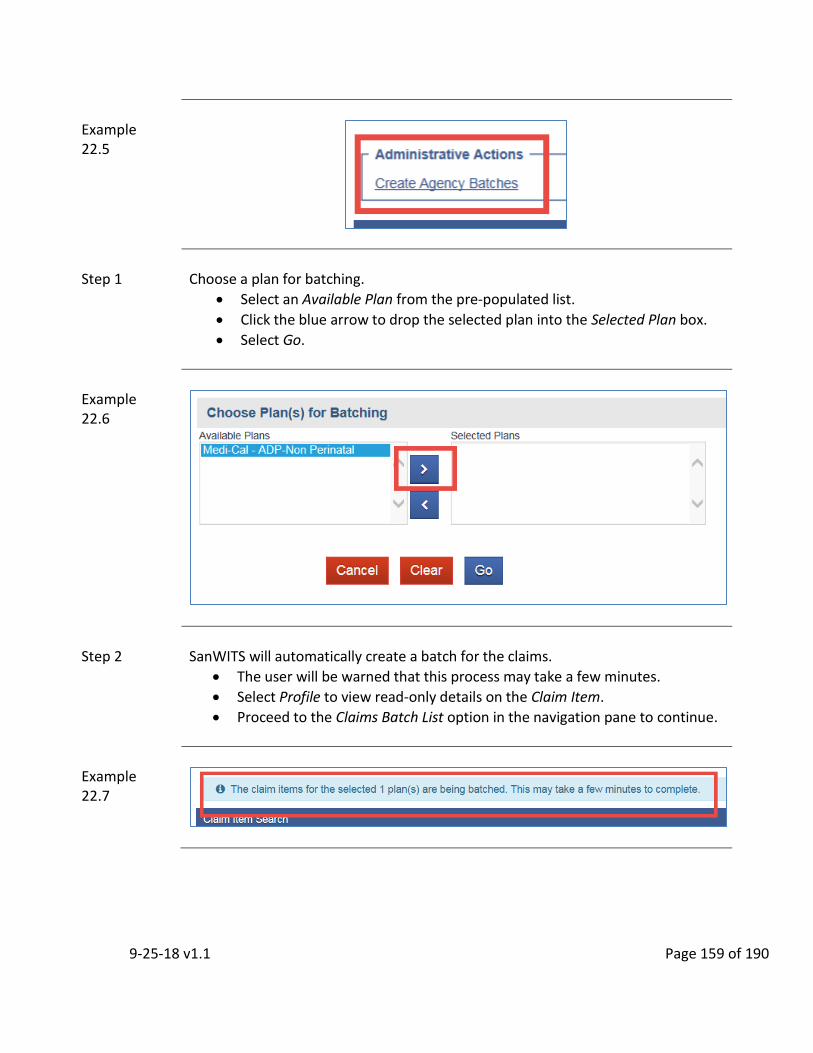
9-25-18 v1.1 Page 159 of 190
Example 22.5
Step 1
Choose a plan for batching.
Select an Available Plan from the pre-populated list.
Click the blue arrow to drop the selected plan into the Selected Plan box.
Select Go.
Example 22.6
Step 2
SanWITS will automatically create a batch for the claims.
The user will be warned that this process may take a few minutes.
Select Profile to view read-only details on the Claim Item.
Proceed to the Claims Batch List option in the navigation pane to continue.
Example 22.7
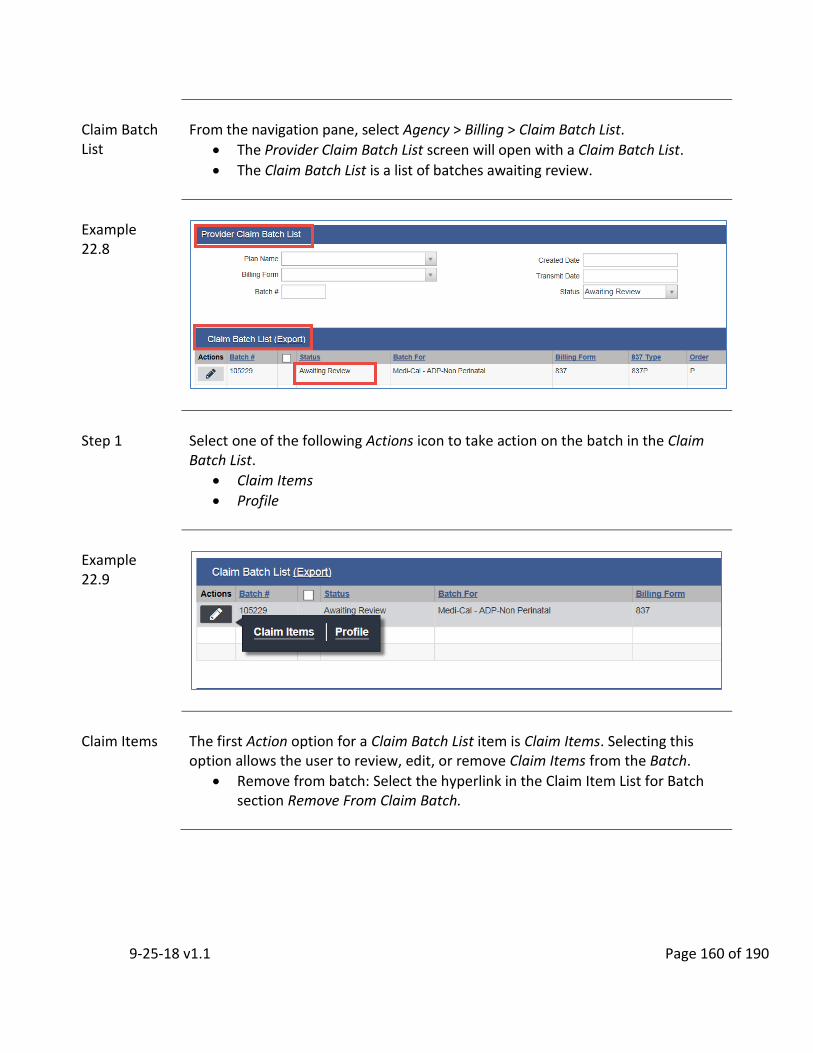
9-25-18 v1.1 Page 160 of 190
Claim Batch List
From the navigation pane, select Agency > Billing > Claim Batch List.
The Provider Claim Batch List screen will open with a Claim Batch List.
The Claim Batch List is a list of batches awaiting review.
Example 22.8
Step 1
Select one of the following Actions icon to take action on the batch in the Claim Batch List.
Claim Items
Profile
Example 22.9
Claim Items
The first Action option for a Claim Batch List item is Claim Items. Selecting this option allows the user to review, edit, or remove Claim Items from the Batch.
Remove from batch: Select the hyperlink in the Claim Item List for Batch section Remove From Claim Batch.
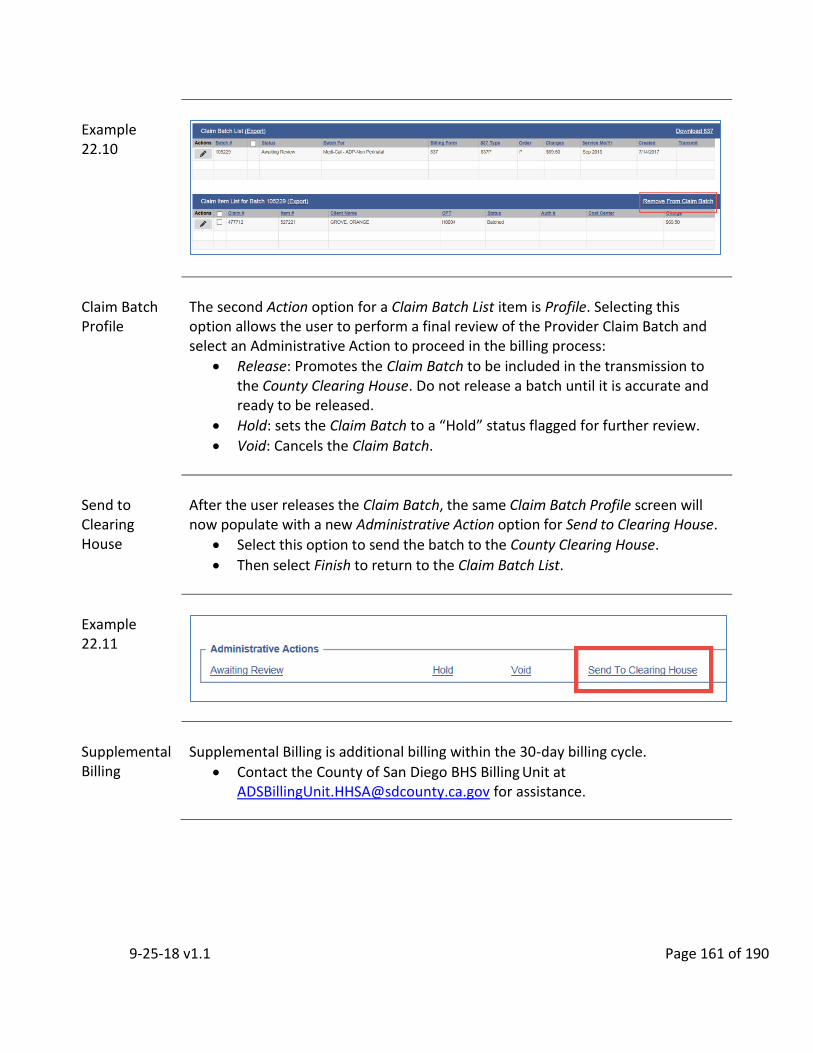
9-25-18 v1.1 Page 161 of 190
Example 22.10
Claim Batch Profile
The second Action option for a Claim Batch List item is Profile. Selecting this option allows the user to perform a final review of the Provider Claim Batch and select an Administrative Action to proceed in the billing process:
Release: Promotes the Claim Batch to be included in the transmission to the County Clearing House. Do not release a batch until it is accurate and ready to be released.
Hold: sets the Claim Batch to a “Hold” status flagged for further review.
Void: Cancels the Claim Batch.
Send to Clearing House
After the user releases the Claim Batch, the same Claim Batch Profile screen will now populate with a new Administrative Action option for Send to Clearing House.
Select this option to send the batch to the County Clearing House.
Then select Finish to return to the Claim Batch List.
Example 22.11
Supplemental Billing
Supplemental Billing is additional billing within the 30-day billing cycle.
Contact the County of San Diego BHS Billing Unit at [email protected] for assistance.

9-25-18 v1.1 Page 162 of 190
Late Billing
Late billing is any claim submitted beyond 30 days after the last date of service year and month.
The Delay Reason Codes are required to justify all late submissions.
The Delay Reason Codes list is distributed to all DMC providers by the ADS Billing Unit.
Contact the County of San Diego BHS Billing Unit at [email protected] if the Delay Reason Code field is not available.
A delay reason code should only be used when there is good cause for a late submission.
Step 1
From the navigation pane, select Agency > Billing > Claim Item List to open the Claim Item Search screen.
Step 2
Enter data in the following fields to change the Claim Item Search parameters:
Plan: Perinatal or Non-Perinatal
Item Status: Awaiting Review
Service Date: Enter the service date range (ex: 12012015:12312015 for December late services)
Select Go to start the search.
Step 3
The Claim Item List will display items that require review and action.
Open the Profile for each item.
Step 4
Review the Profile for Claim Item. Complete the following fields:
Delay Reason: Select a valid reason from the list sent by the ADS Billing Unit.
Report Transmission Type: Select “By Fax”.
Attachment Control Number: Alpha-numberic reference number for the late claim item made up of the 4-digit provider number, month and year of late service, and the word “late”.
o Ex: 379912206late

9-25-18 v1.1 Page 163 of 190
Example 22.12
Step 5
Some Delay Reason Codes require additional paperwork to be submitted to the State from the County and the provider.
Form DHCS 6065A or DHCS 6065B
Check with the ADS Billing Unit to determine if additional paperwork is needed and which type.
Step 6
After completing the required fields for late billing, the user is now able to Release the item to billing, create an Agency Batch, and send the item to the Clearing House.
Follow the steps outlined earlier in the chapter.
Step 7
SanWITS steps for late/supplemental billing are now complete. The user should proceed to the remaining steps required for the ADS Billing Unit:
Submit the completed provider monthly billing report, billing certification (Form ADP 1001886), and the Good Cause Certification (if applicable).
Voided/ Disallowed Services
After a provider submits form 5035C or a claim adjustment form (from QAR), the DMC Billing Unit will process this action in SanWITS once the service is paid by the State.
This will appear as negative dollar amounts in SanWITS.
Do not touch any services with a zero or negative dollar amount.

9-25-18 v1.1 Page 164 of 190
Service Replacement/ Rebill
The DMC Billing Unit works on “replace and rebill” after the provider fixes errors on denied claims.
This will appear as two entries for the same client with the same service date, one with a positive dollar amount and one with a negative dollar amount; this is not a duplicate entry.
Do not touch any services with a zero or negative dollar amount.
Clean-up
It is recommended that billing staff create a schedule to clean-up the following:
Claim Items
Claim Batch List
Unbilled Batches
Cleanup Claim Item List
From the navigation pane, select Agency > Billing > Claim Batch List.
The Provider Claim Batch List screen will open with a Claim Batch List.
Review any old services with an Items Status of Awaiting Review, Released, and Hold.
Reject old services when necessary.
Cleanup Claim Batch List
From the navigation pane, select Agency > Billing > Claim Batch List.
The Provider Claim Batch List screen will open with a Claim Batch List.
Review all unbilled batches.
Cleanup Unbilled Batches
All unbilled batches with an Item Status of Awaiting Review, Released, and Hold, for the Agency will be visible in your facility. Select the Actions icon to open the Claims Batch Profile to review the content of the batch.
If the batch number belongs to another facility, do not take action on the Batch Item; the owner of the batch will need to do their own review/clean-up.
If the batch number belongs to your facility, select the Actions icon to view the Batch Profile; select the Administrative Action to Void the batch.
o This does not void the service; this action is to the batch. The services within the voided batch will return to the Claim Item list with an Item Status of Awaiting Review. From here, individually reject or back-out the service and enter a valid reject reason; backed out services will return to the Encounters.

9-25-18 v1.1 Page 165 of 190
ADDENDUM

9-25-18 v1.1 Page 166 of 190

9-25-18 v1.1 Page 167 of 190
ADDENDUM 1: FACILITY INPATIENT UNIT SET-UP (For Residential Providers Only)
Overview
A Residential facility consists of: Unit, Room and Bed. The Inpatient Unit provides the user a way to manage and monitor their residential beds.
SanWITS Fields
Each screen contains fields for data that are identified by four different colors.
Bright yellow: system required; can be CalOMS and/or County of San Diego data.
Light yellow: required; can be CalOMS and/or County of San Diego data.
White: non-required.
Grey: non-fillable by the user; either system generated or auto-populated; cannot be changed as is or when case is closed.
Navigation Buttons
Use the arrow button to move from screen to screen through the Program Enrollment. Select one of the following navigation buttons to take actions when necessary:
Cancel: Returns the user to the previous screen or mode without saving the data entered into the screen.
Save: Serves two functions; first saves data after completing required fields; second, used to add multiple records to certain screens.
Finish: Saves any unsaved data and returns user to the first screen of the module or Activity List.
Facility Inpatient Unit
The Facility Inpatient Unit section allows the Facility Administrator or Agency Administrator to manage the Inpatient unit for the facility. Each Inpatient Unit is composed of a unit, room and bed.
Creating a Unit
A Unit is a wing or other subdivision within a residential facility. Programs are assigned to each unit.
Step 1
From the navigation pane, select Agency > Facility List. Hover over the pencil icon and select Inpatient Unit

9-25-18 v1.1 Page 168 of 190
Example A1.1
Step 2
The Inpatient Unit List will list all units created for the facility.
New facilities should have no information in this screen
Select the hyperlink Add New Inpatient Unit
Example A1.2
Step 3
There are several required fields in the Inpatient Unit Setup
Inpatient Unit Name: System required field
Description: Not required but allows the user to describe the current Inpatient unit
Available Bed Count: Read-only field that counts the number of active beds in the current inpatient unit, but excludes all virtual beds and unavailable rooms. If no room or bed set-up for the Inpatient Unit, field will be blank
Inpatient Unit Accepted Programs: Select all programs listed under Available Programs and move it to the IP Unit Accepted Programs by selecting the right arrow. System required field.
Effective Date: System required field
Notes: Comments
Saving Data
The user should now save the data by selecting Save and Finish.
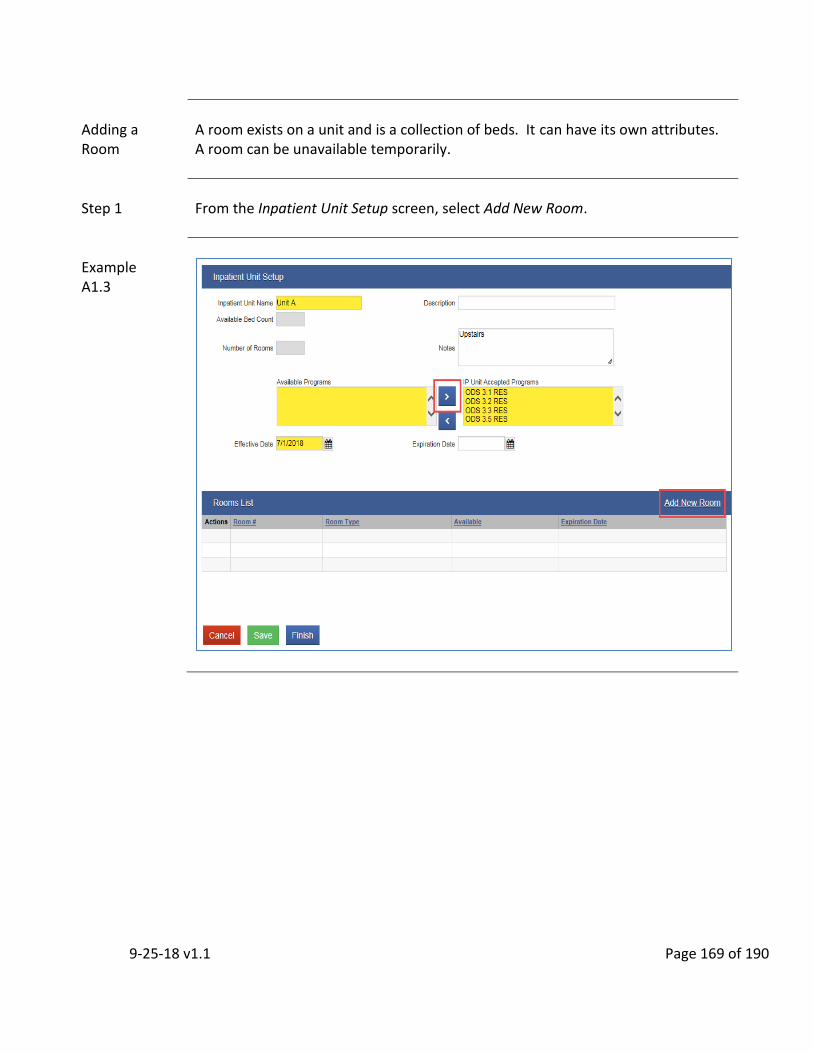
9-25-18 v1.1 Page 169 of 190
Adding a Room
A room exists on a unit and is a collection of beds. It can have its own attributes. A room can be unavailable temporarily.
Step 1
From the Inpatient Unit Setup screen, select Add New Room.
Example A1.3

9-25-18 v1.1 Page 170 of 190
Step 2
There are several required fields in the Room Setup For Unit
Room Number: Alphanumeric System required field; description must include the gender ex. A Female, B Male; this should be updated in real time as the room characteristics change
Room Type: System required field with the following values: Single, Double, Triple, Quad and Virtual.
Available: System required field. All beds must be vacant prior to changing availability to No.
Effective Date: System required field. Pre-populates with today’s date. Review and change as needed
Description: Enter additional details about the current room as needed
General Comments: Enter additional notes about the room
Expiration Date: Applies to all bed of the room. All beds must be vacant prior to expiration
Saving Data
The user should now save the data by selecting Save.
Adding a Bed
A bed can be assigned to a person who has been admitted to the facility for treatment. It can also have its own attributes and can be unavailable
Step 1
From the Room Setup for Unit screen, select Add New Bed.

9-25-18 v1.1 Page 171 of 190
Example A1.4
Step 2
The Bed Setup for Unit includes the following fields:
Bed Number: Alphanumeric System required field; description should include the type of bed ex. 101 upper bunk, 102 lower bunk, or 103 single; this makes for ease of placing clients in appropriate beds and can be used for referral purposes
Effective Date: System required field. Pre-populates with today’s date. Review and change as needed
Description: Enter additional details about the bed as needed
Expiration Date: Applies to all bed of the room. All beds must be vacant prior to expiration
General Comments: Enter additional notes about the bed
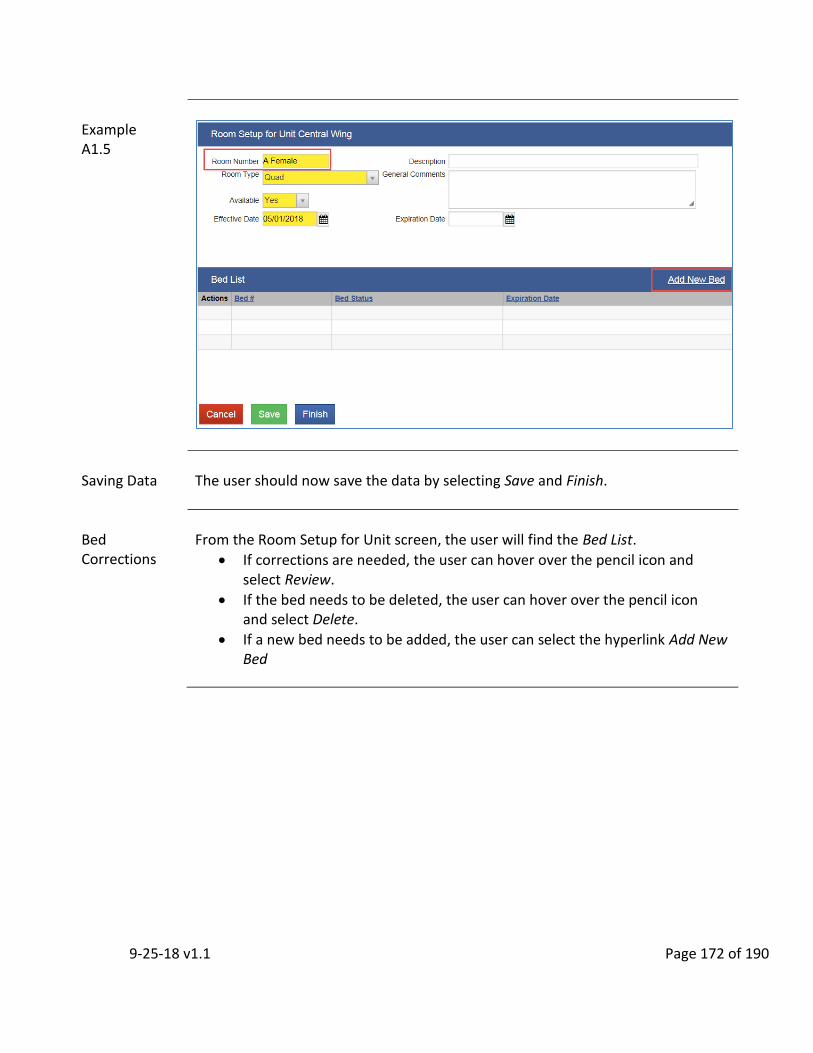
9-25-18 v1.1 Page 172 of 190
Example A1.5
Saving Data
The user should now save the data by selecting Save and Finish.
Bed Corrections
From the Room Setup for Unit screen, the user will find the Bed List.
If corrections are needed, the user can hover over the pencil icon and select Review.
If the bed needs to be deleted, the user can hover over the pencil icon and select Delete.
If a new bed needs to be added, the user can select the hyperlink Add New Bed
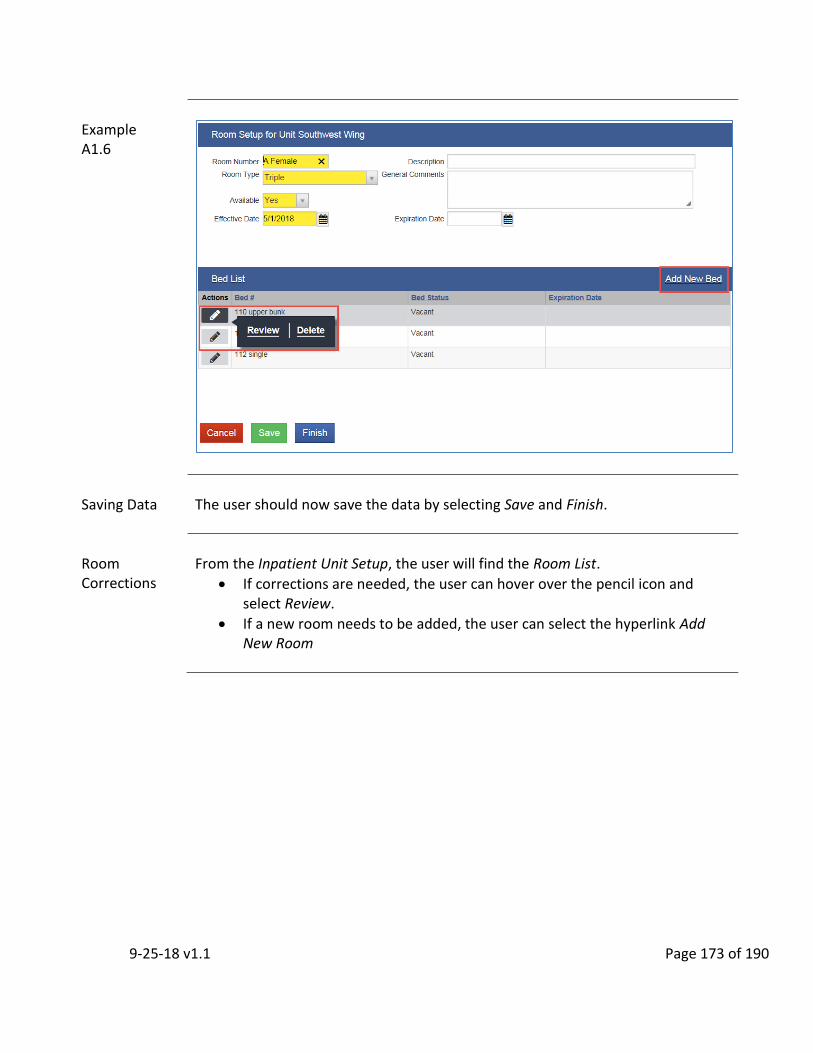
9-25-18 v1.1 Page 173 of 190
Example A1.6
Saving Data
The user should now save the data by selecting Save and Finish.
Room Corrections
From the Inpatient Unit Setup, the user will find the Room List.
If corrections are needed, the user can hover over the pencil icon and select Review.
If a new room needs to be added, the user can select the hyperlink Add New Room
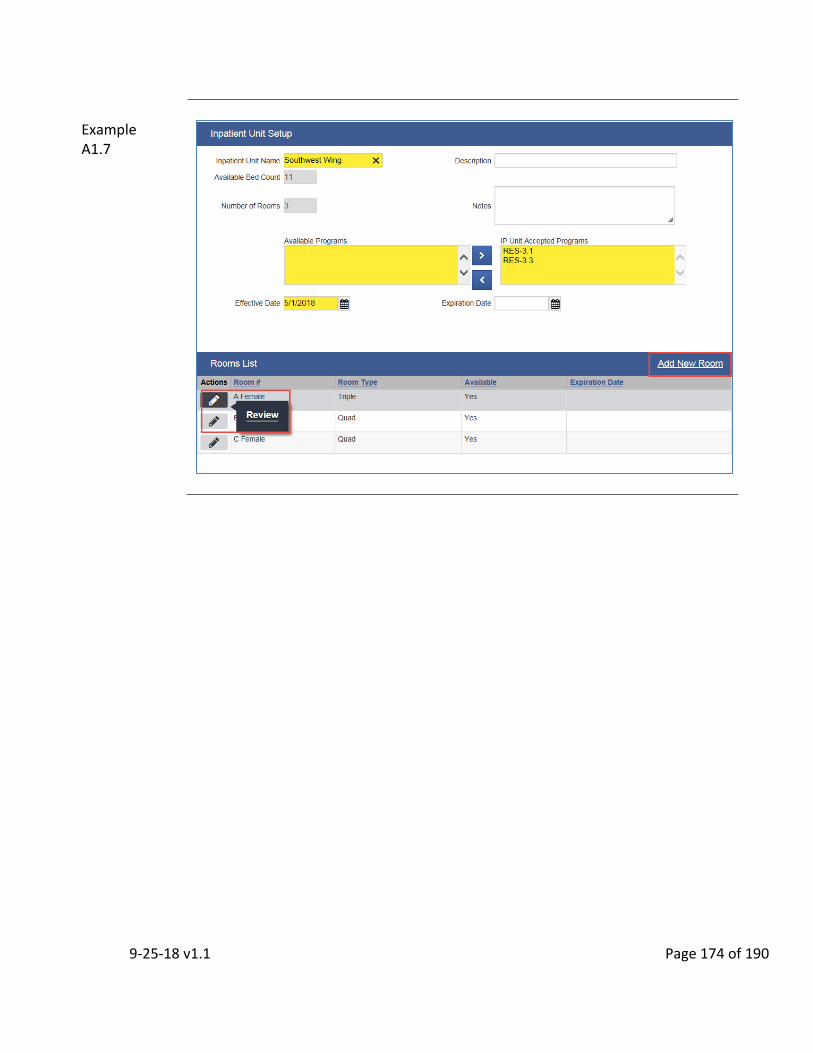
9-25-18 v1.1 Page 174 of 190
Example A1.7

9-25-18 v1.1 Page 175 of 190
ADDENDUM 2: DRUG TEST RESULTS
Overview
SanWITS has a module for documenting drug testing results for clients.
Requirement
Questions regarding whether or not drug test results should be documented in SanWITS for your facility, should be directed toward your management staff.
At this time only SUD treatment providers serving DDC clients must document drug test results in SanWITS.
Drug Testing
To view a previously entered test results or to add new test results, select Client Profile > Activity List > Drug Testing to open the Drug Test Search Results Screen.
Test Results
The Drug Test Search Results screen pre-populates the search date field for one month prior to today’s date.
When there are no drug test results entered for a client, an informational warning at the top of the screen will indicate “No results match your search criteria”.
The search date may need to be adjusted to widen the search.
Select the hyperlink Add Test Result to start the process for adding drug test result data.
Example A2.1
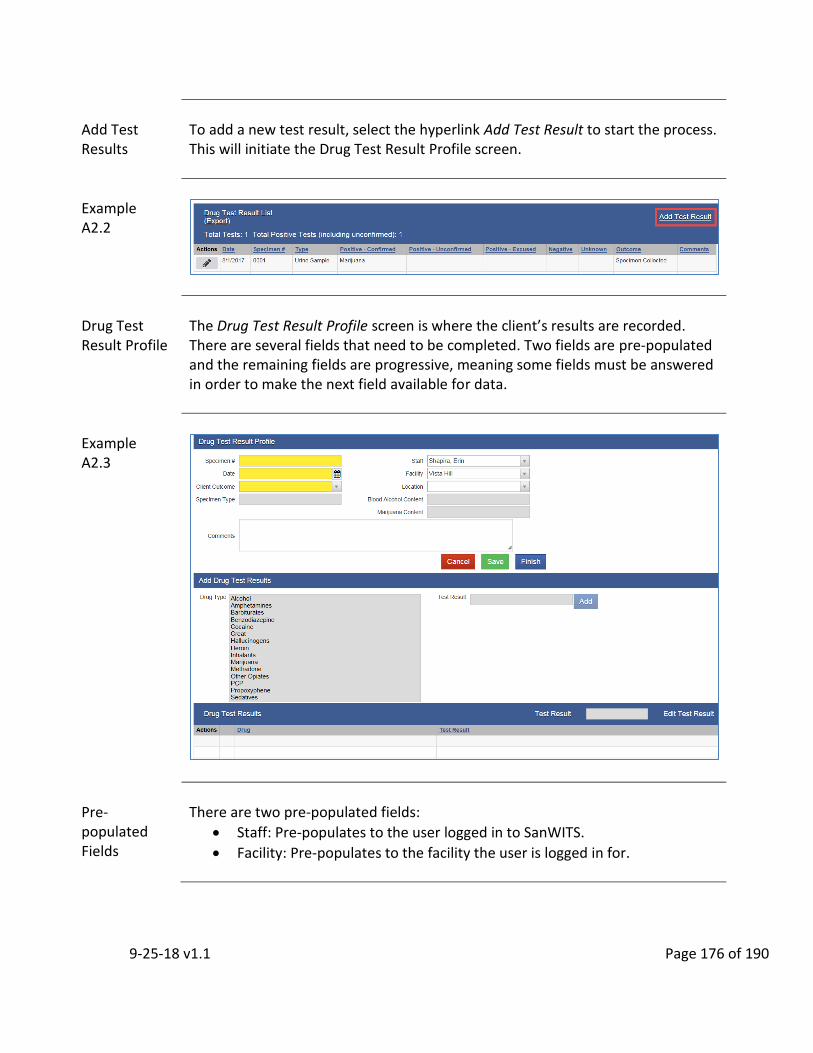
9-25-18 v1.1 Page 176 of 190
Add Test Results
To add a new test result, select the hyperlink Add Test Result to start the process. This will initiate the Drug Test Result Profile screen.
Example A2.2
Drug Test Result Profile
The Drug Test Result Profile screen is where the client’s results are recorded. There are several fields that need to be completed. Two fields are pre-populated and the remaining fields are progressive, meaning some fields must be answered in order to make the next field available for data.
Example A2.3
Pre-populated Fields
There are two pre-populated fields:
Staff: Pre-populates to the user logged in to SanWITS.
Facility: Pre-populates to the facility the user is logged in for.
9-25-18 v1.1 Page 177 of 190
Specimen #
This is a unique number associated with an individual client’s drug test.
For clients who do not provide a specimen, other information will need to be enterered in in this field.
Example: For clients who fail to appear for the test, enter FTA in the Specimen # field.
Date
Enter the date that the test was administered.
Location
Enter the location where the test was administered.
Client Outcome
Client Outcome is a drop-down menu with several choices to record the status of the client’s particiaption in the drug test:
Failed to Appear
Excused Absence
Specimen Collected
Specimen Diluted
Specimen Rejected
Refused to Provide Specimen
Unable to Provide Specimen
Other
Low Creatinine
Specimen Type
Select the type of specimen collected.
This field is not available for data until an appropriate Client Outcome is selected.
Typical drug test specimen types are urine samples.
There are several additional types available.

9-25-18 v1.1 Page 178 of 190
Drug Type
Add the drug types included in the client’s drug test.
Drug Types must include the test result for each drug.
If all drug types tested have the same result, the drug types can be added at the same time.
If there are various results for the drug types, the drugs must be added individually.
Failure to add any drug types to a test will result in an In Progress status on the Client Activity List for Drug Test Results.
Test Results
Select the appropriate test result for each drug type.
Example A2.4
Blood Alcohol/ Marijuana Content
When the drug types Alcohol and Marijuana are selected, the fields for Blood Alcohol Content and Marijana Content become available for data.
Blood Alcohol Content: Data is used to determine present level of intoxication.
Marijana Content: Data is used to measure changes over time which typically determines additional use or no additional use since the initial drug test.
Comments
There is a comment box available for the user to enter text.
Saving
The user should now save the data by selecting Save and Finish.

9-25-18 v1.1 Page 179 of 190
Generate Report
The header contains a hyperlink Generate Report which allows the user to produce a report from the current screen or module.
Example A2.5

9-25-18 v1.1 Page 180 of 190
ADDENDUM 3: CLIENT CONSENTS
Overview
Consents are required before sharing any information about a client with anyone outside the agency.
Consent
The client consent section has two screens. From the navigation pane, select Client List > Activity List > Consent to start the process.
Client Consent List
Client Disclosure Agreement
Existing Consents
Clients may have existing consents already documented.
Review existing consents to ensure it has not been revoked.
If the client has expired or revoked consents on file, a new consent should be created.
New Consents
To start the process to add a new consent, select the hyperlink Add New Client Consent Record.
Example A3.1
Client Disclosure Agreement
The Client Disclosure Agreement screen will be available.
The following warning will be visible “Consented information may not be re-disclosed.”
The client’s name and unique client number will be visible.
The user’s agency disclosing the client information will also be visible.
There are several required fields that will need to be answered.

9-25-18 v1.1 Page 181 of 190
Example A3.2
Entities with Disclosure Agreement
To share information electronically across agencies, an Agency Disclosure must be setup. This step has already been established in SanWITS by the County of San Diego.
The field Entities with Disclosure Agreements is pre-populated based on the completed Agency Disclosure.
Select the available option “All Other Agencies”. o This option will pre-populate the fields for Disclosed to Agency and
Disclosure Selections.
9-25-18 v1.1 Page 182 of 190
System Agency
The System Agency field is asking if the client information will be disclosed to an agency that is a County of San Diego SUD agency and part of the SanWITS system.
This field pre-populates with “Yes”.
Selecting “No” will result in the following: o Disclosed to Agency field will become read-only. o Disclosed to Entity (Non System Agency) will change from read-only
to writable.
Disclosed to Agency/ Facility
Select the agency and facility you intend to send client information.
Only one agency can be selected for each consent.
Additional consents must be created for additional agencies.
Disclosed to Entity
This field will only be available when the System Agency field is “No”.
This allows the user to document consents with providers and/or agencies that do not use SanWITS.
Purpose of Disclosure
The consent requires the user to enter the purpose of disclosing data.
Enter “SUD Treatment”.
Consented Date
Enter the date the consent was granted.
Signed Paper Form
Client data may not be transferred until the paper consent or release of information has been signed and is on file. Each agency is responsible for their own client consent documents. There are two fields that must be answered for the signed consent:
Has the client signed the paper agreement form
Date client signed consent
Regulations
Clients must have the option to consent to disclosing individual records without disclosing all records related to their treatment.
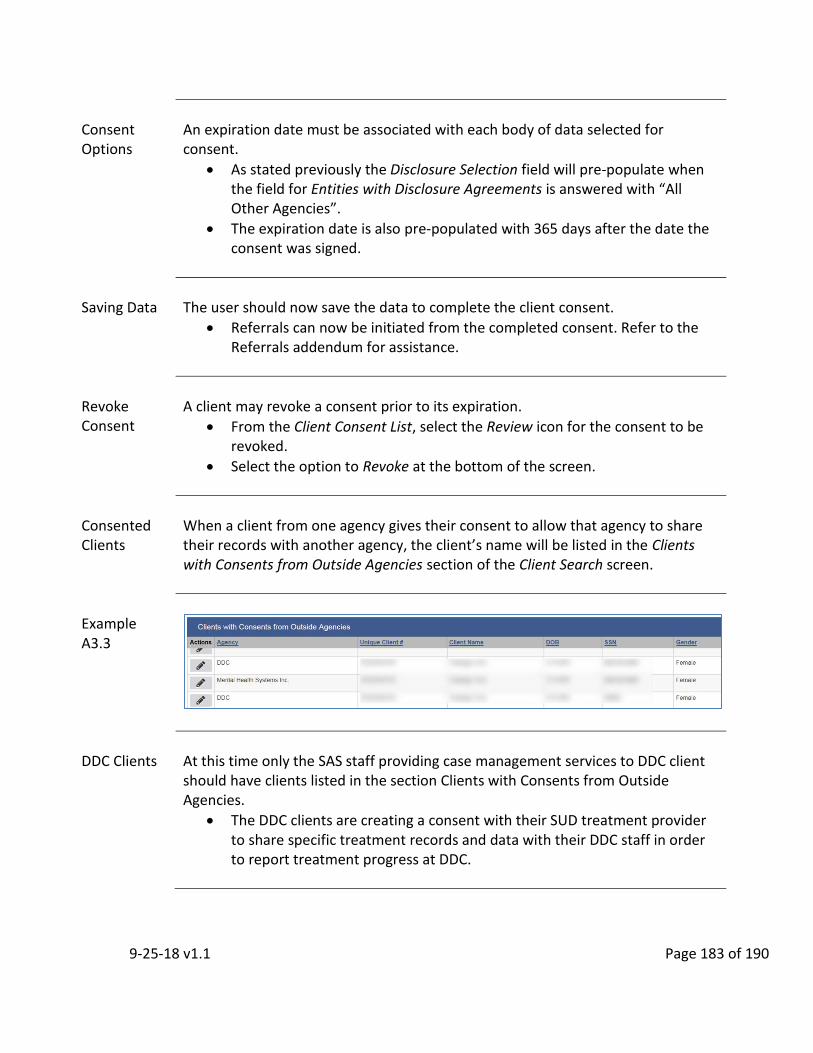
9-25-18 v1.1 Page 183 of 190
Consent Options
An expiration date must be associated with each body of data selected for consent.
As stated previously the Disclosure Selection field will pre-populate when the field for Entities with Disclosure Agreements is answered with “All Other Agencies”.
The expiration date is also pre-populated with 365 days after the date the consent was signed.
Saving Data
The user should now save the data to complete the client consent.
Referrals can now be initiated from the completed consent. Refer to the Referrals addendum for assistance.
Revoke Consent
A client may revoke a consent prior to its expiration.
From the Client Consent List, select the Review icon for the consent to be revoked.
Select the option to Revoke at the bottom of the screen.
Consented Clients
When a client from one agency gives their consent to allow that agency to share their records with another agency, the client’s name will be listed in the Clients with Consents from Outside Agencies section of the Client Search screen.
Example A3.3
DDC Clients
At this time only the SAS staff providing case management services to DDC client should have clients listed in the section Clients with Consents from Outside Agencies.
The DDC clients are creating a consent with their SUD treatment provider to share specific treatment records and data with their DDC staff in order to report treatment progress at DDC.

9-25-18 v1.1 Page 184 of 190
View Consented Activity
To view the consented client activity, select the action icon to open the Consented Activity List.
Review the Federal confidentiality rules regarding re-disclosure.
Consented activity will be listed. The user can review each consented activity by selecting the action icon for each record.
Example A3.4
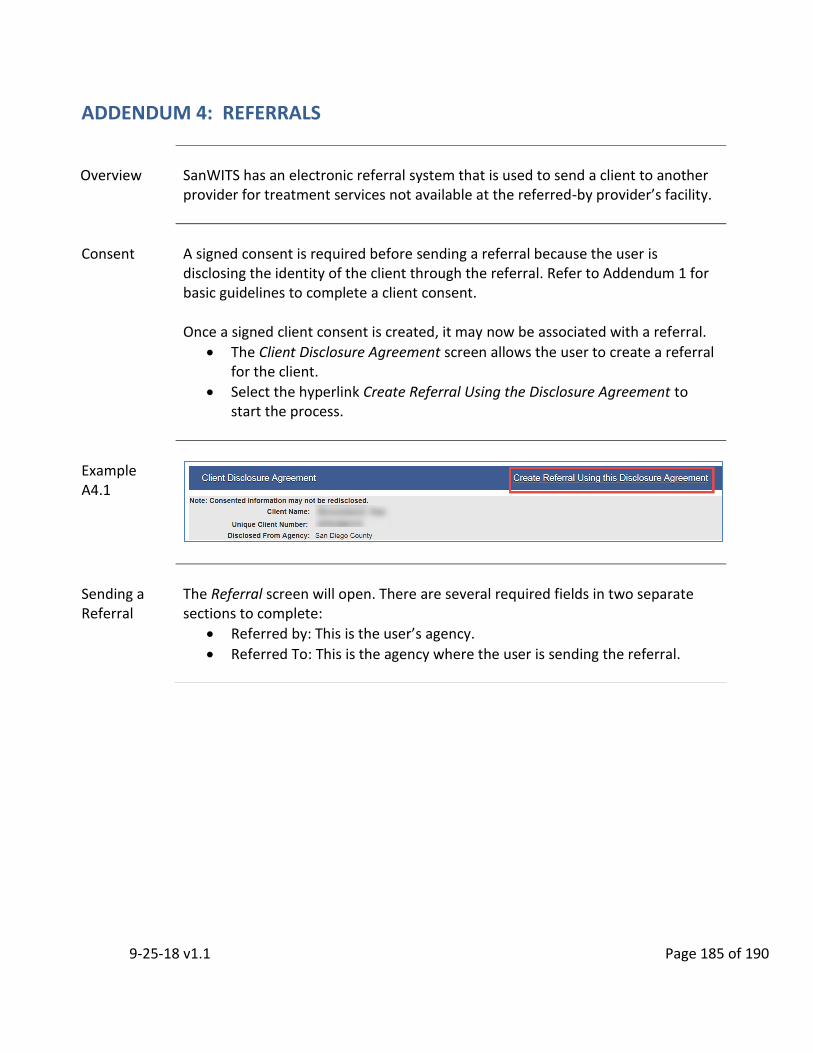
9-25-18 v1.1 Page 185 of 190
ADDENDUM 4: REFERRALS
Overview
SanWITS has an electronic referral system that is used to send a client to another provider for treatment services not available at the referred-by provider’s facility.
Consent
A signed consent is required before sending a referral because the user is disclosing the identity of the client through the referral. Refer to Addendum 1 for basic guidelines to complete a client consent. Once a signed client consent is created, it may now be associated with a referral.
The Client Disclosure Agreement screen allows the user to create a referral for the client.
Select the hyperlink Create Referral Using the Disclosure Agreement to start the process.
Example A4.1
Sending a Referral
The Referral screen will open. There are several required fields in two separate sections to complete:
Referred by: This is the user’s agency.
Referred To: This is the agency where the user is sending the referral.

9-25-18 v1.1 Page 186 of 190
Example A4.2
Referred By
There are several read-only fields that will pre-populate based on the user logged in to SanWITS. These fields cannot be changed:
Agency
Facility
Staff Member
State Reporting Agency
Created Date There are several required fields the user must answer. The appropriate answer is provided below:
Reason: Service not available at this facility
Is Consent Verification Required: Yes
Is Consent Verified: Yes
Continue this episode of care: No
Referral Status: Referral Created/Pending There are several fields that do not require data to save the referral.
DDC referrals are the exception to this requirement.
When referring a Dependency Drug Court client, the Comment field must include information regarding the client’s level (Level 1 or Level 2).

9-25-18 v1.1 Page 187 of 190
Referred To
There are several read-only fields that will pre-populate based on the user, the agency/facility referred to, and if the facility is a non-system agency.
Agency
State Reporting Category
Non-System Agency: This will become a writeable field when a consent is selected for a non-system agency.
Non-System Modality: This will become a writeable field when a consent is selected for a non-system agency.
Non-System Specifier: This will become a writeable field when a consent is selected for a non-system agency.
Consents Granted
There are several required fields the user must answer. The appropriate answer is provided below:
Signed Consent: This should match the consent for agency where the referral is being sent.
Facility: Select the facility from the drop down menu; if only one facility is available for this agency, the field will pre-populate with that facility.
Program: This is based on the programs/modalities available at the facility. There are several fields that do not require data to save the referral.
Staff Member
Appt Date
Saving Data
The user should save the data by selecting Save and Finish.
Activity List
The user can now view a client’s referrals in the Client Activity List.

9-25-18 v1.1 Page 188 of 190
Client Referral List
The user can also view a client’s referrals by viewing the Client Referral List. Select Client Profile > Activity List > Referrals to open the Client Referral List.
This list profiles more detailed information about each referral than what can be viewed from the Client Activity List without selecting each individual referral to view more information.
There is a hyperlink for Add New Client Referral Record. This is not the most ideal way to start a referral because as stated previously, a referral must be associated with a signed consent first.
Example A4.3
Referrals Out
The user can also view every referral sent out from their facility. Select Agency > Agency List > Referrals > Referrals Out to open the Referrals Out Search screen.
Select the Referral Status Codes
Add selected Referral Status Codes to Search Criteria by selecting the right arrow button.
Select Go.
View the referrals on the screen or export to Excel.
Example A4.4

9-25-18 v1.1 Page 189 of 190
Accepting a Referral
Referrals sent from one facility to another are identified with a Referral Created/Pending status.
Referral Warning
All pending referrals result in a blue information warning on each facility’s home screen.
The user cannot click this information warning to access the pending referrals.
Example A4.5
Referral Alert
All pending referrals will result in a new alert to the Alert List on the user’s home screen called Referrals In.
Select the alert’s action icon to go directly to the Referrals In Search screen.
Select the Referral Created/Pending status
Add selected Referral Status Codes to Search Criteria by selecting the right arrow button.
Select Go.
View the referrals on the screen or export to Excel.
Referrals In
The user can also view all pending referrals received by going directly to the Referrals In screen. Select Agency > Agency List > Referrals > Referrals In to open the screen.
Select the Referral Created/Pending status
Add selected Referral Status Codes to Search Criteria by selecting the right arrow button.
Select Go.
View the referrals on the screen or export to Excel.

9-25-18 v1.1 Page 190 of 190
Example A4.6
Review the Referral
Before accepting any referrals, the user should review the referral and consider a number of factors first:
If the client is appropriate for services available at their facility.
If there is a wait list.
If the client is already receiving services at their facility.
If the client is refusing services.
Example A4.7
9-25-18 v1.1 Page 191 of 190
Referral Status
After reviewing the referral, the user should update the Referral Status based on the following options:
Placed/Accepted
Referral Terminated
Refused Treatment
Rejected by Program
Wait List
Appt Date
If the client is scheduled for an appointment, the field for Appt Date should be updated. The status for this appointment date should also be updated to reflect one of the following options:
Canceled
Complete
Confirmed
Kept Appointment
No Show
Not kept appointment
Other
Rescheduled
Reserved for Contracting Agency
Scheduled
Undetermined
DDC Referrals
Status on pending referrals and appointment details are important to the DDC staff working with this clients. This information is used to report back to the courts.
Accepted Referral
When a pending referral’s status is changed to Placed/Accepted, the following occurs:
The client’s pending referral will be removed from the Referrals In list.
If the client does not already exist in the agency, the client profile will be copied into the user’s agency from the sending agency.
The user will be automatically taken to the Intake screen to start a new Episode for the client.

9-25-18 v1.1 Page 192 of 190
Referral Terminated
SanWITS will not allow pending referrals to be accepted when the clients already receiving treatment at the referred-to facility.
In these cases, update the Referral Status to “Referral Terminated”.
Best practice is to always review pending referrals prior to adding a new client to SanWITS.