sample in s t r u c t io n s - the home depot in s t r u c t io n s. x x x x x x ... (called a...
TRANSCRIPT

Manufactured by Reynolds Building Systems, Inc.205 Arlington Drive Greenville, PA 16125 724-646-3775
This manual is copyrighted. Under the copyright laws, this manualmay not be copied, in whole or in part, without consent from ReynoldsBuilding Systems, Inc. © Copyright 2011
the Easton DLX 16'x 12'
Revised June 25, 2011Assembly Book
Best Barns USA
SAMPLEINSTRUCTIONS

X XX X
XX
16"15-1/4"
2x4 Joist Header XX
16"
Nail 2x4 joist headers andfloor joist to 4x4.
It is important that the floor be level and square. Square the floor as follows: before nailing theflooring, measure the floor diagonally (corner to corner). Then measure the opposite corners.These measurements will be the same if the floor is square.
2x4 Floor Joistspaced 16" o.c.
2x4 Joist Header
4x4 Treated Runners
Flooring
Outside Measurement
When using a concrete slab for a floor, use the same overall foundation measurements. Installfoam sill sealer as a moisture barrier between the concrete and the wall plates. Foam sill sealeris available in rolls 3-1/2" or wider.
Typical Wood Floor System 12' x 16'
2. Cut 2x4-12' floor joist to 11'-9". Treated lumber may be thicker than 1-1/2". Take this intoaccount when cutting the length of floor joists. Shorten joist measurements if necessary toobtain 12'-0" building width.
1. Cut (2) two 2x4 joist headers to 15' - 7 1/2". Layout for 16" on center joist spacing. 'X' markswhere floor joist will be placed.
Material Description 12' x 16' shed2x4 Joist Headers 2 pcs. 16'2x4 Floor Joist 13 pcs. 12'4x4 Treated Runners 8 pcs. 8'Flooring 5/8" or 3/4" 6 pcs. 4x8Screw Floor Nails 2 lb. 8dGalv. Box Nails 2 lb. 16d
15' - 7 1/2" Floor Length 12' - 0" Wide
Shown below is a typical wood floor. Depending on your area, the construction mayhave to be changed to meet local codes.
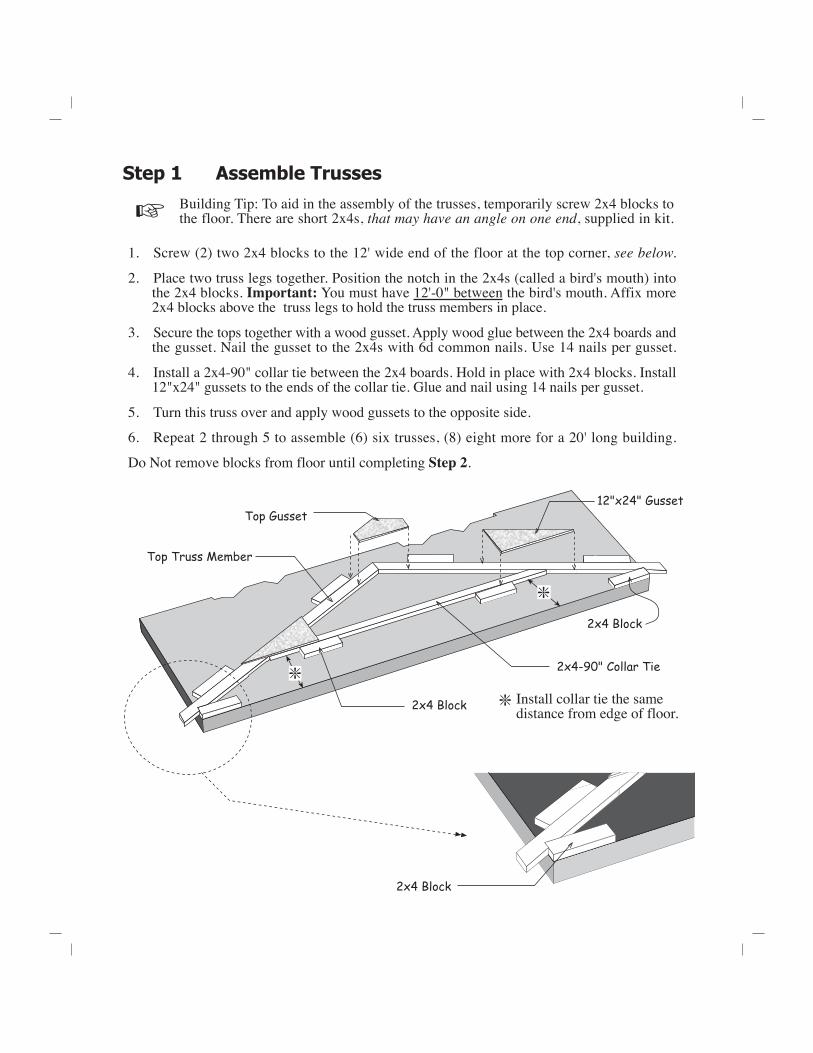
Step 1 Assemble TrussesBuilding Tip: To aid in the assembly of the trusses, temporarily screw 2x4 blocks tothe floor. There are short 2x4s, that may have an angle on one end, supplied in kit.
1. Screw (2) two 2x4 blocks to the 12' wide end of the floor at the top corner, see below.
2. Place two truss legs together. Position the notch in the 2x4s (called a bird's mouth) intothe 2x4 blocks. Important: You must have 12'-0" between the bird's mouth. Affix more2x4 blocks above the truss legs to hold the truss members in place.
3. Secure the tops together with a wood gusset. Apply wood glue between the 2x4 boards andthe gusset. Nail the gusset to the 2x4s with 6d common nails. Use 14 nails per gusset.
4. Install a 2x4-90" collar tie between the 2x4 boards. Hold in place with 2x4 blocks. Install12"x24" gussets to the ends of the collar tie. Glue and nail using 14 nails per gusset.
5. Turn this truss over and apply wood gussets to the opposite side.
6. Repeat 2 through 5 to assemble (6) six trusses, (8) eight more for a 20' long building.
Do Not remove blocks from floor until completing Step 2.
2x4 Block
Top Gusset12"x24" Gusset
2x4-90" Collar Tie
2x4 Block
2x4 Block !
!
Install collar tie the samedistance from edge of floor.
Top Truss Member
!
AA
BB
X XX X
X XX X
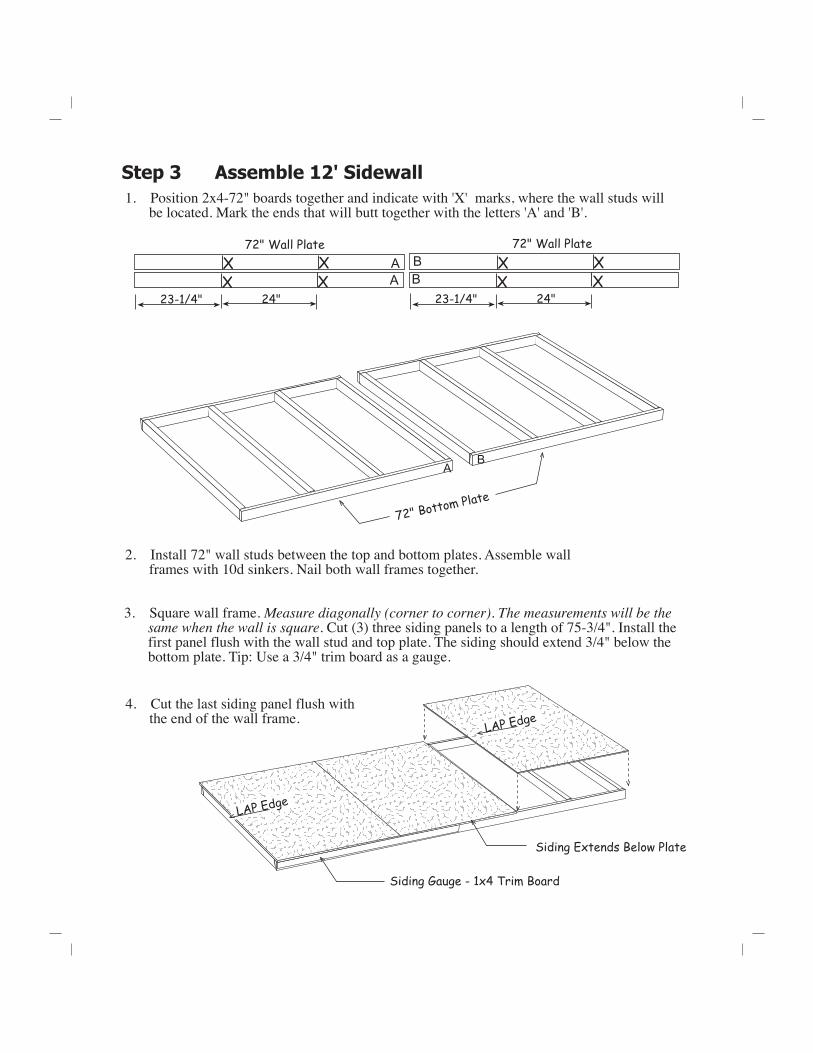
2. Install 72" wall studs between the top and bottom plates. Assemble wallframes with 10d sinkers. Nail both wall frames together.
4. Cut the last siding panel flush withthe end of the wall frame.
Step 3 Assemble 12' Sidewall
3. Square wall frame. Measure diagonally (corner to corner). The measurements will be thesame when the wall is square. Cut (3) three siding panels to a length of 75-3/4". Install thefirst panel flush with the wall stud and top plate. The siding should extend 3/4" below thebottom plate. Tip: Use a 3/4" trim board as a gauge.
Siding Extends Below Plate
1. Position 2x4-72" boards together and indicate with 'X' marks, where the wall studs willbe located. Mark the ends that will butt together with the letters 'A' and 'B'.
LAP Edge
LAP Edge
72" Wall Plate
24"23-1/4" 24"23-1/4"
72" Wall Plate
Siding Gauge - 1x4 Trim Board
72" Bottom Plate
AB

X X XX X X
X X XX X X
Do Not Nail Along This Edge
24" 24"
1. Position (4) four 2x4-90-1/4" boards together and indicate where the wall studs will belocated. Mark the ends that butt together with the letters 'A' and 'B'.
90-1/4" Wall Plate
17-1/2"
24" 24"23-1/4"
BB
AA
Step 6 Assemble Back Wall
2. Cut (4) four siding panels to a length of 75-1/4". Install a 46-1/2" siding panel with the cutedge extending 3-1/2" past the wall stud. The siding will extend 3/4" below bottom plate.Install a full width siding panel next to the first panel.
3. Install another full width siding panel but DO NOT nail the long edge that overlaps the 2ndsiding panel. You can nail this edge after the wall panels are installed later. This will enableyou to separate the wall panels making them easier to handle. Install the last siding panel.Cut the width to extend 3-1/2" past the wall frame.
CutEdge
46-1/2" WideSiding Panel
90-1/4" Wall Plate
Siding Extends3-1/2" Past Frame
A B
90-1/4" Wall Plate

flush
Cut 2x4 From Opening
Cut 2x4From Opening
1. Secure wall panels together at the corners and to the floor with 10d sinkers.2. Brace front wall with a 90-1/4" long 2x4.
Step 7 Set Wall Panels
3. Install (2) two 1x4x72-1/4" boards along each side of the front door opening. Tack theseboards with a couple nails; you may want to move the trim later when you install the doors.
4. Install a 1x4x41-1/2" board, that has angle cuts on both ends, over the door opening.
Step 8 Install End Wall Trim
1x4x75-3/4" Trim Board
Double DoorWall
1. Install 75-3/4" long 2x4 trim boards at the corners of the 12' end walls. Install the trim flushwith siding on the front and back walls. Use 8d galv. nails.
2. Cut (2) two 1x4-70" trim boards to fit between the corner trim, flush with the top of the wall.
3. Install (2) two 1x4x72-1/4" boardsalong each side of the door opening.Tack these boards with a couple nails;you may want to move the trim laterwhen you install the doors.
Siding Extends Below Trim

4. Install 1x6-87" trim boards flush with thetop of the gables. Use 8d galv. nails
1. Layout the truss spacing. Measure from the outside face of the gable siding when markingthe location of the first truss. Important: When marking the opposite wall, place the 'X' markon the same side of the line so your trusses are parallel when they are installed.
2. Using 1-1/2" hanger nails, install metal hangers to the 2x4 tie plate. The opening should lineup with the 'X' mark, the bottom of the opening, flush with the 2x4 tie plate. See Detail 'D'.
Inside of Building
Detail 'D'
3. Install trusses over the 'X' marks. Secure to metalhangers using 1-1/2" hanger nails.
Step 11 Install Roof Trusses
1x6 Gable Trim
22-1/2"
24"

3. Cut roof sheathing to fit across the top of the roof. If installing ridge vent, cut sheathing1" below the peak of the trusses. Install sheathing with 7d sinkers. Space nails 12" apart.
AirSpace
TrussShingles
Ridge vent providesideal ventilation.
Step 12 Install 1x6 Fascia & Roof Sheathing1. Install 1x6-80" fascia boards to the 2x4 trusses. Use 8d galv.
nails. Install the fascia so the bottom edge of the roofsheathing will rest on the beveled edge. Install 22-1/2"long 2x4s between the trusses to support the fasciaboards where they butt. See detail below.
2. Cut the last 1x6 fascia board to fit.
22-1/2" Block
4. Cut leftover exterior siding and install assoffit under the truss overhang.
5. Install 75-3/4" 1x4 corner trim. If necessary,cut trim to fit under the soffit.
1x6 Fascia
Soffit
4' x 8' 4' x 8'
48" Length48"96" Length
Insert 4x4' Sheathing for 20' Building
96" Length for 20' Building
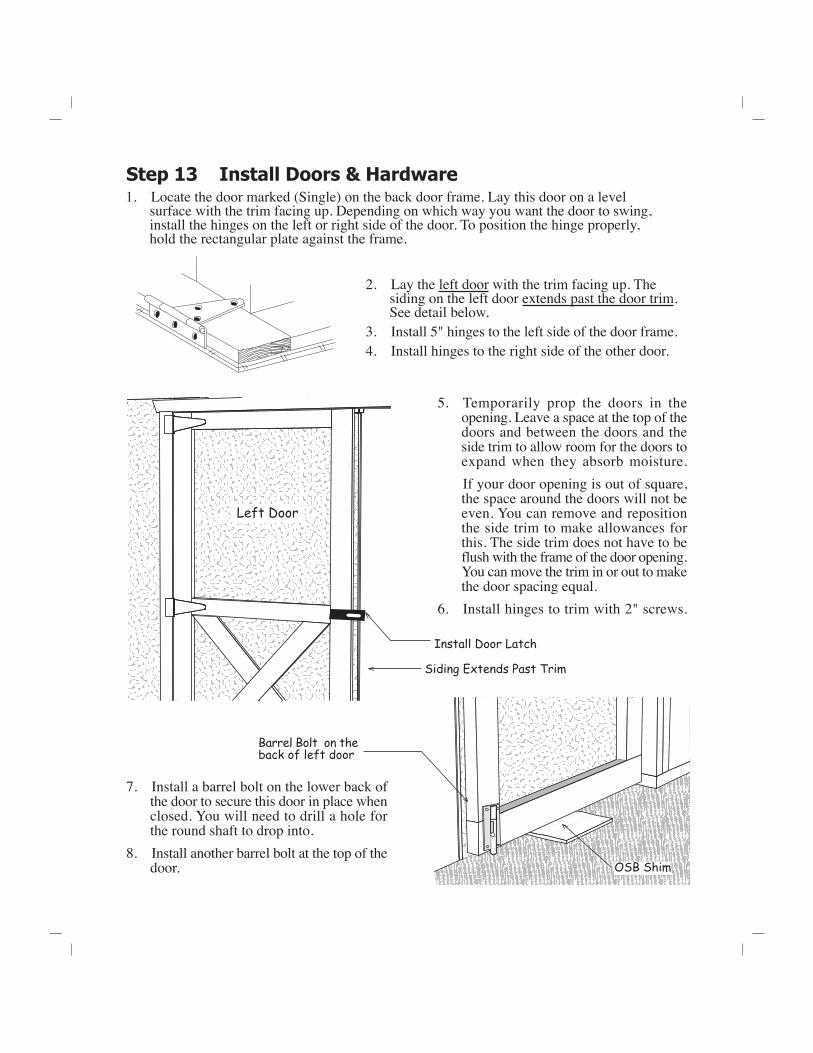
1. Locate the door marked (Single) on the back door frame. Lay this door on a levelsurface with the trim facing up. Depending on which way you want the door to swing,install the hinges on the left or right side of the door. To position the hinge properly,hold the rectangular plate against the frame.
Step 13 Install Doors & Hardware
5. Temporarily prop the doors in theopening. Leave a space at the top of thedoors and between the doors and theside trim to allow room for the doors toexpand when they absorb moisture.If your door opening is out of square,the space around the doors will not beeven. You can remove and repositionthe side trim to make allowances forthis. The side trim does not have to beflush with the frame of the door opening.You can move the trim in or out to makethe door spacing equal.
6. Install hinges to trim with 2" screws.
OSB Shim
2. Lay the left door with the trim facing up. Thesiding on the left door extends past the door trim.See detail below.
3. Install 5" hinges to the left side of the door frame.4. Install hinges to the right side of the other door.
7. Install a barrel bolt on the lower back ofthe door to secure this door in place whenclosed. You will need to drill a hole forthe round shaft to drop into.
8. Install another barrel bolt at the top of thedoor.
Barrel Bolt on theback of left door
Install Door Latch
Left Door
Siding Extends Past Trim