sample chapter - amazon web services chapter 10 processing text, files, and xml to work. initially,...
TRANSCRIPT

SAMPLE CHAPTER

Windows PowerShell in Actionby Bruce Payette
Chapter 10
Copyright 2007 Manning Publications

i
brief contents
Part 1 Learning PowerShell 1
1 Welcome to PowerShell 3
2 The basics 25
3 Working with types 55
4 Operators and expressions 87
5 Advanced operators and variables 115
6 Flow control in scripts 147
7 Functions and Scripts 177
8 Scriptblocks and objects 214
9 Errors, exceptions, and script debugging 251
Part 2 Using PowerShell 295
10 Processing text, files, and XML 297
11 Getting fancy—.NET and WinForms 344
12 Windows objects: COM and WMI 392
13 Security, security, security 440

297
C H A P T E R 1 0
Processing text, files, and XML10.1 Processing unstructured text 29810.2 File processing 30510.3 XML processing 32210.4 Summary 342
Where is human nature so weak as in the bookstore?
—Henry Ward Beecher
Outside of a dog, a book is man’s best friend. Inside of a dog, it’s toodark to read.
—Groucho Marx
One of the most common applications for scripting languages is processing text andtext files. In this chapter, we’re going to cover PowerShell's features for this kind of pro-cessing. We’ll revisit regular expressions and take another look at the language featuresand cmdlets that are provided for dealing with text. This chapter also covers the featuresthat PowerShell offers for dealing with a special kind of text—XML—as strings and infiles. In the process, we’ll see how to use the .NET classes to accomplish tasks when thenative PowerShell language features may not be sufficient.
298 CHAPTER 10 PROCESSING TEXT, FILES, AND XML
10.1 PROCESSING UNSTRUCTURED TEXT
While PowerShell is an object-based shell, it still has to deal with text. In chapter 4,we covered the operators (-match, -replace, -like) that PowerShell provides forworking with text. We showed how to concatenate two strings together using theplus operator. In this section, we’ll cover some of the more advanced string process-ing operations. We’ll discuss techniques for splitting and joining strings using the[string] and [regex] members, and using filters to extract statistical informationfrom a body of text.
10.1.1 Using System.String to work with text
One common scenario for scripting is processing log files. This requires breaking thelog strings into pieces to extract relevant bits of information. Unfortunately, Power-Shell has no split operator, so there is no way to split a string into pieces in the lan-guage itself. This is where our support for .NET is very important. If you want to splita string into pieces, you use the Split() method on the [string] class.
PS (1) > "Hello there world".Split()Hellothereworld
The Split() method with no arguments splits on spaces. In this example, it pro-duces an array of three elements.
PS (2) > "Hello there world".Split().length3
We can verify this with the length property. In fact, it splits on any of the charactersthat fall into the WhiteSpace character class. This includes tabs, so it works properlyon a string containing both tabs and spaces.
PS (3) > "Hello`tthere world".Split()Hellothereworld
In the revised example, we still get three fields, even though space is used in one placeand tab in another.
And while the default is to split on a whitespace character, you can specify a stringof characters to use split fields.
PS (4) > "First,Second;Third".Split(',;')FirstSecondThird
Here we specified the comma and the semicolon as valid characters to split the field.

PROCESSING UNSTRUCTURED TEXT 299
There is, however, an issue; the default behavior for “split this” isn’t necessarilywhat you want. The reason why is that it splits on each separator character. Thismeans that if you have multiple spaces between words in a string, you’ll get multipleempty elements in the result array. For example:
PS (5) > "Hello there world".Split().length6
In this example, we end up with six elements in the array because there are threespaces between “there” and “world”. Let’s find out if there’s a better way to do this.
Using SplitStringOptions
The string method we’ve been using has worked well so far, but we’ve gotten to thepoint where we need to add some cmdlets to help us out. In this case, we’ll use theGet-Member cmdlet to look at the signature of the Split() method:
PS (6) > ("hello" | gm split).definitionSystem.String[] Split(Params Char[] separator), System.String[]Split(Char[] separator, Int32 count), System.String[] Split(Char[] separator, StringSplitOptions options), System.String[] Split(Char[] separator, Int32 count, StringSplitOptions options), System.String[] Split(String[] separator, StringSplitOptions options), System.String[] Split(String[] separator, Int32 count, StringSplitOptions options)
The default display of the definition is a little hard to read. Fortunately, we now knowhow to split a string.
PS (7) > ("hello" | gm split).definition.split(',')System.String[] Split(Params Char[] separator) System.String[] Split(Char[] separator Int32 count) System.String[] Split(Char[] separator StringSplitOptions options) System.String[] Split(Char[] separator Int32 count StringSplitOptions options) System.String[] Split(String[] separator StringSplitOptions options) System.String[] Split(String[] separator Int32 count StringSplitOptions options)
It’s not perfect as it split on the method argument commas as well; but we can still readit. The methods that take the options argument look promising. Let’s see what theSplitStringOptions are. We’ll do this by trying to cast a string into these options.
PS (8) > [StringSplitOptions] "abc"Cannot convert value "abc" to type "System.StringSplitOptions" due to invalid enumeration values. Specify one of the following e
300 CHAPTER 10 PROCESSING TEXT, FILES, AND XML
numeration values and try again. The possible enumeration values are "None, RemoveEmptyEntries".At line:1 char:21+ [StringSplitOptions] <<<< "abc"
The error message tells us the legitimate values for the enumeration. If we look thisclass up in the online documentation on MSDN, we’ll see that this option tells theSplit() method to discard empty array elements. This sounds just like what weneed, so let’s try it:
PS (9) > "Hello there world".split(" ",>> [StringSplitOptions]::RemoveEmptyEntries)>>Hellothereworld
It works as desired. Now we can apply this to a larger problem.
Analyzing word use in a document
Given a body of text, we want to find the number of words in the text as well as thenumber of unique words, and then display the 10 most common words in the text.For our purposes, we’ll use one of the PowerShell help text files: about_Assign-ment_operators.help.txt. This is not a particularly large file (it’s around 17 kilobytes)so we can just load it into memory using the Get-Content (gc) cmdlet.
PS (10) > $s = gc $PSHOME/about_Assignment_operators.help.txtPS (11) > $s.length434
The variable $s now contains the text of the file as a collection of lines (434 lines, tobe exact.) This is usually what we want, since it lets us process a file one line at time.But, in this example, we actually want to process this file as a single string. To do sowe’ll use the String.Join() method and join all of the lines, adding an additionalspace between each line.
PS (12) > $s = [string]::join(" ", $s)PS (13) > $s.length17308
Now $s contains a single string containing the whole text of the file. We verified thisby checking the length rather than displaying it. Next we’ll split it into an array of words.
PS (14) > $words = $s.split(" `t",>> [stringsplitoptions]::RemoveEmptyEntries)>>PS (15) > $words.length2696

PROCESSING UNSTRUCTURED TEXT 301
So the text of the file has 2,696 words in it. We need to find out how many uniquewords there are. There are a couple ways of doing this. The easiest way is to use theSort-Object cmdlet with the -unique parameter. This will sort the list of wordsand then remove all of the duplicates.
PS (16) > $uniq = $words | sort -uniqPS (17) > $uniq.count533
This help topic contains 533 unique words. Using the Sort cmdlet is fast and sim-ple, but it doesn’t cover everything we said we wanted to do, because it doesn’t givethe frequency of use. Let’s look at another approach: using the Foreach-Objectcmdlet and a hashtable.
Using hashtables to count unique words
In the previous example, we used the -unique parameter to Sort-Object to gen-erate a list of unique words. Now we’ll take advantage of the set-like behavior of hash-tables to do the same thing, but in addition we will be able to count the number ofoccurrences of each word.
In mathematics, a set is simply a collection of unique elements. This is howthe keys work in a hashtable. Each key in a hashtable occurs exactly once.Attempting to add a key more than once will result in an error. In Power-Shell, assigning a new value to an existing key simply replaces the old valueassociated with that key. The key itself remains unique. This turns out tobe a powerful technique, because it’s a way of building index tables for col-lections of objects based on arbitrary property values. These index tables letus run database-like operations on object collections. See section B.9 for anexample of how you can use this technique to implement a SQL-like “join”operation on two collections of objects.
Once again, we split the document into a stream of words. Each word in the streamwill be used as the hashtable key, and we’ll keep the count of the words in the value.Here’s the script:
PS (18) > $words | % {$h=@{}} {$h[$_] += 1}
It’s not really much longer than the previous example. We’re using the % alias forForeach-Object to keep it short. In the begin clause in Foreach-Object, we’reinitializing the variable $h to hold the resulting hashtable. Then, in the processscriptblock, we increment the hashtable entry indexed by the word. We’re takingadvantage of the way arithmetic works in PowerShell. If the key doesn’t exist yet, thehashtable returns $null. When $null is added to a number, it is treated as zero.This allows the expression
$h[$_] += 1
AUTHOR’S NOTE

302 CHAPTER 10 PROCESSING TEXT, FILES, AND XML
to work. Initially, the hashtable member for a given key doesn’t exist. The += operatorretrieves $null from the table, converts it to 0, adds one, then assigns the value backto the hashtable entry.
Let’s verify that the script produces the same answer for the number of words aswe found with the Sort -Unique solution.
PS (19) > $h.psbase.keys.count533
We have 533, the same as before.
Notice that we used $h.psbase.keys.count. This is because there isa member in the hashtable that hides the keys property. In order to accessthe base keys member, we need to use the PSBase property to get at thebase member on the hashtable.
Now we have a hashtable containing the unique words and the number of times eachword is used. But hashtables aren’t stored in any particular order, so we need to sort it.We’ll use a scriptblock parameter to specify the sorting criteria. We’ll tell it to sort thelist of keys based on the frequency stored in the hashtable entry for that key.
PS (20) > $frequency = $h.psbase.keys | sort {$h[$_]}
The words in the sorted list are ordered from least frequent to most frequent. Thismeans that $frequency[0] contains the least frequently used word.
PS (21) > $frequency[0]avoid
And the last entry in frequency contains the most commonly used word. If youremember from chapter 3, we can use negative indexing to get the last element ofthe list.
PS (22) > $frequency[-1]the
It comes as no surprise that the most frequent word is “the” and it’s used 300 times.
PS (23) > $h["The"]300
The next most frequent word is “and”, which is used 126 times.
PS (24) > $h[$frequency[-2]]126PS (25) > $frequency[-2]to
Here are the top 10 most frequently used words the about_Assignment_oper-ators help text:
PS (26) > -1..-10 | %{ $frequency[$_]+" "+$h[$frequency[$_]]}the 300to 126
AUTHOR’S NOTE

PROCESSING UNSTRUCTURED TEXT 303
value 88a 86you 68variable 64of 55$varA 41For 41following 37
PowerShell includes a cmdlet that is also useful for this kind of task: the Group-Object cmdlet. This cmdlet groups its input objects by into collections sorted bythe specified property. This means that we can achieve the same type of ordering bythe following:
PS (27) > $grouped = $words | group | sort count
Once again, we see that the most frequently used word is “the”:
PS (28) > $grouped[-1]
Count Name Group----- ---- ----- 300 the {the, the, the, the...}
And we can display the 10 most frequent words by doing:
PS (29) > $grouped[-1..-10]
Count Name Group----- ---- ----- 300 the {the, the, the, the...} 126 to {to, to, to, to...} 88 value {value, value, value, value...} 86 a {a, a, a, a...} 68 you {you, You, you, you...} 64 variable {variable, variable, variable... 55 of {of, of, of, of...} 41 $varA {$varA, $varA, $varA, $varA...} 41 For {For, for, For, For...} 37 following {following, following, follow...
We create a nicely formatted display courtesy of the formatting and output subsystembuilt into PowerShell.
In this section, we saw how to split strings using the methods on the string class.We even saw how to split strings on a sequence of characters. But in the world ofunstructured text, you’ll quickly run into examples where the methods on [string]are not enough. As is so often the case, regular expressions come to the rescue. In thenext couple of sections, we’ll see how we can do more sophisticated string processingusing the [regex] class.

304 CHAPTER 10 PROCESSING TEXT, FILES, AND XML
10.1.2 Using regular expressions to manipulate text
In the previous section, we looked at basic string processing using members on the[string] class. While there’s a lot of potential with this class, there are times whenyou need to use more powerful tools. This is where regular expressions come in. Aswe discussed in chapter 4, regular expressions are a mini-language for matching andmanipulating text. We covered a number of examples using regular expressions withthe -match and -replace operators. This time, we’re going to work with the regu-lar expression class itself.
Splitting strings with regular expressions
As mentioned in chapter 3, there is a shortcut [regex] for the regular expression type.The [regex] type also has a Split() method, but it’s much more powerful becauseit uses a regular expression to decide where to split strings instead of a single character.
PS (1) > $s = "Hello-1-there-22-World!"PS (2) > [regex]::split($s,'-[0-9]+-')HellothereWorld!PS (3) > [regex]::split($s,'-[0-9]+-').count3
In this example, the fields are separated by a sequence of digits bound on either sideby a dash. This is a pattern that couldn’t be specified with String.Split().
When working with the .NET regular expression library, the [regex] class isn’tthe only class that you’ll run into. We’ll see this in the next example, when we take alook at using regular expressions to tokenize a string.
Tokenizing text with regular expressions
Tokenization, or the process of breaking a body of text into a stream of individualsymbols, is a common activity in text processing. In chapter 2 we talked a lot abouthow the PowerShell interpreter has to tokenize a script before it can be executed. Inthe next example, we’re going to look at how we might write a simple tokenizer forbasic arithmetic expressions in a programming language. First we need to define thevalid tokens in these expressions. We want to allow numbers made up of one or moredigits; any of the operators +,-,*, /; and we’ll also allow sequences of spaces. Here’swhat the regular expression to match these elements looks like:
PS (4) > $pat = [regex] "[0-9]+|\+|\-|\*|/| +"
This is a pretty simple pattern using only the alternation operator “|” and the quanti-fier “+”, which matches one or more instances. Since we used the [regex] cast inthe assignment, $pat contains a regular expression object. We can use this objectdirectly against an input string by calling its Match() operator.
PS (5) > $m = $pat.match("11+2 * 35 -4")

FILE PROCESSING 305
The Match() operator returns a Match object (full name System.Text.Regular-Expressions.Match). We can use the Get-Member cmdlet to explore the full set ofmembers on this object at our leisure, but for now we’re interested in only three mem-bers. The first member is the Success property. This will be true if the patternmatched. The second interesting member is the Value member, which will containthe matched value. The final member we’re interested in is the NextMatch() method.Calling this method will step the regular expression engine to the next match in thestring, and is the key to tokenizing an entire expression. We can use this method in awhile loop to extract the tokens from the source string one at a time. In the example,we keep looping as long the Match object’s Success property is true. Then we displaythe Value property and call NextMatch() to step to the next token:
PS (6) > while ($m.Success)>> {>> $m.value>> $m = $m.NextMatch()>> }>>11+2
*
35
-4
In the output, we see each token, one per line in the order they appeared in the origi-nal string.
We now have a powerful collection of techniques for processing strings. The nextstep is to apply these techniques to processing files. Of course, we also need to spendsome time finding, reading, writing, and copying files. In the next section, we’llreview the basic file abstractions in PowerShell and then look at file processing.
10.2 FILE PROCESSING
Let’s step back for a minute and talk about files, drives and navigation. PowerShellhas a provider abstraction that allows the user to work with system data stores asthough they were drives. A provider is a piece of installable software that surfaces adata store in the form that can be mounted as a “drive”.

306 CHAPTER 10 PROCESSING TEXT, FILES, AND XML
By installable, we mean that the end user can install new providers or evenwrite their own providers. This activity is outside the scope of this book,however. Refer to the PowerShell user documentation for information onhow to install additional providers. The PowerShell Software Developer’sKit includes documentation and examples that can help you write yourown providers.
These drives are a PowerShell “fiction”; that is, they only have meaning to PowerShellas opposed to system drives that have meaning everywhere. Also, unlike the systemdrives, PowerShell drive names can be longer than one character.
We’ve already seen some examples of non-filesystem providers in earlier chapters,where we worked with the variable: and function: drives. These providers letyou use the New-Item and Remove-Item cmdlets to add and remove variables orfunctions just as if they were files.
A key piece to making this provider abstraction is the set of core cmdlets listed intable 10.1. These cmdlets are the “core” set of commands for manipulating the sys-tem and correspond to commands found in other shell environments. Because thesecommands are used so frequently, short aliases—the canonical aliases—are providedfor the commands. By canonical, we mean that they follow a standard form: usuallythe first letter or two of the verb followed by the first letter or two of the noun. Twoadditional sets of “user migration” aliases are provided to help new users work withthe system. There is one set for cmd.exe users and one set for UNIX shell users. Notethat these aliases only map the name; they don’t provide exact functional correspon-dence to either the cmd.exe or UNIX commands.
Table 10.1 The core cmdlets for working with files and directories
Cmdlet
name
Canonica
l alias
cmd
command
UNIX sh
commandDescription
Get-Location gl pwd pwd Get the current directory.
Set-Location sl cd, chdir cd, chdir Change the current directory.
Copy-Item cpi copy cp Copy files.
Remove-Item ri delrd
rmrmdir
Remove a file or directory. PowerShell has no separate command for removing directories as opposed to files.
Move-Item mi move mv Move a file.
Rename-Item rni Rn ren Rename a file.
Set-Item si Set the contents of a file.
Clear-Item cli Clear the contents of a file.
New-Item ni Create a new empty file or directory. The type of object is controlled by the -type parameter.
continued on next page
AUTHOR’S NOTE
FILE PROCESSING 307
On-line help is available for all of these commands; simply type
help cmdlet-name
and you’ll receive detailed help on the cmdlets, their parameters, and some simpleexamples of how to use them. In the next few sections, we’ll look at some moresophisticated applications of these cmdlets, including how to deal with binary data.In traditional shell environments, binary data either required specialized commandsor forced us to create new executables in a language such as C, because the basic shellmodel couldn’t cope with binary data. We’ll see how PowerShell can work directlywith binary data. But first, let’s take a minute to look at the PowerShell drive abstrac-tion to simplify working with paths.
10.2.1 Working with PSDrives
One useful aspect of the PowerShell provider feature is the ability to create your owndrives. To keep people from mixing up the PowerShell drives with the system drives,we call these PSDrives. A common reason for creating a PSDrive is to create a shortpath for getting at a system resource. For example, it might be convenient to have a“docs:” drive that points to our document directory. We can create this using theNew-PSDrive cmdlet:
PS (1) > new-psdrive -name docs -PSProvider filesystem `>> -Root (resolve-path ~/*documents)>>
Name Provider Root Current Location---- -------- ---- --------docs FileSystem C:\Documents and Settings\brucep
Now we can cd into this drive
PS (2) > cd docs:
Mkdir md mkdir Mkdir is implemented as a function in Power-Shell so that users can create directories with- out having to specify –type directory.
Get-Content gc type cat Send the contents of a file to the output stream.
Set-Content sc Set the contents of a file. UNIX and cmd.exe have no equivalent. Redirection is used instead. The difference between Set-Con-tent and Out-File is discussed later in this chapter.
Table 10.1 The core cmdlets for working with files and directories (continued)
Cmdlet
name
Canonica
l alias
cmd
command
UNIX sh
commandDescription

308 CHAPTER 10 PROCESSING TEXT, FILES, AND XML
then use pwd (an alias for Get-Location) to see where we are:
PS (3) > pwd
Path----docs:\
We are, at least according to PowerShell, in the docs: drive. Let’s create a file here:
PS (4) > "Hello there!" > junk.txt
Next, try to use cmd.exe to display it (we’ll get to why we’re doing this in a second):
PS (5) > cmd /c type junk.txtHello there!
Well, that works fine. Display it using Get-Content with the fully qualified path,including the docs: drive.
PS (6) > get-content docs:/junk.txtHello there!
This works as expected. But when we try this with cmd.exe
PS (7) > cmd /c type docs:/junk.txtThe syntax of the command is incorrect.
it fails! This is because non-PowerShell applications don’t understand the PowerShelldrive fiction.
Do you remember the earlier example, where we did a “cd” to the location first,that it did work? This is because when we’re “in” that drive, the system automaticallysets the current directory properly to the physical path for the child process. This iswhy using relative paths from cmd.exe works. However, when we pass in a Power-Shell path, it fails. There is another workaround for this besides doing a cd. You canuse the Resolve-Path cmdlet to get the ProviderPath. This cmdlet takes thePowerShell “logical” path and translates it into the provider’s native physical path.This means that it’s the “real” file system path that non-PowerShell utilities canunderstand. We’ll use this to pass the real path to cmd.exe:
PS (7) > cmd /c type (resolve-path docs:/junk.txt).ProviderPathHello there!
This time, it works. This is an area where we need to be careful and think about howthings should work with non-PowerShell applications. If we wanted to open a filewith notepad.exe in the doc: directory, we’d have to do the same thing we did forcmd.exe and resolve the path first:
notepad (resolve-path docs:/junk.txt).ProviderPath

FILE PROCESSING 309
If you frequently use notepad then you can create a function in your profile:
function notepad { $args | %{ notepad.exe (resolve-path $_)/ProviderPath}
You could even create a function to launch an arbitrary executable:
function run-exe{ $cmd, $files = $args $cmd = (resolve-path $path).ProviderPath $file | %{ & $cmd (resolve-path $_).ProviderPath }}
This function resolves both the file to edit and the command to run. This means thatyou can use a PowerShell drive to map a command path to execute.
10.2.2 Working with paths that contain wildcards
Another great feature of the PowerShell provider infrastructure is universal supportfor wildcards (see chapter 4 for details on wildcard patterns). We can use wildcardsany place we can navigate to, even in places such as the alias: drive. For example,say you want to find all of the aliases that begin with “gc”. You can do this with wild-cards in the alias provider.
PS (1) > dir alias:gc*
CommandType Name Definition----------- ---- ----------Alias gc Get-ContentAlias gci Get-ChildItemAlias gcm Get-Command
We see that there are three of them.We might all agree that this is a great feature, but there is a downside. What hap-
pens when you want to access a path that contains one of the wildcard meta-characters:“?”, “*”, “[” and “]”. In the Windows filesystem, “*” and “?” aren’t a problem becausewe can’t use these characters in a file or directory name. But we can use “[” and “]”. Infact, they are used quite a bit for temporary Internet files. Working with files whosenames contain “[” or “]” can be quite a challenge because of the way wildcards andquoting (see chapter 3) work. Square brackets are used a lot in filenames in browsercaches to avoid collisions by numbering the files. Let’s run some experiments on someof the files in the IE cache.
Here’s another tip. By default, the Get-ChildItem cmdlet (and its aliasdir) will not show hidden files. To see the hidden files, use the -Forceparameter. For example, to find the “Application Data” directory in ourhome directory, we try
PS (1) > dir ~/app*
AUTHOR’S NOTE

310 CHAPTER 10 PROCESSING TEXT, FILES, AND XML
but nothing is returned. This is because this directory is hidden. To see thedirectory, we use -Force as in:
PS (2) > dir ~/app* -Force
Directory:Microsoft.PowerShell.Core\FileSystem::C:\Docum ents and Settings\brucepay
Mode LastWriteTime Length Name---- ------------- ------ ----d-rh- 12/14/2006 9:13 PM Application Data
and now the directory is visible. We’ll need to use -force to get into thedirectory containing the temporary Internet files.
Suppressing wildcard processing in paths
In one of the directories used to cache temporary Internet files, we want to find all ofthe files that begin with “thumb*”. This is easy enough:
PS (2) > dir thumb*
Directory: Microsoft.PowerShell.Core\FileSystem::C:\Doc uments and Settings\brucepay\Local Settings\Temporary I nternet Files\Content.IE5\MYNBM9OJ
Mode LastWriteTime Length Name---- ------------- ------ -----a--- 9/7/2006 10:34 PM 4201 ThumbnailServe r[1].jpg-a--- 9/7/2006 10:35 PM 3223 ThumbnailServe r[2].jpg-a--- 7/8/2006 7:58 PM 2066 thumb[1].jpg
-a--- 9/11/2006 2:48 PM 12476 thumb[2].txt-a--- 9/11/2006 2:48 PM 11933 thumb[3].txt
We get five files. Now we want to limit the set of files to things that match “thumb[”.We try this directly using a wildcard pattern:
PS (3) > dir thumb[*Get-ChildItem : Cannot retrieve the dynamic parameters forthe cmdlet. The specified wildcard pattern is not valid: thumb[*At line:1 char:3+ ls <<<< thumb[*
Of course, it fails because the “[” is being treated as part of a wildcard pattern. Clearlywe need to suppress treating “[” as a wildcard by escaping it. The obvious first step,per chapter 4, is to try a single backtick
PS (4) > dir thumb`[*Get-ChildItem : Cannot retrieve the dynamic parameters forthe cmdlet. The specified wildcard pattern is not valid: th

FILE PROCESSING 311
umb\[*At line:1 char:3+ ls <<<< thumb`[*
This fails because the single backtick is discarded in the parsing process. In fact, ittakes four backticks to cause the square bracket to be treated as a regular character.
PS (5) > dir thumb````[*
Directory: Microsoft.PowerShell.Core\FileSystem::C:\Doc uments and Settings\brucepay\Local Settings\Temporary I nternet Files\Content.IE5\MYNBM9OJ
Mode LastWriteTime Length Name---- ------------- ------ -----a--- 7/8/2006 7:58 PM 2066 thumb[1].jpg-a--- 9/11/2006 2:48 PM 12476 thumb[2].txt-a--- 9/11/2006 2:48 PM 11933 thumb[3].txt
This is because one set of backticks is removed by the interpreter and a second set isremoved by the provider itself. (This second round of backtick removal is so we canuse escaping to represent filenames that contain literal quotes.) Putting single quotesaround the pattern keeps the interpreter from doing escape processing in the string,simplifying this to only needing two backticks:
PS (8) > ls 'thumb``[*'
Directory: Microsoft.PowerShell.Core\FileSystem::C:\Doc uments and Settings\brucepay\Local Settings\Temporary I nternet Files\Content.IE5\MYNBM9OJ
Mode LastWriteTime Length Name---- ------------- ------ -----a--- 7/8/2006 7:58 PM 2066 thumb[1].jpg-a--- 9/11/2006 2:48 PM 12476 thumb[2].txt-a--- 9/11/2006 2:48 PM 11933 thumb[3].txt
In this particular example, much of the complication arises because we want some ofthe meta-characters to be treated as literal characters, while the rest still do patternmatching. Trial and error is usually the only way to get this right.
As we’ve said previously, this stuff is hard. It’s hard to understand and it’shard to get right. But this problem exists in every language that does patternmatching. Patience, practice, and experimentation are the only ways to fig-ure it out.
AUTHOR’S NOTE
312 CHAPTER 10 PROCESSING TEXT, FILES, AND XML
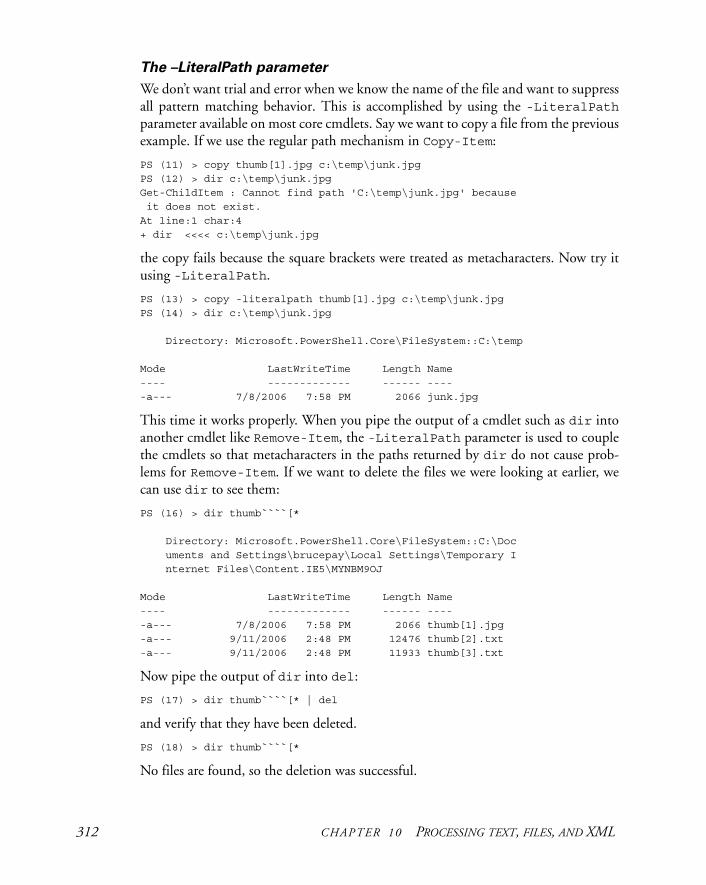
The –LiteralPath parameter
We don’t want trial and error when we know the name of the file and want to suppressall pattern matching behavior. This is accomplished by using the -LiteralPathparameter available on most core cmdlets. Say we want to copy a file from the previousexample. If we use the regular path mechanism in Copy-Item:
PS (11) > copy thumb[1].jpg c:\temp\junk.jpgPS (12) > dir c:\temp\junk.jpgGet-ChildItem : Cannot find path 'C:\temp\junk.jpg' because it does not exist.At line:1 char:4+ dir <<<< c:\temp\junk.jpg
the copy fails because the square brackets were treated as metacharacters. Now try itusing -LiteralPath.
PS (13) > copy -literalpath thumb[1].jpg c:\temp\junk.jpgPS (14) > dir c:\temp\junk.jpg
Directory: Microsoft.PowerShell.Core\FileSystem::C:\temp
Mode LastWriteTime Length Name---- ------------- ------ -----a--- 7/8/2006 7:58 PM 2066 junk.jpg
This time it works properly. When you pipe the output of a cmdlet such as dir intoanother cmdlet like Remove-Item, the -LiteralPath parameter is used to couplethe cmdlets so that metacharacters in the paths returned by dir do not cause prob-lems for Remove-Item. If we want to delete the files we were looking at earlier, wecan use dir to see them:
PS (16) > dir thumb````[*
Directory: Microsoft.PowerShell.Core\FileSystem::C:\Doc uments and Settings\brucepay\Local Settings\Temporary I nternet Files\Content.IE5\MYNBM9OJ
Mode LastWriteTime Length Name---- ------------- ------ -----a--- 7/8/2006 7:58 PM 2066 thumb[1].jpg-a--- 9/11/2006 2:48 PM 12476 thumb[2].txt-a--- 9/11/2006 2:48 PM 11933 thumb[3].txt
Now pipe the output of dir into del:
PS (17) > dir thumb````[* | del
and verify that they have been deleted.
PS (18) > dir thumb````[*
No files are found, so the deletion was successful.
FILE PROCESSING 313
This essentially covers the issues around working with file paths. From here wecan move on to working with the file contents instead.
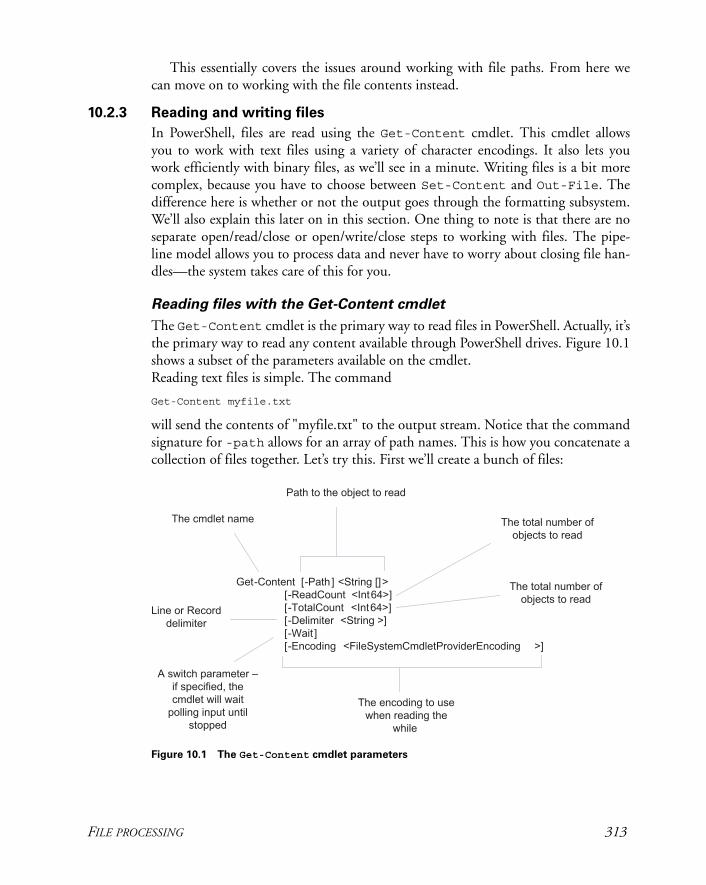
10.2.3 Reading and writing files
In PowerShell, files are read using the Get-Content cmdlet. This cmdlet allowsyou to work with text files using a variety of character encodings. It also lets youwork efficiently with binary files, as we’ll see in a minute. Writing files is a bit morecomplex, because you have to choose between Set-Content and Out-File. Thedifference here is whether or not the output goes through the formatting subsystem.We’ll also explain this later on in this section. One thing to note is that there are noseparate open/read/close or open/write/close steps to working with files. The pipe-line model allows you to process data and never have to worry about closing file han-dles—the system takes care of this for you.
Reading files with the Get-Content cmdlet
The Get-Content cmdlet is the primary way to read files in PowerShell. Actually, it’sthe primary way to read any content available through PowerShell drives. Figure 10.1shows a subset of the parameters available on the cmdlet.Reading text files is simple. The command
Get-Content myfile.txt
will send the contents of "myfile.txt" to the output stream. Notice that the commandsignature for -path allows for an array of path names. This is how you concatenate acollection of files together. Let’s try this. First we’ll create a bunch of files:
Get-Content [-Path ] <String []> [-ReadCount <Int64>] [-TotalCount <Int64>] [-Delimiter <String >] [-Wait ] [-Encoding <FileSystemCmdletProviderEncoding >]
The cmdlet name
Path to the object to read
The total number of objects to read
The encoding to use when reading the
while
A switch parameter – if specified, the cmdlet will wait
polling input until stopped
Line or Record delimiter
The total number of objects to read
Figure 10.1 The Get-Content cmdlet parameters

314 CHAPTER 10 PROCESSING TEXT, FILES, AND XML
PS (1) > 1..3 | %{ "This is file $_" > "file$_.txt"}PS (2) > dir
Directory: Microsoft.PowerShell.Core\FileSystem::C:\Temp\fil es
Mode LastWriteTime Length Name---- ------------- ------ ----
-a--- 7/6/2006 8:33 PM 34 file1.txt-a--- 7/6/2006 8:33 PM 34 file2.txt-a--- 7/6/2006 8:33 PM 34 file3.txt
And now display their contents:
PS (3) > cat file1.txt,file2.txt,file3txtThis is file 1This is file 2This is file 3
or simply
PS (4) > cat *.txtThis is file 1This is file 2This is file 3
In this example, the contents of file1.txt, file2.txt, and file3.txt are sent to the outputstream in order. For cmd.exe users, this is equivalent to
copy file1.txt+file2.txt+file3.txt con
Let’s try this in cmd.exe:
C:\Temp\files>copy file1.txt+file2.txt+file3txt confile1.txt
T h i s i s f i l e 1 file2.txt h i s i s f i l e 2 file2.txt h i s i s f i l e 3 1 file(s) copied.
The output looks funny because the files were written in Unicode. You need to tellthe copy command to write in ASCII, and try it again:
C:\Temp\files>copy /a file1.txt+file2.txt+file3.txt confile1.txtThis is file 1file2.txtThis is file 2file2.txtThis is file 3 1 file(s) copied.

FILE PROCESSING 315
By default, PowerShell uses Unicode for text, but you can override this. We’ll see howto do this in the section on writing files. In the meantime, let’s look at how to workwith binary files.
Example: The Get-HexDump function
Let’s look at an example that uses some of these features to deal with non-text files.We’re going to write a function that can be used to dump out a binary file. We’ll callthis function Get-HexDump. It takes the name of the file to display, the number ofbytes to display per line, and the total number of bytes as parameters. We want theoutput of this function to look like the following:
PS (130) > Get-HexDump "$env:windir/Soap Bubbles.bmp" -w 12 -t 10042 4d ba 01 01 00 00 00 00 00 ba 01 BMº.......º.00 00 28 00 00 00 00 01 00 00 00 01 ............00 00 01 00 08 00 00 00 00 00 00 00 ............01 00 12 0b 00 00 12 0b 00 00 61 00 ..........a.00 00 61 00 00 00 6b 10 10 00 73 10 ..a...k...s.10 00 73 18 18 00 7b 21 21 00 84 29 ..s.........29 00 84 31 31 00 6b 08 08 00 8c 39 ...11.k....931 00 84 31 29 00 8c 31 31 00 7b 18 1..1...11...18 00 8c 39 ...9
In this example, we’re using Get-HexDump to dump out the contents of one of the bit-map files in the Windows installation directory. We’ve specified that it display 12 bytesper line and stop after the first 100 bytes. The first part of the display is the value of thebyte in hexadecimal, and the portion on the right side is the character equivalent. Onlyvalues that correspond to letters or numbers are displayed. Nonprintable characters areshown as dots. The code for this function is shown in listing 10.1.
function Get-HexDump ($path = $(throw "path must be specified"),$width=10, $total=-1)
{ $OFS="" Get-Content -Encoding byte $path -ReadCount $width ` -totalcount $total | %{ $record = $_ if (($record -eq 0).count -ne $width) { $hex = $record | %{ " " + ("{0:x}" -f $_).PadLeft(2,"0")} $char = $record | %{ if ([char]::IsLetterOrDigit($_)) { [char] $_ } else { "." }} "$hex $char" } }}
Listing 10.1 Get-HexDump
Set $OFS to empty
B
Read the fileC
Skip record if length is zeroD
E Format data
Emit formatted outputF

316 CHAPTER 10 PROCESSING TEXT, FILES, AND XML
As required, the function takes a mandatory path parameter and optional parametersfor the number of bytes per line and the total number of bytes to display. We’re goingto be converting arrays to strings and we don’t want any spaces added, so we’ll set theoutput field separator character to be empty.
The Get-Content cmdlet does all of the hard work. It reads the file in binarymode (indicated by setting encoding to byte), reads up to a maximum of -TotalCountbytes, and writes them into the pipeline in records of length specified by -ReadCount.The first thing we do in the foreach scriptblock is save the record that was passed in,because we’ll be using nested pipelines that will cause $_ to be overwritten.
If the record is all zeros , we’re not going to bother displaying it. It might be abetter design to make this optional, but we’ll leave it as is for this example. For dis-play purposes, we’re converting the record of bytes into two-digit hexadecimalnumbers. We use the format operator to format the string in hexadecimal and thenthe PadLeft() method on strings to pad it out to two characters. Finally, we prefixthe whole thing with a space. The variable $hex ends up with a collection of theseformatted strings.
Now we need to build the character equivalent of the record. We’ll use the meth-ods on the [char] class to decide whether we should display the character or a “.”.Notice that even when we’re displaying the character, we’re still casting it into a[char]. This is needed because the record contains a byte value which, if directlyconverted into a string, will be a formatted as a number instead of as a character.Finally, we’ll output the completed record, taking advantage of string expansion tobuild the output string (which is why we set $OFS to “”).
This example illustrates the basic technique for getting at the binary data in a file.The technique has a variety of applications beyond simply displaying binary data, ofcourse. Once you reach the data, you can determine a variety of characteristics aboutthe content of that file. In the next section, we’ll take a look at an example and exam-ine the content of a binary file to double-check on the type of that file.
Example: The Get-MagicNumber function
If you looked closely at the output from the .BMP file earlier, you might have noticedthat the first two characters in the file were BP. In fact, the first few bytes in a file areoften used as a “magic number” that identifies the type of the file. We’ll write a shortfunction Get-MagicNumber that displays the first four bytes of a file so we caninvestigate these magic numbers. Here’s what we want the output to look like. Firstwe’ll try this on a .BMP file
PS (1) > get-magicnumber $env:windir/Zapotec.bmp424d 3225 'BM2.'
and then on an .EXE.
PS (2) > get-magicnumber $env:windir/explorer.exe4d5a 9000 'MZ..'PS (3) >
BC
D
E
F

FILE PROCESSING 317
This utility dumps the header bytes of the executable. The first two bytes identify thisfile as an MS-DOS executable.
Trivia time: As you can see, the ASCII representation of the header bytes(0x5A4D) is MZ. These are the initials of Mark Zbikowski, one of the orig-inal architects of MS-DOS.
The code for Get-MagicNumber is shown in listing 10.2.
function Get-MagicNumber ($path){ $OFS="" $mn = Get-Content -encoding byte $path -read 4 -total 4 $hex1 = ("{0:x}" -f ($mn[0]*256+$mn[1])).PadLeft(4, "0") $hex2 = ("{0:x}" -f ($mn[2]*256+$mn[3])).PadLeft(4, "0") [string] $chars = $mn| %{ if ([char]::IsLetterOrDigit($_)) { [char] $_ } else { "." }} "{0} {1} '{2}'" -f $hex1, $hex2, $chars}
There’s not much that’s new in this function. Again, we set the output field separatorstring to be empty . We extract the first four bytes as two pairs of numbers format-ted in hex and also as characters if they correspond to printable characters.Finally, we format the output as desired.
From these examples, we see that Get-Content allows us to explore any type offile on a system, not just text files. For now, though, let’s return to text files and lookat another parameter on Get-Content: -Delimiter. When reading a text file, thedefault line delimiter is the newline character.
Actually, the end-of-line sequence on Windows is generally a two-charactersequence: carriage return followed by newline. The .NET I/O routines hidethis detail and let us just pretend it’s a newline. In fact, the runtime willtreat newline by itself, carriage return by itself, and the carriage return/new-line sequence all as end-of-line sequences.
This parameter lets you change that. With this new knowledge, let’s return to theword-counting problem we had earlier. If we set the delimiter to be the space charac-ter instead of a newline, we can split the file as we read it. Let’s use this in an example.
get-content about_Assignment_operators.help.txt ` -delimiter " " | foreach { $_ -replace "[^\w]+"} | where { $_ -notmatch "^[ `t]*`$"} | group | sort -descending count | select -first 10 | ft -auto name, count
AUTHOR’S NOTE
Listing 10.2 Get-MagicNumber
Set $OFS to empty string
B
Format as hex
C
Format as charD
Emit outputE
BC D
E
AUTHOR’S NOTE

318 CHAPTER 10 PROCESSING TEXT, FILES, AND XML
In this example, the -delimiter parameter is used to split the file on space bound-aries instead of newlines. We’re using the same group, sort, and format operations asbefore; however, this time we’re sorting in descending order so we can use theSelect-Object cmdlet instead of array indexing to extract the top 10 words. We’realso doing more sophisticated filtering. We’re using a foreach filter to get rid of thecharacters that aren’t legal in a word. This is accomplished with the -replace oper-ator and the regular expression “[^\w]+”. The \w pattern is a meta-character thatmatches any legal character in a word. Putting it in the square brackets prefixed withthe caret says it should match any character that isn’t valid in a word. The where fil-ter is used to discard any empty lines that may be in the text or may have been createdby the foreach filter.
At this point, we have a pretty good handle on reading files and processing theircontents. It’s time to look at the various ways to write files.
Writing files
There are two major ways to write files in PowerShell—by setting file content withthe Set-Content cmdlet and by writing files using the Out-File cmdlet. The bigdifference is that Out-File, like all of the output cmdlets, will try to format the out-put. Set-Content, on the other hand, will simply write the output. If its inputobjects aren’t already strings, it will convert them to strings by calling the.ToString() method. This is not usually what you want for objects, but it’s exactlywhat you want if your data is already formatted or if you’re working with binary data.
The other thing you need to be concerned with is how the files are encoded whenthey’re written. In an earlier example, we saw that, by default, text files are written inUnicode. Let’s rerun this example, changing the encoding to ASCII instead.
PS (48) > 1..3 | %{ "This is file $_" |>> set-content -encoding ascii file$_.txt }>>
The -encoding parameter is used to set how the files will be written. In this exam-ple, the files are written using ASCII encoding. Now let’s rerun the cmd.exe copyexample that didn’t work earlier.
PS (49) > cmd /c copy file1.txt+file2.txt+file3.txt confile1.txtThis is file 1file2.txtThis is file 2file3.txtThis is file 3 1 file(s) copied.
This time it works fine, because the encoding matches what cmd.exe expected. Inthe next section, we’ll look at using -encoding to write binary files.

FILE PROCESSING 319
All together now—Reading and writing
Our next topic of interest is combining reading and writing binary files. First we’ll setup paths to two files: a source bitmap file:
$src = "$env:windir/Soap Bubbles.bmp"
and a destination in a temporary file.
$dest = "$env:temp/new_bitmap.bmp"
Now we’ll copy the contents from one file to the other:
get-content -encoding byte -read 10kb $src | set-content -encoding byte $dest
Now let’s define a (not very good) checksum function that simply adds up all of thebytes in the file.
function Get-CheckSum ($path){ $sum=0 get-content -encoding byte -read 10kb $path | %{ foreach ($byte in $_) { $sum += $byte } } $sum}
We’ll use this function to verify that the file we copied is the same as the original file(note that this is a fairly slow function and takes a while to run).
PS (5) > Get-CheckSum $src268589PS (6) > Get-CheckSum $dest268589
The numbers come out the same, so we have some confidence that the copied filematches the original.
10.2.4 Searching files with the Select-String cmdlet
Another place where regular expressions are used is in the Select-String cmdlet.This cmdlet allows you to search through collections of strings or collections of files.It’s similar to the grep command on UNIX-derived systems and the findstr com-mand on Windows. Figure 10.2 shows a subset of the parameters on this cmdlet.
We might ask why this cmdlet is needed—doesn’t the base language do every-thing it does? The answer is yes, but searching through files is such a common opera-tion that having a cmdlet optimized for this purpose makes sense. Let’s look at someexamples. First, we’re going to search through all of the “about_*” topics in the Pow-erShell installation directory to see if the phrase “wildcard description” is there.

320 CHAPTER 10 PROCESSING TEXT, FILES, AND XML
PS (1) > select-string "wildcard description" $pshome/about*.txt
about_Wildcard.help.txt:36: Wildcard Description Example Match No match
We see that there is exactly one match, but notice the uppercase letters in the match-ing string. Let’s rerun the search using the -CaseSensitive parameter.
PS (2) > select-string -case "wildcard description" `>> $pshome/about*.txt>>
This time nothing was found. If we alter the case in the pattern then it works again.
PS (3) > select-string -case "Wildcard Description" `>> $pshome/about*.txt>>
about_Wildcard.help.txt:36: Wildcard Description Example Match No match
Now let’s try out the -list parameter. Normally Select-String will find allmatches in a file. The -list switch limits the search to only the first match in a file:
PS (4) > select-string -list wildcard $pshome/about*.txt
about_Comparison_operators.help.txt:28: -like wildcard comparison "one" -like "o*" trueabout_Filter.help.txt:60: -like A comparison operator that supports wildcard matchingabout_Globbing.help.txt:5: See Wildcardabout_operator.help.txt:71: -like Wildcard comparison (case insensitive)
Select -String [-Pattern ] <String []> -InputObject <PSObject > [-Path] <String []> [-SimpleMatch ] [-CaseSensitive ] [-Quiet ] [-List ]
The cmdlet name
Pattern to search for
If specified, searching is done case-sensitively
Return a boolean indicating that a match occuredOnly return the first
matching object
Use a simple string match instead of a
regular expression when
searching
What to search – files or strings, only
one of these can parameters can be
specified
Figure 10.2 The Select-String cmdlet parameters
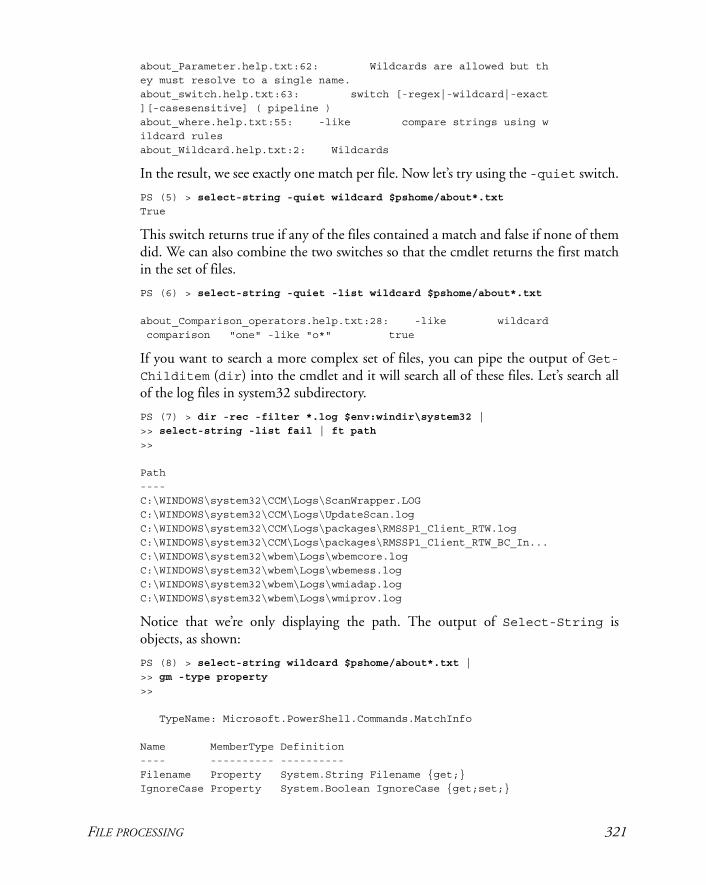
FILE PROCESSING 321
about_Parameter.help.txt:62: Wildcards are allowed but they must resolve to a single name.about_switch.help.txt:63: switch [-regex|-wildcard|-exact][-casesensitive] ( pipeline )about_where.help.txt:55: -like compare strings using wildcard rulesabout_Wildcard.help.txt:2: Wildcards
In the result, we see exactly one match per file. Now let’s try using the -quiet switch.
PS (5) > select-string -quiet wildcard $pshome/about*.txtTrue
This switch returns true if any of the files contained a match and false if none of themdid. We can also combine the two switches so that the cmdlet returns the first matchin the set of files.
PS (6) > select-string -quiet -list wildcard $pshome/about*.txt
about_Comparison_operators.help.txt:28: -like wildcard comparison "one" -like "o*" true
If you want to search a more complex set of files, you can pipe the output of Get-Childitem (dir) into the cmdlet and it will search all of these files. Let’s search allof the log files in system32 subdirectory.
PS (7) > dir -rec -filter *.log $env:windir\system32 |>> select-string -list fail | ft path>>
Path----C:\WINDOWS\system32\CCM\Logs\ScanWrapper.LOGC:\WINDOWS\system32\CCM\Logs\UpdateScan.logC:\WINDOWS\system32\CCM\Logs\packages\RMSSP1_Client_RTW.logC:\WINDOWS\system32\CCM\Logs\packages\RMSSP1_Client_RTW_BC_In...C:\WINDOWS\system32\wbem\Logs\wbemcore.logC:\WINDOWS\system32\wbem\Logs\wbemess.logC:\WINDOWS\system32\wbem\Logs\wmiadap.logC:\WINDOWS\system32\wbem\Logs\wmiprov.log
Notice that we’re only displaying the path. The output of Select-String isobjects, as shown:
PS (8) > select-string wildcard $pshome/about*.txt |>> gm -type property>>
TypeName: Microsoft.PowerShell.Commands.MatchInfo
Name MemberType Definition---- ---------- ----------Filename Property System.String Filename {get;}IgnoreCase Property System.Boolean IgnoreCase {get;set;}
322 CHAPTER 10 PROCESSING TEXT, FILES, AND XML
Line Property System.String Line {get;set;}LineNumber Property System.Int32 LineNumber {get;set;}Path Property System.String Path {get;set;}Pattern Property System.String Pattern {get;set;}
You can select as much or as little information from these objects as you want.All of the text we’ve been working with so far has been unstructured text where
there is no rigorously defined layout for that text. As a consequence, we’ve had to workfairly hard to extract the information we want out of this text. There are, however,large bodies of structured text, where the format is well-defined in the form of XMLdocuments. In the next section, we’ll look at how to work with XML in PowerShell.
10.3 XML PROCESSING
XML (Extensible Markup Language) is becoming more and more important in thecomputing world. XML is being used for everything from configuration files to logfiles to databases. PowerShell itself uses XML for its type and configuration files aswell as for the help files. Clearly, for PowerShell to be effective, it has to be able toprocess XML documents effectively. Let’s take a look at how XML is used and sup-ported in PowerShell.
This section assumes some basic knowledge of XML markup.
We’ll look at the XML object type, as well as the mechanism that .NET provides forsearching XML documents.
10.3.1 Using XML as objects
PowerShell supports XML documents as a primitive data type. This means that youcan access the elements of an XML document as though they were properties on anobject. For example, we create a simple XML object. We’ll start with a string thatdefines a top-level node called “top”. This node contains three descendants “a”, “b”,and “c”, each of which has a value. Let’s turn this string into an object:
PS (1) > $d = [xml] "<top><a>one</a><b>two</b><c>3</c></top>"
The [xml] cast takes the string and converts it into an XML object of type Sys-tem.XML.XmlDocument. This object is then adapted by PowerShell so you can treatit like a regular object. Let’s try this out. First we’ll display the object:
PS (2) > $d
top---top
As we expect, the object displays one top-level property corresponding to the top-level node in the document. Now let’s see what properties this node contains:
AUTHOR’S NOTE

XML PROCESSING 323
PS (3) > $d.aPS (4) > $d.top
a b c- - -one two 3
There are three properties that correspond to the descendents of top. We can useconventional property notation to look at the value of an individual member:
PS (5) > $d.top.aOne
We can then change the value of this node. It’s as simple as assigning a new value tothe node. Let’s assign the string “Four” to the node “a”:
PS (6) > $d.top.a = "Four"PS (7) > $d.top.aFour
We can see that it’s been changed. But there is a limitation: we can only use an actualstring as the node value. The XML object adapter won’t automatically convert non-string objects to strings in an assignment, so we get an error when we try it, as seen inthe following:
PS (8) > $d.top.a = 4Cannot set "a" because only strings can be used as values to set XmlNode properties.At line:1 char:8+ $d.top.a <<<< = 4
All of the normal type conversions apply, of course. The node c contains a stringvalue that is a number.
PS (8) > $d.top.c.gettype().FullNameSystem.String
We can add this field to an integer, which will cause it to be converted into an integer.
PS (9) > 2 + $d.top.c5
Since we can’t simply assign to elements in an XML document, we’ll dig a little deeperinto the [xml] object and see how we can add elements.
Adding elements to an XML object
Let’s add an element “d” to this document. To do this, we need to use the methods onthe XML document object. First we have to create the new element:
PS (10) > $el= $d.CreateElement("d")
In text, what we’ve created looks like “<d></d>”. The tags are there, but they’reempty. Let’s set the element text, the “inner text”:

324 CHAPTER 10 PROCESSING TEXT, FILES, AND XML
PS (11) > $el.set_InnerText("Hello")
#text-----Hello
Notice that we’re using the property setter method here. This is because the XMLadapter hides the basic properties on the XmlNode object. The other way to set thiswould be to use the PSBase member like we did with the hashtable example earlierin this chapter.
PS (12) > $ne = $d.CreateElement("e")PS (13) > $ne.psbase.InnerText = "World"PS (14) > $d.top.AppendChild($ne)
#text-----World
Take a look at the revised object.
PS (15) > $d.top
a : oneb : twoc : 3d : Helloe : World
We see that the document now has five members instead of the original three. Butwhat does the string look like now? It would be great if we could simply cast the doc-ument back to a string and see what it looks like:
PS (16) > [string] $d
System.Xml.XmlDocument
Unfortunately, as you can see, it isn’t that simple. Instead, we’ll save the document asa file and display it:
PS (17) > $d.save("c:\temp\new.xml")PS (18) > type c:\temp\new.xml<top> <a>one</a> <b>two</b> <c>3</c> <d>Hello</d> <e>World</e></top>
The result is a nicely readable text file. Now that we know how to add children to anode, how can we add attributes? The pattern is basically the same as with elements.First we create an attribute object.
XML PROCESSING 325
PS (19) > $attr = $d.CreateAttribute("BuiltBy")
Next we set the value of the text for that object. Again we use the PSBase member tobypass the adaptation layer.
PS (20) > $attr.psbase.Value = "Windows PowerShell"
And finally we add it to the top-level document.
PS (21) > $d.psbase.DocumentElement.SetAttributeNode($attr)
#text-----Windows PowerShell
Let’s look at the top node once again.
PS (22) > $d.top
BuiltBy : Windows PowerShella : oneb : twoc : 3d : Helloe : World
We see that the attribute has been added.
While PowerShell’s XML support is good, there are some issues. The firstrelease of PowerShell has a bug, where trying to display an XML node thathas multiple children with the same name causes an error to be generatedby the formatter. For example, the statement
[xml]$x = "<root><item>1</item><item>2</item></root>" $x.root
will result in an error. This can be disconcerting when you are trying to ex-plore a document. By doing
[xml]$x = "<root><item>1</item><item>2</item></root>" ; $x.root.item
instead, you’ll be able to see the elements without error. Also, for experi-enced .NET XML and XPath users, there are times when the XML adapterhides properties on an XmlDocument or XmlNode object that the .NETprogrammer expects to find. In these scenarios, the .PSBase property isthe workaround that lets you access the raw .NET object. Finally, someXPath users may get confused by PowerShell’s use of the property operator“.” to navigate an XML document. XPath uses / instead. Despite these is-sues, for the nonexpert user or for “quick and dirty” scenarios, the XMLadapter provides significant benefit in terms of reducing the complexity ofworking with XML.
AUTHOR’S NOTE
326 CHAPTER 10 PROCESSING TEXT, FILES, AND XML
It’s time to save the document:
PS (23) > $d.save("c:\temp\new.xml")
Then retrieve the file. You can see how the attribute has been added to the top nodein the document.
PS (24) > type c:\temp\new.xml<top BuiltBy="Windows PowerShell">
<a>one</a> <b>two</b> <c>3</c> <d>Hello</d></top>PS (25) >
We constructed, edited, and saved XML documents, but we haven’t loaded an existingdocument yet, so that’s the next step.
10.3.2 Loading and saving XML files.
At the end of the previous section, we saved an XML document to a file. If we read itback:
PS (1) > $nd = [xml] [string]::join("`n",>> (gc –read 10kb c:\temp\new.xml))>>
Here’s what we’re doing. We use the Get-Content cmdlet to read the file; however,it comes back as a collection of strings when what we really want is one single string.To do this, we use the [string]::Join() method. Once we have the single string,we cast the whole thing into an XML document.
Here’s a performance tip. By default, Get-Content reads one record ata time. This can be quite slow. When processing large files, you shoulduse the -ReadCount parameter to specify a block size of -1. This willcause the entire file to be loaded and processed at once, which is muchfaster. Alternatively, here’s another way to load an XML document usingthe .NET methods:
($nd = [xml]"<root></root>" ).Load("C:\temp\new.xml")
Note that this does require that the full path to the file be specified..
Let’s verify that the document was read properly by dumping out the top-level nodeand then the child nodes.
PS (2) > $nd
top---top
AUTHOR’S NOTE

XML PROCESSING 327
PS (3) > $nd.top
BuiltBy : Windows PowerShella : oneb : twoc : 3d : Hello
All is as it should be. Even the attribute is there. While this is a simple approach and the one we’ll use most often, it’s not necessar-
ily the most efficient approach because it requires loading the entire document intomemory. For very large documents or collections of many documents, this maybecome a problem. In the next section, we’ll look at some alternative approaches that,while more complex, are more memory-efficient.
Example: The dump-doc function
The previous method we looked at for loading an XML file is very simple, but notvery efficient. It requires that you load the file into memory, make a copy of the filewhile turning it into a single string, and create an XML document representing theentire file but with all of the overhead of the XML DOM format. A much more space-efficient way to process XML documents is to use the XML reader class. This classstreams through the document one element at a time instead of loading the wholething into memory. We’re going to write a function that will use the XML reader tostream through a document and output it properly indented. An XML pretty-printer,if you will. Here’s what we want the output of this function to look like when itdumps its built-in default document:
PS (1) > dump-doc<top BuiltBy = "Windows PowerShell">
<a> one </a> <b> two </b> <c> 3 </c> <d> Hello </d></top>
Now let’s test our function on a more complex document where there are moreattributes and more nesting. Listing 10.3 shows how to create this document.
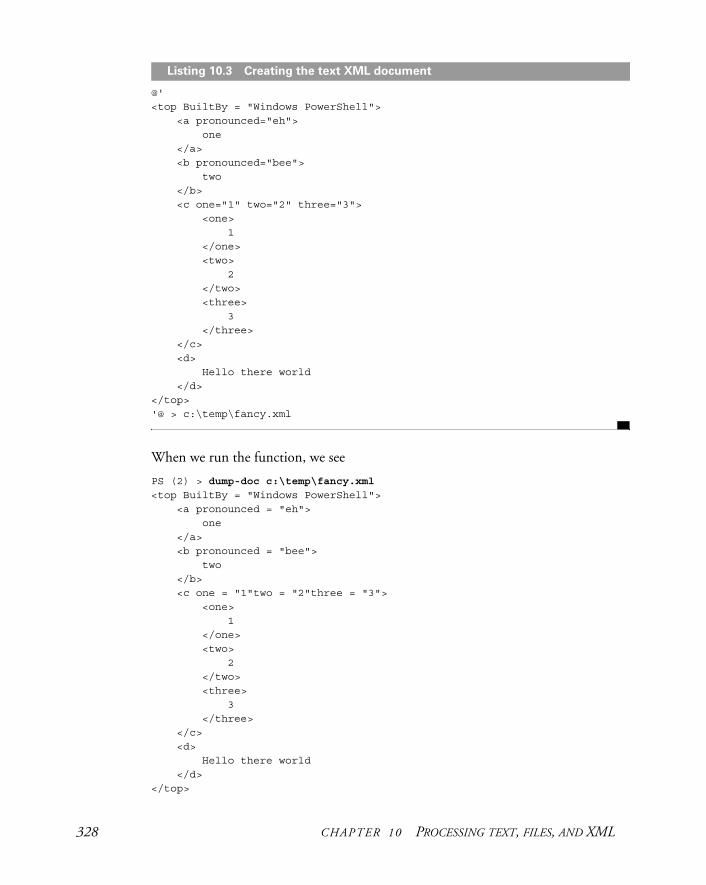
328 CHAPTER 10 PROCESSING TEXT, FILES, AND XML
@'<top BuiltBy = "Windows PowerShell"> <a pronounced="eh"> one </a> <b pronounced="bee"> two </b> <c one="1" two="2" three="3"> <one> 1 </one> <two> 2 </two> <three> 3 </three> </c> <d> Hello there world </d></top>'@ > c:\temp\fancy.xml
When we run the function, we see
PS (2) > dump-doc c:\temp\fancy.xml<top BuiltBy = "Windows PowerShell"> <a pronounced = "eh"> one
</a> <b pronounced = "bee"> two </b> <c one = "1"two = "2"three = "3"> <one> 1 </one> <two> 2 </two> <three> 3 </three> </c> <d> Hello there world </d></top>
Listing 10.3 Creating the text XML document

XML PROCESSING 329
which is pretty close to the original document. The code for the Dump-Doc functionis shown in listing 10.4.
function Dump-Doc ($doc="c:\temp\new.xml"){ $settings = new-object System.Xml.XmlReaderSettings $doc = (resolve-path $doc).ProviderPath $reader = [xml.xmlreader]::create($doc, $settings) $indent=0 function indent ($s) { " "*$indent+$s } while ($reader.Read()) { if ($reader.NodeType -eq [Xml.XmlNodeType]::Element) { $close = $(if ($reader.IsEmptyElement) { "/>" } else { ">" }) if ($reader.HasAttributes) { $s = indent "<$($reader.Name) " [void] $reader.MoveToFirstAttribute() do { $s += "$($reader.Name) = `"$($reader.Value)`"" } while ($reader.MoveToNextAttribute()) "$s$close" } else { indent "<$($reader.Name)$close" } if ($close -ne '/>') {$indent++} }
elseif ($reader.NodeType -eq [Xml.XmlNodeType]::EndElement ) { $indent-- indent "</$($reader.Name)>" } elseif ($reader.NodeType -eq [Xml.XmlNodeType]::Text) { indent $reader.Value } } $reader.close()}
This is a complex function, so it’s worthwhile to take it one piece at a time. We startwith the basic function declaration, where it takes an optional argument that names afile. Next we’ll create the settings object we need to pass in when we create theXML reader object. We also need to resolve the path to the document, because the
Listing 10.4 Dump-Doc
Create the settings object
B
Create the XML reader
C
Define format-ting function D
Process element nodes
E
Process attributesF
GMove throughattributes
Increase indent level
H
Decrease indent level
I
Format text elementJ
1) Close reader object
B

330 CHAPTER 10 PROCESSING TEXT, FILES, AND XML
XML reader object requires an absolute path (see chapter 11 for an explanation ofwhy this is). Now we can create the XmlReader object itself. The XML reader willstream through the document, reading only as much as it needs, as opposed to read-ing the entire document into memory.
We want to display the levels of the document indented, so we’ll initialize anindent level counter and a local function to display the indented string. Now we’llread through all of the nodes in the document. We’ll choose different behavior basedon the type of the node. An element node is the beginning of an XML element. Ifthe element has attributes then we’ll add them to the string to display. We’ll usethe MoveToFirstAttribute()/MoveToNextAttribute() methods to movethrough the attributes. (Note that this pattern parallels the enumerator pattern wesaw in chapter 5 with the $foreach and $switch enumerators.) If there are noattributes, just display the element name. At each new element, increase theindent level if it’s not an empty element tag. If it’s the end of an element, decrease theindent level and display the closing tag . If it’s a text element, just display the valueof the element . Finally, close the reader . We always want to close a handlereceived from a .NET method. It will eventually be discarded during garbage collec-tion, but it’s possible to run out of handles before you run out of memory.
This example illustrates the basic techniques for using an XML reader object towalk through an arbitrary document. In the next section, we’ll look at a more special-ized application.
Example: The Select-Help function
Now let’s work with something a little more useful. The PowerShell help files arestored as XML documents. We want to write a function that scans through the com-mand file, searching for a particular word in either the command name or the shorthelp description. Here’s what we want the output to look like:
PS (1) > select-help propertyClear-ItemProperty: Removes the property value from a property.Copy-ItemProperty: Copies a property between locations or namespaces.Get-ItemProperty: Retrieves the properties of an object.Move-ItemProperty: Moves a property from one location to another.New-ItemProperty: Sets a new property of an item at a location.Remove-ItemProperty: Removes a property and its value from the location.Rename-ItemProperty: Renames a property of an item.Set-ItemProperty: Sets a property at the specified location to a specified value.PS (2) >
In the example, we’re searching for the word property and we find a list of all of thecmdlets that work with properties. The output is a string containing the property
C
D
EF
G
H
IJ 1)

XML PROCESSING 331
name and a description string. Next let’s look at a fragment of document we’re goingto process:
<command:details> <command:name> Add-Content </command:name> <maml:description> <maml:para> Adds to the content(s) of the specified item(s) </maml:para> </maml:description> <maml:copyright> <maml:para></maml:para> </maml:copyright> <command:verb>add</command:verb> <command:noun>content</command:noun> <dev:version></dev:version> </command:details>
PowerShell help text is stored in MAML (Microsoft Assistance Markup Language)format. From simple examination of the fragment, we can see that the name of acommand is stored in the command:name element and the description is stored in amaml:description element inside a maml:para element. The basic approachwe’ll use is to look for the command tag, extract and save the command name, andthen capture the description in the description element that immediately follows thecommand name element. This means that we’ll use a state-machine pattern to pro-cess the document. A state machine usually implies using the switch statement, sothis example is also a good opportunity to use the control structures in the PowerShelllanguage a bit more. The function is shown in listing 10.5.
function Select-Help ($pat = "."){ $cmdHlp="Microsoft.PowerShell.Commands.Management.dll-Help.xml" $doc = "$PSHOME\$cmdHlp"
$settings = new-object System.Xml.XmlReaderSettings $settings.ProhibitDTD = $false $reader = [xml.xmlreader]::create($doc, $settings)
$name = $null $capture_name = $false $capture_description = $false $finish_line = $false
while ($reader.Read()) { switch ($reader.NodeType)
Listing 10.5 Select-Help
Declare functionB
Set up pathsC
Set up XMl readerD
E Initialize variables

332 CHAPTER 10 PROCESSING TEXT, FILES, AND XML
{ ([Xml.XmlNodeType]::Element) { switch ($reader.Name) { "command:name" { $capture_name = $true break }
"maml:description" { $capture_description = $true break } "maml:para" { if ($capture_description) { $finish_line = $true; } } } break } ([Xml.XmlNodeType]::EndElement) { if ($capture_name) { $capture_name = $false } if ($finish_description) { $finish_line = $false $capture_description = $false } break } ([Xml.XmlNodeType]::Text) { if ($capture_name) { $name = $reader.Value.Trim() } elseif ($finish_line -and $name) { $msg = $name + ": " + $reader.Value.Trim() if ($msg -match $pat) { $msg } $name = $null } break } } } $reader.close()}
Process element
F
Process command:name
G
Process maml:description
H
Process maml:para
I
Process end element
J
1) Process captured name
1!Trim name string
1@Check against pattern
1# Close XML reader

XML PROCESSING 333
Once again, this is a long piece of code, so we’ll walk through it a piece at a time. The$pat parameter will contain the pattern to search for. If no argument is suppliedthen the default argument will match everything. Next, we set up the name of thedocument to search in the PowerShell installation directory. Then we create theXmlReader object as in the previous examples.
Since we’re using a state machine, we need to set up some state variables. The$name variable will be used to hold the name of the cmdlet and the others will holdthe state of the processing. We’ll read through the document one node at a time andswitch on the node type. Unrecognized node types are just ignored.
First, we’ll process the Element nodes. We’ll use a nested switch statement toperform different actions based on the type of element. Finding a command:name ele-ment starts the matching process. When we see a maml:description element ,we’re capturing the beginning of a MAML description field, so we indicate that we wantto capture the description. When we see the maml:para element, we need to handlethe embedded paragraph in the description element. In the end tag of an element,we’ll reset some of the state variables if they’ve been set. And finally, we need to extractthe information we’re interested in out of the element. We’ve captured the cmdletname of the element, but we want to remove any leading and trailing spaces, so we’lluse the [string] Trim() method. Now we have both the cmdlet name and thedescription string. If it matches the pattern the caller specified , output it. Again, thelast thing to do is to close the XML reader so we don’t waste resources.
But where are the pipelines, we ask? Neither of these last two examples has takenadvantage of PowerShell’s pipelining capability. In the next section, we’ll remedy thisomission.
10.3.3 Processing XML documents in a pipeline
Pipelining is one of the signature characteristics of shell environments in general, andPowerShell in particular. Since the previous examples did not take advantage of thisfeature, we’ll look at how it can be applied now. We’re going to write a function thatscans all of the PowerShell help files, both the text about topics and the XML files. Forexample, let’s search for all of the help topics that mention the word “scriptblock”.
PS (1) > search-help scriptblockabout_Display about_TypesGet-ProcessGroup-ObjectMeasure-CommandSelect-ObjectTrace-CommandForEach-ObjectWhere-Object
This tool provides a simple, fast way to search for all of the help topics that contain aparticular pattern. The source for the function is shown in listing 10.6.
B
CD
E
F
G H
IJ
1)1!
1@1#

334 CHAPTER 10 PROCESSING TEXT, FILES, AND XML
function Search-Help{ param ($pattern = $(throw "you must specify a pattern")) select-string -list $pattern $PSHome\about*.txt | %{$_.filename -replace '\..*$'} dir $PShome\*dll-help.*xml | %{ [xml] (get-content -read -1 $_) } | %{$_.helpitems.command} | ? {$_.get_Innertext() -match $pattern} | %{$_.details.name.trim()} }
This function takes one parameter to use as the pattern for which we are searching.We’re using the throw keyword described in chapter 9 to generate an error if theparameter was not provided.
First, we search all of the text files in the PowerShell installation directory andreturn one line for each matching file . Then we pipe this line into Foreach-Object (or its alias % in this case) to extract the base name of the file using thereplace operator and a regular expression. This will list the file names in the formthat you can type back into Get-Help.
Then get a list of the XML help files and turn each file into an XML object. Wespecify a read count of -1 so the whole file is read at once. We extract the commandelements from the XML document and then see if the text of the command con-tains the pattern we’re looking for. If so then emit the name of the command, trim-ming off unnecessary spaces.
As well as being a handy way to search help, this function is a nice illustration ofusing the divide-and-conquer strategy when writing scripts in PowerShell. Each stepin the pipeline brings you incrementally closer to the final solution.
Now that we know how to manually navigate through an XML document, let’slook at some of the .NET framework’s features that make this a bit easier and moreefficient.
10.3.4 Using XPath
The support for XML in the .NET framework is comprehensive. We can’t cover all ofit in this book, but we will cover one other thing. XML is actually a set of standards.One of these standards defines a path mechanism for searching through a document.This mechanism is called (not surprisingly) XPath. By using the .NET frameworksXPath supports, we can more quickly retrieve data from a document.
Listing 10.6 Search-Help
B Declare function parameters
C Scan the about files
D Select the matching files
B
C
D

XML PROCESSING 335
Setting up the test document
We’ll work through a couple of examples using XPath, but first we need something toprocess. The following fragment is a string we’ll use for our examples. It’s a fragmentof a bookstore inventory database. Each record in the database has the name of theauthor, the book title, and the number of books in stock. We’ll save this string in avariable called $inventory as shown in listing 10.7.
$inventory = @" <bookstore> <book genre="Autobiography"> <title>The Autobiography of Benjamin Franklin</title> <author> <first-name>Benjamin</first-name> <last-name>Franklin</last-name> </author> <price>8.99</price> <stock>3</stock> </book> <book genre="Novel"> <title>Moby Dick</title> <author> <first-name>Herman</first-name> <last-name>Melville</last-name> </author> <price>11.99</price> <stock>10</stock> </book> <book genre="Philosophy"> <title>Discourse on Method</title> <author> <first-name>Rene</first-name> <last-name>Descartes</last-name> </author> <price>9.99</price> <stock>1</stock> </book> <book genre="Computers"> <title>Windows PowerShell in Action</title> <author> <first-name>Bruce</first-name> <last-name>Payette</last-name> </author> <price>39.99</price> <stock>5</stock> </book> </bookstore>"@
Listing 10.7 Creating the bookstore inventory

336 CHAPTER 10 PROCESSING TEXT, FILES, AND XML
Now that we have our test document created, let’s look at what we can do with it.
The Get-XPathNavigator helper function
To navigate through an XML document and extract information, we’re going to needan XML document navigator. Here is the definition of a function that will create theobject we need.
function Get-XPathNavigator ($text){ $rdr = [System.IO.StringReader] $text $trdr = [system.io.textreader]$rdr $xpdoc = [System.XML.XPath.XPathDocument] $trdr $xpdoc.CreateNavigator()}
Unfortunately, we can’t just convert a string directly into an XPath document. Thereis a constructor on this type that takes a string, but it uses that string as the name of afile to open. Consequently, the Get-XPathNavigator function has to wrap theargument string in a StringReader object and then in a TextReader object thatcan finally be used to create the XPathDocument. Once we have an instance ofXPathDocument, we can use the CreateNavigator() method to get an instanceof a navigator object.
$xb = get-XPathNavigator $inventory
Now we’re ready to go. We can use this navigator instance to get information out of adocument. First, let’s get a list of all of the books that cost more than $9.
PS (1) > $expensive = "/bookstore/book/title[../price>9.00]"
We’ll store the XPath query in the variable $expensive. Let’s look at the actualquery string for a minute. As you might expect from the name XPath, this query startswith a path into the document:
/bookstore/book/title
This path will select all of the title nodes in the document. But, since we only wantsome of the titles, we extend the path with a qualification. In this case:
[../price>9.00]
This only matches paths where the price element is greater than 9.00. Note that apath is used to access the price element. Since price is a sibling (that is, at the samelevel) as the title element, we need to specify this as:
../price
This should provide a basic idea of what the query is expressing, so we won’t go intoany more detail. Now let’s run the query using the Select() method on the XPathnavigator.

XML PROCESSING 337
PS (2) > $xb.Select($expensive) | ft value
Value-----Moby DickDiscourse on MethodWindows PowerShell in Action
We’re running the result of the query into Format-Table because we’re only inter-ested in the value of the element. (Remember that what we’re extracting here is onlythe title element.) So this is pretty simple; we can search through the database andfind the titles pretty easily. What if we want to print both the title and price? Here’sone way we can do it.
Extracting multiple elements
To extract multiple elements from the document, first we’ll have to create a newquery string. This time we need to get the whole book element, not just the title ele-ment, so we can also extract the price element. Here’s the new query string:
PS (3) > $titleAndPrice = "/bookstore/book[price>9.00]"
Notice that this time, since we’re getting the book instead of the title, we can just fil-ter on the price element without having to use the “..” to go up a path. The problemnow is: how do we get the pieces of data we want—the title and price? The result ofthe query has a property called OuterXml. This property contains the XML fragmentthat represents the entire book element. We can take this element and cast it into anXML document as we saw earlier in this section. Once we have it in this form, we canuse the normal property notation to extract the information. Here’s what it looks like:
PS (4) > $xb.Select($titleAndPrice) | %{[xml] $_.OuterXml} |>> ft -auto {$_.book.price},{$_.book.title}>>
$_.book.price $_.book.title------------- -------------11.99 Moby Dick9.99 Discourse on Method39.99 Windows PowerShell in Action
The call to Select() is similar to what we saw earlier. Now we take each object andprocess it using the Foreach-Object cmdlet. First we take the current pipelineobject, extract the OuterXml string, then cast that string into an XML document andpass that object through to the Format-Table cmdlet. We use scriptblocks in thefield specification to extract the information we want to display.

338 CHAPTER 10 PROCESSING TEXT, FILES, AND XML
Performing calculations on elements
Let’s look at one final example. We want a total price of all of the books in the inven-tory. This time, we’ll use a slightly different query.
descendant::book
This query selects all of the elements that have a descendent element titled book.This is a more general way to select elements in the document. We’ll pipe these docu-ments into Foreach-Object. Here we’ll specify scriptblocks for each of the begin,process, and end steps in the pipeline. In the begin scriptblock, we’ll initialize $t tozero to hold the result. In the foreach scriptblock, we convert the current pipelineobject into an [xml] object as we saw in the previous example. Then we get the pricemember, convert it into a [decimal] number, multiply it by the number of booksin stock, and add the result to the total. The final step is to display the total in theend scriptblock. Here’s what it looks like when it’s run:
PS (5) > $xb.Select("descendant::book") | % {$t=0} `>> {>> $book = ([xml] $_.OuterXml).book>> $t += [decimal] $book.price * $book.stock>> } `>> {>> "Total price is: `$$t">> }>>Total price is: $356.81
Having looked at building an XML path navigator on a stream, can we use XPath onan XML document itself? The answer is yes. In fact, it can be much easier than whatwe’ve seen previously. First, let’s convert our inventory into an XML document.
PS (6) > $xi = [xml] $inventory
The variable $xi now holds an XML document representation of the bookstoreinventory. Let’s select the genre attribute from each book:
PS (7) > $xi.SelectNodes("descendant::book/@genre")
#text-----AutobiographyNovelPhilosophyComputers
This query says “select the genre attribute (indicated by the @) from all of the descen-dant elements book”. Now let’s revisit another example from earlier in this sectionand display the books and prices again.

XML PROCESSING 339
PS (8) > $xi.SelectNodes("descendant::book") |>> ft -auto price, title>>
price title----- -----8.99 The Autobiography of Benjamin Franklin11.99 Moby Dick
9.99 Discourse on Method39.99 Windows PowerShell in Action
This is quite a bit simpler than the earlier example, because SelectNodes() on anXmlDocument returns XmlElement objects that PowerShell adapts and presents asregular objects. With the XPathNavigator.Select() method, we’re returningXPathNavigator nodes, which aren’t adapted automatically. As we can see, work-ing with the XmlDocument object is the easiest way to work with XML in Power-Shell, but there may be times when you need to use the other mechanisms, either forefficiency reasons (XmlDocument loads the entire document into memory) orbecause you’re adapting example code from another language.
In this section, we’ve demonstrated how you can use the XML facilities in the.NET framework to create and process XML documents. As the XML format is usedmore and more in the computer industry, these features will be come critical. We’veonly scratched the surface of what is available in the .NET framework. We’ve onlycovered some of the XML classes and a little of the XPath query language. We haven’tdiscussed how to use XSLT, the eXtensible Stylesheet Language Transformation lan-guage that is part of the System.Xml.Xsl namespace. All of these tools are directlyavailable from within the PowerShell environment. In fact, the interactive nature ofthe PowerShell environment makes it an ideal place to explore, experiment, and learnabout XML.
10.3.5 The Import-Clixml and Export-Clixml cmdlets
The last topic we’re going to cover on XML is the cmdlets for importing and export-ing objects from PowerShell. These cmdlets provide a way to save and restore collec-tions of objects from the PowerShell environment. Let’s take a look at how they areserialized.
Serialization is the process of saving an object or objects to a file or a net-work stream. The components of the objects are stored as a series of pieces,hence the name serialization. PowerShell uses a special type of “lossy” seri-alization, where the basic shape of the objects is preserved but not all of thedetails. More on this in a minute.
First we’ll create a collection of objects.
PS (1) > $data = @{a=1;b=2;c=3},"Hi there", 3.5
Now serialize them to a file using the Export-CliXml cmdlet:
AUTHOR’S NOTE

340 CHAPTER 10 PROCESSING TEXT, FILES, AND XML
PS (2) > $data | export-clixml out.xml
Let’s see what the file looks like:
PS (3) > type out.xml<Objs Version="1.1" xmlns="http://schemas.microsoft.com/powershell/2004/04"><Obj RefId="RefId-0"><TN RefId="RefId-0"><T>System.Collections.Hashtable</T><T>System.Object</T></TN><DCT><En><S N="Key">a</S><I32 N="Value">1</I32></En><En><S N="Key">b</S><I32 N="Value">2</I32></En><En><S N="Key">c</S><I32 N="Value">3</I32></En></DCT></Obj><S>Hi there</S><Db>3.5</Db></Objs>
It’s not very readable, so we’ll use the dump-doc function from earlier in the chapterto display it:
PS (4) > dump-doc out.xml<Objs Version = "1.1"xmlns = "http://schemas.microsoft.com/powershell/2004/04">
This first part identifies the schema for the CLIXML object representation.
<Obj RefId = "RefId-0"> <TN RefId = "RefId-0"> <T> System.Collections.Hashtable </T> <T> System.Object </T> </TN> <DCT> <En>
Here are the key/value pair encodings.
<S N = "Key"> a </S> <I32 N = "Value"> 1 </I32> </En> <En> <S N = "Key"> b </S> <I32 N = "Value"> 2 </I32> </En> <En> <S N = "Key"> c </S>

XML PROCESSING 341
<I32 N = "Value"> 3 </I32> </En> </DCT> </Obj>
Now encode the string element
<S> Hi there </S>
and the double-precision number.
<Db> 3.5 </Db></Objs>
Import these objects it back into the session
PS (5) > $new_data = Import-Clixml out.xml
and compare the old and new collections.
PS (6) > $new_data
Name Value---- -----a 1b 2c 3Hi there3.5
PS (7) > $data
Name Value---- -----a 1b 2c 3Hi there3.5
They match. These cmdlets provide a simple way to save and restore collections of objects, but
they have limitations. They can only load and save a fixed number of primitive types.Any other type is “shredded”, that is, broken apart into a property bag composed ofthese primitive types. This allows any type to be serialized, but with some loss offidelity. In other words, objects can’t be restored to exactly the same type they wereoriginally. This approach is necessary because there can be an infinite number of

342 CHAPTER 10 PROCESSING TEXT, FILES, AND XML
object types, not all of which may be available when the file is read back. Sometimesyou don’t have the original type definition. Other times, there’s no way to re-createthe original object, even with the type information because the type does not supportthis operation. By restricting the set of types that are serialized with fidelity, theCLIXML format can always recover objects regardless of the availability of the originaltype information.
There is also another limitation on how objects are serialized. An object has prop-erties. Those properties are also objects which have their own properties, and so on.This chain of properties that have properties is called the serialization depth. Forsome of the complex objects in the system, such as the Process object, serializingthrough all of the levels of the object results in a huge XML file. To constrain this, theserializer only traverses to a certain depth. The default depth is two. This default canbe overridden either on the command line using the -depth parameter or by placinga <SerializationDepth> element in the type’s description file. If you look at$PSHome/types.ps1xml, you can see some examples of where this has been done.
10.4 SUMMARY
In this chapter, we covered the kind of tasks that are the traditional domain of script-ing languages. We looked at:
• Basic text processing—how to split and join strings using the [string]::-Split() and [string]::Join() methods.
• More advanced text processing with the [regex] class. We saw how we can usethis class to conduct more advanced text operations such as tokenizing a string.
• The core cmdlets and how they correspond to the commands in other shellenvironments.
• How to set up shortcuts to long or specialized paths in the filesystem using New-PSDrive; for example, New-PSDrive AppData FileSystem "$Home\Ap-plication Data" creates a drive named AppData mapped to the root of thecurrent user’s Application Data directory.
• How to read and write files in PowerShell using Get-Content and Set-Content, and how to deal with character encodings in text files.
• How to work with binary files. We wrote a couple handy utility functions in theprocess.
• Using the Select-String cmdlet to efficiently search through collections offiles.
• The basic support in PowerShell for XML documents in the form of the XMLobject adapter. PowerShell provides a shortcut for creating an XML documentwith the [xml] type accelerator; for example: [$xml]"<docroot>...</docroot>".

SUMMARY 343
• How to construct XML documents by adding elements to an existing documentusing the CreateElement() method.
• Using the XMLReader class to search XML documents without loading thewhole document into memory.
• Building utility functions for searching and formatting XML documents.
• Examples of processing XML documents using PowerShell pipelines.
• How to save and restore collections of objects using Import-CLIXml andExport-CLIXml.