sam 9.0 user manualtln.lib.mi.us/dept/technology-services/sam/files/sam-9-user-manual.pdfsam 9.0 is...
TRANSCRIPT
SUM90_108
SAM 9.0 User Manual

2 Comprise Technologies, Inc © 2011 | Customer Support: 800‐531‐0132
WELCOME
Thank you for purchasing SAM, the innovative new Smart Access Manager for library patron computers. We hope you find this product easy to use. It should start saving you time and money immediately. If you have any questions about SAM, please call our customer support department toll free at (800) 531‐0132 during normal business hours. We welcome your feedback and suggestions for improving this or any Comprise product. Suggestions for enhancements are coordinated by our Customer Services Manager, Christopher Hayes, who can be contacted by email at [email protected]. All materials originated pursuant to this product are the exclusive property of Comprise including trade secret, patent, title to copyright in all copyrightable material, title to all intellectual property and any other protectable rights or interests under state, federal, or international law. Subject to the terms and conditions of the License Agreement, the Customer may use the Comprise Software solely in the conduct of the business of the Customer. The Software will be provided by Comprise only in machine‐readable object code.
Comprise Technologies, Inc © 2011 | Customer Support: 800‐531‐0132 3
IMPORTANT NOTICES
PRODUCT DEVELOPMENT
Comprise pursues a policy of ongoing product development. Release product version may vary from description herein.
Comprise reserves the right to modify and or discontinue product features at any time without advance notice.
OPERATING SYSTEMS
Not all product features function with or are applicable to all Microsoft Windows Operating Systems. Please consult
your Comprise Representative for further details regarding specific features and your operating system.
HARDWARE MODELS
Not all hardware features may be implemented or applicable to all installations. Please contact your Comprise
Representative for more information.
ILS PRODUCTS
Comprise product documentation describes what our product(s) are capable of doing. However, different ILS products
provide more or less support for these capabilities. Please consult your Comprise Representative for further details
regarding specific features and your ILS Product.
VERSION/ENHANCEMENT SUPPORT
Comprise product versions are released to be backward compatible with earlier versions. With each new release
Comprise provides support for that product version, plus the then current release in general distribution. Older versions
will not be supported. Custom enhancement requests will not be distributed unless the newest version of the product is
currently installed.

4 Comprise Technologies, Inc © 2011 | Customer Support: 800‐531‐0132
TOP 5 THINGS THAT CAN IMPACT
COMPRISE PRODUCTS! 1. ILSUpgrades/Migrations
Please give us at least 2 weeks’ notice before you upgrade or migrate your ILS
product and/or ACS Server. We use that time to prepare your Comprise
Products and to ensure that your patron services are not impacted by the
change.
2. InternetProvider/NetworkConfigurationWhen you change your Internet Service Provider your external IP address in most cases will also change. In most
cases we use the IP Address to access your server for in‐depth technical support issues and for upgrades. In some
cases, for larger library systems, changing your ISP causes your IP Range to change which will impact patron services.
Network changes can also have a dramatic impact on Comprise Products. IP Ranges, routing tables, etc. all must be
configured with Comprise Products in mind. If you think your major network configuration change might have an
effect, it probably will. Please call us to schedule an appointment to make sure everything runs smoothly.
3. HardwareHardware changes refers to many things, but specifically, let us know before you change your firewall, filter
appliance, printers, or copy controllers to ensure your change goes smoothly.
4. OperatingSystem/Application/InternetBrowserAs with any software, changes to the operating system on your patron and staff computers will have an effect on
your Comprise Products, and in particular Internet Browser will impact SAM. Please give us a call to find out before
attempting any major operating system or software changes or upgrades.
5. StaffTrainingWe find that many issues result from staff not being completely confident when the initial training is over or that
there has been a significant staff turn‐over since the product was installed. We offer remote training and in some
cases will come on‐site when training is necessary. In most cases training is offered at no cost! Please contact
Customer Support to schedule an appointment.
Comprise Technologies, Inc © 2011 | Customer Support: 800‐531‐0132 5
TABLE OF CONTENTS
WELCOME..............................................................................................................................................................................................2
IMPORTANT NOTICES........................................................................................................................................................................3
TABLE OF CONTENTS ........................................................................................................................................................................5
WELCOME TO THE SAM 9. EXPERIENCE...................................................................................................................................12
WHAT YOU SHOULD EXPECT FROM SAM .................................................................................................................................13
SAM USER INTERFACE ....................................................................................................................................................................14
SCREEN SAVER..................................................................................................................................................................... 14
MULTI LINGUAL................................................................................................................................................................... 14
THEMES............................................................................................................................................................................... 15
SORRY SCREEN (SAFE MODE)............................................................................................................................................... 15
PC MANAGER MODE ........................................................................................................................................................... 16
SAM PERSONAL SESSION MANAGER ..................................................................................................................................... 16
My Account Information.......................................................................................................................................................16
Screen Name ........................................................................................................................................................................17
Internet Filtering Information..............................................................................................................................................17
Account Balance Information...............................................................................................................................................17
View My History...................................................................................................................................................................18
Make a Payment...................................................................................................................................................................18
Lock PC................................................................................................................................................................................18
Reserve a PC........................................................................................................................................................................19
End Session ..........................................................................................................................................................................19
PATRON SESSION TIMERS ..................................................................................................................................................... 20
Inactivity Timer ....................................................................................................................................................................20
End Of Session Warning Timers ..........................................................................................................................................20
Flex Time..............................................................................................................................................................................20
Library Close Timer.............................................................................................................................................................20
INTERNET MANAGER MODE ................................................................................................................................................. 21
PASSWORD AUTHENTICATION............................................................................................................................................... 21
PRINTING .............................................................................................................................................................................................22
PRINT EXPRESS.................................................................................................................................................................... 22
PRINT RELEASE STATION...................................................................................................................................................... 22
PAYMENT METHODS........................................................................................................................................................................23
COMPUTER SIGN-UP AND RESERVATIONS...............................................................................................................................24
6 Comprise Technologies, Inc © 2011 | Customer Support: 800‐531‐0132
SIGN UP STATION ................................................................................................................................................................ 24
RESERVATIONS..................................................................................................................................................................... 25
SAM MAINTENANCE.........................................................................................................................................................................26
SAM SMARTSERVER LOGIN..................................................................................................................................................... 26
ADMINISTRATOR ACCESS...................................................................................................................................................... 26
SAM ADMINISTRATOR MANAGER WEB INTERFACE ............................................................................................................27
STAFF.................................................................................................................................................................................. 27
Super Admininstrator access (Admin Staff) .........................................................................................................................27
Administrator access (Admin Staff)......................................................................................................................................27
IT manager access (Admin Staff) .........................................................................................................................................28
Report Manager access (Admin Staff)..................................................................................................................................28
Staff access (Admin Staff).....................................................................................................................................................28
Add Staff Member (Admin Staff) ..........................................................................................................................................29
Modify Staff Member (Admin Staff)......................................................................................................................................30
Delete Staff Member (Admin Staff) ......................................................................................................................................30
USERS ................................................................................................................................................................................. 32
Add User (Admin Users) ......................................................................................................................................................32
Modify User (Admin Users) .................................................................................................................................................35
Delete User (Admin Users) ..................................................................................................................................................36
Import User (Admin Users)..................................................................................................................................................39
Register User (Admin Users) ...............................................................................................................................................39
Payments, etc. (Admin Users) ..............................................................................................................................................40
User Reconciliation (Admin Users) .....................................................................................................................................41
User Exceptions (Admin Users) ...........................................................................................................................................42
IDENTIFY AND DEFINE GROUPS OF COMPUTERS..................................................................................................................43
Region ..................................................................................................................................................................................43
Location ...............................................................................................................................................................................43
Zone......................................................................................................................................................................................43
Control Zone ........................................................................................................................................................................43
REGIONS.............................................................................................................................................................................. 44
Add Region (Admin Regions) ...............................................................................................................................................44
Modify Region (Admin Regions) ..........................................................................................................................................45
Delete Region (Admin Regions) ...........................................................................................................................................46
Comprise Technologies, Inc © 2011 | Customer Support: 800‐531‐0132 7
Assign Zone (Admin Regions) ..............................................................................................................................................46
LOCATIONS.......................................................................................................................................................................... 48
Add Location (Locations).....................................................................................................................................................48
FILTERS ............................................................................................................................................................................ 50
ZONES ............................................................................................................................................................................... 51
Add Zone (Zones) .................................................................................................................................................................51
Associate Device (Zones) .....................................................................................................................................................52
Browser Control (Zones)......................................................................................................................................................53
Visitor card/ Sign Up ticket Options (Zones) .......................................................................................................................55
Free Page Options (Zones) ..................................................................................................................................................57
Group Options (Zones) ........................................................................................................................................................58
SAM Timers (Zones).............................................................................................................................................................59
Language Options (Zones) ...................................................................................................................................................61
Invoice Options (Zones) .......................................................................................................................................................71
OPAC Options (Zones) ........................................................................................................................................................72
Print Options (Zones)...........................................................................................................................................................73
Resources (Zones) ................................................................................................................................................................75
System Options (Zones)........................................................................................................................................................77
Time Options (Zones)...........................................................................................................................................................84
Schedule Options (Zones).....................................................................................................................................................85
Menu Options (Zones)..........................................................................................................................................................87
Themes (Zones) ....................................................................................................................................................................91
Creating a custom Theme.....................................................................................................................................................97
CONTROL ZONES ................................................................................................................................................................. 99
Add Control Zone (Control Zones) ......................................................................................................................................99
Modify / Delete Control Zone (Control Zones) ..................................................................................................................101
METERING......................................................................................................................................................................... 103
Add Application / Website (Metering)................................................................................................................................103
Modify / Delete Application/Website (Metering) ...............................................................................................................104
REPORTS ........................................................................................................................................................................... 105
Director’s Report (Admin Reports)....................................................................................................................................105
User Report (Admin Reports).............................................................................................................................................106

8 Comprise Technologies, Inc © 2011 | Customer Support: 800‐531‐0132
Duplicate Names Report (Admin Reports) .........................................................................................................................107
User Usage Report (Admin Reports)..................................................................................................................................108
Account Reports (Admin Reports)......................................................................................................................................108
Print Control Report (Admin Reports)...............................................................................................................................112
Group Report (Admin Reports) ..........................................................................................................................................112
Computer Report (Admin Reports).....................................................................................................................................113
Reservation Report (Reports).............................................................................................................................................114
Agency Report (Admin Reports).........................................................................................................................................114
Statistic Report (Admin Reports)........................................................................................................................................116
Missed Reservation Report (Admin Reports) .....................................................................................................................117
Application / Web Site Report (Admin Reports).................................................................................................................118
Visitor Report (Admin Reports)..........................................................................................................................................120
PC Usage Report (Admin Reports) ....................................................................................................................................120
SUS Report (Admin Reports)..............................................................................................................................................122
HELP................................................................................................................................................................................. 124
User Manual (Help) ...........................................................................................................................................................124
Contact Comprise (Help) ...................................................................................................................................................124
STAFF WEB INTERFACE ................................................................................................................................................................125
STAFF ACCESS ................................................................................................................................................................... 125
USERS ............................................................................................................................................................................... 125
Add User (Staff Users) .......................................................................................................................................................125
Modify User (Staff Users) ..................................................................................................................................................127
Delete User (Staff Users) ...................................................................................................................................................127
Import User (Staff Users)...................................................................................................................................................130
Register User (Staff Users) ................................................................................................................................................131
Payments, etc. (Staff Users) ...............................................................................................................................................132
User Reconciliation (Staff Users).......................................................................................................................................133
RESERVATIONS................................................................................................................................................................... 134
Staff Managed Reservations...............................................................................................................................................134
PC Activity Information (Staff Reservations) .....................................................................................................................134
Web Reservations [Staff Use] (Staff Reservations) ............................................................................................................135
Add Single (Staff Reservations)..........................................................................................................................................135
Add Block (Staff Reservations)...........................................................................................................................................137
Comprise Technologies, Inc © 2011 | Customer Support: 800‐531‐0132 9
Add Multiple (Staff Reservations) ......................................................................................................................................138
Delete Single (Staff Reservations)......................................................................................................................................139
Delete Block (Staff Reservations).......................................................................................................................................140
Delete Multiple (Staff Reservations) ..................................................................................................................................141
REPORTS ........................................................................................................................................................................... 143
User Usage Report (Staff Reports).....................................................................................................................................143
Print Control Report (Staff Reports) ..................................................................................................................................145
Reservation Report (Staff Reports).....................................................................................................................................146
SIGN UP STATION ............................................................................................................................................................................147
Add Multiple Zones to Sign-Up station ..............................................................................................................................147
SAM Sign-Up can be used in two ways:.............................................................................................................................148
SIGN UP STATION CONFIGURATION SCREEN ....................................................................................................................... 149
Library Card Information ..................................................................................................................................................149
Display information for the Sign Up Station......................................................................................................................149
Display information for LED Displays ..............................................................................................................................149
Configuration Information .................................................................................................................................................150
Close the Sign Up Station Application ...............................................................................................................................150
PC ACTIVITY MANAGER ...............................................................................................................................................................152
Computers ..........................................................................................................................................................................154
Patrons...............................................................................................................................................................................155
Reservations .......................................................................................................................................................................155
System Options ...................................................................................................................................................................156
Setup Options .....................................................................................................................................................................156
Reports ...............................................................................................................................................................................157
Help....................................................................................................................................................................................157
Status..................................................................................................................................................................................157
Make a Visitor Card...........................................................................................................................................................158
PC ACTIVITY MANAGER CONFIGURATION SCREEN .............................................................................................................. 159
PRINTING ...........................................................................................................................................................................................161
PRINT EXPRESS MODE ....................................................................................................................................................... 161
PRINT RELEASE STATION.................................................................................................................................................... 163
Print Release Station processing from SAM 9.0 Client PC................................................................................................163
Using the Print Release Station .........................................................................................................................................164

10 Comprise Technologies, Inc © 2011 | Customer Support: 800‐531‐0132
PRINT RELEASE STATION CONFIGURATION ......................................................................................................................... 165
Close the Print Release Station Application ......................................................................................................................165
SAM 9.0 INSTALLATION SUITE SAM CLIENT ..........................................................................................................................166
SAM 9.0 INSTALLATION WIZARD ........................................................................................................................................ 166
SAM CLIENT INSTALLATION ............................................................................................................................................... 166
SAM Server Information.....................................................................................................................................................166
Account Information...........................................................................................................................................................167
Client Modes ......................................................................................................................................................................167
Print Modes........................................................................................................................................................................167
Sign Up/Reservation...........................................................................................................................................................168
SAM ACTIVITY MANAGER (STAFF INTERFACE) ...................................................................................................................169
Location .............................................................................................................................................................................169
Visitory Card Settings ........................................................................................................................................................169
Sign Up Station Information ..............................................................................................................................................169
LED Type ...........................................................................................................................................................................169
SIGN UP STATION INSTALLATION.............................................................................................................................................170
Location .............................................................................................................................................................................170
Sign Up Station Mode ........................................................................................................................................................170
PRINT RELEASE STATION INSTALLATION .............................................................................................................................171
Location .............................................................................................................................................................................171
Printing Information ..........................................................................................................................................................171
SAM Directory Information ...............................................................................................................................................171
PRINT RELEASE STATION MODE ON THE SAM 9.0 CLIENT PC.........................................................................................172
ADD A PRINTER.................................................................................................................................................................. 173
PRINTER CONFIGURATION.................................................................................................................................................. 175
SAM 9.0 TROUBLESHOOTING GUIDE ........................................................................................................................................178
SAM CLIENT ISSUES........................................................................................................................................................... 178
SCREEN DISPLAY................................................................................................................................................................ 178
USER LOGIN ISSUES ........................................................................................................................................................... 179
SESSION ISSUES .................................................................................................................................................................. 180
ACTIVITY MANAGER ISSUES................................................................................................................................................. 180
SIGN UP STATION ISSUES..................................................................................................................................................... 181
PRINT ISSUES ..................................................................................................................................................................... 182
PRINT ISSUES (CONT)......................................................................................................................................................... 183

Comprise Technologies, Inc © 2011 | Customer Support: 800‐531‐0132 11
FREQUENTLY ASKED QUESTIONS.............................................................................................................................................184
GLOSSARY OF TERMS....................................................................................................................................................................185
CHECK OUT THESE OTHER COMPRISE SOLUTIONS! – SALES: 800-854-6822 ................................................................186
12 Comprise Technologies, Inc © 2011 | Customer Support: 800‐531‐0132
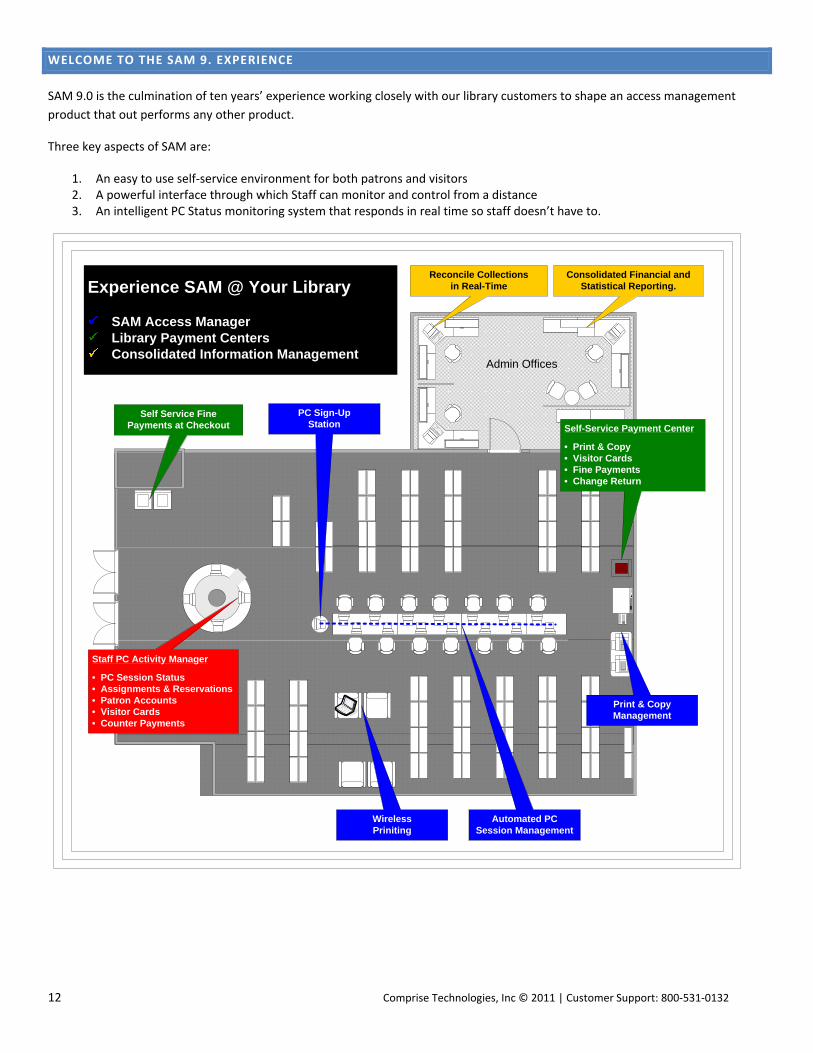
WELCOME TO THE SAM 9. EXPERIENCE
SAM 9.0 is the culmination of ten years’ experience working closely with our library customers to shape an access management
product that out performs any other product.
Three key aspects of SAM are:
1. An easy to use self‐service environment for both patrons and visitors 2. A powerful interface through which Staff can monitor and control from a distance 3. An intelligent PC Status monitoring system that responds in real time so staff doesn’t have to.
Consolidated Financial and Statistical Reporting.
Reconcile Collectionsin Real-Time
Admin Offices
PC Sign-Up Station Self-Service Payment Center
• Print & Copy• Visitor Cards• Fine Payments• Change Return
Staff PC Activity Manager
• PC Session Status• Assignments & Reservations• Patron Accounts• Visitor Cards• Counter Payments
Experience SAM @ Your Library
SAM Access ManagerLibrary Payment CentersConsolidated Information Management
Automated PC Session Management
Print & CopyManagement
WirelessPriniting
Self Service FinePayments at Checkout
Comprise Technologies, Inc © 2011 | Customer Support: 800‐531‐0132 13
WHAT YOU SHOULD EXPECT FROM SAM
SAM 9.0 is designed to offer your customers an understandable managed‐computing environment so that they can serve themselves
through sign up, assignment, session, and print services. SAM lets you “Theme” the look and feel of the patron displays, and this
feature in combination with the ability to control instructional messages in one or more languages all contribute to ease of usage
and customer satisfaction.
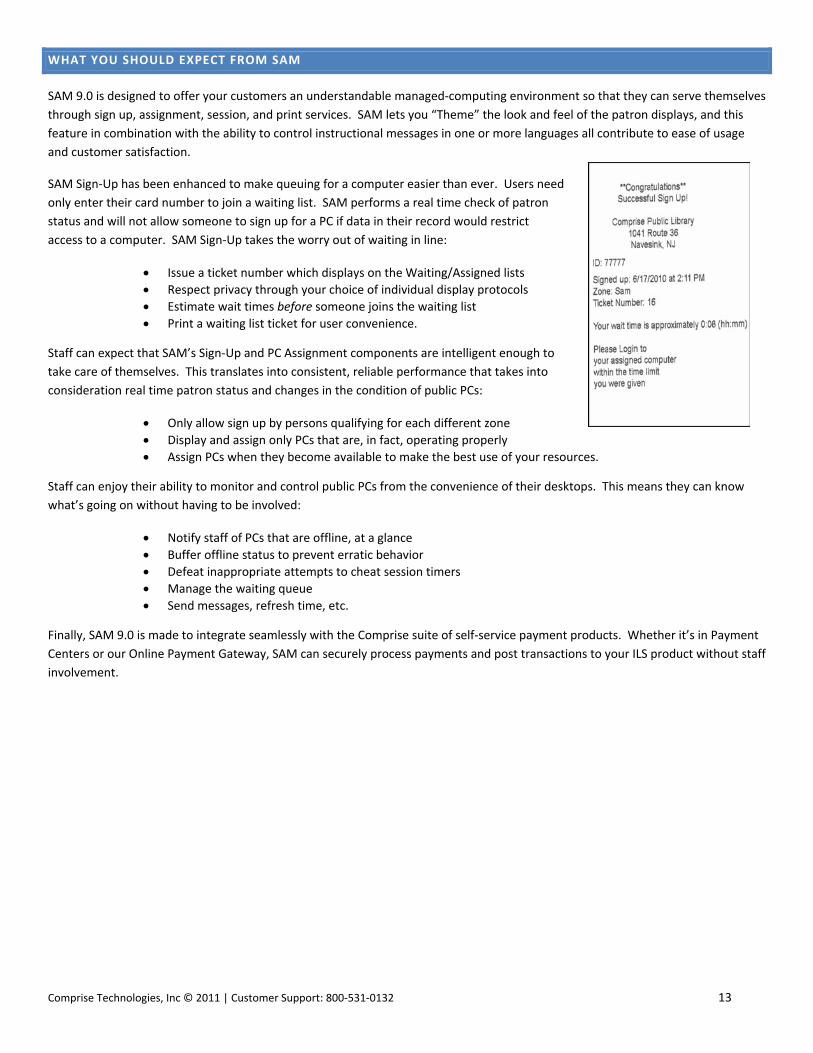
SAM Sign‐Up has been enhanced to make queuing for a computer easier than ever. Users need
only enter their card number to join a waiting list. SAM performs a real time check of patron
status and will not allow someone to sign up for a PC if data in their record would restrict
access to a computer. SAM Sign‐Up takes the worry out of waiting in line:
Issue a ticket number which displays on the Waiting/Assigned lists
Respect privacy through your choice of individual display protocols
Estimate wait times before someone joins the waiting list
Print a waiting list ticket for user convenience.
Staff can expect that SAM’s Sign‐Up and PC Assignment components are intelligent enough to
take care of themselves. This translates into consistent, reliable performance that takes into
consideration real time patron status and changes in the condition of public PCs:
Only allow sign up by persons qualifying for each different zone
Display and assign only PCs that are, in fact, operating properly
Assign PCs when they become available to make the best use of your resources.
Staff can enjoy their ability to monitor and control public PCs from the convenience of their desktops. This means they can know
what’s going on without having to be involved:
Notify staff of PCs that are offline, at a glance
Buffer offline status to prevent erratic behavior
Defeat inappropriate attempts to cheat session timers
Manage the waiting queue
Send messages, refresh time, etc.
Finally, SAM 9.0 is made to integrate seamlessly with the Comprise suite of self‐service payment products. Whether it’s in Payment
Centers or our Online Payment Gateway, SAM can securely process payments and post transactions to your ILS product without staff
involvement.
14 Comprise Technologies, Inc © 2011 | Customer Support: 800‐531‐0132
SAM USER INTERFACE
SAM supports 2 “Running Modes” for client PCs, PC Manager and Internet Manager. PC Manager presents a login screen which
users cannot bypass until they successfully authenticate into SAM. PC Manager controls access to the entire PC rather than a
specific application. Internet Manager presents the user with a login screen only when the computer’s browser is launched.
Internet Manager allows the library to permit non‐authenticated, non‐time‐limited access to applications on the PC. It only limits
access to the Internet. Running Mode can be selected through the Administrative interface from the System Options link and within
SAM Options. You are able to control a user’s session time, Internet access, and print controls in either the PC Manager or Internet
Manager Modes.
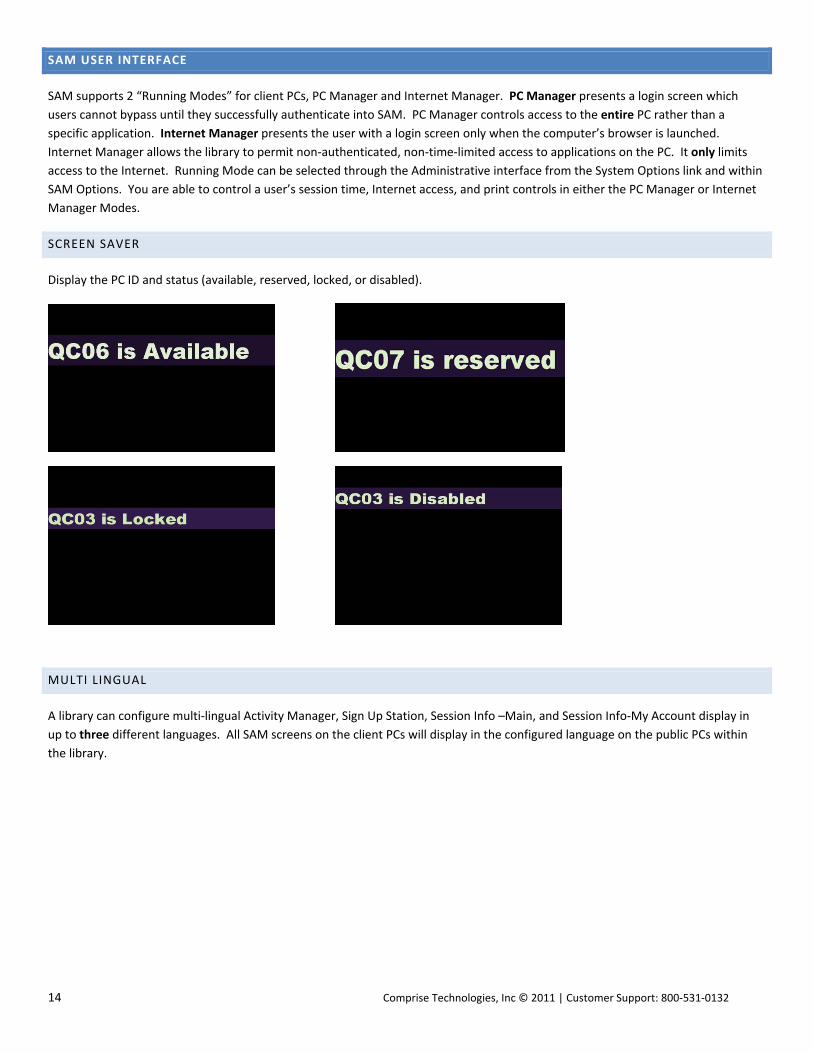
SCREEN SAVER
Display the PC ID and status (available, reserved, locked, or disabled).
MULTI LINGUAL
A library can configure multi‐lingual Activity Manager, Sign Up Station, Session Info –Main, and Session Info‐My Account display in
up to three different languages. All SAM screens on the client PCs will display in the configured language on the public PCs within
the library.
Comprise Technologies, Inc © 2011 | Customer Support: 800‐531‐0132 15
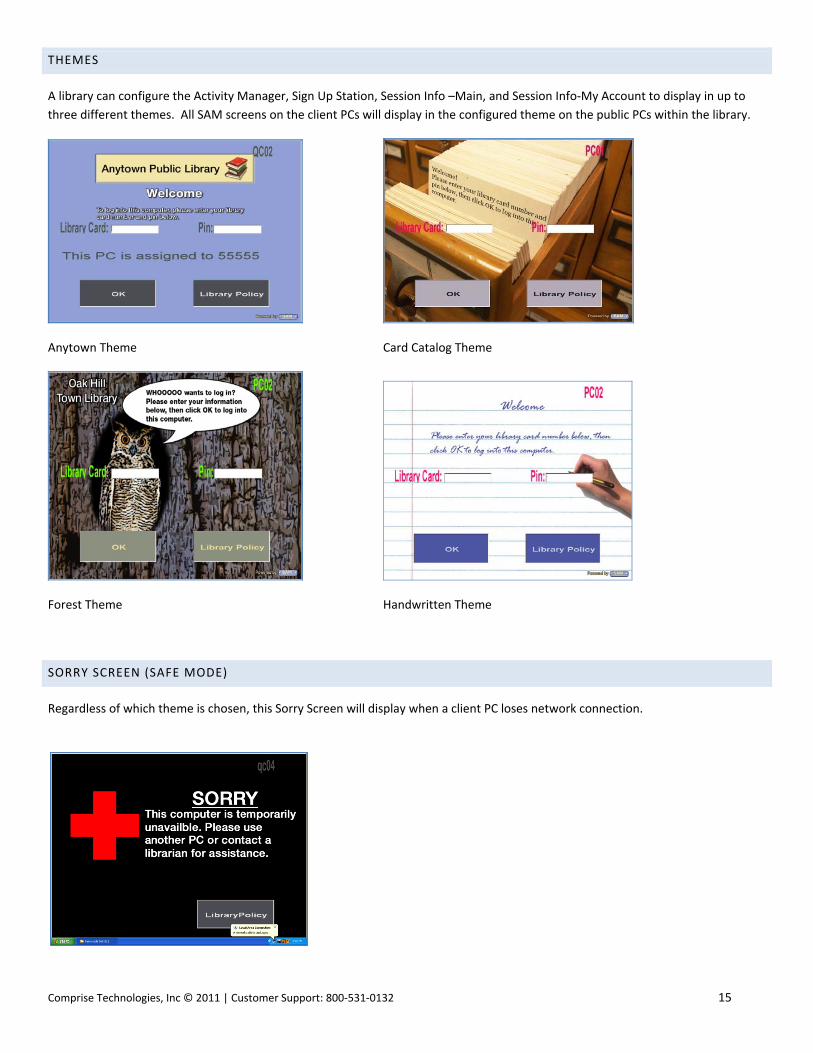
THEMES
A library can configure the Activity Manager, Sign Up Station, Session Info –Main, and Session Info‐My Account to display in up to
three different themes. All SAM screens on the client PCs will display in the configured theme on the public PCs within the library.
Anytown Theme Card Catalog Theme
Forest Theme Handwritten Theme
SORRY SCREEN (SAFE MODE)
Regardless of which theme is chosen, this Sorry Screen will display when a client PC loses network connection.
16 Comprise Technologies, Inc © 2011 | Customer Support: 800‐531‐0132
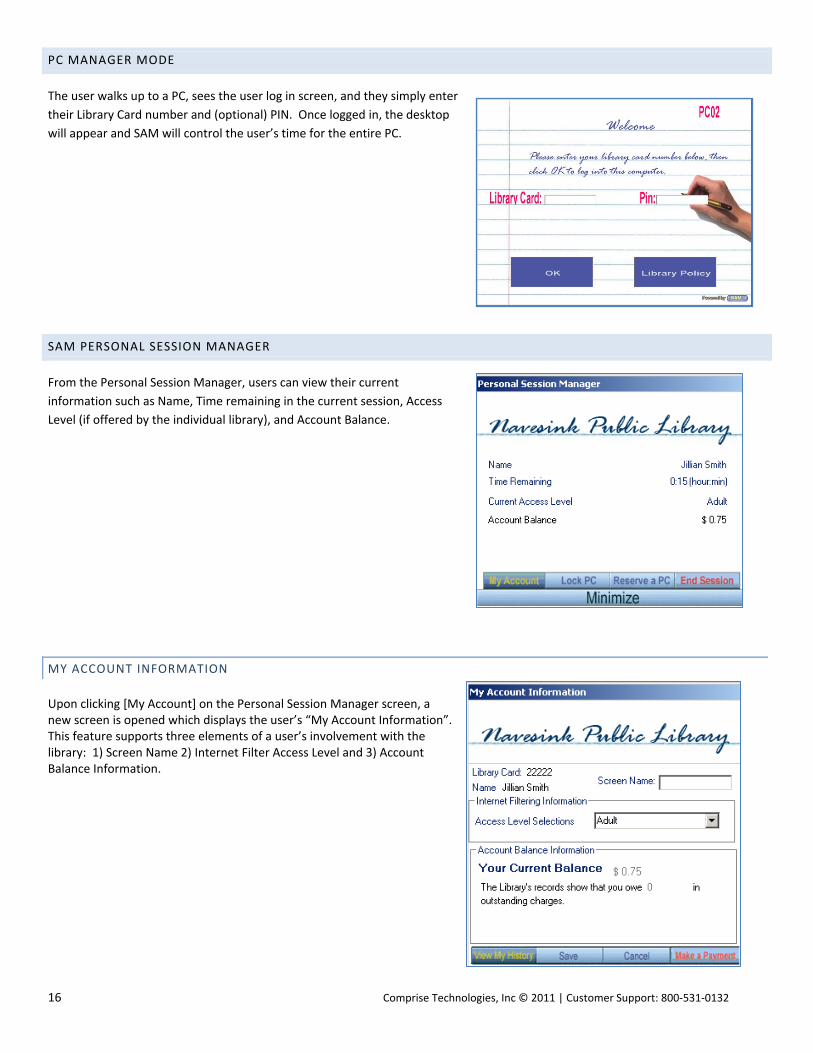
PC MANAGER MODE
The user walks up to a PC, sees the user log in screen, and they simply enter
their Library Card number and (optional) PIN. Once logged in, the desktop
will appear and SAM will control the user’s time for the entire PC.
SAM PERSONAL SESSION MANAGER
From the Personal Session Manager, users can view their current
information such as Name, Time remaining in the current session, Access
Level (if offered by the individual library), and Account Balance.
MY ACCOUNT INFORMATION
Upon clicking [My Account] on the Personal Session Manager screen, a new screen is opened which displays the user’s “My Account Information”. This feature supports three elements of a user’s involvement with the library: 1) Screen Name 2) Internet Filter Access Level and 3) Account Balance Information.
Comprise Technologies, Inc © 2011 | Customer Support: 800‐531‐0132 17
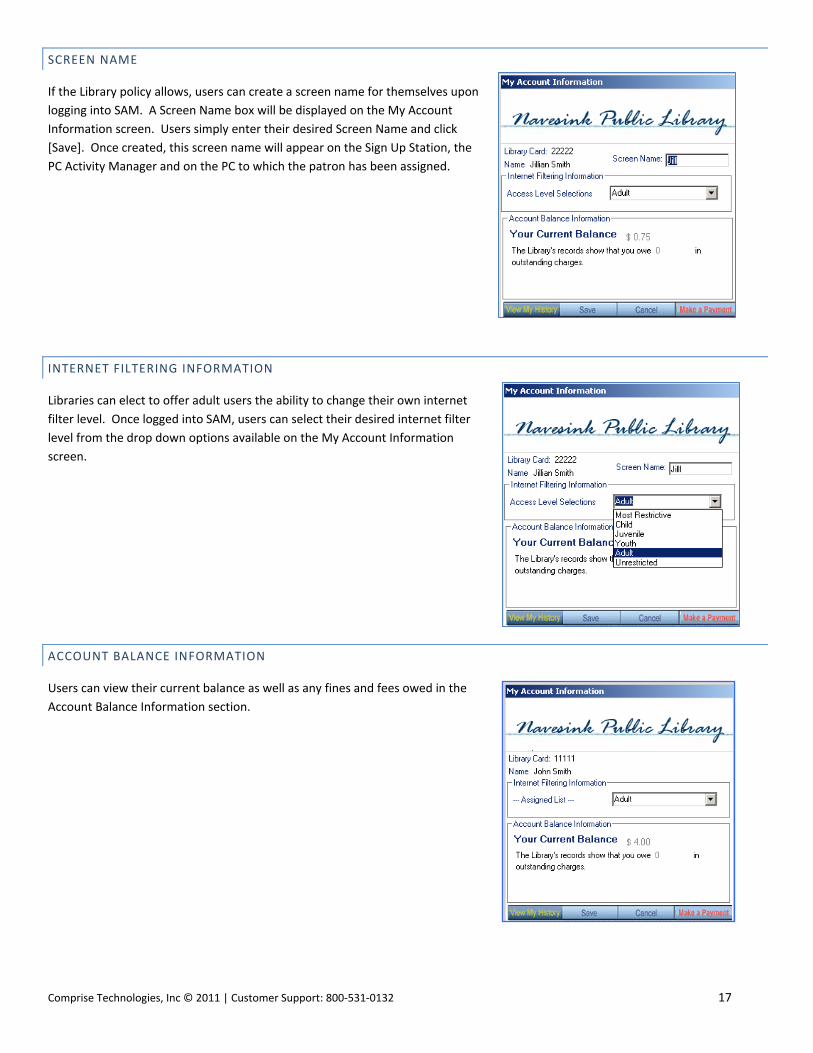
SCREEN NAME
If the Library policy allows, users can create a screen name for themselves upon
logging into SAM. A Screen Name box will be displayed on the My Account
Information screen. Users simply enter their desired Screen Name and click
[Save]. Once created, this screen name will appear on the Sign Up Station, the
PC Activity Manager and on the PC to which the patron has been assigned.
INTERNET FILTERING INFORMATION
Libraries can elect to offer adult users the ability to change their own internet
filter level. Once logged into SAM, users can select their desired internet filter
level from the drop down options available on the My Account Information
screen.
ACCOUNT BALANCE INFORMATION
Users can view their current balance as well as any fines and fees owed in the
Account Balance Information section.
18 Comprise Technologies, Inc © 2011 | Customer Support: 800‐531‐0132
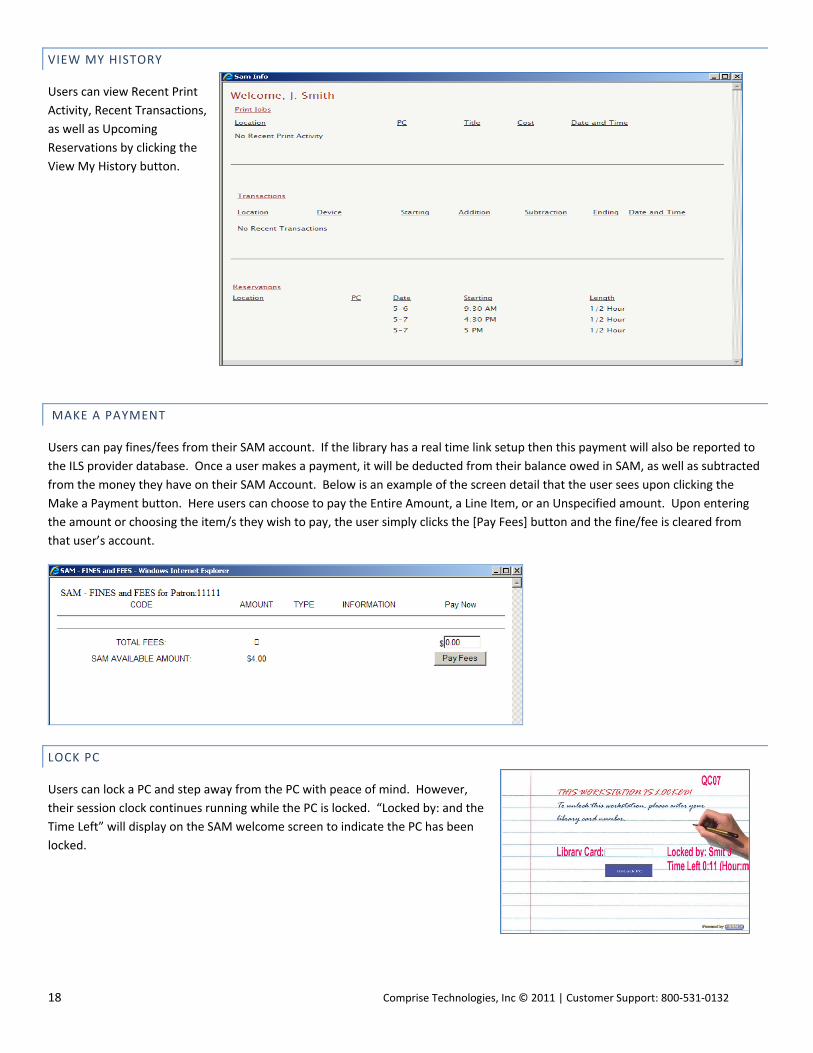
VIEW MY HISTORY
Users can view Recent Print
Activity, Recent Transactions,
as well as Upcoming
Reservations by clicking the
View My History button.
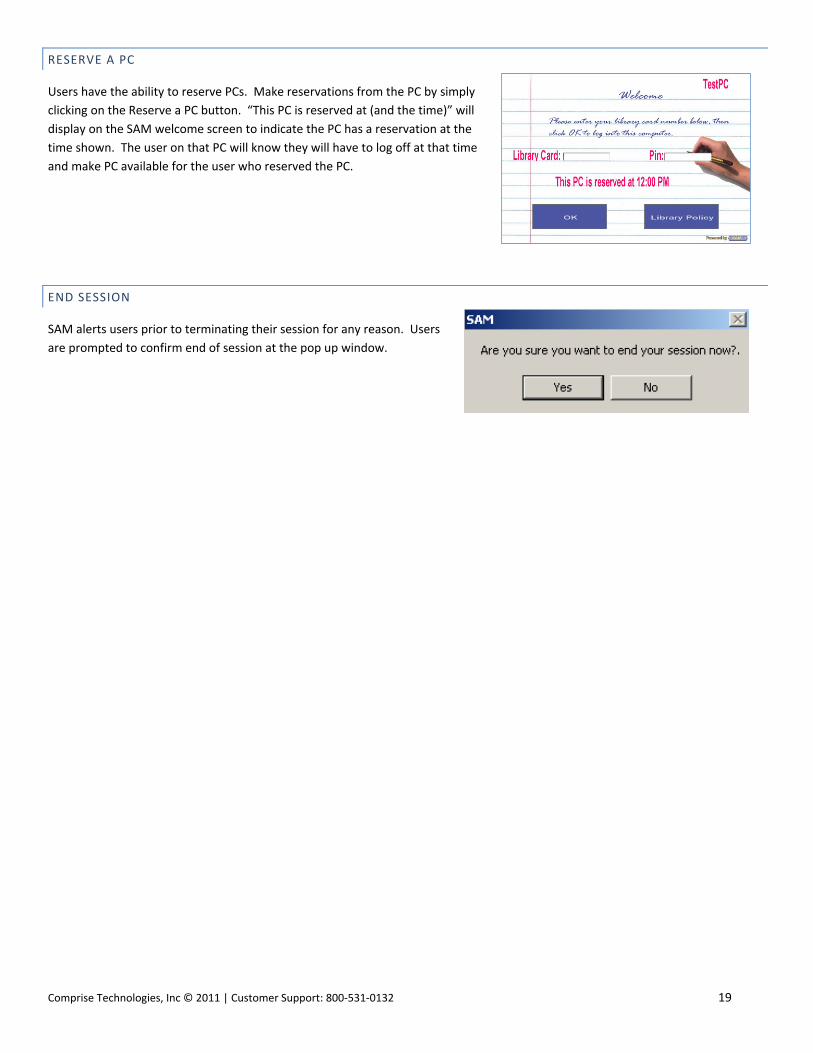
MAKE A PAYMENT
Users can pay fines/fees from their SAM account. If the library has a real time link setup then this payment will also be reported to
the ILS provider database. Once a user makes a payment, it will be deducted from their balance owed in SAM, as well as subtracted
from the money they have on their SAM Account. Below is an example of the screen detail that the user sees upon clicking the
Make a Payment button. Here users can choose to pay the Entire Amount, a Line Item, or an Unspecified amount. Upon entering
the amount or choosing the item/s they wish to pay, the user simply clicks the [Pay Fees] button and the fine/fee is cleared from
that user’s account.
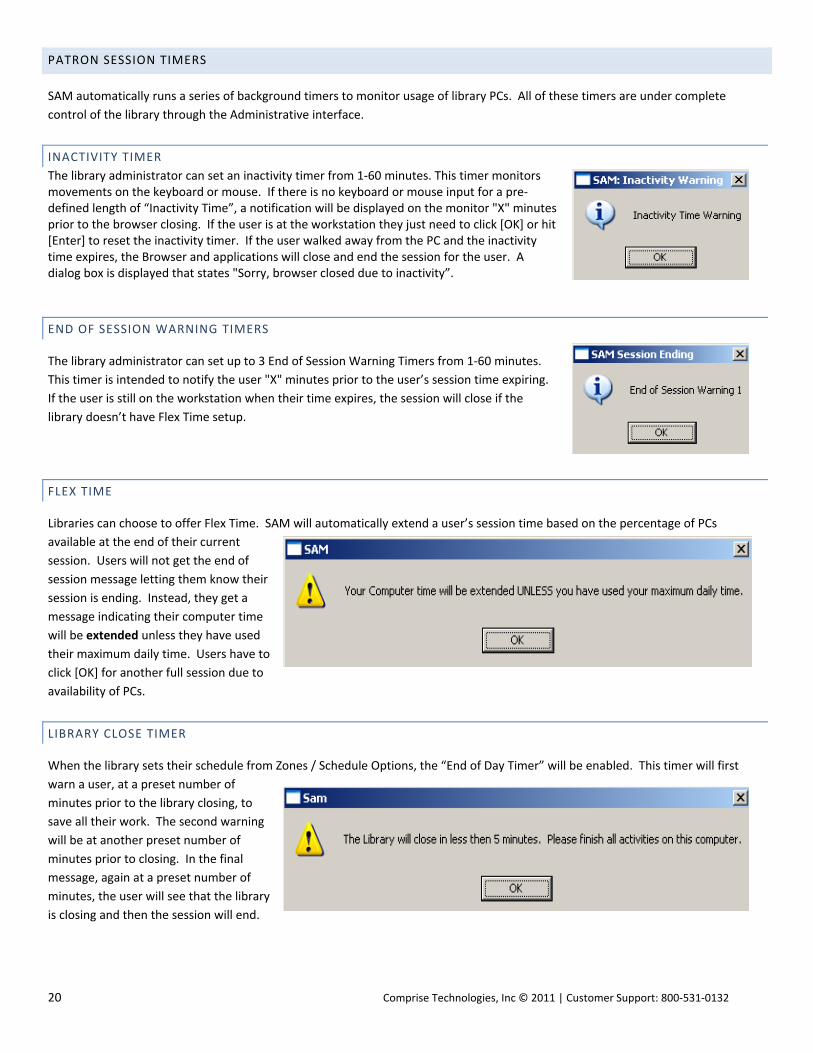
LOCK PC
Users can lock a PC and step away from the PC with peace of mind. However,
their session clock continues running while the PC is locked. “Locked by: and the
Time Left” will display on the SAM welcome screen to indicate the PC has been
locked.
Comprise Technologies, Inc © 2011 | Customer Support: 800‐531‐0132 19
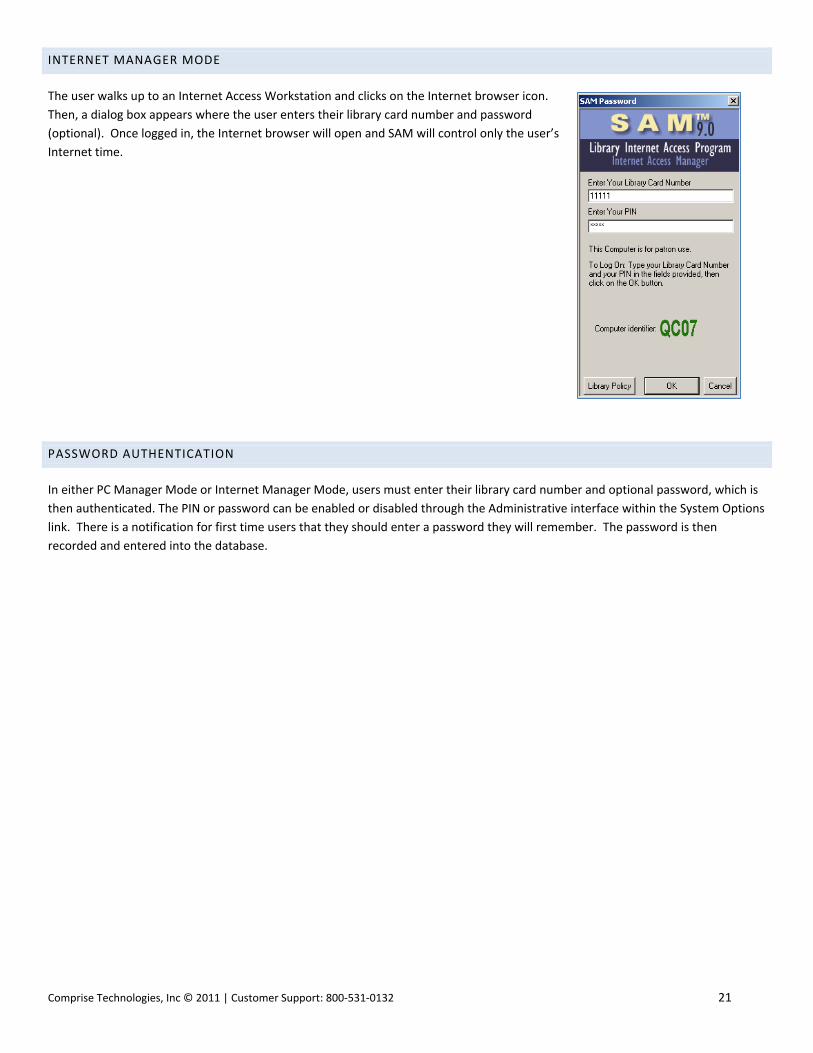
RESERVE A PC
Users have the ability to reserve PCs. Make reservations from the PC by simply
clicking on the Reserve a PC button. “This PC is reserved at (and the time)” will
display on the SAM welcome screen to indicate the PC has a reservation at the
time shown. The user on that PC will know they will have to log off at that time
and make PC available for the user who reserved the PC.
END SESSION
SAM alerts users prior to terminating their session for any reason. Users
are prompted to confirm end of session at the pop up window.
20 Comprise Technologies, Inc © 2011 | Customer Support: 800‐531‐0132
PATRON SESSION TIMERS
SAM automatically runs a series of background timers to monitor usage of library PCs. All of these timers are under complete
control of the library through the Administrative interface.
INACTIVITY TIMER
The library administrator can set an inactivity timer from 1‐60 minutes. This timer monitors movements on the keyboard or mouse. If there is no keyboard or mouse input for a pre‐defined length of “Inactivity Time”, a notification will be displayed on the monitor "X" minutes prior to the browser closing. If the user is at the workstation they just need to click [OK] or hit [Enter] to reset the inactivity timer. If the user walked away from the PC and the inactivity time expires, the Browser and applications will close and end the session for the user. A dialog box is displayed that states "Sorry, browser closed due to inactivity”.
END OF SESSION WARNING TIMERS
The library administrator can set up to 3 End of Session Warning Timers from 1‐60 minutes.
This timer is intended to notify the user "X" minutes prior to the user’s session time expiring.
If the user is still on the workstation when their time expires, the session will close if the
library doesn’t have Flex Time setup.
FLEX TIME
Libraries can choose to offer Flex Time. SAM will automatically extend a user’s session time based on the percentage of PCs
available at the end of their current
session. Users will not get the end of
session message letting them know their
session is ending. Instead, they get a
message indicating their computer time
will be extended unless they have used
their maximum daily time. Users have to
click [OK] for another full session due to
availability of PCs.
LIBRARY CLOSE TIMER
When the library sets their schedule from Zones / Schedule Options, the “End of Day Timer” will be enabled. This timer will first
warn a user, at a preset number of
minutes prior to the library closing, to
save all their work. The second warning
will be at another preset number of
minutes prior to closing. In the final
message, again at a preset number of
minutes, the user will see that the library
is closing and then the session will end.
Comprise Technologies, Inc © 2011 | Customer Support: 800‐531‐0132 21
INTERNET MANAGER MODE
The user walks up to an Internet Access Workstation and clicks on the Internet browser icon.
Then, a dialog box appears where the user enters their library card number and password
(optional). Once logged in, the Internet browser will open and SAM will control only the user’s
Internet time.
PASSWORD AUTHENTICATION
In either PC Manager Mode or Internet Manager Mode, users must enter their library card number and optional password, which is
then authenticated. The PIN or password can be enabled or disabled through the Administrative interface within the System Options
link. There is a notification for first time users that they should enter a password they will remember. The password is then
recorded and entered into the database.

22 Comprise Technologies, Inc © 2011 | Customer Support: 800‐531‐0132
PRINTING
Libraries can offer users 2 choices of print modes, Print Express and Print Release Station.
PRINT EXPRESS
Printed documents are sent directly to the printer(s) that is setup for PCs in the
library. The SAM “Print Manager” window appears each time the user submits a print
a job. Prior to printing, users can review the following:
Current Account Balance
# of pages in print job
# of free pages remaining
# of pages printed for the day
Cost per page
Total Cost for print job
PRINT RELEASE STATION
The Print Release Station operates on a dedicated
computer. Users enter a card number and PIN to
review and print their documents. They will only
see their own documents and can choose to print
or delete them.
Comprise Technologies, Inc © 2011 | Customer Support: 800‐531‐0132 23
PAYMENT METHODS
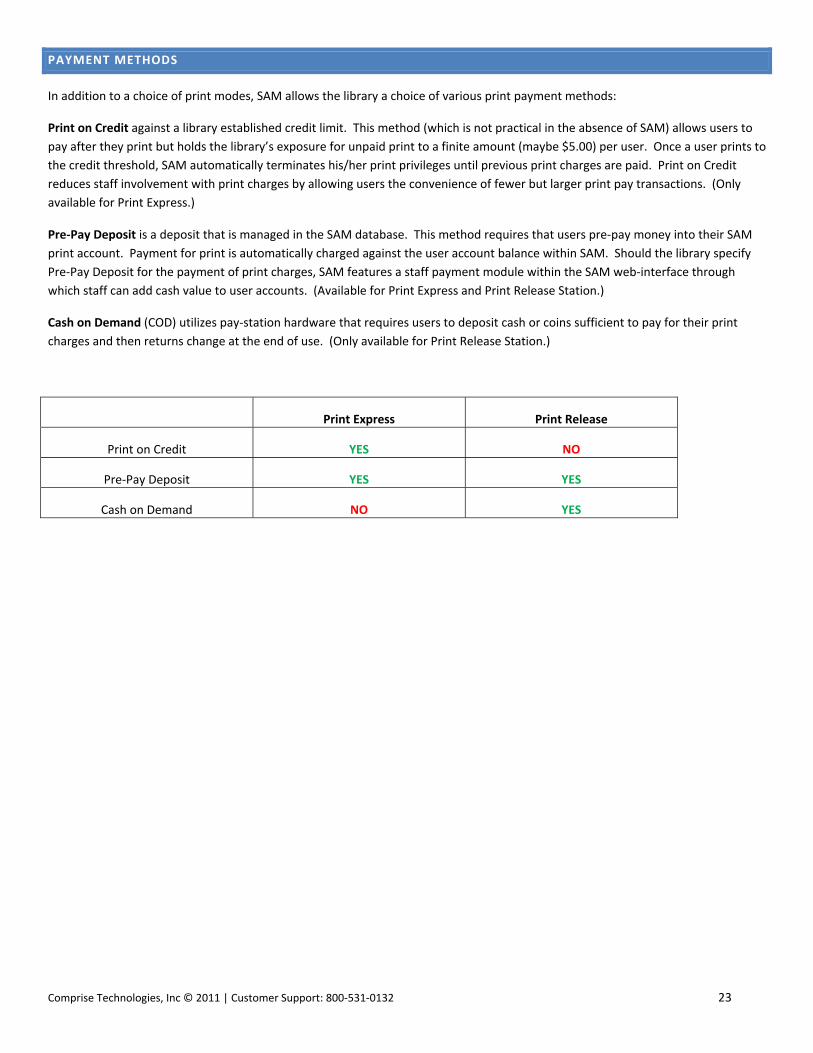
In addition to a choice of print modes, SAM allows the library a choice of various print payment methods:
Print on Credit against a library established credit limit. This method (which is not practical in the absence of SAM) allows users to
pay after they print but holds the library’s exposure for unpaid print to a finite amount (maybe $5.00) per user. Once a user prints to
the credit threshold, SAM automatically terminates his/her print privileges until previous print charges are paid. Print on Credit
reduces staff involvement with print charges by allowing users the convenience of fewer but larger print pay transactions. (Only
available for Print Express.)
Pre‐Pay Deposit is a deposit that is managed in the SAM database. This method requires that users pre‐pay money into their SAM
print account. Payment for print is automatically charged against the user account balance within SAM. Should the library specify
Pre‐Pay Deposit for the payment of print charges, SAM features a staff payment module within the SAM web‐interface through
which staff can add cash value to user accounts. (Available for Print Express and Print Release Station.)
Cash on Demand (COD) utilizes pay‐station hardware that requires users to deposit cash or coins sufficient to pay for their print
charges and then returns change at the end of use. (Only available for Print Release Station.)
Print Express Print Release
Print on Credit YES NO
Pre‐Pay Deposit YES YES
Cash on Demand NO YES

24 Comprise Technologies, Inc © 2011 | Customer Support: 800‐531‐0132
COMPUTER SIGN‐UP AND RESERVATIONS
SAM enables a library to automate the process of assigning computers to users utilizing either a Sign Up Station or PC Reservations.
This process can involve staff or be fully user self‐serve.
SIGN UP STATION
The Sign Up Station offers a fair and efficient method
of PC assignment. Users are immediately assigned to
computers in the order in which they sign up. If a user
leaves prior to their full session entitlement, SAM
immediately assigns that computer to the next waiting
user.
When a user is assigned a computer, their assignment
is displayed at the Sign Up Station as well as on the
computer to which they are assigned.
Comprise Technologies, Inc © 2011 | Customer Support: 800‐531‐0132 25
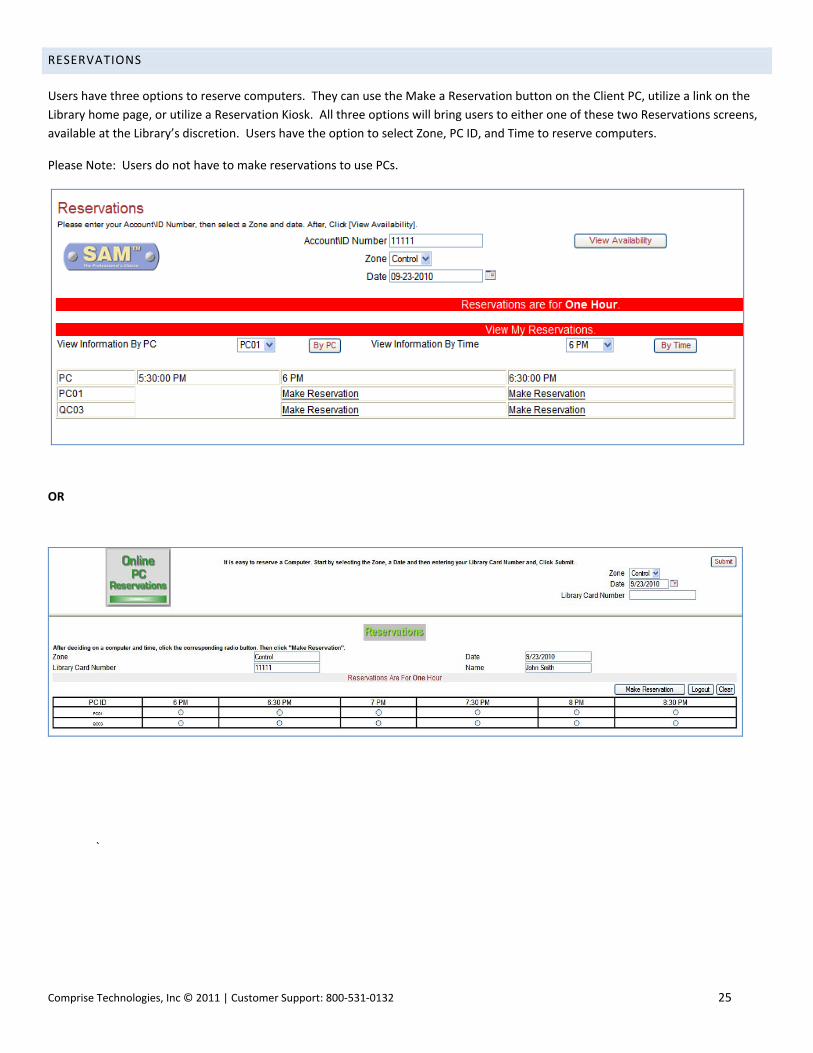
RESERVATIONS
Users have three options to reserve computers. They can use the Make a Reservation button on the Client PC, utilize a link on the
Library home page, or utilize a Reservation Kiosk. All three options will bring users to either one of these two Reservations screens,
available at the Library’s discretion. Users have the option to select Zone, PC ID, and Time to reserve computers.
Please Note: Users do not have to make reservations to use PCs.
OR
`
26 Comprise Technologies, Inc © 2011 | Customer Support: 800‐531‐0132
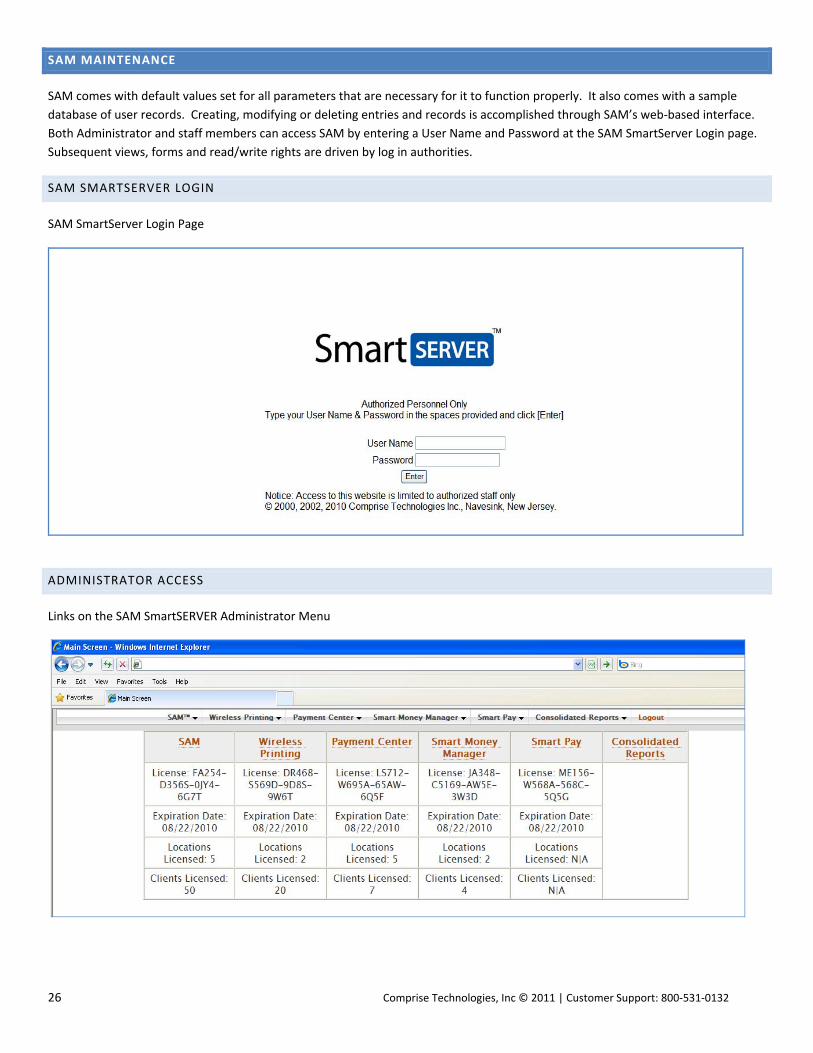
SAM MAINTENANCE
SAM comes with default values set for all parameters that are necessary for it to function properly. It also comes with a sample
database of user records. Creating, modifying or deleting entries and records is accomplished through SAM’s web‐based interface.
Both Administrator and staff members can access SAM by entering a User Name and Password at the SAM SmartServer Login page.
Subsequent views, forms and read/write rights are driven by log in authorities.
SAM SMARTSERVER LOGIN
SAM SmartServer Login Page
ADMINISTRATOR ACCESS
Links on the SAM SmartSERVER Administrator Menu

Comprise Technologies, Inc © 2011 | Customer Support: 800‐531‐0132 27
SAM ADMINISTRATOR MANAGER WEB INTERFACE
STAFF
Staff is used to setup Access Levels as determined by library administration. Each Access Level can be set up with specific, customized rights and access as follows:
SUPER ADMININSTRATOR ACCESS (ADMIN STAFF) Super Administrator: Access to all SAM controls
ADMINISTRATOR ACCESS (ADMIN STAFF) Administrator: Access to selected SAM controls as designated by Super Administrator.

28 Comprise Technologies, Inc © 2011 | Customer Support: 800‐531‐0132
IT MANAGER ACCESS (ADMIN STAFF)
IT Manager (Web Interface): Access limited to only Zones.
REPORT MANAGER ACCESS (ADMIN STAFF)
Report Manager (Web Interface): Access limited to only Reports, this includes ALL SAM of the reports.
STAFF ACCESS (ADMIN STAFF) Staff (Web Interface): Access to User Maintenance, Reservations and Limited Reports
Comprise Technologies, Inc © 2011 | Customer Support: 800‐531‐0132 29
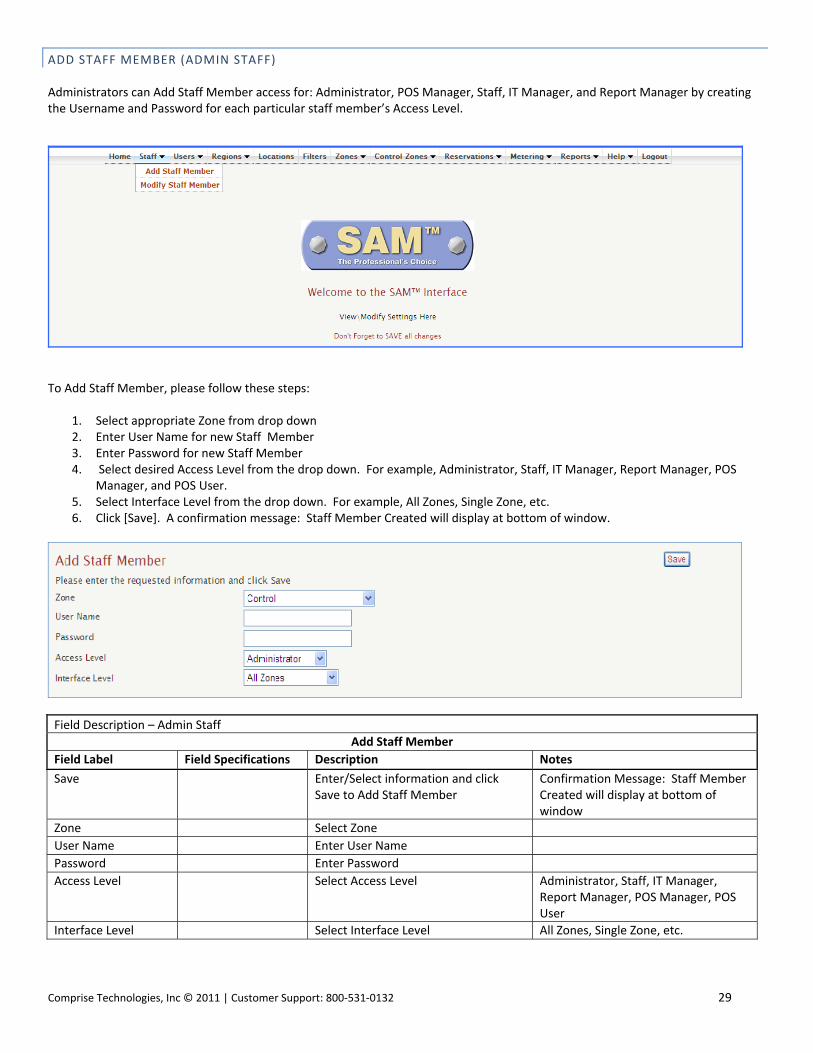
ADD STAFF MEMBER (ADMIN STAFF) Administrators can Add Staff Member access for: Administrator, POS Manager, Staff, IT Manager, and Report Manager by creating the Username and Password for each particular staff member’s Access Level.
To Add Staff Member, please follow these steps:
1. Select appropriate Zone from drop down 2. Enter User Name for new Staff Member 3. Enter Password for new Staff Member 4. Select desired Access Level from the drop down. For example, Administrator, Staff, IT Manager, Report Manager, POS
Manager, and POS User. 5. Select Interface Level from the drop down. For example, All Zones, Single Zone, etc. 6. Click [Save]. A confirmation message: Staff Member Created will display at bottom of window.
Field Description – Admin Staff
Add Staff Member
Field Label Field Specifications Description Notes
Save Enter/Select information and click Save to Add Staff Member
Confirmation Message: Staff Member Created will display at bottom of window
Zone Select Zone
User Name Enter User Name
Password Enter Password
Access Level Select Access Level Administrator, Staff, IT Manager, Report Manager, POS Manager, POS User
Interface Level Select Interface Level All Zones, Single Zone, etc.
30 Comprise Technologies, Inc © 2011 | Customer Support: 800‐531‐0132
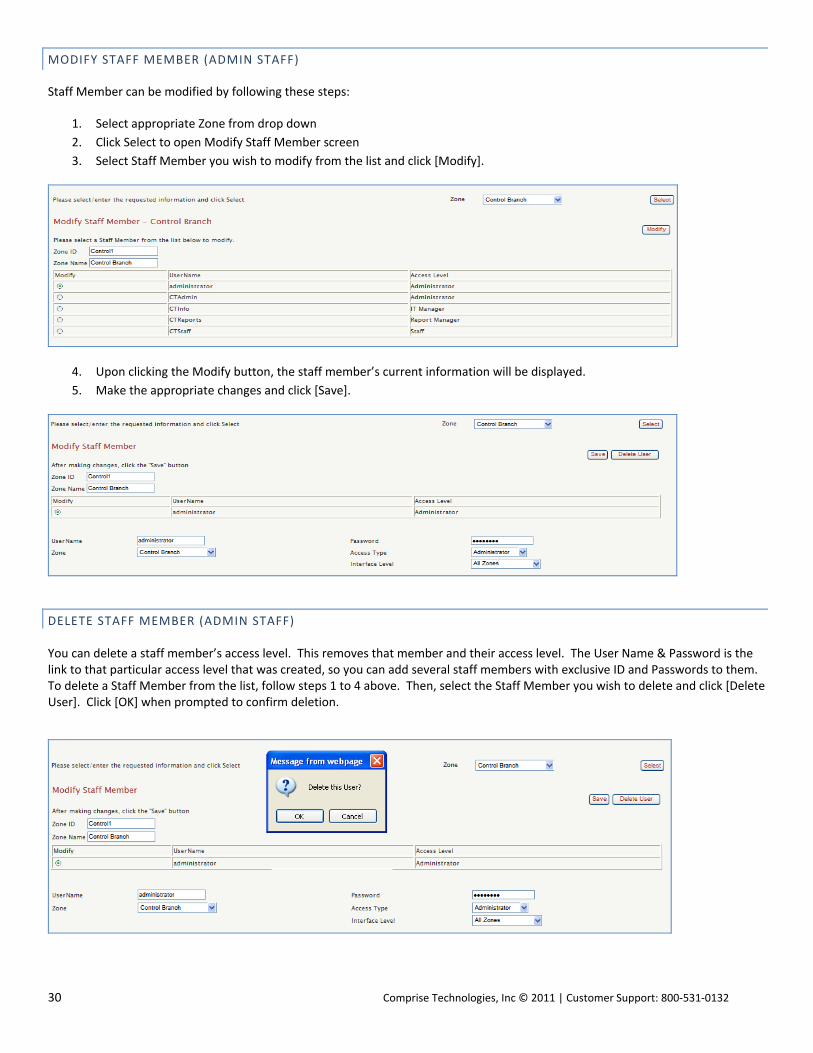
MODIFY STAFF MEMBER (ADMIN STAFF)
Staff Member can be modified by following these steps:
1. Select appropriate Zone from drop down
2. Click Select to open Modify Staff Member screen
3. Select Staff Member you wish to modify from the list and click [Modify].
4. Upon clicking the Modify button, the staff member’s current information will be displayed.
5. Make the appropriate changes and click [Save].
DELETE STAFF MEMBER (ADMIN STAFF) You can delete a staff member’s access level. This removes that member and their access level. The User Name & Password is the link to that particular access level that was created, so you can add several staff members with exclusive ID and Passwords to them. To delete a Staff Member from the list, follow steps 1 to 4 above. Then, select the Staff Member you wish to delete and click [Delete User]. Click [OK] when prompted to confirm deletion.
Comprise Technologies, Inc © 2011 | Customer Support: 800‐531‐0132 31
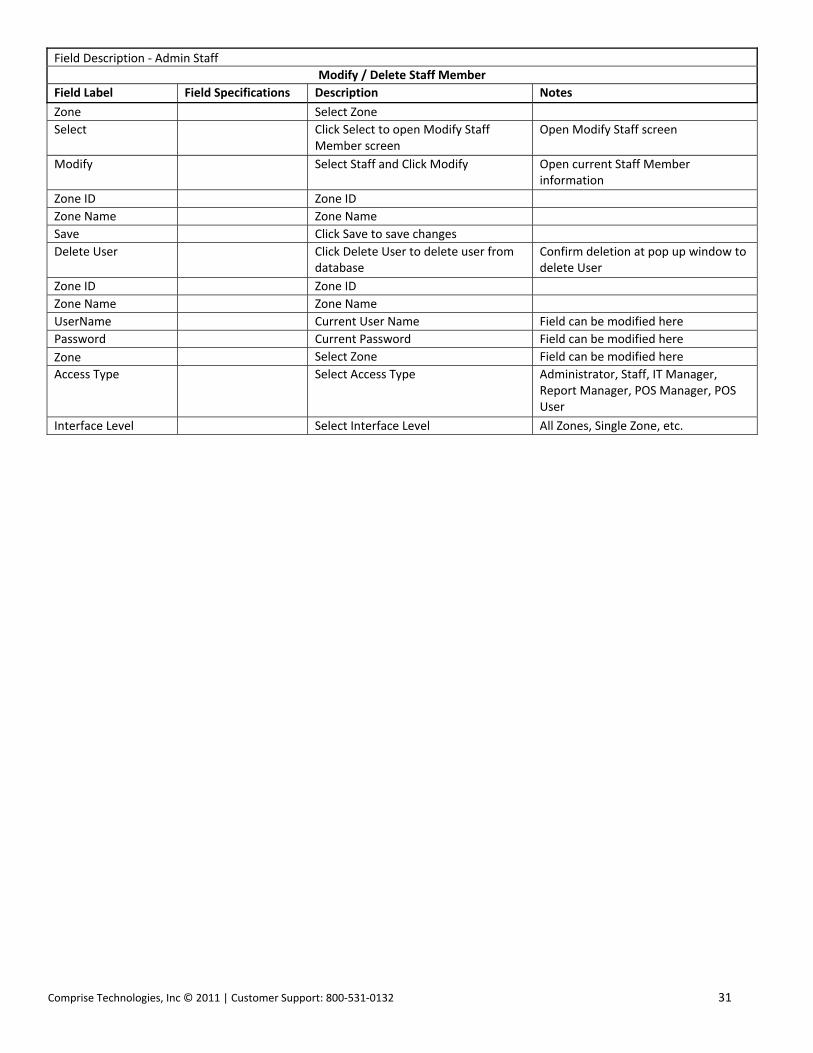
Field Description ‐ Admin Staff
Modify / Delete Staff Member
Field Label Field Specifications Description Notes
Zone Select Zone
Select Click Select to open Modify Staff Member screen
Open Modify Staff screen
Modify Select Staff and Click Modify Open current Staff Member information
Zone ID Zone ID
Zone Name Zone Name
Save Click Save to save changes
Delete User Click Delete User to delete user from database
Confirm deletion at pop up window to delete User
Zone ID Zone ID
Zone Name Zone Name
UserName Current User Name Field can be modified here
Password Current Password Field can be modified here
Zone Select Zone Field can be modified here
Access Type Select Access Type Administrator, Staff, IT Manager, Report Manager, POS Manager, POS User
Interface Level Select Interface Level All Zones, Single Zone, etc.
32 Comprise Technologies, Inc © 2011 | Customer Support: 800‐531‐0132
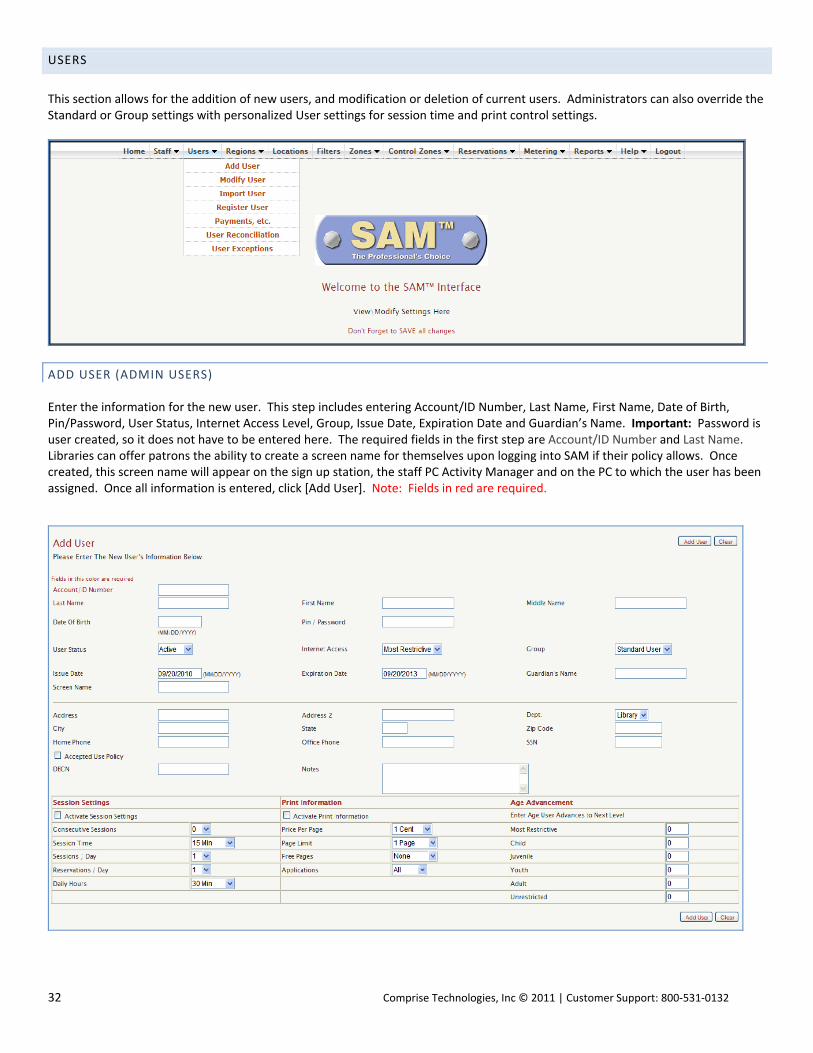
USERS
This section allows for the addition of new users, and modification or deletion of current users. Administrators can also override the Standard or Group settings with personalized User settings for session time and print control settings.
ADD USER (ADMIN USERS) Enter the information for the new user. This step includes entering Account/ID Number, Last Name, First Name, Date of Birth, Pin/Password, User Status, Internet Access Level, Group, Issue Date, Expiration Date and Guardian’s Name. Important: Password is user created, so it does not have to be entered here. The required fields in the first step are Account/ID Number and Last Name. Libraries can offer patrons the ability to create a screen name for themselves upon logging into SAM if their policy allows. Once created, this screen name will appear on the sign up station, the staff PC Activity Manager and on the PC to which the user has been assigned. Once all information is entered, click [Add User]. Note: Fields in red are required.

Comprise Technologies, Inc © 2011 | Customer Support: 800‐531‐0132 33
Field Description ‐ Admin Users
Add User
Field Label Field Specifications Description Notes
Add User Click after adding information to save
Clear Click to clear information entered
Account/ID Number Required field 19 character limit
User Account Number
Last Name Required field 8,000 character limit
Last Name
First Name 8,000 character limit First Name
Middle Name 8,000 character limit Middle Name
Date Of Birth (MM/DD/YYYY) 10 Date of Birth
Pin / Password 19 character limit User Pin / Password
User Status Status Active/Inactive
Internet Access Filter Level Names set by Library will be displayed.
Select appropriate Internet Access Level
For example: Most Restrictive, Child, Juvenile, Youth, Adult, Unrestricted, Block. Or, Level 1 to Level 6 and Block.
Group Select Group Standard, Groups 1 to 4
Issue Date (MM/DD/YYYY) 10 character limit
Account Number issue date
Expiration Date (MM/DD/YYYY) 10 character limit
Account Number expiration date
Guardian's Name 50 character limit Guardian’s Name
Screen Name 50 character limit Screen Name will appear on SUS, PCAM, and on PC to which user is assigned
User can change screen name
Address 35 character limit User Address
Address 2 35 character limit User Address
Dept. Library Dept. Library, Parks, etc.
City 35 character limit User City
State 2 character limit User State
Zip Code 10 character limit User Zip Code
Home Phone 21 character limit Home Phone
Office Phone 21 character limit Office Phone
SSN 11 character limit User SSN
Accepted Use Policy Indicates whether use policy was accepted or not
Will be checked after user accepts use policy
DBCN 50 character limit Unique Identifier. Database Control #
Notes 255 character limit Enter any notes regarding user.
Activate Session Settings
Override Group settings with settings selected below for user. Effective until box is unchecked.
Consecutive Sessions Select Consecutive Sessions Override Group Consecutive settings
Session Time Select Session Time Override Group Session Time
Sessions / Day Select Sessions per Day Override Group Sessions / Day
Reservations / Day Select Reservations per Day Override Group Reservations / Day
Daily Hours Select Daily Hours Override Group Daily Hours
Activate Print Information
Override Group Print Information with settings selected below for user. Effective until box is unchecked.
Price Per Page Select Price Per Page Override Group Price Per Page
Page Limit Select Page Limit Override Group Page Limit
Free Pages Select Free Pages Override Group Free Pages
34 Comprise Technologies, Inc © 2011 | Customer Support: 800‐531‐0132
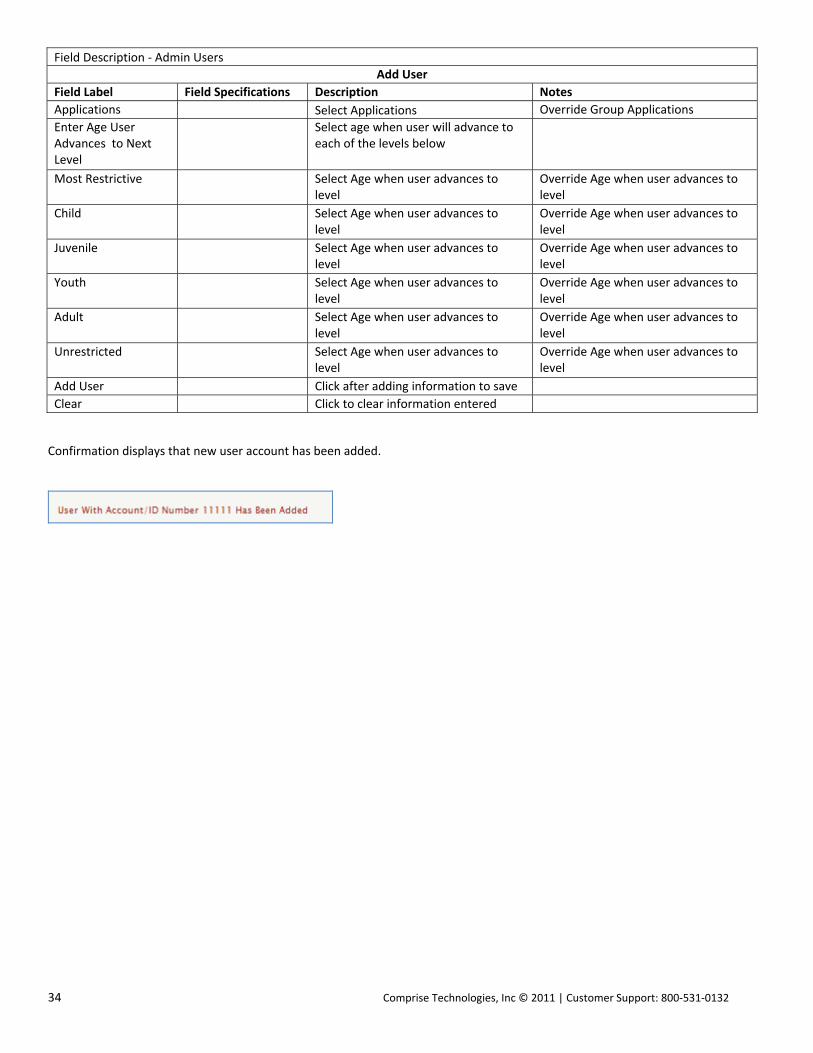
Field Description ‐ Admin Users
Add User
Field Label Field Specifications Description Notes
Applications Select Applications Override Group Applications
Enter Age User Advances to Next Level
Select age when user will advance to each of the levels below
Most Restrictive Select Age when user advances to level
Override Age when user advances to level
Child Select Age when user advances to level
Override Age when user advances to level
Juvenile Select Age when user advances to level
Override Age when user advances to level
Youth Select Age when user advances to level
Override Age when user advances to level
Adult Select Age when user advances to level
Override Age when user advances to level
Unrestricted Select Age when user advances to level
Override Age when user advances to level
Add User Click after adding information to save
Clear Click to clear information entered
Confirmation displays that new user account has been added.
Comprise Technologies, Inc © 2011 | Customer Support: 800‐531‐0132 35
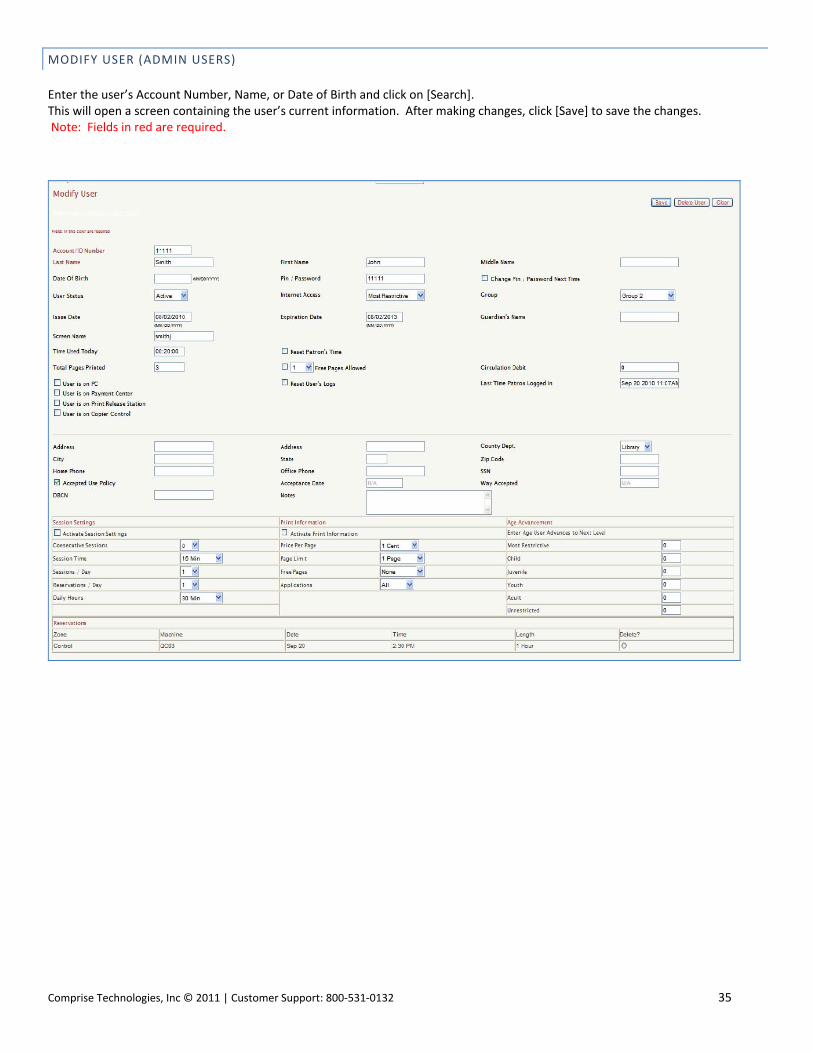
MODIFY USER (ADMIN USERS)
Enter the user’s Account Number, Name, or Date of Birth and click on [Search]. This will open a screen containing the user’s current information. After making changes, click [Save] to save the changes. Note: Fields in red are required.

36 Comprise Technologies, Inc © 2011 | Customer Support: 800‐531‐0132
DELETE USER (ADMIN USERS)
Delete User procedure: From the Modify User screen that displays the user’s current information.
1. If SAM account is zero, click [Delete User] 2. If SAM account is not zero:
a. First, zero out SAM account from Payments, etc. screen. b. Then, return to Modify User screen and click [Delete User].
3. For a replacement card, use method A or B: A.
a. First, zero out SAM account from Payments, etc. screen. b. Return to Modify User screen and click [Delete User]. c. Then, create new account and transfer the balance from the old card # into the newly created account.
B. a. In the Account/ID Number box, replace the old card # with new card #. b. Click [Save]
Transactions for the old card # are still associated with the old card #. Transactions for the new card # will be associated with the new card # going forward.
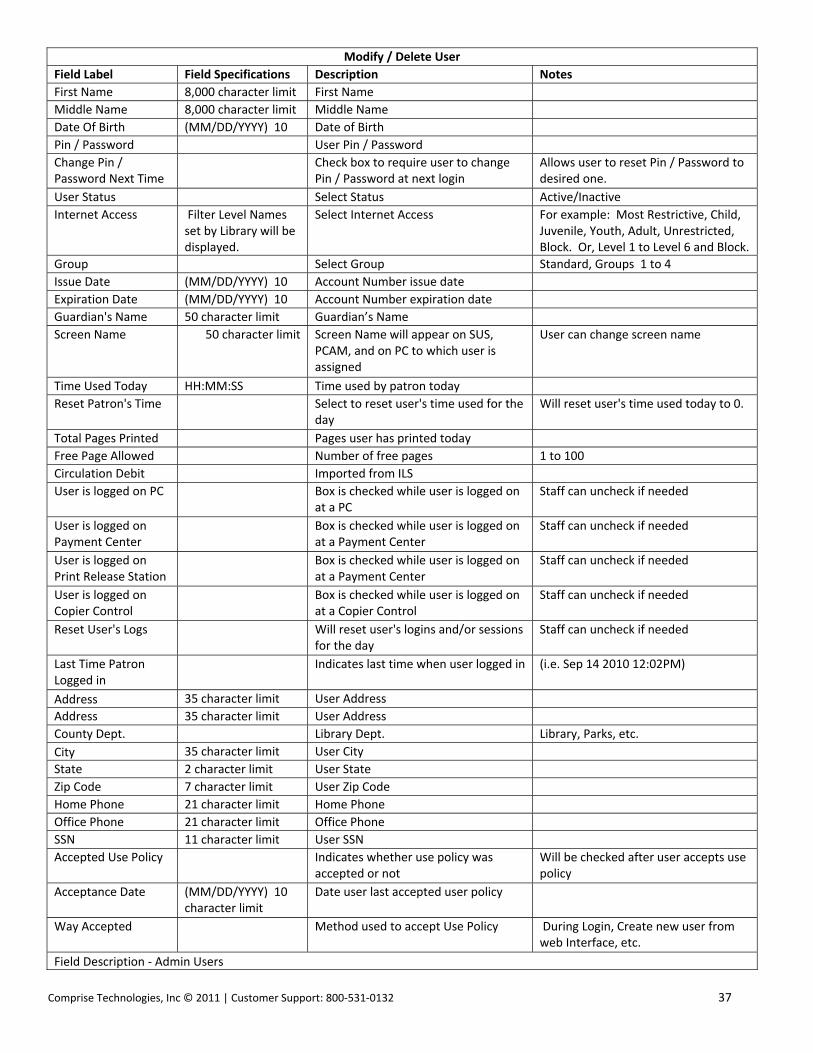
Field Description ‐ Admin Users
Modify / Delete User
Field Label Field Specifications Description Notes
Account/ID User Account Number
Last Name 8,000 character limit Last Name
First Name 8,000 character limit Last Name
DBCN 50 character limit Unique Identifier
Search Click to open Modify User Screen
Save After making changes, click to save
Delete User User SAM account has to be zero
Click to Delete User from database Cannot delete User if there is money in SAM account.
Clear Click to Clear changes without saving
Account/ID Required 19 character limit
User Account Number
Last Name Required 8,000 character limit
Last Name
Field Description ‐ Admin Users
User will not be deleted if there is money in SAM account.
Comprise Technologies, Inc © 2011 | Customer Support: 800‐531‐0132 37
Modify / Delete User
Field Label Field Specifications Description Notes
First Name 8,000 character limit First Name
Middle Name 8,000 character limit Middle Name
Date Of Birth (MM/DD/YYYY) 10 Date of Birth
Pin / Password User Pin / Password
Change Pin / Password Next Time
Check box to require user to change Pin / Password at next login
Allows user to reset Pin / Password to desired one.
User Status Select Status Active/Inactive
Internet Access Filter Level Names set by Library will be displayed.
Select Internet Access For example: Most Restrictive, Child, Juvenile, Youth, Adult, Unrestricted, Block. Or, Level 1 to Level 6 and Block.
Group Select Group Standard, Groups 1 to 4
Issue Date (MM/DD/YYYY) 10 Account Number issue date
Expiration Date (MM/DD/YYYY) 10 Account Number expiration date
Guardian's Name 50 character limit Guardian’s Name
Screen Name 50 character limit Screen Name will appear on SUS, PCAM, and on PC to which user is assigned
User can change screen name
Time Used Today HH:MM:SS Time used by patron today
Reset Patron's Time Select to reset user's time used for the day
Will reset user's time used today to 0.
Total Pages Printed Pages user has printed today
Free Page Allowed Number of free pages 1 to 100
Circulation Debit Imported from ILS
User is logged on PC Box is checked while user is logged on at a PC
Staff can uncheck if needed
User is logged on Payment Center
Box is checked while user is logged on at a Payment Center
Staff can uncheck if needed
User is logged on Print Release Station
Box is checked while user is logged on at a Payment Center
Staff can uncheck if needed
User is logged on Copier Control
Box is checked while user is logged on at a Copier Control
Staff can uncheck if needed
Reset User's Logs Will reset user's logins and/or sessions for the day
Staff can uncheck if needed
Last Time Patron Logged in
Indicates last time when user logged in (i.e. Sep 14 2010 12:02PM)
Address 35 character limit User Address
Address 35 character limit User Address
County Dept. Library Dept. Library, Parks, etc.
City 35 character limit User City
State 2 character limit User State
Zip Code 7 character limit User Zip Code
Home Phone 21 character limit Home Phone
Office Phone 21 character limit Office Phone
SSN 11 character limit User SSN
Accepted Use Policy Indicates whether use policy was accepted or not
Will be checked after user accepts use policy
Acceptance Date (MM/DD/YYYY) 10 character limit
Date user last accepted user policy
Way Accepted Method used to accept Use Policy During Login, Create new user from web Interface, etc.
Field Description ‐ Admin Users

38 Comprise Technologies, Inc © 2011 | Customer Support: 800‐531‐0132
Modify / Delete User
Field Label Field Specifications Description Notes
DBCN 50 Unique Identifier
Notes 255 character limit Enter any notes regarding user.
Session Settings
Activate Session Settings
Override Group settings with settings selected below for user. Effective until box is unchecked.
Consecutive Sessions Select Consecutive Sessions Override Group Consecutive settings
Session Time Select Session Time Override Group Session Time
Sessions / Day Select Sessions per Day Override Group Sessions / Day
Reservations / Day Select Reservations per Day Override Group Reservations / Day
Daily Hours Select Daily Hours Override Group Daily Hours
Print Information
Activate Print Information
Override Group Print Information with settings selected below for user. Effective until box is unchecked.
Price Per Page Select Price Per Page Override Group Price Per Page
Page Limit Select Page Limit Override Group Page Limit
Free Pages Select Free Pages Override Group Free Pages
Applications Select Applications Override Group Applications
Age Advancement
Enter Age User Advances to Next Level
Select age when user will advance to each of the levels below
Most Restrictive Select Age when user advances to level
Override Age when user advances to level
Child Select Age when user advances to level
Override Age when user advances to level
Juvenile Select Age when user advances to level
Override Age when user advances to level
Youth Select Age when user advances to level
Override Age when user advances to level
Adult Select Age when user advances to level
Override Age when user advances to level
Unrestricted Select Age when user advances to level
Override Age when user advances to level
Reservations Reservations user has for the day will be displayed

Comprise Technologies, Inc © 2011 | Customer Support: 800‐531‐0132 39
IMPORT USER (ADMIN USERS)
Import Users from the ILS
Enter the user’s Account Number and click on [Submit Query].
Field Description ‐ Admin Users
Import User
Field Label Field Specifications Description Notes
Submit Query Click after entering information to save
User will be imported to database
Account/ID Number 19 character limit Enter User Account/ID Number
Pin/Password Optional Optional, based on ILS requirements Only shows if applicable
REGISTER USER (ADMIN USERS)
Self‐registration is used in lieu of an automatic link to the patron database. This feature enables the patron to self‐register the first
time they use SAM. This feature is only used when the library has an ILS that does not support SIP or API’s. Staff can verify the
information.
To Register User, click [Register]. User will be registered and name will be removed from the list.
To Change or Add a user’s information before registering them:
1. Click [Add More Info] 2. Change or Add the appropriate information. 3. Click [Add User]

40 Comprise Technologies, Inc © 2011 | Customer Support: 800‐531‐0132
A confirmation box will display: Patron Inforamtion Has Been Added.
Field Description ‐ Admin Users
Register User
Field Label Field Specifications Description Notes
Register Click the card number, name or the 'Register' Button to Register a User with the current information displayed
Add More Info
Click the 'Add More Info' Button to Change or Add a User's information before Registering them
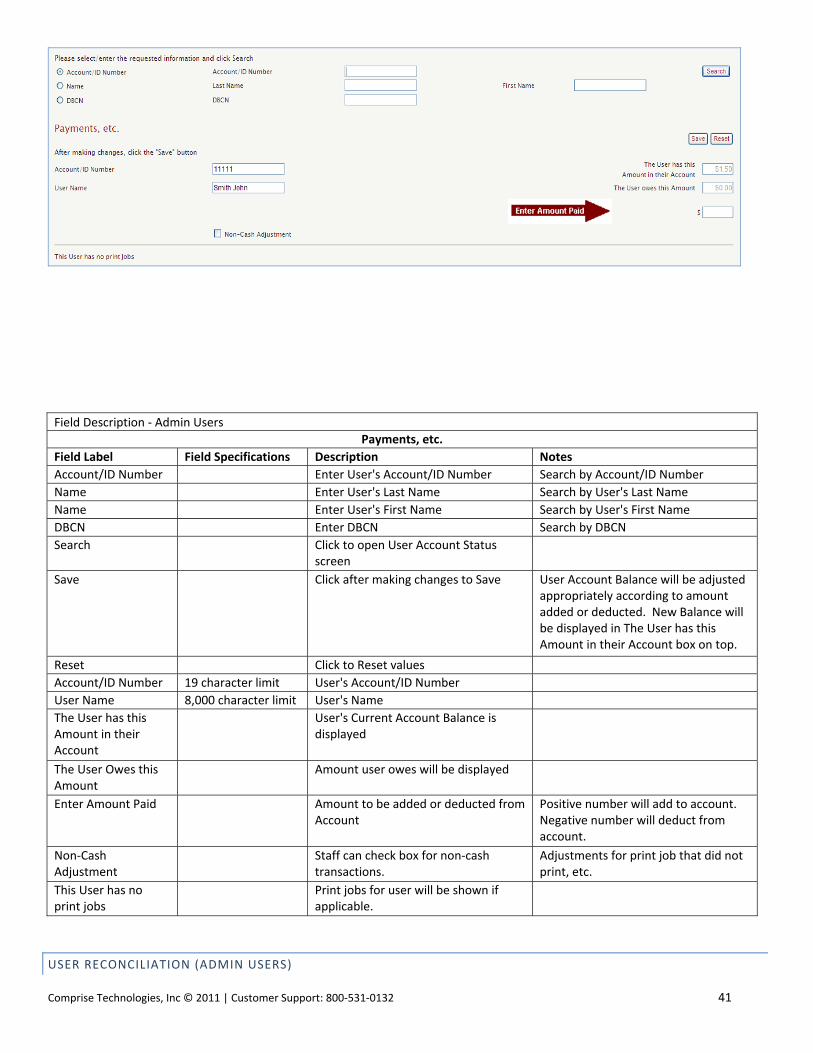
PAYMENTS, ETC. (ADMIN USERS)
Please note, to protect the integrity of SAM account balances, users will be blocked from logging onto the Payment Center, Print
Release Station and Copy Controller concurrently. Users can only log onto one of these devices at a time.
Enter the user’s Account Number and click on [Search].
This will open a screen showing the user’s current information. After making the changes, you can click [Save] to save changes.
Comprise Technologies, Inc © 2011 | Customer Support: 800‐531‐0132 41
Field Description ‐ Admin Users
Payments, etc.
Field Label Field Specifications Description Notes
Account/ID Number Enter User's Account/ID Number Search by Account/ID Number
Name Enter User's Last Name Search by User's Last Name
Name Enter User's First Name Search by User's First Name
DBCN Enter DBCN Search by DBCN
Search Click to open User Account Status screen
Save Click after making changes to Save User Account Balance will be adjusted appropriately according to amount added or deducted. New Balance will be displayed in The User has this Amount in their Account box on top.
Reset Click to Reset values
Account/ID Number 19 character limit User's Account/ID Number
User Name 8,000 character limit User's Name
The User has this Amount in their Account
User's Current Account Balance is displayed
The User Owes this Amount
Amount user owes will be displayed
Enter Amount Paid Amount to be added or deducted from Account
Positive number will add to account. Negative number will deduct from account.
Non‐Cash Adjustment
Staff can check box for non‐cash transactions.
Adjustments for print job that did not print, etc.
This User has no print jobs
Print jobs for user will be shown if applicable.
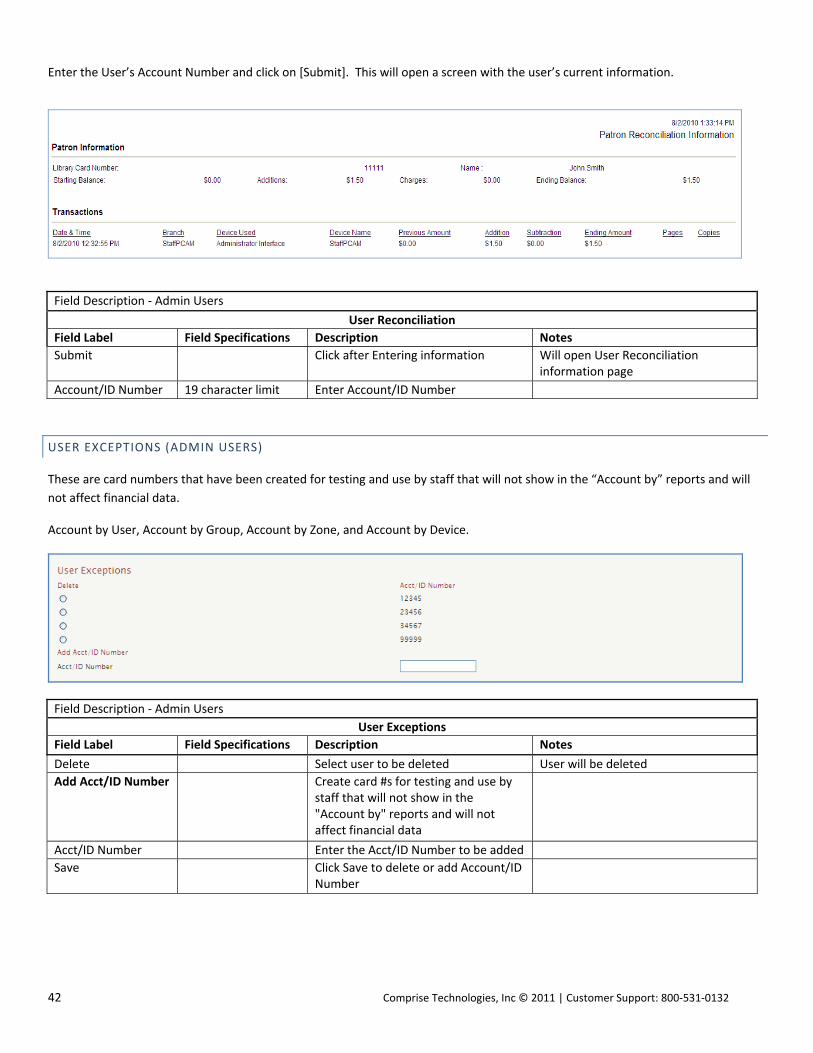
USER RECONCILIATION (ADMIN USERS)
42 Comprise Technologies, Inc © 2011 | Customer Support: 800‐531‐0132
Enter the User’s Account Number and click on [Submit]. This will open a screen with the user’s current information.
Field Description ‐ Admin Users
User Reconciliation
Field Label Field Specifications Description Notes
Submit Click after Entering information Will open User Reconciliation information page
Account/ID Number 19 character limit Enter Account/ID Number
USER EXCEPTIONS (ADMIN USERS)
These are card numbers that have been created for testing and use by staff that will not show in the “Account by” reports and will
not affect financial data.
Account by User, Account by Group, Account by Zone, and Account by Device.
Field Description ‐ Admin Users
User Exceptions
Field Label Field Specifications Description Notes
Delete Select user to be deleted User will be deleted
Add Acct/ID Number Create card #s for testing and use by staff that will not show in the "Account by" reports and will not affect financial data
Acct/ID Number Enter the Acct/ID Number to be added
Save Click Save to delete or add Account/ID Number

Comprise Technologies, Inc © 2011 | Customer Support: 800‐531‐0132 43
IDENTIFY AND DEFINE GROUPS OF COMPUTERS
The following sections will cover how to identify and define the various groups of computers in your building(s).
REGION
A region consists of one or more locations that are configured under the same Administrative authority but organized together so
that their data and reports can be viewed by a specific authentication level.
LOCATION
A Location is a physical description; it is the primary licensing unit for SAM software.
ZONE
A Zone is a way to configure SAM differently for certain PCs without acquiring additional Location licensing. A Zone is typically a
section of a Location in which SAM is configured differently than elsewhere in that Location, for example, The Kids Section. Another
use of a Zone differentiates PCs by purpose. For example, Express Computers can be configured under common Zone settings
regardless of their physical location. All SAM configuration options resolve to the Zone level.
CONTROL ZONE
A Control Zone is another way to configure SAM differently for certain PCs without acquiring additional Location licensing. Control
Zones offer a limited subset of configuration options.

44 Comprise Technologies, Inc © 2011 | Customer Support: 800‐531‐0132
REGIONS
This section allows the Administrator to add, modify, or delete a region in a Consortium. It also allows for assigning a Zone to a
Region.
ADD REGION (ADMIN REGIONS)
To Add Region, please follow these steps:
1. Enter Region ID (must be numeric)
2. Enter Region Name
3. Click [Add Region] to add the new Region.
4. Region will be added to database and display in list below

Comprise Technologies, Inc © 2011 | Customer Support: 800‐531‐0132 45
A confirmation message: Region has been Added will display on the screen.
Field Description – Admin Regions
Add Region
Field Label Field Specifications Description Notes
Add Region Click after entering information to Save
Region will be added to database and display in list below
Region ID Must be numeric Enter Region ID
Region Name 100 character limit Enter Region Name
MODIFY REGION (ADMIN REGIONS)
Region information can be modified by following these steps:
1. Select appropriate Region Name from drop down 2. Click Submit to open Modify Region screen 3. Make the appropriate changes to modify Region information and click [Save].
A confirmation message: Region Has Been Updated will display on screen.

46 Comprise Technologies, Inc © 2011 | Customer Support: 800‐531‐0132
DELETE REGION (ADMIN REGIONS)
Region information can be deleted by following these steps:
1. Select appropriate Region Name from drop down
2. Click Submit to open Modify Region screen
3. Click [Delete Region]. Then, click [OK] when prompted to confirm deletion.
Field Description ‐ Admin Regions
Modify / Delete Region
Field Label Field Specifications Description Notes
Region Name Select Region to Modify
Submit Click to open Modify Region screen
Save Click after changing information to Save Region information will be updated on server
Delete Region Click [Delete Region] and [OK] to confirm deletion.
Region will be deleted from database
Region ID Must be numeric Region ID
Current Region Name Current Region Name
New Region Name 100 character limit Enter New Region Name
ASSIGN ZONE (ADMIN REGIONS)
To Assign Zone to a Region, follow these steps:
1. Select the appropriate Region and click [Submit]. 2. Select desired Zone from the list. To select more than one Zone, hold the CTRL button as you select. 3. Click [Save] to assign the Zone(s) to Region.
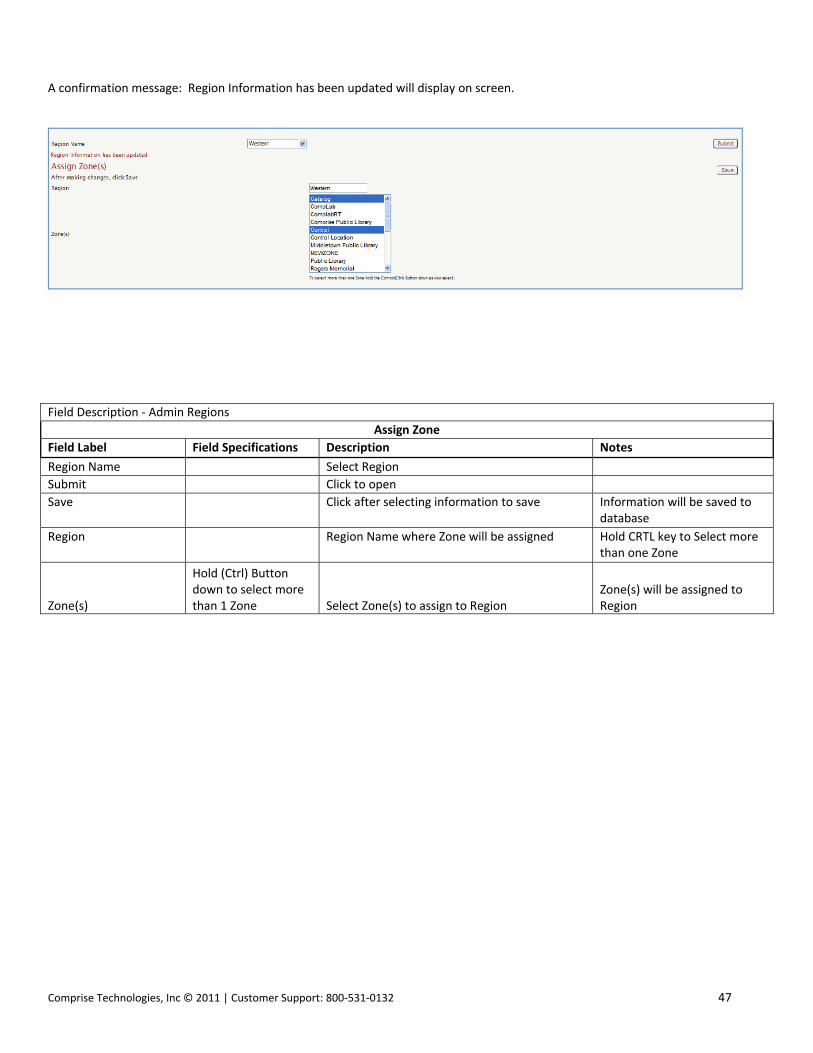
Comprise Technologies, Inc © 2011 | Customer Support: 800‐531‐0132 47
A confirmation message: Region Information has been updated will display on screen.
Field Description ‐ Admin Regions
Assign Zone
Field Label Field Specifications Description Notes
Region Name Select Region
Submit Click to open
Save Click after selecting information to save Information will be saved to database
Region Region Name where Zone will be assigned Hold CRTL key to Select more than one Zone
Zone(s)
Hold (Ctrl) Button down to select more than 1 Zone Select Zone(s) to assign to Region
Zone(s) will be assigned to Region
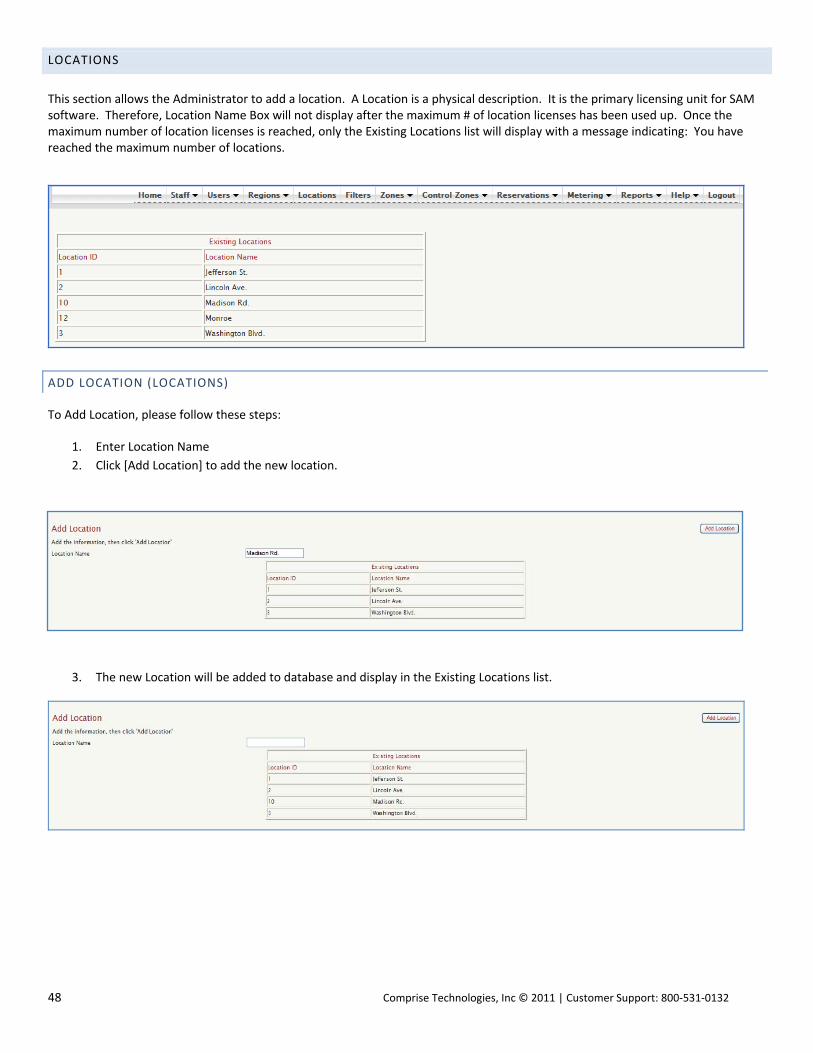
48 Comprise Technologies, Inc © 2011 | Customer Support: 800‐531‐0132
LOCATIONS
This section allows the Administrator to add a location. A Location is a physical description. It is the primary licensing unit for SAM software. Therefore, Location Name Box will not display after the maximum # of location licenses has been used up. Once the maximum number of location licenses is reached, only the Existing Locations list will display with a message indicating: You have reached the maximum number of locations.
ADD LOCATION (LOCATIONS)
To Add Location, please follow these steps:
1. Enter Location Name
2. Click [Add Location] to add the new location.
3. The new Location will be added to database and display in the Existing Locations list.

Comprise Technologies, Inc © 2011 | Customer Support: 800‐531‐0132 49
4. Once the library has reached the maximum number of Licensed Locations, the Location Name box will not display when
attempting to add a location. Instead, there will a message displayed advising: You have reached the maximum number of locations.
Field Description ‐ Locations
Add Location
Field Label Field Specifications Description Notes
Location Name 300 character limit Enter Location Name Location Name Box will not show after the maximum # of location licenses has been used up. Once the maximum number of location licenses is reached, only the Existing Locations list will display.
Add Location Click to save new location information to database
The new Location will be added to database and Existing Locations list.

50 Comprise Technologies, Inc © 2011 | Customer Support: 800‐531‐0132
FILTERS
This section allows the Administrator to set Filter Level Names for Internet Access levels. For example: Most Restrictive, Child,
Juvenile, Youth, Adult, Unrestricted, Block. Or, if the library prefers: Level 1, Level 2, Level 3, Level 4, Level 5, Level 6, and Block.
The Filter Level Names set by the library will be displayed for Internet Access options. Enter the desired Filter Level Names for Level
1 to Level 6 and click [Save].
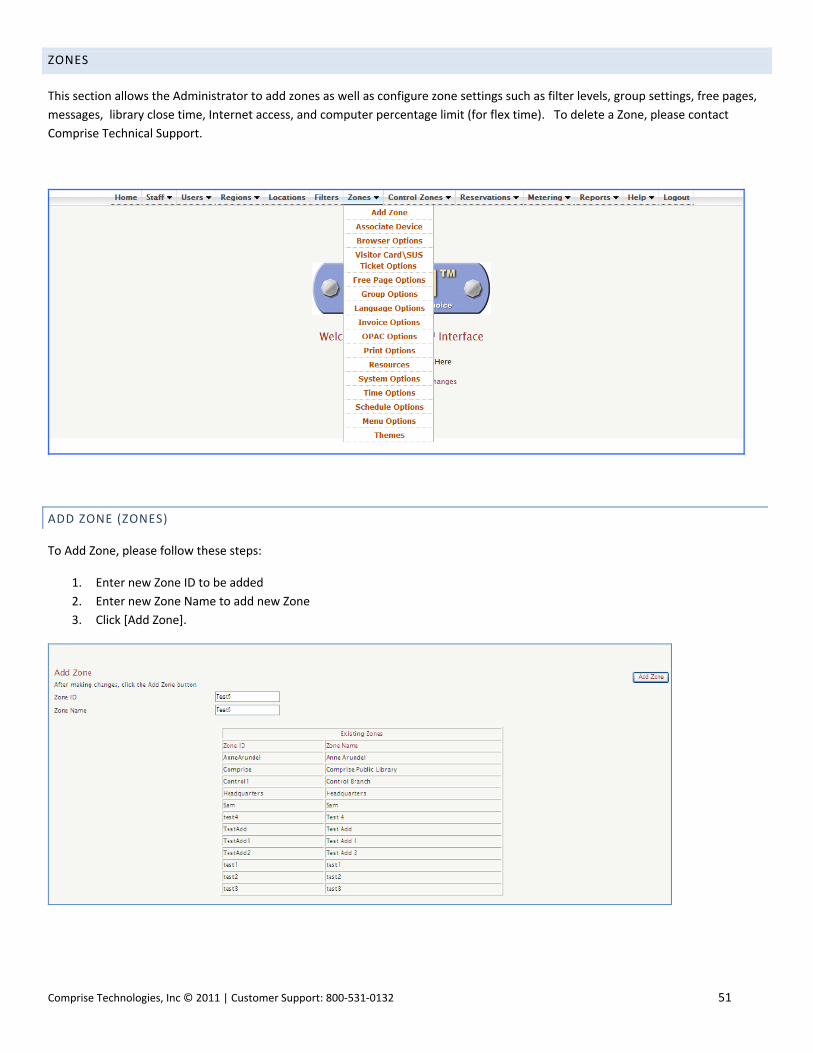
Comprise Technologies, Inc © 2011 | Customer Support: 800‐531‐0132 51
ZONES
This section allows the Administrator to add zones as well as configure zone settings such as filter levels, group settings, free pages,
messages, library close time, Internet access, and computer percentage limit (for flex time). To delete a Zone, please contact
Comprise Technical Support.
ADD ZONE (ZONES)
To Add Zone, please follow these steps:
1. Enter new Zone ID to be added
2. Enter new Zone Name to add new Zone
3. Click [Add Zone].
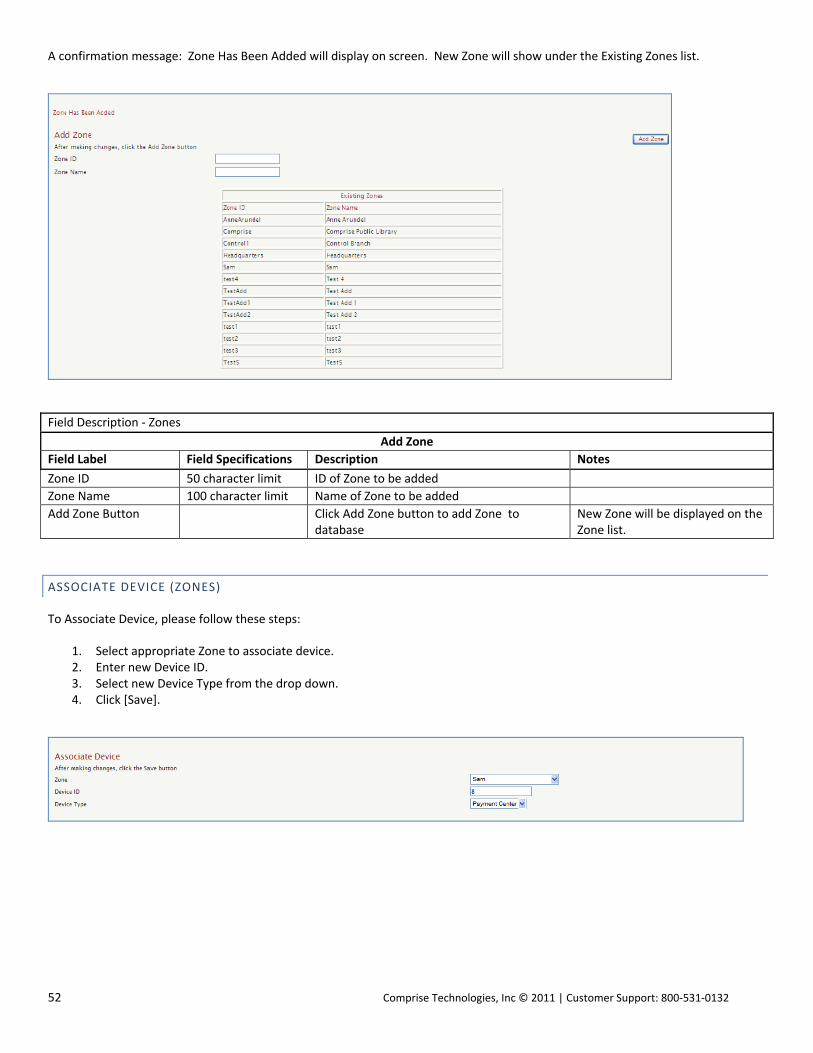
52 Comprise Technologies, Inc © 2011 | Customer Support: 800‐531‐0132
A confirmation message: Zone Has Been Added will display on screen. New Zone will show under the Existing Zones list.
Field Description ‐ Zones
Add Zone
Field Label Field Specifications Description Notes
Zone ID 50 character limit ID of Zone to be added
Zone Name 100 character limit Name of Zone to be added
Add Zone Button Click Add Zone button to add Zone to database
New Zone will be displayed on the Zone list.
ASSOCIATE DEVICE (ZONES)
To Associate Device, please follow these steps:
1. Select appropriate Zone to associate device. 2. Enter new Device ID. 3. Select new Device Type from the drop down. 4. Click [Save].
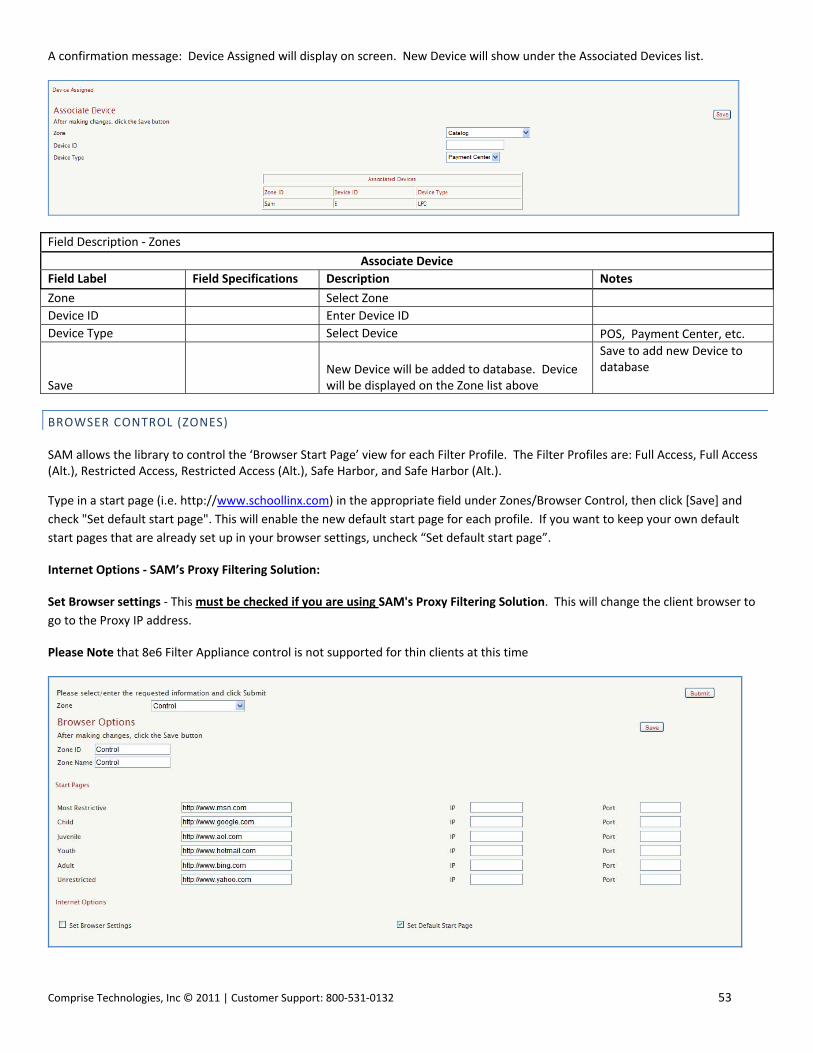
Comprise Technologies, Inc © 2011 | Customer Support: 800‐531‐0132 53
A confirmation message: Device Assigned will display on screen. New Device will show under the Associated Devices list.
Field Description ‐ Zones
Associate Device
Field Label Field Specifications Description Notes
Zone Select Zone
Device ID Enter Device ID
Device Type Select Device POS, Payment Center, etc.
Save New Device will be added to database. Device will be displayed on the Zone list above
Save to add new Device to database
BROWSER CONTROL (ZONES) SAM allows the library to control the ‘Browser Start Page’ view for each Filter Profile. The Filter Profiles are: Full Access, Full Access (Alt.), Restricted Access, Restricted Access (Alt.), Safe Harbor, and Safe Harbor (Alt.).
Type in a start page (i.e. http://www.schoollinx.com) in the appropriate field under Zones/Browser Control, then click [Save] and
check "Set default start page". This will enable the new default start page for each profile. If you want to keep your own default
start pages that are already set up in your browser settings, uncheck “Set default start page”.
Internet Options ‐ SAM’s Proxy Filtering Solution:
Set Browser settings ‐ This must be checked if you are using SAM's Proxy Filtering Solution. This will change the client browser to
go to the Proxy IP address.
Please Note that 8e6 Filter Appliance control is not supported for thin clients at this time

54 Comprise Technologies, Inc © 2011 | Customer Support: 800‐531‐0132
Field Description ‐ Zones
Browser Options
Field Label Field Specifications Description Notes
Zone Select Zone
Submit Open Browser Options Screen
Save Click after making changes to save Save changes and add to database
Zone ID 50 character limit ID of Zone
Zone Name 100 character limit Name of Zone
Start Pages Start Page view for each Filter profile
Most Restrictive Filter Level Name set by Library will be displayed.
Enter URL, IP, and Port For example: Level 1 to Level 6
Child Filter Level Name set by Library will be displayed.
Enter URL, IP, and Port
Juvenile Filter Level Name set by Library will be displayed.
Enter URL, IP, and Port
Youth Filter Level Name set by Library will be displayed.
Enter URL, IP, and Port
Adult Filter Level Name set by Library will be displayed.
Enter URL, IP, and Port
Unrestricted Filter Level Name set by Library will be displayed.
Enter URL, IP, and Port
Internet Options SAM's Proxy Filtering Solution.
Set Browser Settings This will change the client browser to go to the Proxy IP address
Set Default Start Page Default Start Page Note: 8e6 Filter Appliance control is not supported for thin clients at this time.
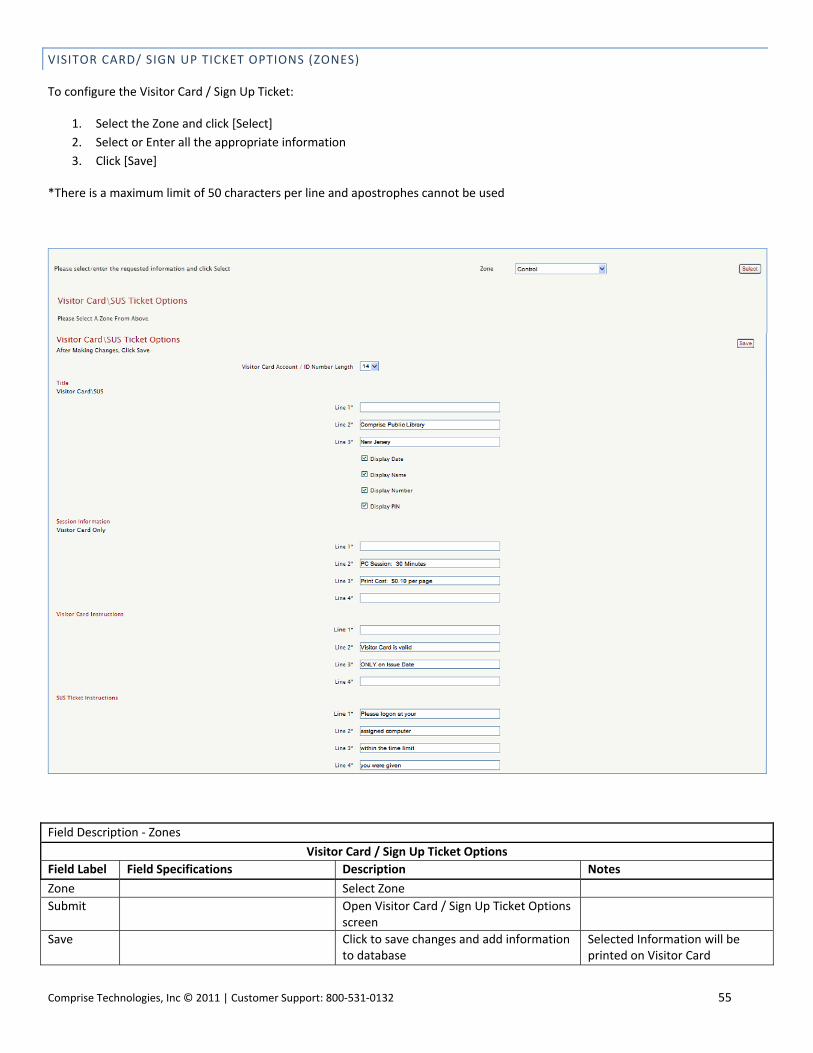
Comprise Technologies, Inc © 2011 | Customer Support: 800‐531‐0132 55
VISITOR CARD/ SIGN UP TICKET OPTIONS (ZONES)
To configure the Visitor Card / Sign Up Ticket:
1. Select the Zone and click [Select]
2. Select or Enter all the appropriate information
3. Click [Save]
*There is a maximum limit of 50 characters per line and apostrophes cannot be used
Field Description ‐ Zones
Visitor Card / Sign Up Ticket Options
Field Label Field Specifications Description Notes
Zone Select Zone
Submit Open Visitor Card / Sign Up Ticket Options screen
Save Click to save changes and add information to database
Selected Information will be printed on Visitor Card

56 Comprise Technologies, Inc © 2011 | Customer Support: 800‐531‐0132
Field Description ‐ Zones
Visitor Card / Sign Up Ticket Options
Field Label Field Specifications Description Notes
Account / ID Number Length
Select Length of Account / ID Number Number to digits of Account / ID Number selected will be printed
Title Visitor Card / SUS
Limit of a maximum of 50 characters per line and cannot use apostrophes
Title Line 1, Title Line 2, and Title Line 3. Can be used to print Library Name, Address, Telephone #, etc.
Information will appear on Visitor Card and Sign Up Station Ticket.
Display Date
Check box to print Date will be printed on Visitor Card
Display Name
Check box to print User Name will be printed on Visitor Card
Display Number
Check box to print Library Card Number will be printed on Visitor Card
Display PIN Check box to print PIN will be printed on Visitor Card
Session Information Visitor Card Only
Limit of a maximum of 50 characters per line and cannot use apostrophes
Session Line 1, Session Line 2, Session Line 3, and Session Line 4. Can be used to print Session Time, Print Cost, etc.
Information will appear only on Visitor Card.
Visitor Card Instructions
Limit of a maximum of 50 characters per line and cannot use apostrophes
VC Instructions Line 1, VC Instructions Line 2, VC Instructions Line 3, and VC Instructions Line 4. Can be used to print Visitor Card valid date.
Information will appear only on Visitor Card.
Sign Up Ticket Instructions
Limit of a maximum of 50 characters per line and cannot use apostrophes
SUS Instructions Line 1, SUS Instructions Line 2, SUS Instructions Line 3, and SUS Instructions Line 4. Can be used to instruct users they have duration of grace period to Sign Up on assigned PC.
Information will appear only on Sign Up Station Ticket.

Comprise Technologies, Inc © 2011 | Customer Support: 800‐531‐0132 57
FREE PAGE OPTIONS (ZONES)
To configure the Free Page Options:
1. Select the Zone and click [Select] 2. Per Day – Select the number of pages that a Standard User will be allowed to print free of charge per day. 3. Per Set Time Period – Check for current time period or Add New Time Period. Select the number of free pages. 4. For ‐ You can specify a name for time period such as Semester, Summer, etc. 5. To ‐ Select start date 6. From ‐ Select end date 7. Delete – Check the appropriate box to delete desired Time Period from list. 8. Click [Save] to save or delete information
Field Description ‐ Zones
Free Page Options
Field Label Field Specifications Description Notes
Zone Select Zone
Select Open Free Page Options screen
Save Click after making changes to save Save information to database
Per Day Select number of free pages that a Standard User will be allowed to print free of charge per day.
Per Set Time Period Select Free Page number For current time period or Add new Time Period
For Specify name for time period Semester, Summer, etc.
From Select start Month, Day, and Year
To Select end Month, Day, and Year
Delete Select Time Period to be deleted

58 Comprise Technologies, Inc © 2011 | Customer Support: 800‐531‐0132
GROUP OPTIONS (ZONES)
This is where you can set up all the controls for User daily sessions and print privileges. SAM supports several user controls other
than session time. First, you can control total daily allocation separately from individual session length. Then you can enforce
session separation by limiting a user’s consecutive logins. Finally, you can determine the total number of times a user can login
during any day. In combination with basic session time, SAM gives you the ability to establish a policy such as: “2 hours per day total
usage, in 30 minute sessions, with a limit of 2 consecutive logins, and maximum of 4 daily logins”.
All Users will get Standard User settings unless you go into their record from either the Administrative Interface – Users screen, or
the PC Activity Manager – Users screen and assign them to a group. SAM accommodates 4 custom groups that you can use for any
special purpose. Members of these groups can have different settings for time and print parameters. Intended uses include: longer
session time for users with bon‐a‐fide research needs or no‐charge print where economic constraints apply.
To configure Group Options: 1. Select the Zone and click [Select] 2. Select desired choices from drop down options for appropriate fields 3. Chick [Save] to save information.

Comprise Technologies, Inc © 2011 | Customer Support: 800‐531‐0132 59
SAM TIMERS (ZONES)
SAM runs a number of timers to effectively control user use of the PC.
Daily Time is the total amount of time available to a user on a daily basis. Users do not have to use all of this time in a single session;
unused time is reserved for their later use. You determine daily time. We recommend one hour, but it can be any easily
understandable time increment. Multiples of 30 minutes can be specified. Note: Staff can reset time either from the staff interface
or from the Client PC.
Session Time is the amount of time that each individual session can be. SAM gives libraries the flexibility to set daily time at, for
example, 2 hours per day. With only 30 minute Session Time in order to accommodate all users throughout the day.
Consecutive Sessions is the number of times a user can login consecutively without having to wait the duration of session length.
For example, the library allows 2 hours per day in 30 minute sessions but only 2 consecutive logins. If this is the case, the User will
be prevented from logging onto any SAM PC for the time that’s set for 1 session length, which in this case is 30 minutes, after they
have used 2 consecutive sessions.
Daily logins is the number of times a User can login to the SAM PC per day. So even if a User has daily time left over for that day and
Daily logins is set to 4, the User will not be able to login to the PCs after 4 successful logins. Note: Staff can reset logins either from
the staff interface or from the Client PC.
Enable Group Settings for Print: If this box is checked, users will be charged per settings under Express and Groups (per Group). Group Settings will override global settings for all printers on the local workstations. If this box is not checked, users will be charged the same way as Standard users (per printer from Print Options).
Page Limit: Number of pages user is allowed to print per print job. 0 = Can't Print, so needs to be greater than 0.
Price / Page: Number of pages user can print free of charge per day.
Applications: Application print range, i.e. All, Internet, None.
Express Time: is the total amount of time available to an Express user in any day. The library determines session time. We
recommend fifteen minutes, but any time increment can be specified. Consecutive Sessions and Daily login settings do not apply to
Express users. Libraries can also restrict print settings for Express users: Page limit (is set per job), free pages (allowed per day),
price per page and the applications that they can print from (Internet Only, All Applications or None).
Groups 1 – 4: SAM accommodates 4 custom groups that can be used for any special purpose. Members of these groups can have
different settings for session, time, and print parameters explained above. The settings on this screen will override the global printer
settings for Users that the library includes in specific groups. As a general rule, the “Express” settings are used to configure Express
PCs and “Group 1 (Visitor Cards)” settings apply to users utilizing Visitor Cards.
When exceeded, Daily Time and Daily Logins both lock user record and block logins.
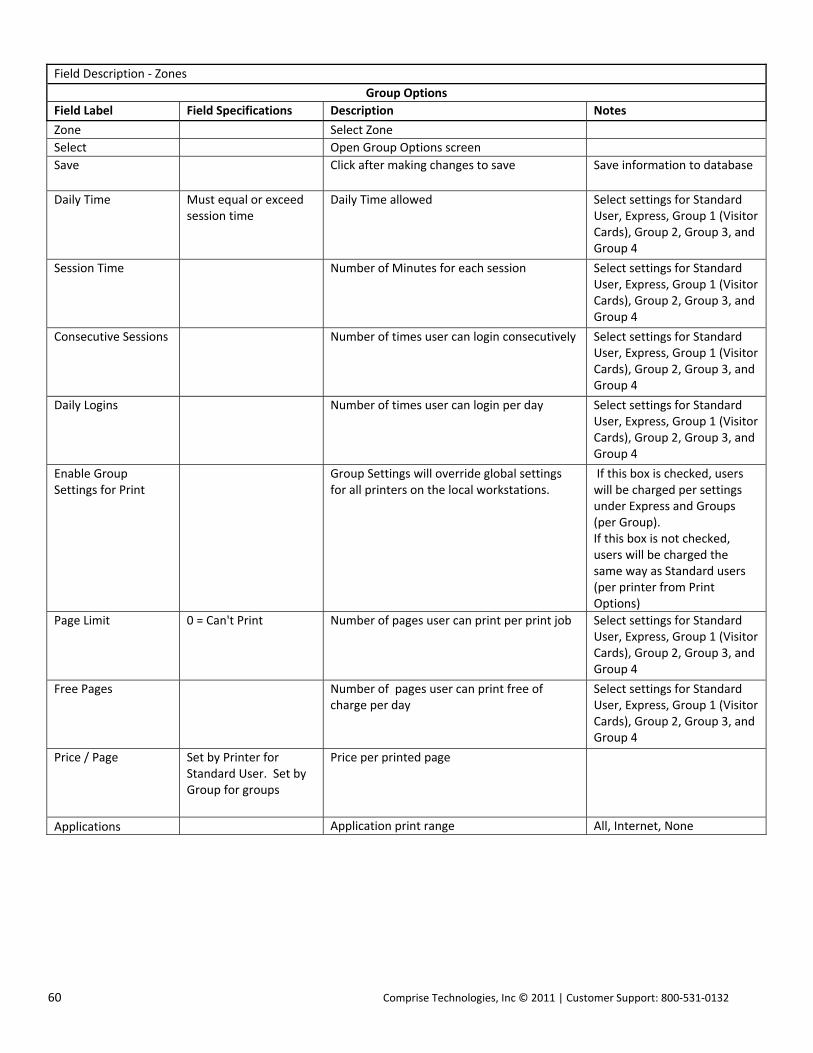
60 Comprise Technologies, Inc © 2011 | Customer Support: 800‐531‐0132
Field Description ‐ Zones
Group Options
Field Label Field Specifications Description Notes
Zone Select Zone
Select Open Group Options screen
Save Click after making changes to save Save information to database
Daily Time Must equal or exceed session time
Daily Time allowed Select settings for Standard User, Express, Group 1 (Visitor Cards), Group 2, Group 3, and Group 4
Session Time Number of Minutes for each session Select settings for Standard User, Express, Group 1 (Visitor Cards), Group 2, Group 3, and Group 4
Consecutive Sessions Number of times user can login consecutively Select settings for Standard User, Express, Group 1 (Visitor Cards), Group 2, Group 3, and Group 4
Daily Logins Number of times user can login per day Select settings for Standard User, Express, Group 1 (Visitor Cards), Group 2, Group 3, and Group 4
Enable Group Settings for Print
Group Settings will override global settings for all printers on the local workstations.
If this box is checked, users will be charged per settings under Express and Groups (per Group). If this box is not checked, users will be charged the same way as Standard users (per printer from Print Options)
Page Limit 0 = Can't Print Number of pages user can print per print job Select settings for Standard User, Express, Group 1 (Visitor Cards), Group 2, Group 3, and Group 4
Free Pages Number of pages user can print free of charge per day
Select settings for Standard User, Express, Group 1 (Visitor Cards), Group 2, Group 3, and Group 4
Price / Page Set by Printer for Standard User. Set by Group for groups
Price per printed page
Applications Application print range All, Internet, None

Comprise Technologies, Inc © 2011 | Customer Support: 800‐531‐0132 61
LANGUAGE OPTIONS (ZONES)
Library has option to enter text translated in a choice of 3 languages. English is the default language. To configure Languages:
1. Select the appropriate Zone from drop down options, Click Languages, and Click [Select].
2. Configure ‐ Languages
3. Language ‐ Current Language in use will be displayed. Select desired Language from drop down options.
Enter translated text for all available Fields / Labels to Configure Languages and click [Save].

62 Comprise Technologies, Inc © 2011 | Customer Support: 800‐531‐0132
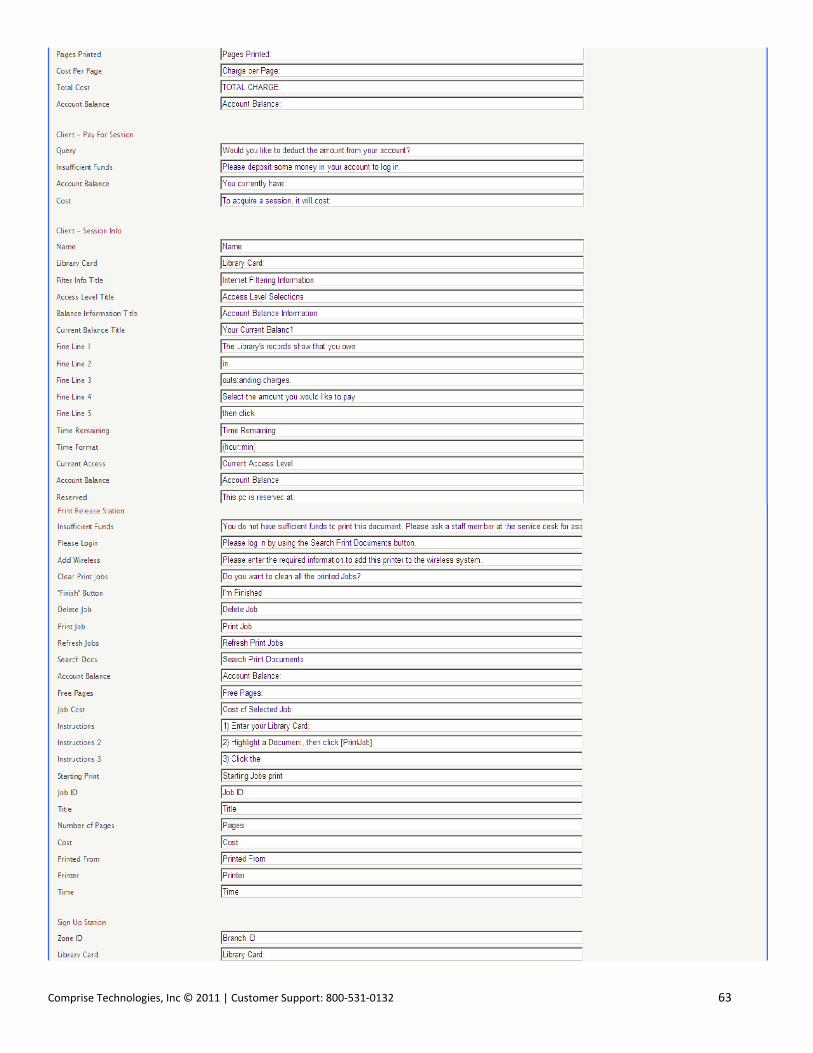
Comprise Technologies, Inc © 2011 | Customer Support: 800‐531‐0132 63
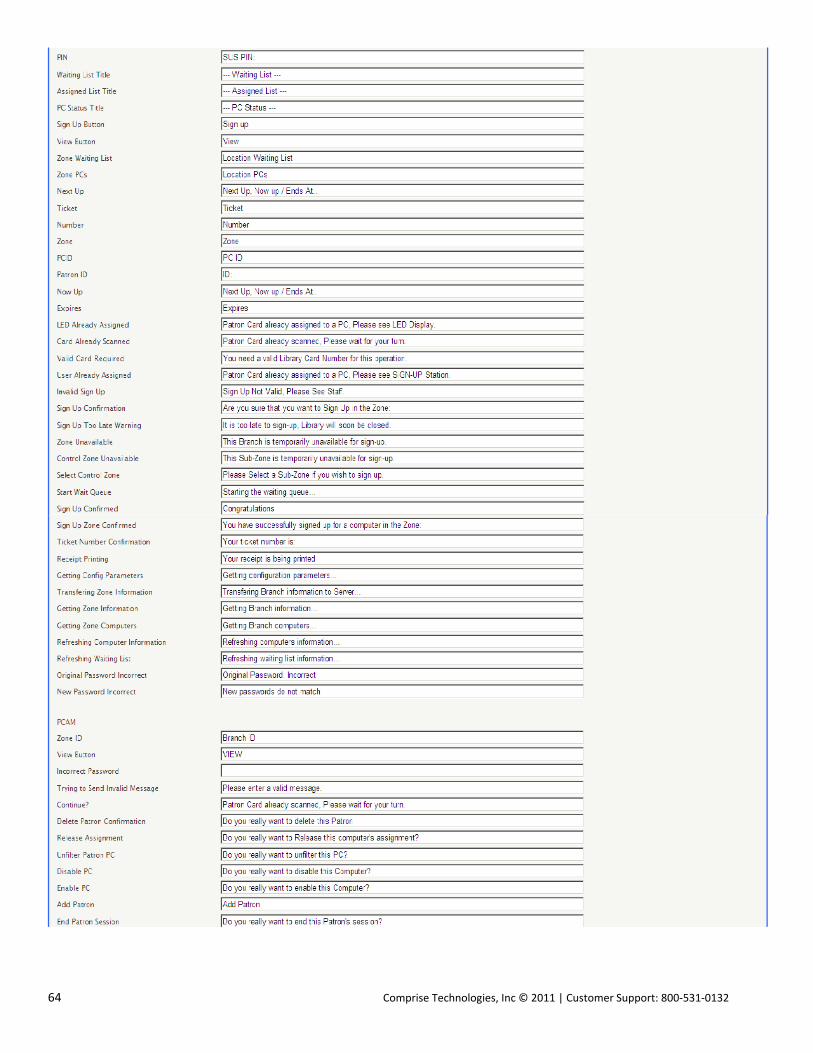
64 Comprise Technologies, Inc © 2011 | Customer Support: 800‐531‐0132
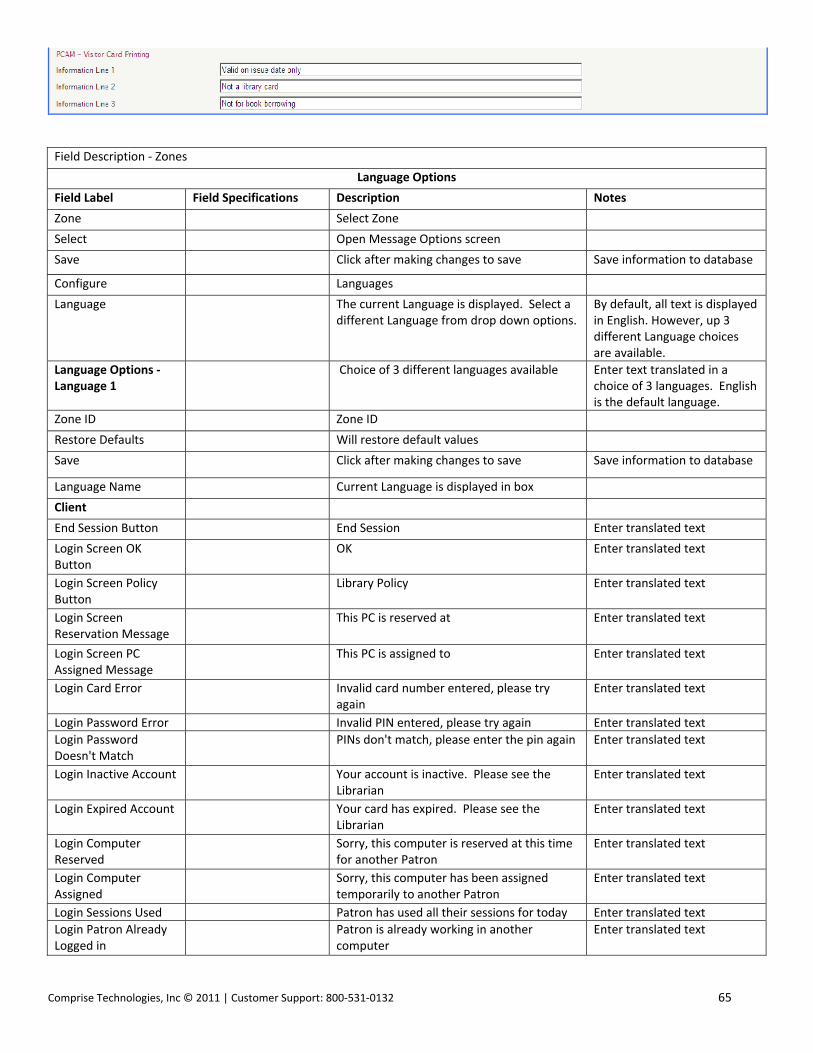
Comprise Technologies, Inc © 2011 | Customer Support: 800‐531‐0132 65
Field Description ‐ Zones
Language Options
Field Label Field Specifications Description Notes
Zone Select Zone
Select Open Message Options screen
Save Click after making changes to save Save information to database
Configure Languages
Language
The current Language is displayed. Select a different Language from drop down options.
By default, all text is displayed in English. However, up 3 different Language choices are available.
Language Options ‐ Language 1
Choice of 3 different languages available Enter text translated in a choice of 3 languages. English is the default language.
Zone ID Zone ID
Restore Defaults Will restore default values
Save Click after making changes to save Save information to database
Language Name Current Language is displayed in box
Client
End Session Button End Session Enter translated text
Login Screen OK Button
OK Enter translated text
Login Screen Policy Button
Library Policy Enter translated text
Login Screen Reservation Message
This PC is reserved at Enter translated text
Login Screen PC Assigned Message
This PC is assigned to Enter translated text
Login Card Error
Invalid card number entered, please try again
Enter translated text
Login Password Error Invalid PIN entered, please try again Enter translated text
Login Password Doesn't Match
PINs don't match, please enter the pin again Enter translated text
Login Inactive Account Your account is inactive. Please see the Librarian
Enter translated text
Login Expired Account Your card has expired. Please see the Librarian
Enter translated text
Login Computer Reserved
Sorry, this computer is reserved at this time for another Patron
Enter translated text
Login Computer Assigned
Sorry, this computer has been assigned temporarily to another Patron
Enter translated text
Login Sessions Used Patron has used all their sessions for today Enter translated text
Login Patron Already Logged in
Patron is already working in another computer
Enter translated text
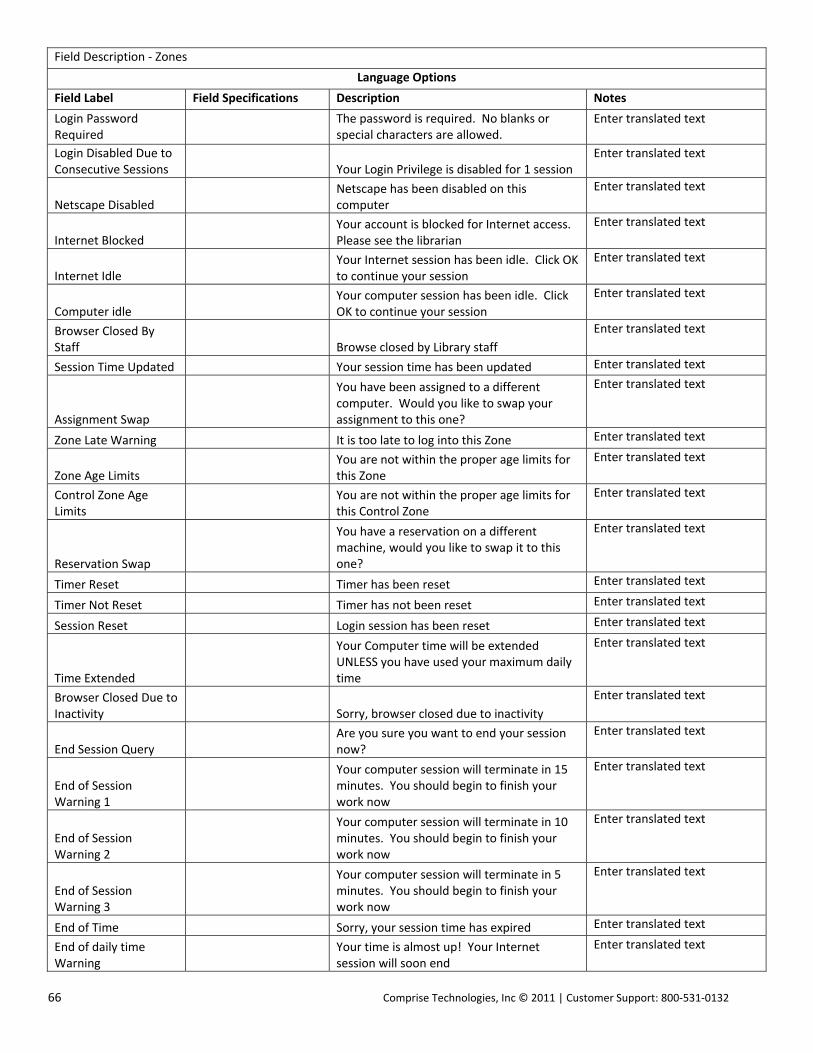
66 Comprise Technologies, Inc © 2011 | Customer Support: 800‐531‐0132
Field Description ‐ Zones
Language Options
Field Label Field Specifications Description Notes
Login Password Required
The password is required. No blanks or special characters are allowed.
Enter translated text
Login Disabled Due to Consecutive Sessions Your Login Privilege is disabled for 1 session
Enter translated text
Netscape Disabled Netscape has been disabled on this computer
Enter translated text
Internet Blocked Your account is blocked for Internet access. Please see the librarian
Enter translated text
Internet Idle Your Internet session has been idle. Click OK to continue your session
Enter translated text
Computer idle Your computer session has been idle. Click OK to continue your session
Enter translated text
Browser Closed By Staff Browse closed by Library staff
Enter translated text
Session Time Updated Your session time has been updated Enter translated text
Assignment Swap
You have been assigned to a different computer. Would you like to swap your assignment to this one?
Enter translated text
Zone Late Warning It is too late to log into this Zone Enter translated text
Zone Age Limits You are not within the proper age limits for this Zone
Enter translated text
Control Zone Age Limits
You are not within the proper age limits for this Control Zone
Enter translated text
Reservation Swap
You have a reservation on a different machine, would you like to swap it to this one?
Enter translated text
Timer Reset Timer has been reset Enter translated text
Timer Not Reset Timer has not been reset Enter translated text
Session Reset Login session has been reset Enter translated text
Time Extended
Your Computer time will be extended UNLESS you have used your maximum daily time
Enter translated text
Browser Closed Due to Inactivity Sorry, browser closed due to inactivity
Enter translated text
End Session Query Are you sure you want to end your session now?
Enter translated text
End of Session Warning 1
Your computer session will terminate in 15 minutes. You should begin to finish your work now
Enter translated text
End of Session Warning 2
Your computer session will terminate in 10 minutes. You should begin to finish your work now
Enter translated text
End of Session Warning 3
Your computer session will terminate in 5 minutes. You should begin to finish your work now
Enter translated text
End of Time Sorry, your session time has expired Enter translated text
End of daily time Warning
Your time is almost up! Your Internet session will soon end
Enter translated text

Comprise Technologies, Inc © 2011 | Customer Support: 800‐531‐0132 67
Field Description ‐ Zones
Language Options
Field Label Field Specifications Description Notes
Reserve Warning 1
There is a reservation within the hour, please be ready to release the computer when needed
Enter translated text
Reserved Please Release
This computer is reserved, please release this computer for the next Patron
Enter translated text
Session Will End Your session will end now. Please release this computer for the next user
Enter translated text
Library Will Close The Library will close soon. Please finish all the activities in this computer
Enter translated text
Library Sign Off Goodbye and thank you for using our library Enter translated text
Reboot for changes Do you want to reboot now for these changes to take effect?
Enter translated text
Lock Screen PC Locked This PC is currently locked. Only a member of the staff can access this PC
Enter translated text
Lock Screen Unlock PC Unlock PC Enter translated text
Lock Screen Library Card Library Card
Enter translated text
License Expired SAM license is expired. Please contact the system administrator
Enter translated text
Mandatory Sign Up
There are other patrons waiting to use the computers. Please wait your turn or check your card at Sign Up Station
Enter translated text
PC Disabled This PC is currently disabled. Please use another PC
Enter translated text
Library closed The Library is closed. Please finish all the activities in this computer
Enter translated text
SAM Start Error
SAM was not initialized properly. Please restart program. If this problem continues, restart Windows and try again. Error Code: MH
Enter translated text
Inactivity Start Error Error starting inactivity warning timer Enter translated text
Client ‐ Print
Print All ‐ instructions
Click Print All to print all your documents. The Library card holder agrees to pay the total charge indicated.
Enter translated text
Print All ‐ Patron ID Patron ID: Enter translated text
Print All ‐ Documents Documents: Enter translated text
Print All ‐ Free Pages Free pages: Enter translated text
Print All ‐ Total Charge Total Charge Enter translated text
Print All ‐ Library Policy Library Policy
Enter translated text
Print All ‐ Cancel Cancel Enter translated text
Print All ‐ Print All Button Print All
Enter translated text
Failure Notification
Your document hasn't been printed due to problems with the printer or your computer, please contact your system Administrator.
Enter translated text
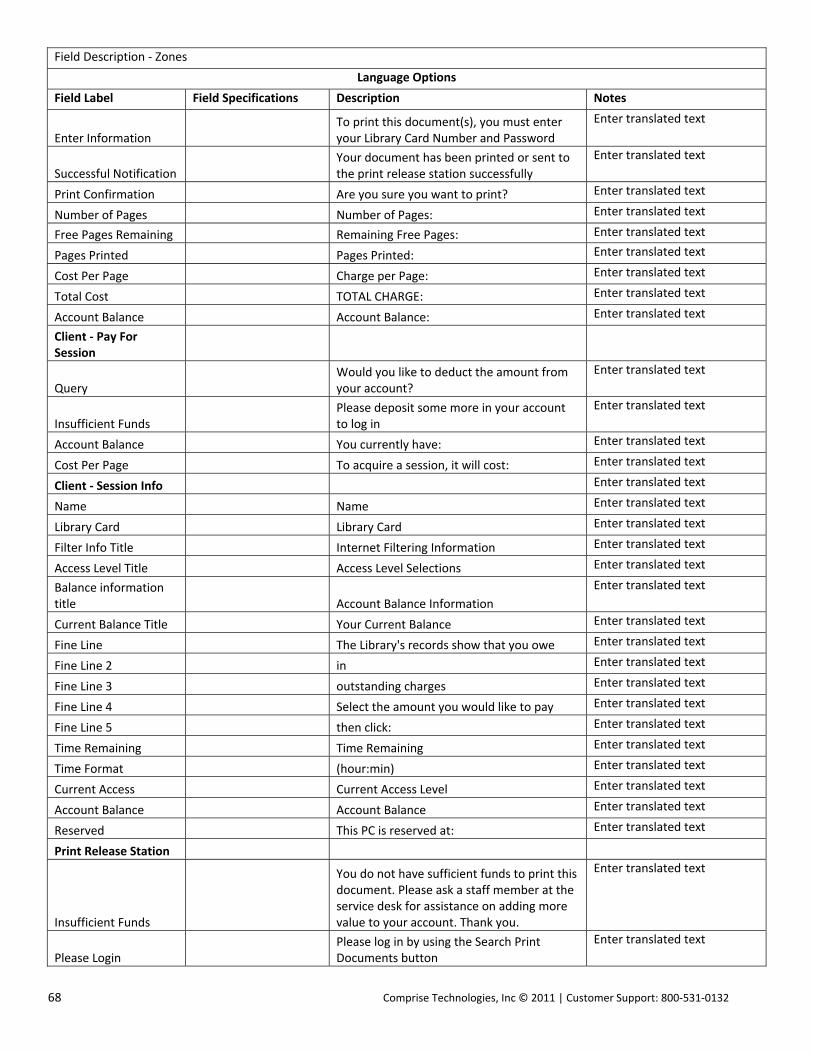
68 Comprise Technologies, Inc © 2011 | Customer Support: 800‐531‐0132
Field Description ‐ Zones
Language Options
Field Label Field Specifications Description Notes
Enter Information To print this document(s), you must enter your Library Card Number and Password
Enter translated text
Successful Notification Your document has been printed or sent to the print release station successfully
Enter translated text
Print Confirmation Are you sure you want to print? Enter translated text
Number of Pages Number of Pages: Enter translated text
Free Pages Remaining Remaining Free Pages: Enter translated text
Pages Printed Pages Printed: Enter translated text
Cost Per Page Charge per Page: Enter translated text
Total Cost TOTAL CHARGE: Enter translated text
Account Balance Account Balance: Enter translated text
Client ‐ Pay For Session
Query Would you like to deduct the amount from your account?
Enter translated text
Insufficient Funds Please deposit some more in your account to log in
Enter translated text
Account Balance You currently have: Enter translated text
Cost Per Page To acquire a session, it will cost: Enter translated text
Client ‐ Session Info Enter translated text
Name Name Enter translated text
Library Card Library Card Enter translated text
Filter Info Title Internet Filtering Information Enter translated text
Access Level Title Access Level Selections Enter translated text
Balance information title Account Balance Information
Enter translated text
Current Balance Title Your Current Balance Enter translated text
Fine Line The Library's records show that you owe Enter translated text
Fine Line 2 in Enter translated text
Fine Line 3 outstanding charges Enter translated text
Fine Line 4 Select the amount you would like to pay Enter translated text
Fine Line 5 then click: Enter translated text
Time Remaining Time Remaining Enter translated text
Time Format (hour:min) Enter translated text
Current Access Current Access Level Enter translated text
Account Balance Account Balance Enter translated text
Reserved This PC is reserved at: Enter translated text
Print Release Station
Insufficient Funds
You do not have sufficient funds to print this document. Please ask a staff member at the service desk for assistance on adding more value to your account. Thank you.
Enter translated text
Please Login Please log in by using the Search Print Documents button
Enter translated text
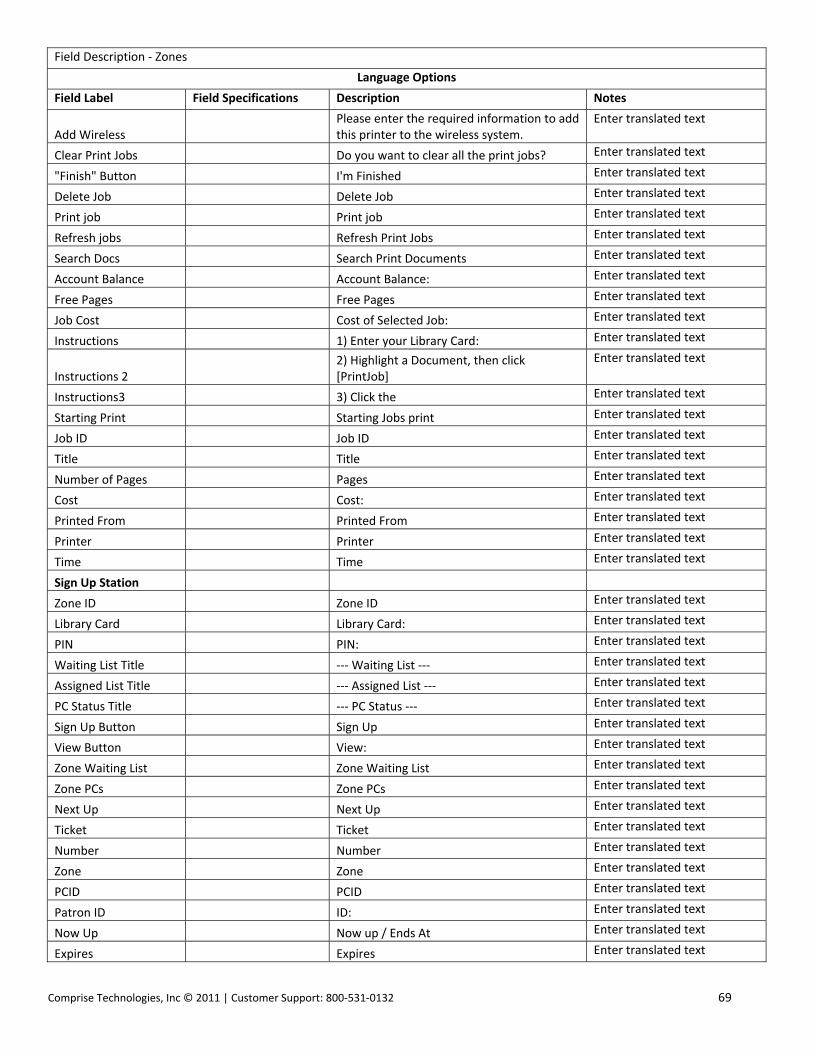
Comprise Technologies, Inc © 2011 | Customer Support: 800‐531‐0132 69
Field Description ‐ Zones
Language Options
Field Label Field Specifications Description Notes
Add Wireless Please enter the required information to add this printer to the wireless system.
Enter translated text
Clear Print Jobs Do you want to clear all the print jobs? Enter translated text
"Finish" Button I'm Finished Enter translated text
Delete Job Delete Job Enter translated text
Print job Print job Enter translated text
Refresh jobs Refresh Print Jobs Enter translated text
Search Docs Search Print Documents Enter translated text
Account Balance Account Balance: Enter translated text
Free Pages Free Pages Enter translated text
Job Cost Cost of Selected Job: Enter translated text
Instructions 1) Enter your Library Card: Enter translated text
Instructions 2 2) Highlight a Document, then click [PrintJob]
Enter translated text
Instructions3 3) Click the Enter translated text
Starting Print Starting Jobs print Enter translated text
Job ID Job ID Enter translated text
Title Title Enter translated text
Number of Pages Pages Enter translated text
Cost Cost: Enter translated text
Printed From Printed From Enter translated text
Printer Printer Enter translated text
Time Time Enter translated text
Sign Up Station
Zone ID Zone ID Enter translated text
Library Card Library Card: Enter translated text
PIN PIN: Enter translated text
Waiting List Title ‐‐‐ Waiting List ‐‐‐ Enter translated text
Assigned List Title ‐‐‐ Assigned List ‐‐‐ Enter translated text
PC Status Title ‐‐‐ PC Status ‐‐‐ Enter translated text
Sign Up Button Sign Up Enter translated text
View Button View: Enter translated text
Zone Waiting List Zone Waiting List Enter translated text
Zone PCs Zone PCs Enter translated text
Next Up Next Up Enter translated text
Ticket Ticket Enter translated text
Number Number Enter translated text
Zone Zone Enter translated text
PCID PCID Enter translated text
Patron ID ID: Enter translated text
Now Up Now up / Ends At Enter translated text
Expires Expires Enter translated text
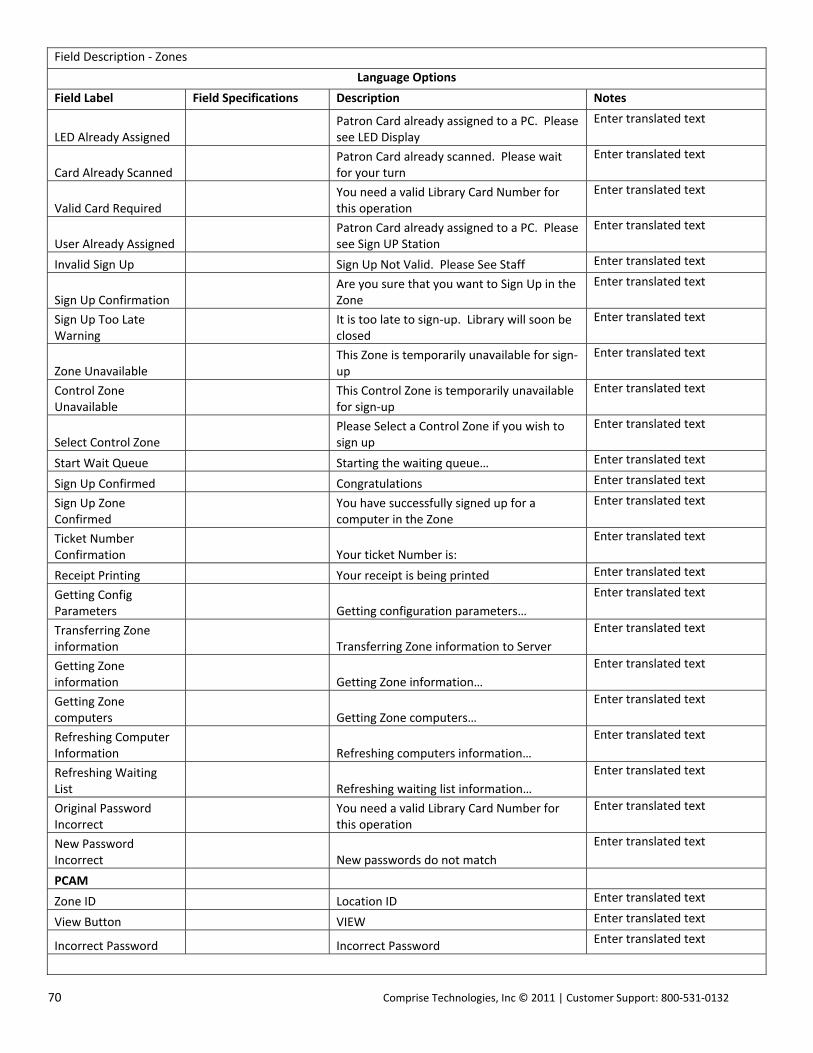
70 Comprise Technologies, Inc © 2011 | Customer Support: 800‐531‐0132
Field Description ‐ Zones
Language Options
Field Label Field Specifications Description Notes
LED Already Assigned Patron Card already assigned to a PC. Please see LED Display
Enter translated text
Card Already Scanned Patron Card already scanned. Please wait for your turn
Enter translated text
Valid Card Required You need a valid Library Card Number for this operation
Enter translated text
User Already Assigned Patron Card already assigned to a PC. Please see Sign UP Station
Enter translated text
Invalid Sign Up Sign Up Not Valid. Please See Staff Enter translated text
Sign Up Confirmation Are you sure that you want to Sign Up in the Zone
Enter translated text
Sign Up Too Late Warning
It is too late to sign‐up. Library will soon be closed
Enter translated text
Zone Unavailable This Zone is temporarily unavailable for sign‐up
Enter translated text
Control Zone Unavailable
This Control Zone is temporarily unavailable for sign‐up
Enter translated text
Select Control Zone Please Select a Control Zone if you wish to sign up
Enter translated text
Start Wait Queue Starting the waiting queue… Enter translated text
Sign Up Confirmed Congratulations Enter translated text
Sign Up Zone Confirmed
You have successfully signed up for a computer in the Zone
Enter translated text
Ticket Number Confirmation Your ticket Number is:
Enter translated text
Receipt Printing Your receipt is being printed Enter translated text
Getting Config Parameters Getting configuration parameters…
Enter translated text
Transferring Zone information Transferring Zone information to Server
Enter translated text
Getting Zone information Getting Zone information…
Enter translated text
Getting Zone computers Getting Zone computers…
Enter translated text
Refreshing Computer Information Refreshing computers information…
Enter translated text
Refreshing Waiting List Refreshing waiting list information…
Enter translated text
Original Password Incorrect
You need a valid Library Card Number for this operation
Enter translated text
New Password Incorrect New passwords do not match
Enter translated text
PCAM
Zone ID Location ID Enter translated text
View Button VIEW Enter translated text
Incorrect Password Incorrect Password Enter translated text
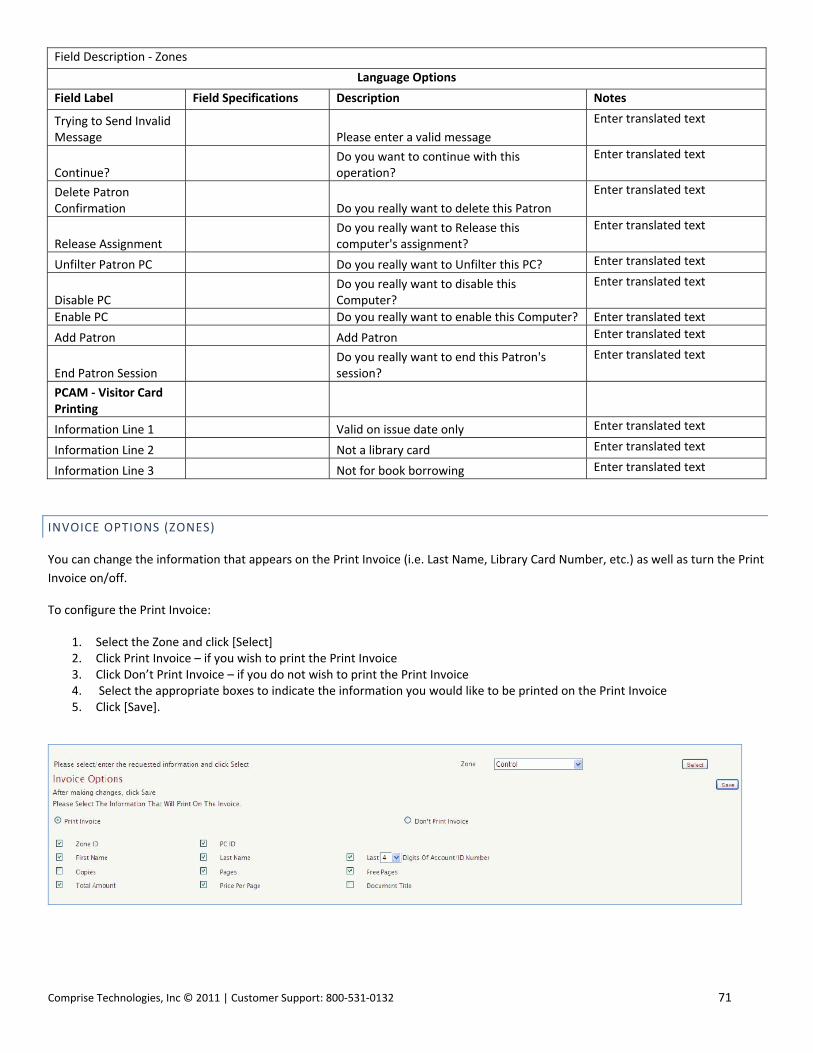
Comprise Technologies, Inc © 2011 | Customer Support: 800‐531‐0132 71
Field Description ‐ Zones
Language Options
Field Label Field Specifications Description Notes
Trying to Send Invalid Message Please enter a valid message
Enter translated text
Continue? Do you want to continue with this operation?
Enter translated text
Delete Patron Confirmation Do you really want to delete this Patron
Enter translated text
Release Assignment Do you really want to Release this computer's assignment?
Enter translated text
Unfilter Patron PC Do you really want to Unfilter this PC? Enter translated text
Disable PC Do you really want to disable this Computer?
Enter translated text
Enable PC Do you really want to enable this Computer? Enter translated text
Add Patron Add Patron Enter translated text
End Patron Session Do you really want to end this Patron's session?
Enter translated text
PCAM ‐ Visitor Card Printing
Information Line 1 Valid on issue date only Enter translated text
Information Line 2 Not a library card Enter translated text
Information Line 3 Not for book borrowing Enter translated text
INVOICE OPTIONS (ZONES)
You can change the information that appears on the Print Invoice (i.e. Last Name, Library Card Number, etc.) as well as turn the Print
Invoice on/off.
To configure the Print Invoice:
1. Select the Zone and click [Select] 2. Click Print Invoice – if you wish to print the Print Invoice 3. Click Don’t Print Invoice – if you do not wish to print the Print Invoice 4. Select the appropriate boxes to indicate the information you would like to be printed on the Print Invoice 5. Click [Save].
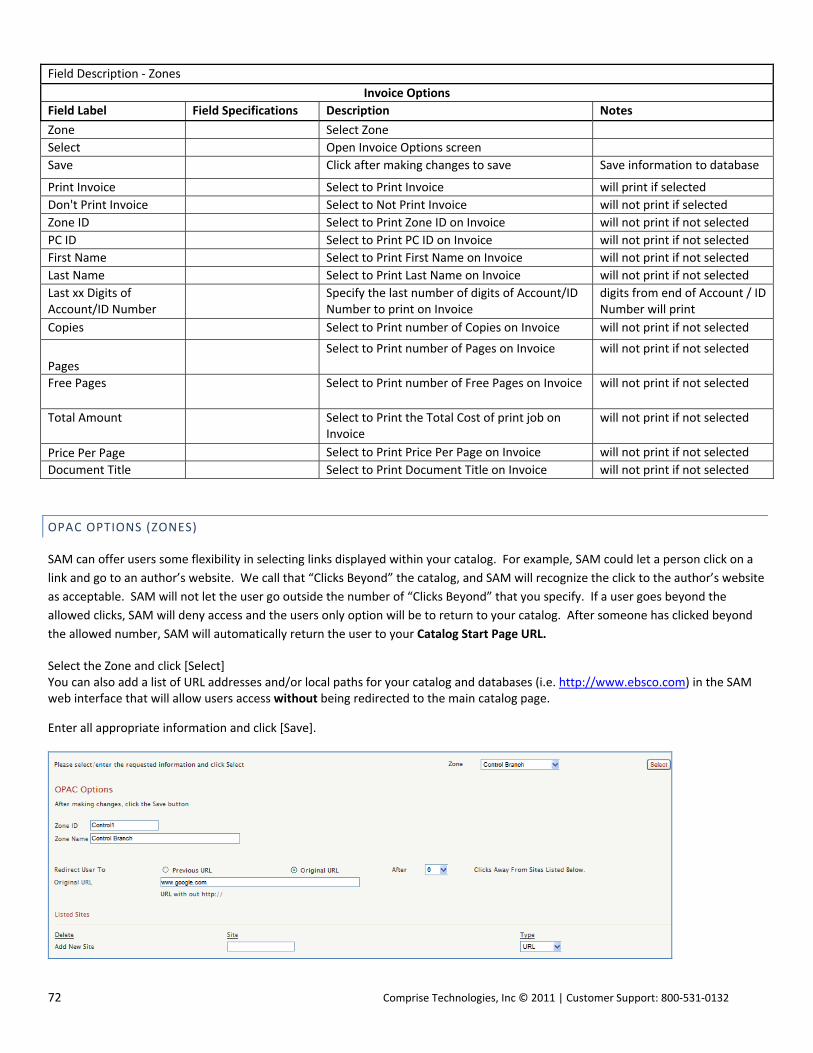
72 Comprise Technologies, Inc © 2011 | Customer Support: 800‐531‐0132
Field Description ‐ Zones
Invoice Options
Field Label Field Specifications Description Notes
Zone Select Zone
Select Open Invoice Options screen
Save Click after making changes to save Save information to database
Print Invoice Select to Print Invoice will print if selected
Don't Print Invoice Select to Not Print Invoice will not print if selected
Zone ID Select to Print Zone ID on Invoice will not print if not selected
PC ID Select to Print PC ID on Invoice will not print if not selected
First Name Select to Print First Name on Invoice will not print if not selected
Last Name Select to Print Last Name on Invoice will not print if not selected
Last xx Digits of Account/ID Number
Specify the last number of digits of Account/ID Number to print on Invoice
digits from end of Account / ID Number will print
Copies Select to Print number of Copies on Invoice will not print if not selected
Pages
Select to Print number of Pages on Invoice will not print if not selected
Free Pages Select to Print number of Free Pages on Invoice will not print if not selected
Total Amount Select to Print the Total Cost of print job on Invoice
will not print if not selected
Price Per Page Select to Print Price Per Page on Invoice will not print if not selected
Document Title Select to Print Document Title on Invoice will not print if not selected
OPAC OPTIONS (ZONES)
SAM can offer users some flexibility in selecting links displayed within your catalog. For example, SAM could let a person click on a
link and go to an author’s website. We call that “Clicks Beyond” the catalog, and SAM will recognize the click to the author’s website
as acceptable. SAM will not let the user go outside the number of “Clicks Beyond” that you specify. If a user goes beyond the
allowed clicks, SAM will deny access and the users only option will be to return to your catalog. After someone has clicked beyond
the allowed number, SAM will automatically return the user to your Catalog Start Page URL.
Select the Zone and click [Select] You can also add a list of URL addresses and/or local paths for your catalog and databases (i.e. http://www.ebsco.com) in the SAM web interface that will allow users access without being redirected to the main catalog page.
Enter all appropriate information and click [Save].
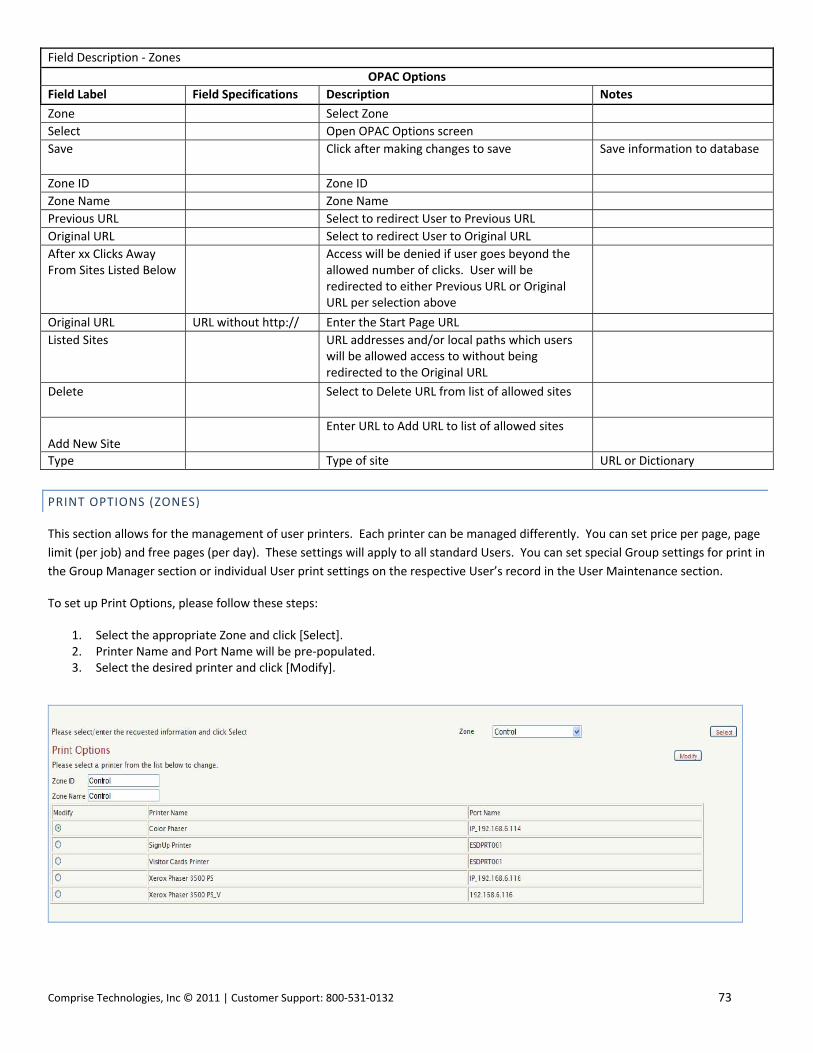
Comprise Technologies, Inc © 2011 | Customer Support: 800‐531‐0132 73
Field Description ‐ Zones
OPAC Options
Field Label Field Specifications Description Notes
Zone Select Zone
Select Open OPAC Options screen
Save Click after making changes to save Save information to database
Zone ID Zone ID
Zone Name Zone Name
Previous URL Select to redirect User to Previous URL
Original URL Select to redirect User to Original URL
After xx Clicks Away From Sites Listed Below
Access will be denied if user goes beyond the allowed number of clicks. User will be redirected to either Previous URL or Original URL per selection above
Original URL URL without http:// Enter the Start Page URL
Listed Sites URL addresses and/or local paths which users will be allowed access to without being redirected to the Original URL
Delete Select to Delete URL from list of allowed sites
Add New Site
Enter URL to Add URL to list of allowed sites
Type Type of site URL or Dictionary
PRINT OPTIONS (ZONES)
This section allows for the management of user printers. Each printer can be managed differently. You can set price per page, page
limit (per job) and free pages (per day). These settings will apply to all standard Users. You can set special Group settings for print in
the Group Manager section or individual User print settings on the respective User’s record in the User Maintenance section.
To set up Print Options, please follow these steps:
1. Select the appropriate Zone and click [Select]. 2. Printer Name and Port Name will be pre‐populated. 3. Select the desired printer and click [Modify].

74 Comprise Technologies, Inc © 2011 | Customer Support: 800‐531‐0132
Upon clicking [Modify], the Printer Configuration window will open. From here, the following parameters can be set:
4. Printer Name – Printer Name need to be identical on the individual client PCs and in Print Options 5. Port Name – the IP address of the printer 6. Price Per Page (in cents), i.e. 25. 7. Page Limit ‐ this is pages allowed to print per job. 8. Enter Applications where users are allowed to print from. The options are: Internet, All, or None. 9. Language is the PCL Driver language of the printer in use (i.e. PCL5, PCL6, etc.). 10. Enter all appropriate information and click [Save].
To delete a Printer from the Zone, follow steps 1 to 3 above. Then, select the printer you wish to delete and click [Delete Printer]. Click OK when prompted to confirm deletion.
Field Description ‐ Zones
Print Options
Field Label Field Specifications Description Notes
Zone Select Zone
Select Open Print Options screen
Modify Select Printer to Modify Click to open Printer Configuration screen
Save Click after making changes to save Save information to database
Delete Printer Selected printer will be deleted Confirm at pop up box to delete printer
Zone ID Zone ID
Zone Name Zone Name

Comprise Technologies, Inc © 2011 | Customer Support: 800‐531‐0132 75
Field Description ‐ Zones
Print Options
Field Label Field Specifications Description Notes
Modify Confirm Printer Name and Port Name Printer Name and Port Name will automatically be defaulted
Printer Name 255 character limit Printer Name
Port Name 256 character limit Printer IP Address
Price Per Page Enter Price in Cents Price Per Page
Page Limit 5 character limit Page Limit Pages allowed to print per print job
Applications allowed to print from
Applications users will be allowed to print from.
Select from: Internet, All, or None.
Language 10 character limit The PCL Driver language of the printer in use (i.e. PCL5, PCL6, etc.)
RESOURCES (ZONES)
This section displays each client PC installed with SAM Client and their computer name and IP address. It allows you to assign more intuitive computer definitions to each PC in order to make it easier for the staff and users to identify during the reservation process. The name that you enter in “Resource ID” will be displayed on the PC screen when using the PC Time Manager running mode, on the PC Activity Manager, Sign Up Station, and on the Reservation Screen.
Resource information can be modified by following these steps:
1. Select appropriate Zone from drop down.
2. Click [Select] to open Modify Resource screen
3. Select the Resource you wish to modify from the list and click [Modify].
4. Upon clicking the Modify button, the current Resource information will be displayed.
5. Name ‐ name to be assigned to resource.
6. IP – IP address of the resource.
7. ID – PC identification label. This will display on the client PC, SUS, and PCAM.
8. Control Zone ID ‐ Control Zone associated with this PC, if applicable.
9. OPAC – Check box to designate resource as a Catalog PC.
10. Users can reserve this resource – Check box to designate resource as a reservable PC.
11. Def 1, Def 2 and Def 3 –further define the Zone of the PCs with these fields. For example, Def 1 = Zone, Def 2 = Floor, and
Def 3 = Section/Purpose. This resource definition will be viewable on the Reservation Station.
12. Click [Save] to save the information.

76 Comprise Technologies, Inc © 2011 | Customer Support: 800‐531‐0132
Click [Delete Resource] to delete a resource and confirm when prompted.
To delete a Resource from the Zone, follow steps 1 to 4 above. Then, select the Resource you wish to delete and click [Delete
Resource]. Click OK when prompted to confirm deletion.
Field Description ‐ Zones
Resources
Field Label Field Specifications Description Notes
Zone Select Zone
Select Open Resources screen
Modify Select resource to Modify Click to open Resource Configuration screen
Save Click after making changes to save Save information to database
Delete Resource Selected resource will be deleted Confirm at pop up box to delete resource
Zone ID 50 character limit Zone ID
Zone Name 100 character limit Zone Name
Modify Confirm resource Name, IP and ID Resource Name and IP will automatically be defaulted
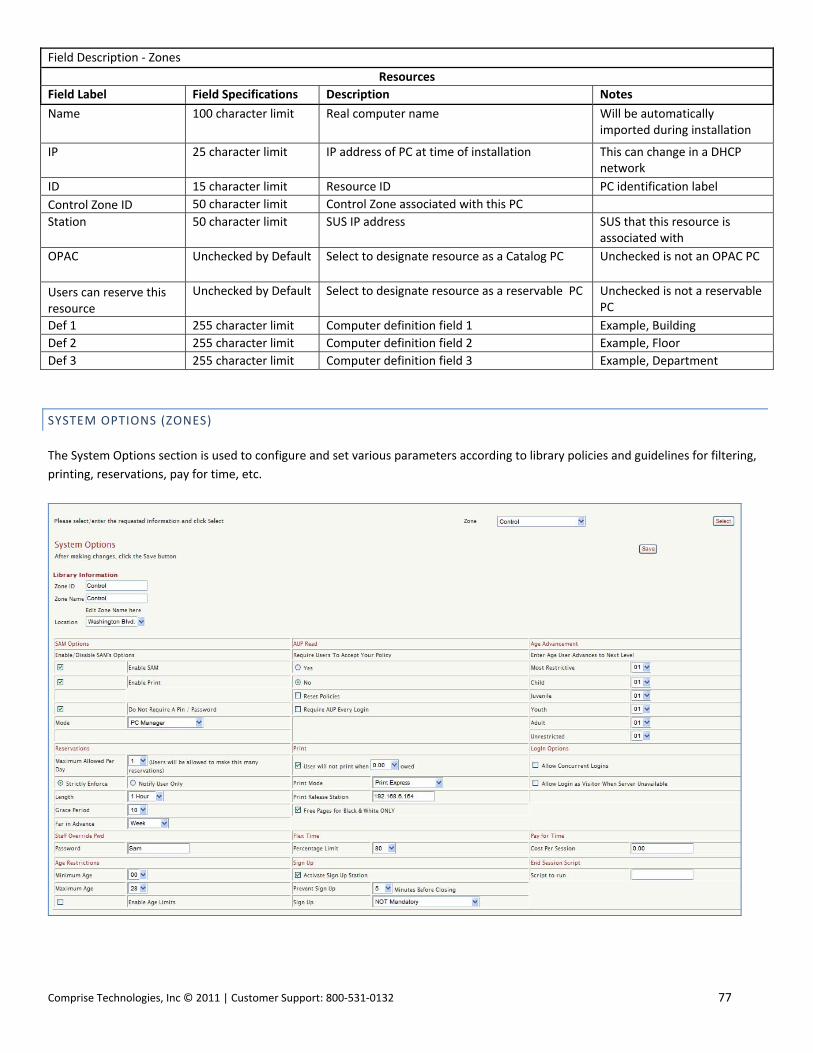
Comprise Technologies, Inc © 2011 | Customer Support: 800‐531‐0132 77
Field Description ‐ Zones
Resources
Field Label Field Specifications Description Notes
Name 100 character limit Real computer name Will be automatically imported during installation
IP 25 character limit IP address of PC at time of installation This can change in a DHCP network
ID 15 character limit Resource ID PC identification label
Control Zone ID 50 character limit Control Zone associated with this PC
Station 50 character limit SUS IP address SUS that this resource is associated with
OPAC Unchecked by Default Select to designate resource as a Catalog PC Unchecked is not an OPAC PC
Users can reserve this resource
Unchecked by Default Select to designate resource as a reservable PC Unchecked is not a reservable PC
Def 1 255 character limit Computer definition field 1 Example, Building
Def 2 255 character limit Computer definition field 2 Example, Floor
Def 3 255 character limit Computer definition field 3 Example, Department
SYSTEM OPTIONS (ZONES)
The System Options section is used to configure and set various parameters according to library policies and guidelines for filtering,
printing, reservations, pay for time, etc.

78 Comprise Technologies, Inc © 2011 | Customer Support: 800‐531‐0132
LIBRARY INFORMATION
Zone ID
Zone Name ‐ Zone Name can be modified in the box. Remember to click [Save] after making changes.
Location
SAM OPTIONS
Enable/Disable SAM's Options:
Enable SAM – Check to Enable SAM in Zone, Uncheck to Disable SAM in Zone.
Enable Print – Check to Enable SAM Printing in Zone, Uncheck to Disable SAM Printing in Zone.
Do Not Require A Pin / Password – Uncheck to require users to enter Pin / Password to log onto a SAM PC.
MODE The Running Mode determines how you want to set up your time manager. One option is to have users only be required to log‐in if they want to use the Internet browser. Another option is to use this feature to control user access to the entire PC. Your decision must be consistent throughout all SAM‐equipped PCs. Please Note that Netscape and Mozilla browsers are not supported for thin clients at this time.
Mode:
Internet Time Manager ‐ set time for the use of Internet browser only.
PC Manager ‐ set time for the use of the client PC including Internet.
OPAC w/ Print ‐ for Catalog PC with printing capability.
OPAC w/o Print ‐ for Catalog PC without printing.
AUP READ
This feature gives libraries the option to require Users to read and accept the Library’s Acceptable Use Policy when logging on for
first time.
Require Users to Accept Your Policy:
Yes ‐ If selected, Users will not be able to use the PC or go to the Internet, depending on what Running Mode you have chosen,
unless they accept the Library Acceptable Use Policy.
No ‐ If selected, Users will not have to accept the Library Acceptable Use Policy in order to use the PC.
Reset Policies – If library changes their Library Acceptable Use Policy or just wants Users to be required to read it again, check
this button.
Require AUP Every Login – If selected, Users will be required to read and accept the Library Acceptable Use Policy at every login.

Comprise Technologies, Inc © 2011 | Customer Support: 800‐531‐0132 79
AGE ADVANCEMENT:
Enter Age User Advances to Next Level ‐ Most Restrictive, Child, Juvenile, Youth, Adult, and Unrestricted.
This option is for Filtering only. Do not use this if you do not currently use Internet filtering with SAM.
If you use SAM's Internet Filtering based on user birth date, this feature can be activated. To set up your defaults for the ‘Age Advancement’ feature for your library, enter the age that you want a specific filter profile to take effect for all users. This is based on the user’s birth date set for specific profiles.
An example of this feature:
The library is using 2 filter profiles of the 6 available; the profiles are Restricted and Full Access.
The library policy is that anyone under 18 is Restricted but on their 18th Birthday they are eligible to have Full Access. All new users
will automatically receive Restricted Access if less than 18, so only the Full Access profile needs to be set for 18. This feature can be
overridden for a single user in the User Profile section of the Administrator Interface.
RESERVATIONS
In the Reservations section, you can set how and when users can reserve library PCs.
This is where, the library can set:
Maximum Allowed Per Day ‐ How many reservations a User can make for one day. The choice is from 1 to 24.
Strictly Enforce – End session and return the PC to the login screen.
Notify User Only ‐ Just notify the current user of reservation.
Length ‐ Length of the Reservation period. The choices are ½ hour or 1 hour.
Grace Period ‐ Select the length of the Grace Period. This is the time users have after PC assignment to log onto their assigned
PC. The choice is from 1 to 30 minutes.
Far in Advance – How far in advance the User can make a reservation. The choices include a day, 3 days, a week, 2 weeks, 1
month, 3 months, 6 months, 9 months or 12 months.
User will not print when money owed – Specify a Credit limit dollar amount.
Print Mode
Print Express – Print Jobs sent directly to Printer
Print Release – Print Jobs sent to Print Release Station
Print Release Station – the IP for the Print Release Station
Free Pages for Black and White ONLY

80 Comprise Technologies, Inc © 2011 | Customer Support: 800‐531‐0132
LOGIN OPTIONS
Allow Concurrent Logins – Select to allow the same library card # to log onto multiple PCs at the same time. Useful for training
sessions, classes, etc.
Allow Login as Visitor When Server Unavailable – If checked, there will be OK button to allow Visitor login at Sorry Screen when PC
loses network connectivity.
STAFF OVERRIDE PWD
Staff Override Password – Staff will be required to enter this SAM Staff Password to perform any staff functions.
FLEX TIME
The library can choose to offer Flex Time. This is where Sam will extend a user's time automatically based on the percentage of
available PCs at the end of the user's session time. For Example, if a library has 10 PCs and the Flex Time Percentage Limit is set at
80, Flex Time will be triggered when there are 7 or less PCs in use. This means, if 3 or more PCs are available, session time will
automatically get extended for another full session. This is beneficial to both the library as well as users because they get the most
usage from the public PCs. Please Note that the Flex Time feature is not available for thin clients at this time.
Percentage Limit – Select the Flex Time percent
PAY FOR TIME
SAM can charge a price per session for a specific zone. Sam will check the patrons account for sufficient funds and ask if they would
like to purchase a session. When a session is almost complete, SAM will ask if they would like to purchase another session.
However, SAM will not ask to renew session if the library is about to close.
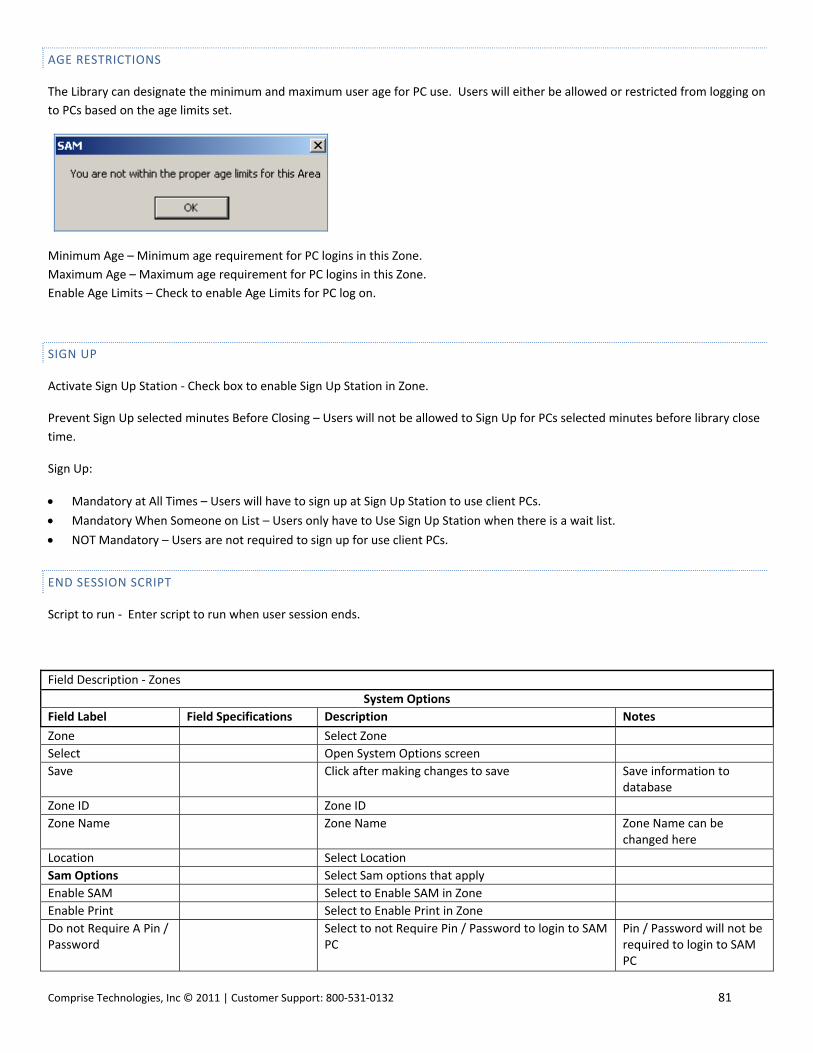
Comprise Technologies, Inc © 2011 | Customer Support: 800‐531‐0132 81
AGE RESTRICTIONS
The Library can designate the minimum and maximum user age for PC use. Users will either be allowed or restricted from logging on
to PCs based on the age limits set.
Minimum Age – Minimum age requirement for PC logins in this Zone.
Maximum Age – Maximum age requirement for PC logins in this Zone.
Enable Age Limits – Check to enable Age Limits for PC log on.
SIGN UP
Activate Sign Up Station ‐ Check box to enable Sign Up Station in Zone.
Prevent Sign Up selected minutes Before Closing – Users will not be allowed to Sign Up for PCs selected minutes before library close
time.
Sign Up:
Mandatory at All Times – Users will have to sign up at Sign Up Station to use client PCs.
Mandatory When Someone on List – Users only have to Use Sign Up Station when there is a wait list.
NOT Mandatory – Users are not required to sign up for use client PCs.
END SESSION SCRIPT
Script to run ‐ Enter script to run when user session ends.
Field Description ‐ Zones
System Options
Field Label Field Specifications Description Notes
Zone Select Zone
Select Open System Options screen
Save Click after making changes to save Save information to database
Zone ID Zone ID
Zone Name Zone Name Zone Name can be changed here
Location Select Location
Sam Options Select Sam options that apply
Enable SAM Select to Enable SAM in Zone
Enable Print Select to Enable Print in Zone
Do not Require A Pin / Password
Select to not Require Pin / Password to login to SAM PC
Pin / Password will not be required to login to SAM PC
82 Comprise Technologies, Inc © 2011 | Customer Support: 800‐531‐0132
Field Description ‐ Zones
System Options
Field Label Field Specifications Description Notes
Mode Internet Time Manager set the time for the use of Internet browser only. PC Manager set the time for the use of the client PC including Internet. OPAC w/ Print for Catalog PC with printing capability. OPAC w/o Print for Catalog PC without printing
PC Manager, Internet Time, Manager, OPAC w/ Print, OPAC w/o Print
AUP Read
Require Users to Accept Your Policy
Gives the option to require users to read and accept the Library's Acceptable Use Policy when logging on for first time
Yes Users will not be able to use the PC or go to the Internet unless they accept the Library's Use Policy
No Users do not have to accept the policy to be able to use the PC
Reset Policies Select option to require users to read policy again if policy is changed
Require AUP Every Login
Select option to require users to read policy for each login
Age Advancement For Filtering only. Do not use if you do not currently use Internet Filtering with SAM.
Based on user's birth date to which the specific profile is set
Enter Age User Advances to Next Level
Select the age that you want a specific filter profile to take effect for all users
Most Restrictive Filter Level Name set by Library will be displayed
Select the age when user advances to next level
Child Filter Level Name set by Library will be displayed
Select the age when user advances to next level
Juvenile Filter Level Name set by Library will be displayed
Select the age when user advances to next level
Youth Filter Level Name set by Library will be displayed
Select the age when user advances to next level
Adult Filter Level Name set by Library will be displayed
Select the age when user advances to next level
Unrestricted Filter Level Name set by Library will be displayed
Select the age when user advances to next level
Reservations
Maximum Allowed Per Day
Number of reservation for each user per day. 0 equals no reservations allowed
Strictly Enforce Strictly end session and return the PC to login screen
Notify User Only Just notify the current user
Length Length of reservation One hour or Half hour
Grace Period Number of Minutes to hold PC for user who reserved the PC
Other users cannot login to PC during this period
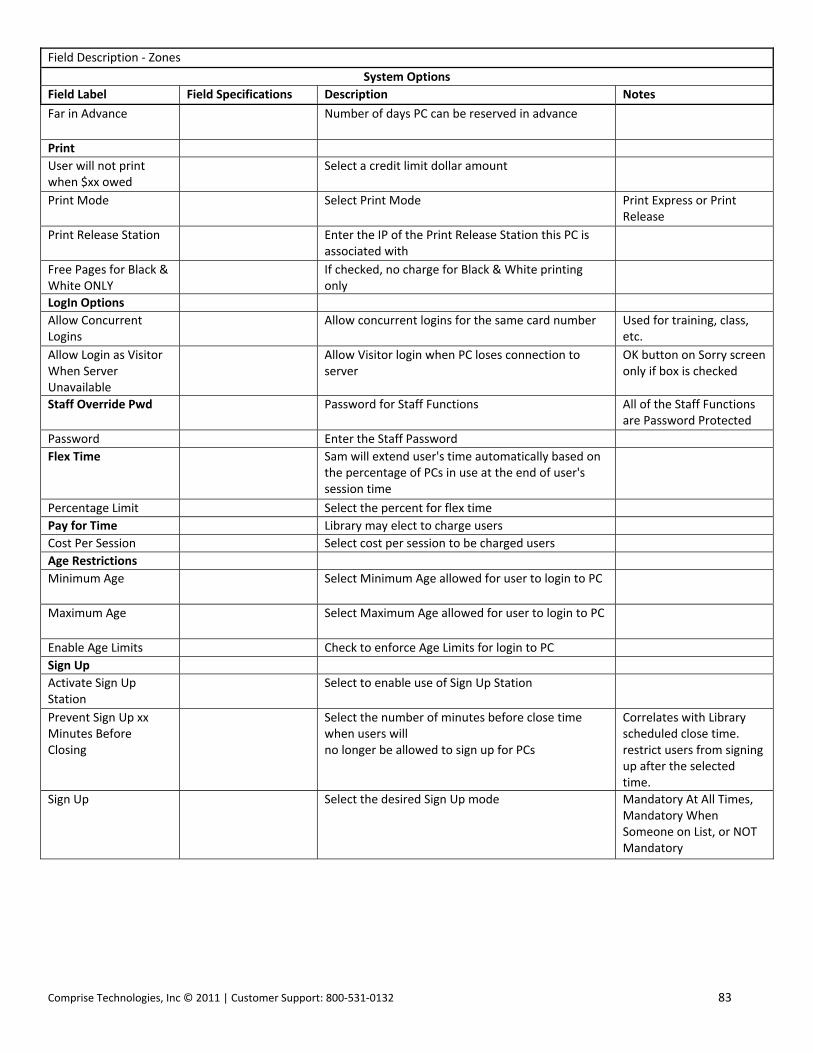
Comprise Technologies, Inc © 2011 | Customer Support: 800‐531‐0132 83
Field Description ‐ Zones
System Options
Field Label Field Specifications Description Notes
Far in Advance Number of days PC can be reserved in advance
User will not print when $xx owed
Select a credit limit dollar amount
Print Mode Select Print Mode Print Express or Print Release
Print Release Station Enter the IP of the Print Release Station this PC is associated with
Free Pages for Black & White ONLY
If checked, no charge for Black & White printing only
LogIn Options
Allow Concurrent Logins
Allow concurrent logins for the same card number Used for training, class, etc.
Allow Login as Visitor When Server Unavailable
Allow Visitor login when PC loses connection to server
OK button on Sorry screen only if box is checked
Staff Override Pwd Password for Staff Functions All of the Staff Functions are Password Protected
Password Enter the Staff Password
Flex Time Sam will extend user's time automatically based on the percentage of PCs in use at the end of user's session time
Percentage Limit Select the percent for flex time
Pay for Time Library may elect to charge users
Cost Per Session Select cost per session to be charged users
Age Restrictions
Minimum Age Select Minimum Age allowed for user to login to PC
Maximum Age Select Maximum Age allowed for user to login to PC
Enable Age Limits Check to enforce Age Limits for login to PC
Sign Up
Activate Sign Up Station
Select to enable use of Sign Up Station
Prevent Sign Up xx Minutes Before Closing
Select the number of minutes before close time when users will no longer be allowed to sign up for PCs
Correlates with Library scheduled close time. restrict users from signing up after the selected time.
Sign Up Select the desired Sign Up mode Mandatory At All Times, Mandatory When Someone on List, or NOT Mandatory

84 Comprise Technologies, Inc © 2011 | Customer Support: 800‐531‐0132
TIME OPTIONS (ZONES)
The library can change the default settings for the Inactivity Timer (3 minutes) Inactivity Time Warning and the End‐of ‐Session
Warning (2 minutes). If you want to use the Library Closing Timers, you may want to keep or change the default settings for the
Initial Warning (15 minutes before the scheduled closing), Second Warning (10 minutes) and the Final Warning (5 minutes).
Select Zone and click [Select]. Then, select / Enter all appropriate information and click [Save].
Field Description ‐ Zones
Time Options
Field Label Field Specifications Description Notes
Zone Select Zone
Select Open Time Options screen
Save Click after making changes to save Save information to database
Zone ID Zone ID
Zone Name Zone Name
Inactivity Time In minutes Time of Inactivity before message will display
Inactivity Time Warning
In minutes Time without keyboard or mouse input
End of Session Time Warning 1
In minutes Select time when user sees 1st End of Session message
1st warning prior to end of session
End of Session Time Warning 2
In minutes Select time when user sees 2nd End of Session message
2nd warning prior to end of session
End of Session Time Warning 3
In minutes Select time when user sees 3rd End of Session message
3rd warning prior to end of session
Library Close Warning 1
In minutes Select time when user sees 1st Library Close message
1st warning prior to Library Closing
Library Close Warning 2
In minutes Select time when user sees 2nd Library Close message
2nd warning prior to Library Closing
Library Close Warning 3
In minutes Select time when user sees 3rd Library Close message
3rd warning prior to Library Closing
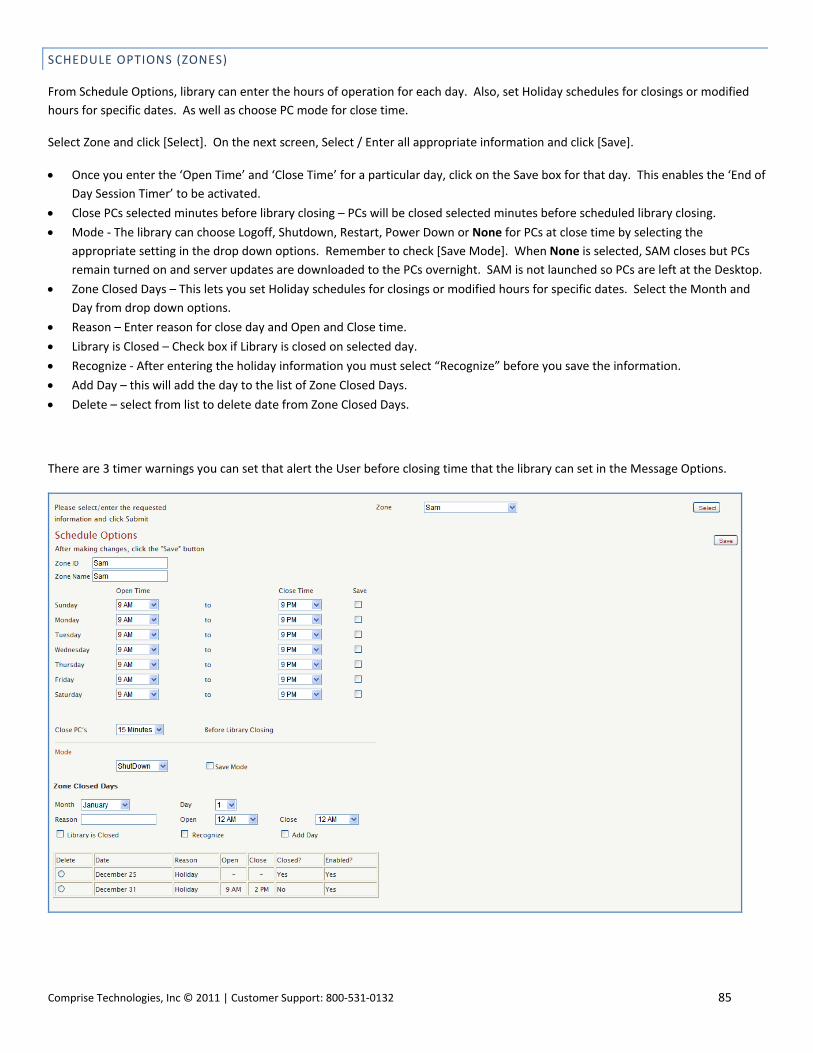
Comprise Technologies, Inc © 2011 | Customer Support: 800‐531‐0132 85
SCHEDULE OPTIONS (ZONES)
From Schedule Options, library can enter the hours of operation for each day. Also, set Holiday schedules for closings or modified
hours for specific dates. As well as choose PC mode for close time.
Select Zone and click [Select]. On the next screen, Select / Enter all appropriate information and click [Save].
Once you enter the ‘Open Time’ and ‘Close Time’ for a particular day, click on the Save box for that day. This enables the ‘End of
Day Session Timer’ to be activated.
Close PCs selected minutes before library closing – PCs will be closed selected minutes before scheduled library closing.
Mode ‐ The library can choose Logoff, Shutdown, Restart, Power Down or None for PCs at close time by selecting the
appropriate setting in the drop down options. Remember to check [Save Mode]. When None is selected, SAM closes but PCs
remain turned on and server updates are downloaded to the PCs overnight. SAM is not launched so PCs are left at the Desktop.
Zone Closed Days – This lets you set Holiday schedules for closings or modified hours for specific dates. Select the Month and
Day from drop down options.
Reason – Enter reason for close day and Open and Close time.
Library is Closed – Check box if Library is closed on selected day.
Recognize ‐ After entering the holiday information you must select “Recognize” before you save the information.
Add Day – this will add the day to the list of Zone Closed Days.
Delete – select from list to delete date from Zone Closed Days.
There are 3 timer warnings you can set that alert the User before closing time that the library can set in the Message Options.

86 Comprise Technologies, Inc © 2011 | Customer Support: 800‐531‐0132
Field Description ‐ Zones
Schedule Options
Field Label Field Specifications Description Notes
Zone Select Zone
Select Open Schedule Options screen
Save Click after making changes to save Save information to database
Zone ID Zone ID
Zone Name Zone Name
Sunday Select scheduled Sunday Open Time
Sunday Select scheduled Sunday Close Time
Save After entering Open and Close time, click on the Save box for each day
This enables the 'End of Day Session Timer'
Monday Select scheduled Monday Open Time
Monday Select scheduled Monday Close Time
Save After entering Open and Close time, click on the Save box for each day
This enables the 'End of Day Session Timer'
Tuesday Select scheduled Tuesday Open Time
Tuesday Select scheduled Tuesday Close Time
Save After entering Open and Close time, click on the Save box for each day
This enables the 'End of Day Session Timer'
Wednesday Select scheduled Wednesday Open Time
Wednesday Select scheduled Wednesday Close Time
Save After entering Open and Close time, click on the Save box for each day
This enables the 'End of Day Session Timer'
Thursday Select scheduled Thursday Open Time
Thursday Select scheduled Thursday Close Time
Save After entering Open and Close time, click on the Save box for each day
This enables the 'End of Day Session Timer'
Friday Select scheduled Friday Open Time
Friday Select scheduled Friday Close Time
Save After entering Open and Close time, click on the Save box for each day
This enables the 'End of Day Session Timer'
Saturday Select scheduled Saturday Open Time
Saturday Select scheduled Saturday Close Time
Save After entering Open and Close time, click on the Save box for each day
This enables the 'End of Day Session Timer'
Close PC's xx minutes before Library Closing
In minutes Select minutes to Close PCs per closing Mode selected below
PCs will close xx minutes before close time according to mode selected below
Mode Closing PC Mode Logoff, Shutdown, Power Down, or None
Save Mode Click after making changes to save Save information to database
Zone Closed Days
Set Holiday Schedule for closings or modified hours for specific dates
Select Recognize before saving information
Month Select Month of Close day
Day Select Day of Close day
Reason 255 character limit Enter Reason for Close day
Open Open Time for modified schedule
Close Close Time for modified schedule

Comprise Technologies, Inc © 2011 | Customer Support: 800‐531‐0132 87
Field Description ‐ Zones
Schedule Options
Field Label Field Specifications Description Notes
Library is Closed Select to add Library Close Days
Recognize After entering Holiday information, you must select Recognize before you save information
Select Recognize before you save information
Add Day Select to add Library Close Days to Schedule
Delete Select Dates to remove days from list
MENU OPTIONS (ZONES)
Select the Zone and Access Level and click [Select]. Select the desired options for each of the Access Levels and click [Save]. Only
the selected items will be available to each of the Access Levels.

88 Comprise Technologies, Inc © 2011 | Customer Support: 800‐531‐0132
Field Description ‐ Zones
Menu Options
Field Label Field Specifications Description Notes
Zone Select Zone
Access Level Options selected will vary according to designated Access Level
Administrator, Staff, IT Manager, Report Manger, POS Manager, POS User
Select Open Menu Options screen
Save Click after making changes to save Save information to database
Users
Admin Add User Select to grant rights/access to selected Access Level
Staff Add User Select to grant rights/access to selected Access Level
Admin Modify User Select to grant rights/access to selected Access Level
Staff Modify User
Select to grant rights/access to selected Access Level
Admin Account Status Select to grant rights/access to selected Access Level
Staff Account Status Select to grant rights/access to selected Access Level
Import User
Select to grant rights/access to selected Access Level
Register User Select to grant rights/access to selected Access Level
User Reconciliation Select to grant rights/access to selected Access Level
User Exceptions Select to grant rights/access to selected Access Level
Reservations
PC Activity Info Select to grant rights/access to selected Access Level
Add Single Select to grant rights/access to selected Access Level
Add Block Select to grant rights/access to selected Access Level
Add Multiple Select to grant rights/access to selected Access Level
Delete Single Select to grant rights/access to selected Access Level
Delete Block Select to grant rights/access to selected Access Level
Delete Multiple Select to grant rights/access to selected Access Level
Zones
Add Zone Select to grant rights/access to selected Access Level
Associate Device Select to grant rights/access to selected Access Level
Browser Options Select to grant rights/access to selected Access Level

Comprise Technologies, Inc © 2011 | Customer Support: 800‐531‐0132 89
Field Description ‐ Zones
Menu Options
Field Label Field Specifications Description Notes
Visitor Card / Sign Up Ticket Options
Select to grant rights/access to selected Access Level
Free Page Options Select to grant rights/access to selected Access Level
Group Options Select to grant rights/access to selected Access Level
Message Options Select to grant rights/access to selected Access Level
Invoice Options Select to grant rights/access to selected Access Level
OPAC Options Select to grant rights/access to selected Access Level
Print Options Select to grant rights/access to selected Access Level
Resources Select to grant rights/access to selected Access Level
System Options Select to grant rights/access to selected Access Level
Time Options Select to grant rights/access to selected Access Level
Schedule Options Select to grant rights/access to selected Access Level
Payment Center Options
Select to grant rights/access to selected Access Level
Client Config ‐ Themes
Select to grant rights/access to selected Access Level
Client Config ‐ Language
Select to grant rights/access to selected Access Level
Staff
Add Staff
Select to grant rights/access to selected Access Level
Modify Staff
Select to grant rights/access to selected Access Level
Control Zones
Add Control Zone
Select to grant rights/access to selected Access Level
Modify Control Zone
Select to grant rights/access to selected Access Level
Metering
Select to grant rights/access to selected Access Level
Add App / Web Site
Select to grant rights/access to selected Access Level
Modify App / Web Site
Select to grant rights/access to selected Access Level
Reports
Director's
Select to grant rights/access to selected Access Level
User
Select to grant rights/access to selected Access Level
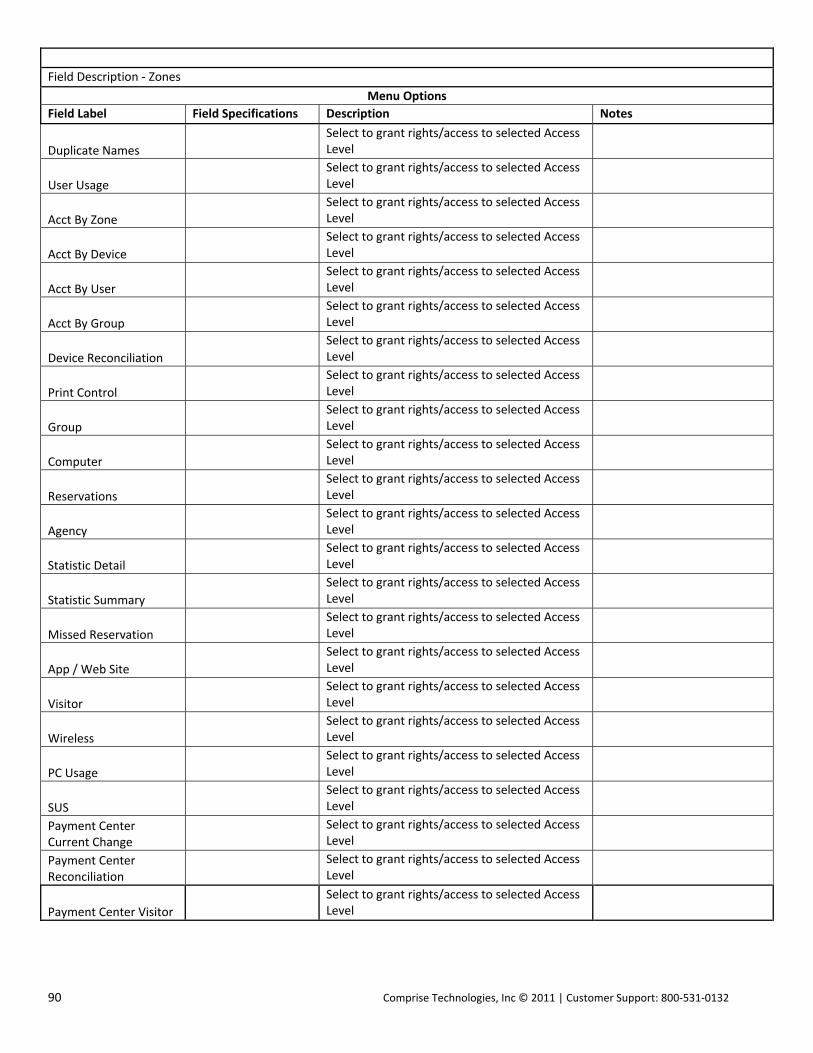
90 Comprise Technologies, Inc © 2011 | Customer Support: 800‐531‐0132
Field Description ‐ Zones
Menu Options
Field Label Field Specifications Description Notes
Duplicate Names
Select to grant rights/access to selected Access Level
User Usage
Select to grant rights/access to selected Access Level
Acct By Zone
Select to grant rights/access to selected Access Level
Acct By Device
Select to grant rights/access to selected Access Level
Acct By User
Select to grant rights/access to selected Access Level
Acct By Group
Select to grant rights/access to selected Access Level
Device Reconciliation
Select to grant rights/access to selected Access Level
Print Control
Select to grant rights/access to selected Access Level
Group
Select to grant rights/access to selected Access Level
Computer
Select to grant rights/access to selected Access Level
Reservations
Select to grant rights/access to selected Access Level
Agency
Select to grant rights/access to selected Access Level
Statistic Detail
Select to grant rights/access to selected Access Level
Statistic Summary
Select to grant rights/access to selected Access Level
Missed Reservation
Select to grant rights/access to selected Access Level
App / Web Site
Select to grant rights/access to selected Access Level
Visitor
Select to grant rights/access to selected Access Level
Wireless
Select to grant rights/access to selected Access Level
PC Usage
Select to grant rights/access to selected Access Level
SUS
Select to grant rights/access to selected Access Level
Payment Center Current Change
Select to grant rights/access to selected Access Level
Payment Center Reconciliation
Select to grant rights/access to selected Access Level
Payment Center Visitor
Select to grant rights/access to selected Access Level
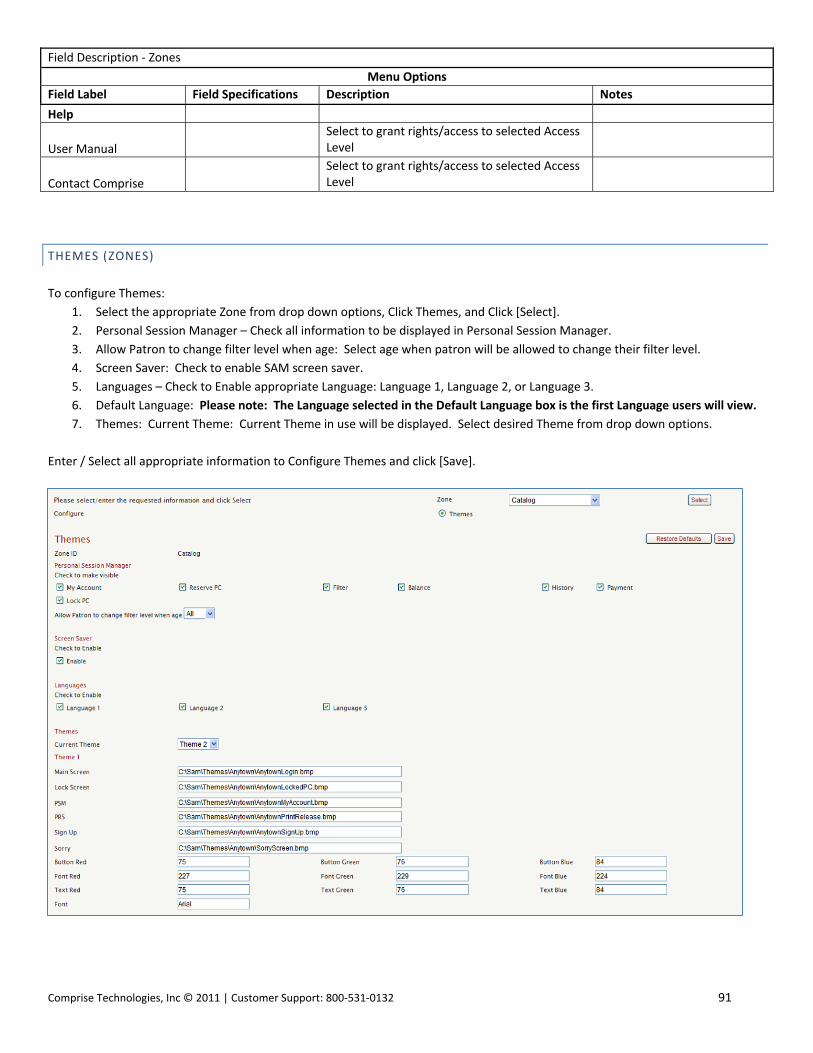
Comprise Technologies, Inc © 2011 | Customer Support: 800‐531‐0132 91
Field Description ‐ Zones
Menu Options
Field Label Field Specifications Description Notes
Help
User Manual
Select to grant rights/access to selected Access Level
Contact Comprise
Select to grant rights/access to selected Access Level
THEMES (ZONES)
To configure Themes:
1. Select the appropriate Zone from drop down options, Click Themes, and Click [Select].
2. Personal Session Manager – Check all information to be displayed in Personal Session Manager.
3. Allow Patron to change filter level when age: Select age when patron will be allowed to change their filter level.
4. Screen Saver: Check to enable SAM screen saver.
5. Languages – Check to Enable appropriate Language: Language 1, Language 2, or Language 3.
6. Default Language: Please note: The Language selected in the Default Language box is the first Language users will view.
7. Themes: Current Theme: Current Theme in use will be displayed. Select desired Theme from drop down options.
Enter / Select all appropriate information to Configure Themes and click [Save].

92 Comprise Technologies, Inc © 2011 | Customer Support: 800‐531‐0132
Please refer to Themes section for examples of available Themes.
Field Description ‐ Zones
Themes
Field Label Field Specifications Description Notes
Zone Select Zone
Configure Themes will be selected by default
Select Open Themes Options screen
Restore Defaults
Save Select Theme and click to save
Zone ID Selected Zone will be displayed
Personal Session Manager
My Account Select to show option in Personal Session Manager window
Option will be visible only if selected
Reserve a PC Select to show option in Personal Session Manager window
Option will be visible only if selected
Filter Select to show option in Personal Session Manager window
Option will be visible only if selected
Balance Select to show option in Personal Session Manager window
Option will be visible only if selected
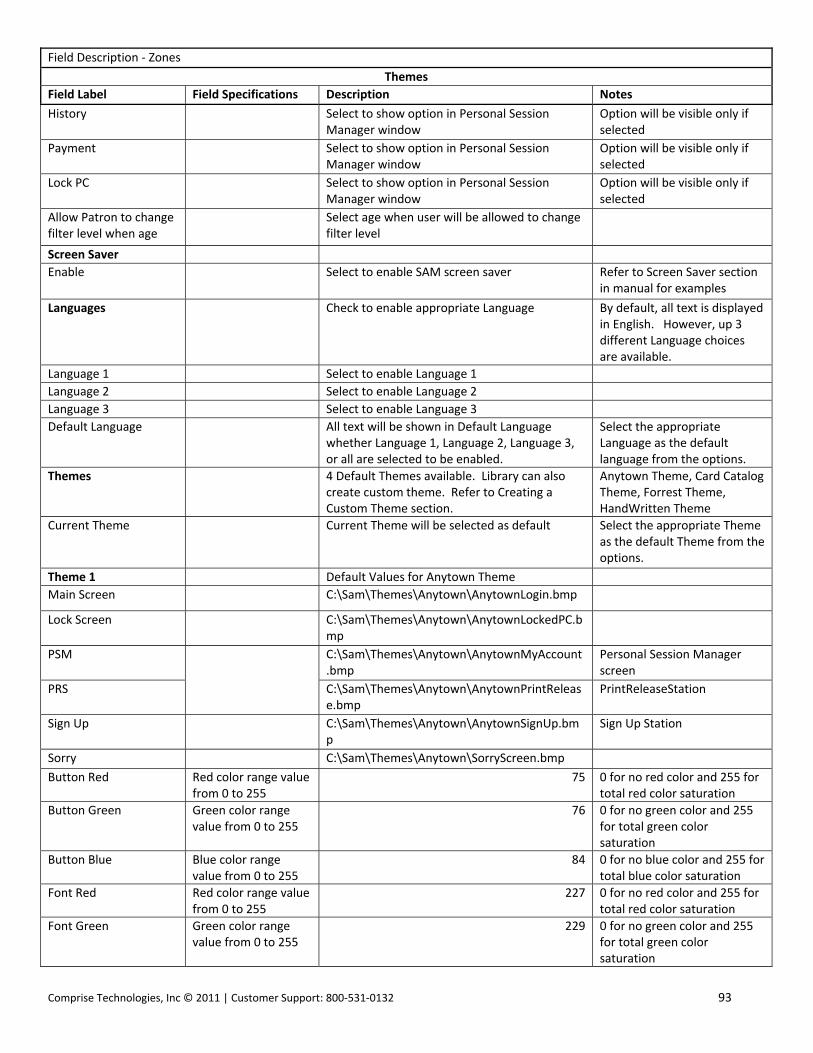
Comprise Technologies, Inc © 2011 | Customer Support: 800‐531‐0132 93
Field Description ‐ Zones
Themes
Field Label Field Specifications Description Notes
History Select to show option in Personal Session Manager window
Option will be visible only if selected
Payment Select to show option in Personal Session Manager window
Option will be visible only if selected
Lock PC Select to show option in Personal Session Manager window
Option will be visible only if selected
Allow Patron to change filter level when age
Select age when user will be allowed to change filter level
Screen Saver
Enable Select to enable SAM screen saver Refer to Screen Saver section in manual for examples
Languages Check to enable appropriate Language By default, all text is displayed in English. However, up 3 different Language choices are available.
Language 1 Select to enable Language 1
Language 2 Select to enable Language 2
Language 3 Select to enable Language 3
Default Language All text will be shown in Default Language whether Language 1, Language 2, Language 3, or all are selected to be enabled.
Select the appropriate Language as the default language from the options.
Themes 4 Default Themes available. Library can also create custom theme. Refer to Creating a Custom Theme section.
Anytown Theme, Card Catalog Theme, Forrest Theme, HandWritten Theme
Current Theme Current Theme will be selected as default Select the appropriate Theme as the default Theme from the options.
Theme 1 Default Values for Anytown Theme
Main Screen C:\Sam\Themes\Anytown\AnytownLogin.bmp
Lock Screen C:\Sam\Themes\Anytown\AnytownLockedPC.bmp
PSM C:\Sam\Themes\Anytown\AnytownMyAccount.bmp
Personal Session Manager screen
PRS C:\Sam\Themes\Anytown\AnytownPrintRelease.bmp
PrintReleaseStation
Sign Up C:\Sam\Themes\Anytown\AnytownSignUp.bmp
Sign Up Station
Sorry C:\Sam\Themes\Anytown\SorryScreen.bmp
Button Red Red color range value from 0 to 255
75 0 for no red color and 255 for total red color saturation
Button Green Green color range value from 0 to 255
76 0 for no green color and 255 for total green color saturation
Button Blue Blue color range value from 0 to 255
84 0 for no blue color and 255 for total blue color saturation
Font Red Red color range value from 0 to 255
227 0 for no red color and 255 for total red color saturation
Font Green Green color range value from 0 to 255
229 0 for no green color and 255 for total green color saturation
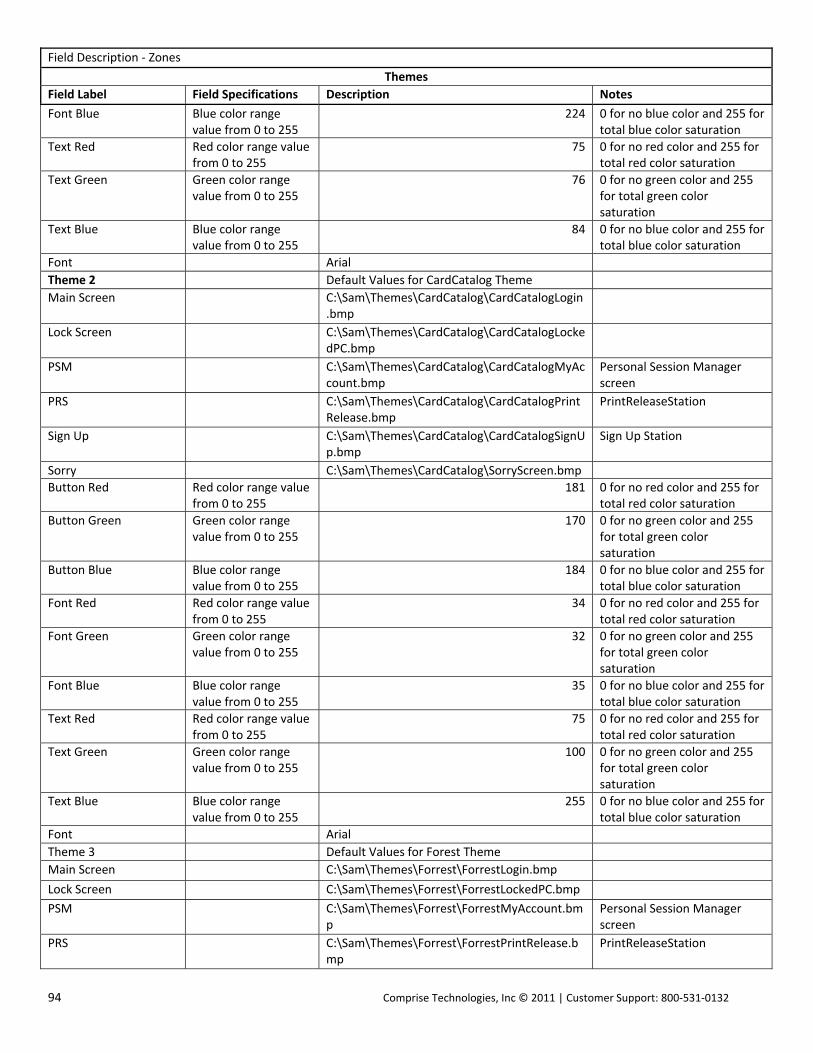
94 Comprise Technologies, Inc © 2011 | Customer Support: 800‐531‐0132
Field Description ‐ Zones
Themes
Field Label Field Specifications Description Notes
Font Blue Blue color range value from 0 to 255
224 0 for no blue color and 255 for total blue color saturation
Text Red Red color range value from 0 to 255
75 0 for no red color and 255 for total red color saturation
Text Green Green color range value from 0 to 255
76 0 for no green color and 255 for total green color saturation
Text Blue Blue color range value from 0 to 255
84 0 for no blue color and 255 for total blue color saturation
Font Arial
Theme 2 Default Values for CardCatalog Theme
Main Screen C:\Sam\Themes\CardCatalog\CardCatalogLogin.bmp
Lock Screen C:\Sam\Themes\CardCatalog\CardCatalogLockedPC.bmp
PSM C:\Sam\Themes\CardCatalog\CardCatalogMyAccount.bmp
Personal Session Manager screen
PRS C:\Sam\Themes\CardCatalog\CardCatalogPrintRelease.bmp
PrintReleaseStation
Sign Up C:\Sam\Themes\CardCatalog\CardCatalogSignUp.bmp
Sign Up Station
Sorry C:\Sam\Themes\CardCatalog\SorryScreen.bmp
Button Red Red color range value from 0 to 255
181 0 for no red color and 255 for total red color saturation
Button Green Green color range value from 0 to 255
170 0 for no green color and 255 for total green color saturation
Button Blue Blue color range value from 0 to 255
184 0 for no blue color and 255 for total blue color saturation
Font Red Red color range value from 0 to 255
34 0 for no red color and 255 for total red color saturation
Font Green Green color range value from 0 to 255
32 0 for no green color and 255 for total green color saturation
Font Blue Blue color range value from 0 to 255
35 0 for no blue color and 255 for total blue color saturation
Text Red Red color range value from 0 to 255
75 0 for no red color and 255 for total red color saturation
Text Green Green color range value from 0 to 255
100 0 for no green color and 255 for total green color saturation
Text Blue Blue color range value from 0 to 255
255 0 for no blue color and 255 for total blue color saturation
Font Arial
Theme 3 Default Values for Forest Theme
Main Screen C:\Sam\Themes\Forrest\ForrestLogin.bmp
Lock Screen C:\Sam\Themes\Forrest\ForrestLockedPC.bmp
PSM C:\Sam\Themes\Forrest\ForrestMyAccount.bmp
Personal Session Manager screen
PRS C:\Sam\Themes\Forrest\ForrestPrintRelease.bmp
PrintReleaseStation
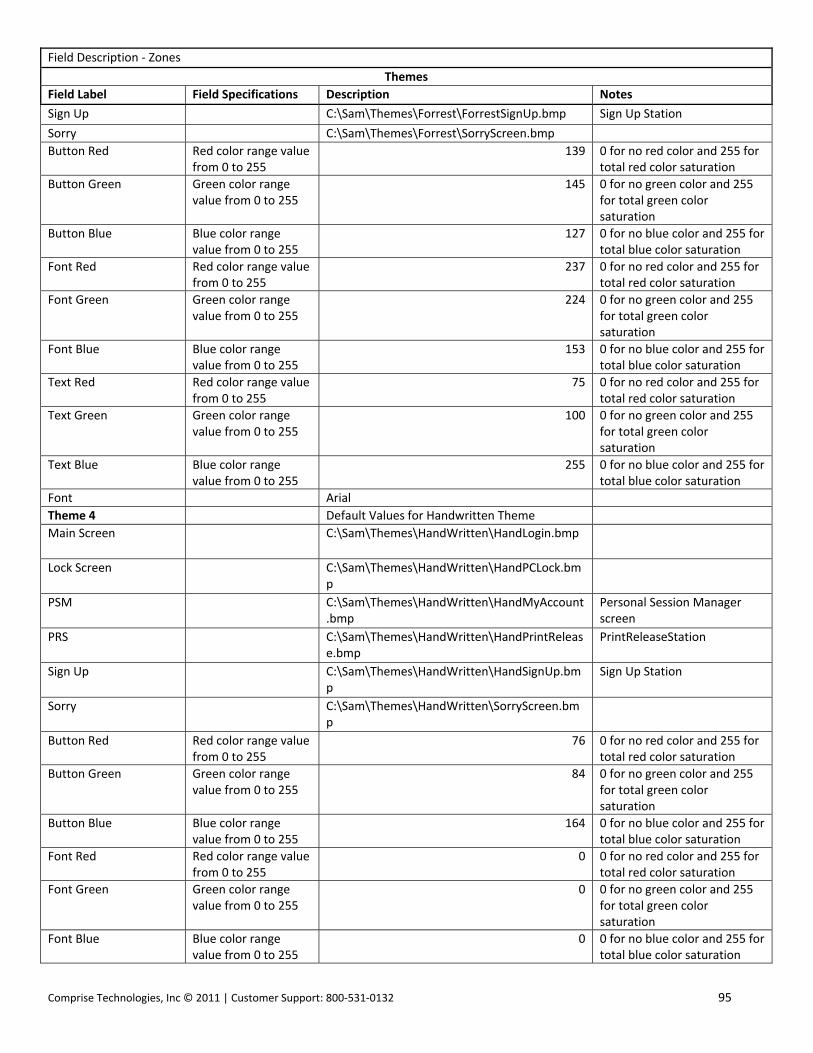
Comprise Technologies, Inc © 2011 | Customer Support: 800‐531‐0132 95
Field Description ‐ Zones
Themes
Field Label Field Specifications Description Notes
Sign Up C:\Sam\Themes\Forrest\ForrestSignUp.bmp Sign Up Station
Sorry C:\Sam\Themes\Forrest\SorryScreen.bmp
Button Red Red color range value from 0 to 255
139 0 for no red color and 255 for total red color saturation
Button Green Green color range value from 0 to 255
145 0 for no green color and 255 for total green color saturation
Button Blue Blue color range value from 0 to 255
127 0 for no blue color and 255 for total blue color saturation
Font Red Red color range value from 0 to 255
237 0 for no red color and 255 for total red color saturation
Font Green Green color range value from 0 to 255
224 0 for no green color and 255 for total green color saturation
Font Blue Blue color range value from 0 to 255
153 0 for no blue color and 255 for total blue color saturation
Text Red Red color range value from 0 to 255
75 0 for no red color and 255 for total red color saturation
Text Green Green color range value from 0 to 255
100 0 for no green color and 255 for total green color saturation
Text Blue Blue color range value from 0 to 255
255 0 for no blue color and 255 for total blue color saturation
Font Arial
Theme 4 Default Values for Handwritten Theme
Main Screen C:\Sam\Themes\HandWritten\HandLogin.bmp
Lock Screen C:\Sam\Themes\HandWritten\HandPCLock.bmp
PSM C:\Sam\Themes\HandWritten\HandMyAccount.bmp
Personal Session Manager screen
PRS C:\Sam\Themes\HandWritten\HandPrintRelease.bmp
PrintReleaseStation
Sign Up C:\Sam\Themes\HandWritten\HandSignUp.bmp
Sign Up Station
Sorry C:\Sam\Themes\HandWritten\SorryScreen.bmp
Button Red Red color range value from 0 to 255
76 0 for no red color and 255 for total red color saturation
Button Green Green color range value from 0 to 255
84 0 for no green color and 255 for total green color saturation
Button Blue Blue color range value from 0 to 255
164 0 for no blue color and 255 for total blue color saturation
Font Red Red color range value from 0 to 255
0 0 for no red color and 255 for total red color saturation
Font Green Green color range value from 0 to 255
0 0 for no green color and 255 for total green color saturation
Font Blue Blue color range value from 0 to 255
0 0 for no blue color and 255 for total blue color saturation
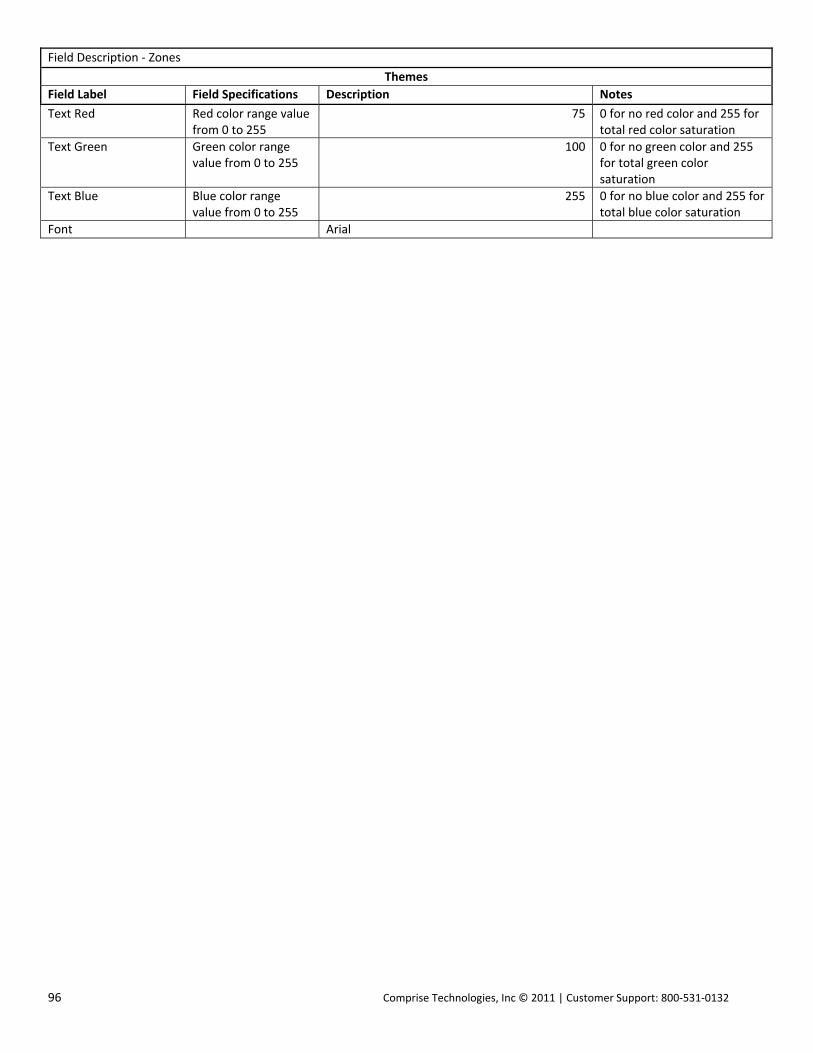
96 Comprise Technologies, Inc © 2011 | Customer Support: 800‐531‐0132
Field Description ‐ Zones
Themes
Field Label Field Specifications Description Notes
Text Red Red color range value from 0 to 255
75 0 for no red color and 255 for total red color saturation
Text Green Green color range value from 0 to 255
100 0 for no green color and 255 for total green color saturation
Text Blue Blue color range value from 0 to 255
255 0 for no blue color and 255 for total blue color saturation
Font Arial
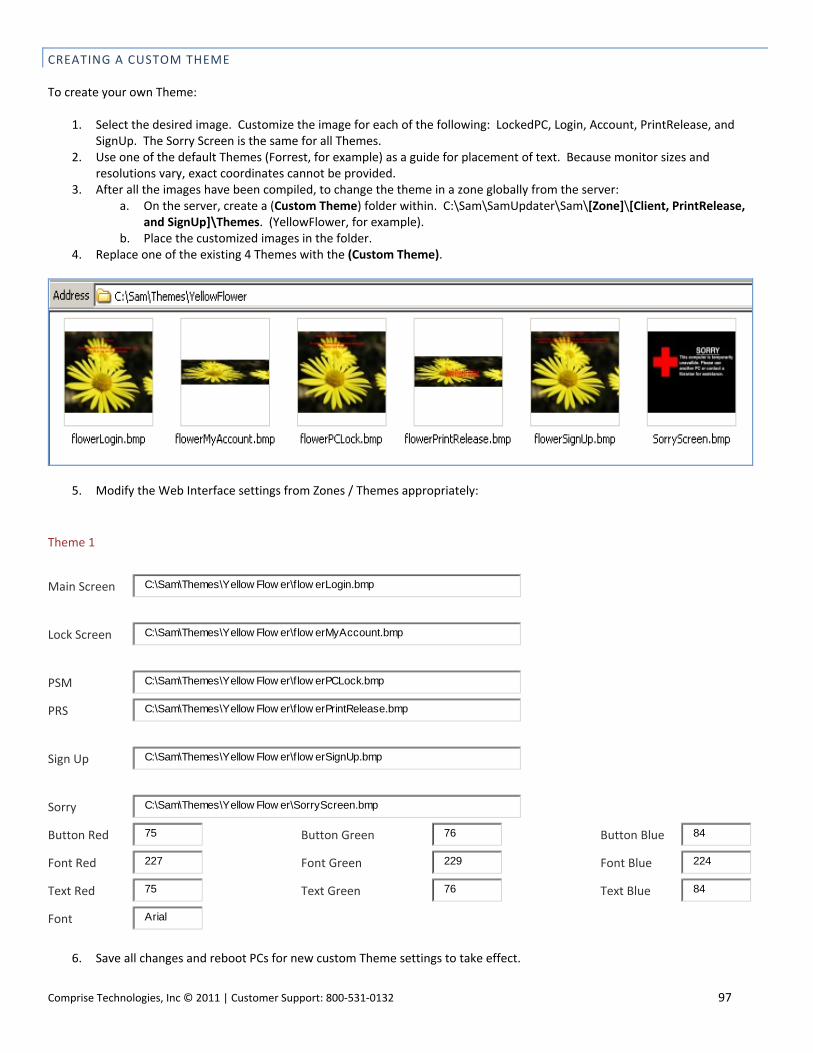
Comprise Technologies, Inc © 2011 | Customer Support: 800‐531‐0132 97
CREATING A CUSTOM THEME To create your own Theme:
1. Select the desired image. Customize the image for each of the following: LockedPC, Login, Account, PrintRelease, and SignUp. The Sorry Screen is the same for all Themes.
2. Use one of the default Themes (Forrest, for example) as a guide for placement of text. Because monitor sizes and resolutions vary, exact coordinates cannot be provided.
3. After all the images have been compiled, to change the theme in a zone globally from the server: a. On the server, create a (Custom Theme) folder within. C:\Sam\SamUpdater\Sam\[Zone]\[Client, PrintRelease,
and SignUp]\Themes. (YellowFlower, for example). b. Place the customized images in the folder.
4. Replace one of the existing 4 Themes with the (Custom Theme).
5. Modify the Web Interface settings from Zones / Themes appropriately:
Theme 1
Main Screen C:\Sam\Themes\Yellow Flow er\f low erLogin.bmp
Lock Screen C:\Sam\Themes\Yellow Flow er\f low erMyAccount.bmp
PSM C:\Sam\Themes\Yellow Flow er\f low erPCLock.bmp
PRS C:\Sam\Themes\Yellow Flow er\f low erPrintRelease.bmp
Sign Up C:\Sam\Themes\Yellow Flow er\f low erSignUp.bmp
Sorry C:\Sam\Themes\Yellow Flow er\SorryScreen.bmp
Button Red 75
Button Green 76
Button Blue 84
Font Red 227
Font Green 229
Font Blue 224
Text Red 75
Text Green 76
Text Blue 84
Font Arial
6. Save all changes and reboot PCs for new custom Theme settings to take effect.

98 Comprise Technologies, Inc © 2011 | Customer Support: 800‐531‐0132
7. After reboot, confirm on the PCs locally (Custom Theme) folder within C:\SAM\Themes has the customized images (YellowFlower, for example)
Field Description ‐ Zones
Themes
CREATING A CUSTOM THEME (YellowFlower)
Field Label Field Specifications Description Notes
Theme 1 Default Values for YellowFlower Theme
Main Screen C:\Sam\Themes\YellowFlower\flowerLogin.bmp
Lock Screen C:\Sam\Themes\YellowFlower\flowerLockedPC.bmp
PSM C:\Sam\Themes\YellowFlower\flowerMyAccount.bmp
Personal Session Manager screen
PRS C:\Sam\Themes\YellowFlower\flowerPrintRelease.bmp
PrintReleaseStation
Sign Up C:\Sam\Themes\YellowFlower\flowerSignUp.bmp
Sign Up Station
Sorry C:\Sam\Themes\YellowFlower\SorryScreen.bmp
Button Red Red color range value from 0 to 255
75 0 for no red color and 255 for total red color saturation
Button Green Green color range value from 0 to 255
76 0 for no green color and 255 for total green color saturation
Button Blue Blue color range value from 0 to 255
84 0 for no blue color and 255 for total blue color saturation
Font Red Red color range value from 0 to 255
227 0 for no red color and 255 for total red color saturation
Font Green Green color range value from 0 to 255
229 0 for no green color and 255 for total green color saturation
Font Blue Blue color range value from 0 to 255
224 0 for no blue color and 255 for total blue color saturation
Text Red Red color range value from 0 to 255
75 0 for no red color and 255 for total red color saturation
Text Green Green color range value from 0 to 255
76 0 for no green color and 255 for total green color saturation
Text Blue Blue color range value from 0 to 255
84 0 for no blue color and 255 for total blue color saturation
Font Arial
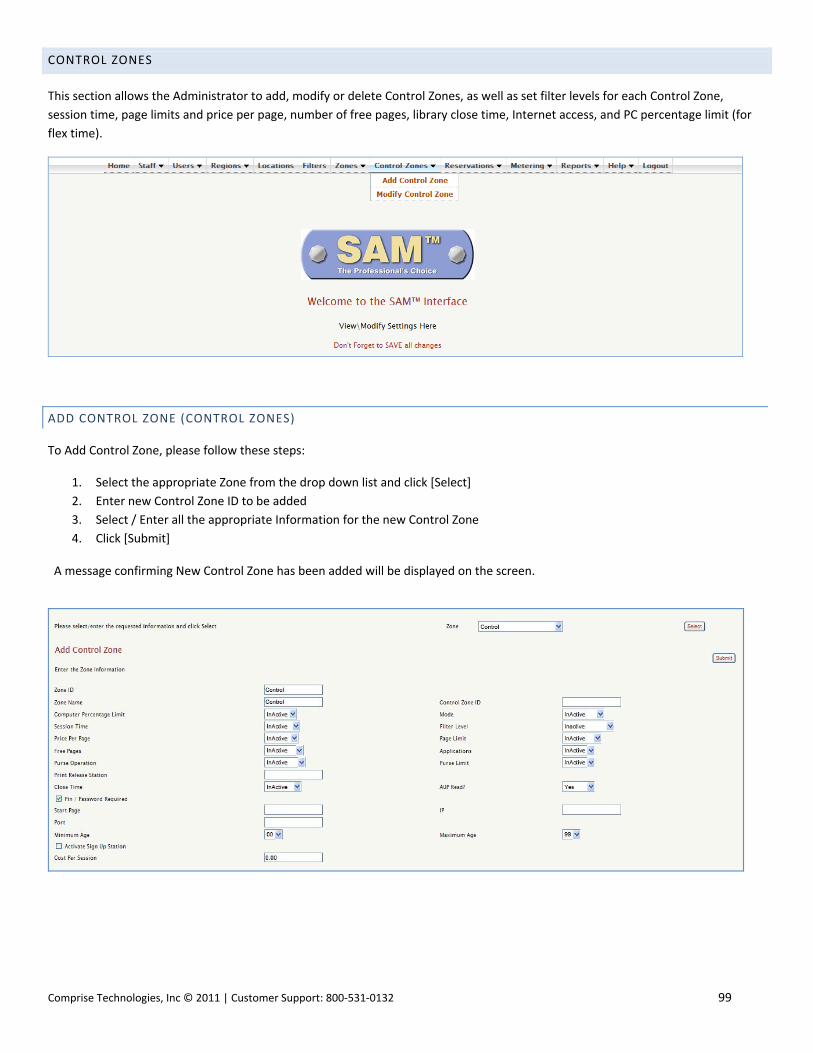
Comprise Technologies, Inc © 2011 | Customer Support: 800‐531‐0132 99
CONTROL ZONES
This section allows the Administrator to add, modify or delete Control Zones, as well as set filter levels for each Control Zone,
session time, page limits and price per page, number of free pages, library close time, Internet access, and PC percentage limit (for
flex time).
ADD CONTROL ZONE (CONTROL ZONES)
To Add Control Zone, please follow these steps:
1. Select the appropriate Zone from the drop down list and click [Select]
2. Enter new Control Zone ID to be added
3. Select / Enter all the appropriate Information for the new Control Zone
4. Click [Submit] A message confirming New Control Zone has been added will be displayed on the screen.
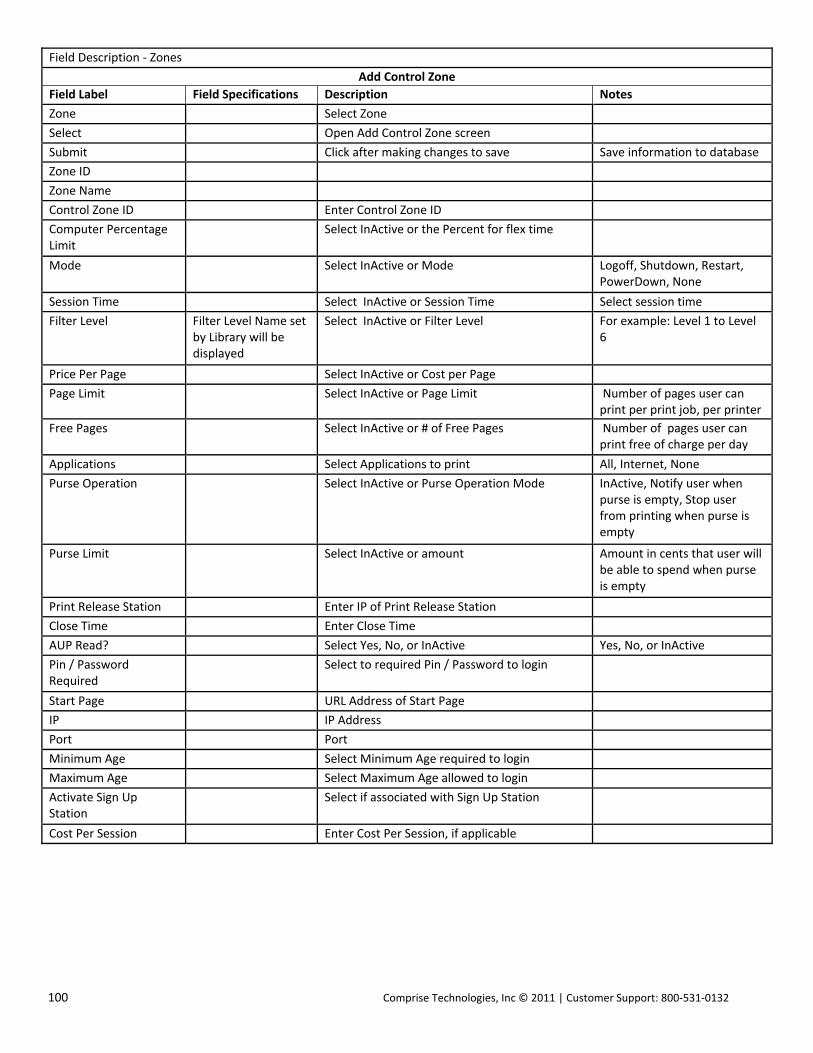
100 Comprise Technologies, Inc © 2011 | Customer Support: 800‐531‐0132
Field Description ‐ Zones
Add Control Zone
Field Label Field Specifications Description Notes
Zone Select Zone
Select Open Add Control Zone screen
Submit Click after making changes to save Save information to database
Zone ID
Zone Name
Control Zone ID Enter Control Zone ID
Computer Percentage Limit
Select InActive or the Percent for flex time
Mode Select InActive or Mode Logoff, Shutdown, Restart, PowerDown, None
Session Time Select InActive or Session Time Select session time
Filter Level Filter Level Name set by Library will be displayed
Select InActive or Filter Level For example: Level 1 to Level 6
Price Per Page Select InActive or Cost per Page
Page Limit Select InActive or Page Limit Number of pages user can print per print job, per printer
Free Pages Select InActive or # of Free Pages Number of pages user can print free of charge per day
Applications Select Applications to print All, Internet, None
Purse Operation Select InActive or Purse Operation Mode InActive, Notify user when purse is empty, Stop user from printing when purse is empty
Purse Limit Select InActive or amount Amount in cents that user will be able to spend when purse is empty
Print Release Station Enter IP of Print Release Station
Close Time Enter Close Time
AUP Read? Select Yes, No, or InActive Yes, No, or InActive
Pin / Password Required
Select to required Pin / Password to login
Start Page URL Address of Start Page
IP IP Address
Port Port
Minimum Age Select Minimum Age required to login
Maximum Age Select Maximum Age allowed to login
Activate Sign Up Station
Select if associated with Sign Up Station
Cost Per Session Enter Cost Per Session, if applicable
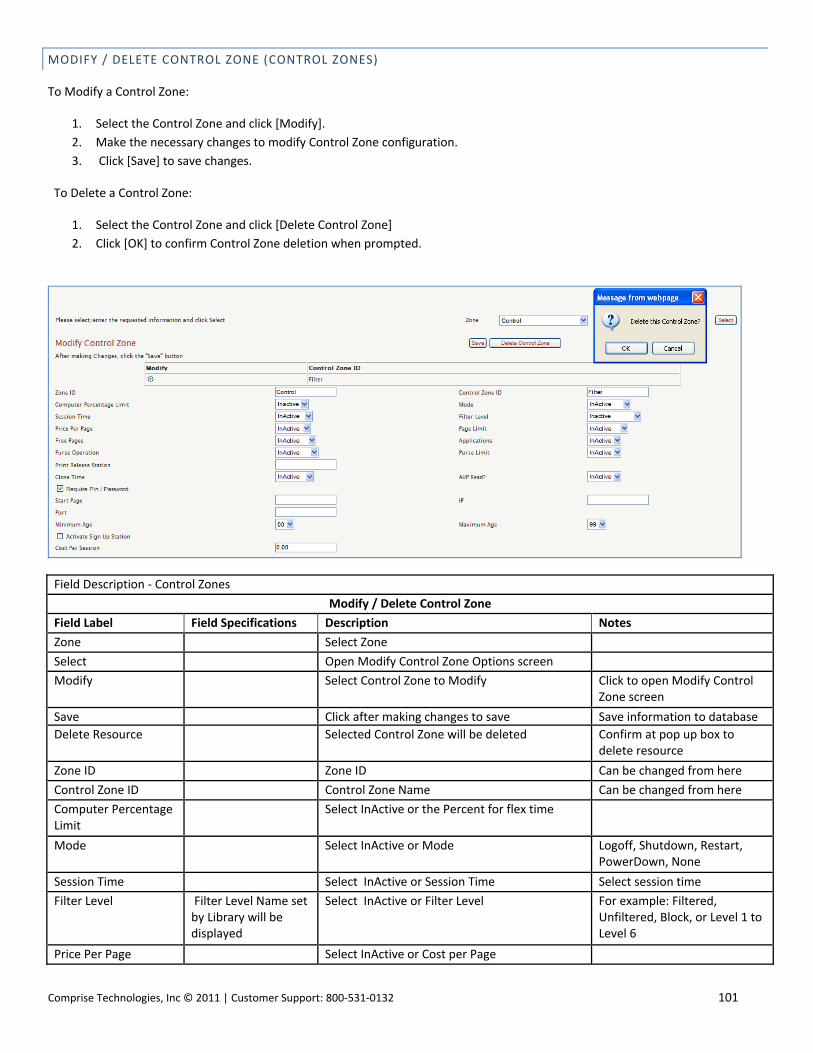
Comprise Technologies, Inc © 2011 | Customer Support: 800‐531‐0132 101
MODIFY / DELETE CONTROL ZONE (CONTROL ZONES)
To Modify a Control Zone:
1. Select the Control Zone and click [Modify].
2. Make the necessary changes to modify Control Zone configuration.
3. Click [Save] to save changes.
To Delete a Control Zone:
1. Select the Control Zone and click [Delete Control Zone]
2. Click [OK] to confirm Control Zone deletion when prompted.
Field Description ‐ Control Zones
Modify / Delete Control Zone
Field Label Field Specifications Description Notes
Zone Select Zone
Select Open Modify Control Zone Options screen
Modify Select Control Zone to Modify Click to open Modify Control Zone screen
Save Click after making changes to save Save information to database
Delete Resource Selected Control Zone will be deleted Confirm at pop up box to delete resource
Zone ID Zone ID Can be changed from here
Control Zone ID Control Zone Name Can be changed from here
Computer Percentage Limit
Select InActive or the Percent for flex time
Mode Select InActive or Mode Logoff, Shutdown, Restart, PowerDown, None
Session Time Select InActive or Session Time Select session time
Filter Level Filter Level Name set by Library will be displayed
Select InActive or Filter Level For example: Filtered, Unfiltered, Block, or Level 1 to Level 6
Price Per Page Select InActive or Cost per Page

102 Comprise Technologies, Inc © 2011 | Customer Support: 800‐531‐0132
Field Description ‐ Control Zones
Modify / Delete Control Zone
Field Label Field Specifications Description Notes
Page Limit Select InActive or Page Limit Number of pages user can print per print job, per printer
Free Pages Select InActive or # of Free Pages Number of pages user can print free of charge per day
Applications Select Applications to print All, Internet, None
Purse Operation Select InActive or Purse Operation Mode InActive, Notify user when purse is empty, Stop user from printing when purse is empty
Purse Limit Select InActive or amount Amount in cents that user will be able to spend when purse is empty
Print Release Station Enter IP of Print Release Station
Close Time Enter Close Time
AUP Read? Select Yes, No, or InActive Yes, No, or InActive
Require Pin / Password
Select to required Pin / Password to login
Start Page URL Address of Start Page
IP IP Address
Port Port
Minimum Age Select Minimum Age required to login
Maximum Age Select Maximum Age allowed to login
Activate Sign Up Station
Select if associated with Sign Up Station
Cost Per Session Enter Cost Per Session, if applicable
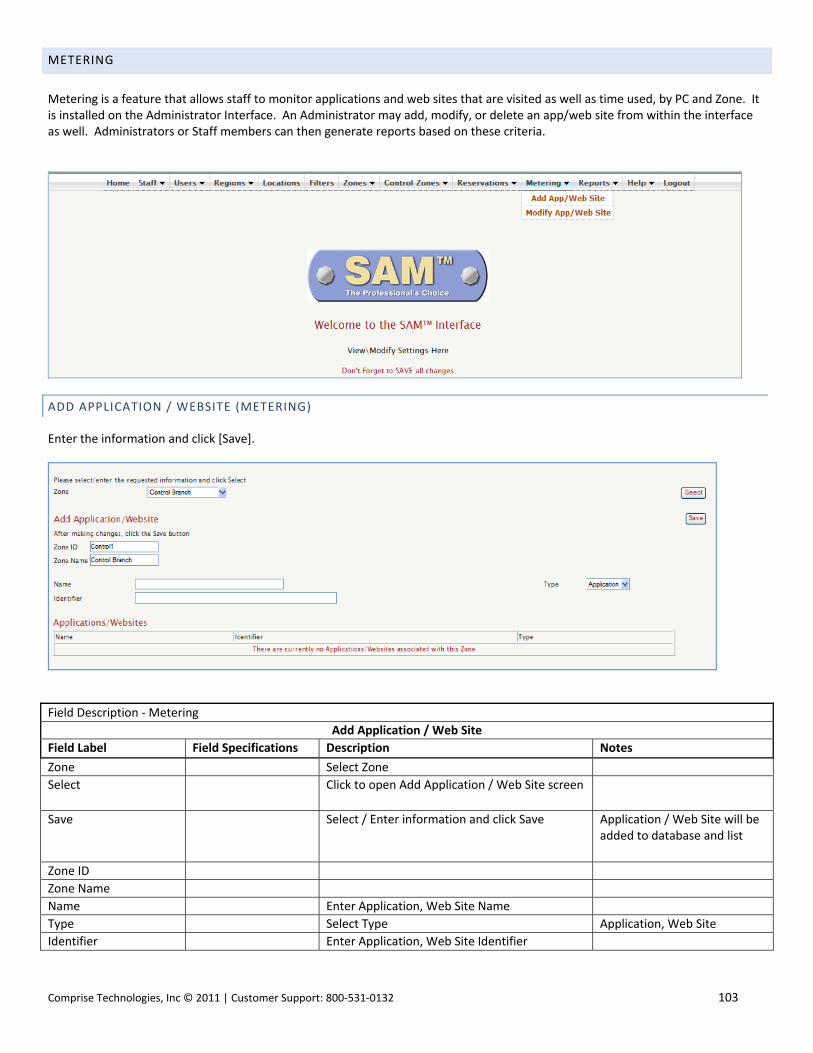
Comprise Technologies, Inc © 2011 | Customer Support: 800‐531‐0132 103
METERING
Metering is a feature that allows staff to monitor applications and web sites that are visited as well as time used, by PC and Zone. It is installed on the Administrator Interface. An Administrator may add, modify, or delete an app/web site from within the interface as well. Administrators or Staff members can then generate reports based on these criteria.
ADD APPLICATION / WEBSITE (METERING)
Enter the information and click [Save].
Field Description ‐ Metering
Add Application / Web Site
Field Label Field Specifications Description Notes
Zone Select Zone
Select Click to open Add Application / Web Site screen
Save Select / Enter information and click Save Application / Web Site will be added to database and list
Zone ID
Zone Name
Name Enter Application, Web Site Name
Type Select Type Application, Web Site
Identifier Enter Application, Web Site Identifier
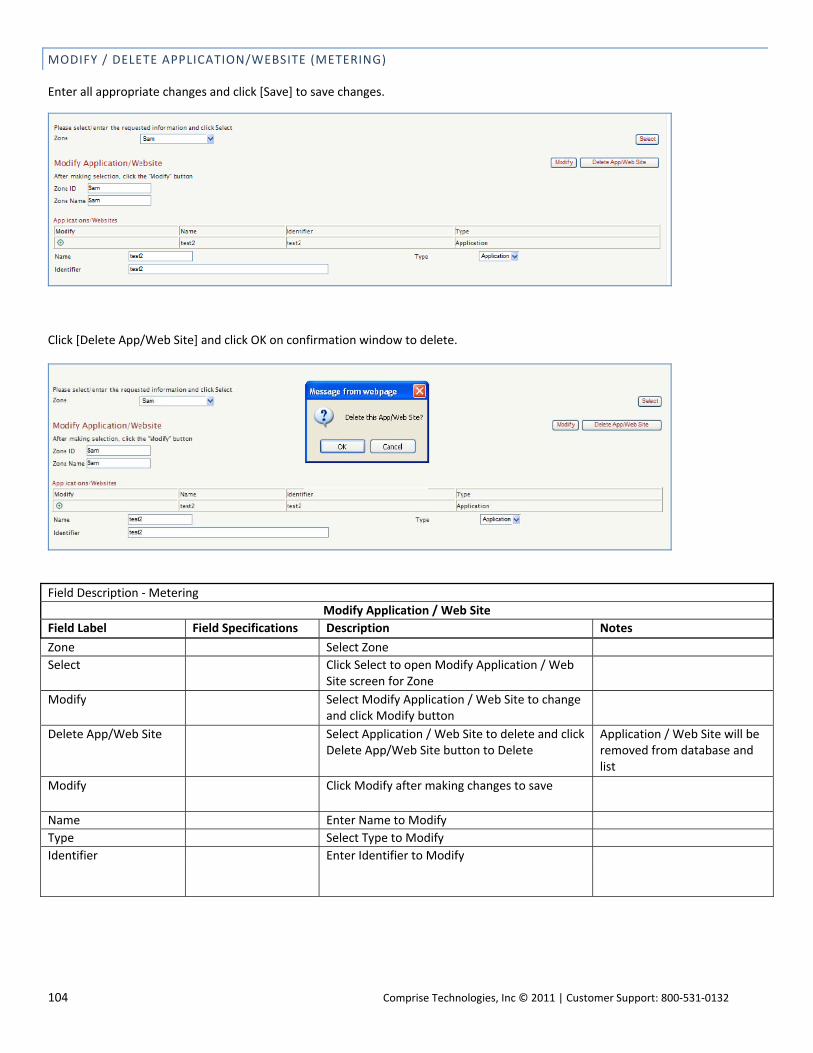
104 Comprise Technologies, Inc © 2011 | Customer Support: 800‐531‐0132
MODIFY / DELETE APPLICATION/WEBSITE (METERING)
Enter all appropriate changes and click [Save] to save changes.
Click [Delete App/Web Site] and click OK on confirmation window to delete.
Field Description ‐ Metering
Modify Application / Web Site
Field Label Field Specifications Description Notes
Zone Select Zone
Select Click Select to open Modify Application / Web Site screen for Zone
Modify Select Modify Application / Web Site to change and click Modify button
Delete App/Web Site Select Application / Web Site to delete and click Delete App/Web Site button to Delete
Application / Web Site will be removed from database and list
Modify Click Modify after making changes to save
Name Enter Name to Modify
Type Select Type to Modify
Identifier Enter Identifier to Modify

Comprise Technologies, Inc © 2011 | Customer Support: 800‐531‐0132 105
REPORTS
Reports can be generated from the Administrative as well as the Staff Interface. Therefore, the origin of the report request will determine the available report selections and options. All reports are date range driven and can be run for all or individual zones with summary and detail options available for selected reports as well. New SAM reports are developed periodically to meet client needs and/or requests. Please contact Comprise for report inquiries.
DIRECTOR’S REPORT (ADMIN REPORTS)
The director’s report is a summary of all aspects of the technology managed by SAM. Library management can understand in a
snapshot, the number and frequency of computer sessions, use of Internet and catalog resources, document printing, as well as
exactly how much money was collected, spent and remains in SAM prepaid accounts. In addition, the director’s report can also
show statistics on average wait for a PC if the library is using SAM sign‐up stations.
Directors Report Selection Criteria
Select Zone and click [Select].
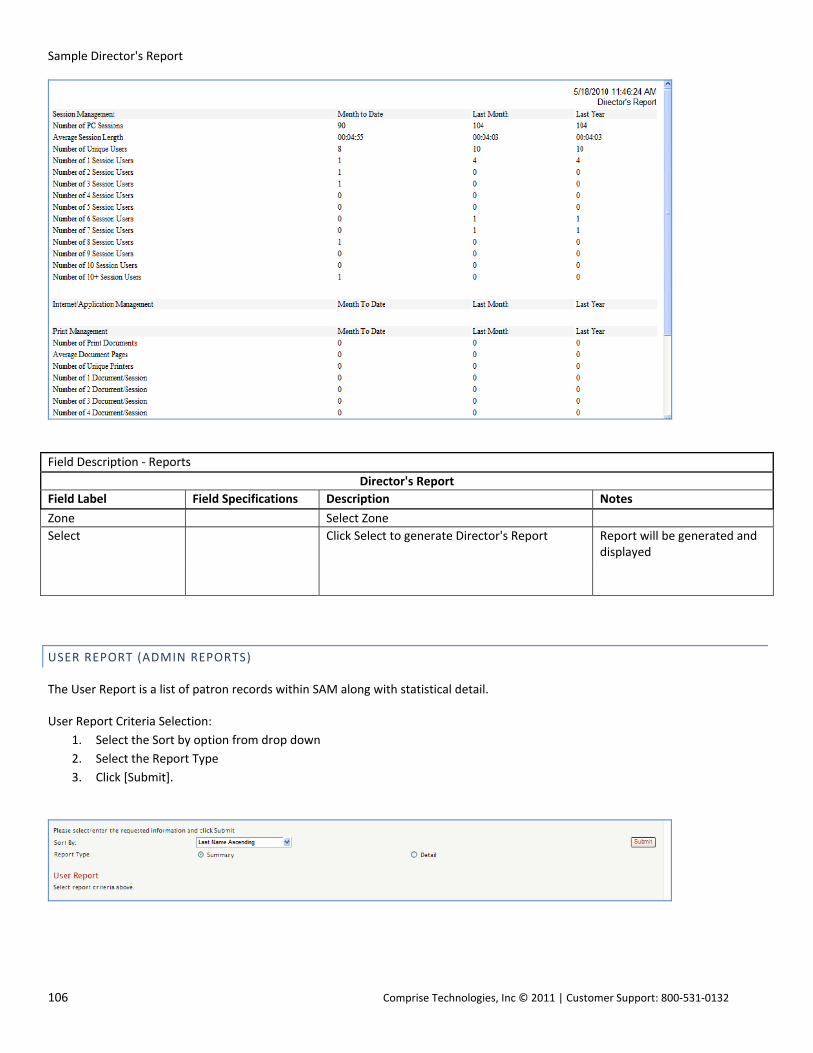
106 Comprise Technologies, Inc © 2011 | Customer Support: 800‐531‐0132
Sample Director's Report
Field Description ‐ Reports
Director's Report
Field Label Field Specifications Description Notes
Zone Select Zone
Select Click Select to generate Director's Report Report will be generated and displayed
USER REPORT (ADMIN REPORTS)
The User Report is a list of patron records within SAM along with statistical detail.
User Report Criteria Selection:
1. Select the Sort by option from drop down
2. Select the Report Type
3. Click [Submit].
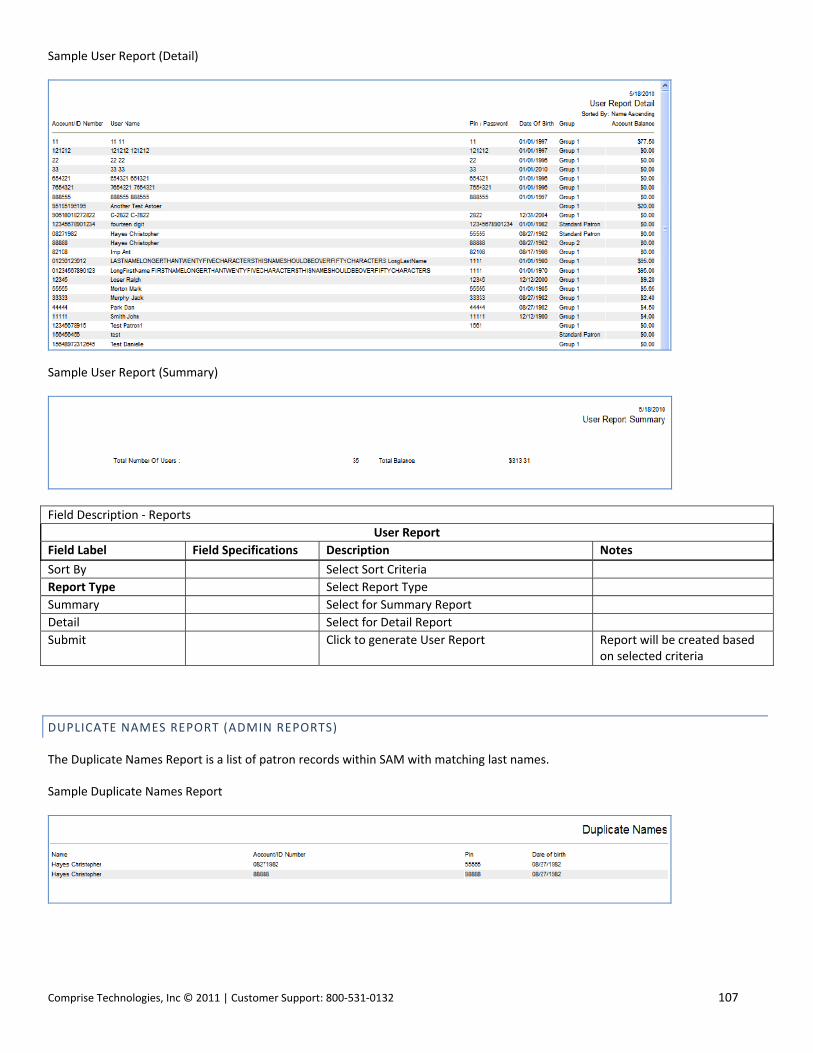
Comprise Technologies, Inc © 2011 | Customer Support: 800‐531‐0132 107
Sample User Report (Detail)
Sample User Report (Summary)
Field Description ‐ Reports
User Report
Field Label Field Specifications Description Notes
Sort By Select Sort Criteria
Report Type Select Report Type
Summary Select for Summary Report
Detail Select for Detail Report
Submit Click to generate User Report Report will be created based on selected criteria
DUPLICATE NAMES REPORT (ADMIN REPORTS)
The Duplicate Names Report is a list of patron records within SAM with matching last names.
Sample Duplicate Names Report
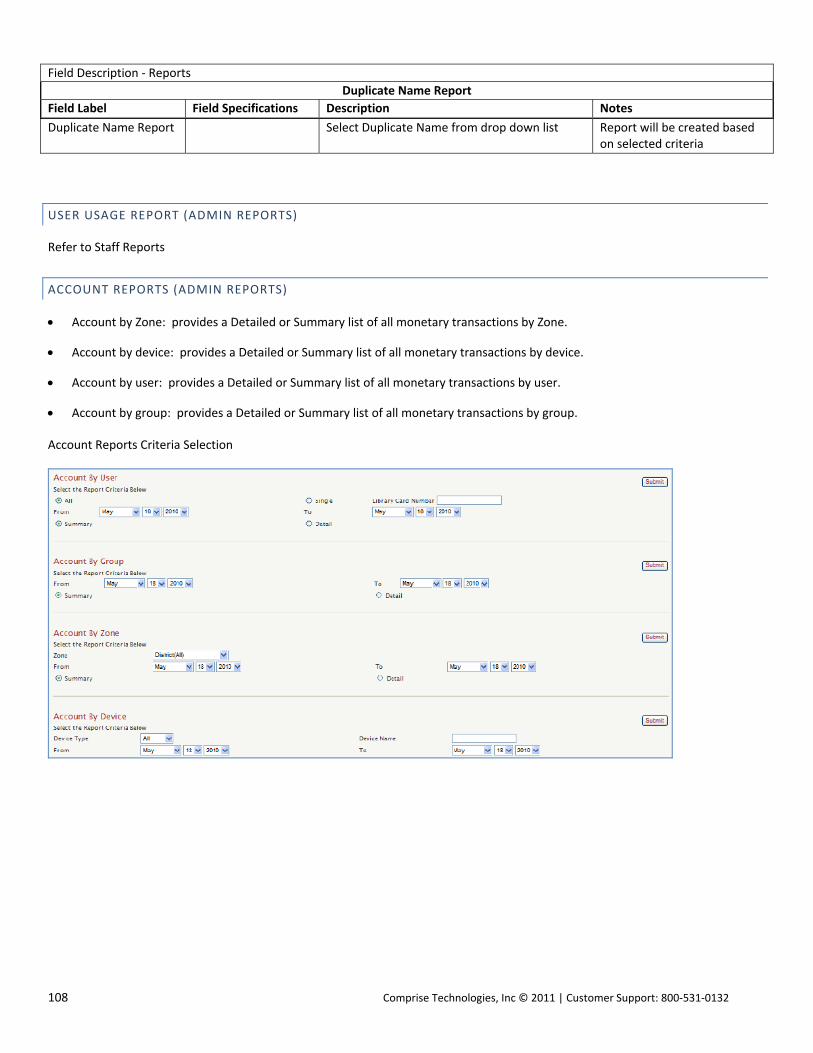
108 Comprise Technologies, Inc © 2011 | Customer Support: 800‐531‐0132
Field Description ‐ Reports
Duplicate Name Report
Field Label Field Specifications Description Notes
Duplicate Name Report Select Duplicate Name from drop down list Report will be created based on selected criteria
USER USAGE REPORT (ADMIN REPORTS)
Refer to Staff Reports
ACCOUNT REPORTS (ADMIN REPORTS)
Account by Zone: provides a Detailed or Summary list of all monetary transactions by Zone.
Account by device: provides a Detailed or Summary list of all monetary transactions by device.
Account by user: provides a Detailed or Summary list of all monetary transactions by user.
Account by group: provides a Detailed or Summary list of all monetary transactions by group.
Account Reports Criteria Selection
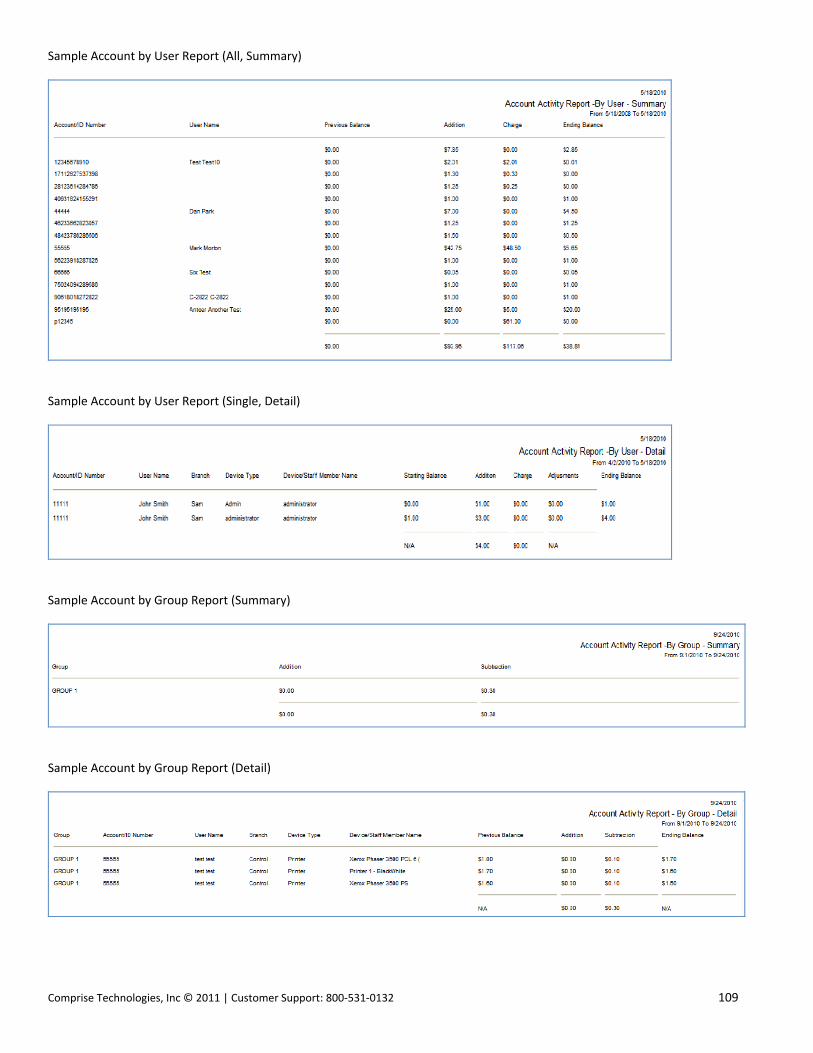
Comprise Technologies, Inc © 2011 | Customer Support: 800‐531‐0132 109
Sample Account by User Report (All, Summary)
Sample Account by User Report (Single, Detail)
Sample Account by Group Report (Summary)
Sample Account by Group Report (Detail)
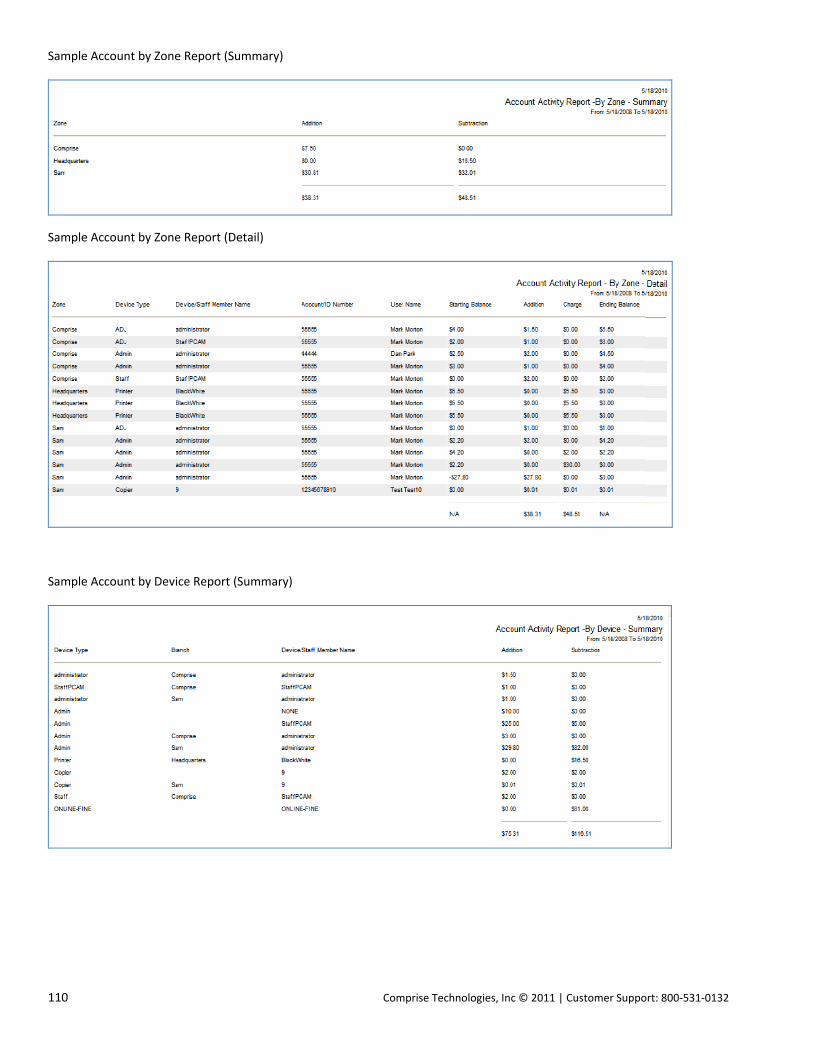
110 Comprise Technologies, Inc © 2011 | Customer Support: 800‐531‐0132
Sample Account by Zone Report (Summary)
Sample Account by Zone Report (Detail)
Sample Account by Device Report (Summary)

Comprise Technologies, Inc © 2011 | Customer Support: 800‐531‐0132 111
Sample Account by Device Report (Detail)
Field Description ‐ Reports
Account Reports
Field Label Field Specifications Description Notes
Account By User
Submit Select report criteria and click Submit to generate Account By User Report
Report will be generated based on selected criteria
All Select All to include All users
Single Select Single to include Single user
Library Card Number Enter Library Number
From Select start date for report
To Select end date for report
Summary Select for Summary Report
Detail Select for Detail Report
Account By Group
Submit Select report criteria and click Submit to generate Account by Group Report
Report will be generated based on selected criteria
From Select start date for report
To Select end date for report
Summary Select for Summary Report
Detail Select for Detail Report
Account By Zone
Submit Select report criteria and click Submit to generate Account By Zone Report
Report will be generated based on selected criteria
Zone Select Zone
From Select start date for report
To Select end date for report
Summary Select for Summary Report
Detail Select for Detail Report
Account By Device
Submit Select report criteria and click Submit to generate Account By Device Report
Report will be generated based on selected criteria
Device Type Select Device
Device Name Enter Device Name
From Select start date for report
To Select end date for report
Summary Select for Summary Report
Detail Select for Detail Report

112 Comprise Technologies, Inc © 2011 | Customer Support: 800‐531‐0132
PRINT CONTROL REPORT (ADMIN REPORTS)
Refer to Staff Reports
GROUP REPORT (ADMIN REPORTS)
The Group Report shows how various filter groups are using the library computers. This report defines group level, # of patrons,
total hours, average session for a group (as defined by run dates), and the average usage time per day for a given group. This is a
cumulative report and does not show details, just the sum of each group by date range specified. Note: This report is only available
if you are using SAM's Internet Filtering.
Group Report Criteria Selection
Sample Group Report (History, Summary)
Sample Group Report (History, Detail)

Comprise Technologies, Inc © 2011 | Customer Support: 800‐531‐0132 113
Field Description ‐ Reports
Group Report
Field Label Field Specifications
Description Notes
Submit Select report criteria and click Submit to generate Group Report
Report will be generated based on selected criteria
Zone Select Zone Name
Database
Current Select for Current
History Select Date Range for History
From Select start date for report
To Select end date for report
Report Type
Summary Select for Summary Report
Detail Select for Detail Report
COMPUTER REPORT (ADMIN REPORTS)
The Computer Report allows you to learn about the number of patrons using a particular computer and for how long their use is.
This report also provides cumulative totals.
Computer Report Criteria Selection
Sample Computer Report (History, Summary)
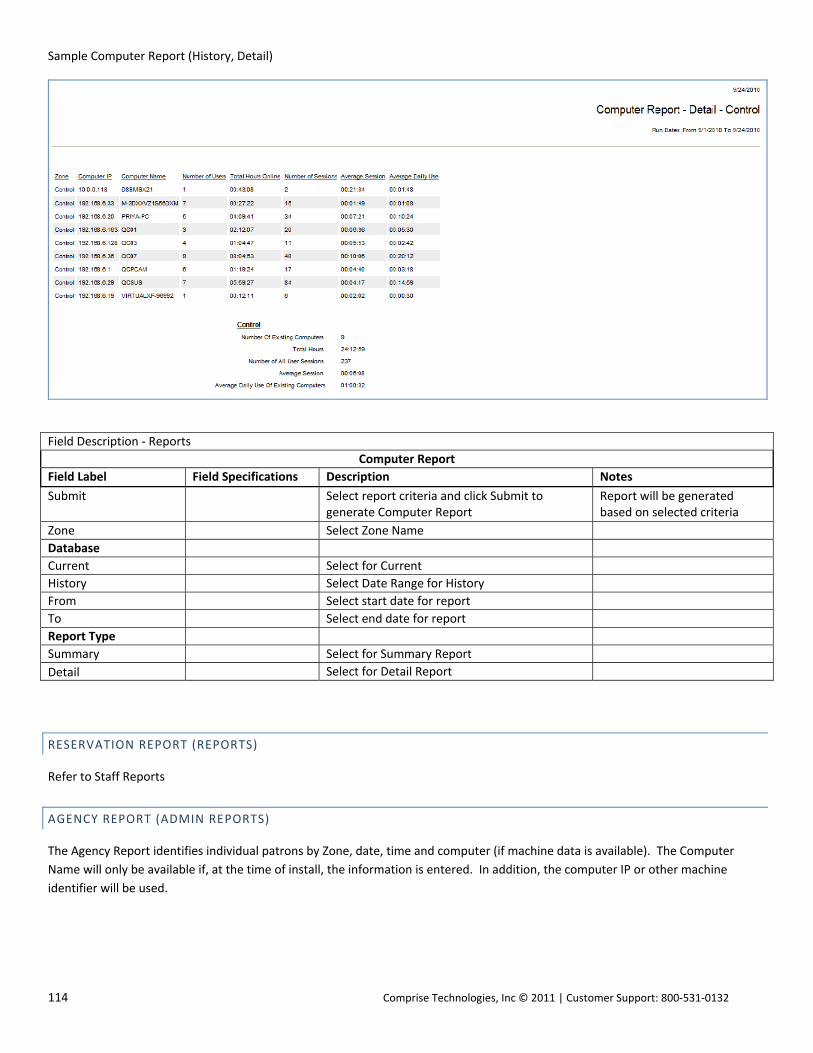
114 Comprise Technologies, Inc © 2011 | Customer Support: 800‐531‐0132
Sample Computer Report (History, Detail)
Field Description ‐ Reports
Computer Report
Field Label Field Specifications Description Notes
Submit Select report criteria and click Submit to generate Computer Report
Report will be generated based on selected criteria
Zone Select Zone Name
Database
Current Select for Current
History Select Date Range for History
From Select start date for report
To Select end date for report
Report Type
Summary Select for Summary Report
Detail Select for Detail Report
RESERVATION REPORT (REPORTS)
Refer to Staff Reports
AGENCY REPORT (ADMIN REPORTS)
The Agency Report identifies individual patrons by Zone, date, time and computer (if machine data is available). The Computer
Name will only be available if, at the time of install, the information is entered. In addition, the computer IP or other machine
identifier will be used.

Comprise Technologies, Inc © 2011 | Customer Support: 800‐531‐0132 115
Agency Report Criteria Selection
Sample Agency Report (Sam, Current)
Sample Agency Report (Sam, History)
Field Description ‐ Reports
Agency Report
Field Label Field Specifications Description Notes
Submit Select report criteria and click Submit to generate Agency Report
Report will be generated based on selected criteria
Zone Select Zone Name
Database
Current Select for Current
History Select Date Range for History
From Select start date for report
To Select end date for report
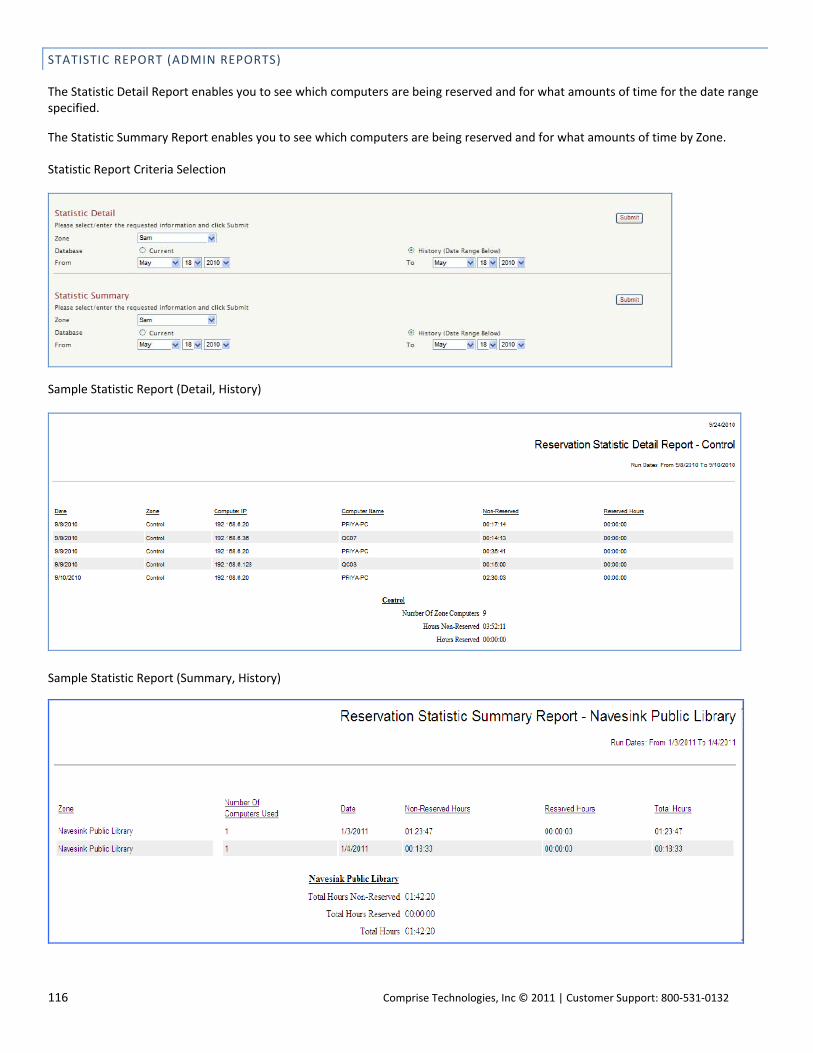
116 Comprise Technologies, Inc © 2011 | Customer Support: 800‐531‐0132
STATISTIC REPORT (ADMIN REPORTS)
The Statistic Detail Report enables you to see which computers are being reserved and for what amounts of time for the date range specified.
The Statistic Summary Report enables you to see which computers are being reserved and for what amounts of time by Zone.
Statistic Report Criteria Selection
Sample Statistic Report (Detail, History)
Sample Statistic Report (Summary, History)

Comprise Technologies, Inc © 2011 | Customer Support: 800‐531‐0132 117
Field Description ‐ Reports
Statistic Report
Field Label Field Specifications Description Notes
Statistic Detail
Submit Select report criteria and click Submit to generate Statistic Report
Report will be generated based on selected criteria
Zone Select Zone Name
Database
Current Select for Current
History Select Date Range for History
From Select start date for report
To Select end date for report
Statistic Summary
Submit Select report criteria and click Submit to generate Statistic Report
Report will be generated based on selected criteria
Zone Select Zone Name
Database
Current Select for Current
History Select Date Range for History
From Select start date for report
To Select end date for report
MISSED RESERVATION REPORT (ADMIN REPORTS)
The Missed Reservation Report allows you to view missed reservations by patron name so that you can enforce a policy regarding
reservation cancellations. Simply select the Zone and month you wish to view data for.
Missed Reservation Report Criteria Selection
Sample Missed Reservation Report (Dist All)

118 Comprise Technologies, Inc © 2011 | Customer Support: 800‐531‐0132
Field Description ‐ Reports
Missed Reservation Report
Field Label Field Specifications Description Notes
Submit Select report criteria and click Submit to generate Missed Reservation Report
Report will be generated based on selected criteria
Zone Select Zone Name
Month Select Month and Year
APPLICATION / WEB SITE REPORT (ADMIN REPORTS)
The App/Web Site Report enables you to see which applications were accessed and web sites visited as well as time used, by computer.
Application / Web Site Report Criteria Selection (Reports)
Sample Application / Web Site Report (Application, Summary)
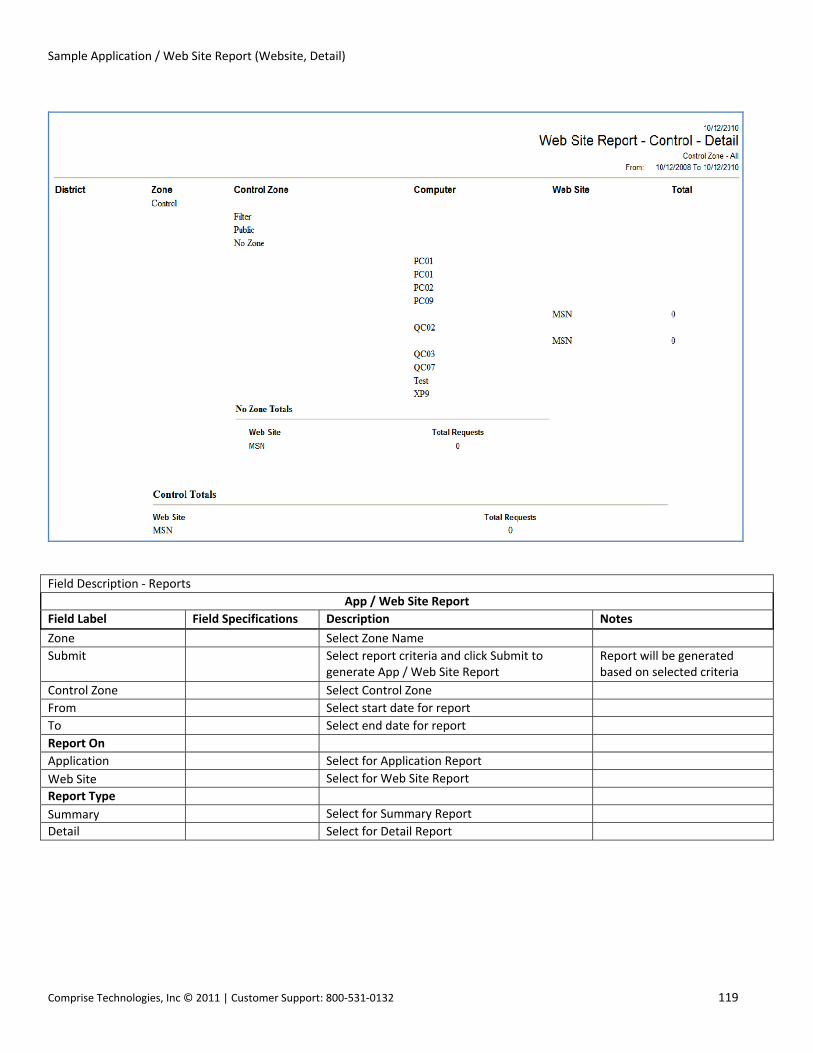
Comprise Technologies, Inc © 2011 | Customer Support: 800‐531‐0132 119
Sample Application / Web Site Report (Website, Detail)
Field Description ‐ Reports
App / Web Site Report
Field Label Field Specifications Description Notes
Zone Select Zone Name
Submit Select report criteria and click Submit to generate App / Web Site Report
Report will be generated based on selected criteria
Control Zone Select Control Zone
From Select start date for report
To Select end date for report
Report On
Application Select for Application Report
Web Site Select for Web Site Report
Report Type
Summary Select for Summary Report
Detail Select for Detail Report

120 Comprise Technologies, Inc © 2011 | Customer Support: 800‐531‐0132
VISITOR REPORT (ADMIN REPORTS)
This report shows the number of Visitor Cards that were printed during the selected time frame.
Visitor Report Criteria Selection
Sample Visitor Report
Field Description ‐ Reports
Visitor Report
Field Label Field Specifications
Description Notes
Submit Select report criteria and click Submit to generate Visitor Report
Report will be generated based on selected criteria
From Select start date for report
To Select end date for report
PC USAGE REPORT (ADMIN REPORTS)
This report shows the computer usage by hour. PC Usage Report Criteria Selection

Comprise Technologies, Inc © 2011 | Customer Support: 800‐531‐0132 121
Sample PC Usage Report (Current, Breakdown By PC)
Sample PC Usage Report (History)
Field Description ‐ Reports
PC Usage Report
Field Label Field Specifications Description Notes
Submit Select report criteria and click Submit to generate PC Usage Report
Report will be generated based on selected criteria
Zone Select Zone Name
Database
Current Select for Current
History Select Date Range for History
From Select start date for report
To Select end date for report
Report Type
Summary Select for Summary Report
Detail Select for Detail Report
Breakdown By PC Select to view Report by PC

122 Comprise Technologies, Inc © 2011 | Customer Support: 800‐531‐0132
SUS REPORT (ADMIN REPORTS)
This report provided Sign Up Station statistics such as total wait time, sign up denied, etc.
SUS Report Criteria Selection
Sample SUS Report (Control l, Current)

Comprise Technologies, Inc © 2011 | Customer Support: 800‐531‐0132 123
Sample SUS Report (Control1, History)
Field Description ‐ Reports
SUS Report
Field Label Field Specifications Description Notes
Submit Select report criteria and click Submit to generate SUS Report
Report will be generated based on selected criteria
Zone Select Zone Name
Database
Current Select for Current
History Select Date Range for History
From Select start date for report
To Select end date for report

124 Comprise Technologies, Inc © 2011 | Customer Support: 800‐531‐0132
HELP
The Help link will allow library personnel to view the Sam User Manual and Comprise Contact information.
USER MANUAL (HELP)
Field Description ‐ Help
User Manual
Field Label Field Specifications Description Notes
User Manual Select User Manual from selection User Manual will open
CONTACT COMPRISE (HELP)
Field Description ‐ Help
Contact Comprise
Field Label Field Specifications Description Notes
Contact Comprise Select Contact Comprise from selection Screen will open with Comprise contact information

Comprise Technologies, Inc © 2011 | Customer Support: 800‐531‐0132 125
STAFF WEB INTERFACE
Staff members can access SAM by entering a User Name and Password at the SAM start page. The Staff Menu is password
protected. It can be accessed from any PC with Internet access. The SAM Administrator can determine what information can be
viewed / edited under a Staff Login.
STAFF ACCESS
Links on the Staff Web Interface Menu
USERS
This section allows staff to add new users, and modify or delete current users. Staff can also import and register users. As well as access user accounts.
ADD USER (STAFF USERS)
Enter the information for the new user. This step includes entering Account/ID Number, Last Name, First Name, Date of Birth, Pin/Password, User Status, Internet Access Level, Group, Issue Date, Expiration Date and Guardian’s Name. Important: Password is user created, so it does not have to be entered here. The required fields in the first step are Account/ID Number and Last Name. Once all information is entered, click [Add User]. Note: Fields in red are required.
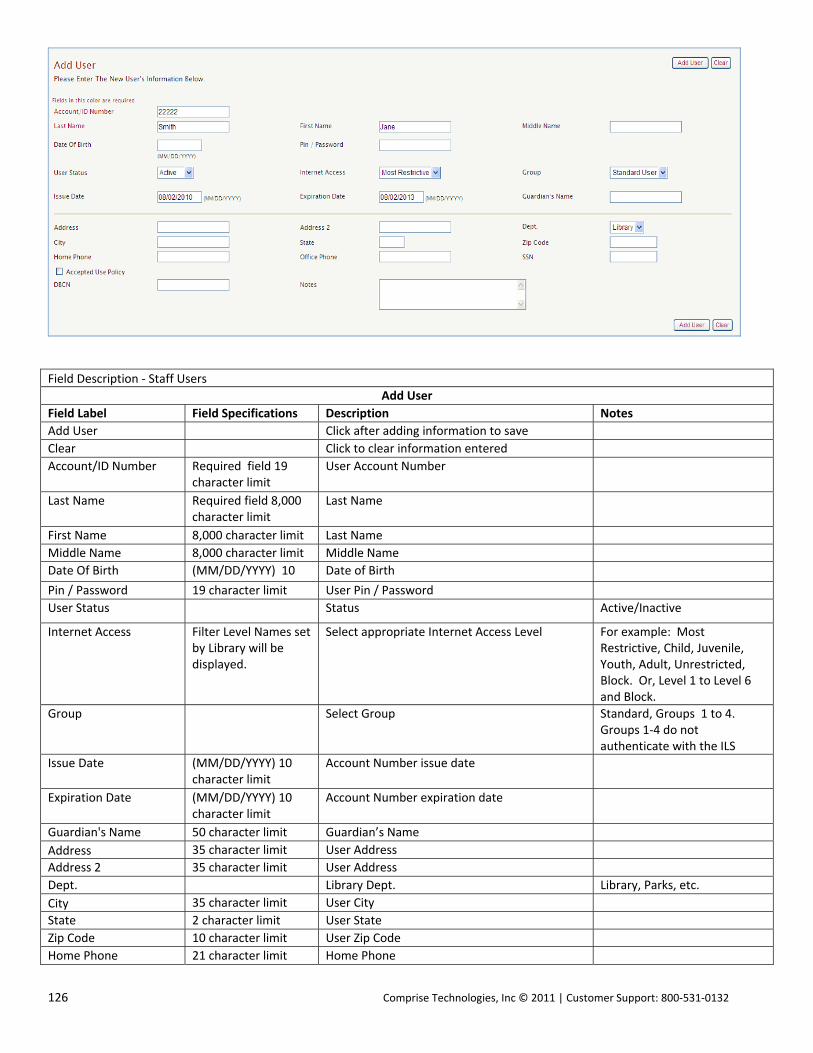
126 Comprise Technologies, Inc © 2011 | Customer Support: 800‐531‐0132
Field Description ‐ Staff Users
Add User
Field Label Field Specifications Description Notes
Add User Click after adding information to save
Clear Click to clear information entered
Account/ID Number Required field 19 character limit
User Account Number
Last Name Required field 8,000 character limit
Last Name
First Name 8,000 character limit Last Name
Middle Name 8,000 character limit Middle Name
Date Of Birth (MM/DD/YYYY) 10 Date of Birth
Pin / Password 19 character limit User Pin / Password
User Status Status Active/Inactive
Internet Access Filter Level Names set by Library will be displayed.
Select appropriate Internet Access Level For example: Most Restrictive, Child, Juvenile, Youth, Adult, Unrestricted, Block. Or, Level 1 to Level 6 and Block.
Group Select Group Standard, Groups 1 to 4. Groups 1‐4 do not authenticate with the ILS
Issue Date (MM/DD/YYYY) 10 character limit
Account Number issue date
Expiration Date (MM/DD/YYYY) 10 character limit
Account Number expiration date
Guardian's Name 50 character limit Guardian’s Name
Address 35 character limit User Address
Address 2 35 character limit User Address
Dept. Library Dept. Library, Parks, etc.
City 35 character limit User City
State 2 character limit User State
Zip Code 10 character limit User Zip Code
Home Phone 21 character limit Home Phone

Comprise Technologies, Inc © 2011 | Customer Support: 800‐531‐0132 127
Field Description ‐ Staff Users
Add User
Field Label Field Specifications Description Notes
Office Phone 21 character limit Office Phone
SSN 11 character limit User SSN
Accepted Use Policy Indicates whether use policy was accepted or not
DBCN 50 character limit Unique Identifier. Database Control #
Notes 255 character limit
Add User Click after adding information to save
Clear Click to clear information entered
Confirmation displays that new user account has been added.
MODIFY USER (STAFF USERS)
Enter the user’s Account Number, Name, or Date of Birth and click on [Search].
This will open a screen containing the user’s current information. After making changes, you can click [Save] to save the changes.
DELETE USER (STAFF USERS)
Delete User procedure: From the Modify User screen that displays the user’s current information.
1. If SAM account is zero, click [Delete User] 2. If SAM account is not zero:
a. First, zero out SAM account from Payments, etc. screen. b. Then, return to Modify User screen and click [Delete User].
3. For a replacement card, use method A or B: A.
a. First, zero out SAM account from Payments, etc. screen. b. Return to Modify User screen and click [Delete User]. c. Then, create new account and transfer the balance from the old card # into the newly created account.
User will not be deleted if there is money in SAM account.
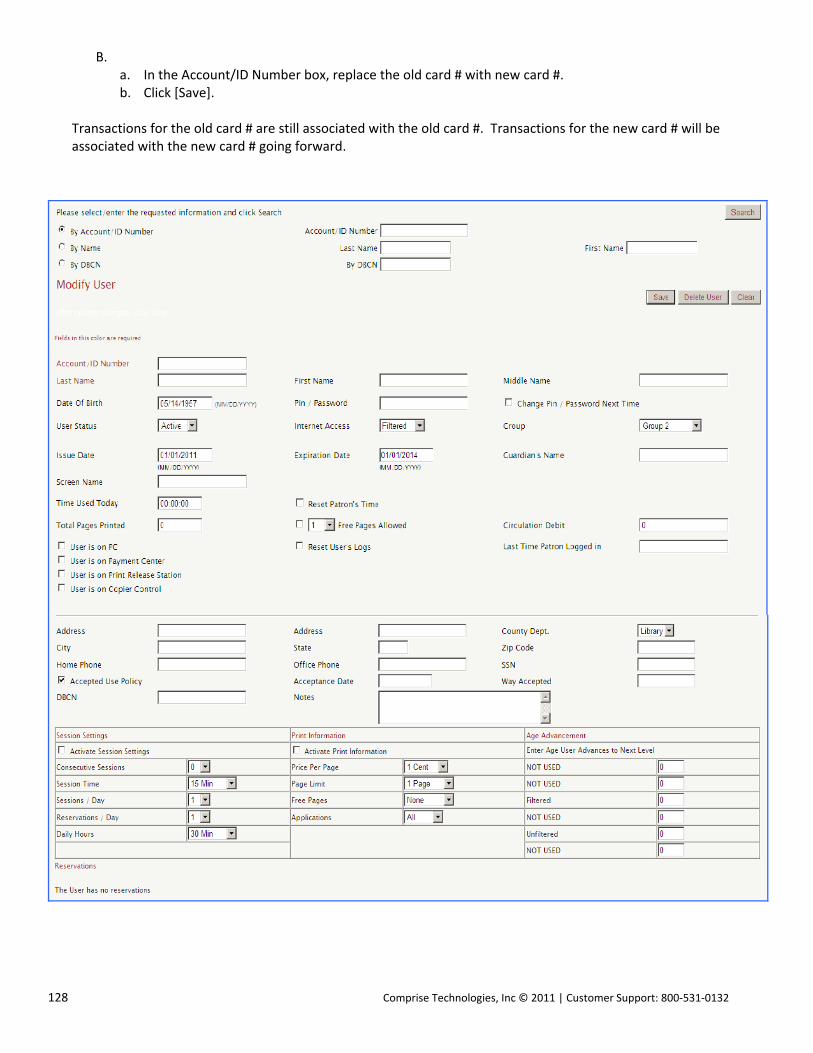
128 Comprise Technologies, Inc © 2011 | Customer Support: 800‐531‐0132
B. a. In the Account/ID Number box, replace the old card # with new card #. b. Click [Save].
Transactions for the old card # are still associated with the old card #. Transactions for the new card # will be associated with the new card # going forward.

Comprise Technologies, Inc © 2011 | Customer Support: 800‐531‐0132 129
Field Description ‐ Staff Users
Modify / Delete User
Field Label Field Specifications Description Notes
Search Click to open Modify User Screen
Account/ID Enter User's Account/ID Number Search by Account/ID Number
Last Name 8,000 character limit Enter User's Last Name Search by User's Last Name
First Name 8,000 character limit Enter User's First Name Search by User's First Name
DBCN 50 character limit Enter DBCN Search by DBCN
Save After making changes, click to save
Delete User User SAM account has to be zero
Click to Delete User from database Cannot delete User if there is money in SAM account.
Clear Click to Clear changes without saving
Account/ID Required 19 character limit
User Account Number
Last Name Required 8,000 character limit
Last Name
First Name 8,000 character limit First Name
Middle Name 8,000 character limit Middle Name
Date Of Birth (MM/DD/YYYY) 10 Date of Birth
Pin / Password User Pin / Password
Change Pin / Password Next Time
Check box to require user to change Pin / Password at next login
Allows user to reset Pin / Password to desired one.
User Status Select Status Active/Inactive
Internet Access Filter Level Names set by Library will be displayed.
Select appropriate Internet Access Level For example: Most Restrictive, Child, Juvenile, Youth, Adult, Unrestricted, Block. Or, Level 1 to Level 6 and Block.
Group Select Group Standard, Groups 1 to 4
Issue Date (MM/DD/YYYY) 10 Account Number issue date
Expiration Date (MM/DD/YYYY) 10 Account Number expiration date
Guardian's Name 50 character limit Guardian’s Name
Time Used Today HH:MM:SS Time used by user today
Update Patron's Time Select minutes to update time N/A, 10 min, 15 min, 30 min, 60 min, or Reset Timer.
Total Pages Printed Pages user has printed today
Free Page Allowed Number of free pages 1 to 100
Circulation Debit Imported from ILS
Reset User's Logs Will reset user's logs for the day Staff can check / uncheck if needed
Last Time Patron Logged in
Indicates last time when user logged in
User is on PC Box will be checked while user is logged on at a PC
Staff can check / uncheck if needed
User is on Payment Center
Box will be checked while user is logged on at an Payment Center
Users restricted from logging onto the Payment Center, Print Release Station, and/or Copier Controller concurrently, can only log onto one device at a time.
User is on Print Release Station
Box will be checked while user is logged on at a Print Release Station

130 Comprise Technologies, Inc © 2011 | Customer Support: 800‐531‐0132
Field Description ‐ Staff Users
Modify / Delete User
Field Label Field Specifications Description Notes
User is on Copier Control
Box will be checked while user is logged on at a Copier Control
Address 35 character limit User Address
Address 35 character limit User Address
County Dept. Library Dept. Municipal, Parks, Library, etc.
City 35 character limit User City
State 2 character limit User State
Zip Code 2 character limit User Zip Code
Home Phone 21 character limit Home Phone
Office Phone 21 character limit Work Phone
SSN 11 character limit User SSN
Accepted Use Policy Indicates whether use policy was accepted or not
Acceptance Date (MM/DD/YYYY) 10 character limit
Date user last accepted user policy
Way Accepted
Method used to accept Use Policy
Login, Create new user from web Interface
DBCN 50 Unique Identifier
Notes 255 character limit
IMPORT USER (STAFF USERS) Import Users from the ILS Enter the user’s Account Number and click on [Submit Query].
Field Description – Staff Users
Import User
Field Label Field Specifications Description Notes
Submit Query Click after entering information to save User will be imported to database
Account/ID Number 19 character limit Enter User Account/ID Number
Pin/Password Optional Optional, based on ILS requirements Only shows if applicable
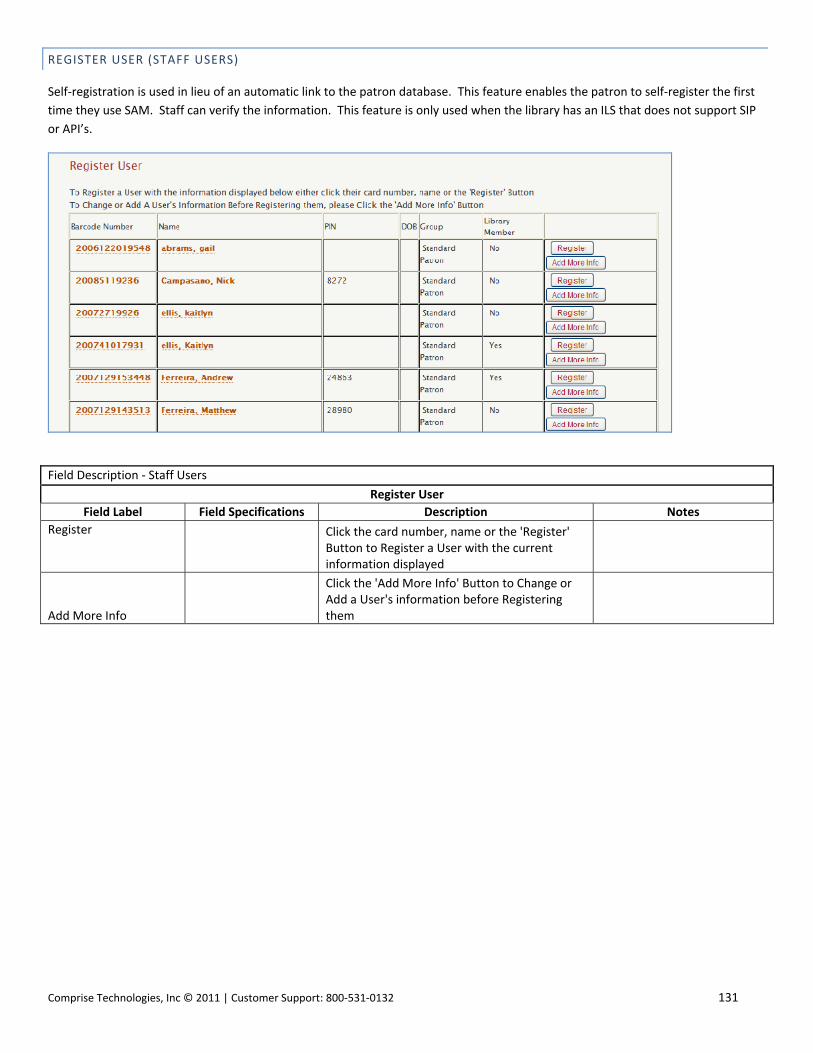
Comprise Technologies, Inc © 2011 | Customer Support: 800‐531‐0132 131
REGISTER USER (STAFF USERS)
Self‐registration is used in lieu of an automatic link to the patron database. This feature enables the patron to self‐register the first
time they use SAM. Staff can verify the information. This feature is only used when the library has an ILS that does not support SIP
or API’s.
Field Description ‐ Staff Users
Register User
Field Label Field Specifications Description Notes
Register Click the card number, name or the 'Register' Button to Register a User with the current information displayed
Add More Info
Click the 'Add More Info' Button to Change or Add a User's information before Registering them

132 Comprise Technologies, Inc © 2011 | Customer Support: 800‐531‐0132
PAYMENTS, ETC. (STAFF USERS)
Please note, to protect the integrity of SAM account balances, users will be blocked from logging onto the Payment Center, Print
Release Station and Copy Controller concurrently. Users can only log onto one of these devices at a time.
Enter the user’s Account Number and click on [Search].
This will open a screen containing the user’s current information. After making the changes, you can click [Save] to save changes.
Field Description ‐ Staff Users
Payments, etc.
Field Label Field Specifications Description Notes
Account/ID Number Enter User's Account/ID Number Search by Account/ID Number
Name Enter User's Last Name Search by User's Last Name
Name Enter User's First Name Search by User's First Name
DBCN Enter DBCN Search by DBCN
Search Click to open User Payments, etc. screen
Save Click after making changes to Save User Account Balance will be adjusted appropriately according to amount added or deducted. New Balance will be displayed in The User has this Amount in their Account box on top.
Reset Click to Reset values
Account/ID Number 19 character limit User's Account/ID Number
User Name 8,000 character limit User's Name
The User has this Amount in their Account
User's Current Account Balance is displayed
The User Owes this Amount
Amount user owes will be displayed
Enter Amount Paid Amount to be added or deducted from Account Typing a positive number will add while typing a negative number will subtract.

Comprise Technologies, Inc © 2011 | Customer Support: 800‐531‐0132 133
Field Description ‐ Staff Users
Payments, etc.
Field Label Field Specifications Description Notes
Non‐Cash Adjustment Staff can check box for non‐cash transactions. Adjustments for print job that did not print, etc.
This User has no print jobs
Print jobs for user will be shown if applicable.
USER RECONCILIATION (STAFF USERS)
Enter the User’s Account Number and click on [Submit]. This will open a screen with the user’s current information.
Field Description ‐ Staff Users
User Reconciliation
Field Label Field Specifications Description Notes
Submit Click after Entering information Will open User Reconciliation information page
Account/ID Number 19 character limit Enter Account/ID Number

134 Comprise Technologies, Inc © 2011 | Customer Support: 800‐531‐0132
RESERVATIONS
STAFF MANAGED RESERVATIONS
Staff members can Make or Delete reservations by selecting the appropriate option. They must choose a Zone and date at the top
of the screen then click on [Submit]. The library can set which PCs can be reserved in the Administrator/Zones/Resources page.
After reviewing the status of PCs that can be reserved, click on the radio button next to the resource to be reserved, enter the
Library Card Number, and then click [Make Reservation]. A confirmation on that same screen will indicate “You have a Reservation
at (time, Resource). To make a reservation for another day, click on the Calendar icon at the top, select the date, enter the library
card number and click [Submit] to get the Reservation schedule for the date selected. Utilize the appropriate link to delete
reservations.
PC ACTIVITY INFORMATION (STAFF RESERVATIONS)
The PC Activity Information screen allows staff to view what resources are “Reserved”, “In Use” or Available (Available is
represented by a blank radio button). Select a Zone and click on [Submit].
This will open a screen with the current PC Activity Information.
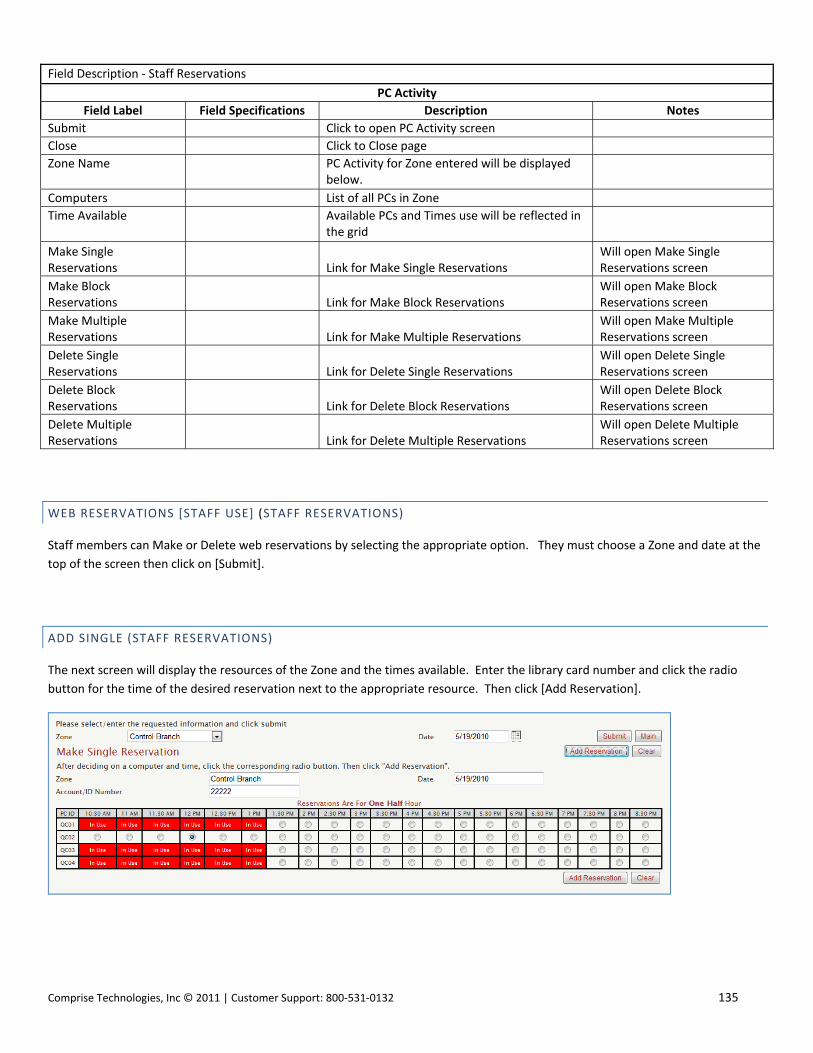
Comprise Technologies, Inc © 2011 | Customer Support: 800‐531‐0132 135
Field Description ‐ Staff Reservations
PC Activity
Field Label Field Specifications Description Notes
Submit Click to open PC Activity screen
Close Click to Close page
Zone Name PC Activity for Zone entered will be displayed below.
Computers List of all PCs in Zone
Time Available Available PCs and Times use will be reflected in the grid
Make Single Reservations Link for Make Single Reservations
Will open Make Single Reservations screen
Make Block Reservations Link for Make Block Reservations
Will open Make Block Reservations screen
Make Multiple Reservations Link for Make Multiple Reservations
Will open Make Multiple Reservations screen
Delete Single Reservations Link for Delete Single Reservations
Will open Delete Single Reservations screen
Delete Block Reservations Link for Delete Block Reservations
Will open Delete Block Reservations screen
Delete Multiple Reservations Link for Delete Multiple Reservations
Will open Delete Multiple Reservations screen
WEB RESERVATIONS [STAFF USE] (STAFF RESERVATIONS)
Staff members can Make or Delete web reservations by selecting the appropriate option. They must choose a Zone and date at the
top of the screen then click on [Submit].
ADD SINGLE (STAFF RESERVATIONS)
The next screen will display the resources of the Zone and the times available. Enter the library card number and click the radio
button for the time of the desired reservation next to the appropriate resource. Then click [Add Reservation].

136 Comprise Technologies, Inc © 2011 | Customer Support: 800‐531‐0132
A confirmation message displays that says “A Reservation for (user name) with Library Card Number (***) (Time) on (Date)
Computer (PC ID) Has Been Added”, and the time is blocked out with an “x” for that particular reservation period, making it
unavailable to other users to select for that time.
Field Description ‐ Staff Reservations
Add Single Reservation
Field Label Field Specifications Description Notes
Zone Select Zone
Date Enter date Click Calendar to open and select future date.
Submit Open Make Single Reservation Screen
Main Return to Main screen
Zone Name Zone Name for reservation
Date Date for reservation
Account/ID Number 19 character limit Enter Account/ID Number for reservation
PC ID's and Time Grid Select PC ID and Time of reservation
Add Reservation Box for selected PC ID and time will be marked with an "X". Reservation will be added to database
PC will be unavailable for other users
Clear Reservation selection will be cleared from PC ID/Time grid
Confirmation Message confirming Reservation will be displayed on top of screen
Name, Library Card Number, Time, Date, and PC ID.
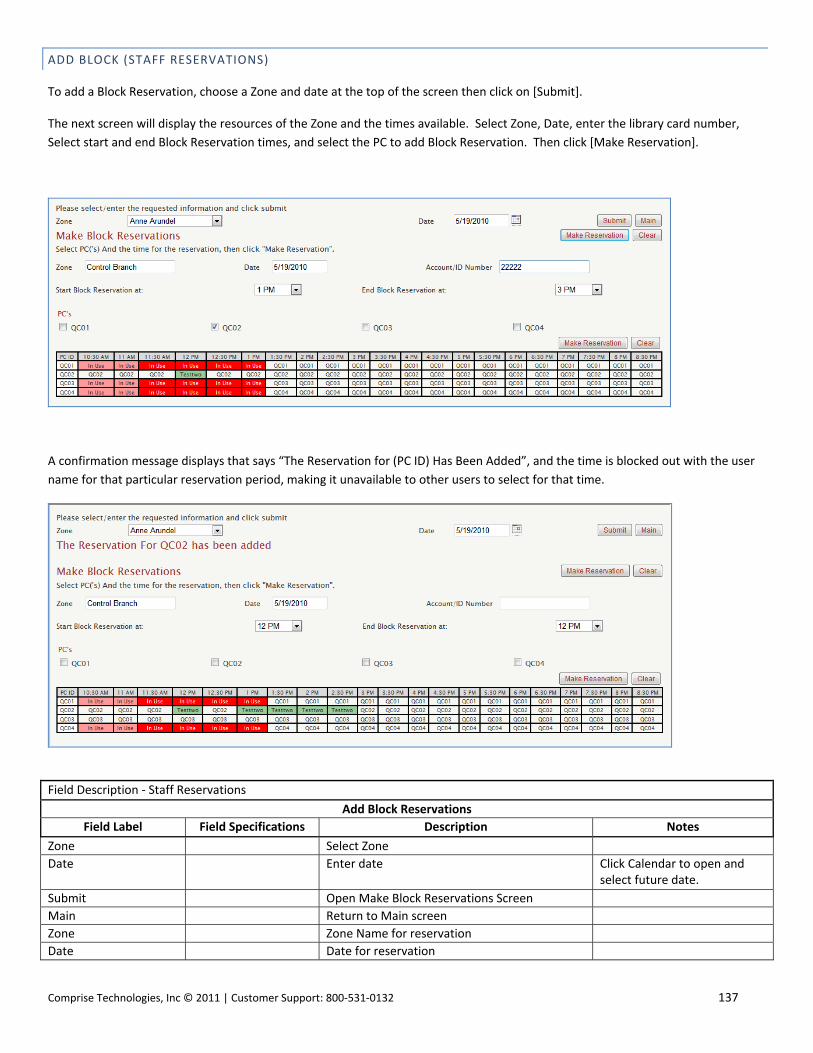
Comprise Technologies, Inc © 2011 | Customer Support: 800‐531‐0132 137
ADD BLOCK (STAFF RESERVATIONS)
To add a Block Reservation, choose a Zone and date at the top of the screen then click on [Submit].
The next screen will display the resources of the Zone and the times available. Select Zone, Date, enter the library card number,
Select start and end Block Reservation times, and select the PC to add Block Reservation. Then click [Make Reservation].
A confirmation message displays that says “The Reservation for (PC ID) Has Been Added”, and the time is blocked out with the user
name for that particular reservation period, making it unavailable to other users to select for that time.
Field Description ‐ Staff Reservations
Add Block Reservations
Field Label Field Specifications Description Notes
Zone Select Zone
Date Enter date Click Calendar to open and select future date.
Submit Open Make Block Reservations Screen
Main Return to Main screen
Zone Zone Name for reservation
Date Date for reservation
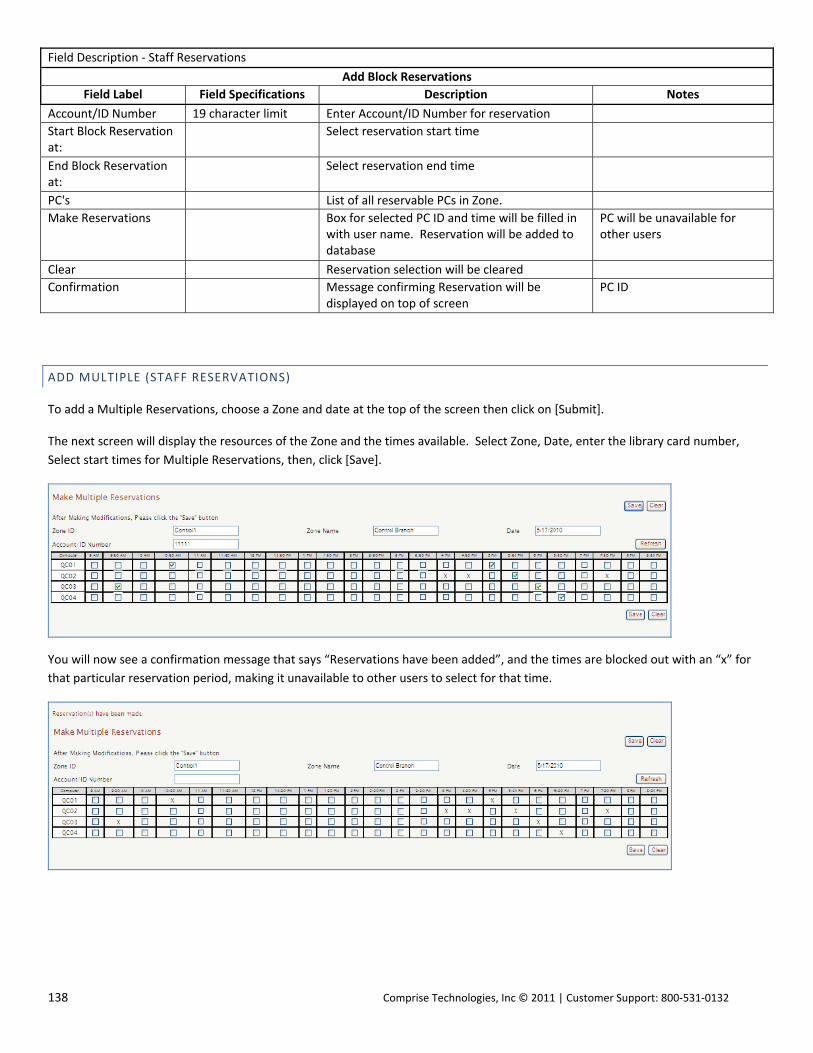
138 Comprise Technologies, Inc © 2011 | Customer Support: 800‐531‐0132
Field Description ‐ Staff Reservations
Add Block Reservations
Field Label Field Specifications Description Notes
Account/ID Number 19 character limit Enter Account/ID Number for reservation
Start Block Reservation at:
Select reservation start time
End Block Reservation at:
Select reservation end time
PC's List of all reservable PCs in Zone.
Make Reservations Box for selected PC ID and time will be filled in with user name. Reservation will be added to database
PC will be unavailable for other users
Clear Reservation selection will be cleared
Confirmation Message confirming Reservation will be displayed on top of screen
PC ID
ADD MULTIPLE (STAFF RESERVATIONS)
To add a Multiple Reservations, choose a Zone and date at the top of the screen then click on [Submit].
The next screen will display the resources of the Zone and the times available. Select Zone, Date, enter the library card number,
Select start times for Multiple Reservations, then, click [Save].
You will now see a confirmation message that says “Reservations have been added”, and the times are blocked out with an “x” for
that particular reservation period, making it unavailable to other users to select for that time.
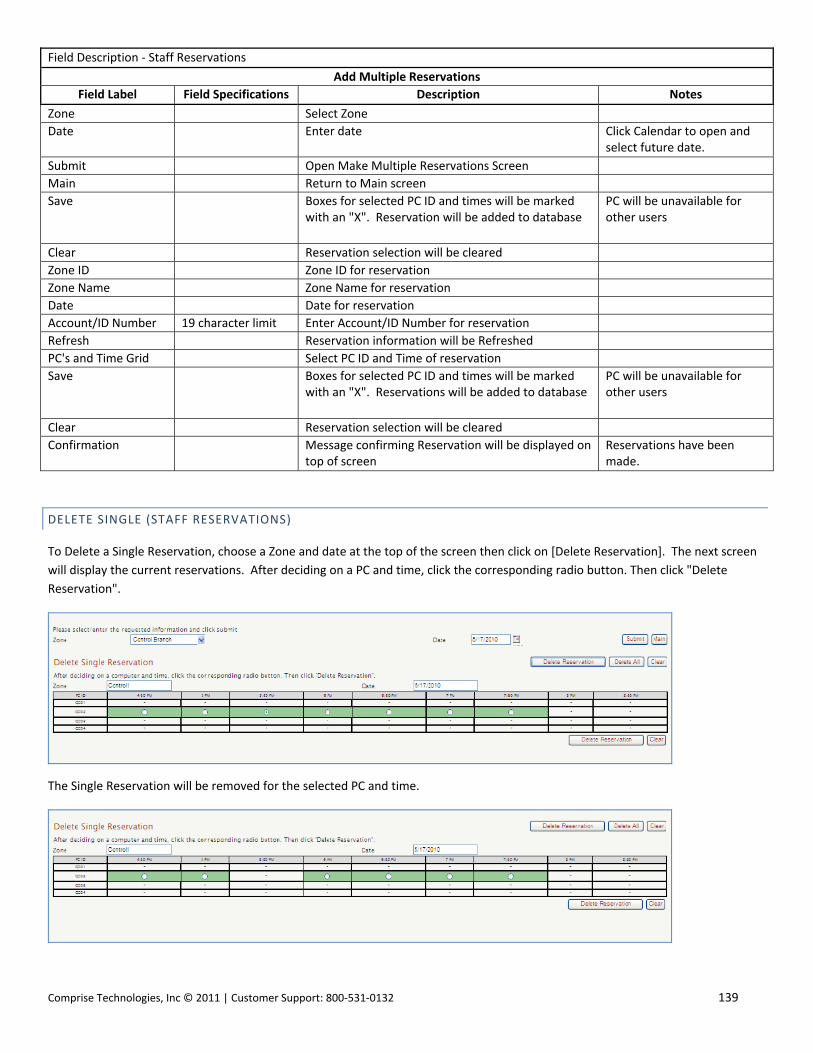
Comprise Technologies, Inc © 2011 | Customer Support: 800‐531‐0132 139
Field Description ‐ Staff Reservations
Add Multiple Reservations
Field Label Field Specifications Description Notes
Zone Select Zone
Date Enter date Click Calendar to open and select future date.
Submit Open Make Multiple Reservations Screen
Main Return to Main screen
Save Boxes for selected PC ID and times will be marked with an "X". Reservation will be added to database
PC will be unavailable for other users
Clear Reservation selection will be cleared
Zone ID Zone ID for reservation
Zone Name Zone Name for reservation
Date Date for reservation
Account/ID Number 19 character limit Enter Account/ID Number for reservation
Refresh Reservation information will be Refreshed
PC's and Time Grid Select PC ID and Time of reservation
Save Boxes for selected PC ID and times will be marked with an "X". Reservations will be added to database
PC will be unavailable for other users
Clear Reservation selection will be cleared
Confirmation Message confirming Reservation will be displayed on top of screen
Reservations have been made.
DELETE SINGLE (STAFF RESERVATIONS)
To Delete a Single Reservation, choose a Zone and date at the top of the screen then click on [Delete Reservation]. The next screen
will display the current reservations. After deciding on a PC and time, click the corresponding radio button. Then click "Delete
Reservation".
The Single Reservation will be removed for the selected PC and time.

140 Comprise Technologies, Inc © 2011 | Customer Support: 800‐531‐0132
Field Description ‐ Staff Reservations
Delete Single Reservation
Field Label Field Specifications Description Notes
Zone Select Zone
Date Enter date Click Calendar to open and select future date.
Submit Open Delete Single Reservation Screen
Main Return to Main screen
Delete Reservations for selected PC ID and times will be deleted from database
PC will be available for other users
Delete All Delete all of the day's Reservations Confirm deletion at pop‐up box. PC will become available for other users.
Clear Reservation selection will be cleared
Zone Name Zone Name for reservation to be deleted
Date Date for reservation to be deleted
PC ID's and Time Grid Click Radio Button for PC ID and Time of reservation to be deleted
Delete Reservation Radio Button for selected PC ID and time will be removed. Reservation will be deleted from database
PC will become available for other users
Clear Reservation selection will be cleared from PC ID/Time grid
DELETE BLOCK (STAFF RESERVATIONS)
To Delete a Block Reservation, select Zone, Date, select start and end Block Reservation times, and select the PC. Then click
[Submit].
The Block Reservation will be removed for the selected PC and time.
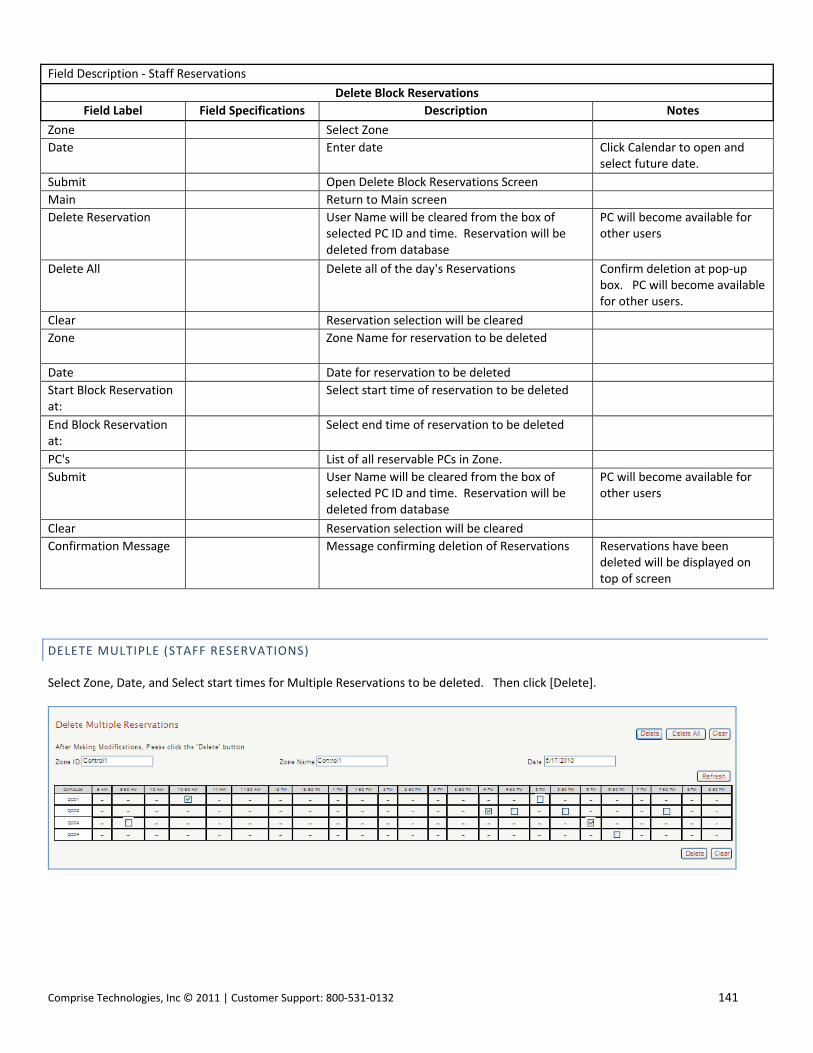
Comprise Technologies, Inc © 2011 | Customer Support: 800‐531‐0132 141
Field Description ‐ Staff Reservations
Delete Block Reservations
Field Label Field Specifications Description Notes
Zone Select Zone
Date Enter date Click Calendar to open and select future date.
Submit Open Delete Block Reservations Screen
Main Return to Main screen
Delete Reservation User Name will be cleared from the box of selected PC ID and time. Reservation will be deleted from database
PC will become available for other users
Delete All Delete all of the day's Reservations Confirm deletion at pop‐up box. PC will become available for other users.
Clear Reservation selection will be cleared
Zone Zone Name for reservation to be deleted
Date Date for reservation to be deleted
Start Block Reservation at:
Select start time of reservation to be deleted
End Block Reservation at:
Select end time of reservation to be deleted
PC's List of all reservable PCs in Zone.
Submit User Name will be cleared from the box of selected PC ID and time. Reservation will be deleted from database
PC will become available for other users
Clear Reservation selection will be cleared
Confirmation Message Message confirming deletion of Reservations Reservations have been deleted will be displayed on top of screen
DELETE MULTIPLE (STAFF RESERVATIONS)
Select Zone, Date, and Select start times for Multiple Reservations to be deleted. Then click [Delete].
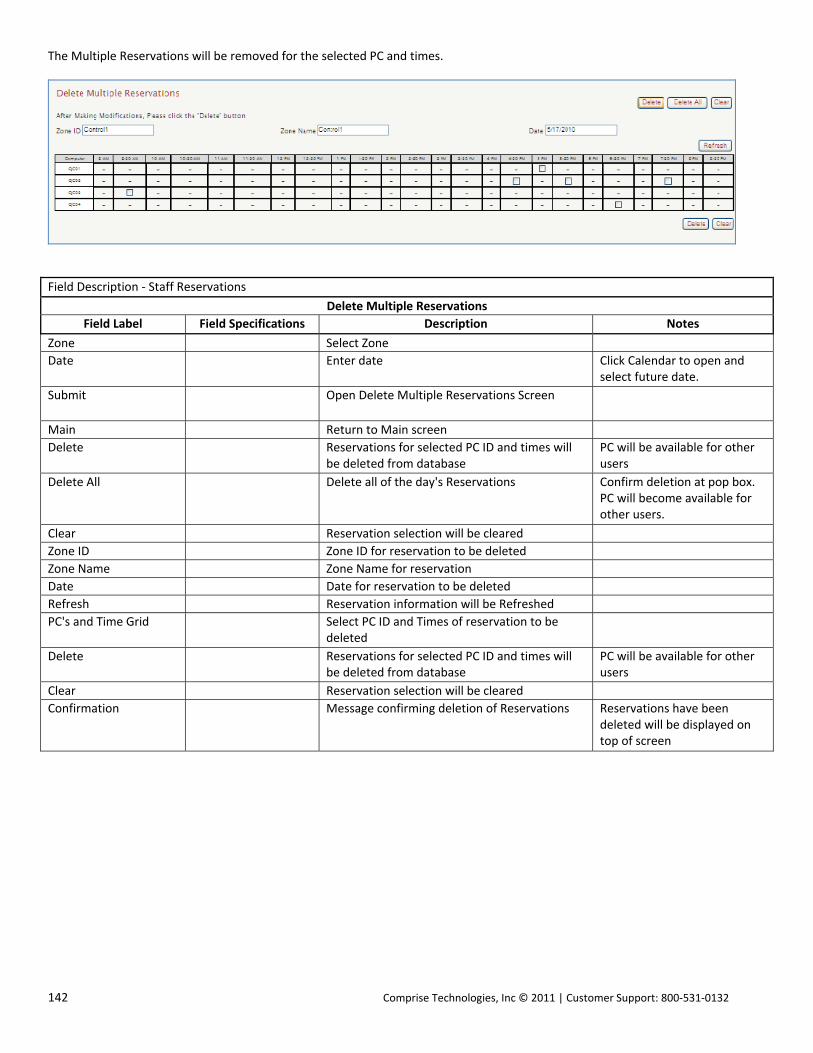
142 Comprise Technologies, Inc © 2011 | Customer Support: 800‐531‐0132
The Multiple Reservations will be removed for the selected PC and times.
Field Description ‐ Staff Reservations
Delete Multiple Reservations
Field Label Field Specifications Description Notes
Zone Select Zone
Date Enter date Click Calendar to open and select future date.
Submit Open Delete Multiple Reservations Screen
Main Return to Main screen
Delete Reservations for selected PC ID and times will be deleted from database
PC will be available for other users
Delete All Delete all of the day's Reservations Confirm deletion at pop box. PC will become available for other users.
Clear Reservation selection will be cleared
Zone ID Zone ID for reservation to be deleted
Zone Name Zone Name for reservation
Date Date for reservation to be deleted
Refresh Reservation information will be Refreshed
PC's and Time Grid Select PC ID and Times of reservation to be deleted
Delete Reservations for selected PC ID and times will be deleted from database
PC will be available for other users
Clear Reservation selection will be cleared
Confirmation Message confirming deletion of Reservations Reservations have been deleted will be displayed on top of screen
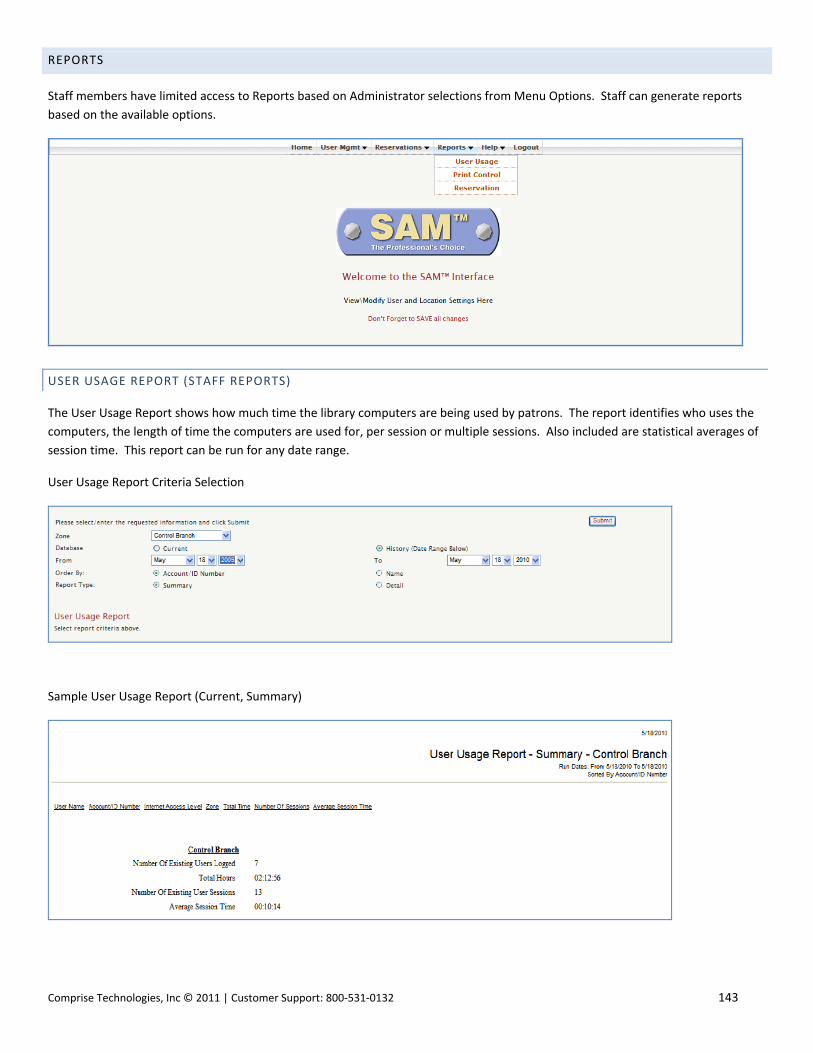
Comprise Technologies, Inc © 2011 | Customer Support: 800‐531‐0132 143
REPORTS
Staff members have limited access to Reports based on Administrator selections from Menu Options. Staff can generate reports
based on the available options.
USER USAGE REPORT (STAFF REPORTS)
The User Usage Report shows how much time the library computers are being used by patrons. The report identifies who uses the
computers, the length of time the computers are used for, per session or multiple sessions. Also included are statistical averages of
session time. This report can be run for any date range.
User Usage Report Criteria Selection
Sample User Usage Report (Current, Summary)
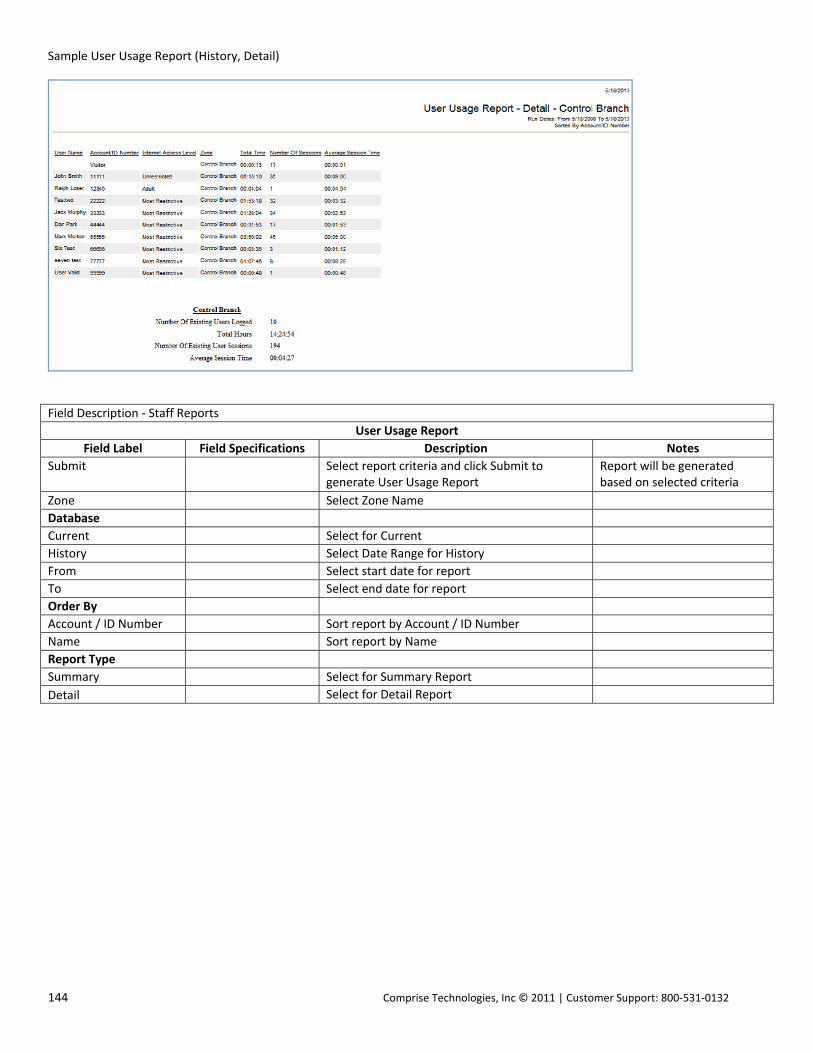
144 Comprise Technologies, Inc © 2011 | Customer Support: 800‐531‐0132
Sample User Usage Report (History, Detail)
Field Description ‐ Staff Reports
User Usage Report
Field Label Field Specifications Description Notes
Submit Select report criteria and click Submit to generate User Usage Report
Report will be generated based on selected criteria
Zone Select Zone Name
Database
Current Select for Current
History Select Date Range for History
From Select start date for report
To Select end date for report
Order By
Account / ID Number Sort report by Account / ID Number
Name Sort report by Name
Report Type
Summary Select for Summary Report
Detail Select for Detail Report
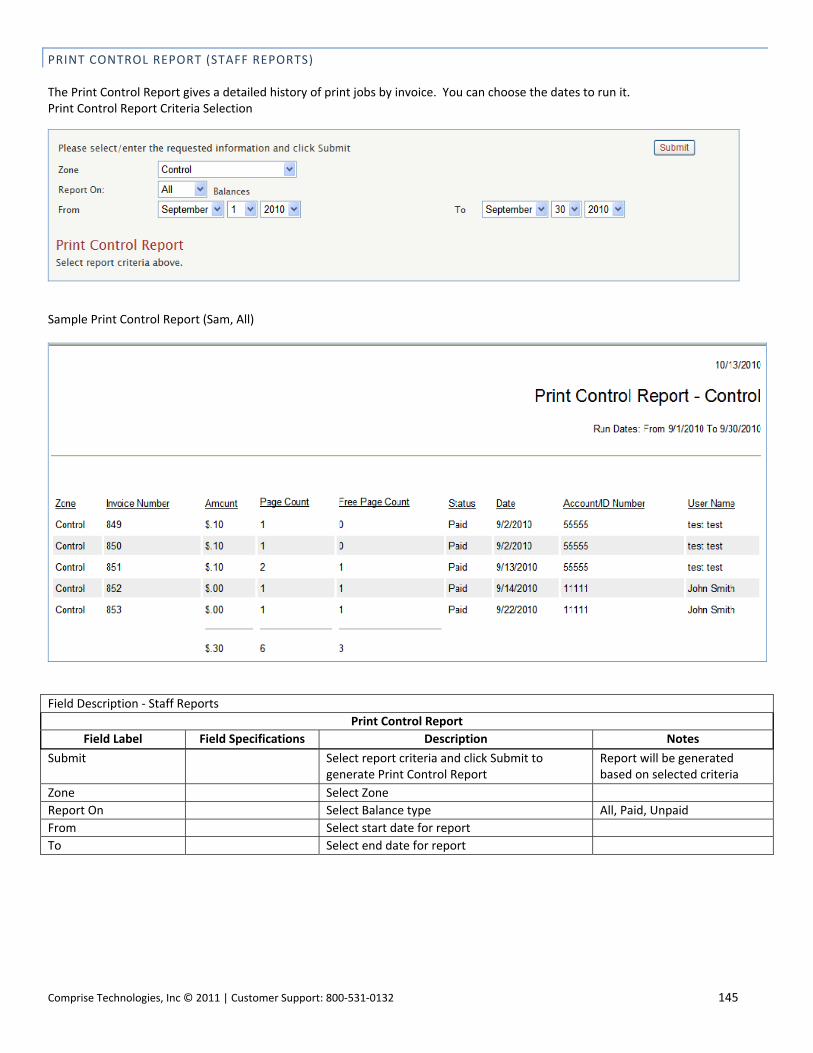
Comprise Technologies, Inc © 2011 | Customer Support: 800‐531‐0132 145
PRINT CONTROL REPORT (STAFF REPORTS) The Print Control Report gives a detailed history of print jobs by invoice. You can choose the dates to run it. Print Control Report Criteria Selection
Sample Print Control Report (Sam, All)
Field Description ‐ Staff Reports
Print Control Report
Field Label Field Specifications Description Notes
Submit Select report criteria and click Submit to generate Print Control Report
Report will be generated based on selected criteria
Zone Select Zone
Report On Select Balance type All, Paid, Unpaid
From Select start date for report
To Select end date for report

146 Comprise Technologies, Inc © 2011 | Customer Support: 800‐531‐0132
RESERVATION REPORT (STAFF REPORTS)
The Reservation Report produces a printed schedule of PC reservations for both staff and patron use. The run date is shown at the
top of the report.
Reservation Report Criteria Selection
Sample Reservation Report (Sam)
Field Description ‐ Staff Reports
Reservation Report
Field Label Field Specifications Description Notes
Submit Select report criteria and click Submit to generate Reservation Report
Report will be generated based on selected criteria
Zone Select Zone Name
Database
Current Select for Current
History Select Date Range for History
From Select start date for report
To Select end date for report
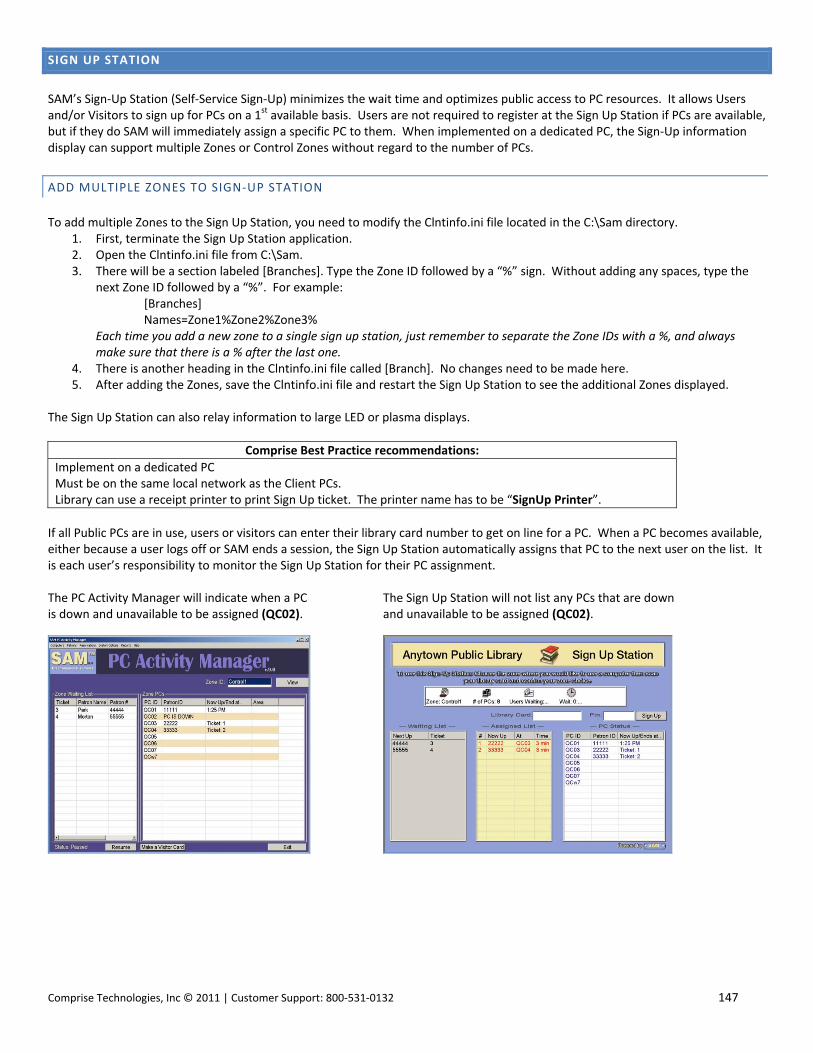
Comprise Technologies, Inc © 2011 | Customer Support: 800‐531‐0132 147
SIGN UP STATION
SAM’s Sign‐Up Station (Self‐Service Sign‐Up) minimizes the wait time and optimizes public access to PC resources. It allows Users and/or Visitors to sign up for PCs on a 1st available basis. Users are not required to register at the Sign Up Station if PCs are available, but if they do SAM will immediately assign a specific PC to them. When implemented on a dedicated PC, the Sign‐Up information display can support multiple Zones or Control Zones without regard to the number of PCs.
ADD MULTIPLE ZONES TO SIGN‐UP STATION
To add multiple Zones to the Sign Up Station, you need to modify the Clntinfo.ini file located in the C:\Sam directory.
1. First, terminate the Sign Up Station application. 2. Open the Clntinfo.ini file from C:\Sam. 3. There will be a section labeled [Branches]. Type the Zone ID followed by a “%” sign. Without adding any spaces, type the
next Zone ID followed by a “%”. For example: [Branches] Names=Zone1%Zone2%Zone3% Each time you add a new zone to a single sign up station, just remember to separate the Zone IDs with a %, and always make sure that there is a % after the last one.
4. There is another heading in the Clntinfo.ini file called [Branch]. No changes need to be made here. 5. After adding the Zones, save the Clntinfo.ini file and restart the Sign Up Station to see the additional Zones displayed.
The Sign Up Station can also relay information to large LED or plasma displays.
Comprise Best Practice recommendations:
Implement on a dedicated PC Must be on the same local network as the Client PCs. Library can use a receipt printer to print Sign Up ticket. The printer name has to be “SignUp Printer”.
If all Public PCs are in use, users or visitors can enter their library card number to get on line for a PC. When a PC becomes available, either because a user logs off or SAM ends a session, the Sign Up Station automatically assigns that PC to the next user on the list. It is each user’s responsibility to monitor the Sign Up Station for their PC assignment. The PC Activity Manager will indicate when a PC The Sign Up Station will not list any PCs that are down is down and unavailable to be assigned (QC02). and unavailable to be assigned (QC02).
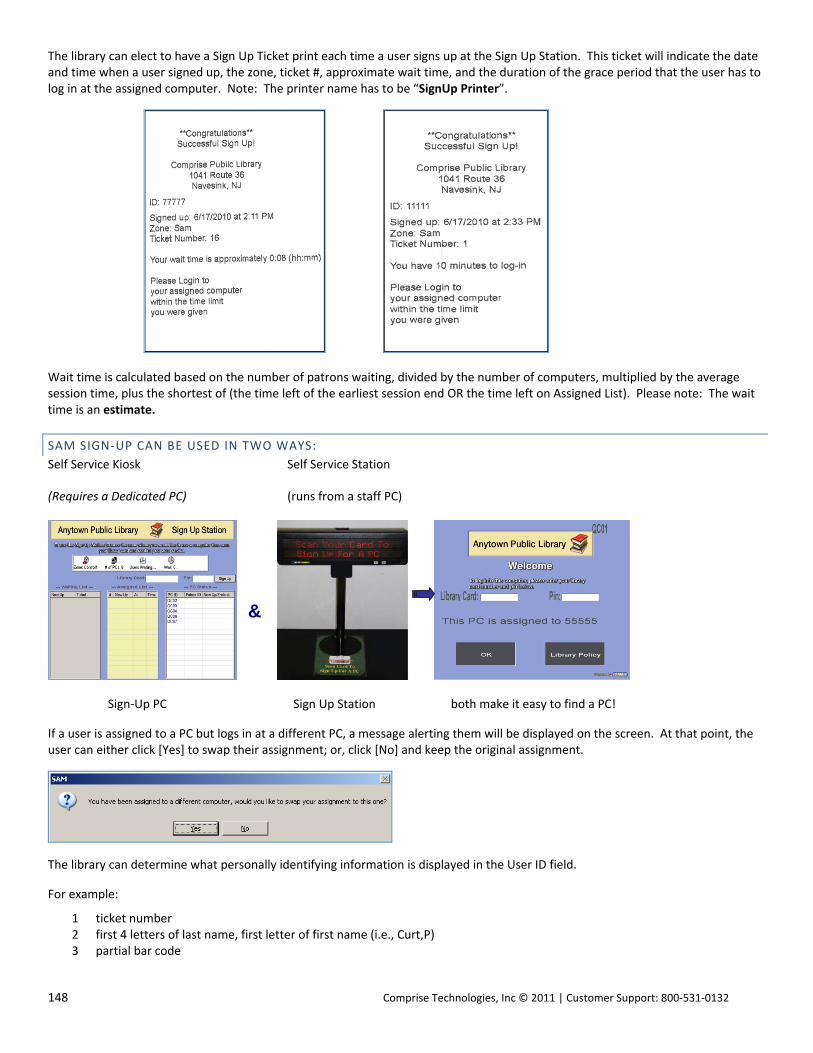
148 Comprise Technologies, Inc © 2011 | Customer Support: 800‐531‐0132
The library can elect to have a Sign Up Ticket print each time a user signs up at the Sign Up Station. This ticket will indicate the date and time when a user signed up, the zone, ticket #, approximate wait time, and the duration of the grace period that the user has to log in at the assigned computer. Note: The printer name has to be “SignUp Printer”.
Wait time is calculated based on the number of patrons waiting, divided by the number of computers, multiplied by the average session time, plus the shortest of (the time left of the earliest session end OR the time left on Assigned List). Please note: The wait time is an estimate.
SAM SIGN‐UP CAN BE USED IN TWO WAYS:
Self Service Kiosk Self Service Station
(Requires a Dedicated PC) (runs from a staff PC)
Sign‐Up PC Sign Up Station both make it easy to find a PC!
If a user is assigned to a PC but logs in at a different PC, a message alerting them will be displayed on the screen. At that point, the user can either click [Yes] to swap their assignment; or, click [No] and keep the original assignment.
The library can determine what personally identifying information is displayed in the User ID field.
For example:
1 ticket number 2 first 4 letters of last name, first letter of first name (i.e., Curt,P) 3 partial bar code
&

Comprise Technologies, Inc © 2011 | Customer Support: 800‐531‐0132 149
SIGN UP STATION CONFIGURATION SCREEN
Libraries can select what information as well as the format of the information
displayed on the Sign Up Station screen on the Sign Up Station Configuration Screen.
To access the Sign Up Station Configuration Screen:
1. From the main Sign Up Station screen, press “Ctrl+S”
2. Enter the Staff Password when prompted.
3. Click [OK].
This will open the Sign Up Station Configuration screen.
LIBRARY CARD INFORMATION
The default length for the library card is 14 digits.
However, a different length can be entered in the
configuration screen. Libraries can also select
whether or not a PIN will be required to Sign Up.
DISPLAY INFORMATION FOR THE SIGN UP
STATION
Libraries have the option to display users’
concatenated name, first 4 letters of the last name
and first initial. Or, display a specific number of
digits starting from the end of user’ library card.
This information will be displayed in all 3 sections
where the user information is displayed on the
Sign Up Station.
DISPLAY INFORMATION FOR LED DISPLAYS
Libraries have the option to display users’
concatenated name, first 4 letters of the last name
and first initial. Or, display a specific number of
digits starting from the end of user’ library card.
This information will be displayed in all 3 sections
where the user information is displayed on the
Sign Up Station. Enter the IP address of the
network adapter for the LED.
The Grace Period set within the SAM Interface in
System Options will appear here. Selecting this
option will make the Sign Up Station wait for the
specified time to allow users to logon to assigned
PCs.
Check the “Enable Flex Time Manager at the Sign Up Station” box to enable the Flex Time feature at the Sign Up Station. Selecting
this option will extend User sessions based on the Percentage Limit set in System Options.
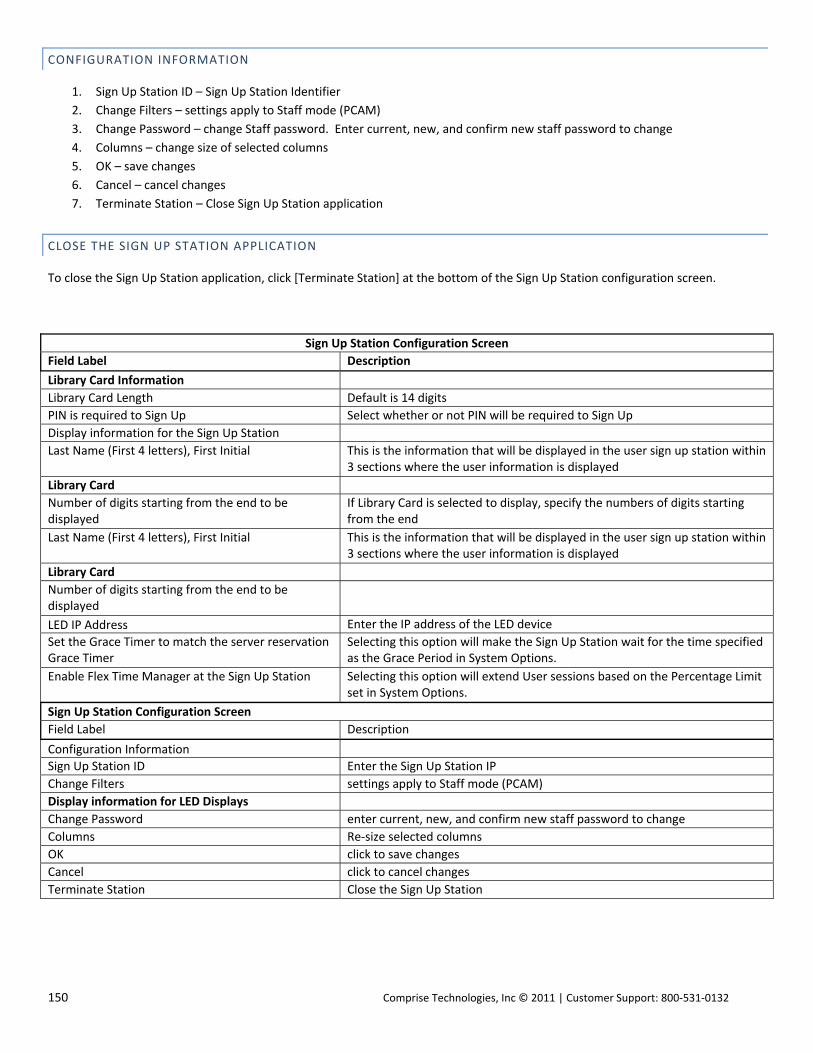
150 Comprise Technologies, Inc © 2011 | Customer Support: 800‐531‐0132
CONFIGURATION INFORMATION
1. Sign Up Station ID – Sign Up Station Identifier
2. Change Filters – settings apply to Staff mode (PCAM)
3. Change Password – change Staff password. Enter current, new, and confirm new staff password to change
4. Columns – change size of selected columns
5. OK – save changes
6. Cancel – cancel changes
7. Terminate Station – Close Sign Up Station application
CLOSE THE SIGN UP STATION APPLICATION
To close the Sign Up Station application, click [Terminate Station] at the bottom of the Sign Up Station configuration screen.
Sign Up Station Configuration Screen
Field Label Description
Library Card Information
Library Card Length Default is 14 digits
PIN is required to Sign Up Select whether or not PIN will be required to Sign Up
Display information for the Sign Up Station
Last Name (First 4 letters), First Initial This is the information that will be displayed in the user sign up station within 3 sections where the user information is displayed
Library Card
Number of digits starting from the end to be displayed
If Library Card is selected to display, specify the numbers of digits starting from the end
Last Name (First 4 letters), First Initial This is the information that will be displayed in the user sign up station within 3 sections where the user information is displayed
Library Card
Number of digits starting from the end to be displayed
LED IP Address Enter the IP address of the LED device
Set the Grace Timer to match the server reservation Grace Timer
Selecting this option will make the Sign Up Station wait for the time specified as the Grace Period in System Options.
Enable Flex Time Manager at the Sign Up Station Selecting this option will extend User sessions based on the Percentage Limit set in System Options.
Sign Up Station Configuration Screen
Field Label Description
Configuration Information
Sign Up Station ID Enter the Sign Up Station IP
Change Filters settings apply to Staff mode (PCAM)
Display information for LED Displays
Change Password enter current, new, and confirm new staff password to change
Columns Re‐size selected columns
OK click to save changes
Cancel click to cancel changes
Terminate Station Close the Sign Up Station
Comprise Technologies, Inc © 2011 | Customer Support: 800‐531‐0132 151
When a user attempts to sign up for a PC at the Sign Up Station, the system performs several confirmation checks to make sure that
the user will be able to login at the assigned PC.
1. The user will not be allowed to sign up in more than 1 Zone at any given time and will not be able to sign up for another PC at the Sign‐Up Station while still logged onto a PC.
2. The user has not used all the allotted daily time the zone allows (Daily Time). 3. The user has not used all the available logins the zone allows (Daily Logins). 4. The user has not exceeded the consecutive sessions the zone allows and has to wait for a session before they can log in
again. 5. The user status is not disabled. 6. The user card is not expired. 7. ILS Link restrictions will also affect the sign up process. The Library can specify “allowance” rules. For example, a person
whose ILS record indicates excessive fees, or a child in an adult zone, can be blocked from signing up for a PC.
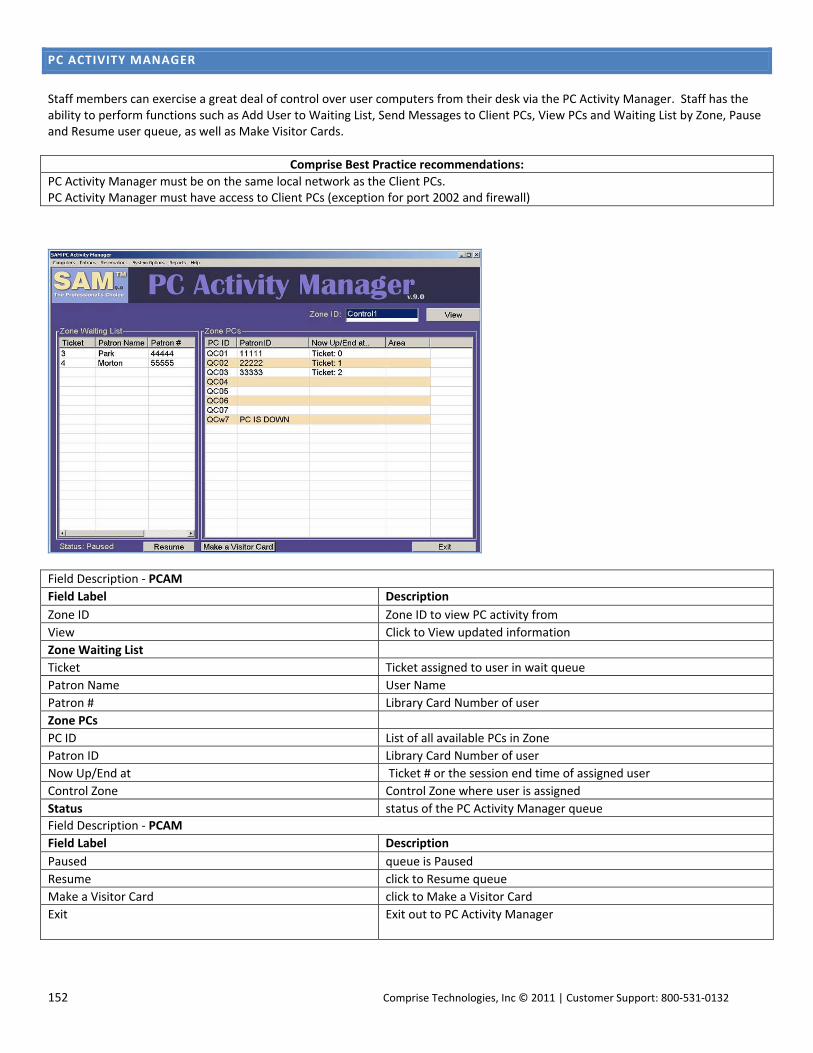
152 Comprise Technologies, Inc © 2011 | Customer Support: 800‐531‐0132
PC ACTIVITY MANAGER
Staff members can exercise a great deal of control over user computers from their desk via the PC Activity Manager. Staff has the ability to perform functions such as Add User to Waiting List, Send Messages to Client PCs, View PCs and Waiting List by Zone, Pause and Resume user queue, as well as Make Visitor Cards.
Comprise Best Practice recommendations:
PC Activity Manager must be on the same local network as the Client PCs. PC Activity Manager must have access to Client PCs (exception for port 2002 and firewall)
Field Description ‐ PCAM
Field Label Description
Zone ID Zone ID to view PC activity from
View Click to View updated information
Zone Waiting List
Ticket Ticket assigned to user in wait queue
Patron Name User Name
Patron # Library Card Number of user
Zone PCs
PC ID List of all available PCs in Zone
Patron ID Library Card Number of user
Now Up/End at Ticket # or the session end time of assigned user
Control Zone Control Zone where user is assigned
Status status of the PC Activity Manager queue
Field Description ‐ PCAM
Field Label Description
Paused queue is Paused
Resume click to Resume queue
Make a Visitor Card click to Make a Visitor Card
Exit Exit out to PC Activity Manager
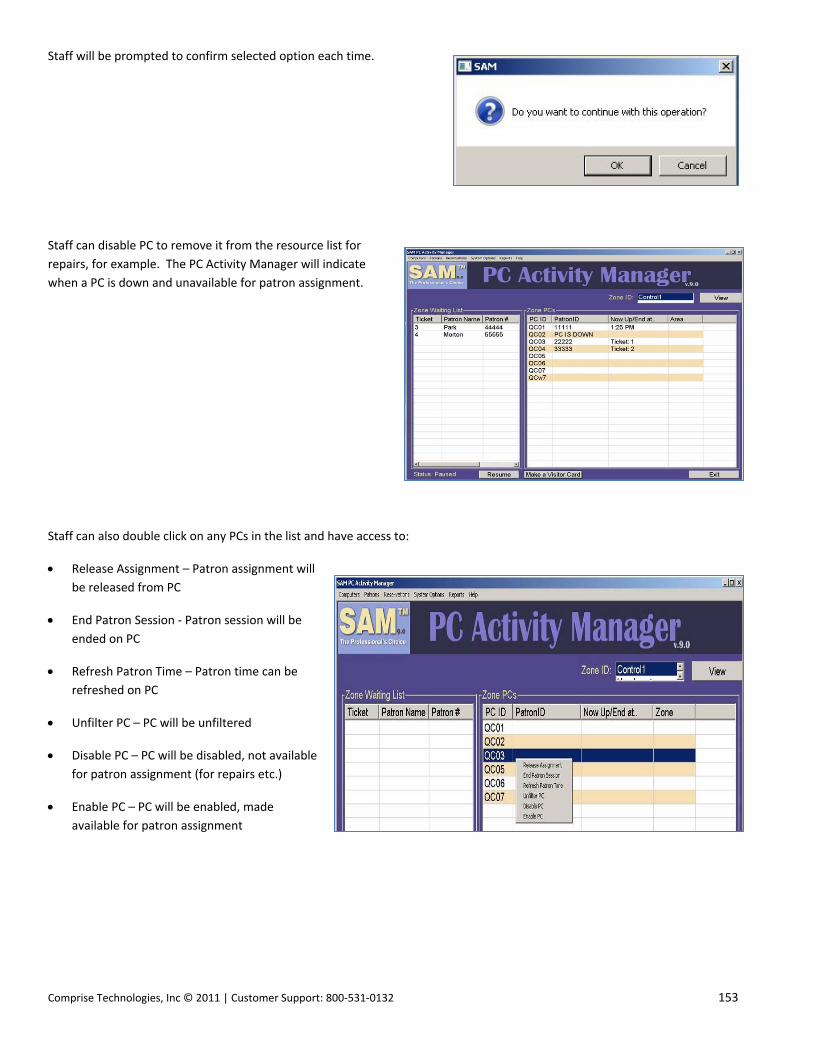
Comprise Technologies, Inc © 2011 | Customer Support: 800‐531‐0132 153
Staff will be prompted to confirm selected option each time.
Staff can disable PC to remove it from the resource list for
repairs, for example. The PC Activity Manager will indicate
when a PC is down and unavailable for patron assignment.
Staff can also double click on any PCs in the list and have access to:
Release Assignment – Patron assignment will
be released from PC
End Patron Session ‐ Patron session will be
ended on PC
Refresh Patron Time – Patron time can be
refreshed on PC
Unfilter PC – PC will be unfiltered
Disable PC – PC will be disabled, not available
for patron assignment (for repairs etc.)
Enable PC – PC will be enabled, made
available for patron assignment

154 Comprise Technologies, Inc © 2011 | Customer Support: 800‐531‐0132
COMPUTERS
Shutdown ‐ PC will shutdown
Restart ‐ PC will be restarted
Power Off ‐ PC will Power Off
Log Off ‐ PC will Log Off
Send Message ‐ Staff can send message to selected
PC
Close Browser ‐ Staff can close Browser on Client
PC. For example, if user is viewing inappropriate
content.
Login Patron ‐ Staff can login single library card
number at selected PC
Login Multiple ‐ Staff can login with the same library
card number on multiple PCs simultaneously from
the PC Activity manager.

Comprise Technologies, Inc © 2011 | Customer Support: 800‐531‐0132 155
PATRONS
End Session ‐ Double Click the PC ID and OK on
confirmation box to end user session on selected PC.
Patron Record ‐ Opens Modify User screen on Web
Interface
Make a Payment ‐ Opens Payments, etc. page on Web
Interface
Refresh Time ‐ Staff can select Additional Time from the
drop down options and double click the desired PC ID.
Then, click [OK] when prompted for confirmation. Refresh
Time will not extend beyond the scheduled close time. This
means, if library close time is 9:00 PM and PCs are set to
close 10 minutes Before Library Closing time, then time will
not be extended past 8:50 PM (10 minutes before Library
Closing).
The additional time selected is added to the patron’s
current time. For example, if a user has 5 minutes
remaining and time is refreshed for 15 minutes; the user’s
total new time will become 20 minutes (5+15=20 minutes).
When user time is refreshed from the PC Activity Manager, the change occurs in real time. This means, the “Ends at” time on the PC Activity Manager and the Time Remaining on the client PC session manager will be instantly updated to the new time.
Please note: Refresh time will add time beyond the Daily Time Limit. Therefore, staff need to use discretion.
RESERVATIONS
Make a reservation ‐ Opens Make a Single Reservation screen
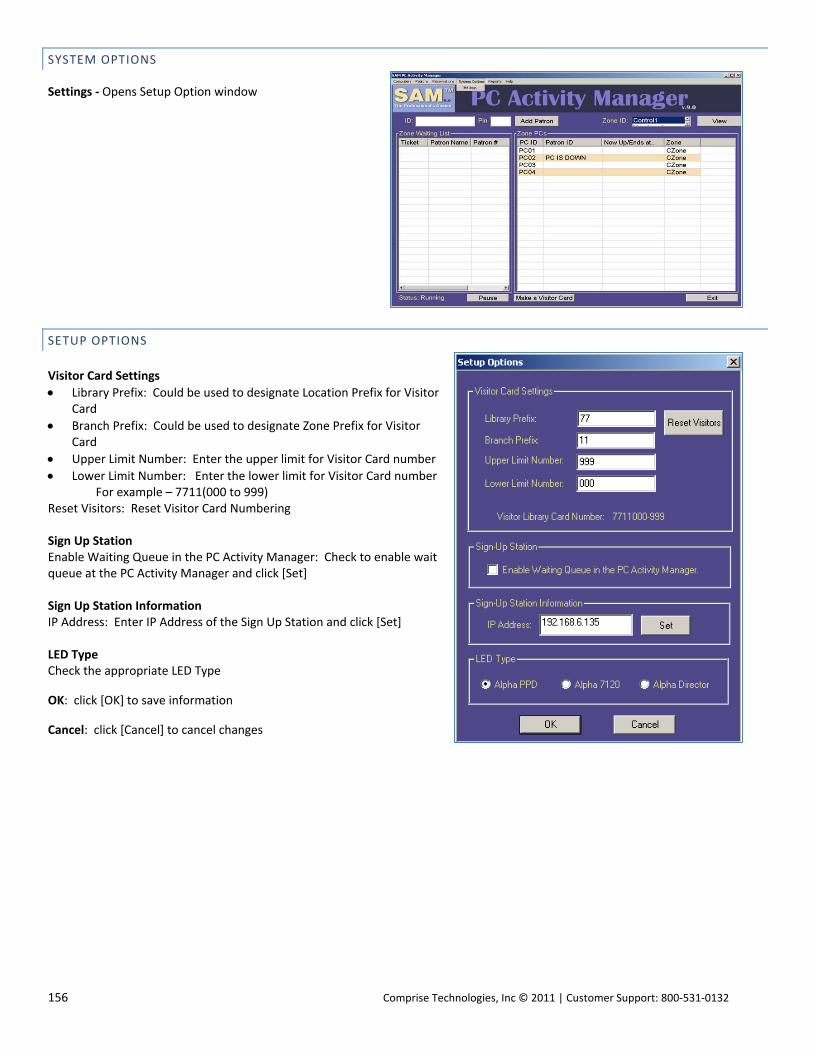
156 Comprise Technologies, Inc © 2011 | Customer Support: 800‐531‐0132
SYSTEM OPTIONS
Settings ‐ Opens Setup Option window
SETUP OPTIONS
Visitor Card Settings
Library Prefix: Could be used to designate Location Prefix for Visitor Card
Branch Prefix: Could be used to designate Zone Prefix for Visitor Card
Upper Limit Number: Enter the upper limit for Visitor Card number
Lower Limit Number: Enter the lower limit for Visitor Card number For example – 7711(000 to 999) Reset Visitors: Reset Visitor Card Numbering Sign Up Station Enable Waiting Queue in the PC Activity Manager: Check to enable wait queue at the PC Activity Manager and click [Set] Sign Up Station Information IP Address: Enter IP Address of the Sign Up Station and click [Set] LED Type Check the appropriate LED Type
OK: click [OK] to save information
Cancel: click [Cancel] to cancel changes
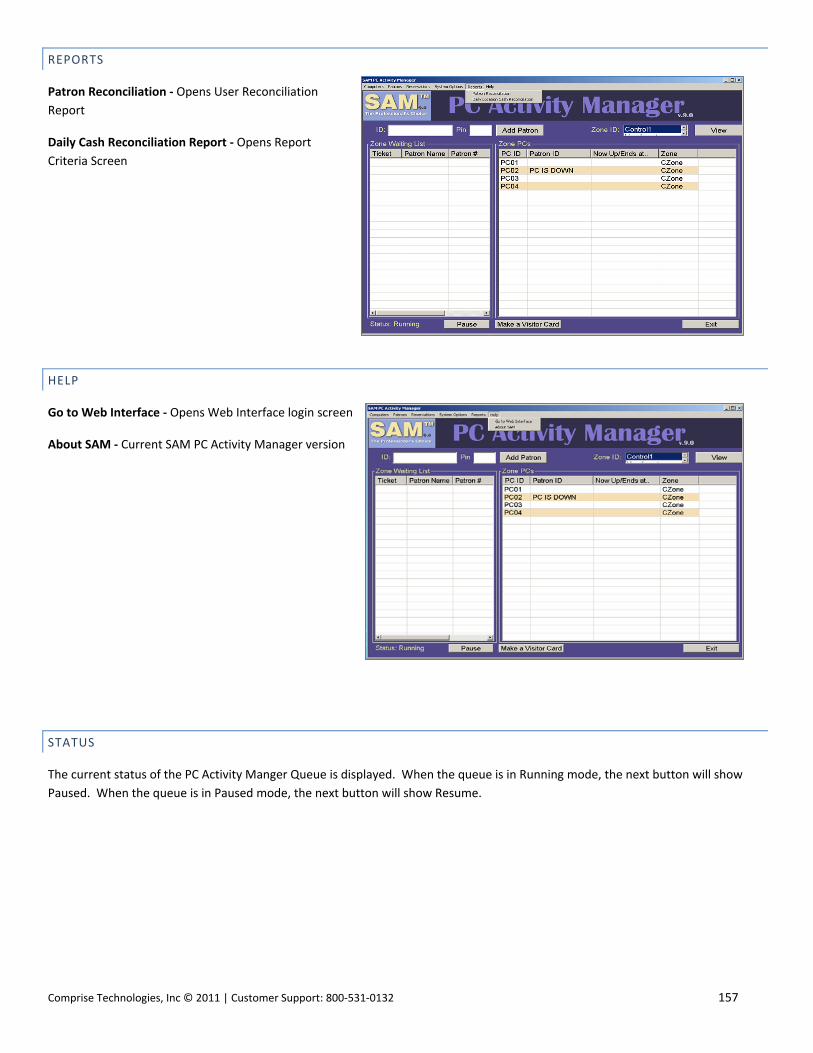
Comprise Technologies, Inc © 2011 | Customer Support: 800‐531‐0132 157
REPORTS
Patron Reconciliation ‐ Opens User Reconciliation
Report
Daily Cash Reconciliation Report ‐ Opens Report
Criteria Screen
HELP
Go to Web Interface ‐ Opens Web Interface login screen
About SAM ‐ Current SAM PC Activity Manager version
STATUS
The current status of the PC Activity Manger Queue is displayed. When the queue is in Running mode, the next button will show
Paused. When the queue is in Paused mode, the next button will show Resume.

158 Comprise Technologies, Inc © 2011 | Customer Support: 800‐531‐0132
MAKE A VISITOR CARD
From the Staff PC Activity Manager, staff can click [Make a Visitor Card] to create and
print an anonymous Visitor Card. Card entitlements will be those defined for Group 1
(Visitor Cards). Visitor Cards are valid for one day by default, but the expiration period
can be changed as specified by the library. Cards are unique in their combination of
card number and PIN. Use of PINs is optional, but the default is to have them issued.
The Visitor Card Configuration window will display the Card # and PIN. Type: will be
Visitor by Default. Select the appropriate Internet Filter Level for the Visitor Card
being printed. Click Finish to print. The Visitor Card will be printed at the designated
printer.
Visitors can be issued these guest cards at the staff desk or can purchase them via our
Payment Center (peripheral device) entirely without staff involvement. Visitor cards
can take the form of printed receipts or be preprinted with unique library information.
Either way they should contain a bar code and other information to make their use as
self service as possible. Customized Visitor Cards can contain up to Ten Lines of
customized text.

Comprise Technologies, Inc © 2011 | Customer Support: 800‐531‐0132 159
PC ACTIVITY MANAGER CONFIGURATION SCREEN
From the main PC Activity Manager screen, press “Ctrl+S” and enter the Staff Password
when prompted.
This will open the PC Activity Manager Configuration screen, displayed as Sign Up Station
Configuration.
Library Card Information
Library Card Length: # of characters in Library Card (applies to Sign Up Station mode)
Pin is required to Sign Up: Select to require users to enter PIN to sign up. (applies to Sign Up Station mode)
Display information for the Sign Up Station
Last Name [First 4 letters], First Initial (applies to
Sign Up Station mode)
Library Card (applies to Sign Up Station mode)
Number of digits starting from the end to be
displayed: (applies to Sign Up Station mode)
Display information for LED Display
Last Name [First 4 letters], First Initial (applies to
Sign Up Station mode)
Library Card (applies to Sign Up Station mode)
Number of digits starting from the end to be
displayed: (applies to Sign Up Station mode)
LED IP Address: (applies to Sign Up Station mode)
Set the Grace Timer to match the server
reservations Grace Timer (applies to Sign Up
Station mode)
Enable Flex Time Manager at the Sign Up Station
(applies to Sign Up Station mode)
Configuration Information
Sign Up Station ID: Enter the IP address of the
Sign Up Station
Change Filters: Assign filter levels and date of
birth for Visitor Cards printed
Toggle Zones: (applies to Sign Up Station mode)
Change Password: enter current, new, and
confirm new staff password to change
Columns: change size of selected columns
OK: click to save changes
Cancel: click to cancel changes
Terminate Station: Close the PC Activity Manager
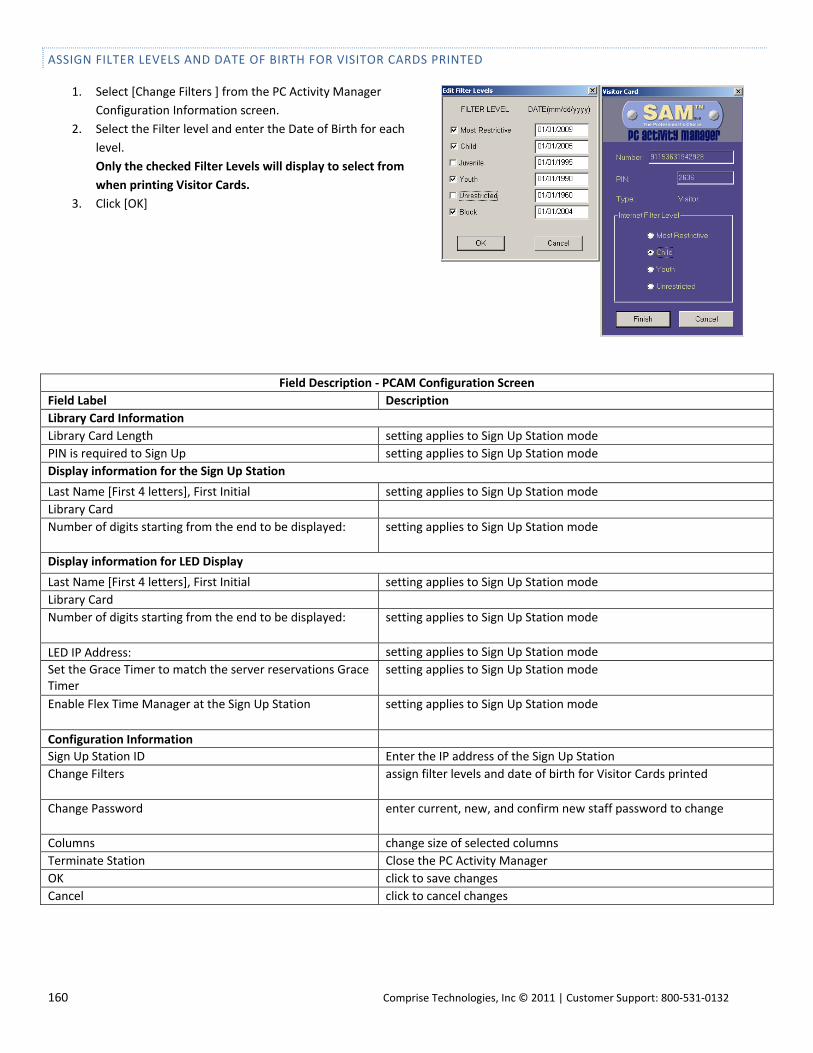
160 Comprise Technologies, Inc © 2011 | Customer Support: 800‐531‐0132
ASSIGN FILTER LEVELS AND DATE OF BIRTH FOR VISITOR CARDS PRINTED
1. Select [Change Filters ] from the PC Activity Manager
Configuration Information screen.
2. Select the Filter level and enter the Date of Birth for each
level.
Only the checked Filter Levels will display to select from
when printing Visitor Cards.
3. Click [OK]
Field Description ‐ PCAM Configuration Screen
Field Label Description
Library Card Information
Library Card Length setting applies to Sign Up Station mode
PIN is required to Sign Up setting applies to Sign Up Station mode
Display information for the Sign Up Station
Last Name [First 4 letters], First Initial setting applies to Sign Up Station mode
Library Card
Number of digits starting from the end to be displayed: setting applies to Sign Up Station mode
Display information for LED Display
Last Name [First 4 letters], First Initial setting applies to Sign Up Station mode
Library Card
Number of digits starting from the end to be displayed: setting applies to Sign Up Station mode
LED IP Address: setting applies to Sign Up Station mode
Set the Grace Timer to match the server reservations Grace Timer
setting applies to Sign Up Station mode
Enable Flex Time Manager at the Sign Up Station setting applies to Sign Up Station mode
Configuration Information
Sign Up Station ID Enter the IP address of the Sign Up Station
Change Filters assign filter levels and date of birth for Visitor Cards printed
Change Password enter current, new, and confirm new staff password to change
Columns change size of selected columns
Terminate Station Close the PC Activity Manager
OK click to save changes
Cancel click to cancel changes
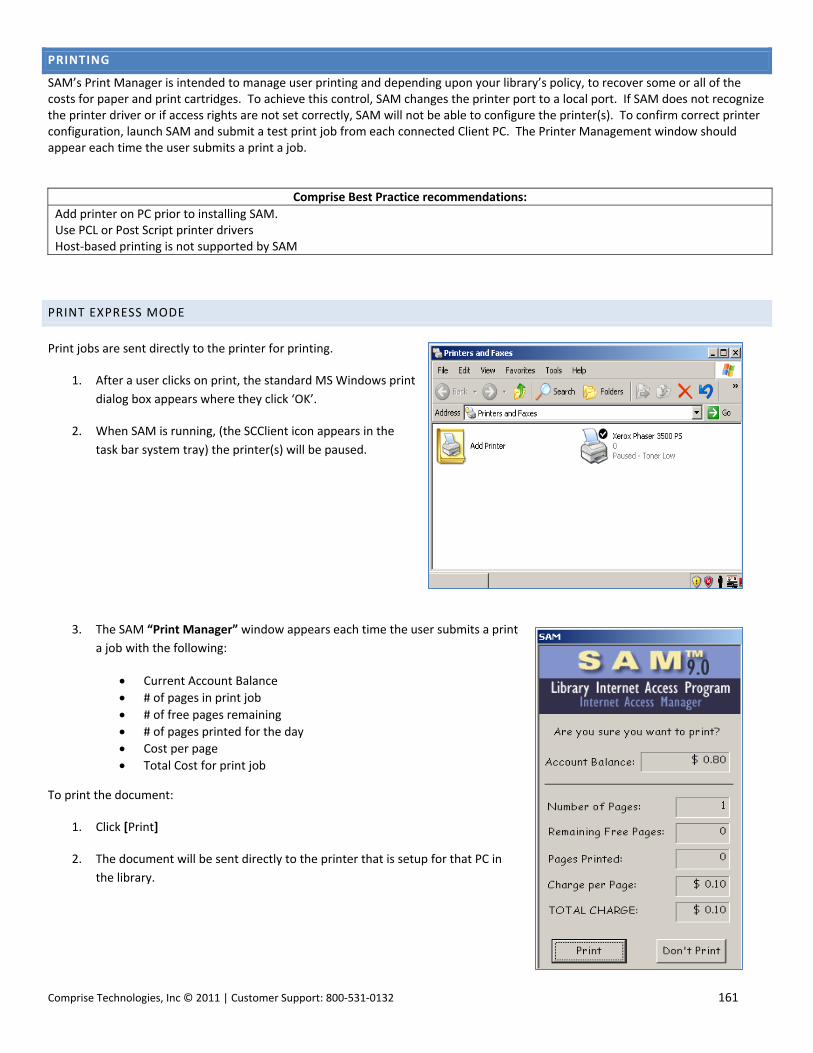
Comprise Technologies, Inc © 2011 | Customer Support: 800‐531‐0132 161
PRINTING
SAM’s Print Manager is intended to manage user printing and depending upon your library’s policy, to recover some or all of the costs for paper and print cartridges. To achieve this control, SAM changes the printer port to a local port. If SAM does not recognize the printer driver or if access rights are not set correctly, SAM will not be able to configure the printer(s). To confirm correct printer configuration, launch SAM and submit a test print job from each connected Client PC. The Printer Management window should appear each time the user submits a print a job.
Comprise Best Practice recommendations:
Add printer on PC prior to installing SAM. Use PCL or Post Script printer drivers Host‐based printing is not supported by SAM
PRINT EXPRESS MODE
Print jobs are sent directly to the printer for printing.
1. After a user clicks on print, the standard MS Windows print
dialog box appears where they click ‘OK’.
2. When SAM is running, (the SCClient icon appears in the
task bar system tray) the printer(s) will be paused.
3. The SAM “Print Manager” window appears each time the user submits a print
a job with the following:
Current Account Balance
# of pages in print job
# of free pages remaining
# of pages printed for the day
Cost per page
Total Cost for print job
To print the document:
1. Click [Print]
2. The document will be sent directly to the printer that is setup for that PC in
the library.
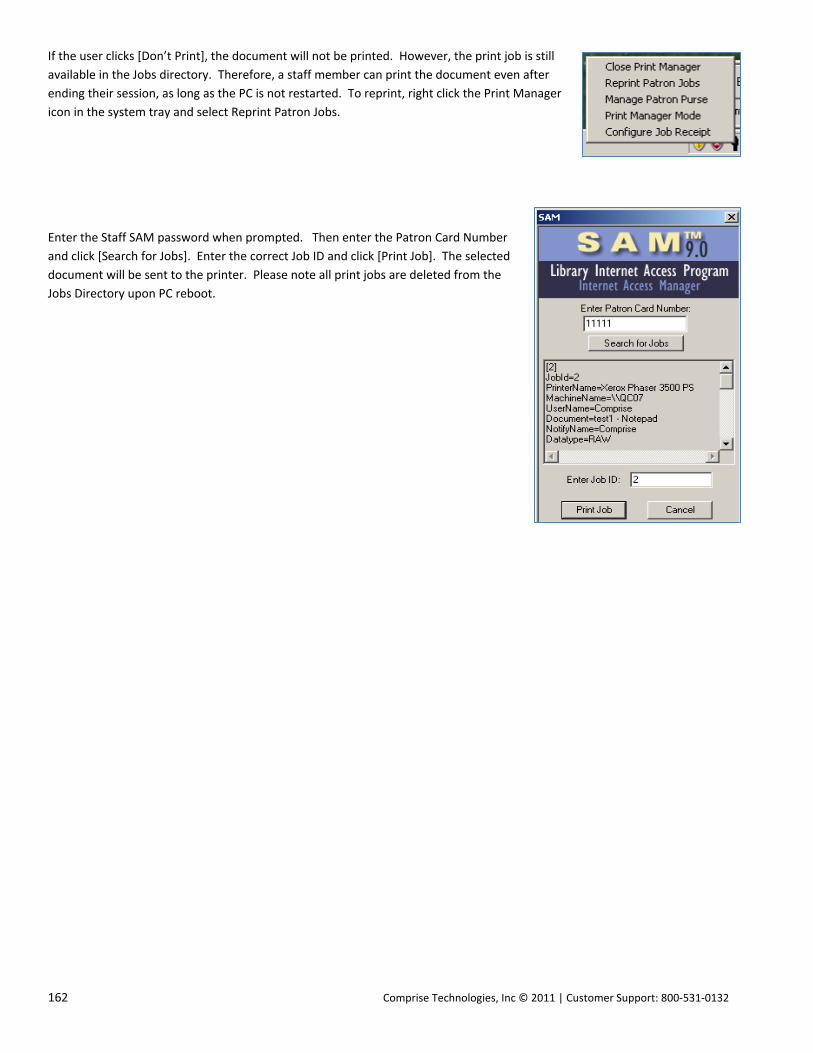
162 Comprise Technologies, Inc © 2011 | Customer Support: 800‐531‐0132
If the user clicks [Don’t Print], the document will not be printed. However, the print job is still
available in the Jobs directory. Therefore, a staff member can print the document even after
ending their session, as long as the PC is not restarted. To reprint, right click the Print Manager
icon in the system tray and select Reprint Patron Jobs.
Enter the Staff SAM password when prompted. Then enter the Patron Card Number
and click [Search for Jobs]. Enter the correct Job ID and click [Print Job]. The selected
document will be sent to the printer. Please note all print jobs are deleted from the
Jobs Directory upon PC reboot.

Comprise Technologies, Inc © 2011 | Customer Support: 800‐531‐0132 163
PRINT RELEASE STATION
The Print Release Station operates on a dedicated computer, usually located next to the printer, and functions entirely from your
library card number. No magnetic stripe or vend‐it card is required. Users simply enter a card number and PIN to review and print
their documents from a client PC. They will only see their own documents and can choose to print or delete them. Please note
when using multiple Print Release Stations, documents are sent to all the Print Release Stations. However, documents are only
deleted from individual Print Release Stations. All undeleted documents remain at all the Print Release Stations until they are
cleared by a staff member, or when PC reboots at the end of the day.
Print Release Station Requirements
1. Must be installed on a dedicated PC, preferably close to the printer. 2. Must be on the same local network as the Client PCs. 3. Client PCs must be able to access the shared jobs directory on the Print Release Station, which is
included during installation. 4. Must have the same printers (names and drivers) installed as the Client PCs.
PRINT RELEASE STATION PROCESSING FROM SAM 9.0 CLIENT PC
After users submit a document for printing on a Client PC, the confirmation window will
display.
Account Balance: user’s current account balance
Number of Pages: number of pages is the current document
Pages Printed: number of pages printed in this session
Charge per Page: cost per page
Total Charge: the total cost to print document
Print: the document will be sent to the Print Release Station
Don’t Print: the print request will be canceled, document will not be sent to the Print
Release Station.
After the user clicks on the Print Now button, the document will sent to the Print Release
Station(s) as indicated on the confirmation window displayed. User can then release and
print document(s) from the Print Release Station.

164 Comprise Technologies, Inc © 2011 | Customer Support: 800‐531‐0132
USING THE PRINT RELEASE STATION
Enter your Library Card: enter Library Card
PIN: enter PIN (if required by Library)
[Search Print Documents]: will display all
print documents only for this user
User will select a document
Select desired language at the bottom of
the screen:
English: to run in English
Español: to run in Spanish
Print Job: to print selected document
Delete Job: to delete the selected
document
I’m Finished: click when done with printing
Cost of Selected Job: will display cost for
printing document (based on # of pages and cost per page)
Pages Printed: will indicate the number of pages printed
Free Pages: the number of free pages (if allowed by library)
Account Balance: user account balance
If Library is using multiple Print Release Stations, documents are sent to all the Print Release Stations as shown above. When users
either print or delete documents, they will no longer display in the queue on this Print Release Station. However, those documents
still remain at all the other Print Release Stations.
To protect the integrity of SAM account balances, users will be blocked from logging onto the Payment Center, Print Release Station and Copy Controller concurrently. Users can only log onto one of these devices at a time.
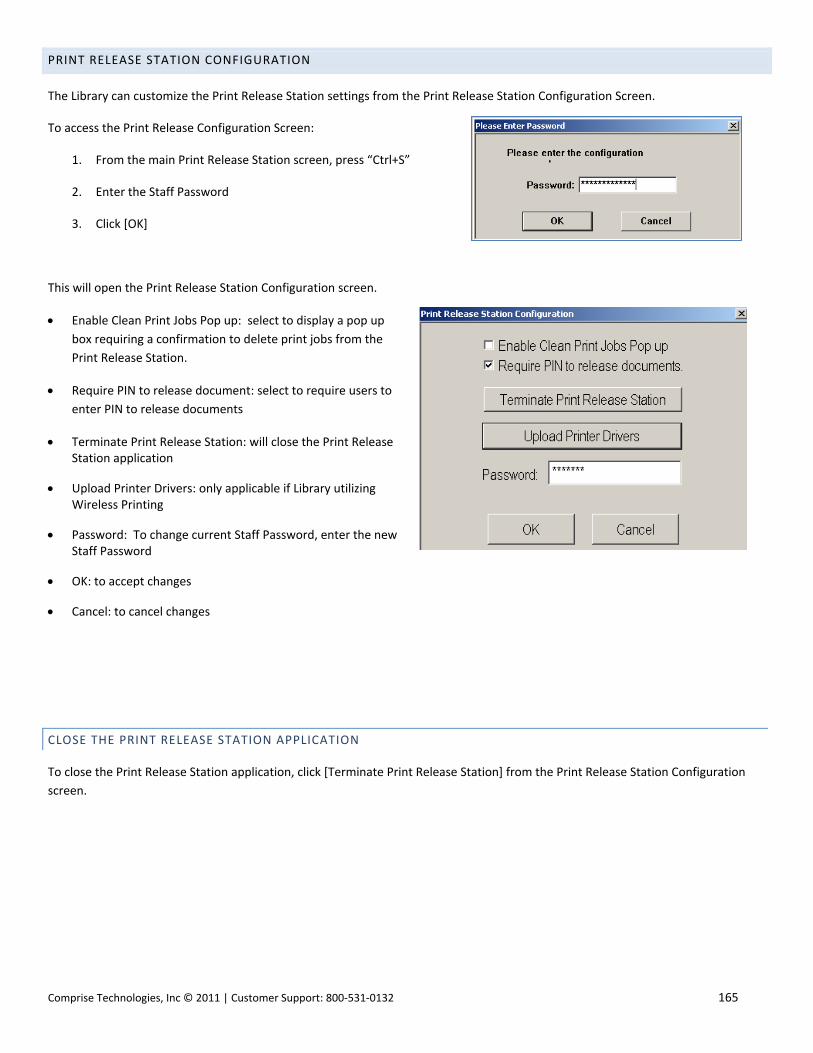
Comprise Technologies, Inc © 2011 | Customer Support: 800‐531‐0132 165
PRINT RELEASE STATION CONFIGURATION
The Library can customize the Print Release Station settings from the Print Release Station Configuration Screen.
To access the Print Release Configuration Screen:
1. From the main Print Release Station screen, press “Ctrl+S”
2. Enter the Staff Password
3. Click [OK]
This will open the Print Release Station Configuration screen.
Enable Clean Print Jobs Pop up: select to display a pop up
box requiring a confirmation to delete print jobs from the
Print Release Station.
Require PIN to release document: select to require users to
enter PIN to release documents
Terminate Print Release Station: will close the Print Release Station application
Upload Printer Drivers: only applicable if Library utilizing Wireless Printing
Password: To change current Staff Password, enter the new Staff Password
OK: to accept changes
Cancel: to cancel changes
CLOSE THE PRINT RELEASE STATION APPLICATION
To close the Print Release Station application, click [Terminate Print Release Station] from the Print Release Station Configuration
screen.
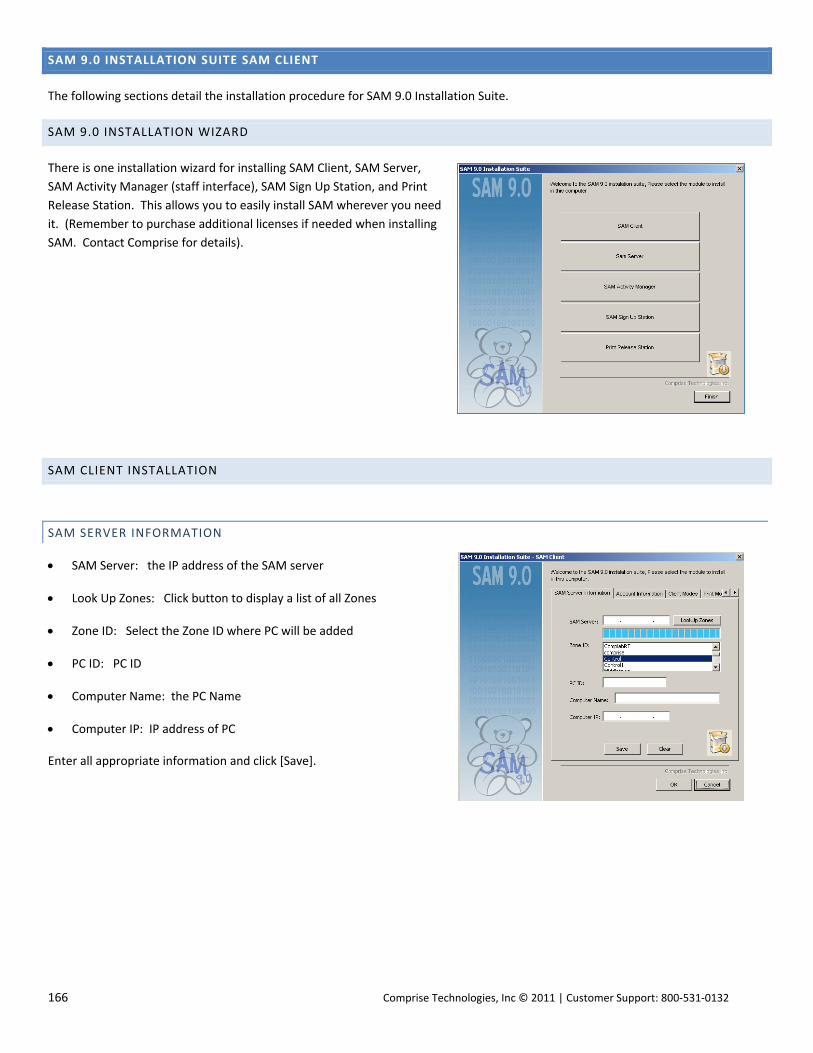
166 Comprise Technologies, Inc © 2011 | Customer Support: 800‐531‐0132
SAM 9.0 INSTALLATION SUITE SAM CLIENT
The following sections detail the installation procedure for SAM 9.0 Installation Suite.
SAM 9.0 INSTALLATION WIZARD
There is one installation wizard for installing SAM Client, SAM Server,
SAM Activity Manager (staff interface), SAM Sign Up Station, and Print
Release Station. This allows you to easily install SAM wherever you need
it. (Remember to purchase additional licenses if needed when installing
SAM. Contact Comprise for details).
SAM CLIENT INSTALLATION
SAM SERVER INFORMATION
SAM Server: the IP address of the SAM server
Look Up Zones: Click button to display a list of all Zones
Zone ID: Select the Zone ID where PC will be added
PC ID: PC ID
Computer Name: the PC Name
Computer IP: IP address of PC
Enter all appropriate information and click [Save].

Comprise Technologies, Inc © 2011 | Customer Support: 800‐531‐0132 167
ACCOUNT INFORMATION
Account Name: Leave field empty unless SAM is to run only when a
specific account is used to log into this PC (administrator, staff,
public, etc.)
Time: Use military time and enter HHMM (1330 for 01:30 PM) to
designate the time for client software updates on this PC
Click [Save].
CLIENT MODES
SAM Default Mode: PC Manager is the Default Mode
SAM Catalog Manager, no PRINT: OPAC Manager will be enabled
with no SAM authentication and no PRINT
SAM Catalog Manager, with PRINT: OPAC Manager will be enabled
with PRINT and no SAM authentication
Click [Save]
PRINT MODES
Disable Print Management: SAM Print Manager will be disabled
Print Express: Print documents sent directly to selected Printer(s)
Print Release Station: Print documents sent to the selected Print
Release Station(s) IP(s). Print documents can be sent to multiple
Print Release Stations
Release Stations: Lists all existing Print Release Station(s) IP(s).
Add ‐ add IP(s) to Release Station list. Click Add after each IP to add
multiple Print Release Stations
Delete ‐ delete IP(s) from Release Station list
Download – download/install selected printer from the server
Upload – upload selected printer to server
Click [Save]
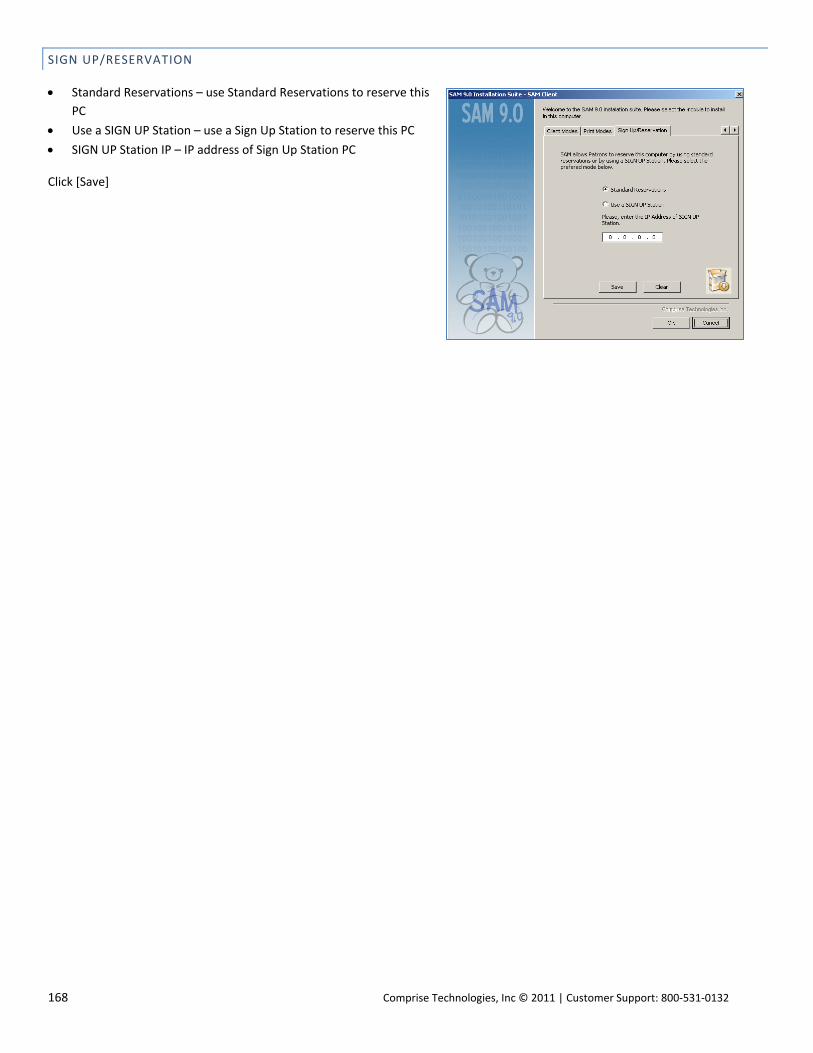
168 Comprise Technologies, Inc © 2011 | Customer Support: 800‐531‐0132
SIGN UP/RESERVATION
Standard Reservations – use Standard Reservations to reserve this
PC
Use a SIGN UP Station – use a Sign Up Station to reserve this PC
SIGN UP Station IP – IP address of Sign Up Station PC
Click [Save]

Comprise Technologies, Inc © 2011 | Customer Support: 800‐531‐0132 169
SAM ACTIVITY MANAGER (STAFF INTERFACE)
From the SAM 9.0 Installation Suite, select [SAM Activity Manager].
LOCATION
SAM Server ‐ Enter the SAM Server IP address and the Zone ID
Enable Sign Up – check box to enable Sign Up for this Zone
Zone – Enter Zone Name
VISITORY CARD SETTINGS
Library Prefix –
Zone Prefix –
Upper Limit ‐
Lower Limit ‐
SIGN UP STATION INFORMATION
Sign Up Station IP – Enter the Sign Up Station IP address
Set – click to save
LED TYPE
Alpha PPD – LED Model
Alpha 7120 – LED Model
Alpha Director – LED Model
Click [OK]
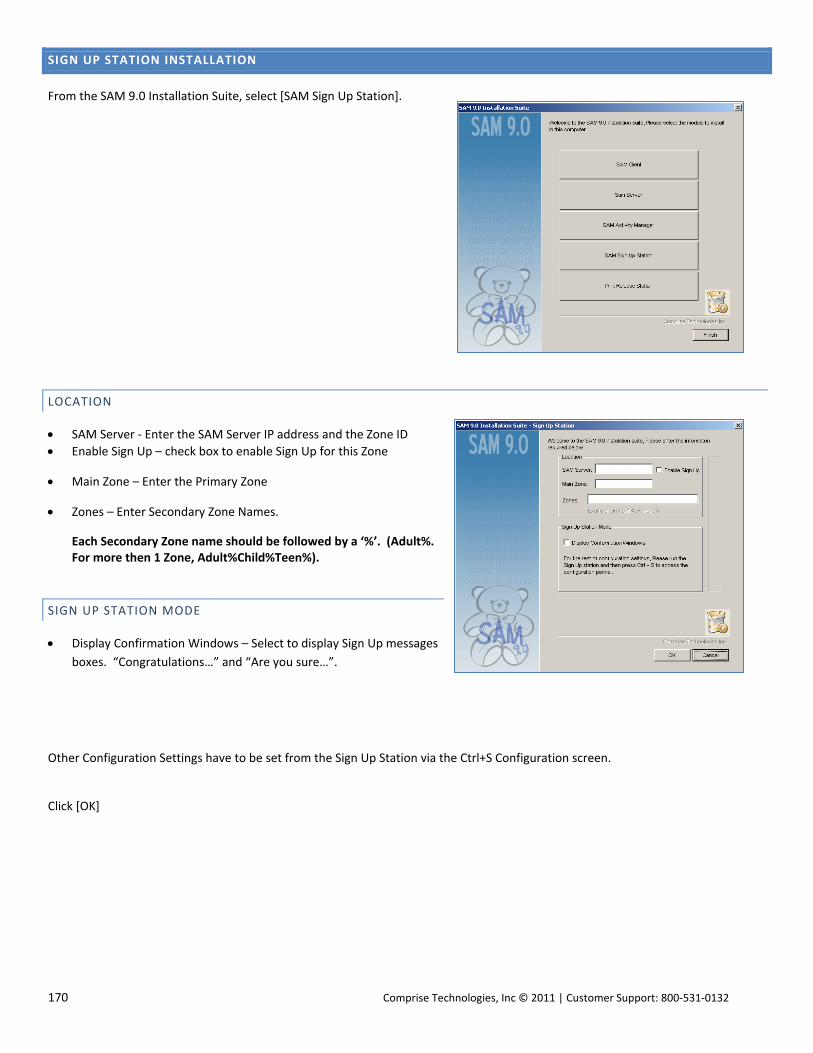
170 Comprise Technologies, Inc © 2011 | Customer Support: 800‐531‐0132
SIGN UP STATION INSTALLATION
From the SAM 9.0 Installation Suite, select [SAM Sign Up Station].
LOCATION
SAM Server ‐ Enter the SAM Server IP address and the Zone ID
Enable Sign Up – check box to enable Sign Up for this Zone
Main Zone – Enter the Primary Zone
Zones – Enter Secondary Zone Names.
Each Secondary Zone name should be followed by a ‘%’. (Adult%. For more then 1 Zone, Adult%Child%Teen%).
SIGN UP STATION MODE
Display Confirmation Windows – Select to display Sign Up messages
boxes. “Congratulations…” and “Are you sure…”.
Other Configuration Settings have to be set from the Sign Up Station via the Ctrl+S Configuration screen.
Click [OK]
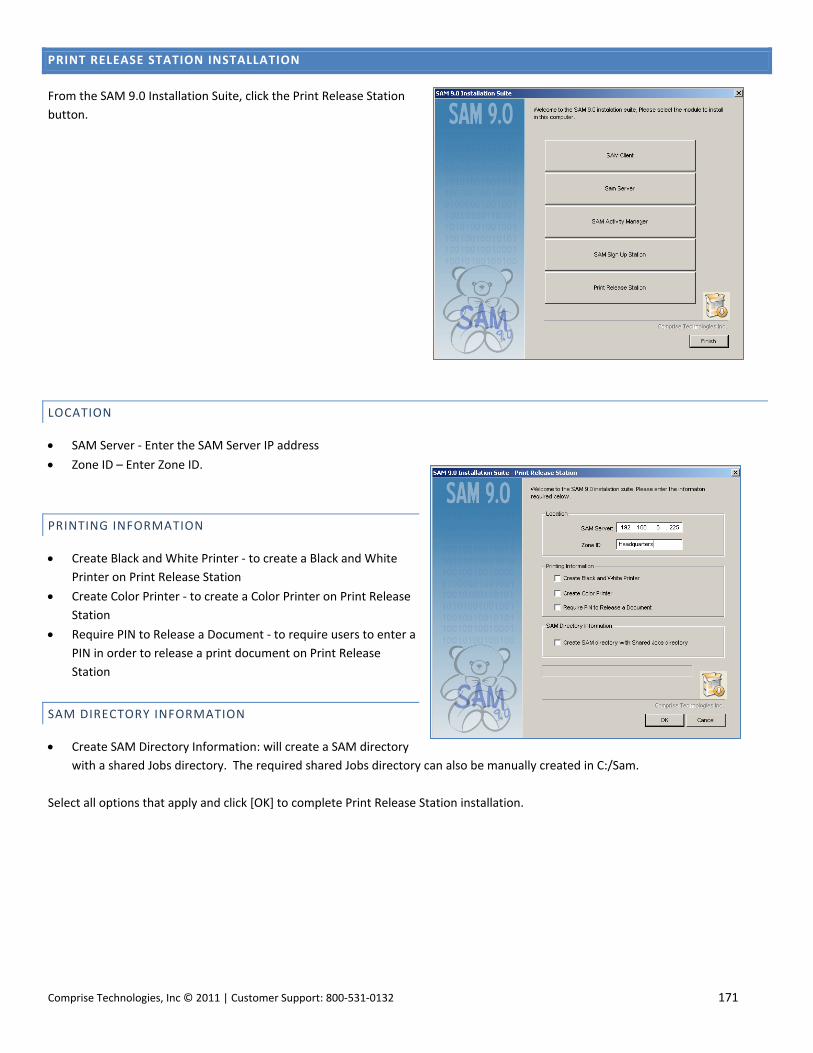
Comprise Technologies, Inc © 2011 | Customer Support: 800‐531‐0132 171
PRINT RELEASE STATION INSTALLATION
From the SAM 9.0 Installation Suite, click the Print Release Station
button.
LOCATION
SAM Server ‐ Enter the SAM Server IP address
Zone ID – Enter Zone ID.
PRINTING INFORMATION
Create Black and White Printer ‐ to create a Black and White
Printer on Print Release Station
Create Color Printer ‐ to create a Color Printer on Print Release
Station
Require PIN to Release a Document ‐ to require users to enter a
PIN in order to release a print document on Print Release
Station
SAM DIRECTORY INFORMATION
Create SAM Directory Information: will create a SAM directory
with a shared Jobs directory. The required shared Jobs directory can also be manually created in C:/Sam.
Select all options that apply and click [OK] to complete Print Release Station installation.
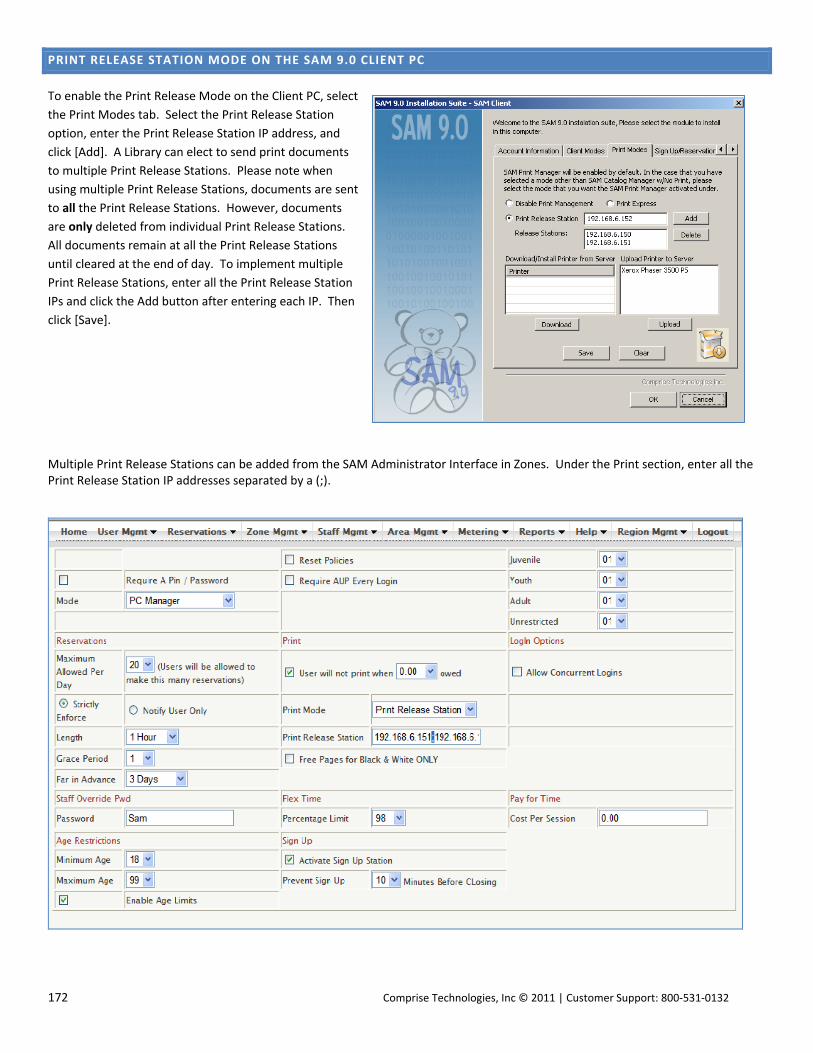
172 Comprise Technologies, Inc © 2011 | Customer Support: 800‐531‐0132
PRINT RELEASE STATION MODE ON THE SAM 9.0 CLIENT PC
To enable the Print Release Mode on the Client PC, select
the Print Modes tab. Select the Print Release Station
option, enter the Print Release Station IP address, and
click [Add]. A Library can elect to send print documents
to multiple Print Release Stations. Please note when
using multiple Print Release Stations, documents are sent
to all the Print Release Stations. However, documents
are only deleted from individual Print Release Stations.
All documents remain at all the Print Release Stations
until cleared at the end of day. To implement multiple
Print Release Stations, enter all the Print Release Station
IPs and click the Add button after entering each IP. Then
click [Save].
Multiple Print Release Stations can be added from the SAM Administrator Interface in Zones. Under the Print section, enter all the Print Release Station IP addresses separated by a (;).
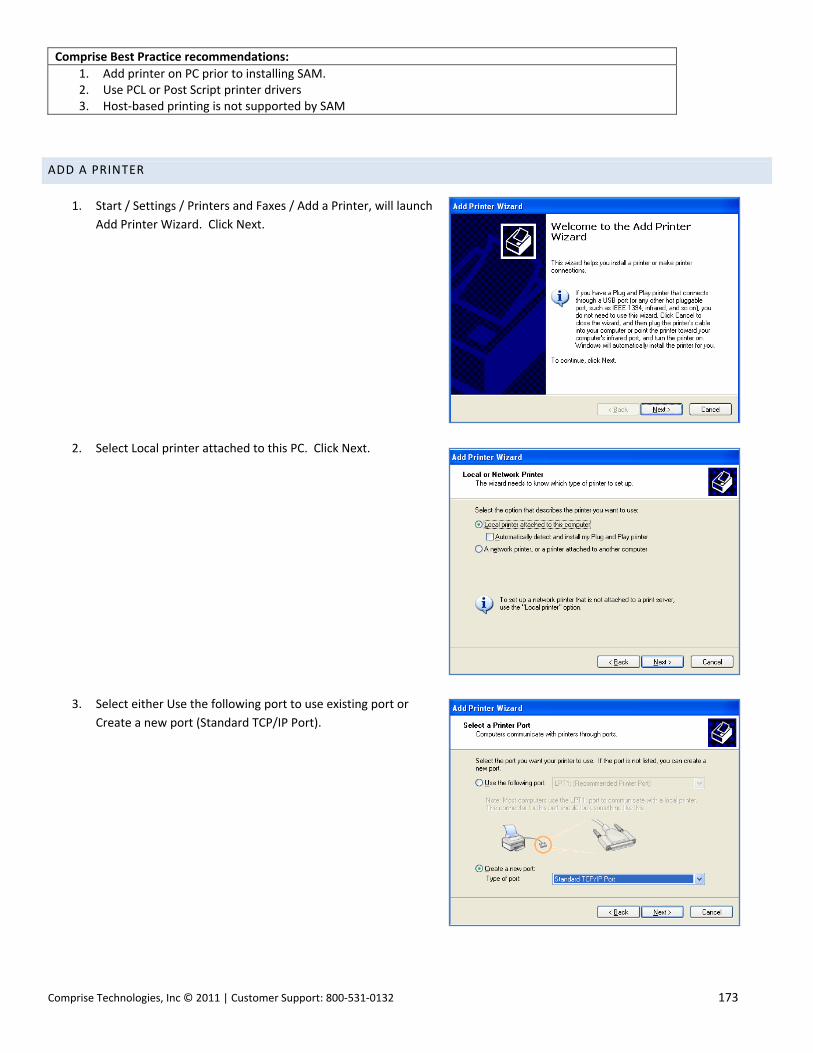
Comprise Technologies, Inc © 2011 | Customer Support: 800‐531‐0132 173
Comprise Best Practice recommendations:
1. Add printer on PC prior to installing SAM. 2. Use PCL or Post Script printer drivers 3. Host‐based printing is not supported by SAM
ADD A PRINTER
1. Start / Settings / Printers and Faxes / Add a Printer, will launch
Add Printer Wizard. Click Next.
2. Select Local printer attached to this PC. Click Next.
3. Select either Use the following port to use existing port or
Create a new port (Standard TCP/IP Port).
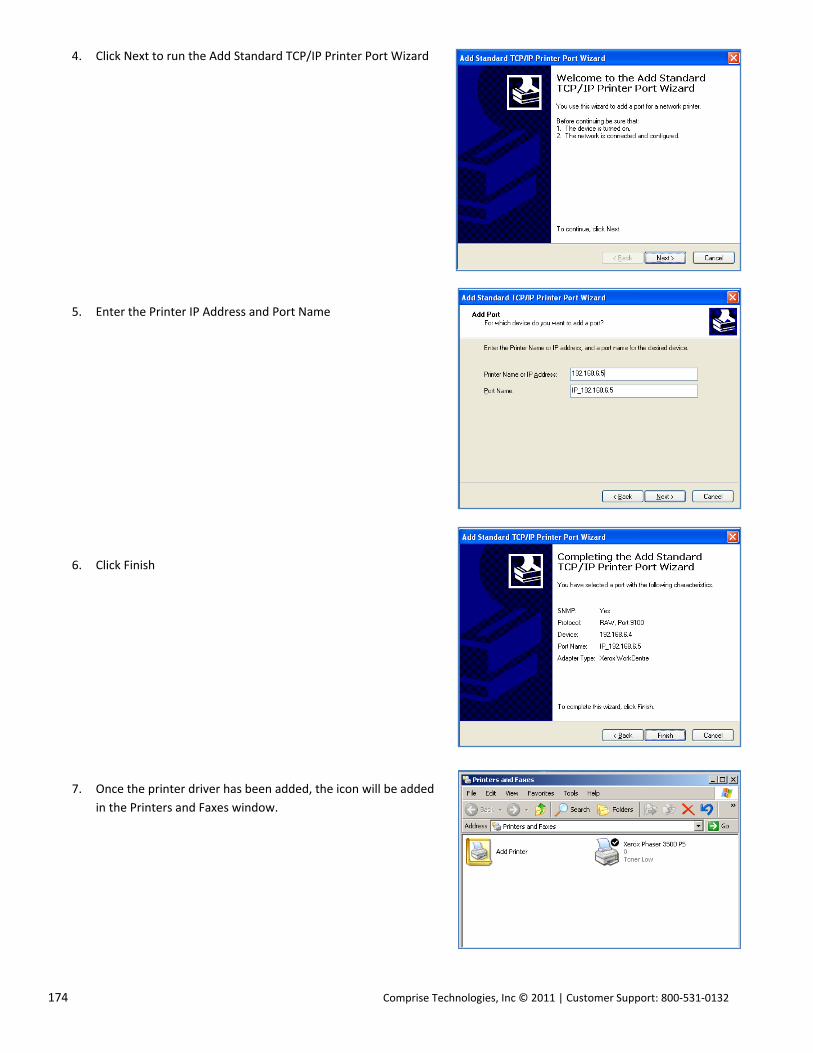
174 Comprise Technologies, Inc © 2011 | Customer Support: 800‐531‐0132
4. Click Next to run the Add Standard TCP/IP Printer Port Wizard
5. Enter the Printer IP Address and Port Name
6. Click Finish
7. Once the printer driver has been added, the icon will be added
in the Printers and Faxes window.
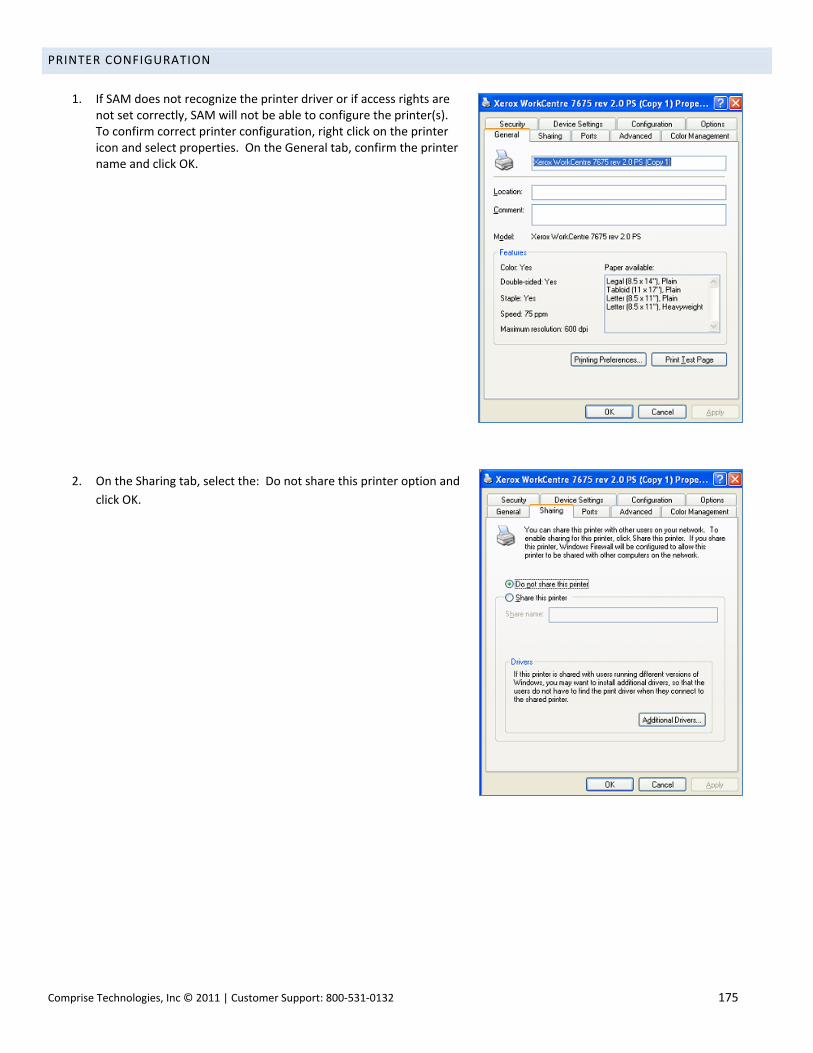
Comprise Technologies, Inc © 2011 | Customer Support: 800‐531‐0132 175
PRINTER CONFIGURATION
1. If SAM does not recognize the printer driver or if access rights are
not set correctly, SAM will not be able to configure the printer(s). To confirm correct printer configuration, right click on the printer icon and select properties. On the General tab, confirm the printer name and click OK.
2. On the Sharing tab, select the: Do not share this printer option and
click OK.
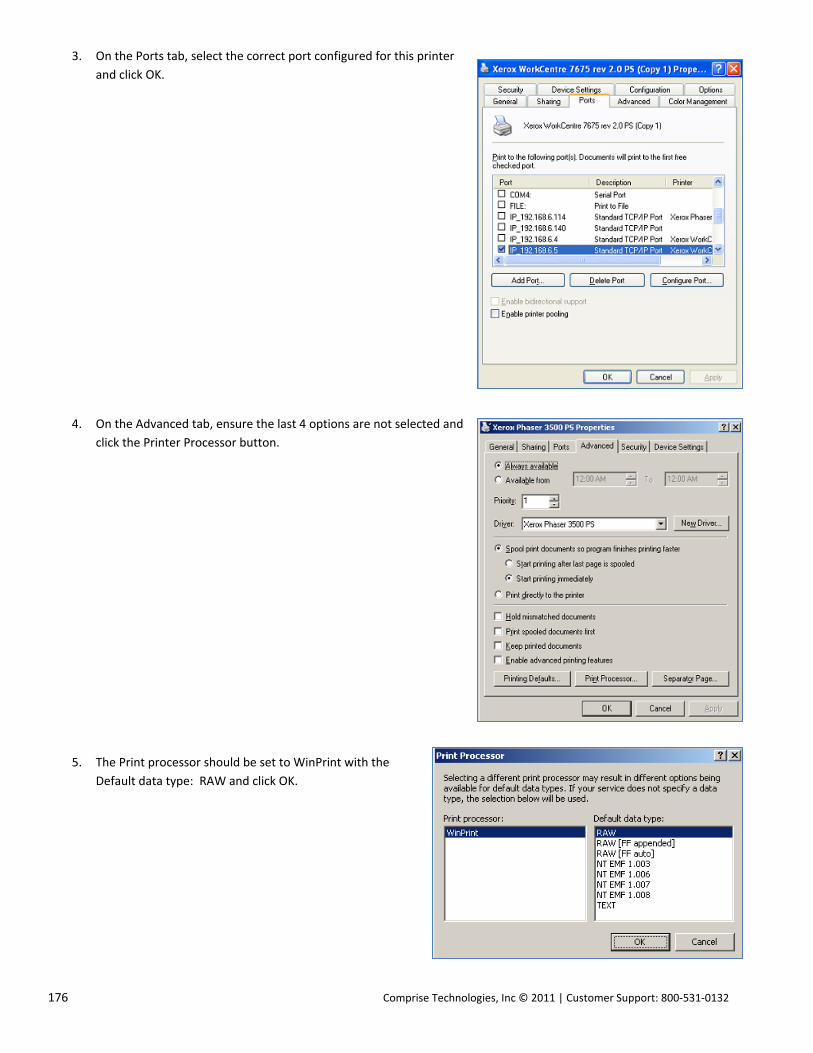
176 Comprise Technologies, Inc © 2011 | Customer Support: 800‐531‐0132
3. On the Ports tab, select the correct port configured for this printer
and click OK.
4. On the Advanced tab, ensure the last 4 options are not selected and
click the Printer Processor button.
5. The Print processor should be set to WinPrint with the
Default data type: RAW and click OK.
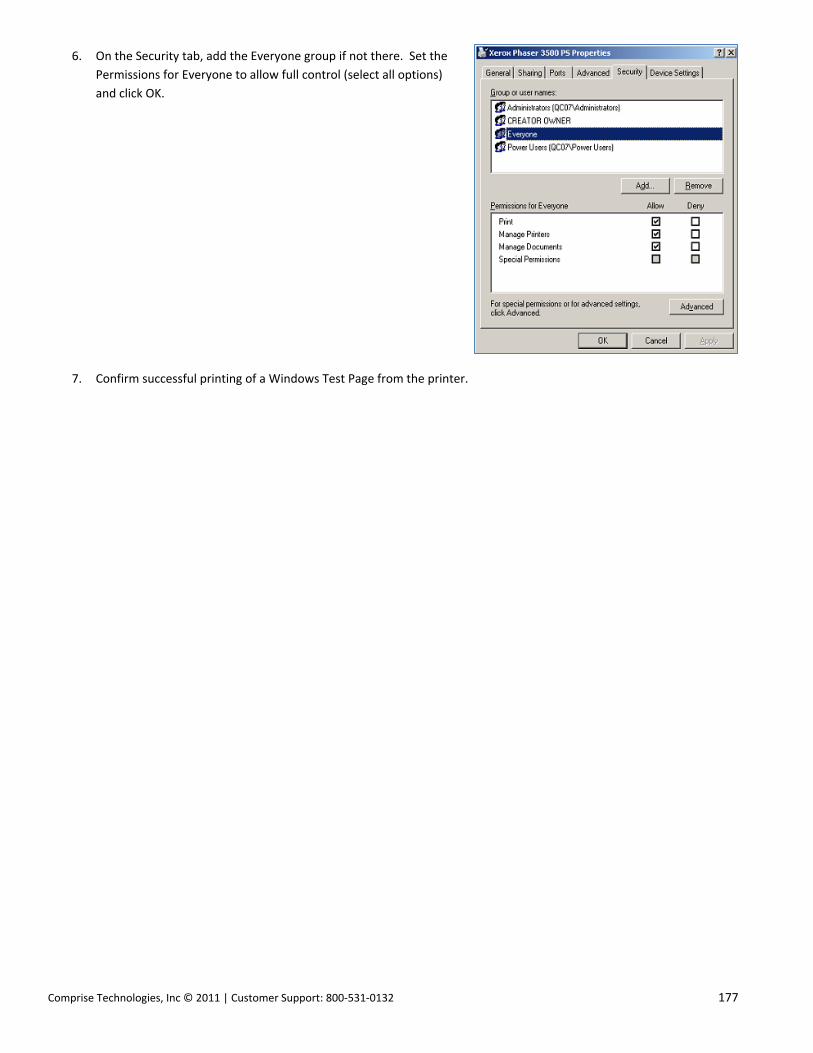
Comprise Technologies, Inc © 2011 | Customer Support: 800‐531‐0132 177
6. On the Security tab, add the Everyone group if not there. Set the
Permissions for Everyone to allow full control (select all options)
and click OK.
7. Confirm successful printing of a Windows Test Page from the printer.

178 Comprise Technologies, Inc © 2011 | Customer Support: 800‐531‐0132
SAM 9.0 TROUBLESHOOTING GUIDE
SAM CLIENT ISSUES
Issue Cause Resolutions
SAM does not start on a single PC The SAM Client Remote Manager Service is not running on the PC.
SAM is not enabled for this Zone in the Administrative Interface.
Firewall is blocking access between the Client PC and the SAM server.
Double click clientsrv.exe in the C:/SAM folder to start the service.
Log onto http://<SAM SERVER IP>/sam/index.html. From Zones / System Options, check [Enable SAM].
Turn off all firewalls. SAM cannot send / receive information to the server, staff PCs or sign up stations with firewall enabled.
SCREEN DISPLAY
Issue Cause Resolutions
SAM image is skewed or covers the Library Card # and PIN boxes for logging in.
The Theme image is not loading correctly due to the screen resolution.
The Theme images are saved in C:\SAM\Themes. Depending on your screen resolution, you may have to make adjustments to display the image properly.
SAM welcome screen has “Sorry” and users cannot login.
Your internet service has been interrupted briefly.
Your internet service is down at this computer, in house or at your Internet Service Provider (ISP). Without Internet service, SAM cannot contact the server to authenticate users logging in.
Wait a moment. The screen refreshes every 5 seconds or so. This could be a temporary aberration.
If only this PC is displaying the “Sorry” screen, check the network cable connection on this PC.
Contact your network administrator to find out if there have been any network changes that may have affected this PC.
Contact your Internet Service Provider.
A gray box is displaying on the desktop and will not go away
Windows or other automatic updates are trying to run.
Turn off automatic updates. You can set the PC to bring down the updates, but, wait for you to manually install them. Or, install them after exiting SAM.
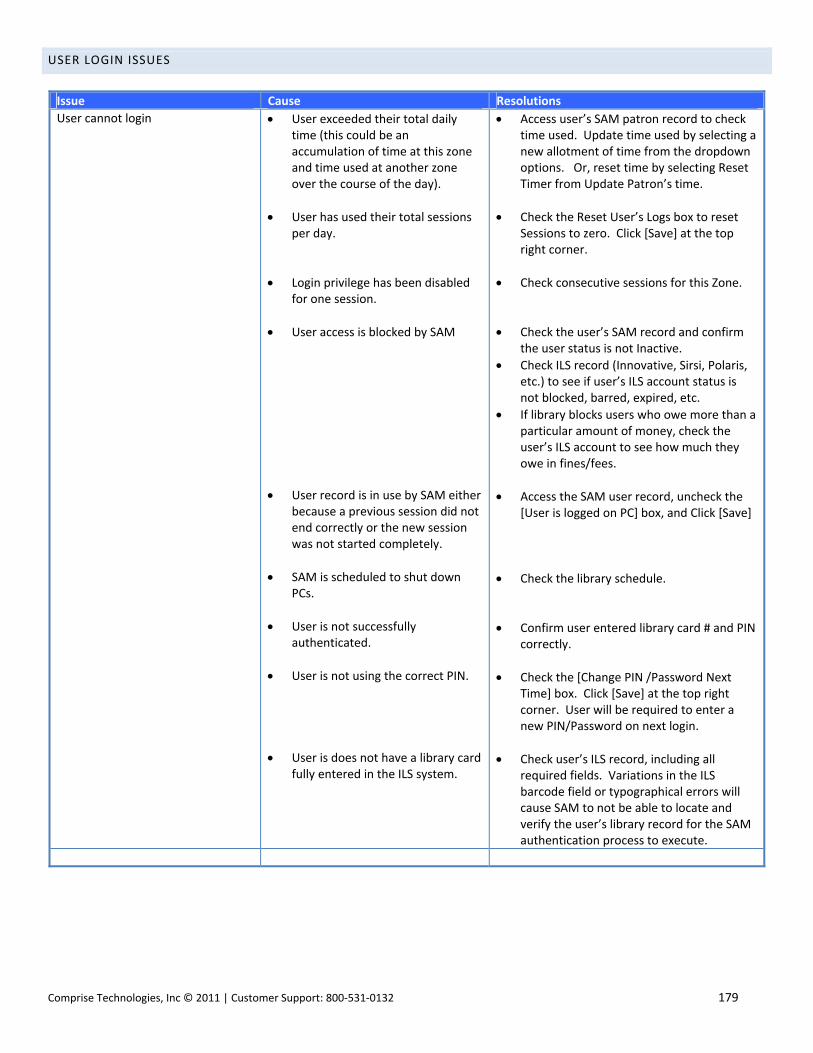
Comprise Technologies, Inc © 2011 | Customer Support: 800‐531‐0132 179
USER LOGIN ISSUES
Issue Cause Resolutions
User cannot login
User exceeded their total daily time (this could be an accumulation of time at this zone and time used at another zone over the course of the day).
User has used their total sessions per day.
Login privilege has been disabled for one session.
User access is blocked by SAM
User record is in use by SAM either because a previous session did not end correctly or the new session was not started completely.
SAM is scheduled to shut down PCs.
User is not successfully authenticated.
User is not using the correct PIN.
User is does not have a library card fully entered in the ILS system.
Access user’s SAM patron record to check time used. Update time used by selecting a new allotment of time from the dropdown options. Or, reset time by selecting Reset Timer from Update Patron’s time.
Check the Reset User’s Logs box to reset Sessions to zero. Click [Save] at the top right corner.
Check consecutive sessions for this Zone.
Check the user’s SAM record and confirm the user status is not Inactive.
Check ILS record (Innovative, Sirsi, Polaris, etc.) to see if user’s ILS account status is not blocked, barred, expired, etc.
If library blocks users who owe more than a particular amount of money, check the user’s ILS account to see how much they owe in fines/fees.
Access the SAM user record, uncheck the [User is logged on PC] box, and Click [Save]
Check the library schedule.
Confirm user entered library card # and PIN correctly.
Check the [Change PIN /Password Next Time] box. Click [Save] at the top right corner. User will be required to enter a new PIN/Password on next login.
Check user’s ILS record, including all required fields. Variations in the ILS barcode field or typographical errors will cause SAM to not be able to locate and verify the user’s library record for the SAM authentication process to execute.
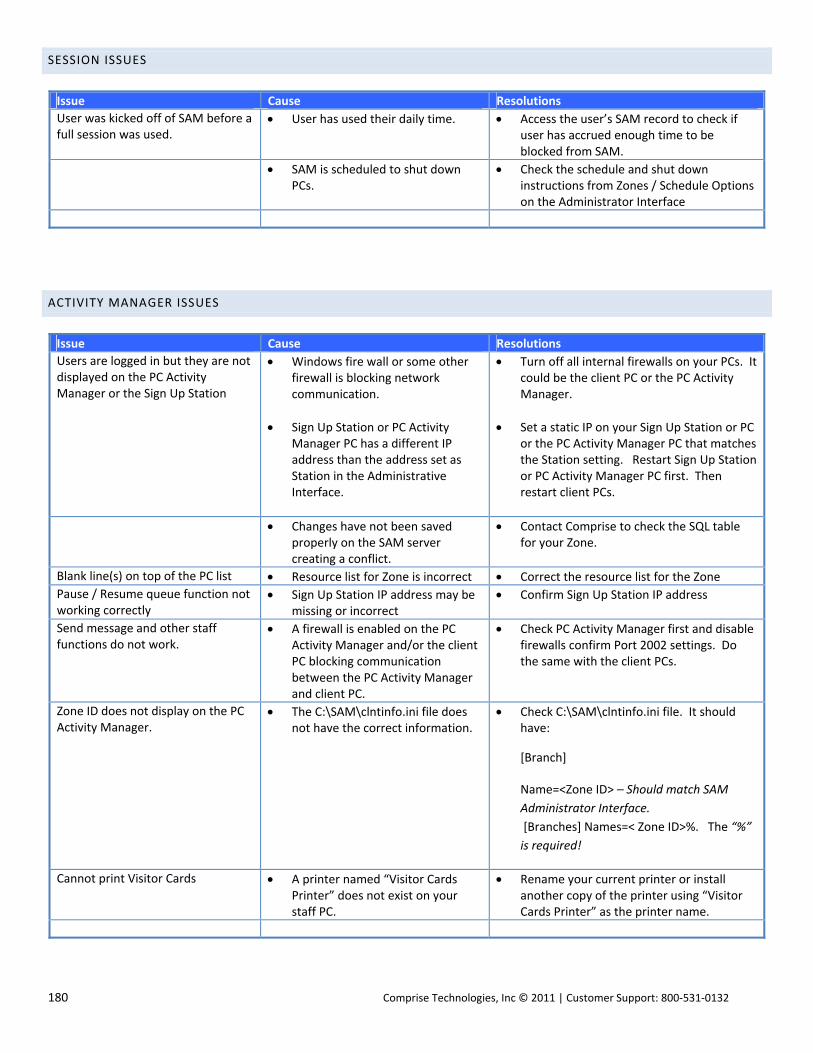
180 Comprise Technologies, Inc © 2011 | Customer Support: 800‐531‐0132
SESSION ISSUES
Issue Cause Resolutions
User was kicked off of SAM before a full session was used.
User has used their daily time. Access the user’s SAM record to check if user has accrued enough time to be blocked from SAM.
SAM is scheduled to shut down
PCs. Check the schedule and shut down
instructions from Zones / Schedule Options on the Administrator Interface
ACTIVITY MANAGER ISSUES
Issue Cause Resolutions
Users are logged in but they are not displayed on the PC Activity Manager or the Sign Up Station
Windows fire wall or some other firewall is blocking network communication.
Sign Up Station or PC Activity Manager PC has a different IP address than the address set as Station in the Administrative Interface.
Turn off all internal firewalls on your PCs. It could be the client PC or the PC Activity Manager.
Set a static IP on your Sign Up Station or PC or the PC Activity Manager PC that matches the Station setting. Restart Sign Up Station or PC Activity Manager PC first. Then restart client PCs.
Changes have not been saved properly on the SAM server creating a conflict.
Contact Comprise to check the SQL table for your Zone.
Blank line(s) on top of the PC list Resource list for Zone is incorrect Correct the resource list for the Zone
Pause / Resume queue function not working correctly
Sign Up Station IP address may be missing or incorrect
Confirm Sign Up Station IP address
Send message and other staff functions do not work.
A firewall is enabled on the PC Activity Manager and/or the client PC blocking communication between the PC Activity Manager and client PC.
Check PC Activity Manager first and disable firewalls confirm Port 2002 settings. Do the same with the client PCs.
Zone ID does not display on the PC Activity Manager.
The C:\SAM\clntinfo.ini file does not have the correct information.
Check C:\SAM\clntinfo.ini file. It should have:
[Branch]
Name=<Zone ID> – Should match SAM
Administrator Interface.
[Branches] Names=< Zone ID>%. The “%”
is required!
Cannot print Visitor Cards A printer named “Visitor Cards Printer” does not exist on your staff PC.
Rename your current printer or install another copy of the printer using “Visitor Cards Printer” as the printer name.
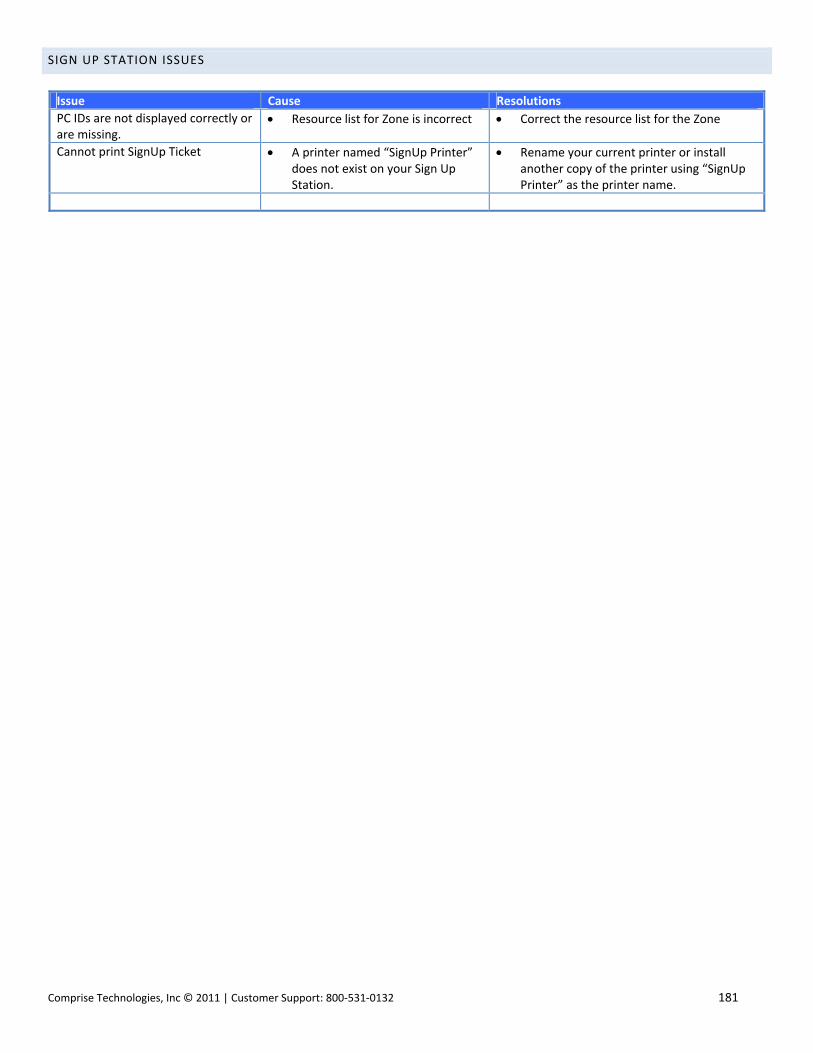
Comprise Technologies, Inc © 2011 | Customer Support: 800‐531‐0132 181
SIGN UP STATION ISSUES
Issue Cause Resolutions
PC IDs are not displayed correctly or are missing.
Resource list for Zone is incorrect Correct the resource list for the Zone
Cannot print SignUp Ticket A printer named “SignUp Printer” does not exist on your Sign Up Station.
Rename your current printer or install another copy of the printer using “SignUp Printer” as the printer name.

182 Comprise Technologies, Inc © 2011 | Customer Support: 800‐531‐0132
PRINT ISSUES
Issue Cause Resolutions
No one can print from SAM First, confirm that this is a SAM issue by closing SAM and printing.
The printer is off, unavailable, unplugged, disconnected from the network, out of paper, or has an error (paper jam).
The printer has been renamed or it has had its IP address changed on the network.
Internal network is down. You can ping the printer from any PC on that network to see if there is communication.
SAM printing did not start when the PC started up. The SAM Print Icon is not present in the system tray.
If you cannot print without SAM, printing problem is unrelated to SAM. If this is the case, contact your network administrator.
Check printer status.
Verify that the printer is at the IP address that is indicated in the “Print Options” in Sam Administrator Interface. Change either Interface settings or printer settings to match.
Check network cable connections. Reset your switch. Contact your network provider.
Restart the PC and ensure that SAM Printing is started. If not, check to see if there is any blocking software (Symantec or other brand) blocking this program and check the firewall.
Error: “Due to printer settings, you cannot print this document…”
# of pages in print job is greater than page limit set in the Web Interface under Print Options.
The printer driver language in the Interface does not match with the driver selected on the client PC
Page limit may be set to 0 pages (0=can’t print). Change page limit to greater than 0.
Confirm printer driver language is same on Interface and client PC.
# of pages and/or cost not accurate PCL language is not correct.
Word may have background printing enabled.
Try changing PCL language to PCL5, PCL6, or PCL7
Confirm Word does not have background printing enabled.
SAM print manager window does not display. Or, Print document encountered error… message comes up.
SAM administrator interface has not been set up for this printer. Parameters need to be set each time a printer is added.
Any change in the name (spaces, caps, etc) will create another instance of the printer on the SAM server. Printer names should be consistent under Print Control on the SAM administrator interface and SAM client PCs.
Update administrator interface with correct printer parameters. Printer list with correct price per page, page limit, applications, and PCL language.
Check the printer name on PC. Rename it to match the printer name on the SAM administrator interface under Print Control.

Comprise Technologies, Inc © 2011 | Customer Support: 800‐531‐0132 183
PRINT ISSUES (CONT)
Issue Cause Resolutions
SAM print manager window displays and print job is interrupted because the user has no $.
User cannot print because they do not have money in their account. User thinks they should have sufficient funds.
Use print preview to see the page count of the document. Have user exit and re‐enter the account.
SAM print manager window displays, user approves job, but nothing happens.
Printer Security does not have the user: Everyone.
In the printer properties, go to the Security tab. Confirm Everyone exists with all Allow boxes checked. If not, just add Everyone and check all Allow boxes.
SAM Print window displays, user approves job, the status box progresses, but nothing prints.
Print Processor is not set to WinPrint with Data Type RAW.
In the Print Processor window, select WinPrint with Data Type RAW.
SAM Print window displays, user approves job, the status box progresses, but the print job prints several pages of random characters.
Printer driver not compatible with SAM.
Printer PCL language not set or correct on SAM administrator interface.
Enable Advanced Features box may be checked in printer properties.
Load PCL driver from manufacturer’s web site or disk.
In the SAM administrator interface, try PCL5, PCL6, or PCL7. Restart your computer and test.
Confirm the Enable Advanced Features box is not checked.
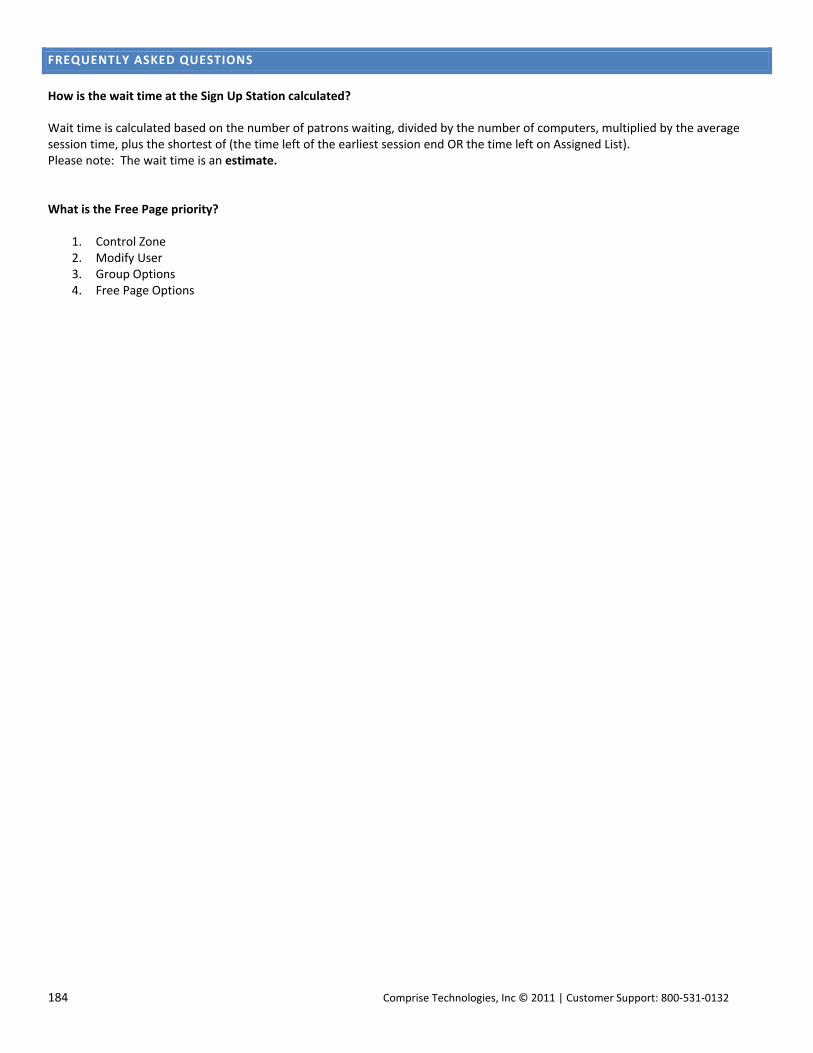
184 Comprise Technologies, Inc © 2011 | Customer Support: 800‐531‐0132
FREQUENTLY ASKED QUESTIONS
How is the wait time at the Sign Up Station calculated?
Wait time is calculated based on the number of patrons waiting, divided by the number of computers, multiplied by the average session time, plus the shortest of (the time left of the earliest session end OR the time left on Assigned List). Please note: The wait time is an estimate. What is the Free Page priority?
1. Control Zone 2. Modify User 3. Group Options 4. Free Page Options

Comprise Technologies, Inc © 2011 | Customer Support: 800‐531‐0132 185
GLOSSARY OF TERMS
Branch (Term no longer
applicable)
A Branch is a term used to describe library locations in earlier versions of SAM. It is no
longer used in SAM version 9.0 and later.
Client (Unchanged from earlier
versions)
A Client is any PC on which Comprise proprietary software is installed; it is the secondary
licensing unit for SAM software.
Control Zone (Term referred to
Zone in SAM v8.5 and earlier)
A Control Zone is another way to configure SAM differently for certain PCs without
acquiring additional Location licensing. Control Zones offer a limited subset of
configuration options.
Location (Term unchanged from
earlier versions)
A Location is a physical description; it is the primary licensing unit for SAM software.
OPAC SAM Catalog PC. SAM offers flexibility in selecting links displayed within the catalog. For
example, a user can click on a link and go to an author’s website. SAM will recognize the
click to the author’s website as acceptable. The user will not be allowed to go past the
number of “Clicks Beyond” specified in OPAC Options. If a user tries to go past the
allowed clicks, SAM will automatically redirect the user to the Catalog Start Page URL.
Region (Term unchanged from
earlier versions)
A region consists of one or more locations that are configured under the same
Administrative authority but organized together so that their data and reports can be
viewed by a specific authentication level.
Zone (Term referred to Virtual
Location in SAM v8.5 and earlier)
A Zone is a way to configure SAM differently for certain PCs without acquiring additional
Location licensing. A Zone is typically a section of a Location in which SAM is configured
differently than elsewhere in that Location, for example, The Kids Section. Another use
of a Zone differentiates PCs by purpose. For example, Express Computers can be
configured under common Zone settings regardless of their physical location. All SAM
configuration options resolve to the Zone level.

186 Comprise Technologies, Inc © 2011 | Customer Support: 800‐531‐0132
CHECK OUT THESE OTHER COMPRISE SOLUTIONS! – SALES: 800‐854‐6822
An access management, point of sale, or self‐service solution from Comprise is an investment in a flexible, expandable Smart web‐
based architecture. All Comprise' solutions can be leveraged from a single SmartServer linked with your library's ILS or organizations
database. All Comprise solutions communicate with leading ILS databases, Microsoft SQL, and integrate seamlessly with each other
offering unparalleled flexibility.
Today you might be interested in access management, but tomorrow you find that you also need a financial management
solution. Comprise offers you the flexibility to upgrade and expand with one server that can manage multiple locations from one
central location. To purchase these add‐on products contact your Comprise Sales Representative at 800‐854‐6822.
PC ACCESS MANAGEMENT
SAM Professional is our flagship access management solution. It is available in two versions to
meet the needs and objectives of different library and public service organizations. 100%
centralized management, access automation, and privacy protection are core to both versions.
Simpler SAM is our hosted version of SAM. It is our entry level access management program
that allows smaller organizations to implement the core features of SAM without the overhead
of a server or other networking hardware.
POINT OF SALE
Smart Money Manager is a point of sale solution specifically designed for the library
environment. It links with your ILS to clear fines/fees in a single step, as well as handling waives
and multiple family member payments.
SELF‐SERVICE SOLUTIONS
Payment Centers (Pictured Right) enable anyone to make self‐service payments and purchases
without any staff involvement. They fully automate the handling of bills, coins, and bankcards,
and return change for unspent funds. Use them to let patrons or visitors pay for fines, print,
copy, or other charges.
SmartPay allows patrons to make fine/fee payments and anyone to make donations to your
library over the Internet. It’s easy to use, convenient, and runs from your website.

Comprise Technologies, Inc © 2011 | Customer Support: 800‐531‐0132 187
We’re Here to Help!
CALL 800‐531‐0132
©2011 COMPRISE TECHNOLOGIES, INC
1041 ROUTE 36 WEST PO BOX 425
NAVESINK, NJ 07752
SALES: 800‐854‐6822 CUSTOMER SUPPORT: 800‐531‐0132
WWW.COMPRISETECHNOLOGIES.COM