salesware access control -...
TRANSCRIPT

1
Salesware Access Control Version 4.2
Siriusware, Inc. 302 Camino de la Placita
Taos, NM 87571 575.751.0633
www.siriusware.com/docs www.siriusware.com/training
google.siriusware.com

2
Copyright Copyright 2013 Siriusware®, Incorporated. All rights reserved. NOTICE: All information contained herein is the property of Siriusware, Incorporated. No part of this publication (whether in hardcopy or electronic form) may be reproduced or transmitted, in any form or by any means, electronic, mechanical, photocopying, recording, or otherwise, without the prior written consent of Siriusware, Incorporated. The software, which includes information contained in any databases, described in this document is furnished under a license agreement and may be used or copied only in accordance with the terms of that agreement. This publication and the information herein is furnished AS IS, is subject to change without notice, and should not be construed as a commitment by Siriusware, Incorporated. Siriusware, Incorporated assumes no responsibility or liability for any errors or inaccuracies, makes no warranty of any kind (express, implied, or statutory) with respect to this publication, and expressly disclaims any and all warranties of merchantability, fitness for particular purposes, and non-infringement of third party rights.

3
Access Control
SALESWARE ACCESS CONTROL ......................................................................................................... 1
COPYRIGHT ............................................................................................................................................. 2
ACCESS CONTROL ................................................................................................................................. 3
INTRODUCTION ......................................................................................................................................11
INSTALLING AND USING SCANMAN MODULE ...................................................................................11
Overview.........................................................................................................................................................................................................11
Preparation ....................................................................................................................................................................................................11 Wireless network/access point(s) ................................................................................................................................................................ 11
The following are some general guidelines that pertain to all access points: ....................................................................................11 Host PC ....................................................................................................................................................................................................... 12
Install ActiveSync or Windows Mobile Device Center .........................................................................................................................12 Programming the cradle .........................................................................................................................................................................13
Mobile computer/scanner ........................................................................................................................................................................... 13 Connecting to ActiveSync and Windows Mobile Device Center ..........................................................................................................14
To configure the MC9090-G (Windows Mobile 5.0) and MC5590 (Windows Mobile 6.5): ...........................................................14 Wireless network ...................................................................................................................................................................................16
To configure the MC9090-G (Windows Mobile 5.0) and MC5590 (Windows Mobile 6.5): ...........................................................16 ScanMan software ...................................................................................................................................................................................... 20
Installation .....................................................................................................................................................................................................21 Connection to PC with ActiveSync or Windows Mobile Device Center.................................................................................................... 21
PDT7246 ................................................................................................................................................................................................21 MC9090-G and MC5590 .......................................................................................................................................................................21
Copying files to the mobile computer/scanner ........................................................................................................................................... 21 MC9090 and MC5590 ...........................................................................................................................................................................21
To copy files to the PPT2846, PPT8846, MC9060-G, MC9090-G and MC5590: ............................................................................21 Updating ScanMan (all models) ................................................................................................................................................................. 23 Cold boot/hard reset .................................................................................................................................................................................... 23
Configuration .................................................................................................................................................................................................23 ScanMan module licensing ......................................................................................................................................................................... 23 SalesEZ settings .......................................................................................................................................................................................... 24 Rollover setting ........................................................................................................................................................................................... 25
The rollover setting works like this: ..................................................................................................................................................25 Example: ...........................................................................................................................................................................................26 The rollover setting can also be set by scanning: ..............................................................................................................................26
Setting .INI settings .................................................................................................................................................................................... 26 Sounds ........................................................................................................................................................................................................ 27 Miscellaneous ScanMan .INI settings......................................................................................................................................................... 27
Example: ...........................................................................................................................................................................................28 Example: ...........................................................................................................................................................................................28
ScanMan use ..................................................................................................................................................................................................29

4
Launching ScanMan module ...................................................................................................................................................................... 29 ScanMan interface ...................................................................................................................................................................................... 29
Date and time .........................................................................................................................................................................................30 Main display area ...................................................................................................................................................................................30 Connect button .......................................................................................................................................................................................31 Config button .........................................................................................................................................................................................31 Manual button ........................................................................................................................................................................................32 Counters display ....................................................................................................................................................................................33 Location and operator information ........................................................................................................................................................34 Quit button .............................................................................................................................................................................................34 ScanInfo and PassInfo buttons ...............................................................................................................................................................35 E-Msg button .........................................................................................................................................................................................35
Location and operator input ........................................................................................................................................................................ 35 Example ............................................................................................................................................................................................36
Validation ................................................................................................................................................................................................... 37 Scanning passes and tickets ...................................................................................................................................................................37 Trickling.................................................................................................................................................................................................39 Manual entry of pass/access number......................................................................................................................................................39
Example: ...........................................................................................................................................................................................39 Each scan event includes the location and the validation result .............................................................................................................39
Exiting ScanMan module ........................................................................................................................................................................... 40 Advanced features ...................................................................................................................................................................................... 40
Blocking access to physical locations ....................................................................................................................................................40 Example ............................................................................................................................................................................................41
Obtain scan information .........................................................................................................................................................................41 Obtain pass or ticket information ...........................................................................................................................................................42 Inquiry mode ..........................................................................................................................................................................................42 E-Messages ............................................................................................................................................................................................43 LocOp setting .........................................................................................................................................................................................44 Hotlist functionality ...............................................................................................................................................................................45
How to create a pass Hotlist for offline scanning: ............................................................................................................................45 Results: ..............................................................................................................................................................................................46
ConfigCode setting ................................................................................................................................................................................47 Example: ...........................................................................................................................................................................................47
Count ......................................................................................................................................................................................................48 Reconnect interval .................................................................................................................................................................................49 Expiration date checking ........................................................................................................................................................................49 Log verbosity .........................................................................................................................................................................................49
Example: ...........................................................................................................................................................................................49 Log verbosity can be set with Config menu off .....................................................................................................................................50 Old log files are retained ........................................................................................................................................................................50 DCI setting .............................................................................................................................................................................................50
Example: ...........................................................................................................................................................................................50 Prepend setting .......................................................................................................................................................................................50
Example: ...........................................................................................................................................................................................50 Extract setting ........................................................................................................................................................................................51
Example: ...........................................................................................................................................................................................51 Example: ...........................................................................................................................................................................................51
Card prefixes ..........................................................................................................................................................................................51 Example: ...........................................................................................................................................................................................51
ScanMan configuration barcodes .................................................................................................................................................................52 Log-in: ...............................................................................................................................................................................................53
ScanMan config settings: ............................................................................................................................................................................ 54 Example: ...........................................................................................................................................................................................57
Unit ID ........................................................................................................................................................................................................ 58

5
ID: IDSCAN01 .................................................................................................................................................................................58 ID: IDSCAN02 .................................................................................................................................................................................59 ID: IDSCAN03 .................................................................................................................................................................................59 ID: IDSCAN04 .................................................................................................................................................................................59 ID: IDSCAN05 .................................................................................................................................................................................59 ID: IDSCAN06 .................................................................................................................................................................................59 ID: IDSCAN07 .................................................................................................................................................................................59 ID: IDSCAN08 .................................................................................................................................................................................60 ID: IDSCAN09 .................................................................................................................................................................................60 ID: IDSCAN10 .................................................................................................................................................................................60 ID: IDSCAN11 .................................................................................................................................................................................60 ID: IDSCAN12 .................................................................................................................................................................................60 ID: IDSCAN13 .................................................................................................................................................................................60 Example: ...........................................................................................................................................................................................61
Loading guest pictures on ScanMan ........................................................................................................................................................... 61 Guest pictures are available even if the scan was bad ................................................................................................................................ 61 Birth dates in guest information .................................................................................................................................................................. 62
Diagnosing problems .....................................................................................................................................................................................62 Mobile computer issues .............................................................................................................................................................................. 62
Power .....................................................................................................................................................................................................62 Lock-ups ................................................................................................................................................................................................62
To perform a warm boot: ..................................................................................................................................................................62 To perform a cold boot: .....................................................................................................................................................................62
INSTALLING AND USING GATEKEEPER MODULE .............................................................................63
Overview.........................................................................................................................................................................................................63
Preparation ....................................................................................................................................................................................................63 Computer .................................................................................................................................................................................................... 63 Windows 7 certification .............................................................................................................................................................................. 65 Configuration of input equipment ............................................................................................................................................................... 65
Installation .....................................................................................................................................................................................................66 Installing GateKeeper module .................................................................................................................................................................... 66
To install GateKeeper module: .........................................................................................................................................................66 Updating GateKeeper module .................................................................................................................................................................... 67
Configuration .................................................................................................................................................................................................67 GateKeeper module licensing ..................................................................................................................................................................... 67 GateKeeper module can be run from a salespoint ...................................................................................................................................... 68
Example: ...........................................................................................................................................................................................68 Standard GateKeeper.INI settings .............................................................................................................................................................. 68 Miscellaneous GateKeeper .INI settings ..................................................................................................................................................... 70
Example: ...........................................................................................................................................................................................71 Advanced features ...................................................................................................................................................................................... 71
Blocking access to physical locations ....................................................................................................................................................71 Rollover setting ......................................................................................................................................................................................71
The rollover setting works like this: ..................................................................................................................................................72 Example: ...........................................................................................................................................................................................72
Card prefixes ..........................................................................................................................................................................................72 Expiration date checking ........................................................................................................................................................................73 DCI setting .............................................................................................................................................................................................73 Prepend setting .......................................................................................................................................................................................73

6
Extract setting ........................................................................................................................................................................................73 Gate/turnstile configuration ........................................................................................................................................................................ 74 Manual settings for scan location, date and/or time .................................................................................................................................... 75 GateKeeper can set a location ..................................................................................................................................................................... 76
Customization ................................................................................................................................................................................................76 Sounds ........................................................................................................................................................................................................ 76 Graphics ...................................................................................................................................................................................................... 76 Response screens text ................................................................................................................................................................................. 77 For GateKeeper module, Sales looks for support files and images ............................................................................................................ 78
GateKeeper use ..............................................................................................................................................................................................79 Executing GateKeeper module ................................................................................................................................................................... 79 Program usage ............................................................................................................................................................................................ 79
Scan pass or ticket ..................................................................................................................................................................................79 Example: ...........................................................................................................................................................................................80
Responses displayed after scan ..............................................................................................................................................................80 Trickling.................................................................................................................................................................................................81
Displaying a guest’s mug shot .................................................................................................................................................................... 82 Displaying guest information...................................................................................................................................................................... 83 Guest information displays on the Gatekeeper screen ................................................................................................................................ 83 Using GateKeeper module to read rotation detection from a serial port connection .................................................................................. 83 Checkpoint logging ..................................................................................................................................................................................... 84
Example: ...........................................................................................................................................................................................84 Exiting GateKeeper .................................................................................................................................................................................... 85
Diagnosing problems .....................................................................................................................................................................................85
ENCRYPTION ..........................................................................................................................................85
SUPPORT FOR RFID (RADIO FREQUENCY IDENTIFICATION)...........................................................86
RFID overview ...............................................................................................................................................................................................86
Media options .................................................................................................................................................................................................86
Validation options ..........................................................................................................................................................................................87
Hardware options ..........................................................................................................................................................................................87 Printers ........................................................................................................................................................................................................ 87 Transceivers/antennas units (readers) ......................................................................................................................................................... 88
FAQs ...............................................................................................................................................................................................................88 What is the advantage of using pre-encoded numbers on the tags? ............................................................................................................ 88 Can RFID be used in conjunction with Siriusware’s In-House Cards product? ......................................................................................... 88 Our site’s season passes can also be used to store In-House Card funds. Can we continue this program if we switch to RFID? ............. 88 Our Access Control scanning takes place in severe weather (rain, snow, etc.). How does inclement weather affect RFID scanning? .... 88 What is the difference between high frequency and ultra-high frequency? ................................................................................................ 88
GATE ACCESS ........................................................................................................................................89
Functionality ..................................................................................................................................................................................................89

7
Implementation ..............................................................................................................................................................................................89 Changing the IP address ....................................................................................................................................................................90
Configuration .................................................................................................................................................................................................93 Prerequisites for the computer: ................................................................................................................................................................... 93 Setting up the web service: ......................................................................................................................................................................... 93 Setting up the AX Controller hardware: ..................................................................................................................................................... 94 Setting up ww.dll: ....................................................................................................................................................................................... 94 Speed considerations: ................................................................................................................................................................................. 94 Troubleshooting: ......................................................................................................................................................................................... 95 Setting up logging ....................................................................................................................................................................................... 96 Updating ..................................................................................................................................................................................................... 96 No LDT found ............................................................................................................................................................................................ 96 Rebooting the gate ...................................................................................................................................................................................... 96
Salespoint configuration ...............................................................................................................................................................................96 .INI settings ................................................................................................................................................................................................ 96
Example: ...........................................................................................................................................................................................97 XML fields ................................................................................................................................................................................................. 98
Example: ...........................................................................................................................................................................................98 Poe data ...................................................................................................................................................................................................... 98
Example: ...........................................................................................................................................................................................98
AXESS GATE INTEGRATION .................................................................................................................98
Key terms .......................................................................................................................................................................................................99
Axess architecture .......................................................................................................................................................................................100
Product configuration .................................................................................................................................................................................102 Ticket items printed/encoded on reloadable media ................................................................................................................................... 102
Creating Siriusware Access Records ...............................................................................................................................................102 Axess printing of NEW Tickets/Media ...........................................................................................................................................103 E-Commerce considerations ...........................................................................................................................................................103
Ticket items printed/encoded on NON-Reloadable media (one-way tickets) ........................................................................................... 103 Creating Siriusware Access Records ...............................................................................................................................................103 Axess printing of NEW Tickets/Media ...........................................................................................................................................104 E-Commerce considerations ...........................................................................................................................................................105
RELOAD ticket items encoded on reloadable media ............................................................................................................................... 105 Creating Siriusware Access Records ...............................................................................................................................................105 Axess printing of RELOAD ticket items/media ..............................................................................................................................105 E-Commerce considerations ...........................................................................................................................................................106 Example: .........................................................................................................................................................................................107 Example: .........................................................................................................................................................................................107
Pass items printed/encoded on reloadable media ...................................................................................................................................... 111 Axess printing of NEW Pass media: ...............................................................................................................................................111 Printing options ...............................................................................................................................................................................112
RELOAD pass items printed/encoded on reloadable media ..................................................................................................................... 112 Axess printing of RELOAD pass media: ........................................................................................................................................113
Pass renewal/reload considerations for Siriusware Inc. salespoint programs ........................................................................................... 114 In-House Cards (IHC): .........................................................................................................................................................................114 %E discounts: ......................................................................................................................................................................................114
Axess Smart Printer layouts .......................................................................................................................................................................114 RF encoding/SOAP EDE information ...................................................................................................................................................... 115

8
TicketType ......................................................................................................................................................................................115 RF and Barcode ...............................................................................................................................................................................115 POS number and serial number .......................................................................................................................................................116 Pool .................................................................................................................................................................................................116 ReaderPersonGroup ........................................................................................................................................................................116 Week ...............................................................................................................................................................................................116 Time ................................................................................................................................................................................................116 Season .............................................................................................................................................................................................117 Example: .........................................................................................................................................................................................117 Start Date.........................................................................................................................................................................................117 Expiration Date ...............................................................................................................................................................................117 Rides ...............................................................................................................................................................................................117 Period ..............................................................................................................................................................................................118 Points ...............................................................................................................................................................................................118 Available Days ................................................................................................................................................................................118 Restricted Days ...............................................................................................................................................................................118 Hours ...............................................................................................................................................................................................118 CustomerTicketType .......................................................................................................................................................................119 CustomerPersonType ......................................................................................................................................................................119 Production Time Stamp ...................................................................................................................................................................119 Sales Price .......................................................................................................................................................................................119 Free of charge ..................................................................................................................................................................................119 Handfeed .........................................................................................................................................................................................119 Chip ID (WTP) ................................................................................................................................................................................120 External Print ..................................................................................................................................................................................120 Encode Prompt ................................................................................................................................................................................120 BlankType .......................................................................................................................................................................................120
Encoded or not encoded .......................................................................................................................................................................120 Logic ...............................................................................................................................................................................................120
Required layout tags based on Axess ticket type ...................................................................................................................................... 121 Core Ticket Type 1: Pool - Single or Multi Ride .................................................................................................................................121
Sample Ticket Type 1 RF layout: ...................................................................................................................................................121 Core Ticket Type 2: Single or Multi-Day Pass ....................................................................................................................................121
Sample Ticket Type 2 RF layout: ...................................................................................................................................................122 Core Ticket Type 3: Single or Multi-Day Pass in Depot .....................................................................................................................122
Sample Ticket Type 3 RF layout: ...................................................................................................................................................122 Core Ticket Type 4: Point Value Ticket ..............................................................................................................................................123
Sample Ticket Type 4 RF layout: ...................................................................................................................................................123 Core Ticket Type 8: Non-Consecutive Ticket (X of Y days) ..............................................................................................................123
Sample Ticket Type 8 RF layout: ...................................................................................................................................................124 Core Ticket Type 9: Non-Consecutive Ticket (X of Y days) in Depot ................................................................................................124
Sample Ticket Type 9 RF layout .....................................................................................................................................................124 Core Ticket Type 10: Non-Consecutive Season Pass (X days in season) ............................................................................................125
Sample Ticket Type 10 RF layout:..................................................................................................................................................125 Core Ticket Type 15: Season Pass .......................................................................................................................................................125
Sample Ticket Type 15 RF layout:..................................................................................................................................................126 Core Ticket Type 25: Single or Multi-Ride per Day............................................................................................................................126
Sample Ticket Type 25 RF layout:..................................................................................................................................................126 WTP number ............................................................................................................................................................................................. 126 Guest photos ............................................................................................................................................................................................. 127 Additional printed data ............................................................................................................................................................................. 127
Example: .........................................................................................................................................................................................127 Font options .....................................................................................................................................................................................128
Printing coordinates .................................................................................................................................................................................. 129 To print or not to print: ........................................................................................................................................................................129
Encoded data for Siriusware salespoint functions .................................................................................................................................... 129

9
To encode the Siriusware segment with magswipe-like information: .............................................................................................130 Example: .........................................................................................................................................................................................130
Sample layouts .......................................................................................................................................................................................... 130 Purchase of an Adult All-Mountain Season Pass – Portrait .................................................................................................................131
Example: .........................................................................................................................................................................................131 Purchase of an Adult All-Day All-Mountain Ticket on Reloadable Stock – Landscape .....................................................................131
Example: .........................................................................................................................................................................................131 Purchase of an Adult All-Day All-Mountain Ticket on One-Way (non-reloadable) Stock – Portrait .................................................132
Example: .........................................................................................................................................................................................132 Purchase of Adult-Any-5-Days-During-Season Pass on Reloadable Stock – Landscape ....................................................................133
Example: .........................................................................................................................................................................................133 Adult All-Day All-Mountain RELOAD of existing media ..................................................................................................................133
Example: .........................................................................................................................................................................................133 Additional printing options ....................................................................................................................................................................... 134
Text Merge layout using the Axess printer ..........................................................................................................................................135 Example: .........................................................................................................................................................................................135 Important notes for the interleaved 2 of 5 barcode font: .................................................................................................................135
Basic operations ...........................................................................................................................................................................................136 Selling and printing................................................................................................................................................................................... 136 Reloads at a salespoint .............................................................................................................................................................................. 137
Media-present reloads ..........................................................................................................................................................................137 Option 1...........................................................................................................................................................................................137 Option 2...........................................................................................................................................................................................137
Media-not-present reloads....................................................................................................................................................................138 Option 1...........................................................................................................................................................................................138 Option 2...........................................................................................................................................................................................139
Reloads in E-Commerce module .............................................................................................................................................................. 140 Exchanges ................................................................................................................................................................................................. 140
Steps for exchanging: ......................................................................................................................................................................140 Refunds ..................................................................................................................................................................................................... 141 Lookups .................................................................................................................................................................................................... 141 Voids 141 Individual blackouts.................................................................................................................................................................................. 141 Recycling cards ......................................................................................................................................................................................... 142
Salespoint configuration .............................................................................................................................................................................142 INIs 142
Sales32c.INI ....................................................................................................................................................................................142 Ports.INI ..........................................................................................................................................................................................143
Printer configuration ................................................................................................................................................................................. 144 Example: .........................................................................................................................................................................................144 To accommodate this situation: .......................................................................................................................................................144
BatchPrint ....................................................................................................................................................................................................145
Installation ...................................................................................................................................................................................................146 Axess Smart Printer .................................................................................................................................................................................. 146 Axess SOAP EDE interface ...................................................................................................................................................................... 147
Prerequisites: ...................................................................................................................................................................................147 Installation of stored procedures and tables: ...................................................................................................................................147 Creating a SQL Server Agent job: ..................................................................................................................................................148
Sales 148 Sales Host ................................................................................................................................................................................................. 148 SalesEZ ..................................................................................................................................................................................................... 149 SysManager .............................................................................................................................................................................................. 149

10
E-Commerce ............................................................................................................................................................................................. 149 API (ww.dll) information ......................................................................................................................................................................... 150
Troubleshooting ...........................................................................................................................................................................................150 Turning on Axess Smart Printer logging .................................................................................................................................................. 150 Axess Smart Printer does not initialize ..................................................................................................................................................... 151 Printer Intensity needs to be adjusted in order to print readable text on the card stock ............................................................................ 152
Example: .........................................................................................................................................................................................152 Random printer errors (hard to reproduce, mysterious problems) ............................................................................................................ 152 Verification of data forwarding and re-sending to Axess ......................................................................................................................... 152 E-Commerce: Lookup button on WTPReload.aspx produces no results .................................................................................................. 153 No data is showing on the Scanned Usage Report in SysManager (or the other scan reports) ................................................................. 154

11
Introduction
Access Control refers to the verification of the identity and rights of a person seeking access to a controlled area. In Salesware, the two primary means of achieving this are through use of a handheld scanner or a gate.
This document is divided into three parts:
• Installing and using ScanMan (also referred to as Handheld Access) • Installing and using GateKeeper (also referred to as Gate Access) • Axess Gate Control
Installing and using ScanMan module
Overview
This section of the document outlines the recommended procedure for installing and using the ScanMan software for scan access. ScanMan module is designed as an “operator controlled” Access Control system. It is set up to allow operators to “scan” a ticket or pass of a customer and receive a response as to whether it is valid.
ScanMan module runs on mobile computers/scanners from Symbol Technologies. Currently, Siriusware Inc.® supports different models from Symbol (also noted are the most common operating systems Siriusware Inc. supports on the devices): MC9090-G (Windows Mobile 5.0), MC9190 (1D/2D), MC 9500 (Verizon / AT &T capable) MC70 (Verizon and AT&T capable) and MC5590 (Windows Mobile 6.5).
There are three hardware components in the wireless scanning system: access points, handheld mobile computers/scanners and programming cradles from Symbol Technologies.
The access point is the device used by the mobile computers/scanners to communicate with the network. This is the first device to configure. The programming cradles connect to a USB port (or possibly a serial port) on a PC used to configure the mobile computer/scanner and load the ScanMan application onto the unit. The programming cradle is set up after the access points. The mobile computer/scanner scans a ticket or pass and uses the access point to communicate with the network. The mobile computers are configured as the last step.
Preparation
Wireless network/access point(s)
The setup of the wireless access point is specific to the brand and model of access point that is being used. Consult the documentation for your access point.
The following are some general guidelines that pertain to all access points: Generally, access points are configured either through special software or through a web browser. Through the configuration method specific to your access point, several settings must be set specific to your area. These settings are described in the following table:

12
Setting Value
Unit name SiteAP1
IP address 192.168.0.100
Gateway IP address 192.168.0.1
Subnet mask 255.255.255.0
Net_ID (ESS) SSID
Antenna selection Diversity = On
DHCP Disabled
Change the IP settings to match your network. The Unit name and Net _ID can be anything you designate. We recommend you be specific to your location. All access points and handhelds use the same net id (ESSID). However, the IP address and Unit name must be different for all access points. Change diversity to on. Change DHCP to disabled – Siriusware Inc. has discovered that scanners often are not able to regain their IP addresses when disconnected if DHCP is used. Fixed IP addresses are recommended.
Test your configuration by “pinging” the access points from any computer on the network.
Note: For security purposes, Siriusware, Inc. recommends setting up your access point to only talk to designated MAC addresses. The MAC address is like a serial number in the handheld unit and can be obtained on the handheld. Please consult the documentation for the unit for more information
Host PC
To install the ScanMan software, it is necessary to connect the cradle for the mobile computer to a PC running Microsoft ActiveSync software (Windows XP and earlier) or Windows Mobile Device Center (Vista and later). The cradle is generally connected via a USB port (communications port) on the PC, but older models allow for use with a serial connection. With a USB connection, port communication parameters like baud rate are automatically discovered and configured for you. With a serial connection, you have to specify port communication parameters yourself.
Install ActiveSync or Windows Mobile Device Center
If you are using Windows XP or earlier, download ActiveSync from the Microsoft web site. This can be found by going to the site (http://www.microsoft.com) and searching for ActiveSync. If you are using Windows Vista or Windows 7, download Windows Mobile Device Center from the Microsoft web site. This can be found by going to the site (http://www.microsoft.com) and searching for Mobile Device Center. ActiveSync and Windows Mobile Device Center allow you to copy files to and from the mobile computers.

13
After downloading and installing ActiveSync or Windows Mobile Device Center, it is necessary to verify that the software is properly set up. To do this, go Connection Settings. The Connection Settings dialog for ActiveSync is shown in the following screen capture:
Verify that the proper ports are allowed and, if using a serial connection, the proper COM port.
Programming the cradle
Preparing the cradle involves connecting it to power and to the computer with a USB cable or possibly a serial cable. The rest is done through ActiveSync or Windows Mobile Device Center.
For more information, please see the manufacturer’s documentation for the cradle you are using.
Mobile computer/scanner
Before configuring the units, Siriusware, Inc. recommends that you charge the batteries for at least four hours. Familiarize yourself with the operations of the mobile computers from the manual. Power on the systems and follow the instructions for calibrating the touch screen.
On the MC9090-G units, the keyboard appears when it is necessary to enter text. Alternatively it can be brought up by tapping the keyboard icon in the bottom right corner. The MC9090-G unit also has a physical keyboard. The MC5590 unit provides a keyboard icon on the bottom of the screen in the center.
14
Connecting to ActiveSync and Windows Mobile Device Center
If you are using a serial connection, it is necessary to change the communications method on the mobile computer for the method of connection. If you are using a USB connection, the USB protocol negotiates the appropriate parameters automatically. Following are the methods used for the various units supported. The steps were developed using ActiveSync, but the steps on Windows Mobile Device Center are very similar.
Note: In these steps you are simply configuring the unit to connect to the PC. You aren’t using the cradle yet to sync the scanner with the PC.
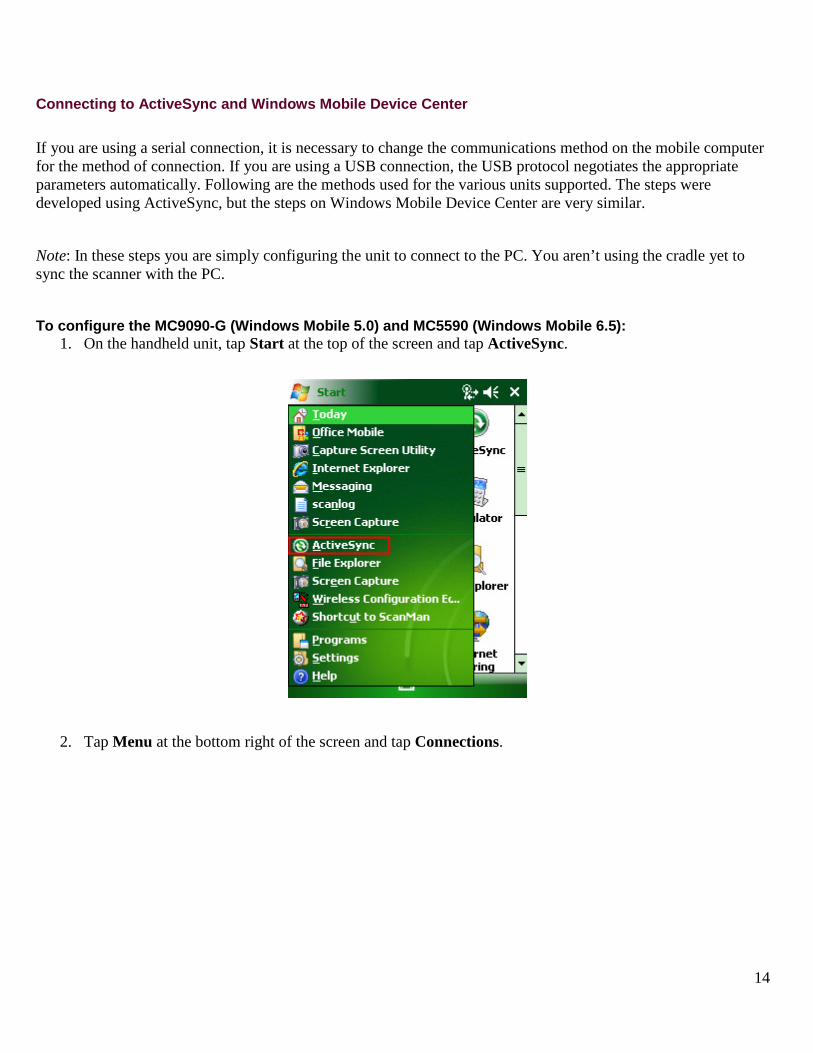
To configure the MC9090-G (Windows Mobile 5.0) and MC5590 (Windows Mobile 6.5):
1. On the handheld unit, tap Start at the top of the screen and tap ActiveSync.
2. Tap Menu at the bottom right of the screen and tap Connections.

15
3. Verify that Synchronize all PCs using this connection: is checked and that ‘USB is selected from the dropdown box.
4. Tap ok on the upper right corner to exit the Connections dialog. 5. Tap ok in the upper right corner to exit ActiveSync.

16
Wireless network
The following are the methods used for the various units supported to connect to a wireless network. The steps were developed using ActiveSync, but the steps on Windows Mobile Device Center are very similar.
Note: Siriusware Inc. recommends assigning static IP addresses for each handheld unit.
To configure the MC9090-G (Windows Mobile 5.0) and MC5590 (Windows Mobile 6.5):
1. On the handheld unit, tap Start at the top left of the screen and tap Wireless Configuration Editor.
2. From the Config Editor dialog, click Find WLANs.

17
3. The device searches for existing WLANs and populates the list. If you have configured your access point correctly, it appears in this list.
Note: From the Start > Settings > Connections tab menu, you can use the Wi-Fi and Wireless Manager programs to get specific information about how the device is responding to your wireless network. If your device is not discovering your wireless network, you are able to find out what the problem is via these programs.

18
4. Double tap on your access point and the CONNECT/REFRESH popup menu appears.
5. Tap on CONNECT and enter your Profile Name: and the ESSID: that corresponds to your access point.
6. Tap Next > and continue entering the information that corresponds to your access point, including the static IP address of handheld device.

19
7. Save your profile. 8. Double-tap on your profile and click Connect to connect to your access point.
20
ScanMan software
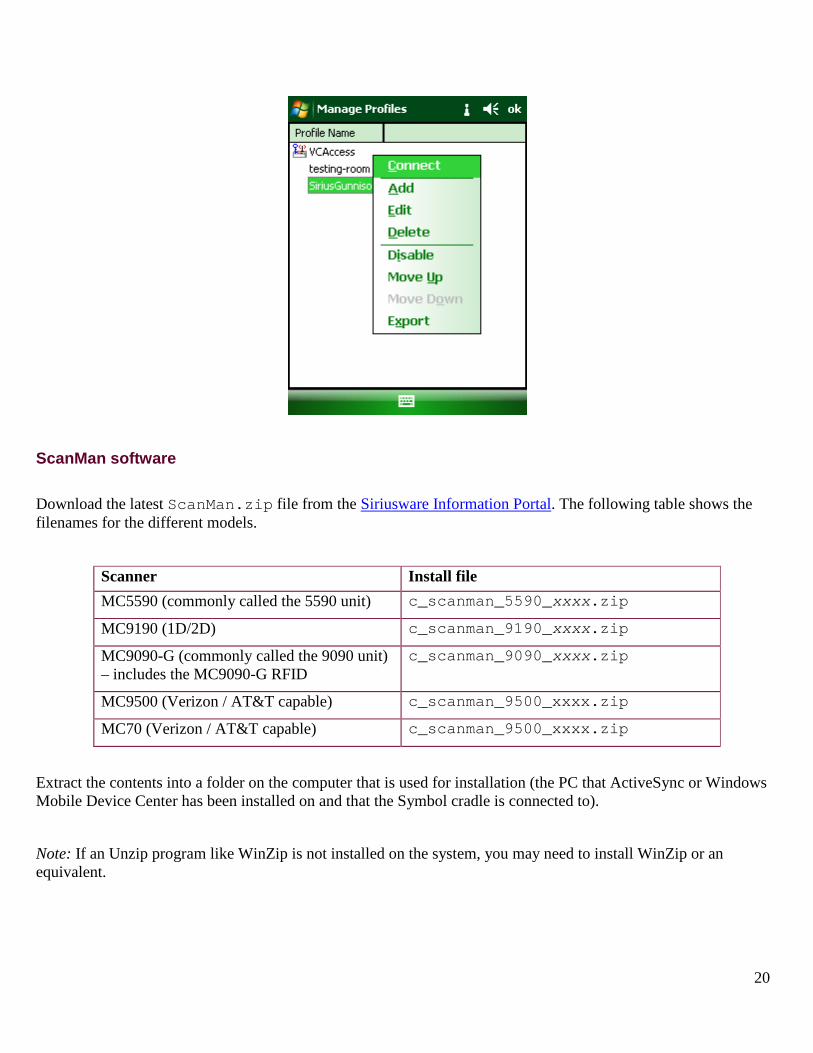
Download the latest ScanMan.zip file from the Siriusware Information Portal. The following table shows the filenames for the different models.
Scanner Install file MC5590 (commonly called the 5590 unit) c_scanman_5590_xxxx.zip
MC9190 (1D/2D) c_scanman_9190_xxxx.zip
MC9090-G (commonly called the 9090 unit) – includes the MC9090-G RFID
c_scanman_9090_xxxx.zip
MC9500 (Verizon / AT&T capable) c_scanman_9500_xxxx.zip
MC70 (Verizon / AT&T capable) c_scanman_9500_xxxx.zip
Extract the contents into a folder on the computer that is used for installation (the PC that ActiveSync or Windows Mobile Device Center has been installed on and that the Symbol cradle is connected to).
Note: If an Unzip program like WinZip is not installed on the system, you may need to install WinZip or an equivalent.

21
Installation
Connection to PC with ActiveSync or Windows Mobile Device Center
Note: For users of the Vista or Windows 7 operating systems, you need to use the new Windows Mobile Device Center instead of ActiveSync.
Note: When connecting a mobile computer to a PC, it is never necessary to set up a Partnership. Rather choose a Guest Partnership (or no partnership, if that is the option given). However, setting up a partnership allows for ActiveSync or Windows Mobile Device Center to be used over the wireless network. See the documentation for ActiveSync or Windows Mobile Device Center and for the mobile computer.
PDT7246
After configuring the unit with the proper Comm Settings (see earlier section) and the PC, making the connection is as simple as navigating to Start > PC Link on the mobile computer.
However, if this does not work, it is recommended that you open ActiveSync on the PC and choose Get Connected… from the File menu. When that is running, select PC Link again on the unit.
In some cases it may be necessary to repeat this procedure a couple of times to get it working. However, it’s also important to check ActiveSync and verify it is properly set up.
MC9090-G and MC5590
After configuring the PC and the unit with the proper settings for ActiveSync/Windows Mobile Device Center, placing the unit in the cradle connected to the PC starts the connection automatically.
For ActiveSync, if this does not work, it is recommended that you open ActiveSync on the PC and choose Get Connected… from the File menu. In some cases it may be necessary to repeat this procedure a couple of times to get it working. However, it’s also important to check ActiveSync and verify it is properly set up. Similarly, for Windows Mobile Device Center you should check your configuration settings.
Copying files to the mobile computer/scanner MC9090 and MC5590 To copy files to the PPT2846, PPT8846, MC9060-G, MC9090-G and MC5590:
1. With the unit connected to the PC via ActiveSync, from the ActiveSync window, click the Explore button. This brings up the “drive” on the mobile computer. If you are using Windows Mobile Device Center, you click Browse the contents of your device from the File Management section of the interface.

22
2. The following files need to be copied into the Application folder (PPT2846, PPT8846, MC9060-G) or Program Files/ScanMan (MC9090-G and MC5590) folder on the mobile computers (you need to create the ScanMan folder yourself): goodoff.wav, goodlive.wav, badlive.wav, badoff.wav, mail.wav, scanman.exe.
3. Create a shortcut to the scanman.exe file by right-clicking the icon and choosing Create Shortcut.
Note: Under ActiveSync, you have to have the scanner in the cradle when you create the shortcut and you have to be connected to ActiveSync or it won’t work. Windows Mobile Device Center doesn’t provide a Create Shortcut option, so you have to create a shortcut on the scanner by navigating to the ScanMan application and clicking to get a Menu. Then you copy, and then when you go to paste in the new location there is an option to Paste Shortcut. To get this menu in the new location just press and hold the pointer.
4. Rename the shortcut to ScanMan. 5. Cut the shortcut by right-clicking it and choosing Cut. 6. Navigate to the Windows/Start Menu folder.
Note: If you want to use the scanner just for ScanMan module and it starts up by itself all the time, you can put the shortcut in Windows/Startup instead of Windows/Start Menu.
7. Paste the shortcut to this location. 8. All programs here can be removed. However, it is recommended to leave the folders named Programs and
Settings in place.

23
Updating ScanMan (all models)
Download the latest ScanMan.zip file into the ScanMan folder on the Siriusware server from the Siriusware Information Portal. Extract the contents into a folder on the computer that is used for installation (the PC that ActiveSync has been installed on and the Symbol cradle connected to).
Although all files are provided in the .zip, updating of the unit involves only the copying of scanman.exe from this ScanMan folder to the Program Files/ScanMan folder on the MC9090-G and MC5590.
Cold boot/hard reset
Note: To perform a cold boot of the MC9090-G and MC5590 units, you need a special file from Motorola, available from the Motorola web site. For more information, please contact Siriusware Technical Support.
After all steps have been completed for configuring the units and installing ScanMan module using the Advanced Installation Methods, it is recommended to perform a “cold boot” on the unit. This is a good test of the configuration of the unit. In fact, the step-by-step configuration methods listed earlier in this document can be by-passed if these Advanced Installation Methods are used.
Configuration
ScanMan module licensing
ScanMan module is a licensed salespoint. A ScanMan station must be on the Sales Point Licenses grid in SysManager > Preferences. To add it, go to SysManager > Activities > System Lists > Salespoints > New and create a new salespoint in ScanMan mode.
When you click New, you are presented with the following dialog:

24
The salespoint name for ScanMan, assigned in SysManager and the unit setting in ScanMan.INI need to be exactly the same.
You can also select the mode from the SysManager > Activities > System Lists > Salespoints > New/Edit > Licensing tab on the Salespoint Configuration dialog.
SalesEZ settings
The following settings are included in the ScanMan.INI file the first time ScanMan module is launched and pertain to the connection to SalesEZ application:
Setting Value IP 127.0.0.1 Port 4203 Unit ID See text
Rollover 8 (tenths of a second)
Timeout 30 (tenths of a second)
TrickleDelay 100 (tenths of a second)
TrickleInterval 30 (tenths of a second)

25
All times are in tenths of a second, so a value of 30 means three seconds. Rollover month is set to the middle of the off-season (see later section for more on this). Unit ID is used in calls as the salespoint name and is distinct from other ScanMan units and salespoints.
Operator and Location are also used in communication with SalesEZ application, but are set on the unit upon launching ScanMan module.
The above settings are configurable on the unit through the Config dialog. Other settings must be specified in a ScanMan.INI file in the same folder as the program on the Symbol device.
Note: Please see the section Advanced Features for more options that can be set.
Rollover setting
The rollover setting is a mechanism used to check validity of Validation Items based on an expiration date encoded in the item’s barcode. This method is derived from a combination of encoding an expiration date into the validation number and checking that date against a setting in ScanMan.INI. The ScanMan setting used to verify whether an item is valid or not is called the “rollover” setting. The rollover setting was introduced to eliminate the need to encrypt the year part of the date in the barcode (making for a shorter barcode on the ticket).
The rollover setting works like this:
1. Scan the barcode. 2. ScanMan module first reads the information about the expiration date of the ticket (usually included in a
line on the layout involving the syntax encrypt_date(tmp_edate).

26
3. ScanMan module first checks the date of the item–if the expiration date encrypted is earlier than the current date of the PC, the item is automatically invalid.
4. If the item is not expired based on the current date, ScanMan module still attempts to determine whether the item is good for the upcoming season.
5. To determine this, ScanMan module checks its own rollover number vs. the number of the month encrypted in the item expiration date.
6. If the rollover number is on or between today’s date (month) and the number of the month the item expires, the item is assumed to be invalid. The system assumes that the item is from a previous year.
7. As long as the rollover number does not fall on or between today’s date (month) and the number of the month the item expires, it is assumed to be valid.
8. The purpose of this is to determine whether an item you are scanning is supposed to be good for dates still to come in this season at the resort or if the item being scanned is really good for next season at the resort.
Example:
• It’s March of 2012. • You scan a ticket that has an expiration date of 12/25/12 (it has been pre-sold for Christmas of the
next ski season). • Your rollover number is set to 10. • The ticket does not scan as valid, because the rollover number falls between today’s month (3) and
December’s month (12). The rollover setting can also be set by scanning: SETROLLx
Where x is the number of the month.
Note: If your area does not have an “off-season” or you want your tickets to be good for more than one year, you should not encrypt the date into your barcodes. That way, ScanMan does not check the date when scanning and assumes that all tickets are good if you are scanning offline.
Setting .INI settings
While some settings can be changed on the Config dialog of ScanMan module, not all can. However, all .INI settings can be set by scanning an appropriate barcode. This must be done outside of the startup setting of Location and Operator. The following table shows key ScanMan configuration barcodes.
Multiple ScanMan.INI settings by stringing together commands in the following format: SETOPMATT;SETLOC1;SETPIC1. ;SET is necessary for the commands following the first to be read.

27
ScanMan configuration barcode Purpose SETIPx Sets the IP address (e.g., SETIP127.0.0.1)
SETPORTx Sets the port
SETTDx Sets the trickle delay (tenths of a second)
SETTIx Sets the trickle interval (tenths of a second)
SETTOx Sets the time out (tenths of a second)
SETIDx Sets the Unit ID
SETROLLx Sets the rollover month
The exceptions are LOC and OP. While SETLOCxxxxxx and SETOPxxxxxx always set the location and operator, respectively, it’s possible to use LOCxxxxxxx and OPxxxxxx. However, please see the section on LocOp, as this can change the behavior.
Sounds
The device tries to use five .WAV files (which it expects to find in the same folder as Scanman.exe):
Filename Function goodlive.wav For valid scans online
badlive.wav For invalid scans online
goodoff.wav For valid scans offline
badoff.wav For invalid scans offline
mail.wav For new e-message
Note: Sample files come with ScanMan module. You can use any sounds, as long as they are named in this manner, and are 16 bit Stereo to play on the Symbol. You can convert them using the Sound Editor in Windows.
Miscellaneous ScanMan .INI settings
This following table lists and describes other ScanMan .INI settings.

28
Setting Description AllowedSiteID You can set ScanMan to accept multiple site IDs by using, for example,
AllowedSiteID=1,2. Passes that do not have a correct site ID get a, “Bad Barcode” message when scanned.
DateFormat Used to set ScanMan to display a different date/time format from the default US format (9090 only). Example: DateFormat=MM/DD/YYYY (default) DateFormat=DD/MM/YYYY DateFormat=YYYY/MM/DD DateFormat=MM.DD.YYYY DateFormat=DD.MM.YYYY DateFormat=YYYY.MM.DD DateFormat=MM-DD-YYYY DateFormat=DD-MM-YYYY DateFormat=YYYY-MM-DD
NoDec='X' Enables you to force a card number in the gst_pass.swipe_no field to validate using the pass validation logic (9090 only). You must remove the same prefix from the prefix.txt file for the card validation logic to be used. Also, you must have SysManager > Preferences > Access Control defined for the prefix and turn off cascading validation.
The setting Card=' B' is also working fine. Cards must always be fifteen or more characters in length and be preceded by a prefix defined by the Card=' B' setting in the .INI file. B is the default.
Note: The single quotes surrounding the prefixes are always good practice, but only strictly necessary when you are trying to include a blank prefix in the list. Also note that this setting says only that this prefix can be a card if the length requirement is met.
The new setting NoDec='MPQ' causes a barcode to not be decrypted when prefixed by something in this list (in this case M, P or Q).
Any text following the prefix is assumed to be the raw number to be sent to SalesEZ application. As always, these settings can be set using scans.
Example: SETNODEC'MPQ' SETCARD' B'
wav Bad scan sound can now be set to 250 (1/4 second) so that it fully performs. To set this, use the following for ScanMan.INI:
wav=250
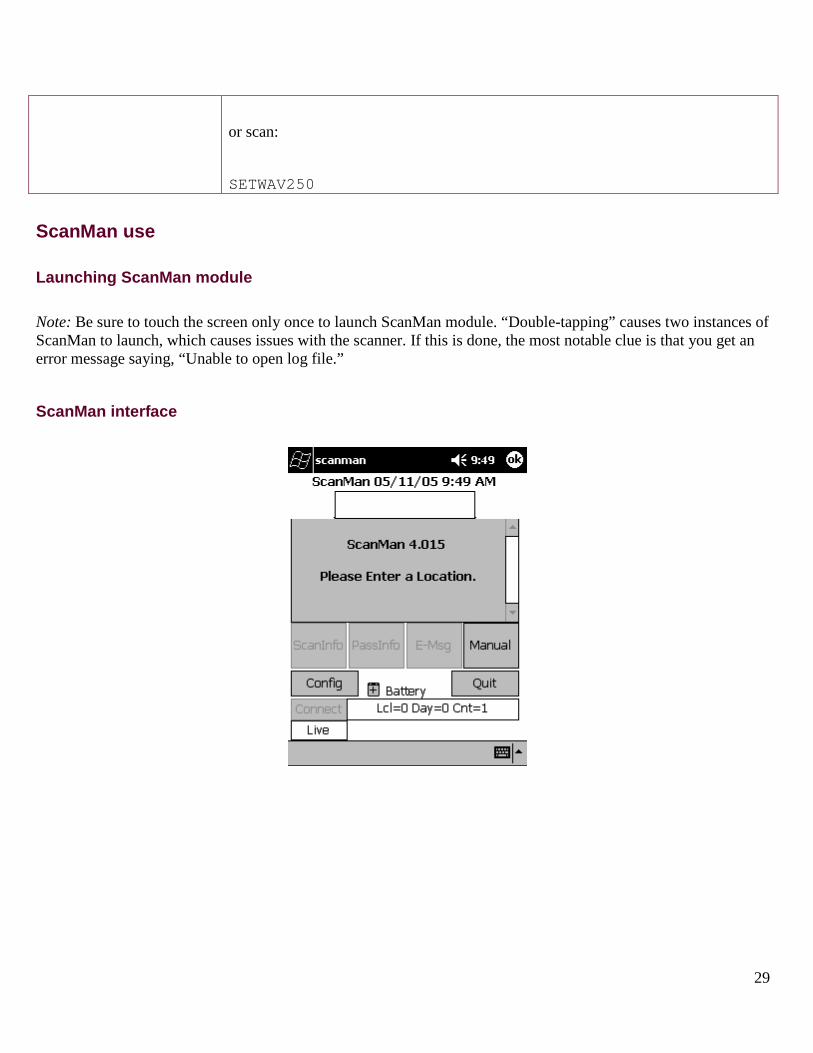
29
or scan:
SETWAV250
ScanMan use
Launching ScanMan module
Note: Be sure to touch the screen only once to launch ScanMan module. “Double-tapping” causes two instances of ScanMan to launch, which causes issues with the scanner. If this is done, the most notable clue is that you get an error message saying, “Unable to open log file.”
ScanMan interface

30
Date and time
The current date and time of the unit is displayed at the top of the ScanMan screen. It is important to verify that these are correct, as they are recorded with the scans that happen.
When ScanMan module connects to SalesEZ application, these are updated from the server, so it is important to verify that ScanMan is live, at least initially.
Main display area
This area of the screen is used to show the results of scans. The scroll bar on the right is enabled if the information to show is more than can fit on the screen.

31
Connect button
ScanMan module always tries to be online. However, this is not always possible due to wireless and standard network or server issues. If the handheld unit becomes disconnected from Pool Service, the Connect button reads, Connect in dark lettering. Also, the word, OFF is placed at the top of the screen on either side. Finally, if a pass or ticket is scanned, ScanMan indicates that it was an offline scan.
To reconnect, tap the Connect button.
Config button
The Config button is rarely needed, but is used to set up ScanMan initially.

32
It can also be locked and requires a password to unlock it. See the ConfigCode section in Advanced Features for more information on this.
Manual button
The Manual button allows entry of a pass number manually.
The on-screen keyboard is needed. The button can also be used for setting .INI settings and anything else that would normally be done with a barcode.

33
Counters display
Three different counters can be displayed in ScanMan module:
1. Lcl indicates the number of “local” scans on the unit. Local scans are scans that happened while ScanMan module was running offline. It is important that this number be at zero before the end of the day to ensure that all admissions were reported to the server.
2. Day indicates the total number of scans on the unit, both local and ones that were sent to the server. 3. Cnt is a re-settable counter independent of anything. See the section Count in the Advanced Features
section.

34
Location and operator information
After the user has entered the location and operator information, these are displayed at the bottom of the screen in ScanMan module.
Quit button
The Quit button is used to exit the ScanMan application.

35
ScanInfo and PassInfo buttons
These buttons are used to obtain more information on a ticket or pass after a scan. See the corresponding sections later in this document for complete information.
E-Msg button
This allows messages sent to guests to be displayed when a pass is scanned. See complete information in the E-Messages section of the Advanced Features section.
Location and operator input
When the program is launched, the first thing the user must do is enter the location and operator. This can be done through the Manual dialog or more commonly (and conveniently) these are barcodes that are scanned.

36
This is entered using the following format:
LOCxxxxxx OPxxxxxx
Where, xxxxxx is a unique six-character Location or Operator ID.
Example:
LOCLIFT1 sets the location to LIFT1.
OPMATT sets the operator to MATT.
After these have been entered, the settings are displayed at the bottom of the screen in ScanMan module.

37
These barcodes can be created using Microsoft Word on a computer with the Salesware Common Files application installed by using the BC C39 2 to 1 Narrow, Regular, Size 30 font. Be sure to add asterisks (*) before and after the text you want printed in 3of9. For more information on barcodes, see ScanMan configuration barcodes.
Note: See section on LocOp for additional information.
At any time during operation a different Location barcode or Operator barcode can be scanned to change either the Location or the Operator for that unit. However, if you are typing them, re-starting the program is necessary.
Validation Scanning passes and tickets
Simply point the scanner at the barcode on the pass or ticket and press and hold the Scan button or trigger.
After a scan, text about the scan (good/bad, etc.) is displayed. These responses are summarized in the following table.

38
Response displayed after scan Description of response
GOOD The pass/ticket was scanned while connected and was valid.
GOOD for # The ticket was scanned while connected and was valid for # customers at one time.
GOOD Offline The pass/ticket was scanned offline and is stored locally to be trickled later.
Expired The pass/ticket is no longer valid and has expired. If the pass has actually not expired but this message is displayed with the correct month/day of expiration, you might want to check and make sure that you didn’t include the expiration date in the barcode expression in the Pass layout without intending.
Not enough total number of uses available on this pass
All uses for the pass/ticket that was scanned have been used already.
This pass is not allowed at this site This pass is not allowed at this site.
This pass was voided by OPERATOR for reason
The pass/ticket was voided by an operator either at a salespoint or in SysManager.
This pass is blacked out MM/DD/YYYY HH:MM through MM/DD/YYYY HH:MM for reason
The pass/ticket has been set up with a black-out period(s). This could be the item or just this pass/ticket.
m more minute(s) and s more second(s) must go by before next validation of this pass
The pass/ticket item has been set up with an access delay to prevent it from being validated more than once during a specified period of time.
This pass is not valid at this physical location The pass/ticket item has been set up to be blocked at specified

39
Response displayed after scan Description of response
physical locations.
This pass is not valid until MM/DD/YYYY HH:MM
The pass/ticket was sold and scanned before its valid period of time.
Scan xxxxxxx INVALID. There is no record for PASS_NO PO in Table xxxxx.
This error implies an encryption or Barcode layout issue.
Trickling
When the handheld unit does not have a connection to Pool Service for SalesEZ application, scans are collected in a database on the unit (unless they fail the expiration date and parsing tests).
ScanMan module can be manually reconnected to SalesEZ application, if available, by tapping the Connect button in ScanMan. Or ScanMan attempts to reconnect to SalesEZ after x number of scans, as defined by the Reconnect Interval .INI setting (see Reconnect Interval section in Advanced Features for details).
When connected to SalesEZ application, the unit tries to trickle after the TrickleDelay has elapsed. At that point, a scan is sent to the server every time the TrickleInterval has elapsed. Any scanning on the unit resets the TrickleDelay.
Manual entry of pass/access number
1. Tap the Manual button. 2. Enter a pass or access number. 3. Tap OK on the dialog box or Ent on the keyboard.
Note: Access and hide the pop-up keyboard on the PDT7246 by half-pressing the trigger.
Note: Any pass numbers entered here are always assumed to be decrypted unless, for testing purposes, an * prefixes the swipe (in which case they are be interpreted exactly like scanned input).
Example: If *A999 is entered, the A999 pass is decrypted before being tested. If A999 is entered, the pass number is assumed to be 999 using an A prefix.
Each scan event includes the location and the validation result
Each scan event, Sales > Guest lookup Pass Inquiry > Pass Information > ScanInfo and in ScanMan > ScanInfo, includes the location and the validation result (Valid, Valid (rescan) or Invalid). Also, if the validation

40
performed is a multiple quantity autosale, it also lists the item(s) and quantity sold. The text passed back for Sales to display now looks like this:
# of Scans: 3 10/12/2009 11:52:29 1/SCAN#1 JT_AMD ADMIN Valid (Autosold 2 1 Day Adult Ticket) (Autosold 3 1 Day Child Ticket) (Autosold 1 1 Day Senior Ticket) 4/11/2009 9:58:08 1/10 GATE01 GATE01 Valid (rescan) 4/11/2009 9:56:56 1/10 GATE01 GATE01 Invalid
Exiting ScanMan module
Tap the Quit button at the bottom right of the screen to exit.
Advanced features Blocking access to physical locations
You can block pass access to physical locations through use of the Location name.
Note: Blocking access to physical locations is one of the primary uses of the Location name. The salespoint name as specified in SysManager > Activities > System Lists > Salespoints usually reveals the location as well and is used to identify where a salespoint or Access Control device is located.
Location is set in ScanMan module by scanning the appropriate barcode, by setting manually from the scanner itself or by using the SETLOCxxxxxx .INI setting. The Location name is the physical location where the scanner is being used. The Location is written into the data with each scan. The name is made up of six characters. The last two characters in the location name must be numbers if you want to use the Block Access To Physical Locations functionality in item templates:

41
Example:
You could use CAB01 (SETLOCCAB01) or TRIP15 (SETLOCTRIP15). Single digits are acceptable too – so CAB1 is a valid name. The total number of characters must be less than 6, though. Thus, TRIP15 is acceptable, but TRIPL15 is not.
This functionality is especially useful for applications such as blocking a lower mountain pass from being able to go to the upper mountain. If you do not require this functionality, then number suffixes are not required.
Obtain scan information
Tap the Scan Info button after a successful scan and the pass/access number, the number of scans today, the date, time and location of the scans, the number of days the pass/ticket has been scanned, and a list of the days on which the pass/ticket was scanned are displayed.

42
Obtain pass or ticket information
Tap the Pass Info button after a successful scan and the following information is displayed: Guest name, phone number, date of birth, Guest number, pass number, start and end date/time, last use date/time, current total uses, points, money, warnings, number of times the pass was printed, number of times the pass was validated, the discount counter level, parent validation information, the DCI for the product, the amount paid and where, when and by whom the pass was sold.
Pass Info for Access Record Pass Info for Pass Record Inquiry mode
In Inquiry mode, passes are checked and any information about the pass is returned, but no validation happens.

43
Inquiry mode can be toggled by tapping on the screen below the PassInfo button (and between the Config and Quit buttons).
The display says, Inquiry Scan, no sounds are played and no records are validated or trickled.
After entering Inquiry mode and scanning a pass or ticket, the unit reverts back to normal mode.
E-Messages
E-Messages are supported in ScanMan module. When a pass is scanned and an E-Message is returned from SalesEZ application, a .wav file is played before the normal .wav file (for good/bad online/offline) is played. This file is stored in the same folder as the other .wav files and must be called mail.wav.
A new button, labeled E-Msg, is on the main dialog and if a message is present, the button becomes active.

44
Tapping the E-Msg button brings up the message for the guest.
When exiting the E-Message, the user may exit with or without clearing the E-Message.
LocOp setting
By default, the LOCxxxxxx and OPxxxxxx barcodes are used to set the Location and Operator. However, the LocOP .INI setting can change this behavior. When LocOp=0 (default), the behavior is as described above. When LocOp=1, you must use the format:
SETLOCxxxxxx SETOPxxxxxx

45
This setting is necessary only for clients using O or L prefixes on their passes or tickets. It can be set on the mobile computer by scanning a barcode of:
SETLO1
Or disabled with:
SETLO0
The location value is written into the data with each validation.
Hotlist functionality
Note: This functionality is available only in versions 4.0, 4.1 and 4.2 of Salesware.
When ScanMan module is running offline, there is support for a Hotlist file. The Hotlist file can contain a list of all passes and tickets that have been voided, expired, etc. This prevents bad passes and tickets from being validated as good (which might occur because ScanMan module is not connected to the server).
How to create a pass Hotlist for offline scanning:
1. In SysManager, go to Activities > Pass Activities > Create Invalid Pass List. 2. Create a list of passes that are included in the invalid passes list by specifying the Prefix and the As of date.

46
3. The Invalid Pass List is stored on the server in a table called Hotlist. You can view its contents with either Enterprise Manager or Query Analyzer (as with any table).
4. Connect ScanMan to SalesEZ application; the Hot List loads on the scanner. 5. Disconnect ScanMan from SalesEZ application so that scanning goes offline.
Results: When scanning blacked out, voided or returned passes, this info displayed:
HOTLIST pass number
This pass is Hotlisted.
When scanning an expired pass, the info shows, GOOD for an offline scan. This is because expired passes are not included in the invalid passes list in order to keep this list to a reasonable size (you wouldn’t want passes from the last five seasons cluttering the list).
When ScanMan module is launched and connects to Pool Service, it checks with the server to download the Hotlist file. The date of the file is recorded in the .INI file and the new file is obtained if a different date is listed. This check is performed only at startup and a timeout of 120 seconds is used for obtaining the Hotlist file.
Also, a scan of shows how many entries are in the Hotlist. This allows users to ensure that the Hotlist is up to date:
SETHOTLIST

47
ConfigCode setting
Access to the Config menu can be controlled by an .INI setting.
If not included, the Config menu is always accessible. If it is included, then a barcode (or manual entry) must be typed to be CON plus the code.
Example: ConfigCode=P5H4
Then, SETCONP5H4 must be scanned for the Config menu to be used. If there is a ConfigCode used and SETCON (or SETCON followed by anything but the actual code), then the Config menu is again disabled.
Note: When the scan is received to enable the Config menu, the scan is not shown (so that prying eyes can’t obtain the secret code).

48
Note: Make sure that the value that ConfigCode is set to is in all capital letters. This is because ScanMan module capitalizes all letters that are scanned or typed in. If the ConfigCode is set to a lower case or mixed case value, then no barcode scanned ever unlocks the Config menu.
Count
A Cnt= section is on the status line at the bottom of the ScanMan main dialog. This is the number of valid scans since the last reset. This number survives shutting down ScanMan module or changing operators and only resets when the status line is touched, at which point a confirmation dialog is brought up.
This counter can be disabled completely with an .INI setting:
Cntr=0

49
Or it can be entered into ScanMan module by a barcode or through the Manual dialog:
SETCNTR0
The default is 1 (counter is enabled).
Reconnect interval
The reconnect interval is the number of scans that must elapse before ScanMan module tries to reconnect to SalesEZ application.
This can be set in the ScanMan .INI:
RecInt=25
It can also be set by scanning a barcode of SETRECINT25. The default if not present is 25.
Expiration date checking
There is an .INI setting for ignoring expiration dates.
Exp=0
The default is Exp=1 which means to check expiration dates (the default is true even if the .INI setting is not listed). This can be set by scanning by using a barcode of SETEXP0 or SETEXP1.
Log verbosity
Scanning a barcode beginning with LOG sets the log verbosity.
Note: The log is always at verbosity 0 unless this is done.
Example: SETLOG5

50
ScanMan module responds with what it has set the verbosity to if all is successful.
Log verbosity can be set with Config menu off
Log verbosity can be set even with Config menu off. This can also be done by concatenating commands, i.e., SETCON...; SETLOG5; SETCON, however this is not necessary. SETLOG5 and SETLOG0 can be used to turn logging on and off.
Old log files are retained
ScanMan module keeps up to 250,000 (M or G)bytes of an old log file, instead of deleting the old log file at startup and properly sets date/time.
DCI setting
This setting causes scans to use the validation template for the item listed to inquire as to whether the pass or ticket would be valid. This is sent in with scans to check and validate pass as well as validate pass.
DCI=HENRY HENRY HENRY
It can also be set up by scanning a barcode prefixed with DCI.
Example: SETDCIHENRY HENRY HENRY
This would configure a scanner.
Prepend setting
This setting causes all barcodes scanned to be pre-pended with the prefix specified.
Example: Prepend=B44614485
This is prepended to scans which do not have a prefix. If a barcode with 889903 is scanned, ScanMan module interprets the barcode as B44614485889903.
This can be set up by scanning a barcode prefixed with PRE , so:

51
SETPREB44614485
This would also set up the scanner properly and save to the .INI file.
Extract setting
This setting allows scans of a certain length that do not have prefixes, to have a substring extracted for processing.
Example: Extract=10,1,2
Three items must be specified, the length to look for (10 in this case), the character to begin extraction at (1) and the number of characters to extract (2). The character to begin extraction on assumes 0 as the first character.
With the above example, if the number 0123456789 is entered, 12 is extracted. Also, the Extract setting can take any number of settings by using a semi-colon as a separator.
Example: Extract=10,1,2;11,2,3 Card prefixes
ScanMan module can be configured to take different prefixes to denote cards. Normally, all card numbers must begin with B or b in order to be accepted.
Now, you can specify these in the .INI file using:
Card=MB
The setting contains all the possibilities for the card prefix.
Note: You can also allow a blank prefix, but you must specify at least two other prefixes around them.
Example: Card=M B
This allows a blank prefix before the card number. This can also be specified by scanning:

52
SETCARDMB
This sets it in the .INI file (this is always the easier method).
ScanMan configuration barcodes
The information in this section applies to ScanMan module. The configuration barcodes shown are examples. You must modify according to the parameters for your site.
Note: To create these barcodes in Microsoft Word, use BC C39 2 to 1 Medium 18 points for barcodes and make sure to include an asterisk * before and after the barcode text. This font is installed as part of the Common Files application.
The following table summarizes all settings currently supported as of version 4.2.
Setting Description SETLOC Sets the location
SETAUTOLOC Automatically set a location at startup
SETOP Sets the operator
SETAUTOOP Automatically set an operator at startup
SETIP IP address to connect to SalesEZ application
SETPORT Port to connect to SalesEZ application
SETTO Timeout in tenths of a second for SalesEZ application to timeout; usually three seconds or SETTO30
SETTD Trickle delay in tenths of a second
SETTI Trickle interval in tenths of a second
SETID Unit ID
SETROLL Rollover month
SETPRE Characters to pre-pend to any scan
SETEXT Extract command to use
SETDCI DCI to pass for validation purposes
SETLOG Log verbosity
SETEXP Whether to react to expiration dates (1=enabled)

53
SETEXP0 shuts off expiration dates
SETCARD List of prefixes to associate with cards
SETCON Attempt to enable Config menu by passing code
SETLO Whether LOC and OP can be used without the SET prefix (0 means you can)
SETIS34 Is this being used with Salesware version 3.4 (1 means it is)
SETCNTR Set the counter (1 means it’s on)
SETRECINT Set reconnect interval
SETCPN Set checkpoint name
SETCPV Set checkpoint value
SETHOTLIST Tells you how many Hotlist entries there are
SETNODEC Set the prefixes that are not decrypted
SETWAV Set delay for WAV file (in tenths of a second)
SETRF Activate RF support (1 means it is active)
SETPIC Activates viewing of pictures
SETPINT Sets auto-display of picture interval (tenths of a second)
SETGITEXT Sets text to show below picture
Log-in:
• Location: 01 – This represents the lift or entrance point and is posted at each lift/entrance. This is unique per lift/entrance.
• Operator: JSMITH – This represents the operator and is on badge they wear

54
ScanMan config settings:
• IP Address of SalesEZ computer: IP172.20.1.251
Resulting setting in the ScanMan.INI file: IP=172.20.1.251
• Port: PORT4203
Resulting setting in the ScanMan.INI file: Port=4203
• Trickle Delay: Number of seconds (in tenths of seconds) to wait until offline scans begin trickling to SalesEZ application
Resulting setting in the ScanMan.INI file: TrickleDelay=100
• Trickle Interval: Time interval at which trickled scans (offline scans) are sent to SalesEZ application (in tenths of seconds)
Resulting setting in the ScanMan.INI file: TrickleInterval=30

55
• Time Out: Number of seconds (in tenths of seconds) to wait until ScanMan disconnects from SalesEZ application
Resulting setting in the ScanMan.INI file: Timeout=30
• Rollover Month: ROLL6
Resulting setting in the ScanMan.INI file: Rollover=6
• Prepend: B44614485 – used only when truncated sixteen digit card numbers are encoded on the pass
Resulting setting in the ScanMan.INI file: Prepend=B44614485
• Log: LOG0 – allows you to increase or decrease logging on the scanner itself
Resulting setting in the ScanMan.INI file: Log=0
• Expiration Date Checking: EXP0 – 0 disables, 1 enables

56
Resulting setting in the ScanMan.INI file: Exp=0
• Reconnect Interval: the number of scans that must elapse before ScanMan module tries to reconnect – default is 25
Resulting setting in the ScanMan.INI file: RecInt=25
• Resettable Counter: disable or enable the resettable counter. Default is 1 (enabled)
Resulting setting in the ScanMan.INI file: Cntr=1
• Setting that controls access to the Config menu if not included the Config menu is always accessible assuming the ScanMan.INI setting shows: ConfigCode=MATTY
Note: The code must be in all CAPS
The barcode that accesses Config menu assuming setting above is in place:
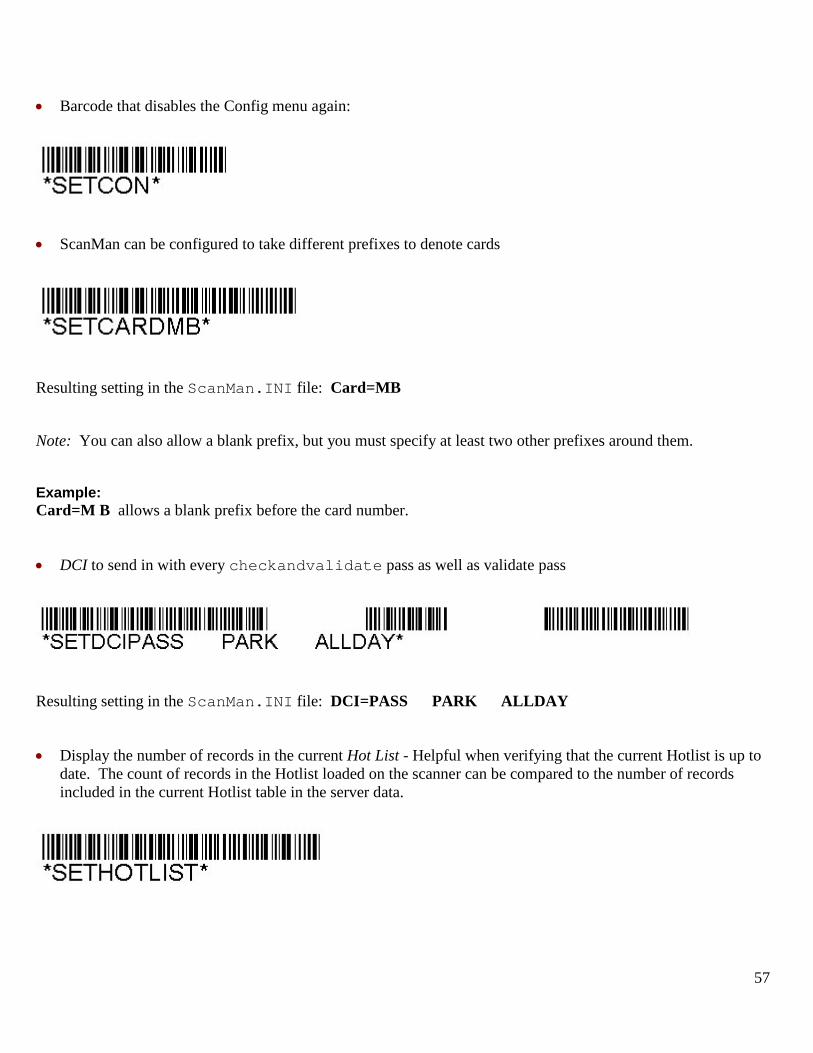
57
• Barcode that disables the Config menu again:
• ScanMan can be configured to take different prefixes to denote cards
Resulting setting in the ScanMan.INI file: Card=MB
Note: You can also allow a blank prefix, but you must specify at least two other prefixes around them.
Example: Card=M B allows a blank prefix before the card number.
• DCI to send in with every checkandvalidate pass as well as validate pass
Resulting setting in the ScanMan.INI file: DCI=PASS PARK ALLDAY
• Display the number of records in the current Hot List - Helpful when verifying that the current Hotlist is up to date. The count of records in the Hotlist loaded on the scanner can be compared to the number of records included in the current Hotlist table in the server data.

58
No ScanMan.INI setting is created with the scan of this barcode. It is only used to get information regarding the number of records contained in the Hotlist loaded on the scanner.
• CheckpointName -Typically used with GateKeeper module, but can also be used with ScanMan module when monitoring capacity counts within a specific location. Limited to ten characters (anything beyond ten is truncated in the data). Used with CheckPointValue (described below).
Resulting setting in the ScanMan.INI file: CheckPointName=WATERPARK
• CheckpointValue -Typically used with GateKeeper module, but can also be used with ScanMan when monitoring capacity counts within a specific location. Value is IN or OUT and is used with the CheckPointName setting (described above).
Resulting setting in the ScanMan.INI file: CheckPointValue=IN
Unit ID
This is the unit’s internal ID and is unique for all units. It corresponds to the salespoint name
ID: IDSCAN01

59
ID: IDSCAN02
ID: IDSCAN03
ID: IDSCAN04
ID: IDSCAN05
ID: IDSCAN06
ID: IDSCAN07

60
ID: IDSCAN08
ID: IDSCAN09
ID: IDSCAN10
ID: IDSCAN11
ID: IDSCAN12
ID: IDSCAN13

61
ScanMan can have an operator and location specified in the .INI file. AUTOOP and AUTOLOC and can be set through the manual entry using.
Example: SETAUTOOPMATT SETAUTOLOCLIFT1
SET commands to the scanner not be processed if there is a Config code and the Config menu has not been enabled (although location and operator commands are).
Loading guest pictures on ScanMan
ScanMan can load guest pictures on Symbol 9090 and 5590. This is enabled by an .INI setting:
SETPIC1
This setting downloads the pictures. When reading RF cards, it may be advantageous to show the picture automatically. This is activated using:
SETPINT30
This stands for Picture Interval and is in tenths of a second. So, this would show the picture for three seconds, and then dismiss the dialog. The dialog also can show text on the bottom using the field names *FNAME*, *LNAME*, *HEIGHT*, *AGE*. These are specified in the .INI:
SETGITEXT*LNAME*, *FNAME*, *HEIGHT*, *AGE*
GIText stands for Guest Info Text.
Guest pictures are available even if the scan was bad
A guest picture is available even if the scan was bad using the following setting: palw=1 in the .INI or SETPALW1 at the manual dialog or scanned to enable this option. PALW stands for PictureALWays.

62
Birth dates in guest information
ScanMan shows a birth date in guest info text (i.e., GITEXT) with *BIRTH*. The available items are: *FNAME* *LNAME* *HEIGHT* *AGE* *BIRTH*.
Diagnosing problems
Mobile computer issues Power
• Always keep the scanners powered up and the batteries charged. When shutting down for the evening, always allow the scanners to trickle in their scans, and then exit the application before powering down.
• Make sure to replace the batteries if they get low. • If ScanMan module is running and the batteries die, scans may be lost.
Lock-ups
It is possible that ScanMan module or the mobile computer itself locks and does not respond. However, some operations can take time and patience should be exercised. For example, the Hotlist function can take a few minutes when ScanMan module is launched. If it is found that the unit is locked and needs to be reset, there are two different ways to do this:
• Warm boot/soft reset – Restarts the mobile computer by closing all running programs. • Cold boot/hard reset – Restarts the mobile computer, but erases all stored records and entries in RAM. Data
saved in flash memory is not lost. In addition, it returns formats, preferences and other settings to the factory default settings.
Always attempt a warm boot first. This restarts the mobile computer and saves all stored records and entries. If the mobile computer still does not respond, perform a cold boot.
To perform a warm boot: MC9090-G and MC5590: Hold down the Power button for approximately five seconds. As soon as the mobile computer starts to perform a warm boot, release the Power button.
To perform a cold boot:
Note: To perform a cold boot of the MC9090-G and MC5590 units, you need a special file from Motorola, available from the Motorola web site. For more information, please contact Siriusware Technical Support.

63
Note: Perform these if the warm boot does not work. If the Advanced Installation Methods are used on the Pocket PC units, a cold boot does not cause any data loss or require any reconfiguration. However, it does take time and a warm boot is the preferred “reboot” method.
Installing and using GateKeeper module
Overview
This section of the document outlines the recommended procedure for installing, configuring and using GateKeeper module for gate access. GateKeeper module is designed as a “customer controlled” Access Control system. In many applications, it is connected to a turnstile/gate for Access Control module. It can be set up to allow customers to “scan” a ticket or pass and receive a response as to whether it is valid or not. If connected to a turnstile, GateKeeper opens/activates the turnstile for valid tickets and passes.
GateKeeper module is designed to run from any standard PC. A variety of components can be used including barcode scanners and magnetic stripe readers for the input and validation of Validation Items (tickets, passes, etc.).
Preparation
Computer
The computer running GateKeeper module is a standard PC running Windows. The computer needs to be configured in the same fashion as any computer to be used as a salespoint. The PC must be configured on the network and must be able to connect to the “share” on the Salesware server. Some clients choose to map a network drive for this purpose. The PC must also be able to connect the IP address(es) of the SalesEZ server.
Because this computer most likely does not have a keyboard connected to it, it might be desirable to set up Windows to automatically log-in.
At times, it is necessary to access the computer. If there is no keyboard or mouse connected, it would be necessary to connect them. An alternative is to use a program such as TeamViewer. Siriusware, Inc. often uses TeamViewer to help with technical support across the Internet, but it is also convenient to use on your own network. In this case, the TeamViewer can be installed on the GateKeeper computer, and a client can be installed on another computer. This allows the user to connect to the PC remotely for the purposes of configuration, troubleshooting, etc.
GateKeeper module is designed to run at a resolution of 640x480. Unfortunately, many computer graphics cards do not allow reduction to this resolution. If this is the case, here is solution to the issue:
1. Click on the Start button 2. Type msconfig into the search bar and hit Enter. 3. Click on msconfig.exe 4. The System Configuration Utility appears:

64
5. Switch to the Boot tab as shown in the above figure. 6. Check the box labeled BASEVIDEO.

65
7. Click OK and, if ready, restart the computer to test the change.
Windows 7 certification
GateKeeper module runs in a manner that satisfies Windows 7 certification. Static files are in \Program Files\Siriusware\GateKeeper and dynamic files are to be found in \ProgramData\Siriusware\GateKeeper. .INI settings are split between \Program Files\Siriusware\Gatekeeper\gatekeeper_system.INI, containing [DATA] and [SalesEZ] sections and the rest of the.INI setting residing in \ProgramData\Siriusware\Gatekeeper\gatekeeper.INI
Configuration of input equipment
For most sites, the input equipment is a barcode scanner. However, it is also possible to use a magnetic stripe reader (MSR)/credit card swipe.
When using a barcode scanner to scan Validation Items, it is necessary to either add a % prefix to the scanners or to add the % prefix to the barcodes of the items that are scanned. The former method is preferred as it requires the least change. Additionally, changing the format of the barcode could cause problems if the barcode is used for anything else (e.g., discount card, etc.).
Note: GateKeeper module always needs the % prefix whether the barcode is encrypted or not.
The method of adding a prefix to a barcode scanner depends on the model of scanner that is being used. Generally they are added by scanning barcodes in the manual. Other models require the use of a utility from the manufacturer. Consult the documentation for information on configuration.
Also, most barcode scanner models are available with different interfaces: serial, USB, PS/2, etc. Because of this, the scanner and the interface cable are often sold separately. When the cable is connected to the scanner, it is usually necessary to “tell” the scanner what kind of cable is connected. This is generally done by scanning a barcode specific to the interface and is available in the manual that comes with the scanner. Before this is done, the scanner does not operate.
Almost all MSRs do need to be programmed to function with Salesware applications in any use. This is because different manufacturers ship them with different default configurations. For example, most MSRs have a “carriage return” at the end or often between tracks. A carriage return is the equivalent of pressing Enter on the keyboard.
Here is the format that an MSR needs to be programmed to:
%<track1>?;<track2>?;<track3>?
Note: Not all MSRs can read track 3 and it is not generally used.

66
The % at the beginning of the track1 is the header for that track (tracks 2 and 3 use ;). The ? at the end of each track is the terminator.
As mentioned before, most MSRs need to be programmed to put the output into this proper format. How this is done is dependent on the brand, model and interface of the MSR. With USB interface models, this always requires the use of a utility to program them. With PS/2 models, some use a utility, while others can be programmed using the keyboard connected to it. Consult the documentation for your unit.
Installation
Installing GateKeeper module To install GateKeeper module:
1. Download the following installers from the Siriusware Information Portal: • Install_Siriusware_CommonFiles_xxxx.msi • Install_Siriusware_Gatekeeper_xxxx.msi
2. Install Common Files application as described in the Salesware Installation Guide. 3. Double click Install_Siriusware_Gatekeeper_xxxx.msi. 4. Allow shortcuts to be placed on the desktop. (Don’t uncheck the check box – use the default.) 5. On the SalesEZ IP address dialog, enter the IP address of the computer where SalesEZ application is
running. 6. When the install is finished, double-click the GateKeeper icon on the desktop.
If you haven’t already created a salespoint in SysManager for this installation of GateKeeper module you get the message:
GATE1 is the default salespoint name assigned to the salespoint .INI setting in GateKeeper.INI. You need to create a salespoint named GATE1 using SysManager or choose a new name if you wish. See GateKeeper licensing for more information.

67
Updating GateKeeper module
GateKeeper module automatically updates upon launch if a newer version is found in the Updates folder on the server. Updating of GateKeeper module requires only the gatekeeper.exe file from the latest update. However, all files are provided and overwrite any existing files. Because of this, when custom images and sound files are used, it is necessary to not use the same names of the files included with GateKeeper module, but rather change the GateKeeper.INI file to use the custom files. This is because GateKeeper updates include the default images and sounds and overwrite the custom ones if they have the same name.
Configuration
GateKeeper module licensing
GateKeeper module is a licensed salespoint. A ScanMan station must be on the Sales Point Licenses grid in SysManager > Preferences. To add it, go to SysManager > Activities > System Lists > Salespoints > New and create a new salespoint in ScanMan mode.
When you click New, you are presented with the following dialog:
The salespoint name for GateKeeper assigned in SysManager and the salespoint setting in Gatekeeper.INI need to be exactly the same.
You can also select the mode from the SysManager > Activities > System Lists > Salespoints > New/Edit > Licensing tab on the Salespoint Configuration dialog.

68
GateKeeper module can be run from a salespoint
To run GateKeeper module from Sales, the salespoint must be assigned a GKS license in SysManager > Preferences >Salespoint Licenses. GateKeeper module must be installed on the computer with Sales. To set up a main action button to open GateKeeper module from Sales use MainButtonXX=GKP. The Sales32c.INI must contain the path to the GateKeeper.exe file in the GateKeeper module directory in the [Preferences] section of the Sales32c.INI.
Example: [Preferences] Gatekeeper=C:\Program Files\Siriusware\Gatekeeper\gatekeeper.exe
When GateKeeper module is used in conjunction with a salespoint with a GKS license the GateKeeper instance does not need its own salespoint license. The salespoint= line in the [Preferences] section of the Gatekeeper.INI does not need to correspond to an existing salespoint license and can be any value of six characters or less.
SysManager > Preferences > Salespoint Licenses supports Run GateKeeper within Sales (GKS) license type.
Note: When using GateKeeper module in Sales, the operator must remember to close GateKeeper before returning to Sales. The penalty for forgetting is a locked up salespoint.
Note: You must have a % in front of what you are swiping. You do not have to hit Enter after you swipe. The % is unique to GateKeeper in Sales.
Standard GateKeeper.INI settings
The following settings are included in the GateKeeper.INI file and are used for all setups. There are also advanced settings that may or may not be necessary for your installation. These are explained later in this document.
[Preferences]
ReadyBmp: Image used at the Ready screen
GoodBmp: Image used at the Good Scan Response screen
BadBmp: Image used at the Bad Scan Response screen
GoodSound: Sound played at the Good Scan Response screen

69
BadSound: Sound played at the Bad Scan Response screen
ResponseTimeout: The amount of time in milliseconds (1/1000 sec.) that the Scan Response image (Good or Bad) is displayed.
VerbosityLevel: Log Verbosity Level
RolloverMonth: See information in Rollover setting
Salespoint: Salespoint name that is recorded with validations (is truncated to six characters)
Operator: Operator name that is recorded with validations (is truncated to six characters)
Location: Location name that is recorded (written into the data) with validations. Also used for validation of location-based tickets. There is more information on this in a later section
Note: The Salespoint and Location .INI settings must be unique amongst all GateKeeper stations. If desired, all GateKeeper stations can share the same Operator. Furthermore, it is important that the Salespoint setting not match a Sales station’s salespoint name to prevent issues with reporting.
CheckExp: The value of this setting determines whether scans are to be validated with encrypted expiration date
DCI: See information in a later section
ReconnectInterval: The number of scans between attempts to reconnect to SalesEZ application
ReconnectSeconds: Amount of time with no activity that must pass before GateKeeper attempts to reconnect to SalesEZ application to trickle offline scans
DisconnectSeconds: Amount of time with no activity that must pass before GateKeeper module disconnects from SalesEZ application. This is to prevent issues with GateKeeper module improperly disconnecting from SalesEZ when idle.
[SalesEZ]
IP: IP Address of the SalesEZ Pool Manager server
Port: Port of SalesEZ Pool Manager server. 4203 is the default
Timeout: Timeout in seconds for connection to SalesEZ application
[Output1] Information on the settings in these sections is later in this document
[Output2]: Information on the settings in these sections is later in this document
[Trickle]: Information on the settings in this section are detailed in Trickling

70
[Internal]
Prefix: This is populated when GateKeeper connects to SalesEZ application. It corresponds to the Prefix table in the system.
Miscellaneous GateKeeper .INI settings
Setting Description NoDecryptPrefixes=’M’ Used to process card numbers in the gst_pass.swipe_no field using the pass
validation logic. This allows card numbers to be processed without cascading validation.
You must remove the same prefix from the GateKeeper.INI setting CardPrefixes=M or the card validation logic is used. Also, you must have SysManager > Preferences > Access Control defined for the prefix and turn off cascading validation.
Usually card numbers must always be fifteen or more characters in length and be preceded by a prefix defined in the CardPrefixes=’B’ setting in the GateKeeper.INI file. The default is B.
Note: The single quotes surrounding the prefixes are always good practice, but only strictly necessary when you are trying to include a blank prefix in the list. Also note that this setting says only that this prefix can be a card if the length requirement is met.
[Preferences] NoDecryptPrefixes=’MPQ’
This setting causes a barcode to not be decrypted when prefixed by something in this list (in this case M, P or Q).
Any text following the prefix is assumed to be the raw number to be sent to SalesEZ application.
Note: In most cases, the only setting that needs to be present is NoDecryptPrefixes=’M’.
CountGoodFor CountGoodForSize=NN
Used for dealing with access/pass records with a “good for” value. (Condition: SysManager > Activities > DCIs > New/Edit > Action tab > access/pass template has the Create only one Access Record for quantities > 1 check box checked.) [Preferences] CountGoodFor= CountGoodForSize=NN The default value for CountGoodFor is FALSE. If CountGoodFor is set to

71
TRUE, GateKeeper shows, “1 of N” for each scan of a certain pass. When the “good for” limit is reached, access is denied. GateKeeper can keep up to five such tallies running. The intent is that groups have one to five tickets (for example, a ticket for twenty adults and one for ten children) and the venue scans the tickets again and again at a single gate in order to admit all the members of the group. When the uses are gone, customers then have to go to the counter to pay for the remaining group members. See the Salesware Validation document for more information.
CountGoodForSize has no default value and only works when CountGoodFor=TRUE. The value for NN must be in numeric form to represent how many tallies that gate remembers locally.
Example: If the CountGoodForSize=5, four other different “good for” tickets can be scanned until the next scan makes the gate “forget” about the first one.
Note: Additional GateKeeper.INI Settings can be found within the Salesware .INI Settings Reference document.
Advanced features Blocking access to physical locations
You can block pass access to physical locations through use of the Location name.
Note: Blocking access to physical locations is one of the primary uses of the Location name. The salespoint name as specified in SysManager > Activities > System Lists > Salespoints usually reveals the location as well and is usually used to identify where a salespoint or Access Control device is located.
Location is set in GateKeeper module via the LOCATION .INI setting. The Location name is the physical location where GateKeeper is being used. Location is written into the data with each scan. The name is made up of six characters. The last two characters in the location name must be numbers if you want to use the Block Access To Physical Locations functionality. For more information, see Blocking access to physical locations in the ScanMan section.
Rollover setting
The rollover setting is a mechanism used to check validity of Validation Items based on an expiration date encoded in the item’s barcode. This method is derived from a combination of encoding an expiration date into the validation

72
number and checking that date against a setting in GateKeeper.INI. The GateKeeper setting used to verify whether an item is valid or not is called the rollover setting. The rollover setting was introduced to eliminate the need to encrypt the year part of the date in the barcode (making for a shorter barcode on the ticket).
The rollover setting works like this:
1. Scan the barcode. 2. GateKeeper module first reads the information about the expiration date of the ticket (usually included in a
line on the layout involving the syntax encrypt_date(tmp_edate). 3. GateKeeper module checks the date of the item—if the expiration date encrypted is earlier than the current
date of the PC, the item is automatically invalid. 4. If the item is not expired based on the current date, GateKeeper still attempts to determine whether the item
is good for the upcoming season. 5. To determine this, GateKeeper module checks its own rollover number vs. the number of the
month encrypted in the item expiration date. 6. If the rollover number is between today’s date (month) and the number of the month the item expires, the
item is assumed to be invalid. The system assumes that the item is from a previous year. 7. As long as the rollover number does not fall between today’s date (month) and the number of the month the
item expires, it is assumed to be valid. 8. The purpose of this is to determine whether an item you are scanning is supposed to be good for dates still
to come in this season at the resort or if the item being scanned is really good for next season at the resort.
Example: • It’s March of 2012. • You scan a ticket that has an expiration date of 12/25/12 (it has been pre-sold for Christmas of the
next ski season). • Your rollover number is set to 10. • The ticket does not scan as valid, because the rollover number falls between today’s month (3) and
December’s month (12).
Note: If your area does not have an “off-season”, or you want your tickets to be good for more than one year, you should not encrypt the date into your barcodes. That way, GateKeeper module does not check the date when scanning and assumes that all tickets are good if you are scanning offline. If the date has been encrypted into the barcode, the GateKeeper.INI setting of CheckExp=FALSE can be used.
Card prefixes
GateKeeper module can be configured to take different prefixes to denote cards. Normally, all card numbers must begin with B or b in order to be accepted. Now, you can specify these in the .INI file using:
CardPrefixes=MB
The setting contains all the possibilities for the card prefix.

73
Note: You can also allow a blank prefix, but you must specify at least two other prefixes around the blank: CardPrefixes=M B Expiration date checking
There is an .INI setting for ignoring expiration dates.
CheckExp=FALSE
The default is CheckExp=TRUE which means to check expiration dates (the default is true even if the .INI setting is not listed).
DCI setting
This setting causes scans to use the validation template for the item listed to inquire as to whether the pass or ticket would be valid. This is sent in with scans to checkandvalidate pass as well as validate pass.
DCI=HENRY HENRY HENRY Prepend setting
This setting causes all barcodes scanned to be pre-pended with the prefix specified.
Prepend=B44614485
This is prepended to scans which do not have a prefix. Then, if a barcode with 889903 is scanned, ScanMan module interprets the barcode as B44614485889903.
Extract setting
This setting allows scans of a certain length that do not have prefixes, to have a substring extracted for processing.
Extract=10,1,2

74
Three items must be specified, the length to look for (10 in this case), the character to begin extraction at (1), and the number of characters to extract (2).
Note: The character to begin extraction on assumes 0 as the first character.
In this case, if 0123456789 is entered, 12 is extracted. The Extract setting can also take any number of settings:
Extract=10,1,2;11,2,3
Each section of three numbers must be separated by a semi-colon.
Gate/turnstile configuration
The principal purpose of the GateKeeper module is to control a turnstile. This is done through a serial connection to the turnstile controller.
There are five sections that are used for this purpose.
[Serial] ComPort=1 BaudRate=9600 Parity=N DataBits=8 StopBits=1 SerialGoodPause=1000 SerialBadPause=0 [SerialGood1] Char1=010 Char2=020 Char3=010 Char4=000 Char5=000 Char6=000 [SerialGood2] Char1=010 Char2=020 Char3=010 Char4=000 Char5=000 Char6=000 [SerialBad1]

75
Char1=010 Char2=060 Char3=010 Char4=000 Char5=000 Char6=000 [SerialBad2] Char1=010 Char2=060 Char3=010 Char4=000 Char5=000 Char6=000
The serial port settings need to be specified (9600,N,8,1 are default if omitted). There are four serial sections used for character strings: [SerialGood1] [SerialGood2] [SerialBad1] [SerialBad2]
The Char1-Char6 settings in each section are used to specify the decimal characters that are to be sent when the gate is released. The [SerialGoodx] sections are for when the scan is good, the [SerialBadx] sections represent the characters when the scan is bad. If the second section is filled out for Good or Bad, a time delay specified in milliseconds is checked: [Serial] SerialGoodPause=1000 SerialBadPause=0
In this case, at least one second would separate the contents of SerialGood1 being sent and SerialGood2.
Note: The actual delay before a second signal is sent may be slightly longer because the .wav file is played before the final signal is sent.
Manual settings for scan location, date and/or time
Configuration code logic in GateKeeper module allows for manual setting of scan date and/or time as well as location using SETDATE and SETLOC functions either by manual entry or scanning a barcode with SETDATE or SETLOC information. In order to display Date and Location, the Gatekeeper.INI file must be updated.

76
The use of SET commands operate as follows: SETDATE09/25/2010 8am sets the DATE & TIME for trickling any subsequent scans to the date and time scanned. The text can be any parse-able date. 2010-09-25 08:00 would work for example. If no time is specified it is assumed to be 12:00 AM of the date scanned.
• SETDATE with no argument, resets the gate back to normal mode (current date, time and live). • SETLOCGATE9 sets the gate location, GATE9 in this case. • SETLOC with no argument, sets the location back to the default defined in the Gatekeeper.INI
Note: Date and/or Time Configuration Code settings can be found within the Salesware .INI Settings Reference document.
GateKeeper can set a location
The GateKeeper module can set a location by entering SETLOCXXX prefixed with a % if scanned. SETLOC is the command and XXX is the location.
Customization
Sounds
GateKeeper module has the ability to play audio files for responses. For this to work, a computer with speakers, either built-in or attached, needs to be used.
Four different files can be used for online and offline good responses and online and offline bad responses. They must be .wav files and it is recommended to keep them under one to two seconds.
Note: When using custom sounds, please take note of the section on Updating GateKeeper for important information.
Note: Disabling sounds for multiple admissions settings can be found within the Salesware .INI Settings Reference document.
Graphics
Five different bitmap files are used with GateKeeper module: Ready, Good Response (for online and offline) and Bad Response (for online and offline).
While Siriusware, Inc. does provide these with GateKeeper module, it is recommended that the bitmap files be customized for your resort, especially the file used for the Ready screen. Siriusware, Inc. recommends adding the company’s logo or other artwork to the Ready screen and providing information as to how the customer scans, swipes, etc., their Validation Item.

77
Note: When using custom images, please take note of the section on Updating GateKeeper for important information.
Response screens text
There are two Output sections in the GateKeeper.INI file that refer to the placement of text on the response screens. These correspond to both the Good and Bad response screens.
The default settings are listed below and the placement of text is shown in the screen captures after that.
[Output1] Size=56 Font=Arial X1=.25 X2=.75 Y1=.1 Y2=.3 [Output2] Size=18 Font=Arial X1=.25 X2=.75 Y1=.5 Y2=.8
• Output1 - Section refers only to the text for GOOD and BAD • Output2 - Section refers to the Scan results information that is returned by SalesEZ application • X1, X2, Y1, Y2 - Ratios of screen size • Size - Point size

78
• Font - Any recognized Windows font name
The text is centered between the X1, X2 and Y1, Y2 values.
Here is an example of what can happen with changes to these settings:
This layout was the result of the following settings (please note that the bitmap images have also been changed):
[Output1] Size=72 Font=GillSans X1=.25 X2=.75 Y1=.4 Y2=.6 [Output2] Size=12 Font=Arial X1=.25 X2=.75 Y1=.8 Y2=.9
For GateKeeper module, Sales looks for support files and images
Sales looks for support files and image in the ProgramData directory first. If they exist there, they are used. If not, the Program Files directory is searched for the file. If there is a subdirectory, it is the same subdirectory in both the ProgramData and Program Files subdirectories. Local layouts defined in the [Layouts] .INI section are looked for in multiple locations.

79
• ProgramData\Siriusware\Sales\ • Program Files\Siriusware\Sales • LayoutPath defined in the .INI file. Zip code files reside in the Program Files directory.
GateKeeper module looks for support files, .bmp or .wav, in the ProgramData directory. If they exist there, they are used, if not, the Program Files directory is searched for the files and used if present. If a subdirectory contains the support files, it looks in both ProgramData and Program Files for the support files in the subdirectory indicated.
GateKeeper use
Executing GateKeeper module
GateKeeper module is normally launched by double-clicking the shortcut that was created on the desktop during installation. However, some users find it convenient to place a copy of the shortcut in the Startup folder so that it is launched when the computer boots.
Program usage
The procedure for use is to scan/swipe a ticket or pass. The results are returned, and then GateKeeper module is ready for the next customer.
GateKeeper module always tries to be connected to SalesEZ application in order to validate scans. However, it has been designed to validate offline using an encrypted expiration date in the barcode or magnetic stripe. If this is the first use of validation, then the layouts for your tickets, passes, etc., may need to be modified. Please consult Siriusware Technical Support for more information.
When GateKeeper module validates Validation Items offline, they are stored locally and later “trickled” to SalesEZ application when the connection has been re-established.
After a scan, text about the scan (good/bad etc.) is displayed. Bad scans provide information as to why the validation failed.
If the GateKeeper computer is connected to a turnstile/gate, a Good scan opens the turnstile.
Scan pass or ticket
This depends on the hardware being used, but essentially the procedure involves scanning or swiping a barcoded ticket or pass or encoded card.
It is also possible to enter a pass/ticket number with a keyboard into GateKeeper. This is not designed for normal use, but rather for testing purposes. This is done by adding the following setting to the Preferences section of the GateKeeper.INI file:

80
TestMode=TRUE
When absent, the default for this setting is FALSE.
The Test Mode input box is expecting the input to be in the same format as the barcode or swipe. For tickets, this is the encrypted form of the expiration date and access number. To enter an access number that is not encrypted, enter an * first, followed by the prefix, and then the access number.
Example: *A230487000
In encrypted format, this would be entered as: AXX2YKH1E
Note: XX is in place of the expiration date.
Responses displayed after scan
The following table lists and describes the responses displayed after a scan.
Response displayed after scan Description of response
GOOD The pass/ticket was scanned while connected and was valid.
GOOD for # The ticket was scanned while connected and was valid for # customers at one time.
GOOD Offline The pass/ticket was scanned offline and is stored locally to be trickled later.
Expired The pass/ticket is no longer valid and has expired. If the pass has actually not expired but this message is displayed with the correct month/day of expiration, you might want to check and make sure that you didn’t include the expiration date in the barcode expression in the Pass layout without intending.
Not enough total number of uses available on this pass
All uses for the pass/ticket that was scanned have been used already.
Does Not Allow Remote Validation From Site ... Of Pass Type ...
This is for site-specific validation for tickets/passes scanned at a remote site which is not the original purchase site.
This pass was voided by OPERATOR for The pass/ticket was voided by an operator either at a salespoint or

81
Response displayed after scan Description of response
reason in SysManager.
This pass is blacked out MM/DD/YYYY HH:MM through MM/DD/YYYY HH:MM for reason
The pass/ticket has been set up with a black-out period(s). This could be the item or just this pass/ticket.
m more minute(s) and s more second(s) must go by before next validation of this pass
The pass/ticket item has been set up with an access delay to prevent it from being validated more than once during a specified period of time.
This pass is not valid at this physical location The pass/ticket item has been set up to be blocked at specified physical locations.
This pass is not valid until MM/DD/YYYY HH:MM
The pass/ticket was sold and scanned before its valid period of time.
Scan xxxxxxx INVALID. There is no record for PASS_NO PO in Table xxxxx.
This error implies an encryption issue.
Trickling
When GateKeeper module does not have a connection to Pool Service for SalesEZ application, scans are collected in a database (unless they fail the expiration date and parsing tests).
The following .INI settings correspond to trickling:
[Preferences] ReconnectInterval=25 ReconnectSeconds=180 [Trickle] Delay=150 Interval=50
ReconnectInterval is the number of scans between attempts to connect to SalesEZ application. ReconnectSeconds is similar, but corresponds to amount of idle time before GateKeeper module attempts to connect again to trickle offline scans. When GateKeeper module has offline scans, and then connects to SalesEZ, GateKeeper tries to trickle only after the Delay has elapsed. At that point, a scan is sent to the server every time the Interval has elapsed. Any scanning on GateKeeper module resets the Delay.

82
Displaying a guest’s mug shot
You can display a guest’s mug shot on GateKeeper module. The mug_shot from a guest can be displayed on the GateKeeper screen. To activate this functionality, the region where the image is displayed is defined using .INI settings: [Mug] X1=.6 X2= 1 Y1=.6 Y2= 1 These settings put the image in the bottom right corner of the screen (from 60% to 100% of the screen for x and y). Additional guest information is retrieved: birth date, first name and last name. This information can be formatted and displayed using:
[GuestInfo] Size=18 Font=Arial X1=.5 X2=1 Y1=.45 Y2=.5 Text= Welcome *FNAME* *LNAME* *AGE* These settings define the region to display the text. The Text setting is what to display and the *XXX* fields are replaced with the actual information. In addition, you can use a different .bmp and a different sound for child guests.
[Preferences] ChildAgeLimit=12.0 GoodBmpChild=aux_files\child.bmp GoodSoundChild=aux_files\child.wav
When the response is good and online and the age is less than the threshold, the appropriate .bmp or wave file is used (if defined).
GateKeeper module displays the guest’s mug shot when a valid pass is scanned. GateKeeper module can display a designated .bmp file and sound a designated .wav file when a ticket is scanned with a specified DCI. The ability also exists to set multiple programs in GateKeeper module. This replaces the ChildAgeLimit, GoodBmpChild and GoodSoundChild settings (which can be replicated much more effectively using this new system). Each program needs settings similar to:

83
[Program1] Name=Junior Ticket GoodBmp=GoodChild.bmp GoodSound=GoodChild.wav DCI=TICKETS,ALLDAY,CHILD;TICKETS,HALFDAY,CHILD [Program2] Name=Senior Ticket GoodBmp=GoodSenior.bmp GoodSound=GoodSenior.wav DCI=TICKETS,ALLDAY,SENIOR
The programs need to be numbered (1 to whatever) in order. The DCI is a list separated by semicolons. The department, category and item are separated by commas.
Displaying guest information
GateKeeper module can display the guest’s height along with first name, last name and age when the guest’s picture is pulled up when his pass is scanned. The .INI setting for all four to be displayed is:
[GuestInfo] Text= Welcome *FNAME* *LNAME* *HEIGHT* *AGE*
“Welcome John Doe 5'7" 29” would be the display results if John Doe has height and birth date in the guest data.
Guest information displays on the Gatekeeper screen
Gatekeeper module gets guest information (picture, etc.), when necessary, to display on the Gatekeeper screen. This is when the [GuestInfo] Text is set or the display area x2 and y2 are non-zero (real area).
Using GateKeeper module to read rotation detection from a serial port connection
GateKeeper module can read rotation detection from a serial port connection. To enable this, the [SerialAdmit] section needs to be added to GateKeeper.INI:
[SerialAdmit] ComPort=13 BaudRate=9600 Parity=N DataBits=8 StopBits=1

84
This is where the DSR and ground pins need to be wired back from the gate. Tests have been made with the Boon Edam Tomsed gates and setup is detailed in the hardware setup document. Also, GateKeeper module needs to be modified to process, “Good for N” responses to pop the gate multiple times.
[Preferences] AdmitGoodFor=TRUE AdmitGoodForDelay=500 AdmitGoodForText=Next Person Proceed – Entries Remaining:*ADM* AdmitGoodForResetTimeout=30000
AdmitGoodForDelay (in milliseconds) is the length of time that GateKeeper module waits after receiving an indication that the turnstile has turned over before trying to pop it again. The default is half a second, which seems to work well. AdmitGoodForText substitutes the actual number of entries remaining for *ADM*. This is displayed whenever the next person is to proceed through the gate.
In the event that multiple “Good for N” scans are received, the numbers of admissions are added up. So, if you scan a “Good for 3” admission, and then a “Good for 2” admission, you have five turns of the turnstile.
Also, if you scan %EXECADMRESET (or just type EXECADMRESET into the test box), any unused admittances are reset.
In addition, when running in this mode, the admittance screen is dismissed as soon as the DSR is received (the gate is tripped). It is not reset until AdmitGoodForResetTimeout has expired. The regular response timeout is only active in the case of a bad scan.
Checkpoint logging
GateKeeper module allows CheckPoint logging to work with serial rotation detection. The [SerialAdmit] section must be completed and connected just as if multiple admissions were being supported (so that a serial DSR is received whenever a person enters). Then, the [Checkpoint] section must be completed.
Example: [Checkpoint] SerialCheckpoint=TRUE Name=Main Value=IN
The Value of 'IN' is the default. If the Name is left blank, the Location setting is transmitted instead. Values are recorded in the checkpt file. So, all that is required is:
[Checkpoint] SerialCheckpoint=TRUE

85
and the serial admit settings.
Exiting GateKeeper
There are a number of ways to exit GateKeeper module. When a keyboard is available, either the Escape (Esc) key or Alt-F4 exits.
However, for cases when a keyboard is not connected, inputting EXECQUIT causes the GateKeeper module to exit. This can be done by scanning a barcode with EXECQUIT encoded into it.
Note: EXECTOOLS is designed to bring up the Tools/Configuration menu. At this time, this feature is not available.
These barcodes can be created using Microsoft Word on a computer with Common Files application installed by using the BC C39 2 to 1 Narrow, Regular, Size 30 font. Be sure to add asterisks (*) before and after the text you want printed in 3of9.
Finally, it has been added to this document for your convenience:
Diagnosing problems
When troubleshooting a GateKeeper station, it is important to first determine where the problem lies. This can be difficult to diagnose, so it is best to determine that the hardware is properly configured first.
Encryption
Encryption allows very long numbers to be encoded into relatively small barcodes. Typically, all barcodes (pass and access/ticket) are encrypted. In order to be able to scan encrypted barcodes in Sales, the setting EncryptedPassNumbers=TRUE must be included within the [Preferences] section of the Sales32c.INI file.
Passes are almost always encrypted. Tickets don’t have to be encrypted but they need to work with scanners. Scan systems typically require encrypted dates, so scanned products have encrypted numbers. Encrypted numbers have the advantage of being able to store a valid date in case the scanner/gate goes offline.

86
If Sales has the EncryptedPassNumbers=TRUE .INI setting, then non-encrypted tickets do not work when scanned. In these cases you have to manually enter the ticket number when validating in Sales.
Thus Siriusware Inc. recommends that clients follow these guidelines when deciding whether to encrypt numbers:
• Scanning at handheld scanner or gate – Encrypt numbers • Scanning/swiping at a salespoint – Unencrypt numbers
Please note the following .INI settings, documented in detail in the Salesware .INI Settings Reference document:
[Preferences] EncryptedAutoCommand=TRUE EncryptedAutoCommandXXOnly=TRUE
These allow you to have encrypted numbers for the %E functionality.
Support for RFID (Radio Frequency Identification)
Salesware supports RFID via several different configurations.
RFID overview
RFID is a technology that is seeing increasing use in the industry as an alternative to barcode scanning. RFID has a major advantage over barcodes in that it does not require direct contact or close proximity line-of-sight scanning. Collection of Access Control or financial data can therefore be faster and less intrusive than with traditional approaches to Access Control module.
An RFID system consists of three major components: an antenna and transceiver (often combined into a single reader) and a transponder tag. The antenna uses radio frequency waves to transmit a signal that activates the transponder. When activated, the tag transmits data back to the antenna. The data is used to notify a programmable logic controller that an action occurs (for example, an Access Control gate opens).
High-frequency RFID systems (30 KHz to 500 KHz) have short transmission ranges (generally less than six feet). Ultra high-frequency RFID systems (850 MHz to 950 MHz and 2.4 GHz to 2.5 GHz) offer longer transmission ranges (more than ninety feet).
Media options
While RFID tags can be used in disposable ticket stock, all Siriusware clients currently using the Salesware RFID solution use plastic cards. The primary reason – maybe the only reason – is the high cost of the media. While the cost for disposable media and plastic cards is in the same range (depending on quantity, roughly $1.00 - $2.00 USD each), Siriusware Inc. has found that its clients are more willing to pay for RFID when using a plastic card that can

87
be reloaded/reused. Plastic cards can be credit card size, key fob size, or anywhere in between. RFID wristbands can also be utilized and are especially useful in environments where physically carrying a card might be impractical (for example, in a water park).
In either case, a potential marketable benefit is that this is a “green” solution in that the media is re-used rather than discarded.
Validation options
There are two options available within Siriusware’s RFID solution: database validation and hardware validation.
Database validation relies on live communication between the RFID reading unit and the Siriusware database. When an RFID tag is activated, the reading unit must check the database to see if the media is valid or not, and to write the use log. Unless there are networking problems, there is typically very little delay between the time the tag is read and the time a response is received. The advantages to using this method are that:
• The full database is available for validation checks • Changes to approaches to validation are simply software changes • Configuration of the products is all done in one system
The disadvantages are that if network communication is unavailable, full, live validation checks are also unavailable (the system defaults to assuming “good” responses from the database while off-line) and the system is necessarily slower than the alternative.
The second option is to use hardware validation. This method stores validation information in the tag itself, making full, live communication with the database unnecessary. This allows for greater speed in the validation process and a level of robustness that cannot be matched by a database validation approach. If the network or any of its components goes down, validation still occurs. It is also much easier with hardware validation to validate tickets from other sites. Because the validation information is embedded in the card, the other system need only understand how to validate the card based on the rules associated with the program.
Hardware options
Printers
RFID plastic card printers are made by a number of manufacturers. RFID card printers cost roughly $3,000 - $4,000 USD.
PrintEZ application encodes RFID chips using the PEZ GetRFIDTagCode command on Zebra p330i printers. For information on PEZ commands, see the Salesware Layouts document. This requires a Zebra p330i printer with firmware version 1.18.01. If the ZBRUHFReader.dll is not on the computer, “ZBRUHFReader.dll not found” prints on the card.

88
Transceivers/antennas units (readers)
Readers and antennas can be standalone, but are most typically included as pieces of Access Control hardware. Types of RFID-compatible Access Control hardware include:
• Handheld scanners − Siriusware Inc. offers a dual barcode/RFID reading unit that is ideal for mixed use (for example, daily tickets can be read with a barcode while passes or membership cards can utilize RFID tags). These MC9090 scanners cost roughly $4,000 USD.
• Turnstiles – Siriusware partners with Axess to provide a number of RFID turnstiles. Please contact Siriusware Technical Support for more information and various turnstile options.
• Gates – Siriusware partners with Axess to provide an RFID Flap Gate. This gate is easy, fast and convenient for guests to ski through.
• Posts or portals – These are convenient for sites that want to read an RFID transponder, but do not wish to physically block access to the venue.
FAQs
What is the advantage of using pre-encoded numbers on the tags?
Pre-encoded numbers can reduce the hardware costs because a printer/encoder is not necessary. A desktop reader can be used to associate cards to people or products. However pre-encoded cards can only be used as a form of payment or in a database validation environment.
Can RFID be used in conjunction with Siriusware’s In-House Cards product?
Yes. RFID readers must be used instead of magnetic swipe readers.
Our site’s season passes can also be used to store In-House Card funds. Can we continue this program if we switch to RFID?
See previous.
Our Access Control scanning takes place in severe weather (rain, snow, etc.). How does inclement weather affect RFID scanning?
RFID is not affected by inclement weather, whereas barcode scanning is affected by fogging of scanners or extremely moist environments.
What is the difference between high frequency and ultra-high frequency?

89
High frequency (HF) cards are currently the only type of card supported by existing gate systems. HF cards have a shorter read range (1 meter maximum) and require more power. They are also the most widely used, accepted, rapidly growing and secure technology in the world.
Ultra high frequency (UHF) cards are supported by and more appropriate for handheld RFID scanning solutions. Their read range is longer (two to three meters), they require lower power so battery powered devices can last much longer and the read rate is fast making them appropriate for the handheld environment.
Gate Access
The Gate Access module interface for Axess controller hardware can interface with multiple Axess control units and each Axess controller hardware can govern up to four entryways. This enables customers to enter, exit and re-enter at different entryways with ticket or pass media. Client’s staff can have more permanent barcoded or RFID media allowing them access. This configuration uses the Siriusware.Axess.GateController application.
Functionality
An Axess controller, which is a Unix based device, talks to the Gate Access module interface which in turn communicates with ww.dll. The ww.dll interfaces with SalesEZ application to validate the ticket or pass. When a barcode or RFID is scanned, the controller connects to the SOAP interface and passes the scan. The SOAP interface passes the scan to ww.dll which calls SalesEZ application to validate the scanned pass. The validation or failed validation information is passed back to the SOAP interface which passes a command string telling the controller what to do e.g., open the door, flash the light, display a message, etc. Gate Access module is hosted in IIS as a web service and can function anywhere. (There are no particular limitations on where the service is running in relation to the Axess controller).
Implementation
AXOEM High Speed Channel version 2.3 is a SOAP interface where the Axess gate controller is the hardware and Siriusware.Axess.GateController application controls the data for entry validation. You can see a sample of this interface running if you open a browser and navigate to http://89.26.127.61:16302/axis_000/services/AXOEM_HS?wsdl. This is the web service description language (WSDL) for the sample service that Axess hosts. When the gate is set up properly, it accesses Siriusware’s AxessGate.svc hosted in a local IIS server.
The Axess controller hardware runs on a piece of gate hardware and looks something like this:

90
The Axess gate hardware comes shipped with a static IP address. You must first change the IP address of the gate to match the client’s network.
Changing the IP address
1. Find the IP address of the gate. Cycle the power and watch the display during startup and the address is shown (i.e., 192.168.100.100).
2. To change the IP address on the gate, you need a device on the same subnet as the gate. Perhaps the simplest way to do this is to change the IP address of a laptop, and then connect it to the gate with a network cable. Your laptop’s IP address can be set by going to the Network Adapter settings for IP v4:

91
3. After setting the laptop’s IP address and connecting the network cable, you are able to open a Browser (Internet Explorer is fine) and enter the gate’s IP address (i.e., 192.168.100.100). You need to log-in if everything is working at this point (Username = admin, Password = AXCustomer, mind the capitalization). If you can’t connect, you need to troubleshoot. (Try pinging 192.168.100.100, etc.)
4. Using the gate’s web interface, you assign a new static IP address (you need to check for an address that won’t get clobbered by DHCP on the network). This is set under Admin > Configuration > Network. Also, the new IP address needs to be accessible from the ww.dll computer. For example, if your network is on 192.168.1.xxx, then you must set the turnstile to 192.168.1.xxx where xxx represents the new IP you are assigning.
5. Under the Services > Datainterfaces > axcoem_hs tab, change the URL to the address where the Gate Access service lives.

92
In this case, it runs off the screen, but the full text is, “http://192.168.100.154:80/AXSite/AGService.svc”. Also, the version of the reader controller (noted at the bottom of the screen capture) is 8.0.61.00. Older software versions won’t allow this setting to “take”. The way to test if this is working is to set the URL, press the UPDATE button at the top, and then reload. Make sure it’s still what you set originally. Then, power the controller off, and then on again. At this point, go back and recheck the setting. Then, you can go to Logfiles and open the topmost logfile (quelt1.log). It has a line in it like this and indicates the actual URL being used to find the service:
22.11.2011 18:47:55.514 5 0 Url of OEM Interface: http://192.168.100.154/AXSite/AGService.svc
The AxessGate service is a c# component which is hosted in IIS and calls ww.dll in order to perform validations. The ww.dll, in turn, calls SalesEZ application. A computer which deals with reader requests need to be set up with a web site that hosts AxessGate. Ww.dll must be installed and registered on the computer. Also, Pool Service and Salesez.dll is installed and registered on the computer.

93
Configuration
Prerequisites for the computer:
• The computer must have .Net 4.0 and IIS set up. • It also needs a Static IP address. • The SiriusSQL database needs a user to allow the .dll and SalesEZ application to connect to it. This must be
a dedicated user (not Sirius/Sirius).
Setting up the web service:
1. Start IIS and Add Application Pool. 2. The pool is named, “AXPool” and enabled to use version 4.0 of the .Net framework. 3. Edit the Advanced Settings and make sure that Enable 32-Bit Applications is set to True. 4. Also, set the Maximum Worker Processes to 5. 5. Now, add an application to the default web site. 6. Next, click Add Application 7. Make the alias, “AXSite” and the virtual path, /AXSite. The physical path can be, c:\program
files\siriusware\SiriusAxessSOAP. In this location, there needs to be AGService.svc and web.config. There also needs to be a Bin directory containing AxessGate.dll and Siriusware.Utility.dll. You can test this by browsing to the full address (i.e., http://192.168.100.154:80/AXSite/AGService.svc) and you see this screen:

94
Setting up the AX Controller hardware:
Use a web browser to get to the gate itself and set it to look for the web application you just set up. If your IP address was set as in the example above, you’d set the URL to be, “http://192.168.100.154:80/AXSite/AGService.svc”.
Setting up ww.dll:
The .dll must be version 4.2 and have Validation and Axess sections to the ww.INI file.
[Validation] SalesEZ=127.0.0.1:4203 Location=1 [Axess] GoodScan=<BTURNSTILEACTIVE>1</BTURNSTILEACTIVE><NTURNSTILEACTION>0</NTURNSTILEACTION><NGREENLIGHT>1</NGREENLIGHT><NREDLIGHT>0</NREDLIGHT><NYELLOWLIGHT>0</NYELLOWLIGHT><NRETNICKTIME>30</NRETNICKTIME><NSOUNDTYPE>1</NSOUNDTYPE><NDISPTIME>30</NDISPTIME> BadScan= <BTURNSTILEACTIVE>0</BTURNSTILEACTIVE><NTURNSTILEACTION>0</NTURNSTILEACTION><NGREENLIGHT>0</NGREENLIGHT><NREDLIGHT>0</NREDLIGHT><NYELLOWLIGHT>1</NYELLOWLIGHT><NRETNICKTIME>30</NRETNICKTIME><NSOUNDTYPE>2</NSOUNDTYPE><NDISPTIME>30</NDISPTIME>
It’s important that all possible fields be filled in for the GoodScan and BadScan settings. These settings are described in Axess’ documentation, but indicate the manner in which the turnstile is to respond to scans.
Note:
• NRETNICKTIME and NDISPTIME is in tenths of seconds. • BTURNSTILEACTIVE indicates whether or not to open the turnstile (and, as of POE #100 (192.168.0.104)
it indicates the number of entries). So, this is often overridden. • NRETNICKTIME may need to be adjusted with multiple entries. It is the amount of time the person has to
go through. Axess recommends setting this to 0, but actually a long time-out (i.e., 300 / 30 seconds or 600 / 60 seconds) makes sense for a group.
Speed considerations:
SalesEZ application can sometimes respond too slowly. This is because SalesEZ application was located in one location and the SQL server Computer was in another distant location (i.e., differing States). In this case,

95
configuring ww.dll to point to the SalesEZ IP address to the SQL Server was much faster (three-five seconds for response time reduced to .3-one second).
Troubleshooting:
• If IIS isn’t running, you get an “unknown ticket” from the gate. • If the app pool can’t run ww.dll, you get an, “ERR” returned when you scan a ticket. • If while installing there is no asp.net section present on IIS, go into the Control Panel to turn on
Windows Features and check asp.net here:
Also set:
Install .NET Framework 4.0 Full

96
Setting up logging
There is a web.config.logging included which writes a log file. This needs to be used in place of the web.config with AGService.svc. It also requires creating a Logs directory c:\Program Files\SiriusAxessSOAP\Logs.
Updating
To update, stop IIS and copy the zip file to the SiriusAxessSOAP directory and unzip it. Then, re-start IIS.
No LDT found
If you change the entry number on the unit, you may need to put a .ldt file onto the unit. You modify the .ldt file (there is one included in the install) and rename it to the entry number (i.e., 300.ldt) and upload it to the unit.
Rebooting the gate
The gold star icon at the bottom of the controller interface reboots the controller.
Salespoint configuration
.INI settings
Functionality was added to the ww.dll to allow pass and ticket validation. This requires the following new settings in ww.INI.
[Validation] SalesEZ=127.0.0.1:4203 RolloverMonth=8 CheckExp=TRUE PrependList= Extract=

97
CardPrefixes=' B' NoDecryptPrefixes= Location=1
The checkpass and validate calls were modified to respond to an .INI setting in ww.INI.
[Validation] DCI=TEST TEST MYVAL
This is passed along to all validation calls in absence of a specific <dci> tag passed with the call.
The ww.dll can recognize multiple [Validation] sections when in the ww.INI file. The main [Validation] section is used except when a <poedata> tag is passed to checkpass or validate pass from Gate Access module. In these cases, ww.dll looks for a ValidationNNNNN section (where NNNNN is the poedata).
Example: <func>validatepass</func><poedata>101</poedata>....
The ww.dll uses any settings in [ValidationNNNNN] in favor of any of the other settings. These can be SalesEZ, RolloverMonth, CheckExp, PrependList, Extract, CardPrefixes, NoDecryptPrefixes, Location, DCI, AxessGoodScan and AxessBadScan. Also, while the [Axess] section is still allowed, it is now preferred for the Axess data to be inside the Validation section(s) and be labeled as AxessGoodScan and AxessBadScan.
In addition, to support the Axess gate integration, two more settings are required when ww.dll is being called from the Axess Gate Soap Service.
[Axess] GoodScan=<BTURNSTILEACTIVE>1</BTURNSTILEACTIVE><NTURNSTILEACTION>1 </NTURNSTILEACTION><NGREENLIGHT>1</NGREENLIGHT><NREDLIGHT>0 </NREDLIGHT><NYELLOWLIGHT>0</NYELLOWLIGHT><NRETNICKTIME>3 </NRETNICKTIME><NSOUNDTYPE>1</NSOUNDTYPE><NDISPTIME>3</NDISPTIME> BadScan= <BTURNSTILEACTIVE>0</BTURNSTILEACTIVE><NTURNSTILEACTION>1 </NTURNSTILEACTION><NGREENLIGHT>0</NGREENLIGHT><NREDLIGHT>0 </NREDLIGHT><NYELLOWLIGHT>1</NYELLOWLIGHT><NRETNICKTIME>3 </NRETNICKTIME><NSOUNDTYPE>2</NSOUNDTYPE><NDISPTIME>3</NDISPTIME>

98
XML fields
All eight of the xml fields listed in GoodScan and BadScan are required for the Axess integration to work correctly. Validations are performed like this:
<func>validate</func><scan>3013001</scan>
Optional parameters are location, operator, salespoint, ip, port, decrypt, axessdata and timeout (three seconds is the default). A call with all options would look like this:
<func>validate</func><scan>3013001</scan><ip>127.0.0.1</ip> <port>4203</port><decrypt>1</decrypt><axessdata>0</axessdata> <timeout>3</timeout>
The axessdata parameter means to return the axessdata specified in the ww.INI file (depending on if the scan is good or bad). This function returns valid, msg, detail and perhaps an axessdata tag.
Example: <detail>Scan: E007800ACDD37617 Error: Pass# 0 is not a valid pass# </detail><msg>BAD</msg><valid>0</valid> close window
Poe data
Gate Access module passes <poedata></poedata> tags to ww.dll. This is derived by taking the poe number (up to 999) multiplied by 100 and adding on the lane number (up to 99).
Example: poe=1, lane=1: <poedata>101</poedata> poe=999, lane=22: <poedata>99922</poedata>
Calls to checkpass and validatepass are now returned with a <goodfor> tag if they are supposed to allow for multiple entries. In addition, with the Gate Access module interface, the gate gets triggered for that number of entrances.
Axess Gate integration
The Siriusware system is used to sell products that can be validated by Axess Gates. The media used by Axess includes an RF chip, and all instructions for how to validate the ticket or pass is contained within the chip. Axess RF media (for the most part) can be reloaded. For instance, the purchase of a 1-Day Adult Ticket item in

99
Siriusware produces a piece of media with an encoded RF chip and a unique number, referred to as the WTP number. The guest can then reload that same ticket media on-line (or in person at a salespoint) by entering the WTP number during the reload purchase process.
During the gate validation process, if a ticket or pass is invalid based on information currently encoded in the chip, a check is performed by Axess to see if any new purchase/reload data is available. If it does not find new purchase/reload data, the customer cannot enter through the gate. If it does find new data, the new information is encoded in the RF chip by the gate and the customer is allowed entry (assuming, of course, that the new reload data allows gate entrance at that location/date/time/etc.).
Key terms
Axess Oracle Database: The database used for storing all Axess configurations, Sales transactions and guest photos (forwarded from Siriusware) and gate validation activity.
Axess Gate: The physical hardware used to grant/deny entrance to a given lift/location and encode RF chips from WTP reloads.
Axess SOAP EDE: A service installed by Axess that allows communication between Axess and Siriusware.
Siriusware Sales: The application used to sell and encode new Axess media and sell and encode reloads to existing Axess media. WTP reloads can also be generated from Sales for media-not-present transactions.
Siriusware E-Commerce: The Siriusware on-line shopping cart. Processing of web reload transactions via Sales Host utility updates SiriusSQL application and send updates to the Axess system for subsequent encoding of new information into corresponding RF chips directly by the Axess Gates. E-Commerce module can also sell new media, but the encoding process must occur by recalling a ticket sale and finalizing at a salespoint with an Axess printer or by looking up a finalized pass sale and printing/encoding a new piece of media for the new pass sale.
Siriusware SOAP EDE Interface: Stored Procedures within the SiriusSQL database used to forward new or updated WTP information to the Axess Oracle database. This interface is also used to gather scan data from the Axess Oracle database in order to generate scan (usage) data within SiriusSQL database.
Siriusware RF Serial Number (Axess Serial Number): A number that is a combination of the Site ID ([SmartPrinter] Project=## setting), Salespoint ID ([SmartPrinter] POS=## setting), and an incrementing number that is unique per every 50,000 access records (1-49,999) and every 50,000 pass records (50,000-99,999).

100
Note: The idea behind restarting the count with every 50,000 tickets or passes per salespoint is that at any given time, only one of those RF Serial Numbers are active. So, even though throughout several years the same RF Serial number could be generated, only one of those numbers would be relevant.
Siriusware WTP Number (Axess Chip ID): An alpha-numeric number that is unique per piece of RF media. The WTP number is a combination of several factors including the manufacturer chip number, the project or site ID and a check sum digit. The WTP number is used during the reload process in E-Commerce module and for media-not-present reloads in Sales.
Note: The same WTP number is written into the WTP field across multiple gst_pass and access records as these records represent the full history for that particular piece of media (all original purchases and reloads).
Axess architecture
NEW MEDIA Sale (Encode): During the card encoding process
1. The RF Serial number is generated and inserted into the rf_serial field of the access or gst_pass record.

101
2. The WTP number for the card is retrieved from the Axess Smart Printer and inserted into the corresponding wtp_no field of the access or gst_pass record. A MEDIA ENCODED record (activity type 150) is also generated in either acc_actv or gst_actv whenever a piece of media is encoded. The presence of new MEDIA ENCODED records (activity type 150) is used to generate updates to the SOAP EDE.
RELOAD of MEDIA at a salespoint:
1. Finalization of a reload sale prompts the operator to hand-feed the existing media into the Axess Smart Printer for the encoding process.
2. At the time the card is encoded, Sales updates the new access or gst_pass record with a new RF Serial number and the existing WTP number.
3. Sales generates a MEDIA ENCODED (activity type 150) record within the acc_actv or gst_actv table in order to send an update to the SOAP EDE.
4. Finalization of a reload sale that includes the manual entry of a WTP number, in lieu of a card encode, generates a RELOAD record (activity type 151) in either gst_actv or acc_actv in order to send an update to the SOAP EDE for later encoding by the Axess Gates.
NEW MEDIA in E-Commerce:
1. An E-Commerce sale of a new pass item results in the sale being finalized in Sales Host utility. 2. An operator must then lookup the pass and encode it with the Axess Smart Printer. 3. When the pass media is encoded, an RF Serial number is generated and inserted into the rf_serial field
on the gst_pass record; and the WTP number is retrieved from the Axess Smart Printer and inserted into the wtp_no field in the gst_pass record.
4. A MEDIA ENCODED record (activity type 150) is also generated in gst_actv to send an update to the SOAP EDE.
5. An E-Commerce sale of new ticket items results in Sales Host utility creating a saved sale. 6. The saved sale must then be recalled and finalized at a salespoint that has an Axess Smart Printer. 7. RF Serial numbers are generated during the ticket encoding process and inserted into the rf_serial field
of the access records; and the WTP numbers are retrieved from the Axess Smart Printer and inserted into the wtp_no fields of the access records.
8. Sales generates MEDIA ENCODED records (activity type 150) in acc_actv to update the SOAP EDE. RELOAD of MEDIA in E-Commerce:
1. A visitor/guest starts by entering his/her WTP number. 2. The WTP number is verified as valid (it exists within SiriusSQL database) and a list of eligible reload items
is returned. 3. The visitor/guest adds the desired item to the cart and completes the checkout. 4. Sales Host utility processes the sale and forwards the new access data including a new RF Serial number
and the existing WTP number to SiriusSQL via SalesEZ applications. 5. Sales Host utility also creates a RELOAD record (activity type 151) within the acc_actv table in order to
generate an update to the SOAP EDE.

102
SCAN Data:
1. A SOAP EDE call (GetReaderTransactions) gathers gate validation data from the Axess Oracle database based on the RF Serial Numbers.
2. The data is fed to SalesEZ application in order to generate the appropriate usage data in SiriusSQL application.
3. All scans fed to SalesEZ application in this manner are treated as “trickled” scans. 4. This method allows the standard scanning reports to be utilized in the Siriusware ReportManager
application, as well as more complicated features such as triggering Revenue Recognition Rules and Direct-to-Lift capability.
Product configuration
DCIs are configured in Siriusware with all the usual configurations, profit center, price, special, etc. There are five basic types of items:
• NEW ticket items (access records) printed on reloadable media. • NEW ticket items (access records) printed on “one-way” non-reloadable media. • RELOAD ticket items (access records) that require the entry of an existing WTP number in E-Commerce
module or at the salespoint for media-not-present reloads or hand-feeding of an existing ticket or card at a salespoint.
• NEW pass items (gst_pass records) issued on reloadable media. • RELOAD pass items (gst_pass records) that require the entry of an existing WTP number in E-
Commerce module or hand-feeding of an existing card at a salespoint. These items would typically be used to renew a season pass from year to year.
Ticket items printed/encoded on reloadable media Creating Siriusware Access Records For items that generate new ticket media (new RF cards/tickets that need to be printed/encoded) the item must be configured to Create Access Record. Although validation is controlled by the Axess Gates, and not the configurations within the Siriusware Access Template, it is still necessary to configure the template with the typical settings, such as Total Number of Uses, for consistency when researching access records in Siriusware vs. WTP/RF Serial Numbers in Axess and for exchanges. Also, any Siriusware salespoint validation programs still need to have all of the relevant configurations added.

103
Axess printing of NEW Tickets/Media In order to send instructions to the Axess Smart printer for printing and encoding you must configure a Text layout for the item under the Axess Smart Printer option:
Note: Please refer to the Axess Smart Printer Layouts section of this document for more details on configuring layouts.
E-Commerce considerations New ticket sales should NOT be finalized in Sales Host utility. Instead, saved sales or reservations are generated that can be recalled and finalized at a salespoint that has an Axess printer and the appropriate RF stock.
Ticket items printed/encoded on NON-Reloadable media (one-way tickets) Creating Siriusware Access Records For items that generate new ticket media (new RF cards/tickets that need to be printed/encoded) the item must be configured to Create Access Record. Although validation are controlled by the Axess Gates and not the configurations within the Siriusware Access Template, it is still necessary to configure the template with the typical settings, such as Total Number of Uses, for consistency when researching access records in Siriusware vs.

104
WTP/RF Serial Numbers in Axess and for exchanges. Also, any Siriusware salespoint validation programs still need to have all of the relevant configurations added.
Axess printing of NEW Tickets/Media In order to send instructions to the Axess Smart printer for printing and encoding you must configure a Text layout for the item under the Axess Smart Printer option:
Note: Because this type of media cannot be reloaded, the WTP number should NEVER be printed on these tickets. Please refer to the Axess Smart Printer layouts section of this document for more details on configuring layouts.

105
E-Commerce considerations New ticket sales should NOT be finalized in Sales Host utility. Instead, saved sales or reservations are generated that can be recalled and finalized at a salespoint that has an Axess printer and the appropriate RF stock.
RELOAD ticket items encoded on reloadable media Creating Siriusware Access Records For items that reload existing ticket media, the item must be configured to Create Access Record. Although validation is controlled by the Axess Gates and not the configurations within the Siriusware Access Template, it is still necessary to configure the template with the typical settings, such as Total Number of Uses, for consistency when researching access records in Siriusware vs. WTP/RF Serial Numbers in Axess and for exchanges.
Axess printing of RELOAD ticket items/media In order to send instructions to the Axess Smart printer for printing and encoding you must configure a Text layout for the item under the Axess Smart Printer option:

106
One very important element is configuring the layout to prompt for hand-feeding of the customer’s existing ticket or pass (previously encoded media) through the printer instead of the printer pulling a new card from the hopper. Please refer to the Axess Smart Printer layouts section of this document for more details on configuring layouts.
E-Commerce considerations All E-Commerce transactions that include a WTP number in the Sales string is automatically finalized in Sales Host utility in order to send an update to the SOAP EDE as soon as the sale is processed.
• During the purchase of a reload item in E-Commerce module, the visitor/guest is forced to enter a valid WTP number. Based on the WTP number entered, a list of eligible reload items are presented.
• In order to generate the list of eligible reload items, all reload items need to have Optional Validation selected. The optional validation in this scenario uses the Item/Pass Relationship tab to link the reload item currently being edited to all original media producing items that it is allowed to load.
• This type of configuration can be used, for example, to limit the purchase of CHILD RELOAD items to only those visitors/guests who originally purchased a CHILD media producing item (to prevent the situation of a customer purchasing an ADULT item originally, but then always reloading the ADULT media with items priced at a CHILD rate).
• To configure this link within the Reload item, select Optional Validation and click on the Template button.
• It is not necessary to enter anything on the Validation tab. Instead, go to the Item/Pass Relationships tab and move all original media producing items that can be loaded with this reload item to the Assigned Passes dialog. If the original media producing item can be expired at the time of the reload, enter IGNOREEXPIRATION() in the Discount macro box.

107
Example: A Discount Card allows 50% discount lift ticket reloads during the season. In this scenario, if the original Discount Card has expired, the reload is not allowed, so the IGNOREEXPIRATION() macro is NOT used.
Example: A business has decided to limit reloads based on a value equal to or greater than the original media producing purchase. For instance, a SENIOR 1 DAY ticket can be loaded with SENIOR RELOAD or ADULT RELOAD items; but an ADULT 1 DAY ticket can only be loaded with ADULT RELOAD items. In this scenario, the original SENIOR 1 DAY or ADULT 1 DAY ticket has most likely expired, but the reload is still allowed. So, the IGNOREEXPIRATION() macro is used for all reload options:

108
This linking of reload items and original media producing items is also possible within the Pass Action Specifics or the Access Record Template of the original media producing item. When approaching the linking from within the Pass Action Specifics or Access Template, the Item Discounts tab is used to associate all RELOAD items that can load the pass or access item currently being edited. The INGOREEXPIRATION() macro is entered for all reload DCIs if the pass or access item currently being edited does NOT have to be valid in order to be loaded.

109
Using the Adult 1 Day ticket and Senior 1 Day example from above:

110
The effect is the same whether the link is created within the reload item’s Validation template or the original media producing item’s Pass Action Specifics or Access Template.

111
Pass items printed/encoded on reloadable media
For items that generate NEW pass media (new RF cards need to be printed/encoded) the item must be configured to Create Pass. The configurations within the Action Specifics are still important for Siriusware In-House Cards module and salespoint validation features i.e., the %E discount function. Although validation is controlled by the Axess Gates and not the configurations within the Pass Action Specifics, it is still necessary to configure the typical settings, such as Total Number of Uses, for consistency when researching guest pass records in Siriusware vs. WTP/RF Serial Numbers in Axess and for exchanges.
A Graphic Pass layout is created, and then selected within the Action Specifics > Global Settings tab in order to print the typical information on the pass (guest name, item description, guest photo, etc.) if using a graphic card printer along with the Axess Smart Printer.
Axess printing of NEW Pass media: In order to send instructions to the Axess Smart printer for encoding you must configure a Text layout for the item under the Axess Smart Printer option:

112
Note: Please refer to the Axess Smart Printer Layouts section of this document for more details on configuring layouts.
Printing options (Exclusively using the Axess Smart Printer vs. using a Graphic Card Printer along with the Axess Smart Printer)
Passes can be printed and encoded exclusively through the Axess Smart Printer in Sales. It is also possible to use BatchPrint utility to bulk encode the cards when exclusively using an Axess Smart Printer for all printing/encoding. Keep in mind that the printed visual elements are limited when using the Axess Smart Printer. For instance, no colors or logos can be printed and the guest photo is very small and black/white with very little resolution.
Note: Because the photo from the guest record is displayed to the lift operator during the gate read and the card is almost never presented to a lift operator, the need for a quality photo on the actual media is greatly reduced. Additionally, Sales can be configured to prompt the operator with the guest name and photo when a card is presented for salespoint validation programs.
It is also possible to use a graphic card printer to add the visual elements to the pass, and then send the card through the Axess Smart Printer for encoding (and to print the WTP number.) When using this two-step printing process, the card first goes through the normal graphic printing via a Magicard, Fargo, etc. Then, the Siriusware system prompts the operator to feed the card through the Axess Smart Printer for encoding. This same two-step process happens when printing a pass upon finalization of a sale or by doing a Guest Lookup > Pass Inquiry. BatchPrint utility can also be used to bulk print the graphic elements of the passes, and then the cards can be encoded one-by-one using Ticket Inquiry or Guest Lookup > Pass Inquiry in Sales.
Important!: The PVC Pass Cards (four-color graphic cards) provided by Axess can only be encoded through the Axess Smart Printers. It is NOT POSSIBLE to do any sort of printing through the Axess Smart Printers on a PVC card. In order to print the WTP number on the card through the Axess Smart Printer, the pass cards MUST be ordered with one thermal (non-PVC) side with empty space on the thermal side for the WTP number.
Note: It is no longer necessary to order cards with a magswipe for encoding through a graphic card printer. The RF chip in the Axess media includes a Siriusware segment that can be encoded with the same type of data that used to be encoded in magswipes. In order to use this Siriusware segment for salespoint validation programs, the appropriate card media and desktop readers must be ordered from Axess.
RELOAD pass items printed/encoded on reloadable media
For pass items that reload existing media the item must be configured to Create Pass. The configurations within the Action Specifics are still important for Siriusware In-House Cards programs and salespoint validation features i.e., the %E discount function. And, although validation is controlled by the Axess Gates and not the configurations within the Pass Action Specifics, it is still necessary to configure the typical settings, such as Total Number of

113
Uses, for consistency when researching guest pass records in Siriusware vs. WTP/RF Serial Numbers in Axess and for exchanges.
A Graphic Pass layout can also be created, and then selected within the Action Specifics > Global Settings tab in order to print the typical information on the pass (guest name, item description, guest photo, etc.) if using a graphic card printer along with the Axess Smart Printer. This layout would only be used during exchanges for lost passes; not during the initial reload transaction.
Axess printing of RELOAD pass media: In order to send instructions to the Axess Smart printer for encoding or the Axess SOAP EDE for WTP reloads, you must configure a Text layout for the item under the Axess Smart Printer option:
Note: Please refer to the Axess Smart Printer Layouts section of this document for more details on configuring layouts.
Note: Additional printing using a Graphic layout would only be used during exchanges of lost media. Please refer to the Printing Options noted previously for NEW pass media sales.

114
Pass renewal/reload considerations for Siriusware Inc. salespoint programs
In order for a passholder to keep the same piece of media from season-to-season, yet still access his/her In-House Cards balance and receive the current year’s swipe discounts (%EP discounting at the salespoint), there are a few critical configurations that need to be set.
In-House Cards (IHC):
The Ignore Debitware card’s expiration date… dialog box located within Action Specifics > Debitware is checked for In-House Cards programs that are loaded onto Axess Media. This allows the same sixteen digit number (from the original pass purchase that generated the encoding) to be used for IHC reloads and purchases despite the original pass record expiring.
%E discounts:
When a pass record has expired, the %E swipe discounting can be configured to cascade to other passes owned by the guest. When configuring pass items:
1. Select the Check for Void and Date Range – Cascading option.
Note: Typically, Check for Void and Date Range is selected here, but for a single piece of media that is used from season to season, the Check for Void and Date Range – Cascading option is necessary.
Axess Smart Printer layouts
Axess Smart Printer layouts for Siriusware items contain up to five basic sections of information.
1. The tags used for encoding the RF chip for gate entry and/or sending information to Axess via the SOAP EDE interface.

115
2. The tags used to print a WTP number on the media 3. The tags used to print a guest photo 4. The tags used to print other readable data on the media 5. The tags used to encode the Siriusware segment of the chip for use in salespoint validation programs.
Note: For proper encoding to occur, do NOT insert any carriage returns or line feeds within the Axess Smart Printer layouts!
RF encoding/SOAP EDE information
There are tags within the Axess Smart Printer layout that are used to encode the RF chip and there are tags used to pass information to Axess via the SOAP EDE interface (and some do both). Most of these values are defined by the client during the initial training from Axess in Austria.
TicketType The Ticket Type is a preset program value within Axess used to define the type of data that needs to be encoded in the RF chip for proper gate validation. In Axess, this is often referred to as the Core Ticket Type. See the Required Tags Based on Axess Ticket Type section below for more information. The Ticket Type value needs to be included in the Axess Smart Printer layout, is encoded in the RF chip and is passed to the Axess database via the SOAP EDE.
<TicketType>#</TicketType> RF and Barcode RF and Barcode values determine whether the ticket or pass uses an encoded RF chip or a printed barcode for validation at the gates. You cannot use RF encoding and a printed Axess barcode on a single piece of media, and only certain Ticket Types can use a barcode for gate validation: 1, 2, 3 and 15. The RF or Barcode value must be specified in the layout, although they are not passed to Axess via the SOAP EDE.
<RF>1</RF>
OR <Barcode>1</Barcode>
If using a printed barcode instead of RF encoding, you must also specify the barcode position on the media:
<BarcodeX>2</BarcodeX><BarcodeY>990</BarcodeY>

116
POS number and serial number The POS number is unique per salespoint and is defined in the Ports.INI file: [SmartPrinter] POS=###. The Serial number ranges from 1-49,999 for access records and from 50,000-99,999 for guest pass records.
The combination of POS#, Project #, and incrementing Serial # value (1-49,999 or 50,000-99,999) create the contents of the rf_serial field in the Siriusware Access and gst_pass tables. The POS and RF Serial numbers are encoded into the RF chip by the Axess printers, but this happens automatically and does not need to be specified within the layout. The POS and Serial numbers are always part of the information passed to Axess via the SOAP EDE.
Pool Pool is a defined group of gates. For instance, All Mountain Gates, All Mountain Gates plus Ice Rink, Ski School Gates, etc. The Pool needs to be specified in the Axess Smart Printer layout, is encoded in the RF chip and is passed to Axess via the SOAP EDE.
<Pool>#</Pool> ReaderPersonGroup Reader Person Group is a classification of customers typically based on age or status, and is used to generate a visual indication of the type of person going through the gate. For instance, ADULT, SENIOR, CHILD, STAFF. The Reader Person Group needs to be included in the Axess Smart Printer layout. It is encoded in the RF chip but is not passed to Axess via that SOAP EDE.
<ReaderPersonGroup>#</ReaderPersonGroup> Week Week indicates a predefined set of days of the week. For instance, Weekday Only, All Week, Sunday Only, etc. Additionally, in Axess it is possible to set the valid time of day based on day of week. For instance, Sunday through Friday the ticket can be used all day, but on Saturday the ticket cannot be used until 3:00 PM. It needs to be specified in the Axess Smart Printer layout and is encoded in the RF chip. It is not passed to Axess via the SOAP EDE.
<Week<#</Week> Time Time indicates a predefined time range in a 24 hour day. For instance, All Day, Night Only, Morning Half Day, Afternoon Half Day, etc. Additionally, in Axess the number of hours the ticket can used based on the first read can be specified. For instance, a ticket can be sold that expires four hours from first use. Another example would be a five day ticket that allows a ticket to be used for two hours during each of the five days (good for school programs). It needs to be specified in the Axess Smart Printer layout and is encoded in the RF chip. It is not passed to Axess via the SOAP EDE.

117
<Time>#</Time> Season Season indicates a predefined date range within a calendar year. For instance, Winter Season or Summer Season. If pass sales for next season occur during the current season and the next season passes cannot be used for the remaining portion of the current season, a new Season definition needs to be created in Axess for each operational year.
Example: The current season ends on April 30, 2012. Pass sales for 2012-13 go on-sale on March 1, 2012. If a customer purchases a 2012-13 pass between March 1 and April 30 and is allowed to use the 2012-13 pass for the remaining days in the 2011-12, then only one Season value needs to be entered in Axess, and that value can extended. But, if the 2012-13 pass cannot be used for the remaining portion of 2011-12, a new Season value representing the 2012-13 operational year needs to be entered in Axess. Then, the Season value needs to be specified in the Axess Smart Printer layout depending on the Ticket Type (see the Required Tags Based on Axess Ticket Type section below) and is encoded in the RF chip. It is not passed to Axess via the SOAP EDE.
<Season>#</Season> Start Date The Start Date is the first valid date of the ticket or pass. It does not need to be specified in the Axess Smart Printer layout but it does get automatically encoded in the chip depending on the Ticket Type and sent to Axess via the SOAP EDE.
Expiration Date The Expiration Date is the last valid date of the ticket or pass. It does not need to be specified in the Axess Smart Printer layout but it does get automatically encoded in the chip depending on the Ticket Type and sent to Axess via the SOAP EDE.
Rides Rides indicates the number of rides allowed per gate in the specified pool. For instance, on or two Scenic chair lift rides, as opposed to an All-day unlimited scenic rides type of ticket. It needs to be specified in the Axess Smart Printer layout depending on the Ticket Type (see the Required Tags Based on Axess Ticket Type section below) and is encoded in the RF chip. It is not passed to Axess via the SOAP EDE.
<Rides>#</Rides>

118
Period (number of days)
Period indicates the number of days that a ticket or pass can be used. For instance, a three day ticket, a four day ticket or a five day ticket. It needs to be included in the Axess Smart Printer layout depending on the Ticket Type (see the Required Tags Based on Axess Ticket Type section below) and is encoded in the RF chip. It is not passed to Axess via the SOAP EDE.
<Period>#</Period> Points This is the number of total points to load on a ticket. It needs to be specified in the Axess Smart Printer layout depending on the Ticket Type (see the Required Tags Based on Axess Ticket Type section below), and is encoded in the RF chip. It is not passed to Axess via the SOAP EDE.
<Points>#</Points> Available Days This tag is used for tickets that offer X out of Y days. For instance, a three out of five day ticket. The available days tag is used to define the number of days that the ticket can be used, so for this example, 3. It needs to be specified in the Axess Smart Printer layout depending on the Ticket Type (see the Required Tags Based on Axess Ticket Type section below), and is encoded in the RF chip. It is not passed to Axess via the SOAP EDE.
<AvailableDays>#</ AvailableDays > Restricted Days This tag is used for tickets that offer X out of Y days. For instance, a three out of five day ticket. The restricted days tag is used to define the full time span (or duration) of the ticket, so for this example, 5. It needs to be specified in the Axess Smart Printer layout depending on the Ticket Type (see the Required Tags Based on Axess Ticket Type section below) and is encoded in the RF chip. It is not passed to Axess via the SOAP EDE.
<RestrictedDays>#</ RestrictedDays > Hours The Hours tag is used for tickets that expire X hours after the first use at the gate. For example, a four hour ticket that is read at the gate at 10:15 AM expires at 2:14 PM. The <Hours> value needs to be specified in the Axess Smart Printer layout depending on the Ticket Type (see the Required Tags Based on Axess Ticket Type section below) and is encoded in the RF chip. It is not passed to Axess via the SOAP EDE.
<Hours>#</ Hours >

119
CustomerTicketType Customer Ticket Type is a broad classification of items, for instance Unlimited Season Pass, Midweek Pass, All Day Ticket, Half Day Ticket, 2 Day Night–Only Ticket, etc. The Customer Ticket Type needs to be included in the Axess Smart Printer layout so that it can be passed to Axess via the SOAP EDE (it is not actually encoded in the RF chip.) The CustomerTicketType values used in Siriusware Axess Smart Printer layouts must correspond to the Customer Product Types (EDE Numbers) set up in the Axess system. A match in these two values is critical for proper encoding by the gate when a WTP record is processed. Please refer to the Information Included in the Send Sale SOAP EDE Call below for a detailed description of how the CustomerTicketType interacts with the Axess Customer Product Type (EDE Number) for reloads at the gates.
<CustomerTicketType>#</CustomerTicketType> CustomerPersonType Customer Person Type is another broad classification of items, but typically based on an age range or status. For instance, Adult, Senior, Senior 70+, Child, Child Under 5, Part Time Staff, Full Time Staff, Management, etc. The Customer Person Type needs to be included in the Axess Smart Printer layout so that it can be passed to Axess via the SOAP EDE. It is not actually encoded in the RF chip. To keep configuration in Axess easy, the CustomerPersonType value always corresponds to the ReaderPersonGroup value.
<CustomerPersonType>#</CustomerPersonType> Production Time Stamp This is the date/time field of the access or gst_pass record. It does not need to be included in the Axess Smart Printer layout and it does not get encoded in the RF chip. It does get sent to Axess via the SOAP EDE.
Sales Price This is the price paid for the item (original or reload). It does not need to be included in the Axess Smart Printer layout, it is not encoded in the RF chip, but it is passed to Axess via the SOAP EDE.
Free of charge Free of charge indicates that the purchase price was $0.00. It does not need to be included in the Axess Smart Printer layout and it is automatically encoded in the RF chip, but only for Ticket Type 2 products. It is not sent to Axess via the SOAP EDE.
Handfeed Handfeed is specified in the Axess Smart Printer layout and is used to prompt for a hand-feed of media or a feed from the hopper. Set to 0 to feed from the hopper and set to 1 to hand-feed.
<Handfeed>0</Handfeed>

120
Chip ID (WTP) The Chip ID (WTP) is a number generated by the Axess printer that is inserted into the wtp_no field of the access or gst_pass record. This number is unique per chip/piece of media and is inserted into all transactions involving a given piece of media (original purchase and all reloads using that same media). It is also the number entered within E-Commerce module during the reload process. It does not need to be included in the Axess Smart Printer layout. It is only passed to the SOAP EDE for web (E-Commerce module) reloads or media-not-present reloads at the salespoint.
External Print Add this in order to trigger the two step printing process for graphic printing of a pass through a Fargo/Magicard printer followed by encoding through the Axess Smart Printer.
<ExternalPrint>1</ExternalPrint> Encode Prompt This tag can be used to give the operator an option to NOT encode a hopper-fed pass when a sale is finalized at a salespoint that uses PrintPassOnFinalize=TRUE. The default value is 0 (encode from the hopper without prompting the operator with a message between each print). This is only set to 1 for pass items (not access items) that do not use the two step (ExternalPrint) process and that pull from the hopper (are not hand-fed) and there is a need to sell the passes independently of printing (for instance, a guest photo or liability still needs to be collected prior to printing) and salespoints are configured with PrintPassOnFinalize=TRUE.
<EncodePrompt>1</EncodePrompt> BlankType Add this in order to suppress the erase function prior to printing for new media. This can increase the speed by which new media is printed from the Axess Smart Printers. Reload layouts do not include this as it is important to erase the card prior to printing (or this value is set to 0).
<BlankType>1</BlankType> Encoded or not encoded
Because Axess media is reloadable, but the media only has a limited number of segments that can be encoded for validation (typically 2 or 3), the Siriusware software must make a determination regarding what segment to encode during the reload process.
Logic The software checks all segments to determine which ones are eligible for encoding. The first eligible segment found is used for the new encoding/information. An “eligible” segment is one that is either no longer valid

121
(expired, cancelled, all days used, etc.) or one that has not been encoded previously. For instance, a Midweek Season Pass is only good at the gates Mon-Fri. Customers are allowed to load this pass with discounted Weekend tickets. Even though the Midweek Season Pass might not be good on a Sat or Sun, because it is a season pass (Ticket Type 15), the expiration date of the pass is used to determine validity. This logic prevents the purchase of a Weekend ticket from overwriting the segment encoded with the Midweek Season Pass information. Please refer to Axess documentation for an explanation of how a Gate determines which segment to encode when a new WTP record is located for a piece of media.
Required layout tags based on Axess ticket type Core Ticket Type 1: Pool - Single or Multi Ride
A Ticket Type 1 allows the number of Rides to be specified per lift in the defined Pool. For instance, if the Rides value is 1 and the Pool includes three lifts, the guest is able to take one ride on each of the three defined lifts. If the Rides value is 1 and the Pool only includes one lift, the guest is able to take one ride on only the one defined lift. This differs from Ticket Type 25 in that it is not a per day offering. The number of rides are per ticket (whether that ticket has a single day date span or multi-day date span).
<RF>1</RF> <TicketType>1</TicketType> <Pool>#</Pool> <Week>#</Week> <Time>#</Time> <ReaderPersonGroup>#</ReaderPersonGroup> <CustomerPersonType>#</CustomerPersonType> <Season>#</Season> <Rides>#</Rides> <CustomerTicketType>#</CustomerTicketType> Sample Ticket Type 1 RF layout: <BlankType>0</BlankType><RF>1</RF><TicketType>1</TicketType><Pool>#</Pool><Week>#</Week><Time>#</Time><ReaderPersonGroup>#</ReaderPersonGroup><CustomerPersonType>#</CustomerPersonType><Season>#</Season><Rides>#</Rides><CustomerTicketType>#</CustomerTicketType><Handfeed>0</Handfeed><CardMask>%DIR:L %FNT:2L %PX:39 %PY:950 %TXL:'WTP Number: ' %TXL:'<<WTPNUMBERVAR>>'</CardMask> Core Ticket Type 2: Single or Multi-Day Pass
A Ticket Type 2 is used for consecutive day tickets where the customer must select the valid date. For instance, when selling a ticket in Sales or adding a ticket to the cart in E-Commerce module, the operator/customer must select the first date they use the ticket. The ticket expires X days later based on the Period value.

122
<RF>1</RF> <TicketType>2</TicketType> <Pool>#</Pool> <Week>#</Week> <Time>#</Time> <ReaderPersonGroup>#</ReaderPersonGroup> <CustomerPersonType>#</CustomerPersonType> <Period>#</Period> <CustomerTicketType>#</CustomerTicketType> Sample Ticket Type 2 RF layout: <BlankType>0</BlankType><RF>1</RF><TicketType>2</TicketType><Pool>#</Pool><Week>#</Week><Time>#</Time><ReaderPersonGroup>#</ReaderPersonGroup><CustomerPersonType>#</CustomerPersonType><Period>#</Period><CustomerTicketType>#</CustomerTicketType><Handfeed>0</Handfeed><CardMask>%DIR:L %FNT:2L %PX:39 %PY:950 %TXL:'WTP Number: ' %TXL:'<<WTPNUMBERVAR>>'</CardMask> Core Ticket Type 3: Single or Multi-Day Pass in Depot
A Ticket Type 3 is used for a consecutive day ticket, but the expiration date is based on the first day it is used at the gate, not based on the valid date selected at the time of sale. For instance, a 5 Day Ticket can be sold/started any time during the season, but as soon as the ticket is read at the gate the expiration date is reset to five days into the future.
<RF>1</RF> <TicketType>3</TicketType> <Pool>#</Pool> <Week>#</Week> <Time>#</Time> <ReaderPersonGroup>#</ReaderPersonGroup> <CustomerPersonType>#</CustomerPersonType> <Season>#</Season> <Period>#</Period> <CustomerTicketType>#</CustomerTicketType> Sample Ticket Type 3 RF layout: <BlankType>0</BlankType><RF>1</RF><TicketType>3</TicketType><Pool>#</Pool><Week>#</Week><Time>#</Time><ReaderPersonGroup>#</ReaderPersonGroup><CustomerPersonType>#</CustomerPersonType><Season>#</Season><Period>#</Period><CustomerTi
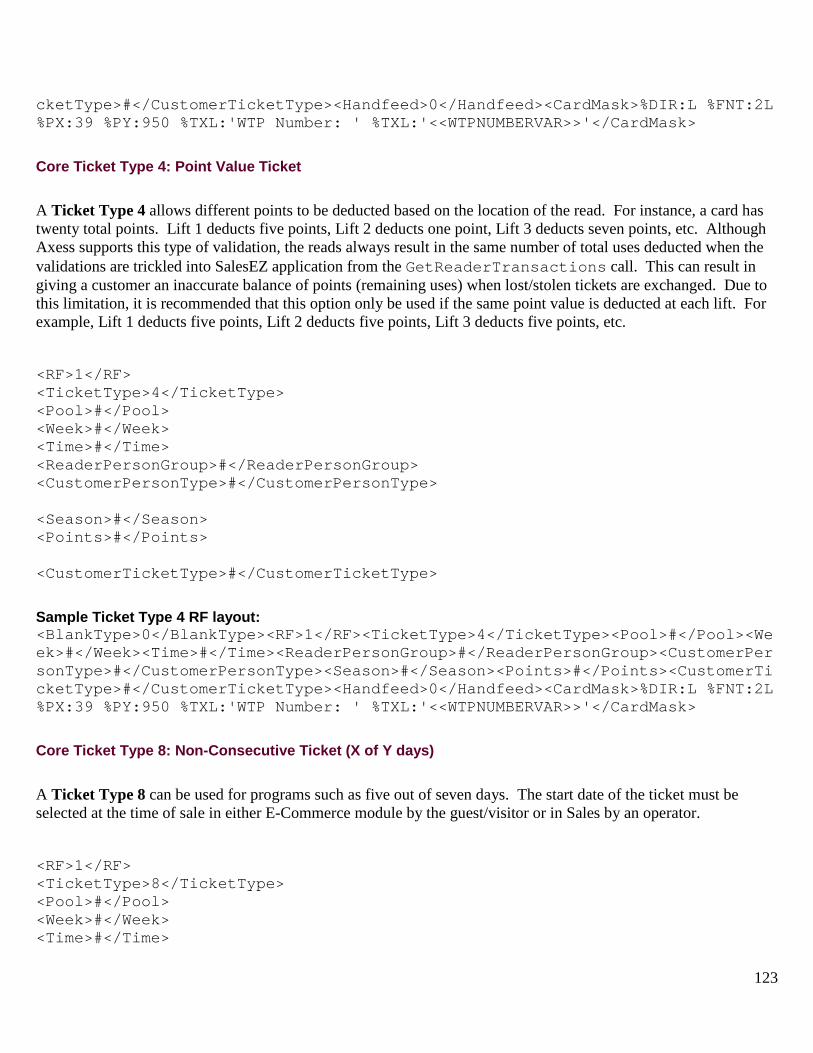
123
cketType>#</CustomerTicketType><Handfeed>0</Handfeed><CardMask>%DIR:L %FNT:2L %PX:39 %PY:950 %TXL:'WTP Number: ' %TXL:'<<WTPNUMBERVAR>>'</CardMask> Core Ticket Type 4: Point Value Ticket
A Ticket Type 4 allows different points to be deducted based on the location of the read. For instance, a card has twenty total points. Lift 1 deducts five points, Lift 2 deducts one point, Lift 3 deducts seven points, etc. Although Axess supports this type of validation, the reads always result in the same number of total uses deducted when the validations are trickled into SalesEZ application from the GetReaderTransactions call. This can result in giving a customer an inaccurate balance of points (remaining uses) when lost/stolen tickets are exchanged. Due to this limitation, it is recommended that this option only be used if the same point value is deducted at each lift. For example, Lift 1 deducts five points, Lift 2 deducts five points, Lift 3 deducts five points, etc.
<RF>1</RF> <TicketType>4</TicketType> <Pool>#</Pool> <Week>#</Week> <Time>#</Time> <ReaderPersonGroup>#</ReaderPersonGroup> <CustomerPersonType>#</CustomerPersonType> <Season>#</Season> <Points>#</Points> <CustomerTicketType>#</CustomerTicketType> Sample Ticket Type 4 RF layout: <BlankType>0</BlankType><RF>1</RF><TicketType>4</TicketType><Pool>#</Pool><Week>#</Week><Time>#</Time><ReaderPersonGroup>#</ReaderPersonGroup><CustomerPersonType>#</CustomerPersonType><Season>#</Season><Points>#</Points><CustomerTicketType>#</CustomerTicketType><Handfeed>0</Handfeed><CardMask>%DIR:L %FNT:2L %PX:39 %PY:950 %TXL:'WTP Number: ' %TXL:'<<WTPNUMBERVAR>>'</CardMask> Core Ticket Type 8: Non-Consecutive Ticket (X of Y days)
A Ticket Type 8 can be used for programs such as five out of seven days. The start date of the ticket must be selected at the time of sale in either E-Commerce module by the guest/visitor or in Sales by an operator.
<RF>1</RF> <TicketType>8</TicketType> <Pool>#</Pool> <Week>#</Week> <Time>#</Time>

124
<ReaderPersonGroup>#</ReaderPersonGroup> <CustomerPersonType>#</CustomerPersonType> <Season>#</Season> <AvailableDays>#</AvailableDays> <RestrictedDays>#</RestrictedDays> <CustomerTicketType>#</CustomerTicketType> Sample Ticket Type 8 RF layout: <BlankType>0</BlankType><RF>1</RF><TicketType>8</TicketType><Pool>#</Pool><Week>#</Week><Time>#</Time><ReaderPersonGroup>#</ReaderPersonGroup><CustomerPersonType>#</CustomerPersonType><Season>#</Season><AvailableDays>#</AvailableDays><RestrictedDays>#</RestrictedDays><CustomerTicketType>#</CustomerTicketType><Handfeed>0</Handfeed><CardMask>%DIR:L %FNT:2L %PX:39 %PY:950 %TXL:'WTP Number: ' %TXL:'<<WTPNUMBERVAR>>'</CardMask> Core Ticket Type 9: Non-Consecutive Ticket (X of Y days) in Depot
A Ticket Type 9 can be used for programs such as five out of seven days. The start date of the ticket does not have to be selected at the time of sale. The duration of the ticket can originally span the entire season. Then, based on the first use, the expiration date is reset. For instance, a five out of seven day ticket is bought on July 1 for the upcoming season. The expiration date of the ticket when purchased is April 30, the last day of the season. The customer uses the ticket on December 1. The new expiration date of the ticket is December 7.
<RF>1</RF> <TicketType>9</TicketType> <Pool>#</Pool> <Week>#</Week> <Time>#</Time> <ReaderPersonGroup>#</ReaderPersonGroup> <CustomerPersonType>#</CustomerPersonType> <Season>#</Season> <AvailableDays>#</AvailableDays> <RestrictedDays>#</RestrictedDays> <CustomerTicketType>#</CustomerTicketType>
Sample Ticket Type 9 RF layout: <BlankType>0</BlankType><RF>1</RF><TicketType>9</TicketType><Pool>#</Pool><Week>#</Week><Time>#</Time><ReaderPersonGroup>#</ReaderPersonGroup><CustomerPersonType>#</CustomerPersonType><Season>#</Season><AvailableDays>#</AvailableDays><RestrictedDays>#</RestrictedDays><CustomerTicketType>#</CustomerTicketTyp

125
e><Handfeed>0</Handfeed><CardMask>%DIR:L %FNT:2L %PX:39 %PY:950 %TXL:'WTP Number: ' %TXL:'<<WTPNUMBERVAR>>'</CardMask> Core Ticket Type 10: Non-Consecutive Season Pass (X days in season)
A Ticket Type 10 can be used for programs such as “any five days during the season”. The days can be used non-consecutively.
<RF>1</RF> <TicketType>10</TicketType> <Pool>#</Pool> <Week>#</Week> <Time>#</Time> <ReaderPersonGroup>#</ReaderPersonGroup> <CustomerPersonType>#</CustomerPersonType> <Season>#</Season> <Period>#</Period> <CustomerTicketType>#</CustomerTicketType> Sample Ticket Type 10 RF layout: <BlankType>0</BlankType><RF>1</RF><TicketType>10</TicketType><Pool>#</Pool><Week>#</Week><Time>#</Time><ReaderPersonGroup>#</ReaderPersonGroup><CustomerPersonType>#</CustomerPersonType><Season>#</Season><Period>#</Period><CustomerTicketType>#</CustomerTicketType><Handfeed>0</Handfeed><CardMask>%DIR:L %FNT:2L %PX:39 %PY:950 %TXL:'WTP Number: ' %TXL:'<<WTPNUMBERVAR>>'</CardMask> Core Ticket Type 15: Season Pass A Ticket Type 15 can be used for Season Pass programs that don’t have a set number of uses. The pass may have blackout dates or times, but is not restricted to, for instance, a total of ten days of use during the season.
<RF>1</RF> <TicketType>15</TicketType> <Pool>#</Pool> <Week>#</Week> <Time>#</Time> <ReaderPersonGroup>#</ReaderPersonGroup> <CustomerPersonType>#</CustomerPersonType> <Season>#</Season> <CustomerTicketType>#</CustomerTicketType>

126
Sample Ticket Type 15 RF layout: <BlankType>0</BlankType><RF>1</RF><TicketType>15</TicketType><Pool>#</Pool><Week>#</Week><Time>#</Time><ReaderPersonGroup>#</ReaderPersonGroup><CustomerPersonType>#</CustomerPersonType><Season>#</Season><CustomerTicketType>#</CustomerTicketType><Handfeed>0</Handfeed><CardMask>%DIR:L %FNT:2L %PX:39 %PY:950 %TXL:'WTP Number: ' %TXL:'<<WTPNUMBERVAR>>'</CardMask> Core Ticket Type 25: Single or Multi-Ride per Day
A Ticket Type 25 allows for X number of rides per lift, per day in the defined Pool based on the full duration of the ticket. For example, a corporate event allows one scenic chair ride each day of the seven day event. If the defined Pool only has one lift (POE), the customer is allowed one ride per day on the defined lift for seven days. If the defined Pool has two lifts (POEs), the customer is allowed one ride on each of the two lifts per day for seven days.
<RF>1</RF> <TicketType>25</TicketType> <Pool>#</Pool> <Week>#</Week> <Time>#</Time> <ReaderPersonGroup>#</ReaderPersonGroup> <CustomerPersonType>#</CustomerPersonType> <Season>#</Season> <Rides>#</Rides> <CustomerTicketType>#</CustomerTicketType> Sample Ticket Type 25 RF layout: <BlankType>0</BlankType><RF>1</RF><TicketType>3</TicketType><Pool>#</Pool><Week>#</Week><Time>#</Time><ReaderPersonGroup>#</ReaderPersonGroup><CustomerPersonType>#</CustomerPersonType><Season>#</Season><Rides>#</Rides><CustomerTicketType>#</CustomerTicketType><Handfeed>0</Handfeed><CardMask>%DIR:L %FNT:2L %PX:39 %PY:950 %TXL:'WTP Number: ' %TXL:'<<WTPNUMBERVAR>>'</CardMask>
WTP number
Every piece of reloadable media includes tags to print the WTP number.
Important! Do NOT include this on One-Way/Non-Reloadable media. The tags specify the position of the number on the media.

127
<WTPPositionX>2</WTPPositionX><WTPPositionY>900</WTPPositionY>
Note: When the WTP number is specified in this manner, you cannot alter the font or direction. In order to format the WTP number, use the <CardMask> option described later.
Guest photos
Guest photos can still be printed via a graphic card printer within Siriusware (Fargo, Magicard, etc.), but it is also possible to print a small, black and white photo with the Axess Smart Printer if using thermal media for pass cards. Use the following tags to specify the position on the media, height/width ratio and rotation (in degrees) if necessary.
<PrintPhoto>1</PrintPhoto> <PicPosX>12</PicPosX><PicPosY>450</PicPosY> <PicWidth>20</PicWidth><PicHeight>140</PicHeight> <RotatePhoto>90<RotatePhoto>
Note: With Salesware 4.2 the Pegasus ImagXpress control was replaced with the GDPicture control for photo rotation for Axess printing.
Additional printed data
In addition to the WTP number, it can be helpful to print additional information on the media, such as the Siriusware Access number on one-way/non-reloadable stock in place of the WTP number, the date/time of the original sale or other basic product info. All printable data (except for the guest photo) is contained between <CardMask></CardMask> tags. Siriusware data available for printing includes any field within the local Printing table. You can also specify the WTP number within the CardMask tags in order to format the position and font of the WTP number.
Example: <CardMask> %DIR:P %FNT:2N %PX:01 %PY:700 %TXL:'Ticket No: ' %TXL:<|tmp_access|> %FNT:2N %PX:01 %PY:730 %TXL:<|tmp_date|> %TXL:' ' %TXL:<|tmp_time|> %FNT:2N %PX:47 %PY:730 %TXR:'USD' %TXR:<|tmp_totext|> %FNT:2H %PX:01 %PY:780 %TXL:'All Area' %FNT:2N %PX:47 %PY:775 %TXR:'Expires: ' %TXR:<|tmp_edate|> %FNT:2H %PX:01 %PY:825 %TXL:<|descrip|> %FNT:2L %PX:01 %PY:975 %TXL:'WTP Number: ' %TXL: '<<WTPNUMBERVAR>>' </CardMask>
%DIR: Portrait or landscape (P or L)

128
%FNT: Font
%PX: Column position
%PY: Row position
%TXL: Text left justified
%TXR: Text right justified
%BC2OF5: Interleaved 2 of 5 barcode font
<|xxxx_xxxxxx|> Field name from the Siriusware local printing table
'<<WTPNUMBERVAR>>' Field used to print WTP number that allows formatting
Font options
1=Small size font
2=Medium size font
3=Large size font
N=Normal
B=Double Wide
H=Double High
L=Double High and Double Wide
It is also possible to use a specific font and size, for example, Arial Size 12. Please refer to Axess documentation for more information on using a font other than the default 1, 2 or 3 values.

129
Printing coordinates
To print or not to print:
CardMask tags are always included in both new media layouts and reload layouts. However, that doesn’t mean they are always used. By default, the behavior of the Axess Smart Printer is to erase a card prior to printing and encoding, but ONLY if there are no valid segments found on the card. If a valid segment is located, then no erasing or printing occurs (only encoding is performed assuming a segment is available). The default behavior of always erasing prior to printing is very useful, especially when recycling previously used cards for new media purchases. This can, however, impact printing speed. To turn off the default behavior of erasing prior to printing in order to increase printing speed, insert <BlankType>1<BlankType> tags in the appropriate new media layouts (it is recommended that reload products always perform an erase/print).
Encoded data for Siriusware salespoint functions
It is possible to order media from Axess that has one of the three chip segments specifically dedicated for use at Siriusware salespoints. This Siriusware-specific segment is used to mimic the contents of a magswipe. For instance, the %E prefix + the guest pass number and a sixteen digit card number for Debitware can be encoded into the RF chip to mimic what would normally be encoded into a magswipe. This allows both gate and salespoint validation to be performed using only the RF chip contents as opposed to using the two step printing process for barcode printing and magswipe encoding with a graphic card printer. The downside is that only two segments are now available for gate validation. Desktop readers that have been specifically configured to read the Siriusware segment must also be purchased from Axess.

130
To encode the Siriusware segment with magswipe-like information: 1. Add a <SwipeMask> section to the layout.
Example: • This encodes %E plus the pass number in Track 1 and the sixteen digit IHC number in Track 2:
<SwipeMask>%E<|tmp_passno|>?;<|tmp_swipe|>?</SwipeMask>
• This encodes the sixteen digit IHC number in Track 1 and the pass number in Track 2:
<SwipeMask>%B<|tmp_swipe|>?;<|tmp_passno|>?</SwipeMask>
• This encodes the sixteen digit IHC number in Track 1, the pass number in Track 2 and a guest number in Track 3:
<SwipeMask>%B<|tmp_swipe|>?;<|tmp_passno|>?;<|tmp_gstno|>?</SwipeMask>
2. The <SwipeMask> information can be encoded independently of RF information for gate entry and can also include a <CardMask> and guest photo. For instance, a Debitware item can have a layout similar to below in order to encode and print a sixteen digit card number without encoding a gate validation segment:
<SwipeMask>%B<|tmp_swipe|>?</SwipeMask><CardMask> %DIR:P %FNT:2N %PX:01 %PY:700 %TXL:'Card No: ' %TXL:<|tmp_swipe|></CardMask>
3. The F-key functions in Sales that are used to read a specific track and append, strip, prompt, etc., can be used with this RF encoding method.
4. In order to encode SwipeMask data, add the following setting to the Sales32c.INI (or Global Salespoint .INI):
[Preferences] AxessEncodeSwipe=TRUE
Sample layouts
Important! Do not insert any carriage returns or line feeds in the Axess Smart Printer layouts as this causes encoding to fail. The carriage returns and line feeds shown below are only present in order to provide an easy visual reference of the type of data contained within each sample layout.
Note: Do not insert any spaces in the layout EXCEPT to separate printing commands found within the <CardMask></CardMask> section that begin with a %.

131
Purchase of an Adult All-Mountain Season Pass – Portrait Example: <BlankType>1</BlankType> <RF>1</RF> <TicketType>15</TicketType> <CustomerTicketType>15</CustomerTicketType> <ReaderPersonGroup>1</ReaderPersonGroup> <CustomerPersonType>1</ CustomerPersonType > <Pool>1</Pool> <Week>1</Week> <Time>1</Time> <Season>1</Season> <Handfeed>1</Handfeed> <ExternalPrint>1</ExternalPrint>
<CardMask> %DIR:P %FNT:1L %PX:5 %PY:750 %TXL: '<<WTPNUMBERVAR>>' </CardMask>
Note: ExternalPrint could be 0 depending on whether or not the two step printing process is required)
Sample with carriage returns and line feeds removed: <BlankType>1</BlankType><RF>1</RF><TicketType>15</TicketType><CustomerTicketType>15</CustomerTicketType><ReaderPersonGroup>1</ReaderPersonGroup><CustomerPersonType>1</CustomerPersonType><Pool>1</Pool><Week>1</Week><Time>1</Time><Season>1</Season><Handfeed>1</Handfeed><ExternalPrint>1</ExternalPrint><CardMask>%DIR:P %FNT:1L %PX:5 %PY:750 %TXL:'<<WTPNUMBERVAR>>'</CardMask> Purchase of an Adult All-Day All-Mountain Ticket on Reloadable Stock – Landscape Example: <BlankType>1</BlankType> <RF>1</RF> <TicketType>2</TicketType> <CustomerTicketType>2</CustomerTicketType> <ReaderPersonGroup>1</ReaderPersonGroup> <CustomerPersonType>1</CustomerPersonType> <Pool>1</Pool> <Week>1</Week> <Time>1</Time>

132
<Period>1</Period>
<Handfeed>0</Handfeed> …..or 1 depending on what is loaded in hopper
<CardMask> %DIR:L %FNT:2L %PX:39 %PY:950 %TXL:'WTP Number: ' %TXL:'<<WTPNUMBERVAR>>' %FNT:2L %PX:45 %PY:950 %TXL:'Ticket Type: ' %TXL:<|descrip|> </CardMask>
Sample with carriage returns and line feeds removed: <BlankType>1</BlankType><RF>1</RF><TicketType>2</TicketType><CustomerTicketType>2</CustomerTicketType><ReaderPersonGroup>1</ReaderPersonGroup><CustomerPersonType>1</CustomerPersonType><Pool>1</Pool><Week>1</Week><Time>1</Time><Period>1</Period><Handfeed>0</Handfeed><CardMask>%DIR:L %FNT:2L %PX:39 %PY:950 %TXL:'WTP Number: ' %TXL:'<<WTPNUMBERVAR>>' %DIR:L %FNT:2L %PX:45 %PY:950 %TXL:'Ticket Type: ' %TXL:<|descrip|></CardMask> Purchase of an Adult All-Day All-Mountain Ticket on One-Way (non-reloadable) Stock – Portrait Example: <BlankType>1</BlankType> <RF>1</RF> <TicketType>2</TicketType> <CustomerTicketType>2</CustomerTicketType> <ReaderPersonGroup>1</ReaderPersonGroup> <CustomerPersonType>1</CustomerPersonType> <Pool>1</Pool> <Week>1</Week> <Time>1</Time> <Period>1</Period> <Handfeed>0</Handfeed> …..or 1 depending on what is loaded in hopper
<CardMask> %DIR:P %FNT:2L %PX:02 %PY:800 %TXL:'ADULT – CANNOT BE RELOADED' </CardMask>
Sample with carriage returns and line feeds removed: <BlankType>1</BlankType><RF>1</RF><TicketType>2</TicketType><CustomerTicketType>2</CustomerTicketType><ReaderPersonGroup>1</ReaderPersonGroup><CustomerPersonType>1</CustomerPersonType><Pool>1</Pool><Week>1</Week><Time>1</Time><Peri

133
od>1</Period><Handfeed>0</Handfeed><CardMask>%DIR:P %FNT:2L %PX:02 %PY:800 %TXL:'ADULT – CANNOT BE RELOADED'</CardMask> Purchase of Adult-Any-5-Days-During-Season Pass on Reloadable Stock – Landscape Example: <BlankType>1</BlankType> <RF>1</RF> <TicketType>10</TicketType> <CustomerTicketType>10</CustomerTicketType> <ReaderPersonGroup>1</ReaderPersonGroup> <CustomerPersonType>1</CustomerPersonType> <Pool>1</Pool> <Week>1</Week> <Time>1</Time> <Period>5</Period> <Season>1</Season> <Handfeed>1</Handfeed> …..or 0 depending on what is loaded in hopper
<CardMask> %DIR:L %FNT:2L %PX:39 %PY:950 %TXL:'WTP Number: ' %TXL:'<<WTPNUMBERVAR>>' </CardMask>
Sample with carriage returns and line feeds removed: <BlankType>1</BlankType><RF>1</RF><TicketType>10</TicketType><CustomerTicketType>10</CustomerTicketType><ReaderPersonGroup>1</ReaderPersonGroup><CustomerPersonType>1</CustomerPersonType><Pool>1</Pool><Week>1</Week><Time>1</Time><Period>5</Period><Season>1</Season><Handfeed>1</Handfeed><CardMask>%DIR:L %FNT:2L %PX:39 %PY:950 %TXL:'WTP Number: ' %TXL:'<<WTPNUMBERVAR>>'</CardMask> Adult All-Day All-Mountain RELOAD of existing media Example: <RF>1</RF> <TicketType>2</TicketType> <CustomerTicketType>2</CustomerTicketType> <ReaderPersonGroup>1</ReaderPersonGroup> <CustomerPersonType>1</CustomerPersonType> <Pool>1</Pool> <Week>1</Week> <Time>1</Time>

134
<Period>1</Period> <Handfeed>1</Handfeed> <CardMask> %DIR:L %FNT:2L %PX:39 %PY:950 %TXL:'WTP Number: ' %TXL:'<<WTPNUMBERVAR>>' %FNT:2L %PX:45 %PY:950 %TXL:'Ticket Type: ' %TXL:<|descrip|> </CardMask>
Sample with carriage returns and line feeds removed: <RF>1</RF><TicketType>2</TicketType><CustomerTicketType>2</CustomerTicketType><ReaderPersonGroup>1</ReaderPersonGroup><CustomerPersonType>1</CustomerPersonType><Pool>1</Pool><Week>1</Week><Time>1</Time><Period>1</Period><Handfeed>1</Handfeed><CardMask>%DIR:L %FNT:2L %PX:39 %PY:950 %TXL:'WTP Number: ' %TXL:'<<WTPNUMBERVAR>>' %DIR:L %FNT:2L %PX:45 %PY:950 %TXL:'Ticket Type: ' %TXL:<|descrip|></CardMask>
Note: For reloads, it is still important to insert a full <CardMask></CardMask> section in order to allow text to be printed on a card during the reload or exchange process.
Additional printing options
With the Axess Gate system, it is still possible to produce tickets or vouchers that are NOT validated at the Axess gates (for example, rental tickets or consignment vouchers redeemed at a salespoint) by using standard ticket printers and layouts (Boca, Cognitive, Receipt, etc.). The primary purpose of the Axess Printer is to produce media for use at the Axess gates by encoding the RF chip or printing an Axess barcode for scanning at the gates.
However, if non-Axess related tickets or vouchers need to be produced and using a Boca, Cognitive or Receipt printer is not an option, a Text Merge or Shared TM layout (as opposed to an Axess Smart Printer layout) can be created and sent to the Axess printer. The content of the Text Merge or Shared TM layouts would include only the <CardMask> tags.
When using the Axess Printer as a simplified Text Merge printer, layouts must be configured using fields from the tmp_inv table, NOT the Printing table.
• Axess Smart Printer layouts = Printing table • Text Merge or Shared TM layouts = tmp_inv table

135
Additionally, the Axess Printer must be selected in Sales > Tools > Sales Pt Setup > Printing. This action is not required when using the Axess Printer to produce Axess Smart Printer layouts (layouts that encode the RF chip or produce a barcode that is read by the gate), but it is required when using the Axess Printer as a simplified Text Merge printer.
Note: Printing functions using the Axess Printer are limited! There are no IF conditions available, the only barcode font allowed is Interleaved 2 of 5, which cannot be encrypted, special characters such as the % sign cannot be used as they interfere with the printer commands (depending on the version of AXCoding installed), etc. Because of these limitations, Siriusware Inc. recommends keeping standard ticket printers (Boca, Cognitive, Receipt, etc.) available to create media that is exclusively used at Siriusware salespoints and using the Axess Printers for media that are used at the gates.
Text Merge layout using the Axess printer Example: <Handfeed>1</Handfeed><CardMask>%DIR:P %PX:5 %PY:750 %FNT:2N %TXL:<|descrip|> %PX:5 %PY:900 %BC2OF5:<|tmp_access|> %PX:5 %PY:950 %FNT:2N %TXL:'AX' %TXL:<|tmp_access|></CardMask>
The layout above prints the item description, a non-encrypted Siriusware access number in the Interleaved 2 of 5 barcode font, and print the access number with an, “AX” prefix on the ticket.
Important notes for the interleaved 2 of 5 barcode font:
• The Interleaved 2 of 5 Barcode Font only works with an even number of digits. Siriusware accommodates this limitation by padding the number to the left with a 0 when necessary. This 0 is stripped away when sending a barcode scan to SalesEZ application for validation.
• The Interleaved 2 of 5 Barcode Font only allows numbers, no characters. This means that prefixes used by the Siriusware system to trigger specialized functions (%EP, %AA, etc.) cannot be included in the barcodes. If a prefix is required, it must be sent in prior to scanning the barcode using a programmed F-Key. It also means that encrypted barcodes cannot be printed; only un-encrypted numeric-only barcodes are possible.
• If it is not possible to use EncryptedPassNumbers=FALSE at salespoints due to encrypted media already in the marketplace, the following settings can be used to prevent the non-encrypted Interleaved 2 of 5 barcodes from being decrypted by Sales. This setting selectively prevents decryption based on the Access Control Prefix prepended to the barcode scan and can take a list of prefixes.
[Preferences] EncryptedPassNumbers=TRUE NoDecryptPrefixes=XMZ

136
In the example above, any barcode scan that includes an Access Control Prefix of X, M or Z is not decrypted before sending the number into SalesEZ application for validation.
Additionally, it is possible to produce an encrypted number within the <SwipeMask> tags when encoding the Siriusware segment, as opposed to printing a barcode (the encoded Siriusware segment can act as a substitute for an encrypted barcode in this scenario):
<SwipeMask>%AAXX<|EncryptNumber(tmp_access)|>?</SwipeMask>
Basic operations
Selling and printing
Selling tickets configured for use with the Axess gate system is easy. Simply add items to the sale and upon Finalization the system either pulls cards for encoding and printing from the Axess Smart Printer hopper or the system prompts the operator to hand-feed cards for printing and encoding.
Selling passes is equally as easy. Add the pass items to the sale, enter guest information for each pass item and click Finalize. If the pass is printed upon Finalization, the system prompts for the pass to be fed into the Axess Smart Card printer for encoding once the graphic card printing is complete. Or, when only printing/encoding through the Axess Smart Card printer, the operator is prompted to hand-feed the card or the card is pulled from the hopper depending on the <Handfeed> tags in the Axess layouts.
Note: When PrintPassOnFinalize=FALSE, the operator is not prompted to graphically print the pass and all Axess encoding is suppressed for gst_pass records when the sale is finalized. When PrintPassOnFinalize=TRUE, the operator is given the option to graphically print the pass and/or encode the Axess media when the sale is finalized or at a later time. The tag <EncodePrompt>1</EncodePrompt> can be used in Axess Smart Printer layouts to give the choice of encoding the card now or later when PrintPassOnFinalize=TRUE, the cards are hopper-fed (not hand-fed) and the two step printing process is NOT being used.
To print/encode a pass at a later time, lookup the pass record in Sales (Ticket Inquiry main action button or Guest History > Pass Inquiry). The system prompts for hand-feeding of the pass into the Axess Smart Printer once the graphic printing is complete. When exclusively printing/encoding through the Axess Smart Card printer, the operator is prompted to hand-feed the card or the card is pulled from the hopper depending on the <Handfeed> tags in the Axess layouts.
Important: When using the two step printing process, there is no longer any sort of Reprint Pass function available for passes. Remember, the WTP number is unique to the actual piece of media; which means you can’t simply reprint a pass that has already been encoded. You must do an exchange instead of a reprint.
• Graphically Printed but not Encoded = Graphic reprinting OK

137
• Encoded but not Graphically Printed = First Graphic Print using the encoded card OK • Graphically Printed and Encoded = No Graphic reprinting
Reloads at a salespoint
A reload at the salespoint can either immediately encode the existing card (media-present reloads) or it can generate a WTP record that is encoded later by the Axess gates (media-not-present reloads). Generally speaking, if a customer is standing at the salespoint with his/her card, it is best to encode the card rather than generate a WTP record, as there is a good chance the customer makes it out to the gate before the new WTP reload record has been transferred to the Axess system.
Media-present reloads Option 1 Add a reload item to the sale and Finalize/collect payment. When prompted, hand-feed the card into the Axess Smart Printer for encoding. This method is very easy, but doesn’t offer much control over the type of reload items that can be purchased. In other words, it is up to your operators to not reload a Child item on an Adult piece of media.
Option 2 Press the Ticket Inquiry main action button and select Read RF Card.
Click OK to exit the Chip Information dialog and press the Reload Media button.

138
This action presents a list of eligible reload items (based on the Item/Pass Relationship tab linking that is also utilized in E-Commerce module). Select an item from the list for the reload. Finalize the sale and when prompted, hand-feed the card into the Axess Smart Printer for encoding.
Note: When doing media-present reloads, if the card does not have any available segments, the operator is notified that a WTP record is created for later encoding by the Axess gates once a segment becomes available.
Media-not-present reloads Option 1 Add a reload item to the sale and click on the “Other” line item button. Go to the WTP tab and enter the WTP number. Siriusware verifies that the WTP number exists in the database.

139
Note: This method does NOT verify that the currently active item can be used to reload the media based on the Item/Pass Relationship tab links.
When the sale is finalized the operator is NOT prompted to hand-feed the card for encoding. Instead, a WTP reload record is sent to Axess via the SOAP EDE interface for encoding by the gate.
Option 2 Press the Ticket Inquiry main action button, hand-enter the WTP number, select the WTP button and click OK.
Press the Reload Media button. This action presents a list of eligible reload items (based on the Item/Pass Relationship tab linking that is also utilized in E-Commerce module). Select an item from the list for the reload. When the sale is finalized the operator is NOT prompted to hand-feed the card for encoding. Instead, a WTP reload record is sent to Axess via the SOAP EDE interface for encoding by the gate.

140
Reloads in E-Commerce module
To load an existing Axess card on-line, the visitor/guest needs to click on the WTP Reload link that leads to the WTPLoad.aspx page: http://<yoursite>/E-Commerce/WTPLoad.aspx. In the default Siriusware pages, this link is located in the lower right-hand corner.
1. The visitor/guest is prompted to enter the WTP number printed on the card. 2. The Siriusware system performs a search for the WTP number and when located returns a list of items that
can be used to load the card. 3. The visitor/guest selects an item from the list and adds it to the cart.
Tip: Set the Min/Max Quantity settings (Restrictions tab when editing an item) on reload items to 1 in order to ensure that E-Commerce visitors/guests always enter a WTP number for each product purchased (to prevent selling a line item quantity of three, with only one WTP number).
4. After the guest checkouts, Sales Host utility processes the sale and immediately finalizes the WTP reload transaction in order to send the new WTP data to the Axess database via the SOAP EDE.
5. When the card is read at an Axess gate, if there isn’t a valid segment found, a check is performed to see if there are any WTP records for the card. If one is found, the gates encode the card.
Exchanges
In order to replace lost/stolen tickets and passes, the Siriusware system offers an Exchange function. Keep in mind that if the exchange of tickets is allowed, it becomes important to provide the guest with a list of access records that correspond to his/her purchase for later use when a ticket is lost or stolen.
Steps for exchanging:
1. Using Ticket Inquiry, lookup the access or pass number to be exchanged. This can also be done through Guest Lookup > Pass Inquiry for passes or Guest Lookup > History for access records if a guest name was associated with the purchase.
2. Click on the Exchange button located on the Pass Information dialog. When a WTP number is associated with the access or pass record to be exchanged, the system searches for all records associated with the same WTP number and adds an exchange to the sale for each valid record (non-voided, non-expired and/or more than 0 uses remaining depending on the Ticket Type defined by Axess).
3. When the sale is finalized, the access or pass records that were still valid on the lost card are voided and the operator is prompted to encode a new card for each exchange in the sale. For instance, if two valid segments were found and exchanged, the operator needs to feed the SAME new card into the Axess Smart Printer two times. If the exchange involves a pass that needs to be printed through a graphic card printer, such as a Fargo or Magicard, the same two step prompted-printing process is followed.
The system also replaces the old WTP number on all previous records with the new WTP number in order to allow a full history to be retrieved instead of ending the life of that history when a card is lost or stolen.

141
The voided ticket or pass information is sent to Axess via the SOAP EDE to prevent entry through the gates on the lost/stolen ticket or pass.
Refunds
The easiest way to refund a ticket is to lookup the ticket number using Ticket Inquiry and press the Refund button on the Ticket Information dialog. This adds the correct item to the sale with the Siriusware access number already entered on the Void Pass tab. It is also possible to refund by adding a negative quantity of the appropriate item to the sale and hand-entering the access or pass record to be voided on the Void Pass tab.
The voided ticket or pass information is sent to Axess via the SOAP EDE to prevent entry through the gates on the refunded ticket.
Lookups
The Ticket/Pass Lookup dialog allows operators to look up tickets and passes with WTP numbers or RF SERIAL numbers for Axess gates. When AxessInquiry=TRUE in the Sales32c.INI two additional buttons appear on the dialog, WTP and RF Serial. In addition, the Additional# button now allows for lookups by addit #, addit #2, addit #3, additchar #1 and additchar #2 fields of the ticket or pass item. The following changes were made to SiriusSQL application to support this functionality:
Wtp_no, rfserial, additchar1, additchar2, all varchar(25) addit_no2 and addit_no3 both numeric(17,0) fields in the access table.
Wtp_no, rfserial, additchar1, additchar2, all varchar(25) addit_no2 and addit_no3 both numeric(17,0) fields in the gst_pass table.
Voids
To void a ticket or pass without exchanging or refunding, lookup that ticket or pass in Sales and click Modify on the Pass Information dialog. The Void button can be pressed to automatically populate the Voided By field with the currently logged in operator and the Voided For field with See Operator. To un-void a pass, follow the same steps but clear the Voided By and Voided For fields by pressing the button that now says Un-Void.
The void/un-void ticket or pass information is sent to Axess via the SOAP EDE to prevent/allow entry through the gates as appropriate.
Individual blackouts
To block a pass or ticket from being used during a specific date range, for instance, Ski Patrol has pulled a pass for two weeks, an Individual Blackout date range can be assigned to that pass or ticket. To do so, lookup the ticket or pass in Sales and click Modify on the Pass Information dialog. Enter the Blackout Date Range along with a Reason.

142
Void information that is sent to Axess via the SOAP EDE to prevent a guest from entering the gates on the first date of the blackout range; and Un-Void information that is sent to Axess on the day after the last date of the blackout range.
Recycling cards
In order to recycle previously used cards for new transactions, it is possible to completely clear the media. This action erases the printed text on the card and wipes out any encoding in the chip, including any information encoded in the Siriusware segment.
1. Create an item called, “Clear Cards” (or similar) and enter this for the Axess Smart Printer layout:
<ClearMedia>1</ClearMedia>
2. Gather the recycled cards and sell a quantity of the Clear Cards item that is equal to the number of cards collected.
3. When the sale is finalized, the operator is prompted to feed each card through the printer. 4. Load the cleared stock into the hopper or add them to the stack of cards to be used for new media sales.
Note: This process has recently been improved in the latest version of AXCoding.
The Clear Media function now totally erases all of the printed text and wipes out all encoding in the chip, including the Siriusware segment of the chip, in order to essentially get back to the same state as a brand new piece of media. It is still possible to only “cancel” any valid segments instead of totally erasing all encoding and printing by using the tags <CancelMedia>1</CancelMedia>.
Salespoint configuration
INIs Sales32c.INI There is an optional setting that can be used to allow Ticket Inquiry searches by WTP number on salespoints that do not have an Axess Smart Printer installed:
[Preferences] AxessInquiry=TRUE
If the media needs to be encoded for Siriusware salespoint validation programs, the following setting also needs to be added:

143
[Preferences] AxessEncodeSwipe=TRUE
It is possible to prompt a Sales operator with the guest name and photo when performing a %E (swipe discount) or %A (auto-sale) auto-validation using a pass number encoded within the Siriusware segment. Although this setting is not specific to Axess, it can be helpful when using the small black and white guest photos printed on Axess media.
[Preferences] GuestPhotoVerify=TRUE GuestPhotoVerifyTimeout=3
• GuestPhotoVerify=TRUE activates the functionality • GuestPhotoVerifyTimeout determines the number of seconds before auto-closing the dialog.
Setting this to 0 forces the operator to click OK to close the GuestPhotoVerify dialog. Ports.INI The following settings are required for AXCoding:
[SmartPrinter] Port=Number (comport used by the Axess smart printer)
POS=Number (number that uniquely identifies the physical computer and salespoint ID; can be a value of 1 to 199)
Project=Number (site number – is the same on every computer)
Type=2 (this is the default value used for the SmartPrinter; if encoding with a SmartReader, set this to 6).
For the Sales Host or any other salespoint where only WTP records are generated and cards are never encoded (for example, call center salespoints that do not have Axess Smart Printers installed), it is still necessary to add the POS= and the Project= setting, but do not include a Port= setting as it causes the salespoint to continually fail when attempting to initialize the (nonexistent) printer. Also, remember to add the full list of POS numbers to Axess! Any transaction performed in Siriusware containing a POS number that does not exist in Axess is rejected by the Axess interface.
Scanned input using the Axess gate keys off the presence of a % at the beginning and is processed just like input to GateKeeper module directly. GateKeeper module has the ability to connect to piicom.ocx and piicom.dll. In order to connect to a Team Axess gate, these two components must be registered somewhere on the system. In addition, the proper .INI settings must be in place:
[PiiCom] Enabled=TRUE

144
IP=192.168.0.99 Side=1 OpenTime=1 RFPrefix=Y ScanPrefix=P
OpenTime is the number of seconds to flash the gate to allow someone to go through if a valid scan is received. Side is 1 or 2 for a double-sided gate. RFPrefix is used to validate the chip ID of the pass read before it is sent to SalesEZ application. The RF chip ID is an eight-digit hex number that is converted to decimal. Similarly, ScanPrefix is used for scanned content, but the raw number is passed with the prefix to SalesEZ application.
Printer configuration
It is not necessary to specify the Axess Printer within Tools > Sales Pt Setup > Printing for Axess Smart Printer only layouts, unless there is a need to specify feeding different types of stock from the hopper for different locations. If the Axess Printer is not specified for Ticket 1, Ticket 2, Voucher 1 or Voucher 2, then the system simply picks the first Axess Smart layout it finds for the item. But, if the Axess Printer is selected for one of the printing options, then Sales ONLY uses the Axess Smart Printer layouts found for that option.
Note: If using the Axess Printer as a simplified Text Merge printer, it is necessary to specify the Axess Printer for the appropriate printing option.
Example: Group Tickets are always printed/encoded on one-way (non-reloadable) stock and this type of stock is loaded into the hopper at the Group Sales Office. At the Ticket Office, the stock loaded in the hopper is reloadable and is used for all non-pass programs, such as Adult Daily Tickets. On occasion, the Group Sales Office needs to issue Adult Daily Tickets on reloadable stock in addition to issuing the Group tickets on one-way stock.
To accommodate this situation:
1. The Axess Smart Printer layouts for the Adult Daily Ticket items are configured in both Ticket 1 and Ticket 2.
2. The layouts are identical, except that the <Handfeed></Handfeed> value for Ticket 1 is 0 and the <Handfeed></Handfeed> value for Ticket 2 is 1.
3. All Group Ticket Axess Smart Printer layouts is configured in Ticket 2. 4. The salespoints at the Ticket Office do NOT specify the Axess Printer within Tools > Sales Pt Setup >
Printing so that the first layout found is used. 5. The salespoints at the Group Sales Office has the Axess Printer specified for Ticket 2 within Tools > Sales
Pt Setup > Printing so that salespoints at that location ONLY use layouts configured for that printing option.

145
BatchPrint
BatchPrint utility can be used to either print graphic passes OR encode Axess RF media. The two step printing process (graphic card printing followed by prompted Axess RF encoding) does not work with BatchPrint utility. If two step printing is required, the most efficient process is to graphically print using BatchPrint utility, and then encode the cards one-by-one using Sales (Ticket Inquiry > Read RF > Encode RF).
To use BatchPrint utility for Axess RF Encoding, start by installing BatchPrint on a PC that already has Sales and AXCoding installed. This allows BatchPrint utility to read from the existing ports.INI for the POS= and Project= setting, as well as use the same license key for AXCoding.
Note: It is possible to run BatchPrint utility on a PC that doesn’t have Sales installed, but this requires another AXCoding license and manual creation of a maxkeys table and ports.INI.
The Sales Data Path and Axess Printer Port settings need to be set when using BatchPrint utility for encoding, and the Pass Printer (for graphic card printing) is disabled. All other settings, such as the Layout Path, Label Layout, Label Printer and Ticket/Voucher printers can still be configured if mailing labels and/or graphic ticket and vouchers need to be printed during the batch encode process.

146
All other Pass Selection and Passes on Reservations filters can be used for batch encoding in the same manner they are used for graphic pass printing.
Notes:
• The batch encode process always assumes a card feed from the hopper, even if the Axess Smart Printer layouts specify hand-feeding.
• The batch encode process always assumes a one-step printing/encoding process, even if the <ExternalPrint> is set to 1.
• Sales should NOT be running at the same time as BatchPrint utility on the same computer due to a conflict with sharing AXCoding between two applications.
• The Passes Printed X Times Or Less setting is irrelevant when encoding passes, because if a pass record has already been encoded (a WTP number is present on the gst_pass record) BatchPrint utility skips that record.
Installation
Axess Smart Printer
1. Install AXCoding on each computer that encodes cards (installer from Axess). During the install of AXCoding the user is prompted to insert a unique activation key per salespoint (Axess provides the keys).
Note: Please refer to Axess documentation for more details on installing AXCoding for the Smart Printers.
2. Insert the [SmartPrinter] settings in the Ports.INI noted within the Salespoint Configuration section above.
3. Do NOT store cards on top of the Axess Smart Printer as this can cause issues with a WTP number from a card sitting on top of the printer to be read as opposed to the card currently being encoded and printed.

147
Axess SOAP EDE interface Prerequisites:
1. Axess: Must install the Oracle database. 2. Axess: Must install the SOAP EDE interface. 3. Client: SQL Server must have the .NET 4.0 framework installed if it isn’t already 4. Client: CLR needs to be enabled by running the script below
-- Script to enable CLR sp_configure 'show advanced options', 1; GO RECONFIGURE; GO sp_configure 'clr enabled', 1; GO RECONFIGURE; GO
5. Client: Ensure the DB Owner is SA Installation of stored procedures and tables:
1. Get a zip file from here: http://dl.dropbox.com/u/14729305/SiriusAxessCLRv4103.0003.zip 2. Extract the files to a folder that is accessible to the log-in for the SQL Server service. 3. Drop any old Axess procedures by running: DropAxessCLRProcsAndAssemblies.sql

148
• Remember to double-check the directory names and DB names on this and all following scripts 4. Create the new ones by running: CreateAxessCLRProcsAndAssemblies.sql 5. Create the tables and T-SQL stored procedures by running:
CreateTSQLStoredProcsAndSupportTables.sql 6. Create the Sirius CLR Procedures (different than the Axess ones) by running:
DropAndCreateSiriusSP_CLR.sql 7. Set your Axess configuration properly:
• exec SiriusSP_ax_SetValue @tcKeyName = 'AxessUrl', @tcValue = 'http://192.168.2.91:16302/axis_990/services/SOAPEDEInterface'
• exec SiriusSP_ax_SetValue @tcKeyName = 'AxessUserName', @tcValue = 'Siriusware'
• exec SiriusSP_ax_SetValue @tcKeyName = 'AxessPassword', @tcValue = 'Siriusware'
• exec SiriusSP_ax_SetValue @tcKeyName = 'AxessProjectNumber', @tcValue = '990'
8. Set your Siriusware configuration properly: • exec SiriusSP_Ax_SetValue @tcKeyName = 'SalesEzIpPort', @tcValue =
'127.0.0.1:4203' 9. Run the test scripts, and verify the output is similar to the commented examples.
• Axess: TestAxessConnect.sql • Sirius: TestSiriusConnect.sql
10. Give SiriusWeb execute permissions to [SiriusSP_Ax_GetWtpReloadList] Creating a SQL Server Agent job: A SQL Server Agent job is created that runs every five minutes and executes a SQL Script. There are two steps:
1. Process Siriusware Activity: T-SQL script: exec SiriusSP_Ax_ProcessActivity 2. Process Gate Scans: T-SQL script: exec SiriusSP_Ax_GetReaderTransactions
Note: On the Advanced tab in step one above, ensure that Go to next step is selected for both success and failure. On the Advanced tab in step two, ensure that Quit the job reporting success is selected for both.
Sales
There is no need to install anything for Sales to start encoding cards once the Axess Smart Printer/AXCoding is installed and the Ports.INI [SmartPrinter] settings have been added (Port=, POS= and Project=).
Sales Host
There is no need to install anything for Sales Host utility to process WTP reload transactions and new media sales once the Ports.INI [SmartPrinter] settings are added (POS= and Project=).

149
SalesEZ
Siriusware Inc. recommends installing a second instance of SalesEZ application that is specifically used to process GetReaderTransactions. Because scanning is now active, the Middleware components (SalesEZ, BookEZ, TallyEZ) need to reside on their own computer instead of being installed on the same server running SQL.
SysManager
All scans fed into SalesEZ application from gate reads have a salespoint and operator name of AXESS. In order to filter reports using the AXESS salespoint or operator name it is necessary to configure a salespoint named AXESS and an operator named AXESS within System Lists in SysManager. Additionally, when using the following SalesEZ.INI setting, it is necessary to license the AXESS salespoint with either a GateKeeper or ScanMan license (not just a Reporting Only license), in order to have the validations managed correctly when they are fed to Siriusware.
[Preferences] AllowScannerValidationIfSalespointValidatedThisShift=TRUE
E-Commerce
WTP reload capabilities are built into the core E-Commerce module, although a new page is required: WTPReload.aspx.
A regex web.config setting is also available to facilitate the entry of the WTP numbers:
<add key="WTPRegex" value="^([0-9a-zA-Z]{8})-([0-9a-zA-Z]{3})-([0-9a-zA-Z]{3})$"/>
Another web.config setting can be used to customize text to customers when eligible reload products are located for the WTP number. Omitting this setting takes the customer directly to the eligible list of items instead of presenting a link to the list.
<add key="WTPItemsText" value ="Items are available. Click <a href="ItemList.aspx?node_type=WTP">here</a> to see them."/>
Finally, a web.config setting can be used to customize how the WTP numbers are displayed next to the selected reload items in the cart:
<add key="WTPDescrip" value="(WTP: {{wtp_no}})" />

150
API (ww.dll) information
A call can be made to the SiriusSP_Ax_GetWtpReloadList stored procedure using the execsp call in ww.dll. The wtp_no and date (separated with a comma) are passed in the <params> tags. A list of eligible reload items are returned.
Sample sales string with wtp_no for reloads.
Note: Sales Host utility always finalizes items that include a wtp_no:
<item><dci>AXESS TKTS-LOAD RLADT01 </dci><qty>1</qty><finalprice>40.0000</finalprice><access><wtp_no>N20000E3-R14-XPF</wtp_no></access><swipe_no>1</swipe_no><val_info></val_info><do_on_sale></do_on_sale><descrip>Reload - Adult 1 Day (WTP: N20000E3-R14-XPF)</descrip></item>
Troubleshooting
Turning on Axess Smart Printer logging
Note: Users must have write/modify permission to the Program Files\Axess AG\Axess AG AxCoding folder to gather AXCoding logs.
To enable AX Coding logging (typically used to troubleshoot encoding issues), add the following tag to an Axess Smart Printer layout, sell the item and print/encode.
<logging>1</logging>
0 is off, 1 is on
Note: It is not a verbosity level of 1-5 as it is for Siriusware logging…
This logging does not add anything to the Sales32c_log.txt, but does create a full set of information here:
• C:\Program Files\Axess AG\Axess AG AxCoding

151
Or for 64-bit computers, here:
• C:\Program Files (x86)\Axess AG\Axess AG AxCoding
There are many files located in this directory, but the relevant files for troubleshooting all end with .log*.
There are two scripts that can be used to globally add or remove the logging tags from all Axess Smart Printer layouts in Siriusware.
Note: these update statements assume the Axess layout is:
• in t1_layout • To turn logging on for all Axess ticket types:
update items set t1_layout = '<Logging>1</Logging>' + cast(t1_layout as varchar(4000)) where prn_tkt1 = 4 and datalength(t1_layout) > 0 and t1_layout not like '%<Logging>1</Logging>%' -- To turn Logging Off for all Axess Ticket Types update items set t1_layout = replace(cast(t1_layout as varchar(4000)), '<Logging>1</Logging>', '') where prn_tkt1 = 4 and datalength(t1_layout) > 0 and t1_layout like '%<Logging>1</Logging>%'
Additionally, logging can be forced “on” by using the following Sales32c.INI settings (this can be used as an alternative to turning logging on within the Axess Smart Printer layouts):
[Preferences] VerbosityLevel=4 AxessLogging=TRUE
Axess Smart Printer does not initialize
1. Check the Ports.INI and make sure that the correct comport is specified under the [SmartPrinter] Port= setting.
2. Check to see if the computer name changed. AXCoding requires the entry of Activation Keys on each computer that uses the Axess Smart Printers. These activation keys are generated by Axess and are based on several factors, including the computer name. If the computer name changes, the AXCoding won’t work, so the printer won’t be able to print or encode.

152
3. In order to rectify the situation the computer name must be set back to the original name submitted to Axess when the activation keys were generated or Axess must be given with the new computer name so that they can generate a new activation key for AXCoding.
4. To verify the Activation Key used on a computer with AXCoding installed, look at the registry under (for 64 bit systems):
HKLM\SOFTWARE\Axess AG\AxCoding (HKLM\SOFTWARE\Wow6432Node\Axess AG\AxCoding
Printer Intensity needs to be adjusted in order to print readable text on the card stock
If text is printing too light (or too dark) on cards, the Printer Intensity can be adjusted. By default, a value of 500 for Printer Intensity is used. Lower values make the text lighter; higher values make the text darker. Values can range between 500 and 699, although Axess recommends values that are between 590 and 630.
Add this to the <CardMask> section of the layout: %INTST1:###
Example: <CardMask>%INTST1:600 %DIR:L %FNT:2L %PX:39 %PY:950 %TXL:'WTP: ' %TXL:'<<WTPNUMBERVAR>>' %DIR:L %FNT:1L %PX:43 %PY:950 %TXL:<|tmp_fname|> %TXL:' ' %TXL:<|tmp_lname|></CardMask>
If the default value is producing the desired results, there is no need to add this specification to the layout.
Random printer errors (hard to reproduce, mysterious problems)
Release the serial port (comport) that was used by a previous printer installed (Boca, Cognitive) prior to the Axess system. At times this has resolved issues with printer communication as the port is not “free” for full interaction with the Axess Smart Printer.
If using a USB to serial converter, try a direct serial connection. Direct serial connections tend to be more reliable than those through a USB converter.
Verification of data forwarding and re-sending to Axess
To verify that transactions are being sent to the Axess database, run the following query:
select * from _Ax_Transactions at where at.[Status] = 9
If zero records are returned it means that all data has been forwarded. If there are records returned, look at the errors and try to correct them. Once they are corrected, reprocess the transactions by running the following

153
statement in a query window: exec SiriusSP_Ax_ReprocessTransactions
After resending - verify again with the select statement above. Repeat the process as necessary. To retire old errors, run this in a query window adjusting the dates as appropriate:
Update _ax_transactions set status = 8 where status = 9 and DateAdded between '2010-08-01' and '2010-12-15'
E-Commerce: Lookup button on WTPReload.aspx produces no results
After entering a WTP number and hitting Lookup, no messages regarding the WTP number entered are returned (no message regarding a failed number and no message regarding eligible reload items). Most likely this is due to the siriusweb user not being granted Execute rights to the SiriusSP_Ax_GetWtpReloadList stored procedure. Permissions are set as below:

154
No data is showing on the Scanned Usage Report in SysManager (or the other scan reports)
Try running one of the reports in Axess, such as the Reader Frequency Report, to see if data has been forwarded to the Axess database from the gates. If there is no data in the Axess Report the issue is between the gates and the Axess database. If there is data in the Axess Report, the issue is somewhere with the SOAP interface or within Siriusware when scans are being sent through SalesEZ application.